

Panasonic Lumix DMC-GF5, DMC-GF5XR, DMC-GF5KW Owner's Manual
Owner’s Manual
for advanced features
Digital Camera
Model No. DMC-GF5
Before connecting, operating or adjusting this product,
please read the instructions completely.
VQT4G00
F0412YS0

Contents
Before Use
Care of the camera ...................................5
Standard Accessories ...............................6
Names and Functions of Components......7
About the Lens........................................12
Preparation
Changing the Lens. .................................13
Attaching the Shoulder Strap ..................16
Charging the Battery...............................17
• Charging ...........................................17
• Approximate operating time and
number of recordable pictures..........19
Inserting and Removing the Card
(optional)/the Batter y.................. .......... ...22
About the Card........................................23
• About cards that can be used with
this unit....... ..................................... .23
• Approximate number of recordable
pictures and available recording
time...................................................25
Setting Date/Time (Clock Set)................. 27
• Changing the Clock Setting ..............28
Basic
Selecti n g the R e c o rd i n g Mo d e.......... .. ....29
Tips for taking good pictures...................31
• Detects orientation of camera
(Direc ti o n D e te ction Function) ...... .. ..31
Taking a St i ll p i c ture......... .......... . ............32
• How to set focus when taking a still
picture (AFS /AFF/AFC).....................32
• Taking a Still picture..........................34
• Taking pictures using the Touch
Shutter function.................................35
• Switching the Information Displayed
on the recording screen....................36
Taking Pictures using the Automatic
Function (Intelligent Auto Mode) .............37
Recording with Camera-Recommended
•
Effects...............................................40
Easily adjust and record
(Intelligent Auto Plus Mode) ....................41
Taking Pictures with Defocus Control
Function...................................................43
Taking Pictures with Your Favorite
Settings (Program AE Mode) ..................45
Recording Motio n Pic tu re................. .......47
• How to set focus when recording a
motion picture (Continuous AF)........47
• Recording Motion Picture..................48
Recording still pictures while recording
•
motion pictu res.......... ........................50
Playing Back Pictures/Motion Pictures....51
• Playing Back Pictures .......................51
• Changing the information displayed
on the playback screen.....................54
• Playing Bac k Motion Pict ur e s............ 5 5
• Creating Still Pictures from a Motion
Picture...............................................57
Deleting Pictures.....................................58
Setting the Menu.....................................60
• Setting menu items ...........................60
• Setting the menu screen
background.......................................63
Setting th e Q u i c k M en u..................... ......65
About the Setup Menu.............................67
- 2 -

Recording
Optical Image Stabilizer..........................74
Taking P i ctu res with th e Zo om...... .. ........7 6
• Zooming using touch operations.......78
Taking Pictures using the Flash..............79
• Switching to the appropriate flash
setting...............................................79
Compensating the Exposure................... 83
Taking Pictures using Burst Mode ..........84
Taking Pictures using Auto Bracket........86
Taking Pictures with the Self-timer..........88
Taking Pi ctu res with Aut o Fo c u s.............90
Taking Pictures with Manual Focus ........96
Adjusting the White Balance ...................99
Using the function button......................103
• Fixing the Focus and the Exposure
(AF/AE Lock).............. ................... .105
• Confirm the Effects of Aperture and
Shutter Speed (Preview Mode).......106
Easily set aperture/shutter speed for
•
suitable exposure (One Push AE)
Taking Pictures by Specifying the
Aperture/Shutter Speed ............... .... .... .108
• Aperture-priority AE ........................ 108
• Shutter-priority AE...........................109
• Manual Exposure Mode..................110
Taking Pictures that match the Scene
being recorded (Scene Guide Mode)....112
• [Clear Portrait].................................114
• [Silky Sk i n ] ........................ .. .......... ..114
• [Backlit Softness] ............................114
• [Clear in Backlight]..........................115
• [Relaxing Tone]...............................115
• [Sweet Child's Face].......................115
• [Distinct Scenery]............................116
• [Bright Blue Sky] .............................116
• [Roman tic Sunset Glow ] .................116
• [Vivid Sunset Glow].........................116
.....107
• [Glistening Water]............................117
• [Clear Nightscape]...........................117
• [Cool Night Sky] ..............................117
• [Warm Glowing Nightscape]............118
• [Artistic Nightscape] ........................118
• [Glittering Illuminations]...................118
• [Clear Night Portrait]........................119
• [Soft Image of a Flower]..................119
• [Appeti zi n g Fo od] ............... .. ......... ..120
• [Cute Dessert].................................120
• [Freeze Animal Motion]...................121
• [Clear Spo rts Shot].......................... 1 2 1
• [Monochrome] .................................121
Taking Pictures with different image
effects (Creative Control Mode) .. ..........122
• [Expressive].....................................125
• [Retro] .............................................125
• [High Key]........................................125
• [Low Key] ........................................125
• [Sepia].............................................126
• [Dynamic Monochrome] ..................126
• [Impres s i ve Art] ........ ..................... ..126
• [High Dy n a mic]......... .. .......... . ..........126
• [Cross Pro cess].......... .....................127
• [Toy Effect]......................................127
• [Miniature Effect].............................128
• [Soft Focus].....................................130
• [Star Filter].......................................130
• [One Poin t C o l o r]....................... ......13 0
Taking Pictures in Custom Set..............132
• Registering Personal Menu Settings
(Registering custom settings) .........132
• Recording using registered custom
set...................................................133
Taking a Picture with Face Recognition
Function.................................................134
Entering Text.........................................138
- 3 -

Using the [Rec] Menu............................ 139
• [Photo Style]....................................139
• [Aspect Ratio].................................. 141
• [Picture Size]...................................141
• [Quality]...........................................142
• [Sensitivity]......................................143
• [ISO Limi t Se t ]...... .. .. ..................... ..144
• [ISO Increments].............................144
• [Extended ISO]................................ 144
• [Face Re co g .]........... .. ......... .. ..........144
• [Profile S e tup] ............ .. ......... .. ........1 4 5
• [Focus Mode]..................................146
• [Quick AF].......................................146
• [Metering Mode]..............................146
• [Flash].............................................147
• [Red-Eye Removal].........................147
• [i.Reso l u ti o n ] .............. ......... .. ..........147
• [i.Dynamic] (Intelligent dynamic
range control).................................. 148
• [Long Shtr NR]................................148
• [Shading Comp.]............................. 148
• [Ex. Tele Conv.] ..............................149
• [Digital Zoom]..................................149
• [Burst Rate].....................................149
• [Auto Bracket] ................................. 149
• [Self Timer]......................................149
• [Color Space]..................................150
• [Stabilizer].......................................150
• [Recommended Filter].....................150
Using the [Motion Picture] Menu...........151
• [Rec Mode]......................................151
• [Rec Qua l i ty] .... .. .......... .. ......... .. ......152
• [Continuous AF] ..............................152
• [Ex. Tele Conv.] ..............................153
• [Wind Cut] ....................................... 153
• [Mic Level Disp.]..............................153
• [Mic Level Adj.]................................153
• [Flkr Decrease]................................153
Using the [Custom] Menu......................154
Playback/Editing
Using the [Playback] Menu....................160
• [2D/3D S e tt i n g s ]................. .. ......... ..160
• [Slide Show]....................................160
• [Playb a c k M ode]....... .. ................... ..162
• [Title Edit]........................................163
• [Text Stamp]....................................164
• [Video Divide]..................................166
• [Resize]...........................................167
• [Cropping]........................................168
• [Rotate]............................................168
• [Favorite] .........................................169
• [Print Set] ........................................170
• [Protect]...........................................171
• [Face Re c Ed i t ]................................ 1 7 2
Connecting to other equipment
Enjoying 3 D p ic tu res .. .. .......... .. .............173
Playing Back Pictures on a TV
Screen...................................................177
• Using VIERA Link (HDMI)...............179
Saving still pictures and motion pictures
on your PC ................ ............................181
Saving still pictures and motion pictures
on a Recorder.............. .......... ................185
Printing the Pictures............................. .186
Others
Optional accessories.............................190
LCD Mon i t o r Display ..................... .. ......19 1
Cautions for Use............ ........................194
Message Display...................................201
Troubleshooting.....................................203
- 4 -
Before Use
Before Use
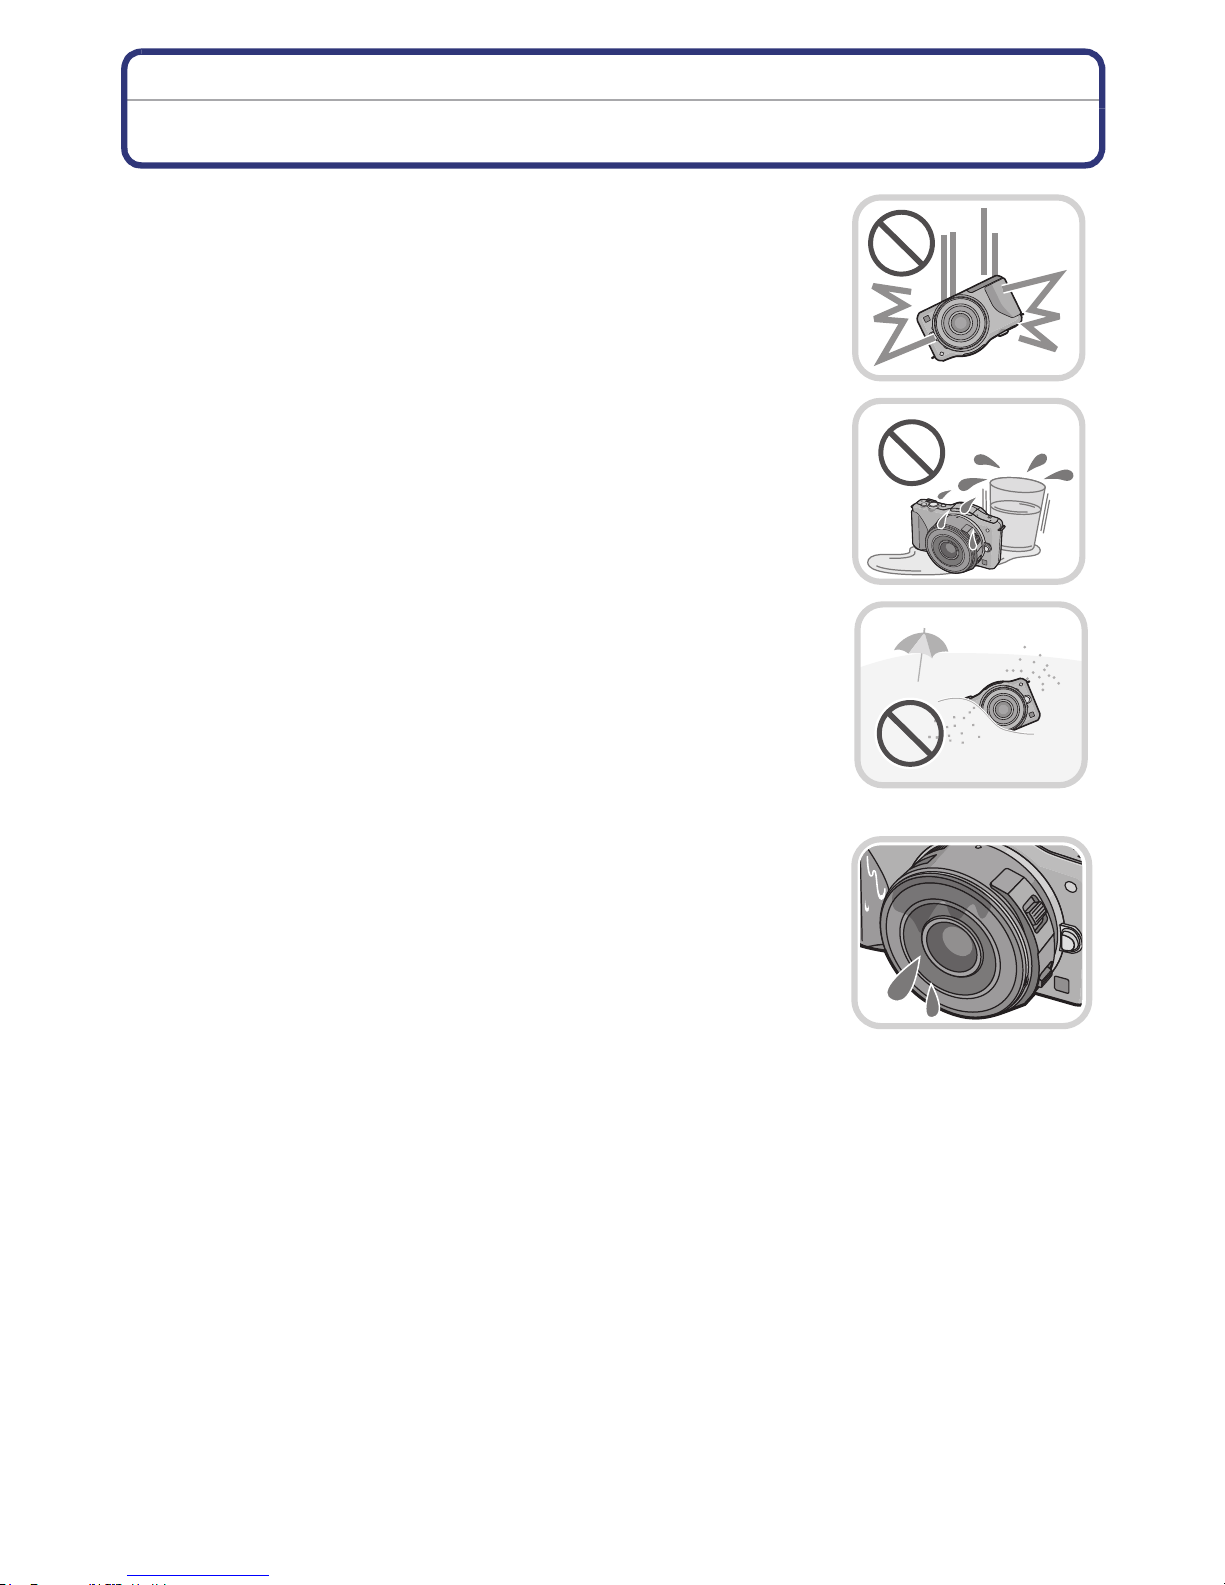
Care of the camera
Do not subject to strong vibration, shock, or pressure.
•
The lens, LCD mon itor, or ex ternal case may b e damaged if used in
the following conditions.
It may also malfunct i on or image may not record if you:
–Drop or hit the camera.
–Press hard on the lens or the LCD monitor.
This camera is not dus t/drip/water pr oof.
Avoid using the camera in places with a lot of dust, water,
sand, etc.
•
Liquid, sand and oth er foreign material may get into the space
around the lens, buttons, etc. Be particularly careful since it may
not just cause malfunctions, but it may also become irreparable.
–Places with a lot of sand or dust.
–Places where water can come into contact with this unit, such as
when using it on a rainy day or at the beach.
Do not place your hands inside the mount of the digital
camera body. Since the sensor unit is a precision
apparatus, it may cause a malfunction or damage.
∫ About Condensation (When the lens or the LCD monitor
is fogged up)
•
Condensation occurs when the ambient temperature or hu midity
changes. Be car eful of condensation since it causes lens and LCD
monitor stains, fungus and camera malf unction.
•If condensation occurs, turn the camera off and leave it for about
2 hours. The fog will disappear naturally when the temperature of
the camera becomes close to the ambient temp erature.
- 5 -

Before Use
Standard Accessories
Check that all the accessories are supplied before using the camera.
The accessories and their s ha pe will dif fer de pend ing o n the c ount ry or ar ea wh ere the camera
•
was purchased.
For details on the accessories, refer to Basic Owner’s Manual.
•Battery Pack is indicated as battery p ack or battery in the text.
•Battery Charger is indicated as battery charger or charger in the text .
•SD Memory Card, SDHC Memory Card and SDXC Memory Card are indicated as card in the
text.
•The card is optional.
•Description in this owner’s manual is based on the interchangeable lens (H-PS14042).
•If any accessories are lost, customers in the USA and Puerto Rico sh ould contact Panasonic’s
parts dep artment at 1-800-833- 9626 and customers in Canada should cont act 1-800 -99-LUMIX
(1-800-995-8649) for further information about obtaining replacement parts.
- 6 -
Before Use
1
2 3
4567
8
910 1511
1213 14
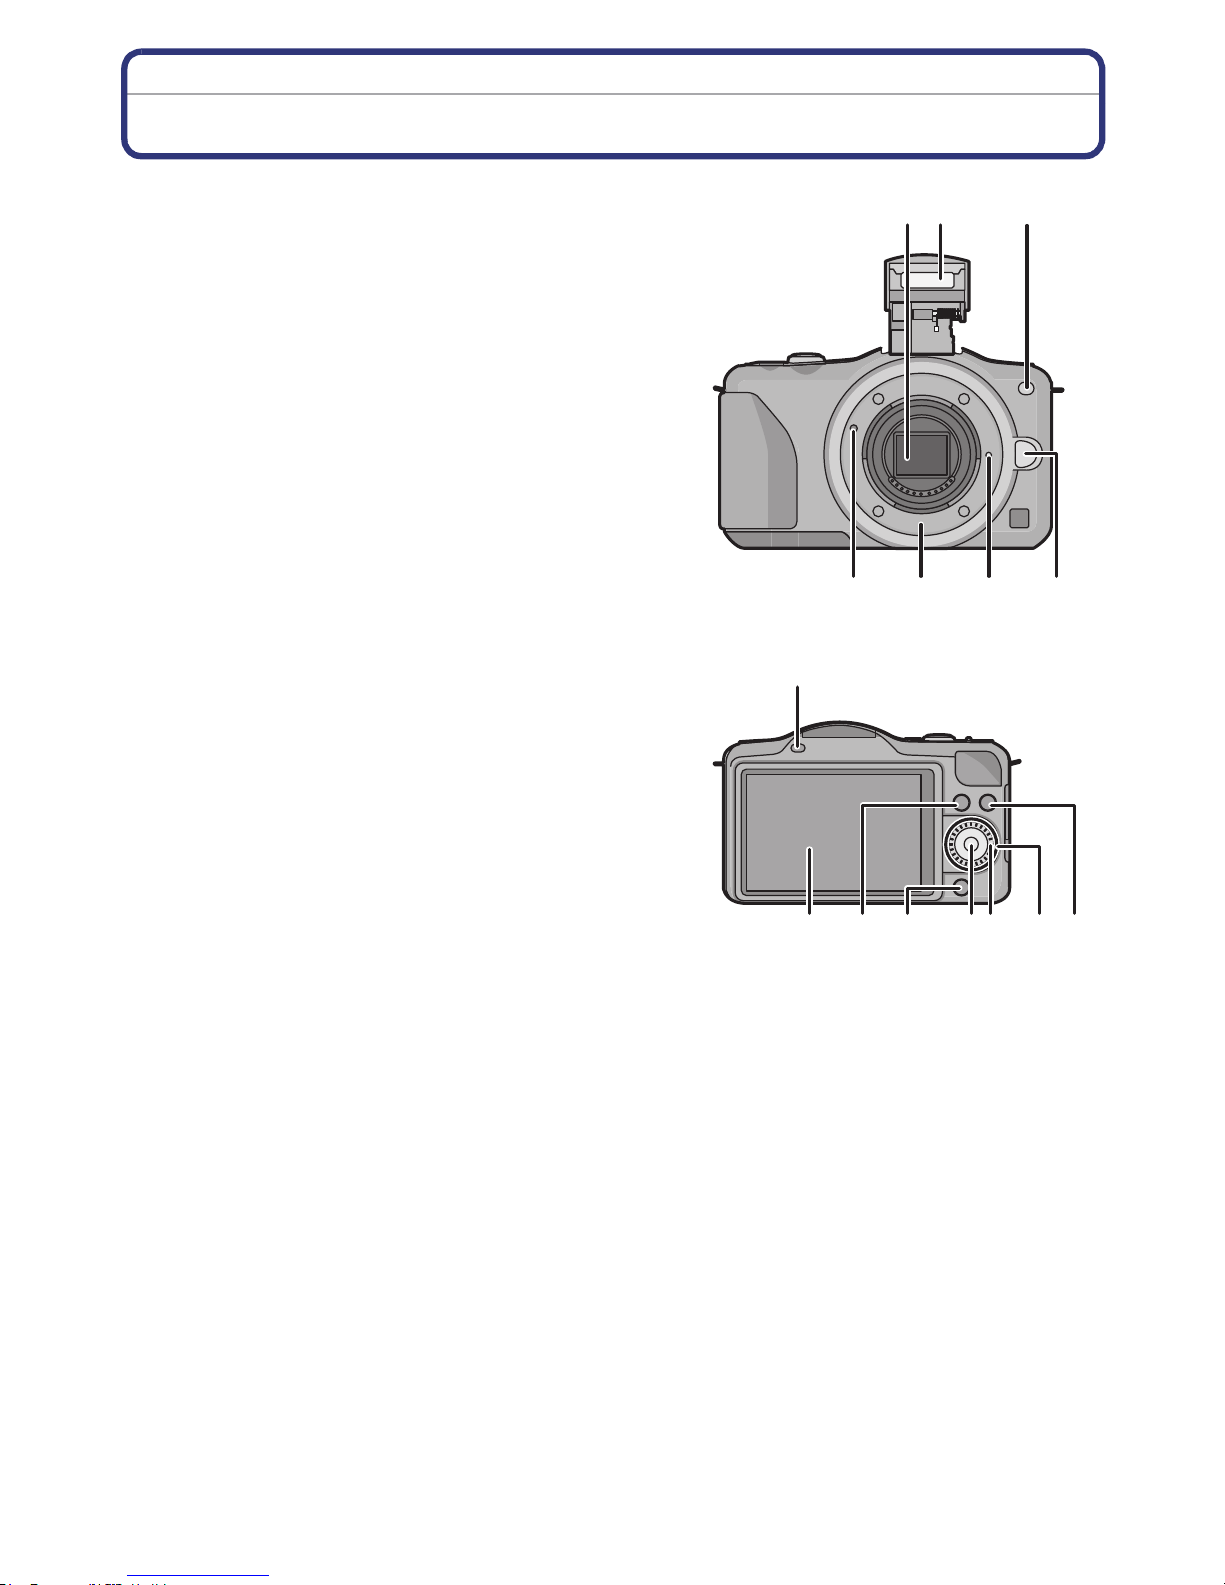
Names and Functions of Components
∫ Camera body
1 Sensor
2Flash (P79)
3 Self-timer indicator (P88)/
AF Assist Lamp (P156)
4 Lens fitting mark (P14)
5 Mount
6 Lens lock pin
7 Lens release button (P13)
8 Flash open button (P79)
9 Touch screen/LCD monitor (P10)
10 Playback button (P51, 55)
11 [Q.MENU/Fn1] button (P65, 103)/
Delete/Return button (P58, 62)
12 [MENU/SET] button (P11, 60)
13 Control dial (P11)
14 Cursor buttons (P11)
3/Exposure Compensation button (P41, 83,
108, 109, 110)
1/WB (White Balance) (P99)
2/AF Mode button (P90)
4/[Drive Mode] button
This button in picture record mode will allow the
user to select between the following options.
Single (P34)/Burst (P84)/Auto bracket (P86)/Self-timer (P88)
15 [DISP.] button (P36, 54)
- 7 -

Before Use
16
17
18
2322 24 25
2120
19
26
LOCKOPEN
28 29 3027
16 Shoulder strap eyelet (P16)
Be sure to attach the shoulder strap when
•
using the camera to ensure that you will not
drop it.
17 [HDMI] socket (P177)
18 [A V OUT/DIGITAL] socket (P177, 182, 185,
186)
19 St ereo microphone (P153)
•
Be careful not to cov er the microphone with
your finger. Doing so may make it difficult to
record sound.
20 Shutter button (P34)
21 Motion picture button (P48)
22 Speaker (P68)
•
Be careful no t to cov er th e s peak er with y our
finger. Doing so may make it difficult to hear
sound.
23 Focus distance reference mark (P98)
24 Intelligent Auto button (P37)
25 Camera ON/OFF switch (P27)
26 Status indicator (P27)
27 Tripod receptacle (P200)
28 Card/Battery door (P22)
29 DC coupler cover
•
When using an AC adaptor, ensure that the
Panasonic DC coupler (opt ional) and AC
adaptor (optional) are used. (P190)
Do not attempt to use the AC adaptor in
other devices.
30 Release lever (P22)
- 8 -
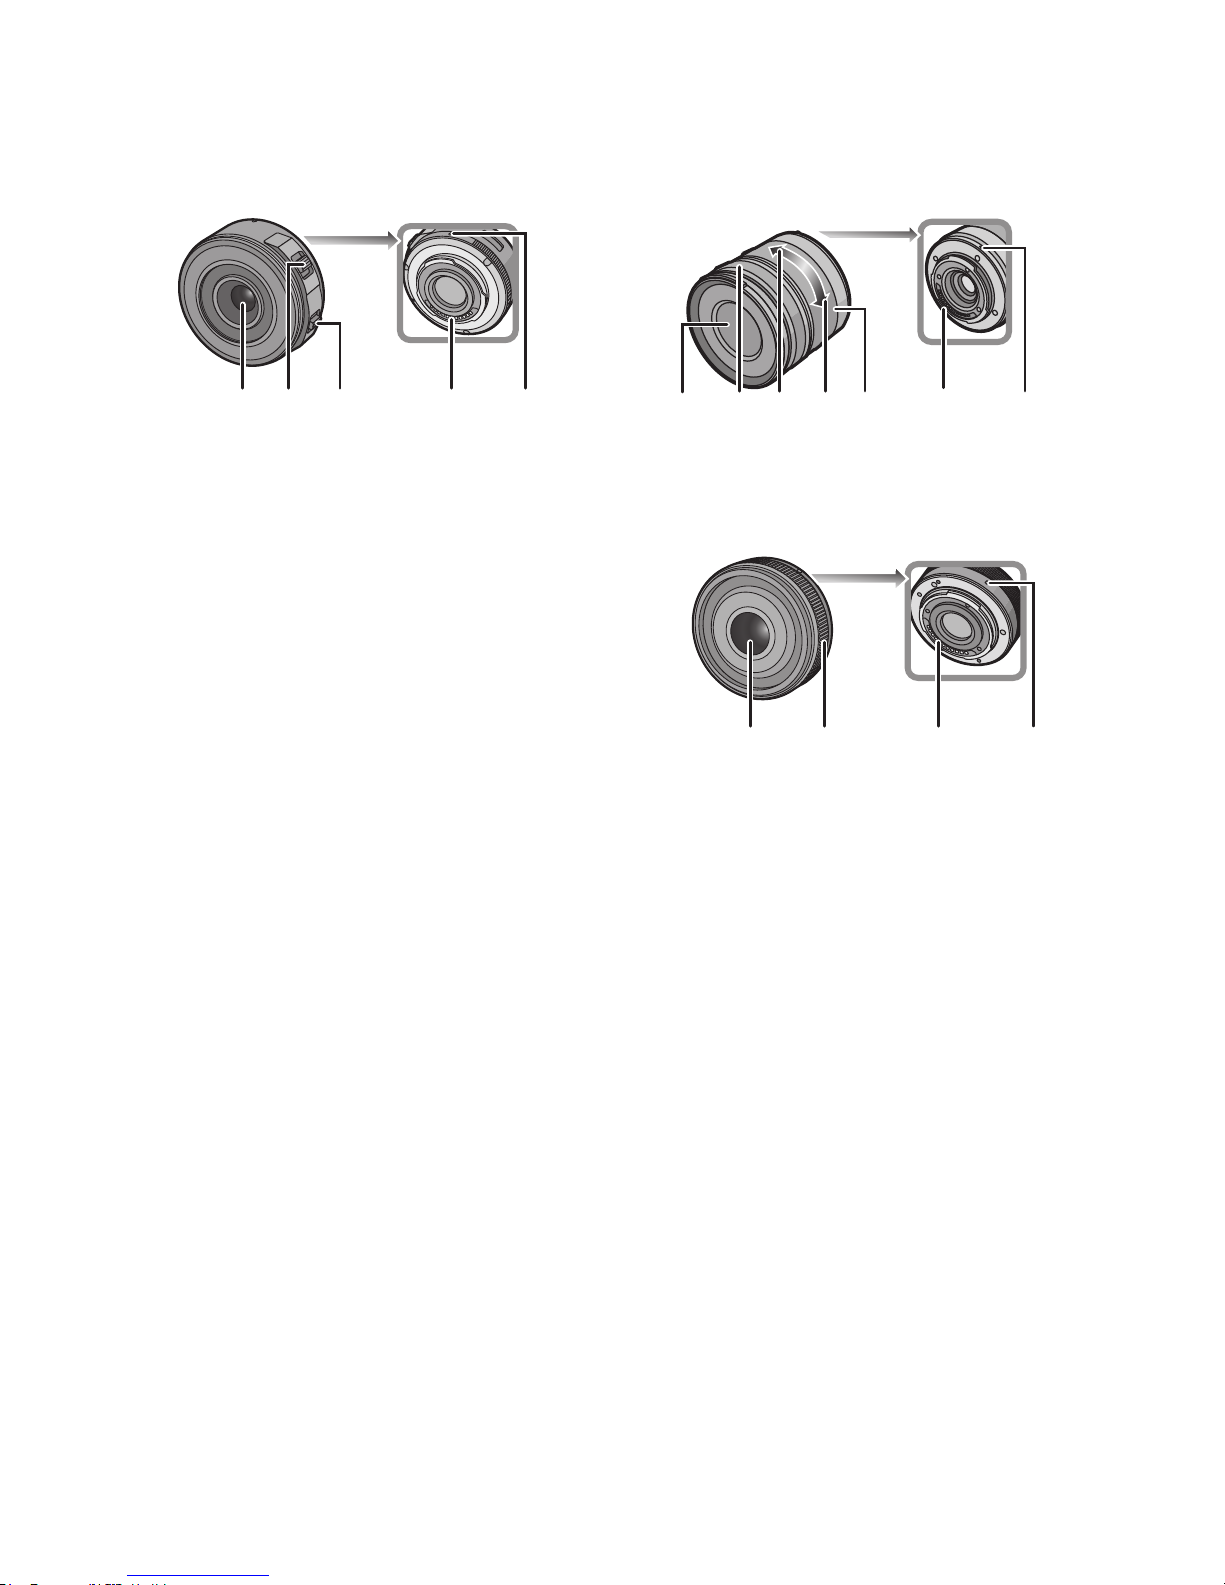
∫ Lens
34 35333231
3637 38 39 34 3531
34 353631
Before Use
H-PS14042
(LUMIX G X VARIO PZ 14–42 mm/
F3.5–5.6 ASPH./POWER O.I.S.)
31 Lens surface
32 Zoom lever (P76)
33 Focus lever (P96)
34 Contact point
35 Lens fitting mark (P14)
36 Focus ring (P96)
37 Tele
38 Wide
39 Zoom ring (P76)
H-FS014042
(LUMIX G VARIO 14–42 mm/F3.5–5.6
ASPH./MEGA O.I.S.)
H-H014
(LUMIX G 14 mm/F2 .5 ASPH.)
- 9 -
Before Use
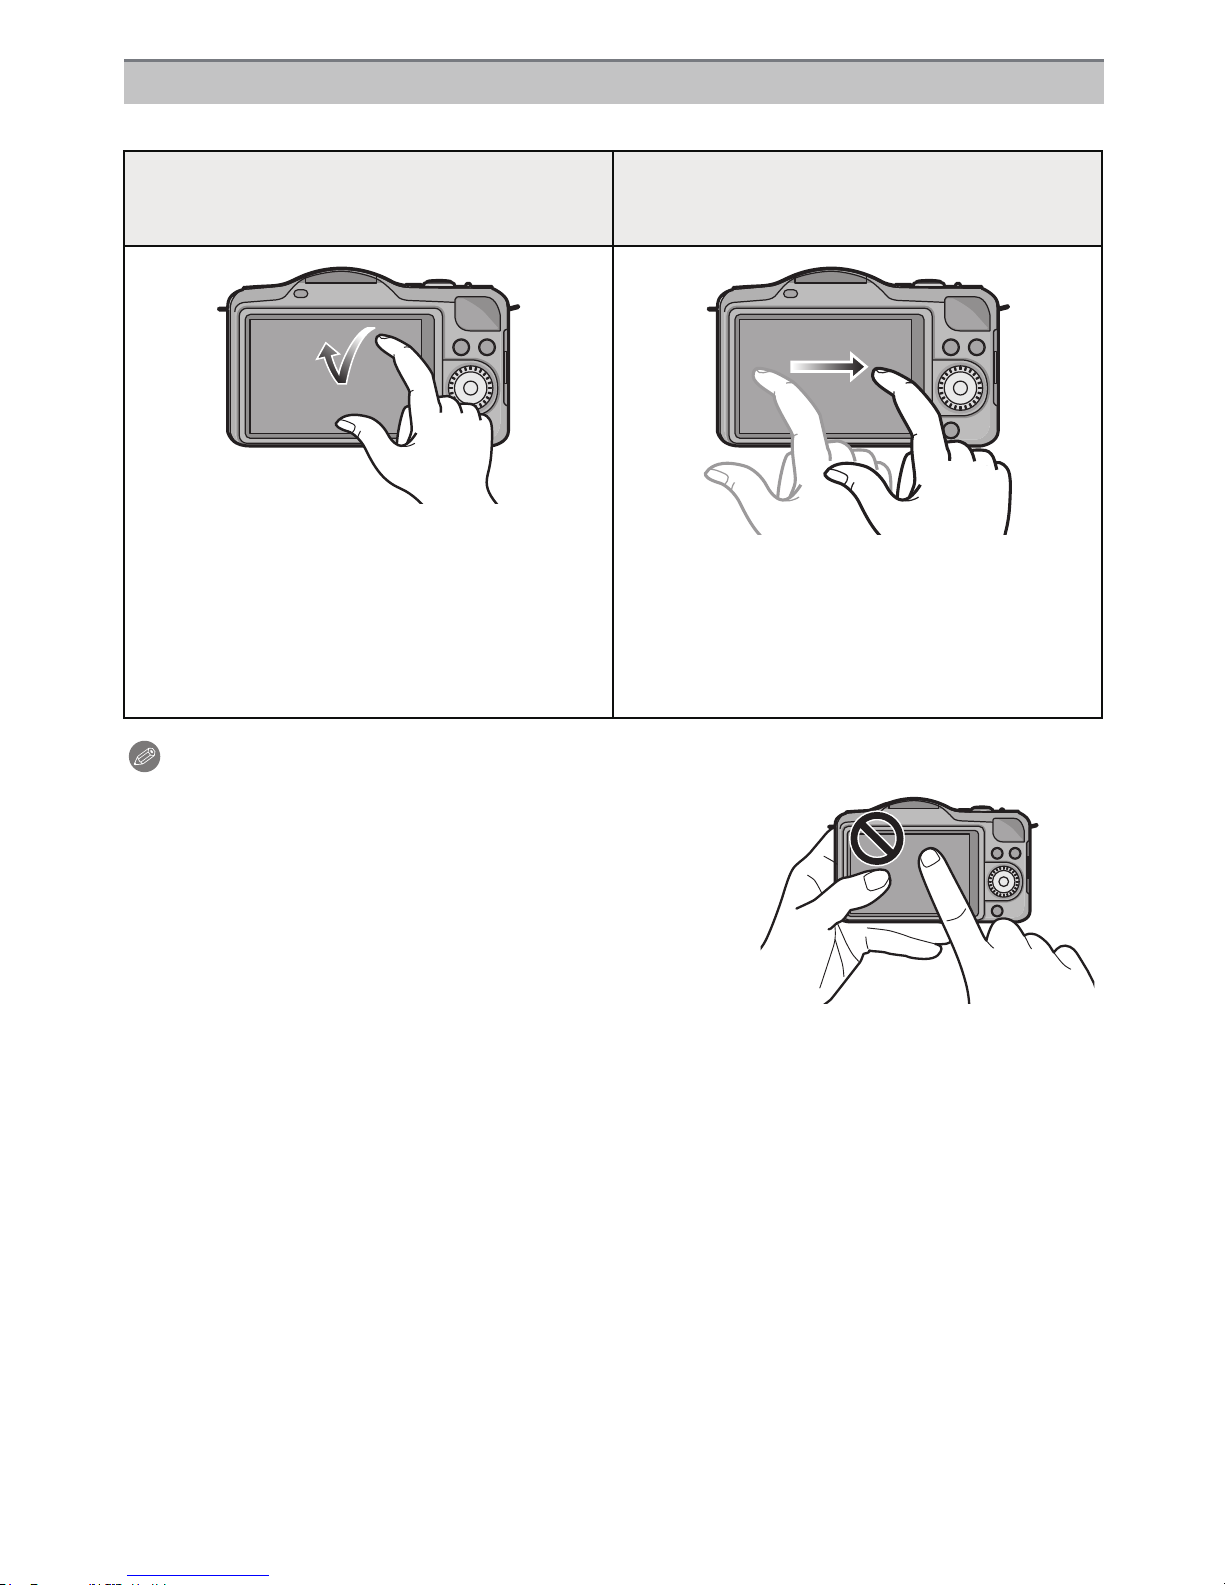
Touch screen
This touch screen is a type that detects pressure.
Touch the screen
To touch and release the touch screen.
Use this to perform tasks such as selecting
icons or images displayed on the touch
screen.
•
When selecting feat ures using the touch
screen, be sure to touch the center of the
desired icon.
Drag
A movement without releasing the touch
screen.
This is used to move the AF area, operate
the slide bar, etc.
This can also be used to move to the next
image during playback, etc.
Note
•
If you use a comme rcially avai lable liqu id cryst al prot ection
sheet, please follow the instructions that accompany the
sheet. (Some liquid crystal protection sheets may impair
visibility or operability.)
•If a commercially available LCD protect ion sheet is us ed, a
little extra pr essure may be required if you notice t hat the
touch screen is not responsive.
•Avoid having the hand holding t he camera accident ly apply
pressure to the t ouch screen. Doing so may affect the
touch screen op eration.
•Do not press on the LCD monitor with hard pointed t i ps,
such as ball point pe ns.
•Do not operate with your fingernails.
•Wipe the LCD monitor with dry soft cloth when it gets dirty with finger prints and others.
•Do not scratch or press the LCD monitor too hard.
•For information about the icons displayed on the touch screen, refer to “LCD Monitor Display”
on P191.
- 10 -
Before Use
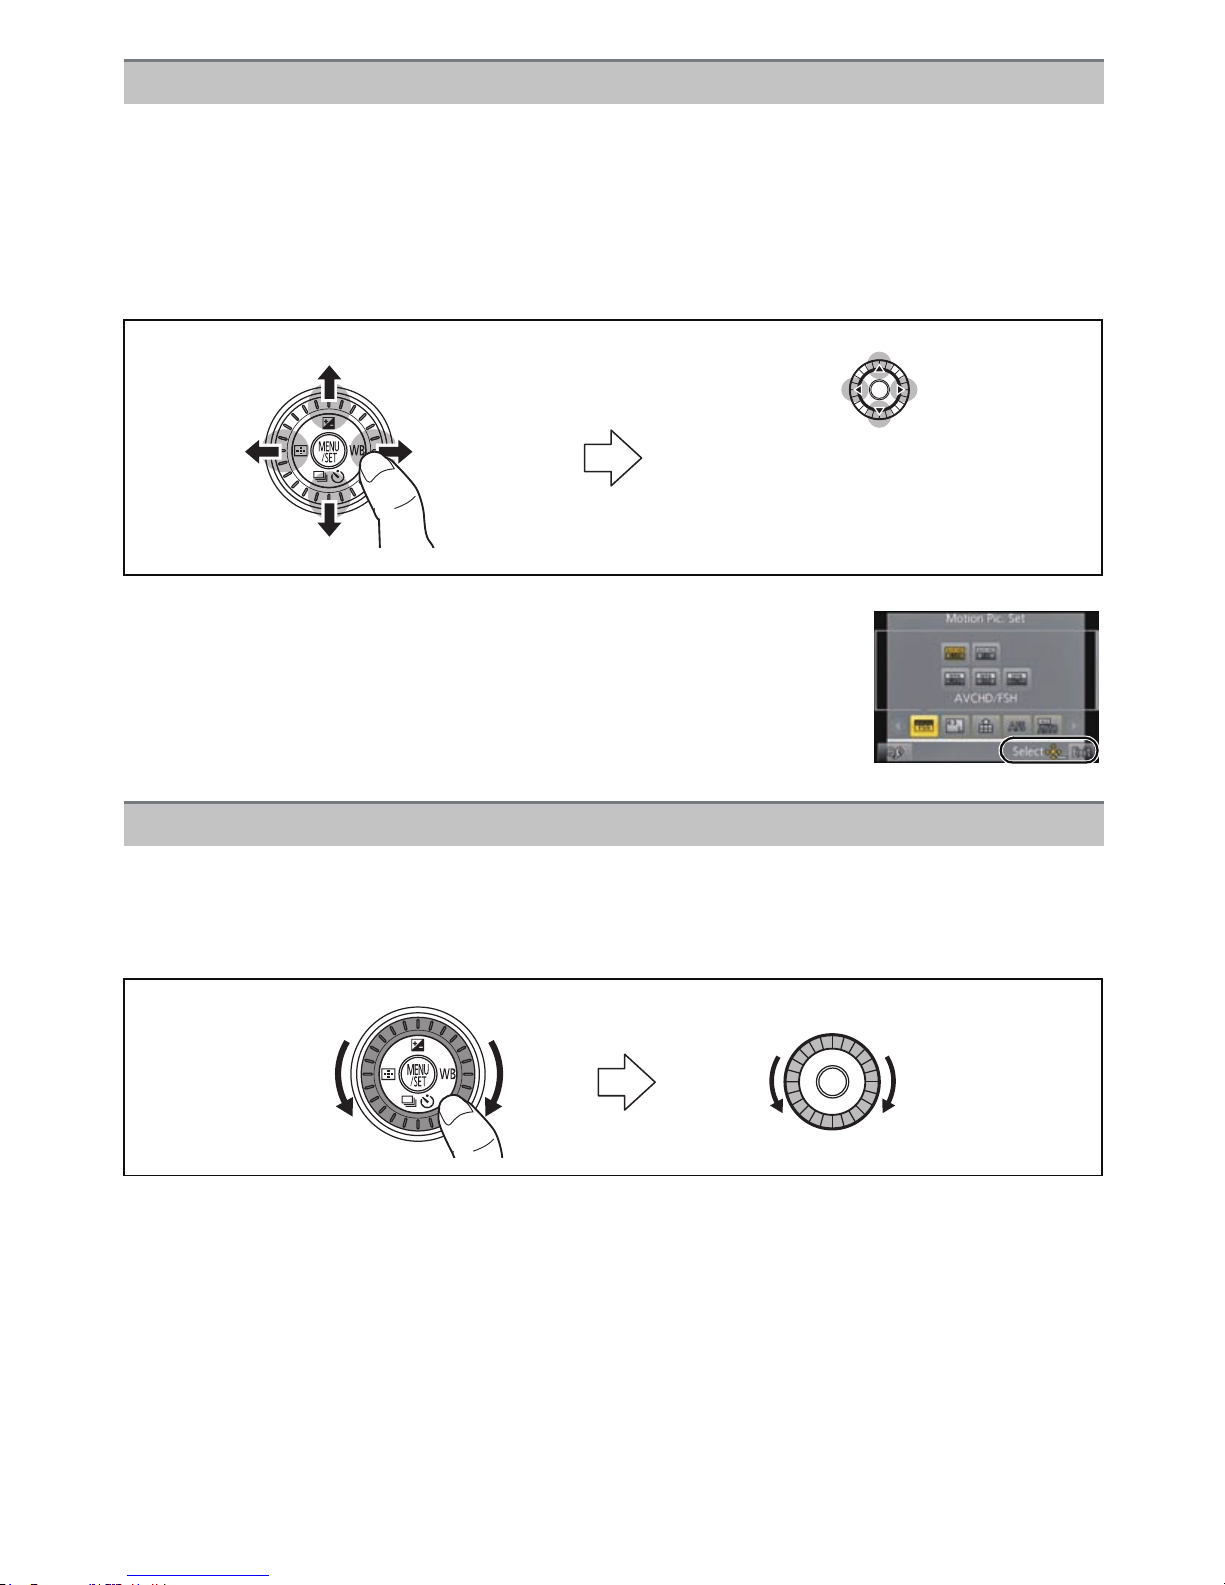
Cursor buttons/[MENU/SET] butto n
Pressing the cursor button:
Selection of items or setting of values etc., is performed.
Pressing [MENU/SET]:
Confirmat ion of setting contents, etc., is performed.
This document expresses the up, down, left, and right of the cursor button as follows, or as
3/4/2/1.
or
Press 3/4/2/1
Even when the camera is operated using the touch screen, it is
possible to operate with the cursor button and [MENU/SET] button
if a guide like the one shown on the right is displayed.
Even on menu screens etc. on which the guide is not displayed,
you can make settings and selections by operating the buttons.
Control Dial
Rotating the control dial:
Selection of items or setting of values etc., is performed.
In this Owner’s Manual, turning the control dial is indicated as follows.
- 11 -

Before Use
About the Lens
∫ Micro Four Thirds™ mount specification lens
This unit can use the dedicated lenses compatible with
the Micro Four Thirds System lens mount specification
(Micro Four Thirds mount).
∫ Four Thirds ™ mount specificat ion lens
Lens with the Four Thirds mount specification can be
used by using the mount adaptor (DMW-MA1: optional).
∫ Leica mount specification lens
•
When you use the M mount adapt or or R mount adaptor (DMW-MA2M, DMW-MA3R:
optional), you can use Leica M Mount or Leica R Mount interchangeable lenses.
–For certain lenses, the actu al dist a nce at which the subj ect is in fo cus may dif fer s lightly fr om
the rated distance.
–When using a Leica lens mount adaptor, set [Shoot w/o L ens] (P159) to [ON].
About the lens and functions
There are functions that cannot be used, or the operation may be different depending on
the lens used.
Auto Focus
¢
/Auto aperture setting¢/Defocus control function (P43)/[Stabilizer] (P74)/
Touch zoom (P78)/[Quick AF] (P146)/[Shading Comp.] (P148)/[Power Zoom Lens] ( P157)
¢ The inte rchang eab le lens (H-P S14042, H-FS0 14042 or H-H01 4) is comp atible with the Au to
Focus and automatic Aperture operation during the recording of motion pictures. With the
interchangeable lens (H-PS14042), when using the power zoom (electrically operated
zoom); you can record motion pictures ev en more smoothly and qui etly thanks to the
powerful high AF follo wing performance and silence design.
For details on the lens used, refer to the website.
Refer to catalogs/Web pages for most current information regarding compatible lenses.
http://panasonic.jp/support/global/cs/dsc/
(This Site is English only.)
Note
The available fl ash ra nge etc. differs depen ding on t he aper ture v alue of the le ns you a re usin g.
•
•The focal length noted on the lens in use is equivalent to double when co nverted to the 35 mm
film camera. (It will be equivalent to 100 mm lens when a 50 mm lens is used.)
Refer to the website for details about the 3D interchangeable lens.
- 12 -
Preparation
Preparation
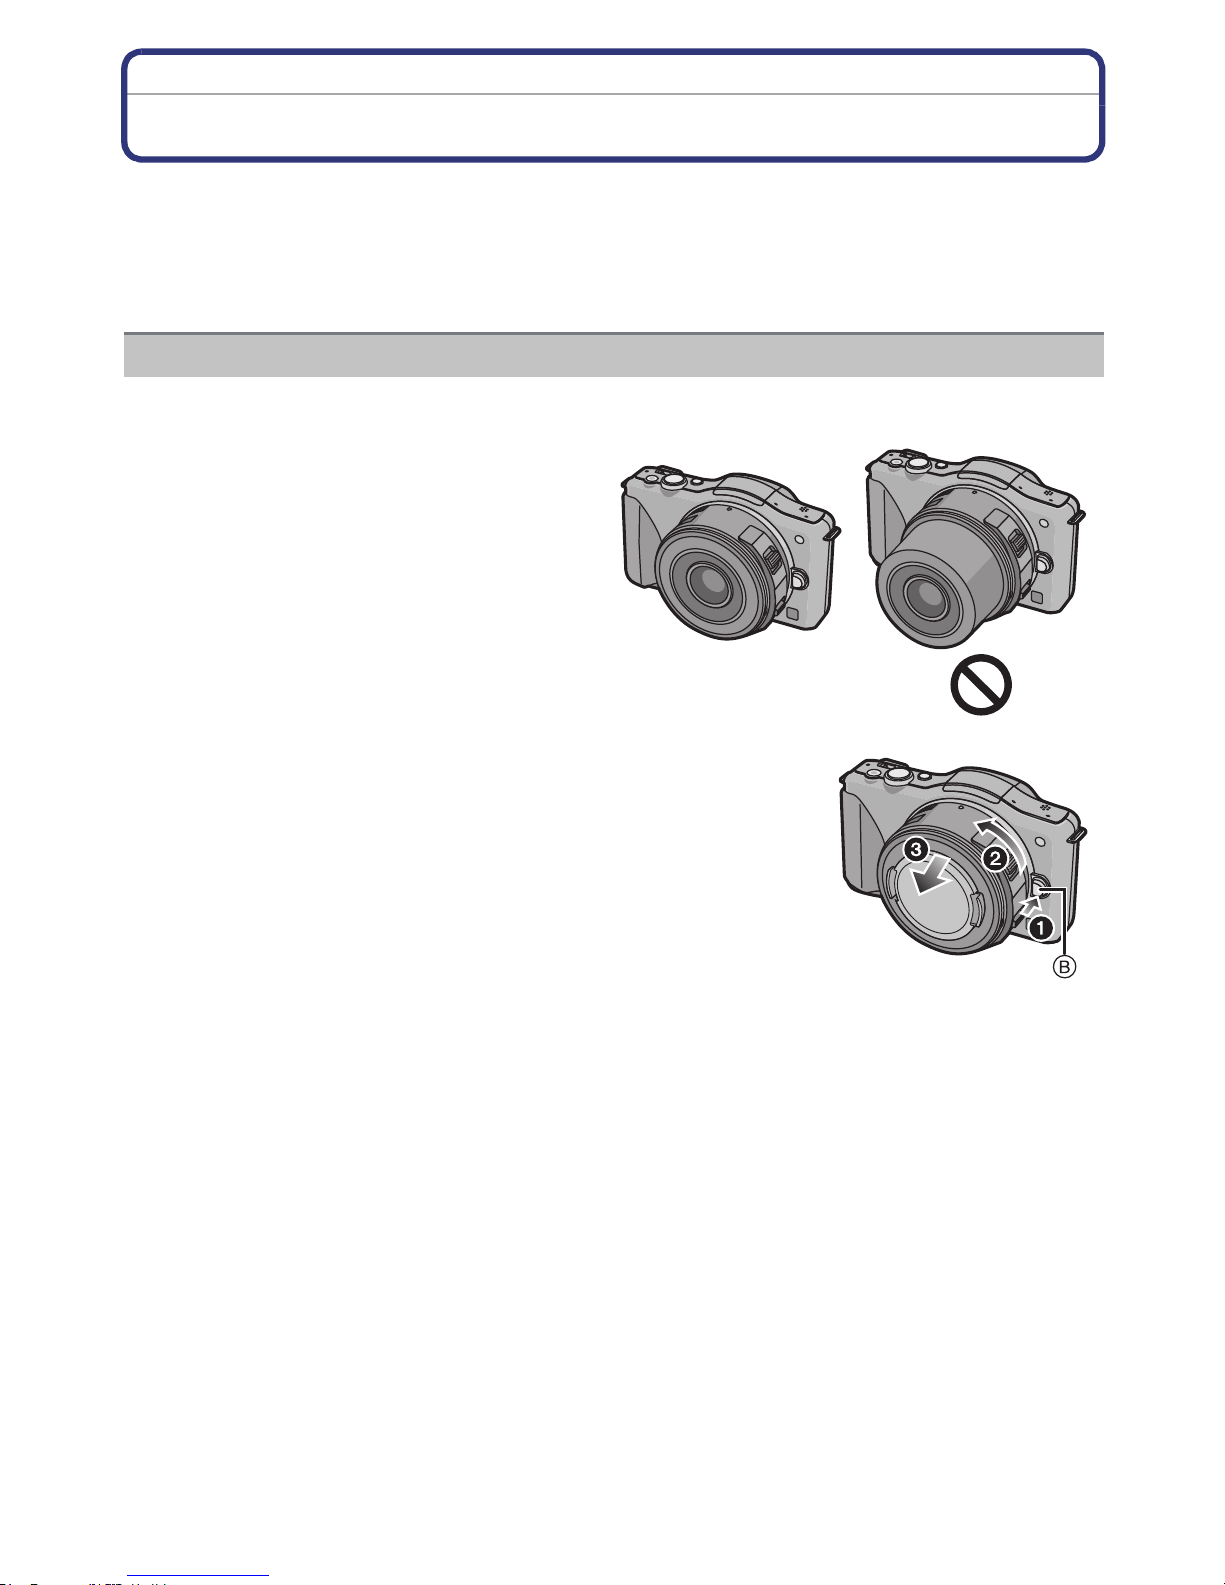
Changing the Lens
By changing the lens, you will increase your picture taking-options and further your
enjoyment of the camera. Change the lens using the following procedure.
•
Check that the camera is turned off.
•Change lenses where there is not a lot of dirt or dust. Refer to P195 when dirt or dust gets on
the lens.
Detaching the lens
Preparations: Attach the lens cap.
•
When using the interchangeable lens
(H-PS14042), change the lens only after
turning the power switch [OFF] and checking
that the lens barrel has retracted. (Do not
push in the lens barrel with your fingers.
Doing so may damage the lens.)
A When retracting the lens barrel
While pressing on the lens release button B, rotate
the lens toward the arrow until it stops and then
remove.
- 13 -
Preparation
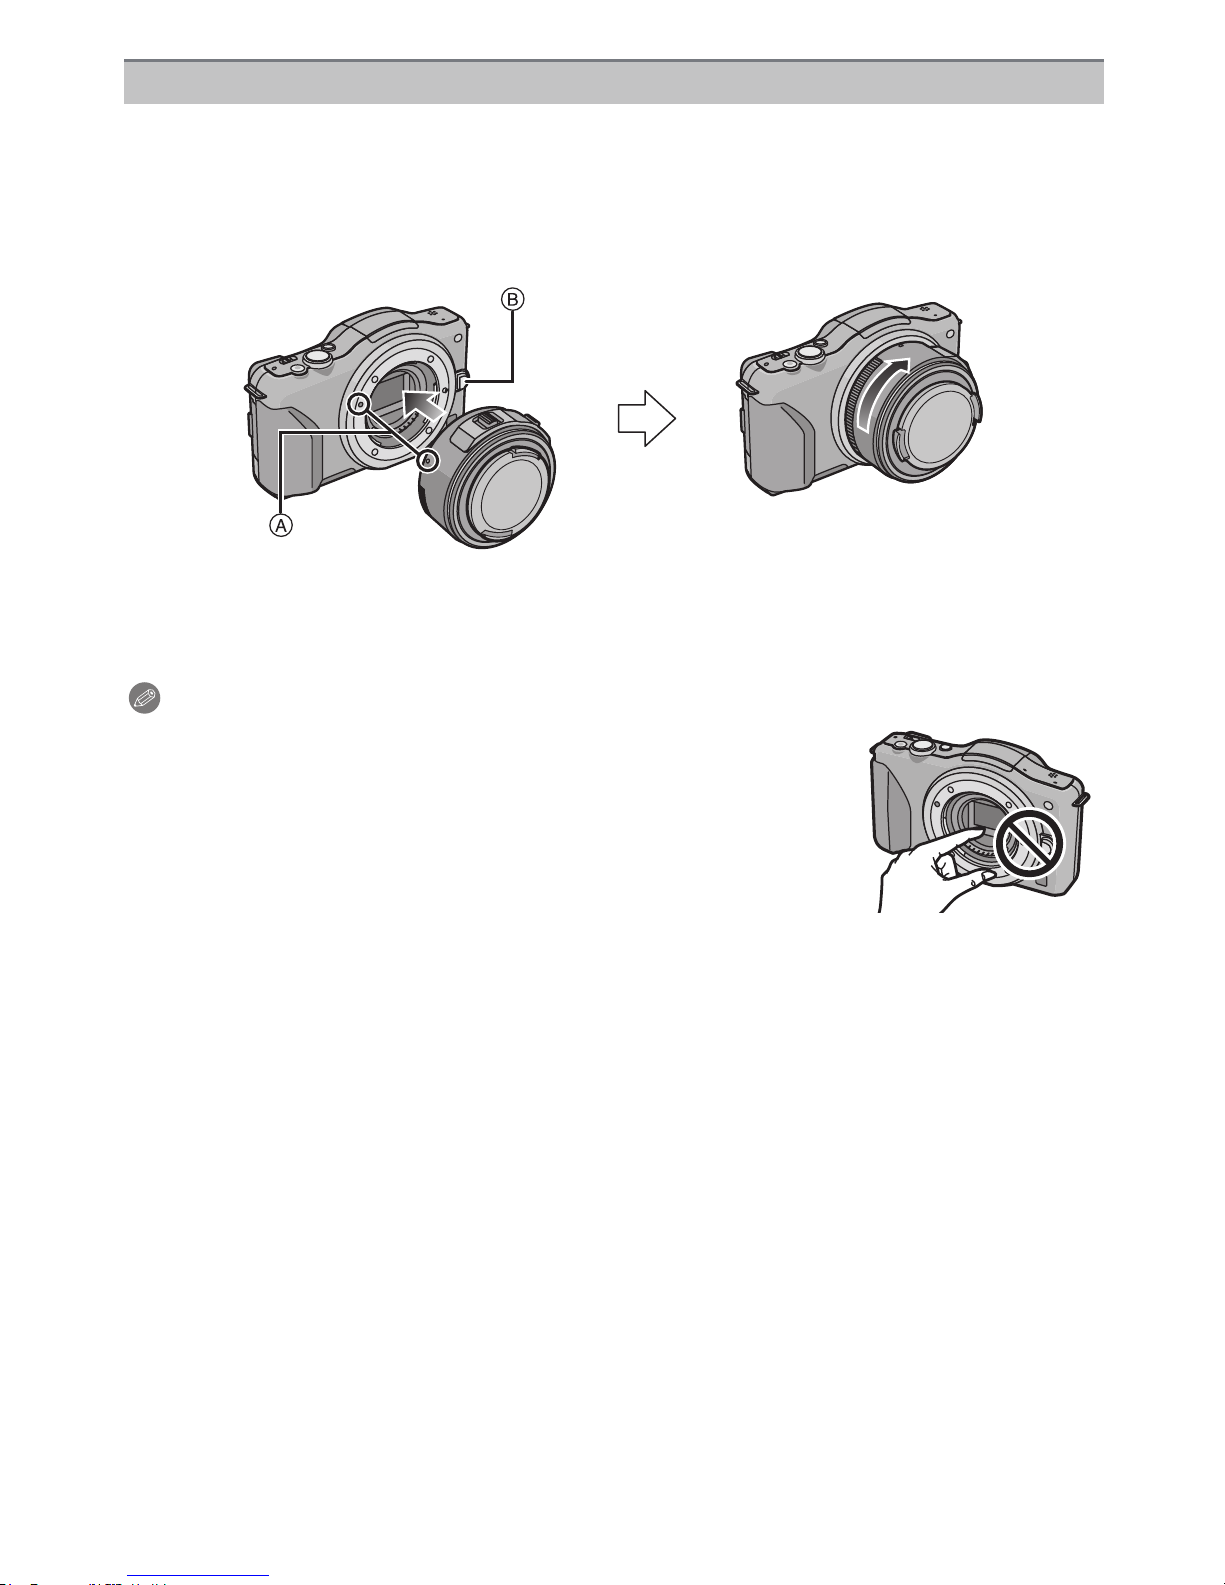
Attaching the lens
Preparations: Remove the rear lens cap from the lens.
If the body cap is fitted to the camera, remove it.
•
Align the lens fitting marks A (red marks) and then rotate the lens in the
direction of the arrow until it clicks.
•Do not press the lens release button B when you attach a lens.
•Do not try to attach the lens when holding it at an angle to the camera body as the lens mount
may get scratched.
•Be sure to remove the lens cap when recording.
Note
Do not insert your fin gers i nt o t he moun t when th e le ns an d b ody c ap
•
are removed from the camera body.
•To prevent dust or deb ris from adhering to internal parts of the
camera body, fit the body cap or a lens to the mount on the camera
body.
•T o prevent scra tchi ng of the cont act poin ts, fit the lens rear cap to the
lens when it is unattached or fit the lens to the camera body.
•It is recommended to attach the lens cap or attach the MC Protector
(optional) to protect the lens surface when carry ing. (P190)
- 14 -
Preparation
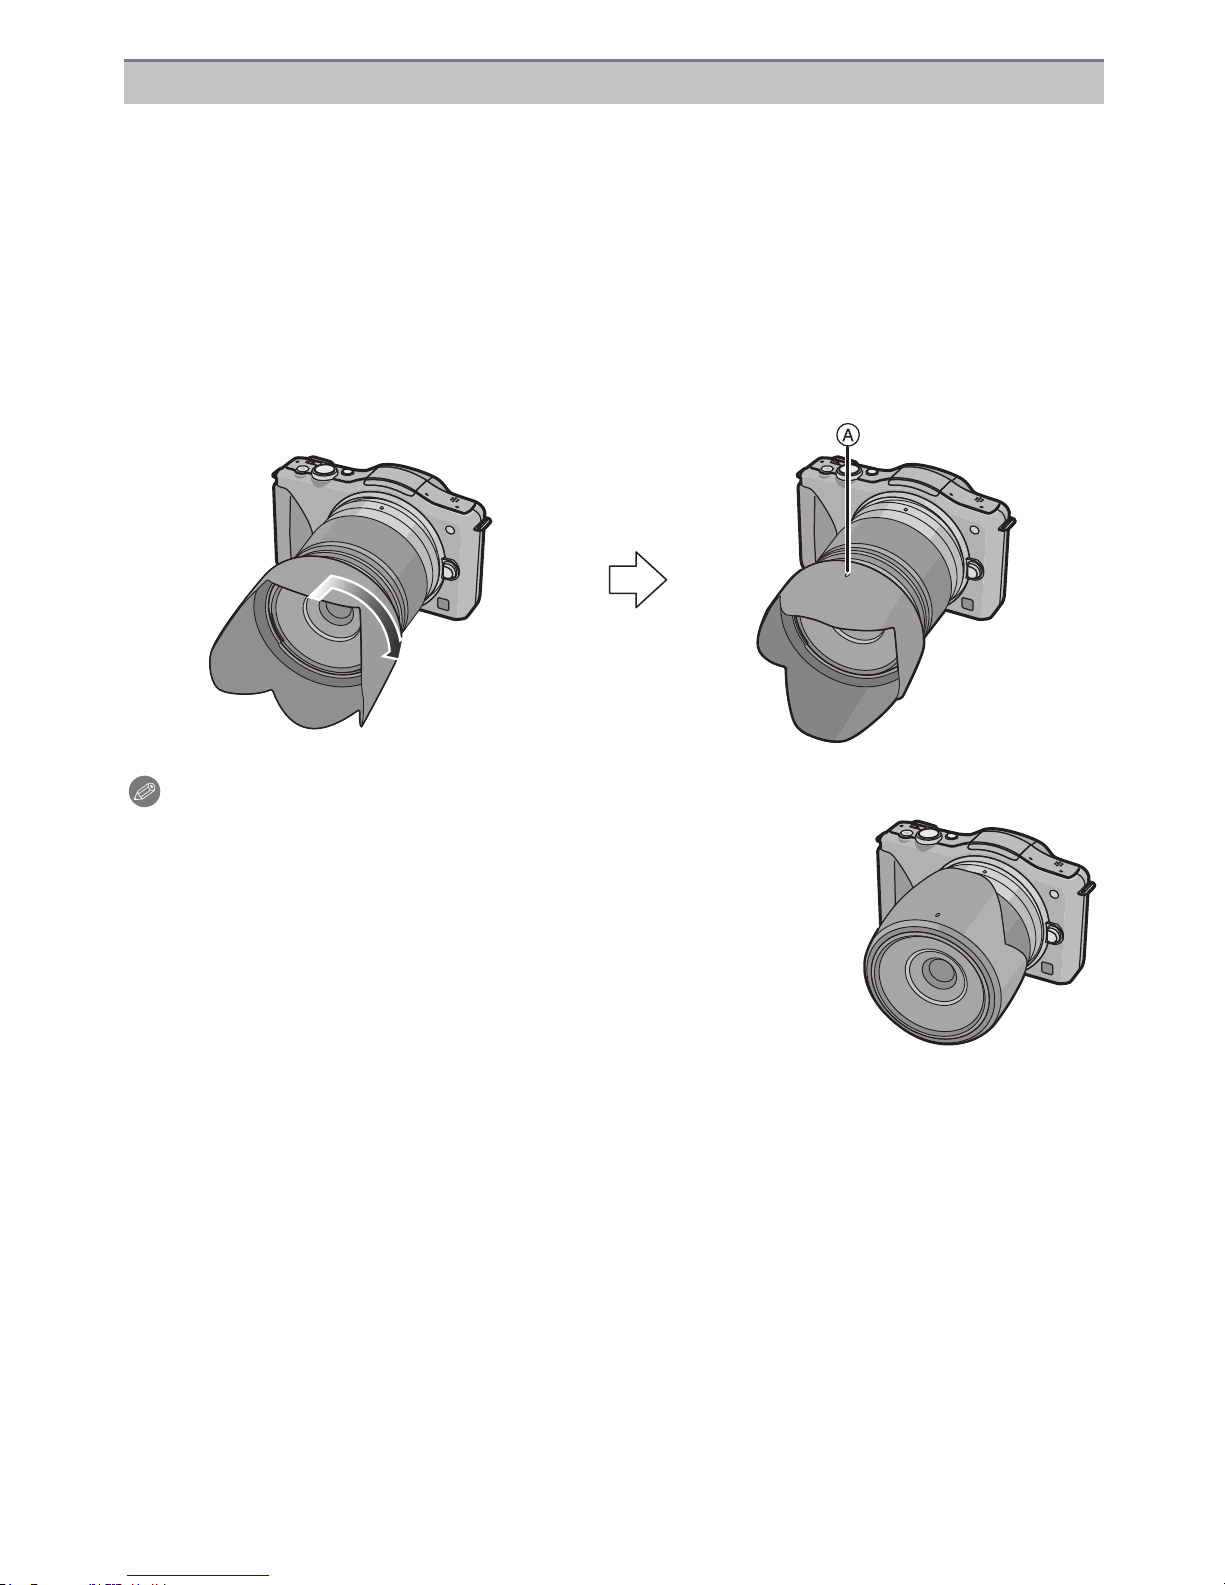
Att a c hing the Lens Hood
When recording into strong backlight, irregular reflection may occur within the lens. The
lens hood reduces the inclusion of unwanted light in the recorded images and lowers the
drop in contrast. The lens hood cuts off excess lighting and improves the picture quality.
To attach the lens hood (flower shape) that came with the interchangeable lens
(H-FS014042)
•
The interchangeable lens (H-PS14042, H-H014) does not have a lens hood.
Insert the lens hood into the lens with the short sides at the top and
bottom, and turn in the direction of the arrow until it stops.
A Fitting to the mark.
Note
•
When temporarily det aching and carrying the len s hood, attach the
lens hood to the lens in the reverse direction.
- 15 -

Preparation
Attaching the Shoulder Strap
•We recommend attaching the shoulder strap when using the camera to prevent it from
dropping.
Pass the shoulder strap through the shoulder
strap eyelet on the camera body.
A:Shoulder strap eyelet
Pass the end of the shoulder strap through the
ring in the d irection of the arr ow and then pa ss it
through the stopper.
Pass the end of the shoulder strap through the
hole on the other side of the stopper.
Pull the other side of the should er
strap and then check that it will
not come out.
• Perform steps 1 to 4 and then attach the
other side of the s houlder strap.
Note
•
Use the shoulder strap around your shoulder.
–Do not wrap the strap around your neck.
–It may result in injury or accident.
•Do not leave the shoulder strap where an infant can reach it.
–It may result in an accident by mista kenly wrapping around the neck.
- 16 -

Preparation
Charging the Battery
∫ About batteries that you can use with this unit
It has been found that counterfeit battery packs which look very similar to the
genuine product are made available for purchase in some markets. Some of
these battery packs are not adequately protected with internal protection to meet
the requirements of appropriate safety standards. There is a possibility that
these battery packs may lead to fire or explosion. Please be advised that we are
not liable for any accident or failure occurring as a result of use of a counterfeit
battery pack. To ensure that safe products are used, we recommend that a
genuine Panasonic battery pack is used.
•
Use the dedicated charger and battery.
Charging
•The battery is not charged when the camera is shipped. Charge the battery before use.
•Charge the battery with the charger indoors.
Attach the battery paying
attention to the direction of
the battery.
Connect the charger to the
electrical outlet.
• The [CHARGE] indicator A lights
up and charging be gins.
plug-in type inlet type
- 17 -

Preparation
∫ About the [CHARGE] indicator
The [CHARGE] indicator turns on:
The [CHARGE] indicator is turned on during charging.
The [CHARGE] indicator turns off:
The [CHARGE] indicator will turn off once the charging has completed without any
problem. (Disconnect the charger from the electrical socket and detach the battery after
charging is completed.)
•
When the [CHARGE] indicator flashes
–The battery temperat ure is too hi gh or too low. It is recommended to char ge the ba tt er y aga in
in an ambient temperature of between 10 oC and 30 oC (50 oF and 86 oF).
–The terminals of the charger or the battery are dirty. In this case, wipe them with a dry cloth.
∫ Charging time
Charging time Approx. 180 min
The indicated charging time is for when t he battery has been dis charged completely.
•
The charging time may vary depending on how the battery has been used. The charging
time for the battery in hot/cold environments or a battery that has no t be en used for a
long time may be longer than normal.
Note
Do not leave any metal items (such as clips) near the contact areas of the power plug.
•
Otherwise, a fire and/or electric shocks may be caused by short-circuiting or the
resulting heat generated.
•The battery can be recharged even when it still has some charge left, but it is not
recommended that the battery charge be frequently topped up while the battery is fully
charged. (Since characteristic swelling may occur.)
- 18 -
Preparation
Approximate operating time and number of recordable pictures
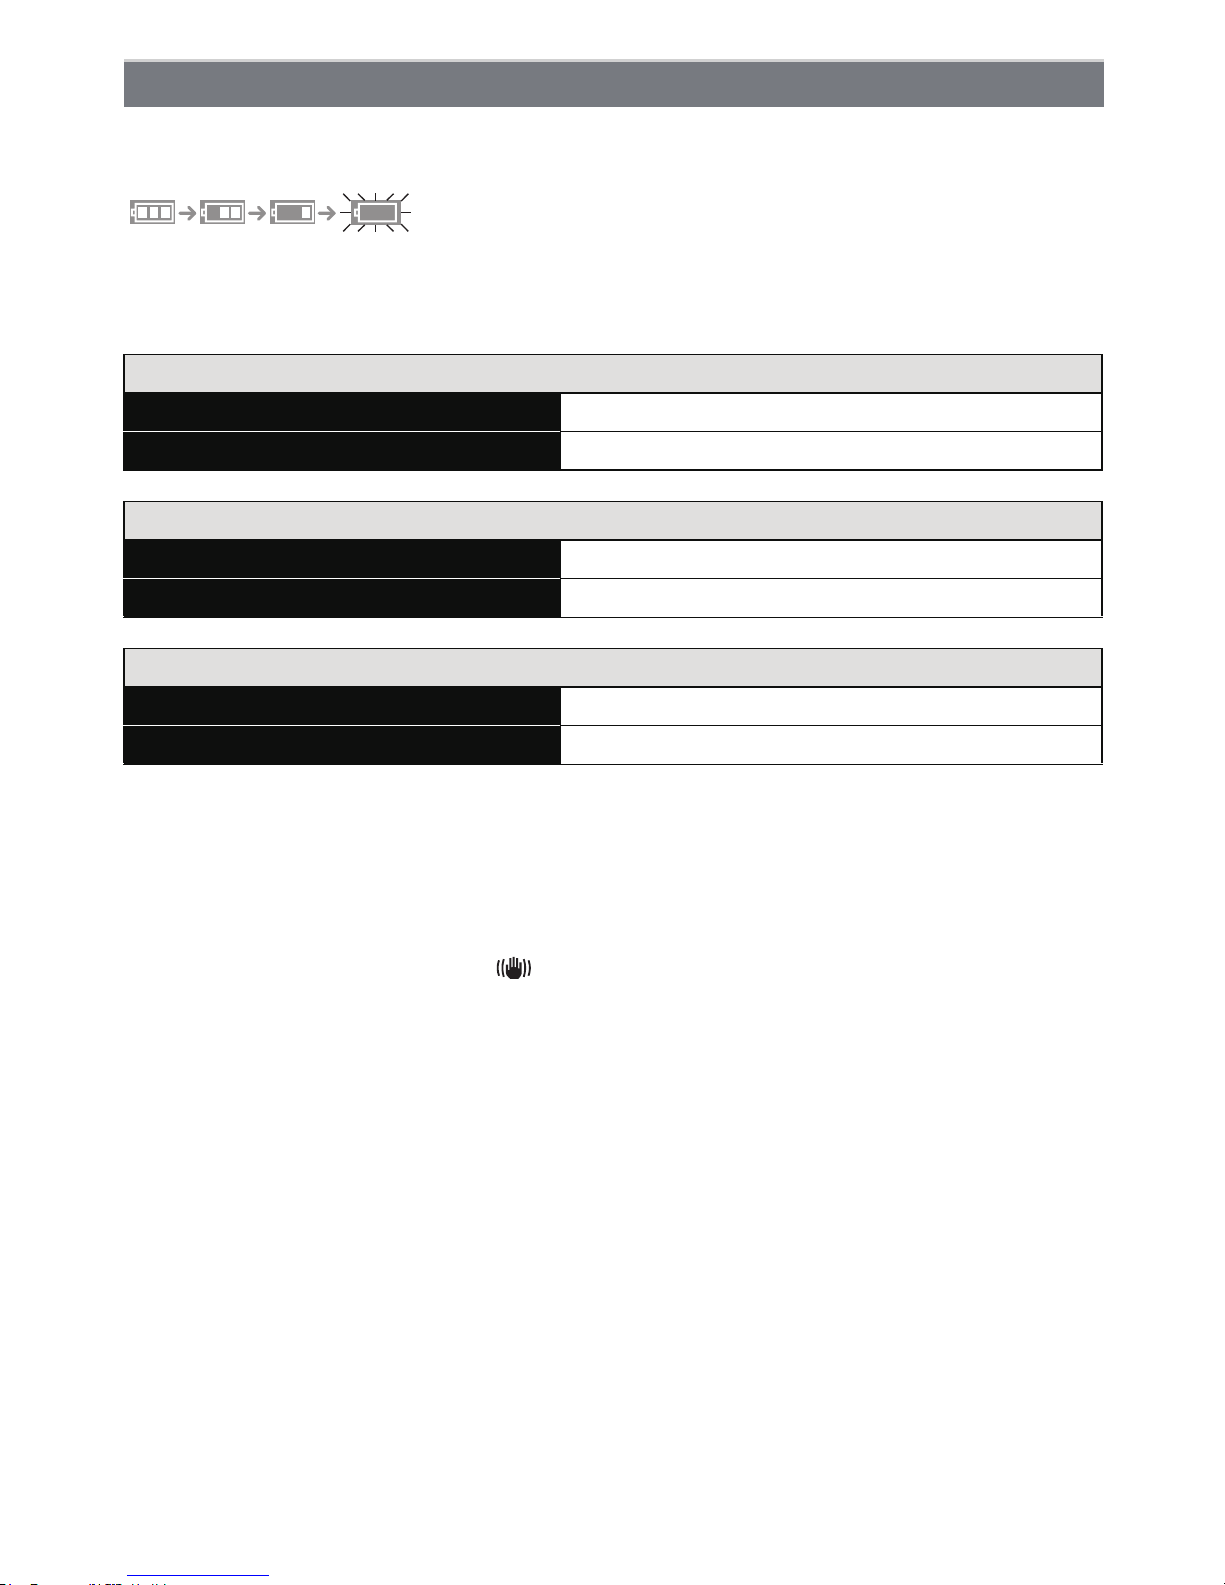
∫ Battery indication
The battery indication is displayed on the screen.
The indication turns red and blinks if the rema ining battery power is exhaust ed. (The status
•
indicator also blinks) Recharge the battery or replace it with a fully charged battery.
∫ Recording still pictures (By CIPA standard in Program AE Mode)
When the interchangeable lens ( H -PS14042) is used
Number of recordable pictures Approx. 330 pictures
Recording time Approx. 165 min
When the interchangeable lens (H-FS014042) is used
Number of recordable pictures Approx. 320 pictures
Recording time Approx. 160 min
When the interchangeable lens (H-H014) is used
Number of recordable pictures Approx. 360 pictures
Recording time Approx. 180 min
Recording conditions by CIPA standard
CIPA is an abbreviation of [Camera & Imaging Products Association].
•
•Temperature: 23 oC (73.4 oF)/Humidity: 50%RH when LCD monitor is on.
•Using a Panasonic SD Memory Card (2 GB).
•Using the supplied battery.
•Starting reco rding 30 seconds after the camera is turned on.
(When attaching an i nterchan geable l ens comp a tib le with t he Opt ical Imag e Stabilizer function,
set the Optical Image Stabilizer to [ ])
•Recording once every 30 seconds using full flash every second recording.
•When an interchangeable lens compatible with power zoom (electrically operated zoom) is
attached, the zoom moves from Tele to Wide or from Wide to Tele on each recording.
•Turning the camera off every 10 recordings and leaving it until t he temperature of the battery
decreases.
The number of recordable pictures varies depending on the recording interval time.
If the recording interval time becomes longer, the number of recordable pictures
decreases. [For example, if you were to take one picture every two minutes, then the
number of pictures would be reduced to approximately one-quarter of the number
of pictures given above (based upon one picture taken every 30 seconds).]
- 19 -

Preparation
∫ Recording motion pictures
–
[AVCHD] (Recording with picture quality set to [FSH])
When the interchangeable lens ( H -PS14042) is used
Recordabl e time Approx. 130 min
Actual recordable time Approx. 65 min
When the interchangeable lens (H-FS014042) is used
Recordabl e time Approx. 120 min
Actual recordable time Approx. 60 min
When the interchangeable lens (H-H014) is used
Recordabl e time Approx. 140 min
Actual recordable time Approx. 70 min
–[MP4] (Recording with picture quality set to [FHD])
When the interchangeable lens ( H -PS14042) is used
Recordabl e time Approx. 130 min
Actual recordable time Approx. 65 min
When the interchangeable lens (H-FS014042) is used
Recordabl e time Approx. 120 min
Actual recordable time Approx. 60 min
When the interchangeable lens (H-H014) is used
Recordabl e time Approx. 140 min
Actual recordable time Approx. 70 min
•These times are for an ambient temperature of 23 oC (73.4 oF) and a humidity of 50%RH.
Please be aware that these times are approximate.
•Actual recordable time is the time available for recording when repeating actions such as
switching the power supply [ON]/[OFF], starting/st opping recording, etc.
•Maximum time to record motion pictures continuously with [MP4] is 29 minutes 59 seconds or
up to 4 GB.
You can check the recordable time on the screen. (For [FHD] in [MP4] format, the file size is
large and so the recordable time will drop below 29 minutes 59 seconds.)
- 20 -

Preparation
∫ Playback
When the interchangeable lens ( H -PS14042) is used
Playback time Approx. 210 min
When the interchangeable lens (H-FS014042) is used
Playback time Approx. 200 min
When the interchangeable lens (H-H014) is used
Playback time Approx. 240 min
Note
•
The operating times and number of recordable pictures will differ according to the
environment and the operating conditions.
For example, i n the following cas es, the operating times shorten and the number of recordable
pictures is reduced.
–In low-temperature environments, such as on ski slopes.
–Using the [AUTO] of [LCD Mode] or [MODE1] of [LCD Mode].
–When [Live View Mode] is set to [NORMAL].
–When flash is used repeatedly.
•When the operating time of the camera becomes extremely short even after pr operly charging
the battery, the life of the battery may have ex pired. Buy a new battery.
- 21 -
Preparation
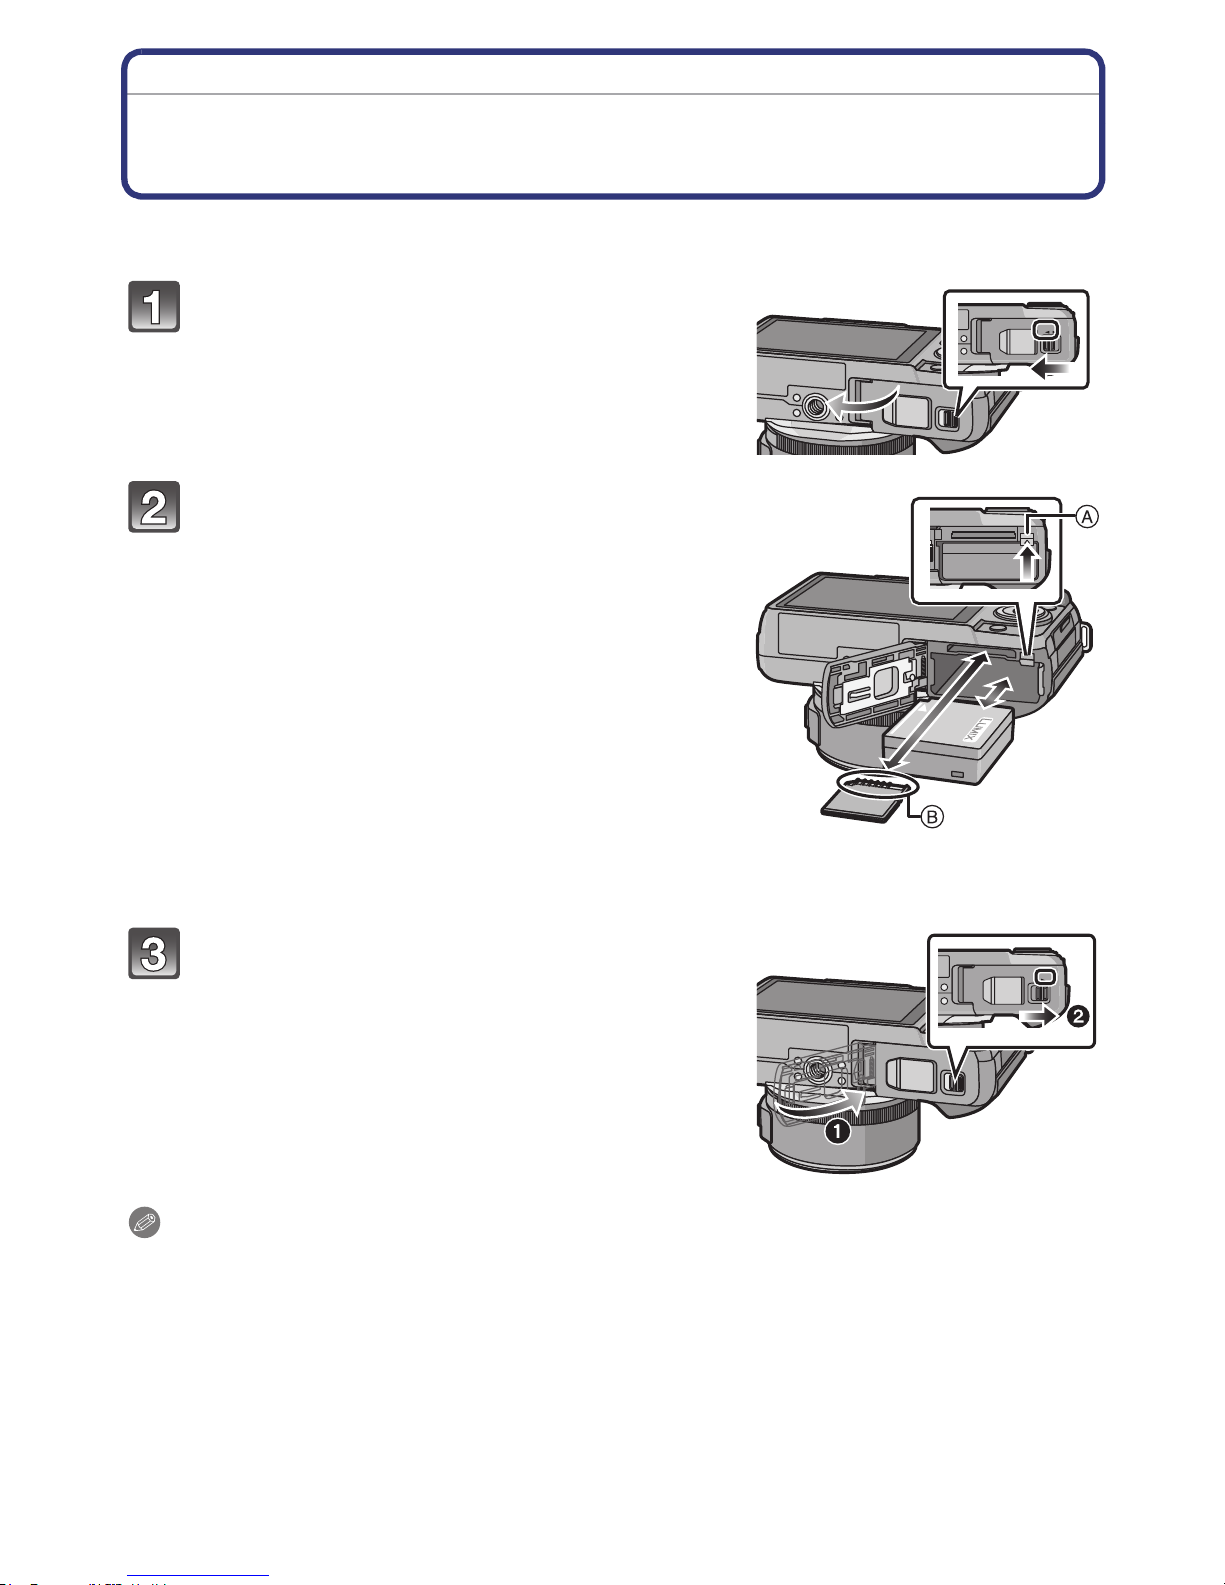
Inserting and Removing the Card (optional)/
the Battery
•Check that this unit is turned off.
•We recommend using a Panasonic card.
Slide the release lever in the direction of
the arrow and open the card/battery
door.
• Always use genuine Panasonic batteries.
• If you use other batteries, we cannot guarantee
the quality of this product.
Battery: Being careful about the battery
orientation, insert all the way until you
hear a locking sound and then check that
it is locked by lever A.
Pull the lever A in the direction of the
arrow to remove the battery.
Card: Push it securely all the way until
you hear a “click” while being careful
about the direction in which you insert it.
T o rem ove the card, push the card until it
clicks, then pull the card out upright.
B:Do not touch the connection terminals of the
card.
LOCKOPEN
1:Close the card/battery door.
LOCKOPEN
2:Slide the release lever in the dire ctio n
of the arrow.
Note
•
Remove the batter y aft er use. (The battery wil l be exhaus ted if le ft fo r a long peri od of ti me after
being charged.)
•The battery becomes warm after using it and during and after charging. The camera also
becomes warm during use. This is not a malfunction.
•Before removing the card or battery, turn the camera off, and wait until the status indicator has
gone off completely. (Otherwise, this unit may no longer operate normally and the card itself
may be damaged or the recorded pictures may be los t.)
- 22 -
Preparation
About the Card
About cards that can be used with this unit
The following cards which conform to the SD video standard can be used with this unit.
(These cards are indicated as card in the tex t.)
Remarks
¢
with “Class 4” or
SD Memory Card
(8 MB to 2 GB)
SDHC Memory Card
(4 GB to 32 GB)
SDXC Memory Card
(48 GB, 64 GB)
•Use a card with SD Speed Class
higher when recording motion pictu res.
•SDHC Memory Card can be used with SDHC Memory Card
or SDXC Memory Card comp atible equipment.
•SDXC Memory Card can only be used with SDXC Memory
Card compatible equipment.
•Check that the PC and other equipment are compatible when
using the SDXC Memory Cards.
http://panasonic.net/avc/sdcard/information/SDXC.html
•This unit is compatible with UHS-I standard SDHC/SDXC
memory cards.
•Only the cards with capacity lis ted left can be used.
¢ SD Speed Class is the speed standard regarding continuous writing. Check via the label on
the card, etc.
e.g.:
Access to the card
The access indication displays red when pictures are being recorded on
the card.
•
During access (image writing, reading and deleting, formatting etc.), do not turn off the
power, remove the battery, card or disconnect the AC adaptor (optional). Furthermore,
do not subject the camer a to vib ration, impact or static electricity.
The card or the data on the card may be damaged, and this unit may no longer operate
normally.
If operation fails due to vibration, impact or static electricity, perform the operation
again.
•Please confirm the latest information on the following website.
http://panasonic.jp/support/global/cs/dsc/
(This Site is English only.)
- 23 -

Preparation
2
Note
Write-Protect switch A provid ed (When this switch is set to the [LOCK] position,
•
no further data writing, deletion or formatting is possible. The ability to write,
delete and format data is restored when the switch is returned to its orig inal
position.)
•The data on the card may be damaged or lost due to electromagnetic waves,
static electricity or breakdown of the camera or the card. We recommend storing
important data on a PC etc.
•Do not format the card on your PC or other equipment. Format it on the camera only to ensure
proper operation. (P73)
•Keep the Memory Card out of reach of childre n to prevent swallowing.
- 24 -
Preparation
A B
Approximate number of recordable pictures and available recording
time
∫ About the display of the number of recordable pictures and available recording
time
Switching between the dis play of number of recordable
•
pictures and available record ing time can be performe d in
the [Remaining Disp.] (P158) in the [Custom] menu.
A Number of recordable pictures
B Available recording time
∫ Number of recordable pictures
•
[9999i] is display ed if there are more than 10000 pictures remaining.
•Aspect ratio [X], Quality [A]
[Picture Size] 2GB 8GB 32 GB 64 GB
L (12M) 280 1150 4650 9150
M (6M) 510 2060 8350 16470
S (3M) 810 3260 13210 24710
•Aspect ratio [X], Quality [ ]
[Picture Size] 2GB 8GB 32 GB 64 GB
L (12M) 89 360 1460 2900
M (6M) 100 410 1690 3380
S (3M) 110 450 1830 3630
- 25 -
Preparation
∫ Available recording time (when recording motion pictures)
•
“h” is an abbreviation for hour, “m” for minute and “s” for second.
•[AVCHD]
[Rec Quality] 2GB 8GB 32 GB 64 GB
FSH 14m00s 1h1m 4h10m 8h27m
SH 14m00s 1h1m 4h10m 8h27m
•[MP4]
[Rec Quality] 2GB 8GB 32 GB 64 GB
FHD 12m18s 50m6s 3h23m14s 6h51m13s
HD 23m30s 1h35m39s 6h28m00s 13h5m5s
VGA 51m43s 3h30m32s 14h13m55s 28h47m50s
•The recordable time is the total time of all the motion pictures which have
been recorded.
•Maximum time to record motion pictures continuously with [MP4] is
29 minutes 59 seconds or up to 4 GB.
You can check the recordable time on the screen. (For [FHD] in [MP4]
format, the file size is large and so the recor dabl e time will drop below 29 minutes 59 seconds.)
•The maximum available continuous recording time is displayed on the screen.
Note
•
The number of recordable pictures and the available recording time are an approximation.
(These vary depending on the recording conditions and the type of card.)
•The number of recordable pictures and the available recording time varies depending on the
subjects.
- 26 -
Preparation
Setting Date/Time (Clock Set)
•The clock is not set when the camera is shipped.
Turn the camera on.
• The status indicator 1 lights when you turn this unit on.
• If the language select screen is no t displayed, proceed to s tep 4.
Touch [Language Set].
Select the language.
Touch [Clock Set].
Touch the items you wish to set (Year/Month/
Day/Hours/Minutes), and set using [ ]/[ ].
A: Time at the home area
B: Time at the travel destination
•
You can continue to switch the settings by c ontinuously
touching [ ]/[ ].
• Touch [ ] to cancel the date and time settings without
setting a date and time.
:
:
To set the display orde r and the time display format.
•
Touch [Sty le] to display the settings screen for setting
display order/time display format.
- 27 -

Preparation
Touch [Set] to set.
Touch [Set] in the confirmation screen.
Changing the Clock Setting
Select [Clock Set] in the [Setup] menu. (P60)
•
The clock can be reset as shown in steps 5 and 6.
•The clock setting is maintained for 3 months using the built-in clock battery even
without the battery. (Leave the charged battery in the unit for 24 hours to charge the
built-in battery.)
Note
If the clock is not set, the correct date cannot be printed when you stamp the date on the
•
pictures with [Text Stamp] or order a photo studio to print the pictures.
•If the clock is s et, the corr ec t dat e can be prin ted eve n if t he da te is n ot dis p layed on the s cr een
of the camera.
- 28 -
Basic
A
Basic
Selecting the Recording Mode
Press [MENU/SET].
Touch [Rec Mode].
• A screen listing the Recording Mode is displayed.
• It is also possible to display the screen
listing the Recording Mode by touching
the Recording Mode icon in Recording
Mode.
Touch the Recording Mode to select.
• The explanation A for the touched Recording Mode is
displayed.
• If you release your finger, the mode will be selected. If you
hold your finger on the screen, move it to an area with no
icons and then release, the mode will not be selected.
- 29 -
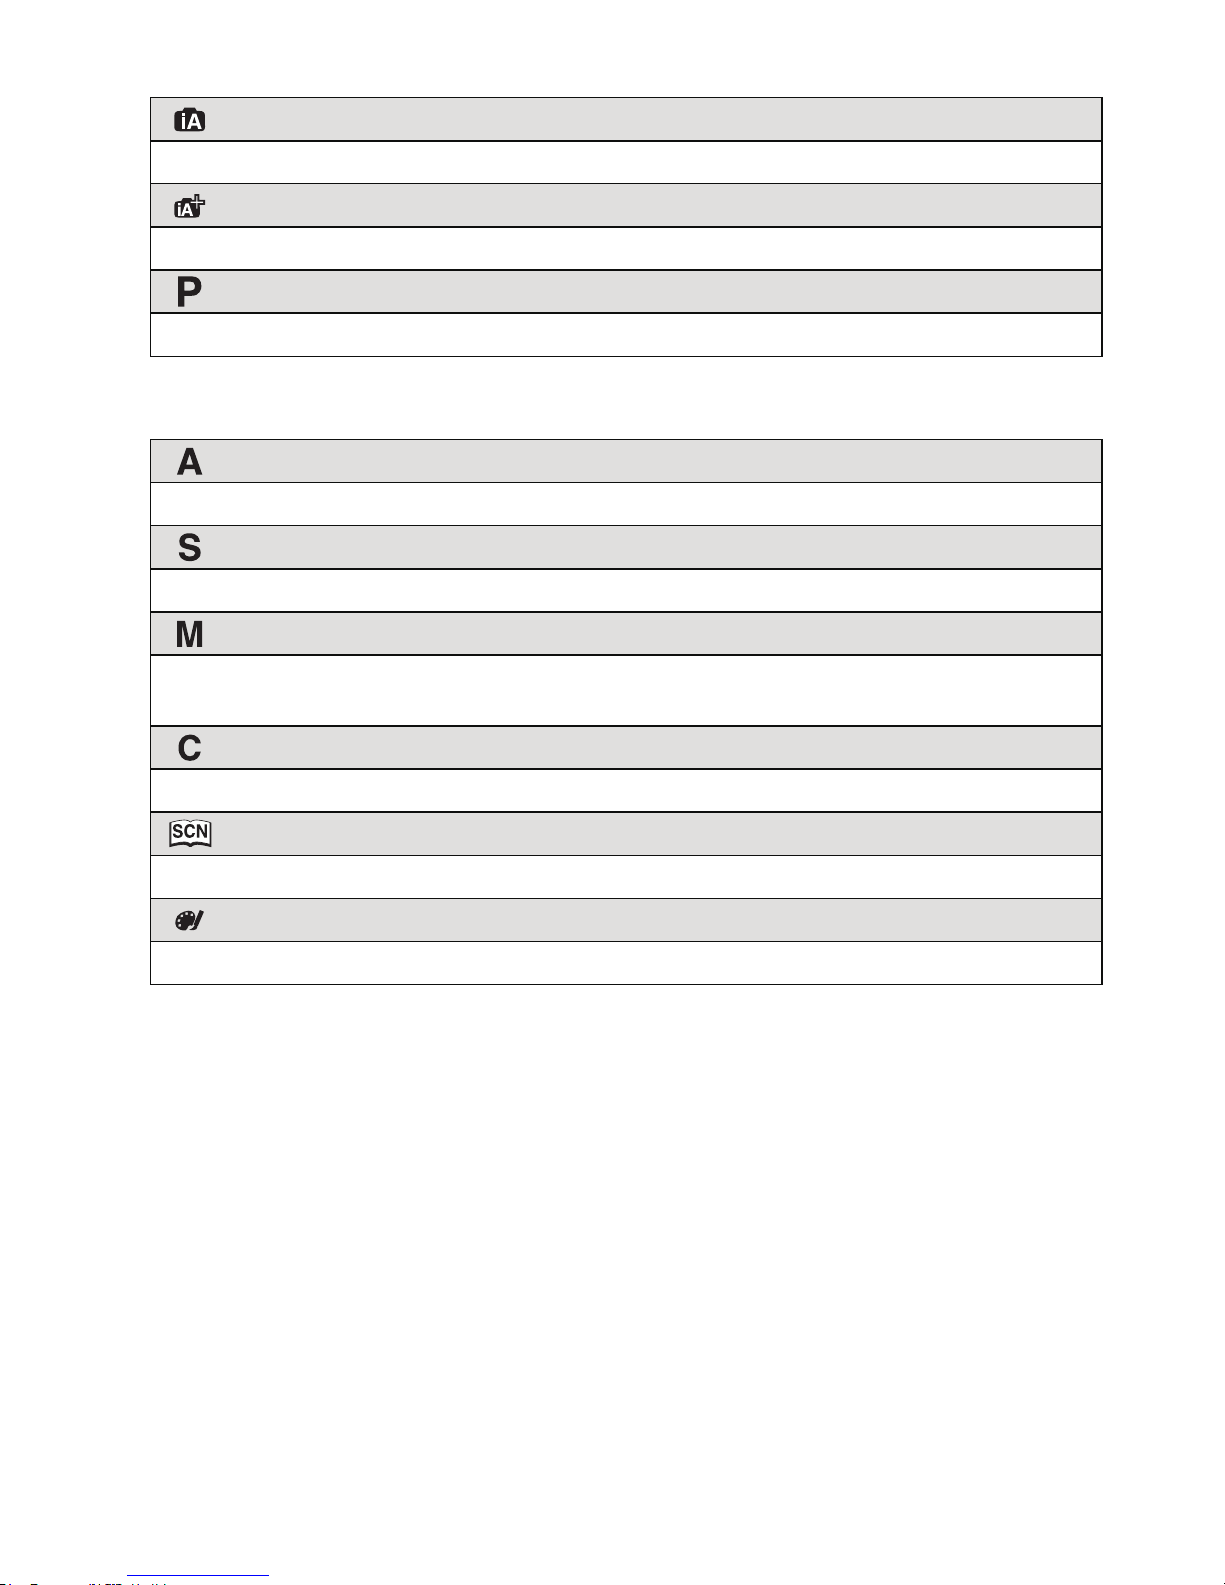
Basic
∫ Basic
Intelligent Auto Mode (P37)
The subjects are recorded using settings automatically selected by the camera.
Intelligent Auto Plus Mode (P41)
Easily match settings selected by the camera to your preferences and record.
Program AE Mode (P45)
The subjects are recorded using your own settings.
∫ Advanced
Aperture-Priority AE Mode (P108)
The shutter speed is automatically determined by the aperture value you set.
Shutter-Priority AE Mode (P109)
The aperture value is automatically determined by the shutter speed you set.
Manual Exposure Mode (P110)
The exposure is adjusted by the aperture value and the shutter speed which are
manually adjusted.
Custom Mode (P132)
Use this mode to take pictures with previously registered settings.
Scene Guide Mode (P112)
This allows you to take pictures that match the scene being recorded.
Creative Control Mode (P122)
Record while checking the image effect.
- 30 -
 Loading...