

2
AB
C
3
DEF
1
5
JKL
6
MNO
4
GH
I
8
TUV
9
WXYZ
7
PQRS
0
R
(R) Button (3-A)
RINGER Selector
(1-B)
Button (2-A)
VOLUME (^), (_)
Buttons (2-A)
To Single-Line Telephone Jack
Handset Cord
Handset
Telephone Line Cord
RINGER Selector
1
2
HIGH OFF
RINGER
(\\\)
To Single-Line
Telephone Jack
Screws
8.3 cm
Hooks
1
1
2
1
2
E-SP-PQQX13904ZA03.8.206:47PMページ1
Integrated Telephone System
Operating Instructions
Model No. KX-TS500EX
KX-TS500EXW
PLEASE READ BEFORE USE AND SAVE.
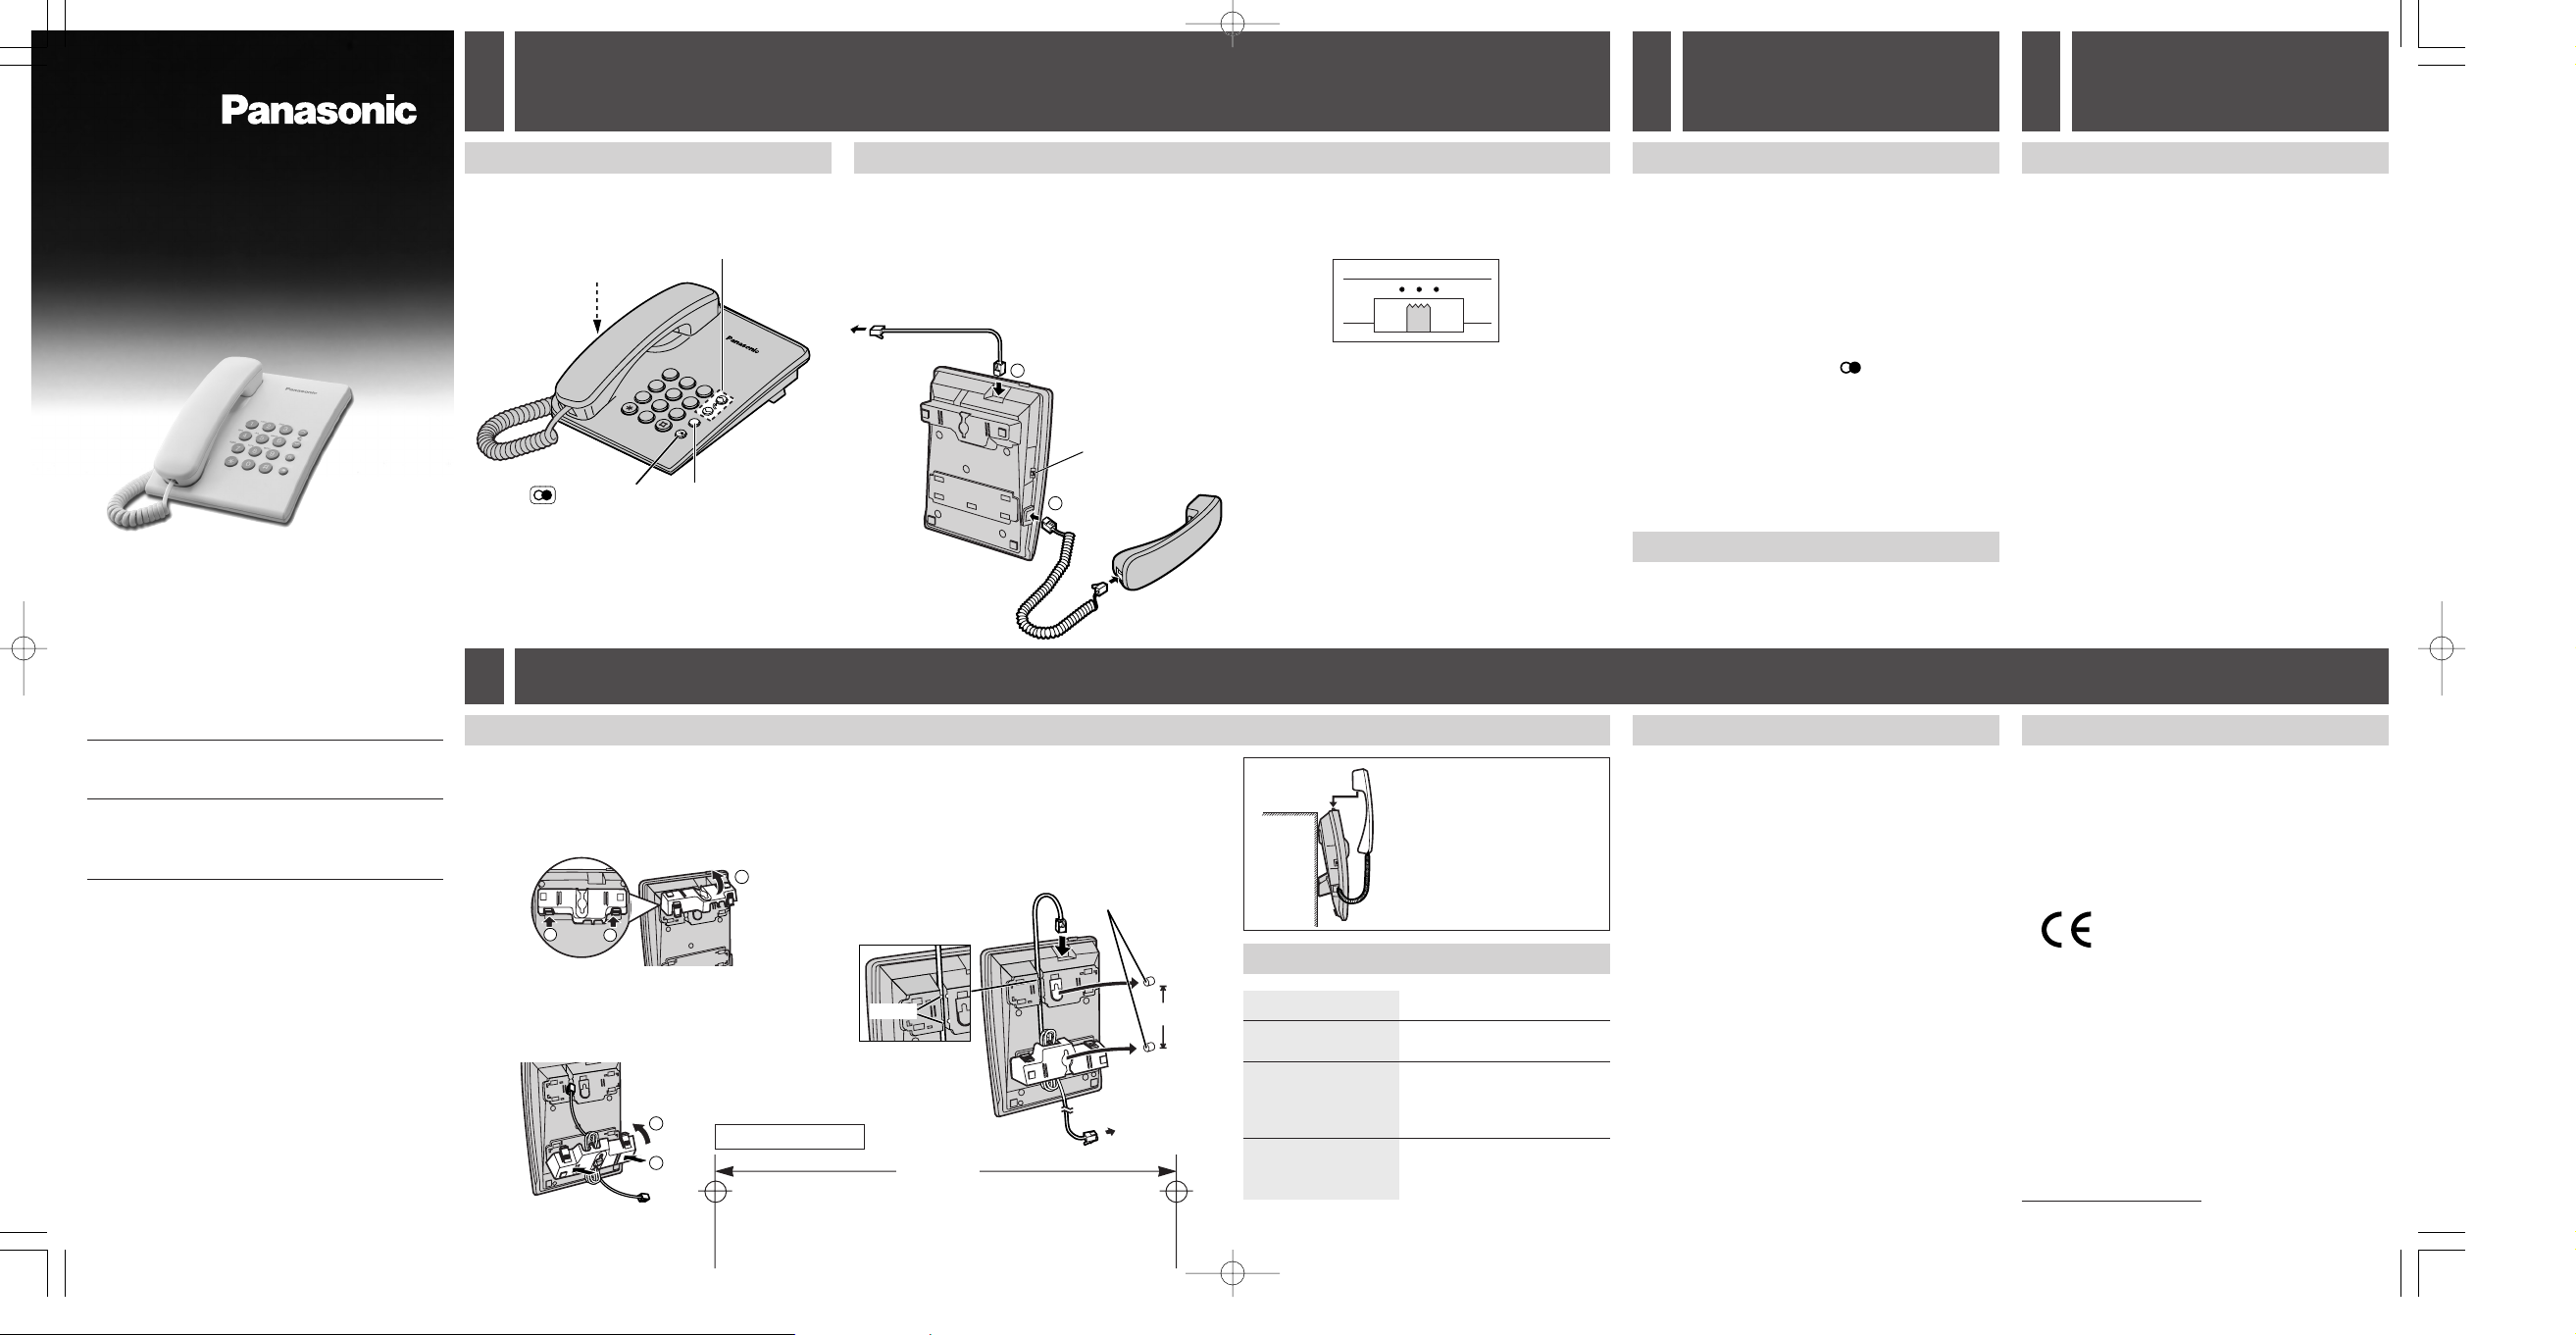
1 Getting Started
1-A Location of controls
Accessories (included)
∑ Handset. . . . . . . one
∑ Handset Cord. . . one
∑ Telephone Line Cord
. . . . . . . . . . . . . one
1-B Settings
1 Connect the telephone line cord (1).
2 Connect the handset cord (2), then confirm
the dial tone.
≥Use only a telephone line cord included in the
unit.
3 Set the RINGER selector to HIGH, LOW or
OFF.
(Ex. “LOW” is selected.)
≥When set to OFF, the unit will not ring.
2 Operation 3 Special Features
2-A Making Calls
1
Lift the handset.
2 Dial a phone number.
≥If you misdial, hang up and start again from
step 1.
3 When finished talking, hang up.
To redial the last number dialed
Lift the handset.
➡ Press .
To adjust the receiver volume (6 levels)
while talking
To increase, press (^).
To decrease, press (_).
≥
After hanging up, the volume level will be saved.
2-B Answering Calls
1 When the unit rings, lift the handset.
2 When finished talking, hang up.
3-A For Call Waiting Service Users
Press (R) if you hear a call-waiting tone while
talking.
≥The first call is put on hold and you can answer the
second call.
≥To return to the first caller, press (R) again.
For your future reference
Serial No.
(found on the bottom of the unit)
Date of purchase
Name and address of dealer
If trouble occurs, disconnect the unit from the
telephone line and connect to a known working
phone. If the known working phone operates
properly, do not reconnect the unit until the trouble
has been repaired. If the known working phone
does not operate properly, consult your telephone
company.
Manufactured by Panasonic
Communications (Malaysia) Sdn. Bhd.
Senai Malaysia
PQQX13904ZA F0803-0 D
4 Things You Should Know
4-A Wall Mounting
The unit can be mounted on a wall.
1 Press the tabs in the direction of the arrows
(1), then remove the wall mounting adaptor
(2).
2 Tuck the telephone line cord inside the wall
mounting adaptor, and push it in the
direction of the arrow (1 and 2).
≥The word “UP WALL” should face upward.
Wall Template
3 Install screws using the wall template
below. Connect the telephone line cord.
Mount the unit, then slide down.
≥Fasten the cord to prevent it from being
disconnected.
8.3 cm
To temporarily set the
handset down during
a conversation, place
it as shown here.
4-B Troubleshooting
Problem
The unit does not
work.
The call cannot be
connected even if
you dialed
correctly.
The unit does not
ring.
≥Check the settings (1-B).
≥Check the settings (1-B).
≥The RINGER selector is
Remedy
set to OFF. Set to HIGH
or LOW (1-B).
4-C Safety Instructions
Take special care to follow the safety suggestions
listed below.
Installations
Environment
1) Do not use this unit near water—for example,
near a bathtub, washbowl, sink, etc. Damp
basements should also be avoided.
2) The unit should be kept away from heat sources
such as radiators, kitchen range, etc. It also
should not be placed in rooms where the
temperature is less than 5oC or greater than 40oC.
Placement
1) Do not place heavy objects on top of this unit.
2) Care should be taken so that objects do not fall
onto, and liquids are not spilled into the unit. Do
not subject this unit to excessive smoke, dust,
mechanical vibration or shock.
3) Place the unit on a flat surface.
WARNING:
TO PREVENT FIRE OR SHOCK HAZARD, DO
NOT EXPOSE THIS PRODUCT TO RAIN OR ANY
TYPE OF MOISTURE.
4-D Specifications
Power Source: From telephone line
Dimensions (H x W x D):
Approx. 96 mm x 150 mm x 200 mm
Mass (Weight): Approx. 475 g
Dialing Mode: Tone (DTMF)
Operating Environment: 5°C–40°C
Specifications are subject to change without notice.
1999/5/EC
This equipment is designed for use in Italy, Spain,
Greece, Netherlands and France.
In the event of problems, you should contact your
equipment supplier in the first instance.
We, Panasonic Communications Co., Ltd. declare
that this equipment is in compliance with the
essential requirements and other relevant provisions
of Directive 1999/5/EC.
If you want to get a copy of the original Declaration
of Conformity of our products which relates to the
R&TTE, please contact to our web address:
http://doc.panasonic-tc.de
2
ABC
3
DEF
1
5
JKL
6
MNO
4
GHI
8
TUV
9
WXYZ
7
PQRS
0
R
Tecla (R) (3-A)
Selector de timbre (RINGER)
(1-B)
Tecla (2-A)
Tecla VOLUME (^), (_) (2-A)
Cable del
microteléfono
Microteléfono
Cable para línea telefónica
Selector de timbre
(RINGER)
1
2
Al conector de teléfono
de línea única
HIGH OFF
RINGER
(\\\)
Al conector de
teléfono de
línea única
Tornillos
8,3 cm
Gancho
1
1
2
1
2
E-SP-PQQX13904ZA03.8.206:47PMページ2
Sistema telefónico integrado
Instrucciones de
funcionamiento
Modelo N.° KX-TS500EX
KX-TS500EXW
Lea estas instrucciones antes de
utilizar el sistema y guárdelas.
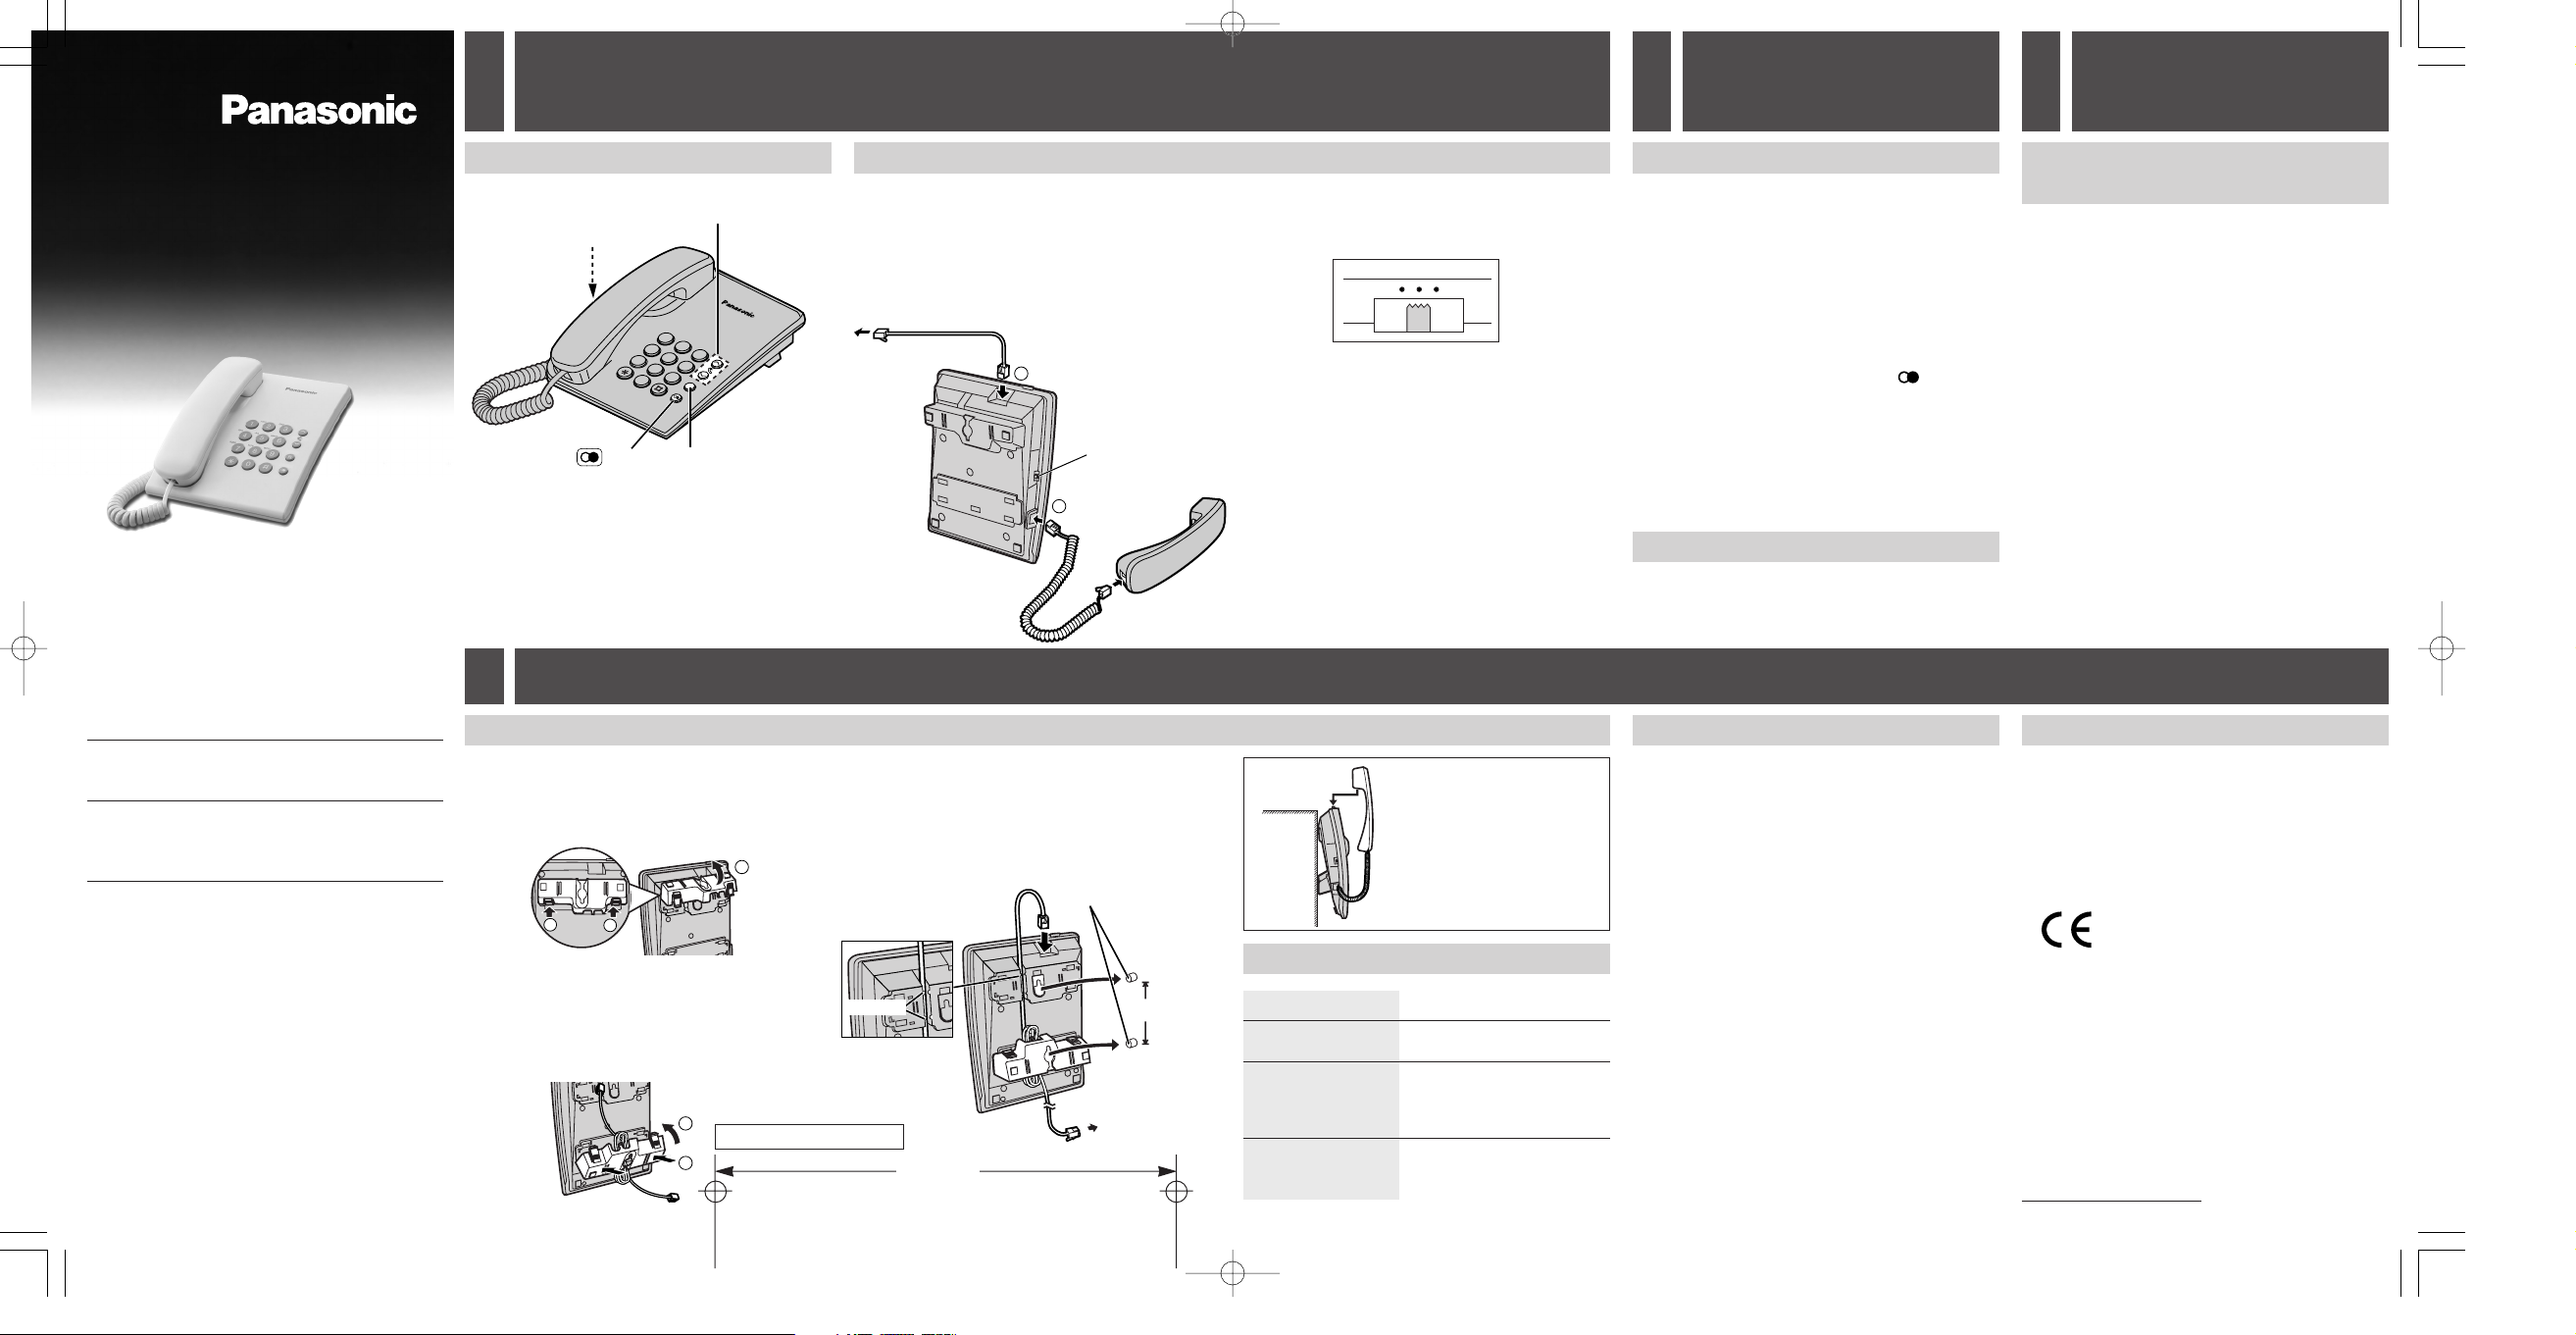
1 Antes de empezar
1-A Ubicación de los controles
Accesorios (incluidos)
∑ Microteléfono . . Uno
∑ Cable del
microteléfono . . Uno
∑ Cable para línea
telefónica
. . . . . . . . . . . . . Uno
1-B Ajustes
1 Conecte el cable de la línea telefónica (1).
2 Conecte el cable del microauricular (2), y
después confirme el tono de marcación.
≥Utilice únicamente el cable de línea que se
incluye junto con el teléfono.
3 Colocar el selector de RINGER en la
posición deseada HIGH, LOW o OFF.
(por ejemplo ahora “LOW” esta seleccionado.)
≥Cuando lo ponga en OFF, la unidad no sonará.
2 Operación 3
2-A Para hacer llamadas
1
Levante el auricular.
2 Marque un número de teléfono.
≥Si se equivoca al marcar, cuelgue y
empiece de nuevo desde el paso 1.
3 Cuando termine de conversar, cuelgue.
Para repetir la marcación del último
número marcado
Levante el auricular. ➡ Presione .
Para ajustar el volumen del auricular
(6 niveles) mientras está conversando
Para incrementar el volumen, presione (^).
Para disminuirlo, presione (_).
≥
Después de colgar, el nivel de volumen será
almacenado.
2-B Para contestar llamadas
1 Levante el auricular cuando suene la unidad.
2 Cuando termine de conversar, cuelgue.
Características especiales
3-A Para utilizar el Servicio
Llamada en Espera
Presione (R) si escucha el tono de llamada en
espera mientras está conversando.
≥La primera llamada se pondrá en espera y podrá
contestar la segunda llamada.
≥Para volver con la primera llamada, presione (R)
de nuevo.
Para su futura referencia
N.° de serie
(se encuentra en la parte inferior de la unidad)
Fecha de compra
Nombre y dirección del distribuidor
Si ocurriese cualquier problema, desconecte el
teléfono de la línea telefónica y conecte un
teléfono que funcione. Si ese teléfono funcionara
correctamente no vuelva a conectar el teléfono
hasta que haya sido reparado. Si este teléfono
tampoco funcionara consulte con su operador de
telefonía.
Fabricado por Panasonic
Communications (Malaysia) Sdn. Bhd.
Senai Malaysia
4 Otras cosas que debe conocer
4-A Montaje en pared
Este teléfono puede ser montado en la pared.
1 Presione los anclajes en la dirección de las
flechas (1), después quite el adaptador
para el montaje mural (2).
2 Recoja el cable de línea telefónica dentro del
adaptador para montar en pared, y empuje el
adaptador en el sentido de la flecha (1 y 2).
≥La palabra “UP WALL” debe estar en el
exterior.
Plantilla para pared
3 Instale los tornillos utilizando la plantilla
para pared de abajo. Conecte el cable de
línea telefónica. Monte la unidad, y
deslícela hacia abajo.
≥Asegure el cable para prevenir de su
desconexión.
8,3 cm
Para dejar el auricular
temporalmente durante
una conversación,
póngalo como se
muestra aquí.
4-B Solución de Problemas
Problema
La unidad no
funciona.
No se pueden realizar
llamadas aunque se
haya marcado el
número de teléfono.
No suena el
timbre de la
unidad.
≥Compruebe los ajustes
≥Compruebe los ajustes
≥El selector RINGER está
Remedio
(1-B).
(1-B).
en OFF. Póngalo en
HIGH o LOW (1-B).
4-C Instrucciones de seguridad
Tenga especial cuidado en observar las
instrucciones de seguridad indicadas abajo.
Instalación
Condiciones ambientales
1) No utilice esta unidad cerca del agua—por
ejemplo, cerca de una bañera, fregadero, etc.—.
También deben evitarse los sótanos húmedos.
2) La unidad debe permanecer alejada de fuentes de
calor tales como radiadores, cocinas, etc.
Tampoco debe instalarse en habitaciones donde la
temperatura sea inferior a 5°C o superior a 40°C.
Ubicación
1) No ponga objetos pesados encima de esta unidad.
2) Tenga cuidado de que no caigan objetos ni se
derramen líquidos encima de esta unidad. No
exponga esta unidad a excesos de humo, polvo,
vibraciones mecánicas o golpes.
3) Ponga la unidad sobre una superficie plana.
ADVERTENCIA:
PARA IMPEDIR PELIGROS DE INCENDIO O DE
DESCARGAS ELÉCTRICAS, NO EXPONGA ESTE
PRODUCTO A LA LLUVIA NI A CUALQUIER TIPO
DE HUMEDAD.
4-D Especificaciones
Alimentación: Desde la línea telefónica
Dimensiones (Al x An x P):
Aprox. 96 mm x 150 mm x 200 mm
Peso: Aprox. 475 g
Modo de Marcación: Tonos (DTMF)
Condiciones Ambientales: 5°C–40°C
Especificaciones sujetas a cambio sin noticia.
1999/5/EC
Este equipo está diseñado para su uso en Italia,
España, Grecia, Holanda y Francia.
En el caso de problemas, debería contactar con el
proveedor del equipo en primera instancia.
Nosotros, Panasonic Communications Co., Ltd.
declaran que este equipo cumple con los
requerimientos esenciales y otros relevantes de la
Directiva 1999/5/EC.
Si necesita una copia del documento original de la
Declaración de Conformidad de nuestros productos
relacionados con R&TTE, visite la dirección:
http://doc.panasonic-tc.de
 Loading...