

Panasonic KX-TS401W User Manual
Panasonic
Integrated Telephone System
Pulse‘Or-tone dialing capability
4 LINE I
Model No.
KX-TS401W
Before Initial Use
Please read IMPORTANT SAFETY
INSTRUCTIONS on page 29 before use.
Read and understand all instructions.
Thank you for purchasing the Panasonic integrated
telephone system.
^ Attach your purchase receipt here. ^
For your future reference
Serial No.______________________ Date of purchase
(found on the bottom of the unit)
Name and address of dealer
To order accessories, call 1-800-332-5368.

Contents
Getting Started
Location of Controls................................................................................. 4
Display........................................................................................................ 6
Setting Up................................................................................................... 7
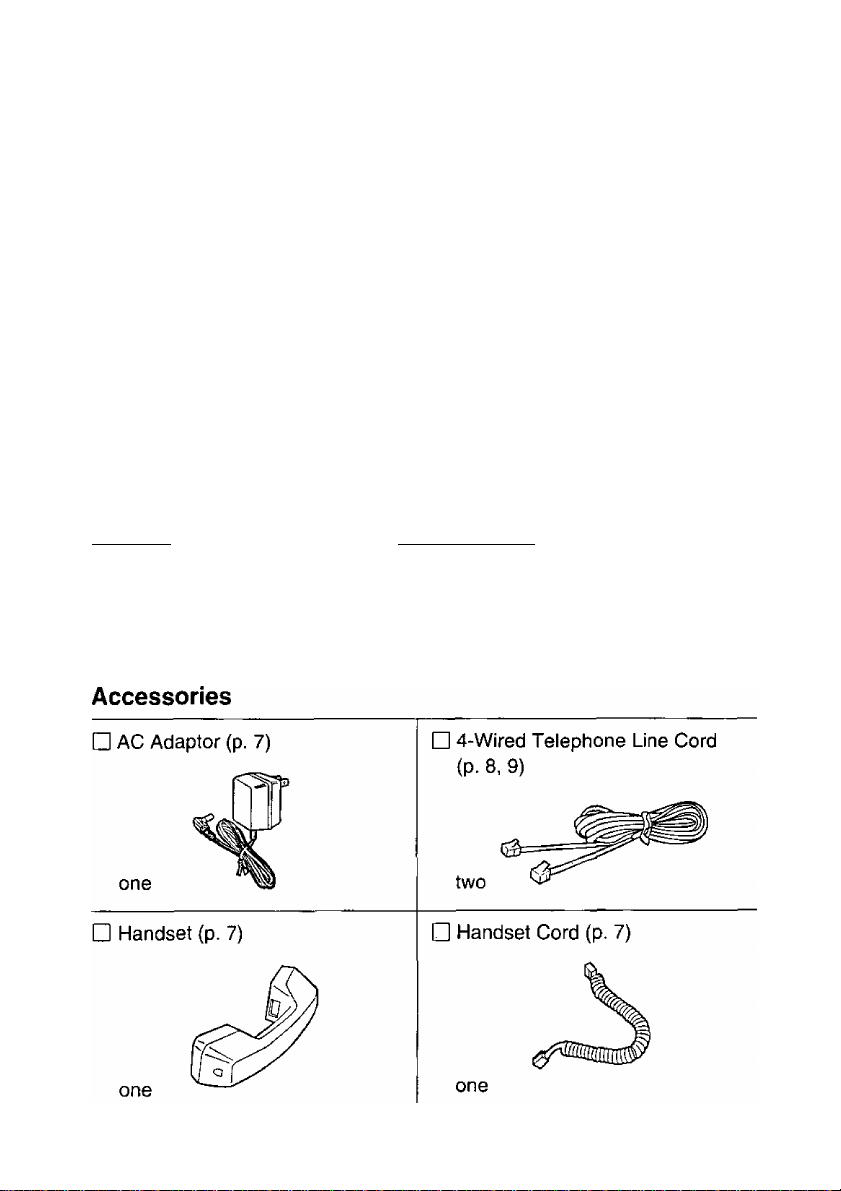
Connecting the Handset/AC Adaptor.................................................... 7
Connecting the Telephone Line Cords
Setting Selectors.....................................................................................io
Setting Time............................................................................................11
Making Calls..............................................................................................12
Answering Calls....................................................................................... 15
Using Another Line(s) during a Conversation.......................................16
Conference................................................................................................ 17
Full One-Touch Automatic Dialing..........................................................18
Storing Phone Numbers in Memory
Dialing a Stored Number........................................................................22
Special Features........................................................................................23
For Call Waiting Service Users
Temporary Tone Dialing (For Rotary Service Users)..........................23
Using the REDIAL/PAUSE Button.........................................................23
Muting Your Conversation.....................................................................23
Programmable Functions.........................................................................24
Line Selection Programming.................................................................24
Line Indicator Programming
Incoming Call Tone Programming........................................................25
.............................................................
.................................................................
......................
.....................................................
:...............
..........
8
18
23
25
Wall Mounting........................................................................................... 26
Before Requesting Help...........................................................................27
Important Safety Instructions..................................................................29
FCC and Other Information......................................................................30
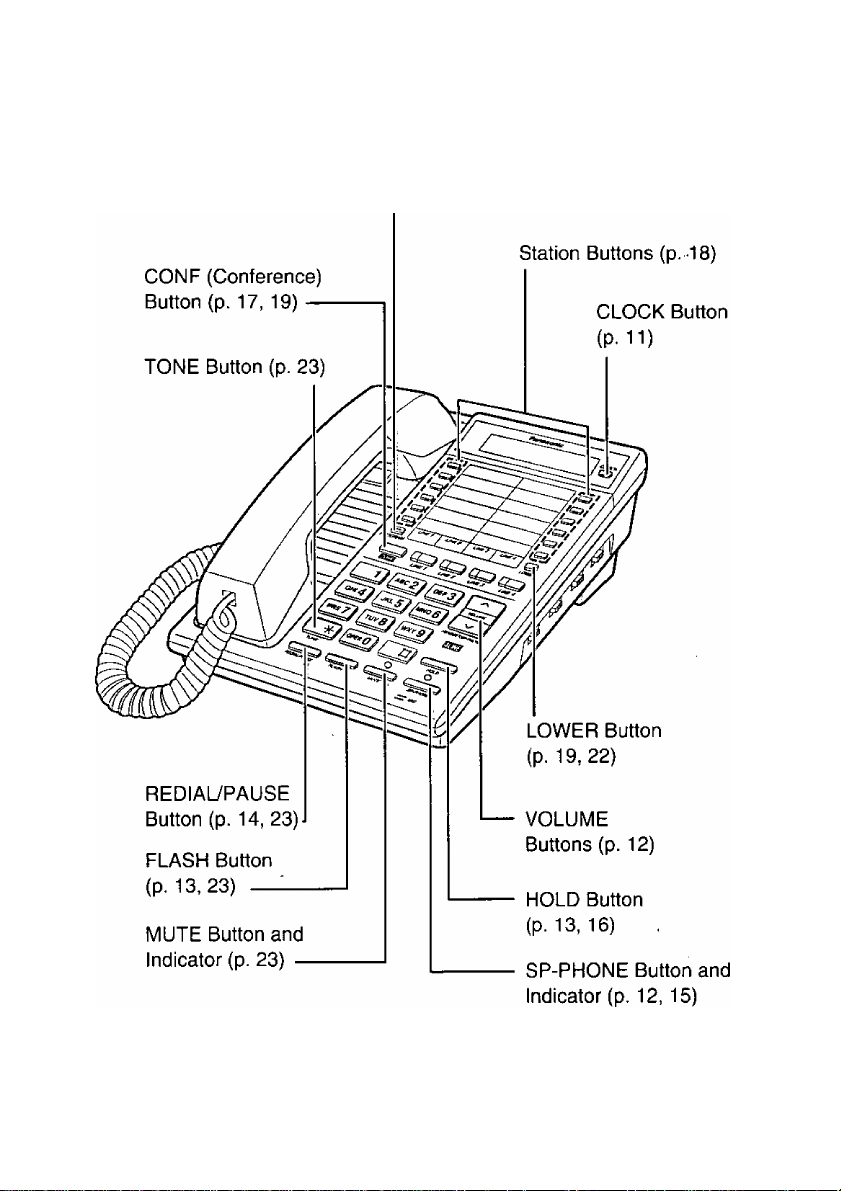
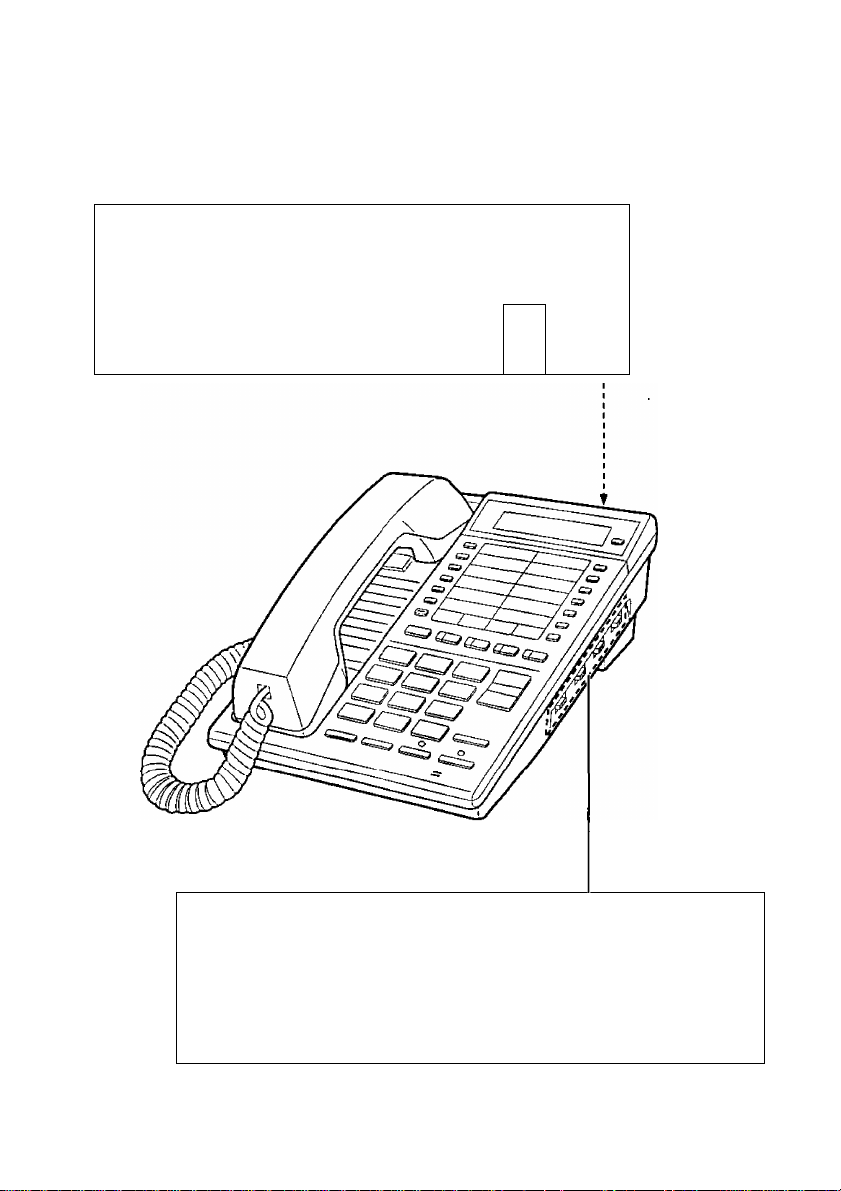
Location of Controls
PROGRAM Button (p. 18, 24)

DIALING MODE Selector (p. 10)

Display
iwiH;i I
AM Of Of o o o o o o o o o o
PMLJ LJ LJ LJ LJ LJ LJ LJ LJ LJ LJ LJ
mt
(This display shows all of the possible configurations.)
\ I / .
— AM t Zf - —
ii_ LJiJ
I \ "
AM ! /_ L/C n /c - ztn displayed. (Example: 15 minutes 30 seconds,
II I U I ^ «1CJ
mESET^B^CLOCK
Hm
The clock needs adjusting (p. 11).
During a conversation, the cal! duration is
current time is 11:45 AM.)
Follow the time setting procedure steps (p. It
The unit is in the programming mode (p. 18).
PHONE NO.-* STAWN
PHONENO.^ STATIONFollow the storing procedure steps (p. 18).
The unit is redialing (p. 14).
A lower memory station is selected (p. 19).
o
vm
The FLASH button is pressed while storing
numbers.
The PAUSE button is pressed.
You pressed when dialing in the TONE
mode.
You pressed “#” when dialing in the TONE mode.
You are adjusting the sound volume (p. 12).
“O” shows the volume level.
• When using the handset: 3 levels
• When using the speakerphone: 12 levels
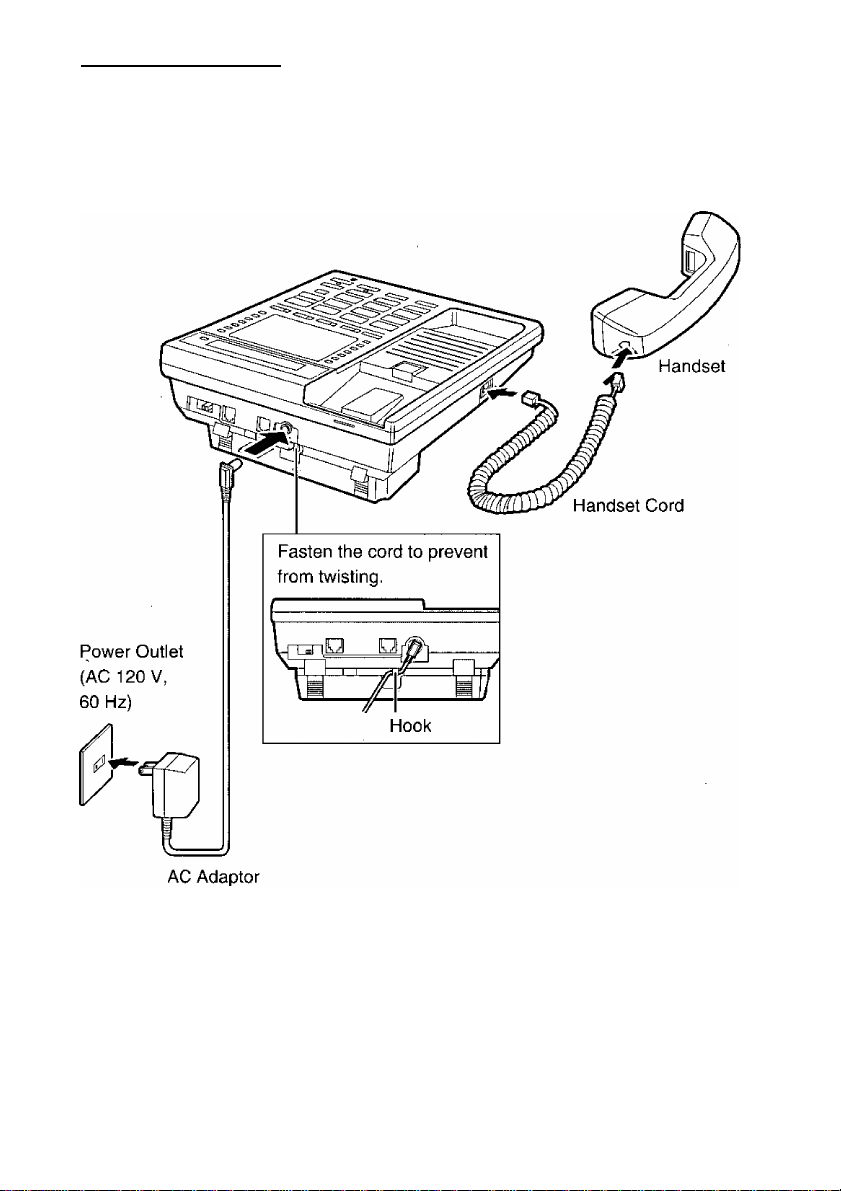
Setting Up________________
Connecting the Handset/AC Adaptor
USE ONLY Panasonic AC ADAPTOR KX-A09. The adaptor must remain
connected at all times. (It may feel warm during use. This is normal.)
Use only a Panasonic Handset for the KX-TS401W.
During a power failure the unit will work as a single-line telephone, but the
line indicators will not light and the RINGER selectors will not function.
KX-TS401W is not designed to be used with a PBX.
Setting Up
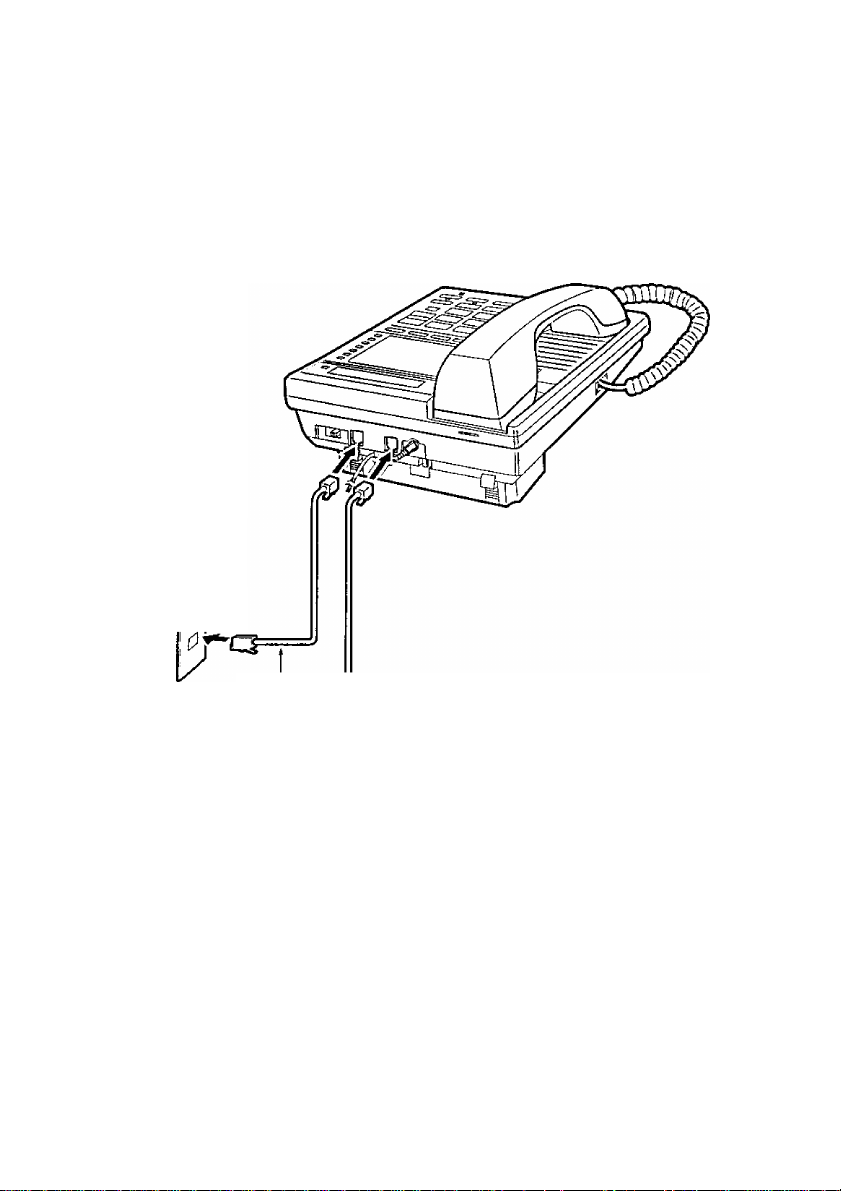
Connecting the Telephone Line Cords
Connect the telephone line cords to the unit as follows.
To connect two two-line telephone jacks
Two-Line
Telephone Jacks
(RJ14C)
LINE 3,
LINE 4
LINE 1,
LINE 2
4-Wired
Telephone
Line Cord -
or-

To connect four single-line telephone jacks
For this connection, please purchase two Panasonic T-adaptors KX-J24.
Two 2-wired telephone line cords are also necessary.
Single-Line
Telephone Jacks
Setting Up
Setting Selectors
DIALING MODE Selector
Set to TONE when all of the
telephone lines have touch tone
service. If more than one has
rotary service, set to PULSE.
DIALING MODE
PULSE TONE
HI]
10
RINGER Selectors
Used to set the ringer volume of
each line. Set to HIGH or LOW.
When set to OFF, the bell will not
ring.
■—p- RiN GE R
rn
--------------------
UN E 2 UN E3
1
---------
UN E 1
[3
OFFJ'LH/GH OFFi*iHfG H O FF ^'*^HfG H
LOW L OW LO W
-
1
ra
UN E 4
OFF H IGH
LOW
 Loading...