

Page 1

TG7150-7170EX(e).book Page 1 Thursday, August 10, 2006 10:40 AM
Operating Instructions
Model No. KX-TG7150EX
KX-TG7150
Digital Cordless Phone
KX-TG7170EX
Contents/Inhalt/Table des matières/
Indice/Contenido/
English instructions
Deutsche Anleitung
Instructions en français
Istruzioni in italiano
Instrucciones en español
Page/Seite/Page/
Pagina/Página/
1 – 36
(1)
–
(36)
–
[1]
{1}
–
–
[36]
–
{36}
<36>
((36))
<1>
((1))
This unit is Caller ID compatible. To display the caller’s phone
number, you must subscribe to Caller ID service.
Charge the batteries for about 7 hours before initial use.
Please read these operating instructions before using the unit and save them for
future reference.
Page 2

TG7150-7170EX(e).book Page 2 Thursday, August 10, 2006 10:40 AM
Introduction
Introduction
Thank you for purchasing a new Panasonic digital cordless phone.
For your future reference
Attach or keep original receipt to assist with any repair under warranty.
Serial No. (found on the bottom of the base unit)
Date of purchase
Name and address of dealer
Your phone
KX-TG7150
(Big button type
handset)
Note:
L The handsets have been pre-registered for use with their base unit. If not registered, see
page 25.
KX-TG7170
(Bone conduction
type handset)
2
Page 3
TG7150-7170EX(e).book Page 3 Thursday, August 10, 2006 10:40 AM
Table of Contents
Preparation
Accessory information . . . . . . . . . . . . . . . 4
Expanding your phone system. . . . . . . . . 6
Important information . . . . . . . . . . . . . . . . 7
Bone conduction earpiece (KX-TG7170
only) . . . . . . . . . . . . . . . . . . . . . . . . . . . . . 8
Controls . . . . . . . . . . . . . . . . . . . . . . . . . . 9
Displays . . . . . . . . . . . . . . . . . . . . . . . . . 10
Connections. . . . . . . . . . . . . . . . . . . . . . 10
Battery installation/replacement. . . . . . . 11
Battery charge . . . . . . . . . . . . . . . . . . . . 11
Turning the power on/off . . . . . . . . . . . . 12
Symbols used in these operating
instructions. . . . . . . . . . . . . . . . . . . . . . . 12
Display language . . . . . . . . . . . . . . . . . . 12
Date and time . . . . . . . . . . . . . . . . . . . . 13
Accessibility features
Talking number display
(Voice announce). . . . . . . . . . . . . . . . . . 14
Making/Answering Calls
Making calls. . . . . . . . . . . . . . . . . . . . . .15
Answering calls . . . . . . . . . . . . . . . . . . . 16
Phonebook
Handset phonebook. . . . . . . . . . . . . . . . 17
Chain dial. . . . . . . . . . . . . . . . . . . . . . . . 18
Quick dial for Call-by-Call: Making calls
using a telephone carrier access code
(Germany only) . . . . . . . . . . . . . . . . . . . 18
Multi-unit Operation
Operating additional units . . . . . . . . . . . 25
Registering a handset to the base unit . 25
Intercom between handsets . . . . . . . . . 26
Transferring calls between handsets . . . 26
Copying phonebook entries. . . . . . . . . . 27
Useful Information
Using the belt clip . . . . . . . . . . . . . . . . . 28
Using the shoulder rest attachment . . . . 28
Character entry . . . . . . . . . . . . . . . . . . . 29
Error messages . . . . . . . . . . . . . . . . . . . 31
Troubleshooting. . . . . . . . . . . . . . . . . . . 31
Specifications. . . . . . . . . . . . . . . . . . . . . 34
Index
Index . . . . . . . . . . . . . . . . . . . . . . . . . . 35
Handset Settings
Handset settings . . . . . . . . . . . . . . . . . . 19
Time settings . . . . . . . . . . . . . . . . . . . . . 21
Base Unit Settings
Base unit settings . . . . . . . . . . . . . . . . . 22
Caller ID Service
Using Caller ID service . . . . . . . . . . . . . 23
Caller list . . . . . . . . . . . . . . . . . . . . . . . . 23
Voice mail service . . . . . . . . . . . . . . . . . 24
3
Page 4

TG7150-7170EX(e).book Page 4 Thursday, August 10, 2006 10:40 AM
Preparation
Accessory information
Included accessories
No. Accessory items Quantity
1 AC adaptor for base unit
Part No. PQLV207CE
2 Telephone line cord (Germany) 1
3 Telephone line cord (France) 1
4 Telephone line cord (Other countries)
5 Telephone plug (Italy) 1
6 Rechargeable batteries AAA (R03) size
Part No. HHR-55AAAB or HHR-4EPT
7 Handset cover
8 Belt clip 1
9 Shoulder rest 1
*2
*1
1
1
2
1
*1 Prepare the appropriate telephone plug needed for use in your country. For Italy, attach the
included telephone plug 5 to telephone line cord before connecting.
*2 The handset cover comes attached to the handset.
123456
789
4
Page 5
TG7150-7170EX(e).book Page 5 Thursday, August 10, 2006 10:40 AM
Preparation
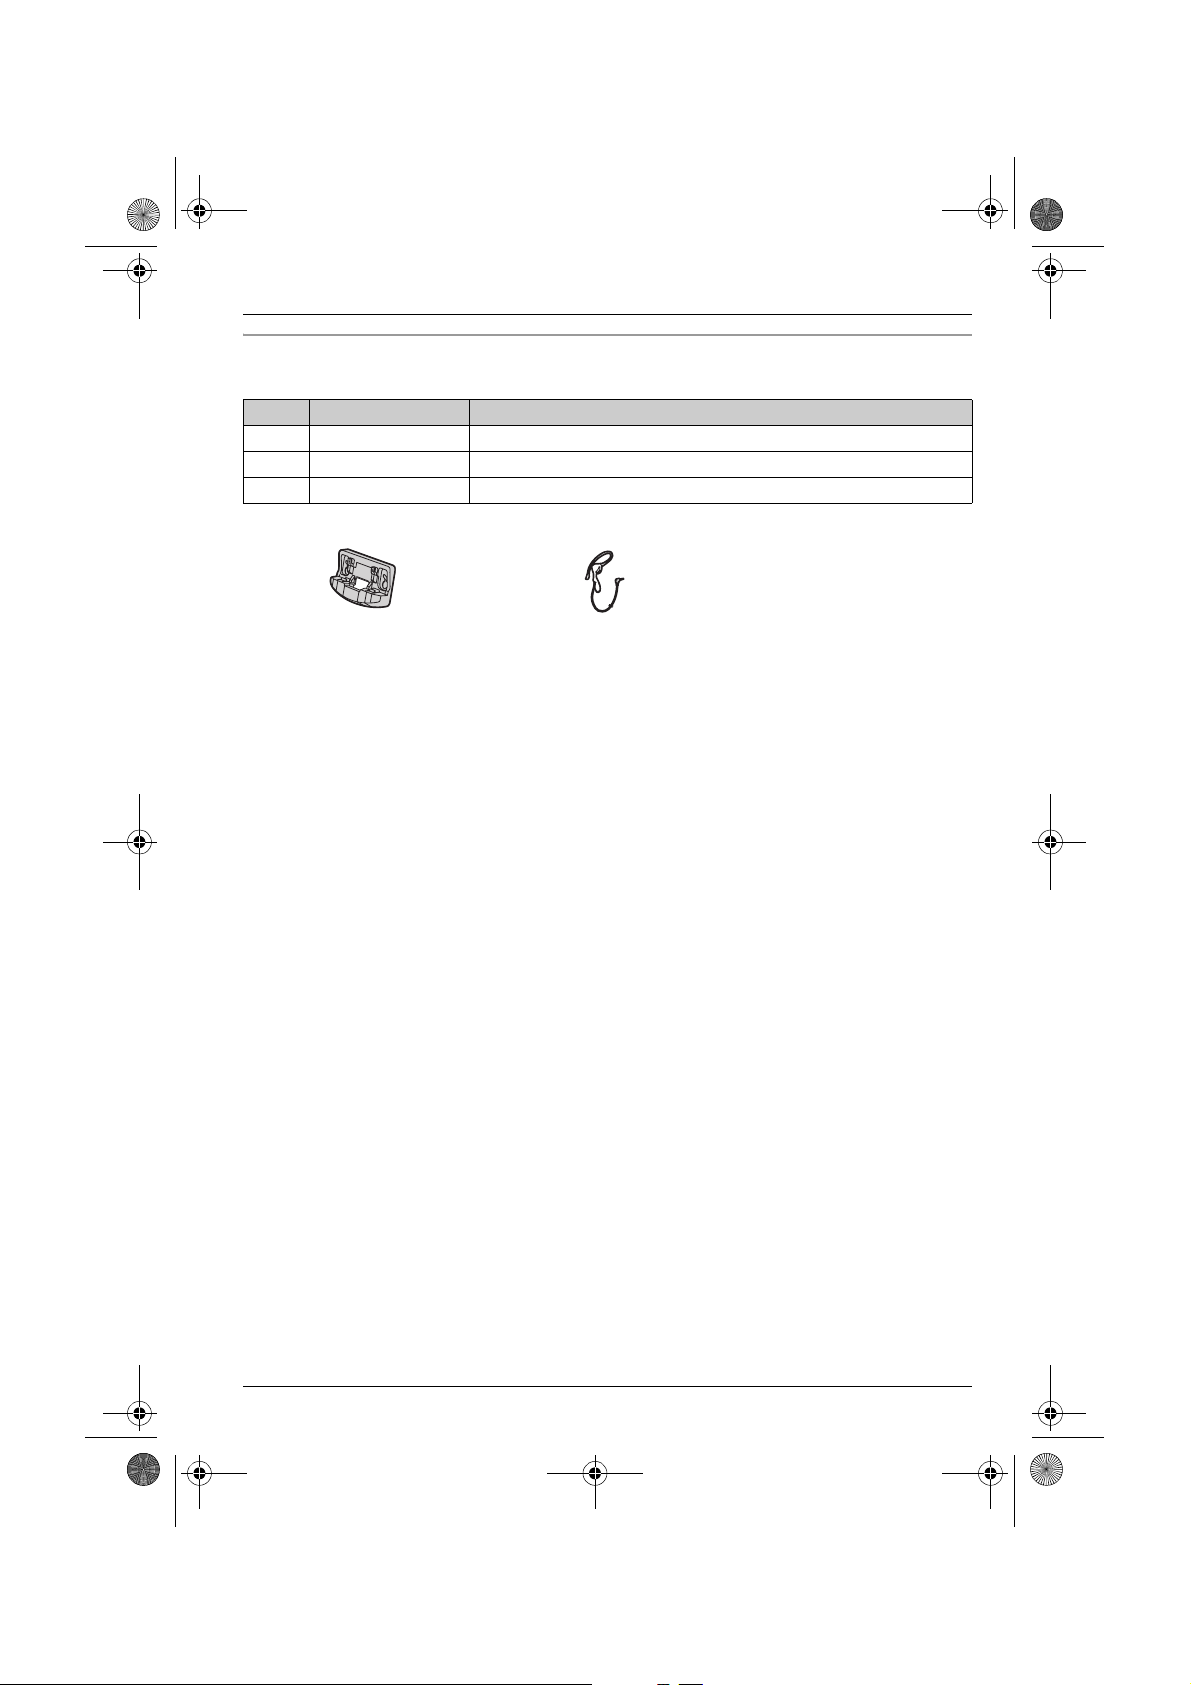
Additional/replacement accessories
Please contact your nearest Panasonic dealer for sales information.
No. Model No. Description
1 KX-TCA717EX Wall-Mounting Adaptor
2 KX-TCA94EX Headset
3 KX-A272 DECT repeater
12
Note:
L You can expand your phone system by registering additional compatible Panasonic
handsets (page 6).
L When replacing the batteries, use only 2 rechargeable AAA (R03) size nickel metal hydride
(Ni-MH) batteries of capacity up to 750 mAh. We recommend using Panasonic
rechargeable batteries (Model No. P03P).
L We cannot be responsible for any damage to the unit or degradation of performance which
may occur from using non-Panasonic rechargeable batteries.
5
Page 6

TG7150-7170EX(e).book Page 6 Thursday, August 10, 2006 10:40 AM
Preparation
Expanding your phone system
You can expand your phone system by registering the following optional handsets to a single
base unit (KX-TG7150 or KX-TG7170): max. 6
Please contact your nearest Panasonic dealer for sales information.
Handsets: max. 6
Additional digital
cordless handset
KX-TGA711EX
Additional digital
cordless handset
KX-TGA717EX
(Bone conduction
type handset)
Additional digital
cordless handset
KX-TGA715EX
(Big button type
handset)
Handset feature overview for KX-TGA711, KX-TGA715, and KX-TGA717
Operations and features of the 3 different accessory handsets have certain differences as
indicated in the table below.
Feature KX-TGA711 KX-TGA715 KX-TGA717 Page
Description Available as
accessory
handset only
Big button — rr—
Bone conduction
earpiece
Call restriction r ———
Headset jack — rrpage 9
Voice announce — rrpage 14
——r page 8
6
Same handset
supplied with
KX-TG7150
Same handset
supplied with
KX-TG7170
—
Page 7

TG7150-7170EX(e).book Page 7 Thursday, August 10, 2006 10:40 AM
Important information
General
L Use only the AC adaptor included with this
product, noted on page 4.
L Do not connect the AC adaptor to any AC
outlet other than a standard 220–240 V
AC outlet.
L This product is unable to make calls when:
– the portable handset battery(ies) need
recharging or have failed.
– there is a power failure.
L Do not open the base unit, charger, or
handset other than to replace the
battery(ies).
L This product should not be used near
emergency/intensive care medical
equipment and should not be used by
people with pacemakers.
L Care should be taken that objects do not
fall onto, and liquids are not spilled into,
the unit. Do not subject this product to
excessive smoke, dust, mechanical
vibration or shock.
Environment
L Do not use this product near water.
L This product should be kept away from
heat sources such as radiators, cookers,
etc. It should also not be placed in rooms
where the temperature is less than 5 °C or
greater than 40 °C.
L The AC adaptor is used as the main
disconnect device. Ensure that the AC
outlet is installed near the product and is
easily accessible.
Warning:
L To prevent the risk of electrical shock, do
not expose this product to rain or any
other type of moisture.
L Unplug this product from power outlets if it
emits smoke, an abnormal smell, or
Preparation
makes unusual noise. These conditions
can cause fire or electric shock. Confirm
that smoke has stopped emitting and
contact an authorised service centre.
Battery caution
L We recommend using the battery(ies)
noted on page 5. Use only rechargeable
battery(ies).
L Do not mix old and new batteries.
L Do not dispose of the battery(ies) in a fire,
as they may explode. Check with local
waste management codes for special
disposal instructions.
L Do not open or mutilate the battery(ies).
Released electrolyte from the battery(ies)
is corrosive and may cause burns or injury
to the eyes or skin. The electrolyte may be
toxic if swallowed.
L Exercise care when handling the
battery(ies). Do not allow conductive
materials such as rings, bracelets or keys
to touch the battery(ies), otherwise a short
circuit may cause the battery(ies) and/or
the conductive material to overheat and
cause burns.
L Charge the battery(ies) in accordance
with the information provided in these
operating instructions.
L Only use the included base unit (or
charger) to charge the battery(ies). Do not
tamper with the base unit (or charger).
Failure to follow these instructions may
cause the battery(ies) to swell or explode.
7
Page 8
TG7150-7170EX(e).book Page 8 Thursday, August 10, 2006 10:40 AM
Preparation
L As sound is generated by vibration, users
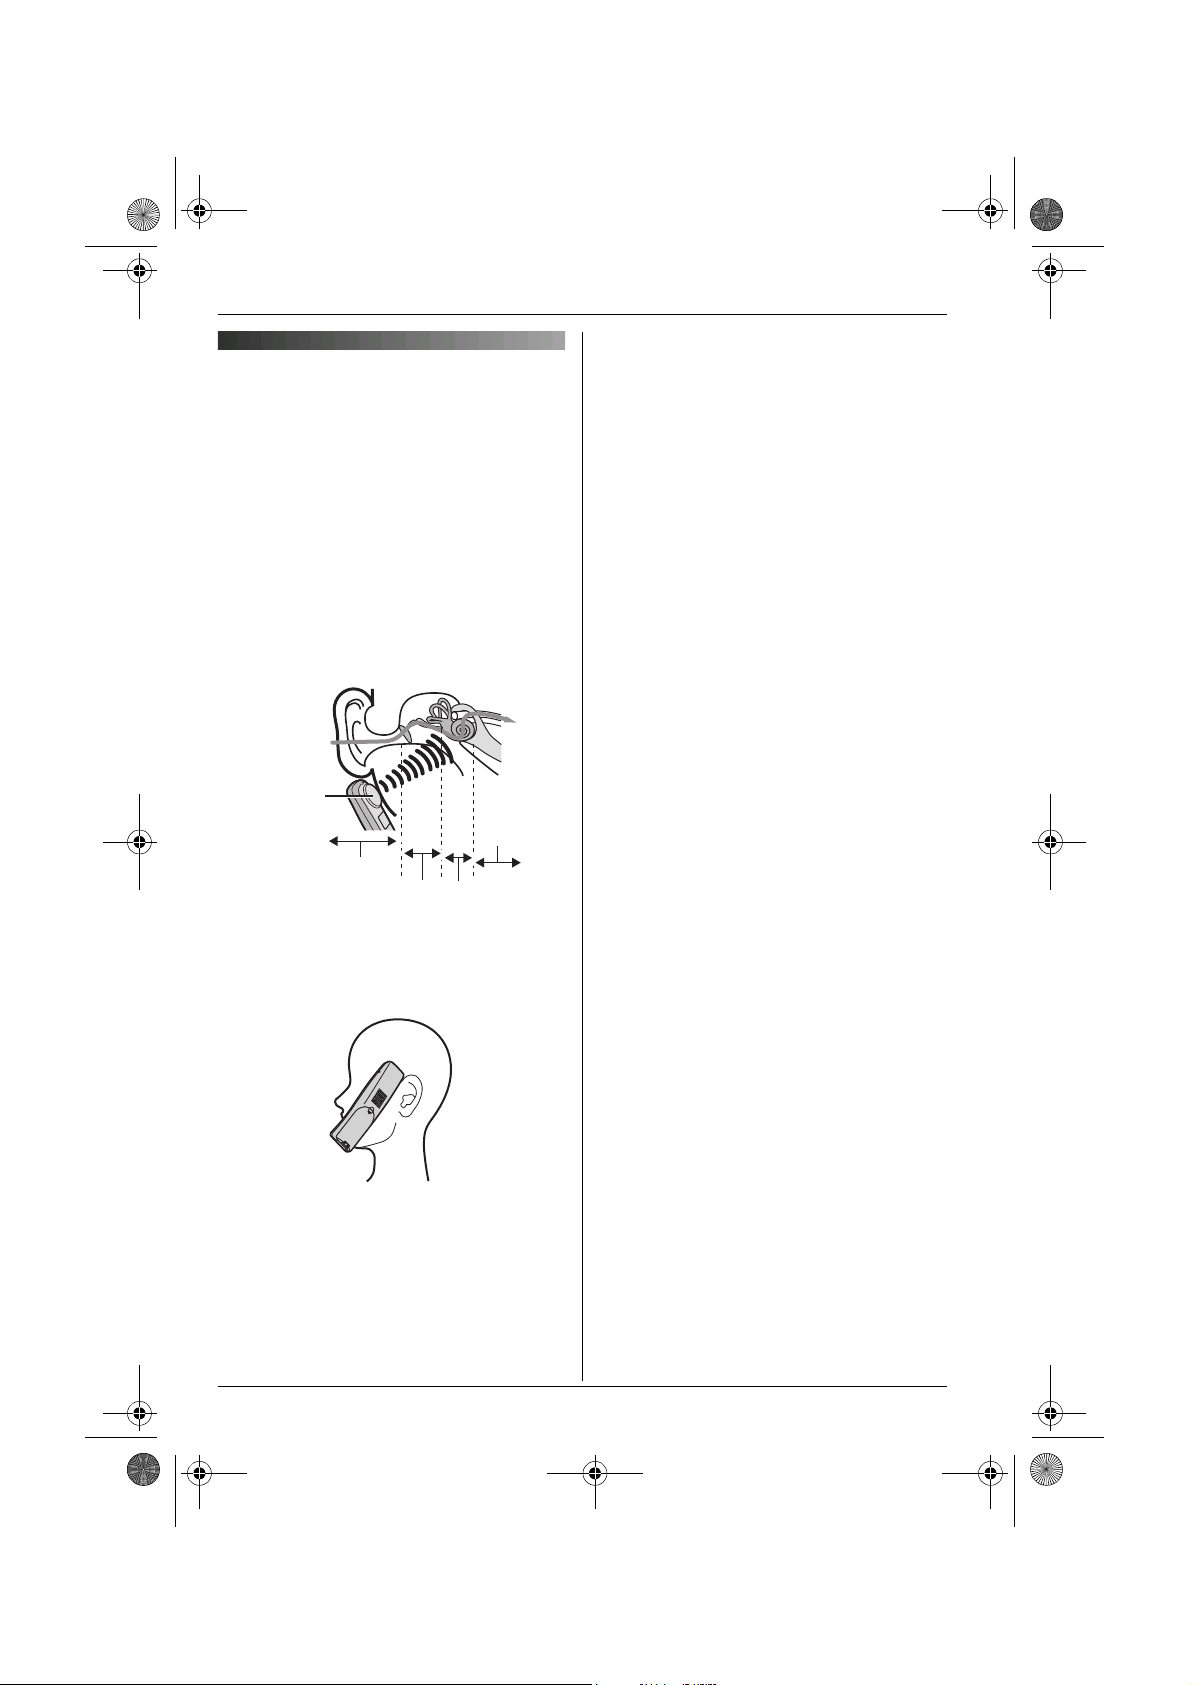
Bone conduction earpiece
(KX-TG7170 only)
The handset features a bone conduction
earpiece that uses vibrations to create
sound during your telephone conversations.
For proper operation press the bone
conduction earpiece against your face near
the ear.
Normally, sound enters the ear canal and
vibrates the eardrum. People feel the
vibration within the inner ear and
comprehend it as it is received by the
auditory nerve.
Sound
Bone
conduction
earpiece
External ear
Middle ear
Auditory
nerve
Inner ear
L If the bone conduction earpiece gets dusty
with normal hearing can use the handset
by placing the bone conduction earpiece
against the ear, as an ordinary telephone.
or greasy, clean it with a soft, dry cloth.
Place the bone conduction earpiece against
your face (not your ear). Try different
locations to find which location works best.
Start with the temple area.
Note:
L Do not place the bone conduction
earpiece on a hearing aid. Howling or
other interference may be heard.
L The effectiveness of the bone conduction
earpiece will vary by the type and degree
of hearing loss of the user.
8
Page 9
A B
TG7150-7170EX(e).book Page 9 Thursday, August 10, 2006 10:40 AM
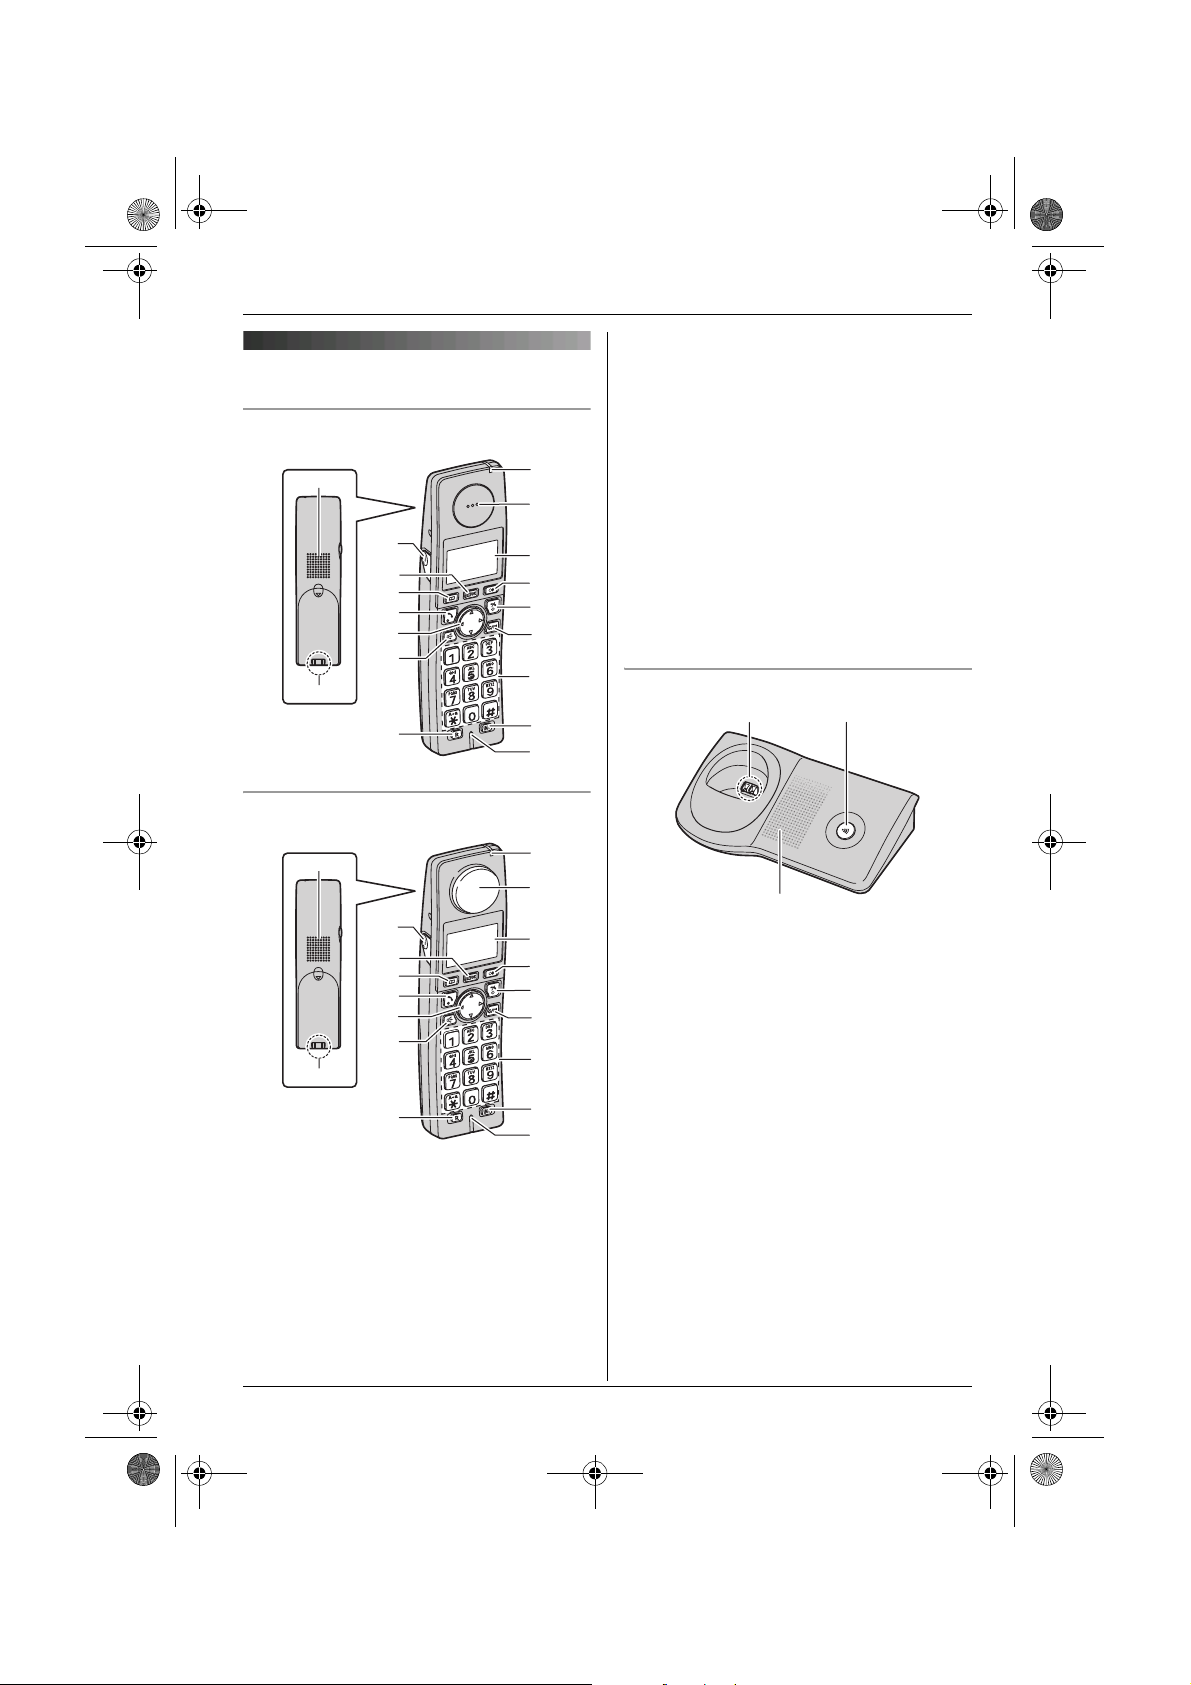
Controls
Handset (KX-TG7150)
A
C
D
E
F
G
H
B
I
J
K
L
M
N
O
P
Q
R
Preparation
I {R} (Recall)
J Charge indicator/Ringer indicator
K KX-TG7150
Receiver
KX-TG7170
Bone conduction earpiece
L Display
M {R} (Redial/Pause)
N {ih} (Off/Power)
O {C/T} (Clear/Mute)
P Dial keypad
Q {INT} (Intercom)
R Microphone
Base unit
Handset (KX-TG7170)
A
C
D
E
F
G
H
B
I
A Speaker
B Charge contact
C Headset jack
D {j/OK} (Menu/OK)
E {k} (Phonebook)
F {C} (Talk)
G Navigator key ({^}/{V}/{>}/{<})
H {s} (Speakerphone)
J
K
L
M
N
O
P
Q
R
C
A Charge contact
B {x} (Page)
C Ringer
9
Page 10
TG7150-7170EX(e).book Page 10 Thursday, August 10, 2006 10:40 AM
Preparation
Displays
Display icons
Display
icon
w Within range of a base unit
L Handset is accessing base
k Handset is on an outside
5 Battery strength
[2] Handset number (Standby
0 New voice mail message
*1 Voice mail users only
Meaning
L When flashing: Handset
is searching for base unit.
(out of range of base unit,
handset is not registered
to base unit, no power on
base unit)
unit. (intercom, paging,
changing base unit
settings, etc.)
call.
display setting, page 19)
*1
received
Line is being used by
another handset.
(page 24)
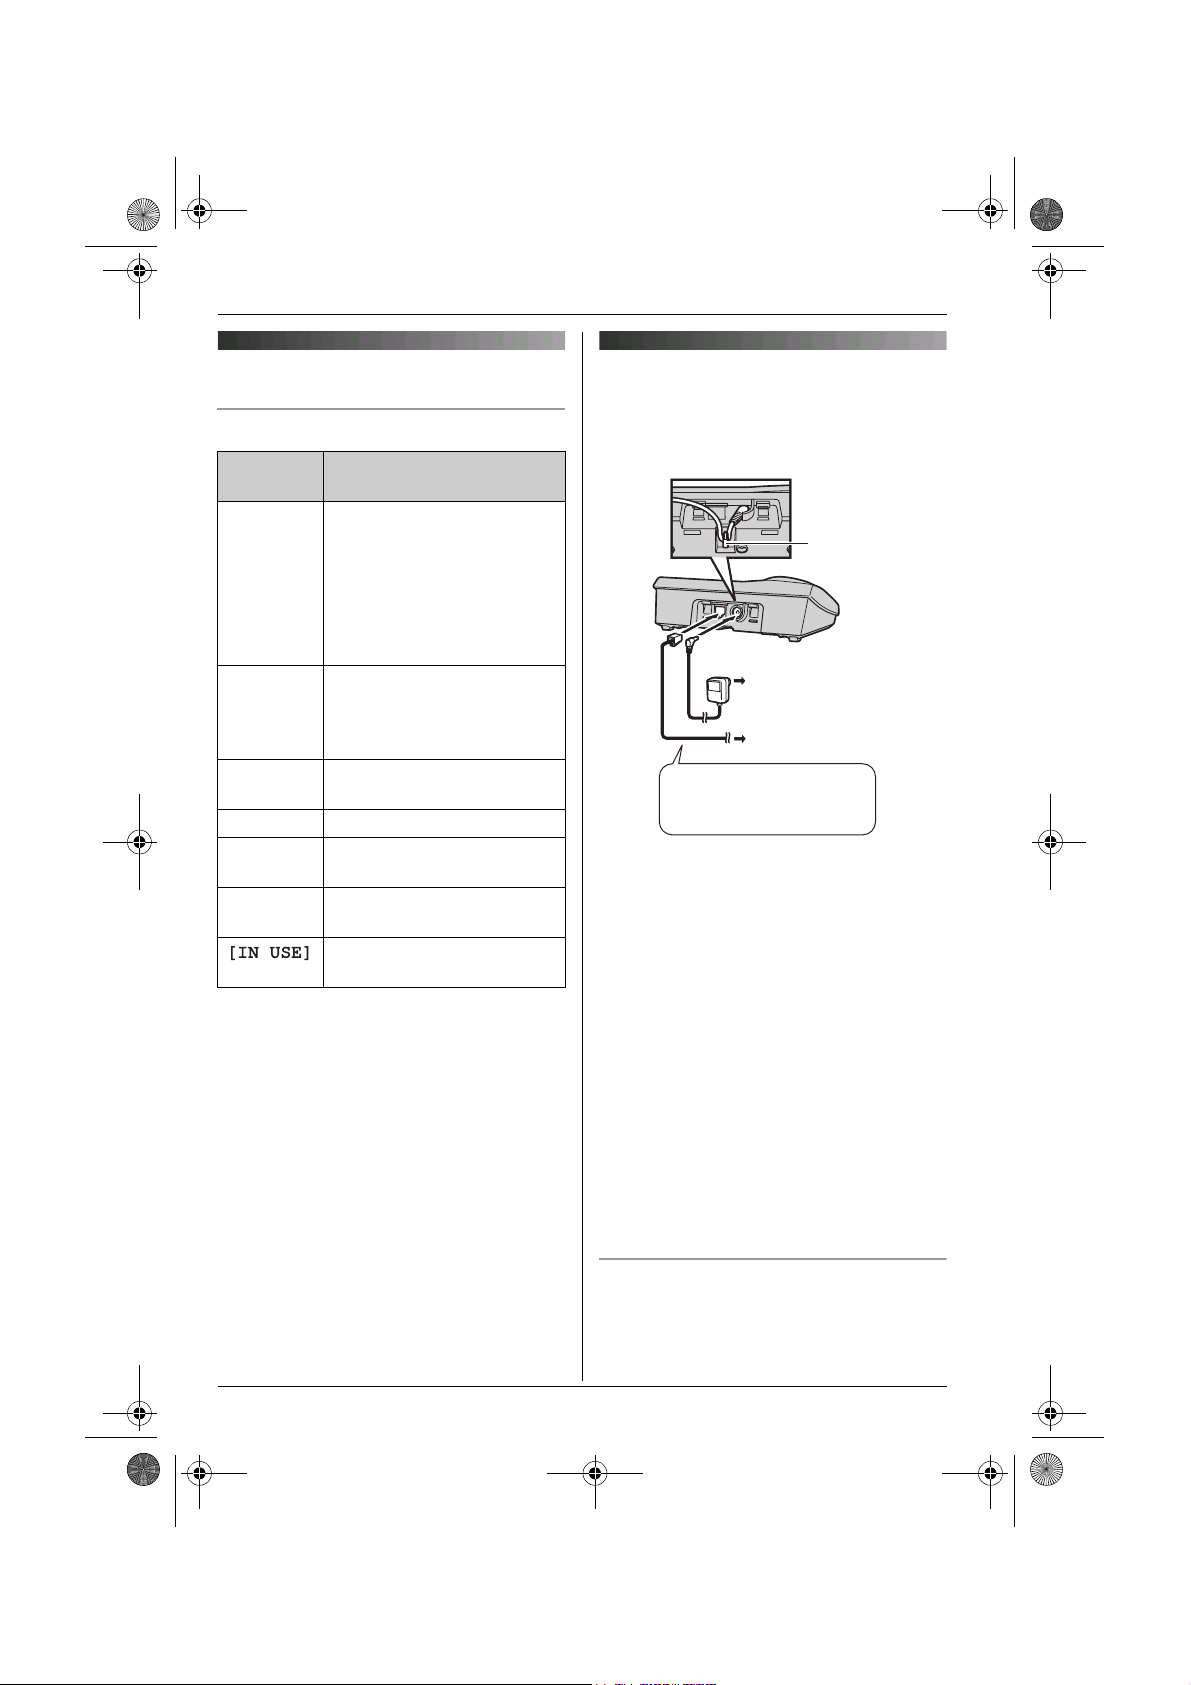
Connections
When connecting the AC adaptor to the
base unit, a short beep will be heard. If it is
not heard, check the connections.
Hook
(220–240 V, 50 Hz)
To telephone
network
Use only the included AC
adaptor and telephone
line cord.
Note:
L When connecting the telephone line cord
to the telephone network, use the included
telephone line cord or telephone plug
appropriate to your country, noted on
page 4.
L Never install telephone wiring during a
lightning storm.
L The AC adaptor must remain connected
at all times. (It is normal for the adaptor to
feel warm during use.)
L The AC adaptor should be connected to a
vertically oriented or floor-mounted AC
outlet. Do not connect the AC adaptor to a
ceiling-mounted AC outlet, as the weight
of the adaptor may cause it to become
disconnected.
10
Location
L For maximum distance and noise-free
operation, place your base unit:
Page 11

TG7150-7170EX(e).book Page 11 Thursday, August 10, 2006 10:40 AM
– away from electrical appliances such as
TVs, radios, personal computers or
other phones.
– in a convenient, high and central
location.
Battery charge
Place the handset on the base unit for
about 7 hours before initial use.
When charging, the battery icon is shown as
follows.
Battery
installation/replacement
Preparation
Important:
L Use only the included rechargeable
batteries noted on page 4, 7.
L When replacing batteries, we recommend
using the Panasonic rechargeable
batteries noted on page 5, 7.
L Wipe the battery ends (S, T) with a dry
cloth.
L When installing the batteries, avoid
touching the battery ends (S, T) or the
unit contacts.
1 Press the notch on the handset cover
firmly and slide it in the direction of the
arrow.
L When replacing batteries, remove the
old batteries positive (S) end first.
2 Insert the batteries negative (T) end
first. Close the handset cover.
When the batteries are fully charged, 5
remains on the display.
L The charge indicator lights up when the
handset is placed on the base unit.
Charge
contact
L The pictured model is KX-TG7150.
Note:
L It is normal for the handset to feel warm
during charging.
L If you want to use the unit immediately,
charge the batteries for at least 15
minutes.
L Clean the charge contacts of the handset
and base unit with a soft, dry cloth once a
month, otherwise the batteries may not
charge properly. Clean more often if the
unit is exposed to grease, dust, or high
humidity.
11
Page 12

You can select
Deutsch
,
English
Espa
,
NORSK
FRANCAIS
Italiano
Dansk
Nederlands
Svenska
Suomi
EKKGMIJA
Portugu
or
Catal
TG7150-7170EX(e).book Page 12 Thursday, August 10, 2006 10:40 AM
Preparation
Battery strength
Turning the power on/off
Battery icon Battery strength
5 High
6 Medium
7 Low
When flashing: Needs
to be charged.
Panasonic Ni-MH battery performance
(included batteries)
Power on
Press {ih} for about 1 second.
Power off
Press {ih} for about 2 seconds.
Operation Operating time
In continuous use KX-TG7150:
12 hours max.
KX-TG7170:
10 hours max.
In continuous
standby mode
Note:
L It is normal for batteries not to reach full
capacity at the initial charge. Maximum
battery performance is reached after a few
complete cycles of charge/discharge
(use).
L Actual battery performance depends on a
combination of how often the handset is in
use and how often it is not in use
(standby).
L Battery operating time may be shortened
over time depending on usage conditions
and ambient temperature.
L Even after the handset is fully charged,
the handset can be left on the base unit
without any ill effect on the batteries.
L The battery strength may not be displayed
correctly after you replace the batteries. In
this case, place the handset on the base
unit and charge for at least 7 hours.
150 hours max.
Symbols used in these
operating instructions
Symbol Meaning
{j/OK} Press {j/OK}.
i Proceed to the next operation.
“ ” Select the words in quotations
shown on the display (e.g.,
“Handset Setup”) by
pressing {^} or {V}.
Display language
14 display languages are available.
You can select
“English
“NORSK
“Dansk
“Suomi
“Portugu
1 {ih} i {j/OK}
2 Press {^} or {V} to select “Handset
Setup”. i {>}
3 Press {^} or {V} to select “Display
Setup”. i {>}
4 Press {^} or {V} to select “Select
Language”. i {>}
5 Press {^} or {V} to select the desired
language. i {>} i {ih}
“Deutsch
”,“Espa
”, , “FRANCAIS
”, , “Nederlands
”, , “EKKGMIJA
ês”, , or
ñolol”,
”, , “Italiano
”, , “Türkrkçe”,
“Catal
”,
”, , “Svenska
à”.
”,
”,
12
Page 13

TG7150-7170EX(e).book Page 13 Thursday, August 10, 2006 10:40 AM
Note:
L If you select a language you cannot read,
press {ih}, press {j/OK}, press {^} 3
times, press {>}, press {V} 2 times, press
{>}, press {V}, press {>}, select the
desired language, press {>}, then press
{ih}.
L To change the voice announce language,
see page 14.
Date and time
1 {j/OK}
2 Press {^} or {V} to select “Handset
Setup”. i {>}
3 Press {^} or {V} to select “Time
Settings”. i {>}
4 Press {^} or {V} to select “Set Date &
Time”. i {>}
5 Enter the current day, month, and year.
Example: 17 May, 2006
{1}{7} {0}{5} {0}{6}
6 Enter the current hour and minute.
Example: 3:30 PM
{0}{3} {3}{0} i Press {*} until
“03:30 PM” is displayed.
7 {j/OK} i {ih}
Note:
L To correct a digit, press {<} or {>} to
move the cursor to the digit, then make
the correction.
L The date and time may be incorrect after a
power failure. In this case, set the date
and time again.
Preparation
13
Page 14
You can select
Deutsch
English
Espa
FRANCAIS
Italiano
Nederlands
EKKGMIJA
TG7150-7170EX(e).book Page 14 Thursday, August 10, 2006 10:40 AM
Accessibility features
Talking number display
(Voice announce)
The voice announce features allow the
handset to announce displayed phone
number. (Caller ID announce/List
announce)
Caller ID announce
When you receive an outside call which has
phone number information, the handset
announces the displayed phone number
from the handset speaker.
L To announce outside caller’s phone
number, you must first subscribe to Caller
ID service (page 23).
L The announcement is heard at the ringer
volume (page 19).
List announce
The handset announces phone numbers
from the handset speaker while you are
viewing the redial list, caller list, and
phonebook.
L If the displayed phone number has a
P(pause), the handset inserts a 0.5
second pause for each P and if the
number has the other symbols, (for
example, ;, #, etc.) the handset skips the
symbols and announces the next number.
7 {>} i {ih}
Note:
L The caller ID announce is heard at the
handset ringer volume (page 19). When
the volume for voice announce is set to
“Off”, the handset does not announce
the phone number regardless of the ringer
volume.
Selecting language for voice
announce
8 voice announce languages are available.
You can select
“Espa
“Nederlands
“Türkrkçe”.
1 {j/OK}
2 “Handset Setup” i {>}
3 “Other Options” i {>}
4 “Voice Announce” i {>}
5 “Select Language” i {>}
6 Select the desired language. i {>}
Note:
L To change the display language, see page
12.
L To turn the voice announce feature off,
select the volume “Off”.
“Deutsch
ñolol”,“FRANCAIS
”, , “EKKGMIJA
i {ih}
”,“English
”, , “Italiano
”, , oror
”,
”,
Setting volume for voice
announce
You can set the volume for list announce.
The volume for caller ID announce is set
when setting the ringer volume on page 19.
1 {j/OK}
2 “Handset Setup” i {>}
3 “Other Options” i {>}
4 “Voice Announce” i {>}
5 “Volume” i {>}
6 Select the desired volume.
14
Page 15

TG7150-7170EX(e).book Page 15 Thursday, August 10, 2006 10:40 AM
3 “Erase” i {>}
Making calls
4 “Yes” i {>} i {ih}
Making/Answering Calls
1 Lift the handset and dial the phone
number.
L To correct a digit, press {C/T}, then
enter the correct number.
2 {C}
3 When finished talking, press {ih} or
place the handset on the base unit.
Speakerphone
1 During a conversation, press {s} to turn
on the speakerphone.
L Speak alternately with the caller.
2 When finished talking, press {ih}.
Note:
L For best performance, use the
speakerphone in a quiet environment.
L To switch back to the receiver, press
{C}.
To adjust the receiver or speaker volume
Press {^} or {V} while on a call.
Redial feature
Previously dialled phone numbers (each 24
digits max.) can be redialled.
To make a call using the redial list
The last 10 phone numbers dialled are
stored in the redial list.
1 {R}
2 Press {^} or {V} to select the desired
number.
3 {C} / {s}
To erase numbers in the redial list
1 {R}
2 Press {^} or {V} to select the desired
number. i {>}
Other features
Mute
While mute is turned on, you will be able to
hear the other party, but the other party will
not be able to hear you.
To mute your voice, press {C/T}.
L To return to the conversation, press
{C/T} again.
{R} button (to use the recall feature)
■ Germany/Austria:
{R} is used to access special telephone
services, such as call waiting. If your
telephone line supports call waiting, you can
press {R} to switch between the first and
second caller during a conversation.
Contact your service provider/telephone
company for details.
■ Other countries:
{R} is used to access optional telephone
services. Contact your service
provider/telephone company for details.
Note:
L If your unit is connected to a PBX (private
branch exchange), pressing {R} can allow
you to access certain features of your host
PBX such as transferring an extension
call. Consult your PBX dealer for details.
L You can change the recall time (page 22).
Pause button (for PBX/long distance
service users)
A pause is sometimes required when
making calls using a PBX or long distance
service.
Example: If you have to dial {0} before
dialling outside numbers manually, you will
probably need to pause after dialling {0}
until you hear a dial tone.
1 {0} i {R}
15
Page 16
TG7150-7170EX(e).book Page 16 Thursday, August 10, 2006 10:40 AM
Making/Answering Calls
2 Dial the phone number. i {C} / {s}
Note:
L A 3 second pause is inserted each time
{R} is pressed. Press repeatedly to
insert longer pauses.
Answering calls
1 Lift the handset and press {C} or {s}
when the unit rings.
L You can also answer a call by pressing
any dial key from {0} to {9}, {*}, {#},
or {INT}. (Any key answer feature)
2 When finished talking, press {ih} or
place the handset on the base unit.
Auto talk feature
You can answer calls simply by lifting the
handset off the base unit. You do not need to
press {C}. To turn this feature on, see
page 19.
To adjust the handset ringer volume
when receiving a call
Press {^} or {V}.
Handset locator
Using this feature, you can locate the
handset if it has been misplaced.
1 Press {x} on the base unit.
2 To stop paging, press {x} on the base
unit or press {ih} on the handset.
16
Page 17

TG7150-7170EX(e).book Page 17 Thursday, August 10, 2006 10:40 AM
Handset phonebook
The handset phonebook allows you to make
calls without having to dial manually. You
can add 50 names and phone numbers to
the handset phonebook.
Adding entries to the handset
phonebook
{k} i {j/OK}
1
2 “New Entry” i {>}
3 Enter the party’s name (16 characters
max.; page 29). i {j/OK}
4 Enter the party’s phone number (24
digits max.). i {j/OK}
5 “Save” i {>} i {ih}
Note:
L Step 1 variation:
{j/OK} i Press {^} or {V} to select
“Ph.Book Setup”. i {>}
Finding and calling a handset
phonebook entry
Handset phonebook entries can be
searched for by first character or by scrolling
through all handset phonebook entries.
When you have found the desired entry,
press {C}.
Scrolling through all entries
1 {k}
2 Press {^} or {V} to display the desired
entry.
3 Press {^} or {V} to scroll through the
Editing entries in the handset
phonebook
Changing a name, phone number
1 Find the desired entry (page 17). i
2 “Edit” i {>}
3 Edit the name if necessary (16
4 Edit the phone number if necessary (24
5 “Save” i {>} i {ih}
Erasing entries from the handset
phonebook
Erasing an entry
1 Find the desired entry (page 17). i
2 “Erase” i {>}
3 “Yes” i {>} i {ih}
Phonebook
L Press the same dial key repeatedly to
display the first entry corresponding to
each letter located on that dial key.
L If there is no entry corresponding to
the letter you selected, the next entry
will be displayed.
L To change the character entry mode:
{R} i Select the character entry
mode. i {>}
phonebook if necessary.
{j/OK}
characters max.; page 29). i
{j/OK}
digits max.). i {j/OK}
{j/OK}
Searching by first character (index
search)
1 {k}
2 Press the dial key ({0} to {9}) which
contains the character you are
searching for (page 29).
Erasing all entries
1 {k} i {j/OK}
2 “Erase All” i {>}
3 “Yes” i {>}
4 “Yes” i {>} i {ih}
17
Page 18

TG7150-7170EX(e).book Page 18 Thursday, August 10, 2006 10:40 AM
Phonebook
Chain dial
This feature allows you to dial phone
numbers in the handset phonebook while
you are on a call. This feature can be used,
for example, to dial a calling card access
number or bank account PIN that you have
stored in the handset phonebook, without
having to dial manually.
1 While on a call, press {k}.
2 Press {^} or {V} to select the desired
entry.
L To search by first character (index
search), see page 17.
3 Press {>} to dial the number.
Quick dial for Call-by-Call:
Making calls using a
telephone carrier access
code (Germany only)
Different telephone carriers charge different
rates to call to different areas. If you store
the telephone carrier access codes you use
into the handset phonebook beforehand,
you can select the appropriate telephone
carrier access code when you make calls in
an effort to save on costs.
Important:
L In order to make calls using a telephone
carrier access code, you may need to
subscribe to that carrier’s service.
1 Find the desired telephone carrier
access code stored in the handset
phonebook.
L To search by first character (index
search), see page 17.
2 Press {C} to dial the telephone carrier
access code.
3 As soon as the number is dialled, press
{k} i Press {^} or {V} to select the
desired entry.
L Select the desired entry before the line
automatically disconnects.
4 Press {j/OK} to dial the desired entry.
18
Page 19

TG7150-7170EX(e).book Page 19 Thursday, August 10, 2006 10:40 AM
Handset Settings
Handset settings
L When customising the handset, the current item or setting is indicated by >.
To customise the handset:
1 {j/OK}
2 Press {^} or {V} to select “Handset Setup”. i {>}
3 Press {^} or {V} to select the desired item in the handset settings menu. i {>}
4 Press {^} or {V} to select the desired item in the sub-menu. i {>}
L In some cases, you may need to select from a second sub-menu. i {>}
5 Press {^} or {V} to select the desired setting then press {>} or follow the instruction in the
rightmost column of the chart.
L To exit the operation, press {ih}.
Handset settings
menu
Time Settings Set Date &
Ringer Setup Ringer Volume — Handset ringer volume
Display Setup Standby
Registration Register H.set — page 25
Other Options Keytones — Keytones on/off (“On”)
Sub-menu Sub-menu 2 Feature (default setting)
— Date and time: page 13
Time
Alarm — Set the alarm: page 21
(Maximum)
Ext. Ringtone — Ringtones for outside calls
(“Ringtone 1”)
Int. Ringtone — Ringtones for intercom
calls
(“Ringtone 3”)
— Standby mode display
Display
Select
Language
Contrast — Display contrast (Level 3)
Auto Talk — Auto talk on/off (“Off”)
Voice Announce Volume Voice announce volume
Select
Language
— Display language
(“Off”)
(“English”): page 12
(“Middle”): page 14
Voice announce language
(“English”): page 14
*1
*2*3
*3
*4
*5
19
Page 20

TG7150-7170EX(e).book Page 20 Thursday, August 10, 2006 10:40 AM
Handset Settings
*1 When the ringer is turned off, the handset will ring:
– at the minimum level for alarm
– at the minimum level for intercom calls
– at the maximum level for paging
*2 If you select one of the melody ringtones, the ringtone will continue to sound for several
seconds if the caller hangs up before you answer. You may hear a dial tone or no one
on the line when you answer a call.
*3 The preset melodies in this product are used with permission of © 2006 Copyrights
Vision Inc.
*4 If “Off” is selected, only current date and time are displayed.
If “Handset Number” is selected and the current handset number is 2, “[2]” is
displayed.
*5 Auto talk feature allows you to answer calls simply by lifting the handset off the base
unit. You do not need to press {C}.
20
Page 21
TG7150-7170EX(e).book Page 21 Thursday, August 10, 2006 10:40 AM
Time settings
Alarm
An alarm will sound for 3 minutes at the set
time once or daily. Set the date and time
beforehand (page 13).
1 {j/OK} i “Handset Setup” i
{>}
2 “Time Settings” i {>}
3 “Alarm” i Press {>} 2 times.
4 Select an alarm mode. i {>}
Off Turns alarm off. Press
{>} again, then press
{ih} to finish.
Once The alarm sounds once
at the set time. Enter the
desired day and month.
Daily An alarm sounds daily at
the set time.
Handset Settings
5 Enter the desired hour and minute. i
{j/OK}
6 Select the desired ringtone. i {>}
7 “Save” i {>} i {ih}
Note:
L To stop the alarm, press any dial key.
L When in talk or intercom mode, the alarm
will not sound until the call has ended.
L If you select “Once”, the setting will
change to “Off” after the alarm sounds.
21
Page 22

TG7150-7170EX(e).book Page 22 Thursday, August 10, 2006 10:40 AM
Base Unit Settings
Base unit settings
L Use the handset to customise the base unit.
L When customising the base unit, the current item or setting is indicated by >.
To customise the base unit:
1 {j/OK}
2 Press {^} or {V} to select “Base Unit Setup”. i {>}
3 Press {^} or {V} to select the desired item in the base unit settings menu. i {>}
4 Press {^} or {V} to select the desired item in the sub-menu. i {>}
5 Press {^} or {V} to select the desired setting then press {>} or follow the instruction in the
rightmost column of the chart.
L To exit the operation, press {ih}.
Base unit settings
menu
Ringer Volume — Base unit ringer volume (Medium)
Call Options Recall/Flash Change the recall time (“100 msec.”).
Other Options Base Unit PIN Change base unit PIN (“0000”).
*1 Change the recall time, if necessary, depending on the requirements of your service
provider/telephone company or PBX.
*2 If you change the PIN, please make note of your new PIN. The unit will not reveal the PIN
to you. If you forget your PIN, consult your nearest Panasonic service centre.
Sub-menu Feature (default setting)
*1
*2
– Enter the current 4-digit base unit PIN.
i Enter the new 4-digit base unit PIN.
i {j/OK}
Repeater Mode (“Off”): page 26
22
Page 23

TG7150-7170EX(e).book Page 23 Thursday, August 10, 2006 10:40 AM
Germany/Austria:
Using Caller ID service
Important:
L This unit is Caller ID compatible. To use
Caller ID features (such as displaying
caller phone numbers), you must
subscribe to Caller ID service. Consult
your service provider/telephone company
for details.
Caller ID features
When an outside call is received, the caller’s
phone number will be displayed.
L Phone numbers of the last 50 callers will
be logged in the caller list.
L When caller information is received and it
matches a phone number stored in the
unit’s phonebook, the stored name will be
displayed and logged in the caller list.
L If the unit is connected to a PBX system,
you may not receive the caller information.
L When the caller dialled from an area
which does not provide Caller ID service,
“Out of Area” will be displayed.
L When the caller requested not to send
caller information, either no information or
“Private Caller” will be displayed.
Missed calls
If a call is not answered, the unit treats the
call as a missed call. The number of missed
calls is shown on the display. This lets you
know if you should view the caller list to see
who called while you were out.
When you hear a call waiting tone during a
conversation, the display will show the
second caller’s information. You can answer
the second call by pressing {R}. The first
caller will be placed on hold. Press {R}
again to switch back to the first caller.
France/Spain/Greece/Belgium/
Sweden:
When you hear a call waiting tone during a
conversation, the display will show the
second caller’s information. You can answer
the second call, keeping the first call on
hold.
Caller ID announce
When you receive an outside call which has
phone number information, the handset
announces the displayed phone number
from the handset speaker.
L To announce outside caller’s phone
L When receive a call while on the phone,
L The announcement is heard at the ringer
L This feature can be turned on or off (page
Caller list
Call Waiting Caller ID
This is a service of your service
provider/telephone company and will only
operate if you have subscribed to this
service. Consult your service
provider/telephone company for details of
this service.
Viewing the caller list and calling
back
1
2 Press {V} to search from the most recent
Caller ID Service
number, you must first subscribe to Caller
ID service. Consult your service
provider/telephone company for details.
the 2nd caller’s phone number will not be
announced even if you subscribe to both
Caller ID and Call Waiting Caller ID
services.
volume (page 19).
14).
{j/OK} i “Caller List” i {>}
call, or press {^} to search from the
oldest call.
23
Page 24
TG7150-7170EX(e).book Page 24 Thursday, August 10, 2006 10:40 AM
Caller ID Service
L If the item has already been viewed or
answered, “Q” is displayed, even if it
was viewed or answered using
another handset.
3 {C} / {s}
Editing a caller’s phone number
before calling back
{j/OK} i “Caller List” i {>}
1
2 Press {^} or {V} to display the desired
entry.
3 {j/OK} i “Edit and Call” i
{>}
4 Edit the number.
L Press dial key ({0} to {9}) to add,
{C/T} to delete.
5 {C} / {s}
Erasing caller information
{j/OK} i “Caller List” i {>}
1
Voice mail service
Voice mail is an automatic answering
service offered by your service
provider/telephone company. If you
subscribe to this service, your service
provider/telephone company’s voice mail
system will answer calls for you when you
are unavailable to answer the phone or
when your line is busy. Messages are
recorded by your service provider/telephone
company, not your telephone.
When you have new messages, 0 will be
displayed on the handset. Please consult
your service provider/telephone company
for details of this service.
Note:
L If 0 still remains on the display even
after you have listened to new messages,
turn it off by pressing and holding {C/T}
for 2 seconds.
2 Press {^} or {V} to display the desired
entry. i {j/OK}
3 “Erase” i {>}
L To erase all entries, select “Erase
All”. i {>}
4 “Yes” i {>} i {ih}
Storing caller information into the
handset phonebook
{j/OK} i “Caller List” i {>}
1
2 Press {^} or {V} to display the desired
entry. i {j/OK}
3 “Add Phonebook” i {>}
4 Continue from step 3, “Adding entries to
the handset phonebook”, page 17.
24
Page 25
TG7150-7170EX(e).book Page 25 Thursday, August 10, 2006 10:40 AM
3 Place the additional handset on the
Operating additional units
Additional handsets
Up to 6 handsets can be registered to the
base unit.
Important:
L The additional handset model
recommended for use with this unit is
noted on page 6. If other model handset is
used, certain operations (handset
settings, base unit settings, etc.) may not
be available.
L Additional handsets will give you the
freedom to, for example, have an intercom
call with another handset while a third
handset is on an outside call.
Note:
L If an error tone sounds, or if w is still
L If all registered handsets start ringing in
L Charge the batteries of your additional
L This registration method cannot be used
Registering a handset to
the base unit
The included handset and base unit are
preregistered. If for some reason the
handset is not registered to the base unit (for
example, w flashes even when the handset
is near the base unit), register the handset
manually (page 25).
To register an additional handset to the
base unit (easy registration)
After purchasing an additional handset,
register it to the base unit. Ensure that the
additional handset is switched on. If it is not
on, press and hold {ih} for few seconds
to turn the handset on.
1 Lift the additional handset and press
{ih} to put the handset in standby
mode.
2 Press and hold {x} on the base unit for
about 3 seconds, until the registration
tone sounds.
To register a handset to the base unit
(manual registration)
You can register a handset to the base unit
manually using the following method.
1 {j/OK} i “Handset Setup” i
2 “Registration” i {>}
3 “Register H.set” i {>}
4 Press and hold {x} on the base unit for
5 Wait until “Enter Base PIN” is
Multi-unit Operation
base unit. The registration tone
continues to sound. With the handset
still on the base unit, wait until a
confirmation tone sounds and w stops
flashing.
flashing, register the handset manually
(manual registration; page 25).
step 2, press {x} to stop. Start again from
step 1.
handset for about 7 hours before initial
use.
for handsets that have already been
registered to the base unit. Register the
handset manually (manual registration;
page 25).
{>}
about 3 seconds, until the registration
tone sounds.
L If all registered handsets start ringing,
press {x} to stop, then repeat this
step.
L After pressing {x}, the rest of this
procedure must be completed within 1
minute.
displayed, then enter the base unit PIN
(default: “0000”), then press {j/OK}.
L When the handset has been
registered successfully, w will stop
25
Page 26

TG7150-7170EX(e).book Page 26 Thursday, August 10, 2006 10:40 AM
Multi-unit Operation
flashing. If keytones are turned on
(page 19), a confirmation tone will be
heard.
Cancelling a handset
A maximum of 6 handsets can be registered
to the base unit. A handset can cancel its
own registration (or the registration of
another handset) that is stored in the base
unit. This will allow the base unit to “forget”
the handset.
1 {j/OK} i “Base Unit Setup” i
{>}
2 Enter “335”.
3 “Cancel Handset” i {>}
L The numbers of all handsets
registered to the base unit are
displayed.
4 Select the handset(s) you want to
cancel, by pressing the desired handset
number.
L The selected handset number(s) will
flash.
L To cancel a selected handset number,
press the number again. The number
will stop flashing.
5 {j/OK} i “Yes” i {>}
L A long beep will sound as each
handset number disappears.
L The handset does not beep when
cancelling its own registration.
6 {ih}
Increasing the range of the base
unit
You can increase the signal range of the
base unit by using a DECT repeater. Please
use only the Panasonic DECT repeater
noted on page 5. Consult your Panasonic
dealer for details.
Important:
L Before registering the repeater to this
base unit, you must turn the repeater
mode on.
L Do not use more than one repeater at a
time.
Setting the repeater mode
1 {j/OK} i “Base Unit Setup” i
{>}
2 “Other Options” i {>}
3 “Repeater Mode” i {>}
4 “On” or “Off” i {>} i {ih}
Note:
L After turning repeater mode on or off, w
will flash on the handset momentarily. This
is normal. The handset can be used once
w stops flashing.
Intercom between
handsets
Intercom calls can be made between
handsets.
Example: When handset 1 calls handset 2
1 Handset 1:
{INT} i Press {2} (desired handset
number).
2 Handset 2:
Press {C} / {s} to answer.
3 When finished talking, press {ih}.
Transferring calls
between handsets
Outside calls can be transferred between 2
people.
26
Page 27

TG7150-7170EX(e).book Page 27 Thursday, August 10, 2006 10:40 AM
Example: When handset 1 transfers a call
to handset 2
1 Handset 1:
During an outside call, press {INT}. i
Press {2} (desired handset number).
L The outside call will be put on hold.
L If there is no answer, press {INT} to
return to the outside call.
2 Handset 2:
Press {C} / {s} to answer the page.
L Handset 2 can talk with handset 1.
3 Handset 1:
To complete the call transfer, press
{ih}.
Transferring a call without speaking to
the other handset user
Copying phonebook
entries
You can copy handset phonebook entries to
the handset phonebook of another
compatible Panasonic handset.
Copying one entry
1 Find the desired handset phonebook
2 “Copy” i {>}
3 Enter the handset number you wish to
1 During an outside call, press {INT}. i
Press the desired handset number.
L k flashes to indicate the outside call
is on hold.
2 {ih}
L The outside call rings at the other
handset.
Note:
L If the other handset user does not answer
the call within 1 minute, the call will ring at
your handset again.
4 {ih}
Copying all entries
1 {k} i {j/OK}
2 “Copy All” i {>}
3 Enter the handset number you wish to
4 {ih}
Multi-unit Operation
entry (page 17). i {j/OK}
send the handset phonebook entry to.
L When an entry has been copied,
“Completed” is displayed.
L To continue copying another entry:
“Yes” i {>} i Find the desired
handset phonebook entry. i {>}
send the handset phonebook entry to.
L When all entries have been copied,
“Completed” is displayed.
27
Page 28

TG7150-7170EX(e).book Page 28 Thursday, August 10, 2006 10:40 AM
Useful Information
Using the belt clip
Attaching the belt clip
Removing the belt clip
Using the shoulder rest
attachment
The shoulder rest attachment allows handsfree phone conversations.
Attaching the shoulder rest attachment
Attach the included belt clip to the handset
beforehand (page 28). Slide the shoulder
rest attachment to the belt clip until it clicks.
Note:
L If the base unit is mounted on a wall,
remove the shoulder rest attachment
before charging the handset.
Removing the shoulder rest attachment
L The pictured model is KX-TG7150.
28
Page 29

TG7150-7170EX(e).book Page 29 Thursday, August 10, 2006 10:40 AM
Useful Information
Character entry
The dial keys are used to enter characters and numbers. Each dial key has multiple
characters assigned to it. The available character entry modes are Alphabet (ABC), Numeric
(0-9), Greek (F), Extended 1 (G), Extended 2 (H), and Cyrillic (I). When in these
entry modes except Numeric, you can select which character is entered by pressing a dial key
repeatedly.
–Press {<} or {>} to move the cursor.
– Press dial keys to enter characters and numbers.
–Press {C/T} to erase the character or number highlighted by the cursor. Press and hold
{C/T} to erase all characters or numbers.
–Press {*} to switch between uppercase and lowercase.
– To enter another character located on the same dial key, press {>} to move the cursor to
the next space, then press the appropriate dial key.
Character entry modes
Several character entry modes can be used when entering text. The characters that can be
entered depend on the entry mode.
Characters available in each character entry mode
When the unit displays the character entry screen:
{k} i Select a character entry mode. i {>}
Alphabet character table (ABC)
Numeric entry table (0-9)
Greek character table (M)
29
Page 30

TG7150-7170EX(e).book Page 30 Thursday, August 10, 2006 10:40 AM
Useful Information
Extended 1 character table (N)
L The following are used for both uppercase and lowercase:
Extended 2 character table (O)
L The following are used for both uppercase and lowercase:
Cyrillic character table (P)
30
Page 31

TG7150-7170EX(e).book Page 31 Thursday, August 10, 2006 10:40 AM
Useful Information
Error messages
Error message Cause & solution
Failed L Phonebook copy failed. Confirm the other handset
(the receiver) is in standby mode and try again.
Incomplete L The receiver’s phonebook memory is full. Erase the
unnecessary phonebook entries from the other
handset (the receiver) and try again.
Memory Full L The handset’s phonebook memory is full. Erase
unnecessary entries (page 17).
You must first subscribe
to Caller ID.
L You must subscribe to Caller ID service. Once you
receive caller information after subscribing to Caller
ID service, this message will not be displayed.
Troubleshooting
If you still have difficulties after following the instructions in this section, disconnect the AC
adaptor and turn off the handset, then reconnect the AC adaptor and turn on the handset.
Telephone
Problem Cause & solution
w is flashing. L The handset is not registered to the base unit.
Register it (page 25).
L The handset is too far from the base unit. Move
closer.
L The AC adaptor is not connected. Check the
connections.
L You are using the handset or base unit in an area
with high electrical interference. Place the handset
and base unit away from interference sources, such
as antennas and mobile phones.
The handset display is blank. L The handset is not turned on. Turn the power on
(page 12).
The handset will not turn on. LMake sure that the batteries are installed correctly
(page 11).
L Fully charge the batteries (page 11).
L Clean the charge contacts and charge again (page
11) .
I have changed the display
language to a language I cannot
read.
L Change the display language (page 12).
31
Page 32

TG7150-7170EX(e).book Page 32 Thursday, August 10, 2006 10:40 AM
Useful Information
Problem Cause & solution
I cannot make or receive calls. L The AC adaptor or telephone line cord is not
connected. Check the connections.
L If you are using a splitter to connect the unit,
remove the splitter and connect the unit to the wall
socket directly. If the unit operates properly, check
the splitter.
L Disconnect the base unit from the telephone line
and connect the line to a known working telephone.
If the working telephone operates properly, contact
our service personnel to have the unit repaired. If
the working telephone does not operate properly,
contact your service provider/telephone company.
The unit does not ring. LThe ringer volume is turned off. Adjust the ringer
volume (page 19, 22).
The batteries should be charging
but the battery icon does not
change.
A busy tone is heard when {C} is
pressed.
Static is heard, sound cuts in and
out. Interference from other
electrical units.
Noise is heard during a call. L You are using the handset or base unit in an area
The handset/base unit stops
working while being used.
Pressing {R} does not
display/dial the last number dialled.
The handset beeps intermittently
and/or 7 flashes.
I fully charged the batteries, but
7 still flashes.
L Clean the charge contacts and charge again (page
11).
L The handset is too far from the base unit. Move
closer and try again.
L Another handset is in use. Wait and try again later.
L Place the handset and the base unit away from
other electrical appliances.
L Move closer to the base unit.
L Your unit is connected to a telephone line with
DSL/ADSL service. We recommend connecting a
filter (contact your DSL/ADSL service provider) to
the telephone line between the base unit and the
telephone line jack.
with high electrical interference. Place the handset
and base unit away from interference sources, such
as antennas and mobile phones.
L Disconnect the AC adaptor and turn off the
handset. Reconnect the AC adaptor, then turn on
the handset and try again.
L The redialled number was more than 24 digits long.
Redial the number manually.
L Fully charge the batteries (page 11).
L Clean the charge contacts and charge again (page
11).
L It is time to replace the batteries (page 11).
32
Page 33

TG7150-7170EX(e).book Page 33 Thursday, August 10, 2006 10:40 AM
Useful Information
Problem Cause & solution
I fully charged the batteries, but the
operating time seems to be short.
Caller information is not displayed. L You need to subscribe to Caller ID service. Consult
The handset does not announce
the displayed phone number.
While viewing caller information,
the display returns to standby
mode.
I cannot register a handset to the
base unit.
L Wipe the battery ends (S, T) and the unit contacts
with a dry cloth.
your service provider/telephone company for
details.
L Your unit is connected to a telephone line with
DSL/ADSL service. We recommend connecting a
filter (contact your DSL/ADSL service provider) to
the telephone line between the base unit and the
telephone line jack.
L The handset ringer volume is turned off. Adjust it
(page 19).
L The voice announce feature is turned off. Turn it on
(page 14).
L While you are on an outside call, the handset does
not announce phonebook information when
searching the phonebook.
L Do not pause for over 1 minute while searching.
L The maximum number of handsets (6) are already
registered to the base unit. Cancel unused handset
registrations from the base unit (page 26).
L You entered the wrong PIN number. If you forget
your PIN, consult your nearest Panasonic service
centre.
L Place the handset and the base unit away from
other electrical appliances.
33
Page 34

TG7150-7170EX(e).book Page 34 Thursday, August 10, 2006 10:40 AM
Useful Information
Note:
Specifications
■ Standard:
DECT (Digital Enhanced Cordless
Telecommunications),
GAP (Generic Access Profile)
■ Number of channels:
120 Duplex Channels
■ Frequency range:
1.88 GHz to 1.90 GHz
■ Duplex procedure:
TDMA (Time Division Multiple Access)
■ Channel spacing:
1,728 kHz
■ Bit rate:
1,152 kbit/s
■ Modulation:
GFSK (Gaussian Frequency Shift Keying)
■ RF transmission power:
Approx. 250 mW
■ Voice coding:
ADPCM 32 kbit/s
■ Power source:
220–240 V, 50 Hz
■ Power consumption, Base unit:
Standby: Approx. 1.9 W
Maximum: Approx. 6.8 W
■ Operating conditions:
5 °C–40 °C, 20 %–80 % relative air humidity
(dry)
■ Dimensions:
Base unit: Approx. 60 mm × 173 mm ×
105 mm
Handset (KX-TG7150): Approx. 179 mm ×
48 mm × 34 mm
Handset (KX-TG7170): Approx. 179 mm ×
48 mm × 38 mm
■ Mass (weight):
Base unit: Approx. 220 g
Handset (KX-TG7150): Approx. 154 g
Handset (KX-TG7170): Approx. 164 g
L Specifications are subject to change.
L The illustrations used in these operating
instructions may differ slightly from the
actual product.
L The range of the handset under maximum
conditions is 50 meters indoors and 300
meters outdoors. Please note it will
probably be shortened when near
concrete barriers, etc.
Connections:
L The unit will not work during a power
failure. We recommend you connect a
standard telephone on the same line for
power protection.
34
Page 35

TG7150-7170EX(e).book Page 35 Thursday, August 10, 2006 10:40 AM
Index
A Additional handsets: 25
Alarm: 21
Answering calls: 16
Auto talk: 16, 19
B Base unit
Settings: 22
Battery
Charge: 11
Installation: 11
Performance: 12
Replacement: 11
Strength: 12
Belt clip: 4, 28
Bone conduction earpiece: 8
C Call-by-Call: 18
Caller ID service: 23
Chain dial: 18
Character entry: 29
Connections: 10
Copy
Phonebook: 27
D Date and time: 13
Display
Contrast: 19
Icons: 10
Language: 12
Standby mode: 19
H Handset
Cancelling: 26
Locator: 16
Power on/off: 12
Registration: 25
Settings: 19
I Intercom: 26
K Keytones: 19
M Making calls: 15
Missed calls: 23
Mute: 15
P Pause: 15
Phonebook
Handset phonebook: 17
Phonebook copy: 27
PIN
R Recall: 15, 22
S Shoulder rest attachment: 4, 28
T Transfer calls: 26
V Voice announce: 14
Index
Base unit: 22
Power on/off: 12
Redialling: 15
Redial list: 15
Registration: 25
Repeater: 26
Ringtones: 19
Speakerphone: 15
Voice mail: 24
Volume
Receiver: 15
Ringer (Base unit): 22
Ringer (Handset): 19
Speakerphone: 15
35
Page 36

TG7150-7170EX(e).book Page 36 Thursday, August 10, 2006 10:40 AM
Copyright:
This material is copyrighted by Panasonic Communications Co., Ltd., and may be reproduced
for internal use only. All other reproduction, in whole or in part, is prohibited without the written
consent of Panasonic Communications Co., Ltd.
© 2006 Panasonic Communications Co., Ltd. All Rights Reserved.
36
Page 37

TG7150-7170EX(g-g).book Page 1 Wednesday, August 9, 2006 3:45 PM
Bedienungsanleitung
Digitales Schnurlos-Telefon
Modellbez. KX-TG7150EX
KX-TG7150
KX-TG7170EX
Dieses Gerät ist mit der Anruferanzeige (CLIP) kompatibel. Zur Anzeige
der Rufnummern von Anrufern müssen Sie sich für das
Leistungsmerkmal Anruferanzeige (CLIP) anmelden.
Laden Sie die Akkus vor dem ersten Gebrauch ca. 7 Stunden lang.
Bitte lesen Sie diese Bedienungsanleitung durch, bevor Sie das Gerät in Betrieb nehmen.
Bewahren Sie sie zur künftigen Bezugnahme gut auf.
Page 38

TG7150-7170EX(g-g).book Page 2 Wednesday, August 9, 2006 3:45 PM
Einführung
Einführung
Vielen Dank, dass Sie sich für den Kauf dieses digitalen Schnurlos-Telefones von Panasonic
entschieden haben.
Zur künftigen Bezugnahme
Bewahren Sie den Originalbeleg auf oder heften Sie ihn ab, damit Sie ihn bei Reparaturen innerhalb des
Garantiezeitraums stets verfügbar haben.
Seriennummer (ist auf der Rückseite der Basisstation angegeben)
Datum des Kaufs
Name und Adresse des Händlers
Ihr Telefon
KX-TG7150
(Mobilteil-Typ mit
großen Tasten)
Hinweis:
L
Die Mobilteile sind für den Gebrauch mit der Basisstation vorregistriert. Anderenfalls siehe Seite 24.
KX-TG7170
(Mobilteil vom Typ
Knochenleitungshörer)
(2)
Page 39

TG7150-7170EX(g-g).book Page 3 Wednesday, August 9, 2006 3:45 PM
Inhalt
Vorbereitung
Zubehör . . . . . . . . . . . . . . . . . . . . . . . . . . . . . 4
Erweiterung des Telefonsystems . . . . . . . . . . 6
Wichtige Informationen. . . . . . . . . . . . . . . . . . 7
Knochenleitungshörer (nur KX-TG7170) . . . . 8
Bedienelemente . . . . . . . . . . . . . . . . . . . . . . . 9
Displays . . . . . . . . . . . . . . . . . . . . . . . . . . . . 10
Anschlüsse . . . . . . . . . . . . . . . . . . . . . . . . . 10
Einsetzen/Auswechseln der Akkus . . . . . . . .11
Laden des/der Akku(s) . . . . . . . . . . . . . . . . . .11
Ein-/Ausschalten des Gerätes . . . . . . . . . . . 12
In dieser Bedienungsanleitung verwendete
Symbole . . . . . . . . . . . . . . . . . . . . . . . . . . . . 12
Display-Sprache . . . . . . . . . . . . . . . . . . . . . . 12
Datum und Uhrzeit . . . . . . . . . . . . . . . . . . . . 13
Zugriffsfunktionen
Ansage eingehender Rufnummern
(Sprachansage) . . . . . . . . . . . . . . . . . . . . . . 14
Anrufen/Beantworten von
Anrufen
Anrufen. . . . . . . . . . . . . . . . . . . . . . . . . . . . . 15
Beantworten von Anrufen. . . . . . . . . . . . . . . 16
Telefonbücher
Mobilteil-Telefonbuch . . . . . . . . . . . . . . . . . . 17
Kettenwahl . . . . . . . . . . . . . . . . . . . . . . . . . . 17
Kurzwahl für Call-by-Call: Telefonieren über die
Zugangsnummer eines Telefonanbieters (nur
Deutschland) . . . . . . . . . . . . . . . . . . . . . . . . 18
Verwenden mehrerer Geräte
Verwenden von Zusatzgeräten . . . . . . . . . . .24
Registrieren eines Mobilteils an der
Basisstation. . . . . . . . . . . . . . . . . . . . . . . . . .24
Interngespräch zwischen Mobilteilen. . . . . . .25
Weiterleiten von Anrufen zwischen
Mobilteilen . . . . . . . . . . . . . . . . . . . . . . . . . . . 25
Kopieren von Telefonbucheinträgen . . . . . . . 26
Nützliche Informationen
Verwendung des Gürtelclips . . . . . . . . . . . . .27
Verwendung der Schulterstütze. . . . . . . . . . .27
Eingabe von Zeichen. . . . . . . . . . . . . . . . . . .28
Fehlermeldungen. . . . . . . . . . . . . . . . . . . . . .30
Fehlerbehebung . . . . . . . . . . . . . . . . . . . . . .30
Technische Daten . . . . . . . . . . . . . . . . . . . . .34
Index
Index . . . . . . . . . . . . . . . . . . . . . . . . . . . . . . 35
Mobilteil-Einstellungen
Mobilteil-Einstellungen . . . . . . . . . . . . . . . . . 19
Zeiteinstellungen . . . . . . . . . . . . . . . . . . . . . 20
Einstellungen der Basisstation
Einstellungen der Basisstation . . . . . . . . . . . 21
Leistungsmerkmal
Anruferanzeige (CLIP)
Verwenden des Leistungsmerkmals
Anruferanzeige (CLIP) . . . . . . . . . . . . . . . . . 22
Anruferliste . . . . . . . . . . . . . . . . . . . . . . . . . . 23
Voice Mail-Dienst . . . . . . . . . . . . . . . . . . . . . 23
(3)
Page 40

TG7150-7170EX(g-g).book Page 4 Wednesday, August 9, 2006 3:45 PM
Vorbereitung
Zubehör
Mitgeliefertes Zubehör
Nr. Zubehör Menge
1
Netzteil für Basisstation
Teile-Nr. PQLV207CE
2
Telefonkabel (Deutschland) 1
3
Telefonkabel (Frankreich) 1
4
Telefonkabel (Andere Länder)
5
Telefonstecker (Italien) 1
6
Akkus Größe AAA (R03)
Teile-Nr. HHR-55AAAB oder HHR-4EPT
7
Akkufachabdeckung
8
Gürtelclip 1
9
Schulterstütze 1
*1 Verwenden Sie zum Gebrauch in Ihrem Land den entsprechenden Telefonstecker. In Italien:
Befestigen Sie vor dem Anschließen den mitgelieferten Telefonstecker
*2 Das Mobilteil wird mit angebrachter Akkufachabdeckung geliefert.
123456
*2
*1
5
am Telefonkabel.
1
1
2
1
789
(4)
Page 41

TG7150-7170EX(g-g).book Page 5 Wednesday, August 9, 2006 3:45 PM
Vorbereitung
Optionales Zubehör/Ersatzteile
Verkaufsinformationen erfahren Sie bei Ihrem Panasonic-Händler.
Nr. Modellbez. Beschreibung
1
KX-TCA717EX Wandmontagehalterung
2
KX-TCA94EX Headset
3
KX-A272 DECT-Verstärker
12
Hinweis:
L
Das Telefonsystem lässt sich durch Registrierung weiterer kompatibler Panasonic-Mobilteile
erweitern (Seite 6).
L
Wenn Sie Akkus austauschen müssen, verwenden Sie 2 AAA (R03) Nickelmetallhydrid-Akkus (NiMH) mit einer Kapazität von bis zu 750 mAh. Wir empfehlen die Verwendung von Panasonic-Akkus
(Modell Nr. P03P).
L
Panasonic ist nicht haftbar für Schäden am Gerät oder Beeinträchtigung der Leistung, die durch die
Verwendung von nicht von Panasonic hergestellten Akkus verursacht werden.
(5)
Page 42

TG7150-7170EX(g-g).book Page 6 Wednesday, August 9, 2006 3:45 PM
Vorbereitung
Erweiterung des Telefonsystems
Sie können Ihr Telefonsystem ausweiten, indem Sie die folgenden optionalen Mobilteile an einer
einzigen Basisstation registrieren (KX-TG7150 oder KX-TG7170) registrieren:
Verkaufsinformationen erfahren Sie bei Ihrem Panasonic-Händler.
Mobilteile: max. 6
Zusätzliches DECT
Mobilteil KXTGA711EX
Zusätzliches DECT
Mobilteil KXTGA717EX
(Knochenleitung)
Zusätzliches DECT
Mobilteil KXTGA715EX
(große Tasten)
max. 6
Funktionsübersicht der Mobilteile KX-TGA711, KX-TGA715 und KX-TGA717
Die 3 verschiedenen zusätzlichen Mobilteile unterscheiden sich in Bedienung und Funktion wie in der
unten stehenden Tabelle angegeben.
Funktion KX-TGA711 KX-TGA715 KX-TGA717 Seite
Beschreibung Nur als
zusätzliches
Mobilteil
erhältlich
Große Tasten —
Knochenleitungshörer — —
Wahlkontrolle
Headsetanschluss —
Sprachansage —
r
(6)
Wie bei Mobilteil
für KX-TG7150
rr
———
rr
rr
Wie bei Mobilteil
für KX-TG7170
r
—
—
Seite 8
Seite 9
Seite 14
Page 43

TG7150-7170EX(g-g).book Page 7 Wednesday, August 9, 2006 3:45 PM
L
Wichtige Informationen
Allgemein
L
Verwenden Sie nur das im Lieferumfang
enthaltene, auf Seite 4 angegebene Netzteil.
L
Das Netzteil nur an eine StandardNetzsteckdose mit 220–240 V AC
anschließen.
L
In folgenden Fällen können mit diesem
Produkt keine Anrufe getätigt werden:
– Der/Die Akku(s) des Schnurlos-Telefones
muss/müssen geladen werden oder ist/sind
defekt.
– Bei einem Stromausfall.
L
Öffnen Sie Basisstation, Ladegerät oder
Mobilteil nur zum Auswechseln des/der Akkus.
L
Dieses Produkt darf nicht in der Nähe von
medizinischer Notfall/Intensivpflegeausrüstung verwendet und nicht
von Menschen mit Herzschrittmachern
betrieben werden.
L
Stellen Sie sicher, dass keine Objekte auf das
Gerät fallen können und keine Flüssigkeiten in
das Gerät verschüttet werden. Setzen Sie das
Produkt weder übermäßigem Rauch oder
Staub noch mechanischen Schwingungen
oder Stößen aus.
Betriebsumgebung
L
Verwenden Sie dieses Produkt nicht in der
Nähe von Wasser.
L
Betreiben Sie dieses Produkt nicht in der Nähe
von Wärmequellen, wie Heizungen, Kochern
usw. Stellen Sie dieses Produkt nicht in
Räumen auf, in denen die Temperatur unter
°
C oder über 40°C liegt.
5
L
Das Netzteil dient als Trennung zum übrigen
Stromnetz. Stellen Sie sicher, dass sich die
Netzsteckdose in der Nähe des Produkts
befindet und leicht zugänglich ist.
Warnung:
L
Setzen Sie dieses Gerät niemals Regen oder
Feuchtigkeit aus, um elektrische Schläge zu
vermeiden.
Sicherheitshinweis für den Umgang mit
Akkus
L
L
L
L
L
L
L
Vorbereitung
Ziehen Sie den Netzstecker des Produktes
aus der Steckdose, wenn es Rauch entwickelt,
einen anomalen Geruch verströmt oder
ungewöhnliche Geräusche von sich gibt.
Diese Bedingungen können Brände oder
elektrische Schläge auslösen. Warten Sie, bis
das Gerät nicht mehr raucht, und wenden Sie
sich an eine autorisierte Kundendienststelle.
Wir empfehlen den/die auf Seite 5 genannten
Akku(s).
Standardakku(s).
Verwenden Sie keine alten und neuen Akkus
zusammen.
Entsorgen Sie Akku(s) nicht durch
Verbrennen, da sie explodieren können.
Überprüfen Sie die lokalen
Abfallbeseitigungscodes bezüglich
besonderer Entsorgungsvorschriften.
Öffnen und beschädigen Sie den/die Akku(s)
nicht. Freigesetzter Elektrolyt aus dem/den
Akku(s) ist korrosiv und kann Verbrennungen
oder Verletzungen an Augen und Haut
hervorrufen. Der Elektrolyt kann bei
Verschlucken toxisch wirken.
Seien Sie vorsichtig beim Umgang mit
dem/den Akkus. Lassen Sie keine leitenden
Materialien, wie Ringe, Armbänder oder
Schlüssel, den/die Akku(s) berühren, da dies
zu einem Kurzschluss führen kann, bei dem
sich der/die Akku(s) und/oder die leitenden
Materialien überhitzen und somit
Verbrennungen verursachen können.
Laden Sie den/die im Lieferumfang des
Produktes enthaltenen Akku(s) gemäß den
Angaben in dieser Gebrauchsanweisung.
Verwenden Sie zum Laden des/der Akku(s)
nur die mitgelieferte Basisstation (bzw. das
Ladegerät). Nehmen Sie keine Änderungen an
der Basisstation (bzw. am Ladegerät) vor. Die
Nichtbefolgung dieser Anweisungen kann zum
Aufquellen oder Explodieren des/der Akku(s)
führen.
Verwenden Sie nur
(7)
Page 44

TG7150-7170EX(g-g).book Page 8 Wednesday, August 9, 2006 3:45 PM
Vorbereitung
L
Die Effektivität des Knochenleitungshörers
Knochenleitungshörer (nur
KX-TG7170)
Das Mobilteil ist mit einem Knochenleitungshörer
ausgestattet, mit dem beim Telefonieren
Schwingungen in Schall umgesetzt werden.
Um eine ordnungsgemäße Funktion zu
gewährleisten, wird der Knochenleitungshörer in
der Nähe des Ohrs an den Kopf gelegt.
Normalerweise wird der Schall in den Hörkanal
geleitet und versetzt das Trommelfell in
Schwingung. Der Mensch fühlt die Schwingung
im Innenohr, setzt sie über den Hörnerv um und
kann das Gesagte somit verstehen.
Töne
Knochenleitungshörer
Hörnerv
Äußeres
Ohr
Mittelohr
Innenohr
kann je nach Art und Stärke der
Hörbehinderung des Benutzers variieren.
L
Da Schall durch Schwingung erzeugt wird,
können Benutzer mit normalem Hörvermögen
den Knochenleitungshörer wie bei einem
gewöhnlichen Telefon ans Ohr legen.
L
Staub und Fett am Knochenleitungshörer
lassen sich mit einem weichen, trockenen
Tuch entfernen.
Legen Sie den Knochenleitungshörer an den
Kopf (in der Nähe des Ohrs). Probieren Sie
verschiedene Stellen aus, um herauszufinden,
wo es am besten funktioniert. Beginnen Sie im
Schläfenbereich.
Hinweis:
L
Verwenden Sie den Knochenleitungshörer
nicht mit einem Hörgerät. Ansonsten kommt es
zu Pfeiftönen oder anderen störenden
Geräuschen.
(8)
Page 45

A B
TG7150-7170EX(g-g).book Page 9 Wednesday, August 9, 2006 3:45 PM
I{R} (Rückfrage)
Bedienelemente
Mobilteil (KX-TG7150)
A
C
D
E
F
G
H
B
I
Mobilteil (KX-TG7170)
J
K
L
M
N
O
P
Q
R
J
K
L
M
N
O{C/T}
P
Q{INT} (Interngespräch)
R
Basisstation
Ladeanzeige/Ruftonanzeige
KX-TG7150
Hörer
KX-TG7170
Knochenleitungshörer
Display
{R}
(Wahlwiederholung/Pause)
{ih}
(Aus/Ein)
(Löschen/Stumm)
Wähltastatur
Mikrofon
Vorbereitung
A
C
D
E
F
G
H
B
I
A
Lautsprecher
B
Ladekontakt
C
Headsetanschluss
D{j/OK} (Menü/OK)
E
{k}
(Telefonbuch)
F
{C}
(Gespräch)
G
Navigationstaste (
H
{s}
(Freisprecheinrichtung)
{^}/{V}/{>}/{<}
J
K
A
B
C
Ladekontakt
{x}
(Ruf-Taste)
Klingel
L
M
N
O
P
Q
R
)
C
(9)
Page 46

TG7150-7170EX(g-g).book Page 10 Wednesday, August 9, 2006 3:45 PM
Vorbereitung
Displays
Display-Symbole
DisplaySymbol
w
L
k
5
[2]
0
*1 Nur für Voice Mail-Benutzer
Bedeutung
Innerhalb der Reichweite einer
Basisstation
L
Blinkt: Mobilteil sucht
Basisstation. (Mobilteil
befindet sich außerhalb der
Reichweite der
Basisstation, ist nicht an der
Basisstation registriert oder
Basisstation ist nicht an das
Stromnetz angeschlossen)
Mobilteil greift auf Basisstation
zu. (internes Gespräch,
Mobilteilsuche, Ändern der
Einstellungen der Basisstation
usw.)
Das Mobilteil wird für einen
externen Anruf verwendet.
Akkuladung
Mobilteil-Nummer (Standby-
Displayeinstellung, Seite 19)
Neue Voice Mail empfangen*1
(Seite 23)
Leitung wird von einem
anderen Mobilteil belegt.
Haken
(220–240 V, 50 Hz)
Zum Fernsprechnetz
Verwenden Sie nur das im
Lieferumfang enthaltene /
angegebene Netzteil und
Telefonkabel.
Hinweis:
L
Zum Anschließen des Telefonkabels an das
Telefonnetz, benutzen Sie das mitgelieferte
Telefonkabel und den mitgelieferten
Telefonstecker, der für Ihr Land zutrifft, siehe
Seite 4.
L
Schließen Sie das Telefonkabel niemals
während eines Gewitters an.
L
Das Netzteil muss stets angeschlossen
bleiben. (Es ist normal, dass sich das Netzteil
während des Betriebes warm anfühlt.)
L
Das Netzteil sollte an einer Wand- oder
Bodensteckdose angeschlossen werden.
Schließen Sie das Netzteil nicht an einer
Deckensteckdose an, da sein Gewicht es aus
der Steckdose ziehen könnte.
Anschlüsse
Wenn das Netzteil an die Basisstation
angeschlossen wird, ertönt ein kurzes
akustisches Signal. Prüfen Sie die Anschlüsse,
wenn das akustische Signal nicht ertönt.
(10)
Aufstellort
L
Für einen rauschfreien Betrieb bei maximaler
Kommunikationsentfernung stellen Sie die
Basisstation wie folgt auf:
– Nicht in der Nähe von elektrischen Geräten,
wie TV-Geräten, Radiogeräten, PCs oder
weiteren Telefonen.
– An einer leicht zu erreichenden und
zentralen Stelle.
Page 47

TG7150-7170EX(g-g).book Page 11 Wednesday, August 9, 2006 3:45 PM
Vorbereitung
Einsetzen/Auswechseln der
Akkus
Wichtig:
L
Verwenden Sie nur die mitgelieferten, auf
Seite 4, 7 angegebenen Standardakkus.
L
Wenn Sie die Akkus austauschen müssen,
empfehlen wir, nur die auf Seite 5, 7
angegebenen Panasonic-Akkus zu
verwenden.
L
Wischen Sie die Pole des Akkus (S, T) mit
einem trockenen Tuch ab.
L
Achten Sie beim Einlegen der Akkus darauf,
S, T
die Pole der Akkus (
Gerätes nicht zu berühren.
1
Drücken Sie fest auf die Aussparung auf der
Akkufachabdeckung und schieben Sie die
Abdeckung in Pfeilrichtung.
L
Nehmen Sie die alten Akkus mit dem
S
Pluspol (
) zuerst heraus.
) und Kontakte des
Laden des/der Akku(s)
Legen Sie das Mobilteil vor dem ersten
Gebrauch ca. 7 Stunden lang auf die
Basisstation.
Während des Ladevorgangs wird das
Akkusymbol wie folgt angezeigt.
5
Wenn die Akkus geladen sind, wird
Display angezeigt.
L
Die Ladeanzeige leuchtet auf, sobald das
Mobilteil in die Basisstation gesetzt wird.
Ladekontakt
auf dem
2
Setzen Sie die Akkus mit dem Minuspol (T)
zuerst ein. Schließen Sie die
Akkufachabdeckung.
L
Die Abbildung zeigt das Modell KX-TG7150.
Hinweis:
L
Es ist normal, dass sich das Mobilteil während
des Ladens warm anfühlt.
L
Laden Sie die Akkus mindestens 15 Minuten,
wenn Sie das Gerät sofort benutzen möchten.
L
Reinigen Sie die Ladekontakte des Mobilteils
und der Basisstation einmal im Monat mit
einem weichen, trockenen Tuch, ansonsten
lassen sich die Akkus möglicherweise nicht
richtig laden. Reinigen Sie die Kontakte
häufiger, wenn das Gerät Schmierstoffen,
Staub oder hoher Luftfeuchtigkeit ausgesetzt
ist.
(11)
Page 48

Sie k
nnen
Deutsch
English
,
Espa
NORSK
FRANCAIS
,
Italiano
Dansk
Nederlands
,
Svenska
Suomi
EKKGMIJA
,
Portugu
oder
Catal
ausw
hlen.
TG7150-7170EX(g-g).book Page 12 Wednesday, August 9, 2006 3:45 PM
Vorbereitung
Akkuladung
Akkusymbol Akkuladung
5
6
7
Panasonic Ni-MH-Akkuleistung (mitgelieferte
Akkus)
Betrieb Betriebsdauer
In Dauerbetrieb KX-TG7150:
In dauerhaftem
Standby-Modus
Hinweis:
L
Es ist normal, wenn die Akkus beim ersten
Aufladen nicht die volle Kapazität erreichen.
Die maximale Akkuleistung wird erst nach
einigen abgeschlossenen Lade/Entladezyklen (Gebrauch) erreicht.
L
Die tatsächliche Akkuleistung hängt davon ab,
wie häufig das Mobilteil verwendet bzw. nicht
verwendet wird (Standby).
L
Die Akku-Betriebsdauer kann sich je nach
Gebrauchsbedingungen und
Umgebungstemperatur mit der Zeit verkürzen.
L
Auch wenn das Mobilteil voll aufgeladen ist,
kann es auf der Basisstation liegen gelassen
werden, ohne dass die Akkus dadurch
Schaden nehmen.
L
Der Ladezustand wird nach dem
Wiedereinsetzen der Akkus möglicherweise
nicht richtig angezeigt. Legen Sie in diesem
Fall das Mobilteil auf die Basisstation und
laden Sie es mindestens 7 Stunden lang auf.
Hoch
Mittel
Niedrig
Wenn die Anzeige blinkt:
Muss aufgeladen
werden.
max. 12 Stunden
KX-TG7170:
max. 10 Stunden
max. 150 Stunden
Ein-/Ausschalten des
Gerätes
Einschalten
Halten Sie
Ausschalten
Halten Sie
In dieser
Bedienungsanleitung
verwendete Symbole
Symbol Bedeutung
{j
i
“ ” Wählen Sie die mit
Display-Sprache
14 Display-Sprachen stehen zur Auswahl.
Sie k
“Espa
“Italiano
“Svenska
“Türkrkçe”, “Portugu
ausw
Die Display-Sprache ist auf Englisch
voreingestellt. Die in dieser Bedienungsanleitung
abgebildeten Displaybeispiele sind Deutsch. Um
die Display-Sprache auf eine von Ihnen
gewünschte Sprache umzustellen, drücken Sie
nacheinander auf
{>}
gewünschte Sprache aus und drücken Sie
und dann
{ih}
ca. 1 Sekunde gedrückt.
{ih}
ca. 2 Sekunden gedrückt.
/OK}Drücken Sie {j/OK}.
Gehen Sie weiter zum nächsten
Vorgang.
die auf dem Display angezeigten
Wörter in Anführungszeichen
“
Mobilteileinst.”) aus.
(z. B.
önnen
“Deutsch
ñolol”, , “NORSK
”, , “Dansk
”, “Suomi
ählen.
, 2 Mal
{V}, {>}, {V}, {>}
{ih}
”, , “English
”, , “FRANCAIS
”, , “Nederlands
”, , “EKKGMIJA
ês” oder
{ih}, {j
.
/OK} 3 Mal
, wählen Sie die
{^}
oder
“Catal
”,
”,
”,
{V}
{^}
{>}
”,
à”
,
(12)
Page 49

TG7150-7170EX(g-g).book Page 13 Wednesday, August 9, 2006 3:45 PM
Die Display-Sprache ändern
1
{ih} i {j
2
Drücken Sie
“
Mobilteileinst.” auszuwählen. i
{>}
3
Drücken Sie
Einst.
4
Drücken Sie
Sprache
5
Drücken Sie
gewünschte Sprache auszuwählen.
i {ih}
Hinweis:
L
Zum Ändern der Ansagesprache siehe Seite
14.
/OK
}
{^}
oder
{V}
{^}
oder
{V}
”
auszuwählen. i
{^}
oder
{V}
”
auszuwählen. i
{^}
oder
{V}
, um
, um “Display-
{>}
, um “Auswahl
{>}
, um die
i {>}
Datum und Uhrzeit
1
{j
/OK
}
2
Drücken Sie
“
Mobilteileinst.” auszuwählen. i
{>}
3
Drücken Sie
“
Zeiteinstell.” auszuwählen. i {>
4
Drücken Sie
eing.
5
Geben Sie Tag, Monat und Jahr ein.
Beispiel:
{1}{7} {0}{5} {0}{6}
6
Geben Sie die aktuelle Uhrzeit ein.
Beispiel:
{0}{3} {3}{0} i
“
03:30 PM” angezeigt wird.
7
{j
/OK} i
Hinweis:
L
Um eine Ziffer zu korrigieren, bewegen Sie den
Cursor mit
Stelle und nehmen Sie dann Ihre Änderungen
vor.
L
Nach einem Stromausfall stimmen Datum und
Uhrzeit möglicherweise nicht mehr. Stellen Sie
Datum und Uhrzeit ggf. neu ein.
{^}
oder
{V}
{^}
oder
{V}
{^}
oder
{V}
”
auszuwählen. i
17. Mai 2006
3:30 PM
Drücken Sie auf
{ih}
{<}
oder
{>}
an die betreffende
, um
, um
}
, um “Datum/Uhr
{>}
{*}
, bis
Vorbereitung
(13)
Page 50

Sie k
nnen
Deutsch
English
Espa
FRANCAIS
Italiano
Nederlands
EKKGMIJA
oder
ausw
hlen.
TG7150-7170EX(g-g).book Page 14 Wednesday, August 9, 2006 3:45 PM
Zugriffsfunktionen
Ansage eingehender
Rufnummern
(Sprachansage)
Mit den Sprachansagefunktionen kann das
Mobilteil die angezeigte Telefonnummer
ansagen.
Anruferansage
Geht ein externer Anruf mit
Rufnummerinformationen ein, sagt das Mobilteil
die angezeigte Rufnummer über den
Lautsprecher an.
L
L
Listenansage
Beim Anzeigen von
Anruferliste
die jeweiligen Rufnummern über den
Lautsprecher an.
L
Einstellen der Lautstärke für die
Sprachansage
Sie können die Lautstärke für die
einstellen. Die Lautstärke für die Anruferansage
wird beim Einstellen der Ruftonlautstärke auf
Seite 19 mit eingestellt.
1
2
3
4
5
6
(Anruferansage/Listenansage)
Um die Rufnummeransage für externe Anrufe
nutzen zu können, müssen Sie sich zunächst
für das Leistungsmerkmal Anruferanzeige
(CLIP) anmelden (Seite 22).
Die Ansage erfolgt in der Ruftonlautstärke
(Seite 19).
Wahlwiederholungsliste
und
Telefonbuch
Enthält die angezeigte Rufnummer ein P
(Pause), fügt das Mobilteil bei der Ansage für
jedes P eine 0,5 Sekunden lange Pause ein;
enthält sie andere Symbole (beispielsweise
# usw.), überspringt das Mobilteil die Symbole
und sagt die nächste Nummer an.
{j
/OK
}
“
Mobilteileinst.” i {>
“
Andere Optionen” i {>
“
Ansage Rufnr.” i {>
“
Lautstärke” i {>
Wählen Sie die gewünschte Lautstärke aus.
sagt das Mobilteil
Listenansage
}
}
}
}
7
Hinweis:
L
Die Anruferansage erfolgt in der
Ruftonlautstärke des Mobilteils (Seite 19).
Wenn Sie die Lautstärke für die Sprachansage
auf
Rufnummer unabhängig von der
Ruftonlautstärke nicht an.
Auswählen einer Sprache für die
Sprachansage
Für die Sprachansage stehen 8 Sprachen zur
Auswahl.
Sie k
“Espa
“Nederlands
“Türkrkçe” ausw
1
,
2
3
4
5
6
;
,
Hinweis:
L
Zum Ändern der Display-Sprache siehe Seite
12.
L
Zum Deaktivieren der
Sprachansagefunktion stellen Sie die
“
Lautstärke auf
{>} i {ih}
“
Aus” einstellen, sagt das Mobilteil die
önnen
“Deutsch
ñolol”, , “FRANCAIS
{j
/OK
}
“
Mobilteileinst.” i {>
“
Andere Optionen” i {>
“
Ansage Rufnr.” i {>
“
Auswahl Sprache” i {>
Wählen Sie die gewünschte Sprache aus.
i {>} i {ih}
Aus” ein.
”, , “English
”, , “Italiano
”, , “EKKGMIJA
ählen.
”,
”,
” oder
}
}
}
}
(14)
Page 51

TG7150-7170EX(g-g).book Page 15 Wednesday, August 9, 2006 3:45 PM
Löschen einer Nummer in der
Anrufen
1
Nehmen Sie das Mobilteil ab und wählen Sie
die Rufnummer.
L
Zur Korrektur einer Ziffer drücken Sie auf
{C/T} und geben dann die korrekte
Nummer ein.
2
{C}
3
Drücken Sie nach Beendigung des
{ih}
Gesprächs
Mobilteil auf die Basisstation.
Freisprecheinrichtung
1
Drücken Sie während eines Gesprächs
um die Freisprecheinrichtung zu aktivieren.
L
Sprechen Sie im Wechsel (nicht
gleichzeitig) mit Ihrem Gesprächspartner.
2
Sprechen Sie in den Hörer und drücken Sie
nach Beendigung des Gesprächs
Hinweis:
L
Für eine optimale Verständigung sollten Sie
die Freisprecheinrichtung in einer ruhigen
Umgebung verwenden.
L
Um wieder auf den Hörer umzuschalten,
drücken Sie
Einstellen der Lautstärke des Hörers oder
Lautsprechers
Drücken Sie
Gesprächs.
{^}
Wahlwiederholung
Zuvor gewählte Rufnummern (jeweils max. 24
Ziffern) können per Wahlwiederholung erneut
gewählt werden.
Einen Anruf mithilfe der
Wahlwiederholungsliste tätigen
Die letzten 10 gewählten Rufnummern sind in der
Wahlwiederholungsliste gespeichert.
1
{R}
2
Drücken Sie
gewünschte Nummer auszuwählen.
3
{C}
/
{s}
oder legen Sie das
{C}
.
oder
{V}
{^}
oder
{ih}
während eines
{V}
, um die
{s}
Wahlwiederholungsliste
1
2
3
4
Sonstige Funktionen
Stumm
Wenn die Funktion Stumm aktiviert ist, können
Sie Ihren Gesprächspartner hören, Ihr
Gesprächspartner kann Sie jedoch nicht hören.
,
Zum Stummschalten Ihrer Stimme drücken Sie
{C/T}.
L
.
{R}
Rückfragefunktion)
■ Deutschland/Österreich:
{R}
Ihrer TK-Anlage bzw. Ihres Telefonanbieters
(Anklopfen, Makeln, usw.) verwendet. Wenn Ihr
Telefon Anklopfen unterstützt, können Sie
während eines Gesprächs durch Drücken von
{R}
Anrufer umschalten. Einzelheiten erfahren Sie
bei Ihrem Service Provider/Ihrer
Telefongesellschaft.
■ Andere Länder:
{R}
Telefonfunktionen verwendet. Einzelheiten
erfahren Sie bei Ihrem Service Provider/Ihrer
Telefongesellschaft.
Hinweis:
L
L
Anrufen/Beantworten von Anrufen
{R}
Drücken Sie
gewünschte Nummer auszuwählen.
“
Löschen” i {>
“Ja” i {>} i {ih}
Um zurück zum Gespräch zu gelangen,
drücken Sie erneut auf
Taste (zur Verwendung der
wird als Zugang zu speziellen Funktionen
zwischen dem ersten und dem zweiten
wird als Zugang zu optionalen
Falls Ihr Telefon an eine Nebenstellenanlage
angeschlossen ist, können Sie durch Drücken
der Taste {R} bestimmte Leistungsmerkmale
Ihrer lokalen Nebenstellenanlage nutzen; z.B.
die Weiterleitung eines externen Anrufs.
Einzelheiten erfahren Sie bei Ihrem TKFachhändler.
Sie können die Rückfragezeit ändern (Seite
21).
{^}
oder
}
{V}
, um die
{C/T}.
i {>}
(15)
Page 52

TG7150-7170EX(g-g).book Page 16 Wednesday, August 9, 2006 3:45 PM
Anrufen/Beantworten von Anrufen
Die Pause-Taste
(Nebenstellenanlage/Amtsleitungsmerkmale)
Eine Pause ist gelegentlich erforderlich, wenn ein
Anruf über eine Nebenstellenanlage getätigt
wird, oder wenn Ferngespräche geführt werden.
Beispiel:
der externen Nummern eingeben müssen,
müssen Sie wahrscheinlich nach dem Wählen
von
Wählton hören.
1
2
Hinweis:
L
Wenn Sie {0} manuell vor dem Wählen
{0}
eine Pause einlegen, bis Sie einen
{0} i {R}
Wählen Sie die Rufnummer. i
Jedes Mal, wenn Sie
3-sekündige Pause eingefügt. Wird die Taste
mehrmals gedrückt, werden die Pausen
länger.
{R}
{C}
/
{s}
drücken, wird eine
Beantworten von Anrufen
1
2
Automatischer Gesprächsmodus
Sie können Anrufe auch entgegennehmen,
indem Sie einfach das Mobilteil von der
Basisstation nehmen. Sie müssen nicht
drücken. Zum Aktivieren dieser Funktion siehe
Seite 19.
Zum Einstellen der Ruftonlautstärke des
Mobilteils bei eingehenden Anrufen
Drücken Sie
Mobilteil-Suchfunktion
Mit dieser Funktion können Sie das Mobilteil
finden, wenn Sie es verlegt haben.
1
2
Nehmen Sie das Mobilteil ab und drücken
Sie
{C}
oder
{s}
, wenn das Gerät klingelt.
L
Sie können einen Anruf auch
entgegennehmen, indem Sie eine
{0}
beliebige Wähltaste,
oder
{
INT}, drücken.
Drücken Sie nach Beendigung des
Gesprächs
Mobilteil auf die Basisstation.
Drücken Sie
Um die Mobilteilsuche zu beenden, drücken
Sie
Mobilteil.
{ih}
{^}
oder
{V}
{x}
an der Basisstation.
{x}
an der Basisstation oder
bis {9},
oder legen Sie das
.
{*}, {#}
{C}
{ih}
am
(16)
Page 53

TG7150-7170EX(g-g).book Page 17 Wednesday, August 9, 2006 3:45 PM
Mobilteil-Telefonbuch
Das Mobilteil-Telefonbuch ermöglicht es Ihnen
Anrufe zu tätigen, ohne manuell wählen zu
müssen. Sie können dem Mobilteil-Telefonbuch
50 Namen und Telefonnummern hinzufügen.
Dem Mobilteil-Telefonbuch Einträge
hinzufügen
1
{k} i {j
2
“
Neuer Eintrag” i {>
3
Geben Sie den Namen des Teilnehmers ein
(maximal 16 Zeichen; Seite 28).
{j
/OK
4
Geben Sie die Rufnummer des Teilnehmers
ein (max. 24-stellig).
5
“
Speichern” i {>} i
Hinweis:
L
Schritt 1 Alternative:
{j
/OK} i Drücken Sie
“
Telbuch-Einst.” auszuwählen. i {>
/OK
}
}
i
}
i {j
/OK
}
{ih}
{^}
oder
{V}
, um
Suchen und Anrufen eines Eintrags
im Mobilteil-Telefonbuch
Einträge im Mobilteil-Telefonbuch können nach
Anfangsbuchstaben oder durch Abrollen
durchsucht werden.
Wenn Sie den gewünschten Eintrag gefunden
{C}
{^}
oder
.
{V}
, um den
haben, drücken Sie
Durchblättern aller Einträge
1
{k}
2
Drücken Sie
gewünschten Eintrag anzuzeigen.
Suche nach Anfangsbuchstaben
(Indexsuche)
1
{k}
2
Drücken Sie die Wahltaste ({0} bis {9}), die
mit dem gesuchten Zeichen belegt ist (Seite
28).
L
Drücken Sie dieselbe Wahltaste
wiederholt, um den ersten Eintrag
anzuzeigen, der mit dem Buchstaben auf
dieser Wahltaste übereinstimmt.
3
Bearbeiten von Einträgen im
Mobilteil-Telefonbuch
Ändern eines Namens bzw. einer Rufnummer
1
2
3
4
}
5
Löschen von Einträgen aus dem
Mobilteil-Telefonbuch
Löschen eines Eintrags
1
2
3
Löschen aller Einträge
1
2
3
4
Kettenwahl
Mit dieser Funktion können Sie während eines
Gesprächs Rufnummern im Telefonbuch wählen.
Diese Funktion kann beispielsweise verwendet
werden, um eine in Ihrem Telefonbuch
Telefonbücher
L
Wenn kein Eintrag vorliegt, der mit dem
von Ihnen ausgewählten Buchstaben
übereinstimmt, wird der nächste Eintrag
angezeigt.
L
Zum Ändern des Zeicheneingabemodus:
{R} i
auswählen.
Drücken Sie
Telefonbuch durchzublättern.
Wählen Sie den gewünschten Eintrag (Seite
17).
“
Editieren” i {>
Bearbeiten Sie den Namen nach Bedarf
(maximal 16 Zeichen; Seite 28).
{j
Bearbeiten Sie die Rufnummer nach Bedarf
(maximal 24-stellig).
“
Speichern” i {>} i
Wählen Sie den gewünschten Eintrag (Seite
17).
“
Löschen” i {>
“Ja” i {>} i {ih}
{k} i {j
“
Alle löschen” i {>
“Ja” i {>}
“Ja” i {>} i {ih}
Zeicheneingabemodus
i {>}
{^}
oder
i {j
/OK
}
/OK
}
i {j
/OK
}
/OK
i {j
}
}
{V}
, um das
}
/OK
{ih}
}
i
}
(17)
Page 54

TG7150-7170EX(g-g).book Page 18 Wednesday, August 9, 2006 3:45 PM
Telefonbücher
gespeicherte Telefonkarten-Zugriffsnummer oder
eine Konto-PIN-Nummer zu wählen, ohne sie
manuell eingeben zu müssen.
1
Drücken Sie während des Telefongesprächs
{k}
.
2
Drücken Sie
gewünschten Eintrag auszuwählen.
L
Weitere Informationen zur Suche mithilfe
des ersten Zeichens (Indexsuche) finden
Sie auf Seite 17.
3
Drücken Sie
{^}
oder
{V}
, um den
{>}
, um die Nummer zu wählen.
Kurzwahl für Call-by-Call:
Telefonieren über die
Zugangsnummer eines
Telefonanbieters (nur
Deutschland)
Verschiedene Telefonanbieter berechnen
unterschiedliche Gebühren für Anrufe in
unterschiedliche Ortsnetze. Wenn Sie die
Zugangsnummern der verwendeten
Telefonanbieter vorher im Mobilteil-Telefonbuch
speichern, können Sie beim Telefonieren Geld
sparen, indem Sie die gewünschte
Zugangsnummer auswählen.
Wichtig:
L
Um die Zugangsnummer eines
Telefonanbieters nutzen zu können, müssen
Sie sich unter Umständen vorher bei diesem
anmelden.
1
2
3
4
Suchen Sie die Zugangsnummer des
gewünschten Telefonanbieters im MobilteilTelefonbuch.
L
Weitere Informationen zur Suche mithilfe
des ersten Zeichens (Indexsuche) finden
Sie auf Seite 17.
Drücken Sie
des gewünschten Telefonanbieters zu
wählen.
Wenn die Nummer gewählt wird, drücken Sie
{k} i
gewünschten Eintrag auszuwählen.
L
Wählen Sie den gewünschten Eintrag,
bevor die Verbindung automatisch
getrennt wird.
Drücken Sie {j/OK}, um den gewünschten
Eintrag zu wählen.
{C}
, um die Zugangsnummer
Drücken Sie
{^}
oder
{V}
, um den
(18)
Page 55

TG7150-7170EX(g-g).book Page 19 Wednesday, August 9, 2006 3:45 PM
Mobilteil-Einstellungen
Mobilteil-Einstellungen
L
Bei der Benutzereinstellung des Mobilteils wird der aktuelle Eintrag oder die aktuelle Einstellung
>
/OK
angezeigt.
}
{^}
{^}
{^}
{^}
oder
{V}
, um “Mobilteileinst.” auszuwählen. i
oder
{V}
, um den gewünschten Eintrag im Einstellungsmenü des Mobilteils
i {>}
oder
{V}
, um den gewünschten Eintrag im Untermenü auszuwählen. i
oder
{V}
, um die gewünschte Einstellung auszuwählen, und drücken Sie
{>}
bzw. folgen Sie den Anweisungen in der rechten Spalte der Tabelle.
{ih}
.
— Datum und Uhrzeit: Seite 13
Alarm
Rufsignal ext.
Rufsignal int.
Auswahl Sprache
Kontrast
Autom.Gespräch
Ansage Rufnr. Lautstärke
Auswahl
Sprache
— Alarm einstellen: Seite 20
— Mobilteil-Ruftonlautstärke
— Ruftöne für externe Anrufe
— Ruftöne für interne Anrufe
— Anzeige für den Standby-
— Display-Sprache
— Display-Kontrast (Stufe 3)
—Seite 24
— Tastentöne ein/aus (“Ein”)
— Automatischer
{>}
(Standardeinstellung)
(Maximum)
“
Klingelton 1”)
(
“
Klingelton 3”)
(
“
Modus (
“
(
Gesprächsmodus ein/aus
(
“
Ansagelautstärke
“
(
Ansagesprache (“English”):
Seite 14
Aus”)
English”): Seite 12
*5
Aus”)
Normal”): Seite 14
*1
*4
durch den
So passen Sie das Mobilteil an:
1
{j
2
Drücken Sie
3
Drücken Sie
auszuwählen.
4
Drücken Sie
L
In einigen Fällen müssen Sie in einem zweiten Untermenü eine Auswahl treffen. i
5
Drücken Sie
anschließend
L
Um den Vorgang zu beenden, drücken Sie
Menüeinstellungen Untermenü Untermenü 2 Funktion
Zeiteinstell. Datum/Uhr eing.
Ruftoneinstell. Ruflautstärke
Display-Einst. Display Anzeige
Registrierung Mobilt.registr.
Andere Optionen Tastentöne
{>}
{>}
*2*3
*3
(19)
Page 56

TG7150-7170EX(g-g).book Page 20 Wednesday, August 9, 2006 3:45 PM
Mobilteil-Einstellungen
*1 Wenn der Rufton ausgeschaltet ist, klingelt das Mobilteil:
– mit Minimallautstärke bei Alarm
– mit Minimallautstärke bei Interngesprächen
– mit Maximallautstärke bei Mobilteilsuche
*2 Wenn Sie eine Melodie als Rufton auswählen, kann es sein, dass dieser für ein paar Sekunden
ertönt, obwohl der Anrufer bereits aufgelegt hat. Möglicherweise hören Sie beim
Entgegennehmen eines Anrufes ein Freizeichen. Möglicherweise hören Sie dann beim
Entgegennehmen eines Anrufes einen Wählton.
*3 Die in diesem Produkt voreingestellten Melodien werden mit Erlaubnis von © 2006 Copyrights
Vision Inc. verwendet.
“
*4 Bei Auswahl von
“
Mobilt.-Nr.” ausgewählt wird und die aktuelle Mobilteilnummer 2 lautet, wird “[2]”
Wenn
angezeigt.
*5 Mit dem automatischen Gesprächsmodus können Sie Anrufe entgegennehmen, indem Sie
einfach das Mobilteil von der Basisstation nehmen. Sie müssen nicht
Aus” werden nur das aktuelle Datum und die Uhrzeit angezeigt.
{C}
drücken.
Zeiteinstellungen
Alarm
Ein Alarm ertönt zum festgelegten Zeitpunkt einmal oder täglich jeweils 3 Minuten lang. Stellen Sie
vorher Datum und Uhrzeit ein (Seite 13).
1
{j
/OK} i “Mobilteileinst.” i
2
“
Zeiteinstell.” i {>
3
“
Alarm” i Drücken Sie {>} 2 Mal.
4
Wählen Sie einen Alarm-Modus aus. i
Aus
Einmalig
TäglWiederholen
}
Schaltet den Alarm aus. Drücken Sie erneut
{ih}
.
Der Alarm ertönt einmal zur festgelegten Zeit. Geben Sie den
gewünschten Tag und Monat ein.
Ein Alarm ertönt täglich zur festgelegten Zeit.
{>}
{>}
{>}
und anschließend
5
Geben Sie die gewünschte Uhrzeit ein. i {j/OK
6
Wählen Sie den gewünschten Rufton aus. i
7
“
Speichern” i {>} i
Hinweis:
L
Um den Alarm zu stoppen, drücken Sie eine beliebige Wähltaste.
L
Im Gesprächs- oder Interngespräche-Modus ertönt der Alarm erst nach Beendigung des aktuellen
Gesprächs.
L
Wenn Sie “Einmalig” auswählen, ändert sich die Einstellung nach dem Ertönen des Alarms in
“
Aus”.
{ih}
(20)
}
{>}
Page 57

TG7150-7170EX(g-g).book Page 21 Wednesday, August 9, 2006 3:45 PM
Einstellungen der Basisstation
Einstellungen der Basisstation
L
Stellen Sie die Basisstation über das Mobilteil nach Ihren Wünschen ein.
L
Bei der Einstellung der Basisstation wird der aktuelle Eintrag oder die aktuelle Einstellung durch den
>
angezeigt.
So passen Sie die Basisstation an:
1
{j
/OK
}
2
Drücken Sie
3
Drücken Sie
auszuwählen.
4
Drücken Sie
5
Drücken Sie
anschließend
L
Um den Vorgang zu beenden, drücken Sie
Menü Einstellungen
der Basisstation
Ruflautstärke
Rufoptionen Rückfrage
Andere Optionen Basiseinh. PIN
{^}
oder
{V}
, um “Basis-Einstell.” auszuwählen. i
{^}
oder
{V}
, um den gewünschten Eintrag im Einstellungsmenü der Basisstation
i {>}
{^}
oder
{V}
, um den gewünschten Eintrag im Untermenü auszuwählen. i
{^}
oder
{V}
, um die gewünschte Einstellung auszuwählen, und drücken Sie
{>}
bzw. folgen Sie den Anweisungen in der rechten Spalte der Tabelle.
{ih}
.
Untermenü Funktion (Standardeinstellung)
— Ruftonlautstärke der Basisstation (Mittel)
Rückfragezeit ändern (“100 mSek”).
Basisstations-PIN ändern (“0000”).
– Geben Sie die aktuelle 4-stellige
Basisstations-PIN ein.
i
Geben Sie die neue 4-stellige
Basisstations-PIN ein.
i {j
/OK
}
Wiederholmodus(“
Aus”): Seite 25
{>}
*2
{>}
*1
*1 Ändern Sie gegebenenfalls die Rückfragezeit, je nach Anforderungen Ihres Service Providers/Ihrer
Telefongesellschaft oder Ihrer Nebenstellenanlage.
*2 Wenn Sie die PIN ändern, notieren Sie sich bitte Ihre neue PIN. Das Gerät zeigt Ihnen die PIN nicht
an. Wenn Sie Ihre PIN vergessen haben, wenden Sie sich an das nächstgelegene Panasonic
Service-Center.
(21)
Page 58

TG7150-7170EX(g-g).book Page 22 Wednesday, August 9, 2006 3:45 PM
Leistungsmerkmal Anruferanzeige (CLIP)
Anklopfen mit Anruferanzeige (CLIP)
Verwenden des
Leistungsmerkmals
Anruferanzeige (CLIP)
Wichtig:
L
Dieses Gerät ist mit der Anruferanzeige (CLIP)
kompatibel. Zur Verwendung der
Anruferanzeige (CLIP)-Funktionen (z. B. die
Anzeige der Rufnummern von Anrufern)
müssen Sie sich für das Leistungsmerkmal
Anruferanzeige (CLIP) anmelden. Einzelheiten
erfahren Sie bei Ihrem Service Provider/Ihrer
Telefongesellschaft.
Anruferanzeige (CLIP)-Funktionen
Wenn ein externer Anruf eingeht, wird die
Rufnummer des Anrufers angezeigt.
L
Die Rufnummern der letzten 50 Anrufer
werden in der Anruferliste erfasst.
L
Wenn Anruferdaten empfangen werden und
mit einer im Telefonbuch gespeicherten
Rufnummer übereinstimmen, wird der
gespeicherte Name angezeigt und in der
Anruferliste protokolliert.
L
Wenn das Gerät an eine Nebenstellenanlage
angeschlossen ist, werden die Anruferdaten
unter Umständen nicht zu Ihrem Anschluss
durchgereicht und nicht angezeigt.
L
Wenn der Anrufer aus einem Ortsnetz anruft,
daß das Leistungsmerkmal Anruferanzeige
“
(CLIP) nicht unterstützt, wird
”
ni.vorh.
L
Wenn der Anrufer verlangt hat, dass keine
Anruferdaten weitergesendet werden, wird
entweder Keine Anruferdaten oder
Anrufinfo
Versäumte Anrufe
Wenn ein Anruf nicht entgegengenommen wird,
behandelt das Gerät diesen als einen
versäumten Anruf. Die Anzahl der versäumten
Anrufe wird im Display angezeigt. Daran können
Sie erkennen, ob Sie die Anruferliste anzeigen
sollten, um zu sehen, wer in Ihrer Abwesenheit
angerufen hat.
angezeigt.
”
angezeigt.
Dienst
“
Keine
Um diesen Dienst nutzen zu können, müssen Sie
ihn bei Ihrem Service Provider/Ihrer
Telefongesellschaft anmelden. Nähere
Informationen zu diesem Dienst erhalten Sie bei
Ihrem Service Provider/Ihrer Telefongesellschaft.
■ Deutschland/Österreich:
Wenn Sie während eines Gesprächs einen
Anklopfton am Mobilteil hören, werden die
Informationen des zweiten Anrufers im Display
angezeigt. Sie können den zweiten Anruf
entgegennehmen, indem Sie {R} drücken. Der
erste Anruf wird geparkt. Drücken Sie erneut
um zum ersten Anrufer zurückzuschalten.
■ Frankreich/Spanien/Griechenland/Belgien/
Schweden:
Wenn Sie während eines Gesprächs einen
Anklopfton am Mobilteil hören, werden die
Informationen des zweiten Anrufers im Display
angezeigt. Sie können den zweiten Anruf
entgegennehmen und den ersten Anruf parken.
Anruferansage
Geht ein externer Anruf mit
Rufnummerinformationen ein, sagt das Mobilteil
die angezeigte Rufnummer über den
Lautsprecher an.
L
Um die Rufnummeransage für externe Anrufe
nutzen zu können, müssen Sie sich zunächst
für das Leistungsmerkmal Anruferanzeige
(CLIP) anmelden. Einzelheiten erfahren Sie
bei Ihrem Service Provider/Ihrer
Telefongesellschaft.
L
Wenn während eines Telefongespräches ein
weiterer Anruf eingeht, wird die Rufnummer
des 2. Anrufers nicht angesagt, auch wenn Sie
sich sowohl für das Leistungsmerkmal
Anruferanzeige (CLIP) als auch für das
Leistungsmerkmal Anklopfen mit
Anruferanzeige (CLIP) angemeldet haben.
L
Die Ansage erfolgt in der Ruftonlautstärke
(Seite 19).
L
Diese Funktion kann ein- oder ausgeschaltet
werden (Seite 14).
{R}
,
(22)
Page 59

TG7150-7170EX(g-g).book Page 23 Wednesday, August 9, 2006 3:45 PM
Leistungsmerkmal Anruferanzeige (CLIP)
3
Anruferliste
4
Anzeigen der Anruferliste und
Rückruf
1
{j
/OK} i “Anruferliste” i
2
Drücken Sie
jüngsten Anruf zu starten, oder
dem ältesten Anruf zu beginnen.
L
Wenn der Eintrag bereits angezeigt oder
beantwortet wurde, wird “
auch wenn dazu ein anderes Mobilteil
verwendet wurde.
3
{C}
/
{s}
{V}
, um die Suche beim
Q
Bearbeiten der Rufnummer eines
Anrufers vor dem Rückruf
1
{j
/OK} i “Anruferliste” i
2
Drücken Sie
gewünschten Eintrag anzuzeigen.
3
{j
/OK} i “Bearb.&Anrufen” i
4
Bearbeiten Sie die Nummer.
L
Drücken Sie die entsprechende Wähltaste
{0}
(
oder
5
{C}
{^}
oder
{V}
, um den
bis {9}), um eine Ziffer hinzuzufügen,
{C/T}, um eine Ziffer zu löschen.
/
{s}
{>}
{^}
, um mit
” angezeigt,
{>}
{>}
Voice Mail-Dienst
Voice Mail ist ein automatischer Antwortdienst,
der von Ihrem Service Provider/Ihrer
Telefongesellschaft angeboten wird. Wenn Sie
sich für diesen Dienst anmelden, kann das Voice
Mail-System Ihres Service Providers/Ihrer
Telefongesellschaft Anrufe für Sie
entgegennehmen, falls Sie nicht erreichbar sind
oder Ihre Leitung besetzt ist. Nachrichten werden
vom Service Provider/der Telefongesellschaft
aufgezeichnet, nicht von ihrem Telefon.
Wenn Sie neue Nachrichten erhalten haben, wird
0
Informationen zu diesem Dienst erhalten Sie bei
Ihrem Service Provider/Ihrer Telefongesellschaft.
Hinweis:
L
“
Telbuch hinzuf.” i {>
Fahren Sie mit Schritt 3 auf “Dem MobilteilTelefonbuch Einträge hinzufügen”, Seite 17
fort.
am Mobilteil angezeigt. Nähere
Wenn 0 auch nach dem Abhören der neuen
Nachrichten im Display angezeigt wird,
blenden Sie sie aus, indem Sie 2 Sekunden
{C/T} drücken.
lang
}
Löschen der Anruferdaten
1
{j
/OK} i “Anruferliste” i
2
Drücken Sie
gewünschten Eintrag anzuzeigen.
{j
/OK
3
“
Löschen” i {>
Zum Löschen aller Einträge wählen Sie
L
“
Alle löschen”. i {>
4
“Ja” i {>} i {ih}
{^}
oder
{V}
, um den
}
}
{>}
i
}
Speichern von Anruferinformationen
im Mobilteil-Telefonbuch
1
{j
/OK} i “Anruferliste” i
2
Drücken Sie
gewünschten Eintrag anzuzeigen.
{j
/OK
{^}
oder
{V}
}
, um den
i
{>}
(23)
Page 60

TG7150-7170EX(g-g).book Page 24 Wednesday, August 9, 2006 3:45 PM
Verwenden mehrerer Geräte
2
Verwenden von
Zusatzgeräten
Zusätzliche Mobilteile
An der Basisstation können bis zu 6 Mobilteile
registriert werden.
Wichtig:
L
Das zusätzliche Mobilteil-Modell, das bei der
Benutzung dieser Station empfohlen wird, ist
auf Seite 6 aufgeführt. Wird ein anderes Modell
benutzt, können bestimmte Funktionen
(Mobilteil-Einstellungen, BasisstationenEinstellungen usw.) nicht verfügbar sein.
L
Durch zusätzliche Mobilteile haben Sie
beispielsweise die Möglichkeit, ein
Interngespräch mit einem anderen Mobilteil zu
führen, während Sie gleichzeitig ein drittes
Mobilteil für einen externen Anruf nutzen.
Registrieren eines Mobilteils
an der Basisstation
Das im Lieferumfang enthaltene Mobilteil und die
entsprechende Basisstation sind werkseitig
vorregistriert. Wenn das Mobilteil aus
irgendeinem Grund nicht an der Basisstation
registriert ist (w blinkt beispielsweise auch dann,
wenn sich das Mobilteil in der Nähe der
Basisstation befindet), müssen Sie das Mobilteil
manuell registrieren (Seite 24).
Registrieren eines zusätzlichen Mobilteils an
der Basisstation (einfache Registrierung)
Nach dem Kauf eines zusätzlichen Mobilteils
müssen Sie es an der Basisstation registrieren.
Stellen Sie sicher, dass das zusätzliche Mobilteil
eingeschaltet ist. Andernfalls halten Sie
einige Sekunden gedrückt, um das Mobilteil
einzuschalten.
1
Nehmen Sie das zusätzliche Mobilteil ab und
drücken Sie
Modus zu schalten.
{ih}
, um es in den Standby-
{ih}
3
Hinweis:
L
Ertönt ein Fehlersignal oder blinkt w weiterhin,
registrieren Sie das Mobilteil manuell
(manuelle Registrierung; Seite 24).
L
Wenn alle registrierten Mobilteile in Schritt 2 zu
klingeln beginnen, drücken Sie
Vorgang zu beenden. Wiederholen Sie den
Vorgang erneut ab Schritt 1.
L
Laden Sie die Akkus des zusätzlichen
Mobilteils vor dem ersten Gebrauch ca. 7
Stunden lang auf.
L
Diese Registrierungsmethode kann nicht für
Mobilteile verwendet werden, die bereits an
der Basisstation registriert sind. Registrieren
Sie das Mobilteil manuell (manuelle
Registrierung; Seite 24).
Registrieren eines Mobilteils an der
Basisstation (manuelle Registrierung)
Sie können ein Mobilteil wie folgt manuell für die
Basisstation registrieren.
1
2
3
4
5
Halten Sie
Sekunden lang gedrückt, bis das
Registriersignal ertönt.
Legen Sie das zusätzliche Mobilteil auf die
Basisstation. Das Registriersignal ertönt
weiterhin. Lassen Sie das Mobilteil auf der
Basisstation liegen und warten Sie, bis ein
Bestätigungssignal ertönt und
aufhört.
{j
{>}
“
Registrierung” i {>
“
Mobilt.registr.” i {>
Halten Sie
Sekunden lang gedrückt, bis das
Registriersignal ertönt.
L
Wenn alle registrierten Mobilteile zu
klingeln beginnen, drücken Sie
den Vorgang zu beenden und wiederholen
Sie diesen Schritt.
L
Nachdem Sie auf
müssen Sie den restlichen Vorgang
innerhalb von 1 Minute abschließen.
Warten Sie, bis “Basis PIN Eing.”
angezeigt wird, geben Sie dann die
{x}
an der Basisstation ca. 3
w
zu blinken
{x}
, um den
/OK} i “Mobilteileinst.” i
}
}
{x}
an der Basisstation ca. 3
{x}
, um
{x}
gedrückt haben,
(24)
Page 61

TG7150-7170EX(g-g).book Page 25 Wednesday, August 9, 2006 3:45 PM
Verwenden mehrerer Geräte
Basisstations-PIN ein (Standardwert:
“
0000”) und drücken Sie {j/OK}.
L
Wenn das Mobilteil erfolgreich registriert
w
ist, hört
Tastentöne aktiviert sind (Seite 19), ist ein
Bestätigungston zu hören.
auf zu blinken. Wenn die
Löschen eines Mobilteils
An der Basisstation können maximal 6 Mobilteile
registriert werden. Ein Mobilteil kann seine
eigene, in der Basisstation gespeicherte
Registrierung (oder die Registrierung eines
anderen Mobilteils) löschen. Hierdurch “vergisst”
die Basisstation das Mobilteil.
1
{j
/OK} i “Basis-Einstell.” i
2
Geben Sie “335” ein.
3
“
Mobilt. Löschen” i {>
Die Nummern aller an der Basisstation
L
registrierten Mobilteile werden angezeigt.
4
Wählen Sie das/die Mobilteil(e), das/die Sie
löschen möchten, indem Sie die gewünschte
Mobilteil-Nummer drücken.
L
Die ausgewählte(n) Mobilteil-Nummer(n)
blinkt/blinken.
L
Zum Annullieren einer ausgewählten
Mobilteil-Nummer geben Sie die Nummer
erneut ein. Die Nummer hört auf zu
blinken.
5
{j
/OK} i “Ja” i
Beim Löschen der einzelnen
L
Mobilteilnummern ertönt ein langer
Piepton.
L
Beim Löschen der eigenen Registrierung
piept das Mobilteil allerdings nicht.
6
{ih}
}
{>}
{>}
Vergrößern der Reichweite der
Basisstation
Sie können die Reichweite der Basisstation mit
einem DECT-Verstärker erhöhen. Verwenden
Sie ausschließlich den auf Seite 5 angegebenen
DECT-Verstärker von Panasonic. Einzelheiten
erfahren Sie bei Ihrem Panasonic-Fachhändler.
Wichtig:
L
Bevor Sie den Verstärker an dieser
Basisstation registrieren können, müssen Sie
den Verstärkermodus aktivieren.
L
Verwenden Sie nicht mehr als einen Verstärker
gleichzeitig.
Einstellen des Verstärkermodus
1
{j
/OK} i “Basis-Einstell.” i
{>}
2
“
Andere Optionen” i {>
3
“
Wiederholmodus” i {>
4
“
Ein” oder “Aus” i {>} i
Hinweis:
L
Nach Aktivieren oder Deaktivieren des
Verstärkermodus blinkt
Das ist normal. Das Mobilteil kann verwendet
werden, sobald w nicht mehr blinkt.
w
}
}
{ih}
kurz im Mobilteil.
Interngespräch zwischen
Mobilteilen
Zwischen Mobilteilen können interne Anrufe
getätigt werden.
Beispiel:
1
2
3
Wenn Mobilteil 1 Mobilteil 2 anruft
Mobilteil 1:
{
INT} i Drücken Sie {2} (gewünschte
Mobilteil-Nummer).
Mobilteil 2:
Drücken Sie zur Antwort auf
Sprechen Sie in den Hörer und drücken Sie
nach Beendigung des Gesprächs
{C}
/
{s}
{ih}
Weiterleiten von Anrufen
zwischen Mobilteilen
Externe Anrufe können zwischen 2 Personen
weitergeleitet werden.
Beispiel:
Mobilteil 2 weiterleitet
1
Wenn Mobilteil 1 einen Anruf an
Mobilteil 1:
Während eines externen Anrufs drücken Sie
{
INT}. i Drücken Sie {2} (gewünschte
Mobilteil-Nummer).
.
.
(25)
Page 62

TG7150-7170EX(g-g).book Page 26 Wednesday, August 9, 2006 3:45 PM
Verwenden mehrerer Geräte
L
Der externe Anruf wird gehalten.
L
Wenn der andere Gesprächspartner nicht
{
abnimmt, drücken Sie
zum externen Anruf zu gelangen.
2
Mobilteil 2:
Drücken Sie
zu reagieren.
L
Mobilteil 2 kann mit Mobilteil 1
kommunizieren.
3
Mobilteil 1:
Zum Abschluss der Rufweiterleitung
drücken Sie
{C}
{ih}
INT}, um zurück
/
{s}
, um auf den Anruf
.
Kopieren von
Telefonbucheinträgen
Sie können Einträge aus dem MobilteilTelefonbuch in das Telefonbuch eines anderen
kompatiblen Panasonic-Mobilteils kopieren.
Kopieren eines Eintrags
1
2
Direktes Weiterleiten eines Anrufs ohne
Kommunikation mit dem anderen MobilteilAnwender
1
Während eines externen Anrufs drücken Sie
{
INT}. i Drücken Sie die gewünschte
Mobilteil-Nummer.
Lk blinkt, um anzuzeigen, dass der
externe Anruf gehalten wird.
2
{ih}
L
Der Rufton des externen Anruf ertönt am
anderen Mobilteil.
Hinweis:
L
Wenn der andere Mobilteil-Anwender den
Anruf nicht innerhalb von 1 Minute
entgegennimmt, ertönt der Rufton erneut an
Ihrem Mobilteil.
3
4
Kopieren aller Einträge
1
2
3
4
Wählen Sie den gewünschten Eintrag im
Mobilteil-Telefonbuch (Seite 17).
{j
/OK
}
“
Kopieren” i {>
Geben Sie die Mobilteil-Nummer ein, an die
Sie den Mobilteil-Telefonbucheinträge
senden möchten.
L
Nach dem Kopieren eines Eintrags wird
“
Abgeschlossen” angezeigt.
L
Zum Fortfahren mit dem Kopieren eines
weiteren Eintrags:
“Ja” i {>} i
gewünschten MobilteilTelefonbucheintrag. i
{ih}
{k} i {j
“
Alle kopieren” i {>
Geben Sie die Mobilteil-Nummer ein, an die
Sie den Mobilteil-Telefonbucheinträge
senden möchten.
L
Nachdem alle Einträge kopiert wurden,
“
Abgeschlossen” angezeigt.
wird
{ih}
}
Wählen Sie den
/OK
}
{>}
}
i
(26)
Page 63

TG7150-7170EX(g-g).book Page 27 Wednesday, August 9, 2006 3:45 PM
Nützliche Informationen
Verwendung des Gürtelclips
Befestigen des Gürtelclips
Abnehmen des Gürtelclips
Verwendung der
Schulterstütze
Die Schulterstütze ermöglicht freihändiges
Telefonieren.
Anbringen der Schulterstütze
Bringen Sie vorher den Gürtelclip am Mobilteil an
(Seite 27). Schieben Sie die Schulterstütze in
den Trageclip, bis er einrastet.
Hinweis:
L
Befindet sich die Basisstation an der Wand,
muss die Schulterstütze vor dem Laden des
Mobilteils abgenommen werden.
Abnehmen der Schulterstütze
L
Die Abbildung zeigt das Modell KX-TG7150.
(27)
Page 64

TG7150-7170EX(g-g).book Page 28 Wednesday, August 9, 2006 3:45 PM
Nützliche Informationen
Eingabe von Zeichen
Die Wähltasten dienen zur Eingabe von Zeichen und Nummern. Jeder Wahltaste sind mehrere Zeichen
F
{>}
),
, um den
zugewiesen. Als Zeicheneingabemodi stehen Alphabet (ABC), Numerisch (0-9), Griechisch (
G
Durchwahl 1 (
Numerisch können Sie in diesen Eingabemodi das Zeichen, das eingegeben werden soll, durch
wiederholtes Drücken der entsprechenden Wähltaste auswählen.
– Drücken Sie
– Drücken Sie die Wahltasten, um Zeichen und Nummern einzugeben.
– Drücken Sie
{C/T} gedrückt, um alle Zeichen oder Nummern zu löschen.
– Drücken Sie
– Wenn Sie ein weiteres Zeichen auf derselben Wahltaste eingeben möchten, drücken Sie
Cursor an die nächste Stelle zu bewegen, und dann die entsprechende Wahltaste.
), Durchwahl 2 (H) und Kyrillisch (I) zur Verfügung. Mit Ausnahme von
{<}
oder
{>}
, um den Cursor zu bewegen.
{C/T}, um das/die durch den Cursor markierte Zeichen/Ziffer zu löschen. Halten Sie
{*}
, um zwischen Klein- und Großbuchstaben umzuschalten.
Zeicheneingabemodi
Für die Texteingabe sind verschiedene Zeicheneingabemodi verfügbar. Je nach Eingabemodus können
andere Zeichen eingegeben werden.
Im jeweiligen Eingabemodus verfügbare Zeichen
Wenn auf dem Gerät die Anzeige für die Zeicheneingabe erscheint:
{k} i
Alphabetische Zeichentabelle (ABC)
Wählen Sie einen Zeicheneingabemodus. i
{>}
Numerischer Eingabetabelle (0-9)
Griechische Zeichentabelle (
M
(28)
)
Page 65

TG7150-7170EX(g-g).book Page 29 Wednesday, August 9, 2006 3:45 PM
Nützliche Informationen
Zeichentabelle für die Durchwahl 1 (
L
Folgendes wird sowohl für die Schreibweise mit Groß- als auch mit Kleinbuchstaben verwendet:
Zeichentabelle für die Durchwahl 2 (O)
L
Folgendes wird sowohl für die Schreibweise mit Groß- als auch mit Kleinbuchstaben verwendet:
Kyrillische Zeichentabelle (P)
N
)
(29)
Page 66

TG7150-7170EX(g-g).book Page 30 Wednesday, August 9, 2006 3:45 PM
Nützliche Informationen
Fehlermeldungen
Fehlermeldung Ursache und Lösung
Fehlgeschlagen
Unvollständig
Speicher Voll
Bitte die Rufnr. Anzeige
bestellen !
L
Kopieren des Telefonbuchs fehlgeschlagen.
Vergewissern Sie sich, dass sich das andere Mobilteil
(Empfänger) im Standby-Modus befindet und
wiederholen Sie den Vorgang.
L
Der Telefonbuchspeicher des Empfängers ist voll.
Löschen Sie die nicht benötigten Telefonbucheinträge
aus dem anderen Mobilteil (Empfänger) und wiederholen
Sie den Vorgang.
L
Der Telefonbuchspeicher des Mobilteils ist voll. Löschen
Sie nicht mehr benötigte Einträge (Seite 17).
L
Sie müssen sich für die Nutzung des Leistungsmerkmals
Anruferanzeige (CLIP) angemeldet haben. Sobald Sie
Anruferinformationen empfangen, nachdem Sie sich für
die Nutzung des Leistungsmerkmals Anruferanzeige
(CLIP) angemeldet haben, wird diese Meldung nicht
mehr angezeigt.
Fehlerbehebung
Sollten Sie noch immer Probleme haben, nachdem Sie die Anweisungen in diesem Abschnitt befolgt
haben, ziehen Sie das Netzteil ab und schalten das Mobilteil aus. Schließen Sie das Netzteil dann
wieder an und schalten Sie das Mobilteil wieder ein.
Telefon
Problem Ursache und Lösung
w
blinkt.
Das Mobilteil-Display ist leer.
(30)
L
Das Mobilteil ist nicht für die Basisstation registriert.
Registrieren Sie es (Seite 24).
L
Das Mobilteil ist zu weit von der Basisstation entfernt.
Bringen Sie es näher an die Basisstation heran.
L
Das Netzteil ist nicht angeschlossen. Prüfen Sie die
Anschlüsse.
L
Sie verwenden das Mobilteil oder die Basisstation in
einer Umgebung mit hoher elektrischer Interferenz.
Platzieren Sie Mobilteil und Basisstation nicht in der
Nähe von Interferenzverursachern, wie Antennen oder
Handys.
L
Das Mobilteil ist nicht eingeschaltet. Schalten Sie das
Gerät ein (Seite 12).
Page 67

TG7150-7170EX(g-g).book Page 31 Wednesday, August 9, 2006 3:45 PM
Problem Ursache und Lösung
Das Mobilteil lässt sich nicht
einschalten.
Ich habe die Display-Sprache auf eine
Sprache eingestellt, die ich nicht lesen
kann.
Es können keine Anrufe getätigt oder
empfangen werden.
Das Gerät erzeugt kein Rufsignal.
Die Akkus sollen eigentlich geladen
werden, aber das Akkusymbol ändert
sich nicht.
Ein Besetztzeichen ist hörbar, wenn
{C}
Sie
Statikgeräusche, Ton geht
vorübergehend weg. Störungen von
anderen Elektrogeräten.
drücken.
L
Stellen Sie sicher, dass die Akkus korrekt eingesetzt sind
(Seite 11).
L
Laden Sie die Akkus vollständig auf (Seite 11).
L
Reinigen Sie die Ladekontakte und laden Sie die Akkus
erneut auf (Seite 11).
L
Ändern Sie die Display-Sprache (Seite 12).
L
Das Netzteil oder das Telefonkabel ist nicht
angeschlossen. Prüfen Sie die Anschlüsse.
L
Wenn das Gerät über eine Faxweiche angeschlossen ist,
entfernen Sie die Faxweiche und schließen Sie das Gerät
direkt an die Telefonbuchse an. Funktioniert das Gerät
jetzt einwandfrei, überprüfen Sie die Faxweiche.
L
Trennen Sie das Gerät von der Telefonleitung und
schließen Sie ein Telefon an, von dem bekannt ist, dass
es einwandfrei funktioniert. Wenn über dieses Telefon
einwandfreier Betrieb möglich ist, wenden Sie sich an
den Kundendienst, um das Gerät reparieren zu lassen.
Ist über dieses Telefon kein einwandfreier Betrieb
möglich, wenden Sie sich an den Service Provider/die
Telefongesellschaft.
L
Der Rufton ist ausgeschaltet. Einstellen der
Ruftonlautstärke (Seite 19, 21).
L
Reinigen Sie die Ladekontakte und laden Sie die Akkus
erneut auf (Seite 11).
L
Das Mobilteil ist zu weit von der Basisstation entfernt.
Bringen Sie es dichter heran und wiederholen Sie den
Vorgang.
L
Ein anderes Mobilteil wird gerade benutzt. Warten Sie,
und versuchen Sie es später noch einmal.
L
Stellen Sie Basisstation und Mobilteil entfernt von
anderen elektrischen Geräten auf.
L
Bringen Sie das Mobilteil näher an die Basisstation
heran.
L
Ihr Gerät ist an eine Telefonleitung mit DSL/ADSL-Dienst
angeschlossen. Es wird empfohlen, zwischen
Basisstation und Telefonbuchse einen Filter (wenden Sie
sich an Ihren DSL/ADSL-Service Provider) an die
Telefonleitung anzuschließen.
Nützliche Informationen
(31)
Page 68

TG7150-7170EX(g-g).book Page 32 Wednesday, August 9, 2006 3:45 PM
Nützliche Informationen
Problem Ursache und Lösung
Während eines Gesprächs hören Sie
ein Geräusch.
Das Mobilteil/die Basisstation schaltet
sich während der Verwendung aus.
Durch Drücken von
zuletzt gewählte Nummer nicht
angezeigt/gewählt.
Das Mobilteil gibt zwischenzeitlich
Signaltöne ab und/oder
Ich habe die Akkus vollständig
geladen,
Ich habe die Akkus vollständig
geladen, aber die Betriebszeit scheint
dennoch kurz zu sein.
Es werden keine Anruferdaten
angezeigt.
Das Mobilteil zeigt die Rufnummer
nicht an.
Während der Betrachtung der
Anruferdaten wechselt das Display
zurück in den Standby-Modus.
7
{R}
wird die
7
blinkt.
blinkt jedoch weiterhin.
L
Sie verwenden das Mobilteil oder die Basisstation in
einer Umgebung mit hoher elektrischer Interferenz.
Platzieren Sie Mobilteil und Basisstation nicht in der
Nähe von Interferenzverursachern, wie Antennen oder
Handys.
L
Ziehen Sie das Netzteil ab und schalten Sie das Mobilteil
aus. Schließen Sie das Netzteil wieder an, schalten Sie
das Mobilteil ein und wiederholen Sie den Vorgang.
L
Die wiederholt gewählte Nummer umfasste mehr als 24
Stellen. Wiederholen Sie die Wahl der Nummer manuell.
L
Laden Sie die Akkus vollständig auf (Seite 11).
L
Reinigen Sie die Ladekontakte und laden Sie die Akkus
erneut auf (Seite 11).
L
Die Akkus müssen ausgewechselt werden (Seite 11).
L
Wischen Sie die Pole der Akkus (S, T) und die Kontakte
des Geräts mit einem trockenen Tuch ab.
L
Sie müssen sich für die Nutzung des Leistungsmerkmals
Anruferanzeige (CLIP) angemeldet haben. Einzelheiten
erfahren Sie bei Ihrem Service Provider/Ihrer
Telefongesellschaft.
L
Ihr Gerät ist an eine Telefonleitung mit DSL/ADSL-Dienst
angeschlossen. Es wird empfohlen, zwischen
Basisstation und Telefonbuchse einen Filter (wenden Sie
sich an Ihren DSL/ADSL-Service Provider) an die
Telefonleitung anzuschließen.
L
Die Ruftonlautstärke ist ausgeschaltet. Stellen Sie sie ein
(Seite 19).
L
Die Sprachansagefunktion ist ausgeschaltet. Schalten
Sie die Funktion ein (Seite 14).
L
Während eines externen Anrufs sagt das Mobilteil beim
Durchsuchen des Telefonbuchs keine
Telefonbuchinformationen an.
L
Machen Sie beim Suchen keine Pausen von mehr als 1
Minute.
(32)
Page 69

TG7150-7170EX(g-g).book Page 33 Wednesday, August 9, 2006 3:45 PM
Problem Ursache und Lösung
Ich kann kein Mobilteil für die
Basisstation registrieren.
L
Die maximale Anzahl der für die Basisstation
registrierbaren Mobilteile (6) wurde erreicht. Löschen Sie
nicht verwendete Mobilteilregistrierungen an der
Basisstation (Seite 25).
L
Sie haben die falsche PIN-Nummer eingegeben. Wenn
Sie Ihre PIN vergessen haben, wenden Sie sich an das
nächstgelegene Panasonic Service-Center.
L
Stellen Sie Basisstation und Mobilteil entfernt von
anderen elektrischen Geräten auf.
Nützliche Informationen
(33)
Page 70

TG7150-7170EX(g-g).book Page 34 Wednesday, August 9, 2006 3:45 PM
Nützliche Informationen
Hinweis:
L
Technische Daten
■
Standard:
DECT (Digital Enhanced Cordless
Telecommunications: Digitale, verbesserte
schnurlose Telekommunikation.),
GAP (Generic Access Profile: Allgemeines
Zugriffsprofil)
■
Anzahl der Kanäle:
120 Duplex-Kanäle
■
Frequenzbereich:
1,88 GHz bis 1,90 GHz
■
Duplexverfahren:
TDMA (Time Division Multiple Access:
Zeitmultiplexverfahren)
■
Kanalabstand:
1.728 kHz
■
Bitrate:
1.152 kbit/s
■
Modulation:
GFSK (Gaussian Frequency Shift Keying:
Frequenzumtastung mit Gauss-Filter)
■
RF-Übertragungsleistung:
Ca. 250 mW
■
Sprachkodierung:
ADPCM 32 kbit/s
■
Stromversorgung:
220–240 V, 50 Hz
■
Leistungsaufnahme, Basisstation:
Bereitschaft: ca. 1,9 W
Maximum: ca. 6,8 W
■
Betriebsbedingungen:
5°C–40°C, 20 %–80 % relative Luftfeuchtigkeit
(trocken)
■
Abmessungen:
Basisstation:
Mobilteil (KX-TG7150):
34 mm
Mobilteil (KX-TG7170):
38 mm
■
Masse (Gewicht):
Basisstation:
Mobilteil (KX-TG7150):
Mobilteil (KX-TG7170):
ca. 60 mm × 173 mm × 105 mm
ca. 179 mm × 48 mm ×
ca. 179 mm × 48 mm ×
ca. 220
g
ca. 154
ca. 164
g
g
Änderungen der technischen Daten ohne
vorherige Ankündigung vorbehalten.
L
Die in dieser Bedienungsanleitung
verwendeten Abbildungen können vom
eigentlichen Produkt geringfügig abweichen.
L
Die Reichweite des Mobilteils beträgt
innerhalb von Gebäuden 50 Meter und
außerhalb von Gebäuden 300 Meter. Bitte
beachten Sie, dass sie durch Betonbarrieren
u. Ä. eingeschränkt werden kann.
Anschlüsse:
L
Das Gerät lässt sich während eines
Stromausfalls nicht betreiben. Wir empfehlen,
dass Sie ein normales Telefon an derselben
Leitung anschließen, um auf einen
Stromausfall vorbereitet zu sein.
(34)
Page 71

TG7150-7170EX(g-g).book Page 35 Wednesday, August 9, 2006 3:45 PM
Index
A
Akku
Auswechseln: 11
Einsetzen: 11
Laden: 11
Leistung: 12
Stärke: 12
Alarm: 20
Anrufe entgegennehmen: 16
Anrufen: 15
Anschlüsse: 10
Automatischer Gesprächsmodus: 16, 19
B
Basisstation
Einstellungen: 21
C
Call-by-Call: 18
D
Datum und Uhrzeit: 13
Display
Kontrast: 19
Sprache: 12
Standby-Modus: 19
Symbole: 10
E
Einschalten/Ausschalten: 12
F
Freisprecheinrichtung: 15
G
Gürtelclip: 4, 27
I
Interngespräche: 25
K
Kettenwahl: 17
Knochenleitungshörer: 8
Kopieren
Telefonbuch: 26
L
Lautstärke
Freisprecheinrichtung: 15
Mobilteil-Hörer: 15
Rufton (Basisstation): 21
Rufton (Mobilteil): 19
Leistungsmerkmal Anruferanzeige
(CLIP): 22
M
Mobilteil
Abbrechen: 25
Einschalten/Ausschalten: 12
Einstellungen: 19
Registrierung: 24
Suchfunktion: 16
P
Pause: 16
R
S
T
V
W
Z
Index
PIN
Basisstation: 21
Registrierung: 24
Rückfrage: 15, 21
Ruftöne: 19
Schulterstütze: 4, 27
Sprachansage: 14
Stumm: 15
Tastentöne: 19
Telefonbuch
Mobilteil-Telefonbuch: 17
Telefonbuch kopieren: 26
Versäumte Anrufe: 22
Verstärker: 25
Voice Mail: 23
Wahlwiederholung: 15
Wahlwiederholungsliste: 15
Weiterleiten von Anrufen: 25
Zeicheneingabe: 28
Zusätzliche Mobilteile: 24
(35)
Page 72

TG7150-7170EX(g-g).book Page 36 Wednesday, August 9, 2006 3:45 PM
Urheberrecht:
Dieses Material ist von Panasonic Communications Co., Ltd. urheberrechtlich geschützt und darf nur für
interne Zwecke reproduziert werden. Jede weitere Reproduktion des Materials, sowohl im Ganzen als
auch auszugsweise, ist ohne schriftliche Genehmigung von Panasonic Communications Co., Ltd. nicht
gestattet.
© 2006 Panasonic Communications Co., Ltd. Alle
Rechte vorbehalten.
(36)
Page 73

r
TG7150-7170EX(fr-fr).book Page 1 Wednesday, August 9, 2006 3:44 PM
Téléphone numérique sans fil
KX-TG7150
Manuel utilisateu
Modèle KX-TG7150EX
KX-TG7170EX
Cet appareil est compatible avec la fonction d’identification des appels.
Pour afficher le numéro de téléphone de l’appelant, vous devez vous
abonner à un service d’identification des appels.
Chargez les batteries pendant environ 7 heures avant la première
utilisation.
Veuillez lire le présent manuel utilisateur avant d’utiliser l’appareil et conservez-le pour
référence ultérieure.
Page 74

TG7150-7170EX(fr-fr).book Page 2 Wednesday, August 9, 2006 3:44 PM
Introduction
Introduction
Vous venez d’acquérir un nouveau téléphone numérique sans fil Panasonic et nous vous en
remercions.
Références à nous communiquer lors de tout contact
Gardez la facture d’achat de l’appareil à portée de la main lors de toute demande de réparation sous
garantie.
N° de série (en dessous de la base de l’appareil)
Date d’achat
Nom et adresse du vendeur
Votre téléphone
KX-TG7150
(Combiné à
larges touches)
Remarque:
L
Les combinés ont été pré-enregistrés pour une utilisation avec leur base. S’ils ne sont pas
enregistrés, reportez-vous à la page 25.
KX-TG7170
(
Combiné à
conduction osseuse
)
<2>
Page 75

TG7150-7170EX(fr-fr).book Page 3 Wednesday, August 9, 2006 3:44 PM
Sommaire
Préparatifs
Informations sur les accessoires . . . . . . . . . . 4
Développement de votre système
téléphonique. . . . . . . . . . . . . . . . . . . . . . . . . . 6
Informations importantes . . . . . . . . . . . . . . . . 7
Ecouteur à conduction osseuse (KX-TG7170
uniquement) . . . . . . . . . . . . . . . . . . . . . . . . . . 8
Commandes. . . . . . . . . . . . . . . . . . . . . . . . . . 9
Ecrans . . . . . . . . . . . . . . . . . . . . . . . . . . . . . 10
Raccordements . . . . . . . . . . . . . . . . . . . . . . 10
Installation/remplacement de la batterie. . . . .11
Charge de la batterie . . . . . . . . . . . . . . . . . . .11
Mise sous/hors tension. . . . . . . . . . . . . . . . . 12
Symboles utilisés dans ce manuel utilisateur 12
Langue d’affichage . . . . . . . . . . . . . . . . . . . . 12
Date et heure . . . . . . . . . . . . . . . . . . . . . . . . 13
Fonctions d’accessibilité
Annonce vocale des numéros
(Annonce vocale) . . . . . . . . . . . . . . . . . . . . . 14
Appeler un correspondant/
répondre à un appel
Appeler un correspondant . . . . . . . . . . . . . . 15
Répondre à un appel . . . . . . . . . . . . . . . . . . 16
Répertoire
Répertoire du combiné. . . . . . . . . . . . . . . . . 17
Numérotation en chaîne. . . . . . . . . . . . . . . . 17
Numérotation rapide pour Call-by-Call : effectuer
des appels à l’aide d’un code d’accès opérateur
du téléphone (Allemagne uniquement) . . . . 18
Mode utilisation multipostes
Utilisation d’appareils supplémentaires . . . . . 25
Enregistrement d’un combiné sur la base . . . 25
Intercommunication entre combinés . . . . . . .26
Transfert d’appels entre combinés . . . . . . . .26
Copie d’entrées du répertoire . . . . . . . . . . . .27
Informations utiles
Utilisation du clip ceinture . . . . . . . . . . . . . . .28
Utilisation du porte-combiné . . . . . . . . . . . . .28
Entrée de caractères . . . . . . . . . . . . . . . . . . .29
Messages d’erreur. . . . . . . . . . . . . . . . . . . . .31
Dépannage . . . . . . . . . . . . . . . . . . . . . . . . . . 31
Caractéristiques. . . . . . . . . . . . . . . . . . . . . . .34
Index
Index . . . . . . . . . . . . . . . . . . . . . . . . . . . . . . 35
Réglages du combiné
Réglages du combiné. . . . . . . . . . . . . . . . . . 19
Réglages horaires . . . . . . . . . . . . . . . . . . . . 21
Réglages de la base
Réglages de la base. . . . . . . . . . . . . . . . . . . 22
Service d’identification des
appels
Utilisation du service d’identification des
appels. . . . . . . . . . . . . . . . . . . . . . . . . . . . . . 23
Liste des appelants . . . . . . . . . . . . . . . . . . . 24
Service de messagerie vocale . . . . . . . . . . . 24
<3>
Page 76

TG7150-7170EX(fr-fr).book Page 4 Wednesday, August 9, 2006 3:44 PM
Préparatifs
Informations sur les accessoires
Accessoires inclus
N° Accessoires Quantité
1
Adaptateur secteur pour la base
Réf. PQLV207CE
2
Cordon téléphonique (l’Allemagne) 1
3
Cordon téléphonique (la France) 1
4
Cordon téléphonique (Autres pays)
5
Fiche téléphonique (l’Italie) 1
6
Batteries rechargeables AAA (R03)
Réf. HHR-55AAAB ou HHR-4EPT
7
Couvercle du combiné
8
Clip ceinture 1
9
Porte-combiné 1
*1 Préparez la prise téléphonique appropriée en usage dans votre pays. Pour l’Italie, raccordez la prise
téléphonique incluse
*2 Le couvercle du combiné est livré fixé au combiné.
123456
5
*2
au cordon téléphonique avant de vous connecter.
*1
1
1
2
1
789
<4>
Page 77

TG7150-7170EX(fr-fr).book Page 5 Wednesday, August 9, 2006 3:44 PM
Préparatifs
Accessoires supplémentaires/de rechange
Pour des informations commerciales, contactez votre revendeur Panasonic le plus proche.
N° Modèle Description
1
KX-TCA717EX Adaptateur à montage mural
2
KX-TCA94EX Casque
3
KX-A272 Répétiteur DECT
12
Remarque:
L
Vous pouvez développer votre système téléphonique en enregistrant des combinés Panasonic
supplémentaires compatibles (page 6).
L
Lorsque vous remplacez les batteries, utilisez uniquement 2 batteries rechargeables taille AAA (R03)
à hydrure métallique de nickel (Ni-MH) d’une capacité de 750 mAh maximum. Il est recommandé
d’utiliser les batteries rechargeables Panasonic (réf. P03P).
L
Nous ne pouvons être tenus responsables des dommages causés à l’unité ou d’une dégradation des
performances que pourrait entraîner l’utilisation de batteries rechargeables d’une marque autre que
Panasonic.
<5>
Page 78

TG7150-7170EX(fr-fr).book Page 6 Wednesday, August 9, 2006 3:44 PM
Préparatifs
Développement de votre système téléphonique
Vous pouvez développer votre système téléphonique en enregistrant les combinés en option suivants
sur une même base (KX-TG7150 ou KX-TG7170) :
Pour des informations commerciales, contactez votre revendeur Panasonic le plus proche.
Combinés : 6 maximum
Combiné
supplémentaire
numérique sans fil
KX-TGA711EX
Combiné
supplémentaire
numérique sans fil
KX-TGA717EX
(combiné à
conduction osseuse)
6 maximum
Combiné
supplémentaire
numérique sans fil
KX-TGA715EX
(combiné à larges
touches)
Aperçu des fonctions des combinés KX-TGA711, KX-TGA715 et KX-TGA717
L’utilisation et les fonctions des 3 combinés en option diffèrent légèrement comme indiqué dans le
tableau ci-dessous.
Fonction KX-TGA711 KX-TGA715 KX-TGA717 Page
Description Disponible en
tant que combiné
en option
uniquement
Touches larges —
Ecouteur à
conduction osseuse
Restriction d’appel
Prise pour casque —
Annonce vocale —
——
r
<6>
Même combiné
que celui fourni
avec le KXTG7150
rr
———
rr
rr
Même combiné
que celui fourni
avec le KXTG7170
r
—
—
page 8
page 9
page 14
Page 79

TG7150-7170EX(fr-fr).book Page 7 Wednesday, August 9, 2006 3:44 PM
Informations importantes
Généralités
L
N’utilisez que l’adaptateur secteur fourni avec
ce produit, présenté à la page 4.
L
Ne branchez pas l’adaptateur secteur sur une
prise secteur autre qu’une prise 220–240 V
c.a. standard.
L
Cet appareil ne peut pas être utilisé pour
téléphoner dans les cas suivants :
– lorsque les batteries du combiné portatif
sont déchargées ou défectueuses ;
– en cas de panne de courant.
L
N’ouvrez ni la base, ni le chargeur, ni le
combiné (sauf pour remplacer la pile).
L
Cet appareil ne doit être utilisé ni à proximité
d’un appareil de soins médicaux d’urgence ou
intensifs, ni par des personnes portant un
appareil de stimulation cardiaque
(pacemaker).
L
Veillez à ce qu’aucun objet ou liquide ne
pénètre dans l’appareil. N’exposez pas
l’appareil à une fumée excessive, à la
poussière, aux vibrations mécaniques ou aux
chocs.
Environnement
L
N’utilisez pas cet appareil près de l’eau.
L
Maintenez l’appareil éloigné de toute source
de chaleur (radiateur, autocuiseur, etc.) et ne le
laissez pas dans une pièce où la température
°
est inférieure à 5
L
L’adaptateur secteur est utilisé comme
principal organe de déconnexion. Assurezvous que la prise secteur est installée près de
l’appareil et est facilement accessible.
Attention:
L
Pour éviter tout risque de décharge électrique,
n’exposez jamais cet appareil à la pluie ou
toute autre source d’humidité.
L
Débranchez l’appareil de la prise électrique s’il
émet de la fumée, une odeur anormale ou fait
un bruit inhabituel. Ces situations pourraient
en effet provoquer un incendie ou une
décharge électrique. Assurez-vous que la
C ou supérieure à 40°C.
Précautions relatives aux batteries
L
L
L
L
L
L
L
Préparatifs
fumée a cessé et contactez un centre de
service agréé.
Il est recommandé d’utiliser la ou les batteries
présentées à la page 5.
batteries rechargeables.
N’utilisez pas ensemble des batteries neuves
et des batteries usagées.
N’incinérez pas les batteries, car elles
pourraient exploser. Elles doivent être mises
au rebut conformément à la réglementation
locale sur les déchets.
N’ouvrez pas les batteries et ne les détériorez
pas. L’électrolyte des batteries est corrosif et
peut provoquer des brûlures ou des blessures
aux yeux ou à la peau. L’électrolyte est toxique
et ne doit jamais être avalé.
Manipulez les batteries avec précaution. Ne
les mettez pas en contact avec des matériaux
conducteurs tels que bagues, bracelets ou
clés, car cela risquerait de provoquer un courtcircuit et les batteries et/ou matériaux
conducteurs pourraient surchauffer et
occasionner des brûlures.
Rechargez les batteries conformément aux
instructions fournies dans le présent manuel
utilisateur.
N’utilisez que la base fournie (ou le chargeur)
pour recharger les batteries. N’altérez pas la
base (ou le chargeur). Le non-respect de ces
instructions risque de faire gonfler ou exploser
les batteries.
N’utilisez que des
<7>
Page 80

TG7150-7170EX(fr-fr).book Page 8 Wednesday, August 9, 2006 3:44 PM
Préparatifs
L
L’efficacité de l’écouteur à conduction osseuse
Ecouteur à conduction
osseuse (KX-TG7170
uniquement)
Le combiné dispose d’un écouteur à conduction
osseuse qui utilise des vibrations pour produire
les sons pendant vos conversations
téléphoniques.
Pour une utilisation correcte, appuyez l’écouteur
à conduction osseuse contre votre visage à
proximité de l’oreille.
Normalement, le son entre dans le conduit auditif
et fait vibrer le tympan. Les vibrations sont
ressenties dans l’oreille interne et interprétées
par le nerf auditif.
Son
varie selon le type et le degré du déficit auditif
de l’utilisateur.
L
Le son étant généré à l’aide de vibrations, les
utilisateurs ne présentant pas de déficit auditif
peuvent utiliser le combiné en plaçant
l’écouteur à conduction osseuse contre
l’oreille, comme un téléphone ordinaire.
L
Si l’écouteur à conduction osseuse est sale ou
gras, nettoyez-le avec un chiffon sec et doux.
Ecouteur à
conduction
osseuse
Oreille externe
Oreille
moyenne
Placez l’écouteur à conduction osseuse contre
votre visage (et pas votre oreille). Essayez
différents emplacements pour déterminer le
meilleur. Commencez par les alentours de la
tempe.
Remarque:
L
Ne placez pas l’écouteur à conduction
osseuse sur une prothèse auditive. Cela
pourrait créer un sifflement ou d’autres
interférences.
auditif
Oreille
interne
Nerf
<8>
Page 81

A B
TG7150-7170EX(fr-fr).book Page 9 Wednesday, August 9, 2006 3:44 PM
I{R} (Rappel)
Commandes
Combiné (KX-TG7150)
A
C
D
E
F
G
H
B
I
Combiné (KX-TG7170)
J
K
L
M
N
O
P
Q
R
J
K
L
M
N
O{C/T}
P
Q{INT} (Intercommunication)
R
Base
Préparatifs
Voyant de charge/voyant de sonnerie
KX-TG7150
Ecouteur
KX-TG7170
Ecouteur à conduction osseuse
Ecran
{R}
(Renumérotation/Pause)
{ih}
(Mise hors/Sous tension)
(Annulation/Désactivation du
micro)
Clavier de numérotation
Microphone
A
C
D
E
F
G
H
B
I
A
Haut-parleur
B
Contact de charge
C
Prise pour casque
D{j/OK} (Menu/VALIDATION)
E
{k}
(Répertoire)
F
{C}
(Prise de ligne)
G
Touche de navigation (
H
{s}
(Haut-parleur)
{^}/{V}/{>}/{<}
J
K
L
M
N
O
P
Q
R
C
A
Contact de charge
B
{x}
(Appel)
C
Sonnerie
)
<9>
Page 82

TG7150-7170EX(fr-fr).book Page 10 Wednesday, August 9, 2006 3:44 PM
Préparatifs
Ecrans
Affichages
Affichages Signification
w
L
k
5
[2]
0
*1 Utilisateurs de la messagerie vocale
uniquement
Dans la zone de couverture
d’une base
L
Clignotant : le combiné
recherche la base. (le
combiné est hors de la zone
de couverture de la base, le
combiné n’est pas
enregistré sur la base ou la
base n’est pas alimentée en
électricité)
Le combiné accède à la base.
(intercommunication,
recherche, modification de
réglages de la base, etc.)
Le combiné est en
communication avec
l’extérieur.
Niveau de charge
Numéro de combiné (réglage
de l’écran de veille, page 19)
Nouveau message vocal
*1
(page 24)
reçu
La ligne est utilisée par un
autre combiné.
Raccordements
Lors de la connexion de l’adaptateur secteur à la
base, un bip bref est émis. Si vous n’entendez
pas de bip, vérifiez les connexions.
Crochet
(220–240 V, 50 Hz)
Vers le réseau
téléphonique
N’utilisez que
l’adaptateur secteur et le
cordon téléphonique
Remarque:
L
Lorsque vous branchez le cordon
téléphonique au réseau, utilisez le cordon
téléphonique fourni ou la fiche téléphonique
appropriée à votre pays, présenté à la page 4.
L
Ne raccordez jamais le câble du téléphone
pendant un orage.
L
L’adaptateur secteur doit rester branché en
permanence. (Il est normal que l’adaptateur
soit chaud pendant son utilisation.)
L
L’adaptateur secteur doit être branché sur une
prise secteur verticale ou montée au sol. Ne
branchez pas l’adaptateur secteur à une prise
secteur montée au plafond, car il risque de se
débrancher sous l’effet de son poids.
<10>
Emplacement
L
Pour bénéficier d’une zone de couverture
maximale et éviter les bruits parasites, il est
recommandé d’installer la base comme
indiqué ci-dessous :
– loin d’appareils électriques tels que
téléviseurs, radios, ordinateurs ou autres
téléphones ;
Page 83

TG7150-7170EX(fr-fr).book Page 11 Wednesday, August 9, 2006 3:44 PM
– dans un endroit facile d’accès, élevé et
central.
Installation/remplacement de
la batterie
Important:
L
Utilisez uniquement les batteries
rechargeables incluses présentées à la page
4, 7.
L
Lors du remplacement des batteries, il est
recommandé d’utiliser les batteries
rechargeables Panasonic présentées à la
page 5, 7.
L
Nettoyez les pôles des batteries (S, T) avec
un tissu sec.
L
En installant les batteries, évitez de toucher les
pôles des batteries (
l’appareil.
1
Appuyez fermement sur l’encoche du
couvercle du combiné et faites-le glisser
dans le sens indiqué par la flèche.
L
Lors du remplacement des batteries,
retirez les anciennes, pôle positif (
premier.
S, T
) ou les contacts de
S
) en
Charge de la batterie
Placez le combiné sur la base pendant
environ 7 heures avant la première utilisation.
Lorsque la batterie est en cours de chargement,
son icône s’affiche comme suit.
Lorsque la charge des batteries est terminée,
5
L
Préparatifs
reste affiché.
Le voyant de charge s’allume lorsque le
combiné est placé sur la base.
Contact
de charge
2
Insérez les batteries, pôle négatif (T) en
premier. Refermez le couvercle du combiné.
L
Le modèle illustré est le KX-TG7150.
Remarque:
L
Il est normal que le combiné soit chaud
pendant la charge.
L
Si vous souhaitez utiliser l’appareil
immédiatement, chargez les batteries pendant
au moins 15 minutes.
L
Nettoyez une fois par mois les contacts de
charge du combiné et de la base à l’aide d’un
chiffon doux et sec, sinon les batteries risquent
de ne pas être chargées correctement.
Procédez à des nettoyages plus fréquents si
l’appareil est exposé à des substances
grasses, de la poussière ou une atmosphère
très humide.
<11>
Page 84

V
Vous pouvez s
lectionner les langues
suivantes:
Deutsch
English
Espa
,
NORSK
FRANCAIS
Italiano
Dansk
Nederlands
Svenska
Suomi
EKKGMIJA
Portugu
ou
Catal
TG7150-7170EX(fr-fr).book Page 12 Wednesday, August 9, 2006 3:44 PM
Préparatifs
Niveau de charge
Icône de
batterie
5
6
7
Autonomie de la batterie Ni-MH Panasonic
(piles incluses)
Etat Autonomie
En utilisation continue KX-TG7150 :
En mode veille
continue
Remarque:
L
Il est normal que les batteries n’atteignent pas
leur capacité totale lors de la première charge.
La batterie atteint son autonomie maximale
après avoir effectué plusieurs cycles complets
de charge/décharge (utilisation).
L
L’autonomie réelle de la batterie dépend de la
combinaison de la fréquence d’utilisation du
combiné et de la fréquence de non-utilisation
du combiné (mode veille).
L
L’autonomie de la batterie peut diminuer avec
le temps en fonction des conditions d’utilisation
et de la température ambiante.
L
Même complètement chargé, le combiné peut
être déposé sur la base sans affecter les
batteries.
L
Le niveau de charge peut ne pas s’afficher
correctement après le remplacement des
batteries. Dans ce cas, placez le combiné sur
la base et chargez-le pendant au moins 7
heures.
Niveau de charge
Elevé
Moyen
Faible
Clignotant : la batterie
doit être chargée.
12 heures max.
KX-TG7170 :
10 heures max.
150 heures max.
Mise sous/hors tension
Mise sous tension
Appuyez sur la touche
secondes.
Mise hors tension
Appuyez sur la touche
secondes.
Symboles utilisés dans ce
manuel utilisateur
Symbole Signification
{j
i
“ ” Sélectionnez les termes entre
Langue d’affichage
14 langues d’affichage sont disponibles.
ous pouvez s
suivantes:
“Deutsch
“NORSK
“Dansk
“Suomi
“Portugu
L’anglais est la langue d’affichage préréglée. Les
exemples d’affichage présentés dans ce manuel
utilisateur sont en français. Pour définir la langue
d’affichage sur la langue souhaitée, appuyez sur
{ih}, {j
{>}
sur
{V}
, sur {>}, sélectionnez la langue de votre
choix, appuyez sur
{ih}
pendant environ 1
{ih}
pendant environ 2
/OK}Appuyez sur la touche {j/OK}.
Procédez à l’opération suivante.
guillemets qui s’affichent à l’écran
“
(par ex.,
appuyant sur la touche
”, , “English
”, , “FRANCAIS
”, , “Nederlands
”, , “EKKGMIJA
ês” ou
/OK}, appuyez 3 fois sur
, appuyez 2 fois sur
PROG. COMBINE”) en
{^}
ou
{V}
électionner les langues
”,“Espa
”, , “Italiano
”, , “Türkrkçe”,
“Catal
{V}
{>}
, puis sur
ñolol”,
”, , “Svenska
à”.
{^}
, puis sur {>}, sur
{ih}
.
”,
”,
, puis
.
<12>
Page 85

TG7150-7170EX(fr-fr).book Page 13 Wednesday, August 9, 2006 3:44 PM
Pour changer la langue d’affichage
1
{ih} i {j
2
Appuyez sur la touche
sélectionner
3
Appuyez sur la touche
sélectionner
4
Appuyez sur la touche
sélectionner
5
Appuyez sur la touche
sélectionner la langue souhaitée.
i {ih}
Remarque:
L
Pour changer la langue de l’annonce vocale,
voir page 14.
/OK
}
{^}
ou
{V}
pour
“
PROG. COMBINE”. i {>
{^}
ou
{V}
pour
“
PROG. AFFICHAGE”. i {>
{^}
ou
{V}
pour
“
CHOIX LANGAGE”. i {>
{^}
ou
{V}
pour
i {>}
}
}
}
Date et heure
1
{j
/OK
}
2
Appuyez sur la touche
sélectionner
3
Appuyez sur la touche
sélectionner
4
Appuyez sur la touche
sélectionner
5
Entrez le jour, le mois et l’année actuels.
Exemple:
{1}{7} {0}{5} {0}{6}
6
Entrez l’heure et les minutes actuelles.
Exemple:
{0}{3} {3}{0} i
{*}
7
{j
/OK} i
Remarque:
L
Pour corriger un chiffre, appuyez sur {<} ou
{>}
pour déplacer le curseur vers le chiffre,
puis effectuez la correction.
L
La date et l’heure peuvent être incorrectes
après une panne de courant. Dans ce cas,
réglez de nouveau la date et l’heure.
“
PROG. COMBINE”. i {>
“
PROG. HORLOGE”. i {>
“
REG. DATE/HEURE”. i {>
17 mai 2006
3:30 PM
jusqu’à ce que “03:30 PM” s’affiche.
{ih}
{^}
ou
{V}
pour
{^}
ou
{V}
pour
{^}
ou
{V}
pour
Appuyez sur la touche
}
}
}
Préparatifs
<13>
Page 86

V
Vous pouvez s
lectionner les langues
s
suivantes:
Deutsch
English
Espa
,
FRANCAIS
Italiano
,
Nederlands
EKKGMIJA
TG7150-7170EX(fr-fr).book Page 14 Wednesday, August 9, 2006 3:44 PM
Fonctions d’accessibilité
L
Annonce vocale des
numéros (Annonce vocale)
Les fonctions d’annonce vocale permettent au
combiné d’annoncer le numéro de téléphone
affiché.
(Annonce de l’identification des
appels/Annonce de liste)
Annonce de l’identification des appels
Lorsque vous recevez un appel externe
disposant d’informations sur le numéro de
téléphone, le combiné annonce le numéro de
téléphone affiché depuis le haut-parleur du
combiné.
L
Pour l’annonce du numéro de téléphone de
l’appelant externe, vous devez préalablement
vous abonner à un service d’identification des
appels (page 23).
L
L’annonce s’effectue au même volume que la
sonnerie (page 19).
Annonce de liste
Le combiné annonce les numéros de téléphone
depuis le haut-parleur du combiné pendant que
vous consultez
liste des appelants
L
Si le numéro affiché comporte un P(pause), le
combiné insère une pause de 0,5 seconde
pour chaque P et, si le numéro comporte
d’autres symboles (par exemple,
combiné les ignore et annonce le numéro
suivant.
la liste de renumérotation, la
et
le répertoire.
;
, #, etc.), le
7
{>} i {ih}
Remarque:
L
L’annonce de l’identification des appels
s’effectue au même volume que la sonnerie du
combiné (page 19). Lorsque le volume de
l’annonce vocale est réglé sur
combiné n’annonce pas le numéro de
téléphone, quel que soit le volume de la
sonnerie.
Sélection de la langue de l’annonce
vocale
8 langues sont disponibles pour l’annonce
vocale.
ous pouvez s
uivantes:
“Deutsch
“FRANCAIS
“Nederlands
“Türkrkçe”.
1
{j
2
“
3
“
4
“
5
“
6
Sélectionnez la langue souhaitée. i {>}
i {ih}
Remarque:
L
Pour changer la langue à l’écran, voir page 12.
Réglage du volume de l’annonce
vocale
Vous pouvez régler le volume pour
. Le volume de l’annonce de l’identification
liste
des appels est réglé lors du réglage du volume
de la sonnerie (page 19).
1
{j
/OK
}
2
“
PROG. COMBINE” i {>
3
“
AUTRES OPTIONS” i {>
4
“
ANNONCE VOCALE” i {>
5
“
VOLUME” i {>
6
Sélectionnez le volume souhaité.
}
l’annonce de
}
}
}
Pour désactiver la fonction d’annonce
“
“
NON”, le
ñolol”,
”, , ou
}
}
}
}
NON”.
vocale, sélectionnez le volume
électionner les langues
”, , “English
”, , “Italiano
”, , “EKKGMIJA
/OK
}
PROG. COMBINE” i {>
AUTRES OPTIONS” i {>
ANNONCE VOCALE” i {>
CHOIX LANGAGE” i {>
”, , “Espa
”,
<14>
Page 87

TG7150-7170EX(fr-fr).book Page 15 Wednesday, August 9, 2006 3:44 PM
Appeler un correspondant/répondre à un appel
Pour effacer des numéros de la liste de
Appeler un correspondant
1
Décrochez le combiné et composez le
numéro de téléphone.
L
Pour modifier un chiffre, appuyez sur la
{C/T}, puis entrez le numéro
touche
correct.
2
{C}
3
A la fin de la conversation, appuyez sur la
{ih}
touche
base.
Haut-parleur
1
Pendant une conversation, appuyez sur la
touche
L
Parlez en alternance avec l’appelant.
2
A la fin de la conversation, appuyez sur la
touche
Remarque:
L
Pour des performances optimales, utilisez le
haut-parleur dans un environnement calme.
L
Appuyez sur la touche
l’écouteur.
Pour régler le volume de l’écouteur ou du
haut-parleur
Appuyez sur la touche
communication.
Renumérotation
Vous pouvez recomposer des numéros de
téléphone précédemment composés (de 24
chiffres max.).
Pour appeler un correspondant à l’aide de la
liste de renumérotation
Les 10 derniers numéros de téléphone
composés sont mémorisés dans la liste de
renumérotation.
1
{R}
2
Appuyez sur la flèche
sélectionner le numéro souhaité.
3
{C}
/
ou replacez le combiné sur la
{s}
pour activer le haut-parleur.
{ih}
.
{C}
pour revenir à
{^}
ou
{V}
{^}
ou
{s}
pendant la
{V}
pour
renumérotation
1
2
3
4
Autres fonctions
Désactivation du micro
Lorsque le micro est désactivé, vous pouvez
entendre le correspondant, mais ce dernier ne
peut pas vous entendre.
Pour désactiver le micro, appuyez sur la touche
{C/T}.
L
{R}
■
l’Allemagne/l’Autriche :
La touche {R} permet d’accéder à des services
téléphoniques spéciaux, tels que le signal
d’appel. Si votre ligne téléphonique prend en
charge le signal d’appel, vous pouvez appuyer
sur la touche {R} pour basculer entre le premier
et le deuxième correspondant pendant une
conversation. Pour plus d’informations,
contactez votre fournisseur de
services/compagnie de téléphone.
■
Autres pays :
La touche {R} permet d’accéder à des services
téléphoniques en option. Pour plus
d’informations, contactez votre fournisseur de
services/compagnie de téléphone.
Remarque:
L
L
{R}
Appuyez sur la flèche
sélectionner le numéro souhaité.
“
EFFACER” i {>
“
OUI” i {>} i
Pour revenir à la conversation, appuyez de
nouveau sur la touche
(touche de la fonction de rappel)
Si votre appareil est relié à un central
téléphonique, la touche
à certaines fonctions de votre central hôte,
telles que le transfert d’appel vers un autre
poste. Pour plus d’informations, contactez
votre revendeur PBX.
Vous pouvez modifier le délai de rappel (page
22).
{^}
ou
{V}
}
{ih}
{C/T}.
{R}
permet d’accéder
pour
i {>}
<15>
Page 88

TG7150-7170EX(fr-fr).book Page 16 Wednesday, August 9, 2006 3:44 PM
Appeler un correspondant/répondre à un appel
Touche Pause (pour les appareils reliés à une
central téléphonique ou pour les appels
longue distance)
Il est parfois nécessaire d’insérer une pause
lorsque vous appelez un correspondant via un
central téléphonique ou effectuez un appel
longue distance.
Exemple:
composer manuellement des numéros externes,
vous devrez probablement insérer une pause
après avoir tapé le
entendiez une tonalité.
1
2
Remarque:
L
Si vous devez former le {0} avant de
{0}
jusqu’à ce que vous
{0} i {R}
Composez le numéro de téléphone. i
{C}
/
{s}
Une pause de 3 secondes est insérée à
chaque fois que vous appuyez sur la touche
{R}
. Appuyez sur la touche à plusieurs
reprises pour prolonger les pauses.
Répondre à un appel
1
Décrochez le combiné et appuyez sur la
touche
sonne.
L
2
A la fin de la conversation, appuyez sur la
touche
base.
Prise de ligne automatique
Vous pouvez répondre à un appel simplement en
soulevant le combiné de la base. Il n’est pas
nécessaire d’appuyer sur la touche
activer cette fonction, reportez-vous à la page 19.
Pour ajuster le volume de la sonnerie du
combiné lorsque vous recevez un appel
Appuyez sur la touche
Localisation du combiné
Cette fonction permet de localiser le combiné si
vous l’avez égaré.
1
Appuyez sur la touche
2
Pour arrêter la recherche, appuyez sur la
touche
{ih}
{C}
ou
{s}
lorsque le téléphone
Vous pouvez également répondre à un
appel en appuyant sur n’importe quelle
touche de numérotation, de {0} à {9},
{*}, {#}
ligne avec n’importe quelle touche)
ou {INT}.
{ih}
{x}
de la base ou sur la touche
du combiné.
(Fonction de prise de
ou replacez le combiné sur la
{^}
ou
{V}
{x}
sur la base.
.
{C}
. Pour
<16>
Page 89

TG7150-7170EX(fr-fr).book Page 17 Wednesday, August 9, 2006 3:44 PM
Répertoire du combiné
Le répertoire du combiné permet d’effectuer des
appels sans devoir composer le numéro
manuellement. Vous pouvez ajouter jusqu’à 50
noms et numéros de téléphone dans le répertoire
du combiné.
Ajout d’entrées au répertoire du
combiné
1
{k} i {j
2
“
NOUVELLE ENTREE” i {>
3
Entrez le nom de votre correspondant (16
caractères max. ; page 29).
4
Entrez le numéro de téléphone de votre
correspondant (24 chiffres max.).
{j
/OK
5
“
SAUVEGARDE” i {>} i
Remarque:
L
Etape 1 alternative :
{j
/OK} i Appuyez sur
sélectionner
/OK
}
i {j
}
{^}
“
PROG. REPERT.”. i {>
}
{ih}
ou
{V}
i
/OK
pour
}
}
Recherche et appel d’une entrée du
répertoire du combiné
Vous pouvez rechercher les entrées du
répertoire selon le premier caractère, ou encore
en faisant défiler toutes les entrées du répertoire.
Une fois l’entrée souhaitée trouvée, appuyez sur
{C}
la touche
Défilement de toutes les entrées
1
{k}
2
Appuyez sur la flèche
afficher l’entrée souhaitée.
Recherche par premier caractère (recherche
par index)
1
{k}
2
Appuyez sur la touche de numérotation ({0}
{9}
à
recherchez (page 29).
L
.
{^}
ou
{V}
pour
) qui contient le caractère que vous
Appuyez sur la même touche de
numérotation à plusieurs reprises pour
afficher la première entrée correspondant
3
Modification d’entrées dans le
répertoire du combiné
Modification d’un nom, d’un numéro de
téléphone
1
2
3
4
5
Effacement d’entrées du répertoire
du combiné
Effacement d’une entrée
1
2
3
Effacement de toutes les entrées
1
2
3
4
Numérotation en chaîne
Cette fonction vous permet de composer des
numéros de téléphone du répertoire pendant un
appel. Vous pouvez l’utiliser, par exemple, pour
Répertoire
à chaque lettre de la touche de
numérotation.
L
Si aucune entrée ne correspond à la lettre
sélectionnée, l’entrée suivante s’affiche.
L
Pour modifier le mode d’entrée de
caractères :
{R} i
de caractères.
Appuyez sur la flèche
défiler le répertoire au besoin.
Recherchez l’entrée souhaitée (page 17).
i {j
“
MODIFICATION” i {>
Modifiez le nom au besoin (16 caractères
max. ; page 29).
Modifiez le numéro de téléphone au besoin
(24 chiffres max.).
“
SAUVEGARDE” i {>} i
Recherchez l’entrée souhaitée (page 17).
i {j
“
EFFACER” i {>
“
OUI” i {>} i
{k} i {j
“
EFFACER TOUT” i {>
“
OUI” i {>
“
OUI” i {>} i
Sélectionnez le mode d’entrée
i {>}
{^}
ou
{V}
pour faire
/OK
}
}
i {j
/OK
}
i {j
/OK
}
{ih}
/OK
}
}
{ih}
/OK
}
}
}
{ih}
<17>
Page 90

TG7150-7170EX(fr-fr).book Page 18 Wednesday, August 9, 2006 3:44 PM
Répertoire
composer le numéro d’accès d’une carte d’appel
ou le code d’un compte bancaire mémorisé dans
le répertoire sans devoir le composer
manuellement.
1
Lors d’un appel, appuyez sur la touche
2
Appuyez sur la flèche
sélectionner l’entrée souhaitée.
L
Pour effectuer une recherche sur le
premier caractère (recherche par index),
reportez-vous à la page 17.
3
Appuyez sur la flèche {>} pour composer le
numéro.
{^}
ou
{V}
{k}
pour
Numérotation rapide pour
Call-by-Call : effectuer des
.
appels à l’aide d’un code
d’accès opérateur du
téléphone (Allemagne
uniquement)
Les tarifications varient en fonction des
opérateurs téléphoniques et des régions vers
lesquelles sont effectués les appels. Si vous
mémorisez au préalable les codes d’accès
opérateurs du téléphone que vous utilisez dans
le répertoire du combiné, par souci d’économie,
vous pouvez sélectionner le code d’accès
opérateur du téléphone approprié lorsque vous
effectuez des appels.
Important:
L
Afin d’effectuer des appels à l’aide d’un code
d’accès opérateur du téléphone, vous devez
vous abonner à cet opérateur.
1
Recherchez le code d’accès opérateur du
téléphone de votre choix mémorisé dans le
répertoire du combiné.
L
2
Appuyez sur la touche
le code d’accès opérateur du téléphone.
3
Dès que le numéro est composé, appuyez
sur
{V}
L
4
Appuyez sur {j/OK} pour composer
l’entrée souhaitée.
Pour effectuer une recherche sur le
premier caractère (recherche par index),
reportez-vous à la page 17.
{C}
pour composer
{k} i
pour sélectionner l’entrée souhaitée.
Sélectionnez l’entrée souhaitée avant la
déconnexion automatique de la ligne.
Appuyez sur la flèche
{^}
ou
<18>
Page 91

TG7150-7170EX(fr-fr).book Page 19 Wednesday, August 9, 2006 3:44 PM
Réglages du combiné
Réglages du combiné
L
Lors de la personnalisation du combiné, le réglage en cours est indiqué par le curseur >.
Pour personnaliser le combiné :
1
{j
/OK
}
2
Appuyez sur la touche
3
Appuyez sur la touche
du combiné.
4
Appuyez sur la touche
L
Dans certains cas, vous devez sélectionner l’option dans un deuxième sous-menu. i {>
5
Appuyez sur la touche
{>}
ou suivez l’instruction affichée dans la colonne de droite du tableau.
L
Pour quitter, appuyez sur la touche
Menu des réglages
du combiné
PROG. HORLOGE REG. DATE/HEURE
PROG. SONNERIE VOLUME SONNERIE
PROG. AFFICHAGE ECRAN VEILLE
INSCRIPTION INSCRIP.COMBINE
i {>}
{^}
ou
{V}
pour sélectionner “PROG. COMBINE”. i {>
{^}
ou
{V}
pour sélectionner l’option souhaitée dans le menu des réglages
{^}
ou
{V}
pour sélectionner l’option souhaitée dans le sous-menu. i {>
{^}
ou
{V}
pour sélectionner l’option souhaitée, puis appuyez sur la touche
{ih}
.
Sous-menu Sous-menu 2 Fonction (réglage par
défaut)
— Date et heure : page 13
ALARME
SONNERIE EXT.
SONNERIE INT.
CHOIX LANGAGE
CONTRASTE
— Réglage de l’alarme : page 21
— Volume de la sonnerie du
combiné (Maximum)
— Sonneries pour les appels
externes
(“SONNERIE 1”)
— Sonneries pour les appels
d’intercommunication
“
SONNERIE 3”)
(
— Affichage du mode veille
— Langue d’affichage
— Contraste d’affichage (Niveau
— page 25
*4
“
NON”)
(
“
English”) : page 12
(
3)
}
}
}
*1
*2*3
*3
AUTRES OPTIONS BIP TOUCHES
REPONSE AUTO
ANNONCE VOCALE VOLUME
— Activation/désactivation des
bips de touche (
— Activation/désactivation de la
prise de ligne automatique
*5
“
NON”)
(
Volume de l’annonce vocale
“
MOYEN”) : page 14
(
CHOIX LANGAGE
Langue de l’annonce vocale
“
English”) : page 14
(
“
OUI”)
<19>
Page 92

TG7150-7170EX(fr-fr).book Page 20 Wednesday, August 9, 2006 3:44 PM
Réglages du combiné
*1 Lorsque la sonnerie est désactivée, le combiné sonne :
– au niveau minimum pour les alarmes
– au niveau minimum pour les appels d’intercommunication
– au niveau maximum pour la recherche du combiné
*2 Si vous sélectionnez une sonnerie de type mélodie, la sonnerie continue de retentir pendant
plusieurs secondes si l’appelant raccroche avant que vous ne répondiez. Vous pouvez entendre
une tonalité ou ne pas entendre l’appelant lorsque vous répondez à un appel.
*3 Les mélodies prédéfinies de ce produit sont utilisées avec la permission de © 2006 Copyrights
Vision Inc.
“
NON” est sélectionné, seules la date et l’heure en cours s’affichent.
*4 Si
“
NO.DE COMBINE” est sélectionné alors que le numéro actuel du combiné est 2, “[2]”
Si
s’affiche.
*5 La fonction prise de ligne automatique vous permet de répondre à un appel simplement en
{C}
soulevant le combiné de la base. Il n’est pas nécessaire d’appuyer sur la touche
.
<20>
Page 93

TG7150-7170EX(fr-fr).book Page 21 Wednesday, August 9, 2006 3:44 PM
Réglages horaires
Alarme
Une alarme retentit pendant 3 minutes à l’heure
réglée une seule fois ou tous les jours. Réglez au
préalable l’heure et la date (page 13).
1
{j
/OK} i “PROG. COMBINE” i {>
2
“
PROG. HORLOGE” i {>
3
“
ALARME” i Appuyez 2 fois sur la touche
{>}
.
4
Sélectionnez un mode d’alarme. i {>
NON
UNE SEULE
FOIS
CHAQUE
JOUR
Désactive l’alarme.
Appuyez de nouveau sur la
flèche {>}, puis sur la
touche
terminer.
L’alarme retentit une seule
fois à l’heure réglée. Entrez
le jour et le mois souhaités.
Une alarme retentit tous les
jours à l’heure réglée.
{ih}
}
pour
}
}
Réglages du combiné
5
Entrez l’heure et les minutes souhaitées. i
{j
/OK
}
6
Sélectionnez la sonnerie désirée. i {>
7
“
SAUVEGARDE” i {>} i
Remarque:
L
Pour arrêter l’alarme, appuyez sur n’importe
quelle touche de numérotation.
L
Lorsque l’appareil fonctionne en mode
conversation ou intercommunication, l’alarme
ne retentit qu’après la fin de la communication.
L
Si vous sélectionnez le réglage “UNE SEULE
FOIS
”
, il est remplacé par le réglage “NON”
après le retentissement de l’alarme.
{ih}
}
<21>
Page 94

TG7150-7170EX(fr-fr).book Page 22 Wednesday, August 9, 2006 3:44 PM
Réglages de la base
Réglages de la base
L
Utilisez le combiné pour personnaliser la base.
L
Lors de la personnalisation de la base, le réglage en cours est indiqué par le curseur >.
Pour personnaliser la base :
1
{j
/OK
}
2
Appuyez sur la touche
3
Appuyez sur la touche
de la base.
4
Appuyez sur la touche
5
Appuyez sur la touche
{>}
L
Pour quitter, appuyez sur la touche
Menu des réglages de
la base
VOLUME SONNERIE
OPTIONS D’APPEL DOUBLE-APPEL
AUTRES OPTIONS PIN BASE
i {>}
ou suivez l’instruction affichée dans la colonne de droite du tableau.
{^}
ou
{V}
pour sélectionner “PROG. BASE”. i {>
{^}
ou
{V}
pour sélectionner l’option souhaitée dans le menu des réglages
{^}
ou
{V}
pour sélectionner l’option souhaitée dans le sous-menu. i {>
{^}
ou
{V}
pour sélectionner l’option souhaitée, puis appuyez sur la touche
{ih}
.
Sous-menu Fonction (réglage par défaut)
— Volume de la sonnerie de la base (Moyen)
Modification du délai de rappel (“100 MS”).
Modification du code PIN de la base (“0000”).
– Entrez le code PIN actuel à 4 chiffres de la
base.
i
Entrez le nouveau code PIN à 4 chiffres de
la base.
i {j
/OK
}
MODE REPETEUR
(“NON”): page 26
}
}
*1
*2
*1 Modifiez, si nécessaire, le délai de rappel en fonction des critères de votre fournisseur de
services/compagnie de téléphone ou de votre central téléphonique.
*2 Si vous modifiez le code PIN, prenez soin d’inscrire votre nouveau code PIN. L’appareil ne vous le
donnera pas. Si vous avez oublié votre code PIN, consultez le centre de services Panasonic le plus
proche.
<22>
Page 95

TG7150-7170EX(fr-fr).book Page 23 Wednesday, August 9, 2006 3:44 PM
Identification des appels en attente
Utilisation du service
d’identification des appels
Important:
L
Cet appareil est compatible avec la fonction
d’identification des appels. Pour utiliser les
fonctions d’identification des appels (comme
l’affichage du numéro de téléphone de
l’appelant), vous devez vous abonner à un
service d’identification des appels. Pour plus
d’informations, contactez votre fournisseur de
services/compagnie de téléphone.
Service d’identification des appels
Lorsqu’un appel extérieur est reçu, le numéro de
téléphone de l’appelant s’affiche.
L
Les numéros de téléphone des 50 derniers
appelants sont enregistrés dans la liste des
appelants.
L
Lorsque des informations sur un appelant sont
reçues et correspondent à un numéro de
téléphone enregistré dans le répertoire de
l’appareil, son nom s’affiche et est enregistré
dans la liste des appelants.
L
Si l’appareil est relié à un central téléphonique,
vous risquez de ne pas recevoir les
informations des appelants.
L
Si le correspondant appelle d’une zone non
couverte par le service d’identification des
appels, le message “HORS ZONE” s’affiche.
L
Si le correspondant ne souhaite divulguer
aucune information le concernant, aucune
“
information n’apparaît ou le message
”
PROTEGE
Appels manqués
Si vous ne répondez pas à un appel, l’appareil le
considère comme manqué. Le nombre d’appels
manqués s’affiche à l’écran. Cela vous permet de
savoir si vous devez afficher la liste des
appelants pour voir qui a appelé pendant votre
absence.
s’affiche.
APPEL
Ce service est assuré par votre fournisseur de
services/compagnie de téléphone et ne
fonctionnera que si vous vous y êtes abonné.
Pour plus de détails sur ce service, contactez
votre fournisseur de services/compagnie de
téléphone.
■
l’Allemagne/l’Autriche :
Lorsque vous entendez un signal d’appel en
attente pendant votre conversation, les
informations du second correspondant
s’affichent. Vous pouvez répondre au second
appel en appuyant sur la touche
appelant sera mis en attente. Appuyez de
nouveau sur la touche {R} pour revenir à votre
premier correspondant.
■
la France/l’Espagne/la Grèce/la Belgique/
la Suède :
Lorsque vous entendez un signal d’appel en
attente pendant votre conversation, les
informations du second correspondant
s’affichent. Vous pouvez répondre au second
appel en mettant votre premier correspondant en
attente.
Annonce de l’identification des appels
Lorsque vous recevez un appel externe
disposant d’informations sur le numéro de
téléphone, le combiné annonce le numéro de
téléphone affiché depuis le haut-parleur du
combiné.
L
L
L
L
Service d’identification des appels
{R}
. Le premier
Pour l’annonce du numéro de téléphone de
l’appelant externe, vous devez préalablement
vous abonner à un service d’identification des
appels. Pour plus d’informations, contactez
votre fournisseur de services/compagnie de
téléphone.
Lorsque vous recevez un appel pendant une
conversation, le numéro de téléphone du 2e
correspondant n’est pas annoncé, même si
vous êtes abonné aux services d’identification
des appels et d’identification des appels en
attente.
L’annonce s’effectue au même volume que la
sonnerie (page 19).
Cette fonction peut être activée ou désactivée
(page 14).
<23>
Page 96

TG7150-7170EX(fr-fr).book Page 24 Wednesday, August 9, 2006 3:44 PM
Service d’identification des appels
2
Appuyez sur la flèche
Liste des appelants
Affichage de la liste des appelants et
afficher l’entrée souhaitée.
3
“
4
Poursuivez à l’étape 3, “Ajout d’entrées au
répertoire du combiné”, page 17.
rappel
1
{j
/OK} i “LISTE APPELANTS” i {>
2
Appuyez sur la flèche
partir de l’appel le plus récent ou sur la flèche
{^}
pour rechercher à partir de l’appel le plus
ancien.
L
Si vous avez déjà affiché ou répondu à
l’appel, le symbole “
l’opération a été effectuée à l’aide d’un
autre combiné.
3
{C}
/
{s}
{V}
pour rechercher à
Q
” s’affiche, même si
Modification du numéro de téléphone
d’un appelant avant de le rappeler
1
{j
/OK} i “LISTE APPELANTS” i {>
2
Appuyez sur la flèche
afficher l’entrée souhaitée.
3
{j
/OK} i “MODIF. ET APPEL” i {>
4
Modifiez le numéro.
L
Appuyez sur la touche de numérotation
{0}
à {9}) pour ajouter, et sur la touche
(
{C/T} pour supprimer.
5
{C}
/
{s}
{^}
ou
{V}
pour
}
Service de messagerie
vocale
La messagerie vocale est un service de
répondeur automatique offert par votre
fournisseur de services/compagnie de
téléphone. Si vous vous abonnez à ce service, la
messagerie vocale de votre fournisseur de
services/compagnie de téléphone répondra aux
appels lorsque vous êtes dans l’impossibilité de
le faire ou lorsque la ligne est occupée. Les
messages sont enregistrés par votre fournisseur
de services/compagnie de téléphone, et non par
}
votre téléphone.
Si vous avez de nouveaux messages,
s’affiche sur le combiné. Pour plus de détails sur
}
ce service, veuillez contacter votre fournisseur de
services/compagnie de téléphone.
Remarque:
L
Si 0 reste affiché même après que vous
avez écouté les nouveaux messages,
désactivez le service en maintenant la touche
{C/T} appuyée pendant 2 secondes.
Effacement des informations des
appelants
1
{j
/OK} i “LISTE APPELANTS” i {>
2
Appuyez sur la flèche
afficher l’entrée souhaitée.
3
“
EFFACER” i {>
L
Pour effacer toutes les entrées,
sélectionnez
4
“
OUI” i {>} i
{^}
ou
}
“
EFFACER TOUT”. i {>
{ih}
{V}
pour
i {j
/OK
}
}
}
{^}
ou
i {j
AJOUT. REPERT.” i {>
{V}
}
pour
/OK
0
}
Mémorisation des informations des
appelants dans le répertoire du
combiné
1
{j
/OK} i “LISTE APPELANTS” i {>
<24>
}
Page 97

TG7150-7170EX(fr-fr).book Page 25 Wednesday, August 9, 2006 3:44 PM
3
Utilisation d’appareils
supplémentaires
Combinés supplémentaires
Vous pouvez enregistrer jusqu’à 6 combinés par
base.
Important:
L
Le modèle de combiné supplémentaire
recommandé pour être utilisé avec cet appareil
est présenté à la page 6. Si un autre modèle
est utilisé, certaines opérations (réglages du
combiné, réglages de la base, etc.) peuvent ne
pas être disponibles.
L
Des combinés supplémentaires vous
permettent d’avoir, par exemple, un appel
d’intercommunication avec un autre combiné
pendant qu’un troisième est en communication
avec l’extérieur.
Remarque:
L
L
L
L
Mode utilisation multipostes
Replacez le combiné supplémentaire sur la
base. La tonalité d’enregistrement continue
à retentir. Le combiné toujours sur la base,
attendez qu’une tonalité de confirmation
w
retentisse et que
Si une tonalité d’erreur retentit ou si w
continue à clignoter, enregistrez le combiné
manuellement (enregistrement manuel ; page
25).
Si tous les combinés enregistrés commencent
à sonner à l’étape 2, appuyez sur la touche
{x}
pour arrêter. Recommencez à l’étape 1.
Chargez les batteries de votre combiné
supplémentaire pendant environ 7 heures
avant la première utilisation.
Cette méthode d’enregistrement ne fonctionne
pas pour les combinés qui ont déjà été
enregistrés sur la base. Dans ce cas,
enregistrez le combiné manuellement
(enregistrement manuel ; page 25).
arrête de clignoter.
Enregistrement d’un
combiné sur la base
Le combiné et la base inclus sont préenregistrés.
Si pour une raison quelconque le combiné n’est
pas enregistré sur la base (par exemple, w
clignote même lorsque le combiné est à proximité
de la base), enregistrez-le manuellement (page
25).
Pour enregistrer un combiné supplémentaire
sur la base (enregistrement simple)
Après l’acquisition d’un combiné supplémentaire,
enregistrez-le sur la base. Vérifiez que ce
combiné est sous tension. S’il ne l’est pas,
{ih}
appuyez sur la touche
enfoncée pendant quelques secondes.
1
Décrochez le combiné supplémentaire et
appuyez sur la touche
combiné en mode veille.
2
Appuyez sur la touche
maintenez-la enfoncée pendant environ 3
secondes jusqu’à ce que la tonalité
d’enregistrement retentisse.
et maintenez-la
{ih}
pour mettre le
{x}
de la base et
Pour enregistrer un combiné sur la base
(enregistrement manuel)
Vous pouvez enregistrer manuellement un
combiné sur la base, de la manière suivante.
1
{j
/OK} i “PROG. COMBINE” i {>
2
“
INSCRIPTION” i {>
3
“
INSCRIP.COMBINE” i {>
4
Appuyez sur la touche
maintenez-la enfoncée pendant environ 3
secondes jusqu’à ce que la tonalité
d’enregistrement retentisse.
L
Si tous les combinés enregistrés
commencent à sonner, appuyez sur la
touche
{x}
pour arrêter, puis
recommencez cette étape.
L
Après avoir appuyé sur la touche
vous devez exécuter le reste de cette
procédure en 1 minute.
5
Attendez que le message “ENTRER PIN
”
s’affiche, entrez le code PIN de la
BASE
base (par défaut :
la touche
L
{j
/OK}.
Lorsque le combiné est enregistré, w
arrête de clignoter. Si les bips de touche
}
}
{x}
de la base et
“
0000”), puis appuyez sur
{x}
}
,
<25>
Page 98

TG7150-7170EX(fr-fr).book Page 26 Wednesday, August 9, 2006 3:44 PM
Mode utilisation multipostes
sont activés (page 19), une tonalité de
confirmation se fait entendre.
Annulation d’un combiné
6 combinés maximum peuvent être enregistrés
sur la base. Un combiné peut annuler son propre
enregistrement (ou celui d’un autre combiné)
mémorisé dans la base. Cette fonctionnalité
permet à la base “d’oublier” le combiné.
1
{j
/OK} i “PROG. BASE” i {>
2
Entrez “335”.
3
“
ANNUL. COMBINE” i {>
L
Les numéros de tous les combinés
enregistrés sur la base s’affichent.
4
Sélectionnez le ou les combinés à annuler en
appuyant sur le numéro de combiné
souhaité.
L
Le ou les numéros de combinés
sélectionnés clignotent.
L
Pour annuler un numéro de combiné
sélectionné, appuyez de nouveau dessus.
Le numéro arrête de clignoter.
5
{j
/OK} i “OUI” i {>
L
Un bip prolongé retentit en même temps
que les numéros de combiné
disparaissent.
L
Le combiné n’émet aucun bip au moment
de l’annulation de son propre
enregistrement.
6
{ih}
}
}
}
Augmentation de la zone de
couverture de la base
Vous pouvez augmenter la zone de couverture
du signal de la base à l’aide d’un répétiteur
DECT. Utilisez uniquement le répétiteur DECT
Panasonic présenté à la page 5. Pour plus
d’informations, contactez votre revendeur
Panasonic.
Important:
L
Avant d’enregistrer le répétiteur sur la base,
vous devez activer le mode répétiteur.
L
N’utilisez pas plus d’un répétiteur à la fois.
Réglage du mode répétiteur
1
{j
/OK} i “PROG. BASE” i {>
<26>
}
2
“
AUTRES OPTIONS” i {>
3
“
MODE REPETEUR” i {>
4
“
OUI” ou “NON” i {>} i
Remarque:
L
Après avoir activé ou désactivé le mode
w
répétiteur,
combiné. C’est normal. Vous pouvez utiliser le
combiné une fois que w ne clignote plus.
clignote momentanément sur le
}
}
{ih}
Intercommunication entre
combinés
Les appels d’intercommunication peuvent être
passés entre différents combinés.
Exemple:
1
2
3
Le combiné 1 appelle le combiné 2
Combiné 1 :
{
INT} i Appuyez sur la touche {2}
(numéro de combiné souhaité).
Combiné 2 :
Appuyez sur la touche
répondre.
A la fin de la conversation, appuyez sur la
{ih}
touche
{C}
/
{s}
pour
.
Transfert d’appels entre
combinés
Les appels extérieurs peuvent être transférés
entre 2 personnes.
Exemple:
combiné 2
1
2
Le combiné 1 transfère un appel au
Combiné 1 :
Lors d’une communication avec l’extérieur,
{
appuyez sur la touche
sur la touche
souhaité).
L
L’appel externe est mis en attente.
L
Si vous n’obtenez pas de réponse,
appuyez sur la touche
reprendre l’appel externe.
Combiné 2 :
Appuyez sur la touche
répondre à l’appel.
{2}
INT}. i Appuyez
(numéro de combiné
{
INT} pour
{C}
/
{s}
pour
Page 99

TG7150-7170EX(fr-fr).book Page 27 Wednesday, August 9, 2006 3:44 PM
L
Le combiné 2 peut parler avec le combiné
1.
3
Combiné 1 :
Pour terminer le transfert d’appel, appuyez
{ih}
sur la touche
Transfert d’un appel sans parler à l’utilisateur
de l’autre combiné
1
Lors d’une communication avec l’extérieur,
appuyez sur la touche
sur le numéro de combiné souhaité.
Lk clignote pour indiquer que l’appel
externe est en attente.
2
{ih}
L’appel externe sonne sur l’autre combiné.
L
Remarque:
L
Si l’utilisateur de l’autre combiné n’a pas
répondu à l’appel après 1 minute, l’appel
retentit de nouveau sur votre combiné.
.
{
INT}. i Appuyez
Copie d’entrées du répertoire
Vous pouvez copier des entrées de répertoire du
combiné sur le répertoire d’un autre combiné
Panasonic compatible.
Copie d’une entrée
1
2
3
4
Mode utilisation multipostes
Recherchez l’entrée du répertoire du
combiné qui vous intéresse (page 17).
{j
/OK
}
“
COPIER” i {>
Entrez le numéro du combiné vers lequel
vous voulez envoyer l’entrée du répertoire.
L
Une fois une entrée copiée, “TERMINE”
s’affiche.
L
Pour continuer avec la copie d’une autre
entrée :
“
OUI” i {>} i Recherchez l’entrée
du répertoire du combiné qui vous
intéresse.
{ih}
}
i {>}
i
Copie de toutes les entrées
1
{k} i {j
2
“
COPIER TOUT” i {>
3
Entrez le numéro du combiné vers lequel
vous voulez envoyer l’entrée du répertoire.
L
Une fois toutes les entrées copiées,
“
TERMINE” s’affiche.
4
{ih}
/OK
}
}
<27>
Page 100

TG7150-7170EX(fr-fr).book Page 28 Wednesday, August 9, 2006 3:44 PM
Informations utiles
Utilisation du clip ceinture
Fixation du clip ceinture
Retrait du clip ceinture
Utilisation du porte-combiné
Le porte-combiné permet d’avoir des
conversations en mains-libres.
Fixation du porte-combiné
Fixez préalablement le clip ceinture au combiné
(page 28). Faites glisser le porte-combiné dans le
clip ceinture jusqu’au clic.
Remarque:
L
Si la base est montée sur un mur, vous devez
retirer le porte-combiné avant de charger le
combiné.
Retrait du porte-combiné
L
Le modèle illustré est le KX-TG7150.
<28>
 Loading...