

Page 1

Quick Reference Guide
Model No. KX-T7710
Important Information
When using the KX-T7710, keep the following conditions in mind.
• If there is any problem, unplug the extension line and connect a known working phone.
If the known working phone operates properly, have the defective phone repaired.
If the known working phone does not
operate properly, check the Panasonic KX series Business Telephone System and the
internal extension wiring.
• Keep the unit away from heating appliances and electrical noise generating devices
such as fluorescent lamps and motors.
• The unit should be kept free of dust, moisture and vibration, and should not be exposed
to direct sunlight.
• Do not use thinner, or any abrasive powder to clean the cabinet. Wipe it with a
soft cloth.
• Do not disassemble this product. Dangerous electrical shock could result. The unit
must only be disassembled and repaired by qualified service technicians.
• Do not use any handset other than a Panasonic handset.
• The apparatus is designed to be installed and operated under controlled conditions of
ambient temperature and a relative humidity not greater than 60%.
• Avoid installing the apparatus in damp or humid environments, such as in bathrooms or
near swimming pools.
• 999 and 112 can be dialled on the apparatus after accessing the exchange line for the purpose
of making outgoing calls to the BT emergency (999) and (112) services.
WARNING:
TO PREVENT THE RISK OF FIRE OR ELECTRIC SHOCK, DO NOT EXPOSE THIS PRODUCT
TO RAIN OR ANY TYPE OF MOISTURE.
THIS HANDSET EARPIECE IS MAGNETISED AND MAY RETAIN SMALL FERROUS OBJECTS.
IMPORTANT NOTICE:
This product is designed for use in the U.K.
Note:
In this manual, the suffix of each model number is omitted.
2003 Panasonic Communications Co., Ltd. All Rights Reserved.
Page 2
Features List
Off-hook On-hook Feature number
Talk
* The Feature numbers described in this manual are for the Panasonic Hybrid IP-PBX
KX-TDA100/KX-TDA200. If you are connected to a different Panasonic KX series Business
Telephone System, please refer to its manuals.
* "Location of Controls" is shown on page 5.
Desired Function
Operation
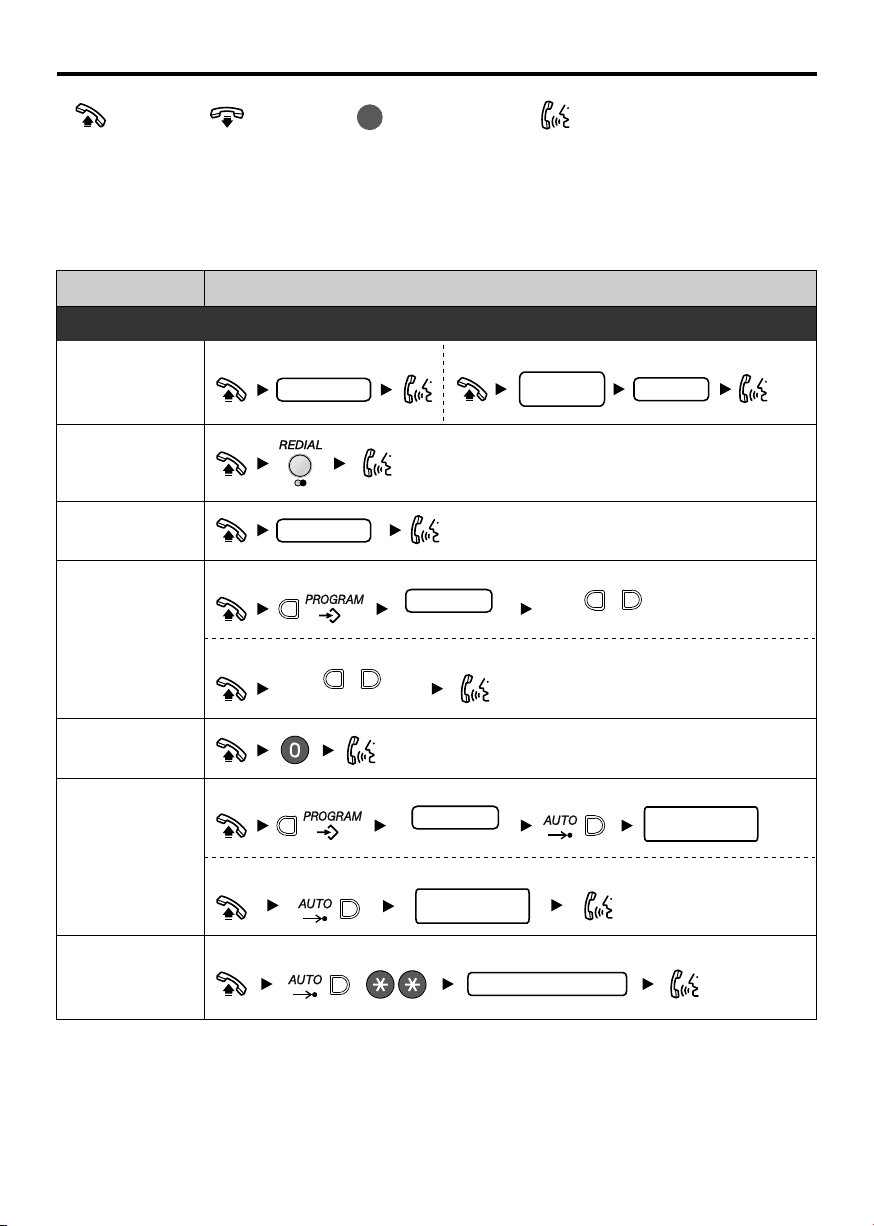
Making Calls
To an extension To an external party
Calling
Redial
Quick Dialling
One-touch
Dialling
extension no.
The REDIAL will dial the last number you called manually.
quick dial no.
To store
desired no.
(max., 22 digits)
To dial
line access
no.
/
Press One-touch button.
phone no.
/
Press One-touch button.
Calling an
operator
Station Speed
Dialling
System Speed
Dialling
To store
To dial
To dial
/
desired no.
(max., 22 digits)
Station speed
dial no. (0-9)
System speed dial no.
– 2 –
Station speed
dial no. (0-9)
Page 3

Features List
Desired Function
Message
Waiting
Holding a call
Transferring
a call
Paging
Operation
When the Dialled Extension is Busy/No Answer
To leave/cancel a notification
Sender
To call back
Receiver
Leave
Cancel
* In Normal Mode, you should change
the default setting to " 702" for
Message button. (See page 4.)
extension no.
During a Conversation
Holding To retrieve a call at the holding extension
dial no.
Announce.
Useful Features
To page
group no.
To answer a page
Announce.
Three-party
Conference
Locking your
extension
During a conversation
desired phone no.
To lock
To unlock
Useful Features
lock code
– 3 –
Page 4

Operations in NORMAL Mode
One-touch buttons
Five One-touch buttons can be used as speed dialling buttons or to access a features.
Station Speed Dialling
You can store up to 10 Station speed dial numbers.
MESSAGE Button
You can change the feature access number for the MESSAGE Button. [Default: 702]
For more detail, refer to the manual for the connected Panasonic KX series Business
Telephone Systems.
desired no.
(max., 22 digits)
Setting Lock/Unlock
You can lock the settings for one-touch buttons and MESSAGE button. [Default: Unlock]
To lock
To unlock
Confirmation in Programming Mode
When programming, you can confirm your entry by three types of beep sound.
• One long beep: Your entry is accepted.
• Two beeps: Your entry is same as a previous entry.
• Three beeps: Your entry is rejected.
Memory Back Up
If the telephone line is disconnected for more than three days, the stored numbers
for One-touch dialling and Speed dialling will be erased. Please store them again.
Also, the settings for MESSAGE and Flash time will return to the default settings.
Flash Time
Before programming the length of Flash time, make sure the position of the Mode
switch lever is "NORMAL". Enter the appropriate selection number for your country.
selection no.
1: 80 ms, 2: 90 ms, 3: 100 ms,
4: 110 ms,
Regarding other operations, please refer to the manuals
for the Panasonic KX series Business Telephone System
to which you are connected.
Printed in Japan
– 4 –
PSQW2002ZA KK0103DH0 (E)
Page 5

Location of Controls
The KX-T7710 has two modes, NORMAL Mode and Panasonic PBX Mode*.
Please use the corresponding side of the Telephone Card depending on the mode.
*The PBX Mode may not be available depending on the model of the Panasonic KX series Business
Telephone Systems to which you are connected.
For more detail, please consult your dealer.
PBX ModeNORMAL Mode
Message/Ringer Lamp: Flashes when you receive a call or when
someone has left you a message.
NORMAL mode
PBX mode
4
3
2
1
One-touch Buttons (M1-M5): Used to
access a feature or as a speed
dialling button.
PAUSE: Used to insert a pause when
storing a telephone number.
AUTO: Used for Station Speed dialling.
PROGRAM: Used to enter the
programming mode.
MESSAGE: Used to call back the party who left the message
waiting indication.
Handset Volume Control Buttons: Used to adjust the handset volume.
FLASH/RECALL: Used to send a recall signal in order to access a
8
7
6
5
PBX feature (eg., Hold, Transfer, or Three-party Conference).
REDIAL: Used to redial the last dialled number.
Telephone Card: Has two sides (NORMAL mode, PBX mode).
One-touch Buttons
(1-8): Used as preset
feature buttons
set at the
Panasonic
KX series Business
Telephone System
; you
do not need to program
at your extension.
Confirming the Mode
You can confirm the current mode by the position of the Mode switch
lever (at the bottom of the unit). [Default: NORMAL]
Adjusting the RINGER Volume
Adjust the RINGER volume selector lever (at the bottom of the unit) to
the desired setting. ( – LOW, – MIDDLE, – HIGH)
[Default: MIDDLE]
Connecting a Communication Device
To connect a communication device such as a computer modem
to the telephone line, please use the DATA PORT (at the right
side of the unit). RJ11 modular jack.
– 5 –
DATA PORT
Page 6

Telephone
line cord
Wall
mounting
adaptor
Things You Should Know
Wall Mounting
1
3
Removing the Telephone Card Cover
1 2
2
To temporarily
place the handset
down during a
conversation:
This product is intended to be connected to Panasonic KX series Business Telephone
Systems only.
We, Panasonic Communications Co., Ltd., declare that this equipment is in compliance with
the essential requirements and other relevant provisions of Directive 1999/5/EC.
If you want to get a copy of the original Declaration of Conformity of our products which
relates to the R&TTE, please use our web site: http://www.panasonic-tc.de
– 6 –
 Loading...