

Page 1
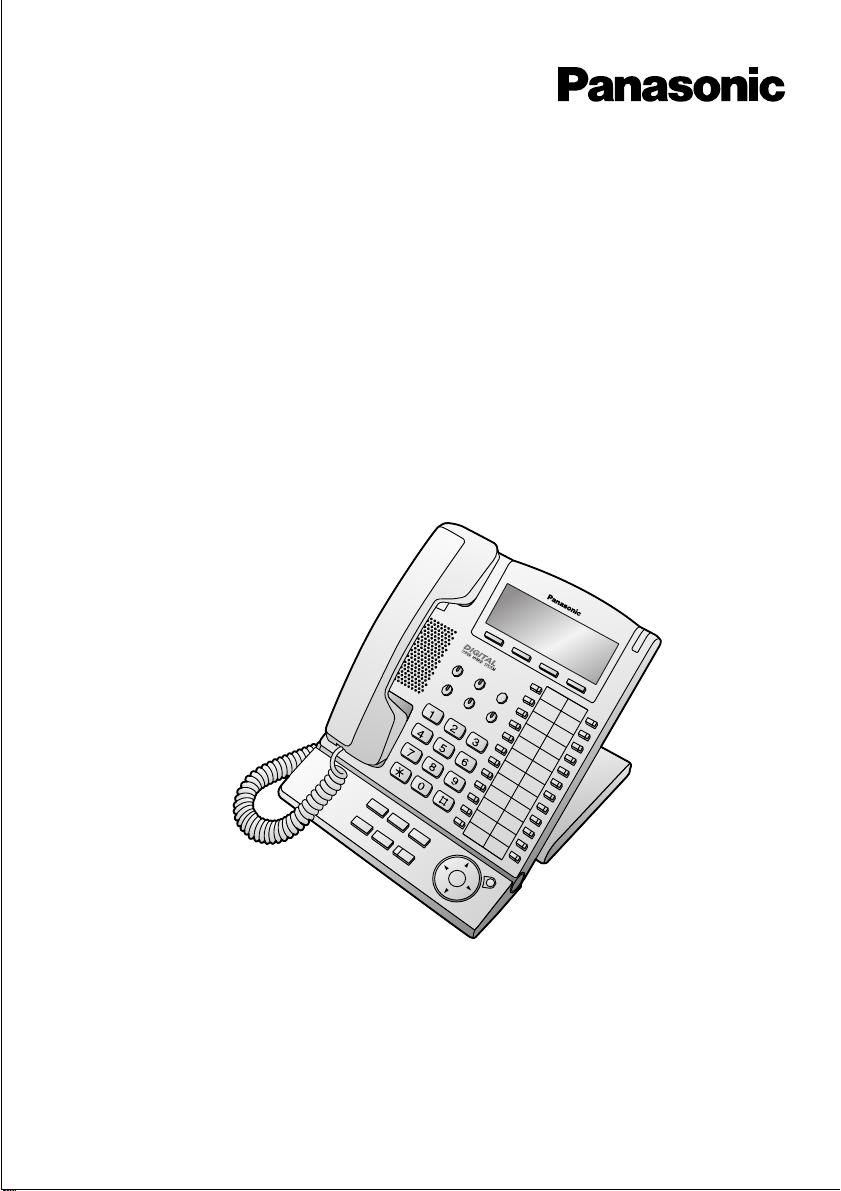
Digital Proprietary Telephones
for Hybrid IP PBX
Operating Instructions
Model No.
KX-T7625
KX-T7630
KX-T7633
KX-T7636
KX
-
T
7636
CONF
FWD/DND
INTERCOM
PAUSE
AUTO ANSWER
MUTE
ABC
STORE
GHI
DEF
JKL MNO
TUV
WXYZPQRS
OPER
MESSAGE
REDIAL
FLASH/
RECALL
TRANSFER
HOLD
SP
-
PHONE
3
2
1
ENTER
AUTO DIAL
4
CANCEL
12
11
24
10
23
9
22
8
21
7
20
6
19
5
18
17
16
15
14
13
KX-T7636
Please read this Operating Instructions before using and save for future reference.
This manual is designed to be used with your Proprietary Telephone and a Panasonic
KX-TDA200/100.
Page 2
Before Initial Use
Thank you for purchasing a Panasonic Digital Proprietary Telephone.
Please read IMPORTANT SAFETY INSTRUCTIONS on page XX before use.
Read and understand all instructions.
When you ship the product
Carefully pack and send it prepaid, adequately insured and preferably in the original
carton. Attach a postage-paid letter, detailing the symptom to the outside of the carton.
DO NOT send the product to the Executive or Regional Sales offices. They are NOT
equipped to make repairs.
Product service
Panasonic Servicenters for this product are listed in the servicenter directory. Consult
your authorized Panasonic dea ler for detailed instructions.
Helpful hints for the handsfree operation
• If the other party has difficulty hearing you:
Lower the speaker volume.
• Absorbing echoes:
Use this unit in a room which has curtains and/or carpeting.
• To avoid missing part of the conversation:
If you and the other party speak at the same time, parts of your conversation will be
lost. To avoid this, speak alternately.
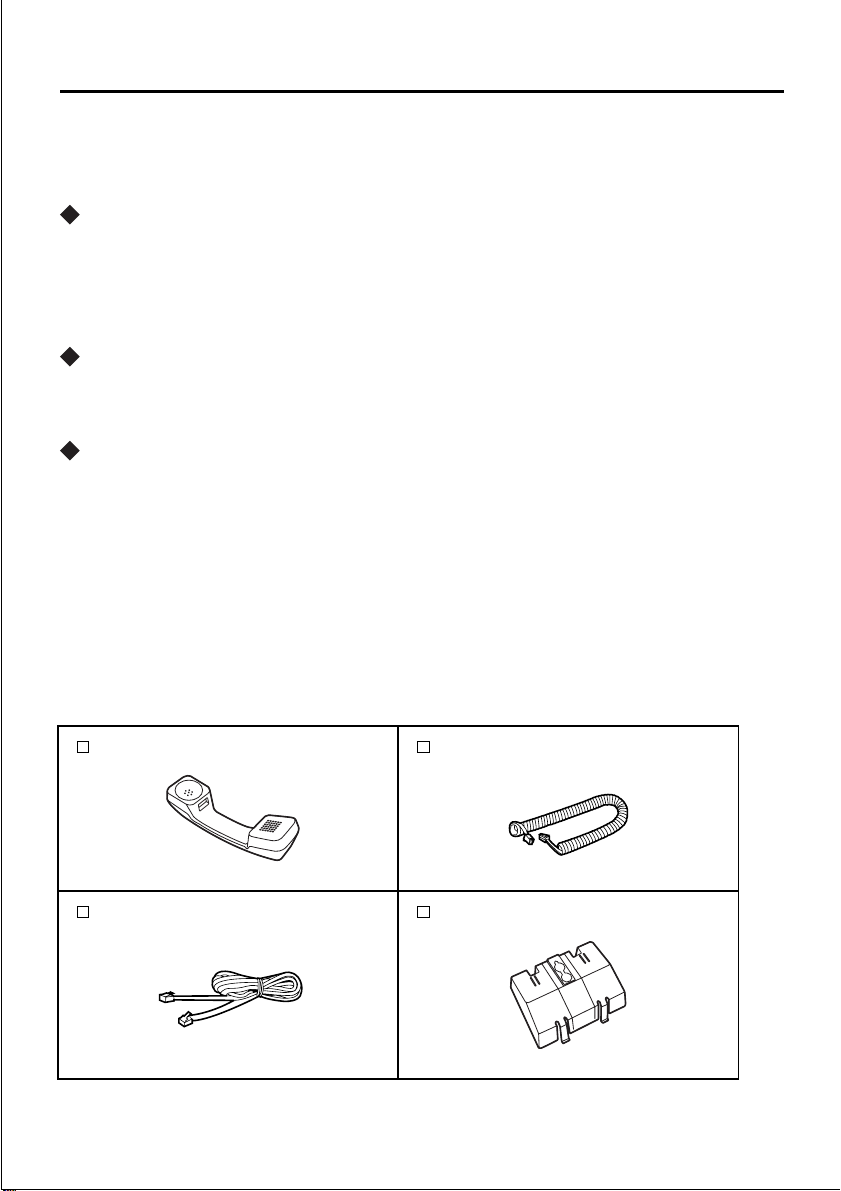
Accessories (included)
Handset
Telephone Line Cord
2
For extra orders, call toll free 1-800-332-5368
Handset Cord
One
Wall Mounting Plate
One
One
One
Page 3

Table of Contents
Before Initial Use ...................................................................................2
Before Operating the Telephones ................... ...................... .. ............4
Location of Controls ......................................................................................4
Connection ................................................................... ................................. 6
Tilt Angle Adjustment .................................................................................... 6
Setting .......................................................................... ................................. 7
Making Call s ........... .. ............................... .. ................ .. ................ .. .. ......8
Calling Another Extension .............................................................................8
Calling an Outside Party ............................................................................... 8
Receiving Calls ......................................................................................9
Answering Calls ............................................................................................ 9
During a Conversation .................................................... .. ..................10
Transferring a Call .......................................................................................10
Holding a Call ........................ ....... ...... ....... ...... ....... ...... ....... ...... .................. 11
Using the Display Proprietary Telephone .........................................12
Incoming Call Log ....................................................................................... 12
Outgoing Call Log ....................................................................................... 13
Using the Directories ................................................................................... 14
Entering Characters .................................................................................... 15
Accessing the System Features ..................................................................15
Other Operations .................................................................................16
Personal Programming .......................................... .. ...........................19
Wall Mounting ......................................................................................20
Installing the KX-T7601/KX-T7603 ..................................... ................21
KX-T7601 ..................................................................... ............................... 21
KX-T7603 ..................................................................... ............................... 21
Important Safety Instructions ............................................................22
FCC and Othe r In fo r m a t io n ....... .. ................ .. ............... ... ............... .. ..23
3
Page 4
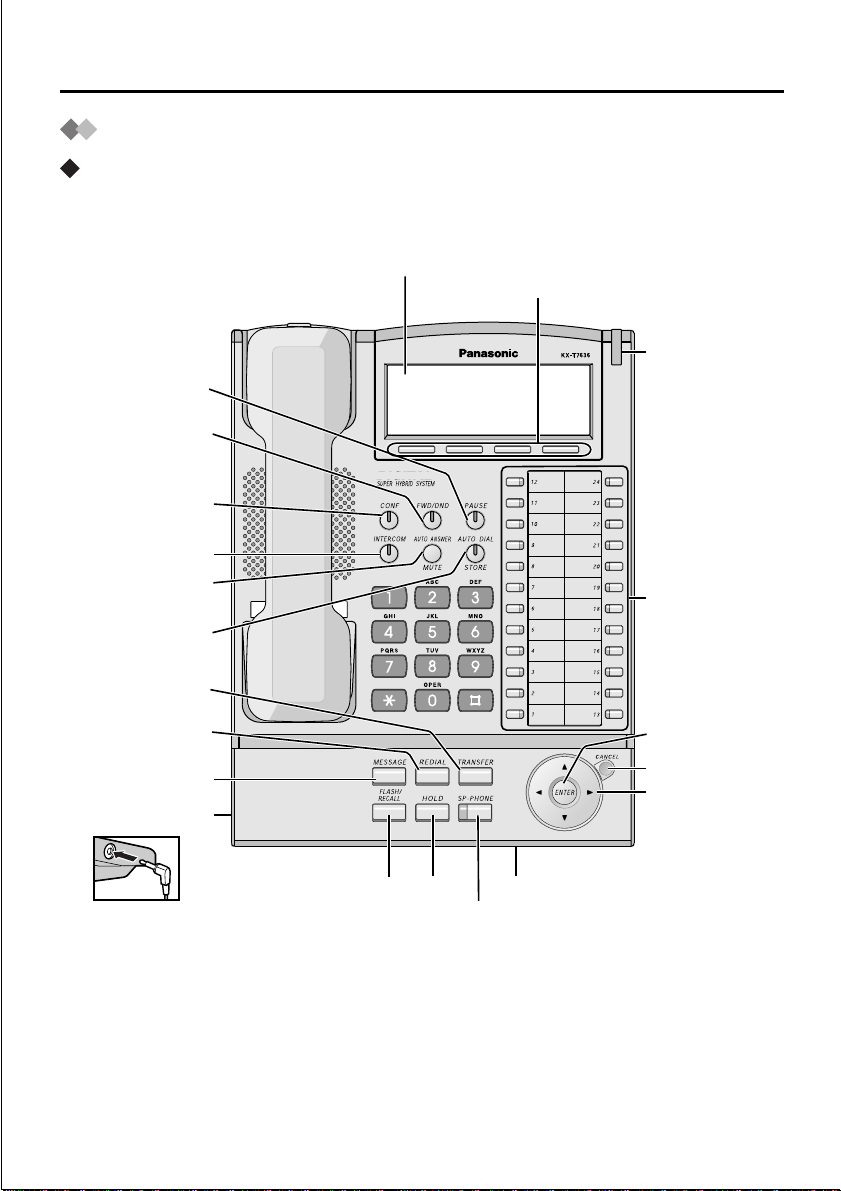
Before Operating th e Telephones
Location of Controls
KX-T7636
PAUSE
FWD/DND
(Call Forwarding
/Do Not Disturb)
CONF
(Conference)
INTERCOM
AUTO ANSWER
/MUTE
AUTO DIAL
/STORE
TRANSFER
REDIAL
MESSAGE
Headset Jack
LCD (Liquid Crystal Display)
Soft Buttons
(S1 through S3)
MessagecumRinging
Lamp
Flexible
Outside
(CO) Line
Buttons
ENTER
CANCEL
Navigator Key
FLASH/
RECALL
HOLD
Microphone
SP-PHONE
(Speakerphone)
4
Page 5

Before Operating the Telephones
R
L
AUTO ANSWE
MUTE
AUTO DIA
STORE
CANCEL
CONF
ENTER
FLASH/
RECALL
(CO)
AUTO ANSWER/MUTE
Used to receive an incoming call in
the hands-free mod e or m u te the
microphone du ring a co nversation.
AUTO DIAL/STORE
Used fo r Syst em Speed Diall ing or
storing programme changes.
CANCEL
Used to cancel the selected item.
PROGRAM (KX-T7625 only)
Used to enter and exit the
Personal Programming mode.
CONF (Conference)
Used to establish a mu ltip le party
conversation.
ENTER
Used to confirm the selected item.
FLASH/RECALL
Used to disconne ct the curr ent call
and make another call without
hanging up.
Flexible Outside (CO) Line
Button
Used to make or receive an
outside call. Pressing this button
seizes an idle outside line
automatically. (Button assignment
is required.)
Also used as th e desired function
buttons. (Button assignment is
required.)
HOLD
INTERCOM
MESSAGE
ENTER
VOLUME
PAUSE
REDIAL
HOLD
Used to place a call on hold.
INTERCOM
Used to make or receive an
intercom call.
MESSAGE
Used to leave a message waiting
indication or call back the party
who left the message waiting
indication.
Navigator Key
Used to adjust the volume and the
display contrast or select desired
items for each function.
MESSAGE-cum-RINGER LAMP:
When you receive a call or
someone has left you a message,
the lamp will flash.
Volume Key (KX-T7625 only)
Used to adjust the volume.
PAUSE
Used to insert a pause during
dialling. Used as the PROGRAM
button if it is not equipped.
REDIAL (ordinarily)
Used to redial.
Soft
Used to perform a function or
operation appe aring on the bottom
line of the display.
FWD/DND (Call Forwarding/Do
Not Disturb)
FWD/DND
Used to perf orm Call F o rwarding
or Do Not Disturb.
SP-PHONE
TRANSFER
SP-PHONE
Used for the handsfree operation.
TRANSFER
Used to transfer a call to another
party.
5
Page 6
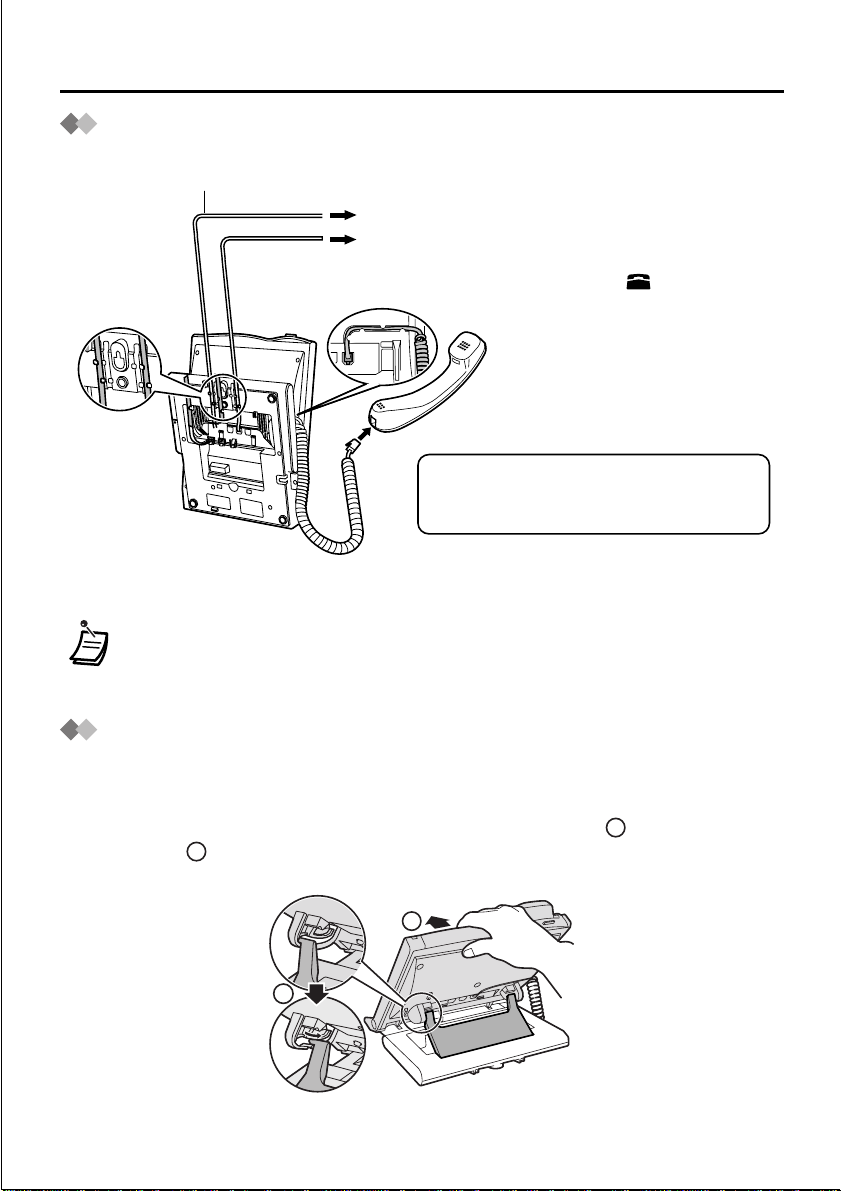
Before Operating the Telephones
Connection
The telephone line cord (included)
Connect to a Digital Hybrid IP PBX ( )
Connect to a digital proprietary telephone
for DXDP, or a single line telephone for XDP,
or a standard telephone jack ( ).
CAUTION
Ensure the cord is inserted in the groove
to prevent damage to the connector.
< Back view>
• Consult your dealer for more details about DXDP and XDP.
PABX
TO MAIN UNIT
TO TEL
Tilt Angle Adjustment
The tilt angle of the operation board can be adjusted.
To lift : Lift up the operation board.
To set down : Lift up the operation board until the hook knobs clic k ( ), then press down
2
().
1
2
6
1
Page 7
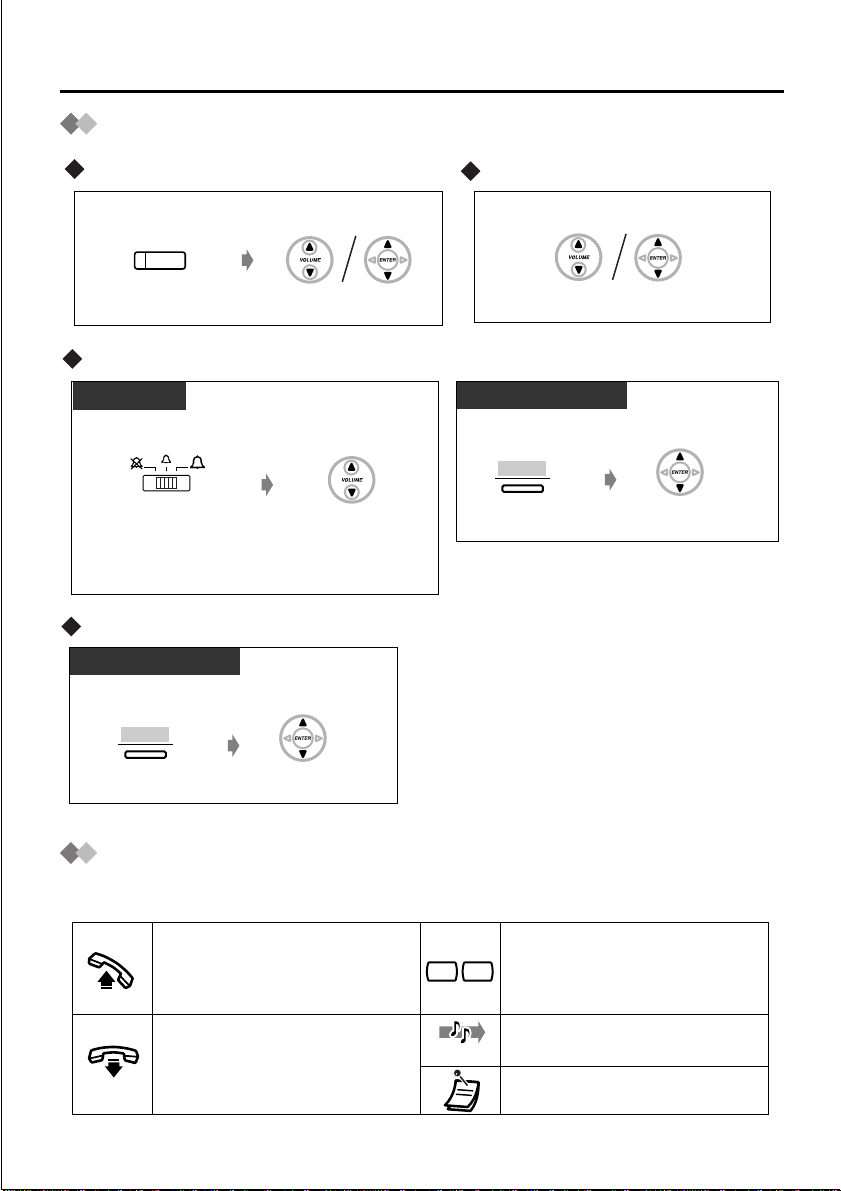
Setting
Before Operating the Telephones
Speaker volume
While in on-hook or during a conversation
SP-PHONE
Press SP-PHONE.
Press Up or Down.
Ringer volume
KX-T7625
While in on-hook or receiving a call
RINGER
Slide the lever of the
RINGER Volume Selector
to the desired setting
(OFF/ON).
If "ON" is selected,
press Up or Down.
Display contrast
KX-T7630/33/36
While in on-hook or receiving a call
CONT
Handset/Headset volume
While using a handset or headset
Press Up or Down.
KX-T7630/33/36
While in on-hook or receiving a call
RING
Press Up or Down.Press "RING".
Press "CONT".
Press Up or Down.
Icon Descriptions
The following icons show you the feature availability, note and action to use the features.
Off-hook (One of the following):
• Lift the handset.
• Press the SP-PHONE button.
• Press TALK button.
Off-hook (One of the following):
• Hang up.
• Press the SP-PHONE button.
• Press CANCEL button.
X Y
C.Tone
Press the desired number keys
on the telephone.
You will hear a confirmation tone.
Note
7
Page 8

Making Calls
Calling Another Extension
extension no.
Off-hook.
Calling an Outside Party
(CO)
Off-hook.
button.
Talk.Dial extension number.
outside
phone no.
Dial outside phone
number.
Talk.Press an idle CO
8
Page 9

Answering Calls
Receiving Calls
Off-hook.
Select one of the following methods:
· Lift the handset to receive the preferred line.
(Default: Ringing line is selected.)
· Press the SP-PHONE button.
· Press the flashing CO, INTERCOM or G-DN button directly.
Talk.
9
Page 10

During a Conversation
Transferring a Call
Transferring to an extension
extension no.
C.Tone
Off-hook.
Transferring to an outside party
Talk.Dial extension number.
outside
phone no.
Dial outside phone
number.
Talk.Press an idle
Off-hook.
C.Tone
(CO)
CO button.
• You can transfer a held call without talking by going on-hook.
If a call is not retrieved within a specified time, you will hear an alarm as a
reminder.
• To return to the held call before the destination answers,
press the TRANSFER button, corresponding CO, G-DN or INTERCOM button.
10
Page 11

Holding a Call
To hold
HOLD
C.Tone
Press HOLD.
To retrieve
At the holding extension
During a Conversation
On-hook.
Off-hook.
(CO) (G-DN)
Press flashing CO/INTERCOM/G-DN.
INTERCOM
Talk.
For an outside call from another extension
Off-hook.
(CO)
Press flashing CO.
C.Tone
Talk.
For an outside call from another extension
Off-hook.
5 1
Enter 51.
(DSS)
Press flashing
DSS.
C.Tone
Talk.
• If a call is not retrieved within a specified time, you will hear an alarm as a
reminder.
• The CO, G-DN or INTERCOM button light shows the current status as follows:
Flashing green slowly: Your held call
Flashing red: Another extension's held call.
11
Page 12

Using the Display Propriet ary Telephone
Incoming Call Log
When you receive an outside call, the caller's information is recorded automatically in the
incoming call log.
When the Call Log button light turns on, there is a call which you do not answer.
The information shows as follows:
Information sample (KX-T7636)
BOB SMITH
0924771458
01 JAN.08:00AM MON
Old No Answer
To confirm the log information
With the Call Log button
(Call Log)
Press Call Log.
To clear the log information
CLEAR
Press "CLEAR".
Caller's Name
Caller's Phone Number
Date & Time of a call received
Status – Old: Confirmed
New: Not confirmed
With the Navigator key
While in on-hook
Press Left. Press ENTER.
To call
When the desired party is displayed
Off-hook.
12
Page 13

Using the Display Proprietary Telephone
To store the caller's information for personal speed dialling
When the desired party is displayed
AUTO DIAL
STORE
Press "STORE".
• The Call Log button light shows the current status as follows:
Off: No incoming calls. Or you have already confirmed/received the call log.
Red on: You have never confirmed/received it yet.
Outgoing Call Log
You can redial with the outgoing call log.
To call
While in on-hook
Press Left. Press ENTER.
Press Up or Down
until desired number
appears.
Off-hook.
• You can lock your call log by using a password, so that you can deny showing
your call log information. Consult your dealer for more details.
13
Page 14

Using the Display Propriet ary Telephone
Using the Directories
You can select and call with the directories as follows:
Personal Speed Dialling Directory
System Speed Dialling Directory
Extension Number Directory
Calling with the directory
While in on-hook
Press Right until
desired directory
appears.*
Press ENTER. Press ENTER.
Press Up or Down
until desired
party appears.
• * The display order is as follows:
One time: Personal Speed Dialling Directory
Two times: System Speed Dialling Directory
Three times: Extension Number Directory
• To cancel or exit the current display, press
EXIT
Storing the names and numbers in the personal speed dialling directory
While in on-hook
phone no.
Enter phone
number
(max. 32 digits).
name
Press ENTER. Press ENTER.
Enter name
(max. 20 characters).
*
OR
PAUSE
Press PROGRAM
or PAUSE.
14
• * To enter characters, refer to "Entering Characters".
Page 15

Using the Display Proprietary Telephone
Entering Characters
To store a name or message, you can enter the following characters.
The tables show you the characters available for each button.
Buttons
Times
1231456789
?ä"
!
2
A
BCa bcÀ
3
D
E Fdef•
4
G
HIghi Ì
5
J
K L jkl5
6
M
NOmn Ño
7
P
QRSpqrs
8
T
UVt uv
9
W
XYwxyÝ9
0
.,':;0
ö1ü
БВГДЕЖЗ2
ÈÉÊË3
ÍÎÏ4
ТУФХЦШŒ6
ÙÚÛÜ8
10
ß7
11 12 13 14 15
/+—=<>
#
$
%&@()• #•
Accessing the System Features
You can access a desired feature with the "Feature Access" menu.
While in on-hook
MENU
Press "MENU".
• Consult your dealer for more details about the accessible features.
Press Up
one time.
Press ENTER.
Press Up or Down
until desired feature
appears.
15
Page 16

Other Operations
Desired Function Operation
Making Calls
Redial
Quick Dialling
One-Touch
Dialling
Calling an
operator
Speed Dialling
(Personal)
Speed Dialling
(System)
Doorphone Call
Automatic
Callback Busy
Multiple Parties
conversation
Mute
(Microphone/
Handset)
Off-hook Monitor
quick dial no.
To dial
To store
To dial
To dial
To set To cancel
While hearing a busy tone
6
To answer the extension To answer the outside line
assigned as a One-Touch
—
Dialling button
9
0
/
3 0
/
/
3 1
personal speed
dial no. (2 digits)
personal speed dial no. (2 digits)
system speed dial no. (3 digits)
doorphone no. (2 digits)
phone no.
desired no.
4 6
During a Conversation
To add other parties
desired phone no.
To talk to one party by terminating the other To leave a conference
/ /
(CO) (G-DN)
To set / cancel
During a conversation
To set / cancel
During a conversation using the handset
#
16
Page 17

Desired Function Operation
Useful Features
Other Operations
Forwarding
a call and
Do Not Disturb
(DND)
Picking up
a call
Receiving a
Call Waiting
All
Outside line
(External)
Intercom
(Internal)
Directed
4 1
Group
4 0
Intercom Calls
7 3 1
Outside Calls
7 3 2
To talk to the new party
While hearing a tone
Do Not Disturb (DND)
1
Forwarding a call
All calls
2
extension no.
Busy
3
extension no.
No answer
4
extension no.
Busy / No answer
5
extension no.
To an outside line
6
outside line no.
Follow Me
7
your extension no.
Cancel Follow Me
8
Cancel
extension no.
group no.
your extension no.
0
No tone
0
Tone
1
2
3
No tone
0
Tone
1
#
#
#
#
phone no.
OHCA
Whisper OHCA
Sending a Call
Waiting tone
/
(CO)
While hearing a busy tone
1
Wait for an answer.
17
Page 18

Other Operations
Desired Function
Paging
Message
Waiting
Setting Absent
Message
Log-In/Log-Out
Locking your
extension
To set
To answer
To deny
Sender
Receiver
To set
To cancel
To lock
To unlock
Operation
Useful Features
3 3
4 3
7 2 1
7 2 1
To leave a notification
When the called extension is busy or does not answer
To cancel a notification
To call back
7 5 0
7 7 1
lock code (same code)
#
7 7 0
paging group no.
Deny
1
Allow
0
7 0 1
message no.
0750
For Log-In
1736
For Log-Out
0736
lock code (max. 10 digits)
#
lock code (max. 10 digits)
Announce.
extension no.
Wait for
an answer.
parameter
(if required)
group no.
#
Clearing the
Feature Settings
Timed
Reminder
To set
0
1
To cancel To stop or answer the ringback
7 9 0
7 6 0 1
once
daily
7 6 0 0
12 H
hour / minute
24 H
hour / minute
/
* Consult with your dealer for more details about the feature access numbers.*
18
AM
0
PM
1
Page 19

Direct Station
Selection
Group Direct
Station Selection
One-touch
Dialling
Group Directory
Number
FWD/DND
— External
(CO)
(CO)
(CO)
(CO)
(CO)
PROG.
/
extension
1
receiving group
1
extension no.
2
desired no.
receiving group
3
extension no.
4 2
no.
Operation
FWD/DND
— Internal
SAVE
Account
Log-In/
Log-Out
Personal Programming
To exit the programming modeTo enter the programming mode
PROG.
/
3
(CO)
(CO)
(CO)
(CO)
4
4 7
4 8
5 5
receiving group
extension no.
Preferred Line Assignment,
Outgoing
Preferred Line Assignment,
Incoming
Intercom Alerm Assignment
Call Waiting Tone Type Selection
Handset/Headset Selection
Personal Programming Data
Default Set
0 1
0 2
04
07
09
##
ENTER
0
1
2
(CO)
3
ENTER
0
1
2
(CO)
ENTER
ENTER
ENTER
Outside line no.
Outside line no.
Ringing
0
Directly
1
Ring only
2
tone 1 tone 2
0 1
headset
0 1
off
No line
Idle outside line
Prime line
Intercom line
No line
A first linging line
Prime line
ENTER
/
headset
/
on
ENTER
ENTER
ENTER
ENTER
19
Page 20

Wall Mounting
Pull down the handset hook until it
1
locks, so the tab holds the handset.
Lift up the operation board until the
2
hook knob clicks ( ), then press
down ( ).
2
1
1
2
Mount the unit on the wall.
4
To temporarily place the handset down
during a conversation,
hook it over the top edge of the phone as
shown.
Attach the wall mounting plate.
3
Stand
Telephone
line cord
20
* The illustrations used in this page are a
KX-T7636.
Page 21

Installing the KX-T 76 01/KX-T7603
KX-T7601
The USB unit can be connected between
the digital proprietary telephone and the
personal computer through USB interface
to implement personal CTI (Computer
Telephony Integration).
1
Remove the connector
cover using a plier.
2
Insert the cable into
the connector.
KX-T7603
The function key unit has
12 CO buttons. These
buttons are used to
seize an outside line,
make a call using onetouch dialling, or
access certain
features.
<KX-T7636 with a KX-T7603>
1
Open the cover.
2
Attach the KX-T7603
to your telephone
with screws.
3
Couple both hinges
and slide in the
unit.
4
Push down the cover
until it locks.
3
Insert the cable
into the
connector.
4
Close the cover.
PULL
21
Page 22

Important Safety Instructions
When using your tele phone equipment, bas i c
safety precautions should always be followed
to reduce the risk of fire, electric shock and
injury to persons, including the following:
1. Read and understand all instructions.
2. Follow all warnings and instructions
marked on the product.
3. Unplug this product from the wall outlet
before cleaning. Do not use liquid
cleaners or aerosol cleaners. Use a
damp cloth for cleaning.
4. Do not use this product near water, for
example, near a bath tub, wash bowl,
kitchen sink, or laundry tub, in a wet
basement, or near a swimming pool.
5. Do not place t his product on an unstable
cart, stand, or table. The product may fall,
causing serious damage to the product.
6. Slots and openings in the cabi net and th e
back or bottom are provided for
ventilation, to protect it from overheating,
these openings must not be blocked or
covered. The openings should never be
blocked by placing the product on the
bed, sofa, rug, or other similar surface.
This product shoul d ne ver be placed near
or over a radiator or heat register. This
product should not be placed in a built-in
installation unless proper ventilation is
provided.
7. Do not allow anything to rest on the
telephone cord. Do no t locate this
product where the cord will be abused by
persons walking on it.
8. Do not overload wall outlets and
extension cord as this can result in the
risk of fire or electric shock.
9. Never push objects of any kind into this
product through cabinet slots as they
may touch dangerous voltage points or
short out parts that could result in a risk
of fire or electric shock. Never spill liqu id
of any kind on the product.
10. To reduce the risk of electric shoc k, do
not disassemble this product, but take it
to a qualified serviceman when some
service or repair work is required.
Opening or rem oving co vers may expo se
you to dangerous voltages or other risks.
Incorrect reassembly can cause electric
shock when the appliance is
subsequently used.
11. Unplug this product from the wall outlet
and refer servicing to qualified service
personnel under the following cond itions:
A. When the power supply cord or plug
is damaged or frayed.
B. If liquid has been spilled into the
product.
C. If the product has been exposed to
rain or wat er.
D.If the product does not operate
normally by following the operating
instructions. Adjust only those
controls, that are covered by the
operating ins tructions because
improper adjustment of other controls
may result in damage and will often
require extensive work by a qualified
technician to restore the product to
normal operation.
E. If the product has been dropped or
the cabinet has been damaged.
F. If the product exhibits a distinct
change in performance.
12. Avoid using a telephone (other than a
cordless type) during an electrical storm.
There may be a remote risk of electric
shock from light ning.
13. Do not use the telephone to report a gas
leak in the vicinity of the leak.
SAVE THESE INSTRUCTIONS
22
Page 23

FCC and Other Information
NOTE:
This equipment has been tested and found to
comply with the limits for a Class B digital
device, pursuant to Part 15 of the FCC Rules.
These limits are designed to provide
reasonable pr otection against harmful
interference in a residential installation. This
equipment generates, uses and can radiate
radio frequen cy energ y and, i f not installe d and
used in accordance with the instructions, may
cause harmful interference to radio
communications. However, there is no
guarantee that interference will not occur in a
particular installation. If this equipment does
cause harmful interference to radio or
television rece ption, which can be determined
by turning the equipment off and on, the us er
is encourage d to try to correct the interferenc e
by one or more of the following measures:
– Reorient or relocate the receiving antenna.
– Increase the separation between the
equipment and receiver.
– Connect the equipment int o an outlet on a
circuit different from that to which the
receiver is connected.
– Consult the dealer or an experienced radio/
TV technician for help.
WARNING:
TO PREVENT FIRE OR SHOCK HAZARD,
DO NOT EXPOSE THIS PRODUCT TO RAIN
OR ANY TYPE OF MOI ST UR E.
CAUTION:
To assure continued compliance with FCC
rules, do not make any unauthorized
modificatio ns. When programming emergency
numbers and/or making test call s to
emergency num b ers :
1) Remain on the lin e and briefly explain to
the dispatcher the reason for the call
before hanging up.
2) Perform such activities in the off-peak
hours, such as early morning hours or
late evenings.
If there is any trouble , disconn ect the un it from
the extension line and connect a known
working phone. If the known working phone
operates properly, have it repaired by one of
the specified Panasonic Factory Service
Centers. If the known working phone does not
operate prope rly, check the Electronic M odular
Switching System and the internal extension
wiring.
• Keep the unit away form heating appliances
and electrical n oise ge nerat ing d e vices s uch
as fluoresc ent lamps and moto rs.
• The unit should be kept free of dust ,
moisture and vibration, and should not be
exposed to direct sunlight.
• Do not use benzine, thinner, or the like, or
any abrasive powder to cl ean the cabinet.
Wipe it with a soft cloth.
• Do not use any handset other than
Panasonic handset.
This telephone provides magnetic
coupling for hearing aids.
23
Page 24

For your future reference
SERIAL NO.
(found on the bottom of the unit)
DATE OF PURCHASE
NAME OF DEALER
DEALER’S ADDRESS
DEALER’S TEL. NO.
Copyright:
This manual is copyrighted by Kyushu Matsushita Electric Co., Ltd. (KME).
Under the applicable copyright laws, this manual may not be reproduced in any
form, in whole or part, without the prior written consent of KME and its licensee.
© 2001 Kyushu Matsushita Electric Co., Ltd. All Rights Reserved.
Panasonic Consumer Electronics
Company, Division of Matsushita
Electric Corporation of America
One Panasonic Way, Secaucus,
New Jersey 07094
Panasonic Sales Company (“PSC”),
Division of Matsushita Electric of
Puerto Rico, Inc.
Ave. 65 de Infantería, Km. 9.5,
San Gabriel Industrial Park, Car oli na,
Puerto Rico 00985
www.panasonic.com
Printed in Japan
PSQX2607A
KK1101TT0
Page 25

 Loading...