

Panasonic KX-HCM230 User Manual
PSQX2811XB.book 1 ページ 2003年5月30日 金曜日 午後4時38分
Getting Started
Please read the Operating Instructions for the details.
Network Camera
Keep this leaflet for the future reference.
The suffix of each model number is omitted.
Model No. KX-HCM230
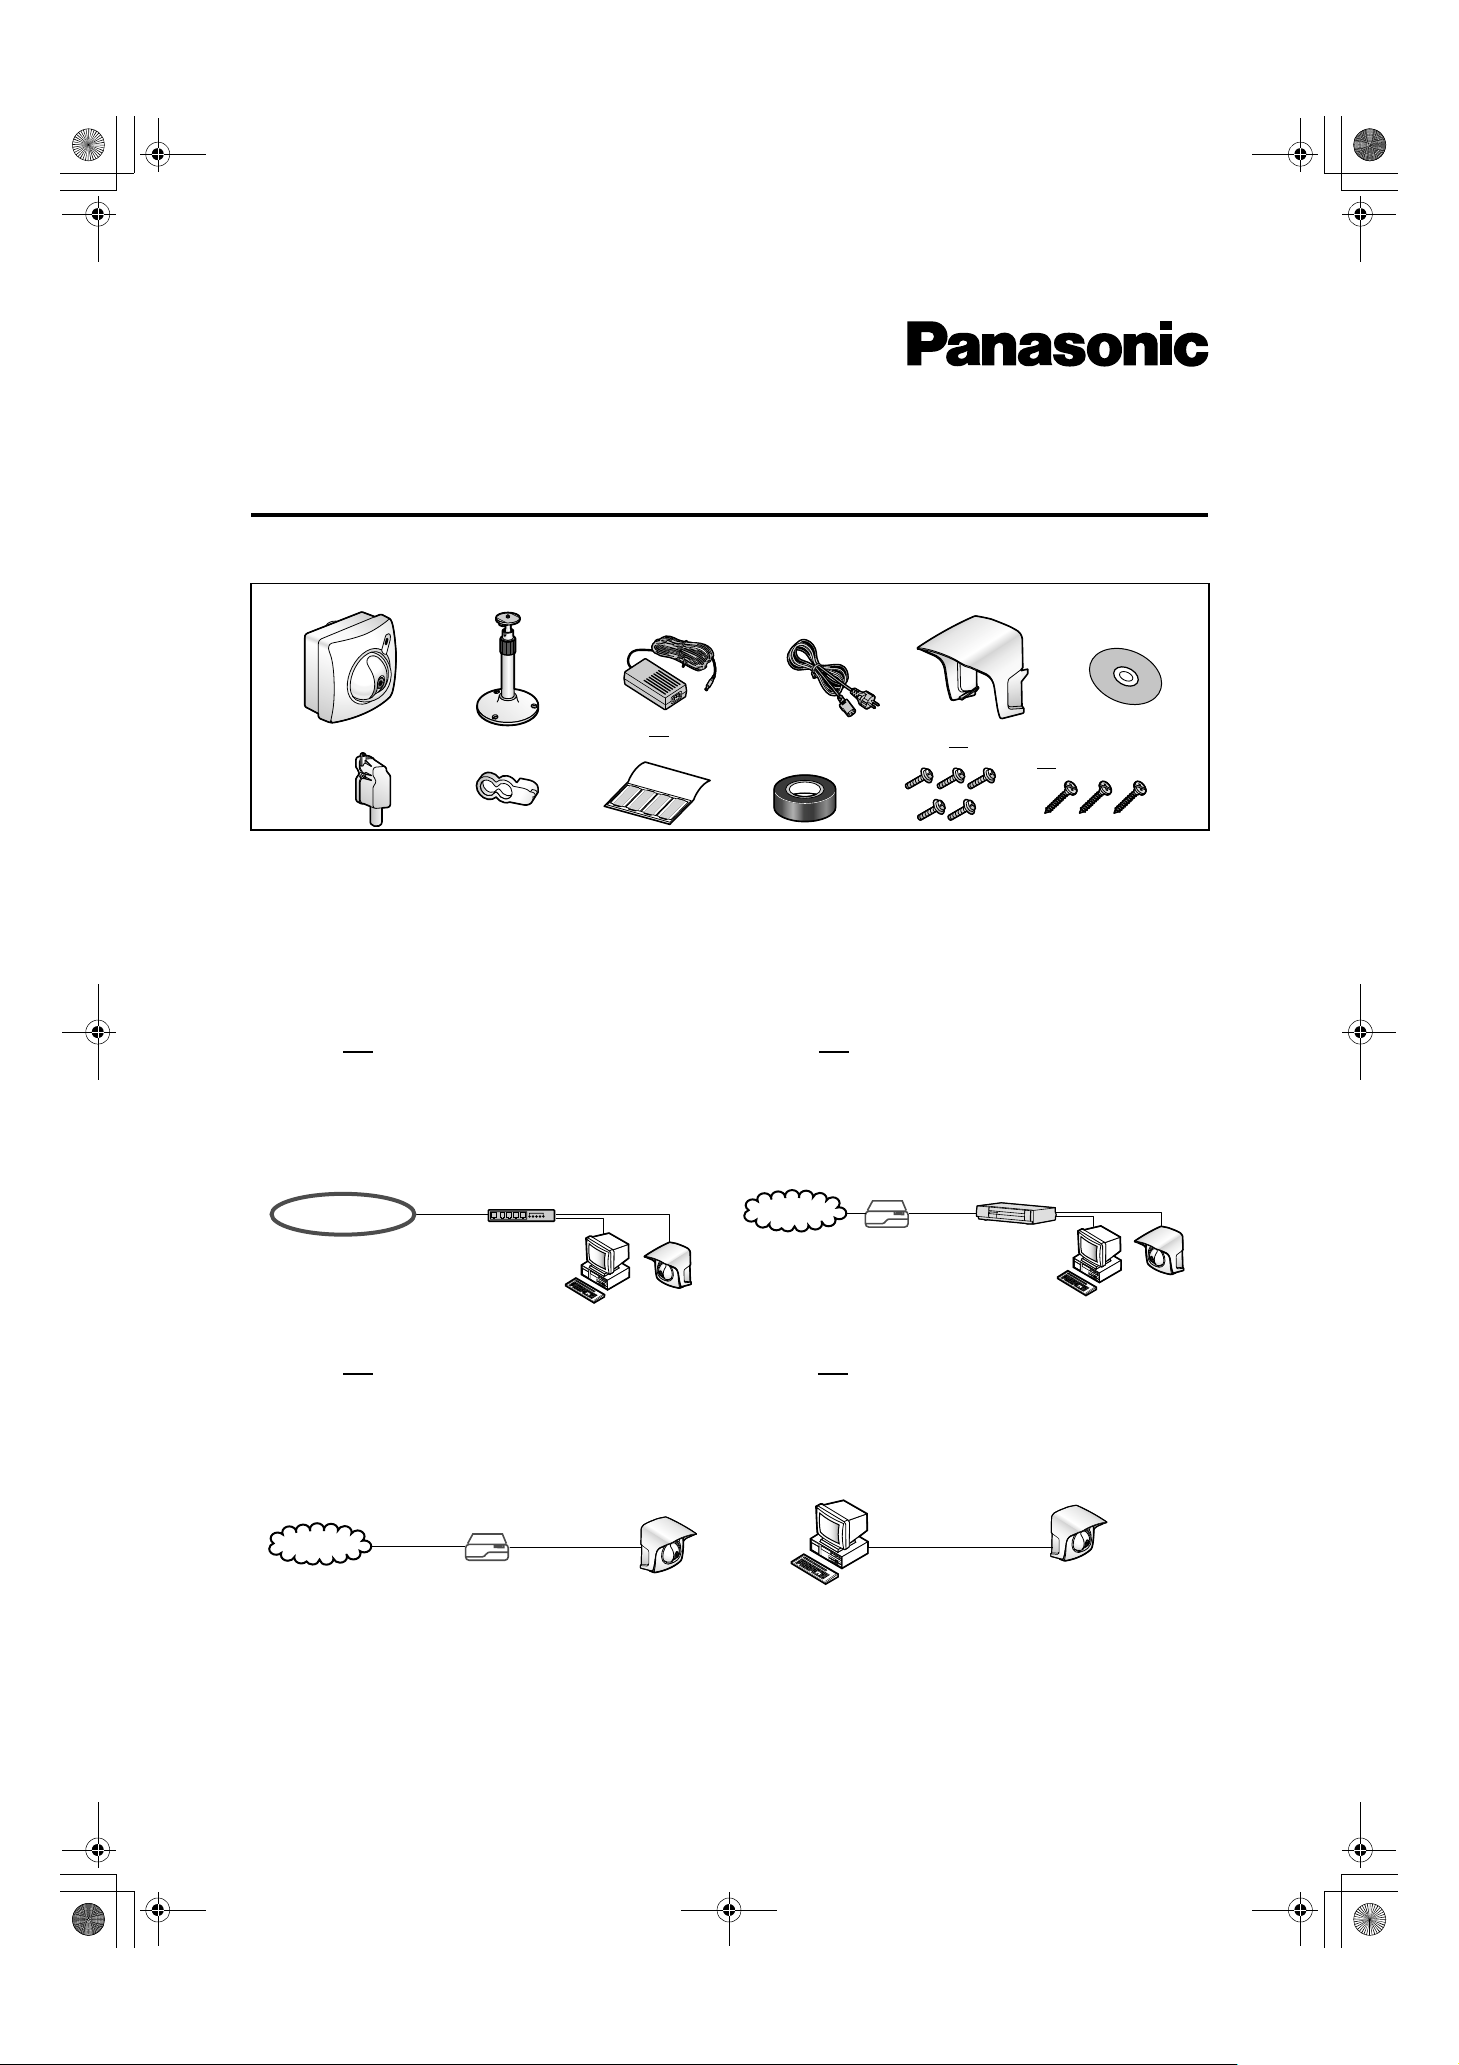
Included Accessories
Main Unit
Connector Cover
Note
If any items are missing, please contact the dealer immediately.
Flexible Stand
Rubber Cap
AC Adaptor
Putties 1 set
(4 pcs.)
AC cord
Self Bonding
tape
Sunshade
Screws 5 pcs.
Setup
CD-ROM
Screws for
Flexible Stand
3 pcs.
Network Camera Configuration Type
The Network Camera can be connected over the LAN/Intranet and the Internet. Please select from
the four Network Camera configuration types. Network parameters differ depending on the Network Camera
configuration type.
[Type 1]
LAN/Intranet Connection with an
Ethernet® Switching Hub
Network Camera can be installed on the LAN/Intranet.
Ethernet switching hub*
LAN/Intranet
*1Network traffic can be smooth by using the Ethernet switching
hub.
[Type 3]
Internet Direct Connection
1
with a Modem
Network Camera can be installed alone without PC on the
network. When you set up the Network Camera in [Type 3],
please connect the Network Camera temporarily in [Type 1],
[Type 2] or [Type 4].
Modem
Internet
Note
Most of the xDSL services use PPPoE. Network Camera
does not support PPPoE. If the Internet connection
requires PPPoE, please connect with the router supporting
PPPoE like [Type 2].
[Type 2] Internet Connection with a
Broadband Router
Network Camera can be accessed from the Internet.
The broadband router needs Port Forwarding (IP Masquerade)
feature on Page 32 in the Operating Instructions.
Internet
Modem
CATV
xDSL
Optical cable
WAN
Broadband
Router
LAN
[Type 4] Direct Connection with a PC
Network Camera can be installed with the PC directly.
Category 5 cross cable
Note
Please use Category 5 cross cable when connecting directly
with the cable to the PC.
Printed in Japan PSQX2811XB KK1102RM3043 (CE)
PSQX2811XB.book 2 ページ 2003年5月30日 金曜日 午後4時38分
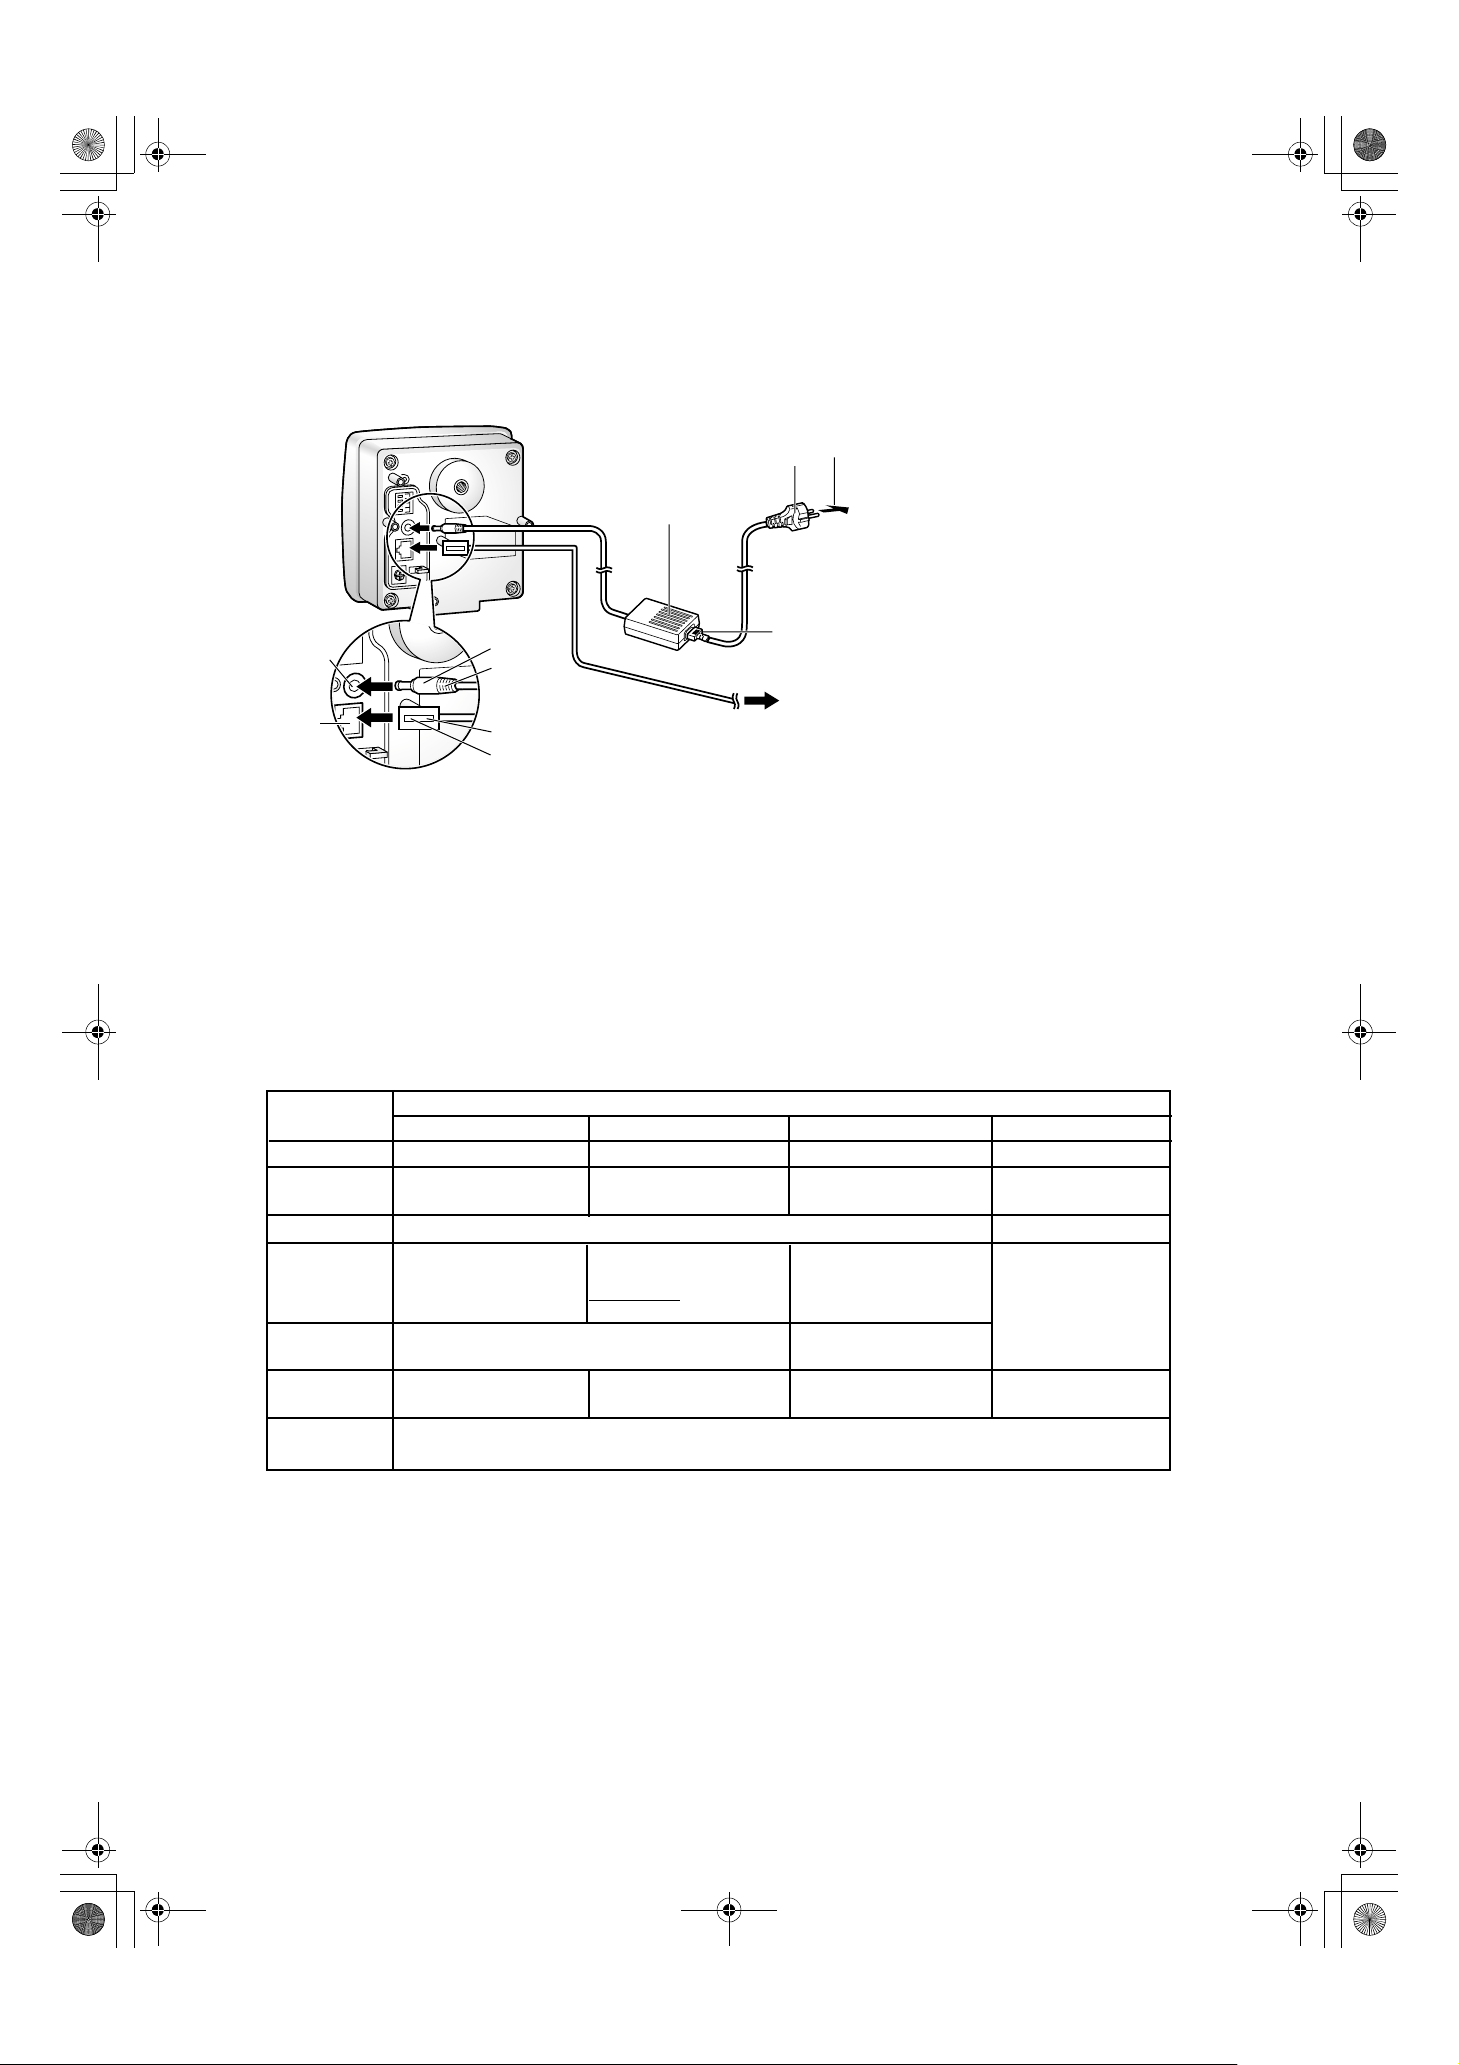
How to turn on Network Camera for Installation
Connect the DC plug of the AC adaptor to the DC IN jack (1.) and Category 5 straight/cross cable to the
Ethernet port (2.). Attach the AC cord to the AC adaptor (3.). Connect the AC plug to the power outlet (4.).
AC adaptor
AC cord
(4.)
Power
Outlet
Notes
AC adaptor is used as the main
•
disconnect device, ensure that the
power outlet is located/installed near
the equipment and is easily accessible.
Use Only with specified Panasonic
•
AC adaptor PSLP1238
(Order No. PSLP1238Z).
AC Adaptor is for indoor use only.
•
After you have finished setting up the
DC IN
jack
Ethernet
port
(1.)
(3.)
DC Plug
To Network
Category 5 straight/cross cable
(2.)
•
Network Camera, please go to Page 5
in this Getting Started for Outdoor
Cabling and Mounting.
When you set up the Network Camera
•
in [Type 3], please connect the Network
Camera temporarily in [Type 1], [Type 2]
or [Type 4].
Preparing the Network Parameters for the Network Camera
Before starting to set up the network parameters of Network Camera, please make note of corresponding
network parameters.
[Type 1]
[Type 2]
[Type 3]
[Type 4]
Ask the network administrator for the network parameters.
Refer to the broadband router's manual for the network parameters.
Ask the ISP for the network parameters.
Install the Network Camera in the default condition. Please set the PC "192.168.0.250" (IP address) and
"255.255.255.0" (Subnet Mask). Please refer to Page 24 in the Operating Instructions.
Network Parameters Table
Parameters
[Type 1] [Type 2] [Type 3] [Type 4]
Port No.
IP address
Check [Static], and set the
static private IP address.
Subnet Mask
Default
Gateway
DNS
Set Default Gateway
address.
Set DNS server address.
Server 1, 2
DDNS
You do not need to
set up.
Max.
Bandwidth
Usage
1
*
Many ISP's intentionally block the port number 80 to guard against network viruses. If your ISP blocks port number 80,
substitute another unused port number.
2
When you use more than one Network Camera with a broadband router, each Network Camera needs its own port number.
*
3
The Port Forwarding (IP Masquerade) feature needs to be set to the broadband router. Refer to Page 32 in the Operating Instructions.
*
4
*
Refer to the broadband router's manual.
5
*
When you use a Network Camera in DHCP feature, check [DHCP] and enter the Host Name if your ISP requires. If you
automatically get the address of Default Gateway and DNS server from DHCP server, you do not need to set up.
6
*
Verify that your ISP supports DHCP. If your ISP supports DHCP, or if you assign a domain name to the Network Camera,
you need to contract and register for DDNS service. If you set a static global IP address to the Network Camera and the
broadband router, you do not need to register for DDNS service. Refer to Page 6 in the Operating Instructions (Additional Features).
Network Camera Configuration Type
3
1
*
80 (default)80 (default) 80 (default)
Check [Static], and set the
static private IP address.
*
2
*
Check [Static], and set the
4
static global IP address.
*
Set the Subnet Mask fitted to your network.
Set the private IP address
of the broadband router (on
your network), not of the
gateway of the ISP.
4
*
Set Default Gateway
address.
Set DNS server address.*
6
*
It can restrict the transmit bandwidth.
Select from 0.1 to Unlimited Mbit/s.
80 (default)*
5
*
6
*
1
192.168.0.253 (default)
5
*
255.255.255.0 (default)
You do not need to
set up.
5
You do not need to
set up.
2
PSQX2811XB.book 3 ページ 2003年5月30日 金曜日 午後4時38分
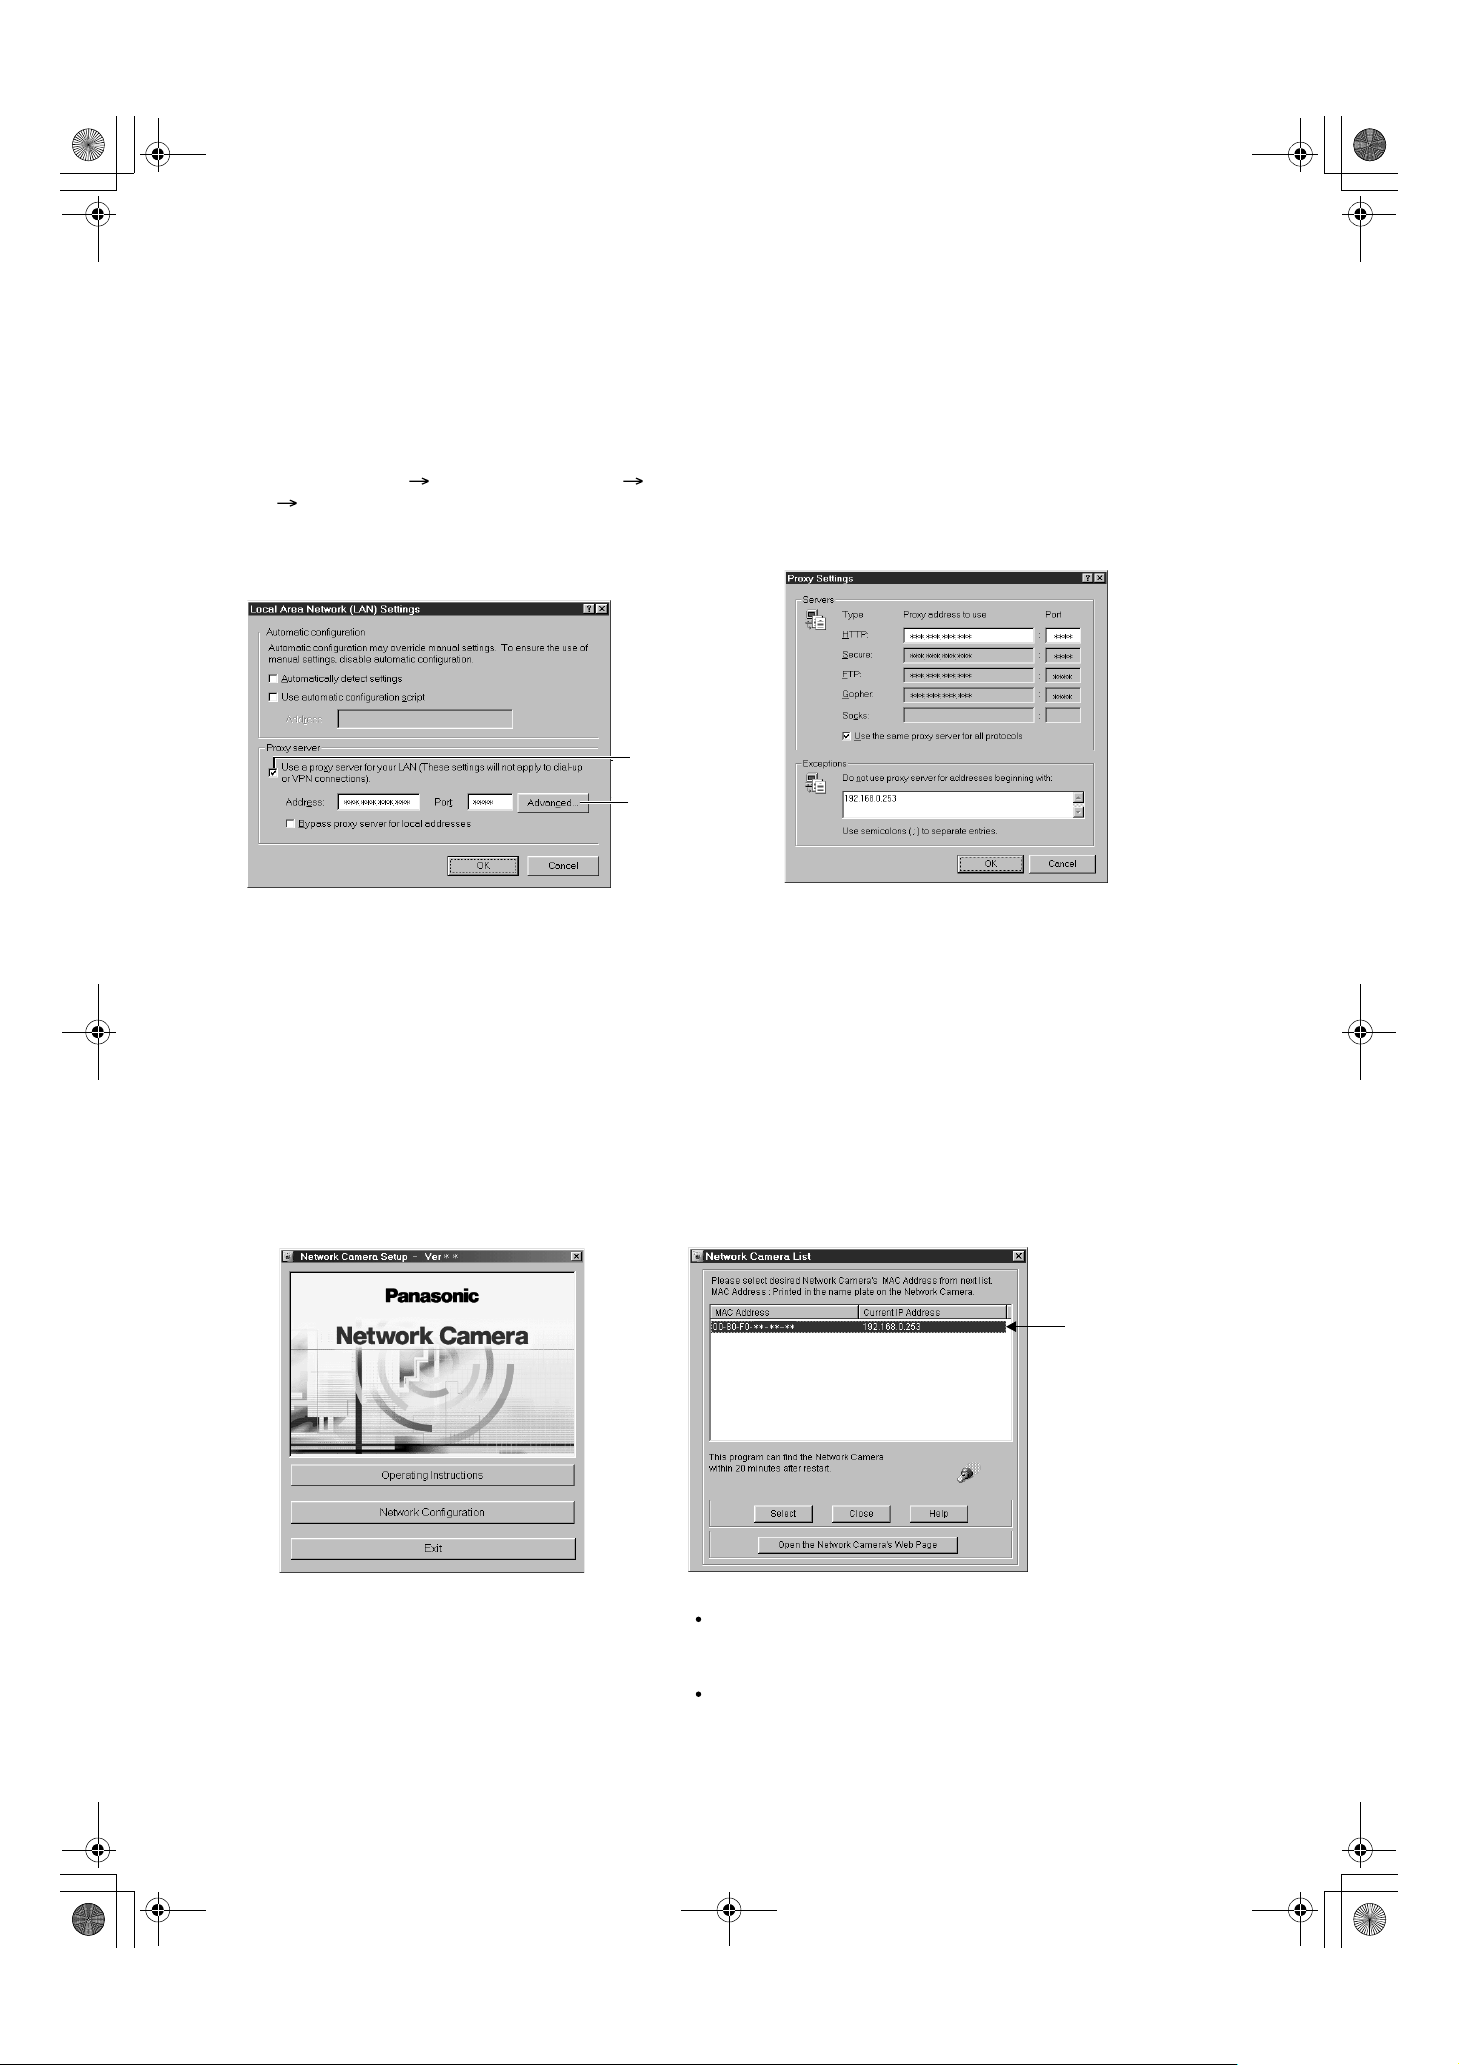
Proxy Server Setting
The proxy server may prevent you from connecting directly to the Network Camera in some corporate
environments. The web browser can set up the IP address communication without the proxy server. Please
discuss the installation with the ISP or network administrator.
1.
Start up the Internet Explorer. (The window comes from Internet Explorer 5.50.)
Select [Tools] [Internet Options...]
2.
[Connections] tab and click [LAN Settings].
Please confirm if the Use a proxy server
check box is checked or not in the next window.
When checked, click [Advanced...].
See if the check
box is checked or not.
When checked, click
[Advanced...].
Click [OK] on all of the opening window.
4.
Enter the IP address of Network Camera
3.
assigned from the ISP or the network
administrator into the Do not use proxy server
for addresses beginning with data field.
Simple Installation using the Setup CD-ROM
After finishing cabling, please turn on the Network Camera and insert the Setup CD-ROM in the CD-ROM
drive of the PC. Setup CD-ROM should start the application automatically. This program automatically
finds the Network Cameras on the network.
1.
Turn on the Network Camera.
Insert the Setup CD-ROM in the CD-ROM
2.
drive of the PC. (If the Network Camera
Setup window does not appear, please
click "Setup.exe" in the Setup CD-ROM.)
Click [Network Configuration]. The Network Camera
3.
List window appears. The Network Camera List window
lists all of the MAC addresses and IP addresses of the
Network Camera on the network.
(A)
Notes
Setup CD-ROM software identifies the Network Camera by listening f or the
data sent out for the first 20 minutes after the Network Camera is powered
up. If it e xceeds 20 minutes , please temporarily disconnect the power to
restart this operation.
Do not connect the Network Camera over the broadband routers. Setup
program cannot detect the Network Camera.
3
 Loading...