

Panasonic KX-FPC95 User Manual
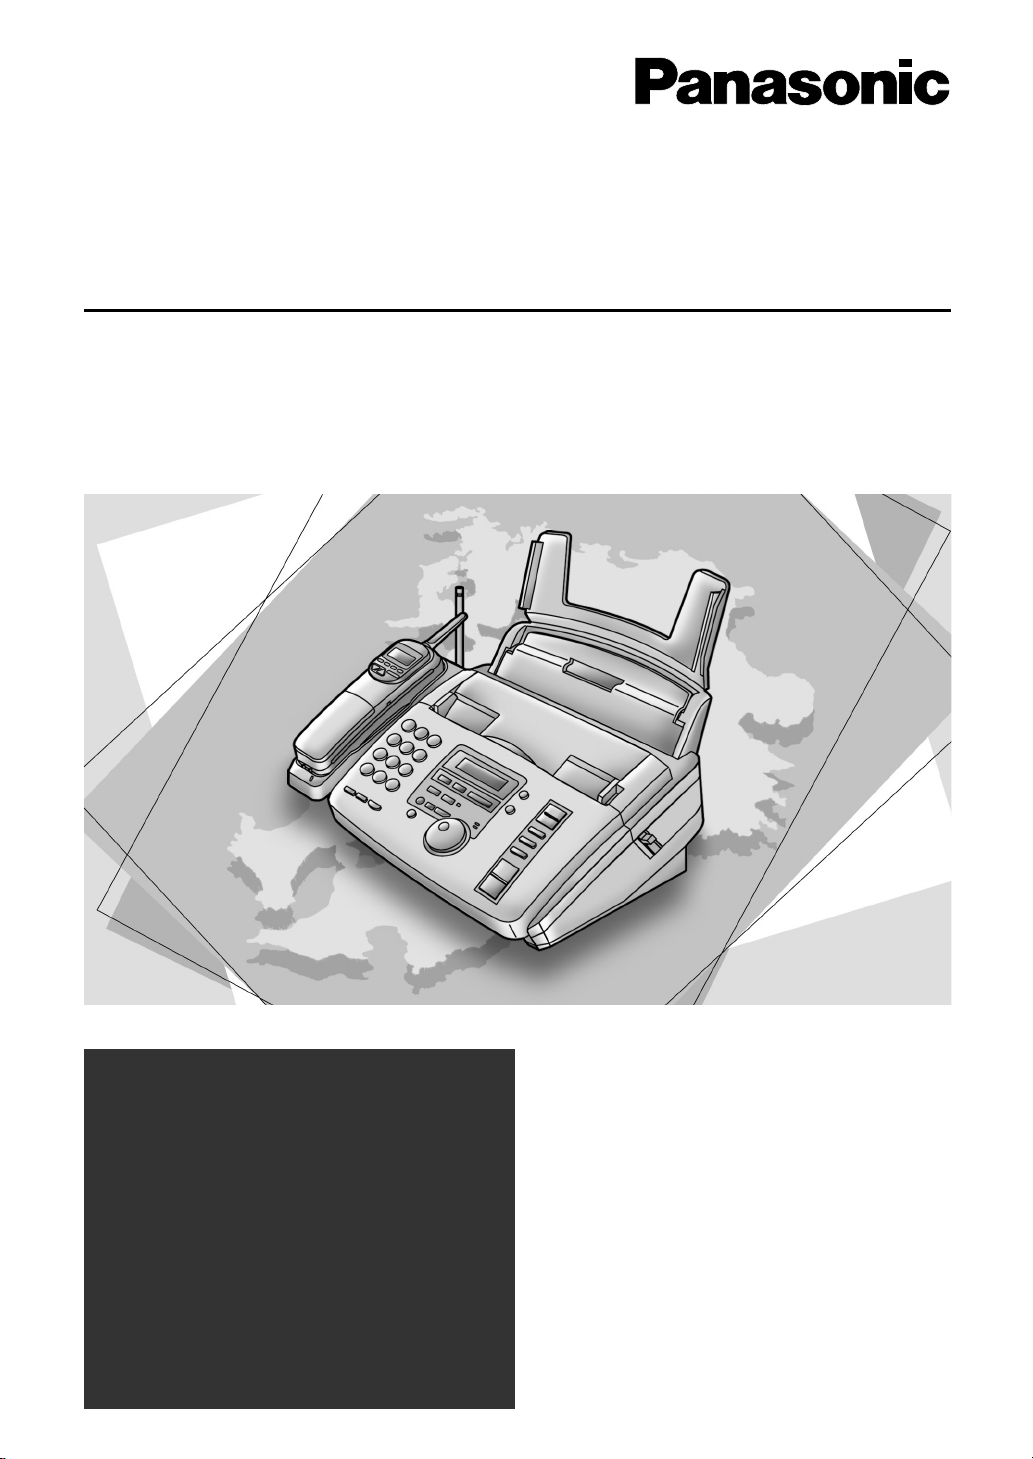
Compact Plain Paper FAX
with Cordless Phone
Operating Instructions
Model No. KX-FPC95
KX-FPC96
FOR FAX ADVANTAGE ASSISTANCE:
– CALL
1-800-HELP-FAX (1-800-435-7329)
– E-MAIL TO
consumerproducts@panasonic.com
for customers in the USA or
Puerto Rico
– REFER TO
www.panasonic.com
for customers in the USA or
Puerto Rico
Please read these Operating
Instructions before using the unit
and save for future reference.
Thank you for purchasing a Panasonic facsimile.
R
R
R
Welcome to the world of Panasonic facsimiles.
This product combines facsimile, telephone, telephone answering device and
copier features to provide you with more efficient office or home use. By utilizing
these convenient features, you can maximize the effectiveness of this unit.
Things you should keep record of
Attach your sales receipt here
For your future reference
Date of purchase Serial number
(found on the rear of the unit)
Dealer’s name and address
Dealer’s telephone number
Caution:
●
The Telephone Protection Act of 1991 requires the following information to be clearly stated
either at the top or bottom margin of the first message page when transmitting messages via
telephone facsimile:
— Date and time of transmission,
— Identification of the business, entity or person(s) sending the facsimile, and
— Telephone number of the business, entity or person(s).
To program this information into your unit, complete all the instructions on pages 15 to 18.
●
Note that the images of copied or received documents will remain on the used ink film. Use
discretion when disposing of the used ink film.
●
Do not rub or use an eraser on the printed side of recording paper, as the print may smear.
Trademarks
Hammermill is a registered trademark of INTERNATIONAL PAPER in the United States and/or
other countries.
All other trademarks identified herein are the property of their respective owners.
Energy Star
As an ENERGY STAR Partner, Panasonic has determined
that this product meets the ENERGY STAR guidelines for
energy efficiency.
ENERGY STAR is a U.S. registered mark.
Copyright:
This manual is copyrighted by Kyushu Matsushita Electric Co., Ltd. (KME) and its licensee.
Under the copyright laws, this manual may not be reproduced in any form, in whole or part,
without the prior written consent of KME and its licensee.
Kyushu Matsushita Electric Co., Ltd. 2000
©
2
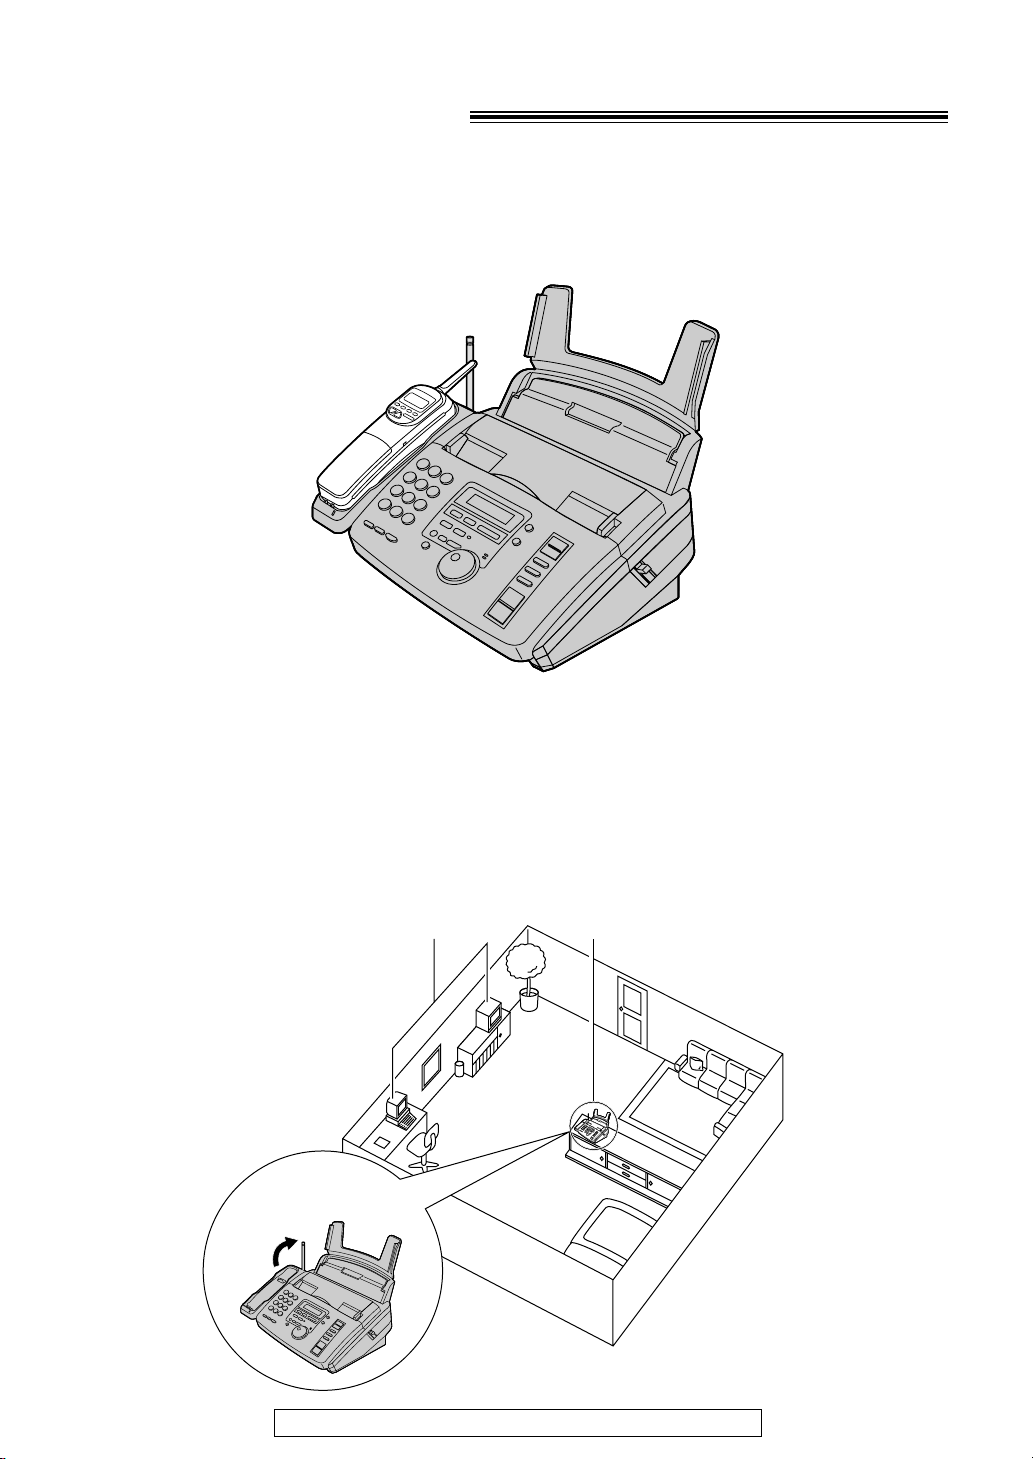
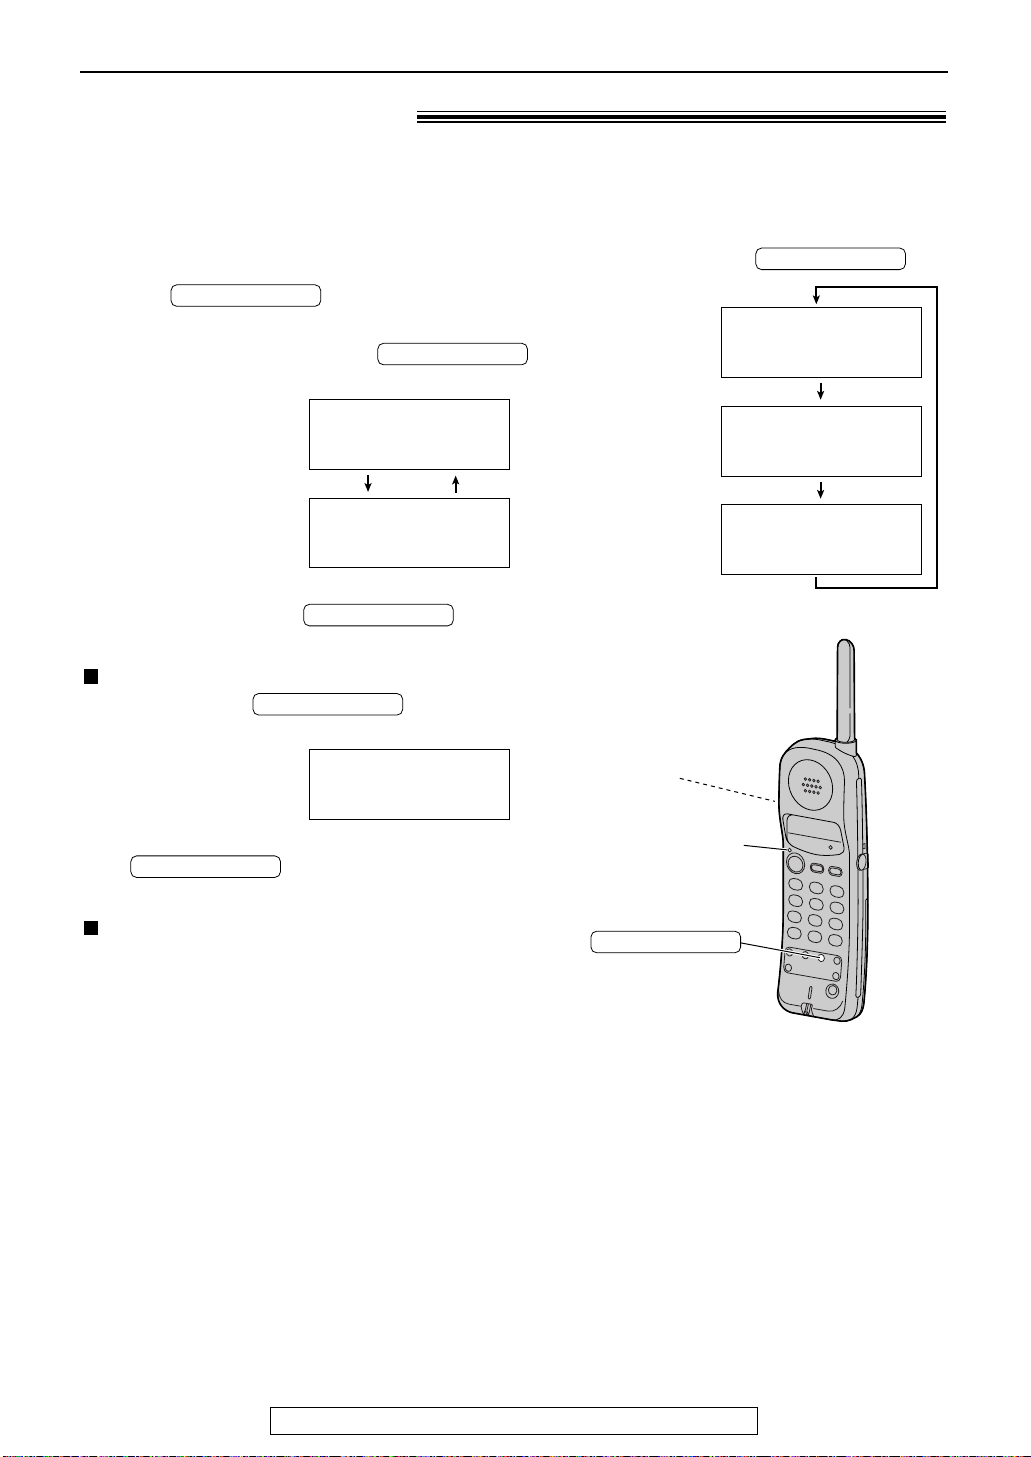
For best performance
Away from electrical
appliances such as TVs,
radios, or personal computers.
In a HIGH and CENTRAL
location with no obstructions
such as walls.
Raise the antenna.
Battery charge
To power the handset, charge for about 4 hours before initial use (p. 20).
Operating distance and noise
Calls are transmitted between the main unit and the handset using wireless radio waves.
For maximum distance and noise free operation, the recommended main unit location is:
For fax advantage assistance, call 1-800-435-7329.
3

Important safety instructions!
When using this unit, basic safety precautions
should always be followed to reduce the risk of
fire, electric shock, or personal injury.
1. Read and understand all instructions.
2. Follow all warnings and instructions marked
on this unit.
3. Unplug this unit from power outlets before
cleaning. Do not use liquid or aerosol
cleaners. Use a damp cloth for cleaning.
4. Do not use this unit near water, for example
near a bath tub, wash bowl, kitchen sink, or
the like.
5. Place the unit securely on a stable surface.
Serious damage and/or injury may result if
the unit falls.
6. Do not cover slots and openings on the
unit. They are provided for ventilation and
protection against overheating. Never place
the unit near radiators, or in a place where
proper ventilation is not provided.
7. Use only the power source marked on the
unit. If you are not sure of the type of power
supplied to your home, consult your dealer
or local power company.
8. For safety purposes this unit is equipped
with a three prong grounded plug. If you do
not have this type of outlet, please have
one installed. Do not use any type of
adaptor plug to defeat this safety feature.
9. Do not place objects on the power cord.
Install the unit where no one can step or trip
on the cord.
10. Do not overload wall outlets and extension
cords. This can result in the risk of fire or
electric shock.
11. Never push any objects through slots in this
unit. This may result in the risk of fire or
electric shock. Never spill any liquid on the
unit.
12. To reduce the risk of electric shock, do not
disassemble this unit. Take the unit to an
authorized servicenter when service is
required. Opening or removing covers may
expose you to dangerous voltages or other
risks. Incorrect reassembly can cause
electric shock when the unit is subsequently
used.
13. Unplug this unit from the wall outlet and
refer servicing to an authorized servicenter
when the following conditions occur:
A. When the power supply cord or plug is
damaged or frayed.
B. If liquid has been spilled into the unit.
C.If the unit has been exposed to rain or
water.
D.If the unit does not work normally by
following the operating instructions.
Adjust only controls covered by the
operating instructions. Improper
adjustment may require extensive work
by an authorized servicenter.
E. If the unit has been dropped or
physically damaged.
F. If the unit exhibits a distinct change in
performance.
14. During thunderstorms, avoid using
telephones except cordless types. There
may be a remote risk of an electric shock
from lightning.
15. Do not use this unit to report a gas leak,
when in the vicinity of the leak.
SAVE THESE
INSTRUCTIONS
4
For fax advantage assistance, call 1-800-435-7329.

CAUTION
To reduce the risk of fire or injury to
persons, read and follow these instructions.
1. Use only the battery(ies) specified.
2. Do not dispose of the battery(ies) in a fire.
They may explode. Check with local waste
management codes for special disposal
instructions.
3. Do not open or mutilate the battery(ies).
Released electrolyte is corrosive and may
cause burns or injury to the eyes or skin.
The electrolyte may be toxic if swallowed.
4. Exercise care in handling batteries in order
not to short the battery to conductive
materials such as rings, bracelets, and keys.
The battery and/or conductor may overheat
and cause burns.
5. Charge the battery(ies) provided with or
identified for use with this product only in
accordance with the instructions and
limitations specified in this manual.
INSTALLATION
1. Never install telephone wiring during a
lightning storm.
2. Never install telephone jacks in wet
locations unless the jack is specifically
designed for wet locations.
3. Never touch uninsulated telephone wires or
terminals unless the telephone line has
been disconnected at the network interface.
4. Use caution when installing or modifying
telephone lines.
WARNING
●
To prevent the risk of fire or electrical shock,
do not expose this product to rain or any type
of moisture.
OTHER INFORMATION
●
Keep the unit away from electrical noise
generating devices, such as fluorescent
lamps and motors.
●
The unit should be kept free from dust, high
temperature and vibration.
●
The unit should not be exposed to direct
sunlight.
●
Do not place heavy objects on top of this unit.
●
Do not touch the plug with wet hands.
For fax advantage assistance, call 1-800-435-7329.
5
Table of Contents
Initial Preparation
Accessories Included accessories . . . . . . . . . . . . . . . . . . . . . . . . . . . . . . . . . . . . . . . . . . . 8
Accessory order information. . . . . . . . . . . . . . . . . . . . . . . . . . . . . . . . . . . . . . 9
Help Button Help function . . . . . . . . . . . . . . . . . . . . . . . . . . . . . . . . . . . . . . . . . . . . . . . . 10
Finding the Location. . . . . . . . . . . . . . . . . . . . . . . . . . . . . . . . . . . . . . . . . . . . . . . . . . . . 11
Controls Overview . . . . . . . . . . . . . . . . . . . . . . . . . . . . . . . . . . . . . . . . . . . . . . . . . . . 12
(Main Unit)
Setup Removing the information leaflet . . . . . . . . . . . . . . . . . . . . . . . . . . . . . . . . . 12
(Main Unit) Paper tray . . . . . . . . . . . . . . . . . . . . . . . . . . . . . . . . . . . . . . . . . . . . . . . . . . 12
Recording paper . . . . . . . . . . . . . . . . . . . . . . . . . . . . . . . . . . . . . . . . . . . . . 13
Connections. . . . . . . . . . . . . . . . . . . . . . . . . . . . . . . . . . . . . . . . . . . . . . . . . 14
Date and time, your logo and facsimile telephone number . . . . . . . . . . . . . . 15
Setup Location. . . . . . . . . . . . . . . . . . . . . . . . . . . . . . . . . . . . . . . . . . . . . . . . . . . . 19
(Handset) Battery charge . . . . . . . . . . . . . . . . . . . . . . . . . . . . . . . . . . . . . . . . . . . . . . . 20
Belt clip . . . . . . . . . . . . . . . . . . . . . . . . . . . . . . . . . . . . . . . . . . . . . . . . . . . . 21
Headset (not included). . . . . . . . . . . . . . . . . . . . . . . . . . . . . . . . . . . . . . . . . 21
Volumes Adjusting volumes . . . . . . . . . . . . . . . . . . . . . . . . . . . . . . . . . . . . . . . . . . . . 22
Telephone
Making and Voice calls - making . . . . . . . . . . . . . . . . . . . . . . . . . . . . . . . . . . . . . . . . . . 24
Answering Calls
Voice calls - answering . . . . . . . . . . . . . . . . . . . . . . . . . . . . . . . . . . . . . . . . 26
Intercom between the handset and the main unit . . . . . . . . . . . . . . . . . . . . . 27
Transferring a call between the handset and the main unit . . . . . . . . . . . . . . 29
Remote speakerphone. . . . . . . . . . . . . . . . . . . . . . . . . . . . . . . . . . . . . . . . . 30
Setting the auto talk feature . . . . . . . . . . . . . . . . . . . . . . . . . . . . . . . . . . . . . 32
TONE, FLASH and PAUSE buttons. . . . . . . . . . . . . . . . . . . . . . . . . . . . . . . 33
Automatic Storing telephone numbers in the handset . . . . . . . . . . . . . . . . . . . . . . . . . . 34
Dialing Making a voice call with the handset using
(Handset) stored numbers . . . . . . . . . . . . . . . . . . . . . . . . . . . . . . . . . . . . . . . . . . . 35
JOG DIAL Storing names and telephone numbers in the JOG DIAL directory. . . . . . . . 36
Making a voice call using the JOG DIAL directory . . . . . . . . . . . . . . . . . . . . 39
Caller ID Caller ID service from your phone company . . . . . . . . . . . . . . . . . . . . . . . . 40
Calling back/storing/editing/erasing/caller information . . . . . . . . . . . . . . . . . 44
For call waiting service users . . . . . . . . . . . . . . . . . . . . . . . . . . . . . . . . . . . . 47
Voice Contact Talking to the other party after fax transmission or reception . . . . . . . . . . . . 48
Fax
Sending Faxes Sending a fax manually/using the JOG DIAL directory . . . . . . . . . . . . . . . . . 49
Sending a fax with the voice guide . . . . . . . . . . . . . . . . . . . . . . . . . . . . . . . 53
One time broadcast transmission . . . . . . . . . . . . . . . . . . . . . . . . . . . . . . . . 54
Broadcast transmission to pre-programmed parties . . . . . . . . . . . . . . . . . . . 55
Receiving Setting the unit to receive faxes . . . . . . . . . . . . . . . . . . . . . . . . . . . . . . . . . 58
Faxes TEL mode (answering all calls manually). . . . . . . . . . . . . . . . . . . . . . . . . . . 60
FAX ONLY mode (all calls are received as faxes) . . . . . . . . . . . . . . . . . . . . 61
TEL/FAX mode (receiving voice calls with rings and fax calls
without rings when you are near the unit) . . . . . . . . . . . . . . . . . . . . . . . . 62
Using the unit with a computer . . . . . . . . . . . . . . . . . . . . . . . . . . . . . . . . . . 64
Extension telephone . . . . . . . . . . . . . . . . . . . . . . . . . . . . . . . . . . . . . . . . . . 64
Pager call - when the unit receives a fax or voice message. . . . . . . . . . . . . 65
6
For fax advantage assistance, call 1-800-435-7329.

Copy
Copying Making a copy . . . . . . . . . . . . . . . . . . . . . . . . . . . . . . . . . . . . . . . . . . . . . . 66
Answering Device
Setup TAD/FAX mode (using the built-in answering device
and receiving voice and fax calls automatically) . . . . . . . . . . . . . . . . . . . 68
Greeting Pre-recorded greeting messages. . . . . . . . . . . . . . . . . . . . . . . . . . . . . . . . . 69
Recording your own greeting messages . . . . . . . . . . . . . . . . . . . . . . . . . . . 70
Erasing your own recorded greeting messages . . . . . . . . . . . . . . . . . . . . . . 71
Incoming Listening to recorded messages . . . . . . . . . . . . . . . . . . . . . . . . . . . . . . . . . 72
Messages Erasing recorded messages . . . . . . . . . . . . . . . . . . . . . . . . . . . . . . . . . . . . 73
Recording Memo message (leaving a message for others or yourself) . . . . . . . . . . . . . 74
From the Handset
Operating from the handset . . . . . . . . . . . . . . . . . . . . . . . . . . . . . . . . . . . . . 75
Remote Operating from a remote location . . . . . . . . . . . . . . . . . . . . . . . . . . . . . . . . 77
Operation Operation from a remote touch tone telephone . . . . . . . . . . . . . . . . . . . . . . 78
Option Transferring recorded messages to another telephone. . . . . . . . . . . . . . . . . 80
Programmable Features
Features Programming . . . . . . . . . . . . . . . . . . . . . . . . . . . . . . . . . . . . . . . . . . . . . . . . 82
Summary Basic features . . . . . . . . . . . . . . . . . . . . . . . . . . . . . . . . . . . . . . . . . . . . . . . 83
Advanced features. . . . . . . . . . . . . . . . . . . . . . . . . . . . . . . . . . . . . . . . . . . . 84
Help
Error Messages
Operations When a function does not work, check here before requesting help. . . . . . . . 92
Jams Recording paper jam . . . . . . . . . . . . . . . . . . . . . . . . . . . . . . . . . . . . . . . . . . 98
Ink Film Replacing the ink film. . . . . . . . . . . . . . . . . . . . . . . . . . . . . . . . . . . . . . . . . 100
Battery Replacing the handset battery . . . . . . . . . . . . . . . . . . . . . . . . . . . . . . . . . . 102
Reports . . . . . . . . . . . . . . . . . . . . . . . . . . . . . . . . . . . . . . . . . . . . . . . . . . . . 89
Display . . . . . . . . . . . . . . . . . . . . . . . . . . . . . . . . . . . . . . . . . . . . . . . . . . . . 90
If a power failure occurs. . . . . . . . . . . . . . . . . . . . . . . . . . . . . . . . . . . . . . . . 97
Sending document jams. . . . . . . . . . . . . . . . . . . . . . . . . . . . . . . . . . . . . . . . 99
Sending document does not feed, or multi-feeds . . . . . . . . . . . . . . . . . . . . . 99
Cleaning Document feeder . . . . . . . . . . . . . . . . . . . . . . . . . . . . . . . . . . . . . . . . . . . . 103
Thermal head . . . . . . . . . . . . . . . . . . . . . . . . . . . . . . . . . . . . . . . . . . . . . . 104
Charge contacts. . . . . . . . . . . . . . . . . . . . . . . . . . . . . . . . . . . . . . . . . . . . . 104
General Information
Print Reports Reference lists and reports. . . . . . . . . . . . . . . . . . . . . . . . . . . . . . . . . . . . . 105
Limited Limited Warranty . . . . . . . . . . . . . . . . . . . . . . . . . . . . . . . . . . . . . . . . . . . . 106
Warranty Servicenter Directory . . . . . . . . . . . . . . . . . . . . . . . . . . . . . . . . . . . . . . . . . 107
FCC Information
Specifications Technical data about this product . . . . . . . . . . . . . . . . . . . . . . . . . . . . . . . . 109
Index Index . . . . . . . . . . . . . . . . . . . . . . . . . . . . . . . . . . . . . . . . . . . . . . . . . . . . . 110
List of FCC requirements and information. . . . . . . . . . . . . . . . . . . . . . . . . . 108
For fax advantage assistance, call 1-800-435-7329.
7

Accessories
Included accessories!
Power cord..............1
Part No. PFJA1030Z Part No. PQJA10075Z
Paper tray ...............1
Part No. PFKS1040Y2
●
If any items are missing or damaged, check with the place of purchase.
●
The part numbers listed above are subject to change without notice.
●
Save the original carton and packing materials for future shipping and transportation of the
unit.
Telephone line cord
Ink film.....................1
(included film roll)
—The ink film is
pre-installed.
...1 Cordless handset....1
The rechargeable
—
battery is pre-installed.
Operating instructions
Part No. PFQX1454Z
...1
Belt clip ...................1
Part No. PQKE10083Z1
8
For fax advantage assistance, call 1-800-435-7329.
Accessories
Accessory order information!
●
The included film roll is 10 meters (321⁄2') long.
We recommend that you buy full size replacement film – 50 meters (164
continuous use of your unit.
For best results, use genuine Panasonic replacement film Model No. KX-FA53
or KX-FA55.
●
To install legal size recording paper, use a legal paper tray Model No. KX-FA50-B
(p. 12).
To order
Telephone: Call 1-800-332-5368.
Fax:
Send a fax to 1-800-237-9080.
Include:
–your name, shipping address and telephone number,
–credit card type, number, expiration date and your signature,
–order part number and quantity.
Via the Internet:
Visit our web site: http://www.panasonic.com/store
(for customers in the USA or Puerto Rico ONLY)
●
If you have any questions about internet orders, please contact us at this
E-MAIL ADDRESS: panasonicdirect@panasonic.com
or call us at: 201-348-7292
'
) for
Model No.
KX-FA53 Replacement film
KX-FA55 Replacement film
Item Specifications / Usage
1
1 roll – 216 mm x 50 m (8
2 rolls – 216 mm x 50 m (8
⁄2"x 164')
1
⁄2"x 164')
KX-FA50-B Legal paper tray To install legal size recording paper.
KX-A36
Rechargeable
battery
Ni-Cd battery
KX-TCA87 Headset For a hands-free telephone conversation
Note:
●
The ink film is not reusable. Do not rewind and use the ink film again.
For fax advantage assistance, call 1-800-435-7329.
9

SET
HELP
Display
JOG DIAL
Help Button
SET
JOG DIAL
HELP
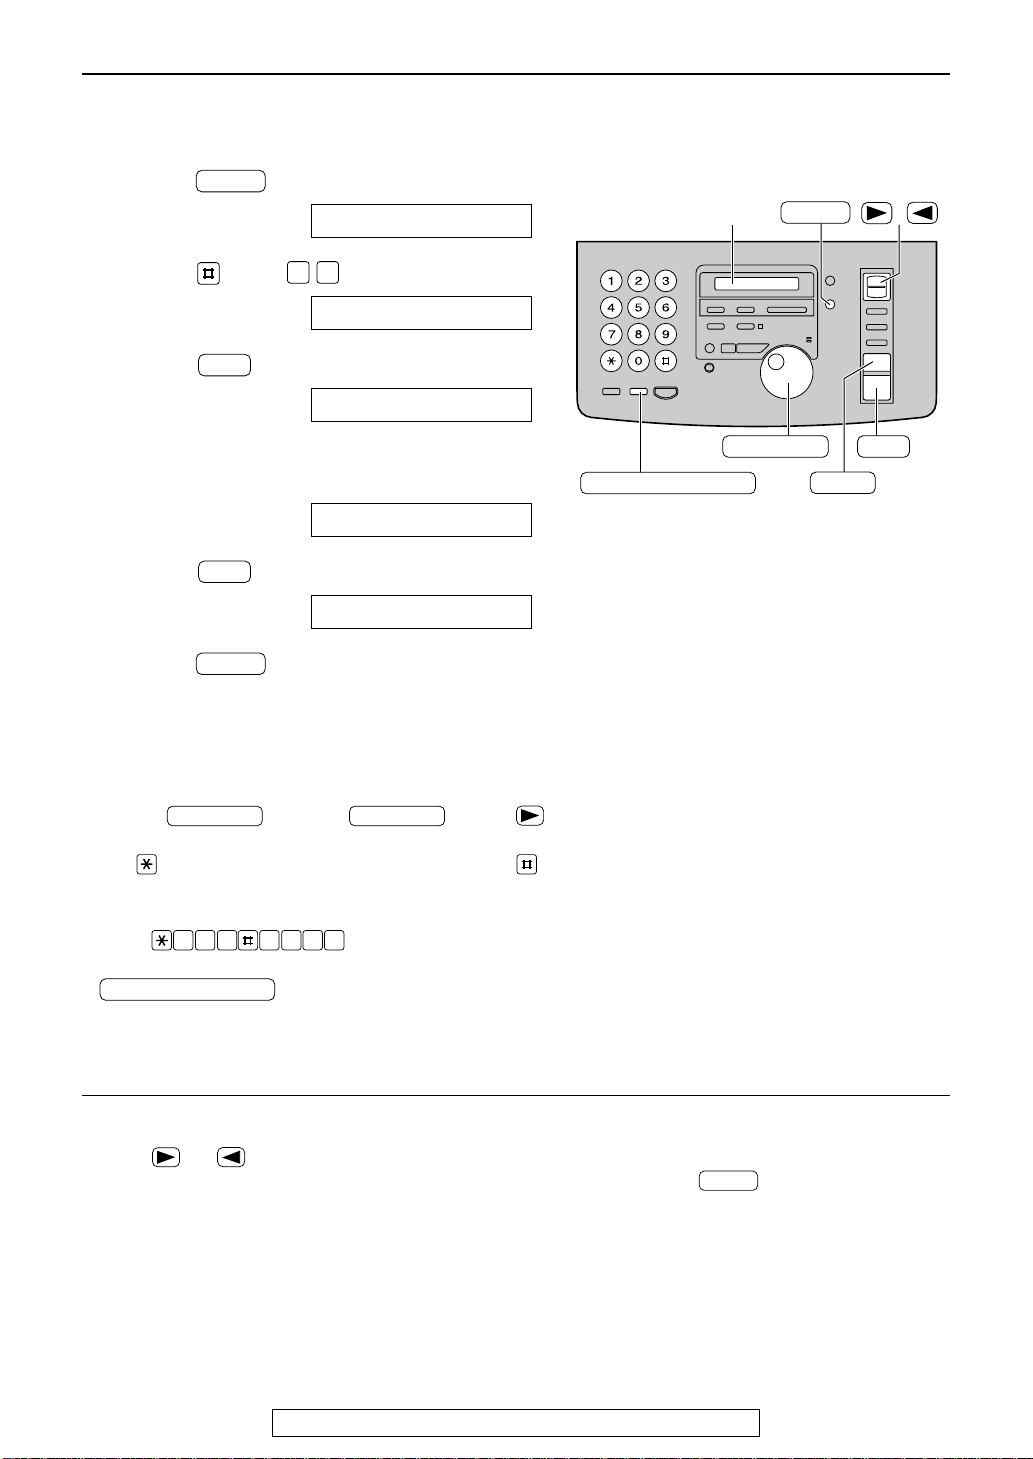
Help function!
You can print a quick reference for assistance as follows.
Press .
1
Rotate until the desired item is
2
displayed.
1. How to send faxes with the voice guide
2. How to set the date, time, your logo and
3. How to program the features
Display:
fax number
ROTATE & SET
1.SEND GUIDE
2.QUICK SET UP
3.FEATURE LIST
4. How to store names in the JOG DIAL
directory and how to dial them
4.JOG-DIAL
5. Help with problems operating the
answering device
5.TAD OPERATION
6. Help with problems sending/receiving
faxes
7. How to use the copier function
8. Frequently asked questions and answers
9. Explanation of error messages shown on
the display
10. List of available reports
6.FAX SND/RCV
7.COPIER
8.Q and A
9.ERRORS
10.REPORTS
3
10
11. How to use the Caller ID service
11.CALLER ID
Press .
123PRINTING
For fax advantage assistance, call 1-800-435-7329.
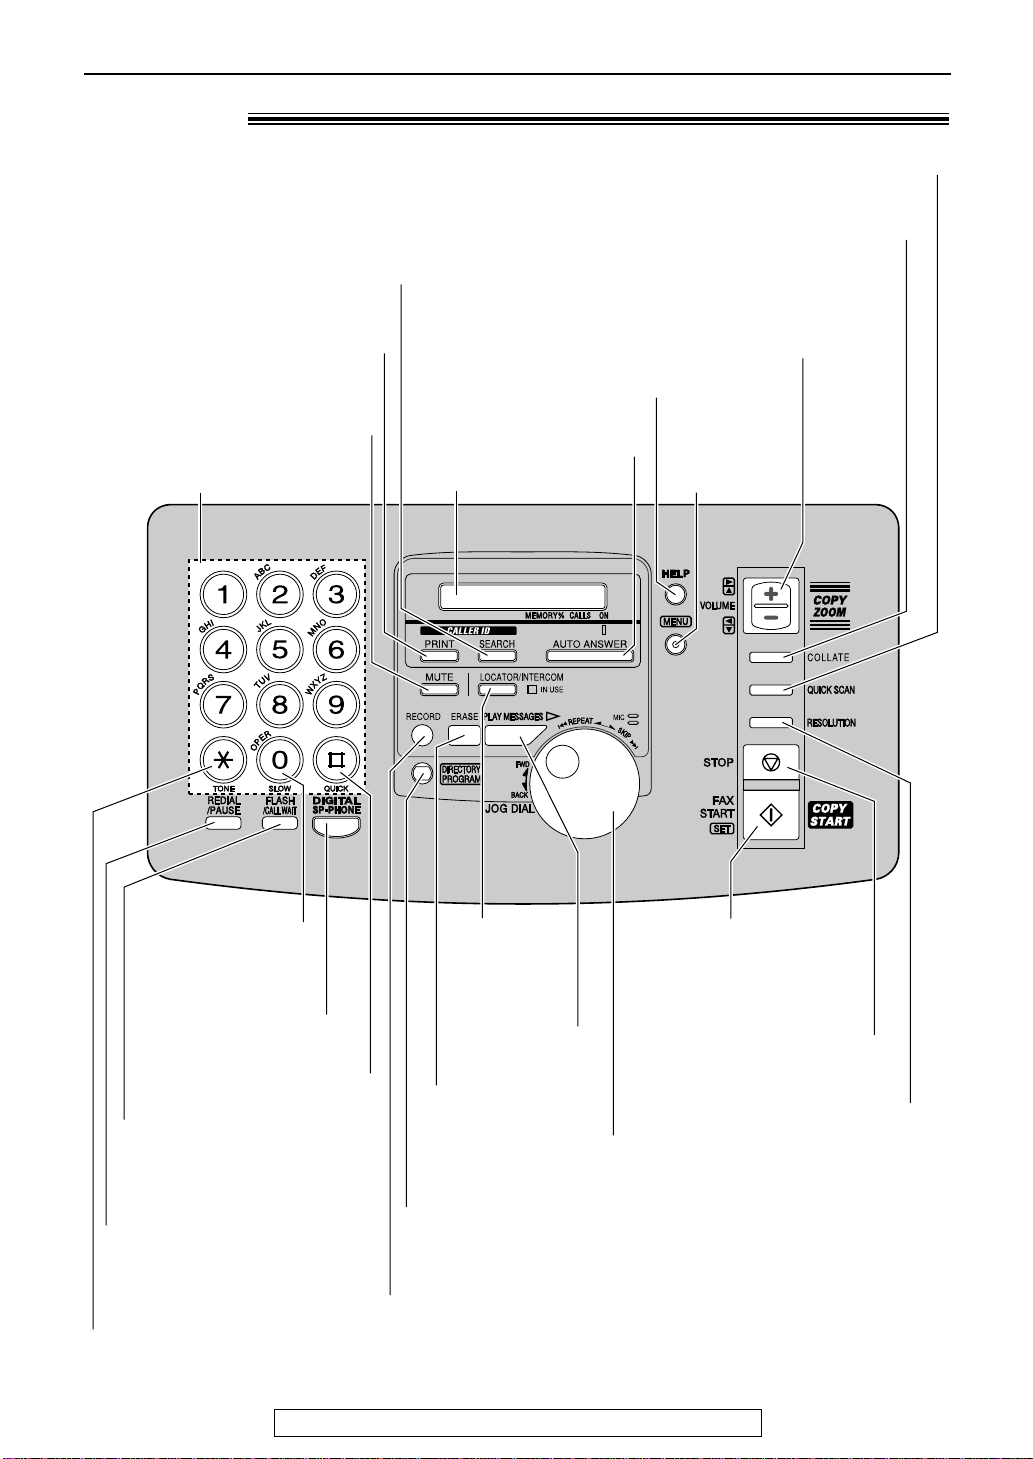
Location!
Dial keypad
●
To redial the last number
dialed (p. 25, 50).
●
To insert a pause during
dialing (p. 33).
●
To store or edit
names and telephone
numbers (p. 36).
●
For quick playback (p. 72).
●
To change from pulse to
tone during dialing (p. 33).
●
For speakerphone
operation.
●
To use special features
or services (p. 33).
●
To insert a hyphen
(p. 36, 37)
●
To search for a stored name (p. 39, 49).
●
To select characters during
programming (p. 17).
●
To select the features/feature settings
during programming (p. 82).
●
To record your own
greeting messages (p. 70).
●
To record memo messages
(p. 74).
●
To erase recorded
messages (p. 73).
●
To erase your own
greeting messages
(p. 71).
●
To initiate fax transmission,
reception or copying.
●
To store a setting during
programming.
●
To stop an operation or
cancel programming.
●
For voice muting
(p. 25, 26).
●
To turn on/off the AUTO
ANSWER mode (p. 58, 59).
●
To print a quick reference (p. 10).
●
For the Caller ID service
(p. 42, 45).
●
To print the Caller ID list
(p. 43).
Display
●
To initiate
or exit
programming.
●
To select a resolution (p. 49).
●
To choose “Collated” (sorted) in the copy mode (p. 66).
●
To adjust volumes (p. 23).
●
To select an enlargement/reduction rate in the
copy mode (p. 66, 67)
.
●
To confirm a stored telephone number (p. 39).
●
To scan and store a document into memory, and then
transmit or copy the stored document (p. 49, 66).
●
For slow
playback
(p. 72).
●
To play recorded
messages(p. 72).
●
To page or
locate the
handset
(p. 28, 29).
Finding the Controls (Main Unit)
For fax advantage assistance, call 1-800-435-7329.
11
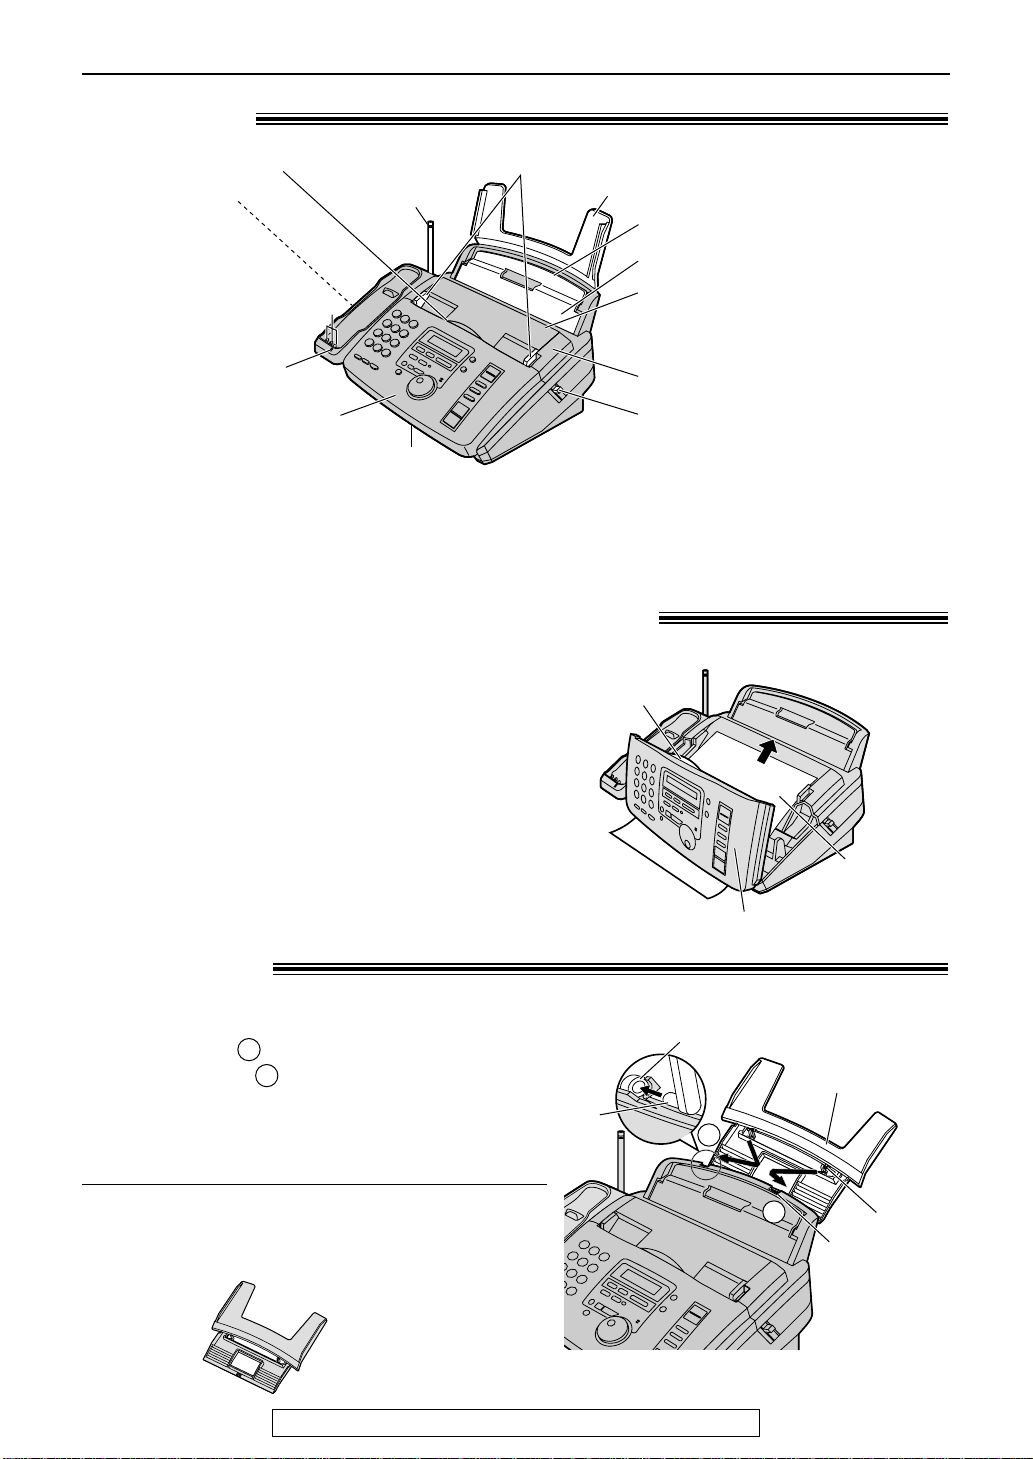
Back cover open button
Back cover
Tension bar
Recording paper entrance
Paper tray
Document entrance
Speaker
(Left side
of the
handset cradle)
Document guides
Front cover
Document exit
Recording paper exit
●
Up to 30 sheets of printed
paper can be held.
Antenna
Charge contacts
CHARGE light
Paper tray
Slot
Tab
1
1
Slot
2
Information
leaflet
Center part
Front cover
Finding the Controls / Setup (Main unit)
2
1
KX-FA50-B
Legal paper tray
Overview!
Note:
●
The document will be ejected from the front of the unit. Install the unit on a desk or floor with a smooth
surface and do not place anything in front of the unit.
Removing the information leaflet!
1
2
3
Paper tray!
Insert one tab on the paper tray into one slot on the
back of the unit ( ) and then insert the other tab
into the other slot ( ).
Note:
●
To use legal size paper
●
12
Open the front cover by pulling up the center
part.
Remove and read the information leaflet.
Close the front cover securely.
Do not place the unit in areas where the paper tray may
be obstructed by a wall, etc.
Please purchase a legal paper tray, Model No.
KX-FA50-B (p. 9) and install as shown above.
For fax advantage assistance, call 1-800-435-7329.
Setup (Main unit)
R
Tab
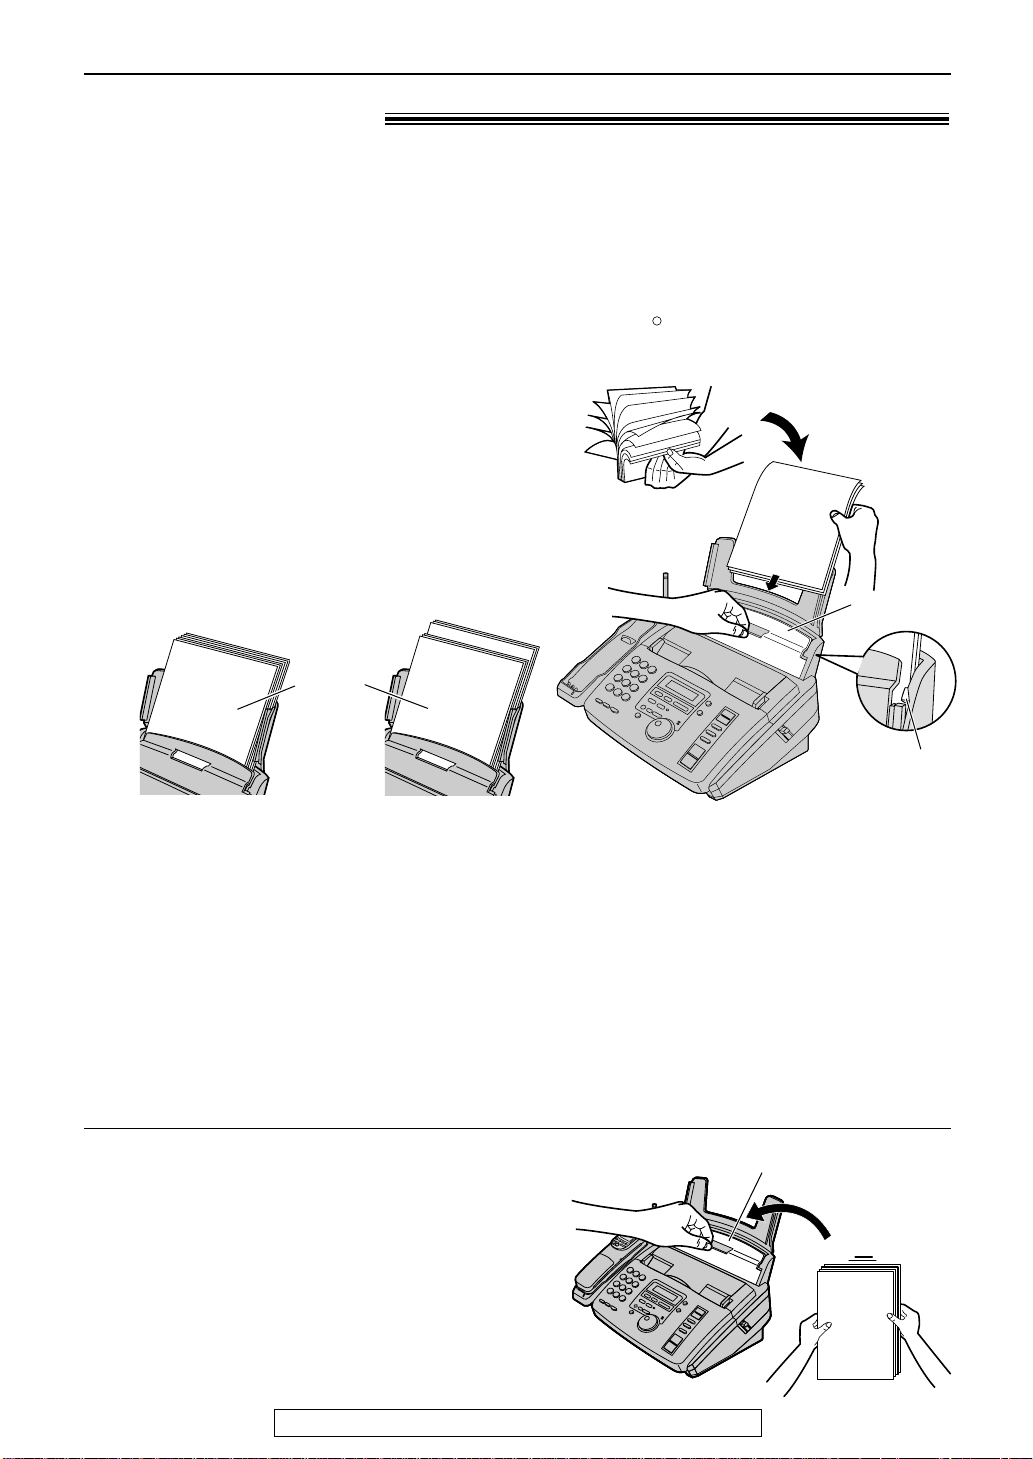
Tension bar
Stack of
paper
Correct
Incorrect
Tension bar
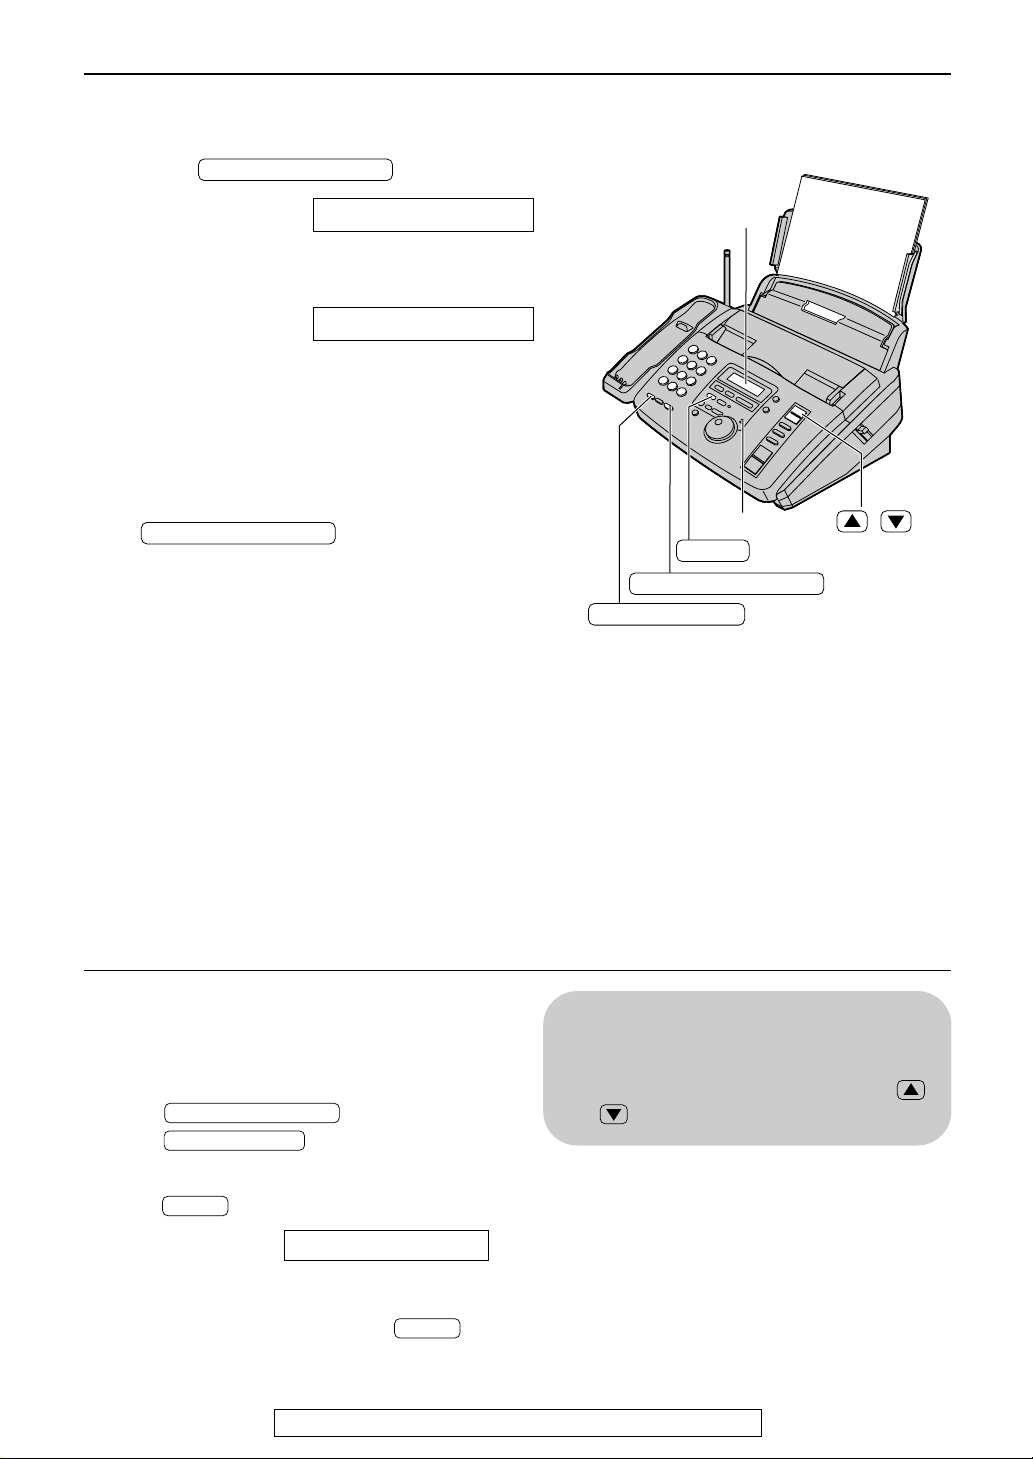
Recording paper!
Letter* or legal** size recording paper can be loaded. The unit can hold up to 50 sheets of
60 g/m2to 75 g/m2(16 lb. to 20 lb.) paper or 30 sheets of 90 g/m2(24 lb.) paper.
**Letter =
**Legal =
If you use legal size paper, please purchase a legal paper tray, Model No. KX-FA50-B (p. 9) and
install it (p. 12).
For best results, only use inkjet paper such as Hammermill Jet Print. If you use other
types of paper, the print quality may be affected.
1
2
216 mm x 279 mm (81⁄2" x 11")
216 mm x 356 mm (81⁄2" x 14" )
Fan the stack of paper to prevent a paper
jam.
Pull the tension bar forward and hold open
while inserting the paper.
●
The paper should not be over the tab.
●
If the paper is not inserted correctly,
readjust the paper or the paper may jam.
Note for recording paper:
●
Avoid paper with a cotton and/or fiber content that is over 20%, such as letterhead paper or paper
used for resumes.
●
Do not use different types or thicknesses of paper at the same time. This may cause a paper jam.
●
Avoid extremely smooth or shiny paper that is highly textured.
●
Avoid paper that is coated, damaged or wrinkled.
Note:
●
Avoid double-sided printing.
●
Do not use paper printed from this unit for double-sided printing with other copiers or printers, or the
paper may jam.
●
Some paper only accepts print on one side. Try using the other side of paper if you are not happy with the
print quality.
Adding paper
1. Pull the tension bar forward and hold open while
removing all of the installed paper.
2. Add paper to the removed paper and straighten.
3. Fan the stack of paper.
4. Pull the tension bar forward and hold open while
inserting the paper.
For fax advantage assistance, call 1-800-435-7329.
13
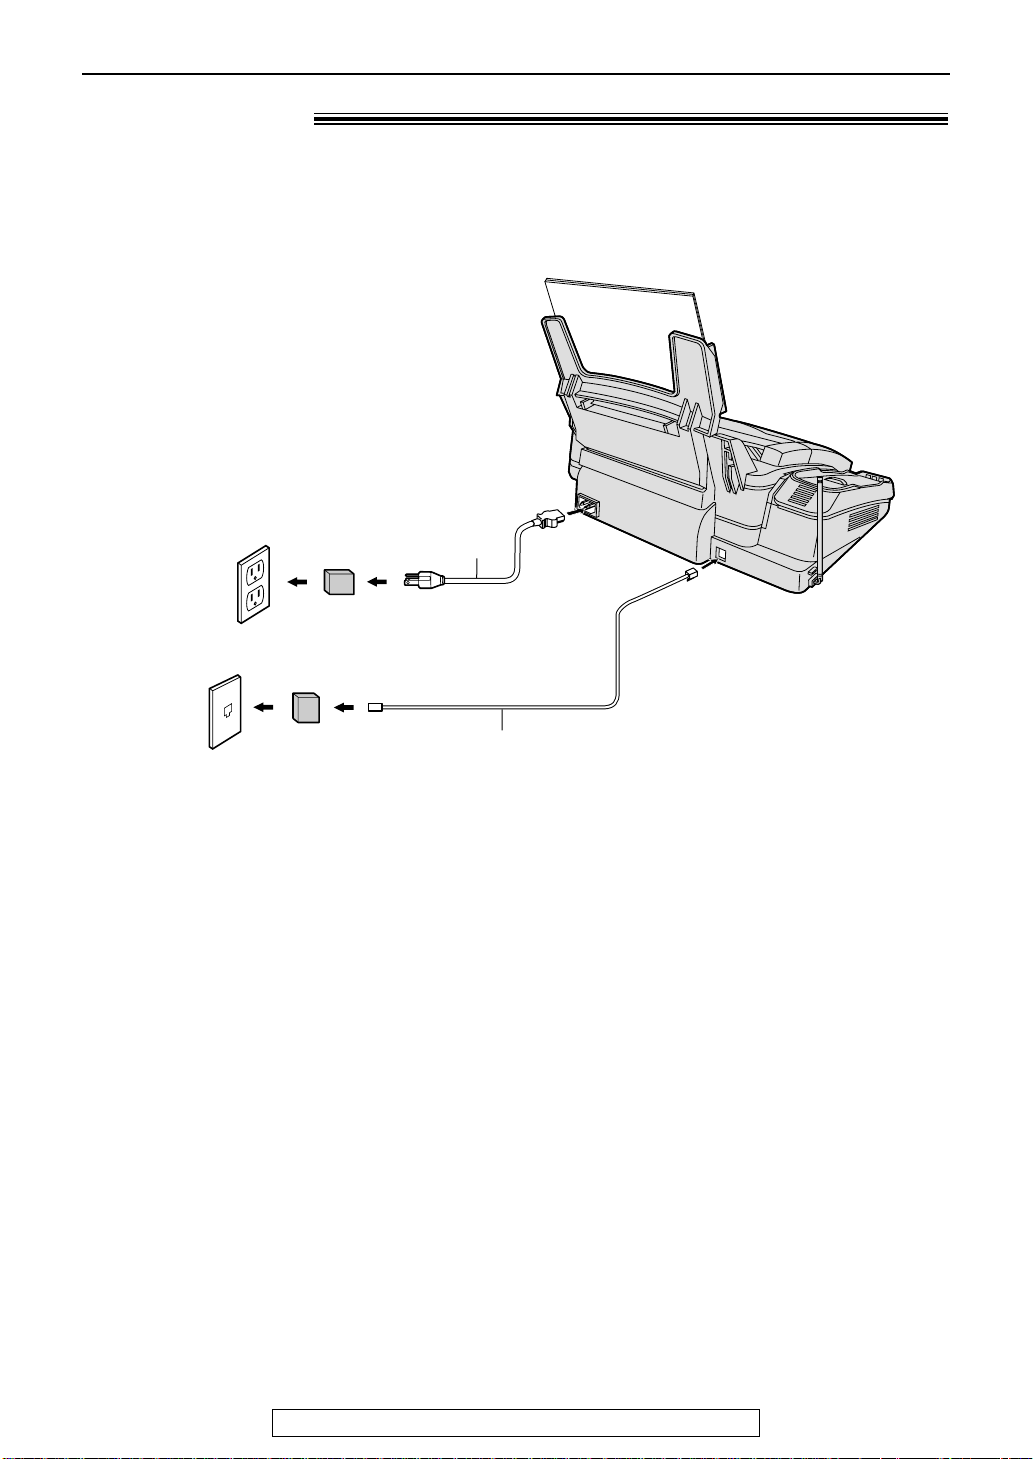
Setup (Main unit)
Wall jack
(RJ11C)
120 V, 60 Hz
Telephone
line cord
Power cord
Power surge
protector
( )
Line surge
protector
( )
Connections!
Connect the telephone line cord.
1
Connect the power cord.
●
2
When the power is turned on for the
first time, the unit will print some
basic information.
Note:
●
For additional equipment protection, we recommend the use of a surge protector. The following types are
available; TELESPIKE BLOK MODEL TSB (TRIPPE MFG. CO.), SPIKE BLOK MODEL SK6-0 (TRIPPE
MFG. CO.), SUPER MAX (PANAMAX) or MP1 (ITW LINX).
The warranty does not cover damage due to power line surges or lightning.
●
When you operate this product, the power outlet should be near the product and easily accessible.
14
For fax advantage assistance, call 1-800-435-7329.
Setup (Main unit)
Fax Correspondence
Your logo
Your facsimile telephone number
Date and time
FROM : Panasonic Fax
Example:
FAX NO. : 1234567 Feb. 26 2000 09:02AM P1
1503
SET
001 080
SET
0 1
MENU
MENU
SET
/
JOG DIAL
SET
MENU
STOP
Display
STOP
JOG DIAL
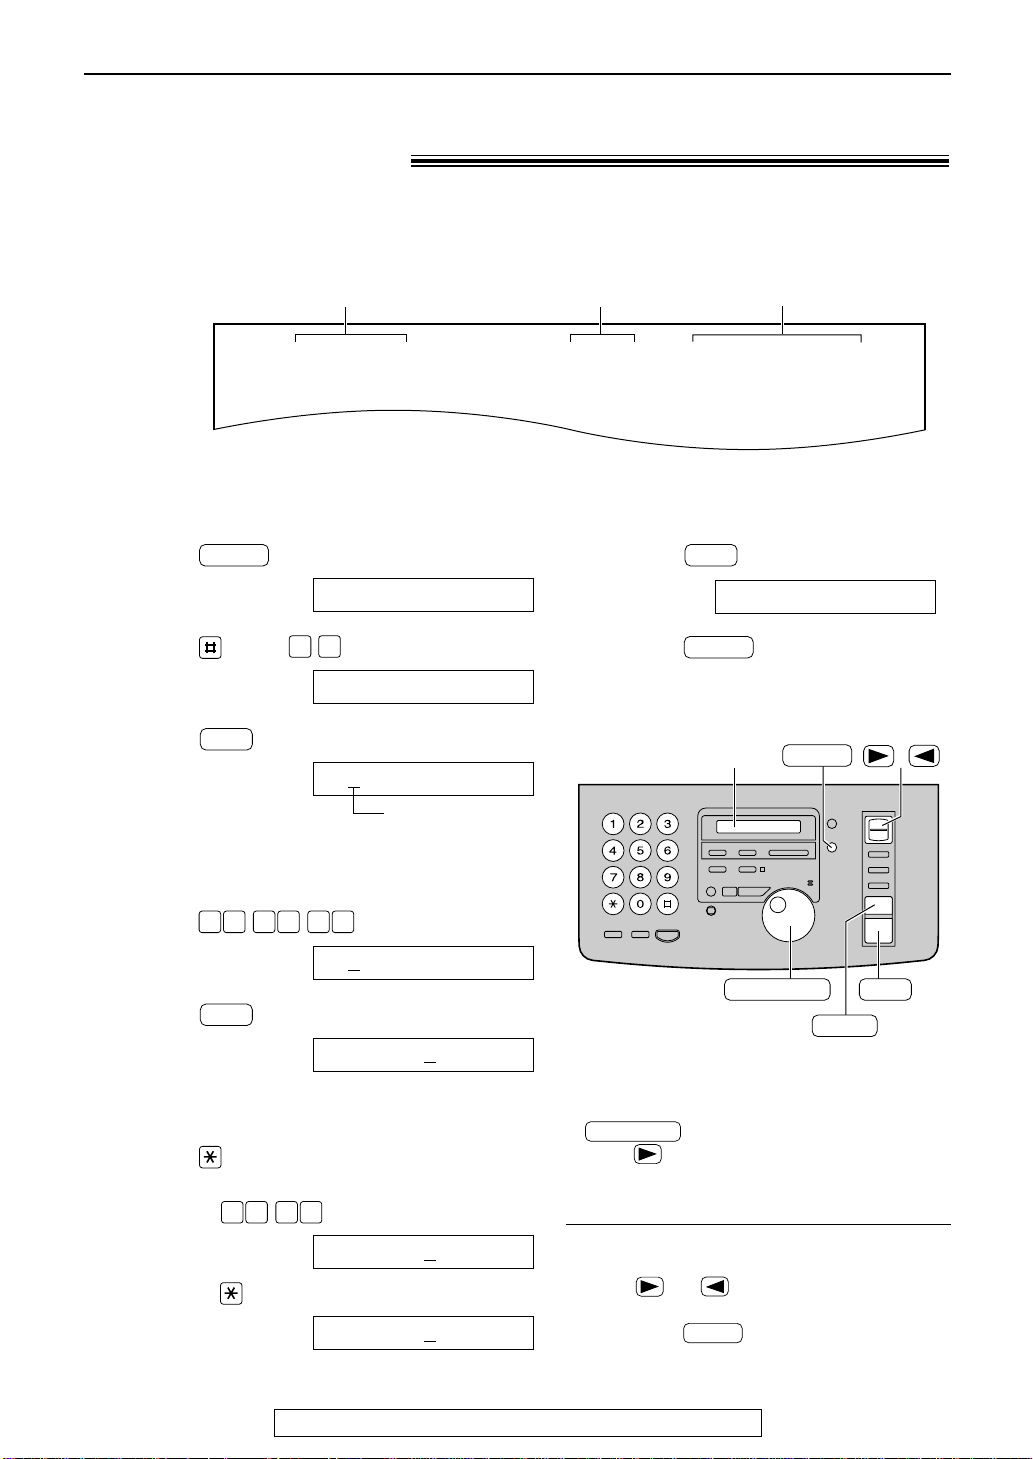
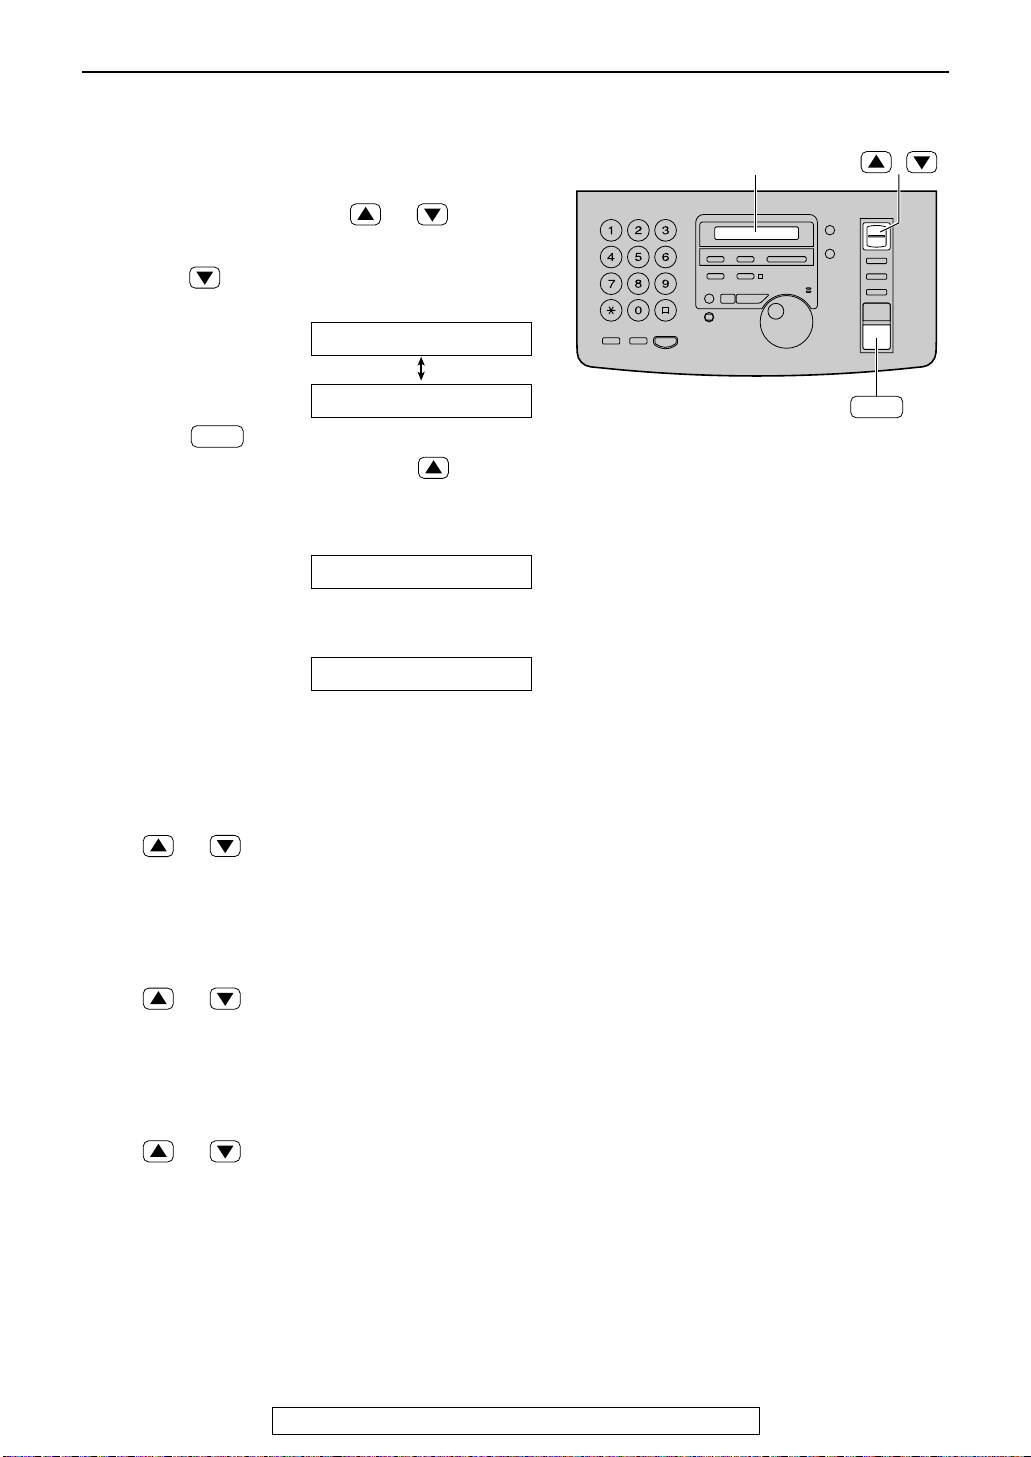
Date and time, your logo and facsimile
telephone number!
You should program the date and time, your logo and facsimile telephone number. This
information will be printed on each page transmitted from your unit, fulfilling the requirements of
the Telephone Protection Act of 1991.
Setting the date and time
Press .
1
Press , then .
2
Press .
3
Enter the correct month/day/year by selecting
4
2 digits for each, using the dial keypad.
Example: Aug. 10, 2000
Press .
Press .
5
Enter the correct hour/minute by selecting
6
2 digits for each, using the dial keypad.
Press to select “AM” or “PM”.
Example: 3:15PM
1. Press .
Display:
1.SYSTEM SET UP
SET DATE & TIME
M:01/D:01/Y:00
Cursor
M:08/D:10/Y:00
TIME: 12:00AM
Press .
7
SETUP ITEM [ ]
Press .
8
Note:
●
You can enter your number by rotating
in steps 4 and 6. In this case,
press to move the cursor.
●
The accuracy of the clock is approximately
±60 seconds a month.
TIME: 03:15AM
2. Press until “PM” is displayed.
TIME: 0
For fax advantage assistance, call 1-800-435-7329.
To correct a mistake
●
Press or to move the cursor to the
incorrect number, and make the correction.
●
3:15PM
If you press while programming, the
display will return to the previous one.
15
Setup (Main unit)
/
JOG DIAL
SET
MENU
STOP
Display
MUTE
(Insert)
(Hyphen)
(Delete)
FLASH/CALL WAIT
MENU
SET
5
5
4
2
SET
0 2
MENU
STOP
MUTE
JOG DIAL
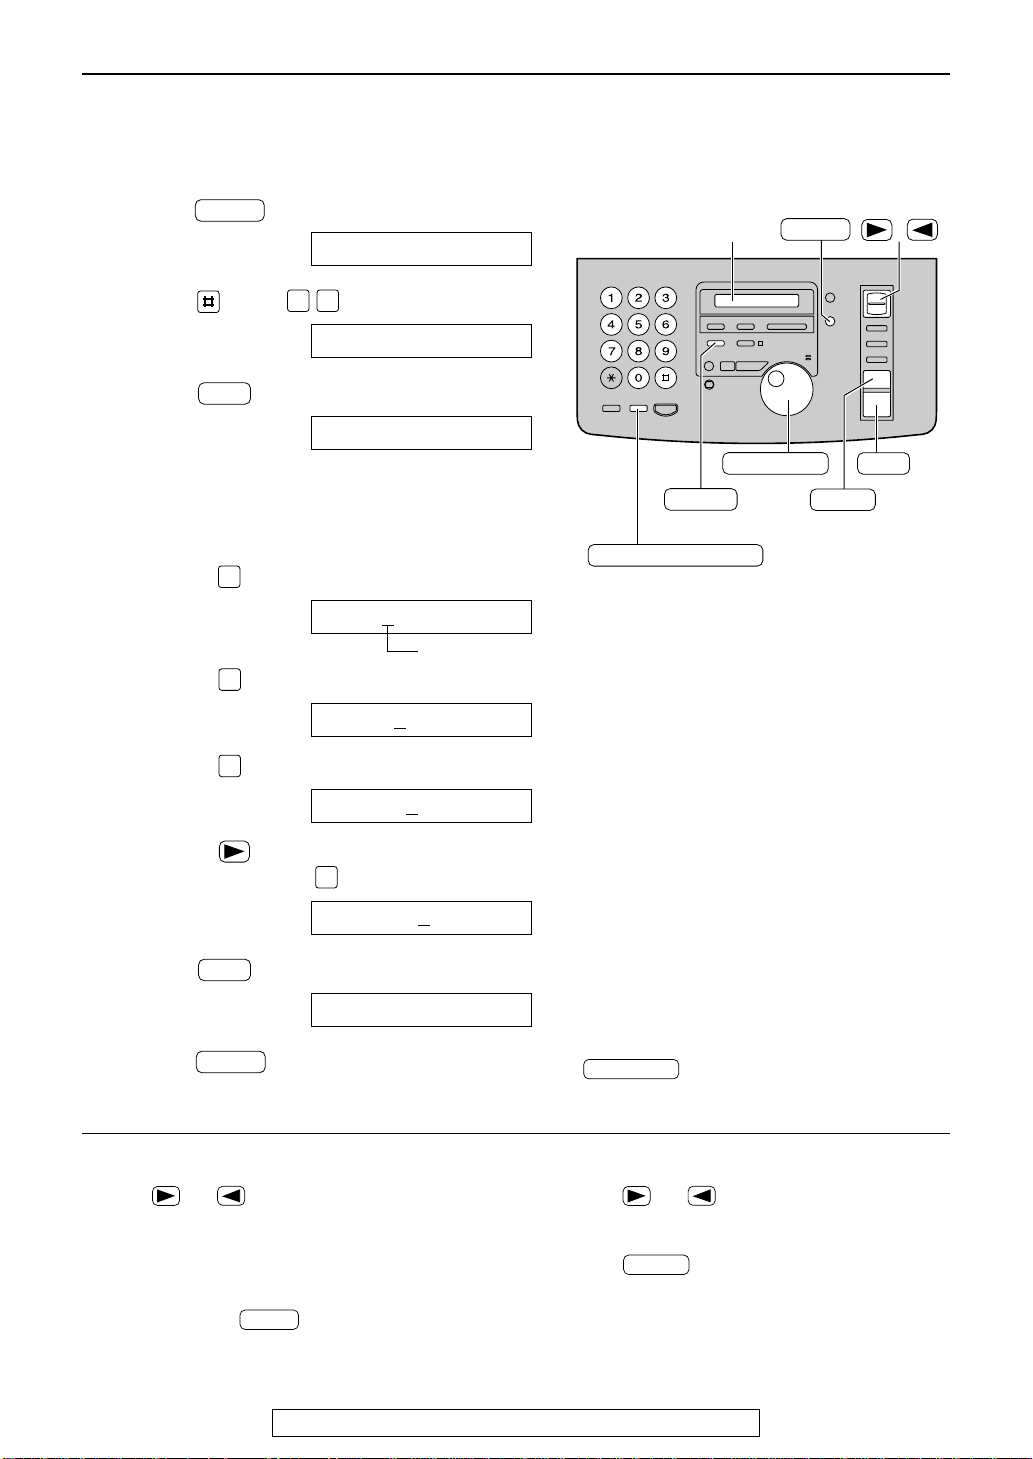
Setting your logo
The logo can be your company, division or name.
Press .
1
Press , then .
2
Press .
3
Enter your logo, up to 30 characters, using
4
the dial keypad. See next page for details.
Example: Bill
1. Press twice.
Display:
1.SYSTEM SET UP
YOUR LOGO
LOGO=
LOGO=B
2. Press six times.
LOGO=Bi
3. Press six times.
LOGO=Bil
4. Press to move the cursor to the next
space and press six times.
LOGO=Bill
Press .
5
Press .
6
To correct a mistake
●
Press or to move the cursor to the
incorrect character, and make the correction.
To delete a character
●
Move the cursor to the character you want to
delete and press .
SETUP ITEM [ ]
Cursor
Note:
●
You can enter your logo by rotating
(see next page).
To insert a character
1. Press or to move the cursor to the
position to the right of where you want to insert
the character.
2. Press (Insert) to insert a space and
enter the character.
16
For fax advantage assistance, call 1-800-435-7329.
1
2
3
4
5
6
7
8
9
0
STOP
MUTE
FLASH/CALL WAIT
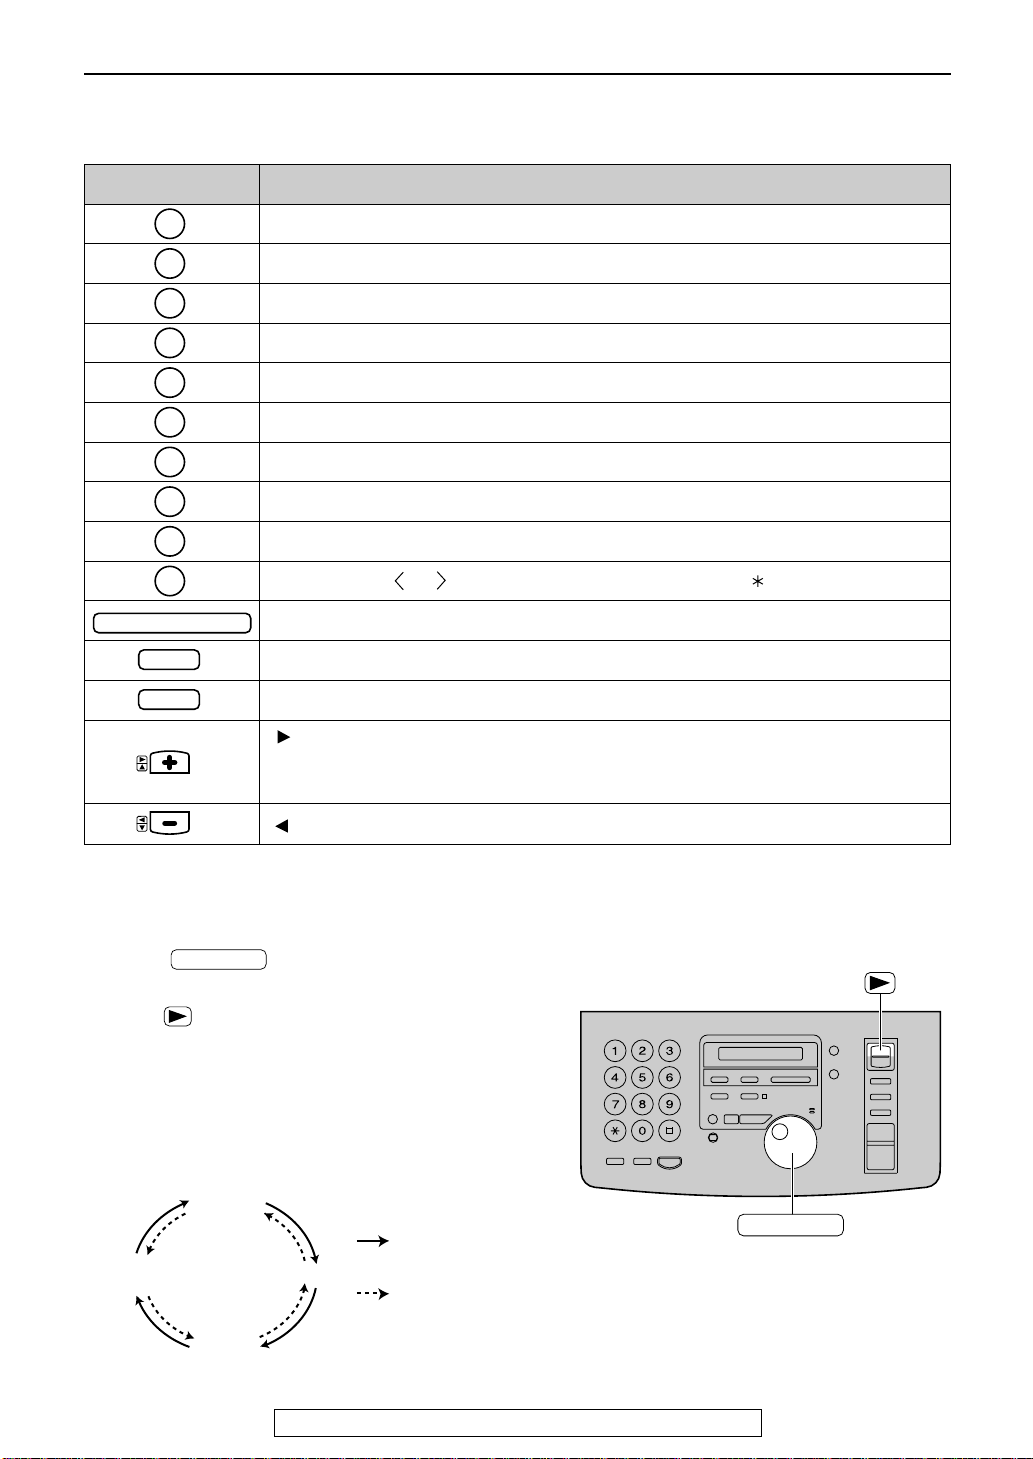
To select characters with the dial keypad
JOG DIAL
Capital
alphabet
Lower case
alphabet
Number
Symbol
: Rotating to
the right
: Rotating to
the left
JOG DIAL
Pressing the dial keys will select a character as shown below.
Keys Characters
1[]{}+–/=,._`:;? |
ABCabc2
DEFde f 3
GHIghi4
JKLj k l 5
MNOmno6
PQRSpq r s7
TUVt uv8
WXYZwxyz9
0() !"#$%&¥ @^’ →
Hyphen button (To insert a hyphen.)
Setup (Main unit)
To select characters using the JOG DIAL
Instead of pressing the dial keys, you can select characters using the JOG DIAL.
1. Rotate until the desired character is
displayed.
2. Press to move the cursor to the next space.
●
The character displayed in step 1 is inserted.
3. Return to step 1 to enter the next character.
Display order of characters
Insert button (To insert one character or one space.)
Delete button (To delete a character.)
key (To move the cursor to the right.)
To enter another character using the same number key, move the cursor to the next
space.
key (To move the cursor to the left.)
For fax advantage assistance, call 1-800-435-7329.
17
FLASH/CALL WAIT
2 467 835
JOG DIAL
JOG DIAL
Setup (Main unit)
MENU
SET
SET
0 3
MENU
/
JOG DIAL
SET
MENU
STOP
Display
(Delete)
(Hyphen)
FLASH/CALL WAIT
STOP
Setting your facsimile telephone number
Press .
1
Press , then .
2
Press .
3
Enter your facsimile telephone number, up to
4
20 digits, using the dial keypad.
Display:
1.SYSTEM SET UP
YOUR FAX NO.
NO.=
Example:
Press .
5
Press .
NO.=1234567
SETUP ITEM [ ]
6
Note:
●
You can enter your facsimile telephone number by
rotating . If using , press
to move the cursor.
●
The button replaces the digit with a “+” and the
button replaces it with a space.
Example (using the dial keypad): +234 5678
Press .
●
To enter a hyphen in a telephone number, press
(Hyphen).
To correct a mistake
●
Press or to move the cursor to the
incorrect number, and make the correction.
18
To delete a number
For fax advantage assistance, call 1-800-435-7329.
●
Move the cursor to the number you want to
delete and press .
Location)
EXIT
SEARCH
EDIT
CLEAR
CALL WAIT
●
To exit programming
functions (p. 32).
●
To exit the Caller ID list
(p. 41).
●
To edit the caller’s
phone number (p. 44).
●
For call waiting service users
(p. 47).
●
To delete a number (p. 34).
●
To erase a stored number
(p. 34).
●
To erase the Caller ID list
information (p. 44, 46).
●
To check the number of
new calls (p. 44).
●
To view the Caller ID list
(p. 41).
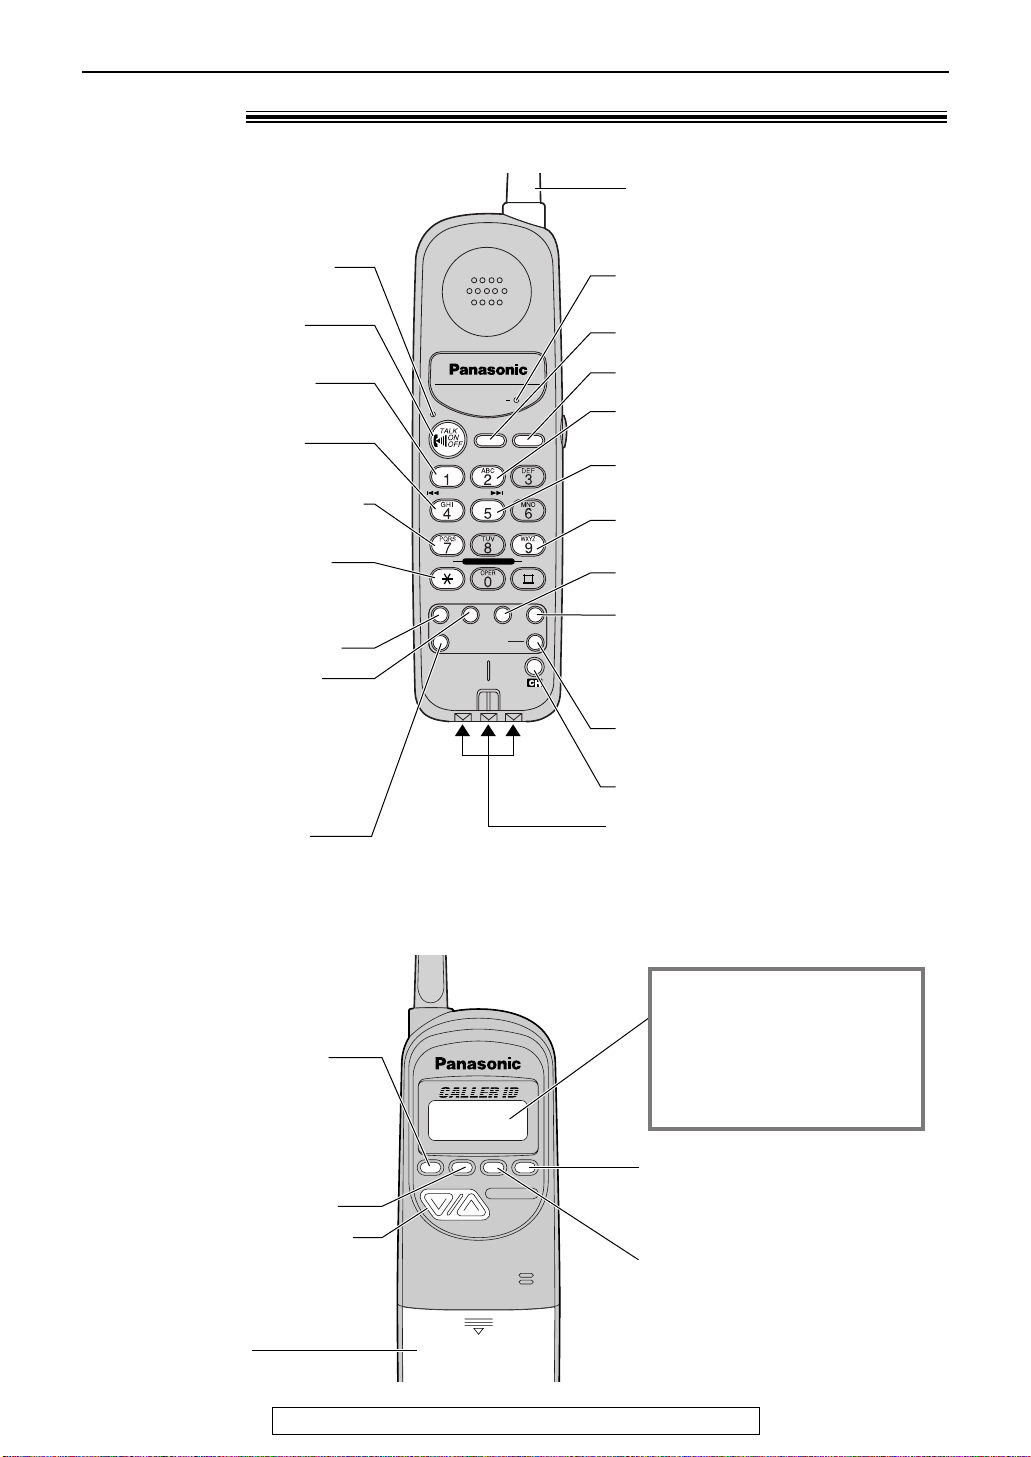
Battery cover
Backlit LCD display
The lighted handset display
will stay on for about 10
seconds after pressing a
handset button or lifting the
handset off the main unit.
(Front)
●
Lights when the handset
is in use (p. 24).
●
To make/answer calls
(p. 24, 26).
●
To repeat the recorded
messages (p. 76).
●
To play new recorded
messages (p. 75).
●
To turn the AUTO ANSWER
mode on (p. 76).
●
To change from pulse to
tone during dialing (p. 33).
●
To turn on the speakerphone
using the handset (p. 30).
●
To use special features
or services (p. 33).
●
For call waiting service users
(p. 47).
●
To operate the answering
device (p. 75, 76).
●
To enter programming
functions (p. 34).
INTERCOM
AUTO
INTERCOM
REPEAT SKIP
JKL
ALL MSGNEW MSG
ON
TONE
REMOTE SP FLASH LOUD REDIAL
PLAYBACK
PROGRAM
AUTO ANSWER
FAX
OFF
PAUSERINGER
Setup (Handset)
Antenna
●
Lights while using the intercom
(p. 27, 28).
●
For automatic dialing (p. 34, 35).
●
To page the main unit (p. 27-29).
●
To skip the recorded messages
(p. 76).
●
To play all recorded messages
(p. 75).
●
To turn the AUTO ANSWER
mode off (p. 76).
●
To adjust volumes (p. 22).
●
To redial the last number dialed
(p. 24, 31).
●
To insert a pause during dialing
(p. 33).
●
To receive a fax on the main unit
(p. 60).
●
To select a clear channel (p. 24).
Charge contacts (p. 104)
(Back)
For fax advantage assistance, call 1-800-435-7329.
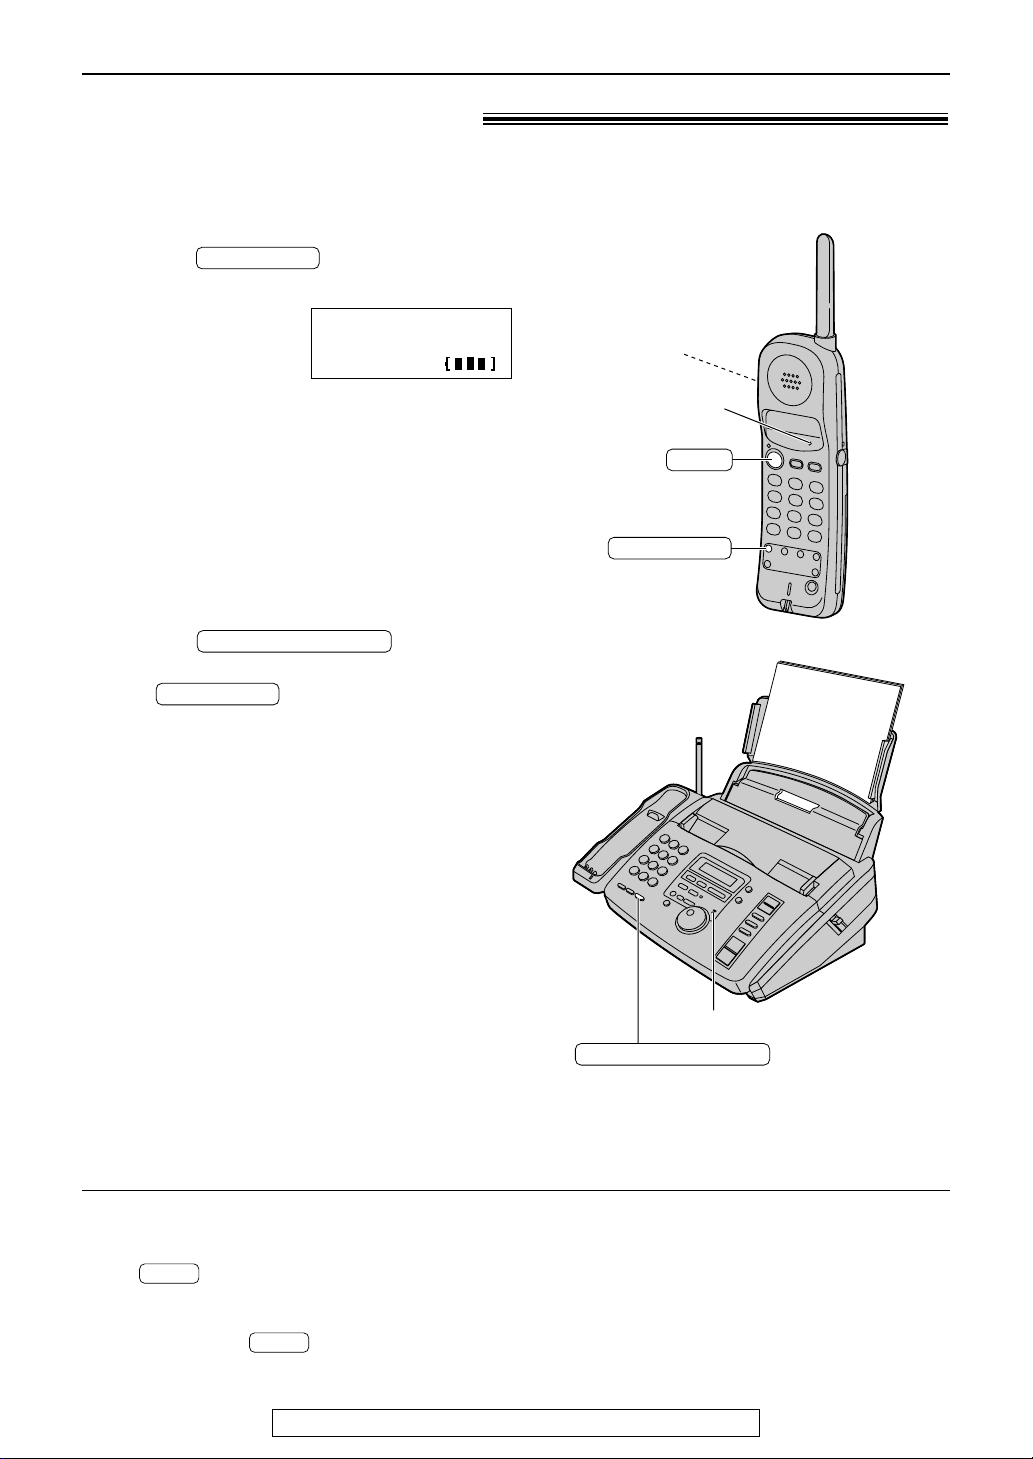
19
While in use
(in conversation)
20
Setup (Handset)
For fax advantage assistance, call 1-800-435-7329.
Up to about 8 hours
Up to about 21 days
While not in use
(stand-by/off the main unit)
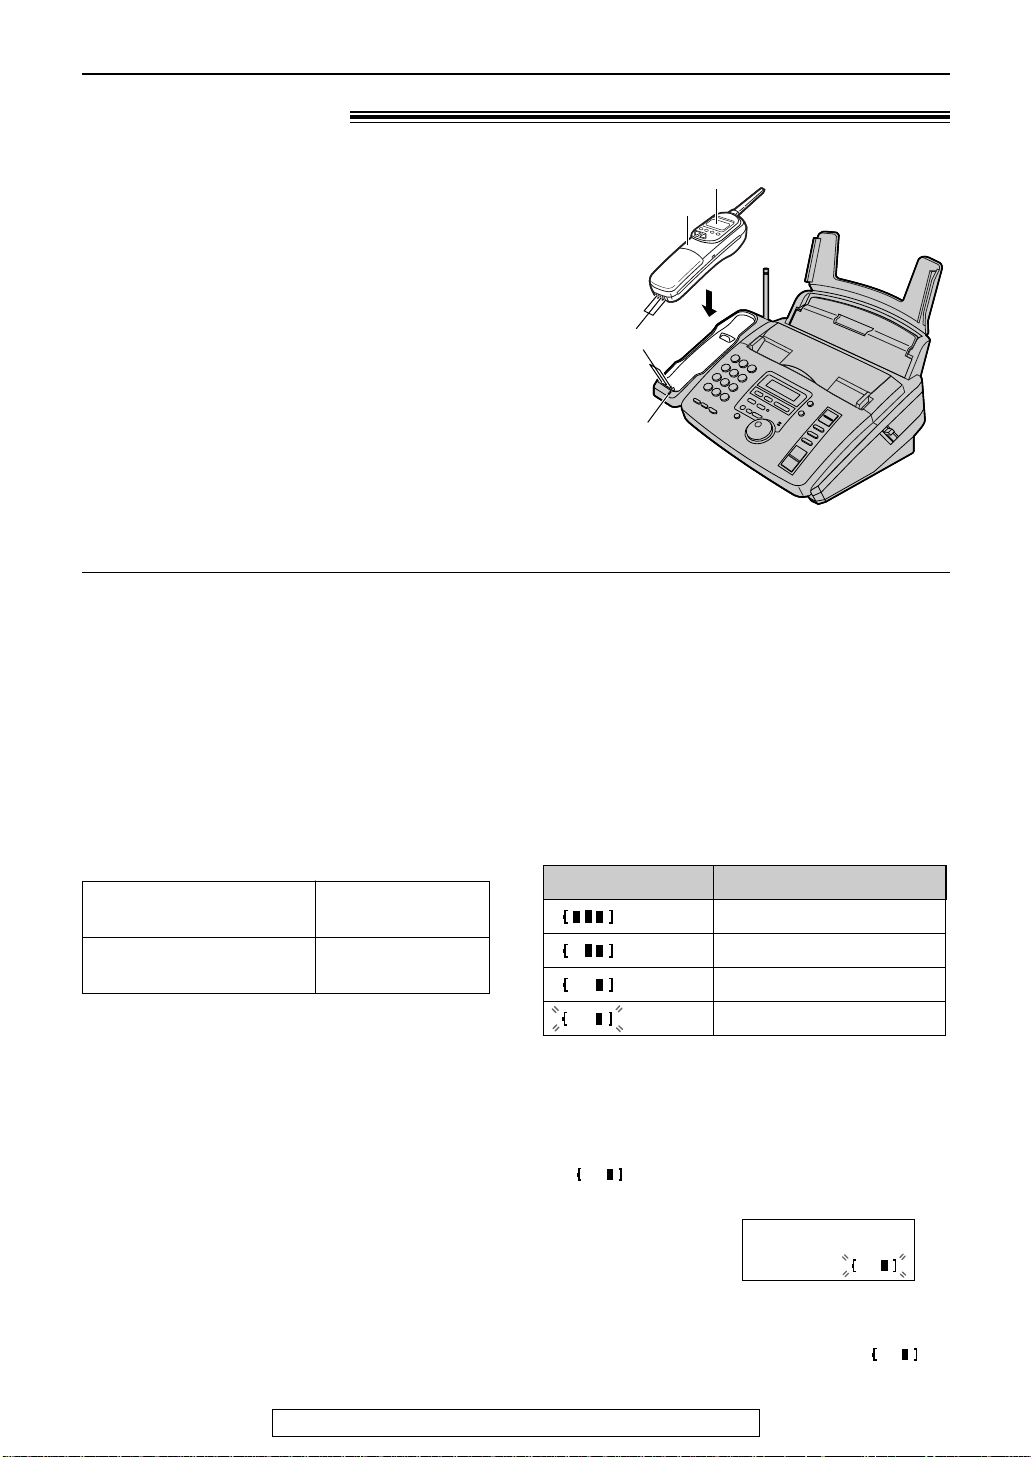
Battery charge
Place the handset on the cradle of the main unit for
about 4 hours.
●
The CHARGE light will turn on.
Handset
Charge contacts
CHARGE light
Display
Note:
●
Clean the handset and the main unit
charge contacts with a dry cloth once a
month, or the battery may not charge
properly (p. 104).
●
The battery cannot be overcharged.
Automatic security code setting
Whenever you place the handset on the main
unit, the unit will automatically select one of a
million security codes. These codes help to avoid
unauthorized use of your telephone line by
another cordless telephone.
Battery life
If your Panasonic battery is fully charged, the
battery life will be as follows.
Note:
●
Battery life may vary depending on usage
conditions and ambient temperature.
(flashing)
Display prompt
Fully charged
Medium
Low
Needs to be recharged.
Battery strength
Battery strength
You can check the present battery strength on the
display while the handset is on the main unit,
while it is in use (making/answering a call etc.), or
after viewing the Caller ID List, programming, etc.
The battery strength indicator will remain on for
about 5 seconds after using the handset, then the
display will return to the stand-by mode (see left).
The battery strength is indicated as shown in the
chart below.
Stand-by mode
(The handset is off the main unit.)
The handset enters the stand-by mode after you
finish using the handset (making/answering a call,
viewing the Caller ID List, etc.).
Display is blank, but the handset can receive
calls.
The battery life is conserved in this mode.
Recharge
Recharge the battery when:
— the following message is displayed on the
handset,
— “ ” flashes on the handset display, or
—
the handset beeps intermittently while it is in use.
Display:
●
If you DO NOT recharge the handset battery for
more than 15 minutes, the display will keep
indicating the above message and/or “ ”
will continue to flash.
Recharge
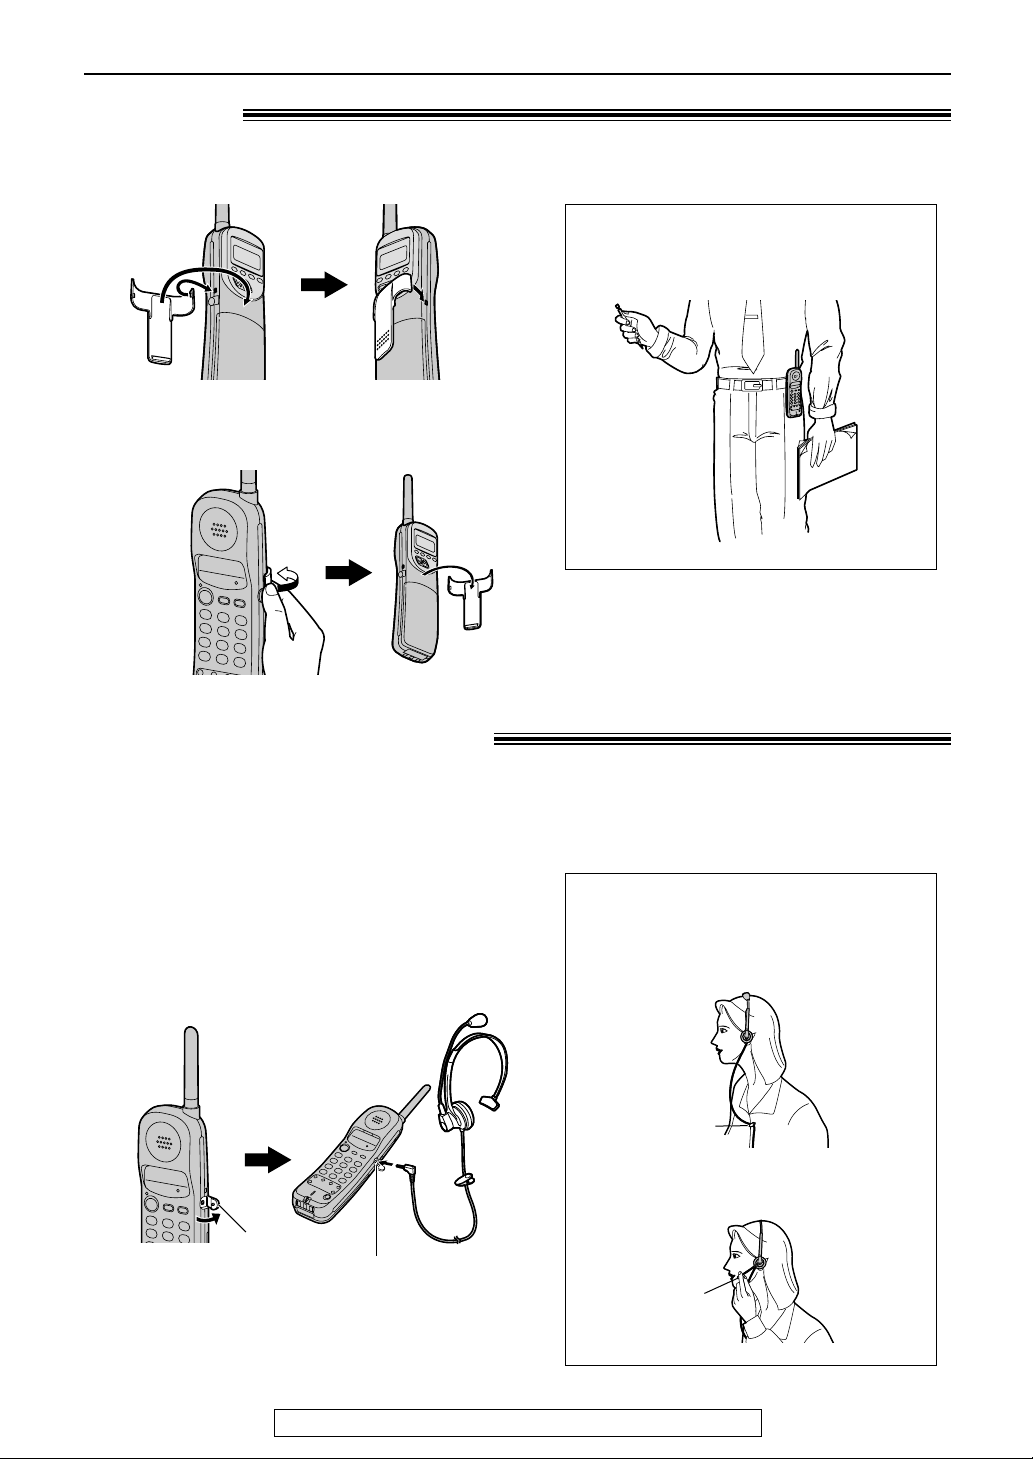
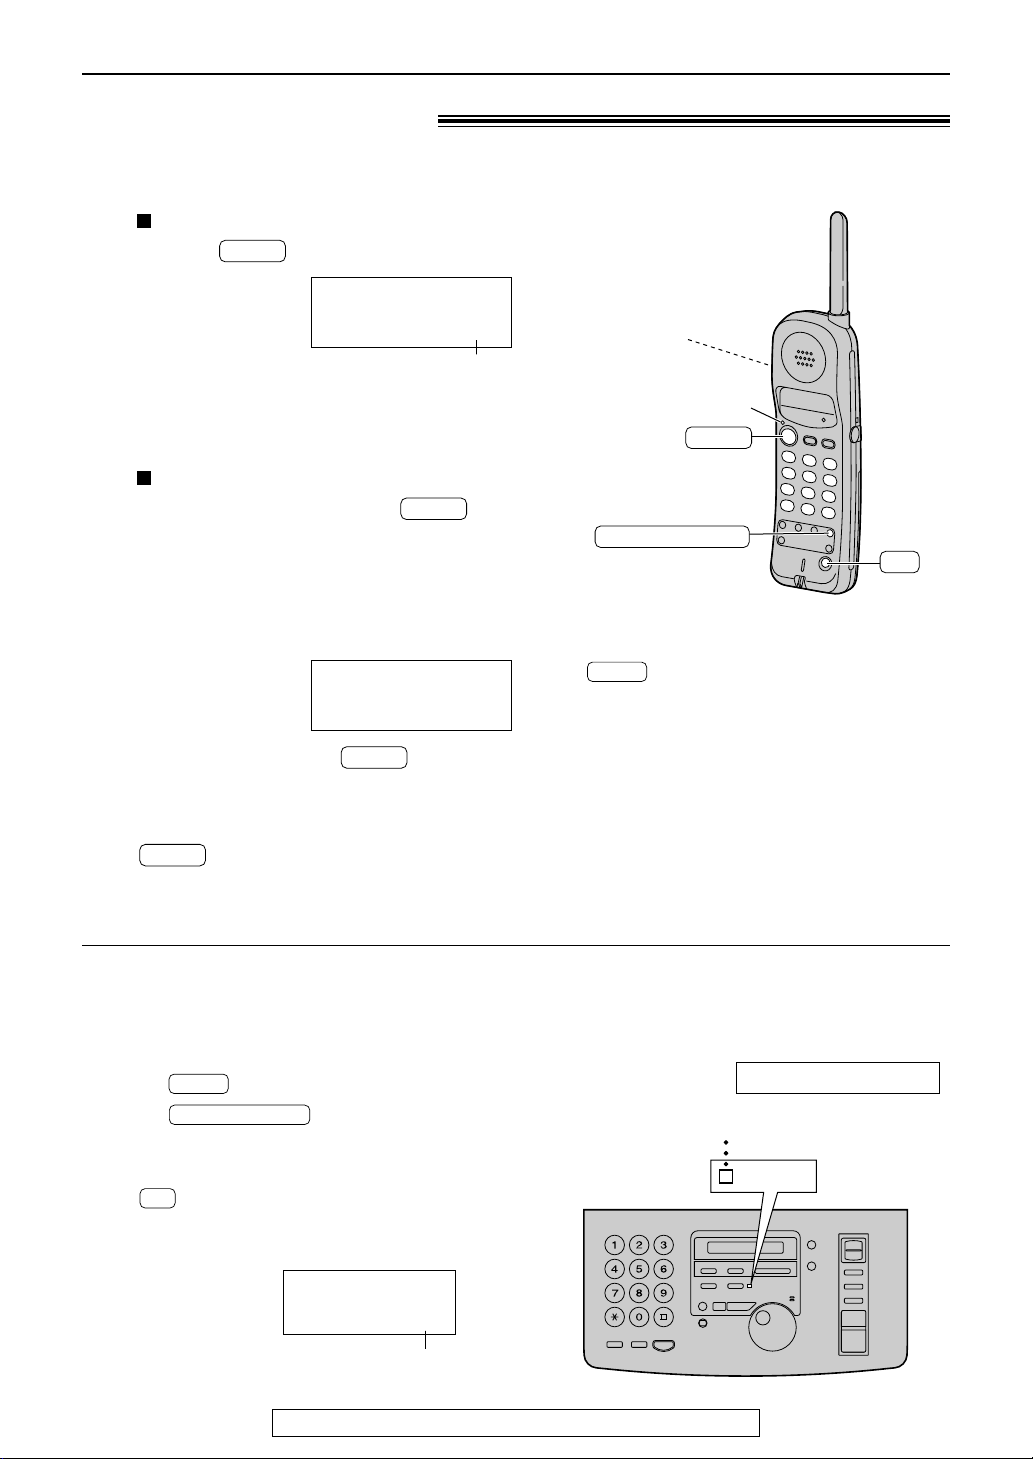
Belt clip
Headset
jack cover
Headset jack
1. Place the headset on your head and
attach the clothing clip to the desired
position.
Microphone
2. Adjust the microphone so it is near
your mouth.
Clothing
clip
■
To install the belt clip
■
To remove the belt clip
Setup (Handset)
Wearing the belt clip
Headset (not included)
Plugging the headset into the handset allows a hands-free telephone conversation. For best
results, use the Panasonic headset Model No. KX-TCA87. To order, see page 9.
■
To connect the headset
Open the headset jack cover, and connect the
headset to the headset jack as shown below.
Wearing the headset
For fax advantage assistance, call 1-800-435-7329.
21
V olumes
LOUD/RINGER
LOUD/RINGER
LOUD/RINGER
LOUD/RINGER
TALK indicator
Display
LOUD/RINGER
Adjusting volumes!
Handset
Ringer volume
3 levels (high/low/off) are available.
Make sure the TALK indicator is off.
1. Press .
●
The current ringer will sound.
2. To change the volume, press
again within 5 seconds.
Ringer
Display:
●
The new ringer will sound.
●
If you do not press within
5 seconds, the volume will not change.
To turn the ringer off:
Press and hold until you hear
2 beeps.
Low
■■■■■■
Ringer
Low
■■
LOUD/RINGER
High
High
Handset volume
3 levels (high/middle/low) are available.
While talking, press .
Loud
Display:
Low
■■
Loud
Low
■■■■
Loud
Low
■■■■■■
High
High
High
●
To turn the ringer back on, press
LOUD/RINGER
level.
While the ringer volume is set to off:
When receiving a call, the handset will not ring,
and the TALK indicator will flash.
Display:
12Ringer1off
. It will sound at a high
22
For fax advantage assistance, call 1-800-435-7329.
SET
/
SET
Display
Main unit
Ringer volume
4 levels (high/middle/low/off) are available.
While the unit is idle, press or .
■
To turn the ringer off:
1. Press repeatedly until the following
message is displayed.
V olumes
Display:
2. Press .
●
To turn the ringer back on, press .
■
While the ringer volume is set to off:
The display will show the following message.
When a call is received, the unit will not ring and
will show the following message.
RINGER1OFF=1OK?
YES:SET/NO:STOP
123RINGER1OFF
1INCOMING1CALL11
Speaker volume
8 levels (high to low) are available.
While using the speakerphone,
press or .
Fax voice guidance volume
9 levels (high to off) are available.
While listening to the fax voice guidance,
press or .
Answering device volume
9 levels (high to off) are available.
While listening to the recorded messages,
press or .
For fax advantage assistance, call 1-800-435-7329.
23
Making and Answering Calls
TALK
TALK
TALK
TALK
TALK
CH
REDIAL/PAUSE
TALK
IN USE
LIGHT
Voice calls - making
With the handset
Handset is off the main unit:
1
Press .
Talk
Example:
Channel number
●
The TALK indicator will light.
●
The selected channel number will be
displayed.
Handset is on the main unit:
Lift the handset and press .
●
The TALK indicator will light.
●
The selected channel number will be
displayed.
CH10
Display
TALK indicator
REDIAL/PAUSE
TALK
CH
Dial the telephone number.
2
Example:
●
If you misdial, press and start
again from step 1.
When you have finished talking, press
3
unit.
●
The TALK indicator will turn off.
To redial the last number
The last number dialed will be redialed.
●
The number to be redialed is different between
the main unit and the handset.
1. Press
2. Press .
If noise interferes with the conversation
Press to select a clear channel or move
closer to the main unit.
●
The selected channel number will be displayed.
or place the handset on the main
.
Example:
Talk
1112222
Talk
00-01-30111CH12
CH10
Note:
●
If an alarm tone sounds when you press
;
—move towards the main unit, or
—place the handset on the main unit.
Then try again.
●
If the TALK button on the handset is pressed
while using the main unit, the call will be
switched to the handset and the main unit is
disconnected.
●
The dialing mode is set to “TONE” as the
default setting. If you cannot dial, change to
“PULSE” with feature #13 (p. 83).
While the handset is in use
On the main unit, the IN USE indicator lights and
the following will be displayed.
Display:
CORDLESS1IN1USE
24
Channel number
For fax advantage assistance, call 1-800-435-7329.
Making and Answering Calls
DIGITAL SP-PHONE
REDIAL/PAUSE
Display
MUTE
Microphone
/
DIGITAL SP-PHONE
DIGITAL SP-PHONE
MUTE
MUTE
REDIAL/PAUSE
DIGITAL SP-PHONE
With the speakerphone
Press .
1
Display:
Dial the telephone number.
2
●
If you misdial, hang up and dial again.
When the other party answers, talk into the
3
microphone.
When finished talking, press
Example:
4
Note:
●
If the TALK button on the handset is pressed while
using the main unit, the call is switched to the handset
and the main unit is disconnected.
●
The dialing mode is set to “TONE” as the default
setting. If you cannot dial, change to “PULSE” with
feature #13 (p. 83).
TEL=
TEL=2345678
.
To redial the last number
The last number dialed will be redialed.
●
The number to be redialed is different between
the main unit and the handset.
1. Press or lift the handset.
2. Press .
To mute your voice to the other party
1.
Press during a telephone conversation.
●
The other party cannot hear you, but you can
hear them.
2. To resume the conversation, press
again.
Display:
Speakerphone operation
●
Use the speakerphone in a quiet room.
●
Adjust the speakerphone volume using
or .
111111<MUTE>
For fax advantage assistance, call 1-800-435-7329.
25
Making and Answering Calls
TALK
MUTE
MUTE
OR
TALK
DIGITAL SP-PHONE
DIGITAL SP-PHONE
DIGITAL SP-PHONE
MUTE
Microphone
/
Voice calls - answering)
With the handset
Handset is off the main unit:
1
2
Press when the handset rings.
●
Handset is on the main unit:
Lift the handset when the main unit rings.
When finished talking, press or
place the handset on the main unit.
TALK
You can also answer a call by pressing
any dial key 0 to 9, , or #.
(Any key talk feature)
With the speakerphone
When the unit rings, press
1
When you have finished talking, press
2
To mute your voice to the other party
1.
Press during a telephone conversation
using the speakerphone.
●
The other party cannot hear you, but you can
hear them.
2. To resume the conversation, press
again.
Display:
.
.
111111<MUTE>
Speakerphone operation
●
Use the speakerphone in a quiet room.
●
Adjust the speakerphone volume using
or .
26
For fax advantage assistance, call 1-800-435-7329.
Making and Answering Calls
INTERCOM
INTERCOM
INTERCOM
INTERCOM
indicator
Microphone
Intercom between the handset and the main unit
)
Paging the main unit from the handset
Handset:
1
Press .
●
The INTERCOM indicator will flash, then
light.
Main unit:
2
When the main unit rings, answer through
the microphone.
●
While using the intercom, the display will
show:
For the main unit:
For the handset:
(Example)
Handset:
3
When finished, press .
●
The INTERCOM indicator will turn off.
INTERCOM CALL
Intercom
00-01-12
For fax advantage assistance, call 1-800-435-7329.
27
Making and Answering Calls
INTERCOM
INTERCOM
LOCATOR/INTERCOM
LOCATOR/INTERCOM
INTERCOM
INTERCOM
indicator
LOCATOR/INTERCOMLOCATOR/INTERCOM
IN USEIN USE
FLASH
Microphone
Display
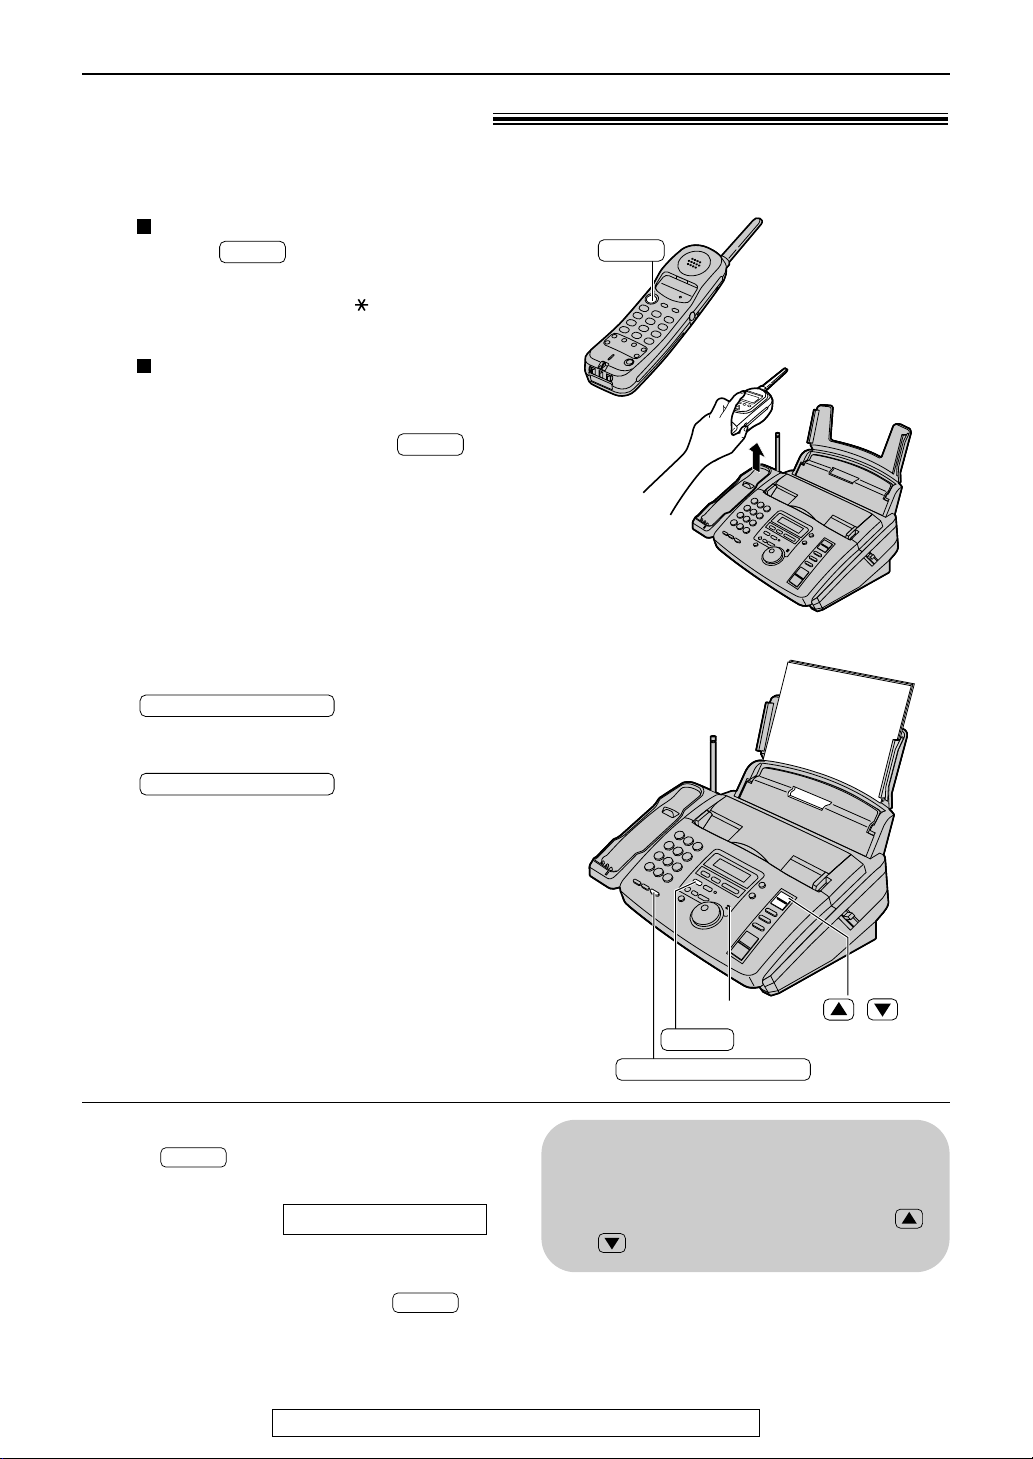
Paging the handset from the main unit (handset locator)
Using this feature, you can locate the handset if it has been misplaced.
Main unit:
1
Press .
●
The IN USE indicator will flash and start
paging the handset for 1 minute.
●
The handset will display the following
message.
1111Paging
Display:
Press1INTERCOM
●
To stop paging, press
again.
Handset:
2
Press to answer.
●
The INTERCOM indicator will light.
●
The IN USE indicator on the main unit will
light.
Main unit:
3
Speak into the microphone.
●
While using the intercom, the display will
show:
For the main unit:
For the handset:
(Example)
Handset:
4
When finished, press .
●
The INTERCOM and IN USE indicators will
turn off.
While using the intercom
●
Intercom calls can only be ended by the handset.
●
If the handset user has difficulty hearing the main
unit user, ask the main unit user to decrease the
speaker volume by pressing .
INTERCOM1CALL
Intercom
00-01-12
28
For fax advantage assistance, call 1-800-435-7329.
Making and Answering Calls
DIGITAL SP-PHONE
INTERCOM
DIGITAL SP-PHONE
Microphone
Display
Display
INTERCOM
Display
LOCATOR/INTERCOM
Display
TALK
INTERCOM
INTERCOM
LOCATOR/INTERCOM
TALK
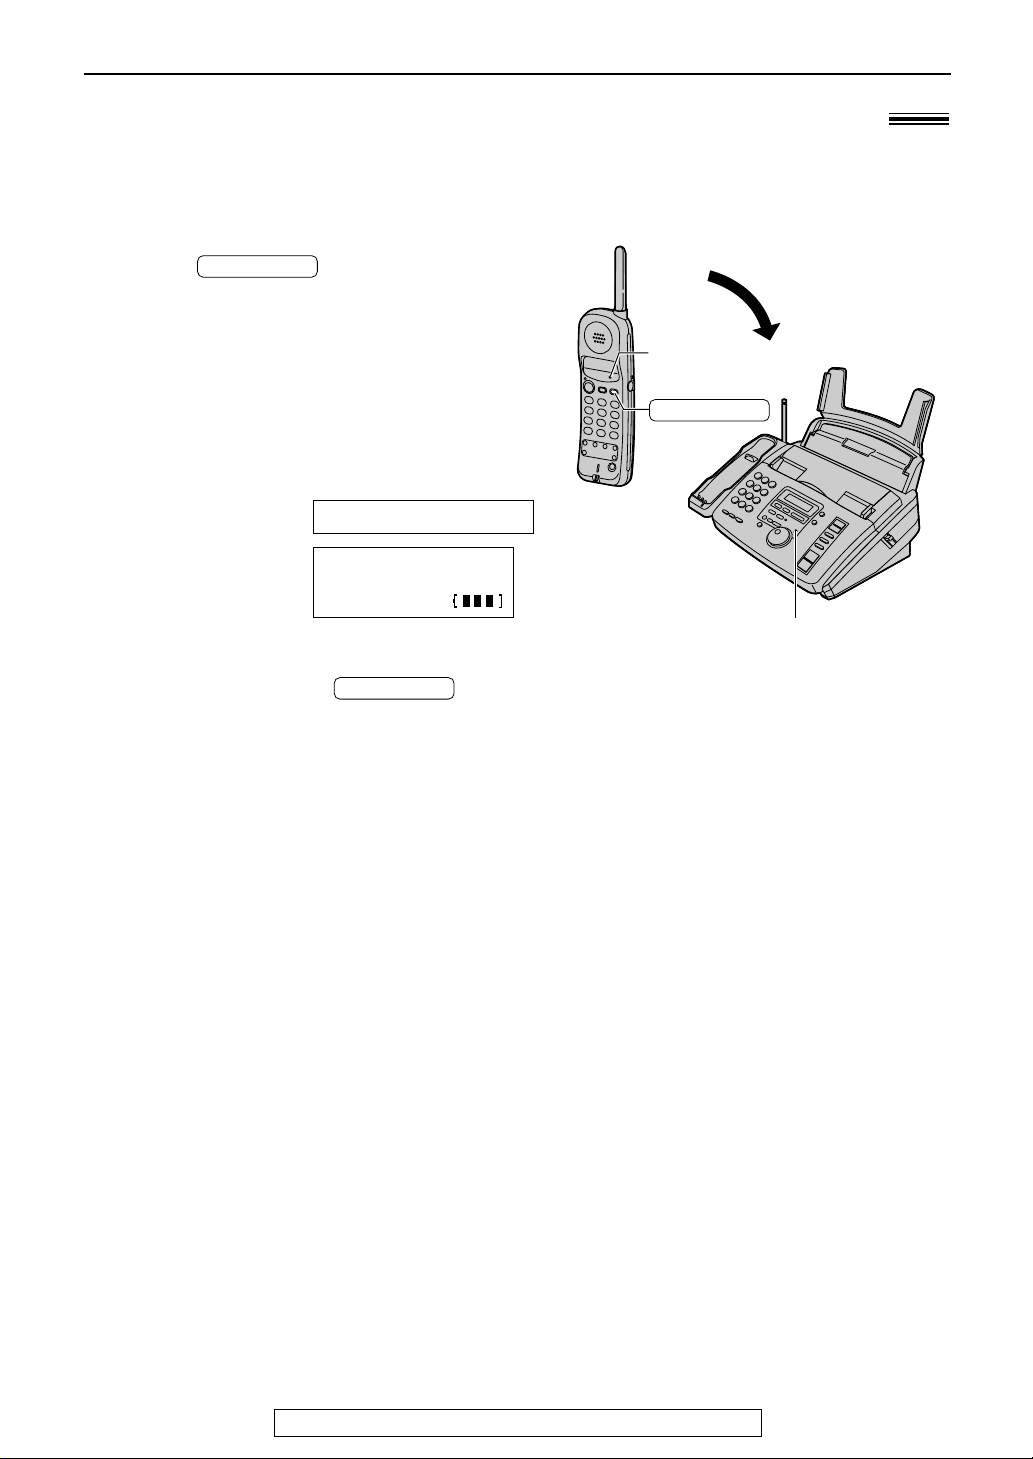
Transferring a call between the handset and the main unit
The intercom can be used during a call. This feature enables you to transfer a call between the
handset and the main unit.
)
From the handset to the main unit
Handset:
1
During a call, press .
●
The handset user can talk with the main
unit user.
●
The call will be put on hold.
Intercom1hold
Example:
Main unit:
2
Talk with the handset user through the microphone.
Display:
Main unit:
3
To answer the call, press .
●
The transfer will be completed.
00-01-12
123456
INTERCOM1HOLD
HOLD
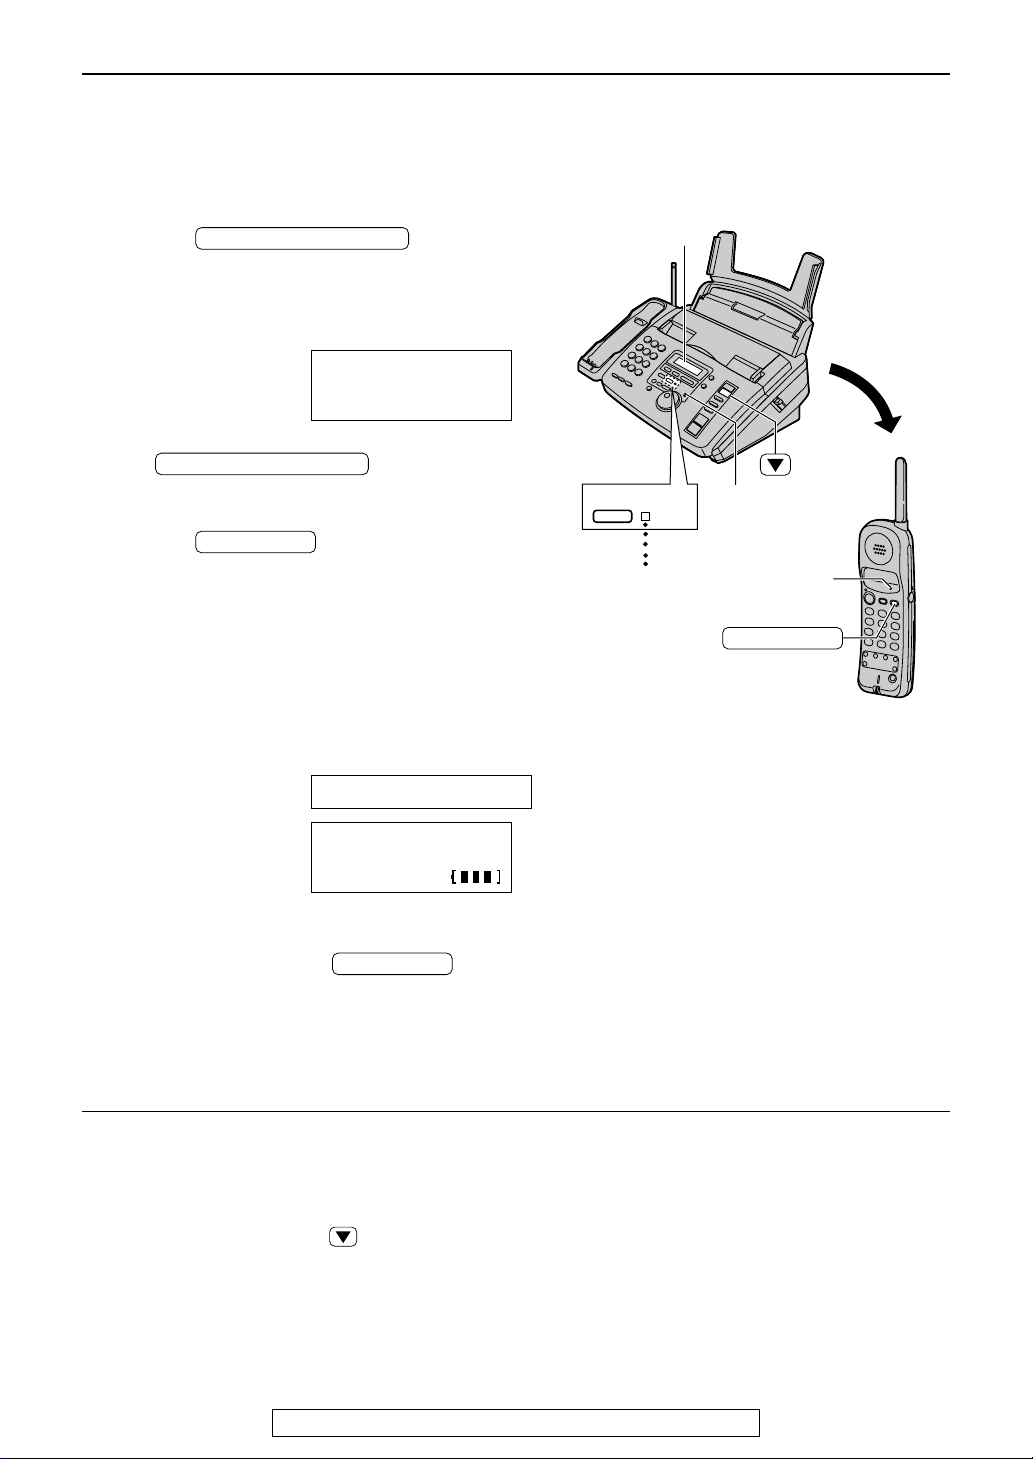
From the main unit to the handset
Main unit:
1
During a call, press
to page the handset.
●
The call will be put on hold, and the
following message will be displayed on the
main unit and the handset.
111111
1111Paging
Press1INTERCOM
Intercom1hold
00-01-12
INTERCOM1HOLD
HOLD
2
For the main unit:
For the handset:
Handset:
Press to answer the page.
Example:
●
The main unit will display the following
message.
Handset:
3
To answer the call, press .
●
The transfer will be completed.
●
The main unit will display the
following message.
CORDLESS1IN1USE
For fax advantage assistance, call 1-800-435-7329.
29
Making and Answering Calls
REMOTE SP
DIGITAL SP-PHONE
REMOTE SP
TALK
INTERCOM
indicator
REMOTE SP
Display
DIGITAL SP-PHONE
Microphone
TALK
TALK
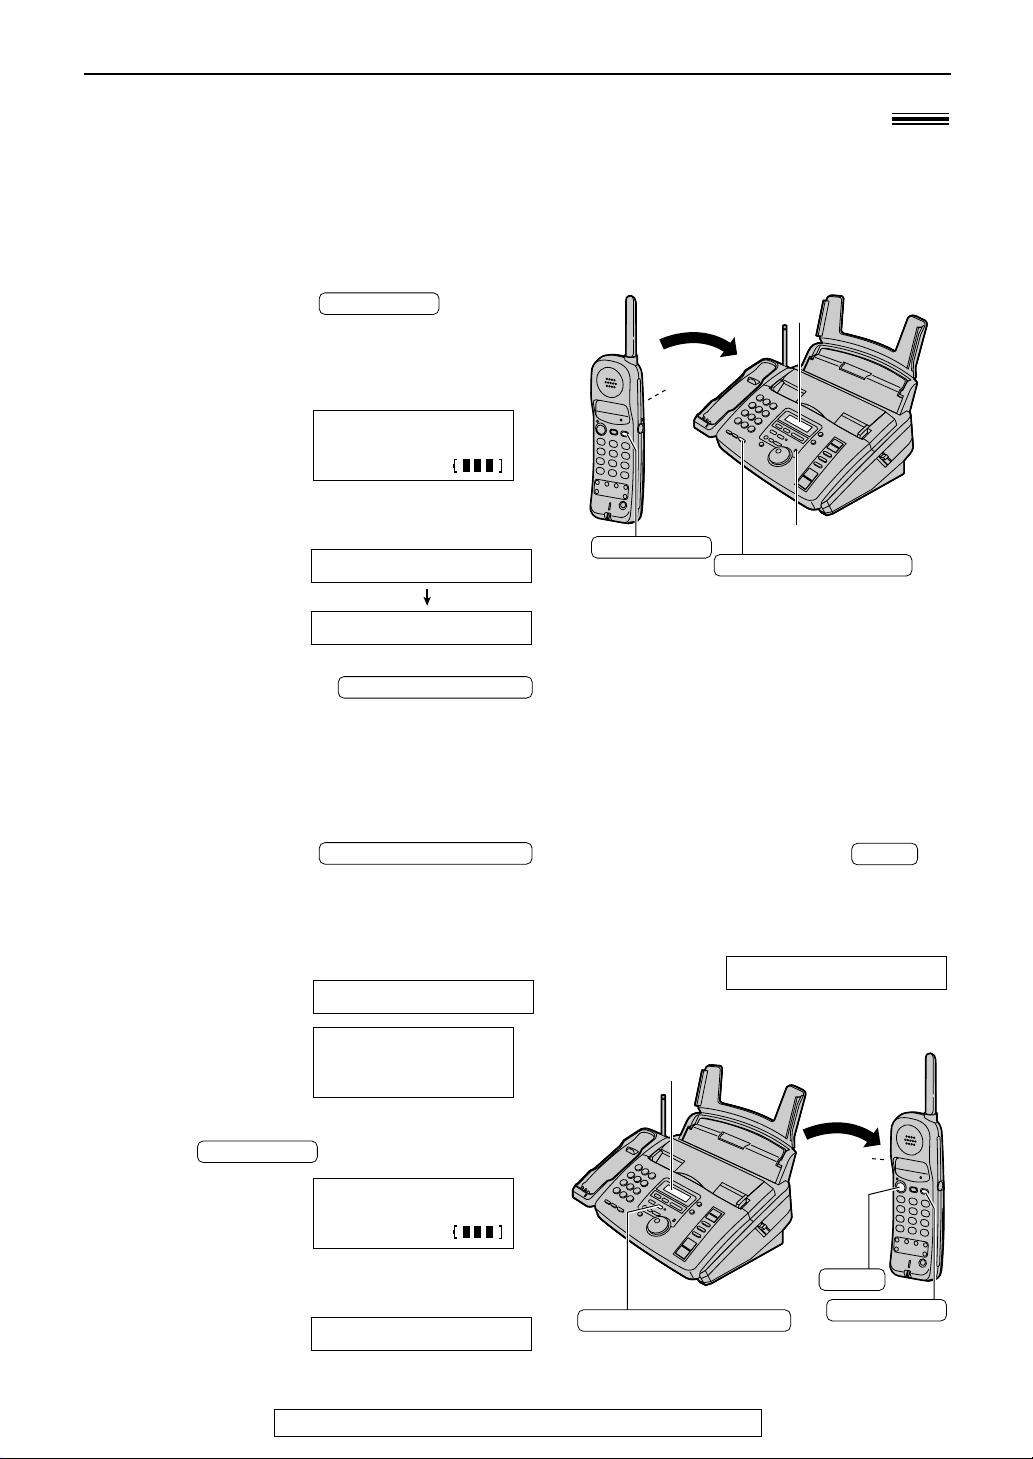
Remote speakerphone)
Switching a call to the DIGITAL SP-PHONE with the handset
Handset:
1
Press on the handset during
a call.
Remote1sp-phone
Display:
●
The INTERCOM indicator flashes.
●
The call is switched to the main unit.
Main unit:
2
Talk into the microphone from a distance of
about 20 cm (8 inches).
●
To switch to the handset, see below.
Main unit:
3
Press to hang up.
●
You can also hang up by pressing
00-00-27
.
To switch to the handset
(while using the remote speakerphone)
Press on the handset.
●
You can continue the conversation using the
handset. The speakerphone will be disconnected.
●
To hang up, press or place the handset
on the main unit.
30
For fax advantage assistance, call 1-800-435-7329.
 Loading...