

Panasonic KX-F2710NZ User Manual

Model No. KX-F2750NZ
O p e r a t i n g
Panasonic
Telephone Answering System
with Facsimile
KX-F2710NZ
/ N S T R U C T I O N S
Please read these Operating
Instructions before using the unit.
Please read IMPORTANT SAFETY INSTRUCTIONS on
page 74 before use. Read and understand all instructions.
WARNING
WHEN A FAILURE OCCURS WHICH RESULTS IN THE INTERNAL PARTS BECOMING
ACCESSIBLE, DISCONNECT THE POWER SUPPLY CORD IMMEDIATELY AND RETURN THIS
UNIT TO AN AUTHORIZED SERVICE CENTER.
DISCONNECT THE TELECOM CONNECTION BEFORE DISCONNECTING THE POWER
CONNECTION PRIOR TO RELOCATING THE EQUIPMENT, AND RECONNECT THE POWER
FIRST.
THE POWER SOCKET WALL OUTLET SHOULD BE LOCATED NEAR THE EQUIPMENT AND BE
EASILY ACCESSIBLE.
TO PREVENT FIRE OR SHOCK HAZARD, DO NOT EXPOSE THIS PRODUCT TO RAIN OR ANY
TYPE OF MOISTURE.
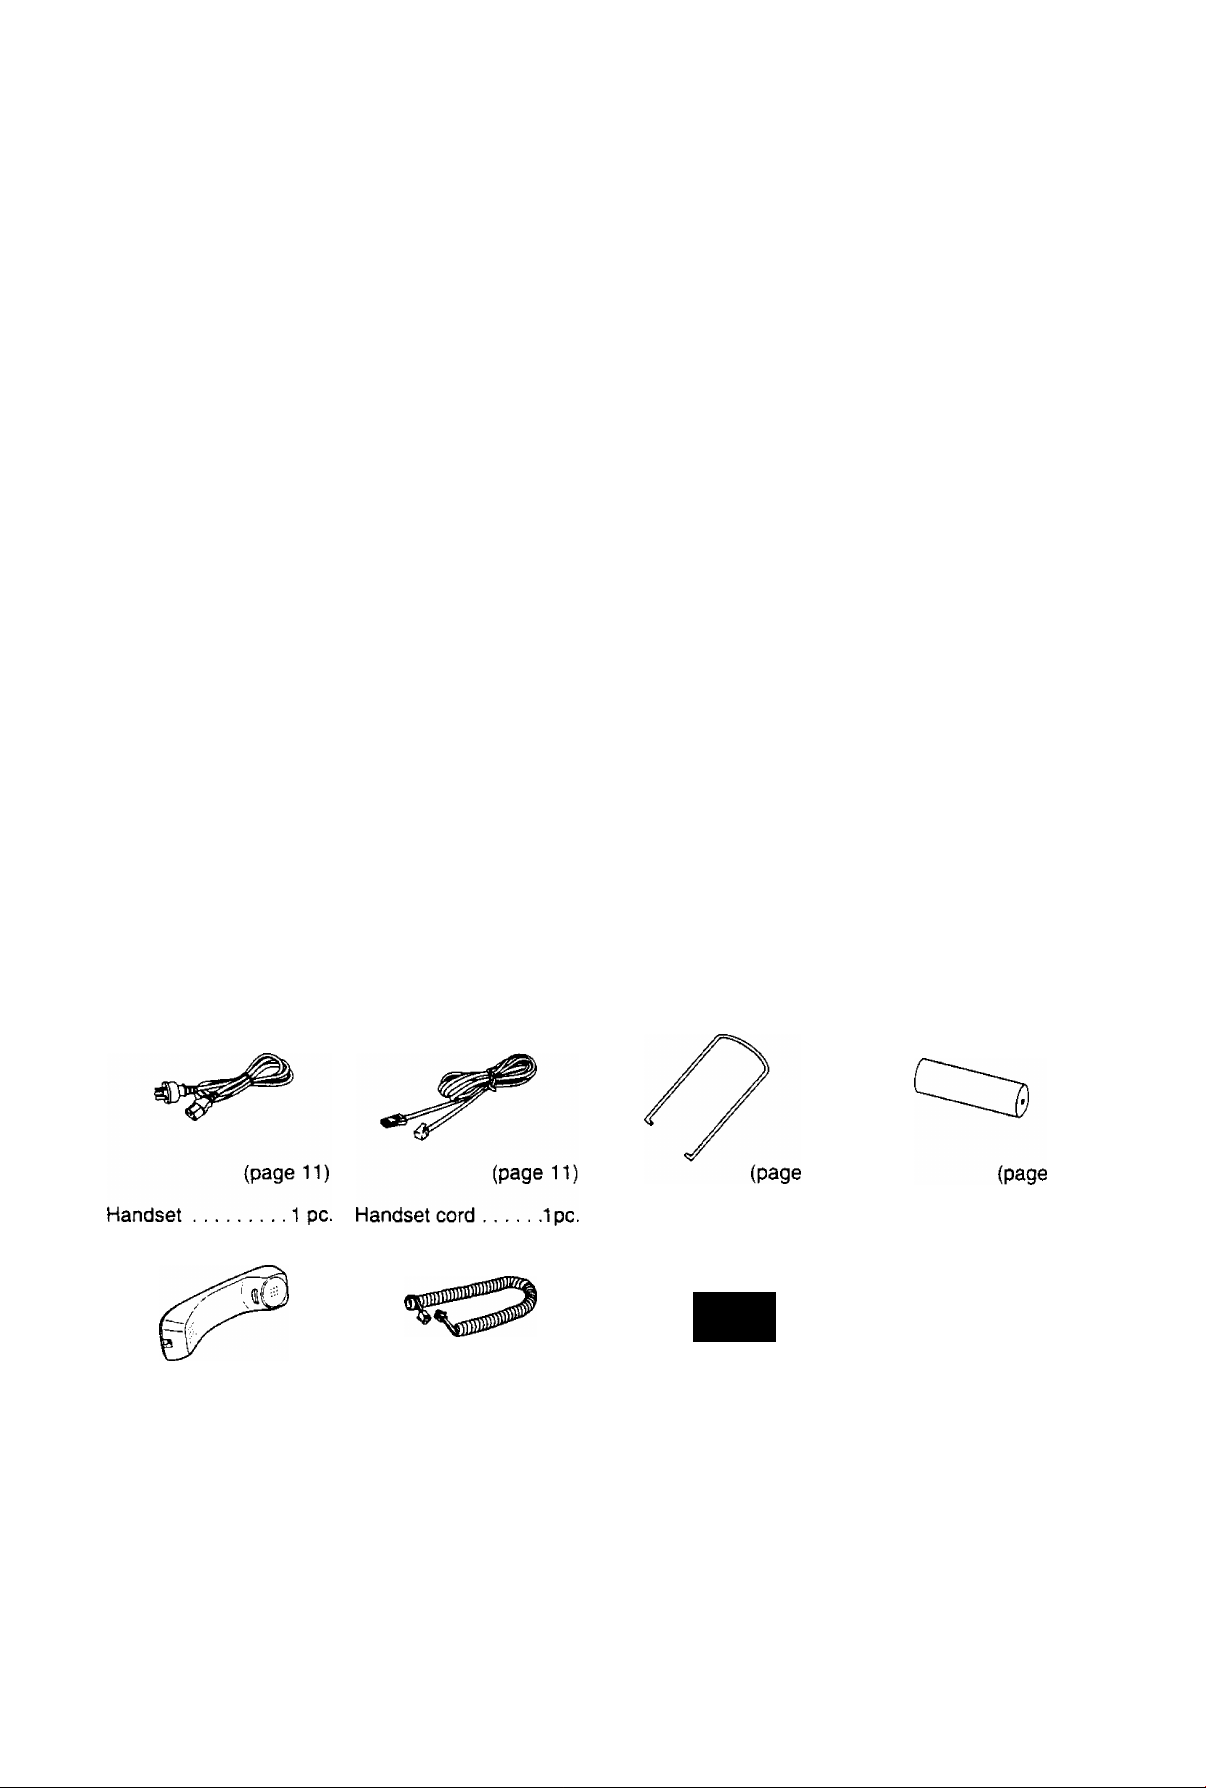
Accessories
Power cord
.............
1 pc. Telephone line
cord
........................
1 pc.
Paper stacker .... 1 pc. Recording paper . .1 pc.
battery
.................
4 pcs.
if]
(page 11)
Any details given in these instructions are subject to change without notice.
The picture on the cover page may vary from the actual product.
The product is available in either white (KX-F2710NZ) or grey (KX-F2750NZ).
(c) 1995 Kyushu Matsushita Electric Co., Ltd. All Rights Reserved.
(page IV
(page 10)

Thank you for purchasing the Panasonic Telephone Answering System with Facsimile.
This unit combines multiple functions of Facsimile, Answering Device and Telephone;
You can send and receive documents and voice messages on a single line.
Features
General
• Desktop type
• LCD (Liquid Crystal Display) readout
• Automatic paper cutter
• Silent ring fax recognition system (page 32)
• Help function (see below)
• Copier function (page 34)
Facsimile
•Automatic document feeder (up to 15 sheets)
• 64-level halftones
• Resolution: standard/fine/super fine/halftone (page 26)
• Delayed transmission (page 42)
• Paper save function (page 49)
• Overseas transmission mode (page 47)
• Remote fax receiving using an extension phone (page 43)
•Junk mail prohibitor (page 44)
• Day/night mode (page 48)
• Ring pattern detection (page 46)
Digital Answering System:
• Voice mailbox (page 54)
• Tone remote control system
Integrated telephone system
• One-touch dialer (10 phone numbers) (page 19)
•22-station speed dialer (page 20)
• Hands-free speakerphone (page 23)
• Electronic telephone directory (page 21)
HELP function
Use this function if the instructions are lost while using the unit. It will
provide the user with instructions.
When the HELP button is pressed, the unit will print a quick reference.
Information:
• Transmit the leaflet on page 77 to several of your associates. In this way, you can confirm that your unit
will function correctly and inform them of the procedure for transmitting documents and/or recording voice
messages.

Table of Contents
B Installation and Preparation
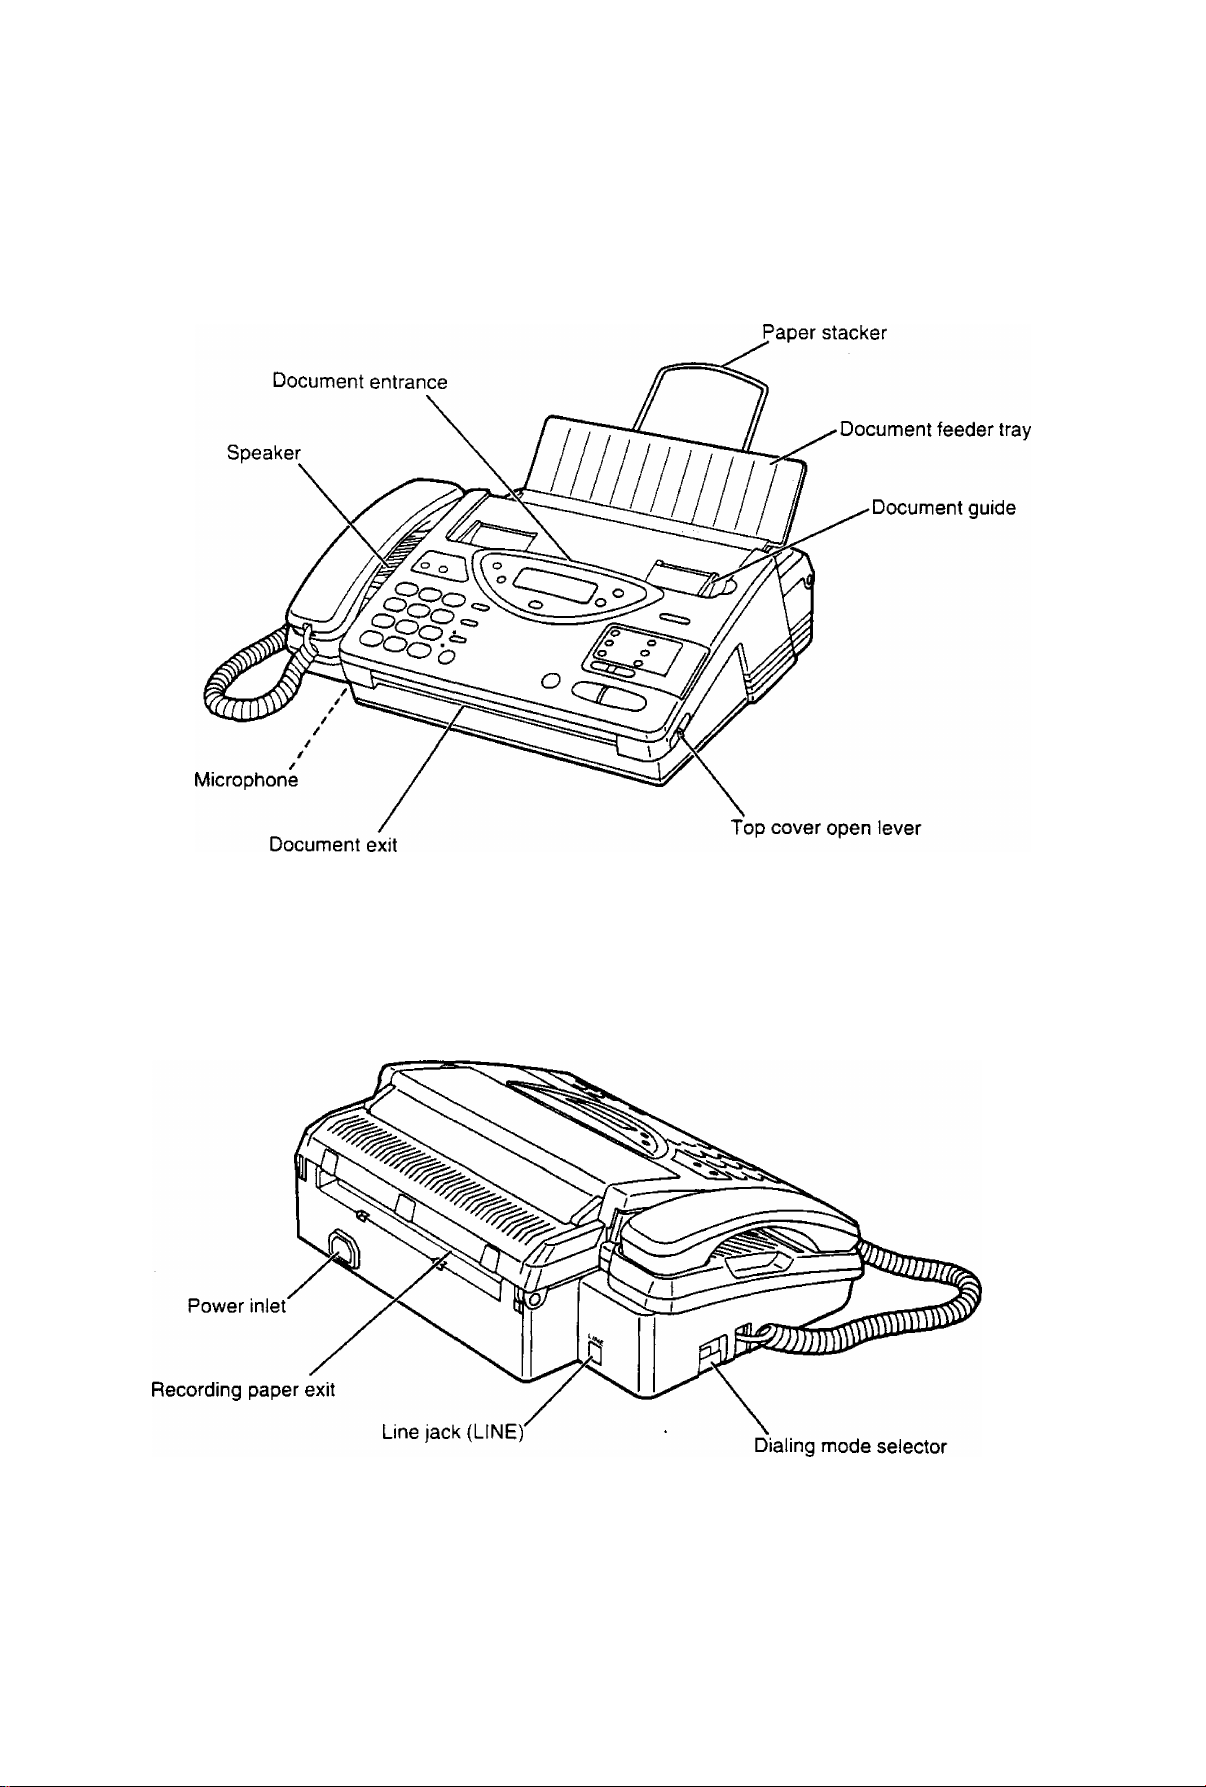
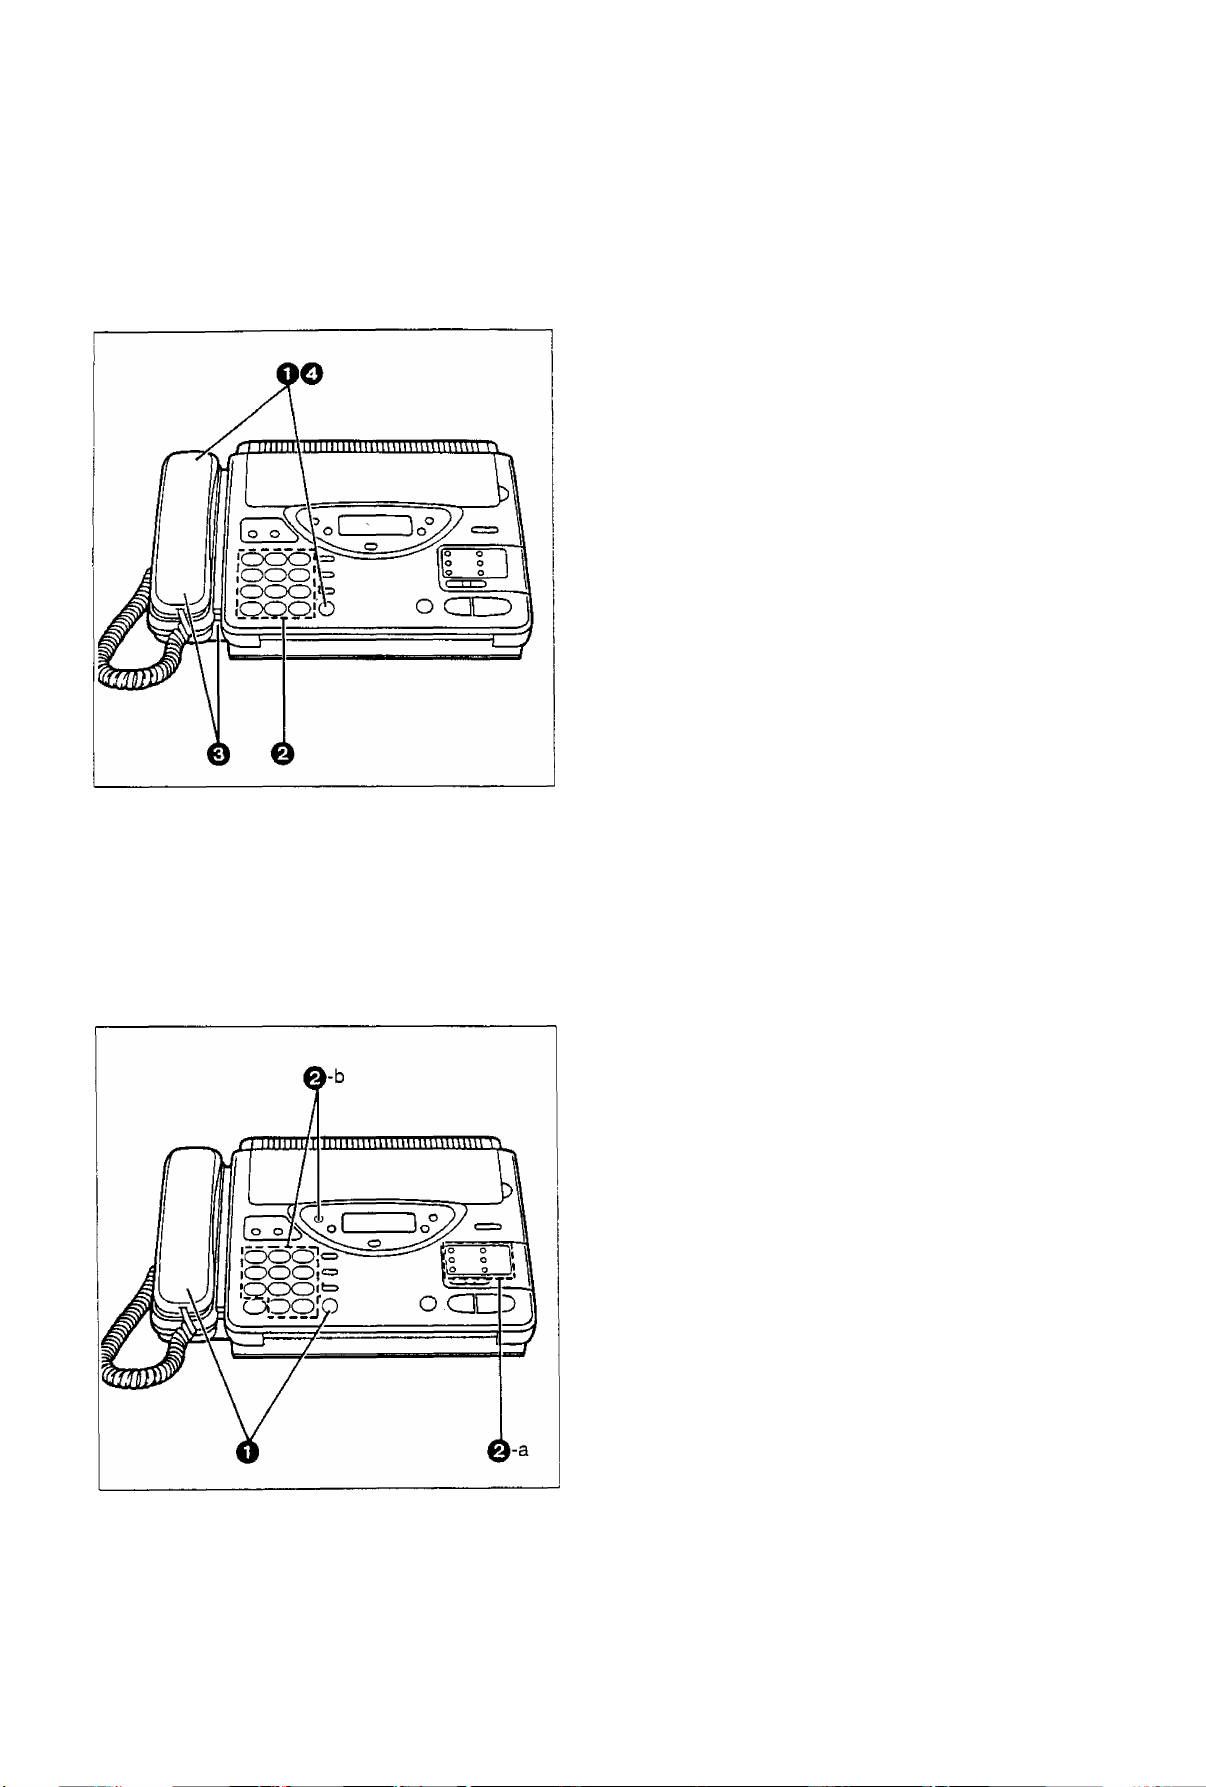
Location of Controls
Front view.......................................................... 0
Rear view
Control panel .................................................... 7
Answering control buttons................................. 8
Installing Your Unit
Installing the recording paper........................... 9
Installing the paper stacker
Installing the batteries
Connections and dialing mode setting
Adjusting Volumes
Recording Greeting Messages
How to record greeting messages
Checking greeting messages.......................... 14
Setting the caller’s recording time .................. 14
Setting the Date, Time, Logo and ID
How to enter letters and symbols
To enter characters
Special uses of the direct call
Setting the date and time................................ 17
Setting your logo ............................................ 17
Setting your facsimile telephone number ... 18
Setting the transmission report printing
Storing Phone Numbers for Automatic
Dialing............................................................. 19
Storing phone numbers for one-touch
dialing
Storing phone numbers for speed dialing ... 20
To keep a phone number secret
Electronic Telephone Directory
How to use the electronic telephone
directory....................................................... 21
Selecting the Receive Mode............................... 22
..........................................................
station keys
..........................................................
Basic Instructions
.............................................
..............................................
.............................
.............................
...........
............................................
..........................
..................
.................
..................
....................................
............................................
..........
.....................
..........................
9
9
10
11
12
13
13
15
15
15
16
18
19
20
21
6
0
Facsimile
Before Transmission
Acceptable documents
Loading documents
Setting resolution............................................ 26
Sending 16 or more sheets
Transmitting Documents
Transmitting documents manually
Transmitting documents with fewer
procedures
Transmitting documents using automatic
dialing.......................................................... 28
Receiving Documents and/or
Voice Calls ..................................................... 29
Manual reception............................................ 29
Automatic reception.........................................29
Receiving in the ANS/FAX mode
Setting the number of rings to answer
in the ANS/FAX mode
Receiving in the TEL/FAX mode
Setting the number of rings to answer
in the TEL/FAX mode ............................. 32
Silent ring fax recognition system.
Receiving in the FAX mode ........................... 33
Setting the number of rings to answer
in the FAX mode...................................... 33
Copier
Making a Copy
Answering Device
Operating the Answering Device
Setup of voice message and document
reception..................................................... 35
Listening to recorded messages
Functions during playback
Erasing recorded messages
Recording a memo message
Recording a telephone conversation
Setting the message alert
Setting the recording time alert
..........................................
...................................
........................................
...........................
...................................
..................
.................................................
...................
.............................
..................
..............
..................................................
.......................
....................
............................
..........................
.........................
............
..............................
......................
25
25
26
26
27
27
27
29
30
31
32
34
35
35
36
36
37
37
38
38
Telephone
Making and Answering Voice Calls
Making voice calls .......................................... 23
Making voice calls using automatic
dialing
..........................................................
Redialing the last dialed number
Voice muting
Answering voice calls
Helpful hints for the speakerphone
operation ..................................................... 24
..................................................
.....................................
................
....................
4
23
23
24
24
24
Programming Functions
User Programmable Features
Basic features
Advanced features
................................................
.........................................
........................
39
39
40

Advanced Instructions
Polling ................................................................ 41
Polling reception
Polling transmission (Polled)
Delayed Transmission ....................................... 42
Remote Fax Receiving Using an Extension
Phone ............................................................. 43
Using an extension phone
Changing the remote fax activation code ... 43
............................................
..........................
..............................
41
41
43
Erasing a specific message from memory ... 61
Erasing all messages from memory................61
Recording a marker message ........................61
Re-recording a greeting message
Turning on/off pager alert..............................■. 62
To skip the greeting message
Pager Alert
........................................................
..................
........................
Reports and Lists
62
62
63
Junk Mail Prohibitor
Setting the junk mail prohibitor ....................... 44
Transmitting documents to your unit
with the prohibitor ID ................................... 45
Receiving with distinctive ring service
Setting the ring pattern detection
Special Settings
Logo print position........................................... 47
Overseas transmission mode ......................... 47
Setting the day/night mode
Paper save reception/copy
Extension copy ............................................... 50
Original mode ................................................... 51
Resetting the advanced features
Voice Contact ..................................................... 52
Initiating voice contact..................................... 52
Receiving a request for voice contact
TONE, RECALL and PAUSE Buttons ................ 53
TONE button ................................................... 53
RECALL button
PAUSE button................................................... 53
Voice Mailbox ..................................................... 54
To use mailbox
Recording a personal greeting message
for mailbox
Programming the mailbox password
How incoming messages are recorded
into each mailbox......................................... 55
Retrieving messages in the mailbox
Erasing recorded messages in the
mailbox
Retrieving messages in the mailbox
from a remote location
Setting the mailbox alert ................................. 57
.......................................................
............................................
................
....................
.................................................
............................
............................
....................
.............
..............................................
...............................................
...................................................
...............
..............
.................................
44
46
46
47
48
49
51
52
53
54
54
55
56
56
57
Printing Reports and Lists
How to print each report/list.............................64
Sample reports and lists
Setting journal auto print .................................67
..............................
..................................
64
65
LSI Troubieshooting and
Maintenance
Troubleshooting
Error messages on the display
General corrective measures
Explanation of communication result
on the report.................................................70
Clearing a recording paper jam ......................71
Clearing a document jam.................................72
Adjusting the feeder pressure .........................72
Maintenance.......................................................73
Cleaning the document feeder unit .................73
Cleaning the thermal head
Generai information
Important Safety Instructions
Specifications
Index ..................................................................76
FAX CORRESPONDENCE
Speed dialer list................................................ 79
Answering device remote operation
card ............................................................... 81
...............................................
........................
..........................
..............................
..........................
...................................................
...............................
68
68
69
77
73
74
75
Operating the Answering Device
from a Remote Phone
Summary of remote operations....................... 58
Programming the remote ANS ID
Listening to the recorded messages
in the common memory
Retrieving the recorded messages
in the mailbox
Functions during playback
.....................................
..................
...............................
.............................................
..............................
58
59
59
60
60
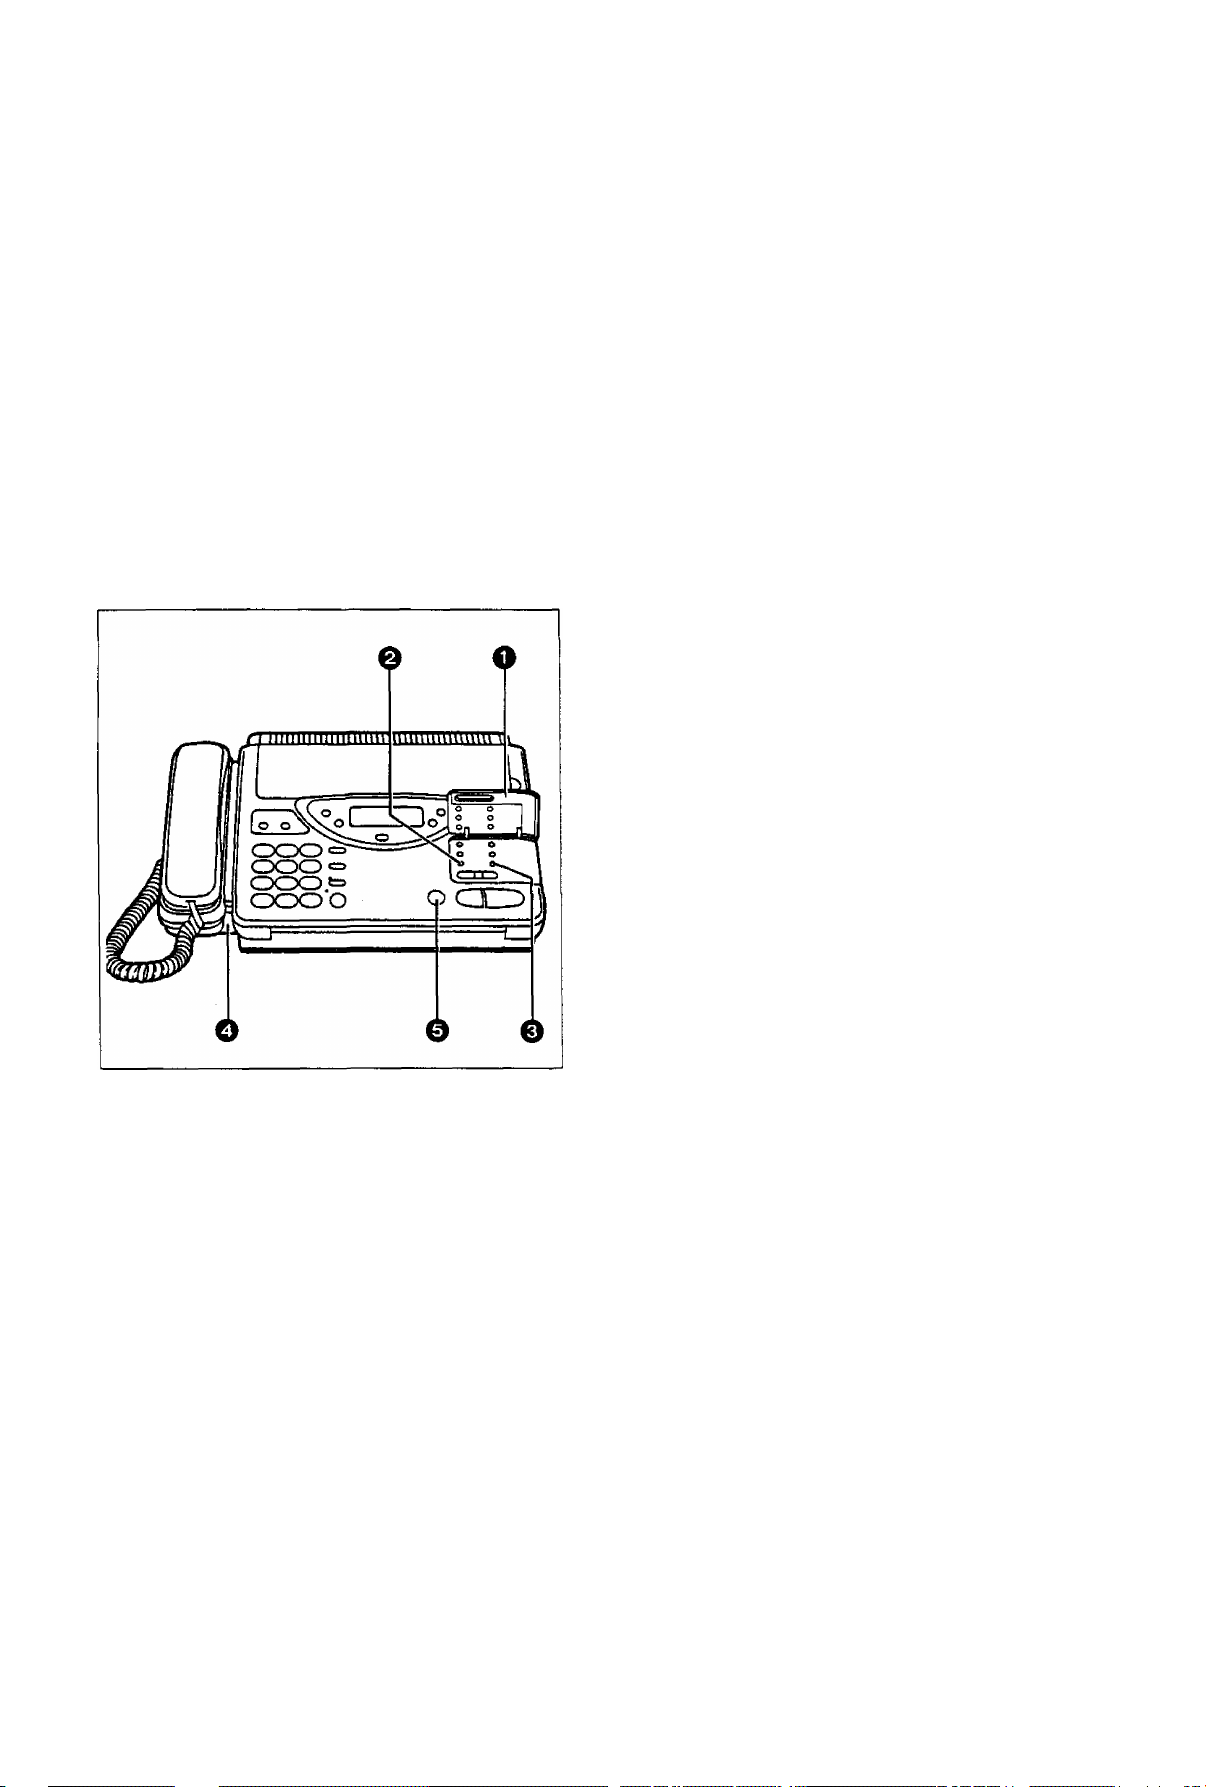
¡nstallation and Preparation
Location of Controls
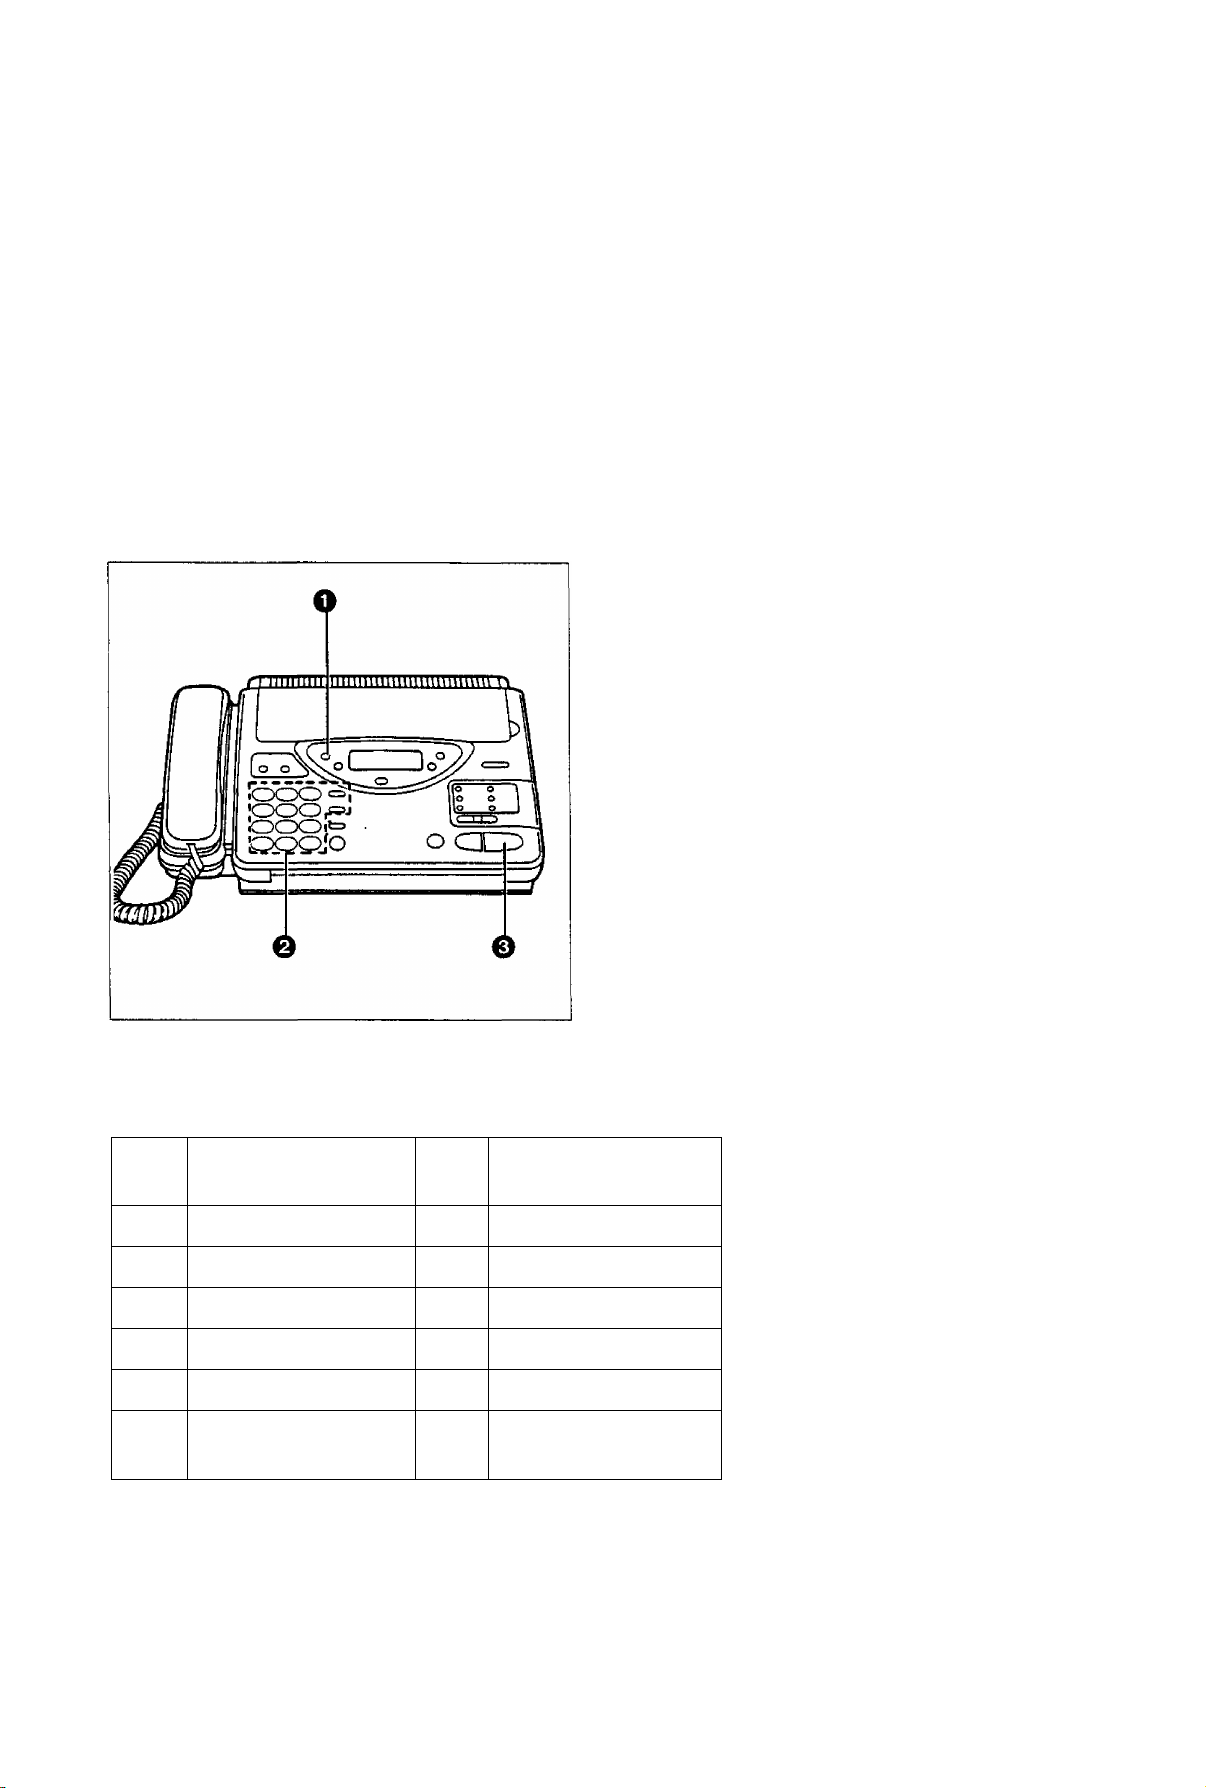
Front view
___________
Rearview
Installation and Preparation
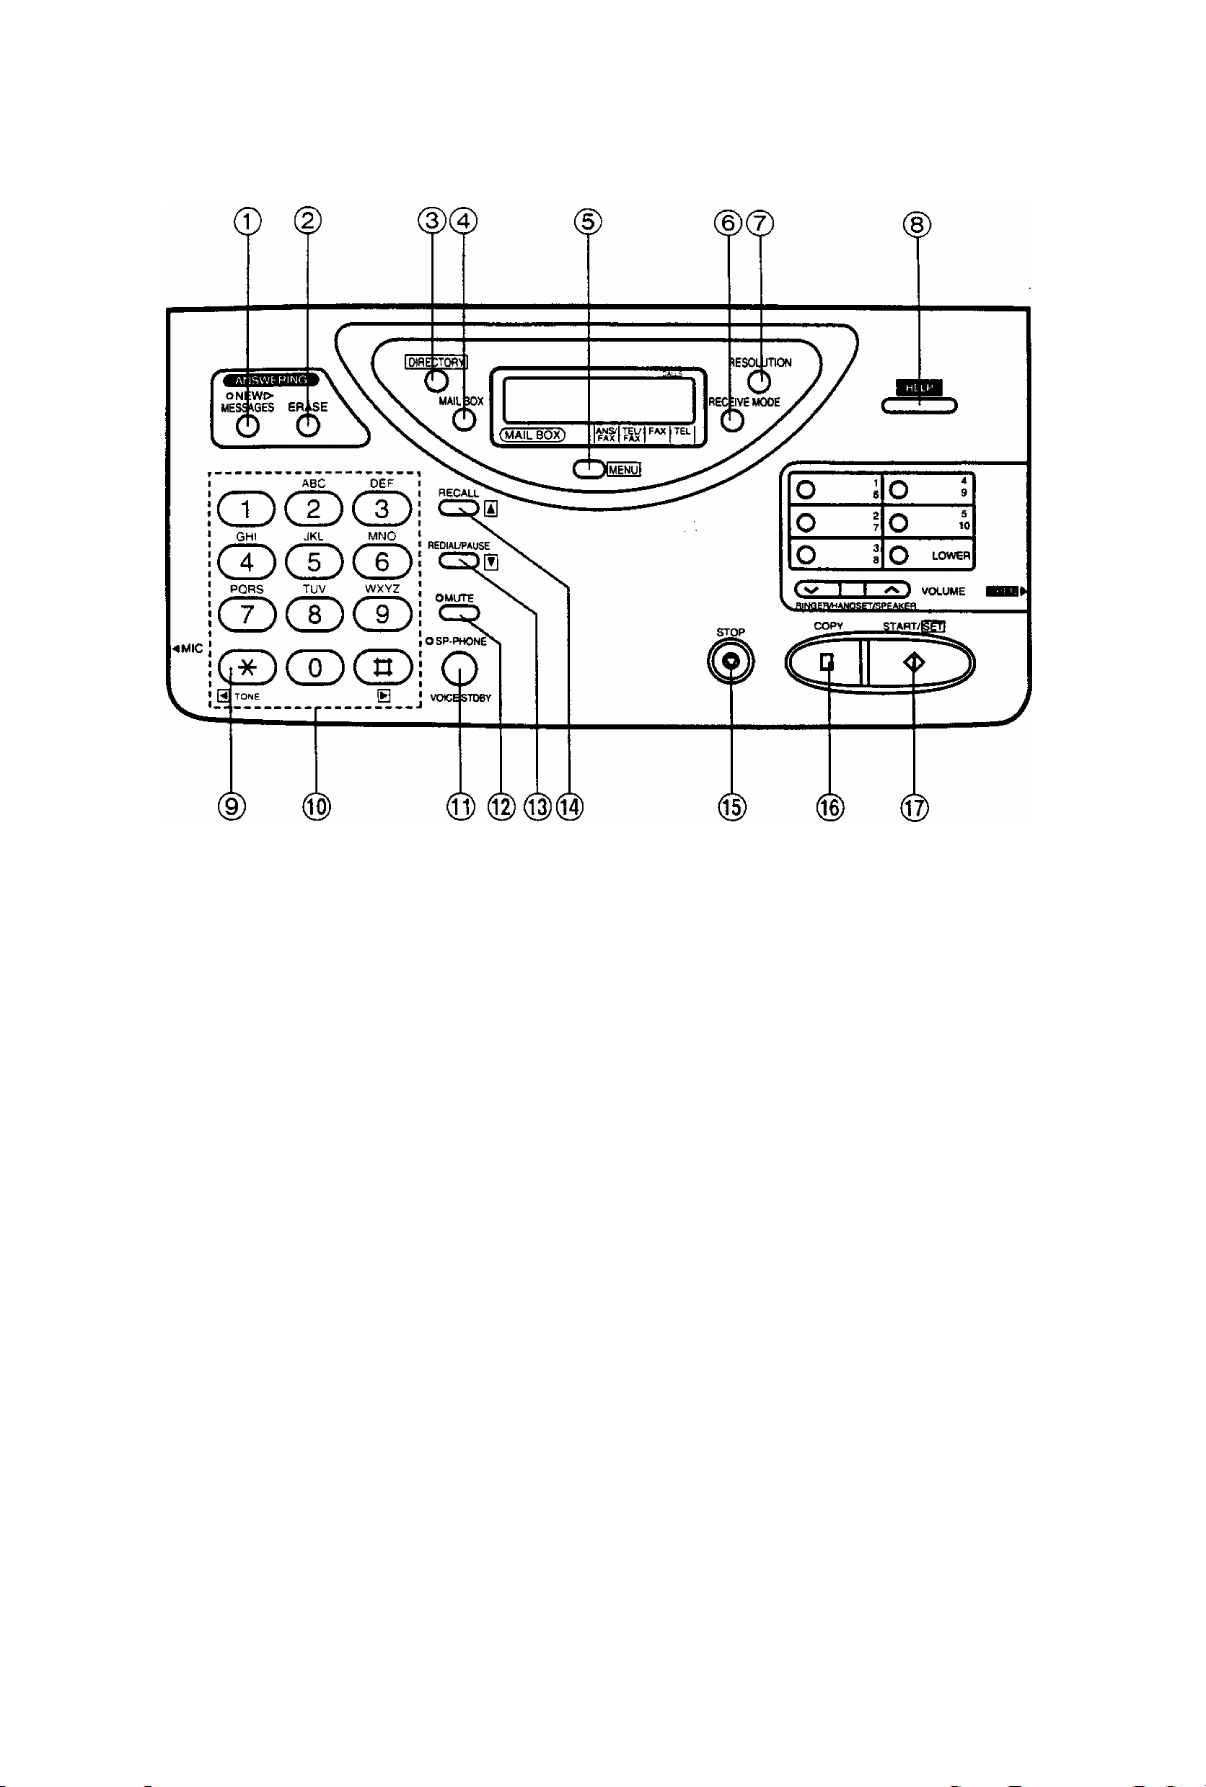
Control panel
B
© NEW MESSAGES button (page 35)
Used to play back only new messages.
(2) ERASE button (page 36)
Used to erase recorded incoming messages.
(© DIRECTORY button (pages 21,23 and 28)
Used for speed dialing. Also used for the
electronic telephone directory.
@ MAIL BOX button (page 56)
Used to select a voice mailbox number.
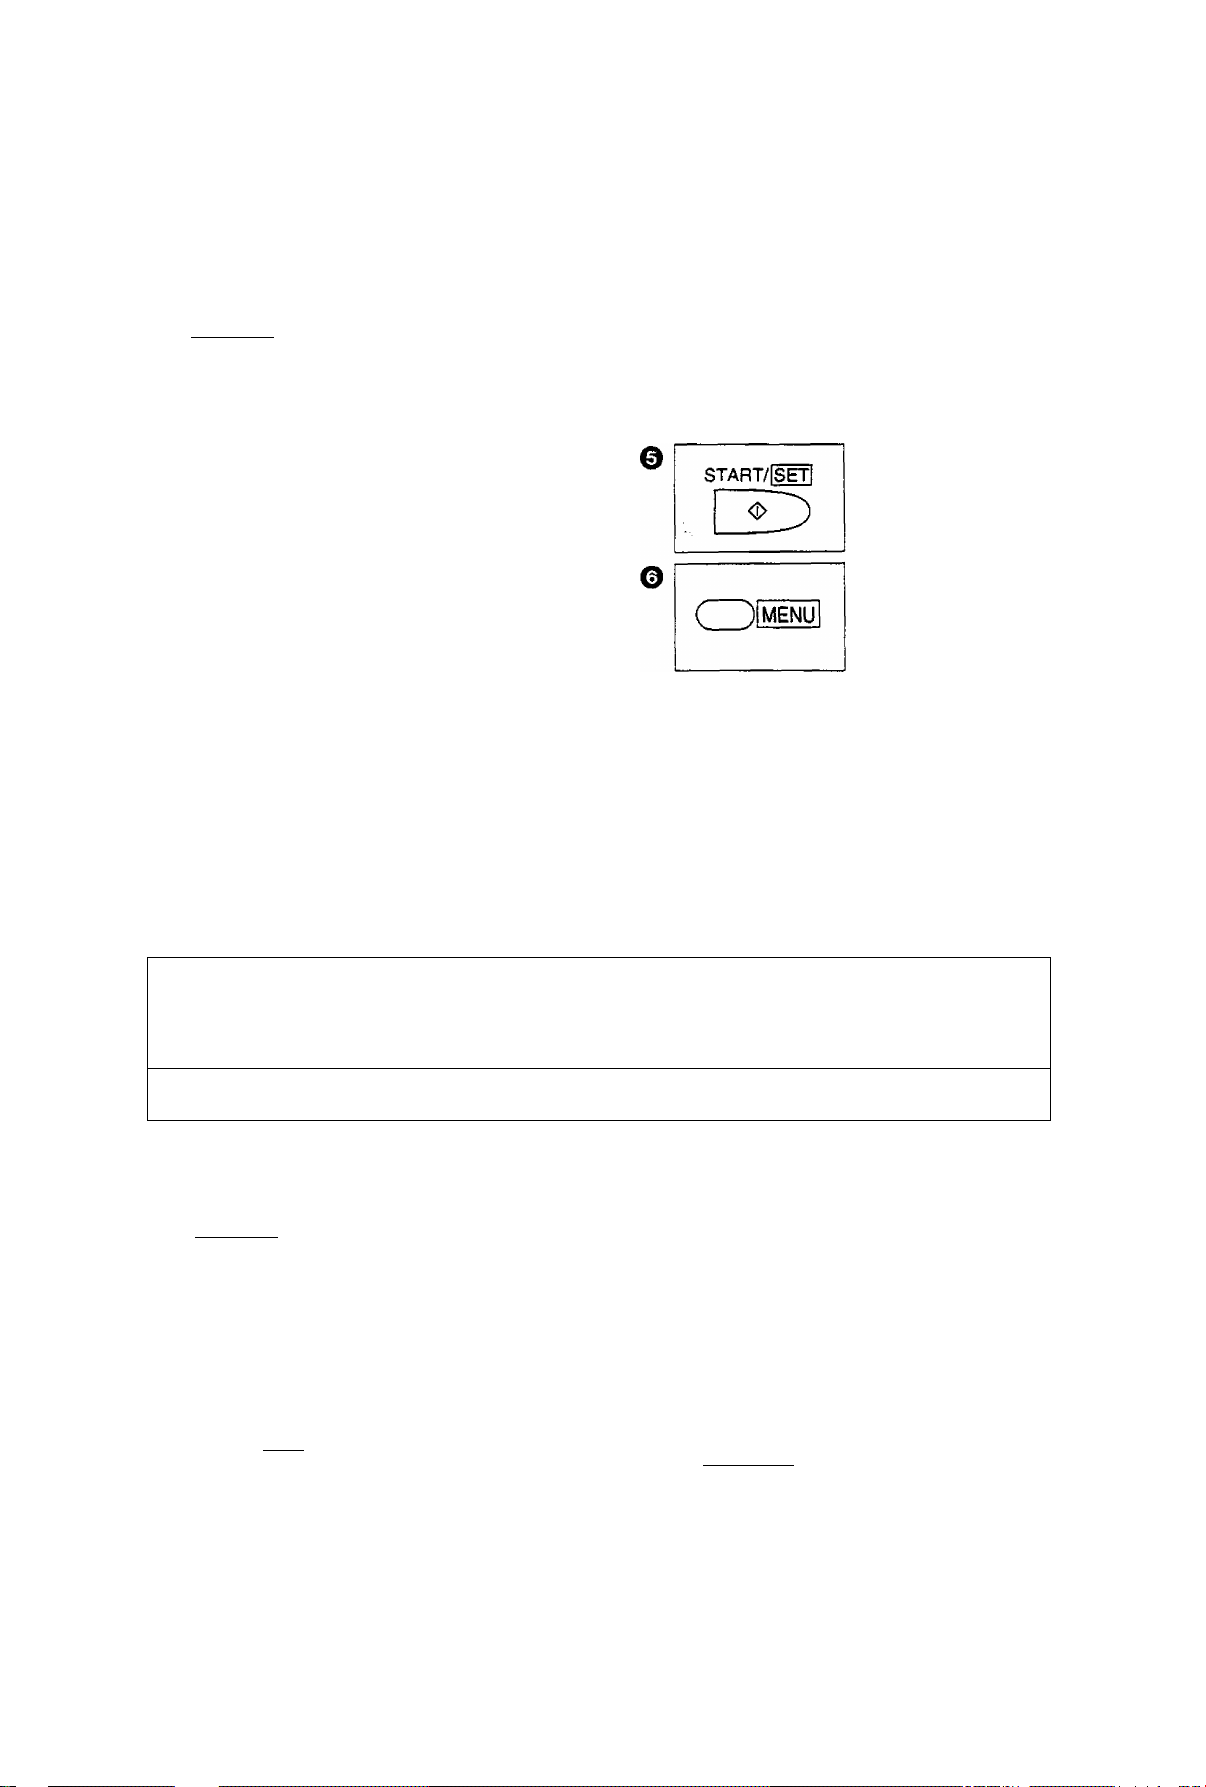
© MENU button
Used to start and exit various programming.
© RECEIVE MODE button (page 22)
Used to select the desired receiving mode.
@ RESOLUTION button (page 26)
Used to adjust scanning line density.
@ HELP button (page 3)
Used to print an easy guide for operations.
© TONE button (page 53)
Used to temporarily change the dialing mode
from pulse to tone during a dialing operation.
Dial keypad
Used for dialing operation and parameter
setting. Also used as character keys.
SP-PHONE/VOICE STDBY button
(pages 23 and 52)
Used for on-hook dialing and voice contact
features.
MUTE button (page 24)
Used for voice muting.
REDIAL/PAUSE button (pages 24 and 53)
Used to redial the last dialed number. Also
used to insert a pause into a phone number.
RECALL button (page 53)
Used to access some features of your host
exchange.
STOP button (page 27)
Used to stop fax communication.
COPY button (page 34)
Used to start copying.
START/SET button
Used to start fax communication. Also used to
store parameters during programming.
Installation and Preparation
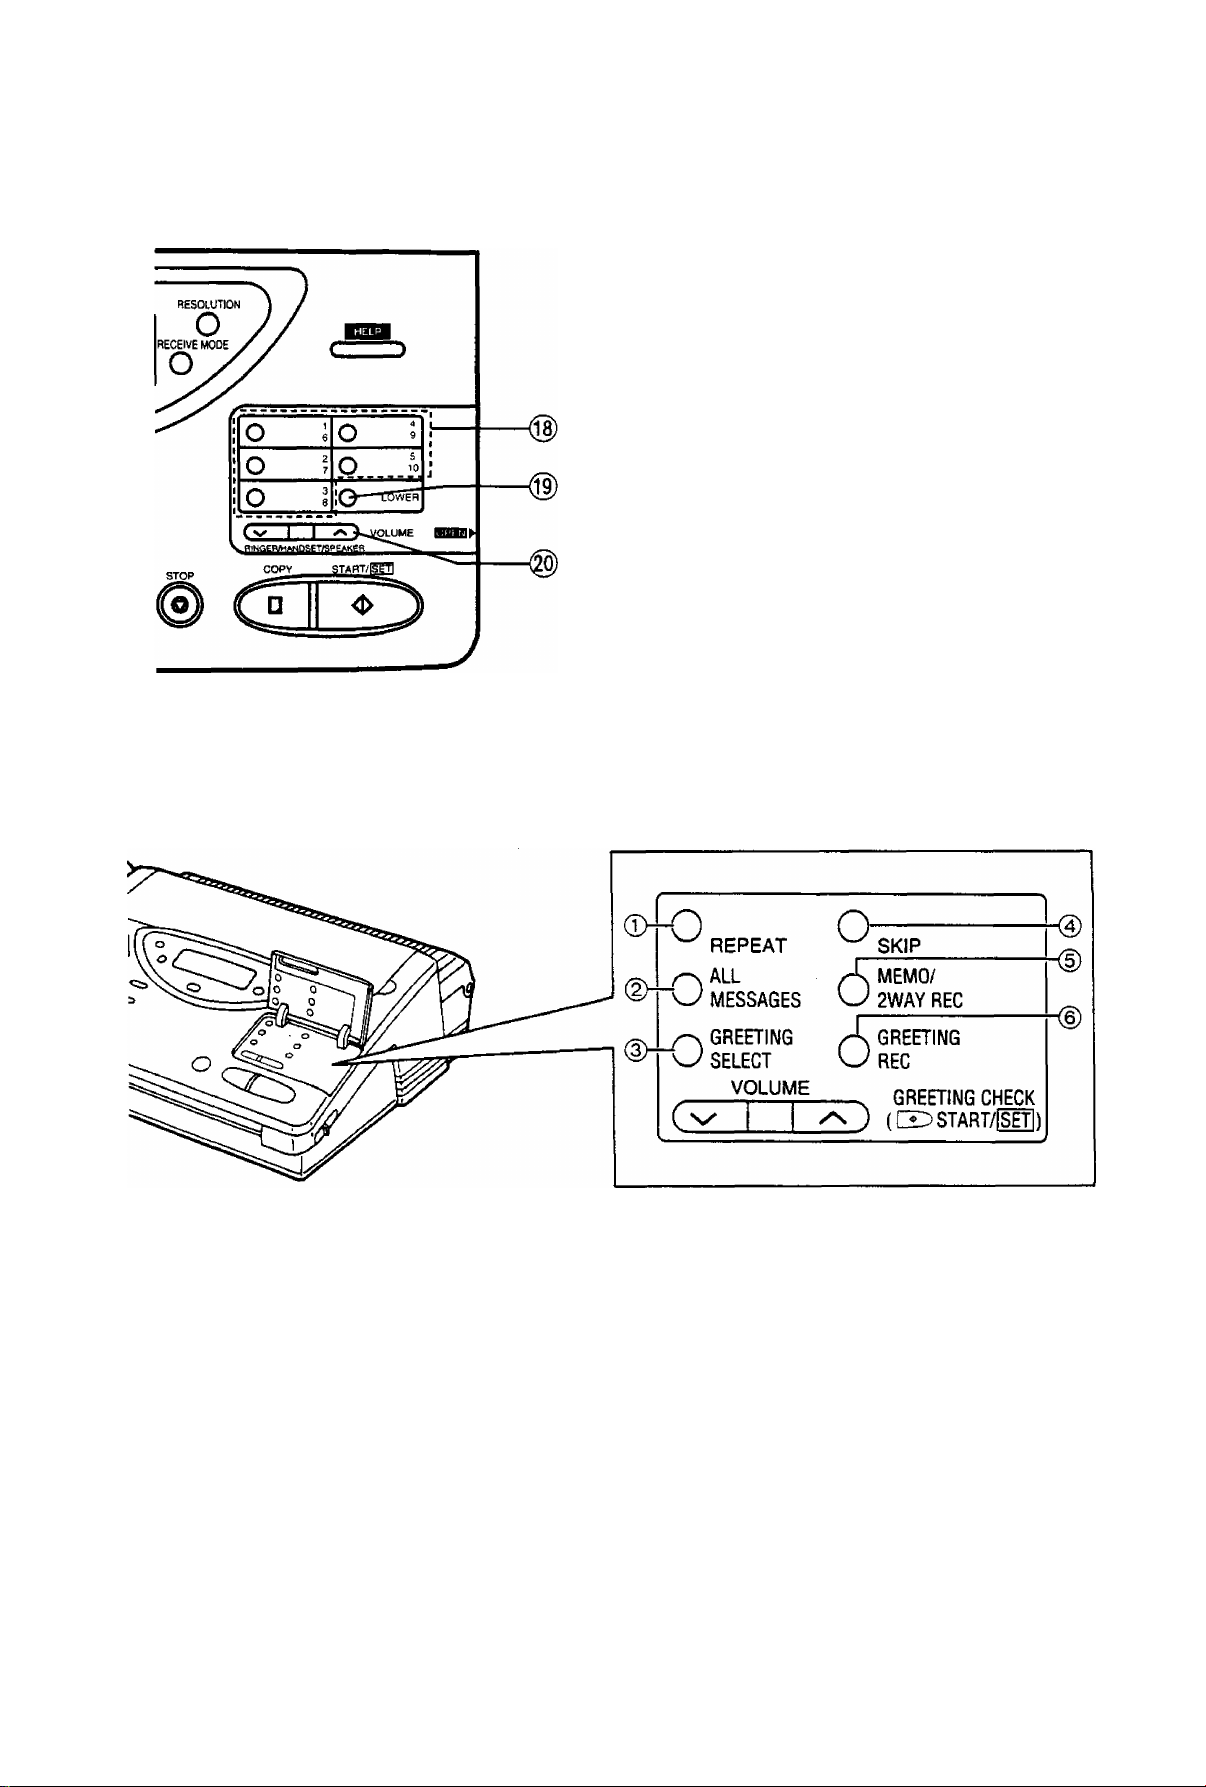
Control panel (cont.)
@ Direct call station keys (pages 19, 23 and 28)
Used for one-touch dialing. Also used as
character keys when logo and station names
are programmed.
@ LOWER key (pages 19, 23 and 28)
Used to access lower stations (6 to 10) for
one-touch dialing.
@ VOLUME buttons (page 12)
Used to adjust the volume level of the ringer,
handset and speaker.
Answering control buttons
0 REPEAT button (page 36)
Used to replay the previous message during
the message playback.
@ SKIP button (page 36)
Used to skip to the next message during the
message playback.
@ ALL MESSAGES button (page 35)
Used to play back all the recorded voice
messages.
@ GREETING SELECT button (pages 13 and
54)
Used to select a desired greeting message
when recording or checking the greeting
message.
8
© MEMO/2WAY REC button (page 37)
Used to start and stop recording a memo
message or a telephone conversation.
(g) GREETING REC button (pages 13 and 54)
■ Used to start and stop recording a greeting
message.
Installation and Preparation
Installing Your Unit
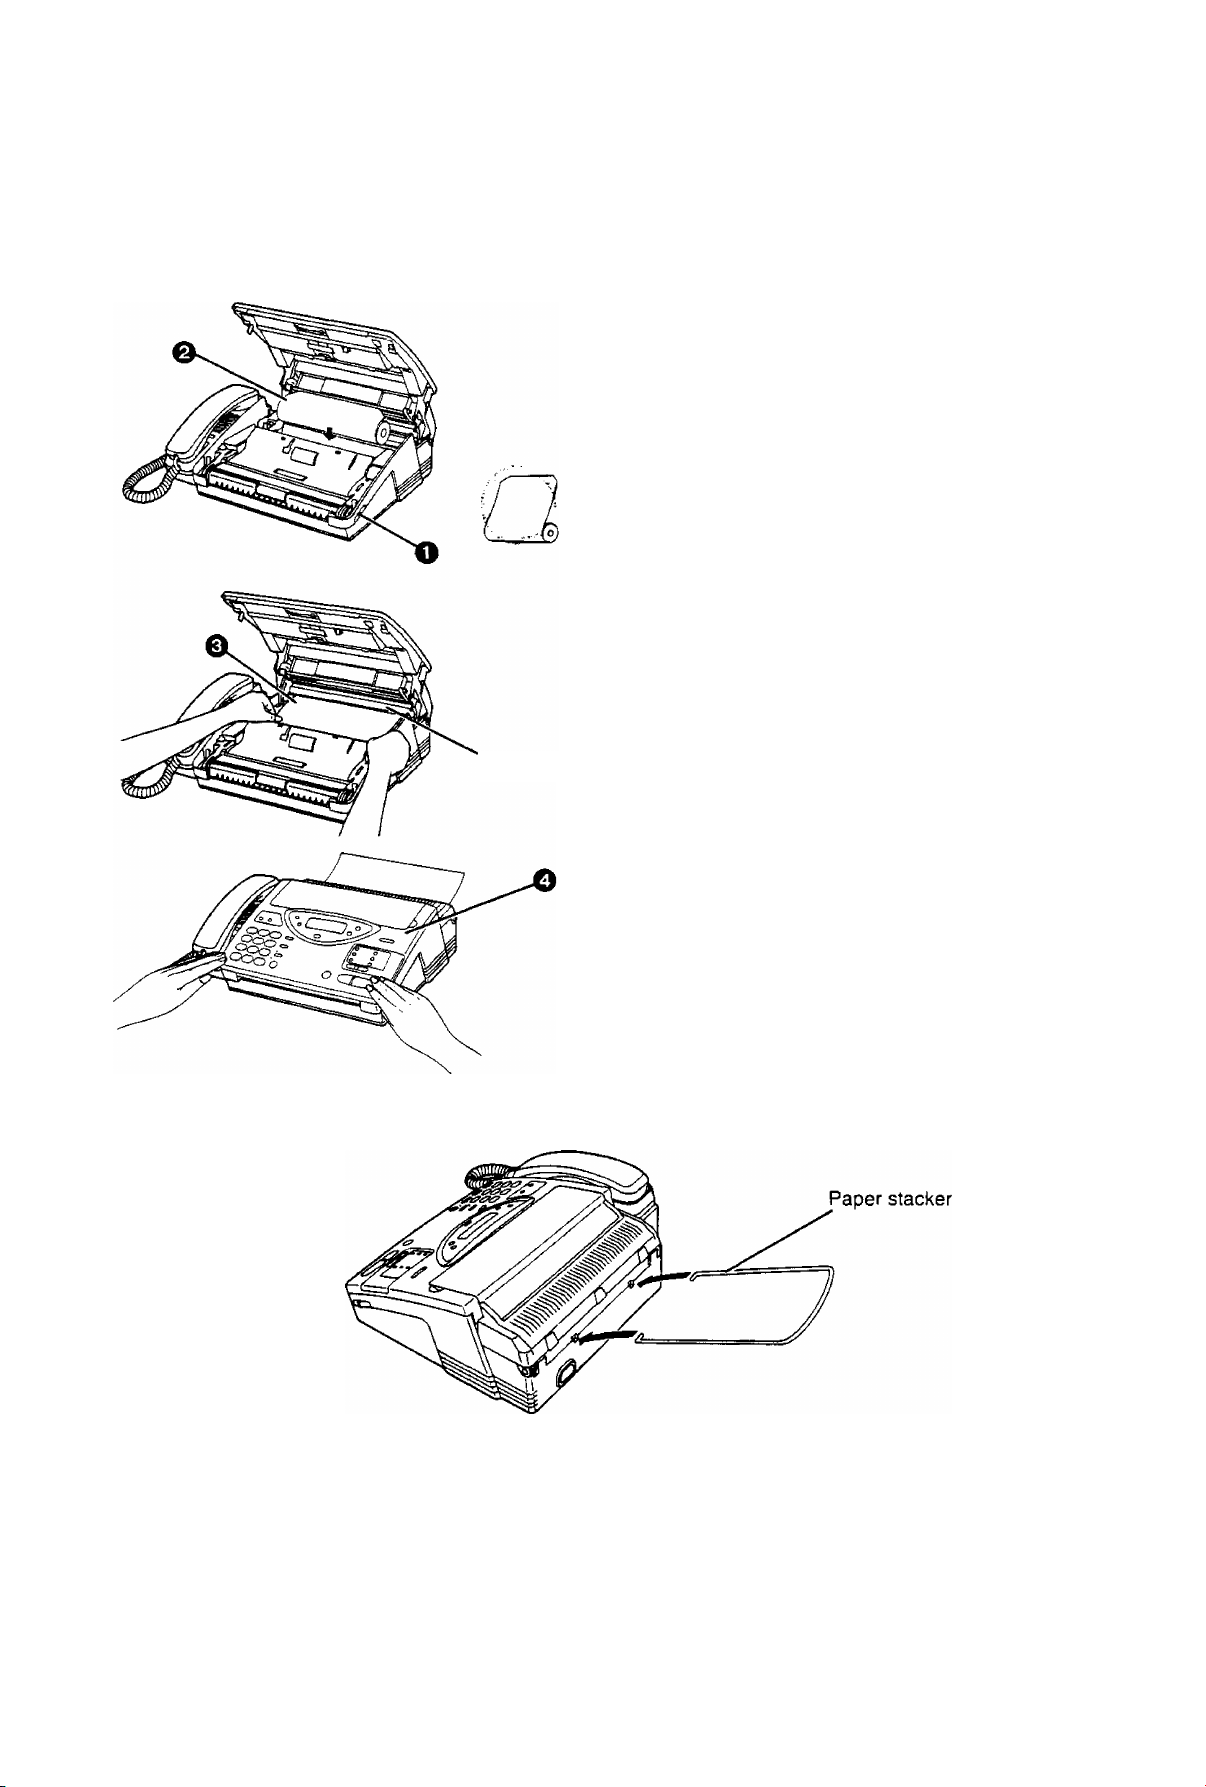
Installing the recording paper
Green bar
B
^ Slide the lever toward you to open
the top cover,
Q Place a recording paper roll in the unit.
—Make sure that the shiny side of
the paper is facing up and that
there is no slack, tape or
glue residue on the paper roll.
&
{See note below.)
o Insert the leading edge of recording
paper under the green bar,
Q Close the top cover carefully by gently
pressing down on both ends.
Notes:
• Use only the included roll or specified
recording paper, or else the print
quality may be affected and/or
excessive thermal head wear may
occur.
• The start of some recording paper rolls
is secured using glue or tape. Residue
from this gfue/tape may cause the
paper cutter to Jam immediately
following installation of a new roll. To
prevent this, cut approximately 150 mm
(6 inches) from the new roll of paper
prior to installation.
Installing the paper stacker
Installation and Preparation
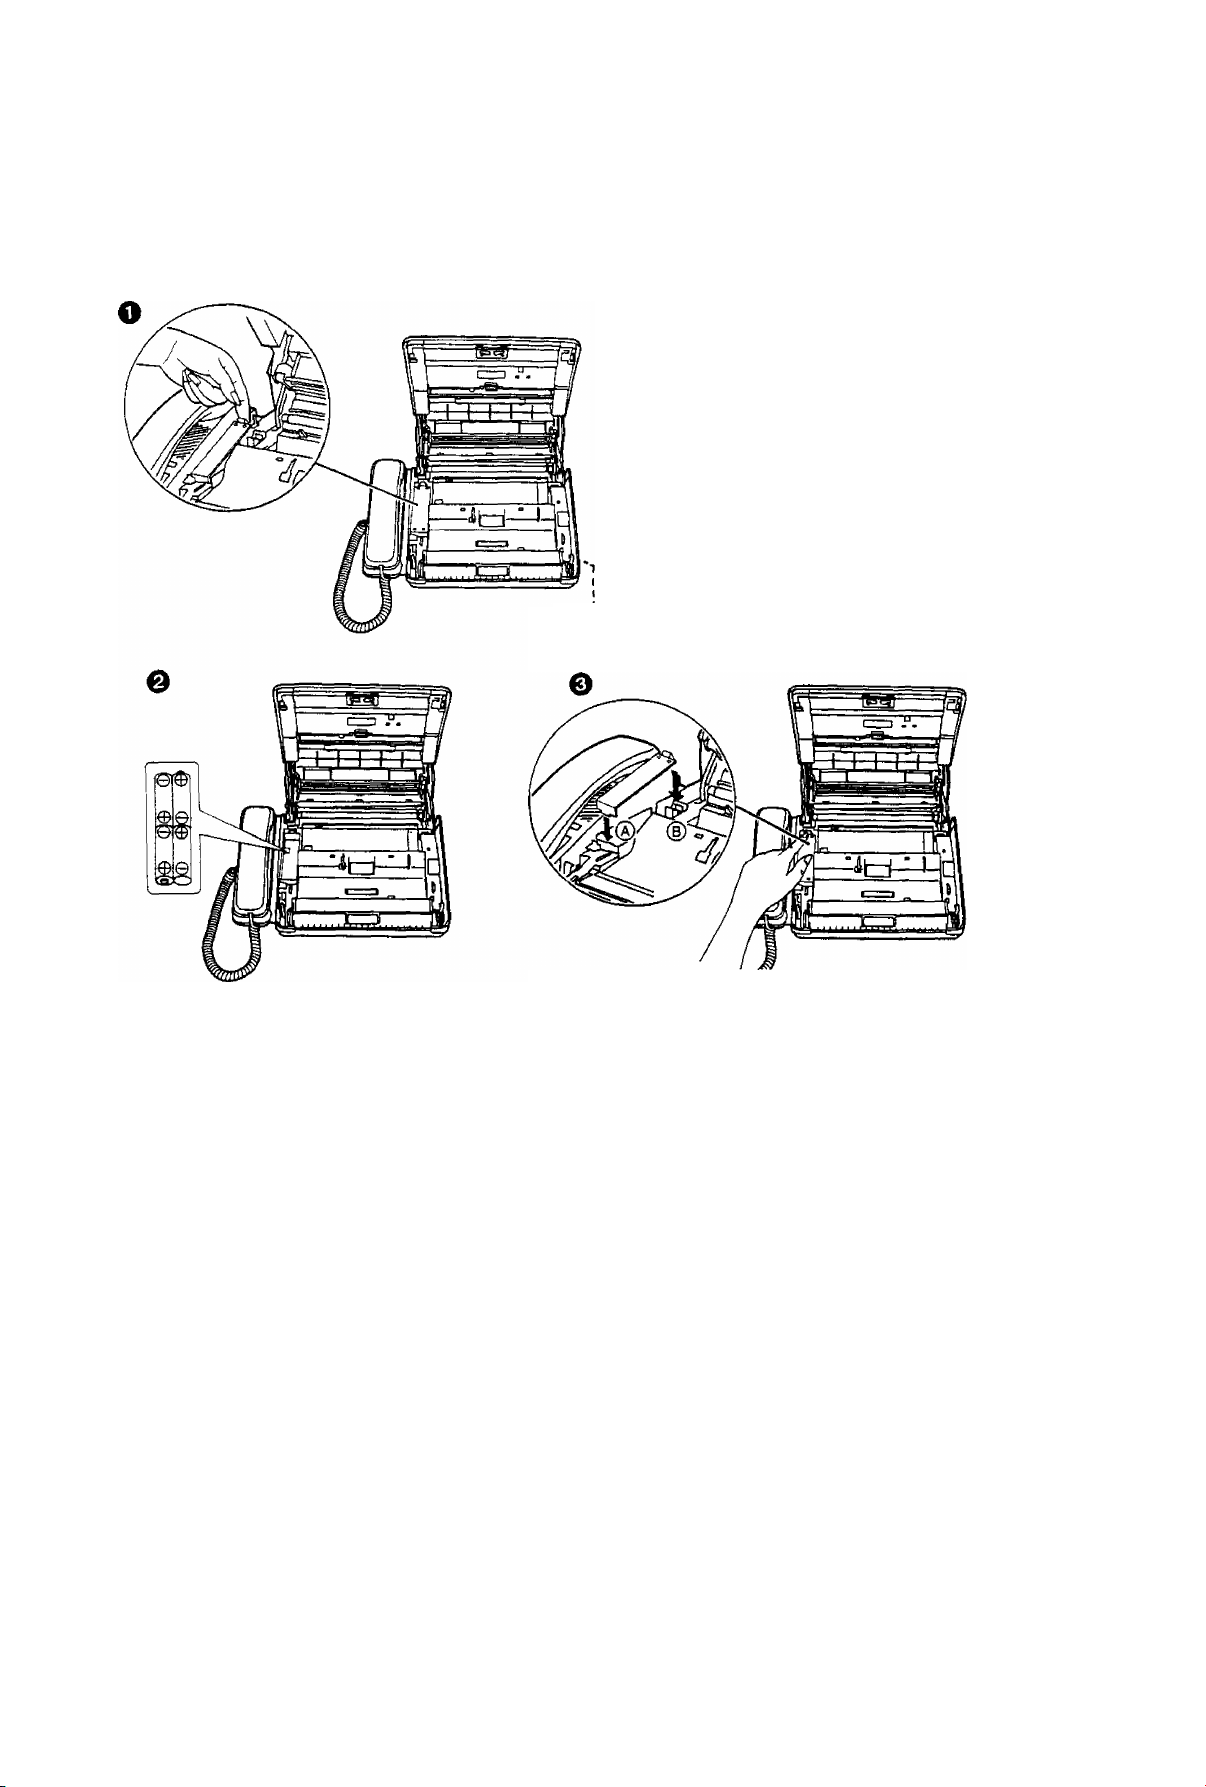
Installing the batteries
The batteries are required to retain voice messages in memory when the power cord is disconnected or
during a power failure. Install four AA batteries (supplied) before using the unit.
O Slide the lever toward you to open the top
cover and remove the battery compartment
cover by pulling the hook toward you and lifting
it up.
Q Install four AA batteries into the compartment
using correct polarity {+, —).
e Replace the battery compartment cover by
installing the tab of the cover into the hole
first.
(D Press down the part marked “PRESS" until
it clicks.
Lever
O Close the top cover.
Battery precautions:
• The batteries should be used correctly, otherwise, the unit may be damaged due to battery leakage.
• Do not mix different types of batteries.
• Do not charge, short-circuit, disassemble, heat or dispose in fire.
• Remove all the batteries when replacing.
Notes:
• If you do not install the batteries, or if the battery power is low:
—The display will show the following message;
B.^TTERY LOV;
Install new batteries.
—Greeting and all messages saved in memory will be erased when a power failure occurs.
• Batteries should be installed in order to provide message retention during a power failure. Message
retention time is approximately 1 day with new batteries.
• To avoid losing the greeting and all messages saved in memory, the power cord must remain connected
when replacing batteries.
• Disconnect the telephone line cord before opening the battery compartment cover.
• Replace all the batteries once a year, or mis-operation may occur.
• Do not use Nickel-Cadmium batteries.
10
Installation and Preparation
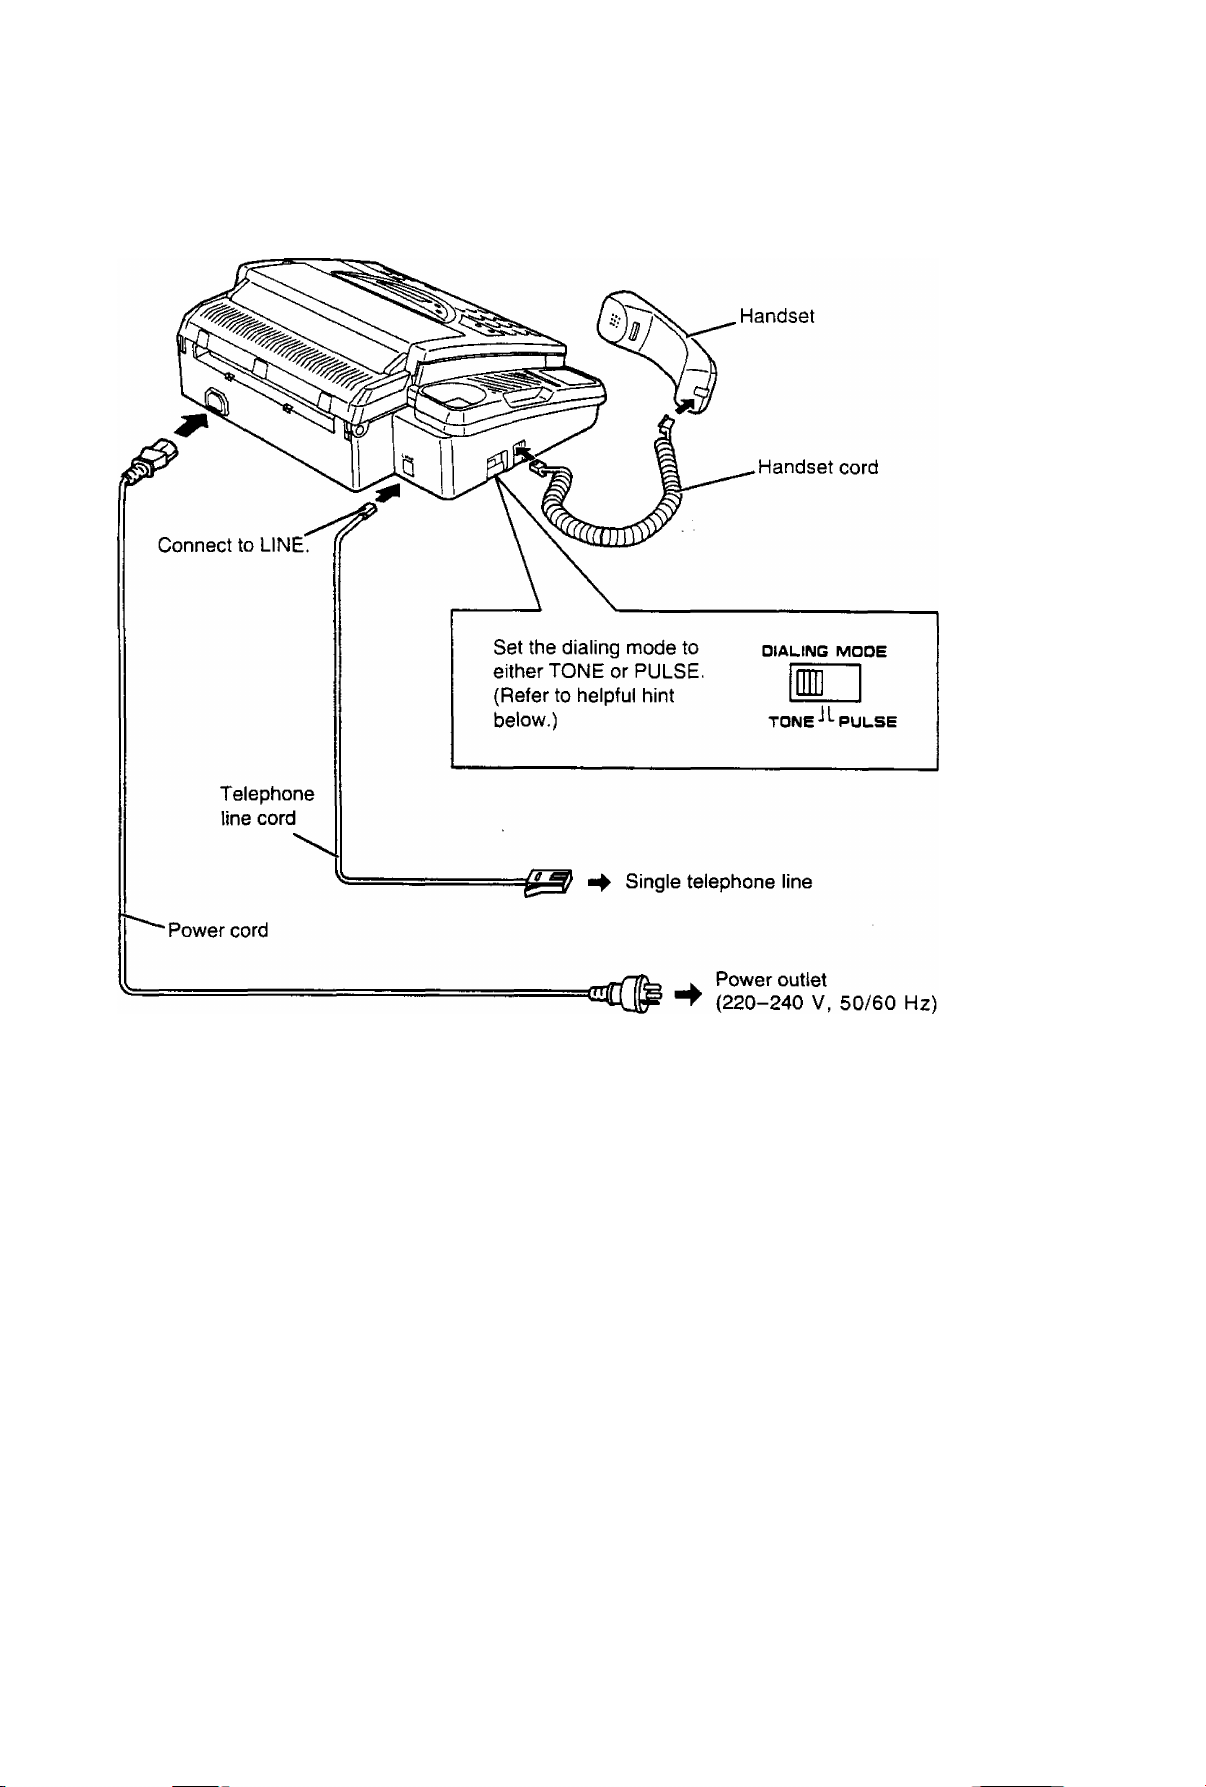
Connections and dialing mode setting
D
Helpful hint for setting the dialing mode:
1. Ensure that the dialing mode selector is set to TONE.
2. Lift the handset or press the SP-PHONE button, then listen for the dial tone.
3. Dial a familiar number.
4. If the call is successful, the unit is connected to a tone exchange. Leave the selector set to TONE.
5. If the call is n^ successful, the unit is connected to a pulse exchange. Switch the selector to PULSE.
Notes:
• We recommend the use of an exclusive power outlet to avoid interference from other equipment.
• When you operate this product, the power outlet should be near the product and be easily accessible.
• The unit will not function during a power failure.
• When you connect another telephone on the same line and if the decadic (pulse) signalling option is used,
bell tinkle may occur during dialling. If this occurs, the matter should be discussed with the telephone
supplier and should NOT be referred to Telecom Faults Service.
• Not all standard telephones will respond to incoming ringing when connected to the same line.
11
Installation and Preparation
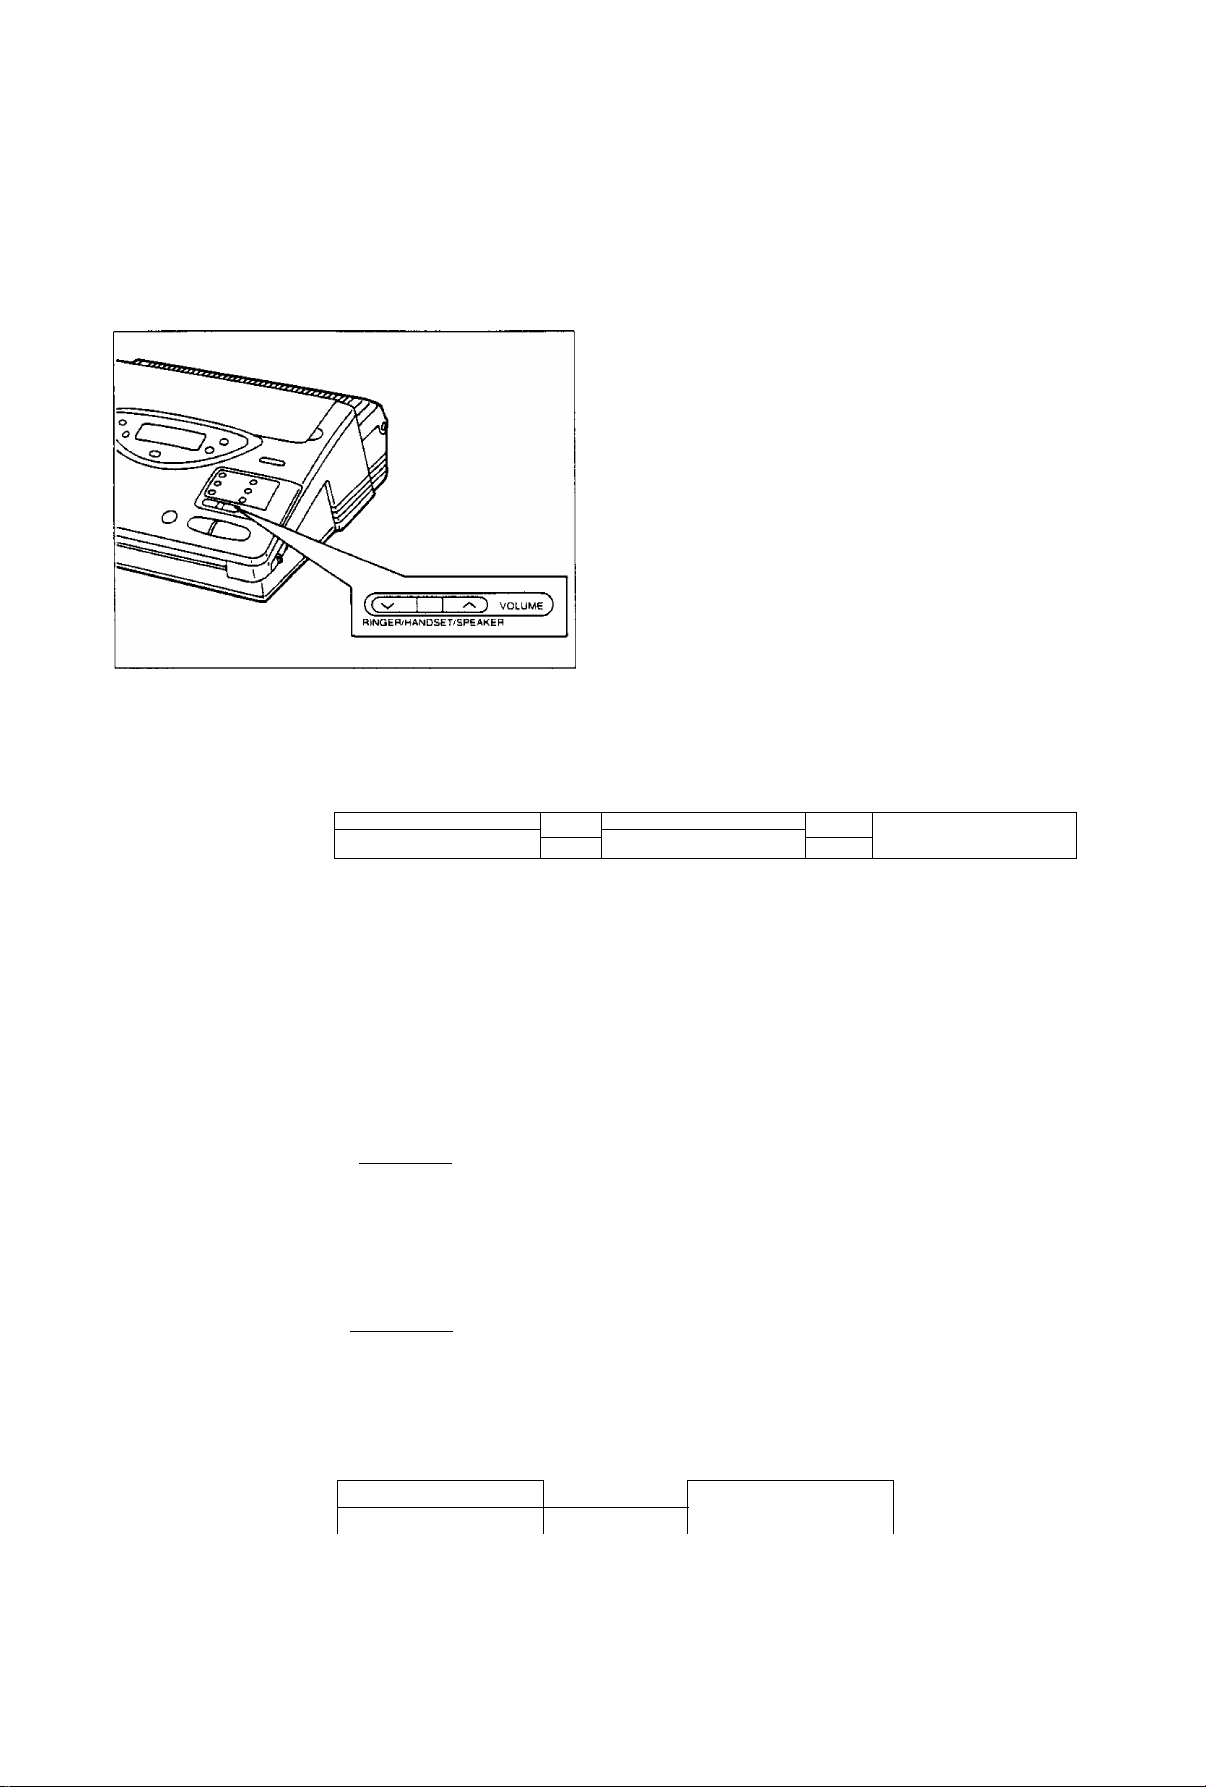
Adjusting Volumes
You can adjust the volume level of the ringer, the handset and the speaker.
These volume levels should be adjusted respectively.
To increase the volume level,
press A repeatedly.
To decrease the volume level,
press V repeatedly.
—The number of the black squares in the display
shows the volume level as below.
Ringer volume Press the buttons (a/v) repeatedly while the unit is in idle status.
3 levels are available.
High
LLLU-LLLUH
Note:
• If the ringer volume is set to off, the unit wit! not ring and the display will show
“RINGER OFF" in idle status.
ij-rm H
Low
RINGER OFF= OK?
Press START/SET for
confirmation.
Handset volume Press the buttons { a/v ) repeatedly when the handset is in use.
3 levels are available.
High
i I 1 1 I I I HH
Middle Low
LD
Speaker volume Press the buttons { a/v ) repeatedly when the speakerphone is used.
8 levels are available.
High
Low
Off
Answering
device volume
12
nI I I 1 I 1 HH
8 levels
Press the buttons (a/v) repeatedly while listening to messages recorded on the
answering device. 9 levels are available.
High Off
: I I rrrrm-
9 levels
LO
H
Installation and Preparation
Recording Greeting Messages
Record two types of greeting messages before using the unit as an answering device and a facsimile. One is
the message for the ANS/FAX mode, and the other is for the TEL/FAX mode.
The greeting message for the ANS/FAX mode tells a caller that you are unable to answer, and allows the
caller to leave a voice message or to send a fax message.
The greeting message for the TEL/FAX mode tells a caller that the unit is calling you up, and allows the
caller to wait until you answer the call or to send a fax message.
How to record greeting messages
Recording time is limited to 16 seconds for each message. Record a greeting message within 12 seconds
for optimum performance. Perform the following steps to record each of the messages.
O Open the station key panel.
0 ■ For the ANS/FAX mode: Press
GREETING SELECT.
B
Suggested messages
■ For the 4AfS/FAXmode:
“This is (your name, business and/or telephone
number). We are unable to answer right now. To
send a fax, start transmission. To leave a
message, speak (or 'speak for up to 1 minute’)
after the long beep. Thank you.’’.
m For the TEL/FAX mode:
“This is (your name, business and/or telephone
number). Please wait for someone to answer the
line. To send a fax, start transmission. “
ANS-GREETING
For the TEL/FAX mode: Press GREETING
SELECT repeatedly until the following is
displayed.
TEL-GREETING
0 Press GREETING REC.
Example: Recording for the ANS/FAX mode
ANS REC 16s
—A beep will be heard.
0 Immediately after the beep, speak clearly and
loudly toward the microphone from a distance
of approximately 200 mm (8 inches).
0 When finished, press STOP.
—After a beep, the unit will play back the
message so that you can confirm it.
Adjust the speaker’s volume to a suitable
level by pressing the VOLUME buttons.
Notes:
• If you make a mistake while recording, repeat
from step 2.
• You can record the greeting message for the
ANS/FAX mode by directly pressing the
GREETING REC button without pressing the
GREETING SELECT button.
• To delete greeting message; after pressing the
GREETING REC button in step 3, immediately
press the GREETING REC button again or press
the STOP button.
13
Installation and Preparation
Checking greeting messages
O Open the station key panel.
0 ■ Checking the greeting message for the
ANS/FAXmo6e:
Press GREETING SELECT.
ANS-GREETING
Checking the greeting message for the
TEUFAX mode:
Press GREETING SELECT repeatedly until
the following is displayed.
TEL-GREETING
0 Press START/SET.
—After a beep, the unit will play back the
message.
Notes:
•Adjust the speaker volume using the VOLUME button (see page 12).
• You can check the greeting message for the ANS/FAX mode by directly pressing the START/SET button
without pressing the GREETING SELECT button.
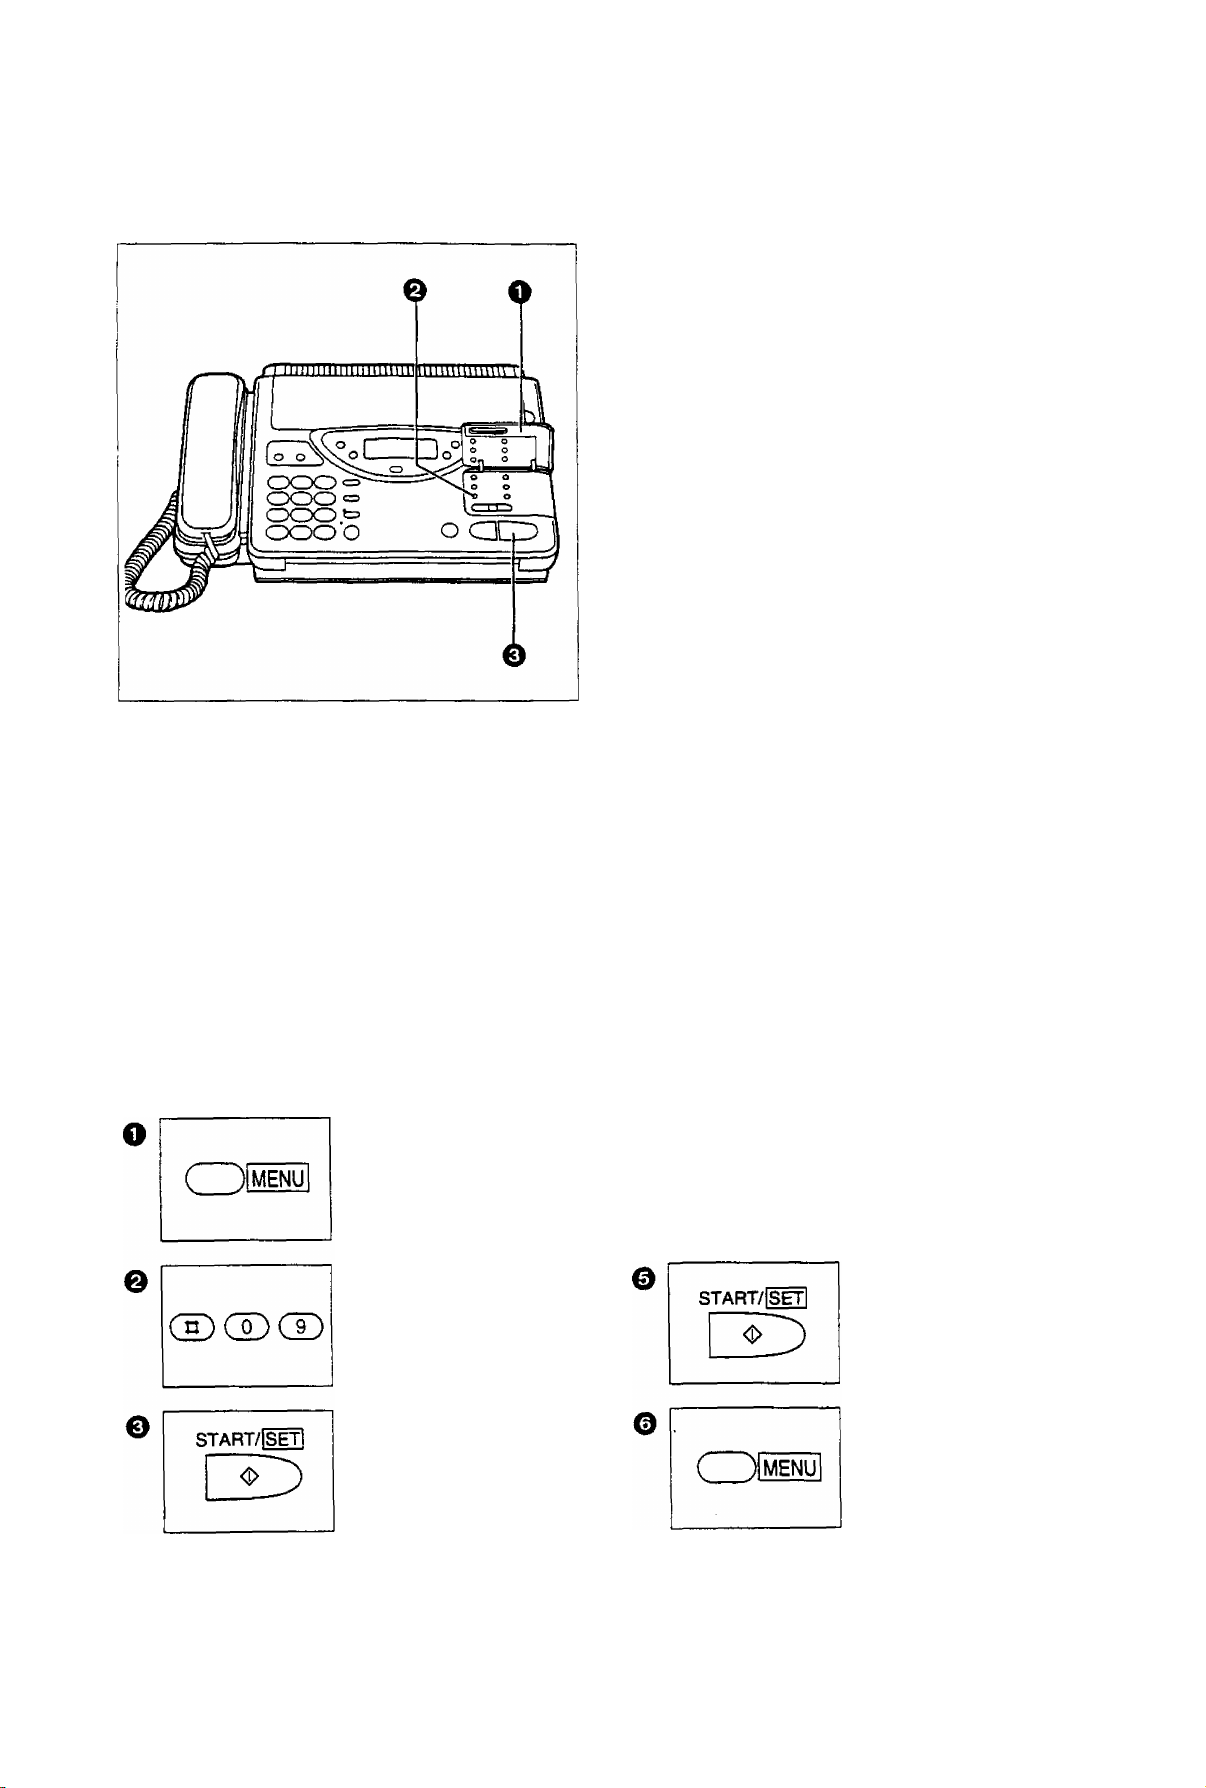
Setting the caller’s recording time
You can choose from two lengths of recording times for incoming messages.
VOX (unlimited): The unit will record an incoming message as long as a caller speaks {pre-selected
setting).
1 MIN (1 minute): The unit will record an incoming message up to 1 minute per message.
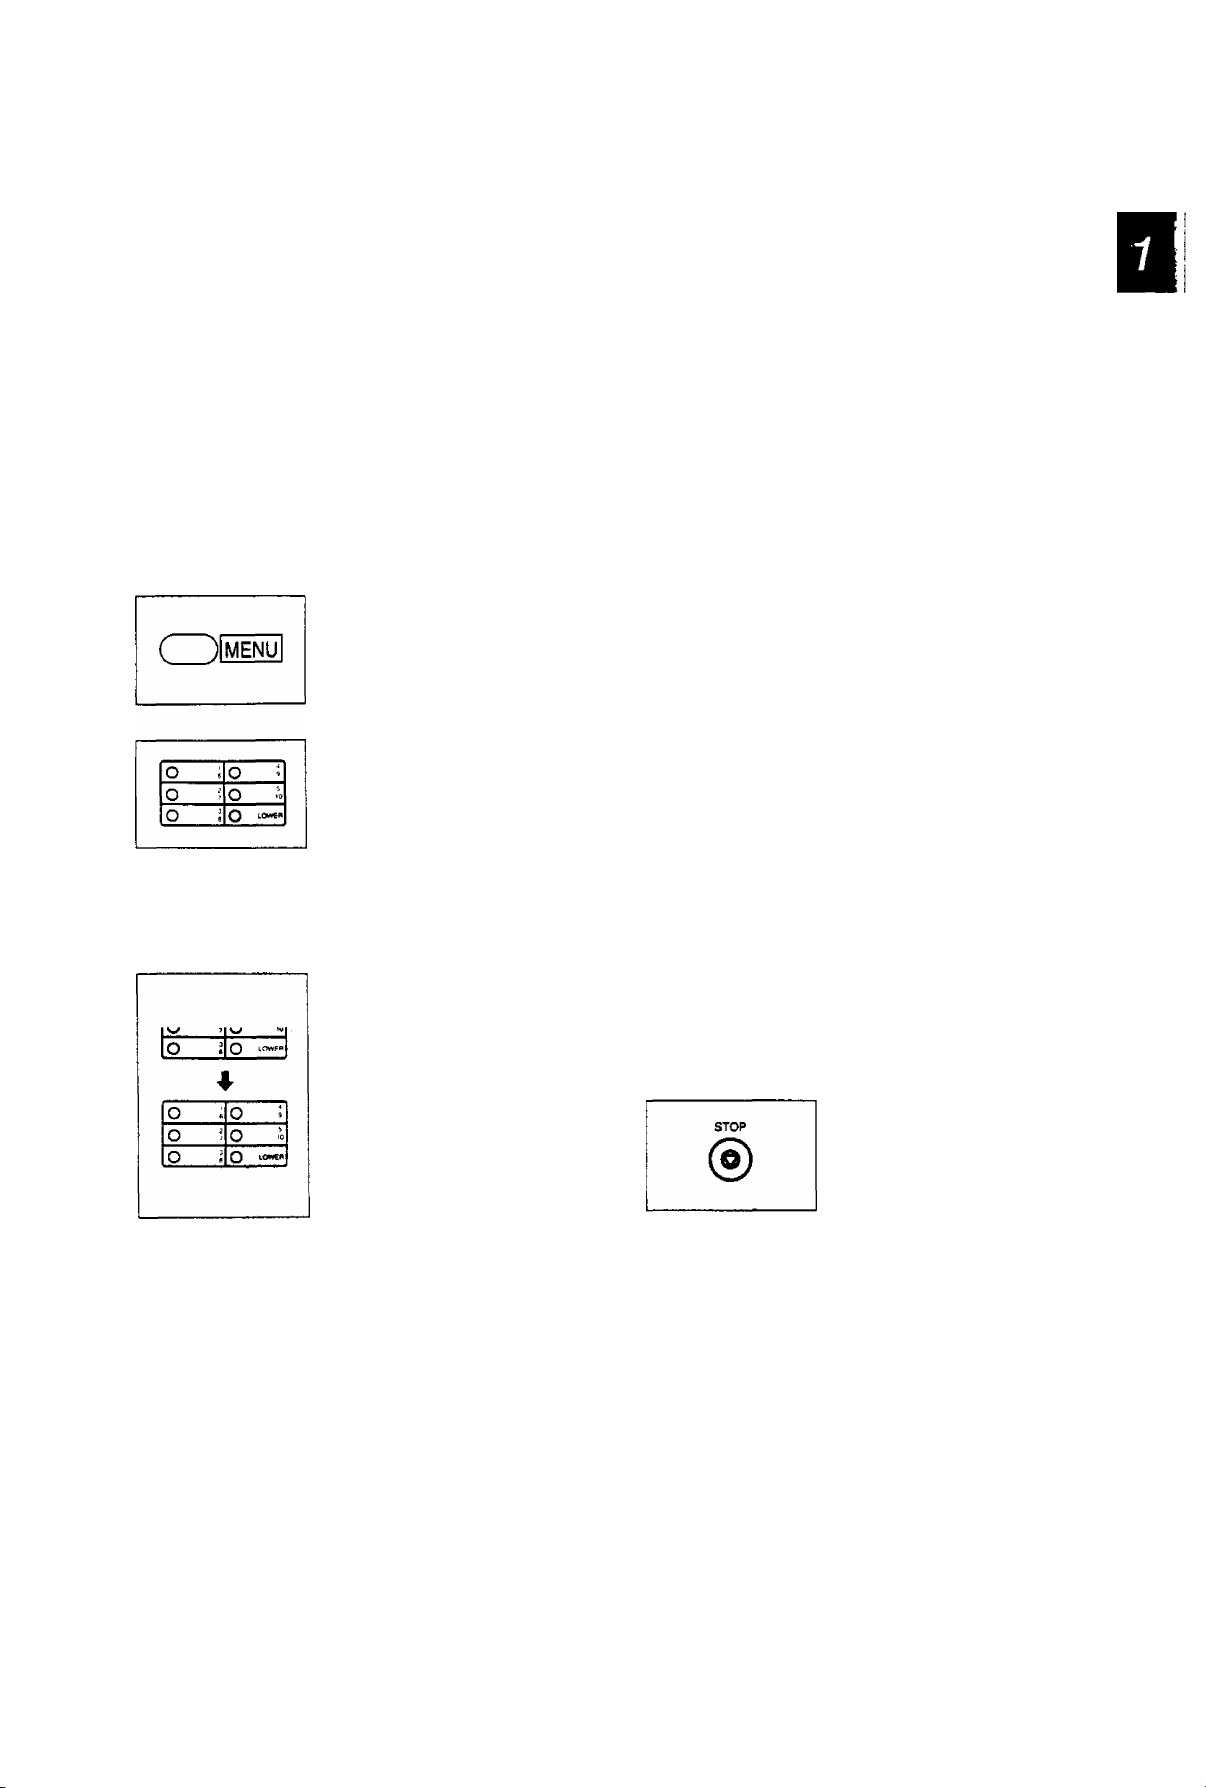
To change the recording time, proceed as follows:
Press MENU.
1 . SYSTEM SET UP
Press #09.
RECORDING TIME
RECALL
REDIAUPAUSE
(ZDS
Press A or T to select
the desired mode.
Press START/SET to
store the setting.
14
Press START/SET.
MODE = vox [AT]
Press MENU to end the
program.

Installation and Preparation
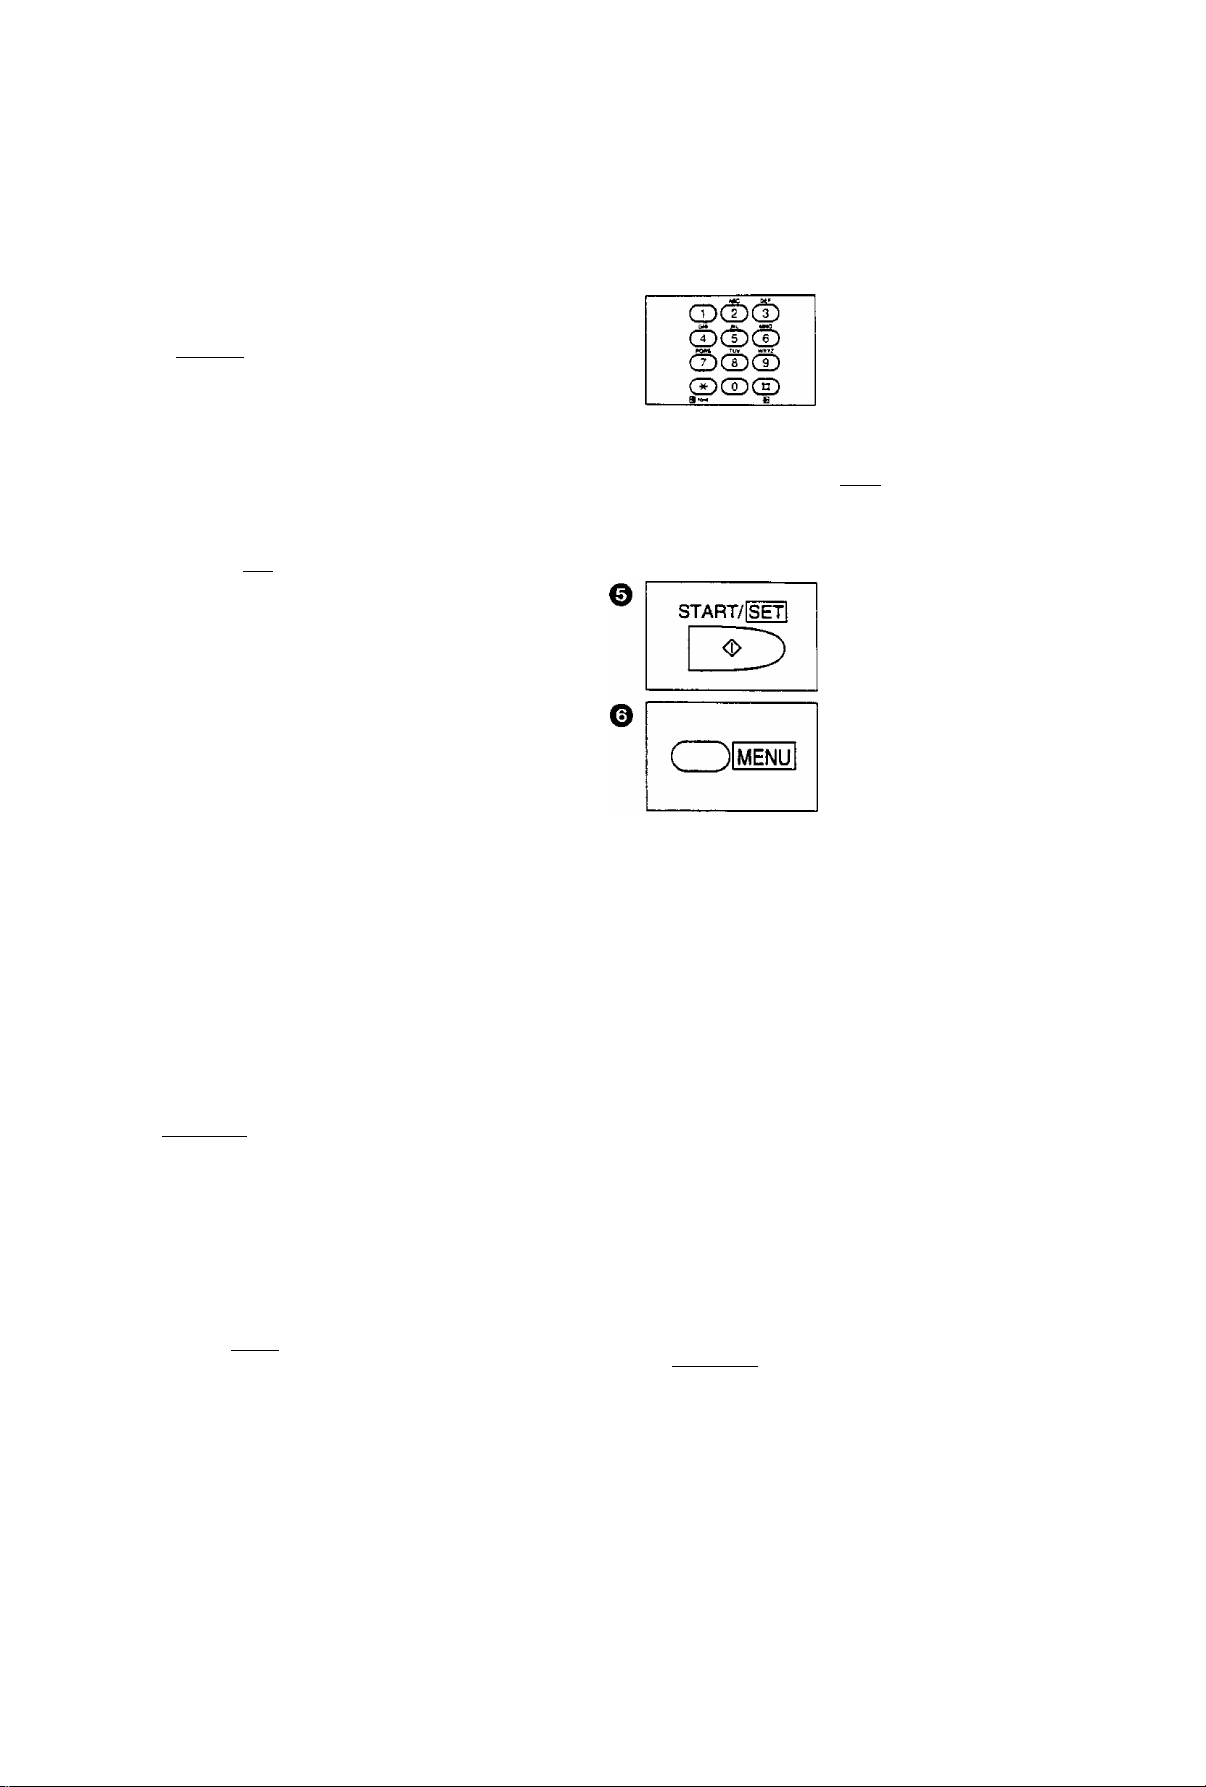
Setting the Date, Time, Logo and iD
How to enter letters and symbols
The dial keypad and the direct call station 1 are used as alphabet and symbol character input keys when
you enter your logo and station names for automatic dialers.
__ __ _ __ _ _
To enter characters
Pressing each key will alternately select a character as shown below.
When the desired character Is displayed, press # to move the cursor to the right and enter the next
character.
Keys
CD
CD
ÛD
Œ)
CD
(D
CD
CD
CD
CD
Lo il
1 2
1
A B
D
G
J
M N
P
T U
w X
0
3 4
1
] {
c
F
1
L
0
R
V t
Y
)
?
a b
d
g
j
m n
S
2
<
!
[
E
H
K
Q
(
Number of pressing times
f
t 4
1
!
7
-
2
3
5
6
8 9
/
r
y
"
A
s 7
z
#
'
5
}
e
h
k
6
4"
c
0
P
u
w
>
q
V 8
X
@
10
=
9
$
%
11
Ï
12
&
¥
B
13
-
CD
CD
For example, when entering “Mike" as your logo:
Q Press 6 once, then press #.
0 Press 4 six times, then press #.
Note:
• If you make a mistake white programming, use it or ^ to move the cursor to the incorrect character, then
make the correction.
◄ key (Used to move the cursor to the left)
► key (Used to move the cursor to the right)
o Press 5 five times, then press #.
LOGO=M
O Press 3 five times.
LOGO=K:
LOGO=Mik
LOGO=Mike
15
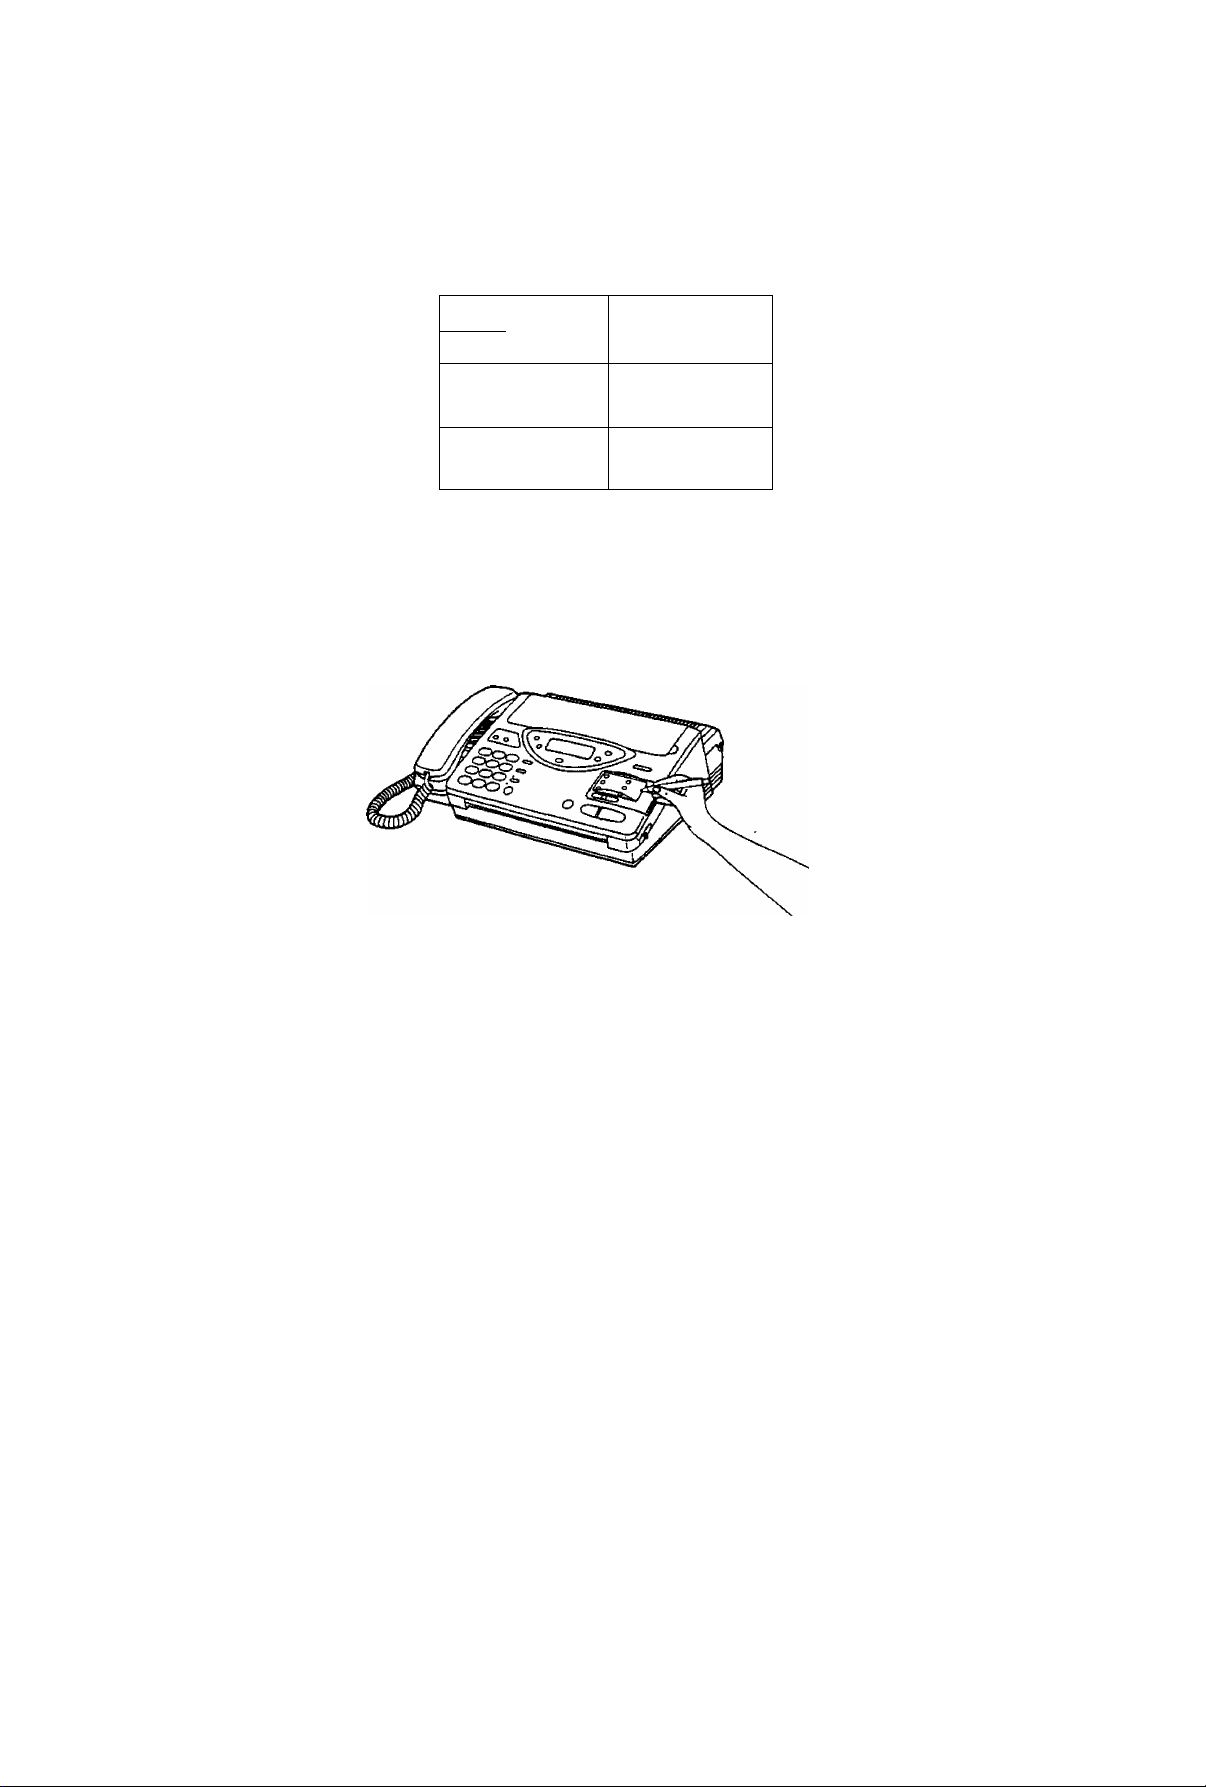
Installation and Preparation
Special uses of the direct call station keys
Direct call stations 2, 4 and 5 are used as command keys.
--------------
Character key
The layout of the direct call station keys is printed on the reverse side of the directory card.
1. Remove the directory card cover with a pencil or similar object as shown.
2. Turn over the directory card. You will find how each command is assigned to the direct call station keys.
o
o
0
INSERT 7
SECRET 8
E
4
0
2
0
3
6
SPACE 9
5
DELETE 10
LOWER
HYPHEN
■Command keys
Direct call station 2 (INSERT):
This key is used to insert one character (or one
space) in the programmed logo.
Example; Compny-^Company
1. Press # or * repeatedly until the cursor is
positioned on "n".
LOGO=Compny
2. Press INSERT.
LOGO=Comp ny
3. Press 2 repeatedly until “a" is shown.
LOGO=Company
16
Direct call station 4 (SPACE):
This key is used to replace one character with a
space.
Direct call station 5 (DELETE):
This key is used to delete one character from
the programmed logo.
Example; Comnpany-^Company
1. Press # or * repeatedly until the cursor is
positioned on “n".
LOGO=Comnpany
2. Press DELETE.
LOGO=Company
installation and Preparation
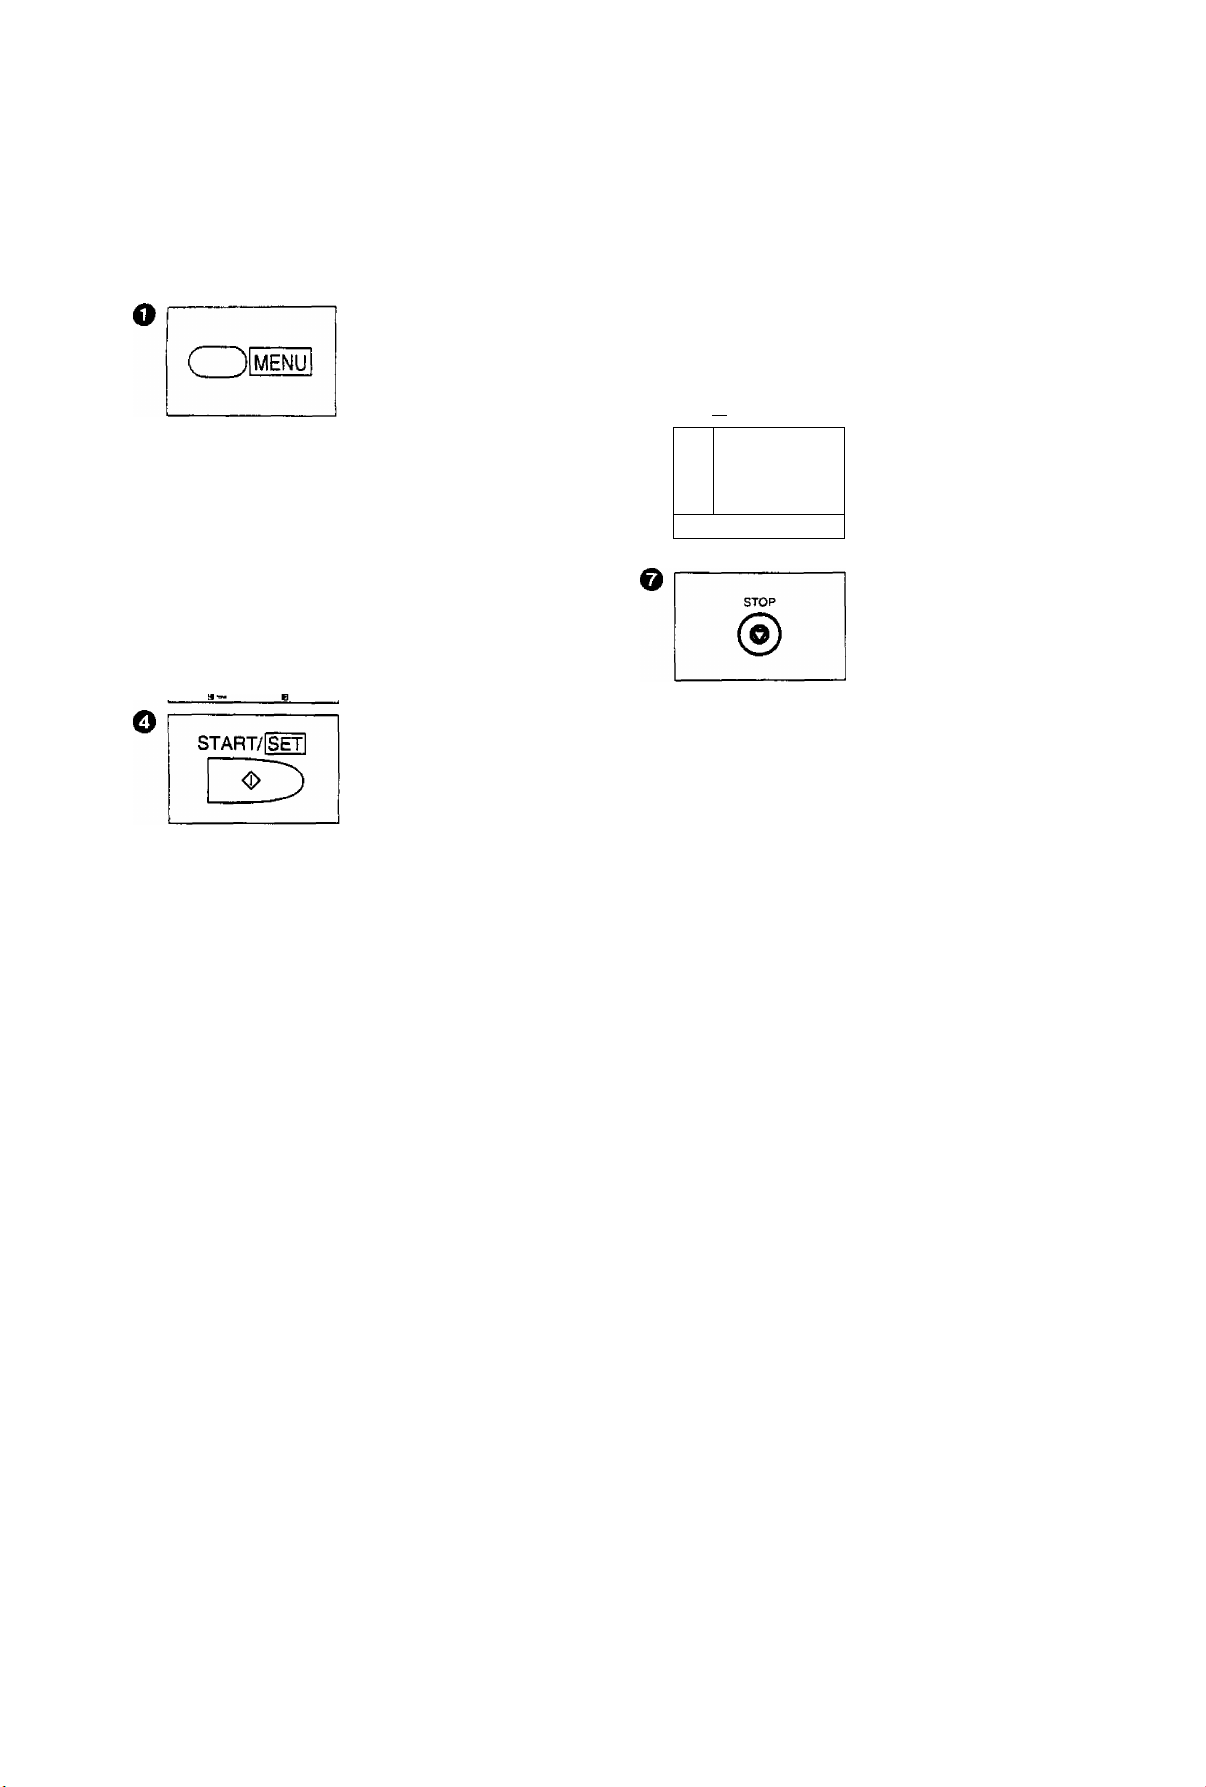
Setting the date and time
The internal clock of the unit will print the date and time', on the top line of all fax messages you transmit,
and on the fax communication reports such as the journal report and the transmission report.
r^lMENUl
® СЮОЗ
О
START/lsin
Press MENU.
1.SYSTEM SET UP
Press #01.
SET DATE & TIME
Press START/SET.
01/01/95 12:C0A
О
Enter the current
month/day/year/hour/
minute by selecting each
2 digits. Then press
for AM or press # for PM.
Example:
Aup. 10 7995, 3:00 PM
Press 08 10 95 03 00,
then press # to select
PM.
Press START/SET to
store the setting.
В
Press MENU to end the
program.
',w
Notes:
When you make a mistake while programming, press the STOP button, then make the correction.
The accuracy of the clock will be approximately ± 45 seconds a month at room temperature.
к
i/Y
Setting your logo
The logo is used to identify fax messages that are being transmitted by your unit. It may consist of
alpha-numeric letters and symbols. Usually the logo is a company, division or personal name in an
abbreviated form.
( )|menu
® CDCD
Press MENU.
1.SYSTEM SET UP
Press #02.
YOUR LOGO
©
gdcSq)
(Set)®
В
START/[S£t1
о
Enter your logo up to
30 characters by
following the instructions
on page 15.
Press START/SET to
store the setting.
О
Press START/SET.
start/[set1
LOGO =
©
( )|menu
о
Note:
• When the first character is entered, the preset logo will be cleared.
Press MENU to end the
program.
17
Installation and Preparation
Setting your facsimile telephone number
Your programmed phone number will be printed oh the top of each page transmitted from your unit.
( )|menuI
e
CDCDCX)
e
START/iSETl
Press MENU.
1.SYSTEM SET U?
Press #03.
YOUR TEL NO.
Press START/SET.
NO. =
CDd)cS)
C±)C£)CD
©CD CD
CD CD CD
Enter your facsimile
telephone number up to
20 digits.
—The # button provides
a space and the *
button provides
Press START/SET to
store the setting.
Press MENU to end the
program.
Setting the transmission report printing
Each time a document is transmitted, this feature will give you a printed record of the transmission.
The following choices are available:
ERROR: The report will print only when the transmission fails.
ON: The report will print, indicating whether the transmission is successful or not.
OFF: The report will not print.
Sample of transmission report:
XMT REPtFT
OTKf=R FflCSiniLS
e
N0.
CC№ANY ftBC
01
( )|MENU
CDCDCD
stabt/isetI
ZD
STPPT TIME
Jan. 01 l2:09fiM
Press MENU
1.SYSTEM SET UP
Press #04.
TX-REPORT MODE
Press START/SET.
MODE = ERROR [AT
USPQc
01'05
TIHE MODE
TX
©
PAGES
01
RECALL
REDIAL/PAUSE
START/IWl
o
C )|MENU
Jan. 01 1995 12:09An
RESULT
QK
Press A or T to select
the desired mode.
Press START/SET to
store the setting.
Press MENU to end the
program.
18
Installation and Preparation
Storing Phone Numbers for Automatic Dialing
The unit's memoty allows you to use both one-touch dialing (up to 10 phone numbers) and speed dialing
(up to 22 phone numbers) for rapid access to your most frequently dialed numbers.
One-touch dialing; The unit is equipped with 5 direct call station keys, each of which is divided into an
upper station and a lower station.
Speed dialing; The unit is equipped with additional 22 dialing stations. These stations are assigned to
2-digit numbers (00-21).
storing phone numbers for one-touch dialing
Each station can store a phone number up to 30 digits in length and the associated station name up to
10 alpha-numeric characters.
or
Press MENU repeatedly
until the following is
displayed.
.STORE TEL NO.
For upper stations 1 to
5;
Press one of the direct
call station keys.
Example: Station 4
<S04>=
or
For lower stations 6 to
10:
Press LOWER, then
press one of the direct
call station keys.
Example: Station 8
<LWR>
o
©
Od)Ci)
Sd)®
(S®©
®CT)Cb)
____
START/{Sg]
O
QDCScS)
©cS)©
START/iSEfl
O
Enter a phone number
H_
Press START/SET to
store the number.
NAME =
Enter the station name
by following the
instructions on page 15.
Press START/SET to
store the station name.
—To program other
stations, repeat from
step 2.
Press STOP to end the
program.
<S08>^
Notes:
• To enter a hyphen in a phone number, press the LOWER key. A hyphen is counted as 2 digits.
• If you make a mistake while programming, press the STOP button, then make the correction.
• To erase a programmed phone number in step 3, press the STOP button when the cursor is positioned on
the beginning of the number.
• Confirm that phone numbers and their station names have been correctly stored by printing the telephone
number list. See page 64.
19
Installation and Preparation
Storing phone numbers for speed dialing
Each dialing station can store a phone number up to 30 digits in length and the associated station name up
to 10 alpha-numeric characters.
Press MENU repeatedly
until the following is
displayed.
■STORE TEL NO.
d)(p(p
©CD®
a~
______
B
O
cx)cJ)cS
cS)Cl)(S)
C*)CD(^
0
©CD®
Notes:
• To enter a hyphen in a phone number, press the LOWER key. A hyphen is counted as 2 digits.
• If you make a mistake while programming, press the STOP button, then make the correction.
• To erase a programmed phone number in step 3, press the STOP button when the cursor is positioned on
the beginning of the number.
• Confirm that phone numbers and their station names have been correctly stored by printing the telephone
number list (see page 64).
Press #, then press a
2-digit number (00-21).
Example: Station #00
<A00>=
Enter a phone number.
Press START/SET to
store the number.
NAME =
s
TART/ISETl
O
Enter the station name
by following the
instructions on page 15.
Press START/SET to
store the station name.
—To program other
stations, repeat from
step 2.
Press STOP to end the
program.
To keep a phone number secret
Use this feature to keep a whole phone number or a portion of a phone number secret. When the telephone
number list is printed out (see pages 64 and 65), secret numbers will not be printed.
Using the SECRET (direct call station 3) button:
Press SECRET before and behind the phone number you wish to keep
SECRET 8
20
o
©ct)©
®CD®
a** i
o
4
4-
SECRET 8
secret.
Example: The phone number you wish to keep secret is 12345.
Press SECRET, 1 2 3 4 5 and SECRET again.
2 34 5 j
Note:
• Pressing the SECRET button once counts as two digits.
Installation and Preparation
Electronic Telephone Directory
The station names stored in memory for automatic dialing will be automatically registered in the electronic
telephone directory in alphabetical order.
With the electronic telephone directory feature, you can make a fax or voice call by selecting the desired
station name on the display.
D
How to use the electronic telephone directory
To search a station name and make a voice or fax call, proceed as follows.
If you wish to send a fax, insert the documents into the document feeder first.
O Press DIRECTORY.
or
________________
Press a dial key to which the initial of a
station name is assigned (see Index table).
Example: To search a name with the initial
Press 6 repeatedly until the first station
name with the initial “N” is displayed and
press ▼ until the desired name is displayed.
■ Press A or T repeatedly until the desired
name is displayed.
o Press START/SET.
SELECT INDEX
“N"
Index table
Dial
key
1
1
2 A, B, C, 2
D, E, F, 3
3
4 G, H, I, 4
J, K, L, 5
5
M,N, 0, 6
6
Index
Dial
key
7
8
9
0
*
#
—The unit will start dialing.
—If a document has been fed into the unit, the
transmission will start.
Index
P, Q, R. S, 7
T. U,V, 8
W. X, Y,Z. 9
0
Other symbols
(Used for speed dialing.
See pages 23 and 28.)
21

Installation and Preparation
Selecting the Receive Mode
Select a desired receiving mode by pressing the RECEIVE MODE button repeatedly. The arrow mark in the
1. TEL Mode
Recommended Usage
• MOST Home Offices or Small Businesses (unless unattended), especially those which have either or both
of;
—Low volume of incoming faxes relative to the number of telephone voice calls that a user receives.
—Other extensions (touch tone dialing capable) on the same line in the home or office which are used to
answer incoming calls.
•When you pick up the handset and fax reception is required, you can press the START/SET button to
receive documents. For further details, see page 29.
•When you answer a call using the touch tone extension phone on the same line and fax reception is
required, you can press ** (remote fax activation code) to receive documents. For further details, see
page 43.
• If no one answers a call within 15 rings, the receiving mode will automatically switch to the ANS/FAX mode.
2. TEUFAXMode
Recommended Usage
•The FEW Home Offices or Small Businesses which have both:
—A high volume of Incoming automatic fax transmissions from machines that generate a sending fax tone,
with only occasional incoming telephone voice calls on that line.
—Other extensions on the same line are generally not used to answer incoming calls.
—For further details see page 31.
3. ANS/FAX Mode
Recommended Usage
• ALL users who wish to receive fax and voice messages when they are away from the home/office.
• Users who wish to screen all incoming calls when they are in the home/office.
—For further details see page 29.
4. FAX Mode
Recommended Usage
•ALL users who wish to use their machine as a dedicated fax machine only and who never expect to
receive telephone voice calls on that telephone number.
—For further details see page 33.
Note:
• Regardless of which receive setting is used, the machine can still be used to make outgoing voice and fax
calls.
22
Basic Instructions
Making and Answering Voice Caiis
Making voice caiis
__________________
O Press SP-PHONE or lift the handset, then
listen for the dial tone.
a
@ Dial a phone number.
o When the other party answers, speak through
the microphone from a distance of
approximately 50 cm (20 inches) or handset.
Q When finished, press SP-PHONE again or
place the handset on the cradle.
Heipfui hints:
•Adjust the volume to a suitable level. See
page 12.
• If you wish to switch to the handset from the
speakerphone, lift the handset. To switch to the
speakerphone, press the SP-PHONE button.
• For helpful hints for the speakerphone operation,
see page 24.
Making voice calls using automatic dialing
You can dial a phone number automatically using one-touch dialing and speed dialing.
Before using automatic dialing, make sure that the desired telephone numbers have been stored in memory.
For storing phone numbers, see pages 19 and 20.
0 Press SP-PHONE or lift the handset.
0-a Using one-touch dialing:
■ When using the upper stations 1 to 5:
Press the desired direct call station key.
■ When using the lower stations 6 to 10:
Press LOWER, then press the desired
direct call station key.
0-b Using speed dialing:
Press DIRECTORY, then press # and the
desired 2-digit number (00-21).
Heipfui hint:
• You can aiso use the eiectronic telephone
directory to make a voice call (see page 21).
23

Basic Instructions
Redialing the last dialed number
tf the tine is busy or you wish to redial the last dialed number, use the RED1AL7PAUSE button.
Press SP-PHONE or lift the handset, then press REDIAL/PAUSE.
RED1AL7PAUSE
CZ)S
Note:
• If the line Is busy when using the speakerphone, the unit will automatically
redial the number up to 2 times.
Voice muting
The MUTE button will mute your voice during a telephone conversation. Using this feature, you can hear the
voice of the other party, but the other party cannot hear your voice.
Press MUTE and confirm the MUTE indicator light is on.
To resume the conversation, press MUTE again.
Answering voice calls
When the unit rings, lift the handset or press SP-PHONE to answer the call.
When you have finished, replace the handset on the cradle or press SP-PHONE.
Note:
• For helpful hints for the speakerphone operation, see below.
Helpful hints for the speakerphone operation
• Use the speakerphone in a quiet room for best performance.
• If the other parly has difficulty hearing you, decrease the volume using the VOLUME buttons (see
page 12).
• If you and the other party speak at the same time, parts of your conversation will be lost. To avoid this,
speak alternately.
24
Basic Instructions
Before Transmission
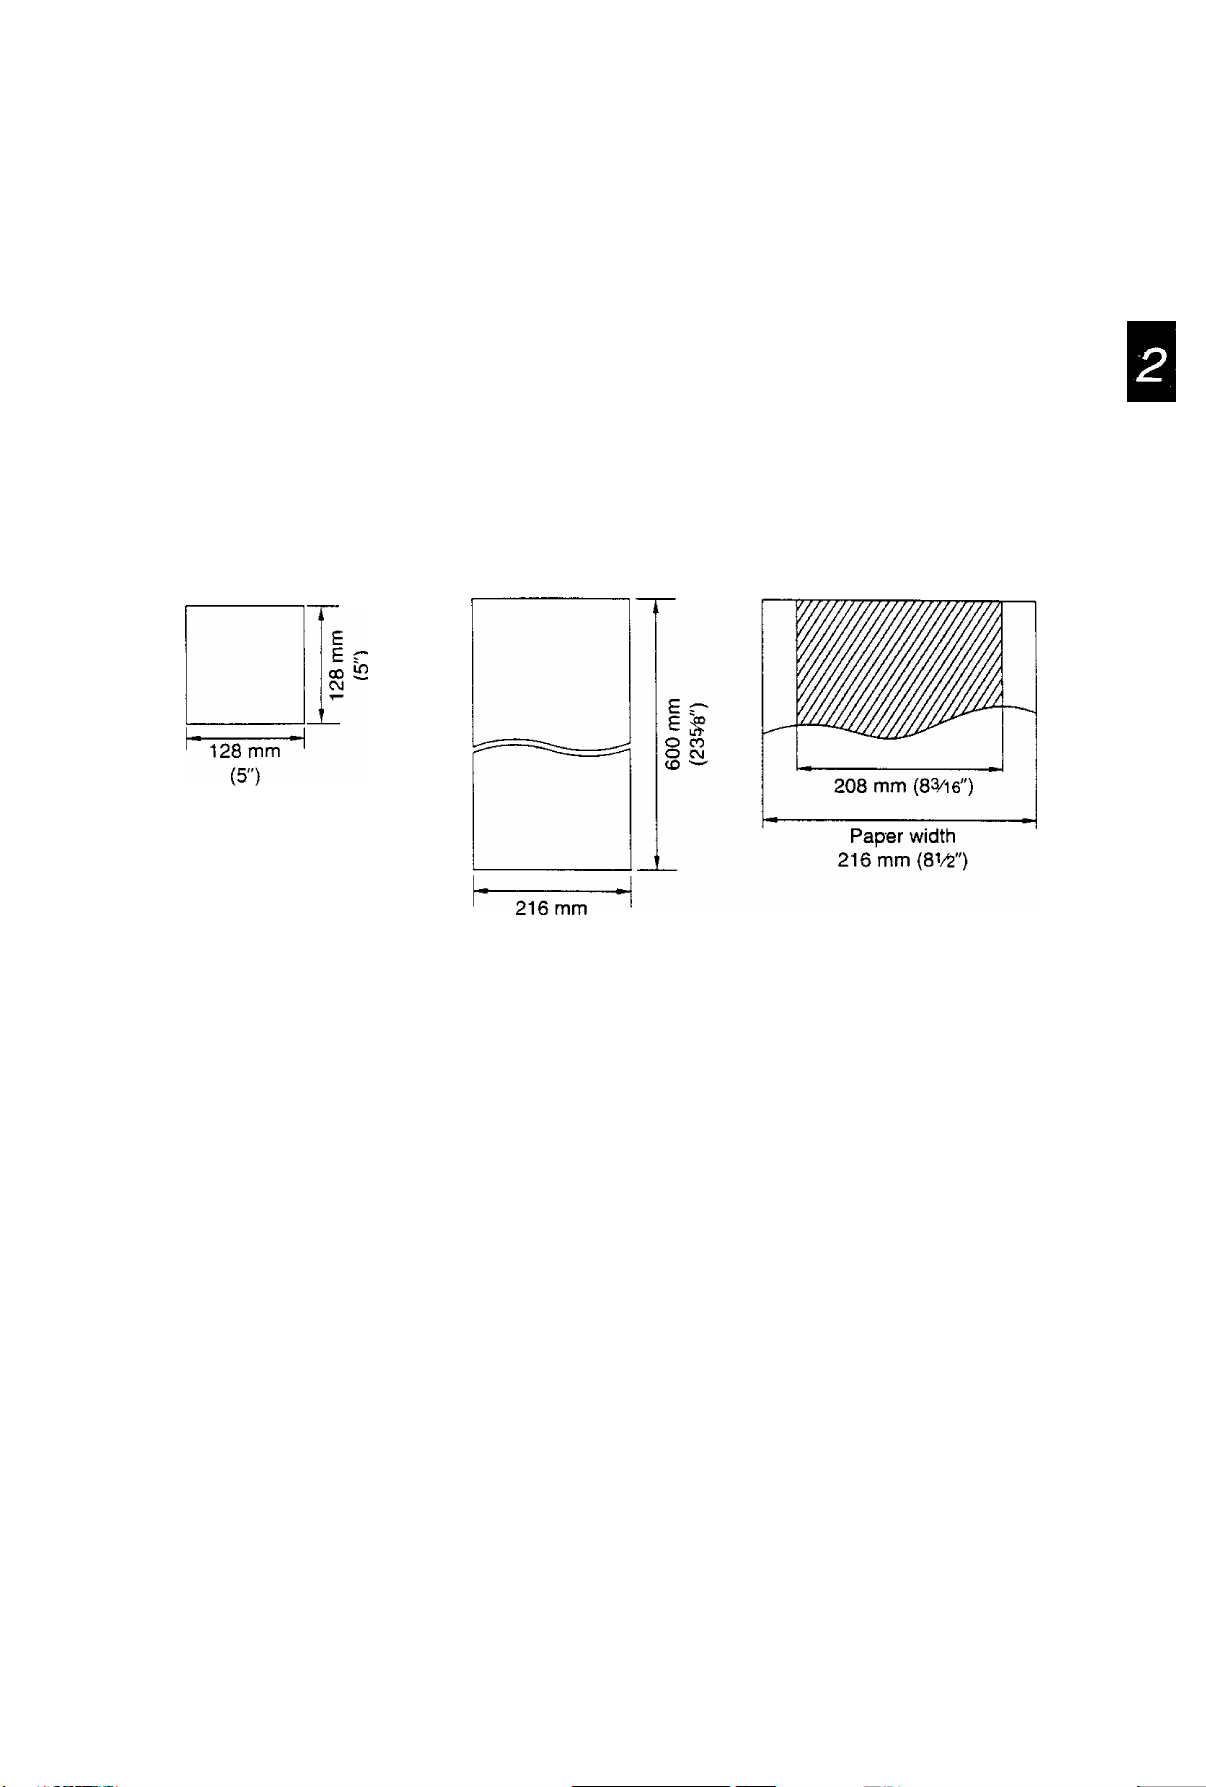
Acceptable documents
The unit can transmit documents that meet the following conditions.
—Document width should be from 128 to 216 mm {5 to
—Maximum document length should not exceed 600 mm {23^").
—Effective scanning width can be up to 208 mm (8Vi6").
—Number of pages that can be set in the document feeder tray must not exceed 15 sheets.
—Document weight;
Single sheet: 45 to 90 g/m^ (12 to 24 lb.)
Multiple sheets: 60 to 75 g/m^ (16 to 20 lb.)
Minimum document size
Note:
• Do not feed the following types of documents. Make a copy of these documents with a copier machine and
feed the copy into the unit.
—Paper with a chemically treated surface such as carbon paper or carbonless duplicating paper
—Electrostatically charged paper
—Heavily curled, creased or torn paper
—Paper with a coated surface
—Small-sized paper such as a slip or voucher
— Thin paper less than 45 g/nf (12 lb.)
— Thick paper over 90 g/rrf (24 lb.)
—Paper with faint contrast between the printing and the background
—Paper with printing on the reverse side that can be seen through the front (e.g. newspaper)
Maximum document size
(81/^")
Effective scanning width
25
 Loading...