

Panasonic KX-F1000NZ User Manual
Panasonic
Plain Paper Facsimile
Model No.
KX-F1OOONZ
read these Operating Instructions before
Mt and save for future reference.
Contents
Chapt 1. Installation and Connection
Chapt 2. Initial Preparation
Chapt 3. Making and Answering Voice Cails
Chapt 4. Transmitting and Receiving Fax Cails
Chapt 5. Copier Function
Chapt 6. Automatic Dialing
Chapt 7. Advanced Operations

Thank you for purchasing the Panasonic Plain Paper Facsimile.
For your future reference
Date of purchase
Dealer’s name and address
Dealer’s telephone number
Serial No.
(found on the rear of the unit)
Warning:
•When a failure occurs which results in the internal parts becoming accessible, disconnect the power
supply cord immediately and return this unit to an authorized service center.
•Disconnect the Telecom connection before disconnecting power connection prior to relocating the
equipment, and reconnect the power first.
Caution:
•Note that the images of copied or received documents will remain on the used film. When disposing of the
used film, use discretion.
•Do not rub the printed side or use an eraser on the printed side, as it may smear.
•The used film is not reusable. You can order a new film for replacement through the nearest Panasonic
dealer.
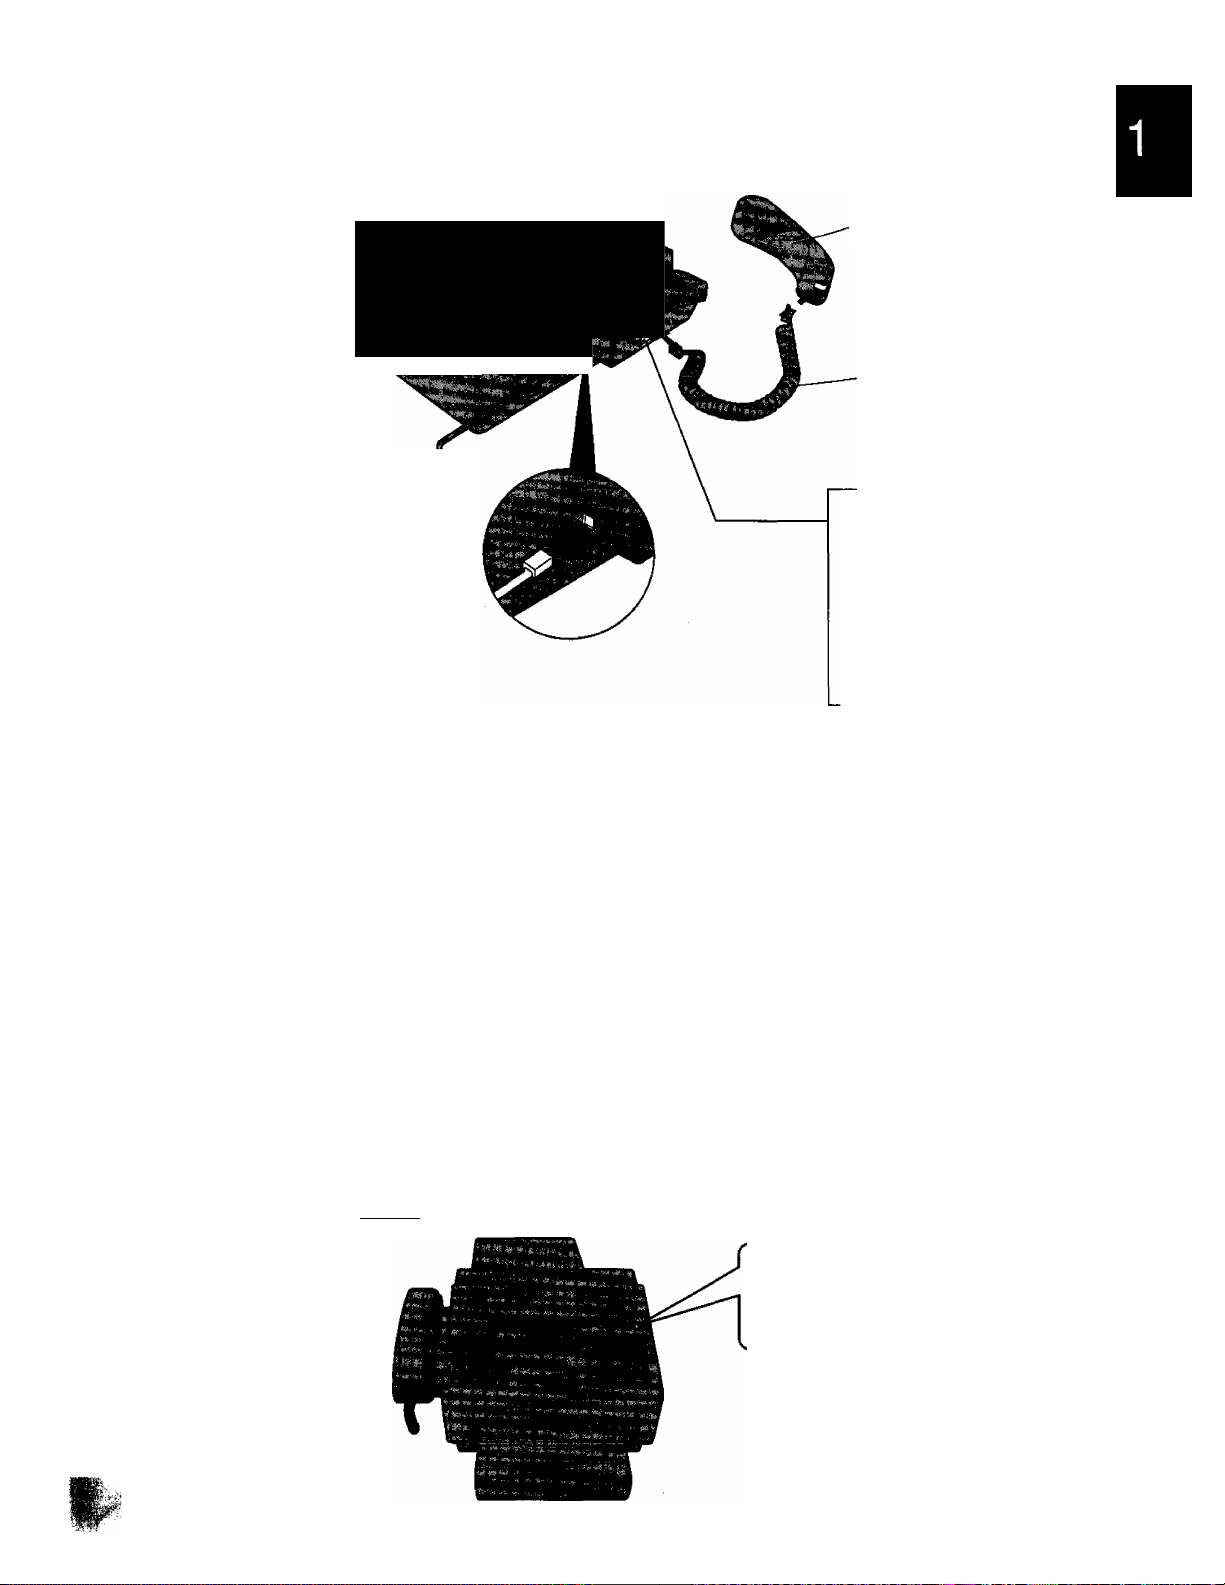
Included accessories
Power cord ... 1 pc.
(p. 7)
Document stacker
.....................
1 pc.
(P-6)
•If any Items are missing, check with place of purchase.
•Save the original carton and packaging.
Telephone line
cord................1 pc.
(P-7)
Film cartridge
1 pc.
(pp. 4. 57)
—^The included film
is 30 meters.
Handset
Paper cassette
.....................
........
1 pc.
(P- 7)
1 pc.
(p. 5)
Handset cord
1 pc.
(p.7)
Extension
telephone adaptor
.....................
1 pc.
(P-21)
Document feeder
tray.................1 pc.
(P. 6)
1996 Kyushu Matsushita Electric Co., Ltd. All Rights Reserved.

Table of Contents
Installing the film cartridge.....................................4
Installing the paper cassette..................................5
Installing the document stacker
Installing the document feeder tray
Connections...........................................................7
Location of controls
Setting the date and time
Setting your logo................................................ 10
How to enter characters and symbols................. 11
Setting your facsimile telephone number.... 12
Adjusting volumes............................................... 12
Selecting the receive mode
Making voice calls
Answering voice calls
Transmitting documents
Manual reception
Automatic reception
...............................................
...............................................
..........................................
................................................
............................................
.............................
......................
....................................
................................
.....................................
6
10
13
14
14
15
17
18
6
8
Facsimile
Voice contact
Polling..................................................................29
Delayed transmission..........................................30
Reserving transmission
during a fax reception
Printing a cover page..........................................31
Remote fax receiving using an extension.... 32
Junk mail prohibitor
Receiving with distinctive ring service
.......................................................
.....................................
............................................
................
28
31
33
34
Special settings
Logo print position...............................................35
Overseas transmission mode
Copy reduction mode
Receiving reduction mode...................................37
Film/Paper save reception
Extension copy................................................... 39
Pager alert for fax reception................................40
Display contrast
Resetting the advanced features........................ 41
..........................................
..................................................
.............................
.................................
35
38
41
Others
TONE, RECALL and PAUSE buttons
Printing reports and lists......................................43
Summary of user programmable features ... 46
.................
36
42
Making a copy......................................................24
Storing Tel/Fax numbers
Making voice calls using automatic dialing.. 26
Transmitting documents using automatic
dialing................................................................26
Electronic telephone directory
.....................................
.............................
25
27
Error messages on the display
Before requesting help........................................48
Clearing a recording paper jam
Clearing a document jam
Cleaning the unit
Replacing the film or film cartridge
Important safety instructions............................... 56
Accessory order information
Specifications......................................................57
Fax Correspondence
Speed dialer list...................................................61
Index.............................
.................................................
..........................................
...........................
..........................
....................................
.....................
...............................
......................................
47
50
52
53
54
57
59
63
3
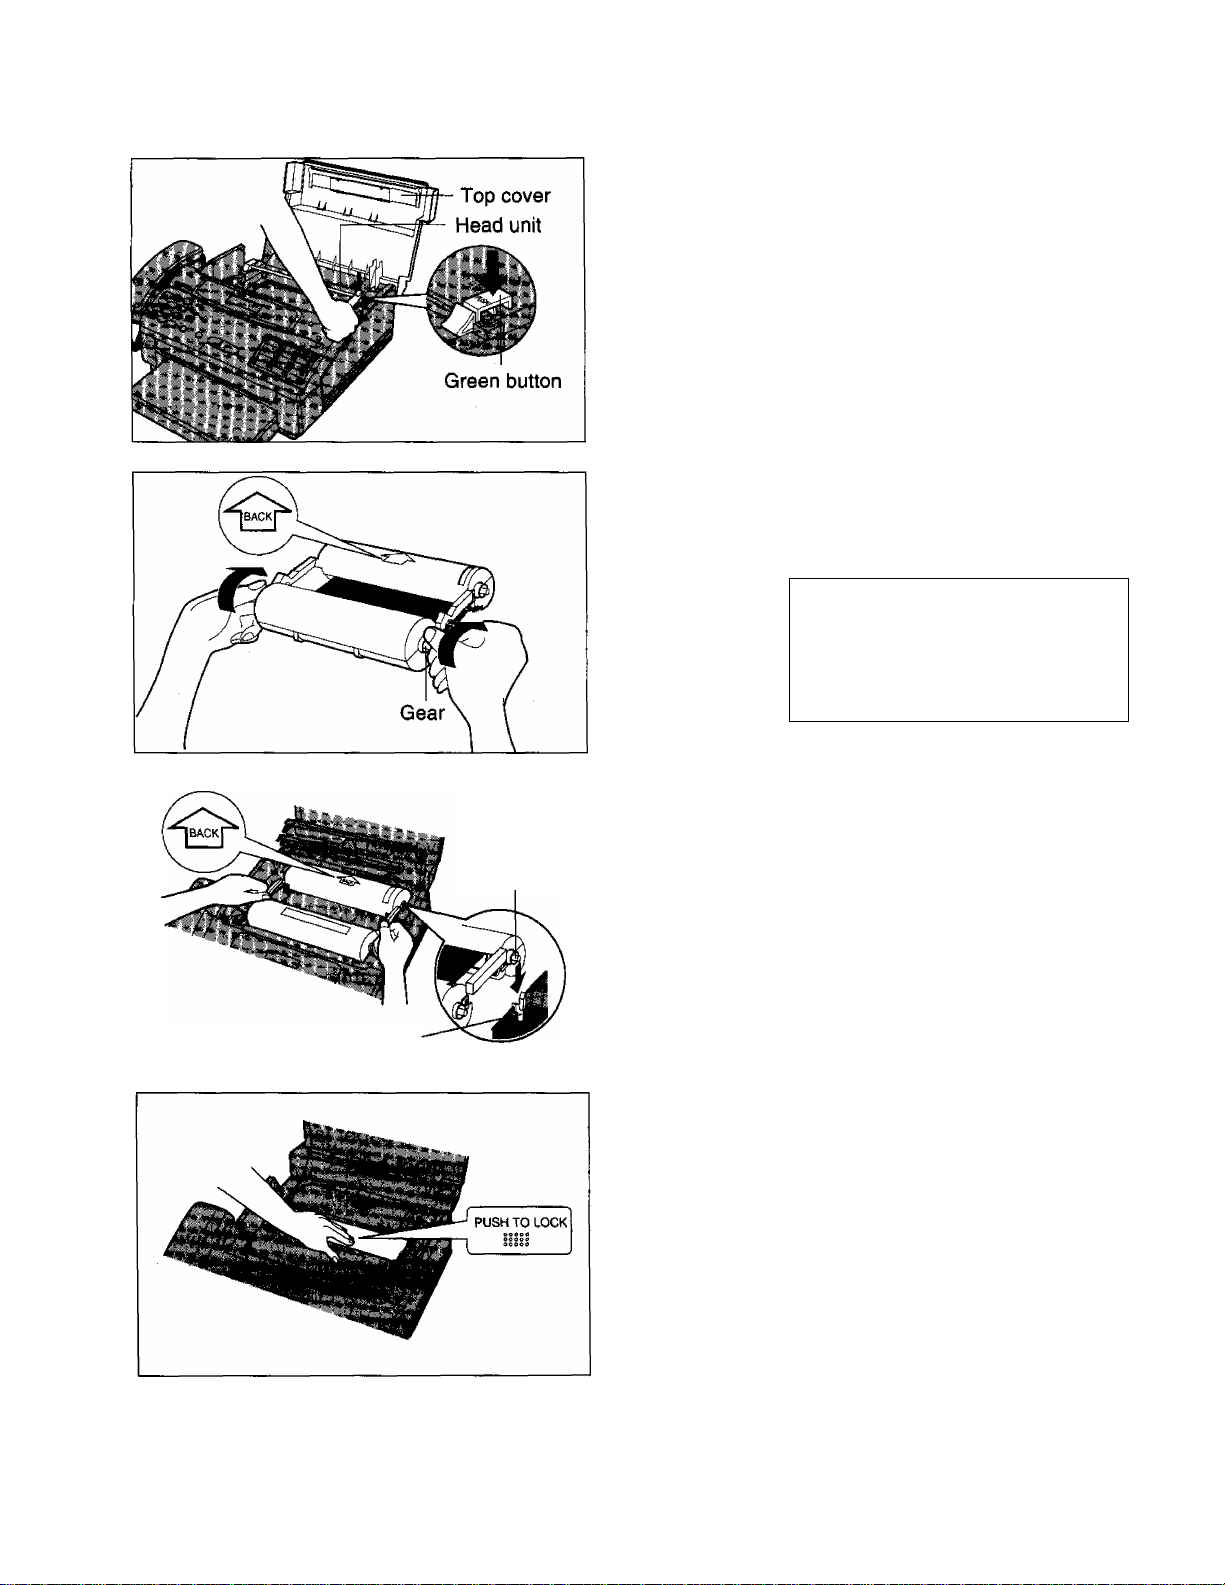
Installing the film cartridge
^ Open the top cover.
Press the green button on the right marked
2
“PUSH” and lift up the head unit.
Place the cartridge with the “BACK” indicator
facing up and tighten the film by winding the
gears if there is slack.
Green holder
Green gear
Incorrect
Q®
^ Slack
Place the “BACK” side of the cartridge into the
unit, by inserting the pins on the sides of the
green gears into the green holders. Then
lower the front of the cartridge into place.
Press the head unit down firmly to lock in
5
place.
Correct
¥
6
Close the top cover securely by pushing down
on both sides.
Note:
Because the length of the included film is 30 meters, it is recommended to purchase 200 meter length film for
t^lacement soon. See page 57.
4
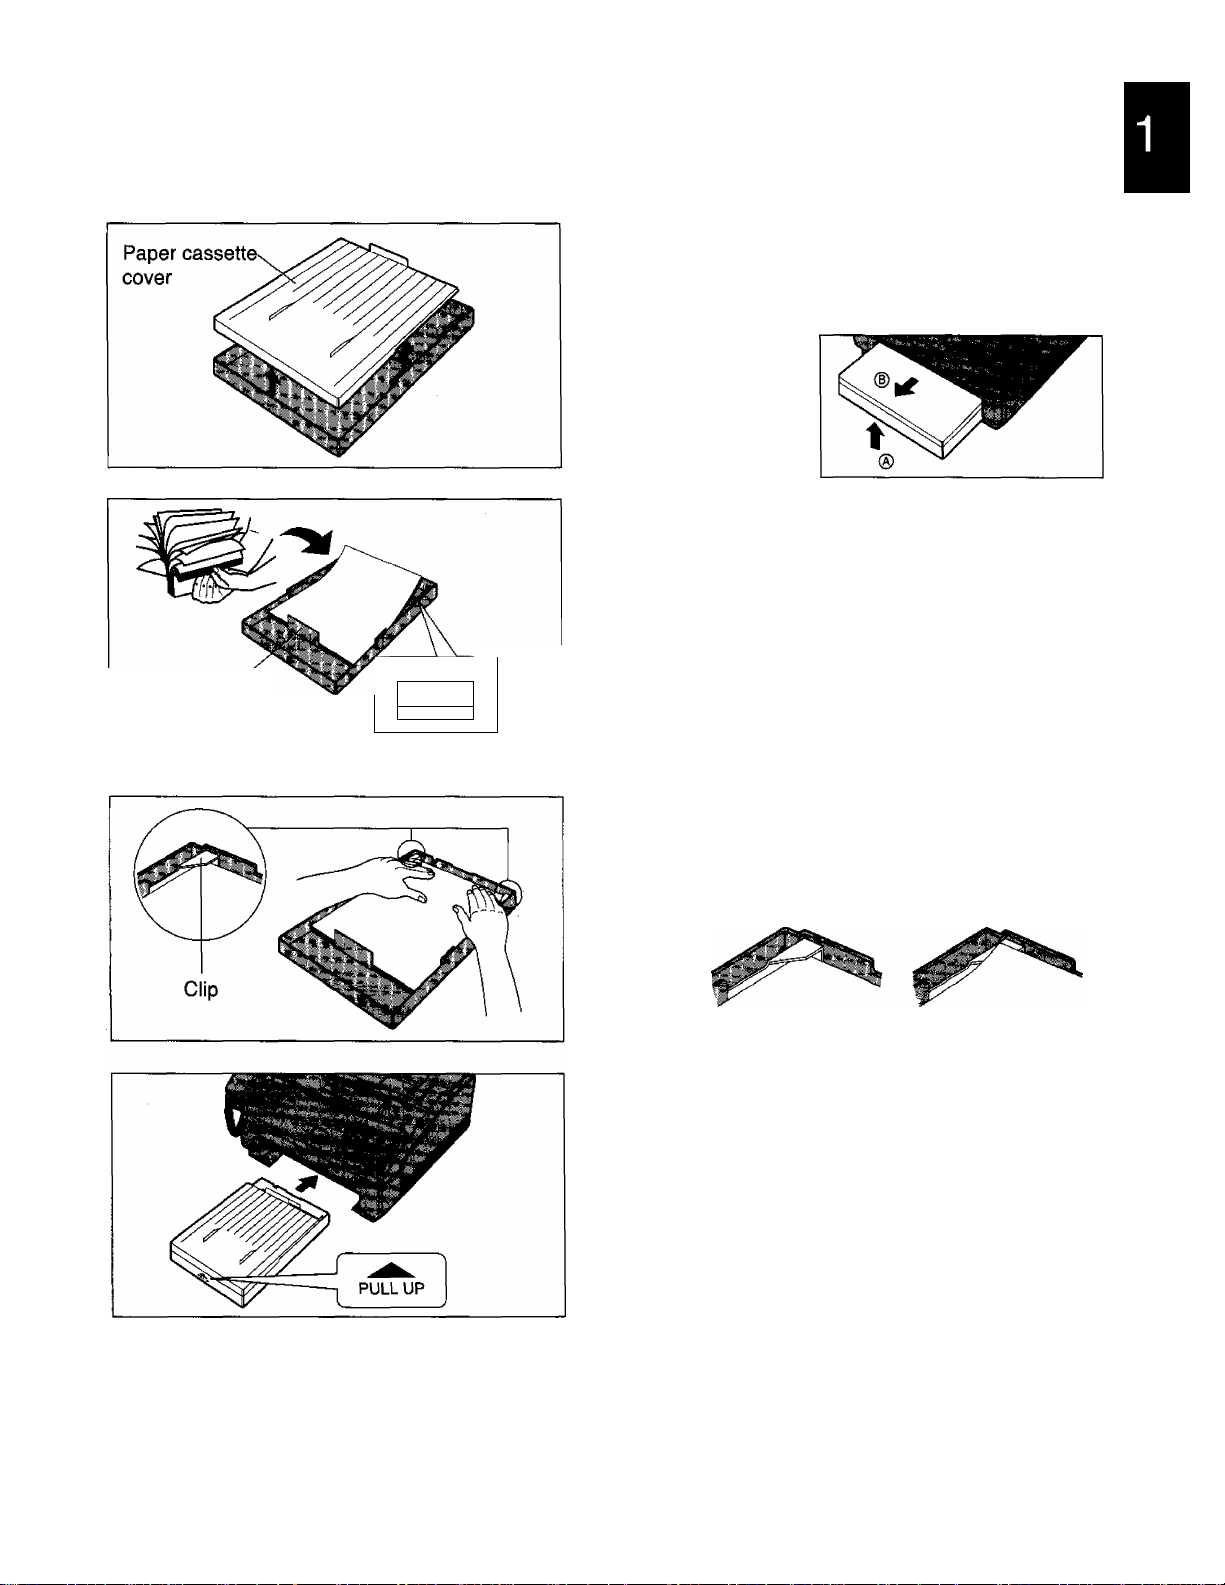
Installing the paper cassette
You can use A4 size paper. The paper cassette can hold up to 250 sheets of 75 g/m^ (20 lb.) paper. Use 60 to
90 g/m2(16 to 24 lb.) paper.
Open the paper cassette cover.
1
•When removing the paper cassette from the
unit, lift it up slightly (®) and pull it towards
you (d)).
Fan the stack of paper to avoid a paper jam.
2
Insert the paper by aligning the paper edges
3
with the partition.
•Most paper has instructions recommending
the side to print on. Insert the paper with the
print side down.
•The height of the paper should not exceed
the limit mark on the paper cassette or it may
cause a paper jam.
Partition
Limit mark
♦upper UMrri-
\
__
J
Push down the opposite edges so they are
secured under the clips.
Correct
Close the paper cassette cover and insert the
paper cassette into the unit until it clicks into
place.
Note:
•Do not insert paper of different thickness into the cassette at same time. This may cause a paper jam.
•Avoid extremely smooth or shiny paper that is highly textured. Also avoid paper that is coated, damaged or
wrinkled paper with a cotton and/or fiber content that is over 20 %.
•Avoid used paper for double-sided printing.
•Do not use paper printed with this unit for double-sided printing with other copters or printers, or a paper jam
№ occur.
Incorrect
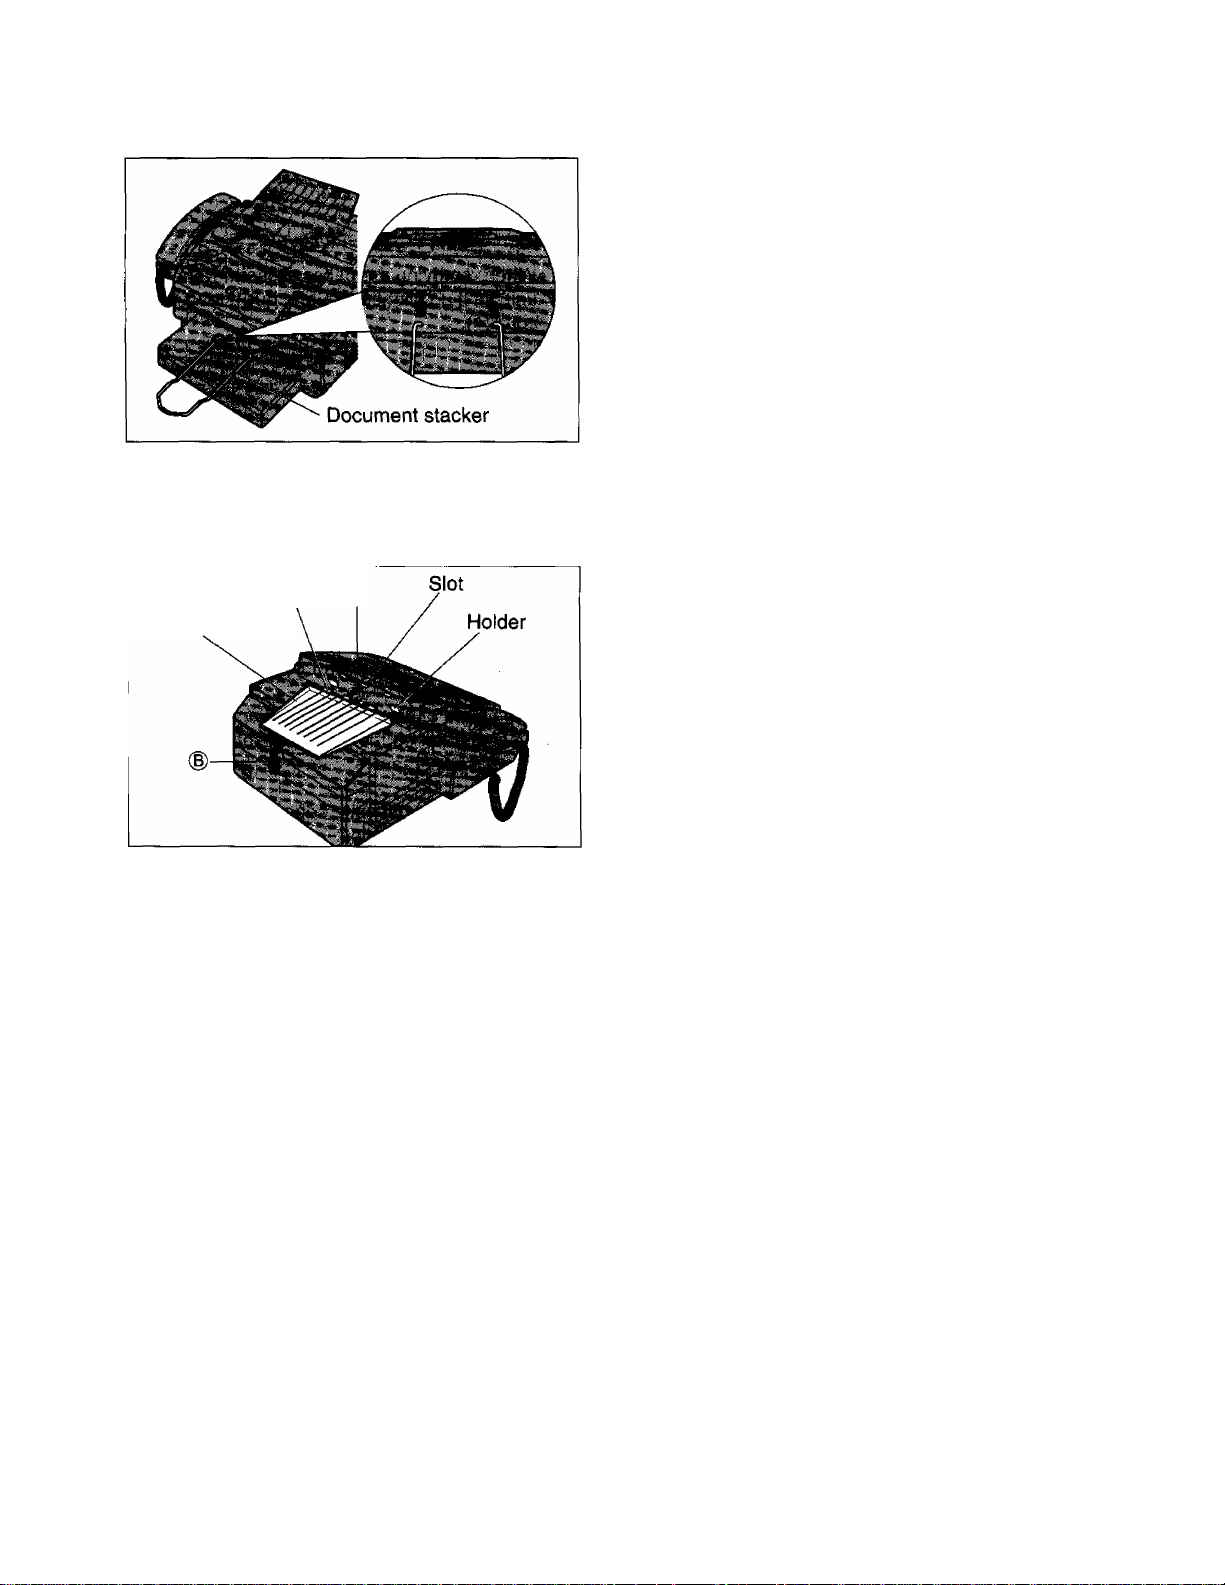
Installing the document stacker
Referring to the illustration to the left, insert the
document stacker with the bent side facing up until it
clicks into place.
Helpful hint:
To extend the document stacker, pull it towards you
until it clicks into place.
To save space, slide the document stacker into the
unit until it clicks into place.
Installing the document feeder tray
Insert the three tray fins into the slots of the
Document ®
feeder tray
1
Press down the tray to place it on the two
2
unit (®).
holders ((D).
0
Connections
Power socket
Handset
.J
Connect to LINE.
Power cord
Telephone line cord
Note:
•When you operate this product, the power outlet should be near the product and easily accessible.
•The unit will not function during a power failure.
•You can connect an extension phone or a telephone answering machine to the unit after peeling off the tape
on the external telephone jack (EXT.). See page 21.
•When you connect another telephone on the same line and if the decadic (pulse) signalling option is used, bell
tinkle may occur during dialing. If this occurs, the matter should be discussed with the telephone supplier and
should NOT be referred to Telecom Faults Service.
•Not all standard telephones will respond to incoming ringing when connected to the same line or the external
telephone jack (EXT.).
' ....................... ^ '
Handset cord
Dialing mode switch:
Set to TONE.
—If you cannot dial, set
to PULSE.
DIALING MODE
TONE PULSE
^ Single telephone line
Power outlet
{220-240V)
Helpful hint:
If assistance is needed, press IHELPI. The unit will print a quick reference.
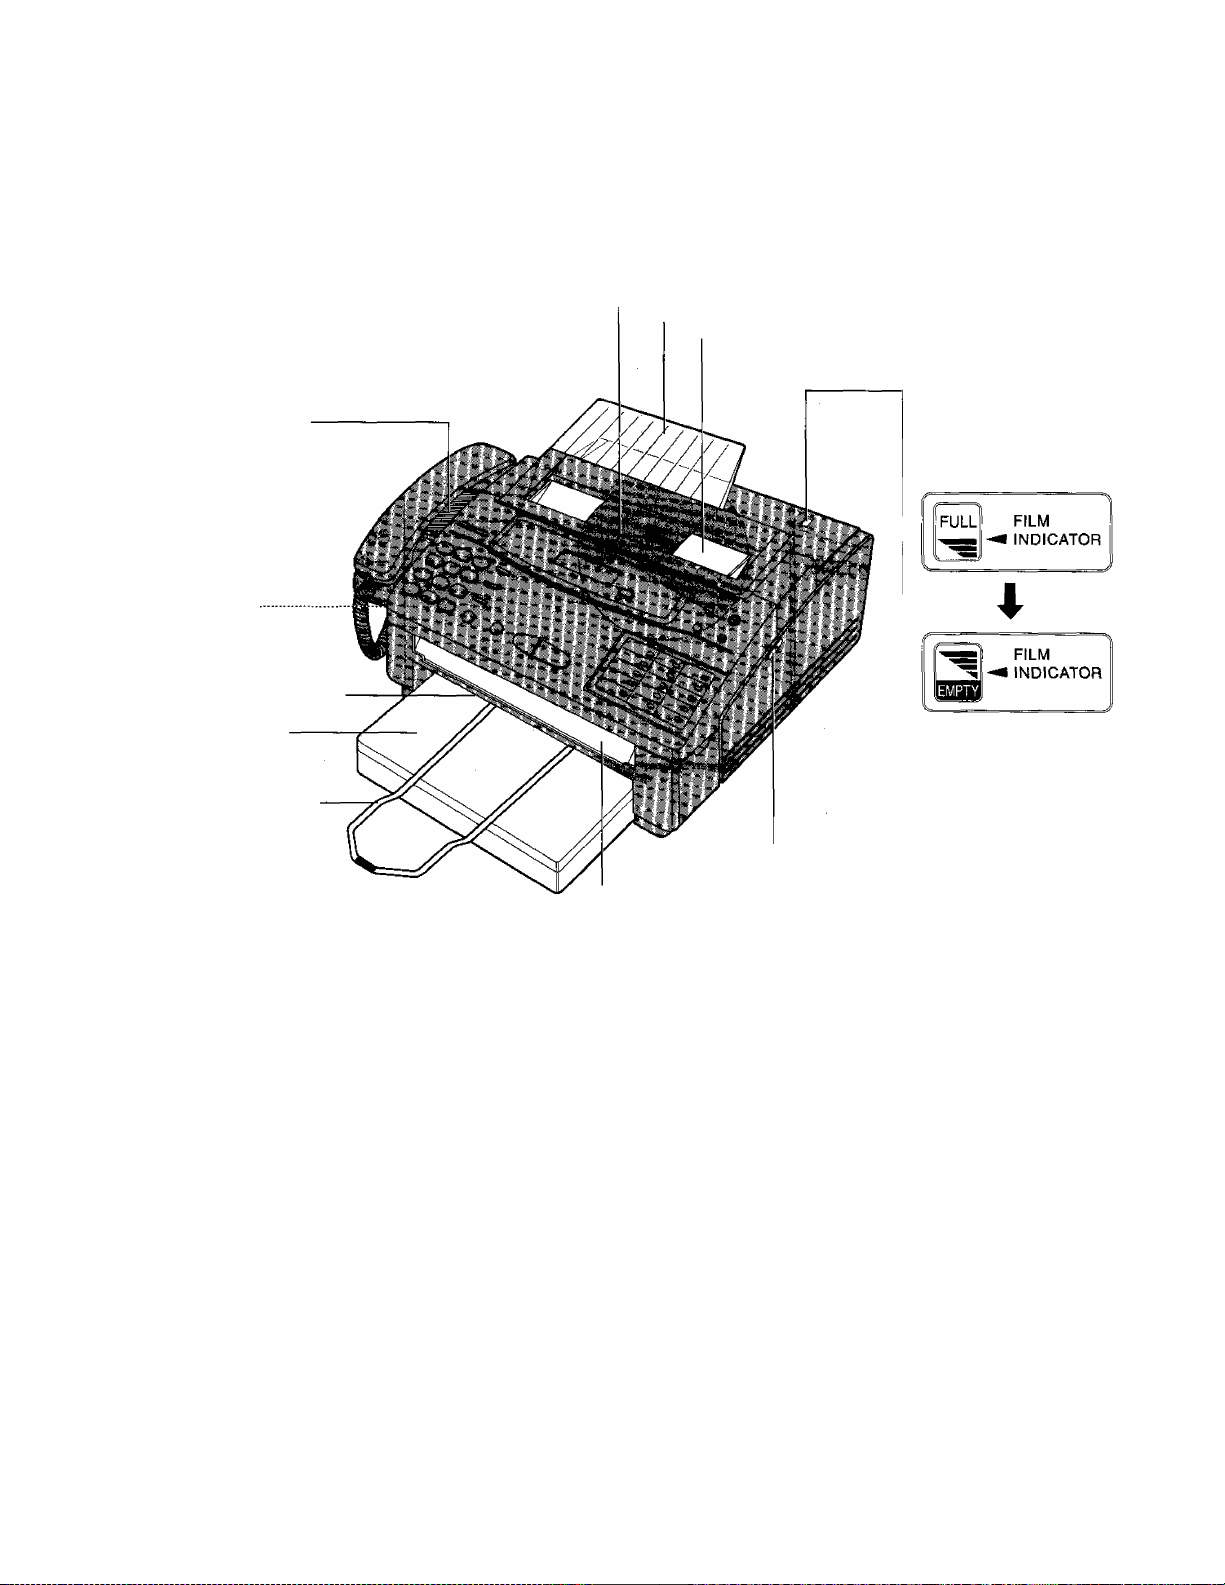
Location of controls
Front view.
Speaker (p. 12)
Microphone
(p. 14)
Recording paper exit
Paper cassette
(P-5)
Document stacker
(P- 6)
Document entrance —
— Document feeder tray (p. 6)
— Document guide(s) {p. 15)
Document exit
Front lid open
lever (pp. 52, 53)
Visual film indicator:
shows the approximate
amount of remaining
fiim.
When the film indicator
points to the position in
the illustration above,
the remaining fiim
produces approx. 65
pages of A4 size
document. Prepare a
new fiim or film
cartridge for
replacement.
Note;
The visual film indicator will show “FULL” when a new 200 meter film is installed. When the included film
cartridge (30 meter roll film) is installed, the indicator will not show “FULL”.
9
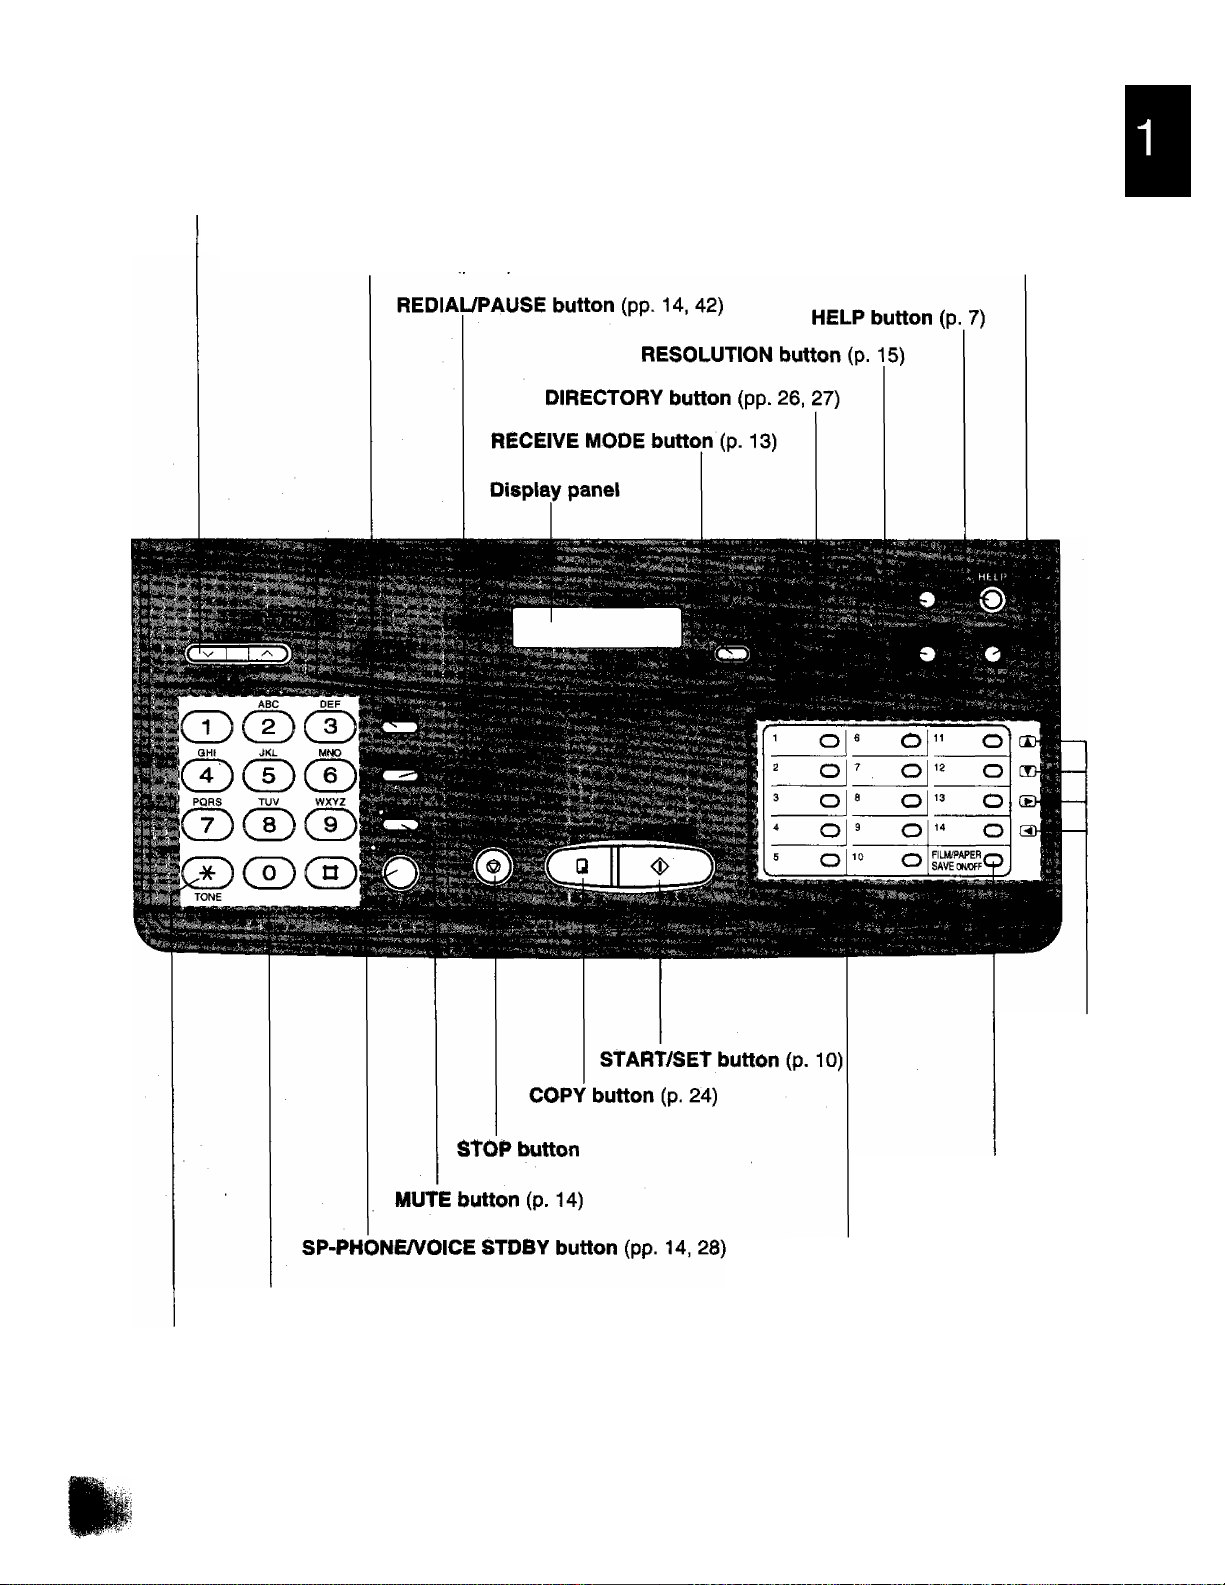
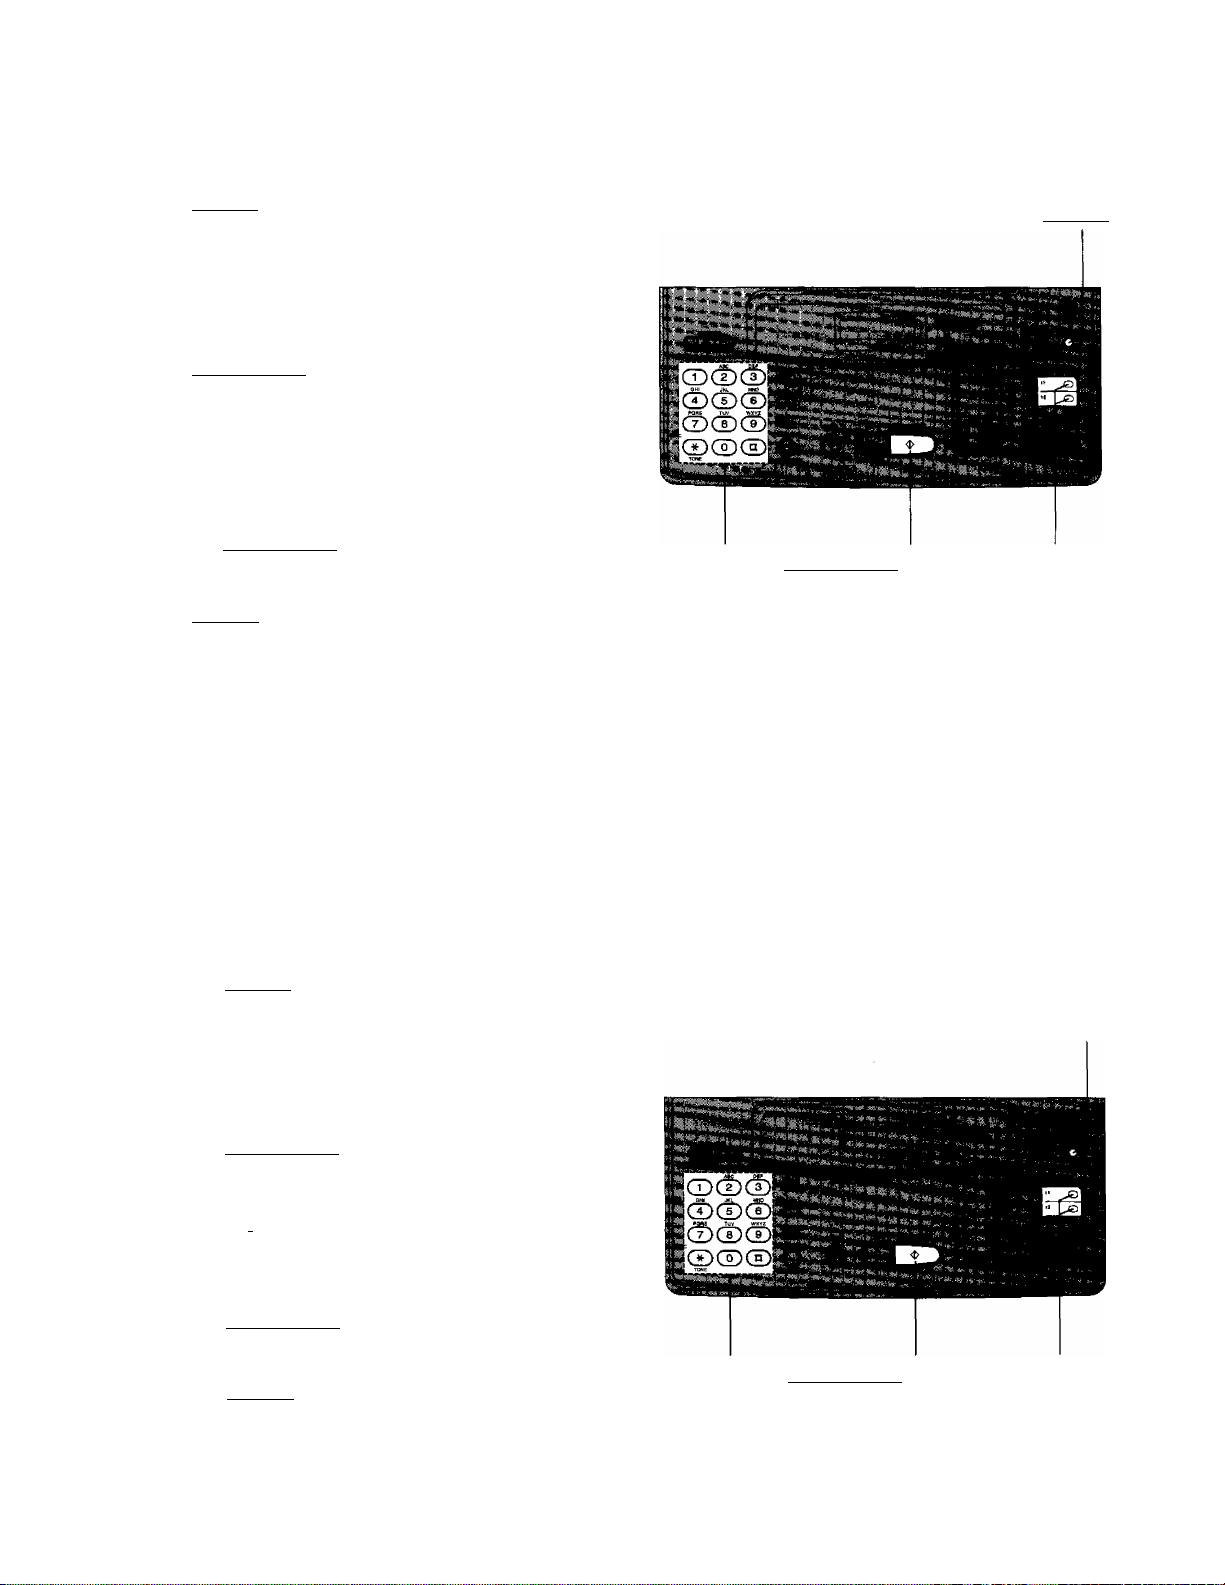
Control panel
VOLUME buttons (p. 12)
REGAL MENU button (p. 10)
Dial keypad
TONE button (p. 42)
A, ^ key
(pp. 19. 27)
< key
(P.11)
FILM/PAPER SAVE
key (p. 38)
Direct call station keys
(PP.11.25)
Before using your unit, program the following;
•Current date and time
•Your logo
•Your facsimile telephone number
This information will be printed on the top of each page transmitted from your unit.
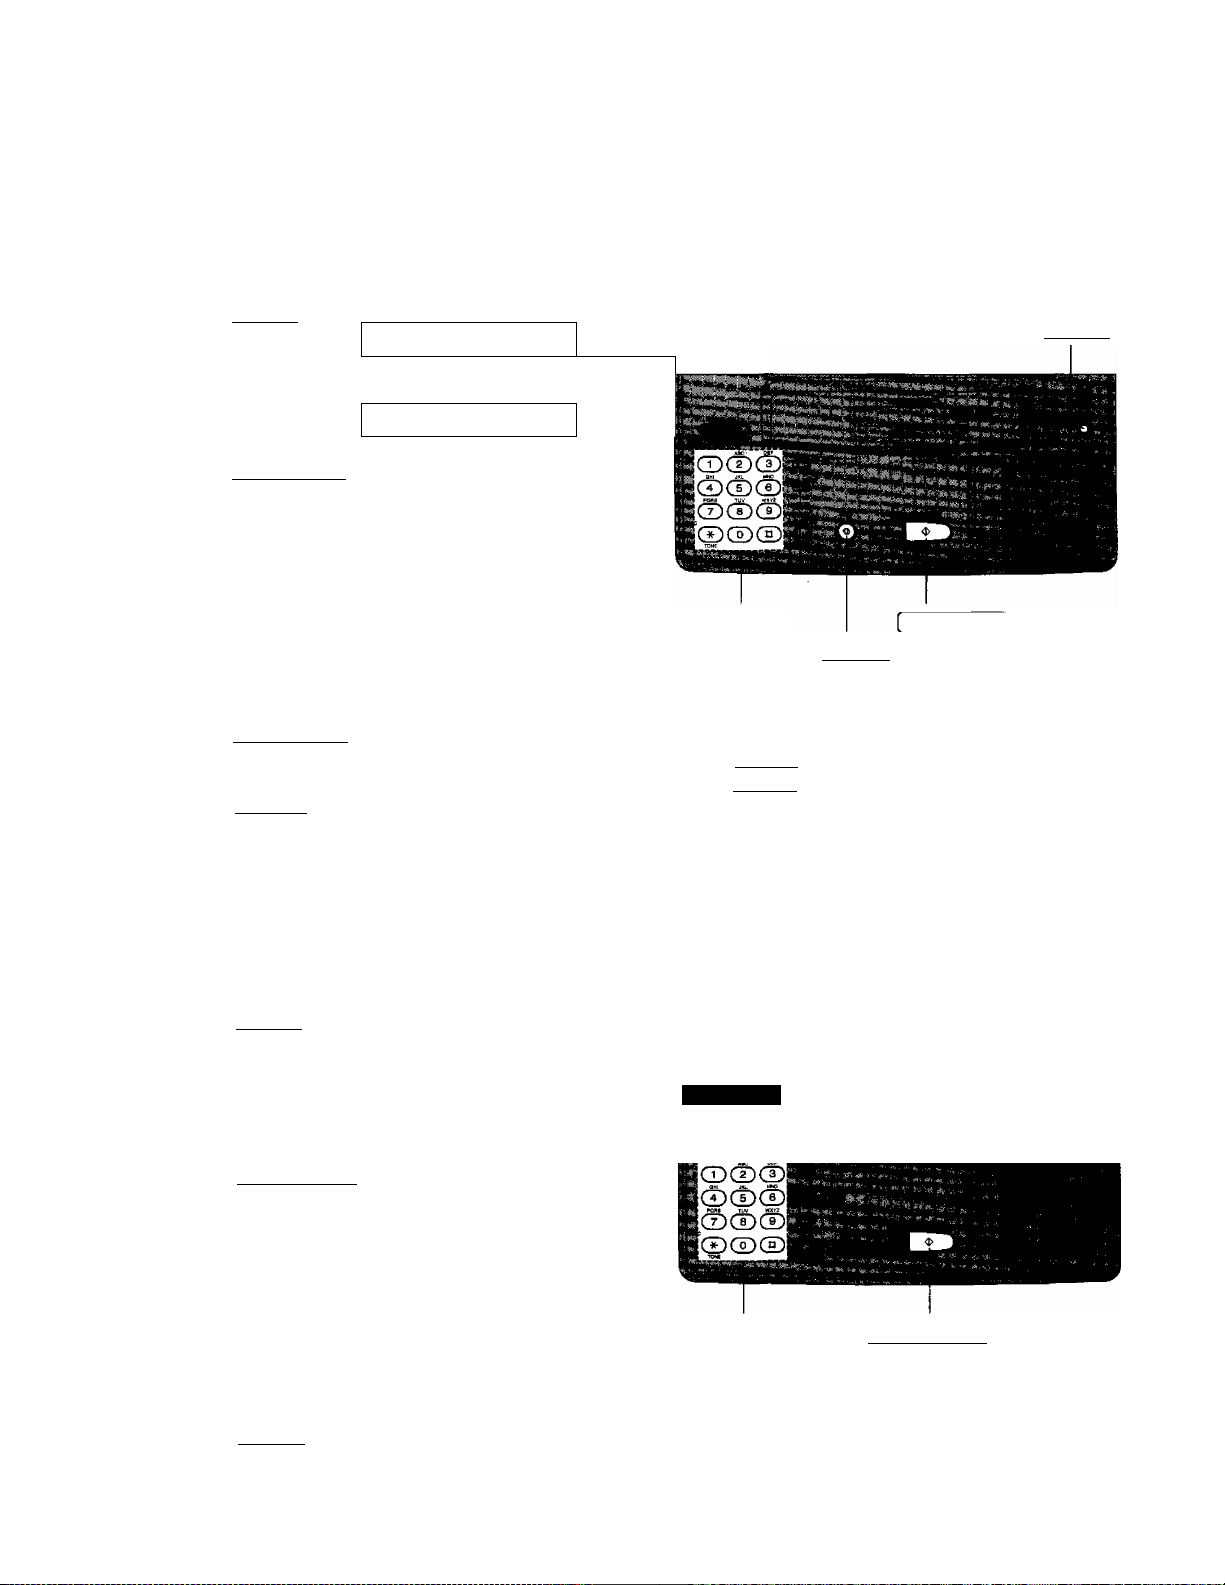
Setting the date and time
Press IMENUI.
1
Press [#), then ®(T)-.
2
Press [START/SETl.
SYSTEM SET UP
SET DATE & TIME
3
Enter the correct month/day/year/hour/
4
minute by selecting each 2 digits.
Then press © for AM or press (S for PM.
Example: Aug. 10 1996, 3:00PM
Press (0)® d]® ®(D ®®,
then press ® for PM.
Press ISTART/SETI.
5
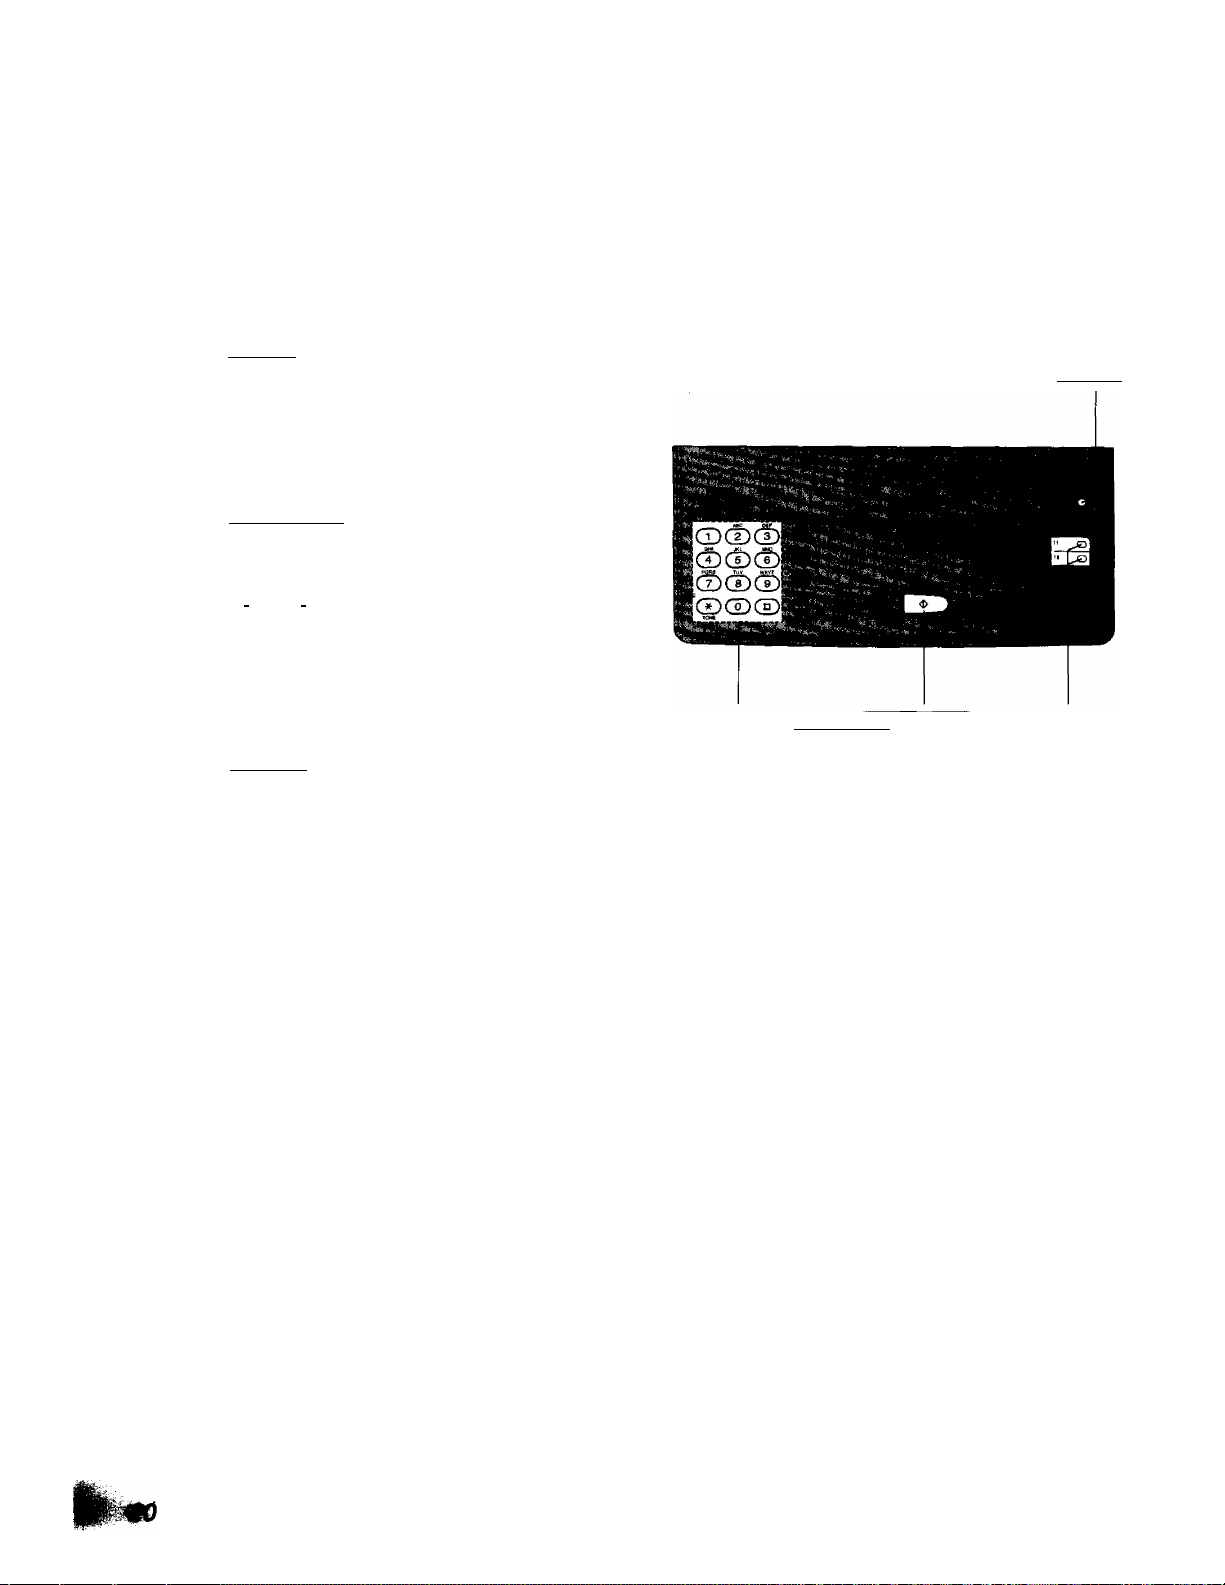
Press I MENU].
6
[MENU]
Dial keypad
[STOP I
Note:
•When you make a mistake while programming,
press (STOPI then make the corrections.
•The accuracy of the clock will be approximately
±60 seconds a month.
START/SETl
Setting your logo
Usually the logo is a company, division or personal name in an abbreviated form.
Press IMENUI.
1
Press ®, then ®®.
2
Press I START/SETl.
3
Enter your logo up to 30 characters.
4
(The preset logo will be cleared.)
•Refer to the instructions on page 11.
Press I START/SETl.
_______________________
SYSTEM SET UP
YOUR LOGO
LOGO=
Dial keypad
5
Press IMENUI.
6
[MENUl
I START/SETl
to

How to enter characters and symbols
The dial keypad and the direct call stations can be used as character input keys and command keys.
Pressing 0-9 and direct call station 1 will alternately select a character as shown below.
: : : CD :
•; (T)
, CD
Keys
CD
CD
CD
CD
(D
CD
i' o|
" o
® o
CD-
Number of tlm^
1
1
A
D E
G
J K
M N
P
T
w
0
INSERT key (Used to insert one character or one space.)
SPACE key (Used to replace one character with a space.)
2
[
B
H 1
Q
U V
X y
( )
1
3
■ 4 D
] {
c a
F
L
0
R
?
d e
g
j
m n
S
t
2 w
< >
1
5 6
}
b c
h
k
P
u V
*
+
f
i 4
1
0
q
X
!
@
7 8
-
2
3
5
6
r
8
y
II
A
/
s 7
z
#
J
9 10 11
=
9
$
->
1
%
& ¥
12
13
t
^ O
13 Q
14 Q
For example, when entering “Mike” as your logo:
Press (6], then press direct call station
DELETE key (Used to delete one character.)
► key (Used to move the cursor to the right.)
◄ key (Used to move the cursor to the left.)
1
LOGO=1«
Press (D six times, then press direct call
2
station frn.
LOGO=MiI
Press (D five times, then press direct call
station fin.
LOGO=Miki
Press (D five times.
LOGO=Mike
Note:
•If you make a mistake while programming, use
direct call stations QD and QD to move the
cursor to the incorrect character, then make the
correction.
•The layout of the direct call station keys is printed
on the reverse side of the directory card; Remove
the directory card cover with a pencil or similar
object and turn the directory card over.
11
Setting your facsimile telephone number
Press [MENUI.
1
Press (¥), then (Ö) d).
2
Press ISTART/SETl.
3
Enter your facsimile telephone number up
4
to 20 digits.
•(D button inserts a space and [*] button
a
Press iSTART/SETl.
SYSTEM SET UP
YOUR TEL NO.
NO.=
5
Press IMENUI.
6
Note for users in New Zealand:
Example: +64 9 1234567
mm
\ Ij. . ;; '
&
'
________
Dial keypad
Note:
Logo, telephone number, date, time and page
number will be printed outside of the document
you send. To change the print position, see page
35.
ISTART/SETl
j
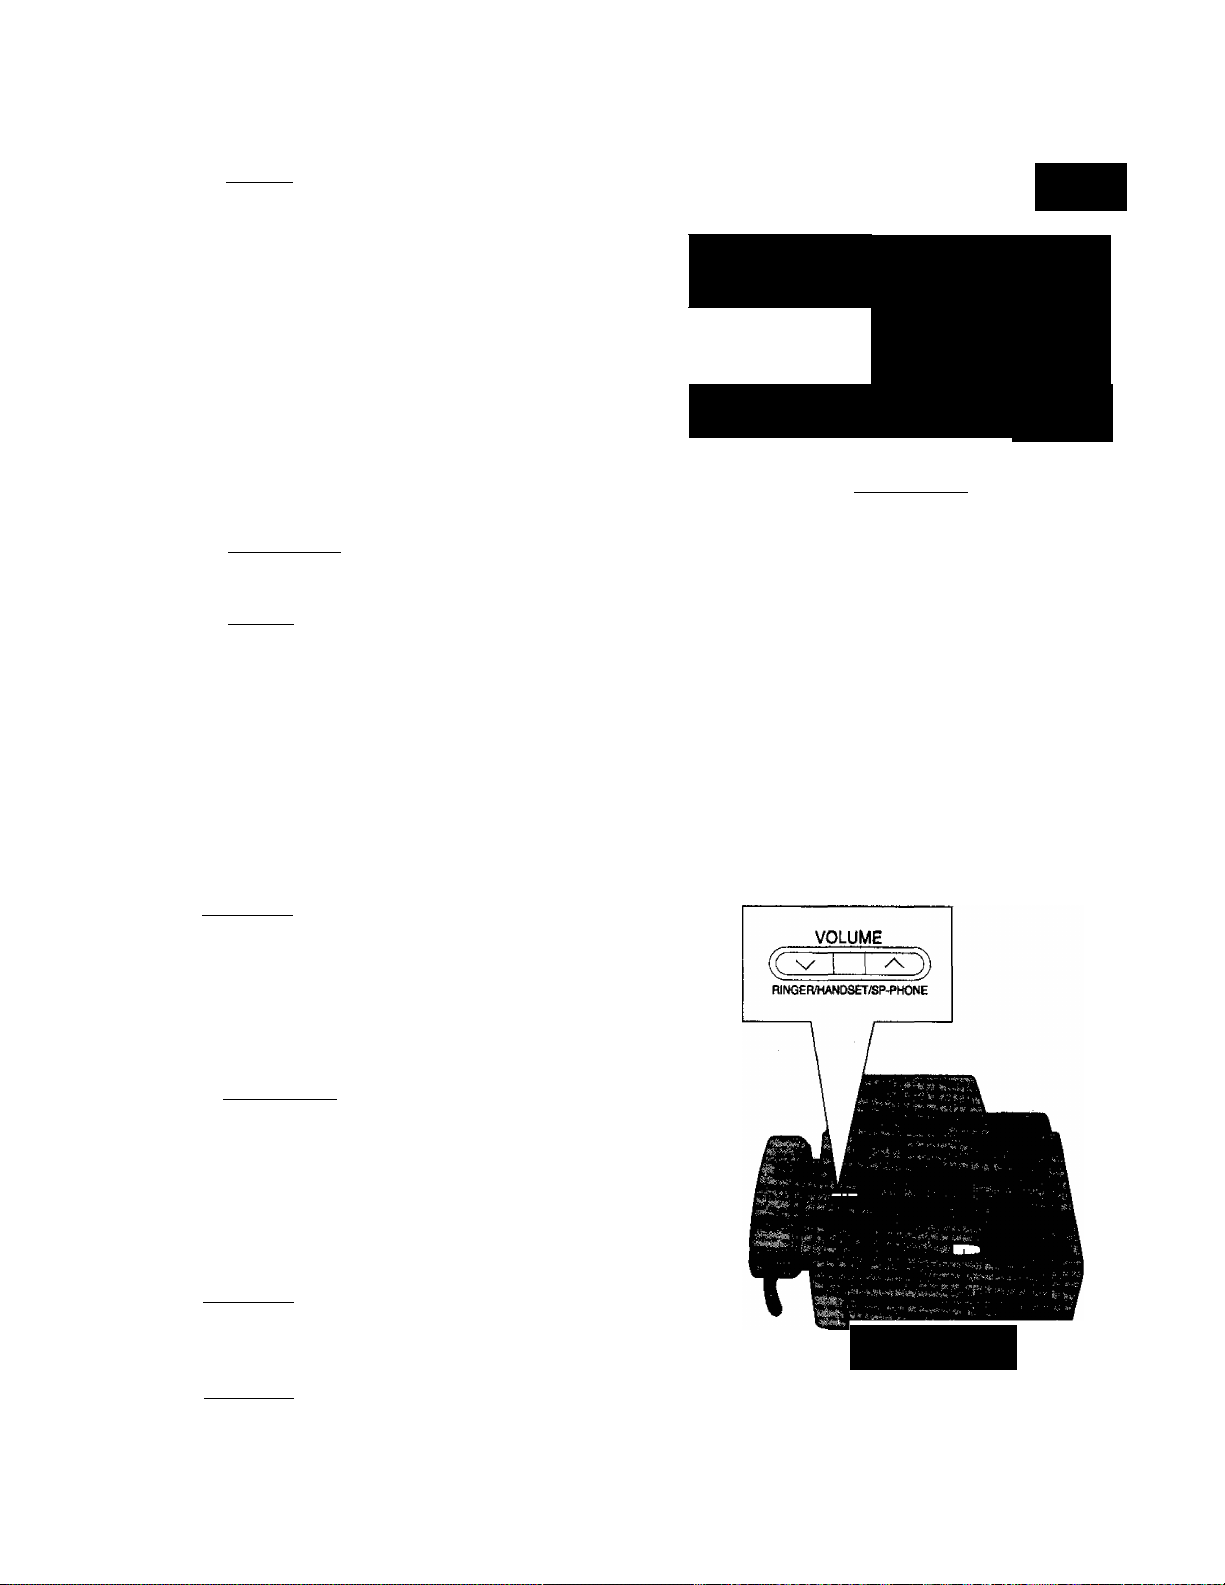
Adjusting volumes
Ringer volume: 3 levels (high/low/off) are available.
Press [VOLUME] (v/a) while the unit is in an idle status.
To turn the ringer off:
1. Press V repeatedly.
•The following messages will be shown alternately.
RINGER OFF- OK?
2. Press ISTART/SETl.
While the ringer volume is set to off;
The display will show the following message
and the unit will not ring when receiving a call.
RINGER OFF
Handset volume; 3 levels (high/middle/low) are available.
Press [VOLUMEI (v/a) when using the
handset.
Speaker volume: 8 levels (high to low) are available.
Press IVOLUMEl (v/a) when using the
speakerphone.
YES: PRESS SET
* ' i ‘ \ \ * i ■
ISTART/SETl
l:^э«==й!^"нnШЩ;=*sЗЙg
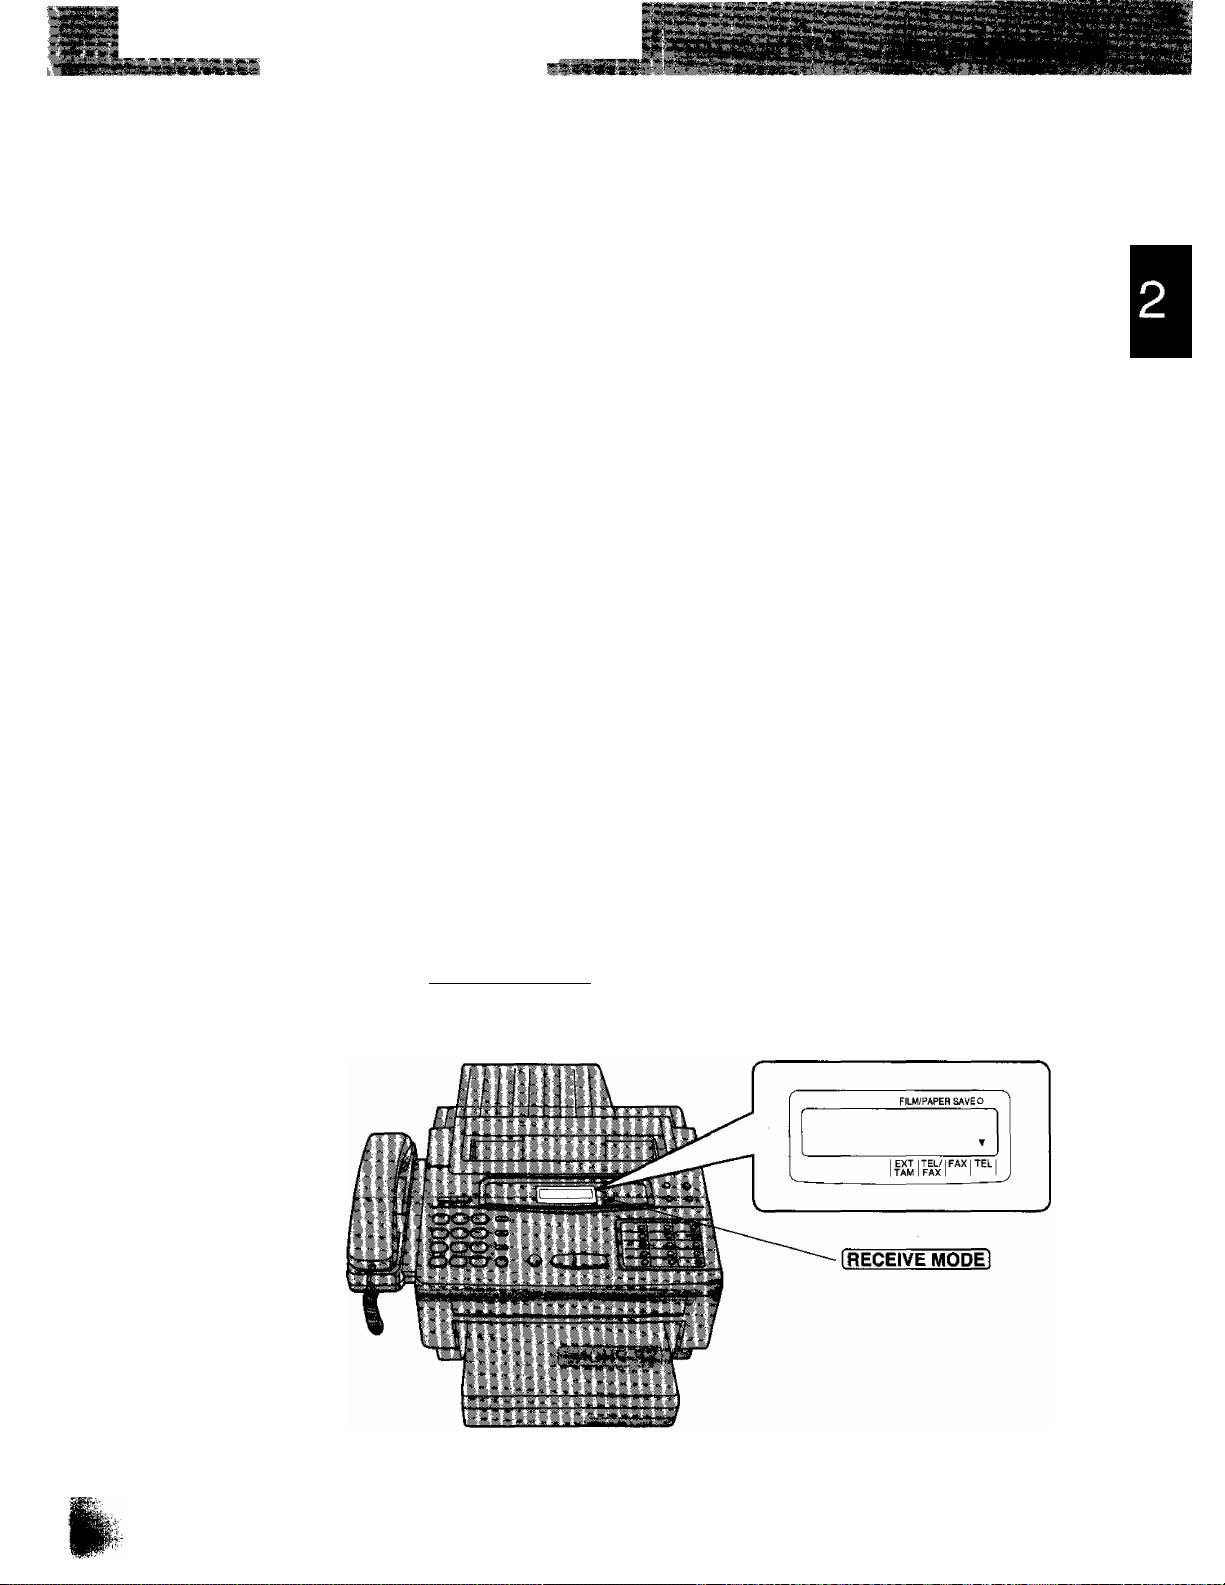
Selecting the receive mode
This unit combines the functions of facsimile and telephone. In addition, this unit provides a TAM (Telephone
Answering Machine) interface. To perform these functions, this unit has four types of receive modes; TEL/FAX,
FAX, TEL and EXT. TAM.
Regardless of the mode that you select, you can always place calls and send faxes. The descriptions below will
help you understand how the unit can work for you.
TEL/FAX mode:
This mode can be used when you are near the unit and do not want to hear the unit ring when faxes are
received but wish to answer voice calls. The unit will automatically receive fax documents without ringing when
fax calls are received. You will not be disturbed by incoming faxes. The unit will generate a double ring when
voice calls are received. If you do not answer by the last ring, the unit will switch to the fax mode to prevent
missing any fax documents. For further details, see page 18.
FAX mode:
We recommend that you select this mode when you will be using the unit solely as a fax machine. The unit will
automatically answer all calls and generate fax tones to the callers. Callers will hear fax tones and will only be
able to transmit faxes. For further details, see page 20.
TEL mode:
This mode can be used when you wish to answer all calls manually. The unit will not automatically answer fax
and voice calls. If you wish to answer a fax call, you can start reception by pressing the START/SET button. If
no one answers an incoming call by 15 rings, the receive mode will switch to the TEL7FAX mode automatically.
EXT. TAM mode:
This mode can be used when you wish to connect a telephone answering machine (TAM) to the external
telephone jack on your facsimile unit. When a call is received, the answering machine will play a greeting
message. If a voice call is detected, the answering machine will begin recording, then caller can leave a voice
message. If a fax call is detected, the facsimile unit will disconnect the answering machine and receive the fax
documents. For further details, see page 21. If your external telephone does not have an answering/recording
feature, do not select this mode. We recommend that you select the TEL/FAX or the TEL mode.
Select the desired mode by pressing I RECEIVE MODE! repeatedly. The arrow mark in the display shows your
selection.
13
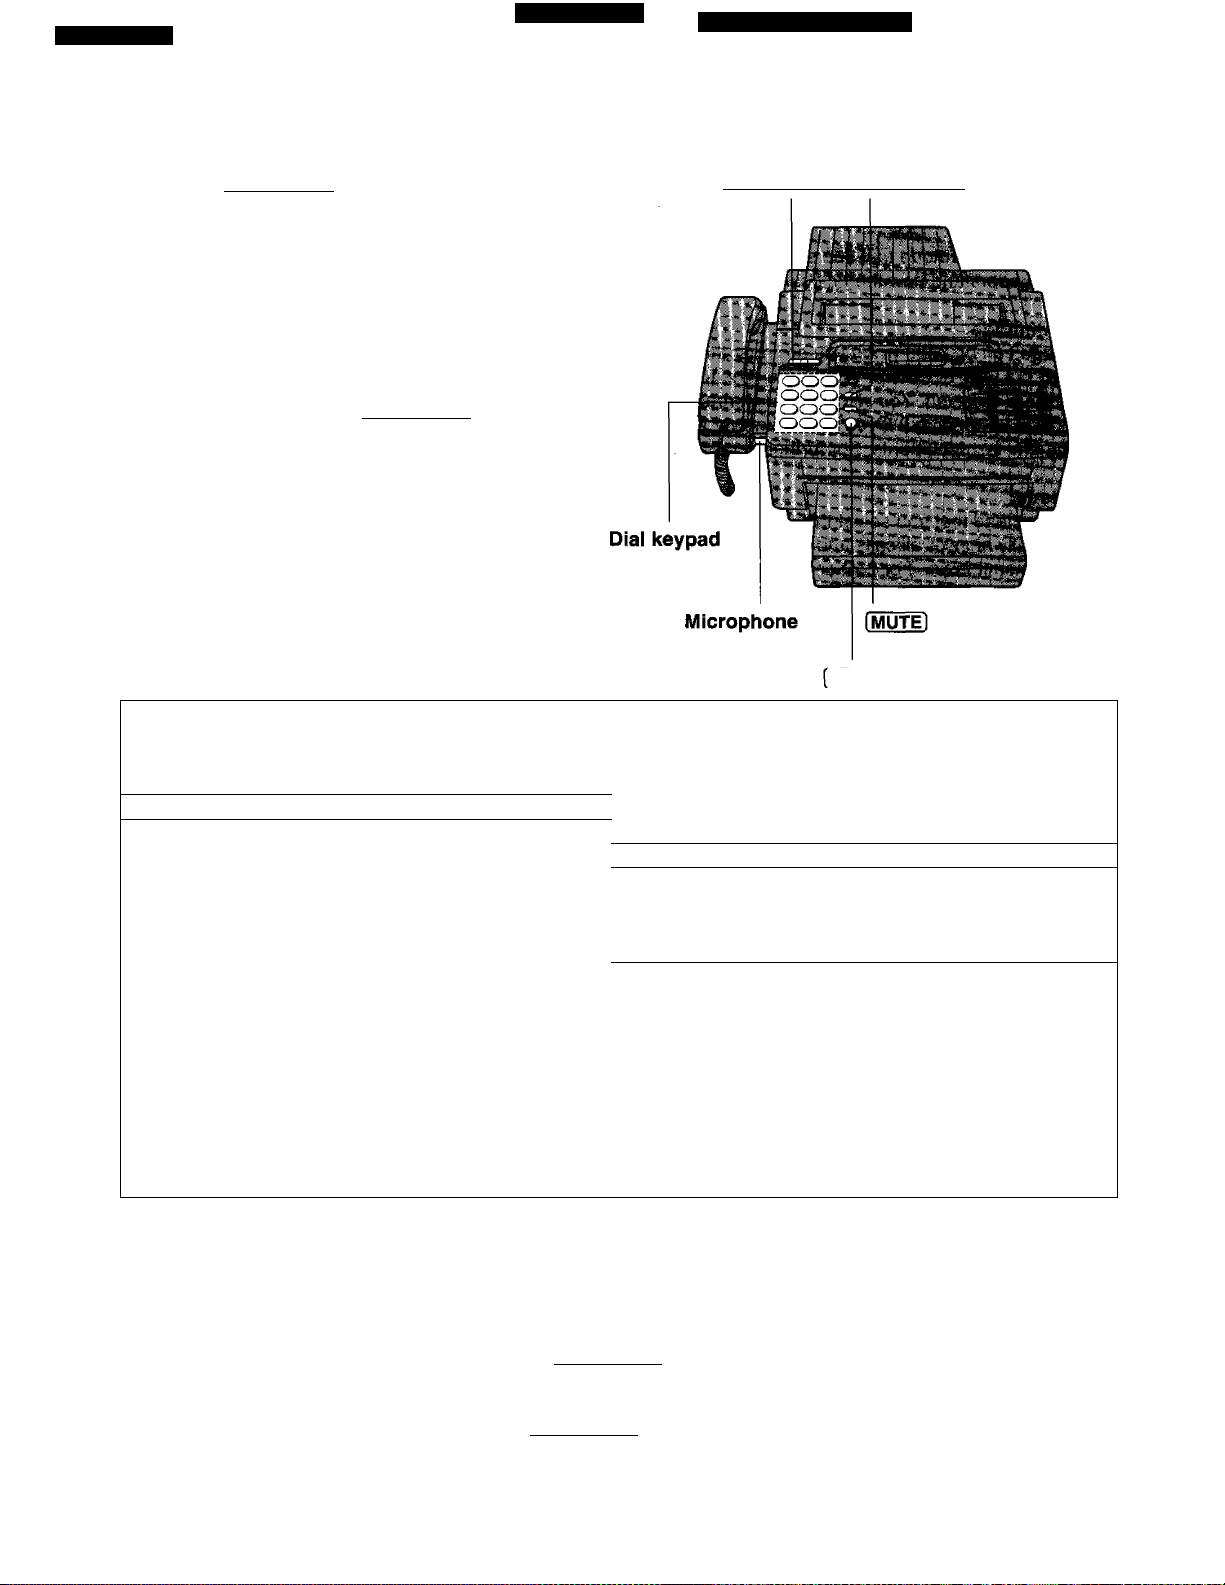
Making voice caiis
Press ISP-PHONEI or lift the handset.
1
Dial a phone number.
2
•If you misdial, hang up and dial again.
When the other party answers, speak into
3
the microphone or handset.
When finished, press ISP-PHONEl again
4
or replace the handset.
To redial the last number dialed
IVOLUMEi IREDIAUPAUSEI
SP-PHONEi
Hints for speakerphone operation
1. Press ISP-PHONEl or lift the handset.
2. Press IREDIAUPAUSEI. performance.
•If the line is busy when using the
speakerphone, the unit will automatically
redial the number up to 2 times.
Voice muting
Using this feature, you can hear the voice of the
other party, but the other party cannot hear your
voice.
1. Press iMUTEl durina a teleohone
conversation.
•The MUTE indicator light goes on.
2. To resume the conversation, oress I MUTE I
again.
•Use the speakerphone in a quiet room for best
•If the other party has difficulty hearing you,
adjust the volume usina [VOLUMEI.
•If you and the other party speak at the same
time, parts of your conversation will be lost.
•If you wish to switch to the handset from the
speakerphone, lift the handset. To switch to the
soeakerohone. oress ISP-PHONEl.
Answering voice caiis
When the unit rings, lift the handset or press ISP-PHONEl.
1
To hang up, replace the handset or press ISP-PHONEl.
2
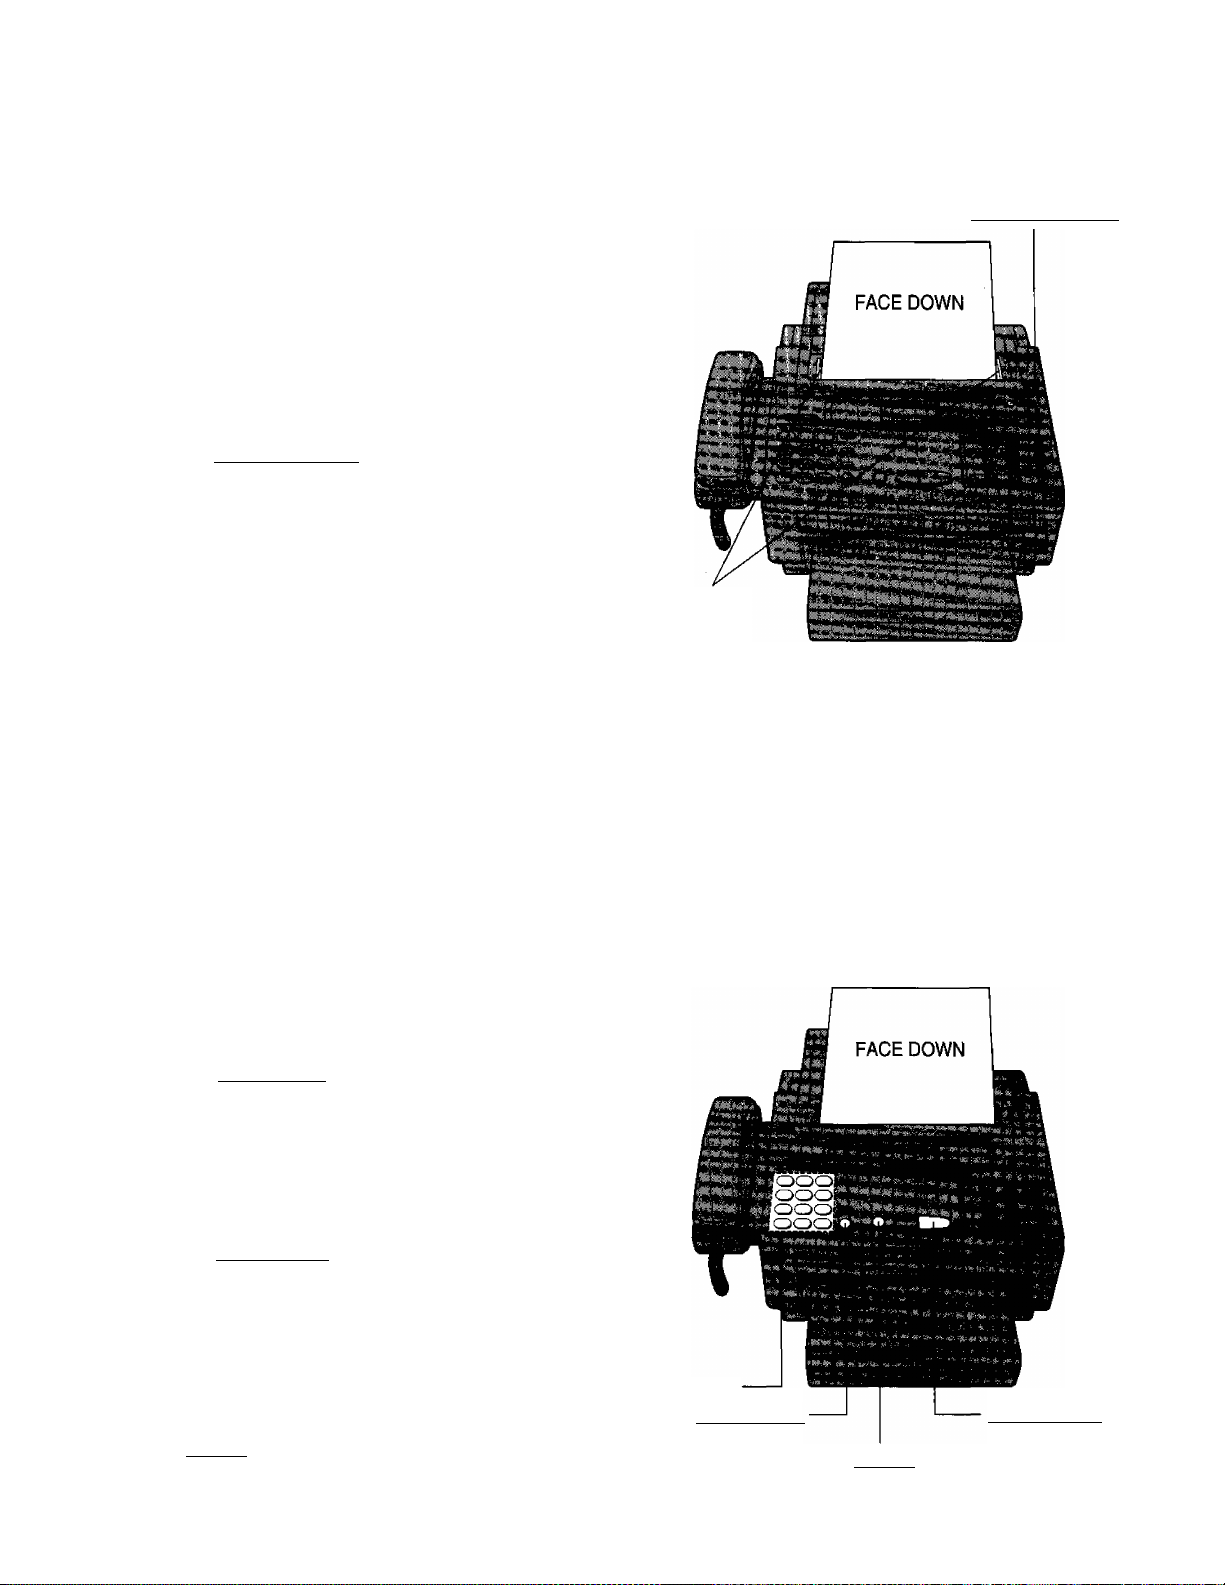
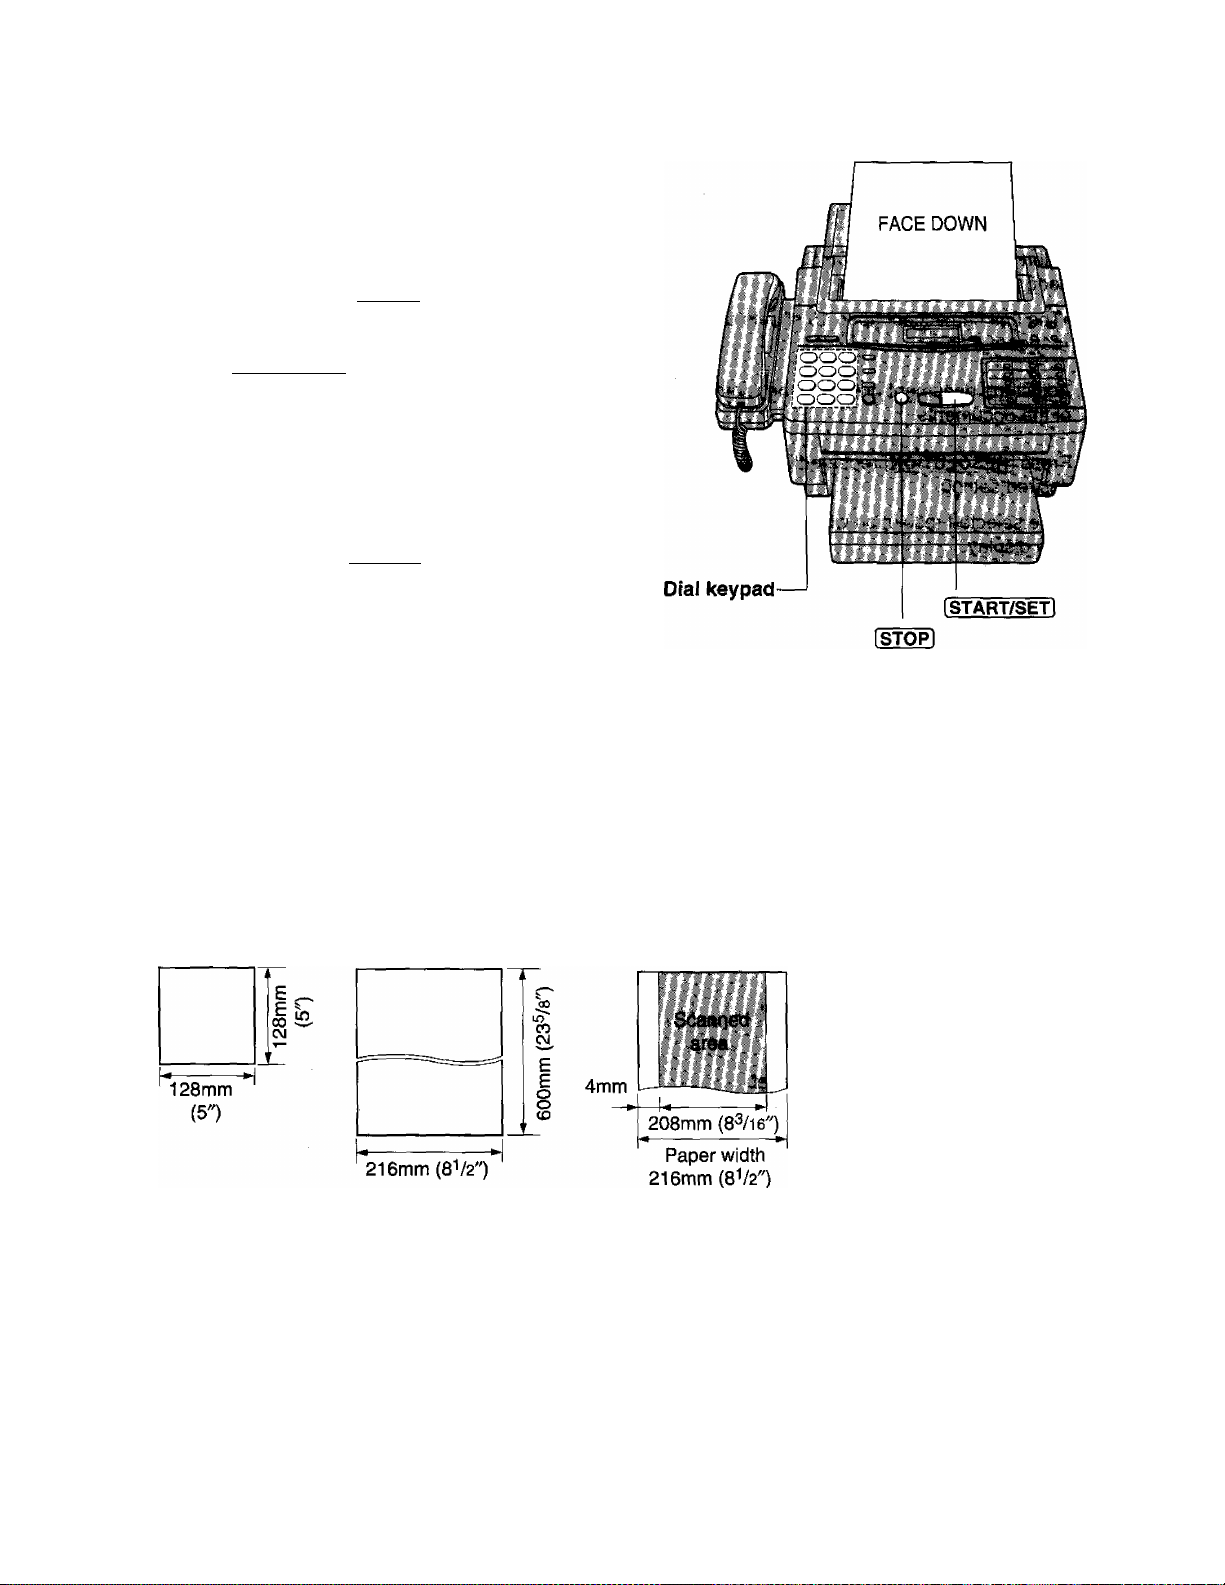
Transmitting documents
Loading documents
Insert the documents FACE DOWN until a
1
beep tone is heard.
•The unit can accept up to 15 sheets of
paper at a time.
Adjust the document guides to the width
2
of the documents.
Press I RESOLUTION I repeatedly to the
3
desired setting.
•The selected resolution will be shown on
the display.
I RESOLUTION I
Document
guides
Selecting the resolution
STANDARD: Suitable for printed or typewritten originals with normal-sized characters.
FINE: Suitable for originals with small printing.
HALF TONE: Useful for originals containing photographs, shaded drawings, etc.
•Note that using the FINE or HALF TONE setting will increase transmission time.
•If the setting is changed during page feeding, it will be effective from the next sheet.
Transmitting documents manually
Insert the documents FACE DOWN.
1
Press ISP-PHONEl or lift the handset.
2
Dial a phone number.
3
•If you misdial, hang up and dial again.
When a fax tone is heard,
4
press iSTART/SETl.
Replace the handset if using it.
5
To stop transmission halfway
Press ISTOPl.
Dial keypad
ISP-PHONEl
ISTART/SETl
ISTOPl
15
Transmitting documents with fewer procedure.
Insert the documents FACE DOWN.
1
Dial a phone number.
2
•If you misdial, press ¡STOPI and dial again.
Press ISTART/SETi.
•The unit will start to dial and transmit the
documents.
Note:
If there is no answer or the line is busy, the unit will
automatically redial the number up to 2 times.
To cancel redialing, press I STOP I.
To send 16 or more sheets at a time
Insert the first 15 sheets of the documents. Add the extra sheets (up to 15) before the last sheet is fed into the
unit.
Documents you can send
Minimum size Maximum size
Note:
•Remove clips, staples or other similar fastening objects from a document.
•Check that ink, paste or correction fluid on the documents have completely dried.
•Do not feed the following types of documents into the unit. Make copies of these documents by using a copier
then use these copies for fax transmission.
—Paper with a chemically treated surface such as carbon paper or carbonless duplicating paper
—Electrostatically charged paper
—Heavily curled, creased or torn paper
—Paper with a coated surface
—Paper with faint contrast between the printing and the background
—Paper with printing on the reverse side that can be seen through the front (e.g. newspaper)
Effective scanning area Document weight
Single sheet:
45 to 90 g/m^ (12 to 24 lb.)
Multiple sheets:
60 to 75 g/m^ (16 to 20 lb.)

Manual reception
When the unit rings, press ISP-PHONEl or
1
lift the handset to answer the call.
When:
—document reception is required,
—a slow beep is heard, or
—no sound is heard,
press ISTART/SETl.
2 Replace the handset if using it.
•The unit will start reception.
To Stop reception halfway
Press I STOP I.
Note:
•When receiving an over-sized document, the unit will
divide it into two or more pages when printing out.
•If an appropriate reduction rate {page 37) is set, the
unit can print an over-sized document on one page.
iSP-PHONEl
I STOP I
B
17

Automatic reception
Set to the TEL7FAX, FAX, or EXT. TAM mode by pressing RECEIVE MODE.
When a fax call is received, the unit will automatically activate the fax function to receive documents.
Caution:
Do not let more than 100 sheets of 75 g/m^ (20 lb.) paper accumulate at one time on the paper cassette.
This may cause a paper jam.
Receiving in the TEL/FAX mode.
When a call is received, the unit will work as follows.
The number of rings can be changed. See “Setting the TEL7FAX mode ring count” on page 19.
^2 The number of rings can be changed. See “Setting the silent fax recognition ring count” on page 19.
Note:
Some fax messages which are transmitted manually may not be sent using a calling tone. These calls must be
received manually.
Setting the TEL/FAX mode ring count
You can choose from 2 to 9 toll rings.
^ Press IMENU],
SYSTEM SET UP
2 Press d), then press 0(6).
TEL/FAX RING
O Press ISTART/SETl.
COUNT=2
Press or to select the desired
number of rings.
4
g Press ISTART/SETl.
O Press IMENUI.
Note:
•If you find difficulty in receiving faxes from
machines that have an automatic transmission
feature, decrease the number of rings.
IMENUI
[AW]
Dial keypad ISTART/SETl [5/[v]
D
Setting the silent fax recognition ring count
When a fax call is received in the TEUFAX mode, the unit will automatically activate the fax function without
ringing. If the unit detects a voice call, it will ring. The number of rings can be set from 3 to 6.
Press IMENUI.
1
Press (i), then press (3]®.
2
Press ISTART/SETl.
3
Press Ior to select the desired
4
number of rings.
Press ISTART/SETl.
SYSTEM SET UP
SILENT FAX RING
C0UNT=3
IMENUI
[AT]
5
Press [MENU).
Dial keypad ISTART/SETl @/Q
6
19
Receiving in the FAX mode
When a call is received, the unit will ring and activate the fax function.
Setting the FAX mode ring count
You can choose from 2 to 9 rings.
Press (MENUI.
1
Press (S, then press
2
Press ISTART/SETI.
3
Press I or I to select the desired
4
number of rings.
SYSTEM SET UP
FAX RING
C0UNT=2
[AT]
IMENUl
Press ISTART/SETI.
5
Press I MENU I.
6
Note:
•If you wish to be able to answer a call before
the unit does, increase the number of rings.
•If you find difficulty in receiving faxes from
machines that have an automatic transmission
feature, decrease the number of rings.
Dial keypad Istart/setI
 Loading...