

Page 1

KX-E3000
Operators Instruction Manual
Panasonic
tLii^rnCfttc
Page 2

This equipment has been tested and found to comply with the limits for a
Class B computing device in accordance with the specifications set forth in
Sub part J of Part 15 of the FCC Rules. If this equipment does cause
interference to radio or television reception which can be determined by
turning the equipment on and off use the equipment in another location
andlor utilize an electrical outlet different from that used by the receiver.
When using special accessories such as cables, the user should use
accessories recommended in these operating instructions or supplied by the
manufacturer to comply with the limits for a Class B computing device
pursuant to Subpart J of Part 15 of FCC Rules.
WARNING: TO PREVENT FIRE OR SHOCK HAZARD, DO
NOT EXPOSE THIS PRODUCT TO RAIN OR ANY TYPE OF
MOISTURE.
The serial number of the unit may be found on the label on the bottom of
the unit. For your convenience, note this number below, and retain this
book along with your proof of purchase, to serve as a permanent record of
your purchase in the event of a theft, or for future reference.
MODEL NO.
SERIAL NO.
NAME OF DEALER
DATE OF PURCHASE.
Page 3

Preface
Congrandütions! You иге about to enter the exciting world of electronic
typing with one of the most advanced electronic typewriters available
today.
Your Panasonic typewriter has been designed to help you prepare your
typing projects as simply and efficiently as possible.
Many of your tedious typing tasks may now be performed quickly and
automatically. By reading through the manual, you will learn how to
operate all of the functions which will help you on a day-to-day basis.
it is important that you read this manual and do the exercises, !t has been
designed to teach you every function your Panasonic typewriter has to
offer. Once you have completed this manual, you will find how much
easier it will be to do some of your daily typing projects.
Take the time to learn everything you can about your new typewriter. We
are convinced you will find typing much more interesting and your finished
projects cleaner, more professional looking, and much easier to do.
We hope you enjoy using your Panasonic typewriter and are confident you
will have many years of reliability ahead of you.
Page 4

PANASONIC TYPEWRITER
Operating Instructions
Preface
Learning the Basics .......................................................................................... 1
• Power ON/OFF Switch .......................................................................... 2
• Changing the Ribbon Cartridge ............................................................. 2
• Changing the Correction Tape
• Changing the Daisywheel ............................................................................. J
• Copy Control Lever ...................................................................................... 4
• Automatic Paper Insertion ............................................................................ 4
Keyboard Layout ............................................................................................... 5
• Character Keys ............................................................................................. 6
Selector Switches................................................................................................ 7
• Line Spacing Selector
• Mode Selector ................................................................................................ 7
• Pitch Selector
• Impact Control Selector ................................................................................ 8
• KB I/KB II Selector ....................................................................................... 9
...............................;........................................................
...................................................................................
Function Keys ................................................................................................. 10
..............................................................
3
8
7
Using the Typewriter ...................................................................................... 12
• Margin Formats .......................................................................................... 12
• To Clear Margins and Tabs ................................................................... 12
• To Set Margins and Tabs ....................................................................... 12
• Storing Margin Formats In Memory ...................................................... 14
• Recalling Margin Formats From Memory
• Adjustable "Hot Zone”
...............................................................................
.................................................
15
15
Page 5

Using the Function Keys ............................................................................ 16
• Index and Reverse Index ............................................................................. 16
• Micro Indexing
• Correction Memory
• Correcting Errors On Paper
• Making Corrections Within the Correction Memory
• Making Corrections Out of the Correction Memory
• No Print When Making Manual Corrections
• Decimal Tabulation
• Centering .................................................................................................... 22
...........................................................................................
....................................................................................
......................................................................
.................................
.................................
.........................................
.....
.............................................................................. 21
16
17
17
18
18
19
Between Margins ........................................................................................ 22
Over A Point ............................................................................................... 23
Between Tab Stops ......................................................................■
Aligned At the Right Margin
• Paragraph Indent
• Underscoring .............................................................................................. 26
.......................................................................................
...........................................................
........
23
24
25
Coded Functions ............................................................................................. 28
• CODE Key .................................................................................................. 28
• Bold Print ............................................................................................. 29
• Soft Hyphen (CODE+HYPHEN) ................................................................. 29
• Permanent Space ........................................................................................ 30
• Incremental Space ..................................................................................... 30
• Caps Lock ............................................................................................. 31
• Auto Paper Eject ........................................................................................ 31
• Permanent Backspace ................................................................................ 32
Forms Layout ................................................................................................... Ji
• Storing the Layout
• Printing the Form ....................................................................................... 35
• Correcting Errors While At the TAB Stop
• Correcting Errors At a Previous TAB Stop
• Changing a Stored Form’s Layout ........................................................ 37
• Adding TAB Stop Positions ......................................................................... 37
• Deleting Tab Stop Positions ....................................................................... 38
......................................................................................
.............................................
...........................................
36
36
34
Page 6

Changing Parameters
...............................................................
39
CODE Operations Chart
Cautions .................................................................................... 42
Parts Function ........................................................................... 43
Platen Removal and Installation ............................................... 45
Shipping Information
Troubleshooting ........................................................................ 47
Specifications
Options ...................................................................................... 49
Index .......................................................................................... 50
............................................................................
..........................................................
................................................................
40
46
48
Page 7
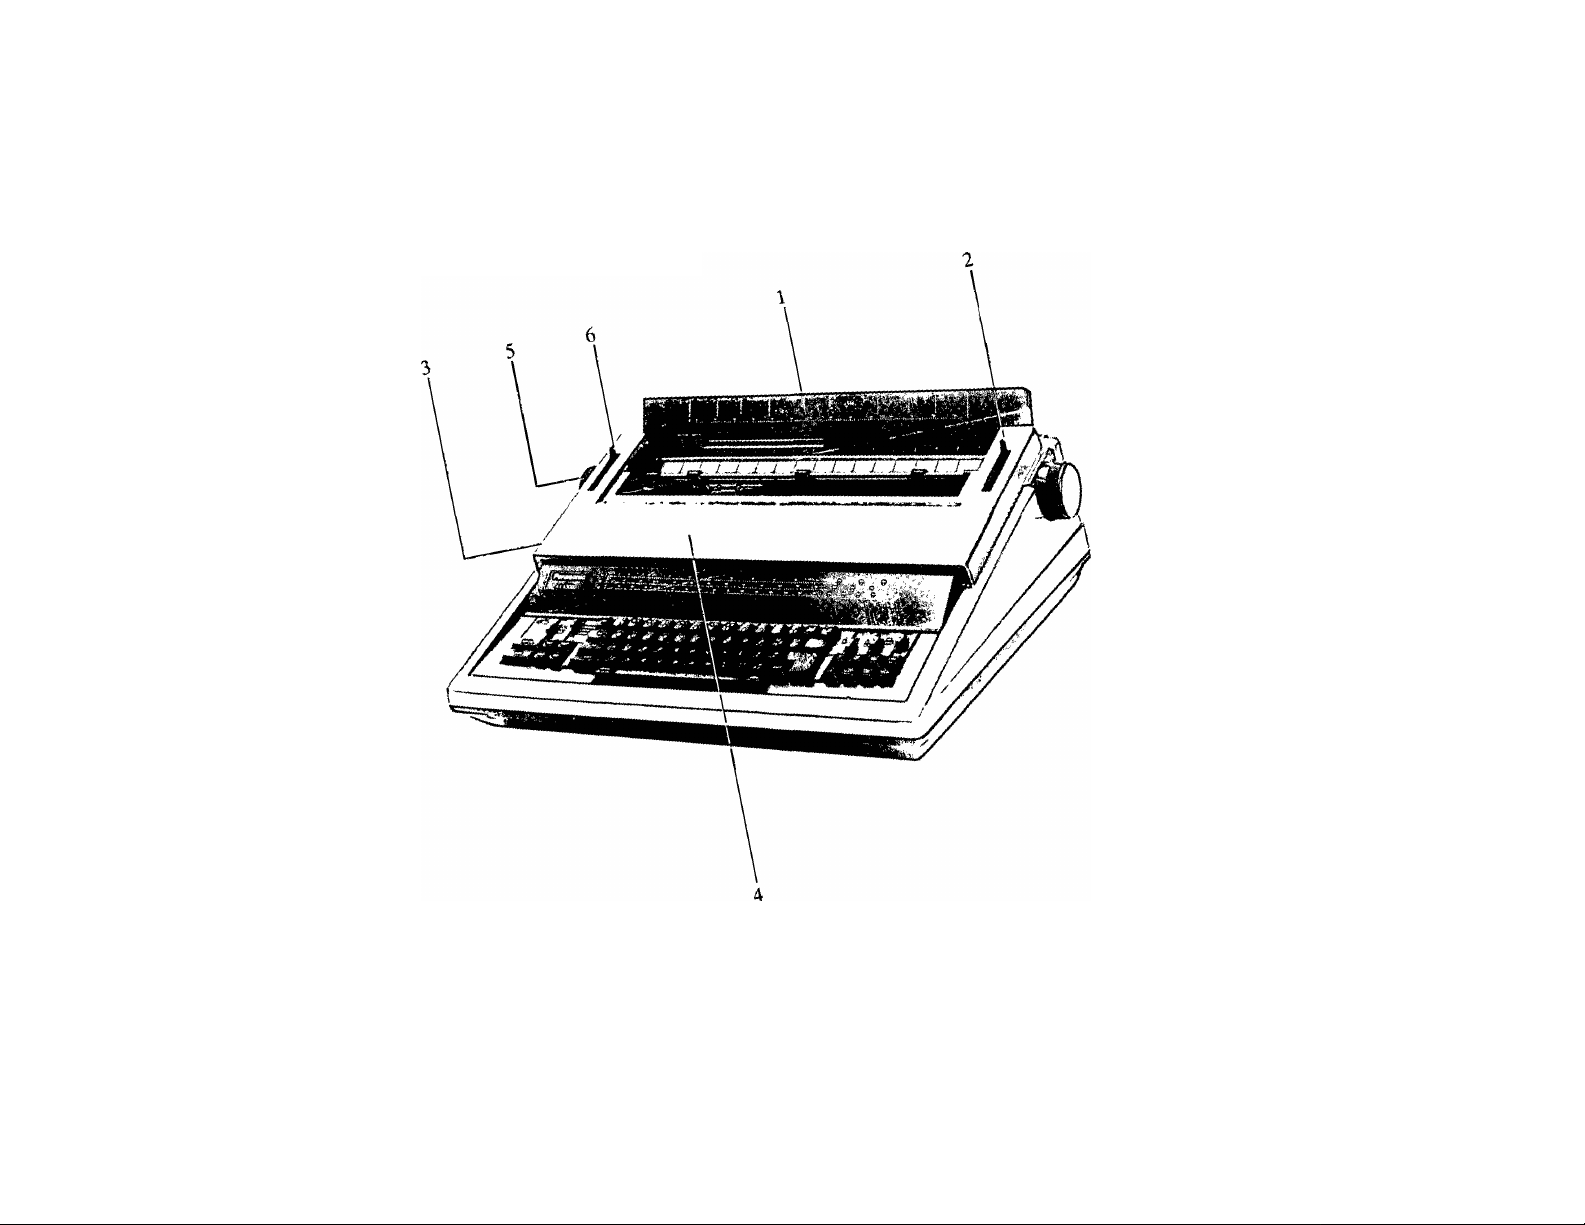
THE BASICS
! PcJpEf
2 P<‘P'='''^onToFFS"’“‘''’
2 pOVVE^
6
Page 8
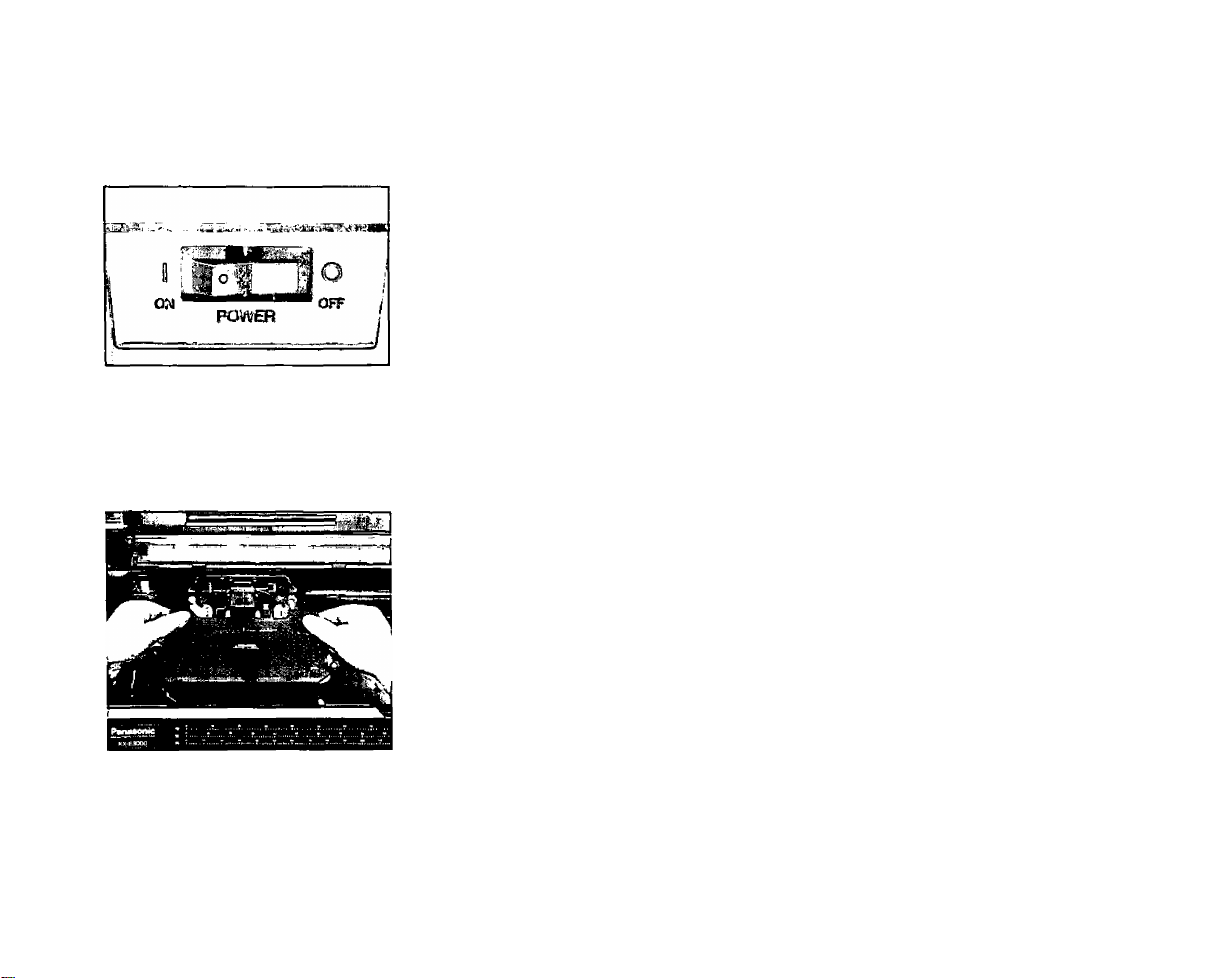
POWER ONIOFF SWITCH
The power ON/OFF switch is located toward the back left-hand side of the
machine. When turned on, the indicator light to the left of the keyboard
will he lit.
The typewriter will remember the last margins and tabs used when you turn
the machine off. When turned hack on, the printer will move to the current
left margin and the daisywheel will spin to position itself accurately.
CHANGING THE RIBBON CARTRIDGE
When you lift the top cover of your typewriter, you will see your printer,
ribbon cartridge and daisywheel. To remove the ribbon, press forward on
the blue lever to release the cartridge. Grasp the cartridge on both sides, lift
the front end up and out of .the machine.
To insert a new cartridge, place the tabs on the back portion of the ribbon
into the two guides. Place the exposed portion in front of the printhead and
snap into place.
Advance the thumb wheel on the cartridge clockwise until the ribbon slack
is tightened.
Page 9
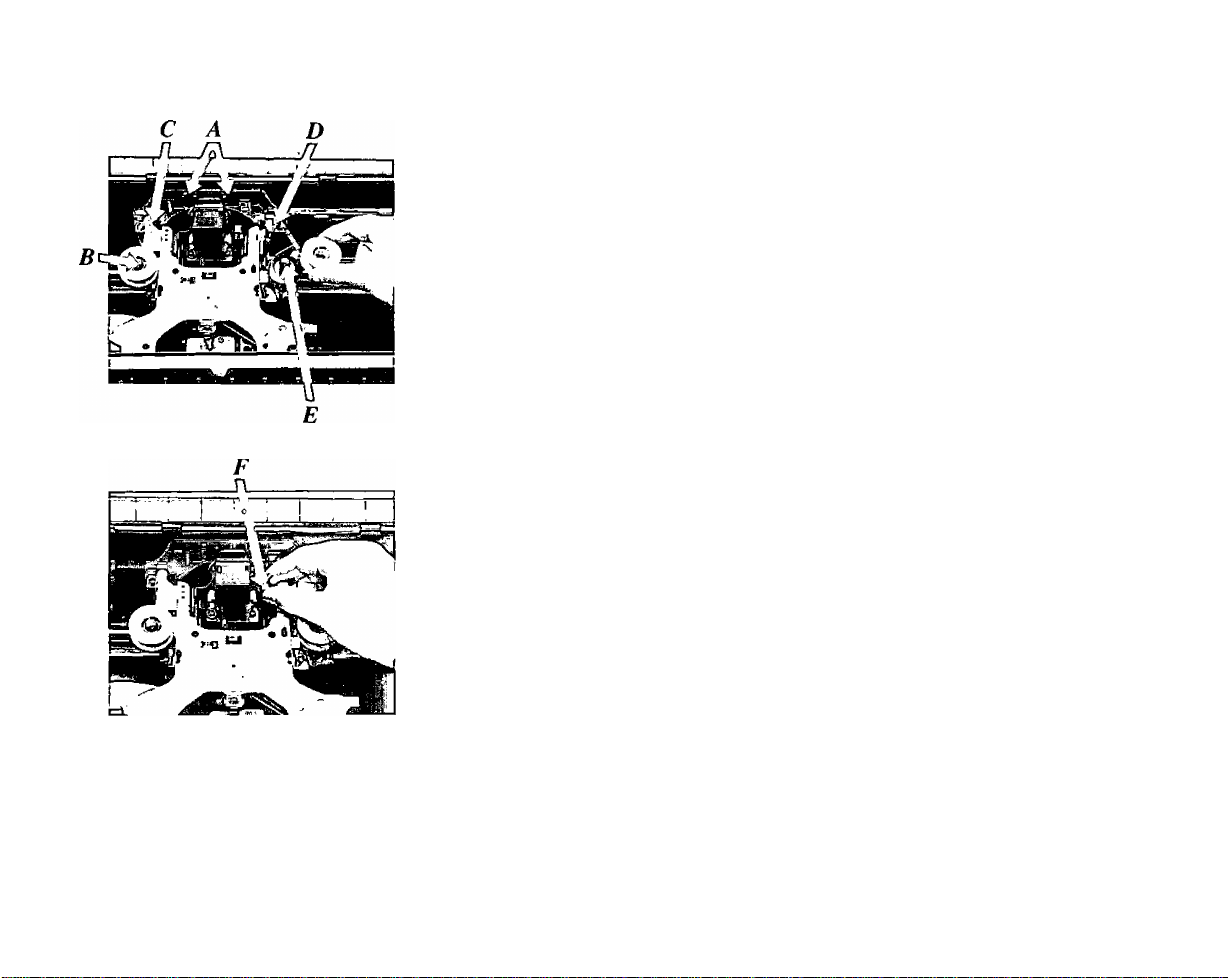
CHANGING THE CORRECTION TAPE
To replace (he correction tape, lift out the typing ribbon cartridge and
remove the two spools of lift-off tape. Place the loaded spool of new tape
on the left pin (B) so that the tape unwinds in a counter-clockwise
direction. Place the tape around the left ribbon guide (C) and behind both
tape guides (A). Pull the tape around the right ribbon guide (D) and place
the empty spool on the right pin (E).
Manually turn the right-hand spool counter-clockwise, tightening the tape
until resistance is felt.
Replace the typing ribbon cartridge.
CHANGING THE DAISYWHEEL
To remove the daisywheel, pull the green lever (F), to the right of the
printer, towards you. Grasp the clear plastic cartridge and lift the
daisywheel out of the machine.
To insert the daisywheel, place the plastic cartridge in the carrier with the
characters facing the platen. Push the green lever back into position.
Page 10
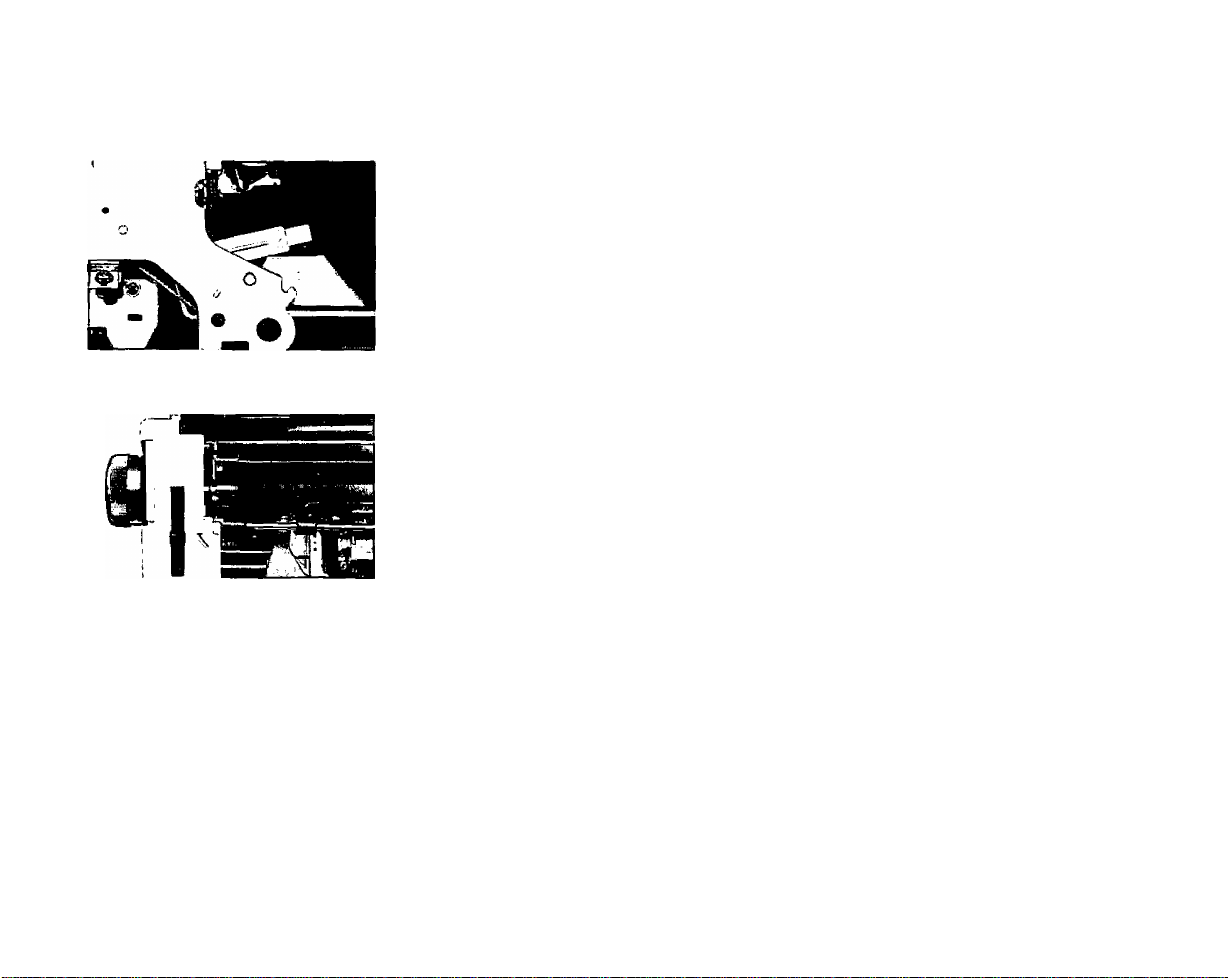
COPY CONTROL LEVER
Located inside the unit on the right side underneath the ribbon cartridge is
a green lever, which is for copy control. Position 1 is for one to three
copies; position 2 is for three to six copies; position 3 is for six or more
copies (dependent upon paper weight). Set according to your requirements.
AUTOMATIC PAPER INSERTION
The Panasonic typewriter is pre-programmed to insert your paper seven (7)
lines from the top of the page. Place your paper in the machine and pull the
paper bail release lever toward you. Your paper is automatically positioned
at line 7.
Should you wish to change the point of insertion, automatically insert your
paper as outlined above. Using the RETURN, INDEX ( -^ ), REVERSE
INDEX ( f ) keys, position the printer to the desired position. Depress
CODE->rA (You must hold down the CODE key while depressing the
letter A).
The typewriter has stored this position and will remain at this location until
you change the setting.
Page 11
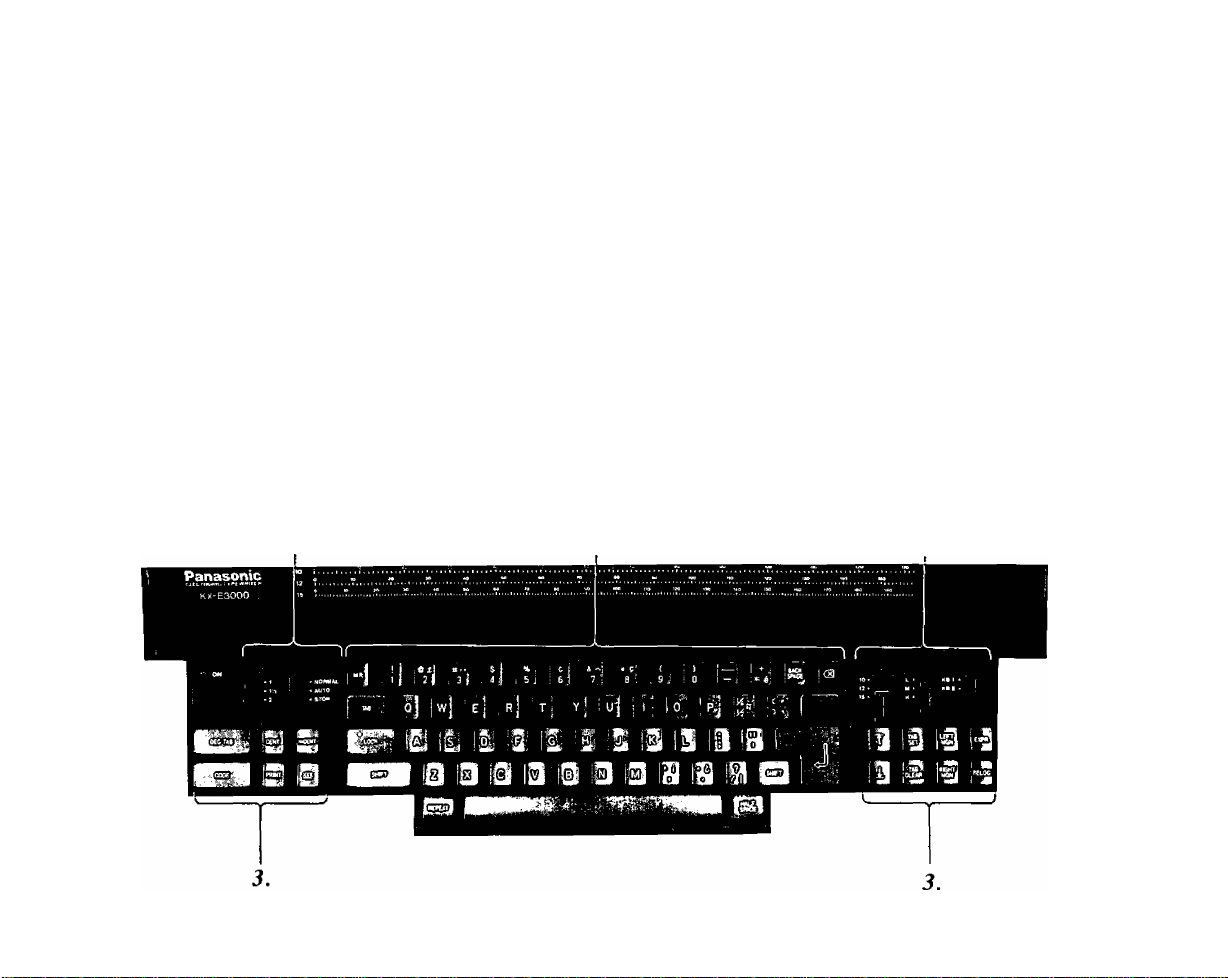
KEYBOARD LAYOUT
In order to simplify the explanation of the typewriter and its capabilities, the keyboard has been divided into three (3)
sections.
1. Character Keys
All alpha!nnmeric keys found on traditional typewriters, as well as Margin Release, TAB, Return, Backspace,
Cancel Shift and Shift Lock, Space, Repeat, Half Space, Index ( ^ ), and Reverse Index f f
2. Selector Switches
The Selector Switches are found to the top left and right of the standard keyboard and control various options. You
have a Line Space selector, a MODE selector, a Pitch selector, an Impact Control selector and a KB l/KB II
selector.
3. Function Keys
Additional keys to the left and right of the standard keyboard will automate some functions that are performed
manually on traditional typewriters.
2. 1, 2,
Page 12
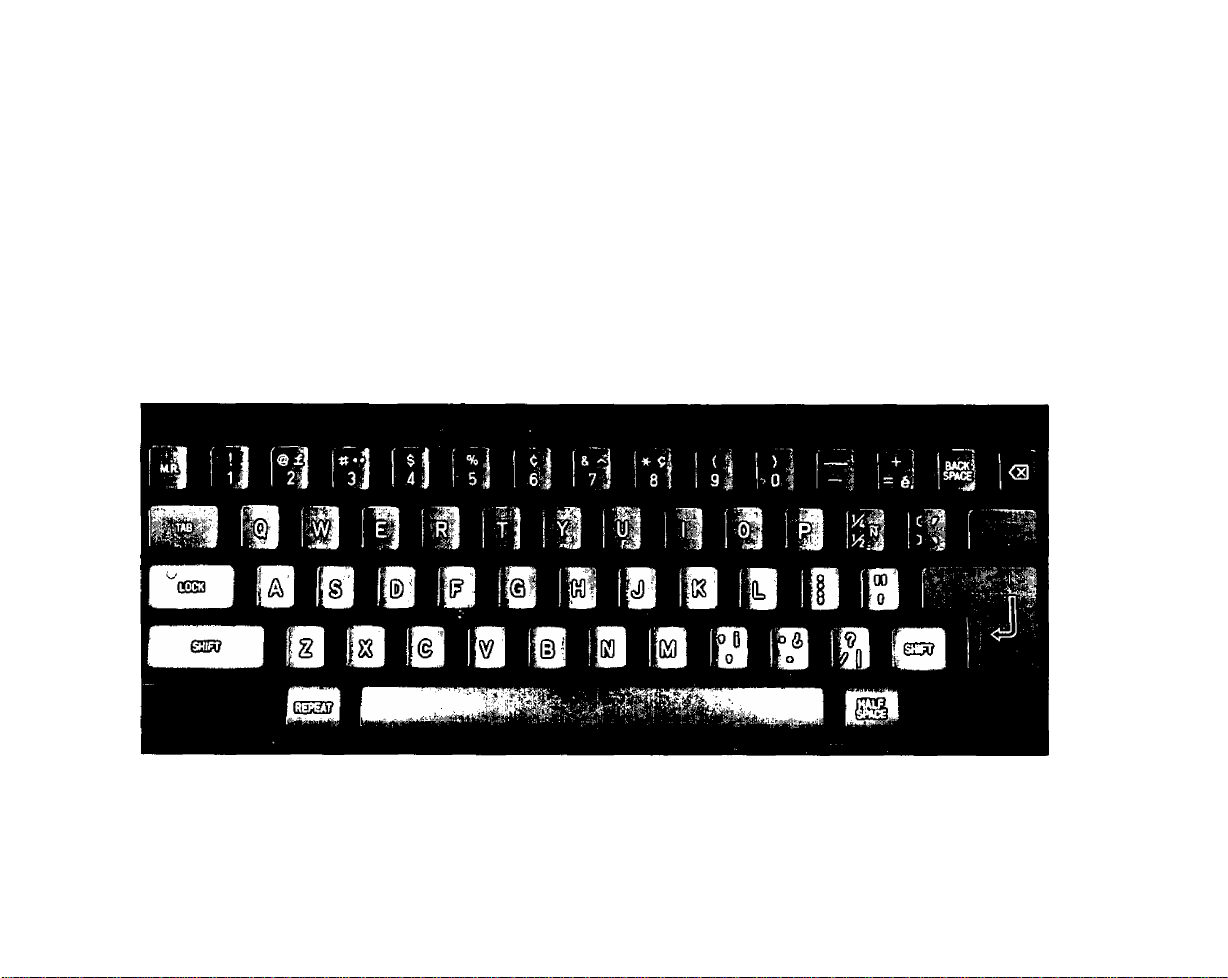
CHARACTER KEYS
The character keys are those found on traditional typewriters. You will notice that some of the key-tops have second
symbols to the right of the normal characters. These are functional when using the second keyboard feature (KB !I),
which will be described later in the manual.
Page 13

SEL E C T OR SW I T C HE S
LINE SPACING SELECTOR
This selector is located at the top left of the keyboard console. It is marked
/, P/2 and 2 and controls the number of lines between each RETURN.
In addition, you may choose from 3 different lines per vertical inch settings
as outlined on page 39. The choices and their use are listed below.
5.25 - legal applications (court reporting)
6 - normal correspondence
8 - used in conjunction with 15 pitch
MODE SELECTOR
This selector is to the immediate right of the line spacing selector. It offers
three modes of operations.
NORMAL Manual Return is required at the end of each line.
AUTO The carrier automatically returns after the first space or
CODE+ HYPHEN entered after the bell.
STOR Allows you to store margin formats. You cannot type
in this mode.
Page 14
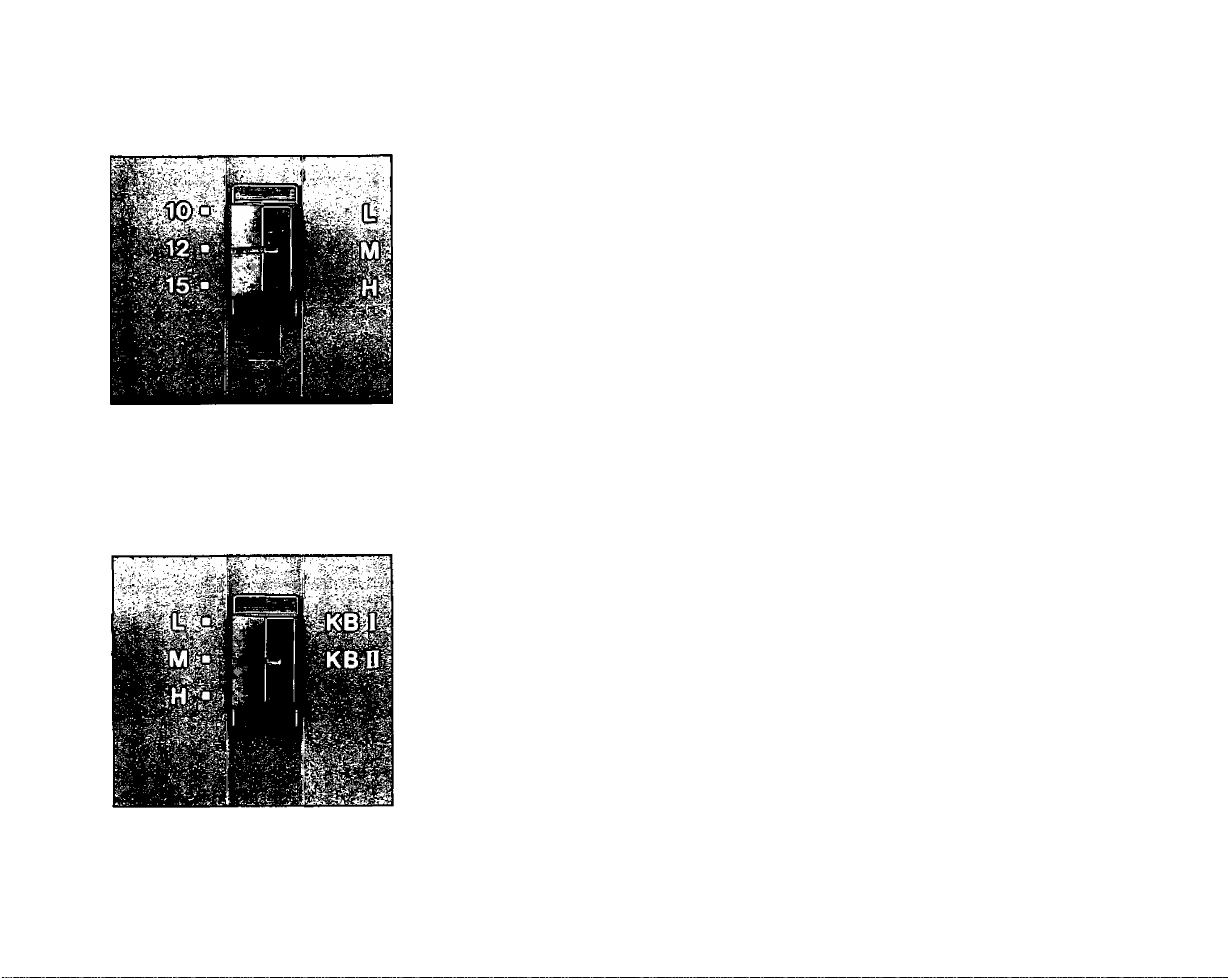
PITCH SELECTOR
On the right side of the keyboard is the pitch selector switch, indicating 10,
12 and 15. The pitch selector should correspond with the pitch of the
daisywheel in the machine.
You have the choice of three (3) typing pitches.
10
12
15
Your typewriter comes standard with a 10 pitch daisywheel.
PICA
ELITE
MIKRON 15 characters/inch
10 characters/inch
12 characters/inch
IMPACT CONTROL SELECTOR
Located to the right of the Pitch Selector, the Impact Control Selector
allows you to choose from three positions: position L (light), M (medium),
and H (heavy).
Page 15
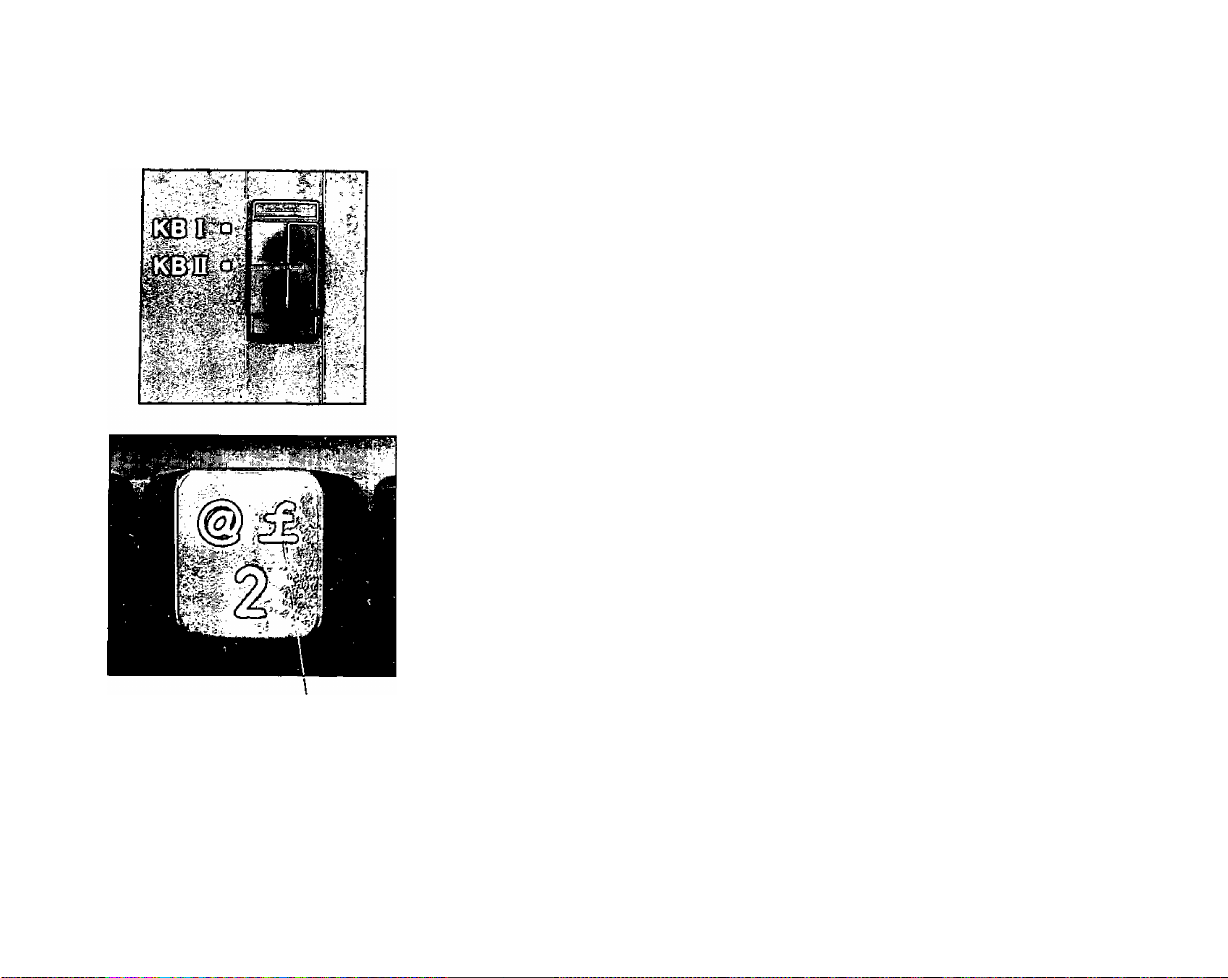
KB HKB II SELECTOR
This selector switch is located at the far right of the console, next to the
Impact Control selector. KB I allows printing of normal U.S. characters.
KB II allows the printing of additional characters not normally associated
with the U.S. keyboard (foreign language symbols).
To activate KB II and access the foreign language symbols (G), move the
selector switch to KB II. Any key-top with '‘extra" symbols are for use in
this mode. The characters are printed when the key is depressed.
The following symbols or characters are accessible in KB II when a "200
series" daisywheel is being used, instead of "extra” symbols: (N=<)
(n = >) (£=^) H ) (e = ^) d = §) (g=°)
Page 16
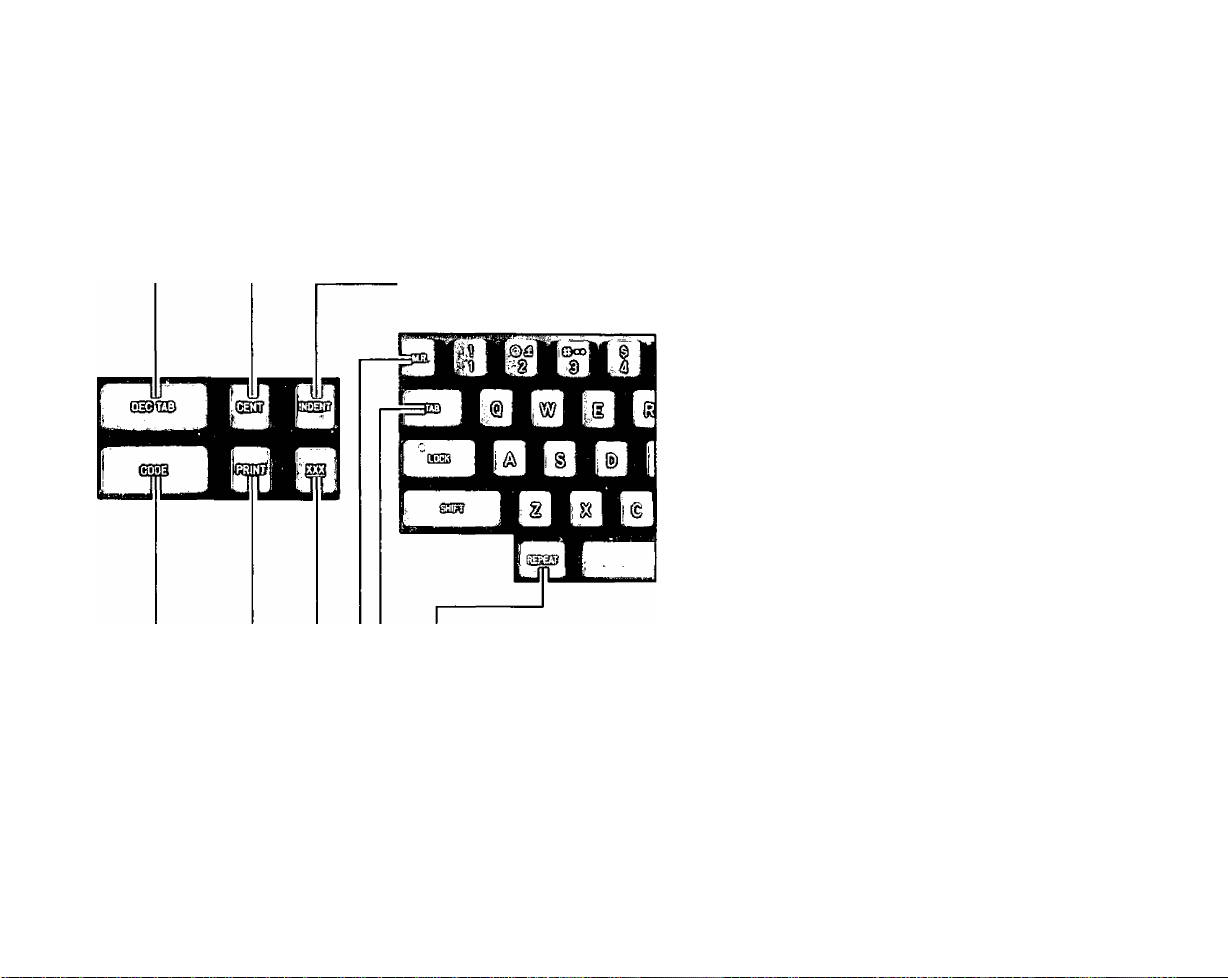
FUNCTION KEYS
■DEC TAB Aligns decimal points when typing statistical formats
■CENT Allows you to center information betweemmargins or tabs,
over a point, or aligns data at the right margin
INDENT Sets a temporary left margin and eliminates the necessity to TA B on
each line
REPEAT Makes every key a repetitive key
10
■ TAB Moves the printer to the next tab position
M.R. Margin release for left and right margins
XXX Sets/releases automatic underscore command
■PRINT Allows corrections to be made out of the correction memory using
the NO PRINT method
■CODE Command key for automated functions used in conjunction with other
keyboard keys
Page 17

■BACKSPACE Moves the printer one character to the left
and backtraces through correction memory
Deletes characters from paper
Reverse Index advances V2 line toward the top of the page
— TAB SET
Sets TAB stops (maximum 29)
^LEFT MGN Sets the left margin
EXPR. Express moves the printer to the beginning of the line without line spacing
L
RELOC Moves the printer to the last printed character after correction
RIGHT MGN Sets the right margin and bell
TAB CLEAR Clears TAB stops. Also clears margins
and tabs when used with the CODE key
11
^ Index advances ^/2 line toward the bottom of the page
HALF SPACE Used for "squeezing” characters
Page 18

U S I N G T HE T YP E WR I T E R
This section introduces you to the fundamental operations of the Panasonic typewriter. Read through it and do the
exercises to familiarize yourself with each operation.
MARGIN FORMATS
When you turn ON the typewriter, it will remember the last margin format you used. If you want to change the.se
margins and tabs, simply do the following:
TO CLEAR MARGINS AND TABS
Depress RETURN
The printer must be at the left margin to begin making changes to the margin format.
Depress CODE+TAB CLEAR
Tlte printer moves to the far left and clears the entire line, (both margins and all tabs).
TO SET MARGINS AND TABS
Depress SPACE BAR
This moves the printer to the new left margin position. When you have reached the desired left margin
12
Depress LEFT MGN
To position the printer at the first recjuired TAB stop.
Depress the SPACE BAR
Depress TAB SET
Repeat the last two steps for each TAB .stop required on the writing line. Remember, the maximum number of
tab stops on one tine is 29.
Page 19

To position the printer (it a new right margin.
Depress SPACE BAR
To set the new right margin.
Depress RIGHT MGN
Depress RETURN
You may change the left and right margins as you would on a traditional typewriter, using the M.R., SPACE or
BACKSPACE keys.
To change a TAB stop, you may do so by using the TAB CLEAR and TAB SET keys.
To clear only the tabs, you may do so by moving the printer to the first tab position and depressing CODE+TAB
CLEAR. Your margins are still on the writing line.
For the first exercise, be sure you set up the following:
The paper guide is at 0
The pitch selector is set at 10 (PICA)
The daisywheel in the unit is 10 pitch
The MODE selector is set at NORMAL
Depress RETURN
Depress CODE+TAB CLEAR
13
Depress RETURN
Set the left margin at 15
Set the first TAB at 30
Set the second TAB at 45
Set the third TAB at 60
Set your right margin at 74
Page 20

STORING MARGIN FORMATS IN MEMORY
Two different margin formats (margins, tabs and hot zones) may be stored in the memory of the typewriter for
repetitive use. You may name these formats Y or Z.
In Exercise 1 you have set up a margin format. Now you are going to store this format in memory.
Move the MODE selector to STOR
Depress CODE^-Y
In the future, this margin format may be recalled at any time by depressing CODE+ Y with the MODE selector
on NORMAL or AUTO.
Move the MODE selector to NORMAL or AUTO
Clear the existing format from the typewriter by depressing CODE+TAB CLEAR. Now, set up this ne.xt format and
store it under format Z.
Set the left margin at 11
Set the first TAB at 20
Set the second TAB at 33
Set the third TAB at 45
Set the fourth TAB at 54
Set the right margin at 64.
Depress RETURN
Move the MODE selector to STOR
Depress CODE+Z
This format is now stored in memory.
Move the MODE selector to NORMAL or AUTO
NOTE: The typewriter will beep 3 times if you attempt to type or set a new format while in STOR.
14
Page 21

RECALLING MARGIN FORMATS FROM MEMORY
You should now have iwo margin formats in memory. These formats will be recalled several times throughout the
Practice Exercises. To recall a margin format, you must do the following:
Move the MODE selector to NORMAL or AUTO
Depress CODE+Y
The first margin format has been recalled and is ready to use. If you had depressed CODE+Z, the second
format would have been brought to the writing line.
When you want to change any of the stored margin formats, simply set new margins and tabs and store over the
previous format.
Remember, you NEVER position the mode selector on STOR to recall margin formats from memory (only to store them).
ADJUSTABLE ‘^HOT ZONE*^
The '‘Hot Zone" represents the number of spaces between the bell and the right margin. It is pre-programmed for 0.7
of an inch (7 spaces in 10 pitch) from the right margin. You may change the setting to within one inch of the right
margin.
To change the setting:
15
Position the MODE selector to NORMAL
SPACE or TAB to the right margin
BACKSPACE to the new bell position
Depress CODE-VRIGHT MGN
Page 22

U S I N G T HE FU N CTI ON KE Y S
INDEX ( k ) AND REVERSE INDEX( T )
The INDEX ( ^ ) key allows you to advance the paper V2 line toward the bottom of the page. The REVERSE
INDEX ( f ) key allows you to advance the paper V2 line toward the top of the page.
These keys are useful when typing superscripts and subscripts. You will also use them in conjunction with other
features discussed later in this manual. Type the exercise and follow the instructions listed below.
, th
The 4 of July is America's Independence Day.
To type this you would first enter "The 4” and then:
Depress the REVERSE INDEX f ^ ) key and type *7/i”
Depress INDEX ( ^ ) to reposition the printer on the actual typing line and continue typing.
MICRO INDEXING
Micro Indexing moves the printer incrementally (N-ts of an inch) up or down on the paper. This is extremely useful
when aligning the printer with pre-printed forms. The Forms Layout feature will he covered later in this manual.
16
To perform micro indexing:
Depress SHIFT+INDEX ( i ) or SHIFT+ REVERSE INDEX ( f ;
NOTE: Micro Indexing is not recorded in the correction memory.
Page 23

CORRECTION MEMORY
The Panasonic typewriter has a maximum 500 character correction memory for automatic Uft-off. If you have typed
several lines and notice an error in one of the preceding lines, you may instruct the typewriter to make the correction.
Keep in mind that 500 characters are approximately two average paragraphs. When you have reached the end of the
500 character correction memory, your typewriter will alert you with three (3) “beeps". When this occurs, depress
CODE+CANCEL ( ) i^nd make the corrections out of the 500 character memory.
CORRECTING ERRORS ON PAPER
The BACKSPACE key is used to move the printer one space to the right of the incorrect character and backtraces by
line through the correction memory.
The CANCEL f <3 J key allows you to “lift" incorrect characters off the paper when an error has been made.
The EXPRESS key (EXPR.) moves the printer to the beginning of the line without line spacing.
The RELOCATE key (RELOC) moves the printer to the last printed character on the page after a correction has been
made, or to the last carrier return.
Using the first stored line format (CODE+Y), type the following sentence using these keys to make the corrections. Do
not RETURN at the end of the line.
17
Whne tpying quickly, a typist is likely to make mistakse.
Change “Whne" to “When"
“tpying" to “typing"
“mistakse" to “mistakes"
Page 24

MAKING CORRECTIONS WITHIN THE CORRECTION MEMORY
To cancel printed characters on previous lines:
EXPR. to the beginning of the current line
Depress BACKSPACE to position the printer on the line containing the error
This will advance the printer by line through the correction memory. If the printer is located at the beginning of
the line, depressing CANCEL f <3 ) advance the printer to the end of the previous line.
SPACE to position the printer one character to the right of the error
Depress CANCEL ( <^ ) to lift off the incorrect character(s) and.type the correction
Depress RELOC
NOTE: Once you have advanced into the correction memory, you may use RETURN to position the printer on
lines below the current line. If REVERSE INDEX f ^ ) is used to advance into previous lines, the
correction memory will be erased.
MAKING CORRECTIONS OUT OF THE CORRECTION MEMORY
When you have reached the end of the correction memory, you will hear 3 ''beeps". To correct characters above that
point:
Depress C0DE3^CANCEL ( <3 )
This instructs the typewriter that you are going to correct out of the 500 character memory. Your printer will
automatically move to the left margin to allow you to begin making corrections.
Depress REVERSE INDEX ( f )
To position the printer on the line of the error.
18
Page 25

Depress SPACE BAR to position the printer over the error
Depress CODEaCANCEL f<xj) once
Retype the incorrect character
This will lift the character off the paper.
Type the correct character
Repeat the steps outlined above for each incorrect character on the same line.
Depress RELOC
This positions the printer at the last printed character or REl'URN.
* If you have more than one correction to be made out of the 500 character correction memory, you must RETURN
to position the printer at the left margin in order to REVERSE INDEX ( ]') to the next error.
NO PRINT WHEN MAKING MANUAL CORRECTIONS
When an error is out of the 500 character correction memory, the PRINT key may he used as a stencil key to re-enter
text into the correction memory without reprinting. This feature is especially useful when correcting words or
consecutive errors.
After reaching the end of the correction memory:
19
Depress CODE-VCANCEL to exit the correction memory
Depress REVERSE INDEX ( ^ ) to position printer on the desired line
SPACE to position printer over the first character of the incorrect character(s)
Depress the PRINT key and retype the character(s) exactly as the appear on paper
CANCEL ( <^ ) to delete the error(s)
Retype correct character(s)
Depress RELOC
Page 26

Using the CODE-\-Y format, with the MODE selector on AUTO, type the following exercise including the errors. As you
type, the printer will automatically return at the end of the line. You do not need to stop typing as the printer returns; it
will ^^catch” up with you. Upon completion, use the correction procedures you have just read. Be sure to first make the
corrections within the correction memory and then out of the correction memory.
Distantly related to the opossum< the Koala bear is only
3/4 of an inch long at birth and weighs only 1/5 of an
ounce. Usually only one Koala is born at a time, with
the mother bearing young only every other year-
TheIinfznti will remain in its mother's pouch until it
is ready to emerge at six months of age. It will then
[climg I to its mother's back until it is a year old.
-
When fully grown, it will stand about two feet |high[ and
may |wiegh[ as much as 33 pounds. At the age of four,
the animal will have attained full sexual maturity and
its life span may be as long as 20 years*
When the Koala is ready to strike out on [it's won,| i£
will find its own eucalyptus tree, whose leaves are almost
its only food. Only on rare occasions will it leave
the tree, as when it seeks aruother tree to | tkae |up new
residence.
The Koala is suited for climbing, as all four of its
sharpiclawdej feet are made for grasping. During the day
the Koala sleeps, usually curled up inconspicuously in
the crotch of a tree, and feeds only at |n ightime ■]
At one time, the Koala, a native of Australia, was severely
threatened with extinction. Now the Australian rgovernemth |
is taking drastic|stes^ to insure its survival.
______________
____________
yri^X;tZctn£.
20
Page 27

DECIMAL TABULATION
The DEC TAB key is used in place of the TAB key when typing statistical formats. It instructs the typewriter to
automatically align numbers at the decimal point. For foreign statistical typing, you may choose to align numbers at
the comma position (refer to page 39) instead of the decimal point.
To align decimal points:
Depress DEC TAB
The printer will move to the first TAB position.
Enter the number, decimal point and cents
Depress DEC TAB again
Your first entry will print and the printer will move to the next tab position.
Enter the next number and decimal point
Depress DEC TAB
Repeat the last two steps until you have completed all of your entries.
Depress RETURN
Begin typing the second line of data
For practice, type the following, still using the CODE+Y format; set the MODE selector at NORMAL or AUTO.
Am
0
r
0
r
0
T
0
/Em
E
rJ>f^7AiS-
347
123
J64
12
jlO
1234
.'56
Jl2
Jo%
21
13
7654
5U5%
.191
Jo 6
J23
U24
156
31
4851
8
.198
J28
J12
-|36
|J3%
Page 28

CENTERING
There are four »vrt v.v to center information; between mar}>ins, over a point, between tab stops and aligned at the right
margin.
If more than one special command is given on one line, the centering command must be entered first.
Between Margins
Depress RETURN to position the printer at the left margin
Depress CENT key and enter the information to be centered
Depress RETURN or TAB to print the information on each line
Depress CENT for each line requiring centering
s
22
Cent
cc/iV
(Your name)
► Panasonic
Elect roni c Typewri ter
Page 29

Over A Point
Depress SPACE BAR to move your printer to the desired position
Depress CENT and enter the information to be centered
Depress RETURN or TAB to print the information
A/n ^ T
n? C£At ^
Panasonic
Between Tab Stops
TAB to the left tab position of the tabs you want to center between
Depress CENT and enter the information
Depress TAB or RETURN to print the information
Repeat the same steps for each line requiring center commands
/Ur?
0
CLN7
Bold Print
Index
Centering
RELOC
Decimal Tab
r
T
£/77
r
Q
23
Page 30

Aligned At the Right Margin
TAB to the right margin
Depress CENT and enter the information to be aligned
Depress RETURN to print the information
Repeat the same steps for each line you want to align
Am
TAB
r
TAB V9S
r
(Your name)
Panasonic Industrial Company
Two Panasonic Way
Secaucus/ NJ 07094 |_*
£/r?
Ce^t
24
Page 31

PARAGRAPH INDENT
The INDENT key provides the typist with the ability to set a temporary left margin and eliminates the need to TAB
on every line of an indented paragraph.
To position the printer at the desired indented location:
Depress TAB or SPACE BAR
This will instruct the typewriter where to set the temporary left margin.
Depress INDENT to set the temporary left margin
Type the indented text
Depress INDENT again to deactivate the command
25
/jn
X
aaaaaaaaaaa
aaaaaaaaaaaaaaaaa
~ ».f bbbbbbbbbb
cccccccccccccccccc
cccccccccccc
[iilif^Middddddddd
eeeeeeeeeee
dddddddd
dddddddddddddd,
r
X
bbbbbbbbbbbbbbb
bbbbbbbbbb
T
X
t//ep£,A^7~
Page 32

UNDERSCORING
To underscore words and spaces continuously:
Depress XXX and type
All characters and spaces will be underscored automatically until you deactivate the command.
This IS continuous underscore.
Depress XXX again to deactivate the command
To underscore word by word only, eliminating the underscored spaces:
Depress CODE+XXX
This is word ^ word underscore.
Depress CODE-¥XXX again to deactivate this command
The following exercise incorporates all of the operations you have just learned and gives you the opportunity to use
them in a standard letter. Set the margins and tabs indicated below to he used with this exercise and store them in
margin format Y.
Depress CODE+TAB CLEAR
Set the left margin at 11
Set the first TA B at 26
Set the second TAB at 39
Set the third TAB at 49
Set the fourth TAB at 59
Set the right margin at 66
26
Move the MODE selector to STOR
Depress C ODE + Y
To begin the exercise, set the MODE selector at AUTO and recall margin format CODE+Z.
Page 33

(Today’s Date)
15 Hunts Lane
Weston, CT. 06883
Mr. C. C* Charles
19 Treaty Road
Valley Forge, PA. 08901
Dear Mr, Charles:
In response to your recent inquiry regarding our
new line of customized designer wall coverings,
I am enclosing the samples you had requested, for
your approval, Outlined below is the quantity
pricing for each of the patterns we discussed.
•^DESIGNER LINE
Cus
Csntc&-------------•
tom Wall Coverings
СгГП4^ Sc(jXn,
Pattern Reta i 1‘
-1-5- -6-9- =10 +
.ccfd^L
27
1
\lfcc Zi/s \
Wheat 36L|70
Willow 38lUo
Tulip 44l60
DISCOUNT
) (T h e s e p r i c
_________pat
If you have any questions regarding the quantities
required, I would need exact room measurements
for each of your offices.
I look forward to working with you in the near
future and thank you for considering our product
line.
Sincerely,
{Your name)
______
8_i!o%
[colored to
es are based upon the length
of one (1) standard roll. Each
terns we discussed may be custom
meet your personal requirements.
291,90 251(40
311,55
37lS0 34!S0
7[j5% 7[j5%
26 [¡80
professional Home Designs
"2П-20
22‘.'б0
30lfe0
8lp%
Page 34

CODED FONCTIONS
CODE KEY
The CODE key is used in conjunction with other keys to perform various automated functions. When performing
coded functions, you must hold down the CODE key while you depress the desired key.
Some of these coded functions you have already used: CODE+A is for setting automatic paper insertion, CODE+ Y
and Z for recalling margin formats, CODE-BRIGHT MGN to set a new bell position and CODE-BXXX to
underscore word by word.
The following exercises will teach you additional functions the CODE key offers.
28
Page 35

HOLD PRINT
This feature allows you to instruct the printer to “highlight" certain words or characters for emphasis using a BOLD
print function.
Depress CODE+H and enter the information to be highlighted
Depress CODE+H again to deactivate the command
Bold print highlights words for emphasis.
SOFT HYPHEN (CODE+HYPHEN)
A Soft tiypen will allow you to hyphenate words that fall at the right margin when using the AUTO mode. This will
“tighten" up your margins atid give a less ragged appearance. With this feature, the printer will automatically return if
a coded hyphen is entered in the “Hot Zone".
To insert a soft hyphen:
Depress CODE+HYPHEN (-)
Using the CODE+Z format, type the following paragraph. Be sure your MODE selector is set at AUTO.
29
Soft hyphens are entered in the hot zone to pre-i
vent long words from causing extremely ragged mar-^
gins on the right side of the page. However, re-[
member to use the CODE key before you depress the
hyphen key. This tells the typewriter to return
at the next character typed.
Page 36

PERMANENT SPACE
Because your typewriter has an auto return feature, there may he times you will not want to separate specific words
such as cities and states or dates. Using a permanent space, the typewriter will recognize the group of words as one
and not separate them when the printer automatically returns.
To enter this command:
Type the first word
Depress CODE+SPACE BAR
Type the next word
Type the foilwing paragraph using the permanent space feature. Be sure your MODE selector is set at A UTO.
Permanent spaces prevent names or dates from being
separated. In instances such as San Francisco,
or New liork/ N.Y. or dates such as September 30/ ^;^36
you may instruct the typewriter to never separate
these character or numbers onto different typing
lines.
INCREMENTAL SPACE
An incremental space allows you to move the printhead I!6th of a space.
30
Depress CODE+HALF SPACE
Page 37

CAPS LOCK
Normally, when you type infonnation in capital letters, you use the LOCK key and need to release it to type
numbers. When this feature is activated, you may type capital letters and access numbers at the satne time without
having to shift back and forth from upper to lower case. The lock key's indicator light will flash when this feature is
turned on.
To activate CAPS LOCK:
Depress CODE+LOCK and type text
Every letter that you typed will be in CAPITALS and when you type a number, you will not receive the
symbols.
Depress CODE+LOCK to deactivate the feature
AUTO PAPER EJECT
After typing your project, you may instruct the typewriter to automatically eject the paper. It has been pre-program
med for standard 8C2 X J! paper (66 lines) and will eject the paper based on that setting. If you are working with
paper other than 8C2 x II, refer to page 39 for changing the page length.
To automatically eject the paper:
31
Depress CODE+V
Page 38

PER!\4ANENT BACKSPACE
There may be times you will require overlapping of characters or numbers in a project. This is easily achieved using
another coded function, CODE+U.
Type the first character or number
Depress CODE+V
Type the character or number you want to overlap the first entry
EXAMPLE:
0 + (CODE +U) + / = ,0'
32
Page 39

FORMS LAYOUT
The Forms Layout feature allows you to fill-in pre-printed forms easily and automatically. With the Panasonic
typewriter, you have the ability to store the layout of a form with specific tab stop positions once, and then recall it
whenever you need it. This will make it much easier for you to use those pre-printed forms that never seem to line up.
You may store two (2) forms with up to 8 stops on each form. If you try to set more than 8 stops, the typewriter will
beep 3 times, alerting you that the maximum has been set.
When printing the form, the printer moves to the tab stop and waits for you to type the information. It will
automatically adjust for spacing and the number of lines used and remembers the exact position you set the next tab
stop. You no longer need to continually RETURN to get to the next location, nor space over to the next box on the
form where you must type information. Store the form once, and it is there for you every time you need it.
All of us use different types of forms and we do not necessarily have your particular one at hand. Therefore, we are
not able to provide you with specific exercises. It is extremely important that you use your own forms when working
with these instructions. Please, READ through the operational steps provided to get the most benefit from this time
saving feature.
33
Page 40

STORING THE LAYOUT
In order to begin, yon must first have one of yonr forms to work with.
Depress CODIi+TAIi CLEAR to clear existing margins and tabs
Set both margins at the edge of the form and depress RETURN
Remove the form from the typewriter
Depress CODE +EXPR. to enter forms layout
Type the number 1 or 2, whichever number you wish to assign
Remember, yon may store 2 forms with a total of 8 stops per form.
Auto insert the form
Using the following keys, advance the printer to the desired stop positions:
34
RETURN
SPACE BAR
BACKSPACE
HALF SPACE
INDEX( ¿ )
REVERSE INDEX ( ^ )
SHIFT+INDEX
SHI FT-^REVERSE INDEX
CODE+HALF SPACE (Incremental space)
Depress TAB SET at each .stop location
Depress CODE+EXPR. to end the form
NOTE: If the auto insertion point is changed after the form is set up, the programmed stops will not align
properly. Therefore, it is suggested that a blank form noting the original Insertion point he saved so the
ifisertion point can be reset.
Page 41

PRINTING THE FORM
Once you have stored the layout of a form, you may recall it at any time. You should always recall the form layout
and then insert the form by using the Automatic Paper Insert feature.
Depress CODE+EXPR,
Type the number I or 2, whichever number you assigned to the form
Insert your form using the automatic insertion feature
Depress ТЛИ
The printer will move to the first tab stop of the form.
Type the information required at this tab stop position
An INDENT (temporary left margin) is set at each tab stop. Therefore, if you type more than one line, the
information will auiotnatically be aligned.
Depress TAB to reach remaining stop position
When you have reached the end of the form, your typewriter will “beep" 3 times. If you have another of the same
form to fill in, you may do so without recalling the form again.
Auto insert the next form
Depress TAB to fill in tab stops
35
Depress CODE+EXPR, to exit forms layout
Page 42

CORRECTING ERRORS WHILE AT THE TAB STOP
If you notice an error while typing, depress the CANCEL f <3 J key to delete.
If there are several lines of text at one tab stop, you may use the same correction procedures as those outlined when
making corrections within the correction memory.
If there is one line of text at the tab stop, CODE+REVERSE INDEX ( ^ ) will take you to the previous tab stop.
CORRECTING ERRORS AT A PREVIOUS TAB STOP
Depress CODE-\-REVERSE INDEX ( T ) to reach the tab stop containing the error
Space to error
Depress PRINT and retype error(s)
Depress CANCEL ( <^ ) to lift off character(s)
Type correct character(s)
Page 43

CHANGING A STORED FORMAS LAYOUT
You may add or delete tab stop positions within a stored form whenever necessary. It is important to remember that
you may only store 8 tab stops per form.
ADDING TAB STOP POSITIONS
Depress CODE+EXPR. to enter Forms Layout
Type the number, 1 or 2
Insert the form using auto insert
Depress TAB until you reach the stored tab stop closest to where you want to insert a new tab stop
NOTE: If the new tab stop is to be inserted between an existing tab stop and the right margin, move the printer
to the desired location.
If the new tab stop is to be inserted between the left margin and an existing tab stop, depress INDENT to
release the temporary margin and RETURN. Then move the printer to the desired location.
Depress TAB SET to set the new stop
Depress CODE+EXPR. to exit forms layout
NOTE: If you attempt to set an additional tab stop and hear 3 beeps, the typewriter is alerting you that the
maximum number of stops has been set.
37
Page 44

DELETING TAB STOP POSITIONS
Depress CODE+EXPR. to enter Forms Layout
Type the number, 1 or 2
Insert the form using the auto insert feature
Depress TAB until you reach the tab stop you want to delete
Depress TAB CLEAR
The tab stop has been deleted.
Depress CODE^-EXPR. to exit Forms Layout
NOTE: If you want to delete al[ tab stops in a form, depress CODEd- TAB CLEAR after recalling the form you
wish to delete.
38
Page 45

CHA NGING PA RAMETERS
You may change specific default parameters of the typewriter. Default simply means that certain settings are pre
programmed into the typewriter and will remain that way until you change them. The settings that can be changed are
fisted below.
To change the parameters:
Insert a sheet of paper
Depress CODT+P
A series of numbers will print (60. 66, N, 6, P)
They represent:
60 - Page end (01-99 lines) - used with optional communication interface
66 - Paper length - total nutnher of lines on the paper (01-99 lines)
N - Paper feed control (N:none, T: tractor feed, S:sheet feed)
6 - Lines per vertical inch (5:5.25 - legal, 6:6 - normal, 8:8 - 15 pitch)
P - Dec Tab alignment character (P:decimal point, C. comma)
Backspace to the desired parameter
Depress CANCEL f <x) ) and type appropriate parameter
39
Depress RETURN
The new paratneters will print confirming your changes. These settings will remain until changed.
Page 46

CODE OPERATIONS CHART
CODE+A
CODE+B
CODE+E
CODE+P
CODE+U
CODE+V
CODE+Y
CODE+Z
CODE+CAls/CEL ( <2 )
CODE+HYPHEN
CODE+REVERSE INDEX ( f )
CODE+RIGHT MGN
CODE+SPACE BAR
Sei Auto Paper Insertion
BOLD Print
Reset Printer and Correction Memory (must depress twice)
Set Parameters
Permanent Backspace
A uto Paper Eject
Margin Format Recall
Margin Format Recall
Escape Correction Memory
Soft Hyphen
To go back to previous Stop position during Forms Layout
Set New Bell Position
Permanent Space
CODE+HALF SPACE
40
Incremental Space
Page 47

CODE-{-TAB CLEAR
Clear Margins anil Tabs
CODE+XXX
CODE+LOCK
CODE+EXPR.
SHIFT+INDEX( i )
SH! FT+REV ERSE INDEX ( ^ )
Underscore by Word
CAPS Lock
Forms Layout
Advance the paper U4s of an inch toward the bottom of page
Advance the paper U48 of an inch toward the top of page
41
Page 48

CAUTIONS
Be sure that the carrier stopper that holds the printer stationary during
shipping is removed before turning the unit on.
Be sure to keep this stopper so that the unit can be transported safely, if
the need arises.
For the best possible operation of your typewriter do not use a power outlet
which is presently being used for a copier or other device which consumes
a large volume of power.
Do not use your typewriter in the following environmental conditions:
In direct sunlight where additional heat will be generated.
In areas where the atmosphere is extremely salty or where corrosive
gases are present.
On surfaces that are not flat, or that are subject to vibration.
Cleaning
Use only a soft, dry cloth to clean your typewriter. Water or thinners may
damage the covers, cases, or electronic circuitry.
42
Cable
Use a shielded cable 3 meters or less in length with KX-EI2 Serial
Communication Interface option installed.
Use a shielded cable 2 meters or less in length with KX-E7I Parallel
Interface option installed.
Page 49

PARTS FUNCTION
Paper Support
When the typewriter is unhojced, it will have to be installed as shown.
43
Cover Interlock Switch
Cover Interlock Switch
The top cover has a safety interlock switch which deactivates the printer
whenever the top cover is opened.
Page 50

Paper Release Lever
Pulling forward on the paper release lever releases the paper so that the
operator can adjust it freely.
Paper Bail Release Lever
Pulling forward on the paper bail release lever moves the paper bail away
from the platen. Additional forward movement of this lever activates the
automatic paper insert function. Also refer to page 4.
44
Page 51

Release Latch
PLATEN REMOVAL AND INSTALLATION
Platen Removal
If you have to remove the platen to clear a gummed label or clean the
platen, please follow the instructions below:
1. Turn the power off
2. Open the top cover.
3. Lift the eraser table.
4. Position the paper release lever and paper bail release lever toward the
front of the machine.
5. While pushing down on both release latches, lift out the platen.
45
Platen Installation
1. Position the slot of the platen shaft so that it aligns with the left release
latch. Push down until you hear it lock.
2. Reset the paper release lever, the paper bail release lever and the eraser
table then close the top cover.
Page 52

Carrier Stopper
4.
SnirriNG INFORMATION
• The carrier stopper holds the printer stationary during shipping.
• Remove the stopper before turning the unit on.
When you transport or ship the typewriter, follow the steps below:
• Position the printer at the far left of the unit.
• Install the carrier stopper to the carrier shaft so that the printer will not
move.
• Remove the paper support.
To remove the paper support, stand it up straight and pull up.
46
Page 53

TROUBLESHOOTING
PROBLEM
1. Character spacing is erratic.
2. Character printout is not clear.
• Make sure the ‘'Pitch selector" is set correctly.
• Make sure the ribbon is good.
• Make sure the "Pitch Selector" and ‘‘Impact Control
Selector" are set correctly.
3. Characters cannot be printed.
• Make sure the daisywheel is mounted correctly on the
print unit.
• Change the ribbon cartridge.
4. Characters cannot be cancelled.
• Make sure the correction tape matches the type of
ribbon cartridge being used.
• Make sure the correction tape is installed correctly.
• Change the correction tape.
5. Character printout is scrambled.
• The printwheel is misaligned. Depress CODE+E
twice to reset the typewriter.
If the problem persists after performing all of the above checks call for service.
REMEDY
47
Page 54

SPECIFICATIONS
Print Element:
Print Speed:
Print Pitch:
Line Spacing:
Paper Width:
Writing Line:
Ribbon Cassette:
Correcting Tape:
Keyboard:
Correction Memory;
Line Format Memory:
Power Requirements:
Power Consumption:
Memory Protection:
Storage Environment:
Operating Environment:
Dimension:
Weight:
Daisywheel; WO char.
16 char, fsec:
10 char./inch
12 char./inch
15 char./inch
1, V/2, 2 lines
16.5 inches Max. (419 mm Max.)
13.2 inches Max. (335 mm Max.)
High Yield Correctable Carbon Ribbon (Black, Blue, Brown)
High Yield Non-Correctable Single Strike Carbon Ribbon (Black)
High Yield Multi-Strike Ribbon (Black)
High Yield Fabric Ribbon (Black)
Fabric Ribbon (Black)
Lift Off Tape
Cover Up Tape
Alpha/Numeric Key;
Function Key;
500 Char. Max
2 formats Current
AC120V60HZ
Approx. 68 W
Lithium Battery (5 years)
-4^F~-140^F (—20^C~6(PC) temperature, J0%~90% humidity
50°F~104^F (10^C~40°C) temperature, 20%'-80% humidity
23.9 (W) X 18.6 (D) X 8.0 (H) in. (607 x 472 x 203 mm)
Approx. 27.6 lbs. (12.5 kg)
45 keys
25 keys
48
Specifications subject to change without notice.
Page 55

OPTIONS
KX-E12
KX-E20
KX-E45
KX-E71
KX-E80
Serial Communications Interface
Tractor Feed
SpellScan®
Parallel Interface
Automatic Sheet Feed
NOTE: To prevent possible RF interference, when using this typewriter with an interface option (KX-E12/71), the
clamp-on ferrite core provided with the interface must be installed on the interface cable within 4 inches of
the typewriter interface connector.
SpeltScan'^ is a regisiered trademark of Panasonic Industrial Company, Division of Matsushita Electric Corporation of America.
49
Page 56

INDEX
Auio paper eject ........................................................... 31
Auto paper insertion ....................................................... 4
Backspace ................................................................ 1}
Bold print ..................................................................... 29
CANCEL ( <^ ) ............................................................. 17
CAPS lock .................................................................... 31
Centering
.....................................................................
22
Aligned at right margin ............................................ 24
Between margins ...................................................... 22
Between tabs
Over a point
Changing parameters
............................................................
.............................................................
..................................................
23
23
39
Character keys ............................................................... 6
CODE key
....................................................................
28
CODE Operations ........................................................ 40
Copy control lever
.........................................................
Correcting errors ......................................................... 17
Within correction memory
.......................................
18
Outside correction memory ...................................... 18
Using NO PRINT method
........................................
19
Correction tape .............................................................. 3
Daisywheel ..................................................................... 3
Decimal tabulation ...................................................... 21
with decimal point
with comma
...................................................
...................................................
21
21, 39
EX PR........................................................................... 11
Eorms layout ................................................................. 33
Adding tab stops ........................................................ 37
Correcting errors ...................................................... 36
Deleting tab stops
.....................................................
38
Printing ..................................................................... 35
Storing ....................................................................... 34
Functions keys ..................................................... 5, 10
Half space
................................................................
11
Hot zone ......................................................................... /5
Hyphen (soft hyphen) .................................................... 29
Impact control ................................................................. 8
Incremental space ......................................................... 30
INDENT ........................................................................ 10
INDEX ( ^ ) .......................................................... 11, 16
KBHKBll ......................................................................... 9
4
Keyboard Layout
............................................................
5
Left margin ................................................................... 11
Lines per vertical inch
..................................................
39
Line spacing .................................................................... 7
Margin formats
.............................................................
12
Storing ....................................................................... 14
Recalling ................................................................... 15
Margins ......................................................................... 12
Clearing .................................................................... 12
Setting
.......................................................................
12
Margin release (M. R.) 10
50
Page 57

Micro indexing.............................................................. 16
Mode selector
................................................................
7
A UTO ........................................................................ 7
NORM ........................................................................ 7
STOR .......................................................................... 7
ON/OFF switch
Overlapped characters
...............................................................
................................................
32
Paper bail release ........................................................ 44
Paper length ................................................................. 39
Paper release lever
Paper support
Permanent backspace
......................................................
..............................................................
..................................................
44
43
32
Permanent space .......................................................... 30
Pitch selector
PRINT
.................................................................
..........................................................................
8
10
RELOC .......................................................................... 11
REPEAT ....................................................................... 10
REVERSE INDEX ( T )
....................................
1F 16
Ribbon cartridge ............................................................ 2
Right margin ............................................................ 11
Right margin alignment
Selector Switches
Subscripts
......................................................................
...............................................
...........................................................
24
16
Superscripts ................................................................... 16
Supplies ......................................................................... 48
Tabs .............................................................................. 12
Clearing .................................................................... 12
Decimal .................................................................... 21
Setting ....................................................................... 12
2
Underscore .................................................................. 26
Continuous ................................................................ 26
Word by word ........................................................... 26
XXX ............................................................................... 10
5
51
Page 58

MEMO
Page 59

Page 60

Page 61

Page 62

/‘ritilcfl ill Japan
Panasonic Industrial Company
Division of Matsushita Electric Corporation of America
Two Panasonic Way, Secaucus, New Jersey 07094
Panasonic Hawaii, Inc. (PHI)
91-238 Kauhi St. Ewa Beach, Honolulu, Hawaii 96808-0774
Panasonic Sales Company
Ave. 65 De Infanteria, KM9.7 Victoria Industrial Park Carolina, Puerto RiC'
 Loading...