

Page 1
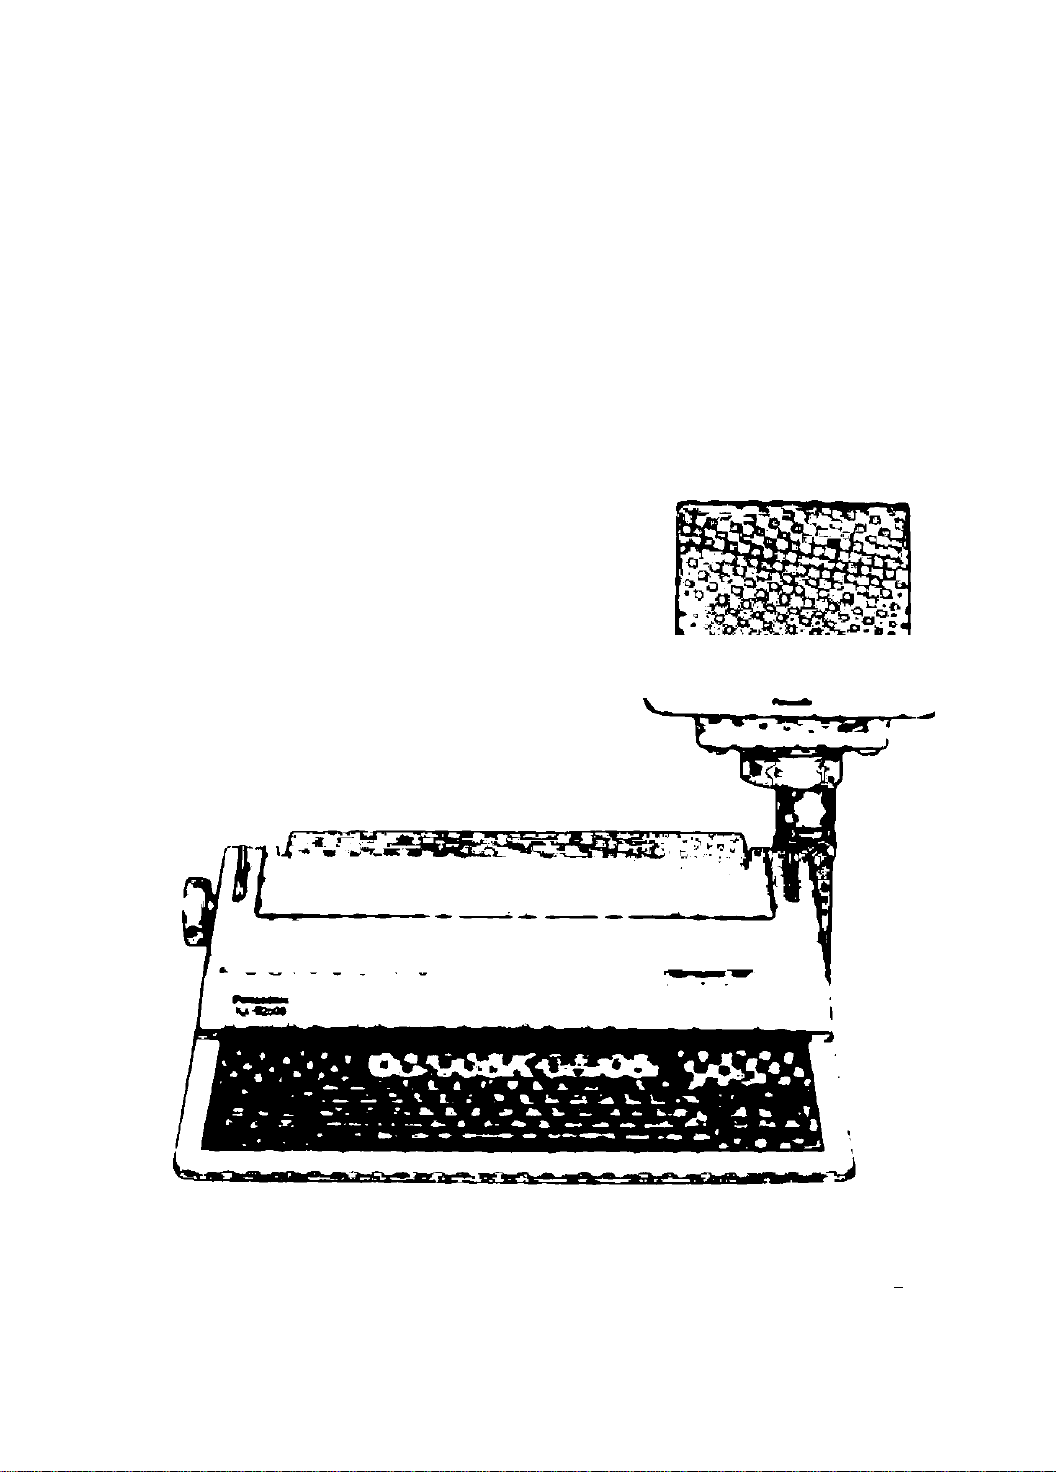
KX-E2500
Operator’s Instruction Manual
Panasonic
•Mm«« ««k opUMMi CUT ifpen
Page 2

FOR USERS IN UNITED STATES ONLY
This equipment has been tested and found to comply with the limits for a Class B digital
device, pursuant to Part 15 of the FCC Rules. These limits are designed to provide reasonable
protection against harmful interference in a residential installation. This equipment generates,
uses and can radiate radio frequency energy and, if not installed and used in accordance with
the instructions, may cause harmful interference to radio communications. However, there is
no guarantee that interference will not occur in a particular installation. If this equipment does
cause harmful interference to radio or television reception, which can be determined by turning
the equipment off and on, the user is encouraged to try to correct the interference by one or
more of the following measures:
— Reorient or relocate the receiving antenna.
— Increase the separation between the equipment and receiver.
— Connect the equipment into an outlet on a circuit different from that to which the receiver
is connected.
—Consult the dealer or an experienced radio/TV technician for help.
The user may find the booklet “Something About Interference” available from FCC local
regional offices helpful.
FCC Warning: To assure continued FCC emission limit compliance, the user must use only
the recommended shielded interface cable when connecting to computer or peripheral. Also,
any unauthorized changes or modifications to this equipment would void the users authority
to operate this device.
WARNING
• When you operate this equipment, the power outlet should be near the equipment and be
easily accessible.
• Power source voltage of this unit is listed on the nameplate. Do not fail to plug the typewriter
into an outlet with the proper voltage.
• To prevent fire or shock hazard, do not expose this product to rain or any type of moisture.
The serial number of the unit may be found on the inside label. For your convenience, note this
number in the space provided below, and retain this book along with your proof of purchase, to
serve as a permanent record in the event of a theft, or for future reference.
MODEL NO.
SERIAL NO.
NAME OF DEALER _
DATE OF PURCHASE
Page 3

Preface
Congratulations' You are about to enter the exciting world of
electronic typing with one of the most advanced electronic type
writers available today
Your Panasonic typewriter has been designed to help you prepare
your typing projects as simply and efficiently as possible
Many of your tedious typing tasks may now be performed quickly
and automatically By reading through the manual, you will learn
how to operate all of the functions which will help you on a day-today basis
It is important that you read this manual and do the exercises It
has been designed to teach you every function your Panasonic
typewriter has to offer Once you have completed this manual, you
will find It easier to do many of your daily typing projects
Take the time to learn everything you can about your new type
writer We are convinced you will find typing much more interest
ing and your finished projects cleaner, more professional looking,
and much easier to do
We hope you enjoy using your Panasonic typewriter and are con
fident you will have many years of reliability ahead of you
Page 4

TABLE OF CONTENTS
Preface
1. LEARNING THE BASICS i
• Part Functions......................................................................................................................... 2
Power On/Off Switch ......................................................................................................... 2
Paper Release Lever ........................................................................................................... 2
Paper Bail Release Lever.................................................................................................... 2
Copy Control Lever............................................................................................................ 3
Cover Interlock Switch ...................................................................................................... 3
CRT Brightness Control...................................................................................................... 3
2. KEYBOARD LAYOUT 4
• Character Keys ....................................................................................................................... 4
• Selector Switches ................................................................................................................... 5
Line Spacing Selector......................................................................................................... 5
Mode Selector..................................................................................................................... 5
Pitch Selector...................................................................................................................... 6
Impact Control Selector..................................................................................................... 6
KB I/KB II Selector........................................................................................................... 7
Accessing KB II ............................................................................................................. 7
• Function Keys......................................................................................................................... 8
3. DEFAULT SETTINGS lo
• Accessing the Default Settings Menu .................................................................................. 10
• Default Settings Menu Overview......................................................................................... 10
Printed Lines Per Page ..................................................................................................... 10
Form Feed ........................................................................................................................ 11
Lines Per Inch .................................................................................................................. 11
Dec Tab Character ......................................................................................................... 11
Low Impact....................................................................................................................... 11
Cursor Shape..................................................................................................................... 12
Blinking Cursor................................................................................................................. 12
Background Color............................................................................................................. 12
Auto Paper Insertion ........................................................................................................ 12
KB Symbols Displayed .................................................................................................... 12
COMM. Auto LF.............................................................................................................. 13
COMM. Paper Feed ......................................................................................................... 13
• Changing the Default Settings.............................................................................................. 13
Changing the Printed Lines Per Page or the Forms Feed setting...................................... 13
4. DISPLAY OVERVIEW i4
• Status Line ........................................................................................................................... 14
Typewriter Mode .............................................................................................................. 14
Memory Mode ................................................................................................................. 15
• Ruler Line ............................................................................................................................ 15
• Display Messages ................................................................................................................ 15
• Display Symbols . . . . :........................................................................................................ 16
• Embed .................................................................................................................................. 17
Embeding Non-Printable Symbols.................................................................................... 17
Displaying Non-Printable Symbols................................................................................... 17
• Changing the Background Color
..........................................................................................
18
Page 5

• Changing the Cursor Shape .................................................................................................. 19
• Turning the Cursor Blinking On and Off.............................................................................. 20
• Changing the KBII Symbols Displayed............................................................................... 21
• Controlled Printer Movement .............................................................................................. 22
Typewriter Mode .............................................................................................................. 22
Memory Mode .................................................................................................................. 22
Activating Controlled Printer Movement ..................................................................... 22
Deactivating Controlled Printer Movement
5. USING THE TYPEWRITER 23
• Help ...................................................................................................................................... 23
Accessing Help in the Typewriter Mode....................................................................... 23
Accessing Help in the Memory Mode........................................................................... 23
Exiting the Help Menu ..................................................................................................... 23
• Automatic Paper Insertion.................................................................................................... 24
Changing the Paper Insertion Position.............................................................................. 24
Resetting the Default Paper Insertion Position
• Automatic Paper Eject ......................................................................................................... 25
Automatically Ejecting the Paper
• Index/Reverse Index............................................................................................................. 25
• Micro Index.......................................................................................................................... 25
Micro Indexing ................................................................................................................. 25
• Margins and Tabs................................................................................................................. 26
Setting Margins and Tabs.................................................................................................. 26
Clearing a Tab Stop........................................................................................................... 27
Clearing All Tabs and Retaining Margins .................................................................... 27
Clearing All Margins and Tabs ........................................................................................ 27
Adjustable Hot Zone......................................................................................................... 28
Setting the Hot Zone...................................................................................................... 28
• Store Ruler ........................................................................................................................... 29
Storing Margins and Tabs................................................................................................. 29
• Recall Ruler.......................................................................................................................... 31
Recalling Margins and Tabs............................................................................................. 31
• Edit Ruler.............................................................................................................................. 32
Editing Margins and Tabs................................................................................................. 33
• Using the Display in the Typewriter Mode
• Corrections ........................................................................................................................... 35
Within the Correction Memory ........................................................................................ 36
Correcting Errors on the Same Line............................................................................. 36
Correcting Errors on Previous Lines............................................................................. 36
Out of the Correction Memory ......................................................................................... 37
Using the No Print Method............................................................................................ 37
Making Manual Corrections.......................................................................................... 38
Correcting Errors on Display in the Typewriter Mode
.....................................................................................
.................................................................
............................................................
..........................................................................
.....................................................
24
22
25
34
40
6. AUTOMATED TYPING FEATURES 4i
• Caps Lock............................................................................................................................. 41
• Bold Print............................................................................................................................ 41
• Underscore ........................................................................................................................... 42
Continuous Underscore..................................................................................................... 42
Word by Word Underscore ............................................................................................. 43
Double Underscore............................................................................................................ 43
Page 6

• Centering............................................................................................................................................ 44
Between Margins ........................................................................................................................... 44
Over a Point ................................................................................................................................... 44
Between Tab Stops ........................................................................................................................ 45
Aligned at the Right Margin ........................................................................................................ 45
• Indent.................................................................................................................................................. 46
Left Indent ..................................................................................................................................... 46
Indenting the Left Side of the Text ......................................................................................... 46
Block Indent .................................................................................................................................. 47
Indenting Both Sides of the Text ............................................................................................. 47
• Decimal Tabulation ........................................................................................................................... 48
Using Decimal Tabulation............................................................................................................ 49
• Temporary Hyphen .......................................................................................................................... 50
Inserting a Temporary Hyphen .......................................................................................... 50
• Permanent Space .............................................................................................................................. 51
Entering a Permanent Space........................................................................................................ 51
•Microspace....................................................................................................................................... 51
Entering a Micro Space................................................................................................................ 51
• Permanent Backspace....................................................................................................................... 52
Entering a Permanent Backspace ............................................................................................... 52
• Half Space .......................................................................................................................................... 52
Entering a Half Space.................................................................................................................... 52
7. MEMORY......................................................................................................................................... 54
• Typing in Memory............................................................................................................................. 55
• Correcting Errors in Memory ......................................................................................................... 56
• Phrase Memory ................................................................................................................................. 57
Storing a Phrase............................................................................................................................. 58
Editing a Phrase............................................................................................................................. 60
Printing a Phrase .......................................................................................................................... 60
Clearing a Phrase.......................................................................................................................... 61
Listing Phrases .............................................................................................................................. 61
Writing Phrases into Text Memory ............................................................................................ 63
Reading Phrases from Text Memory into Phrase Locations .................................................... 64
Phrase Link
Linking Phrases........................................................................................................................ .66
Addressing Envelopes with Phrases ............................................................................................ 67
• Text Memory ..................................................................................................................................... 68
• Main Menu Overview........................................................................................................................ 68
• Create.................................................................................................................................................. 69
Creating a Text.............................................................................................................................. 69
• Edit...................................................................................................................................................... 71
Recalling a Text for Modification ............................................................................................... 71
Recalling a Ruler in Text Memory .............................................................................................. 72
Editing a Ruler in Text Memory ................................................................................................. 73
Changing Line Spacing within a Text ......................................................................................... 74
Hyphenatin Scan ........................................................................................................................... 75
Scanning Text for Hyphenation Requests ............................................................................... 75
Jumping to a Page.......................................................................................................................... 76
Search ............................................................................................................................................. 77
Activating a Search.................................................................................................................... 78
Global Search and Replace .......................................................................................................... 79
in
Activating a Global Search and Replace.................................................................................. 79
.........................
;..................................................................................................... 66
Page 7

Selective Search and Replace .................................................................................................. 80
Activating a Selective Search and Replace......................................................................... 80
Block Move, Copy, Delete, and Print ..................................................................................... 81
Marking a Block of Text .......................................................................................................... 81
Deleting a Block of Text ........................................................................................................... 82
Moving a Block of Text............................................................................................................. 82
Copying a Block of Text ........................................................................................................... 83
Printing a Block of Text ........................................................................................................... 83
Removing Marks from a Block of Text
.............................................................................
84
• Print ................................................................................................................................................... 85
Page End......................................................................................................................................... 85
Activating Page End ................................................................................................................. 86
Deactivating Page End .............................................................................................................. 86
Printing with a Page End Command Activated .................................................................... 87
Typewriter Mode....................................................................................................................... 87
Text Memory Mode................................................................................................................... 87
Printing from within a Text or Phrase....................................................
...............................
88
Halt Print........................................................................................................................................ 88
Halting a Print Command........................................................................................................ 88
Printing from the Main Menu.................................................................................................... 89
Printing from the Main Menu.................................................................................................. 90
Printing Multiple Copies of the Same Text ....................................................................... 91
Headers/Footers............................................................................................................................. 92
Storing a Header/Footer ........................................................................................................... 92
Printing Text with a Header/Footer . . ;
.............................................................................
92
Page Numbering ........................................................................................................................ 93
Printing a Text with Page Numbers......................................................................................... 93
Text Linking .................................................................................................................................. 94
Linking Texts............................................................................................................................. 94
8. APPLICATIONS 98
• Centering Application for Columns ................................................................................................ 99
• Automatic Column Layout ............................................................................................................ 100
Setting a Column Layout ........................................................................................................... 100
• Insert Codes...................................................................................................................................... 102
Creating a Text with Insert Codes............................................................................................. 102
Printing a Text with Insert Codes ........................................................................................../ 104
• Inserting a Manual Page Break in Text Memory......................................................................... 105
• Inserting a Phrase into Text........................................................................................................... 106
• Append
...
......................................................................................................................................... 107
Appending an Entire Text........................................................................................................... 107
Appending a Block of Text ......................................................................................................... 108
• Line Framing .................................................................................................................................. 109
Line Framing on a Printed Page................................................................................................. 109
Drawing Vertical Lines ................................................................................................................ Ill
Drawing Horizontal Lines........................................................................................................... 112
Line Framing while Creating a Text in Memory................................................................... 114
Deleting a Line Frame Command within a Text
......................................................................
115
• Dual Column Typing ..................................................................................................................... 116
Setting a Dual Column Format .................................................................................................. 116
Typing a Dual Column Text in Typewriter Mode ................................................................ 118
•
IV
Page 8

• Dual Column Text in Memory..................................................................................................... 119
Typing a Dual Column Text in Memory................................................................................. 120
Exiting a Dual Column Format in Memory .......................................................................... 123
Printing a Dual Column Text .................................................................................................. 123
• Mail Merge ..................................................................................................................................... 125
Form Letter.................................................................................................................................. 125
Creating a Form Letter........................................................................................................... 126
Mail List ....................................................................................................................................... 127
Creating a Mail List................................................................................................................. 129
Merge Overview .......................................................................................................................... 130
Printing on Individual Sheets of Paper .............................................................................. 130
Printing on Continuous Paper................................................................................................ 130
Merging a Form Letter and Mail List
Qualifying Line............................................................................................................................ 133
Entering a Qualifying Line .................................................................................................... 133
Wildcards.................................................................................................................................... 134
Selectively Printing from a Qualified Mail List........................................................................ 135
Counting Letters to be Merged .................................................................................................. 136
Using the Mail List to Print Envelopes .................................................................................. 136
Using the Mail List to Print Labels ........................................................................................... 139
Merging a Mail List Directly from Disk.................................................................................... 140
• Forms Layout................................................................................................................................... 141
Setting up the Form..................................................................................................................... 142
Stop Positions............................................................................................................................... 143
Storing Stop Positions............................................................................................................. 144
Form Fill-In.................................................................................................................................. 146
Filling-In a Form ..................................................................................................................... 147
Correcting Errors on a Form .................................................................................................... 148
Correcting Errors at a Current Stop Position ..................................................................... 148
Correcting Errors at a Previous Stop Position
Adding Stop Positions.................................................................................................................. 149
Inserting a Stop Position to the Left of the Current Stop........................................................ 149
Deleting Stop Positions ............................................................................................................... 149
Deleting an Automatic Phrase Insertion Stop Position............................................................ 150
Editing Prompts........................................................................................................................... 150
• Calculator...................................................................................................................................... 151
Using the Calculator ................................................................................................................... 151
Fixing Decimal Places.................................................................................................................. 152
...................................................................................
.....................................................................
131
148
9. SPELLCORRECT® 153
• SpellCorrect® Menu Overview...................................................................................................... 154
Typewiter Mode........................................................................................................................... 154
Memory Mode ............................................................................................................................. 154
• Turning SpellCorect® On ............................................................................................................ 155
• Turning SpellCorrect® Off............................................................................................................. 155
• Quit.................................................................................................................................................... 156
Quitting SpellCorrect®.............................................................................................................. 156
• Making Manual Corrections.......................................................................................................... 157
• Alternatives....................................................................................................................................... 158
Displaying Alternate Spelling Suggestions................................................................................ 158
• Correcting a Double Word ............................................................................................................. 159
Page 9

• Skip.................................................................................................................................................... 160
Skipping a Flashing Word........................................................................................................... 160
• Insert................................................................................................................................................ 161
Inserting a Word into the Glossary with SpellCorrect® On................................................. 162
Inserting a Word into the Glossary with SpellCorrect® Off................................................ 163
• Delete................................................................................................................................................. 164
Deleting a Word from the Glossary............................................................................................ 164
• Scan................................................................................................................................................... 165
Scanning a Text or Phrase Memory ...................................................................................
...
165
• Glossary.......................................................................................................................................... 167
Inputing a Text File into the User Glossary........................................................................... 167
Outputing a Glossary to Text Memory...................................................................................... 169
• List.................................................................................................................................................... 171
Listing the Glossary..................................................................................................................... 171
Printing the Glossary .................................................................................................................. 172
• Clear ................................................................................................................................................ 173
Clearing a Glossary..................................................................................................................... 173
10. TEXT MANAGEMENT i74
• Advancing from One Phrase Location to Another........................................................................ 174
• Advancing from One Text Location to Another........................................................................... 175
• List....................................................................;
............................................................................
176
Displaying a List of Text Names................................................................................................. 176
Printng a List of Text Names .................................................................................................. 177
• More ................................................................................................................................................. 178
Renaming a Text from the Main Menu ................................................................................... 178
Renaming a Text while in Memory ........................................................................................... 179
Deleting a Text while in Memory............................................................................................... 180
Deleting a Single Text from Memory
.................................................................................
180
Deleting Multiple Texts from Memory...................................................................................... 182
• Clearing All Text Memory.............................................................................................................. 184
• Clearing All Pharse Memory.......................................................................................................... 185
• Clearing All Memory ...................................................................................................................... 186
• Resetting the Printer ....................................................................................................................... 187
• Displaying the Amount of Memory Available .............................................................................. 187
• Word Count...................................................................................................................................... 188
Counting Total Words................................................................................................................. 188
Counting Selective Words........................................................................................................... 189
11. DISK .............................................................................................................................................. 190
• Disk Menu Overview ...................................................................................................................... 190
• Inserting a Micro-Floppy Disk....................................................................................................... 191
• Ejecting a Micro-Floppy Disk......................................................................................................... 191
• Protecting a Micro-Floppy Disk from Erasure ......................................................................... 192
• Formatting a Disk............................................................................................................................ 193
•Write
....................................................................
Writing a Single Text to Disk
....................
..................................................................., . . 195
.............................................................................. 195
Writing Multiple Texts to Disk .................................................................................................. 197
• Read .................................................................................................................................................. 199
Reading a Single Text into Memory........................................................................................... 200
Reading Multiple Texts into Memory . •.............................................................................. 201
vi
Page 10

• List .................................................................................................................................................... 203
Displaying a Disk Directory........................................................................................................ 203
Printing a Disk Directory............................................................................................................ 205
• More ................................................................................................................................................. 206
Renaming a Text on Disk............................................................................................................ 206
Deleting a Single Text from Disk ............................................................................................... 208
Deleting Multiple Texts from Disk............................................................................................. 210
Printing a Text from Disk........................................................................................................... 213
Loading Texts from Other Panasonic Typewriters.................................................................. 215
Loading an ASCII file.................................................................................................................. 217
• Tutorial............................................................................................................................................. 219
12-1. SCREEN MESSAGES 221
12-2. CODE OPERATIONS CHART 223
12-3. CAUTIONS..................................................................................................................................... 226
• Batteries .........................................................................................................................................' 226
• Cleaning............................................................................................................................................ 226
• Handling Disks ................................................................................................................................ 226
• Cables................................................................................................................................................ 226
12-4. CHANGING SUPPLIES
• Changing the Ribbon Cartridge .................................................................................................... 227
• Changing the Correction Tape..................................................................................................... 228
• Changing the Daisywheel ............................................................................................................... 229
• Changing the Batteries ................................................................................................................... 230
12-5. PLATEN REMOVAL AND INSTALLATION 23i
• Removing the Platen ....................................................................................................................... 231
• Installing the Platen
12-6. SHIPPING INFORMATION 233
• Disconnecting the Display Unit ...................................................................................................... 233
12-7. TROUBLESHOOTING 234
12-8. SPECIFICATIONS 235
12-9. OPTIONS......................................................................................................................................... 236
12-10. COMMUNICATIONS (with KX-EIP2) 237
• Connection to a Computer.............................................................................................................. 237
12-11. INDEX .......................................................................................................................................... 238
....
.................................................................................................................... 232
221
Vll
Page 11
1. LEARNING THE BASICS
® ® ®
© Power ON/OFF Switch
@ Platen Knob
Manually feeds paper
@ Paper Bail Release Lever
Moves the paper bail away from the
platen
© Interface Connector
(On the rear of the typewriter)
You can use this units as a printer by
connecting the optional Interface
Adaptor KX-EIP2 to receive data
from a computer
® Paper Support
@ Top Cover
@ Paper Release Lever
Releases paper
(g) Floppy Disk Drive
(D CRT (Screen)
® CRT Brightness Control
Page 12

Part Functions
Power ON/OFF Switch
The power ON/OFF switch is located toward the back left-hand
side of the typewriter.
When you turn the machine on, the daisywheel will spin to position
itself accurately, the printer will position itself to the left margin
and the typewriter will resume the margins and tabs that were set
when it was turned off.
Paper Release Lever
Pulling forward on the Paper Release Lever releases the pan which
holds the paper tight against the platen and enables the operator
to adjust the paper freely.
Paper Bail Release Lever
Pulling forward on the Paper Bail Release Lever moves the paper
bail away from the platen. Additional forward movement of this
lever activates the automatic paper insert function.
Page 13
Copy Control Lever
Located inside the unit on the right side underneath the ribbon
cartridge is a green lever, which is for copy control. Position 1 is
for one to three copies; position 2 is for three to five copies
(dependent upon paper weight). Set according to your require
ments.
Cover Interlock Switch
Cover Interlock Switch
The top cover has a safety interlock switch which deactivates the
printer and keyboard whenever the top cover is opened.
CRT Brightness Control
The Brightness Control knob, which is located on the lower righthand side of the CRT, enables you to choose the level of “bright
ness” or “darkness” that makes it most comfortable for you to
view your screen.
Page 14
2. KEYBOARD LAYOUT
In order to simplify the explanation of the typewriter and its capabilities, the keyboard has been
divided into three (3) separate sections: Character Keys, Selector Switches, and Function Keys.
Selector Switches
'Y'
Function
Keys
Character Keys
Selector
Character Keys
Switches
^ f
-------
--------
^
Function
Keys
The KX-E2500 Character Keys are clearly labeled for ease of use.
All coded functions are labeled in blue and correspond with the
CODE key, which is also labeled in blue. All operations which
need to be performed with the SHIFT key are framed in a box.
Keys with one or two characters to the right of the traditional
characters offer special symbols. These symbols are accessed in KB
II. For more information on KB II refer to page 7.
Page 15

Selector Switches
A total of five selector switches are located on the KX-E2500.
Line Spacing Selector
The Line Spacing Selector is located on the top left of the key
board. It is marked 1, ]V2, 2, and 3 and is used to control the
number of lines between each RETURN.
You may also select from three different lines per vertical inch
settings which are accessed through the default menu discussed on
page 11. These choices and their uses are listed below:
Mode Selector
The Mode selector is located to the immediate right of the line
spacing selector. It controls your typing output by offering you
three modes of operation: NORM, DISP, JSTFY.
5.25 — Legal Applications (court reporting)
6 — Normal Correspondence
8 — Used in conjunction with 15 pitch
f
n
NORM Deactivates your display screen allowing you to type
directly on the paper. When you come to the end of a
line, a manual return is required.
DISP Accesses the display screen allowing you to view one
line of text before it is printed on the paper. DISP will
also trigger an automatic return at the end of each line.
JSTFY Works the same as the DISP mode. However, in the
JSTFY mode, your text will print with an even right
margin, giving your work a clean, professional look.
Page 16
Pitch Selector
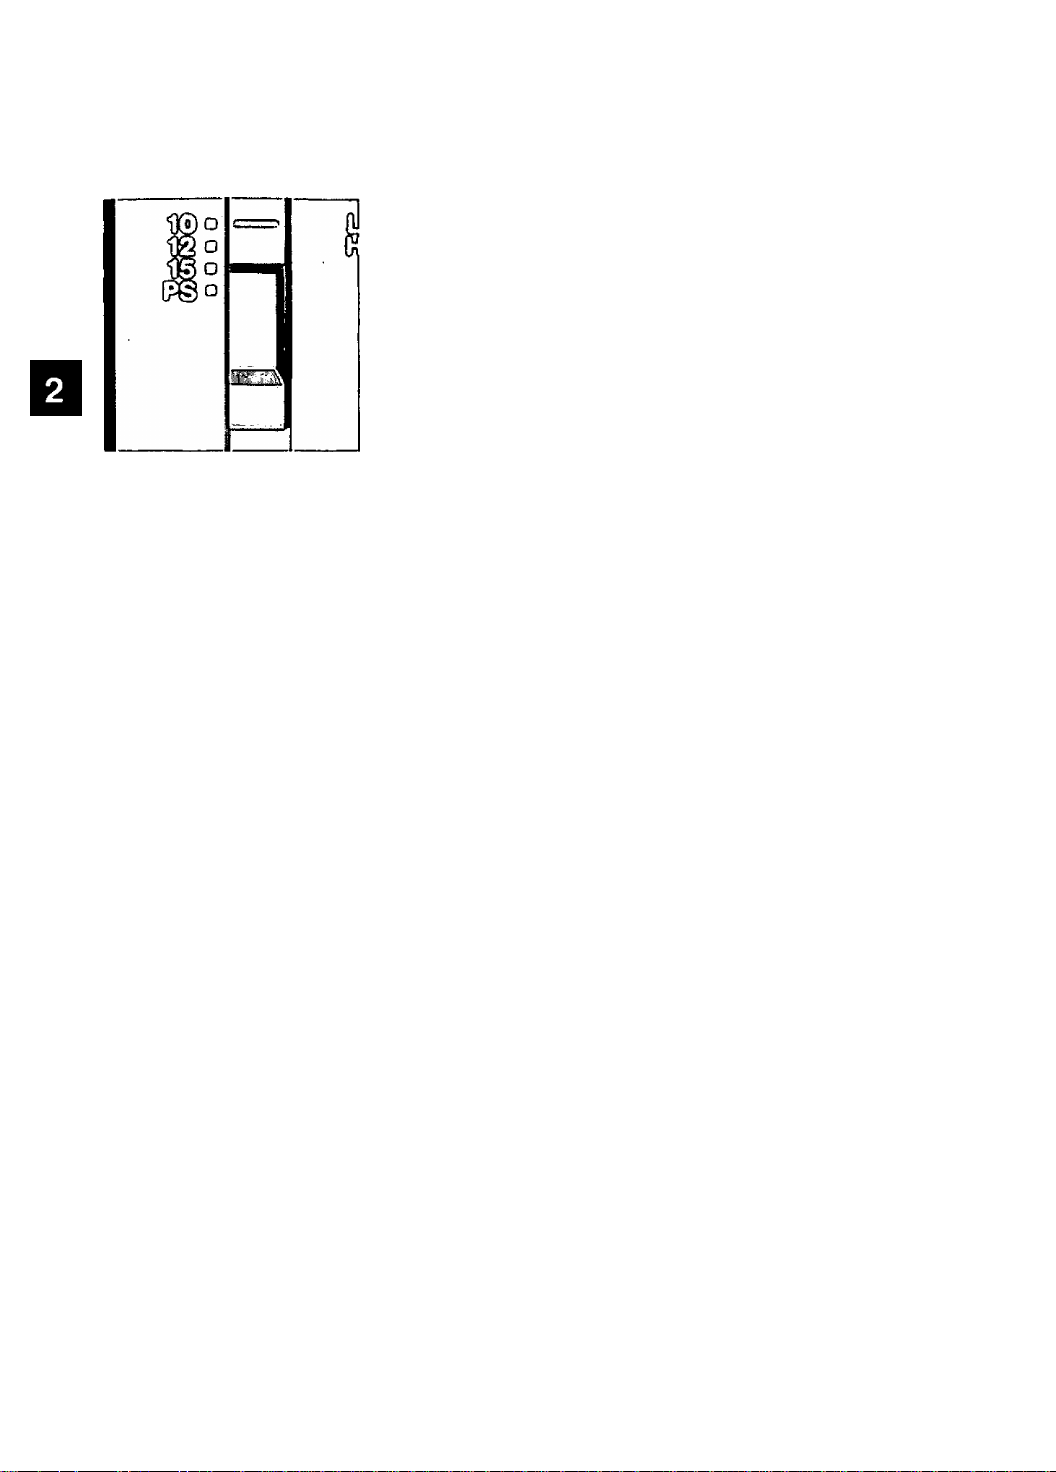
On the right side of the keyboard is the Pitch Selector which is
labeled 10, 12, 15, and PS. The Pitch Selector indicates the number
of characters printed per inch as outlined below:
¡L O
ra Ü
10 PICA
12 ELITE
15 MIKRON
PS PROPORTIONAL
For the best results, your Pitch Selector switch should correspond
with the pitch of the daisywheel in your typewriter.
10 Characters per inch
12 Characters per inch
15 Characters per inch
Variable Spacing
Impact Control Selector
The Impact Control Selector, which is located to the right of the
Pitch Selector, dictates to the printer how hard the characters on
the daisywheel will strike the page. You have a choice of two
settings: L (light) and H (heavy).
Page 17

KB l/KB II Selector
The KB I/KB II selector switch is located to the far right of the
keyboard. KB 1 allows printing of the alpha/numeric symbols nor
mally associated with a traditional keyboard. On keys which con
tain three or more characters, KB II enables you to access the
symbols located on the right side of the traditional characters.
Accessing KB II
• Move the selector switch to KB II.
The symbols to the right side of the traditional characters are
now available for use.
If the symbol is located on the upper right side of the traditional
character,
• Press SHIFT -b the Desired Key
If the symbol is located to the lower right side of the traditional
character,
• Press the Desired Key (no shift is required)
Panasonic offers two types of daisywheels:
D1—For International Symbols
D2—For American Symbols
This is a sample of the special keyboard II symbols on our 100
series (Dl) Daisywheels which allow typing in other languages.
£”‘seNh'' i^l
This is a sample of the special keyboard II symbols on the 200
series (D2) Daisywheels which are commonly used for applications
in legal, scientific, publishing, and other specialized typing.
2 -
' ' < > § If
Page 18
Function Keys
MAIN MENU
PRINT
Displays a list of memory options. The internal
memory, disk, and print functions are all ac
cessed through the Main Menu key.
Allows you to center four ways:
between margins, over a point, between tabs,
or right margin flush.
Sets a temporary left margin.
Advances the printer to the next tab position
and aligns the decimal point or comma on the
tab position.
Sets and releases the automatic underscore
command.
Initiates the printer while in memory. It ad
vances to “fill-in” positions in Forms Layout.
The No Print mode is activated when the
PRINT key is used in conjunction with the
CODE key.
Displays HELP menu for Coded functions.
[-SHIFT
REPEAT
SPELL
CORRECT
CODE
Margin release for left and right margins.
Advances the printer to the next tab position,
and aligns all characters to the right of the tab
setting.
Allows typing of capital letters without holding
down the SHIFT key. Caps lock is activated
when used with the CODE key.
Allows typing of capital letters. It also accesses
the automated features which are framed in a
box on the key tops.
Makes every key a repetitive key.
Turns the SpellCorrect® feature on and off.
Is used in conjunction with other keys (most of
which are clearly labeled in blue) to perform
automated functions.
Page 19
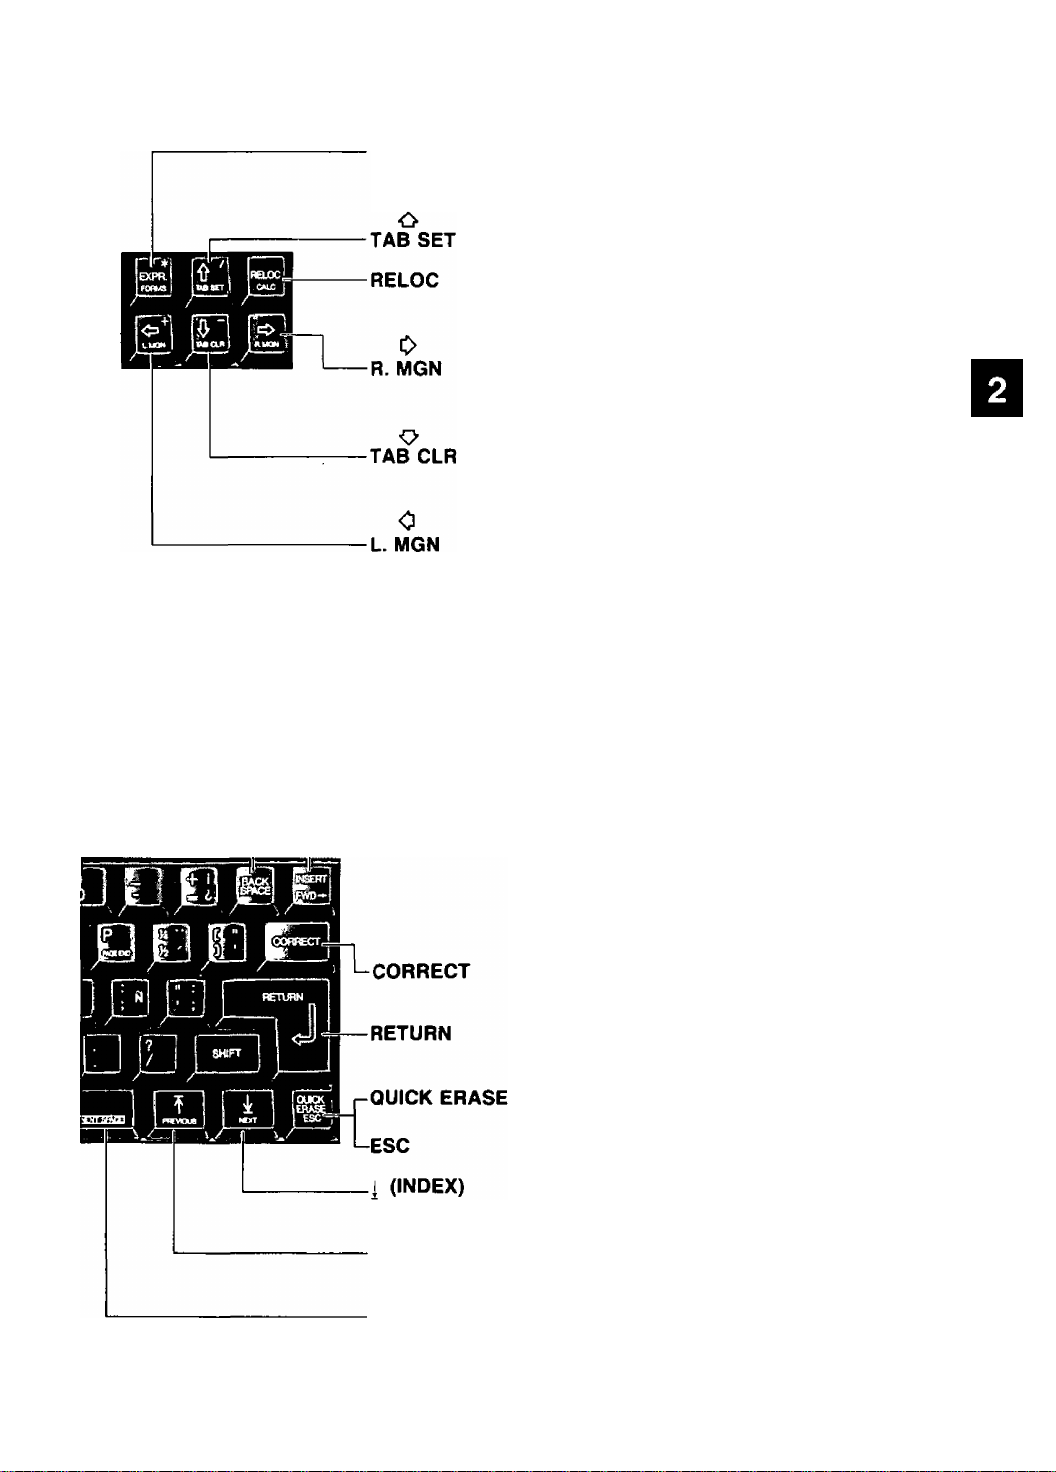
EXPR
Moves the printhead to the beginning of the
line without line spacing.
Moves the cursor up one line in memory.
Sets TAB stop positions (maximum 28).
Moves the printhead to the last character on
the paper.
Moves the cursor to the right in memory.
Sets the right margin. Used with the CODE
key, it sets the hot zone.
Moves the cursor down one line in memory.
Clears TAB stops. When used with the CODE
key, it clears all tabs, or all margins and tabs.
Moves the cursor to the left in memory.
Sets the left margin.
BACKSPACE
INSERT
Moves the printer one space to the left.
The INSERT/FWD-* key is used primarily
when editing text on the display.
In the Typewriter Mode, it is the Forward
(FWD-*^) key and advances the cursor one char
acter to the right on the display.
In the Memory Mode, it acts as a toggle be
tween the insert and.overtype methods of typ
ing. Insert, which is the default setting, enables
you to add words between existing text. Over
type replaces existing text with newly typed
characters.
Deletes the character to the left of the
printhead.
Advances one line down, and brings the
printhead back to the left margin.
Deletes the entire word to the left of the
printhead.
Cancels current pop up or prompt.
T (REVERSE
INDEX)
SPACE BAR
Advances a Vl line toward the bottom of the
page.
Moves a Vl line toward the top of the page.
Advances the printhead to the right. When
used with the CODE key, it moves the
printhead Vfeth of an inch if your pitch is set on
10.
Page 20
3. DEFAULT SETTINGS
The KX-E2500 is shipped with pre-set characteristics such as the background color of your display
or the number of printed lines per page. The default settings menu enables you to change the
pre-programmed characteristic of the typewriter to meet your individual requirements. When you
make a change to the default settings menu, it will remain until you access the default settings again.
Accessing the Default Settings Menu
D
D6FAU1.T
Press CODE + D (for Default)
Your screen will prompt:
DEFAULT SETTINGS
II Printed Lines Per Page
Form Feed
Lines Per Inch
Dec Tab Character
Low Impact
Cursor Shape
Blinking Cursor
Background Color Black White
Auto Paper Insertion
KB Symbol Displayed D1 D2
COMM. Auto LF No Yes
COMM. Paper Feed
RETURN to Enter, RELOC
Default Settings Menu Overview
1
5.25
Period Comma
Yes
Block
No Blink
Default No
No
to Enter All or ESC
[54] lines
[56] lines
6 8
No
Underline
Yes
10
Printed Lines Per Page
Printed lines per page defines the number of lines to print on each
page.
Example:
You are using a standard sheet of paper (8.5"xH") and the auto
paper insertion is set at 7 lines for a one inch margin at the top of
the paper. In addition, you may also require a one inch bottom
margin. If you subtract 12 lines from the total available lines (66)
this would equal 54 printed lines per page.
Page 21

Form Feed
The paper length is calculated in lines and relates to the lines per
inch setting To arrive at this calculation, simply multiply the
length of the paper in inches by the number of lines to the inch
Example 6 vertical lines per inch
H" letter size paper=66 lines
14" legal size paper=84 lines
Lines Per Inch
The number of lines per inch represents the spacing between two
printed lines on a page When using a traditional format, 6 is the
standard setting For legal applications 5 25 spacing is usually
appropriate When using a 15 pitch pnntwheel, the line spacing
should be set on 8 to minimize excess white space between the
lines
Dec Tab Character
You may choose to align numbers at the decimal point (period) or
comma
Low Impact
The KX-E2500 offers low impact ribbons to reduce noise levels
If you are using this ribbon type, select “Yes ”
NOTE: If you select “Yes” and you are not using a low impact ribbon,
Panasonic will not assume responsibility for inconsistent print
quality If you experience inconsistent print quality, change
this setting to correspond with the correct ribbon type
11
Page 22

Cursor Shape
The cursor indicates the current position on the Display Screen.
You can select Block or Underline for the cursor shape.
Blinking Cursor
In addition to the shape of the cursor, the cursor can be changed
to a blinking cursor or non-blinking cursor.
Background Color
The default background color is a white background with black
characters. The background color can be reversed at any time by
selecting Background Color and choosing black background with
white characters.
Auto Paper Insertion
The typewriter is pre-programmed to insert your paper seven (7)
lines from the top of the page. You can change your insertion
position in Typewriter Mode by using CODE + A. When the in
sertion position is changed, the word “No” will be highlighted on
the Auto Paper Insertion line of the Default settings menu. The
Auto Paper Insertion selection on the Default settings menu is
provided so that you can re-set your insertion position to the
original default setting of a 1" top margin quickly and easily.
12
• To re-set the default insertion position, simply select Default
on the Auto Paper Insertion line and press RELOC.
KB (Keyboard) Symbols Displayed
The default KBII symbols displayed are International symbols
(Dl) to agree with the D1 daisywheel shipped with your machine.
The KBII symbols should only be changed when a D2 daisywheel
for American symbols is used in the typewriter. This selection
enables you to display the correct symbols to correspond with your
daisywheel.
Page 23

COMM. Auto LF
Communication Auto Line Feed adds a carriage return after each
printed line. This feature should only be selected after referencing
the KX-EIP2 instruction manual and your computer software
manual.
COMM. Paper Feed
Auto Paper Feed instructs the typewriter to eject the paper after
each page is printed. This feature should only be selected after
referencing the KX-EIP2 instruction manual and your computer
software manual.
Changing the Default Settings
Follow the instructions below for all selections except Printed
Lines Per Page and Form Feed.
1 Use the cursor keys to select the desired option
2 Highlight the desired selection
3 Press RETURN to advance to the next line
or
Press RELOC to skip the other selections and confirm the
changes.
Changing the Printed Lines Per Page or the Forms Feed Setting
1 Position the cursor on the line to be changed.
2 Press CORRECT twice to delete the number diaplayed
3 Type the new entry
4 Press RELOC to skip the other selections and confirm the
change
13
Page 24

4. DISPLAY OVERVIEW
The KX-E2500 offers a high resolution black and white reversible display screen. You can reverse
the default setting of white background with black characters to black background with white
characters by following the instructions on page 17. The KX-E2500 displays 80 characters across
and 23 lines down. However, in typewriter mode only one line of text is displayed.
Status Line
The first line of the display is called the Status Line. It will display
a prompt to inform you of your current selections such as bold,
underscore, indent, etc. The status line differs slightly in the type
writer and memory modes. Therefore, each mode will be explained
separately.
Typewriter Mode
The character counter is displayed in the upper right hand corner
of the display in typewriter mode only. This number indicates the
number of characters available between the left and right margin.
As you type, this number will decrease and tell you how many
characters remain.
Status Line
......1.........2,
Ruler Line
Below is an example of how the status line is displayed in type
writer mode:
Character Counter
COUNT 115
14
Page 25
Memory Mode
The text name or phrase number you are currently in is displayed
at the beginning of the status line. The word “INSERT” is dis
played in the center of the status line indicating that you are in the
default typing mode. If this word is not displayed you are in an
overtype mode and will replace existing text as you type. The
COLUMN number indicates your cursor position on the ruler. The
LINE number and PAGE number your cursor is positioned on are
also displayed on the status line.
Below is an example of how the status line is displayed in memory
mode:
80 characters
Status LineRuler Line -
■ (TEXT NAMEi
■L. ........ 1
E
Cursor -
Ruler Line
INSERT
. 3. ........ 4
COLUMN
0 LINE 1 PAGE 1
.6, .,7.
23
lines
Beneath the Status Line, you will see a dotted Ruler Line which
represents the current margin and tab settings. Every tenth space
is marked with a numeric value (1 = 10, 2=20...). The margin and
tab settings are indicated on the ruler line as follows:
L
Left Margin
R
Right Margin
T
Tab Stop
H
Beginning of the Hot Zone
Ht
Hot Zone and Tab Stop
Display Messages
The last line of your display is light grey regardless of the back
ground color you select. This light grey line will display prompts
to guide you through your typing projects. Refer to page 221 for
a complete list of all display messages offered to you on your
system.
15
Page 26

Display Symbols
Below is a complete list of display symbols which will appear on your screen. These symbols will
not print:
Manual Return
Bold Print
(activated/deactivated)
Centering
Q
Decimal Tabulation
B
Insert Code (Stop Code)
D
Index Command
i
Reverse Index Command
T
Half Space
Open/Close of Block Move,
El
Copy, Delete
Left Indent
Permanent Backspace
Temporary Hyphen
Permanent Space
Tab Command
Block Indent
Underscore - Continuous
(activated/deactivated)
Q Underscore-Word by Word
(activated/deactivated)
Double Underscore
0
(activated/deactivated)
X,Y,Z Margin Format
Q End of Text
Q Line Framing
Microspace
^ Form Feed (Auto Paper Eject)
I I I Dual-Column Command
Set/Reset
w Dual-Column Command
change
R Mail Merge Variable
/ Mail List Record Header
T,l5,?,3 Line Spacing
16
Page 27

Embed
The symbols listed on the previous page are displayed when a
feature is turned on or off. As a result, your text will shift one
character to the right for each screen symbol. Many times it is
difficult to visualize how your text will look with these symbols on
screen. Therefore, the KX-E2500 enables to embed (hide) these
non-printable symbols so that you can get a better idea of how
your printed text will look. This feature is extremely useful when
using line framing to box information because the lines are not
visible until the display symbols are embeded.
Embeding Non-Printable Symbols
COM -f-
COM -j-
• Press CODE + =
Displaying Non-Printable Symbols
• Press CODE + = again
17
Page 28

Changing the Background Color
The KX-E2500 enables you to reverse your display. The default
setting is a white background with black characters. You can
change the default to black background with white characters by
using the default settings menu. The new setting will remain the
default until you change it.
D
+
aC'AULT
1 Press CODE + D
The screen will prompt:
DEFAULT SETTINGS
o
TAB CL A
Printed Lines Per Page
Form Feed
Lines Per Inch 5.25 6 8
Dec Tab Character Period Comma
Low Impact
Cursor Shape
Blinking Cursor No Blink
Background Color Black White
Auto Paper Insertion Default No
KB Symbol Displayed D1 D2
COMM. Auto LF No Yes
COMM. Paper Feed No Yes
RETURN to Enter, RELOC to Enter All or ESC
Yes No
Block Underline
2 DOWN ARROW (O) to the Background Color line
[54] lines
[66] lines
3 LEFT ARROW (0) once to highlight Black
4 Press RELOC to skip the other selections
The typewriter will “beep” once to confirm and the display
will be reversed. The background color can be returned to the
default setting by following the instructions outlined above
and selecting “white.”
18
Page 29

Changing the Cursor Shape
The KX-E2500 enables you to change the cursor shape from a
rectangular to an underline.
D
+
[JtFAJLT
1 Press CODE + D
The screen will prompt:
DEFAULT SETTINGS
[54] lines
[66] lines
No
Blink
White
Yes
Yes
o
TABCLH
Printed Lines Per Page
Form Feed
Lines Per Inch
Dec Tab Character
Low Impact Yes
Cursor Shape
Blinking Cursor No
Background Color
Auto Paper Insertion
KB Symbol Displayed
COMM. Auto LF No
COMM. Paper Feed No
RETURN to Enter, RELOC to Enter All or ESC
1
5.25 6 8
Period Comma
Block Underline
Black
Default No
D1 D2
2 DOWN ARROW (O) to the Cursor Shape line
To change the shape from a rectangle to an underline,
3 Highlight “Underline”
4 Press RELOC to skip the other selections
The typewriter will “beep” once to confirm the change.
19
Page 30

Turning the Cursor Blinking On and Off
The KX-E2500 enables you to display a “blinking” or “non-blink
ing” cursor.
CODE
__
D
+
'0'
TABCLN
1 Press CODE + D
The screen will prompt:
DEFAULT SETTINGS
II Printed Lines Per Page
Form Feed
Lines Per Inch
Dec Tab Character
Low Impact
Cursor Shape
Blinking Cursor
Background Color
Auto Paper Insertion
KB Symbol Displayed
COMM. Auto LF Ko Yes
COMM. Paper Feed No Yes
RETURN to Enter, RELOC
1
5.25
Period Comma
Yes
Block Underline
No
Black White
Default No
D1
to Enter
All or ESC
2 DOWN ARROW (<>) to the Blinking Cursor line
[54] lines
[66] lines
6 8
No
Blink
D2
3 LEFT ARROW (C[>) once to highlight No
20
4 Press RELOC to skip the other selections
The typewriter will “beep” once to confirm the change.
Page 31

Changing the KBIl Symbols Displayed
The KX-E2500 is shipped with a D1 or International Daisywheel
and the default is set to display International symbols which cor
respond with the daisywheel, shipped with your typewriter.
Daisywheels with American symbols (D2 daisywheels) are avail
able. When using an American D2 daisywheel, you have the ability
to change the characters displayed to agree with your American
daisywheel by following the stops below:
+
D
DEFAULT
O
TASCLR
1 Press CODE + D
The screen will prompt:
DEFAULT SETTINGS
1 Printed Lines Per Page
Form Feed [56] lines
Lines Per Inch 5.25 6 8
Dec Tab Character Period Comma
Low Impact Yes No
Cursor Shape
Blinking Cursor No
Background Color Black White
Auto Paper Insertion
KB Symbol Displayed
COMM. Auto LF No Yes
COMM. Paper Feed
RETURN to Enter, RELOC to Enter All or ESC
1
Block Underline
Default No
D1 D2
No Yes
[54] lines
Blink
2 DOWN ARROW (<^) to the KB Symbol Displayed line
3 RIGHT ARROW (^) once to select D2 for American symbols
4 Press RELOC to skip the other selections
The typewriter will “beep” once to confirm the change.
Although the KBII characters will display American symbols,these
symbols will not print until you insert a D2 daisywheel in the
typewriter.
21
Page 32

Controlled Printer Movement
Controlled Printer Movement enables you to advance the
printhead as you type on the display without printing. This feature
is available to you in both the typewriter and memory modes.
Typewriter Mode
When using controlled printer movement in the typewriter mode,
the line displayed will print when the KX-E2500 automatically
returns at the end of a line or when the following keys are pressed:
RETURN, TAB, DEC TAB, CENTER, PRINT, HIND, CODE + E,
CODE + F, CODE + K, or CODE + P.
Memory Mode
When using controlled printer movement in the memory mode,
the printhead will move as you type without printing. When you
reach a page end or you press
The system will return to the top of the paper but it will not eject
it from the typewriter.
CODE + E to insert a page break.
CODE
CODE
Activating Controlled Printer Movement
+
RETURN n
• Press CODE + RETURN
Deactivating Controlled Printer Movement
+
RETURN r
• Press CODE -f RETURN again
22
Page 33

5. USING THE TYPEWRITER
This section will introduce you to the fundamental operations of the KX-E2500. Read through it
and do the exercises to familiarize yourself with each operation.
Help
The HELP key has been designed as a quick reference of all coded
functions. The HELP key will display a list of coded functions that
are available in both the typewriter and memory modes.
The HELP key also doubles as a margin release key in typewriter
mode; therefore, the HELP key must be pressed twice to access a
help menu in the typewriter mode.
Accessing Help in the Typewriter Mode
■ J
HELP
MR.
• Press the HELP key twice
• Press RETURN to advance to each screen
or
• Press EXPR to return to the first help menu
Accessing Help in the Memory Mode
• Press the HELP key once
• Press RETURN to advance to each screen
or
• Press EXPR to return to the first help menu
Exiting the Help Menu
Press the HELP key again
23
Page 34

Automatic Paper Insertion
The Panasonic typewriter is pre-programmed to insert your paper
seven (7) lines from the top of the page by pulling the paper bail
release lever toward you. You have the ability to change the
insertion position to meet your requirements (e.g., below letter
head paper). The insertion position you set will remain until you
change it.
The KX-E2500 also enables you to reset the insertion position to
the default of seven lines from the top of the paper quickly and
easily.
Changing the Paper Insertion Position
1 Place your paper against the paper support guide with the left
edge of the page aligned with 0
2 Pull the Paper Bail Release Lever towards you until the paper
is inserted
3 Press RETURN, INDEX ( ^ ), or REVERSE INDEX ( ^ ) to
position the paper at the desired insertion point
+
+
n
D
DtMULI
o
rASCUt
4 Press CODE + A
Resetting the Default Paper Insertion Position
1 Press CODE + D
2 DOWN ARROW (<>) eight times to reach the Auto Paper
Insertion line
3 Highlight Default
4 Press RELOC to skip to the other selections
The typewriter will “beep” once to confirm the change.
24
Page 35

Automatic Paper Eject
The KX-E2500 has been pre-programmed for standard SV^xU"
paper (66 lines), and will eject the paper based on that setting If
you are using legal or ledger size paper (longer than 11"), the paper
will not eject fully from the typewriter unless you change the
default form feed setting (see page 11)
Automatically Ejecting the Paper
+
E
Es>£CT
• Press CODE + E
Index (i) and Reverse Index (|)
The INDEX ( ^ ) key allows you to advance the paper a Vl line
toward the bottom of the page The REVERSE INDEX ( f ) key
allows you to advance the paper a Vl line towards the top of the
page
These keys are useful when typing subscripts and superscripts You
will also use them m conjunction with other features discussed later
in this manual
The scientific equation for water is H^O.j
To type this, you would first enter “H”
h^EXT
T
1 Press INDEX ( ^ ) and type “2”
2 Press REVERSE INDEX (I ) to reposition the printer on the
actual typing line and type O
Micro Index
+
or
+
Micro Indexing moves the printer vertically m increments of
l/48th of an inch up or down on the paper This is extremely useful
when aligning the printer with pre-printed forms
Micro Indexing
• Press SHIFT + INDEX ( ^ ) or SHIFT + REVERSE INDEX
(T)
The SHIFT key must be held down while pressing either key
NOTE: Micro Indexing is not stored in the correction memory
25
Page 36

Margins and Tabs
Because there are no preset margins and tabs, the KX-E2500
enables you to set margins and tabs to meet your requirements. A
maximum of 28 tab stops can be set. The “Ruler” line discussed
on page 15 displays the current margin and tab settings.
The KX-E2500 enables you to store three frequently used margin
formats (margins, tabs, and hot zone) referred to as rulers under
“X”, “Y”, or “Z.” These formats can be recalled at any time and
are available in addition to the current margin and tab settings.
The following keys are used to set and clear margin and tab
settings:
I SPACE BA^
I SPACE BARI
O'
TA0$rr
L. MGN
R.MGN
TAB SET
TAB CLR
CODE + R.MGN
M. R.
Left Margin
Right Margin
Tab Settings
Clears Tab Settings
Hot Zone
Margin Release
Setting Margins and Tabs
1 Position the mode selector on NORM
2 Press SPACE BAR
This moves the printer toward the right. To set the left margin
to the left of the current one, press M.R. and BACKSPACE
to reach the desired position.
3 Press L.MGN
4 Press SPACE BAR to position the printer at a desired Tab
stop
5 Press TAB SET
26
Repeat the last two steps for each tab stop required (max.
28).
1
SPACE BAR I 6 Press SPACE BAR to reach the desired right margin setting
To set the right margin to the right of the current one, press
M.R. to space beyond the current margin setting to the de
sired position.
7 Press R.MGN
8 Press RETURN
' <=y
Page 37

Clearing a Tab Stop
1 TAB to the desired tab setting
2 Press TAB CLR
Clearing All Tabs and Retaining Margins
1 SPACE BAR~| / TAB
+
+
Q
TAOCUt
O
TAeCLfI
1 SPACE or TAB to the first tab position
2 Press CODE + TAB CLR
Clearing Ail Margins and Tabs
1 Press RETURN
This positions the printer at the left margin. (The printer must
be at the left margin to clear all margin and tab settings.)
2 Press CODE + TAB CLR
The printer will move to the far left, clearing all existing
margins and tabs.
27
Page 38

Adjustable Hot Zone
The Hot Zone represents the number of spaces between the bell
and the right margin. It is preprogrammed for 0.7 of an inch
(7 spaces in 10 pitch) from the right margin. You may change the
setting to within one inch of the right margin.
Setting the Hot Zone
1 Position the MODE selector on NORM
SPACE BAR
) / I "• I
CODE -|-
BACK
SPACE
2 Press SPACE BAR or TAB to position the printer at the right
margin
3
BACKSPACE to the required new bell position
(maximum 10 spaces from the right margin)
4 Press CODE + R.MGN
Margin and Tab Exercise
For the first exercise, set your typewriter as indicated below:
The paper guide is at 0
The pitch selector is set at 10 (PICA)
The daisywheel in the unit is 10 pitch
The MODE selector is on NORM
1 Press RETURN
28
2 Press CODE + TAB CLR
Set the margins and tabs below:
Left margin
Tabs 30, 45, 60
Right margin
15
74
4 Press RETURN
Your Counter will show the number of characters available
on the writing line.
Page 39

store Ruler
To eliminate the tedious task of manually setting margins, tabs and
hot zones with each new document, the KX-E2500 allows you to
store three frequently used margin formats in memory. These
formats are stored in locations “X”, “Y”, and “Z” and can be
recalled for use when typing in or out of text memory.
Follow the instructions below and store the margin format that you
set in the last exercise into memory.
Storing Margins and Tabs
+
FOflMAT
F
S
1 Press CODE + F (Margin Format)
Your display will prompt:
RULER
Edit Ruler
Recall Ruler
Store Ruler
RETURN or ESC
2 Press S (for Store Ruler)
Your display will prompt:
STORE RULER
Ruler
Ruler
RETURN or ESC
Press the letter X (Y or Z)
The typewriter will “beep” once to confirm that the ruler has
been stored.
29
Page 40
Exercise
Store the following formats into Memory.
Format Y
O
T4ACLH
+
1 Press CODE + TAB CLR to clear existing margins and tabs
2 Set the margins and tabs below:
Left margin 11
Tabs 20, 33, 45, 54
Right margin
64
3 Press RETURN
■J
F
+
format
4 Press CODE + F
5 Press the letter S
6 Press the letter Y
□
Format Z
30
TUCLR
+
1 Press CODE + TAB CLR to clear existing margins and tabs
Set the margins
Left margin 11
Tabs 26, 39, 49, 59
Right margin
and tabs below:
66
3 Press RETURN
F
+
FORMAT
4 Press CODE + F
5 Press the letter S
6 Press the letter Z
□
Page 41

Recall Ruler
Now that you have three margins stored into memory, lets learn
how to recall them for future use.
Recalling Margins and Tabs
F
+
FORMAT
1 Press CODE + F (Margin Format)
Your display will prompt:
RULER
Edit Ruler
Recall Ruler
Store Ruler
RETURN or ESC
2 Press the letter R (for Recall Ruler)
Your display will prompt:
RECALL RULER
Y Ruler
2 Ruler
RETURN or ESC
Q/Q/Q 3 Press the letter X (Y or Z)
The margin format has been recalled, and is ready for use.
It’s that simple!
31
Page 42

Edit Ruler
The typewriter mode enables you to edit margin and tab settings
in two ways:
(A) Set the new margins and tabs and store them over the current
format by following the instructions outlined on pages 26 and
29.
(B) Select ‘'Edit Ruler” from the format menu and display the
margin and tab format on the ruler line before editing.
In the text memory mode (margins and tabs are ignored in phrase
memory), item “B” above is the only way to edit margin and tab
settings.
The Edit Ruler selection enables you to edit the current margin
and tab settings as well as those stored under formats “X”, ”Y”,
and ”Z.” The Edit Ruler procedure is exactly the same when
selected in either the typewriter or text memory mode as outlined
below:
• The printhead automatically moves beyond the left margin
setting to the end of the platen.
• Margin Release (M.R.) is not necessary in the Edit Ruler
mode to bypass the current left and right margin setting.
• The printhead moves along the ruler line when you press the
SPACE BAR or the FWD- key.
• The same keys used to set new margins, tabs and hot zone
outlined on page 26 are also used when editing the ruler.
• It is not necessary to clear the current left and right margin,
or hot zone before setting a new one. When the new left or
right margin, or hot zone is set, the old setting will automat
ically clear.
• Unwanted Tabs are cleared from the ruler line by positioning
the cursor on the tab (represented by the letter “T”) and
pressing TAB CLR.
•
32
Page 43

The following keys are used to move to the desired position on the
ruler line:
FWD-* Moves the cursor one character to the right
SPACE BAR Moves the cursor one character to the right
BACKSPACE Moves the cursor one character to thè left
TAB Moves the cursor to the next Tab position
EXPR Moves the cursor to the beginning of the ruler
RELOC Moves the cursor to the right margin
Editing Margins and Tabs
+
F
FOftMAT
E
EJECT
1 Press CODE + F
Your display will prompt:
RULER
Edit Ruler
Recall Ruler
Store Ruler
RETURN or ESC
2 Press E (for Edit Ruler)
Your display will prompt:
EDIT RULER
1 Current Ruler 11
X Ruler
. Y Ruler
Z Ruler
RETURN or ESC
or
D ! B
3 Press X, Y, Z, or C (for Current Ruler)
Your cursor will be positioned at 0 on the ruler line.
4 Make the desired changes
5 Press RETURN to enter
33
Page 44

Using the Display in the Typewriter Mode
In typewriter mode, only one line of text is displayed when typing
with the mode selector set on DISP or JSTFY. As you type, your
text will appear on the third line of the screen. The cursor will
indicate exactly where the next character you type will appear.
When typing out of memory, only the insert typing mode is avail
able. Therefore, if you backspace and type in the middle of text,
the characters will insert to the left of the cursor and move the
existing text to the right. The RELOC key can be used to position
the cursor at the end of the line. Below is a list of keys used to
move the cursor when typing on display in the typewriter mode.
FWD-^ Advances the cursor to the right
BACKSPACE Moves the cursor to the left
RELOC
EXPR
The KX-E2500 will automatically return and print the line dis
played when typing in DISP and JSTFY modes. The automatic
return is triggered when a character is typed following a space in
the hot zone. (The hot zone is the area between the bell and the
right margin.)
The line displayed will also print when one of the following keys
is pressed: RETURN, TAB, DEC TAB, CENTER, PRINT, -| IND,
CODE + E, CODE + F, CODE + K, or CODE + P.
Advances the cursor to the end of the line
Moves the cursor to the beginning of the line
34
Page 45

Corrections
The KX-E2500 offers many ways to insure that your work is letter
perfect. In addition to the display, which enables you to correct
errors before they are printed, the KX-E2500 has a 1,000 character
correction memory (approximately Vl a page) which makes cor
recting errors a simple task. There are even two methods of man
ual correction available to correct errors that are made outside of
the correction memory.
In the typewriter mode, two dedicated keys are available to delete
errors:
CORRECT
QUICK ERASE
Below is a list of keys used to make corrections.
SPACE BAR
BACKSPACE
REVERSE INDEX
Deletes one character at a time to the left
of the printhead. If the printhead is lo
cated at the left margin, the CORRECT
key will move the printhead to the end of
the previous line.
Deletes one word at a time to the left of
the cursor.
In the memory mode it is possible to de
lete an entire line by using CODE +
QUICK ERASE.
Used to position the printer one space to
the right of the incorrect character.
Used to position the printer one space to
the right of the incorrect character. It also
advances to the previous line in correc
tion memory when pressed at the left
margin.
Advances by Vi line outside the correc
tion memory when pressed at the left
( T )
margin.
EXPR
RELOC
CODE + CORRECT Enables the printer to advance beyond
CODE -I- PRINT
Moves the printer to the beginning of the
line without line spacing.
Moves the printer to the last printed char
acter on the page, or to the last manual
return.
the correction memory.
Enables you to retype errors into the cor
rection memory without printing (adding
more ink to the paper.)
35
Page 46

Within the Correction Memory
The BACKSPACE key is used to advance to a previous line within
your correction memory. If the INDEX (]^ ) or REVERSE INDEX
( Y ) keys are used to advance to a line within correction memory,
you will not be able to relocate.
Correcting Errors on the Same Line
BACK
SPACE
QUICK
ERASE
ESC
1 BACKSPACE to position the printer one space to the right
of the character you wish to delete
2 Press CORRECT to delete one character at a time
or
Press QUICK ERASE to delete one word at a time
3 Type the correct character(s)
Exercise
Set the mode selector on NORM, and type the following sentence.
Be sure to include the errors, and do not RETURN at the end of the line.
The KX-E2500 has sohpisticated junctions but is easy to yse.
Using the steps outlined above, make the following corrections:
Change: “sohpisticated” to “sophisticated”
“junctions” to “functions”
“yse” to “use”
Correcting Errors on Previous Lines
36
(SPACE BA^
QUICK
ERASE
ESC
BACK
SPACE
1 EXPR to the beginning of the current line
2 Press BACKSPACE to position the printer on the line con
taining the error
You may also position the printer on the desired line by
pressing CODE + INDEX ( f ) or CODE + REVERSE
INDEX (T)
3 SPACE to position the printer one character to the right of
the error
4 Press CORRECT to delete one character at a time
or
Press QUICK ERASE to delete one word at a time
Page 47

Out of the Correction Memory
When you reach the last line in the correction memory, the
KX-E2500 will beep and you will be unable to use the BACK
SPACE or CODE + REVERSE INDEX ( f ) keys to advance to
the previous line. Two methods of correction are available outside
of the correction memory; the No Print method and Manual Cor
rection.
Using the No Print Method
The No Print method enables you to retype errors into the correc
tion memory without re-printing them. This feature is especially
useful when correcting errors typed in proportional spacing (PS),
or in the JSTFY mode.
-j- CORRECT
T
Pf^EvlOUS
+
SPACE BARI
1 Press CODE + CORRECT to exit the correction memory
2 Press REVERSE INDEX { y ) to position the printer on the
desired line
3 Press the CODE + PRINT key
The message “NOPRINT” will appear.
4 If the text was typed in 10, 12, or 15 pitch:
Position the mode selector to NORM
SPACE to position the printer on the error and retype the
incorrect characters
• If the text was typed in PS pitch:
Retype from the beginning of the line to the error
• If the text was typed in JSTFY mode:
Retype the entire line until the printer automatically returns
to the next line
BACK
SPACE
Press CORRECT until all characters are deleted from the
display and the printer advances to the end of previous line
BACKSPACE to position the printer to the right of the
error
37
Page 48

QUICK
ERASE
ESC
5 Press CORRECT to delete one character at a time
or
Press QUICK ERASE to delete one word at a time
The prompt “NOPRINT” will disappear.
6 Retype the correct character(s)
RELOC
____
+
SPACE bar]
+
7 Press RELOC
Making Manual Corrections
Manual Correction is ideal for correcting one or two errors outside
of the correction memory.
1 Press CODE + CORRECT to advance beyond the correction
memory
The printer will automatically move to the left margin
T
2 Press REVERSE INDEX ( ^ ) to position the printer on the
line containing the error
3 SPACE to position the printer directly over the error
4 Press CODE + CORRECT
5 Retype the incorrect character
38
This will lift the character off the paper.
6 Type the correct character
7 Repeat the steps outlined above for each incorrrect character
on the same line
8 Press RELOC
This repositions the printer at the last printed character or
RETURN.
Page 49

Exercise
Type the following exercise including the errors using the format “X” with the mode selector set
on NORM. When finished, use the correction procedures you have just learned. Be sure to make
the corrections within the correction memory first, and then make the corrections out of correction
memory.
Distantly relatec3 to the opossum, the Koala bear is only
3/4 of an inch long at birth and weighs only 1/5 of an
ounce. Usually only one Koala is born at a time, with
the mother bearing young only every other year.
The linfznt]will remain in its mother's pouch until it
is ready to emerge at six months of age. It will then
"clTm^to its mother's back until it is a year old.
When fully grown, it will stand about two feet [highland
may [wiethl as much as 33 pounds. At the age of four,
the animal will have attained full sexual maturity and
its life span may be as long as 20 years.
When the Koala is ready to strike out on lit‘s won,! it
will find its own eucalyptus tree, whose leaves are almost
its only food. Only on rare occasions will it leave
the tree, as when it seeks another tree to [tkae 1 up n^
residence.
The Koala is suited for climbing, as all four of its
d J sharpfclawdel feet are made for grasping. During the day
the Koala sleeps, usually curled up inconspicuously in
the crotch of a tree, and feeds only at |nightime.|
At one time, the Koala a native of Australia, was severely
threatened with extinction. Now the Australian[governemth]
is taking drastic [stesp] to insure its survival, j
______
______
_
f/iM
39
Page 50

Correcting Errors on Display in the
Typewriter Mode
As mentioned earlier, when the mode selector is set on DISP or
JSTFY, the screen will allow you to view one line of text before
it is printed on paper. Since most operators can sense when an
error has been made, having the mode selector on DISP or JSTFY
provides the opportunity to correct errors before they are printed.
ВАСИ
SPACE
or
EXPft
FO^MS
INSERT
1 Press BACKSPACE to position the cursor one space to the
right of the error
or
Press EXPR to advance to the beginning of the line and
FWD- to position thé cursor one space to the right of the
error
OUICK
ERASE
ESC
2 Press CORRECT to delete one character at a time
or
Press QUICK ERASE to delete one word at a time
3 Type the correct character
4 Press RELOC and continue typing
Exercise
1 Set the mode selector to DISP
2 Recall margin format “X”
3 Type the following sentence including the errors. Do not press RETURN at the end of the line.
4 Make the necessary corrections as outlined above.
Errors are corrected before tehy pritn on paper.
40
Page 51

6. AUTOMATED TYPING FEATURES
Caps Lock
The Caps Lock feature enables you to type capital letters and
numbers at the same time without having to shift back and forth
from upper to lower case The LOCK key's indicator light will flash
when this feature is activated
To Activate Caps Lock;
o
CODE
COD E
LOCK
CAPS
o
LOC K
+
CAPS
Bold Print
• Press CODE + LOCK
Every letter you type will be in CAPITAL LETTERS, when
you use the number keys you will not get the traditional shift
symbols, you will get the numbers
To Deactivate Caps Lock*
• Press CODE + LOCK again
The indicator light on the lock key will no longer flash
This feature instructs the printer to strike each character twice, this
will '■‘highlight” or emphasize certain words for you
When bold print is activated, the word BOLD will appear on the
status line When typing on display, in addition to the status line
prompt, the symbol Q will appear indicating where bold print was
turned off and on The text between these symbols will be printed
in bold face
To Activate Bold Print:
B
+
«OLO
• Press CODE + B and type the word(s) to be highlighted
To Deactivate Bold Print:
B
+
■OLD
• Press CODE + B again
41
Page 52

Underscore
The KX-E2500 offers you three ways to underscore; Continuous,
Word by Word, and Double.
The appropriate underscore symbol shown below will appear on
the status line when underscore is activated.
Example
XXX
XX XX
XX XX Word by Word Underscore
XX XX Double Underscore
When typing on display, in addition to the status line prompt, the
following underscore symbols “g”, “g ' or ‘"0” will appear
indicating where underscore was turned off and on. The text
between these symbols will be underscored.
Continuous Underscore
Continuous Underscore
To Activate:
• Press XXX
Both the characters and spaces will be underscored.
To Deactivate:
• Press XXX again
42
This is continuous underscore
Page 53

Word by Word Underscore
To Activate:
XXX
+
XXX
+
• Press CODE + XXX
Only words will be underscored.
To Deactivate:
• Press CODE + XXX again
Example
This is word by word underscore
Double Underscore
To Activate:
XXX
+
• Press SHIFT + XXX
Both characters and spaces will be underscored with a double
line.
Example
This is double underscore
To Deactivate:
+
• Press SHIFT + XXX again
43
Page 54

Centering
There are four ways to center information; between margins, over
a point, between tab stops and aligned at the right margin.
The word CENTER will appear on the status line when centering
in the typewriter mode. The symbol Q will appear on the display
when centering in the phrase or text memory mode.
Between Margins
Example
Lin
X
Ceufcr _
c&fifer' E
SPACE BAR
W r
1 Press RETURN to position the printer at the left margin
2 Press CENTER and type the information
3 Press RETURN to print
X
(Your Name)
Panasonic
Electronic Typewriter
Over a Point
1 Press the SPACE BAR to move your printer to the-desired
position
Example
44
ED /
2 Press CENTER and type the information
3 Press TAB or RETURN to print
Page 55

1 1
jcEWTEwj
Between Tab Stops
1
2
3 Press CENTER and type the information
3
Example
]/[
nrrURN |-|
4 Press RETURN or TAB to print
4
2 Press CENTER and type the information to be aligned
Example
r
Lin
X
E
L,
iE £
3 Press RETURN to print
T
X
-m
3 c
T
X
'IM:
T
X
3
(Your Name)
Panasonic
Tov Panasonic Way
SecausuSi NJ 07094^
X
OeK fty
45
Page 56

Indent
The KX-E2500 offers two forms of indent: Left Indent and Block
Indent. Left Indent allows you to set a temporary left margin and
eliminates the need to TAB before typing each indented line.
Block Indent automatically indents the left and right margin
evenly. When either INDENT is activated, the word INDENT will
appear on the status line. When typing on display, an indent
symbol “lii; ” or “ ” will appear on the ruler line to indicate
where the indent was set. When typing in text memory, in addition
to the symbols on the status and ruler line, an indent symbol will
also appear at the beginning and at the end of the indented text.
The display symbol for each indent is shown below:
Left Indent
Block Indent
The indent feature is not available when typing in phrase memory.
Left Indent
SPACE bar! /
Left Indent will provide indentation from the left side only.
Indenting the Left Side of the Text
1 SPACE or TAB to the desired point of indentation
2 Press H IND to activate the command
3 Type the text
4 Press H IND to deactivate the command
46
Page 57

Left Indent Exercise
Type the follwing exercise using the format “X” and the mode selector set on JSTFY.
Lin,
X
Bel ow is th e re vis ed c om p an y p o lic y r eg ar din g th e us e o f
lim ou sin e se rvi ce s f or b usi ne ss tr av el.
T
X
Com p an y emp lo ye es m ay u se W es te rly Lim o
Ser vic e an d ha ve the cha rg es bille d dir ect ly
to the com pa ny . If a diffe re nt lim o servi ce
is u se d f a paid rece ipt m u st acco m pa ny y ou r
exp en se re p ort
T
X
Block Indent
Block indent automatically indents the right margin in proportion
to the left margin. This feature creates a uniform appearance and
centers the text between margins.
The temporary margins set with block indent must be more than
one inch apart.
T
X
kin,
X
SPACE BAR1 /
CODE I -|-
Indenting Both Sides of the Text
1 SPACE or TAB to the desired point of indentation
]
2 Press CODE+ ^IND to activate the command
The same number of spaces indented from the left will auto
matically be indented from the right.
3 Type the text
4 Press CODE + H IND to deactivate the command
47
Page 58

Block Indent Exercise
Type the foilwing exercise using the format “X” and the mode selector set on JSTFY.
Lfti'
X
If W es te rly L im o Se rvic e is no t av aila b le at th e tim e of
you r r eq ue st / p le as e co nta ct th e co m pa ny 's tra ve l a g en cy .
If y ou ha ve a ny q ue st ion s co nc er ing b us in es s t rav e l, p le ase
let us kn ow .
T
X
Uto pi a Trav el is lo ca te d on
the third flo or of the no rt h
adm in is tra tio n b u ild ing . You
ma y C O nta ct th em o n e xt en si on
1234
T
X
Decimal Tabulation
The DEC TAB key advances the printer to the next tab position.
Alpha or numeric characters are aligned to the left of that tab
position. A period {decimal point) or comma is aligned at the tab
stop. Characters following the period or comma are positioned to
the right of the tab position.
T
X
X
48
Because DEC TAB aligns all characters before a period or a
comma to the left of the tab position, it is ideal for whole numbers
or characters that require a flush right appearance. For statistical
typing, DEC TAB simplifies the tedious task of manually aligning
a column of numbers.
The word DECTAB will appear on the status line when used in
the typewriter mode. The symbol “[3” will appear on the display
when typing in text memory. The DEC TAB feature is not avail
able when typing in phrase memory.
For statistical typing in foreign countries, numbers are aligned at
the comma position instead of the decimal point. If this is required,
you may change the alignment character by accessing the default
settings menu (see page 11).
Page 59

Using Decimal Tabulation
1 Set tab stop
Remember, set the tab stop in the position you want the
decimal point to appear.
2 Press RETURN
This will bring the printer back to the Left Margin.
Example
DEC
TAB
3 Press DEC TAB
4 Type the numbers, decimal point, or text to be aligned
The primer backtraces once for every character entered be
fore the decimal point.
DEC
TAB
5 Press DEC TAB to advance to the next tab stop
6 Repeat steps 4 & 5 until you have completed all your entries
7 Press RETURN
■J
Begin typing the second line of information.
r
X
X
T
X
7
X
X
123.46
12.10
1234,56
.12
347.91
13.06
7654.23
.24
m^TAB.
156.98
31.28
4851.12
.36
49
Page 60

Temporary Hyphen (Soft Hyphen)
A Temporary Hyphen enables you to hyphenate words that fall
within the hot zone (between the bell and the right margin). A
Temporary Hyphen triggers an Auto Return and should only be
used in the DISP or JSTFY typing modes. Because the Temporary
Hyphen enables you to fit more characters on a line, it gives the
right margin a less ragged appearance.
The symbol “ = ” will appear on your display.
Inserting a Temporary Hyphen
1 Type until you hear the ‘‘beep’' (bell) as you near the end of
the line
2 Press CODE + HYPHEN (-) at the desired hyphenation point
Thé printer will automatically return to the left margin.
Exercise
Type this exercise below using the "Y” ruler and the mode selector on DISP.
j Soft hyphens are entered in the hot zone to pre-/^
vent long words from causing extremely ragged mar^<
gins on the right side of the page. However* re
member to use the CODE key before you depress the
hyphen key. This tells the typewriter to return
at the next character typed.
CodLt
50
Page 61

Permanent Space
Permanent Space enables you to type a space between two words
within the hot zone, without triggering an auto return. This feature
is ideal when typing proper names or dates which should appear
on the same line.
Entering a Permanent Space
1 Type until you hear the “beep” (bell) as you near the end of
the line
+ fS^CE BAR
2 Press SHIFT + SPACE BAR between the two words that you
want to appear on the same line
Exercise
Type the following text using the permanent space feature where indicated.
• Set the mode selector on DISP and use the “Y” ruler.
Permanent spaces prevent names or dates from being
separated. In instances such as San Francisco
• or New York, N. Y. or dates such as September 30 ,^!i989.
you may instruct the typewriter to never separate"“
these characters or numbers onto different typing
lines.
Micro Space
+ SPACE BAR
A micro space allows you to move the printhead Veth of a space
in 10 pitch. The symbol “...” will appear when typing on display.
Entering a Micro Space
• Press CODE + SPACE BAR
51
Page 62

Permanent Backspace
When typing in memory or in a display mode, a permanent back
space is required to instruct the system to print one character over
another. Using left arrow or backspace alone when typing on
display will only insert the character in front of the one you are
trying to overlap.
Although is it possible to print one character over another in the
typewriter (NORM) mode, use the Permanent Backspace feature
to include both characters in the correction memory. This enables
you to correct both characters automatically. For instance, if you
type 0 without using the Permanent Backspace feature, you will
only be able to correct the slash (/), not the zero (0).
Entering a Permanent Backspace
1 Type the first character
^ + 1^
Half Space
+
2 Press CODE + U
If typing on display, a small arrow pointing to the left.(+-)
will appear.
3 Type the character you want to print over the first entry
A half space is used for squeezing characters. The symbol will
appear when typing on display.
Entering a Half Space
• Press CODE + H
52
Page 63

Exercise
The following exercise incorporates the function key operations you have just learned and gives
you the opportunity to use them in a standard letter,
To begin this exercise, recall margin format “V” and set your MODE selector on DISP.
(Today's DatQ'Jr
15 Hunts Lane
Weston, CT 06883
Mr* C, C. Charles
19 Treaty Road
Valley Forge, PA 00901
Dear Mr. Charles:
In response to your recent inquiry regarding our
new line of customized designer wall coverings,
I am enclosing the samples you had requested, for
your approval. Outlined below is the quantity
pricing for each of the patterns we discussed.
designer line
Cetiftf +
Custom Wall Coverings
Pattern Retail 1-5 6-9
>ec TAg
Wheat
"iGj.TO
38 .Uo
44 J60
8 Jo%
tAtca,l( flJtt Yl /
fTai t l%dc'Kf] of the patte rns we discussed may be custom
^ ^ ^ colored to meet your personal requirements.
If you have any questions, please let me know I look forward to working with you and thank you
for considering our products.
Sincerely,
(Your Name)
Professional Home Designs
These prices are based upon the length
and width of one (1) standard roll. Each
(MiM Cmm {»ac M
" 3^/40 2l).!20
29/90
31J55
37 JSO
7[J5%
2 5,'40
I
26i80
34J5 O
7l.'5%
22.*60
30.
8.
90
0%
53
Page 64

7. MEMORY
Memory works very much like your file cabinet; allowing you to store information in separate files
and even in separate drawers.
The KX-E2500 gives you three separate storage areas or drawers. Two of these storage areas, Phrase
Memory and Text Memory, are located in the internal memory of the typewriter.
Phrase Memory—Phrase Memory is designed to store frequently used addresses, short para
graphs, and text which will print as a header or footer. The information is stored in files
numbered from 1 through 99.
Text Memory^—Text Memory is used to store more lengthy documents, such as letters and
reports. These files are stored by name.
Your typewriter comes standard with 25,000 characters (approx. 12 to 15 pages) of internal memory.
The internal memory can be divided between phrase and text memory to meet your requirements.
If desired, you can use all your internal memeoy to create one file. The choice is yours. When all
the internal memory is used, the system will prompt, “MEMORY FULL!” You then have the ability
to store your text files to disk and clear the internal memory for future use.
The third storage area is the Disk Drive. The standard 3W ' floppy disk drive, located on the left
side of the typewriter and allows you to store 720,000 characters on each disk. This gives you
virtually unlimited storage capabilities.
The following pages contain instructions on how to use both the memory, and the text editing
features that make memory so useful.
54
Page 65

Typing in Memory
When typing in phrase or text memory, the word INSERT will be
displayed on the status line. Insert is the default setting when
typing in memory.
Insert enables you to add characters at the cursor position by
simply typing the additional characters or words. Your text will
shift to the right as each character is entered, automatically
reformatting the text to conform with the current margins.
The overtype mode is accessed by pressing the INSERT key. The
word INSERT will no longer display on the status line. Overtype
enables you to type over existing text and replace it with newly
typed characters.
The arrow keys are used to move the cursor when typing in
memory. While it is true that the BACKSPACE key will allow you
to move one character to the left in both the typewriter and
memory mode. The FWD-* key becomes the INSERT key in
memory mode. Below is a list of keys used to move the cursor
when typing in memory:
Right Cursor ( )
Left Cursor ( )
Down Cursor ( o )
Up Cursor ( O )
EXPR (Express)
RELOC (Relocate)
CODE + Right Cursor ( )
CODE + Left Cursor ( )
CODE + Down Cursor ( )
CODE + Up Cursor ( O )
CODE + J
CODE + FWDCODE + BACKSPACE
CODE + Index ( i )
One character to the right
One eharacter to the left
Down one line
Up one line
Beginning of the text
End of the text
End of line
Beginning of line
Top of next screen
Top of previous screen
Jump to page
Word by word to the right
Word by word to the left
Advance to next text or phrase
Next search word position
Next stop position in forms
CODE + Reverse Index ( f )
Advance to previous text or phrase
Move to previous search word position
Previous stop position in Forms Layout
55
Page 66

Correcting Errors in Memory
There are several ways to edit text typed in phrase or text memory
as outlined below:
CORRECT
QUICK ERASE
CODE + QUICK ERASE
Deletes one character at a time to the left of the cursor. If the
cursor is located at the left margin, the CORRECT key will position
the cursor to the end of the previous line.
Deletes one word at a time to the left of the cursor.
Deletes the entire line to the left of the cursor
You also have the ability to delete an entire block of information
typed in phrase or text memory. This feature is explained on
page 82.
56
Page 67

Phrase Memory
The KX-E2500 will allow you to store up to 99 phrases. The length
of each phrase is limited only by the available memory of your
typewriter. Keep in mind however, that the phrase memory loca
tions were designed to store small blocks of information such as
names and dates, signature blocks, standard paragraphs, etc.
For example, if you were sending A&J Enterprises a multi-docu
ment package which included a cover letter, an invoice, a ques
tionnaire, and an envelope; rather than typing their name and
address on every document, you could type it once in Phrase
Memory and simply print it on all of the documents.
Another example of Phrase Memory is the use of standard para
graphs. Many times you will begin or end a document with a
standard paragraph. Rather than typing this paragraph each time
it is required, you can store it in phrase memory and recall it when
needed.
Phrase Memory is also used to store the text for headers and
footers. The phrase number containing the header/footer is indi
cated on the print menu and automatically inserted into the doc
ument. You will learn more about headers and footers later in this
manual.
Phrases are stored with no regard to margin formats. It is not
possible to store margin formats in Phrase Memory. When a
Phrase is recalled, it will conform to the current margin format.
Below is a list of functions that can and cannot be performed in
Phrase Memory.
Phrase Memory will accept: Phrase Memory will not accept:
Center
Bold
Underscore
Index
Reverse Index
Soft Hyphen
Permanent Space
Permanent Backspace
Insert Code
Tab
Dec Tab
X, Y, Z Margin Format
Indent
Line Framing
Dual-Column Typing
Micro Indexing
Auto Paper Eject
57
Page 68

storing a Phrase
The phrase storage locations are accessed by pressing CODE+Any
number between 1 and 99. If you are entering a two digit number
(10 thru 99), you must hold down the CODE key while you enter
both numbers. Enter a manual return at the end of a phrase to
insure the last line of text will print.
CODE -|-
(□-□O
1 Press CODE + 1-99
This will “open” the phrase.
2 Type the desired information
+
(□-O
Exercise
Store the following paragraph in CODE + 1 using the Z Ruler with the MODE selector on DISP.
Our collection includes such interesting models as:^
Store the following paragraph in CODE + 2.
3 Press CODE + 1-99
This will “close” the phrase, the information is now stored in
Phrase Memory.
58
The Bennett t possiblethe
typewriter
ever produced/
fit into a pocket andwas
"The Junior
" . ^ 1
least expensive
sold for $18.
manufactured in
fully keyed
It could
1907 as
Page 69

Store the following paragraph in CODE + 3.
The Blickersderfer Electric was introduced about
1902 and is the first known single-element . typewriter
Though short-lived/ this machine anticipated the
future of typewriters by nearly 50 years.^
Store the following paragraph in CODE + 8.
The Lambert Typewriter, dating from 1896, was a novel
machine that had no keys. The entire top assembly
pivoted upon the depression of a button, to swivel
the desired character over the top of the paper below.f-*
Store the following paragraph in CODE + 12.
The perfected Type Writer No. 2 appeared in 1887
and was a Remington Standard. It was the first typewriter
to use a Shift Key for capital letters.^
Store the following paragraph in CODE + 99.
59
Page 70

Editing a Phrase
cooc -|-
1 Press CODE + 1-99 to recall the desired phrase
2 Position the cursor at the point of modification by using the
cursor keys
3 Make your revisions
You can use the following keys:
CORRECT to delete one character at a time
QUICK ERASE to delete one word at a time
CODE+
QUICK ERASE to delete to the beginning of the line
B+E-IDO 4 Press CODE + 1-99 to close the phrase
Printing a Phrase
CODE -|-
(□-□O
1 Press CODE + 1-99 to recall the desired phrase
The screen will display the phrase.
2 Press PRINT
The phrase will print within the current margin format. You
will no longer be in the phrase memory when the printing is
complete.
60
Page 71

Clearing a Phrase
CODE -|-
(□-□a
pn /
EXPR.
FOAMS
CORRECT
1 Open a Phrase (Press CODE + 1-99)
The phrase will appear on your display screen.
2 Press EXPR
This will move the cursor to the beginning of the phrase.
3 Press CORRECT
The display screen will prompt:
CLEAR THIS PHRASE ?
Are You Sure ?
No
4 Press Y (for Yes) to confirm the cancellation
or
Press N (for No) to exit
3+(D
Listing Phrases
Panasonic gives you the ability to display or print a list of all the
phrases you have stored. This list will indicate the phrase number,
the first 20. characters on display/45 characters on printing of the
phrase, the number of characters the phrase contains, and the
amount of internal memory available. When printing a list, manual
returns will appear as “/.” Print attributes such as bold or under
score will be ignored in the phrase listing.
1 Press CODE -t- 0 (zero)
Your screen will prompt:
PHRASE
Write
List
RETURN or ESC
61
Page 72

□
-2T
demjltI
QUICK
ERASE
ESC
2 Press L (for List)
Your screen will prompt:
LIST
Display,
Print
RETURN or ESC
3 Press P to print the list of phrases
or
Press D to display the list of phrases
Press ESC to clear the phrase list from the screen
Below is an example of a phrase directory:
B
List of Phrase
01 Our collection indu
03 The Blickersderfer E
12 The perfected Type W
ESC to exit
197
149
6 Files
02 The Bennett, possibl 159
08 The Lambert Typewrit 212
99 (Today's Date)JJ 16
1564 Characters Free
62
Page 73

Writing Phrases into Text Memory
The KX-E2500 gives you the ability to write all phrases 1-99 into
text memory. All phrases are read at one time, using the Write
selection under CODE + 0. Once the phrases are written to a text
memory, the text memory containing the phrases can be stored to.
disk.
However, the text memory containing the phrases cannot be ac
cessed. For this reason, the text name containing the phrases will
not be displayed on the edit menu. The text file containing the
phrases will be displayed on the list menu with an exclamation
point (!) before the text name.
CODE -|-
□
w
DUAL COL
Type a text name
1 Press CODE + 0
Your screen will prompt:
PHRASE
Write
List
RETURN or ESC
2 Press W (for Write)
Your screen will prompt:
WRITE
Text Name
RETURN/RELOC to Enter or ESC
[!| ]
3 Type a new text name and press RETURN
The typewriter will “beep” once when the write is complete.
63
Page 74

3+0
Reading Phrases from Text Memory into
Phrase Locations
The KX-E2500 also gives you the ability to read a text containing
phrases back into their original phrase locations, or you can select
the phrases to be read.
1 Press CODE + 0
Your screen will prompt:
PHRASE
Write
List
RETURN or ESC
R
HtfCCM
Type the text name
2 Press R (for Read)
Your screen will prompt:
READ
Text Name
RETURN - Enter/List,
RELOC - Enter All or ESC
nl 1
3 Type the text name and press RETURN
or
Press RETURN to display the directory
(Only text files containing phrases will be displayed.)
Highlight the text name desired and press RETURN
• If phrases are currently stored in the phrase memory, your
screen will prompt:
REPLACE
Partial
64
Page 75

4 Press RETURN to select all
or
Highlight Partial and press RETURN
or
Highlight Partial
N
Your screen will prompt:
REPLACE PHRASE [XX] ?
Are You Sure ?
No
Press Y to replace the phrase number displayed
or
Press N to skip this phrase
65
Page 76

Phrase Link
Phrase Link enables you to quickly recall several phrases to print
as one document. It is not necessary to wait for one phrase to finish
printing before pressing the PRINT key to begin printing the sec
ond phrase.
If your MODE selector is on NORM or DISP, your phrases will
print with a ragged right margin. If you set your MODE selector
on JSTFY, your phrases will print with a justified right margin.
Linking Phrases
1 Insert a sheet of paper
+
2 Recall a Phrase (CODE + 1-99)
3 Press PRINT
4 Repeat steps 2 and 3 to recall each Phrase
Exercise
1 Set your MODE selector on JSTFY
2 Recall margin format Z
3 Link phrase numbers 3, 12, 8, and 2
The Blickersderfer Electric was introduced about 1902
and is the first known single-element typewriter.
Though short-lived/ this machine anticipated the future
of typewriters by nearly 60 years.
The perfected Type Writer No. 2 appeared, in 1887 and
was a Remington Standard. It was the first typewriter
to use a Shift Key for capital letters.
66
The Lambert Typewriter/ dating from 1896/ was a novel
machine that had no keys. The entire top assembly
pivoted upon the depression of a button/ to swivel the
desired character over the top of the paper below.
The Bennett, possible the least expensive fully keyed
typewriter ever produced/ sold for $18. It could fit
into a pocket and was manufactured in 1907 as "The
Junior".
Page 77

Addressing Envelopes with Phrases
Envelopes can be printed easily using names and addresses stored
in Phrase Memory. Phrases conform to the current typewriter
settings; therefore, there are two points to consider—the auto
insertion point and the left margin or indent position.
1 Set the Insertion Point
• Insert a blank envelope
• RETURN, INDEX ( [ ), REVERSE INDEX ( f ), SHIFT +
INDEX ( i ), or SHIFT + REVERSE INDEX ( f ) to reach
the desired first line of print for the address
CODE -J-
SPACE BAR
)/[
□
R
S+dD-DO
• Press CODE + A
2 Set an Indent
Rather than moving your left margin, you can set an indent.
The indent will set a temporary left margin and ensure that
each address prints at the same position on every envelope.
• SPACE or TAB until you reach the desired printing position
• Press -\ IND
3 Print the Envelopes
• Auto Insert a blank envelope
• Press CODE + 1-99 (whichever is applicable)
• Press PRINT
Insert the next envelope and repeat the last two bulleted
items outlined in step #3.
4 Press H IND to deactivate the indent command after-all the
envelopes have been addressed
67
Page 78

Text Memory
Main Menu Overview
Text memory is used to store lengthy documents. All the applica
tions available on the KX-E2500 are designed for use with files
stored in text memory. Text files are named by you and there is
no limit to the number of files you can store in text memory. Your
only limitation is the amount of internal memory available.
The KX-E2500 has simplified text handling. All text applications
can be accessed with one key—the MAIN MENU key. Below is
an overview of the Main Menu.
MAIN MENU
Create
Edit
List
Print
Disk
More
68
RETURN or ESC
• Create is used when you are creating the initial text
• Edit is used when:
Recalling a text for modification
Recalling a text to print
Deleting a text from memory
Renaming texts
Scrolling through text memory
• List is used to display or print a list of texts that are stored in
the internal memory.
• Print is used to command the typewriter to print a text that
•
is stored in internal memory.
• Disk is used to access the disk drive
• More is used when:
Deleting text from the internal memory
Renaming a text
Page 79

Create
Create is used to store documents into text memory. The docu
ments in text memory are stored by file name. The file name can
be any name you choose, as long as it does not exceed ten (10)
characters.
The current margin and tab settings as well as the “X”, “Y”, and
“Z” rulers are recorded with each text you create. The KX-E2500
enables you to set your margins and tabs before accessing text
memory or you can edit your margin formats while creating your
document.
Creating a Text
1 Press MAIN MENU
Your screen will prompt:
MAIN MENU
Edit
List
Print
Disk
More
RETURN or ESC
C
2 Press C (for Create)
Your screen will prompt:
CREATE
Text Name
RETURN/RELOC to Enter or ESC
3 Type a text name (maximum 10 characters)
4 Press RETURN
When RETURN is entered, the prompt on your screen will
disappear. The cursor will appear in the upper left corner of
the screen, and the typewriter will beep once to confirm that
you are now in text memory.
69
Page 80

5 Type your document
When you have completed the document,
MAIN
MENU
6 Press MAIN MENU
This will close the file.
70
Page 81

Edit is used to recall a document stored in the text memory. The
real benefits of text memory are found in the text editing features.
These are the features that will simplify your typing projects and
give your work a polished look.
As you become familiar with the KX-E2500, you will find that the
edit mode gives you a great deal of flexibility; and, in many cases
you will find that there is more than one way to perform a single
task. No one way is right or wrong, it is simply a matter of comfort.
Recalling a Text for Modification
There are two ways for you to recall a text for modification, the
first way is to simply recall the text by name. The second way is
to display a list of all the files stored in memory and choose your
file from the directory.
WAIN
MENU
E
EJECT
1 Press MAIN MENU
Your screen will prompt:
MAIN MENU
Edit
List
Print
Disk
More
RETURN or ESC
2 Press E (for Edit)
Your screen will prompt:
Text Name
RETURN - Enter/List,
EDIT
[| 1
RELOC - Enter All or ESC
Type the text name
or
3 Type the text name or press RETURN to display the directory
If you bring up the directory, cursor to highlight the desired
text.
71
Page 82

4 Press RETURN ,
The text will now be displayed on your screen
Recalling a Ruler in Text Memory
In text memory you have the ability to recall margin and tab
formats (ruler) “X”, “Y”, and “Z ” CODE+F must be pressed at
the left margin to recall a ruler m memory If you attempt to recall
a ruler when the cursor is not positioned at the left margin, the
KX-E2500 will beep three times and display the message “CAN
NOT SET HERE ”
1 Position the cursor at the left margin
F
+
FOftWAT
2 Press CODE + F
Your display will prompt
RULER
Edit Ruler
Recall Ruler
Line Spacing
RETURN or ESC
R
NtFCODE
3 Press the letter R (for Recall Ruler)
Your display will prompt
RECALL RULER
Ruler
Ruler
RETURN or ESC
72
4 Press the letter X, Y, or Z
The margin setting on the ruler line will change, and the ruler
letter selected will appear at the left margin with a line over
It
Page 83

Editing a Ruler in Text Memory
When a ruler is edited in memory, all text typed under that ruler
is automatically reformatted to the new settings. It is not possible
to store a new ruler setting while in memory.
The Edit Ruler procedure is the same in typewriter or memory
mode. Therefore, the FWD-^ key is used to move the printhead
to the right and the BACKSPACE key is used to move the
printhead to the left. Remember, it is not necessary to clear the
current left and right margin or hot zone before setting new ones.
The new settings will automatically clear the old settings. How
ever, unwanted tabs must be cleared by positioning the cursor on
the unwanted tab (represented by the letter “T”) and pressing
TAB CLR.
F
4-
FORM*T
1 Press CODE + F
Your display will prompt:
RULER
Edit Ruler
Recall Ruler
Line Spacing
RETURN or ESC
E
EJECT
2 Press E (for Edit Ruler)
Your display will prompt:
EDIT
RULER
II Current Ruler II
X Ruler
Y Ruler
Z Ruler
RETURN or ESC
or
□ /a
F]/ B
3 Press X, Y, Z, or C (for Current Ruler)
If you choose Current Ruler, your cursor will be positioned
at 0 on the ruler line.
• Make the desired changes
4 Press RETURN to enter
Text typed after the ruler change will automatically reformat.
73
Page 84

Changing Line Spacing within a Text
The line spacing selector on the keyboard controls the line spacing
of your text during print out. Your text will always conform to the
keyboard setting unless you have a line spacing command set
within the document.
Let’s assume that you are creating a text in memory and your line
space selector is set on single spacing. Your project requires one
paragraph to be double spaced. Before typing that particular para
graph, use the line space command to change thé setting to double
space. This tells the system to override the selector setting on the
keyboard. When you have finished typing the paragraph, insert
another line space command to change the spacing back to single
space.
The line spacing command must be entered when the cursor is
positioned at the left margin. If you attempt to change the line
spacing when the cursor is not positioned at the left margin, the
KX-E2500 will beep three times and display the message “CAN
NOT SET HERE.” Also, if a margin format is recalled or dual
column typing is entered, the line spacing must be changed after
these commands. You may also insert a line spacing command at
the beginning of the text to insure it always prints in the desired
spacing.
□
The screen only displays text in single spacing. Therefore, a line
spacing command will not change the appearance of the text on
your display. However, when you print the document, the selected
line spacing will be honored.
1 Press CODE + F
Your screen will prompt:
RULER
Edit Ruler
Recall Ruler
Line Spacing
RETURN or ESC
2 Press L (for Line Spacing)
Your screen will prompt:
LINE SPACING
1.5
74
RETURN/RELOC to Enter or ESC
Page 85

3 Highlight the desired line spacing
4 Press RETURN
The change will be stored in the text and the line spacing
symbol (I, li, 2, 3) will be displayed.
Hyphenation Scan
A hyphenation scan insures the proper appearance of your text. It
locates each word that can be hyphenated. You must decide the
proper hyphenation position and insert a soft hyphen (CODE +
-). The characters to the left of the cursor as well as the soft
hyphen will automatically move to the end of the previous line
when scanning in the JSTFY mode.
A soft hyphen will only print if it falls within the hot zone (between
the bell and the right margin). Therefore, if the text is modified
and the soft hyphen no longer falls within the hot zone, the hy
phenated word will print without the hyphen.
CODE I "l“
Scanning Text for Hyphenation Requests
B
1 Recall a text
V
+
2 Press CODE + V
The cursor will advance to the first word.
If the word cannot be hyphenated (e.g., proper name), skip
the word by pressing CODE + V to advance to the next hy
phen request.
3 Backspace to position the cursor one character to the right of
the desired hyphen position
4 Press CODE + HYPHEN (-)
D
A soft hyphen (“) will appear, on your screen.
V
+
ICAh
5 Press CODE + V to locate the next hyphenation request
75
Page 86

Jumping to a Page
The Jump Page command enables you to quickly advance to the
top of a specific page. This feature is extremely useful when
working with multi-page documents.
j
+
JUMPPG
1 Press CODE + J (jump)
Your screen will prompt:
JUMP TO PAGE
Jump to Page Number
RETURN/RELOC to Enter or ESC
[ ]
2 Type the page number you want to jump to
3 Press RETURN
Your cursor will be positioned at the top of that page.
76
Page 87

Search
Direct Search enables you to quickly locate each occurrence of a
word or string of characters without scrolling through your text.
The KX-E2500 will find all occurrences of the word or character
string. It ignores print attributes such as bold or underscore and
also ignores upper and lower case. Because it finds every occur
rence of the character string, when searching for small words such
as “the”, enter a space before and after the word on the search
menu so that only whole words are located. If a space is not
entered, in this instance, it will also stop at words such as “theatre”and “them.” If searching for long words with a unique char
acter string, it really isn’t necessary to type the entire word. For
instance, if searching for a proper name such as “Cimilluca,” in
the search string it is fairly safe to say that if “Cimi” is entered on
the search menu, the cursor will advance directly to the name
“Cimilluca.” If you are searching for a misspelled word, be sure
to spell it incorrectly when entering the search string. In addition,
the KX-E2500 also enables you to search for a manual return by
entering CODE + RETURN in the search menu. If you enter two
manual returns on the search menu you will be able to search
paragraph by paragraph through your text.
When a search command is activated, the typewriter will search
from the cursor position to the end of the text. For this reason, it
is always best to search from the beginning of your document. The
cursor positions itself to the immediate right of the word or char
acter string entered. You can easily edit or delete the word
(QUICK ERASE)
INDEX ( j, ). You also have the ability to search to a previous
occurrence by pressing CODE + REVERSE INDEX ( ^ ).
and continue the search by pressing CODE +
77
Page 88

Activating a Search
1 Recall a text from memory
B
s
+
$eafich
2 Press CODE + S (Search)
Your screen will prompt:
SEARCH STRING
Search string [I
RETURN/RELOC to Enter or ESC
Once the search string is located, press
- CODE + INDEX (J^) for next location
- CODE + REVERSE INDEX (T) for previous location
f
Type the word or string of characters you are looking for
3
(maximum 30 characters)
4 Press RETURN
"J
Your cursor will move to the right of the first occurrence of
the word or string of characters.
If the search string you are looking for is not located, your
screen will prompt:
NOT LOCATED!
78
CODE
CODE
+
NEXT
or
T
+
5 Press CODE + INDEX ( f ) to advance to the next occurrence
or
Press CODE + REVERSE INDEX ( t ) to advance to the
previous occurrence
Page 89

Global Search and Replace
Global Search and Replace is used when you have a name, date,
or other word located throughout your document several times and
you want it changed at all occurrences.
For example, you have a standard letter which you sent to Ms.
Diana Presepe stored in text memory. You want to take that same
letter and send it to Mr. Gary Karpinski; however, Diana’s name
is mentioned several times throughout the letter. Rather than
scrolling through the document and deleting the name Diana every
time it appears and inserting the name Gary, you could perform a
global search and replace which would automatically exchange the
name Diana with the name Gary.
Activating a Global Search and Replace
1 Recall your text
c
+
DnowoKc
2 Press CODE -F C (Change word)
Your screen will prompt:
REPLACE STRING
Search String
Replace String [
Global
RETURN to Enter, RELOC to Enter All or ESC
Yes
No
3 Type the word or words you want to replace (maximum 30
characters)
4 Press RETURN
5 Type the new word
6 Press RETURN
The default setting “No” will be highlighted.
7 Press LEFT ARROW (<^) to highlight “Yes”
79
Page 90

8 Press RETURN
The message “MACHINE IS BUSY” will be displayed.
When the exchange is complete, the cursor will be positioned
to the right of the last exchange.
Selective Search and Replace
There may be instances when you won’t want to replace a word
globally. With the search and replace feature, you can choose the
positions you would like the new information to be exchanged and
skip the other occurrences.
Activating a Selective Search and Replace
1 Follow steps 1 through 6 under “Activating a Global Search
and Replace”
2 Press RELOC to confirm the “No” selection and advance to
the first occurrence
R
refcom
or
S
SEARCH
or
Your screen will prompt:
Replace, Skip, Quit ?
• Press R to replace that occurrence
The system will automatically advance to the next occurrence.
• Press S to skip that occurrence
The system will automatically advance to the next occurrence.
• Press Q to quit the operation
The system will “beep” once when it has completed the
selective search and replace operation.
80
Page 91

Block Move, Copy, Delete, and Print
The KX-E2500 gives you the ability to move, copy, delete or print
portions of a text simply and automatically. To do this, you must
first mark the area of information at the starting point and at the
ending point. Once you have done this, you must indicate to the
typewriter what you want to do with this information. Let’s begin
by learning how to mark a block of information.
Marking a Block of Text
1 Recall your text
2 Search or Scroll to position your cursor on the first character
to be marked
If you are marking indented text, place your cursor at the
beginning of the line.
M
+
3 Press CODE + M
A mark symbol m will appear on the screen and the text will
be highlighted from the mark symbol to the end of the docu
ment.
4 Search or Scroll to position your cursor on the last character
to be marked
If trying to mark an entire paragraph, position the cursor to
the right of both manual returns at the end of the paragraph.
CODE -|-
M
Your text should look like this:
□Panasonic Communications & Systems Company is pleased t
extend our invitation for a private showing of our Antique
Typewriter Collection and our presentation of the History
of Typewriters.C
You may not know that Panasonic Communications & Systems
Company maintains an Antique Typewriter Collection in its
Executive Offices in New Jersey. We would like to invite
the members of your secretarial institute to see this
collection and learn more about the evolution to the
typewriter -
5 Press CODE -f M a second time
A second mark symbol El will appear on the screen. The
highlighting will now end at the second mark symbol.
81
Page 92

Now that you have told the typewriter which block of information
you want to work with, you must tell it what you would like to do
with this information. Do you want to move, copy, delete or print
it?
Deleting a Block of Text
1 Mark the text to be deleted
M
+
2 Press CODE + M for a third time
Your screen will prompt:
MARKED TEXT
Copy
Delete
Print
RETURN or ESC
D
DEFAULT
3 Press D (for Delete)
The marked text will be deleted.
Moving a Block of Text
1 Mark the text to be moved
2 Move the cursor to the location you would like to move the
text to
82
CODE -}-
3 Press CODE + M for a third time
Your screen will prompt:
MARKED TEXT
Copy
Delete
Print
RETURN or ESC
M
4 Press M (for Move)
The text will move to the new location and will no longer be
highlighted.
Page 93

Copying a Block of Text
1 Mark the text to be copied
2 Move the cursor to the location you want the text copied to
M
3 Press CODE + M for a third time
Your screen will prompt:
MARKED TEXT
Copy
Delete
Print
RETURN or ESC
4 Press C (for Copy)
The text will appear in both the original and new location and
will no longer be highlighted,
Printing a Block of Text
1 Mark the text to be printed
CODE -J-
M
2 Press CODE + M for a third time
Your screen will prompt:
MARKED TEXT
Copy
Delete
Print
RETURN or ESC
3 Auto insert a sheet of paper
p
4 Press P (for Print)
The screen will clear and display the message “PRINTING.”
When the printing is complete, the document will be displayed
and the block of text will no longer be highlighted.
83
Page 94

Removing Marks from a Block of Text
1 Position the cursor to the right of the first mark symbol and
press CORRECT
2 Position the cursor to the right of the second mark symbol
and press CORRECT
NOTE; It is very important to delete both mark symbols. If one
mark symbol is left in the document, all text from that
mark symbol to the end of the document will be
highlighted.
84
Page 95

There are several way to print a document with the KX-E2500.
You can print from within a text file or phrase location. You can
also choose to print only a portion of the text file as outlined on
page 85. The KX-E2500 also gives you a Print selection on the
Main Menu. In addition, the KX-E2500 also gives you the ability
to print a document stored on the disk. Refer to page 213 for
instructions.
The KX-E2500 enables you to define the number of printed lines
per page and assign page numbering or a header and/or footer to
print with your document. The following pages will explain all the
print features available to you.
Page End
A page end command enables you to tell the typewriter how many
lines you want per page. The Page End command can be set while
in typewriter or memory mode. You can change the setting or turn
it off and on at your convenience.
The page end setting is stored with the information typed in text
memory. As you type in memory, a dashed line will appear on the
screen indicating where the page will end. During print out, the
prompt “PAGE END !!“ will appear on the screen. The printing
will also stop allowing you to insert another sheet of paper and
continue printing.
85
Page 96

Activating Page End
1 Automatically insert a sheet of paper
B
p
‘AOl f**
2 Press CODE + P (Page End)
Your screen will prompt:
PAGE END
Page End
Number of Print Line [54]
RETURN to Enter, RELOC to Enter Ail or ESC
ON OFF
3 Press RETURN
The cursor will appear to the right of the “Number of Print
Line.”
4 Press CORRECT twice to erase the current page end setting
5 Type the desired number of lines (maximum 99)
6 Press RETURN
86
Deactivating Page End
p
+
PAOt CMO
1 Press CODE + P
Your screen will prompt:
PAGE END
Page End
Number of Print Line [54]
RETURN to Enter, RELOC to Enter All or ESC
OH OFF
2 Highlight OFF
R£LQC
3 Press RELOC to enter
The page end command is deactivated.
Page 97

Printing with a Page End Command
Activated
Typewriter Mode
When you reach the last line of a page end setting, the keyboard
will lock and the screen will prompt:
PAGE END !!
To Continue Typing on a New Page:
E
EJECT
1 Press CODE + E to automatically eject the paper
2 Automatically insert a new sheet of paper
3 Continue typing
To Continue Typing on the Same Page:
• Press the CORRECT key before typing each additional line
or
• Turn the Page End setting off
Text Memory Mode
When the last line of a page end setting is printed, the keyboard
will lock and the screen will prompt:
PAGE END !!
To Continue Printing on a New Page:
E
+
ijecT
1 Press CODE + E to automatically eject the paper
2 Automatically insert a new sheet of paper
3 Press the PRINT key to continue
To Print Additional Lines on the Same Page:
• Press the CORRECT key to print each additional line
87
Page 98

Printing from Within a Text or Phrase
The KX-E2500 gives you the ability to print the document you are
working on while it is displayed on screen. You can print from any
point within a text or phrase memory. The KX-E2500 will print
from the current cursor position to the end of the text. The docu
ment is not displayed on the screen when printing. However, when
the printing is complete, the document will reappear and the cursor
will be positioned at the beginning of the document.
1 Access a phrase or text memory
2 Press EXPR to position the cursor at the beginning of the
memory
or
Position the cursor at the point you would like printing to
begin
3 Press PRINT
Halt Print
The print key enables you to print a text or phrase from within a
document. It is also used to pause or quit printing. It can actually
be referred to as the “start and stop” print button.
You can pause printing when an important phone call is received
and resume printing at a more convenient time or you can quit
printing when an incorrect phrase or text memory is recalled.
When you quit printing, the phrase or text you were printing will
appear on the screen and you will be in the edit mode.
Halting a Print Command
1 Press PRINT to Halt the printing
Printing will stop and your screen will prompt:
HALT PRINTING
Quit
2 Press R to Resume Printing
or
Press Q to Quit Printing
88
Page 99

Printing from the Main Menu
The KX-E2500 gives you the ability to print a document directly
from the main menu. This will save you time, as you do not have
to recall the document from memory before giving the print com
mand.
Below is an example of the print menu;
PRINT MENU
Print Text
Text Linking
Mail Merge
RETURN or ESC
Print Text
Enables you select the document you
would like to print. You also have the abil
ity to print multiple copies, select a header
or footer to print with your text, and auto
matically page number.
Text Linking Enables you to print several documents as
one. The features listed under print (e.g.,
page numbering) are also available under
Text Linking
Mail Merge
Enables you to personalize correspon
dence by merging variable information
from a mail list into a standard letter.
89
Page 100

Printing a Text from the Main Menu
1 Auto Insert a sheet of paper
2 Press the MAIN MENU key
p
l*rt:
3 Press P (for Print)
Your screen will prompt:
PRINT MENU
Print Text
Text Linking
Mail Merge
RETURN or ESC
4 Press RETURN to select Print Text
Your screen will prompt:
PRINT TEXT
1 Text Name
Copies Required
Printed Lines Per Page
Form Feed [ ] lines
Header Phrase No.
Footer Phrase No.
Starting Page Number .
Page No. Position Top Right Bottom Center
1
[ 1]
[ ] lines
[ ]
[ ]
[ ]
90
Type the text name
RETURN - Enter/List, RELOC - Enter All or ESC
5 Type the text name to be printed and press RETURN
or
Press RETURN to display the directory
Cursor to the desired text name and press RETURN
The text name will be automatically inserted into the Back
ground Print Menu.
6 Press RELOC to skip the other print selections and begin
printing
 Loading...