

Page 1
OV
tíO®
a'
xï«*P
Page 2

FOR USERS IN UNITED STATES ONLY
This equipment has been tested and found to comply with the limits for a Class
B digital device, pursuant to Part 15 of the FCC Rules. These limits are designed
to provide reasonable protection against harmful interference in a residential installation.
This equipment generates, uses and can radiate radio frequency energy and, if not
installed and used in accordance with the instructions, may cause harmful interference
to radio communications. However, there is no guarantee that interference will not
occur in a particular installation. If this equipment does cause harmful interference
to ràdio or television reception, which can be determined by turning the equipment
off and On, the user is encouraged to try to correct the interference by one or
more of the following measures:
- Reorient or relocate the receiving antenna.
- Increase the separation between the equipment and receiver.
- Connect the equipment into an outlet on a circuit different from that to which
the receiver is connected.
- Consult the dealer or an experienced radio/TV technician for help.
The user may find the booklet “Something About Interference” available from FCC
local regional offices helpful.
FCC Warning: To assure continued FCC emission limit compliance, the user must
use only the recommended shielded interface cable when connecting to computer
or peripheral. Also, any unauthorized changes or modifications to this equipment
would void the users authority to operate this device.
WARNING
When you operate this equipment, the power-outlet should be near the equipment
and be eas ily accessible.
Power source voltage of this unit is listed on the nameplate. Do not fail to
plug the typewriter into an outlet with the proper voltage.
To prevent fire or shock hazard, do not expose this product to rain or any
type of moisture.
The serial number of the unit may be found on the inside label. For your convenience,
note this number in the space provided below, and retain this book along with
your proof of purchase, to serve as a permanent record in the event of a theft,
or for future reference.
MODEL NO.
SERIAL NO.
NAME OF DEALER
DATE OF PURCHASE
Page 3

Preface
Congratulations! You are about to enter the exciting world of
electronic typing with one of the most advanced electronic type
writers available today.
Your Panasonic typewriter has been designed to help you prepare
your typing projects as simply and efficiently as possible.
Many of your tedious typing tasks may now be performed quickly
and automatically. By reading through the manual, you will
learn how to operate all of the functions which will help you
on a day-to-day basis.
It is important that you read this manual and do the exercises.
It has been designed to teach you every function your Panasonic
typewriter has to offer. Once you have completed this manual,
you will find it easier to do many of your daily typing projects.
Take the time to learn everything you can about your new
typewriter. We are convinced you will find typing much more
interesting and your finished projects cleaner, more professional
looking, and much easier to do.
We hope you enjoy using your Panasonic typewriter and are
confident you will have many years of reliability ahead of you.
Page 4

Page 5

TABLE OF CONTENTS
Preface
LEARNING THE BASICS ......................................................................................... l
• Parts Functions ........................................................................................................ 2
Power On/Off Switch
Paper Release Lever
Paper Bail Release Lever............................................................................2
Copy Control Lever ...................................................................................3
Cover Interlock Switch ..............................................................................3
KEYBOARD LAYOUT ..............................................................................................4
• Character Keys ....................................................................................................... 4
• Selector Switches..........................................
Line Spacing Selector.................................................................................5
Mode Selector ............................................................................................5
Pitch Selector..............................................................................................5
Impact Control Selector..............................................................................6
KB I/KB II Selector....................................................................................6
Accessing KB II ............................................................................. 6
• Function Keys...........................................................................................................7
USING THE TYPEWRITER ......................................................................................9
• Automatic Paper Insertion.......................................................................................9
Changing the Paper Insertion Position
• Automatic Paper Eject.............................................................................................9
Automatically Ejecting the Paper ..............................................................9
• Margins and Tabs..................................................................................................... 10
Setting Margins and Tabs............................................................................ 10
Clearing a Tab Stop .........................................................................11
Clearing All Tabs and Retaining Margins........................................11
Clearing All Margins and Tabs
Storing Margin Formats...............................................................................12
Recalling Margin Formats
Adjustable Hot Zone....................................................................................13
Setting the Hot Zone....................................................................... 13
• Index ( ) and Reverse Index (^ ) ................................................................14
• Micro Index ............................................................................................................ 14
Micro Indexing.............................................................................................14
• Corrections................................................................................................................15
Correcting Errors on the Same Line............................................................ 16
Out of the Correction Memory.....................................................................17
Using the No Print Method ..............................................................17
Making Manual Corrections
................................................................................
...................................................................................
..........................................................
.......................................................
........................................................
...........................................................................
.............................................................
2
2
5
9
11
13
18
Page 6

AUTOMATED TYPING FEATURES .....................................................20
• Caps Lock.................................................................................................................20
• Bold Print................................................................................................................ .20
• Underscore...............................................................................................................21
Continuous Underscore ..............................................................................21
Word by Word Underscore
Double Underscore......................................................................................22
• Centering ............................................................................................................. 23
Between Margins.........................................................................................23
Over a Point ................................................................................................23
Between Tab Stops......................................................................................24
Aligned at the Right Margin .......................................................................24
Centering Application for Columns ............................................................25
• Indent .......................................................................................................................26
Left Indent .................................................................................................. 26
Indenting the Left Side of the Text
Block Indent
• Decimal Tabulation.................................................................................................. 28
Using Decimal Tabulation...........................................................................28
• Temporary Hyphen...................................................................................................30
Inserting a Temporary Hyphen....................................................................30
• Permanent Space ................................................................................................... 31
Entering a Permanent Space .......................................................................31
• Micro Space............................................................................................................ 31
Entering a Micro Space...............................................................................31
• Permanent Backspace ........................................................................................... 32
Entering a Permanent Backspace................................................................ 32
...............................................................................................
Indenting Both Sides of the Text......................................................27
........................................................................
.................................................
21
26
27
SPELLSCAN........................................................................................................ 33
• Turning SpellScan On ..............................................................................................33
• Turning SpellScan Off..............................................................................................34
• Inserting a Word Into the Glossary ..........................................................................34
• Deleting a Word From the Glossary.........................................................................35
• Listing the Glossary ................................................................................................ 36
DEFAULT SETTINGS ....................................................................................37
• Resetting the Printer ................................................................................................38
CODE OPERATIONS CHART 39
CAUTIONS ...........................................................................................................41
• Batteries ...................................................................................................................41
• Cleaning .................................................................................................................. 41
• Cables ......................................................................................................................41
Page 7

CHANGING SUPPLIES
• Changing the Ribbon Cartridge
• Changing the Correction Tape
• Changing the Daisywheel
• Changing the Batteries
42
42
43
44
45
PLATEN REMOVAL AND INSTALLATION
• Removing the Platen
• Installing the Platen
SHIPPING INFORMATION
TROUBLESHOOTING
OPTIONS
SPECIFICATIONS
INDEX
46
46
47
48
49
50
51
52
Page 8
(D CD
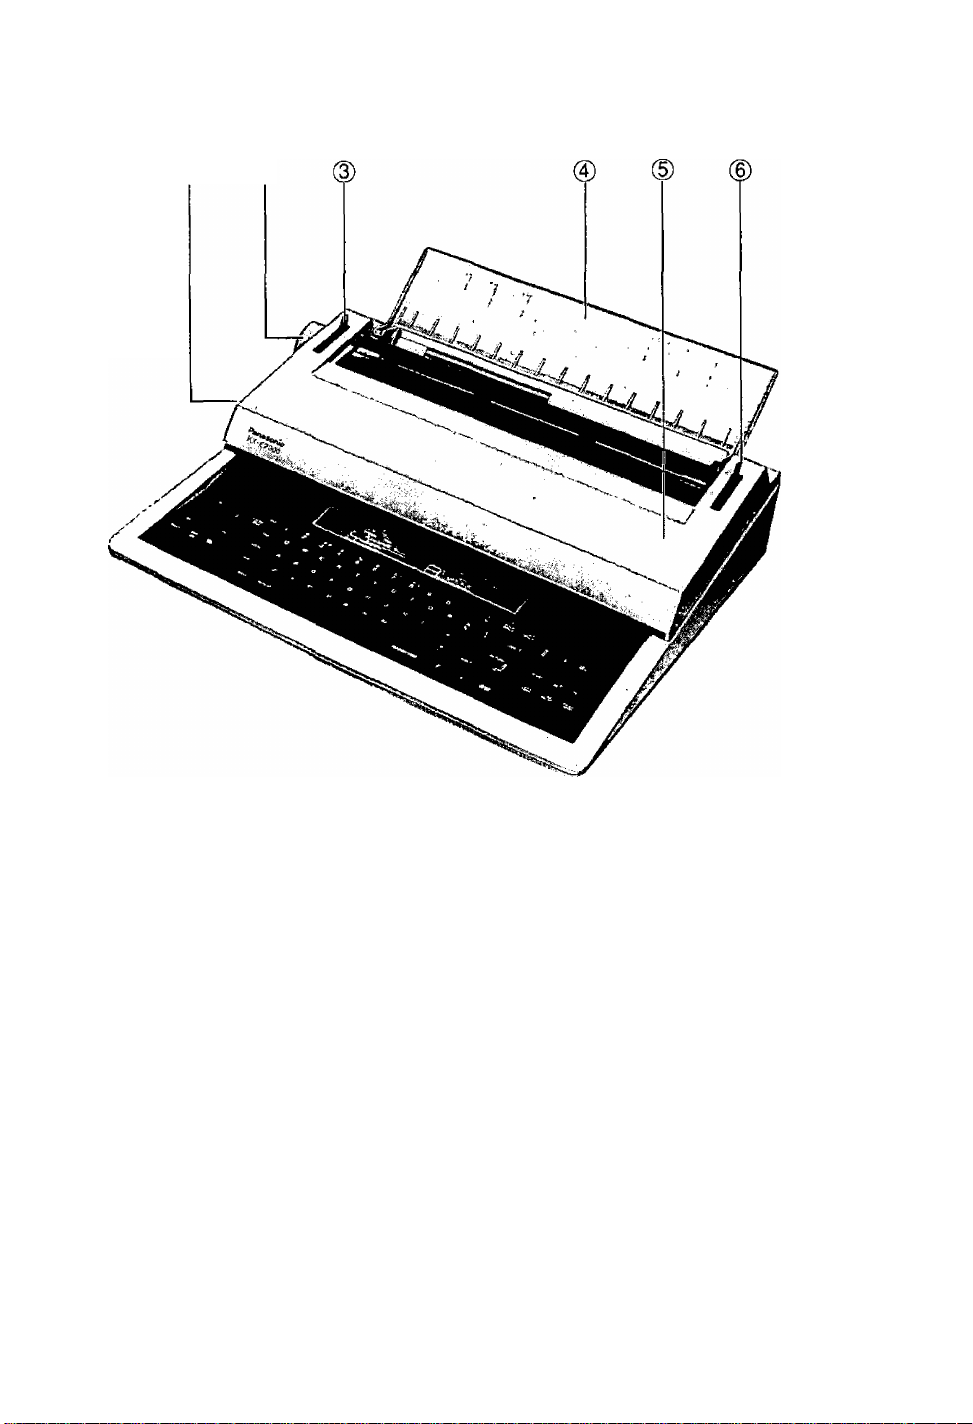
LEARNING THE BASICS
©Power ON/OFF Switch
©Platen Knob
Manually feeds paper
©Paper Bail Release Lever
Moves the paper bail away from
the platen
©Paper Support
©Top Cover
©Paper Release Lever
Releases paper
Page 9
Parts Functions
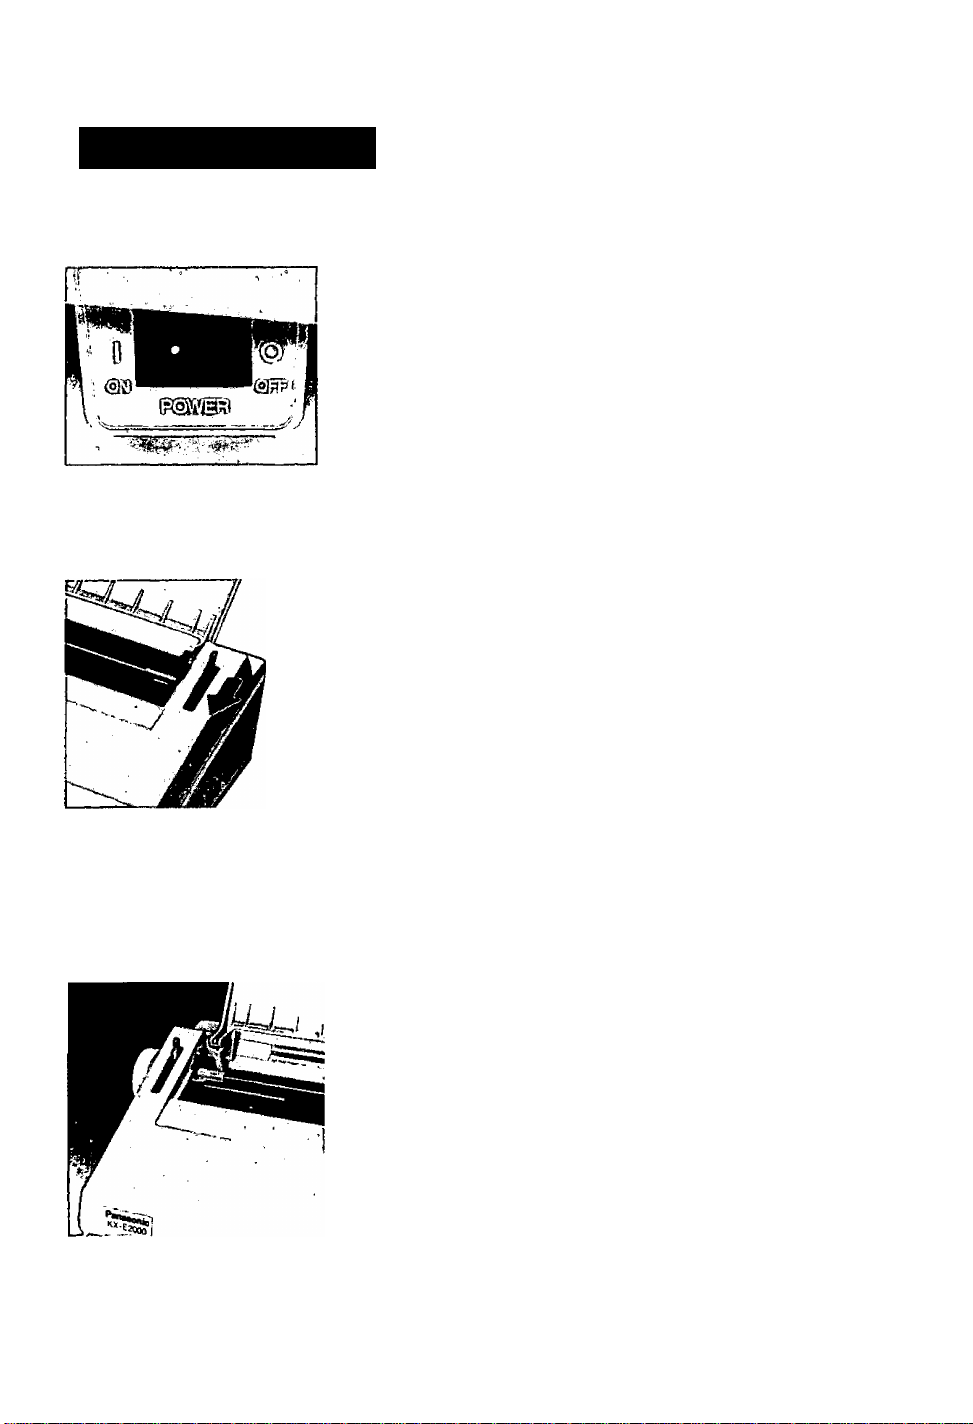
Power On/Off Switch
The power ON/OFF swiich is located toward the back left-hand
side of the machine.
When you turn the unit on, the printer will move to the current
left margin and the daisywheel will spin to position itself accurately.
The typewriter will remember the last margins and tabs used
when you turn the machine off.
Paper Release Lever
Pulling forward on the Paper Release Lever releases the paper
so that the operator can adjust it freely.
Paper Bail Release Lever
Pulling forward on the Paper Bail Release Lever moves the
paper bail away from the platen. Additional forward movement
of this lever activates the automatic paper insert function.
Page 10
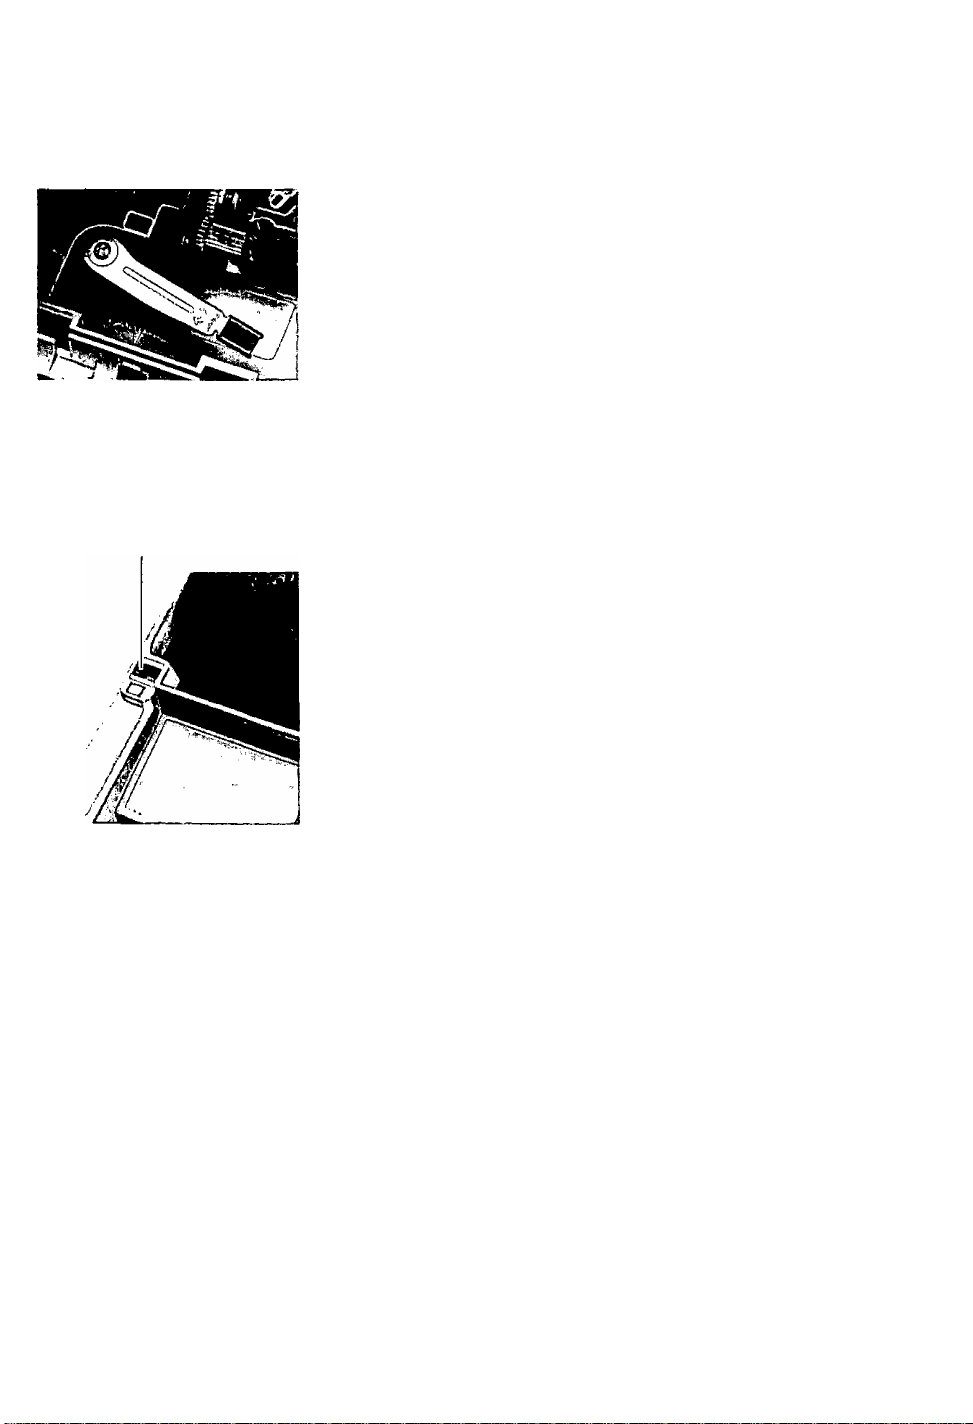
Copy Control Lever
Located inside the unit on the right side underneath the ribbon
cartridge is a green lever, which is for copy control. Position
1 is for one to three copies; position 2 is for three to five
copies (dependent upon paper weight). Set according to your
requirements.
Cover Interlock Switch
Cover Interlock Switch
The top cover has a safety interlock switch which deactivates
the printer and keyboard whenever the top cover is opened.
Page 11
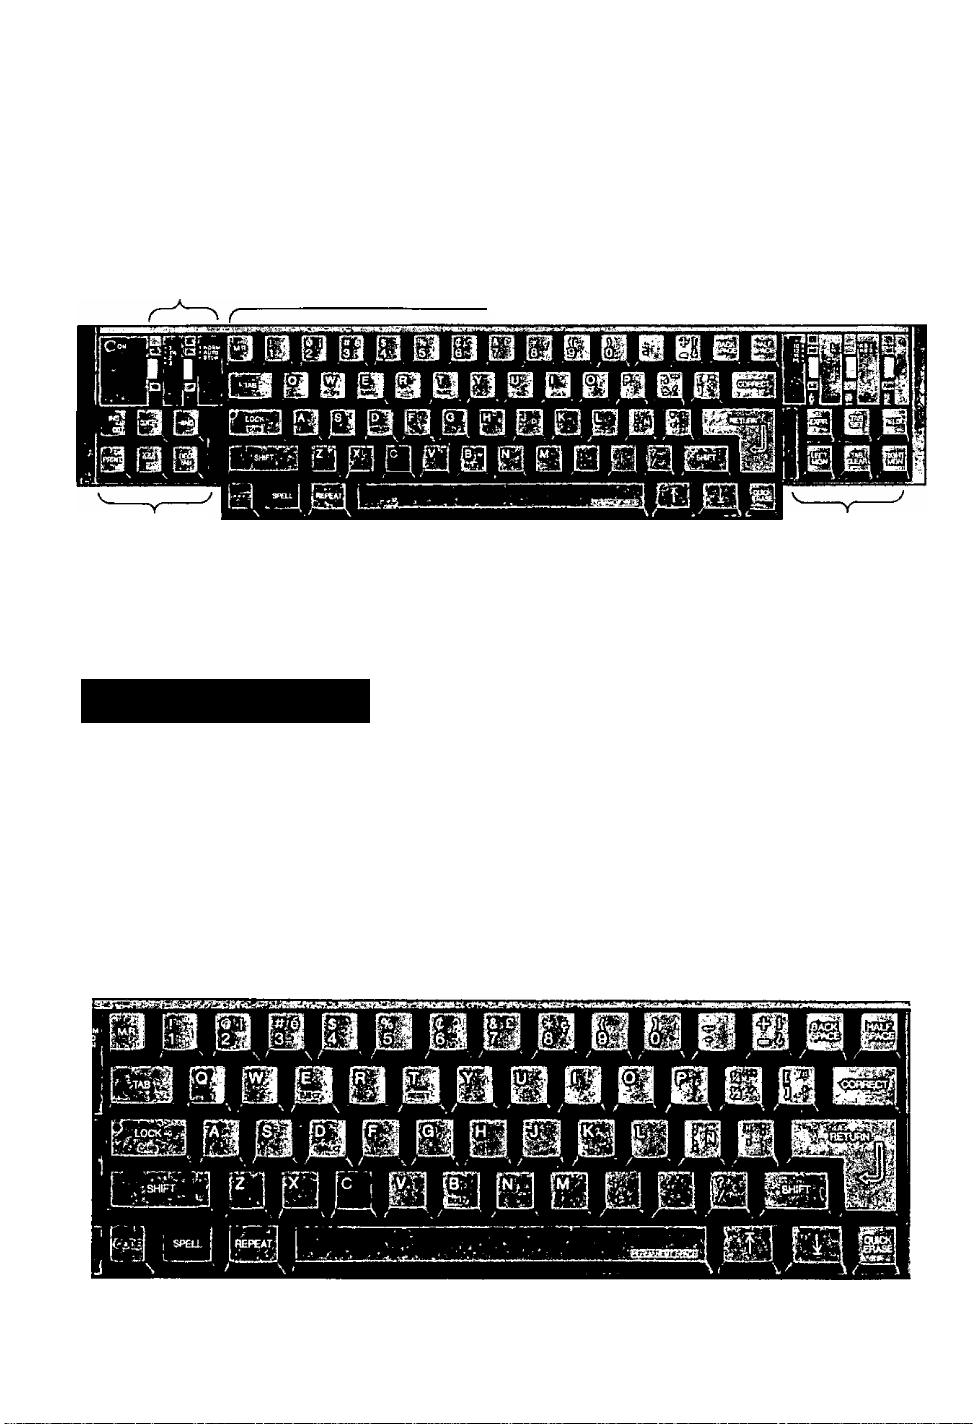
KEYBOARD LAYOUT
In order to simplify the explanation of the typewriter and its capabilities, the keyboard has
been divided into three (3) separate sections: Character Keys, Selector Switches, and Function
Keys.
Selector Switches
Function
Keys
Character Keys
Selector
Character Keys
Switches
z'
------
^^
Function
Keys
The KX-E2000 Character Keys are clearly labeled for ease of
u.se. All coded functions are labeled in blue and correspond
with the CODE key, which is also labeled in blue. All operations
which need to be performed with the SHIFT key are framed
in a box. Keys with one or two characters to the right of the
traditional characters offer special symbols. These symbols are
accessed in KB II. For more information on KB II refer to
page 6.
Page 12
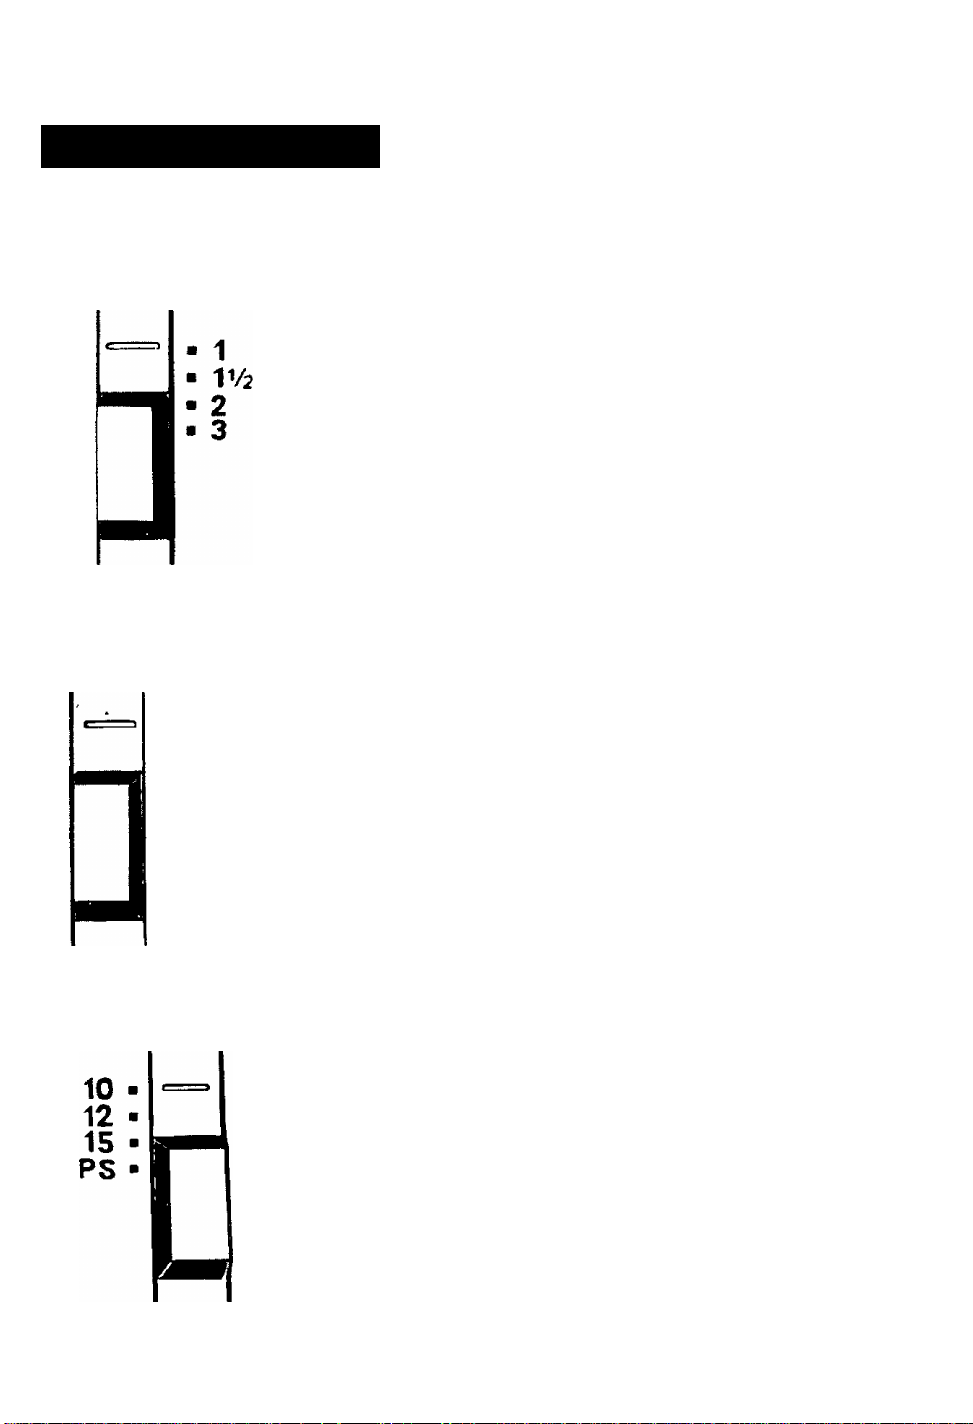
Selector Switches
Line Spacing Selector
The Line Spacing Selector is located on the top left of the
keyboard It is marked 1, 1^/2, 2 and 3 and is used to control
the number of lines between each RETURN
You may also select from three different lines per vertical inch
settings which are accessed through the default menu discussed
on page 37 These choices and their uses are listed below
Mode Selector
The Mode Selector is located to the immediate right of the
NORM
AUTO
STOR
Line Spacing Selector It offers three options
NORM Prints each character as you type and requires a manual
A total of five selector switches are located on the KX-E2000
5 25 - legal applications (court reporting)
6 - normal correspondence
8 - used in conjunction with 15 pitch
return at the end of each line
AUTO Prints each character as you type and automatically
returns at the end of each line
STOR This mode is used to store margin and tab formats in
Code X, Y, or Z You cannot type m this mode
Pitch Selector
On the right side of the keyboard is the Pitch Selector which
is labeled 10, 12. 15 and PS The Pitch Selector indicates the
number of characters printed per inch as outlined below
10 PICA
12 ELITE
15 MIKRON
PS PROPORTIONAL
For the best results, your Pitch Selector switch should correspond
with the pitch of the daisywheel in your typewriter
10 Characters per inch
12 Characters per inch
15 Characters per inch
Variable Spacing
Page 13
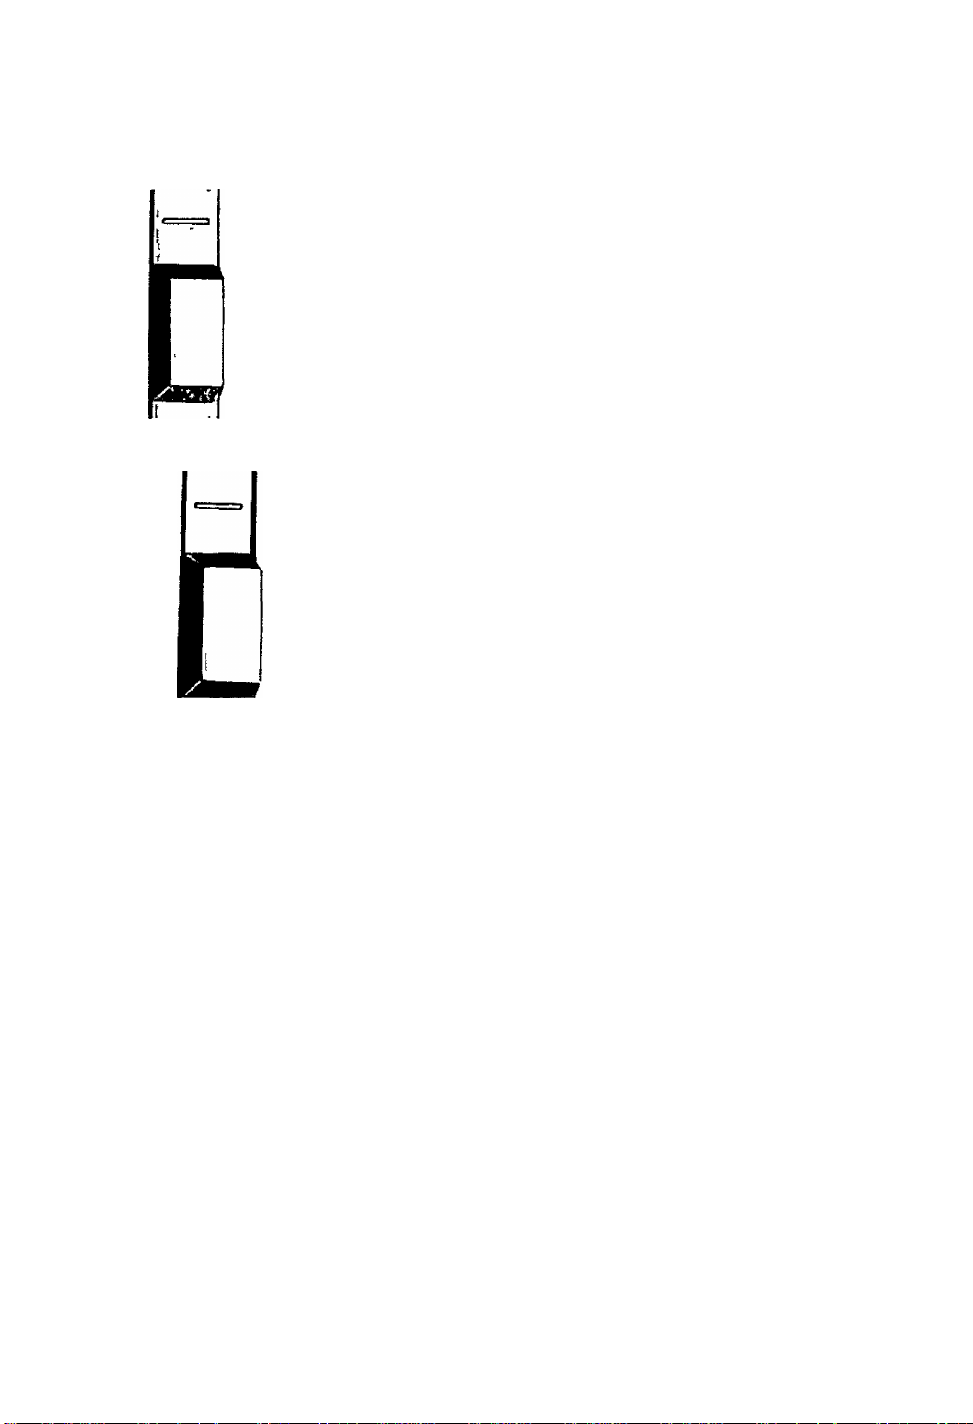
L
H
KB 1 KB I
Impact Control Selector
The Impact Control Selector, which is located to the right of
the Pitch Selector, dictates to the printer how hard the characters
on the daisywheel will strike the page You have a choice of
two settings L (light) and H (heavy)
KB I/KB II Selector
The KB I/KB II selector switch is located to the far right of
the keyboard KB I allows printing of the alpha/numenc symbols
normally associated with a traditional keyboard On the keys
which contain three or more characters, KB II enables you to
access the symbols located on the right side of the traditional
characters
Accessing KB 11
• Move the selector switch to KB II
The symbols to the right side of the traditional characters are
now available for use
If the symbol is located on the upper right side of the traditional
character,
• PRESS SHIFT + THE DESIRED KEY
If the symbol is located to the lower right side of the traditional
character,
• PRESS THE DESIRED KEY (no shift is required)
Panasonic offers two types of daisywheels
D1 - For International Symbols
D2 - For American Symbols
When using a D1 daisywheel, which is provided with your
KX-E2000, you have the ability to type the following International
symbols
£ ? e
When using the D2 daisywheel, you have the ability to type
the following American symbols
I 6
§ U < >
N h
Page 14
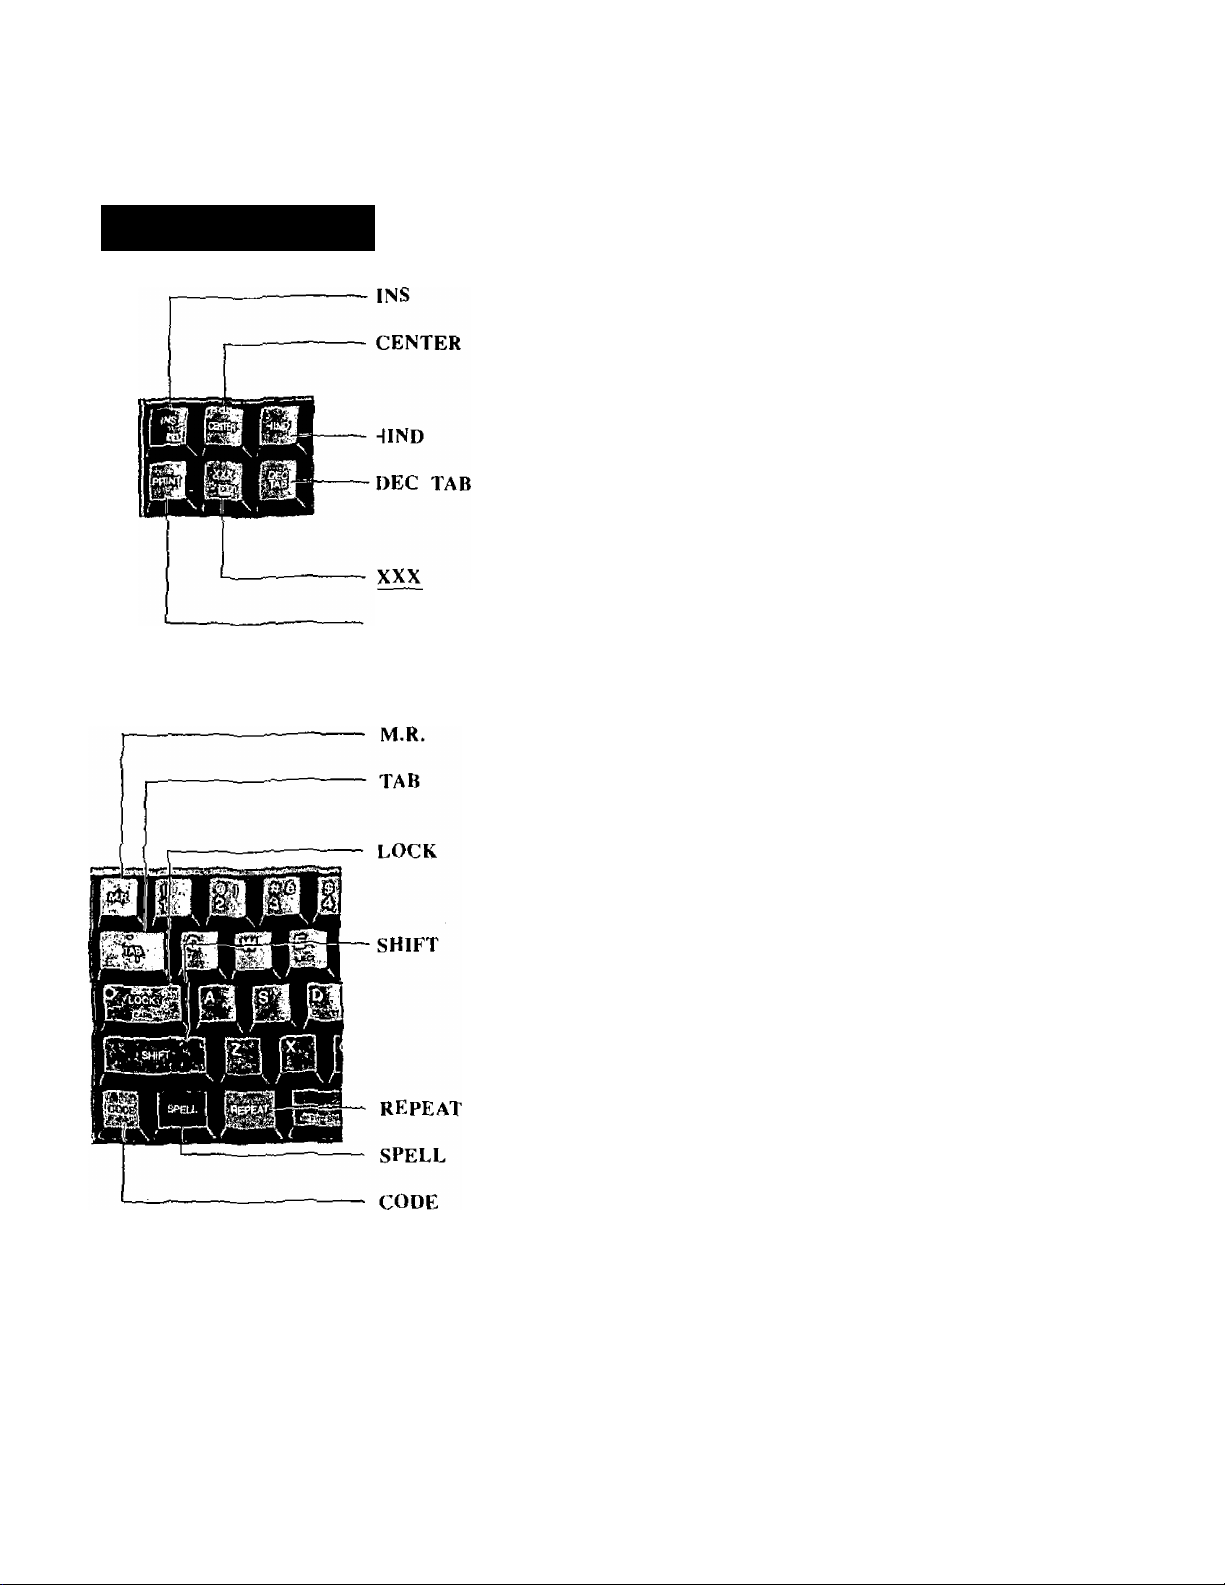
Function Keys
Inserts a word into the spell user glossary
Allows you to center four ways:
between margins, over a point, between tabs, or
right margin flush.
Sets a temporary left margin.
Advances the printer to the next tab position and
aligns the decimal point or comma on the tab
position.
Sets and releases automatic underscore command
PRINT
Advances to “fill-in” positions in Forms Layout.
The No Print mode i5 activated when used in
conjunction with the CODE key.
Margin release for left and right margins.
Advances the printer to the next tab position, and
aligns all characters to the right of the tab setting.
Allows typing of capital letter without holding
down the SHIFT key. Caps lock is activated when
used with the CODE key.
Allows typing of capital letters. It also accesses
the automated features which are framed in a box
on the keytops.
You must hold down the SHIFT key while pressing
the desired key.
Make.s every key a repetitive key.
Turns the spell feature on and off.
Is u.sed in conjunction with other keys (most of
which are clearly labeled in blue) to perform
automated functions.
SPACE BAR
You must hold down the CODE key while pressing
the desired key,
Advances the printer to the right. When used with
the CODE key, it advances the printer i/6th of a
space if your pitch is set on 10.
Page 15

EXPR
RIGHT MGN Sets the right margin. Used with the CODE key,
TAB CLEAR Clears TAB stops. When used with the CODE key,
LEFT MGN Sets the left margin.
Moves the printer to the beginning of the line
without line spacing.
Sets TAB stop positions (maximum 28).
Moves the printer to the last character on the
paper.
it sets the hot zone.
it clears all tabs, or all margins and tabs.
BACK SPACE
HALF SPACE
CORRECT
RETURN
QUICK
ERASE
i (INDEX)
T (REVERSE
INDEX)
Moves the printer one space to the left.
Advances the printer a Vi space to the right.
Deletes the character to the left of the printhead.
Advances the page one line down, and brings the
printer back to the left margin.
Deletes the entire word to the left of the printhead.
Advances the page a ^/2 line toward the bottom
of the page.
Advances the page a ^/2 line toward the top of the
page.
Page 16

USING THE TYPEWRITER
Automatic Paper Insertion
The Panasonic typewriter is pre-programmed to insert your paper
seven (7) lines from the top of the page. Place your paper in
the machine and pull the paper bail release lever toward you
until the paper begins to insert.
Changing the Paper Insertion Position
1 Place your paper against the paper support guide with the left
edge of the page aligned with 0 on the margin scale (located on
the top cover)
2 Pull the Paper Bail Release Lever towards you until the paper
begins to insert
3 Press RETURN. INDEX (i) or REVERSE INDEX (T) to position
J
the paper at the desired insertion point
j
CODE
NOTE: You can reset the auto paper insertion point to the default setting
4 Press CODE + A
The new position is now stored and will remain the point of
insertion until you change the setting again by following the
steps outlined above.
(7 lines) by changing the default parameter (refer to page 37).
Automatic Paper Eject
After typing a project, you can instruct your typewriter to au
tomatically eject the paper.
Automatically Ejecting the Paper
E
EJfCI
• Press CODE + E
The KX-E2000 has been pre-programmed for standard
paper (66 lines), and will eject the paper based on that setting.
If you are using legal or ledger size paper (longer than 11"),
the paper will not eject fully from the typewriter unless you
change the paper length default setting (see page 37).
Page 17

Margins and Tabs
Because there are no preset margins or tabs, the KX-E2000
enables you to set margins and tabs to meet your requirements.
A maximum of 28 tab stops can be set on a writing line.
Panasonic also gives you the ability to store three different
margin formats (margins, tabs, and hot zones). These formats
are stored in X. Y and Z, and can be recalled at any time;
thus, eliminating the need to manually set frequently used margin
formats.
Setting Margins and Tabs
1 Press SPACE BAR
This moves the printer toward the right. When you have
reached the desired left margin position,
LEFT
MGN
TAB
SET
RIGHT
MGN
J
2 Press LEFT MGN
To position the printer at the first required TAB stop,
3 Press SPACE BAR
4 Press TAB SET
Repeat the last two steps for each tab stop required. The
maximum number of tab stops on one line is 28.
5 Press SPACE BAR to reach the right margin setting
6 Press RIGHT MGN
7 Press RETURN
• You may also change the left margin as you would on a traditional
typewriter by using the M.R., SPACE or BACK SPACE key, and
pressing LEFT MGN at the new position.
10
Page 18

Clearing a Tab Stop
vctto s^*ce
or TAB
-h
TAB
CLEAR
CLEAR
J
TAB
TAB
1 TAB to the desired tab setting
2 Press TAB CLEAR
Clearing All Tabs and Retaining Margins
1 SPACE or TAB to the first tab position
2 Press CODE + TAB CLEAR
Clearing All Margins and Tabs
1 Press RETURN
This positions the printer at the left margin. (The printer must
be at the left margin to clear all of the settings.)
1 1
TAB
CLEAR
2 Press CODE + TAB CLEAR
The printer will move to the far left, clearing all existing
margins and tabs.
Page 19

Storing Margin Formats
Exercise
TAB
+
ICLEAHl
1 Press CODE + TAB CLEAR to clear the current margin format
2 Set the desired margins and tabs
nn
3 Press RETURN
J
4 Move the MODE selector to STOR
5 Press CODE + X (Y or Z)
6 Move the MODE selector to NORM or AUTO
The typewriter will beep once to let you know the format has
been stored.
The typewriter will beep three times if you attempt to type or set
a new format while in the STOR mode.
NOTE: When you want to change any of the stored margin formats,
simply set the new format and store it over the previous format.
Following the steps outlined above, store the following formats.
Press CODE+TAB CLEAR to clear the current margins and tabs. Set the new margins and
tabs as follows:
Format “X'*
Left Margin 15
Tabs 30, 45, 60
Right Margin 74
Format “Y"
11
20, 33, 45, 54
64
12
Page 20

Recalling Margin Formats
NEVER position the MODE selector on STOR to recall margin
formats from memory (only to store them).
1 Move the MODE selector to NORM or AUTO
MC)IO S^ACE
CODE I I ^ j
or
BACK
IspaceJ
2 Press CODE + X (Y or Z)
The designated format will be recalled.
Adjustable Hot Zone
The Hot Zone represents the number of spaces between the bell
and the right margin. It is preprogrammed for 0.7 of an inch
(7 spaces in 10 pitch) from the right margin. You may change
the setting within one inch of the right margin (max 10 spaces).
Setting the Hot Zone
1 Position the MODE selector on NORM
2 Press SPACE BAR or TAB to position the printer at the right
margin
3 BACKSPACE to the required new bell position
13
“h
RIGHT
MGN
4 Press CODE + RIGHT MGN
Page 21

Index (ii) and Reverse Index (T)
The INDEX (i:) key allows you to advance the paper a !/^ line
toward the bottom of the page. The REVERSE INDEX (T) key
allows you to advance the paper a line towards the top of
the page.
These keys are useful when typing subscripts and superscripts.
You will also use them in conjunction with other features discussed
later in this manual.
The scientific equation for water is H2O.
To type this, you would first enter "H”
Micro Index
+
—
or SHIFT
+
@ I
2
1 Press INDEX {^) and type “2”
2 Press REVERSE INDEX (T) to reposition the printer on the
actual typing line and continue typing
Micro Indexing moves the printer vertically in increments of
l/48th of an inch up or down on the paper. This is extremely
useful when aligning the printer with pre-printed forms. The
Forms Layout feature will be covered later in the manual.
Micro Indexing
• Press SHIFT + INDEX (i) or SHIFT + REVERSE INDEX (T)
The SHIFT key must be held down while pressing either key.
NOTE: Micro Indexing is not stored in the correction memory.
14
Page 22

Corrections
Your typewriter has a one line correction memory. Very simply,
this means that if you make an error on the current typing
line, you may instruct the typewriter to “lift off’ the error
automatically.
Errors can be corrected both in correction memory and out of
correction memory. The KX-E2000 even offers two ways to
correct out of the correction memory.
If you have typed several lines and notice an error above the
current line, you may correct the error with a manual correction.
Listed below are the keys you will use when making corrections.
• SPACE BAR is used to position the printer one space to the
right of the incorrect character.
• BACKSPACE is used to move the printer one space to the right
of the incorrect character.
• CORRECT deletes characters to the left of the printhead.
• EXPRESS (EXPR) moves the printer to the beginning of the
line without line spacing.
• RELOCATE (RELOC) moves the printer to the last printed
character on the page, or to the last manual return.
• QUICK ERASE deletes one word at a time to the left of the
printhead.
•
15
Page 23

Correcting Errors on the Same Line
BACK
ISPACEl
QUICK
ERASE
/
1 BACKSPACE to position the pnnter one space to the right of
the character you wish to delete
2 Press the CORRECT to delete one character at a time
or
Press QUICK ERASE to delete one word at a time
3 Type the correct character (s)
Exercise
Set the mode selector on NORM, and type the following sentence Be sure to include the
errors, and do not RETURN at the end of the line
The KX-E2000 has sohpisticated junctions but is easy to yse.
Using the steps outlined above, make the following corrections
Change “sohpisticated” to “sophisticated”
“junctions” to “functions”
“yse" to “use”
16
Page 24

Micno BPACt
Out of the Correction Memory
Two methods of correction are available outside of the correction
memory; the No Print method and Manual Correction.
Using the No Print Method
The No Print method enables you to retype errors into the
correction memory without re-printing them. This feature is espe
cially useful when correcting errors typed in proportional spacing.
After reaching the end of the correction memory,
1 Press CODE + CORRECT to exit the correction memory
2 Press REVERSE INDEX (T) to position the printer on the desired
line
3 Position the mode selector on NORM
1
4 SPACE to position the printer over the first incorrect character(s)
-h
5 Press the CODE + PRINT key and retype the characters exactly
as they appear on the paper
If the text was typed in PS (Proportional Spacing), retype from
the beginning of the line to the error to ensure proper spacing.
6 Press CORRECT to delete the error(s)
7 Retype the correct character(s)
8 Press RELOC
17
Page 25

Making Manual Corrections
Manual correction is ideal for correcting one or two errors
outside of the correction memory.
—
CODE
CORRECT
1 Press CODE + CORRECT to advance beyond the correction
The printer will automatically move to the left margin
2 Press REVERSE INDEX (T) to position the printer on the line
containing the error
3 SPACE to position the printer directly over the error
4 Press CODE + CORRECT
5 Retype the incorrect character
This will lift the character off the paper.
6 Type the correct character
7 Repeat the steps outlined above for each incorrect character on
the same line
8 Press RELOC
This repositions the printer at the last printed character or
RETURN.
NOTE: If you have multiple corrections to make on different lines, you
must RETURN to position the printer at the left margin in order
to REVERSE INDEX (T) to the next line containing the error.
18
Page 26

Exercise
Type the following exercise including the errors. When finished, use the correction procedures
you have just learned. Be sure to make the corrections within the correction memory first,
and then make the corrections out of correction memory.
• Set the mode selector on NORM and use the CODE + X format.
Distantly related to the opossum, the Koala bear is only
3/4 of an inch long at birth and weighs only 1/5 of an
ounce. Usually only one Koala is born at a time, with
the mother bearing young only every other year.
The [infznt] will remain in its mother's pouch until it
is ready to emerge at six months of age. It will then
fciimgl to its mother's back until it is a year old.
When fully grown, it will stand about two feet [high| and
may iwTetHl as much as 33 pounds. At the age of four,
the animal will have attained full sexual maturity and
its life span may be as long as 20 years.
When the Koala is ready to strike out on fit's won ,j it '
will find its own eucalyptus tree, whose leaves are almost
its only food. Only on rare occasions will it leave
the tree, as when it seeks another tree to |tkae| up n^
residence.
_________________________
^ -
The Koala is suited for climbing, as all four of its
sharpjclawde| feet are made for grasping. During the day
the Koala sleeps, usually curled up inconspicuously in
the crotch of a tree, and feeds only at jnightime.|____________________
At one time, the Koala, a native of Australia, was severely
threatened with extinction. Now the Australian Igovernemtnj
is taking drastic (stespi to insure its survival. j
19
Page 27

AUTOMATED TYPING FEATURES
The Caps Lock feature enables you to type capital letters and
numbers at the same time without having to shift back and
forth from upper to lower case. The LOCK key’s indicator light
will flash when this feature is activated.
To Activate CAPS LOCK;
CODE 4- LOCK
*
CODE
"h
CODE
-h
LOCK
CAPS
B
BOLD
• Press CODE + LOCK
Every letter you type will be in CAPITAL LETTERS, when
you use the number keys you will not get the traditional shift
symbols, you will get the numbers.
To Deactivate CAPS LOCK:
• Press CODE + LOCK again
The indicator light on the lock key will no longer flash.
This feature instructs the printer to strike each character twice,
this will '‘highlight” or emphasize certain words for you.
To Activate Bold Print:
• Press CODE + B and type the word(s) to be highlighted.
CODE
-P
B
BOLD
To Deactivate Bold Print:
• Press CODE + B again
20
Page 28

Underscore
The KX-E2000 offers you three ways to underscore: Continuous,
Word by Word, and Double.
Continuous Underscore
To Activate:
Example
“h
MX.
1 <(iit
XXX
X
XXX
I
• Press XXX
Both the characters and spaces will be underscored.
To Deactivate:
• Press XXX again
This is continuous underscore.
Word by Word Underscore
To Activate:
• Press CODE + XXX
Only words will be underscored.
Example
21
To Deactivate:
XXX
: «SiS
• Press CODE + XXX again
This is word by word underscore
Page 29

Double Underscore
To Activate
Example
+
XXX
a iBig
xxx
s »Eiil
• Press SHIFT + XXX
Both characters and spaces will be underscored with a double
line
To Deactivate
• Press SHIFT + XXX again
This IS double underscore.
22
Page 30

Centering
There are four ways to center information; between margins,
over a point, between tab stops and aligned at the right margin.
Between Margins
Example
MICRO ^ICE
RETURN
RETURN
J
J
Lm
1 Press RETURN to position the printer at the left margin
2 Press CENTER and type the information to be centered
3 Press RETURN to print
^S^tYour Name)
Ce.M-te-)'
IPanasonic
'Electronic Typewriter
Over a Point
1 Press the SPACE BAR to move your primer to the desired
position
X
Example
23
CENTER
2 Press CENTER and type the information to be centered
3 Press TAB or RETURN to print
J
¿m T
X Cfrute-v X
•l*
Panasonic
r
T
Page 31

Between Tab Stops
1 Choose the tabs you would like to center between
2 TAB to the left stop position
Example
J
/1 I
CENTER
Lm
TAB,
3 Press CENTER and type the information
4 Press RETURN or TAB to print
T
X
Ce-nter
Bold Print
Index
Centering
RELOC
'i Decimal Tab
Aligned at the Right Margin
1 TAB to the right margin
2 Press CENTER and type the information to be aligned
Example
Pin
J
¿.m
X
3 Press RETURN to print
r r
TAB
X X
TAB
——, TAB
Two Panasonic Way
Secaucua, N J 07(594
T
------------—
(Your Name]
Panasonic
Ryn
X
J
24
Page 32

Centering Application for Columns
The CENTER key is ideal to use when trying to determine
proper tab settings to align columns of information Below is
an easy way to define proper tab positions before you begin
typing the actual chart
1 Insert a sheet of paper
TAB
ICLEAR
ril'l
J
2 At the left margin, press CODE + TAB CLEAR to clear all
margins and tabs
3 Set your margins at the edge of tl^ paper and press RETURN
4 At the left margin press the CENTER key
5 Type the longest word or number in the first column
6 Press the SPACE BAR to enter the desired number of spaces
between the first and second column
7 Repeat steps 5 and 6 for each column of information
8 After typing the longest word or number in the last column, press
RETURN
The longest word in each column will print evenly spaced on
the paper If the columns appear too close together, repeat
from step #4 and enter additional space between each column
If you are unable to complete the longest word in each column,
repeat from step #4 and enter fewer spaces between each
column
Example
25
Darlene
i
LEFT
MGN
Space across and set margins and tabs to agree with the print out
Be sure to set a tab on the decimal point to properly align a
column of numbers Set the right margin one or two spaces after
the last column
93 Webb Street
i
TAB
SET
$158.95
i
TAB
SET
t
1
RIGHT
MGN
Page 33

Indent
Indent allows you to set a temporary left margin and eliminates
the need to TAB before typing each indented line. When INDENT
is activated the printer will return to the point of indentation
rather than to the left margin.
There are two forms of indent available on the KX-E2000:
Paragraph and Block Indent.
Left Indent
Left Indent will provide indentation from the left side only.
Indenting the Left Side of the Text
1 SPACE or TAB to the point of indentation
or
2 Press HIND to activate the command
3 Type the text
Example
HlND
Lm
X
Below is the revised company policy regarding the use of
limousine services during business travel.
1
^ ^ A Company employees may use Westerly Limo
4 Press HIND to deactivate the command
T
X
'Service and have the charges billed di rectly
to the company. If a different limo service
is used t a paid receipt must accompany your
expense report
T
X
■t _______
T
X
26
Page 34

Block Indent
Block indent automatically indents the right margin in proportion
to the left margin. This feature creates a uniform appearance
and centers the text between margins.
The temporary margins set with block indent must be more than
one inch apart.
Indenting Both Sides of the Text
Example
iron
1 SPACE or TAB to the point of indentation
or
CODE -j- Hind
2 Press CODE +-IIND to activate the command
The same number of spaces indented from the left will auto
matically be indented from the right.
3 Type the text
CODE Hind
Lm
If Westerly Li mo Service is not available at the time of
your request, please contact the company's travel agency.
If you have any questions concering business traveli please
let us know.
4 Press CODE + HIND to deactivate the command
T
X
¿5, Utopia Travel is located on
the third floor of the north
administration building. You
may contact them on extension
1234. t
T
X
T
X
fiin
27
Page 35

Decimal Tabulation
The DEC TAB key advances the printer to the next tab position
and aligns alpha or numeric characters to the left of that tab
position. It aligns a period (decimal point) or comma on the
tab stop and places the characters following the period or comma
to the right of the tab position.
Because DEC TAB aligns all characters before a period or a
comma to the left of the tab position, it is ideal for whole
numbers or characters that require a flush right appearance. For
statistical typing, DEC TAB simplifies the tedious task of manually
aligning a column of numbers.
For statistical typing in foreign countries, numbers are aligned
at the comma position instead of the decimal point. If this is
required, you may change the alignment character by accessing
the default settings menu (see page 37).
Using Decimal Tabulation
1 Set tab stops
Remember, set the tab stop in the position you want the decimal
point to appear.
RETURN
J
DEC
TAB
DEC
TAB
2 Press RETURN
This will bring the printer back to the Left Margin.
3 Press DEC TAB 4 Type the numbers, decimal point, or text to be aligned
The printer backtraces once for every character entered before
the decimal point.
5 Press DEC TAB to advance to the next tab stop
28
Page 36

6 Repeat steps 4 & 5 until you have completed all your entries
7 Press RETURN
Example
LM
J
1,000
246
Begin typing the second line of information.
T
-TAP_
J L
123.64
. 12
7,38
Zl L
Main Street
Trask Avenue
, Gleccourt Ave
'Sky Top Lane
Ravens Crest Ave
RM
29
Page 37

Temporary Hyphen (Soft Hyphen)
A Temporary Hyphen enables you to hyphenate words that fall
within the Hot Zone (between the bell and the right margin).
A Temporary Hyphen triggers an Auto Return and should only
be used in the AUTO typing mode. Because the temporary
hyphen enables you to fit more characters on a line, it gives
the right margin a less ragged appearance.
Inserting a Temporary Hyphen
1 Type until you hear the “beep” (bell) as you near the end of the
line
2 Press CODE + HYPHEN ( —) at the desired hyphenation point
+ [I]
The character after the hyphen will trigger an automatic return.
Exercise
* •
Type this exercise below.
• Set the mode selector on AUTO and use the CODE + Y format.
Soft hyphens are entered in the hot zone to vent long words from causing extremely ragged
gins on the right side of the page. However» re-^Z^member to use the CODE key before you depress the
hyphen key. This tells the typewriter to return
at the next character typed.
-----------------------------
________ ____
'-C
__
----
(
30
Page 38

Permanent Space
Permanent Space enables you to type a space between two
words within the Hot Zone, without triggering an Auto Return,
This feature is ideal when typing proper names or dates which
should appear on the same line.
Entering a Permanent Space
1
Type until you hear ‘he “beep” (bell) as you near the end of the
line
2 Press SHIFT + SPACE BAR between the two words that you
want to appear on the same line
Exercise
Type the following using permanent space feature where indicated.
• Set the mode selector on AUTO and use the CODE + Y format.
Permanent spaces prevent names or dates from beijj
separated - In instances such as San Francisco, *
or New York, N.Y. or dates such as September 30, ^99Q_
you may instruct the typewriter never to separate^~‘’'*~^^
these characters or numbers onto different typing
lines.
Micro Space
A micro space allows you to move the printhead l/6th of a
space in 10 pitch.
Entering a Micro Space
• Press CODE + SPACE BAR
-
----—t
31
Page 39

Permanent Backspace
When typing characters that overlap, use the Permanent Backspace
feature to include both characters in the correction memory.
This means you can automatically correct the both letters. For
instance, if you type 0 without using the Permanent Backspace
feature, you will only be able to correct the slash (/), not the
zero (0),
Entering a Permanent Backspace
1 Type the first character
+
□
2 Press CODE + U
3 Type the character you want to overlap the first entry
32
Page 40

SPELLSCAN
SpellScan offers a base dictionary of 86,000 words. The dictionary is ROM (Read Only
Memory) based, which simply means that you may only read the words in the dictionary;
you cannot delete or edit them.
In addition to the base dictionary, Panasonic has included a IK (approximately 120 words)
user glossary. The glossary enables you to store frequently used words such as medical or
legal terms, proper or company names. Words may be added or deleted from the glossary at
any time, without disturbing the 86,000 words base dictionary.
The spelling of each word is checked against the base dictionary and the words you have
entered into the glossary. If a word is not found in the dictionary or the glossary, the typewriter
will beep twice to signal that an error has been made.
The typewriter will recognize the end of a word when a space, tab or carrier return is entered.
It will check a word whether it is typed in upper or lower case and .will ignore the fact that
it is underscored or in bold print. It will also accept apostrophes and certain abbreviations
such as “don’t”, “isn’t”, “1st”, “2nd” and “3rd”
SpellScan® is a registered trademark of Panasonic Communications & Systems Company, Division
of Matsushita Electric Corporation of America.
Turning SpellScan On
spell
Press the SPELL key
The typewriter will “beep” once to confirm.
SpellScan will remain on until the feature or the typewriter
is turned off.
The typewriter will “beep” twice to alert you that a misspelled
or unrecognized word has been typed. If the word is spelled
correctly, ignore the beeps and continue typing.
If correction is needed, press the CORRECT key to delete
the error.
Page 41

Exercise
Follow the instructions outlined on the previous page, type the paragraph below correcting the
errors when you hear the beeps. There is no need to correct proper names; therefore, continue
typing and ignore the warning.
There will be a company meetiing in the large conferance
room located in the south lobbie. Mr. Penter will
be arriving at the airpout at approximatly the same
time as Dr. Carlton. The doctor is our guast speaker
at this meeting. Please arrange for a limosine to
pick them up at the airport, promptly at 5:30 o'clock.
Turning SpellScan Off
• Press the SPELL key again
The typewriter will beep once to confirm.
Inserting a Word Into the Glossary
Words can only be entered into the glossary one at a time, and
they cannot exceed 30 characters. The typewriter will beep three
times when the glossary is full.
1 Press the SPELL key to activate SpellScan
2 Type the word that you want added into the glossary (max. 30
characters), and space once
The typewriter will beep twice informing you that it does not
recognize this word.
INS
LiSTEgn
3 Press INS
The typewriter will beep once to confirm that the word has
been inserted into the glossary.
34
Page 42

Exercise
With SpellScan activated, type the sentence below correcting the errors when alerted, and insert
the word “cardiopathy” into the glossary as you are typing.
Dr. Carlton will be discussing the probable cause
of cardiopathy affecting men and women 30 years of
age and older. *
Now insert the following medical terms into the glossary:
adenopathy, rhinopathy, angiopathy, dermopathy
Deleting a Word From the Glossary
You can delete one word at a time from the glossary.
1 Be sure SpellScan is on
2 Type the word to be deleted from the glossary and space once
1NS
■f-
iBigtn
Exercise
Delete the word "angiopathy” from the glossary. Your glossary should now contain only four
medical terms.
3 Press SHIFT + INS
The typewriter will beep once to confirm that the word was
deleted from the glossary. Repeat these steps for each word
to be deleted.
35
Page 43

Listing the Glossary
When listing, the glossary will print each word in alphabetical
order.
1 Insert a sheet of paper
"h
INS
uitQQ
NOTE: To stop printing, press the PRINT key. To resume printing, press
2 Press CODE + INS
The glossary will begin printing.
You will hear three beeps if you attempt to list the glossary
when there are no words present.
the PRINT key again
To cancel printing, press the PRINT key and then the CORRECT
key.
36
Page 44

DEFAULT SETTINGS
You may change specific default settings of the typewriter. Default
simply means that certain settings are pre-programmed into the
typewriter and will remain that way until you change them.
The settings that can be changed are outlined under step #2
below. Changing the default settings:
1 Insert a sheet of paper
CODE
D
-f
0€FauLT
BACK
SPACE
2 Press CODE + D
The numbers 60, 66, 6, P, N, D, 1 will print.
They represent:
60 - Page end - number of lines to print per page
(01 - 99 lines)
66 - Paper length - total number of lines on the paper
(01 - 99 lines)
6 - Lines per vertical inch
(5:5.25- legal, 6:6 -normal, 8:8 - 15 pitch)
P - Dec tab alignment character
(P:decimal point, C:comma)
N - Impact control
(N:normal impact, L:low impact)
D - Auto paper insertion point
(D:default - at seven lines, N:not default)
1 - Daisywheel
(1:100 series, 2:200 series)
3 BACKSPACE to the desired default setting
4 Press CORRECT and type the appropriate parameter
5 Press RETURN
The new default settings will print confirming your changes,
J
NOTE: • If you change the automatic paper insertion point, your default
and communication parameters (N, N) are also printed. Com
munication parameters are settings when you communicate
with interface option. These settings will remain the default
until changed again.
prompt will automatically be changed. When CODE-i-D is pressed,
the Default setting will read:
60, 66, 6, P, N, N, 1
You can reset the auto paper insertion point back to the default
(seven lines from the top), by changing the second “N” to “D".
• If the impact control parameter is set on L (low impact) and you
are not using this type of ribbon, Panasonic will not assume
responsibility for inconsistent print quality. If you experience
inconsistent print quality, change this setting to correspond with
the correct type of ribbon.
•
Page 45

Resetting the Printer
In the event of a paper jam or improper printing, it may be
necessary to reset the printer. When the printer is reset, the
daisywheel will spin, and the printhead will move to the left
end of the platen before returning to the left margin. You will
not loose the margin formats you have stored, and all default
settings will remain.
To Reset the Printer:
-H
T
RtSCT
• Press CODE + T twice
■ Your printhead will move to the left side of the platen beep
once, and then move back to the left margin.
38
Page 46

CODE OPERATIONS CHART
CODE
CODE + A
CODE + B
CODE + D
CODE + E
CODE + T
CODE + U
CODE + X
CODE + Y
CODE + Z
CODE + CORRECT
CODE + HYPHEN
CODE + IND
CODE + INS
FUNCTION
Set auto paper-insertion
Bold print
Default settings
Auto paper eject
Reset printer and correction memory
Permanent backspace
Margin format recall/store
Margin format recall/store
Margin format recall/store
Escape correction memory
Soft hyphen
Block indent
Listing the glossary
Page
9
20
37
9
38, 49
32
13
13
13
17
30
27
36
CODE + LOCK
CODE + PRINT
CODE + RIGHT MGN
CODE + SPACE BAR
CODE + TAB CLEAR
CODE + XXX
Caps lock
No print mode
Set new bell position
Micro space
Clear margins and tabs
Underscore by word
20
17
13
31
11
2!
39
Page 47

SHIFT + INDEX (J;)
Advance the paper 1/48 of an inch
toward the bottom of page
14
SHIFT + INS
SHIFT + REVERSE
INDEX (T)
SHIFT + SPACE BAR
SHIFT + XXX Double underscore
Deletes a word from the glossary
Advance the paper 1/48 of an inch
toward the top of page
Permanent space
35
14
31
22
40
Page 48

CAUTIONS
Be sure that the carrier stopper which holds the printer stationary during shipping is removed
before turning the unit on.
Be sure to keep this stopper so that the unit can be transported safely, if the need arises.
For the best possible operation of your typewriter, do not use a power outlet which is presently
being used for a copier or other device which consumes a large volume of power.
Do not use your typewriter in the following environmental conditions:
• In direct sunlight where additional heat will be generated.
• In areas where the atmosphere is extremely salty or where corrosive gases are present.
• On surfaces that are not flat, or subject to vibration.
Batteries
If improperly used, the batteries may leak and cause corrosion.
Therefore, observe the following:
• Insert batteries properly so that the polarity matches the plus (+)
and minus (-) positions indicated in the bottom of the battery
compartment.
• Do not use new and old batteries together.
• Do not use batteries of different types together. Some batteries
differ in voltage, even though they have the .same shape.
• Do not attempt to recharge the batteries.
Cleaning
Cables
41
Use only a soft, dry cloth to clean your typewriter. Water or
thinners may damage the cover, case, or electronic circuitry.
The Parallel Interface (KX-EIP2) requires a shielded cable less,
than 6V2 feet in length.
Page 49

CHANGING SUPPLIES
Changing the Ribbon Cartridge
1 Lift the top cover of your typewriter
2 Grasp the cartridge on both sides and lift it up and out of the
machine
3 To insert a new cartridge, place the front portion (where the ribbon
is exposed) between the card holder and the tape guides. Snap
the back end of the cartridge onto the printer
4 Advance the thumb wheel on the cartridge clockwise until the
ribbon slack is tightened
42
Page 50

Changing the Correction Tape
1 Lift out the ribbon cartridge and remove the two spools of lift-off
tape
3 Feed tape around white spools. Place empty spool of the correction
tape on the right pin
43
4 Manually turn the right hand spool counter-clockwise, tightening
the tape until resistance is felt
5 Replace the typing ribbon cartridge
Page 51

Changing the Daisywheel
1 Lift out the ribbon cartridge
2 Pull the green lever that is located to the right of the printhead
towards you. Grasp the clear plastic cartridge and lift the
daisywheel out of the machine.
Place the plastic cartridge of another daisywheel in the carrier
with the characters facing the platen. Push the right side of plastic
cartridge down into the carrier and push the green lever back into
position.
4 Replace ribbon
5 Close top cover
44
Page 52

Changing the Batteries
The unit must remain on when the batteries are being replaced
to insure that the memory remains intact. When your typewriter
is turned off, the memory (auto insertion point, formats, forms
layout, etc.) is retained through three “AA” size batteries. Your
typewriter will alert you when the batteries need to be replaced.
You will hear a prolonged beep when turning the typewriter
on.
To replace the batteries:
1 Press SPACE BAR or TAB to position the primer at the far right
of the typewriter
2 Open the top cover
3 Remove the battery compartment lid
45
6 Replace the lid and close the top cover
Page 53

PLATEN REMOVAL AND
Removing the Platen
If you have to remove the platen to clear a gummed label or
clean the platen, please follow the instructions below:
1 Turn the power off
2 Open the top cover
3 Pull the paper release lever and paper bail release lever toward
the front of the machine
INSTALLATION
4 Pull both black levers of the platen holders towards the front of
the machine to unlock
46
Page 54

installing the Platen
1 Position the black platen latches (included with Black Levers)
inside the side carriage slots.
2 Push both levers of the platen holders back to secure the platen.
3 Reset the paper release lever, the paper bail release lever and the
eraser table. Then close the top cover.
47
Page 55

SHIPPING INFORMATION
The carrier stopper keeps the printer stationary during shipping. Remove the stopper before
turning the unit on.
When you transport or ship the typewriter, be sure to tollow
the steps below.
1 Position the printer at the far left of the unit.
2 Install the carrier stopper on the carrier shaft so that the printer
does not move.
48
Page 56

TROUBLESHOOTING
PROBLEM REMEDY
I. Character spacing is erratic.
2. Character printout is not clear.
3. Characters cannot be printed. • Make sure the daisywheel is mounted cor
4. Characters cannot be cancelled.
5. Character printout is scrambled.
If the problem persists after performing all of the above checks, call for service.
• Make sure the "Pitch Selector” agrees with
the pitch indicated on the daisywheel.
• Make sure the ribbon is good.
• Make sure the "Pitch Selector” and “Impact
Control Selector” are set correctly.
rectly on the printer.
• Change the ribbon cartridge.
• Make sure the correction tape matches the
type of ribbon cartridge being used.
• Make sure the correction tape is installed
correctly.
• Change the correction tape.
• The printwheel is misaligned. Press
CODE+T twice to reset the typewriter.
49
Page 57

KX-EIP2 Parallel Interface
OPTIONS
50
Page 58

SPECIFICATIONS
Print Element:
Print Speed:
Print Pitch:
Line Spacing:
Paper Width:
Writing Line:
Ribbon Cassette:
Correcting Tape:
Keyboard
Correction Memory:
Line Format Memory:
Power Requirements:
Memory Protection:
Storage Environment:
Operating Environment:
Dimension:
Weight:
Daisywheel; 100 char.
16 char./sec. (max. speed)
lOchar./inch
12 char./inch
15 char./inch
Proportional Spacing
I, 1 '/i, 2 and 3 lines
14.2 inches Max. (361 mm Max)
II. 5 inches Max. (292 mm Max.)
Correctable Carbon Ribbon (Black, Blue, Brown)
Non-Correctable Single Strike Carbon Ribbon (Black)
Multi-Strike Ribbon (Black)
Fabric Ribbon (Black)
Lift Off Tape
Cover Up Tape
Alpha/Numeric Key; 45 keys
Function key; 28 keys
One line Max
3 formats + current
Refer to the nameplate located on the rear of the typewriter
1 year - 3 "AA” size batteries
-4*F - I40°F (-20’C - 60°C) temperature, 10% - 90% humidity
50’F - 104'F (lO'C - 40°C) temperature, 20% - 80% humidity
20'/i6 (W) X nVs (D) X (H) in. (510 x 442 x 174mm)
Approx. 19 lbs. (8.6kg)
Specifications subject to change without notice.
51
Page 59

INDEX
Auto paper eject
A
Auto paper insertion
BACKSPACE .....................................8
B
Batteries .............................................41,45
Bold print
Caps lock .............................................20
CENTER .............................................7
Centering .............................................23
At right margin
Between margins
Between tabs
Columns ...........................................25
Over a point
Character keys .....................................4
CODE
.................................................
Code operations
Copy control lever
CORRECT
Correcting errors
On the same line
Outside correction memory . .17
Using NO PRINT method . .17
Correction tape ....................................43
Cover interlock switch
Daisywheel ..........................................44
DEC TAB
Decimal tabulation ..............................28
With decimal point
With comma
Default settings
E
EXPR
..................................................
Function keys ......................................7
F
HALF SPACE .....................................8
H
Hot zone ..............................................13
Hyphen (temporary hyphen) . . .30
Impact control .....................................6
Indent (H IND)
Block indent
Left indent .......................................26
INDEX (],) .................................14
Insert (INS)
..................................
.....................
............................................
................................
.............................
...................................
.....................................
..................................
..............................
..........................................
.................................
..............................
........................
...........................................
..........................
....................................
...................................
..................................
....................................
.........................................
9
9
20
24
23
24
23
7
39
3
8
15
16
3
7
28
28,37
37
8
7,26
27
7
KB I/KB II
K
Keyboard layout ..................................4
Left margin (LEFT MGN) . . .8
Lines per vertical inch .........................5,37
Line spacing
Margin formats
M
Storing
Recalling ..........................................13
Margins
Clearing
Setting
Margin release (M.R.)
Micro indexing ....................................14
Micro space .........................................31
Mode selector ......................................5
AUTO ...............................
NORM
STOR
ON/OFF switch
Overlapped characters .........................32
Paper bail release
Paper length
Paper release lever ..........................2
Paper support
Permanent space
Pitch selector .......................................5
Platen
Installing ..........................................47
Removing
PRINT .................................................7
QUICK ERASE
RELOC
REPEAT
REVERSE INDEX (t ) ... 8
Ribbon cartridge
Right margin (RIGHT MGN) .8
Right margin alignment
....................................
........................................
...................................
.............................................
...............................................
...........................................
.............................................
.....................
..............................................
..................................................
........................................
...............................................
.............................................
.......................
...................................
................................
..............................
..............................
.................................
..................................
.................................
......................
. .6
...............
..............
5
12
12
10
11
10
7
5
5
5
2 '
2
9,37
1
31
46
46
8,15,H
8
7
42
24
52
Page 60

Selector switches . . . .
SHIFT ...................................
SPELL
SpellScan ..............................
Subscripts
Superscripts
Supplies ................................
..................................
Deleting a word . . .
Inserting a word . . .
Listing ...............................
Turning off ........................
Turning on
........................ ............
.............................
..........................
............
............
............
............
............
............
............
............
............
............
............
5,6
7
7
33
35
34
36
34
33
14
14
42-45
TAB CLEAR ........................
TAB SET ..............................
TAB ......................................
Tabs
......................................
u
Clearing
Decimal
Setting ...............................
Underscore
Continuous ........................
Double
Word by word . . . .
XXX
............................
............................
...........................
..............................
.....................................
............
............
............
............
............
............
............
............
............
............
............
............
8
8
7
10
n
28
10
21
21
22
21
7
53
Page 61

Page 62

Page 63

Panasonic Communications & Systems Company
Division of Matsushita Electric Corporation of America
Two Panasonic Way, Secaucus, New Jersey 07094
PJQX6130ZA S1090B0
 Loading...