

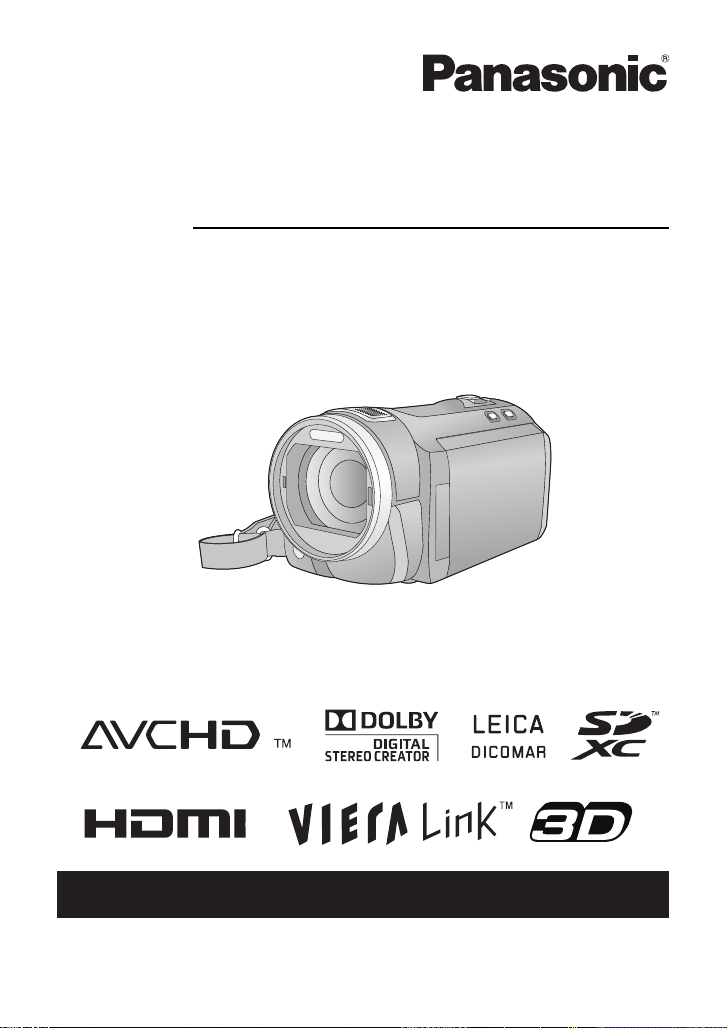
Panasonic HDC-SD800P User Manual
For USA and Puerto Rico assistance, please call: 1-800-211-PANA(7262) or,
contact us via the web at: http://www.panasonic.com/contactinfo
Owner’s Manual
High Definition Video Camera
Model No. HDC-SD800P
Before connecting, operating or adjusting this product, please read the instructions completely.
VQT3K35
Things You Should
The lightning flash with arrowhead
symbol, within an equilateral
triangle, is intended to alert the user
to the presence of uninsulated
“dangerous voltage” within the
product’s enclosure that may be of
sufficient magnitude to constitute a
risk of electric shock to persons.
CAUTION
CAUTION: TO REDUCE THE RISK OF ELECTRIC
SHOCK, DO NOT REMOVE SCREWS.
NO USER-SERVICEABLE PARTS
INSIDE.
REFER SERVICING TO QUALIFIED
SERVICE PERSONNEL.
The exclamation point within an
equilateral triangle is intended to
alert the user to the presence of
important operating and
maintenance (servicing) instructions
in the literature accompanying the
appliance.
RISK OF ELECTRIC SHOCK
DO NOT OPEN
Know
Thank you for choosing Panasonic!
You have purchased one of the most
sophisticated and reliable products on
the market today. Used properly, we’re
sure it will bring you and your family
years of enjoyment. Pleas e take time to
fill in the information on the right.
The serial number is on the tag loca te d
on the back of your camera. Be sure to
retain this manual as your convenient
camera information source.
Date of Purchase
Dealer Purchased From
Dealer Address
Dealer Phone No.
Model No.
Serial No.
Safety Precautions
WARNING:
TO REDUCE THE RISK OF FIRE, ELECTRIC SHOCK OR PRODUCT DAMAGE,
≥ DO NOT EXPOSE THIS APPARATUS TO RAIN, MOISTURE, DRIPPING OR
SPLASHING AND THAT NO OBJECTS FILLED WITH LIQUIDS, SUCH AS
VASES, SHALL BE PLACED ON THE APPARATUS.
≥ USE ONLY THE RECOMMENDED ACCESSORIES.
DO NOT REMOVE T HE C O VER (OR BAC K); THE R E AR E NO U S ER S ERVICEABLE
≥
PARTS INSIDE. REFER SERVICING TO QUALIFIED SERVICE PERSONNEL.
CAUTION!
DO NOT INSTALL OR PLACE THIS UNIT IN A BOOKCASE, BUILT-IN CABINET OR IN
ANOTHER CONFINED SPACE. ENSURE THE UNIT IS WELL VENTILATED. TO
PREVENT RISK OF ELECTRIC SHOCK OR FIRE HAZARD DUE TO OVERHEATING,
ENSURE THAT CURTAINS AND ANY OTHER MATERIALS DO NOT OBSTRUCT THE
VENTILATION VENTS.
The following mark and symbols are located on bottom of the unit.
2
VQT3K35

FCC Note:
HDC-SD800P
This equipment has been tested and found to comply with the limits for a Class B dig i tal
device, pursuant to Part 15 of the FCC Rules. These limits are designed to provide
reasonable protection against harmful interference in a residential installation. This
equipment generates, uses, a nd can radia te radio fr equenc y energy and, if not inst alled and
used in accordance with the instructions, may cause harmful interference to radio
communications. However, there is no guarantee that interference will not occur in a
particular installa tion. If this equipment does cause harmful interference to radio or
television recept ion, whic h ca n be determin ed b y tur ning th e eq uipment off and on, the user
is encouraged to try to correct the interference by one or more of the following measures:
≥ Reorient or relocate the receiving antenna.
≥ Increase the separation between the equipment and receiver.
≥ Connect the equipment into an outlet on a circuit different from that to which the receiver
is connected.
≥ Consult the dealer or an experienced radio/TV technician for help.
FCC Caution: To assure continued compliance, follow the at tached installation
instructions and use only shielded interface cables with ferrite
core when connecting to computer or peripheral devices.
Any changes or modifications not expressly approved by the party responsible for
compliance could void the us er’s authority to operate this equipment.
Declaration of Conform ity
Trade Name: Panasonic
Model No.: HDC-SD800P
Responsible party: Panasonic Corporation of North Amer ica
One Panasonic Way, Secaucus, NJ 07094
Support Contact: Panasonic Consumer Electronics Company
1-800-211-PANA (7262)
This device complies with Part 15 of the FCC Rules. Operation is subject to the following
two conditions: (1) This dev ice may not c ause harmf ul interfer ence, and (2) this device mus t
accept any interference received, including interference that may cause undesired
operation.
VQT3K35
3

AC adaptor
This AC adaptor operates on AC between 110 V and 240 V.
But
≥ In the U.S.A. and Canada, the AC adaptor must be connected to a 120 V AC power
supply only.
≥ When connecting to an AC supply out side of th e U.S .A. or Canada , use a plu g ada ptor to
suit the AC outlet configuration.
≥ When connecting to a supply of greater than AC 125V, ensure the cord you use is suited
to the voltage of the AC supply and the rated current of the AC adaptor.
≥ Contact an electrical parts dis tributor for assistance in selecting a s uitable AC plug
adaptor or AC cord set.
The unit should be install ed near an accessible AC power outlet, with the power cord
connected directly to i t.
To completely disconnect power from the unit, unplug the power cord from the AC power
outlet.
∫ Concerning the battery
Batteries
1 Battery pack (Li thium ion battery pack)
≥ Use the specified unit to recharge the battery pack.
≥ Do not use the battery pack with equipment other than the specified unit.
≥ Do not get dirt, sand, liquids, or other foreign matter on the terminals.
≥ Do not touch the plug terminals (i and j) with metal objects.
≥ Do not disassemble, remodel, heat or throw into fire.
2 Button-type battery (Lithium battery)
≥ Insert with poles aligned.
≥ Do not touch the terminals (i and j) with metal objects.
≥ Do not recharge, disassemble, remodel, heat or throw into fire.
≥ Keep out of reach of children.
If any electrolyte should come int o con tac t wit h yo ur hands or cl othes, wash i t off th oroughly
with water.
If any electrolyte should come into contact with your eyes, never rub the eyes. Rinse eyes
thoroughly with water, and then consult a doctor.
Warning
Risk of fire, explosion and burns. Do not disassemble.
Do not heat the batteries above the following temperatures or incinerate.
Button-type battery 60 oC (140 oF)
Battery pack 60 oC (140 oF)
4
VQT3K35

CAUTION
A lithium ion/polymer battery that is recyclable powers the product
you have purchased. Please call 1-800-8-BATTERY for information
on how to recycle this battery.
U.S.A. CONSUMERS: ATTENTION:
Danger of explosion if battery is incorrectly replaced. Replace only with the same or
equivalent type recommended by the manufacturer. Dispose of used batteries according
to the manufacturer’s instructions.
∫ Product Identification Marking
Product Location
High Definition Video Camera Battery holder
AC adaptor Bottom
<For USA-California only>
This product contains a CR Coin Cell Lithium Batte ry which contains Perchlorate Material –
special handling may apply.
See www.dtsc.ca.gov/hazardous waste/perchlorate
.
VQT3K35
5

IMPORTANT SAFETY
INSTRUCTIONS
Read these operating instructions carefully before using the unit. Follow the safety
instructions on the unit and the applicable safety instructions listed below. Keep these
operating instructions handy for future reference.
1) Read these instructions.
2) Keep these inst ructions.
3) Heed all warnings.
4) Follow all instructions.
5) Do not use this apparatus near water.
6) Clean only with dry cloth.
7) Do not block any ventilat i on openings.
Install in accordance with the
manufacturer’s instructions.
8) Do not install near any heat sources
such as radiators, heat registers,
stoves, or other apparatus (including
amplifiers) that produce heat.
9) Do not defeat the safety purpose of the
polarized or grounding-type plug. A
polarized plug has two blades with one
wider than the other. A grounding-type
plug has two blades and a third
grounding prong. The wide blade or the
third prong are provided fo r your safety.
If the provided plug does not fit into your
outlet, consult an electrician for
replacement of the obsolete outlet.
11) O nl y us e attachments/a c cessories
specified by the manufacturer.
12) Use only with the
cart, stand, tripod,
bracket, or table
specified by the
manufacturer, or
sold with the
apparatus. When a
cart is used, use caution when moving
the cart/apparatus combination to avoid
injury from tip-over.
13) Unplug this apparatus during lightning
storms or when unused for long periods
of time.
14) Refer all servicing to qualified service
personnel. Servicing is required when
the apparatus has been damage d in any
way, s uc h as power-supply cord or plug
is damaged, liquid has been spilled or
objects have fallen into the apparatus,
the apparatus has been exp osed to rain
or moisture, does not operate normally,
or has been dropped.
10) Protect the power cord from being
walked on or pinched particularly at
plugs, convenience recept acles, and the
point where they exit fr om the
apparatus.
6
VQT3K35
Precautions
WARNING
CAUTION
USE & LOCATION
≥ TO AVOID SHOCK HAZARD ... Your
camera and power supply shoul d not be
exposed to rain or moisture. Do not
connect the power supply or operate your
camera if it gets wet. Your camera has
been designed for outdoor use, howeve r it
is not designed to sust ain direct exposure
to water, rain, sleet, snow, sand, dust, or a
direct splashing fro m a pool or even a cup
of coffee. This action could permanently
damage the internal parts of your camera.
Do not attempt to disassemble this unit.
There are no user serviceable parts
inside. Unplug your camera from the
power supply before cleaning.
≥ AS WITH ANY SMALL OBJECT, SD
CARDS CAN BE SWALLOWED BY
YOUNG CHILDREN. DO NOT ALLOW
CHILDREN TO HANDLE THE SD CARD.
≥ DO NOT AIM YOUR CAMERA AT THE
SUN OR OTHER BRIGHT OBJECTS
≥ DO NOT EXPOSE YOUR CAMERA TO
EXTENDED HIGH TEMPERATURE ...
Such as, in direct sunlight, inside a closed
car, ne xt to a heater, etc... This action
could permanently damage the i nternal
parts of your camera.
≥ AVOID SUDDEN CHANGES IN
TEMPERATURE ... If the unit is suddenly
moved from a cold place to a warm place,
moisture may form on the SD card and
inside the unit.
≥ DO NOT LEAVE YOUR CAMERA OR
THE POWER SUPPLY TURNED ON
WHEN NOT IN USE.
≥ STORAGE OF YOUR CAMERA ... Store
and handle your camera in a manner tha t
will not subject it to unnecessary
movement (avoid shaking and striking).
Y our camera contains a sensitive pick-up
device which could be damaged by
improper handling or storage.
CARE
≥ TO CLEAN YOUR CAMERA ... Do not
use strong or abrasive detergents when
cleaning your camera body.
≥ TO PROTECT THE LENS ... Do not touch
the surface of the lens with your hand.
Use a commercial camera lens solution
and lens paper when cleaning the lens.
Improper cleaning can scratch the lens
coating.
≥ TO PROTECT THE FINISH OF YOUR
CAMERA ... Before handling your
camera, make sure your hands and face
are free from any chemical prod ucts , su ch
as suntan lotion, as it may damage the
finish.
-If you see this symbol-
Information on Dispos a l in other
Countries outside the European
Union
This symbol is only
valid in the European
Union.
If you wish to discard
this product, please
contact your local
authorities or dealer
and ask for the correct
method of disposal.
VQT3K35
7

∫ About the recording format for
recording motion pictures
Y ou can select from AVCHD, 1080/60p or
iFrame recording formats to record motion
pictures using this unit. (l 51, 61)
AVCHD:
Y ou can record high defi nition qua lity images
with this format. It is suitab le for viewing on a
large format TV or for saving to disc.
1080/60p:
This is a 1080/60p (1920k1080/60
progressive) recoeding mode that can record
in maximum quality
1080/60p can be saved or played back by
this unit or the HD Writer AE 3.0.
* This means the highest quality for this unit.
iFrame:
This is a recording format suitable for
playing back or editing on Mac (iMovie’11).
Using iMovie’1 1, iFrame mot ion pictu res can
be imported faster than AVCHD motion
pictures. Also, the imported file size of
iFrame motion pictures will be smaller than
that of AVCHD motion pictures.
≥ It is not compatible with motion pictures
recorded in AVCHD or
*
. The scenes recorded in
1080/60p
format.
∫ Indemnity about recorded
content
Panasonic does not accept any
responsibility for damages directly or
indirectly due to any type of problems that
result in loss of recording or edited content,
and does not guarantee any cont ent if
recording or editing does not work properly.
Likewise, the above also applies in a case
where any type of repair is made to the unit.
∫ Cards that you can use with
this unit
SD Memory Card, SDHC Memory Card
and SDXC Memory Card
≥ 4 GB or more Memory Cards that do not
have the SDHC logo or 48 GB or more
Memory Cards that d o not have t he S DXC
logo are not based on SD Memory Card
Specifications.
≥ Refer to page 22 for more details on SD
cards.
∫ For the purposes of this
owner’s manual
≥ SD Memory Card, SDHC Memory Card
and SDXC Memory Card are referred to
as the “SD card”.
≥ Functions that can be used for Motion
Picture Recording Mode:
Functions that can be used for Still Picture
Recording Mode:
≥ Functions that can be used for Motion
Picture Playback Mode:
Functions that can be used for Still Picture
Playback Mode:
≥ Pages for reference are indicated by an
arrow, for example: l 00
8
VQT3K35

Contents
Accessories.............................................11
Quick Guide....... ... .. ... ................. ... ... .. .....12
Advanced (Recording)
PreparationBasicAdvanced
Preparation
Parts identificat ion and handling ..... ... ..16
Power supply.. ... ... ................................. ..19
Inserting/removing the battery........... 19
Charging the battery ......................... 20
Charging and reco rdi n g tim e.... ... ...... 21
Preparation of SD cards ......... ... ... ... .......22
Cards that you can use
with this unit ...................................... 22
Inserting/removing an SD card.......... 23
Turning the unit on/off............................24
Turning the unit on and off
with the power button........................ 24
Turning the unit on and off
with the LCD moni to r. . ... ................ ... . 24
Selecting a mode ....................................25
How to use the touch screen.................25
About the Touch Menu.. .. ................. . 26
Setting date and time..............................27
Basic
Before recording.....................................28
Recording motion pictures ....................30
Recording still pictures..........................32
Recording still pictures in
Motion Picture Recording Mode........ 33
Intelligent Auto Mode .............................34
Motion picture/Still picture playback ....36
Using the menu scre e n ................ ..........39
Using the quick menu ....................... 40
Using the Setup M enu .... ... .. ...................41
Using with the remote control...............47
Operation of direction buttons/
OK button..... ..................................... 48
Zoom in/out function..............................49
About the zoom spee d.................. ... . 49
Extra Optical Zoom ...... ... ... ............... 49
Image Stabilizer Function...................... 50
1080/60p recording................................. 51
Recording with the Touch function.......52
Touch function icons ......................... 52
Recording functions of
operation icons .................... ................... 55
Operation icons................................. 55
Recording functions of menus.............. 60
Manual recording.................................... 75
White balance ................................... 76
Manual shutter speed/iris
adjustment ..... ................................... 77
Manual focus adju stme n t.................. 78
Recording 3D video................................ 79
Functions not available du ring
3D recording ..................................... 81
Advanced (Playback)
Playback Operatio ns....... ................. ......82
Motion picture playback us ing
operation icon ................. ... ... ............ 82
Creating still picture from
motion picture ................................... 83
Highlight&Time frame index.............. 84
Repeat playba ck .......... ... ... ............... 84
Resuming the previous playback...... 85
Zooming in on a still picture during
playback (Playbac k zoom )................ 85
Various playback function s ........ ... ... .....86
Playing back motion pictures/
still pictures by date .......................... 86
Highlight Playback ............................ 87
Changing the playback settings and
playing back the slide show.............. 89
(Recording)
(Playback)
Copy/DubbingWith a PCOthers Advanced
VQT3K35
9

Deleting scene s/ sti ll p ic t ure s .............. ..91
Dividing a scene
(AVCHD, 1080/60p) .......................... 92
Dividing a scene to partially delete
(iFrame) ............................................ 93
Deleting personal information ........... 94
Protecting scenes/still pictures.......... 95
DPOF setting ...........................................9 6
Watching Video/Pictures
on your TV ................. ..............................97
Connecting with a HDMI mini
cable ............................................... 100
Connecting with the AV multi
cable ............................................... 100
Playback using VIERALink
3D video playback.................................103
Functions not available during
3D playback .................................... 104
™
..............101
Copy/Dubbing
Connecting a DVD burner to copy to/
play back a disc........................... .........105
Preparing for copying/
playing back .................................... 105
Copying to discs.............................. 107
Playing back the copied disc........... 110
Managing the copie d disc ............... 111
Dubbing with a Blu-ray disc recorder,
video device, etc. .................................. 112
3D video storage................................... 116
Others
Indications............................................. 131
Messages ..............................................134
About recovery................................ 135
Troubleshooting ...................................136
Cautions for use ...................................142
About copyright....................................148
Recording modes/approximate
recordable time .....................................149
Approximate number of recordable
pictures..................................................150
Specifications ....................................... 151
Optional accessories ...........................156
Accessory Order Form (For USA
and Puerto Rico Customers).......... 159
Limited Warranty (ONL Y FOR U.S.A.
AND PUERTO RICO).............................160
Index ...................................................... 162
Spanish Quick Use Guide/
Guía española para el uso rápido .......164
With a PC
What you can do with a PC ..................118
End User License Agreement......... 120
Operating environment ........................121
Installation .............................................124
Connecting to a PC............................... 126
About the PC displa y .... .. ................ 128
Starting HD Writer AE 3.0.. ................ ... 129
Reading the operating instructions
of the software applica tio n s............. 129
If using Mac ...........................................130
10
VQT3K35
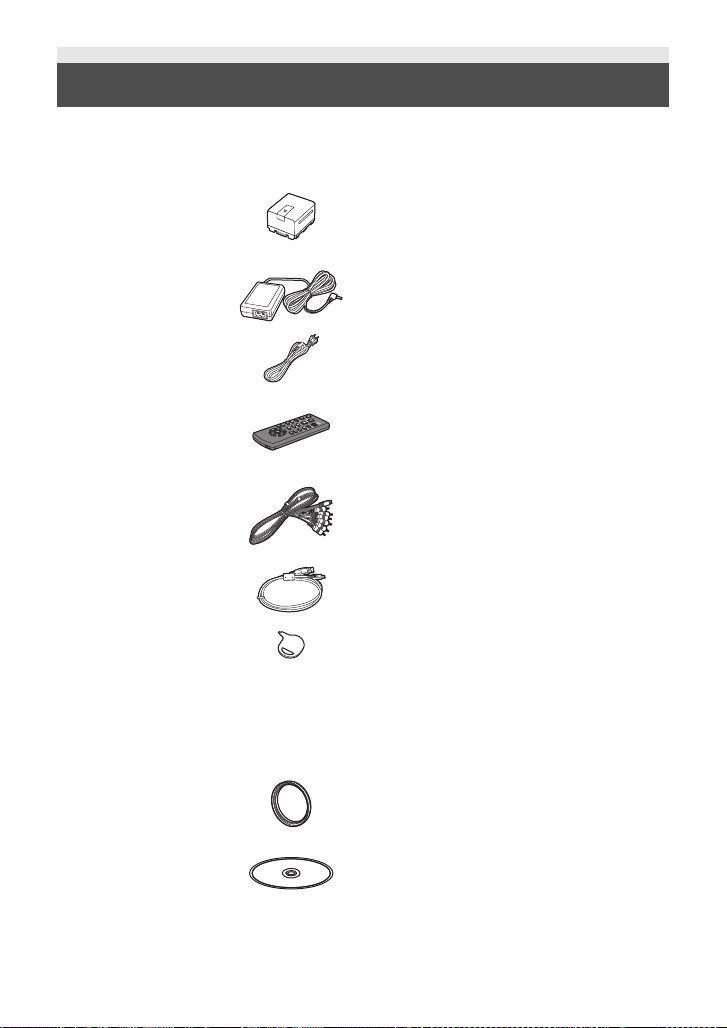
Accessories
Check the accessories before using this unit.
Keep the accessories out of reach of children to prevent swallowing.
Product numbers correc t as of Dec. 2010. These may be subject to change.
Battery pack
VW-VBN130
AC adaptor
VSK0732
AC cable
K2CA2CA00025
Remote control
(Built-in battery)
N2QAEC000024
AV multi cable
K1HY12YY0008
USB cable
K1HA05AD0007
Stylus pen
VGQ0C14
≥ This is used for operations that are hard to
operate with your fingers or performing
detailed operation s wit h the touch screen
operation. (l 25, 46)
Lens hood
VDW2053
CD-ROM
Software
11
VQT3K35
Quick Guide
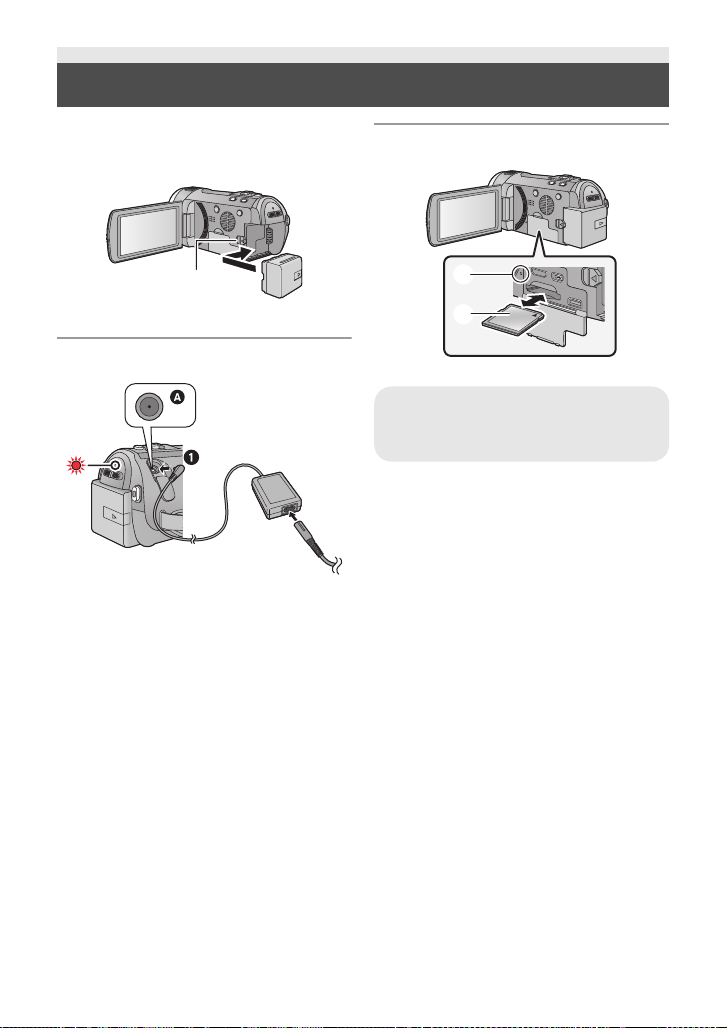
∫ Inserting the battery
Install the battery by inserting it in the
direction shown in the figure.
A Insert the battery until it clicks and locks.
∫ Charging the battery
A DC input terminal
1 Connect the AC adaptor to the DC inp ut
terminal.
2 Connect the AC cable to the AC
adaptor, then the AC outlet.
≥ The status indicator will flash red at an
interval of 2 seconds, indicating that
charging has begun.
It will turn off when the charging is
completed.
∫ Inserting/removing an SD card
Access lamp [ACCESS] A
≥ When this unit is accessing the SD
card, the access lamp lights up.
1) Open the LCD monitor.
≥ Check that the access lamp has gone off.
2) Open the SD card/terminal cover and
insert (remove) the SD card into (from)
the card slot.
≥ Face the label side B in the direction
shown in the illustration and press it
straight in as far as it will go.
≥ Press the center of the SD card and then
pull it straight out.
3) Securely close the SD card/terminal
cover.
≥ Securely close it until it clicks.
12
VQT3K35
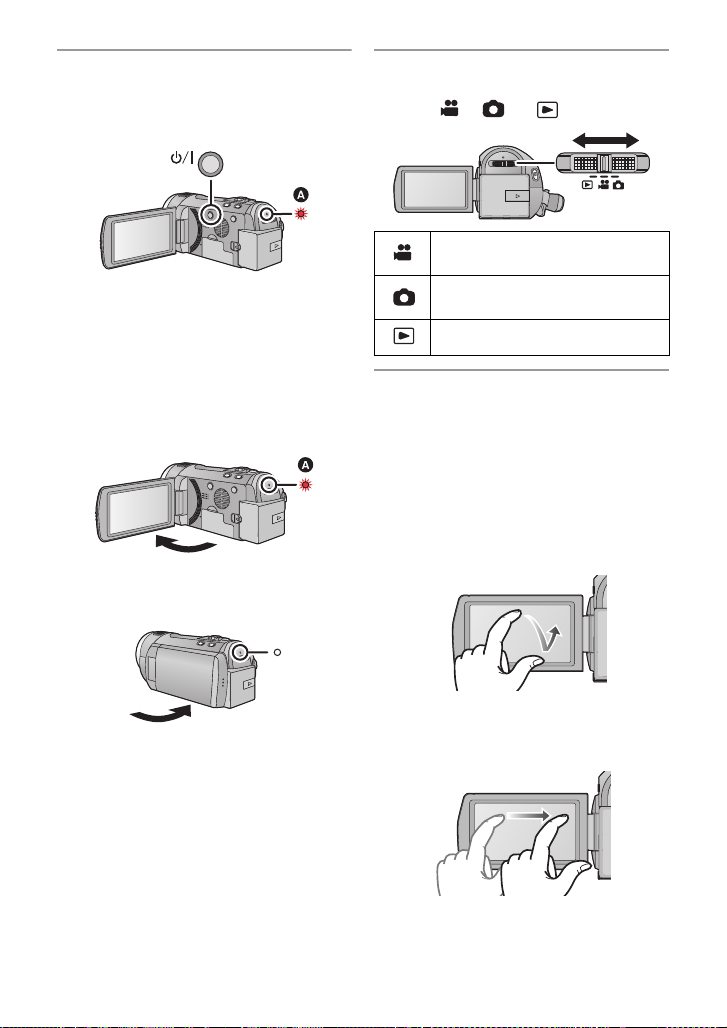
∫ Turning the unit on/off
Turning the unit on and off with the
power button
Press the power button to turn on the unit.
A The status indicator lights on.
≥ To turn off the unit, hold down the power
button until the status indicator goes off.
Turning the unit on and off with the LCD
monitor
Opening the LCD monitor turns on the unit.
Closing the LCD monitor turns off the unit.
To turn on the unit
A The status indicator lights on.
To turn off the unit
∫ Selecting a mode
Operate the mode switch to change the
mode to , or .
Motion Picture Recording
Mode (l 30)
Still Picture Recording Mode
(l 32)
Playback Mode (l 36, 82)
∫ How to use the touch screen
You can operate by directly touching the
LCD monitor (touch screen) with your finger.
It is easier to use the stylus pen (supplied)
for detailed operation or if it is hard to
operate with your fingers.
Touch
T ouch and release t he touch scr een to select
icon or pictur e.
B The status indicator goes off.
Slide while touching
Move your finger while pr essing on t he touch
screen.
13
VQT3K35

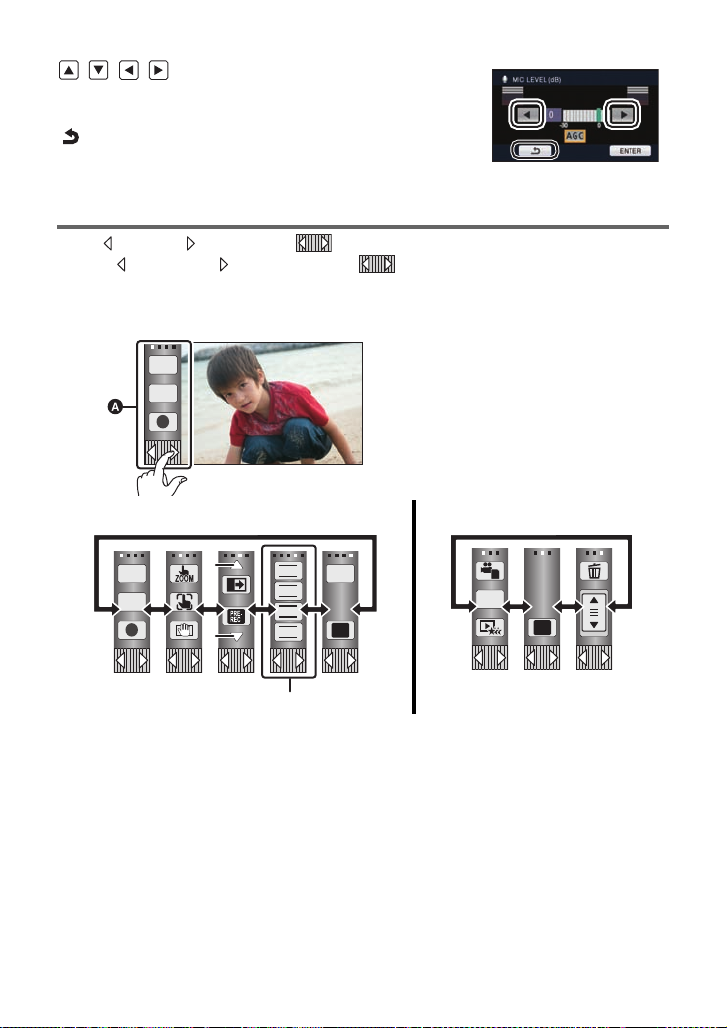
Touch Menu
Touch to display the Touch Menu.
T ouch (lef t side)/ (right side) of on
the Touch Menu to switch the operation
icons.
T
W
A Touch Menu
∫ Language selection
1) Touch [MENU], then touch [SETUP] #
[LANGUAGE].
2) Touch desired language.
∫ Recording motion pictures
1) Change the mode to .
2) Open the LCD monitor.
3) Press the recor ding start/stop button to
start recording.
A When you begin recording, ; changes
to ¥.
∫ Recording still pictures
1) Change the mode to .
2) Open the LCD monitor.
3) Press the button fully to take the
picture.
14
VQT3K35
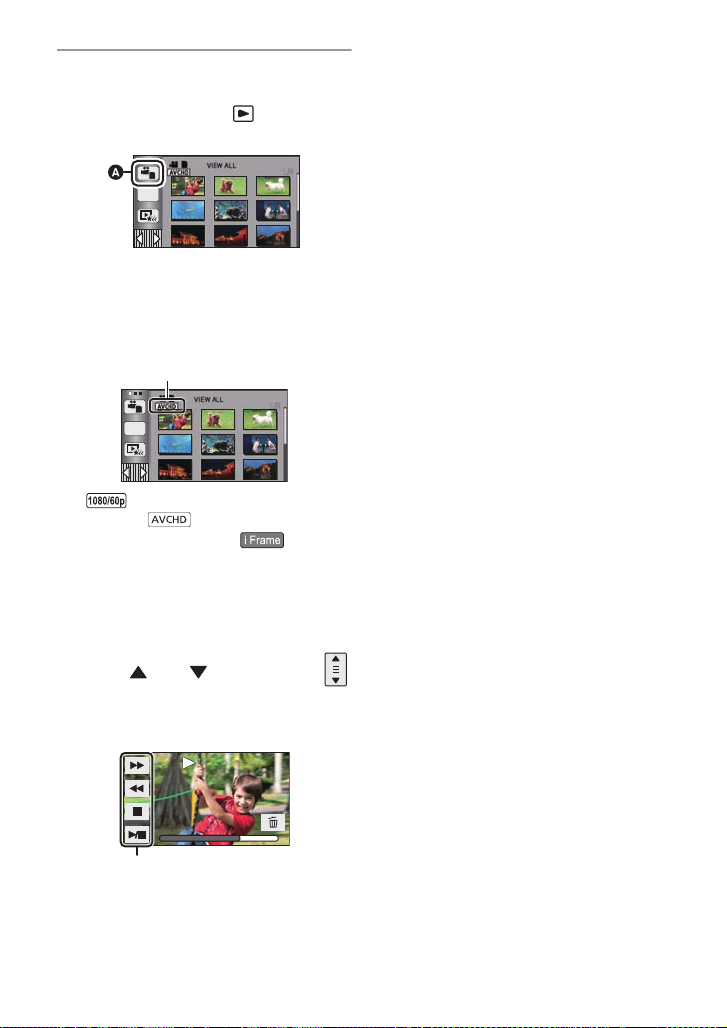
∫ Motion picture/Still picture
0h00m15s0h00m15s0h00m15s
playback
1) Change the mode to .
2) Touch the play mode select icon A.
ALL
3) Touch the [VIDEO/PI CTURE] you wish
to play back.
≥ Touc h [ENTER].
4) Touch the scene or the still pictur e to be
played back.
ALL
B is displayed when [1080/60p] is
touched, is displayed when
[AVCHD] is touched
displayed when [
step 3.
≥ To display the next (previous) page:
jSlide the thumbnail display upward
(downward) while touching it.
jSwitch the Touch Menu, and then
touch (up)/ (down) on the
thumbnail scroll lever.
5) Select the playback operation by
touching the operation icon.
or is
iFrame
] is touched
in
for a specific period of time. To display
them again, touch the screen.
(Motion picture playback)
1/;: Playback/Pause
6: Rewind playback
5: Fast forward playback
∫: Stops the playback and shows
the thumbnails.
(Still picture pl ayback)
1/;: Slide show (playback of the still
pictures in numerical order) start/
pause.
2;: Plays back the previous picture.
;1: Plays back the next picture.
∫: Stops the playback and shows
the thumbnails.
C Operation icon
≥ Operation icons and screen display will
disappear when no function is performed
15
VQT3K35
Preparation
78
2
3
4
5
6
9
10
11
1
1213
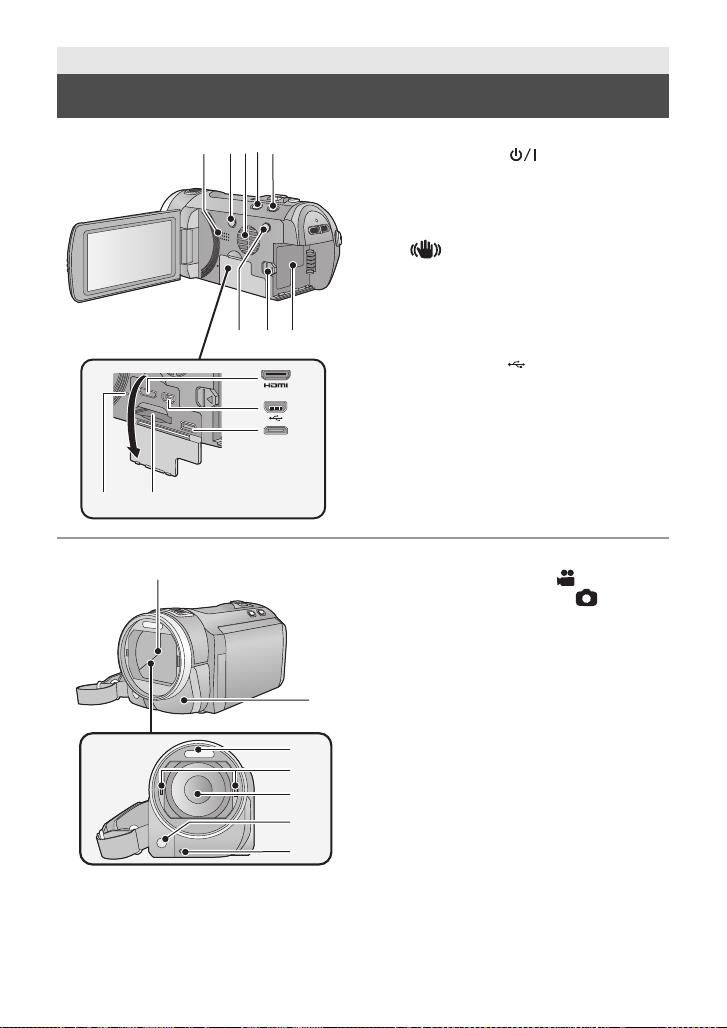
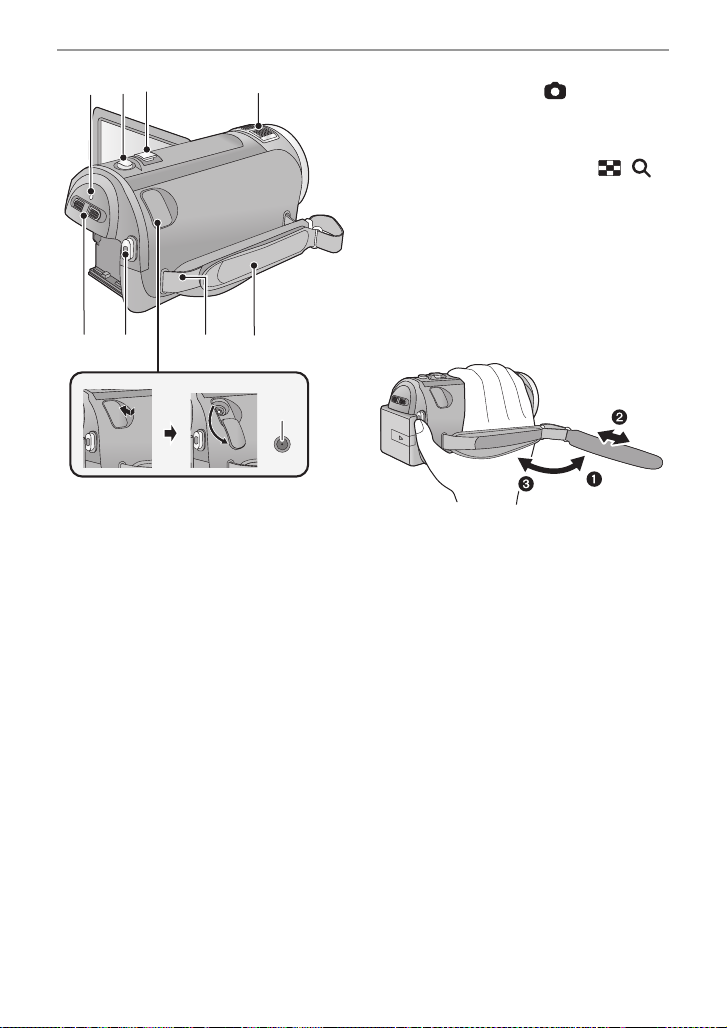
Parts identification and handling
1 Speaker
2 Power button [ ] (l 24)
3 Inlet (cooling fan) (l 28)
4 Intelligent auto/Manual button
[iA/MANUAL] (l 34, 75)
5 Optical image stabilizer button
[ O.I.S.] (l 50)
6 1080/60p button [1080/6 0p] (l 51)
7 Battery release lever [BATT] (l 19)
8 Battery holder (l 19)
9 HDMI mini connector [HDMI]
(l 97, 101)
10 USB terminal [ ] (l 106, 112, 126)
11 AV multi connector (l 97, 115)
≥ Use the AV multi cable (only the supplied
cable).
12 Card slot (l 23)
13 Access lamp [ACCESS] (l 23)
16
VQT3K35
14
15
16
17
18
14 Lens cover
≥ The lens cover opens in Motion
Picture Recording Mode or Still
Picture Recording Mode. (l 25)
15 Remote control sensor (l 48)
16 Built-in flash (l 57)
17 3D Conversion Lens attachment part
(concave) (l 79)
18 Lens (LEICA DICOMAR)
≥ Please refer to page 29 for details about
attaching the lens hood.
19 AF assist lamp (l 74)
20 Recording lamp (l 44)
19
20
21 LCD monitor (Touch screen) (l 25)
21
22
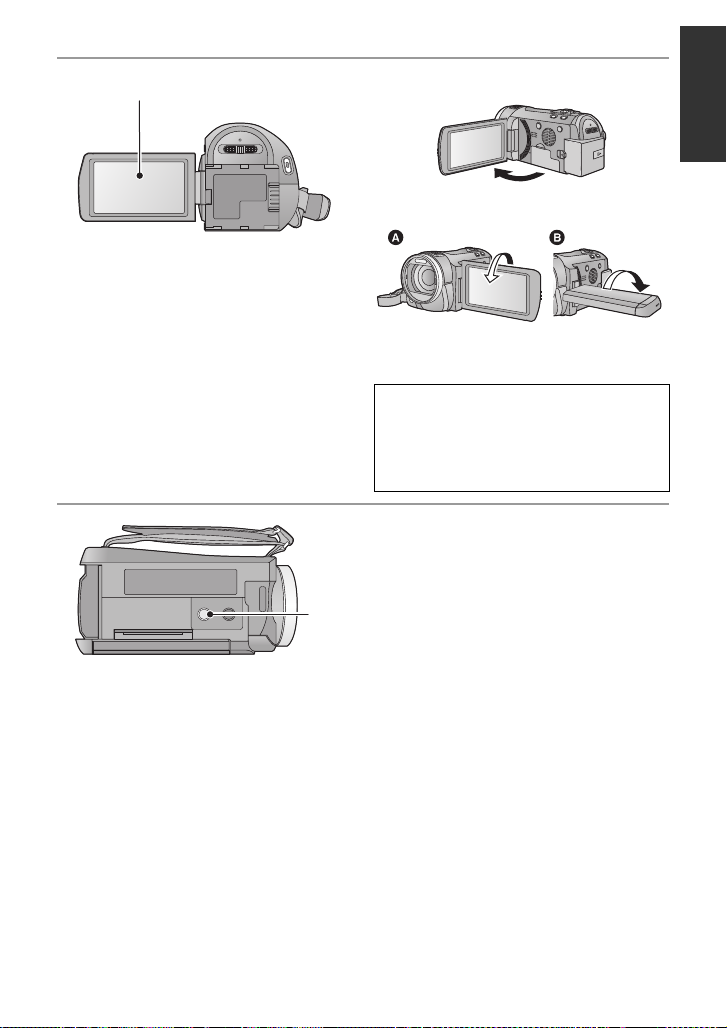
≥ It can open up to 90o.
≥ It can rotate up to 180o A towards the lens
or 90o B towards the opposite direction.
Due to limitations in LCD production
technology , t here may be some ti ny bright
or dark spots on th e L CD monit or scr een.
However, t his is not a malfunction and
does not affect the recorded picture.
22 Tripod receptacle
≥ If you attach a tripod which has 5.5 mm
(0.22 q) screw or larger, it may damage
this unit.
17
VQT3K35
262524
28
27
31
29 30
23
23 Status indicator (l 24)
24 Photoshot button [ ] (l 32)
25 Zoom lever [W/T] (In Motion Picture
Recording Mode or Still Picture
Recording Mode) (l 49)
Thumbnail display switch [ / ]/
Vo lume lever [sVOLr] (In Playback
Mode) (l 37)
26 Internal microphones
27 Mode switch (l 25)
28 Recording start/stop button (l 30)
29 Shoulder strap fixture
30 Grip belt
Adjust the length o f the grip bel t so tha t it fits
your hand.
1 Flip the belt.
2 Adjust the length.
3 Replace the belt.
31 DC input terminal [DC IN] (l 20)
≥ Do not use any other AC adaptors except
the supplied one.
18
VQT3K35
Preparation
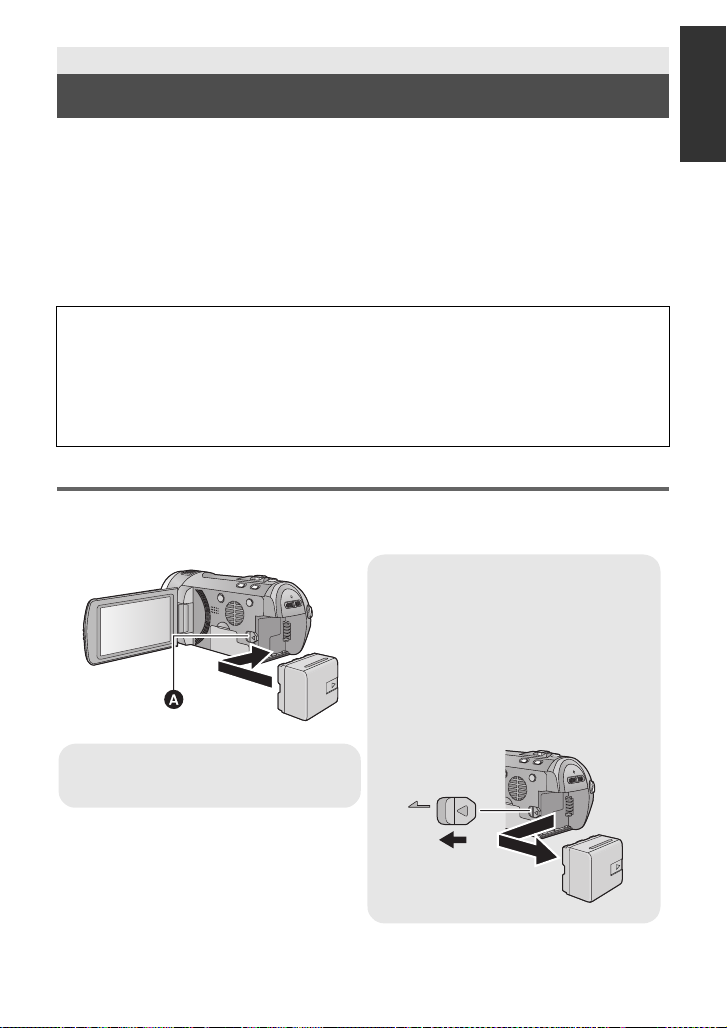
Removing the battery
Be sure to hold down the power button
until the status indicator goes off. Then
remove the battery while support i ng the
unit to prevent it from dropping.
Move the battery release lever in the
direction indicated by the arrow and
remove the battery when unlocked.
A Insert the battery until it clicks and
locks.
Power supply
∫ About batteries that you can use with this unit
The battery that can be used with this unit is VW-VBN130/VW-VBN260.
≥ The unit has a function for distinguishing batteries which can be used safely. The
dedicated battery (VW-VBN130/VW-VBN260) supports this function. The only
batteries suitable for use with this unit are genuine Panasonic products and
batteries manufactured by other companies and certified by Panasonic. (Batteries
which do not support this function cannot be used). Panasonic cannot in any way
guarantee the quality, performance or safety of batteries which have been
manufactured by other companies and are not genuine Panasonic products.
It has been found that counterfeit battery packs which look very similar to the genuine
product are made available to purchase in some markets. Some of these battery packs
are not adequately protected with internal protection to meet the requirements of
appropriate safety standards. There is a possibility that these battery packs may lead
to fire or explosion. Please be advised that we are not liable for any ac cident or failure
occurring as a result of use of a counterfeit battery pack. To ensure that safe products
are used we would recommend that a genuine Panasonic battery pack is used.
Inserting/removing the battery
≥ Press the power button to turn off the unit (l 24)
Install the battery by inserting it in the direction shown in the figure.
BATT
19
VQT3K35
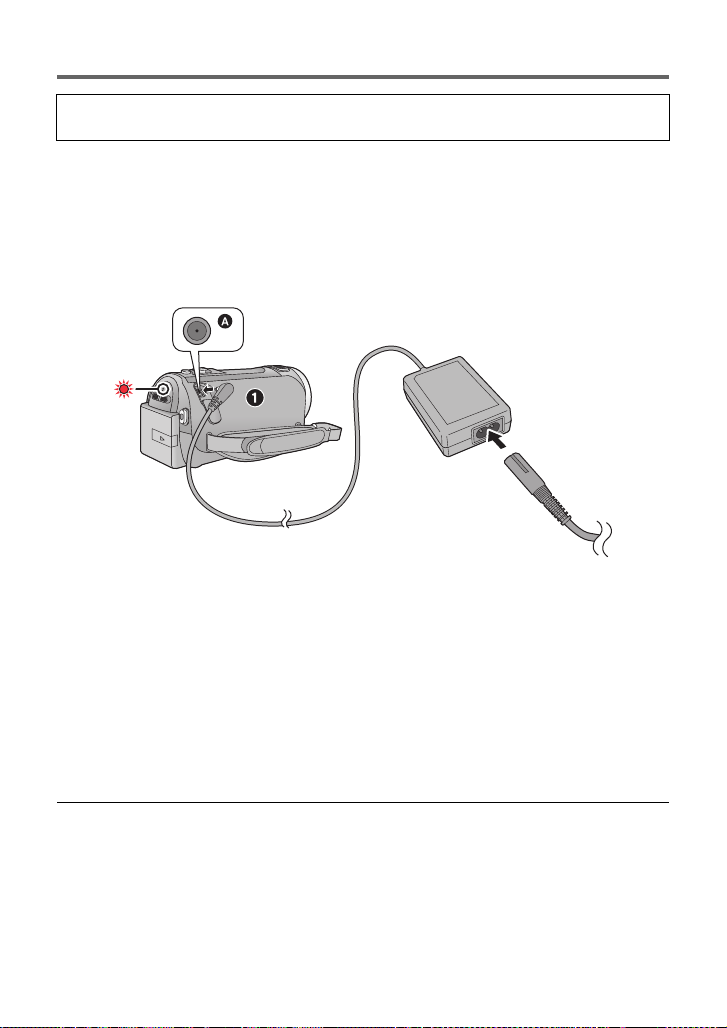
Charging the battery
When this unit is purchased, the battery is not charged. Charge the battery fully
before using this unit for the first time.
Important:
≥ Use the supplied AC adaptor. Do not use the AC adaptor of another device.
≥ Do not use the AC cable with any other equipment as it is designed only for this unit.
Also, do not use the AC cable from other equipment with this unit.
≥ The battery can also be charged using a battery charger (VW-BC20PP; optional).
≥ The battery will not be charged if the unit is turned on.
≥ It is recommended to charge the battery in a temperatu re between 10 °C to 30 °C
(50 °F to 86 °F). (The battery temperature should also be the same.)
A DC input terminal
≥ Insert the plugs as far as they will go.
1 Connect the AC adaptor to the DC input terminal.
2 Connect the AC cable to the AC adaptor, then the AC outlet.
≥ The status indicator will flash red at an interval of 2 seconds, indicating that ch arging has
begun.
It will turn off when the charging is completed.
∫ Connecting to the AC outlet
If you turn on the unit while connec ting the AC adaptor , you can use the unit with power
supplied from the outlet.
≥ If the status indicator flashes at a particularly fast or slow rate, refer to page 144.
≥ We recommend using Panasonic batteries (l 11, 21, 156).
≥ If you use other batteries, we cannot guarantee the quality of this product.
≥ Do not heat or expose to flame.
≥ Do not leave the battery(ies) in an automobile ex posed to direct sunlight for a long period
of time with doors and windows closed.
20
VQT3K35
Charging and recording time
∫ Charging/Recording time
≥ Temperature: 25 oC (77 oF)/humidity: 60%RH
Battery model number
[Voltage/Capacity
(minimum)]
Supplied ba ttery/
VW-VBN130 (optional)
[7.2 V/1250 mAh]
VW-VBN260 (optional)
[7.2 V/2500 mAh]
≥ These times are approximations.
≥ The indicated charging time is f or when the batter y has been disc harged compl etely.
Charging time and recordable time vary depending on the usage conditions such as
high/low temperature.
≥ Recordable time of 3D recording mode is the same.
(During 3D recording mode, 1080/60 p and iF rame recording mode cannot be used.)
≥ The actual recordable time refers to the recorda ble t ime when repeat ed ly st art ing/s toppin g
recording, turning the unit on/off, moving the zoom lever etc.
≥ The batteries heat up after use or charging. This is not a malfunction.
Charging
time
2h30min
4h30min
Recording
mode
[1080/60p] 1 h 35 min
[HA] 1h40min
[HG], [HX],
[HE]
[iFrame] 1h50min
[1080/60p] 3h5min 1h55min
[HA]
[HG], [HX],
[HE]
[iFrame] 3h30min 2h10min
Maximum
continuous
recordable time
1h45min
3h20min
Actual
recordable
time
1h
1h5min
2h
2h5min
Battery capacit y indica tion
≥ The display changes as the battery capacity reduces.
####
If there is less than 3 minutes rema ining, then will become red. If the battery
discharges, then will flash.
≥ The remaining battery capacity is displayed when using the Panasonic battery that you
can use for this unit. The actual time can vary depending on your actual use.
≥ When using the AC adaptor or batteries made by other companies, the remaining
battery capacity will not be shown.
21
VQT3K35
Preparation
32
Preparation of SD cards
This unit (an SDXC compatible device) is compatible with SD Memory Cards, SDHC
Memory Cards and SDXC Memory Cards. When using an SDHC memory card/SDXC
memory card with other equipment, ch eck the equipment is compatible with these
memory cards.
Cards that you can use with this unit
Use SD cards conforming to Class 4 or higher of the SD Speed Class Rating* for
motion picture record ing.
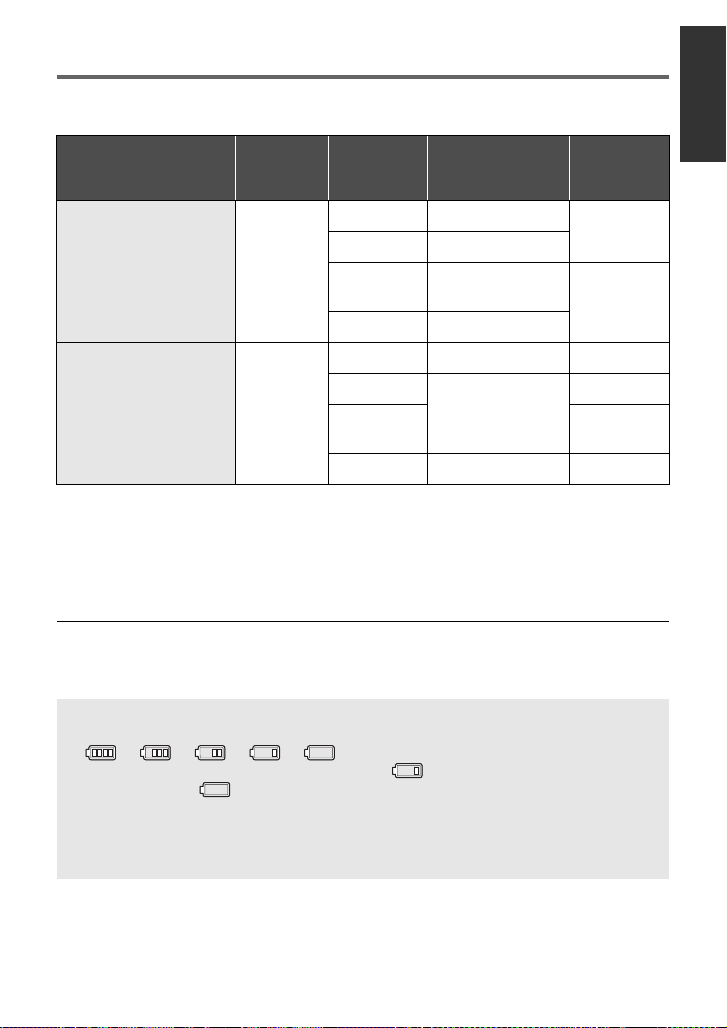
Card type Capacity Motion picture recording
8MB/16MB/
SD
Memory
Card
SDHC
Memory
Card
SDXC
Memory
Card
* SD Speed Class Rating is the speed
standard regarding continuous writing.
Check via the label on the card, etc.
64 MB/128 MB/
4GB/6GB/8GB/
32 MB
256 MB
512MB/1GB/
12 GB/16 GB/
24 GB/32 GB
48 GB/64 GB
Cannot be used.
Cannot be guaranteed in operation.
2GB
Can be used. Can be used.
e.g.:
Still picture
recording
Cannot be
guaranteed in
operation.
≥
Please confirm the latest information about SD Memory Cards/SDHC Memory Cards/SDXC
Memory Cards that can be used for motion picture recording on the following website.
http://panasonic.jp/support/global/cs/e_cam
(This website is in English only.)
≥ 4 GB or more Memory Cards that do not have the SDHC logo or 48 GB or more Memory
Cards that do not have the SDXC logo are not based on SD Memory Card Specifications.
≥ When the write-protect switch A on SD card is locked, no recording,
deletion or editing will be possible on th e card.
≥ Keep the Memory Card out of reach of children to prevent swallowing.
22
VQT3K35

Inserting/removing an SD card
When using an SD card not from Pana sonic, or one previously used on other equipment,
for the first time on this unit, format the SD card. (l 45) When the SD card is formatted, all
of the recorded data is deleted. Once the data is deleted, it cannot be restored.
Caution:
Check that the access lamp has gone off.
Access lamp [ACCESS] A
≥ When this unit is accessing the SD
card, the access lamp lights up.
1 Open the LCD monitor.
2 Open the SD card/terminal
cover and insert (remove) the
SD card into (from) the card
slot.
≥ Face the label side B in the direction
shown in the illustration and press it
straight in as far as it will go.
≥ Press the center of the SD card and then
pull it straight out.
3 Securely close the SD card/
terminal cover.
≥ Securely close it until it clicks.
≥ Do not touch the terminals on the back of
the SD card.
≥ Do not apply strong shocks, bend, or drop
the SD card.
≥ Electrical noise, static electricity or the
failure of this unit or the SD card may
damage or erase the dat a st ored on the
SD card.
≥ When the card access lam p is lit, do not:
jRemove the SD card
jTurn the unit off
jInsert and remove the USB cable
jExpose the unit to vibrations or shock
Performing the above while the lamp is on
may result in damage to data/SD card or
this unit.
≥ Do not expose the terminals of the SD
card to water, dirt or dust.
≥ Do not place SD cards in the following
areas:
jIn direct sunlight
jIn very dusty or humid areas
jNear a hea ter
jLocations susceptible to significant
difference in temperat ure (cond ensation
can occur.)
jWhere static electricity or
electromagnetic waves occur
≥ To protect SD cards, return them to their
cases when you are not using th em.
≥ About disposing of or giving away the SD
card. (l 146)
VQT3K35
23
Preparation
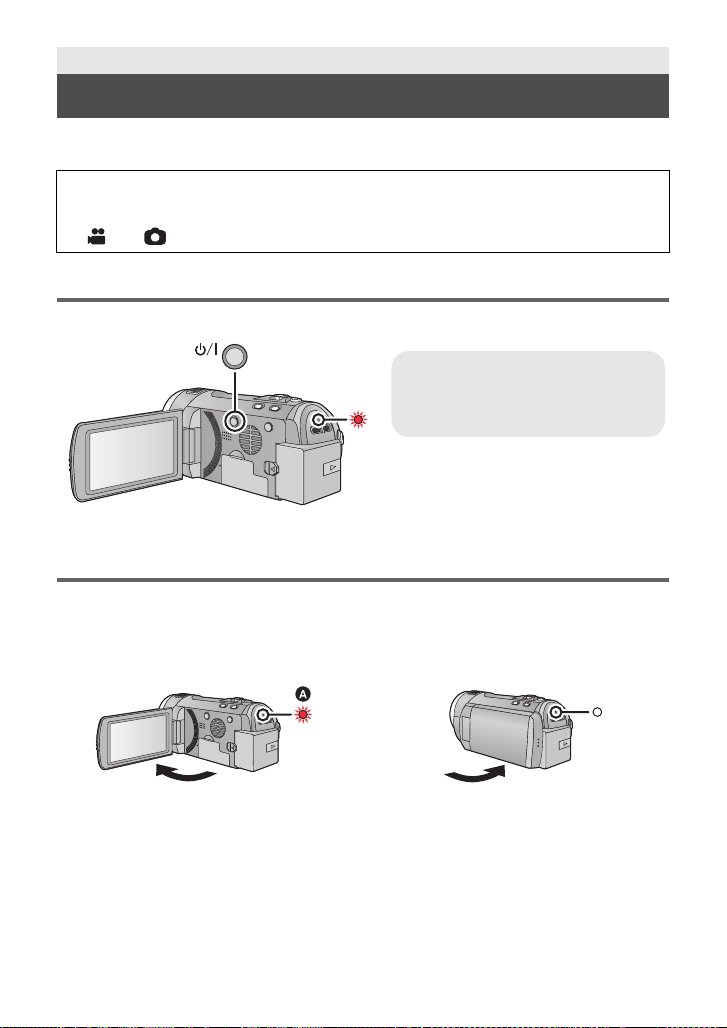
To turn off the unit
Hold down the power button until the
status indicator goes off.
Turning the unit on/off
You can turn the unit on and off using the power button or by opening and closing the LCD
monitor.
A clicking sound is heard when the unit is shaken.
≥ This is the sound of the lens moving an d i s not a defect.
This sound will no longer be heard when the unit is turned on and change the mode to
or .
Turning the unit on and off with the power button
Press the power button to turn on the unit.
A The status indicator lights on.
Turning the unit on and off with the LCD monitor
Unit is turned on when the LCD monitor is opened, and unit is turned off when it is closed.
During normal use, opening and closing of the LCD monitor can be conveniently used
to turn the unit on/off.
∫ To turn on the unit
∫ To turn off the unit
A The status indicator lights on.
≥ The unit will not turn off while recording motion pictures even if the LCD monitor is closed.
≥ In the following cases, opening t he L CD monit or does not t urn on the un it. P ress t he power
button to turn on the unit.
jWhen the un i t i s originally purchased
jWhen you have turned off the unit using the power button
24
VQT3K35
B The status indicator goes off.
Preparation
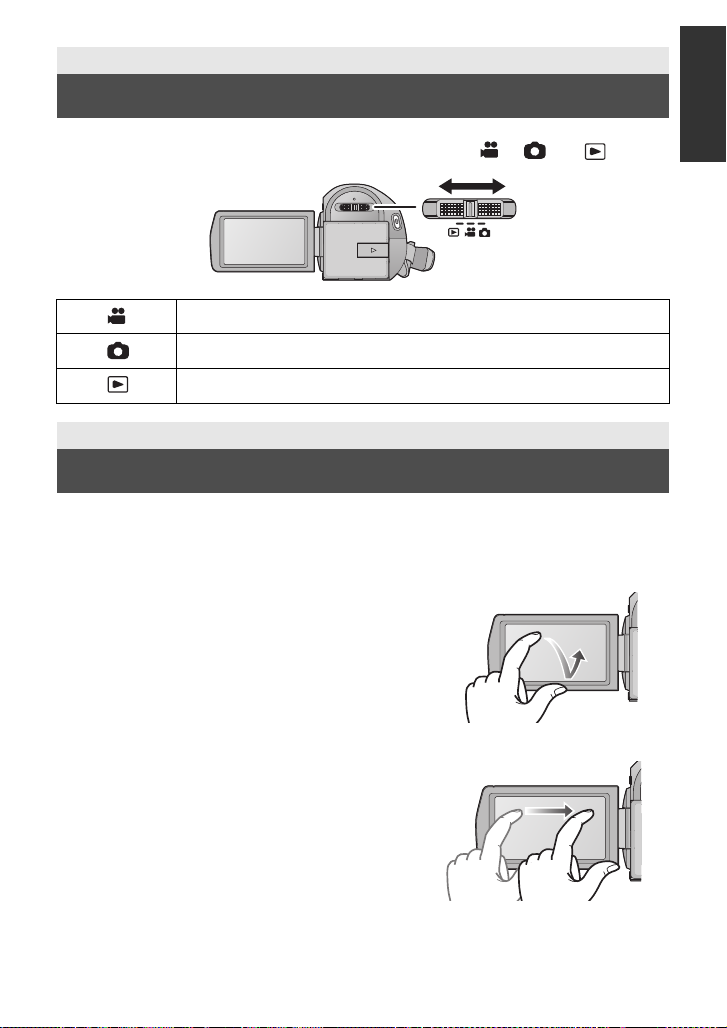
Selecting a mode
Change the mode to recording or pl ayback.
Operate the mode switch to change the mode to , or .
Motion Picture Recording Mode (l 30)
Still Picture Re co rding Mode (l 32)
Playback Mode (l 36, 82)
Preparation
How to use the touch screen
You can operate by directly touching the LCD monitor (touch screen) with your finger.
It is easier to use the stylus pen (supplied) for detaile d operati on or if it is hard to oper ate with
your fingers.
∫ Touch
T ouch a nd releas e the touch screen to sele ct icon o r
picture.
≥ Touch the center of the icon.
≥ Touc hing the touch screen will not operate while
you are touching another part of the touch screen.
∫ Slide while touching
Move your finger while pressing on the touch
screen.
25
VQT3K35
∫ About the operation icons
T
W
FOCUS
WB
SHTR
IRIS
MENU
Q.
MENU
MENU
ALL
///:
These icons are used to switch the menu and thumbnail
display page, fo r item selection and setting etc.
:
Touch to return to the previous screen such as when
setting menus.
About the Touch Menu
Touch (left side)/ (right side) of on the Touch Menu to switch the operation icons.
Touch (left side)/ (right side) of on the Touch Menu.
≥ It is also possible to swit ch the operation icons by sliding the Touch Menu right or left while
touching it.
A Touch Menu
T
W
Recording Mode Playback Mode
B Touch these icons to switch pages upward or downward.
C Displayed only during the Manual Mode.
26
VQT3K35
∫ To display the Touch Menu
MENU
The Touch Menu will disappear when n o function is
performed for a specific period of time during
Recording mode. To display it again, touch .
≥ Do not touch on the LCD monitor with hard pointed tips, such as ball point pens.
≥ Perform the touch screen c alibration when the touch is not recognized or wrong location is
recognized. (l 46)
Preparation
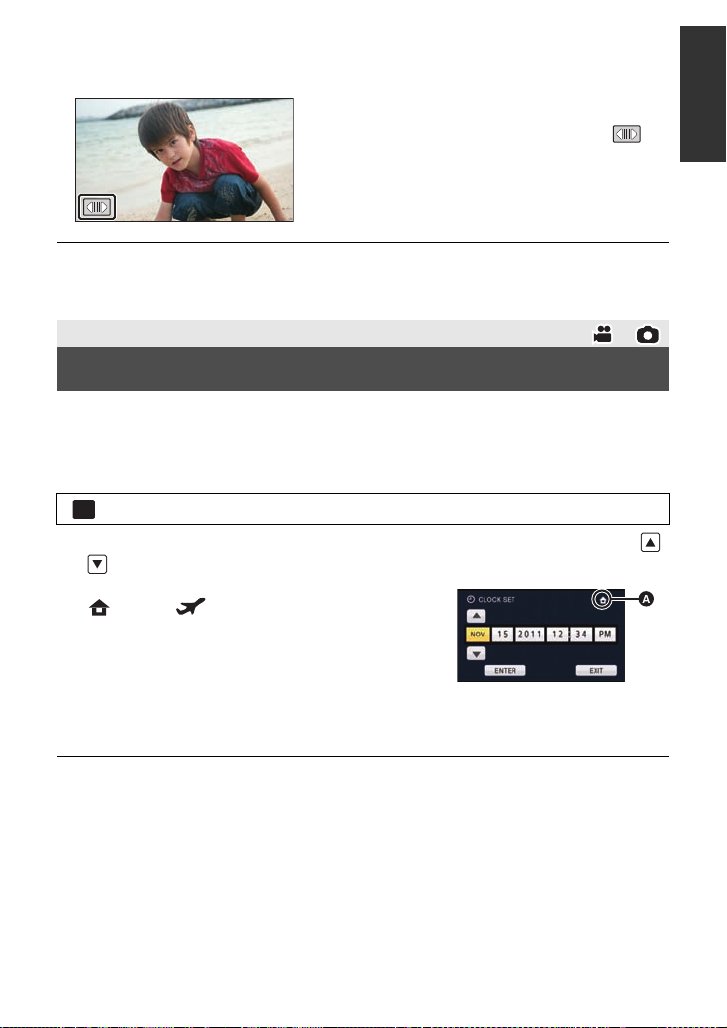
Setting date and time
When the unit is turned on for the first time, a message asking you to set the date and time
will appear.
Select [YES] and perform steps 2 to 3 below to set the date and time.
1 Select the menu. (l 39)
: [SETUP] # [CLOCK SET]
2 Touch the date or time to be set, then set the des ired value using /
.
A Displaying the World time setting (l 41):
[HOME]/ [DESTINATION]
≥ The year can be set between 2000 and 2039.
≥ The 12-hour system is used to display the time.
3 Touch [ENTER].
≥ A message prompting for World time setting may be
displayed. Perform the World time setting by touching the screen. (l 41)
≥ Touch [EXIT] to complete the setting.
≥ The date and time function is driven by a built-in lithium battery.
≥ When this unit is purchased, the clock is set. If the time display becomes [- -], the built-in
lithium battery needs to be cha rged. To recharge the built-in lithium battery, connect the AC
adaptor or attac h the b at ter y t o this unit . Leav e the uni t as it is fo r ap pro x. 2 4hours and the
battery will maintain the date and time for approx. 6 months. (The battery is still being
recharged even if the unit is off.)
27
VQT3K35

Basic
Before recording
∫ Basic cam era positi oning
1 Hold the unit with both hands.
2 Put your hand through the grip belt.
3 It is convenient to use the recording button icon A when holding the unit at waist level.
≥ When recording, make sure your footing is stab le and there is no danger of colliding with
another person or objec t.
≥ When you are outdoors, record pictures with the sunlight behind you. If the subject is
backlit, it will become dark in the recording.
≥ Keep your arms near your body and separate your legs for better balance.
≥ Do not cover the microphones or the cooling fan inlet with your hand etc.
∫ Basic motion picture recording
≥ The unit should normally be held steady when recording.
≥ If you move the unit when recording, do so slowly, maintaining a constant speed.
≥ The zoom operation is use ful f or reco rding sub jec ts yo u ca nnot get cl ose to, bu t overu se o f
zoom in and zoom out can make the resulting motion picture less enjoyable to watch.
28
VQT3K35
∫ To recording yourself
Rotate the LCD monitor towards the lens side.
≥ The image is horizontally flipped as if you see a mirror image.
(However the image recorded is the same as a normal
recording.)
≥ Only some indications will appear on the screen. When appears, return the direction
of the LCD monitor to normal positio n and check the warning/alarm indication. (l 134)
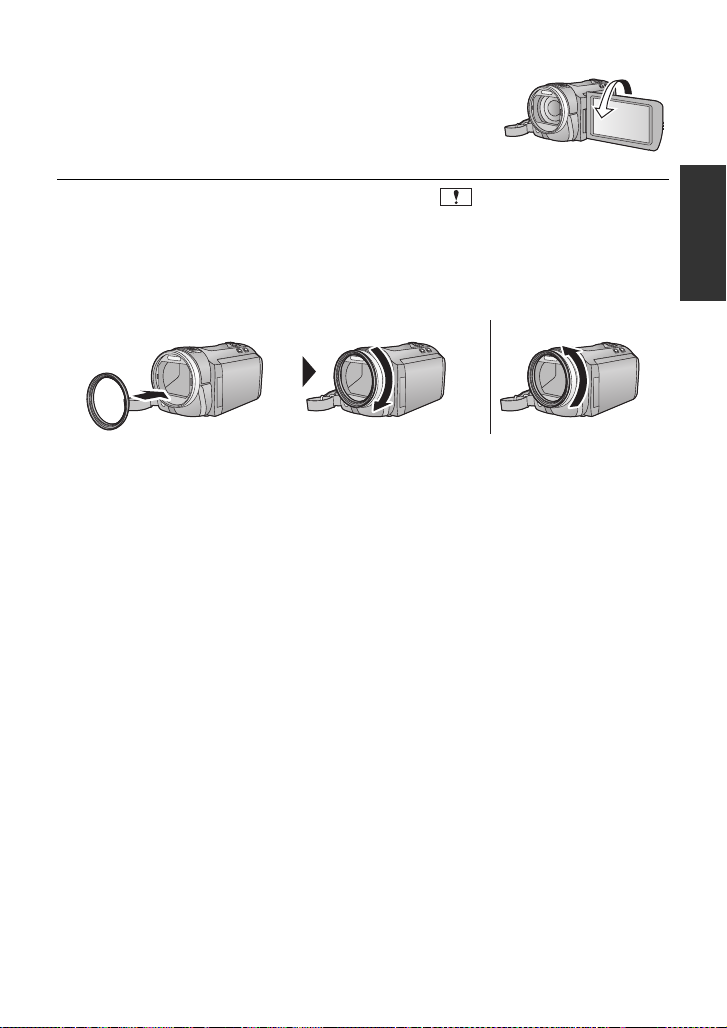
∫ Attaching/Removing the lens hood
This will reduce the extra light entering the lens in bright sunlight or backlight etc., making it
possible to take clearer pictures.
A Attaching the lens hood
B Removing the lens hood
≥ If you use the Filter Kit (optional), the Conversion Lens (optional) or the 3D Conversion
Lens (optional), remove th e lens hood.
29
VQT3K35
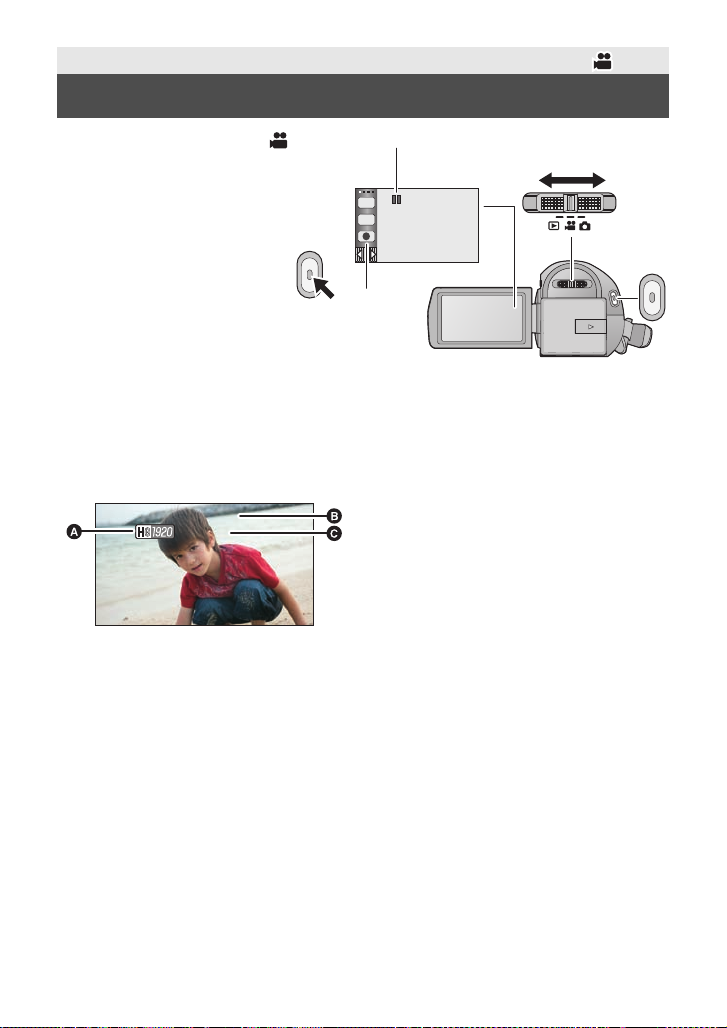
Basic
T
W
0h00m00s0h00m00s0h00m00s
R 1h20mR 1h20mR 1h20m
A Recording mode
B Recording t ime elapsed
Each time the unit is put into recording
pause, the counter display will be reset
to 0h00m00s.
(“h” is an abbreviation for hour, “m” for
minute and “s” for second.)
C Approximate remaining recordable
time
(When the remaining time is less than
1 minute, R 0h00m flashes red.)
≥ Screen display will disappear when no
function is performed for a specific
period of time. To display it again, tou ch
the screen. (It will not display when AF/
AE tracking is used.)
Recording motion pictures
1 Change the mode to .
2 Open the LCD monitor.
3 Press the recording start/stop
button to start recording.
A When you begin recording, ;
changes to ¥.
4 Press the recording start/stop
button again to pause
recording.
B You can also start or pause recording by touching the recording start/stop button icon.
This icon functions in th e same manner as the recording start/stop button.
∫ Screen indications in the Motion Picture Recording Mode
30
VQT3K35
 Loading...