

Page 1
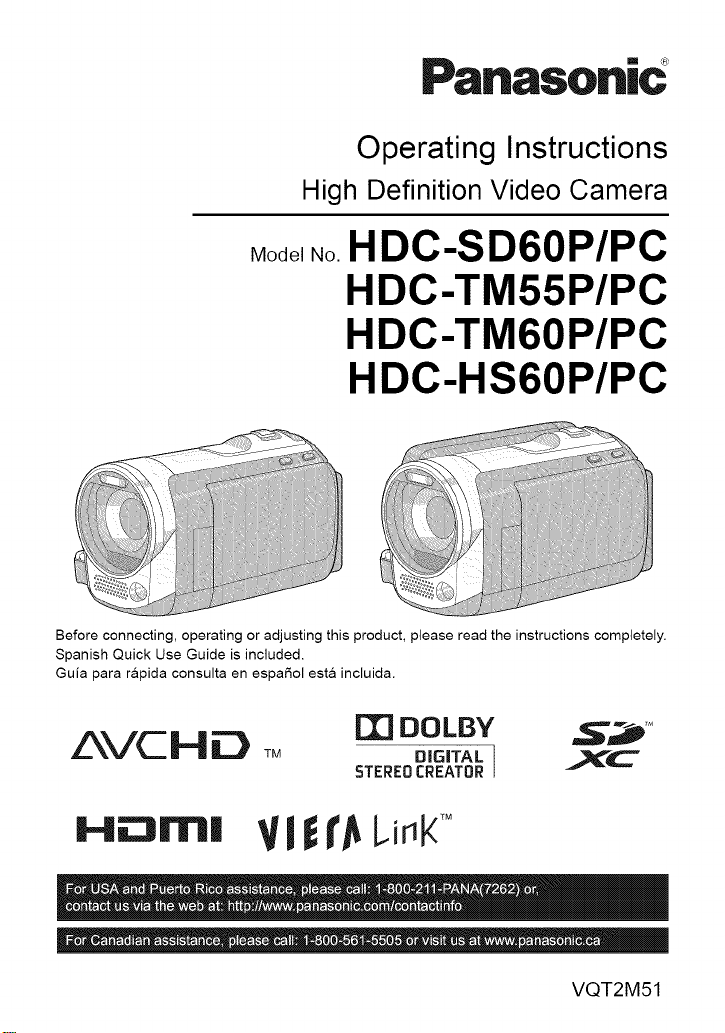
Panasonic
Operating Instructions
High Definition Video Camera
_o_e,.o.HDC-SD60P/PC
HDC-TM55P/PC
HDC-TM60P/PC
HDC-HS60P/PC
Before connecting, operating or adjusting this product, please read the instructions completely.
Spanish Quick Use Guide is included.
Guia para rapida consulta en espaSol esta incluida.
AVCHD TM
m DOLBY _,_'_
DIG|TAL ] _C
STEREO CREATOR
H N'I| V! rAL,ir_kTM
VQT2M51
Page 2

Things You Should
Know
Thank you for choosing Panasonic!
You have purchased one of the most
sophisticated and reliable products on
the market today. Used properly, we're
sure it will bring you and your family
years of enjoyment. Please take time to
fill in the information on the right.
The serial number is on the tag located
on the underside of your camera. Be
sure to retain this manual as your
convenient camera information source.
/Date of Purchase
Dealer Purchased From
Dealer Add ress
Dealer Phone No.
Model No.
Serial No.
k, ,,
Safety Precautions
WARNING:
TO REDUCE THE RISK OF FIRE, ELECTRIC SHOCK OR PRODUCT DAMAGE,
• DO NOT EXPOSE THIS APPARATUS TO RAIN, MOISTURE, DRIPPING OR
SPLASHING AND THAT NO OBJECTS FILLED WITH LIQUIDS, SUCH AS
VASES, SHALL BE PLACED ON THE APPARATUS.
• USE ONLY THE RECOMMENDED ACCESSORIES.
• DO NOT REMOVE THE COVER (OR BACK); THERE ARE NO USER SERVICEABLE
PARTS INSIDE. REFER SERVICING TO QUALIFIED SERVICE PERSONNEL.
CAUTION!
DO NOT INSTALL OR PLACE THIS UNIT IN A BOOKCASE, BUILT-IN CABINET OR IN
ANOTHER CONFINED SPACE. ENSURE THE UNIT IS WELL VENTILATED. TO
PREVENT RISK OF ELECTRIC SHOCK OR FIRE HAZARD DUE TO OVERHEATING,
ENSURE THAT CURTAINS AND ANY OTHER MATERIALS DO NOT OBSTRUCT THE
VENTILATION VENTS.
The following mark and symbols are located on bottom of the unit.
CAUTION
CAUTION TO REDUCE THE RISK OF ELECTRIC
2
VQT2M51
SHOCK, DO NOT REMOVE SCREWS.
NO USER-SERVICEABLE PARTS
REFER SERVICING TO QUALIFIED
SERVICE PERSONNEL.
INSIDE. ,_
The lightning flash with arrowhead
symbol, within an equilateral
triangle, is intended to alert the use1
to the presence of uninsulated
"dangerous voltage" within the
product's enclosure that may be of
sufficient magnitude to constitute a
risk of electric shock to persons.
The exclamation point within an
equilateral triangle is intended to
alert the user to the presence of
important operating and
maintenance (servicing)instructions
in the li/erature accompanying the
appliance.
Page 3

THEFOLLOWINGAPPLIESONLYINTHEU.S.A.
FCCNote:
Thisequipment has been tested and found to comply with the limits for a Class B digital
device, pursuant to Part 15 of the FCC Rules. These limits are designed to provide
reasonable protection against harmful interference in a residential installation. This
equipment generates, uses, and can radiate radio frequency energy and, if not installed
and used in accordance with the instructions, may cause harmful interference to radio
communications. However, there is no guarantee that interference will not occur in a
particular installation, if this equipment does cause harmful interference to radio or
television reception, which can be determined by turning the equipment off and on, the
user is encouraged to try to correct the interference by one or more of the following
measures:
• Reorient or relocate the receiving antenna,
• Increase the separation between the equipment and receiver.
• Connect the equipment into an outlet on a circuit different from that to which the
receiver is connected.
• Consult the dealer or an experienced radioiTV technician for help.
FCC Caution: To assure continued compliance, follow the attached installation
instructions and use only shielded interface cables with ferrite
core when connecting to computer or peripheral devices.
Any changes or modifications not expressly approved by the party responsible for
compliance could void the user's authority to operate this equipment.
Declaration of Conformity
Trade Name: Panasonic
Model No.: HDC-SD60P/HDC-TM55P/HDC-TM60P/HDC-HS60P
Responsible party: Panasonic Corporation of North America
Support Contact: Panasonic Consumer Electronics Company
This device complies with Part 15 of the FCC Rules. Operation is subject to the following
two conditions: (1) This device may not cause harmful interference, and (2) this device
must accept any interference received, including interference that may cause undesired
operation.
One Panasonic Way, Secaucus, NJ 07094
1-800-211-PANA (7262)
HDC-SD60P
_ Panasoaic
IIDCqIS60P
_ pa.aso.ic
THE FOLLOWING APPLIES ONLY IN CANADA.
This Class B digital apparatus complies with Canadian ICES-003.
_ Panas_ic
lID(-TM55P
i
_ Panaso.ic
IIDC-TM60P
i
I
3
VQT2M51
Page 4

Battery pack (Lithium ion battery pack)
• Use the specified unit to recharge the battery pack.
• Do not use the battery pack with equipment other than the specified unit.
• Do not get dirt, sand, liquids, or other foreign matter on the terminals.
• Do not touch the plug terminals (+ and ) with metal objects.
• Do not disassemble, remodel, heat or throw into fire.
If any electrolyte should come into contact with your hands or clothes, wash it off
thoroughly with water.
If any electrolyte should come into contact with your eyes, never rub the eyes. Rinse eyes
thoroughly with water, and then consult a doctor.
Warning
Risk of fire, explosion and burns. Do not disassemble, heat above 60 °C (140 °F) or
incinerate.
AC adaptor
This AC adaptor operates on AC between 110 V and 240 V.
But
• In the U.S.A. and Canada, the AC adaptor must be connected to a 120 V AC power
supply only.
• When connecting to an AC supply outside of the U.S.A. or Canada, use a plug adaptor
to suit the AC outlet configuration.
• When connecting to a supply of greater than AC 125 V, ensure the cord you use is
suited to the voltage of the AC supply and the rated current of the AC adaptor.
• Contact an electrical parts distributor for assistance in selecting a suitable AC plug
adaptor or AC cord set.
The unit should be installed near an accessible AC power outlet, with the power cord
connected directly to it.
To completely disconnect power from the unit, unplug the power cord from the AC power
outlet.
r U.S.A./CANADA CONSUMERS: ATTENTION:
A lithium ion/polymer battery that is recyclable powers the product
7_,oz,__ you have purchased. Please call 1-800-8-BATTERY for information
on how to recycle this battery.
<For USA-California only>
This product contains a CR Coin Cell Lithium Battery which contains Perchlorate Material
- special handling may apply.
See www.dtsc.ca.qov/hazardouswaste/perchlorate.
4
VQT2M51
II Product Identification Marking is located on the bottom of units.
Page 5

IMPORTANT SAFETY
INSTRUCTIONS
Read these operating instructions carefully before using the unit. Follow the safety
instructions on the unit and the applicable safety instructions listed below. Keep these
operating instructions handy for future reference.
1)
Read these instructions. 11 )
2)
Keep these instructions.
3)
Heed all warnings.
Follow all instructions.
4)
5)
Do not use this apparatus near water.
6)
Clean only with dry cloth.
7)
Do not block any ventilation openings.
Install in accordance with the
manufacturer's instructions.
8)
Do not install near any heat sources
such as radiators, heat registers,
stoves, or other apparatus (including
amplifiers) that produce heat.
9)
Do not defeat the safety purpose of the
polarized or grounding-type plug. A
polarized plug has two blades with one
wider than the other. A grounding-type
plug has two blades and a third
grounding prong. The wide blade or the
third prong are provided for your safety.
If the provided plug does not fit into your
outlet, consult an electrician for
replacement of the obsolete outlet.
Only use attachments/accessories
specified by the manufacturer.
12)
Use only with the
cart, stand, tripod,
bracket, or table
specified by the
manufacturer, or
sold with the
apparatus. When a
cart is used, use caution when moving
the cart/apparatus combination to avoid
injury from tip-over.
13)
Unplug this apparatus during lightning
storms or when unused for long periods
of time.
14)
Refer all servicing to qualified service
personnel. Servicing is required when
the apparatus has been damaged in any
way, such as power-supply cord or plug
is damaged, liquid has been spilled or
objects have fallen into the apparatus,
the apparatus has been exposed to rain
or moisture, does not operate normally,
or has been dropped.
10) Protect the power cord from being
walked on or pinched particularly at
plugs, convenience receptacles, and the
point where they exit from the
apparatus.
5
VQT2M51
Page 6
Precautions
USE & LOCATION
• TO AVOID SHOCK HAZARD ... Your
camera and power supply should not be
exposed to rain or moisture. Do not
connect the power supply or operate your
camera if it gets wet. Your camera has
been designed for outdoor use, however it
is not designed to sustain direct exposure
to water, rain, sleet, snow, sand, dust, or a
direct splashing from a pool or even a cup
of coffee. This action could permanently
damage the internal parts of your camera.
Do not attempt to disassemble this unit.
There are no user serviceable parts
inside. Unplug your camera from the
power supply before cleaning.
• AS WITH ANY SMALL OBJECT, SD
CARDS CAN BE SWALLOWED BY
YOUNG CHILDREN. DO NOT ALLOW
CHILDREN TO HANDLE THE SD CARD.
• STORAGE OF YOUR CAMERA ... Store
and handle your camera in a manner that
will not subject it to unnecessary
movement (avoid shaking and striking).
Your camera contains a sensitive pick-up
device which could be damaged by
improper handling or storage.
CARE
• TO CLEAN YOUR CAMERA ... Do not
use strong or abrasive detergents when
cleaning your camera body.
• TO PROTECT THE LENS ... Do not touch
the surface of the lens with your hand.
Use a commercial camera lens solution
and lens paper when cleaning the lens.
Improper cleaning can scratch the lens
coating.
• TO PROTECT THE FINISH OF YOUR
CAMERA ... Before handling your
camera, make sure your hands and face
are free from any chemical products, such
as suntan lotion, as it may damage the
finish.
• DO NOT AIM YOUR CAMERA AT THE
SUN OR OTHER BRIGHT OBJECTS
• DO NOT EXPOSE YOUR CAMERA TO
EXTENDED HIGH TEMPERATURE ...
Such as, in direct sunlight, inside a closed
car, next to a heater, etc... This action
could permanently damage the internal
parts of your camera.
• AVOID SUDDEN CHANGES IN
TEMPERATURE ... If the unit is suddenly
moved from a cold place to a warm place,
moisture may form on the SD card and
inside the unit.
• DO NOT LEAVE YOUR CAMERA OR
THE POWER SUPPLY TURNED ON
WHEN NOT IN USE.
6
VQT2M51
-If you see this symbol-
Information on Disposal in other
Countries outside the European
Union
valid in the European
Union.
This symbol is only
If you wish to discard
this product, please
contact your local
authorities or dealer
and ask for the correct
method of disposal.
Page 7
• Indemnity about recorded
content
Panasonic does not accept any
responsibility for damages directly or
indirectly due to any type of problems that
result in loss of recording or edited content,
and does not guarantee any content if
recording or editing does not work properly.
Likewise, the above also applies in a case
where any type of repair is made to the unit
(including any other non-built-in memory/
HDD related component).
• Handling of built-in memory
[HDC-TM55/H DC-TM60]
This unit is equipped with the built-in 8 GB
[HDC-TM55]/16 GB [HDC-TM60] memory.
When using this component, pay attention to
the following points.
Back up data periodically.
The built-in memory is temporary storage. In
order to avoid erasing data due to static
electricity, electromagnetic waves,
breakage, and failures, back up the data to a
PC or DVD disc. (-_ 101, 109)
• Access lamp [ACCESS] (_ 15)illuminates
while the SD card or built-in memory is
being accessed (initialization, recording,
playback, deleting etc.). Do not perform
the following operations when the lamp
illuminates. It may damage the built-in
memory or cause a malfunction in the unit.
Turn the unit off (remove the battery)
Insert and remove the USB cable
Expose the unit to vibrations or shock
• About disposing of or giving away this unit.
(_ 134)
• Handling of HDD [HDC-HS60]
This unit is equipped with the built-in 120 GB
HDD. While the HDD is capable of storing a
large amount of data, there are a few things
to look out for. When using this component,
pay attention to the following points.
Do not expose the HDD to vibrations and
shocks.
Due to the environment and handling
conditions, the HDD may be subject to
partial damages or may not be able to read,
record, and play back data. Do not expose
the unit to vibrations or shock, and do not
turn off the power during recording or
playback.
If the unit is used in a place with loud
sounds, such as a club or similar venue,
the recording may stop due to sound
vibrations. Recording data on an SD card
is recommended in these places.
Back up data periodically.
The HDD is temporary storage. In order to
avoid erasing data due to static electricity,
electromagnetic waves, breakage, and
failures, back up the data to a PC or DVD
disc. (-_ 101, 109)
If the HDD experiences any abnormality,
back up data immediately,
Failure in the HDD may produce continuous
noise or choppy sound during recording or
playing back. Continuous use will cause
further deterioration, and may eventually
disable the HDD. If these phenomena are
observed, copy the data on the HDD to a
PC, a DVD disc etc. immediately and
contact consumer support. (-) 152, 153)
Once the HDD is out of order, data cannot
be restored.
VQT2M51
7
Page 8

Operation may stop in hot or cold
environments.
The unit is disabled in order to protect the
HDD.
Do not use the unit in low atmospheric
pressures.
The HDD may fail if it is used at altitudes of
3000 m (9800 feet) or higher above sea
level.
Transportation
When the unit is transported, turn off the
power and be careful not to shake, drop, or
cause impact to the unit.
Falling detection
[ _ ] is indicated on the screen when it
detects a falling state (a weightless state). If
the falling state is detected repeatedly, the
unit may stop the recording or playback
operation in order to protect the HDD.
• HDD access lamp [ACCESS HDD] (-) 20)
illuminates while the HDD is being
accessed (initialization, recording,
playback, deleting etc.). Do not perform
the following operations when the lamp
illuminates. It may damage the HDD or
cause a malfunction in the unit.
Turn the unit off (remove the battery)
Insert and remove the USB cable
Expose the unit to vibrations or shock
• About disposing of or giving away this unit.
(-) 134)
• Cards that you can use with
this unit
SD Memory Card, SDHC Memory Card
and SDXC Memory Card
• 4 GB or more Memory Cards that do not
have the SDHC logo or 48 GB or more
Memory Cards that do not have the SDXC
logo are not based on SD Memory Card
Specifications.
• Refer to page 26 for more details on SD
cards.
• For the purposes of these
operating instructions
• SD Memory Card, SDHC Memory Card
and SDXC Memory Card are referred to
as the "SD card".
• Functions that can be used for motion
picture recording/motion picture playback
are
indicated by _ in these
operating instructions.
• Functions that can be used for still picture
recording/still picture playback are
indicated by _ in these operating
instructions.
• Pages for reference are indicated by an
arrow, for example: -) 00
These operating instructions are designed
for use with models
[ HDC-SD60 1,_,
[ HDC-TM60 } and _. Pictures
may be slightly different from the original.
• The illustrations used in these operating
instructions show model I HDC=SD60 ),
however, parts of the explanation refer
to different models.
• Depending on the model, some
functions are not available.
• Features may vary, so please read
carefully.
• Not all models may be available
depending on the region of purchase.
8
VQT2M51
Page 9
Contents
Accessories ............................................ 11
Quick Guide ............................................ 12
Before using
[] Parts identification and
handling ...................................... 15
[H DC-SD60]/[H DC-TM55]/
[HDC-TM60] ................................. 15
[HDC-HS60] ................................. 18
Setup
[] Power supply .............................. 21
Inserting/removing the battery ..... 22
Charging the battery .................... 23
Charging and recording time ........ 24
[] Recording to a card ................... 26
Cards that you can use
with this unit ................................. 26
Inserting/removing an SD card .... 27
[] Turning the unit on/off ............... 28
Turning the power on and off
with the power button ................... 28
Turning the power on and off
with the LCD monitor ................... 28
Selecting a mode ....................... 29
[] Adjusting LCD monitor .............. 30
How to use the touch screen ....... 30
Recording Yourself ....................... 30
[] Setting date and time ................. 31
Recording/Playback
[] Before recording ........................ 32
[] Selecting a media to record
[HDC-TM55/HDC-TM60/
HDC-HS60] .................................. 33
[] Recording motion pictures ....... 34
Recording still pictures ............. 36
Recording still pictures in Motion
Picture Recording Mode .............. 37
[] Intelligent Auto Mode ................ 38
[] Motion picture/Still picture
playback ...................................... 40
Setup
[] Using the menu screen ............. 43
[] Using the Setup Menu ............... 44
Recording (Advanced)
[] Zoom in/out function ................. 51
Extra Optical Zoom ...................... 51
[] Optical Image Stabilizer
Function ...................................... 52
[] AF/AE tracking ........................... 53
[] Recording with the video light .... 54
[] Recording functions of
operation icons .......................... 55
Operation icons ............................ 55
[] Recording functions of
menus ......................................... 60
[] Manual recording ....................... 74
White balance .............................. 75
Manual shutter speed/
iris adjustment .............................. 76
Manual focus adjustment ............. 77
Playback (Advanced)
[] Playback Operations ................. 78
Motion picture playback using
operation icon .............................. 78
Creating still picture from motion
picture .......................................... 79
Highlight&Time frame index ......... 80
Repeat playback .......................... 80
Resuming the previous
playback ....................................... 81
Zooming in on a still picture during
playback (Playback zoom) ........... 81
[] Various playback functions ...... 82
Playing back motion pictures/
still pictures by date ..................... 82
Face Highlight Playback/
Highlight Playback/
Intelligent Scene Selection .......... 83
Changing the playback setting and
playing back the slide show ......... 86
VQT2M51
9
Page 10

Editing
[] Deleting scenes/still pictures ... 87
Dividing a scene to partially
delete ........................................... 88
Deleting personal information ...... 89
Protecting scenes/still pictures ..... 90
[] DPOF setting .............................. 91
[] Relay scene combining
[HDC-TM55/HDC-TM60] ............. 92
With a TV
[] Watching Video/Pictures
on your TV .................................. 94
Connecting with a HDMI mini
cable ............................................ 96
Connecting with the AV multi
cable ............................................ 96
[] Playback using VlERA Link TM
(HDAVI Control TM) ....................... 97
With this unit/other products
[] Copying between SD card and
Built-in Memory/HDD
[HDC-TM55/HDC-TM60/
HDC-HS60] .................................. 99
Copying ........................................ 99
[] Connecting a DVD burner
to copy to/play back a disc ..... 101
Preparing for copying/
playing back ............................... 101
Copying to discs ......................... 103
Playing back the copied disc ...... 106
Managing the copied disc .......... 107
[] Dubbing images onto other
video devices ........................... 108
Before using
[] What you can dowith a PC ..... 109
End User License Agreement .... 111
[] Operating environment ........... 112
Setup
[] Installation ................................ 115
[] Connecting to a PC .................. 117
About the PC display ................. 119
Using with a PC
[] Starting HD WriterAE 2.0 ........ 120
Reading the operating instructions
of the software applications ....... 120
[] If using Mac .............................. 121
Indications
[] Indications ................................ 122
[] Messages .................................. 125
About recovery ........................... 126
Troubleshooting .................................. 127
Cautions for use .................................. 133
About copyright ................................... 139
Recording modes/
approximate recordable time ............. 140
Number of recordable pictures .......... 141
Specifications ...................................... 143
Optional accessories .......................... 148
Accessory Order Form (For USA
and Puerto Rico Customers) ..... 150
Limited Warranty (ONLY FOR U.S.A.
AND PUERTO RICO) ............................ 151
Warranty
(For Canadian Customers) .................. 153
Index ..................................................... 154
Spanish Quick Use Guide/
Guia espa_ola para el uso r_pido ...... 156
10
VQT2M51
Page 11
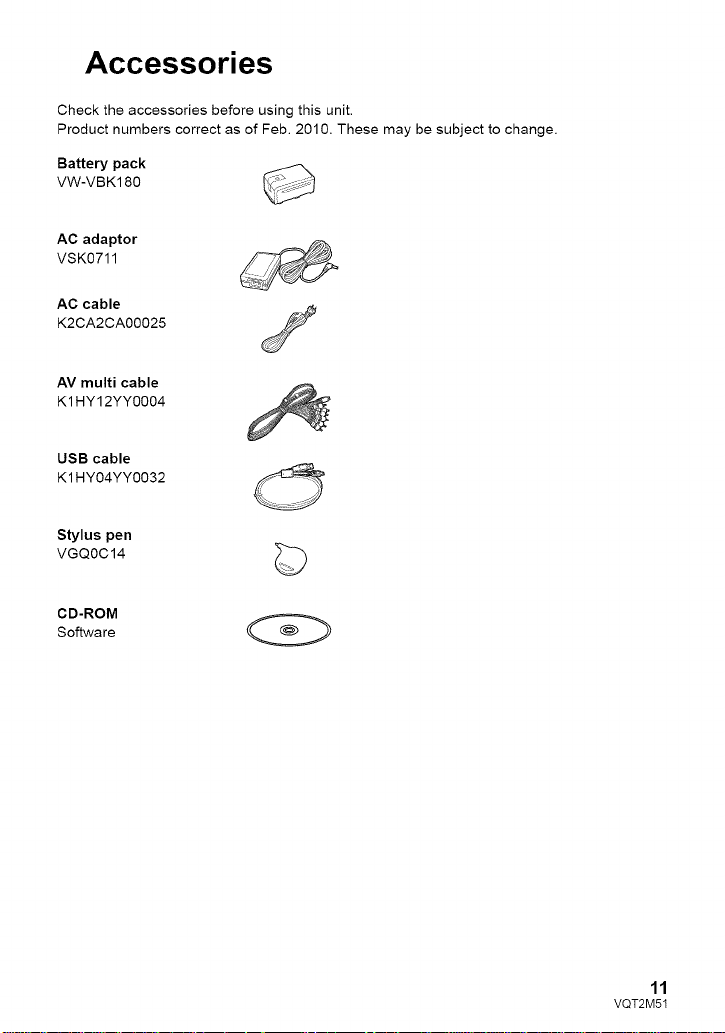
Accessories
Check the accessories before using this unit.
Product numbers correct as of Feb. 2010. These may be subject to change.
Battery pack
VW-VBK180
VSK0711
AC adaptor _,_
AC cable
K2CA2CA00025
AV multi cable
K1 HY12YYO004
USB cable
K1 HY04YY0032
Stylus pen
VGQOC14
CD-ROM
Software
©
11
VQT2M51
Page 12

Quick Guide
• Inserting the battery
Install the battery by inserting it in the
direction shown in the figure.
O Insert the battery until it clicks and locks.
• Charging the battery
O DC input terminal
O Connect the AC adaptor to the DC input
terminal.
Connect the AC cable to the AC
adaptor, then the AC outlet.
• The status indicator will flash red at an
interval of 2 seconds, indicating that
charging has begun.
• Inserting/removing an SD card
1) Open the LCD monitor.
2) Open the SD card cover and insert
(remove) the SD card into (from) the
card slot Q.
• Face the label side _ in the direction
shown in the illustration and press it
straight in as far as it will go.
• Press the center of the SD card and then
pull it straight out.
3) Securely close the SD card cover.
• Securely close it until it clicks.
• Turning the unit on/off
Turning the power on and off with the
power button
Press the power button to turn on the power.
O
®/I
O The status indicator lights on.
• To turn offthe power, hold down the power
button until the status indicator goes off.
Turning the power on and off with the
LCD monitor
Power is turned on when the LCD monitor is
opened, and power is turned off when it is
closed.
• To turn on the power
Access lamp [ACCESS] _
eWhe n this unit is accessing the SD
card or bui!t-in memory, the access
!amp lights up,
12
VQT2M51
O
O The status indicator lights on.
• To turn off the power
Q
Q The status indicator goes off.
Page 13

• Selecting a mode
Operate the mode switch to change the
mode to _ , O or [_.
Selecting a media to record
[HDC-TM55/HDC-TM60/HDC-HS60]
1) Change the mode to _ or _ .
2) Select the menu.
Motion Picture Recording
Mode (-_ 34)
Still Picture Recording Mode
(-> 36)
[] Playback Mode (-_ 40, 78)
• How to use the touch screen
You can operate by directly touching the
LCD monitor (touch screen) with your finger.
It is easier to use the stylus pen (supplied)
for detailed operation or if it is hard to
operate with your fingers.
Touch and release the touch screen to select
icon or picture.
• Language selection
1) Press the MENU button, then touch
[SETUP] _ [LANGUAGE].
2) Touch [English].
: [MEDIA SELECT]
3) Touch the media to record motion
pictures or still pictures.
• Touch [VIDEO/SD CARD] or [PICTURE/
SD CARD] to record to the SD card.
[ HDC=TM55 }/( HDC=TM60 }
Touch [VIDEO/Built-inMemory] or
[PICTURE/Built-inMemory] to record to
the built-in memory.
Touch [VIDEO/HDD] or [PICTURE/HDD]
to record to the HDD.
• The media is selected separately to
motion pictures or still pictures is
highlighted in yellow.
4) Touch [ENTER].
• Recording motion pictures
1) Change the mode to _ .
2) Open the LCD monitor.
3) Press the recording start/stop button to
start recording.
O When you begin recording, | | changes to O.
• Recording still pictures
1) Change the mode to _ .
2) Open the LCD monitor.
3) Press the _ button fully to take the
picture.
I
13
VQT2M51
Page 14

• Motion picture/Still picture
playback
1) Change the mode to [].
2) Touch the play mode select icon O.
3) Touch the desired media to be played
back motion pictures or still pictures.
• Touch [VlDEO/SD CARD] or [PICTURE/
SD CARD] to play back the SD card.
I HDC-TM55 ]/I HDC-TM60 ]
Touch [VIDEO/Built-inMemory] or
[PICTURE/Built-inMemory] to play back
the built-in memory.
Touch [VIDEO/HDD] or [PICTURE/HDD]
to play back the HDD.
4) Touch the scene or the still picture to be
played back,
• Next (previous) page can be displayed by
touching [_/[_ .
5) Select the playback operation by
touching the operation icon.
(Motion picture playback)
• /11: Playback/Pause
4<1: Rewind playback
• • : Fast forward playback
I1: Stops the playback and shows
the thumbnails.
• : Displays the direct playback bar.
(-> 79)
(Still picture playback)
• /I I: Slide show (playback of the still
pictures in numerical order)
start/pause.
411: Plays back the previous picture.
I I • : Plays back the next picture,
I1: Stops the playback and shows
the thumbnails.
• Touch _ / _' to display/not-display the
operation icon.
O Operation icon
14
VQT2M51
Page 15
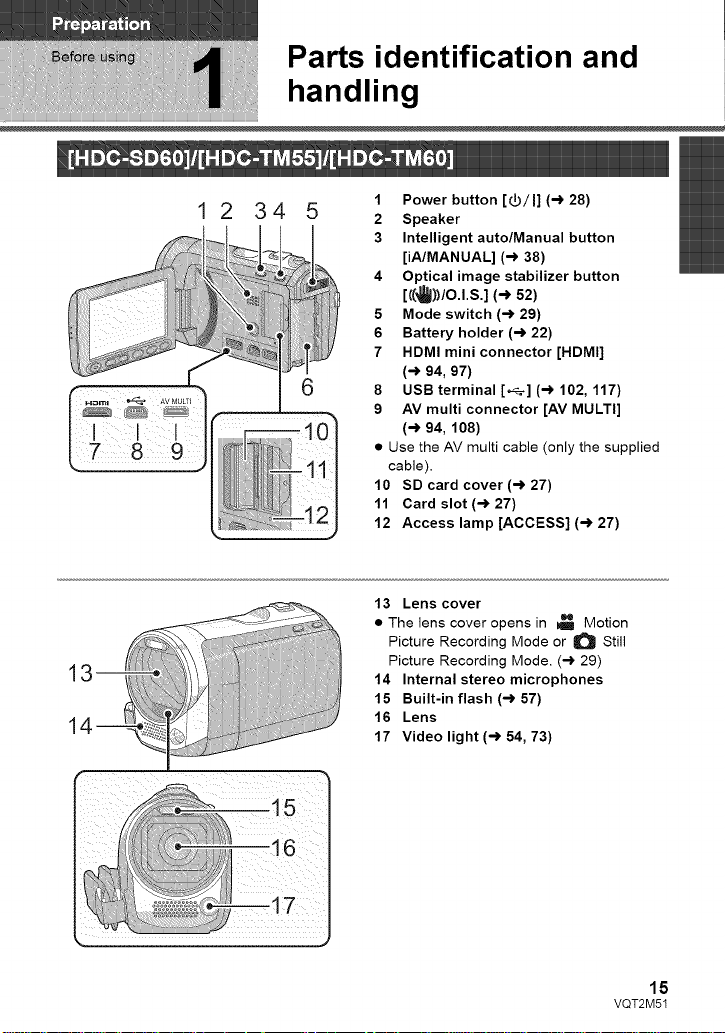
Parts identification and
handling
12345
1 Power button [V/I] (-) 28)
2 Speaker
3 Intelligent auto/Manual button
[iA/MANUAL] (-) 38)
4 Optical image stabilizer button
[((_))/O.l.S.] (-) 52)
5 Mode switch (-) 29)
6 Battery holder (-) 22)
7 HDMI mini connector [HDMI]
6
(-) 94, 97)
8 USB terminal [_] (-) 102, 117)
9 AV multi connector [AV MULTI]
(-) 94, 108)
• Use the AV multi cable (only the supplied
cable).
10 SD card cover (-) 27)
11 Card slot (-) 27)
12 Access lamp [ACCESS] (-_ 27)
13 Lens cover
• The lens cover opens in I_ Motion
Picture Recording Mode or O Still
Picture Recording Mode. (-) 29)
14 Internal stereo microphones
15 Built-in flash (-_ 57)
16 Lens
17 Video light (-) 54, 73)
16
15
VQT2M51
Page 16
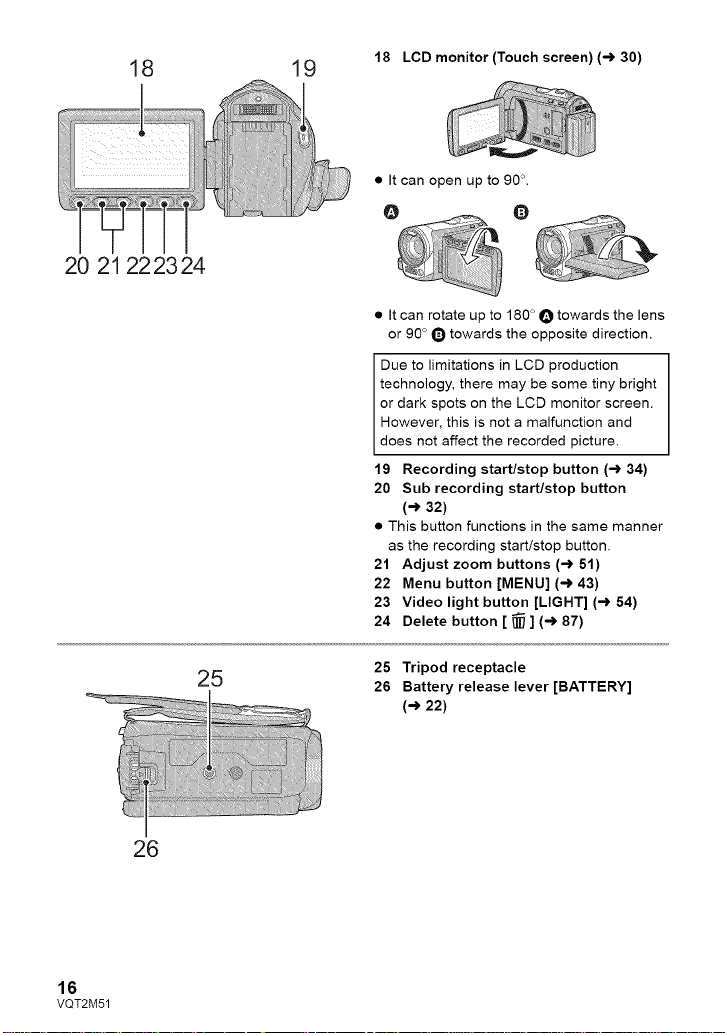
18 19
20 21 22 23 24
18 LCD monitor (Touch screen) (-_ 30)
• It can open up to 90 _.
O Q
• It can rotate up to 180 ° O towards the lens
or 90 ° Q towards the opposite direction.
Due to limitations in LCD production
technology, there may be some tiny bright
or dark spots on the LCD monitor screen.
However, this is not a malfunction and
does not affect the recorded picture.
19 Recording start/stop button (-') 34)
20 Sub recording start/stop button
(-,) 32)
• This button functions in the same manner
as the recording start/stop button.
21 Adjust zoom buttons (-') 51)
22 Menu button [MENU] ('-) 43)
23 Video light button [LIGHT] (,_ 54)
24 Delete button [ _ ] (-') 87)
16
VQT2M51
26
25
25 Tripod receptacle
26 Battery release lever [BATTERY]
(-_ 22)
Page 17

27 28 29
27 Status indicator (-> 28)
28 Photoshot button [ O ] (-> 36)
29 Zoom lever [W/T] (In Motion Picture
Recording Mode or Still Picture
Recording Mode) (-> 51)
Thumbnail display switch [ _ I0_]1
Volume lever [-VOL+] (In Playback
Mode) (-> 42)
30 DC input terminal (-> 23)
• Do not use any other AC adaptors except
the supplied one.
31 Grip belt
31
O Flip the belt.
I_ Adjust the length.
l_l Replace the belt.
17
VQT2M51
Page 18
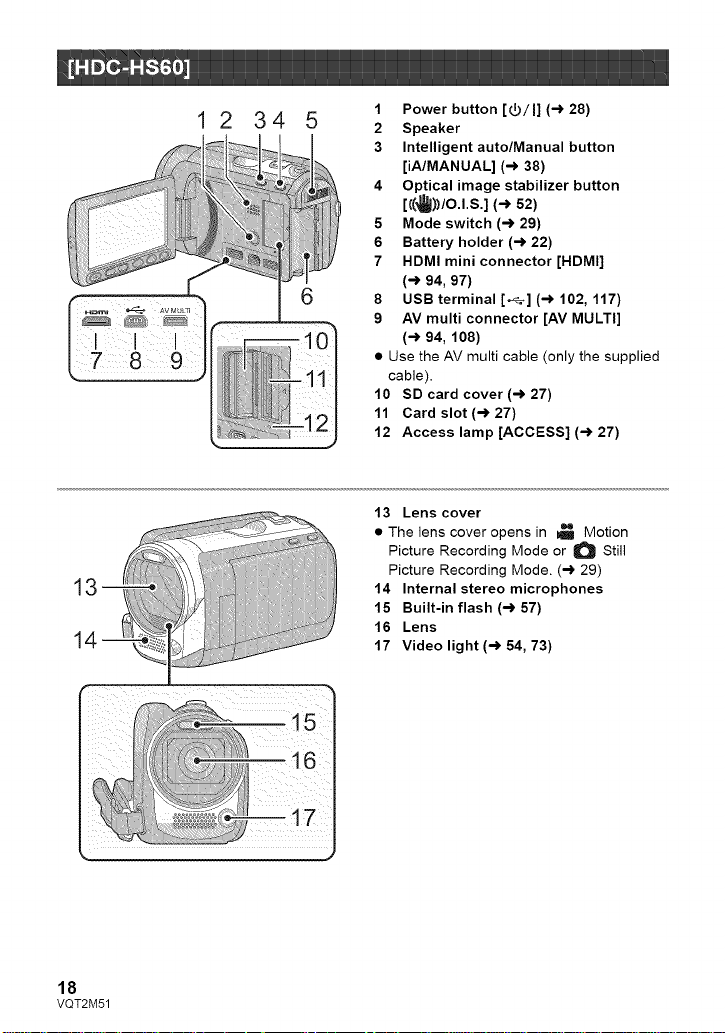
12 34 5
6
1
1
1 Power button [_)/I] (-_28)
2 Speaker
3 Intelligent auto/Manual button
[iA/MANUAL] (-) 38)
4 Optical image stabilizer button
[((_))/O.l.S.] (-_ 52)
5 Mode switch (-) 29)
6 Battery holder (-) 22)
7 HDMI mini connector [HDMI]
(-) 94, 97)
8 USB terminal [._] (-) 102, 117)
9 AV multi connector [AV MULTI]
(-) 94, 108)
• Use the AV multi cable (only the supplied
cable).
10 SD card cover (-) 27)
11 Card slot (-) 27)
12 Access lamp [ACCESS] (-_ 27)
13 Lens cover
• The lens cover opens in _ Motion
Picture Recording Mode or O Still
Picture Recording Mode. (-) 29)
14 Internal stereo microphones
15 Built-in flash (-_ 57)
16 Lens
17 Video light (-) 54, 73)
18
VQT2M51
Page 19
18 19
20 21 222324
18 LCD monitor (Touch screen) (-_ 30)
• It can open up to 90L
@ 0
• It can rotate up to 180 ° O towards the lens
or 90 ° 0 towards the opposite direction.
Due to limitations in LCD production
technology, there may be some tiny bright
or dark spots on the LCD monitor screen.
However, this is not a malfunction and
does not affect the recorded picture.
19 Recording start/stop button (-_ 34)
20 Sub recording start/stop button
(-_ 32)
• This button functions in the same manner
as the recording start/stop button.
21 Adjust zoom buttons (-_ 51)
22 Menu button [MENU] (-_ 43)
23 Video light button [LIGHT] (-_ 54)
24 Delete button [ _ ] (-_ 87)
26
25
25 Tripod receptacle
26 Battery release lever [BATTERY]
(-_ 22)
19
VQT2M51
Page 20
27 28 29 30
27 Status indicator (-) 28)
28 Photoshot button [ O ] (-> 36)
29 Zoom lever [W/T] (In Motion Picture
Recording Mode or Still Picture
Recording Mode) (-> 51)
Thumbnail display switch [ _ I0_]1
Volume lever [-VOL-t-] (In Playback
Mode) (-> 42)
30 HDD access lamp [ACCESS HDD]
31 DC input terminal (-> 23)
• Do not use any other AC adaptors except
the supplied one.
32 Grip belt
O Flip the belt.
Adjust the length.
_l Replace the belt.
2O
VQT2M51
Page 21

Power supply
• About batteries that you can use with this unit
The battery that can be used with this unit is VW-VBK180/VW-VBK360.
• This unit has a function to distinguish the batteries that can be used, and the
batteries (VW-VBK180/VW-VBK360) that are compatible with this function. (The
batteries that are not compatible with this function cannot be used.)
It has been found that counterfeit battery packs which look very similar to the genuine
product are made available to purchase in some markets. Some of these battery packs
are not adequately protected with internal protection to meet the requirements of
appropriate safety standards. There is a possibility that these battery packs may lead
to fire or explosion. Please be advised that we are not liable for any accident or failure
occurring as a result of use of a counterfeit battery pack. To ensure that safe products
are used we would recommend that a genuine Panasonic battery pack is used.
21
VQT2M51
Page 22

• Press the power button to turn off the power. (-_ 28)
Install the battery by inserting it in the direction shown in the figure.
Removing the battery
Be sure to hold down the power button unti
the status indicator goes off. Then remove
the battery while supporting the unit to
prevent it from dropping.
Move the battery release lever in the
direction indicated by the arrow and
remove the battery when unlocked.
O Insert the battery until it clicks
and locks.
BATTERY
CAUTION
Danger of explosion if battery is
incorrectly replaced. Replace only with
the same or equivalent type
recommended by the manufacturer.
Dispose of used batteries according to
the manufacturer's instructions.
22
VQT2M51
Page 23

Whenthis unit is purchased, the battery is not charged. Charge the battery fully
before using this unit for the first time.
Important:
• Use the supplied AC adaptor. Do not use the AC adaptor of another device.
• Do not use the AC cable with any other equipment as it is designed only for this unit.
Also, do not use the AC cable from other equipment with this unit.
• The battery can also be charged using a battery charger (VW-BCIOPP; optional).
• The battery will not be charged if the power is turned on.
O DC input terminal
1 Connect the AC adaptor to the DC input terminal.
2 Connect the AC cable to the AC adaptor, then the AC outlet.
• The status indicator will flash red at an interval of 2 seconds, indicating that charging has
begun.
• Connecting to the AC outlet
If you turn on the unit while charging with the AC adaptor, you can use the unit with power
supplied from the outlet.
• If the status indicator flashes at a particularly fast or slow rate, refer to page 136.
• We recommend using Panasonic batteries (-) 11,24, 25, 148).
• If you use other batteries, we cannot guarantee the quality of this product.
• Do not heat or expose to flame.
• Do not leave the battery(ies) in an automobile exposed to direct sunlight for a long period
of time with doors and windows closed.
VQT2M51
23
Page 24

• Charging/Recording time
• Temperature: 25 °C (77 '_F)/humidity: 60%
Supp!ied battery/
VW-VBK180
(optional)
[3.6 V!1790 mAh]
VW:VBK360
(optional)
[3.6 V/3580 mAh]
Supp!ied battery/
VW-VBK180
(optional)
[3.6 V!1790 mAh]
MW:VBK360
(optional)
[3.6 V/3580 mAh]
2 h 50 min
4 h 50 min
2 h 50 min
4 h 50 min
HA/HG/HX
HE
HA
HG
HX/HE
HA/HG/HX
HE
HA
HG
HX/HE
1 h 45 min
1 h 50 min
3 h 35 min
3 h 40 min
3 h 40 min
1 h 45 min
1 h 50 min
3 h 35 min
3 h 40 min
3 h 40 min
55 min
1 h 50 min
1 h 55 min
55 min
1 h 50 min
1 h 55 min
24
VQT2M51
Page 25

Suppliedbattery!
HDD 1h35min 50min
VW-VBK180
(optional) 2h50min
[3,6V/1790mAh]
SD 50min
1h35min
1h40min
HDD 3h15min lh40min
VW_VBK360
(optional) 4h50min
[3.6V/3580mAh]
SD
3h20min 1h40min
3h20min 1h45min
• These times are approximations.
• The indicated charging time is for when the battery has been discharged completely.
Charging time and recordable time vary depending on the usage conditions such as
high/low temperature.
• The actual recordable time refers to the recordable time when repeatedly starting/stopping
recording, turning the unit on/off, moving the zoom lever etc.
• The batteries heat up after use or charging. This is not a malfunction.
Battery capacity indication
• The display changes as the battery capacity reduces.
If there is less than 3 minutes remaining, then _1 will become red. If the battery
discharges, then _] will flash.
• The remaining battery capacity is displayed when using the Panasonic battery that you
can use for this unit. The actual time can vary depending on your actual use.
• When using the AC adaptor or batteries made by other companies, the remaining
battery capacity will not be shown.
25
VQT2M51
Page 26

Recording to a card
The unit can record still pictures or motion pictures to an SD card, built-in memory or HDD.
To record to an SD card, read the following.
This unit (an SDXC compatible device) is compatible with SD Memory Cards, SDHC
Memory Cards and SDXC Memory Cards. When using an SDHC memory card/SDXC
memory card with other equipment, check the equipment is compatible with these
memory cards.
Use SD cards conforming to Class 4 or higher of the SD Speed Class Rating* for
motion picture recording.
Card type CapacitY Moti0n picture recording picture
, I recording
I I Still
ii_i ! i!:;i:i!i 8 MB/16 MB Cannot be used.
32 MB/84 MB/ The recording may suddenly stop during
128 MB/256 MB motion picture recording depending on
512 MB/1 GB/ Can be
4 GB/6 GB/8 GB/
12 GB/16 GB/ Can be used.
_a :..... 24 GB/32 GB
::M 48 GB/64 GB
* The SD Speed Class Rating is the speed standard for successive writes.
• 4 GB or more Memory Cards that do not
have the SDHC logo or 48 GB or more
Memory Cards that do not have the SDXC
logo are not based on SD Memory Card
Specifications.
Cannot be guaranteed in operation,
the SD card you use. (-) 128)
2 GB used.
• When the write-protect
switch O on SD card is
locked, no recording,
deletion or editing will be
possible on the card.
• Keep the Memory Card out of reach of
children to prevent swallowing.
26
VQT2M51
Page 27

WhenusinganSDcardnotfromPanasonic,oronepreviouslyusedonotherequipment,
forthefirsttimeonthisunit,formattheSDcard.(-)48)WhentheSDcardisformatted,all
oftherecordeddataisdeleted.Oncethedataisdeleted,itcannotberestored.
Caution:
Check that the access lamp has gone off.
• When this unit is accessing the SD
card or bui!t-in memorY , the acces s
lamp lights up,
1 Open the LCD monitor.
2 Open the SD card cover and
insert (remove) the SD card
into (from) the card slot O.
• Face the label side _ in the direction
shown in the illustration and press it
straight in as far as it will go,
• Press the center of the SD card and then
pull it straight out.
3 Securely close the SD card cover.
• Securely close it until it clicks.
• Do not touch the terminals on the back of
the SD card.
• Do not apply strong shocks, bend, or drop
the SD card.
• Electrical noise, static electricity or the
failure of this unit or the SD card may
damage or erase the data stored on the
SD card.
• When the card access lamp is lit, do not:
Remove the SD card
Turn the unit off
Insert and remove the USB cable
Expose the unit to vibrations or shock
Performing the above while the lamp is on
may result in damage to data/SD card or
this unit.
• Do not expose the terminals of the SD
card to water, garbage or dust.
• Do not place SD cards in the following
areas:
In direct sunlight.
In very dusty or humid areas.
Near a heater.
Locations susceptible to significant
difference in temperature (condensation
can occur).
Where static electricity or
electromagnetic waves occur.
• To protect SD cards, return them to their
cases when you are not using them.
• About disposing of or giving away the SD
card. (-) 137)
27
VQT2M51
Page 28

Turning the unit on/off
You can turn the power on and off using the power button or by opening and closing the LCD
monitor.
Press the power button to turn on the power.
Hold down the power button until the status
indicatorgoes off,
O The status indicator lights on.
Power is turned on when the LCD monitor is opened, and power is turned off when it is
closed.
During normal use, opening and closing of the LOB monitor can be conveniently used
to turn the power on/off.
• To turn on the power • To turn off the power
O
O The status indicator lights on. Q The status indicator goes off.
• The power will not turn off while recording motion pictures even if the LCD monitor is
closed.
• In the following cases, opening the LCD monitor does not turn on the power. Press the
power button to turn on the power.
When the unit is originally purchased
When you have turned off the power using the power button
Q
28
VQT2M51
Page 29

Selecting a mode
Change the mode to recording or playback,
Operate the mode switch to change the mode to _ , O or [_.
Motion Picture Recording Mode (-_ 34)
Still Picture Recording Mode (-_ 36)
[] Playback Mode (-_ 40, 78)
29
VQT2M51
Page 30

Adjusting LCD monitor
You can operate by directly touching the
LCD monitor (touch screen) with your finger.
It is easier to use the stylus pen (supplied)
for detailed operation or if it is hard to
operate with your fingers.
• Touch
Touch and release the touch screen to select
icon or picture.
• Touch the center of the icon.
• Touching the touch screen will not operate
while you are touching another part of the
touch screen.
• About the operation icons
These icons are used to switch the menu
and thumbnail display page, for item
selection and setting etc.
__:
Touch to return to the previous screen
such as when setting menus
• Do not touch on the LCD monitor with
hard pointed tips, such as ball point pens.
• Perform the touch screen calibration when
the touch is not recognized or wrong
location is recognized. (-,) 49)
<_Changethe modeto _ or O.
Rotate the LCD monitor towards
the lens side.
The image is horizontally flipped as if you
see a mirror image. (However the image
recorded is the same as a normal
recording.)
Only some indications will appear on the
screen. When _ appears, return the
direction of the LCD monitor to normal
position and check the warning/alarm
indication. (-> 125)
30
VQT2M51
Page 31

Setting date and time
When the unit is turned on for the first time, a message asking you to set the date and time
will appear.
Select [YES] and perform steps 2 to 3 below to set the date and time.
<_ Change the mode to _ or O.
1 Select the menu.
:[SETUP] _ [CLOCK SET]
2 Touch the date or time to be
set, then set the desired value
using [_/[_.
O Displaying the World time setting
(-> 44):
[HOME]/_l_ [DESTINATION]
• The year can be set between 2000 and
2039.
• The 12-hour system is used to display the
time.
The date and time function is driven by a
built-in lithium battery.
When this unit is purchased, the clock is
set. If the time display becomes [- -], the
built-in lithium battery needs to be
charged. To recharge the built-in lithium
battery, connect the AC adaptor or attach
the battery to this unit. Leave the unit as it
is for approx. 24 hours and the battery will
maintain the date and time for approx.
6 months. (The battery is still being
recharged even if the power is off.)
3 Touch [ENTER].
• The clock function starts at [00] seconds.
• A message prompting for World time
setting may be displayed, Perform the
World time setting by touching the screen.
(-) 44)
• Touch [EXIT] or press the MENU button to
complete the setting.
31
VQT2M51
Page 32

Before recording
• Basic camera positioning
O Q
-- O
O Hold the unit with both hands.
I_ Put your hand through the grip belt.
I_ It is convenient to use the Sub-recording Start/Stop button O when holding the unit at
waist level.
• When recording, make sure your footing is stable and there is no danger of colliding with
another person or object.
• When you are outdoors, record pictures with the sunlight behind you. If the subject is
backlit, it will become dark in the recording.
• Keep your arms near your body and separate your legs for better balance.
• Do not cover the microphones.
• Basic motion picture recording
• The unit should normally be held steady when recording.
• If you move the unit when recording, do so slowly, maintaining a constant speed.
• The zoom operation is useful for recording subjects you cannot get close to, but overuse of
zoom in and zoom out can make the resulting motion picture less enjoyable to watch.
32
VQT2M51
Page 33

Selecting a media to record
[HDC-TM55/HDC-TM60/HDC-HS60]
The card, built-in memory, and HDD media can be selected separately to record motion
pictures or still pictures.
1 Change the mode to _ or O •
2 Select the menu.
: [MEDIA SELECT] I
3 Touch the media to record motion pictures or still pictures.
[ HDC-TM55 }/[ HDC-TM60 }
O [VlDEO/SD CARD]
Q [VIDEO/Built-in Memory]
(_ [PICTURE/SD CARD]
_) [PICTU RE/Built-inMemory]
[VlDEO/SD CARD]
_) [VlDEO/HDD]
(_ [PICTURE/SD CARD]
• [PICTURE/HDD]
• The media is selected separately to motion pictures or still pictures is highlighted in yellow.
4 Touch [ENTER].
33
VQT2M51
Page 34

Recording motion
pictures
1 Change the mode to _ . 4==m=_
2 Open the LCD monitor. _=o
3 Press the recording start/stop
button to start recording.
O When you begin recording, II changes
to O.
4 Press the recording start/stop
button again to pause recording.
• Still pictures can be recorded while recording the motion picture. (-_ 37)
• The images recorded between pressing the recording start/stop button to start recording
and pressing it again to pause recording become one scene.
• Maximum number of recordable scenes: 3900
Maximum number of different dates: 200 (-) 82)
When either of them reaches to the maximum limit, additional scenes cannot be recorded.
(In the case of SD cards it is the maximum number of recordable scenes per card.)
• While recording is in progress, the recording will not stop even if the LCD monitor is closed.
34
VQT2M51
Page 35

• Screen indications in the Motion Picture Recording Mode
O Recording mode
Q Remaining time left for recording
Q
• They are not compatible with devices other than those that support AVCHD: Images
cannot be plaYed with equipment that does not SUpport AVCHD (ordinary DVD recorde[s).
Confirm that your equipment supports AVCHD by referring to the operating instructions.
• There are some cases where the recorded motion pictures cannot be played back, even
if the devic e supports AVCHD. In such cases, play the recorded motion picture with this
unit instead.
(When the remaining time is less than
1 minute, [R 0h00m] flashes red.)
(_ Recording time elapsed
Each time the unit is put into recording
pause, the counter display will be reset
to "0h00m00s".
35
VQT2M51
Page 36

1
Change the mode to O •
2
Open the LCD monitor.
3
Press the O button
halfway. (For Auto focus
only)
4
Press the _ button fully.
Focus indication:
Recording still pictures
o&
o&
O Focus indication
O (The white lamp flashes.):
Focusing
• (The green lamp lights up.):
When in focus
No mark:
When focusing is unsuccessful.
Q Focus area (area inside brackets)
• If you set the Optical image stabilizer function (-) 52) to [_i/((,_))1 (MODE1), then the
image Stabilizer function will be more effective. ( MEGA/ (MEGA Optical image Stabilizer)
will be displayed when the _ button is pressed halfway.)
• In dark environments, the video light will turn on.
• Focus indication will change to registered focus icon when [FACE RECOG.] is set to [ON].
(-) 64)
• Using a flash or tripod is recommended when recording still pictures in dark places
because the shutter speed becomes slow.
• The screen will become darker when the _ button is pressed halfway if the shutter
speed is 1/30 or slower.
36
VQT2M51
Page 37

• About the screen indications in
Still Picture Recording
O : Still picture operation indicator
(-) 123)
{: Flash (-,) 57)
: Flash level (-) 57)
@ : Red-eye reduction (-) 58)
iMEGA : MEGA optical image stabilizer
(-) 36)
_1 : Optical image stabilizer (-) 52)
__|!: Quality of still pictures (-,) 71 )
[] : Size of still pictures (-,) 70)
R3000: Remaining number of stiil pictures
(Flashes in red when [0] appears.)
AF_ : AF assist lamp (-,) 73)
• About the focus indication
• The focus indication indicates the status of
the Auto focus.
• The focus indication does not appear in
Manual Focus Mode.
• The focus indication does not appear or has
difficulty focusing in the following cases.
When close subjects and far subjects
are included in the same scene.
When the scene is dark.
When there is a bright part in the scene.
When the scene is filled with only
horizontal lines.
• About the focusing area
When there is a contrasting object ahead or
behind the subject in the focus area, the
subject may not be focused. If so, move the
contrasting object out of the focus area.
• Focus area is not displayed in the
following conditions.
When the Intelligent Auto Mode
(Portrait) is used.
When a zoom magnification of more
than approx. 25x is used.
When AF/AE tracking is used.
When the Extra optical zoom is used.
When it is judged that the video light is
required.
You can record still pictures even in Motion
Picture Recording Mode.
4_ Change the mode to _ .
Press the O button fully (press
to the bottom) to take the picture.
It is possible to record still pictures while
recording motion pictures. (Simultaneous
recording)
Built-in flash, Red-eye reduction,
Self-timer (-) 58) do not work.
While recording motion pictures or during
the PRE-REC operation, the following
arrangements are applied so that motion
picture recording takes preference over
still picture recording.
image quality is different from ordinary
still pictures.
The remaining usable capacity (number
of pictures that can be taken) indication
does not appear.
37
VQT2M51
Page 38

Intelligent Auto Mode
I VIDEOIIPHOTOJ
The following modes appropriate for the condition are set just by pointing the unit towhat you want to record.
Intelligent auto/Manual button
Press this button to switch Intelligent
• Please refer to page 74 for details about
Manua! Mode.
_3 Portrait When the object is a
)erson
Scenery Recording outdoors
Spotlight .1 Under a spotlight
_]_ Low light .1 Dark room or twilight it can record very clearly even in a dark
Night portrait .2 Recording night A subject and the background are
_ortrait recorded with near real-life brightness.
Night scenery .2 Recording night You can record night scenery vividly by
scenery slowing the shutter speed.
Macro .2 Recording zooming in This allows recording at very close
on a flower etc. proximity to the object of recording.
_/_ Normal Other situations Contrast is adjusted automatically for
"1 In Motion Picture Recording Mode only
*2 In Still Picture Recording Mode only
• Depending on the recording conditions, the unit may not enter the desired mode.
• In the Portrait mode, a subject that is bigger and close to center of the screen will be
surrounded by an orange frame. (-) 65)
• Using a tripod is recommended in Night Portrait and Night Scenery Mode.
• Optical Image Stabilizer Function (-,) 52) is set to Active Mode/ON in all modes.
• Faces cannot be detected depending on the recording conditions, such as when faces are
of certain sizes or at certain tilts or when digital zoom is used.
• The zoom microphone is set to [OFF] in the Intelligent Auto Mode. (-) 67)
Faces are detected and focused
automatically, and the brightness is
adjusted so it is recorded clearly.
The whole landscape will be recorded
vividly without whiting out the background
sky, which may be very bright.
Very bright object is recorded clearly.
room or twilight.
clear images.
38
VQT2M51
Page 39

• Intelligent Auto Mode
When switching to intelligent Auto Mode, the
Auto White Balance and Auto Focus operate
and automatically adjust the color balance
and focusing.
Depending on the brightness of the subject
etc., the aperture and shutter speed are
automatically adjusted for an optimum
brightness.
• Color balance and focus may not be
adjusted automatically depending on light
sources or scenes. If so, manually adjust
these settings. (-) 75, 77)
Automatic white balance
The illustration shows the range over which
Automatic white balance functions.
10®_ 2)
_®_ 4)
-- 6)._
_8_ -- 7) I_. _
Auto focus
The unit focuses automatically.
• Auto focus does not work correctly in the
following situations. Record pictures in the
Manual Focus Mode. (-) 77)
Recording distant and close-up objects
at the same time
Recording a subject behind a dirty or
dusty window
Recording a subject that is surrounded
by objects with glossy surfaces or by
highly reflective objects
For details on Scene Mode, refer to page 60.
For how to set Manual Focus/White Balance
manually, refer to page 74-77.
1) The effective range of Automatic white
balance adjustment on this unit
2) Blue sky
3) Cloudy sky (rain)
4) TV screen
5) Sunlight
6) White fluorescent lamp
7) Halogen light bulb
8) Incandescent light bulb
9) Sunrise or sunset
10) Candlelight
If the Automatic White Balance is not
functioning normally, adjust the white
balance manually. (,-) 75)
39
VQT2M51
Page 40

Motion picture/Still
picture playback
IVIDEOIIPHOTO[
1 Change the mode to _.
2 Touch the play mode select icon O.
3 Touch the desired media to be played back motion pictures or still
pictures.
l HDC-SD60 }
O [VIDEO/SD CARD]
@ [PICTURE/SD CARD]
I HDC-TM55 }/( HDC-TM60 }
40
VQT2M51
[VlDEO/SD CARD]
[VIDEO/Built-in Memory]
[PICTURE/SD CARD]
[PICTU RE/Built-inMemory]
[VIDEO/SD CARD]
t_ [VIDEO/HDD]
0 [PICTURE/SD CARD]
I_1 [PICTURE/HDD]
Page 41

4 Touch the scene or the still picture to be
played back.
• Next (previous) page can be displayed by touching
5
Select the playback operation by touching the operation icon.
O Operation icon
• Touch _ / _ to display/not-display the operation
icon.
Motion picture playback Still picture playback
1_/I I: Playback/Pause
,4: Rewind playback
1_1_: Fast forward playback
I: Stops the playback and shows
the thumbnails.
1_: Displays the direct playback
bar. (-_ 79)
1_/11:
Slide show (playback of the still
pictures in numerical order)
start/pause.
,II:
Plays back the previous picture.
III_:
Plays back the next picture.
I:
Stops the playback and shows
the thumbnails.
41
VQT2M51
Page 42

• Change the thumbnail display
While the thumbnail is displayed, the
thumbnail display changes in the following
order if the zoom lever or adjust zoom
buttons are operated to Q, side or _ side.
20 scenes _ 9 scenes _ 1 scene
H Highlight&Time frame index* (-) 80)
VOL
X_ .i._
• Speaker volume adjustment
Operate the volume lever or the adjust zoom
buttons to adjust the speaker volume during
motion picture playback.
<NIIIIIIII
w T
W T
* Highlight&Time frame index can only set
in Motion Picture Playback Mode.
• 9 scenes display returns if the power is
turned off or the mode is changed.
• When the thumbnail display is changed to
1 scene during motion picture playback,
the recording date and time can be
checked. Similarly, when the thumbnail
display is changed to 1 still picture during
still picture playback, the recording date
and file number can be checked.
Towards "+":
Increases the volume
Towards "--""
Decreases the volume
• Sound will be heard only during normal
playback.
• If pause play is continued for 5 minutes,
the screen returns to the thumbnails.
• The elapsed time for playback indication
will be reset to "0h00m00s" for each
scene.
Motion picture compatibility
• This unit is based on the AVCHD format.
• The video signal that can be played back on this unit is 1920x t080/6gi. 1920X1080J
24p or 1440X 1080/6gi.
• This unit may degrade or not play back motion pictures recorded or created on other
products, and other products may degrade or not play back motion pictures recorded on
this unit. even if the products support AVCHD.
Still picture compatibility
• This unit is compliant with the unified standard DCF (Design "ule for Camera File
system) established by JEITA (Japan Electronics and Information Technology Industries
Association).
• The file format of still pictures supported by this unit is JPEG. (Not all JPEG formatted
files will be played back.)
• This unit may degrade or not play back still pictures recorded or created on other
products and other products may degrade or not play back still pictures recorded on this
unit.
42
VQT2M51
Page 43

Using the menu screen
1 Pressthe MENU button. 4
2 Touch the top menu O.
3 Touch the submenu O.
• Next (previous) page can be displayed by
touching _L}/[_ .
Touch the desired item to enter
the setting.
5 Touch [EXIT] or press the
MENU button to exit the menu
setting.
• About _ guide display
After touching _, touching the submenus
and items will cause function descriptions
and settings confirmation messages to
appear.
• After the messages have been displayed,
the guide display is canceled.
43
VQT2M51
Page 44

Using the Setup Menu
• The items displayed differ depending on the position or settings of the mode switch.
Select the menu,
: [SETUP] _ desired setting I
The screen indications are selected as
shown in the illustration.
Please refer to page 95.
Please refer to page 31.
It is possible to display and record the time at the travel destination by selecting your home
region and the travel destination.
1 Touch [SET WORLD TIME].
• If the clock is not set, adjust the clock to the current time. (-> 31 )
• When the [HOME] (your home region) is not set, the message appears. Touch [ENTER]
and proceed to Step 3.
2 (Only when setting your home region)
Touch [HOME].
• Touch [ENTER].
3 (Only when setting your home region)
Touch _/[_ to select your home @
region and touch [ENTER].
• Touch [SUMMER TIME SET] to set daylight
saving time. (_ appears and the _)
summer time setting is turned on; the time
difference from GMT is set forward by one O The current time
hour. Touch [SUMMER TIME SET] again to Q The time difference from GMT
return to the normal time setting. (Greenwich Mean Time)
[OFF] [ON]
[_B BH ,el ] ITa_ |H OhOOmO0_[_7 _ _,_
1
NOV152010
I
44
VQT2M51
Page 45

4 (Onlywhensettingtheregionofyourtraveldestination)
Touch[DESTINATION].
• Touch [ENTER].
• When the home region is set for the first time, the screen for selecting home/travel
destination appears after setting the home region successively. If the home region has
already been set once, execute the menu operation for Step 1.
5 (Only when setting the region of your travel
destination)
Touch [_/[_ to select your travel
destination and touch [ENTER].
• Touch [SUMMER TIME SET] to set daylight
saving time. _ appears and the
summer time setting is turned on. The
clock and time difference from the home
region time are set forward by one hour.
Touch [SUMMER TIME SET] again to return
to the normal time setting.
• Close the setting by pressing the MENU
button. _ appears and the time of the
travel destination is indicated.
To return the display to the home setting
Set the home region using Step 1 to 3, and close the setting by touching [EXIT] or pressing
the MENU button.
• If you cannot find your travel destination in the area shown on the screen, set it by using
the time difference from your home region.
It is possible to change the date and time display mode.
The local time at the selected
travel destination
(_) The time difference between the
travel destination and the home
region
It is possible to change the date format.
When about 5 minutes have passed without any operation, this unit automatically turns off to
save battery life.
• The Power Save Function will not activate when:
connected to AC adaptor
using the USB cable for PC, DVD burner etc.
PRE-REC is used
VQT2M51
45
Page 46

Theunitisputintorecordingpauseapprox.1secondwhenthepoweristurnedonwiththe
modesetto_ orO.
• Dependingontherecordingconditions,starttimemaybelongerthan1secondinStill
PictureRecordingMode.
• IntheQuickpoweronmode,thezoommagnificationbecomes1×.
Thisunitisputintorecordingpauseapprox.0.6secondsaftertheLCDmonitorisreopened.
• When in Quick start standby mode about 80% of the power used in Recording pause
mode is being consumed, so the recording time will be reduced,
• Start time will not shorten if there is no SD card inserted.
Start time will be shortened if the [Built-inMemory] is selected in the [MEDIA SELECT],
even if there is no SD card inserted.
Start time will be shortened if the [HDD] is selected in the [MEDIA SELECT], even if there
is no SD card inserted.
• Change the mode to _ or O.
1 Set [QUICK START] to [ON].
2 Close the LCD monitor while the mode is set
to _ or _. O
The status indicator O flashes green and the unit goes
into Quick start standby mode.
• The lens cover does not close.
3 Open the LCD monitor.
The status indicator O lights red and the unit is put into
recording pause.
O
• Quick start standby mode is canceled if
about 5 minutes have elapsed
mode is set to []
• Depending on the recording conditions, time for Quick Start may be more than 0.6 seconds
slower in Still Picture Recording Mode.
• It may take some time for Automatic white balance to adjust.
• In the Quick Start Mode, the zoom magnification becomes 1×.
• If [ECONOMY] (-) 45) is set to [5 MINUTES] and the unit automatically goes into Quick
Start Standby Mode, close the LCD monitor and then open it again.
• Turn the unit off using the power button.
46
VQT2M51
Page 47

Touchscreenoperation,startingandstoppingofrecordingandpoweron/offcanbe
confirmedwith this sound.
u:[]) (Volume low)/u_]))) (Volume high)
2 Beeps for 4 times
When an error occurs. Check the sentence displayed on the screen. (,-) 125)
This makes it easier to view the LCD monitor in bright places including outdoors.
• These settings will not affect the images actually recorded.
F_ (Makes even brighter)/F_ (Makes brighter)/0_ (Normal)/_ (Makes less bright)/
A_ *(Automatic adjustment)
* It is not displayed in the Manual Mode or in the Playback Mode.
• When the AC adaptor is in use, the LCD monitor is set to F_ automatically.
• The recordable time will become shorter when you use this unit with the LCD monitor lit up.
It adjusts brightness and color density on the LCD monitor.
• These settings will not affect the images actually recorded.
1 Touch [LCD SET].
2 Touch the desired setting item.
[BRIGHTNESS]:
Brightness of the LCD monitor
[COLOR]:
Color level of the LCD monitor
3 Touch [_/[_ to adjust settings.
4 Touch [ENTER].
• Touch [EXIT] or press the MENU button to exit the menu
screen.
Please refer to page 96.
Please refer to page 96.
Please refer to page 96.
Please refer to page 97.
47
VQT2M51
Page 48

Pleaserefertopage95.
Setto[YES]forchangingthemenusettingsbacktothedefaultcondition.
• Settings for [MEDIA SELECT]*, [CLOCK SET] and [LANGUAGE] will not be changed.
* For users who have [ HDC-SD60 ), this menu is not displayed.
Please be aware that if a medium is formatted, then all the data recorded on the medium will be
erased and cannot be restored. Back up important data on a PC, DVD disc etc. (-_ 101, 109)
• When formatting is complete, touch [EXIT] to exit the message screen.
• Perform a physical formatting of the SD card when the SD card is to be disposed/
transferred. (-_ 137)
• Do not turn this unit off or remove the SD card, while formatting. Do not expose the unit to
vibrations or shock.
Use this unit to format media.
Do not format an SD card using any other equipment such as a PC. The card may
not be used on this unit.
Please be aware that if a medium is formatted, then all the data recorded on the medium will be
erased and cannot be restored. Back up important data on a PC, DVD disc etc. (-_ 101, 109)
1 Touch [FORMAT MEDIA].
2 [ HDC=TM55 }/I HDC=TM60 }
Touch [SD CARD] or Touch [SD CARD] or [HDD].
[Built-inMemory].
• When formatting is complete, touch [EXIT] to exit the message screen.
• Perform a physical formatting of the SD card when the SD card is to be disposed/
transferred. (-_ 137)
• Perform a physical formatting of the built-in memory/HDD when this unit is to be disposed/
transferred. (-_ 134)
• Do not turn this unit off or remove the SD card, while formatting. Do not expose the unit to
vibrations or shock.
Use this unit to format media.
Formatting built-in memory or HDD is only available with this unit.
Do not format an SD card using any other equipment such as a PC. The card may
not be used on this unit.
48
VQT2M51
Page 49

TheamountofspaceleftontheSDcardcanbechecked.
(Onlywhenthemodeisatthe[_ position)
• Touch[EXIT]orpresstheMENUbuttontoclosetheindication.
TheamountofspaceleftontheSDcard,thebuilt-inmemoryandHDDcanbechecked.
(Onlywhenthemodeisatthe[] position)
• Touching[CHANGEMEDIA]switchestheunitbetweenthedisplayfortheSDcardandthe
displayforthebuilt-inmemory/HDD.
• Touch[EXIT]orpresstheMENUbuttontoclosetheindication.
• TheSDcard,built-inmemoryorbuilt-inHDDrequiressomespacetostoreinformationand
managesystemfiles,sotheactualusablespaceisslightlylessthantheindicatedvalue.
Theusablebuilt-inmemory/HDDspaceisgenerallycalculatedas1GB=1,000,000,000
bytes.Thecapacitiesofthisunit,PCsandsoftwareareexpressedas
1GB=1,024×1,024×1,024=1,073,741,824bytes.Therefore,theindicatedvalueofthe
capacityappearstobesmaller.
Perform the touch screen calibration if a different object to the one touched is selected.
1 Touch [CALIBRATION].
• Touch [ENTER].
2 Touch the [+] that appears on the screen with the supplied stylus pen.
• Touch [÷] in sequence (up left _ down left _ down right _ up right _ center).
3 Touch [ENTER].
• Calibration cannot be performed when the LCD monitor is turned 180 °.
49
VQT2M51
Page 50

Thisitemisusedtostarttheunitdemonstration.
(Only when the mode is at the _ or 0 position)
[ HDC-SD60 )
If [DEMO MODE] is switched to [ON] when there is no SD card inserted, the demonstration
automatically starts.
[ HD C-TM 55 ] / _ / f_"_m_el
If [DEMO MODE] is switched to [ON] when there is no SD card inserted and while this unit is
connected to the AC adaptor, the demonstration automatically starts.
If any operation takes place, the demonstration is canceled. However if no operations take
place for approx. 10 minutes, the demonstration automatically starts again. To stop the
demonstration, set [DEMO MODE] to [OFF] or insert an SD card.
This item is used to start the Optical Image Stabilizer demo.
(Only when the mode is at the _ or 0 position)
Touch [O.l.S. DEMO], the demonstration automatically starts.
When you touch [EXIT], the demonstration will be canceled.
You can select the language on the screen display and the menu screen.
50
VQT2M51
Page 51

Zoom in/out function
The maximum optical zoom ratio is 25x.
The default setting of the [ZOOM MODE] is [i.Zoom 35x]. It can be extended to a maximum
of 35x during Motion Picture Recording Mode. (-) 61 )
4_ Change the mode to _ or O.
Zoom lever/Adjust zoom buttons
T side:
w T
If the number of the recording pixels is set to anything other than the maximum number of
recording pixels in Still Picture Recording Mode, the still picture can be recorded with a zoom
ratio of a maximum of 50x without degrading the picture quality.
• Extra optical zoom ratio varies depending on the setting of [PICTURE SIZE] and [ASPECT
RATIO]. (-) 70, 71)
• Extra optical zoom mechanism
When you set the picture size to [], the maximum [] area is cropped to the center []
area, allowing a picture with a higher zoom effect.
Close-up recording (zoom in)
W side:
Wide-angle recording (zoom out)
• The zoom speed varies depending on the
range over which the zoom lever is moved.
• The adjust zoom buttons are useful for
making fine adjustments to the zoom
magnification.
• If you take your finger off the zoom lever during zoom operation, the operation sound may
be recorded. When returning the zoom lever to the original position, move it quietly.
• When the zoom magnification is 25x, the subjects are focused at approx. 1.5 m (4.9 feet)
or more.
• When the zoom magnification is 1x, this unit can focus on a subject approx. 4 cm (1.6")
away from the lens.
• The zoom speed does not vary when operating with the adjust zoom buttons.
VQT2M51
51
Page 52

Optical Image Stabilizer
Function
I VIDEOIIPHOTOI
Optical Image Stabilizer can stabilize the image without decreasing the image quality as
much.
4_ Change the mode to _ or O,
0.1.s.
Optical image stabilizer button
Pressing the button changes the Optical
image stabilizer setting,
(Motion Picture Recording Mode)
[_ _ ((_)) _ OFF
(Still Picture Record ing Mode)
_1/_2 _ €(_111/€(_2_ OFF
• Switch to Manual Mode before setting the
Optical image stabilizer function to off.
: Active mode
This setting gives more stabilization ana is
suitable for recording when walking.
((_)) : ON
This setting is suitable for recording n a stable
state such as scenery. We recommend
recording with a tripod in Motion Picture
Recording Mode.
• Changing the Optical Image Stabilizer Function when in Still Picture
Recording Mode
: [RECORD SETUP] _ [O.I.S.] _ [MODE1] or [MODE2]
[MODE1]:
The function works all the time.
[MODE2]:
The function works when the I!_ button is pressed. We recommend you are recording
yourself or recording with a tripod in Still Picture Recording Mode.
• When in [MODE1], _1/(1_))1 appears. When in [MODE2], _2/€(_))2 appears.
I
• Stabilization may not be possible under strong shaking conditions.
52
VQT2M51
Page 53

AF/AE tracking
I VIDEOIIPHOTOI
It is possible to set the focus and exposure to the subject specified on the touch screen.
The focus and exposure will keep following the subject automatically even if it moves.
(Dynamic tracking)
4_ Change the mode to _ or O • 3 Start recording.
.t Touch _. • When you touch [RETURN], the tracking
• _ will be displayed on the screen.
• When [FACE RECOG.] (-) 62) is [ON] and
a registered face is detected, the target is
automatically locked.
2 Touch the object and lock the
target.
O Target frame
• When you touch the head of the object,
the target frame on the head gets locked
and tracking starts.
• Touch the object to be changed again
when you want to change the target.
• When the intelligent Auto Mode is
selected, the setting becomes
(Normal) and touched object is tracked.
Selection becomes _ (Portrait) when
target frame is locked on a face. (It may
turn to _ (Normal) even if the target is
locked on the face when a spotlight is
shining or with a dark scene.)
function will be canceled.
• About target flame
• When target lock fails, the target frame
blinks in red and then disappears. Touch a
characteristic part (color etc.) on the object
to lock onto it again.
• When the O button is pressed halfway
in Still Picture Recording Mode, the focus
is set to the object that is locked. The
target frame turns green when it focuses,
and the target cannot be changed.
• It may track different objects or may not
lock the target depending on the recording
conditions such as the following:
When the object is too large or too small
When color of the object is similar to the
background
When the scene is dark
• When the target is locked in Still Picture
Recording Mode, the screen may become
dark or the video light may turn on.
• AF/AE tracking will be canceled in the
following cases.
When the mode is changed
When the power is turned off
When the Scene mode is set
Switch to Intelligent Auto Mode/Manual
Mode
Switch to recording of yourself.
• After setting [DISPLAY] to [OFF] if no
operation is performed for a few seconds,
the operation icon disappears. Touch the
screen to display the icon again. When the
AF/AE tracking is used, the icon does not
disappear.
53
VQT2M51
Page 54

Recording with the video
light
I VIDEOIIPHOTOi
The video light enables brightening of the images taken in a dimly-lit place.
(_ Change the mode to _ or I1_.
Video light button
Each time the button is pressed, the
indication changes by one setting in the
following order.
_ _IDA/IDA _ Setting canceled
Always on
_l])A / IDA :
Turns on!off automatically according to
brightness of the surroundings.
• When set to _IDA / IDA, the video light turns on in Low Light Mode in Intelligent Auto Mode.
• When the video light is in use, the recordable time when using the battery is shortened.
• The subject should be within 1.5 m (4.9 feet) of the unit.
• Using the Color Night Rec Function at the same time will make conditions even brighter.
• If you turn off the power or change the mode to [] , the video light is turned off.
• If the AF assist lamp is set to [AUTO] (-_ 73) and the video light is set to _IDA / IDA or OFF,
the video light will turn on when taking pictures in a dark place to make the focusing easier.
• Set the video light to off at places where using a light is prohibited.
54
VQT2M51
Page 55

Recording functions of
operation icons
Select the operation icons to add different effects to the images to be recorded.
4_ Change the mode to _ or O.
1 Touch _ to display the 2 (e.g.Backlightcompensation)
operation icons on the screen. Select an operation icon.
• Touch • at the bottom right of the screen
to change the page and touch _ / _ to
display/not-display the operation icon.
Fade .1
intelligent contrast control .I, 2
PRE4_ECPRE-REC .I
Smile Shot .1
Built-in flash .3
@ Red-Eye Reduction .2, 3
Self-timer .3
i(_ intelligent exposure .2, 3
Backlight compensation
(_ Soft skin mode .2
(_) Tele macro
[] Guideline
_,_ Color Night Rec .1' 2
• Select the operation icon again to cancel
the function.
• Refer to the respective pages for
canceling the following functions.
Smile Shot (-) 57)
Built-in flash (-) 57)
Self-timer (-) 58)
"1 Not displayed in Still Picture Recording
Mode.
*2 Not displayed in the Intelligent Auto
Mode.
*3 Not displayed in Motion Picture
Recording Mode.
• If you turn off the power or change the
mode to [], PRE-REC, Color Night
Rec, Backlight compensation, Self-timer
and Tele macro functions are canceled.
• If you turn off the power, the Fade function
is canceled.
• It is possible to set from the menu.
(Except for the PRE-REC and turning
Guideline on/off.)
• After setting [DISPLAY] to [OFF] if no
operation is performed for a few seconds,
the operation icon disappears. Touch the
screen to display the icon again.
55
VQT2M51
Page 56

Fade
When you start recording, the image/audio gradually
appears. (Fade in) (Fade in)
When you pause recording, the image/audio gradually
disappears. (Fade out)
• The Fade setting is canceled when the recording stops.
• To select the color for Fade in/out
: [RECORD SETUP] _ [FADE COLOR]
[WHITE] or [BLACK]
• The thumbnails of scenes recorded using fade in become black (or white).
(Fade out)
Intelligent €ontrast €Ontrol
This brightens parts that are in shadow and difficult to see and suppresses white saturation
in bright parts at the same time. Both bright and dark parts can be recorded clearly.
• If there are extremely dark or bright parts or the brightness is insufficient, the effect may not
be clear.
This allows recording of the pictures and sound to start approximately 3 seconds
before the recording start/stop button is pressed,
• PRE[REC]appears on the screen.
• Aim the unit at the subject beforehand.
• There is no beep sound.
• PRE-REC is canceled in the following cases.
If you change the mode.
If you remove the SD card while [MEDIA SELECT] is set to [VIDEO/SD CARD].
If you press the MENU button.
If you turn the unit off.
If you start recording.
After 3 hours have passed
• After setting PRE-REC, if recording starts in less than 3 seconds, or while the PRE-REC
indication flashes within about 3 seconds after initiating the Quick start operation, motion
pictures taken 3 seconds before pressing the recording start/stop button cannot be recorded.
• images displayed on the thumbnail in Playback Mode will differ from the motion pictures
displayed at the start of playback.
56
VQT2M51
Page 57

Whenasmiling face is detected during motion picture recording, the unit
automatically records a still picture.
The icon changes each time it is touched.
_] (ON) _ _ (Face Recognition) _ OFF
: The unit records a still picture on detecting a smiling face.
_ : Still pictures are only recorded when the face of a person registered using Face
Recognition (-> 62) is detected.
OFF: Cancel the setting.
• During Smile Shot recording, {_]/_ are red and the face detected as a smiling face is
surrounded by a green frame.
• _J_ does not function when [FACE RECOG.] is [OFF] or no one is registered.
• The face of the subject may not be detected correctly depending on the recording
conditions.
• The number of recording pixels are _ (2816 x 1584) or _ (1920 × 1080). (-> 70)
• When still pictures that have been recorded using the Smile Shot are displayed as
thumbnails, the _] appears.
• When the AF/AE tracking function is target locking a face of the subject, still pictures are
only recorded if a smiling face is detected on the locked subject. When the Smile Shot
function is set to _-" (Face Recognition), it will record only if the face of a subject
registered with [FACE RECOG.] is locked as a target.
When the O button is pressed, the flash is activated and the picture will be
recorded. Use the Built-in flash in order to record still pictures in dark places.
Each time the { icon is selected, the indication changes by one setting in the following order:
([ON]) _ {A ([AUTO]) _ (_ ([OFF])
• When the O button is pressed halfway, the flash indicator will appear.
• The unit automatically determines if the flash is necessary even when it has been set to
(_ by detecting the ambient brightness. (If it determines that the flash is necessary, the
indication lights up in red when the _ button is pressed halfway.)
• To adjust the brightness of the flash
: [PICTURE] _ [FLASH LEVEL] _ desired setting
[{ ]: Less bright
[_ +0]: Normal
[{+]: Much brighter
• Set the flash to (_) where using a flash is
prohibited.
• If the { indication etc. flashes when the
button is pressed halfway, the flash
is not activated.
• The available range of the flash is approx.
1 m to 2.5 m (3.3 feet to 8.2 feet) in dark
places.
• Using the flash fixes a shutter speed to
1/500 or slower.
57
VQT2M51
Page 58

Reduces the phenomena where human eyes become red from flashes.
• The flash is activated 2 times.
• The red-eye phenomenon tends to appear in certain recording conditions and more with
some people than with others.
• When faces are detected in the Intelligent Auto Mode, the Red-Eye Reduction is set to on.
This is for recording still pictures using the timer.
Each time the _ icon is selected, the indication changes by one setting in the following
order:
_)10 (Records after 10 seconds) _ _)2 (Records after 2 seconds) _ setting canceled
• When you press the O button, _)10 or _)2 flashes for the set period before a still picture
is recorded. After recording, the Self-timer is canceled.
• In Auto Focus Mode, if the O button is pressed halfway once and then fully, the lens
focuses on the subject when the button is pressed halfway. If the _ button is pressed
fully all at once, the lens focuses on the subject just before recording.
To stop the timer midway through
Press the MENU button.
• Setting the Self-timer to b_)2is a good way to prevent image shake when the _ button is
pressed while using a tripod etc.
This brightens dark areas so the image can be recorded clearly.
• If there are extremely dark parts or the brightness is insufficient, the effect may not be clear.
Backlight compensation
This makes the image brighter to prevent darkening of a backlit subject.
_ Soft skin mode
This makes skin colors appear softer for a more attractive appearance.
This is more effective if you record a person closely from the torso up.
• If the background or anything else in the scene has colors similar to the skin color, they will
also be smoothed.
• If the brightness is insufficient, the effect may not be clear.
• If you record a person in the distance, the face may not be recorded clearly. In this case,
cancel Soft Skin Mode or zoom in on the face (close-up) to record.
58
VQT2M51
Page 59

Tele macro
A more impressive image can be obtained by focusing on the object only in close-up
and shading off the background.
• The unit can focus on the subject at a distance of approx. 70 cm (28").
• if the magnification is 25× or less, then it is automatically set to 25×.
• Tele Macro Function is canceled when the zoom magnification becomes lower than 25x.
[] Guideline
You can check if the image is level while recording or playing back motion pictures
and still pictures. The function can also be used to estimate the balance of the
composition.
• The guidelines do not appear on the images actually recorded.
• Selecting the type of Guideline
: [RECORD SETUP] _ [GUIDE LINES] _ desired setting
[]
• Displaying Guidelines at playback
• Change the mode to [] .
: [VIDEO SETUP] _ [GUIDE LINES] _ desired setting
• To cancel the Guideline function during playback, set to [OFF].
Color Night Rec
This function allows you to record color images in very low light situations. (Minimum
required illumination: approx. I Ix)
• Recorded scene is seen as if frames were missed.
• if set in a bright place, the screen may become washed out for a while.
• Bright dots that are usually invisible may be seen, but this is not a malfunction.
• Using a tripod is recommended.
• in darker areas, Auto Focus may focus a bit slower. This is normal.
59
VQT2M51
Page 60

Recording functions of
menus
[SCENE MODE] _
When you record images in different situations, this mode automatically sets optimum shutter
speeds and apertures.
• Change the mode to _ or O.
: [RECORD SETUP] _ [SCENE MODE] _ desired setting I
[OFF]: Cancel the setting
t_ Sports: To make fast moving scenes less shaky with slow playback
Portrait: To make people stand out against the background
Spotlight: Improved quality when subject is brightly illuminated.
Snow: Improved image quality when shooting in snowy locations.
_=, Beach: To make blue in the sea or sky vibrant
_- Sunset: To make red in the sunnse or sunset vibrant
..,_: Fireworks. To capture the fireworks in the night sky beautifully
Scenery: For spatial scenery
Low light: For dark scenes, such as at dusk
Night scenery: To capture the evening or night scenery beautifully.
m Night portrait: To capture a person and the background bnghtly.
and pause of playback
(In Motion Picture Recording Mode only)
(In Still Picture Recording Mode only)
• (SportslPortraitlSpotlightlSnowlBeachl
Sunset/Scenery)
The shutter speed is 1/8 or more in Still
Picture Recording Mode.
• (Sunset/Low light)
The shutter speed is 1/30 or more in
Motion Picture Recording Mode.
• (SunsetlFireworkslScenerylNight scenery)
Image may get blurry when a close
object is recorded.
• (Sports)
During normal playback, the image
movement may not look smooth.
Color and screen brightness may
change under indoor lighting.
If the brightness is insufficient, the
Sports mode does not function. The
,_ display flashes.
60
VQT2M51
• (Portrait)
Color and screen brightness may
change under indoor lighting.
• (Fireworks)
The shutter speed is 1/30.
image may get washed out when
recorded in bright surroundings.
• (Night scenery/Night portrait)
The shutter speed is 1/2 or more in Still
Picture Recording Mode.
Using a tripod is recommended.
• (Night portrait)
The flash is set to [ON].
Page 61

[ZOOM MODE] _
Set the maximum zoom ratio for the Motion Picture Recording Mode.
• Change the mode to
: [RECORD SETUP] _ [ZOOM MODE] _ desired setting I
[Opt.Zoom 25X]: Optical zoorn (Up to 25×)
[LZoom 35x]: This zoom function allows youto maintain high,definition
[D.Zoom 1500x]: Digital zoom (Up to 1500X)
• The larger the digital zoom magnification, the more the image quality is degraded.
•!_ •
[REC MODE]
Switch the picture quality of the motion pictures to be recorded.
• Change the mode to _ .
: [RECORD SETUP] _ [REC MODE] _ desired setting I
O Favors image quality
Q Favors recording time
• Recordable time using the battery (-_ 24)
• This function's default setting is HG mode.
• Please refer to page 140 for details about approximate recordable time.
• When the unit is moved a lot or moved quickly, or when a fast-moving subject is recorded
(particularly when recording in HE mode), mosaic-type noise may appear at playback.
I
61
VQT2M51
Page 62

HDC-TM55/ HDC-TM60
It is possible to continuously record motion picture to an SD card when there is no space
available in the built-in memory. (It allows you to record only to SD card from built-in memory.)
• Change the mode to
: [RECORD SETUP] _ [RELAY REC] _ [ON] I
• _> [_] is displayed on the screen. E> I_ will disappear when space in the built-in memory is
gone and the recording to the SD card starts.
• Relay recording can only be performed once.
• Combine the scenes that were relay-recorded using the [RELAY SCENE COMBINE]
into the SD card. (-_ 92, 99)
• Once you have performed [RELAY SCENE COMBINE], you can use the Relay Recording
function again. If the [RELAY REC] is set to [ON] without performing the [RELAY SCENE
COMBINE], a message is displayed. You will be able to perform Relay Recording by
touching [YES], but you will not be able to perform the [RELAY SCENE COMBINE] after
that.
• Still pictures are recorded to the SD card after Relay recording.
• _ is displayed on the thumbnail display during the playback of a scene that was relay-
recorded on the built-in memory.
[FACE RECOG.] _
Face Recognition is a function for finding faces that resemble faces which have already been
registered and automatically prioritizing focus and exposure for those faces. This function
makes it possible to keep the face of your loved ones in focus even when they are at the
back or on the end of a line in a group picture.
• Change the mode to _ or O.
: [RECORD SETUP] _ [FACE RECOG.] _ desired setting I
.
I
[OFF]: The Face Recognition function isnot available.
[ON]: The Face Recognition function is available:
[SET]: Face Recognition registration/editing/cancellation.
62
VQT2M51
Page 63

• Registering a face for face recognition
[RECORD SETUP] _ [FACE RECOG.] _ [SET] _ [SAVE]
• Up to a maximum of 6 people can be registered.
1 Align the person's face with the guide.
• Take a picture of the persons face from the front,
ensuring that their hair does not hide the outline of
their face, their eyes or their eyebrows.
2 Touch [REC] or press the O button fully.
• Touch [ENTER].
• It may not be possible to register a face depending
on the recording conditions. In this case, try
recording the face again.
3 Entering the person's name.
• Touch the text entry icon in the center of the screen
and enter the name.
• After entering the name, touch [Enter].
Entering text
[A] etc. Enters a character.
[_) Moves cursor left.
[_ Moves cursor right.
[A/a] Switches between [A]/[a] (alphabet) and [&/1] (symbols/numbers).
Deletes a character.
[Delete] Deletes the previous character if the cursor is in an empty space.
[Enter] Ends text entry.
A maximum of 9 characters can be entered.
4 Touch [ENTER] to end registration,
• Touch [EXIT].
O Guide
Q Text entry icon
I
63
VQT2M51
Page 64

• Changing the information of a registered person
1 Select the menu.
[RECORD SETUP] _ [FACE RECOG.] _ [SET] _ [EDIT]
2 Touch the desired item to enter the setting.
• Up to 3 face shots can be registered. To additionally register
or to change/delete the registered face shots, touch [] or
the face shot.
[SET NAME]:
Change the name.
[PRIORITY]:
Focus and exposure will be set in priority according to the
registration order setting from the first person. Target will be
locked according to the registration order setting from the first
person when AF/AE tracking is active.
• Touch the face shot of the person you wish to promote in the
registration order. This will promote the person forward in the
order,
[FOCUS ICON]:
This changes the focus indication icon that appears during still
picture recording. (Only displayed when Face Recognition is in
use.)
• Touch the icon you wish to have displayed.
3 Touch [ENTER].
• Canceling a registered person
1 Select the menu.
[RECORD SETUP] _ [FACE RECOG.] _ [SET] _ [DELETE] or [DELETE ALL]
• Touching [DELETE ALL] cancels all the registered people.
2 (Only when [DELETE] is selected)
Touch the person to cancel.
• When touched, the person is selected and surrounded by orange. Touch the person again
to cancel the operation.
• Touch [ENTER].
I
I
• Since face recognition searches for faces that resemble the registered faces, there is no
guarantee of positive recognition.
• It may not be possible to correctly recognize a person who has been registered due to
differences in facial expression and environment.
• Perform the registration again if recognition becomes unstable in cases such as when
facial features change with age.
64
VQT2M51
Page 65

Whenaregisteredpersonisdetectedbyfacerecognitionduringrecording,thename
registeredforthatpersonisdisplayed.
• Change the mode to _ or O.
: [RECORD SETUP] _ [NAME DISPLAY] _ desired number I
[0FF]111]112]113]
• Displayed name will disappear after a while.
• It is displayed according to the registration order setting from the first person.
• This function is not displayed during recording of yourself or Playback Mode.
[FACE FRAMING] _
Detected faces appear with frames.
• Change the mode to _ or O.
: [RECORD SETUP] _ [FACE FRAMING] _ desired setting I
cancel the setting.
[PRIMARY]:
Only the prioritized face framing is displayed:
[ALL]
All face detection framings are disp!ayed,
• Up to 15 frames are indicated. Larger faces and faces nearer to the center of the screen
take preference over others. When [FACE RECOG.] is [ON], registered people are given
priority.
• Prioritized face framing
Prioritized face framing is displayed in orange. Focus and adjustment of brightness will be
performed against the prioritized face framing.
• Prioritized face framing is only displayed in Intelligent Auto Mode.
• Focus will be set to prioritized face framing when the I_ button is pressed halfway when
recording still pictures. Prioritized face framing will turn to green when the focus is set.
I
65
VQT2M51
Page 66

[AGS]
If the unit continues to be tilted upside down from the normal horizontal position while
recording motion pictures, it is automatically put into recording pause.
• Change the mode to N
: [RECORD SETUP] _ lAGS] _ [ON]
• The AGS function may activate and cause the unit to pause the recording if you are
recording a subject right above or right below you.
.
[AUTO SLOW SHTR] _
You can record bright pictures even in dark places by slowing the shutter speed.
• Change the mode to
• Switch to Manual Mode. (-> 74)
: [RECORD SETUP] _ [AUTO SLOW SHTR] _ [ON]
• The shutter speed is set to 1/30 or more depending on the surrounding brightness.
• This function cannot be used in Still Picture Recording Mode.
• When the shutter speed becomes 1/30, the screen may be seen as if frames are missed
and afterimages may appear.
.
[Digital Cinema Color]
Recording motion pictures with more vivid colors, using x.v.Color TM technology.
• Change the mode to
• Switch to Manual Mode. (-> 74)
.
: [RECORD SETUP] _ [Digital Cinema Color] _ [ON]
• For more realistic colors, use an HDMI mini cable with a TV that supports the x.v.Color TM.
• This function cannot be used when switched to Intelligent Auto Mode.
• When motion pictures recorded while this function is turned [ON] are played back
with a TV not compatible with x.v.Color TM, colors may not be reproduced properly.
• To play back images recorded in Digital cinema color with vivid colors of wider color
ranges, a device compatible with x.v.Color TM is required. When these images are played
back with devices other than ones compatible with x.v.Color TM, it is recommended to record
the images after this function is turned [OFF].
• x.v.Color TM is a name for devices that are compatible with the xvYCC format, an
international standard for expanded color in motion pictures, and that follow the rules for
signal transmission.
66
VQT2M51
Page 67

[SHOOTING GUIDE]
Message is displayed when this unit is moved rapidly.
• Change the mode to _.
: [RECORD SETUP]
[SHOOTING GUIDE] _ [ON]
When "CAMERA PANNING IS TOO FAST." appears,
move the unit slowly while recording.
• Set to [OFF] to turn off the message indication.
• Message will not appear while pausing the recording. (Message will appear even if it is
pausing the recording if [DEMO MODE] is set to [ON].)
• In some recording conditions, messages may not appear.
[WIND NOISE CANCELER]
This will reduce the wind noise coming into the built-in microphones while maintaining the
realism.
• Change the mode to
• Switch to Manual Mode. (-> 74)
: [RECORD SETUP] _ [WIND NOISE CANCELER] _ [ON] I
• When switching to intelligent Auto Mode, [WIND NOISE CANCELER] is set to [ON], and
the setting cannot be changed.
• You may not see the full effect depending on the recording conditions.
.
[ZOOM MIC]
I
Directivity of the microphone is synchronized with the zoom operation. Sounds near the front
of the unit are recorded more clearly if you zoom in (close-up) and surrounding sounds are
recorded more realistically if you zoom out (wide angle).
• Change the mode to
• Switch to Manual Mode. (-> 74)
: [RECORD SETUP] _ [ZOOM MIC] _ [ON] I
.
VQT2M51
I
67
Page 68

[MIC LEVEL]
When recording, the input level from the built-in microphones can be adjusted.
• Change the mode to
• Switch to Manual Mode. (-) 74)
1 Select the menu.
: [RECORD SETUP] _ [MIC LEVEL] _ desired setting I
_11 •
[AUTO]: AGC is activated; and the recording level is adjusted
[SET-I-_]/[SET]: -i-he desired recording level can beset.
2 Touch [_/[_ to adjust the microphone input
level.
• Touch _ to activate/disactivate AGC.
When AGC is activated, the icon is surrounded by
yellow and the amount of sound distortion can be
reduced. When AGC is disactivated, natural recording
can be performed.
• Adjust the microphone input level so that the last 2 bars O Left
of the gain value are not red. (Otherwise, the sound is Q Right
distorted.) Select a lower setting for microphone input _ Microphone input level
level.
3 Touch [ENTER] to determine the microphone
input level and then touch [EXIT].
• u : }|lllll!li(Microphone input level meter) appears on the screen.
• When switching to Intelligent Auto Mode, the setting is fixed to [AUTO] and cannot be
changed.
• When [ZOOM MIC] is [ON], the volume will be different depending on the zoom rate.
• The microphone input level meter shows the larger of the inputs from the 2 built-in
microphones.
• You cannot record with the audio completely muted.
automatically.
68
VQT2M51
Page 69

Adjustthequalityoftheimagewhilerecording.
AdjustbyoutputtingtoaTVwhile adjusting the quality of the image.
• Change the mode to _ or O.
• Switch to Manual Mode. (-) 74)
1 Select the menu.
: [RECORD SETUP] > [PICTURE ADJUST] I
2 Touch the desired setting items.
[EXPOSURE]: Brightness of the image
[WB ADJUST]: Picture color balance
3 Touch _/_ to adjust settings.
4 Touch [ENTER].
• Touch [EXIT] or press the MENU button to complete the settings.
• _,_:,appears on the screen.
69
VQT2M51
Page 70

[PICTURE SIZE]
The higher the number of pixels, the higher the clarity of the picture when printing.
• Change the mode to O •
: [PICTURE] _ [PICTURE SIZE] _ desired setting
• The number of recording pixels that can be set changes depending on selected screen
aspect ratio. (-_ 71)
• Picture size and Maximum
zoom ratio
• Picture size in Motion Picture
Recording Mode
• Change the mode to _ .
: [PICTURE] _ [PICTURE SIZE]
desired setting
[] 2592 x 1944 -*
4:3 [] 1600x 1200 27.5x
[] 640x480 50x
3:2
16:9
* Extra optical zoom cannot be used. The
maximum zoom magnification is 25×.
• This function's default settings are [] in Still Picture Recording Mode and _ in Motion
Picture Recording Mode.
• Please refer to page 141 for details about the number of recordable pictures.
• The recording will become longer depending on the recording pixels.
2688 x 1792 -*
1680x1120 27.5x
2816x 1584 -*
1920x 1080 -*
iiiii/i!_i! li!iiiM_iiii!!!iii_iii!_UiiHiiiii_!iiii_iiiii!!i_iii_iiii1iiiii;;_:iii_iiii1i_!iiiii_!_iiiiIii_Hi1_ii!!!iii_!ii_i_i;;iii_ii_i_iiiiiii1_i!_iiiiiii_iiiii!_!l!iiiiiiiiii_iiiiiiiii_i
16:9
2816x 1584
1920x 1080
70
VQT2M51
Page 71

[QUALITY]
Selecting the picture quality.
• Change the mode to I_ or O.
: [PICTURE] _ [QUALITY] _ desired setting I
l|- = : Still pictures with ahigh picture qua!ity are recorded.
=Z=: Priority is given to the number of still pictures recorded: Still pictures are recorded
in normal picture quality.
[ASPECT RATIO]
This allows you to select the aspect ratio of the pictures to suit printing or the playback method.
• Change the mode to O.
: [PICTURE] _ [ASPECT RATIO] _ desired setting I
3:2: Aspect ratio of conventional film camera or prints (such as L.size print)
16:9: Aspect ratio of high.definition television, etc.
• This function's default setting is [4:3].
• When the aspect ratio is set to [4:3] or [3:2], black bands may appear on the left and right
of the screen.
• The edges of still pictures recorded on this unit with a 16:9 aspect ratio may be cut at
printing. Check the printer or photo studio before printing.
71
VQT2M51
Page 72

[HI-SPEED BURST]
Recording is done continuously at the rate of 30 or 60 still pictures per second.
Use this function to record an object with fast movement.
• Change the mode to O •
1 Select the menu.
: [PICTURE]
[HI-SPEED BURST] _ desired setting
[OFF]:
Cancel the setting.
[30 frames/sec]:
90 still pictures are recorded continuously
at the rate of 30 per second.
The picture size is _ (1920x1080L
[60 frameslsec]:
180 stil pictures are recordec
continuously at the rate of 60 per second.
The picture size is _ (1280×720),
2 Press the O button.
• _ flashes in red during recording.
• First press the _ button halfway, then
press it fully to set the focus and record. It
will automatically focus if you press fully
once, so it is convenient when recording
objects moving back and forth.
3 Touch [Record] or [Delete].
4 (Only when [Record] is selected in step 3)
Touch [REC ALL] or [SELECT].
[REC ALL]: All pictures are stored.
[SELECT]: Pictures are stored by
specifying range.
5 (Only when [SELECT] is selected in
step 4)
Touch the range of pictures that
will be stored.
O Start point*
Q Finish point
• Previous (Next) page is displayed by
touching [_/[_ .
* Only select the picture for start point if only
1 picture is to be stored.
• A confirmation message is displayed
when [Enter] is touched after selecting the
start point and finish point.
Touch [YES] to store the pictures.
[Record]: Pictures are stored.
[Delete]: All pictures are deleted.
• If you turn off the power or change the mode, this function is canceled.
• The maximum number of times you can record on a media is 15.
(In the case of SD cards it is the maximum number of recordable scenes per card.)
• Color balance and brightness on the screen may change with some light sources such as
fluorescent lamps.
• image quality is different from ordinary still picture recording.
72
VQT2M51
Page 73

Whentherecordingenvironmentisdarkandfocusingisdifficult,thevideolightturnsonto
makefocusingeasier.
• Change the mode to O •
• Switch to Manual Mode. (-) 74)
: [PICTURE] _ [AF ASSIST LAMP] _ [AUTO] I
• Set the video light to _[DA / E)A or OFF. (-') 54)
• When switching to Intelligent Auto Mode, the setting is fixed to [AUTO] and cannot be
changed.
[SHTR SOUND]
You can add a shutter sound when recording still pictures.
• Change the mode to O .
: [PICTURE] _ [SHTR SOUND] _ [OFF]/ J_=_/ _)) I
• No shutter sound is emitted in Motion Picture Recording Mode.
I
73
VQT2M51
Page 74

Manual recording
_ Change themode to _ or O.
Press the iA/MANUAL button to switch to Manual Mode.
• _ appears on the screen.
_/MANUALO
_0cu'_ Focus (-_ 77)
7 White balance (-_ 75)
SHT""_ Manual shutter speed (_ 76)
,R,""7 Aperture adjustment (_ 76)
Perform the setting by touching the desired item to be set.
• Touch I1_to change the page and the manual icon appears or disappears each time _ /
_1_ is touched.
74
VQT2M51
Page 75

I VIDEOIIPHOTOI
Automatic white balance function may not reproduce natural colors depending on the scenes
or lighting conditions. If so, you can adjust the white balance manually.
• Press the iA/MANUAL button to switch to Manual Mode. (-> 74)
1 Touch [WB]. • To set the white balance
2 Touch _/_ to select White manually
balance mode. 1 Select I:_, fill the screen with a
• Select the optimal mode by confirming the
color on the screen.
Auto white balance
adjustment
Sunny mode
Outdoors under a clear sky
Cloudy mode
Outdoors under cloudy sky
Indoor mode 1
"_1 Incandescent light, video lights
like in the studio, etc.
Indoor mode 2
-,.62 Color fluorescent lamps, sodium
lamps in gymnasiums etc.
Manual adjustment mode
• Mercury-vapor lamps,
sodium lamps, some
fluorescent lights
• Lights used for wedding
receptions at hotels, stage
spotlights in theaters
• Sunrise, sunset, etc.
• To return to auto setting, set to | or
press the iA/MANUAL button again.
white subject.
2 Touch and set the blinking I:_ •
• When the screen turns black instantly and
the _ display stops flashing and then
lights constantly, the setting is complete.
• If the _ display continues flashing, the
white balance cannot be set. In this case,
use other White balance modes.
• When the _'_ display flashes, the manual
white balance previously adjusted is
stored.Whenever recording conditions
change, re-set the white balance.
• When setting both the white balance and
the iris/gain, set the white balance first.
• | is not displayed on the screen
when _ is being set.
75
VQT2M51
Page 76

ShutterSpeed:
Adjustitwhenrecordingfast-movingsubjects.
Iris:
Adjustitwhenthescreenistoobrightortoodark.
• Press the iA/MANUAL button to switch to Manual Mode. (-_ 74)
/ Touch [SHTR] or [IRIS].
2 Touch _/_ to adjust
settings.
s.T.____.Shutter speed:
1/60 to 118000
• If [AUTO SLOW SHTR] is set to [ON], the
shutter speed will be set between 1/30
and 1/8000. •
• The shutter speed closer to 1/8000 is
faster.
• The shutter speed will be set between 1/2
and 1/2000 in Still Picture Recording Mode.
m
,.,..._sIris/Gain value:
CLOSE _ (F16 to F2.0) _ OPEN _ (0dB
to 18dB)
• Value closer to [CLOSE] darkens the
image.
• Value closer to [18dB] brightens the
image.
• When the iris value is adjusted to brighter
than [OPEN], it changes to the gain value.
• To return to auto setting, press the iA/
MANUAL button again.
• When setting both the shutter speed and
the iris/gain value, set the shutter speed
and then set the iris/gain value.
Manual shutter speed adjustment
• When the shutter speed is set lower than
1/15 in the Still Picture Recording Mode,
using a tripod is recommended. Also,
white balance cannot be set. The shutter
speed will be set to 1/30 when the power
is turned on again or when the Quick start
is performed.
You may see a band of light around an
object that is shining very bright, or highly
reflective.
• During normal playback, image movement
may not look smooth.
• If you record an extremely bright object or
record under indoor lighting, color and
screen brightness may change or a
horizontal line may appear on the screen.
In this case, record in the intelligent Auto
Mode or set the shutter speed to 1/60 in
areas where the power supply frequency
is 60 Hz, or 1/100 in areas of 50 Hz.
Manual iris/gain adjustment
• If the gain value is increased, the noise on
the screen increases.
• Depending on the zoom magnification,
there are iris values that are not displayed.
I VIDEOIIPHOTOI
76
VQT2M51
Page 77

Ifautofocusingisdifficultduetotheconditions,thenuseManualFocus.
• Change the mode to I_ or O.
• Press the iA/MANUAL button to switch to Manual Mode. (-) 74)
1 (When MF assist function is used)
Select the menu.
: [RECORD SETUP]
[iF ASSIST] _ [ON]
2 Touch [FOCUS].
• When [MF ASSIST] is [OFF], the blue
area is not displayed.
• To restore Auto Focus, touch [AF] in step
3 or press the iA/MANUAL button again.
• The blue display does not appear on the
images actually recorded.
3 Touch [MF] to change to
Manual Focus.
• MF appears on the screen.
4 Adjust the focus by touching
M,_/MZ.
The in-focus area is displayed in blue. The
normal screen returns approximately
2 seconds after you finish bringing the
subject into focus.
I VIDEOIIPHOTOI
77
VQT2M51
Page 78

Panasonic Consumer Electronics Company,
Division of Panasonic Corporation of North America
One Panasonic Way, Secaucus, NJ 07094
Panasonic Canada Inc.
5770 Ambler Drive, Mississauga, Ontario, L4W 2T3
VQT2M51
FO110MLO ( 24000 _))
IilllllllllillllllllllllllOPanason,cCorporat,o,,2OlOpr,nteO,nJapan"
 Loading...