

Operating Instructions
High Definition Video Camera
Model No. HC-X900
Before use, please read these instructions completely.
HC-X900M
HC-X800
Model number suffix “EB” denotes UK model.
VQT4C83

Information for Your Safety
Dear Customer,
We would like to take this opportunity to
thank you for purchasing this Panasonic
High Definition Video Camera. Please read
these Operating Instructions carefully and
keep them handy for future reference.
Please note that the actual controls and
components, menu items, etc. of your High
Definition Video Camera may look
somewhat different from those shown in the
illustrations in these Operating Instructions.
∫ Caution for AC mains lead
For your safety, please read the following
text carefully.
This appliance is supplied with a moulded
three pin mains plug for your safety and
convenience. A 5-ampere fuse is fitted in
this plug.
Should the fuse need to be replaced please
ensure that the replacement fuse has a
rating of 5-ampere and that it is approved by
ASTA or BSI to BS1362.
Check for the ASTA mark Ï or the BSI
mark Ì on the body of the fuse.
If the plug contains a removable fuse cover
you must ensure that it is refitted when the
fuse is replaced.
If you lose the fuse cover the plug must not
be used until a replacement cover is
obtained.
A replacement fuse cover can be purchased
from your local dealer.
CAUTION!
IF THE FITTED MOULDED PLUG IS
UNSUITABLE FOR THE SOCKET
OUTLET IN YOUR HOME THEN THE
FUSE SHOULD BE REMOVED AND
THE PLUG CUT OFF AND DISPOSED
OF SAFELY.
THERE IS A DANGER OF SEVERE
ELECTRICAL SHOCK IF THE CUT OFF
PLUG IS INSERTED INTO ANY
13-AMPERE SOCKET.
If a new plug is to be fitted please observe
the wiring code as stated below.
If in any doubt please consult a qualified
electrician.
IMPORTANT
The wires in this mains lead are coloured in
accordance with the following code:
Blue: Neutral, Brown: Live.
As these colours may not correspond with
the coloured markings identifying the
terminals in your plug, proceed as follows:
The wire which is coloured Blue must be
connected to the terminal which is marked
with the letter N or coloured Black or Blue.
The wire which is coloured Brown must be
connected to the terminal which is marked
with the letter L or coloured Brown or Red.
WARNING: DO NOT CONNECT EITHER
WIRE TO THE EARTH TERMINAL WHICH
IS MARKED WITH THE LETTER E, BY
THE EARTH SYMBOL Ó OR COLOURED
GREEN OR GREEN/YELLOW.
2
VQT4C83
THIS PLUG IS NOT WATERPROOF—
KEEP DRY.
Before use
Remove the connector cover.
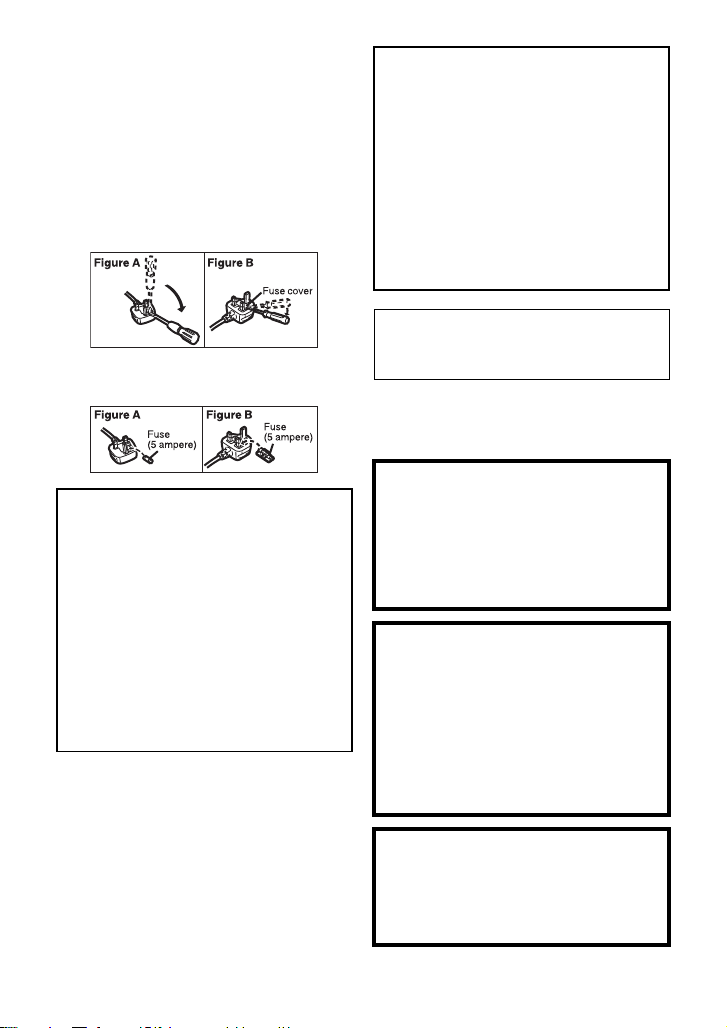
How to replace the fuse
The location of the fuse differ according to
the type of AC mains plug (figures A and B).
Confirm the AC mains plug fitted and follow
the instructions below.
Illustrations may differ from actual AC mains
plug.
1. Open the fuse cover with a screwdriver.
2. Replace the fuse and close or attach the
fuse cover.
WARNING:
To reduce the risk of fire, electric shock or
product damage,
≥ Do not expose this unit to rain,
moisture, dripping or splashing.
≥ Do not place objects filled with liquids,
such as vases, on this unit.
≥ Use only the recommended
accessories.
≥ Do not remove covers.
≥ Do not repair this unit by yourself.
Refer servicing to qualified service
personnel.
CAUTION!
To reduce the risk of fire, electric shock or
product damage,
≥ Do not install or place this unit in a
bookcase, built-in cabinet or in another
confined space. Ensure this unit is well
ventilated.
≥ Do not obstruct this unit’s ventilation
openings with newspapers, tablecloths,
curtains, and similar items.
≥ Do not place sources of naked flames,
such as lighted candles, on this unit.
Install this unit so that the AC mains lead
can be unplugged from the socket outlet
immediately if any problem occurs.
∫ Concerning the battery
Button-type battery: CR2025 (supplied
for HC-X900 and HC-X900M)
Warning
Risk of fire, explosion and burns. Do not
disassemble.
Do not heat the batteries above the
following temperatures or incinerate.
Button-type battery 60 oC
Battery pack 60 oC
CAUTION
≥ Danger of explosion if battery is
incorrectly replaced. Replace only with
the type recommended by the
manufacturer.
≥ When disposing the batteries, please
contact your local authorities or dealer
and ask for the correct method of
disposal.
Warning
Keep the Button-Type battery out of the
reach of children. Never put Button-Type
battery in mouth. If swallowed call your
doctor.
VQT4C83
3
∫ EMC Electric and magnetic
Cd
compatibility
This symbol (CE) is located on the rating
plate.
∫ Product identification marking
Product Location
High Definition
Video Camera
AC adaptor Bottom
Battery holder
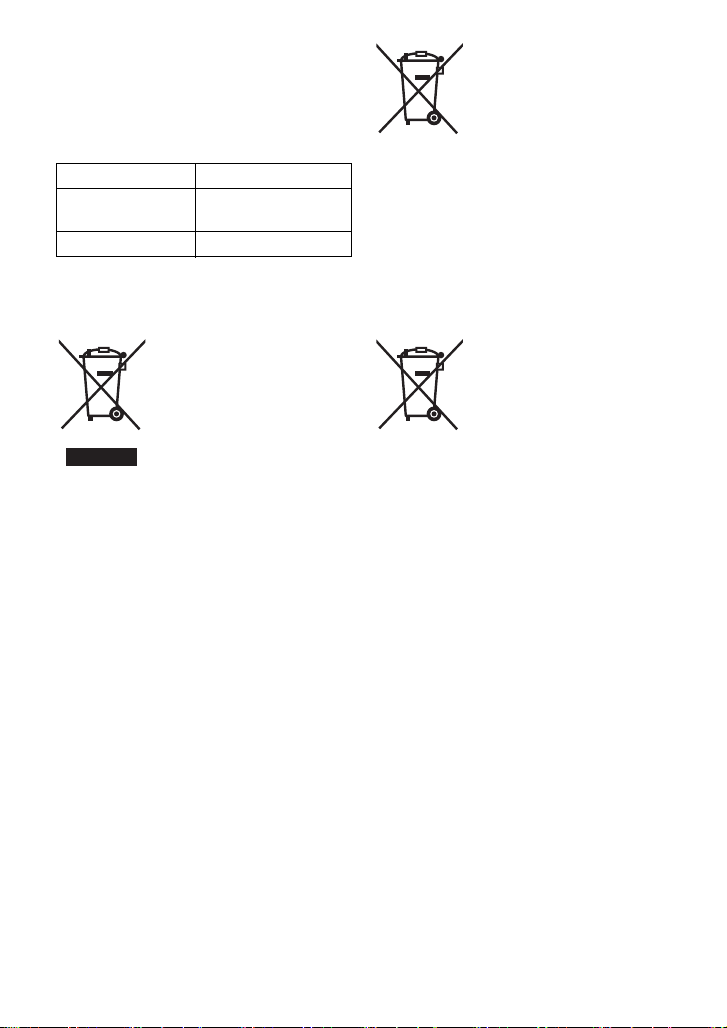
∫ Information for Users on
Collection and Disposal of Old
Equipment and used Batteries
These symbols on the
products, packaging, and/
or accompanying
documents mean that used
electrical and electronic
products and batteries
should not be mixed with
For proper treatment, recovery and
recycling of old products and used
batteries, please take them to applicable
collection points, in accordance with your
national legislation and the Directives
2002/96/EC and 2006/66/EC.
By disposing of these products and
batteries correctly, you will help to save
valuable resources and prevent any
potential negative effects on human
health and the environment which could
otherwise arise from inappropriate waste
handling.
For more information about collection and
recycling of old products and batteries,
please contact your local municipality,
your waste disposal service or the point of
sale where you purchased the items.
Penalties may be applicable for incorrect
disposal of this waste, in accordance with
national legislation.
general household waste.
For business users in the
European Union
If you wish to discard
electrical and electronic
equipment, please contact
your dealer or supplier for
further information.
[Information on Disposal in other
Countries outside the European Union]
These symbols are only valid in the
European Union. If you wish to discard
these items, please contact your local
authorities or dealer and ask for the
correct method of disposal.
Note for the battery
symbol (bottom two
symbol examples):
This symbol might be used
in combination with a
chemical symbol. In this
case it complies with the
requirement set by the
Directive for the chemical
involved.
4
VQT4C83

∫ About the recording format for
recording motion pictures
You can select from AVCHD* or iFrame
recording formats to record motion pictures
using this unit. (l 64)
* It is compatible with AVCHD 3D or AVCHD
Progressive (1080/50p).
AVCHD 3D:
It is possible to record powerful, life-like 3D
full high definition images.
A 3D compatible television compatible to the
frame sequential format is required to view
the 3D full high definition images. (l 112,
117)
AVCHD Progressive:
It is possible to record 2D image in the
highest quality (1080/50p) for this unit.
iFrame:
This is a recording format suitable for
viewing or editing on Mac (iMovie’11). Using
iMovie’11, iFrame motion pictures can be
imported faster than AVCHD motion
pictures. Also, the imported file size of
iFrame motion pictures will be smaller than
that of AVCHD motion pictures.
≥ It is not compatible with motion pictures
recorded in AVCHD format.
∫ Indemnity about recorded
content
Panasonic does not accept any
responsibility for damages directly or
indirectly due to any type of problems that
result in loss of recording or edited content,
and does not guarantee any content if
recording or editing does not work properly.
Likewise, the above also applies in a case
where any type of repair is made to the unit
(including any other non-built-in memory
related component).
∫ Handling of built-in memory
[HC-X900M]
This unit is equipped with the built-in
memory. When using this component, pay
attention to the following points.
Back up data periodically.
The built-in memory is temporary storage. In
order to avoid erasing data due to static
electricity, electromagnetic waves,
breakage, and failures, back up the data to a
PC or DVD disc. (l 123, 136)
≥
Access lamp [ACCESS] (l12) illuminates
while the SD card or built-in memory is
being accessed (initialization, recording,
playback, deleting etc.). Do not perform the
following operations when the lamp
illuminates. It may damage the built-in
memory or cause a malfunction in the unit.
jTurn the unit off (remove the battery)
jInsert and remove the USB cable
jExpose the unit to vibrations or shock
≥ About disposing of or giving away this unit.
(l 159)
VQT4C83
5
∫ /
HC-X900
HC-X900M
HC-X900
HC-X900M
HC-X900
About Condensation
(When the lens, the viewfinder
or LCD Monitor is fogged up)
Condensation occurs when the ambient
temperature or humidity changes. Be careful
of condensation since it causes lens,
viewfinder and LCD monitor stains, fungus
and camera malfunction.
≥ For more details about the cause and
action required for condensation, refer to
page 163.
∫
HC-X800
About Condensation
(When the lens or LCD Monitor
is fogged up)
Condensation occurs when the ambient
temperature or humidity changes. Be careful
of condensation since it causes lens and
LCD monitor stains, fungus and camera
malfunction.
≥ For more details about the cause and
action required for condensation, refer to
page 163.
∫ Cards that you can use with
this unit
SD Memory Card, SDHC Memory Card
and SDXC Memory Card
≥ 4 GB or more Memory Cards that do not
have the SDHC logo or 48 GB or more
Memory Cards that do not have the SDXC
logo are not based on SD Memory Card
Specifications.
≥ Refer to page 20 for more details on SD
cards.
∫ For the purposes of these
operating instructions
≥ SD Memory Card, SDHC Memory Card
and SDXC Memory Card are referred to
as the “SD card”.
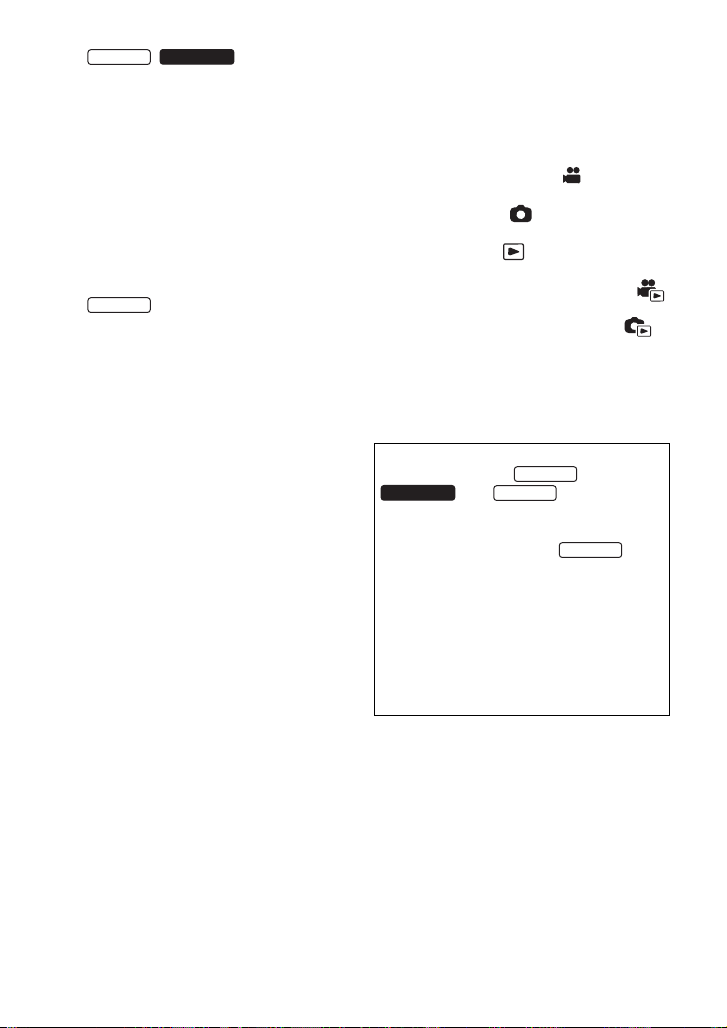
≥ Functions that can be used for Motion
Picture Recording Mode:
Functions that can be used for Still Picture
Recording Mode:
≥ Function that can be used for the
Playback Mode:
Function that can be used for the
Playback Mode (
Function that can be used for the
Playback Mode (still pictures only):
≥ Scene(s) recorded in 1080/50p, 1080/50i,
AVCHD 3D or side-by-side ([SbS 3D]):
AVCHD scene(s)
≥ Pages for reference are indicated by an
arrow, for example: l 00
These operating instructions are designed
for use with models ,
be slightly different from the original.
≥ The illustrations used in these operating
instructions show model ,
however, parts of the explanation refer to
different models.
≥ Depending on the model, some functions
are not available.
≥ Features may vary, so please read
carefully.
≥ Not all models may be available
depending on the region of purchase.
motion picture only
and . Pictures may
HC-X800
):
6
VQT4C83

Contents
Information for Your Safety...................... 2
Accessories.............................................10
Preparation
Names and Functions of Main Parts ..... 11
Power supply........................................... 15
Inserting/removing the battery........... 15
Charging the battery ......................... 16
Charging and recording time............. 17
Recording to a card ................................ 20
Cards that you can use
with this unit ...................................... 20
Inserting/removing an SD card.......... 21
Turning the unit on/off ............................ 22
Selecting a mode ....................................23
Preparation of the LCD monitor/
Viewfinder [HC-X900/HC-X900M]...........24
How to use the touch screen ................. 24
About the Touch Menu ...................... 25
Setting date and time.............................. 26
Basic
Before recording ..................................... 27
Selecting a media to record
[HC-X900M]..............................................28
Recording motion pictures ....................29
Recording still pictures .......................... 31
Recording still pictures
in Motion Picture Recording Mode.... 32
Intelligent Auto Mode ............................. 33
Motion picture/Still picture playback ....35
Using the menu screen ..........................38
Using the quick menu ....................... 38
Using the Setup Menu ............................ 39
Using with the remote control
[HC-X900/HC-X900M]..............................48
Operation of direction buttons/
OK button .......................................... 49
Advanced (Recording)
Using the zoom ....................................... 50
Ring zoom [HC-X900/HC-X900M].... 50
Zoom ratio during the Still Picture
Recording Mode ............................... 51
Image Stabilizer Function ...................... 51
1080/50p recording ................................. 52
Recording with the Touch function....... 53
Touch function icons ......................... 53
Recording functions
of operation icons .................................. 56
Operation icons................................. 56
Recording functions of menus.............. 62
Manual recording.................................... 79
White Balance ................................... 80
Manual shutter speed/
iris adjustment ................................... 81
Recording with Manual Focus .......... 82
Recording 3D image ............................... 84
Advanced (Playback)
Playback Operations ..............................87
Motion picture playback
using operation icon.......................... 87
Creating still picture
from motion picture ........................... 88
Highlight & Time Frame Index .......... 88
Repeat Playback............................... 89
Resuming the previous playback...... 89
Zooming in on a still picture during
playback (Playback zoom) ................ 90
Various playback functions ................... 91
Playing back motion pictures/
still pictures by date .......................... 91
Highlight Playback ............................ 92
Changing the playback settings and
playing back the slide show.............. 97
PreparationBasicAdvanced
(Recording)
(Playback)
Copy/DubbingWith a PCOthers Advanced
VQT4C83
7

Deleting scenes/still pictures ................ 99
Deleting part of a scene
(AVCHD) ......................................... 101
Dividing a scene (AVCHD).............. 102
Dividing a scene to partially delete
(iFrame/MP4) .................................. 103
Deleting personal information ......... 104
Protecting scenes/still pictures........ 104
Relay scene combining [HC-X900M]...105
Watching Video/
Pictures on your TV .............................. 106
Connecting with
a HDMI mini cable........................... 108
Listening in 5.1 channel sound
(AVCHD) [HC-X900/HC-X900M]..... 109
Connecting with
the AV multi cable ........................... 109
Playback using VIERA Link ................. 110
3D image playback
[HC-X900/HC-X900M]............................ 112
Viewing with 3D compatible TV....... 112
Viewing on the LCD monitor ........... 115
Converting and playing back
2D (3D) images as 3D (2D)............. 115
Adjusting 3D effect of
the 3D image ................................... 116
3D image playback [HC-X800] ............. 117
Converting and playing back
2D images as 3D ............................ 119
Adjusting 3D effect of
the 3D image ................................... 119
With a PC
What you can do with a PC .................. 136
End User License Agreement......... 138
Operating environment ........................ 139
Installation ............................................. 142
Connecting to a PC .............................. 142
About the PC display ...................... 144
Starting HD Writer AE 4.1..................... 145
Reading the operating instructions
of the software applications ............ 145
If using Mac ........................................... 145
Others
Indications ............................................. 147
Messages .............................................. 150
About recovery ................................ 151
Troubleshooting ................................... 152
Cautions for use ................................... 158
About copyright.................................... 164
Recording modes/approximate
recordable time ..................................... 165
Approximate number of recordable
pictures.................................................. 166
Optional accessories ...........................168
Specifications ....................................... 170
Index ...................................................... 174
Copy/Dubbing
Copying between SD card and
Built-in Memory [HC-X900M]................ 120
Connecting a DVD burner to copy to/
play back a disc ....................................123
Preparing for copying/
playing back .................................... 123
Copying to discs.............................. 125
Playing back the copied disc........... 127
Managing the copied disc ............... 128
Dubbing with a Blu-ray disc recorder,
video devices, etc.................................129
3D image storage .................................. 133
8
VQT4C83

∫ Sales and Support Information
Customer Communications Centre
≥ For customers within the UK: 0844 844
3899
≥ For customers within Ireland: 01 289
8333
≥ For further support on your product,
please visit our website:
www.panasonic.co.uk
Direct Sales at Panasonic UK
≥ Order accessory and consumable items
for your product with ease and confidence
by phoning our Customer
Communications Centre
Monday–Thursday 9:00 a.m.–5:30 p.m.,
Friday 9:30 a.m.– 5:30 p.m. (Excluding
public holidays)
≥ Or go on line through our Internet
Accessory ordering application at
www.pas-europe.com
≥ Most major credit and debit cards
accepted.
≥ All enquiries transactions and distribution
facilities are provided directly by
Panasonic UK.
≥ It couldn’t be simpler!
≥ Also available through our Internet is
direct shopping for a wide range of
finished products, Take a browse on our
website for further details.
.
VQT4C83
9
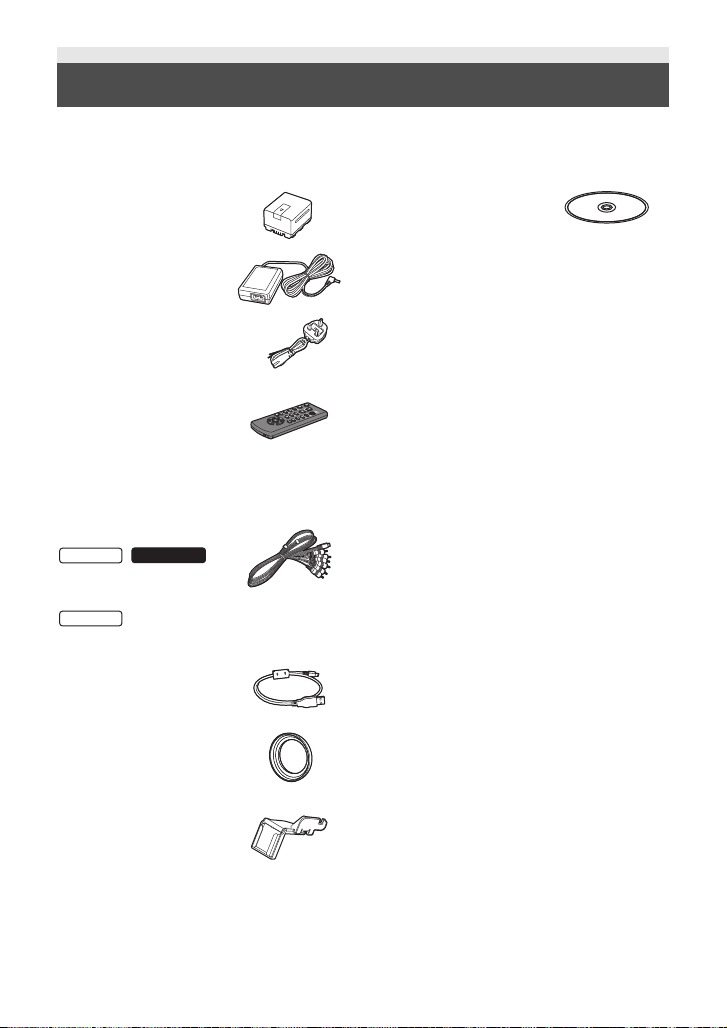
Accessories
HC-X900M
HC-X800
Check the accessories before using this unit.
Keep the accessories out of reach of children to prevent swallowing.
Product numbers correct as of Jan. 2012. These may be subject to change.
Battery pack
VW-VBN130
AC adaptor
VSK0733
AC cable
K2CT3YY00034
Remote control
(Battery built-in)
(supplied for HC-X900 and
HC-X900M; not supplied for
HC-X800)
N2QAEC000024
CD-ROM
Software
AV multi cable
HC-X900
K1HY12YY0012 or
K1HY12YY0008
K1HY12YY0012
USB cable
K2KYYYY00201
Lens hood
VDW2412
Shoe adaptor
(supplied for HC-X900 and
HC-X900M; not supplied for
HC-X800)
VYC0996
10
VQT4C83
/
Preparation
AV MULTI
10
11
12
13
16
14
17
18
15
879
4563
21
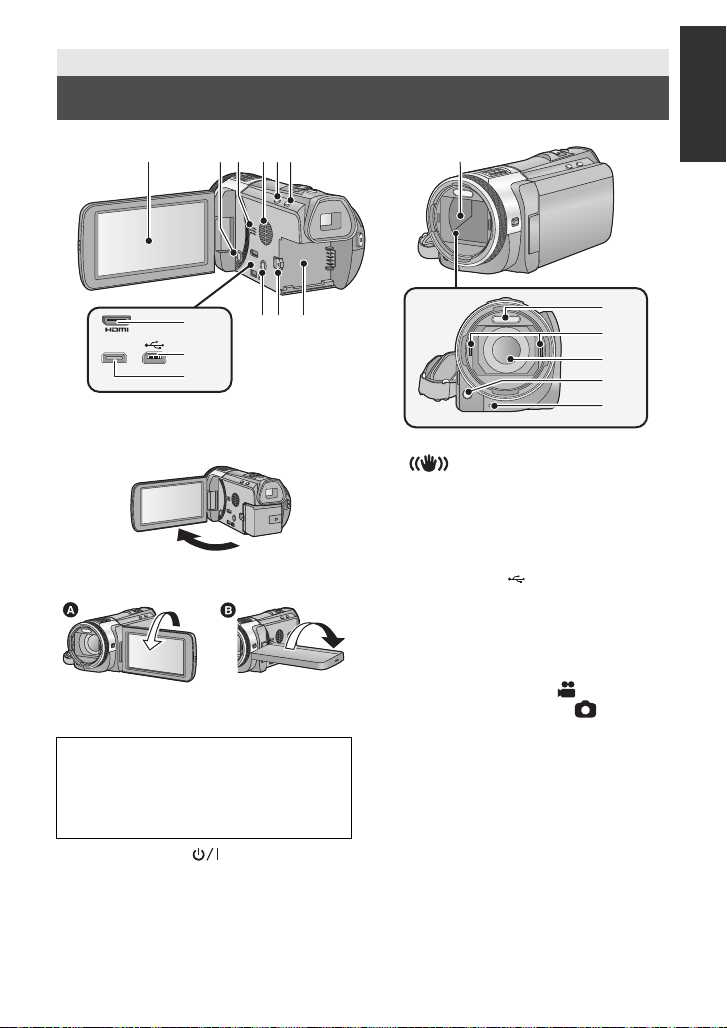
Names and Functions of Main Parts
1 LCD monitor (Touch screen) (l 24)
≥ It can open up to 90o.
≥ It can rotate up to 180o A towards the lens
or 90o B towards the opposite direction.
Due to limitations in LCD production
technology, there may be some tiny bright
or dark spots on the LCD monitor screen.
However, this is not a malfunction and
does not affect the recorded picture.
2 Power button [ ] (l 22)
3 Speaker
4 Inlet (cooling fan) (l 27)
5 Intelligent auto/Manual button
[iA/MANUAL] (l 33, 79)
6 Optical image stabilizer button
[ O.I.S.] (l 51)
7 1080/50p button [1080/50p] (l 52)
8 Battery release lever [BATT] (l 15)
9 Battery holder (l 15)
10 HDMI mini connector [HDMI]
(l 106, 110)
11 USB terminal [ ] (l 124, 129, 142)
12 AV multi connector [AV MULTI]
(l 106, 132)
≥ Use the AV multi cable (only the supplied
cable).
13 Lens cover
≥ The lens cover opens in Motion
Picture Recording Mode or Still
Picture Recording Mode. (l 23)
14 Built-in flash (l 59)
15 3D Conversion Lens attachment part
(concave) (l 84)
16 Lens (LEICA DICOMAR)
≥ Please refer to page 27 for details about
attaching the lens hood.
17 AF assist lamp (l 78)
18 Recording lamp (l 43)
VQT4C83
11
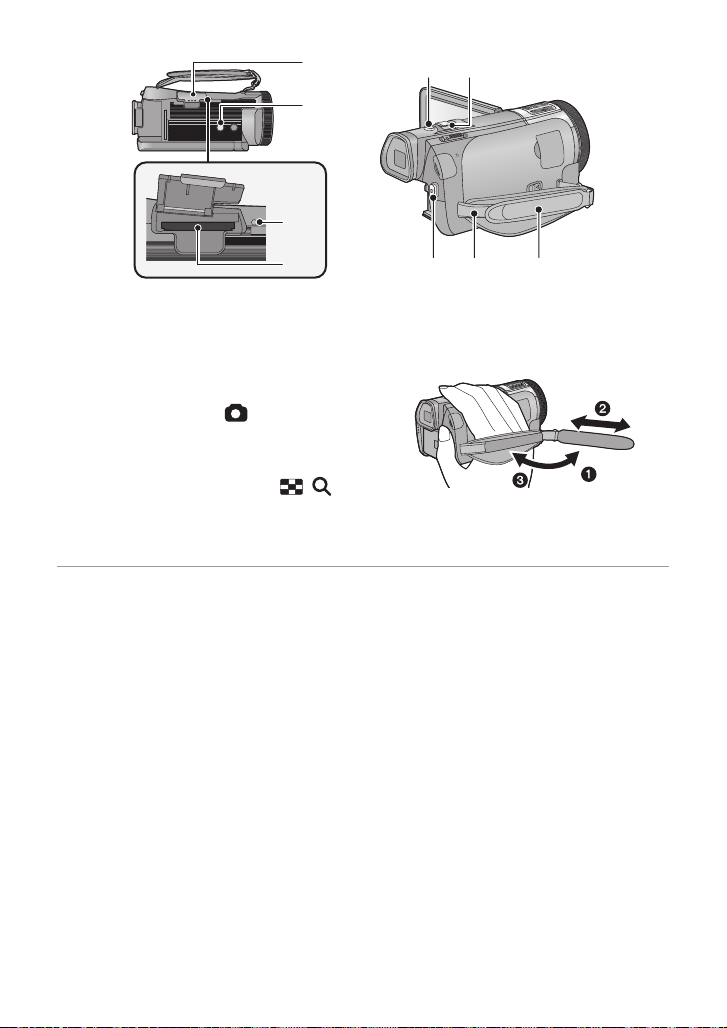
19 SD card cover (l 21)
21
22
20
19
2423
25 26 27
20 Tripod receptacle
≥ If you attach a tripod which has 5.5 mm
screw or larger, it may damage this unit.
21 Access lamp [ACCESS] (l 21)
22 Card slot (l 21)
23 Photoshot button [ ] (l 31)
24 Zoom lever [W/T] (In Motion Picture
Recording Mode or Still Picture
Recording Mode) (l 50)
Thumbnail display switch [ / ]/
Volume lever [sVOLr] (In Playback
Mode) (l 36)
25 Recording start/stop button (l 29)
26 Shoulder strap fixture
27 Grip belt
Adjust the length of the grip belt so that it fits
your hand.
1 Flip the belt.
2 Adjust the length.
3 Replace the belt.
12
VQT4C83
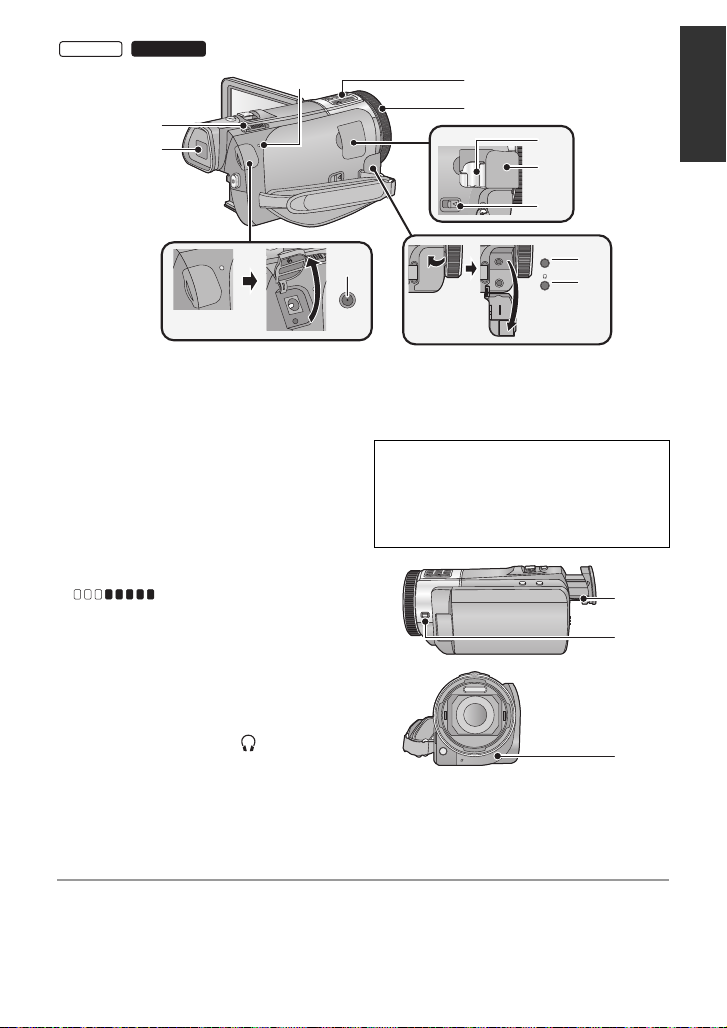
HC-X900
HC-X900M
MIC
34
35
38
37
28
29
30
31
32
33
36
39
41
40
/
28 Status indicator (l 22)
29 Internal microphones
30 Multi manual ring (l 79, 82)
31 Shoe adaptor mounting part (l 169)
32 Shoe adaptor cover (l 169)
33 Shoe adaptor release lever
[SHOE ADAPTOR RELEASE] (l 169)
34 Microphone terminal [MIC]
≥ A compatible plug-in powered microphone
can be used as an external microphone.
≥ Audio will be stereo (2 ch) with the
external microphone input.
≥ (Microphone input level
meter) is displayed when the external
microphone is connected. (l 72)
≥ When the unit is connected with the AC
adaptor, sometimes noise may be heard
depending on the microphone type. In this
case, please switch to the battery for the
power supply and the noise will stop.
35 Headphone terminal [ ] (l 61)
≥ Excessive sound pressure from
earphones and headphones can cause
hearing loss.
≥ Listening at full volume for long periods
may damage the user’s ears.
36 DC input terminal [DC IN] (l 16)
≥ Do not use any other AC adaptors except
the supplied one.
37 Mode switch (l 23)
38 Viewfinder (l 24)
Due to limitations in LCD production
technology, there may be some tiny bright
or dark spots on the viewfinder screen.
However, this is not a malfunction and
does not affect the recorded picture.
39 Eyepiece corrector dial (l 24)
40 Camera function button
[CAMERA FUNCTION] (l 79)
41 Remote control sensor (l 49)
13
VQT4C83

HC-X800
42
43
44
42 Internal microphones
43 Status indicator (l 22)
44 Mode switch (l 23)
45 DC input terminal [DC IN] (l 16)
≥ Do not use any other AC adaptors except
the supplied one.
45
14
VQT4C83
Preparation
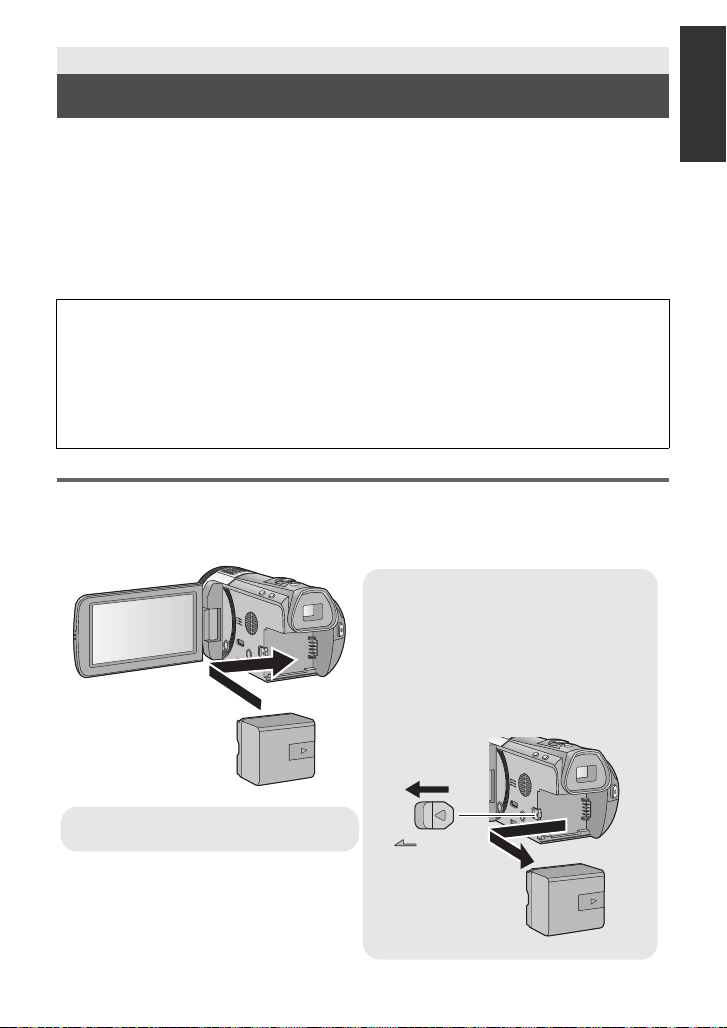
s
Removing the battery
Be sure to hold down the power button
until the status indicator goes off. Then
remove the battery while supporting the
unit to prevent it from dropping.
Move the battery release lever in the
direction indicated by the arrow and
remove the battery when unlocked.
BATT
Insert the battery until it clicks and locks.
Power supply
∫ About batteries that you can use with this unit
The battery that can be used with this unit is VW-VBN130/VW-VBN260.
≥ The unit has a function for distinguishing batteries which can be used safely. The
dedicated battery (VW-VBN130/VW-VBN260) supports this function. The only
batteries suitable for use with this unit are genuine Panasonic products and
batteries manufactured by other companies and certified by Panasonic. (Batteries
which do not support this function cannot be used). Panasonic cannot in any way
guarantee the quality, performance or safety of batteries which have been
manufactured by other companies and are not genuine Panasonic products.
It has been found that counterfeit battery packs which look very similar to the
genuine product are made available to purchase in some markets. Some of these
battery packs are not adequately protected with internal protection to meet the
requirements of appropriate safety standards. There is a possibility that these
battery packs may lead to fire or explosion. Please be advised that we are not liable
for any accident or failure occurring as a result of use of a counterfeit battery pack.
To ensure that safe products are used we would recommend that a genuine
Panasonic battery pack is used.
Inserting/removing the battery
≥ Press the power button to turn off the unit. (l 22)
Open the LCD monitor and install the battery by inserting it in the
direction shown in the figure.
15
VQT4C83
Charging the battery
When this unit is purchased, the battery is not charged. Charge the battery fully
before using this unit for the first time.
The unit is in the standby condition when the AC adaptor is connected. The primary circuit is
always “live” as long as the AC adaptor is connected to an electrical outlet.
Important:
≥ Use the supplied AC adaptor. Do not use the AC adaptor of another device.
≥ Do not use the AC cable with any other equipment as it is designed only for this unit.
Also, do not use the AC cable from other equipment with this unit.
≥ The battery can also be charged using a battery charger (VW-BC20EB: optional).
≥ The battery will not be charged if the unit is turned on.
≥ It is recommended to charge the battery in a temperature between 10 °C and 30 °C.
(The battery temperature should also be the same.)
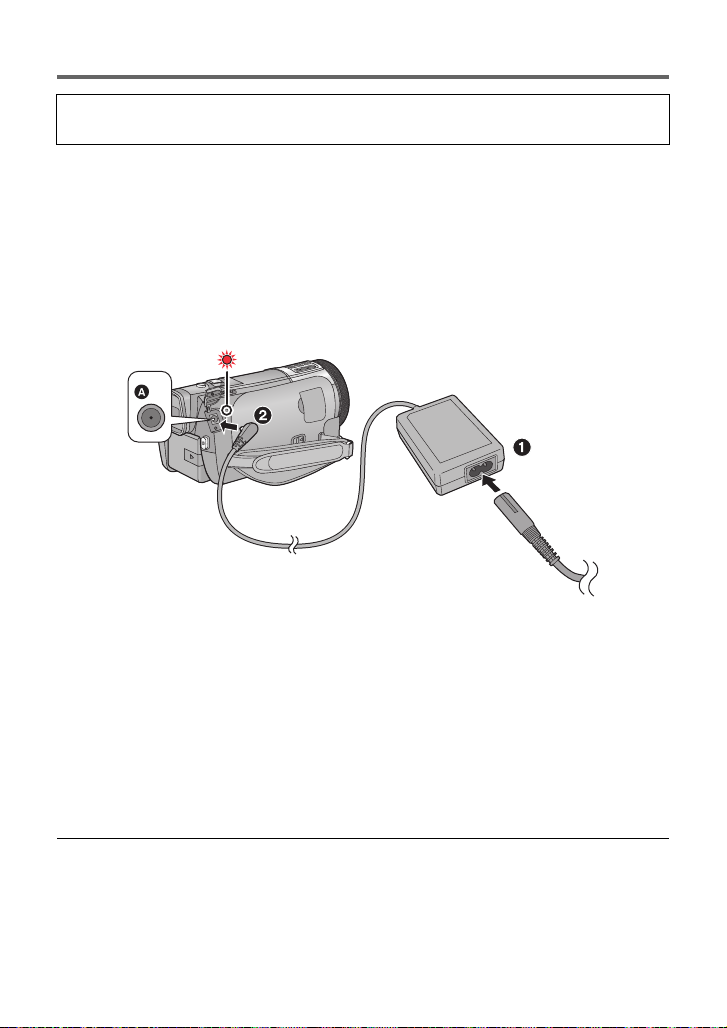
A DC input terminal
≥ Insert the plugs as far as they will go.
1 Connect the AC cable to the AC adaptor, then the AC outlet.
2 Connect the AC adaptor to the DC input terminal.
≥
The status indicator will flash red at an interval of 2 seconds (approximately 1 second on, 1 second
off), indicating that charging has begun. It will turn off when the charging is completed.
∫ Connecting to the AC outlet
If you turn on the unit while connecting with the AC adaptor, you can use the unit with power
supplied from the outlet.
When recording for a long time, keep the AC adaptor connected and use it together with the
battery.
≥ If the status indicator flashes at a particularly fast or slow rate, refer to page 160.
≥ We recommend using Panasonic batteries (l 10, 17, 18, 168).
≥ If you use other batteries, we cannot guarantee the quality of this product.
≥ Do not heat or expose to flame.
≥ Do not leave the battery(ies) in a car exposed to direct sunlight for a long period of time
with doors and windows closed.
16
VQT4C83
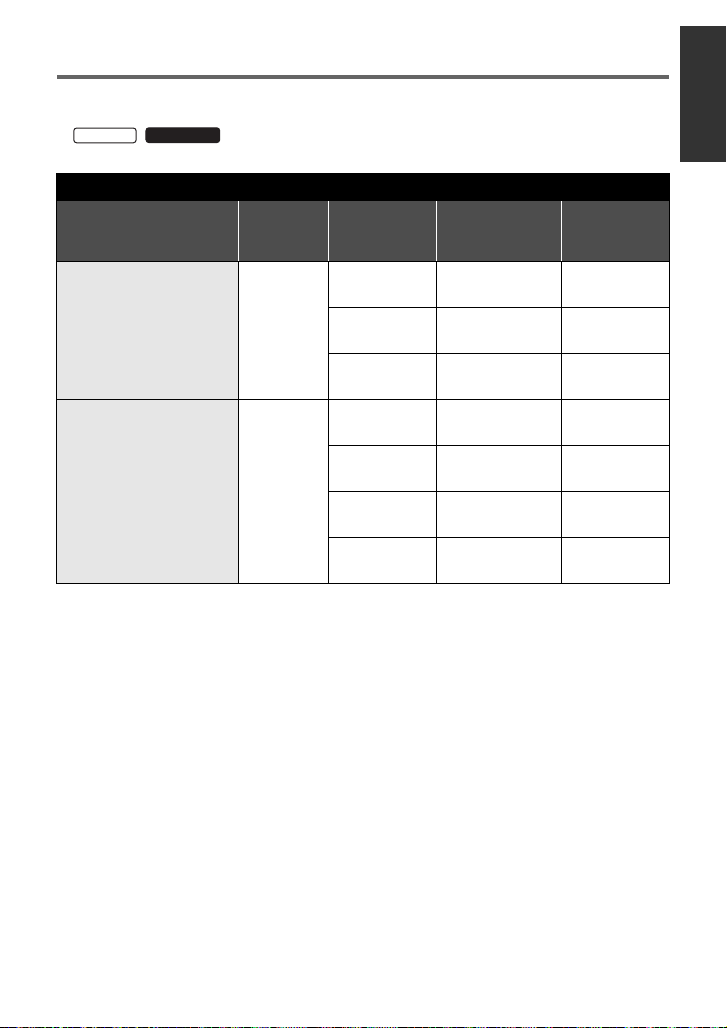
Charging and recording time
HC-X900M
∫ Charging/Recording time
≥ Temperature: 25 oC/humidity: 60%RH
≥ /
HC-X900
When using the viewfinder (times in parentheses are when using the LCD monitor)
HC-X900/HC-X900M
Battery model number
[Voltage/Capacity
(minimum)]
Supplied battery/
VW-VBN130 (optional)
[7.2 V/1250 mAh]
VW-VBN260 (optional)
[7.2 V/2500 mAh]
Charging
time
2h30min
4h30min
Recording
mode
[1080/50p],
[AVCHD 3D]*
[HA], [HG],
[HX], [HE]
[iFrame],
[SbS 3D]*
[1080/50p],
[AVCHD 3D]*
[HA], [HG],
[HX], [HE]
[iFrame]
[SbS 3D]*
Maximum
continuous
recordable time
1h25min
(1h15min)
1h30min
(1h20min)
1h35min
(1h20min)
3h5min
(2h45min)
3h15min
(2h50min)2h(1h45min)
3h20min
(2h55min)2h(1h45min)
3h15min
(2h55min)2h(1h45min)
Actual
recordable
time
55 min
(45 min)
55 min
(50 min)
55 min
(50 min)
1h55min
(1h40min)
17
VQT4C83

HC-X800
Battery model number
[Voltage/Capacity
(minimum)]
Supplied battery/
VW-VBN130 (optional)
[7.2 V/1250 mAh]
VW-VBN260 (optional)
[7.2 V/2500 mAh]
* This will be the recording mode when the 3D Conversion Lens (optional) is attached.
≥ These times are approximations.
≥ The indicated charging time is for when the battery has been discharged completely.
Charging time and recordable time vary depending on the usage conditions such as
high/low temperature.
Charging
time
2h30min
4h30min
Recording
mode
[1080/50p],
[HA], [HG],
[HX], [HE]
[iFrame] 1h35min 55min
[AVCHD 3D]* 1 h 25 min 55 min
[SbS 3D]* 1 h 35 min 55 min
[1080/50p],
[AVCHD 3D]*
[HA], [HG],
[HX], [HE]
[iFrame],
[SbS 3D]*
Maximum
continuous
recordable time
1h30min 55min
3h5min 1h55min
3h15min 2h
3h20min 2h
recordable
Actual
time
18
VQT4C83

≥ The actual recordable time refers to the recordable time when repeatedly starting/stopping
recording, turning the unit on/off, moving the zoom lever etc.
≥ The batteries heat up after use or charging. This is not a malfunction.
Battery capacity indication
≥ The display changes as the battery capacity reduces.
####
If there is less than 3 minutes remaining, then will become red. If the battery
discharges, then will flash.
≥ Screen display will disappear when no touch operation is performed. However, it will be
constantly displayed when the remaining battery time becomes less than 30 minutes.
≥ The remaining battery capacity is displayed when using the Panasonic battery that you
can use for this unit. The actual time can vary depending on your actual use.
≥ When using the AC adaptor or batteries made by other companies, the remaining
battery capacity will not be shown.
19
VQT4C83
Preparation
32
Recording to a card
The unit can record still pictures or motion pictures to an SD card or built-in memory. To
record to an SD card, read the following.
This unit (an SDXC compatible device) is compatible with SD Memory Cards, SDHC
Memory Cards and SDXC Memory Cards. When using an SDHC Memory Card/SDXC
Memory Card with other equipment, check the equipment is compatible with these
Memory Cards.
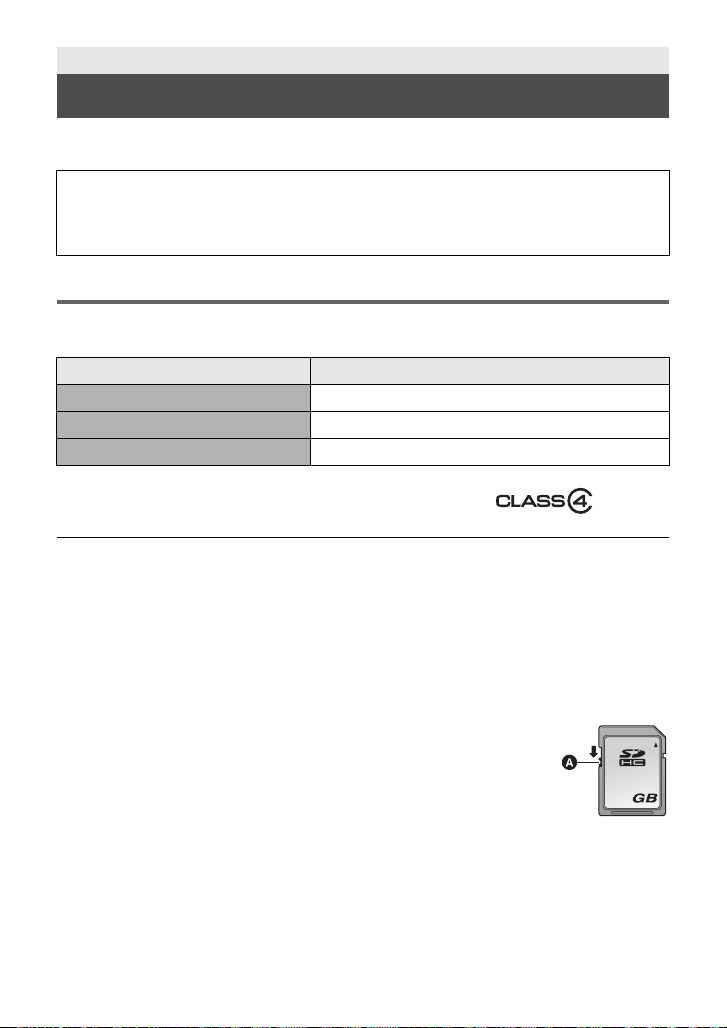
Cards that you can use with this unit
Use SD cards conforming to Class 4 or higher of the SD Speed Class Rating* for
motion picture recording.
Card type Capacity
SD Memory Card 512 MB/1 GB/2 GB
SDHC Memory Card 4 GB/6 GB/8 GB/12 GB/16 GB/24 GB/32 GB
SDXC Memory Card 48 GB/64 GB
* SD Speed Class Rating is the speed
standard regarding continuous writing.
Check via the label on the card, etc.
≥
Please confirm the latest information about SD Memory Cards/SDHC Memory Cards/SDXC
Memory Cards that can be used for motion picture recording on the following website.
http://panasonic.jp/support/global/cs/e_cam
(This website is in English only.)
≥ Operation of the SD Memory Card 256 MB or less is not guaranteed. Also, the SD Memory
Card 32 MB or less cannot be used for the motion picture recording.
≥ 4 GB or more Memory Cards that do not have the SDHC logo or 48 GB or more Memory
Cards that do not have the SDXC logo are not based on SD Memory Card Specifications.
≥ The operation of Memory Cards exceeding 64 GB cannot be guaranteed.
≥ When the write-protect switch A on SD card is locked, no recording,
deletion or editing will be possible on the card.
≥ Keep the Memory Card out of reach of children to prevent swallowing.
e.g.:
20
VQT4C83
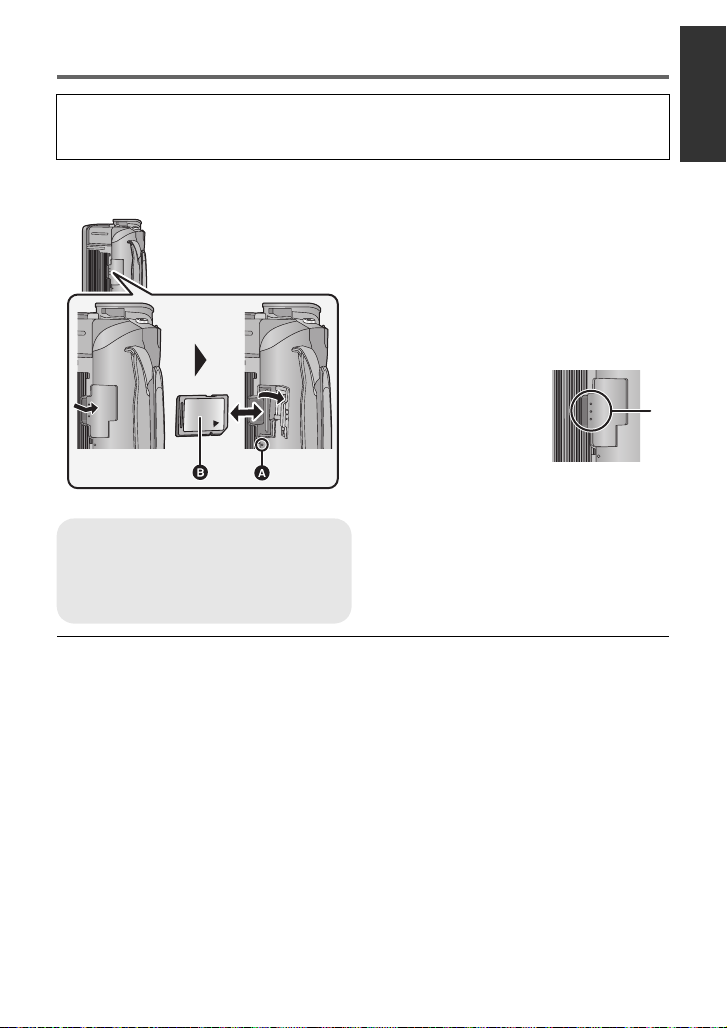
Inserting/removing an SD card
When using a non Panasonic SD card for the first time, or one which was previously used on
another equipment, it is necessary to format the SD card. (
formatted, all of the recorded data is deleted. Once the data is deleted, it cannot be restored.
Caution:
Check that the access lamp has gone off.
l
46) When the SD card is
1 Open the SD card cover and
insert (remove) the SD card
into (from) the card slot.
≥ Face the label side B in the direction
shown in the illustration and press it
straight in as far as it will go.
≥ Press the centre of the SD card and then
pull it straight out.
2 Press the C
part of the SD
card cover and
close the SD
card cover.
≥ Securely close it until it clicks.
Access lamp [ACCESS] A
≥ When this unit is accessing the SD
card or built-in memory, the access
lamp lights up.
≥ Do not touch the terminals on the back of
the SD card.
≥ Do not apply strong shocks, bend, or drop
the SD card.
≥ Electrical noise, static electricity or the
failure of this unit or the SD card may
damage or erase the data stored on the
SD card.
≥ When the card access lamp is lit, do not:
jRemove the SD card
jTurn the unit off
jInsert and remove the USB cable
jExpose the unit to vibrations or shock
Performing the above while the lamp is on
may result in damage to data/SD card or
this unit.
≥ Do not expose the terminals of the SD
card to water, dirt or dust.
≥ Do not place SD cards in the following
areas:
jIn direct sunlight
jIn very dusty or humid areas
jNear a heater
jLocations susceptible to significant
difference in temperature (condensation
can occur.)
jWhere static electricity or
electromagnetic waves occur
≥ To protect SD cards, return them to their
cases when you are not using them.
≥ About disposing of or giving away the SD
card. (l 162)
VQT4C83
21
Preparation
HC-X900M
HC-X900M
Turning the unit on/off
You can turn the unit on and off using the power button, the LCD monitor or the viewfinder.
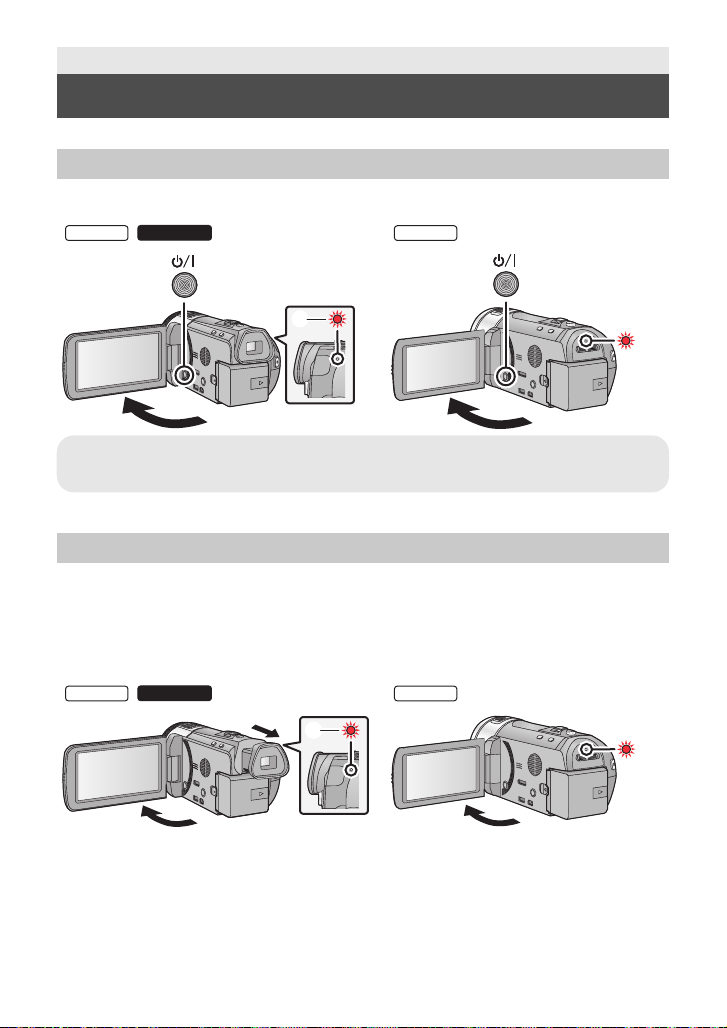
Turning the unit on and off with the power button
Open the LCD monitor and press the power button to turn on the unit.
HC-X900
To turn off the unit
Hold down the power button until the status indicator goes off.
A The status indicator lights on.
Turning the unit on and off with the LCD monitor/viewfinder
Opening the LCD monitor or extending the viewfinder turns on the unit. Closing the LCD
monitor/viewfinder turns off the unit.
During general use, you may find it convenient to turn the unit on/off using the LCD
monitor or viewfinder.
∫ To turn on the unit
HC-X900
/
/
HC-X800
HC-X800
A The status indicator lights on.
22
VQT4C83
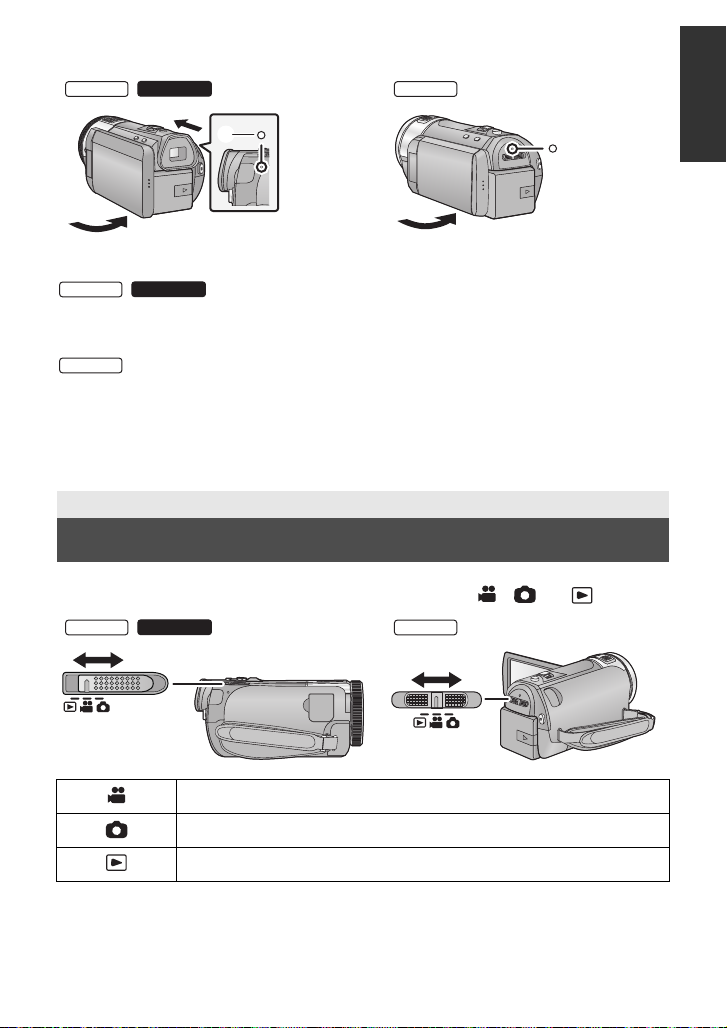
∫ To turn off the unit
HC-X900
HC-X900M
HC-X800
HC-X900M
HC-X800
HC-X900M
/
B The status indicator goes off.
HC-X900
≥ The unit will not turn off unless the LCD monitor is closed and the viewfinder is retracted.
≥ The unit will not turn off while recording motion pictures even if the LCD monitor is closed
≥ The unit will not turn off while recording motion pictures even if the LCD monitor is closed.
≥ In the following cases, opening the LCD monitor or extending the viewfinder does not turn
/
and the viewfinder is retracted.
on the unit. Press the power button to turn on the unit.
jWhen the unit is originally purchased
jWhen you have turned off the unit using the power button
Preparation
Selecting a mode
Change the mode to recording or playback.
Operate the mode switch to change the mode to , or .
HC-X900
/
HC-X800
Motion Picture Recording Mode (l 29)
Still Picture Recording Mode (l 31)
Playback Mode (l 35, 87)
23
VQT4C83
Preparation
Preparation of the LCD monitor/
Viewfinder
The viewfinder is turned off and the LCD monitor is turned on when the LCD monitor is
opened.
The viewfinder is turned on when the LCD monitor is closed and the viewfinder is extended.
≥ Live image recording or 3D recordings can be viewed in 3D on the LCD monitor. (l 84,
112)
There are differences in the way that different people experience 3D images. Check
from a position directly in front of and at around 25 cm from the LCD monitor,
where you can easily see picture.
∫ To adjust the image in the viewfinder
Adjust to make the image clear by
rotating the eyepiece corrector dial.
≥ Extend the viewfinder and close the LCD monitor
to turn on the viewfinder.
Preparation
[HC-X900/HC-X900M]
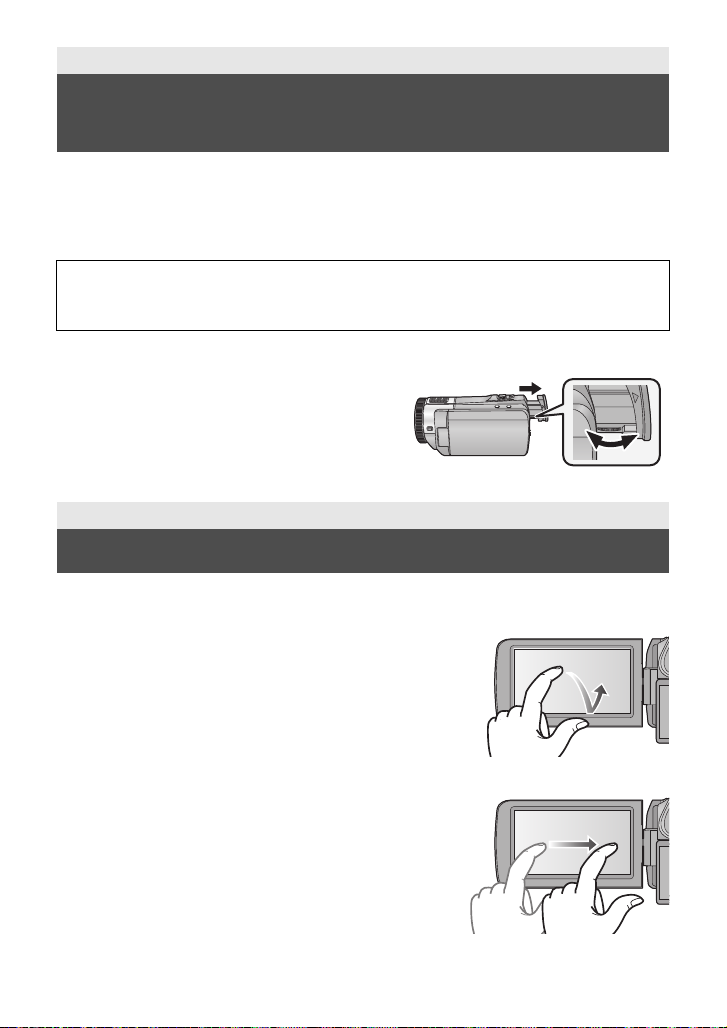
How to use the touch screen
You can operate by directly touching the LCD monitor (touch screen) with your finger.
∫ Touch
Touch and release the touch screen to select icon or
picture.
≥ Touch the centre of the icon.
≥ Touching the touch screen will not operate while you are
touching another part of the touch screen.
∫ Slide while touching
Move your finger while pressing on the touch screen.
24
VQT4C83
∫ About the operation icons
HC-X900
HC-X900M
HC-X800
T
W
FOCUS
WB
SHTR
IRIS
MENU
Q.
MENU
MENU
ALL
/
///:
These icons are used to switch the menu and thumbnail display page, for item
selection and setting etc.
:
Touch to return to the previous screen such as when setting menus.
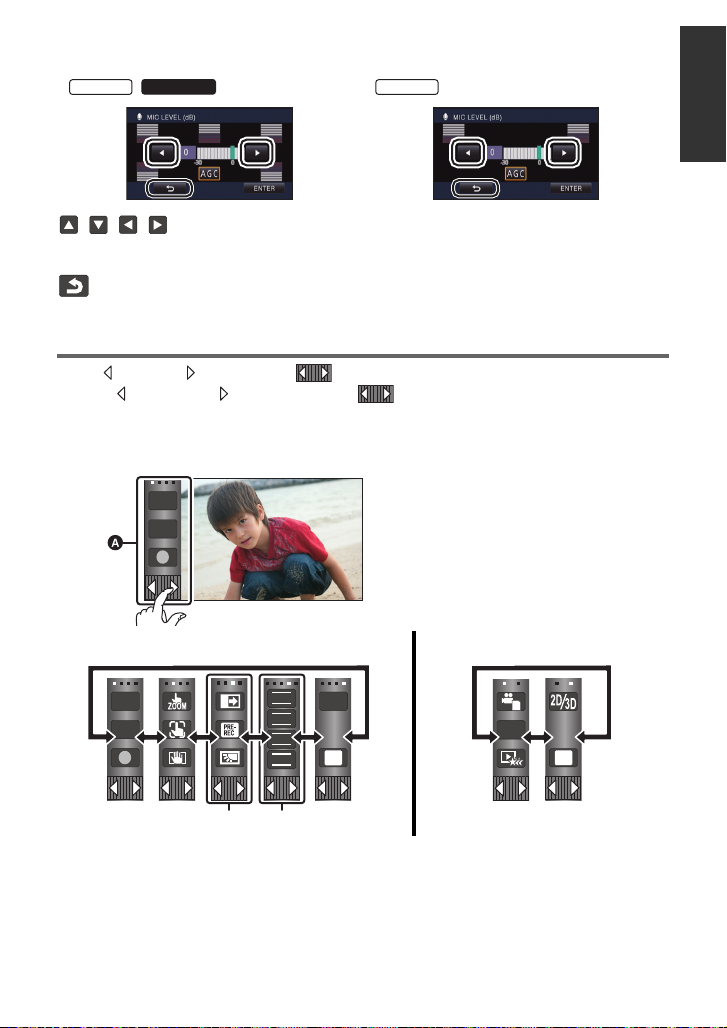
About the Touch Menu
Touch (left side)/ (right side) of on the Touch Menu to switch the operation icons.
Touch (left side)/ (right side) of on the Touch Menu.
≥ It is also possible to switch the operation icons by sliding the Touch Menu right or left while
touching it.
A Touch Menu
T
W
Recording Mode Playback Mode
* Above image is example of display for HC-X900/HC-X900M.
B Operation icons to display can be changed. (l 43)
C Displayed only during the Manual Mode. (l 79)
25
VQT4C83
∫ To display the Touch Menu
MENU
Display of the Touch Menu will disappear when no
touch operation is performed for a specific period
of time. To display it again, touch .
≥ Do not touch on the LCD monitor with hard pointed tips, such as ball point pens.
Preparation
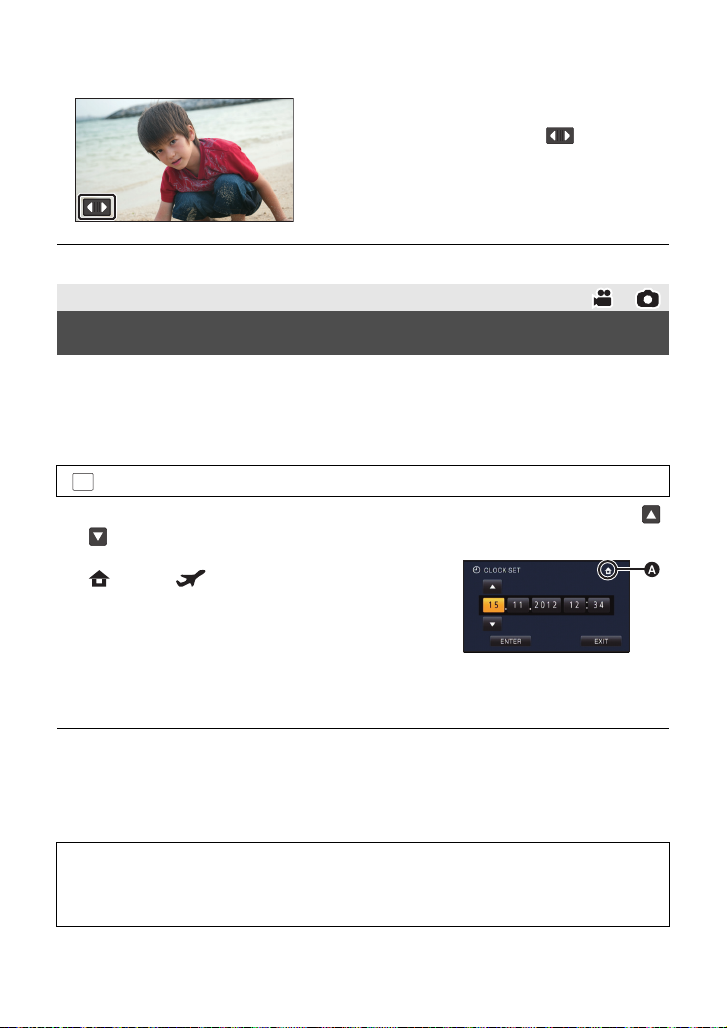
Setting date and time
When the unit is turned on for the first time, a message asking you to set the date and time
will appear.
Select [YES] and perform Steps 2 to 3 below to set the date and time.
1 Select the menu. (l 38)
: [SETUP] # [CLOCK SET]
2 Touch the date or time to be set, then set the desired value using /
.
A Displaying the World time setting (l 39):
[HOME]/ [DESTINATION]
≥ The year can be set between 2000 and 2039.
≥ The 24-hour system is used to display the time.
3 Touch [ENTER].
≥ A message prompting for World Time setting may be
displayed. Perform the World Time setting by touching the screen. (l 39)
≥ Touch [EXIT] to complete the setting.
≥ The date and time function is driven by a built-in lithium battery.
≥ If the time display becomes [- -], the built-in lithium battery needs to be charged. To
recharge the built-in lithium battery, connect the AC adaptor or attach the battery to this
unit. Leave the unit as it is for approx. 24 hours and the battery will maintain the date and
time for approx. 6 months. (The battery is still being recharged even if the unit is off.)
WARNING
THE LITHIUM BATTERY IN THIS EQUIPMENT MUST ONLY BE REPLACED BY
QUALIFIED PERSONNEL. WHEN NECESSARY, CONTACT YOUR LOCAL PANASONIC
SUPPLIER.
26
VQT4C83
Basic
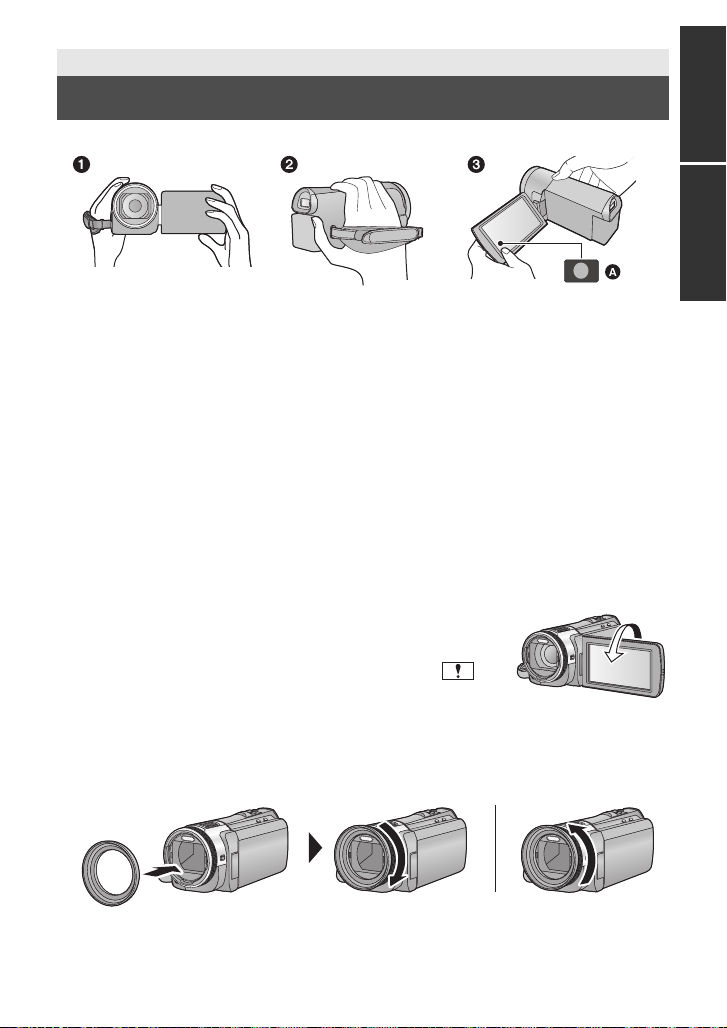
Before recording
∫ Basic camera positioning
1 Hold the unit with both hands.
2 Put your hand through the grip belt.
3 It is convenient to use the recording button icon A when holding the unit at waist level.
≥ When recording, make sure your footing is stable and there is no danger of colliding with
another person or object.
≥ When you are outdoors, record pictures with the sunlight behind you. If the subject is
backlit, it will become dark in the recording.
≥ Keep your arms near your body and separate your legs for better balance.
≥ Do not cover the microphones or the cooling fan inlet with your hand etc.
∫ Basic motion picture recording
≥ The unit should normally be held steady when recording.
≥ If you move the unit when recording, do so slowly, maintaining a constant speed.
≥ The zoom operation is useful for recording subjects you cannot get close to, but overuse of
zoom in and zoom out can make the resulting motion picture less enjoyable to watch.
∫ Recording yourself
Rotate the LCD monitor towards the lens side.
≥ The image is horizontally flipped as if you see a mirror image.
(However the image recorded is the same as a normal recording.)
≥ Only some indications will appear on the screen. When
appears, return the direction of the LCD monitor to normal
position and check the warning/alarm indication. (l 150)
∫ Attaching/Removing the lens hood
This will reduce the extra light entering the lens in bright sunlight or backlight etc., making it
possible to take clearer pictures.
A Attaching the lens hood
B Removing the lens hood
27
VQT4C83
≥ If you use the Filter Kit (optional), the Conversion Lens (optional) or the 3D Conversion
Lens (optional), remove the lens hood.
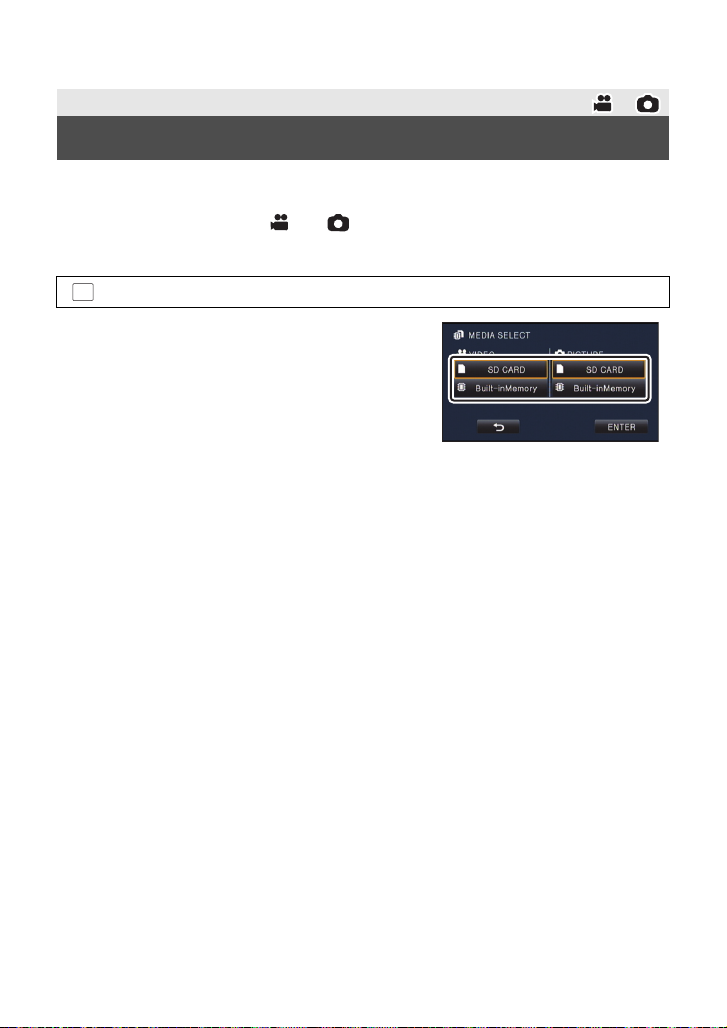
Basic
Selecting a media to record [HC-X900M]
The card and built-in memory can be selected separately to record motion pictures or still
pictures.
1 Change the mode to or .
2 Select the menu. (l 38)
MENU
: [MEDIA SELECT]
3 Touch the media to record motion
pictures or still pictures.
≥ The media is selected separately to motion pictures
or still pictures is highlighted in yellow.
4 Touch [ENTER].
28
VQT4C83
Basic
0h00m00s0h00m00s0h00m00s
R 1h20mR 1h20mR 1h20m
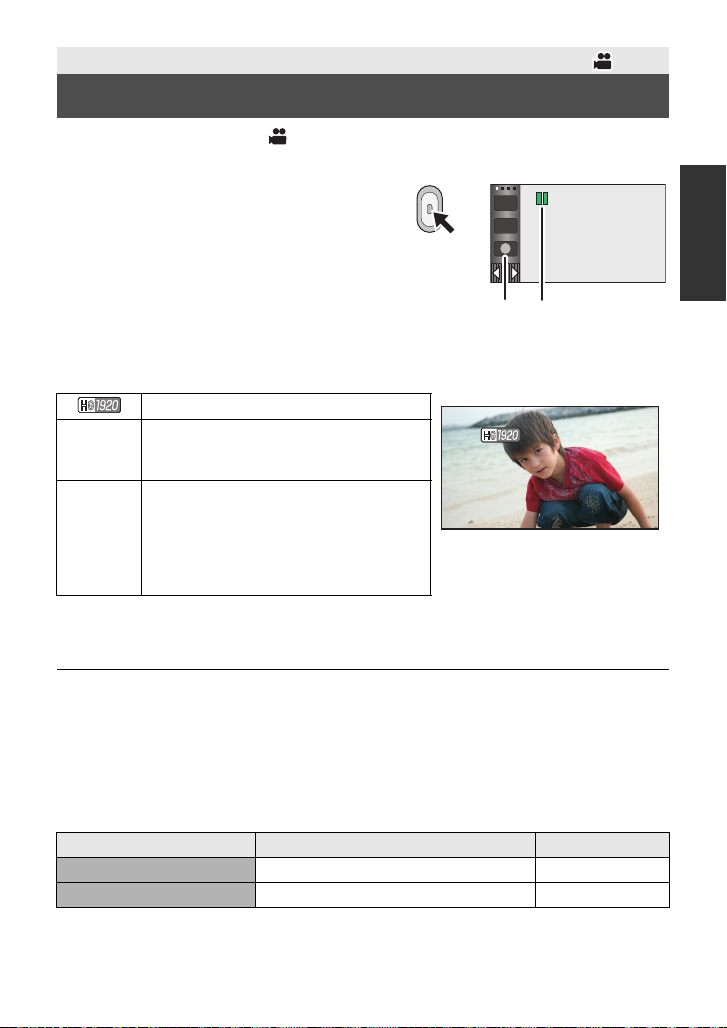
Recording motion pictures
1 Change the mode to . (l 23)
2 Open the LCD monitor or extend the viewfinder.
3 Press the recording start/stop button
to start recording.
A Recording button icon
B When you begin recording, ; changes to ¥.
4 Press the recording start/stop button
again to pause recording.
≥ Recording can also be started/stopped by touching the recording button icon. This icon
functions in the same manner as the recording start/stop button.
∫ Screen indications in the Motion Picture Recording Mode
Recording mode
R 1h20m
0h00m00s
≥ Screen display will disappear when no touch operation is performed for a specific period of
time. To display it again, touch the screen. (l 39)
It will be constantly displayed when the remaining recordable time becomes less than 30 minutes.
≥
Approximate remaining recordable time
≥ When the remaining time is less than
1 minute, R 0h00m flashes red.
Recording time elapsed
≥ “h” is an abbreviation for hour, “m” for
minute and “s” for second.
≥ Each time the unit is put into recording
pause, the counter display will be reset
to 0h00m00s.
T
W
≥ To change the recording format, change the Recording Mode (l 64) or press and
hold the 1080/50p button. (l 52)
≥ Still pictures can be recorded while recording the motion picture. (l 32)
≥ The images recorded between pressing the recording start/stop button to start recording
and pressing it again to pause recording become one scene.
When you record with the [REC MODE] set to [iFrame], the scenes longer than
approximately 20 minutes will be automatically divided. (Recording will continue.)
≥ (Maximum recordable scenes of a single SD card or built-in memory)
Recording formats [1080/50p], [HA], [HG], [HX], [HE] [iFrame]
Recordable scenes Approx. 3900 Approx. 89100
Different dates (l 91) Approx. 900 Approx. 900
≥ Maximum number of recordable scenes and maximum number of different dates will be
less than above table when there are both iFrame scenes and still pictures recorded on an
SD card or the built-in memory.
29
VQT4C83

≥ /
HC-X900M
HC-X800
HC-X900
HC-X900M
HC-X900
While recording is in progress, the recording will not stop even if the LCD monitor is closed
and the viewfinder is retracted.
While recording is in progress, the recording will not stop even if the LCD monitor is closed.
≥ /
Put the unit in Pause mode when connecting or disconnecting an external microphone with
the MIC terminal.
≥ Please refer to page 165 for detail about the approximate recordable time.
About the compatibility of the recorded motion pictures
When motion picture is recorded in AVCHD 3D format
≥ Only motion pictures recorded with the recording format set to AVCHD 3D are
supported by AVCHD 3D compatible equipment.
≥ It is still possible to play back when the motion picture is dubbed to an AVCHD
compatible equipment, but the 3D motion picture recorded on this unit will be converted
to a 2D motion picture. It is not possible to restore the converted 2D motion picture
back to a 3D motion picture.
≥ It is not always possible to play back motion pictures recorded with the recording
format set to AVCHD 3D on AVCHD 3D compatible equipment or AVCHD compatible
equipment. In such a case, play back on this unit instead.
When motion picture is recorded in AVCHD Progressive format
≥ Only motion pictures recorded with the recording format set to AVCHD Progressive are
supported by AVCHD Progressive compatible equipment.
≥ It is not always possible to play back motion pictures recorded with the recording
format set to AVCHD Progressive on AVCHD Progressive compatible equipment. In
such a case, play back on this unit instead.
When motion picture is recorded in AVCHD format
≥ Only motion pictures recorded with the recording format set to AVCHD are supported
by AVCHD compatible equipment. Images cannot be played with equipment that does
not support AVCHD (ordinary DVD recorders). Confirm that your equipment supports
AVCHD by referring to the operating instructions.
≥ It is not always possible to play back motion pictures recorded with the recording
format set to AVCHD on AVCHD compatible equipment. In such a case, play back on
this unit instead.
When motion picture is recorded in iFrame format
≥ You can play back on Mac (iMovie’11).
≥ It is not compatible with motion pictures recorded in AVCHD format.
≥ It is not always possible to play back motion pictures recorded with the recording
format set to iFrame on iFrame compatible equipment. In such a case, play back on
this unit instead.
30
VQT4C83
Basic
MEGA
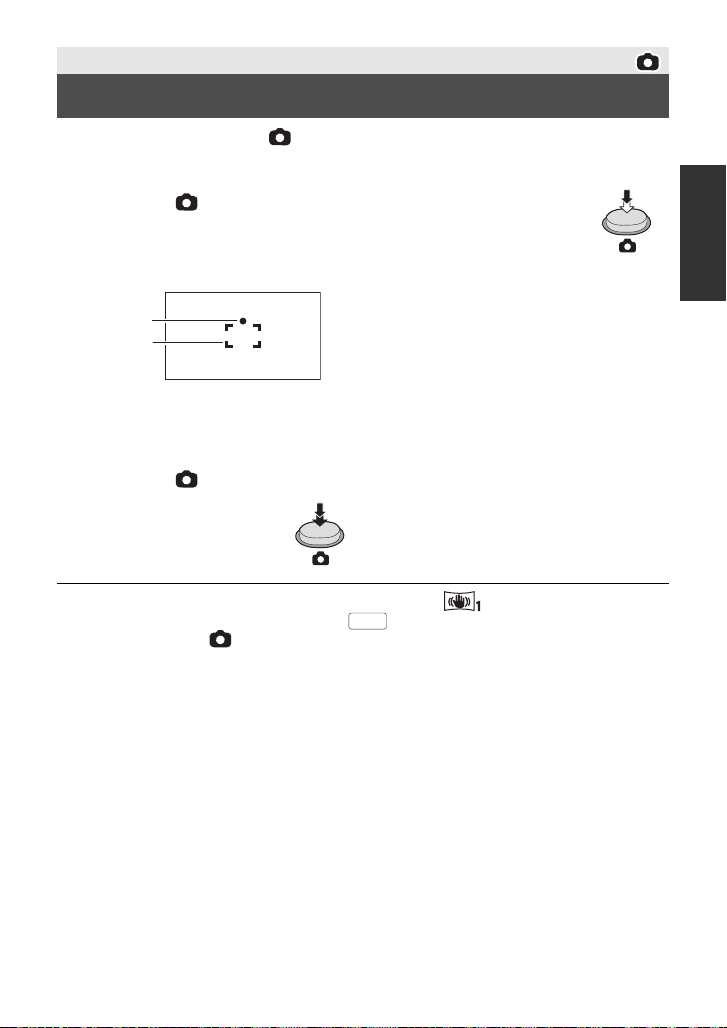
Recording still pictures
1 Change the mode to . (l 23)
2 Open the LCD monitor or extend the viewfinder.
3 Press the button halfway. (For Auto Focus only)
Focus indication:
A Focus indication
± (The white lamp flashes.):
Focusing
¥ (The green lamp lights up.):
When in focus
No mark:
When focusing is unsuccessful.
B Focus area (area inside brackets)
4 Press the button fully.
≥ If you set the Optical Image Stabilizer function (l 51) to ([MODE1]), then the Image
Stabilizer function will be more effective. ( (MEGA Optical Image Stabilizer) will be
displayed when the button is pressed halfway.)
≥ The AF assist lamp lights in dark places.
≥ Using a flash or tripod is recommended when recording still pictures in dark places
because the shutter speed becomes slow.
≥ You can also take a picture just by touching the subject to focus. (Touch Shutter: l 55)
≥ To print a picture, save the picture to the SD card (l 120) and print using a PC or a printer.
31
VQT4C83

∫ About the screen indications in Still Picture Recording
R3000R3000R3000
MEGA
MEGA
R3000
M
16
Still picture operation indicator (l 147)
Remaining number of still pictures
≥ Flashes in red when [0] appears.
Size of still pictures (l 75)
M
16
MEGA Optical Image Stabilizer (l 31) ≥ Screen display will disappear
Optical Image Stabilizer (l 51)
AF assist lamp (l 78)
ß Flash (l 59)
ßj Flash level (l 59)
Red-eye Reduction (l 59)
when no touch operation is
performed for a specific period
of time. To display it again,
touch the screen.
≥ It will be constantly displayed
when the remaining number of
still pictures that can be
recorded becomes 200 or less.
∫ About the focus indication
≥ The focus indication indicates the status of the Auto Focus.
≥ The focus indication does not appear in Manual Focus Mode.
≥ The focus indication does not appear or has difficulty focusing in the following cases.
jWhen close subjects and far subjects are included in the same scene
jWhen the scene is dark
jWhen there is a bright part in the scene
jWhen the scene is filled with only horizontal lines
∫ About the focusing area
When there is a contrasting object ahead or behind the subject in the focus area, the subject
may not be focused. If so, move the contrasting object out of the focus area.
≥ Focus area is not displayed in the following conditions.
jWhen the Intelligent Auto Mode (Portrait) is used
jWhen AF/AE tracking is used
jWhen the Extra Optical Zoom is used
jWhen the unit determines that the AF assist lamp is necessary
Recording still pictures in Motion Picture Recording Mode
You can record still pictures even in Motion Picture Recording Mode.
¬ Change the mode to .
Press the button fully (press to the bottom) to take the picture.
≥ It is possible to record still pictures while recording motion pictures.
(Simultaneous recording)
≥ Remaining number of recordable pictures is displayed while still pictures
are being recorded.
≥ Built-in flash, Red-eye Reduction, Self-timer (l 60) do not work.
≥ While recording motion pictures or during the PRE-REC operation, image quality is
different from ordinary still pictures so that motion picture recording takes preference over
still picture recording.
32
VQT4C83

≥ If simultaneous recording is used while recording a motion picture, the recordable time
/MANUAL
Intelligent auto/Manual button
Press this button to switch Intelligent Auto
Mode/Manual Mode.
≥ Please refer to page 79 about Manual Mode.
remaining will shorten. If the unit is turned off or the mode switch operated, the recordable
time remaining may lengthen.
Basic
Intelligent Auto Mode
The following modes (appropriate for the condition) are set just by pointing the unit to what
you want to record.
Mode Effect
Portrait Faces are detected and focused automatically, and the
Scenery The whole landscape will be recorded vividly without whiting
*1
Spotlight Very bright object is recorded clearly.
*1
Low light It can record very clearly even in a dark room or twilight.
*2
Night portrait A subject and the background are recorded with near real-life
*2
Night scenery You can record night scenery vividly by slowing the shutter
*2
Macro This allows recording at very close proximity to the object of
*1
Normal In modes other than those described above, the contrast is
*2
*1 In Motion Picture Recording Mode only
*2 In Still Picture Recording Mode only
brightness is adjusted so it is recorded clearly.
out the background sky, which may be very bright.
brightness.
speed.
recording.
adjusted to give a clear picture.
33
VQT4C83

≥ Depending on the recording conditions, the unit may not enter the desired mode.
4)
5)
6)
7)
8)
10 000K
9 000K
8 000K
7 000K
6 000K
5 000K
4 000K
3 000K
2 000K
2)
1)
3)
9)
≥ In the Portrait, Spotlight and Low Light Mode, the face will be surrounded by white frame
when detected. In the Portrait Mode, a subject that is bigger and close to centre of the
screen will be surrounded by an orange frame. (l 68)
≥ Using a tripod is recommended in Night Portrait and Night Scenery Mode.
≥ Faces cannot be detected depending on the recording conditions, such as when faces are
of certain sizes or at certain tilts or when digital zoom is used.
∫ Intelligent Auto Mode
When switching to Intelligent Auto Mode, the Auto White Balance and Auto Focus operate
and automatically adjust the colour balance and focusing.
Depending on the brightness of the subject etc., the aperture and shutter speed are
automatically adjusted for an optimum brightness.
≥ Colour balance and focus may not be adjusted automatically depending on light sources or
scenes. If so, manually adjust these settings. (l 80, 82)
Automatic White Balance
The illustration shows the range over which Automatic White Balance functions.
1) The effective range of Automatic White Balance
adjustment on this unit
2) Blue sky
3) Cloudy sky (rain)
4) Sunlight
5) White fluorescent lamp
6) Halogen light bulb
7) Incandescent light bulb
8) Sunrise or sunset
9) Candlelight
If the Automatic White Balance is not functioning normally,
adjust the White Balance manually. (l 80)
Auto Focus
The unit focuses automatically.
≥ Auto Focus does not work correctly in the following situations. Record pictures in the
Manual Focus Mode. (l 82)
jRecording distant and close-up objects at the same time
jRecording a subject behind dirty or dusty window
jRecording a subject that is surrounded by objects with glossy surfaces or by highly
34
VQT4C83
reflective objects

Basic
ALL
HC-X900
HC-X800
1080/50i
3D
Motion picture/Still picture playback
1 Change the mode to . (l 23)
2 Touch the play mode select icon A. (l 25)
3 /
Select the still picture B or the recording
format of the motion picture C you wish
to play back.
HC-X900M
Select the media type D and then select
the still picture B or the recording format
of the motion picture C you wish to play
back.
≥ Touch [ENTER].
≥ The icon is displayed in the thumbnail display when the item for motion picture is touched.
( , , , , , , )
≥ is displayed on the 1080/50p scene, (Blue) is displayed on the AVCHD 3D scene
50p
and is displayed on the side-by-side scene by touching [ALL AVCHD].
3D
4 Touch the scene or the still picture to be
played back.
≥ It will switch to the screen displaying and thumbnail
scroll lever E when no operation is performed for
approximately 5 seconds on the thumbnail display
screen.
For details about deleting, refer to page 99.
≥ To display the next (previous) page:
jSlide the thumbnail display upward (downward) while touching it.
jTouch (up)/ (down) on the thumbnail scroll lever.
35
VQT4C83

5 Select the playback operation by touching the operation icon.
0h01m30s0h01m30s0h01m30s
HC-X900
HC-X900M
F Operation icon
≥ Operation icons and screen display will disappear
when no touch operation is performed for a specific
period of time. To display them again, touch the
screen.
≥ /
The scene or still picture being played back is
converted to 3D image/2D image and played back
when the / is touched. (l 115 )
≥ Slide show will be played back only in 2D or only in 3D. It will play back in 2D if the still
picture at the start of the slide show is 2D (3D still pictures are converted to 2D still pictures
and played back), and it will play back in 3D if it is 3D (2D still pictures are converted to 3D
still pictures and played back).
Motion picture playback Still picture playback
1/;: Playback/Pause
6: Rewind playback
5: Fast forward playback
∫: Stops the playback and shows
the thumbnails.
∫ Change the thumbnail display
While the thumbnail is displayed, the thumbnail display changes in the
following order if the zoom lever is operated to side or side.
20 scenes
* Highlight & Time Frame Index can only set in Motion Picture Playback Mode.
≥ 9 scenes display returns if the unit is turned off or the mode is changed.
≥ By displaying in 1 scene or touching and holding the thumbnail in the 20
()
9 scenes
()
1 scene
()
scenes or 9 scenes display, recording date and time are displayed when playing back
motion pictures, and recording date and file number when playing back still pictures.
∫ Speaker/Headphone volume
adjustment
Operate the volume lever to adjust the speaker/
headphone volume during Motion Picture
Playback Mode.
1/;: Slide show (playback of the still
pictures in numerical order)
start/pause.
2;: Plays back the previous picture.
;1: Plays back the next picture.
∫: Stops the playback and shows
the thumbnails.
Highlight & Time Frame Index* (l88)
Tow a r d s “ r”: Increases the volume
Tow a r d s “ s”: Decreases the volume
* HC-X800 is not equipped with the Headphone volume adjustment function.
≥ Sound will be heard only during normal playback.
≥ If pause play is continued for approx. 5 minutes, the screen returns to the thumbnails.
36
VQT4C83

≥ The elapsed time for playback indication will be reset to 0h00m00s each scene.
≥ When playing back with [ALL AVCHD] selected, the screen may become black
momentarily at the time the scene switches.
Motion picture compatibility
≥ This unit is based on AVCHD 3D/AVCHD Progressive/AVCHD.
AVCHD 3D format
≥
Video signals for the AVCHD 3D that can be played back with this unit are 1920k1080/50i.
≥ Do not delete or edit the 3D image recorded on the SD card with this unit using
anything other than AVCHD 3D compatible equipment (such as conventional
AVCHD compatible equipment). 3D image in the SD card will be converted to 2D
image. Once it is converted to 2D image, it is not possible to restore to 3D image.
≥ This unit may degrade or not play back motion pictures recorded or created on other
products, and other products may degrade or not play back motion pictures recorded
on this unit, even if the products support AVCHD 3D.
AVCHD Progressive format
≥ Video signal for the AVCHD Progressive that can be played back with this unit is
1920k1080/50p.
≥ This unit may degrade or not play back motion pictures recorded or created on other
products, and other products may degrade or not play back motion pictures recorded
on this unit, even if the products support AVCHD Progressive.
AVCHD format
≥ Video signals for the AVCHD that can be played back with this unit are 1920k1080/50i
and 1440k1080/50i.
≥ This unit may degrade or not play back motion pictures recorded or created on other
products, and other products may degrade or not play back motion pictures recorded
on this unit, even if the products support AVCHD.
iFrame format
≥ Video signals for the iFrame that can be played back with this unit are 960k540/25p.
≥ Motion pictures recorded in AVCHD and iFrame are not compatible with each other.
≥ This unit may degrade or not play back motion pictures recorded or created on other
products, and other products may degrade or not play back motion pictures recorded
on this unit, even if the products support iFrame.
MP4 format
≥ Only the MP4 (640k360/25p) created on this unit can be played back.
≥ The other products may degrade or not play back motion pictures created on this unit,
even if the products support MP4.
Still picture compatibility
≥ This unit is compliant with the unified standard DCF (Design rule for Camera File
system) established by JEITA (Japan Electronics and Information Technology
Industries Association).
≥ The file formats of still pictures supported by this unit are MPO and JPEG. (Not all
MPO and JPEG formatted files will be played back.)
≥ This unit may degrade or not play back still pictures recorded or created on other
products and other products may degrade or not play back still pictures recorded on
this unit.
VQT4C83
37

Basic
MENU
MENU
MENU
Q.
MENUQ.MENU
Q.
MENU
Q.
MENU
A
Using the menu screen
≥
Touch (left side)/ (right side) of
on the Touch Menu to display . (
1 Touch .
2 Touch the top menu A.
3 Touch the submenu B.
l
Using the quick menu
25)
This allows quick setting of some of the
menus.
≥
1 Touch .
The following menus can be set. Touch the
desired menu.
≥ The items displayed differ depending on
Touch (left side)/ (right side) of
on the Touch Menu to display . (
the position of the mode switch or settings.
Icon Function Page
[REC MODE]
[PICTURE SIZE]
M
16
/
14.7
M
[POWER LCD]
/
l
25)
l 64
l 75
l 44
≥ Next (previous) page can be displayed by
touching / .
4 Touch the desired item to enter
the setting.
5 Touch [EXIT] to exit the menu
setting.
∫ About guide display
After touching , touching the submenus
and items will cause function descriptions and
settings confirmation messages to appear.
≥ After the messages have been displayed,
the guide display is cancelled.
38
VQT4C83
[GUIDE LINES]
[MIC LEVEL]
[MF ASSIST]
[ZEBRA]
[LUMINANCE]
[HISTOGRAM]
l 61
l 72
l 83
l 74
l 74
l 74
2 Touch the desired item to enter
the setting.
3 Touch [EXIT] to exit the quick
menu.

Basic
MENU
A The current time
B The time difference from GMT
(Greenwich Mean Time)
Using the Setup Menu
≥ The items displayed differ depending on the position or settings of the mode switch.
Select the menu.
: [SETUP] # desired setting
[DISPLAY]
Set the display method for the screen information display.
[5 SECONDS]: Information is displayed on the screen for 5 seconds after starting
the recording mode, starting to playback, or touching the screen.
[ON]: Constantly display
[5 SECONDS]/[ON]
[CLOCK SET]
Please refer to page 26.
[SET WORLD TIME]
It is possible to display and record the time at the travel destination by selecting your home
region and the travel destination.
1 Touch [SET WORLD TIME].
≥ If the clock is not set, adjust the clock to the current time. (l 26)
≥ When the [HOME] (your home region) is not set, the message appears. Touch [ENTER]
and proceed to Step 3.
2 (Only when setting your home region)
Tou c h [H O ME].
≥ Touch [ENTER].
3 (Only when setting your home region)
Touch / to select your home
region and touch [ENTER].
≥ Touch [SUMMER TIME SET] to set daylight
saving time. appears and the
summer time setting is turned on; the time
difference from GMT is set forward by one
hour. Touch [SUMMER TIME SET] again to
return to the normal time setting.
4 (Only when setting the region of your travel
destination)
Touch [DESTINATION].
≥ Touch [ENTER].
39
VQT4C83

≥ When the home region is set for the first time, the screen for selecting home/travel
C The local time at the selected
travel destination
D The time difference between
the travel destination and the
home region
HC-X900
HC-X900M
T
W
destination appears after setting the home region successively. If the home region has
already been set once, execute the menu operation for Step 1.
5 (Only when setting the region of your travel
destination)
Touch / to select your travel
destination and touch [ENTER].
≥ Touch [SUMMER TIME SET] to set daylight
saving time. appears and the
summer time setting is turned on. The travel
destination time and time difference from
the home region time are set forward by one
hour. Touch [SUMMER TIME SET] again to
return to the normal time setting.
≥ Close the setting by touching [EXIT].
appears and the time of the travel destination is indicated.
To return the display to the home setting
Set the home region using Step 1 to 3, and close the setting by touching [EXIT].
≥ If you cannot find your travel destination in the area shown on the screen, set it by using
the time difference from your home region.
[DATE/TIME]
It is possible to change the date and time display mode.
≥ /
You can also show or change the date and time display by repeatedly pressing the DATE/
TIME button on the remote control.
[DATE FORMAT]
It is possible to change the date format.
[ZOOM/REC DISPLAY]
You can set the display method of the zoom button icons ( / ) and recording button
icon ( ).
[DATE]/[D/T]/[OFF]
[Y/M/D]/[M/D/Y]/[D/M/Y]
[ON]/[OFF]
[ON]: Constantly display
[OFF]: Icons will disappear after approx. 5 seconds without any touch operation.
[O.I.S. LOCK DISPLAY]
Set the display method for the Optical Image Stabilizer Lock icon ( ).
[ON]: Constantly display
[OFF]: The icon will disappear after approx. 5 seconds without any touch operation.
40
VQT4C83
[ON]/[OFF]

HC-X800
HC-X900M
HC-X800
HC-X800
HC-X900M
[EXT. DISPLAY]
Please refer to page 108.
[SIMPLE]/[DETAIL]/[OFF]
[ECONOMY (BATT)]
When about 5 minutes have passed without any operation, this unit automatically turns off to
save battery life.
≥ This unit will not automatically turn off even if the [ECONOMY (BATT)] is set to [ON] in
following cases:
jUsing the AC adaptor*
jUsing the USB cable for PC, DVD burner etc.
jPRE-REC is used
jDuring slide show playback
* When [ECONOMY (AC)] is activated, this unit automatically turns off.
[ECONOMY (AC)]
When about 30 minutes have passed without any operation while connecting AC adaptor
with this unit, this unit automatically turns off.
≥ This unit will not automatically turn off even if the [ECONOMY (AC)] is set to [ON] in
following cases:
jUsing the USB cable for PC, DVD burner etc.
jPRE-REC is used
jDuring slide show playback
[QUICK POWER ON]
The unit is put into recording pause approx. 1 second when the unit is turned on with the
mode set to or .
≥ Depending on the recording conditions, start time may be longer than 1 second.
≥ In the quick power on mode, the zoom magnification becomes approx. 1k.
[QUICK START]
This unit is put into recording pause approx. 0.6 seconds after the LCD monitor is reopened
or the viewfinder is extended.
≥ /
HC-X900
When in Quick Start Standby Mode about 70% of the power used in recording pause
mode is being consumed, so the recording time will be reduced.
[ON]/[OFF]
[ON]/[OFF]
[ON]/[OFF]
[ON]/[OFF]
When in Quick Start Standby Mode about 80% of the power used in recording pause
mode is being consumed, so the recording time will be reduced.
≥ /
HC-X900
Quick Start will not work if there is no SD card inserted.
Quick Start will not work if the [SD CARD] is selected in the [MEDIA SELECT], even if there
is no SD card inserted.
VQT4C83
41

≥ Change the mode to or .
HC-X900
HC-X900M
HC-X800
HC-X900M
HC-X900
HC-X900M
HC-X900M
1 Set [QUICK START] to [ON].
2 Close the LCD monitor and retract the viewfinder.
/
The status indicator A flashes green and the unit goes into Quick Start Standby Mode.
≥ The lens cover does not close.
3 Open the LCD monitor or extend the viewfinder.
HC-X900
/
HC-X800
The status indicator A lights red and the unit is put into recording pause.
≥ Quick Start Standby Mode is cancelled if
jabout 5 minutes elapsed
jmode is set to
≥ Depending on the recording conditions and menu settings, time for Quick Start may be
longer than 0.6 seconds.
≥ It may take some time for Automatic White Balance to adjust.
≥ In the Quick Start Mode, the zoom magnification becomes approx. 1k.
≥ /
If [ECONOMY (BATT)] (l 41)/[ECONOMY (AC)] (l 41) is set to [ON] and the unit
automatically goes into Quick Start Standby Mode, close the LCD monitor and viewfinder
and then open the LCD monitor or extend the viewfinder again.
HC-X800
If [ECONOMY (BATT)] (l 41)/[ECONOMY (AC)] (l 41) is set to [ON] and the unit
automatically goes into Quick Start Standby Mode, close the LCD monitor and then open it
again.
≥ Turn the unit off using the power button.
≥ /
HC-X900
Quick Start Standby Mode cannot be released by the remote control.
42
VQT4C83

HC-X900
HC-X900M
HC-X900
HC-X900M
HC-X800
/
[ON]/[OFF]
[REMOTE CONTROL]
Please refer to page 48.
[REC LAMP]
/
The recording lamp lights up during recording and flashes when the unit receives a signal
from the remote control or when the Self-timer is counting down.
The recording lamp lights up during recording and flashes when the Self-timer is counting
down.
When this is set to [OFF], it does not light during recording.
[ALERT SOUND]
Touch screen operation, starting and stopping of recording and unit on/off can be confirmed
with this sound.
(Volume low)/ (Volume high)
2 Beeps for 4 times
When an error occurs. Check the sentence displayed on the screen. (l 150)
[ON]/[OFF]
/ /[OFF]
[SELECT OPERATION
ICONS]
You can change the operation icons displayed in the Touch Menu.
Register 3 favourite operation icons.
≥ This function’s default settings are (Fade), (PRE-REC) and (Backlight
Compensation) for Motion Picture Recording Mode, and (Built-in flash),
(Self-timer) and (Backlight Compensation) for Still Picture Recording Mode.
1 Touch [SELECT OPERATION ICONS].
2 Touch the operation icon you would like to change to cancel the setting.
3 Touch the operation icon to be set.
≥ Name of the function is displayed by touching and holding on the operation icon.
≥ To cancel, touch the operation icon again.
4 Touch [ENTER].
≥ For details about function of each operation icon, refer to page 56.
43
VQT4C83

[POWER LCD]
HC-X900
HC-X900M
A
0
-
1
+2
+1
0
-
1
A
HC-X900M
+1
HC-X900
HC-X900M
/ :
HC-X800
:
This makes it easier to view the LCD monitor in bright places including outdoors.
≥ These settings will not affect the images actually recorded.
≥ It is possible to set from the quick menu. (l 38)
HC-X800
(Makes even brighter)/ (Makes brighter)/ (Normal)/ (Makes less bright)/
*(Automatic adjustment)
* It is not displayed in the Manual Mode or in the Playback Mode.
≥ /
HC-X900
When the AC adaptor is in use, the LCD monitor is set to [ON] automatically.
HC-X800
When the AC adaptor is in use, the LCD monitor is set to automatically.
≥ When the LCD monitor is bright, the recordable time with the battery will be shorter.
[ON]/[OFF]
+1
+2
////
[LCD SET]
It adjusts brightness and colour density on the LCD monitor.
≥ These settings will not affect the images actually recorded.
1 Touch [LCD SET].
2 Touch the desired setting item.
[BRIGHTNESS]: Brightness of the LCD monitor
[COLOUR]: Colour level of the LCD monitor
3 Touch / to adjust settings.
4 Touch [ENTER].
≥ Touch [EXIT] to exit the menu screen.
/
[BRIGHT]/[NORMAL]/[DARK]
[EVF SET]
It adjusts the brightness of the viewfinder.
≥ These settings will not affect the images actually recorded.
≥ These can be set with the LCD monitor. Close the LCD monitor and extend the viewfinder
after setting, and confirm the brightness by turning on the viewfinder.
[AV MULTI]
Please refer to page 109.
[COMPONENT OUT]
Please refer to page 109.
44
VQT4C83
[COMPONENT]/[AV OUT]
[1080i]/[576i]

[HDMI RESOLUTION]
HC-X900
HC-X900M
HC-X900
HC-X800
Please refer to page 108.
[VIERA Link]
Please refer to page 110.
[TV ASPECT]
Please refer to page 107.
/
[AUTO]/[1080p]/[1080i]/[576p]
[ON]/[OFF]
[16:9]/[4:3]
[HDMI]/[LCD]
[3D OUTPUT]
Please refer to page 113.
HC-X800
[AUTO]/[2D]
[3D PLAYBACK]
Please refer to page 117.
[INITIAL SET]
Set to [YES] for changing the menu settings back to the default condition.
≥ Settings for [MEDIA SELECT]
* For users who have / , this menu is not displayed.
[Auto Cursor Position]
The entered character is confirmed in approx. 1 second at the time of character input, and
the cursor is moved to right.
It makes the input easy without moving the cursor when characters on the same key are to
be entered again.
≥ Character input screen is displayed in following conditions:
jWhen registering [FACE RECOG.] (l 66)
jWhen setting [TITLE SETUP] for Highlight Playback (l 96)
*
, [CLOCK SET] and [LANGUAGE] will not be changed.
[ON]/[OFF]
[NUMBER RESET]
Set the file number of the iFrame and still picture recorded next to 0001.
≥ Folder number is updated and file number will start from 0001. (l 144)
≥ To reset the folder number, format the SD card and built-in memory, and then perform
[NUMBER RESET].
≥ Please be aware that if a medium is formatted, then all the data recorded on the medium
will be erased and cannot be restored. Back up important data on a PC, DVD disc etc.
(l 123, 136)
45
VQT4C83

HC-X900
HC-X800
/
[FORMAT CARD]
Please be aware that if a medium is formatted, then all the data recorded on the medium will be
erased and cannot be restored. Back up important data on a PC, DVD disc etc. (
≥ When formatting is complete, touch [EXIT] to exit the message screen.
≥ Perform a physical formatting of the SD card when the SD card is to be disposed/
transferred. (l 162)
≥ Do not turn this unit off or remove the SD card, while formatting. Do not expose the unit to
vibrations or shock.
Use this unit to format media.
Do not format an SD card using any other equipment such as a PC. Otherwise it
may not be possible to use the card on this unit.
HC-X900M
l
123, 136)
[FORMAT MEDIA]
Please be aware that if a medium is formatted, then all the data recorded on the medium will
be erased and cannot be restored. Back up important data on a PC, DVD disc etc. (l 123,
136)
1 Touch [FORMAT MEDIA].
2 Touch [SD CARD] or [Built-inMemory].
≥ When formatting is complete, touch [EXIT] to exit the message screen.
≥ Perform a physical formatting of the SD card when the SD card is to be disposed/
transferred. (l 162)
≥ Perform a physical formatting of the built-in memory when this unit is to be disposed/
transferred. (l 159)
≥ Do not turn this unit off or remove the SD card, while formatting. Do not expose the unit to
vibrations or shock.
Use this unit to format media.
Formatting built-in memory is only available with this unit.
Do not format an SD card using any other equipment such as a PC. Otherwise it
may not be possible to use the card on this unit.
HC-X900 HC-X800
/
[CARD STATUS]
The used space and remaining recordable time of the SD card can be checked.
≥ When the mode switch is set to , remaining recordable time for the selected recording
mode is displayed.
≥ Touch [EXIT] to close the indication.
46
VQT4C83

≥ The SD card requires some space to store information and manage system files, so the
HC-X900M
actual usable space is slightly less than the indicated value. The usable space is generally
calculated as 1 GB=1,000,000,000 bytes. The capacities of this unit, PCs and software are
expressed as 1 GB=1,024k1,024k1,024=1,073,741,824 bytes. Therefore, the indicated
value of the capacity appears to be smaller.
[MEDIA STATUS]
The used space and remaining recordable time of the SD card and built-in memory can be
checked.
≥ Touching [CHANGE MEDIA] switches the unit between the display for the SD card and the
display for the built-in memory.
≥ When the mode switch is set to , remaining recordable time for the selected recording
mode is displayed.
≥ Touch [EXIT] to close the indication.
≥ The SD card or built-in memory requires some space to store information and manage
system files, so the actual usable space is slightly less than the indicated value. The
usable SD card/built-in memory space is generally calculated as 1 GB=1,000,000,000
bytes. The capacities of this unit, PCs and software are expressed as
1 GB=1,024k1,024k1,024=1,073,741,824 bytes. Therefore, the indicated value of the
capacity appears to be smaller.
[DEMO MODE]
This item is used to start the unit demonstration.
(Only when the mode is at the or position)
If [DEMO MODE] is switched to [ON] and you touch [EXIT] when there is no SD card inserted
and while this unit is connected to the AC adaptor, the demonstration automatically starts.
If any operation takes place, the demonstration is cancelled. However if no operations take
place for approx. 10 minutes, the demonstration automatically starts again. To stop the
demonstration, set [DEMO MODE] to [OFF] or insert an SD card.
[ON]/[OFF]
[O.I.S. DEMO]
This item is used to start the Optical Image Stabilizer demo.
(Only when the mode is at the position)
Touch [O.I.S. DEMO], the demonstration automatically starts.
When you touch [EXIT], the demonstration will be cancelled.
[LANGUAGE]
You can select the language on the screen display and the menu screen.
47
VQT4C83

Basic
MENU
SEARCH
STILL ADV STILL ADV
SEARCH
/VOL
DATE/TIME
START/
STOP
EXT DISPLAY
PLAY
STOP
OK
SKIP SKIP
MENU
PAUSE
2
3
4
6
5
8
7
9
10
11
1
Using with the remote control
[HC-X900/HC-X900M]
Select the menu.
: [SETUP] #
[REMOTE CONTROL] # [ON]
8 Recording start/stop button [START/
STOP]
*
9 Date/time button [DATE/TIME] (l 40)
10 Menu button [MENU]
11 OK button [OK]
* means that these buttons function in the
same manner as the corresponding
buttons on the unit.
Remove the insulation sheet A before
using.
1 Power on/off button [ ]
Unit can be turned on/off when the LCD
monitor is opened or the viewfinder is
extended.
≥ Unit cannot be turned on by the power on/
off button when 36 hours have passed
after the unit is turned off. Press the power
button on the unit and turn the unit back
on.
≥ Unit cannot be turned off when it is
connected to the PC or the DVD burner.
2 Photoshot button [ ]
3 On-screen display button
[EXT DISPLAY] (l 108)
4 Playback operation buttons (l 35,
87)
These buttons function in the same manner
as the corresponding playback operation
icon being displayed on screen.
[Excluding skip playback (l 87)]
5 Delete button [ ]
6 Direction buttons [3,4,2,1]
7 Zoom/volume/thumbnail display
switch buttons [T, W, /VOL]
48
VQT4C83
Replace a button-type battery
1 While pressing the stopper B, pull
out the battery holder.
2 Set the button-type battery with its
*
*
(i) mark facing upward and then
put the battery holder back in
place.
≥ When the button-type battery runs
down, replace it with a new battery
(part number: CR2025). The battery
should normally last about 1 year,
however this depends on how
frequently the unit is used.

CAUTION
15
1515
1010
1515
STILL ADV STILL ADV
STOP
OK
SKIP SKIP
MENU
PAUSE
≥ Danger of explosion if battery is
incorrectly replaced. Replace only with
the type recommended by the
manufacturer.
≥ When disposing the batteries, please
contact your local authorities or dealer
and ask for the correct method of
disposal.
Warning
Keep the Button-Type battery out of the
reach of children. Never put Button-Type
battery in mouth. If swallowed call your
doctor.
∫ Remote control usable range
Operation of direction
buttons/OK button
1 Press a direction button.
≥ Selected item will become yellow.
2 Select the item with the
direction button.
3 Confirm the selection by
pressing the OK button.
PAUSE
STILL ADV STILL ADV
STOP
SKIP SKIP
OK
MENU
A Remote control sensor
Distance: Within approx. 5 m
Angle: Approx. 10o up and 15o down, left,
and right
≥ The remote control is intended for indoor
operation. Outdoors or under strong light,
the unit may not operate properly even
within the usable ranges.
≥ Selection/confirmation of operation icons,
thumbnail display etc. can be operated.
≥ All touch operations on the unit can also
be operated by the remote control (some
exceptions).
49
VQT4C83

Advanced (Recording)
Zoom lever/Zoom button icons
T side:
Close-up recording (zoom in)
W side:
Wide-angle recording (zoom out)
6
W
T
6
W
T
T
W
T
W
T
W
A side: Close-up recording (zoom in)
B side: Wide-angle recording (zoom out)
A
B
Using the zoom
A Zoom bar
≥ Maximum zoom ratio for recording motion pictures can be set with [ZOOM MODE]. (l 63)
≥ You can also zoom by simply touching the LCD monitor. (Touch Zoom: l 53)
∫ About the zoom bar
The zoom bar is displayed during the zoom operation.
A Optical zoom
B Motion Picture Recording Mode: i.Zoom/Digital zoom (Blue)
Still Picture Recording Mode: Extra Optical Zoom (Blue)
∫ About the zoom speed
The zoom speed will be faster in the order of zoom lever/ring zoom, zoom button icon/zoom
button on the remote control, touch zoom.
≥ The zoom speed varies depending on the range over which the zoom lever is moved or the
speed to rotate the ring.
≥ The zoom operation using the zoom button icon, zoom button on the remote control or
touch zoom will be performed at a constant speed.
* HC-X800 is not equipped with the zoom ring and the zoom button on the remote control.
Ring zoom [HC-X900/HC-X900M]
Zoom operation can be done using the multi manual ring.
Zoom by rotating the ring.
50
VQT4C83

Zoom ratio during the Still Picture Recording Mode
Optical image stabilizer button
Press the button to turn optical image stabilizer
on/off.
(Motion Picture Recording Mode)
/ # (setting cancelled)
≥ When [HYBRID O.I.S.] is [ON], is
displayed. When [OFF], is displayed.
≥ When recording with a tripod in Motion Picture
Recording Mode, we recommend that you set the
image stabilizer off.
(Still Picture Recording Mode)
/ # (setting cancelled)
≥ When [O.I.S.] is [MODE1], is displayed.
When [O.I.S.] is [MODE2], is displayed.
O.I.S.
The zoom ratio can be expanded up to 25k without degrading the picture quality for the Still
Picture Recording Mode. (Extra Optical Zoom)
≥ Extra optical zoom ratio varies depending on the setting of [PICTURE SIZE] and [ASPECT
RATIO]. (l 75, 76)
≥ If you take your finger off the zoom lever during zoom operation, the operation sound may
be recorded. When returning the zoom lever to the original position, move it quietly.
≥ When the zoom magnification is at its maximum, the subjects are focused at about 1.2 m
or more.
≥ When the zoom magnification is 1k, this unit can focus on a subject approx. 3.5 cm away
from the lens.
Advanced (Recording)
Image Stabilizer Function
Use the image stabilizer to reduce the effects of shake during recording.
This unit is equipped with Hybrid Optical Image Stabilizer.
Hybrid Optical Image Stabilizer is a hybrid of optical and electrical image stabilizer.
51
VQT4C83

∫ Changing Image Stabilizer Mode
MENU
MENU
1080/50p button
To set to 1080/50p recording mode, press and hold the
button until is displayed.
≥ To return to normal recording mode, press and hold
the button until disappears.
1080/50p
1080/50p
MENU
(Motion Picture Recording Mode)
: [RECORD SETUP] # [HYBRID O.I.S.] # [ON] or [OFF]
When set to [ON], you can further improve image stabilization for recording while walking, or
holding the unit and recording a distant subject with zoom.
≥ This function’s default setting is [ON].
(Still Picture Recording Mode)
: [RECORD SETUP] # [O.I.S.] # [MODE1] or [MODE2]
[MODE1]: The function works all the time.
[MODE2]: The function works when the button is pressed. We
recommend using this mode when you are recording yourself or
recording with a tripod in Still Picture Recording Mode.
≥ Please refer to page 55 for details about the Optical Image Stabilizer Lock.
Advanced (Recording)
1080/50p recording
This is a recording mode that can record in 1080/50p (1920k1080/50 progressive), which is
the highest picture quality for this unit.
It is possible to set from the menu.
: [RECORD SETUP] # [REC MODE] # [1080/50p]
≥ Please refer to page 165 about approximate recordable time.
52
VQT4C83

Advanced (Recording)
T
W
≥ An icon is displayed in the
A position when the Touch
function icon is set.
B Touch zoom bar
C Zoom magnification
position
Recording with the Touch function
You can record using convenient functions just by the easy operation of touching the screen.
1 Touch (left side)/ (right side) of on
the Touch Menu to display Touch function
icons. (l 25)
2 Touch the Touch function icon.
(e.g. AF/AE tracking)
≥ To cancel, touch the Touch function icon again. (Optical
Image Stabilizer Lock is cancelled by releasing the finger
touching .)
Touch function icons
Touch Zoom
AF/AE tracking
Optical Image Stabilizer Lock
Touch Shutter
*1 In Motion Picture Recording Mode only
*2 In Still Picture Recording Mode only
*2
Touch Zoom
You can zoom by touching on the touch zoom bar.
≥ Touch zoom function is useful for making fine adjustments to the zoom magnification.
1Touch .
≥ Touch zoom bar appears.
*1
2 Touch and hold the touch zoom bar.
≥ It will zoom to the touched position.
≥ It will zoom in when T side is touched, and zoom out when W
side is touched.
≥ It is also possible to perform zoom operation by touching and
sliding the touch zoom bar toward the T side or W side.
≥ Please refer to page 50 for details about the zoom speed.
53
VQT4C83

AF/AE tracking
A Targ e t f rame
It is possible to set the focus and exposure to the subject specified on the touch screen.
The focus and exposure will keep following the subject automatically even if it moves.
(Dynamic tracking)
1Touch .
≥ When [FACE RECOG.] (l 66) is [ON] and a registered face is detected, the target is
automatically locked.
2 Touch the object and lock the target.
≥ When you touch the head of the object, the target
frame on the head gets locked and tracking starts.
≥ Touch the object to be changed again when you want
to change the target.
≥ When the Intelligent Auto Mode is selected, the setting
becomes (Normal) and touched object is tracked.
Selection becomes (Portrait) when target frame is
locked on a face. (It may turn to (Normal) even if
the target is locked on the face when a spotlight is shining or with a dark scene.)
3 Start recording.
∫ About target frame
≥ When target lock fails, the target frame blinks in red and then disappears. Touch a
characteristic part (colour etc.) on the object to lock onto it again.
≥ When the button is pressed halfway in Still Picture Recording Mode, the focus is set to
the object that is locked. The target frame turns green when it focuses, and the target
cannot be changed.
≥ This function cannot be used in Manual Mode. When Manual Mode is set in Still Picture
Recording Mode, it can only be used with some settings in Scene Mode.
≥ It may track different objects or may not lock the target depending on the recording
conditions such as the following:
jWhen the object is too large or too small
jWhen colour of the object is similar to the background
jWhen the scene is dark
≥ When the target is locked in Still Picture Recording Mode, the screen may become dark or
the AF assist lamp may turn on. (l 78)
≥ AF/AE tracking will be cancelled in the following cases.
jWhen the mode is changed
jWhen the unit is turned off
jWhen the Scene Mode is set
jSwitch to Intelligent Auto Mode/Manual Mode
jSwitch to recording yourself
54
VQT4C83

Optical Image Stabilizer Lock
MENU
In Motion Picture Recording Mode, you can further improve optical image stabilization
by touching and holding . With this function, you can further reduce the effects of
the shake that tends to occur when using zoom.
1 Press the Optical Image Stabilizer button to turn the image stabilizer on.
2 Touch and hold .
≥ Icon is displayed in A while you are touching and holding .
≥ Optical Image Stabilizer Lock is released when you remove your finger from the icon.
∫ To make the display of disappear
Display of will not disappear even when no operation is performed for specific time with
the default setting. To make the display of disappear, change the setting of the
[O.I.S. LOCK DISPLAY].
: [SETUP] # [O.I.S. LOCK DISPLAY] # desired setting
[ON]: Constantly display.
[OFF]: The icon will disappear after approx. 5 seconds without any touch operation.
≥ Stabilization may not be possible under strong shaking conditions.
≥ To record while moving the unit quickly, release Optical Image Stabilizer Lock.
Touch Shutter
It is possible to focus and record a still picture of a subject that is touched.
1Touch .
2 Touch the subject.
≥ Focus area will display to the touched position, and a
still picture is recorded.
≥ Depending on the recording conditions or recognition of the touched position, it may not be
possible to record the intended picture.
≥ This will not operate for recording yourself.
55
VQT4C83

Advanced (Recording)
PRE-REC
B
PRE-REC
HC-X900
Recording functions of operation icons
Select the operation icons to add different effects to the images to be recorded.
1 Touch (left side)/ (right side) of on the Touch Menu to
display the operation icons. (l 25)
2 Touch an operation icon.
(e.g. PRE-REC)
≥ Select the operation icon again to cancel the function.
≥ Refer to the respective pages for cancelling the following
functions.
jSmile Shot (l 58)
jBuilt-in flash (l 59)
jSelf-timer (l 60)
jGuidelines (l 61)
≥ The icon is displayed in A when the operation icon is set.
(PRE-REC or Self-timer icon is displayed in B.)
Operation icons
*1
Fade
Intelligent Contrast Control
PRE-REC
Smile Shot
Built-in flash
Red-eye Reduction
Self-timer
Intelligent Exposure
*1 It is not displayed in Still Picture Recording Mode.
*2 It is not displayed in Motion Picture Recording Mode.
*3 It is displayed only when a headphone is connected to the headphone output terminal.
[MIC LEVEL] (l 72) is set to anything other than [AUTO], is displayed as the
operation icon, and adjustment of input level of the microphone is possible.
≥ The operation icons that are displayed in the Touch Menu can be changed. ([SELECT
OPERATION ICONS]: l 43)
≥ If you turn off the unit or change the mode to , PRE-REC, Backlight compensation,
Colour Night View, Self-timer and Tele Macro functions are cancelled.
≥ If you turn off the unit, the Fade function is cancelled.
≥ It is possible to set from the menu.
(Except for the Headphone volume adjustment)
56
VQT4C83
*1
*1
*2
*2
*1
*2
*2
Backlight Compensation
Te l e M a c ro
Guidelines
Colour Night View
/
HC-X900M
Headphone volume adjustment/
Microphone level adjustment
*1
*3

Fade
(Fade in)
(Fade out)
MENU
PRE-REC
HC-X900
HC-X800
HC-X900M
MENU
Q.
MENU
When you start recording, the image/audio gradually
appears. (Fade in)
When you pause recording, the image/audio gradually
disappears. (Fade out)
≥ The Fade setting is cancelled when the recording stops.
∫ To select the colour for fade in/out
: [RECORD SETUP] # [FADE COLOUR] #
[WHITE] or [BLACK]
≥ The thumbnails of scenes recorded using fade in become black (or white).
Intelligent Contrast Control
This brightens parts that are in shadow and difficult to see and suppresses white
saturation in bright parts at the same time. Both bright and dark parts can be recorded
clearly.
≥ If there are extremely dark or bright parts or the brightness is insufficient, the effect may not
be clear.
PRE-REC
This prevents you from missing a shot.
This allows recording of the pictures and sound to start approximately 3 seconds
before the recording start/stop button is pressed.
≥ appears on the screen.
≥ Aim the unit at the subject beforehand.
≥ There is no beep sound.
≥ PRE-REC is cancelled in the following cases.
jIf you change the mode
j
If you remove the SD card
/
j
If you remove the SD card while [MEDIA SELECT] is set to [VIDEO/SD CARD]
jIf you touch or
jIf you press 1080/50p button
jIf you turn the unit off
jIf you start recording
jAfter 3 hours have passed
57
VQT4C83

≥
HC-X900
HC-X800
HC-X900M
2.1
M
After setting PRE-REC, if recording starts in less than 3 seconds, motion pictures taken
3 seconds before pressing the recording start/stop button cannot be recorded.
≥ Images displayed on the thumbnail during playback will differ from the motion pictures
displayed at the start of playback.
Smile Shot
When a smiling face is detected during motion picture recording, the unit
automatically records a still picture.
The icon changes each time it is touched.
([ON]) # ([FACE RECOG.]) # [OFF]
: The unit records a still picture on detecting a smiling face.
: Still pictures are only recorded when the face of a person registered using
Face Recognition (l 66) is detected.
[OFF]: Cancel the setting.
≥ During Smile Shot recording, the face detected as a smiling face is surrounded by a green
frame and / are red.
≥ Smile Shot recording will not work in the following cases. ( / will flash)
j
When there is no SD card inserted
j
When [MEDIA SELECT] is set to [PICTURE/SD CARD], and there is no SD card inserted
jWhen it is set to Manual Focus
jWhen the Interval Recording is used
jWhen [FACE RECOG.] is set to [OFF], or no one is registered (In ([FACE RECOG.])
only)
≥ Depending on the recording conditions (type of smile, camera shake, etc.), the face of the
subject may not be detected correctly.
≥ The number of recording pixels are (5120k2880), (3840k2160) or
≥ When still pictures that have been recorded using the Smile Shot are displayed as
thumbnails, the appears.
≥ When the AF/AE tracking function is target locking a face of the subject, still pictures are
only recorded if a smiling face is detected on the locked subject. When the Smile Shot
function is set to ([FACE RECOG.]), it will record only if the face of a subject registered
with [FACE RECOG.] is locked as a target.
/
(1920k1080). (l 76)
14.7
M
M
8.3
58
VQT4C83

Built-in flash
When the button is pressed, the flash is activated and the picture will be
recorded. Use the Built-in flash in order to record still pictures in dark places.
The icon changes each time it is touched.
ß ([ON]) # ßA ([AUTO]) # ([OFF])
≥ The unit automatically determines if the flash is necessary even when it has been set to
by detecting the ambient brightness. (If it determines that the flash is necessary, the
indication lights up in red.)
∫ To adjust the brightness of the flash
MENU
: [PICTURE] # [FLASH LEVEL] # desired setting
[ßi]: Much brighter
[ßd0]: Normal
[ßj]: Less bright
≥ The light from the flash may be blocked by the lens hood when the lens hood is attached.
≥ Do not use the flash with the filter kit (optional) or the conversion lens (optional) attached.
≥ If the ß indication etc. flashes when the button is pressed halfway, the flash is not
activated.
≥ The available range of the flash is approx. 1 m to 2.5 m in dark places.
≥ Using the flash fixes a shutter speed to 1/500 or slower.
Red-eye Reduction
Reduces the phenomena where human eyes become red from flashes.
≥ The flash is activated 2 times.
≥ The red-eye phenomenon tends to appear in certain recording conditions and more with
some people than with others.
≥ When faces are detected in the Intelligent Auto Mode, the Red-eye Reduction is set to on.
59
VQT4C83

Self-timer
HC-X900
HC-X900M
This is for recording still pictures using the timer.
The icon changes each time it is touched.
Ø10 (Records after 10 seconds) # Ø2 (Records after 2 seconds) # setting cancelled
≥ When the button is pressed, a still picture is recorded after the Ø10 or Ø2 display
and the recording lamp flashes for the time which has been set. After recording, the Selftimer is cancelled.
≥ In Auto Focus Mode, if the button is pressed halfway once and then fully, the lens
focuses on the subject when the button is pressed halfway. If the button is pressed
fully all at once, the lens focuses on the subject just before recording.
To stop the timer midway through
Touch [CANCEL].
≥ Setting the Self-timer to Ø2 is a good way to prevent image shake when the button is
pressed while using a tripod etc.
≥ /
Self-timer can be stopped midway by pressing MENU on the remote control.
Intelligent Exposure
This brightens dark areas so the image can be recorded clearly.
≥
If there are extremely dark parts or the brightness is insufficient, the effect may not be clear.
Backlight Compensation
This makes the image brighter to prevent darkening of a backlit subject.
Tele Macro
A more impressive image can be obtained by focusing on the object only in close-up
and shading off the background.
≥ The unit can focus on the subject at a distance of approx. 95 cm.
≥ When the Tele Macro is set with the zoom magnification less than 12k, it will automatically
be set to 12k.
≥
Tele Macro function is
60
VQT4C83
cancelled
when the zoom magnification becomes lower than 12k.

Guidelines
HC-X900
HC-X900
HC-X900M
You can check if the image is level while recording or playing back motion pictures and
still pictures. The function can also be used to estimate the balance of the composition.
The icon changes each time it is touched.
# # # Setting cancelled
≥ It is possible to set from the quick menu. (l 38)
≥ The guidelines do not appear on the images actually recorded.
∫ Displaying Guidelines at playback
≥ Change the mode to and touch the play mode select icon. Then, select the
AVCHD scene or set to [iFrame] or [MP4]. (l 35)
MENU
: [VIDEO SETUP] # [GUIDE LINES] # desired setting
≥ To cancel the Guidelines function during playback, set to [OFF].
≥ It cannot be set while in Still Picture Playback Mode.
≥ When tiredness or discomfort is felt by displaying Guidelines during recording or playback
of 3D images:
jCancel the setting of the Guidelines
j /
Set [2D/3D DISPLAY] (l 85, 115) to [2D]
HC-X900M
Colour Night View
This function allows you to record colour images in very low light situations.
(Minimum required illumination: approx. 1 lx)
≥ Recorded scene is seen as if frames were missed.
≥ If set in a bright place, the screen may become washed out for a while.
≥ Bright dots that are usually invisible may be seen, but this is not a malfunction.
≥ Using a tripod is recommended.
≥ In darker areas, Auto Focus may focus a bit slower. This is normal.
/
Headphone volume adjustment
Adjust the volume of the headphone while recording.
: Increase the volume
: Decrease the volume
≥ Actual volume to be recorded does not change.
61
VQT4C83

Advanced (Recording)
Recording functions of menus
[SCENE MODE]
When you record images in different situations, this mode automatically sets optimum shutter
speeds and apertures.
MENU
: [RECORD SETUP] # [SCENE MODE] # desired setting
[OFF]: Cancel the setting
5Sports: To make fast moving scenes less shaky with slow playback
Portrait: To make people stand out against the background
Soft skin: To makes skin colours appear softer for a more attractive
Spotlight: Improved quality when subject is brightly illuminated.
Snow: Improved image quality when shooting in snowy locations.
Beach: To make blue in the sea or sky vibrant
Sunset: To make red in the sunrise or sunset vibrant
Scenery: For spatial scenery
Fireworks: To capture the fireworks in the night sky beautifully
Night scenery: To capture the evening or night scenery beautifully.
Low light: For dark scenes, such as at dusk
Night portrait: To capture a person and the background brightly.
and pause of playback
appearance
(In Motion Picture Recording Mode only)
(In Still Picture Recording Mode only)
≥ (Sports/Portrait/Soft skin/Spotlight/Snow/Beach/Sunset/Scenery)
jThe shutter speed is 1/6 or more in Still Picture Recording Mode.
≥ (Sunset/Low light)
jThe shutter speed is 1/25 or more in Motion Picture Recording Mode.
≥ (Sunset/Scenery/Fireworks/Night scenery)
jImage may get blurry when close object is recorded.
≥ (Sports)
jDuring normal playback, the image movement may not look smooth.
jColour and screen brightness may change under indoor lighting.
jIf the brightness is insufficient, the Sports Mode does not function. The display
flashes.
≥ (Portrait)
jColour and screen brightness may change under indoor lighting.
62
VQT4C83

≥ (Soft skin)
MENU
jIf the background or anything else in the scene has colours similar to the skin colour,
they will also be smoothed.
jIf the brightness is insufficient, the effect may not be clear.
jIf you record a person in the distance, the face may not be recorded clearly. In this case,
cancel Soft Skin Mode or zoom in on the face (close-up) to record.
≥ (Fireworks)
jThe shutter speed is 1/25.
jImage may get washed out when recorded in bright surrounding.
≥ (Night scenery/Night portrait)
jThe shutter speed is 1/2 or more in Still Picture Recording Mode.
jUsing a tripod is recommended.
≥ (Night portrait)
jThe flash is set to [ON].
[ZOOM MODE]
Set the maximum zoom ratio for the Motion Picture Recording Mode.
: [RECORD SETUP] # [ZOOM MODE] # desired setting
[Opt.Zoom 12k]: Optical zoom only (Up to 12k)
[i.Zoom 23k]: This zoom function allows you to maintain high-definition
[D.Zoom 30k]: Digital zoom (Up to 30k)
[D.Zoom 700k]: Digital zoom (Up to 700k)
≥ The larger the digital zoom magnification, the more the image quality is degraded.
≥ This function cannot be used in Still Picture Recording Mode.
picture quality. (Up to 23k)
63
VQT4C83
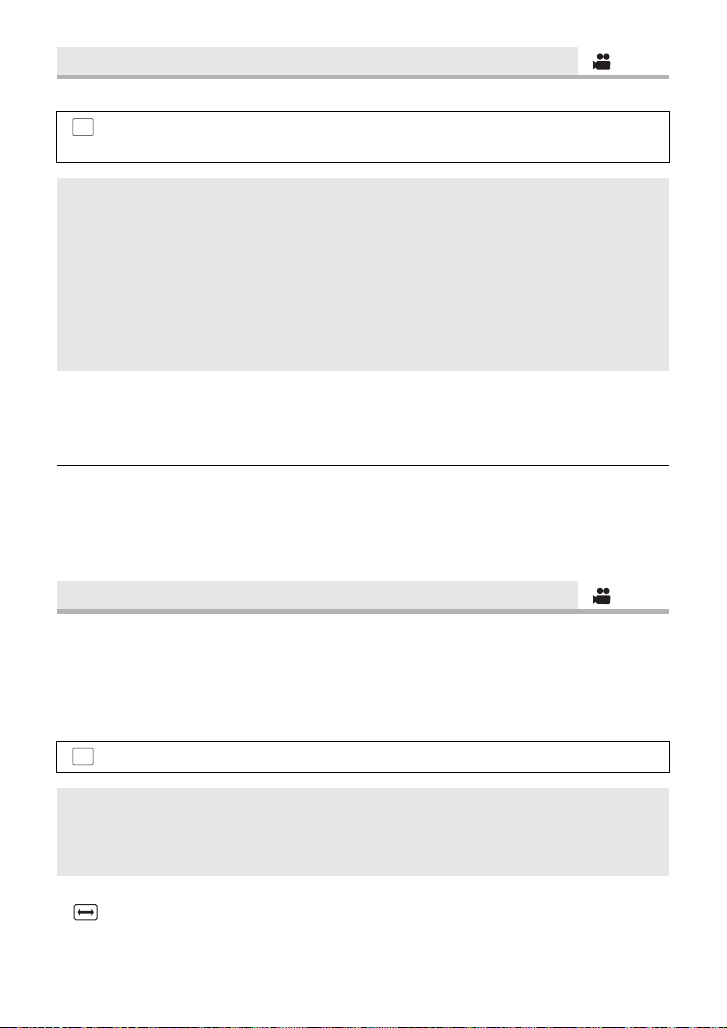
[REC MODE]
MENU
Switch the picture quality and recording format of the motion pictures to be recorded.
: [RECORD SETUP] # [REC MODE] # desired setting
≥ It is possible to set from the quick menu. (l 38)
[HA]/[HG]/[HX]/[HE]*1: Set the recording mode to 1080/50i.
[1080/50p]*2: Set the recording mode to 1080/50p.
[iFrame]*3: Set the recording mode to iFrame.
[AVCHD 3D]*4: Set the recording format to AVCHD 3D format, which can
record in 3D full high definition image.
[SbS 3D]*4: Set the recording format to side-by-side format (2 screen
structure), which can record in 3D image.
*1 Recording will have higher quality in the order of [HA], [HG], [HX] and [HE].
*2 It can record with highest quality image in this unit.
*3 iFrame is a format suitable for Mac (iMovie’11). It is recommended for when using a Mac.
*4 This is displayed only when the 3D Conversion Lens (optional) is attached.
≥ Recordable time using the battery (l 17)
≥ This function’s default setting is [HG] mode.
≥ Please refer to page 165 about approximate recordable time.
≥ When the unit is moved a lot or moved quickly, or when a fast-moving subject is recorded
(particularly when recording in [HE] mode), mosaic-type noise may appear at playback.
[TIME LAPSE REC]
A scene that moves slowly for long period of time is recorded frame by frame with an interval,
and is recorded as a short time motion picture.
A frame is recorded with a set recording interval.
25 frames will make up motion picture of 1 second.
≥ Set [ZOOM MODE] to [Opt.Zoom 12k]. (l 63)
≥ Set [REC MODE] to [HA], [HG], [HX] or [HE].
MENU
: [RECORD SETUP] # [TIME LAPSE REC] # desired setting
[OFF]:
Cancel the setting.
[1 SECOND]/[10 SECONDS]/[30 SECONDS]/[1 MINUTE]/[2 MINUTES]:
Change the recording interval.
≥ Switch to Manual Mode when the Interval Recording is set.
≥ appears on the screen.
≥ After recording, the setting of Interval Recording is cancelled.
≥ Audio cannot be recorded.
64
VQT4C83

Setup time
HC-X900M
Setup example
(recording
Recording time Recorded time
interval)
Sunset 1 s Approx. 1 h Approx. 2 min
Blooming 30 s Approx. 3 h Approx. 12 s
≥ Maximum recordable time is 12 hours.
≥ Still picture recording cannot be used.
≥ Recording mode cannot be changed when the Interval Recording is set.
≥ If you turn off the unit or change the mode to , this function is cancelled.
≥ The shortest motion picture recording time is 1 second.
≥ Colour balance and focus may not be adjusted automatically depending on light sources or
scenes. If so, manually adjust these settings. (l 80, 82)
[DIGITAL CINEMA]
Use this function to record an image with vivid colour, like an image on a movie film.
≥ Switch to Manual Mode. (l 79)
≥ Set [ZOOM MODE] to [Opt.Zoom 12k]. (l 63)
≥ Set [REC MODE] to [HA] or [HG]. (l 64)
MENU
: [RECORD SETUP] # [DIGITAL CINEMA] # [ON]
≥ The images may not appear smooth.
[RELAY REC]
It is possible to continuously record motion picture to an SD card when there is no space
available in the built-in memory. (It allows you to record only to SD card from built-in
memory.)
≥ Set [MEDIA SELECT] to [Built-inMemory].
≥ Set [REC MODE] to [HA], [HG], [HX], [HE] or [1080/50p]. (l 64)
≥ Insert an SD card.
MENU
: [RECORD SETUP] # [RELAY REC] # [ON]
≥ is displayed on the screen. will disappear when space in the built-in memory is
gone and the recording to the SD card starts.
≥ Relay Recording can only be performed once.
≥ Combine the scenes that were relay-recorded using the [RELAY SCENE COMBINE]
into the SD card. (l 105, 120)
≥ Once you have performed [RELAY SCENE COMBINE], you can use the Relay Recording
function again. If the [RELAY REC] is set to [ON] without performing the [RELAY SCENE
COMBINE], a message is displayed. You will be able to perform Relay Recording by
touching [YES], but you will not be able to perform the [RELAY SCENE COMBINE] after
that.
65
VQT4C83

≥ Still pictures are recorded to the SD card after Relay Recording.
MENU
A Guide
B Text entry icon
≥ is displayed on the thumbnail display during the playback of the scene that was relay-
recorded on the built-in memory.
[FACE RECOG.]
Face Recognition is a function for finding faces that resemble faces which have already been
registered and automatically prioritising focus and exposure for those faces. This function
makes it possible to keep the face of your loved ones in focus even when they are at the
back or on the end of a line in a group picture.
: [RECORD SETUP] # [FACE RECOG.] # desired setting
[ON]: The Face Recognition function is available
[OFF]: Cancel the setting
[SET]: Face Recognition registration/editing/cancellation
∫ Registering a face for Face Recognition
MENU
: [RECORD SETUP] # [FACE RECOG.] # [SET] # [SAVE]
≥ Up to a maximum of 6 people can be registered.
1 Align the person’s face with the guide.
≥ Take a picture of the persons face from the front,
ensuring that their hair does not hide the outline of
their face, their eyes or their eyebrows.
2 Touch [REC] or press the button fully.
≥ Touch [ENTER].
≥ It may not be possible to register a face depending on
the recording conditions. In this case, try recording the
face again.
3 Enter the person’s name.
≥ Touch the text entry icon in the centre of the screen
and enter the name.
≥ After entering the name, touch [Enter].
66
VQT4C83

Entering text
111222333
444555
666
123
45
6
ANNA
KEN
MARY
JOE
≥ The characters can be conveniently input without moving the cursor when the [Auto Cursor
Position] is set to [ON]. (l 45)
Icon Description of operation
[A] etc. Enters a character.
/
Moves the cursor to left or right.
[A/a] Switches between [A]/[a] (alphabet) and [&/1] (symbols/numbers).
Enters a space.
[Delete]
Deletes a character.
Deletes the previous character if the cursor is in an empty space.
[Enter] Ends text entry.
≥ A maximum of 9 characters can be entered.
4 Touch [ENTER] to end registration.
≥ Touch [EXIT].
∫ Changing the information of a registered person
1 Select the menu.
MENU
: [RECORD SETUP] # [FACE RECOG.] # [SET] # [EDIT]
2 Touch the desired item to enter the setting.
≥ Up to 3 face shots can be registered. To additionally register or
to change/delete the registered face shots, touch or the
face shot.
≥
If you register several face shots of the same person (up to 3
face shots can be registered), each with a different facial
expression or different background, it is more likely that Face Recognition will be successful.
Change name:
Touch the part displaying the registered name, and change the name.
[PRIORITY]:
Focus and exposure will be set in priority according to the
registration order setting from the first person. Target will be
locked according to the registration order setting from the first
person when AF/AE tracking is active.
≥ To change the registration order, select the person you wish to
change.
[FOCUS ICON]:
This changes the focus indication (l 31) icon that appears during
still picture recording. (Only displayed when Face Recognition is
in use.)
≥ Touch the icon you wish to have displayed.
3 Touch [ENTER].
67
VQT4C83

∫ Cancelling a registered person
MENU
1 Select the menu.
: [RECORD SETUP] # [FACE RECOG.] # [SET] # [DELETE] or [DELETE ALL]
≥ Touching [DELETE ALL] cancels all the registered people.
2 (When [DELETE] is selected)
Touch the person to cancel.
≥ When touched, the person is selected and is displayed. To cancel the selected person,
touch again.
≥ Touch [ENTER].
≥ Since Face Recognition searches for faces that resemble the registered faces, there is no
guarantee of positive recognition.
≥ It may not be possible to correctly recognise a person who has been registered due to
differences in facial expression and environment.
≥ Perform the registration again if recognition becomes unstable in cases such as when
facial features change with age.
[NAME DISPLAY]
When a registered person is detected by Face Recognition during recording, the name
registered for that person is displayed.
MENU
: [RECORD SETUP] # [NAME DISPLAY] # desired number
[3]/[2]/[1]/[OFF]
≥ Displayed name will disappear after a while.
≥ It is displayed according to the registration order setting from the first person.
≥ This function is not displayed during recording of yourself or Playback Mode.
[FACE FRAMING]
Detected faces appear with frames.
MENU
: [RECORD SETUP] # [FACE FRAMING] # desired setting
[PRIMARY]:
Only the prioritised face framing is displayed.
[ALL]:
All face detection framings are displayed.
[OFF]:
Cancel the setting.
≥ Up to 15 frames are indicated. Larger faces and faces nearer to the centre of the screen
take preference over others. When [FACE RECOG.] is [ON] registered people are given
priority.
68
VQT4C83

∫ Prioritised face framing
MENU
MENU
Prioritised face framing is displayed as orange frames. Focus and adjustment of brightness
will be performed against the prioritised face framing.
≥ Prioritised face framing is only displayed with Portrait Mode in the Intelligent Auto Mode.
≥ The white frame is for face detection only.
≥ Focus will be set to prioritised face framing when the button is pressed halfway when
recording still pictures. Prioritised face framing will turn to green when the focus is set.
[AUTO SLOW SHTR (2D)]
You can record bright pictures even in dark places by slowing the shutter speed.
≥ Switch to Manual Mode. (l 79)
: [RECORD SETUP] # [AUTO SLOW SHTR (2D)] # [ON]
≥ The shutter speed is set to 1/25 or more depending on the surrounding brightness.
≥ This function cannot be used when using the 3D Conversion Lens (optional).
≥ This function cannot be used in Still Picture Recording Mode.
≥ When the shutter speed becomes 1/25, the screen may be seen as if frames are missed
and afterimages may appear.
[AUTO SLOW SHTR (3D)]
This auto slow shutter function is only used with the 3D Conversion Lens (optional).
≥ Switch to Manual Mode. (l 79)
: [RECORD SETUP] # [AUTO SLOW SHTR (3D)] # [ON]
≥ For details, refer to [AUTO SLOW SHTR (2D)].
≥ This function’s default setting is [ON].
≥ When a 3D Conversion Lens is used, the recording scene will become darker. We
recommend setting this function to [ON].
[AGS]
If the unit continues to be tilted upside down from the normal horizontal position while
recording motion pictures, it is automatically put into recording pause.
MENU
: [RECORD SETUP] # [AGS] # [ON]
≥ The AGS function may activate and cause the unit to pause the recording if you are
recording a subject right above or right below you.
69
VQT4C83

[Digital Cinema Colour]
MENU
Recording motion pictures with more vivid colours, using x.v.Colour™ technology.
≥ Switch to Manual Mode. (l 79)
≥ Set [REC MODE] to [HA], [HG], [HX], [HE] or [1080/50p]. (l 64)
MENU
: [RECORD SETUP] # [Digital Cinema Colour] # [ON]
≥ For more realistic colours, use an HDMI mini cable (optional) with a TV that supports the
x.v.Colour
≥ When connecting this unit to a TV with the AV multi cable, the TV cannot detect the Digital
Cinema Colour setting on this unit automatically. We recommend connecting this unit to
TVs compatible with x.v.Colour
≥ When viewing on the TV with the Digital Cinema Colour function, turn off the Digital
Cinema Colour function on the TV.
™
.
™
using an HDMI mini cable.
≥ When motion pictures recorded while this function is turned [ON] are played back
with a TV not compatible with x.v.Colour
≥ When these images are played back with devices other than ones compatible with
x.v.Colour
≥ x.v.Colour
™
, it is recommended to record the images after this function is turned [OFF].
™
is a name for devices that are compatible with the xvYCC format, an
™
, colours may not be reproduced properly.
international standard for expanded colour in motion pictures, and that follow the rules for
signal transmission.
[SHOOTING GUIDE]
Message is displayed when this unit is moved rapidly.
MENU
: [RECORD SETUP] # [SHOOTING GUIDE] # [ON]
When “CAMERA PANNING IS TOO FAST.” appears, move the unit slowly while recording.
≥ Message will not appear while pausing the recording. (Message will appear even if it is
pausing the recording if [DEMO MODE] is set to [ON].)
[WIND NOISE CANCELLER]
This will reduce the wind noise coming into the built-in microphones while maintaining the
realism.
≥ Switch to Manual Mode. (l 79)
: [RECORD SETUP] # [WIND NOISE CANCELLER] # [ON]
≥ This function’s default setting is [ON].
≥ When switching to Intelligent Auto Mode, [WIND NOISE CANCELLER] is set to [ON], and
the setting cannot be changed.
≥ You may not see the full effect depending on the recording conditions.
70
VQT4C83

≥ /
HC-X900M
HC-X900
HC-X900M
HC-X800
MENU
HC-X900
If wind sound cannot be reduced with the wind noise canceller function alone, set [BASS
SETTING] to [LOWCUT]. (l 73)
/
[MIC SETUP]
Recording setting of the built-in microphone can be adjusted.
MENU
: [RECORD SETUP] # [MIC SETUP] # desired setting
[SURROUND]: Sound is recorded with 5.1 ch surround microphone.
[ZOOM MIC]: Sound is recorded with 5.1 ch surround microphone changing
[FOCUS MIC]: The forward sound is recorded more clearly by enhancing the
[STEREO MIC]: Sound from two directions is recorded in 2 ch by forward-facing
≥ If you wish to record higher quality sound and maintain realism even when zooming in, for
instance, when recording a music recital, we recommend setting [MIC SETUP] to
[SURROUND].
≥ [MIC SETUP] will become [STEREO MIC] when the [REC MODE] is set to [iFrame].
the directionality in conjunction with the zoom operation.
Sounds near the front of the unit are recorded more clearly if
you zoom in (close-up) and surrounding sounds are recorded
more realistically if you zoom out (wide angle).
directionality toward the centre for the 5.1 ch surround
microphone.
stereo microphones.
[ZOOM MIC]
Directivity of the microphone is interlocked with the zoom operation. Sounds near the front of
the unit are recorded more clearly if you zoom in (close-up) and surrounding sounds are
recorded more realistically if you zoom out (wide angle).
: [RECORD SETUP] # [ZOOM MIC] # [ON]
71
VQT4C83

[MIC LEVEL]
HC-X900
HC-X900M
MENU
HC-X900
HC-X900M
HC-X800
When recording, the input level from the built-in microphones and the external microphone
terminal can be adjusted.
HC-X800
When recording, the input level from the built-in microphones can be adjusted.
1 Select the menu.
/
: [RECORD SETUP] # [MIC LEVEL] # desired setting
[AUTO]: AGC is activated, and the recording level is adjusted
automatically.
[SETr ]/[SET]: The desired recording level can be set.
≥ It is possible to select the setting from the quick menu in Manual Mode. (l 38) The
microphone level returns to the setting adjusted previously, and it cannot be set from the
quick menu.
2 (When [SETr ]/[SET] is selected)
Touch / to adjust.
/
A Centre
B Front left
C Back left
D Front right
E Back right
F Microphone input level
G Left
H Right
I Microphone input level
≥ Touch to activate/disactivate AGC. When AGC is activated, the icon is surrounded by
yellow and the amount of sound distortion can be reduced. When AGC is disactivated,
natural recording can be performed.
≥ Adjust the microphone input level so that the last 2 bars of the gain value are not red.
(Otherwise, the sound is distorted.) Select a lower setting for microphone input level.
3 Touch [ENTER] to set the microphone input level and then touch [EXIT].
≥ (Microphone input level meter) appears on the screen.
72
VQT4C83

≥ /
HC-X900M
HC-X800
HC-X900M
HC-X900
HC-X900M
HC-X900
When [MIC SETUP] is [ZOOM MIC], the volume will be different depending on the zoom
rate.
When [ZOOM MIC] is [ON], the volume will be different depending on the zoom rate.
≥ /
HC-X900
When [MIC SETUP] is set to [STEREO MIC] or external microphone input is used, the
sound is stereo (2 ch) and only the front-left and front-right input level meters function.
≥ The microphone input level meter shows the largest volume for the microphones.
≥ You cannot record with the audio completely muted.
/
[BASS SETTING]
Change the lower setting of the built-in microphone according to your choice.
≥ Switch to Manual Mode. (l 79)
MENU
: [RECORD SETUP] # [BASS SETTING] # desired setting
[0dB]/[+3dB]/[+6dB]/[LOWCUT]
≥ Normally set to [0dB].
≥ Select [+3dB] or [+6dB] to get strong power feeling at bass level.
[PICTURE ADJUST]
Adjust the quality of the image while recording.
Adjust by outputting to a TV while adjusting the quality of the image.
≥ This setting is retained when you change between Motion Picture Recording Mode
and Still Picture Recording Mode.
≥ Switch to Manual Mode. (l 79)
1 Select the menu.
MENU
: [RECORD SETUP] # [PICTURE ADJUST]
2 Touch the desired setting items.
[SHARPNESS]: Sharpness of the edge
[COLOUR]: Depth of the colour of the image
[EXPOSURE]: Brightness of the image
[WB ADJUST]: Picture colour balance
3 Touch / to adjust settings.
4 Touch [ENTER].
≥ Touch [EXIT] to complete the settings.
≥ appears on the screen.
73
VQT4C83

[ZEBRA]
A Zebra pattern
MENU
MENU
50%
Parts where white saturation (colour saturation) is likely to
occur (extremely brightly lit or shiny parts) are displayed
with diagonal lines (zebra pattern).
≥ Switch to Manual Mode. (l 79)
: [RECORD SETUP] # [ZEBRA] # [ON]
≥ It is possible to set from the quick menu in Manual
Mode. (l 38)
≥ You can record an image with little white saturation if you
manually adjust the shutter speed or brightness (Iris/Gain) (l 81).
≥ The zebra pattern does not appear on the images actually recorded.
[LUMINANCE]
Displays the luminance level of the centre of the screen (luminance display frame) in %.
It makes the adjustment of the brightness of the object easier, by checking the luminance
level of the object, when recording same object in different surroundings.
Adjust the brightness using [IRIS]. (l 81)
≥ Switch to Manual Mode. (l 79)
: [RECORD SETUP] # [LUMINANCE] # desired setting
≥ It is possible to set from the quick menu in Manual Mode. (l 38)
[ON ADJUST]:
Display only when [IRIS] is adjusted. (l 81)
[ANYTIME]:
Constantly display.
[OFF]:
Cancel the setting.
A Luminance display frame
B Luminance level
≥ Luminance level is displayed between 0% and 99%. It will be displayed as 99% when it is
over 99%.
[HISTOGRAM]
A graph with brightness as horizontal axis and number of pixels at that brightness as vertical
axis is displayed. It is possible to determine the exposure of the whole image by looking at
the distribution in the graph.
Adjust the brightness using [IRIS]. (l 81)
≥ Switch to Manual Mode. (l 79)
74
VQT4C83

MENU
MENU
15. 1
M
8.6
M
5.8
M
16
M
8.6
M
6.1
M
14.7
M
8.3
M
5.8
M
: [RECORD SETUP] # [HISTOGRAM] # desired setting
≥ It is possible to set from the quick menu in Manual Mode. (l 38)
[ON ADJUST]:
∫ Example of the display
Display only when [IRIS] is adjusted. (l 81)
[ANYTIME]:
Constantly display.
[OFF]:
Cancel the setting.
A Normal
B Dark
C Bright
[PICTURE SIZE]
The higher the number of pixels, the higher the clarity of the picture when printing.
: [PICTURE] # [PICTURE SIZE] # desired setting
≥ It is possible to set from the quick menu. (l 38)
≥ The number of recording pixels that can be set changes depending on selected screen
aspect ratio. (l 76)
∫ Picture size and Maximum zoom ratio
Picture size Aspect ratio Extra optical zoom (l 51)
4480k3360
0.3
3392k2544 12.4k
2784k2088 15.1k
M
640k480 25k
[4:3]
4896k3264
3600k2400 12.2k
[3:2]
3024k2016 14.5k
5120k2880
3840k2160 –
[16:9]
3200k1800 14.4k
* Extra optical zoom cannot be used. The maximum zoom magnification is 12k.
*
–
*
–
*
–
*
75
VQT4C83

∫ Picture size in Motion Picture Recording Mode
14.7
M
8.3
M
2.1
M
14.7
M
MENU
≥ Change the mode to .
MENU
: [PICTURE] # [PICTURE SIZE] # desired setting
≥ It is possible to set from the quick menu. (l 38)
Picture size Aspect ratio
5120k2880
[16:9]3840k2160
1920k1080
≥ This function’s default settings are in Still Picture Recording Mode and in Motion
M
16
Picture Recording Mode.
≥ The recording will become longer depending on the recording pixels.
≥ Please refer to page 166 about the number of recordable pictures.
[ASPECT RATIO]
This allows you to select the aspect ratio of the pictures to suit printing or the playback
method.
: [PICTURE] # [ASPECT RATIO] # desired setting
[4:3]: Aspect ratio of 4:3 television
[3:2]: Aspect ratio of conventional film camera or prints (such as L-size print)
[16:9]: Aspect ratio of high-definition television, etc.
≥ This function’s default setting is [3:2].
≥ When the aspect ratio is set to [4:3] or [3:2], black bands may appear on the left and right
of the screen.
≥ The edges of still pictures recorded on this unit with a [16:9] aspect ratio may be cut at
printing. Check the printer or photo studio before printing.
76
VQT4C83

[HI-SPEED BURST]
A Start poin t
*
B Finish point
Recording is done continuously at the rate of 50 still pictures per second.
Use this function to record an object with fast movement.
1 Select the menu.
MENU
: [PICTURE] # [HI-SPEED BURST] # [ON]
[ON]:
180 still pictures are recorded continuously at the rate of 50 per second.
The picture size is (1920k1080).
[OFF]:
Cancel the setting.
2 Press the button.
≥ flashes in red during recording.
≥ First press the button halfway, then press it fully to set the focus and record. It will
automatically focus if you press fully once, so it is convenient when recording objects
moving back and forth.
3 Touch [Record] or [Delete].
[Record]: Pictures are stored.
[Delete]: All pictures are deleted.
(When [Record] is selected in Step 3)
4
Touch [REC ALL] or [SELECT].
[REC ALL]: All pictures are stored.
[SELECT]: Pictures are stored by specifying range.
5
(When [SELECT] is selected in Step 4)
Touch the range of pictures that will be
stored.
≥ Previous (Next) page is displayed by touching /
.
* Only select the picture for start point if only 1 picture
is to be stored.
≥ A confirmation message is displayed when [Enter] is
touched after selecting the start point and finish
point. Touch [YES] to store the pictures.
2.1
M
≥ If you turn off the unit or change the mode, this function is cancelled.
≥ The maximum number of times you can record on a media is 15
(In the case of SD cards it is the maximum number of recordable scenes per card.)
≥ Colour balance and brightness on the screen may change with some light sources such as
fluorescent lamps.
≥ Image quality is different from ordinary still picture recording.
77
VQT4C83

[AF ASSIST LAMP]
MENU
Illuminating the subject makes it easier for the camera to focus when recording in low light
conditions that make focusing difficult.
≥ Switch to Manual Mode. (l 79)
MENU
: [PICTURE] # [AF ASSIST LAMP] # [AUTO]
≥ The available distance of the AF assist lamp is approx. 1.5 m.
≥ A conversion lens (optional) can block the AF assist lamp, and it will become harder to
adjust the focus.
≥ When switching to Intelligent Auto Mode, the setting is fixed to [AUTO] and cannot be
changed.
[SHTR SOUND]
You can add a shutter sound when recording still pictures.
: [PICTURE] # [SHTR SOUND] # desired setting
: Volume low
: Volu me hi gh
[OFF]: Cancel the setting.
≥ No shutter sound is emitted in Motion Picture Recording Mode.
78
VQT4C83

Advanced (Recording)
HC-X900
HC-X900M
MNL
/MANUAL
FOCUS
WB
SHTR
IRIS
FOCUS
WB
SHTR
IRIS
MNL
HC-X800
/MANUAL
FOCUS
WB
SHTR
IRIS
MNL
Manual recording
The operation sequence differs for the LCD monitor and viewfinder.
≥ The Manual Focus, White Balance, Shutter Speed, Brightness (Iris and Gain)
settings are retained when you change between Motion Picture Recording Mode and
Still Picture Recording Mode.
∫ To switch to Manual Mode
/
Press the iA/MANUAL button or the CAMERA FUNCTION button to
switch to Manual Mode.
HC-X800
Press the iA/MANUAL button to switch to Manual Mode.
≥ appears on the screen.
HC-X900
/
HC-X900M
A Manual icon
Focus (l 82)
White Balance (l 80)
Manual Shutter Speed (l 81)
Iris Adjustment (l 81)
≥ Press the iA/MANUAL button to cancel manual setting.
∫ When using the LCD monitor
1 Touch the desired item to be set.
2 Touch / to enter the selection.
FOCUS
WB
SHTR
IRIS
79
VQT4C83

∫ /
HC-X900
HC-X900M
HC-X900
HC-X900M
FOCUS
WB
SHTR
IRIS
MNL
AWB
AWB
When using the viewfinder
1 Press the CAMERA FUNCTION button to select the desired item.
≥ Selected item changes whenever the CAMERA FUNCTION button is pressed.
MNL
2 Rotate the multi manual ring to
select the setting and press the
CAMERA FUNCTION button to
FOCUS
WB
SHTR
IRIS
enter the setting.
≥ Zoom operation cannot be done using the
multi manual ring during setting.
White Balance
Automatic White Balance function may not reproduce natural colours depending on the
scenes or lighting conditions. If so, you can adjust the White Balance manually.
≥ /
Press the iA/MANUAL button or the CAMERA FUNCTION button to switch to Manual
Mode. (l 79)
For how to perform the settings when using the viewfinder, refer to page 80.
≥
HC-X800
Press the iA/MANUAL button to switch to Manual Mode. (l 79)
1 Touch [WB].
2 Touch / to select White Balance Mode.
≥ Select the optimal mode by confirming the colour on the
screen.
≥ Touch [WB] to determine the mode.
Icon Mode/Recording conditions
Auto White Balance adjustment
Sunny mode: Outdoors under a clear sky
Cloudy mode: Outdoors under cloudy sky
Indoor mode 1: Incandescent light, video lights like in the studio, etc.
Indoor mode 2: Colour fluorescent lamps, sodium lamps in gymnasiums etc.
Manual adjustment mode:
≥ Mercury-vapor lamps, sodium lamps, some fluorescent lights
≥ Lights used for wedding receptions at hotels, stage spotlights in theaters
≥ Sunrise, sunset, etc.
≥ To return to auto setting, set to or press the iA/MANUAL button again.
80
VQT4C83

∫ To set the White Balance manually
FOCUS
WB
SHTR
IRIS
FOCUS
WB
SHTR
IRIS
MNL
HC-X900
HC-X900M
AWB
HC-X900
HC-X900M
HC-X800
SHTR
IRIS
1 Select , fill the screen with a white subject.
2 Touch and set the blinking .
≥ /
When using the viewfinder, press and hold the
CAMERA FUNCTION button.
≥ When the screen turns black instantly and the display
stops flashing and then lights constantly, the setting is
complete.
≥ If the display continues flashing, the White Balance cannot be set. In this case, use
other White Balance Modes.
≥ When the display flashes, the Manual White Balance previously adjusted is stored.
Whenever recording conditions change, re-set the White Balance.
≥ When setting both the White Balance and the iris/gain, set the White Balance first.
AWB
≥ is not displayed on the screen when is being set.
Manual shutter speed/iris adjustment
Shutter Speed:
Adjust it when recording fast-moving subjects.
Iris:
Adjust it when the screen is too bright or too dark.
≥ /
Press the iA/MANUAL button or the CAMERA FUNCTION button to switch to Manual
Mode. (l 79)
For how to perform the settings when using the viewfinder, refer to page 80.
≥
Press the iA/MANUAL button to switch to Manual Mode. (l 79)
1 Touch [SHTR] or [IRIS].
2 Touch / to adjust settings.
≥ Touch [SHTR]/[IRIS] to complete the adjustments.
Shutter speed:
1/50 to 1/8000
≥ If [AUTO SLOW SHTR (2D)] is set to [ON], the shutter speed will be set between 1/25 and
1/8000.
≥ The shutter speed closer to 1/8000 is faster.
≥ The shutter speed will be set between 1/2 and 1/2000 in Still Picture Recording Mode.
Iris/Gain value:
CLOSE
!#
≥ Value closer to CLOSE darken the image.
≥ Value closer to 18dB brighten the image.
≥ When the iris value is adjusted to brighter than OPEN, it changes to the gain value.
≥ To return to auto setting, press the iA/MANUAL button again.
(F16 to F1.7) !# OPEN !# (0dB to 18dB)
81
VQT4C83

≥ When setting both the shutter speed and the iris/gain value, set the shutter speed and then
HC-X900M
set the iris/gain value.
Manual shutter speed adjustment
≥ When the shutter speed is set lower than 1/12 in the Still Picture Recording Mode, using a
tripod is recommended. Also, White Balance cannot be set. The shutter speed will be set
to 1/25 when the unit is turned on again or when the Quick Start is performed.
≥ You may see a band of light around an object that is shining very bright, or highly reflective.
≥ During normal playback, image movement may not look smooth.
≥ If you record an extremely bright object or record under indoor lighting, colour and screen
brightness may change or a horizontal line may appear on the screen. In this case, record
in the Intelligent Auto Mode or set the shutter speed to 1/100 in areas where the power
supply frequency is 50 Hz, or 1/125 in areas of 60 Hz.
≥ Brightness of the image displayed on the LCD monitor may be different from brightness of
the image actually recorded during the Still Picture Recording Mode. Confirm the image on
the playback screen after recording.
Manual iris/gain adjustment
≥ Luminance level and histogram are displayed during the iris adjustment. (l 74)
≥ If the gain value is increased, the noise on the screen increases.
≥ Depending on the zoom magnification, there are iris values that are not displayed.
Recording with Manual Focus
If auto focusing is difficult due to the conditions, then use Manual Focus.
HC-X900
Perform focus adjustments using the multi manual ring.
≥ Press the iA/MANUAL button or the CAMERA FUNCTION button to switch to Manual
/
Mode. (l 79)
For how to perform the settings when using the viewfinder, refer to page 80.
/MANUAL
A Rotate the multi manual ring to adjust the focus.
HC-X800
≥ Press the iA/MANUAL button to switch to Manual Mode. (l 79)
82
VQT4C83

1 (When MF assist function is used)
AF MF
FOCUS
WB
SHTR
IRIS
FOCUS
WB
SHTR
IRIS
MNL
A Part displayed in blue
MF
MF
SHTR
IRIS
WB
FOCUS
MNL
A Part displayed in blue
HC-X800
MF
MF
HC-X900
HC-X900M
Select the menu.
MENU
: [RECORD SETUP] # [MF ASSIST] # [ON]
≥ It is possible to set from the quick menu. (l 38)
≥ Touch to display the Manual icon.
2 Touch [FOCUS].
3 Touch [MF] to change to Manual Focus.
≥ MF appears on the screen.
4 /
HC-X900
Adjust the focus by rotating the multi
manual ring.
Adjust the focus by touching / .
MF
: To focus on a close subject
MF
: To focus on a faraway subject
≥ Touch [FOCUS] to end the adjustment.
The in-focus area is displayed in blue. The normal screen returns approximately 2 seconds
after you finish bringing the subject into focus.
≥ When [MF ASSIST] is [OFF], the blue area is not displayed.
≥ To restore Auto Focus, touch [AF] in Step 3 or press the iA/MANUAL button again.
HC-X900M
MF
≥ /
When adjusting the focus, you cannot zoom using the multi manual ring.
≥ The blue display does not appear on the images actually recorded.
83
VQT4C83

Advanced (Recording)
3D image
The image is an illustration.
HC-X900
HC-X900M
Recording 3D image
With the 3D Conversion Lens (optional) attached, you can record life-like and powerful 3D image.
HC-X800
To view 3D image, a television that supports 3D is required.
≥ In the unit, the recordable 3D images are AVCHD 3D format or side-by-side format (2-
screen structure).
≥ Life-like and powerful 3D full high definition image can be recorded by recording in AVCHD
3D format.
≥ Since the 3D image is recorded in side-by-side format, the recorded 3D image is not of
high definition picture quality.
Please refer to page 112 and 117 when playing back the scenes recorded in AVCHD 3D format
≥
in 3D full high-definition image, and page 133 when dubbing as 3D full high-definition image.
∫ Recording 3D image
For details on how to attach and how to adjust the attachment position of the 3D Conversion
Lens, please read the operating instructions for the 3D Conversion Lens.
When using for the first time, be sure to adjust the 3D Conversion Lens attachment position.
≥ Turn off the unit.
≥ Change the mode to
1 Attach the 3D Conversion Lens to the unit.
≥ Attach the 3D Conversion Lens securely so it will not tilt or move.
≥ You cannot attach the 3D Conversion Lens together with the lens hood or a filter etc.
≥ Attach the Lens front cap supplied with the 3D Conversion Lens.
2 Turn on the unit.
≥ Turn on with the unit in a horizontal state.
≥ The 3D Conversion Lens adjustment mode screen will appear automatically after
performing the initial setting.
≥ If the 3D Conversion Lens adjustment mode screen does not appear automatically,
set from the menu.
([SETUP] # [3D CONV. LENS SETUP])
If the unit is turned on with the USB cable still connected, the USB connection will take priority.
≥
3 Adjust the 3D Conversion Lens attachment part following the
instructions on the screen.
≥ /
The 3D Conversion Lens cannot be adjusted using the viewfinder.
84
VQT4C83
or .

4 Touch [EXIT] to end the adjustment.
HC-X900
HC-X900M
3D
2.1
M
HC-X900
HC-X900M
MENU
Q.
MENU
HC-X900M
≥ /
Display of the LCD monitor is switched to 3D.
≥ When re-attaching the 3D Conversion Lens or after an impact etc., it is recommended that
you perform the adjustment again.
5 (When recording motion pictures)
Press the recording start/stop button to start recording. (l 29)
≥ Start recording after removing the Lens front cap.
≥ [REC MODE] during recording the 3D will be [AVCHD 3D] or [SbS 3D]. (l 64)
(When recording still pictures)
Press the button to record still pictures. (l 31)
≥ appears on the screen.
≥
It is possible to record still pictures while recording motion pictures. (Simultaneous recording)
≥ The number of recording pixels are (1920k1080). (l 76)
∫ /
To switch the image during the recording to 2D (3D) display
≥
Touch (left side)/ (right side) of on the Touch Menu to display ( ). (l25)
≥ ( ) is displayed only when the 3D Conversion Lens (optional) is attached.
Touch ( ).
≥ 2D (3D) image will switch to 3D (2D) image.
≥ It is possible to set from the menu.
([SETUP] # [2D/3D DISPLAY])
To ensure that the 3D image can be safely viewed, pay attention to the following
points when recording.
≥ Where possible, record with the unit in a horizontal state.
≥ Do not get too close to the subject. (record from a distance of at least 1.2 m.)
≥ When moving the unit as you record, move it slowly.
≥
Try to hold the unit as steady as possible when recording while riding in a vehicle or walking.
≥ Use of a tripod is recommended for recording with a stable picture.
≥ /
HC-X900
The reception range for the remote control might become narrow at the upper side of the
unit, so operate from the lower side. (l 49)
≥ [ECONOMY (BATT)]/[ECONOMY (AC)] will not work while you adjust the 3D Conversion
Lens attachment position.
≥ When the 3D Conversion Lens is attached, the auto slow shutter setting is [AUTO SLOW
SHTR (3D)]. The default setting of [AUTO SLOW SHTR (3D)] is [ON]. (l 69)
≥ While 3D recording if moving the unit fast, the message is more likely to appear.
≥
HC-X800
The LCD monitor on this unit will not display in 3D.
≥ If the unit is turned on with the lens cap attached in the shade etc., the screen may appear
to be blue. In such a case, remove the lens cap to return the screen to normal.
85
VQT4C83

∫ Functions that cannot be used during 3D recording
HC-X900
HC-X900M
HC-X800
HC-X900
HC-X900M
HC-X900M
When recording with the 3D Conversion Lens, you cannot use certain functions.
Functions not available during 3D recording
(Button/lever operations) (Motion picture recording functions)
jHybrid Optical Image Stabilizer
*1
jIntelligent Auto Mode (Night portrait,
Macro)
j1080/50p recording
jManual focus
jTouch Zoom
(Setup menu) (Still picture recording functions)
jQuick power on
jQuick Start
j /
Power LCD
*2
jInitial set
jRecording Mode ([1080/50p], [HA],
[HG], [HX], [HE], [iFrame])
jSmile Shot
jTe l e M ac r o
jZoom Mode
*3
jInterval Recording
jDigital Cinema
jFace Recognition
jFace framing display
*4
j /
Microphone Setup ([ZOOM MIC])
Zoom Microphone
jHistogram
jPicture size
jAspect Ratio
jFlash
jFlash Level
jRed-eye Reduction
jNight portrait in Scene Mode
jAF Assist Lamp
*1 The Optical Image Stabilizer and Optical Image Stabilizer Lock can be used.
*2 This can be used when the LCD monitor is displaying in 2D.
*3 Only the Digital Zoom (up to 1.5k) can be used.
*4 /
HC-X900
Face framing display will be displayed when the LCD monitor or TV output setting is set
to 2D.
HC-X800
Face framing display will be displayed when the TV output setting is set to 2D.
86
VQT4C83

Advanced (Playback)
Playback Operations
Motion picture playback using operation icon
For details on the basic playback operations, refer to page 35.
Playback operation
Fast forward/
rewind playback
Skip playback
(to the start of a
scene)
Slow-motion
Playback
Frame-by-frame
playback
The motion picture
is advanced one
frame at a time.
Playback display Operating steps
Touch 5 during playback to fast
forward.
During Playback
During Pause
(Touch 6 to rewind.)
≥ The fast forward/rewind speed increases
if you touch 5/6 again. (The display
on the screen changes from 5 to .)
≥ Normal playback is restored when you
touch .
Touch the LCD monitor and slide from
right to left (from left to right) during
playback.
With the playback paused, continue
touching .
( is for slow rewind playback)
Playback is slow while touching.
≥ Normal playback is restored when you
touch .
≥ When Slow-motion pictures are played
back in reverse, they will be shown
continuously at approximately 2/3
speed of normal playback (intervals of
0.5 seconds).
≥ Slow-motion Playback for iFrame scenes
or scenes saved in MP4 will be in
1 second intervals.
With the playback paused, touch .
(Touch to advance the frames one at
a time in the reverse direction.)
≥ Normal playback is restored when you
touch .
≥ When the frames are advanced one at a
time in the reverse direction, they will be
shown in intervals of 0.5 seconds.
≥ Frame-by-frame playback for iFrame
scenes or scenes saved in MP4 will be in
1 second intervals.
rd
the
87
VQT4C83

Playback
HC-X900M
2.1
M
0.2
M
operation
Direct playback
Playback display Operating steps
Touch the Direct playback bar or slide
it while touching.
≥ The playback pauses temporarily and
During Playback
skips to the position touched or slid to
while touching.
≥ Playback will start by releasing your
touching or sliding finger.
≥ /
HC-X900
Direct playback bar cannot be operated
with the remote control.
Creating still picture from motion picture
A single frame from the recorded motion picture can be saved as a still picture.
3D still pictures are created from the scenes recorded in 3D, and 2D still pictures are created
from the scenes recorded in 2D.
( (1920k1080) still pictures will be recorded for the AVCHD scenes and iFrame scenes,
and (640k360) still pictures will be recorded for the scenes saved in MP4.)
Press the button fully at the location to be saved as a still picture
during playback.
≥ It is convenient to use Pause, Slow-motion Playback and Frame-by-frame Playback.
≥ Date the motion picture was recorded will be registered as date of the still picture.
≥ Quality will be different from the normal still picture.
Highlight & Time Frame Index
An image of one scene is displayed as a thumbnail at set search condition. Scene can be
played back from any midway point of the scene you wish to see.
≥ Operate the zoom lever to side and change over
the thumbnail display to Highlight & Time Frame
Index. (l 36)
1 Touch .
≥ To display the next (previous) page:
jSlide the thumbnail display upward (downward) while touching it.
jTouch (up)/ (down) on the thumbnail scroll lever.
2 Touch the desired search condition.
[3 SECONDS]/[6 SECONDS]/[12 SECONDS]/[MINUTES]/[FACE]*/[HIGHLIGHT]
* It is not displayed on iFrame scenes and scenes saved in MP4.
88
VQT4C83
*

≥ When select [FACE], it will select the portion for which Face Recognition was performed
MENU
from the scenes judged to be clearly recorded. This will then be displayed as a thumbnail.
≥ A portion judged to be clearly recorded will be detected and displayed in thumbnail if you
select [HIGHLIGHT].
3 (When [MINUTES] is selected)
Touch / to set the time.
≥ It can be set up to a maximum of 60 minutes.
≥ Touch [ENTER].
4 Touch the thumbnail to be played back.
≥ Next (Previous) thumbnail can be displayed by touching / .
Repeat Playback
Playback of the first scene starts after playback of the last scene finishes.
MENU
: [VIDEO SETUP] # [REPEAT PLAY] # [ON]
The indication appears on the full screen views.
≥ All the scenes are played back repeatedly. (When playing back motion pictures by date, all
the scenes on the selected date are played back repeatedly.)
Resuming the previous playback
If playback of a scene was stopped halfway, the playback can be resumed from where it was
stopped.
: [VIDEO SETUP] # [RESUME PLAY] # [ON]
If playback of a motion picture is stopped, appears on the thumbnail view of the stopped
scene.
≥ The memorised resume position is cleared if you turn off the unit or change the mode. (The
setting of [RESUME PLAY] does not change.)
89
VQT4C83

Zooming in on a still picture during playback
A Displayed location of the
zoom
(Playback zoom)
You can zoom in by touching a still picture during playback.
1 Touch and hold the part you wish to zoom in on during still picture
playback.
≥ The still picture is zoomed in the following order: k1 # k2 # k4. Touch and hold the
screen to zoom in from the normal display to k2, Touch the screen to zoom in from k2 to
k4.
≥ The still picture is zoomed in on, centring on the part you touched.
2 Move to the zoomed in position by
touching / / / or slide while
touching the screen.
≥ The location of the zoom displays for about 1 second
when zooming in (zooming out) or moving the
displayed location.
≥ The more picture is enlarged, the more its quality
deteriorates.
Zooming out from the zoomed still picture
Touch to zoom out. (k4 # k2 # k1)
≥ Touch to return to normal playback (k1).
≥ You can also perform zoom operations using the zoom lever.
≥ Playback zoom cannot be performed for the still pictures recorded in 3D. It will perform the
playback zoom after switching to 2D playback when the zoom operation is performed.
90
VQT4C83

Advanced (Playback)
A Date select icon
HC-X900
HC-X900M
Various playback functions
Playing back motion pictures/still pictures by date
The scenes or the still pictures recorded on the same day can be played back in succession.
1 Touch the date select icon. (l 25)
2 Touch the playback date.
The scenes or the still pictures recorded on the date
selected are displayed as thumbnails.
ALL
3 Touch the scene or the still picture to be
played back.
≥ Playing back of all the scenes or the still pictures returns if the unit is turned off or the mode
is changed.
≥ Even if AVCHD scenes are recorded on the same day, they are grouped separately in the
following cases. –1, –2... is added after the recording date displayed on the screen.
jWhen the number of scenes exceeds 99
jWhen the 1080/50i recording, 1080/50p recording, AVCHD 3D recording, or side-by-side
recording is changed
j /
When the audio of microphone input (5.1 ch/2 ch) is changed
jWhen the Interval Recording is used
≥ Even if iFrame scenes are recorded on the same day, they are grouped separately in the
following cases. –1, –2... is added after the recording date displayed on the screen.
jWhen the number of scenes exceeds 99
jWhen [NUMBER RESET] is performed
≥ Even if still pictures are recorded on the same day, they are grouped separately in the
following cases.
jWhen the number of still pictures exceeds 999
jWhen pictures are recorded in Hi-Speed Burst Shooting Mode ( is indicated after the
date in the list by date)
jWhen [NUMBER RESET] is performed
≥ is displayed after the date in the list by date for the still pictures created from the motion
picture. (l 88)
≥ is displayed after the date in the list by date for the scenes saved by the Highlight
Playback. (l 96)
91
VQT4C83

Highlight Playback
Part that was recognised as clearly recorded is extracted from a long recording, and it can be
played back or stored in a short time with effects and music added.
It is also possible to create an original Highlight Playback by checking your favourite scenes
and setting up to extract those scenes.
≥ Highlight Playback cannot be used for iFrame scenes and scenes saved in MP4.
1 Touch . (l 25)
ALL
2 Touch the desired effects
[POP]: Recommended for enjoyable situations such as party scene.
[NATURAL]: Recommended for scenery.
[CLASSICAL]: Recommended for slow moving scene.
[DYNAMIC]: Recommended for fast moving scene such as sports scene.
[CUSTOM]: Set the combination of the effect and the music. (l 93)
≥ The scenes matching the effect will be extracted and displayed in the thumbnail view.
≥ Effects such as fade, slow-motion, still (pause), or digest playback are inserted.
≥ It will be played back with the date of last recording. To change the settings, refer to page
93.
3 Touch on the thumbnail view.
≥ To change the settings, refer to page 93.
4 Select the playback operation. (l 35, 87)
≥ When the playback is finished or stopped, the screen to select [SAVE] (l 96), [SELECT
AGAIN] or [EXIT] is displayed. Touch the desired item.
≥ Playing back of all the scenes returns if the unit is turned off or the mode is changed.
≥ Slow-motion Playback and Frame-by-frame Playback are not possible.
≥ Highlight Playback cannot be performed with interval-recorded motion pictures. (l 64)
92
VQT4C83

Setting up the custom effect
It is possible to enjoy the Highlight Playback with your favourite effect by setting up the
combination of an image effect and music.
1 Touch [CUSTOM].
2 Touch [EFFECT SETUP] or [MUSIC SELECT].
3 (When [EFFECT SETUP] is selected)
Touch the desired effect.
≥ When [EFFECT SETUP] is changed, [MUSIC SELECT]
will be set the same as [EFFECT SETUP]. (To set
[EFFECT SETUP] and [MUSIC SELECT] to different settings, change [MUSIC SELECT]
after setting [EFFECT SETUP].)
(When [MUSIC SELECT] is selected)
Touch the desired sound.
≥ When [EFFECT SETUP] is set to [NONE], you will be able to select [NO MUSIC]. When
[NO MUSIC] is selected, the audio recorded at the time of shooting is played back.
≥ To adjust the volume of music during playback or audio testing, operate the volume lever.
(l 36)
4Touch [ENTER]
To test the music audio
Touch [START].
≥ Touch the other music option to change the music to be
tested.
≥ When you touch [STOP], the music playback stops.
Playing back with the settings changed
Touch [SET] to select the item to change.
[SCENE SETUP]: Select the scene or date to be
[FAVOURITE SCENE
SETUP]:
[FAVOURITE SCENE
PLAY]:
[PRIORITY SETUP]: Select the target to give priority to play back. (l 95)
[PLAYBACK TIME]: Select the time to play back. (l 95)
[TITLE SETUP]: Select the cover image and enter the title.
played back. (l 94)
Set up the favourite scenes. (l 94)
Set up if the favourite scenes are to
be included in the Highlight
Playback or not. (l 95)
They are displayed at the beginning. (l 96)
93
VQT4C83

∫ Scene setting
0h00m15s0h00m15s0h00m15s
0h00m15s0h00m15s0h00m15s
1 (Only when Highlight Playback is started from [ALL AVCHD])
Touch the recording format of the scene to play back.
[1080/50p]/[1080/50i]/[AVCHD 3D]/[SbS 3D]
2 Touch [SELECT DATE] or [SELECT SCENES].
3 (When [SELECT DATE] is selected)
Touch the date to be played back.
≥ A maximum of 7 days can be selected.
≥ When touched, the date is selected and surrounded by
red. Touch the date again to cancel the operation.
(When [SELECT SCENES] is selected)
Touch the scenes to be played back.
≥ Up to 99 scenes can be selected in succession.
≥ When touched, the scene is selected and is
displayed. Touch the scene again to cancel the operation.
4 Touch [Enter]/[ENTER].
∫ Checking the favourite scenes
1 Touch the scene to be played back.
2 Touch [Add] and add the favourite part.
≥ Total of 4 seconds before and after touching the [Add] will
be added as favourite.
≥ Number of favourite scenes that can be added are
1 to 14. (Number of scenes that can be added differs
depending on the scenes selected.)
≥ Favourite check display (A) is displayed in orange,
and favourite check display B is displayed on the slide
bar.
≥ To cancel the favourite, play back to the position checked
as favourite, and touch [Cancel].
≥ It is convenient to use Slow-motion Playback and Frame-
by-frame Playback. (l 87)
3 Touch and stop the playback
≥ It will return to the thumbnail display screen and is
displayed on the scenes added as favourite scenes.
≥ All the scenes checked as favourite may not be played back depending on the Playback
time setting. (l 95)
94
VQT4C83

To clear the favourite scenes from the thumbnail display
ANNA
KEN
MARY
JOE
111222333
444
555
666
123
4
5
6
1 Touch [Reset].
2 Touch [RESET ALL] or [RESET SELECTED].
≥ The check on all the favourite scenes will be cleared
when [RESET ALL] is selected.
3 (When [RESET SELECTED] is selected in step 2)
Touch the scene to be cleared.
4 Touch [YES].
∫ Playing back the favourite scenes
Touch [ON] or [OFF].
[ON]: Include the scenes added in the [FAVOURITE SCENE SETUP] into the
Highlight Playback.
[OFF]: Do not include the scenes added in the [FAVOURITE SCENE SETUP] into
the Highlight Playback.
∫ Priority settings
1 Touch [FACE] or [FACE RECOG.].
≥ If you touch [FACE], any detected face, including the face of person registered for Face
Recognition, is given priority on playback.
2 (When [FACE RECOG.] is selected)
Touch a face to specify.
≥ You can specify up to 6 faces, which are to be played
back in priority.
≥ When touched, the registered face is selected and
surrounded by red. Touch the registered face again to
cancel the operation.
≥ Touch [ENTER]. When a single face is specified, the name registered for that face is
displayed. When multiple faces are specified, the number of faces is displayed.
∫ Playback time setting
Touch the playback time.
≥ The playback time of [AUTO] is a maximum of approx.
5 minutes.
≥ Playback time may become shorter than the setting, or it
may not even play back if the part recognised as clearly
recorded is short.
95
VQT4C83

∫ Setting up the title
HC-X900M
1 Touch / and select your favourite title sheet.
[NONE]/[PICTURE 1]/[PICTURE 2]/[PICTURE 3]/[PICTURE 4]
≥ Title and date will not be displayed when [NONE] is selected.
2 Touch [TITLE].
3 Enter the title.
≥
Input method is same operation as for the face recognition. (l66)
≥ Touch [Enter] after entering the title.
≥ A maximum of 18 characters can be entered.
4 Touch [ENTER] to end registration.
≥ The date of the first scene of the Highlight Playback will be displayed as the date.
≥
The title that was input will be cleared when the power is turned off or Highlight Playback is finished.
Saving the Highlight Playback
The scenes put together as a Highlight Playback can be saved as a single scene.
The scenes recorded in the SD card can be saved in the SD card.
The scenes recorded in the built-in memory can be saved in the built-in memory.
1 Stop the playback of the Highlight Playback or wait until the playback of the
Highlight Playback is finished.
2Touch [SAVE].
3 Select the format to save.
.
[QUALITY (AVCHD)]: It is saved in high definition image quality.
[COMPATIBILITY (MP4)]:
≥ When [QUALITY (AVCHD)] is selected, scenes recorded in 1080/50p are converted to
1080/50i (Picture quality [HA] of [REC MODE]) and saved.
≥
It will be saved in [HA] picture quality when [1080/50i] is selected in [SCENE SETUP] (l94)
and scene with different [REC MODE] ([HA]/[HG]/[HX]/[HE]) is selected.
≥ The scene recorded in AVCHD 3D will be saved as 2D. It will be saved in picture quality
[HA] of [REC MODE] when [QUALITY (AVCHD)] is selected.
≥ The scenes recorded in side-by-side will be saved as 3D if [QUALITY (AVCHD)] is selected
and in 2D when [COMPATIBILITY (MP4)] is selected.
4 Touch [YES].
≥ Playback operation is not possible while playing back the scenes to be saved.
5 (When saved on the SD card)
Touch [EXIT]
HC-X900M
(When saved in the built-in memory)
Touch [COPY] or [EXIT].
≥ The Highlight Playback saved in the built-in memory can be copied to the SD card. To copy
to the SD card, select [COPY].
≥ Operate according to the message and touch [EXIT] at the end.
It will be saved in image quality (640k360/25p) appropriate
for playing back on a PC or uploading to Internet.
≥ is displayed on the thumbnail of the scenes saved by the Highlight Playback.
96
VQT4C83

Changing the playback settings and playing back the
ALL
slide show
1 Touch . (l 25)
2 (Only when you would like to change the settings)
Touch [SET] to select the item to change.
[DATE SETUP]: Select the date to be played back.
[PLAYBACK SETUP]: Select to play back in 3D (2D still pictures are converted to
[SLIDES INTERVAL]: Selects the interval between still pictures at playback.
[EFFECT SETUP]: Select the effect for playback.
[MUSIC SELECT]: Select the music to be played on playback.
3D still pictures and played back) or play back in 2D (3D still
pictures are converted to 2D still pictures and played back).
3 (When [DATE SETUP] is selected)
Touch the playback date.
(When [PLAYBACK SETUP] is selected)
Touch [3D (NO EFFECT)] or [2D].
(When [SLIDES INTERVAL] is selected)
Touch the interval of playback for the slide show.
[SHORT]: Approx. 1 second
[NORMAL]: Approx. 5 seconds
[LONG]: Approx. 15 seconds
(When [EFFECT SETUP] is selected)
Touch the desired effect.
≥ When [EFFECT SETUP] is changed, [MUSIC SELECT] will
be set the same as [EFFECT SETUP]. (To set [EFFECT
SETUP] and [MUSIC SELECT] to different settings, change
[MUSIC SELECT] after setting [EFFECT SETUP].)
≥ When [EFFECT SETUP] is set, [SLIDES INTERVAL] cannot be set.
97
VQT4C83

(When [MUSIC SELECT] is selected)
Touch the desired sound.
≥ To adjust the volume of music during playback of the slide
show or audio testing, operate the volume lever. (l 36)
≥ Touch [ENTER].
(To test the music audio)
Touch [START] and start the audio testing.
≥ Touch the other music option to change the music to be tested.
≥ When you touch [STOP], the music playback stops.
4 Touch [START].
5 Select the playback operation. (l 35)
≥ When the playback is finished or stopped, the screen to select [REPLAY], [SELECT
AGAIN] or [EXIT] is displayed. Touch the desired item.
98
VQT4C83

Advanced (Playback)
0h01m30s0h01m30s0h01m30s
Deleting scenes/still pictures
Deleted scenes/still pictures cannot be restored, so perform appropriate
confirmation of the contents before proceeding with deletion.
¬ Change the mode to .
∫ To delete the scene or still picture being
played back
Touch while scenes or still pictures to be
deleted are being played back.
∫ To delete scenes or still pictures from the thumbnail display
≥ Switch the thumbnail display of the scenes or still pictures to delete. (l 35)
≥ The Touch Menu will disappear after approximately 5 seconds, and is displayed.
1
Touch .
≥ When the thumbnail display is 1 scene display or
Highlight & Time Frame Index, the scene or still picture being
displayed is deleted.
2 Touch [ALL SCENES], [MULTI] or [SINGLE].
≥ All the scenes or still pictures displayed as thumbnails will be
deleted by selecting [ALL SCENES].
(In case of playing back scenes or still pictures by date, all
the scenes or still pictures on the selected date will be
deleted.)
≥ Protected scenes/still pictures cannot be deleted.
3 (When [MULTI] is selected in Step 2)
Touch the scene/still picture to be deleted.
≥ When touched, the scene/still picture is selected and the indication appears on the
thumbnail. Touch the scene/still picture again to cancel the operation.
≥ Up to 99 scenes can be selected to be deleted.
(When [SINGLE] is selected in Step 2)
Touch the scene/still picture to be deleted.
≥ Touched scene or still picture is deleted.
4 (When [MULTI] is selected in Step 2)
Touch [Delete].
≥ To continuously delete other scenes/still pictures, repeat Steps 3-4.
(l 35)
99
VQT4C83

When you stop deleting halfway
MENU
MENU
Touch [CANCEL] while deleting.
≥ The scenes or still pictures that have already been deleted when the deletion is cancelled
cannot be restored.
To complete editing
Touch [Return].
≥ You can also delete scenes by touching , selecting [EDIT SCENE] # [DELETE] #
[ALL SCENES], [
MULTI] or [SINGLE].
≥ You can also delete still pictures by touching , selecting [PHOTO SETUP] #
[DELETE] # [ALL SCENES], [
MULTI] or [SINGLE].
≥ During Highlight Playback or Disc Playback when connected to a DVD burner (optional),
scenes/still pictures cannot be deleted.
≥ Scenes that cannot be played back (the thumbnails are displayed as ) cannot be
deleted.
≥ In case of [ALL SCENES], the deletion may take time if there are many scenes or still
pictures.
≥ If you delete scenes recorded on other products or still pictures conforming to DCF
standard with this unit, all the data related to the scenes/still pictures may be deleted.
≥ When still pictures recorded on an SD card by other products are deleted, a still picture
(other than JPEG) that cannot be played back on this unit, may be erased.
100
VQT4C83
 Loading...