

Page 1

PEG1112038CE
Version:1402
Service Manual
Super Quiet Ventilating Fan/Light Combination
Whisper Fit-Lite
(North America Market)
FV-05VFL3
FV-08VFL3
FV-11VFL3
TM
CONTENTS
1.Parts Identification
2.Wiring Diagram
3.Parts List
4.Replacement Guide
PAGE
1~3
4
5~13
14~15
Page 2
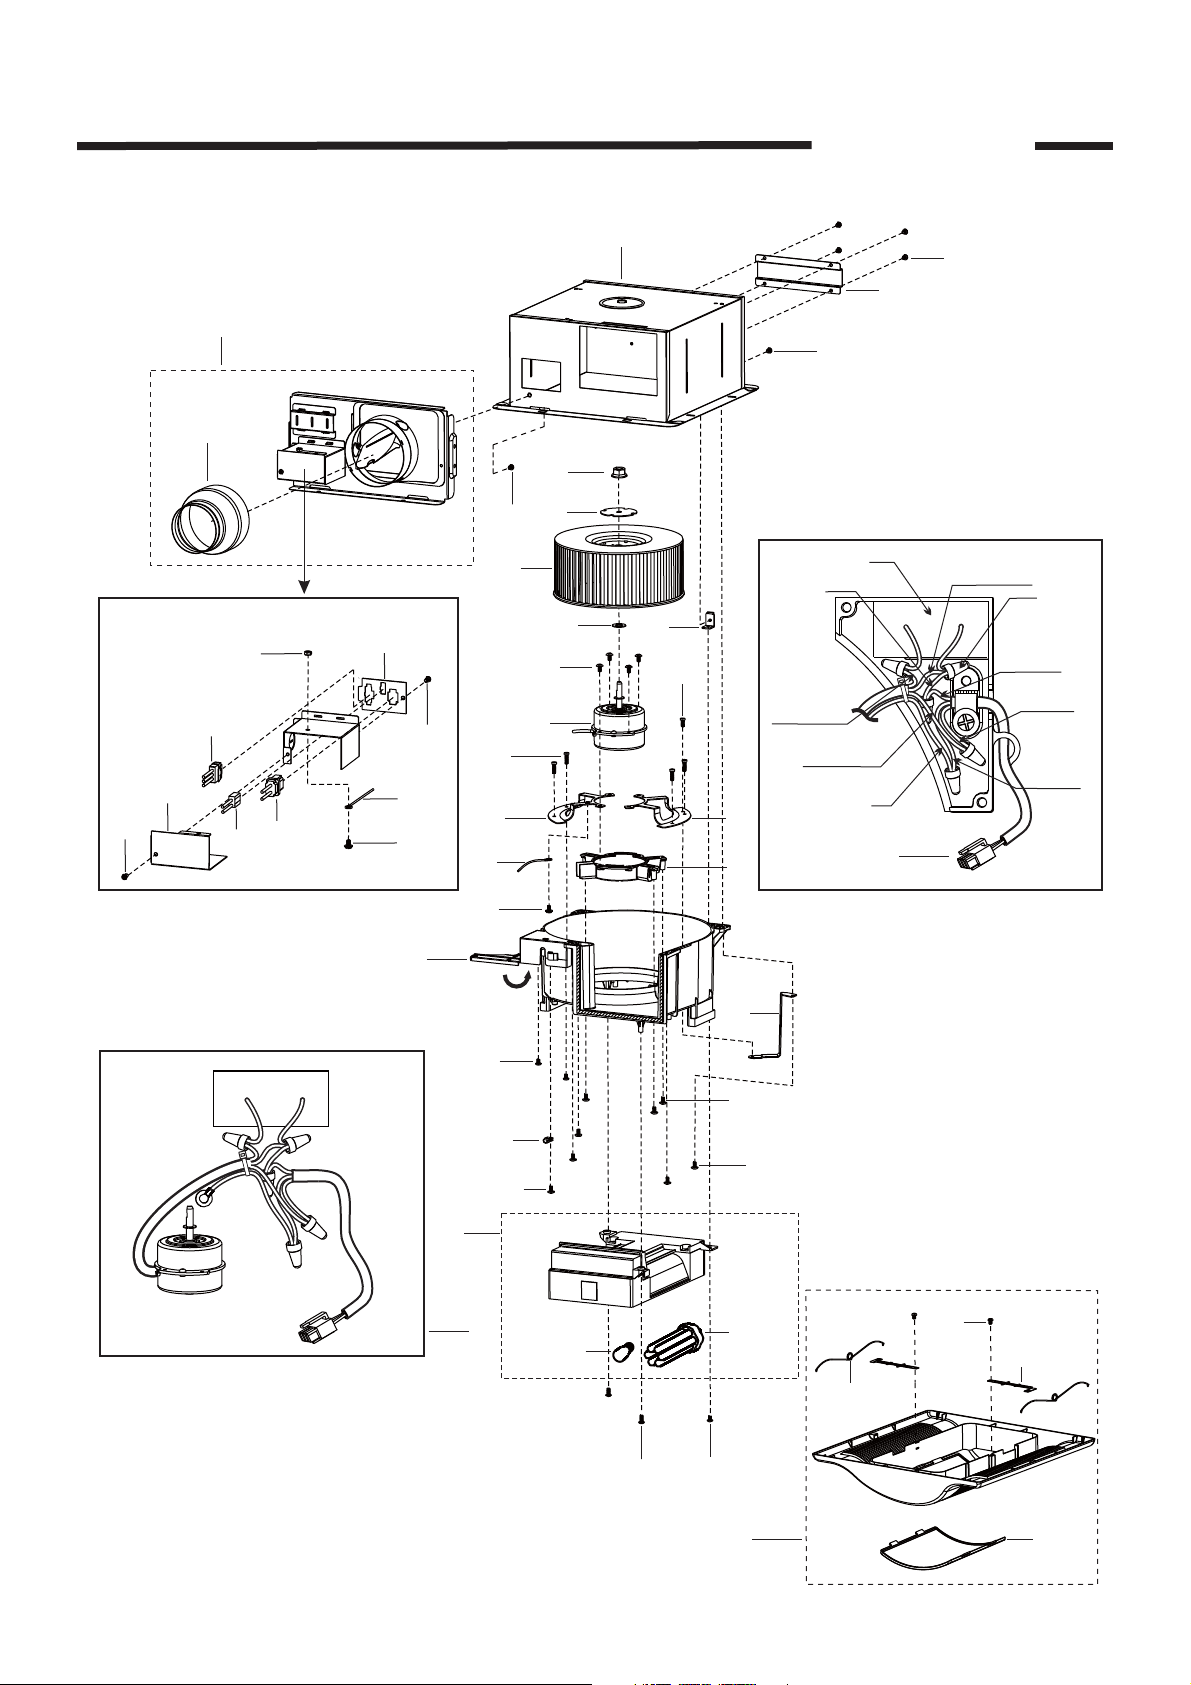
1.Parts Identification
FV-05VFL3
FV-08VFL3
Main Body Section
3
4
9
6
5
C
8
7
11
C
(10)
D
14
G
(4pcs)
18
10
B
(4pcs)
17
12
13
15
E
FV-11VFL3
2
A
(4pcs)
1
B
Motor Lead
(White)
Cord
(White)
34
(5pcs)
Cord
(Black)
Cord
(Green)
16
32
33
F
Motor Lead
(Red)
Motor Lead
(Black)
19
20
(10)
35
Details of Junction Box
21
Motor Unit Section
24
D
H
(2pcs)
23
27
Details of Wiring
22
I
(3pcs)
J
B
(4pcs)
26
29
(2pcs)
L
(2pcs)
30
(2pcs)
H
25
K
(2pcs)
28
31
1
Page 3
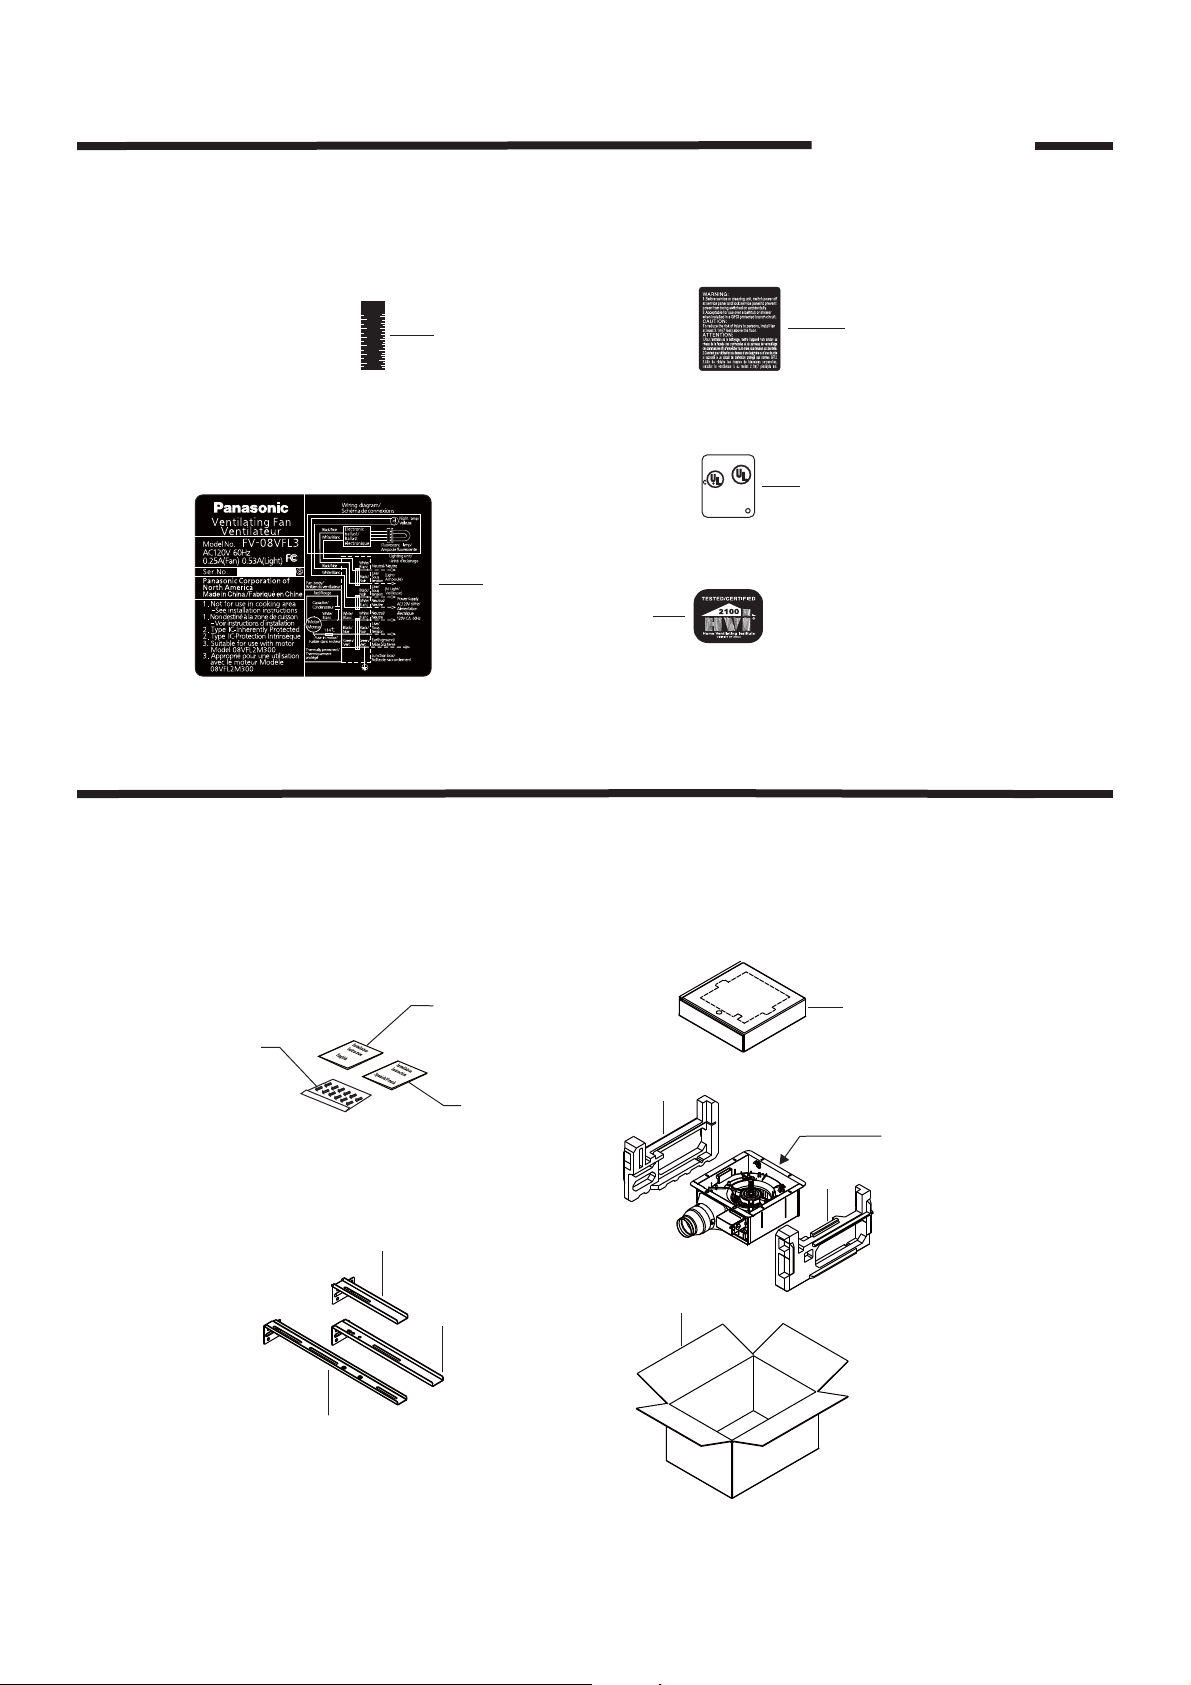
1.Parts Identification
FV-05VFL3
FV-08VFL3
Main Labels
(For Reference)
FV-11VFL3
mm
Inch
1
_
2
2
60
2
50
40
1
_
1
2
30
1
20
1
_
2
10
36
LISTEN
A375682G8
US
FAN
8B68
C
37
40
38
39
Packing Section
41
46
44
42
45
43
47
48
Fan body
49
50
2
Page 4

1.Parts Identification
FV-05VFL3
FV-08VFL3
FV-11VFL3
Lighting Unit Assembly Replacement Method
If the ballast assembly was damaged,please order the new grille unit section(FFV3420057S) to
replace defective ballast assembly& .Please refer to P14-P15 for replacement
guide.
Remark:The minimum quantity of an order for this new grille unit is 10 sets.
original grille unit
51
53
Panasonic
M
52
Replacement
(24)
Lighting UnitAssembly
60
(11pcs)
55
(2pcs)
56
Grille Unit
N
54
59
(2pcs)
58
57
Total Packing Set:10sets
Packing Method
3
Page 5

2.Wiring Diagram
FV-05VFL3
FV-08VFL3
FV-11VFL3
4
Page 6

Main Body Section
No. Part No. Part Name Q'ty Remark
1 FFV0420024S Bracket Cover 1
2 FFV1600064S Frame Assembly 1 Include Frame Packing
3 FFV0000053S Adapter Assembly 1
4 FFV0000038S Adapter Connector 1
5 FFV2800004S Junctiion Cover 1
6 FFV0900013S Connector Assembly 1
7 FFV0900010S Connector Assembly N.L 1 For Night Lamp
8 FFV0900011S Connector Assembly L 1 For Light Bulb
9 FFV7020015S Hexagon Nut 1 For Fixing Earth W ire
10 FFV3402103S Earth Wire 2
11 FFV0900014S Connector Plate 1
12 FFV7020022S Nut 1 For Fixing Blade,Can Replace the Original State
13 FFV4670002S Blade Set Plate 1 For Fixing Blade
14 FFV0400102S Blade 1
15 FFV7010025S Plain Washer 1 For Fixing Blade
16 FFV0420016S Fix Plate 1
17 FFV3702203S Motor Assembly 1
18 FFV3730027S Motor Support 2 1 With Earth Mark
19 FFV3730028S Motor Support 1 1
20 FFV3730029S Motor Support 3 1
21 FFV0790033S Casing 1 Include 1pc Packing A&2pcs Packing
22 FFV5710020S Support 1
23 FFV0740007H Cord Clip 1
24 FFV3420057S Grille Unit Section 1 Include Packing Section
25 FFV3420005S Night Lamp 1
26 FFV3420085S Fluorescent Lamp 1 Brand:Maxlite
27 FFV3730102S Motor Unit 1
28 FFV3400068S Grille Assembly 1
29 FFV5560017S Spring 2
30 FFV5560026S Spring Set Plate 2
31 FFV3410031S Lamp Cover 1
32 FFV0750126S Capacitor 1 220V,1.7uF
33 FFV3400067S Lead Wire 1 For W ire Connection
34 FFV0900024S Connector 5
35 FFV0730022S Cord 1
3.Parts List
FV-05VFL3
5
Page 7

3.Parts List
Main Body Section
No. Part No. Part Name Q'ty Remark
A FFV7000018S Truss Tap Screw 4 For Fixing Bracket Cover to Frame Assembly
B FFV7000137S Truss Screw 3
C FFV7000091S Pan Tap Screw 2
For Fxing Connector Plate(1pc) & Junction Cover(1pc)
D FFV7000168S Earth Screw Assembly 2 For Fixing Earth Wire
E FFV7000081S Truss Screw 4 For Fixing Motor Assembly to Motor Support 3
F FFV7000110S Flush Head Screw 1 For Fixing Support to Casing
G FFV7000088S Flush Head Screw 4 For Fixing Motor Support 1&2 to Casing
H FFV7000097S Truss Tap Screw 3
For Fixing Capacitor Box Cover(2pcs)& Cord Clip(1pc)
I FFV7000111S Truss Head Screw 3 For Fixing Motor Support 3 to Casing
J FFV7000080S Plus Bind Screw 4 For Fixing Casing to Frame Assembly
K FFV7000063S Truss PC Screw 2 For Fixing Linght Unit Assembly to Casing
L FFV7000055S Pan Tap Screw 2 For Fixing Spring Set Plate
Main Labels
No. Part No. Part Name Q'ty Remark
36 FFV5720015S Scale Tape 1 Stuck on Frame Assembly
37 FFV4020739S Name Plate 1 Stuck on Frame Assembly
38 FFV0810010S Caution Label 1 Stuck on Frame Assembly
39 FFV2260003S Holograph Label 1 Stuck on Frame Assembly
40 FFV2260002S HVI Mark 1 Stuck on Frame Assembly
Packing Section
No. Part No. Part Name Q'ty Remark
41 FFV0010206S Accessory A 1 Included Installation Screws
42 FFV2540131S Installation Instruction 1 English,
43 FFV2540132S Installation Instruction 1 Spanish,For USA Market.
(43) FFV2540133S Installation Instruction 1 French,For CA Market.
44 FFV5710017S
Suspension Bracket Ⅲ
1
45 FFV5710018S Suspension Bracket II 1
46 FFV5710019S
Suspension Bracket Ⅰ
1
47 FFV4710346S Grille Case Assembly 1
48 FFV4710219S Left Pad 1
49 FFV4710220S Right Pad 1
50 FFV9001013S Packing Case Assembly 1
FV-05VFL3
6
Page 8

3.Parts List
Lighting Unit Assembly Replacement Method
No. Part No. Part Name Q'ty Remark
51 FFV2540164S Installation Instruction 1
52 FFV0730033S Cord Assembly B 1
53 FFV3420066S Light Kit Cover Assembly 1
54 FFV3420071S Lamp Holder Section 1
55 FFV3420067S Fluorescent Lamp 2
56 FFV3420028S Grille Section 1 Include Lamp Cover
57 FFV3420029S Lamp Cover 1
58 FFV9001068S Packing Case 1
59 FFV4710361S Pad A 2
60 FFV4710362S Pad B 11
M FFV7000191S Bind Screw 1 For Fixing Light Kit Cover Assembly
N FFV7000089S Truss Tap Screw 1 For Fixing Lamp Holder Section
FV-05VFL3
7
Page 9

Main Body Section
No. Part No. Part Name Q'ty Remark
1 FFV0420024S Bracket Cover 1
2 FFV1600064S Frame Assembly 1 Include Frame Packing
3 FFV0000053S Adapter Assembly 1
4 FFV0000038S Adapter Connector 1
5 FFV2800004S Junctiion Cover 1
6 FFV0900013S Connector Assembly 1
7 FFV0900010S Connector Assembly N.L 1 For Night Lamp
8 FFV0900011S Connector Assembly L 1 For Light Bulb
9 FFV7020015S Hexagon Nut 1 For Fixing Earth W ire
10 FFV3402103S Earth Wire 2
11 FFV0900014S Connector Plate 1
12 FFV7020022S Nut 1 For Fixing Blade,Can Replace the Original State
13 FFV4670002S Blade Set Plate 1 For Fixing Blade
14 FFV0400102S Blade 1
15 FFV7010025S Plain Washer 1 For Fixing Blade
16 FFV0420016S Fix Plate 1
17 FFV3702204S Motor Assembly 1
18 FFV3730027S Motor Support 2 1 With Earth Mark
19 FFV3730028S Motor Support 1 1
20 FFV3730029S Motor Support 3 1
21 FFV0790033S Casing 1 Include 1pc Packing A&2pcs Packing
22 FFV5710020S Support 1
23 FFV0740007H Cord Clip 1
24 FFV3420057S Grille Unit Section 1 Include Packing Section
25 FFV3420005S Night Lamp 1
26 FFV3420085S Fluorescent Lamp 1 Brand:Maxlite
27 FFV3730103S Motor Unit 1
28 FFV3400068S Grille Assembly 1
29 FFV5560017S Spring 2
30 FFV5560026S Spring Set Plate 2
31 FFV3410031S Lamp Cover 1
32 FFV0750127S Capacitor 1 250V,2.4uF
33 FFV3400067S Lead Wire 1 For W ire Connection
34 FFV0900024S Connector 5
35 FFV0730022S Cord 1
3.Parts List
FV-08VFL3
8
Page 10

3.Parts List
Main Body Section
No. Part No. Part Name Q'ty Remark
A FFV7000018S Truss Tap Screw 4 For Fixing Bracket Cover to Frame Assembly
B FFV7000137S Truss Screw 3
C FFV7000091S Pan Tap Screw 2
For Fxing Connector Plate(1pc) & Junction Cover(1pc)
D FFV7000168S Earth Screw Assembly 2 For Fixing Earth Wire
E FFV7000081S Truss Screw 4 For Fixing Motor Assembly to Motor Support 3
F FFV7000110S Flush Head Screw 1 For Fixing Support to Casing
G FFV7000088S Flush Head Screw 4 For Fixing Motor Support 1&2 to Casing
H FFV7000097S Truss Tap Screw 3
For Fixing Capacitor Box Cover(2pcs)& Cord Clip(1pc)
I FFV7000111S Truss Head Screw 3 For Fixing Motor Support 3 to Casing
J FFV7000080S Plus Bind Screw 4 For Fixing Casing to Frame Assembly
K FFV7000063S Truss PC Screw 2 For Fixing Linght Unit Assembly to Casing
L FFV7000055S Pan Tap Screw 2 For Fixing Spring Set Plate
Main Labels
No. Part No. Part Name Q'ty Remark
36 FFV5720015S Scale Tape 1 Stuck on Frame Assembly
37 FFV4020740S Name Plate 1 Stuck on Frame Assembly
38 FFV0810010S Caution Label 1 Stuck on Frame Assembly
39 FFV2260003S Holograph Label 1 Stuck on Frame Assembly
40 FFV2260002S HVI Mark 1 Stuck on Frame Assembly
Packing Section
No. Part No. Part Name Q'ty Remark
41 FFV0010206S Accessory A 1 Included Installation Screws
42 FFV2540131S Installation Instruction 1 English,
43 FFV2540132S Installation Instruction 1 Spanish,For USA Market.
(43) FFV2540133S Installation Instruction 1 French,For CA Market.
44 FFV5710017S
Suspension Bracket Ⅲ
1
45 FFV5710018S Suspension Bracket II 1
46 FFV5710019S
Suspension Bracket Ⅰ
1
47 FFV4710346S Grille Case Assembly 1
48 FFV4710219S Left Pad 1
49 FFV4710220S Right Pad 1
50 FFV9001014S Packing Case Assembly 1
FV-08VFL3
9
Page 11

3.Parts List
Lighting Unit Assembly Replacement Method
No. Part No. Part Name Q'ty Remark
51 FFV2540164S Installation Instruction 1
52 FFV0730033S Cord Assembly B 1
53 FFV3420066S Light Kit Cover Assembly 1
54 FFV3420071S Lamp Holder Section 1
55 FFV3420067S Fluorescent Lamp 2
56 FFV3420028S Grille Section 1 Include Lamp Cover
57 FFV3420029S Lamp Cover 1
58 FFV9001068S Packing Case 1
59 FFV4710361S Pad A 2
60 FFV4710362S Pad B 11
M FFV7000191S Bind Screw 1 For Fixing Light Kit Cover Assembly
N FFV7000089S Truss Tap Screw 1 For Fixing Lamp Holder Section
FV-08VFL3
10
Page 12

Main Body Section
No. Part No. Part Name Q'ty Remark
1 FFV0420024S Bracket Cover 1
2 FFV1600064S Frame Assembly 1 Include Frame Packing
3 FFV0000053S Adapter Assembly 1
4 FFV0000038S Adapter Connector 1
5 FFV2800004S Junctiion Cover 1
6 FFV0900013S Connector Assembly 1
7 FFV0900010S Connector Assembly N.L 1 For Night Lamp
8 FFV0900011S Connector Assembly L 1 For Light Bulb
9 FFV7020015S Hexagon Nut 1 For Fixing Earth W ire
10 FFV3402103S Earth Wire 2
11 FFV0900014S Connector Plate 1
12 FFV7020022S Nut 1 For Fixing Blade,Can Replace the Original State
13 FFV4670002S Blade Set Plate 1 For Fixing Blade
14 FFV0400102S Blade 1
15 FFV7010025S Plain Washer 1 For Fixing Blade
16 FFV0420016S Fix Plate 1
17 FFV3702205S Motor Assembly 1
18 FFV3730027S Motor Support 2 1 With Earth Mark
19 FFV3730028S Motor Support 1 1
20 FFV3730029S Motor Support 3 1
21 FFV0790033S Casing 1 Include 1pc Packing A&2pcs Packing
22 FFV5710020S Support 1
23 FFV0740007H Cord Clip 1
24 FFV3420057S Grille Unit Section 1 Include Packing Section
25 FFV3420005S Night Lamp 1
26 FFV3420085S Fluorescent Lamp 1 Brand:Maxlite
27 FFV3730104S Motor Unit 1
28 FFV3400068S Grille Assembly 1
29 FFV5560017S Spring 2
30 FFV5560026S Spring Set Plate 2
31 FFV3410031S Lamp Cover 1
32 FFV0750128S Capacitor 1 200V,3.2uF
33 FFV3400067S Lead Wire 1 For W ire Connection
34 FFV0900024S Connector 5
35 FFV0730022S Cord 1
3.Parts List
FV-11VFL3
11
Page 13

3.Parts List
Main Body Section
No. Part No. Part Name Q'ty Remark
A FFV7000018S Truss Tap Screw 4 For Fixing Bracket Cover to Frame Assembly
B FFV7000137S Truss Screw 3
C FFV7000091S Pan Tap Screw 2
For Fxing Connector Plate(1pc) & Junction Cover(1pc)
D FFV7000168S Earth Screw Assembly 2 For Fixing Earth Wire
E FFV7000081S Truss Screw 4 For Fixing Motor Assembly to Motor Support 3
F FFV7000110S Flush Head Screw 1 For Fixing Support to Casing
G FFV7000088S Flush Head Screw 4 For Fixing Motor Support 1&2 to Casing
H FFV7000097S Truss Tap Screw 3
For Fixing Capacitor Box Cover(2pcs)& Cord Clip(1pc)
I FFV7000111S Truss Head Screw 3 For Fixing Motor Support 3 to Casing
J FFV7000080S Plus Bind Screw 4 For Fixing Casing to Frame Assembly
K FFV7000063S Truss PC Screw 2 For Fixing Linght Unit Assembly to Casing
L FFV7000055S Pan Tap Screw 2 For Fixing Spring Set Plate
Main Labels
No. Part No. Part Name Q'ty Remark
36 FFV5720015S Scale Tape 1 Stuck on Frame Assembly
37 FFV4020741S Name Plate 1 Stuck on Frame Assembly
38 FFV0810010S Caution Label 1 Stuck on Frame Assembly
39 FFV2260003S Holograph Label 1 Stuck on Frame Assembly
40 FFV2260002S HVI Mark 1 Stuck on Frame Assembly
Packing Section
No. Part No. Part Name Q'ty Remark
41 FFV0010206S Accessory A 1 Included Installation Screws
42 FFV2540131S Installation Instruction 1 English,
43 FFV2540132S Installation Instruction 1 Spanish,For USA Market.
(43) FFV2540133S Installation Instruction 1 French,For CA Market.
44 FFV5710017S
Suspension Bracket Ⅲ
1
45 FFV5710018S Suspension Bracket II 1
46 FFV5710019S
Suspension Bracket Ⅰ
1
47 FFV4710346S Grille Case Assembly 1
48 FFV4710219S Left Pad 1
49 FFV4710220S Right Pad 1
50 FFV9001015S Packing Case Assembly 1
FV-11VFL3
12
Page 14

3.Parts List
Lighting Unit Assembly Replacement Method
No. Part No. Part Name Q'ty Remark
51 FFV2540164S Installation Instruction 1
52 FFV0730033S Cord Assembly B 1
53 FFV3420066S Light Kit Cover Assembly 1
54 FFV3420071S Lamp Holder Section 1
55 FFV3420067S Fluorescent Lamp 2
56 FFV3420028S Grille Section 1 Include Lamp Cover
57 FFV3420029S Lamp Cover 1
58 FFV9001068S Packing Case 1
59 FFV4710361S Pad A 2
60 FFV4710362S Pad B 11
M FFV7000191S Bind Screw 1 For Fixing Light Kit Cover Assembly
N FFV7000089S Truss Tap Screw 1 For Fixing Lamp Holder Section
FV-11VFL3
13
Page 15

4.Replacement Guide
INSTALLATION
CAUTION
Disconnect power source before working
on unit.
CAUTION
1. Remove the primary light kit grille by pulling
down one mounting spring. Then pull down
the other mounting spring.
(Squeeze mounting spring and pull down
carefully) (Fig.1)
2. Remove 2 screws (ST4.2X16) and 1 machine
screw (M4X8) from fan unit. Hold the lighting
unit, and removed the plug connector and
plug connector from the receptacle and
receptacle respectively.(Fig 2)
3.Remove the blower assembly. Tape 2pcs of
packing 1(Additional supply) on the bottom
of blower assembly, and tape packing 2
(Additional supply) inside of the frame.
And then re-assemble the blower assembly.(Fig.3)
Glove
Ceiling
Machine screw
(M4X8)
Blower assembly
Grille
2 screws(ST4.2X16)
Slot
Mounting
spring
Lighting unit
Fig.1
Receptacle
Receptacle
Plug connector
Plug connector
Fig.2
Packing 2
(Additional supply)
Frame
4. Take out the light lead wire assembly B from
accessories, and fix the light lead wire assembly B
to junction box.(Fig.4)
IMPORTANT:
Remove the tapes from grille and springs
before installation.As shown below:
Tapes
FFV3420057S
5.Take out the new light kit grille.Remove
screw (M4X8). Remove light kit cover assemby. (Fig.5)
6. Install the night lamp and fluorescent lamps.
(Fig.6)
7. Install light kit cover assembly. (Fig.7)
Light kit cover
assembly
Secure screw
(M4X8)
2pcs of packing 1
(Additional supply)
Plug connector
Light lead
wire assy B
Receptacle
Light cover
Fluorescent
lamp
Remove screw
(M4X8)
Receptacle
Fig.3
Plug connector
Fig.4
Fig.5
Fig.7
3
Night lamp
Fig.6
14
Page 16

4.Replacement Guide
INSTALLATION
8. Insert the grille mounting spring on the
wiring side into the slot, and insert the plug
connector into the housing of lighting
unit.(Fig.8)
9. Insert the other mounting spring into the
slot as shown and mount grille to fan body.
(Fig.9)
Plug connector
lighting unit
Rib
Claw
CAUTION
Mount grille carefully so that lead
wire of lighting unit will not pinched.
MAINTENANCE(REPLACEMENT OF LAMP)
WARNING
Disconnect power source before working
on unit.
This is a pin type lamp base and the lamp’s
glass is fragile.To remove,pull out carefully.
4W night lamp has threaded base,Remove
by turning counterclockwise.
Make sure the temperature of lens and lighting
unit has cooled down before maintenance
(cleaning) or replacement of lamp.
Plug connector
lighting unit
Rib
Claw
Light kit cover
assembly
Ceiling
Gloves
Insert
Ceiling
Grille
Ceiling
Gloves
Insert
Plug connector
Mounting spring
Plug connector
Remove screw
(M4X8)
Grille
Fig.8
Gloves
Fig.9
Grille
Fig.1
CAUTION
Remove dust and dirt from light kit cover assembly
and lens, before replace the lamps.
1. Remove grille by pulling down one mounting spring. Then
pull down the other mounting spring. (Squeeze mounting
spring and pull down carefully) (Fig.1)
2. Remove the screw as shown in step 1 of (Fig.2)
Remove the light kit cover assembly as shown in step 2 of (Fig.2)
3. Remove the fluorescent lamps (Maxlite MLS13GU35,13W)
and night lamp as shown in step 1 ,step 2 and step 3 of (Fig.3)
4. Install new night lamp (MAX 4W incandescent lamp) and
new fluorescent lamps (Maxlite MLS13GU35,13W) as
shown in step 1 ,step 2 and step 3 of (Fig.4)
5.Install light kit cover assembly.(Fig.5)
Light kit cover
assembly
Secure screw
(M4X8)
Fig.5
Fluorescent
lamp
Fluorescent
lamp
3
Fig.2
Lens
3
Night lamp
Fig.3
Night lamp
Fig.4
15
 Loading...