

Page 1
Operating Instructions
Instructions d’utilisation
Manual de instrucciones
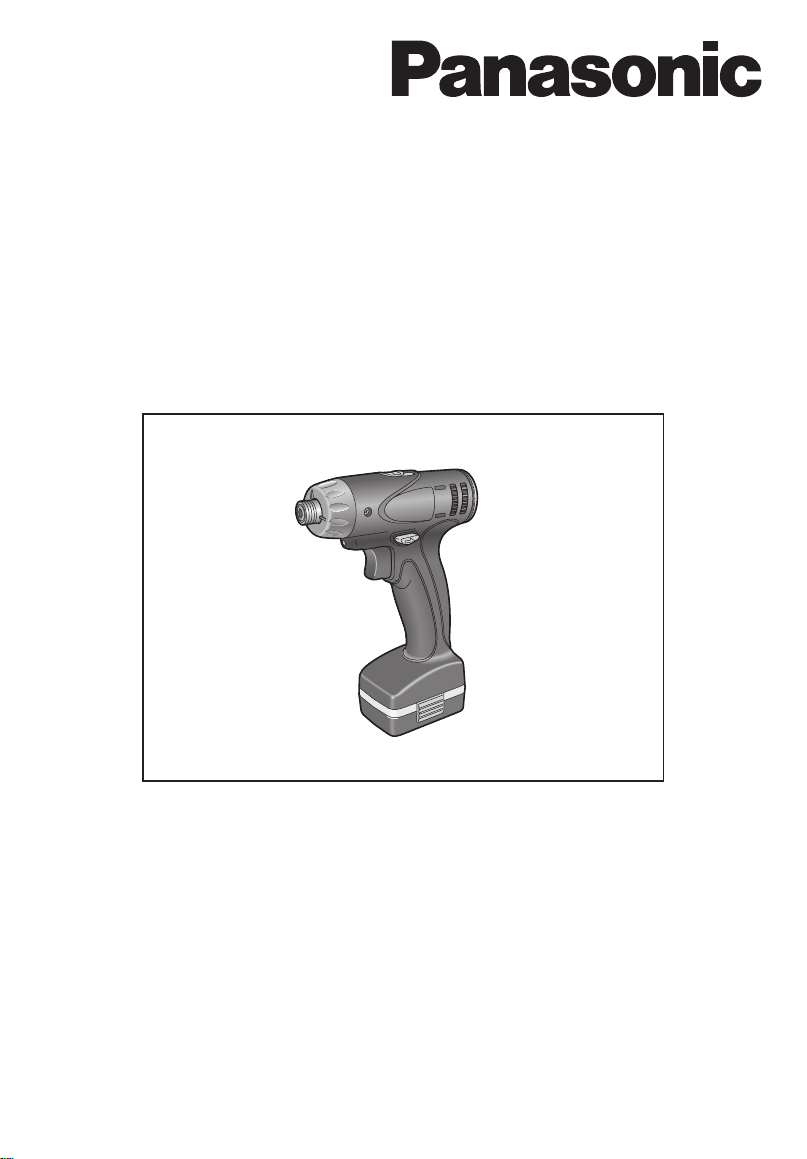
Cordless Drill & Driver
Perceuse-visseuse sans fil
Destornillador y taladro sin cables
Model No: EYFEA1N
IMPORTANT
Before operating this unit, please read these instructions completely and save this manual for future use.
IMPORTANT
Lire entièrement les instructions suivantes avant de faire fonctionner l’appareil et conserver ce mode d’emploi à des fins de
consultation ultérieure.
IMPORTANTE
Antes de usar este aparato por primera vez, lea todas las instrucciones de este manual y guarde el manual para poderlo
consultar en el futuro.
Page 2
Index/Index/Indice
English: Page 4 Français: Page 16 Español: Página 31
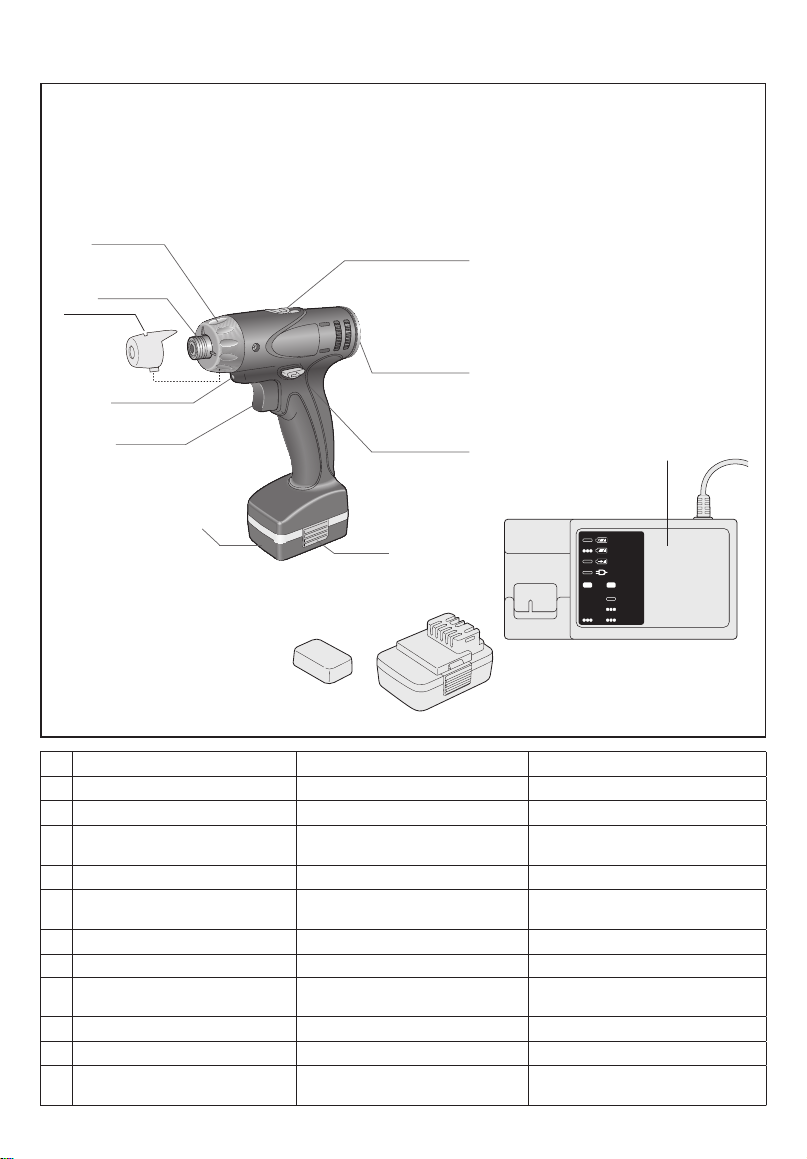
FUNCTIONAL DESCRIPTION
DESCRIPTION DES FONCTIONS
DESCRIPCIÓN FUNCIONAL
(B)
(C)
(A)
(L)
(E)
(H)
(I)
(D)
(G)
(F)
(K)
Bit holder Porte-mèche Soporte para brocas
(A)
Clutch handle Poignée de l’embrayage Mango de embrague
(B)
Speed selector switch Interrupteur de sélection de vitesse Interruptor selector de velocidad
(C)
Forward/Reverse lever
(D)
Hook ring Anneau d'accrochage Anillo de gancho
(E)
Battery pack release button
(F)
Battery pack Batterie autonome Batería
(G)
LED light
(H)
Variable speed control trigger
(I)
Battery charger Chargeur de batterie Cargador de batería
(J)
Pack cover Couvercle de la batterie autonome Cubierta de batería
(K)
Clutch lock cover
(L)
Levier d’inversion marche avantmarche arrière
Bouton de libération de batterie
autonome
Lumière DEL Luz indicadora
Gâchette de commande de vitesse
Couvercle du verrou de
l’embrayage
Palanca de avance/inversión
Botón de liberación de batería
Disparador del control de velocided
variable
Cubierta de bloqueo de embrague
(J)
- 2 -
Page 3

I. INTRODUCTION
These tools can be used to tighten
screws in clutch mode and to drill
holes in wood and metal in drill mode.
Additionally, model EYFEA1N can be
used to drill holes in soft concrete and
similar materials in hammer mode.
II. GENERAL SAFETY
RULES
WARNING! Read all instructions
Failure to follow all instructions listed
below may result in electric shock, fire
and/or serious injury. The term “power
tool” in all of the warnings listed below
refers to your main operated (corded)
power tool and battery operated
(cordless) power tool.
SAVE THESE INSTRUCTIONS
Work Area Safety
1) Keep work area clean and well lit.
Cluttered or dark areas invite
accidents.
2) Do not operate power tools in
explosive atmospheres, such as in
the presence of ammable liquids,
gases or dust.
Power tools create sparks which may
ignite the dust or fumes.
3) Keep children and bystanders away
while operating a power tool.
Distractions can cause you to lose
control.
Electrical Safety
1) Power tool plugs must match the
outlet. Never modify the plug in any
way. Do not use any adapter plugs
with earthed (grounded) power
tools.
Unmodified plugs and matching
outlets will reduce risk of electric
shock.
2) Avoid body contact with earthed or
grounded surfaces such as pipes,
radiators, ranges and refrigerators.
There is an increased risk of electric
shock if your body is earthed or
grounded.
3) Do not expose power tools to rain
or wet conditions.
Water entering a power tool will
increase the risk of electric shock.
4) Do not abuse the cord. Never use
the cord for carrying, pulling or
unplugging the power tool. Keep
cord away from heat, oil, sharp
edges or moving parts.
Damaged or entangled cords increase
the risk of electric shock.
5) When operating a power tool
outdoors, use an extension cord
suitable for outdoor use.
Use of a cord suitable for outdoor use
reduces the risk of electric shock.
Personal Safety
1) Stay alert, watch what you are
doing and use common sense
when operating a power tool. Do
not use a power tool while you
are tired or under the influence of
drugs, alcohol or medication.
A moment of inattention while
operating power tools may result in
personal injury.
2) Use safety equipment. Always wear
eye protection.
Safety equipment such as dust
mask, non-skid safety shoes, hard
hat, or hearing protection used for
appropriate conditions will reduce
personal injuries.
3) Avoid accidental starting. Ensure
the switch is in the off position
before plugging in.
Carrying power tools with your finger
on the switch or plugging in the power
tools that have the switch on invites
accidents.
- 3 -
Page 4

4) Remove any adjusting key or
wrench before turning the power
tool on.
A wrench or a key left attached to a
rotating part of the power tool may
result in personal injury.
5) Do not overreach. Keep proper
footing and balance at all times.
This enables better control of the
power tool in unexpected situations.
6) Dress properly. Do not wear loose
clothing or jewelry. Keep your hair,
clothing and gloves away from
moving parts.
Loose clothes, jewelry or long hair can
be caught in moving parts.
7) If devices are provided for the
connection of dust extraction and
collection facilities, ensure these
are connected and properly used.
Use of these devices can reduce dust
related hazards.
Power Tool Use and Care
1) Do not force the power tool. Use
the correct power tool for your
application.
The correct power tool will do the job
better and safer at the rate for which it
was designed.
2) Do not use the power tool if the
switch does not turn it on and off.
Any power tool that cannot be
controlled with the switch is dangerous
and must be repaired.
3) Disconnect the plug from the power
source and/or the battery pack from
the power tool before making any
adjustments, changing accessories,
or storing power tools.
Such preventive safety measures
reduce the risk of starting the power
tool accidentally.
4) Store idle power tools out of the
reach of children and do not allow
persons unfamiliar with the power
tool or these instructions to operate
the power tool.
Power tools are dangerous in the
hands of untrained users.
5) Maintain power tools. Check for
misalignment or binding of moving
parts, breakage of parts and any
other condition that may affect the
power tools operation. If damaged,
have the power tool repaired before
use.
Many accidents are caused by poorly
maintained power tools.
6) Keep cutting tools sharp and clean.
Properly maintained cutting tools with
sharp cutting edges are less likely to
bind and are easier to control.
7) Use the power tool, accessories
and tool bits etc. in accordance
with these instructions and in the
manner intended for the particular
type of power tool, taking into
account the working conditions
and the work to be performed.
Use of the power tool for operations
different from those intended could
result in a hazardous situation.
Battery Tool Use and Care
1) Ensure the switch is in the off
position before inserting battery
pack.
Inserting battery pack into power
tools that have the switch on invites
accidents.
2) Recharge only with the charger
specied by the manufacturer.
A charger that is suitable for one type
of battery pack may create a risk of
fire when used with another battery
pack.
3) Us e p o wer to o ls onl y w i th
specifically designated battery
packs.
Use of any other battery packs may
create a risk of injury and re.
4) When battery pack is not in use,
keep it away from other metal
objects like paper clips, coins,
keys, nails, screws, or other small
metal objects that can make a
connection from one terminal to
another.
Shorting the battery terminals together
- 4 -
may cause burns, or a re.
Page 5
5) Under abusive conditions, liquid
may be ejected from battery; avoid
contact. If contact accidentally
occurs, flush with water. If liquid
contacts eyes, additionally seek
medical help.
Liquid ejected from the battery may
cause irritation or burns.
Service
1) Have your power tool serviced by a
qualified repair person using only
identical replacement parts.
This will ensure that the safety of
power tool is maintained.
III. SPECIFIC SAFETY
RULES
1) Wear ear protectors. Exposure to
noise can cause hearing loss.
2) Use auxiliary handles supplied with
the tool. Loss of control can cause
personal injury.
3) Hold power tools by insulated grip-
ping sur faces when performing an
operation where the cutting tool
may contact hid den wiring.
Contact with a “live” wire will make ex-
posed metal parts of the tool “live” and
shock the operator.
4) Be aware that this tool is always in an
operating condition, since it does not
have to be plugged into an electrical
outlet.
5)
If the bit becomes jammed,
immediately turn the trigger switch
off to prevent an overload which can
damage the battery pack or motor. Use
reverse motion to loosen jammed bits.
6) Do not operate the Forward/Reverse
lever when the trigger switch is on.
The battery will discharge rapidly and
damage to the unit may occur.
7) When storing or carrying the tool,
set the Forward/Reverse lever to the
center position (switch lock).
8) Do not strain the tool by holding the
speed control trigger halfway (speed
control mode) so that the motor stops.
The protection circuit will activate and
may prevent speed control operation.
If this happens, release the speed
control trigger and squeeze again for
normal operation.
9) Be careful not to get dust inside the
chuck.
10) Do not touch the rotating parts to
avoid injury.
11) Do not use the tool continuously for a
long period of time. Stop using the tool
from time to time to avoid temperature
rise and heat overload of the motor.
12) Do not drop the tool.
13) Wear dust mask, if the work causes
dust.
14) During charging, the charger may
become slightly warm. This is normal.
Do NOT charge the battery for a long
period.
Symbol Meaning
V Volts
Direct current
n
o
-1
...min
Ah
WARNING:
Some dust created by power sanding,
sawing, grinding, drilling, and other
construction activities contains chemicals
known to the State of California to
cause cancer, birth defects or other
reproductive harm. Some examples of
these chemicals are:
* Lead from lead-based paints
* Crystalline silica from bricks and
cement and other masonry products
* Arsenic and chromium from chemically-
treated lumber.
To reduce your exposure to these
chemicals: work in a well ventilated
area, and work with approved safety
equipment, such as dust masks that
are specially designed to filter the
microscopic particles.
No load speed
Revolutions or reciprocations
per minutes
Electrical capacity of battery
pack
Rotation only
To reduce the risk of
injury, user must read and
understand instruction
manual.
For indoor use only.
- 5 -
Page 6

IV. FOR BATTERY
CHARGER &
BATTERY PACK
Important Safety Instructions
1) SAVE THESE INSTRUCTIONS. This
manual contains important safety
and operating instructions for battery
charger.
2) Before using battery charger, read all
instructions and cautionary markings
on (1) battery charger, (2) battery
pack.
3) CAUTION - To reduce the risk of
injury, charge only Panasonic Battery
Pack as shown in last page.
Other types of batteries may burst
causing personal injury and damage.
4) Do not expose charger to rain or
snow.
5) To reduce the risk of damaging the
electric plug and cord, pull by plug
rather than cord when disconnecting
charger.
6) Make sure cord is located so that it
will not be stepped on, tripped over,
or otherwise subjected to damage or
stress.
7) An extension cord should not be used
unless absolutely necessary.
Use of improper extension cord could
result in a risk of fire and electric
shock. If extension cord must be used,
make sure:
a. that pins on plug of extension cord
are the same number, size and
shape as those of plug on charger.
b. that extension cord is properly wired
and in good electrical condition.
c. that wire size is large enough
for ampere rating of charger as
specied below.
RECOMMENDED MINIMUM AWG SIZE
OF EXTENSION CORDS FOR BATTERY
AC Input Rating. Amperes AWG Size of Cord
Equal to or
greater than
0 2 18 18 18 16
8) Do not operate charger with damaged
cord or plug replace them immediately.
9) Do not operate charger if it has
received a sharp blow, been dropped,
or otherwise damaged in any way;
take it to a qualied serviceman.
10) Do not disassemble charger; take
it to a qualified serviceman when
service or repair is required. Incorrect
reassembly may result in a risk of
electric shock or re.
11) To reduce the risk of electric shock,
unplug charger from outlet before
attempting any maintenance or
cleaning.
12) The charger and battery pack are
specically designed to work together.
Do not attempt to charge any other
cordless tool or battery pack with this
charger.
13) Do not attempt to charge the battery
pack with any other charger.
14) Do not attempt to disassemble the
battery pack housing.
15) Do not store the tool and battery pack
in locations where the temperature
may reach or exceed 50°C (122°F)
(such a metal tool shed, or a car
in the summer), which can lead to
deterioration of the storage battery.
16) Do not charge battery pack when the
temperature is BELOW 0°C (32°F)
or ABOVE 40°C (104°F). This is very
important.
17) Do not incinerate the battery pack. It
can explode in a re.
18) Avoid dangerous environment. Do not
use charger in damp or wet locations.
19) The charger is designed to operate on
standard household electrical power
only. Do not attempt to use it on any
other voltage!
CHARGERS
But less
than
Length of Cord, Feet
25 50 100 150
- 6 -
Page 7

20) Do not abuse cord. Never carry
charger by cord or yank it to
disconnect from outlet. Keep cord
away from heat, oil and sharp edges.
21) Charge the battery pack in a well
ventilated place, do not cover the
charger and battery pack with a cloth,
etc., while charging.
22) U s e of a n a t t a c h m e n t n o t
recommended may result in a risk
of fire, electric shock, or injury to
persons.
23) Do not short the battery pack. A
battery short can cause a large current
ow, over heating and burns.
24) NOTE: If the supply cord of this
appliance is damaged, it must only be
replaced by a repair shop appointed
by the manufacturer, because special
purpose tools are required.
25) T O R E D U C E T H E RI S K O F
E L E C T R I C S H O C K , T H I S
APPLIANCE HAS A POLARIZED
PLUG (ONE BLADE IS WIDER THAN
THE OTHER).
This plug will fit in a polarized outlet
only one way. If the plug does not fit
fully in the outlet, reverse the plug. If
it still does not fit, contact a qualified
electrician to install the proper outlet.
Do not change the plug in any way.
WARNING:
Do not use other than the Panasonic
battery packs that are designed for use
with this rechargeable tool.
Panasonic is not responsible for any
damage or accident caused by the use
of the recycled battery pack and the
counterfeit battery pack.
Do not dispose of the battery pack in a
re, or expose it to excessive heat.
Do not drive the likes of nails into the
battery pack, subject it to shocks, dismantle it, or attempt to modify it.
Do not allow metal objects to touch the
battery pack terminals.
Do not carry or store the battery pack
in the same container as nails or similar
metal objects.
Do not charge the battery pack in a
high-temperature location, such as next
to a re or in direct sunlight. Otherwise,
the battery may overheat, catch re, or
explode.
Never use other than the dedicated
charger to charge the battery pack.
Otherwise, the battery may leak, overheat, or explode.
After removing the battery pack from
the tool or the charger, always reattach
the pack cover. Otherwise, the battery
contacts could be shorted, leading to a
risk of re.
When the Battery Pack Has Deteriorated, Replace It with a New One. Continued use of a damaged battery pack
may result in heat generation, ignition
or battery rupture.
- 7 -
Page 8
V. ASSEMBLY
①
②
①
②
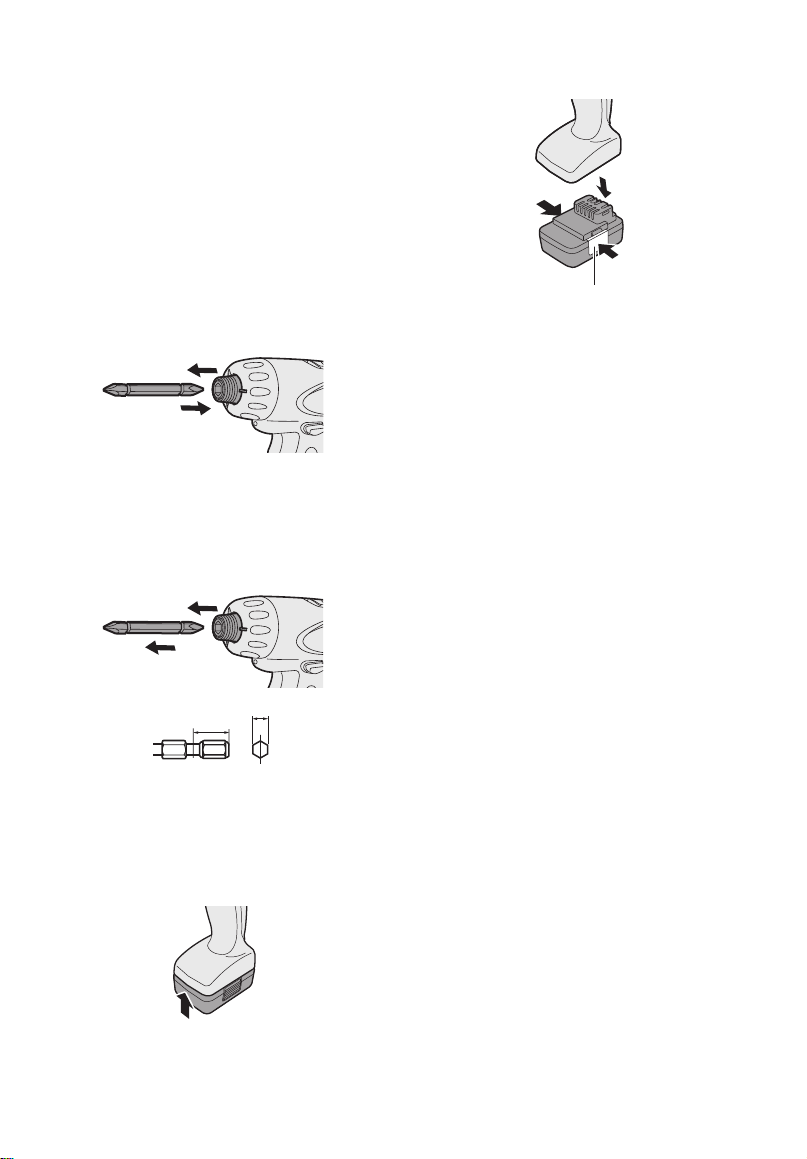
Attaching or Removing Bit
NOTE:
When attaching or removing a bit,
disconnect battery pack from tool or
place the switch in the center position
(switch lock).
1. Attachment
While pulling the bit holder
1
Insert the bit
2
Release the bit holder
3
2. Removal
While pulling the bit holder
1
Remove the bit
2
9.5 mm (3/8") - 13 mm (33/64") 6.35 mm (1/4")
2. To remove the battery pack:
Push on the button from the side to
release the battery pack.
Button
VI. OPERATION
[Main Body]
Switch Operation
1. The speed increases with the amount
of depression of the trigger. When
beginning work, depress the trigger
slightly to start the rotation slowly.
2. A feedback electronic controller is used
to give a strong torque even in low
speed.
3. The brake operates when the trigger
is released and the motor stops
immediately.
NOTE:
When the brake operates, a braking
sound may be heard. This is normal.
Attaching or Removing Battery Pack
1. To connect the battery pack:
Insert the battery pack rmly into the
main body.
- 8 -
Page 9
Switch and Forward/Reverse
Lever Operation
Forward Reverse
Switch lock
CAUTION:
To prevent damage, do not operate
Forward/Reverse lever until the bit
comes to a complete stop.
Forward Rotation Switch
Operation
1. Push the lever for forward rotation.
2. Depress the trigger switch slightly to
start the tool slowly.
3. The speed increases with the amount
of depression of the trigger for efcient
tightening of screws and drilling.
The brake operates and the chuck
stops immediately when the trigger is
released.
4. After use, set the lever to its center
position (switch lock).
Reverse Rotation Switch
Operation
1. Push the lever for reverse rotation.
Check the direction of rotation before
use.
2. Depress the trigger switch slightly to
start the tool slowly.
3. After use, set the lever to its center
position (switch lock).
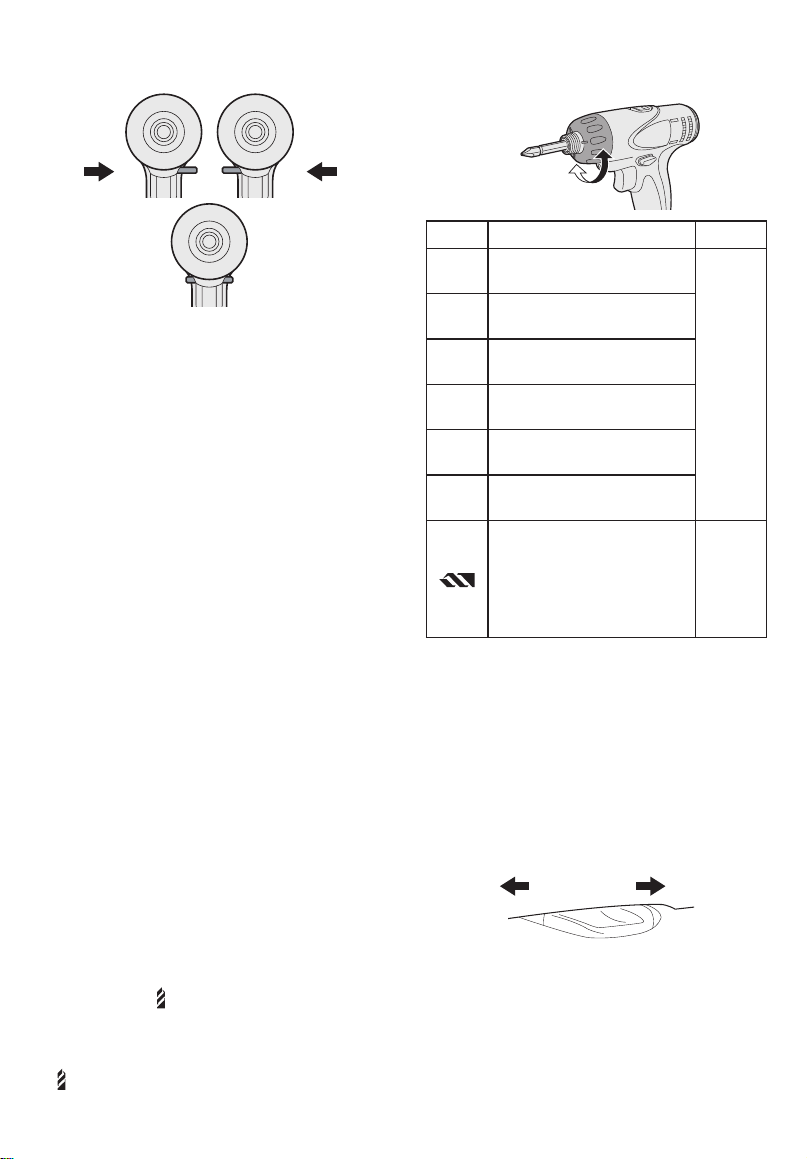
CAUTION:
Set the clutch scale at the alignment
position before actual operation.
Setting Torque Use
Approx: 0.3 N·m
1
(3.0 kgf-cm or 2.6 in-lbs)
Approx: 1.0 N·m
5
(11 kgf-cm or 8.8 in-lbs)
Approx: 1.8 N·m
9
(18 kgf-cm or 15.9 in-lbs)
Approx: 2.5 N·m
13
(26 kgf-cm or 22.1 in-lbs)
Approx: 3.3 N·m
17
(33 kgf-cm or 29.2 in-lbs)
Approx: 4.0 N·m
21
(41 kgf-cm or 35.4 in-lbs)
Approx: 6 N·m
(61 kgf-cm or 53.1 in-lbs)
When using at high speeds, set the clutch
For
driving
screws
For
powerful
driving
screws
and
drilling
at 10 or below. (Operation stops at the
maximum torque of 1.5 N·m (15 kgf-cm)
when the scale is higher.)
The auto shut-of f function may become
inoperable at high clutch settin g s when
batter y power drops. Recha r g e the battery in that case.
Speed Selection
Choose a low or high speed to suit the use.
HIGH LOW
Clutch Torque Setting
Adjust the torque to one of the 21 clutch
settings or “ ” position.
Use for Drilling
When using for drilling, set the clutch at
“ ” position.
Use a bit designed for drilling.
The more the variable speed control
trigger is pulled, the higher the speed
becomes.
CAUTION:
Check the speed selector switch before use.
- 9 -
Page 10
Use at low speed when high torque
is needed during operation. (Using at
high speed when high torque is re-
quired may cause a motor breakdown.)
Do not operate the speed selector
switch (LOW-HIGH) while pulling on
the speed control trigger. This can
cause the rechargeable battery to
wear quickly or damage the internal
mechanism of the motor.
* See specifications for “MAXIMUM
RECOMMENDED CAPACITIES”.
CAUTION:
To prevent excessive temperature
increase of the tool surface, do not
operate the tool continuously using
two or more battery packs. The tool
needs cool-off time before switching
to another pack.
Do not close up vent holes on the
sides of the body during operation.
Otherwise, the machine function is
adversely affected to cause a failure.
Do NOT strain the tool (motor). This
may cause damage to the unit.
Use the tool in such a way as to prevent the air from the body vent holes
from blowing directly onto your skin.
Otherwise, you may get burned.
How to Use Hook ring
WARNING!
When the main unit is held by the hook
ring, avoid jumping or running with it.
Doing so may cause the ring to slip and
the main unit may fall.
This may result in an accident or injury.
When the hook ring is not used, be
sure to return it to the original position.
The hook ring may catch on something.
This may result in an accident or injury.
When the unit is hooked by the hook
ring, do not attach driver bits to the unit.
A sharp edge object, such as a drill bit,
may cause injury or an accident.
Use a hooking tool (carabiner etc.) that
does not come off easily. If this unit falls
it may cause accident.
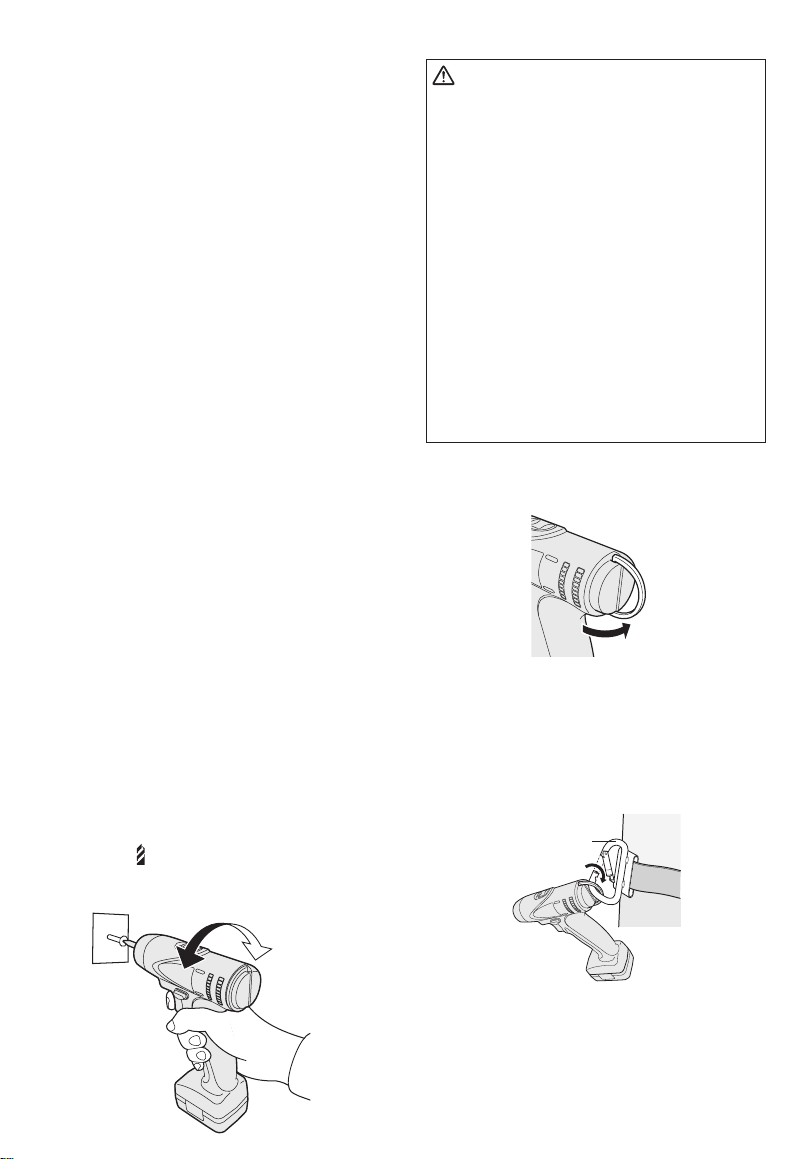
Using Hook Ring
1. Release the hook ring.
Bit-locking Function
1. With the trigger switch not engaged
and a screwdriver bit locked in
place, the tool can be used as a
manual screwdriver (up to 5 N·m,
51 kgf-cm, 44.3 in-lbs).
There will be a little play in the chuck,
but this is not a malfunction.
2. This feature is handy for tightening
screws that require more torque than
the maximum torque of the driver
(position
the tightness of a screw or to loosen an
extremely tight screw.
on the clutch), for conrming
2. Attach the hook ring to the hooking tool.
• Use a hooking tool (carabiner etc.)
that does not come off easily. If this
unit falls it may cause accident.
• Ensure that there is no contact with
the surroundings when a hook ring is
used.
Hooking tool
3. Return the hook ring after use.
- 10 -
Page 11
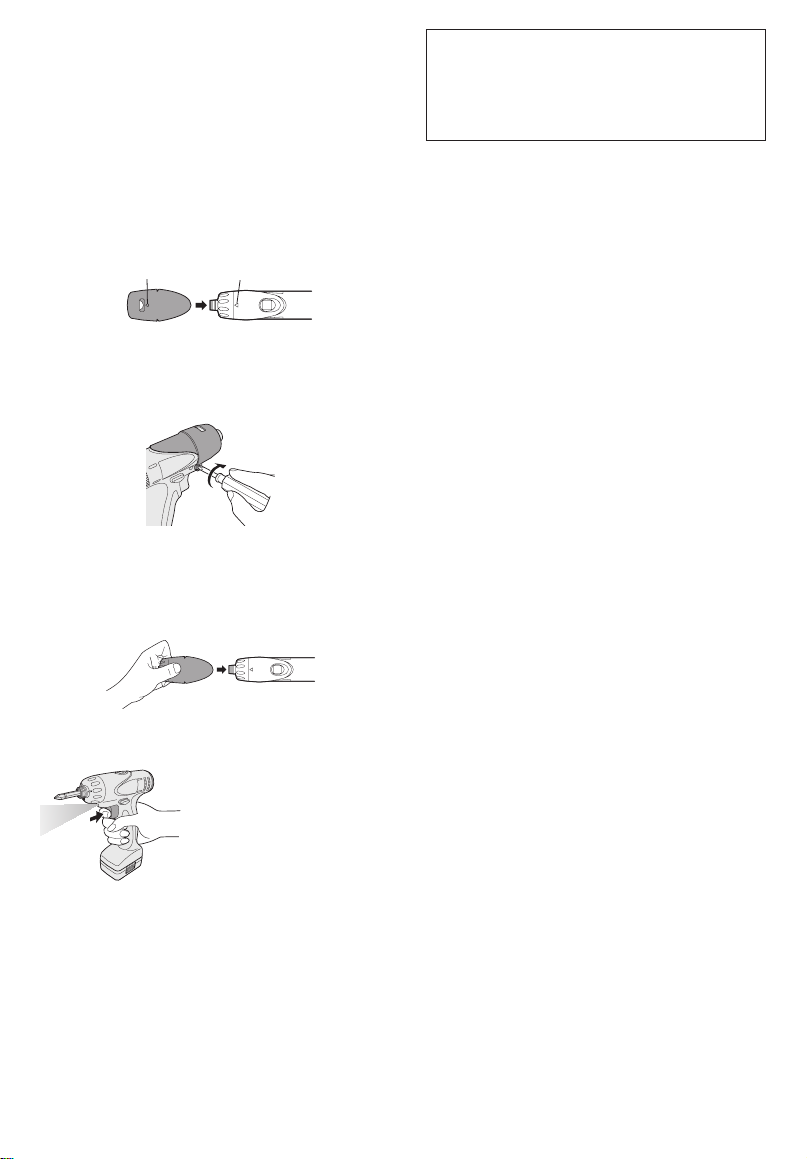
• Clutch Lock Cover
The clutch lock cover allows you to lock
the clutch at the selected setting.
Attaching the cover
1. Select the appropriate clutch setting for
the application.
2. Attach the clutch lock cover.
•
Align the triangle mark on the cover
with the graduation selection mark on
the drill and attach.
Triangle mark
Tightening the screw to immobilize
the cover.
•
Use a hand screwdriver. Tightening the
screw too much may damage the cover.
Only use the screw that comes with the
*
clutch lock cover.
Removing the cover
1. Remove the clutch lock cover.
LED light
CAUTION:
The built-in LED light is designed to
illuminate the small work area temporarily.
Do not use it as a substitute for a
regular flashlight, since it does not
have enough brightness.
Graduation selection mark
Pull the trigger.
The light illuminates
with very low current,
and it does not
adversely affect the
performance of the tool
during use or its battery
capacity.
Caution: DO NOT STARE INTO BEAM.
Use of controls or adjustments or
performance of procedures other than
those specified herein may result in
hazardous radiation exposure.
Automatic power-off function
The automatic power-off function is
designed to prevent a loss of tightening
torque due to reduced battery voltage.
Once it has been activated, the tool will
not operate until the battery pack has
been charged (or replaced with a fresh
unit), even if the trigger is depressed.
LED lamp will flash when the automatic
power-off function is activated.
LED lamp begins flashing, the battery
pack should be charged (or replaced with
a fresh unit) immediately.
Be sure to fully charge the battery pack in
question after activation of the automatic
power-off function. Failure to do so may
prevent the automatic power-off funtion
from being properly deactivated.
[Battery Pack]
For Appropriate Use of
Battery Pack
Li-ion Battery Pack
For optimum battery life, store the Li-ion battery pack following use without charging it.
When charging the battery pack, conrm
that the terminals on the battery charger
are free of foreign substances such as
dust and water etc. Clean the terminals
before charging the battery pack if any
foreign substances are found on the
terminals.
The life of the battery pack terminals may
be affected by foreign substances such
as dust and water etc. during operation.
When battery pack is not in use, keep it
away from other metal objects like: paper
clips, coins, keys, nails, screws, or other
small metal objects that can make a connection from one terminal to another.
Shorting the battery terminals together
may cause sparks, burns or a re.
When operating the battery pack, make
sure the work place is well ventilated.
When the battery pack is removed from the
main body of the tool, replace the battery
pack cover immediately in order to prevent
dust or dirt from contaminating the battery
terminals and causing a short circuit.
- 11 -
Page 12
Battery Pack Life
The rechargeable batteries have
a limited life. If the operation time
becomes extremely short after
recharging, replace the battery pack
with a new one.
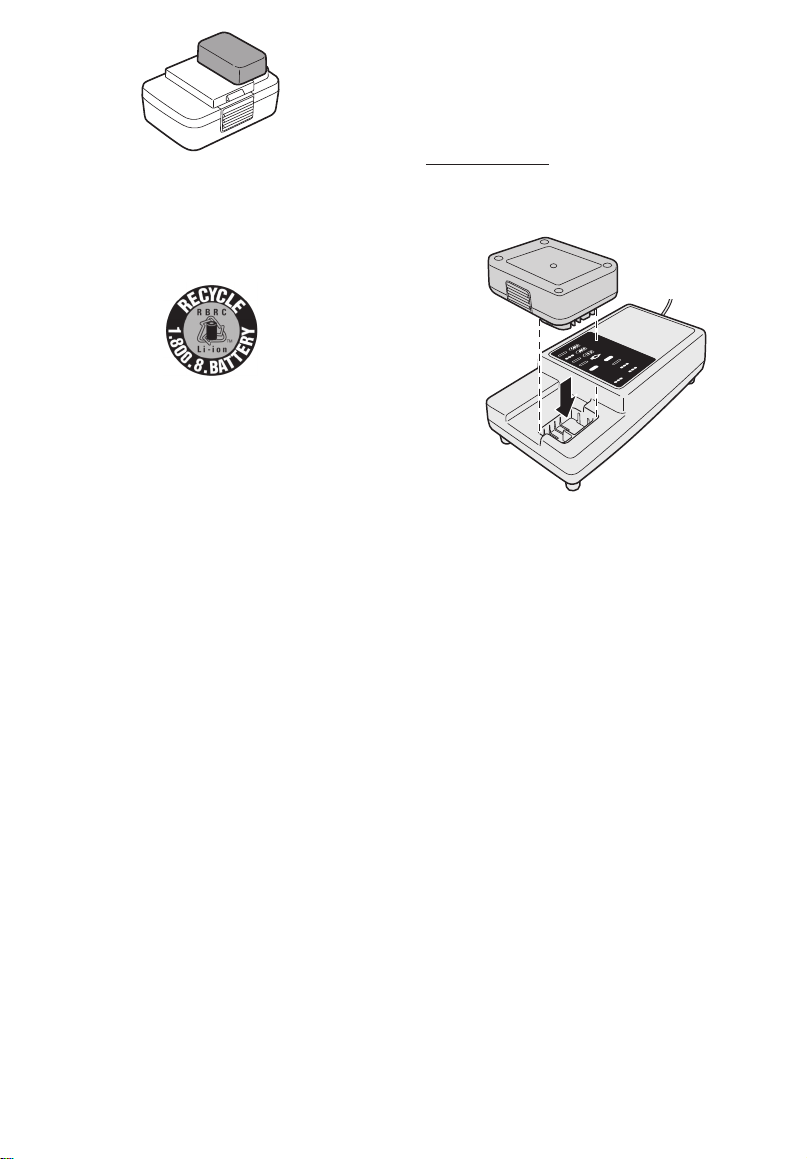
Battery Recycling
ATTENTION:
For environmental protection and
recycling of materials, be sure that it
is disposed of at an officially assigned
location, if there is one in your country.
[Battery Charger]
Charging
CAUTION:
If the temperature of the battery pack
falls approximately below −10°C (14°F),
charging will automatically stop to prevent degradation of the battery.
The ambient temperature range is between 0°C (32°F) and 40°C (104°F).
If the battery pack is used when the
battery temperature is below 0°C (32°F),
the tool may fail to function properly.
When charging a cool battery pack (below
0°C (32°F)) in a warm place, leave the
battery pack at the place and wait for more
than one hour to warm up the battery to the
level of the ambient temperature.
Cool down the charger when charging
more than two battery packs consecutively.
Do not insert your fingers into contact
hole, when holding charger or any other
occasions.
To prevent the risk of re or damage to the
battery charger.
Do not use power source from an engine
generator.
Do not cover vent holes on the charger
and the battery pack.
Unplug the charger when not in use.
NOTE:
Your battery pack is not fully charged at
the time of purchase. Be sure to charge
the battery before use.
Battery charger
1. Plug the charger into the AC outlet.
2. Insert the battery pack firmly into the
charger.
3. During charging, the charging lamp
will be lit.When charging is completed,
an internal electronic switch will
automatically be triggered to prevent
overcharging.
Charging will not start if the battery
pack is warm (for example, immediately after heavy-duty operation).
The orange standby lamp will be
flashing until the battery cools down.
Charging will then begin automatically.
4. The charge lamp (green) will flash
slowly once the battery is approximately
80% charged.
5. When charging is completed, the
charging lamp in green color will turn
off.
6. If the temperature of the battery pack
is 0°C or less, charging takes longer to
fully charge the battery pack than the
standard charging time.
Even when the battery is fully charged,
it will have approximately 50% of the
power of a fully charged battery at
normal operating temperature.
7. Consult an authorized dealer if the
charging lamp (green) does not turn off.
8. If a fully charged battery pack is
inserted into the charger again, the
charging lamp lights up. After several
minutes, the charging lamp in green
- 12 -
color will turn off.
Page 13
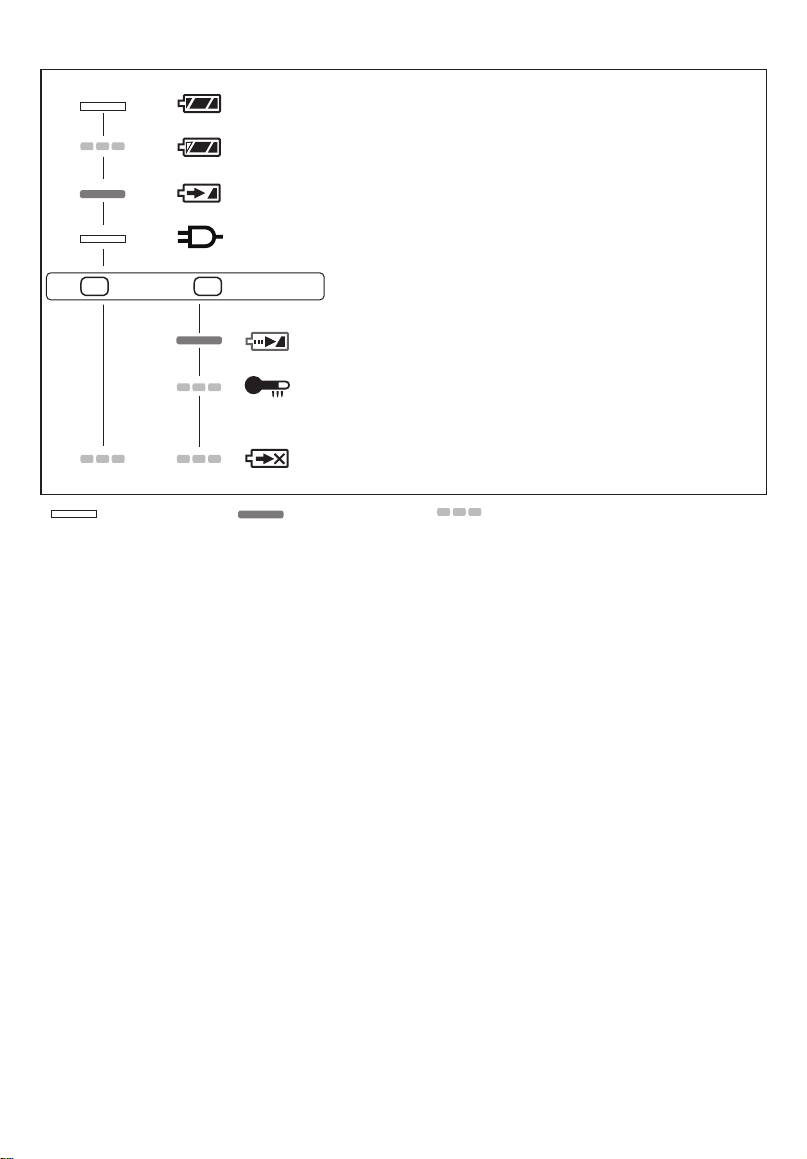
LAMP INDICATIONS
Charging is completed. (Full charge.)
Battery is approximately 80% charged.
Now charging.
Charger is plugged into the AC outlet. Ready to charge.
(Green)
Turn off Lit
(Orange)
Charging Status Lamp.
Left: green Right: orange will be displayed.
Battery pack is cool, or the voltage of the battery is low.
The battery pack is being charged slowly to reduce the load on the battery.
Battery pack is warm.
Charging will begin when temperature of battery pack drops. If
the temperature of the battery pack is -10° or less, the charging
status lamp (orange) will also start ashing. Charging will begin
when the temperature of the battery pack goes up.
Charging is not possible. Clogged with dust or malfunction of
the battery pack.
Flashing
Federal Communication Commission Interference Statement
This equipment has been tested and found to comply with the limits for a Class B
digital device, pursuant to Part 15 of the FCC Rules. These limits are designed to
provide reasonable protection against harmful interference in a residential installation. This equipment generates, uses and can radiate radio frequency energy and,
if not installed and used in accordance with the instructions, may cause harmful interference to radio communications. However, there is no guarantee that interference will not occur in a particular installation. If this equipment does cause harmful
interference to radio or television reception, which can be determined by turning the
equipment off and on, the user is encouraged to try to correct the interference by one
of the following measures:
Reorient or relocate the receiving antenna.
Increase the separation between the equipment and receiver.
Connect the equipment into an outlet on a circuit different from that to which the receiver is connected.
Consult the dealer or an experienced radio/TV technician for help.
FCC Caution: To assure continued compliance, install and use in accordance with
provided instructions. Use only the battery pack specified in the instructions. Any
changes or modications not expressly approved by the party responsible for compli-
ance could void the user's authority to operate this equipment.
This device complies with part 15 of the FCC Rules. Operation is subject to the fol-
lowing two conditions: (1) This device may not cause harmful interference, and (2) this
device must accept any interference received, including interference that may cause
undesired operation.
This Class B digital apparatus complies with Canadian ICES-0013.
- 13 -
Page 14

[Information on Disposal in other Countries outside the
European Union]
These symbols are only valid in the European Union. If you wish to discard these
items, please contact your local authorities or dealer and ask for the correct method of
disposal.
Note for the battery symbol (bottom two symbol examples):
This symbol might be used in combination with a chemical symbol. In this case it
complies with the requirement set by the Directive for the chemical involved.
VII. MAINTENANCE
Use only a dry, soft cloth for wiping the unit. Do not use a damp cloth, thinner, benzine,
or other volatile solvents for cleaning.
In the event that the inside of the tool or battery pack is exposed to water, drain and
allow to dry as soon as possible.
Carefully remove any dust or iron lings that collect inside the tool. If you experience any
problems operating the tool, please contact your nearest authorised service center.
VIII. ACCESSORIES
Use only bits suitable for size of drill's chuck.
IX. APPENDIX
MAXIMUM RECOMMENDED CAPACITIES
Model EYFEA1N
Screw
driving
Machine screw
Low : M5
High : M4
X. SPECIFICATIONS
MAIN UNIT
Model EYFEA1N
Motor voltage 7.2 V DC
No load
speed
Maximum
torque
Clutch torque
Overall length 145 mm (5-7/10")
Weight (with battery pack) 0.63 kg (1.39 lbs)
Low 0 - 300 min
High 0 - 900 min
Low 6.0 N·m (61 kgf-cm, 53.24 in-lbs)
High 2.0 N·m (20 kgf-cm, 17.75 in-lbs)
Approx. 0.3 N·m (3 kgf-cm, 2.6 in-lbs) –
4.0 N·m (41 kgf-cm, 35.6 in-lbs)
- 14 -
-1
(rpm)
-1
(rpm)
Page 15

BATTERY PACK
Model EY9L20
Storage battery Li-ion
Battery voltage 7.2 V DC (3.6 V × 2 cells)
Charging time
Usable: 35 min
Full: 60 min
NOTE: This chart may include models that are not available in your area.
Please refer to the latest general catalogue.
For the dealer name and address, please see the included warranty card.
BATTERY CHARGER
Model EY0L20
Rating See the rating plate on the bottom of the charge.
Weight 0.43 kg (0.95 lbs)
NOTE: This chart may include models that are not available in your area.
Please refer to the latest general catalogue.
NOTE: For the dealer name and address, please see the included warranty card.
- 15 -
Page 16

I. INTRODUCTION
Ces outils peuvent être utilisés pour
serrer des vis en mode embrayé, et
pour percer des trous dans du bois et
du métal en mode perceuse. Le modèle
EYFEA1N peut aussi être utilisé pour
percer des trous dans du béton mou
et des matériaux similaires en mode
percussion.
II. CONSIGNES
DE SECU RITE
GENERALES
AVERTISSEMENT! Veuillez lire
toutes les instructions.
Si les instructions détaillées ci-dessous
ne sont pas observées, cela peut
entraîner une électrocution, un incendie
et/ou des blessures graves. Le terme
“outil mécanique” utilisé dans tous les
avertissements ci-dessous se réfère aux
outils mécaniques opérés par cordons
d’alimentation et par batterie (sans l).
CONSERVEZ CES
INSTRUCTIONS
Sécurité de la zone de travail
1) Gardez la zone de travail propre et
bien aérée.
Les endroits encombrés et sombres
invitent les accidents.
2) Ne faites pas fonctionner les outils
mécaniques dans des atmosphères
explosives, comme en présence de
liquides inammables, de gaz ou de
poussière.
Les outils mécaniques génèrent des
étincelles qui peuvent enflammer la
poussière ou les vapeurs.
3) Gardez les enfants et les spectateurs
éloignés lors du fonctionnement
d’un outil mécanique.
Les distractions peuvent en faire
perdre le contrôle.
Sécurité électrique
1) La f ic he des out ils mécaniq ues
doit correspondre aux prises
secteur. Ne modifiez la fiche sous
aucun prétexte. N’utilisez pas de
fiche adaptatrice avec les outils
mécaniques mis à la terre.
Des ches non modiées et des prises
secteur correspondant réduisent les
risques d’électrocution.
2) Evitez tout contact physique avec
les surfaces mises à la terre telles
que tuyaux, radiateurs, micro-
ondes et réfrigérateurs.
Il y a un risque d’électrocution
supplémentaire si votre corps est mis
à la terre.
3) N ’ e x p o s e z pa s l e s ou t i l s
mé ca niques à la plui e ou à des
conditions humides.
De l’eau pénétrant dans un outil
mécanique augmente le risque
d’électrocution.
4) Ne malmenez pas le cordon.
N’utilisez jamais le cordon pour
transporter, pour tirer ou pour
débr a ncher l’ outil mé c aniq u e .
Gardez le cordon éloigné de la
chaleur, de l’huile, d’objets aux
bords coupants ou de pièces en
mouvement.
Les co rdons endommag és on
emmêlés augmentent le risque
d’électrocution.
5) Lors du fonctionnement des outils
mécaniques à l’extérieur, utilisez
une rallonge adaptée à l’utilisation
à l’extérieur.
L’utilisation d’un cordon adapté à
l’utilisation à l’extérieur réduit les
risques d’électrocution.
Sécurité personnelle
1) Res tez al ert e, reg arde z ce qu e
vous faites et faites preuve de
bo n sen s lor squ e vous utili sez
un ou t il m é cani q ue. N’ u tili s ez
pas un outil mécanique alors que
vous êtes fatigué ou sous les
effets de drogue, d’alcool ou de
- 16 -
médicaments.
Page 17

Un moment d’inattention pendant
que vous faites fonctionner l’outil
mécanique peut entraîner des
blessures graves.
2) U t i l i s e z des équi p e m e n ts de
sécurité. Portez toujours des
protection pour vos yeux.
Des équipements de sécurité comme
masque antipoussière, chaussures
de sécurité non glissantes, casque
de pro te ct io n ou p ro tections
d’oreilles, utilisés dans des conditions
appropriées réduisent les blessures
corporelles.
3) Evitez tout démarrage accidentel.
Assurez-vous que l’ in te rr up te ur
est en position d’arrêt avant de
brancher l’outil.
Le transport d’outils mécaniques
avec le doigt sur l’interrupteur ou le
branchement d’outils mécaniques
dont l’interrupteur est sur la position
de marche invite les accidents.
4) Retirez toute clé d’ajustement ou
clé de serrage avant de mettre l’outil
mécanique en marche.
Une clé de serrage ou une clé
d’ajustement laissée attachée à une
pièce tournante de l’outil mécanique
peu t ent raîner d es bless ures
corporelles.
5) Ne vous mettez pas en déséquilibre.
Gardez une bonne prise au sol et
votre équilibre à tout moment.
Ceci permet un meilleur contrôle de
l’outil mécanique dans des situations
inattendues.
6) Habillez-vous correctement. Ne
portez pas de vêtements lâches
ou de bijoux. Gardez vos cheveux,
vêtements et gants éloignés des
pièces en mouvement.
Des vêtements lâches, des bijoux
ou des cheveux longs peuvent se
faire prendre dans les pièces en
mouvement.
7) Si des disposi t i fs pour l a connexion
d’appareils d’extraction et de
ramassage de la poussière sont
fournis, assurez-vous qu’ils sont
connectés et correctement utilisés.
L’utilisation de ces dispositifs peut
réduire les risques concernés.
Utilisation et soins de l’outil
mécanique
1) Ne forcez pas l’outil mécanique.
Utilisez l’outil mécanique correct
pour votre application.
L’outil mécanique correct exécute
mieux le travail dans de meilleurs
conditions de sécurité s’il est utilisé à
l’allure pour laquelle il a été conçu.
2) N’ ut ilisez pas l’out il méc an ique
si l’interrupteur ne le met pas en
marche ou ne l’arrête pas.
Tout outil mécanique qui ne peut pas
être contrôlé par son interrupteur est
dangereux et doit être réparé.
3) Débranchez la fiche de la source
d’alimentation et/ou du bloc de
batterie avant d’effectuer tout
ajustement, de changer d’accessoire
ou de ranger l’outil mécanique.
De telles mesures de sécurité
préventives réduisent les risques
de faire démarrer l’outil mécanique
accidentellement.
4) Ran g e z l e s o u tils mé c aniq u es
inutilisés hors de la portée des
enfants et ne laissez personne qui
n’est pas familiarisé avec l’outil
mécanique ou ses instructions faire
fonctionner l’outil mécanique.
Les outils mécaniques sont dangereux
dans les mains des utilisateurs
manquant d’entraînement.
5) En t r ete n e z b i en l e s o u t il s
mécaniques. Vérifiez l’alignement
ou l’emboîtage des pièces en
mouvement, l’intégrité des pièces
et toute autre condition pouvant
affecter le fonctionnement de l’outil
mécanique. S’il est endommagé,
fa ites répa re r l’ outil mécan iq ue
avant de l’utiliser.
De nombr eu x ac ci de nt s sont
provoqués par des outils mécaniques
mal entretenus.
- 17 -
Page 18

6) Maintenez les outils de coupe
affûtés et propres.
Les outils de coupe bien entretenus
avec des lames bien affûtées ont
moins de chances de gripper et sont
plus faciles à contrôler.
7) Util i sez l’o u til mé c a niqu e , les
accessoires, les mèches, etc.,
conformément à ces instructions
et de la façon pour laquelle l’outil
particulier a été conçu en tenant
compte des conditions de travail et
de la tâche à exécuter.
L’utilisation de l’outil mécanique à des
ns autres que celles pour lesquelles
il a été conçu peut présenter une
situation à risque.
5) Si elle est malmenée, du liquid e
peut s’échapper de la batterie.
Evitez tout contact. Si un contact
accidentel se produit, rincez à l’eau.
Si du liquide entre en contact avec
les yeux, consultez un médecin.
Le liquide éjecté de la batterie peut
entraîner des irritations ou des
brûlures.
Réparation
1) Faites réparer votre outil mécanique
par du personnel de réparation
qua l ifi é en n’ util isan t q u e d e s
pièces de rechange identiques.
Ceci assure le maintien de la sécurité
de l’outil mécanique.
Utilisation et soins de la
batterie de l’outil
1) Assurez-vous que l’ in te rr up te ur
est dans la position d’arrêt avant
d’insérer le bloc de batterie.
L’insertion du bloc de batterie dans
un outil mécanique dont l’interrupteur
est sur la position de marche peut
provoquer des accidents.
2) N’effectuez la recharge qu’avec le
chargeur spécié par le fabricant.
Un chargeur convenant à un bloc
de batterie peut entraîner un risque
d’incendie lorsqu’un autre bloc de
batterie est utilisé.
3) N’utilisez les outils mécaniques
q u ’ a v ec le s blo c de bat t e r i e
spécialement conçus pour eux.
L’utilisation de tout autre bloc de
batterie peut entraîner un risque de
blessure et d’incendie.
4) Lorsqu’un bloc de batterie n’est pas
utilisé, gardez-le éloigné d’objets
métalliques comme agrafes, pièces
de monnaie, clés, clous, vis ou tout
autre petit objet métallique pouvant
établir une connexion entre les
deux bornes.
Si les bornes de la batterie sont mises
en court-circuit, cela peut entraîner
des brûlures ou un incendie.
III. REGLES DE
SECURITE
PARTICULIERES
1) Portez des lunettes lorsque vous
utilisez l’outil pendant de longues
périodes. L’exposition prolongée à du
bruit de haute densité peut entraîner
la perte de l’ouïe.
2) Utilisez la manche auxiliaire
fournie avec l'outil. Si vous perdez
le contrôle de l'outil, vous risquez de
vous blesser.
3) Tenez l’outil par les surfaces de
prise isolées lorsque vous effectuez
une opération lors de laquelle l’outil
de coupe risque d’entrer en contact
avec des câblages cachés.
Le contact avec un fil sous tension
fera passer le courant dans les pièces
métalliques exposées et électrocutera
l’opérateur.
4) N’oubliez pas que cet appareil est
toujours prêt à fonctionner, parce qu’il
ne doit pas être branché dans une
prise électrique.
- 18 -
Page 19

5) Si la mèche est coincée, mettez
immédiatement le commutateur de la
gâchette hors tension an de prévenir
une surcharge pouvant endommager
la batterie autonome ou le moteur.
Dégagez la mèche en inversant le
sens de rotation.
6) Ne m an œu vrez pa s le le vi er
d’inversion marche avant - marche
arrière lorsque le commutateur
principal est sur la position de marche.
La batterie se déchargerait rapidement
et la perceuse serait endommagée.
7) Lorsque vous rangez ou transportez
l’outil, mettez le levier d’inversion
marche avant - marche arrière sur
la position centrale (verrouillage du
commutateur).
8) Ne forcez pas l’outil en maintenant
la gâchette de contrôle de vitesse
enfoncée à moitié (mode de contrôle
de la vitesse) de sorte que le moteur
s’arrête. Le circuit de protection
s’activera et pourra empêcher le
contrôle de la vitesse. Dans ce cas,
relâchez la gâchette de contrôle de la
vitesse, puis serrez-la à nouveau pour
le fonctionnement normal.
9) Evitez la pénétration de poussière
dans le mandrin.
10) Ne touchez pas les pièces rotatives
pour éviter toute blessure.
11) N’utilisez pas l’outil continuellement
pendant une longue période. Arrêtez
d’utiliser l’outil de temps en temps
pour éviter une augmentation de
la température et de surchauffer le
moteur.
12) Ne laissez pas tomber l’outil.
13) Mettez un masque antipoussière, si
les travaux produisent de la poussière.
14) La température du chargeur peut
s’élever en cours d’utilisation. Ce n’est
pas là le signe d’une anomalie de
fonctionnement. NE chargez PAS la
batterie pendant une longue période.
Symbole Signication
V Volts
Courant continu
n
...min
Ah
o
-1
Vitesse sans charge
Révolutions ou alternances
par minute
Capacité électrique de la
batterie autonome
Rotation seulement
Pour réduire les risques de
blessures, l'utilisateur doit
lire et comprendre le mode
d'emploi.
Pour l’utilisation à l’intérieur
seulement.
AVERTISSEMENT:
La poussière résultant de ponçage,
sciage, meulage, perçage à haute
pression et de toute autre activité de
construction, contient des produits
chimiques réputés être cause de cancer,
de malformations congénitales ou autres
problèmes reproductifs. Ces produits
chimiques sont, par exemple :
* Le plomb contenu dans les peintures à
base de plomb
* La silice cristalline, contenue dans les
briques, le ciment et autres produits de
maçonnerie; et
* L’arsenic et le chrome provenant du
bois traité chimiquement.
Pour réduire l’exposition à ces produits
chimiques, il faut travailler dans un
lieu bien aéré et porter un équipement
de sécurité approprié tel que certains
masques anti-poussière conçus
spécialement pour filtrer les particules
microscopiques.
- 19 -
Page 20

IV. CHARGEUR
DE BATTERIE
ET BATTERIE
AUTONOME
Instructions de sécurité importantes
1) CONSERVEZ CES INSTRUCTIONS.
La présente notice contient des
instructions de sécurité et d’utilisation
importantes pour le chargeur de
batterie.
2) Avant d’utiliser le chargeur de batterie,
lisez toutes les instructions et les
marques d’avertissement figurant
sur (1) le chargeur de batterie, (2) la
batterie autonome.
3) MISE EN GARDE – Pour réduire
le risque de blessures, chargez
la batterie autonome Panasonic
seulement comme indiqué à la
dernière page.
Les autres types de batteries risquent
d’exploser et de causer des blessures
corporelles et des dommages
matériels.
4) N’exposez pas le chargeur à la pluie
ou à la neige.
5) Pour réduire les risques de dommages
à la fiche et au cordon secteur,
débranchez le chargeur en tirant la
che et non le cordon.
6) Veillez à acheminer le cordon de façon
que personne ne risque de le piétiner,
de trébucher dessus, d’endommager
ou d’étirer le cordon.
7) N’utilisez une rallonge qu’en cas de
nécessité absolue.
Si vous utilisez une rallonge
inadéquate, vous risquez de causer un
incendie ou une électrocution. Si vous
devez absolument utiliser une rallonge,
veillez à respecter les points suivants:
a. Le nombre, la taille et la forme des
broches de la fiche de la rallonge
doivent être identiques à ceux de la
che du chargeur de batterie.
b. L a r al lon ge doi t a vo ir des
conducteurs en bon état et être
elle-même en bon état d’utilisation.
c. La taille des conducteurs doit
être suffisante pour les normes
d’intensité en ampères du chargeur,
comme indiqué ci-dessous.
TAILLE AWG MINIMUM RECOMMANDÉE
DES RALLONGES POUR CHARGEURS DE
Norme d’entrée CAAmpères Taille AWG du
Egal ou supérieur à
0 2 18 18 18 16
8) N’utilisez pas un chargeur dont la
che ou le cordon est endommagé –
remplacez-les immédiatement.
9) N’utilisez pas le chargeur s’il a reçu
un choc violent, s’il a subi une chute
ou s’il a été endommagé de quelque
manière que ce soit;
10) Ne démontez pas le chargeur;
si des travaux d’entretien ou de
réparation sont nécessaires, confiezle à un technicien qualifié. Si vous
le remontez incorrectement, vous
risquez de causer une électrocution
ou un incendie.
11) Pour réduire le risque d’électrocution,
débranchez le chargeur de la prise
de courant avant d’entreprendre des
travaux d’entretien ou de nettoyage.
12) Le chargeur et la batterie autonome
ont été conçus spécifiquement pour
fonctionner ensemble.
Ne tentez pas de charger un autre
outil à batterie ou une autre batterie
autonome avec ce chargeur.
13) Ne tentez pas de charger la batterie
autonome avec un autre chargeur.
14) Ne tentez pas de démonter le
logement de la batterie autonome.
15) Ne rangez pas l’outil ou la batterie
autonome à des endroits où la
température est susceptible d’atteindre
ou de dépasser 50°C (122°F) (par
exemple dans une remise d’outils
électriques, ou dans une voiture en
été), car ceci risquerait d’abîmer la
batterie stockée.
BATTERIES
Mais
inférieur à
cordon
Longueur du cor-
don, pieds
25 50 100 150
- 20 -
Page 21

16) N e c h argez p a s l a batt e r i e
autonome lorsque la température est
INFÉRIEURE À 0°C (32°F) ou SUPÉRIEURE à 40°C (104°F). Ceci est très
important.
17) N’incinérez pas la batterie autonome.
Elle risquerait d’exploser dans les
ammes.
18) Evitez toute utilisation dans un
environnement dangereux. N’utilisez
pas le chargeur à un endroit humide
ou mouillé.
19) Le chargeur a été conçu pour
fonctionner uniquement sur des
prises secteur domestiques standard.
Ne l’utilisez pas sous des tensions
différentes!
20) Ne manipulez pas brutalement le
cordon secteur. Ne transportez jamais
le chargeur en le tenant par le cordon,
ou ne le tirez pas brutalement pour
le débrancher de la prise. Gardez le
cordon à l’abri de la chaleur, de l’huile
et de bords coupants.
21) Chargez la batterie autonome à un
endroit bien ventilé; ne couvrez pas le
chargeur et la batterie autonome avec
un chiffon, etc., pendant la charge.
22) Si vous utilisez un accessoire
non recommandé, un incendie,
une électrocution, des blessures
risqueraient de s’ensuivre.
23) Ne court-circuitez pas la batterie
autonome. Un court-circuit de la
batterie risquerait de faire passer
un courant de forte intensité, et
une surchauffe, un incendie ou des
blessures risqueraient de s’ensuivre.
24) REMARQUE: Si le cordon secteur de
cet appareil est endommagé, il doit
être remplacé exclusivement dans un
atelier agréé par le fabricant, car ces
travaux exigent l’utilisation d’outils
spéciaux.
25) POUR RÉDUIRE LES RISQUES
D’ÉLECTROCUTION, CET APPAREIL
EST É Q UIPÉ D ’ U N E FIC H E
POLARISÉE (UNE LAME EST PLUS
LARGE QUE L’AUTRE).
Cette fiche ne pourra être insérée
que d’une seule façon dans une prise
polarisée. Si la che ne peut pas être
insérée à fond dans la prise, insérez
la che sens dessus dessous. Si vous
ne parvenez toujours pas à insérer la
fiche, adressez-vous à un électricien
qualifié pour installer une prise de
courant adéquate.
Ne modiez la che en aucune façon.
AVERTISSEMENT:
N’utilisez que les batteries autonomes
de Panasonic car elles sont conçues
pour cet outil rechargeable.
Panasonic décline toute responsabilité
en cas de dommage ou d’accident
causé par l’utilisation d’une batterie
autonome recyclée et d’une batterie
autonome de contrefaçon.
Ne mettez pas la batterie autonome
dans le feu, ne la placez pas près d’une
source de chaleur excessive.
N’enfoncez pas de clou ou autre dans
la batterie autonome, ne la secouez
pas, ne la démontez pas, n’essayez
pas de la modier.
Ne mettez pas d’objets métalliques en
contact avec les bornes de la batterie
autonome.
Ne placez pas la batterie autonome
dans le même contenant que des clous
ou des objets métalliques semblables.
Ne chargez pas la batterie autonome
dans un endroit où la température est
élevée, comme près d’un feu ou au
contact direct des rayons du soleil.
Sinon la batterie pourrait surchauffer,
s’enammer ou exploser.
N’utilisez jamais un autre chargeur pour
charger la batterie autonome. Sinon
la batterie pourrait fuir, surchauffer ou
exploser.
Après avoir retiré la batterie autonome
de l’outil ou du chargeur, remettez
toujours le couverclede la batterie
autonome en place. Sinon, les contacts
de la batterie peuvent se mettre en
court-circuit, entraînant le risque d’un
incendie.
Si l a ba tt er ie a utonome s’est
détériorée, la remplacer par une
batterie neuve. L’utilisation prolongée
d’une batterie autonome endommagée
peut provoquer des dégagements de
chaleur, un départ de feu ou l’explosion
de la batterie.
- 21 -
Page 22

V. MONTAGE
①
②
①
②
Fixation ou retrait d’une
mèche
REMARQUE:
Lors de l’installation ou de l’enlèvement
d’une mèche, débranchez la batterie
autonome de l’outil ou placez le
commutateur sur la position centrale
(verrouillage du commutateur).
1. Accessoire
Tout en tirant le porte-mèche
1
Insérez la mèche
2
Puis relâchez le porte-mèche
3
2. Enlèvement
Tout en tirant le porte-mèche
1
Retirez la mèche
2
9,5 mm (3/8") - 13 mm (33/64") 6,35 mm (1/4")
Fixation ou retrait de la batterie autonome
1. Pour raccorder la batterie autonome:
Introduisez soigneusement la batterie
autonome dans le corps principal.
2. Pour retirer la batterie autonome:
Appuyez sur le bouton situé sur le côté
pour libérer la batterie autonome.
Bouton
VI. FONCTIONNEMENT
[Corps principal]
Fonctionnement du commutateur
1. La vitesse augmente à mesure où la
gâchette est enfoncée. Lors du début
d’un travail, appuyez légèrement sur
la gâchette pour commencer par une
rotation lente.
2. Un contrôleur électronique de retour
est utilisé pour donner un couple de
serrage fort, même à basse vitesse.
3. Le frein fonctionne lorsque la gâchette
est relâchée et le moteur s’arrête
immédiatement.
REMARQUE:
Lorsque le frein fonctionne, un bruit de
freinage peut se faire entendre. Ceci
est normal.
Utilisation du commutateur et
du levier d’inversion marche
avant-marche arrière
- 22 -
Rotation en
sens normal
Verrouillage du commutateur
Rotation en
sens inverse
Page 23

MISE EN GARDE:
Pour prévenir tout dégât, n’actionnez
pas le levier d’inversion marche
avantmarche arrière tant que la mèche
n’a pas complètement terminé de
tourner.
Utilisation du commutateur
pour une rotation en sens
normal
1. Poussez le levier pour obtenir une
rotation en sens normal.
2. Appuyez légèrement sur la gâchette
pour que l’outil commence à tourner
lentement.
3. La vitesse augmente à mesure où la
gâchette est enfoncée pour un serrage
de vis et un perçage efficaces. Le
frein fonctionne et le mandrin s’arrête
immédiatement lorsque la gâchette est
relâchée.
4. Ramenez le levier en position centrale
lorsque vous n’utilisez plus l’outil
(verrouillage du commutateur).
Utilisation du commutateur
de rotation en sens inverse
1. Poussez le levier pour obtenir une
rotation en sens inverse. Avant d’utiliser
l’outil, vériez le sens de rotation.
2. Appuyez légèrement sur la gâchette
pour que l’outil commence à tourner
lentement.
3. Ramenez le levier en position centrale
lorsque vous n’utilisez plus l’outil
(verrouillage du commutateur).
Réglage du couple de serrage
de l’embrayage
Ajustez le couple de serrage sur l’un
des 21 réglages de l’embrayage ou sur
la position “
” .
Réglage Couple
Environ : 0,3 N•m
1
(3,0 kgf-cm ou 2,6 in-lbs)
Environ: 1,0 N·m
5
(11 kgf-cm ou 8,8 in-lbs)
Environ: 1,8 N·m
9
(18 kgf-cm ou 15,9 in-lbs)
Environ: 2,5 N·m
13
(26 kgf-cm ou 22,1 in-lbs)
Environ: 3,3 N·m
17
(33 kgf-cm ou 29,2 in-lbs)
Environ: 4.0 N·m
21
(41 kgf-cm ou 35,4 in-lbs)
Environ: 6 N·m
(61 kgf-cm ou 53,1 in-lbs)
Lorsque vous utilisez l’outil à des vitesses
Utilisa-
tion
Pour
serrer
des vis
Pour
serrer
solidement
des
vis et
percersolidement
des
vis et
percer
élevées, réglez l’embrayage sur 10
ou moins. (L’outil s’arrête au coup le
maximum de 1,5 N m ( 15 kgf-cm ) lorsque
le repère est supérieur.)
La fonction d’extinction automatique
peut être inopérante avec des réglages
d’embrayage élevés lorsque la puissance
de la batterie diminue. Le cas é c h éa nt ,
rechargez la batterie.
Utilisation pour le perçage
Lorsque l’outil est utilisé pour le perçage,
positionnez l’ embrayage sur “ ”
Utilisez une mèche conçue pour le perçage.
MISE EN GARDE:
Placez le repère d'embrayage dans la
position correcte avant de commencer
à utiliser l'appareil.
Sélection de la vitesse
Choisissez une vitesse basse ou haute
correspondant à l’utilisation désirée.
HOOG LAAG
- 23 -
Page 24

Plus la gâchette de contrôle de vitesse
variable est tirée, plus la vitesse
augmente.
MISE EN GARDE:
Vérifiez le commutateur de selection
de vitesse avant l’utilisation.
Ut il is ez à basse vitesse lorsqu’un
couple de serrage élevé est nécessaire
p end a n t l e f o n c tio n n e m e n t .
( L ’ u t i l i s a t i on à h a u t e v i t es s e
lorsqu’un couple de serrage élevé est
nécessaire peut entraîner une panne
du moteur.)
Ne fai tes pa s f o nct ion n er le
commu ta te ur du s élect eu r de
vitesse (BAS-HAUT) en tirant sur la
gâchette de contrôle de vitesse. Cela
peut entraîner l’usure rapide de la
batterie autonome ou endommager le
mécanisme interne du moteur.
* Reportez-vous aux caractéristiques
techniques pour les “CAPACITES
MAXIMUM RECOMMANDEES”.
utilize comme un tournevis manuel
(jusqu’à 5 N·m, 51 kg/cm, 44,3 in-lbs).
Le mandrin présentera un peu de
jeu, mais ceci n’est pas un mauvais
fonctionnement.
2. Cette caractéristique est pratique pour
serrer les vis qui nécessitent un couple
de serrage plus important que le couple
de serrage maximum du tournevis
(position sur
l’embrayage), pour
s’assurer du serrage d’une vis ou pour
desserrer une vis extrêmement serrée.
MISE EN GARDE:
Afin d’empêcher la température de
la surface de l’outil d’augmenter
ex cessi ve me nt , ne fait es p as
fonctionner l’outil continuellement en
utilisant deux batteries autonomes ou
plus. L’outil a besoin d’une période de
refroidissement avant de passer à une
autre batterie autonome.
Ne fermez pas les évents sur le
côté du corps de l’outil pendant
le f o nct i o nne m e nt. S i no n l e
fonctionnement de la machine peut
être affecté négativement et une
panne peut s’ensuivre.
NE forcez PAS l’outil (le moteur). Cela
peut endommager l’appareil.
Uti lis ez l’out il de f aço n à c e q ue
l’air des évents ne soit pas soufflé
directement sur votre peau. Sinon,
cela peut vous brûler.
Fonction de verrouillage de la
mèche
1. Sans engager le commutateur de la
gâchette et avec un mèche tournevis
verrouillée en place, l’outil peut être
Comment utiliser l’anneau
d’accrochage
AVERTISSEMENT!
Lorsque l'unité principale est tenue par
l'anneau d'accrochage, évitez de sauter
ou de courir. L'anneau pourrait glisser
et l'unité principale pourrait tomber.
Cela pourrait entraîner un accident ou
des blessures.
Lorsque l'anneau d'accrochage n'est
pas utilisé, veillez à le remettre dans sa
position initiale. L'anneau d'accrochage
pourrait se prendre dans quelque
chose.
Cela pourrait entraîner un accident ou
des blessures.
Lorsque l'appareil est accroché grâce à
l'anneau d'accrochage, ne xez pas de
mèche autre qu'une mèche de serrage
sur l'appareil. Un objet pointu tel qu'une
mèche de perçage pourrait entraîner un
accident ou des blessures..
Utilisez un dispositif d'accrochage
(mousqueton ou autre) qui ne se défait
pas facilement. Si l'appareil tombe, il
peut provoquer un accident.
- 24 -
Page 25

Utilisation de l’anneau
d’accrochage
1. Faites pivoter l'anneau d'accrochage.
2. Fixez l'anneau au dispositif
d'accrochage.
• Utilisez un dispositif d'accrochage
(mousqueton ou autre) qui ne se
défait pas facilement. Si l'appareil
tombe, il peut provoquer un accident.
• Veillez à ne pas heurter les éléments
environnants lorsque vous utilisez
l'anneau d'accrochage.
Dispositif d'accrochage
3. Rabattez l'anneau d'accrochage après
utilisation.
• Couvercle du verrouillage
de l’embrayage
Le couvercle du verrouillage de
l’embrayage vous permet de verrouiller
l’embrayage au réglage sélectionné.
Fixation du couvercle
1. Sélectionnez le réglage d’embrayage
pour l’application.
2. Fixez le couvercle du verrouillage de
l’embrayage.
•
Alignez la marque triangulaire sur le
couvercle avec la marque de sélection
de gradation sur la perceuse et xez.
Marque triangulaire
Marque de sélection
de gradation
Serrage de la vis pour immobiliser
le couvercle.
•
Utilisez un tournevis à main. Trop serrer
la vis peut endommager le couvercle.
N’utilisez que la vis accompagnant le
*
couvercle du verrouillage de l’embrayage.
Enlèvement du couvercle
1. Retirez le couvercle du verrouillage de
l’embrayage.
Lumière DEL
Tirez la gâchette.
La lumière éclaire
avec un courant de
très faible intensité
qui n’affecte pas
négativement la
performance de l'outil
ou la capacité de la
batterie pendant son
utilisation.
MISE EN GARDE:
La lumière DEL incorporée est conçue
pour éclairer temporairement la petite
zone de travail.
Ne l’utilisez pas comme remplacement
d’une torche normale, elle n’est pas
assez lumineuse.
- 25 -
Page 26

Mise en garde: NE REGARDEZ PAS
DIRE CT EM EN T LE
FAISCEAU.
L’utilisation de commandes ou de
réglages ou l’exécution de procédures
autres que ceux spécifiés dans ce
manuel peut entraîner l’exposition à de
dangereuses radiations.
Fonction d’extinction automatique
La fonction d’extinction automatique
es t c o nçu e p our emp êch er u n
affaiblissement du couple de serrage dû
à la chute de tension de la batterie. Une
fois activé, l’outil cesse de fonctionner
tant que la batterie n’est pas chargée
(ou remplacée par une neuve), même si
vous enfoncez la gâchette.
La lumière DEL clignote lorsque la
fonction d’extinction automatique est
activée.
Lorsque la lumière DEL se met à
clignoter, il est recommandé de charger
la batterie (ou de la remplacer par une
neuve) immédiatement.
Veillez à charger complètement la
batterie utilisée après avoir activé la
fonction d’extinction automatique.
La fonction d’extinction automatique
risquerait autrement de ne pas être
correctement désactivée.
[Batterie]
Pour une utilisation correcte
de la batterie autonome
Batterie autonome Li-ion
Pour une longévité optimale de la
batterie, rangez la batterie autonome
Li-ion sans la charger après l’avoir
utilisée.
Lors de la charge de la batterie
autonome, assurez-vous que les bornes
du chargeur de batterie sont libres
de tout corps étranger comme de la
poussière et de l’eau, etc. Nettoyez
les bornes avant de charger la batterie
autonome si des corps étrangers se
trouvent sur les bornes.
La durée de vie des bornes de la
batterie autonome peut être affectée
par des corps étrangers comme de la
poussière et de l’eau, etc. pendant le
fonctionnement.
Lorsque vous n’utilisez pas la batterie
autonome, éloignez-la d’autres objets
métalliques tels que : trombones, pieces
de monnaie, clés, clous, vis et autres
petits objets métalliques susceptibles de
connecter les bornes entre elles.
Si vous court-circuitez les bornes de
la batterie, vous risquez de causer
des étincelles, de vous brûler ou de
provoquer un incendie.
Lors de l’utilisation de la batterie
autonome, assurez-vous de la bonne
ventilation du lieu de travail.
Lorsque la batterie autonome est
retiree du corps de l’outil, replacez
immédiatement le couvercle de la
batterie autonome afin d’empêcher la
poussière ou la crasse de contaminer les
bornes de la batterie et de provoquer un
court-circuit.
Longévité des batteries autonomes
Les batteries rechargeables ont une
longévité limitée. Si le temps de
fonctionnement devient très court après
la recharge, remplacez la batterie
autonome par une neuve.
Recyclage de la batterie autonome
ATTENTION:
Pour la protection de l'environnement
naturel et le recyclage des matériaux,
veillez à mettre la batterie au rebut à un
endroit prévu ofciellement à cet effet,
s’il y en a un dans votre pays.
- 26 -
Page 27

[Chargeur de batterie]
Recharge
MISE EN GARDE:
Si la température de la batterie
autonome descend en dessous de
-10ºC (14ºF) environ, la charge s’arrête
automatiquement afin de prévenir la
dégradation de la batterie.
Le niveau de température ambiante
moyenne se situe entre 0°C (32°F) et
40°C (104°F).
Si la batterie autonome est utilisée alors
que sa température est inférieure à 0°C
(32°F), l’outil pourrait ne pas fonctionner
correctement.
Lorsqu’une batterie autonome froide
(endessous de 0°C (32°F)) doit être
recharge dans une pièce chaude,
laissez la batterie autonome dans la
pièce pendant une heure au moins
et rechargez-la quand elle a atteint la
température ambiante.
Laissez refroidir le chargeur quand
vous rechargez plus de deux batteries
autonomes à la suite.
Ne mettez pas vos doigts dans les trous
des connecteurs lorsque vous prenez
les chargeurs ou à n’importe quelle
occasion.
Pour éviter les risques d’incendie ou
d’endommagement du chargeur de
batterie.
N’utilisez pas de source d’alimentation
provenant d’un générateur de moteur.
Ne bouchez pas les trous d’aération du
chargeur et de la batterie autonome.
Débranchez le chargeur lorsque vous ne
l’utilisez pas.
REMARQUE:
Votre batterie autonome n’est pas
complètement chargée au moment
de l’achat. Veillez à bien charger
complètement la batterie avant son
utilisation.
Chargeur de batterie
1. Branchez le cordon d’alimentation du
chargeur dans une prise secteur.
2. Introduisez soigneusement la batterie
autonome dans le chargeur.
3. Pendant la charge, le témoin s’allume.
Lorsque la charge est terminée, un
interrupteur électronique s’actionne
pour protéger la batterie.
La charge ne peut pas être réalisée si
la batterie autonome est chaude (par
exemple, à la suite d’un long travail de
perçage).
Le témoin d’attente orange clignote
jusqu’à ce que la batterie se soit
refroidie. La charge commence alors
automatiquement.
4. Le témoin de charge (vert) clignote
lentement dès que la batterie est
chargée à environ 80%.
5. Lorsque le chargement est terminé,
le témoin de charge de couleur verte
s’éteint.
6. Lorsque la température de la batterie
autonome est de 0ºC ou moins,
la batterie autonome prend plus
longtemps à charger que la durée
standard.
Même l ors qu e l a bat ter ie es t
complètement chargée, elle n’aura
qu’environ 50% de la puissance d’une
batterie complètement chargée à
une température de fonctionnement
normale.
7. Consultez un distributeur agréé si le
témoin de charge (vert) ne s’éteint pas.
8. Si une batterie complètement chargée
est à nouveau insérée dans le chargeur,
le témoin de charge s’allume. Après
quelques minutes, le témoin de charge
- 27 -
de couleur verte s’éteindra.
Page 28

INDICATION DU VOYANT
Chargement terminé. (Pleine charge)
La batterie est chargée à environ 80%.
Chargement en cours.
Le chargeur est branché dans la prise secteur.
Prêt pour la charge.
(Vert)
Éteint Allumé
(Orange)
Témoin de l’état de charge
Gauche: vert Droite: orange s’afchent.
La batterie autonome est froide.
La batterie autonome est chargée lentement pour réduire l’effort de la batterie.
La batterie autonome est chaude.
La charge commence lorsque la température de la batterie
autonome descend. Lorsque la température de la batterie
autonome est de –10ºC ou moins, le témoin de charge (orange)
se met également à clignoter. La charge commence lorsque la
température de la batterie autonome augmente.
Impossible de charger. Colmatage par la poussière ou mauvais
fonctionnement de la batterie autonome.
Clignote
Déclaration sur le brouillage de la Commission Fédérale des
Communications
Cet équipement a été testé et déclaré conforme aux limites des appareils numériques
de classe B, conformément a la section 15 du règlement de la FCC. Ces limites ont été
définies pour fournir une protection raisonnable contre les brouillages préjudiciables dans
une installation résidentielle. Cet équipement produit, utilise et peut émettre des énergies
de fréquence radio et s’il n’est pas installé conformément aux instructions, il pourra
provoquer des brouillages préjudiciables aux communications radio. Il n’y a toutefois aucune
garantie que ces brouillages ne se produisent pas lors d’une installation particulière. Si
cet équipement provoque des brouillages préjudiciables à la réception de la radio ou de
la télévision, ce qui peut être vérifié en mettant en marche puis en arrêtant l’équipement,
l’utilisateur est encouragé à élimi-ner le brouillage selon l’une des mesures suivantes :
Réorienter ou déplacer l’antenne réceptrice.
Augmenter l’espacement entre l’équipement et le récepteur.
Brancher l’équipement à une prise d’un circuit différent de celui auquel le récepteur est
branché.
Consulter un distributeur ou un technicien de radio télévision expérimenté pour obtenir
une aide.
Avertissement de la FCC : an d’assurer la continuité de la conformité, installer et utiliser
selon les instructions données. Utiliser seulement les blocs batteries spécifiés dans
les instructions. Tout changement ou modification non expressément approuvé par les
parties responsables de la conformité pourraient faire perdre à l'utilisateur le droit de faire
fonctionner cet équipement.
Cet appareil est conforme au chapitre 15 du règlement de la FCC. Le fonc-tionnement
est soumis aux deux conditions suivantes : (1) cet appareil ne peut pas provoquer de
brouillage préjudiciable et (2) cet appareil doit pouvoir accepter n’importe quel brouillage
reçu incluant ceux qui pourraient provoquer un fonc-tionnement non désiré.
Cet appareil numérique de la classe B est conforme à la norme NMB-003 du Canada.
- 28 -
Page 29

[Information relative à l’élimination des déchets dans les pays
extérieurs à l’Union européenne]
Ce pictogramme n’est valide qu’à l’intérieur de l’Union européenne. Pour connaître la
procédure applicable dans les pays hors Union Européenne, veuillez vous renseigner
auprès des autorités locales compétentes ou de votre distributeur.
Note relative au pictogramme à apposer sur les piles (voir les 2
exemples ci-contre)
Le pictogramme représentant une poubelle sur roues barrée d’une croix est conforme à
la réglementation. Si ce pictogramme est combiné avec un symbole chimique, il remplit
également les exigences posées par la Directive relative au produit chimique concerné.
VII. ENTRETIEN
Nettoyez l’appareil au moyen d’un chiffon sec et propre. N’utilisez ni eau, ni solvant, ni
produit de nettoyage volatile.
Au cas où l’intérieur de l’outil ou du bloc batterie serait exposé à de l’eau, enlevez l’eau
et laissez sécher dès que possible.
Enlevez soigneusement toutes saletés ou limailles de fer qui s’accumulent à l’intérieur
de l’outil. Si vous rencontrez des problèmes lors de l’utilisation de l’outil, prenez contact
avec votre centre de service agréé le plus proche.
VIII. ACCESSOIRES
Utilisez uniquement des mèches convenant à la taille du mandrin utilisé.
IX. APPENDICE
CAPACITES MAXIMUM RECOMMANDEES
Modèle EYFEA1N
Vissage
de vis
Vis pour machine
Bas : M5
Haut : M4
X. CARACTERISTIQUES TECHNIQUES
UNITE PRINCIPALE
Modèle EYFEA1N
Tension du moteur 7,2 V CC
Vitesse sans
charge
Couple de
serrage
maximum
Couple de serrage de l’embrayage
Longueur totale 145 mm (5-7/10")
Poids (avec la batterie autonome) 0,63 kg (1,39 lbs)
Bas 0 - 300 min
Haut 0 - 900 min
Bas 6,0 N·m (61 kgf-cm, 53,24 in-lbs)
Haut 2,0 N·m (20 kgf-cm, 17,75 in-lbs)
Environ 0,3 N·m (3 kgf-cm, 2,6 po lbs) –
4,0 N·m (41 kgf-cm, 35,6 po lbs)
- 29 -
-1
(t/mn)
-1
(t/mn)
Page 30

BATTERIE AUTONOME
Modèle EY9L20
Stockage de la batterie Li-ion
Tension de la batterie 7,2 V CC (3,6 V × 2 piles)
Durée de chargement
Utilisable: 35 minutes
Plein: 60 minutes
REMARQUE: Ce tableau peut inclure des modèles non disponibles dans votre région.
Veuillez vous reporter au catalogue général le plus récent.
Pour obtenir le nom et l’adresse du revendeur, veuillez consulter la carte de
garantie incluse.
CHARGEUR DE BATTERIE
Modèle EY0L20
Puissance nominale Voir la plaque signalétique se trouvant sur le côté inférieur du chargeur.
Poids 0,43 kg (0,951 lbs)
REMARQUE: Ce tableau peut inclure des modèles non disponibles dans votre région.
Veuillez vous reporter au catalogue général le plus récent.
REMARQUE: Pour obtenir le nom et l'adresse du revendeur, veuillez consulter la carte de
garantie incluse.
- 30 -
Page 31

I. INTRODUCCIÓN
Ces outils peuvent être utilisés pour serrer des vis en mode embrayé, et pour
percer des trous dans du bois et du métal
en mode perceuse. Le modèle EYFEA1N
peut aussi être utilisé pour percer des
trous dans du béton mou et des matériaux similaires en mode percussion.
II. CONSIGNES
DE SECU RITE
GENERALES
AVERTISSEMENT! Veuillez lire
toutes les instructions.
Si les instructions détaillées ci-dessous
ne sont pas observées, cela peut
entraîner une électrocution, un incendie
et/ou des blessures graves. Le terme
“outil mécanique” utilisé dans tous les
avertissements ci-dessous se réfère aux
outils mécaniques opérés par cordons
d’alimentation et par batterie (sans l).
CONSERVEZ CES
INSTRUCTIONS
Sécurité de la zone de travail
1) Gardez la zone de travail propre et
bien aérée.
Les endroits encombrés et sombres
invitent les accidents.
2) Ne faites pas fonctionner les outils
mécaniques dans des atmosphères
explosives, comme en présence de
liquides inammables, de gaz ou de
poussière.
Les outils mécaniques génèrent des
étincelles qui peuvent enflammer la
poussière ou les vapeurs.
3) Gardez les enfants et les spectateurs
éloignés lors du fonctionnement
d’un outil mécanique.
Les distractions peuvent en faire
perdre le contrôle.
Sécurité électrique
1) La f ic he des out ils mécaniq ues
doit correspondre aux prises
secteur. Ne modifiez la fiche sous
aucun prétexte. N’utilisez pas de
fiche adaptatrice avec les outils
mécaniques mis à la terre.
Des ches non modiées et des prises
secteur correspondant réduisent les
risques d’électrocution.
2) Evitez tout contact physique avec
les surfaces mises à la terre telles
que tuyaux, radiateurs, micro-
ondes et réfrigérateurs.
Il y a un risque d’électrocution
supplémentaire si votre corps est mis
à la terre.
3) N ’ e x p o s e z pa s l e s ou t i l s
mé ca niques à la plui e ou à des
conditions humides.
De l’eau pénétrant dans un outil
mécanique augmente le risque
d’électrocution.
4) Ne malmenez pas le cordon.
N’utilisez jamais le cordon pour
transporter, pour tirer ou pour
débr a ncher l’ outil mé c aniq u e .
Gardez le cordon éloigné de la
chaleur, de l’huile, d’objets aux
bords coupants ou de pièces en
mouvement.
Les co rdons endommag és on
emmêlés augmentent le risque
d’électrocution.
5) Lors du fonctionnement des outils
mécaniques à l’extérieur, utilisez
une rallonge adaptée à l’utilisation
à l’extérieur.
L’utilisation d’un cordon adapté à
l’utilisation à l’extérieur réduit les
risques d’électrocution.
Sécurité personnelle
1) Res tez al ert e, reg arde z ce qu e
vous faites et faites preuve de
bo n sen s lor squ e vous utili sez
un ou t il m é cani q ue. N’ u tili s ez
pas un outil mécanique alors que
vous êtes fatigué ou sous les
effets de drogue, d’alcool ou de
- 31 -
médicaments.
Page 32

Un moment d’inattention pendant
que vous faites fonctionner l’outil
mécanique peut entraîner des
blessures graves.
2) U t i l i s e z des équi p e m e n ts de
sécurité. Portez toujours des
protection pour vos yeux.
Des équipements de sécurité comme
masque antipoussière, chaussures
de sécurité non glissantes, casque
de pro te ct io n ou p ro tections
d’oreilles, utilisés dans des conditions
appropriées réduisent les blessures
corporelles.
3) Evitez tout démarrage accidentel.
Assurez-vous que l’ in te rr up te ur
est en position d’arrêt avant de
brancher l’outil.
Le transport d’outils mécaniques
avec le doigt sur l’interrupteur ou le
branchement d’outils mécaniques
dont l’interrupteur est sur la position
de marche invite les accidents.
4) Retirez toute clé d’ajustement ou
clé de serrage avant de mettre l’outil
mécanique en marche.
Une clé de serrage ou une clé
d’ajustement laissée attachée à une
pièce tournante de l’outil mécanique
peu t ent raîner d es bless ures
corporelles.
5) Ne vous mettez pas en déséquilibre.
Gardez une bonne prise au sol et
votre équilibre à tout moment.
Ceci permet un meilleur contrôle de
l’outil mécanique dans des situations
inattendues.
6) Habillez-vous correctement. Ne
portez pas de vêtements lâches
ou de bijoux. Gardez vos cheveux,
vêtements et gants éloignés des
pièces en mouvement.
Des vêtements lâches, des bijoux
ou des cheveux longs peuvent se
faire prendre dans les pièces en
mouvement.
7) Si des disposi t i fs pour l a connexion
d’appareils d’extraction et de
ramassage de la poussière sont
fournis, assurez-vous qu’ils sont
connectés et correctement utilisés.
L’utilisation de ces dispositifs peut
réduire les risques concernés.
Utilisation et soins de l’outil
mécanique
1) Ne forcez pas l’outil mécanique.
Utilisez l’outil mécanique correct
pour votre application.
L’outil mécanique correct exécute
mieux le travail dans de meilleurs
conditions de sécurité s’il est utilisé à
l’allure pour laquelle il a été conçu.
2) N’ ut ilisez pas l’out il méc an ique
si l’interrupteur ne le met pas en
marche ou ne l’arrête pas.
Tout outil mécanique qui ne peut pas
être contrôlé par son interrupteur est
dangereux et doit être réparé.
3) Débranchez la fiche de la source
d’alimentatio n et/ou du bloc
de batterie avant d’effectuer
tout ajustement, de changer
d’accessoire ou de ranger l’outil
mécanique.
De telles mesures de sécurité
préventives réduisent les risques
de faire démarrer l’outil mécanique
accidentellement.
4) Ran g e z l e s o u tils mé c aniq u es
inutilisés hors de la portée des
enfants et ne laissez personne qui
n’est pas familiarisé avec l’outil
mécanique ou ses instructions faire
fonctionner l’outil mécanique.
Les outils mécaniques sont dangereux
dans les mains des utilisateurs
manquant d’entraînement.
5) En t r ete n e z b i en l e s o u t il s
mécaniques. Vérifiez l’alignement
ou l’emboîtage des pièces en
mouvement, l’intégrité des pièces
et toute autre condition pouvant
affecter le fonctionnement de l’outil
mécanique. S’il est endommagé,
fa ites répa re r l’ outil mécan iq ue
- 32 -
avant de l’utiliser.
Page 33

De nombr eu x ac ci de nt s sont
provoqués par des outils mécaniques
mal entretenus.
6) Maintenez les outils de coupe
affûtés et propres.
Les outils de coupe bien entretenus
avec des lames bien affûtées ont
moins de chances de gripper et sont
plus faciles à contrôler.
7) Util i sez l’o u til mé c a niqu e , les
accessoires, les mèches, etc.,
conformément à ces instructions
et de la façon pour laquelle l’outil
particulier a été conçu en tenant
compte des conditions de travail et
de la tâche à exécuter.
L’utilisation de l’outil mécanique à des
ns autres que celles pour lesquelles
il a été conçu peut présenter une
situation à risque.
Si les bornes de la batterie sont mises
en court-circuit, cela peut entraîner
des brûlures ou un incendie.
5) Si elle est malmenée, du liquid e
peut s’échapper de la batterie.
Evitez tout contact. Si un contact
accidentel se produit, rincez à l’eau.
Si du liquide entre en contact avec
les yeux, consultez un médecin.
Le liquide éjecté de la batterie peut
entraîner des irritations ou des
brûlures.
Réparation
1) Faites réparer votre outil mécanique
par du personnel de réparation
qua l ifi é en n’ util isan t q u e d e s
pièces de rechange identiques.
Ceci assure le maintien de la sécurité
de l’outil mécanique.
Utilisation et soins de la
batterie de l’outil
1) Assurez-vous que l’ in te rr up te ur
est dans la position d’arrêt avant
d’insérer le bloc de batterie.
L’insertion du bloc de batterie dans
un outil mécanique dont l’interrupteur
est sur la position de marche peut
provoquer des accidents.
2) N’effectuez la recharge qu’avec le
chargeur spécié par le fabricant.
Un chargeur convenant à un bloc
de batterie peut entraîner un risque
d’incendie lorsqu’un autre bloc de
batterie est utilisé.
3) N’utilisez les outils mécaniques
q u ’ a v ec le s blo c de bat t e r i e
spécialement conçus pour eux.
L’utilisation de tout autre bloc de
batterie peut entraîner un risque de
blessure et d’incendie.
4) Lorsqu’un bloc de batterie n’est pas
utilisé, gardez-le éloigné d’objets
métalliques comme agrafes, pièces
de monnaie, clés, clous, vis ou tout
autre petit objet métallique pouvant
établir une connexion entre les
deux bornes.
III. REGLES DE
SECURITE
PARTICULIERES
1) Utilice protectores auditivos
cuando deba usar la herramienta
por períodos prolongados. Una
exposición prolongada a ruidos de alta
intensidad puede provocar pérdida de
audición.
2) Utilice el mango auxiliar entregado
con la herramienta. Una pérdida de
control puede provocarle heridas.
3) Mantenga la herramienta por
las superficies de empuñadura
ai s l ada s cu a n do h aga u na
operación donde la herramienta de
corte pueda entrar en contacto con
cables ocultos.
El contacto con un cable “vivo”
puede hacer que las piezas de
metal expuestas de la herramienta
descarguen electricidad al operador.
4) Recuerde que esta herramienta puede
funcionar en cualquier momento
ya que no necesita enchufarse al
tomacorriente para hacerlo funcionar.
- 33 -
Page 34

5) Si la broca se atasca, desconecte
inmediatamente el disparador para
evitar una sobrecarga que pudiera
dañar la batería o el motor.
Utilice la marcha atrás para aojar las
brocas atascadas.
6) NO haga funcionar la palanca de
avance/marcha atrás cuando esté
conectado el interruptor principal. La
batería se descargará rápidamente y
la unidad puede dañarse.
7) Cuando guarde o transporte la
herramienta, coloque la palanca de
avance/marcha atrás en la posición
central (bloqueo del interruptor).
8) No fuerce la herramienta apretando
el gatillo de control de velocidad a la
mitad (modo de control de velocidad)
para que se pare el motor. El circuito
de protección se activará haciendo
que deje de funcionar el control de
velocidad. Si esto sucediera, suelte
el gatillo de control de velocidad y
vuelva a apretar nuevamente para
que funcione normalmente.
9) Utilice la herramienta con cuidado
para que no entre polvo por el
portabroca.
10) No toque las piezas giratorias para
evitar herirse.
11) N o ut i l i c e la h e r r a m i e n t a
continuamente durante un largo
período de tiempo. Deje de utilizar la
herramienta de vez en cuando para
evitar que suba la temperatura y se
caliente excesivamente el motor.
12) No deje caer la herramienta.
13) Utilice una máscara de polvo, si el
trabajo produce polvo.
14) Puede que el cargador se caliente
ligeramente durante la operación
de carga, pero esto es normal. NO
cargue la batería durante largos
periodos de tiempo.
Símbolo Signicado
V Voltios
Corriente continua
n
...min
Ah
o
-1
Velocidad sin carga
Revoluciones o reciprocacio-
nes por minuto
Capacidad eléctrica del blo-
que de batería
Solo rotacion
Para reducir el riesgo de
lesiones el usuario debe leer
y comprender el manual de
instrucciones.
Sólo para uso en interiores.
AVERTISSEMENT:
La poussière résultant de ponçage,
sciage, meulage, perçage à haute
pression et de toute autre activité de
construction, contient des produits
chimiques réputés être cause de cancer,
de malformations congénitales ou autres
problèmes reproductifs. Ces produits
chimiques sont, par exemple :
* Le plomb contenu dans les peintures à
base de plomb
* La silice cristalline, contenue dans les
briques, le ciment et autres produits de
maçonnerie; et
* L’arsenic et le chrome provenant du
bois traité chimiquement.
Pour réduire l’exposition à ces produits
chimiques, il faut travailler dans un
lieu bien aéré et porter un équipement
de sécurité approprié tel que certains
masques anti-poussière conçus
spécialement pour filtrer les particules
microscopiques.
- 34 -
Page 35

IV. CHARGEUR
DE BATTERIE
ET BATTERIE
AUTONOME
Instructions de sécurité
importantes
1) CONSERVEZ CES INSTRUCTIONS.
La présente notice contient des
instructions de sécurité et d’utilisation
importantes pour le chargeur de
batterie.
2) Avant d’utiliser le chargeur de batterie,
lisez toutes les instructions et les
marques d’avertissement figurant
sur (1) le chargeur de batterie, (2) la
batterie autonome.
3) MISE EN GARDE – Pour réduire
le risque de blessures, chargez
la batterie autonome Panasonic
seulement comme indiqué à la
dernière page.
Les autres types de batteries risquent
d’exploser et de causer des blessures
corporelles et des dommages
matériels.
4) N’exposez pas le chargeur à la pluie
ou à la neige.
5) Pour réduire les risques de dommages
à la fiche et au cordon secteur,
débranchez le chargeur en tirant la
che et non le cordon.
6) Veillez à acheminer le cordon de façon
que personne ne risque de le piétiner,
de trébucher dessus, d’endommager
ou d’étirer le cordon.
7) N’utilisez une rallonge qu’en cas de
nécessité absolue.
Si vous ut ilise z une rall onge
inadéquate, vous risquez de causer
un incendie ou une électrocution. Si
vous devez absolument utiliser une
rallonge, veillez à respecter les points
suivants:
a. Le nombre, la taille et la forme des
broches de la fiche de la rallonge
doivent être identiques à ceux de la
che du chargeur de batterie.
b. L a r al lon ge doi t a vo ir des
conducteurs en bon état et être
elle-même en bon état d’utilisation.
c. La taille des conducteurs doit
être suffisante pour les normes
d’intensité en ampères du chargeur,
comme indiqué ci-dessous.
TAILLE AWG MINIMUM RECOMMANDÉE
DES RALLONGES POUR CHARGEURS DE
Norme d’entrée CAAmpères Taille AWG du
Egal ou supérieur à
0 2 18 18 18 16
8) N’utilisez pas un chargeur dont la
che ou le cordon est endommagé –
remplacez-les immédiatement.
9) N’utilisez pas le chargeur s’il a reçu
un choc violent, s’il a subi une chute
ou s’il a été endommagé de quelque
manière que ce soit;
10) Ne démontez pas le chargeur;
si des travaux d’entretien ou de
réparation sont nécessaires, confiezle à un technicien qualifié. Si vous
le remontez incorrectement, vous
risquez de causer une électrocution
ou un incendie.
11) Pour réduire le risque d’électrocution,
débranchez le chargeur de la prise
de courant avant d’entreprendre des
travaux d’entretien ou de nettoyage.
12) Le chargeur et la batterie autonome
ont été conçus spécifiquement pour
fonctionner ensemble.
Ne tentez pas de charger un autre
outil à batterie ou une autre batterie
autonome avec ce chargeur.
13) Ne tentez pas de charger la batterie
autonome avec un autre chargeur.
14) Ne tentez pas de démonter le
logement de la batterie autonome.
15) Ne rangez pas l’outil ou la batterie
autonome à des endroits où la
température est susceptible d’atteindre
ou de dépasser 50°C (122°F) (par
exemple dans une remise d’outils
électriques, ou dans une voiture en
été), car ceci risquerait d’abîmer la
batterie stockée.
16) N e c h argez p a s l a batt e r i e
autonome lorsque la température est
INFÉRIEURE À 0°C (32°F) ou SUPÉRIEURE à 40°C (104°F). Ceci est très
- 35 -
important.
BATTERIES
Mais
inférieur à
Longueur du cor-
don, pieds
25 50 100 150
cordon
Page 36

17) N’incinérez pas la batterie autonome.
Elle risquerait d’exploser dans les
ammes.
18) Evitez toute utilisation dans un
environnement dangereux. N’utilisez
pas le chargeur à un endroit humide
ou mouillé.
19) Le chargeur a été conçu pour
fonctionner uniquement sur des
prises secteur domestiques standard.
Ne l’utilisez pas sous des tensions
différentes!
20) Ne manipulez pas brutalement le
cordon secteur. Ne transportez jamais
le chargeur en le tenant par le cordon,
ou ne le tirez pas brutalement pour
le débrancher de la prise. Gardez le
cordon à l’abri de la chaleur, de l’huile
et de bords coupants.
21) Chargez la batterie autonome à un
endroit bien ventilé; ne couvrez pas le
chargeur et la batterie autonome avec
un chiffon, etc., pendant la charge.
22) Si vous utilisez un accessoire
non recommandé, un incendie,
une électrocution, des blessures
risqueraient de s’ensuivre.
23) Ne court-circuitez pas la batterie
autonome. Un court-circuit de la
batterie risquerait de faire passer
un courant de forte intensité, et
une surchauffe, un incendie ou des
blessures risqueraient de s’ensuivre.
24) REMARQUE: Si le cordon secteur de
cet appareil est endommagé, il doit
être remplacé exclusivement dans un
atelier agréé par le fabricant, car ces
travaux exigent l’utilisation d’outils
spéciaux.
25) POUR RÉDUIRE LES RISQUES
D’ÉLECTROCUTION, CET APPAREIL
EST É Q UIPÉ D ’ U N E FIC H E
POLARISÉE (UNE LAME EST PLUS
LARGE QUE L’AUTRE).
Cette fiche ne pourra être insérée
que d’une seule façon dans une prise
polarisée. Si la che ne peut pas être
insérée à fond dans la prise, insérez
la che sens dessus dessous. Si vous
ne parvenez toujours pas à insérer la
fiche, adressez-vous à un électricien
qualifié pour installer une prise de
courant adéquate.
Ne modiez la che en aucune façon.
- 36 -
AVERTISSEMENT:
N’utilisez que les batteries autonomes
de Panasonic car elles sont conçues
pour cet outil rechargeable.
Panasonic décline toute responsabilité
en cas de dommage ou d’accident
causé par l’utilisation d’une batterie
autonome recyclée et d’une batterie
autonome de contrefaçon.
Ne mettez pas la batterie autonome
dans le feu, ne la placez pas près d’une
source de chaleur excessive.
N’enfoncez pas de clou ou autre dans
la batterie autonome, ne la secouez
pas, ne la démontez pas, n’essayez
pas de la modier.
Ne mettez pas d’objets métalliques en
contact avec les bornes de la batterie
autonome.
Ne placez pas la batterie autonome
dans le même contenant que des clous
ou des objets métalliques semblables.
Ne chargez pas la batterie autonome
dans un endroit où la température est
élevée, comme près d’un feu ou au
contact direct des rayons du soleil.
Sinon la batterie pourrait surchauffer,
s’enammer ou exploser.
N’utilisez jamais un autre chargeur pour
charger la batterie autonome. Sinon
la batterie pourrait fuir, surchauffer ou
exploser.
Après avoir retiré la batterie autonome
de l’outil ou du chargeur, remettez
toujours le couverclede la batterie
autonome en place. Sinon, les contacts
de la batterie peuvent se mettre en
court-circuit, entraînant le risque d’un
incendie.
Si l a ba tt er ie a utonome s’est
détériorée, la remplacer par une
batterie neuve. L’utilisation prolongée
d’une batterie autonome endommagée
peut provoquer des dégagements de
chaleur, un départ de feu ou l’explosion
de la batterie.
Page 37

V. MONTAJE
①
②
①
②
Colocación o extracción de la
broca
NOTA:
Al poner o extraer una broca o cubo,
desconecte la batería de la herramienta
o coloque el interruptor en la posición
central (bloqueo de interruptor).
Botón
1. Colocación
Mientras tira del soporte para brocas
1
Introduzca la broca
2
Suelte el soporte para brocas
3
2. Desmontaje
Mientras tira del soporte para brocas
1
Extraiga la broca
2
9,5 mm (3/8") - 13 mm (33/64") 6,35 mm (1/4")
Colocación y extracción de la
batería
1. Para conectar la batería:
Meta rmemente la batería en el cuerpo
principal.
VI. FUNCIONAMIENTO
[Cuerpo principal]
Funcionamiento del interruptor
1. La velocidad aumenta de acuerdo
con la fuerza a la que presiona el
disparador. Cuando empiece el trabajo,
presione ligeramente el disparador para
empezar una rotación lenta.
2. Se utiliza un controlador electrónico de
realimentación para darle una fuerte
torsion incluso a bajas velocidades.
3. El freno funciona cuando se suelta
el disparador y el motor se para
inmediatamente.
NOTA:
Cuando el freno funciona, puede
escucharse un sonido de frenado. Esto
es normal.
Funcionamiento del interruptor y de la palanca de avance/
marcha atrás
Avance Marcha
atrás
2. Para extraer la batería:
Presione el botón del lateral para quitar
el paquete de baterías.
Bloqueo delinterruptor
- 37 -
Page 38

PRECAUCIÓN:
Para impedir que se produzcan daños,
no utilice la unidad de palanca de
avance/marcha atrás; la broca se
detiene del todo.
Funcionamiento del interruptor de rotación de avance
1. Empuje la palanca para que se
produzca una rotación de avance.
2. Apriete ligeramente el gatillo del
disparador para iniciar la herramienta
con lentitud.
3. La velocidad aumenta con la fuerza con
la que presiona el disparador para un
eciente apriete de tornillos y taladrado.
El freno funciona y la broca se para
inmediatamente cuando se suelta el
disparador.
4. Tras utilizarlo, coloque la palanca
en su posición central (bloqueo del
interruptor).
Funcionamiento del interruptor de rotación inversa
1. Empuje la palanca para que se
produzca una rotación inversa.
Compruebe la Direcc ión de la rotación
antes de utilizarlo.
2. Apriete ligeramente el gatillo del
disparador para iniciar la herramienta
con lentitud.
3. Tras utilizarlo, coloque la palanca
en suposición central (bloqueo del
interruptor).
Ajuste de torsión del embrague
Ajuste la torsión a uno de los 21 ajustes
de embrague o a la posición “
” .
Utilización para taladrar
Cuando se utilice para taladrar, ajuste el
embrague en la posición “ ”
Utilice una broca designada para taladrar
PRECAUCIÓN:
Ajuste la escala de embrague en la
posición de alineamiento antes de
proceder a la operación.
Ajuste Par Uso
Aprox.: 0,3 N·m
1
(3,0 kgf-cm o 2,6 in-lbs)
Aprox.: 1,0 N·m
5
(11 kgf-cm o 8,8 in-lbs)
Aprox.: 1,8 N·m
9
(18 kgf-cm o 15,9 in-lbs)
Aprox.: 2,5 N·m
13
(26 kgf-cm o 22,1 in-lbs)
Aprox.: 3,3 N·m
17
(33 kgf-cm o 29,2 in-lbs)
Aprox.: 4,0 N·m
21
(41 kgf-cm o 35,4 in-lbs)
Aprox.: 6 N·m
(61 kgf-cm o 53,1 in-lbs)
Cuando se utilice a grandes velocidades,
Para introducir
tornillos
Para introducir
tornillos
con
fuerza y
perforar
ajuste el embrague en 10 o meno s . (La
operación se detiene en el par máximo
de 1,5 Nm (15 kfg-cm) cuando la escala
es superior.)
La function de cierr e automát i co pu e d e
volverse ino perable c on ajuste s de
embrague elevados cuando la potenci a
de la batería cae. Recargue la batería en
ese caso.
Selección de velocidad
Elija una alta o baja velocidad de
acuerdo al uso.
ALTA
A medida que aumenta la fuerza de
presión del disparador de control
de velocidad variable, mayor es la
velocidad.
BAJA
- 38 -
Page 39

PRECAUCIÓN:
Inspeccione el interruptor selector de
velocidad antes de utilizar.
Utilice a baja velocidad cuando
necesite una alta torsión durante el
funcionamiento (El uso a alta velocidad
cuando se necesita una alta torsión
puede provocar una avería del motor.)
No haga funcionar el interruptor
selector de velocidad (BAJO-ALTO)
mientras presiona el disparador de
control de velocidad. Esto puede
desgastar rápidamente la batería
recargable o dañar el mecanismo
interno del motor.
* Vea las especicaciones para “MÁXIMAS
CAPACIDADES RECOMENDADAS”.
PRECAUCIÓN:
Para evitar un aumento excesivo de
temperatura de la superficie de la
herramienta, no haga funcionar la
herramienta continuamente utilizando
dos o más baterías. Es necesario que
la herramienta tenga un tiempo de
enfriamiento antes de poder cambiar
por otra batería.
No cierre los orificios de ventilación
en los lados del cuerpo durante el
funcionamiento. De lo contrario,
se ve afectado adversamente el
funcionamiento de la máquina y se
produce una avería.
No manche la herramienta (motor).
Esto puede dañar la unidad.
Utilice la herramienta de tal forma
que se evite que el aire que sale por
los oricios de ventilación del cuerpo
sople directamente sobre su piel. De
lo contrario, puede quemarse.
Función de bloqueo de broca
1. Con el interruptor disparador no
activado y una broca de destornillador
bl oq uea da en s u p os ición , l a
herramienta puede utilizarse como un
destornillador manual (hasta 5 N·m, 51
kgf-cm, 44,3 in-lbs.)
Habrá un ligero juego en la broca pero
esto no es un mal funcionamiento.
2. Esta función es útil para apretar tornillos
que necesiten una mayor torsión que
la torsión máxima del destornillador
(posición
en el embrague), para
conrmar el apriete de un tornillo o para
aojar un tornillo demasiado apretado.
Cómo utilizar el anillo de gancho
ADVERTENCIA!
Cuando la unidad principal se sostiene
por el anillo de gancho, evite saltar o
correr con ella, ya que el anillo podría
resbalarse y la unidad principal podría
caerse.
Podría producirse un accidente o
lesiones.
Cuando no se utilice el anillo de
gancho, asegúrese de devolverlo a la
posición original.
E n a n i l l o d e g a n c h o p u e d e
engancharse con algo, produciendo un
accidente o lesiones.
Cuando la unidad está enganchada
por un anillo de gancho, no acople
puntas de destornillados en la unidad.
Un objeto afilado, como por ejemplo
una broca, podría causar lesiones o un
accidente.
Utilice una herramienta de enganche
(mosquetón, etc.) que no se suelte
fácilmente. Si se cae este elemento,
podría causar un accidente.
- 39 -
Page 40

Utilizar un anillo de gancho
1. Suelte el anillo de gancho.
Apretar el tornillo para inmovilizar
la cubierta.
•
Utilice un destornillador de mano. Si
se aprieta el tornillo demasiado podría
dañarse la cubierta.
2. Acople el anillo de gancho en la
herramienta de enganche.
Herramienta de
enganche
3. Devuelva el anillo de gancho después
de su uso.
• Cubierta de bloqueo del
embrague
La cubierta de bloqueo del embargue
le permite bloquear el embrague en el
ajuste seleccionado.
Instalación de la cubierta
1. Seleccione el ajuste de embargue
adecuado para la aplicación.
2. Instale la cubierta de bloqueo del
embrague.
•
Alinee la marca de triángulo en la
cubierta cn la marca selectora de
calibración en el taladro e instale.
Marca de triángulo
Marca selectora de
calibración
Utilice sólo el tornillo que viene con la
*
cubierta de bloqueo del embrague
.
Desmontaje de la cubierta
1. Retire la cubierta de bloqueo del
embrague.
Luz LED
Tire del activador.
La luz se enciende con
muy poca corriente y no
afecta adversamente
el funcionamiento de la
herramienta durante el
uso o la capacidad de la
batería.
PRECAUCIÓN:
La luz LED integrada se ha diseñado
pa ra ilum inar la peq ueñ a are a de
trabajo temporalmente.
No lo utilice en lugar de una linterna
normal ya que no tiene suciente brillo.
Precaución: NO MIRE FIJAMENTE EL
HAZ DE LUZ.
El uso de controles o ajustes o la
realización de otros procedimientos
que no sean los especificados puede
producer una exposición a radiación
peligrosa.
- 40 -
Page 41

Función de apagado automático
La function de apagado automático
está diseñada para evitar una pérdida
del par de apriete debido a una tensión
reducida de la batería. Una vez activada,
la herramienta no funcionará hasta que
el paquete de baterías se haya cargado
(o susitituido por una unidad nueva),
incluso si se presiona el activador.
La lámpara LED parpadeará cuando
la función de apagado automático esté
activada.
Cuando la lámpara LED comience a
parpadear, el paquete de baterías deberá
cargarse (o sustituirse por una unidad
nueva) inmediatamente.
Asegúrese de cargar completamente
el paquete de baterías en cuestión
tras activar la función de apagado
automático. De lo contrario, la función
de apagado automático tal vez no se
desactive correctamente.
[Bloque de pilas]
Para un uso adecuado de la batería
Cuando haga funcionar con la batería,
asegúrese que el lugar de trabajo está
bien ventilado.
Cuando se saca la batería del cuerpo
principal de la herramienta, vuelva a
cerrar inmediatamente la cubierta de
batería, para evitar que el polvo o la
suciedad puedan ensuciar los terminales
de batería y provocar un cortocircuito.
Vida útil de la batería
Las baterías recargables tienen una
vida útil limitada. Si el tiempo de
funcionamiento se acorta mucho tras
la recarga, sustituya la batería por una
nueva.
Batería de Li-ión
Para una vida óptima de la batería,
guarde la batería de Li-ión siguiendo el
uso sin carga.
Cuando cargue la caja de batería,
confirme que los terminales en el
cargador de batería estén libres de
materias extrañas tales como polvo y
agua, etc. Limpie los terminals antes de
cargar la caja de batería si hay materias
extrañas en los terminales.
La vida de los terminales de la caja
de batería puede verse afectada por
materias extrañas tales como polo y
agua, etc. durante su funcionamiento.
Cuando no se utiliza la batería,
manténgala separada de otros objetos
metálicos, como: clips de papel, monedas,
llaves, clavos, tornillos u otros objetos
metálicos pequeños que pueden actuar
de conexión entre un terminal y el otro.
Un cortocircuito entre los terminales de
la batería pueden ocasionar chispas,
quemaduras o incendios.
Reciclado de la batería
ATENCIÓN:
Para la protección del medio ambiente
y reciclado de materiales, asegúrese
de que la desecha en un lugar
especicado ocialmente, si hay uno en
su país.
[Cargador de la batería]
Carga
PRECAUCIÓN:
Si la temperatura del paquete de baterías
cae aproximadamente bajo −10°C (14°F),
la carga se detendrá automáticamente
para evitar la degradación de la batería.
La variación de temperatura ambiente es
de entre 0°C (32°F) y 40°C (104°F).
Si la batería se utiliza cuando la
temperature de la batería es inferior a
0°C (32°F), la herramienta puede no
funcionar correctamente.
- 41 -
Page 42

Cuando se vaya a cargar una batería
fría (unos 0°C (32°F) o menos) en
un cuarto cálido, deje la batería en la
habitación durante al menos una hora y
cárguela cuando se haya calentado a la
temperatura de la habitación.
Deje que se enfríe el cargador al
cargar más de dos baterías de forma
consecutiva.
No introduzca sus dedos dentro del
hueco del contacto, cuando esté
sujetando el cambiador o en ninguna
otra ocasión.
Para impedir el riesgo de incendio o daños
del cargador de batería.
No utilice una fuente de alimentación de
un generador motorizado.
No tapone los oricios de ventilación del
cargador y la batería.
Desenchufe el cargador cuando no lo
utilice.
NOTA:
Su batería no está totalmente cargada
al momento de comprarla. Asegúrese
de cargar la batería antes de utilizarla.
Cargador de batería
1. Enchufe el cargador en la fuente de
alimentación de CA.
2. Meta firmemente la batería en el
cargador.
3. La luz indicadora de carga permanecerá
encendida durante la carga. Cuando
haya terminado la carga, se accionará
automáticamente un conmutador
electrónico interno para impedir
cualquier sobrecarga.
No podrá cargar la batería si ésta
está todavía caliente (por ejemplo,
inmediatamente después de haber
trabajado mucho).
La luz de espera naranja seguirá
destellando hasta que se enfríe
la batería. La carga comenzará
automáticamente.
4. La luz de carga (verde) destellará
lentamente cuando la batería se haya
cargado a un 80%.
5. Cuando se completa la carga, la luz de
carga en verde se apagará.
6. Si la temperatura de la batería es de 0°C
o menos, la batería demora más en
cargarse completamente que el tiempo
de carga normal.
Incluso cuando la batería esté
completamente cargada, tendrá
aproximadamente 50% de la carga de
una batería totalmente cargada a la
temperatura de funcionamiento normal.
7. Si no se enciende la luz (verde) de
carga consulte con un concesionario
autorizado.
8. Si se vuelve a colocar una batería
totalmente cargada en el cargador, se
encenderá la luz de carga. Luego de
algunos minutos, la lámpara de carga
en verde se apagará.
- 42 -
Page 43

INDICACIÓN DE LA LÁMPARA
La carga ha sido completada. (Carga completa.)
La batería se cargó en aproximadamente 80%.
Ahora cargando.
Se ha enchufado el cargador en la fuente de alimentación
de CA. Está preparado para cargar.
(Verde)
Apagada Encendida
(Naranja)
Luz de estado de carga
Aparecerá Izquierda: verde Derecha: naranja
La batería está fría.
La batería se esta cargando lentamente para reducir la carga
de la batería.
La batería está caliente.
La carga comenzará cuando baje la temperatura de la batería.
Si la temperatura de la batería es de –10°C o menos, la luz de
carga (naranja) también empezará a destellar. La carga empezará
cuando sube la temperatura de la batería.
No es posible realizar la carga. Existe un bloqueo de polvo o
una falla de la batería.
Parpadeando
Declaración de interferencias con radiofrecuencias de la
Comisión Federal de Comunicaciones
Este equipo ha sido probado y se ha determinado que cumple con las limitaciones de un
dispositivo digital de Clase B, de conformidad con el Apartado 15 de las regulaciones de
FCC. Estas limitaciones están diseñadas para brindar protección razonable contra las
interferencias perjudiciales en un entorno residencial. Este equipo genera, utiliza y puede
irradiar energía de radiofrecuencia y, si no se instala y utiliza de acuerdo a las instrucciones,
puede provocar interferencias perjudiciales en las comunicaciones de radio. Sin embargo,
no existe ninguna garantía de que no se produzcan interferencias en una instalación
concreta. Si este equipo provoca interferencias perjudiciales en la recepción de radio o
televisión, lo que se puede determinar apagando y encendiendo el equipo, se recomienda
al usuario intentar corregir la interferencia adoptando una de las siguientes medidas:
Cambie la orientación o posición de la antena receptora.
Aumente la separación entre el equipo y el receptor.
Conecte el equipo en una toma de corriente de un circuito que no sea el mismo en el que
está conectado el receptor.
Consulte por ayuda a un proveedor o un técnico de radio/televisión con experiencia.
Precaución de FCC: Para asegurar un cumplimiento continuo, instale y use el equi-po
según las instrucciones provistas. Utilice solamente el paquete de pilas especi-cado en el
manual de instrucciones. Cualquier cambio o modicación no aprobada expresamente por
el grupo responsable de su certicación puede anular el derecho del usuario sobre el uso
del equipo.
Este dispositivo cumple con el Apartado 15 de las regulaciones de FCC. La operación
está sujeta a las siguientes dos condiciones (1) Este dispositivo no puede ocasionar
interferencias que ocasionen daños y (2) este dispositivo debe aceptar cualquier
interferencia, incluida una interferencia que pueda ocasionar una operación no deseada.
Este aparato digital de Clase B cumple con la norma canadiense ICES-003.
- 43 -
Page 44

[Informacion sobre la Eliminación en otros Países fuera de la
Unión Europea]
Estos símbolos sólo son válidos dentro de la Unión Europea. Si desea desechar estos
objetos, por favor contacte con sus autoridades locales o distribuidor y consulte por el
método correcto de eliminación.
Nota sobre el símbolo de la bateria (abajo, dos ejemplos de
símbolos):
Este símbolo puede ser usado en combinación con un símbolo químico. En este caso,
el mismo cumple con los requerimientos establecidos por la Directiva para los químicos
involucrados.
VII. MANTENIMIENTO
Utilice sólo un paño suave y seco para limpiar la herramienta. No utilice paños
húmedos, bencina, diluyentes u otros disolventes volátiles de limpieza.
Para el caso en que el interior de la herramienta o el paquete de pilas estén expuestos
al agua, drénelo o séquelo lo antes posible.
Retire cuidadosamente cualquier polvo o restos de acero que queden dentro de la
herramienta. Si experimenta problemas al utilizar la herramienta, póngase en contacto
con su centro de servicio autorizado más cercano.
VIII. ACCESORIOS
Utilice sólo brocas adecuadas al tamaño del portabrocas.
IX. ANEXO
MÁXIMAS CAPACIDADES RECOMENDADAS
Modelo EYFEA1N
Apriete de
tornillo
Tornillo de máquina
Baja : M5
Alta : M4
X. SPECIFICHE TECNICHE
APPARECCHIO PRINCIPALE
Modelo EYFEA1N
Voltaje del motor 7,2 V CC
Sin velocidad de
cargal
Torsión
máxima
Torsión de embrague
Longitud total 145 mm (5-7/10")
Peso (con batería) 0,63 kg (1,39 lbs)
Baja 0 - 300 min
Alta 0 - 900 min
Baja 6,0 N·m (61 kgf-cm, 53,24 in-lbs)
Alta 2,0 N·m (20 kgf-cm, 17,75 in-lbs)
Aprox. 0,3 N·m (3 kgf-cm, 2,6 pulg-lbs) –
4,0 N·m (41 kgf-cm, 35,6 pulg-lbs)
- 44 -
-1
(bpm)
-1
(bpm)
Page 45

BATERÍA
Modelo EY9L20
Batería de almacenaje Li-ión
Tensión de batería 7,2 V CC (3,6 V × 2 celdas)
Tiempo de carga
Utilizable: 35 min
Completa: 60 min
NOTA: Este cuadro puede contener modelos no disponibles en su país.
Consulte el más reciente catálogo general.
Puede consultar el nombre y la dirección del concesionario en la tarjeta de garantía
que se incluye.
CARGADOR DE BATERÍA
Modelo EY0L20
Potencia nominal Vea la placa de especicaciones en la parte inferior del cargador.
Peso 0,43 kg (0,951 lbs)
NOTA: Este cuadro puede contener modelos no disponibles en su país.
Consulte el más reciente catálogo general.
NOTA: Puede consultar el nombre y la dirección del concesionario en la tarjeta de garantía
que se incluye.
- 45 -
Page 46

EN. FR. ES
EY9810FEA12 2011 03 Printed in Japan
 Loading...