

Page 1
Operating Instructions
Bedienungsanleitung
Instructions d’utilisation
Istruzioni per l’uso
Gebruiksaanwijzing
Manual de instrucciones
Brugsvejledning
Driftsföreskrifter
Destornillador y taladro sin cables/Destornillador y taladro percutor sin cables
Bruksanvisning
Käyttöohjeet
Ladattava pora & ruuvinväännin/ladattava vasaraporapora & ruuvinväännin
Cordless Drill & Driver/Cordless Hammer Drill & Driver
Akku-Bohrschrauber/Akku-Schlagbohrschrauber
Perceuse-visseuse sans l/Perceuse à percussion-visseuse sans l
Trapano avvitatore cordless/Trapano avvitatore cordless a percussione
Snoerloze schroef-boormachine/Snoerloze slagschroef-boormachine
Akku bor & skruetrækker/Akku hammerbor & skruertrækker
Sladdlös skruvdragare & borrmaskin/slagborrmaskin
Ledningløs drill og skrutrekker/Ledningløs slagdrill og skrutrekker
Model No: EY7460/EY7960
Before operating this unit, please read these instructions completely and save this manual for future use.
Vor Inbetriebnahme des Gerätes die Betriebsanleitung bitte gründlich durchlesen und diese Broschüre zum späteren Nachschlagen
sorgfältig aufbewahren.
Lire entièrement les instructions suivantes avant de faire fonctionner l’appareil et conserver ce mode d’emploi à des ns de consultation
ultérieure.
Prima di usare questa unità, leggere completamente queste istruzioni e conservare il manuale per usi futuri.
Lees deze gebruiksaanwijzing aandachtig door voor u het apparaat in gebruik neemt en bewaar de gebruiksaanwijzing voor eventuele
naslag.
Antes de usar este aparato por primera vez, lea todas las instrucciones de este manual y guarde el manual para poderlo consultar en el
futuro.
Gennemlæs denne betjeningsvejledning før brugen og gem den til fremtidig brug.
Läs igenom hela bruksanvisningen innan verktyget tas i bruk. Spara bruksanvisningen för senare användning.
Før enheten tas i bruk, vennligst les disse alle anvisningene og oppbevar deretter bruksanvisningen for senere bruk.
Lue ohjeet huolella ennen laitteen käyttöönottoa ja säilytä tämä käyttöohje tallessa tulevaa tarvetta varten.
EY7460_EY7960_Book.indb 1 2013-12-2 16:12:11
Page 2
Index/Index/Index/Indice/Index/Indice/Indeks/Index/Indeks/Hakemisto
English: Page 5
Deutsch: Seite 17
Français: Page 29
Italiano: Pagina 41
Nederlands: Bladzijde 53
Español: Página 65
Dansk: Side 77
Svenska: Sid 88
Norsk: Side 99
Suomi: Sivu 110
FUNCTIONAL DESCRIPTION
FUNKTIONSBESCHREIBUNG
DESCRIPTION DES FONCTIONS
DESCRIZIONE DELLE FUNZIONI
FUNCTIEBESCHRIJVING
DESCRIPCIÓN FUNCIONAL
FUNKTIONSBESKRIVELSE
FUNKTIONSBESKRIVNING
FUNKSJONSBESKRIVELSE
TOIMINTAKUVAUS
- 2 -
EY7460_EY7960_Book.indb 2 2013-12-2 16:12:11
Page 3
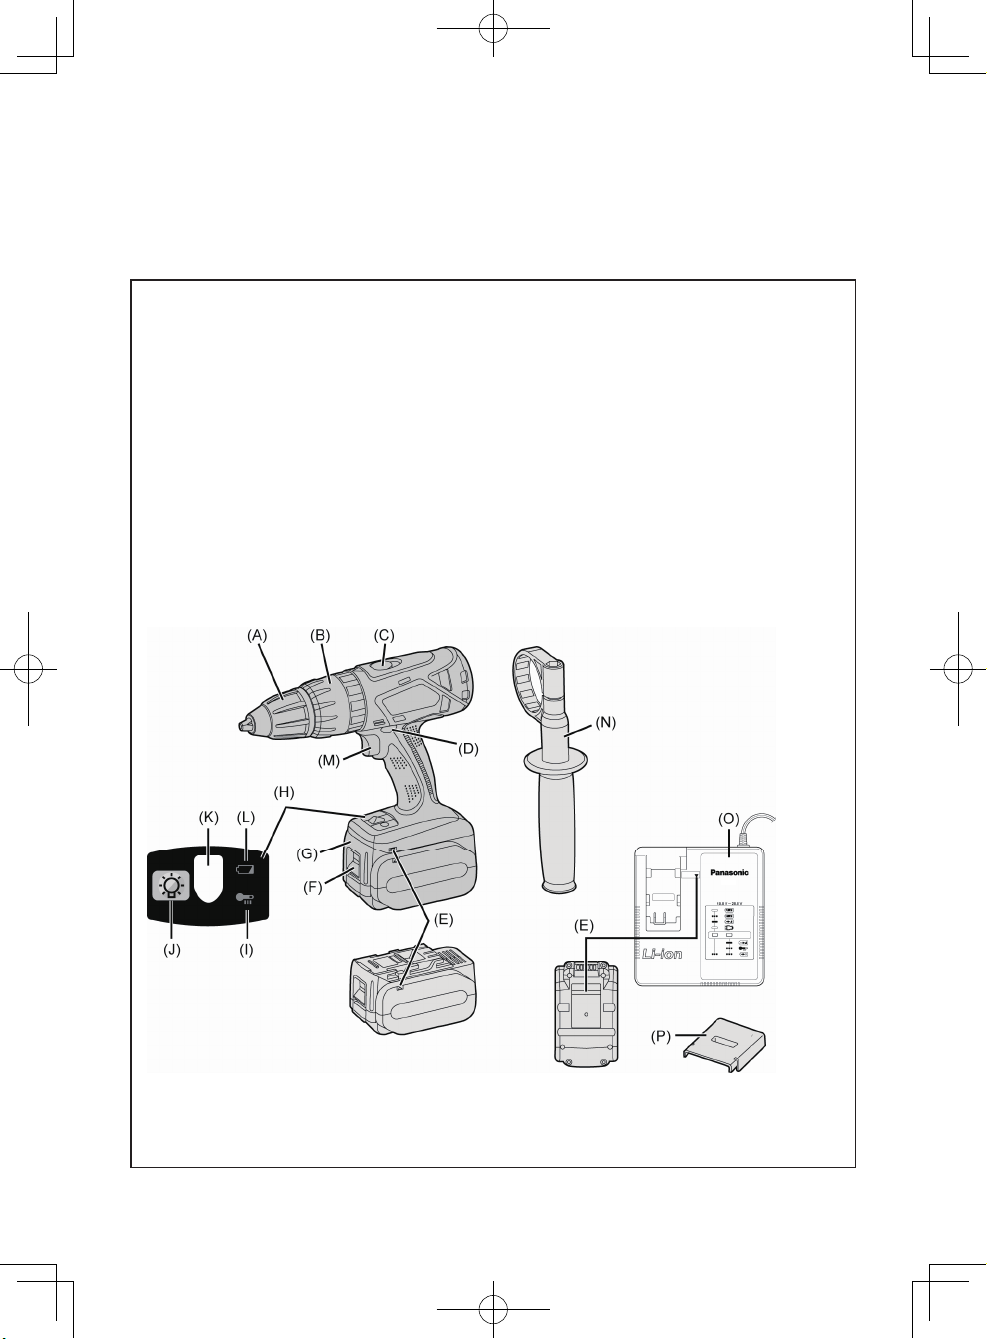
Keyless drill chuck
Schlüsselfreies Bohrfutter
Mandrin porte-foret sans l
Mandrino autoserrante
Boorkop zonder sleutel
(A)
Mandril sin llave
Nøglefri borepatron
Nyckellös borrchuck
Nøkkelfri drillchuck
Avaimeton poran kiinnityslaite
Speed selector switch
Bereichsschalter
Interrupteur de sélection de vitesse
Regolatore di velocità
Snelheidskeuzeschakelaar
(C)
Interruptor selector de velocidad
Hastighedsvælger
Hastighetsomkopplare
Hastighetskontroll
Nopeuden valintakytkin
Alignment marks
Ausrichtmarkierungen
Marques d’alignement
Marcature allineamento
Uitlijntekens
(E)
Marcas de alineación
Flugtemærker
Anpassningsmärken
Opprettingsmerke
Sovitusmerkit
Battery pack
Akku
Batterie autonome
Pacco batteria
Accu
(G)
Batería
Batteripakning
Batteri
Batteripakke
Akku
Overheat warning lamp (battery/motor)
Überhitzungs-Warnlampe (Akku/motor)
Témoin d’avertissement de surchauffe (batterie/moteur)
Spia avvertenza surriscaldamento (batteria/motore)
Oververhitting-waarschuwingslampje (accu/motor)
(I)
Luz de advertencia de sobrecalentamiento (batería/motor)
Advarselslamp til overophedning (batteri/motoren)
Varningslampa för överhettning (batteri/motorn)
Varsellampe for overoppheting (batteri/motor)
Ylikuumenemisen varoituslamppu (akku/moottoria)
LED light
LED-Leuchte
Lumière DEL
Luce LED
LED-lampje
(K)
Luz indicadora
LED-lys
LED-ljus
LED-lys
LED-valo
Clutch handle
Kupplungsring
Poignée de l’embrayage
Impugnatura frizione
Koppelingshandgreep
(B)
Mango de embrague
Koblinghåndtag
Kopplingshandtag
Koblingshåndtak
Kytkimen kahva
Forward/Reverse lever
Rechts/Linkslauf Schalter
Levier d’inversion marche avant-marche arrière
Leva di avanzamento/inversione
Voorwaarts/achterwaarts-hendel
(D)
Palanca de avance/inversión
Greb til forlæns/baglæns retning
Riktningsomkopplare
Forover/Revers bryter
Eteenpäin/taaksepäin vipu
Battery pack release button
Akku-Entriegelungsknopf
Bouton de libération de batterie autonome
Tasto di rilascio pacco batteria
Accu-ontgrendeltoets
(F)
Botón de liberación de batería
Udløserknap til batteripakning
Frigöringsknapp för batteri
Utløserknapp for batteripakke
Akkupaketin irrotuspainike
Control panel
Bedienfeld
Panneau de commande
Pannello di controllo
Bedieningspaneel
(H)
Panel de controle
Kontrolpanel
Kontrollpanel
Kontrollpanel
Säätöpaneeli
LED light on/off button
LED-Leuchten-EIN/AUS-Taste
Bouton Marche/Arrêt de la lumière DEL
Tasto di accensione e spegnimento della luce LED
Aan/uit-toets (ON/OFF) voor LED-lampje
(J)
Botón ON/OFF de luz LED
TÆND/SLUK-knap til LED-lys
Strömbrytare för LED-ljus
PÅ/AV-knapp for LED-lys
LED-valon kytkin/katkaisupainike
Battery low warning lamp
Akkuladungs-Warnlampe
Témoin d’avertissement de batterie basse
Spia avvertenza batteria scarica
Waarschuwingslampje voor lage accuspanning
(L)
Luz de aviso de baja carga de batería
Advarselslampes batterieffekt lav
Varningslampa för svagt batteri
Varsellampe for at batteriet er for lavt
Alhaisen akkujännitteen varoituslamppu
- 3 -
EY7460_EY7960_Book.indb 3 2013-12-2 16:12:11
Page 4
Variable speed control trigger
Betriebsschalter
Gâchette de commande de vitesse
Grilletto di controllo velocità variable
Startschakelaar variabele snelheid
(M)
Disparador del control de velocided variable
Kontroludløser for variabel hastighed
Steglös varvtalsreglerare
Hovedbryter, trinnløs
Nopeudensäätökytkin
Battery charger
Ladegerät
Chargeur de batterie
Caricabatterie
Acculader
(O)
Cargador de batería
Batterioplader
Batteriladdare
Batterilader
Akkulaturi
Support handle
Zusatzgriff
Manche de support
Maniglia di sostegno
Steungreep
(N)
Mango de soporte
Hjælpehåndtag
Stödhandtag
Støttehåndtak
Tukikahva
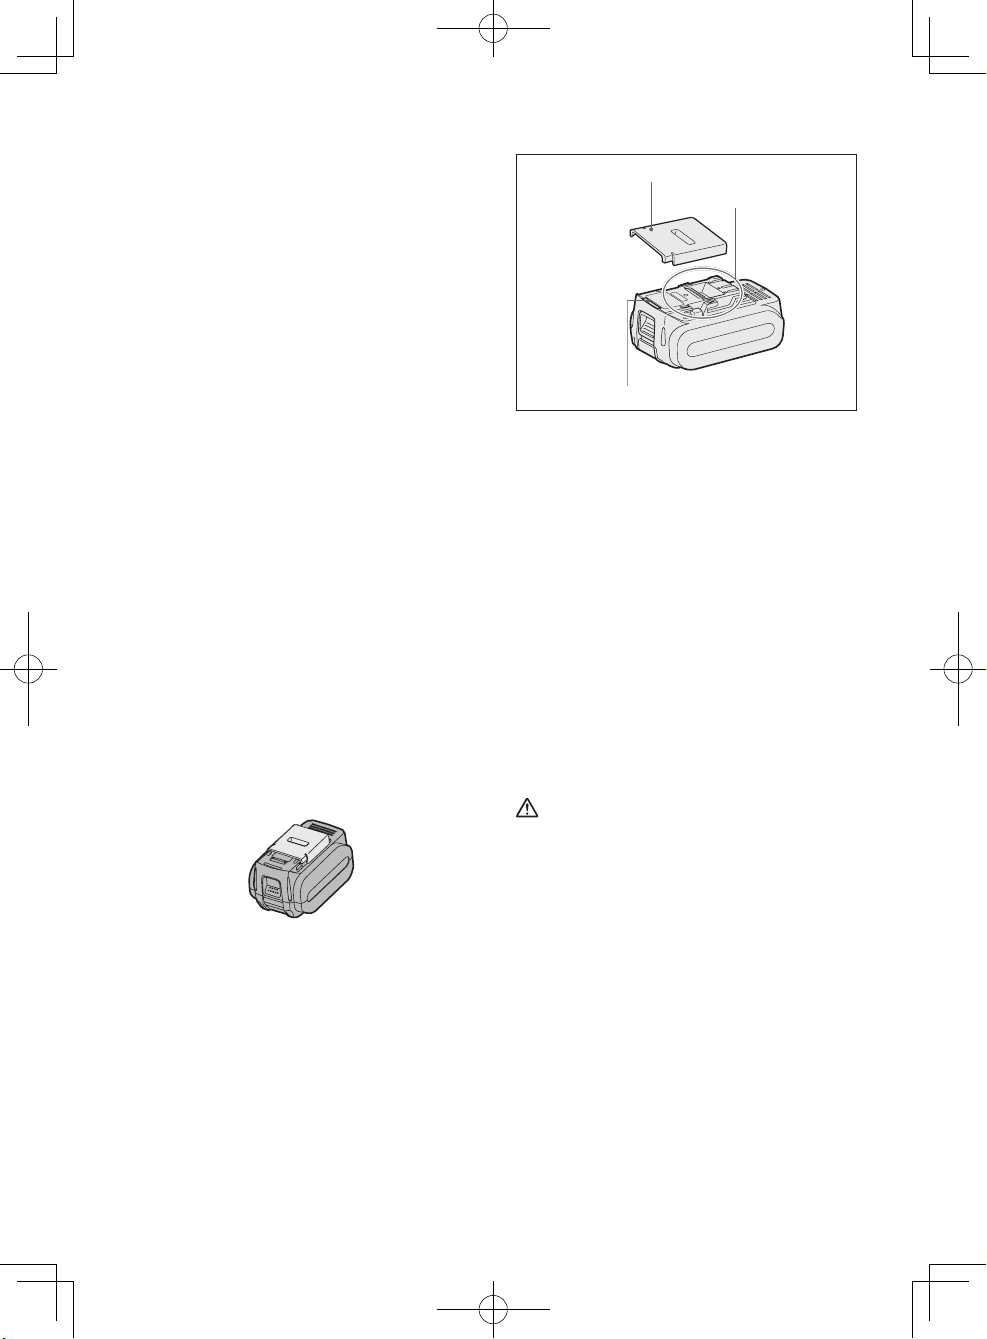
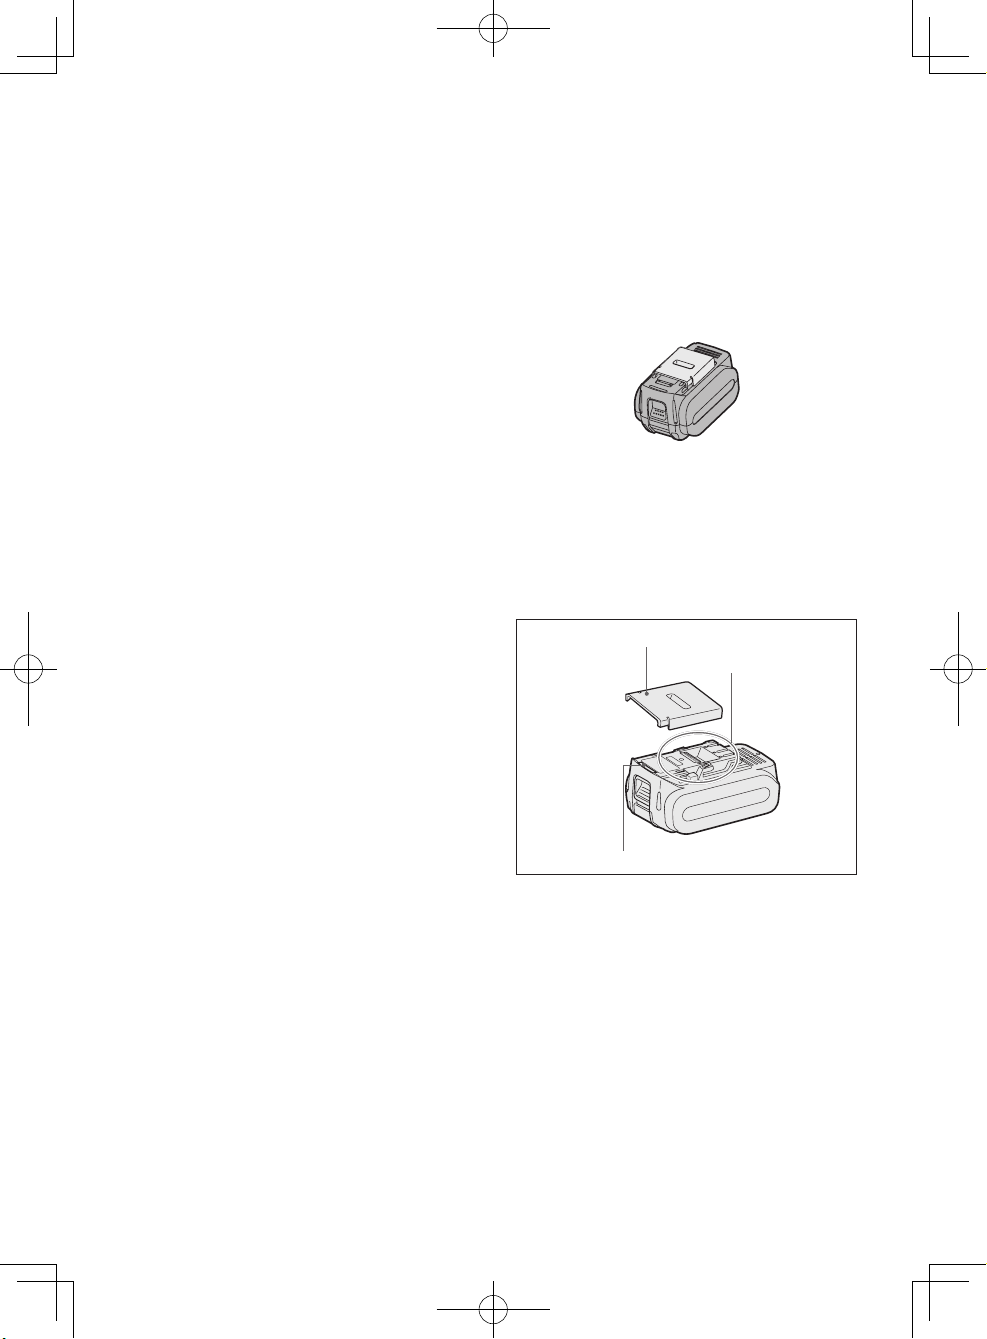
Battery pack cover
Akkuabdeckung
Couvercle de la batterie autonome
Coperchio pacco batteria
Accudeksel
(P)
Cubierta de batería
Akkuafdækning
Batterilock
Batteripakkedeksel
Akun kansi
- 4 -
EY7460_EY7960_Book.indb 4 2013-12-2 16:12:11
Page 5
Original instructions: English
Translation of the original instructions:
Other languages
I. INTENDED USE
These tools can be used to tighten
screws in clutch mo de and to drill
holes in wood and metal in drill mode.
Additionally, model EY7960 can be
used to drill holes in soft concrete and
similar materials in hammer mode.
Read the Safety Instructions booklet
and the following before using.
II. ADDITIONAL
SAFETY RULES
1) Wear ear protectors.
Exposure to noise can cause hearing
loss.
2) Use auxiliary handle supplied with
the tool.
Loss of control can cause personal
injury.
3) Hol d p ower tools by insulated
gripping surfaces when performing
an operation where the cutting tool
may contact hidden wiring; contact
with a “live” wire will make exposed
metal parts of the tool “live” and shock
the operator.
4) Wear a dust mask, if the work causes
dust.
5) Be aware that this tool is always in an
operating condition, since it does not
have to be plugged into an electrical
outlet.
6) When drilling or driving into walls,
oors, etc., “live” electrical wires may
be encountered. DO NOT TOUCH
THE CHUCK OR ANY FRONT METAL
PARTS OF THE TOOL! Hold the tool
only by the plastic handle to prevent
electric shock in case you drill or drive
into a “live” wire.
7) I f t h e b it b e c o m e s j a m m e d ,
immediately turn the trigger switch
off to prevent an overload, which can
damage the battery pack or motor.
Use reverse motion to loosen jammed
bits.
8) Do NOT operate the Forward/Reverse
lever when the trigger switch is on.
The battery will discharge rapidly and
damage to the unit may occur.
9) During charging, the charger may
become slightly warm. This is normal.
Do NOT charge the battery for a long
period.
10) When storing or carrying the tool,
set the Forward/Reverse lever to the
center position (switch lock).
11) Do not strain the tool by holding the
speed control trigger halfway (speed
control mode) so that the motor stops.
12) Do not operate the speed selector
switch (LOW-HIGH) while pulling on
the speed control trigger. This can
cause the rechargeable battery to
wear quickly or damage the internal
mechanism of the motor.
- 5 -
EY7460_EY7960_Book.indb 5 2013-12-2 16:12:11
Page 6
Symbol Meaning
V Volts
Direct current
n
...min
Ah
o
-1
No load speed
Revolutions or reciprocations
per minutes
Electrical capacity of battery
pack
Forward rotation
Reverse rotation
Rotation with hammering
Rotation only
To reduce the risk of
injury, user must read and
understand instruction
manual.
For indoor use only.
WARNING:
●
Do not use other than the Panasonic
battery packs that are designed for use
with this rechargeable tool.
●
Panasonic is not responsible for any
damage or accident caused by the use
of the recycled battery pack and the
counterfeit battery pack.
●
Do not dispose of the battery pack in a
re, or expose it to excessive heat.
●
Do not drive the likes of nails into the
ba ttery pack, subject it to shocks,
dismantle it, or attempt to modify it.
●
Do not allow metal objects to touch the
battery pack terminals.
●
Do not carry or store the battery pack
in the same container as nails or similar
metal objects.
●
Do not charge the battery pack in a
high-temperature location, such as next
to a re or in direct sunlight. Otherwise,
the battery may overheat, catch re, or
explode.
●
Never use other than the dedicated
charger to charge the battery pack.
Oth e rwise , the b a ttery ma y leak ,
overheat, or explode.
●
After removing the battery pack from
the tool or the charger, always reattach
the pack cover. Otherwise, the battery
contacts could be shorted, leading to a
risk of re.
●
W he n t h e B a t t er y P a ck H a s
Deteriorated, Replace It with a New
One.
Continued use of a damaged battery
pack may result in heat generation,
ignition or battery rupture.
III. ASSEMBLY
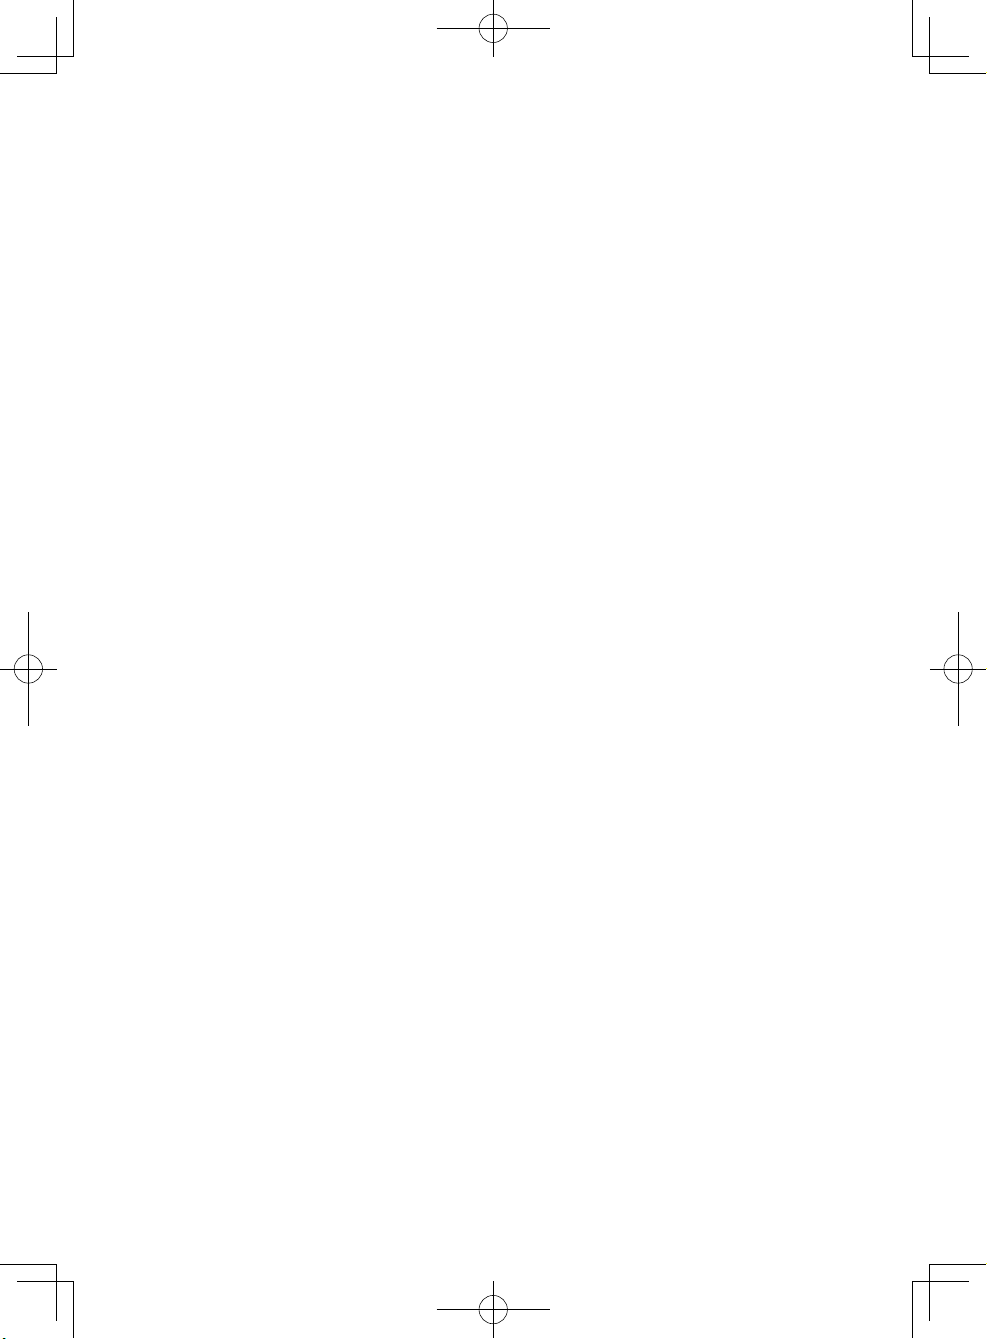
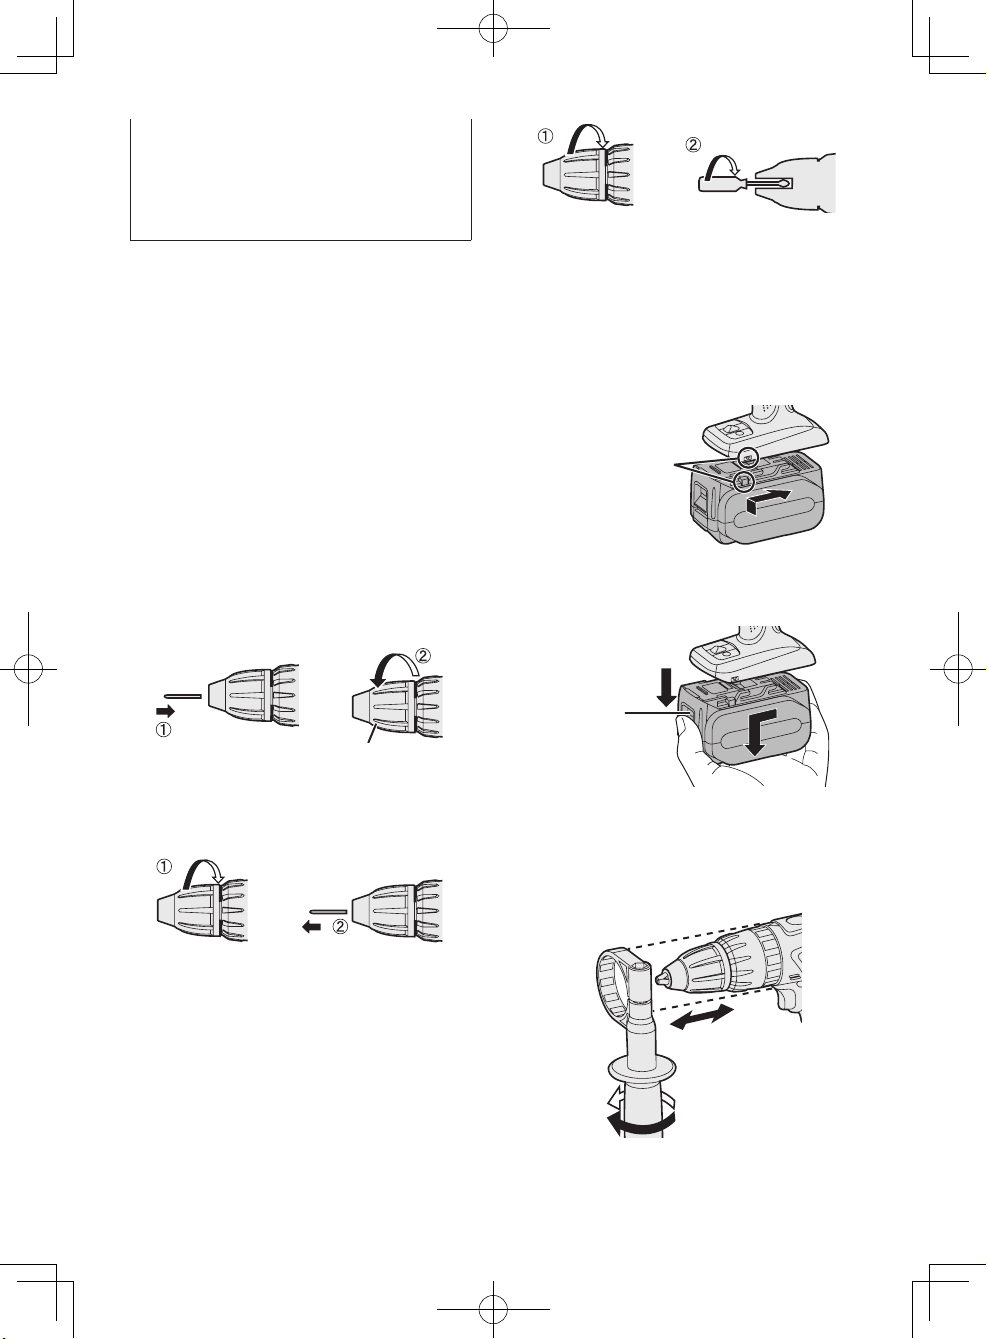
Attaching or Removing Bit
NOTE:
Wh en att aching or removi ng a bit,
disconnect battery pack from tool or
place the switch in the center position
(switch lock).
This tool is equipped with a keyless drill
chuck.
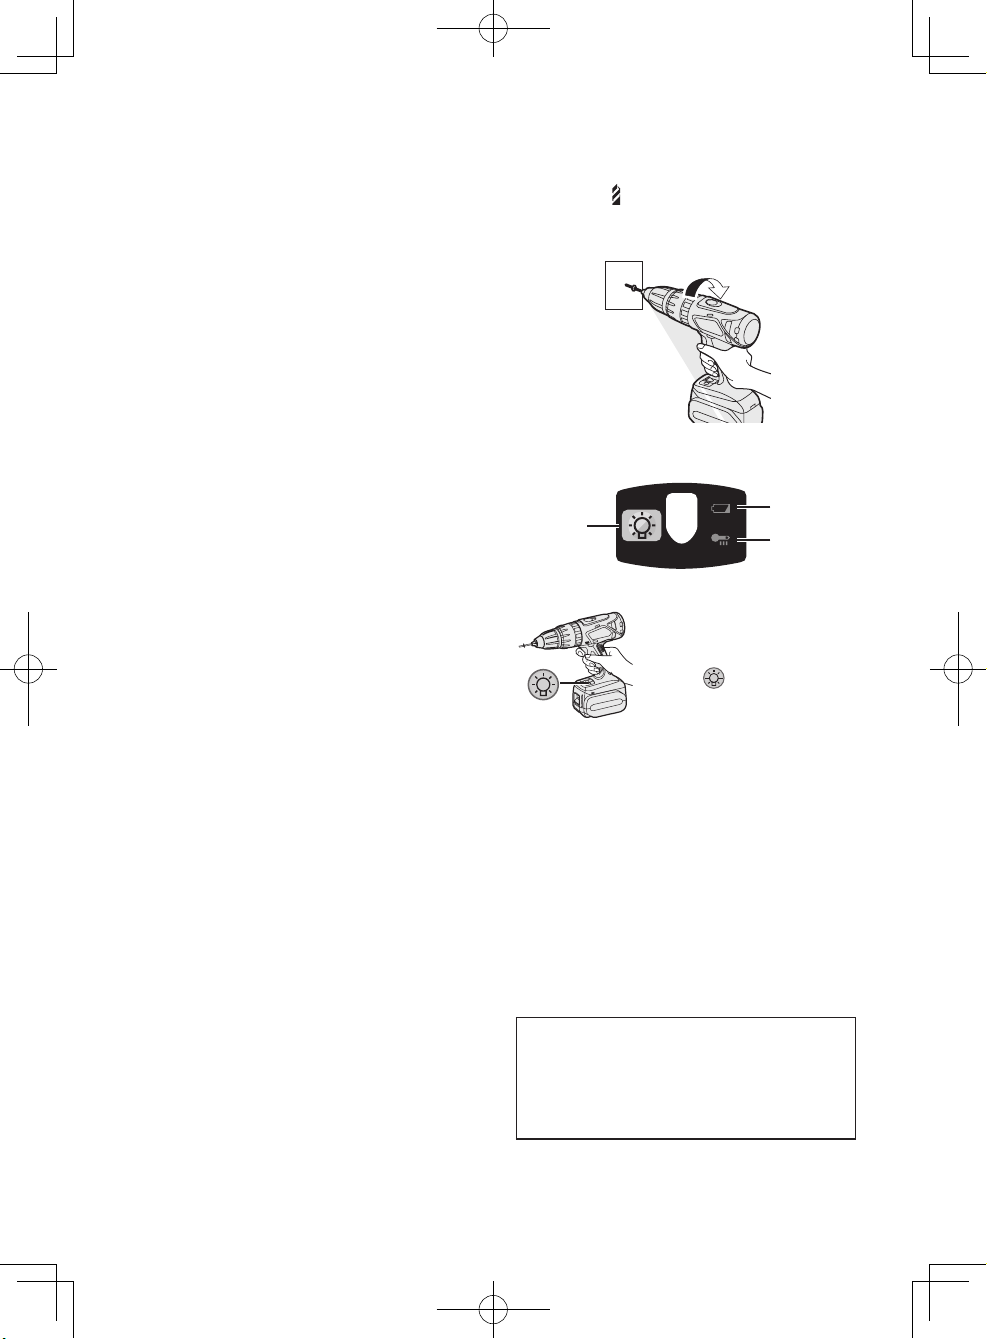
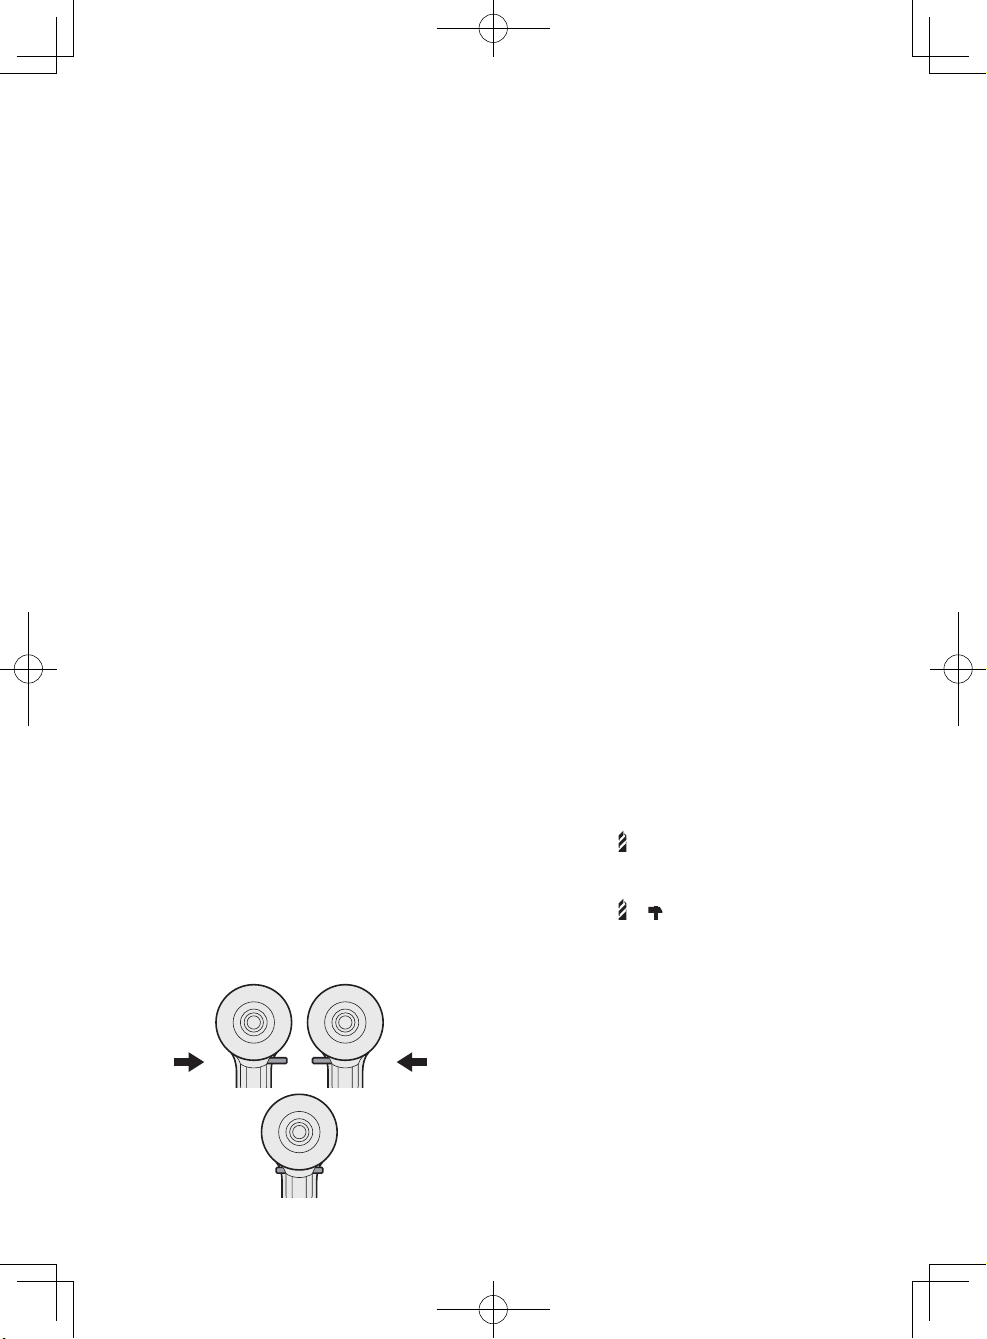
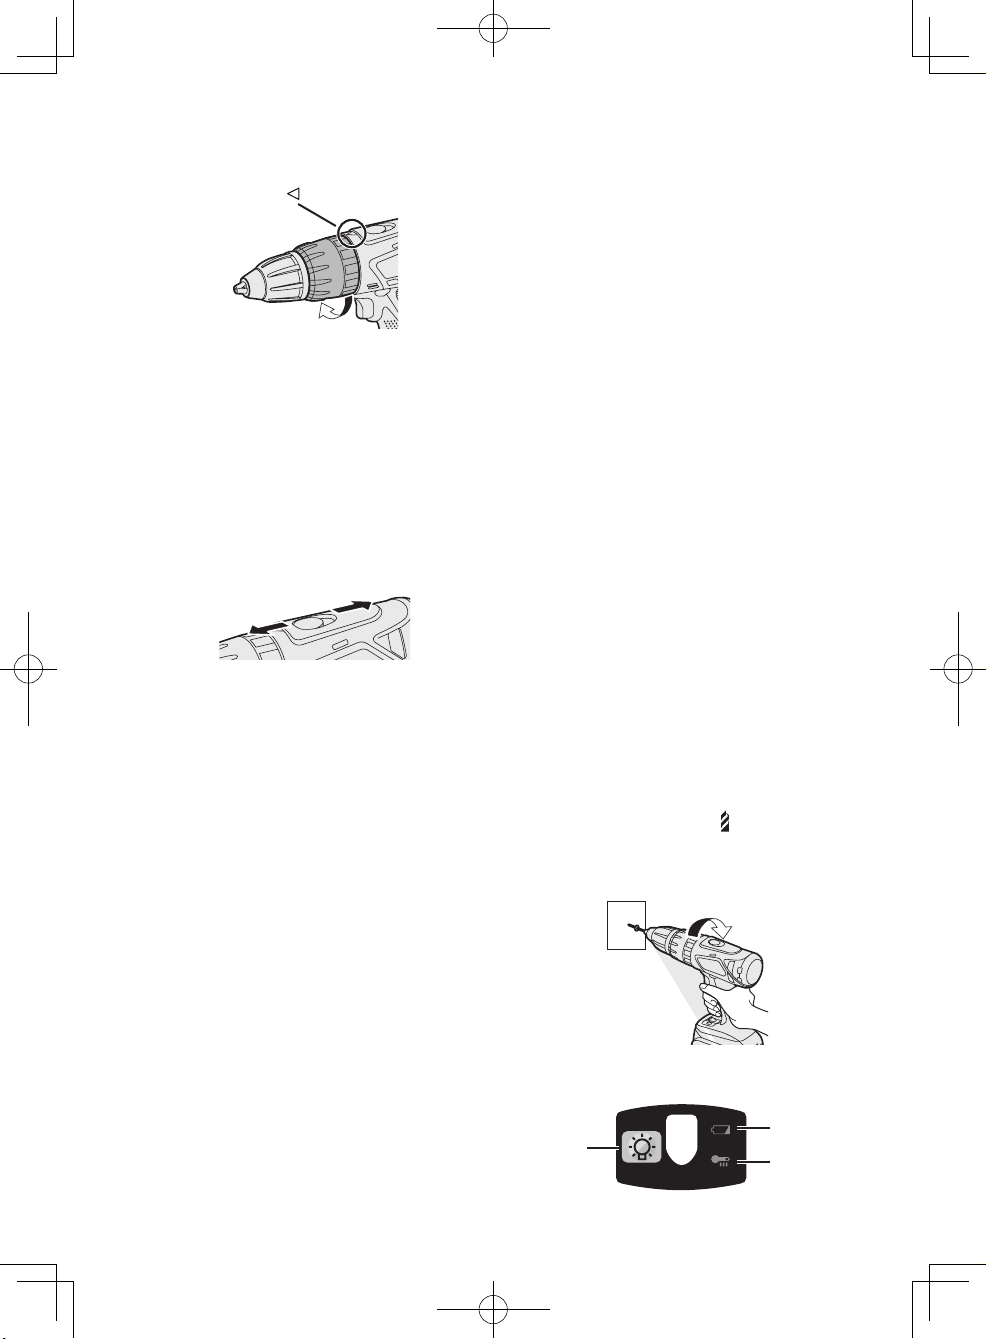
1. Attachment
Insert the bit and turn the lock collar
clockwise (looking from the front) to
tighten rmly until it stops clicking.
Lock collar
2. Removal
Turn the lock collar counterclockwise
(looking from the front), then remove
the bit.
- 6 -
EY7460_EY7960_Book.indb 6 2013-12-2 16:12:16
Page 7
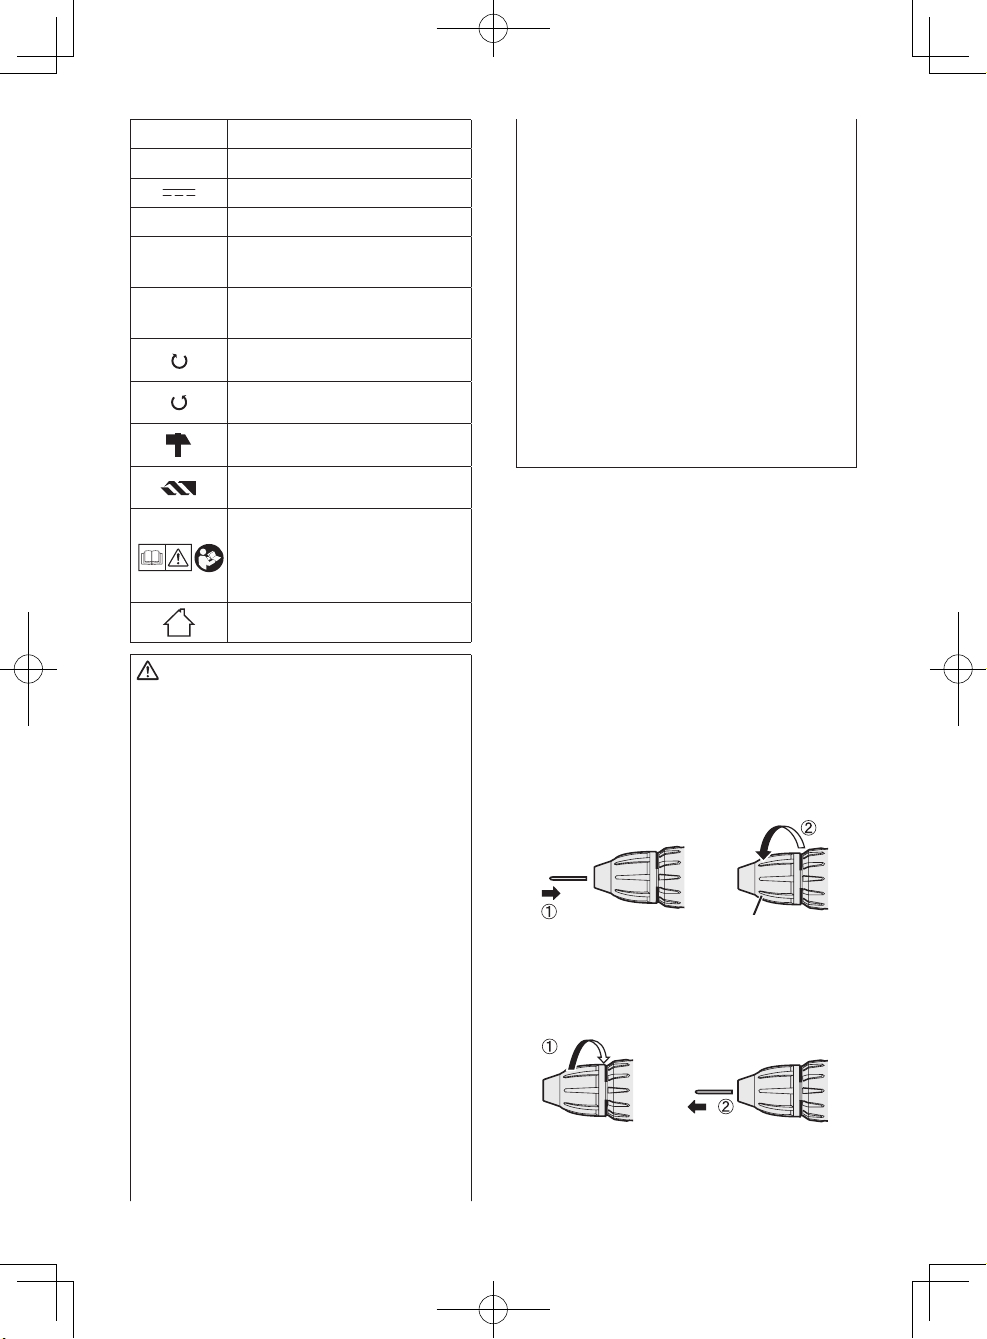
NOTE:
If excessive play occurs in the chuck,
secure the drill in place and 1 open
the chuck jaws by turning the lock collar
and 2 tighten the screw (left-handed
screw) with a screwdriver by turning
it counterclockwise (viewed from the
front).
Attaching or Removing
Battery Pack
1. To connect the battery pack:
Align the highlighted marker points and
attach battery pack.
●
Slide the battery pack until it locks
into position.
Alignment marks
2. To remove the battery pack:
Push down the button and slide the
battery pack forward.
Button
Support handle
Pla ce t he s uppo r t h andle at y o ur
favorite position and tighten the handle
securely.
Tighten
Loosen
Remove the handle when placing the
tool in the storage case.
IV. OPERATION
[Main Body]
Switch Operation
1. The speed increases with the amount
of depression of the trigger. When
beginning work, depress the trigger
slightly to start the rotation slowly.
2. A feedback electronic controller is used
to give a strong torque even in low
speed.
3. The brake operates when the trigger
is r e l e a s e d an d th e moto r stops
immediately.
CAUTION:
When operating the tool by pulling the
trigger, there may be a momentary lag
before rotation starts. This does not
signal a malfunction.
* This lag occurs as the tool’s circuitry
starts up when the trigger is pulled
for the rst time after installing a new
battery pack or after the tool has not
been used for at least 1 minute (or
at least 5 minutes when the LED is
on). Rotation will start without any
lag during second and subsequent
operations.
- 7 -
EY7460_EY7960_Book.indb 7 2013-12-2 16:12:20
Page 8
NOTE:
When the brake operates, a braking
sound may be heard. This is normal.
Switch and Forward/Reverse
Lever Operation
Forward Reverse
Switch lock
CAUTION:
To prevent damage, do not operate
Forward/Reverse lever until the bit
comes to a complete stop.
Forward Rotation Switch
Operation
1. Push the lever for forward rotation.
2. Depress the trigger switch slightly to
start the tool slowly.
3. The speed increases with the amount
of depression of the trigger for efcient
tig h teni n g of sc rews an d drill i ng.
The brake operates and the chuck
stops immediately when the trigger is
released.
4. After use, set the lever to its center
position (switch lock).
Clutch Torque Setting
Adjust the torque to one of the 18 clutch
settings or “
Adjust the torque to one of the 18 clutch
settings or “
” position (EY7460).
”, “ ” position (EY7960).
NOTE:
Always make sure to stop operation
of the tool and disengage it from the
work, when you select Hammering
mode from Drilling mode or when you
shift to Drilling mode from Hammering
mode by rotating clutch handle.
CAUTION:
Set the clutch setting at this mark ( )
before actual operation.
If the clutch handle cannot be set at
“drilling” or “hammering” mode after
driving with clutch function, set the
clutch handle at position 1 and operate
the clutch for a second.
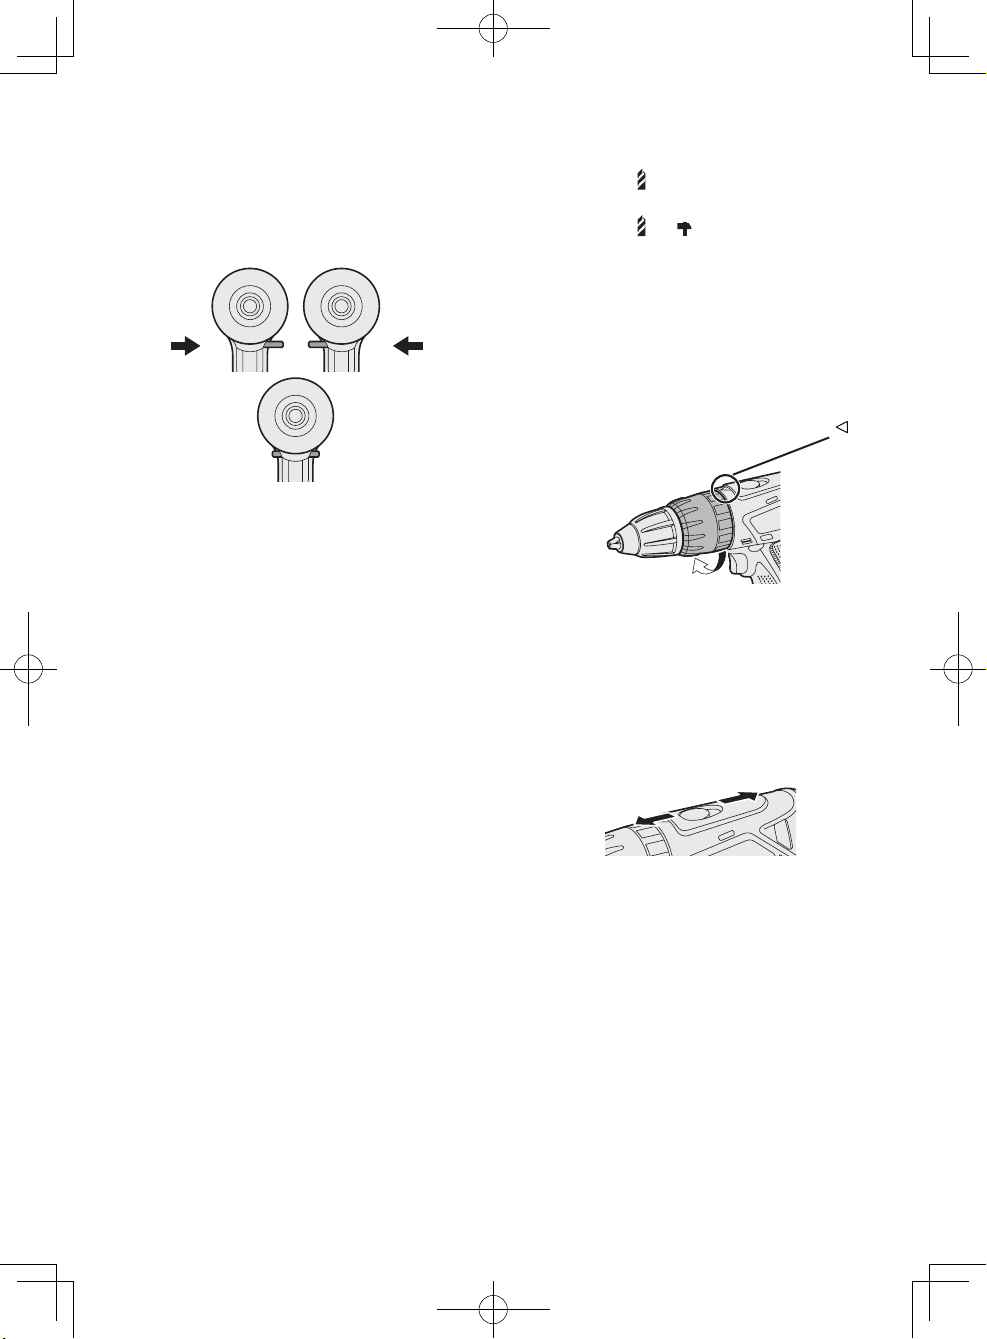
Speed Selection
Choose a low or high speed to suit the
use.
LOW
The more the variable speed control
trigger is pulled, the higher the speed
becomes.
HIGH
Reverse Rotation Switch
Operation
1. Push the lever for reverse rotation.
Check the direction of rotation before use.
2. Depress the trigger switch slightly to
start the tool slowly.
3. After use, set the lever to its center
position (switch lock).
- 8 -
EY7460_EY7960_Book.indb 8 2013-12-2 16:12:23
Page 9
CAUTION:
●
Check the speed sele ctor switch
before use.
●
Use at low speed when high torque
is needed during operation. (Using
at high spe ed w h en h i gh t orque
is re q uired may cause a m o tor
breakdown.)
●
Do not operate the speed selector
switch (LOW-HIGH) while pulling on
the speed control trigger. This can
cause the rechargeable battery to
wear quickly or damage the internal
mechanism of the motor.
* Se e speci f i cation s fo r “M AXIMUM
RECOMMENDED CAPACITIES”.
CAUTION:
●
To prevent excessive temperature
increase of the tool surface, do not
operate the tool continuously using
two or more battery packs. The tool
needs cool-off time before switching
to another pack.
●
Do not close up vent holes on the
sides of the body during operation.
Otherwise, the machine function is
adversely affected to cause a failure.
●
Do NOT strain the tool (motor). This
may cause damage to the unit.
●
Use t he tool in such a way a s to
prevent the air from the body vent
holes from blowing directly onto your
skin. Otherwise, you may get burned.
Bit-locking Function
1. With the trigger switch not engaged
and a screwdriver bit locked in place,
th e too l can be used as a manual
screwdriver (up to 40 N·m, 408 kgf-cm,
353 in-lbs).
There will be a little play in the chuck,
but this is not a malfunction.
2. This feature is handy for tightening
screws that require more torque than
the m aximum torqu e of the driver
(position
on the clutch), for conrming
the tightness of a screw or to loosen an
extremely tight screw.
Control Panel
(1)
(1) LED light
Before the use of L ED
light, always pull the power
switch once.
Pr ess
button.
The light illuminates with
very low current, and it does not adversely
affect the performance of the tool during
use or its battery capacity.
CAUTION:
●
The built-in LED light is designed
to illumina te the small work area
temporarily.
●
Do not use it as a substitute for a
regular flashlight, since it does not
have enough brightness.
●
LED light turns off when the tool has
not been used for 5 minutes.
Caution: DO NOT STARE INTO BEAM.
Use of co ntrol s or adjust m ents or
performance of procedures other than
those specified herein may result in
hazardous radiation exposure.
(3)
(2)
the LED light
- 9 -
EY7460_EY7960_Book.indb 9 2013-12-2 16:12:25
Page 10
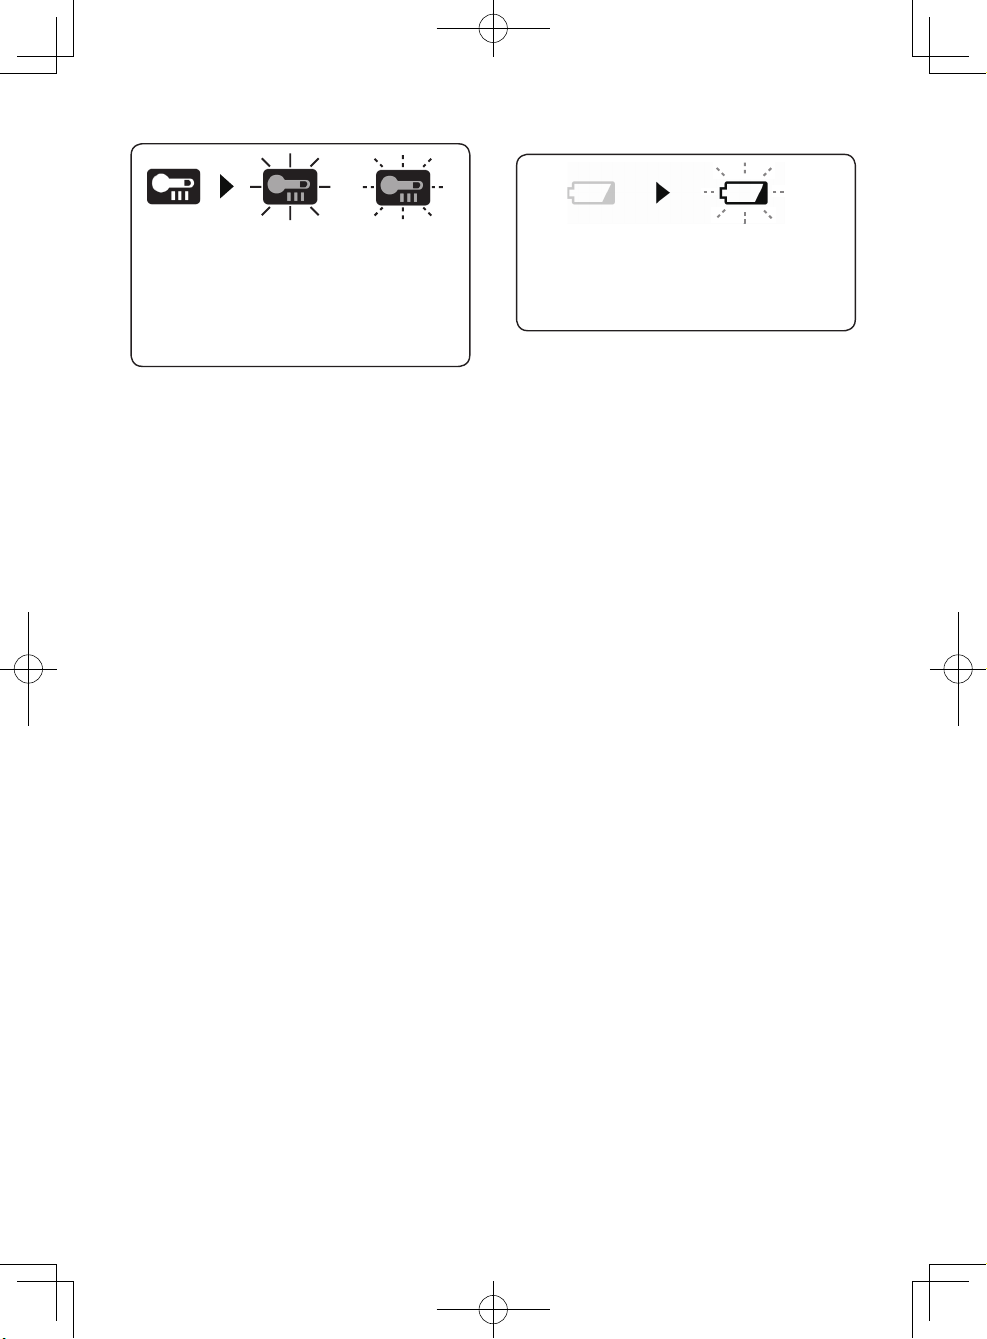
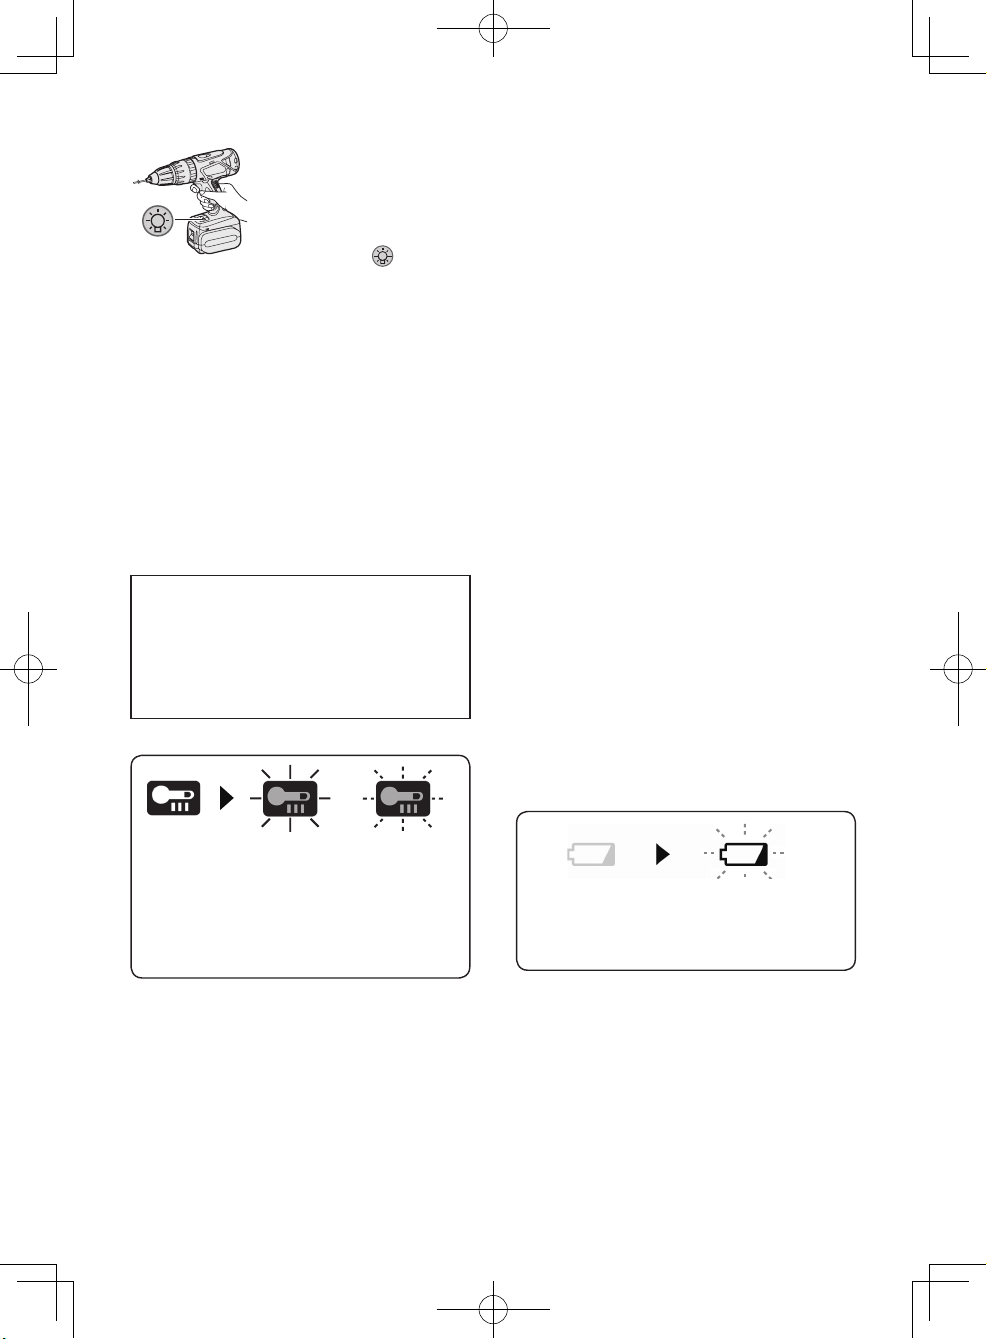
(2) Overheat warning lamp
(3) Battery low warning lamp
Off
(normal
operation)
Illuminated:
Overheat
(motor)
Flashing:
Overheat
(battery)
Indicates operation has
been halted due to motor
or battery overheating.
To protect the motor or battery, be sure to
note the following when carrying out this
operation.
●
If the motor or battery becomes hot, the
protection function will be activated and
the motor or battery will stop operating.
The ove rhea t w arni ng lamp on t he
control panel illuminates or ashes when
this feature is active.
●
If the overheating protection feature
ac t i va t e s , a l l o w the too l to coo l
thoroughly (at least 30 minutes). The
tool is ready for use when the overheat
warning lamp goes out.
●
Avoid using the tool in a way that causes
the overheating protection feature to
activate repeatedly.
●
If the tool is operated continuously under
high-load conditions or if it is used in hottemperature conditions (such as during
summer), the overheating protection
feature may activate frequently.
●
If the tool is used in cold-temperature
conditions (such as during winter) or if
it is frequently stopped during use, the
overheating protection feature may not
activate.
●
The ambien t tempe ratur e range is
between 0°C (32°F) and 40°C (104°F).
If the battery pack is used when the
battery temperature is below 0°C (32°F),
the tool may fail to function properly.
●
When char gin g a cool b att ery pack
(below 0°C (32°F)) in a warm place,
leave the battery pack at the place and
wait for more than one hour to warm up
the battery to the level of the ambient
temperature.
Off
(normal
operation)
Flashing
(No charge)
Battery protection
feature active
Excessive ( com ple te) discharging of
lithium ion batteries shortens their service
life dramatically. The driver includes a
battery protection feature designed to
prevent excessive discharging of the
battery pack.
●
The battery protection feature activates
immediately before the battery loses its
charge, causing the battery low warning
lamp to ash.
●
If you notice the battery low warning
lamp flashing, charge the battery pack
immediately.
●
If it is started with too little battery power
remaining, the tool may stop operating
without the battery low warning lamp
ashing rst. This indicates that there is
too little battery power remaining to use
the tool, and the battery pack should be
charged before further use.
●
If the tool is subject to a sudden load
during use that causes the motor to
lock up, the overdischarge prevention
sensor may be triggered, and the battery
low warning lamp may flash. The lamp
will stop flashing once you address the
cause of the motor’s locking up and cycle
the trigger.
- 10 -
EY7460_EY7960_Book.indb 10 2013-12-2 16:12:25
Page 11
[Battery Pack]
For Appropriate Use of
Battery Pack
Li-ion Battery Pack
●
For optimum battery life, store the Liion battery pack following use without
charging it.
●
When charging the battery pack, conrm
that the terminals on the battery charger
are free of foreign substances such as
dust and water etc. Clean the terminals
before charging the battery pack if any
foreign substances are found on the
terminals.
The life of the battery pack terminals may
be affected by foreign substances such
as dust and water etc. during operation.
●
When battery pack is not in use, keep it
away from other metal objects like: paper
clips, coins, keys, nails, screws, or other
small metal objects that can make a
connection from one terminal to another.
Shorting the battery terminals together
may cause sparks, burns or a re.
●
When operating the battery pack, make
sure the work place is well ventilated.
●
When the battery pack is removed from the
main body of the tool, replace the battery
pack cover immediately in order to prevent
dust or dirt from contaminating the battery
terminals and causing a short circuit.
Battery Pack Life
The rec h argeab l e ba tterie s ha ve
a limited li fe. If the o peration time
b e c o m e s ex t r e m e l y s h o r t a f t er
recharging, replace the battery pack
with a new one.
Battery Recycling
ATTENTION:
For envir onme ntal prote ctio n a nd
recycling of materials, be sure that it
is disposed of at an officially assigned
location, if there is one in your country.
Recommendations for use
Pack cover
Terminals
Label
Be sure to use the Pack cover
●
When the battery pack is not being used,
store the battery in a way that foreign
substances such as dust and water etc.
do not contaminate the terminals. Be
sure to attach the battery pack cover to
protect the battery terminals.
●
When charging the battery pack, conrm
that the terminals on the battery charger
are free of foreign substances such as
dust and water etc. Clean the terminals
before charging the battery pack if any
foreign substances are found on the
terminals.
The life of the battery pack terminals may
be affected by foreign substances such
as dust and water etc. during operation.
CAUTION:
To protect the motor or battery, be sure
to note the following when carrying out
operation.
●
If the battery becomes hot, the protection
function will be activated and the battery
will stop operating.
The ove rhea t w arni ng lamp on t he
control panel illuminates or ashes when
this feature is active.
For safe use
●
Th e batter y pack is designed to be
installed by proceeding two steps for
safety. Make sure the battery pack is
installed properly to the main unit before
use.
- 11 -
EY7460_EY7960_Book.indb 11 2013-12-2 16:12:26
Page 12
●
If the battery pack is not connected rmly
when the switch is switched on, the
overheat warning lamp and the battery
low warning lamp will flash to indicate
that safe operation is not possible, and
the main unit will not rotate normally.
Connect the battery pack into the unit
of the tool until the red or yellow label
disappears.
[Battery Charger]
Charging
CAUTION:
●
The charger is designed to operate on
standard domestic electrical power only
as stated in the rating plate. Charge only
on the voltage indicated on the rating
plate of unit. e.g.230V / 50Hz.
●
Do not attempt to use it on any other
voltage or frequency rating!
●
If the temperature of the battery pack
falls approximately below −10°C (14°F),
cha rgin g wil l aut omati call y sto p to
prevent degradation of the battery.
●
The ambien t tempe ratur e range is
between 0°C (32°F) and 40°C (104°F).
If the battery pack is used when the
battery temperature is below 0°C (32°F),
the tool may fail to function properly.
●
When char gin g a cool b att ery pack
(below 0°C (32°F)) in a warm place,
leave the battery pack at the place and
wait for more than one hour to warm up
the battery to the level of the ambient
temperature.
●
Cool down the charger when charging
more than two battery packs consecutively.
●
Do not insert your fingers into contact
hole, when holding charger or any other
occasions.
CAUTION:
To prevent the risk of re or damage to the
battery charger.
●
Do not use power source from an engine
generator.
●
Do not cover vent holes on the charger
and the battery pack.
●
Unplug the charger when not in use.
NOTE:
Your battery pack is not fully charged at
the time of purchase. Be sure to charge
the battery before use.
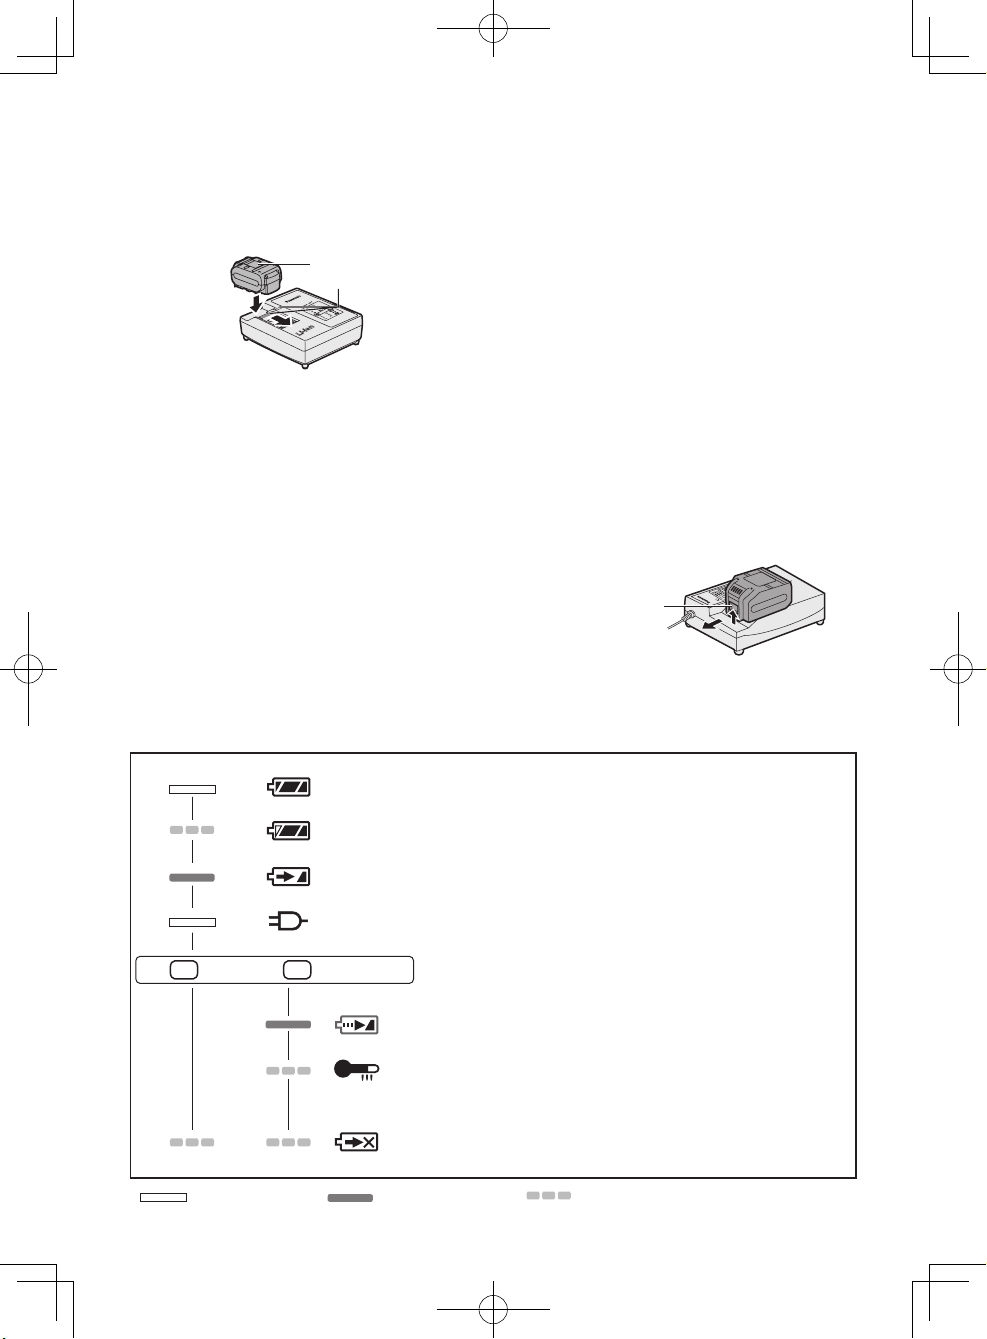
How to charge
1. Plug the charger into the AC outlet.
NOTE:
Sparks may be produced when the plug
is inserted into the AC power supply,
but this is not a problem in terms of
safety.
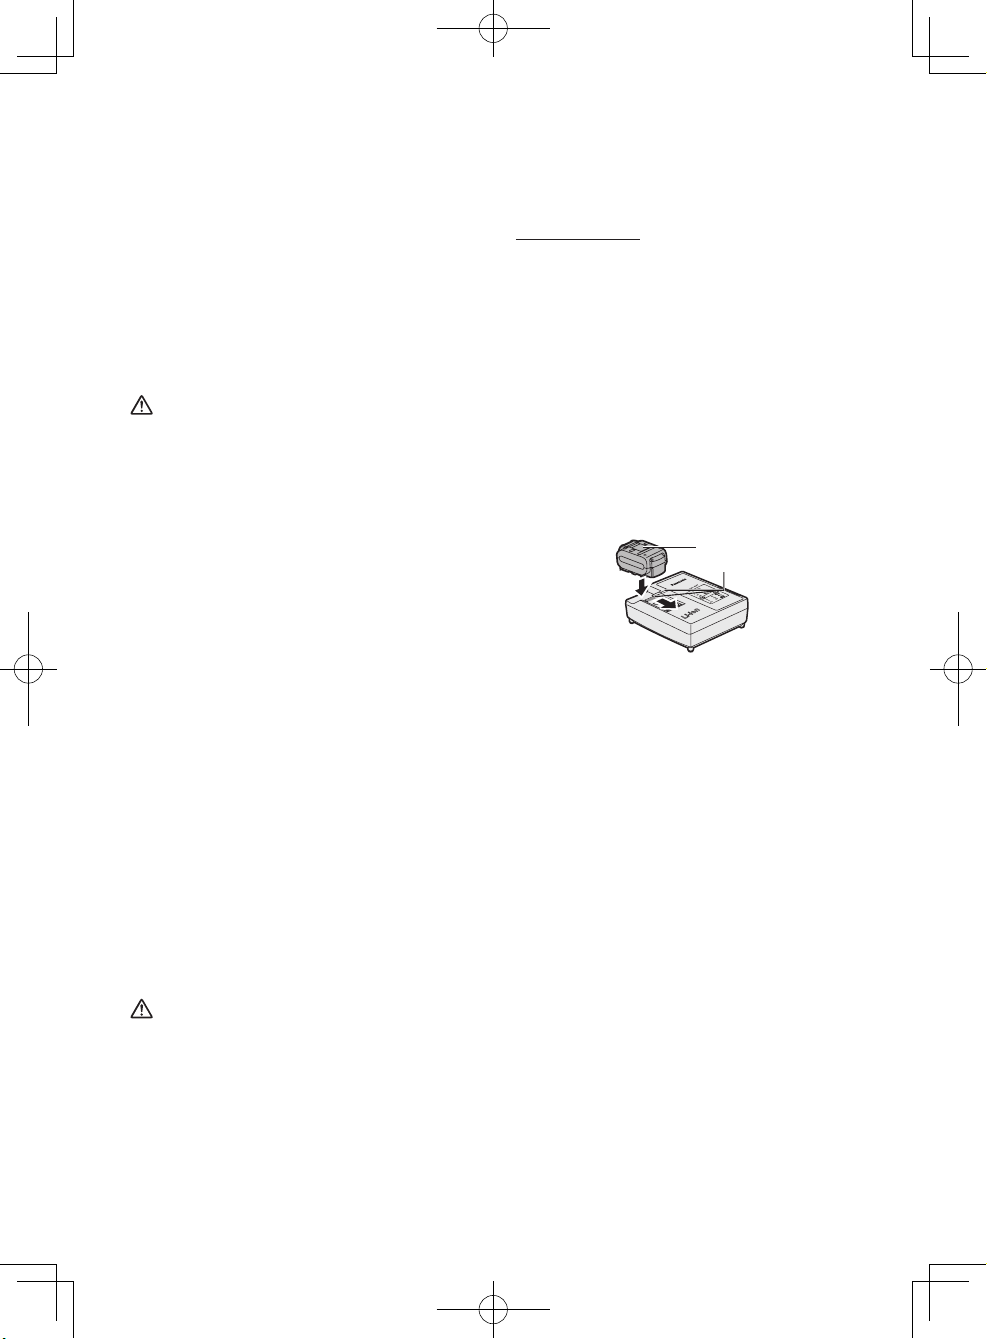
2. Connect the battery pack firmly into the
charger.
1) Line up the alignment marks and
place the battery onto the dock on
the charger.
2) Slide forward in the direction of the
arrow.
Alignment marks
3. During charging, the charging lamp will
be illuminated.
When charging is completed, an internal
electronic switch will automatically be
triggered to prevent overcharging.
●
C h a r g i ng wi l l no t s t a r t if t h e
battery pack is warm (for example,
i m m edi a t e l y af t e r hea v y - d u t y
operation).
The orang e standby lamp will be
flashing until the battery cools down.
Charging will then begin automatically.
4. The charge lamp (green) will flash
slowly once the battery is approximately
80% charged.
5. When chargi ng i s com plete d, t he
charging lamp in green color will turn off.
6. If the temperature of the battery pack
is 0°C or less, charging takes longer to
fully charge the battery pack than the
standard charging time.
Even when the battery is fully charged,
it will have approximately 50% of the
power of a fully charged battery at
normal operating temperature.
- 12 -
EY7460_EY7960_Book.indb 12 2013-12-2 16:12:26
Page 13
7. Consult an authorized dealer if the
charging lamp (green) does not turn off.
8. If a fully ch arged batter y pac k is
inserted into the charger again, the
charging lamp lights up. After several
minutes, the charging lamp in green
color will turn off.
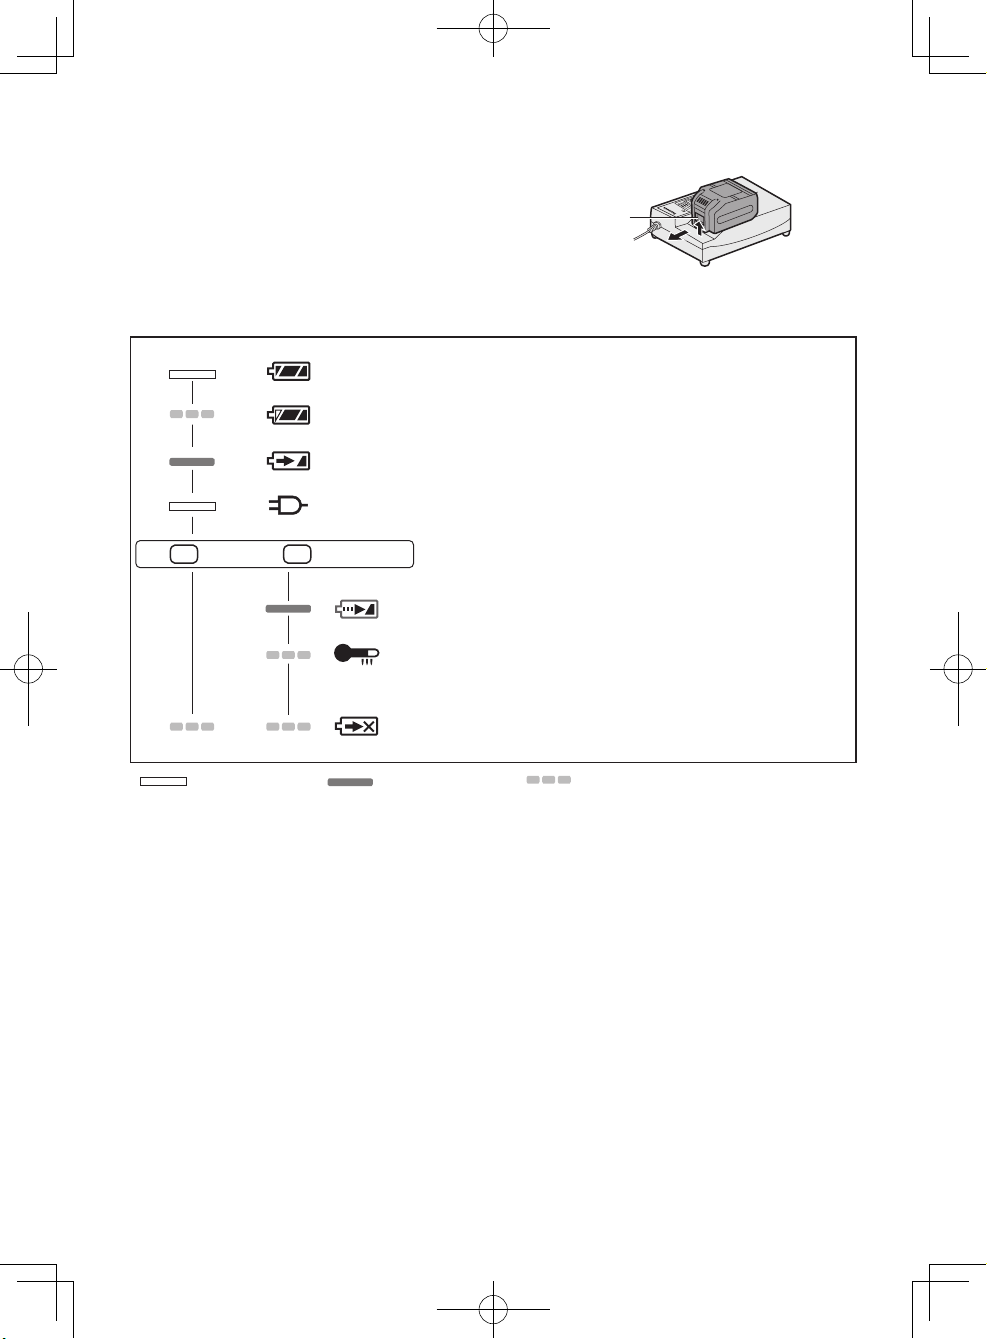
LAMP INDICATIONS
Charging is completed. (Full charge.)
Battery is approximately 80% charged.
Now charging.
Charger is plugged into the AC outlet. Ready to charge.
9. Remove the battery pack while the
battery pack release button is held up.
Battery pack
release button
(Green)
Turn off Illuminated
(Orange)
Charging Status Lamp.
Left: green Right: orange will be displayed.
Battery pack is cool.
The battery pack is being charged slowly to reduce the load on the battery.
Battery pack is warm.
Charging will begin when temperature of battery pack drops. If
the temperature of the battery pack is -10° or less, the charging
status lamp (orange) will also start ashing. Charging will begin
when the temperature of the battery pack goes up.
Charging is not possible. Clogged with dust or malfunction of
the battery pack.
Flashing
- 13 -
EY7460_EY7960_Book.indb 13 2013-12-2 16:12:27
Page 14

Information for Users on Collection and Disposal of Old
Equipment and used Batteries
These symbols on the products, packaging, and/or accompanying
documents mean that used electrical and electronic products and batteries
should not be mixed with general household waste.
For proper treatment, recovery and recycling of old products and used
batteries, please take them to applicable collection points, in accordance
with your national legislation and the Directives 2002/96/EC and 2006/66/
EC.
By disposing of these products and batteries correctly, you will help to save
valuable resources and prevent any potential negative effects on human
health and the environment which could otherwise arise from inappropriate
waste handling.
For more information about collection and recycling of old products and
batteries, please contact your local municipality, your waste disposal
service or the point of sale where you purchased the items.
Penalties may be applicable for incorrect disposal of this waste, in
accordance with national legislation.
For business users in the European Union
If you wish to discard electrical and electronic equipment, please contact your dealer or
supplier for further information.
[Information on Disposal in other Countries outside the
European Union]
These symbols are only valid in the European Union. If you wish to discard these
items, please contact your local authorities or dealer and ask for the correct method of
disposal.
V. MAINTENANCE
●
Use only a dry,soft cloth for wiping the unit.Do not use a damp cloth,thinner,benzine,or
other volatile solvents for cleaning.
●
In the event that the inside of the tool or battery pack is exposed to water,drain and allow
to dry as soon as possible.Carefully remove any dust or iron lings that collect inside the
tool. If you experience any problems operating the tool,consult with a repair shop.
VI. ACCESSORIES
Use only bits suitable for size of drill's chuck.
- 14 -
EY7460_EY7960_Book.indb 14 2013-12-2 16:12:27
Page 15

VII. APPENDIX
MAXIMUM RECOMMENDED CAPACITIES
Model EY7460 EY7960
Screw
driving
Drilling
Machine screw M8
Wood screw ø 10 mm
Self-drilling screw ø 6 mm
For Wood ø 38 mm
For Metal ø 13 mm
For Masonry --- 13 mm
WARRANTY SUPPLEMENT
The breakdown and damage caused by usage consistent for a long time (e.g.: factory work
on the assembly line, etc.) is out of warranty.
VIII. SPECIFICATIONS
MAIN UNIT
Model EY7460 EY7960
Motor voltage 21.6 V CD
No load speed
Blows Rate
Per Minute
Chuck capacity ø1.5 mm - ø13 mm
Clutch torque Approx. 1.0 N•m (10kgf-cm) – 6.9 N•m (70kgf-cm)
Overall length 232mm 245mm
Weight (with battery pack EY9L61)
Low 100~400 min
High 350~1500 min
Low --- 1800~7200 min
High --- 6300~27000 min
2.45 kg 2.55 kg
-1
(rpm)
-1
(rpm)
-1
(bpm)
-1
(bpm)
BATTERY PACK
Model No. EY9L61 EY9L62
Storage battery Li-ion Battery
Battery
voltage DC 21.6 V
detail spec. 3.6 V × 6 cells 3.6 V × 12 cells
BATTERY CHARGER
Model No. EY0L82
Electrical rating See the rating plate on the bottom of the charger.
Weight 0.93 kg (2 lbs)
EY9L61 EY9L62
Charging time
NOTE: This chart may include models that are not available in your area.
Please refer to the latest general catalogue.
NOTE: For the dealer name and address, please see the included warranty card.
EY7460_EY7960_Book.indb 15 2013-12-2 16:12:27
Usable: 50 min. Usable: 65 min.
Full: 60 min. Full: 85 min.
- 15 -
Page 16
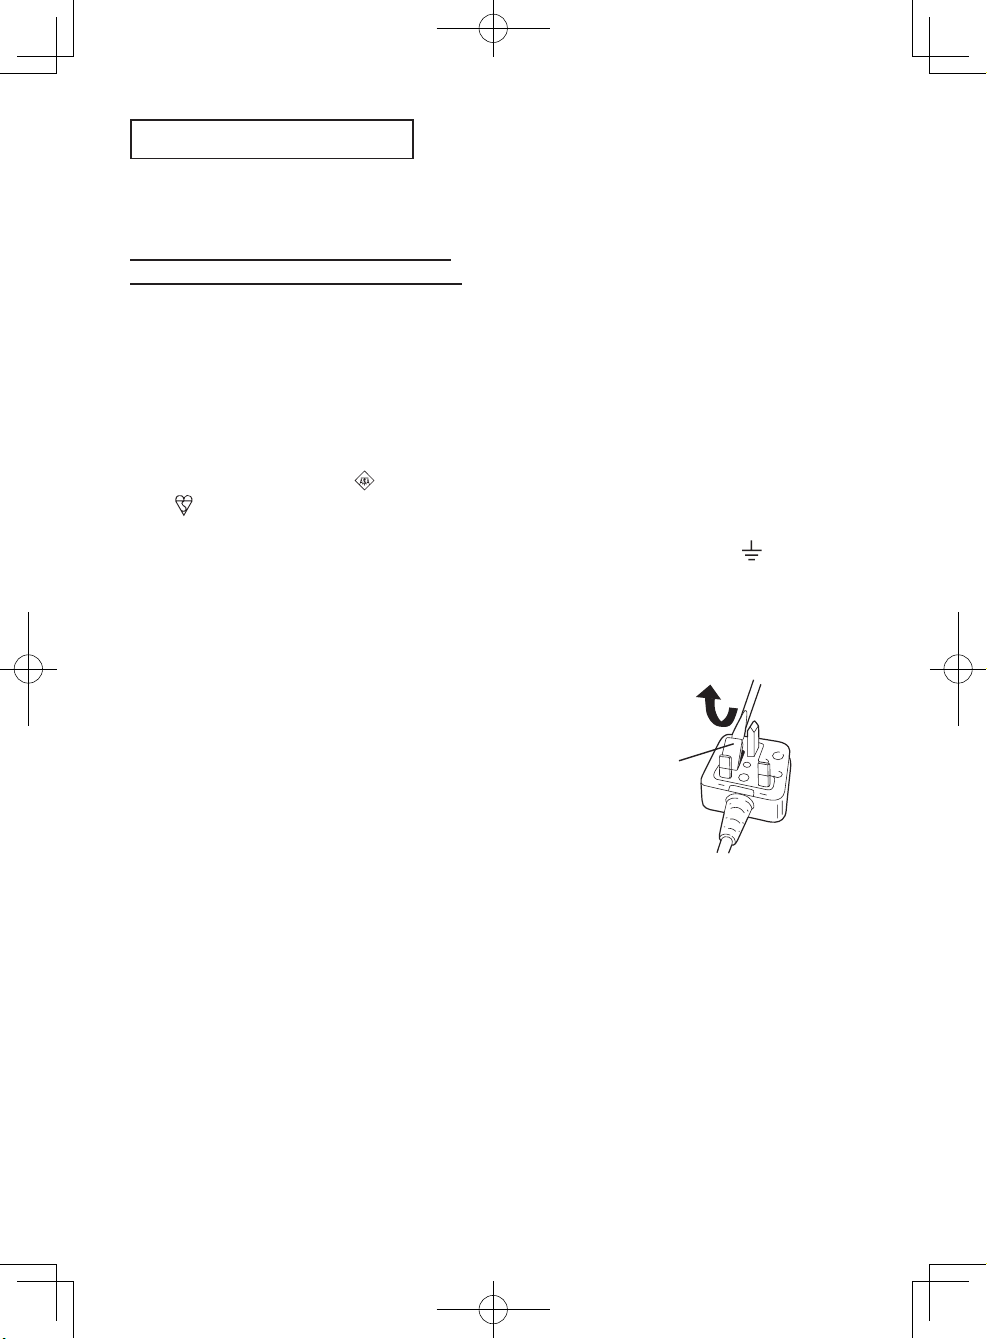
ONLY FOR U. K.
IX
.
ELECTRICAL PLUG
INFORMATION
FOR YOUR SAFETY PLEASE READ
THE FOLLOWING TEXT CAREFULLY
This appliance is supplied with a moulded
three pin mains plug for your safety and
convenience.
A 5 amp fuse is tted in this plug.
Should the fuse need to be replaced please
ensure that the replacement fuse has a
rating of 5 amp and that it is approved by
ASTA or BSI to BS1362.
Check for the ASTA mark
mark
If the plug contains a removable fuse cover
you must ensure that it is retted when the
fuse is replaced.
If you lose the fuse cover the plug must not
be used until a replacement cover is obtained.
A replacement fuse cover can be purchased
from your local Panasonic Dealer.
IF THE FITTED MOULDED PLUG IS
UNSUITABLE FOR THE SOCKET OUTLET IN YOUR HOME THEN THE FUSE
SHOULD BE REMOVED AND THE PLUG
CUT OFF AND DISPOSED OF SAFELY.
THERE IS A DANGER OF SEVERE
ELECTRICAL SHOCK IF THE CUT OFF
PLUG IS INSERTED INTO ANY 13 AMP
SOCKET.
If a new plug is to be tted please observe
the wiring code as shown below.
If in any doubt please consult a qualied
electrician.
on the body of the fuse.
or the BSI
IMPORTANT:
The wires in this mains lead are
coloured in accordance with the following code:
Blue: Neutral
Brown: Live
As the colours of the wire in the mains lead
of this appliance may not correspond with
the coloured markings identifying the terminals in your plug, proceed as follows.
The wire which is coloured BLUE must be
connected to the terminal in the plug which
is marked with the letter N or coloured
BLACK.
The wire which is coloured BROWN must be
connected to the terminal in the plug which
is marked with the letter L or coloured RED.
Under no circumstances should either of
these wires be connected to the earth terminal of the three pin plug, marked with the
letter E or the Earth Symbol
How to replace the fuse: Open the fuse
compartment with a screwdriver and replace the fuse and fuse cover if it is removable.
Fuse Cover
.
- 16 -
EY7460_EY7960_Book.indb 16 2013-12-2 16:12:28
Page 17

Original-Anleitung: Englisch
Übersetzung der Original-Anleitung:
Andere Sprachen
I.
BESTIMMUNGSGEMÄSSE
VERWENDUNG DER
MASCHINE
Diese Werkzeuge können zum Festziehen der Schrauben im Kupplungsmodus
und zum Bohren von Löchern in Holz
und Metall im Bohrmodus verwendet
werden. Mit dem Modell EY7960 lassen sich außerdem im Hammermodus
Löcher in weichen Beton oder ähnliche
Materialien bohren.
Lesen Sie bitte vor der ersten Inbetriebnahme dieses Gerätes das separate
Ha ndbuch „Sicherheits maßregeln“
sorgfältig durch.
II.
WEITERE WICHTIGE
SICHERHEITSREGELN
1) Geeigneten Gehörschutz tragen.
Lärmeinwirkung kann zu Gehörverlust
führen.
2) Ver w e n d e n S i e de n m i t de m
Werkzeug gelieferten Zusatzgriff.
Verlust der Kontrolle kann Verletzungen
verursachen.
3) Halten Sie Elektrowerkzeuge an
den isolierten Griffflächen, wenn
Sie eine Arbeit durchführen, bei
der die Maschine auf verborgene
Kabel treffen könnte; bei Kontakt mit
stromführenden Kabeln werden die
freiliegenden Metallteile der Maschine
eben f a lls s t romführ e nd und d er
Benutzer erleidet einen elektrischen
Schlag.
4) Tragen Sie eine Staubmaske, falls bei
der Arbeit Staub anfällt.
5) Denken Sie daran, dass das Werkzeug
ständig betriebsbereit ist, da es nicht
an die Steckd ose a ngeschlosse n
werden muss.
6) Beim Bohren oder Schrauben in Wände,
Fußböden usw. Können stromführende
Kabel berührt werden. DAHER NIE
DAS SCHNELLSPANNFUTTER ODER
ANDERE VORDERE METALLTEILE
BERÜHREN! Das Werkzeug beim
Schraub en nur am Kunsts toffgriff
halten, um in solchen Fäll en vor
elektrischen Schlägen geschützt zu
sein.
7) Falls das Bit stecken bleibt, lassen Sie
sofort den Elektronikschalter los, um
eine Überlastung zu verhüten, die den
Akku oder Motor beschädigen kann.
Verwenden Sie die Rückwärtsdrehung,
um klemmende Bits zu lösen.
8) Betätigen Sie den Rechts-/LinkslaufUmschalth ebel N ICHT, wenn d er
Hauptschalter eingeschaltet ist. Der
Akku entlädt sich sonst schnell, und
das Gerät kann beschädigt werden.
9) Beim Aufladen kann sich das Ladegerät etwas erhitzen. Dies ist normal.
Den Akku daher NICHT über lange
Zeit auaden.
10) Stellen Sie den Rechts-/LinkslaufUmscha lthebel zum Lagern oder
Tragen d e s Werkzeugs a u f die
Mittenstellung (Schaltersperre).
11) Belasten Sie das Werkzeug nicht,
indem Sie den Elektronikschalter halb
gedrückt halten (Drehzahlregelmodus),
sodass der Motor stehen bleibt.
12) V e r ste l l e n S i e d en Dr e hza h l Wahls chalter (LOW-HI GH) nicht,
während Sie den Elektronikschalter
betätigen. Dies kann zu schneller
Abnutzung der wiederaufladbaren
Batterie oder zu einer Beschädigung
des internen Moto rmechanismu s
führen.
- 17 -
EY7460_EY7960_Book.indb 17 2013-12-2 16:12:28
Page 18
Symbol Bedeutung
V Volt
Gleichstrom
n
...min
Ah
o
-1
Leerlaufdrehzahl
Drehzahl oder Hubzahl pro
Minute
Akkukapazitat in Ampere
Stunden
Rechtslauf
Linkslauf
Schlagbohren
Bohren
Zur Verminderung der
Verletzungsgefahr muss
die Bedienungsanleitung
gründlich gelesen werden.
Nur für Inneneinsatz.
WARNUNG:
●
Bi t t e verwe n d e n Sie für di es e s
wiederaufladbare Gerät nur die von
Panasonic vorgesehenen Akkus.
●
Panasonic übernimmt keine Verantwortung
für etwaige Schäden oder Unfälle, die
durch den Gebrauch von recycelten und
gefälschten Akkus verursacht werden.
●
Entsorgen Sie diesen Akku niemals im
Feuer und setzen Sie ihn keinesfalls
starker Hitze aus.
●
Versuchen Sie niemals, Gegenstände
wie Nägel in den Akku zu schlagen,
dies könnte zu einem elektr ische n
Schlag führen. Sehen Sie außerdem
davon ab, den Akku zu zerlegen oder
zu verändern.
●
A c h t e n S i e d a r au f, das s k e i ne
metallischen Gegenstände mit den
Anschlüssen des Akkus in Verbindung
kommen.
●
Der Akku darf nicht im selben Behälter
wie Nägel oder ähnliche metallische
Gegenstände transportiert oder gelagert
werden.
●
Laden Sie de n Akku niemals an
eine m Ort m i t hoher Tem perat u r,
beispielsweise neben einem Feuer
oder dire kte r Sonnen ein str ahl ung.
Andernfalls kann dies zu Überhitzung,
ei nem Brand oder einer Explo sion
führen.
●
Laden Sie den Akku ausschließlich mit
dem dafür vorgesehenen Ladegerät.
Andernfalls ka n n dies zu einem
Auslaufen des Akkus, einem Brand
oder einer Explosion führen.
●
Nachdem Si e de n Ak k u von de r
M a s chi n e o d e r d em Lad e g e r ät
abg e nomm e n hab e n, b ringe n Sie
stets die Akkuabdeckung wieder an.
Anderenfalls könnten die Akkukontakte
kurzgeschlossen werden, was zu einem
Brand führen kann.
- 18 -
EY7460_EY7960_Book.indb 18 2013-12-2 16:12:29
Page 19
●
Wenn der Akku schwach geworden ist,
ersetzen Sie ihn durch einen neuen.
Fortgesetzter Gebrauch eines beschädigten
Akkus kann zu Wärme erze ugung,
Entzündung oder Bruch führen.
III. BAUGRUPPE
Anbringen oder Abnehmen
des Bits
HINWEIS:
Trennen Sie vor dem Anbringen oder
Abnehmen eines Bits den Akku vom
Werkzeug ab, oder stellen Sie den
Elektronikschalter auf die Mittelstellung
(Schaltersperre).
D i es e s W e rk z eu g is t mi t ei n em
schlüssellosen Bohrfutter ausgestattet.
1. Anbringen
Das Bit einführen, und den Knebelring
zum Anziehen im Uhrzeigersinn drehen
(von vorn gesehen), bis das Klicken
aufhört.
Anbringen oder Abnehmen
des Akkus
1. Zum Anschließen des Akkus:
Die Ausrichtmarkierungen aufeinander
ausrichten, und den Akku anbringen.
●
De n Ak k u ei n s c h ie b e n , bi s er
einrastet.
Ausrichtmarkierungen
2. Zum Entfernen des Akkus:
Den Knopf nach unten drücken und den
Akku nach vor schieben.
Knopf
2. Abnehmen
D e n K n e b elr i n g ent g e ge n dem
Uhrzeigersinn dr e hen (v o n vorn
gesehen), dann das Bit abnehmen.
HINWEIS:
Wenn starkes Spiel im Futter auf-
tri tt, den Bohr er sich ern, dann 1
die Futterklauen durch Drehen der
Sperrhülse öffnen und 2 die Schraube
(Linksgewinde) durch Drehen entgegen
dem Uhrzeigersinn (von vorn gesehen)
mit einem Schraubenzieher anziehen.
Knebelring
Zusatzgriff
Bringen Sie den Zusatzgriff an Ihrer
bevorzugten Position an, und ziehen
Sie den Griff fest an.
Festziehen
Lösen
Entfernen Sie den Griff, wenn Sie die
Maschine in die Aufbewahrungsschachtel
legen.
- 19 -
EY7460_EY7960_Book.indb 19 2013-12-2 16:12:30
Page 20
IV. BETRIEB
[Hauptteil]
Schalterfunktion
1. Die Drehzahl erhöht sich, je stärker
der Elektronikschalter gedrückt wird.
Drücken Sie den Elektronikschalter zu
Beginn der Arbeit nur leicht, um mit
langsamer Drehung zu beginnen.
2. Ein elektronischer Feedback-Controller
wird verwendet, um auch bei niedriger
Drehzahl ein starkes Drehmoment zu
erhalten.
3. Beim Loslassen des Elektronikschalters
wird die Bremse betätigt und der Motor
sofort angehalten.
VORSICHT:
Wird die Maschine durch Betätigen
des Auslösers gestartet, kann eine
kurzzeitige Verzögerung auftreten,
bevor die Drehung beginnt. Dies ist kein
Anzeichen für eine Funktionsstörung.
* Di e s e Ve r z ö ge r u n g tritt beim
Hochfahren der Schaltkreise der
Maschine auf, wenn der Auslöser
zum ersten Mal nach dem Einsetzen
eines neuen Akkus betätigt wird, oder
nachdem die Maschine mindestens
1 Minute lang nicht benutzt worden
ist (oder mindestens 5 Minuten bei
leuchtender LED). Bei der zweiten
und jeder weiteren Betätigung läuft
die Maschine ohne Verzögerung an.
HINWEIS:
Bei der Betätigung der Bremse kann
ein Bremsgeräusch hörbar sein. Dies
ist normal.
Umschalten und Betätigung
des Rechts-/Linkslauf-Umschalthebels
Rechts Links
VORSICHT:
N i c h t d e n R e ch t s - / L in k s l a u f-
Umschalthebel betätigen, bevor der Bit
vollständig zur Ruhe gekommen ist, um
Schäden zu ver-hindern.
Rechtslauf – Schalterbetätigung
1. Für Rechtslauf den Hebel drücken.
2. Drücken Sie den Schalter leicht, um
das Werkzeug langsam zu starten.
3. Die Drehzahl nimmt zu, je stärker der
Elektronikschalter gedrückt wird, um
effizientes Anziehen von Schrauben
un d Bohren zu ermöglic hen . Bei m
Los lass en des Scha lter s wir d die
Bremse betätigt und das Futter sofort
angehalten.
4. Nach de r Verw endun g den Hebel
auf die Mitten-position zurückstellen
(Schaltersperre).
Linkslauf – Schalterbetätigung
1. Für Linkslauf den Hebel drücken. Die
Drehrichtung vor dem Betrieb prüfen.
2. Drücken Sie den Schalter leicht, um
das Werkzeug langsam zu starten.
3. Nach de r Verw endun g den Hebel
auf die Mitten-position zurückstellen
(Schaltersperre).
Einstellung des Kupplungsdrehmoments
Stellen Sie das Drehmoment auf eine
der 18 Kupplu n gsstu fen o der d ie
Position „
Stellen Sie das Drehmoment auf eine
der 18 Kupplu n gsstu fen o der d ie
Position „
HINWEIS:
Schalten Sie stets die Maschine aus
und nehmen Sie sie vom Werkstück
ab, wenn Sie du rch Dre hen des
Kupplungsgriffs vom Bohrmodus
auf d en Sch lagbohr mod us ode r
umgekehrt umschalten.
“ ein (EY7460).
“„ “, ein (EY7960).
Schaltersperre
EY7460_EY7960_Book.indb 20 2013-12-2 16:12:30
- 20 -
Page 21
VORSICHT:
Stellen Sie die Kupplungseinstellung
vor dem tatsächlichen B etr ieb auf
dieses Zeichen (
).
Wenn der Kupplungsring sich nach
dem Festziehen von Schrauben mit
Kupplungsfunktion nicht auf Bohr- oder
Hammermodus einstellen lässt, den
Kupplungsring auf Position 1 stellen
und die Kupplung eine Sekunde lang
betätigen.
Wahl der Drehzahl
Wählen Sie je nach der Arbeit eine
niedrige oder hohe Drehzahl.
NIEDRIG
Je w e iter der stuf e nlose
Elektronikschalter hineingedrückt wird,
desto höher wird die Drehzahl.
VORSICHT:
●
Ü b e rpr ü f en S ie den D r e h z ahlWahlschalter vor Gebrauch.
●
Verwenden Sie eine niedrige Drehzahl,
wenn eine große Kraft bei der Arbeit
er forderlich ist. ( Die Verwendung
einer hohen Drehzahl bei Ausübung
einer großen Kraft kann z u eine r
Beschädigung des Motors führen.)
●
V e r s t e ll e n S i e d e n D r e h z a h l Wahl s c h a l t e r (LOW- H I G H) nicht ,
während Sie den Elektronikschalter
betä tigen. Di es k a nn zu schnel ler
Abnu tzung de r wiedera u fladb a ren
Batterie oder zu einer Beschädigung
des internen Motormechanismus führen.
* Si e he die tec h n i s c hen Daten fü r
„MAXIMAL ZULÄSSIGE KAPAZITÄTEN“.
VORSICHT:
●
Um übermäßigen Temperaturanstieg
der Werkzeugoberfläche zu vermeiden,
HOCH
sollte das Werkzeug nicht kontinuierlich
mit zwei oder mehr Akkus betrieben
werden. Das Werkzeug muss vor dem
Akkuwechsel abkühlen.
●
B l o c k i e r e n S i e n i c h t d i e
Ven t ila t i o n söf f nun g e n a n d e n
Seiten des Gehäuses während des
Betriebs. A n d e renfalls wi r d die
Maschinenfunktion beeinträchtigt,
was zu einem Ausfall führen kann.
●
Bel asten Sie das Werkze ug ( den
Motor) NICHT übermäßig. Es kann
so nst z u einer Beschädig ung der
Maschine kommen.
●
Halten Sie die Maschine so, dass die
Abluft von den Ventilationsöffnungen
im Gehäuse nicht direkt auf Ihre Haut
bläst. Anderenfalls können Sie sich
verbrennen.
Bitverriegelungsfunktion
1. Wenn der Elektroni k s c h a l t e r be i
ein gesetztem Schraubendre herb it
ausgerückt ist, kann das Werkzeug
wie ein manueller Schraubendreher
verwendet werden (bis zu 40 N·m, 408
kgf·cm, 353 in-lbs).
Es kann etwas Spiel im Futter vor-
handen sein, was jedoch keine Funktionsstörung ist.
2. Dies es Merkmal ist praktisch, um
Sc h r a ub e n a n z u z i e h e n, die ein
h ö he r es D re h mo m en t al s d a s
maximale Drehmoment des Schraubers
benötigen (Position
an der Kupplung), um die Festigkeit einer Schraube
zu überprüfen, oder um eine sehr fest
angezogene Schraube zu lösen.
Bedienfeld
(1)
(3)
(2)
- 21 -
EY7460_EY7960_Book.indb 21 2013-12-2 16:12:31
Page 22
(1) LED-Leuchte
Vor Verwendung der LEDL e u c h t e m u ss im m e r
der Netzschalter einmal
gezogen werden.
Drücken Sie die LEDLeuchtentaste
.
Die Leuchte braucht nur einen sehr
geringen Strom, so dass die Leistung des
Werkzeugs und die Akkukapazität nicht
beeinträchtigt wird.
VORSICHT:
●
Die eingebaute LED-Leuchte ist für
kurzzeitige Beleuchtung eines kleinen
Arbeitsbereichs ausgelegt.
●
Verwenden Sie sie nicht als Ersatz für
eine normale Taschenlampe, weil sie
nicht hell genug ist.
●
Die LED-Leuchte schaltet sich aus,
wenn das Tool während 5 Minuten
nicht verwendet wurde.
Vorsicht: SEHEN SIE NICHT IN DEN STRAHL.
Die Verwendung von Bedienelementen,
Ein-stellungen oder Vorgängen außer
den h i e r besc h r i e b e n e n ka n n zu r
Freise tzun g gefä hrli cher Strahl ung
führen.
(2) Überhitzungs-Warnlampe
●
Falls die Überhitzungs-Schutzfunktion
akt ivier t wird, lassen Sie d as Tool
gr ü n dl i c h abkü h l e n ( m i nd e s te n s
30 Mi n u t e n ) . Das Tool is t wieder
einsatzbereit, wenn die ÜberhitzungsWarnlampe erlischt.
●
Verwenden Sie das Tool so, dass die
Übe r hitzu n gs-Sc hutzfu nktio n nicht
wiederholt aktiviert wird.
●
Fall s das Wer k zeug kontin u ierlic h
unter starker Belastung oder bei hoher
Umg ebun gstem pera tur im Somme r
verwendet wird, kann die ÜberhitzungsSchutzfunktion öfters ansprechen.
●
Falls d a s We r k z eug be i ni e d r i ger
Umgebungstemperatur im Winter oder
jeweils nur kurzzeitig verwendet wird,
spricht die Überhitzungs-Schutzfunktion
nicht an.
●
Der Umgebungstemperaturbereich liegt
zwischen 0°C und 40°C.
Wenn der Akku bei einer Akkutemperatur
un ter 0 °C benutzt wird, funktion iert
die M aschine möglicher wei se nic ht
einwandfrei.
●
Wenn ein kalter Akku (von etwa 0°C
oder weniger) in einem warmen Raum
aufgeladen werden soll, lassen Sie den
Akku für mindestens eine Stunde in dem
Raum und laden Sie ihn auf, wenn er
sich auf Raumtemperatur erwärmt hat.
(3) Akkuladungs-Warnlampe
Aus
(normaler
Betrieb)
Zum Schutz des Motors und des Akkus
müs sen beim Betrie b d ie f olge nden
Punkte beachtet werden.
●
Bei einer Motor- oder Akkuüberhitzung
sp r i ch t d i e S c hu tz sc h a l t u n g an ,
um de n Be trie b des Mo t o r s bz w.
Des Akk u s zu unterbr e c h e n. Die
Über h itzung swarnl e uchte au f de m
Bedienungsfeld leuchtet oder blinkt bei
aktivierter Funktion.
Leuchten:
Überhitzung
(motor)
Blinken:
Überhitzung
(akku)
Zeigt an, dass der
Betrieb wegen Motoroder
Akkuüberhitzung
Aus
(normaler
Betrieb)
Blinken (Keine
Ladung)
Akkuschutzfunktion
aktiv
Übermäßiges (vollständiges) Entla-den
von Li-Ion-Akkus führt zu einer erheblichen
Verkürz u ng i h rer L ebens d auer. D e r
Schrauber ist mit einer Akkuschutzfunktion
ausgestattet, die übermäßiges Entladen
des Akkus verhindert.
●
Die Akkuschutzfunktion wird unmittelbar
vor der Erschöpfung des Akkus aktiviert
und bewirkt Blinken der AkkuladungsWarnlampe.
- 22 -
EY7460_EY7960_Book.indb 22 2013-12-2 16:12:31
Page 23
●
W e nn S ie b e me r k e n, d as s di e
Akkuladungs-Warnlampe blinkt, laden
Sie den Akku unverzüglich auf.
●
Wird d ie Maschine bei zu gerin ger
Akku-Restladung gestartet, kann sie
stehen bleiben, ohne dass zuvor die
Akkuladungs-Warnlampe blinkt. Dies
zeigt an, dass zu wenig Akku-Restladung
für den Betrieb der Maschine vorhanden
ist. Daher sollte der Akku vor weiterem
Gebrauch aufgeladen werden.
●
Wird die Maschine während des Betriebs
einer plötzlichen Last ausgesetzt, die
Blo ckier en d es M otor s veru rsac ht,
kann der Tiefentladungs-Schutzsensor
ausgelöst werden, so dass eventuell
die Akkuladungs-Warnlampe blinkt. Die
Lampe hört auf zu blinken, sobald die
Ursache der Motorblockierung behoben
und der Auslöser betätigt wird.
[Akku]
Für richtigen Gebrauch des
Akkus
Li-Ion-Akku
●
Um eine möglichst lange Lebensdauer
des Li-Ion-Akkus zu erzielen, lagern
Sie ihn nach dem Gebrauch, ohne ihn
aufzuladen.
●
Ach ten Si e b eim Lade n des A kkus
darauf, dass die Kontakte am Ladegerät
frei von Fremdstoffen, wie z. B. Staub
und Wasser usw., sind. Reinigen Sie
die Kontakte vor dem Laden des Akkus,
falls Fremdstoffe auf den Kontakten
vorhanden sind.
Die Lebensdauer der Akkukontakte kann
durch Anhaften von Fremdstoffen, wie z.
B. Staub und Wasser usw., während des
Betriebs beeinträchtigt werden.
●
Wenn Sie den Akku nicht benutzen,
halten Sie ihn von Metallgegenständen
fern: Büroklammern, Münzen, Schlüssel,
Nägel, Schrauben oder andere kleine
Metallgegenstände können die Kontakte
kurzschließen.
Das Kurzschließen der Akkukontakte
kann Funken, Verbrennungen oder einen
Brand verursachen.
●
Sorgen Sie bei Benutzung des Akkus
f ü r aus r e i c he nde Be l ü ft ung de s
Arbeitsplatzes.
●
We n n d e r Akk u vo m W e r k z e u gHauptte il abg enommen wird, ist die
Akkuabdeckung sofort anzubringen,
um zu verhüten, dass die Akkukontakte
durch Staub oder Schmutz verunreinigt
werden und ein Kurzschluss verursacht
wird.
Lebensdauer des Akkus
Der A k ku h a t nur ei n e begr enzte
Le b e n s d au e r . We n n a u c h na c h
einer ordnungsgemäßen Ladung die
Betriebszeit extrem kurz ist, muss der
Akku erneuert werden.
Gebrauchsempfehlungen
Akkuabdeckung
Anschlüsse
Schild
Unbedingt die Akkuschutzkappe
verwenden
●
We nn der Akku n icht ben utzt wird ,
bew ahre n S ie ihn so auf, d ass die
Kontakte nicht durch Fremdstoffe, wie z.
B. Staub und Wasser usw., verschmutzt
werden . B ringen Sie unbedin gt die
Akkus c hutzkap p e zu m Sc hutz d e r
Kontakte an.
- 23 -
EY7460_EY7960_Book.indb 23 2013-12-2 16:12:31
Page 24
●
Ach ten Si e b eim Lade n des A kkus
darauf, dass die Kontakte am Ladegerät
frei von Fremdstoffen, wie z. B. Staub
und Wasser usw., sind. Reinigen Sie
die Kontakte vor dem Laden des Akkus,
falls Fremdstoffe auf den Kontakten
vorhanden sind.
Die Lebensdauer der Akkukontakte kann
durch Anhaften von Fremdstoffen, wie z.
B. Staub und Wasser usw., während des
Betriebs beeinträchtigt werden.
VORSICHT:
Zum Schutz des Motors und des Akkus
müssen beim Betrieb die folgenden
Punkte beachtet werden.
●
Bei einer Motor- oder Akkuüberhitzung
sp r i ch t d i e S c hu tz sc h a l t u n g an ,
um de n Be trie b des Mo t o r s bz w.
de s Ak ku s zu unt e r b re c h e n. Die
Über h itzung swarnl e uchte au f de m
Bedienungsfeld leuchtet oder blinkt bei
aktivierter Funktion.
Für den sicheren Gebrauch
●
Der Akku ist aus Sicherheitsgründen
so entworfen, dass er in zwei Schritten
eingesetzt werden muss. Vergewissern
Sie sich vor de r Inbetri e b n a hm e
d e r M as ch in e, d as s d er A k k u
ordnungsgemäß in diese eingesetzt ist.
●
Wenn der Akku nicht fest eingesetzt ist,
blinken die Überhitzungs-Warnlampe und
die Akkuladungs-Warnlampe und das
Gerät dreht den Bohrer nicht wie üblich,
um darauf hinzuweisen, dass das Gerät
nicht betriebssicher arbeitet, selbst wenn
ein Schalter ausgelöst wird. Schieben
Sie den Akku soweit in das Gerät hinein,
bis das rote Schild verschwindet.
[Ladegerät]
Laden
VORSICHT:
●
Das Ladegerät ist nur für StandardH a u s h a l t s s t r o m w i e a u f d e m
Leistungsschild angegeben ausgelegt.
L a d e n S i e n u r m i t d e r a u f d e m
Lei s t u n g ssc h i l d de s La deg e r ä t s
angegebenen Spannung auf, z.B. 230 V
/ 50 Hz.
●
Versuchen Sie nicht, irgendeine andere
Spannung oder Frequenz zu benutzen!
●
Falls die Temperatur des Akkus unter
etwa −10°C abfällt, wird der Ladevorgang
au tomatisch unterb rochen, um ein e
Schwächung des Akkus zu verhüten.
●
Der Umgebungstemperaturbereich liegt
zwischen 0°C und 40°C.
Wenn der Akku bei einer Akkutemperatur
un ter 0 °C benutzt wird, funktion iert
die M aschine möglicher wei se nic ht
einwandfrei.
●
Wenn ein kalter Akku (von etwa 0°C
oder weniger) in einem warmen Raum
aufgeladen werden soll, lassen Sie den
Akku für mindestens eine Stunde in dem
Raum und laden Sie ihn auf, wenn er
sich auf Raumtemperatur erwärmt hat.
●
Den Akku abkühlen lassen, wenn er
mehr als 2× hintereinander aufgeladen
wurde.
●
Stecken Sie Ihre Finger nicht in die
Kon takt öff nung , um das L adeg erät
f e st z uh a lt e n o d er b ei a n d er e n
Gelegenheiten.
VORSICHT:
Um die G efahr ei n es B r andes od e r
Schadens am Ladegerät zu verhindern.
● Keinen Moto r g e n e r a t o r a l s
Spannungsquelle benutzen.
●
Decken Sie die Entlüftungsöffnungen des
Ladegerätes und den Akku nicht ab.
●
Tren n e n Si e da s La d e g er ä t v o m
Stromnetz, wenn es nicht benutzt wird.
HINWEIS:
Beim Ka u f ist Ihr Akku ni c ht voll
aufgeladen. Laden Sie daher den Akku
vor Gebrauch auf.
Auaden
1. Ladegerät an Wandsteckdose anschlie ßen.
HINWEIS:
Bei m Einf ühre n des Stecker s in
die Netzstec k d o s e k a n n e s z u
Funkenbildung kommen. Dies stellt
jedoch kein Sicherheitsrisiko dar.
- 24 -
EY7460_EY7960_Book.indb 24 2013-12-2 16:12:32
Page 25
2. Setzen Sie den Akku fest in das Ladegerät ein.
1) D i e A us r i c h t m a r k i e r u n g en
ausrichten, und den Akku in den
Schacht des Ladegerätes einsetzen.
2) In Pfeilrichtung nach vorn schieben.
Ausrichtmarkierungen
3. Während d es Lad ens leuc hte t die
Ladekontrolllampe. Mit Erreichen der
vollen Ladung spricht automatisch eine
interne, elektronische Schaltung an, die
ein Überladen verhindert.
●
Das Laden beginnt nicht, solange
der Akk u n och heiß ist (wie z.B.
u n mi t te l ba r n a ch i nt e ns i ve m
Gebrauch).
Die Bereit scha ftsla mpe blink t i n
Orange, bis der Akku abgekühlt ist.
Das Laden beginnt dann automatisch.
4. Die Ladekontrolllampe (grün) blinkt
langsam, wenn der Akku zu etwa 80%
aufgeladen ist.
5. Wenn der Ladevorgang beendet ist,
erlischt die grüne Ladekontrolllampe.
6. Falls die Akkutemperatur 0°C oder
weniger beträgt, dauert der Ladevorgang
bis zur vollen Aufladung des Akkus
länger als die normale Ladezeit.
Selbst wenn der Akku voll aufgeladen
ist, hat er nur etwa 50% der Leistung
eines vol l aufgeladenen Akk us bei
normaler Betriebstemperatur.
7.
Wenden Sie sich an einen Vertragshändler,
falls die Ladekontrolllampe (grün) nicht
erlischt.
8. Wird ein voll aufgeladener Akku erneut
in das Ladegerät eingesetzt, leuchtet
die L adekont r olllamp e au f . Nach
ei nigen Mi nuten erlischt die grüne
Ladekontrolllampe.
9. Nehmen Sie den Akku bei angehobenem
Akku-Entriegelungsknopfab.
Entriegelungsknopf
Akku-
ANZEIGELAMPEN
(Grün) (Orange)
Erlischt Leuchtet
Ladevorgang ist abgeschlossen. (Volle Ladung)
Der Akku ist zu etwa 80 % aufgeladen.
Ladevorgang läuft.
Das Ladegerät ist an eine Netzsteckdose angeschlossen.
Ladebereitschaft hergestellt.
Ladezustandslampe.
Links: Grün Rechts: Orange wird angezeigt.
Akku ist kalt.
Der Akku wird langsam geladen, um seine Belastung zu reduzieren.
Der Akku ist warm geworden.
Der Ladevorgang beginnt wieder, wenn dieTemperatur des Akku
gefallen ist. Beträgt die Temperatur des Akkus –10°C oder weniger,
beginnt die Ladekontrolllampe (orange) ebenfalls zu blinken. Der
Ladevorgang beginnt, wenn die Temperatur des Akkus steigt.
Keine Ladung möglich. Verstaubt oder Defekt des Akkus.
Blinkt
- 25 -
EY7460_EY7960_Book.indb 25 2013-12-2 16:12:32
Page 26
Benutzerinformation zur Sammlung und Entsorgung von veralteten Geräten und benutzten Batterien
Diese Sy m b o l e auf de n Produkten, Verpackun g e n und/oder
Begleitdokumenten bedeuten, dass benutzte elektrische und elektronische
Produkte und Batterien nicht in den allgemeinen Hausmüll gegeben
werden sollen.
Bitte bringen Sie diese alten Produkte und Batterien zur Behandlung,
Aufarbeitung bzw. zum Recycling gemäß Ihrer Landesgesetzgebung
und den Richtlinien 2002/96/EG und 2006/66/EG zu Ihren zuständigen
Sammelpunkten.
Indem Sie diese Produkte und Batterien ordnungsgemäß entsorgen, helfen
Sie dabei, wertvolle Ressourcen zu schützen und eventuelle negative
Auswirkungen auf die menschliche Gesundheit und die Umwelt zu
vermeiden, die anderenfalls durch eine unsachgemäße Abfallbehandlung
auftreten können.
Wenn Sie ausführlichere Informationen zur Sammlung und zum Recycling
alter Produkte und Batterien wünschen, wenden Sie sich bitte an Ihre
örtlichen Verwaltungsbehörden, Ihren Abfallentsorgungsdienstleister oder
an die Verkaufseinrichtung, in der Sie die Gegenstände gekauft haben.
Gemäß Landesvorschriften können wegen nicht ordnungsgemäßer
Entsorgung dieses Abfalls Strafgelder verhängt werden.
Für Geschäftskunden in der Europäischen Union
Bitte treten Sie mit Ihrem Händler oder Lieferanten in Kontakt, wenn Sie elektrische und
elektronische Geräte entsorgen möchten. Er hält weitere Informationen für sie bereit.
[Informationen zur Entsorgung in anderen Ländern außerhalb
der Europäischen Union]
Dieses Symbol ist nur in der Euro-päischen Union gültig.
Bitte treten Sie mit Ihrer Gemeindeverwaltung oder Ihrem Händler in Kontakt, wenn Sie
dieses Produkt entsorgen möchten, und fragen Sie nach einer Entsorgungsmöglichkeit.
V. WARTUNG
●
Das Gerät nur mit einem trockenen, weichen Lappen abwischen. Verwenden Sie zum
Reinigen keine feuchten Lappen oder flüchtige Lösungsmittel wie Farbverdünner oder
Benzin.
●
Falls Wasser in das Werkzeug oder den Akku eindringt, lassen Sie umgehend das
Wasser ablaufen und die Teile trocknen. Entfernen Sie sorgfältig jeglichen Staub oder
Eisenfeilspäne, die sich im Werkzeug angesammelt haben. Sollten Sie Probleme mit dem
Betrieb des Werkzeugs haben, konsultieren Sie eine Werkstatt.
- 26 -
EY7460_EY7960_Book.indb 26 2013-12-2 16:12:32
Page 27
VI. ZUBEHÖR
Verwenden Sie nur für die Futtergröße passende Bits.
VII. ANHANG
MAXIMAL ZULÄSSIGE KAPAZITÄTEN
Modell EY7460 EY7960
Maschinenschraube
Schrauben
eindrehen
Bohren
Holzschraube ø 10 mm
Selbstbohrende
Schraube
Für Holz ø 38 mm
Für Metall ø 13 mm
For Masonry --- 13 mm
ZUSATZ ZUR GARANTIE
Ausfall und Schaden durch dauernde Benutzung über lange Zeit (z.B.: Fabriksarbeit am
Montagefließband usw.) sind nicht von der Garantie abgedeckt.
M8
ø 6 mm
VIII. TECHNISCHE DATEN
HAUPTGERÄT
Modell EY7460 EY7960
Motorspannung 21,6 V CD
Drehzahl ohne
Last
Schlagzahl/
Min
Futterkapazität ø1,5 mm - ø13 mm
Kupplungsdrehmoment Ca. 1,0 N•m (10kgf-cm) – 6,9 N•m (70kgf-cm)
Gesamtlänge 232mm 245mm
Gewicht (mit Akku
Niedrig 100~400 min
Hoch 350~1500 min
Niedrig --- 1800~7200 min
Hoch --- 6300~27000 min
EY9L61)
2,45 kg 2,55 kg
-1
(rpm)
-1
(rpm)
-1
(bpm)
-1
(bpm)
AKKU
Modellnr. EY9L61 EY9L62
Akku Li-ion Akku.
Batterie
EY7460_EY7960_Book.indb 27 2013-12-2 16:12:32
Spannung DC 21.6 V
Detailspez. 3,6 V × 6 Zellen 3,6 V × 12 Zellen
- 27 -
Page 28
AKKU-LADEGERÄT
Modellnr. EY0L82
Nennwert Siehe Leistungsschild auf der Unterseite des Ladegerätes.
Gewicht 0,93 kg (2 lbs)
EY9L61 EY9L62
Ladezeit
HINWEIS: Diese Tabelle kann Modelle enthalten, die möglicherweise in Ihrem Wohngebiet
nicht angeboten werden.
Bitte nehmen Sie auf den neusten Generalkatalog Bezug.
HINWEIS: Name und Adresse des Händlers entnehmen Sie bitte der beiliegenden
Garantiekarte.
Nutzbar
: 50 min
Voll: 60 min Voll: 85 min
Nutzbar
: 65 min
- 28 -
EY7460_EY7960_Book.indb 28 2013-12-2 16:12:32
Page 29

Instructions originales: anglais
Traduction des instructions originales:
Autres langues
I. USAGE PREVU
Ces outils peuvent être utilisés pour
serrer des vis en mode embrayé, et
pour percer des trous dans du bois et
du métal en mode perceuse. Le modèle
EY7960 peut aussi être utilisé pour percer des trous dans du béton mou et des
matériaux similaires en mode percussion.
Veuil lez lire la broc hure “Instructions de sécurité” et ce qui suit avant
d’utiliser l’appareil.
II.
REGLES DE
SECURITE
COMPLEMENTAIRES
1) Portez des protections auditives.
L'exposition au bruit risquerait de vous
détériorer l'ouïe.
2) Utilisez la poignée auxiliaire fournie
avec l'outil.
Une perte de contrôle risquerait de
vous blesser.
3) Maintenez l’outil par ses surfaces
de prise isolées si vous exécutez
un per ç a g e au cou r s duque l
l’outil tranchant pourrait entrer en
contact avec un câble encastré; le
contact avec un câble “sous tension”
transmettra l’électricité aux parties
métalliques et exposera l’opérateur à
une décharge électrique.
4) Mettez un masque antipoussière, si
les travaux produisent de la poussière.
5) N’oubliez pas que cet outil est toujours
en état de fonctionner puisqu’il est
alimenté par batterie.
6) Lors du perçage ou du vissage dans
des murs, des planchers, etc., des
câbles électriques sous tension
peuvent être rencontrés. NE
TOUCHEZ NI AU MANDRIN
HEXAGONAL RAPIDE NI AUX
PARTIES METALLIQUES DE L’OUTIL!
Tenez l’outil au moyen de la poignée
en matière plastique an d’éviter toute
secousse électrique si la mèche venait
en contact avec un l électrique.
7) Si la mèch e est coinc ée, mett ez
immédiatement le commutateur de la
gâchette hors tension an de prévenir
une surcharge pouvant endommager
la batterie autonome ou le moteur.
Dégagez la mèche en inversant le
sens de rotation.
8) NE manipulez PAS le levier d’inversion
marche avant-marche arrière lorsque
le commutateur de la gâchette est sur
la position de marche. La batterie se
déchargerait rapidement et l’appareil
serait endommagé.
9) La température du chargeur peut
s’élever en cours d’utilisation. Ce n’est
pas là le signe d’une anomalie de
fonctionnement. NE chargez PAS la
batterie pendant une longue période.
10) Lorsque vous rangez ou transportez
l’outil, mettez le levier d’inversion
ma rche avant-march e arrière sur
la position centrale (verrouillage du
commutateur).
11) Ne forcez pas l’outil en maintenant
la gâchette du contrôle de vitesse à
micourse (commande de vitesse) pour
arrêter le moteur.
12) N e f a i t es p as f o nc t io n ne r le
commutateur du sélecteur de vitesse
(BA SHAU T) tout en tir ant sur l a
gâchette du contrôle de vitesse. Cela
peut entraîner l’usure rapide de la
batterie rechargeable ou endommager
le mécanisme interne du moteur.
- 29 -
EY7460_EY7960_Book.indb 29 2013-12-2 16:12:33
Page 30

Symbole Signication
V Volts
Courant continu
n
...min
Ah
o
-1
Vitesse sans charge
Révolutions ou alternances
par minute
Capacité électrique de la
batterie autonome
Rotation en sens normal
Rotation en sens inverse
Rotation avec martelage
Rotation seulement
Pour réduire les risques de
blessures, l'utilisateur doit
lire et comprendre le mode
d'emploi.
Pour l’utilisation à l’intérieur
seulement.
AVERTISSEMENT!
●
N'utilisez que les batteries autonomes
de Panasonic car elles sont conçues
pour cet outil rechargeable.
●
Panasonic décline toute responsabilité
en cas de dommage ou d’accident
causé par l’utilisation d’une batterie
autonome recyclée et d’une batterie
autonome de contrefaçon.
●
Ne mettez pas la batterie autonome
dans le feu, ne la placez pas près d'une
source de chaleur excessive.
●
N'enfoncez pas de clou ou autre dans
la batterie autonome, ne la secouez
pas, ne la démontez pas, n'essayez
pas de la modier.
●
Ne mettez pas d'objets métalliques en
contact avec les bornes de la batterie
autonome.
●
Ne placez pas la batterie autonome
dans le même contenant que des clous
ou des objets métalliques semblables.
●
Ne chargez pas la batterie autonome
dans un endroit où la température est
élevée, comme près d'un feu ou au
contact direct des rayons du soleil.
Sinon la batterie pourrait surchauffer,
s'enammer ou exploser.
●
N'utilisez jamais un autre chargeur pour
charger la batterie autonome. Sinon
la batterie pourrait fuir, surchauffer ou
exploser.
●
Après avoi r r et i ré la bat ter i e
autonome de l’outil ou du chargeur,
remettez toujours le couverclede la
batterie autonome en place. Sinon,
les contacts de la batterie peuvent se
mettre en court-circuit, entraînant le
risque d’un incendie.
●
Si la bat ter ie a u t on o m e s ’ e st
dété r iorée, la re mplace r pa r une
batterie neuve.
L’utilisation prolongée d’une batterie
autonome endommagée peut provoquer
des dégagements de chaleur, un départ
de feu ou l’explosion de la batterie.
- 30 -
EY7460_EY7960_Book.indb 30 2013-12-2 16:12:34
Page 31

III. MONTAGE
Fixation ou retrait d’une mèche
REMARQUE:
Lors de l’installation ou de l’enlèvement
d’une mèche, débranchez la batterie
auton o m e de l’ outil o u pl acez l e
commutateur sur la position centrale
(verrouillage du commutateur).
Cet outil est équipé d’un mandrin de
perçage sans clé.
1. Accessoire
Insérez la mèche et faites tourner le
collier de verrouillage dans le sens des
aiguilles d’une montre (en regardant
depuis l’avant) pour serrer fermement
jusqu’à ce qu’il s’arrête de cliqueter.
Fixation ou retrait de la batterie autonome
1. Pour raccorder la batterie autonome:
Alignez les marques d'alignement mises
en valeur et xez la batterie autonome.
●
Faites glisser la batterie autonome
jusqu’à ce qu’elle se verrouille en
position.
Marques
d’alignement
2. Pour retirer la batterie autonome:
Poussez le bouton et faites glisser la
batterie autonome vers l’avant.
2. Enlèvement
Faites tourner le collier de verrouillage
dans le sens inverse des aiguilles d’une
montre (en regardant depuis l’avant)
puis retirez la mèche.
Collier de verrouillage
Bouton
Manche de support
Placez le manche de support à votre
position préférée, et serrez le manche
fermement.
REMARQUE:
Si le mandrin présente un jeu excessif,
fixez la mèche en place et 1 ouvrez
les mâchoires du mandrin en faisant
tourner le collier de verrouillage et 2
serrez la vis (vis tournant à gauche)
avec un tournevis en la faisant tourner
dans le sens inverse des aiguilles d’une
montre (en regardant depuis l’avant).
Serrez
Desserrez
Retirez la poignée lorsque vous rangez
l’outil dans la boîte de rangement.
- 31 -
EY7460_EY7960_Book.indb 31 2013-12-2 16:12:34
Page 32

IV. FONCTIONNEMENT
[Corps principal]
Fonctionnement du commutateur
1. La vitesse augmente à mesure où la
gâchette est enfoncée. Lors du début
d’un travail, appuyez légèrement sur
la gâchette pour commencer par une
rotation lente.
2. Un contrôleur électronique de retour
est utilisé pour donner un couple de
serrage fort, même à basse vitesse.
3. Le frein fonctionne lorsque la gâchette
est relâ ché e et le mot eur s’arrête
immédiatement.
MISE EN GARDE:
Lorsque vous faites fonctionner l’outil
en appuyant sur la gâchette, il peut y
avoir un décalage momentané avant
le début de la rotation. Cela ne signie
pas qu’il y a un dysfonctionnement.
*
Ce décalage se produit alors que les
circuits de l’outil sont activés quand on
appuie sur la gâchette pour la première
fois après l’installation d’un nouveau
bloc batterie ou après que l’outil n’a
pas été utilisé pendant au moins 1
minute (ou pendant au moins 5 minutes
si le LED est en marche). La rotation
dém arre ra sans décalage lors du
second fonctionnement et des suivants.
REMARQUE:
Lorsque le frein fonctionne, un bruit de
freinage peut se faire entendre. Ceci
est normal.
Utilisation du commutateur et
du levier d’inversion marche
avant-marche arrière
Rotation en
sens normal
Verrouillage du commutateur
Rotation en
sens inverse
MISE EN GARDE:
Pour prévenir tout dégât, n’actionnez
pas l e le v i e r d’ inversion marc h e
avantmarche arrière tant que la mèche
n’a pas com plèteme nt term iné de
tourner.
Utilisation du commutateur
pour une rotation en sens
normal
1. Poussez le levier pour obtenir une
rotation en sens normal.
2. Appuyez légèrement sur la gâchette
pour que l’outil commence à tourner
lentement.
3. La vitesse augmente à mesure où la
gâchette est enfoncée pour un serrage
de vis et un perçage e fficaces. Le
frein fonctionne et le mandrin s’arrête
immédiatement lorsque la gâchette est
relâchée.
4. Ramenez le levier en position centrale
lorsqu e vous n’ut ili sez plus l’ou til
(verrouillage du commutateur).
Utilisation du commutateur
de rotation en sens inverse
1. Poussez le levier pour obtenir une
rotation en sens inverse. Avant d’utiliser
l’outil, vériez le sens de rotation.
2. Appuyez légèrement sur la gâchette
pour que l’outil commence à tourner
lentement.
3. Ramenez le levier en position centrale
lorsqu e vous n’ut ili sez plus l’ou til
(verrouillage du commutateur).
Réglage du couple de serrage
de l’embrayage
Ajustez le couple de serrage sur l’un
des 18 réglages de l’embrayage ou sur
la position “
Ajustez le couple de serrage sur l’un
des 18 réglages de l’embrayage ou sur
la position “
REMARQUE:
Vei l l e z à t o u jou r s a rrê t e r l e
fonctionnement de l’outil e t à le
dégager de l’ouvrage lorsque vous
- 32 -
” (EY7460).
”, “ ” (EY7960).
EY7460_EY7960_Book.indb 32 2013-12-2 16:12:35
Page 33

sélectionnez le mode de percussion
à pa r t i r du m o d e de perçage,
ou lorsque vous faites passer la
perceuse du mode de percussion
au mode de perçage en tournant la
poignée d’embrayage.
MISE EN GARDE:
Réglez l’embrayage sur cette marque
( ) avant l'utilisation réelle.
Si la poignée d’embrayage ne peut pas
être réglée sur le mode de perçage ou
de percussion après le vissage avec la
fonction embrayée, placez la poignée
d’embrayage en position 1 et utiliser
l’embrayage pendant une seconde.
Sélection de la vitesse
Choisissez une vitesse basse ou haute
correspondant à l’utilisation désirée.
BAS
Plus la gâchette de contrôle de vitesse
var iable est tiré e, p lus la vites se
augmente.
MISE EN GARDE:
●
Vérifiez le commutateur de selection
de vitesse avant l’utilisation.
●
Util is ez à basse vitesse lorsqu’un
couple de serrage élevé est nécessaire
pendant le fonctionnement. (L’utilisation
à haute vitesse lorsqu’un couple de
serrage élevé est nécessaire peut
entraîner une panne du moteur.)
●
N e fa i t e s p a s f o nc t i o nn e r l e
commutateur du sélecteur de vitesse
(BAS-HAUT) en tirant sur la gâchette de
contrôle de vitesse. Cela peut entraîner
l’usure rapide de la batterie autonome
ou endommager le mécanisme interne
du moteur.
HAUT
* Report ez-vous aux caract éristiqu es
techni q u e s po u r le s “C A PACI T E S
MAXIMUM RECOMMANDEES”.
MISE EN GARDE:
●
Afin d’empêcher la température de
la surf ace de l’outil d’augme nter
excessivement, ne faites pas fonctionner
l’outil continuellement en utilisant deux
batteries autonomes ou plus. L’outil a
besoin d’une période de refroidissement
avant de passer à une autre batterie
autonome.
●
Ne f e r m e z pa s les évents sur l e
côté du corps de l’outil pendant le
fonctionnement. Sinon le fonctionnement
de la machin e peut être af fecté
négat i v e ment e t un e pa n n e peut
s’ensuivre.
●
NE forcez PAS l’outil (le moteur). Cela
peut endommager l’appareil.
●
Uti lis ez l’out il de f aço n à c e q ue
l’air des évents ne soit pas soufflé
directement sur votre peau. Sinon, cela
peut vous brûler.
Fonction de verrouillage de la
mèche
1. Sans engager le commutateur de la
gâchette et avec un mèche tournevis
verrouillée en place, l’outil peut être
utilisé comme un tournevis manuel
(jusqu’à 40 N·m, 408 k /cm, 353 po-lbs).
Le mand rin prés ent era un peu de
jeu, mais ceci n’est pas un mauvais
fonctionnement.
2. Cette caractéristique est pratique pour
serrer les vis qui nécessitent un couple
de serrage plus important que le couple
de se rrage maximum du tournevis
(position sur
s’assurer du serrage d’une vis ou pour
desserrer une vis extrêmement serrée.
l’embrayage), p our
- 33 -
EY7460_EY7960_Book.indb 33 2013-12-2 16:12:35
Page 34

Panneau de commande
(1)
(1) Lumière DEL
Avant d'utiliser la lumière
D E L , t i r e z t o uj o u r s
une fo i s l'in t errup t eur
d'alimentation.
Appuyez sur la touche de
la lumière DEL
La lumière éclaire avec un courant de
très fa ible intensité qui n’affecte pas
négativement la performance de l'outil
ou la capacité de la batterie pendant son
utilisation.
MISE EN GARDE:
●
La lumière DEL incorporée est conçue
pour éclairer temporairement la petite
zone de travail.
●
Ne l’utilisez pas comme remplacement
d’une torche normale, elle n’est pas
assez lumineuse.
●
La lumière DEL s'éteint quand l'outil
n'est pas utilisé pendant 5 minutes.
Mise en garde: NE REGA RDEZ PAS
D I RE C T E ME N T L E
FAISCEAU.
L’ utilis a tion de comm a ndes o u de
réglages ou l’exécution de procédures
autres que ceux spé cifi és dans ce
manuel peut entraîner l’exposition à de
dangereuses radiations.
(2) Témoin d’avertissement de
surchauffe
Arrêt
(fonctionnement
normal)
Allumé:
Surchauffe
(moteur)
Indique que le
fonctionnement a été
arrêté à la suite d'une
surchauffe du moteur ou
de la batterie.
(3)
(2)
.
Clignotant:
Surchauffe
(batterie)
Pour protéger le moteur ou la batterie,
veillez à bien noter les points suivants
lorsque vous effectuez cette opération.
●
Si le moteur ou la batterie deviennent
chauds, la fonction de protection sera
act ivée et l e m oteu r o u la batterie
cesseront de fonctionner. Le témoin
d'avertissement de surchauffe s'allume
ou clignote sur le panneau de commande
lorsque cette caractéristique est active.
●
Si la caractéristique de protection contre
la surchauffe s'active, laissez l'outil se
refroidir complètement (au moins 30
minutes). L'outil est prêt à être utilisé
lorsque le témoin d'avertissement de
surchauffe s'éteint.
●
Evi t ez d 'util iser l' outil d'une fa çon
qui a ctivera i t de fa ç on répété e la
caractéristique de protection contre la
surchauffe.
●
Si l'outil est utilisé de façon continue
sous haute charge, ou s'il est utilisé
dans un environnement chaud (en été
par exemple), il est possible que la
caractéristique de protection contre la
surchauffe s'active fréquemment.
●
Si l'outil est utilisé dans un environnement
froid (en hiver par exemple), ou s'il est arrêté
fréquemment pendant l'utilisation, il est
possible que la caractéristique de protection
contre la surchauffe ne s'active pas.
●
Le niveau de tem pérature ambiante
moyenne se situe entre 0°C (32°F) et
40°C (104°F).
Si la batterie autonome est utilisée alors
que sa température est inférieure à 0°C
(32°F), l’outil pourrait ne pas fonctionner
correctement.
●
Lorsqu’une batterie autonome froide
(endessous de 0°C (32°F)) doit être
recha r g e dans une p ièce c h a ude,
laissez la batterie autonome dans la
pièce pendant une h eur e au moins
et rechargez-la quand elle a atteint la
température ambiante.
- 34 -
EY7460_EY7960_Book.indb 34 2013-12-2 16:12:36
Page 35

(3) Témoin d’avertissement de
batterie basse
Arrêt
(fonctionnement
normal)
Une décharge excessive (totale) des
bat t eries aux i o ns d e lith ium rédui t
leu r d urée de v ie d e f açon notab le.
L’outil comprend une caractéristique de
protection de la batterie conçue pour
empêcher une décharge excessive de la
batterie autonome.
●
La caractéristique de protection de la
batterie s’active automatiquement avant
que la batterie ne perde sa charge,
entraînant le clignotement du témoin
d’avertissement de batterie basse.
●
Dès que vous remarquez le clignotement
du témoin d’avertissement de batterie
basse, rechargez immédiatemen t la
batterie autonome.
●
Si l'outil est démarré avec trop peu de
batterie restante, il pourra s’arrêter en
cours d’opération sans que le voyant
d’avertissement de batterie faible ne
clignote avant cela. Cela indiquera qu'il
y a trop peu de batterie disponible pour
utiliser l'outil et que le bloc batterie devra
être rechargé avant tout autre utilisation.
●
Si l'outil est sujet à une charge soudaine
durant son utilisation, cela provoquera le
verrouillage du moteur, le détecteur de
prévention des décharges pourrait être
déclenché et le voyant de batterie faible
pourrait clignoter. Le voyant arrêtera de
clignoter une fois que vous aurez géré la
raison du verrouillage du moteur et que
vous aurez activer la gâchette.
Clignotant
(Pas de charge)
Caractéristique
de protection de
la batterie active.
●
Lors de la charge de la batterie autonome,
assurez-vous que les bornes du chargeur
de b atter ie son t libre s de tou t corps
étranger comme de la poussière et de
l’eau, etc. Nettoyez les bornes avant de
charger la batterie autonome si des corps
étrangers se trouvent sur les bornes.
La d urée d e vie d e s bo rnes d e la
batterie autonome peut être affectée
par des corps étrangers comme de la
poussière et de l’eau, etc. pendant le
fonctionnement.
●
Lorsque vous n’utilisez pas la batterie
autonome, éloignez-la d’autres objets
métalliques tels que : trombones, pièces
de monnaie, clés, clous, vis et autres
petits objets métalliques susceptibles de
connecter les bornes entre elles.
Si vous court-circuitez les bornes de
la batterie, vous risquez d e causer
des étincelles, de vous brûler ou de
provoquer un incendie.
●
Lors de l’u t i lisati o n de la ba t terie
autonome, assurez-vous de la bonne
ventilation du lieu de travail.
●
Lor s q u e la batter i e auton o m e est
ret irée du c orps de l ’outil, repl acez
immédiatement le couvercle de la batterie
autonome afin d’empêcher la poussière
ou la crasse de contaminer les bornes de
la batterie et de provoquer un court-circuit.
Longévité des batteries autonomes
Les batteries rechargeables ont une
long é vité limité e . Si le t emps d e
fonctionnement devient très court après
la recharge , rem pla cez l a batter ie
autonome par une neuve.
[Batterie]
Pour une utilisation correcte
de la batterie autonome
Batterie autonome Li-ion
●
Pou r une l ongév ité o ptima le d e la
batterie, rangez la batterie autonome Liion sans la charger après l’avoir utilisée.
- 35 -
EY7460_EY7960_Book.indb 35 2013-12-2 16:12:36
Page 36

Recommandations concernant
l’utilisation
Couvercle de la batterie autonome
Bornes
rouge
Veillez à utiliser le couvercle de la
batterie autonome
●
Lo rsq ue le cou vercle d e la batterie
autonome n’est pas utilisé, rangez la
batterie de façon à ce qu’aucun corps
étranger comme de la poussière et de
l’eau ne contamine les bornes. Veillez à
xer le couvercle de la batterie autonome
an de protéger les bornes de la batterie.
●
Lo r s de la ch a r g e de la batte r i e
autonome, assurez-vous que les bornes
du chargeur de bat ter ie sont libres
de tout corps étranger comme de la
poussière et de l’eau, etc. Nettoyez
les bornes avant de charger la batterie
autonome si des corps étrangers se
trouvent sur les bornes.
La d urée d e vie d e s bo rnes d e la
batterie autonome peut être affectée
par des corps étrangers comme de la
poussière et de l’eau, etc. pendant le
fonctionnement.
MISE EN GARDE:
Pour protéger le moteur ou la batterie,
veillez à bien noter les points suivants
lorsque vous utilisez la machine.
●
Si le moteur et la batterie deviennent
chauds, la fonction de protection sera
acti vée e t le moteu r et la batter ie
cesseront de fonctionner.
Pour un usage sans risque
●
La batterie est conçue pour être installée
en deux étapes pour des raisons de
sécurité. Assurez-vous que la batterie
est installée correctement dans l’unité
principale avant toute utilisation.
●
Lorsque la batterie autonome n’est pas
connectée fermement à la mise sous
tension, le témoin d’avertissement de
surchauffe et le témoin d’avertissement
de faible batterie clignotent pour indiquer
qu’un fonctionnement sans danger n’est
pas possible et l’unité principale ne
tourne pas normalement. Branchez la
batterie autonome dans l’unité de l’outil
jusqu’à ce que l’indicateur rouge ou
jaune disparaisse.
[Chargeur de batterie]
Recharge
MISE EN GARDE:
●
Le chargeur est conçu pour fonctionner
uniquement sur une prise électrique
domestique standard conformément aux
indications de la plaque signalétique.
Le chargement doit uniquement être
effectué à la tension indiquée sur la
plaque signalétique de l’appareil (par ex :
230 V / 50Hz).
●
Ne tentez pas de l’utiliser à une autre
tension ou fréquence !
●
Si la température de la batterie autonome
chute au-dessous d’environ -10ºC, la
charge s’arrête automatiquement pour
empêcher la détérioration de la batterie.
●
Le niveau de tem pérature ambiante
moyenne se situe entre 0°C (32°F) et
40°C (104°F).
Si la batterie autonome est utilisée alors
que sa température est inférieure à 0°C
(32°F), l’outil pourrait ne pas fonctionner
correctement.
●
Lorsqu’une batterie autonome froide
(endessous de 0°C (32°F)) doit être
rechar gée dans une pièce c haude,
laissez la batterie autonome dans la
pièce pendant une h eur e au moins
et rechargez-la quand elle a atteint la
température ambiante.
●
La iss ez refroidir le chargeur quand
vous rechargez plus de deux batteries
autonomes à la suite.
●
Ne mettez pas vos doigts dans les trous
des connecteurs lorsque vous prenez
les chargeurs ou à n’importe quelle
occasion.
- 36 -
EY7460_EY7960_Book.indb 36 2013-12-2 16:12:36
Page 37

MISE EN GARDE:
Pour éviter les risques d’incendie ou
d’endommagement du chargeur de batterie.
●
N’utilisez pas de source d’alimentation
provenant d’un générateur de moteur.
●
Ne bouchez pas les trous d’aération du
chargeur et de la batterie autonome.
●
Débranchez le chargeur lorsque vous ne
l’utilisez pas.
REMARQUE:
Votre batterie autonome n’est pas
complètement chargée au moment
de l’achat. Veillez à bien charger
complètement la batterie avant son
utilisation.
Comment charger
1. Branchez le cordon d’alimentation du
chargeur dans une prise secteur.
REMARQUE:
Des étincelles peuvent être produites
lorsque la fiche est introduite dans la
prise d’alimentation secteur; toutefois,
ce ci ne pos e aucun problème de
sécurité.
2. Connectez fermement la batterie
autonome sur le chargeur.
1) Alignez les marques d’alignement
et placez la batterie dans le poste
d’accueil sur le chargeur.
2) Faites glisser vers l’avant dans le
sens de la èche.
Marques d’alignement
4. Le témoin de charge (vert) clignote
lentement dès que la bat terie est
chargée à environ 80%.
5. Lorsque le chargement est terminé,
le témoin de charge de couleur verte
s’éteint.
6. Lorsque la température de la batterie
autonome es t de 0 º C ou moins,
la b a t t e r ie au t onome prend p l u s
lo ngtemps à charger que la durée
standard.
M ê me l or s qu e la b at t er i e es t
complètement chargée, elle n’aura
qu’environ 50% de la puissance d’une
batterie complètement chargée à une
température de fonctionnement normale.
7. Consultez un distributeur agréé si le
témoin de charge (vert) ne s’éteint pas.
8. Si une batterie complètement chargée
est à nouveau insérée dans le chargeur,
le témoin de charge s’allume. Après
quelques minutes, le témoin de charge
de couleur verte s’éteindra.
9. Retirez la batterie lorsque le bouton
de dégagement de la batterie est en
position haute.
Bouton de
dégagement
de la batterie
3. Pendant la charge, le témoin s’allume.
Lorsque la charge est terminée, un
interrupteur électronique s’actionne
pour protéger la batterie.
●
La charge ne peut pas être réalisée si
la batterie autonome est chaude (par
exemple, à la suite d’un long travail de
perçage).
Le témoin d’attente orange clignote
jusqu’à ce que l a batteri e se soit
refroidie. La charge commence alors
automatiquement.
- 37 -
EY7460_EY7960_Book.indb 37 2013-12-2 16:12:37
Page 38

INDICATION DU VOYANT
Chargement terminé. (Pleine charge)
La batterie est chargée à environ 80%.
Chargement en cours.
Le chargeur est branché dans la prise secteur.
Prêt pour la charge.
(Vert)
Éteint Allumé
(Orange)
Témoin de l’état de charge
Gauche: vert Droite: orange s’afchent.
La batterie autonome est froide.
La batterie autonome est chargée lentement pour réduire l’effort de la batterie.
La batterie autonome est chaude.
La charge commence lorsque la température de la batterie
autonome descend. Lo rsque la température de la batterie
autonome est de –10ºC ou moins, le témoin de charge (orange)
se met également à clignoter. La charge commence lorsque la
température de la batterie autonome augmente.
Impossible de charger. Colmatage par la poussière ou mauvais
fonctionnement de la batterie autonome.
Clignote
Avis aux utilisateurs concernant la collecte et l’élimination des
piles et des appareils électriques et électroniques usagés
Apposé sur le produit lui-même, sur son emballage, ou figurant dans la
documentation qui l’accompagne, ce pictogramme indique que les piles et appareils
électriques et électroniques usagés doivent être séparés des ordures ménagères.
Afin de permettre le traitement, la valorisation et le recyclage adéquats
des piles et des appareils usagés, veuillez les porter à l’un des points de
collecte prévus, conformément à la législation nationale en vigueur ainsi
qu’aux directives 2002/96/CE et 2006/66/CE.
En éliminant piles et appareils usagés conformément à la réglementation en
vigueur, vous contribuez à prévenir le gaspillage de ressources précieuses
ainsi qu’à protéger la santé humaine et l’environnement contre les effets
potentiellement nocifs d’une manipulation inappropriée des déchets.
Pour de plus amples renseignements sur la collecte et le recyclage des
piles et appareils usagés, veuillez vous renseigner auprès de votre mairie,
du service municipal d’enlèvement des déchets ou du point de vente où
vous avez acheté les articles concernés.
Le non-respect de la réglementation relative à l’élimination des déchets est
passible d’une peine d’amende.
Pour les utilisateurs professionnels au sein de l’Union européenne
Si vous souhaitez vous défaire de pièces d’équipement électrique ou électronique,
veuillez vous renseigner directement auprès de votre détaillant ou de votre fournisseur.
- 38 -
EY7460_EY7960_Book.indb 38 2013-12-2 16:12:37
Page 39

[Information relative à l’élimination des déchets dans les pays
extérieurs à l’Union européenne]
Ce pictogramme n’est valide qu’à l’intérieur de l’Union européenne. Pour connaître la
procédure applicable dans les pays hors Union Européenne, veuillez vous renseigner
auprès des autorités locales compétentes ou de votre distributeur.
V. ENTRETIEN
●
Nettoyez l’appareil au moyen d’un chiffon sec et propre. N’utilisez ni eau, ni solvant, ni
produit de nettoyage volatile.
●
Au cas où l’intérieur de l’outil ou du bloc batterie serait exposé à de l’eau, enlevez l’eau et
laissez sécher dès que possible. Enlevez soigneusement toutes saletés ou limailles de fer
qui s’accumulent à l’intérieur de l’outil. Si vous rencontrez des problèmes lors de l’utilisation
de l’outil, consulter un atelier de réparation.
VI. ACCESSOIRES
Utilisez uniquement des mèches convenant à la taille du mandrin utilisé.
VII. APPENDICE
CAPACITES MAXIMUM RECOMMANDEES
Modèle EY7460 EY7960
Vissage
de vis
Perçage
Vis pour machine M8
Vis à bois ø 10 mm
Vis auto perçante ø 6 mm
Pour le bois ø 38 mm
Pour le métal ø 13 mm
Pour la maçonnerie
--- 13 mm
COMPLÉMENT DE GARANTIE
Les pannes et dégradations dues à une utilisation intense prolongée (par ex : usinage sur ligne
d’assemblage etc.) ne sont pas couvertes par la garantie.
- 39 -
EY7460_EY7960_Book.indb 39 2013-12-2 16:12:37
Page 40

VIII. CARACTERISTIQUES TECHNIQUES
UNITE PRINCIPALE
Modèle EY7460 EY7960
Tension du moteur 21,6 V CD
Vitesse sans
charge
Vitesse de
percussion
souf erie par
minute
Capacité du mandrin ø1,5 mm - ø13 mm
Couple de serrage de l’embrayage Environ 1,0 N•m (10kgf-cm) – 6,9 N•m (70kgf-cm)
Longueur totale 232mm 245mm
Poids (avec la batterie autonome
EY9L61)
Bas 100~400 min
Haut 350~1500 min
Bas --- 1800~7200 min
Haut --- 6300~27000 min
2,45 kg 2,55 kg
BATTERIE AUTONOME
N° du modèle EY9L61 EY9L62
Stockage de la batterie Batterie Li-ion
Tension DC 21,6 V
Batterie
REMARQUE: Ce tableau peut inclure des modèles non disponibles dans votre région.
Spécications
détaillées
3,6 V × 6 piles 3,6 V × 12 piles
Veuillez vous reporter au catalogue général le plus récent.
-1
(rpm)
-1
(rpm)
-1
(bpm)
-1
(bpm)
CHARGEUR DE BATTERIE
N° du modèle EY0L82
Puissance
nominale
Poids 0,93 kg (2 lbs)
Durée de
chargement
REMARQUE: Ce tableau peut inclure des modèles non disponibles dans votre région.
Veuillez vous reporter au catalogue général le plus récent.
REMARQUE: Pour obtenir le nom et l'adresse du revendeur, veuillez consulter la carte de
garantie incluse.
EY7460_EY7960_Book.indb 40 2013-12-2 16:12:37
Voir la plaque signalétique se trouvant sur le côté inférieur du chargeur.
EY9L61 EY9L62
Utilisable
: 50 min.
Plein: 60 min. Plein: 85 min.
Utilisable
: 65 min.
- 40 -
Page 41

Istruzioni originalmente scritte in: inglese
Istruzioni originali tradotte in: altre lingue
I. USO PREVISTO
Questi utensili possono essere utilizzati per serrare viti e per eseguire fori
nel legno, a seconda della modalità selezionata. Il modello EY7960 può inoltre
essere utilizzato per eseguire fori in
calcestruzzo sofce e materiali simili in
modalità martello.
Leggere le “Istruzioni per la Sicurezza”
ed i seguenti punti, prima di utilizzare
l’apparecchio.
II. NORME DI
SICUREZZA
SUPPLEMENTARI
1) Indossare delle protezioni uditive.
L'esposizione al rumore può causare
la perdita dell'udito.
2) Utilizzare l'impugnatura ausiliaria
fornita con l'utensile.
La perdita del controllo può causare
danni personali.
3) Quando esiste la possibilità che
l'utensile di taglio entri a contatto
con fili elettrici nascosti, afferrare
gli utensili alimentati elettricamente
per mezzo di apposite superfici
isola n t i : il co n tatto c o n un fi l o
elettrico “attivo” può “attivare” le parti
metalliche esposte dell'utensile e
provocare scosse elettriche a carico
dell'operatore.
4) S e i l l a v o r o pr o d uce po l v e r e ,
indossare una mascherina.
5) Tenere presente che lo strumento è
sempre pronto per l’uso, poiché non è
necessario collegarlo ad una presa di
corrente.
6) Durante la trapanatura o l’avvitamento
su pareti, pavimenti, ecc. si potrebbero
incontrare li elettrici in tensione. NON
TOCCARE IL MANDRINO RAPIDO
ESAGONALE O QUALSIASI ALTRA
PARTE METALLICA SULLA PARTE
AN T E R IO R E DE L L’U T E N SI L E !
Tenere l’attrezzo esclusivamente per
l’impugnatura di plastica, per evitare
scosse nel caso di trapanatura di un
cavo sotto tensione.
7) Se la punta dovesse incast rarsi,
spegnere immediatamente l’utensile
con l’interruttore a scatto, così da
evitare un sovraccarico che potrebbe
danneggiare i l pacco batteria o il
motore.
Utilizzare il movimento inverso per
rimuovere i bit incastrati.
8) NON utilizzare la leva di avanzamento/
inve r s ione q uando l ’inter r u ttore
principale è su ON. La batteria si
scarica rapidamente e l’apparecchio
può subire dei danni.
9) Durante la ricarica, il caricabatteria
potrebbe riscaldarsi leggermente.
Questo è normale. NON ricaricare la
batteria troppo a lungo.
10) Quando si ripone o si trasporta l’utensile,
regolare la leva di avanzamento/
inversione nella posizione centrale
(blocco interruttore).
11) Non sottoporre lo strumento a sforzi
tenendo premuto a metà il grilletto di
controllo velocità (modalità di controllo
della velocità) in modo che il motore si
arresti.
12) Non utilizzare il selettore di velocità
(BAS S O -ALTO) m entre si tira il
grilletto di controllo velocità. Questo
comporterebbe un rapido consumo
della ba t t e ria ri c a r i c a bile o un
danneggiamento del meccanismo
interno del motore.
- 41 -
EY7460_EY7960_Book.indb 41 2013-12-2 16:12:38
Page 42

Simbolo Signicato
V Volt
Corrente diretta
n
o
...min
Ah
-1
Velocità senza carico
Giri o reciprocazioni per
minuto
Capacità elettrica del pacco
batteria
Rotazione in avanti
Rotazione indietro
Rotazione con martellatura
Solo rotazione
Per ridurre il pericolo
di lesioni, è necessario
leggere e comprendere il
manuale di istruzioni.
Solo per uso interno.
AVVERTIMENTO!
●
Non utilizzare pacchi batteria diversi
da quelli Panasonic, appositamente
progettati per l’uso con questo utensile
ricaricabile.
●
La Panasonic non sarà responsabile
per eventuali danni o incidenti causati
dall’uso di un pacco batteria riciclato e/
o contraffatto.
●
Non smaltire il pacco batteria nel fuoco
e non esporlo a eccessi di calore.
●
Non introdurre chiodi nel pacco batteria,
non sottoporlo a urti, non smontarlo e
non tentare di modicarlo.
●
Evitare che oggetti metallici entrino
a contatto con i terminali del pacco
batteria.
●
Non trasportare né conservare il pacco
batteria nello stesso contenitore in cui
sono presenti chiodi o oggetti metallici
simili.
●
Non ricaricare il pacco batteria in un
luogo esposto ad alte temperature, per
es. vicino ad un fuoco o alla luce solare
diretta. In caso contrario la batteria
può surriscaldarsi, prendere fuoco o
esplodere.
●
Per ricaricare il pacco batteria utilizzare
esclusivamente il caricabatteria
dedicato. In caso contrario la batteria
po trebbe perdere, surrisca ldarsi o
esplodere.
●
Dopo aver rimosso il pacco batteria
dal l’att rezz o o dal caric abat teria ,
rimontare sempre il coperchio del pacco
batteria. In caso contrario, i contatti
della batteria potrebbero andare in
cortocircuito, con conseguente rischio
d’incendio.
●
Se il pacco batteria risulta deteriorato,
sostituirlo con uno nuovo.
L’uso prolungato di un pacco batteria
danneggiato può generare calore, danni
e incendi.
- 42 -
EY7460_EY7960_Book.indb 42 2013-12-2 16:12:39
Page 43

III. MONTAGGIO
Applicazione e rimozione del
bit
NOTA:
Quando si installano o si rimuovono
le punte, scollegare il pacco batteria
dall’utensile o p p u r e po s i z i o n a r e
l’interruttore nella posizione centrale
(blocco interruttore).
Questo utensile è dotato di un mandrino
senza chiave.
1. Installazione
Inserire la punta e girare il collarino di
blocco in senso orario (posizionandosi
frontalmente) per serrare saldamente
nché non si sente un click.
Collarino di blocco
2. Rimozione
G i r a r e i l c o l l ar in o d i b l o cco in
sens o an t iorario (p o s iziona n d osi
front alm ent e), qu ind i rimuovere la
punta.
Applicazione o rimozione del
pacco batteria
1. Per collegare il pacco batteria:
Allineare le marcature evidenziate e
installare il pacco batteria.
●
Far scorrere il pacco batteria finché
non si blocca in posizione.
Marcature
allineamento
2. Per rimuovere il pacco batteria:
Premere il pulsante in giù e far scorrere
il pacco batteria in avanti.
Tasto
Maniglia di sostegno
Collocare la maniglia di sostegno nella
vostra posizione preferita e stringere la
maniglia in modo ben saldo.
NOTA:
In ca s o d i g i oc o e c c es si v o s u l
mandrino, posizionare saldamente il
trapano e 1 aprire le ganasce girando
il collarino di blocco e 2 serrare la
vite (vite di sinis tra) mediante un
cacciavite girando in senso antiorario
(posizionandosi frontalmente).
Stringere
Allentare
Rimuovere il manico quando si ripone
l’attrezzo nella custodia.
- 43 -
EY7460_EY7960_Book.indb 43 2013-12-2 16:12:39
Page 44

IV. FUNZIONAMENTO
[Corpo principale]
Uso dell’interruttore
1. La velocità aumenta proporzionalmente
alla pressione del grilletto. All’inizio dei
lavori, premere leggermente il grilletto
per iniziare lentamente la rotazione.
2. Viene impiegato un controller elettronico
di reazione per garantire una coppia
elevata anche in caso di bassa velocità.
3. Il fre no si attiva quando il grilletto
viene rilasciato e il motore si ferma
immediatamente.
PRECAUZIONE:
Quando si tira la levetta per avviare il
prodotto, possono trascorrere alcuni
istanti prima che la rotazione inizi. Ciò,
tuttavia, non è un malfunzionamento.
* L'intervallo di tempo è dovuto al fatto
che il circuito del prodotto si avvia
quando la leva viene tirata per la
prima volta dopo che è stato inserito
un pacco batteria nuovo o dopo che
il prodotto non è stato utilizzato per
almeno 1 minuto (o 5 minuti se la luce
LED è accesa). Dalla seconda volta
in poi, la rotazione si avvierà senza
intervalli.
NOTA:
Quando il freno si attiva, si potrebbe
udire un rumore di frenata. È normale.
Uso della leva di avanzamento/inversione
Avanti Inversione
Blocco interruttore
PRECAUZIONE:
Per evitare danni, non usare la leva di
avanzamento/inversione finché il bit
non si arresta completamente.
Uso dell’interruttore di rotazione in avanti
1. Spingere la leva per la rotazione in
avanti.
2. Premere leggermente il grilletto per
avviare lentamente l’utensile.
3. La velocità aumenta proporzionalmente
al la pressione d el grille tto, per un
serraggio delle viti e una trapanatura
efficaci. Il freno si attiva e il mandrino
si ferma immediatamente quando il
grilletto viene rilasciato.
4. Dop o l’uso, ripo rta re la leva nella
posizione centrale (blocco interruttore).
Uso dell’interruttore di rotazione all’indietro
1. Spin gere la leva per l a rot azion e
all’indietro. Controllare la direzione di
rotazione prima dell’uso.
2. Premere leggermente il grilletto per
avviare lentamente l’utensile.
3. Dop o l’uso, ripo rta re la leva nella
posizione centrale (blocco interruttore).
Impostazione coppia mandrino
Regolare la coppia su una delle 18
im pos tazioni per m and rino o sulla
posizione “
Regolare la coppia su una delle 18
im pos tazioni per m and rino o sulla
posizione “
NOTA:
Assicurarsi sempre di interrompere
il funzionamento dell’attrezzo e di
allontanarlo dal lavoro, quando dal
modo trapanatura si seleziona il
modo percussione oppure quando
si passa dal modo trapanatura al
modo percussione ruotando la leva
di innesto.
” (EY7460).
”, “ ” (EY7960).
- 44 -
EY7460_EY7960_Book.indb 44 2013-12-2 16:12:40
Page 45

PRECAUZIONE:
Impo s t a r e la frizione su q ues t a
marcatura ( ) prima dell'uso.
Se dopo aver usato l’apparecchio per
l’avvitamento non si riesce a ruotare
l’imp u g n atura d e l l a fr izione n e lla
posizione di trapanatura o percussione,
si suggerisce di ruotarla nella posizione
1 e di provare quindi a sollecitare la
frizione stessa usandolo per un secondo.
Selezione velocità
Scegliere una velocità alta o bassa in
base all’uso.
BASSO
Più si tira il grilletto di controllo velocità
variabile, più aumenta la velocità.
PRECAUZIONE:
●
Vericare il selettore di velocità prima
dell’uso.
●
Uti l i zzar e ad u n a vel o c ità ba s sa
quando si necessita di una coppia
elevata durante l’uso. L’uso ad una
velocità alta quando si necessita di
una coppia elevata potrebbe portare
ad un arresto del motore.
●
Non utilizzar e il selettore di ve lo ci tà
(BASSO-ALTO) mentre si tira il grilletto di
controllo velocità. Questo comporterebbe
un ra p i d o consumo d e l l a batteria
ricaricabile o un danneggiamento del
meccanismo interno del motore.
* Si vedano le specifiche “CAPACITÀ
MASSIME CONSIGLIATE”.
PRECAUZIONE:
●
Onde ev i tare l’aume n t o ecce s s ivo
dell a te mperat u r a della s uperfi c ie
dell’utensile, non utilizzare l’utensile
consecutivamente mediante l’uso di due
o più pacchi batteria. L’utensile necessita
ALTO
di un periodo di raffreddamento prima di
passare ad un altro pacco batteria.
●
Durante l’uso, non ostruire i fori di ventilazione posti ai lati dell’alloggiamento.
In cas o contra rio, l’a ppare c chio
potrebbe non funzionare correttamente
e guastarsi.
●
NON sottoporre lo strumento (motore) a
sforzi. In caso contrario, l’apparecchio
potrebbe subire danni.
●
Usare l’utensile in modo tale che l’aria
che fuoriesce dai fori di ventilazione
non sia a contatto diretto con la pelle. In
caso contrario, ci si potrebbe bruciare.
Funzione blocco punta
1. Con l’interruttore a scatto non ingranato
e una punta per cacciavite in posizione,
l’utensile può essere utilizzato come un
cacciavite manuale (no a 40 N·m, 408
k f-cm, 353 in-lbs).
Ci sarà un po’ di gioco sul mandrino;
non si tratta di un’anomalia.
2. Q uesta caratteris tica è utile p er il
serraggio di viti che necessitano di una
coppia più elevata rispetto alla coppia
massima dell’avvitatore (posizione
sulla frizione), per rafforzare il serraggio
di una vite o per allentare una vite
estremamente serrata.
Pannello di controllo
(1)
(1) Luce LED
Prima dell'uso della luce
LED , pre mere sempr e
l'interruttore una volta.
Premere
della luce LED.
- 45 -
(3)
(2)
il pulsante
EY7460_EY7960_Book.indb 45 2013-12-2 16:12:41
Page 46

La luce illumina grazie ad un consumo
minimo e non inuenza negativamente la
prestazione dell'utensile, né la capacità
della batteria.
PRECAUZIONE:
●
La luce LED incorporata è stata realizzata
per l ’il luminazion e temp ora nea di
un’area di lavoro ridotta.
●
Non utilizzarla in sostituzione di una
luc e n o rma l e: la lumi n osi t à s arà
insufciente.
●
La luce LED si spegne se l’utensile non
viene utilizzato per 5 minuti.
Precauzione: NON FISSARE DIRETTA-
L’ut ili zzo di comandi, regolazioni e
l’attuazione di istruzioni diversi da quelli
qui ri portat i potreb b ero provoc are
un’esposizione pericolosa alle radiazioni.
(2)
Spia avvertenza surriscaldamento
MENTE IL RAGGIO
●
Evitare un uso dell’utensile che porti
all’attivazione ripetuta della protezione
da surriscaldamento.
●
Se l' utens ile viene utiliz zato in modo
continuato in condizioni di intenso lavoro o di
temperature elevate (ad esempio in estate),
la funzione di protezione da surriscaldamento
potrebbe attivarsi di frequente.
●
Se l'utensile viene utilizzato in condizioni
di temperature molto basse (ad esempio
in inverno) o viene utilizzato con intervalli
frequenti, la funzione di protezione da
surriscaldamento potrebbe non attivarsi.
●
La temperatur a ambient ale si deve
aggirare tra 0°C (32°F) e 40°C (104°F).
Se il pacco batteria è usato quando la
temperature è al di sotto di 0°C (32°F),
lo strumento sm etterà di funzionare
correttamente.
●
Per caricare un pacco batteria freddo (al
di sotto di 0°C (32°F)) in un luogo caldo,
lasciare il pacco batteria nel locale per
oltre un’ora per permettere allo stesso di
raggiungere la temperature ambiente.
(3) Spia avvertenza batteria scarica
Spenta
(funzionamento
normale)
Acceso:
surriscaldamento
(motore)
Lampeggiante:
surriscaldamento
(batteria)
Indica che il
funzionamento è stato
interrotto a causa del
surriscaldame nto della
batteria.
Per proteggere il motore o la batteria, tenere
presente quanto segue nell'esecuzione del
lavoro.
●
Se il motore o la batteria si scurriscaldano
verrà attivata la funzione di protezione,
che comporta l'arresto del motore o della
batteria. Quando questa funzione è attiva,
sul pannello di controllo lampeggia la spia
di avvertenza da surriscaldamento.
●
S e s i a t t i v a l a p r o t e z i o n e d a
surriscaldamento, lasciare raffreddare
completamente l’utensile (per almeno
30 minuti). Quando la spia di avvertenza
da surriscaldamento si spegne, l'utensile
sarà pronto per l'uso.
Spenta
(funzionamento
normale)
Lampeggiante
(no carica)
Funzione
protezione batteria
attiva
Lo scaricarsi eccessivo (totale) delle batterie
a ioni di litio diminuisce drasticamente la
loro autonomia. L’avvitatore è dotato di
una funzione di protezione della batteria
realizzata per evitare lo scaricarsi eccessivo
del pacco batteria.
●
La funzione di protezione della batteria
si attiva immediatamente prima che
la batteria perda la cari ca, così d a
far lampeggiare la spia di avvertenza
batteria scarica.
●
Se si nota la spia di avvertenza batteria
scarica, caricare immediatamente il
pacco batteria.
- 46 -
EY7460_EY7960_Book.indb 46 2013-12-2 16:12:41
Page 47

●
Se la caric a res idua della batter ia
è molto ridotta, il prodotto potrebbe
smettere di funzionare senza che la spia
di avvertenza che segnala la riduzione
della carica lampeggi. Ciò indica che
l'alimentazione è insufficiente e che il
pacco batteria deve essere caricato
prima di continuare l'uso.
●
Se il prodotto v i e n e so t t o p o s t o a
im provviso sfo rzo c on conseguen te
bloc c o de l motore, il se n s ore c h e
previene l'eccessiva scarica potrebbe
attivarsi e la spia di avvertenza che
segnala la riduzione della ca r i c a
potrebbe lampeggiare. La spia smetterà
di lampeggiare quando la causa del
blocco del motore sarà stata risolta e il
ciclo riattivato.
[Pacco batteria]
Per un uso corretto del pacco
batteria
Pacco batteria Li-ion
●
Per una conservazione ottimale della
batteria, riporre il pacco batteria agli ioni
di litio dopo l’uso senza ricaricarlo.
●
Q u a n d o il p a c co ba t ter i a v i e n e
caricato, assicurarsi che i terminali sul
caricabatteria siano privi di sostanze
estranee, quali polvere, acqua, ecc.
Pulire i terminali prima di caricare il
pacco batteria, qualora vengano trovate
sostanze estranee sui terminali.
La durata dei terminali del pacco batteria
può essere influenzata da sostanze
estranee, quali polvere, acqua, ecc.
durante il funzionamento.
●
Qu ando il pac co batter ia non viene
usato, tenerlo lontano da altri oggetti
metallici come: clip, monetine, chiavi,
chiodi, viti o altri piccoli oggetti metallici
che potrebbero creare un collegamento
da un terminale all’altro.
Cortocircuitare i terminali del pacco
batteria potrebbe causare scintille, ustioni
oppure un incendio.
●
Quando si usa il pacco batteria, assicurarsi
che il luogo di lavoro sia ben ventilato.
●
Quando si rimuove il pacco batteria
dall’alloggiamento principale dell’utensile,
riposizionare immediatamente il coperchio
del pacco batteria, onde evitare che
polvere e sporcizia contaminino i terminali
della batteria e causino un cortocircuito.
Durata del pacco batteria
Le batterie ricaricabili posseggono
una durata limitata. Se il tempo di
funzionamento diventa estremamente
breve dopo la ricarica, sostituire il
pacco batteria con uno nuovo.
Precauzioni d’uso
Coperchio pacco
Terminali
rossa
Assicurarsi di usare il coperchio
del pacco batteria
●
Quando il pacco batteria non viene
usato, conservare la batteria in modo che
sostanze estranee, quali polvere, acqua,
ecc non contaminino i terminali. Assicurarsi
di applicare il coperchio al pacco batteria
per proteggere i terminali della batteria.
●
Quand o il pacco b a t t e ri a viene
caricato, assicurarsi che i terminali sul
caricabatteria siano privi di sostanze
estranee, quali polvere, acqua, ecc.
Pulire i terminali prima di caricare il
pacco batteria, qualora vengano trovate
sostanze estranee sui terminali.
La durata dei terminali del pacco batteria
può essere influenzata da sostanze
estranee, quali polvere, acqua, ecc. durante
il funzionamento.
- 47 -
EY7460_EY7960_Book.indb 47 2013-12-2 16:12:41
Page 48

PRECAUZIONE:
Per proteggere il motore o la batteria,
te n e re p r e s e n t e q u a n t o s e gu e
nell’esecuzione del lavoro.
●
Se il motore e la batteria si surriscaldano
verrà attivata la funzione di protezione,
che comporta l'arresto del motore e della
batteria.
Per un utilizzo sicuro
●
Il pacco batteria è stato ideato per
essere installato tramite una procedura
a due fasi per motivi di sicurezza. Prima
dell'uso, vericare che il pacco batteria
sia inserito correttamente nell’unità
principale.
●
Quando il pacco batteria non è
ben collegato, la spia avvertenza
surriscaldamento e la spia avvertenza
batteria scarica lampeggiano per indicare
che il funzionamento sicuro non è
possibile e l'apparecchio non fa ruotare
l’unità principale come di consueto anche
se l'interruttore è bloccato. Collegare il
pacco batteria nell'unità dell'utensile no
alla scomparsa dell'etichetta rossa o
gialla.
[Caricabatterie]
Ricarica
PRECAUZIONE:
●
Il caricaba tter ia è prog etta to per il
funzionam ento e sclusivame nte con
un’alimentazione elettrica domestica
standard come indicato sulla targhetta
dei valori. Caricare soltanto alla tensione
indica t a sul l a ta r g h e tta dei va l ori
dell’unità, es. 230v/50Hz.
●
Non tentare l’uso con qualsiasi altra
tensione o frequenza nominale!
●
Se la temperatura del pacco batteria
scende al di sotto dei −10°C (14°F)
circa , il ca r i camento s’i n t errompe
a u t oma t i cam e n te pe r e v i t a r e l a
degradazione della batteria.
●
La temperatur a ambient ale si deve
aggirare tra 0°C (32°F) e 40°C (104°F).
Se il pacco batteria è usato quando la
temperatura è al di sotto di 0°C (32°F),
lo strumento sm etterà di funzionare
correttamente.
●
Per caricare un pacco batteria freddo (al
di sotto di 0°C (32°F)) in un luogo caldo,
lasciare il pacco batteria nel locale per
oltre un’ora per permettere allo stesso di
raggiungere la temperatura ambiente.
●
Lasciate raffreddare il caricatore quando
car icat e p iù di due pacc hi batt erie
consecutivamente.
●
Non inlate le dita nel foro di contatto per
tenere in mano il caricabatterie o altro
scopo.
PRECAUZIONE:
Onde evitare il rischio d’incendio o il
danneggiamento del caricabatteria:
●
Non u s a te l’energia f o rnita d a un
generatore a motore.
●
Non coprite le prese d’aria di caricabatteria
e pacco batteria.
●
Scollegare il caricabatteria se non in uso.
NOTA:
Al momento de ll’acquisto, il pacco
batteria non è carico. Assicurarsi di
caricare la batteria prima dell’uso.
Modalità di caricamento
1. Collegare il caricatore alla presa di
corrente.
NOTA:
Potrebbero presentarsi delle scintille
quand o l a s pina vien e i n serita
nell’alimentazione CA, ma questo
non pone un problema in termini di
sicurezza.
2. Inserire il pacco batteria saldamente nel
caricabatteria.
1) Allineare le marcature e collocare la
batteria nel raccordo del caricatore.
2) Far scorrere nella direzione indicata
dalla freccia.
- 48 -
EY7460_EY7960_Book.indb 48 2013-12-2 16:12:42
Page 49

Marcature
allineamento
3. Durante la ricarica, la spia di carica si
accende.
Quando la ricarica è stata completata,
un inter rutt ore el ettr onic o i nter no
scatta automaticamente per evitare la
sovraccarica.
●
La ricarica non avviene se il pacco
batteria è caldo (per esempio, subito
dopo l’uso per un lavoro pesante).
L a s p i a d i st a n db y ar anc i o ne
lampeggia mentre la batteria si sta
raffreddando.
L a r i c a r i c a c o m i n c i a p o i
automaticamente.
4. La spia di carica (verde) lampeggia
lentamente quando la batteria è carica
per l’80% circa.
5. A ricarica completata, la spia verde si
spegne.
SEGNALI SPIE
6. Qualora l a tempera tur a del pacc o
batteria raggiunga gli 0°C o meno, il
tempo di ricarica è maggiore rispetto al
tempo di ricarica normale.
Anche a batt e r ia compl e t a mente
carica, l’utensile dispone di circa il 50%
dell’energia di cui dispone una batteria
carica alla temperatura di esercizio
normale.
7. Se la spia di carica (verde) non si
spegne, rivolgersi a un rivenditore
autorizzato.
8. Se un pacco batteria completamente
ricaricato viene inserito di nuovo nel
caricabatteria, la spia di carica si
illumina. Dopo alcuni minuti, la spia di
carica verde si spegnerà.
9. Rimuovere il pacco batteria tenendo il
pulsante di rilascio sollevato.
Tasto di rilascio
pacco batteria
Il caricamento è completato. (Carica completa)
Batteria carica all’80% circa.
In fase di caricamento.
Il caricatore è stato collegato alla presa murale.
E’ pronto per il caricamento.
(Verde)
Spenta Accesa
(Arancione)
Pacco batteria freddo.
La ricarica del pacco batteria avviene lentamente per ridurre il
peso sulla batteria.
Il pacco batteria è caldo.
Il caricamento avrà inizio appena la temperatura del pacco
batteria sarà scesa. Qualora la temperatura del pacco batteria
raggiunga i -10°C o meno, anche la spia di ricarica arancione
inizia a lampeggiare. La ricarica inizia quando la temperatura
del pacco batteria aumenta.
Non è possibile effettuare il caricamento. Il pacco batteria è
impolverato o guasto.
Spia stato ricarica
Sinistra: verde Destra: arancione
Lampeggia
- 49 -
EY7460_EY7960_Book.indb 49 2013-12-2 16:12:42
Page 50

Informazioni per gli utenti sulla raccolta e l’eliminazione di vecchie apparecchiature e batterie usate
Questi simboli sui prodotti, sull’imballaggio, e/o sulle documentazioni o
manuali accompagnanti i prodotti indicano che i prodotti elettrici, elettronici
e le batterie usate non devono essere buttati nei riuti domestici generici.
Per un trattamento adeguato, recupero e riciclaggio di vecchi prodotti
e batterie usate, vi preghiamo di portarli negli appositi punti di raccolta,
secondo la legislazione vigente nel vostro Paese e le Direttive 2002/96/EC
e 2006/66/EC.
Smaltendo correttamente questi prodotti e le batterie, contribuirete a
salvare importanti risorse e ad evitare i potenziali effetti negativi sulla
salute umana e sull’ambiente che altrimenti potrebbero verificarsi in
seguito ad un trattamento inappropriato dei riuti.
Per ulteriori informazioni sulla raccolta e sul riciclaggio di vecchi prodotti e
batterie, vi preghiamo di contattare il vostro comune, i vostri operatori per
lo smaltimento dei riuti o il punto vendita dove avete acquistato gli articoli.
Sono previste e potrebbero essere applicate sanzioni qualora questi riuti
non siano stati smaltiti in modo corretto ed in accordo con la legislazione
nazionale.
Per utenti commerciali nell’Unione Europea
Se desiderate eliminare apparecchiature elettriche ed elettroniche, vi preghiamo di
contattare il vostro commerciante od il fornitore per maggiori informazioni.
[Informazioni sullo smaltimento riuti in altri Paesi fuori
dall’Unione Europea]
Questi simboli sono validi solo all’interno dell’Unione Europea. Se desiderate smaltire
questi articoli, vi preghiamo di contattare le autorità locali od il rivenditore ed informarvi
sulle modalità per un corretto smaltimento.
V. MANUTENZIONE
●
Per la pulizia dell’apparecchio, utilizzare un panno morbido ed asciutto. NON usare un
panno bagnato, solventi, benzina od altre sostanze volatili per la pulizia.
●
Qualora l’interno del prodotto o del pacco batteria si bagni, togliere immediatamente
l’acqua e fare asciugare il prima possibile.
Rimuovere accuratamente la polvere e le limature di ferro accumulatesi nel prodotto. Se il
prodotto presenta problemi di funzionamento, rivolgersi a un negozio di riparazioni.
VI. ACCESSORI
Utilizzare solo i bit adatti per la dimensione del mandrino.
- 50 -
EY7460_EY7960_Book.indb 50 2013-12-2 16:12:42
Page 51

VII. ALLEGATO
CAPACITÀ MASSIME CONSIGLIATE
Modello EY7460 EY7960
Avvitamento
viti
Trapanatura
SUPPLEMENTO DI GARANZIA
I guasti e i danni causati da un utilizzo prolungato nel tempo (es. lavoro di fabbrica sulla catena
di montaggio) è fuori garanzia.
Vite a ferro M8
Vite da legno ø 10 mm
Vite autoforante ø 6 mm
Per legno ø 38 mm
Per metallo ø 13 mm
Per lavori di
muratura
--- 13 mm
VIII. SPECIFICHE TECNICHE
APPARECCHIO PRINCIPALE
Modello EY7460 EY7960
Tensione motore 21,6 V CD
In assenza di
carico
Numero di
colpi al minuto
Capacità mandrino ø1,5 mm - ø13 mm
Coppia frizione Capacità circa 1,0 N•m (10kgf-cm) – 6,9 N•m (70kgf-cm)
Lunghezza totale 232mm 245mm
Peso (con pacco batteria
Basso 100~400 min
Alto 350~1500 min
Basso --- 1800~7200 min
Alto --- 6300~27000 min
EY9L61)
2,45 kg 2,55 kg
-1
(rpm)
-1
(rpm)
-1
(bpm)
-1
(bpm)
PACCO BATTERIA
Modello N° EY9L61 EY9L62
Accumulatore Batteria Li-ion
Batteria
EY7460_EY7960_Book.indb 51 2013-12-2 16:12:42
Tensione DC 21,6 V
Dettaglio spec. 3,6 V × 6 celle 3,6 V × 12 celle
- 51 -
Page 52

CARICABATTERIA
Modello N° EY0L82
Valori Voir la plaque signalétique se trouvant sur le côté inférieur du chargeur.
Peso 0,93 kg (2 lbs)
Tempo di
caricamento
NOTA: Questa tabella può includere dei modelli non disponibili nella propria area.
Fare riferimento al catalogo generale più recente.
NOTA: Per il nome e l'indirizzo del rivenditore, consultare la scheda di garanzia acclusa.
EY9L61 EY9L62
Utilizzabile: 50 min Utilizzabile: 65 min
Completa: 60 min Completa: 85 min
- 52 -
EY7460_EY7960_Book.indb 52 2013-12-2 16:12:43
Page 53

Originele gebruiksaanwijzing: Engels
Vertaling van de originele gebruiksaanwijzing: Andere talen
6) Bi j h e t b o re n o f s c h ro ev en i n
I. TOEPASSING
Dez e g eree dschappen kunnen gebruikt worden voor het vastdraaien van
schroeven in de draaierstand en voor
het boren van gaten in hout en metaal
in de boorstand. Bovendien kan model
EY7960 worden gebruikt voor het boren
van gaten in zacht beton en soortgelijk
materiaal in de klopboorstand.
Lees de “Veiligheidsadviezen” in het afzonderlijke boekje en de onderstaande
voorschriften alvorens gebruik.
II.
EXTRA
VEILIGHEIDSVOORSCHRIFTEN
1) Draag oorbeschermers.
Blootstelling aan lawaai kan gehoorverlies
veroorzaken.
2) Gebruik de extra handgreep die met
het gereedschap is meegeleverd.
Ve r l i e s van controle ka n letsel
veroorzaken.
3) Houd elektrisch gereedschap
vast aan de daarvoor bestemde
geïsoleerde grepen als het
snijgereedschap in contact kan
komen met verborgen bedrading.
Als het gereedschap in contact komt
met bedrading waar stroom op staat,
kan de gebruiker via de metalen delen
van het gereedschap een elektrische
schok krijgen.
4) Draag een stofmasker als het werk
stof veroorzaakt.
5) Denk eraan dat dit gereedschap altijd
gebruiksklaar is zonder dat er een
stekker in het stopcontact gestoken
hoeft te worden.
7) Laat de startschakelaar onmiddellijk
D r a a i e e n vas t zit t end e bi t i n
8) Be dien de lin ks/recht sschakel aar
9) De acculader w o r d t ti j d e n s he t
10)
11) Overbelast het gereedschap niet door
12) Bedien de snelheidskeuzeschakelaar
mu ren en vloeren is het mogelijk
dat u ele k trici t eitsdr a den r a akt.
R A A K D ER H A LV E N O O I T D E
ZESKANTBOORKOP OF ANDERE
ME TALEN ONDER D E L EN VA N
HET GEREEDSC HAP AAN! Houd
het g e reedschap all e e n aa n de
plastic handgreep vast zodat u geen
el ektrische sch ok krijgt als u per
ongeluk een elektriciteitsdraad raakt.
los als de bit vast komt te zitten. Op
deze manier kunt u voorkomen dat de
motor overbelast wordt en de motor of
de accu wordt beschadigd.
omgekeerde draairichting los.
NIET zolang de startschakelaar is
ingedrukt. Anders wordt de accu snel
ontladen en kan het gereedschap
worden beschadigd.
opladen warm. Dit is normaal. Laad
de accu echter NIET te lang op.
Zet de links/rechtsschakelaar in de middelste
stand (schakelaarvergrendeling) indien u
het gereedschap opbergt of meeneemt.
de startschakelaar (toerentalregeling)
slechts zo ver in te drukken dat de
motor tot stilstand komt.
(LAAG- H O O G ) ni e t te r w ijl u de
star t schake laar i ndrukt . Dit k a n
resulteren in een snelle uitputting van
de oplaadbare accu of beschadiging
van het interne mechanisme van de
motor.
- 53 -
EY7460_EY7960_Book.indb 53 2013-12-2 16:12:43
Page 54

Symbool Betekenis
V Volt
Gelijkstroom
n
o
...min
Ah
Omwentelingen of toeren
-1
Elektrische capaciteit van
Onbelast
per minuut
de accu
Voorwaartse rotatie
Achterwaartse rotatie
Klopboren
Alleen draaien
Om het risico van
letsel te verminderen,
dient de gebruiker de
gebruiksaanwijzing te lezen
en ter kennis te nemen.
Alleen voor gebruik
binnenshuis.
WAARSCHUWING!
●
Gebruik uitsluitend Panasonic-accu's
die bestemd zijn voor gebruik met dit
oplaadbare gereedschap.
●
Pan asoni c kan niet aansp rake lijk
worden gesteld voor beschadigingen
of ongelukken veroorzaakt door het
gebruik van een gerecyclede accu of
een namaak-accu.
●
Accu's niet verbranden of aan extreme
hitte blootstellen.
●
Accu's niet doorboren met voorwerpen
als spijkers, niet blootstellen aan harde
schokken, niet demonteren en niet
wijzigen.
●
Laat geen metale n voor werpen in
contact komen met de aansluitingen
van de accu.
●
De accu niet opbergen of vervoeren
in dezelfde verpakking als spijkers of
vergelijkbare metalen voorwerpen.
●
De accu niet opladen bij grote hitte,
zoa l s naa s t een vu ur o f in direc t
zo n l i ch t. De accu kan hie r d o or
oververhit raken, in brand vliegen of
exploderen.
●
Gebruik uitsluitend de bijbehorende
lader voor het opladen van de accu.
De accu k an and ers gaan lekken,
oververhit raken of exploderen.
●
Bevestig altijd het accudeksel nadat
u de accu van het gereedschap of
de acculader hebt losgemaakt. Het
is anders mogelijk dat de accupolen
kortgesloten worden met mogelijk brand
tot gevolg.
●
Wan n e e r d e a c c u v e rs le te n i s ,
moet deze door een nieuwe worden
vervangen.
Als u een versleten of beschadigde
accu blijft gebruiken, kan dit resulteren
in hitteontwikkeling, ontbranding of
barsten van de accu.
- 54 -
EY7460_EY7960_Book.indb 54 2013-12-2 16:12:44
Page 55

III. MONTAGE
Bevestigen of verwijderen
van de bit
OPMERKING:
Voordat u de bit bevestigt of verwijdert, moet
u de accu losmaken van het gereedschap
of de schakelaar in de middenstand
zetten (schakelaarvergrendeling).
Bevestigen en verwijderen
van de accu
1. Bevestigen van de accu:
Lijn de gemarkeerde punten met elkaar
uit en bevestig de accu.
●
Schuif de accu op het gereedschap
totdat deze op de plaats vastklikt.
Dit gereedschap is uitgerust met een
sleutelloze boorkop.
1. Bevestigen
Steek de bit naar binnen en draai de
ve rgr endelkraag rechtsom (gezien
vanaf de voorkant) totdat deze geen
kl ikgeluid en meer maa kt en de bit
stevig vastzit.
Vergrendelkraag
2. Verwijderen
Draai de vergrendelkraag linksom
(gezien vanaf de voorkant) en verwijder
dan de bit.
OPMERKING:
Als de bit erg veel speling in de boorkop
heeft, zet u het gereedschap vast en
opent dan de boorkopklauwen door
1
aa n de vergrendelk raa g te draa ien,
waarna u 2 de schroef (linksdraaiende
schroefdraad) met een schroevendraaier
linksom draait (gezien vanaf de voorkant).
Uitlijntekens
2. Verwijderen van de accu:
Druk de knop omlaag en schuif de accu
naar voren.
Knop
Steungreep
Zet de steungreep op de machine en
draai de steungreep stevig vast.
Vastdraaien
Lossen
Verwijder de hand greep wanneer u het
gereedschap in de opbergdoos doet.
- 55 -
EY7460_EY7960_Book.indb 55 2013-12-2 16:12:45
Page 56

IV. BEDIENING
[Op het gereedschap]
Bediening van de schakelaar
1. De draaisnelheid neemt toe naarmate
de startschakelaar v e r d e r wordt
ingedrukt. Wanneer u begint, drukt u de
startschakelaar een klein stukje in zodat
de snelheid niet meteen te hoog is.
2. A a n g e z i e n er een el e k t r o n i s c h e
regeleenheid met terugkoppeling is
toegepast, zal er ook bij lage snelheid
een sterk draaimoment zijn.
3. De rem treedt in wer king wanneer
de startschakelaar wordt losgelaten,
waardoor de motor meteen stopt.
OPGELET:
Wanneer u het apparaat gebruikt door
de trekker over te halen kan er mogelijk
een opstarttijd zijn voordat de draaiing
begint. Dit is geen signaal dat op een
defect wijst.
* Deze opstarttijd ontstaat wanneer
de trekker voor de eerste keer wordt
overgehaald na het installeren van
een ni euw accup ack o f wan n eer
het apparaat minstens 1 minuut (of
minstens 5 min uten wan neer het
LED -lam pje aan i s) niet gebruikt
i s . D e dra a i ing b e g int z o n der
opstarttijd tijdens het tweede en het
daaropvolgende gebruik.
OPMERKING:
Wanneer de rem in werking treedt, is
het mogelijk dat u een remgeluid hoort.
Dit is normaal.
Bediening van de startschakelaar en de links/rechtsschakelaar
Rechts Links
Vergrendelstand
OPGELET:
Bedien de links/rechtsschakelaar niet
voordat de bit volledig tot stilstand is
gekomen, om beschadiging van de
motor te voorkomen.
Bediening van de schakelaar
voor rechtsomdraaien
1. Druk de schakelaar voor rechtsomdraaien
in.
2. Druk de startschakelaar iets in om
het gereedschap langzaam te laten
beginnen met draaien.
3. Naarmate de startschakelaar dieper
wordt ingedrukt, neemt het toerental
toe om de schroeven op efciënte wijze
vast te draaien en te boren. De rem
treedt in werking en de boorkop komt
vrijwel onmiddellijk tot stilstand wanneer
de startschakelaar wordt losgelaten.
4. Zet de schakelaar na gebruik in de
middelste stand (vergrendelstand).
Bediening van de schakelaar
voor linksomdraaien
1. Druk de schakelaar voor linksomdraaien
in. Controleer vóór gebruik de draairichting
van de boorkop.
2. Druk de startschakelaar iets in om
het gereedschap langzaam te laten
beginnen met draaien.
3. Zet de schakelaar na gebruik in de
middelste stand (vergrendelstand).
Instellen van het koppelingsdraaimoment
Stel het draaimoment in op een van de
18 koppelingsstanden of kies de “
stand. (EY7460).
Stel het draaimoment in op een van de
18 koppelingsstanden of kies de “
” stand. (EY7960).
“
OPMERKING:
Stop de werking van het gereedschap en
neem dit van het materiaal af wanneer u
vanaf de boorfunctie naar de hamerfunctie
overschakelt of wanneer u vanaf de
hamerfunctie overschakelt op de boorfunctie
- 56 -
door aan de koppelingshendel te draaien.
”
” ,
EY7460_EY7960_Book.indb 56 2013-12-2 16:12:45
Page 57

OPGELET:
Zet de koppelingsinstelling op
deze markering ( ) alvorens het
gereedschap feitelijk in gebruik te
nemen.
Dersom kløtsj-håndtaket ikke kan bli satt
til funksjonen “boring” eller “hamring”
etter å ha kjørt med kløtsjfunksjon, må
du sette kløtsjhåndtaket i posisjon 1 og
kjøre kløtsjen i ett sekund.
Instellen van de snelheid
Kies e e n ho g e of lage s n e l h eid,
afhankelijk van de klus.
HOOG
LAAG
OPGELET:
●
Om te voorkomen dat de behuizing
van het gereedschap te heet wordt,
mag het gereedschap niet zo lang
gebruikt worden dat er twee of meer
accu's achter elkaar nodig zijn. Laat
het gereedschap tussen twee accu's
door voldoende afkoelen.
●
Zorg dat de ventilatiegaten aan de
zijkanten van het gereedschap tijdens
het gebruik niet afgedekt worden. Dit
om te voorkomen dat het gereedschap
door onvo ldo end e koeling defect
raakt.
●
Zorg dat u het gereedschap (motor)
NIET overbelast. Dit kan resulteren in
beschadiging.
● Hanteer het gereedschap op zodanige
wijze dat lucht die uit de ventilatiegaten
wordt geblazen niet direct op de huid
wordt geblazen. Dit om brandwonden
te voorkomen.
Hoe dieper de startschakelaar met
variab ele snelheid sregeli ng wordt
ingedrukt, hoe sneller het gereedschap
zal draaien.
OPGELET:
●
Controleer voor gebruik de instelling
van de snelheidskeuzeschakelaar.
●
Gebruik een lage snelheid wanneer
een hoog d raa imo men t is ver eis t
bij de karwei. (Bij gebruik van een
ho ge snelheid wanneer een hoog
draaimoment is vereist, kan de motor
defect raken.)
●
Bedien de snelheidskeuzeschakelaar
(LA A G - H O OG) niet te r wij l u de
star t s chakel a a r indrukt. Di t ka n
resulteren in een snelle uitputting van
de oplaadbare accu of beschadiging
van het interne mechanisme van de
motor.
*
Zie de te c h n i s c h e gegeven s voor de
“AANBEVOLEN MAXIMALE CAPACITEITEN”.
Bit-vergrendelfunctie
1. Wa n n e e r ee n sch r o ef bit in he t
gere edscha p vergre ndeld is , kan
h e t g er e e d s ch ap a l s ge w o n e
schro eve ndr aaier worden gebruikt
zonder dat de schakelaar wordt ingedrukt
(maximaal aandraaimoment 40 N·m, 408
k f-cm, 353 in-lbs).
In de boorkop is een geringe speling
voelbaar, maar dit is geen defect.
2. D e z e functie i s handig wanneer
schroeven moeten worden ingedraaid
met een groter aandraaimoment dan
het gereedschap kan leveren (stand
op de koppeling), om te controleren
of een schroef goed vastzit of om
een schroef die extreme vastzit los te
draaien.
- 57 -
EY7460_EY7960_Book.indb 57 2013-12-2 16:12:46
Page 58

Bedieningspaneel
(1)
(1) LED-lampje
A lv o r e n s h e t L ED la m p j e te ge br u i k e n,
a l t i j d e e n m a a l d e
h o o f d s c h a k e l a a r
aantrekken. Druk
de LED lampje knop.
Het lampje verbruikt erg weinig stroom
en zal de prestatie van het gereedschap
en de capaciteit van de accu bijna niet
beïnvloeden.
OPGELET:
●
Het ingeb o u w d e LE D-l a m p j e is
slechts bedoeld om het werkgebied
kortstondig te verlichten.
●
Gebruik het lampje niet als vervanging
voor een normale zaklantaarn, want
het licht is niet sterk genoeg.
●
Het LED-lampje wordt uitgeschakeld
wanneer het gereedschap gedurende
5 minuten niet is gebruikt.
Opgelet: KIJK NIET RECHTSTREEKS
IN DE LICHTSTRAAL.
Ander gebruik van de bedieningsorganen,
andere afstellingen of procedures dan
hier beschreven kunnen leiden tot
blootstelling aan gevaarlijke straling.
(2) Oververhitting-
waarschuwingslampje
Uit
(normale
werking)
Let bij het gebruik van het gereedschap
op deze wijze op het volgende om de
motor en de accu te beschermen.
Verlicht:
Oververhitting
(motor)
De werking van het
gereedschap is gestopt
omdat de motor of de
accu te heet is geworden.
(3)
(2)
op
Knippert:
Oververhitting
(accu)
●
Als de motor of de accu o ver verhit
raa kt, wordt de b evei ligi ngsfunctie
gea ctive erd en z al de m otor of de
a c cu s t op p e n m e t we r ke n . He t
oververhitting-waarschuwingslampje op
het bedieningspaneel brandt of knippert
wanneer deze beveiligingsfunctie is
geactiveerd.
●
Wanneer de oververhitting-beveiligingsfunctie
is geactiveerd, moet u het gereedschap
goed laten afkoelen (minstens 30 minuten).
Het ge r eedsc h ap k a n weer g ebrui k t
word e n wanneer he t ov e rverhi t tingwaarschuwingslampje uitgaat.
●
Zorg ervoor dat u het gereedschap niet
zodanig gebruikt dat de oververhittingbeveiligingsfunctie veelvuldig in werking
treedt.
●
Als het gereedschap continu wordt gebruikt
onder omstandigheden met hoge belasting
of bij hoge omgevingstemperaturen (zoals
in de zomer), bestaat de kans dat de ove
rverhittingbeveiligingsfunctie veelvuldig in
werking treedt.
●
Als het gereedschap wordt gebruikt
bi j la g e omgev i n gs t e mp e r at u r e n
(zoals in de winter) of als deze tijdens
ge bruik ve elvuldig wordt stopgezet,
bestaat de kans dat de oververhittingbeveiligingsfunctie niet in werking treedt.
●
De optimale omgevingstemperatuur is
tussen 0°C (32°F) en 40°C (104°F).
Als de accu word t g ebruikt ter wijl d e
temperatuur van de accu lager is dan 0°C
(32°F), kan het voorkomen dat het elektrisch
gereedschap niet goed functioneert.
●
Laat een koude accu (kouder dan 0°C
(32°F)), voordat deze wordt opgeladen
in een warme omgeving, eerst minimal
een uur in deze ruimte liggen om op
temperatuur te komen.
(3) Waarschuwingslampje voor lage
accuspanning
Uit
(normale
werking)
Knippert
(Accu is ontladen)
De accubeveiligingsfunctie
is geactiveerd.
- 58 -
EY7460_EY7960_Book.indb 58 2013-12-2 16:12:47
Page 59

Buitensporige (volledige) ontlading van
een Li-ion accu heeft een zeer nadelige
invloed op de levensduur van de accu.
Het gereedschap is uitgerust met een
accu-beveiligingsfunctie om buitensporige
ontlading van de accu te voorkomen.
●
De a ccu-bev e iliging s functie wo r dt
geactiveerd meteen voordat de accu
ontla den is en zorgt ervoor dat het
w a a r s c h u w i n g s l a m p j e vo o r lag e
accuspanning begint te knipperen.
●
Als u ziet dat het waarschuwingslampje
voor lage accuspanning knippert, moet u
de accu meteen opladen.
●
Als u het gebruik begint met een accu
die niet voldoende is opgeladen, dan kan
het zijn dat het apparaat ineens stopt met
werken zonder dat het ‘accu bijna leeg’-
waarschuwingslampje eerst ikkert. Dit is
een teken dat er te weinig accuvermogen
is en dat het accupack voor verder
gebruik zal moeten worden opgeladen.
●
Als er plotseling te veel vermogen wordt
gevergd van het apparaat kan de motor
vergrendelen, de beveiligingssensor tegen
overontlading is mogelijk ingeschakeld en
het ‘accu bijna leeg’-waarschuwingslampje
kan flikkeren. Het lampje zal ophouden
met flikkeren wanneer u de oorzaak van
de mo torvergrend eling opl ost e n het
apparaat opnieuw start.
Wanneer de accu niet wordt gebruikt,
dient u deze uit de buurt van metalen
voorwerpen te houden zoals paperclips,
munten, sleutels, nagels, schroeven of
andere kleine metalen voorwerpen die de
aansluitpunten van de accu met elkaar in
contact kunnen brengen.
Wanneer de aansluitpunten van de accu
worden kortgesloten, kan dit resulteren in
vonken, brandwonden of zelfs brand.
●
Zorg er bij gebruik van de accu voor dat
de werkplaats goed geventileerd is.
●
Wanneer de accu van het gereedschap
wordt losgemaakt, moet u meteen het
accudeksel op de accu aanbrengen om
te voorkomen dat er stof en vuil op de
accu-aansluitingen komt waardoor er
kortsluiting kan ontstaan.
Levensduur van de accu
De levensduur van d e oplaad bar e
accu is niet onbeperkt. U dient een
nieuwe accu aan te schaffen indien
de gebruikstijd na de accu geladen te
hebben aanzienlijk korter wordt.
[Accu]
Voor een juist gebruik van de
accu
Li-ion accu
●
Voor een optimale levensduur van de
Li-ion accu moet u de accu na gebruik
opbergen zonder dat u deze oplaadt.
●
Kijk bij het laden van de accu of de
aansluitingen op de acculader vrij zijn
van vreemde bestanddelen zoals stof
en water, enz. Reinig de aansluitingen
als u vreemde bestan ddelen op de
aansluitingen aantreft.
De levensduur van de accu-aansluitingen
kan tijdens gebruik nadelig beïnvloed
worden door vreemde bestanddelen
zoals stof en water, enz.
- 59 -
EY7460_EY7960_Book.indb 59 2013-12-2 16:12:47
Page 60

Aanbevelingen voor gebruik
Accudeksel
Aansluitpunten
label
Zorg ervoor het accudeksel te
gebruiken
●
Wanneer de accu niet wordt gebruikt, de
accu op een zodanige manier bewaren
dat vreemde bestanddelen zoals stof en
water, enz. de aansluitingen niet kunnen
verontreinigen.
●
Kijk bij het laden van de accu of de
aansluitingen op de acculader vrij zijn
van vreemde bestanddelen zoals stof
en water, enz. Reinig de aansluitingen
als u vreemde bestanddelen op de
aansluitingen aantreft.
De levensduur van de accu-aansluitingen
kan tijdens gebruik nadelig beïnvloed
worden door vreemde bestanddelen
zoals stof en water, enz.
OPGELET:
Let bij het gebruik van het gereedschap
op deze wijze op het volgende om de
motor en de accu te beschermen.
●
Als de motor en de accu oververhit
raken, wordt de beveiligingsfunctie
geactiveerd en zal de motor en de accu
stoppen met werken.
Voor een veilig gebruik
●
Het aanbrengen van de accu moet om
veiligheidsredenen in twee stappen
worden uitgevoerd. Zorg dat de accu
vóór gebruik goed op het gereedschap is
bevestigd.
●
Als de accu niet goed is bevestigd
wa n n e e r de sch a k el a a r w o r d t
aangezet, gaan het oververhitting
waarschuwingslampje en het laag
acc unive au waars chuw i ngsl ampje
knipperen om aan te geven dat veilig
gebruik niet mogelijk is en zal de
hoofdeenheid niet normaal draaien.
Plaats de accu in de hoofdeenheid van
het gereedschap totdat het rode of gele
label verdwijnt.
Li-ion accu
Bij dit product zijn batterijen geleverd.
Wanneer deze leeg zijn, moet u ze niet
weggooien maar inleveren als KCA.
[Acculader]
Opladen
OPGELET:
●
De acculader is ontworpen voor gebruik
op het lichtnet wanneer dit overeenkomt
met de ge g e v e n s ve r m e l d op h e t
specificatieplaatje. Laad uitsluitend op
met de spanning aangegeven op het
specicatieplaatje van het apparaat, bijv.
230 V/50 Hz.
●
Probeer niet om het apparaat op een
andere spanning of fr e q u e n t i e te
gebruiken!
●
Als de temperatuur van de accu onder
ongeveer −10°C komt, zal het laden
aut o mati s ch s topge zet worde n om
beschadiging van de accu te voorkomen.
●
De optimale omgevingstemperatuur is
tussen 0°C (32°F) en 40°C (104°F).
Als de accu wordt gebruikt terwijl de
temperatuur van de accu lager is dan
0° C (32 °F), kan h et voorkomen dat
het elektrisch gereedschap niet goed
functioneert.
●
Laat een koude accu (kouder dan 0°C
(32°F)), voordat deze wordt opgeladen
in een warme omgeving, eerst minimaal
- 60 -
EY7460_EY7960_Book.indb 60 2013-12-2 16:12:47
Page 61

een uur in deze ruimte liggen om op
temperatuur te komen.
●
Laat de lader afkoelen wanneer u meer
dan twee accu’s na elkaar oplaadt.
●
S t e e k u w v i n g e r s n i e t i n d e
co ntactope ning wanne er u de lader
vastpakt.
OPGELET:
Om brandgevaar en beschadiging van de
acculader te voorkomen.
●
G e b r ui k g e e n s t r o om v a n e en
motorgenerator.
●
Voorkom dat de ventilatiegaten van de
lader en de accu worden bedekt.
●
Maak de acculader los wanneer deze
niet wordt gebruikt.
OPMERKING:
De accu is niet volledig opgeladen
wanneer u deze koopt. Laad de accu
daarom voor gebruik op.
Opladen
1. Steek de lader in een stopcontact.
OPMERKING:
Wanneer de stekker in het stopcontact
wordt gestoken, kunnen er vonken
ontstaan, maar dit is niet gevaarlijk.
2. Plaats de accu stevig in de lader.
1) Zet de uitlijntekens tegenover elkaar
en plaats de accu in de acculader.
2) Schuif de accu in de richting van de
pijl naar voren.
Uitlijntekens
De oranje standby-indicator knippert
tot de accu is afgekoeld.
Vanaf da t moment wordt de accu
automatisch opnieuw geladen.
4. De laadi ndic ator (groe n) k nipp ert
langzaam wanneer de accu ongeveer
80% is opgeladen.
5. Wanneer het opladen is voltooid, zal de
groene laadindicator uitgaan.
6. Als de temperatuur van de accu minder
dan 0°C is, zal het volledig opladen van
de accu langer duren dan de standaard
oplaadtijd.
Zelfs nadat de accu volledig is opgeladen,
zal deze in dit geval slechts ongeveer
50% van het accuvermogen hebben in
vergelijking met een accu die bij normale
bedrijfstemperatuur volledig is opgeladen.
7. Als de laadindicator (groen) niet uitgaat,
moet u contact opneme n met een
ofciële dealer.
8. Als een volledig opgeladen accu opnieuw
in de acculader wordt geplaatst, zal
het oplaadlampje oplichten. Na enkele
minuten zal de groene laadindicator
uitgaan.
9. Ve r w i j der de a c c u ter w i jl u d e
accuontgrendeltoets omhoog houdt.
Accuontgrendeltoets
3. De laadindicator licht op tijdens het
laden.
Wanneer de accu is geladen, wordt
automatisch een interne elektronische
schakeling geactiveerd die voorkomt
dat de accu wordt overladen.
●
Wanneer de accu warm is, zal deze
niet worden opgeladen (bijvoorbeeld
direct na intensief gebruik).
- 61 -
EY7460_EY7960_Book.indb 61 2013-12-2 16:12:48
Page 62

LAMPINDICATIES
(Groen)
(Oranje)
Opladen voltooid. (Volledig opgeladen.)
De accu is ongeveer 80% opgeladen.
Aan het opladen.
Lader is aangesloten op een stopcontact.
Klaar om op te laden.
Laadstatusindicator
De aanduiding is Links: groen en Rechts: oranje.
De accu is koud.
De accu wordt langzaam opgeladen om de belasting van de
accu te verminderen.
De accu is warm.
Het opladen zal beginnen wanneer de temperatuur van de accu
is gedaald. Als de temperatuur van de accu minder dan -10°C is,
zal de laadindicator (oranje) ook gaan knipperen. Het opladen
begint wanneer de statustemperatuur van de accu hoger wordt.
Opladen is niet mogelijk. Stof op de accu of accu defect.
Uit Brandt
Knippert
Informatie voor gebruikers betreffende het verzamelen en verwijderen van oude uitrustingen en lege batterijen
Deze symbolen op de producten, verpakkingen, en/of begeleidende
documenten betekenen dat gebruikte elektrische en elektronische
producten en batterijen niet met het algemene huishoudelijke afval
gemengd mogen worden.
Voor een correcte behandeling, recuperatie en recyclage van oude
producten en lege batterijen moeten zij naar de bevoegde verzamelpunten
gebracht worden in overeenstemming met uw nationale wetgeving en de
Richtlijnen 2002/96/EC en 2006/66/EC.
Door deze producten en batterijen correct te verwijderen draagt u uw
steentje bij tot het beschermen van waardevolle middelen en tot de
preventie van potentiële negatieve effecten op de gezondheid van de
mens en op het milieu die anders door een onvakkundige afvalverwerking
zouden kunnen ontstaan.
Voor meer informatie over het verzamelen en recycleren van oude
producten en batterijen, gelieve contact op te nemen met uw plaatselijke
gemeente, uw afvalverwijderingsdiensten of de winkel waar u de goederen
gekocht hebt.
Voor een niet-correcte verwijdering van dit afval kunnen boetes opgelegd
worden in overeenstemming met de nationale wetgeving.
Voor zakengebruikers in de Europese Unie
Indien u elektrische en elektronische uitrusting wilt vewijderen, neem dan contact op met
uw dealer voor meer informatie.
- 62 -
EY7460_EY7960_Book.indb 62 2013-12-2 16:12:48
Page 63

[Informatie over de verwijdering in andere landen buiten de Europese Unie]
Deze symbolen zijn enkel geldig in de Europese Unie. Indien u wenst deze producten
te verwijderen, neem dan contact op met uw plaatselijke autoriteiten of dealer, en vraag
informatie over de correcte wijze om deze producten te verwijderen.
V. ONDERHOUD
●
Maak het gereedschap met een droge, zachte doek schoon. Gebruik nooit een vochtige
doek, witte spiritus, benzine of andere ontvlambare middelen om het gereedschap schoon
te maken.
●
In het geval er water binnen in het gereedschap of de accu is terechtgekomen, zo
spoedig mogelijk het water laten uitlekken en laten drogen. Verwijder nauwkeurig alle stof
of ijzervijlsel dat zich binnen in het gereedschap heeft verzameld. Neem contact op met
een reparatiedienst als u bij het gebruik van het gereedschap problemen ondervindt.
VI. ACCESSOIRES
Gebruik alleen bits die geschikt zijn voor de maat van de boorkop.
VII. AANHANGSEL
AANBEVOLEN MAXIMALE CAPACITEITEN
Model EY7460 EY7960
Machineschroef M8
Schroeven
Boren
Houtschroef ø 10 mm
Zelfborende
schroef
In hout ø 38 mm
In metaal ø 13 mm
Voor metselwerk --- 13 mm
ø 6 mm
GARANTIE-SUPPLEMENT
De defecten en beschadigingen die veroorzaakt worden door langdurig continu gebruik (bijv.
werkzaamheden in een fabriek aan de lopende band enz.), vallen niet onder de garantie.
- 63 -
EY7460_EY7960_Book.indb 63 2013-12-2 16:12:48
Page 64

VIII. TECHNISCHE GEGEVENS
GEREEDSCHAP
Model EY7460 EY7960
Motorspanning 21,6 V CD
-1
Onbelast
toerental
Aantal kloppen
per minuut
Boorkopcapaciteit ø1,5 mm - ø13 mm
Koppelingsdraaimoment Ong. 1,0 N•m (10kgf-cm) – 6,9 N•m (70kgf-cm)
Totale lengte 232mm 245mm
Gewicht (met accu
Laag 100~400 min
Hoog 350~1500 min
Laag --- 1800~7200 min
Hoog --- 6300~27000 min
EY9L61)
2,45 kg 2,55 kg
ACCU
Modelnr. EY9L61 EY9L62
Soort accu Li-ion accu
spanning DC 21,6 V
Accu
gedetailleerde
gegevens
3,6 V × 6 cellen 3,6 V × 12 cellen
ACCULADER
Modelnr. EY0L82
Toelaatbaar
vermogen
Gewicht 0,93 kg (2 lbs)
Laadtijd
Zie het specicatieplaatje op de onderkant van de acculader.
EY9L61 EY9L62
Bruikbaar
: 50 min
Vol: 60 min Vol: 85 min
(rpm)
-1
(rpm)
Bruikbaar
: 65 min
-1
(bpm)
-1
(bpm)
OPMERKING: In deze tabel zijn mogelijk modellen opgenomen die niet in de handel
verkrijgbaar zijn.
Zie de meest recente algemene catalogus.
OPMERKING: Zie de ingesloten garantiekaart voor de naam en het adres van de dealer.
- 64 -
EY7460_EY7960_Book.indb 64 2013-12-2 16:12:48
Page 65

Manual de instrucciones original: Inglés
Traducción del manual de instrucciones
original: Otros idiomas
I. USO PREVISTO
Estas herramientas se pueden usar
para apretar tornillos en el modo de
acoplamiento y para perforar orificios
de madera y metal en el modo taladro.
Además, se puede usar el modelo
EY7960 para perforar orificios en concreto suave y materiales similares en
modo de martillo.
Lea el folleto de las “Instrucciones de
seguridad” y lo que se describe a continuación, antes de usarlo.
II. REGLAS DE
SEGURIDAD
ADICIONALES
1) Use auriculares protectores.
La exposición al ruido puede provocar
una pérdida auditiva.
2) Utilice el mango auxiliar entregado
con la herramienta.
Una pérdida de control puede causar
provocarle heridas.
3)
Las herramientas eléctricas deben
sujetarse por las superficies de
empuñadura aisladas cuando se realice
una operación en la que la herramienta
de corte pueda entrar en contacto con
cableado oculto; el contacto con un
cable portador de corriente provocará la
transmisión de la corriente a las partes
metálicas expuestas de la herramienta
y el operador podría sufrir una descarga
eléctrica.
4) Utilice una máscara de polvo, si el
trabajo produce polvo.
5) Tenga en cuenta que esta herramienta
e s tá s i e m p r e e n e s t a d o d e
funcionamiento, dado que no necesita
enchufarse a ninguna toma eléctrica.
6) Al taladrar o atornillar en paredes,
pisos, etc. puede habe r cab l e s
eléctricos “con co r r i e n t e ” . ¡N O
TOQUE EL PORTABROCAS RÁPIDO
HEXÁGONAL NI NINGUNA PIEZA
METÁLIC A DELANTE R A DE L A
HERRAMIENTA!
Su jete la herrami enta sólo por la
empuña dura plásti ca para evitar
sacudi das eléctric as en caso d e
que atornille o clave algún cable de
electricidad.
7) Si la broca se atasca, desconecte
inmediatamente el disparador para
evitar una sobrecarga que pudiera
dañar la batería o el motor.
Utilice la marcha atrás para aojar las
brocas atascadas.
8) NO ut ilice la palanca de avanc e/
marcha atrás cuando esté activado
el interruptor principal. La batería se
descargará rápidamente y la unidad
puede dañarse.
9) Puede que el cargador se caliente
ligeramente durante la operación
de carga, pero esto es normal. NO
cargue la bate ría dura nte largos
periodos de tiempo.
10) C u a n d o gu a r d e o t r a n s porte la
herramienta, coloque la palanca de
avance/marcha atrás en la posición
central (bloqueo del interruptor).
11) No fuerce la herramienta manteniendo
parcialmente presionado el disparador
de control de velocidad (modo de
control de velocidad) para parar el
motor.
12) No haga funcionar el select or de
velocidad (interruptor BAJO-ALTO)
mientras tira del disparador de control
de velocidad. Esto puede desgastar
rápidamente la batería recargable o
dañar el mecanismo interno del motor.
- 65 -
EY7460_EY7960_Book.indb 65 2013-12-2 16:12:49
Page 66

Símbolo Signicado
V Voltios
Corriente continua
n
o
...min
Ah
-1
Velocidad sin carga
Revoluciones o
reciprocaciones por minuto
Capacidad eléctrica del
bloque de batería
Rotación en avance
Rotación en inversión
Rotación con martilleo
Solo rotacion
Para reducir el riesgo de
lesiones el usuario debe
leer y comprender el
manual de instrucciones.
Sólo para uso en interiores.
¡ADVERTENCIA!
●
Utilice siempre las baterías Panasonic
diseña d a s pa r a su uso con esta
herramienta recargable.
●
Panasonic no asume ninguna responsabilidad
por daños o accidentes provocados por el
uso de un paquete de baterías recicladas y
un paquete de baterías no originales.
●
No tire la batería al fuego ni la exponga
a temperaturas elevadas.
●
No perfore la batería con clavos o
similar, ni la golpee, la desmonte ni
intente modicarla.
●
Evite el contacto de los terminales de la
batería con objetos metálicos.
●
No transporte ni guarde la batería en
el mismo lugar que clavos u objetos
metálicos similares.
●
No ca rgue la bat ería en un lu gar
som e t i d o a al t a s te m p e r a tu r a s ,
por ejemplo cerca del fuego o bajo
luz solar dir ecta; la batería podría
sobrecalentarse, incendiarse o incluso
explotar.
●
Utilice siempre el cargador diseñado
para tal fin para cargar la batería. De
no ser así, la batería podría presentar
fuga s , sobrec a lentar s e o incluso
explotar.
●
De s p u é s de ex tr a e r e l paq u e t e
de baterías de la herramienta o el
cargador, siempre reinstale la cubierta
del paq uete . D e o tra maner a, los
contactos de la batería podrían ser
cortados, causando el riesgo de fuego.
●
Cu a n d o el paque t e d e pil a s se
deteriora, reemplácelo con uno nuevo.
El uso continuo d e un paquet e de
pilas dañado puede ser causa de la
generación de calor, ignición o rotura
de batería.
- 66 -
EY7460_EY7960_Book.indb 66 2013-12-2 16:12:50
Page 67

III. MONTAJE
Colocación o extracción de la
broca
NOTA:
Al poner o extraer una broca o cubo,
desconecte la batería de la herramienta
o coloque el interruptor en la posición
central (bloqueo de interruptor).
Colocación y extracción de la
batería
1. Para conectar la batería:
Alinee las m a r c as de al i n e a ción
re saltadas y acople e l paquete de
baterías.
●
Deslice la bater ía hasta que se
bloquee en su posición.
Esta herramienta está equipada con un
portabrocas de taladro sin llave.
1. Colocación
Inserte la broca y gire el collar de
bloqueo en sentido horario (visto desde
adelante) para apretar fi rmeme nte
hasta que deje de hacer chasquidos.
2. Desmontaje
Gire el collar de bloqueo en sentido
antihorario (visto desde adelante) y
desmonte la broca.
Collar de bloqueo
NOTA:
Si hay un juego excesivo en la broca,
asegure el taladro en su lugar y 1
abra las garras de la broca girando el
collar de bloqueo y 2 apriete el tornillo
(tornillo de rosca a la izquierda) con
un destornillador girando en sentido
antihorario (visto desde adelante).
Marcas de alineación
2. Para extraer la batería:
Presione el botón hacia abajo y deslice
el paquete de baterías hacia delante.
Botón
Mango de soporte
Posicione el mango de soporte en la
posición que más le acomode y ajústela
rmemente de manera segura.
Apriete
Aoje
Desmonte el mango cuando coloque la
herramienta en la caja de guardado.
- 67 -
EY7460_EY7960_Book.indb 67 2013-12-2 16:12:50
Page 68

IV. FUNCIONAMIENTO
[Cuerpo principal]
Funcionamiento del interruptor
1. La velocidad aumenta de acuerdo
con la fuerza a la que presiona e l
disparador. Cuando empiece el trabajo,
presione ligeramente el disparador para
empezar una rotación lenta.
2. Se utiliza un controlador electrónico de
realimentación para darle una fuerte
torsión incluso a bajas velocidades.
3. El freno funciona cuando se suelta
el d ispara d or y el mo t or s e pa ra
inmediatamente.
PRECAUCIÓN:
Cuando se opera la herramienta tirando
del disparador, puede que genere un
intervalo momentáneamente antes de
iniciarse la rotación. Esto no es señal
de un malfuncionamiento.
* Este interv alo o curre cuando se
ini c ia e l sistem a de c i rcuit o s de
la h erramienta cuando se tira del
disparador por primera vez después de
instalar un nuevo paquete de batería o
después de que la herramienta no ha
sido usada por al menos 1 minuto (o
al menos 5 minutos desde que el LED
está encendido). La rotación se iniciará
sin ningún intervalo durante segundas
y subsiguientes operaciones.
NOTA:
Cua n do e l fre no f u ncion a, p uede
escucharse un sonido de frenado. Esto
es normal.
Funcionamiento del interruptor y de la palanca de avance/
marcha atrás
PRECAUCIÓN:
Para impedir que se produzcan daños,
no utilice la unidad de palanca de
avance/ma rcha a trás; la broca se
detiene del todo.
Funcionamiento del interruptor de rotación de avance
1. Empuje la palanca para que se produzca
una rotación de avance.
2.
Apriete ligeramente el gatillo del disparador
para iniciar la herramienta con lentitud.
3. La velocidad aumenta con la fuerza con
la que presiona el disparador para un
eciente apriete de tornillos y taladrado.
El freno funciona y la broca se para
inmediatamente cuando se suelta el
disparador.
4. Tr as utilizarl o, coloque la palanca
en su posición central (bloqueo del
interruptor).
Funcionamiento del interruptor de rotación inversa
1. Empuje la palanca para que se produzca
una rotación inversa. Compruebe la
Direcc ión de l a rotación antes de
utilizarlo.
2. Aprie te l igera mente el gatil l o del
disparador para iniciar la herramienta
con lentitud.
3. Tr as utilizarl o, coloque la palanca
en su posición central (bloqueo del
interruptor).
Ajuste de torsión del embrague
Ajuste la torsión a uno de los 18 ajustes
de embrague o a l a posición “
(EY7460).
Ajuste la torsión a uno de los 18 ajustes
de embrague o a la posición “
(EY7960).
”
”, “ ”
NOTA:
Asegúrese siemp re de para r e l
Avance Marcha
Bloqueo del interruptor
EY7460_EY7960_Book.indb 68 2013-12-2 16:12:51
atrás
- 68 -
funcionamiento de la herramienta
y desconectarlo del trabajo cuando
seleccione el modo de Martilleo con
respecto al modo de taladrado o
cuando cambia al modo de taladrado
del modo de Martilleo por rotación
del mando del embrague.
Page 69

PRECAUCIÓN:
Realice el ajuste del embrague en esta
marca ( ) antes de usar.
Si no puede colocarse el selector de
embrague en el modo “taladro” o “martillo”
después de utilizar el taladro con la
función de embrague, coloque el selector
de embrague en la posición 1 y accione
el embrague durante un segundo.
Selección de velocidad
Elija una alta o baja velo cid ad de
acuerdo al uso.
BAJA
A medida que aumenta la fuerza de
presión del disparador de control de
velocidad variable, mayor es la velocidad.
PRECAUCIÓN:
●
Inspeccione el interruptor selector de
velocidad antes de utilizar.
●
Utili c e a ba j a ve locidad cua n d o
ne cesite una alta tor sión durante
el fu ncion amien to ( El uso a alta
velocidad cuando se necesita una alta
torsión puede provocar una avería del
motor.)
●
No haga funci onar el interrup tor
selector de velocidad (BAJO-ALTO)
mientras presiona el disparador de
co ntrol de veloc idad. Esto pue de
desgastar rápidam ent e la bat erí a
recarga ble o dañ ar el mecanismo
interno del motor.
* Vea las especicaciones para “MÁXIMAS
CAPACIDADES RECOMENDADAS”.
PRECAUCIÓN:
●
Para evitar un aumento excesivo de
temperatura de la superficie de la
herramienta, no haga funcionar la
herramienta continuamente utilizando
dos o más baterías. Es necesario que
la herramienta tenga un tiempo de
ALTA
enfriamiento antes de poder cambiar
por otra batería.
●
No cierre los orificios de ventilación
en los lados del cuerpo durante el
fun cion amie nto. De l o c ontr ario ,
se v e afectado ad v ersamen t e el
funcionamiento de la máquina y se
produce una avería.
●
No manche la herramienta (motor).
Esto puede dañar la unidad.
●
Utilice la herramienta de tal forma
que se evite que el aire que sale por
los oricios de ventilación del cuerpo
sople directamente sobre su piel. De
lo contrario, puede quemarse.
Función de bloqueo de broca
1. Con el interruptor disparador no activado
y una broca de destornillador bloqueada
en su posición, la herramienta puede
utilizarse como un destornillador manual
(hasta 40 N·m, 408 k f-cm, 353 pulg.lbs.)
Habrá un ligero juego en la broca pero
esto no es un mal funcionamiento.
2. Esta función es útil para apretar tornillos
que necesiten una mayor torsión que
la torsión máxima del destornillador
(p osición
en el embrague) , par a
conrmar el apriete de un tornillo o para
aojar un tornillo demasiado apretado.
Panel de controle
(1)
(1) Luz LED
Antes de usar la luz LED,
tire siempre del interruptor
de alimentación una vez.
Presione el botón de luz
LED
.
(3)
(2)
- 69 -
EY7460_EY7960_Book.indb 69 2013-12-2 16:12:52
Page 70

La luz se enciende con muy poca corriente
y no afecta adversamente el funcionamiento
de la herramienta durante el uso o la
capacidad de la batería.
PRECAUCIÓN:
●
La luz LED integrada se ha diseñado
pa ra iluminar la peq ueña área de
trabajo temporalmente.
●
No lo utilice en lugar de una linterna
normal ya que no tiene suficiente
brillo.
●
La luz LED se apaga cuando la
herramienta no se ha usado por 5
minutos.
Precaución: NO MIRE FIJAMENTE EL
HAZ DE LUZ.
El uso d e c ontroles o ajust es o la
realización de otros procedimientos
que no sean los especificados puede
producir una exposición a radiación
peligrosa.
(2) Luz de advertencia de
sobrecalentamiento
para usar cuando se apaga la luz de
advertencia de sobrecalentamiento.
●
Evi te util izar la h erra mien ta d e t al
forma que la fun ción de prot ecc ión
de so bre c a l e n t amie n t o se ac t ive
repetidamente.
●
Si la herramienta funciona continuamente
bajo condiciones de carga pesada o si se
usa en condiciones de alta temperatura
(t a l co m o dur a n t e el v e r a n o) , la
protección contra sobrecalentamiento
puede activarse frecuentemente.
●
Si la herramienta se usa en condiciones
de temperatura fría (tal como durante el
invierno) o si se detiene con frecuencia
durante el uso, la protección contra
sobrecalentamiento quizás no se active.
●
La variación de temperatura ambiente es
de entre 0°C (32°F) y 40°C (104°F).
Si la batería s e ut i l i z a cu a n d o la
temperature de la batería es inferior a
0°C (32°F), la herramienta puede no
funcionar correctamente.
●
Cuando se vaya a cargar una batería
fría (uno s 0 °C (32 °F) o meno s) en
un cuarto cálido, deje la batería en la
habitación durante al menos una hora y
cárguela cuando se haya calentado a la
temperatura de la habitación.
Apagado
(funcionamiento
normal)
Iluminado:
Sobrecalentamiento
(motor)
Destella:
Sobrecalentamiento
(batería)
Indica que se detuvo el
funcionamiento por un
sobrecalentamiento de la
batería o el motor.
Para proteger el motor o la batería ,
ase gúres e de ob serva r l o sigui ente
cuando efectúe esta operación.
●
Si el motor o la batería se calienta,
se activará la función de protección
y el motor o la b a t e r í a de j a r á de
funcionar. La lámpara de advertencia
de sobrecalentamiento en el panel de
control se ilumina o destella cuando esta
característica está activada.
●
Si se activa la función de protección
de sobrecalentamiento, espere hasta
que la herramienta se haya enfriado
completamente (por lo me n o s 30
minut os) . La herramienta está lista
(3)
Luz de advertencia de batería baja
Apagado
(funcionamiento
normal)
Destella (Sin carga)
Se activó la función
de protección de la
batería
Una descarga excesiva (completa) de las
baterías de Li-ión acorta dramáticamente
su vida de servicio. El destornillador
contiene una función de protección de
batería diseñada para evitar una descarga
excesiva de la batería.
●
La función de protección de batería se
activa inmediatamente antes de que la
batería se quede completamente sin
carga haciendo que destelle la luz de
advertencia batería baja.
●
Si se da cuenta que destella la luz de
advertencia de batería baja, cargue
inmediatamente la batería.
- 70 -
EY7460_EY7960_Book.indb 70 2013-12-2 16:12:52
Page 71

●
Si se comienza c o n poca batería
restante, la herramienta puede que pare
de funcionar sin que parpadee primero
la lámpara de advertencia de batería
baja. Esto indica que hay muy poca
potencia restante en la batería para
usar la herramienta, y el paquete de
batería debe ser cargada antes de seguir
usándola.
●
Si la herramienta está sujeta a una carga
repentina durante su uso que cause
que el motor de bloquee, puede que
se dispare el sensor de prevención de
sobrecarga, y la lámpara de advertencia
de batería baja puede parpadear. La
lámpara parará de parpadear una vez
que se aborde la causa del bloqueo del
motor y disparo de ciclo.
[Bloque de pilas]
Para un uso adecuado de la
batería
Batería de Li-ión
●
Para una vida óptima de la batería,
guarde la batería de Li-ión siguiendo el
uso sin carga.
●
Cua ndo cargue la caja de bate ría,
conf i rme q u e los termin a les e n el
cargador de batería e stén libres de
materias extrañas tales como polvo y
agua, etc. Limpie los terminales antes de
cargar la caja de batería si hay materias
extrañas en los terminales.
La vida de los terminales de la caja
de batería puede verse afectada por
materias extrañas tales como polo y
agua, etc. durante su funcionamiento.
●
Cu a n d o no se utili z a la bat e r í a ,
manténgala separada de otros objetos
metál i c o s , como: clips de pa pel,
monedas, llaves, clavos, tornillos u otros
objetos metálicos pequeños que pueden
actuar de conexión entre un terminal y el
otro.
Un cortocircuito entre los terminales de
la batería pueden ocasionar chispas,
quemaduras o incendios.
●
Cuando haga funcionar con la batería,
asegúrese que el lugar de trabajo está
bien ventilado.
●
Cuando se saca la batería del cuerpo
principal de la herramienta, vuelva a
cerrar inmediatamente la cubierta de
batería, para evitar que el polvo o la
suciedad puedan ensuciar los terminales
de batería y provocar un cortocircuito.
Vida útil de la batería
Las baterías recargables tienen una
vida útil limi tada . Si el tiem po de
funcionamiento se acorta mucho tras
la recarga, sustituya la batería por una
nueva.
Recomendaciones de uso
Cubierta de batería
Terminales
rojo
Asegúrese de utilizar la cubierta de
la caja de batería
●
Cuando no utilice la caja de batería,
guarde la batería de tal forma que las
materi as extr añas tales com o p olvo
y agua, etc. ensucien los terminales.
Asegúrese de colocar la cubierta de la
caja de batería de tal forma de proteger
los terminales de la batería.
●
Cua ndo cargue la caja de bate ría,
conf i rme q u e los termin a les e n el
cargador de batería e stén libres de
materias extrañas tales como polvo y
agua, etc. Limpie los terminales antes de
cargar la caja de batería si hay materias
extrañas en los terminales.
- 71 -
EY7460_EY7960_Book.indb 71 2013-12-2 16:12:53
Page 72

La vida de los terminales de la caja
de batería puede verse afectada por
materias extrañas tales como polo y
agua, etc. durante su funcionamiento.
PRECAUCIÓN:
Para proteger el motor o la batería,
as egúrese de observar lo s iguiente
cuando efectúe esta operación.
●
Si el motor o la batería se calienta, se
activará la función de protección y la
batería dejará de funcionar.
Para un uso más seguro
●
L a b a te r ía e s tá d i s eñ a da p a ra
conectarse siguiendo dos pasos por
motivos de seguridad. Compruebe que
la batería está conectada correctamente
en la unidad principal antes de utilizar la
herramienta.
●
Si l a ba t e r í a no ha qu e d a d o bi en
conect ada, a l a ctivar el i nterrup tor
parpadearán la lámpara de aviso de
sobrecalentamiento y la lámpara de
aviso de bajo nivel de carga de batería,
par a indica r que no es posib l e un
fu ncionamiento seg uro, y la unidad
princ ipa l no girará c on normalidad.
Conecte la batería a la unidad de la
herramienta hasta que el indicador rojo o
amarillo desaparezca.
[Cargador de la batería]
Carga
PRECAUCIÓN
●
El cargador está diseñado para funcionar
con alimentación eléctrica doméstica
estándar únicamente tal y como se indica
en la placa de características. Realice
la ca rga únicamente con la tensión
indicada en la placa de características
de la unidad. P. ej. 230 V/50 Hz.
●
No intente utilizarlo con ninguna otra
tensión o frecuencia nominal.
●
Si la temperatura de la caja de batería
cae unos −10°C (14°F), la carga se
parará automáticamente para evitar un
deterioro de la batería.
●
La variación de temperatura ambiente es
de entre 0°C (32°F) y 40°C (104°F).
Si la batería s e ut i l i z a cu a n d o la
temperatura de la batería es inferior a
0°C (32°F), la herramienta puede no
funcionar correctamente.
●
Cuando se vaya a cargar una batería
fría (uno s 0 °C (32 °F) o meno s) en
un cuarto cálido, deje la batería en la
habitación durante al menos una hora y
cárguela cuando se haya calentado a la
temperatura de la habitación.
●
Deje qu e se en f ríe e l ca rgador al
cargar más de dos baterías de forma
consecutiva.
●
No introduzca sus dedos dentro del
hueco de l contacto, cu a ndo es t é
sujetando el cambiador o en ninguna
otra ocasión.
PRECAUCIÓN
Para impedir el riesgo de incendio o daños
del cargador de batería.
●
No utilice una fuente de alimentación de
un generador motorizado.
●
No tapone los oricios de ventilación del
cargador y la batería.
●
Desenchufe el cargador cuando no lo
utilice.
NOTA:
Su batería no está totalmente cargada
al momento de comprarla. Asegúrese
de cargar la batería antes de utilizarla.
Cómo cargar el dispositivo
1. Enchufe el cargador en la fuente de
alimentación de CA.
NOTA:
Se pueden producir chispas cuando se
inserta el enchufe en la alimentación
eléctrica de CA pero este no es un
problema en términos de seguridad.
2. Conecte el paquete de batería con
rmeza al cargador.
1) Alinee las marcas de alineación y
coloque la batería en el enchufe del
cargador.
- 72 -
EY7460_EY7960_Book.indb 72 2013-12-2 16:12:53
Page 73

2) Deslice hacia adelante en el sentido
de la echa.
Marcas de alineación
3. La luz indicadora de carga permanecerá
encendida durante la carga. Cuando
haya terminado la carga, se accionará
automáticamente un conmutador
electrónico interno para impedir
cualquier sobrecarga.
●
No podrá cargar la batería si ésta
está todavía caliente (por ejemplo,
inmediatamente después de haber
trabajado mucho).
La luz de espera naranja seguirá
destellando hasta que se enfríe la
batería.
La carga comenzará automáticamente.
4. La luz de c arga (verde) destellará
lentamente cuando la batería se haya
cargado a un 80%.
5. Cuando se completa la carga, la luz de
carga en verde se apagará.
6. Si la temperatura de la batería es de 0°C
o menos, la batería demora más en
cargarse completamente que el tiempo
de carga normal.
Incluso cuando la batería esté completamente
cargada, tendrá aproximadamente 50% de la
carga de una batería totalmente cargada a la
temperatura de funcionamiento normal.
7. Si no se enciende la luz (verde) de
carga consulte con un concesionario
autorizado.
8. Si se vuelve a colocar una batería
totalmente cargada en el cargador, se
encenderá la luz de carga. Luego de
algunos minutos, la lámpara de carga
en verde se apagará.
9. Extraiga la batería mientras mantiene
levantado el botón de desbloqueo de la
batería.
Botón de
desbloqueo de la
batería
INDICACIÓN DE LA LÁMPARA
La carga ha sido completada. (Carga completa.)
La batería se cargó en aproximadamente 80%.
Ahora cargando.
Se ha enchufado el cargador en la fuente de alimentación
de CA. Está preparado para cargar.
(Verde)
Apagada Encendida
(Naranja)
Luz de estado de carga
Aparecerá Izquierda: verde Derecha: naranja
La batería está fría.
La batería se esta cargando lentamente para reducir la carga
de la batería.
La batería está caliente.
La carga comenzará cuando baje la temperatura de la batería.
Si la temperatura de la batería es de –10°C o menos, la luz de
carga (naranja) también empezará a destellar. La carga empezará
cuando sube la temperatura de la batería.
No es posible realizar la carga. Existe un bloqueo de polvo o
una falla de la batería.
Parpadeando
- 73 -
EY7460_EY7960_Book.indb 73 2013-12-2 16:12:54
Page 74

Información para Usuarios sobre la Recolección y Eliminación
de aparatos viejos y baterías usadas
Estos símbolos en los productos, embalajes y/o documentos adjuntos,
significan que los aparatos eléctricos y electrónicos y las baterías no
deberían ser mezclados con los desechos domésticos.
Para el tratamiento apropiado, la recuperación y el reciclado de aparatos
viejos y baterías usadas, por favor, observe las normas de recolección
aplicables, de acuerdo a su legislación nacional y a las Directivas 2002/96/
CE y 2006/66/CE.
Al desechar estos aparatos y baterías correctamente, Usted estará
ayudando a preservar recursos valiosos y a prevenir cualquier potencial
efecto negativo sobre la salud de la humanidad y el medio ambiente que,
de lo contrario, podría surgir de un manejo inapropiado de los residuos.
Para mayor información sobre la recolección y el reciclado de aparatos y
baterías viejos, por favor, contacte a su comunidad local, su servicio de
eliminación de residuos o al comercio donde adquirió estos aparatos.
Podrán aplicarse penas por la eliminación incorrecta de estos residuos, de
acuerdo a la legislación nacional.
Para usuarios empresariales en la Unión Europea
Si usted desea descartar aparatos eléctricos y electrónicos, por favor contacte a su
distribuidor o proveedor a n de obtener mayor información.
[Informacion sobre la Eliminación en otros Países fuera de la
Unión Europea]
Estos símbolos sólo son válidos dentro de la Unión Europea. Si desea desechar estos
objetos, por favor contacte con sus autoridades locales o distribuidor y consulte por el
método correcto de eliminación.
V. MANTENIMIENTO
●
Utilice sólo un paño suave y seco para limpiar la herramienta. No utilice paños húmedos,
bencina, diluyentes u otros disolventes volátiles de limpieza.
●
Para el caso en que el interior de la herramienta o el paquete de pilas estén expuestos al
agua, drénelo o séquelo lo antes posible. Retire cuidadosamente cualquier polvo o restos
de acero que queden dentro de la herramienta. Si experimenta problemas durante el
funcionamiento de la herramienta consulte con su servicio de reparaciones.
VI. ACCESORIOS
Utilice sólo brocas adecuadas al tamaño del portabrocas.
- 74 -
EY7460_EY7960_Book.indb 74 2013-12-2 16:12:54
Page 75

VII. ANEXO
MÁXIMAS CAPACIDADES RECOMENDADAS
Modelo EY7460 EY7960
Tornillo de
máquina
Apriete de
tornillo
Taladrado
Tornillo para
madera
Tornillo
autorroscante
Para madera ø 38 mm
Para metal ø 13 mm
Para albañilería --- 13 mm
INFORMACIÓN ADICIONAL SOBRE LA GARANTÍA
La rotura y los daños provocados por un uso continuado durante un periodo de tiempo
prolongado (por ejemplo trabajos en líneas de montaje de fábricas, etc.) no están cubiertos por
la garantía.
M8
ø 10 mm
ø 6 mm
VIII. SPECIFICHE TECNICHE
APPARECCHIO PRINCIPALE
Modelo EY7460 EY7960
Voltaje del motor 21,6 V CD
Sin velocidad
de cargal
Velocidad de
soplado por
minuto
Capacidad de broca ø1,5 mm - ø13 mm
Torsión de embrague
Longitud total 232mm 245mm
Peso (con batería
Baja 100~400 min
Alta 350~1500 min
Baja --- 1800~7200 min
Alta --- 6300~27000 min
Aprox
. 1,0 N•m (10kgf-cm) – 6,9 N•m (70kgf-cm)
EY9L61)
2,45 kg 2,55 kg
-1
(rpm)
-1
(rpm)
-1
(bpm)
-1
(bpm)
BATERÍA
N.º de modelo EY9L61 EY9L62
Storage battery Batería Li-ión
Batería
EY7460_EY7960_Book.indb 75 2013-12-2 16:12:54
voltaje DC 21,6 V
espec. detalladas 3,6 V × 6 cells 3,6 V × 12 cells
- 75 -
Page 76

CARGADOR DE BATERÍA
N.º de modelo EY0L82
Batería de
almacenaje
Peso 0,93 kg (2 lbs)
Tiempo de carga
NOTA: Este cuadro puede contener modelos no disponibles en su país.
Consulte el más reciente catálogo general.
NOTA: Puede consultar el nombre y la dirección del concesionario en la tarjeta de garantía
que se incluye.
Vea la placa de especicaciones en la parte inferior del cargador.
EY9L61 EY9L62
Utilizable
Completa: 60 min Completa: 85 min
: 50 min
Utilizable
: 65 min
- 76 -
EY7460_EY7960_Book.indb 76 2013-12-2 16:12:54
Page 77

Oprindelige instruktioner: Engelsk
Oversættelse af de oprindelige instruktioner:
Andre sprog
I. BEREGNET BRUG
Disse maskiner kan anvendes til at
stramme skruer i koblingsindstilling
og til at bore huller i træ og metal i
boreindstilling. Derudover kan model
EY7960 anvendes til at bore huller i
blød beton og lignende materialer i
hammerindstilling.
Læs hæftet med “Sikkerhedsinstruktioner” samt det følgende før brug.
II.
EKSTRA
SIKKERHEDSREGLER
1) Anvend høreværn.
Udsætt e l s e fo r st øj kan f ø r e ti l
høresvækkelse.
2) Anvend støttehåndtaget, som følger
med dette værktøj.
Hvis herredømemt mistes, kan man
komme til skade.
3) Hold værktøjer under strøm ved
deres isolerede gribeflader, når der
udføres arbejde, hvor skæreværktøjer
kan komme i kontakt med skjulte
ledninger; kontakt med en strømførende
le dning sætter u dsatte metald ele
i værktøjet under strøm og giver
operatøren elektrisk stød.
4) Brug st ø v m a ske, hv i s arbejdet
frembringer støv.
5) Vær opmærksom på, at dette værktøj
altid er klar til at kunne betjenes, da
det ikke skal sættes i en stikkontakt.
6) Når der skrues eller bores ind i vægge,
gulve el.l ign ., kan man s tød e på
strømførende ledninger. BERØR IKKE
DEN HEXAGONALE BOREPATRON
ELLER NOGEN AF DE FORRESTE
METALDELE PÅ VÆRKTØJET! Hold
kun værktøjet i plastichåndtaget for at
forhindre elektrisk stød, hvis du skulle
skrue eller bore ind i en strømførende
ledning.
7) Hvis bitset sætter sig fast, skal det
straks afbrydes med triggeren for at
forhindre overbelastning, som kan
øve skade på batteripakningen eller
motoren.
Anvend baglæns rotation til at løsne
bor, der har sat sig fast.
8) Anv end IKKE grebet til f orlæ ns/
baglæns retning, når hovedafbryderen
er aktiveret. Batteriet vil hurtig blive
afladet og der kan opstå skade på
værktøjet.
9) Under opladnin g k an det ske, at
opladeren bliver en smule varm. Dette
er normalt. Oplad IKKE batteriet over
en længere periode.
10) N å r værktø j e t o p b e v ar e s ell e r
t r a n s por t ere s , s k a l gr e b e t t i l
fo rlæns/baglæns r etning sættes i
midterstillingen (omskifterlås).
11) Belast ikke værktøjet ved at holde
hastighedskontroltriggeren halvt ned
(hastighedskontrolfunktion), således
at motoren stopper.
12) Anvend ikke hastighedsvælgeren (LAVHØJ), mens hastighedskontroltriggeren
trykkes ind. Dette kan bevirke, at det
genopladelige batteri hurtigt bliver
udtjent eller at der øves skade på
motorens interne mekanisme.
- 77 -
EY7460_EY7960_Book.indb 77 2013-12-2 16:12:54
Page 78

Symbol Betydning
V Volt
Jævnstrøm
n
...min
Ah
o
-1
Ubelastet hastighed
Omdrejninger eller slag pr.
minut
Batteripakningens elektriske
kapacitet
Forlæns rotation
Modsat rotation
Rotation med hamring
Kun rotation
For at reducere risikoen
for tilskadekomst, skal
brugeren læse og forstå
brugsvejledningen.
Kun til indendørs brug
ADVARSEL!
●
Brug kun Panasonic batteripakninger,
som er konstrueret til brug med dette
genopladelige værktøj.
●
Panasonic ka n ikke ho l d e s ikke
ansvarlig for skader eller uheld, som er
forårsaget af anvendelse af en genbrugt
batteripakning eller en ikke-original
batteripakning.
●
Bortskaf ikke batteripakningen ved at
brænde den, og udsæt den ikke for
overdreven varme.
●
Slå ik ke s ø m elle r lignen d e ind i
batteripakningen, udsæt den ikke for
stød, og prøv ikke på at demontere eller
ændre den.
●
Lad ik k e meta l genst a nde k omme
i berør ing me d b atter ipak ninge ns
terminaler.
●
Trans por ter ikke batt eripakn ingen
o g o p b ev a r d e n ik k e i sa m me
beh o lder so m søm eller li gnend e
metalgenstande.
●
Op lad ikke batt eripakningen på et
sted med høje temperaturer, som for
eksempel i nærheden af åben ild eller
i direkte sollys. Ellers kan batteriet
over ophed e s, b r yde i brand el l er
eksplodere.
●
Brug altid kun den dert il høre nde
oplader til at oplade batteripakningen.
Ellers kan batteriet lække, overophedes,
eller eksplodere.
●
Når b a tteripak n i n gen er t a g et af
værktøjet eller opladeren, skal man altid
huske at sætte pakningsdækslet på.
Hvis dette ikke gøres, er der risiko for,
at batterikontakterne kortsluttes, hvilket
kan være årsag til brandfare.
●
Når b a t t e r i pakningen e r udt j e n t ,
sk a l de n skif t e s ud me d en ny.
Fortsat anvendelse af en beskadiget
bat t e r ip a k n i n g ka n re s u l te r e i
varmedannelse, antænding og revner i
batteriet.
III. MONTERING
Montering eller afmontering
af bit
BEMÆRK:
Når et bit monteres eller afmonteres,
s k a l ba t t e r i pa kn inge n t a g e s af
værktøjet, eller triggeren skal stilles i
midterstilling (omskifterlås).
Dette værktøj er udstyret med en nøgleløs
borepatron.
1. Montering
Sæt bitset ind og drej låsemanchetten
med uret (set forfra) for at stramme godt
til, indtil den holder op med at klikke.
2. Afmontering
Drej låsemanchetten mod uret (set
forfra), og tag derefter bitset ud.
Låsemanchet
- 78 -
EY7460_EY7960_Book.indb 78 2013-12-2 16:12:56
Page 79

BEMÆRK:
Hvis der forekommer ekstremt slør i
borepatronen, skal du fastgøre boret
på plads og 1 åbne borkæberne ved
at dreje låsemanchetten og 2 stramme
skruen (skrue med venstregevind) med
en skruetrækker ved at dreje den mod
uret (set forfra).
Isætning og udtagning af batteripakningen
1. Tilslutning af batteripakningen:
Sæt de fremhævede flugtemærker på
linje og sæt batteripakningen på.
●
Skyd batteripakningen i stilling, indtil
den klikker på plads.
Flugtemærker
2. Udtagning af batteripakningen:
Tr y k kn a pp e n n e d o g s k u b
batteripakningen fremad.
Knap
Fastspænd
Løsn
Tag håndtagene af, inden værktøjet
lægges i opbevaringskassen.
IV. BETJENING
[Hoveddel]
Omskifterbetjening
1. Hastigheden øges i takt med, hvor
meget man trykker på triggeren. Når
du påbegynder arbejdet, skal du trykke
triggeren en smule ned for at starte
rotationen langsomt.
2. En e lektr o nisk ko ntrol e nhed me d
feedback anvendes til at opnå et kraftigt
moment, selv ved lave hastighed.
3.
Bremsen fungerer, når triggeren slippes,
og motoren stopper med det samme.
FORSIGTIG:
Der vil være en momentan forsinkelse,
fø r r o t at i o n e n påbe g y nd e s ved
betjening af værktøjet når der trækkes i
triggeren. Dette signalerer ikke en fejl.
*
D e nne f o r s i nke l se o p st å r s o m
værktøjets kredsløb starter op, når
triggeren er trukket for første gang efter
installation af en ny batteripakke eller når
værktøjet ikke er blevet anvendt i mindst
1 minut (eller i det mindste 5 minutter,
hvis LED’en er tændt). Rotation vil
starte uden nogen forsinkelse under
anden og efterfølgende operationer.
BEMÆRK:
Når bremsen fungerer, vil en bremselyd
muligvis kunne høres. Dette er normalt.
Hjælpehåndtag
Anbring hjælpehåndtaget i den ønskede
position og spænd håndtaget godt til.
- 79 -
EY7460_EY7960_Book.indb 79 2013-12-2 16:12:56
Page 80

Anvendelse af grebet til forlæns/baglæns retning
Forlæns Baglæns
Omskifterlås
FORSIGTIG:
For at forhindre skade må grebet til
forlæns/baglæns retning ikke anvendes,
før bitset er helt stoppet.
Forlæns rotation – betjening
af omskifter
1. Tryk på grebet, hvis du ønsker forlæns
rotation.
2. Tryk l et på trig gere n f or at starte
værktøjet langsomt.
3. Hastighe d e n øges i t a k t med, at
trig g eren t rykkes in d , således at
iskruning af skruer og boring kan ske
effektivt. Bremsen virker, og bitset
stopper straks, og borholderen stopper
straks, når triggeren slippes.
4. Efte r b ruge n s kal grebet sæt tes i
midterstillingen (omskifterlås).
Baglæns rotation – betjening
af omskifter
1. Tryk på grebet, hvis du ønsker baglæns
rotation. Kontroller rotationsretningen
inden brugen.
2. Tryk l et på trig gere n f or at starte
værktøjet langsomt.
3. Efte r b ruge n s kal grebet sæt tes i
midterstillingen (omskifterlås).
Indstilling af koblingsmoment
Indstil momentet t i l en a f de 18
koblingsindstillinger eller “
(EY7460).
” stillingen
Indstil momentet t i l en a f de 18
koblingsindstillinger eller “
stillingen (EY7960).
”, “ ”
FORSIGTIG:
Hold op med at anvende værktøjet
og fjern det fra arbejdsemnet, når
der skiftes fra hammerindstilling til
boreindstilling eller når der skiftes til
boreindstilling fra hammerindstilling
ved at koblingshåndtaget drejes.
FORSIGTIG:
Sæt kob ling sindsti llin gen til dett e
mærke ( ), inden maskinen betjenes.
Hvis du har arbejdet med koblingsfunktionen,
og du ikke kan indstille koblingshåndtaget til
“boreindstilling” eller “hammerindstilling”, skal
du sætte koblingsindstillingen til position 1 og
aktivere koblingen i ét sekund.
Valg af hastighed
Vælg en lav eller høj hastighed, alt efter
arbejdets karakter.
HØJ
LAV
Jo mere den variable hastighedskontroltrigger
trykkes ind, desto højere bliver hastigheden.
FORSIGTIG:
●
Kontroller hastighedsvælgeren før
brugen.
●
Anvend ved lav hastighed, når et højt
moment er påkrævet under arbejdet.
(Anvendelse med høj hastighed, når et
højt moment er påkrævet, kan bevirke,
at motoren bryder sammen).
●
Drej ikke hastighedsvælgeren (LAVHØJ),
mens du trykker hastighedskontroltriggeren
ind. Dette kan bevirke, at det genopladelige
batteri hurtigere udtjenes eller at motorens
interne mekanisme lider skade.
- 80 -
EY7460_EY7960_Book.indb 80 2013-12-2 16:12:57
Page 81

* Se sp e d i f i kat i o n e r ne for “M A KS.
TILLADTE KAPACITETER”.
FORSIGTIG:
●
For at for h i n d r e , at væ r k t ø j e ts
overade bliver for varm, må man ikke
●
anv ende værktøjet uaf brud t m ed
brug af to eller ere batteripakninger.
Værktøjet har behov for afkølingstid,
i n d en det s k i f t er ti l e n an d e n
batteripakning.
●
L a d v æ r e m e d a t b l o k e r e
ventilationsåbningerne på siderne af
værktøjet under anvendelsen. Dette kan
bevirke, at maskinens funktion påvirkes
negativt, så maskinen ikke fungerer
som den skal.
●
Belas t IKKE værktøjet (motoren).
Dette kan bevirke, at værktøjet lider
skade.
●
Anvend værktøjet på en sådan måde,
at luft fra ventilationsåbningerne
forhindres i at blæse direkte på din
hud. Dette kan giver forbrændinger.
Bitlåsefunktion
1. Når triggeren ikke er aktiveret og et
skruetrækkerbit er låst på plads, kan
værktøjet anvendes som en almindelig,
manuel skruetrækker (op til 40 N·m,
408 k f-cm, 353 in-lbs).
D e r v il v æ r e en s m u le s l ø r i
boreholderen, men dette er normalt.
2. Denne egenskab er praktisk til stramning
af skruer, som kræver et større moment
end det mak simale moment for en
skruetrækker (stilling
på koblingen),
til bekræftelse af en skrues stramning
eller til at løsne en ekstremt stram
skrue.
Kontrolpanel
(1)
(3)
(2)
(1) LED-lys
Inden anvendelse af LEDlyset, skal der
altid trækkes en gang i
afbryderen. Tryk på
LED-lysknappen.
Ly s e t l y s er m e d e n
meget lav strøm, og det
påvirker ikke maskinens
ydelse negativt under brug eller dens
batterikapacitet.
FORSIGTIG:
●
Det indbyggede LED-lys er beregnet
til at oplyse et lille arbejdsområde
midlertidigt.
●
Anvend det ikke som erstatning for en
almindelig lommelygte, da det ikke har
tilstrækkelig lysstyrke.
●
LED-lyset slukker, hvis værktøjet ikke
har været anvendt i 5 minutter.
Forsigtig: UNDLAD AT STIRRE IND I
STRÅLEN
Anvendelse af kontroller eller justeringer
eller udførelser af andre procedurer end
de heri specicerede, kan medføre farlig
udsættelse for stråling.
(2)
Advarselslampe for overophedning
Fra
(normal
anvendelse)
For at beskytte motoren og batteriet, skal
man være opmærksom på følgende, når
denne operation udføres.
Lyser:
Overophedning
(motor)
Blinker:
Overophedning
(batteri)
Betyder, at anvendelsen er
blevet stoppet på grund af
overophedning af motoren
eller batteriet.
- 81 -
EY7460_EY7960_Book.indb 81 2013-12-2 16:12:58
Page 82

●
Hvis motoren eller batteriet bliver varme,
vil beskyttelseskredsløbet blive aktiveret
og motoren eller batteriet vil holde op
med at fungere. Advarselslampen til
overophedning på kontrolpanelet lyser
eller blinker, når denne egenskab er
aktiveret.
●
Hvis overophedningsbeskyttelsesfunkt
ionen aktiveres, skal du give værktøjet
tid til at køle helt af (mindst 30 minutter).
Værktø jet er k lar til brug igen, når
advars elslamp en til overophe dning
slukker.
●
Undgå at anvende værktøjet på en sådan
måde, at overophedningsbeskyttelsesfun
ktionen aktiveres gentagne gange.
●
Hvis værktøjet anvendes kontinuerligt
ved høj belastning eller den anvendes
under forhold med høje temperaturer
(som f.eks. om sommeren), kan overo
phedningsbeskyttelsesfunktionen blive
aktiveret hyppigt.
●
Hvis værktøjet anvendes under forhold
med lave temperaturer (som f.eks. om
vinteren) eller hvis den stoppes hyppigt
under brug, vil overophedningsbeskyttels
esfunktionen måske ikke blive aktiveret.
●
Det omgivende temperaturområde er
mellem 0˚C (32˚F) og 40˚C (104˚F).
Hvis bat t e ripakken an v e ndes, n å r
batteritemperaturen er under 0˚C (32˚F),
kan der opstå problemer i værktøjets
funktion.
●
Når man vil oplade en kold batteripakning
(under 0˚C (32˚F)) i et varmt rum, så
anb ring batte ripak ning en i rumme t
mindst en time, så dens temperatur kan
komme på niveau med rummets, inden
den oplades.
(3)
Luz de advertencia de batería baja
Fra
(normal
anvendelse)
Blinker
(ingen opladning)
Batteribeskyttelsesfunktionen
er aktiveret
Ekstrem (fuld) aedning af Li-ion batterier
vi l afkort e deres leve tid b etragteligt.
Skr uetr ækker en er u dsty ret me d e n
batteribeskyttelsesfunktion til forhindring af
ekstrem aadning af batteripakningen.
●
Batteribeskyttelsesfunktionen aktiveres
umiddelbart inden batteriet mister sin
effekt, hvilket bevirker, at advarselslampen
for lav batterieffekt begynder at blinke.
●
Hvis du bemærker, at advarselslampen
for lav batterieffekt blinker, skal du straks
oplade batteripakningen.
●
Hvis der fra starten af var for lidt strøm
tilbage, kan værktøjet stoppe driften
uden at advarselslampen for lavt batteri
først blinker. Dette indikerer, at der er for
lidt strøm tilbage til at bruge værktøjet,
og batteriet skal oplades før yderligere
brug.
●
Hvis værktøjet udsættes for en pludselig
belastning under brug, som får motoren til
at lukke ned, kan overbelastningssensoren
udløses, og lampen for lavt batteri kan
blinke. Lampen vil stoppe med at blinke,
når du behandler årsagen til motorens
nedlukning og sætte triggeren i gang.
[Batteripakning]
Korrekt brug af batteripakningen
Li-ion batteripakning
●
Opbevar Li-ion batteripakningen efter
brugen uden at oplade den, således at
optimal batterilevetid opnås.
●
Når du oplader b a t t e r i p a k n i n g en,
skal du bekræfte at terminalerne på
batteriopladeren er fri for uvedkommende
substanser, som for eksempel støv og
vand etc. Rengør terminalerne inden
du o p lader b a tteripa k n ingen, hvis
uvedkommende substanser observeres
på terminalerne.
Levetiden for batteripakningens terminaler
kan påvirkes af uvedkommende
substanser, som for eksempel støv og
vand etc., under brugen.
- 82 -
EY7460_EY7960_Book.indb 82 2013-12-2 16:12:58
Page 83

Når batteriet ikke anvendes, skal
det holdes på god afstand af andre
metalgenstande som for eksempel
papirclips, mønter, nøgler, søm, skruer og
andre mindre metalgenstande, som kan
forårsage en tilslutning fra en terminal til
en anden.
Kortslutning af batteriterminalerne kan
frembringe gnister, forbrændinger eller
ildebrand.
●
Når d u a nvender bat ter ipaknin gen,
skal du sørge for, at arbejdsstedet er
velventileret.
●
Når batter i p a k n ing e n er ta get af
værktøjet, skal batteripakningens dæksel
straks sættes på for at forhindre, at støv
og snavs forurener batteriterminalerne
og forårsager kortslutning.
Sørg for at anvende
batteripakningsdækslet
●
Når batteripakningen ikke anvendes,
skal batteriet opbevares således, at
uvedkommende substanser, som for
eksempel støv og vand etc., ikke kan
komme til at forurene terminalerne. Sørg
for at sætte batteripakningsdækslet på
for at beskytte batteriterminalerne.
●
Når du oplader b a t t e r i p a k n i n g en,
skal du bekræfte at terminalerne på
batteriopladeren er fri for uvedkommende
substanser, som for eksempel støv og
vand etc. Rengør terminalerne inden
du o p lader b a tteripa k n ingen, hvis
uvedkommende substanser observeres
på terminalerne.
Le v e ti de n f o r bat t e r i p a kn in ge ns
t e r m i n a l e r k a n p å v i r k e s a f
uvedkommende substanser, som for
eksempel støv og vand e tc. , unde r
brugen.
Batteripakningens levetid
De udskif t b a r e batteri e r har en
begrænset levetid. Hvis betjeningstiden
bliver meget kort efter opladningen, skal
batteripakningen udskiftes med en ny.
Anbefalinger for brugen
Pakningsdæksel
Terminaler
etikette
FORSIGTIG:
For at beskytte motoren og batteriet skal
man være opmærksom på følgende ved
anvendelse.
●
Hvis motoren og batteriet bliver varmt, vil
beskyttelseskredsløbet blive aktiveret, og
motoren og batteriet vil holde op med at
fungere.
For sikker brug
●
Batteripakken er beregnet til at
blive installeret ved at følge en
fre mgangsmåde med to t rin fo r
sikkerhedens skyld. Kontroller, at
batteripakken er korrekt installeret i
hovedenheden inden brug.
●
Hvis batter ipa kke n ikke e r tilsluttet
korrekt, når der tændes for kontakten,
blinker advarselslampen for overhedning
og advarselslampen for lavt batteri
for at indikere, at det ikke er muligt at
foretage sikker anvendelse, samt at
hovedenheden ikke vil rotere normalt.
Slut batt e r i pakken t i l in de i se l v e
værktøjets enhed, indtil etiketten rød eller
gul forsvinder.
- 83 -
EY7460_EY7960_Book.indb 83 2013-12-2 16:12:59
Page 84

[Batterioplader]
Opladning
FORSIGTIG:
●
Hvi s bat terip akni ngens tempe ratur
falder til under cirka -10°C, vil opladning
aut omati sk s toppe for a t for h indr e
forringelse af batteriet.
●
Det omgivende temperaturområde er
mellem 0˚C (32˚F) og 40˚C (104˚F).
Hvis bat t e ripakken an v e ndes, n å r
batteritemperaturen er under 0˚C (32˚F),
kan der opstå problemer i værktøjets
funktion.
●
Når man vil oplade en kold batteripakning
(under 0˚C (32˚F)) i et varmt rum, så
anb ring batte ripak ning en i rumme t
mindst en time, så dens temperatur kan
komme på niveau med rummets, inden
den oplades.
●
Lad opladeren køle ned ved genopladning
af ere end to batteripakninger efter
hinanden.
●
Sæt ikke ngrene ind i kontaktåbningen,
når ladeaggreatet holdes i hænderne
eller yttes.
FORSIGTIG:
Forebyggelse af risiko for brand eller
skade på batteriopladeren.
●
Anvend ikke strøm fra en generator på
en motor.
●
Tildæk ikke ventalitationshullerne på
ladeaggregatet og på batteripakken.
●
Tag opladeren ud af forbindelse, når den
ikke skal anvendes.
BEMÆRK:
Batteripakningen er ikke fuldt opladet
på købstidspunktet. Sørg for at oplade
batteriet før brugen.
Sådan foretages opladning
1. Stik opladerens stik ind i en stikkontakt
fra lysnettet.
BEMÆRK:
Der kan opstå gnister, når stikket
tilsluttes til lysnettet, men dette er ikke
noget problem mht. sikkerheden.
2. Til slut batter ipak ken orde ntlig t til
opladeren.
1) Sæt flugt emærkerne på linje og
anb ring batteriet på dokken på
opladeren.
2) Tryk fremad i pilens retning.
Flugtemærker
3. Under opladningen vil opladelampen
lyse. Når opladningen er afsluttet, vil en
indre elektronisk omskifter automatisk
udløses til forhindring af overopladning.
●
Opladningen starter ikke, hvis
batteripakningen er varm (for
eksempel, umiddelbart efter ekstra
svær betjening.)
Den orangefarvede lampe blinker, indtil
batteriet er kølet af.
Opladningen begynder straks derefter.
4. Opladelampen (grøn) blinker langsomt,
når batteriet er omkring 80% opladet.
5. Når opladningen er færdig, vil den
grønne opladelampe slukke.
6. Hvis temperaturen af batteripakningen
er 0°C eller mindre, vil det tage længere
at oplade b a t t e r i p a kningen helt,
sammenlignet med standardopladetiden.
Selv hvis batteriet er fuldt opladet,
vil det have omkring 50% af effekten
i et fuldt opladet batteri ved normal
brugstemperatur.
7. Rådfør dig med en autoriseret forhandler,
hvis opladelampen (grøn) ikke slukker.
8. Hvis en fuldt opladet batteripakning sættes
ind i opladeren igen, vil opladelampen
begynde at lyse. Efter nogle minutter vil
den grønne opladelampe slukke.
9. F j e rn b at t e r ip a kn i ng e n, m e ns
batteripakningens udløserknap holdes
oppe.
Udløserknap på
batteripakningen
- 84 -
EY7460_EY7960_Book.indb 84 2013-12-2 16:12:59
Page 85

LAMPEINDIKERINGER
Opladning er afsluttet. (Fuld opladning)
Batteriet er omkring 80% opladet.
Lader.
Opladeren er sat i lysnetadapteren.
Klar til opladning.
(Grøn)
Slukket Tændt
(Orange)
Ændring af statuslampen
Venstre: grøn Højre: orange vil blive vist
Batteripakningen er kold.
Batterpakningen oplades langsomt for at reducere belastningen
af batteriet.
Batteripakningen er varm.
Opladningen vil begynde, så snart batteripakningens temperatur er
faldet. Hvis batteripakningens temperatur er -10°C eller derunder,
vil opladelampen (orange) også begynde at blinke. Opladningen
vil begynde, når batteripakningens statustemperatur stiger.
Opladning ikke mulig. Batteripakningen er tilsmudset eller
defekt.
Blinker
Brugerinformation om indsamling og bortskaffelsse af elektronikskrot og brugte batterier
Disse symboler på produkter, emballage og/eller ledsagedokumenter
betyder, at brugte elektriske og elektroniske produkter og batterier ikke må
smides ud som almindeligt husholdningsaffald. Sådanne gamle produkter
og batterier skal indleveres til behandling, genvinding resp. recycling i
henhold til gældende nationale bestemmelser samt direktiverne 2002/96/
EF og 2006/66/EF.
Ved at bortskaffe sådanne produkter og batterier på korrekt vis hjælper
du med til at beskytte værdifulde ressourcer og imødegå de negative
påvirkninger af det menneskelige helbred og miljøet, som vil kunne være
følgen af usagkyndig affaldsbehandling.
Ønsker du mere udførlig information om indsamling og recycling af
gamle produkter og batterier, kan du henvende dig til din kommune,
deponeringsselskabet eller stedet, hvor du har købt produkterne.
Usagkyndig bortskaffelse af elektronikskrot og batterier kan eventuelt
udløse bødeforlæg.
For kommercielle brugere i Den Europæiske Union
Når du ønsker at kassere elektriske eller elektroniske apparater, bedes du henvende dig
til din forhandler eller leverandør for nærmere information.
- 85 -
EY7460_EY7960_Book.indb 85 2013-12-2 16:13:00
Page 86

[Information om bortskaffelse i lande uden for Den Europæiske
Union]
Disse symboler gælder kun inden for Den Europæiske Union. Ønsker du at kassere
sådanne produkter, bedes du forhøre dig hos din forhandler eller kommune med henblik
på en hensigtsmæssig bortskaffelse.
V. VEDLIGEHOLDELSE
●
Brug kun er tør, blød klud til at tørre apparatet af med. Brug ikke en fugtig klud, fortynder,
benzin eller andre ygtige opløsningsmidler til rengøringen.
●
I tilfælde af, at indersiden af værktøjet eller batteripakningen er blevet udsat for vand, skal
de tømmes for vand og lægges til tørre så hurtigt som muligt. Fjern omhyggeligt alt støv
og alle jernspåner, som måtte have samlet sig inden i værktøjet. Ret henvendelse til et
reparationsværksted, hvis der er nogen problemer med anvendelse af værktøjet.
VI. TILBEHØR
Anvend kun bits, som passer til størrelsen af borpatronen.
VII. APPENDIKS
MAKS. TILLADTE KAPACITETER
Model EY7460 EY7960
Maskinskrue M8
Skrueidrivning
Boring
Træskrue ø 10 mm
Selvborende skrue
Til træ ø 38 mm
Til metal ø 13 mm
Til murværk --- 13 mm
ø 6 mm
TILLÆG TIL GARANTI
Sammenbrud og skader forårsaget af konstant brug i længere tid (f.eks. fabriksarbejde på
samlebånd osv.) er uden for garantien.
- 86 -
EY7460_EY7960_Book.indb 86 2013-12-2 16:13:00
Page 87

VIII. TEKNISKE SPECIFIKATIONER
HOVEDENHED
Model EY7460 EY7960
Motorspænding 21,6 V CD
Ubelastet
hastighed
Slaghastighed
per minut
Borepatron-kapacitet ø1,5 mm - ø13 mm
Koblingsmoment Ca. 1,0 N•m (10kgf-cm) – 6,9 N•m (70kgf-cm)
Længde i alt 232mm 245mm
Vægt (med batteripakning
Lav 100~400 min
Høj 350~1500 min
Lav --- 1800~7200 min
Høj --- 6300~27000 min
EY9L61)
2,45 kg 2,55 kg
BATTERIPAKNING
Model nr. EY9L61 EY9L62
Opbevaringsbatteri Li-ion batteri
Batteri
spænding DC 21,6 V
detaljerede spec. 3,6 V × 6 celler 3,6 V × 12 celler
BATTERIOPLADER
Model nr. EY0L82
Mærkedata Se mærkepladen på undersiden af opladeren.
Vægt 0,93 kg (2 lbs)
EY9L61 EY9L62
Opladningstid
Brugbar: 50 min. Brugbar: 65 min.
Fuld: 60 min. Fuld: 85 min.
-1
(rpm)
-1
(rpm)
-1
(bpm)
-1
(bpm)
BEMÆRK: Denne oversigt kan inkludere modeller, der ikke fås i dit område.
Se venligst det nyeste, almindelige katalog.
BEMÆRK: Med hensyn til forhandlernavn og adresse henvises til det vedlagte garantikort.
- 87 -
EY7460_EY7960_Book.indb 87 2013-12-2 16:13:00
Page 88

Originalanvisningar: Engelska
Översättning av originalanvisningarna:
Andra språk
I. AVSEDD
ANVÄNDNING
Dessa verktyg kan användas för att dra
fast skruvar i kopplingsläget samt för
att borra hål i trä och metall i borrläget.
Dessutom kan EY7960 användas för att
borra hål i mjuk betong och liknande
material i slagborrläget.
Læs hæftet med “Sikkerhedsinstruktioner” samt det følgende før brug.
II.
EKSTRA
SIKKERHEDSREGLER
1) Använd öronskydd.
Buller kan leda till hörselskador.
2) Anv ä nd d et e xtrah andta g som
medföljer verktyget.
Förlorad kontroll kan orsaka
personskador.
3) Håll i de isolera d e ytorna p å
elverktyg när arbeten utförs där
skärdonet kan komma i kontakt med
dolda ledningar. Om det kommer i
kontakt med en strömförande ledning
kommer d e bara m eta llytorna på
verktyget att bli strömförande vilket
kan ge användaren en elektrisk stöt.
4) Använd en ansiktsmask, om arbetet
är dammigt.
5) Obs erve ra att ve rkty get allti d är
i drif tstillstånd, eftersom det inte
behöver vara nätanslutet.
6) Tänk på att strömförande ledningar
kan förekomma vid borrning eller
skruvdragning i väggar, golv o.s.v.
VIDRÖR INTE SNABBCHUCKEN ELLER
NÅGON ANNAN AV VERKTYGETS
FRÄMRE METALLDELAR! Håll endast
i plasthandtaget på verktyget för att
undvika risk för elstötar i händelse av att en
strömförande ledning skulle råka stötas på
vid skruvning eller indrivning.
7) Om bitset kör fast, så slå släpp genast
upp avtryck are n för att förh ind ra
överbe last ning, vilk et kan skada
batteriet eller motorn.
Använd motsatt rörelse för att lossa
bitsar som fastnat.
8) Ändra INTE riktningsomkopplaren
medan hu v u dströmb r ytaren är i
påslaget läge. Det gör att batteriet
la ddas ur väl digt snabbt och ka n
orsaka skador på verktyget.
9) Vid laddn i n g ka n de t hän d a at t
laddaren blir varm , v ilk et är fullt
normalt. Ladda INTE upp batteriet
under för lång tid.
10) Ställ riktningsomkopplaren i mittläget
(låst läge) vid förvaring eller flyttning
av verktyget.
11) Ansträng inte verktyget genom att
hålla var vtalsregleraren ha lvvägs
intryckt (i läget för varvtalsreglering),
så att motorn stannar.
12) Ändra inte var vta lso mko ppl arens
(LÅ- GA VARVTAL-HÖGA VARVTAL)
läge medan varvtalsregleraren hålls
intryckt. Det kan orsaka snabbt slitage
på det laddningsbara batteriet eller
skador på motorns inre mekaniska
delar.
- 88 -
EY7460_EY7960_Book.indb 88 2013-12-2 16:13:00
Page 89

Symbol Betydelse
V Volt
Direkt ström
n
...min
Ah
o
-1
Tomgångsvarv
Varv eller pendlingar per
minut
Batteriets elektriska
kapacitet
Medsols rotation
Motsols rotation
Slagborr
Endast rotation
För att minska risken
för skador måste
användaren läsa och förstå
bruksanvisningen.
Endast för inomhusbruk.
VARNING!
●
An v ä n d in t e a n d r a ba t t e ri er än
Panasonic- batterier som är utformade
för det laddningsbara verktyget.
●
Pan asoni c p åtar si g i nget ansvar
fö r eventuella skador eller olyckor
ors akad e a v a nvän dnin gen av e tt
återvunnet batteri eller ett oäkta batteri.
●
Kasta inte batterier i eld eller utsätt dem
för hög värme.
●
Slå inte in spikar i batteriet eller utsätt
det för stötar. Ta inte isär det eller försök
ändra på det.
●
Låt inte metallföremål komma i kontakt
med batteripolerna.
●
Bär ell er förvara inte batterie r p å
samma ställe som spikar eller liknande
metallföremål.
●
Ladda inte batteriet på en plats med
hög temperatur, t.ex. i närheten av
öppen eld eller i direkt solljus. Det kan
göra att batteriet överhettas, fattar eld
eller exploderar.
●
Använd inte någon annan laddare än
den avsedda när batteriet laddas. Det
kan göra att batteriet läcker, överhettas
eller exploderar.
●
Sätt alltid på batteriskyddet efter att det
laddningsbara batteriet har demonterats
från verktyget eller laddaren. Annars
kan det hända att batterikontakterna
kortsluts, vilket medför risk för eldsvåda.
●
Byt ut batte r iet mo t ett n ytt efter
att batteriet förs ämrats m ärkb art.
Fortsatt anvä ndn ing av ett skadat
batteri kan resultera i värmealstring,
antändning eller batterihaveri.
III. MONTERING
Isättning/urtagning av bits
OBSERVERA:
Koppla loss batteriet från verktyget eller
ställ omkopplaren i mittläget (låst läge),
när ett bits ska sättas i eller tas ur.
Verkt yget är f örse tt m ed en spärr fri
borrchuck.
1. Isättning av bits
För in bitset och vrid låsringen medurs
(sett framifrån). Dra åt ordentligt tills
klickandet upphör.
2. Urtagning av bits
Vrid låsringen moturs (sett framifrån)
och dra sedan ut bitset.
Låsring
- 89 -
EY7460_EY7960_Book.indb 89 2013-12-2 16:13:02
Page 90

OBSERVERA:
Om spelrummet i chucken blir för stort,
så justera detta genom att spänna fast
borren och 1 öppna chuckbackarna
genom att vrida på låsringen och 2
dra åt skruven (vänstergängad) med
en skruvmejsel genom att skruva den
moturs (sett framifrån).
Spänn
Lossaa
Ta av handtaget när verktyget placeras
i dess förvaringsväska.
Montering/demontering av
batteri
1. För att sätta fast batteriet:
Passa in de utmärkta punkterna mot
varandra och sätt fast batteriet.
●
Skjut batteriet bakåt tills det hakar
fast i korrekt läge.
Anpassningsmärken
2. För att ta loss batteriet:
Tryck ner knappen och skjut batteriet
framåt.
Frigöringsknapp
Stödhandtag
Placera stödhandtaget i önskat läge
och dra åt handtaget ordentligt.
IV. DRIFIV. DRIFT
[Verktygshuset]
Omkoppling
1. Varvtalet ökar i förhållande til l hur
mycket avtryckaren trycks in. Påbörja
e t t a r b e te ge n o m a t t t r y cka i n
avtryckaren en liten bit för att starta
med långsam rotation.
2. En elektronisk återkopplingsstyrenhet
sörjer för stark åtdragning även vid lågt
varvtal.
3. En broms kopplas in när avtryckaren
släpps upp, varpå motorn omedelbart
stannar.
VIKTIGT:
När du använder verktyget genom att
aktivera avtryckaren, kan en tillfällig
fördröjning uppstå innan rotation startar.
Detta signalerar inget fel.
* Denna eftersläpning sker då maskinens
strö m k retsar sta r t ar upp e fter a tt
avtryckaren aktiveras för första gången
efter att ett nytt batteri har installerats, eller
efter det att verktyget inte har använts
under minst 1 minut (eller minst 5 minuter
när LED-lysdioden är tänd). Rotation
startar utan fördröjning under nästa och
påföljande användning.
OBSERVERA:
När br o m s e n kopplas in ka n ett
inbromsningsljud höras. Det är helt
normalt.
- 90 -
EY7460_EY7960_Book.indb 90 2013-12-2 16:13:03
Page 91

Användning av riktningsomkopplaren och avtryckaren
Framåt Bakåt
Låst läge
VIKTIGT:
Ändra inte riktningsomkopplarens läge
förrän bitset har stannat helt för att
undvika skador.
Drift med rotation framåt
1. Tryck riktningsomkopplaren till läget för
rotation framåt.
2. Tryck in avtryckaren en liten bit för att
sakta starta verktyget.
3.
Var vtalet ökar i förhål lande till hur
mycket avtryckaren trycks in för effektiv
skruvdragning och borrning. Bromsen
koppl a s in o ch ch u c ken st a n nar
omedelbart, när avtryckaren släpps upp.
4. Ställ riktningsomkopplaren i mittläget
(låst läge) efter avslutat arbete.
Drift med rotation bakåt
1. Tr y c k rik t n in g s o m k o p p l a re n til l
läget för rotation bakåt. Kontrollera
rotationsriktningen innan arbetet påbörjas.
2. Tryck in avtryckaren en liten bit för att
sakta starta verktyget.
3. Ställ riktningsomkopplaren i mittläget
(låst läge) efter avslutat arbete.
Inställning av kopplingens
åtdragningsmoment
Ställ in kopplingens åtdragningsmoment
i något av de 18 olika lägena eller läget
” (EY7460).
“
Ställ in kopplingens åtdragningsmoment
i något av de 18 olika lägena eller läget
”, “ ” (EY7960).
“
OBSERVERA:
Var a lltid noga m ed a tt s toppa
verktyget o c h ta bort d e t från
arbetsstycket innan du ändrar från
bo rrläget till sla gläget ell er från
slagläget till borrläget genom att
vrida på kopplingshandtaget.
VIKTIGT:
Sä t t kopp l i ng s i n s t ä ll n i n g en vid
denna märkning ( ) innan du börjar
användningen.
Om kopplingshandtaget inte kan ställas
till ”borrläget” eller ”slagläget” efter
användning med kopplingsfunktionen,
ställ kopplingshandtaget till läge 1 och
kör kopplingen under en sekund.
Varvtalsomkoppling
Välj lämpligt läge för låga eller höga
varvtal i enlighet med aktuellt arbete.
HÖGA VARVTAL
LǺGA VARVTAL
Ju mer avtryck aren (steglös
varvtalsreglerare) trycks in, desto högre
blir varvtalet.
VIKTIGT:
●
Kontrollera varvtalsomkopplarens
läge före användning.
●
Använd ett lågt varvtal för ett arbete som
kräver ett högt åtdragningsmoment.
(Användning av ett högt varvtal
för ett arbete som kräver ett högt
åtdragningsmoment kan resultera i
motorhaveri.)
●
Ändra inte varvtalsomkopplarens
(LÅGA VARVTAL-HÖGA VARVTAL)
läge medan varvtalsregleraren hålls
intryckt. Det kan orsaka snabbt slitage
på det laddningsbara batteriet eller
skador på motorns inre mekaniska
delar.
- 91 -
EY7460_EY7960_Book.indb 91 2013-12-2 16:13:03
Page 92

* L ä s s p e c i f i k a t i o n e r n a u n d e r
”REKOMMENDERADE SKRUV- OCH
BULTSTORLEKAR”.
VIKTIGT:
●
Använd inte verktyget under alltför
lång tid i sträck med hjälp av två eller
er batterier, eftersom det kan göra att
verktygshusets ytterhölje blir väldigt
hett. Verktyget behöver svalna mellan
varje batteribyte.
●
Täck inte för ventilationsöppningarna
i sidan p å verktyg s h u s e t un d e r
pågående drift, eftersom det kan leda
till funktionsfel.
●
Överansträng INTE verktyget (motorn),
eftersom det kan leda till skador på
verktyget.
●
Se v i d användnin g av ve r k tyget
till at t hå lla d e t på et t sätt som
förhindrar att luft från verktygshusets
ventilationsöppningar blåser direkt
mot huden, eftersom det kan orsaka
brännskador.
Bitslåsningsfunktion
1.
Me d a v t r y c k ar e n vi l a n d e och ett
skruvmejselbits isatt och spärrat kan
verktyget användas som en manuell
skruvmejsel (upp till 40 N·m, 408 k f-cm).
Ett litet glapp uppstår i chucken, men
det tyder inte på något fel.
2. Denna funktion kan vara praktisk vid
åtdragnin g av skr uvar s om kräver
större åtdragningsmoment än maximalt
åtdragningsmoment vid skruvdragning
(läget
en skruvs åtdragning eller vid lossning
en skruv som dragits åt för hårt.
på kopplingen), vid kontroll av
(1) LED-ljus
Drag alltid en gång i strömbrytaren före
användning av LED-ljuset.Tryck på
för
att tända LED-ljusknappen.
Ljuset förbrukar väldigt lite ström och har
ingen negativ påverkan
på verktygets prestanda
under användning och
inte heller på batteriets
kapacitet.
VIKTIGT:
●
Det inbyggda LED-ljuset är avsett
för temporär belysning av ett litet
arbetsområde.
●
Använd inte LED-ljuset som ersättning
för en vanlig cklampa, eftersom dess
ljusstyrka inte räcker till för det.
●
Lysdiodljuset släcks när verktyget inte
har använts under 5 minuter.
Viktigt: TITTA INTE RAKT IN I STRÅLEN.
Användning av reglage, justeringar eller
utförande av åtgärder utöver vad som
beskrivs häri kan resultera i exponering
för farlig strålning.
(2) Varningslampa för överhettning
Släckt
(normal
drift)
Lyser:
Överhettning
(motor)
Blinkande:
Överhettning
(batteri)
Anger att driften har
avbrutits på grund av
överhettning av motor eller
batteri.
För att skydda motorn och batt eri et,
skall du komma ihåg följande vid denna
användning.
●
Om motorn eller batteriet överhettas,
akt iveras skyddsfunktione n och då
Kontrollpanel
(1)
(3)
(2)
slutar motorn eller batteriet att fungera.
Varningslampan för öv erhettning på
kontrollpanelen lyser eller blinkar när
denna funktion har aktiverats.
- 92 -
EY7460_EY7960_Book.indb 92 2013-12-2 16:13:04
Page 93

●
Om skyddsfunktionen för överhettning
h a r a kti v e r a ts, s å lå t v e rkt y g e t
svalna ordentligt (i minst 30 minuter).
Verktyget kan användas igen efter att
varningslampan för överhettning har
slocknat.
●
Undvik att använda verktyget på ett
sätt som medför att skyddsfunktionen
för överhettning aktiveras upprepade
gånger.
●
Om verktyget används kontinuerligt med
hög belastning eller när temperaturen
är hög (t.ex. under sommaren), kan
skyd d sfunkt i onen f ör ö v e rhettn i ng
aktiveras upprepade gånger.
●
Om verktyget används när temperaturen
är låg (t.ex. under vintern), eller om
den stoppas ofta under användning,
kan det hända att skyddsfunktionen för
överhettning inte aktiveras.
●
Temperaturen i omgivningen skall vara
mellan 0˚C och 40˚C.
Om batteriet används under fryspunkten
0˚C, kan verktyget fungera onormalt.
●
När du ska ladda ett kallt batteri (under
0°C) på ett varmt ställe, ska du låta
ba tteriet ligga på detta stä lle m inst
en timme i förväg så att batteriet får
rumstemperatur.
(3) Varningslampa för svagt batteri
Släckt
(normal
drift)
För mycket (fullständig) urladdning av ett
litiumjonbatteri förkortar dess livslängd
väsent l i g t . Verktyg e t in k l u d e rar en
skyddsfunktion för batteriet avsett att
förhindra alltför stor urladdning av batteriet.
●
Batteriets skyddsfunktion aktiveras strax
innan batteriet förlorar sin laddning,
varpå varningslampan för svagt batteri
börjar blinka.
●
Ladda genast upp batteriet vid upptäckt
av att varningslampan för svagt batteri
blinkar.
Blinkande
(ingen laddning)
Batteriets
skyddsfunktion
aktiverat
●
Om m a skinen sta r t as med f ör lite
batterikraft återstående, kan den sluta
fungera utan att varningslampan för
bat teril addn ing förs t bli nkar. Detta
indikerar att för lite batterikraft nns kvar
för att använda verktyget och att batteriet
måste laddas före vidare användning.
●
Om verktyget under användning blir
föremå l för en p l ö tslig belast n i n g
som får mot o r n att lå s a si g , ka n
överladdningssensorn aktiveras och
varningslampan för batteriladdning kan
börja blinka. Lampan slutar blinka när du
behandlar orsaken till motorns låsning
samt släpper och trycker in avtryckaren.
[Batteri]
Korrekt hantering av batteri
Litiumjonbatteri
●
Förvara litiumjonbatteriet utan att ladda
upp det efter användning för att erhålla
optimal batterilivslängd.
●
Kontrollera vid laddning av batteriet att
po lerna på ba tteriladdaren är f ria från
främmande äm nen, såsom damm eller
vatten. Rengör polerna innan batteriet
laddas, om något främmande ämne åternns
på polerna. Batteripolernas livslängd kan vid
drift påverkas av främmande ämnen, såsom
damm eller vatten.
●
När batteriet inte används ska det hållas
borta från mynt, nycklar, gem, spikar,
skruvar och andra små metallföremål
som kan orsaka kortslutning genom att
vidröra kontakterna.
En kortslutning av batteriets kontakter
k a n o rsa k a g n i s t o r , br a n d el l e r
brännskador.
●
Se till att ar b e t s o m r ådet ha r god
ventilation vid användning av batteriet.
●
Sätt g enast på batteris kydd et igen
efter att batteriet har tagits loss från
verktygshuset för att förhindra ansamling
av damm eller smuts på batteripolerna
och kortslutning.
- 93 -
EY7460_EY7960_Book.indb 93 2013-12-2 16:13:04
Page 94

Batteriets livslängd
Batteriet har en begränsad livslängd.
Om batteriets kapacitet är extremt kort
efter att ha laddats ordentligt, skall det
bytas ut mot ett nytt.
Rekommendationer för användning
Batteriskydd
Poler
dekal
Se till att använda batteriskyddet
●
När batter iet in te a nvänd s b ör d et
fö r v ar a s på et t s ä t t s o m gör att
främmande ämnen, såsom damm eller
vatten, inte kan hamna på batteripolerna.
Var noga med att skydda batteripolerna
genom att sätta på batteriskyddet.
●
Kontrollera vid laddning av batteriet att
polerna på batteriladdaren är fria från
främmande ämnen, såsom damm eller
vatten. Rengör polerna innan batteriet
la ddas, om något främmande ämne
åternns på polerna.
Batteripolernas livslängd kan vid drift
påverkas av främmande ämnen, såsom
damm eller vatten.
VIKTIGT:
För att skydda motorn och batteriet,
skall du komma ihåg följande vid denna
användning.
●
Om motorn och batteriet överhettas,
aktiveras skyddsfunktionen och då slutar
motorn och batteriet att fungera.
För säker användning
●
Batteriet ska monteras genom vidta
att två säkerhetsåtgärder. Kontrollera
att batteriet är ordentligt monterat på
huvudenheten före användning.
●
Om batteriet inte är ordentligt anslutet
n ä r e n br y t a r e s l å s p å ko m m e r
varningslampan för överhettning och
varningslampan för lågt batteri att blinka
för att indikera att säker hantering inte
är möjlig och huvudenheten kommer
inte att rotera normalt. Anslut batteriet till
verktygets enhet tills du inte längre kan
se den röda eller gula dekalen.
[Batteriladdare]
Laddning
VIKTIGT:
●
La d d ar e n ä r utfo r m ad f ö r a t t
enda st a n vändas me d st andard
hushållsströmkälla som anges på
märkp l å t en. La d da en d ast m e d
spänningen som indikeras på verktygets
märkplåt t.ex.230 V / 50 Hz.
●
Försök inte att använda den med någon
annan spänning eller frekvens!
●
Om batteriets temperatur sjunker till
under cirka −10°C, så avbryts laddning
automatiskt för att förhindra försämring
av batteriets prestanda.
●
Temperaturen i omgivningen skall vara
mellan 0˚C och 40˚C.
Om batteriet används under fryspunkten
0˚C, kan verktyget fungera onormalt.
●
När du ska ladda ett kallt batteri (under
0°C) på ett varmt ställe, ska du låta
ba tteriet ligga på detta stä lle m inst
en timme i förväg så att batteriet får
rumstemperatur.
●
Kyl ner laddaren om du tänker ladda mer
än två batteri i följd.
●
Stick inte in fingrarna i kontakthålet när
du håller laddaren i handen eller vid
andra tidpunkter.
VIKTIGT:
Iaktta följande för att förhindra brand och
andra skador.
●
Använd inte en motordriven generator
som strömkälla.
●
Tä ck inte ö ver ve nti lationshålen på
laddaren och batteriet.
●
Kop p l a lo s s batt e r i l a dd a r e n fr å n
vägguttaget, när den inte ska användas.
- 94 -
EY7460_EY7960_Book.indb 94 2013-12-2 16:13:05
Page 95

Litiumjonbatteri
OBSERVERA:
Batteriet är inte helt uppladdat när det
säljs. Se till att ladda upp batteriet fore
användning.
Hur man laddar
1. Anslut laddaren till ett vägguttag.
OBSERVERA:
Gnistor kan uppstå när kontakten
sätts in i eluttaget men det är inget
säkerhetsproblem.
2. Anslut batteriet ordentligt i laddaren.
1) Placera ba t teriet i d o c kan på
laddaren med anpassningsmärkena
placerade mot varandra.
2) Skjut batteriet framåt i pilens riktning.
Anpassningsmärken
3. U n de r la d d n i n ge n ly s e r
laddningslampan. För att förhindra
överladdning kopplar en inbyggd brytare
automatiskt bort laddningsfunktionen
när laddningen är färdig.
●
Om ba t t e r i e t är fö r vamt (t.ex.
direkt efter tungt arbete) startar inte
laddningen.
Den orange standby-lampan blinkar
tills batteriet har svalnat.
D ä r eft e r på b ö rja s l a d d n ing e n
automatiskt.
4. Den gröna laddningslampan börjar
blinka långsamt när batteriet har nått
cirka 80 % laddning.
5. När laddningen är klar slocknar den
gröna laddningslampan.
6. Om batteriets temperatur är 0°C eller
lägre, så tar det längre tid än normalt
att ladda upp batteriet helt.
Även när batteriet har laddats upp
helt har det bara cirka 50% av den
styrka so m gäller fö r ett ba t t e r i
som l addats upp helt vid n ormala
temperaturförhållanden.
7. R åd gö r m e d e n a u kt o r i s e r a d
återförsäljare, om laddningslampan
(grön) inte slocknar.
8. Vid isättning av ett fulladdat
batteri i laddaren på nytt kommer
laddningslampan att tändas. Efter
ett antal minuter slocknar den gröna
laddningslampan.
9. Tryck upp batteripaketets lossningsknapp
och ta bort batteripaketet.
Lossningsknapp för
batteripaket
- 95 -
EY7460_EY7960_Book.indb 95 2013-12-2 16:13:05
Page 96

ANZEIGELAMPEN
Laddningen är klar (batteriet helt uppladdat).
Batteriet är uppladdat till cirka 80 %.
Laddning pågår.
Laddaren är ansluten till vägguttaget.
Redo för laddning.
(Grön)
Släckt Lyser
(Orange)
Laddningslampor (för laddningstillstånd)
Vänster: grön lampa; Höger: orange lampa
Batteriet är kallt.
Batteriet laddas upp långsamt för att minska belastningen på
batteriet.
Batteriet är för varmt.
Laddningen startar när batteriet har svalnat. Om batteriets
temperature är –10°C eller lägre, så börjar den orange
laddningslampan också att blinka. Laddningen startar då efter
att batteriet har värmts upp en aning.
Laddningen kan inte starta. För mycket damm eller felaktigt
batteri.
Blinkar
Information för användare om hopsamling och avfallshantering
av gammalt material och använda batterier
Dessa symboler på produkter, förpackningar och/eller medföljande
dokument betyder att man inte ska blanda elektriska och elektroniska
produkter eller batterier med vanliga hushållssopor.
För att gamla produkter och använda batterier ska hanteras och återvinnas
på rätt sätt ska man ta dem till passande uppsamlingsställe i enlighet med
nationella bestämmelser och direktiven 2002/96/EC och 2006/66/EC.
När du kasserar dessa produkter och batterier på rätt sätt hjälper du till att
spara på värdefulla resurser och förebygga en potentiell negativ inverkan
på människors hälsa och på miljön som annars skulle kunna uppstå p.g.a.
otillbörlig avfallshantering.
För mer information om uppsamling och återvinning av gamla produkter
och batterier, var god kontakta din kommun, din avfallshanterare eller det
försäljningsställe där du köpte din artikel.
Olämplig avfallshantering kan beläggas med straff i enlighet med nationella
bestämmelser.
För affärsanvändare inom den Europeiska Unionen
Om du vill kassera elektrisk eller elektronisk utrustning, var god kontakta din
återförsäljare eller leverantör för ytterligare information.
- 96 -
EY7460_EY7960_Book.indb 96 2013-12-2 16:13:05
Page 97

[Information om avfallshantering i länder utanför den Europeiska unionen]
Dessa symboler är endast giltiga inom den Europeiska Unionen. Om du vill kassera
dessa föremål, var god kontakta dina lokala myndigheter eller din lokala återförsäljare
och fråga efter rätt metod för avfallshantering.
V. SKÖTSEL
●
Använd endast en torr, mjuk trasa till att torka rent verktyget med. Använd inte en fuktig
trasa, thinner, bensin eller något annat yktigt lösningsmedel vid rengöring.
●
Om det skulle hända att vatten tränger in i verktyget eller batteriet, så töm ut vattnet och
låt verktyget/batteriet torka så fort som möjligt. Avlägsna försiktigt eventuell ansamling
av damm eller järnlspån från insidan av verktyget. Kontakta en reparationsverkstad, om
något problem vid användning av verktyget uppstår.
VI. TILLBEHÖR
Använd endast bits som är anpassade till storleken på slagskruvdragarens chuck.
VII. APPENDIX
REKOMMENDERADE SKRUV- OCH BULTSTORLEKAR
Modell EY7460 EY7960
Maskinskruv M8
Skruvdragning
Borrning
Träskruv ø 10 mm
Självdragande
skruv
I trä ø 38 mm
I metall ø 13 mm
För murverk --- 13 mm
ø 6 mm
TILLÄGG TILL GARANTIN
Slitage och skada orsakad av långvarig användning (t.ex. fabriksarbete på monteringsbandet,
m.m.) täcks inte av garantin.
VIII. SPECIFIKATIONER
SLAGSKRUVDRAGARE
Modell EY7460 EY7960
Motorspänning 21,6 V CD
Tomgångsvarvtal
Slagtakt per
minut
Chuckens storlekskapacitet ø1,5 mm - ø13 mm
Kopplingens åtdragningsmoment Ca 1,0 N•m (10kgf-cm) – 6,9 N•m (70kgf-cm)
Total längd 232mm 245mm
Vikt (inkl. batteriet
EY7460_EY7960_Book.indb 97 2013-12-2 16:13:05
Låga varvtal 100~400 min-1 (rpm)
Höga varvtal 350~1500 min
Låga varvtal --- 1800~7200 min
Höga varvtal --- 6300~27000 min
EY9L61)
2,45 kg 2,55 kg
-1
(rpm)
- 97 -
-1
(bpm)
-1
(bpm)
Page 98

BATTERI
Modellnr. EY9L61 EY9L62
Ackumulatorbatteri Litiumjonbatteri
Batteri
spänning DC 21,6 V
detalj. spec. 3,6 V × 6 celler 3,6 V × 12 celler
BATTERILADDARE
Modellnr. EY0L82
Märkdata Se märkplåten på undersidan av laddaren.
Vikt 0,93 kg (2 lbs)
EY9L61 EY9L62
Laddningstid
OBSERVERA: Schemat kan innehålla modeller som inte säljs i ditt område.
OBSERVERA: Återförsäljarens namn och adress anges på det medföljande garantikortet.
Användbar uppladdning: 50 min Användbar uppladdning: 65 min
Fullständig uppladdning: 60 min Fullständig uppladdning: 85 min
Vi hänvisar till senast allmäna katalog.
- 98 -
EY7460_EY7960_Book.indb 98 2013-12-2 16:13:05
Page 99

Opprinnelige bruksanvisninger: Engelsk
Oversettelse av de opprinnelige bruksanvisningene: Andre språk
I. TILSIKTET BRUK
Disse verktøyene kan brukes til skruing i clutchmodus, og til boring i tre og
metall i boremodus. I tillegg kan modell
EY7960 brukes til å bore hull i lettbetong og tilsvarende materialer i slagmodus.
Les heftet “Sikkerhetsveiledning” og
følgende før du tar i bruk verktøyet.
II.
EKSTRA
SIKKERHETSREGLER
1) Bruk hørselsvern.
Støyeksponering kan føre til tap av
hørsel.
2) Bruk hjelpehåndtaket (støttehåndta-
ket) som følger med verktøyet.
Ta p a v k o n t ro ll k a n f ø r e t i l
personskade.
3) Hold kun på elektriske verktøys
isolerte håndtak/ gripeoverater når
du utfører en jobb der verktøyets
kuttefunksjon kan komme i kontakt
med skjul te elekt risk e anl egg/
ledninger. Slik kontakt kan føre til at
verktøyet leder strøm og gi brukeren
farlige elektriske støt.
4) Br u k støv m a s k e hv i s arbe i d e t
forårsaker støv.
5) Vær klar over at dette verk tøyet
alltid er klart til bruk, da det ikke må
tilkoples et vegguttak for strøm.
6) Nå r du borer i vegger, gulv, etc.,
k a n d u k o mme i k o nta k t m e d
strømførende elektriske ledninger.
I K KE B ER Ø R H E XC H UC K E N
ELLER NOEN ANNEN METALLDEL
FORAN PÅ VERKTØYET! Hold kun
verktøyet i plasthåndtaket, slik at du
ikke får elektrisk støt dersom du skrur
verktøyet inn i strømførende elektriske
ledninger.
7) Dersom en bit ikke roterer mer, må du
slå av hovedbryteren med en gang for
å unngå overbelastning på motoren,
ellers kan det skade batteripakken
eller motoren.
Bruk bakove rrotasjo n for å l øsne
fastklemte bits.
8) Bruk IKKE forover-/bakoverbryteren
så lenge hovedbryteren er slått på.
Batteriet vil bli raskt utladet og det kan
oppstå skader på verktøyet.
9) Under opplading kan laderen bli litt
varm. Dette er normalt. IKKE lad opp
batteriet over lang tid.
10) Under lagring eller transport av
verktøyet skal forover-/bakoverbryteren
settes i midtstilling (bryterlås).
11) Ikke belast verktøyet ved å holde
h o ve d br y te r en h a l vv e is i nn e
(hastighetskontroll) slik at motoren stanser.
12) Bruk ikke hastighetsvelgeren (LAV –
HØY) mens du holder hovedbryteren
inne. Det kan forårsake at batteriet
slites for raskt eller at motorens indre
mekanisme blir beskadiget.
- 99 -
EY7460_EY7960_Book.indb 99 2013-12-2 16:13:06
Page 100

Symbol Betydning
V Volt
Likestrøm
n
...min
Ah
o
Hastighet uten belastning
-1
Omdreininger eller
vekselgang per minutt
Elektrisk kapasitet av
batteripakke
Forover rotasjon
Revers rotasjon
Rotasjon med slag
Kun rotasjon
For å redusere faren
for personskader, må
brukeren ha lest og forstått
bruksanvisningen.
For kun bruk inne i huset.
ADVERSEL!
●
Ik ke bruk an dre ba tte ripakker enn
dem fra Panasonic som er utviklet til å
brukes i dette oppladbare verktøyet.
●
Panasonic kan ikke ta ansvar for skader
eller ulykker som skjer på grunn av bruk
av gjenbrukte batteripakker eller falske
batteripakker.
●
Batteripakken må ikke kastes på bål
eller utsettes for overdreven varme.
●
D e t sk a l ik k e slå s spi k e r i n n i
batteripakken og det skal heller ikke
gjøres forsøk på å modifisere den,
utsette den for støt eller demontere
den.
●
Ikke la m etallgjenstander komme i
berøring med polene på batteripakken.
●
Ikke oppbevar eller frakt batteripakken
i samme beholder som spiker eller
lignende metallgjenstander.
●
Batteripakken må ikke lades på et sted
med høy temperatur, for eksempel ved
siden av åpen flamme eller i direkte
sollys. Dette kan føre til overoppheting
av batteriet, og det kan ta fyr eller
eksplodere.
●
Bruk al d ri n o en anne n la der e n n
den so m er anvist fo r lading av
batter i p a k ken. Dette kan f ø re ti l
batterilekkasje, overoppheting eller
eksplosjon.
●
Etter at batteriet er tatt ut av verktøyet
eller l a d e r e n , må d u alltid sette
pakkedekselet på plass. Dersom ikke
det gjøres kan kontaktene kortsluttes,
noe som medfører brannrisiko.
●
Dersom batteripakkens ytelse er blitt
forringet, skift den ut med en ny en.
Fortsatt bruk av en defekt batteripakke
kan føre til varmeutvikling, brann eller
brudd på batteriet.
III. MONTERING
Montere eller demontere en bit
MERK:
Før du skal montere eller fjerne en bit
må du koble batteripakken fra verktøyet
eller sette hovedbryteren i midtstilling
(bryterlås).
Verktøyet er utstyrt med en nøkkelløs
borchuck.
1. Montering
Innsett biten og drei låsekragen med
urviserne (sett fra forsiden) inntil kragen
klikker på plass.
2. Demontering
Drei låsekragen mot urviserne (sett fra
forsiden) og trekk av biten.
Låsekrage
- 100 -
EY7460_EY7960_Book.indb 100 2013-12-2 16:13:07
 Loading...