

Panasonic DVDS27EG, DVD-S24EG User Manual

DVD/CD PLAYER
DVD-S27/S24
Operating Instructions
PanasonicPanasonic
DVD / CD PLAYER DVD-S27 DVD / CD PLAYER DVD-S27
DVD
CD
DVD-RAM VIDEO PLAYBACK
Contents Page
Included Accessories 2
Inserting Batteries
Safety Precautions 2 - 3
Front DVD-Player 4
Connectors 5
Remote control unit 6 - 7
QUICK SETUP
Playback functions 9 - 11
Navigation Menu 12 - 13
54MNz/10bit VIDEO D/A CONVERTER
OPEN/CLOSE
AV ENHANCER
Before connecting the device, operating it or adjusting settings please read these
operating instructions completely; especially the safety precautions on pages 2-3.
HighMAT / CD Text 14
DISPLAY menu 15 - 17
SETUP menus
Before requesting service 20 - 21
Information 22
Specifications 23
Index last page
Country-codes
8
18 - 19
Dear customer
Thank you for your trust and your decision to purchase this top-quality device. Panasonic is
one of the leading manufacturers of entertainment electronics devices. We are sure that you
will be completely satisfied with this device.
Matsushita Electric Industrial Co., Ltd.
http://www.panasonic.co.jp/global/
A
V
EH
NN
A
DV
A
N
S R
U D
R
O
1
2
4
5
7
8
C
A
N
C
E
L
0
S P
K
I
S
T
O
P
D
IR
E
C N
T V R
A IG
AT
O
TO
P
M
EN
U
D P
I
S
LA
Y
SU
BT
I L
T
E
AU
D
PA
LO
Y
M
SL
D
E
EE
D
VD
N 0
2
QA
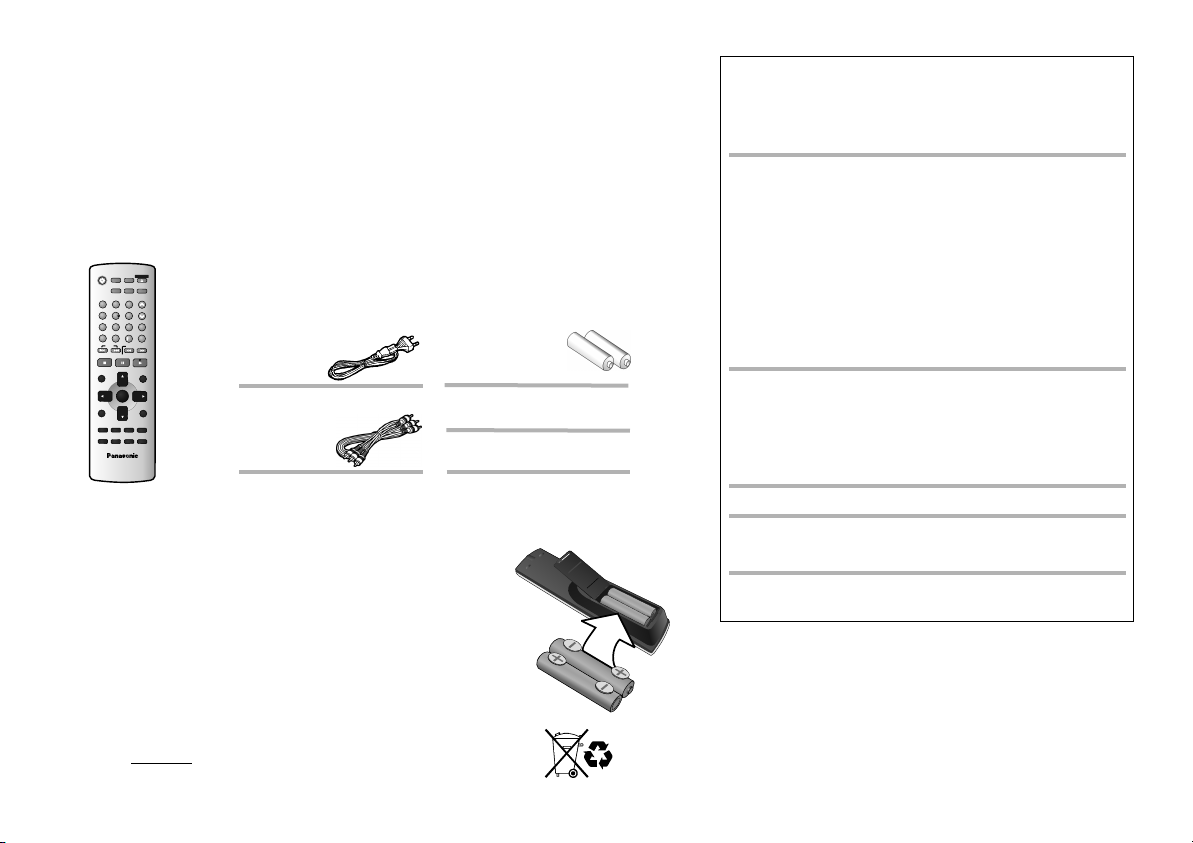
A
Inserting Batteries
The batteries last for about a year, depending on how often you use
the remote control unit.
!
Do not mix old with new batteries or batteries of different types.
!
Only use batteries without any harmful substances (lead, cadmium, mercury).
!
Do not use rechargeable type batteries.
!
Remove the batteries if the remote control unit will remain unused
for longer periods of time.
!
Do not heat or short-circuit the batteries. Immediately remove
used-up batteries and replace with batteries of type AA, UM3 or R6.
!
Be sure to put in the batteries the right way round (+ and -).
Dispose of batteries, packaging material and the unit according to
statutory regulations. They must not be thrown into the household refuse.
Included
C
E
R
F L
L
O /C
S
P
E
E
N O
E
C
L
T
S
E
C
E
DA
P T
I
C
U
REM
DE
O
R E
P
E
A
T
U
N
3
P
L
A
Y
S
P
E
E
D
ccessories
6
P
O
S
TI N
I O
M
M
E
O Y
R
9
QIKR
U
C
EP
LY
A
1
0
LW E
O
/
S A H
R
CS
P
AU
S
E
P
L
A
Y
P
L Y
AL S
I
T
M E
N
U
E
N
TR
E
R
E
TU N
R
IO
A
N
G
LE
/
P
A
G
E
S
ET
U
P
P
Z
O
O
M
G
R
O
U
P
PL
AY
E
R
J
B
0
00
9
1
Remote control
AC Mains Lead
RJA0043-1C
Audio/Video Cable
K2KA6CA00001
N2QAJB00091
Batteries
AA, UM3 or R6
Operating Instructions
Guarantee Card
2
WARNING:
TO REDUCE THE RISK OF FIRE, ELECTRIC SHOCK OR PRODUCT DAMAGE,
DO NOT EXPOSE THIS APPARATUS TO RAIN, MOISTURE, DRIPPING OR
SPLASHING AND THAT NO OBJECTS FILLED WITH LIQUIDS, SUCH AS
VASES, SHALL BE PLACED ON THE APPARATUS.
CAUTION!
!
DO NOT INSTALL OR PLACE THIS UNIT IN A BOOKCASE, BUILT-IN
CABINET OR IN ANOTHER CONFINED SPACE. ENSURE THE UNIT IS
WELL VENTILATED. TO PREVENT RISK OF ELECTRIC SHOCK OR FIRE
HAZARD DUE TO OVERHEATING, ENSURE THAT CURTAINS AND ANY
OTHER MATERIALS DO NOT OBSTRUCT THE VENTILATION VENT S.
!
DO NOT OBSTRUCT THE UNIT’S VENTILATION OPENINGS WITH
NEWSPAPERS, TABLECLOTHS, CURTAINS, AND SIMILAR ITEMS.
!
DO NOT PLACE SOURCES OF NAKED FLAMES, SUCH AS LIGHTED
CANDLES, ON THE UNIT.
!
DISPOSE OF BATTERIES IN AN ENVIRONMENTALLY FRIENDLY
MANNER.
CAUTION!
THIS PRODUCT UTILIZES A LASER. USE OF CONTROLS OR
ADJUSTMENTS OR PERFORMANCE OF PROCEDURES OTHER THAN
THOSE SPECIFIED HEREIN MAY RESULT IN HAZARDOUS RADIATION
EXPOSURE. DO NOT OPEN COVERS AND DO NOT REPAIR YOURSELF.
REFER SERVICING TO QUALIFIED PERSONNEL.
THIS UNIT IS INTENDED FOR USE IN MODERATE CLIMATES.
This product may receive radio interference caused by mobile telephones
during use. If such interference is apparent, please increase separation
between the product and the mobile telephone.
The socket outlet shall be installed near the equipment and easily accessible or
the mains plug or an appliance coupler shall remain readily operable.
Voltage: Only use power sources complying with the specifications for
this device.
AC mains lead protection: Ensure the AC mains lead is connected
correctly and not damaged. Poor connection and lead damage can
cause fire or electric shock.
Service: Never attempt to repair this unit by yourself. If a problem
occurs that is not described in these operating instructions,
disconnect the power supply and contact your dealer or an authorised
after sales service centre.
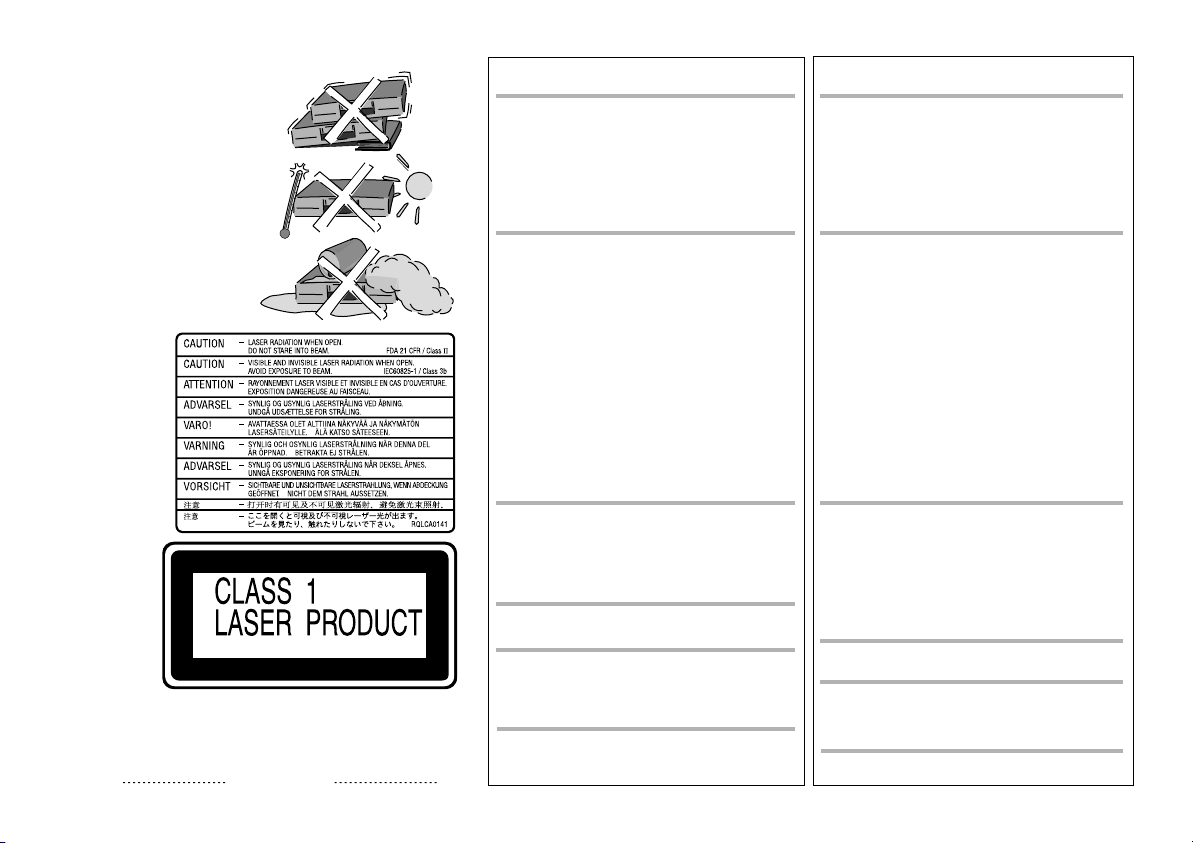
Safety Precautions
Install this in a horizontal position.
Do not place anything heavy on it.
Keep this away from high
temperatures and avoid changes
in temperatures.
device
device
SUOMI
VAROITUS:
TULIPALO-, SÄHKÖISKUVAARAN TAI TUOTETTA
KOHTAAVAN MUUN VAHINGON VÄHENTÄMISEKSI EI
LAITETTA SAA ALTISTAA SATEELLE, KOSTEUDELLE,
VESIPISAROILLE TAI ROISKEELLE, EIKÄ NESTETTÄ
SISÄLTÄVIÄ ESINEITÄ, KUTEN ESIMERKIKSI
MALJAKOITA, SAA ASETTAA LAITTEEN PÄÄLLE.
NORSK
ADVARSEL:
FOR Å REDUSERE FAREN FOR BRANN, ELEKTRISK
STØT ELLER SKADER PÅ PRODUKTET, MÅ DETTE
APPARATET IKKE UTSETTES FOR REGN, FUKTIGHET,
VANNDRÅPER ELLER VANNSPRUT. DET MÅ HELLER
IKKE PLASSERES GJENSTANDER FYLT MED VANN, SLIK
SOM BLOMSTERVASER, OPPÅ APPARATET.
Keep away from humidity and dust.
Inside of product
Produktets innside
(Norsk)
Tuotteen sisällä
(Suomi)
Back of product,
see page 5.
På baksiden
av produktet
(Norsk).
Laitteen takaosa
(Suomi).
LUOKAN 1 LASERLAITE
KLASS 1 LASER APPARAT
The model and serial number of this product can be found on the
back of the unit. Please note them and keep for future reference
Model No. Serial No.
VAROITUS!
!
ÄLÄ ASENNA TAI LAITA TÄTÄ LAITETTA
KABINETTITYYPPISEEN KIRJAKAAPPIIN TAI
MUUHUN SULJETTUUN TILAAN, JOTTA
TUULETUS ONNISTUISI. VARMISTA, ETTÄ VERHO
TAI MIKÄÄN MUU MATERIAALI EI HUONONNA
TUULETUSTA, JOTTA VÄLTETTÄISIIN
YLIKUUMENEMISESTA JOHTUVA SÄHKÖISKU TAI
TULIPALOVAARA.
!
ÄLÄ PEITÄ LAITTEEN TUULETUSAUKKOJA
SANOM ALEHDELLÄ , PÖYTÄLIINALLA, VERHOLLA TAI
MUULLA VASTAAVALLA ESINEELLÄ.
!
ÄLÄ ASETA PALAVAA KYNTTILÄÄ TAI MUUTA
AVOTULEN LÄHDETTÄ LAITTEEN PÄÄLLE.
!
HÄVITÄ PARISTOT LUONTOA
VAHINGOITTAMATTOMALLA TAVALLA.
VAROITUS!
LAITTEEN KÄYTTÄMINEN MUULLA KUIN TÄSSÄ
KÄYTTÖOHJEESSA MAINITULLA TAVALLA SAATTAA
ALTISTAA KÄYTTÄJÄN TURVALLISUUSLUOKAN 1
YLITTÄVÄLLE NÄKYMÄTTÖMÄLLE LASERSÄTEILYLLE.
TÄMÄ LAITE ON TARKOITETTU KÄYTETTÄVÄKSI
LEUDOSSA ILMASTOSSA.
Tämä tuotteen toimintaan saattaa tulla häiriöitä lähellä
olevasta matkapuhelimesta. Mikäli matkapuhelimesta
johtuvia häiriöitä ilmenee, siirrä matkapuhelin
mahdollisimman kauas laitteesta jotta häiriöt poistuvat.
Laite tulee asettaa lähelle verkkopistorasiaa ja pistokkeen
täytyy olla sellaisessa asennossa, että siihen on helppo
tarttua ongelman sattuessa.
ADVARSEL!
!
APPARATET MÅ IKKE PLASSERES I EN BOKHYLLE, ET
INNEBYGGET KABINETT ELLER ET ANNET LUKKET
STED HVOR VENTILASJONSFORHOLDENE ER
UTILSTREKKELIGE. SØRG FOR AT GARDINER ELLER
LIGNENDE IKKE FORVERRER
VENTILASJONSFORHOLDENE, SÅ RISIKO FOR
ELEKTRISK SJOKK ELLER BRANN FORÅRSAKET AV
OVERHETING UNNGÅS.
!
APPARATETS VENTILASJONSÅPNINGER MÅ IKKE
DEKKES TIL MED AVISER, BORDDUKER, GARDINER
OG LIGNENDE.
!
PLASSER IKKE ÅPEN ILD, SLIK SOM LEVENDE LYS,
OPPÅ APPARATET.
!
BRUKTE BATTERIER MÅ KASSERES UTEN FARE FOR
MILJØET.
ADVARSEL!
DETTE PRODUKTET ANVENDER EN LASER. BETJENING
AV KONTROLLER, JUSTERINGER ELLER ANDRE
INNGREP ENN DE SOM ER BESKREVET I DENNE
BRUKSANVISNING, KAN FØRE TIL FARLIG BEST RÅLING.
DEKSLER MÅ IKKE ÅPNES, OG FORSØK ALDRI
Å REPARERE APPARATET PÅ EGENHÅND. ALT SERVICE
OG REPARASJONSARBEID MÅ UTFØRES AV
KVALIFISERT PERSONELL.
DETTE APPARATET ER BEREGNET TIL BRUK UNDER
MODERATE KLIMAFORHOLD.
Dette apparatet kan under bruk fange opp høyfrekvente
forstyrrelser forårsaket av en mobiltelefon som benyttes i
nærheten. Hvis slik forstyrrende påvirkning konstateres, bør
mobiltelefonen benyttes på større avstand fra dette apparatet.
Utstyret bør plasseres i nærheten av AC-stikkontakten, og
støpslet må være lett tilgjengelig hvis det skulle oppstå problemer.
3
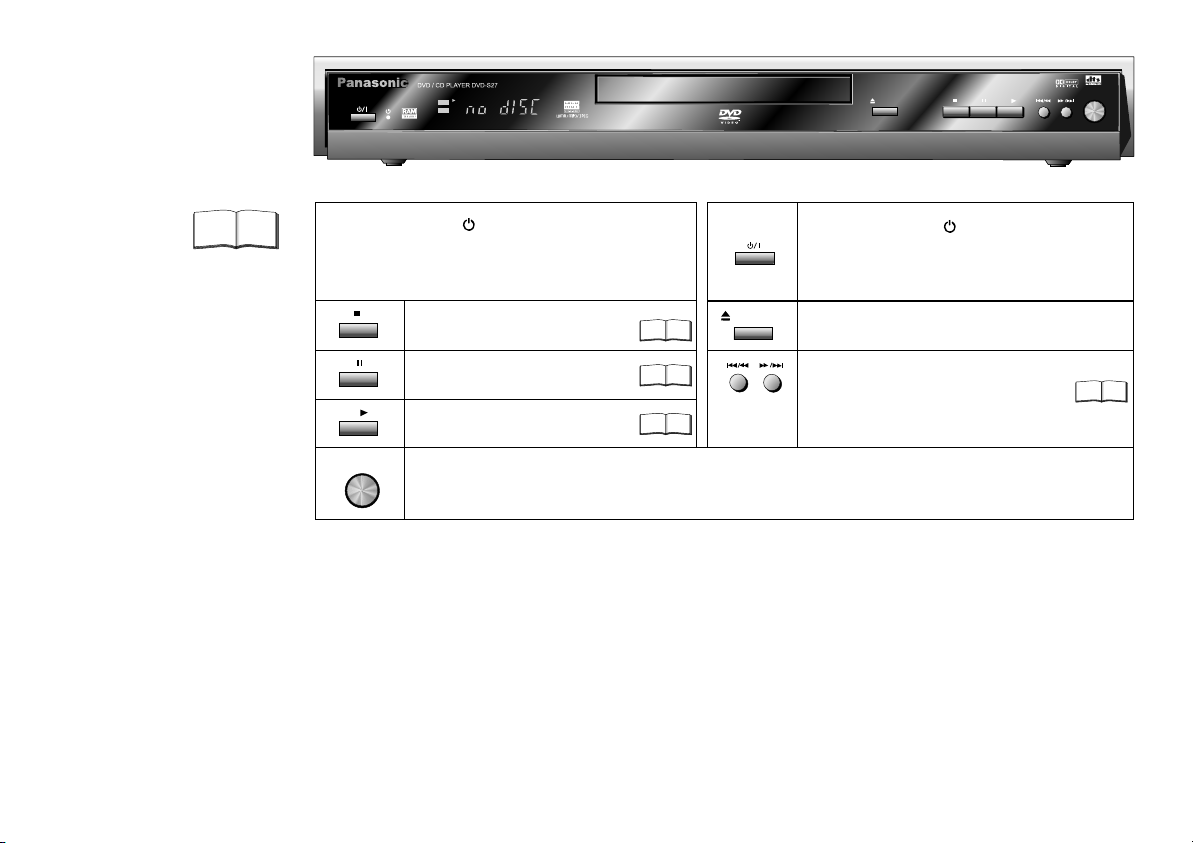
Front DVD-Player
PanasonicPanasonic
DVD / CD PLAYER DVD-S27 DVD / CD PLAYER DVD-S27
DVD
CD
DVD-RAM VIDEO PLAYBACK
54MNz/10bit VIDEO D/A CONVERTER
OPEN/CLOSE
AV ENHANCER
Detailed information
is available on the
specified pages.
4
Page
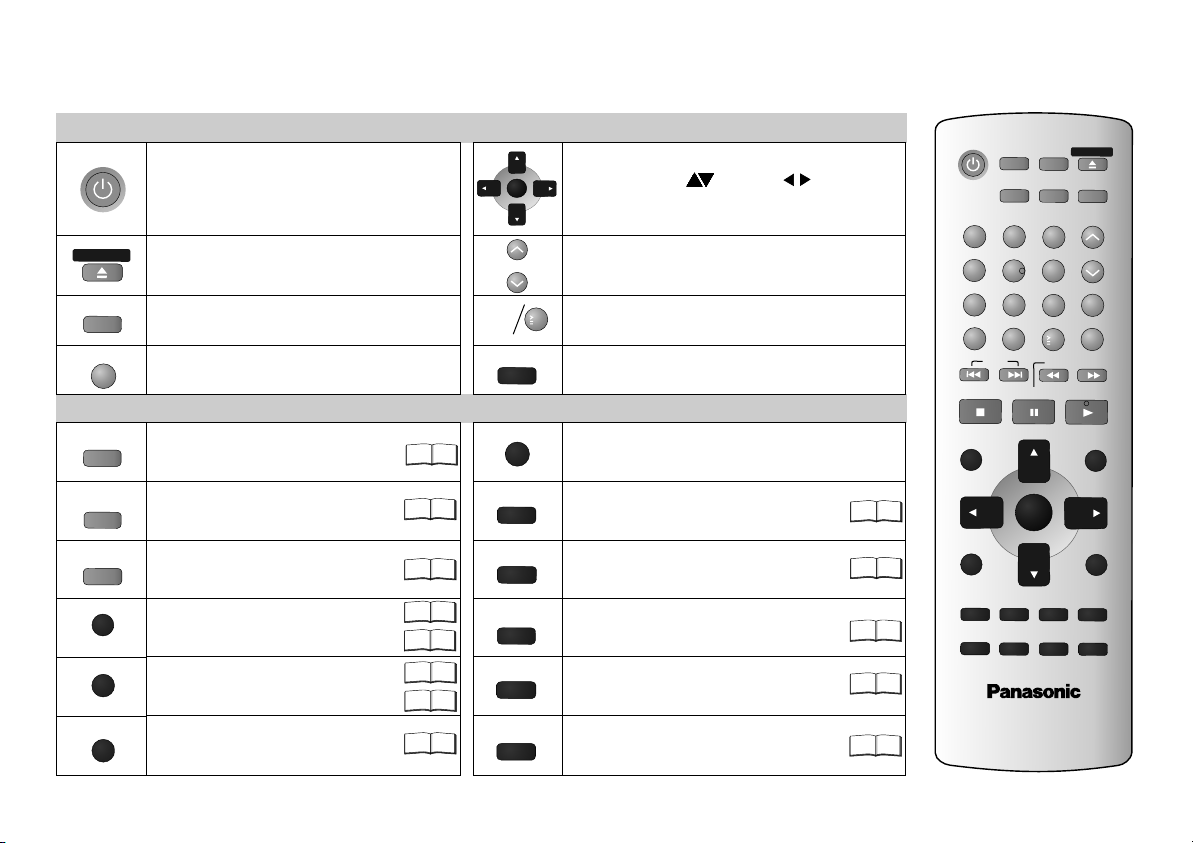
Stand-by indicator
When the unit is connected to the AC mains supply,
this indicator lights up in standby mode and goes out
when the unit is turned on.
Stops playback.
Pauses playback.
Starts playback.
AV ENHANCER
AV-Enhancer: Automatically optimises and adapts the audio and video settings to the disc used. The
OPEN/CLOSE
7
7
7
Stand-by/on switch /I
Press to switch the unit from on to stand-by mode
or vice versa. In stand-by mode, the unit is still
consuming a small amount of power.
Opens and closes the disc tray.
SKIP: Skips chapters, titles or frames.
SLOW/SEARCH () keep button pressed
Slow motion/search function.
Picture and Audio menus are not available when this function is enabled.
Your DVD player provides a perfect digital DVD video output. Depending on the type of DVD, your equipment or your
hi-fi
stereo TV set you can play back stereo sound or digital multi-channel sound in excellent cinema quality. DVD video also
features options for selecting the audio channel, the synchronised language, the language of subtitles and for choosing from
various camera pick-up angles.
All basic functions of your DVD player can be controlled either via the unit or by means of the remote control.
However, these operating instructions will make reference to the remote control symbols only.
The remote control lets you make any changes to the device settings which will be retained
when you switch off the player unit.
7
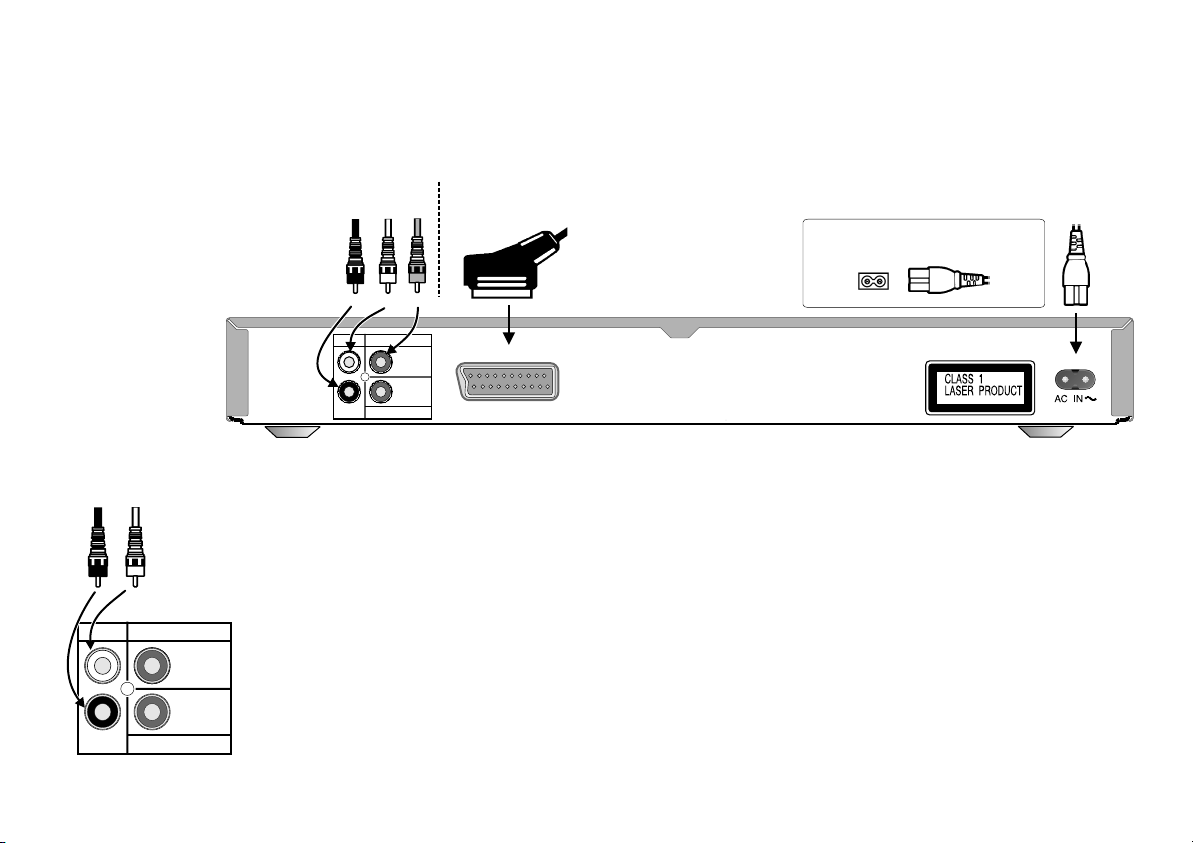
Connectors
Before connecting
!
Verify that all devices to be connected up are unplugged from the AC mains.
Note on all connections shown
Attach the unit directly to the TV set. If you let the player connection go through a video recorder
You will experience a disturbed picture when playing copy-protected DVDs.
Connection to a TV set without a scart socket or to
an amplifier component (home cinema):
White
Red
VIDEO OUT
Rear of
DVD/CD player
AUDIO OUT
L
R
Please connect
directly to TV.
COAXIAL
DIGITAL AUDIO OUT
(PCM/BITSTREAM)
To be able to hear sound in stereo or Dolby Pro Logic quality, attach an amplifier or an analogue audio component
Home cinema
supporting these features.
!
To avoid sound quality problems deactivate function Advanced Surround when you attach an amplifier with
Dolby Pro Logic functionality. Please refer to page 15.
Digital connectors (COAXIAL)
Red
White
To play programmes with a 5.1-channel surround sound, connect the digital audio output (COAXIAL) with an
external "Multi-channel Dolby Digital amplifier" or similar appliance.
AUDIO OUT
L
VIDEO OUT
Please connect
directly to TV
Rear of
DVD player
Prerequisites for making recordings with an external digital recorder
- The original disc must not be copy-protected.
- The recorder must be able to process signals with a scanning frequency of 48 kHz/16 bit.
- You cannot make MP3/WMA recordings.
R
COAXIAL
DIGITAL AUDIO OUT
(PCM/BITSTREAM)
D
Adapt the Audio SETUP menu settings (see page 19) to the following:
PCM Digital Output: [up to 48 kHz]
Dolby Digital / DTS Digital Surround / MPEG: [PCM]
D
Deactivate function Advanced Surround (see page 15).
Connection to a TV set with scart socket:
Yellow
21-pin scart cable
AV
When the unit is fully connected up
attach the AC mains cable.
AC IN ~
5
Remote control unit
O
PE /C S
F
L
C
AV E
ADVAN
S RROUN
PI
C
TU O
D
IREC
T
O M N
P
D
LO
EL
A
N
C
N
HAN
RE M E
T NA
A
Y
ME
NU
S
P AYI L
Stand-by/on switch
Press to switch the unit from on to stand-by mode
or vice versa. In stand-by mode, the unit is still
consuming a small amount of power.
EN
Opens and closes the disc tray.
ES
C
T
Selects the display contents.
(Title/Chapter or Time)
E
L
Discards entries
C
ER
AV Enhancer.
CED
Produces an effect similar
DU
.
to surround sound.
D
Selects the picture mode.
VI
G
A
T
O
R
Displays the DVD-RAM menu.
Displays the main menu.
UP E
I
S
TL L
Displays a play list.
Displays the menu.
Displays the on-screen display.
General control
E E
N
T
R
L
A EE
Y
S
P
0...9
SLE P
E
Menu control
R
TURNE
4
SUBTITLE
15
A
DUI
ANGLE/PAGE
SETUP
GR
OUP
22
12
15 17
17
11
11
22
!
OSD menu selection buttons.
!
Select Groups ( ) or Titles ( ) for JPEG,
WMA or MP3.
!
ENTER: accepts the menu function you selected
Playback speed control.
DP
Adapts to a factor between x0.6 and x1.4.
1
0
Numeric key pad; input of two-digit numbers.
Switches off the unit at the set time.
Quits a menu.
Selects the language of subtitles.
O
Changes the audio track.
ANGLE: Selects a camera angle.
PAGE : Changes menu pages.
Rotates JPEG images.
Displays the SETUP menu.
Displays the DISPLAY menu
Group Search.
16 22
16
13
8
16
AV EN
HANC
E
R
FL SELECT
OPEN/CLOSE
AD
VANCED
TU
R MO
EPIC
DE
D
N
TER
ANGLE/PAG
P
3
6
9
10
SLOW/
E
ZOOM
REPEAT
P
LAY SP
POSITION MEMOR
Q
U
I
CK
R
EPL
S
E
A
R
C
A
YPL
P
LA
Y L
ME
NU
R
ETU
E
SE
TUP
ROU
EE
D
Y
A
Y
H
IST
RN
PG
SURR
O
UN
1
2
4
5
7
8
A C
NC
EL
0
S
K
IP
STO
P
PAUS
D
IRE
CT NA
VIGA
TO
R
T
OP
ME
NU
E
D
I
S
PL
AY
US B
T
IT
L
E
A
UD
IO
16
PLAY MODE
S
LEE
18
D
V
D P
L
A
Y
E
R
N2
Q
AJB000
09
1
6
P Y
L
Playback control
A
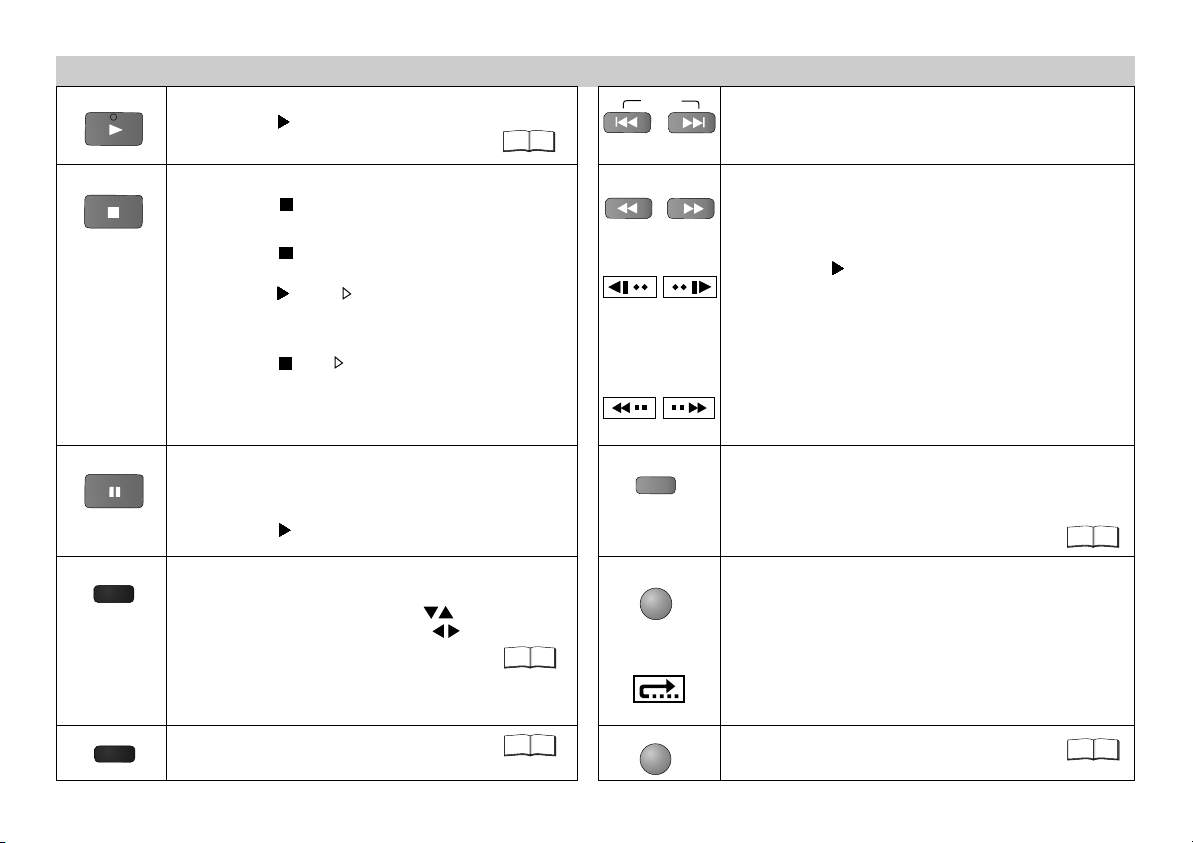
Start playback
!
Press PLAY .
Playback starts automatically.
SKIP
9
Skip chapters, titles or frames
!
Press SKIP during playback or in Pause mode.
STOP
PA
ZOO
P
L M
AY D
Stop playback
!
Press STOP twice.
Resume
!
Press STOP during playback
to store the current position on the disc.
!
Press PLAY while [ ] is flashing on the display.
SLOW/SEARCH
On-screen display
Playback is resumed at the point where you stopped it.
Cancel the Resume function
!
Press STOP until [ ] disappears from the display.
D
Opening the disc tray or the unit going into stand-by mode
On-screen display
also clears the stored position on the disc.
US
E
Pause playback (still image)
!
Press PAUSE during playback.
REPEAT
Playback stops at the current picture frame.
!
Press PLAY to resume playback.
Zoom
M
!
Press ZOOM during playback.
QUICK REPLAY
To fine-tune the zoom factor press
To set the zoom mode: ENTER and .
Restore factory setting
!
Press ZOOM until x1.00 is shown.
17
On-screen display
The zoom functionality may be restricted
depending on the disc format.
O
SIT
IO
N E
OE
Random Playback/Program Play.
10
M
Slow motion (backwards/forwards)
!
Press SLOW in Pause mode.
Keeping the button pressed increases the speed
of search at 5 steps.
!
Press PLAY to resume normal playback.
D
VCDs do not support reverse slow motion playback.
Search
!
Press SEARCH during playback.
Keeping the button pressed increases the speed of
search at 5 steps.
Repeat
!
Press REPEAT during playback.
There is no mode for repeatedly playing back
entire discs.
Scene replay
!
Press QUICK REPLAY during playback.
Every push of the button replays a couple of seconds of
the current track or programme. However, you cannot go
back to before the beginning of a title.
D
QUICK REPLAY is not supported by all discs.
M R
OP
Y
Resumes playback at stored
Position following an interruption.
9
10
7
QUICK SETUP
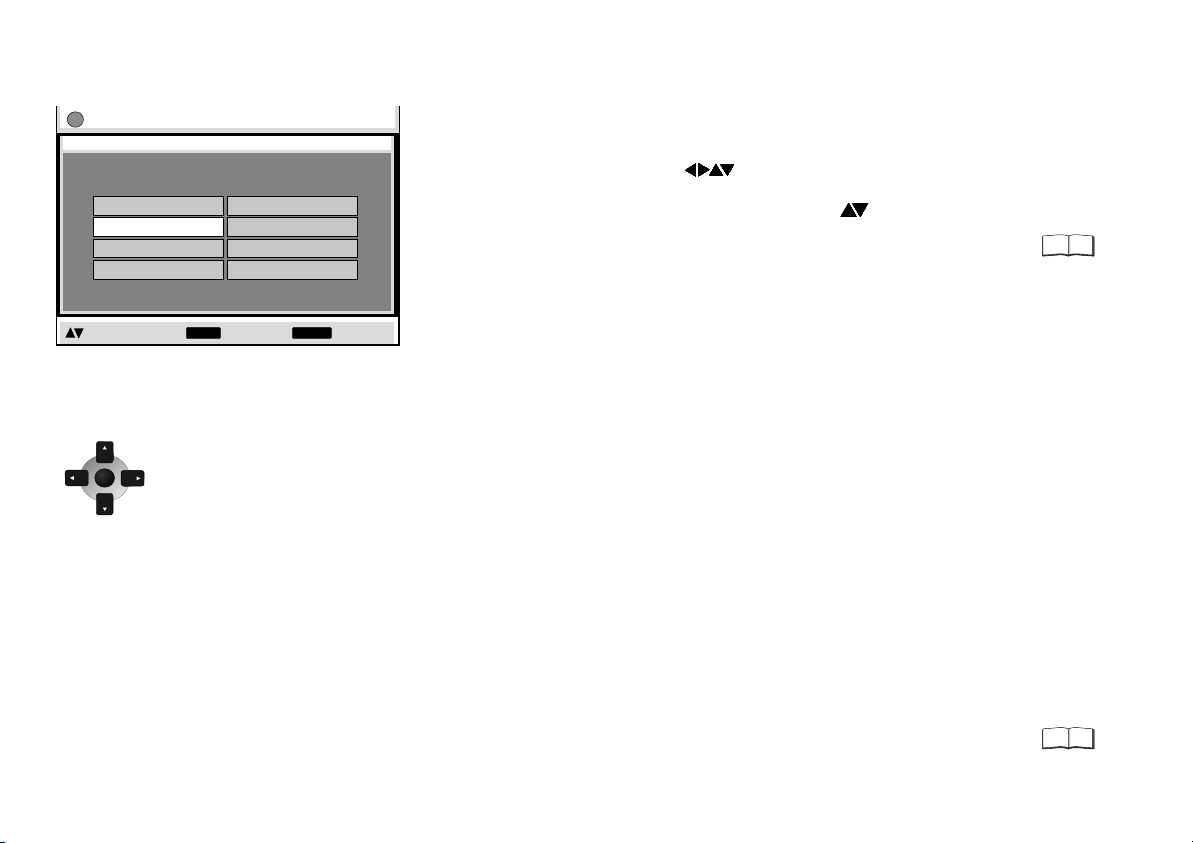
Setup
QUICK SETUP
Select the menu language.
English
Deutsch
Español
Svenska
to select and press to return
ENTER RETURN
The navigator keys of the remote control unit allow you
to move between menus and to accept or change the
selected settings.
Press ENTER to store a change.
ENTE
Press RETURN to go back to the
R
previous screen.
Press SETUP to quit the menu.
Français
Italiano
Português
Nederlands
!
Switch on the TV set and set it to the video input that matches
the connection between player and TV set.
!
Press the Stand-by/on button to switch on the DVD player.
!
Press SETUP to display the QUICK SETUP menu.
!
Use the navigator keys to select a menu language,
then press ENTER to confirm.
!
To continue with setting the defaults, press to select [Yes]
and ENTER to confirm. You can later go to the Setup menu to
run QUICK SETUP again.
!
Use the Setup menu options to adapt the default settings below
to your appliance. Every menu item provides further information
on the options you have.
D
Please refer to the operating instructions of your TV set to read
more about the best settings.
Select the type of TV you have connected.
Optimise the picture settings of the connected appliance.
Select your TV's aspect ratio.
The format of TV screens is either 4:3 (standard) or 16:9 (wide-screen).
Select the aspect ratio that matches the screen setting of your TV set.
Select the signal type output from the SCART terminal.
Before you proceed please check which setting is supported by your TV set.
To improve the picture quality, you can set the AV scart socket output to
a variety of video signals:
[Video] = standard picture quality
[S-Video] = enhanced picture quality
[RGB] = best picture quality
S-Video and RGB: Requires a 21-pin scart cable.
19
Following QUICK SETUP, you can use the options of the
Setup menu to make further settings.
18
Press RETURN or SETUP to quit the Setup menu.
8
 Loading...