

Panasonic DVD-A320U User Manual
Panasonic
DVDA/ideo CD/CD Player
Operating Instructions
Model No.
DVD-A320U
Before anempting to conr>ect, operate or adjust this player, please read
these instructions completely. Please save this manual.
Dear Customer
May we take this opportunity to thank you for purchasing this Panasonic
DVDA/ideo CD/CD Player.
We strongly recommend that you carefully study the Operating Instruc'
tions before attempting to operate the player and that you note the listed
precautions.
S5ff•£Г ncoMWicT
â
Oii Mi®
[DtOfTAL VIOCO} DIGITAL AUDIO
PRINT» WITN
SOY INK
Th<$ manual waa pnntad with aoy baaad Init
VQT8107

Safety information
Note
This player can be used only where the power supply
is AC 120 V, 60 Hz. It cannot be used elsewhere.
CAUTION:
DVDA^lDEO CD/CD PLAYER IS A CLASS I LASER
PRODUCT. HOWEVER THIS DVDA^IDEO CD/CD
PLAYER USES A VISIBLE LASER BEAM WHICH
COULD CAUSE HAZARDOUS RADIATION EXPO
SURE IF DIRECTED. BE SURE TO OPERATE THE
DVD/VIDEO CD/CD PLAYER CORRECTLY AS IN
STRUCTED.
WHEN THIS DVD/VIDEO CD/CD PLAYER IS
PLUGGED TO THE WALL OUTLET, DO NOT
PLACE YOUR EYES CLOSE TO THE OPENING
OF THE DISC TRAY AND OTHER OPENINGS TO
LOOK INTO THE INSIDE OF THIS PLAYER.
USE OF CONTROLS OR ADJUSTMENTS OR PER
FORMANCE OF PROCEDURES OTHER THAN
THOSE SPECIFIED HEREIN MAY RESULT IN
HAZARDOUS RADIATION EXPOSURE.
DO NOT OPEN COVERS AND DO NOT REPAIR
YOURSELF. REFER SERVICING TO QUALIFIED
PERSONNEL.
WARNING:
TO REDUCE THE RISK OF FIRE OR ELECTRIC
SHOCK, DO NOT EXPOSE THIS PLAYER TO
RAIN OR MOISTURE.
TO REDUCE THE RISK OF FIRE OR ELECTRIC
SHOCK, AND ANNOYING INTERFERENCE, USE
THE RECOMMENDED ACCESSORIES ONLY.
THIS PLAYER IS INTENDED FOR CONTINUOUS OPERATION!
CAUTION
RISK OF ELECTRIC SHOCK
A
CAUTION: TO REDUCE THE RISK OF ELECTRIC
SHOCK, DO NOT REMOVE COVER {OR
BACK). NO USER-SERVICEABLE PARTS
INSIDE. REFER SERVICING TO QUALI
FIED SERVICE PERSONNEL.
The lightning flash with arrowhead symbol, within
an equilateral triangle, is intended to alert the user
to the presence of uninsulated “dangerous volt
age” within the product’s enclosure that may be of
A
A
ATTENTION-RAYONNEMENT LASER EN CAS D'OUVERTURE.
VORSICHT -LASERSTRAHLUNG, WENN ABDECKUNG
ADVARSEL-LASERSTRÂLINGVEDÂBNING.
ADVARSEL -USERSTRÂLING NÂR DEKSEL ÂPNES.
VARO! -AVATTAESSA ÖLET ALTTIINA LWSERSATEILYLLE.
sufficient magnitude to constitute a risk of electric
shock to persons.
The exclamation point within an equilateral trian
gle is intended to alert the user to the presence of
important operating and maintenance (servicing)
instructions in the literature accompanying the ap
pliance.
■LASER RADIATION WHEN OPEN.
DO NOT STARE INTO BEAM.
NE PAS REGARDER DANS LE FAISCEAU.
NICHT IN DEN STRAHL BLICKEN.
SEIKKEINDISTRÂLEN.
STIRRIKKEINNISTRÂLEN.
-LASERSTRÄLNING NÂR DENNA DEL ÄR ÖPPNAD.
STIRRAEJINISTRÂLEN.
ÂLÂÎUIJÛTA SÄTEESEEN.
DO NOT OPEN
A
GEÖFFNET.
CAUTION:
TO PREVENT ELECTRIC SHOCK, DO NOT USE
THIS (POLARIZED) PLUG WITH AN EXTENSION
CORD, RECEPTACLE OR OTHER OUTLET UN
LESS THE BLADES CAN BE FULLY INSERTED
TO PREVENT BLADE EXPOSURE.
FCC NOTE:
This equipment has been tested and found to comply with the lim
its for a Class B digital device, pursuant to Part 15 of the FCC
Rules. These limits are designed to provide reasonable protection
against harmful interference in a residential installation. This
equipment generates, uses and can radiate radio frequency ener
gy and, if not installed and used in accordance with the instruc
tions, may cause harmful interference to radio communications.
However, there is no guarantee that interference will not occur in
a particular installation. If this equipment does cause harmful in
terference to radio or television reception, which can be deter
mined by turning the equipment off and on, the user is encou
raged to try to correct the interference by one or more of the
following measures:
(Inside of player)
• Reorient or relocate the receiving antenna.
• Increase the separation between the equipment and receiver.
• Connect the equipment into an outlet on a circuit different from
that to which the receiver is connected.
• Consult the dealer or an experienced radio/TV technician for
help.
FCC Caution: To assure continued compliance, follow the at
tached installation instructions and use only shielded cables when
connecting to other devices. Also, any changes or modifications
not expressly approved by the party responsible for compliance
could void the user’s authority to operate this equipment.
Precautions
Please read these precautions before operating this player.
■ AC cord protection
To avoid malfunctions and to protect against electric shock,
fire or personal injury, please observe the following:
• Hold the plug firmly when connecting or disconnecting
the AC cord.
•Do not connect or disconnect the AC cord with wet
hands.
• Keep the AC cord away from heating appliances.
• Do not put heavy objects on the AC cord.
• Do not attempt to repair or reconstruct the AC cord in
any way.
•Remove dust, dirt, etc. from the plug regularly.
•If the player has been dropped or damaged in any way,
set the player to the standby mode and disconnect the
AC cord.
•If smoke, odors or noises are emitted from the player, set
the player to the standby mode and disconnect the AC
cord.
■ Placement
•Do not place in direct sunlight, near radiators, or in closed
automobiles.
•Avoid high temperature [over 95“F {35°C)] and high humidity
(over 90%).
•Avoid excessive dust.
•Do not place where it can be exposed to vibration or impacts.
•Avoid placing on an inclined surface.
■ Non-use periods
When the player is not being used, set to standby mode.
When left unused for a long period of time, the player should
be unplugged from the household AC outlet.
■ No fingers or other objects inside
•Touching internal parts of this player is dangerous, and may
cause serious damage to the player. Do not attempt to disas
semble the player.
• Do not put any object other than discs on the disc tray.
■ Keep away from water and magnets.
• Keep the player away from flower vases, tubs, sinks, etc. If
liquids are spilled into the player, serious damage could
occur.
•Keep magnetic objects such as speakers, at a distance from
the player.
■ Stacking
• Place the player in a horizontal position, and do not place
anything heavy on it.
•Do not place the player on amplifiers or other equipment
which may become hot.
■ Condensation
Moisture may form on the lens in the following conditions:
• immediately after a heater has been turned on.
• in a steamy or very humid room.
•when the player is moved from a cold environment to a warm
one.
If moisture forms inside this player, it may not operate proper
ly. In this case, turn on the power and wait about one hour for
the moisture to evaporate.
■ If there is interference on the TV while a broad
cast is being received
Depending on the reception condition of the TV, interference
may occur if the player is left on. This is not a malfunction of
the player or the TV. To watch a TV broadcast, set the player
to the standby mode.
The model number and serial number of this player can be found on either the back or the bottom of the player.
Please note them in the space provided below and retain this booklet as a permanent record of your purchase to aid identifica
tion in the event of theft.
MODEL NUMBER______________________________________________________________________________________
SERIAL NUMBER____________________________________________________________________________________________
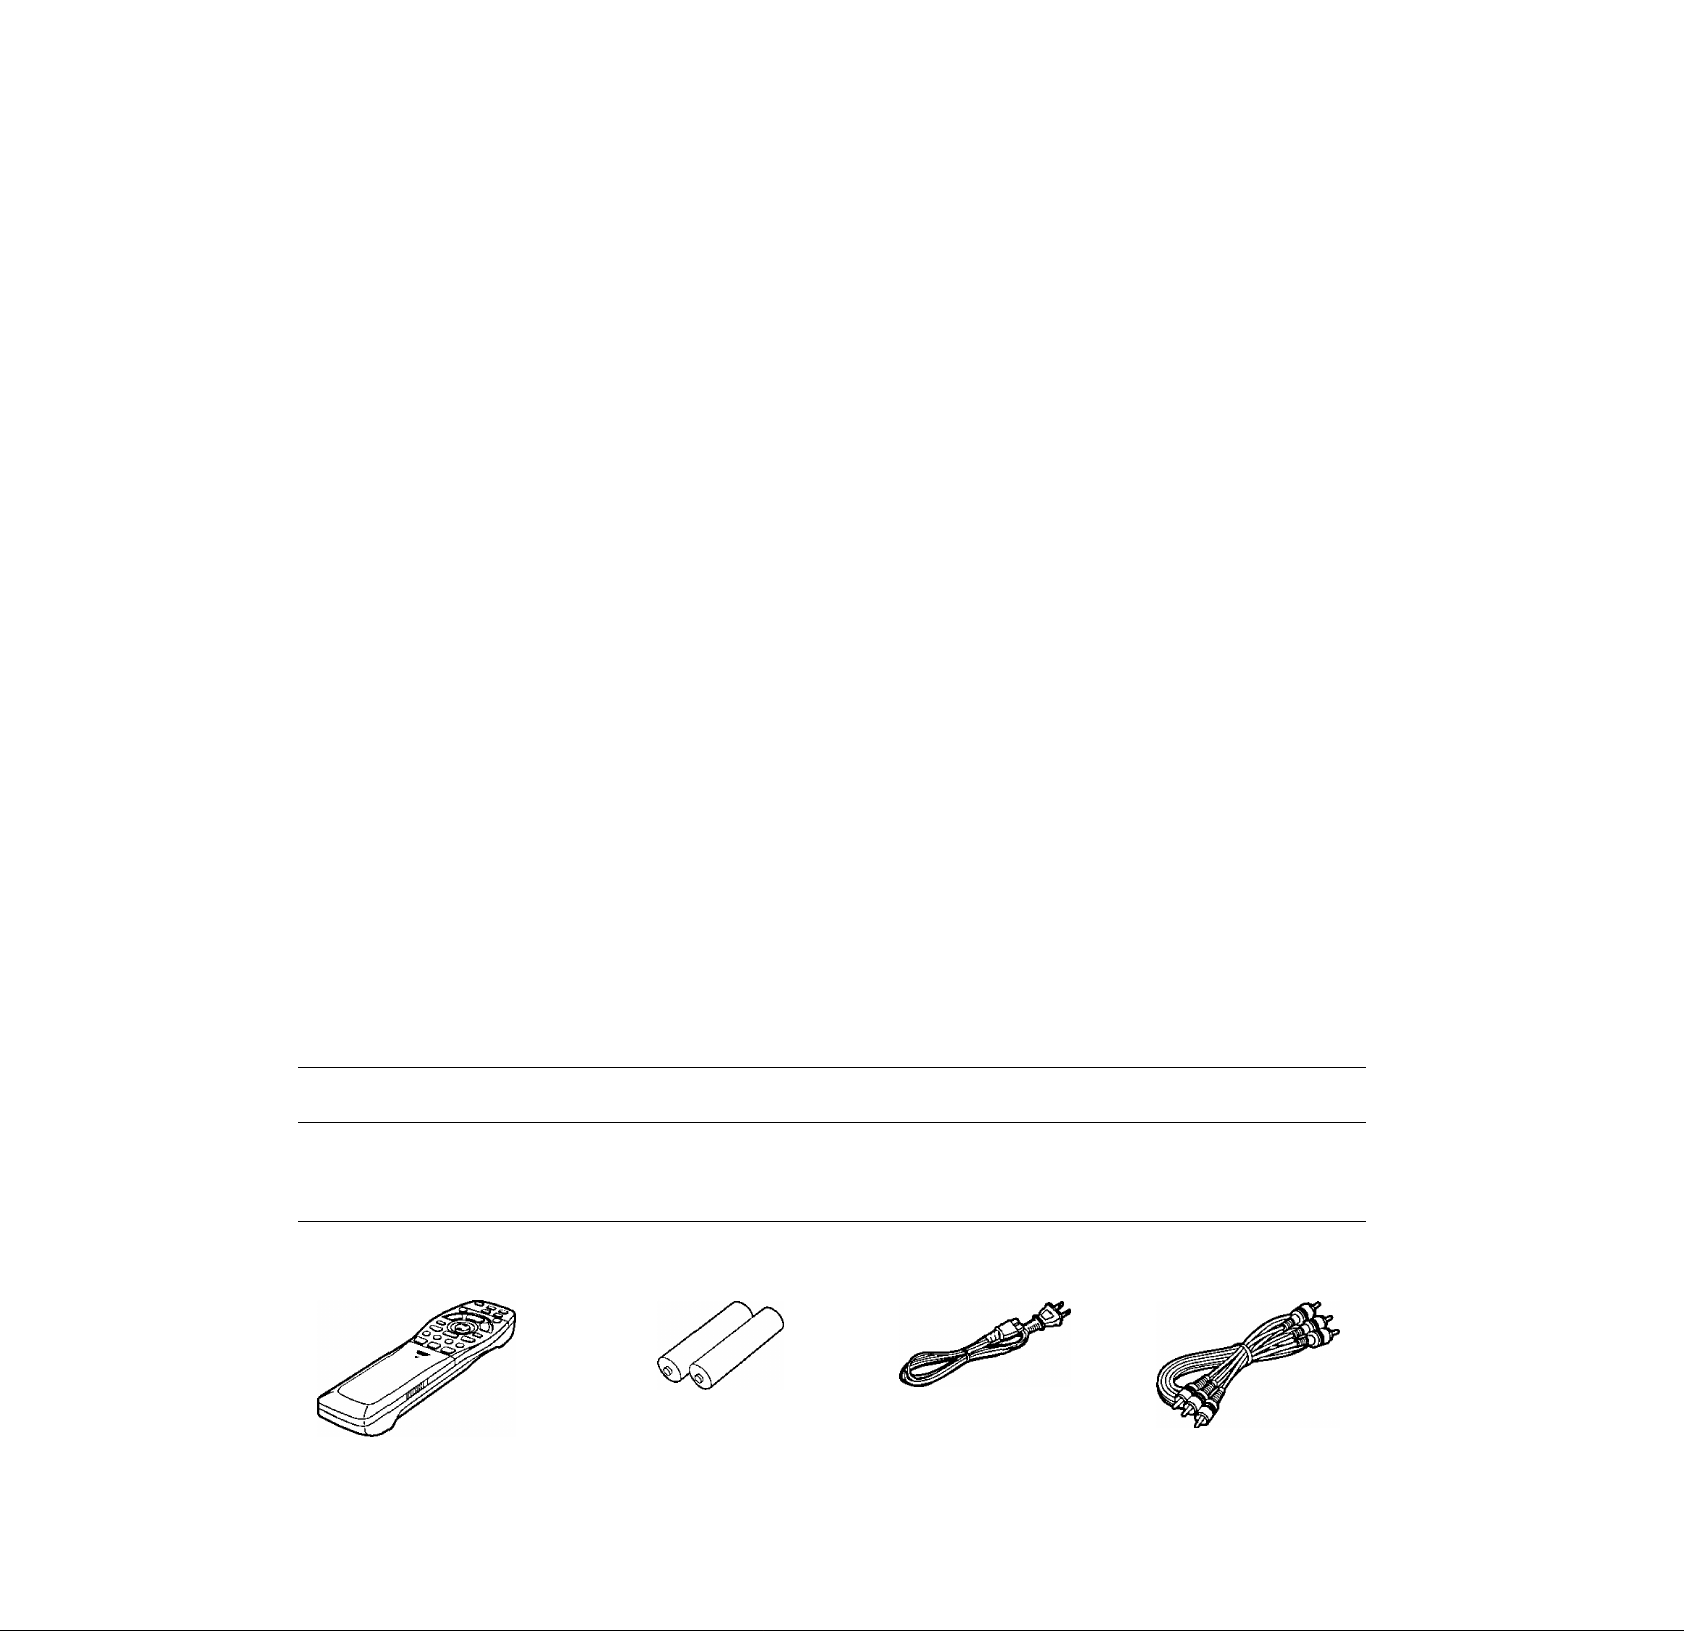
Accessories
Please check and identify the supplied accessories.
To order accessories, call PASC Accessory Dept.
1-888-PANA-DVD (1-888-726-2383).
□ Rennote control...
(Part No. VEQ2250)
□ Service Center list........................................................1
□ Warranty card
□ Safety Instructions card
............................................................
.................................................
□ Batteries
.....................
for remote control
(R6, AA, UM-3)
2
1
1
□ AC cord
□ Product information card................................................1
□ Setup Guide (Spanish)....................................................1
...................
(Part No. VJA1094)
Operating Instructions....................................................1
Optional accessories
S video cable
Optical digital audio cable
Coaxial audio cable
Q Audio/video
cable.....................
(Part No. VJA1062)

Features
■ High picture quality
•10 bit video D/A converter
Reproduces fine images faithfully.
•Component video output
When used with a compatible monitor, a video connection via the com
ponent video output jacks of your DVDA/ideo CD/CD player enables
precise color reproduction.
•An array of picture quality modes yielded by digital
processing
Signal deterioration is kept to minimum by processing the data digi
tally.
This feature can be used to tailor picture quality for DVD playback.
-Digital picture mode (See pages 15 and 21.)
Using the On-Screen Menu Icons allows you to adjust picture quali
ty to suit the kind of software you are viewing,
-User selection (See page 21.)
Using the On-Screen Menu Icons, the contrast, color hue, equalizer
and brightness can be adjusted to suit your own preference.
-Monitor selector (See page 35.)
Once the type of TV used [Standard (Direct View TV), CRT Projec
tor, LCD Projector, Projection TV] has been selected when the ini
tial setting operations are performed, the optimum picture quality for
the type of TV concerned will be automatically selected.
■ High sound quality
•96 kHz/24 bit audio D/A converter
This player enables 96 kHz/24 bit linear PCM signals, the highest
specifications in DVD standards, to be reproduced faithfully. To sup
port 96 kHz sampling/24 bit sound, the shaping noise of this multi
level digital sigma type D/A converter is kept flat up to 44 kHz, thus
preventing the audio signals from being affected in any way. This
means sound is reproduced faithfully.
• Virtual battery operation power supply circuit
By radically cutting down the amount of noise from the power supply
and digital circuits and delivering a clean supply of power free from
undesirable signal components (noise, ripple components, etc.), this
feature gives the bass range a tangible depth and yields a clear reso
lution in the midrange and treble ranges.
•Advanced Dolby Digital (AC-3)/dts (digital theater sys-
terns) S.lch surround decoder (See pages 10 and 37.)
The advanced Dolby Digital (AC-3)/dts S.lch surround decoder in
corporated in this player comes with speaker mode settings which
support the low-range reproduction capability of the speakers, speak
er level settings, delay time adjustment*, audio dynamic range sup
pression, and other features.
“Delay time adjustment is effective only for Dolby Digital DVDs (cen
ter and surround channels).
• Dolby Digital (AC‘3)/dts (digital theater systems) digital
output (See page 12.)
By connecting a Dolby Digital/dts decoder or an amplifier incorporat
ing a Dolby Digital/dts decoder, you can enjoy high quality digital sur
round sound from Dolby Digital/dts discs.
■ Advanced Virtual Surround Sound (VSS) function
(See page 28.)
Even when two front speakers are being used, simply press the VSS
(Virtual Surround Sound) button during playback of a Dolby Digital
DVD (2 channel or over) to provide a rear surround effect. This effect
also works while listening with headphones connected to an amplifier
or other equipment. (This does not work with Karaoke DVDs. The ef
fect depends on the kind of DVD used.)
■ On-Screen Menu icons (See page 18.)
By simply pressing the DISPLAY button on the remote control, informa
tion on the DVD/Video CD/CD player and disc can be displayed on the
TV screen for easy identification. The player’s operations and settings
can be easily accessed by operating the joystick on the remote control
while monitoring the TV screen. The color and position of the OnScreen Menu Icons can be changed.
■ Marker function (See page 23.)
This player can store a maximum of 5 positions in memory for conven
ient access.
■ Versatile DVD features
•Multi-audio function (See page 26.)
The audio soundtrack can be heard in up to 8 languages.
(The number of languages depends on the software.)
• Multi-subtitle function (See page 27.)
Subtitles may be displayed in one of 32 languages.
(The number of languages depends on the software.)
•Multi-angle function (See page 27.)
This function allows you to choose the camera angle of scenes shot
from different angles. (Limited to DVDs recorded with multiple cam
era angles.)
•Parental lock function (See page 31.)
This function can prevent playback of DVD software which may be
unsuitable for some audiences (especially for children), (Limited to
DVDs encoded with specific rating level.)
■ Disc formats supported by this player
The player can playback discs bearing any of the following marks:
n COMPACT
HHGirALWDEOj
01® (io§(S
DVD Video CD CD
[3" (8 cm) disc/ [3" (8 cm) disc/ [3" (8 cm) disc/
5" (12 cm) disc] 5" (12 cm) disc] 5" (12 cm) disc]
■ Discs which cannot be played with this player
• DVD with Region No. other than “1” or “ALL”
• PAL discs •VSD »DVD+RW
•DVD-ROM •CDV •CVD
• DVD-R/DVD-RAM •CD-G •SVCD
•CD-ROM •CD-RW •Divx Video Disc
etc.
• Do not try to play Photo CD or CD-R.
(Data on the disc may be damaged.)
■ Region Management Information
This player is designed to respond to the Region Management Informa
tion recorded on DVDs. The region number of this player is “1". If the
region number described on the DVD does not correspond to the re
gion number of this player, this player cannot play this disc. This player
will play DVDs made for '“ALL" regions.
This player will play DVDs marked with labels containing the region
number “1” or “ALL”:
Example:
or
■ Dialogue Enhancer (See pages 15 and 21.)
During playback of Dolby Digital/dts DVDs (2 channel or over) with the
dialogue contained in the center channel, this function will boost the
sound level of the center channel so that it is easier to hear the dia
logue on movie software.

Table of contents
Getting Started
Safety information
Precautions
Accessories.................................................................. 3
Features
Control reference guide
•Player................................................................................. 6
•Remote control................................................................... 6
Front panel FL (Fluorescent Light)
display....................................................................... 7
Basic connection......................................................... 8
•Connecting to a TV set with video input connector or
S video input connector..................................................... 8
•Connecting to a TV set or monitor with component video
input connectors................................................................ 9
Optional audio connections
•Connecting to audio equipment.......................................... 9
•Connecting to an AV amplifier with 5.1ch input connectors
supporting Dolby Digital (AC-3) or dts (digital theater
systems)............................................................................ 10
•Enjoying digital audio output from the digital audio
output connector............................................................... 11
•Connecting to a decoder with Dolby Digital (AC-3) or
dts (digital theater systems) processing............................ 12
Remote control preparations...................................13
•Battery installation.............................................................. 13
•Remote control operation range
................................................................
........................................................................
.....................................................
.............................................
......................................
........................................
2
3
4
6
9
13
Basic Operations
Basic play.............................................
•Before enjoying DVDA/ideo CD/CD...............
•Basic play.......................................................
•Stopping play
.................................................
Skipping chapters or tracks.................
Still picture (Pause)
Rapid advance (Rapid reverse)
............................
..........
14
16
16
17
Frame advance (Frame reverse)
[DVDA/ideo CD]..........................................
Slow-motion play [DVD/Video CD]
..............
Canceling playback control [Video CD]
17
17
17
14
14
15
Advanced Operations
Repeat play....................................................................22
•Repeat viewing (listening)
•Repeating sections between two specific points
(A-B repeat)
Storing markers in memory to be viewed
(listened to) again.....................................................23
•Storing a marker in the memory
• Recalling/clearing a marker
Program play [video cd/cd]
Random play [Video CD/CD]
Changing audio soundtrack language
[DVD]..........................................................................26
Switching vocals ON or OFF for Karaoke
discs [DVD/Video CD]
Changing subtitle language [dvd]
Viewing from another angle [dvd]
Reproducing an Advanced Virtual Surround
Sound (VSS) effect [Dolby Digital (AC-3) DVD
(2 channel or over)]
Using a title menu [dvd]
Using a DVD menu [dvd]
Initial settings................................................................30
•Common procedures
•Selecting disc languages [DVD]............................... 31
•Selecting rating level [DVD]...................................... 31
•Selecting On-Screen Display menu language
•Selecting On-Screen Display format
•Selecting FL display brightness
•Selecting TV screen type........................................... 35
•Selecting digital output.............................................. 35
•Speaker setting.......................................................... 37
•Other settings
Language code list.......................................................41
How images appear on your TV
(aspect ratios of the screen)
................................................................
.............................................................
........................................
...............................
.....................................
.........................................
.......................................
..............................................
........................
........................
..................................................
...............................................
......
......................................
.................................................
.........
.......................
.................................
...................................
22
23
23
23
24
25
26
27
27
28
29
29
30
33
33
34
39
42
vt
v>
o ^
re
re re
o. re
CO
re
CO
£
O is
Operations Using oh-Sàrèen Menu,Icons
General Information about On-Screen Menu
Icons.............................................................18
•Common procedures
...................................................
18
Detailed descriptions of On-Screen Menu
Icons.............................................................19
•Screen for disc information (For DVD)
•Screen for disc information (For Video CD/CD)
•Screen for player information
•Shuttle screen.............................................................. 21
......................................
........................
..........
19
20
21
For Your Reference
Using the remote control with your TV
set..................................................................43
Troubleshooting
•Self-diagnosis display function
...............................................
.....................................
44
46
Disc handling ...................................................47
Maintenance.....................................................47
Specifications
...................................................
48
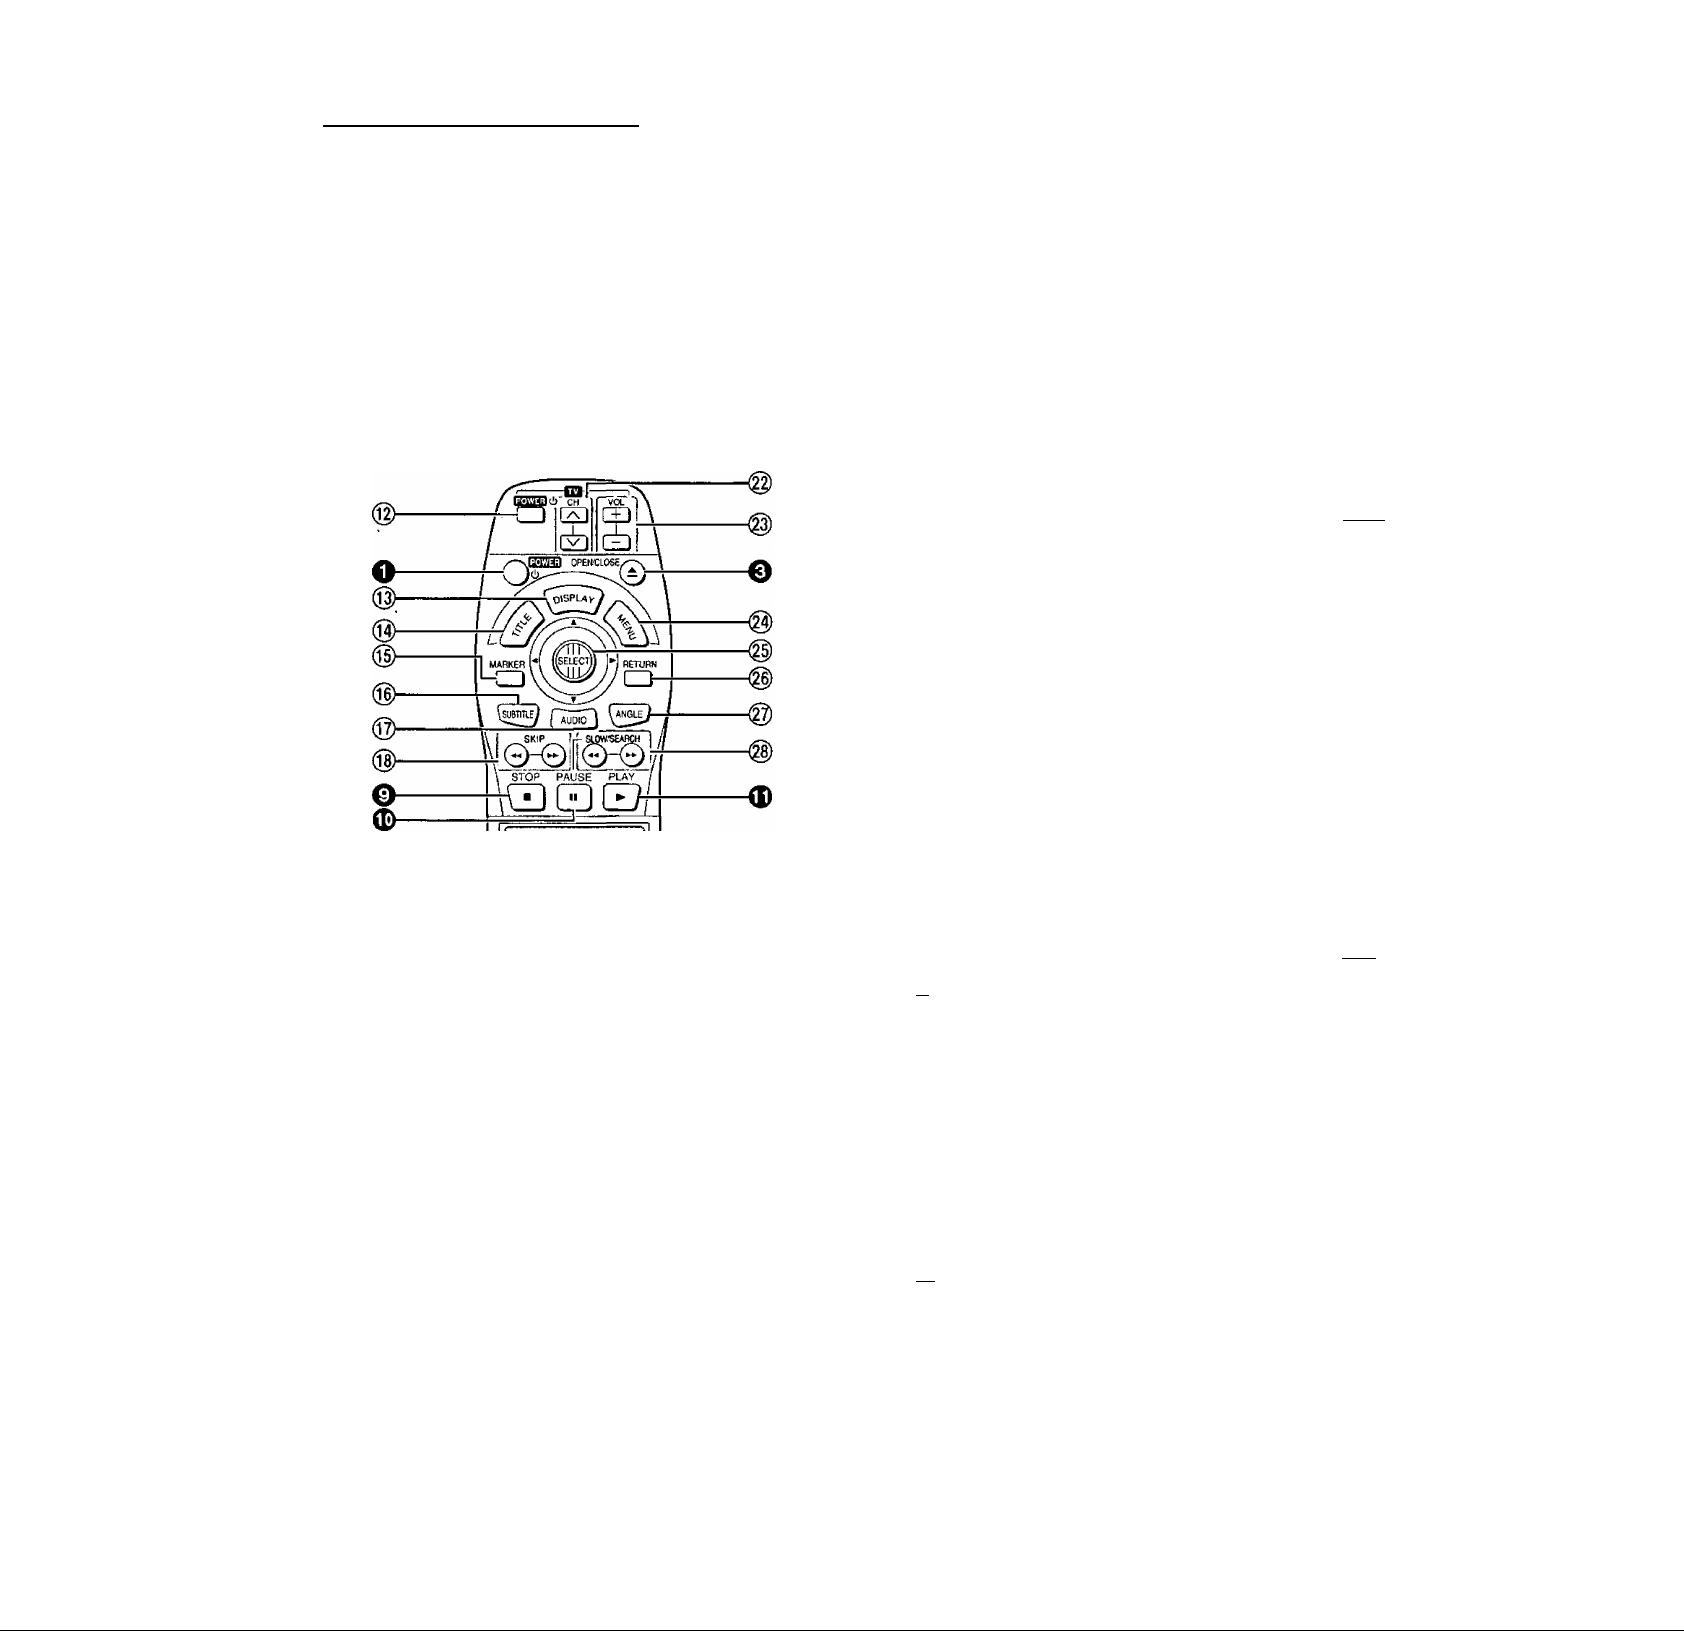
Control reference guide
0 © ©
Pmasonic
n
CX> CD CD
®-
CD CD CD
CD CD CD
CD
REPEAT~A^ PUVY' ,
CANCEL MODE REPEAT MODE [
b
ACTION VSS
©-
-C3 ~
■<S)
V
I
Panasonic
DVDPLAYEFVTV
Buttons such as O function in exactly the same way as the
buttons on the player.
CPWX0££U4$Kr«£M№M- VS$
O O Ch'
STOP PAUSE PLAY
BLRLT-g^ fXMJTV OICITAL/
«t DECODER
DDD
©
Player
o POWER button (c!;/l) .................................................14
Press to switch the player from on to standby mode or vice
versa. In standby mode, the player is still consuming a
small amount of power,
(2) Disc tray
O OPEN/CLOSE button (A)
@ SKIP/SEARCH buttons (!◄◄, ►>!/◄◄, ►► ) ... 16,17
0 VSS (Virtual Surround Sound) button
© Remote control signal sensor........................................ 13
@ FL Display..................................................................7
® VSS indicator.............................................................28
©STOP button (■)
PAUSE button (I I)......................................................16
<D PLAY button (►) ........................................................14
Remote control
___________________________________________________
m POWER button (6)
©
DISPLAY button.........................................................18
TITLE button............................................................29
MARKER button.........................................................23
©
SUBTITLE button
©
AUDIO button...........................................................26
SKIP buttons (!◄◄, ►►!)
®
Numeric buttons
®
•To select a 2-digit number
Example: To select track 23
Press “^10", “2" and then “3".
CANCEL button....................................................23, 25
ACTION button
EH CH buttons (A, V)
iQ VOL buttons (+, -)
MENU button ...........................................................29
Joy Stic k/SELECT button.............................................15
©
RETURN button.....................................................15,30
ANGLE button ..........................................................27
SLOW/SEARCH buttons (◄◄, ►►)
PLAY MODE button
A-B REPEAT button
REPEAT MODE button
© (t) ®
.................................................................
................................................
.................................
..........................................................
..................................................
.......................................................
................................................
.......................................................
.........................................................
..................................................
..................................................
.....................................
...............................................
....................................................
.................................................
Page
14
14
28
15
Page
43
27
16
15
30
43
43
17
24, 25
23
22
Front panel FL (Fluorescent
0
0
0
0
0
©
JlI ^
□ VD
j.ir^
DVD
’5'ikC
DVD
/ / //Sr"
►
i-d D-Hj taf
iJ !
ri y
►
c(?5
~T : —:
:
; i‘ . IB°0|
Light) display
__________________
O Air^ Rotates during play.
^ ^ Rotates fast clockwise or counterclockwise
during rapid advance (reverse). (See page 17.)
Rotates siowly clockwise or counterclockwise
during slow-motion play.
[DVDA/ideo CD] {See page 17.)
V w Illuminates in the stop mode.
4k
Q Illuminates during playback.
Flashes when the RESUME function is ON.
(See page 15.)
o Illuminates during repeat play. (See page 22.)
O Illuminates in the still picture (pause) mode.
(See page 16.)
0 Title/chapter number [DVD]
Track number [Video CD/CD]
Q Elapsed playing time from the start of the title/track
during play
O Audio channel information recorded in the disc being
played back (e.g. 2ch or 5.1 ch)
Center
Surround (left)
Front (left)
B^BId— Subwoofer
^
-------
Front (right)
Surround (right)
3=
u
03
0
©
0
0
0
0
DVD
’VilC
ir
ik
ir
b 4
F ^
PROG.
r 1 "‘1
1/ C .P
S' ; S;
taf
B^al
VsT
I
Q A DVD is loaded.
0 It is possible to switch the angle.
[DVD] (See page 27.)
Illuminates during program play. [Video CD/CD]
(See page 24.)
0» Linear PCM of 96 kHz sampiing is being played.
0 Linear PCM of 24 bit is being played.
0 The disc tray is open.
0 The disc tray is being closed (retracted).
0 Display during play of a DVD
0 Display during play of an interactive DVD^
0 Display during play of a Karaoke DVD
0 Display during play of an interactive Karaoke DVD^
0 Display during play of a Video CD
0 Display during play of a Video CD with playback control
0 Display during play of a CD
0 Display when selecting tracks for program play.
[Video CD/CD] (See page 25.)
0 Scrolls after a dts CD is detected (total number of
tracks and total playing time displayed when finished
scrolling).
0 Playback is impossible.
• DVD for which playback is prohibited by the initial settings
“2 Ratings”. (See page 31.)
• DVD with Region No. other than “1" or “ALL”.
(See page 4.)
• PAL discs
0 No disc is loaded.
*An interactive DVD is DVD software which includes multi
ple angles, multiple plot endings, etc.
Basic connection
•Ensure that this player and other equipment to be connected are set to the standby mode or off and disconnect the AC cord before
commencing connection.
•Do not block ventilation holes of any of the equipment and arrange them so that air can circulate freely.
•Read through the instructions before connecting other equipment.
•Ensure that you observe the color coding when connecting audio and video cables.
•Select the appropriate screen type at the initial setting “6 TV Aspect" according to your TV set [4:3/16:9 and Standard (Direct View
TVyCRT Projector/LCD Projector/Projection TV], (See page 35.)
Note
• Peripheral equipment and optional cables sold separately unless otherwise indicated.
• During DVD play, the TV volume may be at a lower level than during TV broadcasts, etc. If this is the case, adjust the volume to the
desired level.
Connect Your DVD/Video CD/CD Player Directly To Your TV Set.
If the DVD/Video CD/CD player is connected to the TV
through a video cassette recorder, the picture may not
be played back correctly with some DVDs. So we
strongly recommend you do not connect the DVD/
Video CD/CD player to your video cassette recorder
when setting up your home entertainment system.
Do not place the
player on amplifiers or
other equipment
which may become
hot.
I---0 r)"C)-" o
XO ••••■“
1 1 |ooooo
p
The S (separate) video output connector separates the color (C) and luminance (Y) signals before
transmitting them to the TV set in order to achieve a sharper picture.
Use the S video cable when connecting the player to a TV set equipped with an S video input
connector for the best picture clarity possible.
Note
• If your TV is monaural, use a stereo-monaura I audio cable instead of the supplied audio/video cable. The video part of the cable
(yellow) can still be used if required. Audio cable
8
_ _
To TV audio input connector
__
* •
I „ ^ To player audio output connector (white, “L”)
To player audio output connector (red, “R”)
Connecting to a TV set or monitor with component video input connectors
TV set or monitor
[Z
]
To audio input connector (white, “L")
To audio input connector (red, “R") ♦
To component video input connectors (Y/Pb/Pr)
t I
Direction of
signal flow
Audio/video cable
(included)
The component video output connector outputs the color difference signals (Pb/Pr) and luminance signal (Y)
separately in order to achieve high fidelity in reproducing colors.
•The description of the component video input connectors depends on the TV set or monitor
(e.g. Y/Pb/Ph, Y/B-Y/R-Y, Y/Cb/Cr and so on). Refer to the instruction manual of your TV set for details.
Video cable
Optional audio connections
Connecting to audio equipment
Audio equipment
Optional audio connections
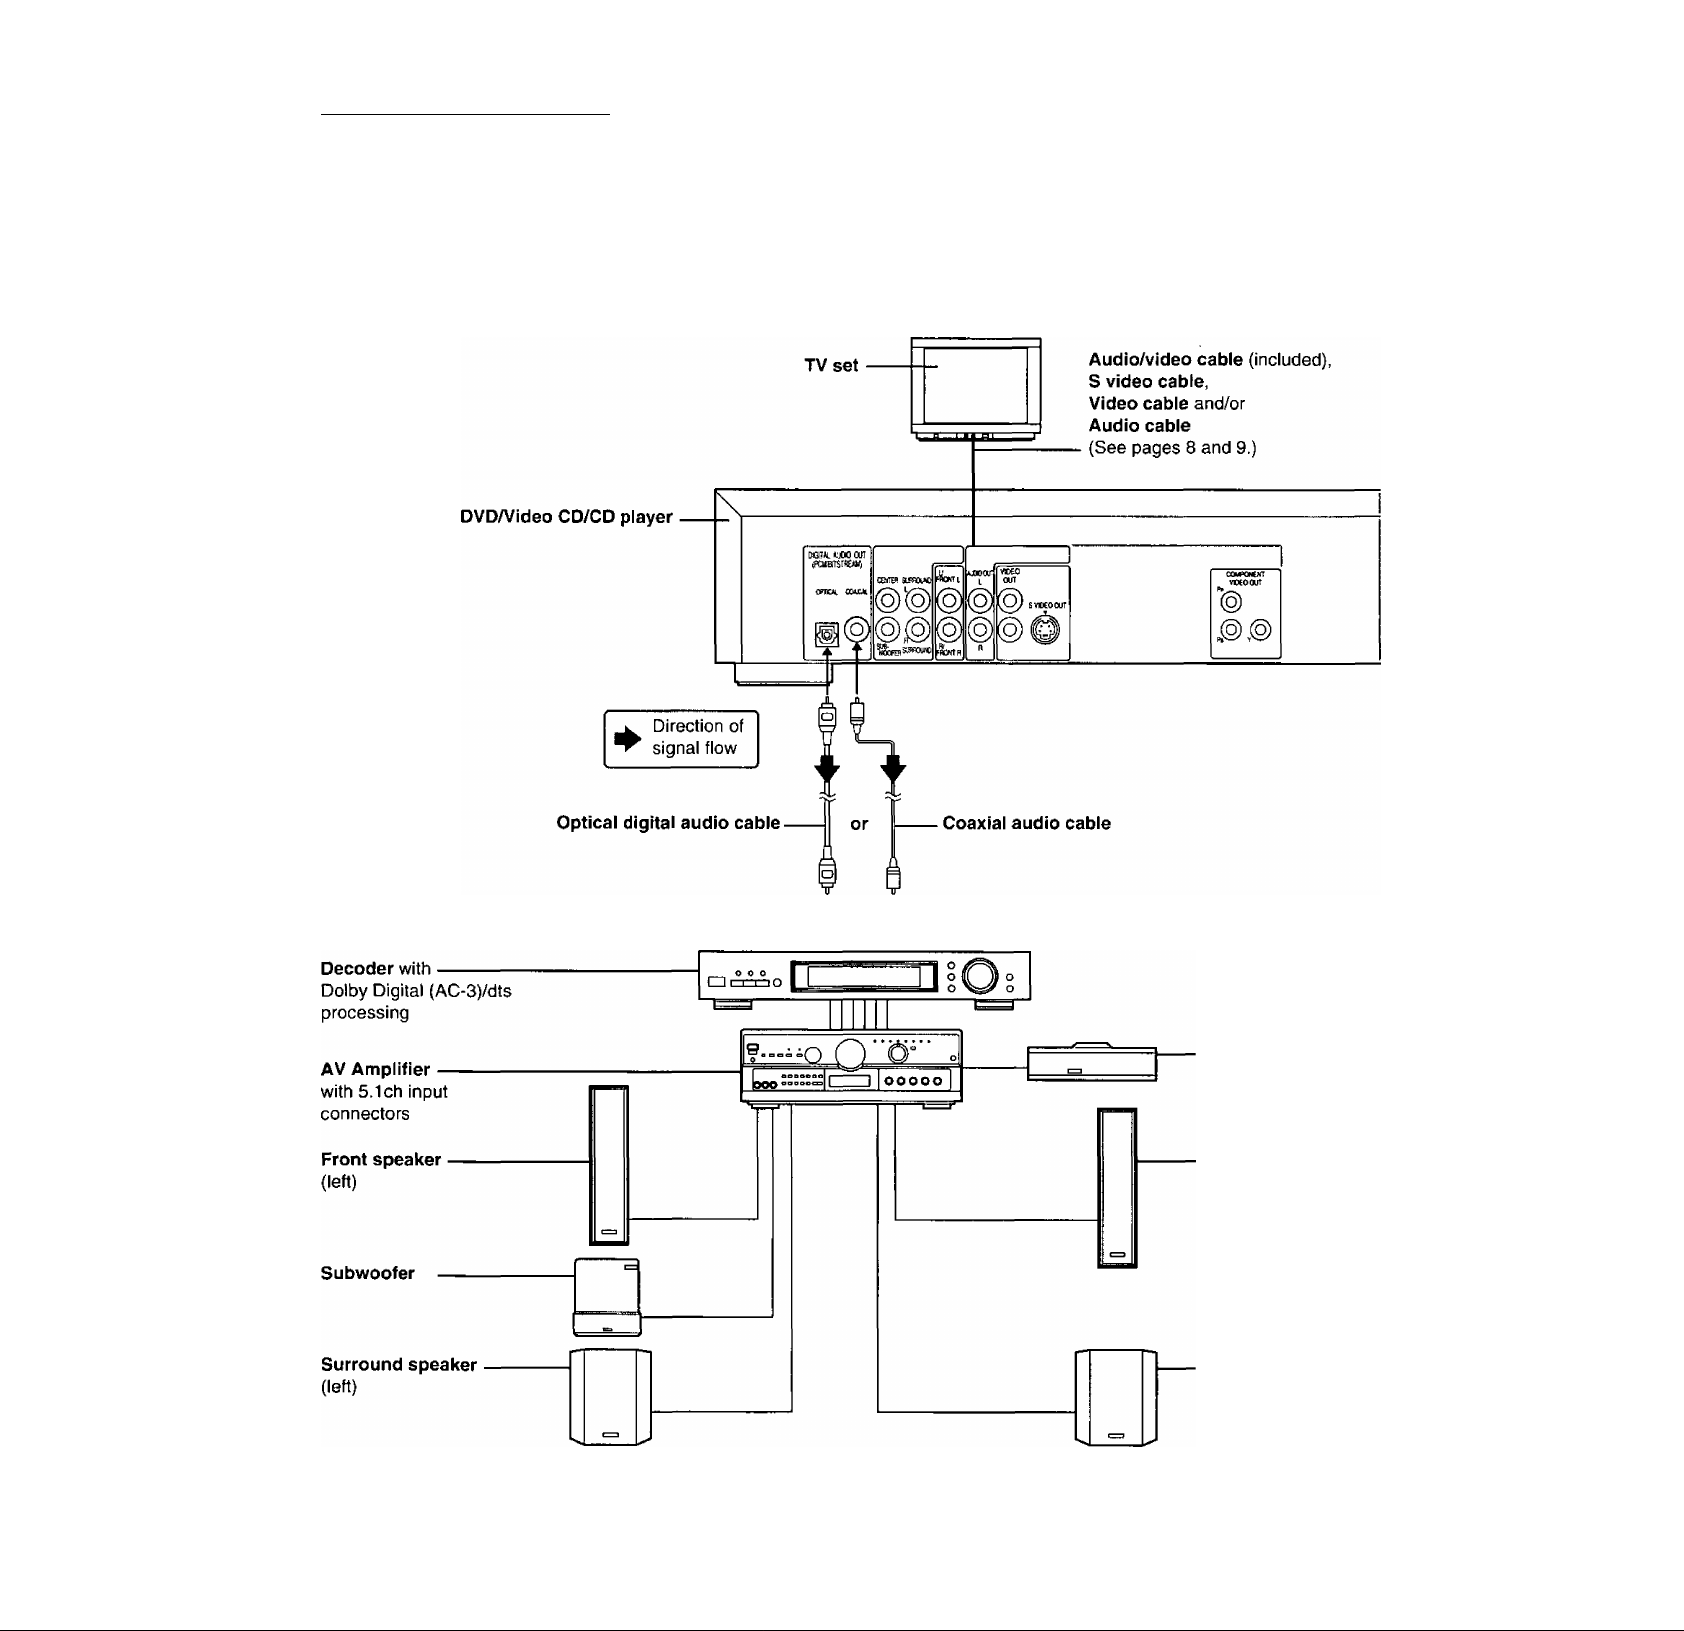
Connecting to an AV amplifier with 5.1 ch input connectors supporting Dolby Digital
(AC-3) or dts (digital theater systems)
This player contains a Dolby Digital (AC-3) decoder and dts decoder. This enables playback of DVDs recorded in Dolby Digital or dts
without the need for an external decoder with Dolby Digital or dts processing. When the player is connected to an AV amplifier with
5,1ch input connectors, you can enjoy theater-quality audio in your own home when playing DVDs recorded in Dolby Digital or dts.
AV Amplifier
with S.lch input connectors
Front speaker ■ (left)
Subwoofer
Surround speaker
(teft)
Note
•After connection is made, set the "8 Speaker Setting" (such
as Yes/No and Large/Small) according to your speaker sys
tem. (See page 37.)
•Turn Virtual Surround Sound (VSS) or Headphone VSS off if
you are using more than just the two front speakers (see
page 28). Sound will only come from the front speakers if
VSS or Headphone VSS is turned on.
----------------------
n'W
ooooo
For your reference:
•This player can play CDs recorded in dts. When the player is
connected to an AV amplifier with S.lch input connectors,
you can enjoy multi-channel audio of CDs recorded in dts as
well as DVDs.
Center speaker
Front speaker
(right)
Surround speaker
(right)
10
Enjoying digital audio output from the
digital audio output connector
Note
•Some dts decoders which do not support DVD-dts interface
may not work properly with the DVDA/ideo CD/CD player.
e:
Note when connecting the optical digital audio cable
•Remove the dust protection cap from the optical digital audio
output connector and connect the cable firmly so that the
configurations of both the cable and the connector match.
•Keep the dust protection cap and reattach when not using
the connector.
Concerning the audio output from the player’s optical/coaxial digital audio output connector
Disc Sound
recording
format
DVD Dolby Digital
(AC-3)
Linear PCM
(48/96 kHz
16/20/24 bit)
dts
Video
CD
CD
*The type of audio output from the connector can be selected
by “7 Digital Audio Output” of the initial settings.
(See page 35.)
®^Compressed sound converted to PCM will be output.
*3The settings and connections necessary to enjoy CDs re
corded in dts are the same as for DVDs recorded in dts.
MPEG 1
Linear PCM
dts*3
Optical/coaxial digital
audio output from
connector
Dolby Digital bitstream
(1-5.1ch) or PCM (2ch)
(48 kHz/16 bit)*i*2
Linear PCM (2ch)
(48 kHz sampling/16 bit only)
or no output*’
PCM (2ch) (48 kHz/16 bit)»2
or dts bitstream (1-5.Ich)*’
PCM
(44.1 kHz sampling)*^
Linear PCM
(44.1 kHz sampling)
PCM (2ch) (44.1 kHz/
16 bit)*2 or dts bitstream
(1-5.1ch)*’
For your reference:
•Dolby Digital (AC-3) is a digital sound compression tech
nique developed by the Dolby Laboratories, Inc.
Supporting 5.1-channel surround sound, as well as stereo
{2-channel) sound, this technique enables a large quantity
of sound data to be efficiently recorded on a disc.
•The digital theater systems (dts) is a 5.1-channel surround
sound system, which is widely used in movie theaters around
the world. It allows the bit rate to be increased in order to
provide good sound quality without excessively compressing
the data.
•Linear PCM is a signal recording format used in a CD. While
a CD is recorded in 44.1 kHz/16 bit, a DVD is recorded in
48 kHz/16 bit up to 96 kHz/24 bit.
•If you have a Dolby Pro Logic Surround decoder, you will
obtain the full benefit of Pro Logic from the same DVD mov
ies that provide full 5.1 -channel Dolby Digital soundtracks, as
well as from titles with the Dolby Surround mark.
•The digital audio output connector (optical) converts electri
cal signals into optical signals and transfers them to an am
plifier. These optical signals are immune from electrical
interference, and they also have minimal effect on other
equipment.
Caution for the optical/coaxial digital au
dio output connector:
•When connecting an amplifier (with an optical/co
axial digital input connector) which does not con
tain a Dolby Digital (AC-3) or dts decoder, be sure
to select “PCM” at the “2 Dolby Digital” and at the
“3 dts” of the initial setting “7 Digital Audio Out
put”. (See page 35.)
•if “Bitstream” is selected, any attempt to play DVDs (or
CDs recorded in dts) may cause such a high level of
noise that it may be harmful to your ears and damage
your speakers.
•Video CDs and CDs can be played as normal.
Manufactured under license from Dolby Laboratories.
“Dolby", "AC-3", “Pro Logic” and the double-D symbol
are trademarks of Dolby Laboratories. Confidential Un
published Works. © 1992-1997 Dolby Laboratories,
Inc. All rights reserved.
Manufactured under license from Digital Theater Sys
tems, Inc. US Pat. No. 5,451,942 and other world-wide
patents issues and pending. “DTS" and “DTS Digital
Surround" are trademarks of Digital Theater Systems,
Inc. © 1996 Digital Theater Systems, Inc. Alt rights re
served.
11
Optional audio connections
Connecting to a decoder with Dolby Digital (AC-3) or dts (digitai theater systems)
processing
When DVDs recorded in Dolby Digital or dts are played, Dolby Digital bitstream or dts bitstream is output from the player's OPTICAL
digital audio output connector or COAXIAL digital audio output connector. When the player is connected to a Dolby Digital decoder or
dts decoder, you can enjoy theater-quality audio in your home. [An optical digital audio cable or coaxial audio cable is required when an
optional Dolby Digital decoder or dts decoder is used.]
To optical digital audio input connector To coaxial digital audio input connector
i i
Center speaker
Front speaker
(right)
Surround speaker
(right)
12
m
Remote control preparations
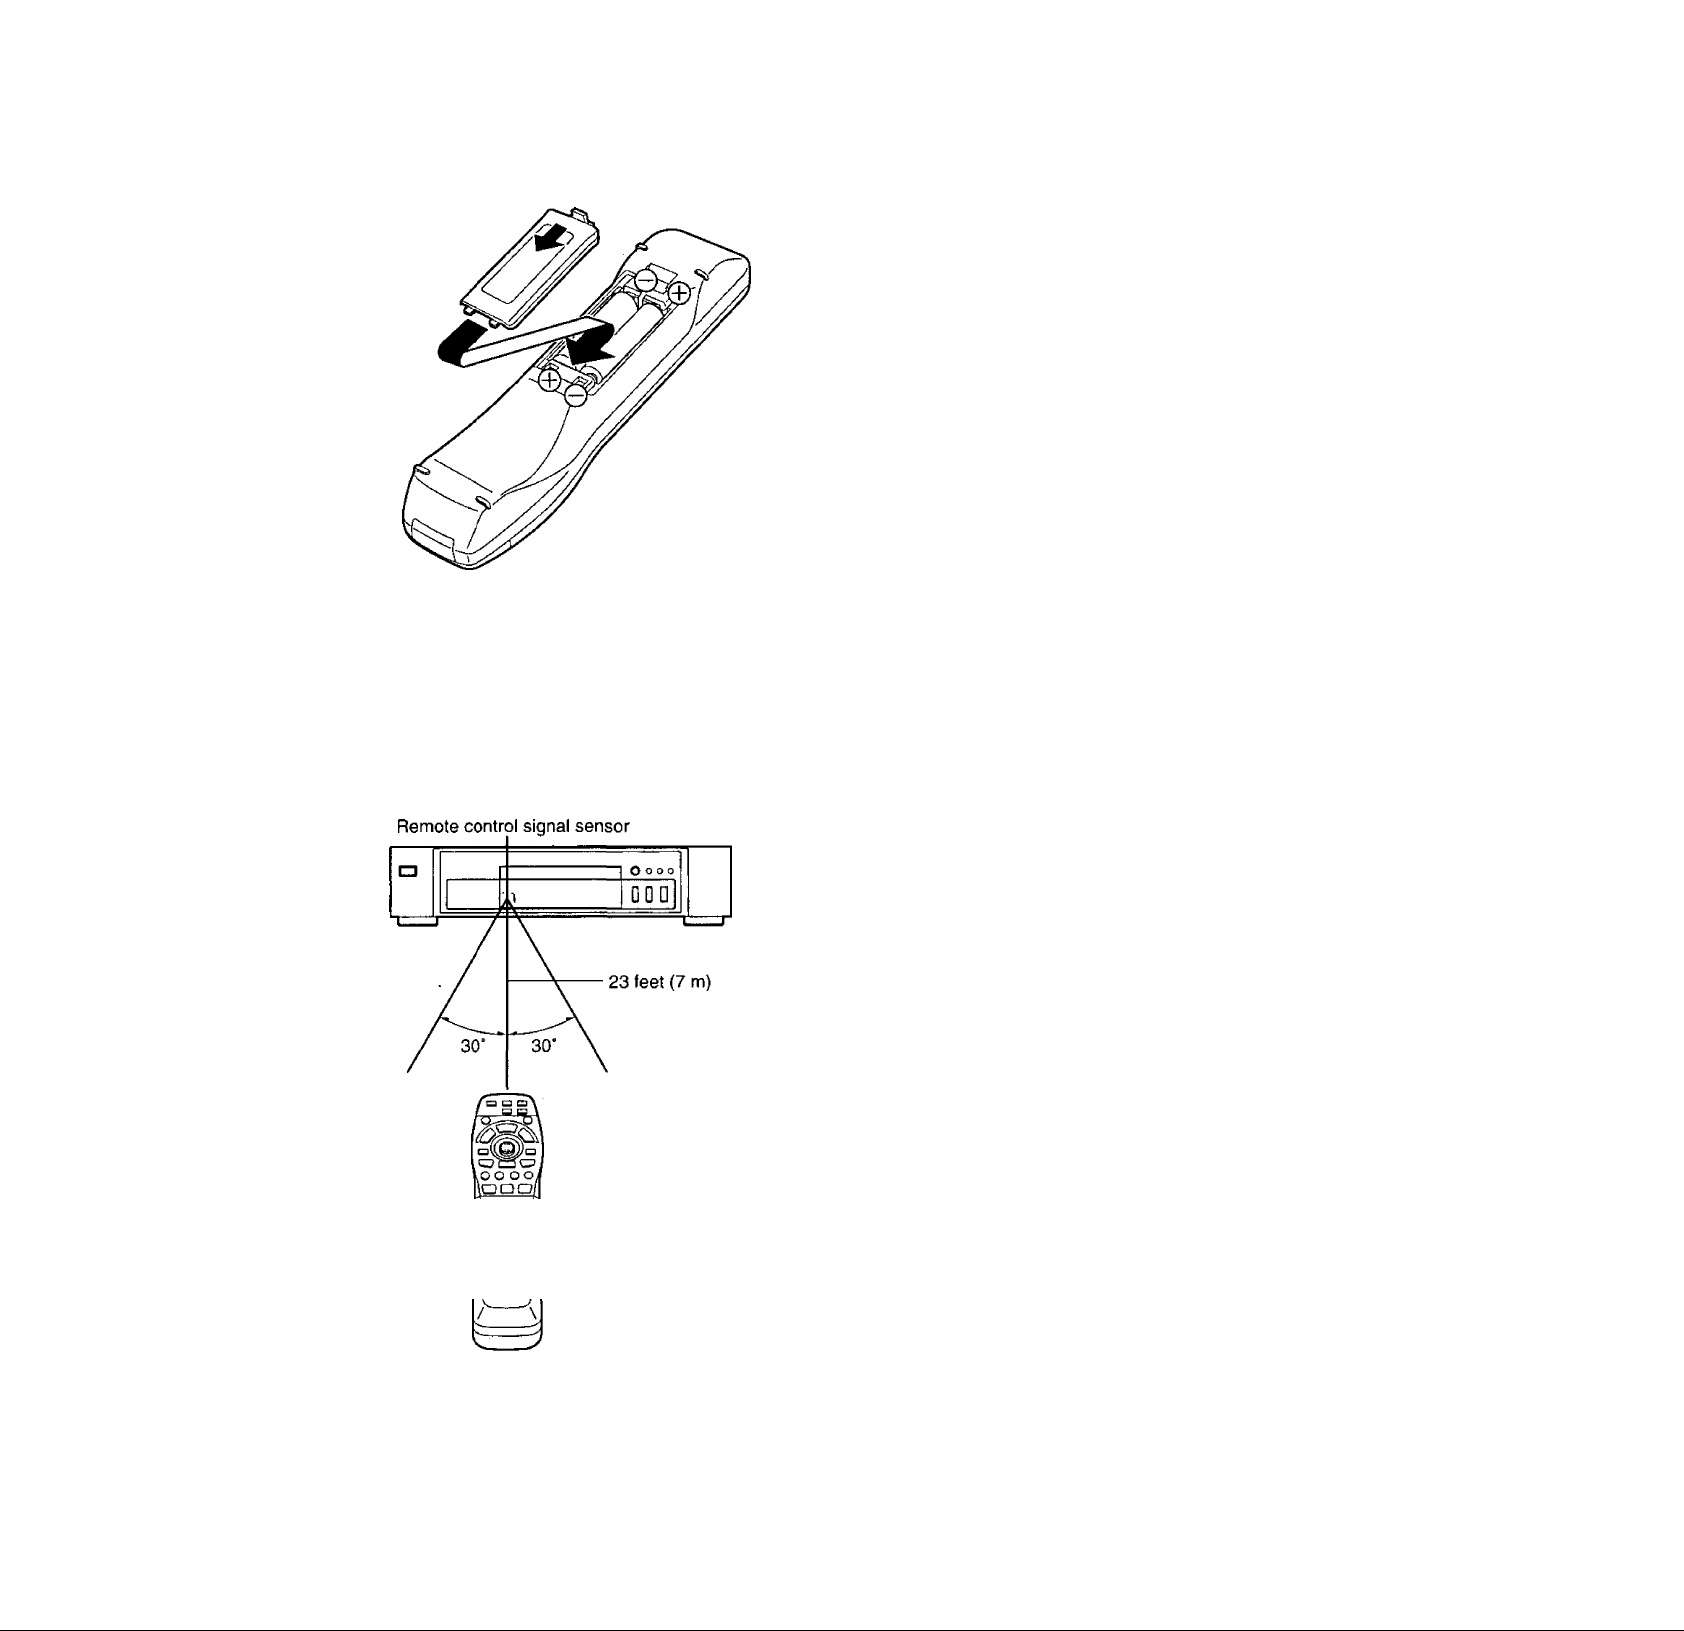
Battery installation Q
Insert the batteries while observing polarities (+ and -) as
lustrated.
Service life of batteries
•The batteries normaliy iast for about one year although this
depends on how often, and for what operations, the remote
controi is used.
• If the remote control fails to work, even when it is operated
near the player, replace the batteries.
•Use size “R6, AA, UM-3” batteries.
Note
• Do not use rechargeable (Ni-Cd) batteries.
• Do not attempt to charge, short-circuit, disassemble,
heat or throw the batteries into a fire.
•Do not drop, step on or otherwise impact the remote
control. This may damage the parts or lead to malfunc
tion.
•Do not mix old and new batteries.
• If the remote control is not going to be used for a long
time, remove the batteries. Othen/vise, electrolyte may
leak which may lead, not only to malfunction, but also
to burns if contact is made with the electrolyte.
•Wipe away any electrolyte leaking inside the remote
control, and install new batteries.
• If any electrolyte should come into contact with parts of
your body, wash it off thoroughly with water.
Remote control operation range ^
Use the remote control within 23 feet (7 m) of the sensor. Use
it within a 60° angle directly in front of the sensor.
•The distance varies with the brightness of the room.
Note
•Do not point bright lights at the sensor.
•Do not place objects between the remote control and the
sensor.
•Do not use this remote control while operating the remote
control of other equipment.
13
Basic play
Joystick/
SELECT
CD CD CD
CD CD CD
CD CD CD
I
CD
REPEAT A-B PLAY
CANCEL MOOE REPEAT MODE
cu CD CD CD
ACTION VSS
CD CD
Panasoiw
; OPEWCLOSE
MENU
RETURN
'PLAY
Numeric
buttons
Before enjoying OVDA/ideo CD/CD
The On-Screen menu language ot your player has been
factory preset to English.
You can change the menu language to French or
Spanish. Refer to “Selecting On-Screen Display menu
language" on page 33.
In the explanations given below it is assumed that Eng
lish has been selected as the menu language.
Preparations
•Confirm that the TV set or the audio equipment (if connected)
is properly connected to the player,
•Confirm that the power for the TV set or the audio equipment
{if connected) is turned on.
•Confirm that the input setting for the TV set or the audio
equipment (if connected) is properly selected.
(Example: Select “VCR 2" on the TV set if this player has
been connected to TV input connector [2].)
Basic play
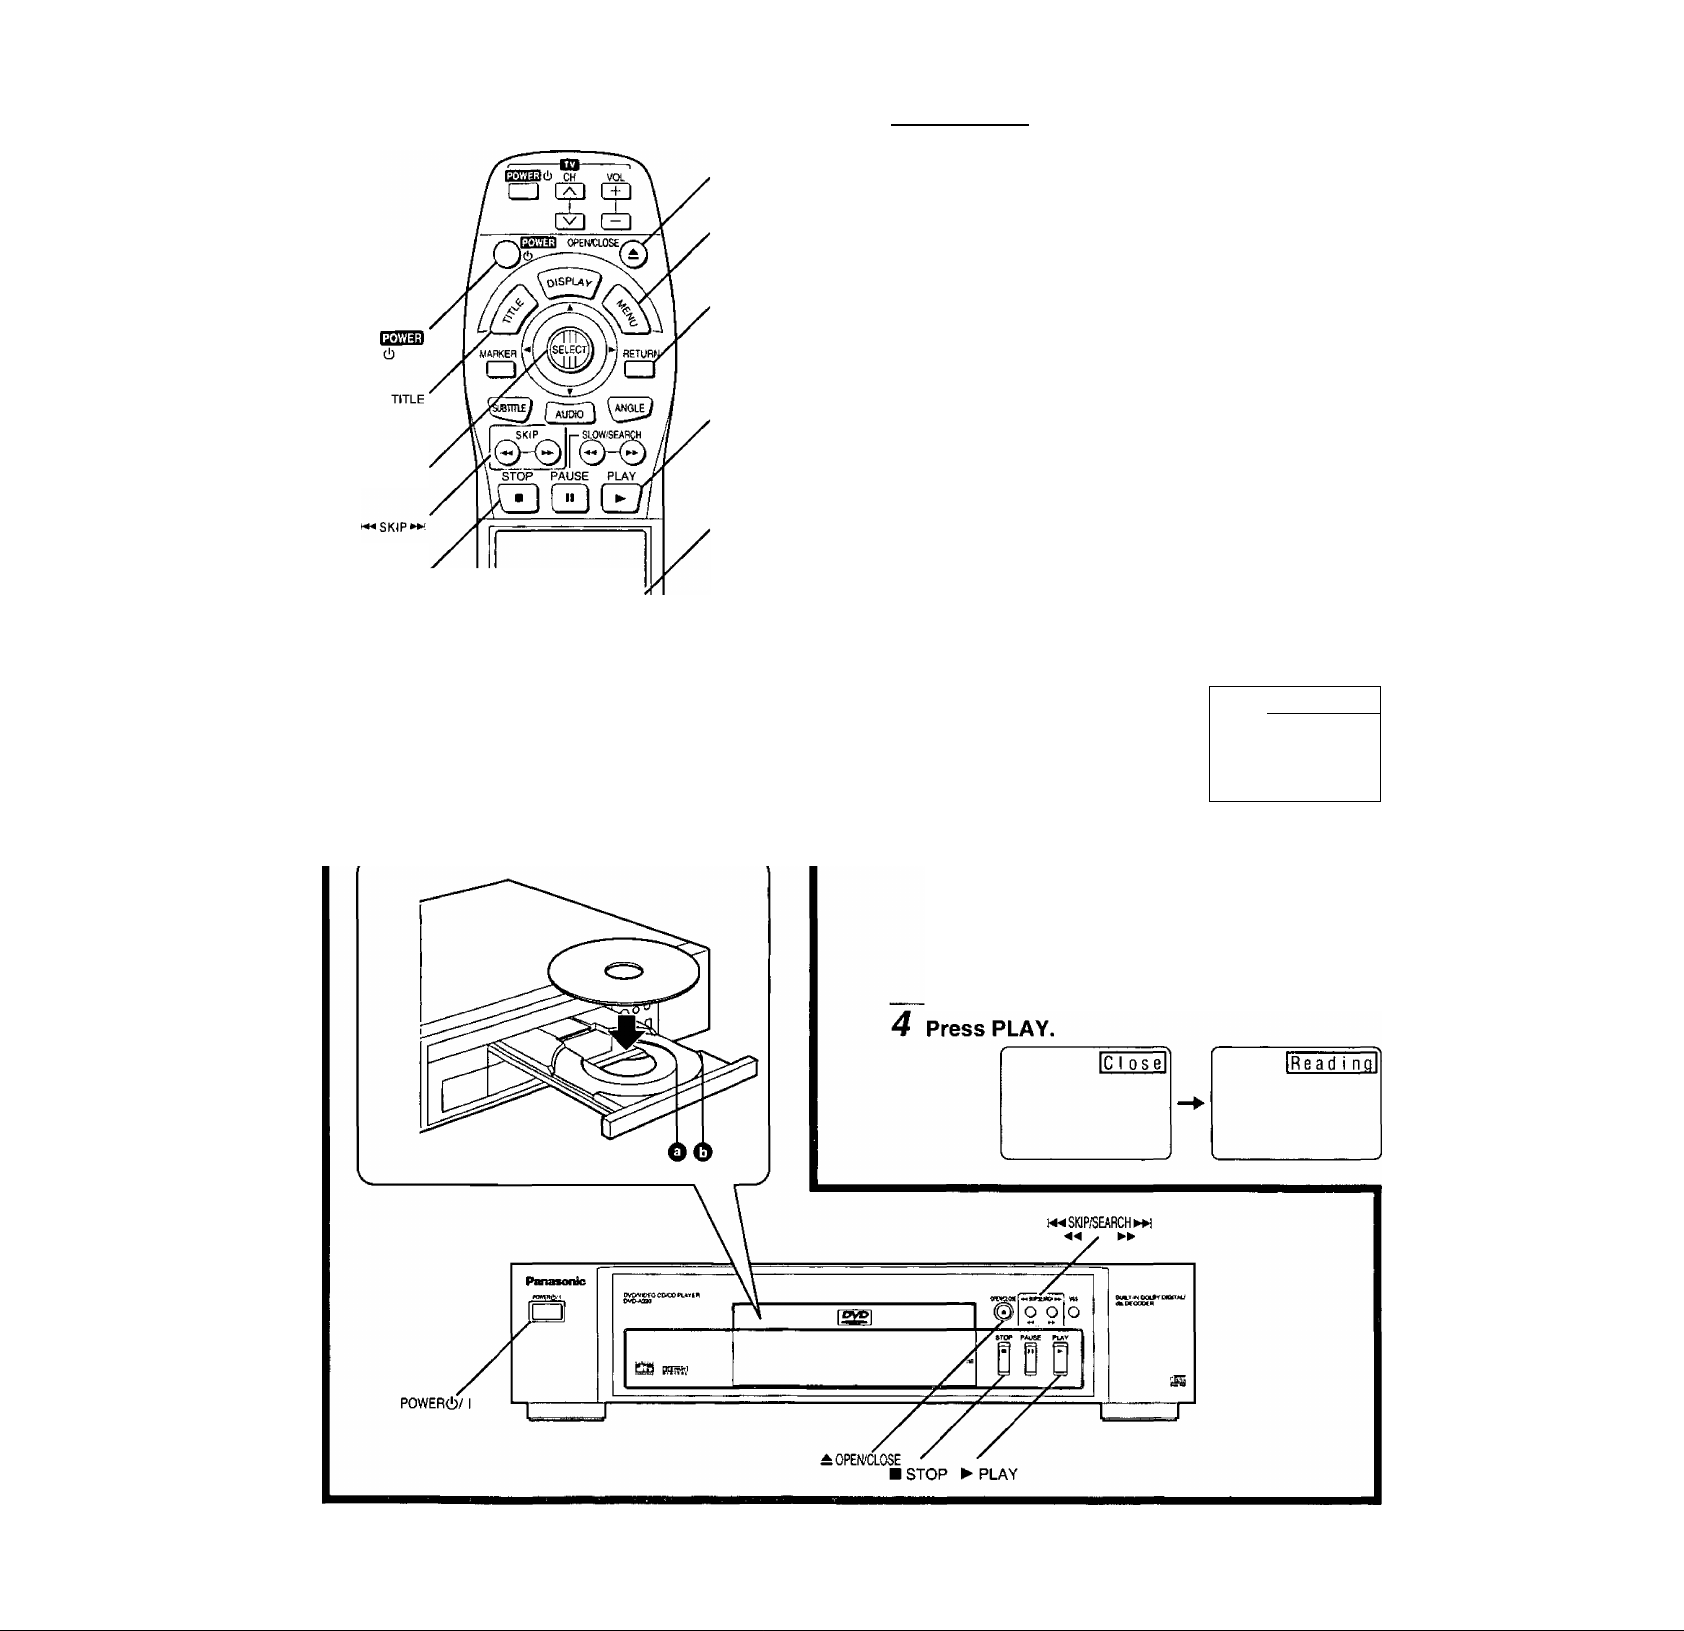
1 Press POWER to switch on the power.
f
Press OPEN/CLOSE to
open the disc tray.
------
IOd enl
A
Place the disc on the disc tray with the iabel side to be played facing upwards.
(If the disc has a iabel)
Hold the disc without touching either of its surfaces, posi
tion it with the label side to be played facing upwards,
align it with the guides, and place it in position.
O 3" (8 cm) disc O 5" (12 cm) disc
14

The disc tray is automatically closed and play begins.
•When the disc tray is closed by pressing OPEN/CLOSE,
press PLAY to start play.
•When a menu screen appears on the TV monitor
In the case of many movie
DVDs, an interactive DVD or
Video CD with playback control,
a menu screen appears on the
TV monitor. Perform step 5 to
start play.
TITLE MENU
Dogs ¡Cast 1es
Lovers
(Example of DVD)
Birds
*
...""..
5 Tilt the joystick (A, T, ◄, ►) and press
SELECT, or press the numeric buttons, to
select the item.
•The joystick is not effective for selecting items for Video
CDs.
TITLE MENU
В i rds
Dogs Cast 1es
Lovers
J. .....
Play of the selected item now begins.
-1
Birds
While watching movies
•Adjusting picture quality for movie viewing
Using the On-Screen Menu Icons (for player information) will
select the optimum picture quality for movies. This setting
gives a gentler feel to videos, producing more detail in darker
scenes and helping to reduce noise. (See page 21.)
• Raising dialogue volume
The volume for the dialogue can be raised by displaying the
On-Screen Menu Icons (for player information) and setting
“Dialogue Enhancer” to “ON”. (See page 21.)
This setting takes effect only for discs which are recorded
with Dolby Digital (AC-3)/dts (2 channel or over) and with the
dialogue contained in the center channel.
When the menu continues onto another screen
After step 4 on page 14, press SKIP (►>!) [in case of the play
er, SKIP/SEARCH (►►!/►►)].
•To return to the previous menu screen
Press SKIP (!◄◄) [In case of the player, SKIP/SEARCH
•Due to the design of some software titles, SKIP (f«, ►>!)
or SKIP/SEARCH (!◄◄, ►►!/◄◄, ►►) may not always
work. For operation, refer also to the jacket of the disc con
cerned.
of the world
(Example)
-b
After operation
When the player is not in use, remove the disc and press
POWER to set the player to the standby mode.
The player is automatically set to the standby mode after
30 minutes or so have elapsed in the stop mode.
(Auto power-off function)
What is playback control?
If a Video CD has “playback control” written on its disc or
jacket, it means that particular scenes or information can
be selected for viewing interactively with the TV monitor
using the menu screen.
Note
•The disc continues to rotate while the menu is displayed
even after the player has finished playing a particular item.
When no further selections are to be played, be sure to press
STOP to clear the menu display.
• If the disc is put in upside down (and it is a single sided disc),
the FL display will indicate “NO PLAY".
For your reference:
•When Q appears on the TV monitor when a button is
pressed, the operation is prohibited by the player or disc.
Stopping play
Press STOP during play.
RESUME function
The player records the point where STOP was pressed during
play. flashes on the player’s FL display when this function
is activated.
• Press PLAY again while is flashing, and play will resume
from this point.
•When the tray is opened or STOP is pressed again while
is flashing, the RESUME function will be cleared.
The RESUME function works only with titles for which the
elapsed playing time appears on the player’s FL display during
playback.
This feature remains active if the player is set to the standby
mode and then turned back ON.
Chapter preview function (DVD only)
When PLAY is pressed while
is flashing, the message
shown on the right is briefly dis
played.
Press PLAY to Chapter Preview
Stopping play and returning to the menu screen
Press TITLE, MENU or RETURN (for DVD), or RETURN (for
Video CD).
Play is suspended, and the menu screen is displayed.
•The buttons may not work depending on the disc used.
If PLAY is pressed again while the above message is dis
played on the screen, the first few seconds of each chapter
from the beginning of the title up to the point where operation
was stopped will be played. This makes it possible to review
previous chapters. Normal playback will commence from the
point where operation was stopped.
Note
►Canceling the RESUME function will also clear the chapter
preview function.
►The chapter preview function may not work with some DVDs.
15
 Loading...