

Page 1
Software
Operating Instructions
(For Document Management System, Printer and Class 2 Fax Modem)
Before UsePrinter Section
Model No.
DP-130P/135P/135FP/150P/150PA/150FP/150FX
DP-1510P/1810P/1810F/2000/2010E/2500/3000
System Section
Document Management
Before operating this software, please read these instructions completely and keep these operating instructions for future reference.
English
Troubleshooting
Section
Class 2 Fax Modem
Page 2

2
The following trademarks and registered trademarks are used throughout this manual:
Microsoft, MS-DOS, Windows and Windows NT are registered trademarks of Microsoft
Corporation in the USA and other countries.
i386, i486 and Pentium are trademarks of Intel Corporation.
Centronics is a registered trademark of Centronics Data Computer Corporation.
TrueType is a registered trademark of Apple Computer, Inc.
All other trademarks identified herein are the property of their respective owners.
Copyright c 2000-2002 by Matsushita Graphic Communication Systems, Inc.
All rights reserved. Unauthorized copying and distribution is a violation of law.
Published in Japan.
The contents of these Operating Instructions are subject to change without notice.
Page 3

Table of Contents
Before Use
Precautions.....................................................................................................................6
For User in USA ............................................................................................. 6
External View and Control Panel .................................................................................. 7
External View ................................................................................................. 7
Control Panel.................................................................................................. 10
Printer Section
Installing the Printer Driver .......................................................................................... 15
Windows 98/Me/NT/2000/XP ......................................................................... 15
Installing the LPR (Line Printer Remote) Monitor ....................................................... 18
Windows 98/Me.............................................................................................. 18
Windows NT 4.0 ............................................................................................. 22
Windows 2000/XP .......................................................................................... 26
Configuring the Printer Driver Settings ....................................................................... 30
Windows 98/Me.............................................................................................. 30
Windows NT 4.0 (Administrator) .................................................................... 40
Windows NT 4.0 (User) .................................................................................. 48
Windows 2000/XP (Administrator) ................................................................. 54
Windows 2000/XP (User) ............................................................................... 63
Setting Print Conditions: Setting on the Device.......................................................... 70
....................................................................................................................... 70
Print Operation ............................................................................................................... 72
Printing from Windows Applications ............................................................... 72
Printing on Network ........................................................................................ 73
Document Management System Section
Installing the Document Management System............................................................ 75
Windows 98/Me/NT/2000/XP ......................................................................... 75
Document Manager ........................................................................................................ 80
Main Window.................................................................................................. 80
Basic Operations ............................................................................................ 82
Setting Plug-in ................................................................................................ 84
File Menu........................................................................................................ 85
Edit Menu ....................................................................................................... 90
View Menu...................................................................................................... 91
Document Menu ............................................................................................. 92
Image Converter ............................................................................................................. 94
General Description........................................................................................ 94
Windows 98/Me.............................................................................................. 94
Windows NT 4.0 ............................................................................................. 95
Windows 2000/XP .......................................................................................... 96
Document Scanner......................................................................................................... 97
Main Window.................................................................................................. 97
Tool Menu ...................................................................................................... 99
Image Scanning ............................................................................................. 101
3
Page 4

Table of Contents
Document Management System Section
Document Viewer ........................................................................................................... 103
Main Window ................................................................................................. 103
Basic Operations............................................................................................ 105
Annotation Function ....................................................................................... 106
File Menu ....................................................................................................... 107
Edit Menu....................................................................................................... 111
View Menu ..................................................................................................... 112
Page Menu..................................................................................................... 113
Annotation Menu ............................................................................................ 116
Window Menu ................................................................................................ 125
Status Monitor ................................................................................................................ 126
Task Bar Display............................................................................................ 126
Task Bar Menu............................................................................................... 127
Display Status Details .................................................................................... 128
Configuration Editor ...................................................................................................... 131
Main Window ................................................................................................. 131
User Parameters Folder................................................................................. 133
Fax Parameters Folder .................................................................................. 134
General Functions Folder .............................................................................. 135
Copier Setting Folder ..................................................................................... 136
Journal Folder ................................................................................................ 137
Phonebook Setting Shortcut Activation Folder .............................................. 138
Phonebook Editor .......................................................................................................... 139
Features......................................................................................................... 139
Activation Procedure ...................................................................................... 140
Main Window (For DP-2500/3000) ................................................................ 141
Main Window (For DP-1810F/2000) .............................................................. 142
Main Window (For DP-135FP/150FP/150FX)................................................ 144
Retrieve/Write ................................................................................................ 146
Open/Save File .............................................................................................. 148
Insert Entry..................................................................................................... 150
Delete Entry ................................................................................................... 151
Panafax Desktop ............................................................................................................ 152
General Description ....................................................................................... 152
Sending Document ........................................................................................ 152
Managing the Personal Address Book........................................................... 157
Receiving Document ...................................................................................... 161
Cover Sheet ................................................................................................... 162
Tool Bar ......................................................................................................... 165
Setup Menu.................................................................................................... 166
Configuration Menu........................................................................................ 168
Client and Server Setting ............................................................................... 170
4
Page 5

Table of Contents
Troubleshooting
Troubleshooting ............................................................................................................. 172
Printing operation fails.................................................................................... 172
Document is not printed correctly ................................................................... 173
Error messages displayed on the computer................................................... 174
Appendix ......................................................................................................................... 175
Printing/Scanning Area................................................................................... 175
Parallel Interface Connector ........................................................................... 176
Class 2 Fax Modem Section
Installing the Panasonic Class 2 Fax Modem.............................................................. 178
Installation (Windows 98/Me) ......................................................................... 178
Installation (Windows NT 4.0) ........................................................................ 184
Installation (Windows 2000/XP) ..................................................................... 187
5
Page 6

Before Use
Precautions
For User in USA
This equipment has been tested and found to comply with the limits for a Class B digital device, pursuant to
Part 15 of the FCC Rules. These limits are designed to provide reasonable protection against harmful
interference in a residential installation. This equipment generates, uses and can radiate radio frequency
energy and, if not installed and used in accordance with the instructions, may cause harmful interference to
radio communications. However, there is no guarantee that interference will not occur in a particular
installation. If this equipment does cause harmful interference to radio or television reception, which can be
determined by turning the equipment off and on, the user is encouraged to try to correct the interference by
one of the following measures:
1. Reorient or relocate the receiving antenna.
2. Relocate fax machine with respect to receiver or other equipment.
3. Connect fax machine into outlet on a circuit different from that to which the receiver is connected.
4. Consult the dealer or an experienced radio/TV technician for help.
Warning: To assure continued compliance, use only shielded interface cable when connecting the facsimile
machine parallel interface port to host computer. Also, any changes or modifications not expressly approved
by the party responsible for compliance could void the user's authority to operate this equipment.
This device complies with Part 15 of the FCC Rules. Operation is subject to the following two conditions: (1)
This device may not cause harmful interference, and (2) this device must accept any interference received,
including interference that may cause undesired operation.
Responsible Party: Matsushita Electric Corporation of America
One Panasonic Way, Secaucus, NJ 07094
Technical Support: Panasonic Document Imaging Company/Technical Support Department
Two Panasonic Way, Secaucus, NJ 07094
1-800-225-5329
Email: consumerproducts@panasonic.com
• You need to read the software license agreement before setting up the Printer Driver.
• You need to read the following precautions which is described in the Machine’s Operating Instructions.
1. Installation
2. Ventilation
3. Handling
4. Toner and Paper
5. For your safety
6
Page 7
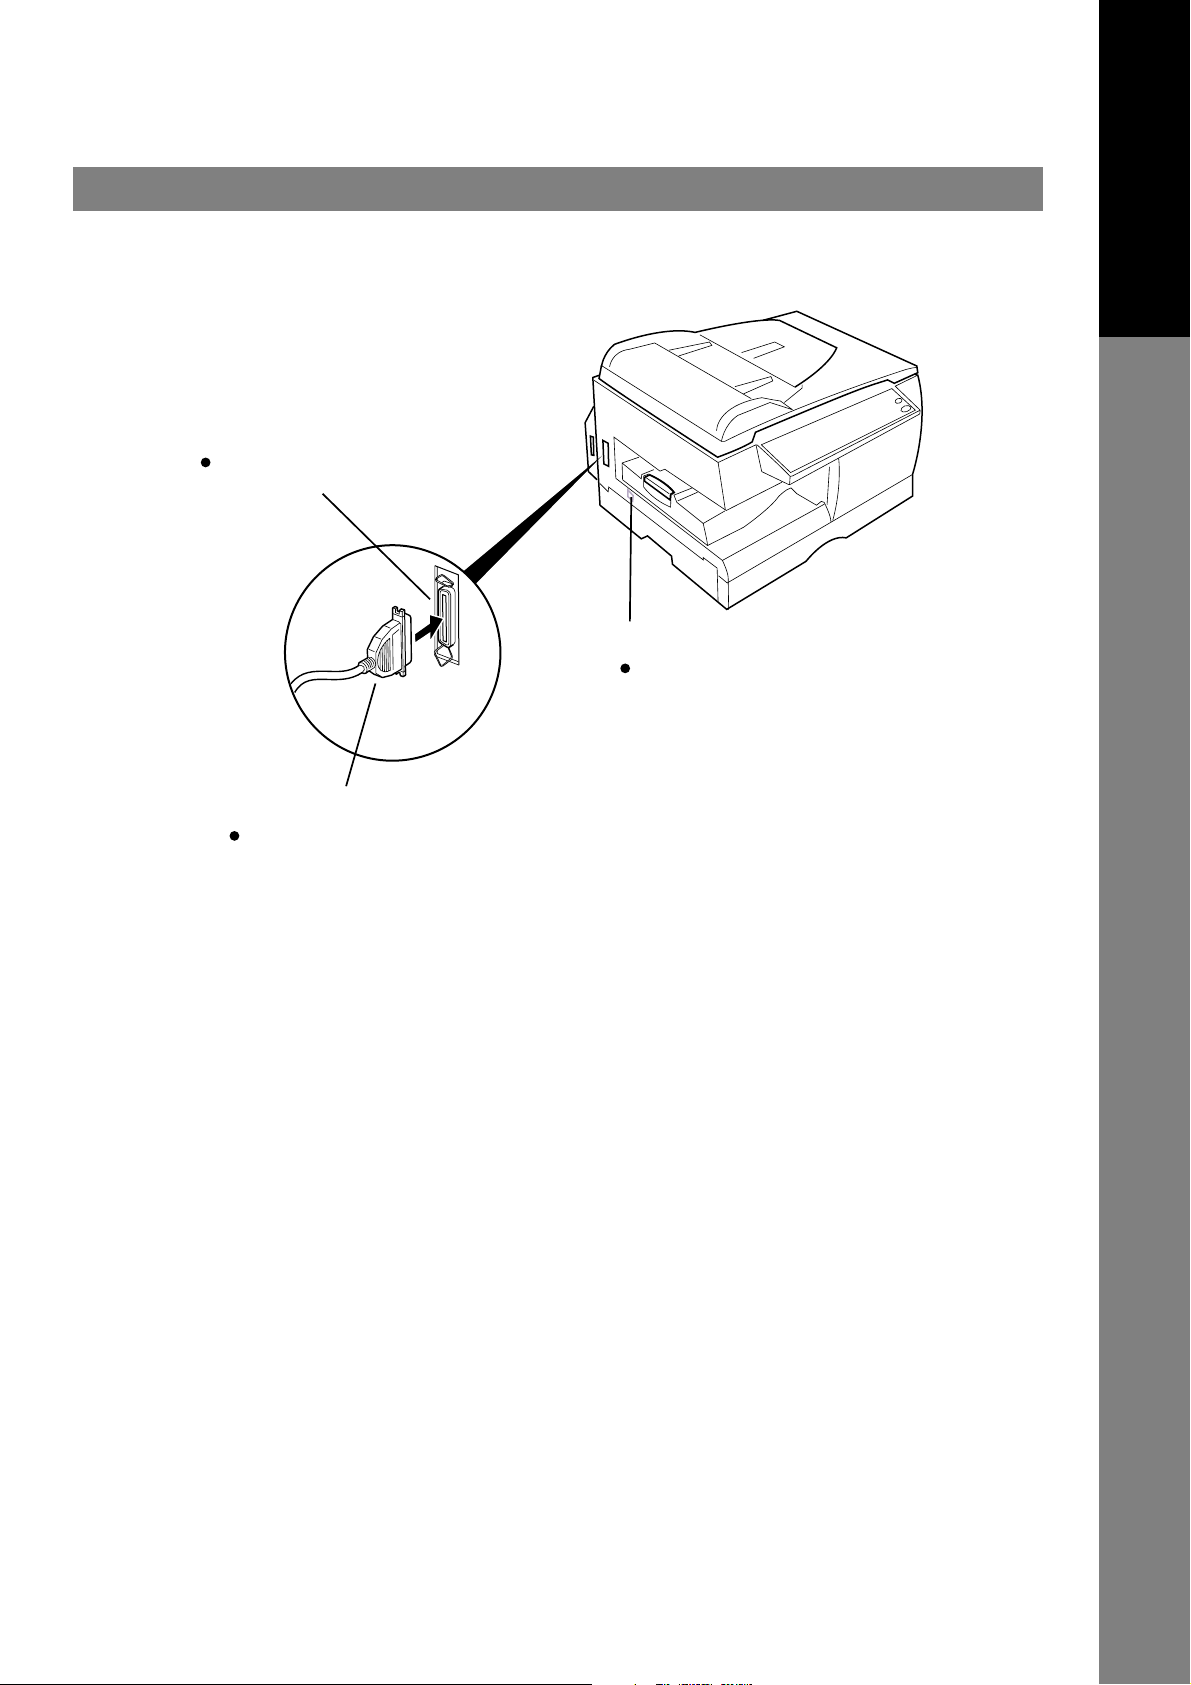
External View and Control Panel
External View
DP-130P/135P/135FP/150P/150PA/150FP/150FX
Parallel interface connector
Connect to the PC
Power Switch
Parallel interface cable
(A cable does not come with the unit.) Use a cable of IEEE
1284 specifications, with a maximum length of 20 ft (6m).
Consult a service provider for details.
Before Use
Usually set to (l) position.
7
Page 8
External View and Control Panel
External View
DP-1510P/1810P/1810F/2010E
Parallel interface connector
Connect to the PC
Power Switch
Usually set to (l) position.
Parallel interface cable
(A cable does not come with the unit.) Use a cable of IEEE
1284 specifications, with a maximum length of 20 ft (6m).
Consult a service provider for details.
8
Page 9
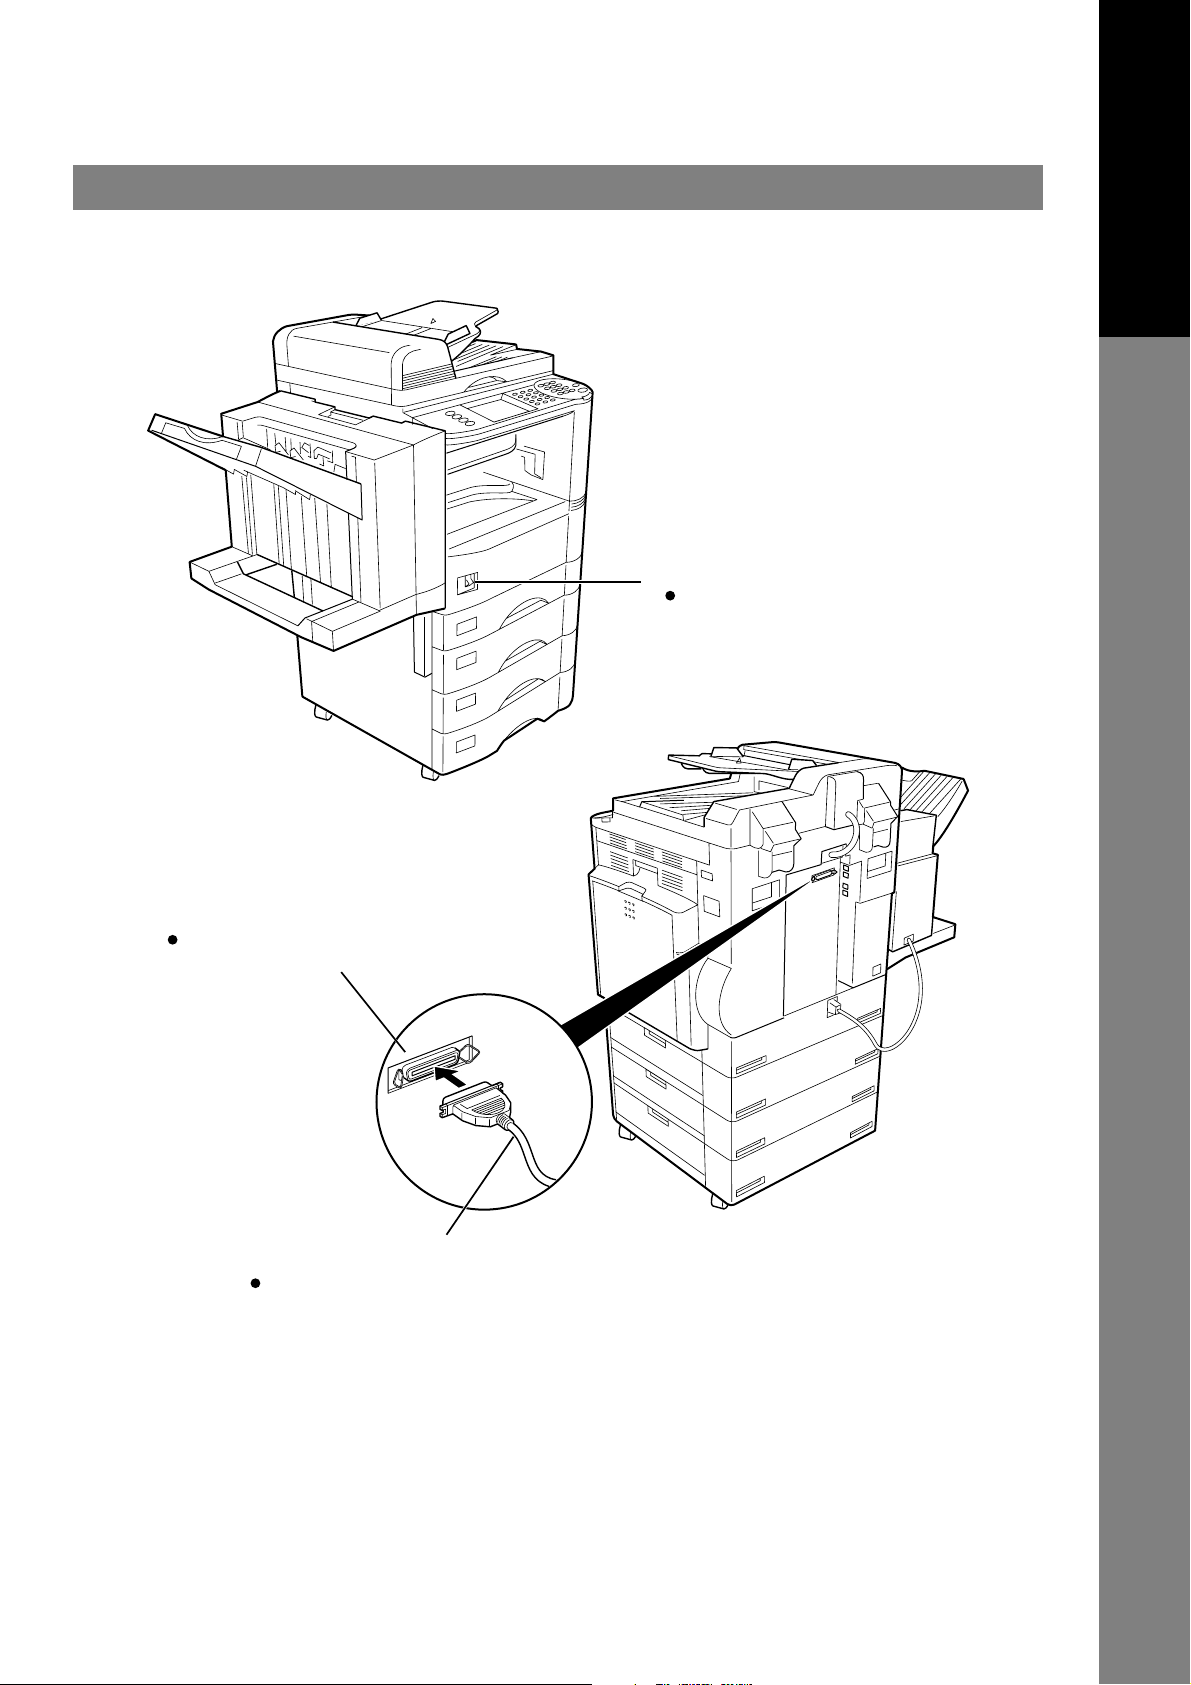
External View
External View and Control Panel
DP-2000/2500/3000
Power Switch
Usually set to (l) position.
Before Use
Parallel interface connector
Connect to the PC
Parallel interface cable
(A cable does not come with the unit.) Use a cable of IEEE
1284 specifications, with a maximum length of 20 ft (6m).
Consult a service provider for details.
9
Page 10
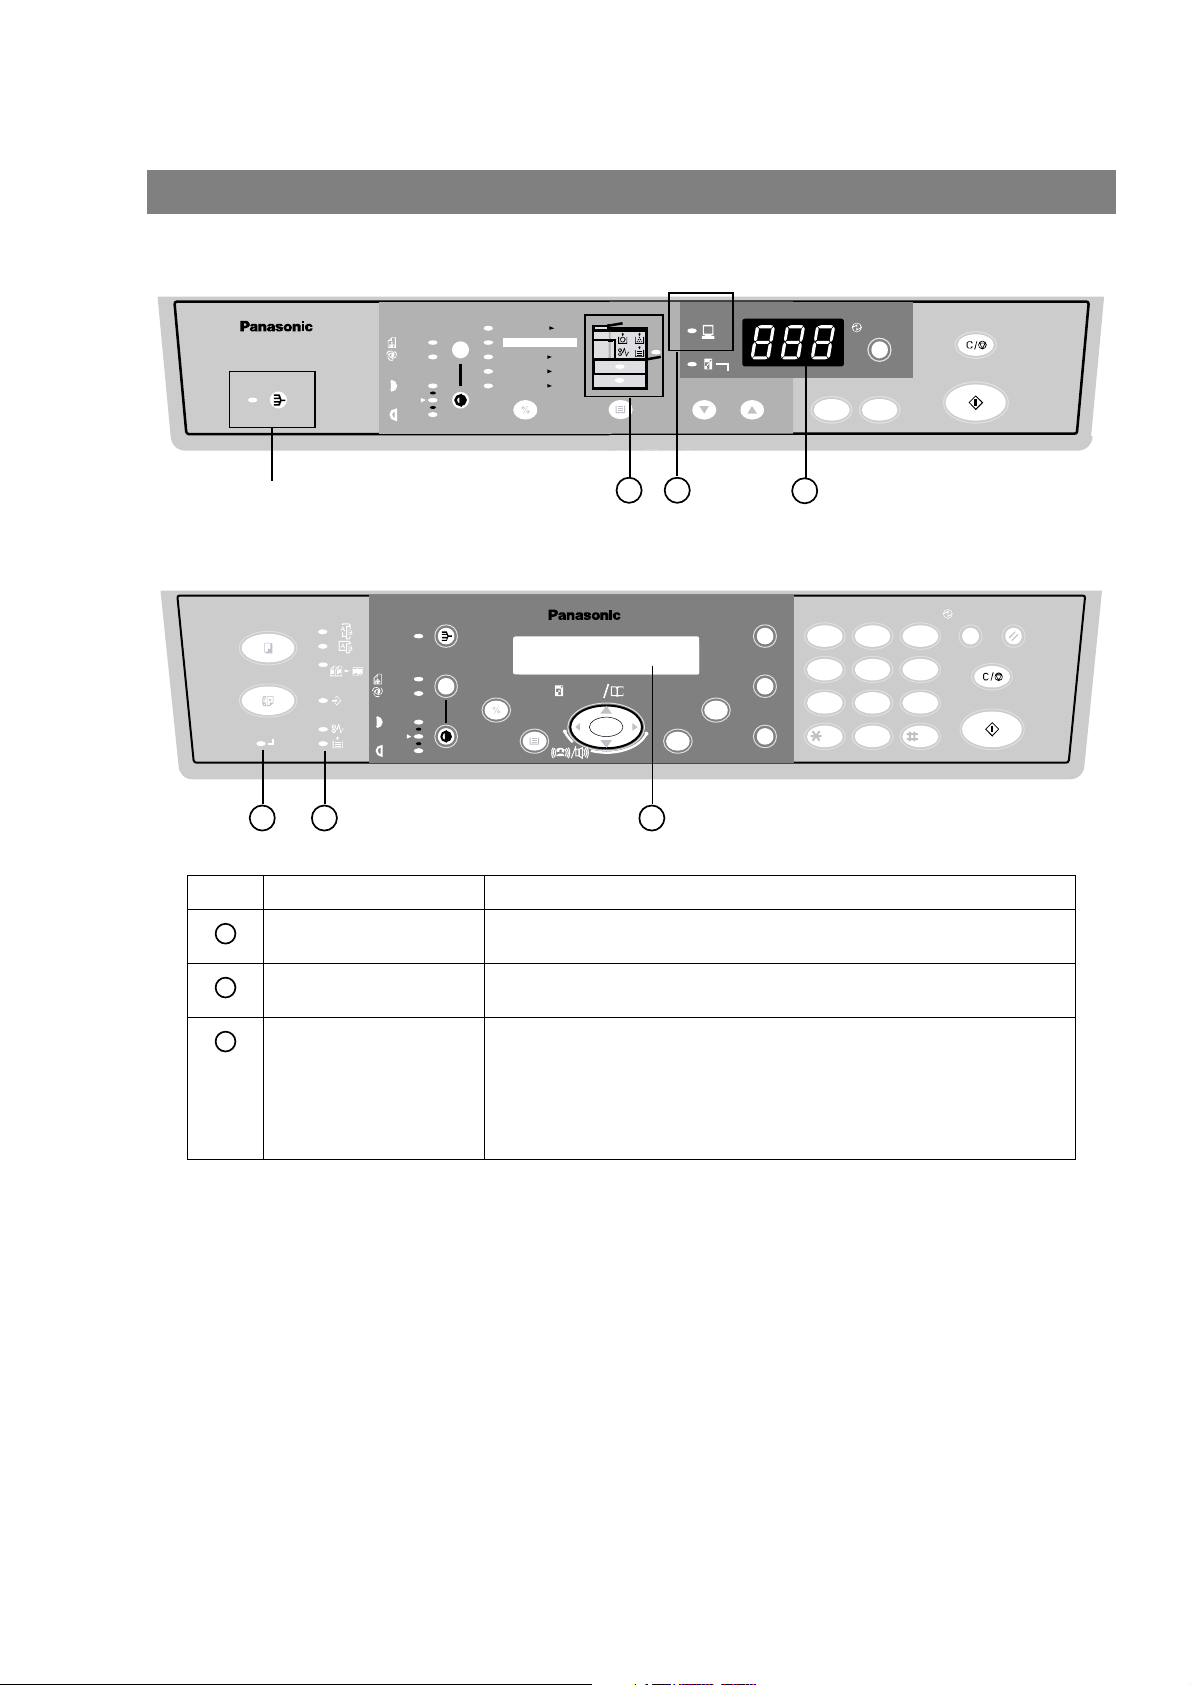
External View and Control Panel
Control Panel
DP-130P/135P/150P/150PA
PHOTO O
AUTO
2SIDED
DARKER
LIGHTER
For DP-150PA
DP-135FP/150FP/150FX
2SIDED
COPY
FAX
ON LINE
2 SIDED
2 in 1
DATA
PHOTO
AUTO
DARKER
LIGHTER
1 2 3
No. Name Function
ON LINE LED Lit : Data is being received from the PC.
1
Paper Misfeed/
2
Add Paper LED
3 Digits LED
3
(DP-130P/135P/150P/
150PA)
Message Display
(DP-135FP/150FP/
150FX)
129%
79%
65%
61%
INVOICE
100%
LEGAL
LETTER
LEGAL
LETTER
LETTER
INVOICE
INVOICE
ON LINE
ZOOM
(50~200%)
ENERGY
SAVER
10 1
1
2
SORT
ZOOM
SELECT FUNCTION
PAPER TRAY
abc..
(50~200%) SEARCH
DP-150FX
DIRECTORY
+-
SET
REDIAL/
PAUSE
FLASH/
SUB-ADDR
MONITOR
3
ABC DEF
12
GHI JKL MNO
45
PQRS
TUV
78
TONE
0
3
6
WXYZ
9
-/()
Off : Printer is in standby.
Paper is misfed.
Paper is empty.
Displays Printer Condition
If an error code/message is shown, please refer to the “Troubleshooting”
section for a corrective action.
CLEAR/STOP
START
ENERGY
SAVER
CLEAR/STOP
START
RESET
10
Page 11
Control Panel
External View and Control Panel
DP-1510P/1810P
DP-1810F
Before Use
11
Page 12
External View and Control Panel
Control Panel
DP-2010E
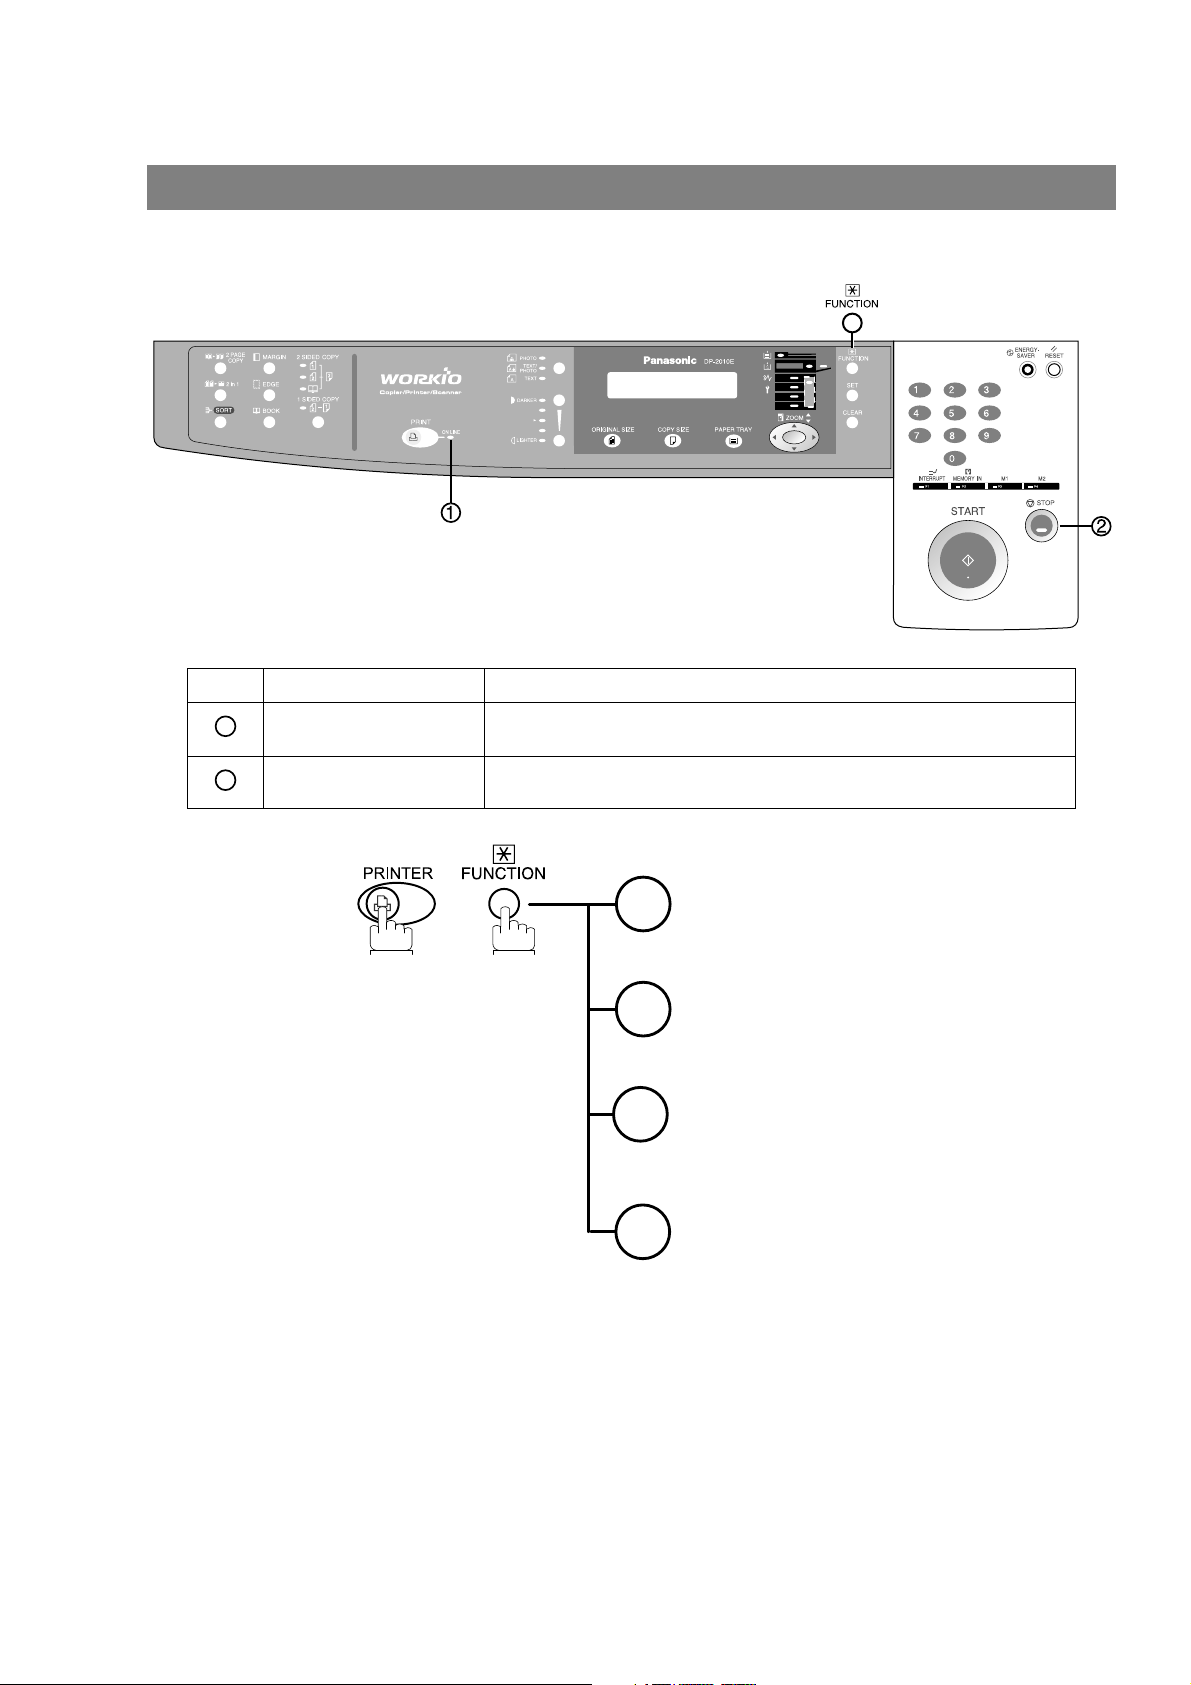
No. Name Function
ON LINE LED Lit : Printer is operational online
1
STOP key Used to cancel the print job.
2
Off : Printer is offline
1
2
3
4
Printer Status
1=On Line
2=Off Line
Not Used
Security Print
1=Print
2=Delete
Letter/A4 Tray Selection
(See page 70)
12
Page 13
Control Panel
PAUSE
SUB-ADDR
PQRS
GHI
TUV
JKL
ABC
WXYZ
MNO
DEF
ON LINE
ON LINE
DATA
2SIDED
COPY
1SIDED
COPY
LINE SELECT
FUNCTION
SORT
STAPLE
SHIFT
LIGHTER
DARKER
ZOOM/VOL
PHOTO
TEXT/
PHOTO
TEXT
External View and Control Panel
DP-2000
MULTI-SIZE FEED
COPIED
OHP
abcde
2 in 1 BOOK EDGE MARGIN
01f02g03h04i05
06k07l08m09n10
11p12q13r14s15
u17v18w19x20y
16
P1zP2 P3
No. Name Function
1
2
3
2SIDED
BLANK
2PAGE
COPY
1SIDED
COPY
SPACE
S-FINE
SORT
STAPLE
SHIFT
STAMP
MEM XMT
M1
SYMBOLSP5CAPS
P4
RESOLUTION LINE SELECT
DP-2000
M2
COPY
j
FAX
o
t
INTERNET
PRINTER
ON LINE
ON LINE
DATA
OUTPUT
TRAY
PAPER
TRAY
DIRECTORY
SERCH
LIGHTER
ZOOM/VOL
COPY
MEMORY IN
FINE
PHOTO
TEXT/
PHOTO
TEXT
DARKER
ENERGY SAVER
ORIGINAL COPY
SIZE SIZE
LEDGER
LEGAL
LETTER
LETTER
INVOICE
INTERRUPT
FUNCTION
REDIAL/
PAUSE
FLASH/
SUB-ADDR
ABBR
MONITOR
SET
RESET
ABC
1 2 3
GHI
JKL
4 5 6
PQRS
TUV
7 8 9
0
TONE
ALARM ACTIVE
CLEAR
DEF
MNO
WXYZ
START
OCT-12-2000 15:00
PRINTER ON LINE
ON LINE LED Lit : Printer is operational online
Off : Printer is offline
DATA LED Lit : Data is being received from the PC, or printing is under operation.
Off : Printer is in standby or printing has been completed.
STOP key Used to cancel the print job.
Before Use
STOP
Printer Status
1=On Line
1
2=Off Line
Printer Settings
2
(See page 71)
Security Print
1=Print
3
2=Delete
13
Page 14
External View and Control Panel
CONTRAST
LCD
PAUSE
SUB-ADDR
LEDGER
LEGAL
INVOICE
LETTER
LETTER
START
PQRS
GHI
TUV
JKL
ABC
WXYZ
MNO
DEF
INTERNET
PRINTER
MULTI-SIZE
INTERRUPT
COPY
Control Panel
DP-2500/3000
LCD
CONTRAST
SORT
MULTI-SIZE
FEED
COPY
FAX
INTERNET
PRINTER
ADD TONER
ON LINE
ON LINE
DATA
DP-2500
ENERGY SAVER
ORIGINAL COPY
SIZE SIZE
LEDGER
LEGAL
LETTER
LETTER
INVOICE
INTERRUPT
FUNCTION
REDIAL/
PAUSE
FLASH/
SUB-ADDR
LINE
SELECT
MONITOR
SET
MON.VOL.
RESET
ABC
1 2 3
GHI
JKL
4 5 6
PQRS
TUV
7 8 9
0
TONE
ALARM ACTIVE
CLEAR
DEF
STOP
MNO
WXYZ
START
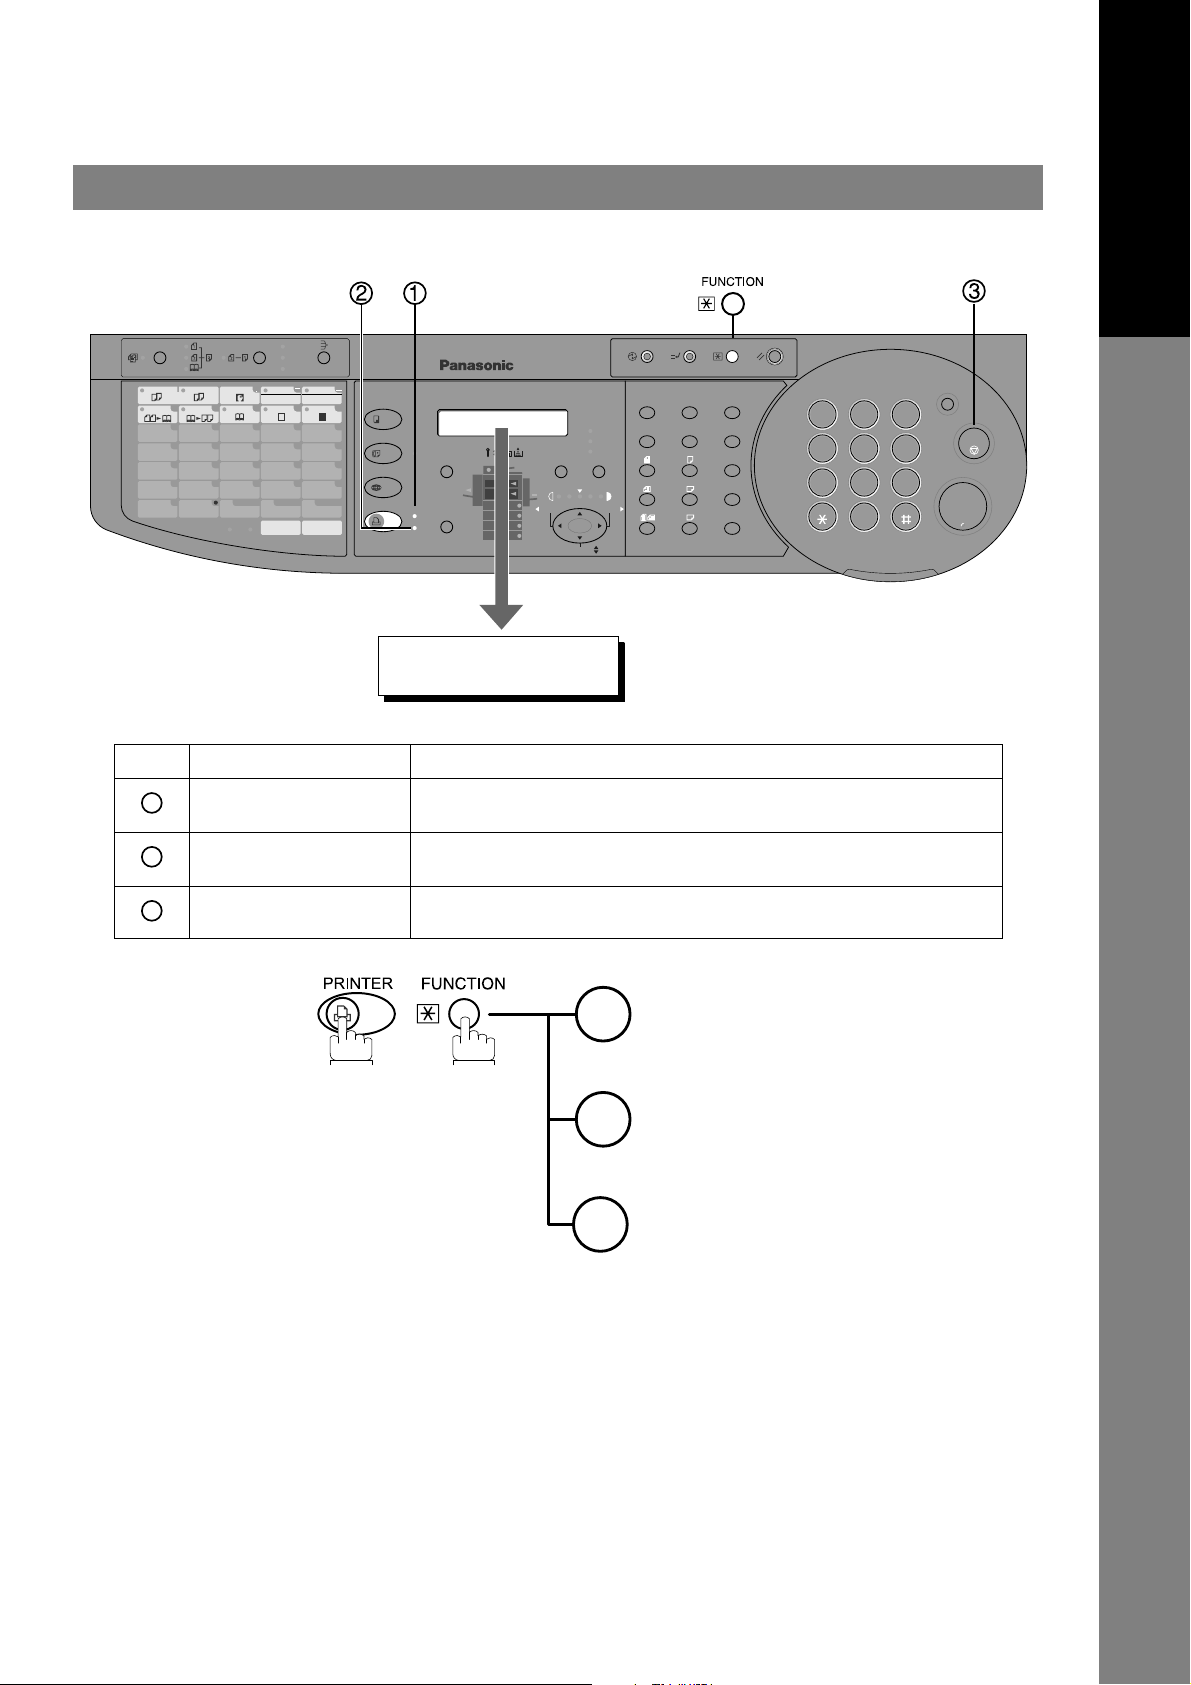
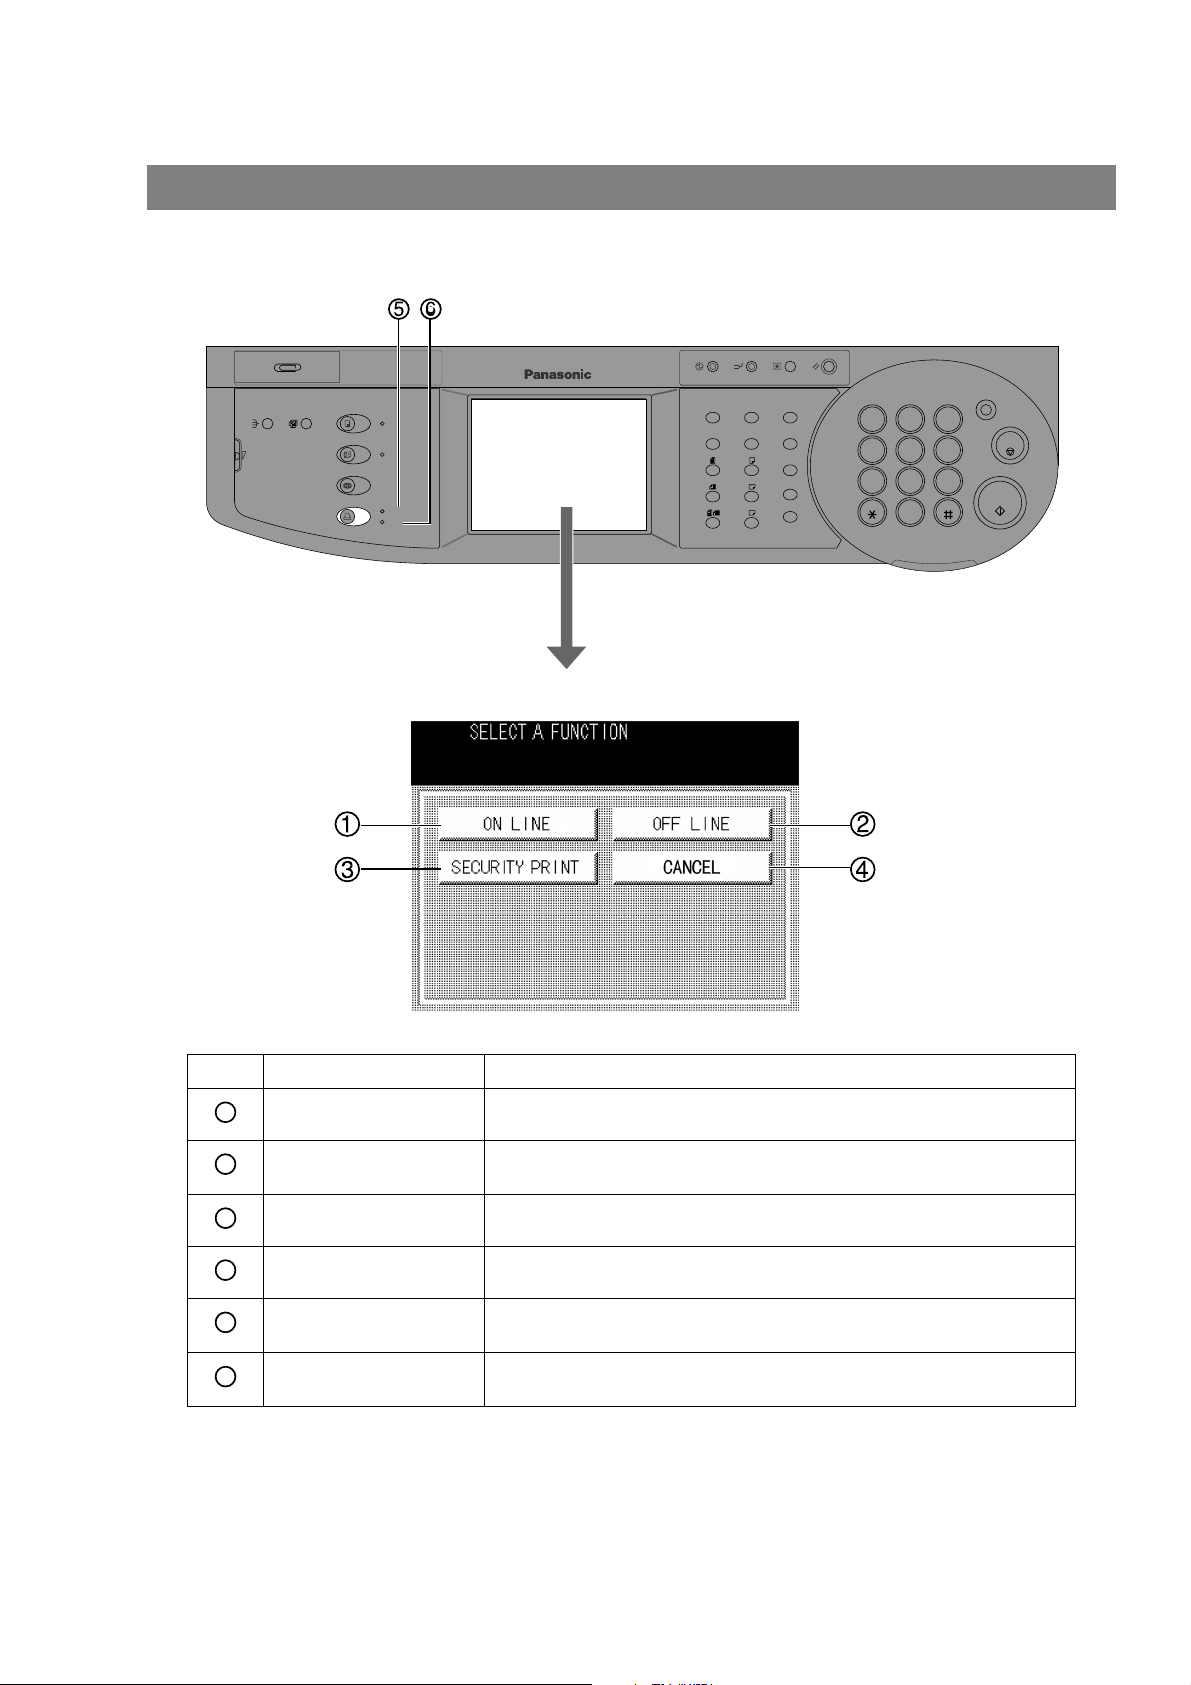
No. Name Function
ON LINE Switch the printer from off-line status to on-line status.
1
OFF LINE Switch the printer to off-line status. (The printer cannot be set off line
2
SECURITY PRINT Used to print or delete the security print data.
3
CANCEL Used to cancel the print job.
4
ON LINE LED Lit : Printer is operational online
5
DATA LED Lit : Data is being received from the PC, or printing is under operation.
6
when the data LED is blinking.
Off : Printer is offline
Off : Printer is in standby or printing has been completed.
14
Page 15

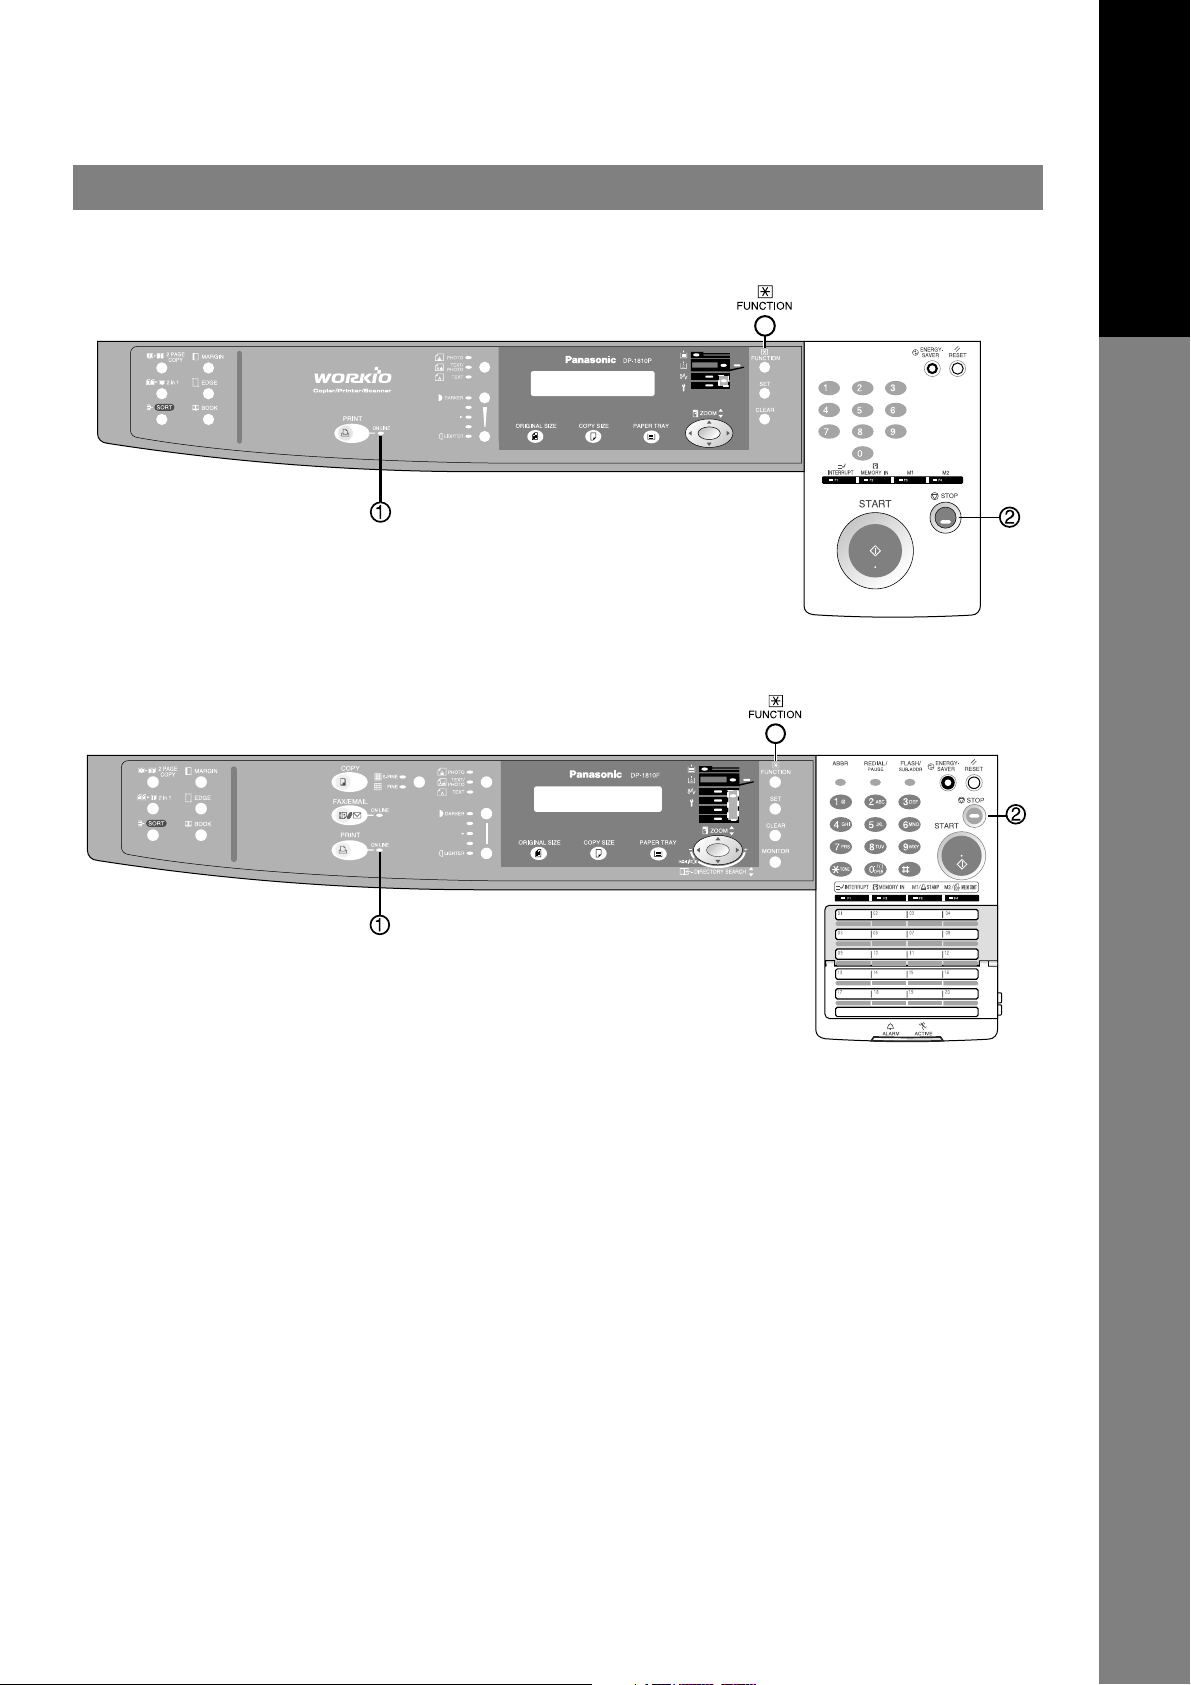
Printer Section
Installing the Printer Driver
Windows 98/Me/NT/2000/XP
1
2
3
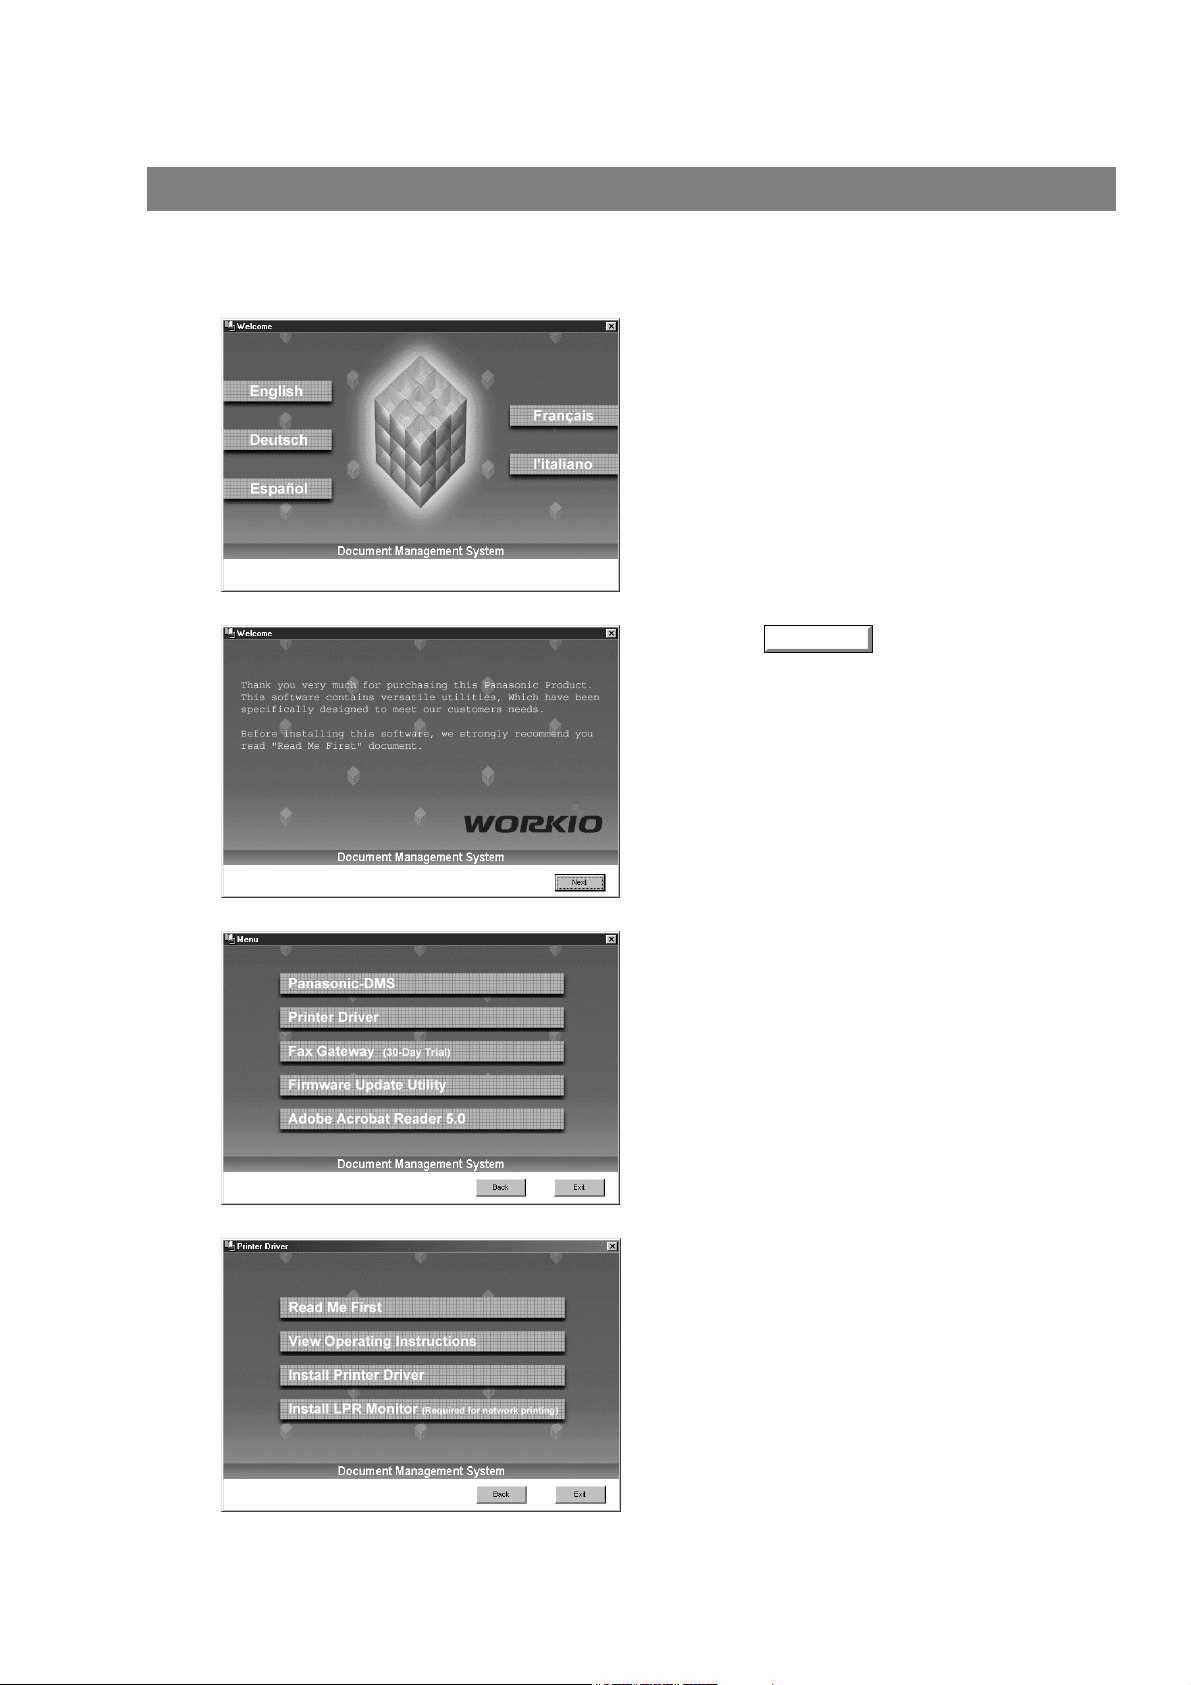
Insert the Panasonic Document Management
System CD-ROM.
Click on the desired language.
Click on the button.
Next
Printer Section
4
Continued on the next page...
Click Printer Driver.
The Fax Gateway and Firmware Update
Note:
Utility is only available on U.S.A. and
Canada only.
15
Page 16
Installing the Printer Driver
Windows 98/Me/NT/2000/XP
5
6
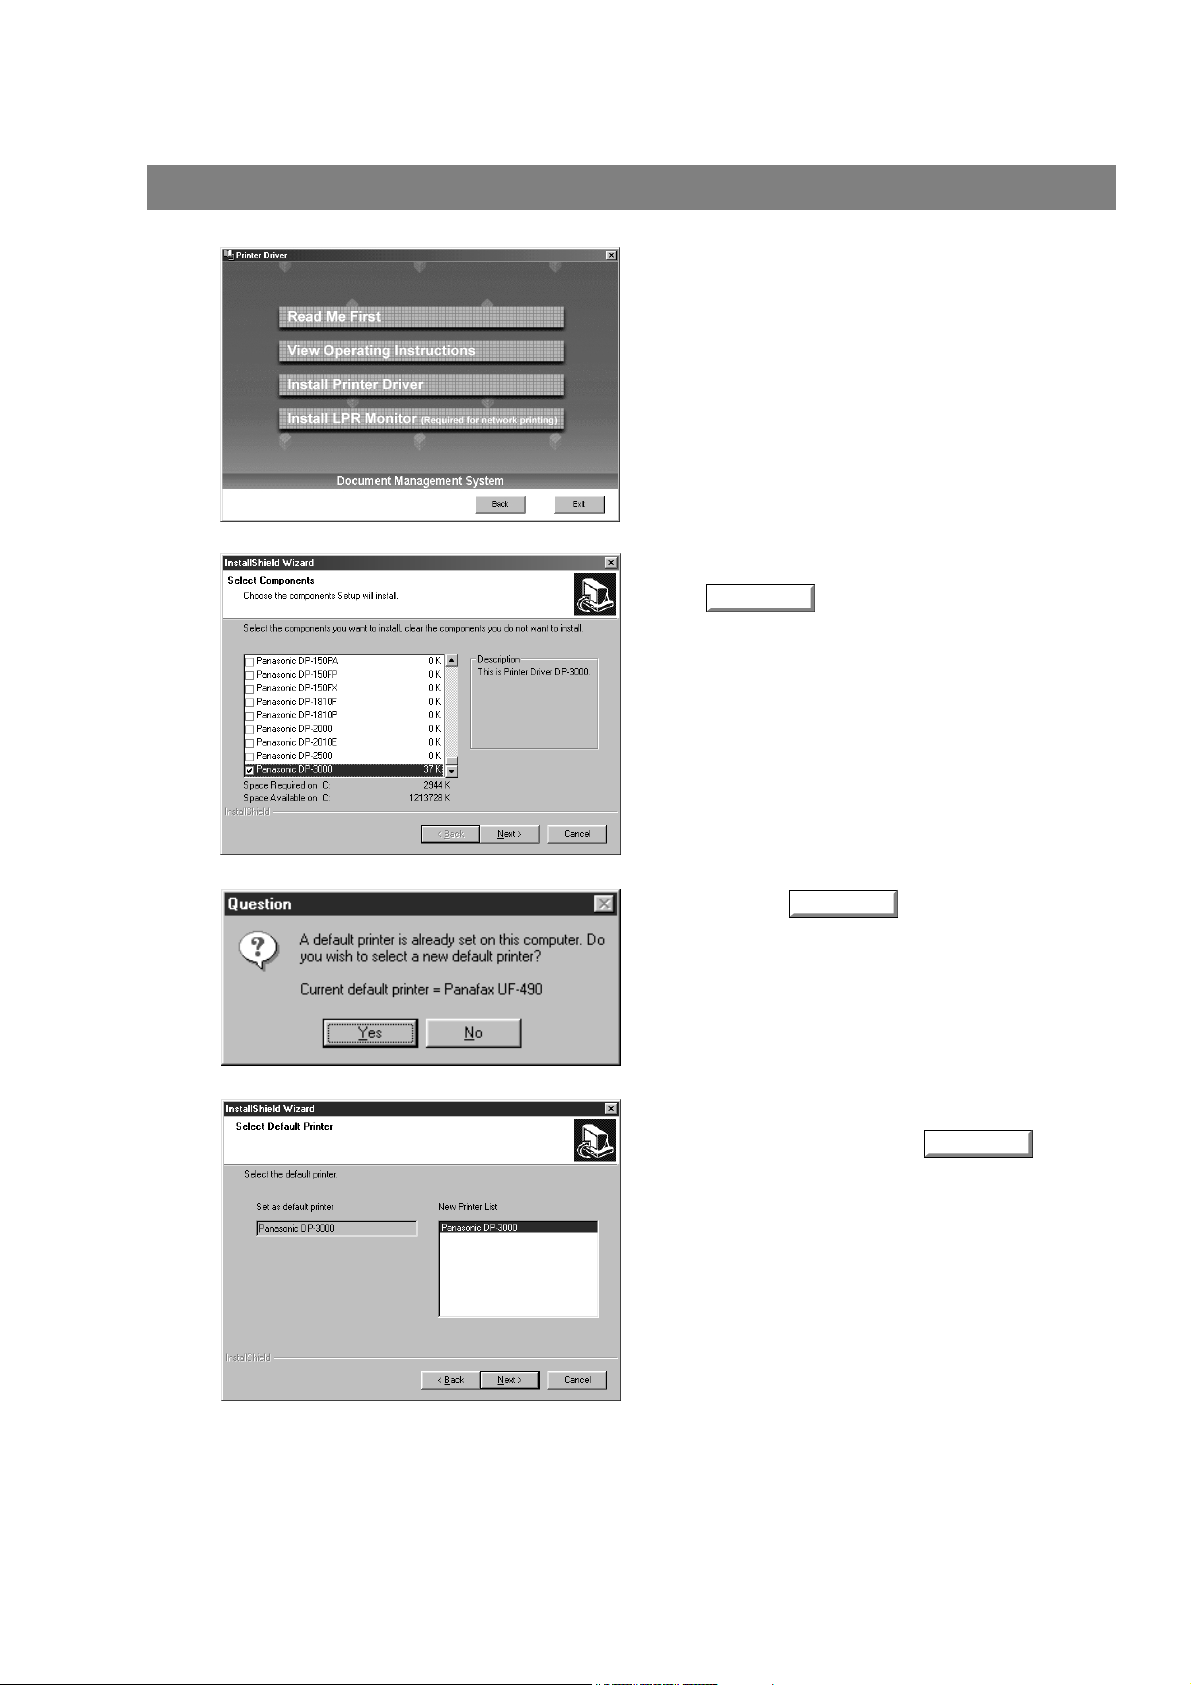
Click Install Printer Driver.
Select your machine's model(s) and click the
Next
button.
7
8
Click the button if you would like
to change your current default printer to the
one that you are installing.
Select your new default printer from the New
Printer List and click the button.
Yes
Next
16
Page 17
Windows 98/Me/NT/2000/XP
Installing the Printer Driver
9
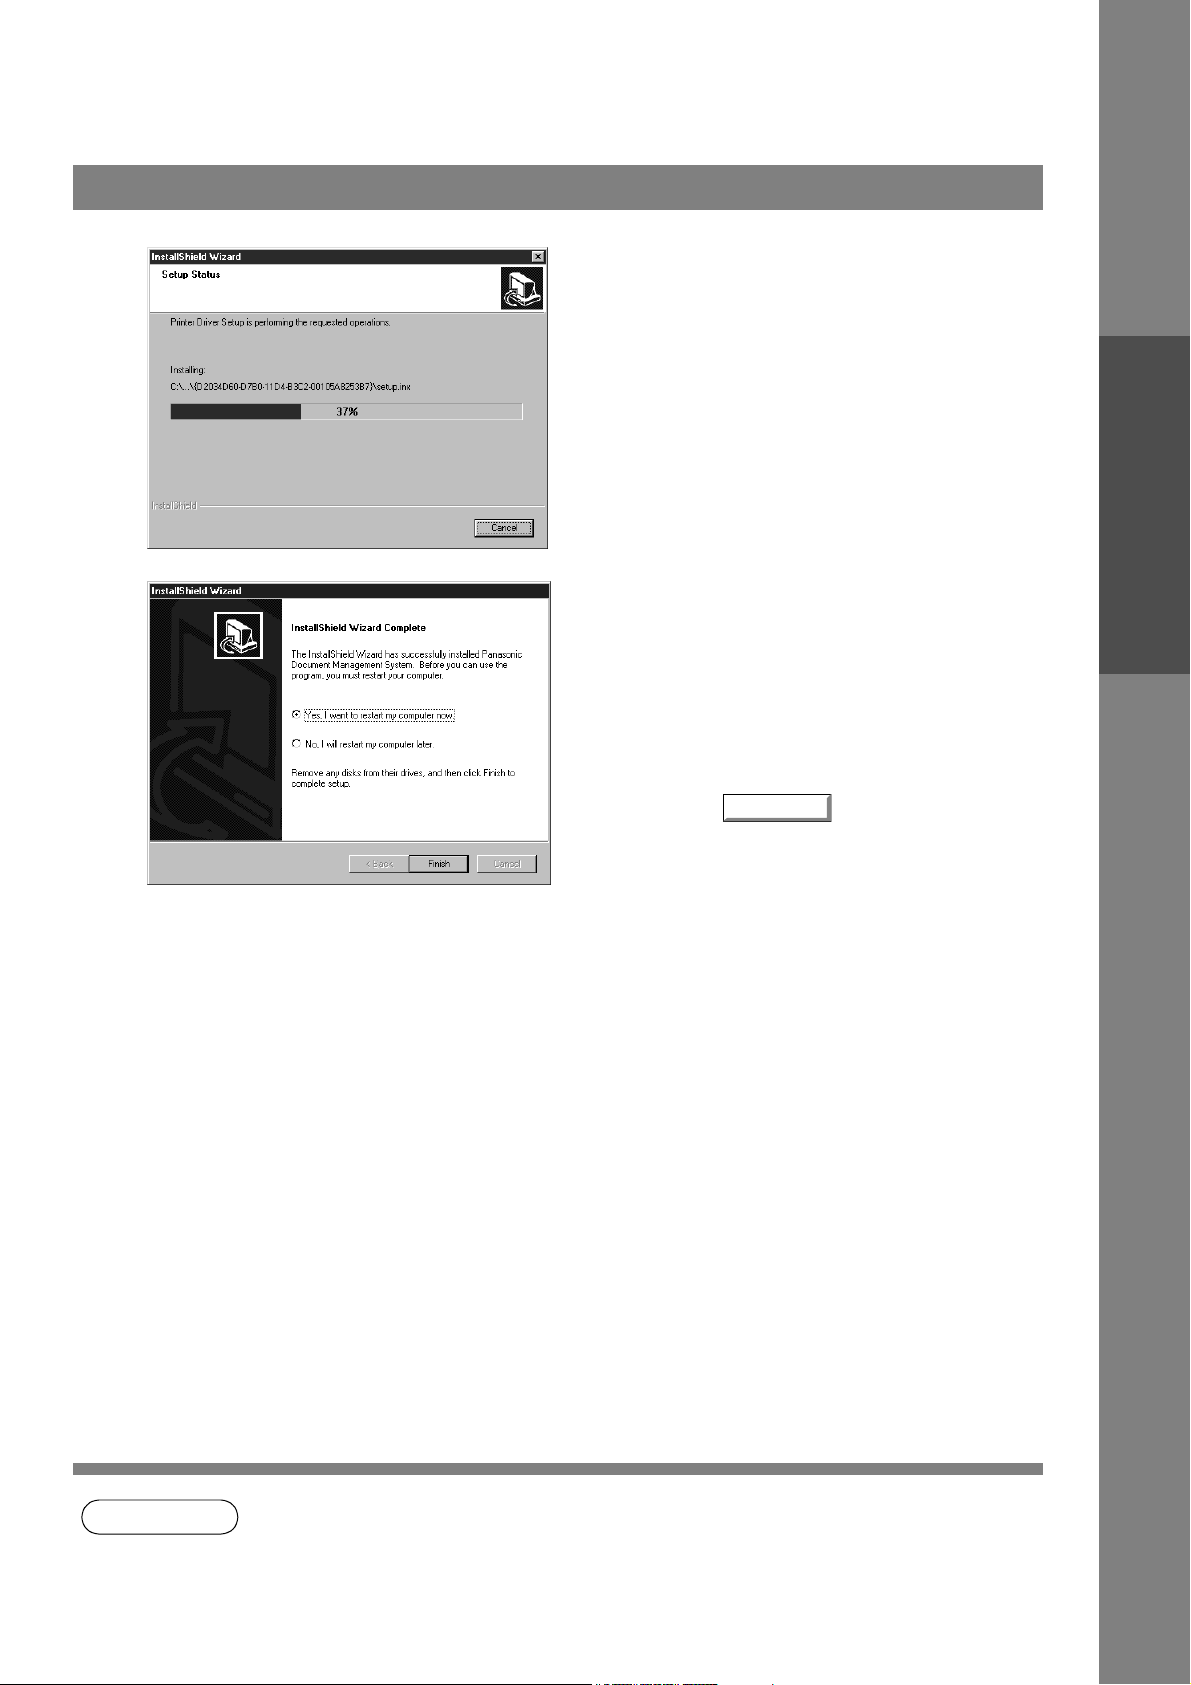
10
The required files are copied.
When the setup process is completed, a
message is displayed prompting you to restart
your computer.
Click the button to restart your
Finish
Printer Section
computer.
The Panasonic/Panafax Printer Driver is installed, and the Panasonic/Panafax Printer icon(s) are added to
the Printer folder.
If you are installing the Printer Driver for network printing, please contact your network administrator for the
IP Address of the machine and proceed to the next section to install the LPR Monitor service after your
computer has rebooted.
NOTE
1. When installing on Windows NT 4.0 and Windows 2000/XP, log onto the computer/network
with an account rights of Administrator.
17
Page 18
Installing the LPR (Line Printer Remote) Monitor
Windows 98/Me
1
2
3
Insert the Panasonic Document Management
System CD-ROM.
Click on the desired language.
Click on the button.
Next
4
5
Click Printer Driver.
The Fax Gateway and Firmware Update Utility is
Note:
only available on U.S.A. and Canada only.
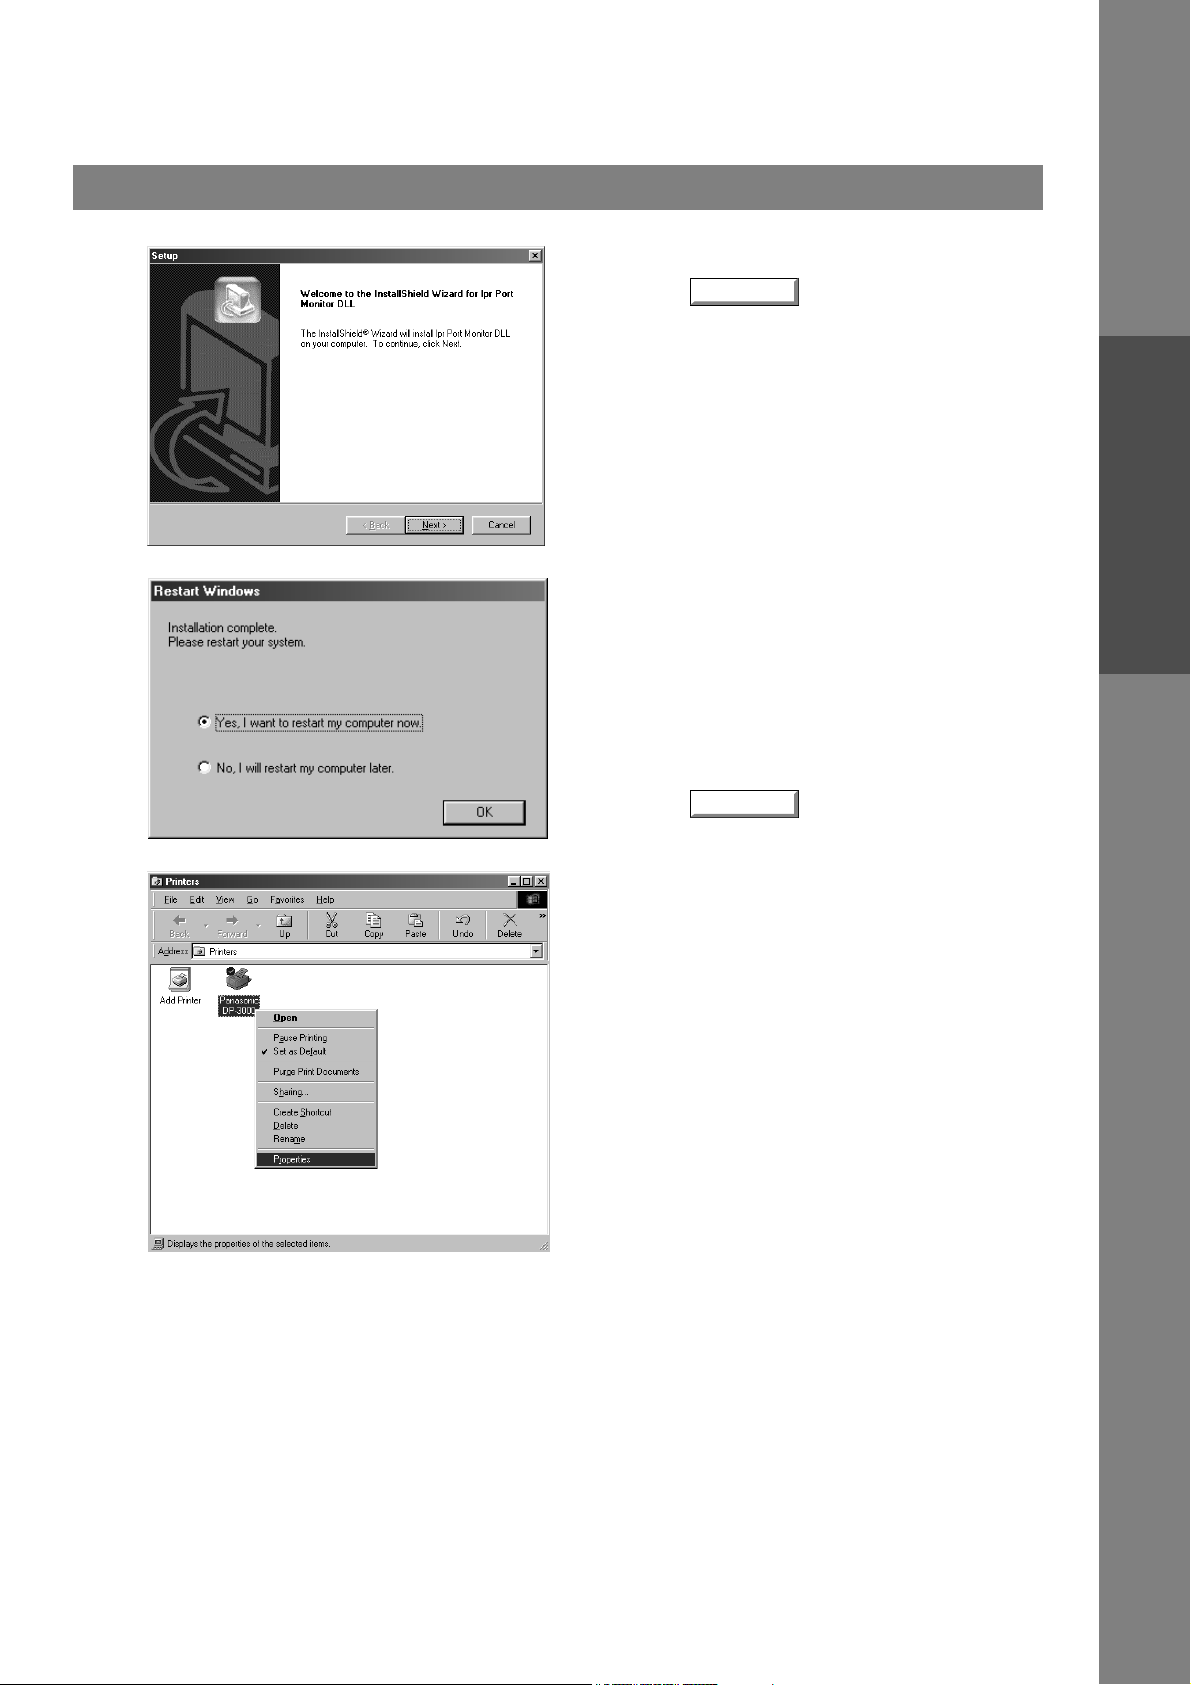
Click Install LPR Monitor.
18
Page 19
Installing the LPR (Line Printer Remote) Monitor
Windows 98/Me
6
7
The Setup dialog box appears.
Click on the button.
The setup program copies the necessary files onto
your Hard Disk.
When the setup process is completed, a message
is displayed prompting you to restart your
computer.
It is recommended that you restart your computer
now so that the LPR Monitor is started.
Click on the button.
Next
OK
Printer Section
8
Continued on the next page...
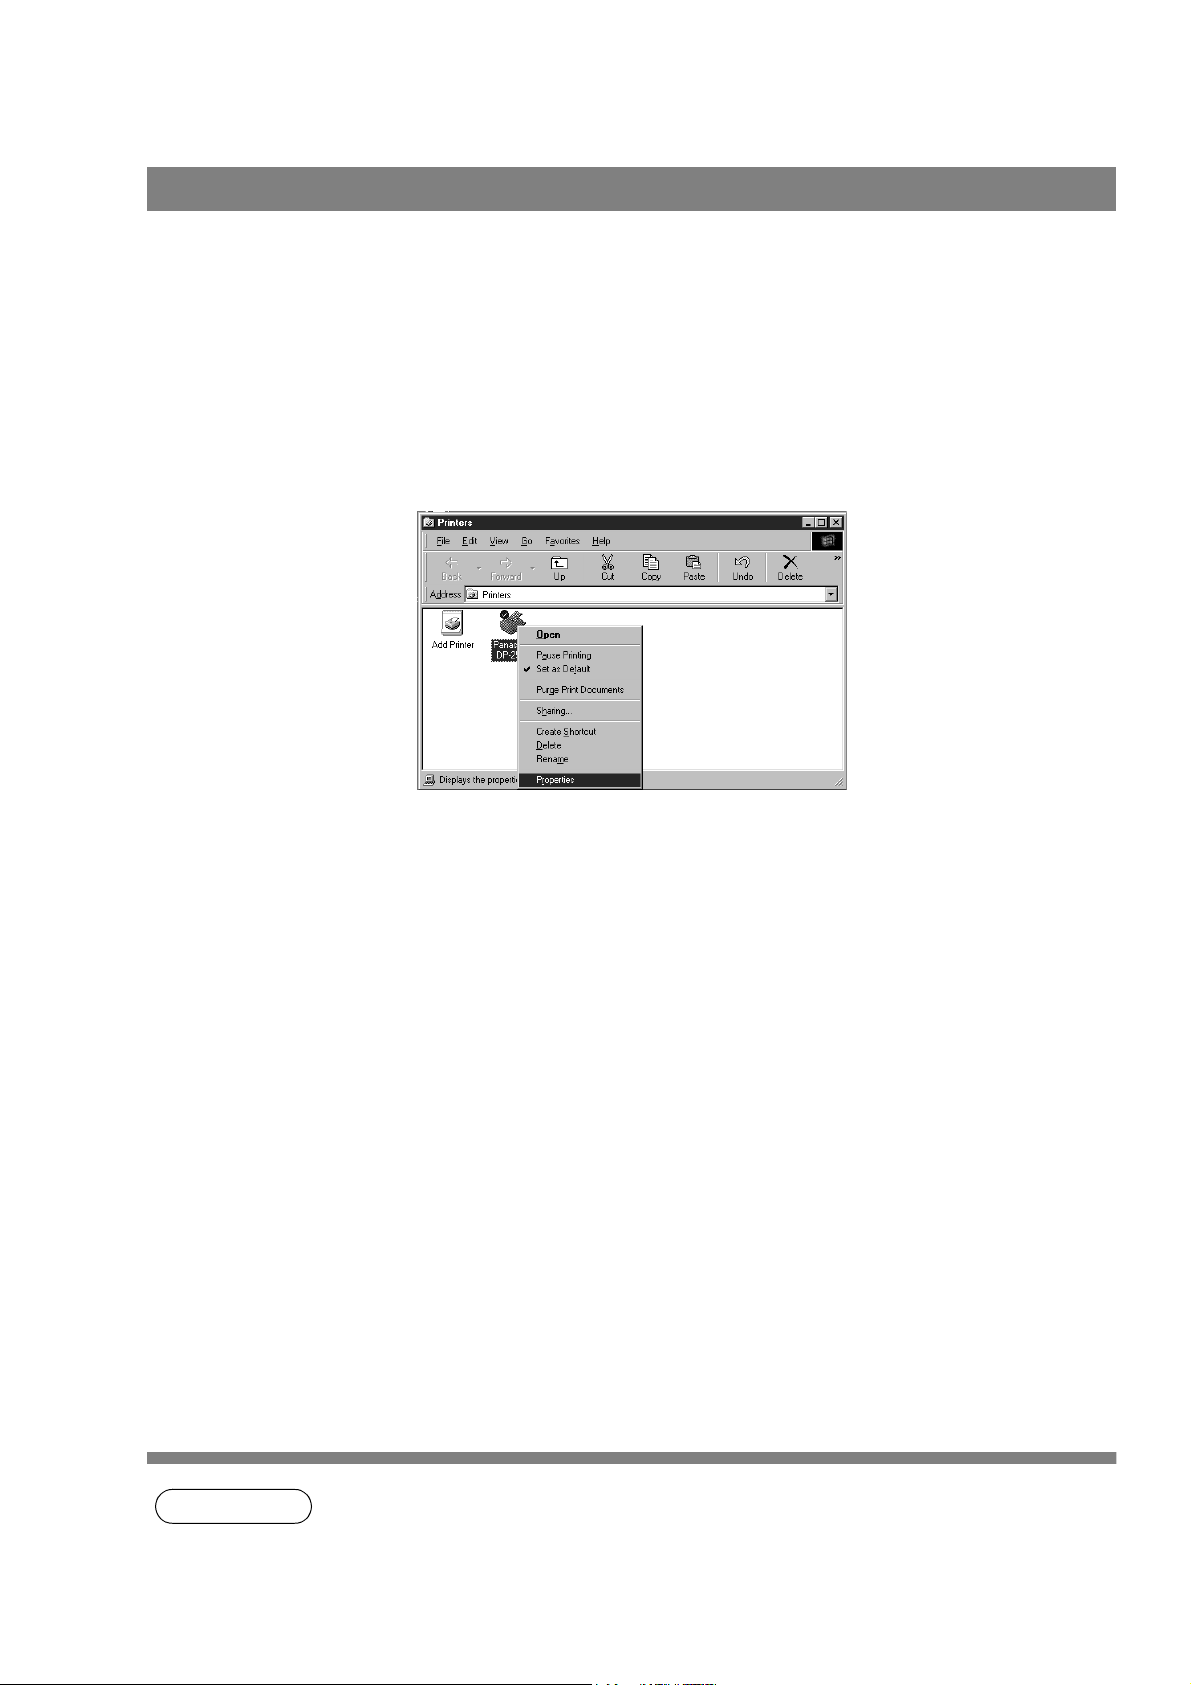
After your computer is rebooted, click the Start
button, point to Settings, and then click Printers.
The Printers folder appears.
Right-click on your desired printer (Ex. Panasonic
DP-3000) and select Properties from the pop-up
menu.
19
Page 20
Installing the LPR (Line Printer Remote) Monitor
Windows 98/Me
9
10
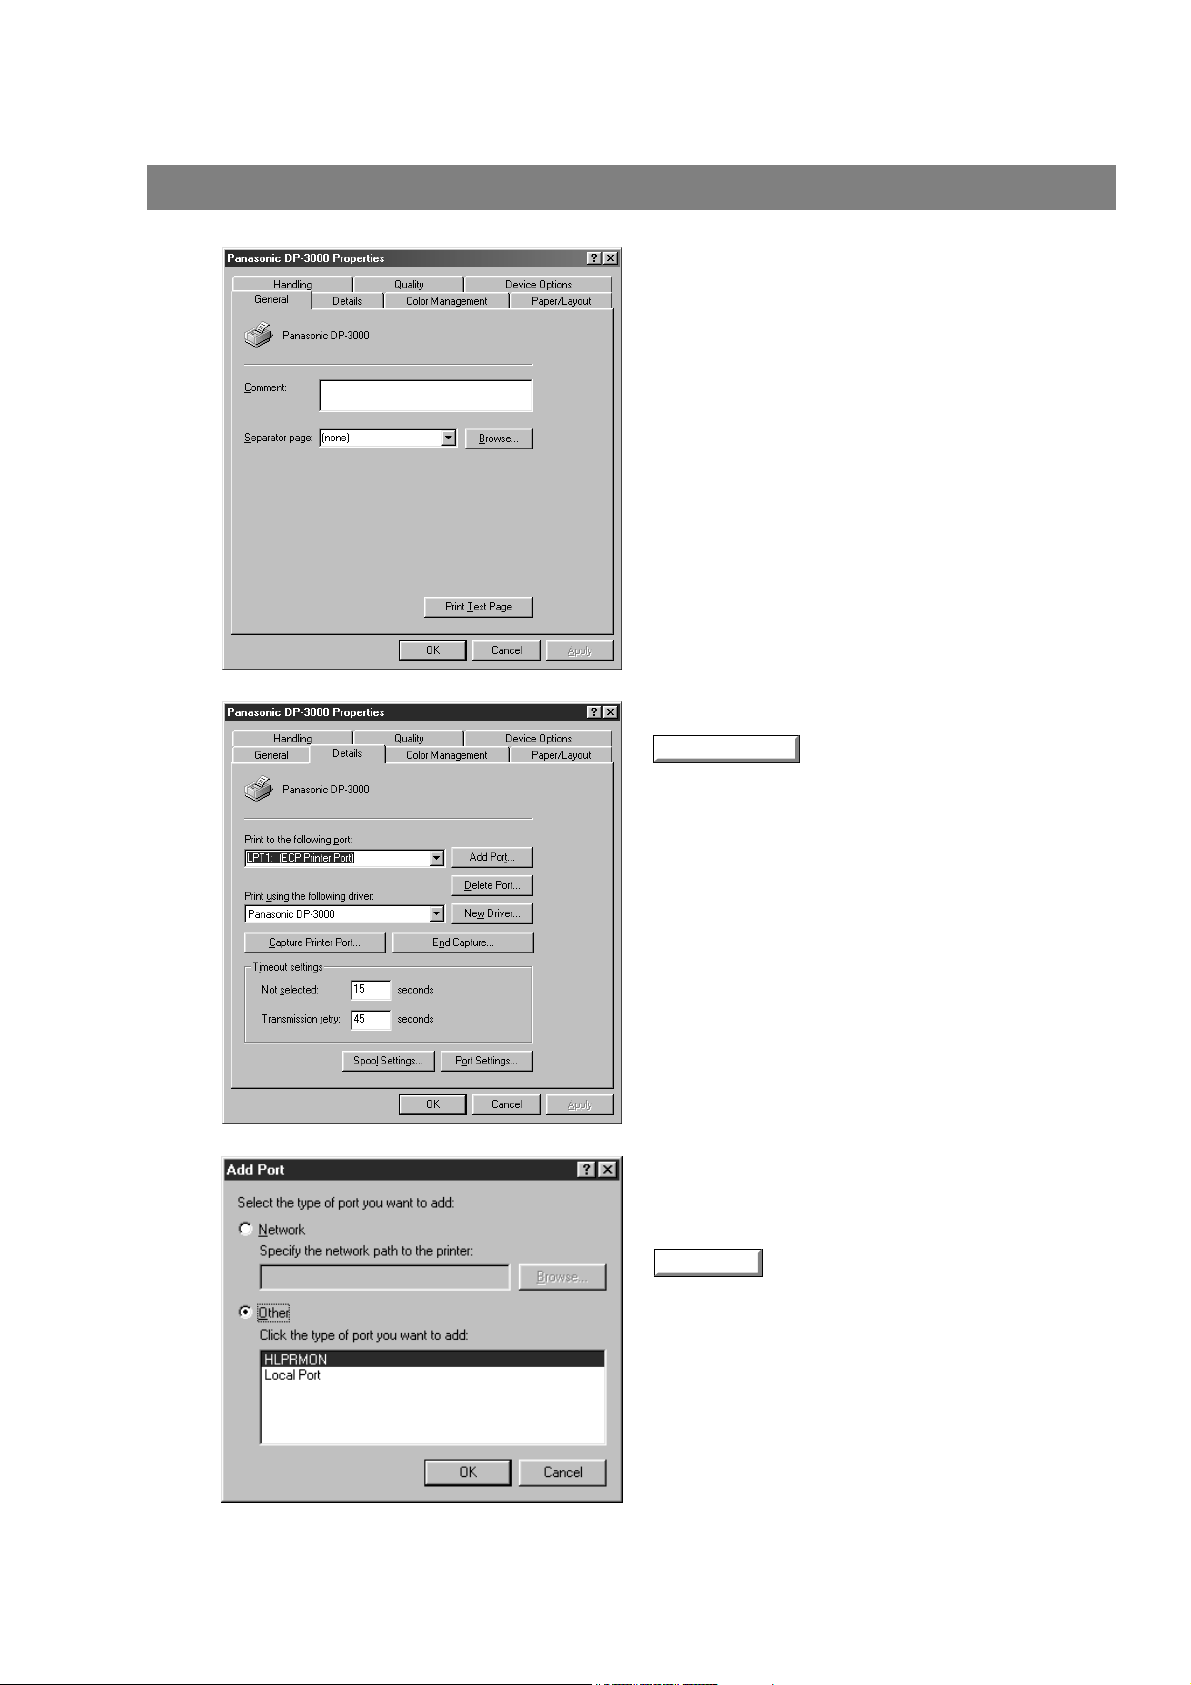
The printer properties dialog box appears.
The following step is to Register the LPR Port for
network printing.
Before proceeding, ensure that the Printer is
installed, connected to the Network, is turned ON
and operating properly.
Select the Details tab and click on the
Add Port...
button.
20
11
The Add Port dialog box appears. Click the Other
radio button, and select HLPRMON from "Click the
type of port you want to add:" and click on the
OK
button.
Page 21
Installing the LPR (Line Printer Remote) Monitor
Windows 98/Me
12
13
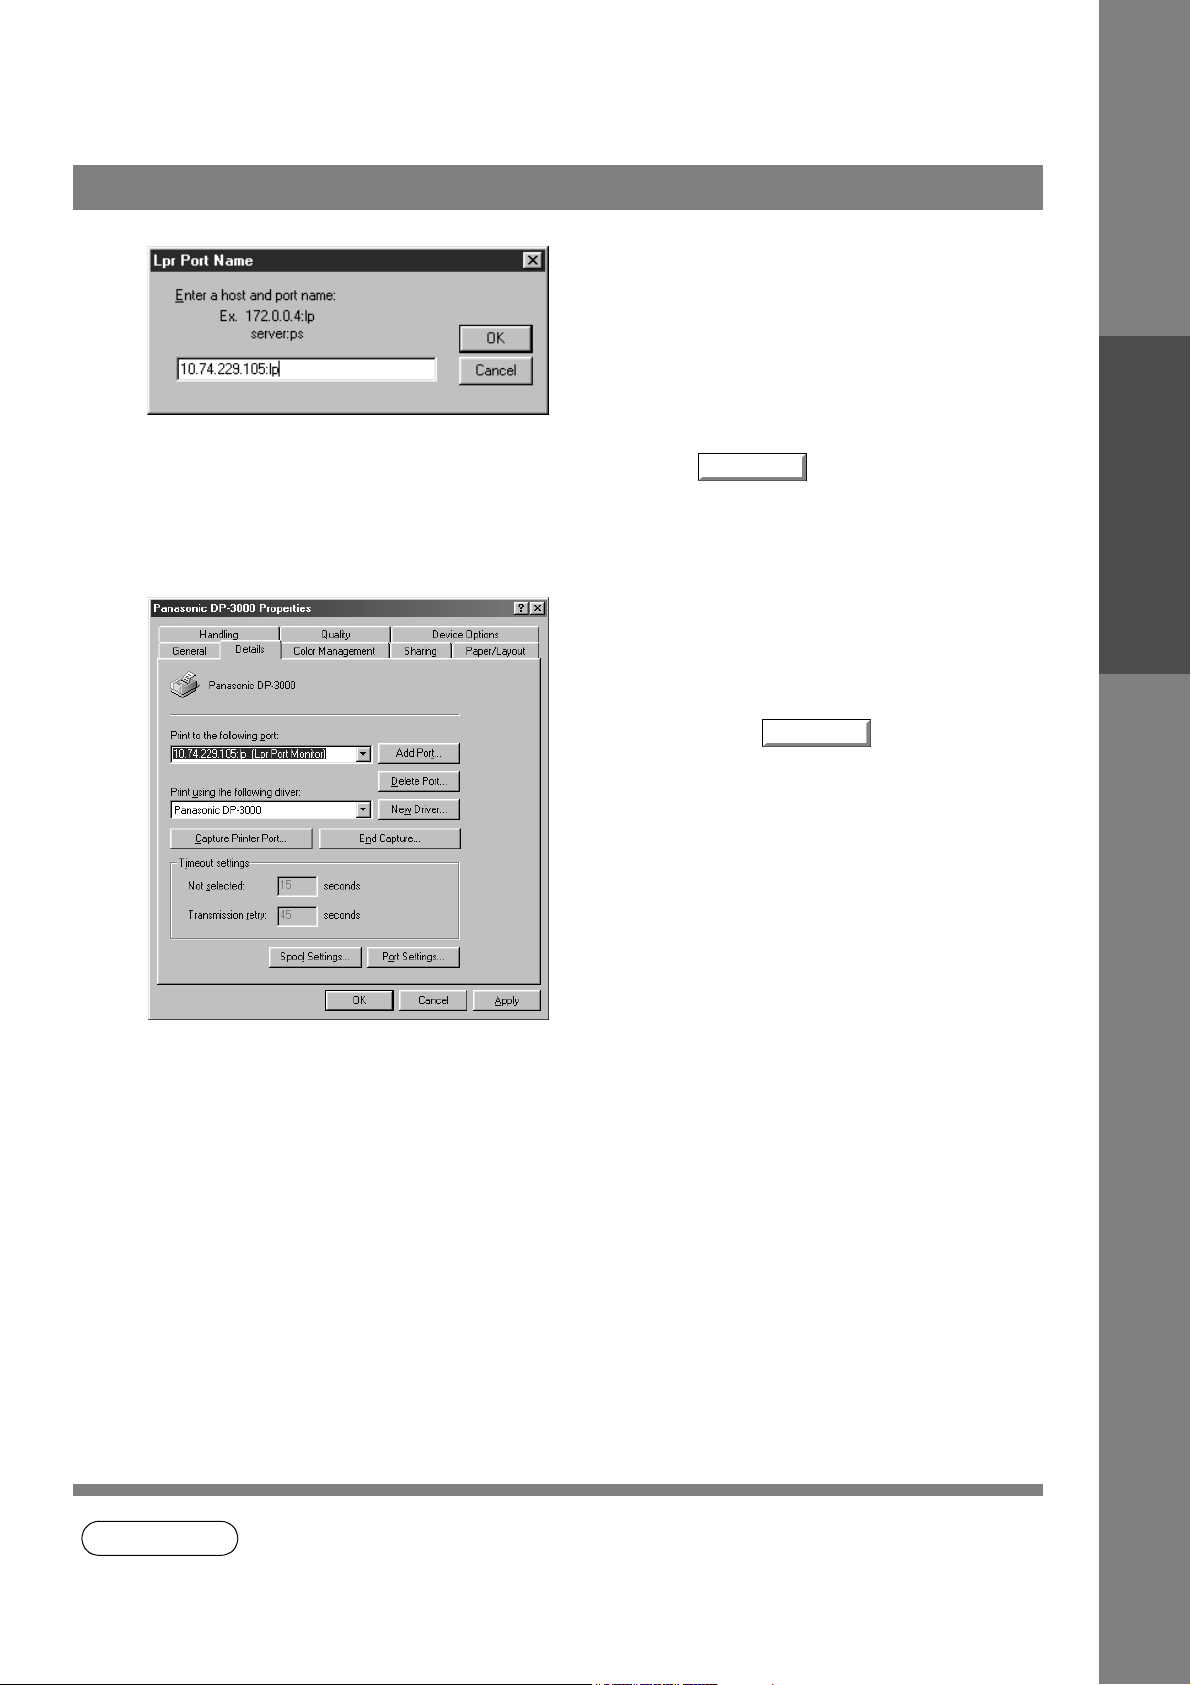
The LPR Port Name dialog box appears.
Type the IP Address of the machine and "lp"as the
queue name separated by a ":"
Ex: 10.74.229.105:lp
Click on the button. If an error occurs
because the queue name was already used for the
same IP Address, select a different unique name
such as "lpr".
The screen reverts to the Printer’s Properties.
Check that the "Print to the following port:" was
changed as entered, and click on the Apply button
first and then on the button.
The printer properties dialog box is closed and you
have now configured the printer as a network printer.
OK
OK
Printer Section
NOTE
1. The LPR Monitor is necessary to install your PC if printing a data via LAN.
21
Page 22
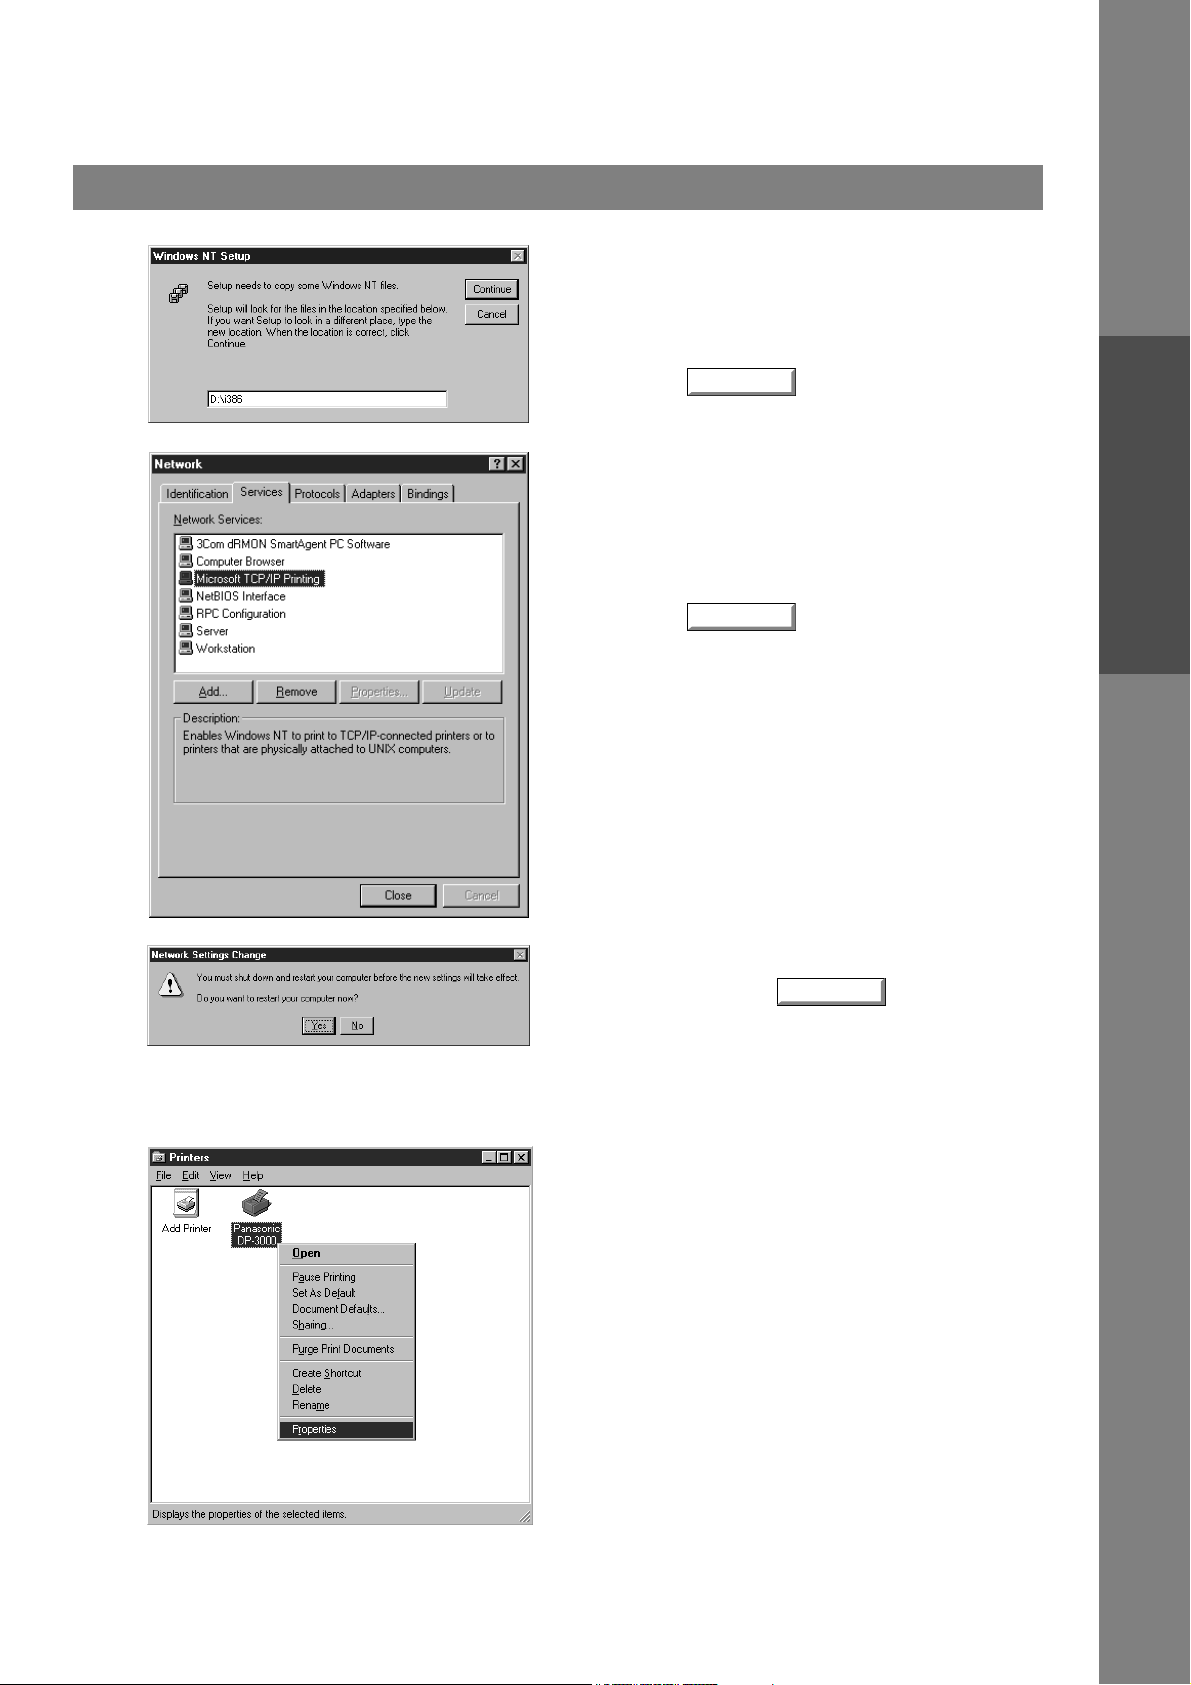
Installing the LPR (Line Printer Remote) Monitor
Windows NT 4.0
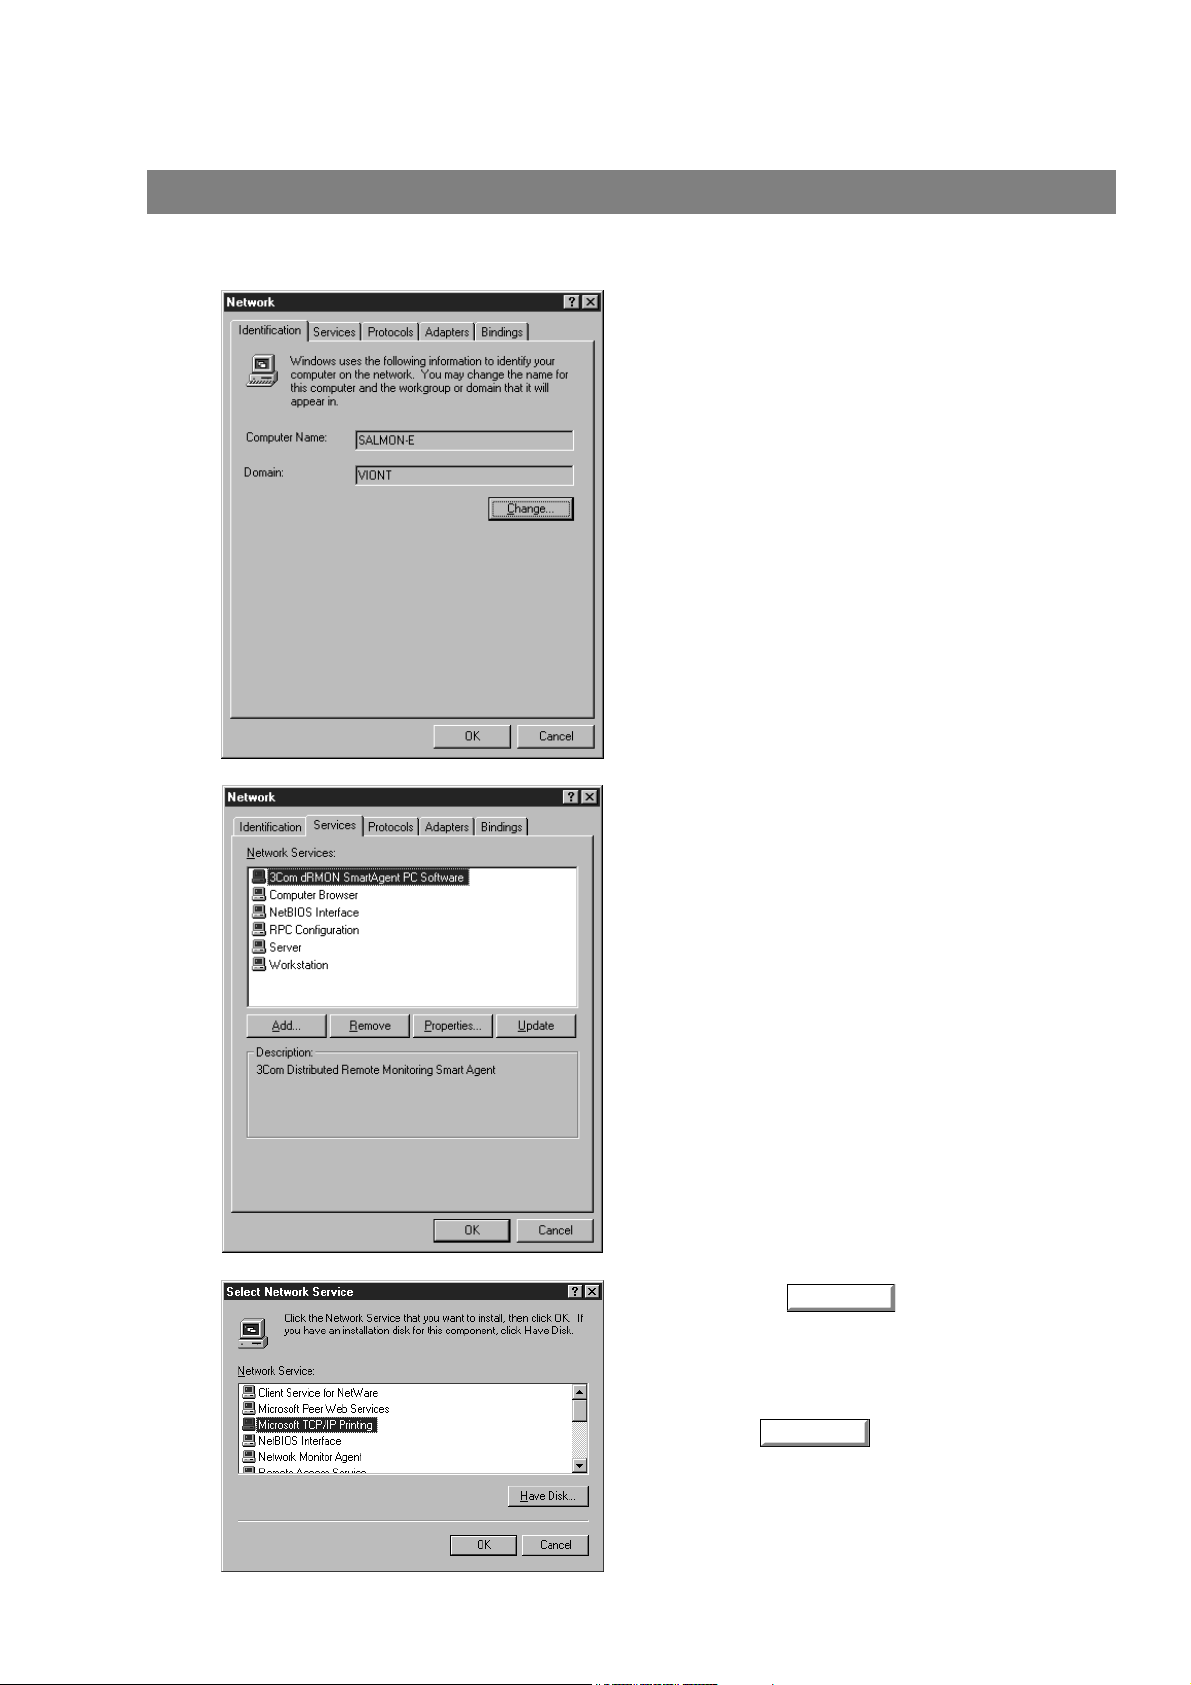
Log in using an account with the administrator's right.
1
2
Click on the Start button, point to Settings, and click
Control Panel.
The Control Panel window appears.
Double-click on the Network applet.
The Network dialog box appears.
Click on the Services tab.
Verify whether the LPR Service is already installed.
(Indicated by Microsoft TCP/IP Printing shown in the
Network Services list.)
3
If it is already installed, skip over to Step 7. Otherwise
continue installing the LPR Service.
Click on the button to display the
Select Network Service dialog box, then select
Microsoft TCP/IP Printing.
Click on the button.
Add...
OK
22
Page 23
Installing the LPR (Line Printer Remote) Monitor
Windows NT 4.0
4
5
The Windows NT Setup dialog box appears.
Insert the Windows NT 4.0 CD-ROM, and type
D:\i386 (where "D:" is your CD-ROM drive).
Click on the button.
After the files are copied into your Hard Drive, the
display returns to the Network dialog box. Confirm
that the Microsoft TCP/IP Printing service was added
to Network Services list.
Click on the button.
Note:
Continue
Close
Delete and Reinstall the Microsoft TCP/IP
Printing if an error occurs, and the Microsoft
TCP/IP Printing is displayed in the Network
Services list, but, the OK button does not
change into a Close button.
Printer Section
6
7
The Network Settings Change dialog box is
displayed, click on the button to confirm
whether to restart your computer now.
You have now completed the LPR Service
installation.
After your computer is rebooted, click the Start
button, point to Settings, and then click Printers.
The Printers folder appears.
Right-click on your desired printer (Ex. Panasonic
DP-3000) and select Properties from the pop-up
menu.
Yes
Continued on the next page...
23
Page 24
Installing the LPR (Line Printer Remote) Monitor
Windows NT 4.0
8
9
The following step is to Register the LPR Port for
network printing.
Before proceeding, ensure that the Printer is
installed, connected to the Network, is turned ON
and operating properly.
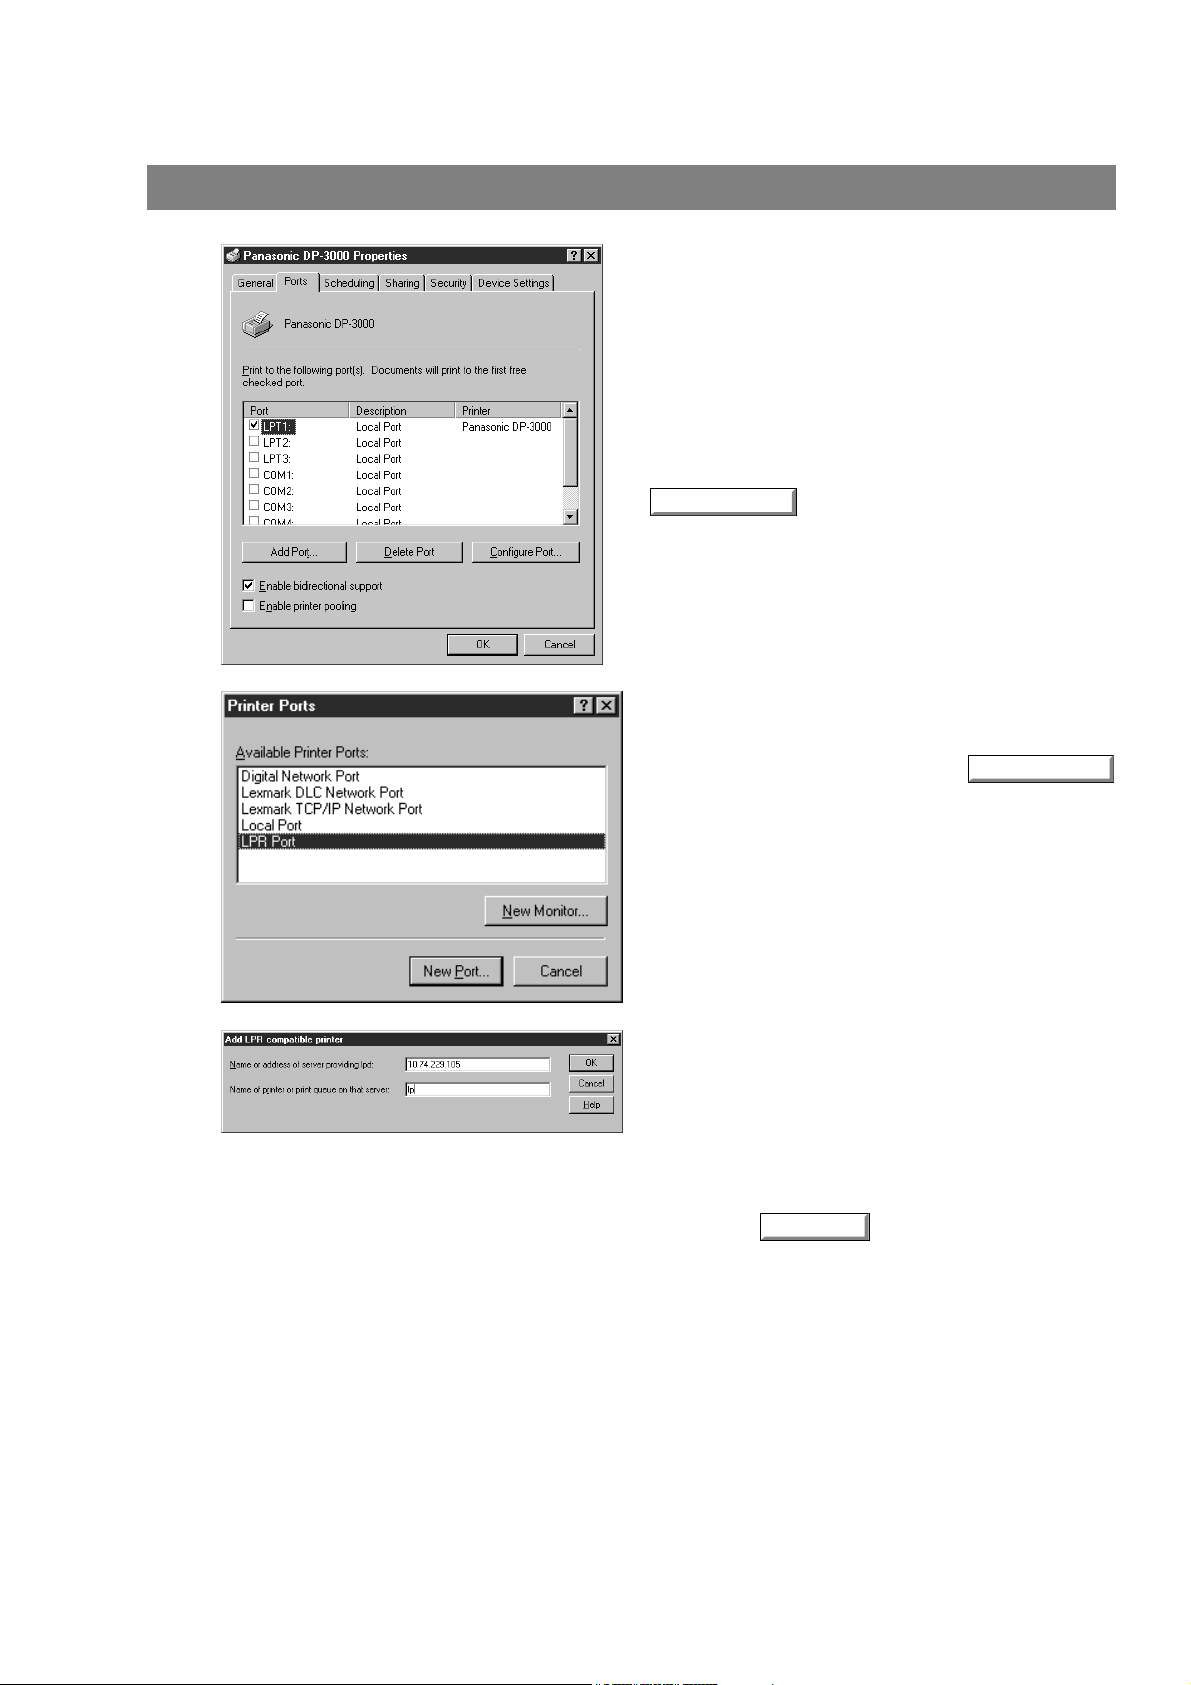
Select the Ports Tab and click on the
Add Port...
The Printer Ports dialog box appears.
Select LPR Port and click the
button.
button.
New Port
10
The Add LPR compatible printer dialog box
appears.
Enter the IP Address of the Printer in the upper field,
and "lp" for the print queue name in the lower field.
Click on the button.
(Please wait while the wizard verifies the IP Address
and connectivity to the Network)
OK
24
Page 25
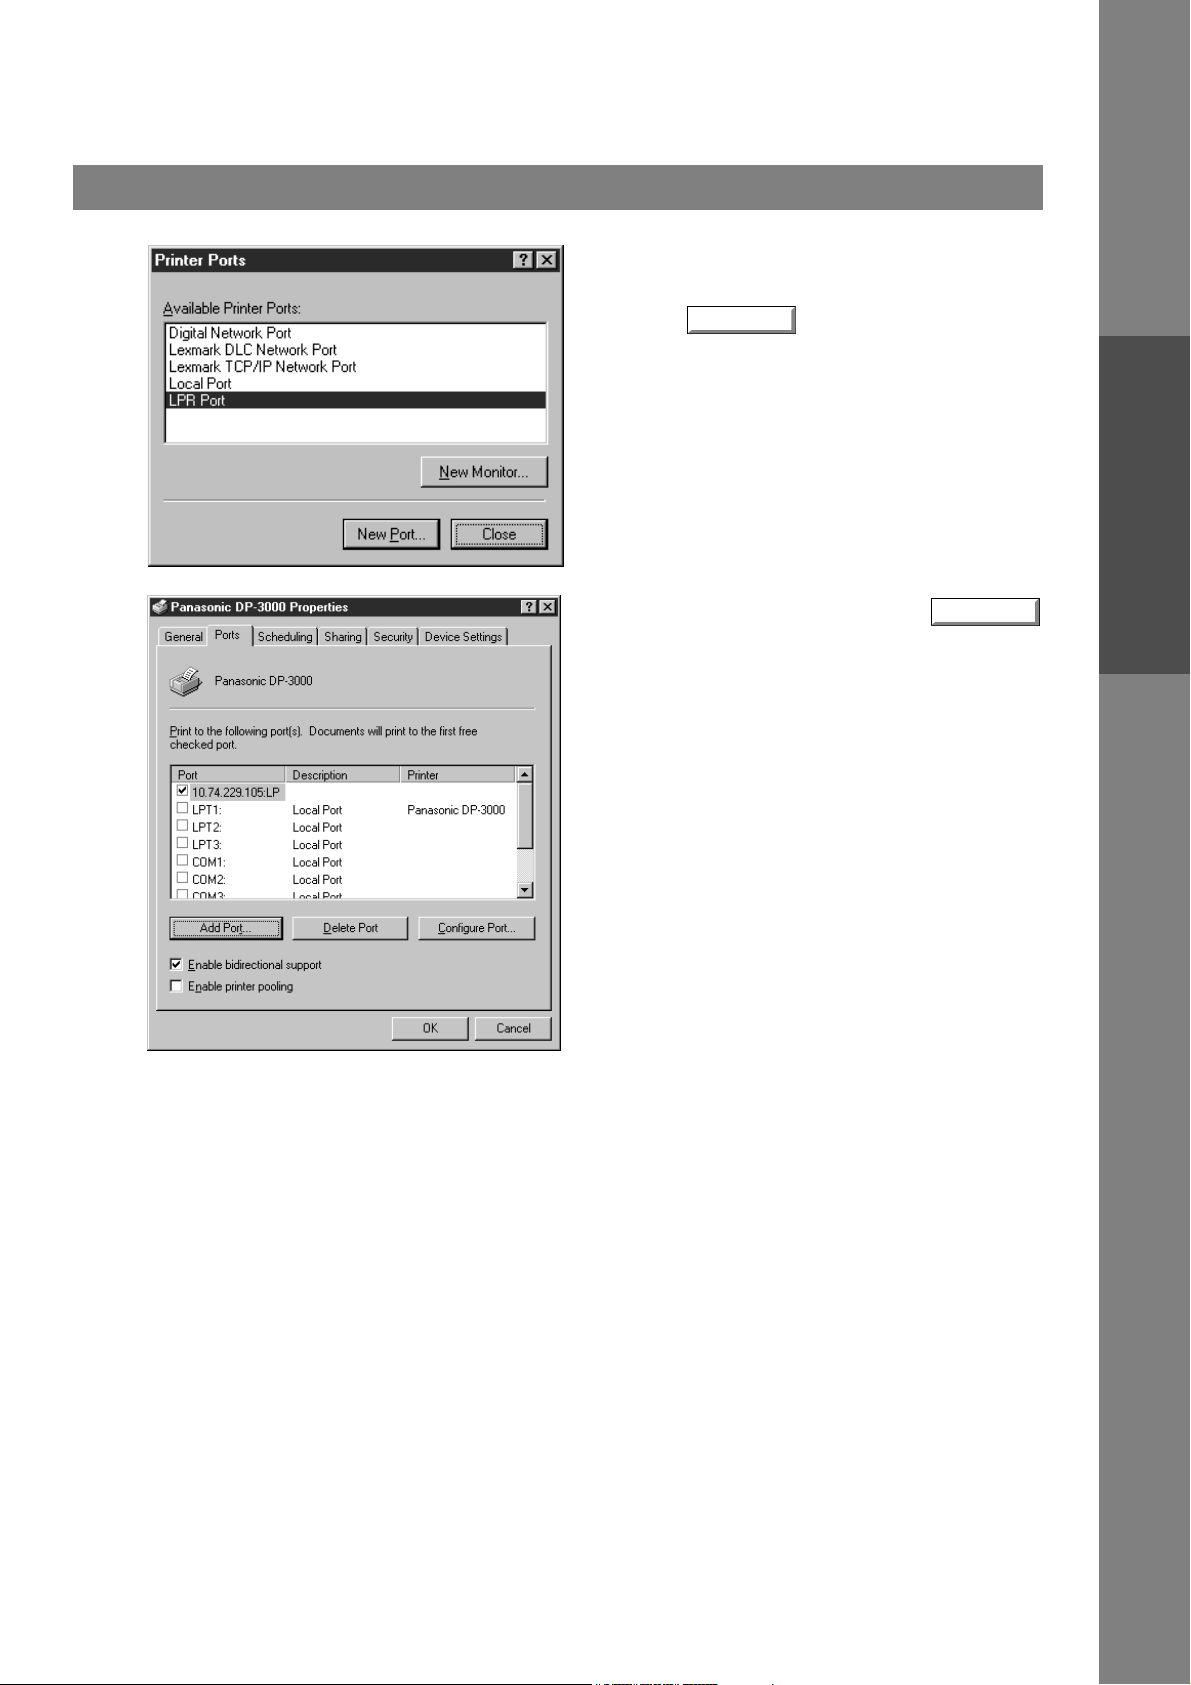
Installing the LPR (Line Printer Remote) Monitor
Windows NT 4.0
11
12
The Printer Ports dialog box appears.
Click on the button.
Select the printer port and click the
button.
The printer properties dialog box is closed and you
have now configured the printer as a network printer.
Close
OK
Printer Section
25
Page 26
Installing the LPR (Line Printer Remote) Monitor
Windows 2000/XP
Log in using an account with the administrator's right.
1
2
Open the Printers folder.
Right-click on your desired printer (Ex.
Panasonic DP-3000) and select Properties
from the pop-up menu.
The printer properties dialog box appears.
Select the Ports Tab and click on the
Add Port...
button.
26
Page 27
Installing the LPR (Line Printer Remote) Monitor
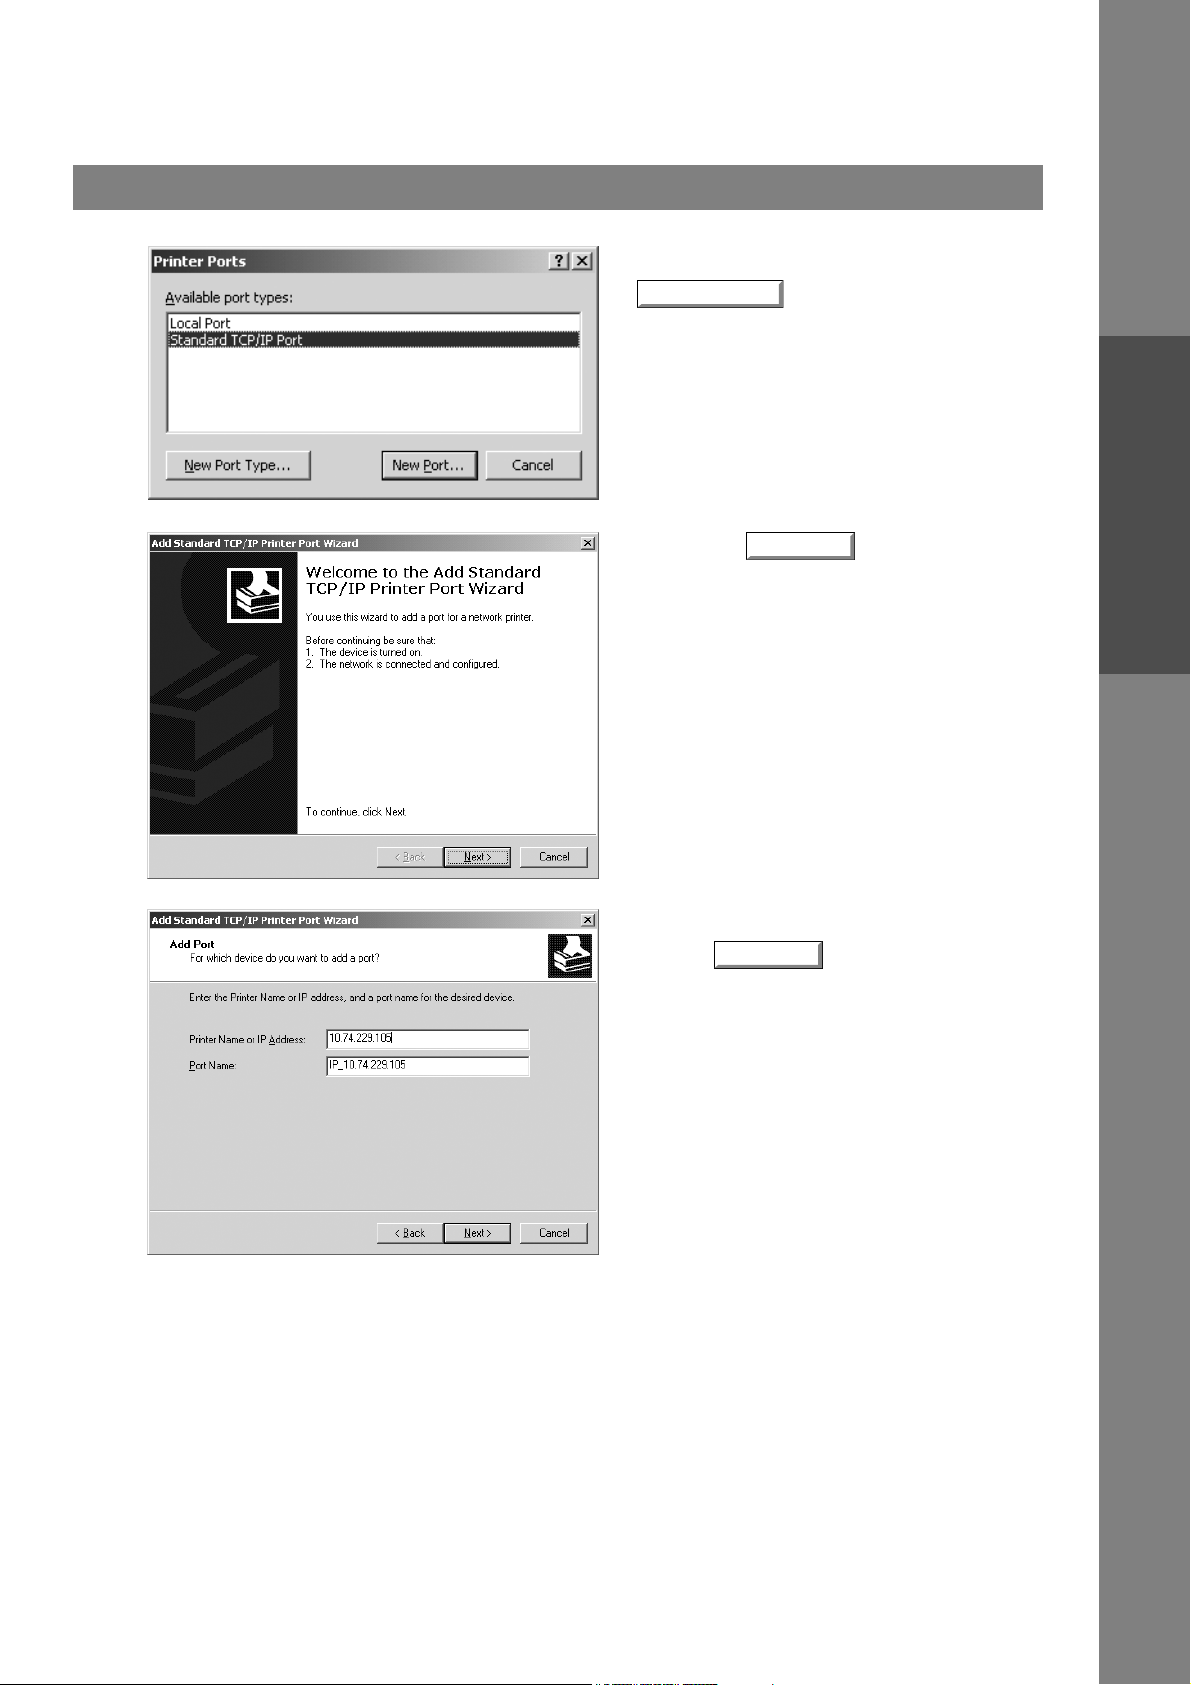
Windows 2000/XP
3
4
Select Standard TCP/IP Port and click the
New Port ...
Click on the button.
button.
Next
Printer Section
5
Continued on the next page...
Enter the IP Address and the Port Name and
click the button.
Note:
Next
The Port Name is automatically
entered by Windows 2000/XP. You
may change this as required.
27
Page 28
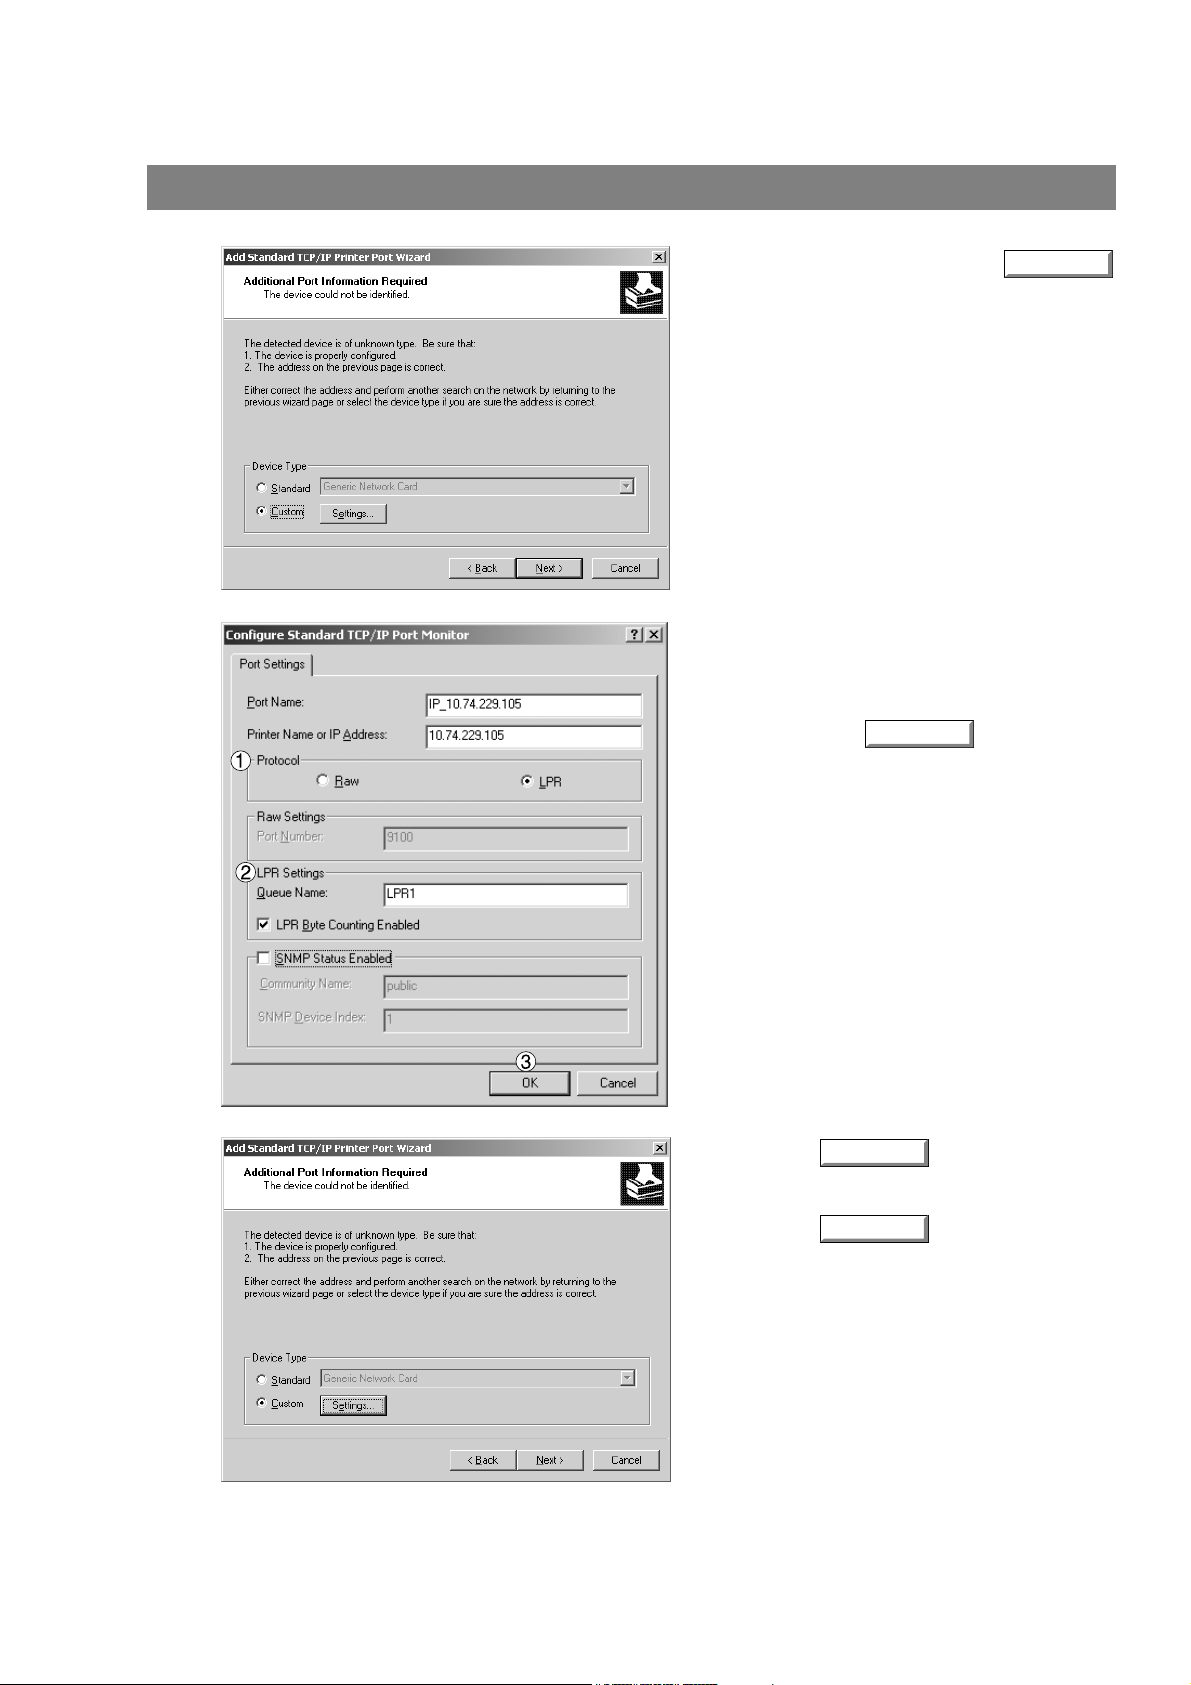
Installing the LPR (Line Printer Remote) Monitor
Windows 2000/XP
6
7
Select Custom and click the
button.
1. Under the Protocol, select LPR.
2. Under the LPR Settings, enter the
Queue Name (Ex. LPR1) and check the
LPR Byte Counting Enabled.
3. Click on the button.
OK
Settings...
28
8
Click on the button.
Click on the button.
The printer properties dialog box is closed and
you have now configured the printer as a
network printer.
Next
OK
Page 29
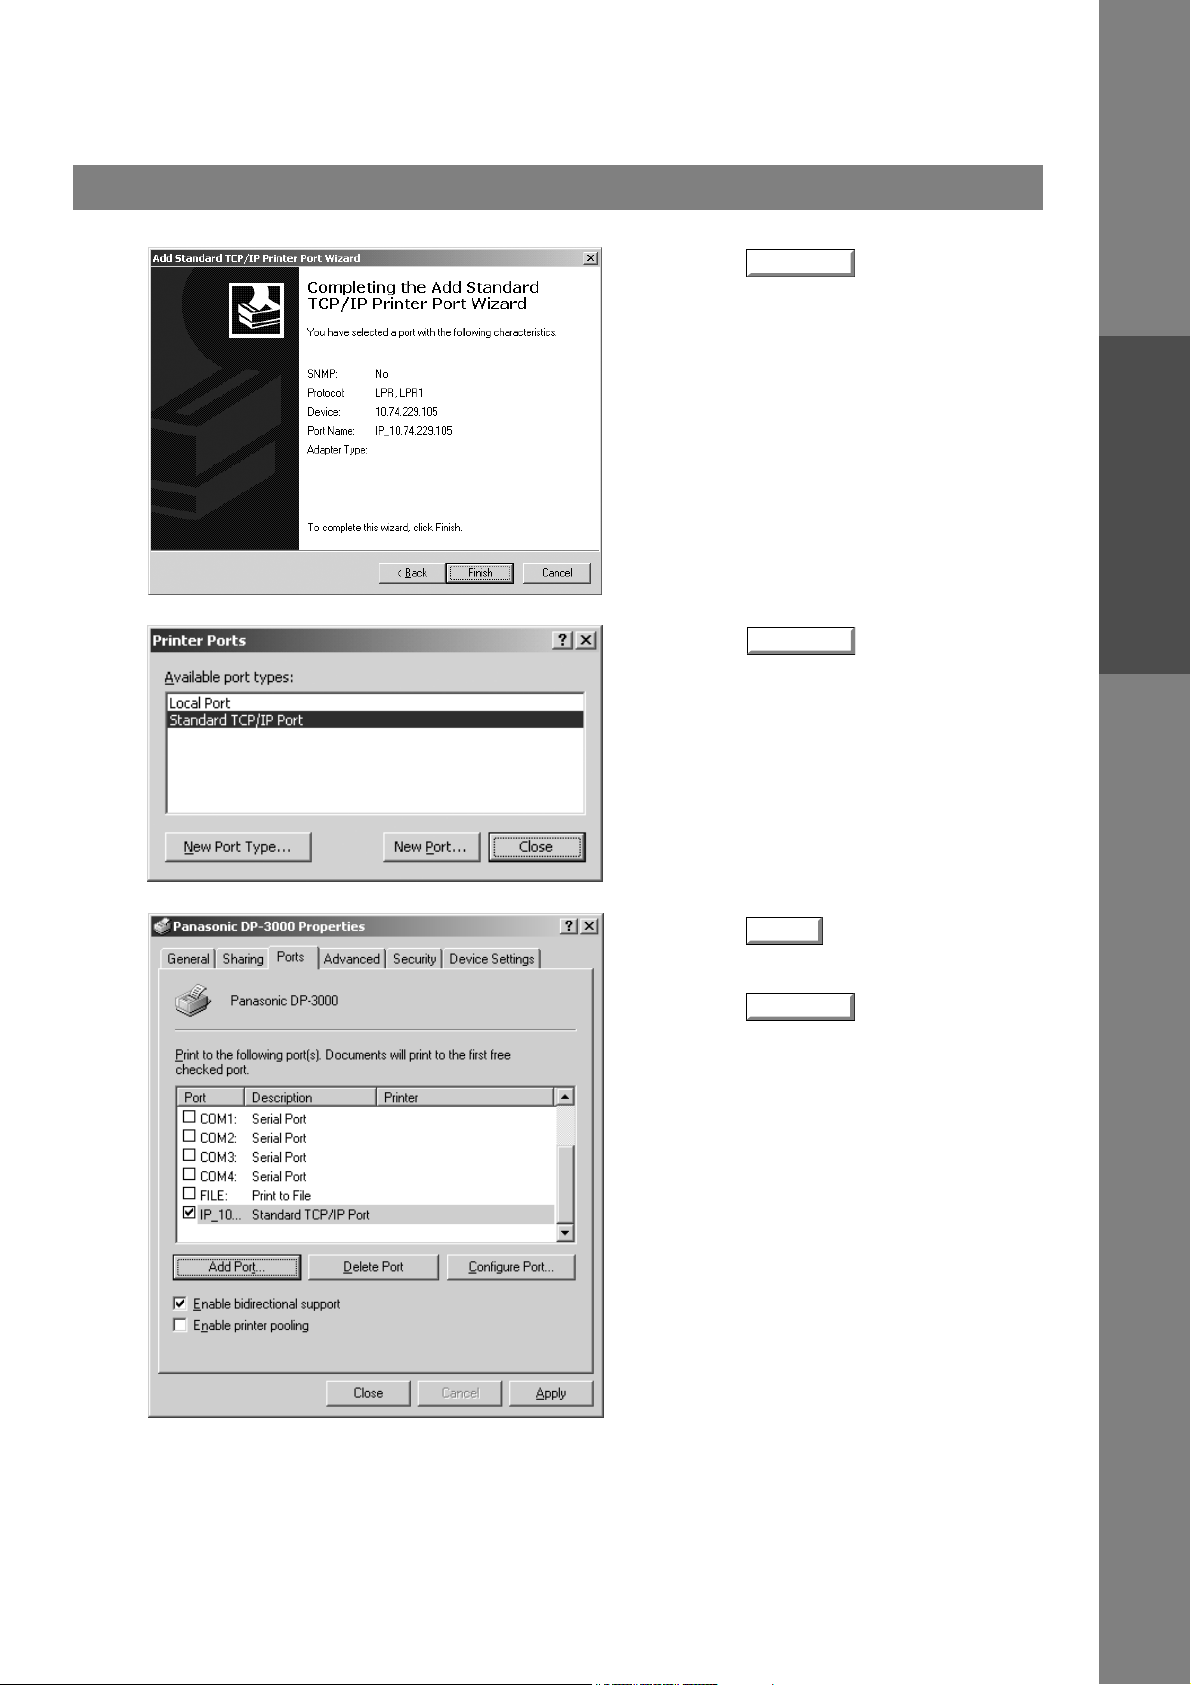
Installing the LPR (Line Printer Remote) Monitor
Windows 2000/XP
9
10
Click on the button.
Click on the button.
Finish
Close
Printer Section
11
Click on the button.
Click on the button.
The printer properties dialog box is closed and
you have now configured the printer as a
network printer.
Apply
OK
29
Page 30
Configuring the Printer Driver Settings
Windows 98/Me
To change the printer settings, open the dialog box for the printer properties by the following steps.
Click the Start button, point to Settings, and then click
1
2
Printers.
Right-click the desired printer icon in the printers folder,
and select Properties in the pop-up menu.
The printer properties dialog box appears.
30
NOTE
1. Upon printing, changing the properties of Paper/Layout, Handling, Quality and Device
Options is allowed by clicking Properties in the print dialog box of an application.
2. Sharing Tab in property dialog box is not displayed unless printer sharing has been specified.
Page 31

Windows 98/Me
General Tab
Configuring the Printer Driver Settings
Printer Section
1. Comment
Enter comments to the properties, if any.
If another user sets up this printer on his or her computer when sharing the printer, the comment specified
here will also appear on that computer. However, the comment displayed for an already set-up user will
remain unchanged even if the comment is modified later.
2. Separator page
This feature is not available on your machine.
3. button
Print Test Page
Prints a test page. This allows the user to verify if the printer is installed properly.
31
Page 32

Configuring the Printer Driver Settings
Windows 98/Me
Details Tab
1. Print to the following port
Displays either the port to which the printer is connected or the path to the network printer.
To change the printing destination, either select the printing destination port from the list or enter the
network path here.
2. Print using the following driver
Displays the type of the printer driver. Specify the printer being used or a printer model which can be
emulated with the printer being used.
3. / button
Capture Printer Port...
Assigns a port to the network drive or cancels a port assigned to the network drive.
4. Timeout settings - Not selected
Specify the amount of time (in seconds) allowed to elapse before the printer becomes online. If the printer
is not online within this duration, an error message will be displayed.
5. Timeout settings - Transmission retry
Specify the amount of time (in seconds) allowed to elapse before the printer is ready for printing. If the
printer is not ready for printing within this duration, an error message will be displayed.
Increase this value if a timeout error occurs when printing a large document.
6. / button
Add Port...
Adds/deletes a new port or a new network path.
Delete Port...
End Capture...
32
7. button
New Driver...
Updates or modifies the printer driver.
Page 33

Configuring the Printer Driver Settings
Windows 98/Me
Spool Settings...
8. button
Specify the method of sending (spool) documents from the program to the printer.
• Spool Data Type
Select spool data type (EMF format or RAW format). Specifying RAW format results in longer time
before placing an application operational after printing on the application.
Note: Spooling by EMF format (metafile compression) may cause the following problems on some
application software.
1) Printing result is different from the screen display.
2) Printing requires excessive time.
• Enable bidirectional support
Be sure to check the check box for "Enable bidirectional support" when installing the status monitor
(See page 126). Otherwise, printing may not function properly.
9. button
Port Settings...
Modifies printer port settings.
Printer Section
33
Page 34

Configuring the Printer Driver Settings
Windows 98/Me
Sharing Tab
1. Not Shared/Shared As
Select whether to display or use this printer with other computers.
2. Share Name
Specify the name of the shared printer. The displayed name can be used as it is or a new name may be
entered. The name specified at this time will be displayed when other users view information about the
printer on the network.
3. Comment
You can enter comment regarding a shared printer (such as the type of printer and the location where it is
installed). When other users view information about the printer on the network, the comment specified
here will be displayed.
4. Password
Specify a password when other users will connect to this printer.
Leave the box blank in order not to use any password.
34
NOTE
1. Sharing Tab in property dialog box is not displayed unless printer sharing has been specified.
Page 35

Windows 98/Me
Paper/Layout Tab
Configuring the Printer Driver Settings
Printer Section
1. Paper Size
Select a document size.
2. Paper Source
Specify where the paper you want to use is located in the machine. If you choose Auto Selection, the
printer driver will automatically select an appropriate tray according to the Paper Size.
3. Orientation
Select the print orientation (Portrait/Landscape).
4. Copies (1-99)
Specify the number of copies to be printed. If the number of copies to be printed can be specified within
the application, indicate one copy here and specify the number of copies in the Print dialog box of the
application.
5. Zoom (50-200%)
Specify an enlargement or reduction percentage when printing documents. If enlargement/reduction can
be set within the application, indicate 100% here and specify the enlargement/reduction percentage in
the Print dialog box of the application.
6. N in 1
For printing two or more pages on one sheet, specify a printing method.
Layout is selected by combining with "Orientation." Each layout is displayed with the icon.
• 2 in 1: Print 2 pages of documents zoomed out by 65 or 71% on one sheet.
• 4 in 1: Print 4 pages of documents zoomed out by 50% on one sheet.
7. button
Restore Defaults
Return all items in Paper/Layout Tab to standard settings (default).
35
Page 36

Configuring the Printer Driver Settings
Windows 98/Me
Handling Tab
1. Sorter
Select whether to Stack or Sort when printing multiple copies.
2. Printing on both sides (Duplex) (For DP-150FX/2000/2010E/2500/3000)
Select duplex printing for printing on both sides.
Note 1) Duplex Printing is allowed only when the Dual-Path Exit Guide Unit, Paper Transport Unit and
Automatic Duplex Unit (DA-FK200/FK210/MD200) are mounted.
2) Check [Duplex Unit] check box in Device Options Tab.
3. Flipping Direction
Select binding side (Long Edge/Short Edge) for duplex printing.
4. Binding Margin (For DP-2000/2010E/2500/3000)
Select the binding margin upon duplex printing.
The width of the binding margin is specified on the main unit.
5. Output Tray (For DP-2000/2500/3000)
Specify the output destination (Auto Selection, Inner Tray 1, Inner Tray 2 or Outer Tray).
Note 1) Output Tray selection is allowed only with Dual-Path Exit Guide Unit, Paper Transport Unit, Exit
Tray (Outer) or 1-Bin Finisher (DA-FK200/FK210/XT200/FS200) is installed.
2) Check [Inner Tray], [Finisher / Outer Tray] check boxes in Device Options Tab.
36
Page 37

Configuring the Printer Driver Settings
Windows 98/Me
6. Staple (For DP-2000/2500/3000)
Specifying staple printing is allowed if the output bin is set to outer.
Note 1) Staple printing is allowed only with Electronic Sorting Board (DA-ES200 : For DP-2000 only) and
1-Bin Finisher (DA-FS200) mounted.
2) Select "Sort" in the sort menu.
3) Paper is stapled at the top left or at the top right. (See table below.)
Document orientation Paper orientation Stapling position
Top left
Letter
A4
Letter
A4
Letter
A4
Letter/A4
Ledger
Legal
A3
FLS
B4
Ledger/
Legal/
A3/FLS/B4
Letter/A4
Letter
A4
Letter/A4
Ledger/
Legal/
A3/FLS/B4
Top right
Letter
A4
Note) Stapling on Invoice/B5
sheet is not allowed.
Top right
Letter/A4
Top left
Letter/A4
Note) Stapling on Invoice/B5
sheet is not allowed.
Ledger
Legal
A3
FLS
B4
Note) Stapling on Invoice/B5 sheet is
not allowed.
Top left
Ledger/
Top right
Legal/
A3/FLS/B4
Note) Stapling on Invoice/B5 sheet is
not allowed.
Printer Section
37
Page 38

Configuring the Printer Driver Settings
Windows 98/Me
Quality Tab
1. Halftone
Select method of expressing halftone. Select the setting according to the data to be printed and your
preference
• Normal: Select the halftoning method to be used. Select it according to the details of data and your
preference.
• Line Art: Use when printing originals containing line drawings or text.
2. Resolution
Select the printer resolution (300dpi/600dpi).
3. Density
Adjust the printing density (Contrast and Brightness) as desired.
4. button
Restore Defaults
Return all items in the Quality Tab to standard settings (default).
38
NOTE
1. dpi (dot per inch) means the number of dots contained in one inch. The higher the value is, the
higher the resolution becomes.
Page 39

Windows 98/Me
Device Options Tab
Configuring the Printer Driver Settings
Printer Section
1. Security Print Password (For DP-1810F/2000/2500/3000)
Set the password for Security Print, to enable the feature.
2. Duplex Unit (For DP-2000/2500)
Check this checkbox if the Automatic Duplex Unit (DA-MD200) is installed.
3. Inner Tray (For DP-2000/2500/3000)
Check this checkbox if the Exit Tray (Inner) and the Dual-Path Exit Guide Unit (DA-XN200/FK200) are
installed.
Specifying inner bins, Inner 1 and Inner 2, is allowed for printing on the printer.
4. Finisher/Outer Tray (For DP-2000/2500/3000)
Check this checkbox if the 1-Bin Finisher (DA-FS200) or Outer Tray (DA-XT200) is installed.
Setting of Finisher/Outer Tray option is allowed when the Inner Tray option is enabled. The staple
function also is selectable when the Finisher/Outer Tray option is enabled.
5. Number of Paper Tray
Select the number of available paper trays for the printer if an optional Paper Feed Module is installed.
6. Printer/Fax Memory (For DP-1810F/2000/2500/3000)
Select the size of the Expansion Flash Memory Card or whether a Fax Option (2MB) has been installed,
to enable the Security Print.
7. button
Restore Defaults
Return all items in the Device Options Tab to standard settings (default).
8. button
About...
Displays the version information about the printer driver.
NOTE
1. Device Options Tab specifies device-specific settings and settings of optional devices.
39
Page 40

Configuring the Printer Driver Settings
Windows NT 4.0 (Administrator)
To change the printer settings, open the dialog box for the printer properties by the following steps.
Log onto the computer/network with an account rights of
1
2
3
Administrator.
Click the Start button, point to Settings, and then click
Printers.
Right-click the desired printer icon in the printers folder,
and select Properties in the pop-up menu.
The printer properties dialog box appears.
40
NOTE
1. In Windows NT 4.0, setting the properties depends on the log-in account. This section
describes properties to be specified by an administrator (system manager).
2. See "Configuring the Printer Driver Settings (User)" for details of user properties. (See page
48)
Page 41

Configuring the Printer Driver Settings
Windows NT 4.0 (Administrator)
General Tab
Printer Section
1. Comment
Enter comments to the properties, if any.
If another user sets up this printer on his or her computer when sharing the printer, the comment specified
here will also appear on that computer. However, the comment displayed for an already set-up user will
remain unchanged even if the comment is modified later.
2. Location
Specify the printer location.
3. Driver
Displays the printer driver type. Specify the printer being used or a printer model that can be emulated
with the printer being used.
4. button
New Driver...
Updates or modifies the printer driver.
5. button
Separator Page...
This feature is not available on your machine.
Print Processor...
6. button
Specify the processor to be used for printing (Print Processor) and the data type (Default Data type).
The processor and data type affect the manner in which the printer functions in Windows NT. Normally
they do not need to be modified. However, modification might be necessary when the printer is used with
a special application.
7. button
Print Test Page
Prints a test page. This allows the user to verify if the printer is installed properly.
41
Page 42

Configuring the Printer Driver Settings
Windows NT 4.0 (Administrator)
Ports Tab
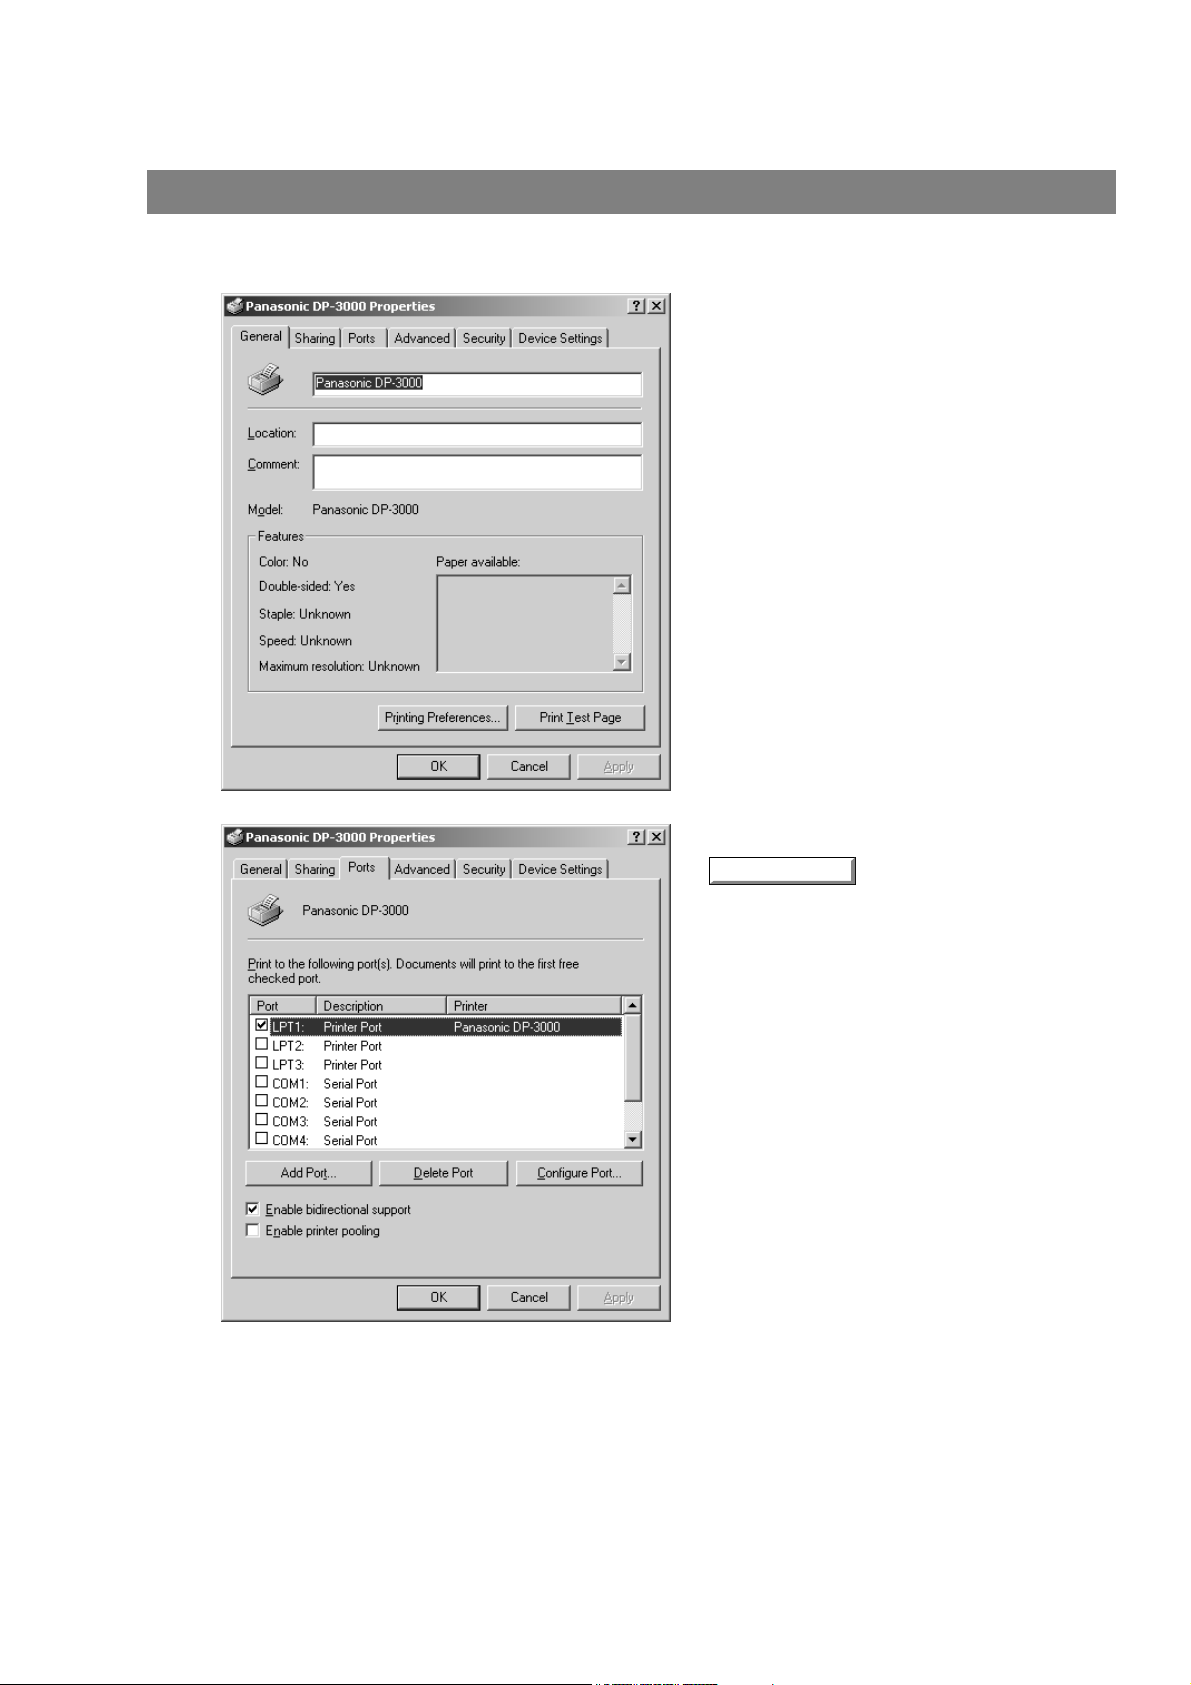
1. Print to the following port(s)
Displays a list of available ports for printing (Port), their status (Description) and printers that are
connected to these ports (Printer).
2. / button
Add Port...
Adds/deletes a new port or a new network path.
3. button
Configure Port...
Configures the selected port. In case of a parallel port, Transmission Retry should be specified.
4. Enable bidirectional support
On a printer, this setting enables reception of configuration data and status data from computer. Be sure
to check this checkbox when installing status monitor (See page 126). Printing may be disabled without
checking on the checkbox.
5. Enable printer pooling
Printer spool allows outputting data from one logical printer to two or more printers. With printer spool
enabled, a transmitted printing job is output to the first printer that is available for printing.
Delete Port...
42
NOTE
1. Specify the time (seconds) waiting for the printer to be ready for printing. If a printer is not
ready for printing after the specified time has elapsed, an error message is displayed.
2. If a timeout error occurs frequently upon printing a large size document, specify a larger value
here.
Page 43

Configuring the Printer Driver Settings
Windows NT 4.0 (Administrator)
Scheduling Tab
Printer Section
1. Available
Schedules the printer for operation. Specify operating hours when From-To is selected.
2. Priority
Sets printing priority. The slider allows the priority to be adjusted from 1 through 99.
3. Spool print documents... / Print directly to the printer
Specify how documents should be sent from the application to the printer.
4. Hold mismatched documents
The spooler compares document settings against printer settings and holds printing of a document if its
settings (Paper Size, Orientation, and so on) do not match the printer settings.
5. Print spooled documents first
Always prints spooled documents first regardless of printing priority.
6. Keep documents after they have printed
Holds documents in the print queue even after they have been printed. These documents can be printed
again directly from the queue regardless of the state the application is in.
43
Page 44

Configuring the Printer Driver Settings
Windows NT 4.0 (Administrator)
Sharing Tab
1. Not Shared/Shared
Select whether to display or use this printer with other computers.
2. Share Name
Specify the name of the shared printer. The displayed name can be used as it is or a new name may be
entered. The name specified at this time will be displayed when other users view information about the
printer on the network.
3. Alternate Drivers
Specify the operating systems of other computers that might share this printer.
44
NOTE
1. When sharing a printer on the network, the print driver is installed on one print server, other
computers will automatically copy and use that driver.
2. For this reason, the print server must be ready with printer drivers for all the operating systems
of all computers that will be sharing the printer.
Page 45

Configuring the Printer Driver Settings
Windows NT 4.0 (Administrator)
Security Tab
Printer Section
1. button
Permissions
Set printer access privileges.
Auditing
2. button
Displays the persons who used this printer and how they used.
Ownership
3. button
Set the ownership of the printer.
NOTE
1. In order to utilize these features, you need to have selected Audit... from User Manager's
Policies and have enabled File and Object Access in the Audit Policy dialog box.
45
Page 46

Configuring the Printer Driver Settings
Windows NT 4.0 (Administrator)
Device Settings Tab
1. Halftone Setup
Halftone Setup...
Select the halftoning method to be used (halftones specific to the printer).
Select it according to the details of data and your preference.
• Halftone Pattern
Select the pixel size to be used for halftones.
The greater the value, the coarser the image would become. However, a larger value is suited to printing
in large areas.
The Enhanced pattern allows printing at a higher resolution using the same number of pixels. However,
the pattern might generate unnatural lines, patterns, moire effects, and so on depending on the image to
be printed.
button
46
• Device Gamma
Adjust the gamma of print images (color intensities).
• Pixel Diameter
Adjust the darkness of the print image. Manipulate the slider to specify the pixel size. You can select
between specifying the real size in inches or specifying in percentage relative to the printer resolution.
Page 47

Configuring the Printer Driver Settings
Windows NT 4.0 (Administrator)
• Luminance (CIE Y)
Adjust the luminosity of the print image.
2. Duplex Unit (For DP-2000/2500)
Check this checkbox if the Automatic Duplex Unit (DA-MD200) is installed.
Duplex printing function is enabled.
3. Output Tray (For DP-2000/2500/3000)
If Exit Tray (Inner) and Dual-Path Exit Guide Unit (DA-XN200/FK200) are installed, select inner option.
This allows specifying Inner 1 and Inner 2 as output bins for printer output.
If 1-Bin Finisher or Exit Tray (Outer) (DA-FS200/XT200) is installed, select inner option + outer option.
This allows specifying inner 1, inner 2, and outer as output bins for printer output. Also, stapling function
becomes available if inner option and outer option are enabled.
4. Number of Paper Tray
Select the number of available paper trays for the printer if an optional Paper Feed Module is installed.
5. Printer/Fax Memory (For DP-1810F/2000/2500/3000)
Select the size of the Expansion Flash Memory Card to enable the Secure Print.
Printer Section
6. Secure Print Password (DP-1810F/2000/2500/3000)
Set the password for Security Print, to enable the feature.
NOTE
1. Device Settings Tab specifies device-specific settings and settings of optional devices. Refer
to the operation manuals of the optional devices, or on-line manuals for settings items.
2. Settings specified in this section are saved as standard (default) settings of the printer.
47
Page 48

Configuring the Printer Driver Settings
Windows NT 4.0 (User)
To change the printer settings, open the dialog box for the printer properties by the following steps.
Select Print in the File menu of the application.
1
Select the printer model in the name box.
2
3
4
Click the button in the Print dialog box.
The printer properties dialog box appears. Click the
desired tabs of the dialog box and specify the properties.
Properties...
48
NOTE
1. In Windows NT 4.0, setting properties depends on the log-in account. This section describes
properties to be specified by a user, upon executing a print operation on an application. See
"Configuring the Printer Driver Settings (Administrator)" for details of administrator properties.
(See page 40)
Page 49

Configuring the Printer Driver Settings
Windows NT 4.0 (User)
Page Setup Tab
Printer Section
1. Paper Size
Select a document size.
2. Paper Source
Specify where the paper you want to use is located in the machine. If you choose Auto Selection, the
printer driver will automatically select an appropriate tray according to the Paper Size.
3. Copy Count
Specify the number of copies to be printed. If the number of copies to be printed can be specified within
the application, indicate one copy here and specify the number of copies in the Print dialog box of the
application.
4. Sort
Select whether to Stack or Sort when printing multiple copies.
5. Orientation
Select the print orientation (Portrait/Landscape).
6. Print on Both Sides (Duplex Printing) (For DP-150FX/2000/2010E/2500/3000)
Specify if duplex printing is performed. Select the binding side (None/Short Edge/Long Edge) for duplex
printing.
Note 1) Duplex Printing on post card is not allowed.
2) Duplex Printing is allowed only when the Dual-Path Exit Guide Unit, Paper Transport Unit and
Automatic Duplex Unit are mounted.
3) Check [Duplex Unit] check box in Device Options Tab.
49
Page 50

Configuring the Printer Driver Settings
Windows NT 4.0 (User)
Advanced Tab
1. Paper Size
Select a document size.
2. Orientation
Select the print orientation (Portrait/Landscape).
3. Paper Source
Specify where the paper you want to use is located in the machine. If you choose Auto Selection, the
printer driver will automatically select an appropriate tray according to the Paper Size.
4. Copy Count
Specify the number of copies to be printed. If the number of copies to be printed can be specified within
the application, indicate one copy here and specify the number of copies in the Print dialog box of the
application.
5. Print on Both Sides (Duplex Printing) (For DP-150FX/2000/2010E/2500/3000)
Specify if duplex printing is performed.
6. Resolution
Select the printer resolution (300dpi/600dpi).
7. Scaling
Specify custom zoom when printing a document by zooming in/out at a desired rate. If the zooming rate is
specifiable in an application, specify "100%" (same size) here. Specify a zooming rate in the print dialog
box of the application.
50
NOTE
1. Settings specified in this section are valid until an application is shut down.
Page 51

Configuring the Printer Driver Settings
Windows NT 4.0 (User)
Advanced Tab
Printer Section
1. Metafile Spooling
With Metafile Spooling enabled, the file is spooled in EMF format (metafile compression). With the
function disabled, the file is spooled in RAW (non-compression) format. Specifying RAW format results in
longer time before placing an application operational after printing on the application.
Note: Spooling by EMF format may cause the following problems on some application software.
1)Printing result is different from the screen display.
2)Printing requires excessive time.
2. N in 1
For printing two or more pages on one sheet, specify a printing method.
Layout is selected by combining with "Orientation." Each layout is displayed with an icon.
2 in 1: Print 2 pages of documents zoomed out by 65 or 71% on one sheet.
4 in 1: Print 4 pages of documents zoomed out by 50% on one sheet.
3. Binding Margin (For DP-2000/2010E/2500/3000)
Select the binding margin upon duplex printing.
The width of the binding margin is specified on the main unit.
51
Page 52

Configuring the Printer Driver Settings
Windows NT 4.0 (User)
4. Staple (DP-2000/2500/3000)
Specifying staple printing is allowed if the output bin is set to outer.
Note 1) Staple printing is allowed only with Electronic Sorting Board (DA-ES200 : For DP-2000 only) and
1-Bin Finisher (DA-FS200) mounted.
2) Paper is stapled at the top left or at the top right. (See table below.)
Document orientation Paper orientation Stapling position
Top left
Letter
A4
Letter
A4
Letter
A4
Letter/A4
Ledger
Legal
A3
FLS
B4
Ledger/
Legal/
A3/FLS/B4
Letter/A4
Letter
A4
Letter/A4
Ledger/
Legal/
A3/FLS/B4
Top right
Letter
A4
Note) Stapling on Invoice/B5
sheet is not allowed.
Top right
Letter/A4
Top left
Letter/A4
Note) Stapling on Invoice/B5
sheet is not allowed.
Ledger
Legal
A3
FLS
B4
Note) Stapling on Invoice/B5 sheet is
not allowed.
Top left
Ledger/
Top right
Legal/
A3/FLS/B4
Note) Stapling on Invoice/B5 sheet is
not allowed.
52
Page 53

Configuring the Printer Driver Settings
Windows NT 4.0 (User)
5. Output Tray
Specify the output destination.
Note 1) Output Tray selection is allowed only with Dual-Path Exit Guide Unit, Paper Transport Unit, Exit
Tray (Outer) or 1-Bin Finisher (DA-FK200/FK210/XT200/FS200) is installed.
2) Post cards cannot be output from the outer tray.
6. Security Print
Select to enable Security Print.
7. Halftone Color Adjustment
Printer Section
• Contrast
Adjust the contrast of print images.
• Brightness
Adjust the brightness of print images.
• Dark Picture
Select this option in order to print dark images brighter.
• Negative
Select this option in order to print images with black and white reversed.
• Input RGB Gamma
Adjust the gamma of print images (color intensities). Red, Green and Blue can also be adjusted
individually.
• Black Ref/White Ref
Adjust the difference between the darkest and lightest colors of an image. Increasing the Black Ref
value or decreasing the White Ref value will intensify the contrast of the image but reduces the range of
colors in between.
• Picture
Select a test pattern type.
Selecting the View check box will display halftone adjustment results in the test pattern.
NOTE
1. Settings specified in this section are valid until an application is shut down.
2. Specifying [Yes] for [Binding Margin] moves a printing area vertically or horizontally (for
ensuring binding margin). For specifying margin in consideration of a double-page spread
printing on application, specify [No] for [Binding Margin].
53
Page 54

Configuring the Printer Driver Settings
Windows 2000/XP (Administrator)
To change the printer settings, open the dialog box for the printer properties by the following steps.
Log onto the computer/network with an account rights of
1
2
3
Administrator.
Click the Start button, point to Settings, and then click
Printers.
Right-click the desired printer icon in the printers folder,
and select Properties in the pop-up menu.
The printer properties dialog box appears.
54
NOTE
1. In Windows 2000/XP, setting the properties depends on the log-in accounts. This section
describes properties to be specified by an administrator (system manager). See "Configuring
the Printer Driver Settings" for details of user properties. (See page 63)
Page 55

Configuring the Printer Driver Settings
Windows 2000/XP (Administrator)
General Tab
Printer Section
1. Printer Name
Name of the printer specified upon installation is displayed.
2. Location and Comment
Enter a comment about the location of the printer installation and information about the printer.
If a printer is shared, the location and comment specified in this field appears when another user sets up
this printer on his/her computer. After completion of setup, however, changing this comment does not
update the location and comment appearing on users PCs.
3. Model
Model name of the printer is displayed.
4. Features
Functions and settings of the printer are displayed.
Printing Preferences...
5. button
Changes properties (print settings) specifiable for each user.
Refer to "Configuring the Printer Driver Settings" for details of settings (See page 63)
6. button
Print Test Page
Prints a test page. This allows the user to verify if the printer is installed properly.
55
Page 56

Configuring the Printer Driver Settings
Windows 2000/XP (Administrator)
Sharing Tab
1. Not Shared/Shared As
Specify if this printer is displayed or used on a computer of other users.
For sharing a printer, specify the share name of a printer to be shared. A name specified here appears
when other users view the printer information on a network
2. button
Additional Drivers...
Install additional printer drivers on the system.
When users running different versions of Windows share a printer, installing additional drivers avoids the
necessity for installing new drivers on their systems.
56
NOTE
1. If a printer is shared on a network, installing the printer driver on one print server allows other
computers to copy the driver automatically for use. Accordingly, a print server is required to
provide alternative printer drivers for other OS's that may use the printer.
Page 57

Configuring the Printer Driver Settings
Windows 2000/XP (Administrator)
Ports Tab
Printer Section
1. Print to the following port(s)
Displays a list of ports that allows printing, their status (description), and printers connected to the ports.
2. / button
Add Port...
Adds/deletes a new port or a new network path.
3. button
Configure Port...
Configure the port that is selected. On a parallel port, wait time (in seconds) for retransmission is
specified.
4. Enable bidirectional support
On a printer, this setting enables reception of configuration data and status data from computer. Be sure
to check this checkbox when installing status monitor (See page 126). Printing may be disabled without
checking on the checkbox.
5. Enable printer pooling
Printer spool allows outputting data from one logical printer to two or more printers. With printer spool
enabled, a transmitted printing job is output to the first printer that is available for printing.
Delete Port...
NOTE
1. Specify the time (seconds) waiting for the printer to be ready for printing. If a printer is not
ready for printing after the specified time has elapsed, an error message is displayed.
2. If a timeout error occurs frequently upon printing a large size document, specify a larger value
here.
57
Page 58

Configuring the Printer Driver Settings
Windows 2000/XP (Administrator)
Advanced Tab
1. Always available/Available from
Specify the operation schedule for a printer. Selecting Available from allows specifying an operation
time.
2. Priority
Specify the priority in printing. Priority is adjustable from 1 to 99. Document of higher priority are printed
before those of lower priority.
3. Driver
Displays the printer driver type. Specify the printer being used or a printer model that can be emulated
with the printer being used.
4. button
New Driver...
Updates or modifies the printer driver.
5. Spool print documents so program finishes printing faster
Specify the method of sending a document from the program to the printer.
6. Hold mismatched documents
The spooler compares document settings against printer settings and holds printing of a document if its
settings (Paper Size, Orientation, and so on) do not match the printer settings.
7. Print spooled documents first
Always prints spooled documents first regardless of printing priority.
58
8. Keep printed documents
After printing, documents are kept in the queue. The documents are allowed to be reprinted directly from
the queue regardless of the status of an application.
Page 59

Configuring the Printer Driver Settings
Windows 2000/XP (Administrator)
9. Enable advanced printing features
Enables advanced printing features. Optional features of the printer (page ordering, booklet printing,
numbering on sheets) are enabled. These features can be disabled if a problem occurs due to
incompatibility. Disabling the features may disable the printing options also.
10. button
Printing Defaults...
Specifies standard (default) values for the properties (print settings) specifiable for each user. If a local
printer is shared, the settings here are used as printing defaults for other users.
Refer to "Configuring the Printer Driver Settings" for detailed settings. (See page 63)
Print Processor...
11. button
Specify a print processor and data type to be used for printing.
The processor and data type define operations of printers on Windows 2000/XP.
Usually no change is required in the settings. Use of a printer on a special application, however, may
require changes on the settings.
12. button
Separator Page...
This feature is not available on your machine.
Printer Section
59
Page 60

Configuring the Printer Driver Settings
Windows 2000/XP (Administrator)
Security Tab
Displays a list of users and groups that are assigned access to this printer. A list of standard access
permitted/prohibited for each group or user is displayed. Check the checkbox for permitting or prohibiting
access. Gray checkbox indicates inheritance of access permission.
1. / button
Add... Remove
Add or delete a user or group in the list.
Advanced...
2. button
Specify access to a printer, audit, and owner.
60
NOTE
1. Windows 2000/XP provides the capability of managing access to various objects (e.g. printers)
by users.
2. Refer to manuals of Windows 2000/XP for details of access permission, audit, and owner.
Page 61

Configuring the Printer Driver Settings
Windows 2000/XP (Administrator)
Device Settings Tab
Printer Section
Halftone Setup...
1. button
Select the method of expressing device halftone (printer-specific halftone). Select the settings according
to printing data and preference.
• Halftone Pattern
Select the pixel size to be used for halftones.
The greater the value, the coarser the image would become. However, a larger value is suited to printing
in large areas.
The Enhanced pattern allows printing at a higher resolution using the same number of pixels. However,
the pattern might generate unnatural lines, patterns, moire effects, and so on depending on the image to
be printed.
• Device Gamma
Adjust the gamma of print images (color intensities).
• Pixel Diameter
Adjust the darkness of the print image. Manipulate the slider to specify the pixel size. You can select
between specifying the real size in inches or specifying in percentage relative to the printer resolution.
• Luminance (CIE Y)
Adjust the luminosity of the print image.
61
Page 62

Configuring the Printer Driver Settings
Windows 2000/XP (Administrator)
2. Duplex Unit (For DP-2000/2500)
Check this checkbox if the Automatic Duplex Unit (DA-MD200) is installed.
Duplex printing function is enabled.
3. Output Tray (For DP-2000/2500/3000)
If Exit Tray (Inner) and Dual-Path Exit Guide Unit (DA-XN200/FK200) are installed, select inner option.
This allows specifying Inner 1 and Inner 2 as output bins for printer output.
If 1-Bin Finisher or Exit Tray (Outer) (DA-FS200/XT200) is installed, select inner option + outer option.
This allows specifying inner 1, inner 2, and outer as output bins for printer output. Also, stapling function
becomes available if inner option and outer option are enabled.
4. Number of Paper Tray
Select the number of available paper trays for the printer if an optional Paper Feed Module is installed.
5. Printer/Fax Memory (For DP-1810F/2000/2500/3000)
Select the size of the Expansion Flash Memory Card or whether a Fax Option (2MB) has been installed,
to enable Security Print.
6. Security Print Password (For DP-1810F/2000/2500/3000)
Set the password for Security Print, to enable the feature.
62
NOTE
1. Device Settings Tab specifies device-specific settings and settings of optional devices. Refer
to operation manuals of the optional devices, or on-line manuals for settings items.
2. Settings specified in this section are saved as standard (default) settings of the printer.
Page 63

Configuring the Printer Driver Settings
Windows 2000/XP (User)
To change the printer settings, open the dialog box for the printer properties by the following steps.
Select Print in the File menu of the application.
1
2
3
Click the button in the Print dialog box.
The dialog box for the printer properties appears. Click
the desired tabs of the dialog box and specify the
properties.
Properties...
Printer Section
NOTE
1. In Windows 2000/XP, setting the properties depends on the log-in accounts. This section
describes properties to be specified by a user, upon executing a print operation on an
application. See "Settings Printer Driver on Windows 2000/XP (Administrator)" for details of
administrator (system manager) properties. (See page 54)
63
Page 64

Configuring the Printer Driver Settings
Windows 2000/XP (User)
General Tab
1. Select Printer
Select a printer for printing.
2. Page Range
Select a page range for printing.
3. Number of Copies (1-99)
Specify the number of copies.
4. Collate
Upon printing two or more copies, pages are output for each copy.
64
Page 65

Configuring the Printer Driver Settings
Windows 2000/XP (User)
Layout Tab
Printer Section
1. Orientation
Select the print orientation (Portrait/Landscape).
2. Print on Both Sides (Duplex) (For DP-150FX/2000/2010E/2500/3000)
Select duplex printing for printing on both sides.
Select the binding side (None/Flip on Short Edge/Flip on Long Edge) for duplex printing.
Note 1) Duplex Printing on post card is not allowed.
2) Duplex Printing is allowed only when the Dual-Path Exit Guide Unit, Paper Transport Unit and
Automatic Duplex Unit are mounted.
3) Check [Duplex Unit] check box in Device Options Tab.
Advanced...
3. button
Specify detailed settings. Refer to Advanced (See page 67) for details.
65
Page 66

Configuring the Printer Driver Settings
Windows 2000/XP (User)
Paper/Quality Tab
1. Paper Source
Specify where the paper you want to use is located in the machine. If you choose Auto Selection, the
printer driver will automatically select an appropriate tray according to the Paper Size.
Advanced...
2. button
Specify detailed settings. Refer to Advanced (See page 67) for details.
66
Page 67

Configuring the Printer Driver Settings
Windows 2000/XP (User)
Advanced
Printer Section
1. Paper Size
Select a document size.
2. Resolution
Select the printer resolution (300dpi/600dpi).
3. Scaling
Specify custom zoom when printing a document by zooming in/out at a desired rate. If the zooming rate is
specifiable in an application, specify "100%" (same size) here. Specify a zooming rate in the print dialog
box of the application.
4. Metafile Spooling
With Metafile Spooling enabled, the file is spooled in EMF format (metafile compression). With the
function disabled, the file is spooled in RAW (non-compression) format. Specifying RAW format results in
longer time before placing an application operational after printing on the application.
Note: Spooling by EMF format may cause the following problems on some application software.
1)Printing result is different from the screen display.
2)Printing requires excessive time.
5. N in 1
For printing two or more pages on one sheet, specify a printing method.
Layout is selected by combining with "Orientation." Each layout is displayed with an icon.
2 in 1: Print 2 pages of documents zoomed out by 65 or 71% on one sheet.
4 in 1: Print 4 pages of documents zoomed out by 50% on one sheet.
6. Binding Margin (For DP-2000/2010E/2500/3000)
Select for ensuring the binding margin upon duplex printing.
Specifying On for Binding moves a printing area vertically or horizontally (for ensuring binding margin).
For specifying a margin in consideration of a double-page spread printing on application, specify Off for
Binding.
Width of binding margin is specified on the main unit.
67
Page 68

Configuring the Printer Driver Settings
Windows 2000/XP (User)
7. Staple (For DP-2000/2500/3000)
Specifying staple printing is allowed if the output bin is set to outer.
Note 1) Staple printing is allowed only with Electronic Sorting Board (DA-ES200 : For DP-2000 only) and
1-Bin Finisher (DA-FS200) mounted.
2) Paper is stapled at the top left or at the top right. (See table below.)
Document orientation Paper orientation Stapling position
Top left
Letter
A4
Letter
A4
Letter
A4
Letter/A4
Ledger
Legal
A3
FLS
B4
Ledger/
Legal/
A3/FLS/B4
Letter/A4
Letter
A4
Letter/A4
Ledger/
Legal/
A3/FLS/B4
Top right
Letter
A4
Note) Stapling on Invoice/B5
sheet is not allowed.
Top right
Letter/A4
Top left
Letter/A4
Note) Stapling on Invoice/B5
sheet is not allowed.
Ledger
Legal
A3
FLS
B4
Note) Stapling on Invoice/B5 sheet is
not allowed.
Top left
Ledger/
Top right
Legal/
A3/FLS/B4
Note) Stapling on Invoice/B5 sheet is
not allowed.
68
Page 69

Configuring the Printer Driver Settings
Windows 2000/XP (User)
8. Output Tray (For DP-2000/2500/3000)
Specify the output destination. <Auto Selection, Outer, Inner 1, or Inner 2>
Note 1) Output Tray selection is allowed only with Dual-Path Exit Guide Unit, Paper Transport Unit, Exit
Tray (Outer) or 1-Bin Finisher (DA-FK200/FK210/XT200/FS200) is installed.
2) Post cards cannot be output from the outer tray.
9. Security Print
Select to enable Security Print.
10.Halftone Color Adjustment
• Contrast
Adjust the contrast of print images.
Printer Section
• Brightness
Adjust the brightness of print images.
• Dark Picture
Select this option in order to print dark images brighter.
• Negative
Select this option in order to print images with black and white reversed.
• Input RGB Gamma
Adjust the gamma of print images (color intensities). Red, Green and Blue can also be adjusted
individually.
• Black Ref/White Ref
Adjust the difference between the darkest and lightest colors of an image. Increasing the Black Ref
value or decreasing the White Ref value will intensify the contrast of the image but reduces the range of
colors in between.
• Picture
Select a test pattern type.
Selecting the View check box will display halftone adjustment results in the test pattern.
69
Page 70

Setting Print Conditions: Setting on the Device
DP-1510P/1810P
Function Settings Reset Key
DP-1810F
Function Settings Reset Key
DP-2010E
Function Settings Reset Key
4 LTR/A4 TRAY SEL.
1:PORTRAIT 2:L-SCAPE
Press the PRINTER key.
Press the FUNCTION key.
Press 4 and the SET key.
Select the desired output paper orientation
After setting, press the SET key.
70
Setting mode Settings Preset value number
LTR/A4 TRAY SEL. Set the printer paper priority orientation.
1: Portrait 2: Landscape
Portrait
Page 71

CONTRAST
LCD
REDIAL/L/
PAUSE
LINE
SELECT
FLASH/H/
SUB-ADDR
SET
MON.VOL.
ORIGINAL
COPY
SIZE
SIZE
MONITOR
START
PQRS
GHI
TUV
JKL
ABC
WXYZ
MNO
DEF
STOP
ON LINE
ON LINE
DATA
FAX
INTERNET
PRINTER
ALARM
ACTIVE
TONE
COPY
ADD TONER
RESET
START
RESOLUTION
LINE SELECT
CLEAR
ENERGY SAVER
DP-2000
FUNCTION
COPY
OUTPUT
TRAY
DIRECTORY
SERCH
PAPER
TRAY
DP-2500/3000
MULTI-SIZE
COPY
SORT
CONTRAST
FEED
LCD
INTERNET
PRINTER
ADD TONER
FAX
ON LINE
ON LINE
DATA
Setting Print Conditions: Setting on the Device
Function Settings
Reset Key
DP-2500
Touch-panel
display
ENERGY SAVER
ORIGINAL
SIZE
LEDGER
LEGAL
LETTER
LETTER
INVOICE
INTERRUPT
COPY
SIZE
FUNCTION
REDIA
FLAS
SUB-ADDR
SELECT
MONITOR
MON.VOL.
RESET
PAUSE
LINE
1 2 3
GHI
4 5 6
PQRS
7 8 9
SET
TONE
CLEAR
ABC
DEF
JKL
TUV
0
ALARM
STOP
MNO
WXYZ
START
ACTIVE
DP-2000
2SIDED
MULTI-SIZE FEED
COPY
COPIED
BLANK
OHP
2PAGE
abcde
2 in 1 BOOK EDGE MARGIN
COPY
01f02g03h04i05
06k07l08m09n10
11p12q13r14s15
u17v18w19x20y
16
P1zP2 P3
MEMORYIN
FINE
Press the PRINTER key.
Press the FUNCTION key.
Printer Section
Press the PRINTER SETTINGS key.
Select the 00 PRINTER OUTPUT TRAY.
Select the desired Output Tray.
After setting, press the OK key on the screen.
Press the RESET key.
Function Settings
Reset Key
1SIDED
SORT
COPY
STAPLE
SHIFT
STAMP
MEM XMT
M2
M1
SYMBOLSP5CAPS
SPACE
P4
S-FINE
RESOLUTION
LINE SELECT
COPY
j
FAX
o
ON LINE
t
INTERNET
PRINTER
ON LINE
DATA
OUTPUT
DP-2000
TRAY
PAPER
TRAY
PHOTO
TEXT/
PHOTO
TEXT
DIRECTORY
SERCH
LIGHTER DARKER
ZOOM/VOL
ENERGY SAVER
ORIGINAL COPY
SIZE SIZE
LEDGER
LEGAL
LETTER
LETTER
INVOICE
INTERRUPT
FUNCTION
REDIAL/
FLASH/
SUB-ADDR
MONITOR
RESET
PAUSE
ABBR
1 2 3
GHI
4 5 6
PQRS
7 8 9
SET
TONE
ABC
JKL
TUV
0
ALARM ACTIVE
CLEAR
DEF
STOP
MNO
WXYZ
START
4 PRINTER OUTPUT TRAY
1:INNER 1
Press the PRINTER key.
Press the FUNCTION key.
Press 2 and the SET key.
Setting mode Settings Preset value number
00 PRINTER OUTPUT TRAY Set the printer paper priority Accommodation
position.
Outer/Inner 2/Inner 1
Select the desired Output Tray.
After setting, press the SET key.
Inner 1
71
Page 72

Print Operation
Printing from Windows Applications
If the printer driver is installed properly and a printer is selected as the default printer in the printer setup,
printing can be accomplished from any Windows application with simple operations.
To print from most Windows applications, use the Print... command on the File menu. Selecting the Print...
command typically displays the following Print dialog box:
After selecting the print range to be printed and the number of copies, click on to start printing.
While documents are being printed, a printer icon appears on the System Tray near the clock on the bottom
right hand corner of the screen. The icon disappears when printing is completed.
You may double-click on the printer indicator on the System Tray to open and verify the details of the print
queue in the spooler.
OK
72
NOTE
1. Follow the steps below to set a default printer:
1) Click the Start button and select Printers in the Settings menu.
2) Select the printer icon in the window and select [Set As Default] in dropdown menu by
right-clicking it. Then the check mark is displayed.
Page 73

Print Operation
Printing on Network
For sharing a printer by connecting two computers via crossed-cable or using a hub, a connection among
computers must be established.
Establishing a connection among computers is verified by displaying the connected computers in Network
Neighborhood on the desktop.
The settings for printer sharing is specified by the following steps:
Printer server (PC connected to a printer)
Install the printer driver on a computer to be connected to
1
2
3
the machine.
Click the Start button, point to Settings, and then click
Printers.
Right-click on the desired printer icon and select
[Sharing...] in the dropdown menu.
Printer Section
Select Shared As in the properties dialog box.
4
Click on the button.
OK
5
Upon completion of the setting, the shape of the icon changes indicates it is shared.
NOTE
1. Refer to the manual of the network cards and Windows users guide for connection among
computers.
2. On Windows 98/Me, a computer connected to a printer must have been set up to allow printer
sharing by the following operations:
1) Double-click on the Network applet in the control panel folder, and then click on the
File and Print Sharing...
2) Check [I want to be able to allow others to print to my printer(s).] in the File and Print
Sharing dialog box.
button in the Network Configuration tab.
73
Page 74

Print Operation
Printing on Network
Client workstation (PC that uses other computer's printer)
Click the Start button, point to Settings, and then click
1
2
3
4
The operations above enable output from the client workstaton to a printer connected to a printer server.
Printers.
Double-click Add Printer in the printers folder.
Add Printer Wizard appears.
Click on the button.
Select Network Printer.
Click on the button.
Specify the other computer's printer by entering the
network path.
Then, complete the installation by following the instruction
of the Add Printer Wizard.
Next
Next
74
Page 75

Document Management System Section
Installing the Document Management System
Windows 98/Me/NT/2000/XP
1
2
3
Insert the Panasonic Document Management
System CD-ROM.
Select the language.
Click on the button.
Next
4
5
Click Panasonic-DMS.
The Fax Gateway and Firmware Update
Note:
Utility is only available on U.S.A. and
Canada only.
Click Install Panasonic-DMS Software.
System Section
Document Management
Continued on the next page...
75
Page 76

Installing the Document Management System
Windows 98/Me/NT/2000/XP
6
7
Verify the installation destination and click the
Next
Select your machine's model(s) and click the
Then, click the button.
button.
(Add) button.
Next
8
9
Click the Typical button.
Enter the program folder name and click the
Next
button.
76
Page 77

Installing the Document Management System
Windows 98/Me/NT/2000/XP
10
11
12
The required files are copied.
<For DP-1810F on Windows 98/NT only>
Click on the button.
When the setup process is completed, a
message is displayed prompting you to restart
your computer.
OK
Continued on the next page...
Click the button to restart your
computer.
Finish
System Section
Document Management
77
Page 78

Installing the Document Management System
Windows 98/Me/NT/2000/XP
13
<Windows 98/NT only>
Check [Yes, I accept....] and
Click on the button.
Note:
Click on the button.
Next
After rebooting your PC, the Microsoft
Data Access Components is also
automatically installed. Log on to the
PC with an account rights of
Administrator when installing on
Windows NT 4.0.
Next
Click on the button.
The Panasonic Document Management System folder is added to the Start menu, and the installation is
completed.
Finish
78
Page 79

Installing the Document Management System
Windows 98/Me/NT/2000/XP
NOTE
1. When installing on Windows NT 4.0, log onto the computer with an account rights of
Administrator.
2. The Typical installation method installs all of the following drivers and applications.
Selecting the Custom installation allows the selected installation of scanner and MFP utilities
individually.
• Scanner
Document Scanner (TWAIN scanner driver) (See page 97)
• Document Manager and Viewer
Document Manager (Image management application) (See page 80)
Document Viewer (Image editing application) (See page 103)
•PC Faxing
Panafax Desktop (See page 152)
• MFP Utilities
Status Monitor (Device status monitor) (See page 126)
Configuration Editor (See page 131)
Phonebook Editor (See page 139)
COM Port Redirector
Operating Instructions
3. By installing this software, the system selects LPT1 as the parallel port to be connected to the
device. For connecting the device to a port other than LPT1, change connection ports by
selecting [Panasonic], [Panasonic Document Management System], and [Port Selection Utility]
from the Start menu.
4. Before updating the software, be sure to remove the older version of software.
5. Take the following steps to install the software on Windows 2000/XP:
1) For installation, log onto the computer with an account rights of Administrator.
2) Restart Windows after completion of installation.
3) After restart, log on again with an account rights of Administrator to complete the Windows
system update.
Document Management
System Section
79
Page 80

Document Manager
Main Window
Document Manager is an application for managing documents (image files). By utilizing the Document
Manager and Document Viewer (See page 103) in combination, a number of documents (image files) can
be classified, managed, browsed, and edited.
Selecting Panasonic
Programs of the Start menu displays the main window of the Document Manager.
1. Title Bar
Displays the title of a screen.
→ Panasonic Document Management System → Document Manager in
2. Menu Bar
Displays the menu of the Document Manager.
3. Tool Bar
Displays the tool buttons of the Document Manager. Tool buttons correspond to functions of the menus in
the menu bar.
4. Folder Window
Displays the folders containing the documents in tree form.
5. Link Icon
Dropping a dragged document onto a link icon, an application corresponding to the function of the icon is
activated.
6. Status Bar
Displays information such as the number of documents in a folder, the number of selected documents,
and file sizes, etc.
80
Page 81

Document Manager
Main Window
7. Document Window
Displays a list of documents in the selected folder.
Documents are displayed in thumbnails (reduced images). Page number and and buttons are
displayed at the bottom of a thumbnail image for grouped documents (configured with two or more
pages).
• Image data files
A thumbnail image of the document is displayed.
• Application data files
A thumbnail image of the document with it original application icon is displayed (i.e. Word, Excel and
PowerPoint).
Clicking on the < and > buttons turns the page on a multi-page document.
Document Management
System Section
81
Page 82

Document Manager
Basic Operations
The Document Manager allows editing and managing documents displayed in thumbnail images by
dragging and dropping. The function enables various operations as described below:
• Selecting Documents
Clicking thumbnail images in the document window allows
selection of documents. Dragging a mouse cursor on the
screen or clicking with the Shift key held down allows
selecting two or more documents at one time.
• Editing Documents
Double-clicking thumbnail images in document window
activates Document Viewer (See page 103), allowing
opening and editing documents.
• Creating Documents
Drag and dropping any application file into Document
Manager creates a new document. A thumbnail image file is
created and the application icon is displayed.
82
Page 83

Basic Operations
• Copying/Moving Documents
Dragging a thumbnail image in document window and
dropping it onto a folder in the folder window allows moving
the document to the folder. Dragging & dropping with the Ctrl
key held down copies a document.
Dragging a document and dropping it onto another document
in a document folder results in grouping the two documents
together.
Document Manager
Dragging a document and dropping onto a link icon activates
an application corresponding to the function of each icon.
Link icons are registered and deleted by selecting Launch to
Another Application
File menu.
• Dragging a document and dropping it onto “Shared Folder”
allows other computers connected to the same network
access to it.
Browse “Shared Folder” for how to create shared folders.
→ External Application Setup in the
System Section
Document Management
83
Page 84

Document Manager
Setting Plug-in
• Import document (from scanner)
Selecting Acquire Image... in the File menu displays a window for the Document Scanner (See page 86).
The operation imports a document read on the scanner into a folder.
• Import document (from file)
Selecting Open in the File menu displays a dialog box for selecting files. The dialog box allows importing
image files saved in a computer as documents onto a folder.
An attempt of importing files that cannot be handled by Document Manager results in displaying an error
shown below. Press OK and verify a file format.
Dragging and dropping a selected document onto a link icon at the bottom of the window activates an
application specified for the link icon, and opens the image file.
The link icons can be Added/Removed freely by selecting Launch to Another Application
Application Setup in the File menu.
The following applications are specifiable as destinations of the Document Manager:
- Draw/Graphics software (Applications such as MS-Paint, Photoshop etc.)
- OCR software (Application such as e-Typist, etc.)
- PC-FAX software
- E-Mail software (MAPI-compatible mail application such as MS-Outlook, Netscape Messenger etc.)
-Others
(Other application documents such as MS-Word, MS-Excel etc.)
NOTE
1. Document Viewer provides a function to add various graphics and texts to an image.
The graphics and texts added to an image are called "Annotation." See "Annotation Menu"
(See page 116) for details of annotation.
→ External
84
Page 85

File Menu
• New Folder
Create a new folder under a folder that is currently selected.
Path of a folder to be created can be specified as required.
• Shared Folder
Create a new shared folder. Documents in “shared folder “
can be shared through a network from different computers.
• Released Shared Folder
Released a shared folder. Documents in “shared folder” will
be released from a network.
• Open
A file saved in the computer and can be imported into a folder
as a document.
Document Manager
• Save As
A document is saved as an ordinary image file under a
specified name.
• Rename
Change the name of a document.
System Section
Document Management
85
Page 86

Document Manager
File Menu
• Properties
Display the file properties.
• Backup
Backs up the documents stored in the selected folder.
• Acquire Image...
Using a scanner, etc. selected in Select Source, import a
document to a folder that is currently selected.
• Select Source
Select a TWAIN-compatible device for scanning documents.
86
NOTE
1. See "Document Scanner" (See page 97) for operation of scanner.
Page 87

File Menu
• Print
Print a document selected in the document window.
• Print Setup
Specify layout and printing size for a document to be printed.
1. Horizontal Position and Vertical Position
Adjust the printing position on a sheet.
Document Manager
2. Print Size
Select printing in original size or printing in accordance with
the sheet size.
3. N in 1
Select for printing reduced pages on one sheet.
System Section
Document Management
NOTE
1. Print Setup specifies printing or not printing annotations edited in the Document Viewer. See
"Annotation Menu" (See page 116) for details of annotation.
87
Page 88

Document Manager
File Menu
• Launch to another application
Opens a document selected in the document window with a
specified application.
Selecting External Application Setup displays a dialog box for
adding/changing/deleting the application.
Clicking the Add button displays a dialog box to Add External
Application.
1. Name
If an external application is specified, the name in this field
appears on a link icon.
2. Application Type
Specify the application type.
3. Program File
Specify the execution file of an application.
4. MAPI Correspondence
Check here if the E-mail application is compatible with MAPI.
5. Parameter
If the E-mail application is incompatible with MAPI, adding a
parameter here allows automatic activation of a transmission
screen.
88
NOTE
1. See "Setting Plug-in" (See page 84) for specifying an external application.
Page 89

File Menu
• Trash Can
- Open Trash Can
Opens the Trash Can and displays any files. Selecting
Document Manager
documents and clicking the button restores
documents that have been discarded.
Click the button to delete the selected
document.
- Empty Trash Can
Deletes the files in the Trash Can. If the documents are
emptied from the Trash Can, they are permanently deleted.
They are not stored in the Recycle Bin.
Delete
Undo
Document Management
System Section
89
Page 90

Document Manager
Edit Menu
• Undo
Undo the last editing operation done.
• Cut
Delete a selected document from a folder and copy it to the
clipboard.
• Copy
Copy a selected document onto the clipboard.
• Paste
Paste a document from the clipboard onto a selected folder.
• Delete
Delete a selected document from a folder to the Trash Can.
A confirmation message for deletion appears.
• Select All
Select all documents in the folder.
• Find
Search for documents by specifying a document name,
creation date, or character string in the document.
90
NOTE
1. See "Annotation Menu" (See page 116) for details of annotation.
Page 91

View Menu
• Tool Bar
Switch between displaying/hiding the tool bar.
• Status Bar
Switch between displaying/hiding the status bar.
• List Format/Thumbnail Format
Switch between list display and thumbnail display in the
document window.
• Arrange Folders
Sort the document folders by name or date.
• Arrange Document
Sort the documents in the current folder in the specified order
(Name, Type, Size or Date).
• Line Up Documents
Line up the documents in the document window.
• Refresh
Refreshes the contents of the Document Manager.
Document Manager
Document Management
System Section
91
Page 92

Document Manager
Document Menu
• Open
Open a selected document. Activates the Document Viewer
(See page 80) and opens a document for editing.
• Duplicate
Makes a copy of the selected document in a folder.
• Rotate
Rotate the selected document.
- Rotate Right
- Rotate 180 Degrees
- Rotate Left
• Group
Makes a group of two or more selected documents. The
grouped documents are indicated by page number and
and buttons at the bottom of a thumbnail image.
- Every Document
The selected documents are grouped.
- Every Page Alternately
Groups pages alternately.
- Every page reverse alternately
Groups pages alternately by reversing the pages.
92
Page 93

Document Menu
• Ungroup
Cancel the grouping for grouped documents. Either dividing
all pages into individual documents or releasing only specified
documents from a group can be selected.
• Enhancement
Apply the following correction to a selected document:
- Correct Skew
Detect any inclination of a document and automatically
correct it.
- Enhance Edge
Enhance edge (border) of image.
- Eliminate Noise
Remove noise on a document.
- Reverse Gradation
Display image in reverse.
Document Manager
• Page
Select pages to be displayed in thumbnail among grouped
documents.
Selecting Rearrange Page displays the page sorter dialog box.
The order of the pages are changed by selecting, dragging and
dropping the pages.
Click the Reverse Order button to reverse the page order.
• Attachment File
Open a dialog box to launch the application associated with
the selected attachment.
System Section
Document Management
• File Conversion
Create image of the selected attachment.
93
Page 94

Image Converter
General Description
Once Panasonic-DMS has been installed, the Panasonic Document Manager (Image Converter) is
automatically installed in the Printers folder too. This driver is for rasterizing application files such as Word
or Excel for placing them in the Document Manager. To change the default properties, follow the
instructions below:
Windows 98/Me
1. Click the Start button, point to Settings and then click Printers.
2. Right-click on Panasonic Document Manager and select Properties from the dropdown menu.
The Properties dialog box appears.
• Paper/Layout tab
- Paper Size
Sets the document paper size.
- Orientation
Sets the document orientation.
- Resolution
Sets the document resolution.
• Quality tab
- Color
Sets the color document conversion to color or
monochrome.
- Monochrome
Select Normal (Black and White) or Grayscale (Photo) when
converting to monochrome. Also sets the brightness and
contrast.
94
3. Click on the button to save the settings and close the Properties dialog box.
OK
Page 95

Image Converter
Windows NT 4.0
1. Click the Start button, point to Settings and then click Printers.
2. Right-click on Panasonic Document Manager and select Document Defaults from the dropdown
menu. The Document Properties dialog box appears.
• Page Setup Tab
- Paper Size
Sets the document paper size.
- Orientation
Sets the document orientation.
- Color Appearance
Sets the document to color or grayscale.
• Advanced Tab
- Paper Size
Sets the document paper size.
- Orientation
Sets the document orientation.
- Resolution
Sets the document resolution.
- Color Appearance
Sets the document to color or grayscale.
- Metafile Spooling
- Halftone Color Adjustment
3. Click on the button to return to the Printers folder.
OK
System Section
Document Management
95
Page 96

Image Converter
Windows 2000/XP
1. Click the Start button, point to Settings and then click Printers.
2. Right-click on Panasonic Document Manager and select Printing Preferences from the dropdown
menu. The Printing Defaults dialog box appears.
• Layout tab
Sets the document orientation.
• Paper/Quality tab
Sets the document to color or grayscale.
• Advanced button
Sets the paper size, resolution and spooling properties.
96
3. Click on the button to return to the Printers folder.
OK
Page 97

Document Scanner
Main Window
Upon image scanning, an image is imported directly into a document using a TWAIN-compatible application
(image editing software, etc.).
Selecting Acquire Image... in the File menu displays for the Document Scanner dialog box.
1. Preview Window
Displays images of a preview scan. The black frame represents the actual scanning area (Output Size). You may
adjust/select the final scanning area by resizing the black frame over the desired area of the image. The size of the
black frame is shown in the Output Size field.
2. Image Type
Select the type of image to be scanned.
• Monochrome image (no halftone correction)
A method suitable for an image containing mainly text and drawings. Select this type when halftone correction
results in a blurred image.
• Halftone image (error diffusion)
This method, using no uniform pattern in halftone, is suitable for natural images such as photographs and
produces smooth images. The method, although requiring somewhat large file sizes, produces high-quality
images in comparison to the dither method.
• Halftone image (4x4, 8x8 dot dither)
This method, which produces images with a unique uniform pattern, is suitable for photographs.
• Halftone image (4x4 Bayer's dither)
This method, with somewhat lower image quality, reduces file sizes.
• Grayscale image (256 scales)
This method, best suitable to natural images such as photographs, produces tones with high fidelity by no
halftone correction. Compared to halftone image scanning, this method requires longer scanning times and
results in larger file sizes.
3. Resolution
Select the resolution for scanning.
Note: The Standard, Fine and Super Fine resolution are types that is best suitable if you are to send the images
to an ordinary fax machine in the future.
4. Paper Size
Select the size of originals to be scanned. The size and orientation of the preview window changes according to
the selected document size.
5. Lock
Fixes the size of the scanning area (black border) in the preview window, disallowing changing the size.
System Section
Document Management
97
Page 98

Document Scanner
Main Window
6. Scanning Method
Select the scanning method to be used.
• Auto (Flatbed/ADF 1-sided)
Auto select between the Flatbed or the ADF (Automatic Document Feeder) by sensing whether an original is
set on the ADF.
• Flatbed (Platen)
Scan the document set on the Flatbed.
• ADF (1-sided)
Scan the document(s) set on the ADF.
• ADF (2-sided, Long Edge) - Require an optional Inverting ADF installed
Scan both sides of the document(s) automatically with the long edge side of the original set in the ADF.
• ADF (2-sided, Short Edge) - Require an optional Inverting ADF installed
Scan both sides of the document(s) automatically with the short edge side of the original set in the ADF.
7. Slice Level (valid only when monochrome is selected)
Specify the value of distinction between monochrome for monochrome manuscript. Adjust the value according to
density of a manuscript to be scanned.
8. Brightness (valid only when halftone or grayscale is selected)
Adjust the brightness for halftone or grayscale documents.
9. Contrast (valid only when halftone or grayscale is selected)
Adjust the contrast (difference between dark and light) for halftone or grayscale documents.
10. Invert
Scan the image in negative.
11. Edge Enhancement
Scan the image with a highlighted edge.
12. Output Size
Displays size of the scanning image and the size of the scanned file.
The output size is determined by the size of the scanning area (black frame) in the preview window and the
resolution.
13. Unit
Select the unit of measurement (mm, inch, or pixel).
14.
Scan
button
98
Scan an image into the document desktop.
15.
16.
17. Restore Defaults ...
18. Close
Preview
Perform preview scanning and display the image on the preview window.
Zoom In
Zoom in/out for a preview-scan image.
Returns all items to standard settings (default).
Closes the Document Scanner window.
NOTE
button
/ button
Zoom Out
1. The menu for operating the Document Scanner (scanner driver) depends on the application.
Refer to the manuals of the application for details.
2. If a TWAIN-compatible application has not been installed, select Document Scanner from the
Start menu.
Page 99

Document Scanner
Tool Menu
• Adjustment - Gamma Curve
Display a dialog box for adjusting the gamma (color strength characteristics) of an image. (valid only when
halftone or grayscale is selected)
Adjust the gamma curve by dragging the slide bar or entering a value.
Moving the slide bar in the + direction reduces the difference between the highlight (light portion) and
halftone. Moving the slide bar in the - direction reduces the difference between the shadow (dark portion)
and halftone. In either case, the halftone becomes less prominent.
Click the button to apply the changes.
Apply
System Section
Document Management
NOTE
1. Adjustment in the Tool menu becomes valid only if <Halftone> or <Grayscale> have been
selected in <Image Type> on the main window.
99
Page 100

Document Scanner
Tool Menu
• Adjustment - Highlight and Shadow
Displays a dialog box for adjusting the highlight and shadow. (valid only when halftone or grayscale is
selected)
Adjust the highlight and shadow by dragging the slide bar or entering a value. Enhancing the highlight
(bright portion) and the shadow (dark portion) makes clear shades on an image.
Click the button to apply the changes.
• Parameter Reset
Return all settings in the Document Scanner to standard settings (default).
Apply
100
 Loading...