

Panasonic DMR-BCT845, DMR-BST745, DMR-BCT745, DMR-BST740, DMR-BST845 Operating Instructions
...Page 1

Operating Instructions
EG
Blu-ray Disc™ Recorder
Model No. DMR-BCT845
DMR-BCT745
DMR-BCT740
DMR-BST845
DMR-BST745
DMR-BST740
Thank you for purchasing this product.
Please read these instructions carefully before using this product, and save this manual for future use.
• This unit is equipped with two CI/CI Plus slots. They can receive encrypted digital broadcast
services.
Software (Firmware) Update
Blu-ray Disc technology and broadcast services continue to add new features.
As they evolve, firmware updates may be required to support the latest
features. Panasonic strives to continually update firmware as new technology is
released. It’s very important you install the latest updates to maintain proper
operation of your unit.
For details, refer to “Software (Firmware) Update” (> 104) or
http://panasonic.jp/support/global/cs/ (This site is in English only.)
SQT0300
Page 2

Safety precautions
WARNING
Unit
• To reduce the risk of fire, electric shock or
product damage,
- Do not expose this unit to rain, moisture,
dripping or splashing.
- Do not place objects filled with liquids, such as
vases, on this unit.
- Use only the recommended accessories.
- Do not remove covers.
- Do not repair this unit by yourself. Refer
servicing to qualified service personnel.
- Do not let metal objects fall inside this unit.
- Do not place heavy items on this unit.
AC mains lead
• To reduce the risk of fire, electric shock or
product damage,
- Ensure that the power supply voltage
corresponds to the voltage printed on this unit.
- Insert the mains plug fully into the socket
outlet.
- Do not pull, bend, or place heavy items on the
lead.
- Do not handle the plug with wet hands.
- Hold onto the mains plug body when
disconnecting the plug.
- Do not use a damaged mains plug or socket
outlet.
• The mains plug is the disconnecting device.
Install this unit so that the mains plug can be
unplugged from the socket outlet immediately.
Small object
• Keep the Memory Card out of reach of children
to prevent swallowing.
CAUTION
Unit
• This unit utilizes a laser. Use of controls or
adjustments or performance of procedures other
than those specified herein may result in
hazardous radiation exposure.
• Do not place sources of naked flames, such as
lighted candles, on this unit.
• This unit may receive radio interference caused
by mobile telephones during use. If such
interference occurs, please increase separation
between this unit and the mobile telephone.
• This unit is intended for use in moderate
climates.
Placement
• Place this unit on an even surface.
• To reduce the risk of fire, electric shock or
product damage,
- Do not install or place this unit in a bookcase,
built-in cabinet or in another confined space.
Ensure this unit is well ventilated.
- Do not obstruct this unit’s ventilation openings
with newspapers, tablecloths, curtains, and
similar items.
- Do not expose this unit to direct sunlight, high
temperatures, high humidity, and excessive
vibration.
2
SQT0300
Page 3

Batteries
• Danger of explosion if battery is incorrectly
replaced. Replace only with the type
recommended by the manufacturer.
• Mishandling of batteries can cause electrolyte
leakage and may cause a fire.
- Do not mix old and new batteries or different
types at the same time.
- Do not heat or expose to flame.
- Do not leave the battery(ies) in a car exposed
to direct sunlight for a long period of time with
doors and windows closed.
- Do not take apart or short circuit.
- Do not recharge alkaline or manganese
batteries.
- Do not use batteries if the covering has been
peeled off.
- Remove batteries if you do not intend to use
the remote control for a long period of time.
Store in a cool, dark place.
• When disposing of the batteries, please contact
your local authorities or dealer and ask for the
correct method of disposal.
Restriction on use of unauthorized copied
content
This unit adopts the following technology for
copyright protection.
Cinavia Notice
This product uses Cinavia technology to limit
the use of unauthorized copies of some
commercially-produced film and videos and
their soundtracks. When a prohibited use of
an unauthorized copy is detected, a message
will be displayed and playback or copying will
be interrupted. More information about
Cinavia technology is provided at the Cinavia
Online Consumer Information Center at
http://www.cinavia.com
. To request additional
information about Cinavia by mail, send a
postcard with your mailing address to:
Cinavia Consumer Information Center, P.O.
Box 86851, San Diego, CA, 92138, USA.
Supplied accessories
Please check and identify the supplied
accessories.
(Product numbers are correct as of July 2014.
These may be subject to change.)
Remote control (N2QAYB000986): 1pc.
Batteries for remote control: 2 pcs.
AC mains lead: 1pc.
[BCT845] [BCT745] [BCT740]
RF coaxial cable: 1pc.
• Do not use AC mains lead with other equipment.
About descriptions in these operating
instructions
• These operating instructions are applicable to models
DMR-BCT845, DMR-BCT745, DMR-BCT740, DMRBST845, DMR-BST745 and DMR-BST740. The
illustrations in these Operating Instructions show images
of DMR-BCT845 unless otherwise indicated.
• [BCT845] :
indicates features applicable to DMR-BCT845 only.
• [BCT745] [BCT740] :
indicates features applicable to DMR-BCT745/DMRBCT740 only.
• [BST845] :
indicates features applicable to DMR-BST845 only.
• [BST745] [BST740] :
indicates features applicable to DMR-BST745/DMRBST740 only.
• Pages to be referred to are indicated as “> ±±”.
SQT0300
3
Page 4

Table of contents
Safety precautions . . . . . . . . . . . . . . . . . . . . . . 2
Supplied accessories . . . . . . . . . . . . . . . . . . . . 3
Getting started
HDD and media information. . . . . . . . . . . . . . . 6
- Recordable/playable contents . . . . . . . . . . . . . . . . 6
- Recording mode . . . . . . . . . . . . . . . . . . . . . . . . . 8
-Notes. . . . . . . . . . . . . . . . . . . . . . . . . . . . . . . . 9
Unit care . . . . . . . . . . . . . . . . . . . . . . . . . . . . . 11
Control reference guide . . . . . . . . . . . . . . . . . 12
CI (Common Interface) module . . . . . . . . . . . 14
- About CI Plus compatible broadcast . . . . . . . . . . . 15
Connection . . . . . . . . . . . . . . . . . . . . . . . . . . . 16
- [BCT845] [BCT745] [BCT740] Basic connections . . . . . . 16
- [BST845] [BST745] [BST740] Basic connections . . . . . . 17
- General information for Basic connections . . . . . . . 18
- Amplifier/receiver connections . . . . . . . . . . . . . . . 19
- Network connection . . . . . . . . . . . . . . . . . . . . . . 21
Settings . . . . . . . . . . . . . . . . . . . . . . . . . . . . . 22
- TV operation buttons . . . . . . . . . . . . . . . . . . . . . 22
- [BCT845] [BCT745] [BCT740] Easy Setting . . . . . . . . . . 23
- [BST845] [BST745] [BST740] Easy Setting . . . . . . . . . . 25
- Easy Network Setting. . . . . . . . . . . . . . . . . . . . . 26
FUNCTION MENU screen . . . . . . . . . . . . . . . 28
Watching broadcasts
Watching broadcasts . . . . . . . . . . . . . . . . . . . 29
- Using Channel List . . . . . . . . . . . . . . . . . . . . . . 30
- Using TV Guide system . . . . . . . . . . . . . . . . . . . 30
- Using channel information . . . . . . . . . . . . . . . . . . 31
- Operations while watching broadcast . . . . . . . . . . . 31
- REWIND LIVE TV/PAUSE LIVE TV. . . . . . . . . . . . 33
Recording
Recording TV programmes . . . . . . . . . . . . . . 34
- Operation during Recording. . . . . . . . . . . . . . . . . 35
- Notes for recording of an encrypted broadcast . . . . . 36
Timer recording . . . . . . . . . . . . . . . . . . . . . . . 38
- Manually programming timer recording. . . . . . . . . . 39
- Timer recording options . . . . . . . . . . . . . . . . . . . 39
- Timer recording from channel information . . . . . . . . 40
- Notes on timer recording. . . . . . . . . . . . . . . . . . . 40
- To confirm and edit a timer programme . . . . . . . . . 41
Keyword Recording . . . . . . . . . . . . . . . . . . . . 42
Playing back video
Playing titles on the HDD . . . . . . . . . . . . . . . . 44
- DIRECT NAVIGATOR screen . . . . . . . . . . . . . . . 44
- Playing Keyword Recording titles . . . . . . . . . . . . . 47
Playing titles on the media . . . . . . . . . . . . . . . 48
- Notes for BD-Live discs . . . . . . . . . . . . . . . . . . . 49
Operation during play. . . . . . . . . . . . . . . . . . . 50
- General operations . . . . . . . . . . . . . . . . . . . . . . 50
- 3D video playback. . . . . . . . . . . . . . . . . . . . . . . 52
Editing video
Deleting/Editing recorded titles . . . . . . . . . . . 54
- Deleting . . . . . . . . . . . . . . . . . . . . . . . . . . . . . 54
- Editing . . . . . . . . . . . . . . . . . . . . . . . . . . . . . . 54
Copying video
Copying titles . . . . . . . . . . . . . . . . . . . . . . . . . 59
- Copying from media other than HDD with DIRECT
NAVIGATOR
- Copying titles with copying list . . . . . . . . . . . . . . . 61
- Notes for copying . . . . . . . . . . . . . . . . . . . . . . . 64
- Copying a finalised disc . . . . . . . . . . . . . . . . . . . 65
- Copying Title Playing . . . . . . . . . . . . . . . . . . . . . 66
- Copying HD Video (AVCHD) to the DVD-R in High
Definition
. . . . . . . . . . . . . . . . . . . . . . . . . . 61
. . . . . . . . . . . . . . . . . . . . . . . . . . . . 66
Photo and Music
Playing photos . . . . . . . . . . . . . . . . . . . . . . . . 67
- Photo Menu screen . . . . . . . . . . . . . . . . . . . . . . 67
- Photo play option . . . . . . . . . . . . . . . . . . . . . . . 68
- Slideshow settings . . . . . . . . . . . . . . . . . . . . . . 68
Editing photos . . . . . . . . . . . . . . . . . . . . . . . . 69
Copying photos . . . . . . . . . . . . . . . . . . . . . . . 70
- Selecting and copying the photos . . . . . . . . . . . . . 70
- Copying automatically . . . . . . . . . . . . . . . . . . . . 70
Playing music . . . . . . . . . . . . . . . . . . . . . . . . . 71
- Copying music (MP3) to HDD . . . . . . . . . . . . . . . 71
- Playing music recorded on HDD . . . . . . . . . . . . . . 72
- Operations during music play. . . . . . . . . . . . . . . . 73
Editing music/playlist . . . . . . . . . . . . . . . . . . . 74
Network
Smart Home Networking (DLNA) . . . . . . . . . . 75
- Using this unit as Server . . . . . . . . . . . . . . . . . . . 75
- Using this unit as Client . . . . . . . . . . . . . . . . . . . 76
- Using this unit as Media Renderer. . . . . . . . . . . . . 77
- Using Smart Home Networking (DLNA) with
Wi-Fi Direct
- Using Miracast
TM
. . . . . . . . . . . . . . . . . . . . . . . . . . 78
TM
. . . . . . . . . . . . . . . . . . . . . . . . 78
Remote Viewing and Recording . . . . . . . . . . 79
Enjoying Network Service . . . . . . . . . . . . . . . 79
With Other Equipment
Recording from external equipment. . . . . . . . 80
Copying the HD Video (AVCHD) . . . . . . . . . . 81
Registering the external HDD (USB HDD)
- Connecting the USB HDD . . . . . . . . . . . . . . . . . . 82
- Disconnecting the USB HDD . . . . . . . . . . . . . . . . 82
- Registering the USB HDD . . . . . . . . . . . . . . . . . . 83
. . . . . . 82
4
SQT0300
Page 5

Convenient functions
VIERA Link functions . . . . . . . . . . . . . . . . . . . 84
Playback menu. . . . . . . . . . . . . . . . . . . . . . . . 85
Basic Settings . . . . . . . . . . . . . . . . . . . . . . . . 87
- Common procedures . . . . . . . . . . . . . . . . . . . . . 87
- [BCT845] [BCT745] [BCT740] DVB Tuning . . . . . . . . . . 89
- [BST845] [BST745] [BST740] DVB Tuning . . . . . . . . . . 91
- HDD / Disc / USB HDD. . . . . . . . . . . . . . . . . . . . 93
-Picture . . . . . . . . . . . . . . . . . . . . . . . . . . . . . . 96
- Sound . . . . . . . . . . . . . . . . . . . . . . . . . . . . . . 96
- Display . . . . . . . . . . . . . . . . . . . . . . . . . . . . . . 97
- Connection . . . . . . . . . . . . . . . . . . . . . . . . . . . 98
-Network . . . . . . . . . . . . . . . . . . . . . . . . . . . . . 99
- Others . . . . . . . . . . . . . . . . . . . . . . . . . . . . . 101
- Language code list . . . . . . . . . . . . . . . . . . . . . 103
Software (Firmware) Update . . . . . . . . . . . . 104
- Update software (firmware) of this unit . . . . . . . . . 104
- CI Plus compatible CAM software (firmware)
. . . . . . . . . . . . . . . . . . . . . . . . . . . . . 104
update
Other operations . . . . . . . . . . . . . . . . . . . . . 105
- Media management . . . . . . . . . . . . . . . . . . . . . 105
- HOLD function . . . . . . . . . . . . . . . . . . . . . . . . 106
- Entering text . . . . . . . . . . . . . . . . . . . . . . . . . 107
- Switching the aspect ratio of the screen . . . . . . . . 107
Troubleshooting
Troubleshooting guide . . . . . . . . . . . . . . . . . 108
- General operation . . . . . . . . . . . . . . . . . . . . . . 108
- Displays . . . . . . . . . . . . . . . . . . . . . . . . . . . . 109
- TV screen and video . . . . . . . . . . . . . . . . . . . . 109
- Sound . . . . . . . . . . . . . . . . . . . . . . . . . . . . . 110
- Recording, timer recording and copying . . . . . . . . 110
-Play. . . . . . . . . . . . . . . . . . . . . . . . . . . . . . . 111
-Edit . . . . . . . . . . . . . . . . . . . . . . . . . . . . . . . 112
- Photo . . . . . . . . . . . . . . . . . . . . . . . . . . . . . . 112
-USB. . . . . . . . . . . . . . . . . . . . . . . . . . . . . . . 112
-TV Guide . . . . . . . . . . . . . . . . . . . . . . . . . . . 113
- Broadcast . . . . . . . . . . . . . . . . . . . . . . . . . . . 113
- VIERA Link . . . . . . . . . . . . . . . . . . . . . . . . . . 114
-Network . . . . . . . . . . . . . . . . . . . . . . . . . . . . 114
-Reset. . . . . . . . . . . . . . . . . . . . . . . . . . . . . . 114
- Messages on the front panel display . . . . . . . . . . 115
- When you experience problems with Easy Network
. . . . . . . . . . . . . . . . . . . . . . . . . . . . . 117
Setting
Reference
Specifications . . . . . . . . . . . . . . . . . . . . . . . . 118
Licenses . . . . . . . . . . . . . . . . . . . . . . . . . . . . 124
Index . . . . . . . . . . . . . . . . . . . . . . . . . . . . . . 126
Getting started
Watching broadcasts
Recording
Playing back video
Editing video
Copying video
Photo and Music
Network
With Other Equipment
Convenient functions
Troubleshooting
Reference
SQT0300
5
Page 6
Getting started
Getting started
HDD and media information
For more details, refer also to the specifications. (> 118)
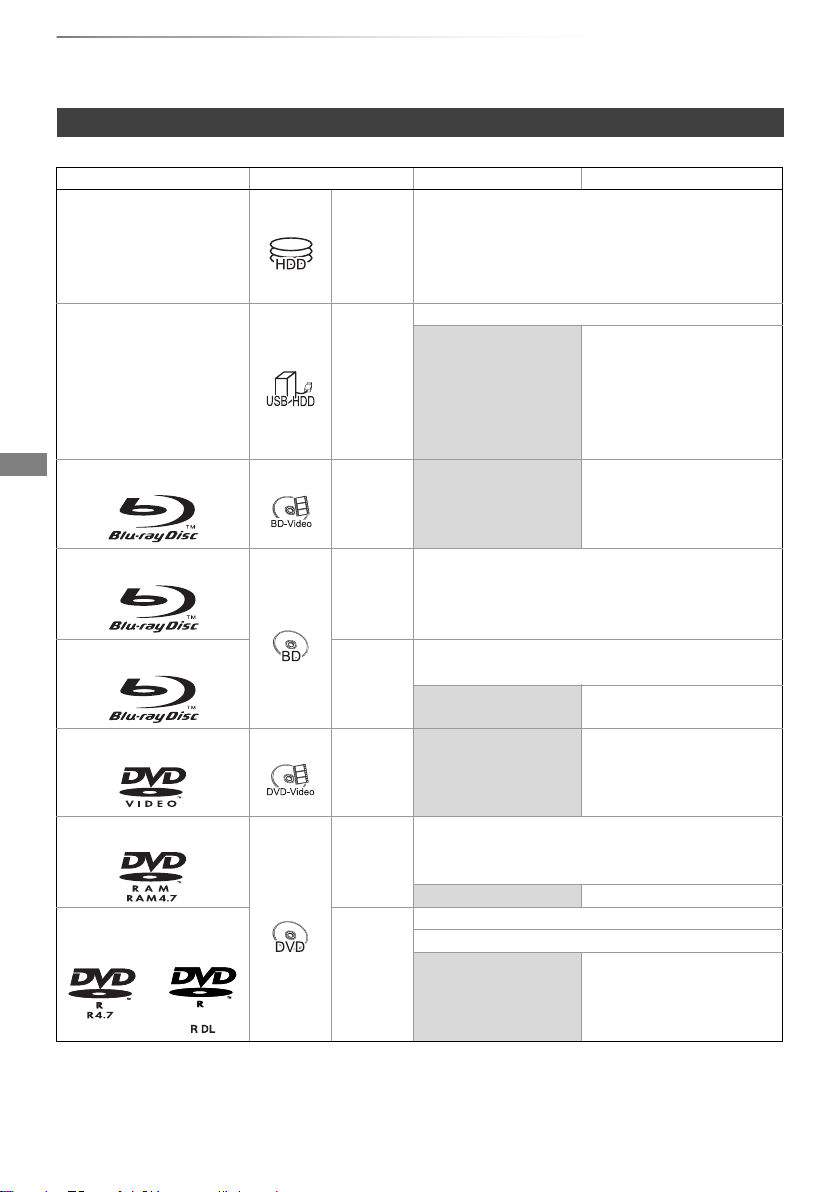
Recordable/playable contents
Media type Standard symbol Recordable contents Playable contents
• Video
Built-in hard disk drive
§1
(HDD)
External hard disk drive
(USB HDD)
§1
(> 9)
BD-Video
[HDD]
[USB_HDD]
[BD-V]
• AVCHD/AVCHD 3D
•JPEG
• MPO (3D photo)
•MP3
§2
• Video
–
–
• AVCHD/AVCHD 3D
•MP4
• Xvid
•JPEG
• MPO (3D photo)
•MP3
•Video
(–: Impossible)
§3, 4
• MPEG2
•MKV
BD-RE
BD-R
DVD-Video
DVD-RAM
DVD-R
DVD-R DL
§1
[BD-RE]
• Video
• AVCHD/AVCHD 3D
•JPEG
• MPO (3D photo)
• Video
[BD-R]
• AVCHD/AVCHD 3D
–
§5
§3
• Xvid • MKV
•Video
[DVD-V] –
§1
[RAM]
• Video
•JPEG
• MPO (3D photo)
–
•AVCHD
§3
• Video
• AVCHD
[DVD-R]
§3
• Xvid • MKV
–
•JPEG
• MPO (3D photo)
•MP3
6
SQT0300
Page 7
Getting started
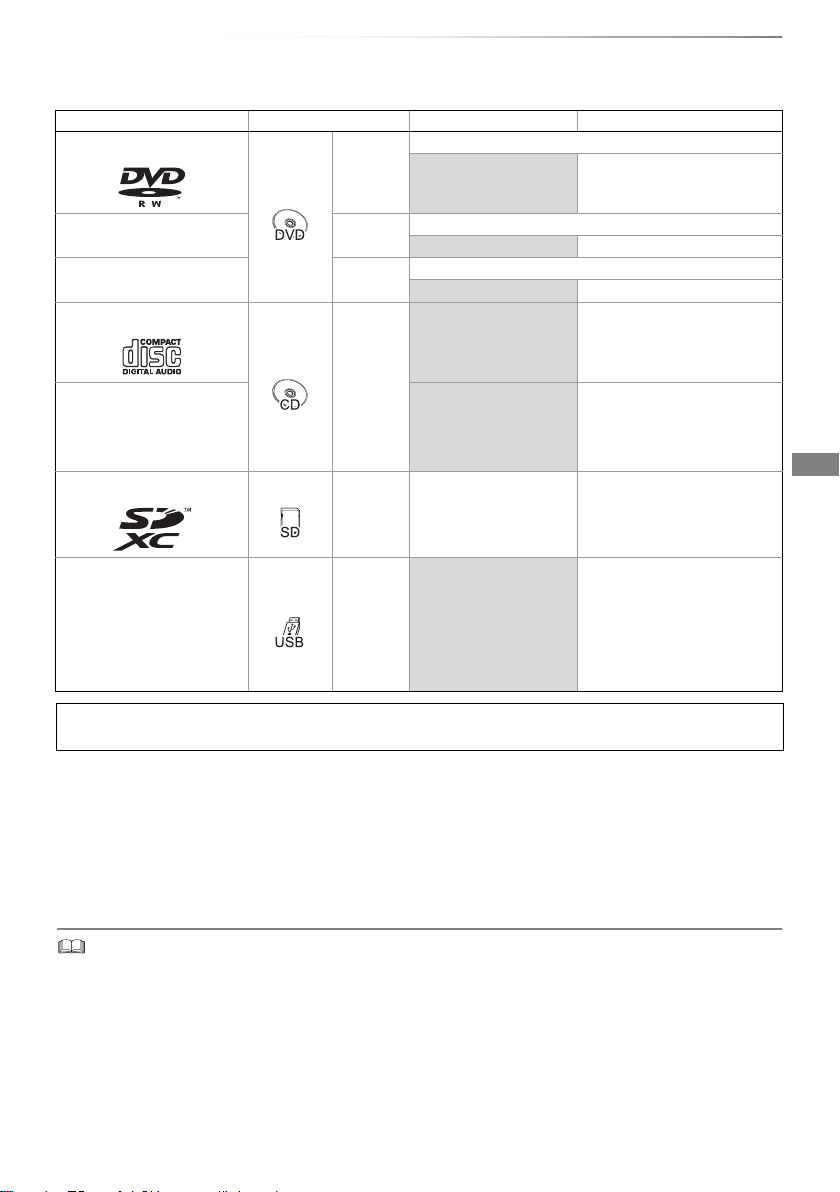
(–: Impossible)
Media type Standard symbol Recordable contents Playable contents
DVD-RW
§1
[DVD-RW]
• Video
• AVCHD
§3
–
+R/+R DL [+R]
§1
+RW
Audio CD (CD-DA)
[+RW]
• Video
• Video
–
–
• AVCHD
• AVCHD
§3
§3
•Music
–
CD
(including CD-R/RW)
[CD]
–
•Xvid •MKV
•JPEG
• MPO (3D photo)
•MP3
SD Cards
§1
[SD]
•JPEG
• MPO (3D photo)
• AVCHD/AVCHD 3D
•MP4 •JPEG
• MPO (3D photo)
• AVCHD/AVCHD 3D
USB memory [USB]
•MP4
–
•Xvid
•JPEG
•MPEG2
•MKV
• MPO (3D photo)
•MP3
Playable contents as DLNA client
Refer to “Playable contents”. (> 77)
§1
Rewritable media
§2
It cannot be recorded directly. (Only compatible with copying from the built-in HDD)
§3
Recorded with AVCHD format compatible devices (Panasonic video camera, etc.). It may not be
able to play back, add, or edit depending on the device.
§4
It cannot be played back directly from the USB HDD or USB memory. Playback is possible by
copying to the built-in HDD. (> 81)
§5
Includes finalised DVD-R, DVD-R DL, DVD-RW, +R and +R DL.
§3
§3, 4
• [+RW] This unit cannot record to 8X Speed +RW disc.
• The producer of the disc can control how d iscs are played. So you may not always be able to control play as described in
these operating instructions. Read the disc’s instructions carefully.
• With certain recording states and folder structures, the play order may differ or playback may not be possible.
SQT0300
7
Page 8
Getting started
HDD and media information
About extension of files
MP4: “.MP4” “.mp4” “.MOV” “.mov”
MPEG2: “.MPG” “.mpg” “.MPEG” “.mpeg” “.M2TS” “.m2ts”
Xvid: “.AVI” “.avi”
Subtitle text files: “.SRT” “.srt” “.SUB” “.sub” “.TXT” “.txt”
MKV: “.MKV” “.mkv”
Subtitle text files: “.SRT” “.srt” “.SSA” “.ssa” “.ASS” “.ass”
JPEG: “.JPG” “.jpg”
MPO: “.MPO” “.mpo”
MP3: “.MP3” “.mp3”
• The video file and subtitle text files are inside th e same folder, and the file names are the same except for the file extensions.
• Some files may not be played back even if they have these extensions.
“.MTS” “.mts” “.TS” “.ts”
“.SUB” “.sub” “.TXT” “.txt”
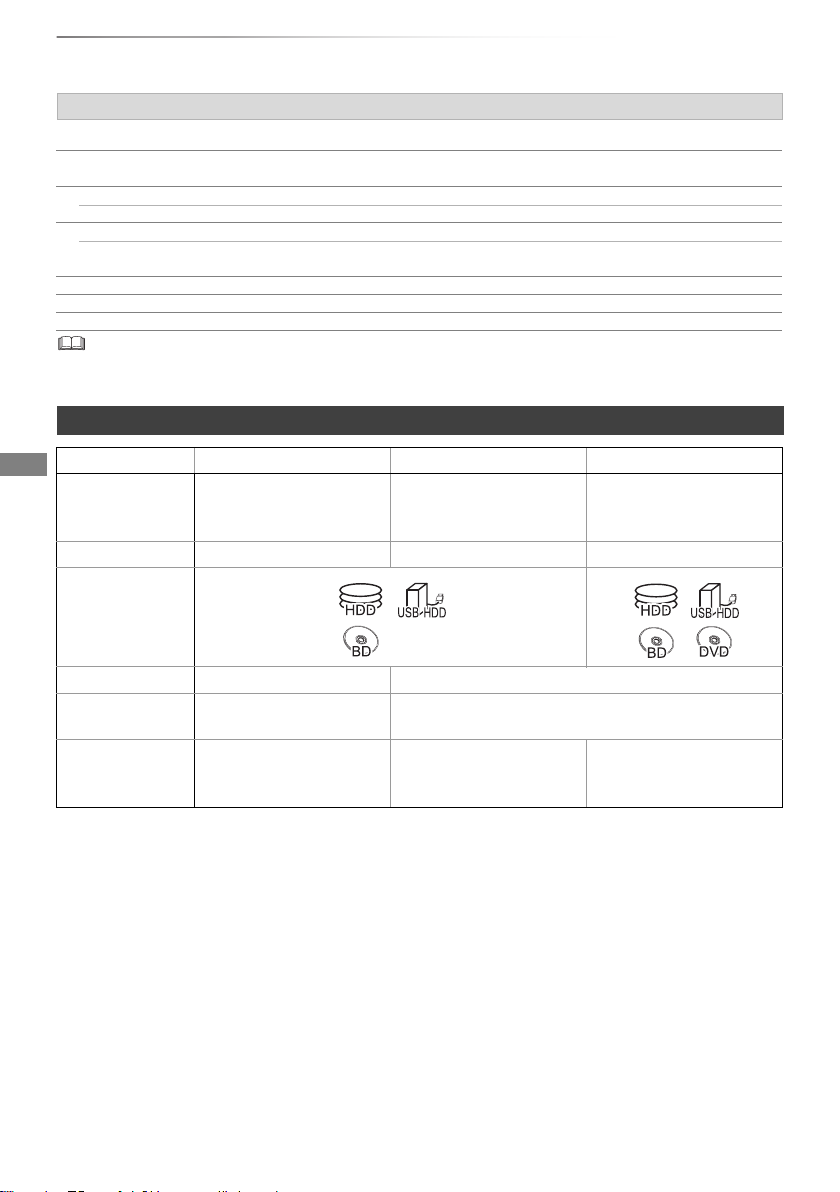
Recording mode
Recording Mode DR HG/HX/HE/HL/HM XP/SP/LP/EP/FR
Feature Programmes can be
recorded in a nearly
perfect broadcasted state.
Quality Quality as the broadcast
Recordable
media
Recording can be done
with reduced recording
volume in HD quality.
High definition
§1
Recording can be done
with reduced recording
volume in SD quality.
Standard definition
Multiple audio Record all multiple audio Record only one audio
Subtitles /
Can be recorded
Can be recorded (only one subtitle or teletext)
Teletext
Surround audio Surround audio as the
broadcast
Surround audio produced
by conversion of
Stereo audio
broadcast audio format
§1
The SD quality programme cannot be converted to HD quality.
§2
You cannot select during play whether it appears or disappears.
Approximate recording times
Refer to “Recording modes and approximate recording times”. (> 121)
• FR (Flexible Recording Mode)
The unit automatically selects the best possible recording rate between XP mode and EP mode.
8
SQT0300
§2
Page 9

Getting started
Notes
Notes for an External HDD (USB HDD)
You can use an external HDD in the following two
ways. (A single HDD cannot handle those two
ways simultaneously.)
• For recorded titles
Moving titles in the built-in HDD to a USB HDD
to save the capacity of the built-in HDD.
• The USB HDD must first be registered on this
unit. (> 82)
• For data files
Playing back MP4, JPEG, MP3, etc. (data files)
in a USB HDD with this unit.
• The USB HDD must be formatted in FAT12,
FAT16, FAT32 and NTFS file system.
• The USB HDD over 2 TB is not usable.
• This unit supports USB 2.0 High Speed.
• Although this unit can use USB 3.0 dev ices as USB 2.0
devices, in certain cases USB 3.0 devices cannot be used
due to differing connector shape, larger current ratings, etc.
(Use of USB 2.0 devices is recommended.)
• This unit does not recognize USB HDDs other than those in
which the size of one sector is 512-bytes or 4096-bytes.
(For details, consult the dealer of your USB HDD.)
• This unit does not guarantee connectio n with all USB
devices.
Notes for the disc
• Region management information
The unit can play back BD-Video/DVD-Video
discs of the following regions codes, including
“ALL”:
e.g., BD-Video DVD-Video
• Disc recorded on another device
• It may be necessary to finalize the disc, create
Top Menu or close the session on the
equipment used for recording to play on this
unit.
• [DVD-RW] Recorded in DVD Video Recording
(DVD-VR) format
- This unit can play back and copy to HDD.
- This unit does not support editing or
recording.
- It is possible to record and edit with
DVD-Video (DVD-V) format by formatting
discs with this unit.
• Recording may not be possible to discs which
were used for recording on other equipment.
• Play on other players
• [BD-RE] [BD-R] When these discs cannot be
played back on other Blu-ray Disc players, etc.
(e.g., title recorded with HE-AAC audio
format), convert the recording mode to play
them back. (> 56, File Conversion)
• [DVD-R] [DVD-RW] [+R] Finalisation is needed.
(> 106)
• [+RW] If the disc failed to play on other
equipment, we recommend you create a Top
Menu (> 106).
• [DVD-R] The disc created in AVCHD format can
only be played back on AVCHD compatible
equipment.
• Regarding 8 cm Disc
This unit cannot record or edit the 8 cm disc.
Only playback or copy to the HDD is possible.
• Discs that cannot be played
- DVD-RAM that cannot be removed from their cartridges
- 2.6 and 5.2 GB DVD-RAM, 12 cm
- DVD-Audio
- HD DVD
- Super Video CD, Super Audio CD, Video CD
- CD-ROM, Photo CD, PD, etc.
• Operation and sound quality of CDs th at do not conform to
CD-DA specifications (copy control CDs, etc.) cannot be
guaranteed.
SQT0300
9
Page 10
Getting started
DO
DO NOT
DO DO NOT
HDD and media information
Notes for the SD cards
• Compatible SD card
- SD Memory Card
(from 8 MB to 2 GB, FAT12 and FAT16
formats)
- SDHC Memory Card
(from 4 GB to 32 GB, FAT32 format)
- SDXC Memory Card
(48 GB, 64 GB, exFAT format)
• Using miniSD card or microSD card
Mini-type and micro-type cards can also be
used, but must be used with adaptor cards
(optional).
To format an SD card
Refer to “Format Disc/Format Card”. (> 105)
• Usable memory is slightly less than the card capacity.
• If the SD card is formatted on other equip ment, the time
necessary for recording may be longer or the card may not
be able to be used on this unit. In these cases, format the
card on this unit.
• SDHC Memory Cards and SDXC Memory Cards can b e
used in equipment that is compatible with the appropriate
cards. (SDHC Memory Cards can also be used in
equipment compatible with SDXC Memory Cards)
Notes for the USB memories
USB memories support FAT12, FAT16, FAT32
and NTFS file systems.
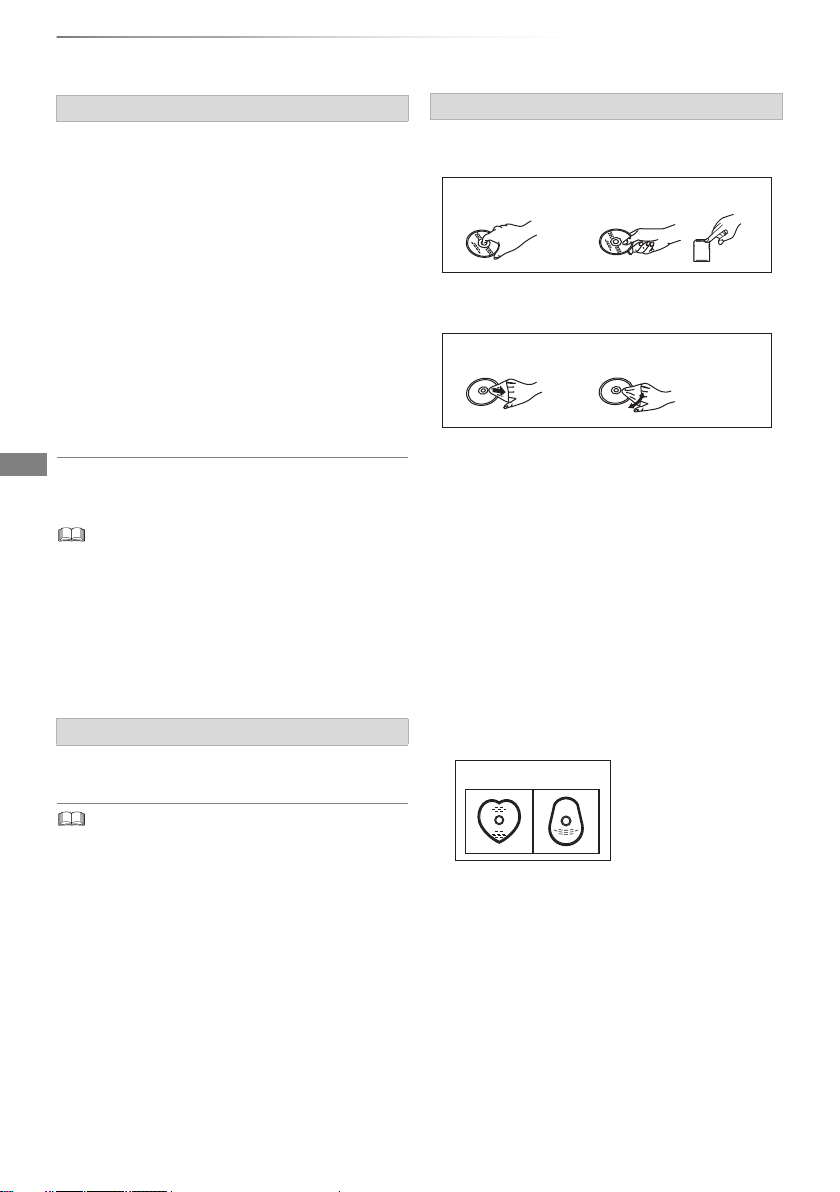
Media handling
• Do not touch the recorded surface of the discs
or the terminal surface of the SD cards.
• If there is dirt or condensation on the disc, wipe
with a damp cloth and then wipe dry.
• Do not attach labels or stickers to discs.
• Do not use disc cleaning sprays, benzine,
thinner, static electricity prevention liquids or
any other solvent.
• Do not use ballpoint pens or other hard writing
implements, when writing on the label side of
the disc.
• Do not drop, stack, or impact discs.
• Do not place objects on discs.
• Do not use the following discs:
- Discs with exposed adhesive from removed
stickers or labels (rental discs, etc.).
- Discs that are badly warped or cracked.
- Irregularly shaped discs.
DO NOT
• The USB memory over 2 TB is not usable.
• This unit supports USB 2.0 High Speed.
• This unit does not guarantee connectio n with all USB
devices.
10
SQT0300
• Do not expose the terminals of the SD card to
water, garbage or other strange things.
• Do not place in the following areas:
- In hot places, such as under the direct
sunlight.
- In very dusty or humid areas.
- Locations susceptible to significant difference
in temperature (condensation can occur).
- Where static electricity or electromagnetic
waves occur.
Page 11

Unit care
Getting started
HDD/USB HDD handling care
• The HDD is a high precision device
The HDD is a high precision recording
instrument and is easily susceptible to damage.
Therefore, be careful of the following points
while the unit is turned on, especially during
operation, otherwise the HDD and the recorded
content may be damaged:
- Do not subject the unit to any vibration and
shock.
- Do not remove the AC mains lead from the
household mains socket.
• The HDD is a temporary storage device
• The HDD is not an everlasting storage device.
It is recommended to save the recorded
content on a disc or to keep the original data or
CDs that they were copied from.
• If you notice a problem with the HDD such as
repetitive strange sounds, immediately save
(backup) all content and request service. If you
continue using the HDD with a problem, the
unit or the recorded content will be damaged.
• If the HDD or USB HDD is damaged, the
recorded content cannot be recovered.
Setup precautions
• Place the unit on a surface that is flat and
not subject to vibration or impact.
• Do not place on anything that generates heat
like a Set Top Box, etc.
• Place in an area where condensation does
not occur. Conditions where condensation
may occur
- When there is an extreme change in
temperature (e.g., when subjected to an air
conditioner or when cooled air directly impacts
the unit).
- When there is high humidity or a lot of steam
in the room.
In the above situation, without turning the unit
on, let the unit adjust to the room temperature
and wait 2–3 hours until condensation is gone.
• The unit may breakdown if cigarette smoke
or bug spray/vapour, etc. gets inside the
unit.
When moving the unit
Before moving the unit, ensure the disc tray is
empty.
1 Switch the unit to standby mode. (Wait until
“Goodbye” disappears from the display.)
2 Remove the AC mains lead from the
household mains socket.
3 Move only after the unit has come to a
complete stop (approx. 3 minutes) in order to
avoid subjecting to vibration and shock. (Even
after the unit is switched to standby mode, the
HDD continues operating for a short time.)
Cleaning
• This unit
- Wipe with a soft, dry cloth.
- Never use alcohol, paint thinner or benzine to
clean this unit.
- Before using chemically treated cloth, carefully
read the instructions that came with the cloth.
• This unit’s lens
• Use the Lens cleaner (optional) to clean the
unit’s lens.
Lens cleaner: RP-CL720AE
• This lens cleaner may not be available for
sale in all countries, e.g. not available in
Germany, please consult your Panasonic
dealer for advice.
When requesting this unit for repair
The registration of the USB HDD may be
cancelled in the process of repairing this unit.
You can use the USB HDD again by
re-registering, but all recorded content already on
the USB HDD will be lost. In such cases, the
recorded content (data) cannot be recovered.
To dispose or transfer this unit
This unit may contain private information. Before
disposing of or transferring this unit, perform the
following to delete the data, including personal or
secret information:
- Format HDD (> 87, 95)
- Perform “Shipping Condition” (> 87, 103)
SQT0300
11
Page 12

Getting started
R6/LR6, AA
(Alkaline or manganese batteries)
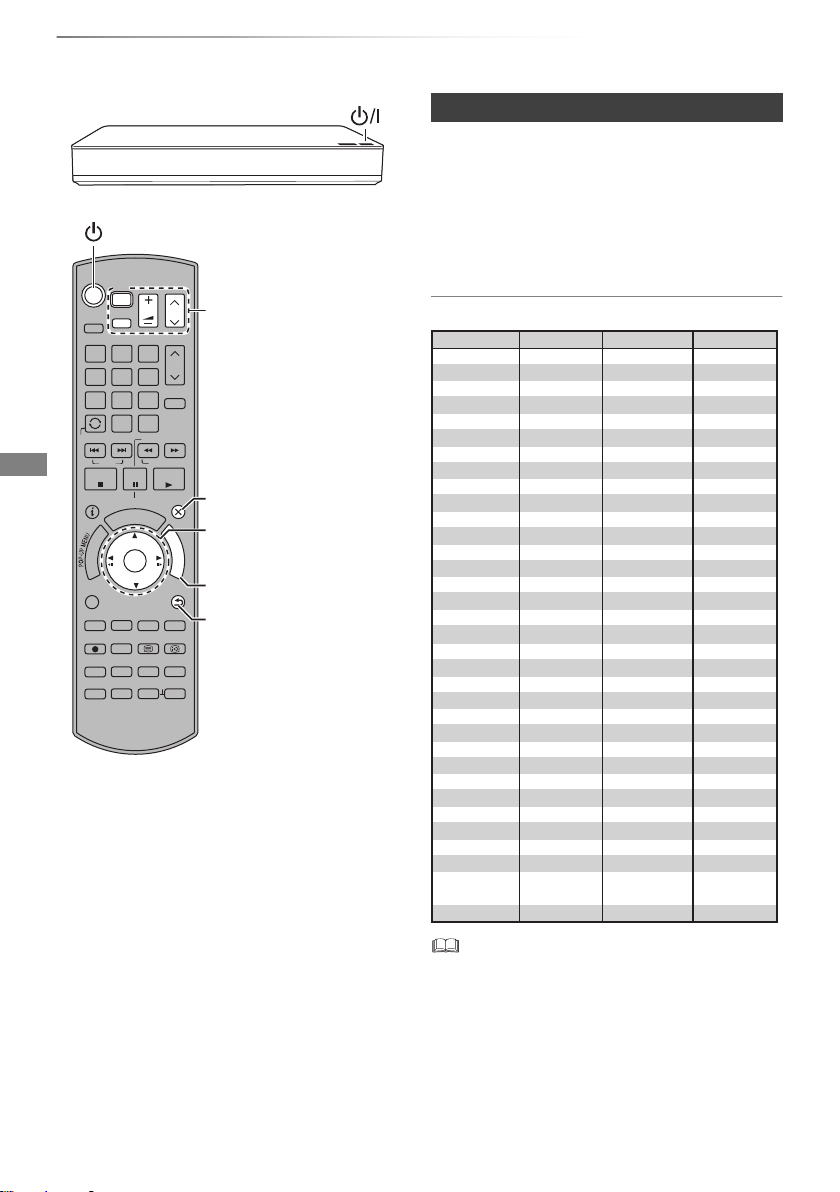
Control reference guide
Instructions for operations are generally described using the remote control.
Remote control
TV
INPUT
AV
abc
2
ghi
jkl
5
p
tuv
qrs
8
0
SKIP
PAUSE
PAUSE LIVE TV
U
G
R
O
T
A
G
I
V
A
N
T
OK
C
R
I
D
REC MODE
CHAPTER
DEL
VOL
def
3
mno
6
w
xyz
9
RADIO/
TV
SLOW/SEARCH
REWIND LIVE TV
I
D
E
TIME SLIP
MANUAL SKIP
-10s +60s
DRIVE
SELECT
1
4
7
LAST VIEW
STOP
STATUS
E
OPTION
REC TEXT STTL
PROG/CHECK
INPUT SELECT
CH
PAGE
CH
INTERNET
PLAY/x1.3
EXIT
F
U
N
C
T
I
O
N
M
E
N
U
RETURN
AUDIO
9 Show DIRECT NAVIGATOR, Top Menu,
Pop-up Menu (> 44)
: Show OPTION menu (> 54, 69, 74)
; Colour buttons (Use in accordance with
instruction on the screen.)
< Start recording (> 34, 80)
= Select a conversion mode/recording mode
(> 34, 80)
> Show the Timer Recording screen (> 39)
? Create chapter (> 51)
@ Input select (> 29, 80)
A To delete unwanted recorded titles, timer
programmes, photos or music (> 54)
B TV operation buttons (> 22)
C Channel select (> 29)/Change pages in the
DIRECT NAVIGATOR screen etc.
D Show the Network Service screen (> 79)
E Switching to the radio channel list (> 29)
F Exit the menu screen
G Show the TV Guide screen (> 30)
H Show the FUNCTION MENU screen (> 28)
I Return to previous screen
J Show subtitles (> 31,
K Show Teletext (> 32, 52)
L Select audio (> 31, 52)
M Skip the specified time (> 51)
N Skip approx. 1 minute forward (> 51)
O Skip approx. 10 seconds backward (> 51)
52)
1 Transmit the remote control signal
• Point it at remote control signal sensor on
this unit. (> 13)
2 Switch the unit from on to standby mode or
vice versa
3 Select drive (HDD, BD, SD or USB)
4 Select channels and title numbers, etc./Enter
numbers or characters
5 Switch to the previously watched channel
(> 29)
6 Basic operations for recording and play,
REWIND LIVE TV/PAUSE LIVE TV (> 33)
7 Show Information (> 31, 45, 50)
8 Selection/OK, Frame-by-frame (> 51)
12
SQT0300
Insert batteries
Insert so the poles (i and j) match those in the
remote control.
Page 13

Getting started
Display
Pull to flip down the
front panel.
SD card
USB memory
Disc
234
910
67
8
5
1
Main unit
1 Remote control signal sensor
• Angle: Approx. 20° up and down, 30° left and
right
• Distance: Within approx. 7 m in front of the
unit
2 Open/close disc tray
3 Standby/on switch (Í/I)
Press to switch the unit from on to standby
mode or vice versa. In standby mode, the unit
is still consuming a small amount of power.
4 CI module eject button (> 14)
5 CI (Common Interface) slot (> 14)
• While writing to/reading from the media, d o not switch the
unit to standby mode or remove the media. Such action
may result in loss of the media contents.
• When inserting the media, ensure that it is facing the right
way up.
Display
1 Main display section indicator
- Current time
- Name of a broadcasting station
- Playback counter
- Various messages (> 115), etc.
2 Drive (HDD, BD or SD) indicator
3 Recording indicator
• The indicator will light up while recording.
• The indicator will blink while recording is
paused and before recording starts.
4 Playback indicator
5 SD card slot indicator
6 USB port indicator
7 Disc indicator
8 Copying indicator
9 Remote control signal indicator
10 Timer recording indicator
This indicator lights up when the timer
recording standby or Keyword Recording
§
standby is activated.
§
[BCT845] [BST845] only
6 Disc tray
7 USB port
8 SD card slot
• When removing the SD card, press on the
centre of the card and pull it straight out.
SQT0300
13
Page 14
Getting started
CAM
Smart Card
CI module
CI (Common Interface) slot
This unit
CI module
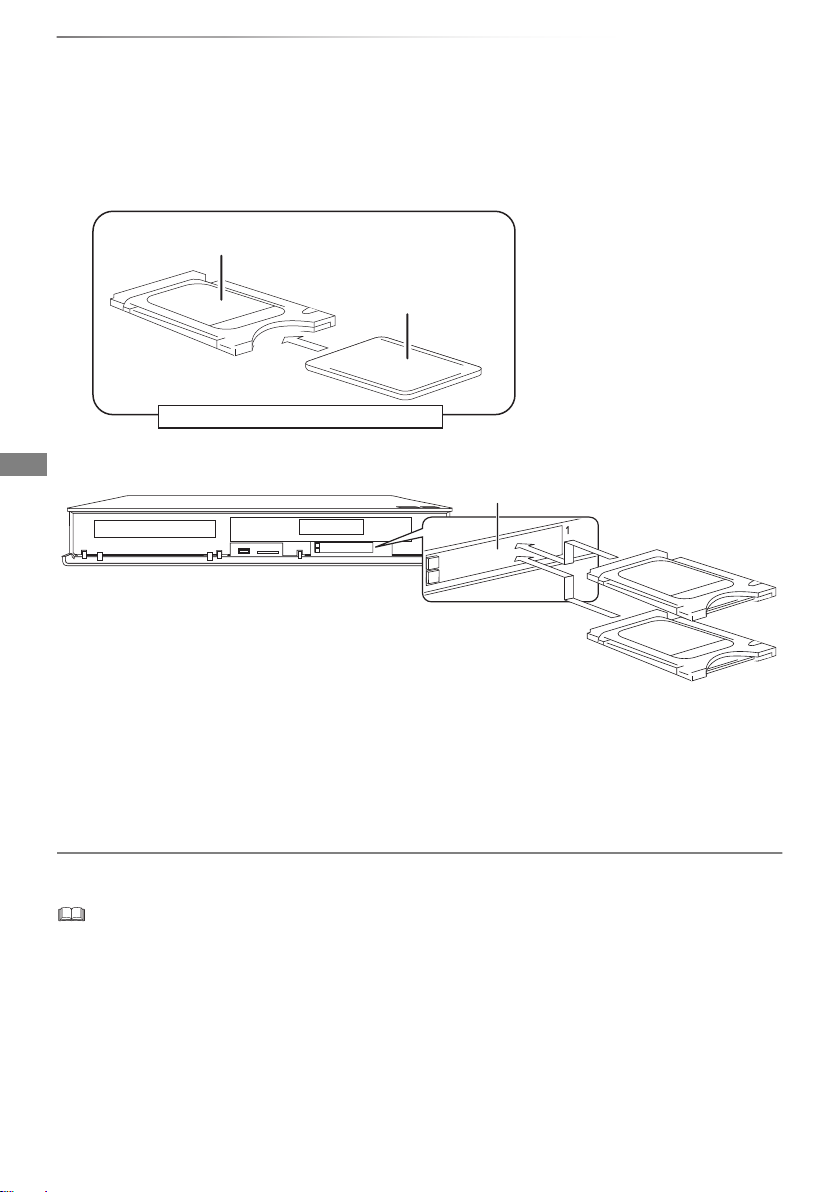
CI (Common Interface) module
An appropriate CI module is required to view or record the encrypted broadcast.
You need a CI module, CAM (Conditional Access Module) together with a certified Smart Card, and a
subscription with the corresponding broadcaster.
• If not viewing/recording an encrypted broadcast, you do not need to insert the CI module.
1 Insert the certified Smart Card into the CAM (both optional).
2 Insert the CI module into the CI (Common Interface) slot of this unit.
TV service encryption is automatically decrypted and the broadcast can be viewed or recorded. (The
recording might be prohibited by broadcasters.)
• Some CAMs may request a PIN. If prompted to enter a PIN code, enter the PIN code with the number
buttons.
• If the PIN is not entered, timer recording may not work correctly. The PIN for timer recording can be
entered later. (> 87, 94, PIN Entry for Decrypt Recording)
Notes for recording of an encrypted broadcast (> 36)
• You can insert one or two different CAMs with Smart Cards into this unit.
• Be sure to insert the CI module horizontally into the slot.
• Insert the CAM and the Smart Card with the correct direction.
• When removing the CI module, press the CI module eject button and pull it straight out.
• For more details, see the manual of the CAM and Smart Card, or consult the dealer.
• The Common Interface supports the modules that comply with DVB Specification and CI Plus Specification.
• Turn off the unit before you insert or remove the CI module.
14
SQT0300
Page 15
Getting started
About CI Plus compatible broadcast
“CI Plus” is a technical specification that imposes
contents protection, etc.
CI Plus contents protection
When the CI Plus compatible broadcast is
recorded, the title may be contents protected.
There are following types of the contents
protection depending on the broadcast:
• Copying not restricted
Depending on the title, you can copy/move only
to USB HDD, BD-RE, BD-R, or DVD-RAM
(CPRM compatible discs only).
• One generation copy is permitted
You can copy to BD-RE, BD-R or DVD-RAM
(CPRM compatible discs only) only once.
• The original title will be deleted.
• You cannot copy from the copied BD-RE,
BD-R or DVD-RAM (CPRM compatible discs)
to HDD or another disc.
When convert recording mode, the original title
will be deleted.
• icon will appear on the DIRECT
NAVIGATOR screen. (> 44)
• Copying is prohibited
You cannot copy/move to the USB HDD or disc.
The content of these media may also have the
following playback restrictions.
- Retention limit (> right)
- Content License (> right)
Retention limit
There are some titles for which the playback will
be disabled after a predetermined time.
(e.g., Permitted playback period is 90 minutes
after recording.)
• When the title does not have playback period,
icon will appear on the DIRECT
NAVIGATOR screen after decrypting. (> 44)
• When the title has playback period, or
icon will appear on the DIRECT NAVIGATOR
screen after decrypting. (> 44)
Content License
Playing back a title with this restriction requires a
CAM with a playback licence for it.
• The number of times the title can be played
back may also be limited.
• When the title does not have playback period,
icon will appear on the DIRECT
NAVIGATOR screen after decrypting. (> 44)
• When the title has playback period, icon
will appear on the DIRECT NAVIGATOR screen
after decrypting. (> 44)
Parental Control
Playing back a title with this restriction requires a
CAM and enter the PIN code.
• icon will appear on the DIRECT
NAVIGATOR screen. (> 44)
Operator profile
Depending on your CAM, the channel list can be
updated to the one recommended by the CAM.
For details, refer to “About Operator profile”.
(> 32)
• All CI Plus compatible broadcasts are encrypted. It may
take some time to display them.
• For details, refer to your CAM’s operating instructions or
consult your dealer.
SQT0300
15
Page 16

Getting started
HDMI
VHF/UHF
RF IN
This unit’s rear panel
Household mains socket
(AC 220 to 240 V, 50 Hz)
AC mains lead
(supplied)
• Connect only after all other
connections are complete.
HDMI cable
TV’s rear panel
To the CATV terminal or the aerial
CATV coaxial cable or aerial cable
RF coaxial cable
(supplied)
Connection
3D programmes or 4K images can be played back when this unit is connected to a 3D or 4K
compatible TV.
• Before connection, turn off all equipment and read the appropriate operating instructions.
• To enjoy 4K output, you need to connect this unit to a 4K compatible TV.
• When outputting 1080p or 24p (4K) signal, please use HDMI cables 5.0 meters or less.
It is recommended that you use Panasonic’s HDMI cable.
• In case problems occur for the playback of content such as no picture or picture distortion, check the
HDMI cable, related connections and the compatibility of TV video input.
To output images in 4K, connect the HDMI cable to a 4K compatible terminal of the connected
device.
[BCT845] [BCT745] [BCT740] Basic connections
16
SQT0300
Page 17

Getting started
This unit’s rear panel
Household mains socket
(AC 220 to 240 V, 50 Hz)
AC mains lead
(supplied)
• Connect only after all other
connections are complete.
HDMI cable
TV’s rear panel
Satellite dish
Satellite dish
Satellite dish
Multi switcher
Single cable
router
[BST845] [BST745] [BST740] Basic connections
The following three connection methods are available. Choose a method suited to your environment.
A Using a multi switcher:
You can record two programmes simultaneously.
• Connect both LNB IN 1 and LNB IN 2 to the satellite dish.
B Using a single cable router:
You can record two programmes simultaneously.
• Connect satellite cable to LNB IN 1 terminal.
C Connecting a satellite cable directly:
You cannot record two programmes simultaneously.
• Connect LNB IN 1 terminal to the satellite dish.
HDMI
SQT0300
17
Page 18
Getting started
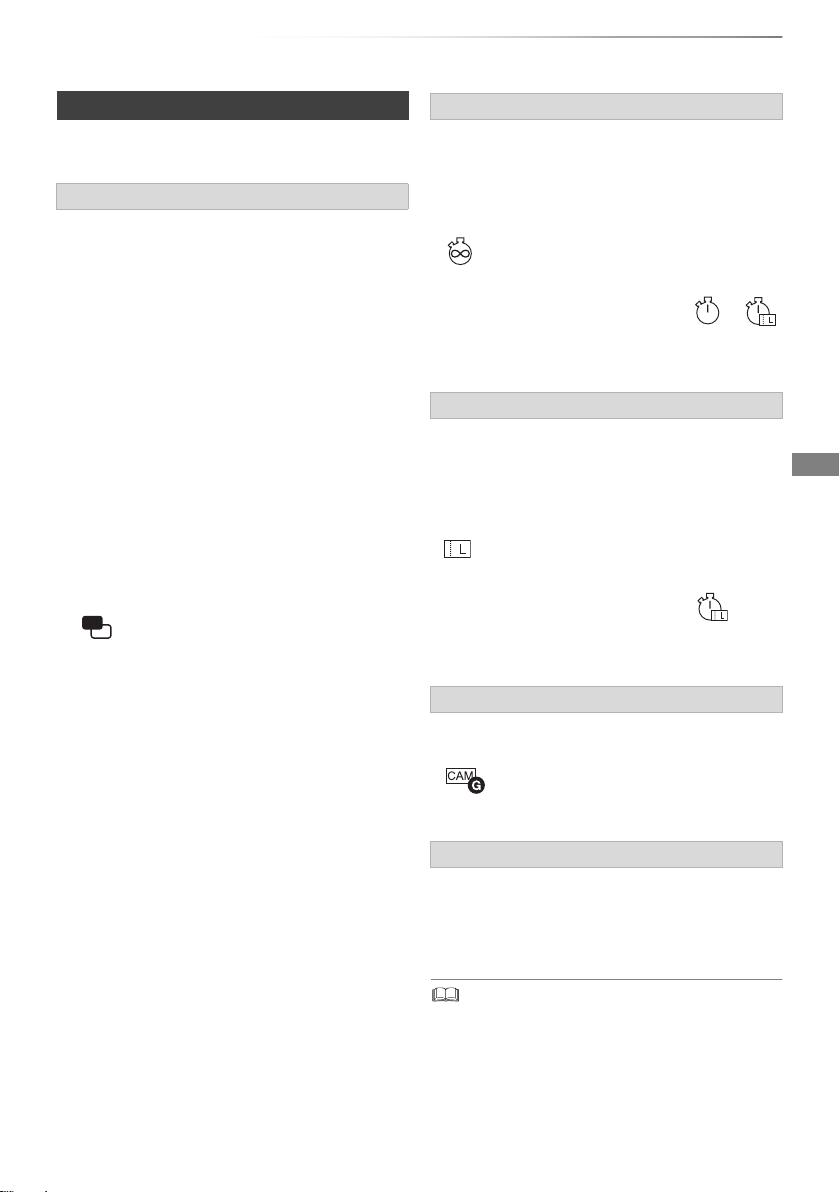
AV
Set Top Box or video equipment
21-pin Scart cable
§
Connection
General information for Basic
connections
To connect and register the USB HDD
(optional)
Refer to “Registering the external HDD
(USB HDD)”. (> 82)
About HDMI cable
Use the High Speed HDMI cables.
Non-HDMI-compliant cables cannot be utilized.
It is recommended that you use Panasonic’s
HDMI cable.
When outputting 1080p signal or 24p(4K) signal,
please use HDMI Cables 5.0 meters or less.
When the unit is not to be used for a long
time
To save power, unplug it from the household
mains socket. This unit consumes a small
amount of power, even when the unit is in
standby mode.
[BCT845] [BCT745] [BCT740]
[approx. 0.2 W (“Quick Start” is not activated
and “RF OUT ( Aerial Signal )” is set to
“Off”)]
[BST845] [BST745] [BST740]
[approx. 0.2 W (“Quick Start” is not
activated)]
• This unit cannot connect the TV tha t does not have the
HDMI terminal.
• The HDMI connection supports VIERA Link “HDAVI
Control” (> 84).
• You cannot connect this unit to DVI devices that are
incompatible with HDCP.
Depending on the device, images may not display properly
or at all when connecting with a DVI/HDMI switching cable.
(Audio cannot be output.)
• If you are connecting to a TV that is only compatible with
2 channel audio output, audio with 3 channels or more will
be down mixed and output as 2 channels, even if
connecting with an HDMI cable. (Some discs cannot be
down mixed.)
• [BCT845] [BCT745] [BCT740]
Keep the RF coaxial cables as far away as possible from
other cables.
Connect the Set Top Box or video equipment
18
SQT0300
§
A 21-pin Adaptor is required for
AUDIO/VIDEO terminal.
Page 19

Getting started
HDMI cable
HDMI cable
Amplifier/
receiver
TV
HDMI IN
(ARC)
HDMI OUT
(ARC)
HDMI IN
HDMI cable
HDMI cable
TV
Amplifier/
receiver
Amplifier/receiver connections
HDMI terminal
3D programmes or 4K images can be played back when this unit is connected to a 3D or 4K
compatible amplifier/receiver and a 3D or 4K compatible TV.
• You will not be able to view 3D programmes or 4K images with this connection if your
amplifier/receiver is not 3D or 4K compatible.
HDMI IN
HDMI OUT
(ARC)
HDMI IN
(ARC)
∫ Amplifier/receiver not compatible with 3D or 4K
3D programmes or 4K images can be played back when this unit is connected to a 3D or 4K
compatible TV.
• This connection only supports up to 5.1ch.
• VIERA Link function is possible by conn ecting to a TV or amplifier/receiver compatible with VIERA Link.
• When using a TV or an amplifier/receiver th at does not display “ARC” on the HDMI terminal, it is necessary to connect the
TV and the amplifier/receiver with a digital audio cable to enjoy the TV audio on the amplifier/receiver.
SQT0300
19
Page 20
Getting started
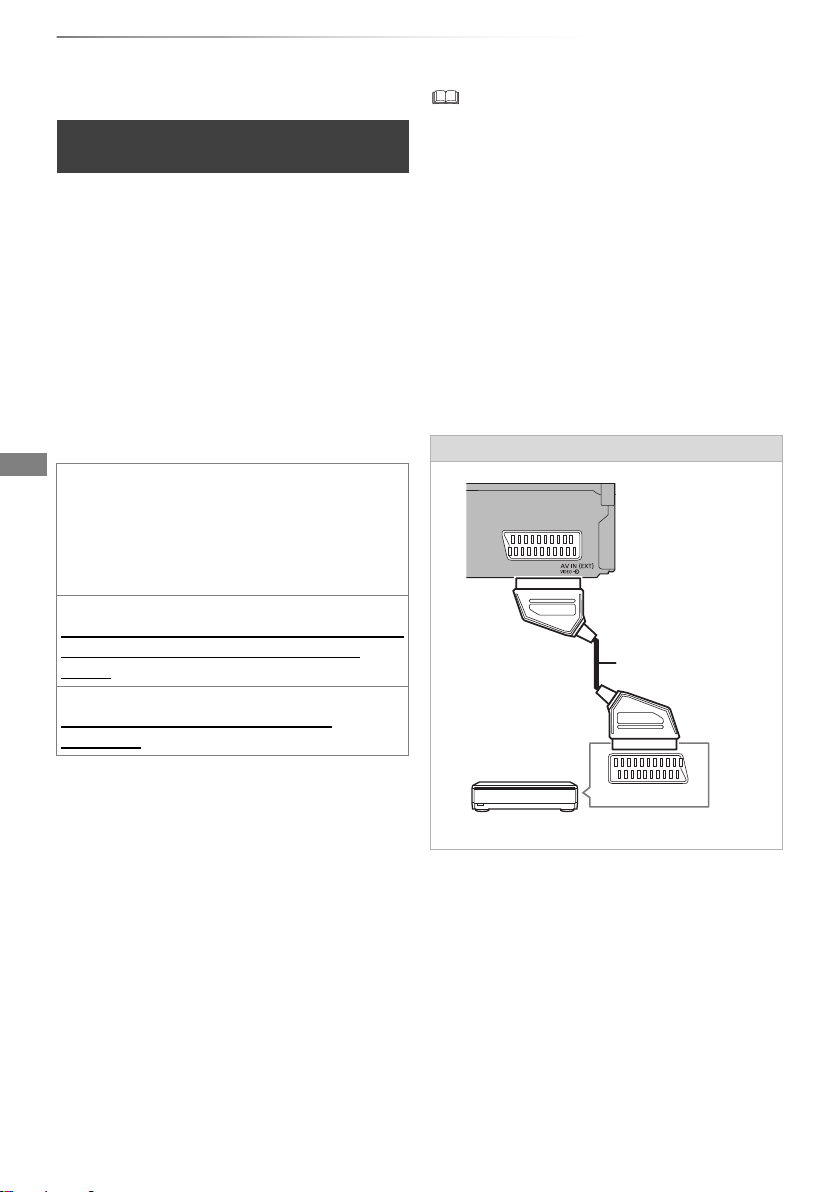
Amplifier/receiver
Optical digital
audio cable
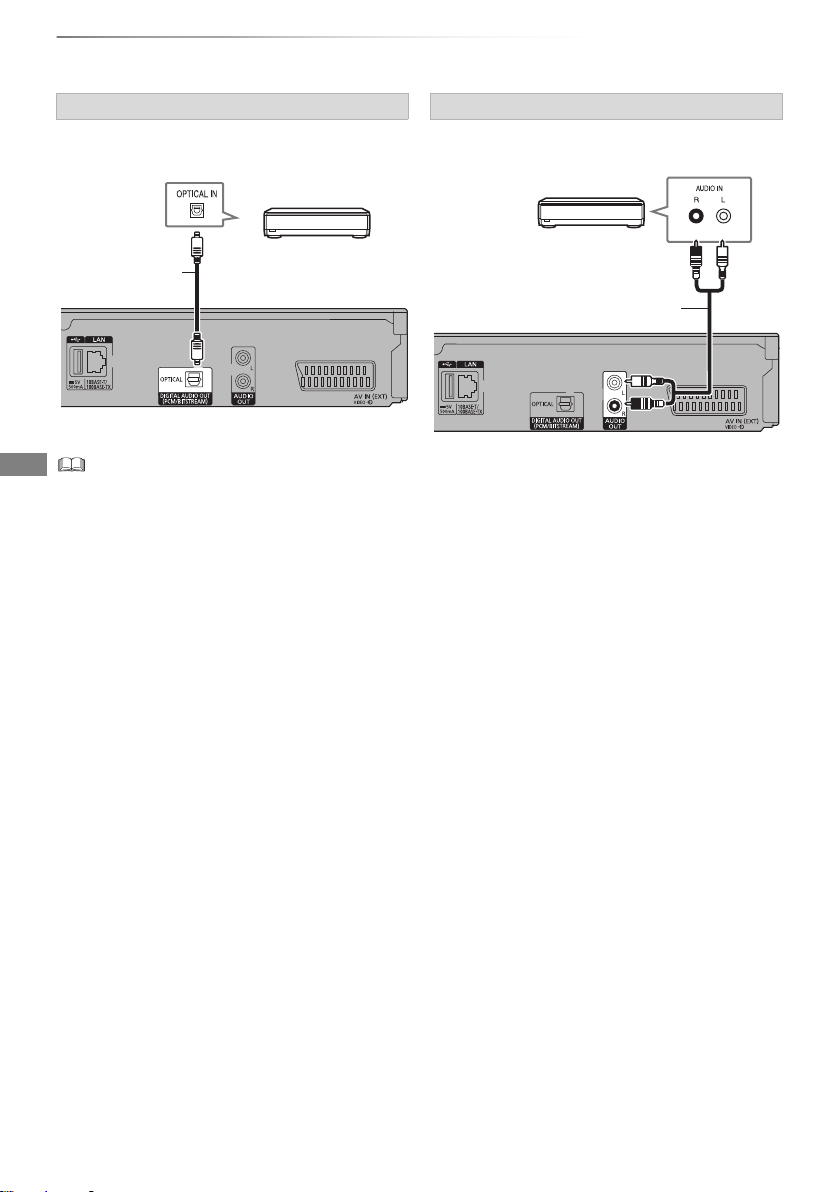
Audio cable
Amplifier/receiver
Connection
DIGITAL AUDIO OUT terminal
∫ Using Optical digital audio cable
• When you do not want the audio to be output from the TV,
set “HDMI Audio Output” to “Off” (> 87, 98).
AUDIO OUT terminal
• Connect to terminals of the same colour.
20
SQT0300
Page 21
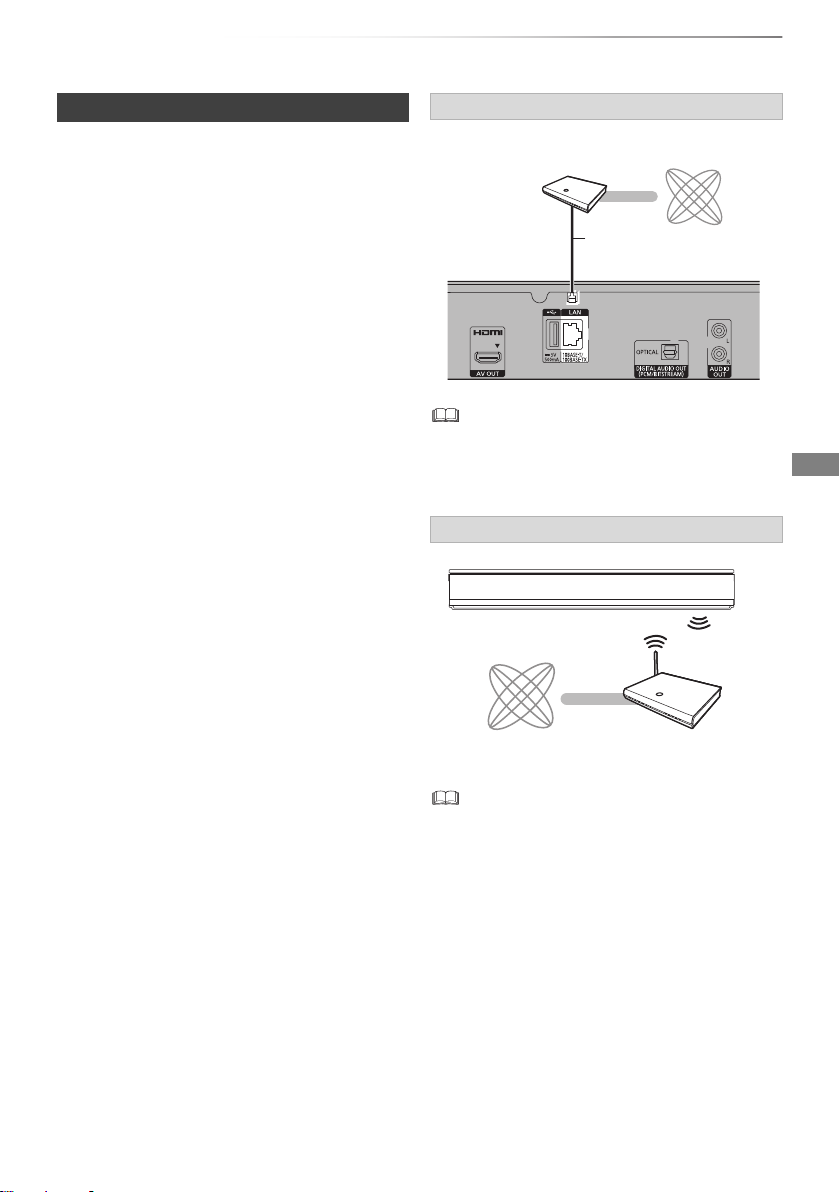
Getting started
Broadband
router, etc.
Internet
LAN (ethernet) cable
Internet
Wireless router, etc.
Network connection
When this unit is connected to the network, you
can enjoy network functions (DLNA function,
Network Service, Remote Viewing and
Recording, etc.).
For details about connection method, refer to the
instructions supplied with the connected
equipment.
After you make the LAN cable/Wireless LAN
connection, the network setting is needed.
(> 26, Easy Network Setting)
∫ Precautions of Wireless LAN connection
The following limits are in place regarding the
usage of this unit. You must be aware of these
limits before using this unit.
Panasonic will in no way be responsible for any
incidental damage which may arise due to a
failure to obey these limits, or to any condition of
use or disuse of this unit.
• Data transmitted and received over radio
waves may be intercepted and monitored.
• This unit contains delicate electronic
components.
Please use this unit in the manner in which it
was intended and follow the following points:
- Do not expose this unit to high temperatures
or direct sunlight.
- Do not bend, or subject this unit to strong
impacts.
- Keep this unit away from moisture.
- Do not disassemble or alter this unit in any
way.
LAN cable connection
• Use category 5 or above straight LAN c ables (STP) when
connecting to peripheral devices.
• Inserting any cable other than a LA N cable in the LAN
terminal can damage the unit.
Wireless LAN connection
• For up-to-date compatibility information on your Wireless
router refer to
http://panasonic.jp/support/global/cs/
(This site is in English only.)
• The unit is not compatible with public wireless LAN
services.
SQT0300
21
Page 22
Getting started
TV operation buttons
(> right)
Select and enter buttons
To return to the previous
screen
To exit the screen
FUNCTION MENU (> 28)
STATUS
D
I
R
E
C
T
N
A
V
I
G
A
T
O
R
G
U
I
D
E
RETURN
PLAY/x1.3
PAUSE
PAUSE LIVE TV
STOP
SLOW/SEARCH
SKIP
CH
PAGE
TV
RADIO/
CH
AV
INPUT
TV
DRIVE
SELECT
EXIT
OK
OPTION
VOL
0
2
abc
5
jkl
8
tuv
1
4
ghi
7
qrs
p
3
def
6
mno
9
xyz
w
TIME SLIP
PROG/CHECK
DEL
AUDIO
-10s +60s
REC MODE
INPUT SELECT
REC TEXT STTL
CHAPTER
MANUAL SKIP
REWIND LIVE TV
INTERNET
LAST VIEW
F
U
N
C
T
I
O
N
M
E
N
U
Settings
22
SQT0300
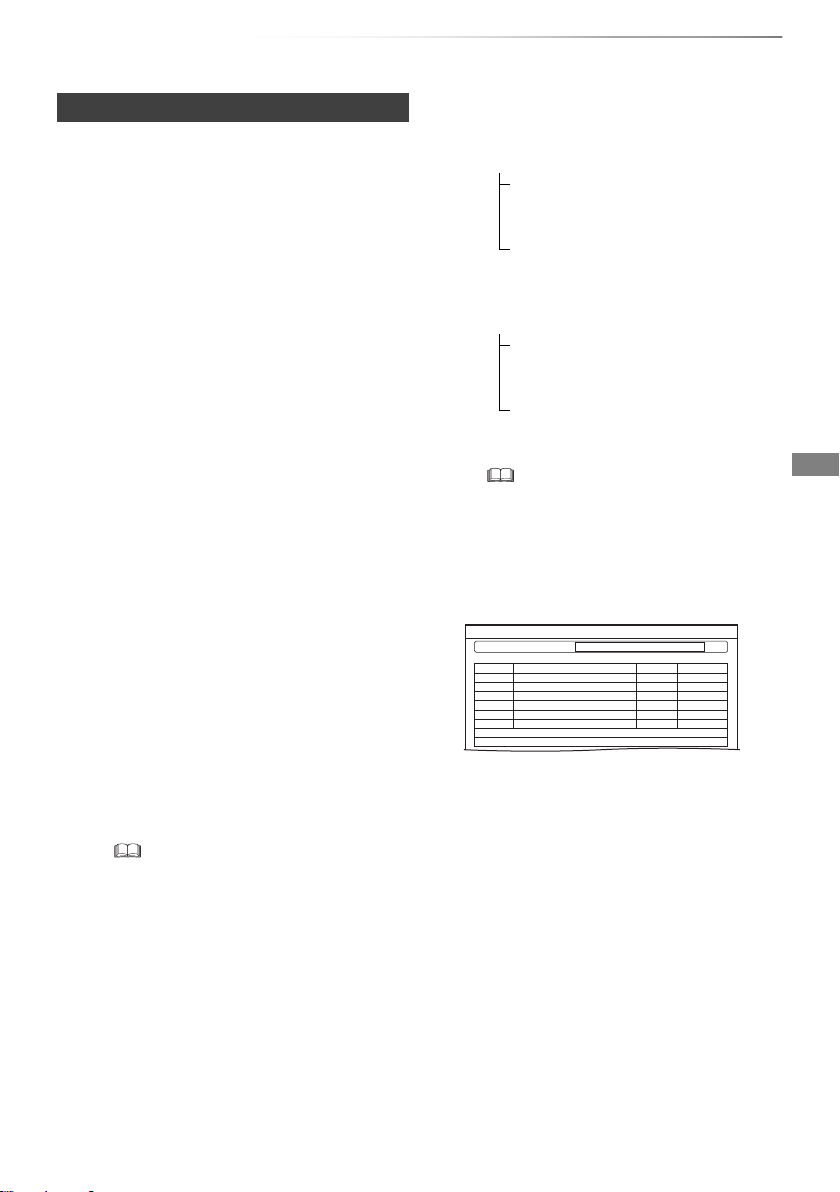
TV operation buttons
The TV can be operated from the TV operation
buttons of the remote control.
• Perform the setting if you cannot operate the TV
with the TV operation buttons.
While pressing [TV Í], enter the code with
the number buttons.
Manufacturer and Code No.
Brand Code Brand Code
Panasonic 01/02/03/04
AIWA 35
AKAI 27/30
BEKO 05/71/72/73/74
BENQ 58/59
BRANDT 10/15
BUSH 05
CENTREX 66
CURTIS 05
DAEWOO 64/65
DESMET 05
DUAL 05
ELEMIS 05
FERGUSON 10/34
FINLUX 61
FISHER 21
FUJITSU 53
FUNAI 63/67
GOLDSTAR 05/50/51
GOODMANS 05
GRADIENTE 36
GRUNDIG 09
HITACHI 05/22/23/40/41
IRRADIO 30
ITT
25
JVC 17/30/39/70
KDS 52
KOLIN 45
KONKA 62
LG
05/50/51
MAG 52
METZ 05/28/79
MITSUBISHI 05/19/20/47
MIVAR 24
• If your TV brand has more than one code listed, select the
one that allows correct operation.
• If the brand of your TV is not listed o r the code number is
invalid for your TV, this remote control is not compatible
with your TV.
NEC 36
NOBLEX 33
NOKIA 25/26/27/60/61
NORDMENDE 10
OLEVIA 45
ONWA 30/39/70
ORION 05
PEONY 49/69
PHILCO 41/48/64
PHILIPS 05/06/46
PHONOLA 05
PIONEER 37/38
PROVIEW 52
PYE 05
RADIOLA 05
SABA 10
SALORA 26
32/42/43/65/68SAMSUNG
SANSUI 05
SANYO 21/54/55/56
SCHNEIDER 05/29/30
SEG
05/69/75/76/77/78
SELECO 05/25
SHARP 18
SIEMENS 09
SINUDYNE 05
SONY 08
31/33/66/67/69TCL
TELEFUNKEN 10/11/12/13/14
TEVION 52
THOMSON 10/15/44
TOSHIBA 16/57
WHITE
WESTINGHOUSE
05
YAMAHA 18/41
Page 23
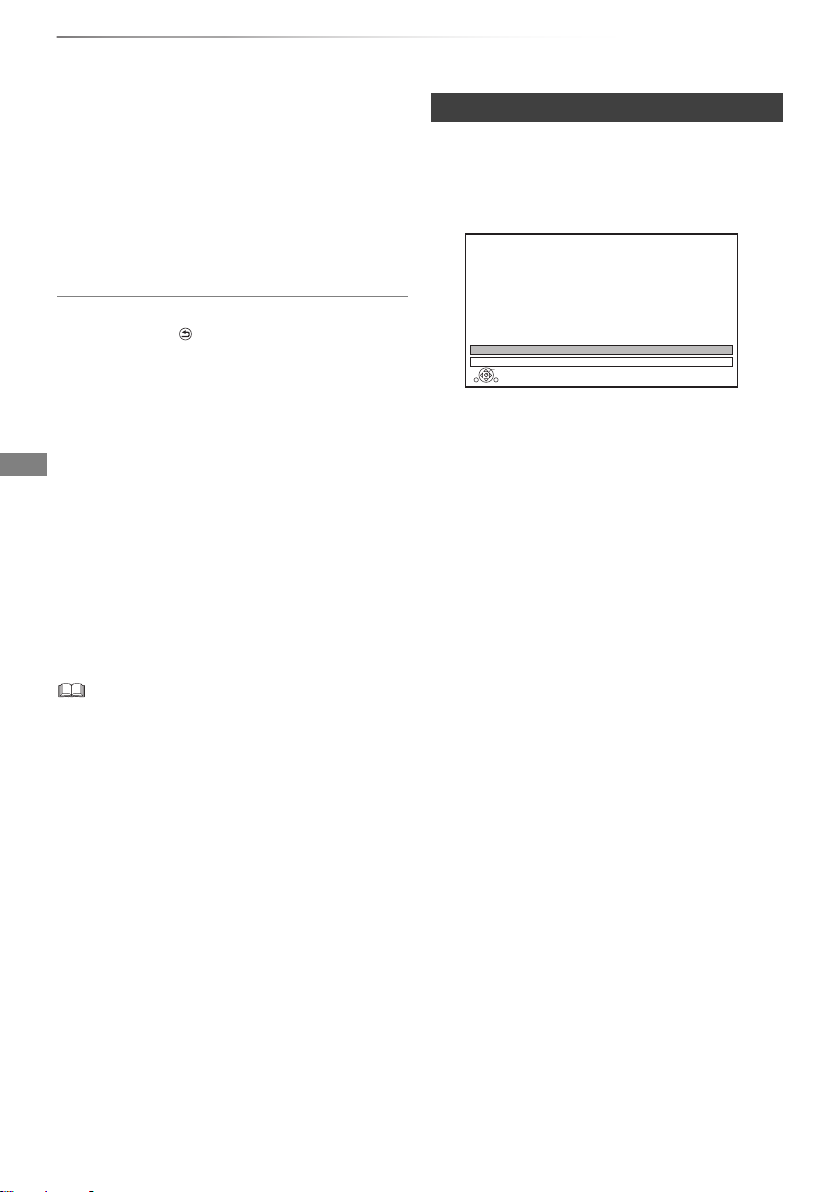
Getting started
Auto Setup
Progress
This will take about 3 minutes.
CH Channel Name Type Quality
Free TV: 0 Pay TV: 0 Radio: 0
Searching
CH5
69
[BCT845] [BCT745] [BCT740] Easy Setting
The tuner in this unit is compatible with digital
Cable broadcast services and digital terrestrial
broadcast services.
• In these operating instructions,
[DVB-C] : indicates features applicable to digital
cable broadcasts (DVB-C).
[DVB-T] : indicates features applicable to digital
terrestrial broadcasts (DVB-T).
• This unit can receive only one of the two
services at a time.
1 Turn on the TV, then select the appropriate
AV input to suit the connections to this unit.
2 Press [Í] on the remote control or [Í/I] on
this unit.
• The Easy Setting will start at the initial
power on.
3 Select language, then press [OK].
4 Select country, then press [OK].
5 Select “Digital Cable (DVB-C) Channels” or
“Digital Terrestrial (DVB-T) Channels”, then
press [OK].
1 [DVB-C]
Select the channel number allocation,
then press [OK].
• For Germany and Austria:
Normally set to “Preset Channel
Number”.
• For Switzerland:
Normally set to “Operator’s Channel
Number ( LCN )”.
• To change channel allocation, restart Auto Setup
in Basic Settings menu and change channel
number allocation selection. (> 92)
2 [DVB-C]
Select “Start Auto Setup”, then press
[OK].
• Frequency
Auto
The preset frequency will be
automatically used.
Manual
Enter the frequency specified by your
cable provider with number buttons.
•Network ID
Auto
The preset Network ID will be
automatically used.
Manual
Enter the Network ID specified by your
cable provider with number buttons.
• Frequency and Network ID settings may be
necessary depending on the cable provider. For
details, consult the cable provider.
6 Auto Setup will start automatically.
(This operation may take some time.)
e.g., [DVB-T]
[DVB-C]
When tuning is completed, press [OK].
7 Clock will be set automatically.
If the clock setting screen appears, set the
time manually (> 102, Clock).
SQT0300
23
Page 24

Getting started
Settings
8 Set Quick Start to “On”, “Off” or “Timer
Setting for Quick Start”, then press [OK].
•On
It is possible to start quickly from standby
mode.
•Off
Power consumption in standby mode is
minimized. (> 118)
However, startup time from standby mode
will be longer.
• Timer Setting for Quick Start
“Quick Start” is activated when the set time
comes.
9 Select the item to match the type of TV
connected.
For details, refer to “TV Aspect”. (> 98)
When “Easy Setting has been completed.”
appears, Easy Setting is complete.
• Select “Yes” to proceed to “Easy Network
Setting”. (> 26)
• Select “No” to finish the Easy Setting.
To stop partway
Press [RETURN ].
To restart setup or change TV signal type
1 Press [FUNCTION MENU]. (> 22)
2 Select “Basic Settings” in “Setup”, then press
[OK].
3 Select “Auto Setup” in “DVB Tuning”, then
press [OK].
4 Select “Yes”, then press [OK].
• If you are asked to select the auto setup
method, refer to “Auto Setup”. (> 89)
To confirm that channels have been tuned
correctly
Refer to “Using Channel List”. (> 30)
• If tuning is cancelled partway through, it may not be
possible to receive the channels. Restart setup again.
24
SQT0300
Page 25
Getting started
User Band Settings
OK
Select
RETURN
Start Auto Setup
Please confirm user band settings before starting Auto Setup.
Tuner 1
C1
1284 MHz (preset: 1284 MHz)
User Band Frequency
Off
User Band PIN
User Band
Tuner 2
C2
1400 MHz (preset: 1400 MHz)
User Band Frequency
Off
User Band PIN
User Band
Auto Setup
RETURN
Satellite
Progress
This will take up to 40 minutes.
Checking LNB1
Satellite
LNB in 1 LNB in 2
Press RETURN to skip Satellite installation
Searching Satellite
Checking... Checking...
0%
100%
Auto Setup
RETURN
Satellite
Progress
This will take up to 40 minutes.
Checking LNB1
Satellite
Tuner 1 Tuner 2
Press RETURN to skip Satellite installation
Searching Satellite
Checking... Checking...
0%
100%
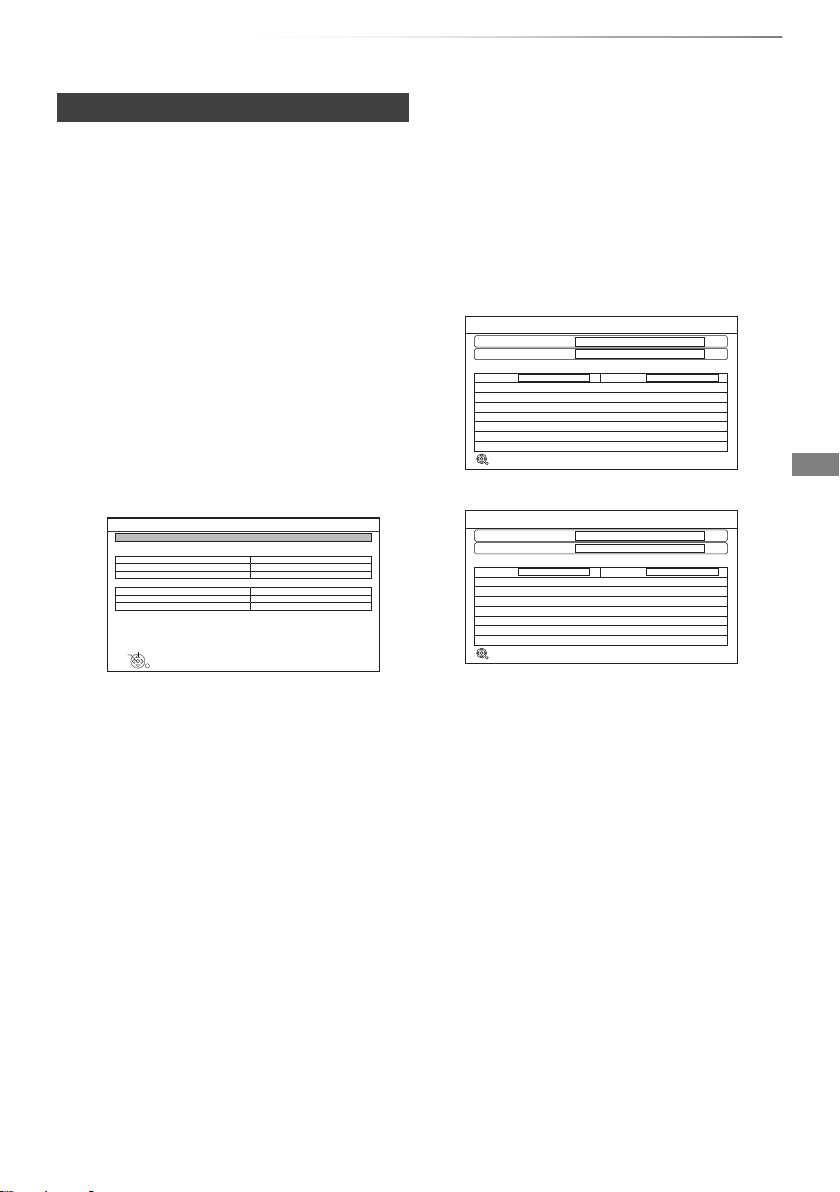
[BST845] [BST745] [BST740] Easy Setting
1 Turn on the TV, then select the appropriate
AV input to suit the connections to this unit.
2 Press [Í] on the remote control or [Í/I] on
this unit.
• The Easy Setting will start at the initial
power on.
3 Select language, then press [OK].
4 Select country, then press [OK].
5 Select the search mode, then press [OK].
6 Select “DiSEqC (Dual Tuner)”, “Single Cable
System” or “DiSEqC (Single Tuner)”, then
press [OK].
When selecting “Single Cable System”
1 Make the settings of user band.
• For details, read the manual of the single
cable router, etc.
2 Select “Start Auto Setup”, then press
[OK].
Auto Setup starts.
These operations (Searching Satellite and
Searching Channels) may take some time.
• When selecting “DiSEqC (Dual Tuner)” or
“DiSEqC (Single Tuner)”
• When selecting “Single Cable System”
• User Band
You can set C1 to C8. Set to a User Band
not used by any other device.
• When only one User Band of the
Router is assigned, set “Tuner 2” to
“OFF”. Note that you will not be able to
record two programmes
simultaneously.
• User Band Frequency
Set the User Band Frequency with
number buttons.
• User Band PIN
If the single cable router requires a PIN
to access an user band, enter the PIN.
After tuning has been completed, clock will
be set automatically.
If the clock setting screen appears, set the
time manually (> 102, Clock).
7 Set Quick Start to “On”, “Off” or “Timer
Setting for Quick Start”, then press [OK].
•On
It is possible to start quickly from standby
mode.
•Off
Power consumption in standby mode is
minimized. (> 118)
However, startup time from standby mode
will be longer.
• Timer Setting for Quick Start
“Quick Start” is activated when the set time
comes.
SQT0300
25
Page 26
Getting started
OK
RETURN
Easy Network Setting
Settings and tests for connection required
for home network and the Internet will be
conducted.
First, please select a connection mode.
LAN cable connection:
Connect a LAN cable to the unit and select “Wired”.
Wireless LAN connection:
Select “Wireless”.
Current setting : Wired
Wired
Wireless
Settings
8 Select the item to match the type of TV
connected.
For details, refer to “TV Aspect”. (> 98)
When “Easy Setting has been completed.”
appears, Easy Setting is complete.
• Select “Yes” to proceed to “Easy Network
Setting”. (> right)
• Select “No” to finish the Easy Setting.
To stop partway
Press [RETURN ].
To restart setup
1 Press [FUNCTION MENU]. (> 22)
2 Select “Basic Settings” in “Setup”, then press
[OK].
3 Select “Auto Setup” in “DVB Tuning”, then
press [OK].
4 Select the search mode, then press [OK].
5 Select “Yes”, then press [OK].
• If you are asked to select the auto setup
method, refer to “Auto Setup”. (> 92)
To confirm that channels have been tuned
correctly
Refer to “Using Channel List”. (> 30)
• If tuning is cancelled partway through, it may not be
possible to receive the channels. Restart setup again.
Easy Network Setting
After completing “Easy Setting”, you can continue
with “Easy Network Setting”.
1 Select “Wired” or “Wireless”, then press
[OK].
2 Follow the on-screen instructions and make
the following confirmation and settings.
“Wired” connection:
- Home Network Connection Check
- Home Network function
- Remote Viewing and Recording
- Internet Connection Test
“Wireless” connection:
• Before beginning wireless connection
setup obtain your Network name (SSID).
An SSID (Service Set IDentification) is a
name used by wireless LAN to identify a
particular network. Transmission is
possible if the SSID matches for both
devices.
- Wireless Connection Check
- Home Network Connection Check
- Home Network function
- Remote Viewing and Recording
- Internet Connection Test
26
SQT0300
3 When “Easy Network Setting is finished.”
appears.
Press [OK].
Page 27
Getting started
e.g.,
Connection method to wireless access point
Search for wireless network:
1 Select “Search for wireless network”, then
press [OK].
2 The available wireless networks will be
displayed. Select your network name and
press [OK].
- If your Network name is not displayed,
search again by pressing the red button on
the remote control.
- Stealth SSID will not be displayed. Enter
manually by using “Wireless Settings”.
(> 87, 99)
• If your wireless network is encrypted, Encryption
Key Input Screen will be displayed.
Input the encryption key of your network.
WPS (PUSH button):
If your Wireless router supports WPS (PUSH
button), you can easily perform the settings by
pressing WPS button on it.
WPS (Wi-Fi Protected Setup™) is a standard that
facilitates settings relating to the connection and
security of wireless LAN devices.
1 Select “WPS (PUSH button)”, then press [OK].
2 Press WPS button or corresponding button of
Wireless router until the lamp starts flashing.
When you experience problems
Refer to “When you experience problems with
Easy Network Setting”. (> 117)
To restart Easy Network Setting
1 Press [FUNCTION MENU]. (> 22)
2 Select “Basic Settings” in “Setup”, then press
[OK].
3 Select “Easy Network Setting” in “Network”,
then press [OK].
To redo settings individually
If “Easy Network Setting” did not work properly or
when you change the settings individually,
perform the following steps:
1 Press [FUNCTION MENU]. (> 22)
2 Select “Basic Settings” in “Setup”, then press
[OK].
3 Select “Network Settings” in “Network”, then
press [OK].
4 Refer to “Network Settings”. (> 99)
Check security before using Home Network
function
If you set “Home Network function” to “On”, all
connected devices on the same network can
access this unit. Ensure that the router for your
home network has adequate security system to
prevent unauthorized access.
• Wi-Fi Protected Setup™-compatible
Wireless router may have the mark.
• For details, refer to the operating instruction
of Wireless router.
3 Press [OK].
• Refer to the operating instructions of t he hub or router.
• If you set “Home Network function” or “Remote Viewing and
Recording” to “On”, the setting for “Quick Start” is fixed to
“On”.
• Do not use this unit to connect to a ny wireless network for
which you do not have usage rights.
During automatic searches in a wireless network
environment, wireless networks (SSID) for which you do
not have usage rights may be displayed; however, using
these networks may be regarded as illegal access.
• After performing network settings on this unit, the settings
(encryption level, etc.) of the Wireless router might change.
When you have trouble getting online on your PC, perform
the network settings on your PC in accordance with the
settings of Wireless router.
• Please be aware that connecting to a network without
encryption may result in the content of the communication
being illegitimately viewed by a third party, or the leaking of
data such as personal or secret information.
SQT0300
27
Page 28

Getting started
RETURN
FUNCTION MENU
OK
Media
TV GuideKeyword Recording
Home Network
Copy VideoSetup
Timer Recording
Contents on HDDNetwork Service
RETURN
FUNCTION MENU
OK
Media TV Guide
Home Network
Copy VideoSetup
Timer Recording
Contents on HDD
Watch TV
Network Service
e.g.,
FUNCTION MENU screen
You can easily access the desired functions, such
as playback, timer recording, the unit’s settings
etc. via the FUNCTION MENU.
1 Press [FUNCTION MENU].
[BCT845] [BST845]
[BCT745] [BCT740] [BST745] [BST740]
2 Select the item, then press [OK].
Contents on HDD
OK
Press
Contents on HDD
Title, Photo or Music on HDD can be played.
Video
Photo
Music
Press
RETURN
FUNCTION MENU list
• [BCT845] [BST845]
Keyword Recording (> 42)
•TV Guide (> 30)
• Timer Recording (> 39)
• Network Service (> 79)
• Contents on HDD
- Video (> 44)
-Photo (> 67)
-Music (> 72)
• Home Network
- Miracast (> 78)
- DLNA Client (> 76)
- Media Renderer (> 77)
- Wi-Fi Direct (> 78)
•Setup
- Basic Settings (> 87)
• You can change the unit’s settings of DVB
Tuning, Sound, Display, Connection,
Network etc.
- Remote Viewing and Recording (> 79)
- Wallpaper
Personalize a background of the FUNCTION
MENU.
• To select from among “Photo”, register photo
in advance. (> 68)
- BD-Video Data Management (> 49)
•Media
-Disc
- SD Card
- USB device
- USB HDD
• [BCT745] [BCT740] [BST745] [BST740]
Watch TV (> 30)
• Copy Video
- Copy Menu (> 61)
- Copy Video (AVCHD) to DVD-R (> 66)
28
SQT0300
Page 29

Watching broadcasts
Watch ing
broadcasts
Watching broadcasts
Instructions for operations are generally
described using the remote control. (> 12)
1 Press [INPUT SELECT] and select “TV”,
then press [OK].
• If the Operator profile is being updated, a
different display may appear on the
screen. (> 32)
2 Press [CH WX] to select the channel.
• You can also select the channel by the
following operations.
- Using number buttons
- Using Channel List (> 30)
- Using TV Guide system (> 30)
- Using channel information (> 31)
To switch to the channel you have previously
watched
Press [LAST VIEW ].
• This function will work only for the channels you
have watched for more than 10 seconds.
To switch to the radio channels or to the all
channels
Press [RADIO/TV].
If this unit request a PIN
Enter the PIN with the number buttons by
following the on-screen instructions.
• If you decide on a PIN, make a note it in case
you forgot it.
• PIN (except CAM’s) can be changed via “PIN
Entry”. (> 102)
• For CAM’s PIN, refer to your CAM’s operating
instructions.
If encrypted channels do not appear
To watch an encrypted broadcast, insert the CI
module into the CI slot. (> 14)
• Set according to the CI module. (> 87, 99,
Common Interface)
• Selection of channel is made easy by crea ting a Favourite
of the channels. (> 89, 91, Favourites Edit)
• When you are watching the 3D programme, subtitles and
TV Guide, etc., may not display correctly depending on the
settings. (> 52, 53, 3D Type, Signal Format)
SQT0300
29
Page 30
Watching broadcasts
All DVB Channels
Select
View
RETURN
7
6
5
4
3
2
1
Page up
Page down
Category
123/ABC
Sorting 123...
Channel names
Encrypted channel
Page Down
Information
Page Up
Keyword Recording+24 hoursTimer Rec.
Portrait/Landscape
GUIDE
TUE 07.01
TV Guide
8:00 - 9:45
TUE 07.01.2014 8:05
Landscape
Category: All DVB Channels
8:00 8:30 9:00 9:30 10:00 10:30
OK
RETURNOPTION
Watching broadcasts
Using Channel List
You can select from the list of channel names.
1 Press [OK].
• To sort the channel, press the red button.
• To change the category, press the blue
button.
2 Select the channel, then press [OK].
To skip unwanted channels
The channel is skipped next time you select the
channel.
1 While watching the broadcast to skip, press
[DEL].
2 Press [OK].
• [BCT845] [BCT745] [BCT740]
[DVB-T] You cannot skip channels.
• You can select the skipped channel with the number
buttons.
• When you want to restore the skipped cha nnel, edit the
channel list. (> 87, 92)
To edit the channel list
Refer to “Channel List”. (> 92)
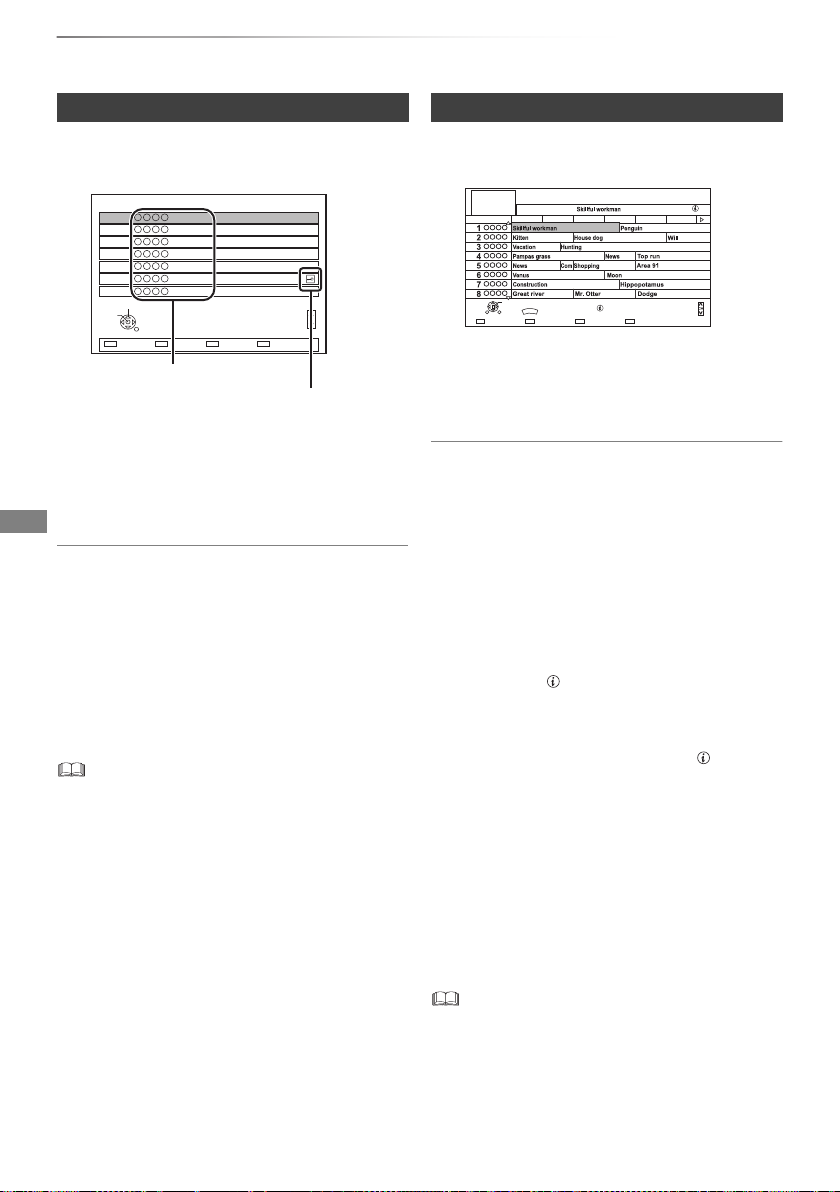
Using TV Guide system
1 Press [GUIDE].
e.g. Landscape view ([BCT845] [BST845])
TV Guide screen appears.
2 Select the programme, then press [OK].
3 Select “View”, then press [OK].
To change TV Guide view
Press [GUIDE] to switch between “Landscape”
view and “Portrait” view.
Page up/down
Press [CH WX].
To view a programme list for another day
Press the green button (Previous) or the yellow
button (Next).
To see programme information
Press [STATUS ].
To retrieve the programme data for the area
where data have not been acquired
Select the area, then press [STATUS ].
• Some broadcasters may not send the
programme data. You cannot retrieve the data
from them.
To set a timer Recording using the TV Guide
System
Refer to “Timer recording”. (> 38)
To search the programmes
Refer to “To search the programmes”. (> 38)
30
SQT0300
• If you make access to Rovi Guide via Network Service, you
can use an additional TV Guide which can search
programmes by keywords and can display the detailed
information, etc. (current as of July, 2014). (> 79)
Page 31

Watching broadcasts
10:30
1
Now
Dolby D
Change category
All DVB Channels
NEWS
9:00 - 11:00
Set timer
e.g.,
Using channel information
While watching a programme
Press [STATUS ].
HDD
71:20 DR
1
NEWS
1
9:00 - 11:00
Now
Set timer
Dolby D
Channel information appears.
1 Current Category
2 Encrypted broadcast
3 Set timer (> 40)
4 Subtitle
5 Te l et ex t
6 Multiple audio/Sub Channel
7 Data service (Hybrid Broadcast Broadband
TV) (> 32)
All DVB Channels
Change category
10:30
Operations while watching broadcast
To show subtitle
When “ ” appears in channel information
(> left)
Press [STTL ].
• Press again to hide subtitle.
To change subtitle language
1 Press [OPTION].
2 Select “Subtitle Language” in “Digital TV
Menu”, then press [OK].
3 Select the desired language.
• Press [EXIT ] to exit the screen.
• Some subtitle contents can be displayed using Teletext.
(> 32)
Switching audio
Press [AUDIO].
• Audio will switch according to the contents of
the programme every time it is pressed.
To show detailed information
Press [STATUS ] again.
To hide the information screen
Press [EXIT ].
To change Category
Press the blue button.
• To register your favourite channels
1 Press [OPTION].
2 Select “Digital TV Menu”, then press [OK].
3 Select “Favourites Edit”, then press [OK].
4 Refer to “Favourites Edit”. (> 89, 91)
To switch between the current programme
and the next programme
Press [2, 1].
To switch to another channel
Press [3, 4], then press [OK].
SQT0300
31
Page 32

Watching broadcasts
Watching broadcasts
To use data service (Hybrid Broadcast
Broadband TV)
You can enjoy the interactive data services for
digital broadcasting.
To use Hybrid Broadcast Broadband TV
application, perform network connection and
settings. (> 21, 26)
When notification message is displayed:
Follow the on-screen instructions.
When the Teletext is included in data service:
When [TEXT ] is pressed, the Teletext of data
service will be displayed.
• Operation buttons:
[3, 4, 2, 1], [OK], number buttons or colour buttons, etc.
• Operations may vary depending on the b roadcaster.
• On-screen instructions may not correspond to the remote
control buttons.
• It may take some time to show the data service.
• Not all the data services are available depending on the
broadcaster.
• Some functions of the data service may be deactivated
during recording.
To show the Teletext
When “ ” appears in channel information
(> 31)
1 Press [TEXT ].
• When the Teletext of data service is
displayed, press [TEXT ] again.
2 Use [3, 4, 2, 1], number buttons or colour
buttons, etc. according to on-screen
instructions.
• You can change the display mode. (> 97, Teletext)
Aspect
You can switch the screen mode.
Refer to “Switching the aspect ratio of the
screen”. (> 107)
To select the contents in the broadcast
When a programme includes audio signals etc.,
you can select signals.
1 Press [OPTION].
2 Select “Digital TV Menu”, then press [OK].
3 Select “Multi Audio” or “Sub Channel”, then
press [OK].
4 Select the item.
About Operator profile
Depending on your CAM, the channel list can be
updated to the one recommended by the CAM.
To perform an update, operate following the
instructions on the screen.
• If cancelled, the notification is instead displayed
on the channel information (> 31).
e.g.,
1
NEWS
9:00 - 11:00
Now
Dolby D
Operator Profile Info
10:30
All DVB Channels
Change category
To execute channel list upgrade, press the red
button.
• Performing an update will delete the e xisting channel list.
To return to the original channel list, restart “Auto Setup” in
“Basic Settings” menu. (> 89, 92)
• The timer recording programmes may be cancelled. Please
confirm a timer programme. (> 41)
32
SQT0300
Page 33

Watching broadcasts
Pause
8:05 9:35
8:50
8:50:55 07.01.2014
Play
8:50.50
REWIND LIVE TV/PAUSE LIVE TV
This unit temporarily saves a live TV programme
you are watching with this unit’s tuner on HDD.
REWIND LIVE TV
You can rewind live TV programme to the point
where temporary save has started (up to
1.5 hours).
• REWIND LIVE TV does not work when watching
a programme via external input.
PAUSE LIVE TV
You can pause live TV programme and restart
watching from the paused position.
1 While watching TV
REWIND LIVE TV:
Press [SLOW/SEARCH 6] to rewind.
PAUSE LIVE TV:
Press [PAUSE ;] to pause.
• The maximum amount of the temporary
save is 1.5 hours.
2 When you want to resume:
Press [PLAY/a1.3 1].
• You can perform search or Quick View, etc.
• If temporary save stops (> right), playback
will be performed by that point.
Display information
While pausing or rewinding a broadcast:
Press [STATUS ].
• Press [STATUS ] again.
While pausing a programme via external input:
Press [STATUS ] twice.
8:50:55 07.01.2014
Play
8:50.50
1 The time that you can rewind the live
programme.
2 The amount of time temporarily saved on
HDD.
3 The time of the current playback position.
To stop REWIND LIVE TV or PAUSE LIVE TV
1Press [STOP∫].
2 Select “Yes”, then press [OK].
To hide the display information
Press [EXIT ].
• The unit cannot rewind and play more than 1.5 hours prior
to the current time.
• Temporary save stops in the following cases:
- When switching to other channels or other screen
- When recording of the watching programme is started
- When two programmes simultaneous recording is started
- When performing PAUSE LIVE TV or REWIND LIVE TV
for more than 8 hours (This may vary depending on the
HDD free space.)
• These functions do not work in the fo llowing cases:
- When the clock is not set
- When setting clock manually (Contents protected title
(Retention limit) only) (> 15)
- While recording two programmes simultaneously
- While copying
- While watching a programme being recorded
- When a radio programme is selected
- While watching an encrypted programme
- REWIND LIVE TV:
When “REWIND LIVE TV” is set to “Off” (> 94)
- PAUSE LIVE TV:
When a timer recording via external input is started while
watching a programme via external input.
• PAUSE LIVE TV:
You can operate this unit with the TV remote control by
using VIERA Link (> 84).
Refer to the TV operating instructions.
SQT0300
33
Page 34

Recording
Recording
HG
HX
HE
HL
HM
XP
SP
LP
EP
Off (DR)
Conversion Mode Setting
OK
RETURN
HDD Remain (DR)m
h
High
Definition
Data Size
Large
Small
Large
Small
Standard
Definition
Automatic Stop at 8:45
REC1/OTR
Recording Time
Continuous recording
30 min
8:00 - 8:45
Recording TV programmes
4 Select “Automatic Stop”, then press
• This operation only records to built-in HDD.
• This unit can record two programmes being
broadcasted at the same time.
• About CI Plus restriction (> 15)
• Notes for recording of an encrypted broadcast
(> 36)
1 Select the channel to record.
2 Press [REC MODE] and select the
conversion mode, then press [OK].
• This unit will record the programmes in DR
mode once, and then automatically
convert to the selected recording mode
while this unit is in standby.
• Recording mode (> 8)
• The conversion mode set here is used
as an initial value for the next recording.
To set the recording time
1 Select “Recording Time” or “Continuous
2 Press [OK].
[OK].
• One touch recording (OTR)
Recording stops automatically when the
programme ends.
• You can also select “Recording Time” or
“Continuous recording”. (> below)
recording” in step 4 (> above).
Recording Time:
You can set the length of recording time from
30 minutes to 4 hours.
• You can select the recording time with
[2, 1].
Continuous recording:
The recording is continued until you press
[STOP ∫].
3 Press [REC ¥].
34
Recording will start.
SQT0300
Page 35

Recording
REC2
HDD
REC1/OTR AUTO
5
Recording programme
displayed on the TV
Recording programme not displayed on the TV
Stop Recording
Yes
No
Recording of this programme is in progress.
Stop this recording ?
OK
RETURN
1
Stop Recording
2 recordings are in progress.
Which recording would you like to stop ?
OK
RETURN
1
2
To convert the recording mode after recording
in DR mode
Refer to “File Conversion”. (> 56)
To confirm whether the conversion is
completed
Refer to “To confirm whether the conversion is
completed”. (> 57)
To cancel a conversion
Refer to “To cancel a “During standby”
conversion”. (> 57)
• One recording will terminate when simultaneous recording
is being done and timer recording starts.
• When the programme recorded in DR mode is c onverted,
teletext will not be recorded.
• Data service will not be recorded.
• Following contents or media cannot be played back while
recording.
- Xvid and MKV file
- photo
- USB HDD (For data files, > 9) and USB memory
• Copying cannot be performed while recordin g.
• When “Automatic Standby after OTR” is set to “On”
(> 101), this unit is turned to standby mode if this unit is not
operated for approximately 5 minutes after completing
“Automatic Stop” or “Recording Time”.
• When a programme is recorded in encrypted form,
conversion will not start until decryption has finished.
(> 36)
• The title before conversion (the title recorde d in DR mode)
will be deleted once the conversion is completed.
• Conversion will take about the same time as the recorded
duration.
• When the HDD does not have enough re maining space,
conversion will not start.
• Conversion is stopped when this unit is turn ed on.
Conversion will start from the beginning again once the unit
is switched to standby mode.
• When converted, audio content and su btitle will be
converted with the same settings as at the start of
recording.
Operation during Recording
To check the recording programme
Press [STATUS ].
e.g., While recording two programmes simultaneously
To stop recording
Press [STOP ∫].
When recording one programme:
If the following screen appears
Select “Yes”, then press [OK].
When recording two programmes:
If the following screen appears
1 Select the programme, then press [OK].
2 Select “Yes”, then press [OK].
SQT0300
35
Page 36

Recording
Page
Select
Start Time
Prog.Type:
Rec Time
Play
RETURN
Channel Date Title Name
Delete
Drama
9:00 0:10(DR)
04.10
04.10
29.10
29.10
Channel Date Title Name
Recording TV programmes
To pause recording
After displaying the recording programme, press
[PAUSE ;].
• Press again to restart recording.
(A title is not split into separate titles.)
• Timer recording programme cannot be paused.
To record two programmes simultaneously
While recording, perform steps 1–4 on page 34.
• Channel or input can only be switched be tween the
recording programmes.
Simultaneous rec and play
You can play the recording title from the beginning
or the titles previously recorded to the HDD.
1 Press [DIRECT NAVIGATOR].
“[” is displayed on the recording programme.
2 Select the title, then press [OK].
Notes for recording of an encrypted
broadcast
This unit allows you to record/view/play an
encrypted programme by decryption using a
supporting CI module.
Recording of encrypted broadcast
The recording of encrypted broadcasts differs
according to the “Recording for Encrypted
Channel” (> 94) settings as follows.
Supporting CI
module is
inserted
Automatic
Decryption
Recording
§1
Depending on the specifications of the CI
Record
(Decrypted)
Record
(Decrypted)
module, the broadcast may be recorded in the
encrypted form.
2 encrypted programmes simultaneous
recording/viewing/playing
Two programmes (e.g., “A” and “B”) which need
the same CI module for decryption will be
recorded/viewed/played as follows:
When “Automatic” is selected
Programme “A” “B”
While recording
programme “A”, start
recording programme
(Decrypted)
“B”.
While viewing/playing
programme “A”, start
timer recording
programme “B”.
While recording
programme “A”,
view/play programme
(Encrypted
“B”.
§2
When you start viewing/playing programme
“B”, the decrypted recording of programme “A”
switches to encrypted recording. You need to
decrypt programme “A” to play it.
§1
Record
Viewing/
playing
possible
Record
Supporting CI
module is not
inserted
Record
(Encrypted)
Recording
impossible
Record
(Encrypted)
Record
(Encrypted)
Viewing/
playing
§2
)
possible
36
SQT0300
Page 37

Recording
When “Decryption Recording” is selected
Programme “A” “B”
While recording
programme “A”, start
recording programme
Record
(Decrypted)
Recording
impossible
“B”.
While viewing/playing
programme “A”, start
timer recording
programme “B”.
While recording
programme “A”,
view/play programme
“B”.
Viewing/
playing
impossible
Record
(Decrypted)
Record
(Decrypted)
Viewing/
playing
impossible
Encrypted titles
Programmes recorded in encrypted form ( )
have the following restrictions:
- The encrypted title can be played back, but it
does not mean that it is decrypted and saved in
the decrypted form.
- Depending on the programme, it may not be
possible to play back/decrypt after recording.
- There are restrictions on the playback and
editing of encrypted programmes.
- To copy an encrypted programme, decryption
must be performed.
Decryption
Decryption is performed when the unit is turned
off. It will take about the same time as the
recorded duration.
“Copy” on the front panel display remains lighted
during decryption.
It is also possible to decrypt manually
Refer to “File Decryption”. (> 57)
• To decrypt, insert the CI module into the CI slot (> 14).
During decryption, do not remove the CI module from this
unit.
• The title before decryption will be deleted once decryption
is completed.
• When the HDD does not have enoug h remaining space,
decryption will not start.
• This function is stopped when this unit is turned on.
Decryption will start from the beginning again once the unit
is turned off.
• When a decryption fails, the screen icon ( ) is changed
to “ ” or “ (Grey)”.
- : In this case, try to decrypt the title manually. (> 57)
- (Grey): When the title is copy protected (Copying is
prohibited) by CI Plus CAM, operation on the title is not
possible except for deletion. In this case, delete the title.
SQT0300
37
Page 38

Recording
Page Down
Information
Page Up
Keyword Recording+24 hoursTimer Rec.
Portrait/Landscape
GUIDE
TUE 07.01
TV Guide
8:00 - 9:45
TUE 07.01.2014 8:05
Landscape
Category: All DVB Channels
8:00 8:30 9:00 9:30 10:00 10:30
OK
RETURNOPTION
Timer recording
• You can enter up to 32 programmes within a
month in advance. (Each daily or weekly
programme is counted as one programme.)
• This operation only records to built-in HDD.
• This unit can record two programmes being
broadcasted at the same time.
• About CI Plus restriction (> 15)
• Notes for recording of an encrypted broadcast
(> 36)
Preparation
If you want to change the recording mode:
Press [REC MODE] and select the recording
mode, then press [OK].
1 Press [GUIDE].
TV Guide screen appears.
e.g. [BCT845] [BST845]
2 Select the programme, then press the
red button.
The timer icon “F” (red) is displayed.
• If on-screen instructions are displayed,
follow them.
To use TV Guide system
Refer to “Using TV Guide system”. (> 30)
To edit the timer recording on the TV Guide
screen
1 Select the programme to edit, then press the
red button.
2 Select “Timer Rec Edit”, then press [OK].
3 Go to step 3 on page 39, “Manually
programming timer recording”.
To cancel a timer recording on the TV Guide
screen
1 Select the programme to cancel, then press
the red button.
2 Select “Timer Rec Cancel”, then press [OK].
(“F” disappears)
Operation during Recording
Refer to “Operation during Recording”. (> 35)
To search the programmes
1 On the TV Guide screen:
[BCT845] [BST845]
Press [OPTION].
[BCT745] [BCT740] [BST745] [BST740]
Press the blue button.
2 Select the item, then press [OK].
Keyword Search
Displays programmes including the input
keyword.
• Refer to “Entering text”. (> 107)
Prog.Type Search
Displays programmes of the selected type.
• Select the programme type, then press [OK].
Category Selection
Displays programmes in the selected
category.
• To return to the previous TV Guide list
Select “All DVB Channels”.
3 Select the programme, then press the red
button for timer recording.
• Some broadcasters may not send prog ramme information.
When programme information is not displayed correctly,
use manual timer recording. (> 39)
• Category may not be assigned correctly depending on the
programme information.
• The receipt of the TV Guide data via Set Top Box is not
possible.
• When timer recording from the external eq uipment, use
manual timer recording. (> 39)
• You can set the start and finish time to make the timer
recording work successfully. (> 87, 94, Timer Record Start
Buffer, Timer Record Stop Buffer)
• “Keyword Search”, “Prog.Type Search” and “Category
Selection” search the First 250 channels on “All DVB
Channels".
38
SQT0300
Page 39

Recording
Channel Name
Schedule
Mode
Space
OK
Page Up
Turn
Total 0/32
Timer Recording
30:30 DRHDD TUE 07.01.2014 8:05
Delete
New Timer Programme
Info
Keyword List
Channel Name
Schedule
Mode
Space
Timer Recording
30:30 DRHDD TUE 07.01.2014 8:05
New Timer Programme
OK
Programme Name
WED 08.01
8:00 - 9:00
DR
e.g.,
Manually programming timer
recording
1 Press [PROG/CHECK].
2 Select “New Timer Programme”, then press
[OK].
3 Select the items and change the items.
(> right, Timer recording options)
4 Press [OK].
The timer programme is stored.
To confirm and edit the timer programme
Refer to “To confirm and edit a timer programme”.
(> 41)
Operation during Recording
Refer to “Operation during Recording”. (> 35)
• When recording from the external equipmen t, “Mode”
(recording mode) is XP, SP, LP, EP or FR.
Timer recording options
Select the items and change the items.
Timer Recording TUE 07.01.2014 8:05
Channel
1 WED 08.01
Title Name
OK
RETURN
Channel
• You can select Category/AV with the red button.
Day/Date
• You can select “Date” or “Weekly” by pressing
the green button.
• Auto Renewal Recording
(Only daily/weekly timer recording)
The unit will record the new programme over
the old one.
Press the yellow button.
“Renew : ON” is displayed.
Start/Stop
• Press and hold [3, 4] to alter in 15-minute
increments.
Mode/Conv.
Refer to step 2. (> 34)
Subtitles
You can choose whether or not to record the
subtitle at conversion.
(Only when item other than “OFF” is selected in
“Conv.”)
Title Name
1 Select “Title Name”, then press [OK].
2 Refer to “Entering text”. (> 107)
HDD
30:24 DR
Day/Date Stop
Start
8:00 9:00
Category/
AV
Date or
Weekly?
Mode
DR OFF
Conv. Subtitles
OFF
SQT0300
39
Page 40

Recording
e.g.,
Timer recording
Timer recording from channel
information
You can make timer recording of the current or
next programme.
1 While watching a programme
Press [STATUS ].
1
NEWS
9:00 - 11:00
Now
Dolby D
Set timer
10:30
All DVB Channels
Change category
2 Display the channel information of a
programme to record.
• Switch the programme with [2, 1].
• Switch the channel with [3, 4].
3 Press the yellow button.
4 Go to step 3 on page 39, “Manually
programming timer recording”.
Notes on timer recording
• When the programme recorded in DR mode is
converted, the audio content and subtitle
language will be selected according to the
following settings:
- “Multi Audio” of “Preferred Language” (> 93)
- “Subtitles” of “Preferred Language” (> 93)
- Audio for HG / HX / HE / HL / HM Recording
(> 97)
• When the programme recorded in DR mode is
converted, teletext will not be recorded.
• Data service will not be recorded.
• (Only when recording broadcast in other than
DR mode)
This unit will record in the DR mode once, and
then convert to the selected mode automatically
during standby. If the title has not been
decrypted, conversion will start after decryption.
• Even if you switch the unit to standby mode
during the timer recording, the recording is
continued.
• When you programme successive timer
recordings to start, about last 1 minute of earlier
programme will not be recorded.
• Timer recording will not start while:
- copying a title in high speed mode [with
finalising or creating Top Menu ([+RW])]
- copying a title in normal speed mode
- converting a title in “File Conversion” (Only
when “Now” is selected)
- copying HD Video (AVCHD) from USB device
or SD card
- copying photos/music
-formatting
- finalising/creating Top Menu
• When “Pure Sound mode” is activated, timer
recording does not start during playback of
BD-Video, DVD-Video or music CD. (> 94)
40
SQT0300
Page 41

Recording
Channel Name
Schedule
Mode
Space
OK
RETURN
Page Up
Page Down
Turn
Timer Off
Total 3/32
Timer Recording
30:30 DRHDD TUE 07.01.2014 8:05
Delete
Info
Keyword List
New Timer Programme
MON 13.01
MON 13.01
10:00 - 11:50
11:00 - 11:45
11:30 - 1:00
8:00 - 10:45
MON 13.01
TUE 07.01
DR
HG
DR
DR
OK
OK
e.g., [BCT845] [BST845]
To confirm and edit a timer
programme
1 Press [PROG/CHECK].
2 Select the programme, then perform the
operations.
To deactivate a timer programme
Press the red button.
• The timer icon “F” will change from red to
grey.
• Press the red button again to activate timer
recording standby. (The timer icon “F” will
change to red.)
To delete a timer programme
Press [DEL].
To edit a timer programme
1 Press [OK].
2 Change the timer recording options.
• Refer to “Timer recording options”.
(> 39)
3 Press [OK].
To show programme information
Press [STATUS ].
To exit the timer recording list
Press [EXIT ].
Screen icons
Red: Timer recording standby is activated.
F
Grey: Timer recording standby is
deactivated.
Currently recording programme
[
A part or all of the programme will not be
recorded since the programme is
overlapping.
The HDD is full.
Copy-protected programme
It was not recorded.
The recording of the programme was not
completed because of some reason.
Auto Renewal Recording is set (> 39).
Displayed if timer recording of two
encrypted programmes is overlapping.
(When “Recording for Encrypted Channel”
is set to “Decryption Recording” only)
A part or all of the programme will not be
recorded since the encrypted programme
is overlapping.
Displayed if the recording can fit in the
OK
remaining space
Daily or weekly timer programme is set.
(Date)
It may not be possible to record because:
!
- there is not enough space left.
- the number of possible titles has
reached its maximum. (> 120)
- programmes are deactivated, etc.
[BCT845] [BST845]
• Programmes to be recorded with Keyword reco rding (> 42)
are not displayed.
SQT0300
41
Page 42

Recording
Keyword Recording FRI 12.09.2014 20:01
Please specify Search Conditions and Recording Settings. To activate, press “Set”.
Search Conditions.
Recording Settings
Keyword1
Olympic
Search Target
Extra Word Settings
Programme Name only
Conversion Mode
Off (DR)
Subtitle
Off
Prog.Type
All Prog.Type
Search Channel
First 250 Channels
Search
OK
RETURN
Set Cancel
e.g.,
Keyword Recording
[BCT845] [BST845]
The unit can find programmes that include
specified keywords from programme names and
programme information on TV Guide, and record
the programmes automatically.
• This operation only records to built-in HDD.
• This unit can record two programmes being
broadcasted at the same time.
•
Restrictions on CI Plus and encrypted programmes
that apply when recording programmes also apply to
this function.
(> 15, 36)
• Notes on timer recording (> 40)
1 On the TV Guide screen:
Select the programme for keyword
recording and press the blue button.
2 Select the items and change the items if
necessary.
• Refer to “Keyword Recording conditions”.
(> right)
3 Select “Set”, then press [OK].
4 Press [OK].
The Keyword Recording icon “F” (blue) is
displayed on the TV Guide screen.
• Programmes that are set to be recorded au tomatically with
Keyword Recording are not displayed on the Timer
Recording confirmation screen. (> 41). (> right, “To
display the list of programmes found with the set keyword”)
• When a search brings up too many programmes, we
recommend revising the search settings.
• On the TV Guide screen, up to 128 pro grammes are
displayed with the Keyword Recording icon “F” (blue).
42
SQT0300
Keyword Recording conditions
Search Conditions:
Keyword 1-16
Input the keyword to be registered.
• Refer to “Entering text”. (> 107)
• Default keyword is the programme title
selected on the TV Guide screen.
If the programme title includes its episode
number, etc., delete the number before
registering the title.
Search Target
Select the search target.
Extra Word Settings
1 Add up to two keywords and two excluded
words to refine search conditions.
2 Select “Set”, then press [OK].
Prog.Type
Select the programme type.
Search Channel
The Keyword Recording function can search
the First 250 channels listed on “All DVB
Channels” or the First 50 channels registered
for “Favourites1”.
•
When setting “First 50 Favourites1” as a search
target, register the channels you want to search
with Keyword Recording to
“Favourites1” in advance.
First
50 channels of
(> 90, 92)
Recording Settings:
Conversion Mode
Refer to step 2 on page 34, “Recording TV
programmes”.
Subtitle
You can choose whether or not to record the
subtitle at conversion.
(Only when item other than “Off(DR)” is
selected in “Conversion Mode”)
To display the list of programmes found with
the set keyword
Press the yellow button in “Keyword Recording” screen.
SAT 18.10
2
ABC1
23
ABC2
22
ABC1
2
ABC2/4
22
ABC1
Blue: Recording has already been set with a
F
Schedule Programme Name
7:00-7:30 Olympic opening ceremony
7:00-8:00 Olympic opening ceremony
9:00-11:30 Olympic Soccer
7:00-7:30 Olympic Judo
9:00-10:30 Olympic Boxing
different Keyword.
Red:
F
Timer recording standby is activated.
Page 43

Recording
Keyword Recording FRI 12.09.2014 20:01
The programme including keyword is searched every day and timer registration is carried out automatically.
Keyword 1 World cup
All Keywords Search Timer RecordingTurn Keyword Off Video Menu
Delete
OK
DEL
RETURNOPTION
Keyword 2 Soccer
Keyword 3 Premier League
Keyword 4 Olympic
Keyword 5 --- (No Keyword)
Keyword 6 --- (No Keyword)
Keyword 7 --- (No Keyword)
Keyword 8 --- (No Keyword)
Priority order of Keyword Recording
Recording takes place in the following order of
priority:
1 A programme that is already being recorded
2 Timer Recording
3 A programme with a smaller keyword
number (1 to 16)
4 A programme that starts first
Keyword Recording may not work in some cases.
To avoid recording failure, we recommend using
Timer Recording instead of Keyword Recording.
Changing the recording method
Select the programme marked “
F” (Blue), then
press the red button on the Keyword Recording
status screen or TV Guide screen. (> 42)
• If you press the red button selecting the
programme marked “
F” (Red), “Timer Rec
Edit” (> 39) or “Timer Rec Cancel” is available.
• Programmes set for timer recordings a re not treated as
Keyword Recording programmes.
Displaying the Keyword List
You can also set keywords from
[FUNCTION MENU].
1 Press [FUNCTION MENU].
2 Select “Keyword Recording”, then press [OK].
To add/edit the Keyword
Select the Keyword and press [OK], then
make required settings.
• Refer to “Keyword Recording” (> 42)
To deactivate the Keyword Recording
Select the Keyword, then press the red button.
• Press again to return back to the Keyword
Recording standby.
To search programmes matched with any
of the registered keywords
Press the yellow button.
To play programmes recorded with
Keyword Recording
Press the green button.
• Refer to “Playing Keyword Recording titles”
(> 47)
To delete the registered Keyword
1 Select the Keyword, then press [DEL].
2 Select “Yes”, then press [OK].
To change the recording priority of
keywords
• Refer to “Priority order of Keyword
Recording” (> left)
1 Press [OPTION].
2 Select “Change Priority”, then press [OK].
3 Press [3, 4] to shift the position, then
press [OK].
Automatic deletion of Keyword Recording
By default, the unit automatically deletes titles
recorded with Keyword Recording after 10 days
Perform the following not to delete them as
necessary. (> 47)
- Protect titles.
- Change Delete Settings.
- Remove titles from “Keyword Record”.
- Copy titles before deleting them.
SQT0300
.
43
Page 44

Playing back video
Playing
back video
§
Time Remaining 45:54 (DR)
HDD
Page
Select Copy
Grouped Titles
DIRECT NAVIGATOR
Start Time
Prog.Type:
Rec time
Play
RETURN
Social/Economic
AVCH DMovieNot Viewed
Video Menu
Channel Date Title Name Titles
All
Keyword Record
Delete
Page Up
Page Down
Movie
9:00 0:01(DR)
R
Playing titles on the HDD
§
“For recorded titles (> 9)” only
1 Press [FUNCTION MENU].
2 Select “Video” in “Contents on HDD”,
then press [OK].
e.g., [BCT845] [BST845]
1 Tab (> 45)
2 Programme type
3 [BCT845] [BST845] Keyword Recording
Refer to “Playing Keyword Recording
titles” (> 47)
• [USB_HDD] When connecting registered
USB HDD, “USB HDD” tab and
registration number appears.
Select “USB HDD” tab.
e.g., [BCT845] [BST845]
Video Menu
USB-HDD
USB HDD
Keyword Record
3 Select the title, then press [OK].
Playback will start.
Resume play function
If the following screen appears, select the point to
start playback.
Playback
Where do you want to start playback from ?
Last Stopped
OK
Grouped Titles DIRECT NAVIGATO
Time Remaining 45:54 (DR) Registration number 1
Beginning
RETURN
All
Not Viewed
Movie
Social/Economic
DIRECT NAVIGATOR screen
Screen icons
[ Currently recording programme
Protected title
Title was not recorded due to
recording protection
Title cannot be played
t
(When data is damaged etc.)
Title is copy protected (One
generation copy is permitted)
Title requires a CAM with a playback
licence to play back.
§
• The number of times the title can
be played back may also be limited.
Title cannot be played back when a
certain time has elapsed after the
recording.
The icon turns grey after the
§
playback period has passed.
• Playback period limit can be
checked in the information of that
title. (> 45, Showing Information)
§
Title is copy restricted.
Title requires a CAM with a playback
licence to play back. If a certain time
has elapsed after the recording, the
§
AVCHD
(Grey)
title cannot be played back.
• The number of times the title can
be played back may also be limited.
Encrypted title
Title has failed to be decrypted
• Press [STATUS ] to show the
reason of the failure.
Title cannot be played back, edited
(except deleting) or copied.
Delete the title. (> 54)
Grouped titles
Title has not yet been played
44
SQT0300
Page 45

Playing back video
Title is recorded using a different
encoding system from that of the
unit.
Change the “TV System” (> 87, 98).
Radio programme
3D contents
• This icon will not display even with
&
3D programmes when a broadcast
programme is recorded.
Recorded in 1080/50p contents
Recorded in 1080/60p contents
Recording did not complete as the
timer recording has started.
Title has a rating level set by the
CAM.
[BCT845] [BST845]
Keyword recording title which has not
yet been played
Grouped Keyword recording titles
Keyword recording title which has
already been played
Notification icon for a new Keyword
Recording
[BCT845] [BCT745] [BCT7 40]
Title is restricted by Child Lock List or
Parental Rating (> 91).
§
Title cannot be edited (except deleting) or
copied.
Tab
Titles will be categorised automatically.
You can quickly find the recorded titles by
selecting the tab.
Showing Information
Select the title, then press [STATUS ].
Switching the appearance
1 Press [OPTION].
2 Select “Grouped Titles” or “All Titles”, then
press [OK].
Grouped Titles:
• Two or more titles recorded in the
daily/weekly timer recording mode are
bundled and displayed as one item.
[BCT845] [BST845]
• Two or more Keyword recording titles
recorded from the same Keyword.
All Titles:
Displays all titles.
Playing back grouped titles
1 On the Grouped Titles screen:
Select the item marked with or .
(:[BCT845] [BST845] only)
2 When playing all titles:
Press [PLAY/a1.3 1].
• This function cannot be used if the group includes a ny
encrypted title ( ).
When playing the individual title:
Press [OK] and select the title, then press
[OK].
To select the tab
Press [2, 1].
To change the displayed programme type tab
1 Select the programme type, then press the
green button.
2 Select the item, then press [OK].
SQT0300
45
Page 46

Playing back video
Chapter
Title
Chapter Marks
Press OK to start playing from
the selected chapter.
Selected chapter can be edited
via OPTION.
Press RETURN to go back to
previous menu.
Page 001/001
0:00.00
001
0:12.29
Play
SelectEdit Chapter Mark
Play
RETURN
Delete
Playing titles on the HDD
Editing the grouped titles
1 Select the title or the group, then press the
yellow button.
• A check mark is displayed. Repeat this step.
• Press the yellow button again to cancel.
• If you perform “Remove”, select the title in
the group.
2 Press [OPTION].
3 Select the item, then press [OK].
Create Group:
Selected titles are bundled to form a group.
Select “Create”, then press [OK].
Release Grouping:
All the titles in the group are released.
Select “Release”, then press [OK].
Remove:
Selected titles are removed from the group.
Select “Remove”, then press [OK].
Changing the group name
1 Select the group, then press [OPTION].
2 Select “Edit”, then press [OK].
3 Select “Enter Title Name”, then press [OK].
4 Refer to “Entering text”. (> 107)
Playback from Chapter View
Regarding chapters
You can divide a title into multiple chapters. Each
section between the division points (Chapter
Marks) becomes a chapter.
• Chapter Creation
This unit can create chapters automatically
while recording broadcasting. (> 95)
• If the title is recorded in the encrypted form, the chapter
will be created only after the title is decrypted.
1 Select the title, then press [OPTION].
2 Select “Chapter View”, then press [OK].
e.g., [HDD]
3 Select the chapter, then press [OK].
To edit the chapter in Chapter View
Refer to “Editing chapters”. (> 58)
SQT0300
46
Page 47

Playing back video
Time Remaining 45:54 (DR)
HDD
Page 1/3
Select Copy
DIRECT NAVIGATOR
1: World Cup
2: Soccer
3: Premier League
4: Olympic
5: --- (No Keyword)
6: --- (No Keyword)
7: --- (No Keyword)
Rec Mode
OK
RETURN
Delete Settings Keyword List
Social/Economic
AVCHDMovieNot Viewed
Video Menu
Titles will be deleted 10 days after recording. Press RED button to change.
All
Keyword Record
Page Up
Page Down
(DR HX)
0
0
0
Playing Keyword Recording titles
[BCT845] [BST845]
1 Select “Keyword Record” tab.
1 Recording mode for conversion (> 56)
2 Select the Keyword, then Press [OK].
3 Select the title, then press [OK].
To play back all Keyword Recording titles
recorded with the selected Keyword
Select the Keyword, then press [PLAY/a1.3 1] in
step 2.
To change automatic delete settings
1 Press the red button in step 2. (> above)
2 Select the item, then press [OK].
• Select “No Automatic Deletion” not to delete
titles automatically.
To display Keyword List
Press the green button in step 2. (> left)
• Refer to “Displaying the Keyword List”. (> 43)
To protect Keyword Recording titles
Protection setting prevents the Keyword
Recording title from automatic deletion.
1 Select the title, then press the red button in
step 3. (> left)
2 Select “Set up Protection”, then press [OK].
• To release the protection
Select “Cancel Protection”, then press [OK].
To remove Keyword Recording titles from
“Keyword Record”
Removed Keyword Recording titles are not under
“Keyword Record”.
• Keyword Recording titles removed from
“Keyword Record” will be treated as normal
titles.
1 Select the title, then press [OPTION] in step 3.
(> left)
2 Select “Remove from Keyword Record”, then
press [OK].
3 Select “Remove”, then press [OK].
To copy Keyword Recording titles
You can copy Keyword Recording titles on the
disc or the USB HDD.
1 Select the title, then press the yellow button in
step 3. (> left)
or
Select the Keyword, then press the yellow
button in step 2. (> left)
A check mark is displayed. Repeat this step.
• Press the yellow button again to cancel.
2 Perform steps 5-9 on page 59, “Copying titles”.
SQT0300
47
Page 48

Playing back video
§
USB Device
OK
RETURN
USB device is inserted.
View Photos
Play Video
Play / Copy Music ( MP3 )
Copy Video ( AVCHD )
Copy New Photos
Play Play
RETURN
Page 0001 / 0003
Parent Folder
Videos \ Video \USB
Folder 01
Folder 02
video01.mkv
video02.mkv
video03.mkv
video04.mkv
Page Up
Page Down
Playing titles on the media
Menu screen
Selecting screen for each operation is displayed
when the media is inserted, and you can access
§
“For data files (> 9)” only
1 Insert the media.
Depending on the type of the media, play
starts from the specified position, or the
screen appears.
• AVCHD: If the menu screen is not
displayed
Press [PLAY/a1.3 1].
2 When the DIRECT NAVIGATOR screen or
menu screen etc., appears:
Select the item or title, then press [OK].
• Repeat this step if necessary.
Playback will start.
To play back the playlist created on other
equipment
1 Press [FUNCTION MENU].
2 Select “Disc” in “Media”, then press [OK].
3 Select “Playlists”, then press [OK].
4 Select the playlist, then press [OK].
the operation screen easily.
e.g., [USB]
• Display items differ depending on what is
recorded in each media.
If the menu screen is not displayed, display it
by performing the following operation.
1 While stopped
2 Select “Media”, then press [OK].
3 Select the media, then press [OK].
Video list screen
e.g.,
Press [FUNCTION MENU].
• [BD-V] You cannot play back while recording from external
equipment. Also, playback stops when the timer recording
starts from external equipment.
• Some files may not be played back, depending on the video
resolution and frame rate condition.
48
SQT0300
Screen icons:
Folder
Titles
Move to the parent folder
Page 49

Playing back video
DIRECT NAVIGATOR screen
e.g.,
Video Menu
BD-RE
All
Play
RETURN
All Titles DIRECT NAVIGATOR
10:30 (DR)
Time Remaining
Channel Date Title Name
Dogs and Cats
29.10
Start Time 22:46 Rec time 0:10(HM)
04.10
Birds
04.10
World news
Football
29.10
Delete
Page Down
CopySelect
Page Up
Page 003/003
DEL
Showing Information
Select the title, then press [STATUS ].
Playback from Chapter View
1 Select the title, then press [OPTION].
2 Select “Chapter View”, then press [OK].
3 Select the chapter, then press [OK].
• Regarding chapters
Refer to “Regarding chapters”. (> 46)
Video Menu ( AVCHD ) screen
[SD]
e.g.,
Video Menu ( AVCHD )
SD Card
Rec time
Play
RETURN
0:30.41
Date Day
No.
001
002
003
004
005
006
007
008
009
010
Time
SUN 9:00 Dogs and Cats
05.01
SUN
05.01 5:00 Birds
MON
06.01 9:30 World news
TUE
07.01 10:00 Football
TUE
07.01 11:30 House dog
WED
08.01 2:00 Hunting
THU
09.01 11:00 Shopping
THU
09.01 10:00 Venus
FRI
10.01 3:45 Kitten
FRI
10.01 9:00 Moon
Title Name
Page 03/03
Page Up
Page Down
Showing Information
1 Select the title, then press [OPTION].
2 Select “Information”, then press [OK].
Notes for BD-Live discs
[BD-V]
BD-Live allows you to enjoy more functions such
as subtitles, exclusive images and online games
by connecting this unit to the Internet.
Preparation
1 Perform network connection and settings.
(> 21, 26)
2 Insert a disc.
For the playback method, refer to the
instructions for the disc.
Delete BD-Video data
If you no longer need BD-Live data recorded on
the built-in HDD, you can delete data with the
following operation.
1 Press [FUNCTION MENU].
2 Select “BD-Video Data Management” in
“Setup”, then press [OK].
3 Select “Delete BD-Video data”, then press
[OK].
4 Select “Yes”, then press [OK].
5 Select “Start”, then press [OK].
6 Press [OK].
• The usable functions and the opera ting method may vary
with each disc, please refer to the instructions on the disc.
• You can restrict Internet access when BD-Live functions are
used (> 87, 93, BD-Live).
• When “Pure Sound mode” is set to “On”, this unit cannot
use BD-Live functions. (> 94)
About screen icons
Refer to “Screen icons”. (> 44)
SQT0300
49
Page 50

Playing back video
Operation during play
Quick View
Press and hold [PLAY/a1.3 1].
• Press again to return to normal speed.
• Depending on the media and the type of file, some
operations may not be possible.
• Depending on the media, it may take time for the menu
screen, pictures, sound, etc. to start.
• Discs continue to rotate while menus are displayed. Press
[STOP ∫] when you have finished playback to protect the
unit’s motor, your TV screen, etc.
General operations
Status messages
Press [STATUS ] twice.
e.g.,
8:05:50 07.01.2014
Remain HDD
T1 0:05.14 DR
0:30.00
Stop
Press [STOP ∫].
Resume play function
Press [PLAY/a1.3 1] to restart from the stopped
position.
• Discs: On ly previous stopped position is memorized. The
position may be cleared if the tray is opened or the unit is
switched to standby mode.
• Xvid, MKV, MP4 and MPEG2: Quick View is not effective.
• Quick View is not effective when playing back the DVD-RW
disc.
• Quick View may not work when recording in XP or FR
mode.
• Quick View cannot be used on encrypted titles ( ).
Search
Press [SLOW/SEARCH 6] or
[SLOW/SEARCH 5].
•Press [PLAY/a1.3 1] to restart play.
• The speed increases up to 5 steps.
([+R] [+RW]: Up to 3 steps)
• Xvid, MKV, MP4 and MPEG2: Audio is not heard during all
levels search.
Pause
Press [PAUSE ;].
•Press [PLAY/a1.3 1] to restart play.
Slow-motion
While paused, press [SLOW/SEARCH 6] or
[SLOW/SEARCH 5].
•Press [PLAY/a1.3 1] to restart play.
• The speed increases up to 5 steps.
• Xvid, MKV, MP4 and MPEG2: Slow-motion is not effective.
• [BD-V], AVCHD ([DVD-R] [SD]): Forward direction
[SLOW/SEARCH 5] only.
• Slow-motion cannot be used on encryp ted titles ( ).
50
SQT0300
Page 51

Playing back video
Frame-by-frame
While paused, press [2](2;) or [1](;1).
• Each press shows the next frame.
• Press and hold to change in succession forward
or backward.
•Press [PLAY/a1.3 1] to restart play.
• Xvid, MKV, MP4 and MPEG2: Frame-by-frame is no t
effective.
• [BD-V], AVCHD ([DVD-R] [SD]): Forward direction [1](;1)
only.
• Frame-by-frame cannot be used on encrypte d titles ( ).
Manual Skip
Skip forward 1 minute:
Press [MANUAL SKIP +60s].
Skip backward 10 seconds:
Press [MANUAL SKIP -10s].
• Xvid and MKV: Manual Skip is not effective.
Skipping the specified time
1 Press [TIME SLIP].
2 Select the time with [3, 4].
• Press and hold [3, 4] to change the time by
10-minute.
3 Press [OK].
• Play skips the specified time.
To display menu
[BD-V] [DVD-V]
1 Press [OPTION].
2 Select “Playback Menu”, then press [OK].
3 Select “Top Menu”, “Pop-up Menu” or “Menu”,
then press [OK].
Skipping the title or chapter
Press [SKIP :] or [SKIP 9].
• [HDD] [USB_HDD] (For recorded titles, > 9): It will not skip the
title. But the title in the grouped titles will be skipped. (> 45)
• [SKIP 9] is not effective for encrypted titles ( ).
To create Chapter Marks
[HDD] [USB_HDD] (For recorded titles, > 9)
[BD-RE] [BD-R] [RAM]
During the playback or pause
Press [CHAPTER].
To delete the Chapter Mark
[HDD] [USB_HDD] (For recorded titles, > 9)
[BD-RE] [BD-R] [RAM]
1 While paused
Press [SKIP :] or [SKIP 9] and skip to
the location you want to delete.
2 Press [CHAPTER].
3 Select “Yes”, then press [OK].
• [BD-V] [DVD-V], Xvid, MKV, AVCHD, MP4 and MPEG2:
[TIME SLIP] is not effective.
SQT0300
51
Page 52

Playing back video
Operation during play
Changing audio
Press [AUDIO].
• It will switch depending on the contents
recorded every time it is pressed.
Switching subtitles
[HDD] [USB_HDD] (For recorded titles, > 9)
[BD-RE] [BD-R]:
1 Press [STTL ].
2 Press [OK].
3 Select “On” or “Off”, then press [OK].
• If you want to switch the subtitle language,
select it in the Basic Operation menu (> 85).
[BD-V] [DVD-V], Xvid and MKV:
Display with “Subtitle Settings” in the Basic
Operation menu (> 85).
• Xvid and MKV: If the subtitles text are not d isplayed
correctly, try changing the language settings (> 94, Subtitle
Te xt ) .
Displaying the Teletext
[HDD] [USB_HDD] (For recorded titles, > 9)
[BD-RE] [BD-R]:
3D video playback
Preparation
Connect 3D compatible TV to this unit. (> 16, 17)
• Perform the necessary preparations for the TV.
Play back following the instructions displayed
on the screen.
Preparatory 3D settings
Perform the following settings as necessary.
3D BD-Video Playback
It is also possible to play back 3D discs in 2D
(conventional video). (> 87, 93)
3D Type
If 3D video cannot be played back in 3D, you may
be able to play it in 3D by changing the setting.
(> 87, 98)
3D AVCHD Output
If 2D AVCHD video is recognised as 3D video and
cannot be played back correctly, you may be able
to play it by changing the setting. (> 87, 98)
3D Playback Message
Hide the 3D viewing warning screen. (> 87, 98)
Press [TEXT ].
• Teletext display mode is TOP (FLOF) only.
• Some functions may not work.
• Teletext cannot be displayed when the subtitles are set to
ON.
Aspect
You can switch the screen mode.
Refer to “Switching the aspect ratio of the
screen”. (> 107)
52
SQT0300
Page 53

3D settings during playback
Change this setting when the screen is not
correctly displayed for 3D compatible
programmes.
1 Press [OPTION].
2 Select “Playback Settings” in “Playback
Menu”, then press [OK].
3 Select “3D Settings”, then press [OK].
4 Select the item, then press [OK].
Signal Format
- Original:
Keep original picture format.
- Side by side:
3D picture format comprising of left and right
screens.
-2D to 3D:
Converts 2D pictures to 3D effect while playing.
3D Picture Mode
-Normal:
Normal 3D effects.
-Soft:
Soft 3D effects.
• This function cannot be enabled when “Signal
Format” is set to “2D to 3D”.
- Manual:
3D effects set manually (> below)
Playing back video
• Depending on the contents, displayed items are different.
• This unit only guarantees the playba ck of the Frame
Sequential and the Side-by-Side (Half) programme types.
• Please refrain from viewing 3D images if you do not feel
well or are experiencing visual fatigue.
In the event that you experience dizziness, nausea, or other
discomfort while viewing 3D images, discontinue use and
rest your eyes.
• Depending on the connected TV, the video being played
back might switch to 2D video due to changes in resolution
etc. Check the 3D setting on the TV.
• 3D video might not output the way it is set in “HDMI Video
Format” (> 98) and “24p Output” (> 98).
• It may display as Side-by-Side when play back of the 3D
video is started.
Manual Settings
(To change the setting, set “3D Picture Mode” to
“Manual”.)
Distance
Set the amount of depth perception.
Screen Type
Selects how the screen appears during 3D
playback (flat or round).
Frame Width
Set the amount of feathering at the edge of
screen.
Frame Colour
Set the colour of feathering at the edge of
screen.
Graphic Display Level
Adjust the 3D position for the playback menu or
message screen etc. (> 86)
SQT0300
53
Page 54

Editing video
Editing vid eo
§
Start Time
Prog.Type:
Rec time
Channel Date Title Name
Movie
9:00
Time Remaining 45:54 (DR)
HDD
Page
Select Copy
Grouped Titles DIRECT NAVIGATOR
Start Time
Prog.Type:
Rec time
Play
RETURN
Social/Economic AVCHDMovieNot Viewed
Video Menu
Channel Date Title Name Titles
All
Keyword Record
Delete
Page Up
Page Down
Movie
9:00 0:01(DR)
Set up Protection
Cancel Protection
Partial Delete
Divide Title
File Conversion
Enter Title Name
Delete Title
Playback
Information
Chapter View
Create Group
Release Grouping
Edit
All Titles
File Decryption
Deleting/Editing recorded titles
Once deleted, divided or partially deleted,
recorded content cannot be restored to its
original state. Make certain before proceeding.
§
“For recorded titles (> 9)” only
• If the disc is protected, release the protection. (> 105, Disc
Protection)
• Depending on the media and the type of file, some
operations may not be possible.
[BCT845] [BCT745] [BCT740]
• PIN is required to edit the titles with in some functions.
(> 45)
Deleting
1 On the DIRECT NAVIGATOR screen:
Select the title.
e.g. [BCT845] [BST845]
Video Menu
HDD
Keyword Record
Play
RETURN
Grouped Titles DIRECT NAVIGATOR
Time Remaining 45:54 (DR)
All
Channel Date Title Name Titles
Start Time
9:00 0:01(DR)
Prog.Type:
Movie
Social/Economic AVCHDMovieNot Viewed
Rec time
Page
Delete
Select Copy
Page Up
Page Down
Available disc space after deleting
• [HDD] [USB_HDD] [BD-RE] [RAM]
The space deleted becomes available for
recording.
• [BD-R] [DVD-R] [+R]
Available space does not increase even after
the contents are deleted.
• [DVD-RW] [+RW]
Available recording space increases only when
the last recorded title is deleted.
• Even after deletion is completed, it may take time until the
updated available space is displayed.
Editing
• If the title is contents protected, you may not
perform editing other than deleting. (> 15)
1 On the DIRECT NAVIGATOR screen:
Select the title.
e.g. [BCT845] [BST845]
2 Press [DEL].
3 Select “Delete”, then press [OK].
Multiple deleting
Select the title, then press the yellow button in
step 1.
A check mark is displayed. Repeat this step.
• Press the yellow button again to cancel.
Deleting during play
1 Press [DEL] while playing.
2 Select “Delete”, then press [OK].
54
SQT0300
2 Press [OPTION].
3 Select the item, then press [OK].
e.g.,
• “Edit” has several functions.
Page 55

Editing video
Start Time
Prog.Type:
Rec time 0:01(DR)
Channel Date Title Name
Movie
9:00
Multiple editing
Select the title, then press the yellow button in
step 1.
A check mark is displayed. Repeat this step.
• Press the yellow button again to cancel.
Deleting
1 Select “Delete Title”, then press [OK].
2 Select “Delete”, then press [OK].
Entering title name
1 Select “Enter Title Name” in “Edit”, then press
[OK].
2 Refer to “Entering text”. (> 107)
Setting protection
[HDD] [USB_HDD] [BD-RE] [BD-R] [RAM] [+R] [+RW]
Protection setting prevents the title from
accidental deletion.
1 Select “Set up Protection” or “Cancel
Protection” in “Edit”, then press [OK].
2 Select “Yes”, then press [OK].
appears when setting the protection.
• This function cannot be used on encrypted titles ( ).
Partial deleting
[HDD] [USB_HDD] [BD-RE] [BD-R] [RAM]
1 Select “Partial Delete” in “Edit”, then press
[OK].
2 Press [OK] at the start point and end point to
delete.
• You can find the desired point by using play,
search, etc. (> 50)
3 Select “Continue”, then press [OK].
• Select “Next”, then press [OK] to delete other
sections. Up to 20 sections can be set.
(> go to step 2)
4 Select “Delete”, then press [OK].
• Chapter Mark is generated in the scene that
was partially deleted.
5 Press [RETURN ].
• This function cannot be used on en crypted titles ( ).
Dividing title
[HDD] [USB_HDD] [BD-RE] [BD-R] [RAM]
1 Select “Divide Title” in “Edit”, then press [OK].
2 Press [OK] at the point to divide the title.
• You can find the desired point by using play,
search, etc. (> 50)
3 Select “Continue”, then press [OK].
4 Select “Divide”, then press [OK].
To confirm the division point
After performing step 2.
Select “Preview”, then press [OK].
• The unit plays 10 seconds before and after the
division point.
To change the division point
After performing step 2.
Restart play and select “Divide”, then press [OK]
at the division point.
• [HDD] [USB_HDD] Divided titles will become a group of titles.
• This function cannot be used on en crypted titles ( ).
SQT0300
55
Page 56

Editing video
File Conversion
Convert the selected title by changing its recording mode.
Please select recording mode and other options, then press OK.
RETURN
Subtitles
Off
Recording Mode
HL -- Longer Play
Timing
During standby
OK
Deleting/Editing recorded titles
File Conversion
[HDD] [USB_HDD]
File Conversion is a function to convert the
recording mode of the title in DR mode and
AVCHD contents. The size of the converted title
will be small regularly. It will take about the same
time as the recorded duration.
1 Select “File Conversion” in “Edit”, then press
[OK].
e.g.,
2 Set the conversion options, then press [OK].
Recording Mode (> 8):
• [USB_HDD] You cannot select XP, SP, LP and
EP mode.
Subtitles:
•Automatic
Subtitles will be recorded if they are included
in the title, and will not be recorded if they are
not included.
•Off
Subtitle will not be recorded.
Timing:
•Now
Conversion begins immediately after step 4.
• Timer recording will not be performed
during conversion.
• If an encrypted title ( ) is included, “Now”
cannot be selected.
• During standby
Conversion will be performed after the unit is
switched to standby mode.
3 Select the item, then press [OK].
Convert & Delete:
The original title will be deleted to save HDD
capacity after conversion.
Convert Only:
The original title remains after conversion.
• The original title will be deleted after File
Conversion, if the selected title is indicated
with . (> 15)
4 “Now” conversion:
Select “Start”, then press [OK].
“During standby” conversion:
Press [OK].
• Conversion will be performed after the unit is
switched to standby mode.
“Copy” or “Conversion” on the front panel
display remains lighted during conversion.
• If the title is encrypted ( ), conversion
will start after decryption.
56
SQT0300
To cancel a “Now” conversion
Press and hold [RETURN ] for more than
3 seconds.
Page 57

Editing video
To confirm whether the conversion is
completed
Press [DIRECT NAVIGATOR].
e.g.,
Channel Date Title Name Titles
04.10
04.10
29.10
29.10
Start Time
Prog.Type:
9:00
Movie
Rec time
0:01(DR HL)
When “±± > ±± (Recording mode for
conversion)” is displayed, the conversion has not
finished.
To cancel a “During standby” conversion
After performing steps 1–3 (> 54, Editing)
1 Select “File Conversion” in “Edit”, then press
[OK].
2 Select “Yes”, then press [OK].
• To use “File Conversion”, the HDD needs enough storage
capacity.
• The size of converted title might increase depending on the
title.
• Teletext will not be recorded.
• File Conversion is stopped when this unit is turned on
during performing “During standby” conversion. Conversion
will start from the beginning again once the unit is switched
to standby mode.
• When converted, the audio content an d subtitle language
will be selected according to the following settings:
- “Multi Audio” of “Preferred Language” (> 93)
- “Subtitles” of “Preferred Language” (> 93)
- Audio for HG / HX / HE / HL / HM Recording (> 97)
• When converted, 3D information may not be retained.
• In titles with the Auto Renewal Recording fu nction (> 39)
set, a programme may be unintentionally converted while in
“During standby”.
File Decryption
[HDD]
Encrypted titles ( ) can be decrypted manually.
1 Select “File Decryption” in “Edit”, then press
[OK].
2 Select whether to delete the original title or
not, then press [OK].
•Yes
The original title will be deleted to save HDD
capacity after decryption.
•No
The original title remains after decryption.
3 Select “Start”, then press [OK].
Decryption starts.
“Decrypting” appears during decryption.
• When a title that is copy protected (One
generation copy is permitted) is selected, the
original title will be deleted after decryption.
(> 15)
• When a decryption fails, the screen icon
( ) is changed to “ ”.
To cancel the decryption
Press and hold [RETURN ] for more than
3 seconds.
• For decryption, the CI module tha t supports the programme
is necessary.
• Depending on the programme, playba ck/decryption may
not be possible.
• During decryption, do not remove the C I module from this
unit.
SQT0300
57
Page 58

Editing video
Deleting/Editing recorded titles
Editing chapters
[HDD] [USB_HDD] [BD-RE] [BD-R] [RAM]
1 Select “Chapter View”, then press [OK].
2 Perform the editing operations.
Edit Chapter Mark:
Select the point where you want to start a new
chapter while viewing the title.
1 Press the green button.
2 Press [OK] at the point you want to divide.
• Repeat this step.
3 Press [RETURN ] to go to Chapter View
screen.
To delete the chapter:
1 Select the chapter, then press [DEL].
Multiple editing
Select the chapter, then press the yellow
button.
A check mark is displayed. Repeat this
step.
• Press the yellow button again to cancel.
2 Select “Delete”, then press [OK].
To combine chapters (Delete chapter
mark):
1 Select the chapter, then press [OPTION].
2 Select “Combine Chapters”, then press
[OK].
3 Select “Combine”, then press [OK].
The selected chapter is combined to the
next chapter.
• The maximum number of chapters:
(Depends on the state of recording.)
[HDD] [USB_HDD]: Approx. 1000 per title
[BD-RE] [BD-R] [RAM]: Approx. 1000 per disc
• [HDD] [USB_HDD] When the title has the maximum number of
chapters, you cannot perform the Resume play function
(> 44) with the title.
• This function cannot be used on en crypted titles ( ).
Playback from Chapter View
Refer to “Playback from Chapter View”. (> 46)
58
SQT0300
Page 59

Copying titles
Copying video
§1, 2, 3
§1, 3
Standby status can be changed if required.
Please press OK to start copying.
OK
RETURN
Automatic Standby after Copy
Off
§1
“For recorded titles (> 9)” only
§2
The title in the source media will be deleted.
§3
The recording mode cannot be changed.
Copying video
8 Set other settings, then press [OK].
e.g.,
(> 60, Setting the copying options)
1 Insert or connect the media.
2 Press [FUNCTION MENU].
3 Select “Video” in “Contents on HDD”,
then press [OK].
4 Select the title, then press the yellow
button.
A check mark is displayed. Repeat this
step.
Channel Date Title Name
Start Time
9:00
Prog.Type:
Movie
• Press the yellow button again to cancel.
5 Press the blue button.
6 Set the copy direction, then press [OK].
7 Select “Yes”, then press [OK].
• If you select “No”, you can change the
selection. (> 60, To change the selection)
Rec time
9 Select “Yes”, then press [OK].
To register the external HDD (USB HDD)
Refer to “Registering the USB HDD”. (> 83)
To copy HD Video (AVCHD) to the DVD-R in
High Definition
Refer to “Copying HD Video (AVCHD) to the
DVD-R in High Definition”. (> 66)
Release the disc protection
Refer to “Disc Protection”. (> 105)
• Encrypted titles ( ) cannot be copied. (> 36)
• During copying, do not remove the CI module from this unit.
• If you wish to choose the audio lang uage, select the
language from “Multi Audio” of “Preferred Language” before
copying (> 93).
• Simultaneous operation is not possible while copying with
finalising or creating Top Menu. However, the titles on the
HDD can be played back while high speed copying without
finalising or creating Top Menu.
SQT0300
59
Page 60

Copying video
1
2
Remaining space
The order of copying
Copying titles
To change the selection
1 Select “No”, then press [OK] in step 7 (> 59).
e.g., [HDD] > [BD-RE] ([BCT845] [BST845])
Copy
HDD
Keyword Record
OK
RETURN
Grouped Titles BD-RE Remain
All
Channel Date Title Name Titles
Start Time
Prog.Type:
Social/Economic
Rec time
9:00 0:01(DR)
Movie
Page
Select Copy
AVCHDMovieNot Viewed
Page Up
Page Down
90%
2 To change the selected titles:
Select the title, then press the yellow button.
Repeat this step to select titles.
To change the picture quality:
[HDD] > [BD-RE] [BD-R] [RAM] [DVD-R] [DVD-RW]
[+R] [+RW]
1 Select the title, then press [OPTION].
2 Select “Conversion Select”, then press
[OK].
3 Select the picture quality, then press [OK].
Repeat steps if necessary.
Setting the copying options
1 Select the item in step 8 (> 59).
2 Press [2, 1] to change the settings.
• Automatic Standby after Copy
On:
This unit is turned to standby mode when it is
not operated for approximately 5 minutes
after completing copy.
• Subtitles
Automatic:
Subtitles will be recorded if they are included
in the title.
• If you wish to choose the sub title, select the language
from “Subtitles” of “Preferred Language” before
copying (> 93).
•Finalise
On:
[DVD-R] [DVD-RW] [+R] The discs become
play-only and you can also play them on
other DVD equipment.
• Create Top Menu
On:
[+RW] You can play the disc on other DVD
equipment.
3 Press the blue button.
4 Go to step 7. (> 59)
Screen icons
Titles that will be copied to the disc
in normal speed
Titles that cannot be copied
About screen icons on the DIRECT
NAVIGATOR
Refer to “Screen icons”. (> 44)
60
SQT0300
• You can perform “Finalise” or “Create Top Menu” later.
(> 106)
Page 61

Copying video
Start Time Rec time
Channel Date Title Name
9:00 0:30 (D
Copy
1
2
3
Cancel All
Copy Direction
Copy Mode
Create List
Start Copying
HDD
High Speed
RETURN
OK
2
Press OK to start copying.
Disc
Copy
HDD
Disc
1
2
3
Source
Destination
Cancel All
Copy Direction
Copy Mode
Create List
Start Copying
HDD Disc
High Speed
Select the copy direction.
RETURN
0
Information of the copy destination
- BD-RE
- Copy restricted titles can be
copied on to disc
Copying from media other than HDD
with DIRECT NAVIGATOR
[BD-RE] [BD-R] [RAM] [+RW] > [HDD]
1 Insert a disc.
The menu screen appears. (> 48)
2 Select “Play Video”, then press [OK].
3 Select the title, then press the yellow button.
A check mark is displayed. Repeat this step.
4 Press the blue button.
• To change the detailed settings for copy,
refer to “Copying titles with copying list”.
(> right)
Copying titles with copying list
[HDD] ,.
[HDD] >
[USB_HDD]
§1, 3
[BD-RE] [BD-R]
[RAM] [+RW]
§1
“For recorded titles (> 9)” only
§2
The title in the source media will be deleted.
§3
The recording mode cannot be changed.
[USB_HDD]
[BD-RE] [BD-R] [RAM] [DVD-R]
[DVD-RW] [+R] [+RW]
[BD-RE] [BD-R]
>
> [HDD]
§1, 2, 3
1 [HDD] ,. [USB_HDD]:
1 Press [FUNCTION MENU].
2 Select “Copy Menu” in “Copy Video”, then
press [OK].
Except “[HDD] ,. [USB_HDD]”:
1 Insert a disc.
The menu screen appears. (> 48)
2 Select “Copy”, then press [OK].
2 Set the copy direction.
1 Select “Copy Direction”, then press
[1] (right).
2 Set “Source” and “Destination”.
3 Press [2].
5 Select “Start Copying”, then press [OK].
6 Select “Yes”, then press [OK].
3 Set the recording mode (> 8).
1 Select “Copy Mode”, then press
[1] (right).
2 Set “Recording Mode”.
3 Press [2].
SQT0300
61
Page 62

Copying video
Page 01/01
Size:
Destination Capacity:
No. Size
New item (Total=0)
Title
( 0% )
0 MB
3200 MB
Copying titles
4 Register titles for copy.
1 Select “Create List”, then press
[1] (right).
2 Select “New item”, then press [OK].
3 Select the title, then press the yellow
button.
Repeat this step to select titles.
e.g., [HDD]
Create List Grouped Titles
HDD
Time
Rec time
Size 1360 MB
OK
RETURN
• To change the appearance of the list
or show information of the title
1 Press [OPTION].
2 Select the item, then press [OK].
• Th e titles will be copied in the order of the
copying list. If you want to specify the order, edit
the copying list after the titles are selected.
(> 63, Editing the copying list)
4 Press [OK].
5 Press [2].
Data size of each registered title
9:00
0:30 (DR)
Date Channel
01.01
01.01
02.01
03.01
03.01
04.01
05.01
05.01
06.01
06.01
Time
9:00
15:00
9:30
10:00
18:30
2:00
11:0 0
15:00
3:45
9:00
Page
Select
Size:
Data size recorded to
the copy destination
001/003
Title Name
Page Up
Page Down
5 Make other settings.
1 Select “Other Settings”, then press
[1] (right).
e.g.,
Copy
Cancel All
Copy Direction
1
HDD Disc
Copy Mode
2
Create List
Titles
1
1
1
1
1
1
1
1
1
1
3
Other Settings
4
Start Copying
OK
RETURN
• This screen does not appear depending
on the copying mode. (> go to step 6)
Subtitles
Finalise
HG
1
Press OK to change the setting.
Off
Off
2 Select the copying option, then press
[OK].
(> 60, Setting the copying options)
3 Select the item, then press [OK].
4 Press [2].
6 Select “Start Copying”, then press [OK].
7 Select “Yes”, then press [OK].
To cancel all registered copying settings and
lists
After performing step 1
1 Select “Cancel All”, then press [OK].
2 Select “Yes”, then press [OK].
• Encrypted titles ( ) cannot be copied. (> 36)
• If you wish to choose the audio lang uage and subtitle
language, select the language from “Multi Audio” of
“Preferred Language” before copying (> 93).
• Titles in the grouped titles and other titles cannot be
registered simultaneously.
62
SQT0300
Page 63

Copying video
Editing the copying list
1 Select the title after step 4-4 (> 62).
Copy
Cancel All
Copy Direction
1
HDD Disc
Copy Mode
2
Create List
3
Other Settings
4
Start Copying
OK
RETURN
HG
2
Create copy list.
Destination Capacity:
Size:
No. Size
01
0:30 DR (25%)
0:30 DR (25%)
02
New item (Total=2)
Page 01/01
2:00
( 50% )
1:00
Title
2 Press [OPTION].
3 Select the item, then press [OK].
Delete All:
All titles that you registered to copy are
deleted.
Select “Yes”, then press [OK].
Add:
Add new items to the copying list.
1 Select the titles with the yellow button.
2 Press [OK].
Delete:
Selected titles are deleted.
• Select the title, then press the yellow button
before step 2.
Repeat this step to select titles.
Select “Yes”, then press [OK].
Screen icons
Titles that cannot be copied in high
speed mode
Titles that cannot be copied
Title contains photos
• Photos cannot be copied.
(NTSC)
(PAL)
Title recorded using a different
encoding system from that of the
unit.
• Titles displaying these marks
cannot be selected.
About other screen icons
Refer to “Screen icons”. (> 44)
Move:
Change the order of items on the copying list.
• Select the title to move before step 2.
Select the destination, then press [OK].
• When copying at normal speed, the total data size will
change according to the recording mode.
• The total data size shown may be larger than the sum of the
data sizes for each registered item.
SQT0300
63
Page 64

Copying video
§
Copying titles
Notes for copying
Notes for high speed copy
High Speed Copying is the process of copying a
title to disc in high speed while maintaining the
original record mode and recording length. If any
conversion is required during the copy process,
the copying will be done at normal speed.
• The following recording mode and media
combinations support high speed copying.
Original title’s
recording mode
DR
HG
HX
HE
HL
HM
XP
SP
LP
EP
FR
§
• Converting the recording mode will result in a
normal speed copy.
• High speed copy is possible only when there is
enough recording capacity on the destination
media.
• It is impossible to copy at high speed in the following cases:
- [HDD] > [BD-RE] [BD-R] :
• Copying radio programmes
- [HDD] > [DVD-R] [DVD-RW] [+R] [+RW] :
• Titles that contain many deleted segments
- [HDD] > [+R] [+RW] :
• Titles recorded in “EP” mode and “FR (recordings
5 hours or longer)” mode
• Titles recorded in 16:9 aspect
- [HDD] > [DVD-R] [DVD-RW] :
• Titles recorded via AV input in 16:9 aspect using “EP”
mode or “FR (recordings 5 hours or longer)” mode
Media
DVD-RAM only
Notes for normal speed copy
• [DVD-R] [DVD-RW] [+R] [+RW] You cannot copy to
the disc in the following cases.
- When there is not enough free space on the
HDD.
- When the number of titles recorded to the
HDD and the number of titles to be copied to
the disc is greater than 3000 in total.
• Copying will continue up to the point cancelled.
- [DVD-R] [DVD-RW] [+R] [+RW] If copy is cancelled
during the step while temporarily copying to
the HDD, then nothing will be copied.
- [BD-R] [DVD-R] [DVD-RW] [+R] [+RW] Even if the
title was not copied to the disc, the amount of
remaining writable disc space becomes less.
• When copying title recorded in 1080/50p or
1080/60p, it cannot copy in progressive.
Notes for copying
You cannot copy the following titles.
- [USB_HDD] Protected titles
- [USB_HDD] HD Video (AVCHD)
- [RAM] Radio programme
Notes for copying 3D programmes
• It may not display correctly in 3D when a copied
3D programme is played back. In such a case,
change the “Signal Format” during the playback
of the title. (> 53)
• 3D information may not be copied.
• If you want to copy 3D AVCHD video to the disc
in 3D, use BD-R or BD-RE and copying speed
must be high speed.
About maintaining the chapter mark
• The position of the chapter might shift slightly.
• Maximum number of chapters on the disc is
limited.
- [BD-RE] [BD-R] [RAM] [DVD-R] [DVD-RW] :
Approx. 1000
- [+R] [+RW] : Approx. 254
(Depends on the state of recording.)
64
SQT0300
Page 65

Copying video
01/02
01
Mouse
03
02
04
06
Cattle
Tiger Rabbit
Copying a finalised disc
[DVD-V] > [HDD]
While playing a disc, the content being played is
copied to the HDD according to the set time.
1 Press [FUNCTION MENU].
2 Select “Copy Menu” in “Copy Video”, then
press [OK].
3 Set “Copy Mode”.
1 Select “Copy Mode”, then press
[1] (right).
2 Press [OK], then select the recording
mode (XP/SP/LP/EP).
3 Press [2].
4 Set “Copy Time”.
1 Select “Copy Time”, then press
[1] (right).
2 Select “Time Setting”, then press [OK].
3 Select “On” or “Off”.
On:
Set the copying time.
• Set a few minutes longer than the
source title, in order to include the
operation time before play begins.
Off:
Copying all the content on the disc.
4 Press [2].
6 Select “Yes”, then press [OK].
• When the Top Menu is displayed:
Select the title you want to start copying,
then press [OK].
After the last title on the disc has finished
playing the Top Menu is recorded until the
set time is reached.
To stop copying
Press [STOP ∫].
• You can also press and hold [RETURN ] for
3 seconds.
• If stopped partway, copying will be up to that
point.
• Operations and on-screen displays durin g copy are also
recorded.
• Almost all DVD-Video on sale have been treated to prevent
illegal copying, and cannot be copied.
• If play does not begin automatically p ress [PLAY/a1.3 1]
to start.
5 Select “Start Copying”, then press [OK].
SQT0300
65
Page 66

Copying video
Copying titles
Copying Title Playing
[HDD] > [BD-RE] [BD-R] [RAM] [DVD-R] [DVD-RW] [+R]
[+RW]
1 Play back the title to copy.
• Multiple audio, subtitle and Teletext
displayed during playback will be copied.
- Select the multiple audio with “Multi
Audio” in the Basic Operation menu
(> 85)
- Select the subtitles with “Subtitle
Language” in the Basic Operation menu.
(> 85)
2 Press [OPTION].
3 Select “Copy Title Playing”, then press [OK].
4 Select “Start”, then press [OK].
Copying will start from the beginning of the
title regardless of the playing position.
To stop copying
Press and hold [RETURN ] for 3 seconds.
• Encrypted titles ( ) cannot be copied.
• You can record to or play HDD while high speed copying.
Press [OK] to exit the screen display.
• Press [STATUS ] to confirm the current progress.
• Speed and recording mode when copying
The high speed copy is performed if available.
Refer to “Notes for copying”. (> 64)
Copying HD Video (AVCHD) to the
DVD-R in High Definition
You can copy HD Video (AVCHD) recorded on
HDD to a DVD-R in High Definition quality.
[HDD] > [DVD-R]
1 Insert an unformatted DVD-R or DVD-R DL.
The menu screen appears. (> 48)
2 Select “Copy Video ( AVCHD ) to Disc”, then
press [OK].
3 Go to step 4 on page 62, “Copying titles with
copying list”.
To copy HD Video (AVCHD) from other
equipment
Refer to “Copying the HD Video (AVCHD)”.
(> 81)
• This function can only be used for un formatted disc.
• When a disc is named, formatting will be a utomatically
performed. Therefore, do not name a disc before this
operation. (> 105, Disc Name)
• Discs will be automatically finalised after copy.
• The following HD Videos (AVCHD) cannot be copied to the
disc in high definition.
- Exceeding 18 Mbps
- 1080/50p or 1080/60p
- Without the AVCHD information (video recorded with
certain non-Panasonic equipment, video copied to the
HDD after copying it to BD-R or BD-RE once, etc.)
• 3D video may not be copied correctly.
• [BD-RE] [BD-R] When copying the titles in DR, HG, HX, HE,
HL or HM modes and the copy destination does not have
enough space, one from HG, HX, HE, HL or HM modes
will be selected to match the available space.
• [RAM] [DVD-R] [DVD-RW] [+R] [+RW] When copying the titles
in DR, HG, HX, HE, HL or HM modes, copy will be
performed at normal speed in FR mode.
• Wh en copying the titles in XP, SP, LP, EP or FR modes
and the copy destination does not have enough space,
copy will be performed at normal speed in FR mode.
66
SQT0300
Page 67

Playing photos
Photo and Music
§2 §3§1
HDD
Page
SelectSlideshow
Calendar
03.01.2012
29.10.2012
25.02.2013
15.03.2013
0002/0002
Copy
OK
RETURN
8
12
18
4
Photo Menu
All
3D
Page Up
Page Down
CH
Ta b
HDD
Page
SelectSlideshow
Calendar
03.01.2012
29.10.2012
25.02.2013
15.03.2013
0002/0002
Copy
OK
RETURN
8
12
18
4
Photo Menu
All
3D
Page Up
Page Down
CH
e.g., [HDD]
§1
“For data files (> 9)” only (JPEG, MPO)
§2
[BD-RE] only
§3
[RAM] [DVD-R] only
• In order to play back 3D photo (MPO), this unit
should be connected to a Full HD 3D
compatible TV.
1 [HDD]
1 Press [FUNCTION MENU].
2 Select “Photo” in “Contents on HDD”,
then press [OK].
[USB_HDD] [BD-RE] [RAM] [DVD-R] [CD] [SD]
[USB]
1 Insert or connect the media.
The menu screen appears. (> 48)
2 Select “View Photos”, then press
[OK].
2 Select the folder, then press [OK].
e.g., [HDD]
Photo and Music
To exit the Calendar screen
Press [PAUSE ;].
• When there are many files and/or folde rs, some files may
not be displayed or not be playable. (> 1 20)
Photo Menu screen
Folder
• Photos imported to the HDD (> 70) are
managed using folders.
Folders and photos can be edited by pressing
[OPTION]. (> 69)
Screen icons
3D
(Tab)
3D photos (MPO) are automatically
sorted. Select from this tab to play
back in 3D. (It will play back in 2D
when selected from other tabs.)
• To select the tab
Press [2, 1].
• Start Slideshow
Refer to “Slideshow settings”. (> 68)
• [HDD]
Switching to the Calendar screen
Press [PAUSE ;].
3 Select the photo, then press [OK].
•Press [2, 1] to display the previous or
next photo.
Photo protected
New photo which is stored and not
viewed
SQT0300
67
Page 68

Photo and Music
Slideshow
OK
RETURN
Start Slideshow
Interval
Transition Effect
Repeat Play
Normal
Fade
On
Music Selection
No background music
Background Music
No List
Random BGM
Off
Playing photos
Photo play option
1 While displaying a photo:
Press [OPTION].
2 Select the item, then press [OK].
Graphic Display Level
You can change the 3D position of the
screen display, etc., during the 3D photo
playback.
Photo Menu
•Start Slideshow
You can start a slideshow.
• Rotate RIGHT/Rotate LEFT
e.g.,
• The information of the rotated photos will
not be stored depending on the media.
• This function is not available during the
3D photo playback.
• Information
Information (shooting date etc.) is shown.
• Wallpaper
A photo being played back is registered as
wallpaper on the FUNCTION MENU
screen. (> 28)
Slideshow settings
1 On the Photo Menu screen:
Press the green button.
2 Select the item, then press [OK].
Start Slideshow
You can start a slideshow.
Interval
You can set up the time until the next photo
is to display.
Transition Effect
Effect for the next photo to display can be
set.
Repeat Play
You can set up to play back repeatedly.
Music Selection
You can select background music on (either
from HDD or USB) or off.
Background Music
You can select background music from HDD
(My Favourites or Playlists) or USB (Folder).
Random BGM
You can play back the BGM (Background
Music) in random order.
§
This function is not available during the
3D photo playback.
§
§
§
§
68
SQT0300
To pause the Slideshow
Press [PAUSE ;].
•Press [PAUSE;] again to restart.
To stop the Slideshow
Press [RETURN ].
Page 69

Editing photos
§1 §2
e.g., [HDD]
HDD
Page
SelectSlideshow
Calendar
03.01.2012
29.10.2012
25.02.2013
15.03.2013
0002/0002
Copy
OK
RETURN
8
12
18
4
Photo Menu
All
3D
Page Up
Page Down
CH
§1
[BD-RE] only
§2
[RAM] only
Photo and Music
3 Select the item, then press [OK].
Enter Folder Name
Refer to “Entering text”. (> 107)
1 On the Photo Menu screen:
To edit the folder:
Select the folder.
To edit the photo:
1 Select the folder, then press [OK].
2 Select the photo to edit.
• To select multiple folders or photos
Press the yellow button when selecting the
folder or photo.
A check mark is displayed. Repeat this
step.
• Press the yellow button again to cancel.
2 Press [OPTION].
• Selectable items will change depending on
the media and the type of file.
Combine Folders
[HDD]
Select “Yes”, then press [OK].
Delete Folder
Select “Yes”, then press [OK].
Move Photos
[HDD]
Select “Move to new folder” or “Move to
another folder”, then press [OK].
• If “Move to another folder” is selected, set a
destination folder.
Delete Photos
Select “Yes”, then press [OK].
Set up Protection
[BD-RE] [RAM] [SD]
Select “Yes”, then press [OK].
appears when the protection is set.
• Even if the protection is set, the photo may
be deleted by another unit.
Cancel Protection
[BD-RE] [RAM] [SD]
Select “Yes”, then press [OK].
Photos For Music
[HDD]
Select “Yes”, then press [OK].
SQT0300
69
Page 70

Photo and Music
§2 §3§1
Yes No
Start copying ?
Copy New Photos
OK
RETURN
HDDSD card
Copying photos
Copying automatically
§1
“For data files (> 9)” only (JPEG, MPO)
§2
[BD-RE] only
§3
[RAM] [DVD-R] only
Selecting and copying the photos
[HDD] > [BD-RE] [RAM] [SD]
[BD-RE] [RAM] [DVD-R] [CD] > [HDD] [SD]
[USB_HDD] [SD] [USB] > [HDD] [BD-RE] [RAM]
1 On the Photo Menu screen:
To copy the folder:
Select the folder, then press the blue button.
To copy the photo:
1 Select the folder, then press [OK].
2 Select the photos to copy, then press the
blue button.
• To select multiple folders or photos
Press the yellow button when selecting the
folder or photo.
A check mark is displayed. Repeat this
step.
• Press the yellow button again to cancel.
2 Select the copying destination, then press
[OK].
3 Select “Yes”, then press [OK].
Copying starts.
[USB_HDD] [BD-RE] [RAM]
[DVD-R] [CD] [SD] [USB]
> [HDD]
Newly added photos will automatically be copied
to the HDD.
1 Insert the media.
The menu screen appears. (> 48)
2 Select “Copy New Photos”, then press [OK].
e.g., [SD]
3 Select “Yes”, then press [OK].
Copying starts.
4 Once the copy is completed, select “Yes” or
“No”, then press [OK].
To stop copying
Press and hold [RETURN ] for 3 seconds.
• Photos without shooting date will be c ategorised using the
creation date.
• If the space on the destination drive runs out or the n umber
of files/folders to be copied exceeds the maximum (> 120),
copying will stop partway through.
• The name of the copied photos will be changed.
To stop copying
Press and hold [RETURN ] for 3 seconds.
• The name of the copied photos will be ch anged.
• If the number of files/folders to be copied exceeds the
maximum (> 120), copying will stop partway through.
SQT0300
70
Page 71

Playing music
§1 §2
e.g., [CD] (MP3)
§1
“For data files (> 9)” only (MP3)
§2
[DVD-R] only
Music CD:
Insert the disc.
Playback will automatically start.
MP3:
1 Insert or connect the media.
The menu screen appears. (> 48)
• [DVD-R] [CD] Playback will automatically
start if only MP3 is recorded.
2 Select “Play / Copy Music ( MP3 )”, then
press [OK].
Playback will start.
• Using the tree screen to find a folder
1 Press [OPTION].
2 Select “Select Folder”, then press [OK].
3 Select the folder, then press [OK].
To play other music (track)
Select the item, then press [OK].
Photo and Music
Copying music (MP3) to HDD
[USB_HDD] [DVD-R] [CD] [USB] > [HDD]
After performing steps 1–2 (> left)
1 Press the blue button.
2 Select “Copy”, then press [OK].
To stop copying
Press and hold [RETURN ] for 3 seconds.
• While copying, no other operations can be performed.
Timer recordings will not proceed.
• All tracks in the folder will be copied.
• Tracks recorded to HDD in one operation will be regarded
as one album.
Music Menu
CD
No.
0001
0002
0003
0004
0005
• The track/artist name will be displayed if the in formation is
contained in ID3 tag of the MP3 file.
• If there is a large amount of photo data etc. within a MP3
file, play may not be possible.
Track List
Track Name
To show the playback information in the front
panel display
Press [STATUS ] during playback.
• The playback information, such as the title
name, will switch every time it is pressed.
(Displayed information varies depending on the
type of media.)
SQT0300
71
Page 72

Photo and Music
Music Menu
Artists
Frequently Played
Albums
Total Tracks 53
HDD
Random Play
My Favourites
Playlists
Playing music
Playing music recorded on HDD
[HDD]
1 Press [FUNCTION MENU].
2 Select “Music” in “Contents on HDD”, then
press [OK].
3 Select the item, then press [OK].
Artists
1 Press [2, 1] to select the initial of the
artist.
2 Select the name of the artist, then press
[OK].
3 Select the album, then press [OK].
4 Select the track, then press [OK].
Albums
1 Press [2, 1] to select the initial of the
album.
2 Select the album, then press [OK].
3 Select the track, then press [OK].
Playlists
1 Select the playlist, then press [OK].
2 Select the track, then press [OK].
Frequently Played
Tracks most often played recently (up to
30 tracks)
Select the track, then press [OK].
Random Play
Random playback of all tracks
Playback starts.
Showing Track Information
On the track list screen:
1 Select the track, then press [OPTION].
2 Select “Information”, then press [OK].
My Favourites
Tracks registered in “My Favourites”
Select the track, then press [OK].
• Registering a track to the “My Favourites”.
(Up to 99 tracks)
While the track list screen is displayed:
Select the track, then press the green
button.
72
SQT0300
Page 73

Photo and Music
Please select image or photo folder to be displayed during screen saver.
RETURN
OK
Setting for Screen Saver
Original Image
Screen Saver Photo Folder
Operations during music play
[HDD] [USB_HDD] [DVD-R] [CD] [USB]
Stop
Press [STOP ∫].
Pause
Press [PAUSE ;].
•Press [PLAY/a1.3 1] to restart play.
Search
Press [SLOW/SEARCH 6] or
[SLOW/SEARCH 5].
•Press [PLAY/a1.3 1] to restart play.
Skip
Press [SKIP :] or [SKIP 9].
Repeat Play/Random
Refer to “Repeat Play” or “Random” in Basic
Operation menu (> 85).
Displaying photos (Screen Saver)
Photos can be displayed during music playback.
While playing the music
Press the red button.
• To select the photos to display
The original photo stored in the HDD by default
or a folder registered with “Photos For Music”
(> 69) can be selected.
(3D photos in the folder are played back in 2D.)
1 While screen saver is displayed
Press [OPTION].
2 Select “Setting for Screen Saver”, then press
[OK].
3 Select the item, then press [OK].
e.g.,
To end the screen saver
Press [RETURN ].
Sound Effects
Refer to “Sound Effects” in Sound Settings menu
(> 86).
High Clarity Sound
[BCT845] [BST845]
Refer to “High Clarity Sound” in Sound Settings
menu (> 86).
To play music continuously even if the Power
off link works
Refer to “Playing music continuously even after
turning off power to the TV”. (> 84)
SQT0300
73
Page 74

Photo and Music
Music Menu
Artists
Frequently Played
Albums
Total Tracks 53
HDD
Random Play
My Favourites
Playlists
Add to Playlist
Edit Album Name
Playback Settings
Delete Album
Editing music/playlist
1 On the Music Menu screen:
Press [OPTION].
e.g.,
Delete All Tracks
1 If the confirmation screen appears:
Select “Yes”, then press [OK].
2 Select “Delete”, then press [OK].
Delete Album
Select “Delete”, then press [OK].
Delete
Select “Delete”, then press [OK].
2 Select the item, then press [OK].
e.g., while selecting an Album
• Editing operations will change depending
on the screen.
74
SQT0300
Edit Album Name/Edit Track Name/Edit Artist
Name/Edit Playlist Name
Refer to “Entering text” on page 107.
Remove All Tracks
Select “Remove”, then press [OK].
• Tracks themselves are not deleted from the
HDD.
Clear My Favourites/Clear Frequently Played
Select “Clear”, then press [OK].
• Tracks themselves are not deleted from the
HDD.
Remove
Select “Remove”, then press [OK].
• Tracks themselves are not deleted from the
HDD.
Add to Playlist
You can register your favourite albums and tracks
into 10 preset playlists.
Select the playlist, then press [OK].
• New playlist cannot be added.
• Up to 999 tracks can be registered to each
playlist.
Page 75

Smart Home Networking (DLNA)
Network
This unit (Server)
DLNA compatible
equipment (Client)
§
Smart Home Networking (DLNA) allows you to
watch the contents and broadcasts on Server
equipment connected on the same network from
Client equipment.
This unit can be used both as Server and Client.
Additionally, if used as Client, this unit can also be
used as Media Renderer, which can be controlled
by a Smartphone, etc.
Preparation
• Network connection (> 21, 26)
• Perform Home Network settings of the DLNA
compatible equipment.
For more details, refer to the following website
and the operating instructions for each item of
equipment.
http://panasonic.jp/support/global/cs/
(This site is in English only.)
• Some video or broadcasts cannot be enjoyed depending on
the DLNA (Client) compatible equipment, the condition of
this unit, or the file type.
• Ensure that the router for your home network has adequate
security system to prevent unauthorized access.
• If using slow network connection, the video may not be
displayed correctly. A high-speed home network with a
speed of at least 20 Mbps is recommended.
Using this unit as Server
You can watch broadcasts received by this unit
(Multiroom TV Streaming), videos and photos
saved on HDD of this unit on DLNA (Client)
compatible equipment.
For details regarding the connection and
operation of equipment connected via a network,
refer to their respective operating instructions.
§
DLNA function compatible software should be
installed.
Preparation
• When DLNA (Server) Function is deactivated,
make the settings. (> 87, 100, Home Network
Settings)
1 Operate the playback equipment (Client) to
display the list of contents on this unit.
• Refer to their respective operating
instructions.
Network
2 Select the item, then press [OK].
• The titles with access restriction (e.g., cop y restriction)
signals sent from broadcasters are not available for this
function.
• You cannot play back music from the playback equipment
(Client).
• If video frames are dropped, change the following settings.
- Conversion Setting for DLNA (> 87, 101)
- Resolution Setting for DLNA (> 87, 101)
• The DLNA compatible device that is to be connected to the
unit should be connected to the same hub or broadband
router as the unit.
• Files not on the HDD cannot be played back.
• Playing back 3D video recorded on this unit may not work
properly.
• 3D photos copied to this unit canno t be played back in 3D.
• Editing is not possible.
SQT0300
75
Page 76

Network
This unit (Client)
DLNA compatible
equipment (Server)
Smart Home Networking (DLNA)
Using this unit as Client
You can share videos, photos and music stored in
the DLNA Certified media server (such as a PC
with Windows 7 installed etc.).
1 Press [FUNCTION MENU].
2 Select “DLNA Client” in “Home Network”,
then press [OK].
A list of equipment connected via the
network is displayed.
• This list can be updated by pressing the red
button.
3 Select the equipment, then press [OK].
4 Select the item, then press [OK].
• Menu structure will be different depending
on the equipment. Select the contents by
repeating the operation.
• Convenient functions can be used by
pressing [OPTION] depending on the
contents.
• Control Panel
Control Panel is displayed once the
playback starts.
Operation can be performed with
[3, 4, 2, 1], [OK] and [EXIT ].
• Press [OK] if the Control Panel is not
displayed.
• (While playing video or photo) Press
[RETURN ] to hide the Control Panel.
• You may not be able to use the Control Panel even if you
use the Panasonic DLNA compatible equipment.
• If you want to display the playback menu while playing back
a video on the Panasonic DLNA compatible equipment,
press [AUDIO].
• Depending on the contents and the connected equipment,
playback may not be possible.
• Playlist of Windows Media
contents that are stored in the libraries.
• While playing back the 3D programme, yo u cannot set “3D
Settings”. (> 53)
• Items displayed in grey on the display c annot be played
back by this unit.
• Depending on the performance of the connected PC, video
frames may be dropped during playback, or video may not
be played back at all. (> 114)
®
Player can play back only the
76
SQT0300
Page 77

Network
This unit
(Media Renderer)
Server
+
Controller
Controller
§
Server
This unit
(Media Renderer)
§
Playable contents
When this unit works as a DLNA client, following
contents are playable.
Video
Container
Recorded
programmes
(XP/SP/LP/
§
1
EP/FR)
Recorded
programmes
(DR/HG/HX/
HE/HL/HM)
§1
AVCHD
MP4 H.264 AAC .mp4
MPEG2 MPEG2
Xvid H.264 MP3
MKV H.264 AAC-LC
Photo
Format Example of file extension
JPEG .jpg
§1, 2
MPO
§1
Only when the server is another Panasonic
Video
codec
MPEG2
MPEG2
H.264
§1
H.264
.mpo
Audio codec
®
Dolby
Digital
Linear PCM
MPEG
HE-AAC
®
Digital
Dolby
®
Dolby
Digital
®
Dolby
Digital
Linear PCM
®
Digital
Dolby
MP3
®
Digital
Dolby
PCM
Vorbis
FLAC
Blu-ray Disc Recorder, etc.
§2
2D playback only.
Audio
Audio codec Example of file extension
MP3 .mp3
WAV . wav
AAC .m4a
WMA .wma
FLAC .flac
Linear PCM –
• Depending on the server, the contents other
than stated above can be played back.
Example of
file
extension
.mpg
.mpeg
.m2ts
.ts
.mts
.mpg
.mpeg
.avi
.mkv
Using this unit as Media Renderer
This unit will work as Media Renderer, which
allows you to play back the contents on DLNA
Server by operating a Digital Media Controller (a
smartphone, etc.).
Possible applications:
§
Digital Media Controller compatible software
should be installed.
Following steps are necessary to use this unit as
Media Renderer.
1 Press [FUNCTION MENU].
2 Select “Media Renderer” in “Home Network”,
then press [OK].
3 Operate the Digital Media Controller
compatible equipment.
To exit from Home Network ( Media Renderer )
screen
Press [RETURN ].
• Depending on the contents and the connected equipment,
playback may not be possible.
• Items displayed in grey on the display c annot be played
back by this unit.
• This unit can be played back via connected equipment only
when controlled using Digital Media Controller.
• Depending on the performance of the connected PC, video
frames may be dropped during playback, or video may not
be played back at all. (> 114)
SQT0300
77
Page 78

Network
Wi-Fi Direct compatible equipment
This unit
Connecting temporarily
Miracast compatible
equipment
This unit
TV
Smart Home Networking (DLNA)
Using Smart Home Networking
(DLNA) with Wi-Fi Direct
Wi-Fi Direct is a standard that enables wireless
LAN devices to communicate each other directly
without a wireless broadband router.
This unit can be connected wirelessly and directly
to other DLNA compatible equipment on a
temporary basis, regardless of the network
connection and settings of this unit.
TM
1 Press [FUNCTION MENU].
2 Select “Wi-Fi Direct” in “Home Network”,
then press [OK].
3 Select the item, then press [OK].
• Set up the device to be connected so that a
Wi-Fi Direct connection can be made. For
details, refer to the operating instructions
for the device to be connected.
4 Select the device to be connected, then
press [OK].
• If the device you want to connect to is not
displayed, switch the connection method
by pressing the green button.
5 When selected “DLNA Client”:
Go to step 4 on page 76.
When selected “DLNA Server”:
Operate the playback equipment (Client).
When selected “Media Renderer”:
Operate the Digital Media Controller.
When no devices are found
Wi-Fi Direct Connection
Device not found.
To connect with a Wi-Fi Direct compatible device,
please check connection mode of pairing device and
select “Search again”.
To connect with a Wi-Fi Direct incompatible device,
please select “Next”.
Search again
OK
Next
If the corresponding device is not found even after
the search is run again, select “Next” and change
the connection method.
Wi-Fi Direct Connection
Please select connection method. Press RED button to
change the wireless type of connection with
the pairing device.
Press RETURN to finish.
Current Wireless type :
OK
RETURN
Wireless type
802.11n/g/b (2.4GHz)
WPS (PUSH button)
WPS (PIN code)
Manual setting
Select the connection method according to the
device to be connected.
Using Miracast
TM
You can enjoy the content you are viewing on a
Miracast-compatible smartphone, etc. on the big
screen of your TV.
• Compatible with Android
TM
device, ver. 4.2 and
above and Miracast certified.
For information on whether the smartphone, etc.
supports Miracast, contact the manufacturer of
the device.
1 Press [FUNCTION MENU].
2 Select “Miracast” in “Home Network”, then
press [OK].
3 Operate the Miracast compatible equipment.
78
SQT0300
To exit from Miracast
Press [EXIT ].
Page 79

Remote Viewing and Recording
This unit
Smartphone,tablet or PC
Internet
Timer recording
Watching TV
Playback titles
MORE
BACK
XXXXXX
You can use the following functions, etc. away
from home using a smartphone, tablet or PC.
- Setting a recording
- Watching TV with this unit’s tuner
- Playing back titles recorded on this unit
§
Not available for PCs.
§
§
(You must register to a service to use these
functions.)
Enjoying Network Service
Network Service allows you to access some
specific websites supported by Panasonic, and
enjoy Internet contents such as photos, videos,
etc. from Network Service home screen.
e.g.,
Network Service home screen
• Images are for illustration purpose, contents
may change without notice.
Preparation
• Network connection (> 21, 26)
1 Press [INTERNET].
The message is displayed. Please read it
carefully and then press [OK].
2 Select the item, then press [OK].
• Operable buttons:
[3, 4, 2, 1], [OK], [RETURN ], colour
buttons and number buttons.
Network
For details, please check the following website.
http://panasonic.jp/support/global/cs/
(This site is in English only.)
Preparation
• Network connection (> 21, 26)
• Remote Viewing and Recording settings (> 87
100)
• This unit will always be connected to the Internet when this
function is activated.
• Please note that a regular main tenance or unexpected
trouble may interrupt the service, and that the service
content may be changed or revoked and operation menu
screens may be changed with or without a prior notice.
To exit
Press [EXIT ].
• Some features of websites may n ot be available on this
unit's web browser.
• In the following cases, settings are possible using “Network
Service Settings” (> 87, 100)
- When restricting the use of Network Service.
- When the audio is disto rted.
• If using slow Internet connectio n, the video may not be
displayed correctly. A high-speed Internet service with a
speed of at least 6 Mbps is recommended.
• Be sure to update the software (firmware) when a software
(firmware) update notice is displayed on the screen.
If the software (firmware) is not updated, you will not be able
to use the Network Service function.
• The services through Network Service are operated by their
respective service providers, and service may be
discontinued either temporarily or permanently without
notice. Therefore, Panasonic will make no warranty for the
content or the continuity of the services.
• All features of websites or content of the service may not be
available.
• Some contents may be inappropriate for some viewers.
• Some contents of Network Service may only be available for
specific countries and may be presented in specific
languages.
• If timer recording starts, Network Service will stop.
SQT0300
79
,
Page 80

With Other Equipment
With Other
Equipment
Amplifier/receiver,
video camera, etc.
This unit
REC1/OTR
Recording Time
Automatic Stop
Continuous recording
30 min
Recording from external equipment
To stop recording
Recording mode: XP, SP, LP, EP
Preparation
Connect the Set Top Box or video equipment
(> 18)
1 Press [INPUT SELECT] and select “AV”,
then press [OK].
2 Press [REC MODE] to select the recording
mode.
3 Select the channel on the Set Top Box or
start play on the video equipment.
4 Press [REC ¥].
Recording will start.
Press [STOP ∫].
Manually programming timer recording from
external equipment
Refer to “Manually programming timer recording”
(> 39).
• Following contents or media cannot be played back while
recording from external equipment.
- BD-Video
- Xvid, MKV and AVCHD file
- photo
-SD card
- USB HDD (For data files, > 9) and USB memory
5 Set the time to record. (> 34)
Input AV
80
SQT0300
Page 81

Copying the HD Video (AVCHD)
§
video camera, etc.
Time
Rec time
Size 200 MB
0:30
9:00
HDD
Copy Video ( AVCHD ) Destination Capacity
Size
SD
002
003
004 AVCHD
AVC HD
AVC HD
AVC HD
001
No. Channel
e.g., [SD]
4 Select the title, then press the yellow button.
A check mark is displayed. Repeat this step.
§
“For data files (> 9)” only
e.g., Connecting to the Panasonic video camera
• Press the yellow button again to cancel.
(All the recordings on the same date
become a title.)
With Other Equipment
USB connection cable
(optional)
1 Connect the video camera or insert the
media.
• Make the video camera ready for data
transfer.
The menu screen appears. (> 48)
2 Select “Copy Video ( AVCHD )”, then press
[OK].
3 When copying from an SD card or video
equipment:
Select “Copy to HDD” or “Copy to Blu-ray
Disc”, then press [OK].
5 Press [OK].
6 Select “Start”, then press [OK].
It will automatically format the unformatted
disc, such as a new disc.
• It may take time for the copying to start.
To stop copying
Press and hold [RETURN ] for 3 seconds.
To copy to the DVD-R in High Definition
Refer to “Copying HD Video (AVCHD) to the
DVD-R in High Definition”. (> 66)
• The original file must be in the AVCHD standard.
• If you connect a Panasonic product with a USB con nection
cable, setup screen may be displayed on the connected
equipment. For details, refer to the instructions for the
connected equipment.
• An AVCHD title with 100 or more scenes will be divided into
titles every 99th scene and copied.
Screen icons
(NTSC)
(PAL)
Title recorded using a different
encoding system from that of the
unit.
• Titles displaying these marks
cannot be selected.
SQT0300
81
Page 82

With Other Equipment
§
This unit’s rear panel
e.g.,
USB HDD
Registering the external HDD (USB HDD)
Connecting the USB HDD
§
“For recorded titles (> 9)” only
If you intend to move recorded titles to a
USB HDD, the USB HDD must be registered to
this unit first.
Limitation information
• A USB HDD with a capacity of less than 160 GB
cannot be used.
• Registering of a USB HDD will format the
USB HDD and all the content already recorded
will be deleted.
• Up to eight USB HDDs can be registered on this
unit.
• Registered USB HDDs cannot be used with
devices other than this unit.
Regarding the external HDD (USB HDD)
Please use a confirmed USB HDD.
For the latest information on confirmed USB
HDDs, please check the following website.
http://panasonic.jp/support/global/cs/
• Certain non-confirmed USB HDDs cannot be
used with this unit.
• If a problem occurs with the USB HDD, please
contact the manufacturer of the device.
Connect this unit with optional USB HDD.
• Only one USB HDD (For recorded titles, > 9)
can be connected at the same time.
• Do not connect additional HDDs using a USB
hub.
• For details about connection method, refer to
the instructions supplied with the USB HDD.
Disconnecting the USB HDD
Please use the following procedure to disconnect.
Disconnecting without following this procedure
may result in the loss of recorded content from
the USB HDD or the internal HDD.
1 Press [FUNCTION MENU].
2 Select “Basic Settings” in “Setup”, then press
[OK].
3 Select “Settings for USB HDD” in “HDD /
Disc / USB HDD”, then press [OK].
4 Select “USB HDD Disconnection”, then
press [OK].
5 Select “Yes”, then press [OK].
6 Disconnect the USB HDD from this unit.
82
SQT0300
Page 83

With Other Equipment
Registering the USB HDD
• If the registering screen appears when
connecting the USB HDD, go to step 5.
1 Press [FUNCTION MENU].
2 Select “Basic Settings” in “Setup”, then press
[OK].
3 Select “Settings for USB HDD” in “HDD /
Disc / USB HDD”, then press [OK].
4 Select “USB HDD Registration”, then press
[OK].
5 Select “Yes”, then press [OK].
• If you have already registered eight
USB HDDs, it will be necessary to delete
one or more of them before registering a
new USB HDD.
The message screen appears:
1 Select “Yes”, then press [OK].
2 Select the USB HDD to cancel, then
press [OK].
The confirmation screen appears.
3 Select “Yes”, then press [OK].
To cancel all USB HDD registrations
Refer to “Cancellation of all USB HDD
Registrations”. (> 95)
• If you register a USB HDD, all the content already recorded
on the USB HDD will be deleted.
• It is not possible to play back the con tent on the USB HDD
whose registration has been cancelled.
• You can check the registration number of the USB HDD on
the DIRECT NAVIGATOR. (> 44)
6 When the registering is complete, message
screen appears.
Press [OK].
7 The confirmation screen appears.
Press [OK].
SQT0300
83
Page 84

Convenient functions
Convenient
functions
VIERA Link functions
What is VIERA Link “HDAVI Control”?
VIERA Link “HDAVI Control” is a convenient
function which will link the operations of this unit
and a Panasonic TV (VIERA) or an
amplifier/receiver. You can use this function by
connecting the equipment with the HDMI cable.
See the operating instructions for connected
equipment.
Automatic input switching/
Power on link
When the following operations are performed, the
input channel of the TV will be automatically
switched and the screen of this unit will be
displayed. Additionally when the TV is off, the TV
will automatically turn on.
- When play starts on this unit
- When an action that uses DIRECT NAVIGATOR
etc, is performed
Power off link
When you set the TV to standby mode, this unit is
also automatically set to standby mode.
• Power off link function does not work when
recording, copying etc.
PAUSE LIVE TV
You can operate this unit with the TV remote
control.
Refer to “PAUSE LIVE TV”. (> 33)
• This function is available with the TV that
supports “HDAVI Control 3” or later.
Direct TV Recording
This function allows you to immediately start
recording the programme that you are viewing on
the TV.
Refer to the TV operating instructions for
operation.
• This function is available with the TV that
supports “HDAVI Control 3” or later.
Easy control only with Panasonic TV’s
remote control
You can operate this unit using the TV remote
control.
Refer to the operating instructions of the TV about
the buttons that you can use.
• This function is available with the TV that
supports “HDAVI Control 2” or later.
Playing music continuously even after
turning off power to the TV
The following operations make it possible to keep
the power of the unit on and to play music
continuously.
When the unit is directly connected to an
amplifier/receiver.
1 While playing music
Press [OPTION].
2 Select “TV Power Off”, then press [OK].
• Sound may be discontinued for several seconds
when the power to the TV is turned off.
• This function is available with the TV that
supports “HDAVI Control 2” or later.
84
SQT0300
• This unit supports “HDAVI Control 5” function.
“HDAVI Control 5” is the standard for Panasonic’s HDAVI
Control compatible equipment. This standard is compatible
with Panasonic’s conventional HDAVI equipment.
Please refer to individual manuals for other manufacturers’
equipment supporting VIERA Link function.
• VIERA Link “HDAVI Control”, based on the control functions
provided by HDMI which is an industry standard known as
HDMI CEC (Consumer Electronics Control), is a unique
function that we have developed and added. As such, its
operation with other manufacturers’ equipment that
supports HDMI CEC cannot be guaranteed.
• These functions may not work normally de pending on the
equipment condition.
• Use the remote control supplied with this unit if you cannot
operate this unit using buttons on the TV remote control.
• The operation of this unit may be inte rrupted when you
press certain buttons on the TV remote control.
Page 85

Playback menu
Menu
Item
Setting
e.g.,
A variety of operations and settings such as
changing the subtitles and audio languages can
be performed during playback of video or music.
Also, picture and sound quality can be set to your
personal taste.
1 Press [OPTION].
2 Select “Playback Settings” in “Playback
Menu” or select “Playback Settings”, then
press [OK].
Basic Operation
Multi Audio Audio1 (Dolby D)
Audio Channel LR
Subtitle Settings On
Subtitle Language eng (MPEG)
Repeat Play Off
Aspect Normal
3 Select the menu, then press [OK].
4 Select the item, then press [OK].
5 Change the setting.
Depending on the condition of the unit (playing,
stopped, etc.) and media contents, there may be
some items which cannot be selected or for which
the effects do not work properly.
To clear the Playback menu
Press [RETURN ] until the Playback menu
disappears.
Language
ENG English JPN Japanese ARA Arabic
FRA French CHI Chinese HIN Hindi
DEU German KOR Korean PER Persian
ITA Italian MAL Malay IND Indonesian
ESP Spanish VIE Vietnamese MRI Maori
NLD Dutch THA Thai BUL Bulgarian
SVE Swedish POL Polish RUM Romanian
NOR Norwegian CES Czech GRE Greek
DAN Danish SLK Slovak TUR Turkish
POR Portuguese HUN Hungarian ¢ Others
RUS Russian FIN Finnish
Convenient functions
Basic Operation
Soundtrack
§1
Show or change the soundtrack.
Multi Audio
Switch in the case of multiple audio.
Audio Channel
Change audio (LR/L/R) during playback.
Subtitle Settings
§1
Turn the subtitle on/off, and change the
language depending on the media.
Subtitle Settings
Subtitle Style
Select the subtitle style recorded on the
disc.
Subtitle Position
Subtitle Luminance
Subtitle Language
Select the subtitle language in the case of
multiple languages.
§1
Angle
Change the number to select an angle.
Repeat Play
Select the item which you want to repeat.
Random
Select whether to play random or not.
Video
The original video recording method
(MPEG-4 AVC etc.) appears.
Primary Video
The original video recording method appears.
Secondary Video
Video
Select on/off of images.
The original video recording method
appears.
Soundtrack
Select on/off of audio and the language.
Aspect (> 107)
Reception
The radio wave status during the playback of
Smart Home Networking (DLNA) is displayed.
(Only when a wireless connection is used)
§1
With some discs, you may only be able to
make changes using the menus on the disc.
SQT0300
85
Page 86

Convenient functions
Playback menu
Picture Settings
Picture Type
§2
Select the picture type.
Sharpness Adjustment
Adjusts the sharpness of images. The greater
the value is, the sharper images will be.
Noise Reduction
Reduces unnecessary noise in videos. The
greater the value is, the less noise will appear.
Luminance / Colour Adjustment
Adjusts the contrast, brightness, white
gamma, black gamma, colour saturation and
hue.
Bandwidth Limitation
Adjusts the bandwidth limitations.
24p/25p Conversion
Plays back videos with film-like motion.
• This function is available on the following
conditions:
- “HDMI Video Format” set to “Automatic”,
§
“1080i
” or “1080p§” (> 98)
§
Only for 24p Conversion
- Connect 24p/25p compatible TV.
• Noise may appear on the image when you
switch the setting.
Progressive
Select the method of conversion for
progressive output to suit the type of title being
played.
•Auto
Automatically detects the film and video
content, and appropriately converts it.
•Video
Select this setting when the content is
distorted if “Auto” is selected.
•Film
Select this if the edges of the
film content appear jagged or
rough when “Auto” is
selected. However, if the
video content is distorted as shown in the
illustration to the right, then select “Auto”.
Reset to Default Picture Settings
Restores the default settings of the Picture
Settings menu.
Sound Effect Settings
§2
Sound Effects
• This function is effective when “Digital Audio
Output” is set to “PCM”. (> 96)
Night Surround
Enjoy a movie with powerful sound even
when the volume is kept low at night.
Re-master 1-3
Sound becomes more natural by adding
higher frequency signals not recorded on
the track.
Digital Tube Sound 1-6
This feature gives you a warm sound, like
that produced by a vacuum tube amplifier.
Sound Effect Frequency
Set the maximum sampling frequency for the
audio selected in “Sound Effects”.
Sound Settings
Sound Effects
§3
• This function is effective when “Digital Audio
Output” is set to “PCM”. (> 96)
Night Surround (> above)
Re-master 1-2 (> above)
Dialogue Enhancer
The volume of the centre channel is raised to
make dialogue easier to hear.
High Clarity Sound
§2
Stop processing signals that affect the audio
quality or turn off the front panel display to
make the audio quality clearer.
Select whether or not to output images.
This setting is able to switch by pressing the
yellow button during playing music.
3D Settings
Signal Format (> 53)
3D Picture Mode (> 53)
Manual Settings (> 53)
Graphic Display Level
You can change the 3D position of the
playback settings display, etc., during the 3D
playback.
§2
[BCT845] [BST845] only
§3
[BCT745] [BCT740] [BST745] [BST740] only
86
• The menu is not displayed when playing photos.
SQT0300
Page 87

Basic Settings
Basic Settings
OK
RETURN
DVB Tuning
HDD / Disc / USB HDD
Picture
Sound
Display
Connection
Network
Others
You can change the unit’s settings of DVB Tuning,
Sound, Display, Connection, Network etc. in the
menu.
Common procedures
1 Press [FUNCTION MENU].
2 Select “Basic Settings” in “Setup”, then press
[OK].
3 Select the menu, then press [OK].
4 Select the item, then make the setting.
(> below)
• Follow the instructions on the screen if further
operations are necessary.
• Depending on the connection or the status of
this unit some items cannot be selected or
changed.
To return to the previous screen
Press [RETURN ].
Menu list
The locations of the setting items are as follows.
For details on each setting item, please refer to
the following pages.
[BCT845] [BCT745] [BCT74 0] DVB Tuning
Favourites Edit (> 89)
Auto Setup (> 89)
Settings for DVB-C Channels (> 90)
Channel List (> 90)
Manual Tuning (> 90)
Update Channel List (> 90)
Signal Condition (> 90)
New Channel Message (> 90)
Settings for DVB-T Channels (> 90)
Channel List (> 90)
Manual Tuning (> 90)
Update Channel List (> 91)
Signal Condition (> 91)
New Channel Message (> 91)
Child Lock (> 91)
Child Lock List (> 91)
Parental Rating (> 91)
Preferred Language (> 91)
Convenient functions
[BST845] [BST745] [BST740] DVB Tuning
Favourites Edit (> 91)
Channel List (> 92)
Auto Setup (> 92)
Manual Tuning (> 92)
Update Channel List (> 92)
Exchange Channel List (> 92)
Signal Condition (> 93)
Antenna System (> 93)
LNB Configuration (> 93)
Preferred Language (> 93)
HDD / Disc / USB HDD
Settings for Playback (> 93)
3D BD-Video Playback (> 93)
Soundtrack (> 93)
Subtitles (> 93)
Menu (> 93)
BD-Live (> 93)
BD-Video Parental Control (> 93)
DVD-Video Parental Control (> 94)
Subtitle Text (> 94)
Pure Sound mode (> 94)
Settings for Recording (> 94)
Timer Record Start Buffer (> 94)
Timer Record Stop Buffer (> 94)
REWIND LIVE TV (> 94)
Recording for Encrypted Channel (> 94)
PIN Entry for Decrypt Recording (> 94)
Aspect for Recording (> 94)
Chapter Creation (> 95)
Disc Speed for High Speed Copy (> 95)
HDD Management (> 95)
Delete all titles (> 95)
Delete all photos (> 95)
Format HDD (> 95)
Settings for USB HDD (> 95)
USB HDD Registration (> 95)
USB HDD Disconnection (> 95)
USB HDD Management (> 95)
Delete all titles (> 95)
Format USB HDD (> 95)
Cancellation of all USB HDD Registrations (> 95)
SQT0300
87
Page 88

Convenient functions
Basic Settings
Picture
Still Mode (> 96)
Sound
Dynamic Range Compression (> 96)
Downmix (> 96)
Bilingual Audio Selection (> 96)
Digital Audio Output (> 96)
PCM Down Conversion (> 96)
Dolby D / Dolby D + / Dolby TrueHD (> 96)
DTS / DTS-HD (> 96)
MPEG (> 96)
BD-Video Secondary Audio (> 96)
HDMI Output Settings of Music Playback
Settings for High Clarity Sound
Audio Output (> 97)
Front Panel Display (> 97)
Audio Delay (> 97)
Audio for HG / HX / HE / HL / HM Recording (> 97)
§1
§1
(> 97)
Display
Language (> 97)
On-Screen Information (> 97)
Front Panel Display (> 97)
Screen Saver (> 97)
Teletext (> 97)
Connection
3D Settings (> 98)
3D Type (> 98)
3D AVCHD Output (> 98)
3D Playback Message (> 98)
TV Aspect (> 98)
Aspect for 4:3 Video (> 98)
TV System (> 98)
HDMI Connection (> 98)
HDMI Video Format (> 98)
24p Output (> 98)
Deep Colour Output (> 98)
HDMI Audio Output (> 98)
Contents Type Flag (> 99)
VIERA Link (> 99)
Common Interface (> 99)
(> 97)
Network
Easy Network Setting (> 99)
Network Settings (> 99)
LAN Connection Mode (> 99)
Wireless Settings (> 99)
Connection Setting (> 99)
Double Speed Mode Setting ( 2.4GHz ) (> 99)
IP Address / DNS Settings (> 100)
Proxy Server Settings (> 100)
Network Service Settings (> 100)
Second Screen Browsing (> 100)
Lock (> 100)
Automatic Volume Control (> 100)
Notice (> 100)
Remote Viewing and Recording settings (> 100)
Remote Viewing and Recording (> 100)
Device ID (> 100)
Initialize Device Password (> 100)
Home Network Settings (> 100)
Home Network function (> 100)
Setting device name (> 101)
Conversion Setting for DLNA (> 101)
Resolution Setting for DLNA (> 101)
Registration type for remote devices (> 101)
Remote device list (> 101)
Others
Standby Settings (> 101)
Quick Start (> 101)
Automatic Standby (> 101)
Automatic Standby after OTR (> 101)
Automatic Standby after Copy (> 102)
[DVB-C] RF OUT ( CATV Signal )
[DVB-T] RF OUT ( Aerial Signal )
Power Save for Network Standby (> 102)
Remote Control (> 102)
Clock (> 102)
PIN Entry (> 102)
System Update (> 103)
Software Update in Standby (> 103)
Software Update Now ( Broadcast ) (> 103)
Software Update Now ( Internet ) (> 103)
Software Licence (> 103)
System Information (> 103)
Initialize (> 103)
Shipping Condition (> 103)
Default Settings (> 103)
§2
§2
(> 102)
(> 102)
88
SQT0300
§1
[BCT845] [BST845] only
§2
[BCT845] [BCT745] [BCT740] only
Page 89

Convenient functions
[BCT845] [BCT745] [BCT740] DVB Tuning
Favourites Edit
You can create four favourites of channels for
making viewing and recording easier.
After editing as follows, save the Favourites.
Press [RETURN ], then press [OK].
• To select the other Favourites list:
Press the green button.
• To add channels to the Favourites list:
Select the channel in the “All DVB Channels”
column, then press [OK]. Repeat this step.
• Red: Change the sorting mode.
• Yellow: Add continuous block of channels to
the list at once.
•Press [3, 4] to make the block, then press
[OK].
• Blue: Select the Category.
• To change the order of the channels list:
1 Select the channel in the “Favourites”
column to move, then press the green
button.
2 Select the new position, then press the
green button.
• To delete channels:
Select the channel in the “Favourites” column,
then press [OK].
• Yellow: Delete all channels.
• To change the name of the Favourites list:
1 Press the red button in the “Favourites”
column.
2Press [3, 4, 2, 1] to select a character,
then press [OK].
Repeat this step to enter other characters.
• Red: Delete a character.
• Blue: Delete all characters.
3 Press [RETURN ].
Auto Setup
You can restart the Auto Setup. (> 23)
1 Select “Yes”, then press [OK].
• If the country selection screen appears:
Select the country, then press [OK].
2 Follow the on-screen instructions and make
the following settings.
[DVB-C]
1 Select “Digital Cable (DVB-C) Channels”,
then press [OK].
2 Select “Preset Channel Number” or
“Operator’s Channel Number ( LCN )”,
then press [OK].
3 Select the items and change the items.
(For details, consult the cable provider.)
Search Mode
• All Channels
Search for all channels.
• Free Channels
Search for free channels only.
Scan Mode
• Quick:
Scans the suitable frequency for the
selected country.
• Full:
Scans the whole frequency range.
Frequency/Symbol Rate/Network ID
Normally set to “Auto”.
If “Auto” is not displayed or if necessary,
enter the value specified by your cable
provider with number buttons.
4 Select “Start scan”, then press [OK].
Auto Setup starts.
[DVB-T]
Select “Digital Terrestrial (DVB-T) Channels”,
then press [OK].
Auto Setup starts.
• The timer recording programmes are cancelled.
SQT0300
89
Page 90

Convenient functions
Basic Settings
Settings for DVB-C Channels
[DVB-C]
Channel List
You can edit the channel list.
• To hide/reveal channels
1 Select the channel.
2 Press [OK].
The check mark is removed/displayed.
• Red: Change the sorting mode.
• Yellow: Reveal all channels.
• Blue: Change the Category.
• To change the channel number assignment
1 Select the channel to change, then press
the green button.
2 Enter the channel number to reassign
with the number buttons.
3 Press [OK].
Manual Tuning
You can add new channels manually.
1 Adjust the frequency, symbol rate and
service ID. (For details, consult the cable
provider.)
• Adjust the frequency by checking the
signal strength and signal quality
displays.
2 Select “Start scan”, then press [OK].
• The set channel is displayed in the table.
• This function is not available d uring an Operator
profile update. (> 32)
Update Channel List
You can update the channel list to the latest
one.
• This function is not available d uring an Operator
profile update. (> 32)
Signal Condition
You can check the quality and strength of
signals.
Press [CH WX] to select the channel.
• When the signal is too strong (red bar), reduce the
CATV signal. (For details, consult your dealer or the
cable provider.)
• When the signal is weak, check that the current
broadcast channel is correctly broadcasting.
New Channel Message
Set whether to obtain the information
automatically when a new DVB channel is
added.
Settings for DVB-T Channels
[DVB-T]
Channel List
You can edit the channel list.
• To hide/reveal channels
1 Select the channel.
2 Press [OK].
The check mark is removed/displayed.
• Red: Change the sorting mode.
• Yellow: Reveal all channels.
• Blue: Change the Category.
• To change the channel number assignment
1 Select the channel to change, then press
the green button.
2 Enter the channel number to reassign
with the number buttons.
3 Press [OK].
Manual Tuning
You can add new channels manually.
1 Press [3, 4] to select the frequency.
• Adjust the frequency by checking the
signal strength and signal quality
displays.
2 Press [OK] to start scan.
• The set channel is displayed in the table.
90
SQT0300
Page 91

Convenient functions
Update Channel List
You can update the channel list to the latest
one.
Signal Condition
You can check the quality and strength of
signals.
Press [CH WX] to select the channel.
• The channels you can receive are affected by weather
conditions, seasons, time (day/night), region, length of
the cable that is connected to the aerial, etc.
• When the signal is too strong (red bar), reduce the
signal amplification at your aerial. (For details, consult
your dealer.)
New Channel Message
Set whether to obtain the information
automatically when a new DVB channel is
added.
Child Lock
• PIN is required to change. (> 29)
Child Lock List
You can restrict the viewing of channels and
playback of titles. You can lock each channel
or AV input.
1 Select the channel or AV input to lock.
2 Press [OK].
is displayed.
• Press [OK] again to cancel.
• Green: Lock all channels.
• Yellow: Unlock all channels.
Parental Rating
You can restrict the viewing and recording of
channels unsuitable to children.
Set a ratings level to limit broadcast viewing
and playback.
• Follow the on-screen instructions.
[BST845] [BST745] [BST740] DVB Tuning
Favourites Edit
You can create four favourites of channels for
making viewing and recording easier.
After editing as follows, save the Favourites.
Press [RETURN ], then press [OK].
• To select the other Favourites list:
Press the green button.
• To add channels to the Favourites list:
Select the channel in the “All DVB Channels”
column, then press [OK]. Repeat this step.
• Red: Change the sorting mode.
• Yellow: Add continuous block of channels to
the list at once.
•Press [3, 4] to make the block, then press
[OK].
• Blue: Select the Category.
• To change the order of the channels list:
1 Select the channel in the “Favourites”
column to move, then press the green
button.
2 Select the new position, then press the
green button.
• To delete channels:
Select the channel in the “Favourites” column,
then press [OK].
• Yellow: Delete all channels.
• To change the name of the Favourites list:
1 Press the red button in the “Favourites”
column.
2Press [3, 4, 2, 1] to select a character,
then press [OK].
Repeat this step to enter other characters.
• Red: Delete a character.
• Blue: Delete all characters.
3Press [RETURN ].
Preferred Language
Select the language for multi broadcast.
If the selected language is not available, the
original language will be selected.
SQT0300
91
Page 92

Convenient functions
Basic Settings
Channel List
You can edit the channel list.
• To hide/reveal channels
1 Select the channel.
2 Press [OK].
The check mark is removed/displayed.
• Red: Change the sorting mode.
• Yellow: Reveal all channels.
• Blue: Change the Category.
• To move the channel number assignment
1 Select the channel to change, then press
the green button.
2 Input the channel number to move.
3 Press [OK].
• If another channel is already assigned to the
channel number, the two channels will be
switched.
Auto Setup
You can restart the Auto Setup. (> 25)
1 Select the Auto Setup method, then press
[OK].
• Search by selected satellite
Transponders for the already found satellite
are searched for channels.
• Search all satellites
All satellites and transponders are searched
for channels.
2 Select “Yes”, then press [OK].
• The timer recording programmes are cancelled.
Manual Tuning
You can add new channels manually.
1 Select the items and change the items.
• Change the items by checking the signal
strength and signal quality displays.
2 Select “Start scan”, press [OK] to start scan.
• The set channel is displayed in the table.
• This function is not available during an Op erator profile
update. (> 32)
Update Channel List
You can update the channel list to the latest one.
1 Select the method and settings.
Search Mode
• Free Channels
Search for free channels only.
• All Channels
Search for all channels.
Scan Mode
•Quick
Scans the suitable frequency for the
selected satellite.
•Full
Scans the whole frequency range.
2 Press [OK].
The unit starts searching for newly available
satellite digital channels.
• This function is not available during an Op erator profile
update. (> 32)
Exchange Channel List
Exports/Imports DVB-S Channel List settings
using the SD card to share the same settings
with another DIGA which has the same function.
• Export Channel List
You can export the channel list of this unit to
the SD card.
• Import Channel List
You can import the channel list of another
DIGA from SD card.
92
SQT0300
Page 93

Convenient functions
Signal Condition
You can check the quality and strength of
signals.
• Press [2, 1] to select the LNB.
• Press [CH WX] to select the channel.
• The channels you can receive are affected by weather
conditions, seasons, time (day/night), region, length of the
cable that is connected to the aerial, etc.
• When the signal is too strong (red bar), reduce the signal
amplification at your aerial.
• When the signal is weak:
- adjus t the position and direction of the dish.
- check that the current digital broadcast channel is
correctly broadcasting.
Antenna System
You can receive several satellites if you have
DiSEqC control antenna system or single cable
router.
1 Select “Antenna System”.
2 Press [2, 1] to select antenna system.
• One LNB
Compatible with Single LNB.
• MiniDiSEqC
Up to 2 LNBs can be controlled.
•DiSEqC1.0
Up to 4 LNBs can be controlled.
• Single Cable
Compatible with single cable router.
• This unit supports DiSEqC Version 1.0.
LNB Configuration
You can set LNB setting and User Band when
necessary.
• If you do not know the connected satellite,
select “No Satellite” in “Satellite”. (Available
satellite will be searched in Auto Setup.)
• If you select “User defined” in “Satellite”, set
“Test Transponder Frequency” manually.
Preferred Language
Select the language for multi broadcast.
If the selected language is not available, the
original language will be selected.
HDD / Disc / USB HDD
Settings for Playback
3D BD-Video Playback
Select the playback method of 3D compatible
video software.
Soundtrack
Select the audio language.
• If “Original” is selected, the original
language of each disc will be selected.
• Enter a code with the number buttons when
you select “Other ¢¢¢¢”.
(> 103, Language code list)
Subtitles
Select the language for subtitle.
• If “Automatic” is selected and the language
selected for “Soundtrack” is not available,
subtitles of that language will automatically
appear if available on that disc.
• Enter a code with the number buttons when
you select “Other ¢¢¢¢”.
(> 103, Language code list)
Menu
Select the language for disc menus.
• Enter a code with the number buttons when
you select “Other ¢¢¢¢”.
(> 103, Language code list)
BD-Live
You can restrict Internet access when
BD-Live functions are used.
• If “On ( Limit )” is selected, Internet access
is permitted only for BD-Live contents which
have content owner certificates.
BD-Video Parental Control
Set an age limit of BD-Video play.
• PIN is required to change. (> 29)
SQT0300
93
Page 94

Convenient functions
Basic Settings
DVD-Video Parental Control
Set a rating level to limit DVD-Video play.
• PIN is required to change. (> 29)
Subtitle Text
Select the language for Xvid and MKV
subtitles text.
• This item is displayed only after playing
back a Xvid or MKV file with subtitle text.
Pure Sound mode
You can enjoy movies or music in an
environment more suitable for viewing by
stopping the rotation of the HDD when playing
back commercial BD-Videos, DVD-Videos or
music CDs.
• If “On” is selected, timer recording does not
start during playback BD-Video, DVD-Video
or music CD.
Settings for Recording
Timer Record Start Buffer
This function sets the timer recording to start
earlier than the TV Guide time.
Timer Record Stop Buffer
This function sets the timer recording to stop
later than the TV Guide time.
REWIND LIVE TV
Turn on/off the REWIND LIVE TV function.
• When “Automatic Standby” is set to “Off”
(> 101), “On” cannot be selected.
Recording for Encrypted Channel
The function allows you to change the
recording limitation on the encrypted
programme. (> 36)
[BST845] [BST745] [BST74 0]
• “Automatic” cannot be selected in the
following cases.
- “DiSEqC (Single Tuner)” has been
selected in “Easy Setting” or “Auto Setup”.
(> 25, 92)
PIN Entry for Decrypt Recording
If your CAM requires a PIN for timer
recording, it can be entered here in advance.
Aspect for Recording
Sets the aspect ratio when recording or
copying except in DR mode.
• “HG”, “HX”, “HE”, “HL” or “HM” mode:
If “Automatic” is selected, the title will be
recorded with the original aspect ratio.
• “XP”, “SP”, “LP” or “FR (recordings less
than 5 hours)” mode:
If “Automatic” is selected, the title will be
recorded with the original aspect ratio at the
time when recording started (including when
recording started at a commercial, etc.).
• “EP” or “FR (recordings 5 hours or longer)”
mode:
If “Automatic” is selected, aspect is fixed to
4:3.
• In the following cases, the programme will
be recorded with the original aspect ratio.
- [BD-RE] [BD-R] When the recording mode is
set to “XP”, “SP”, “LP”, “EP” or “FR”
• In the following cases, aspect is fixed to 4:3.
- When recording to a +R, +R DL and +RW.
94
SQT0300
Page 95

Convenient functions
Chapter Creation
Set the Chapter Creation method.
• Even if “Automatic” is selected, depending
on the programme to be recorded, the
chapter may not be created correctly.
Disc Speed for High Speed Copy
Select the speed of high-speed copying.
If “Normal ( Silent )” is selected, the time
required for copying will be longer.
HDD Management
Press and hold [OK] for 3 seconds to show the
following settings.
Delete all titles
Delete all titles (video) on the built-in HDD.
• Delete does not work if one or more titles
are protected.
Delete all photos
Delete all photos on the built-in HDD.
Format HDD
Formatting deletes all contents on the
built-in HDD, and they cannot be restored.
Check carefully before proceeding.
Settings for USB HDD
USB HDD Registration
Register the USB HDD. (> 83)
USB HDD Disconnection
This function puts the USB HDD in a state in
which it can be safely disconnected. (> 82)
USB HDD Management
Press and hold [OK] for 3 seconds to show
the following settings.
Delete all titles
Delete all titles on the USB HDD.
• Delete does not work if one or more
titles are protected.
Format USB HDD
Formatting deletes all contents, and
they cannot be restored. Check
carefully before proceeding.
Cancellation of all USB HDD Registrations
This function cancels the registrations of all
the USB HDDs registered on this unit.
Only do this if you are going to dispose of this
unit.
• Before operation, perform “USB HDD Disconnection”
(> above) and remove the USB HDD.
• It is not possible to play back the content from a
USB HDD whose registration has been cancelled.
SQT0300
95
Page 96

Convenient functions
Basic Settings
Picture
Still Mode
Select the type of picture shown when you pause
play.
•Field:
Select if jittering occurs when “Automatic” is
selected. (The picture is coarser.)
•Frame:
Select if small text or fine patterns cannot be
seen clearly when “Automatic” is selected.
(The picture is clearer and finer.)
Sound
Dynamic Range Compression
To lower the dynamic range for playback (e.g., at
night).
• This does not work depending on broadcasts
and recorded titles.
Downmix
Select the downmix system of multi-channel to
2-channels sound.
• Select “Surround encoded”, when the
connected equipment supports the virtual
surround function.
• There is no effect on “Bitstream” via HDMI AV
OUT and DIGITAL AUDIO OUT terminal.
• The audio will be output in “Stereo” in the
following cases.
- AVCHD playback
- [BD-V] : Playback of clicking sound on the
menu and audio with secondary video in
picture-in-picture mode.
Bilingual Audio Selection
Select whether to record the audio type (“M1” or
“M2”) when:
- File Conversion (> 56)
- Copying to a DVD-R, DVD-RW, +R and +RW.
Digital Audio Output
PCM Down Conversion
Select how to output audio with a sampling
frequency of 96 kHz.
•On:
Signals are converted to 48 kHz.
(Choose when the connected equipment
cannot process signals with a sampling
frequency of 96 kHz.)
•Off:
Signals are output as 96 kHz.
• The signals will be converted to 48 kHz
regardless of the setting in the following
cases.
- The signals have a sampling frequency
of over 96 kHz.
- The disc has copy protection.
- “BD-Video Secondary Audio” is set to
“On”. ([BD-V]) (> below)
Dolby D / Dolby D + / Dolby TrueHD
DTS / DTS-HD
MPEG
Select the audio signal to output.
• Select “PCM” when the connected
equipment cannot decode the respective
audio format.
• Not making the proper settings may result in
noise.
BD-Video Secondary Audio
Turn on/off the clicking sound on the menu
and audio with secondary video.
96
SQT0300
Page 97

Convenient functions
[BCT845] [BST845]
HDMI Output Settings of Music Playback
Select the HDMI output settings.
• If “Sound Quality Priority” is selected, the audio
noise is minimised during music playback by
automatically switching the video output to
1080i.
[BCT845] [BST845]
Settings for High Clarity Sound
You can set “Audio Output” and “Front Panel
Display” when “High Clarity Sound” (> 86) is set
to “On (Video Off)” or “On(Video On)”.
Audio Output
Select a terminal that will stop processing
audio signals.
• Set an option for video playback and audio
playback.
Front Panel Display
Select whether or not to turn on/off the front
panel display.
• Set an option for video playback and audio
playback.
Audio Delay
Mis-sync between the video and audio is
corrected by delaying the audio output.
Display
Language
Select the language for on-screen menus.
On-Screen Information
Select the time until the channel information
screen (> 31) disappears automatically.
Front Panel Display
Changes the brightness of the front panel
display.
• If “Automatic” is selected, the display turns dark
during play and disappears when the unit is in
standby mode. While using this mode, the
standby power consumption can be reduced.
• When “Quick Start” is set to “Off” or “Timer
Setting for Quick Start” (> 101), this function is
fixed to “Automatic”.
Screen Saver
This is to prevent burn-in on the screen.
Teletext
Select the Teletext (> 32) display mode.
Audio for HG / HX / HE / HL / HM Recording
If the programme has multi channel audio,
priority is given to what you select.
• This setting will give effect in the following
cases.
- Timer recording (> 38)
- File Conversion (> 56)
- Normal speed copy in HG, HX, HE, HL or HM
mode from a title recorded in DR mode.
(> 61, 64)
SQT0300
97
Page 98

Convenient functions
Basic Settings
Connection
3D Settings
3D Type
If 3D video cannot be played back in 3D, you
may be able to play it in 3D by changing the
setting.
• Change the settings for 3D on the TV also
when “Side by side” is selected.
3D AVCHD Output
If 2D AVCHD video is recognised as 3D video
and cannot be played back correctly, you may
be able to play it by changing the setting.
3D Playback Message
Set to display or hide the 3D viewing warning
screen.
TV Aspect
Set to match the type of TV connected.
• Pan & Scan:
Side picture is trimmed for 16:9
picture.
The pictures may be shown in the letterbox
style depending on the content.
• Letterbox:
Black bands appear for 16:9
picture.
Aspect for 4:3 Video
To play a 4:3 title, set how to show pictures on a
16:9 TV.
•4:3:
Picture output expands left or right.
• 16:9:
Picture is output as original aspect with side
panels.
TV System
Set in accordance with the TV System for the
connected TV.
HDMI Connection
HDMI Video Format
You can only select items compatible with the
connected equipment.
• If “Automatic” is selected, the output
resolution best suited to the connected TV
(1080p, 1080i, 720p or 576p/480p) is
automatically selected.
• To enjoy High Quality Video up-converted to
1080p, you need to connect the unit to
1080p compatible HDTV. If this unit is
connected to an HDTV through other
equipment, it must also be 1080p
compatible.
24p Output
When playing BD-Video recorded in
24 frames, this unit displays each frame at
1/24 second intervals–the same interval
originally shot with the film movie.
• When this unit is connected to TV
compatible with 4K/24p and “HDMI Video
Format” is set to “Automatic”, images will be
output in 4K/24p.
• When this unit is connected to a TV
compatible with 1080/24p and “HDMI Video
Format” is set to “Automatic”, “1080i” or
“1080p”, images will be output in 1080/24p.
• When BD-Video images other than 24p are played,
images are output at 60p.
• This unit cannot output 4K image when playing back in
3D.
Deep Colour Output
This setting is for selecting whether to use
Deep Colour output when a TV that supports
Deep Colour is connected.
HDMI Audio Output
Select “Off” when connected to an
amplifier/receiver with a DIGITAL AUDIO
OUT terminal.
98
SQT0300
Page 99

Convenient functions
Contents Type Flag
If “Automatic” is selected, the optimal method
of playback depending on the TV (e.g.
cinema) will automatically be selected (only
when the TV supports Contents Type Flag).
VIERA Link
Select “Off” when you do not want to use
“HDAVI Control”.
Common Interface
Access to software contained on CI module.
(> 14)
• Select “Slot 1:” or “Slot 2:” and press [OK].
Follow the on-screen instructions.
• This setting cannot be made when “TV
System” is set to “NTSC” (> 98).
• On-screen instructions may not correspond to the remote
control buttons.
• For more information about TV service, please con tact
your service provider.
• Depending on the card, in some cases its use together
with this unit may be limited or not possible.
Network
Easy Network Setting
Press [OK] to start Easy Network Setting. (> 26)
Network Settings
LAN Connection Mode
Select the LAN connection method.
• When not using wireless LAN (when turning
it off), select “Wired”.
Wireless Settings
This allows to set and check the connection
settings of the Wireless router.
e.g.,
Wireless Settings
Connection Setting
Double Speed Mode Setting ( 2.4GHz )
The current connection settings and status are
displayed.
Current connection settings
Network name
( SSID )
Wireless type
Authentication type
Encryption type
Current status
Connection status
Reception
1 Encryption type
2 Reception
3 Type of wireless router
802.11n (5GHz/40MHz)
AES
Connected
Connection Setting
The Wireless router connection wizard will
be displayed.
Double Speed Mode Setting ( 2.4GHz )
When a 2.4 GHz wireless format is used,
this setting sets the connection speed.
• If you connect using the “Double Speed
Mode (40MHz)”, 2 channels use the
same frequency band, and there is
consequently a greater risk of reception
interference. This can cause the
connection speed to drop or the
connection to become unstable.
SQT0300
99
Page 100

Convenient functions
Basic Settings
IP Address / DNS Settings
Check the connection of the network or set
the IP address and DNS.
• To set the IP address and DNS
1 Set “IP Address Auto-assignment” and
“DNS-IP Auto-assignment” to “Off”.
2 Select the item, then press [OK] to show
the respective setting.
• When the router’s DHCP server function is
not activated, check the numbers of other
connected devices such as personal
computers, then assign a number different
from those of other devices for the “IP
Address” and assign the same number for
“Subnet Mask” and “Gateway Address”.
Proxy Server Settings
Check and set the connection to the Proxy
server.
• Press [OK] to show the respective setting.
Network Service Settings
Second Screen Browsing
When this function is set to “On”, you can
enjoy the content you are viewing on a
Network Service application of
smartphone, etc. with the home network
on the big screen of your TV.
Lock
You can restrict using Network Service.
• PIN is required to change. (> 29)
Automatic Volume Control
Volume is adjusted automatically to the
standard volume while using Network
Service.
• Depending on contents, this function will
not work.
• Select “Off” when the audio is warped.
Notice
Displays the terms of service for the cloud
services.
• You must agree to the terms of use for the Internet
function and the privacy policy.
Remote Viewing and Recording settings
You must register to a service to use this
function.
For details please check the following
website.
http://panasonic.jp/support/global/cs/
(This site is in English only.)
Remote Viewing and Recording
When you control this unit from a
smartphone or a tablet away from home,
set this function to “On”. (> 79)
Device ID
This is the device ID and device password
required for registering to and using a
service.
Initialize Device Password
The device password for this unit is
initialized.
• When you initialize the device password,
you will not be able to use Remote
Viewing and Recording. To use the
Remote Viewing and Recording again,
you must re-register to the service.
Home Network Settings
You can set the DLNA (Server) function.
(> 75)
Home Network function
You can switch between enable/disable of
the DLNA (Server) and DMR (Media
Renderer) function.
• If “On” is selected, the setting for “Quick
Start” is fixed to “On”. (> 101)
• If “Off” is selected, the setting for
“Remote Viewing and Recording” is
fixed to “Off”. (> above)
• This cannot be set to “On” if the
connection with the wireless broadband
router is not encrypted in the wireless
connection.
100
SQT0300
 Loading...