

Page 1
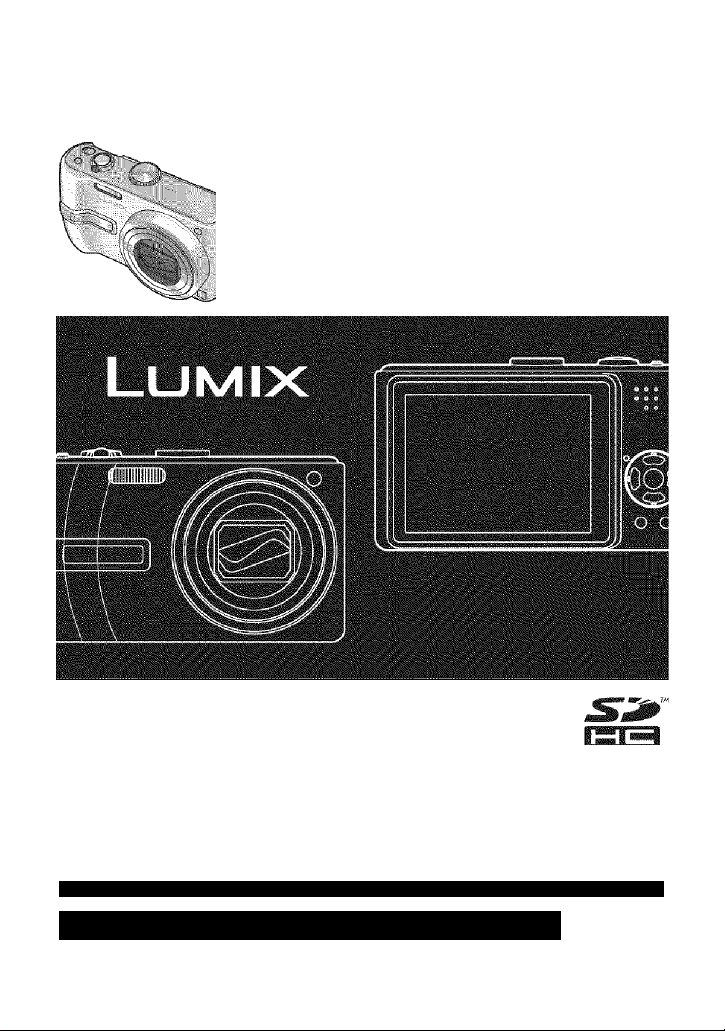
Panasonic
Operating Instructions
Digital Camera
Model No. DMC»TZ2
D1VIC-TZ3
LEICA DC VARIO-ELMAR
Before connecting, operating or adjusting this product, please read
the instructions completely.
This manual is based on the DMC-TZ3 model. Product illustrations
and screens may vary.
For USA assistance, please call: 1-800-272-7033 or send e-mail to : digitalstillcam@us.panasonic.com
For Canadian assistance, please call: 1-800-99-LUMIX p-800-995-8649) or
SE3 VQT1B61-1
send e-mail to: iumixconcierge@ca.panasonic.com
Page 2

Dear Customer,
Thank you for choosing Panasonic!
You have purchased one of the most
sophisticated and reliable products on the
market today. Used properly, we’re sure
it will bring you and your family years of
enjoyment. Please take time to fill in the
information below.
The serial number is on the tag located
on the underside of your Camera. Be sure
to retain this manual as your convenient
Camera information source.
Model No.______________________________
Serial No.
______________________________
liifuriiicilioii lot Youl Salely
WARNING:
I
TO REDUCE THE RISK OF FIRE,
i ELECTRIC SHOCK OR PRODUCT
i DAMAGE,
i • DO NOT EXPOSE THIS APPARATUS
I
TO RAIN, MOISTURE. DRIPPING
I
OR SPLASHING AND TH/TT NO
i OBJECTS FILLED WITH LIQUIDS,
I
SUCH AS VASES, SHALL BE
I
PLACED ON THE APPARATUS.
I
• USE ONLY THE RECOMMENDED
i ACCESSORIES.
I
• DO NOT REMOVE THE COVER
i (OR BACK); THERE ARE NO USER
I SERVICEABLE PARTS INSIDE.
I
REFER SERVICING TO QUALIFIED
i SERVICE PERSONNEL.
Carefully observe copyright laws.
Recording of pre-recorded tapes or
discs or other published or broadcast
material for purposes other than your
own private use may infringe copyright
laws. Even for the purpose of private
use, recording of certain material may
be restricted.
A lithium ion/polymer battery that is recyclable powers the product you
have purchased. Please call 1-800-8-BATTERY for information on how
to recycle this battery.
; THE SOCKET OUTLET SHALL BE
! INSTALLED NEAR THE EQUIPMENT
! AND SHALL BE EASILY ACCESSIBLE.
CAUTION
Danger of explosion if battery is
incorrectly replaced. Replace only
with the same or equivalent type
recommended by the manufacturer.
Dispose of used batteries according to
the manufacturer’s instructions.
Warning
Risk of fire, explosion and burns. Do not
disassemble, heat above 60 ‘’C (140 °F)
or incinerate.
Marking sign is located on bottom of the
unit.
THE FOLLOWING APPLIES ONLY IN
THE U.S.A.
FCC Note: (U.S. only)
This equipment has been tested and
found to comply with the limits for a
Class B digital device, pursuant to
Part 15 of the FCC Rules. These limits
are designed to provide reasonable
protection against harmful interference
in a residential installation. This
equipment generates, uses, and can
radiate radio frequency energy and, if
not installed and used in accordance
with the instructions, may cause harmful
interference to radio communications.
However, there is no guarantee that
interference will not occur in a particular
installation. If this equipment does
cause harmful interference to radio
or television reception, which can be
determined by turning the equipment off
and on, the user is encouraged to try to
correct the interference by one or more
of the following measures:
• Reorient or relocate the receiving
antenna.
• Increase the separation between the
equipment and receiver.
• Connect the equipment into an outlet
on a circuit different from that to which
the receiver is connected.
• Consult the dealer or an experienced
radio/TV technician for help.
FCC Caution: To assure continued
compliance, follow the
attached installation
instructions and use only
shielded interface cables
with ferrite core when
connecting to computer or
peripheral devices.
Any changes or modifications not
expressly approved by the party
responsible for compliance could void
the user’s authority to operate this
equipment.
Declaration of Conformity
Trade Name: Panasonic
Model No.: DMC-TZ2
Responsible party: Panasonic
Support Contact: Panasonic Consumer
This device complies with Part 15 of the
FCC Rules. Operation is subject to the
following two conditions: (1) This device
may not cause harmful interference,
and (2) this device must accept any
interference received, including
interference that may cause undesired
operation.
DMC-TZ3
Corporation of
North America One
Panasonic Way,
Secaucus, NJ 07094
Electronics Company
1-800-272-7033
Panasonic
Fe
DMC TZ2
Panasonic
Fe
THE FOLLOWING APPLIES ONLY IN
CANADA
This Ciass B digitai apparatus complies
with Canadian ICES-003.
DMc:-TZ3
VQT1B61 VQT1B61
Page 3
-If you see this symbol- About the battery charger
Information on Disposal in other
Countries outside the European
Union
This symbol is only valid in the
European Union. If you wish to discard
this product, please contact your ioca!
authorities or dealer and ask for the
correct method of disposal.
CAUTION!
DO NOT INSTALL OR PLACE THIS
UNIT IN A BOOKCASE, BUILTIN CABINET OR IN ANOTHER
CONFINED SPACE. ENSURE THE
UNIT IS WELL VENTILATED. TO
PREVENT RISK OF ELECTRIC
SHOCK OR FIRE HAZARD DUE
TO OVERHEATING, ENSURE
THAT CURTAINS AND ANY OTHER
MATERIALS DO NOT OBSTRUCT THE
VENTILATION VENTS.
Battery charger
This battery charger operates on AC
between 110V and 240 V.
About the battery pack
Battery pack (Lithium ion battery pack)
• Use the specified unit to recharge the
battery pack.
• Do not use the battery pack with
equipment other than the specified
unit.
• Do not get dirt, sand, liquids, or other
foreign matter on the terminals.
• Do not touch the plug terminals (+ and
-) with metal objects.
• Do not disassemble, remodel, heat or
throw into fire.
If any electrolyte should come into
contact with your hands or clothes, wash
it off thoroughly with water.
If any electrolyte should come into
contact With your eyes, never rub the
eyes. Rinse eyes thoroughly with water,
and then consult a doctor.
But
• in the U.S.A. and Canada, the battery
charger must be connected to a 120V
AC power supply only.
• When connecting to an AC supply
outside of the U.S.A. or Canada, use
a plug adaptor to suit the AC outiet
configuration.
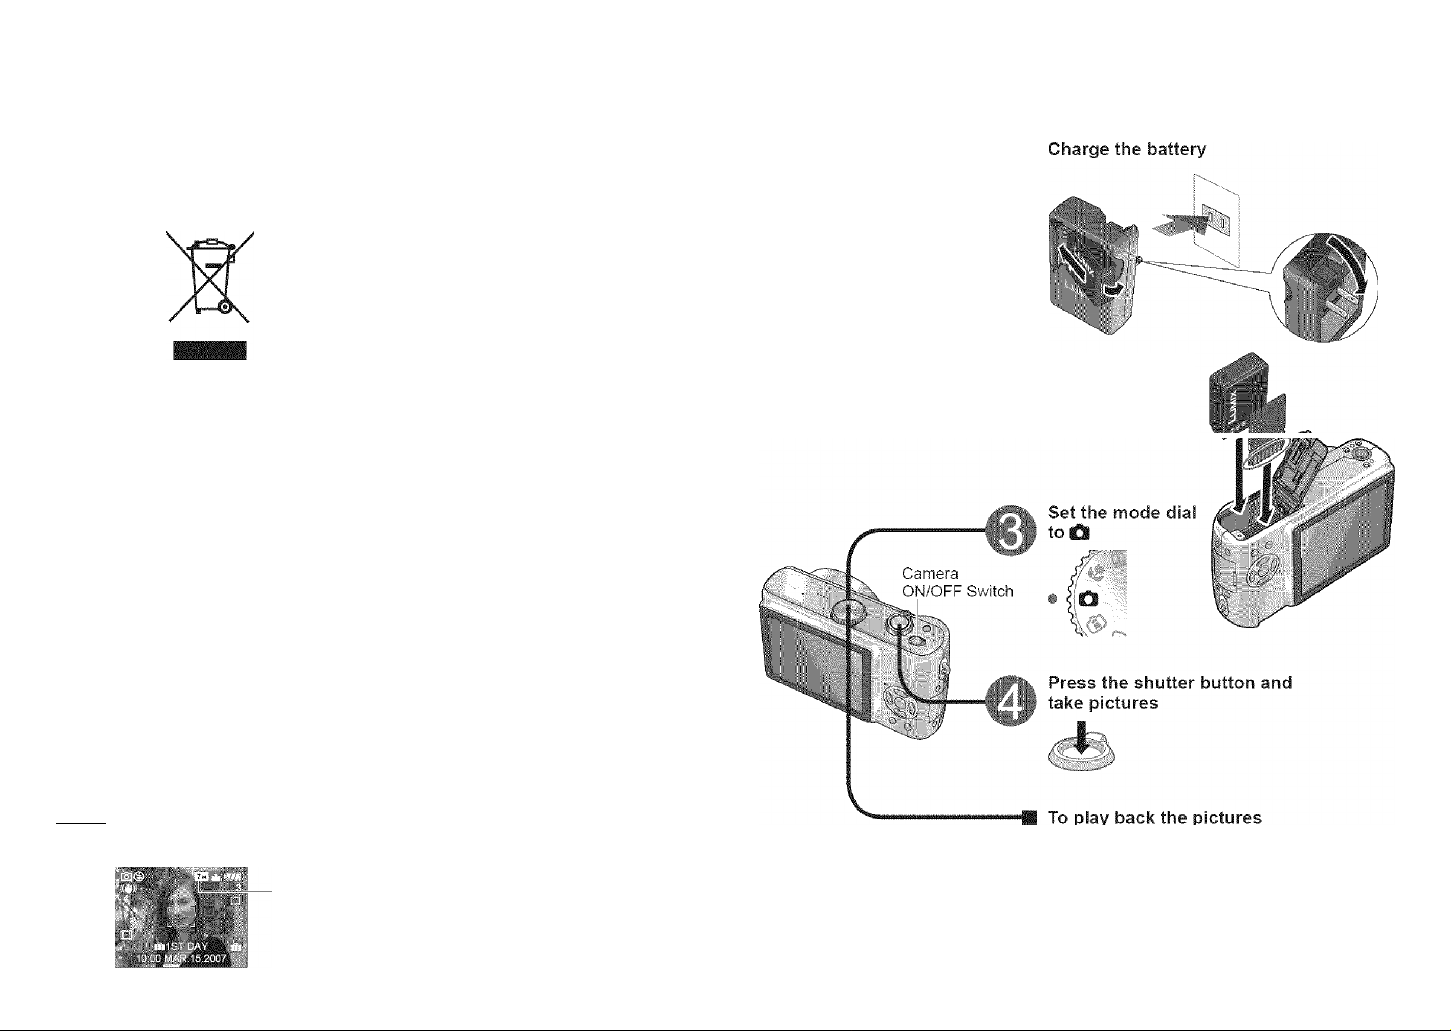
Quick start guide
The battery is not charged
when the camera is
shipped. Charge the
battery and set the clock
before use.
When you do not use the
card (sold separately), you
can record or play back
pictures on the built-in
memory (P.26).
Insert the battery
and the card
( Note )
Example screens displayed in this manual are for DMC-TZ3 model.
DMC-TZ2: Em
VQT1B61 VQT1B61
1. Set the mode dial to [g.
2. Select the picture
you want to view.
Previous Next
Page 4
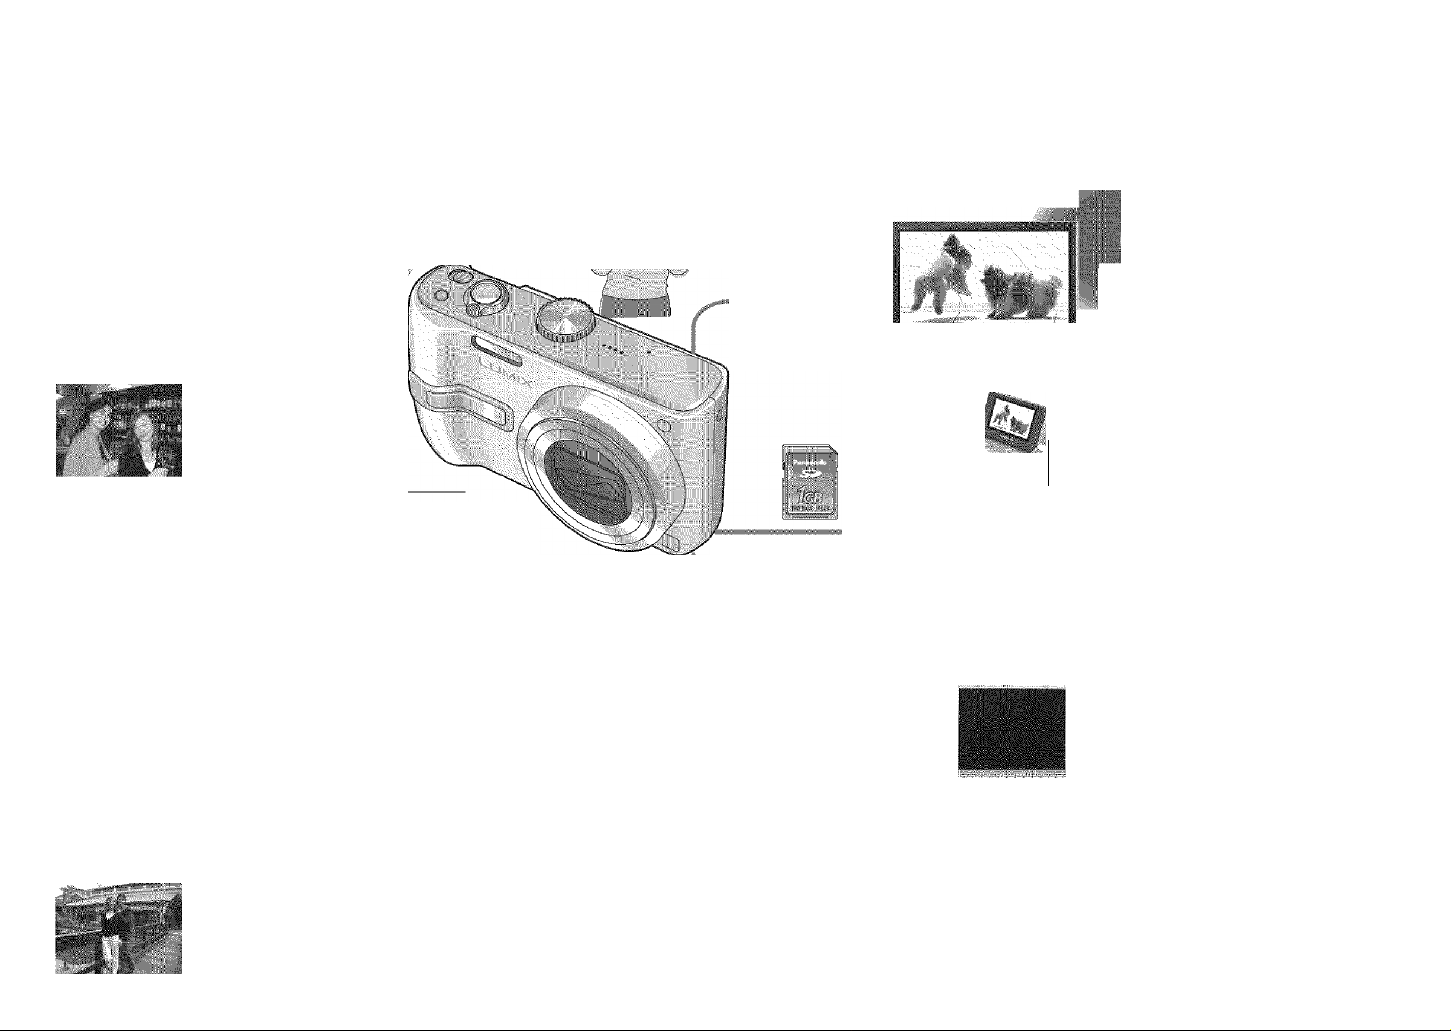
Record, view, save those precious moments.
iCards may be inserted directly
into devices with SD memory
card slots.
w°% W j
'i/>\ *V 'J'H !
Close-up pictures O' '.-' .
in distance
[1 Ox optical zoom) _ ■
SD meno'v oa-'d
AlTbtrasvely.
connect with AV
cable isunp led, on^Vscieen
MW
f" 11 • I IM M
lU ii 1 a ■ 1
Hi
Clear pictures
Prevents blurring from shaky hands
[Optical Image Stabilizer] (P.39)
Bee -‘C'<i; ic-.'.ib/fk-i
■
Dark places, moving subjects
[Intelligent ISO] (P.46)
Alternatively,
connect with USB
connection cable
(supplied)
m
With your printer
Connect directly to easily print pictures at home (P.76)
Use a PictBridge-compatible printer.
At digital photo center
Give card to shop assistant to print pictures. (P.68)
,WMW t ,
w
I . P »1* '
Alternatively,
Motion pictures
; : Capture moving scenes
»
W . . . .
g ; i*?v I I [Motion Picture Mode] (P.47)
VQT1B61 VQT1B61
Create photos (still pictures) from your favorite motion
^ pictures (P.63)
Holiday pictures
Useful features for travel - ‘TRAVEL DATE’ (P.48)
‘WORLD TIME’ (P.49)
‘CLIPBOARD’ (P.58)
v_
connect with USB
connection cable
(supplied)
Alteinasvely,
connect with AV
cable (supplied)
On computer
) Send by e-mail, save to hard disk.
(I Print out pictures.
With DVD recorder
Save to DVD or hard disk
,lill
Page 5

Contents
■ 'SiCS
Applications
■: ■■:.orci)
Applications
(¥iew pictures)
10
14
24
61
• Before use........
Read first (10)
To prevent damage and faults (10)
•Charging battery....................................... 14
• Inserting battery and card
»Taking pictures......................................... 24
Adjusting the focus (25)
Problems v/ith adjusting focus (25)
Checking remaining battery and memory
capacity (25)
Picture save destination (26)
•Changing recording information
display
• Making LCD monitor easier to see.. 34
•Taking pictures with self-timer...
•Taking pictures with flash......................... 36
©Taking pictures with exposure
compensation......................................... 38
•Optical image stabilizer............................ 39
•Taking pictures according to the
scene...................................................... 40
Scene types (41)
•Avoiding subject blurring
(Intelligent ISO)
•Taking close-up pictures
(MACRO mode)
•Viewing as list (Multi playback/
Calendar playback)
#Viewing motion pictures/
pictures with audio
•Creating still pictures from motion
pictures (DMC-TZ3 only)
.......................................
......................
....................................................
...............
......................................
.....................................
.............................
.................................
.......................
10
15
33
35
46
46
61
62
63
#Standard Accessories
•Setting the clock and language
®Know the different menus
•Taking pictures with zoom
................
.....
..........
.......................
11
16
17
27
•Taking pictures with SIMPLE MODE 28
Backlight compensation (28)
‘SIMPLE MODE‘ menu (29)
•Taking motion pictures
• Useful features for travel........................ 48
Recording holiday duration
(TRAVEL DATE) (48)
Registering local time at your overseas
destination (WORLD TIME) (49)
• Using REC menu
W.BALANCE (50)
SENSITIVITY (51)
ASPECT RATIO (51)
PiCTMODE (52)
PiCTSIZE (52)
QUALITY (53)
AUDIO REC. (53)
METERING MODE (53)
AF MODE (54)
• Using PLAY menu
DUAL DISPLAY (DMC-TZ3 only) (64)
SLIDE SHOW (64)
FAVORITE (65)
ROTATE DISP/ROTATE (66)
DATE STAMP (66)
DPOF PRINT (68)
................
.......................
........................
47
50
64
• Names of parts
Mode dial (13)
•Using menus
•Using SETUP menu
•Viewing your pictures instantly
(REVIEW)
•Viewing your pictures (Play)
«Deleting pictures
BURST (54)
CONT.AF (55)
AF ASSIST LAMP (56)
SLOW SHUTTER (56)
D.ZOOM (56)
COL. MODE (57)
CLOCK SET (57)
Quick setting (57)
•Taking/viewing clipboard pictures
(CLIPBOARD)
Taking clipboard pictures (58)
Viewing clipboard pictures (59)
CLIPBOARD menu (60)
PROTECT (69)
AUDIO DUB. (70)
RESIZE (70)
TRIMMING (71)
ASPECT CONV (72)
COPY (73)
FORMAT (73)
.............................
................................
......................
..................................
.........
......................
............................
12
18
20
30
31
32
58
74
80
»Using with computer................................ 74
Folder and file names on computer (75)
• List of LCD monitor displays
• Message displays
•Q&A Troubleshooting............................... 84
• Usage cautions and notes
• Recording picture/time capacity
................................ 82
..................
.....................
.............
80
90
92
•
«Printing.......................................... 76
•Specifications
©Optional accessories
'»Digital Camera Accessory Order Form
(For USA Customers)
•Request for Service Notice
(For USA Only)
..................................
..................
................
..........................
94
96
97
98
•Viewing on TV screen
• Limited Warranty (For USA Only).... 99
•Customer Services Directory
(For USA Only)
......................
..........................
•index............................................ 104
8 VQT1B61 VQT1B61
79
101
Page 6
'.''i.Mindard
Accessories
Part numbers are as of January 2007
■Do a test shot first!
• Check first to see if you can take
pictures and record sounds {motion
pictures/pictures with audio)
successfuily.
IWe will not compensate for failed/
lost recording or for direct/indirect
damage.
• Panasonic will not provide
compensation even if damage is
caused by faults with camera or card.
■Certain pictures cannot be played
back
• Pictures edited on a computer
©Pictures taken or edited on a different
camera
(Pictures taken or edited on this camera
may also not be able to be played back
on other cameras)
■Software on the CD-ROM supplied
The following actions are prohibited:
• Making duplicates (copying) for sale or
rent
• Copying onto networks
■LCD monitor characteristics
Extremely high precision technology is
employed to produce the LCD monitor
screen. However there may be some dark
or bright spots (red, blue or green) on the
screen. This is not a malfunction.
The LCD monitor screen has more than
99.99% effective pixels with a mere
0.01% of the pixels inactive or always lit.
The spots will not be recorded on pictures
on the built-in memory or a card.
■Avoid shocks, vibration, and pressure
#Avoid exposing the camera to strong
vibration or shock; e.g. dropping or
hitting the camera, or sitting down with
the camera in your pocket.
• Do not press the lens or the LCD monitor.
■Do not get the camera wet or insert
foreign objects
• Do not expose the camera to water,
rain, or seawater.
(If camera gets wet, wipe with a soft,
dry cloth. Wring cloth thoroughly first if
wet with seawater, etc)
•Avoid exposing lens and socket to dust
or sand, and do not allow liquids to leak
into gaps around buttons.
■Avoid condensation caused by sudden
changes in temperature and humidity
• When moving between places of
different temperature or humidity, place
camera into a plastic bag and allow to
adjust to conditions before use.
• if the lens clouds up, switch off the
power and leave for about two hours to
allow camera to adjust to conditions.
• if the LCD monitor clouds up, wipe with
a soft, dry cloth.
'imm
*
LCD monitor
■
■I®
IWhen transporting □ Battery Pack
• Switch off power. CGA-S007A
We recommend using a genuine leather (P.14)
case (DMW-CT3, sold separately).
(referred to in this manual as ‘battery’)
DBattery Charger
DE-A45B
(P.14)
(referred to in this manual as 'charger')
D Battery Carrying
Case
VYQ3680
(P91)
D Strap
VFC4090
(P.12)
sunlight.
• If dirty, clean with soft,
dry cloth.
DUSB Connection
Cable
K1HA08CD0007 ^ ■
■Optional accessories (P.96)
• Cards are optional. You can record
or play back pictures on the built-in
memory when you are not using a card.
(P.26)
• If any accessories are lost, customers
in the USA should contact Panasonic’s
parts department at 1 800 833-9626
and customers in Canada should
contact 1 800 99-LUIVIIX (1-800-995
8649) for further information about
obtaining replacement parts.
(P.74, 76)
□ AV Cable
K1HA08CD0008
(P.79) ■
□ CD-ROM
The following software on the CD-ROM
is referred to in this manual as 'supplied
software’.
• LUMIX Simple Viewer
«PHOTOfunSTUDIO -viewer-
’’ '//
10 VQT1B61
VQT1B61 11
Page 7
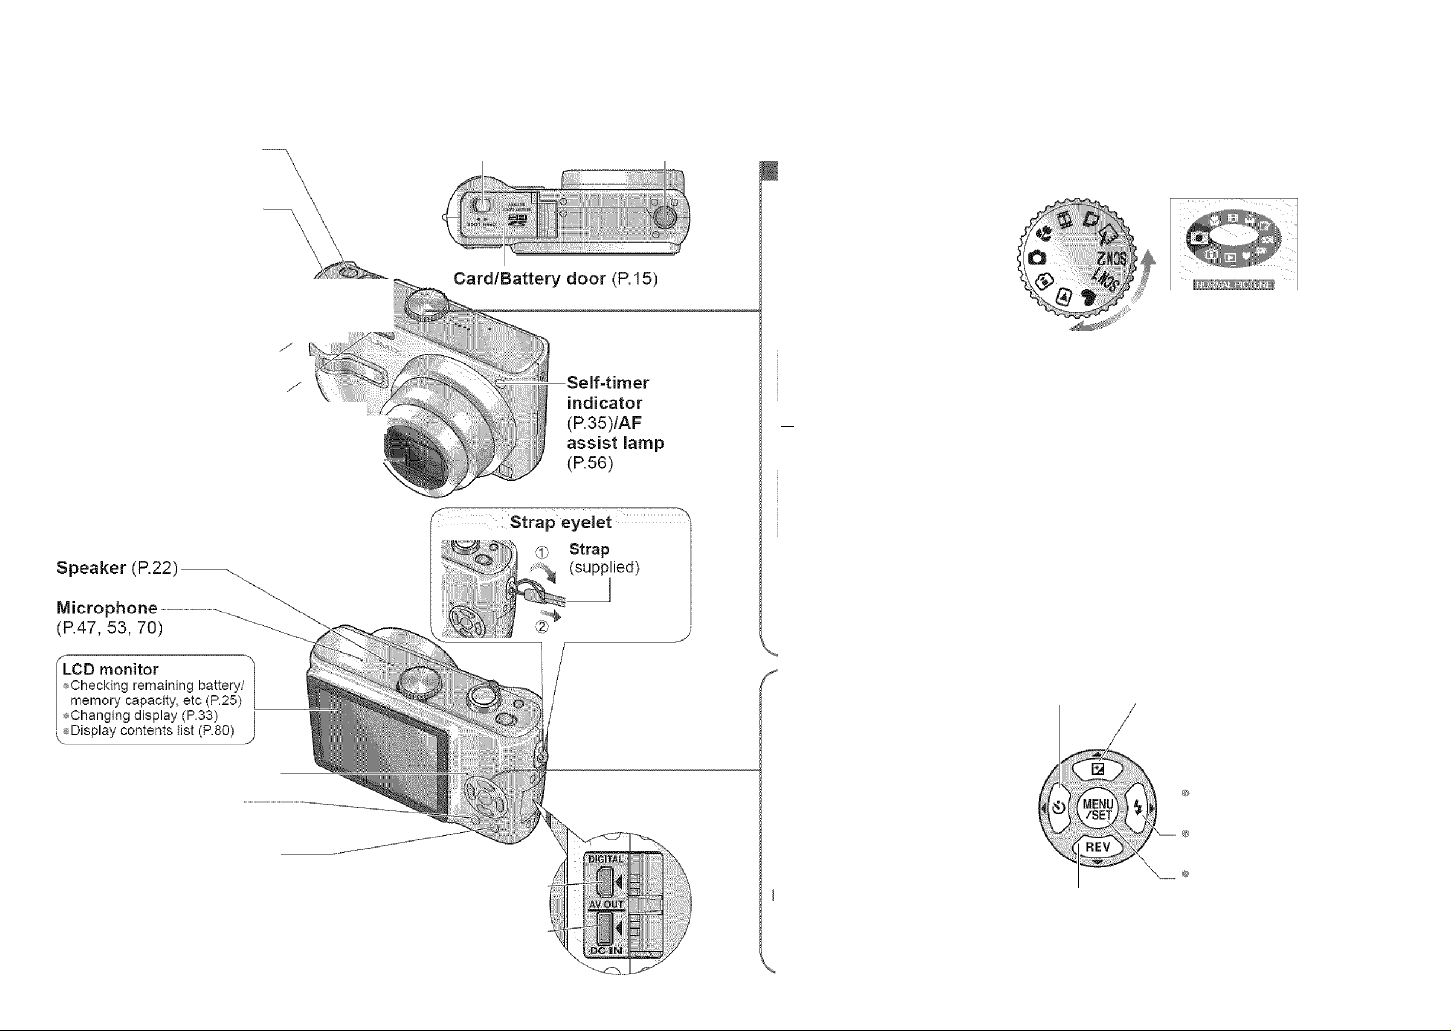
Names of parts
Camera ON/OFF switch
(P.18)
Optical image stabilizer
button (P.39)
Shutter button (P.24)-------------'j ’ . '' .
Zoom lever (P.27)
Flash (P36) "
Lens barrel
Lens (P.11)
------------------------------------
------------------------------------
Status indicator (P.15, 24)
DISPLAY/LCD MODE
button (P.33, 34)
FUNC (Quick setting P.57)/
delete (P.32) button
DIGITAL/AV OUT socket —
DC IN socket (P.74, 76)
• Always use a genuine Panasonic AC
adaptor (DMW-AC5PP: optional).
Release lever (P.15) Tripod receptacle
^
(P.74, 76, 79)
---------------
Align fo correct mode
iQl ; NQR;iV1Ai.' PiÇTÜ R£; modé.
' Take pictiires (P24);. : ) ) ) ) ) ) ) )
SCNJ-.- S.CENE mode' ■ ■ . ' f ■
SCN2 Take pictures! accorctin<(.-t6. scene
i:: iwiPAOv:;.-J. v.i ■■p; :; --ppp
fjl INTELLIGENT ISO mode
Take pictures according to motion
and brightness of subject (P.46).
r>J ;,PLAYBACK mbde;.) ; : ■
i'i i • ;Vie\v/eciit pictures pre^^
■.i )■, ■ iaxen. (P.-3l:( 6:1 )• • ip i
^ SIMPLE MODE
For beginners (P.28).
n MOTION PICTURE mode
iAp^MAÇROînbdé--T' ■ ■ ■'■
i ■ - : Take .ciosë-tippicttire-s (P46)
Self-timer (P.35) ^
UpA
■4 left
wj-
downT
n this manual, direction buttons View previously
to be pressed will be shown in taken oicture
white, or with AT -<►. immediately
rights
(Review) (P.30)
(Displayed on screen when
mode changed)
CLIPBOARD mode
Take/view pictures as memos
;p.53).
.PRINT mode-
■Print (R76). ; ;
Take motion pictures (P.47).
......
«Exposure
compensation {P.38)
©Auto bracket * (P.38)
«White balance fine
adjustment (P.50)
Backlight
compensation (P.28)
Flash (P.36)
MENU/SET
(menu display/set) (P.18)
* DMC-TZ3 on:
V
12 VQT1B61 VQT1B61
13
Page 8
. .
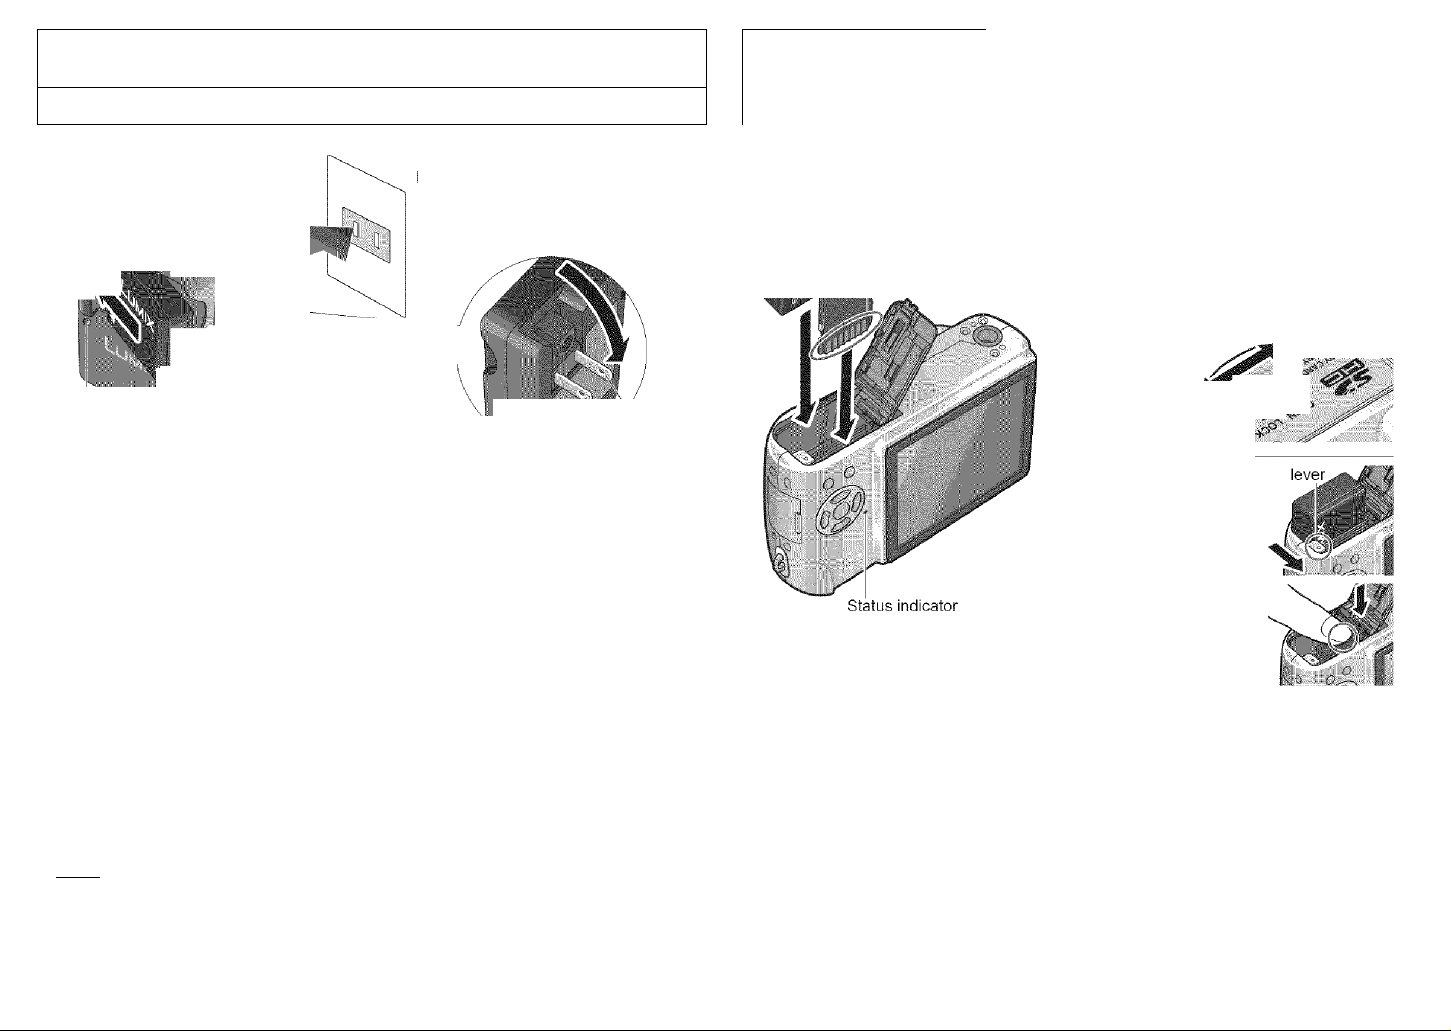
ip s y a « , « : : / : ; ; : : C h a r g i n g
Always charge before first use! (not sold pre-charged)
Battery (model-specific)
Charger
(node'-specific)
battery
ndoor electrical outlet
{charge at room temperature of 1035°C (50°F-95“F))
ir“
Kt-
Mp I 2 Fold out pins and
plug into electrical outlet.
Disconnect charger and
battery when charging is
©Connect to charger.
(Ensure ‘LUIVIIX’ faces outwards.)
'Charging light (CHARGE) '
• On: Charging in progress (approx. 120 min.)
#Off: Charging compiete
• If light is flashing...
»Battery temperature is too high/too low ^ Battery may still be charged, but it will
take longer as it must adjust to the room temperature.
•Battery/charger connector is dirty ^ clean with dry cloth.
■Approximate battery life
Number of pictures:
270 [300*2] (g( 30-sec intervals) (equivalent to approx. 135 [150 *2] mins)
* ' Values based on Cl PA standards. (P91)
(Number reduced if intervals longer - 67 [75 *2] pictures if 2-minute intervals)
Playback time: Approx. 260 [280 *2] mins
Above figures may be reduced if intervals between recording are longer; if flash, zoom,
or POWER LCD are used frequently; or in colder climates (depends on actual usage).
*2 DMC-TZ2
( Note )
©Battery will be warm during charging and for some time thereafter.
©Battery will run out if not used for long periods of time, even after being charged.
• Battery can be topped up even if not fully depleted.
• Do not disassemble or modify the charger.
• Please purchase a new battery if battery life becomes significantly reduced.
compiete.
plug
■ Rrèparaiions:- (:■.■ ‘ ■ v
' Battery
(check orientation)
Card
(check orientation)
Do not touch
connector
ting battery and card
©Set the camera ON/OFF switch to
OFF
©Slide to the ‘OPEN’ position and
open the lid
©Completely insert battery and card
(both click into place)
©Close lid
* Slide to the ‘LOCK’ position.
OPEN
.OCK
/ V r
ITo remove
•To remove battery,
move lever in direction
of arrow.
«To remove card,
press down in center.
■Compatible memory cards (sold separately)
• The following SD standard-based cards (Panasonic brand
recommended)
*SD memory cards, 8MB-2GB
*SDHC memory cards (4GB) ^ (P.96)
(4GB (or greater) cards without the SDHC logo are not of SD standard.)
— For recording picture/time capacity, see (P.92)
— For model numbers and types,
see http://panasonic.co.jp/pavc/global/GS (This Site is English only.)
• MultiMediaCards (still images only)
( Caution )
«Always use genuine Panasonic batteries.
• If you use other batteries, we cannot guarantee the quality of this product.
#Do not remove card or battery while power is ‘ON’ or while status indicator is on
(Camera may cease operating correctly, or card/recorded contents may be damaged).
• The reading/writing speed of a MultlMediaCard is slower than an SD memory card. When a
MultiMediaCard is used, the performance of certain features may be slightly slower than advertised.
• Keep the Memory Card out of reach of children to prevent swallowing.
SDHC logo
SDHC memory
card
14 VQT1B61 VQT1B61 15
Page 9
Pri
spara tic
ns
:ing the clock and language
li
Set mode dial (R13) to NORMAL PICTURE mode O before turning on power.
( Note )
• Failure to set the clock will mean
correct date will not be printed
(P.76) when printing pictures in
digital photo center or when using
DATE STAMP (P.66).
• Time is displayed in 24-hour
format. Year can be set between
2000 and 2099.
• Clock settings will be saved for
approx. 3 months even after
battery is removed, provided a
fully-charged battery was installed
in camera for the 24 hours
beforehand.
‘PLEASE SET THE CLOCK’ will be displayed when power is turned on for the first time.
While this message is displayed
Press
year, month, date, time
i i ‘ I Select
Adjust
Press
• Turn on power again and check time
display.
■ To change time setting
■1» Select ‘CLOCK SET’ from SETUP
menu (P.18), perform @ and above,
and press
■ To set local time at overseas
destination
‘WORLD TIME’ (P.49)
■ To set language
Select LANGUAGE (P.22) from SETUP
menu (P.20), and set to language
displayed on the monitor.
• Example of SETUP menu setting
(P.18)
Select to change
date format
Preparations
M
vour mera
This camera contains a range of menus to enable you to set your photography and
playback preferences, and to make the camera easier and more fun to use.
The ‘SETUP’ menu in particular contains important functions, such as for time and power
source. Please check these settings before use.
■ Making the camera more convenient to use (SETUP menu) (P.20)
• Make settings for ease of use such as adjusting the clock
and changing the beep sounds.
•Applicable modes (P.13): SCN1SCN2H(B
Changing photography preferences (REC menu) (P.50)
• Make settings such as white balance, sensitivity, aspect
ratio, and picture size.
■ I ■■ .'.'^smviTY
•Applicable modes (P.13): SCN1SCN2H
: ,U -,. =ECT RATIO
■■ Is ^lOT.SiZE..........
' à 0..ALITY
(Screen example; DMC-TZ3)
Using your pictures (PLAY menu) (P.64)
IQWIMOWM
. 'jii- ■ ■■ ■■
l6i#iaSL!DE SHOW
mif FAVORITE i
• Make settings for using the pictures you have taken,
including rotating, protecting, trimming, and handy settings
for printing your pictures (DPOF).
•Applicable modes (P.13): IS
JìSìROTATEDISr:
ROTATE
The following menus are also included:
............
f
(Screen example: DMC-TZ3)
■ To make photography settings to fit certain scenes, e.g. night
SCENE menu (P.40)
■ To easily change settings such as picture quality, for beginners
^ SIMPLE MODE menu (P.29)
16
VQT1B61 VQT1B61 17
Page 10
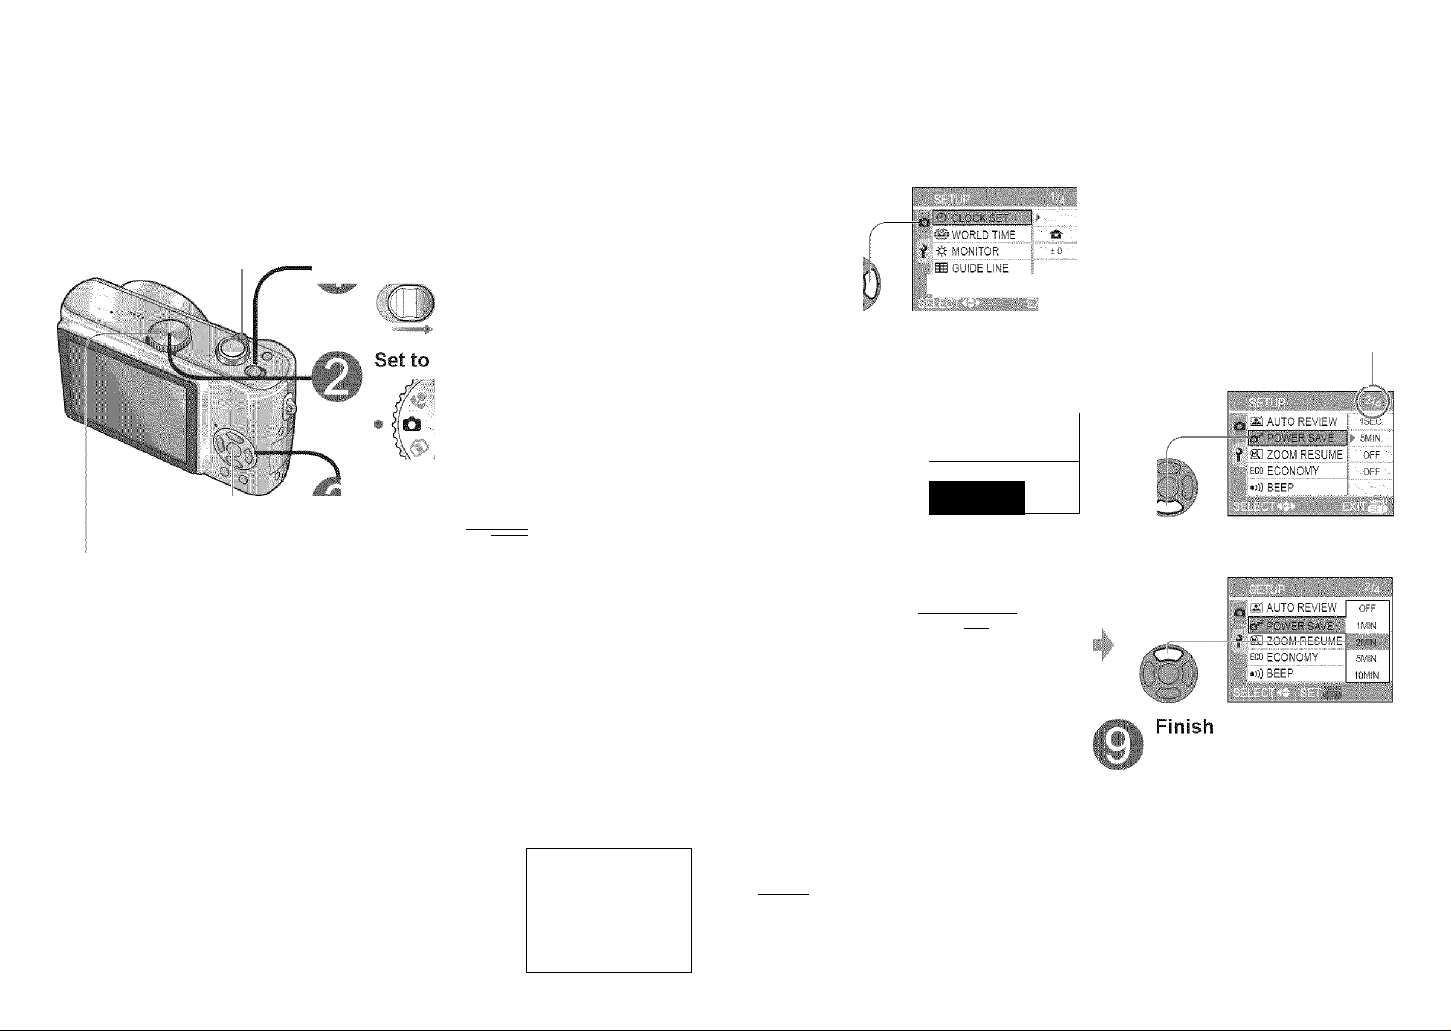
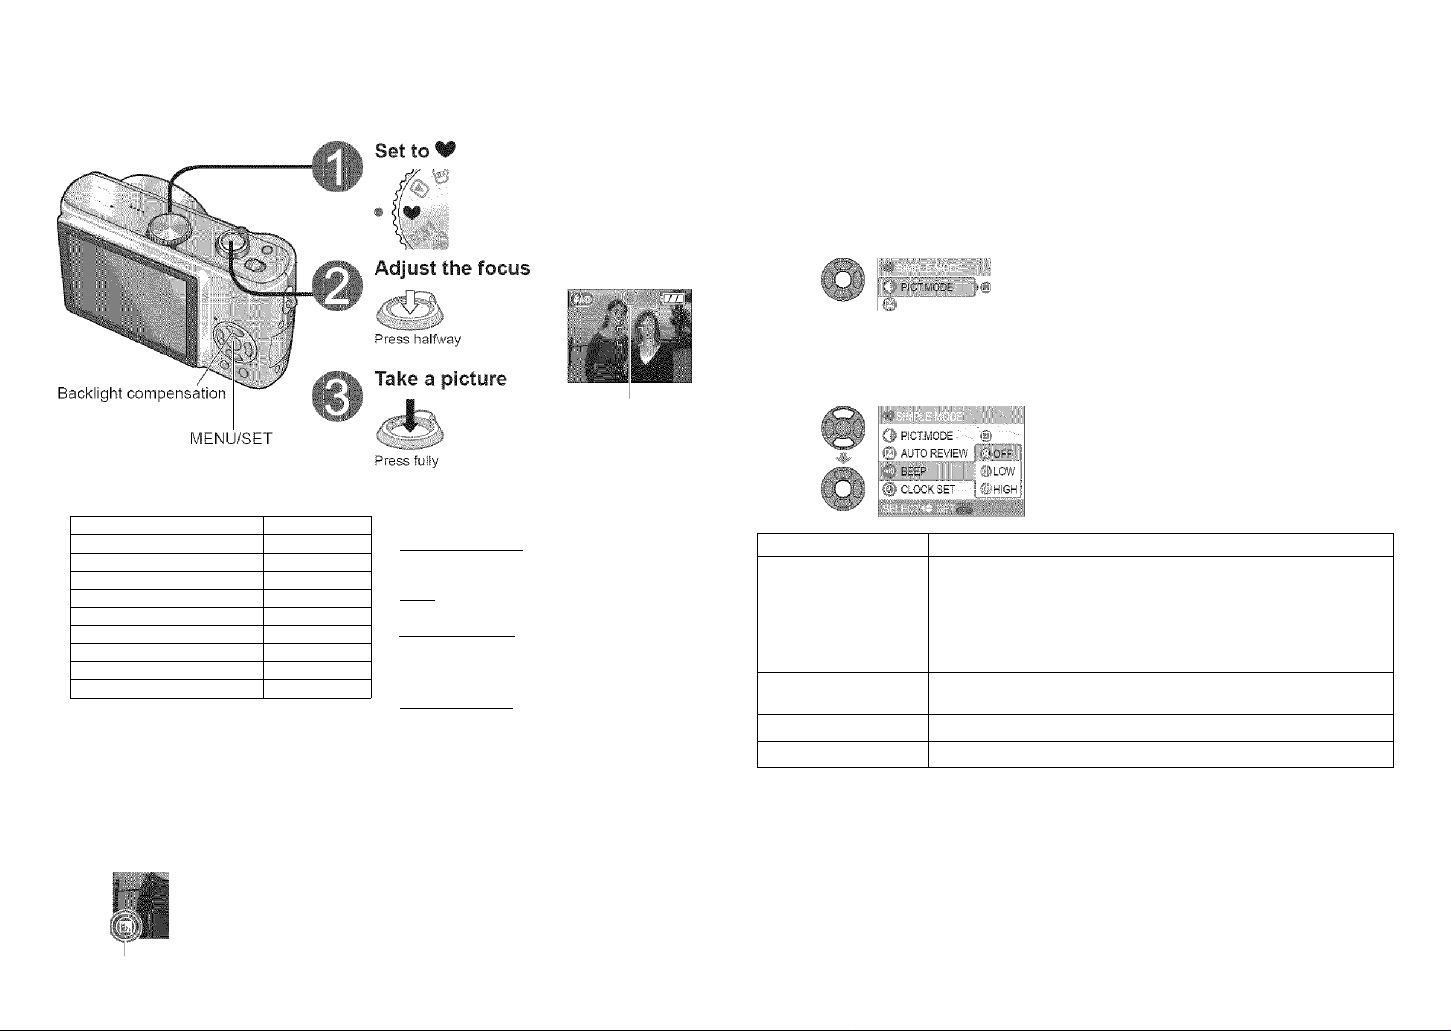
■PrépáfátiariS'
Explanation of settings method for SETUP menu, REC menu, and PLAY menu.
(Screen example: DMC-TZ3)
Here is explained an example of changing the ‘POWER SAVE’ setting from '5 MIN.’ to ‘2
MIN.’from SETUP menu.
(‘POWER SAVE’ is a function to extend battery life by automatically turning the camera
off if no operations are performed for a certain period.)
Zoom lever
Turn on the power
OFF ON
g up the menu
MENU/SET
•SETUP menu
AppSicabie modes:
#REC menu
Applicable modes:
ittCl3%XsCNlSCN2H
• PLAY menu
Applicable modes: ®
SCN1SCN2 H
CB
^ REC menu is disp'ayed.
■HMIM
lol I 'AWB
|is;i SENSITIVITY s AUTO
f EE A„-'ECT RATIO 1
■" II -ILT.siZE i . 7m
■ A QUALITY I ■
First page of three currently
displayed. (Zoom lever can be
used to scroll through pages.)
Move across to the items
Highlight ‘CLOCK SET’
llllTRAVELdate''¡-' off
Select the correct item
Press T and move beyond the
>
bottom item
:© CLOCK SET
WORLD time' '
MONITOR
fB GUIDE LINE
Select this item
Displays settings
>
pa AÜTQ REVIEW r
- ' == ='
f ai ZOOM RESUME
.») BEEP
ct this setting
!■ ■
..Ï
i- ■ 1Ü
W: OFF',.,
»3
OFF
llvIlN
2MIN
iOMIN.
Page 2 displayed
Move down to ‘POWER SAVE’,
Highlight ‘2 MIN.
18
f Select SETUP menu
Select O
IwiW.BALANCE ¡„„'„awb ^
iiWtiisensitivity' 'll"■'auto'
[^ASPECTRATIO
PiCTSiZE'' " I' 7m|
0 '
VQT1B61
QUALITY
..........
Í-.á"
Select Í
© CLOCK SET '
■' WORLD TÍME
ff fr MONITOR
ffi GUIDE LINE
TRAVEL DATE
±0 '
OFF
L
AUTO REVIEW ¡ -ISEC.
■' EfSSSHv] ^
f ZOOM RESUME (""-"off"
«ECO ECONOMY
.......
¡'Toff
»C)))BEEP ■.i " ■
.
Press
O
( Note )
• To restore default settings > ‘RESET’ (P.22)
• For certain items, there may be no settings selection (step ®) (e.g. ‘ROTATE’ on PLAY
menu), or actual display may differ from that above (e.g. ‘WORLD TIME' on SETUP
menu).
VQT1B61 19
Page 11

P.nepar ail
OnS':
f Using SETUP menu
fv/lake genera! camera settings such as adjusting the ciock, extending the battery
life, and changing the beep sounds. (Settings method > P.18)
• Default setting outlined: |
‘CLOCK SET, ‘AUTO REVIEW, ‘POWER SAVE’ and ‘ECONOMY’ are important for
clock setting and battery life. Be sure to check these before use. ) '
;:{2}Vei30GK:SETT':i(,;’:
ii WORLD TIME^■''2
# MONITOR‘”■'■2
H GUIDE LINE ■; ■
lip TRAVEL DATE Record the number of days elapsed in your travels. |OFF|/SET(P48)
REVIEW-; V:
Set the date and time. • Set the date/month/year and time (P.16).
Set the local time at an overseas destination (P.49)
Adjust the brightness of the LCD monitor (7 ieveis). -3 ■ • ■ ■ +3
Change the pattern of the guide lines displayed when taking : :
pictures.: ' : ( - : : ; . . ' ....................................................................: ■ ■ ■■
Display recording information or histogram together with guide .
lines (P.33). ■ C w
Automatically display pictures immediately after taking
them..;... . . .. . . .: • • . , : . .■ . . .
Select display time (seconds). . : : ; ; . ; ;............................................................
h-‘ZOOM’is useful Tor checking focus. : . : : r .........................................................
...........................................
•*’ Settings also reflected in SIMPLE MODE W (P.28).
Settings also reflected in CLIPBOARD mode ^ (P.58).
#’^'3 DMC-TZ3 only.
:REC. INFO. (Recording information): | OFF |/ ON : HISTOGRAM: 1 OFF If ON 3 3
PATTERN: IH/a • . ' : ■ ■ / : ^ ‘ . . : : ) i
■ PATTERN' cannot be selected in CLIPBOARD mode (P.58). Recording information
and histogram cannot be displayed.: : : r..........................................................................................................
: Not displayed in SIMPLE MODE.
OFF /ilSEC.|/3SEC. /ZOOM’»3(displays for i second, then at 4x zoom for 1 . : :
second)
■■■ in 'SELF PORTRAIT scene mode (P.42), ‘AUTO BRACKET’ «(P.38), 'BURST mode' ■
■ (P.54), or pictures with audio {P.53, 70), auto review performed regardless of setting.
■ Motion pictures cannot be automatically reviewed.
OFF /1 MIN. 1 2 MIN./Is MIN.j/ 10MIN. (Set time before POWER SAVE is initiated)
■ Cannot be used in the following oases:
When using AC adaptor {DIVIW-AC5PP, sold separately), when connected to computer/
printer, during motion picture recording/playback, during slideshows (exception: set to
10 minutes while slideshow is paused and during ‘MANUAL’ slideshows)
• Setting fixed to ‘2 MIN.’ in ‘ECONOMY’, and to ‘5 MiN.’ in SIMPLE MODE (P.28) and
CLIPBOARD (P.58).
ff"^3PQWE
RISAVETV:
Automatically shut off power while not in use.
(Saves battery consumption)
■:t 7o restore: Press the shutter button halfway, or turn on the
power again.
........
■ r
(DESTINATION) / ® (HOME) w
......................
: : .
.................................................
^ ^ :
ffl ZOOM RESUME T'2
EG0--ÉCpNOpVÌY
Remember the zoom ratio when turning power off. : . : .
Restrict battery consumption when recording.
(Dims LCD monitor, automatically shuts off monitor when not
in use.)
• Monitor also shut off during flash battery charging.
• Status indicator is illuminated while monitor is off.
r restore: Press any button.
IoFfI/ON Position cannot be stored. . ' ■ ...................................................................................................
■'
-----
' ' -fi Released and cannot be set when using ‘SELF PORTRAIT scene mode.
1 OFF 1 / LEVEL 1 (turned off after approx. 15 seconds of inactivitvVLEVEL 2 (turned off
after approx. 15 seconds, or approx. 5 seconds of inactivity after recording)
• Cannot be used in the following cases:
When using SIMPLE MODE. CLIPBOARD mode .or AC adaptor (DMW-AC5PP, sold
separately), when menu screen is displayed, when using self-timer setting or during
motion picture recording.
• LCD monitor not dimmed when using ‘POWER LCD’ or 'HIGH ANGLE’ (P.34).
20 VQT1B61 VQT1B61 21
Page 12

■/Prèjpar'afiòns ■
f
Jsillifj 'jr”n fT li if/'Ibi. e
fContlnyed)
• Default setting outlined:
Settings also reflected in SIMPLE MODE W (R28).
Settings also reflected in CLIPBOARD mode (P.58).
»))) BEEP"''
SHUTTER
<]))) VOLUME «
HI NO. RESET"
S(R RESET
K VIDEO OUT :
@ TV ASPECT
SCENE MENU Display scene menu when mode dial is set to SCN1 or SCN2.
DIAL DISPLAY *■'’2 Display mode dial operation on screen.
Change or mute beep sounds.
■Change or mute shutter sounds.; ' ' ( '
Adjust volume of sound from speakers (7 levels).
Reset image file numbers and start again from 0001'
;#F(ie numbers and folder numbers (P.75)
Reset SETUP menu (P.20) and REC menu items (P.50) to
their default settings.
Change the video output format when connected to a TV, etc.
Change the aspect ratio when connected to a TV. etc
(PLAYBACK mode only).
...........................
Volume: ® (mute) / |iQ )| (low) /t(]0) (high) Tone: | .#| / ;j@ / #
Volume: ¿2. (mute) /E (low) /¿1 (high) Tone: | # | / M i M
LEVELS LEVELS
• Cannot be used to adjust TV speaker volume when connected to TV.
YES/NO . . :.. ■ :■ ..... ::... . : .. . . ' .
.. Numbers .cannot be reset once folder number reaches 999. in this case, save ail .
necessary pictures to your computer, and format the built-in memory/card. (P73) .
. To reset folder number to 100: : ■ . ■ : f
First, format (P73) the built-in memory or card, and reset the file numbers using NO.
RESET. Then, select 'YES’ on the foider number reset screen.
............................
RESET REC. SETTINGS? (YES/NO) RESET SETUP PARAMETERS? (YES/NO)
• Resetting SETUP parameters causes the following to be reset: Birthdays in BABY
(P.42) and PET modes (P.44), ‘TRAVEL DATE’ (P.48), ’WORLD TIME’ (P.49), ‘ZOOM
RESUME’ (P.20), ‘FAVORITE’ in PLAY menu (set to ‘OFF’) (P65), ‘ROTATE DiSP’ (set
to ‘ON’) (P.66), CLIPBOARD menu (INITIAL DISP.) (set to ‘ON’) (P.60)
(Only ‘BEEP’ is reset in the SIMPLE MODE menu.)
iSFolder numbers and clock settings will not be reset.
I NTSCi / PAL : : : :
isi/ n
I When set to M, pictures will be displayed vertically long on LCD monitor when
connecting AV cable (supplied) (P.79).
OFF (use previously selected scene mode) /1 AUTO | (displays scene menu)
•To display scene menu when set to‘OFF’: Press’MENU/SET. '
......................................'....'....'....'....
OFF/1 ON I (display)
I ENGLISH 1/ DEUTSCH (German) / FRANÇAIS (French) / ESPAÑOL (Spanish) /
LANGUAGE ;Change display language.
ÍTALiANO{lta!ian)/ iÍ!X" (Chinese)/ 0$:ii (Japanese)'
* Not displayed on DMC-TZ3P/DMC-TZ2P......................................................................................
.........
22 VQT1B61 VQT1B61 23
Page 13
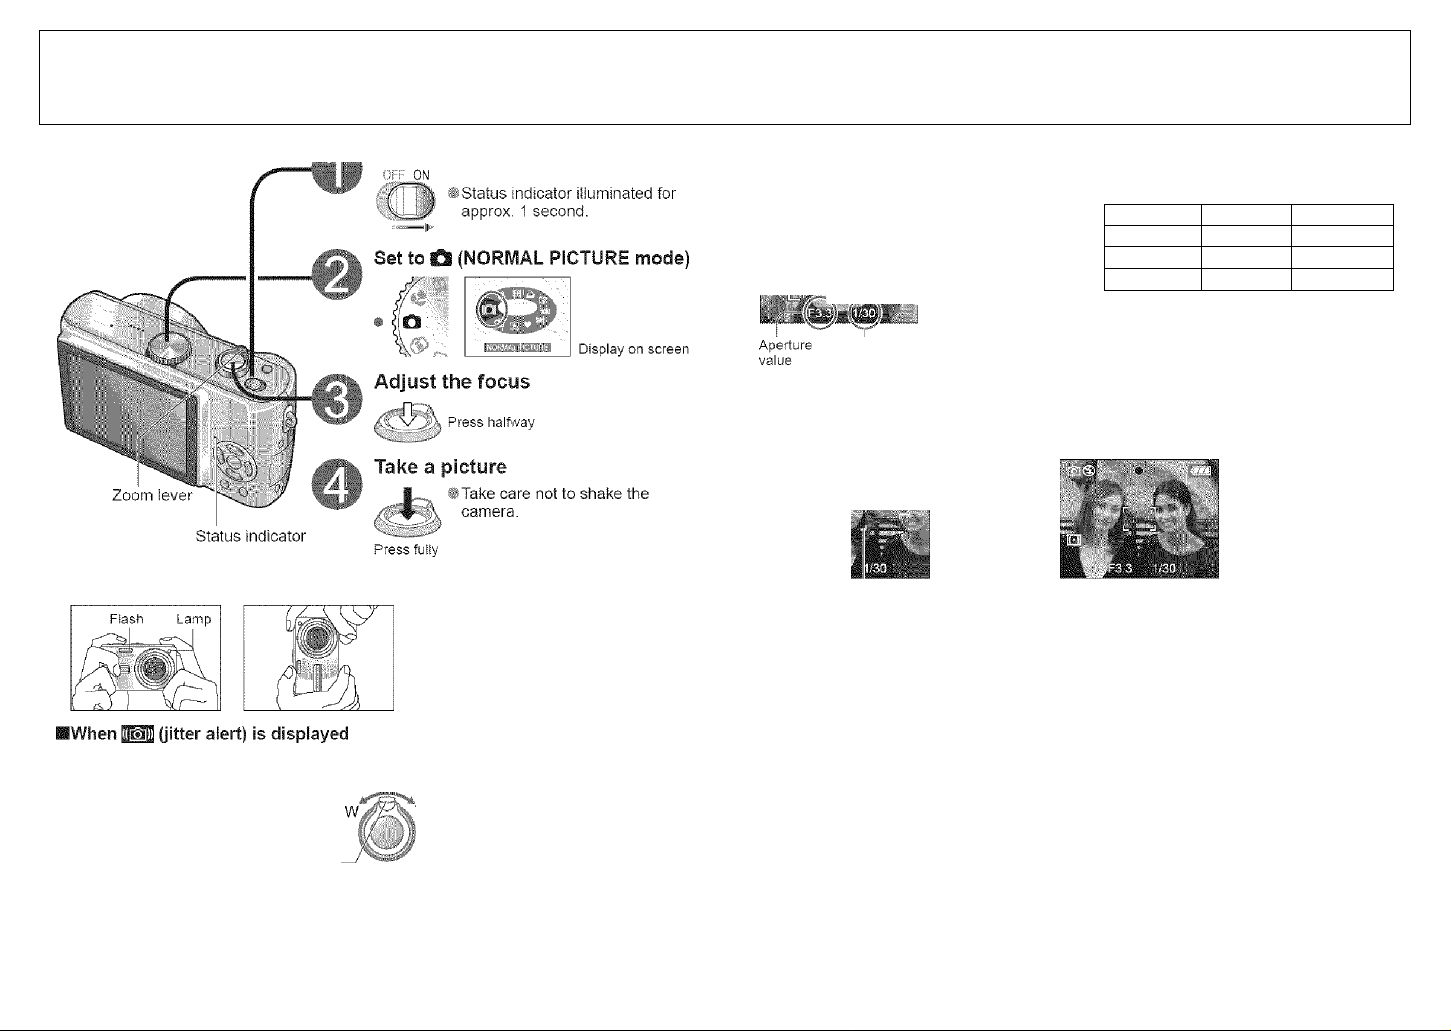
fsmtmssmimgim:
.B.àSfCS :V; ; ;p ;
.^King pictures
Turn on the power
Please set the clock before taking pictures (P.16).
Press the shutter button halfway, ensuring that the subject is aligned with the AF area.
Focus in focus Not in focus
Focus display On^ Flashing
AF area Green Red/white
Sound Double beep Multiple beep
* Images outside of the focus range may
not be in full focus even if the light
remains on.
Shutter speed
Focus display
“ AF area (normal)
— A F area (when dark or
using digital zoom)
Ì
.......................................
■
IHoiding the camera
Horizontally Vertically
Use the Optical image stabilizer (P.39), a tripod, or the self-timer (P.35).
»Do not block the flash or the lamp
(R12). Do not look at them from close
range.
♦ Do not touch the lens.
»Stand with your arms close to your
body and with your legs apart.
Focus range (To take pictures from close range^P.46)
Distance of at least 50 cm
(1.64 feet) from subject
Zoom lever
When set to maximum T (maximumWhen set to maximum W (IX):
zoom): Distance of at least 2 m
(6.56 feet) from subject
ITo use flash (P.36)
(If red; Could not achieve optimal exposure (P.51).)
■ Use flash (P.36) or change ‘SENSITIVITY’
tlUMMLLMJJllHlllIM
31
Hold down
half'A'ay
CTFirst adjust focus
according to subject
I Readjust focus if not correctly adjusted initially.
Subjects/environments which may make focusing difficult:
»Fast-moving or extremely bright objects, or objects with no color contrast
»Taking pictures through glass or near objects emitting light. In dark, or with significant
Jitter.
•When too close to object or when taking pictures of both distant and close objects
together in the same picture
■ 122-
Pictures remaining
Remaining battery
m D B. j«j (flashes red)
(Status indicator flashes when LCD monitor is off)
Recharge or replace battery (P.14).
• Not displayed when using AC adaptor (DMW-AC5PP,
sold separately).
C2)Retum to desired
composition
1
F.-ess fu lh
J
24
VQT1B61 VQT1B61 25
Page 14

'.Sasfcs
Pictures will be saved to a card if one is inserted, or to the built-in memory if not.
till
i:ai
• Pictures may be copied between cards and the built-in memory (P.73).
• It is recommended that you copy important pictures to your computer (as
electromagnetic waves, static electricity, or faults may cause data to be damaged).
, When in operation
Card
Built-in memory
I Kir
S a are Illuminated red.
Card Built-in memory
This means that an operation is in progress, such as the
recording, reading, or deleting of pictures. Do not turn off the
power or remove the battery, card, or AC adaptor {DMW-
AC5PP, sold separately) (this may cause damage to or loss
of data).
0S (Continued)
■Cards
•Always format (P.73) cards in this camera before first use.
#lf the switch on the card is set to ‘LOCK’, operations such
as formatting, copying, and deleting cannot be performed.
• Compatible memory cards ^ (P.15)
Recording picture/time capacity > (P.92)
Switch (LOCK)
■Built-in memory (approx. 12.7 MB)
• Used as a temporary save destination when you have no card,
f# May take longer to access than cards.
• Clipboard pictures (P.58) are saved to built-in memory.
■Recording picture capacity estimates (default settings)
Save destination
Pictures (DMC-TZ3) 2 68 135 270 550
Pictures (DMC-TZ2) 3 81 160 320 660
The number of pictures that may be recorded varies greatly according to aspect settings
(P.51), picture size (P.52), and quality (P.53) settings, in addition to the capacity of the
card. (For more details: P.92)
Buitt-ln memory memory card (Example)
12.7 MB 256 MB 512 MB 1 GB 2 GB
-tV;
.Básics.
Subjects can be enlarged by ten times with ‘Optical zoom’ and up to 15 (13.8’^) times with
‘Extended optical zoom’. ‘Digital zoom’ can then be used to multiply this effect by four
times further. (28-280 mm: 35 mm film camera equivalent) * DIVIC-TZ2
I! n.kirig pictures whri zoom
Enlarge (Tele) Restore (Wide)
w
,T w
Turn to T side Turn to W side
T
IZoom types
Typ e
Max.
enlargement
Picture quality No loss No loss Deteriorates by factor of enlargement
Conditions None
Screen display
DMC-TZ3 only, DMC-TZ2 only (Zoom ratio depends on ASPECT RATIO and PICT.SIZE.)
Optical zoom Extended o ptical zoom (EZ ) Digital zoo m
lOx
15x*'. 13.8x«T lax’«
12.6x*L 12x, 11.6X®
Select picture size
(P.5 2) m arked with ®
HH displayed
40x (including optical zoom: lOx)
60x (including extended optical zoom: 15x)
‘D. ZOOM' (P.56) set to 'ON’ In REC
menu
Displays digital zoom are a
With in digital zoom area AF a rea
becomes larger when pressing
shutter b utton haí^^/ay
■What is Extended optical zoom (EZ)?
if, for example, set to ‘31V! EZ’ (equivalent to 3 million pixels), a picture will only be taken
of a 3M-sized central part of a 7M (equivalent to 7.2 million pixels) area, meaning that
the picture can be enlarged further. *3 divic-TZ2: 6M
■ Entering digital zoom area .. ■ _
Once the bar stops before the digital zoom area,
continue to hold the zoom lever, or release it once
then push it again.
Bar stops momentarily
-Digital zoom area
■To recall zoom ratio from time power was turned off i#- ‘ZOOM RESUME’ {P.20)
•The enlargement ratio displayed in the bar on screen is an estimate.
•Adjust the focus after adjusting the zoom.
• Do not block the lens barrel (P.12) movement while zooming.
•Zoom cannot be adjusted during motion picture recording.
9 A greater degree of distortion may be generated by taking wider-angled pictures of
close objects, while using more telescopic zoom may result in more coloring appearing
around the outlines of objects.
•The camera may make a rattling noise and vibrate when the zoom lever is operated - this
is not a fault.
• When using extended optical zoom, zoom movement may stop momentarily near
maximum W (lx), but this is not a fault.
• The Optical image stabilizer may be less effective when using digital zoom, it is
recommended that you use a tripod and the self-timer (P.35).
26
VQT1B61 VQT1B61 27
Page 15
Green when
focus aligned
This mode is designed for beginners to easily take pictures.
Only major functions and menu items are displayed.
Use the menu to change settings such as picture quality and beep sounds.
Display SIMPLE MODE
menu
■"Ì
Select desired item
(Screen shows beep setting change)
AUTO REVIEW . ©
®BEEP.
f() CLOCK SET ' '■
ct fif- ji-eii -.ATiing
■
Cl
PICT.MODE
© AUTO REVIEW } ©OFF
I The settings for the following functions are
fixed.
SELFTIMER (P.35) OFF/10 SEC .
POWER SAVE (P.20) 5 MIN.
STABILIZER (P.39) MO DE1
W.BALANCE (P.50) AWB
SENSITIVITY (P.51) d)«
METERING MODE (P.55)
AF MODE (P.54)
AF ASSIST LAMP (P.56) ON
COL.MODE (P.57) STANDARD
*' Same as w ith ISO LIMIT ‘800’ setting in
Intelligent ISO mode (P.46),
Item SettlnH
e
H
№
© Displayed when compensation is on.
28
VQT1B61
• The following functions cannot be used.
BURST mode (P.S4)
Digital zoom (P.27)
Exposure compensation/AUTO BRACKET ’
(P.38)
_________________________________
White balance fine adjustment ¡P.50)
AUDIO REC. (P.53)
CONT.AF (P.55)
ECONOMY (P.20)
HIGH ANGLE (P.34)
GUIDE LINE (P.33)
revents subjects being dark when background is light.
’To cancel compensation: Press A again.
• Using flash (FORCED FLASH ON) is recommended
(P.36)
• Adjust using ‘EXPOSURE’ (P.38), except for in SIMPLE
MODE.
Item
« DMC-TZ3 only
• Default setting outlined:
stem Setting
[§ ENLARGE (4:3, 7U*\ Fine):
for printing to 8"x10”size, letter size etc.
Q PICT.MODE
©AUTO REVIEW
©BEEP“
©CLOCK SET’*3
’'■' 6M for DMC-TZ2 model. Extended optical zoom (P.27) available.
Settings changes reflecte d in other modes.
• Focus range
Max. W: Distance of at least 5 cm Max. T: Distance of at least 1 m (3.28 feet)
(0,16 feet) from subject / from subject displayed)
«Flash can be set to ‘AUTO/RED-EYE’ or ‘FORCED OFF’ (‘FORCED FLASH ON’ or
‘FORCED OFF’ when using backlight compensation).
• Recording picture capacity (P.92)
4”x6710x15cm’*2 (3:2, 2.5M EZ, Standard):
for printing regular sizes.
@ E-MAIL“ (4:3, 0.3M EZ, Standard):
for attaching to emails or using in homepage.
® OFF/[^ON:
Displays picture for approx. 1 second after taking
® OFF / p] LOW /©HIGH
Change the date and time (P.16)
Zoom lever—'
(2 m (6.56 feet) unless m ax. T)
VQT1B61 29
Page 16
II
astcs
■B
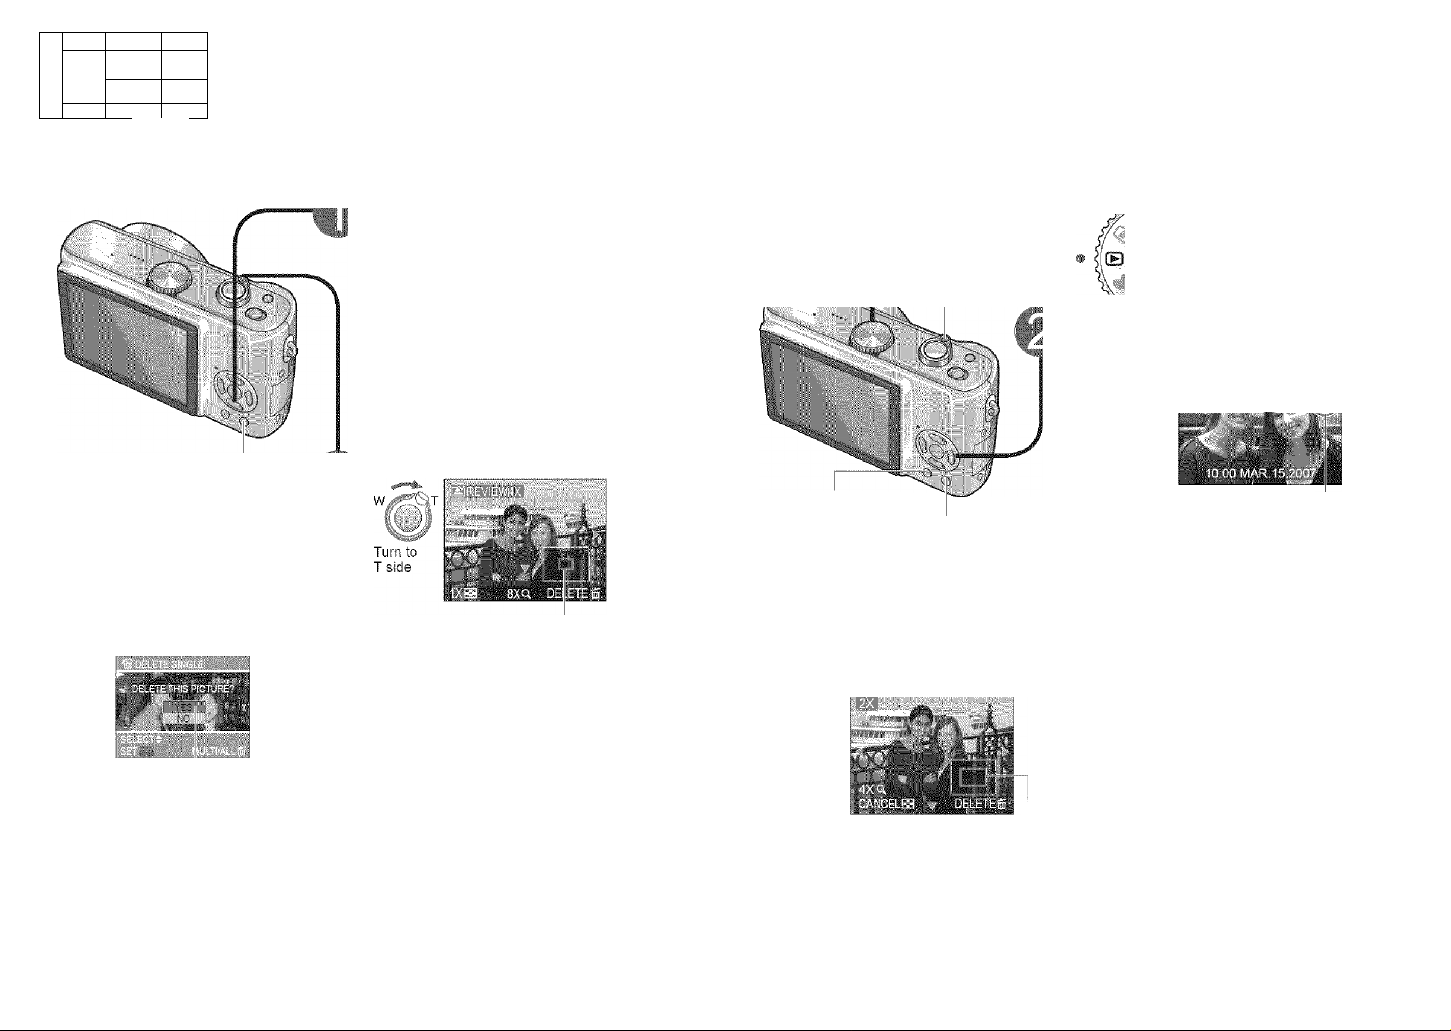
your pictures instaintly
.B.asics.
your pictures f.rc.y)
Pictures can be checked while still in a recording mode ( SCN1SCN2 V ).
Display picture
• Most recently taken picture wiii be
displayed for about 10 seconds.
*To close: Press T or press the shutter
button halfway.
#To view previous/next picture: ^
Enlarge picture (4x/8x)
While picture is f-UNC
displayed ' i
O
Select ‘YES’
Current zoom position (displayed
for 1 sec.)
• Picture is eniarged as you turn zoom lever
towards T.
• To reduce zoom: Turn lever towards W
side.
• To move zoom position: A T ^
Highlight ‘YES’ in orange
ITo display portrait pictures vertically
(P.66)
■To delete several or all
(P.32)
V___________________
C Note ')
• D
• Deleted pictures cannot be recovered.
• Motion pictures cannot be reviewed in this way. View in PLAYBACK mode (P.62).
When there is no card inserted, the pictures played back from the built-in memory.
(Clipboard pictures can oniy be played back in CLIPBOARD mode (P.59).)
Enlarge
VLewaslist (P.61)
Scroll through pictures
File number
00
Previous Next
Change information
display (P.33) g Qg|g,g (P32)
»Returns to the first picture after the final
picture.
■To fast-forward (rewind)
¡"■ 1 'A Hold down until the desired #Cannot be used when using ‘REVIEW’ (P.30) or
picture number Is displayed
• Holding down increases the picture scroll rate.
Cannot be used when
‘Multi playback’ (P.61).
■To enlarge (playback zoom)
"IZoom ratio: 1 x/2x/4x/8x/16x
w
TU'” -.0
. -
ITo reduce zoom: Turn lever towards W side
»Move zoom position: AT -<►
lEniarging picture will reduce display quality.
Current zoom position (displayed for 1 sec.)
■To playback as list ■ (P.61)
■To display picture vertically ^ (P.66)
■To print
• Using own printer:
• Direct connection > (P.76) »Connection via computer > (P.74)
•At photo shops — Give card to shop assistant.
Picture number
30 VQT1B61
VQTIB6I 31
Page 17
■ Öasies;
Deleting pictures
'I. .. .
(Record)
Changing racording information
Set to PLAYBACK mode Pictures deleted will be from card if card is inserted, or from
built-in memory if not. To delete clipboard pictures, set to CLIPBOARD mode ¡^.
■To delete 1 picture
While picture is vE-i'
displayed (P.31)
FUN C
''S
Press
o
■Highlight‘YES’
in orange
ITo delete multiple (up to 50) or all pictures
FUN G
Press tw ice
FUN C
m
Select type of
deletion
tiSkip to step @ if
selecting 'ALL DELETE’
Select the pictures to
delete (Repeat)
©
' ■ o Picture selected
•To release: Press T again
ITo cancel
To cancel ‘ALL DELETE’ or ‘ALL
Press
( Note ~)
• Deleted pictures cannot be recovered.
• Do not turn off the power during deletion.
• Use a sufficiently charged battery or an AC adaptor {DMW-AC5PP, sold separately).
•When deleting all pictures from built-in memory, pictures actually deleted differ
according to mode.
PLAYBACK mode ® : All pictures in built-in memory, except clipboard picture
If ‘FAVORITE’ (P.65) setting is ‘ON’, you can ‘ALL DELETE EXCEPT (FAVORITE)’.
CLIPBOARD mode G’": All clipboard pictures
• Pictures cannot be deleted in the following cases:
«Protected pictures (P.69) (Release the protection before deleting)
»Card switch is in ‘LOCK’ position.
»Pictures not of DCF standard (P.90)
• May take time depending on number of pictures deleted.
ghiight ‘YES’ in
orange
DELETE EXCEPT press
‘MENU/SET’.
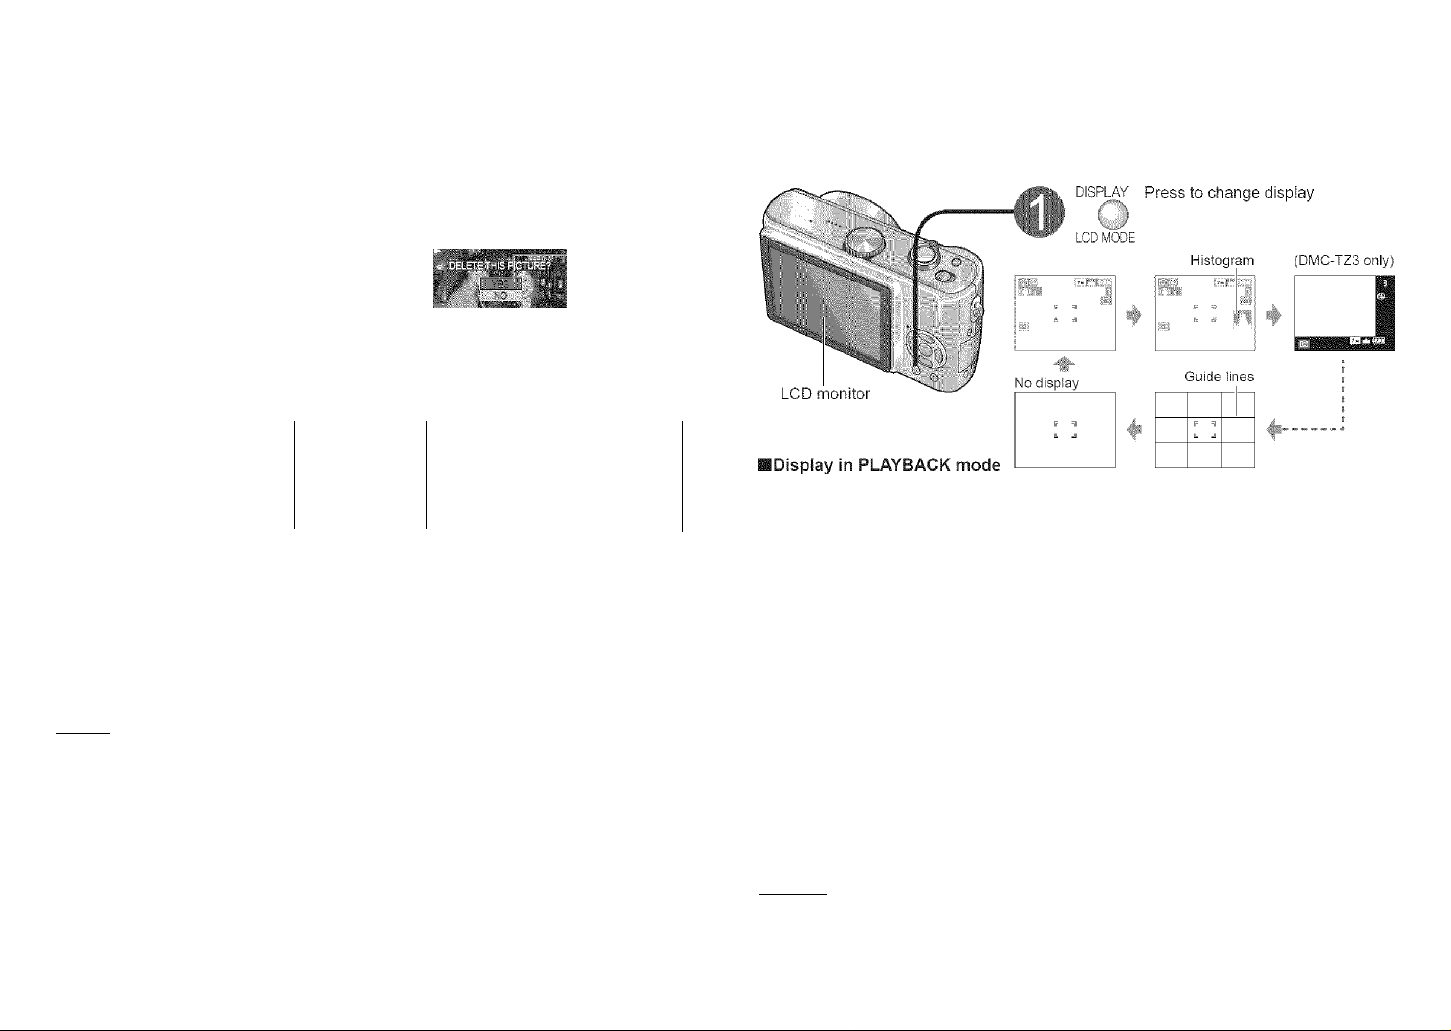
Change between different LCD monitor displays, such as histograms.
Histogram
•I NO
display
IHistogram
Shows brightness of subject as graph,
useful for exposure compensation (P.36),
etc. (Display shown is an estimate.)
• Histogram from time of recording
is displayed in orange if different to
histogram in playback, for example when
recording with flash or in dark locations.
• Histogram may differ between times of recording and playback, or from histograms
made with image editing software. ^_
• During playback zoom (P.31), motion
picture playback (P.62), slideshow (P.64):
Display on/off
• During multi playback, calendar playback
(P.61), DUAL DISPLAY (DIVIC-TZ3 only)
(P.64): Display cannot be changed
(Example)
OK Dark Bright
IGuide lines
Reference for composition (e.g. balance) when recording.
• ‘GUIDE LINE’ settings (P.20)
(....Note
....
}
• Display cannot be changed during menu (P.17) display.
#!n SIMPLE MODE, display can only be turned on and off.
• Histograms cannot be displayed in SIMPLE MODE (P.28). MOTION PICTURE mode
(P.47), or CLIPBOARD mode (P.58).
32
VQT1B61
VQT1B61 33
Page 18
Applications
(Record)
IIM
AppHcMphs-
;(’R;fccord:]pt
Till
ding picture“' ” iiiL. ' df 'dimer
Make it easier to see the LCD monitor when taking pictures from high positions or in
bright outdoor conditions.
Display ‘LCD MODE’
DISPLAY
Hold down
LCD MO DE
Select mode
•RdHiGH ANGLE
• POWER LCD
Makes screen brighter than normal (for
outdoor use).
HIGH ANGLE
Makes screen easier to see when taking
pictures from high positions.
(becomes harder to see from the front)
• OFF: Normal
HIGP. AKG_E
This is also effective for correcting jitter when pressing the shutter button, by setting the
self timer to 2 seconds.
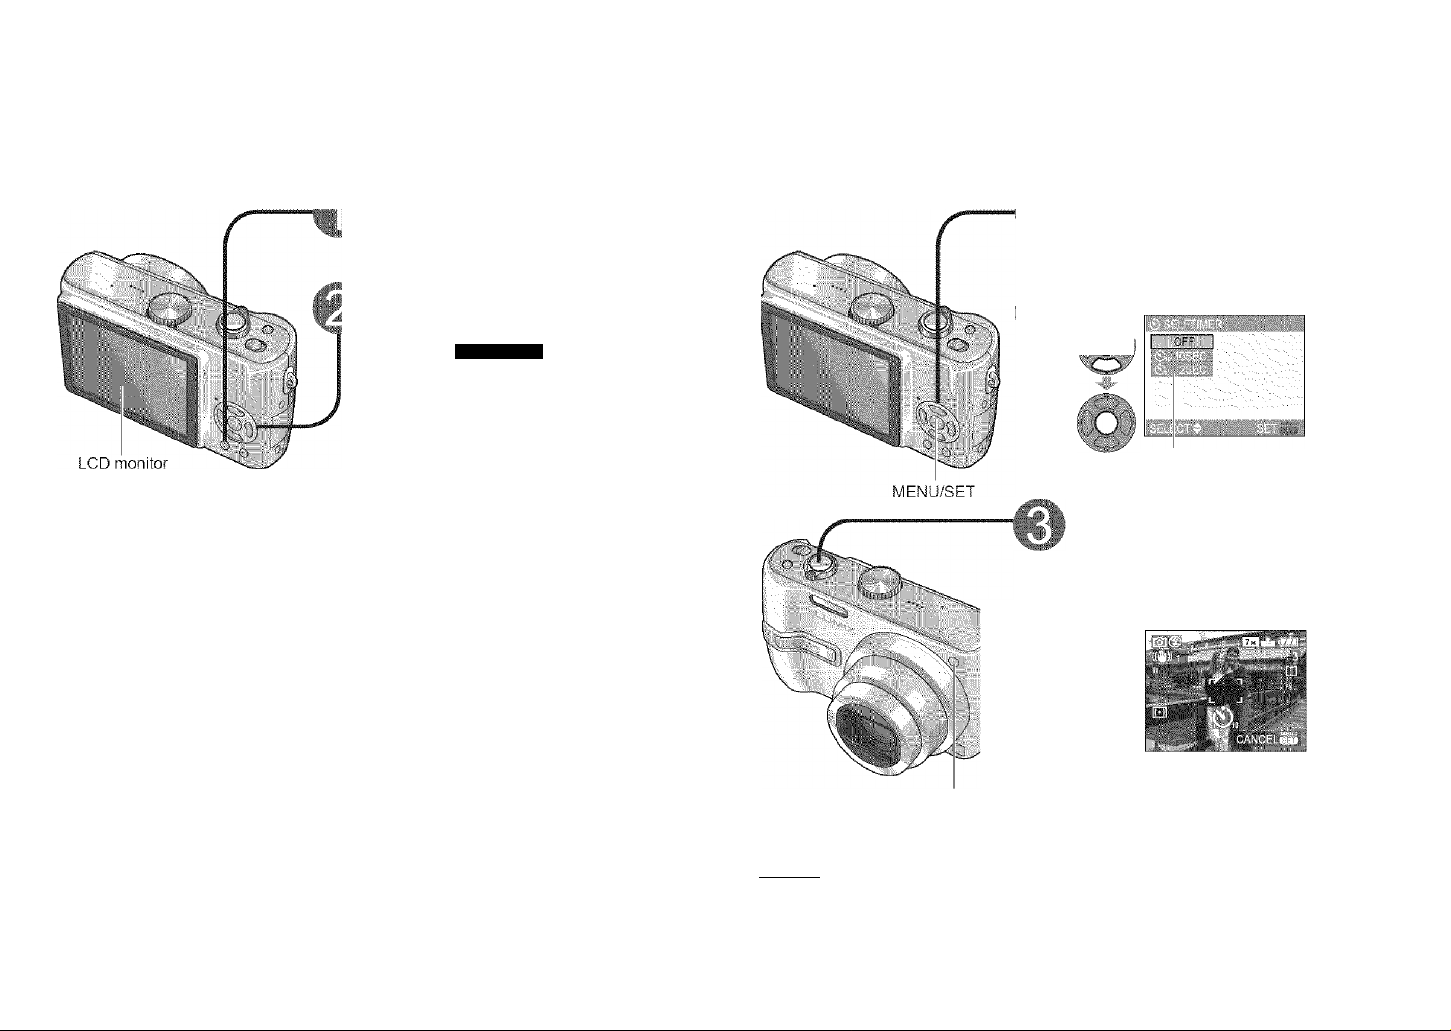
Display ‘SELFTIMER’
elect time duration
Displayed for approx. 5 sec.
• Can also be selected with
Adjust focus
, -'JT ■Focus will be automatically
' adjusted immediately before
Fiess recording if shutter button is
■'■ri ‘v.av pressed fully here.
Take a picture
I ft
I
Press
Note ')
•‘HiGH ANGLE’ will be canceled when power is turned off (including POWER SAVE).
# Block out sunlight (with hand, etc) if reflection makes screen difficult to see.
• ‘HIGH ANGLE’ cannot be used in the following cases.
»SIMPLE MODE
«PLAYBACK mode
«PRINT mode
«During menu screen display
«While reviewing pictures
• ‘POWER LCD’ will be deactivated if no operations are performed for 30 seconds while
recording. (Brightness can be restored by pressing any button)
* Brightness/color of screen in ‘LCD MODE’ has no effect on pictures recorded.
34 VQT1B61
#The self-timer indicator will flash, and the
Self-timer indicator
( Note ~)
#This function cannot be used in the ‘UNDERWATER’ scene mode or in MOTION
PICTURE mode H.
• in some modes, only ‘2SEC.’ or only ‘10SEC.’ may be selected.
SIMPLE MODE: ‘10SEC.’
CLIPBOARD mode, SCENE mode ‘SELF PORTRAIT’: ‘2SEC.’
picture will be taken after the selected
duration of time has elapsed.
•To cancel while in operation: Press
'MENU/SET
VQT1B61 35
Page 19

Applications
iRecprd):;
..king piciiires with flash
Available types vary depending on the mode in use.
Display ‘FLASH’
m
ъ
tho rtc'-;lr^-c; t-Jnc
Flash —
• Do not cover With nard Do not
look at from close range (fev/ cm;.
• Do not bring objects close (heat
and light may damage object).
■Types
AUTO
•Automatic ON/OFF
AUTO/RED-EYE reduction
•Automatic ON/OFF
•■Reduces red-eye
FORCED FLASH ON
•Always on
FORCED FLASH ON/RED-EYE reduction
(For ‘PARTY’ and ‘CANDLE LIGHT’ scene modes only
(P.42))
•Always on
• Reduces red-eye
g^^ SLOW SYNC./RED-EYE reduction
«Automatic ON/OFF
• Reduces red-eye
• Slows shutter speed to take brighter pictures
FORCED OFF
•Always off
#Two flashes are emitted when using red-eye reduction. Do not move until the second
flash is over. Effects may vary depending on the person,
gShutter speeds are as follows:
am 1/30-1/2000th
1/8 (changed by SLOW SHUTTER setting (P.56)) -1/2000th
' Disp ayea for approx. 5 sec.
#Can also be selected with
Normal use
Taking pictures of subjects in
dark places
Taking pictures with backlight
or under bright lighting (e.g.
fluorescent)
Taking pictures of subjects
against a nightscape (tripod
recommended)
Places where flash use is
prohibited
¡Available types in each mode (©: default setting)
a w
та
Lins
A c£)
:■-?■
о О
O'*
;W:|:
:ai Mi ill :ii£ Ml Mi Ml iSS 111 Ml ■ifll ■
O'
В S3 s
/©:
о
-
© © о ©
ШШ о о
£g:S
Щ
i-l
• Cannot be used with MOTION PICTURE mode H and scene modes И
H, Ш, orH
• Flash settings may be changed when changing recording mode.
• Scene mode flash settings are restored to default when scene mode is changed.
• Only SH or ^ may be selected when using backlight compensation (P.28).
O'* о о о о о О о О о о © о o о о ©
Igj;;
§si
SCENE MODE
(E!
.
'
H
m a El m
1Ш
i —:
iigi
:0'
Mi’
И
'sms
ilii:
- - - - -
М)
БЗ
: iO
■ Focus range according to ISO sensitivity {‘SENSITIVITY’) (P.51) and zoom
(P.27). ■ ■
i AtiTO : ; . . i Max: ’¡y .i4pprox.,0.6:-4 2.гс.;1 S7-'3:<3 fee?) i М;>л;Т:- Appro*. ri).(SiSS-a.'lS:feeii
ISO10G Max?. W. A|jO.'o:x. C.6-1.5 ;r. ;1.£7-5.25 fes:; Max. T: Approx. ! ii? (2.28-3.51 feet)
I |:S02O.S : .:r■.rMa.x.iV ,;. Apprpx. G,e:2:3.iFi1'& 7-7.o5;fee?/- Max.lT ApprdA-1i.Q-1..:5 m ;S:£a)4,S)2.te'e?j.
ISO400 Max. W: A pprox. 0.6-3.3 m (1 £7-?C.8 feet; Max. T: .Approx. 1 0-2.2 ir (-3.2.8 -7.22 feet)
: iso eo.0).Max;.W: Approx,. i3(8W.m i2iS2-;2 feat;: М5;х:Т ::.Арр1:ох.::1..р^Э...1.т ¡-ILia-ilp:?. feeiY
1SO1250 Max. W : Approx. 1.0 -4.7 m (3.28 -15.4 feet) M ax. T: Approx. 1.0-3.1 m (3.28-10.2 feet)
• Edges of picture may become slightly dark if using flash at short distances without using
zoom (close to max. W). This may be remedied by using a little zoom.
■ Maximum ISO sensitivity (‘ISO LIMIT’) (P.51) and focus range when using
Intelligent ISO (P.46).
I l■Sp4o;o) :; ;. ' ; '.) Mai:W: Approx.-Л.6©3.^1Т1 (i Л73о:В-feet) (Max. T:■Approx. l'-0r2-,2'ffl){3.28-7.22:feet)^
IS0800/IS01250 Max. W: Approx. 0.6-4.2 m (1,97-13.8 feet) Max. T: Approx. 1.0-2.8 m (3.28-9.19 feet)
( Note )
!t If flash is to be emitted, flash type marks (e.g. RT1) will turn red when shutter button is
pressed halfway.
• No pictures may be taken if these marks (e.g. QjHj) are flashing (flash is charging).
• Insufficient fiash reach may be due to inadequately set exposure or white balance.
• Flash effect may not be fully achieved with high shutter speeds.
• Flash charging may take time if battery is low, or if using flash repeatedly.
•When using ECONOMY (P.20), LCD monitor is shut off while flash is charging.
36 VQT1B61 VQT1B61 37
Page 20

Applications
(Record)
IfllCinQ piCtUrGS \
comDensation
■^pjicailGns-
;(ReCprci.):;-^;^
iiTiaqG staoiti2.Gr
Corrects exposure when adequate exposure cannot be obtained {if difference between
brightness of object and background, etc). Depending on the brightness, this may not be
possible in some cases.
ay ‘EXPOSURE’
• Example of exposure compensation
Over-exposed
t a value
‘0’ (no compensation)
• The compensation value is displayed on the
bottom-left of the screen. (WWBk. etc)
■AUTO BRACKET (DMC-TZ3 only)
Takes 3 pictures in succession, changing the exposure. After exposure compensation, the
compensation value is as standard.
Display ‘AUTO BRACKET’
i Press several times
13
• e.g. AUTO BRACKET with +1EV
r.’ lies direction
Optimum
exposure
F us ■: irection
Under-exposed
First picture
OEV
(Standard)
iioior,’- a value
O' ''0 conp eisation)
n
Second picture
-1EV
(Darker)
Automatically detects and prevents jitter.
Settings cannot be changed in SIMPLE MODE (P.28) or in 'SELF PORTRAIT’ (P.42) and
‘STARRY SKY’ (P.44) scene modes.
(Monitor image stable, composition
• Cases where optical image
stabilizer may be ineffective:
«■Heavy jitter
■»High zoom ratio (digital zoom:
P.27)
• Fast-moving objects
»indoors or in dark locations
(due to low shutter speed)
MODE2: Correction at moment shutter
EB button is pressed
OFF: Pictures deliberately taken with no
(FJH jitter correction
easy to determine)
(More effective than MODE1)
■To view jitter/movement detection demo screen
Extent of jitter and of subject movement are shown on graph. (Estimate)
Large < ■ Small —> Large
Press
(Press again to c lose)
Jitter
Movement detection
38
Value displayed after exposure
compensation set
• Cannot be used with flash or when there is remaining capacity for only 2 more
pictures.
«When ‘AUTO BRACKET’ is set, H is displayed on the left of the screen.
• Canceled when the power is turned off.
VQT1B61
Third picture
-HEV
(Brighter)
• Recording and zoom cannot be performed during demo.
• Automatic ISO sensitivity settings based on movement detection are only effective
when using^telligent ISO © (P.46) and the ‘SPORTS’ 0 (P.42), ‘BABY’ £1 (P.42),
and ‘PET’ H (P44) scene modes.
• Use the movement detection demo with objects with contrasting coloring.
•
VQT1B61 39
Page 21

—
Applications
Takina Dictui CO IIK
(Record)
Set to ‘SCN1’or‘SCN2’
Select scene, and press ‘DiSPLAY’.
ISCN1 and SCN2
When using SCENE MODE, the camera remembers the previously selected scene.
For example, if SCN1 is set to ‘NIGHT SCENERY’ and SCN2 is set to ‘NIGHT
PORTRAIT’, you can easily switch between settings depending on whether or not there
will be people in the picture.
• To enable pictures to be taken immediately (no automatic SCENE MENU display)
0 Display SETUP menu (P.18)
@ Select ‘SCENE MENU’ (P.22) and set it to ‘OFF’.
•To display scene menu: Press ‘MENU/SET’
( Note ^
• Selecting a scene mode inappropriate for the actual scene may affect the coloring of
your picture.
• Brightness may be adjusted using ‘EXPOSURE’ (P.38) (except in ‘STARRY SKY’ mode).
• Detailed settings can be made in REC menu (P.50).
(Except in ‘SENSITIVITY’, ‘METERING MODE’, and ‘COL. MODE’)
Certain settings cannot be made for some scenes.
®‘W. BALANCE’ can be set to the following.
‘PORTRAIT’,‘SOFT SKIN’,‘SELF PORTRAIT’,‘SPORTS’,‘BABY’,‘PET’,'HiGH SENS.’
(Setting is restored to ‘AWB’ when scene is changed.)
• The types of flash available (P.36) vary according to the scene.
The scene mode flash setting is reset to the initial setting when the scene mode is
changed.
• Guidelines displayed in grey in ‘NIGHT PORTRAIT’, ‘NIGHT SCENERY’, ‘STARRY
SKY’, and ‘FIREWORKS’ scene modes.
Using SCENE MODE enables you to take pictures with optimum settings (exposure,
coloring, etc) for given scenes.
fp/'i i E SOFT SKIN
......
-J31
m SELF PORTRAIT E3 :.i -Nhv-
m sponrc
40 VQT1B61 VQT1B61
Page 22

Applications
(Record)
ding to the
Using flash in scene modes (P.37)
n
PORTRAIT
E
SOFT SKIN
Q
SELF PORTRAIT
PI
SCENERY :
H
SPORTS
: (
m NIGHT
iO
PORTRAIT
H
night scenery
EMI
FOOD : c r
H
PARTY
H CANDLE LIGHT
m
_ BABY
m
(Continued)
Improves the skin tone of subjects for a health ier appearance in bright
daylight conditions.
^Sm ooths skin colors in bright,, outdoor.daylig ht conditions (portraits from
:chest upwards).
Take pictures of yourself.
•Press shutter button halfway > self-timer indicator illuminates
->
(if self-timer indicator flashes, focus is not correctly aligned )
•To take pictures with audio (P.53)
(self-timer indicator illuminated during recording)
Take clear pictures of wide, distant,subjects,
Take pictures of scenes with fast movement, e.g. sports. #Stand at least 5 m (16,4 feet) away.
Take pictures of people a nd nightscapes with close to actual brightness.
Interference.may be noticeable with dark scenes.
■. Shutter may remain closed for 1 second after taking picture.
Take clear pictures of night scenes.
•Interference may be noticeable with dark scenes.
•Shutter may remain dosed fo r up to 8 seconds after taking picture.
Take natural-looking pictures of food.
Brighten subjects and background in pictures of indoor events, such as
wedding s.
Bring out the atm osphere of a candleiit room. ............................................................ ....................... .......................
Uses weak flash to bring out skin colors.
•To record age:
BIRTHDAY SET: Select ‘WITH AGE’, and press ‘MENU/SET'.
©Select‘BIRTHDAY SET.’.
©Set birthday with A T -< ► , and press ‘MENU/SET’.
- ' ■. •.■" ■ ' ' ■
press shutter button fully > review
■ • •
■ ■ - ■ ■
(‘BABY1 ’ and ‘BABY2’ can be set separately.)
... ... ... ... ... ..
■
................
■
.
..................................
.......
.
#Stand as close as possible to object.
#Zoom; As telescopic as possible (T side)
#Stand as close as possible to object. • ■ '.
#Zoom: As telescopic as possible (T side)
»Focus: 30-70 cm (0.98-2.30 feet) (Max. W)
•Do not use zoom (harder to focus).
(Zoom moved to max. W auto matically)
•2-second self-timer (P.35) recom mended.
#Stand at least 6,m ,(1,6.4 feet) away.
■'
'Subject should not move for at least 1 second.
■■■'Use flash. .
■■
■
angle), 1.5 m (4.92 feet) recommended) away.
#Stand at least 5 m (16,4 feet) away.
#Do not move for 8 seconds.
(Shutter speed: max. 8 sec)
#Tripod, self-timer recommended
•Focus: Max. W: 5 cm (0.16 feet) and above
• stand approx. 1.5 m (4.92 feet) away.
•Zoom: Wide (W side)
• Use flash.
•Tripod, self-timer recommended.
■: Focus: Max..W: 5 cm (0.16 feet) and above ■
Do not u se flash.'■ i :
■ 'Tripod, self-tim er recommended.
•Focus: Max. W: 5 cm (0.16 feet) and above
•Age will be displayed for approx. 5 seconds after
setting this mode.
•Age display format depends on L ANGUA GE
setting.
■ ■
. .
Tripod, self-timer recommended.
Stand 1.2-5 m (3 .94-16.4.feet) (Max. W (wide-
. ■■ Max. T : 1 m (3.28 feet) and above
.... .... ......
Max. T: 1 m (3.28 feet) and above
Max. T: 1 m (3.28 feet) and above
'
■ ■
..... .. ..... .. .. ... .
: I
.
■ , , , , .
■
............................
SEN SITIVITY: ISO100
SEN SITIVITY: IS0100
STABiLIZER : MODE2
AF MODE: |B| 9 areas
AF ASSIST LAM P: O FF
SELFTIMER: OFF/2SEC.
ZOOM RESUME: OFF
FLASH: ^ FORCED OFF
,
AF ASSIST LAM P: O FF
SEN SITIVITY: ISO LIMIT : ISO800
(Same a s Intellig ent ISO mode
SLO W SHUTTER: Cannot be set
Digital zoom: Cannot be set
OONT.AF: O FF
FLASH: ^ FORCED OFF
CONT.A F: O FF/AF ASSIST LAMP: OFF
SEN SITIVITY: ISO100
SLO W SHUTTER: Cannot be set
.... .... ............. .... ....
'($)’
' ^ ^ ^ ■
, ■ . ^ ( .--------------. ( . ( .
SEN SITIVITY: ISO LIMIT : ISO400
(Same a s Intellig ent ISO mode ‘(a]’ (P.46))
Digital zoom: Cannot be set
(P.46))
—
42 VQT1B61 VQT1B61 43
Page 23

Applications
(Record)
n^—
BABY
El PET
m SUNSET
m HIGH SENS.
STARRY SKY
FIREWORKS
Pi BEACH
FI SNOW
AERIAL PHOTO
O UNDERWATER :
;
......................
pictures according to
: ■, '■ lene {Continyeci}
IDate of birth will be d isplayed as ‘0 month 0 day’.
>To reset: Select ‘RESET’ from SETU P m enu (P.2 2).
iRecord pet’s age when taking pictures.
Settings method sam e as tor 'BABY' (P.42-45).
Take clear pictures of scenes such as sunsets .
:Prevents blurring of subject in dark, indoor conditions...................................................
Pictures may appear slightly grainy due to high sensitivity.
Take clear pictures of starry skies or dark subjects,
•Shutter speed settings
® Select with À ▼, a nd press
‘MENU/SET’.
'•-E speeds
‘ bi‘ SEl. . “ • ‘ .
Take clear pictures of fireworks in the night sky. ■
■ Shutter speed can be set to 1/4 second o r 2 seconds (if little jitter
or if optica! image stabilizer is ‘OFF’), (when not using exposure
■ compensation) .......................................................................................................................................
Bring out the clear blues of th e sky and the sea without darkening
subject.
Bring out the natural color of the snow in ski slope and mountain
scenes...................................................................................................................................
Take pictures of the view from aircraft windows.
Achieve natural colors under water. .
:®tA lways use marine case [DMW -MCTZ3, sold
: separately). ■ ■ ■ ■ ■..................................
Set longer
shutter
for d arker
conditions.
...........................................
) Press shutter button.
-Countdown
begins
AF LOCK (focus fixed) ‘
Using flash in scene modes (P.37)
•Age cannot be added after recording.
•Age may be printed from a computer using the
supplied software (P.11).
•Age can be stamped onto picture using ‘DATE
STAMP’ (P.56).
lAF ASSIST LAMP default setting Is ‘OFF’.
lOthers same as'BABY'(P.42-45)
. Focus: Max. W: 5 cm (0.16 feet) and above
Max. T: 1 m (3.28 feet) and above
•Alw ays use a tripod,
• Self-timer recomm ended.
®Do not move the camera until countdown has
ended.
•To change shutter speed, press ‘MENU/SET,
then ►, and select ‘STARRY SKY'.
• ‘EXPOSU RE’, ‘AUTO BRACKET’ (DMC-TZ3
only), and ‘BURST’ cannot be used.
.Stand at least 10 m (32.8 feet) aw ay.
Tripod recommended.
IBeware of sand and sea water.
•Battery life is reduced in lower air temperatures.
lAngle the camera towards areas of contrasting
colors when aligning the focus.
ICheck that the Interior of the aircraft is not
reflected in the w indow.
For fast moving subjects, alig n w ith the AF area
and press (A F lock). ■ . ■
Press < again to release. ■ '
Adjust red and blue levels with 'white balance
M
fine adju stment’(P.50). ■ ■ : ■
Focus M ax. W: 5 cm (0.16 feet) and above
Max. T: 1 m {3.2S feet) and a bove
....................................
......................................
(P-43)
Sam e as for‘BAB Y’(P.43)
FLASH: ^ FORCED OFF
AF ASSIST LAM P: O FF
SEN SITIVITY: ISO100
FLASH: ^ FORCED OFF '
SEN SITIVITY: IS03200 .
Exte nded optical zoom and digital zoom cannot
be used. ......................................................................................................
FLASH: ^ FORCED OFF
AUDIO REC.: OFF
CONT.A F: O FF
STABILIZER : OFF
SEN SITIVITY: ISO100
SLO W SHUTTER: Cannot be set
FLASH: ^ FORCED OFF
SEN SITIVITY: iS OlOO
CONT.A F:OFF/ \ ‘
AF ASSIST LAM P: O FF..........................
FLASH; ^ FORCED OFF
AF ASSIST LAM P: O FF
Self-timer: Cannot be used ■
.......
44 VQT1B61 VQT1B61 45
Page 24

Applications
(Record)
iriQ
nielli 1S(
jject / Taking dose-up
/ pictures
(MACRO mode)
■
H
Detects movement of the subject and sets the optimum ISO sensitivity and shutter speed
according to the brightness.
Set to d3
I
IFor moving subjects indoors...
sensitivity and shutter speed raised to
avoid subject blurring.
■
• The maximum level for ISO sensitivity can also be set (P.51, ‘ISO LIMIT’). If the
maximum level is set to ‘800’ or ‘1250’, this will be reduced to ‘640’ when using the
flash.
©Subject movement may not be detected if subject is too smail, is at the edge of the
screen, or starts to move at the same time as the shutter, (when button is pressed fully).
• Blurring may occur depending on the brightness and movement speed.
• ‘D.ZOOM’ (P.27) and ‘SLOW SHUTTER’ {P.56} cannot be used.
IFocus range in
Intelligent ISO mode,
MACRO mode
Max. W: Distance of at
least 5 cm (0.16 feet)
from subject
Zoom lever—'
ictures of flowers, etc
Set to ^
I
#We recommend using a tripod, the self-timer (P.35), and flash ‘FORCED OFF’ (P.36).
• Moving the camera after aligning the focus is likely to result in poorly focused pictures if
subject is close to camera, due to margin for focus alignment being severely reduced.
•(Resolution may be reduced around the edges of the picture.
■Taking close-up pictures from more distant locations (Tele Macro function)
Zoom to max. T to take close-up pictures of flowers at foot-level, or animals that you
cannot approach, from distances of at least 1 m (3.28 feet). Align focus after zooming
by pressing shutter halfway. Using tripod is recommended as jitter occurs easily.
Take a picture (P.24)
IFor stationary subjects indoors...
sensitivity io'vered to avoid interference.
Max. T: Distance of at ¡east 1
m (3.28 feet) from subject
displayed)
(2 m (6.56 feet) unless m ax. T)
Take a picture (P.24)
AppljcatiioriS.
;(Recb:rd;j
Takiiri") Lii'^ition pictures
J
Record motion pictures and sound (motion pictures cannot be recorded without sound).
Set to H
■ Estimated recording time
(P.92)
( Note )
«Zoom and CONT.AF (P.55)
functions cannot be used during
movie recording.
• Not compatible with
MultiMediaCards.
• STABILIZER ‘IVIODE2’ cannot
be used.
• Focus range is 5 cm (0.16 feet)
and above for max. W/1 m (3.28
feet) and above for max. T. (2 m
(6.56 feet) unless max. T)
• Focus, zoom, and a perture
value are fixed from the onset of
recording.
• A maximum of approx. 2 GB can
be recorded in any one session.
To continue recording, press the
shutter button again. Available
recording time is calculated on a
2 GB basis (estimated).
• Recording may be terminated
midway, depending on card
type.
Available recording time
Press halfway
(align focus)
A
Press fuliy
Elapsed time (approx.)
Finish
»Ends automatically if memory
i
Press fuliy
is full.
■Aspect and picture quality
Set ‘ASPECT RATIO’ (P.51) before ‘PICT.MODE’
(P.52).
ASP ECT PICT.MO DE Picture size F rames/sec
SOfps VGA^^
10fp s VGA 10/sec
30fps QVGA
4:3
lOfps QVGA
(For e-m ail
attachments)
30fps 16:9*
16:9
lOfps 16:9 10/sec
‘30fps’: for smooth picture movement
* We recommend using a card of at least lOMB/s
(as marked on its packaging, etc).
• Only QVGA-format motion pictures can be
recorded to the built-in memory.
‘1 Dips’: for longer motion pictures
540>^480
320^240
848^480
(approx.)
30/sec
30/sec
10/sec
30/sec
46
VQT1B61 VQT1B61 47
Page 25

Applications
(Record)
Useful
m
for travel
;ld TIME)
Record holiday day number or locai time at overseas destination. Can be displayed
during playback or stamped onto picture. (P.66)
• Clock must be set in advance (P16).
J
. Select TRAVEL DATE’ from
I SETUP menu (P.18, 20)
Select ‘SET’
• Recording
I
■f \ ■;
Itü GUIDE lihlE Rtn
Set departure date
i£E?ti $23 EÍÍ3S
w
Set return date
Exit without entering if you do
not wish to set a return date.
C Note )
#To stop date recording, select ‘OFF’ in step @.
•When destination is set in ‘WORLD TIME’ (see right), days elapsed are calculated
based on local destination time.
• If settings are made before holiday, number of days to departure are displayed in
orange with a minus sign (but not recorded).
•When TRAVEL DATE is displayed in white with a minus sign, the ‘HOME’ date is one
day in advance of the ‘DESTINATION’ date (this is recorded).
#To print number of elapsed days:
«Activate 'DATE STAMP’ (P.66) before printing.
«Use the supplied software (P.11).
Displayed for approx. 5 sec when
switching from PLAYBACK to
recording mode
• Playback
Days elapsed
displayed
ct ‘WORLD TIME’ from SETUP menu (P.18,20)
■ ■ ‘PLEASE SET THE HOME AREA’ will be displayed when setting for
i the first time. In this case, press ‘MENU/SET’ and skip to step
Ct ‘HOME’
____________
lect
ESTINATIONI’
■ 1#'«
r:
•Area settings can be
aborted by pressing q in
steps ® or @. *
;h
©
m
ITo set/release summer time (*©)
“ To set, go through steps 0.
ynu r hwtme =rps
W
Difference with GMT (Gre enw ich
Mean Time)
• If s etting for second (or later) tim e, press ►.
Set destination area
Km
Difference with h ome time
# If actual destination is unavailable,
select based on ‘difference with home
time’.
Yess again to release)
lUpon your return Go through steps ff|i, fj < < and press ‘MENU/SET’ to
finish.
• Clock settings (P.16) will not be changed even if home summer time is set.
• Pictures recorded when set to destination will be displayed with in PLAYBACK
mode.
Current time
:ity/area nam e
L Current tim e
at selected
destination
- City/area name
48
VQT1B61 VQT1B61 49
Page 26

Applications
(Record)
ÖlJsirii ' *
Detailed settings can be made for recording, such as coloring, sensitivity, aspect ratio,
and picture size.
Items vary depending on mode.
.'ШвШИИ
¿■ISaShNSIIIVIIY : AUTO
I ® ASPECT RATIO
i ffi PICT SIZE ; 7«
TrieD.IÄUIV
The same color may appear more blue or more red depending on the light source (sun
lamps, etc). Colors can be adjusted to their natural appearance by adjusting the white
balance.
REC menu settings (P.18)
Default setting outlined:
‘Quick setting’ (P.57) is useful to easily call up frequently-usecf menus.
i m
i &
lCi)(SsCN1SCN2HApplicable modes: I
Settings: | AWB | (automatic) I -{¡i- (outdoor, clear sky) / (outdoor, cloudy
sky) / (outdoor, shade) / -JS- (incandescent lighting) / (uses
value set in tftSEi) I tSsSET (set manually)
‘AWB’ operational range: ttSSW (‘AWB’ sets the optimum white balance automatically.)
»Blue sky
»Cloudy sky (rain)
»Shade
»TV screen
»Sunlight
»White fluorescent lighting
»Incandescent lighting
‘ Sunset/sunrise
* Candlelight
■Setting white balance manually (äset)
®Seiect ÄSET and press ‘MENU/SET’.
C3)Pointthe camera towards a white object (e.g. paper) and press
‘MENU/SET’.
©Press ‘MENU/SET’ twice.
(Or press shutter button halfway.)
• Making this setting will reset white balance fine adjustment (see
below).
■White balance fine adjustment (excluding ‘AWB’)
©Press A several times until ‘WB ADJUST’ is displayed.
©Adjust with if reds are strong, adjust with if blues are
strong.
©Press ‘MENU/SET’ (erpress shutter button halfway).
#‘AWB’ may not function normally in certain
conditions, such as under red (e.g. candlelight),
blue (e.g. TV screen), or a mixture of light
sources, or with an absence of any color close
to white.
#We recommend setting to ‘AWB’ or ‘äset’
when under fluorescent lighting.
Only takes image of
white objects within
frame (step ®)
I
Changes to red
(blue) when making
fine adjustment
• ‘■if-’, ‘ids’, ‘fik’, ‘‘A’’, and ‘tSa’ can be adjusted independently.
• Settings are remembered even if power is turned off.
• Settings remain applied when using flash photography.
• Even though the ‘AWB’ setting is fixed in ‘UNDERWATER’ scene mode (P.44), fine
adjustments may still be made.
• Fine adjustments cannot be made when ‘COL.MODE’ (P.57) is set to ‘COOL’,
‘WARM’, ‘B/W’, or‘SEPIA’.
Set sensitivity to lighting. We recommend higher settings to take clear pictures in darker
locations.
■Applicable modes:
■Settings: |AUTO| (automatic) /100 / 200 / 400 / 800 /1250
(if @ mode: ‘ISO LIMIT’ 400/fSOOl/1250)
*AUTO: Automatically set with range up to 200 (640 when using flash) according to
brightness.
• Maximum ISO sensitivity (‘SSO LIMIT’) can be set when using [f) mode.
• Setting guide
SENSITIVITY
Location (recommended)
Shutter speed Slow -4
interference Low
Aspect ratio of picture can be changed according to printing or playback format.
.....................................
100 ----------------------------► 1250
, ^
-----------------------------------------
(outdoors)
-------------------------
----------------------------
.....................
1. Dark
► Fast
► High
■Applicable modes: O Ce3 sem SCN2 H
^SettinyS- [i^j (Stlll pictures only)
1'^---------------3
Same as 4:3 TV or
computer
• Edges may be cut off when printing - be sure to check in advance (P.86).
Same as normal film
camera
-----------------
^1
For playback on
widescreen/high
definition TV
■
M —
50
VQT1B61 VQT1B61 51
Page 27

Applications
(Record)
tM, \ tt
Set picture quality for motion pictures (P.47).
■Applicable modes: H
■Settings:
Aspect ratio : ¡30fpsVGA| 110fps VGA / 30fps QVGA / 10fps QVGA
^:!30fps1^/10fps16:9
#‘30fps’: smoother movement; iDips’: longer recording time
Set size of picture. Number of pictures v/hich can be recorded depends on this setting
and on ‘QUALITY’ (see right). (P.92)
• Picture size setting guide
Larger picture size = Crisper picture
(lower recording capacity)
Smaller picture size = Coarser picture
(higher recording capacity)
■Applicable modes:
■Settings:
ASPECT RATIO Picture size
|7M |*’ 3072x2304 5M E*2 2560x 1920 3M ® 2048x 1536
2Mffi 1600x 1200
|7M|*5 3216x2144 4.5ME 2560 X 1712 2.5M ® 2048x 1360
mm
• Picture sizes for DMC-TZ2 model are as follows.
*L 6M (2816x2112) : None : 6M (2976 x 1984) 5.5M (3072 x 1728)
• Extended optical zoom (P.27) can be used for picture sizes indicated with [S.
is not displayed in the ‘HIGH SENS.’ scene mode (P.44) (as extended optical
zoom cannot be used).
• Mosaic effect may appear depending on subject and recording conditions.
[Wl’’“* 3328x 1872
SCN1SCN2
1M [S 1280x960 0.3M ® 640x480
3.5M1B 2560 X 1440
2M [B 1920x 1080
Set compression ratio for saving. Number of pictures which can be recorded depends on
this setting and on ‘PICT.SiZE’ (see left). (P.92)
■Applicable modes: SCN1SCN2
■Settings:
: Fine (priority to picture quality)
m : Standard (increases recording capacity by limiting standard picture
size and picture quality)
Sounds can also be recorded with pictures. This is useful for conversation or memo
recording.
■Applicable modes: SCN1SCN2
■Settings:
|QFF| :No sound recording
ON : Record approx. 5 seconds of sound { D displayed on screen)
• To cancel recording: Press ‘MENU/SET’.
«Cannot be used with ‘BURST’ (P.54), ‘STARRY SKY’ (P.44) and ‘AUTO BRACKET’
(P.38, DMC-TZ3 only).
• ‘DATE STAMP’, ‘RESIZE’, ‘TRiMMING’, and ‘ASPECT CONV’ cannot be used with
pictures with audio.
• Settings also reflected in ‘AUDIO REC.’ (P.60) in REC ON CLIPBOARD menu.
Method of measuring exposure (P.38) can be changed.
■Applicable modes: £i(i3«!&e
■Settings:
[Hi : (Multiple: Measures brightness of whole screen. Normally
recommended)
O
: (Center weighted: Measures entire picture evenly, with focus on center
of screen)
rn : (Spot: Measures subject within spot metering target)
^1
52 VQT1B61
Spot metering target
VQT1B61 53
Page 28
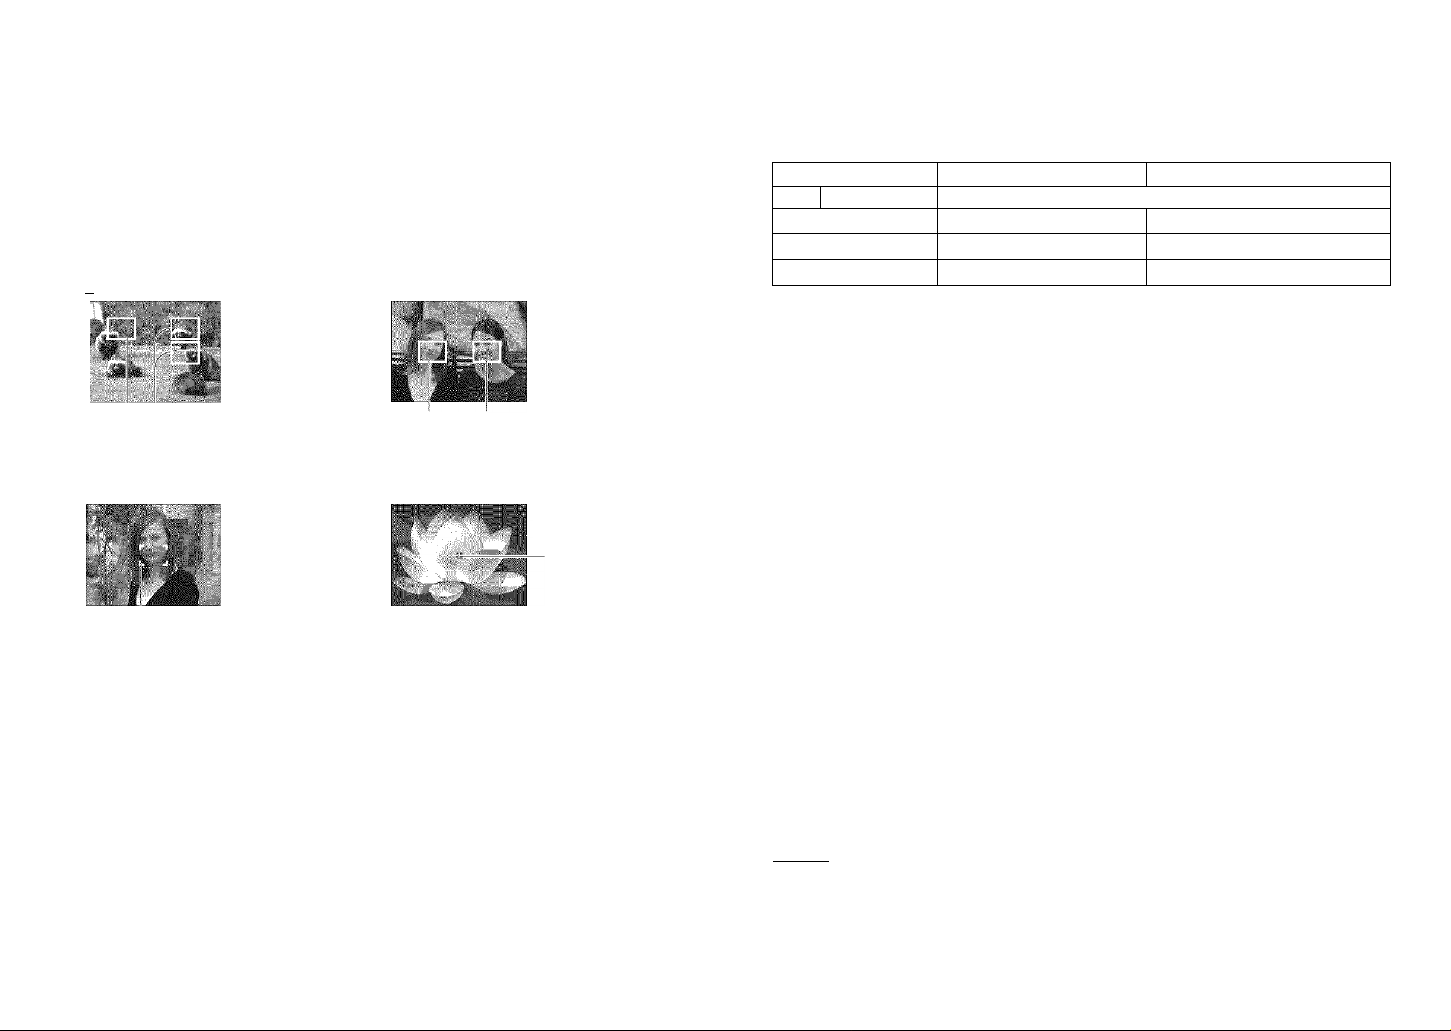
Applications
(Record)
Method of aligning focus can be changed according to position and number of subjects.
■Applicable modes: SCN1SCN2 e
■Settings:
• Subject not in center of picture (AF area displayed after focuses completely aligned)
B 9-area-focusing HH 3-area-focusing (High speed)
t Determined position for focus
HHi -area-focusing (High speed)
H 1-area-focusing
•When using HH or HH picture may freeze momentarily before focus is aligned.
•AF area becomes larger in dark locations
or when using digital zoom. etc.
/ HH / HH /[Hj / H ( H : High-speed focus)
Automatically focuses
on any of 9 points
■ _ : :
Focuses on AF area
n center of picture.
(Recommended for
when focus is difficult
to align)
AF area
AF area
Spot-focusing
Automatically focuses
on either side or
center.
Focuses on smaller,
limited area.
Spot AF area.
ISettings:
BURST setting
...........
Speed«.............. No. of pictures*®
OFF No burst
(High speed)’*’’
(Low speed)
, (Free)
: Depends on shutter speed and ‘SENSITIVITY’ settings.
: When using self-timer: Fixed at 3 pictures
*3: DMC-TZ3 only. « : DMC-TZ2 only.
: DMC-TZ3: Becomes progressively slower. (Delayed timing depends on card type,
picture size, and QUALITY.)
DMC-TZ2: Depends on type of card. ‘PICTSIZE’ (P.52). and ‘QUALITY’ (P.53).
• Burst speed may be reduced if using SENSITIVITY (P.51) of 1SO400’ or greater, or if
shutter speed is reduced in darker locations.
• This feature cannot be used with the flash (flash mark turns red, P.36) or with ‘AUTO
BRACKET (P.38, DMC-TZ3 only).
• Settings will be stored even if power is turned off.
• Focus is fixed from first picture.
• Exposure and white balance are set as follows:
«DMC-TZ3
High speed: Setting fixed from first picture.
Low speed, Free: Reset for each picture.
*DMC-TZ2
Reset for each picture.
•When using BURST while following a moving subject in locations with major
differences in brightness (e.g. indoor to outdoor), exposure stabilization may require a
little time, and optimal exposure may not be achieved.
#Auto review performed regardless of ‘AUTO REVIEW’ setting.
3 pictures/sec
2 pictures/sec H Standard: Max. 7
Approx. 2 pictures/sec*’ Until card/built-in memory is full
Fine: Max. 5
Focus is continually adjusted according to movement of subject.
• Use HH or H if focus is difficult to align with HL
(Increases battery consumption)
■Applicable modes: SCN1SCN2 B
■Settings:
I OFF I: Not set ON : Set (jffl displayed on screen)
• Focus alignment may take time if zoom is suddenly changed from max. W to max. T,
Enables a rapid succession of photographs to be taken. Succession of photographs taken
while shutter button is held down.
■Applicable modes: SCM SCN2
or if suddenly moving closer to subject.
• Press shutter button halfway if focus is difficult to align.
•When using HH, H. or H ‘AF mode’, focus will be aligned quickly when shutter
button is pressed halfway.
• Focus is not re-adjusted during motion picture recording.
54 VQT1B61 VQT1B61 55
Page 29

. Appllicaiic
ns:
A I iiirig REC meinu fcontinyecJi
illuminates lamp when dark to facilitate focus alignment.
■Applicable modes: SCM SCN2 e
■Settings:
OFF : Lamp off (taking pictures of animals in dark, etc)
I ON I: Lamp illuminated with halfway press of shutter button
(ffl and larger AF area displayed)
1
Shutter speed can be reduced further to take bright pictures in dark locations.
■Applicable modes: £i A SCM SCN2
■Settings: 11/8-1 (normally recommended) /1/4- /1/2- /1-
• Slower shutter speeds allow for brighter pictures but increase risk of jitter, so we
recommend using a tripod and the self-timer (P.35).
• Can be used with NIGHT PORTRAIT (P.42) to brighten both night scene and
subjects.
#W displayed on screen for settings other than ‘1/8-’.
Multiplies effect of optical zoom or extended optical zoom by up to 4 times. (P.27).
■Applicable modes: Cl liSi SCNl SCN2 H
■Settings: j OFF |: (Do not use) / ON: (Use)
•This cannot be set when using SIMPLE MODE V, Intelligent ISO mode CS), or the
'SPORTS’, ‘BABY’, ‘PET’, or‘HIGH SENS.’ scene modes.
• Do not cover or look at lamp from close range
• Fixed to ‘ON’ when using SIMPLE MODE V.
©Effective distance: 1.5 m (4.92 feet)
- Lamp
■
Set color effects.
■Applicable modes:
■Settings: | STANDARD | / NATURAL (soft) / VIVID (sharp) / COOL (more blue) /
WARM (more red) / B/W / SEPIA
• If interference is noticeable in dark locations: Set to ‘NATURAL’,
• MOTION PICTURE mode: ‘NATURAL’ and ‘VIVID’ cannot be selected.
• White balance fine adjustment cannot be used when using ‘COOL, ‘WARM’, ‘B/W’, or
‘SEPIA’.
• Settings for stiil pictures and motion pictures are made separately.
Set the clock. Same function as that in SETUP menu (PI6).
The following items can be quickly called up from REC menu.
Items vary depending on mode.
BURST (P54) « W.BALANCE (P.50) (excluding äset) • SENSITIVITY (P51)
ASPECT RATIO (P.51) • PiCT.SIZE (P.52) • QUALITY (P.53)
i|| Set to one from ‘O A H SCNl S0N2 d)
Display ‘Quick setting’
FUNC
-Quick setting
©
511
Hold
% Select item
® M
Ä Select setting
^ «----------------------------
56 VQT1B61 VQT1B61 57
Page 30

Applications
(Record)
ÆUri
lewir
Useful for taking pictures of timetables and maps instead of taking memos.
Regardless of presence of card, pictures will always be saved to clipboard folder of
built-in memory, so that they can be distinguished from norma! pictures and viewed
immediately.
1
MENU/SET
• Functions unavailable:
BURST, D.ZOOM, AUTO
BRACKET(DMC-TZ3 only), WB
ADJUST, CONT.AF
• The settings for the following
functions are fixed.
ASPECT RATIO: m
QUALITY: BS
SELFTIMER: OFF/2SEC.
SENSITIVITY: AUTO
Functions other than those
above are the same as fixed
in SIMPLE MODE (P.28).
(However, STABILIZER (P.39)
settings may be made.)
• If internal memory is full
»Delete unwanted clipboard
pictures in PLAY ON
CLIPBOARD mode.
(Copy required pictures onto
card P.60)
»Remove card and use
PLAYBACK mode ® to
delete pictures from other
recording modes (e.g. ‘rtth.
• Beware of copyrights, etc (P.2)
idî^i l-j ri"
Seiei.' k-; c
PLAY
iS^iSSI
ft
Take a clipboard picture
Press half'A'ay
©Represents built-in memory used entirely
for clipboard pictures
Picture size 1M 2M
Pictures 36 24
Recording capacities above are reduced
if pictures are recorded to built-in memory
(P.26) in other recording modes (e.g. ■O’)-
#To view clipboard pictures (clipboard
playback): T (150)
®To change picture size
^initial display) |
Highlight 'REC’ in orange
»S'- , I
(align focus)
(take picture)
.............
Press fully
► (P.60)
Select ‘PLAY’ in step on left
■View 1 picture at a time IView 9 pictures on screen
Previous -i
Next
w
I
r Turn to W side
, (To restore: Turn
to T side)
(•Select a clipboard
picture and press
‘MENU/SET’to display
single screen.
ITo zoom in (playback zoom) ^ (P.31)
Expand
Change
position
•To register zoom enlarged size and position (Zoom mark):
Useful for enlarging and saving parts of maps, etc.
After selecting enlarged i
size and position
•To change zoom and position: Repeat the above
•To finish zoom mark setting: Restore zoom to original (normal) ratio
•jilBi
.......
.............
......
,
Zoom mark
Displayed on registered
pictures
•To view registered ratio and position:
(No need
to manually
enlarge or
move)
Display picture with [S]
I
-■-IS’.,!.;,,.,....,.,,,
■■ ■
...........
t=
4-
Immediately displayed at
recorded size and position
ITo delete clipboard pictures sp- (P.32)
• Both original picture and picture with zoom mark will be deleted.
• Picture can be deleted even while zoomed in.
( Note ~)
«During clipboard recording: Press shutter button halfway. (EDI)
• PLAY menu (P.64) functions cannot be used.
Pictures taken in other recording modes, modified with ROTATE (P.66) and copied
(P.73) as clipboard pictures will be displayed in their original form (before rotation).
• Printing (P.76) cannot be performed during clipboard playback.
58
VQT1B61
VQT1B61 59
Page 31

Applications
(Record)
Press ‘MENU/SET’ while recording or viewing to display menu.
me
fill
>ntin
■REC ON CUPBOARD menu
Select item
• PICT.SIZE: Change picture size. (2M EZ / |1M EZ|)
Select picture size with A V and press ‘MENU/SET’. _____________________
•AUDIO REC.: Record sound (5 seconds) simultaneously. i|OFF|/ON)
Select setting with A T and press ‘MENU/SET’.
Settings will also be reflected in ‘AUDIO REC.’ (P.53) in REC menu.
• INITIAL DISP.: Select to display/not display initial display (P.58).
(OFF/! ON h
Select setting with A T and press ‘MENU/SET’.
• CLOCK SET: Same function as that in SETUP menu (P.16).
IPLAY ON CLIPBOARD menu
Select item
#
[S] CANCEL MARK
I^.AUDIODUB,
EacoPY
® INITIAL DISP
.............
..
____
»GO TO REC: Take clipboard pictures.
• CANCEL MARK: Cancel zoom position.
Ci) Select clipboard picture with ^.
(23 Cancel with T.
•AUDIO DUB.: Add sound to previously-taken clipboard picture.
03 Select clipboard picture with ^.
(Ij Reoord/stop with T.
• COPY: Copy single pictures from clipboard to card.
(Zoom mark will not be copied.)
03 Select clipboard picture with and press T.
(2) Select ‘YES’ with A ▼ and press ‘MENU/SET’.
• INITIAL DISP.: Same as in ‘REC ON CLIPBOARD’ (above)
pboard
Default setting:
Applications
¥tfll
(’\/isw)
You can view 9 (or 25) pictures at once (multi playback), or view all pictures taken on a
certain date (calendar playback). (To view clipboard pictures as a list
............................
> P.59)
Set to ®
Set to multiple screen display
Date recorded Picture no.
.......
-Tota! no.
-Scroll
bar
> calendar
( Note )
• Pictures edited on a computer
may not be displayed correctly
or may show incorrect dates.
• Only one month of pictures is
displayed on calendar screen.
Pictures taken without clock
settings are displayed with a
date of January 1, 2007 (P.16).
I
Turn to W
side
Picture type
FAVORITE MOTION PICTURE H,
BABY a, PETE1> TRAVEL DATE ifi,
WORLD TIME DATE STAMP Q
•Turn lever to change between 1 screen
..
> 9 screens
screen.
•To restore: Turn to T side.
.......
> 25 screens
(Select date from calendar screen
• When displaying pictures
taken on same day on
9 screens in calendar
playback, selecting ‘ALL
DELETE’ or ‘ALL DELETE
EXCEPT ★ ’ will delete
pictures taken on other days
as well.
• Cannot be displayed rotated.
Select picture with A T ◄ ► and
press ‘MENU/SET’
• Displayed on 9 screens.
Press ‘MENU/SET’ to restore to single
screen.
60
VQT1B61 VQT1B61 61
Page 32

Applications I r
(Visw) Ij
ion pictures/
1 siidio
Set to E
ct and play picture
i/o'^on .■;i!,:ure‘6
Motor pc-jre cor
0
'li ;
ji ^ I Gdli If i|| ’
( V i©V/ ) ’ ’ r , ' I ' 1 11
J
During playback, pause at desired moment
i (see left for playback method)
s To continue playback: A
I To advance single frame: < ►
To make single picture from single frame when paused (go to step @)
To make single picture from 9 surrounding frames
Jr ,
W. ■ T
Turn to vV side
■■MM
Frame step:
To advance by 3 frames: A T
To advance by 1 frame: < ►
■Operations during motion picture playback
Pause (play, when already
Hold to rewind Hold to fast
(single frame step—lA,;’ 'jA—forward (single
while paused) frame step while
¡To adjust volume
( Note ')
«Pictures can be viewed using ‘QuickTime’ on the CD-ROM (supplied).
• Pictures taken on other devices may not be played back correctly.
•When using a high capacity card, it is possible that fast rewinding may be slower than
usual.
• Playback zoom cannot be used during motion picture playback/pausing or audio
playback.
• To create pictures with audio ‘AUDIO REC.’ (P.53), ‘AUDIO DUB.’. (P.70)
62
VQT1B61 VQT1B61 63
paused)
paused)
Stop
‘VOLUME’ (P.22)
• Pictures with audio
[>51 Audio icon
viewing
• To change no. of frames/second: Turn further to W side (turn to T side to
restore).
PICT. MODE Frames/sec
«‘RESIZE’ (P.70) and ‘ASPECT CONV.’ (P.72) cannot be used for single
pictures created from 9 screens.
Create still picture Select ‘YES’
I
Press fully
• Picture size of still pictures created
PICT.MODE 1 screen 9 screens
MUH
Ml«
0.3M 2M
0.3M m
2M 2M
30 ->15^10^5
10^5
e.g. 15 frames: Display frames
from each 1/15 second as still
pictures
^‘QUALITY’ fixed to H (^-53).
Page 33

: Applications
I (View)
|js.—
-51
Displays 2 pictures vertically. Useful for comparing pictures.
^ Select 'DUAL DISPLAY’from PLAY menu (P.17, 18)
View pictures
Selected pictures outlined in orange
ing PLAY menu
IPLAY menu settings (P.18)
»Pictures will be selected from built-in memory (not clipboard) if no
card is inserted.
(Screen example: DMC-TZ3)
-------------------------
Select picture
Previous Next
picture®fflSi9^ picture
Reduce w dr Expand
Move up
Move down
-Return to single screen
i' 'I (Display zoom position for 1 sec)
Various playback and editing features for your pictures.
Set mode dial to ®.
Select ‘START’
I UUKAI lUR -
I EFFECT ■
n
lOperations during slide show
Pause/play
(not available with MANUAL)
Previous-
picture*
• Motion pictures cannot be played back in slide show.
Mark your favorite pictures and enable the following functions.
Favorites-only slide show (P.64)
Delete all except favorites (useful for when printing in shop, etc) (P.32)
-Next
picture*
*Only while paused or during MANUAL
stop
• Preferences
— Playback duration (sec)
‘MANUAL’ only available when
selected
— Picture change effect (not available with
■MANUAL)
M~1 Slide
Diagonal
I I From center to corners
|Mix| Random effect
— Set to ‘ON’ to play audio in pictures with
audio
& Select ‘FAVORITE’from PLAY menu (P.17, 18)
Select picture (repeat)
J
I
»Same picture cannot be displayed in DUAL
DISPLAY.
Automatically scrolls through pictures during playback. Recommended for when viewing
on TV screen.
^ Select ‘SLIDE SHOW’from PLAY menu (P.17, 18)
^ Select either ‘ALL’ or (Go to step !■' if ‘FAVORITE' is OFF)
ALL: Play all
★ : Play pictures set as FAVORITE (P.65)
♦
0OG ■
(Screen example: DMC-TZ3)
(Screen example; DMC-TZ3)
Close menu
■To release all mj^ Select ‘CANCEL’ with ▼ in step @ —► Select ‘YES’ with A, and
press ‘MENU/SET ^ Press 'MENU/SET' to finish.
• It may not be possible to set pictures taken with certain other devices as favorites.
• Setfing/release can also be made with supplied software (P.ll).
m
★ displayed when set (not
displayed when ‘OFF’).
• Up to 999 pictures can be
selected.
• To release —► Press A again.
64 VQT1B61 VQT1B61 65
Page 34

iAppiiGatióris
■ ;(\/iew)
...
Automatically rotate portrait pictures, manuaily rotate pictures by 90°.
wy. rf r
Dispiay with auiomatic rotation
H Select 'ROTATE DISP.’ from
PLAY menu (P.17, 18)
Select ‘ON’
Ml] SLIDE SHOW,
i ¡r FAVORITE '
Jiiig PLAY menu fcontmyed)
Display with manual rotation
|-ii Select ‘ROTATE’ from PLAY
^ menu (P.17, 18)
# Select picture
I
o
(Screen example: DMC-TZ3)
ITo complete Press ‘MENU/SETL
•When set to ‘OFF’, ‘ROTATE’ also
cannot be used.
•‘ROTATE DISP.’ and ‘ROTATE’ cannot be used with motion pictures. :
•‘ROTATE’ cannot be used with protected :
pictures (P.69).
•Some pictures taken facing up or facing HTo complete i
down may not be rotated automatically. twice.
•It may not be possible to rotate pictures
taken with certain other devices.
•Pictures cannot be rotated during multi playback (P.61).
•Will only be displayed rotated on computer if in Exif-compatible (P.90) environment
(OS, software).
Picture date, age (P.42, 44), or TRAVEL DATE (P.48) stamped to bottom right of picture.
Ideal for regular size printing.
• Picture size will be reduced if greater than 3M.
.«.ikZCi'.TA'ii':- Pier: size:
4:3
3:2
16:9
• Picture will become slightly grainier.
7M, 5M (6M only for DMC-TZ2)
7M (6M for DMC-TZ2), 4.5M
6M (5.5M for DMC-TZ2), 3,5M
Scsccl oi'Cc-lic". to 'i-l.ite
Rotate 90° clockwise
Rotate 90° anticlockwise
Press ‘MENU/SET
After DATE, stamp:
3M
2.5M
2M
£| Select ‘DATE STAMP’
from PLAY menu
(P.17, 18)
Select picture
«SINGLE
A
I
HI Select items and make
^ settings for each
«Select‘ON’for AGE/
TRAVEL DATE
stamp.
¡To complete i' Press ‘MENU/SET twice.
• Cannot be used with pictures taken on other devices, pictures taken without setting
clock, motion pictures, or pictures with audio.
• After DATE STAMP is applied, pictures cannot be resized (P.70) or trimmed, (P.71),
and ASPECT CONV. (R72), DATE STAMP and DPOF date printing settings cannot be
changed of pictures.
• Use playback zoom to check stamped date (P.31).
• Characters may be cut off on certain printers.
A Select ‘SINGLE’ or ‘MULTI’
■ ( -
(Screen example: DMC-TZ3)
«/MULTI (up to 50 pictures)
Q DATE STAMP setting
•C3 displayed where DATE
STAMP already set
• To release setting: T
• To complete settings: Press
‘MENU/SET’.
Select whether to delete original picture
™ (Screen varies according to picture size, etc)
■'YES’:
Apply DATE STAMP
♦
o
‘NO’: Create new picture with DATE
STAMP (Original picture remains)
(Original picture
deleted)
• Select ‘NO’ for
protected pictures
(P.69).
• Do not make date printing settings in shop or on printer for pictures with date
stamps. (Date printing may be overlapping.)
j
66
VQT1B61 VQT1B61 67
Page 35

Applications
(View)
Picture/picture no./date printing settings can be made for when printing with DPOF printcompatible shops or printers. (Ask at shop to check compatibility)
For more information visit:
http://panasonic.jp/dc/dpof_110/white_e.htm
0 Select ‘DPOF PRINT’ from PLAY menu (P.17, 18)
^ Select‘SINGLE’or ‘MULTI’
UHoi".-'«M-
14:'=^ protect ,
(Screen example: DMC-TZ3)
Select picture and set number to print (repeat)
^ SINGLE »1710171
- No. to print
■ Date print set
#Date print setting/release: Press ‘DISPLAY’ (P.12).
(Cannot be set on pictures with date stamps (P.66).)
ITo complete ■ ■ Press ‘MENU/SET’ twice.
ITo release all ^ Select ‘CANCEL with ▼ in step ® —> Select ‘YES' with A, and
press ‘MENU/SET ^ Press ‘MENU/SET to finish.
When using PictBridge-compatible printers, check settings on actual printer as these
may take priority over camera settings.
To print from built-in memory at a shop, first copy pictures to card (P.73) before making
settings.
DPOF print settings may not be made to non-DCF (P.90) files.
Settings can only be made for one picture at a time.
If DPOF settings have been made on another device, release these first before making
settings again with this camera.
Date printing settings will be canceled when applying date stamps (P.66).
No. to print
— Date print set
.!
Set protection to disable picture deletion. Prevents deletion of important pictures.
I
m Select ‘PROTECT’ from PLAY menu {P.17, 18) 0 Select ‘SINGLE’ or ‘MULTI’
(Screen example; DMC-TZ3)
# Select picture and make setting
ISINGLE
- Picture protected
®To release: ▼
■To complete Press ‘MENU/SET twice.
■To release all ^ Select ‘CANCEL’ with ▼ in step @ —>• Select ‘YES’ with A, and
• May not be effective when using other devices.
• Formatting (P.73) will cause even protected files to be deleted.
#To cancel while releasing ail: Press ‘MENU/SET.
press ‘MENU/SET ^ Press ‘MENU/SET’ to finish.
68 VQT1B61 VQT1B61 69
Page 36

Applications
(View)
11U (Continued)
Add audio to previously taken pictures.
^ Select ‘AUDIO DUB.’from PLAY menu (P.17, 18)
# Select image and start recording
©For files already with audio, select whether or not to
overwrite existing audio with AT, and press ‘MENU/
SET’.
© Stop recording ^
UTo complete Press ‘MENU/SET twice.
#Cannot be used with motion pictures or protected pictures (P.69).
• May not be compatible with pictures taken on other devices.
»Recording will automatically end after 10 seconds,
even if T is not pressed.
Q RESIZE
Picture size can be reduced to facilitate e-mail attachment and use in homepages, etc.
(Picture of minimum picture size for each aspect setting cannot be resized.)
H Select‘RESIZE’from PLAY menu (P.17, 18)
Select picture ^ Select size
Hi
Current size
Size after change
w
' ; I't! i .V' I. ill'. ;■ ‘1
':. I. ve original picture
—‘YES’: Resize (Original picture deleted)
• Select ‘NO’ for protected pictures (P.69).
—‘NO’: Create new, resized picture (Original picture
remains)
■To complete i#» Press ‘MENU/SET twice.
• Cannot be used with motion pictures, pictures with audio, or pictures with date stamp.
#May not be compatible with pictures taken on other devices.
Enlarge your pictures and trim unwanted areas,
m Select ‘TRIMMING’ from PLAY menu (P.17, 18)
Select picture
Select area to trim
©
<=>
0 Trim
Select whether to delete original picture
©
■To complete 'tip-- Press ‘MENU/SET twice.
• Picture quality is reduced after trimming.
• Cannot be used with motion pictures, pictures with audio, or pictures with date stamp.
• May not be compatible with pictures taken on other devices.
—YES’: Trim (Original picture deleted)
n •Select ‘NO’ for protected pictures (P.69).
—^—‘NO’: Create new, trimmed picture (Original picture
remains)
70 VQT1B61 VQT1B61 71
Page 37

Applications
(View)
(Cannot be used with pictures not taken in
H Select‘ASPECT CONV.’ A Select № or
^ from PLAY menu
(P.17,18) I
Select picture
© Select whether to delete original picture
" — -‘YES’: Convert aspect ratio (Original picture deleted)
• Select ‘NO’ for protected pictures (P.69).
-‘NO’: Create new picture with converted aspect ratio
(Original picture remains)
-i (Continued)
for printing. (P.51)Convert pictures taken in H to or
№1
(Screen exampie:
■ DMC-TZ3)
,-i h'-ri.-!.i; |-,o-ition and convert
Changes to outlined
size
• Move portrait
pictures using
AT.
Select picture (for Select ‘YES’ (Screen shown is example)
^ dS] and □ \^ )
m
r
■To complete Press ‘MENU/SET twice.
»To copy to a card, use a card with a capacity of at least 12.7MB.
• Copying pictures may take several minutes. Do not turn off power or perform other
operations during copying.
«DPOE settings (P.68) will not be copied if identical folder or file numbers are present in
the copy destination.
• Use ‘COPY’ on PLAY ON CLIPBOARD menu to copy clipboard pictures to card. (P.60)
• Only pictures from Panasonic digital cameras may be copied.
Use when ‘BUILT-IN MEMORY ERROR’ or ‘MEMORY CARD ERROR’ appears.
This requires a sufficiently charged battery (P.14) or AC adaptor (DMW-AC5PP, sold
separately). To format built-in memory, first remove memory card.
(If card is inserted, only card will be formatted.)
gh Select ‘FORMAT’ from A Select ‘YES’
PEAY menu (P.17, 18) ^ '
msmw^mssmi
'•To cancel during
riNl*n ' Press
‘MENU/SET.
■To complete «► Press ‘MENU/SET twice.
• Picture size may be increased after aspect ratio is changed.
• Cannot be used with motion pictures, pictures with audio, or non-DCF files (P.90).
• May not be compatible with pictures taken on other devices.
Copy between built-in memory and memory card, or from memory card to clipboard folder.
^ Select 'COPY’from PLAY menu (P.17, 18)
# Select copy method (direction)
|j5] : Copy all pictures (except clipboard) from
#
♦ □■*•[!§]: Copy 1 picture at a time from card to built-in
O
72
-«wi iMNi built-in memory to card (go to step @).
' ^ I g-g □ ♦ : Copy 1 picture at a time from card to clipboard
------------------------------- folder (in built-in memory) (not motion pictures).
VQT1B61 VQT1B61 73
All picture data, including clipboard (P.58) and protected (P.69) pictures, will be deleted.
Do not turn off power or perform other operations during formatting.
Formatting the built-in memory may take several minutes. Press ‘MENU/SET’ to cancel
(all pictures will still be deleted).
Consult your nearest Service Center if format cannot be successfully completed.
Ful USA dsbislditcb. pledbb Udii: 1 ot bend to : diyitdlbtillcciinia'ub.pdndbuiiic.cuin
Foi Canadian assistance, please call: 1-{10U-y9-LUMIX or
send o-rn.iil in: hiriiixconcinKteSCfi.iiiimisonicr.cnin
Page 38
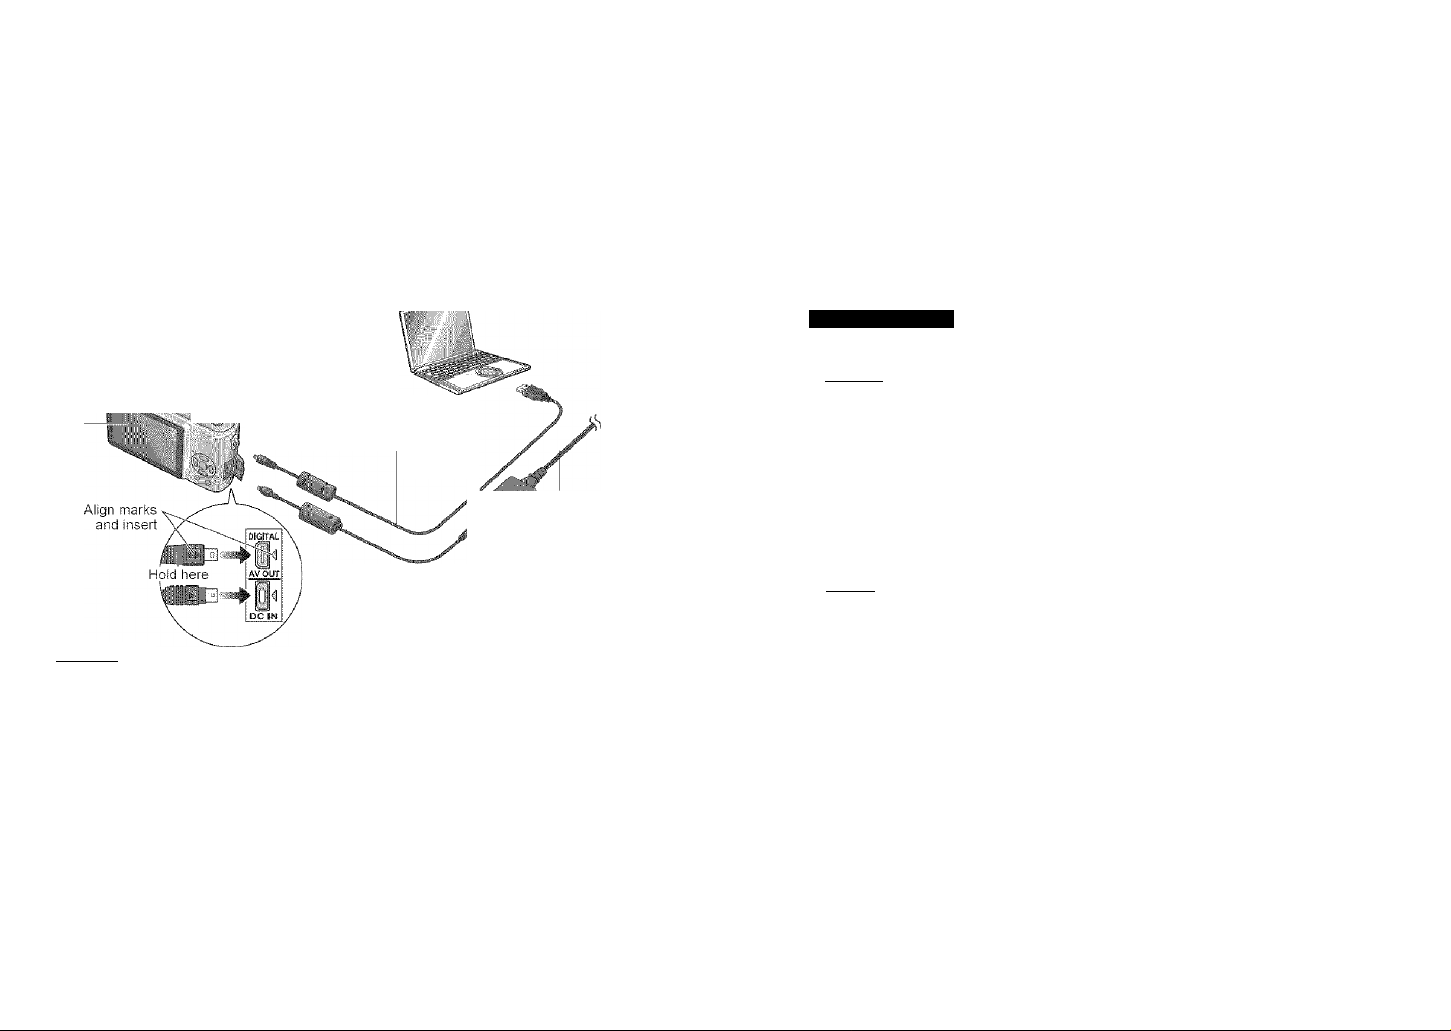
Gonnsciing
with/gtHer
a^yices':/;
Jiiig with computer
Connect to your computer to save, print, and e-mail your pictures.
(Using the supplied software is recommended. (P.11).)
Preparations:« Ensure that you have a sufficiently-charged battery, or an AC adaptor
attached (DIVIW-AC5PP, sold separately).
• Remove memory card if wishing to use built-in memory.
—®Turn on power of both camera and computer
— —©Set to any mode except ^
Displayed
during data
transmission.
::.i:
шшт.
(Do not move the mode dial while connected to computer.)
©Connect camera to computer
USB cable
(always use cable supplied)
If using AC adaptor,
irn off camera
power before
plugging in or
removing.
•Check socket direction and insert straight in.
(Damage to socket shape can lead to faulty
operation.)
{ Caution )
#Do not use any other USB connection cables except the supplied one.
• If using Windows 98/98SE, install USB driver software when connecting for first time.
• For more details, consult the separate ‘PC connection’ or your computer operating
manual.
• Do not disconnect the USB cable while ‘ACCESS’ is displayed.
• Turn off power and disconnect USB cable before inserting or removing memory cards.
When using USB cable with Windows 2000, use ‘ Safely Remove Hardware’
application in task tray before inserting card.
• If the battery display flashes red, cancel the connection from your computer, and
disconnect the USB cable. (Recharge the battery before reconnecting.)
• To play motion pictures on your computer
®Use the ‘QuickTime’ software on the supplied CD-ROM.
(Installed as standard on Macintosh)
If using Windows 98/98SE/Me, download and install ‘QuickTime 6.5.2 for PC’ from the
following website,
•Save motion pictures to your computer before viewing.
• Only built-in memory can be accessed if connecting in CLIPBOARD mode.
http://www.apple.com/support/quickfime/
Windows
Drives are displayed in ‘My Computer’ folder.
Macintosh
Drives are displayed on the desktop.
(Displayed as ‘LUMiX’, ‘NO_NAME’, or ‘Untitled’.
■ Folder structure
Bull-iii ncn
I D.C1M::| (Stiil/motion pictures)
-100_PANA (Up to 999 pictures/folder)
-P1000001.JPG
I П
-P1000002.JPG
-P1000999.JPG
-101_PANA
-999_PANA
)м1-ЗуП(РРОР flies)
'— ••pRivATEI-j {clipboard pictures, P.58)
-MEM00001.JPG
# Folder no.
i'Jf' File no.
Fi! JPG: Still pictures MOV: Motion pictures
@ ®
___
i
■Connecting with FTP (Picture Transfer Protocol)
if using Windows XP or Mac OS X, you can connect to your computer in PTP mode by
setting to PRINT mode
• Pictures can only be read on computer from camera.
• It may not be possible to read if there are 1000 or more pictures on the card.
• The message (PLEASE RE-CONNECT TFiE PRINTER.) will be displayed if you set
to Cl after connecting to your computer. Set the mode dial to a different mode, and
reconnect the camera after ‘ACCESS’ disappears.
• To reset file or folder numbers:
■NO. RESET’ (P.22)
• New folders are created in the
following cases:
*When pictures are taken
to folders containing files
numbered 999.
•When using cards already
containing the same folder
number (including pictures taken
with other cameras, etc)
•When recording after performing
NO. RESET (P.22)
• File may not be able to be played
back on camera after changing
file name.
(Number can be changed without
changing number of digits.)
74 VQT1B61 VQT1B61 75
Page 39
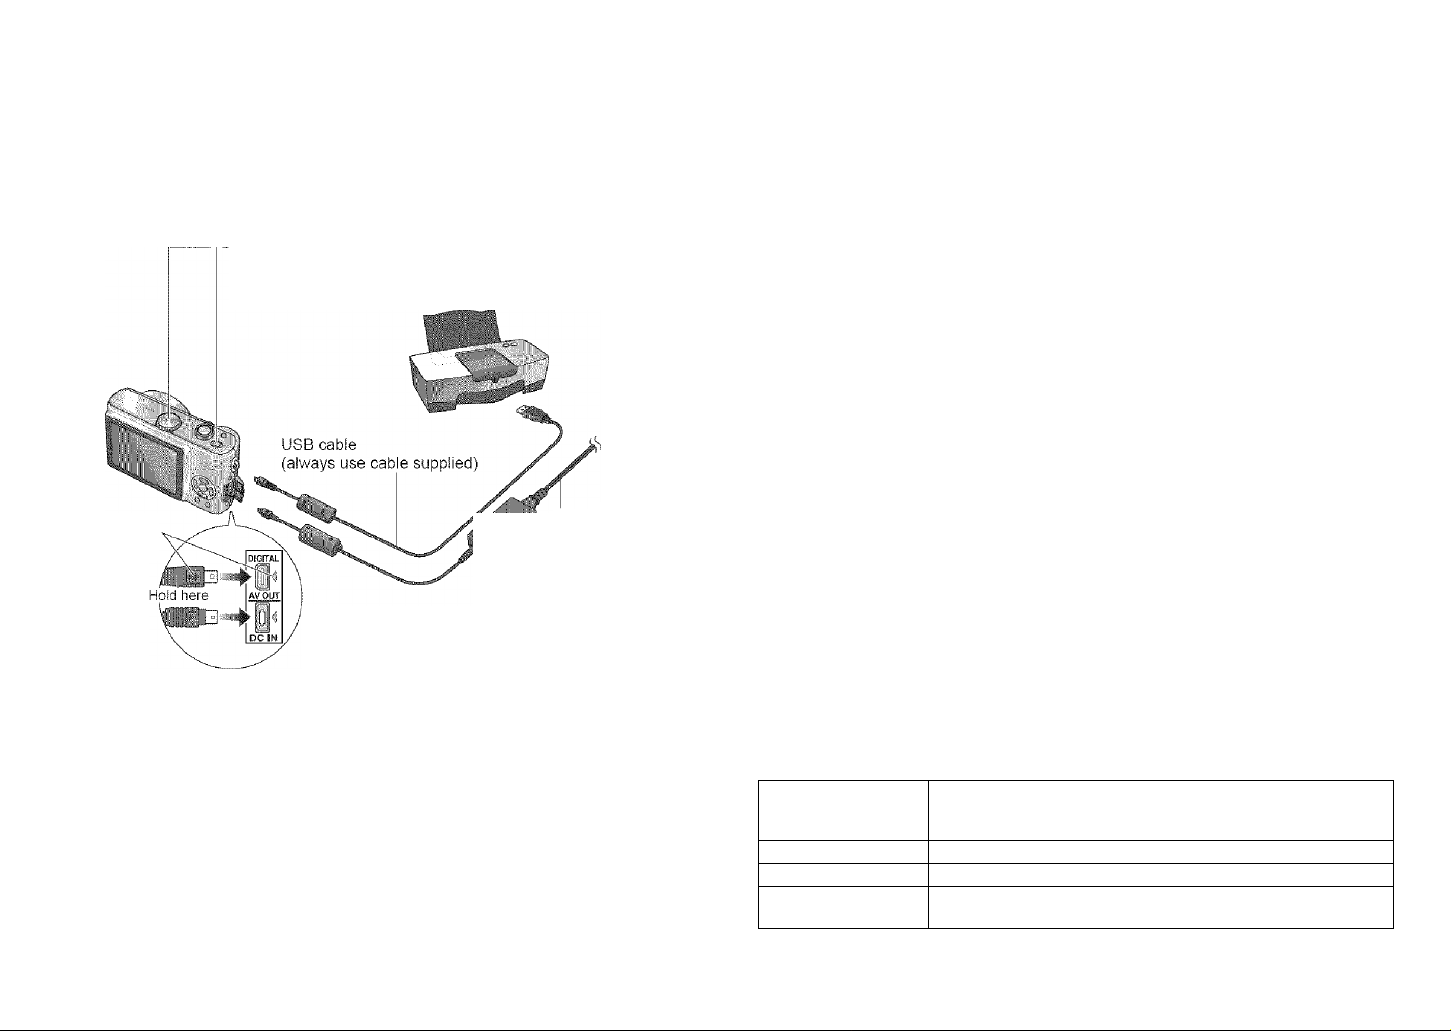
Gónnéciing
with/òther
dèvices':/;
1
You can connect directly to a PictBridge-compatible printer for printing.
Preparations:« Ensure that you have a sufficiently-charged battery, or an AC adaptor
(DMW-AC5PP, sold separately).
• Remove memory card to use pictures in built-in memory.
• Adjust settings on your printer (print quality, etc) as required.
—®Turn on power of both camera and printer
- i2)Set to
©Connect camera to printer
(4)Operate camera to print pictures (see right)
Align marks
and insert
•Check socket direction and insert straight in.
(Damage to socket shape can lead to faulty
operation.)
■#Do not use any other USB connection cables except the supplied one.
• Do not disconnect the USB cable when the cable disconnection icon ^ is displayed
(may not be displayed with some printers).
• Turn off power and disconnect USB cable before inserting or removing memory cards.
• If you have connected the camera without setting it to remove the USB cable,
and set the camera to ^ before reconnecting. (Power may need to be reset on some
printers.)
• if you change to a different mode after connecting, an error message will be displayed.
Set the mode dial back to £k, cancel any printing, and disconnect the USB cable.
#To print clipboard pictures, first copy (P.60) to the memory card.
• If the battery display flashes red, cancel printing and disconnect the USB cable
(reconnect again after charging battery).
•An orange # displayed during printing indicates an error message. Check the printer.
• Print may be divided into different stints if printing several pictures.
(Remaining sheets display may differ from set number.)
jrn off camera
power before
plugging in or
removing.
using AC adaptor,
IPrinting single pictures
Select picture to print
,
-----------------
I, !""Y-
,
¡Printing multiple pictures
Select ‘MULTI PRINT’
I
ct‘PRINT START’
PRINT WITH DATE !i CfF
NUM OF PRINTS i 1
PAPER SIZE ^
PAGE LAYOUT ii ■
....
'
■To cancel print Press ‘MENU/ SET’
• Print settings ^ (P.78)
• Disconnect USB cable after printing.
■Multiple picture printing items
MULTI SELECT
SELECTALL Print all pictures.
DPOF PICTURE Print pictures selected in ‘DPOF PRINT’. (P.68)
FAVORITE
Scroll between pictures with -4 ►, select pictures with T /A
displayed) to print. Press T again to release selection.
Press ‘MENU/SET’ when selection is complete.
Print pictures selected as ‘FAVORITE’.
(Displayed if ‘FAVORITE’ (P.65) set)
Select item
o
See below for details
Select ‘PRINT START’
Select ‘YES’ if print confirmation
screen is displayed.
m 1
PRINT WITH DATE
Alb : OFF
flUM. OF PRINTS
P/\PERSI2E
PAGE LAYOUT
________
" I
i
____
%
76 VQT1B61 VQT1B61 77
Page 40

GG-ftneciitig
wilH pthéf '
àsyicei; : :
P
iiriQ fContinyed)
Connecting
with other
devices
ireen
IPrint settings
PRINT WITH DATE OFF/ON
NUM. 0= PRINTS Set number of pictures
^ (printer takes priority)
L/3.5”x5” (89 X 127 mm)
(127 X 178 mm)
(100 X 148 mm)
(210 X 297 mm)
(54 X 85.6 mm)
(100 X 150 mm)
PAPER SIZE
2L/5”«7”
POSTCARD
A4
CARD SIZE
10x15cm
4”x6” (101.6 X 152.4 mm)
8”x10”
(203.2 X 254 mm)
LETTER (216 X 279.4 mm)
A (printer takes priority) / FI (1 picture, no border) /
PAGE LAYOUT
|E1| (1 picture, with border) / fflffl (2 pictures) / gg (4
pictures)
• Items may not be selected if incompatible with printer.
• To print to paper sizes/layouts not supported by this camera, set to ^ and make
settings on the printer.
(Consult your printer’s operating manual.)
e.g. To print the same picture 4 times on 1 sheet
Layout setting: gg (4 screens) Print copies: 4
(Setting print copies to 1 will print 4 different pictures.)
• Date printing
«If printing in shop: Make DPOF settings (P.68) and request printing ‘with dates’.
»If using printer: Make DPOF settings (P.68) and use a printer compatible with date
printing.
«If using the supplied software: Set to ‘with dates’ in the print settings.
«Use the supplied software to print age for ‘BABY’ (P.42) or ‘PET’ (P.44) scene modes,
or days elapsed in ‘TRAVEL DATE’ (P.48). (These cannot be requested in shops.)
«Even if DPOF settings are made, dates may not be printed with some shops or
printers.
«Settings on the actual printer may be prioritized in some cases. Check the date
printing settings on your printer.
«Do not set date printing on pictures onto which ‘DATE STAMP’ (P.66) is applied.
othePA/ise date will be printed twice.
You can view pictures on a TV screen by connecting your camera to your TV with the
supplied AV cable.
Preparations:# Turn off both camera and TV.
• Set the TV aspect (P.22).
3)Connect camera to TV
C2)Turn on TV
#Set to auxiliary input.
If your.iy .haB iaiiiSD mérriòry card slot,;you cart
yfew .s’titj ptctufes by. inserting a card clirèctiy.
Psctùfesmay riot beyiewabterfronisoiTie'.
.■ .MiiltfMediaCards..- .■ .■ .■ .■ .■ .■ .■ .■ .■ .■ .■ .■ .■ .■ .■ .■ .■ .■ .■ .■ .■ .■ .■ .■
C Note )
#Do not use any other AV cables except the supplied one.
• You can view pictures on TVs in other countries (regions) which use the NTSC or PAL
system when you set ‘VÌDEO OUT’ in SETUP menu. Even if you set ‘VIDEO OUT’ to
‘PAL’, the output signal will still be NTSC in the recording mode.
»Some televisions may cut off the edges of pictures, or not display them full screen.
Pictures rotated to portrait may be blurred slightly.
• Change picture mode settings on TV if aspect ratios are not displayed correctly on
widescreen or high-definition televisions.
• Also consult TV operating manual.
#!f problems such as picture flickering occur, set VIDEO OUT’ (P.22) to ‘NTSC’.
78 VQT1B61 VQT1B61 79
Page 41

:ЗВвЙВЕ
2 3
14
13
12-
я
E 4 Recording mode (R13)*’
1 Flash mode (P.36)
Optical image stabilizer (P.39)
AF area (P54)
Focus (P25)
r^! Picture size (P.52)
riQuality*2 (P53)
|i '7, i Battery capacity (P25)
Number of recordable pictures*^ (P.92)
Save destination (P.26)
Recording state
Histogram (P.33)
1
6 —
s-
illllllli
— 5
— 8
— 11
-4
-6
-7
-9
- 10
9 Travel date (P.48)**
10 yf Aperture value (P.25)
ipf Shutter speed (P.25)
Intelligent ISO mode (P.46)
11 Current date/time
12 'i i High angle mode (P.34)
Elapsed recording time (P.47)
Zoom (P.27)
jSJ Povi/er LCD (P.34)
Metering mode (P.53)
Slow shutter (P.56)
...........
.■■
t i|Auto bracket® (P.38)
'-Wii Exposure compensation (P.38)
5 'is Zoom Resume (P.20)
13 Spot metering target (P.53)
14 Spot AF area (P.54)
• CLIPBOARD mode (P.58)
Clipboard recording mode H
** Clipboard playback transfer guide
* MOTION PICTURE mode (P.47)
® Available recording time |
1 В White balance (P.50)
ШН ISO sensitivity (P.51)
[И/Ш/raiSO LIMIT
1Щ Jitter alert (P.24)
2 Burst mode (P.54)
H Continuous AF (P.55)
El Color mode (P57)
H Audio recording (P.53)
3 Travel elapsed days (P.4S)
4 Age in years/months (P.42)
5 Self-timer mode (P.35)
6 AF assist lamp (P.56)
® DMC-TZ3only.
Tele Macro (P.46)
Displays available pictures/time (sec)
remaining.
(‘+999’ displayed if 1000 pictures/seconds or
more.)
13-1
12
11-
10
9
8 —
7-------
1 U PLAYBACK mode® (P.13)
f+i Number of DPOF prints (P.68)
iB Picture with audio/Motion pictures
FTITI Picture size (P.52)
H Quality® (P.53)
IHMgl' Folder/File number
PH Save destination (P.26)
M Picture number/Total pictures
17
10
IS —
14
13^ ■.
Ш
Protected picture (P.69)
(P.62)
Battery capacity (P.25)
2 3
1211
1 Flash mode (P.36)
2 Focus (P.2S)
3 Picture mode (P.29)
Jitter alert (P.24)
riasiM
10
-6
-4
— 5
-e
-7
— 8
— 9
5 Histogram (P.33)
m
Cable disconnection warning icon (P.76)
6 Favorites settings® (P.65)
7 Recorded date and time
8 Q Destination settings (P.49)
9 Recording information**
ilMMi^MAge in years/months (P.42)
10 H Power LCD (P.34)
11 Travel elapsed days (P.48)
12 Audio playback® (P.62)
13 IH Date stamp display® (P.66)
Q Favorites (P.65)
• CLIPBOARD mode (P.58)
Clipboard playing mode 13!
** Clipboard recording transfer guide
Zoom mark H
• MOTION PICTURE mode (P.62)
4 Battery capacity (P.25)
5 Number of recordable pictures (P.92)
6 Save destination (P.26)
7 Recording state
8 Travel date (P.48)
9 Backlight compensation * I li f (P.28)
10 Self-timer mode (P.35)
11 Travel elapsed days (P.48)
12 Current date/time
Zoom (P.27)
...................
■ 7
m Destination settings (P.49)
13 Backlight compensation (P.28)
14 5*0 Power LCD (P.34)
15 I ■*' Zoom Resume (P.20)
16 AF assist lamp (P.56)
r*'' 1 Tele Macro (P.46)
17 AF area (P.54)
■
VQT1B61 81
Page 42

Meanings of and required responses to major messages displayed on LCD monitor.
THIS MEMORY CARD IS LOCKED
• Release using the write-protect switch on the SD memory card or SDHC memory
card. (P.26)
NO VALID PICTURE TO PLAY
•Take pictures, or insert a different card already containing pictures.
THIS PICTURE IS PROTECTED
• Release the protection before deleting, etc. (P.69)
....
........................................ . . .
...
: , ... t
SOME PICTURES CANNOT BE DELETED/THIS PICTURE CANNOT BE DELETED
• Non-DCF images (P.90) cannot be deleted.
..
> Save all necessary data to computer (or other device), and ‘FORMAT’ (P.73) card
to delete.
NO ADDITIONAL DELETE SELECTIONS CAN BE MADE
#The number of pictures that can be deleted at once has been exceeded.
• More than 999 pictures have been set as ‘FAVORITE’.
»The number of pictures than can be date stamped at once has been exceeded.
CANNOT BE SET ON THIS PICTURE : :
»DPOF settings cannot be made for non-DCF images (P.90).
PLEASE TURN CAMERA OFF AND THEN ON AGAIN : : r
• Force has been applied to lens (or other component) and camera could not operate
correctly.
" •» Turn on power again.
(Consult the dealer or your nearest Service Center if display still remains)
............................
:
SOME PICTURES CANNOT BE COPIED/COPY COULD NOT BE COMPLETED
• Pictures cannot be copied in following cases.
»Picture of same name already exists in copy destination.
»File is not of DCF standard (P.90).
•Picture taken or edited on a different device.
BUILT-IN MEMORY ERROR FORMAT BUILT-IN MEMORY?
• Displayed when formatting built-in memory via computer, etc.
> Reformat directly using camera (P.73).
MEMORY CARD ERROR FORMAT THIS CARD? ..................
©Format cannot be recognized on this camera.
> Save all necessary data to computer (or other device), and ‘FORMAT’ (P.73).
MEMORY CARD ERROR PLEASE CHECK THE CARD
•Access to card has failed.
Insert card again.
.............
■ ..........
MEMORY CARD ERROR MEMORY CARD PARAMETER ERROR
•Card is not of SD standard. Only SDHC memory cards can be used for capacities of
4GB or greater.
READ ERROR PLEASE CHECK THE CARD
• Data read has failed.
Check whether card has been inserted correctly (P.15).
...............................
WRITE ERROR PLEASE CHECK THE CARD
• Data write has failed.
^ Turn off power and remove card, before re-inserting and turning on power again.
• Card may possibly be damaged.
MOTION RECORDING WAS CANCELLED DUE TO THE LIMITATION OF THE :
WRITING'SFEED OF THE CARD
• If ‘PICT.MODE’ is set to ‘30fps VGA’ or ‘30fps 16:9’, use a card of at least 10 MB/s (as
marked on packaging, etc). (P.47)
• Motion picture recording may be automatically terminated with certain cards.
A FOLDER CANNOT BE CREATED
• Folder numbers in use have reached 999 (P.75).
-+ Save all necessary data to computer (or other device), and ‘FORMAT’ (P.73).
Folder number is reset to 100 when performing ‘NO.RESET’ (P.22).
.................
........
....................
...................................................
........................................................ .............
.
.......
PICTURE IS DISPLAYED FOR 4;3 TV/PICTURE IS DISPLAYED FOR 16:9 TV
•AV cable is connected to camera.
»To remove message immediately > Press ‘MENU/SET’.
•To change aspect ratio ^ Change ‘TV ASPECT’ (P.22).
• USB cable is only connected to camera.
^ Message disappears when cable is also connected to another device (P.74, 76).
82 VQT1B61 VQT1B61 83
Page 43

-: r I .'i" 'u Troubleshooting
FAQ
Which cards can I use?
#See (P.15) for types, and (P.92) for recording
capacities.
Using Panasonic cards is recommended.
How can I easily send pictures to my computer?
• Connect the camera to your computer using the
supplied USB cable (P.74) to copy (drag & drop)
picture files to your computer hard disk. (You can also
use the supplied software ‘LUMIX Simple Viewer.)
• Use a USB reader-writer.
Pictures appear dark or have poor coloring
Adjusr the exposure (P.38).
Use W BALANCE to adjust the coloring.
(e.g. Use 'AWB for fluorescent lighting and -,Ocfor
mcandescent lighting.)
If this is still insufficient, try ‘Setting white balance
manually iSset’ (P.50).
How do I get the date printed?
• Use DATE STAMP before printing (P.66). (Do not make date printing settings.)
• In shop: Make DPOF settings (P.68), and request
printing ‘with dates’.
•With printer: Make DPOF settings (P.68), and use a
printer compatible with date printing.
•With supplied software (P.11): Select ‘with dates’
within print settings.
Try checking these items (P.84-89) first.
(Restoring menu settings to default values may solve certain problems.
Try using ‘RESET’ in SETUP menu (P.22).)
Camera does not work even if power is turned on.
• Battery is not inserted correctly (P.15). or needs recharging {P.14).
LCD monitor shuts off even if power is turned on.
• Camera is set to ‘POWER SAVE’ or ‘ECONOMY’ (P.20).
^ Press shutter button halfway to release.
• Battery needs recharging (P.14).
Camera switches off as soon as power is turned on.
Batteiy needs recharging (P.14).
Camera is set to ‘POWER SAVE’ (P.20).
Camera was left with power on (battery needs recharging).
> Use POWER SAVE’ or ‘ECONOMY’ (P.20).
■
Cannot reco-ci pictures.
Mode dial is not set to a recording mode.
Buiit-in memory/card is full. > Free space by deleting unwanted pictures (P.32).
Recorded pictures look white.
Lens IS dirty (fingerprints, etc).
—► Turn on power to extract lens barrel, and clean lens surface with a soft, dry cloth.
Lens IS foggy (P.10).
Recorded pictures are too bright/too dark.
Pictures taken in dark locations, or bright subjects (snow, bright conditions, etc)
occupy most of the screen. (Brightness of LCD monitor may differ from that of actual
picture) > Adjust the exposure (P38).
2-3 pictures are taken when I press the shutter button just once.
•Camera set to use ‘AUTO BRACKET’ (DMC-TZ3 only) or ‘BURST’ in REC menu.
Focus not aligned correctly.
#Not set to mode appropriate for distance to subject. (Focus range varies according to
recording mode.)
•Subject outside of focus range.
• Caused by jitter or subject movement (P.39, 46).
Recorded pictures are blurred. Optical image stabilizer ineffective.
•..Shutter speed is slower in dark locations and Optical image stabilizer is less effective.
► Hold camera firmly with both hands, keeping arms close to body (P24).
• Use a tripod and the self-timer (P.35) when using ‘SLOW SHUTTER’ (P.56).
Jl.
!
84 VQT1B61 VQT1B61 85
Page 44

's
■)
Recorded pictures appear coarse, or there is interference.
• ISO sensitivity is high, or shutter speed is iow.
{Defauit SENSITIVITY setting is ‘AUTO’ - interference may appear with indoor
pictures.)
> Lower ‘SENSITIVITY’ (P.51).
> Set ‘COL. MODE’ to ‘NATURAL’ {P.57)
> Take pictures in brighter locations.
• Camera set to ‘HIGH SENS.’ scene mode (P.44).
(Picture becomes slightly coarser in response to high sensitivity)
Brightness or coloring of recorded picture different from real life.
•Taking pictures under fluorescent lighting may require a faster shutter speed and
result in slightly changed brightness or coloring, but this is not a fault.
Reddish vertical line (smear) appears during recording.
#This is a characteristic of CCD and may appear if subject contains
brighter areas. Some blurring may occur around these areas, but this is
not a fault.
(This will be recorded in motion pictures, but not in still pictures.)
------------
----------------
Motion picture recording stops midway.
'»Using MultiMediaCard (not compatible with motion picture recording).
• ‘PICT. MODE’ set to ‘30fps VGA or ‘30fps 16:9’ (P.47).
> Use a card of at least lOMB/s (as marked on packaging, etc).
•With some cards, access display may appear briefly after recording, and recording
may end midway.
LCD Ilium
Monitor sometimes shuts off even though power is on.
Camera set to ‘ECONOMY’ (P.20).
(LCD monitor shuts off during flash recharging)
: After recording, monitor shuts off until next picture can be recorded.
(Maximum built-in memory usage approx. 6 sec)
Brightness is unstable.
•Aperture value is set while shutter button is pressed halfway.
(Does not affect recorded picture.)
Monitor flickers indoors.
• Monitor may flicker after turning on (prevents influence from fluorescent lighting).
Monitor is too bright/too dark.
•Adjust LCD monitor brightness (P.20).
• Camera set to ‘POWER LCD’ or ‘HIGH ANGLE’ (P.34).
• Monitor may darken when internal temperature is low. Monitor will brighten again
when temperature rises.
Biack/blue/red/green dots or interference appears. Monitor looks distorted when
touched.
•This is not a fault, and will not be recorded on the actual pictures, so there is no need
to worry.
Date/age is not displayed.
• Current date, TRAVEL DATE (P.48), and ages in ‘BABY’(P.42) and ‘PET’ (P.44) scene
modes are only displayed for approx. 5 sec after start-up, setting changes, or mode
changes. They cannot be always displayed.
No flash emitted.
• Flash set to ‘FORCED OFF ^ (P.36).
•When set to ‘AUTO H®’, flash may not be emitted in certain conditions.
• Flash cannot be emitted in MOTION PICTURE mode H, or the ‘SCENERY’, 'NIGHT
SCENERY’ (P.42), ‘FIREWORKS’, ‘STARRY SKY’, 'AERIAL PHOTO’, and ‘HIGH
SENS.’ (P.44) scene modes.
Two flashes emitted
■ Red-eye reduction is active (P.36).
(Flashes twice to prevent eyes appearing red.)
mmMMiam
Pictures have been rotated.
■ ‘ROTATE DISP’ is set to ‘ON’ (P.66).
(Automatically rotates pictures from portrait to landscape. Some pictures taken facing
up or facing down may be interpreted as being portrait.)
— Rotate with ‘ROTATE DISP’ (P66).
Cannot view pictures.
• Mode dial is not set to ®.
• No pictures in built-in memory or card (pictures played from card if inserted, from builtin memory if not).
Folder/file number displayed as Picture is black.
»Picture edited on computer or taken on different device.
® Battery removed immediately after picture taken, or picture taken with low battery.
Use ‘FORMAT’ to delete (P.73).
Incorrect date displayed in calendar playback.
• Picture edited on computer or taken on different device.
• ‘CLOCK SET’ is incorrect (P.16).
(incorrect date may be displayed in calendar playback on pictures copied to computer
and then back to camera, if computer and camera dates differ.)
Depending on the subject, an interference fringe may appear on the screen.
• This is called moire. This is not a malfunction.
I
86 VQT1B61 VQT1B61 87
Page 45

No image appears on TV. Image blurred or not colored.
• Not Gonneofed correctly (P.79).
#TV input setting not set to auxiliary input.
• ‘VIDEO OUT’ not set to ‘NTSC’ (P.22).
_____________________________________________________
TV screen display different to LCD monitor.
•Aspect ratio may be incorrect or edges may be cut off with certain televisions.
Cannot play motion pictures on TV.
• Card is inserted into TV.
> Connect with AV cable (supplied) and play on camera (P.79).
Picture is not displayed on full TV screen.
• Check TV ASPECT’ settings (P.22).
_______________________________________________________
Cannot send pictures to computer.
• Not connected correctly (P.74).
Check whether computer has recognized camera. (See separate ‘PC connection’)
Computer does not recognize card (only reads built-in memory).
• Disconnect USB cable and reconnect with card in place.
I want to play computer pictures on my camera.
• Use the supplied software PHOTOfunSTUDiO-viewer- to copy pictures from computer
to camera. To save to clipboard, use software to copy from computer to card, then
copy to clipboard folder with ‘COPY’ (P.73) in PLAY menu.
Cannot print when connecting to printer.
»/Printer not compatible with PictBridge.
• Mode dial not set to J\.
Edges cut off pictures when printing.
• Release any trimming or edgeless printing settings on printer before printing.
(Consult printer operating manual.)
• Pictures taken on ^ ‘ASPECT RATIO’ (P.51}.
..
> If printing in shop, check if 16:9 sizes can be printed.
Menu not displayed in desired language.
• Change ‘LANGUAGE’ setting (P.22).
Camera rattles if shaken.
• This sound is made by the lens movement and is not a fault.
Cannot set ‘AUTO REVIEW’.
• Cannot be set when any of the following are in use: ‘AUTO BRACKET’ {DMC-TZ3
only) (P.38), ‘BURST’ (P.54), ‘SELF PORTRAiT’ scene mode {P.42), MOTION
PICTURE mode H (P.47), or ‘AUDIO REC.’ (P.53).____________________________________________
Red lamp Illuminated when pressing shutter button halfway in dark locations.
#'AF ASSIST LAMP’ set to ‘ON’ (P.56)._______________________________________________________
AF ASSIST LAMP is not illuminated.
• ‘AF ASSIST LAMP’ is set to ‘OFF’ {P.56).
#Not illuminated in bright locations or when using ‘SCENERY’, ‘NIGHT SCENERY’,
‘SELF PORTRAIT’ (P.42), 'FIREWORKS’, or ‘AERIAL PHOTO’ (P.44) scene modes.
Camera is hot.
• Camera may become a little warm during use, but this does not affect performance or
quality.
Lens makes a clicking noise.
•When brightness changes, the lens may make a clicking noise and the monitor
brightness may also change, but this is due to aperture settings being made.
(Does not affect recording.)
Clock is incorrect.
• Camera has been left for a long period.
^ Reset the clock (P.16).
(Date will be set to ‘0:00 0. 0. 0’ for pictures if clock is not set.)
• Long time was taken to set clock (clock behind by this amount).
When using zoom, picture becomes slightly warped and the edges of the subject
become colored.
«'Pictures may be slightly warped or colored around the edges, depending on the zoom
ratio, but this is not a fault (P.27).
File numbers are not recorded in sequence.
• File numbers are reset when new folders are created (P.75).
* •
File numbers have jumped backwards.
• Battery was removed/inserted with power on.
(Numbers may jump backwards if folder/file numbers are not correctly recorded.)
88 VQT1B61 VQT1B61 89
Page 46

Camera may become warm if used for long periods of time, but this is not a fault.
■ To avoid jitter, use a tripod and piace in a stable location.
{Especially when using telescopic zoom, lower shutter speeds, or self-timer)
Keep the camera as far away as possible from electromagnetic equipment (such
as microwave ovens, TVs, video games etc.).
»if you use the camera on top of or near a TV, the pictures and sound on the camera
may be disrupted by electromagnetic wave radiation.
»Do not use the camera near cell phones because doing so may result in noise
adversely affecting the pictures and sound.
»Recorded data may be damaged, or pictures may be distorted, by strong magnetic
fields created by speakers or large motors.
»Electromagnetic wave radiation generated by microprocessors may adversely affect
the camera, disturbing the pictures and sound.
• if the camera is adversely affected by electromagnetic equipment and stops
functioning properly, turn the camera off and remove the battery or disconnect AC
adaptor (DIVIW-AC5PP; optional). Then reinsert the battery or reconnect AC adaptor
and turn the camera on.
Do not use the camera near radio transmitters or high-voltage lines.
• If you record near radio transmitters or high-voltage lines, the recorded pictures and
sound may be adversely affected.
#Do not extend the supplied cord or cable.
• Do not allow camera to come into contact with pesticides or volatile substances (can
cause surface damage or coating to peel).
• Only use files from other devices if compatible with Design Rule for Camera File
system (Pictures are based on DCF (Design rule for Camera File system) and Exit
(Exchangeable Image File Format) standards, by Japan Electronics and Information
Technology Industries Association (JEITA)}.
Cannq lui
• Disconnect battery/AC adaptor (DMW-AC5PP, sold separately).
• Do not use benzene, thinners, alcohol, kitchen detergent, or chemically treated cloth
(can cause surface damage or coating to peel).
'»Wipe away dust or fingerprints with soft, dry cloth. Clear stubborn stains or rain/sea
water stains with a thoroughly wrung cloth, before wiping with a dry cloth.
• Remove battery and card (ensure that battery is removed to prevent damage through
over-discharge).
• Do not leave in contact with rubber or plastic bags.
• Store together with a drying agent (silica gel) if leaving in drawer, etc. Store batteries
in cool (15 “C-25 °C (59 “F-77 °F)) places with low humidity (40 %-60 %) and no
major temperature changes.
• Charge battery once per year and use completely once before storing again.
•To prevent damage to cards and data
«Avoid high temperatures, direct sunlight, electromagnetic waves, and static
electricity.
*Do not bend, drop, or expose to strong impacts.
®Do not touch connectors on reverse of card or allow them to become dirty or wet.
#When disposing of/transferring memory cards
«If using the ‘format’ or ‘delete’ functions on your camera or computer, this only
changed the file management information, and does not completely delete the data
from Within the memory card. When disposing of or transferring your memory cards,
we recommend physically destroying the memory card itself, or using commercially
available computer data erasing software to completely delete the data from the
card. Data within memory cards should be managed responsibly.
B.ittery
■ Store battery in battery carrying case after use.
■ 'Do not use if damaged or dented (especially connectors),
e.g. by dropping (can cause faults).
■ The unusable battery should be discarded in accordance
with battery recycling laws. Call the RBRC hotline at 1-800
822-8837 for information.
^Estimated recording capacity of 270 [300* •’] pictures (P.14)
is based on the following CIPA'^^ standards.
DMC-TZ2
CIPA standards:
«Using Panasonic SD memory card (16MB) «Temperature 23 ‘’C (73.4 °F), humidity
50 % »NORMAL PICTURE mode ®LCD monitor ON «STABIUZER (MODE1) -«First
picture taken 30 sec after power turned on *1 picture taken per 30 sec eFull flash
used for every other picture »Zoom operation for each picture (max. W ^ max. T, or
max. T > max. W) «Power turned off after each 10 pictures, battery allowed to cool
CIPA= Camera & Imaging Products Association
•When charging
«Remove any dirt on connectors with dry cloth.
«Keep at least 1 m (3.28 feet) away from AM radio (may cause radio interference).
«Noises may be emitted from inside, but this is not a fault.
»Always remove from mains socket after charging (up to 0.1 W consumed if left in
place).
• SDHC Logo is a trademark.
® Leica is a registered trademark of Leica Microsystems IR GmbH.
• Elmar is a registered trademark of Leica Camera AG.
• Other names, company names, and product names printed in these instructions
are trademarks or registered trademarks of the companies concerned.
■
90 VQT1B61 VQT1B61 91
Page 47

_
ording picture/time capacity
■Recording picture capacity (stilt pictures)
Varies according to foliowing settings.
Figures given are estimates. May vary according to conditions, card type, and subject.
Recording capacities/times displayed on LCD monitor may not be reduced regularly.
• ASPECT RATIO (IH ira W) (P.51)
• PICT.SIZE (0.3MEZ-7M) (P.52)
• QUALITY (picture quality^: high^: standard) (P.53)
DMC-TZ3
*": DMC-TZ2
m
'KH
, «•»
Built-in memory 2 6 3 7 4 9 7 15 12 24 19 36 61 100 3 6 3 7 5 10 8 16 3 7 4 8 6 12 11 22
16 MB 3 7 ' 4 ■ S ' ■ 5 ' 10 ■ s ' 16 13 27 21 ' 40 63 "HO 3 ■ 7 "■ 4 8 ■ 5 "12 9 18 "■ 3 7 ■ 4 ' 10 7 14 "12 25
32 MB 7 16 9 19 11 23 18 36 29 58 45 85 145 230 8 16 9 19 13 26 20 40 9 18 10 21 15 31 27 53
64 MB 16 34 20 40 24 48 38 75 61 120 93 175 290 480 16 35 20 40 27 54 43 83 19 35 22 45 32 64 57 105
Memory
• Extended optical zoom (P.27) can be used for picture sizes indicated with ‘EZ’ (except in
128 MB 35 69 41 82 50 99 73 150 125 240 190 350 600 970 35 71 42 82 56 110 88 165 35 79 46 92 66 130 115 220
256 MB ■ 68 135 ' 81 160 98 190 150 290 240 470 370 690 1170 1900 70 140 "82 150 110 210 170 330 "78 150 ■ 91 1 SO 130 250 230 430
card
512 MB 135 270 160 320 195 380 300 590 480 940 730 1370 2320 3770 140 270 150 320 210 430 340 650 155 300 180 350 250 510 450 860
1 GB 270 540 320 640 390 770 600 1180 970 1880 1470 2740 4640 7550 280 550 320 640 440 860 680 1310 310 610 360 710 520 1020 910 1720
2 GB 550 1090 660 1270 790 1530 1220 2360 1920 3610 2920 5120 8780 12290 560 1110 660 1300 890 1700 1360 2560 630 1220 730 1420 1040 2040 1800 3410
4 GB 1090 2150 1290 2510 1560 3010 2410 4640 3770 7090 5740 10050 17240 24130 1110 2190 1310 2560 1740 3350 2680 5020 1240 2410 1450 2800 2040 4020 3540 6700
‘HIGH SENS.’ scene mode (P.44)}.
«,
¡Recording picture capacity
(still pictures)
¡a. .fti
Built-in memory 2 3 16 100
16 MB 3 4 IS 110
32 MB 7 9 40 230
64 MB 16 20 83 480
Memory
128 MB 35 41 165 970
256 MB 58 81 330 1900
card
512 MB 135 160 650 3770
1 GB 270 320 1310 7550
2 GB 550 660 2560 12290
4 GB 1090 1290 5020 24130
ni)
,i^:
: r”-::
¡Recording time capacity
(motion pictures)
Built-in memory
Memory
16 MB
52 MB
64 MB
128 MB
256 MB
512 MB
1 GB
2 GB
4GB
6 sec
” z-,-
39 sec 2 min 2 min 6 min 33 sec 1 min 46 sec
1 min 23 sec 4 min 10 sec 4 min 10 sec 12 min 20 sec 1 min 11 sec 3 min 35 sec
" 2 min 46 sec 8 min 10 sec 8 min 10 sec 24 min 2 min 20 sec 7 min
6 min 30 sec 15 min 20 sec 15 min 20 sec 47 min 50 sec 4 min 40 sec 14 min
11 min 32 min 50 sec 32 min 50 sec 1 hr 35 min 9 min 20 sec 28 min 10 sec
22 min 30 sec 1 hr 7 min 1 hr 7 min 3 hr 15 min 19 min 20 sec 57 min 30 sec
44 min 20 sec 2 hr 11 min 2 hr 11 min 6 hr 22 min 38 min 1 hr 53 min
26 sec I
W 3S
■ ms;
.“'T.
23 sec
26 sec
-i.
' IBJS
1 mtn 13 sec
1 nun 23 sec 5 sec 22 sec
■W
s is'
9=41
■.Mas
S»i
PICTMODE (P.47)
• Picture smoothness
• Picture size
•A maximum of approx. 2 GB
' BiXf
mu-
(fps: frames per second)
30 fps
--------------
' Less
Smooth
16:9 ■'VGA'" QVGA"
Wide Large Small*’
For e-mail attachments or
longer recording
can be recorded in any one
session.
(Screen display also up to
2 GB)
.fm
s»- 10 fps
smooth *-
92 VQT1B61 VQT1B61 93
Page 48

hsrs:.;-
■)
¿liH
Ciners: ■M i^r or your safety
power ^Source: : :
' Power'Consunjptio'n • .".
.Cariosra effective pixels . / : i «DMC-TZ3: 7,200,000 pixels # DMC-TZ2: 6,000,000 pixels
irnsqe sensor
i.;8 •: Optical 10 X zoom
.Exiencled ppti'pa.l zopiV'x.' ^ . !
.
: jhlocm-al.;.;: :. :r . -.'...: h 50 cm (1.64 feet) (Wide)/2 m (6.55 feet) (Tele) to oo
• . Maci'o/SimoleiMoiion pictUrs.»
:: LinietligentlSO/eiipboard -
'• ' Scene mode • /.' • ' i There may be difference in above settings.
Shiuttërsÿstem .. ' T^' :.' ^ ' 1 Electronic shutter + Mechanicai shutter
: Motion .pietur© recording : : 848 X 480 pixelsT640 * 480 pixels* /320 x 240 pixels
■. V BitrstsBfeed ■■ ;■ H #DMC-TZ3:
;sb ssnsitivitv : :
'S|vutt.er's'peed .' ; 8 to 1/2000th
Wisits balance : :: AUTO/Dayiight/Cloudy/Shade/HalogenAA/hite set
.Exppslii'e (AE); .: AUTO (Program AE)
Msterlhg mode ^ -
1.'.. i.l :! t #DMC-TZ3:
F ;t .1 * Flash range: (ISO AUTO)Approx.60 cm (1.97 feet) to 4,2 m (13.8 feet) (Wide)
........................
Digiiiai-'zoe'm- • ^' • • -I • ' ( Max.4 X
Number of recordable. ..
.•.■pictures."'. : !'.- '
cifications
; DC 5.1 V
: ■'.Vhen recording: 1,7 W (DMC-TZ3)/1.4 W (DMC-TZ2)
:■ When playing back: 0.8 W
; #DMC-TZ3: 1/2.35” CCD, total pixel number 8,600,000 pixels
!. f#DMC-TZ2:1/2.33” CCD, total pixel number 7,390,000 pixels
Primary color filter
; f-4,6 mm to 46 mm (35 mm film camera equivalent: 28 mm to 280 mm)!F3,3to F4.9
; Max. 15 X (DMC-TZ3)/Max. 13.8 x (DMC-TZ2)
! Normal/Macro
? 9-area-focusing/3-area-focusing {High speed)/
1-area-focusing (High speed)/1-area-focusing/Spot-focusing
t 5 cm (0.16 feet) (Wfde)/1 m (3.28 feet) (Tele) to co
; (30 or 10 frames/second with audio. The maximum recording time depends
i: on the capacity of the built-in memory or the card.)
( 3 frames/second (High speed), 2 frames/second (Low speed),
i Approx. 2 frames/second {Unlimited)
*DMC-TZ2:
i Approx. 2 frames/second (Uniimited)
/ #DMC-TZ3:
:■ Max. 7 frames (Standard), max. 5 frames (Fine),
i Depends on the remaining capacity of the buiit-in memory or the card (Unlimited),
i #DMC-TZ2:
: Depends on the remaining capacity of the built-in memory or the card.
: AUTO/100/200/400/800/1250
:: [HIGH SENS.] mode: 3200
; [STARRY SKY] mode: 15 seconds, 30 seconds. 60 seconds
■ Motion picture mode: 1/30th to 1/20000th
: Exposure compensation (1/3 EV Step, -2 EV to +2 EV)
/ Multipie/Center weighted/Spot
3.0” low-temperature polycrystalline TFT LCD (Approx. 230,000 pixels)
: (field of view ratio about 100 %)
#DMC-TZ2:
: 2.5" low-temperature polycrystalline TFT LCD (Approx. 207,000 pixels)
(field of view ratio about 100 %)
i. AUTO, AUTO/Red-eye reduction, Forced flash ON (Forced flash ON/
rxea-eye reaucuon), i>iow sync./Kea-eye reauaion, i-orcea uri-
(2 m (6,56 feet) unless max.T)
'Microphone • ■
'Speaker :
Recording ihedia;
PicttM'e size- '•
: : Stüî picture
. .Motloi'j pictures. I . . ..
• .''¿‘■■Qhl.y'Whé-7üs-.np ari SD'
•.MérnorÿC'ard's '.''' •
'Gitîrïlity •'• '. '' ' ' •
Recording file .format . .
Stiii-Picture'.' .' ;
Still :piciu:'jes with audio
IV1ôti:ôn:p{otLiré3
Interface: : : : : : : -.
Termiriar
ipimfenpfo.hs (ex.çluding d
pröj6:ctiori;pafv) ''' ; ; •' •'
Mass:
: Operating .ténipéràture.
Ppèratjhq luMliidlty: ■ :. .;
Battery charger
(Panasonic DE-.A45B): h'-o-n-ation for your safety
Output
....................
.iUplii
.....................
Equipment mobility: Movable
Battery Pack (llthlum-lon)
(Panasonic CGA-SG07A): Information for your safety
.........
Monaural
^ Monaural
. Built-In Memory (Approx. 12.7 MB)/SD Memory Card/SDHC Memory Card/
. MuitiMediaCard (Still pictures only)
. Fine/Standard_______________________________________________
' JPEG (based on Design rule for Camera File system, based on Exit 2.21
; standard) + QuickTime
; QuickTime Motion JPEG
■ Digital: USB 2.0 (Full Speed)
; Analog video/audio;
: DIGITAL/AV OUT: Dedicated jack (S pin)
^ #DMC-TZ2: Approx. 105.0 mm (W) x 59.2 mm (H) x 36.3 mm (D)
: |4.13” (W) X 2.33" (H) x 1.43” (D)]______________________________
. DMC-TZ2 Approx. 222 g (7.83 oz]
;
__________________
: CH^.RGE4.2 V = 0.8A
____________________________________________________
When the aspect ratio setting Is [ HE91
#DMC-TZ3:
3072 2304 pixels / 2560x1920 pixels / 2048x1536 pixels /
1600 X 1200 pixels / 1280 X 960 pixels / 640 x 480 pixels
#DMC-T22:
2816 X 2112 pixels/2048 x 1536 pixels / 1600 x 1200 pixels/
1280 X 960 pixels 1640 x 480 pixels
When the aspect ratio setting Is [ gelRl 1
#DMC-TZ3: 3216 x 2144 pixels/2660 x 1712 pixels/2048 x 1360 pixels
#DMC-TZ2:2976 x 1984 pixels/2560 x 1712 pixels /2048 x 1360 pixels
When the aspect ratio setting is [
#DMC-TZ3: 3328 x 1872 pixels/'2i
#DMC-T22: 3072 x 1728 pixels/2560
848 X 480 pixels'-' /640 x 480 pixels* /320 x 240 pixels
JPEG (based on Design rule for Camera File system, based on Exit 2.21
siandard)/DPOF corresponding
NTSC/PAL Composite (Switched by menu)/Audio line output (monaural)
DC IN: Dedicated jack (2 pin)___________________________________
#DMC-TZ3: Approx. 105.0 mm (W) x 59.2 mm (H) x 36.7 mm (D)
[4.13” (W)x 2.33" (H)x 1.44” (D)]
Excluding card and battery: DMC-TZ3 Approx. 232 g (8.18 oz)I
With card and battery: DMC-TZ3 Approx. 257 g (9.05 oz)/
0 C to 40 °C (32Tto104°F)
ID-/-', to 80%
110 V to 240 V 50/60HZ, 0.2A
3.7 V 1000 mAh
________________________________
_____________________________
1440 pixels / 1920 x 1080 pixels
1440 pixels / 1920 X 1060 pixels
______________________________________
DMC-TZ2 Approx. 247 g (8.71 ozj
_____________________________________
_____________
-
)4 VQT1B61
VQT1B61
Page 49

vOtilërs.
tioiiai accessories
ir‘i';ptali Carnets /Cxessory Order
(For USA Customers)
Product name: Battery Pack
Product no.: CGA-S007A
• Performance identical to supplied
battery pack.
• Recommended for taking on holiday,
etc.
Product name: Leather Case
Product no.: DMW-CT3
- V
Product name: Semi Hard Case Q
Product no.: DMW-CHTZ3
Product name: SDHC Memory Card
Product no.: 4 GB: RP-SDR04GU1K
Product name: SD Memory Card
Product no.: 2 GB: RP-SDK02GU1A, RP-SDR02GU1A
1GB: RP-SDK01GU1A. RP-SDH01GU1A,
RP-SDR01GU1A
512 MB: RP-SDK512U1A, RP-SDR512U1A
256 MB: RP-SDH256U1A, RP-SDR256U1A
128MB:RP-SD128BU1A
64 MB: RP-SD064BPPA
SDHC memory cards
#New standards set in 2006 by SD Association for high-capacity memory cards
exceeding 2 GB.
fitCan be used on SDHC memory card-compatibie devices, but not on devices oniy
compatible with SD memory cards.
• Refer to P.14 for information about the battery charging time and the number of
recordable pictures.
#■ Accessories and/or model numbers may vary between countries. Consult your local
dealer.
Product name: AC adaptor
Product no.: DMW-AC5PP
/iMi
Product name: Marine Case
Product no.: DMW-IVICTZ3
w
y,, ,(
Please photocopy this form when placing an order.
1. Digital Camera Model #
2. items Ordered
Accessory # Description Price Each Quantity
Subtotal
Your State & Local Sales Tax
Shipping S Handling
Total Enclosed
3.Method of payment (check one)
□ Check of Money Order enclosed (NO C.O.D.SHIPMENTS)
□ VISA Credit Card # _______________________________
□ MasterCard
□ Discover
(Please do not send cash)
4. Shipping information (UPS delivery requires complete street address)
Ship To:
Mr.
...
Mrs.
Ms.
First Last
Street Address
City State Zip
TO OBTAIN ANY OF OUR DIGITAL CAMERA ACCESSORIES YOU CAN DO ANY OF
CALL PANASONIC'S ACCESSORY ORDER LINE AT 1-S00-332-536S
MAIL THIS ORDER TO: PANASONIC SERVICE AND TECHNOLOGY
Expiration Date
Customer Signature
VISIT YOUR LOCAL PANASONIC DEALER
20421 84th Avenue South Kent, WA. 98032
_____
Make Check or Money Order to: PANASONIC ACCESSORIES
Phone#:
Day ( )
Night ( )
THE FOLLOWING:
OR
[6 AM-6 PM M-F, PACIFIC TIME]
OR
ACCESSORY ORDER OFFICE
Total Price
6.95
96
VQT1B61
In CANADA, please contact your local Dealer for more information about accessories.
VQT1B61 97
Page 50

Request for Servi /j M otice (For usa omyi
Limited Warranty (For usAomy)
Please photocopy this form when making a request for service notice.
Request for Service Notice:
(USA Only)
Mai! this completed form and your Proof of Purchase along with your unit to:
Panasonic Camera and Digital Service Center
Elk Grove Village, IL 60007
In the unlikely event this product needs service.
Please include your proof of purchase.
(Failure to do so will delay your repair.)
To further speed your repair please provide an
explanation of what wrong with the unit and
any symptom it is exhibiting.
1590 Touhy Ave.
PANASONIC CONSUMER ELECTRONICS COMPANY, DIVISION OF
PANASONIC CORPORATION OF NORTH AMERICA
One Panasonic Way, Secaucus, New Jersey 07094
PANASONIC PUERTO RICO, INC.
Ave. 65 de Infantería, Km. 9.5, San Gabriel Industrial Park, Carolina, Puerto
Rico 00985
Panasonic Digital Still Camera
Limited Warranty
Limited Warranty Coverage
If your product does not work properly because of a defect in materials or
workmanship, Panasonic Consumer Electronics Company or Panasonic Puerto
Rico, Inc. (collectively referred to as “the warrantor”) will, for the length of
the period indicated on the chart below, which starts with the date of original
purchase (“warranty period”), at its option either (a) repair your product with
new or refurbished parts, or (b) replace it with a new or refurbished product.
The decision to repair or replace will be made by the warrantor.
PRODUCT OR PART NAME PARTS LABOR
DIGITAL STILL CAMERA
(EXCEPT ITEMS LISTED
BELOW)
1 (ONE) YEAR 1 (ONE) YEAR
CCD 6 (SIX) MONTHS 90 (NINETY) DAYS
RECHARGEABLE BATTERY
PACK (IN EXCHANGE FOR
DEFECTIVE BATTERY PACK)
90 (NINETY) DAYS NOT APPLICABLE
SD MEMORY CARD
(IN EXCHANGE FOR
DEFECTIVE SD CARD)
90 (NINETY) DAYS NOT APPLICABLE
During the “Labor” warranty period there will be no charge for labor. During the
“Parts” warranty period, there will be no charge for parts. You must carry-in or
mail-in your product during the warranty period. If non-rechargeable batteries
are included, they are not warranted. This warranty only applies to products
purchased and serviced in the United States or Puerto Rico. This warranty is
extended only to the original purchaser of a new product which was not sold “as
is". A purchase receipt or other proof of the original purchase date is required
for warranty service.
98 VQT1B61 VQT1B61 99
Page 51

» ‘M'stomer Services Directory (For usAomy)
Carry-In or Mail-In Service
For Carry-In or Mail-In Service in the United States call
1-800-272-7033.
For assistance in Puerto Rico call Panasonic Puerto Rico, Inc.
(787)-750-4300 or fax (787)-768-2910.
This warranty ONLY COVERS failures due to defects in materials or
workmanship, and DOES NOT COVER normal wear and tear or cosmetic
damage. The warranty ALSO DOES NOT COVER damages which occurred
in shipment, or failures which are caused by products not supplied by the
warrantor, or failures which result from accidents, misuse, abuse, neglect,
mishandling, misapplication, alteration, faulty installation, set-up adjustments,
misadjustment of consumer controls, improper maintenance, power line surge,
lightning damage, modification, or commercial use (such as in a hotel, office,
restaurant, or other business), rental use of the product, service by anyone
other than a Factory Service Center or other Authorized Servicer, or damage
that is attributable to acts of God.
THERE ARE NO EXPRESS WARRANTIES EXCEPT AS LISTED UNDER
“LIMITED WARRANTY COVERAGE”. THE WARRANTOR IS NOT LIABLE
FOR INCIDENTAL OR CONSEQUENTIAL DAMAGES RESULTING FROM
THE USE OF THIS PRODUCT, OR ARISING OUT OF ANY BREACH OF
THIS WARRANTY. (As examples, this excludes damages for lost time, travel
to and from the servicer, loss of media or images, data or other memory
content. The items listed are not exclusive, but are for illustration only.) ALL
EXPRESS AND IMPLIED WARRANTIES, INCLUDING THE WARRANTY
OF MERCHANTABILITY, ARE LIMITED TO THE PERIOD OF THE LIMITED
WARRANTY.
Some states do not allow the exclusion or limitation of incidental or
consequential damages, or limitations on how long an implied warranty lasts,
so the exclusions may not apply to you.
This warranty gives you specific legal rights and you may also have other rights
which vary from state to state. If a problem with this product develops during
or after the warranty period, you may contact your dealer or Service Center.
If the problem is not handled to your satisfaction, then write to the warrantor's
Consumer Affairs Department at the addresses listed for the warrantor.
For Product InlormHtion Opcrnting Assistance Litcr.ituic Request Derilei
LocationA. and ali Customer Service inquiries please contact:
1-800-272-7033. Monday-Friday 8 30am-Spm EST.
Web Site; http:(/wwwi.panasonic.cpm/consumersuppprt:
You can purchase parts, accessories or locate your nearest Service Center by
Accessory Purchases:
Purchase Parts, Accessories and Instruction Books online for all Panasonic
Products by visiting our Web Site at:
http://www.pstc.panasonic.com
or, send your request by E-mail to:
nocoarts&us.Panasonic.com
You may also contact us directly at:
1-800-332-5368 (Phone) 1-800-237-9080 (Fax Only)
(Monday - Friday 9 am to 9 pm, EST.)
PANASONIC SERVICE AND TECHNOLOGY COMPANY
20421 84th Avenue South, Kent, WA 98032
(We Accept Visa, MasterCard, Discover Card, American Express, and Personal Checks)
Product Repairs
Centralized Factory Service Center
MAIL TO: 1590 TouhyAve.
Please carefully pack and ship, prepaid and insured, to 1he Elk Grove Village Centralized
Factory Service Center.
Customer’s in Puerto Rico, please ship or carry in to location below (’’Service in Puerto Rico"),
65 dé Infanteria,Km, 9,5, Sàn Gàbriél industrial Park,,
Sriri :S&àrbÌin'ai
Panasonic Camera and Digital Service Center
Elk Grove Village. IL 60007
As of January 2007
PARTS AND SERVICE WHICH ARE NOT COVERED BY THIS LIMITED WARRANTY ARE YOUR RESPONSIBILITY.
100 VQT1B61 VQT1B61 101
Page 52

Merci d’avoir choisi Panasonic!
Vous avez acheté l’un des appareils les
plus perfectionnés et les plus fiables
actuellement sur le marché. Utilisé selon
les directives, il vous apportera ainsi qu’à
votre famille des années de plaisir. Veuillez
prendre le temps de remplir la fiche ci-
contre. Le numéro de série se trouve sur
l’étiquette située sur le dessous de votre
appareil photo. Conservez le présent
manuel afin de pouvoir le consulter au
besoin.
№ de modèle___________________________
№ de série_____________________________
Piecaulions à jjreiidre
AVERTISSEMENT :
POUR RÉDUIRE LES RISQUES
D’INCENDIE, DE CHOC ÉLECTRIQUE
OU DE DOMMAGES À L’APPAREIL,
• N’EXPOSEZ PAS CET APPAREIL
À LA PLUIE, À L'HUMIDITÉ,
À L’ÉGOUTTEMENT OU AUX
ÉCLABOUSSEMENTS, ET NE
PLACEZ SUR L’APPAREIL AUCUN
OBJET REMPLI DE LIQUIDE, TEL
UN VASE.
‘ UTILISEZ EXCLUSIVEMENT LES
ACCESSOIRES RECOMMANDÉS.
• NE RETIREZ PAS LE COUVERCLE
(OU LE PANNEAU ARRIÈRE) ; IL
N’YAAUCUNE PIÈCE RÉPARABLE
PAR L’UTILISATEUR À
L’INTÉRIEUR. CONFIEZ TOUTE
RÉPARATION À UN TECHNICIEN
DE SERVICE QUALIFIÉ.
ATTENTION
Danger d’explosion si la batterie n’est
pas remplacée correctement.
Remplacez-la uniquement par une
batterie identique ou du même type
recommandée par le fabricant.
Suivez les instructions du fabricant pour
jeter les batteries usées.
Avertissement
Risque d'incendie, d'explosion et de
brûlures. Ne pas démonter, chauffer à
plus de 60 °C (140 °F) ou incinérer.
La plaque signalétîque se trouve sur le
dessous de l’appareil.
Cet appareil numérique de la classe B
est conforme à la norme NMB-003 du
Canada.
• N’utilisez que l’adaptateur secteur
Panasonic DMW-AC5PP (vendu
séparément).
• Utilisez toujours une batterie de marque
Panasonic.
®Si une batterie autre que Panasonic est
utilisée, nous ne pouvons garantir le bon
fonctionnement de l’appareil.
• N’utilisez pas un câble USB autre que
celui fourni.
• N’utilisez pas un câble AV autre que celui
fourni.
• Rangez les cartes mémoire hors de la
portée des enfants.
Éloignez l’appareil le plus possible
de tout dispositif émettant un champ
électromagnétique (tel un four à micro
ondes, un téléviseur, une console de
jeux vidéo, etc.).
®Si vous utilisez l’appareil sur le dessus ou
à proximité d’un téléviseur, les images ou
le son pourraient être déformés par son
champ électromagnétique.
»N’utilisez pas l’appareil à proximité d’un
téléphone cellulaire car l’interférence
pourrait perturber les images et le son.
«Les puissants champs magnétiques
produits par des haut-parleurs ou de
gros moteurs électriques peuvent
endommager les données ou distordre
les images.
«Le champ électromagnétique créé par un
microprocesseur peut nuire à l’appareil et
perturber l’image et le son.
»Dans le cas où l’appareil serait perturbé
par un champ électromagnétique et
cesserait de fonctionner adéquatement,
mettez-le hors marche et retirez-en la
batterie ou débranchez l’adaptateur
secteur (DMW-AC5PP, vendu
séparément). Remettez la batterie en
place ou rebranchez l’adaptateur secteur,
puis remettez l’appareil en marche.
N’utilisez pas ¡’appareil à proximité d’un
émetteur radio ou de lignes à haute
tension.
«Si des prises de vues sont faites à
proximité d’un émetteur radio ou de
lignes à haute tension, les images et
les sons enregistrés pourraient en être
affectés.
À propos du bloc-batterie
Batterie (batterie au lithium-ion)
• Utilisez l’unité spécifiée pour recharger
la batterie.
• N’utilisez la batterie avec aucun autre
appareil que l’appareil spécifiée.
• Évitez le contact des saletés, du sable,
du liquide ou autres corps étrangers
avec les bornes.
• Ne touchez pas les bornes des fiches
(+ et -) avec des objets métalliques.
• Evitez de démonter, remodeler,
chauffer ou jeter au feu.
Si de l’électrolyte entre en contact avec
vos mains ou vos vêtements, lavez-les
avec beaucoup d’eau.
Si de l’électrolyte pénètre dans vos
yeux, ne les frottez pas.
Rincez-vous les yeux avec beaucoup
d’eau, puis consultez un médecin.
À propos du chargeur de batterie
ATTENTIONl
NE PAS INSTALLER CET APPAREIL
DANS UNE BIBLIOTHÈQUE, UNE
ARMOIRE OU TOUT AUTRE ESPACE
CONFINÉ. S’ASSURER QUE LA
VENTILATION DE L’APPAREIL EST
ADÉQUATE. AFIN D’ÉVITER TOUT
RISQUE DE CHOC ÉLECTRIQUE
OU D’INCENDIE DÛ À UN
SURCHAUFFEMENT, S’ASSURER
DES RIDEAUX OU TOUT OBJET
QUE
QUELCONQUE NE BOUCHENT
LES ÉVENTS D’AÉRATION DE
L’APPAREIL.
LA PRISE DE COURANT DOIT
SE TROUVER À PROXIMITÉ DE
L’APPAREIL ET ÊTRE FACILEMENT
ACCESSIBLE.
L’appareil que vous vous êtes procuré est alimenté par une batterie
au lithium-ion/polymère recyclable. Pour des renseignements sur le
recyclage de la batterie, veuillez composer le 1-800-8-BATTERY.
102 VQT1B61 VQT1B61 103
Page 53

I I I . I l ' i l i ' ' ' / .
• List of LCD monitor displays (P80)
AC Adaptor
Aerial Photo Mode
AF Assist Lamp.....................................................56
AF Lock.................................................................44
AF Mode
Aspect Ratio
Audio Dubbing.......................................................70
Audio Recording....................................................53
Auto Bracket..........................................................38
Auto Review...........................................................20, 29
Available Recording Time
...............................................
Baby Mode.............................................................42, 44
Backlight Compensation
Beach Mode..........................................................44
Brightness of the LCD Monitor..............................20
Built-in Flash
Built-in Memory......................................................26, 92
Burst Mode
Calendar Playback
Candle Light Mode................................................42
Charging
Clipboard...............................................................58
Clock Set...............................................................16
Color Mode
Condensation........................................................10
Continuous AF
Copy......................................................................73
H
Date Printing..........................................................67, 68
Date Stamp...........................................................66
Deleting Pictures...................................................32
Digital Zoom..........................................................56
DPOF Print Setting
Dual Display..........................................................64
............................................
................................................
...............................................................
.........................................................
.....................................
.......................................
.........................................................
...........................................................
...............................................
...............................................................
...........................................................
......................................................
...............................................
74, 76, 90
44
54
51
92
■
28
36
54
61
14
57
55
68
Economy Mode.....................................................20
Exposure Compensation
EZ
........................................................................
File Number...................................................31,75
Fireworks Mode
Focus....................................................................25
Folder Composition...............................................75
Food Mode
Formatting.............................................................73
High Angle Mode..................................................34
High Sensitivity Mode
Histogram
...........................................................
.............................................................
......................................
....................................................
...........................................
■
Intelligent ISO Mode
ISO Sensitivity......................................................51
Jitter Alert..............................................................24
Language Setting
LCD Monitor
Macro Mode..........................................................46
Metering Mode......................................................53
Motion Picture Mode.............................................47
Multi Playback......................................................61
Night Portrait Mode...............................................42
Night Scenery Mode
Normal Recording.................................................24
NTSC....................................................................23
Number of Recordable Pictures
.............................................
.................................................
...................................
.............................................
12, 33, 34, 80
...........................
Setting Favorites...................................................65
38
27
44
42
44
33
46
22
Operational Sound
Optical Image Stabilizer
Optical Zoom.........................................................27
PAL.......................................................................23
Party Mode
Pet Mode
PictBridge
Picture Quality Setting (Motion Picture
Mode)............................................................47
Picture Quality Setting (Simple Mode).... 29
Picture Size...........................................................52
Pictures with Audio........................................53, 70
Playback Pictures on TV.......................................79
Playback Zoom
Playing Back Motion Pictures
Portrait Mode
Power LCD
Power Save
Print Mode
Protect
..................................................................
Quality...................................................................53
Quick setting
Recording Guide Line...........................................20
Reset of file No
Reset of Setting
Resizing................................................................70
Review..................................................................30
Rotate
...................................................................
Rotate Display
........................................
........................................
...........................................................
..............................................................
.............................................................
....................................................
...............................
........................................................
...........................................................
..........................................................
............................................................
.........................................................
.....................................................
....................................................
......................................................
22, 29
Setup Menu...........................................................18
Shutter sound........................................................22
39
Simple Mode.........................................................28
Slide Show............................................................64
Slow Shutter..........................................................56
Snow Mode...........................................................44
Soft Skin Mode......................................................42
Sports Mode..........................................................42
42
Starry Sky Mode
44
Strap.....................................................................11
76
Sunset Mode.........................................................44
Travel Date
Trimming
TV Aspect
31
62
■
42
34
20
76
69
57
22
22
66
66
..........................................
Underwater Mode
USB.........................................................11.74, 76
Video Output.........................................................22
Volume of Speakers..............................................22
White Balance.......................................................50
World Time............................................................49
Zoom.....................................................................27
Zoom Resume
...................................................
...........................................................
..............................................................
.............................................................
.................................................
......................................................
44
48
71
22
■
44
20
..............................................■
42
92
Scene Mode..........................................................40
Scenery Mode.......................................................42
Self Portrait Mode
Self-timer...............................................................35
.................................................
42
104 VQT1B61 VQT1B61 105
Page 54

QuickTime and the QuickTime logo are trademarks or registered
Q
QuickTime
trademarks of Apple Computer, Inc., used under license therefrom.
Panasonic Consumer Electronics Company,
Division of Panasonic Corporation of North America
One Panasonic Way. Secaucus, N J 07094
Panasonic Puerto Rico, Inc.
Ave. 65 de Infantería, Km. 9.5, San Gabriel Industrial Park, Carolina, Puerto Rico 00985
Panasonic Canada Inc.
5770 Ambler Drive, Mississauga, Ontario. L4W 2T3
© 2007 Matsushita Electric Industrial Co., Ltd.
VQT1B61-1
M0207KZ2037 (40000 ©)
 Loading...