

Digital Camera
Model No.
DMC-LF1
More about Wi-Fi [Q&A]
VQC9559
Wi-Fi®connection guide
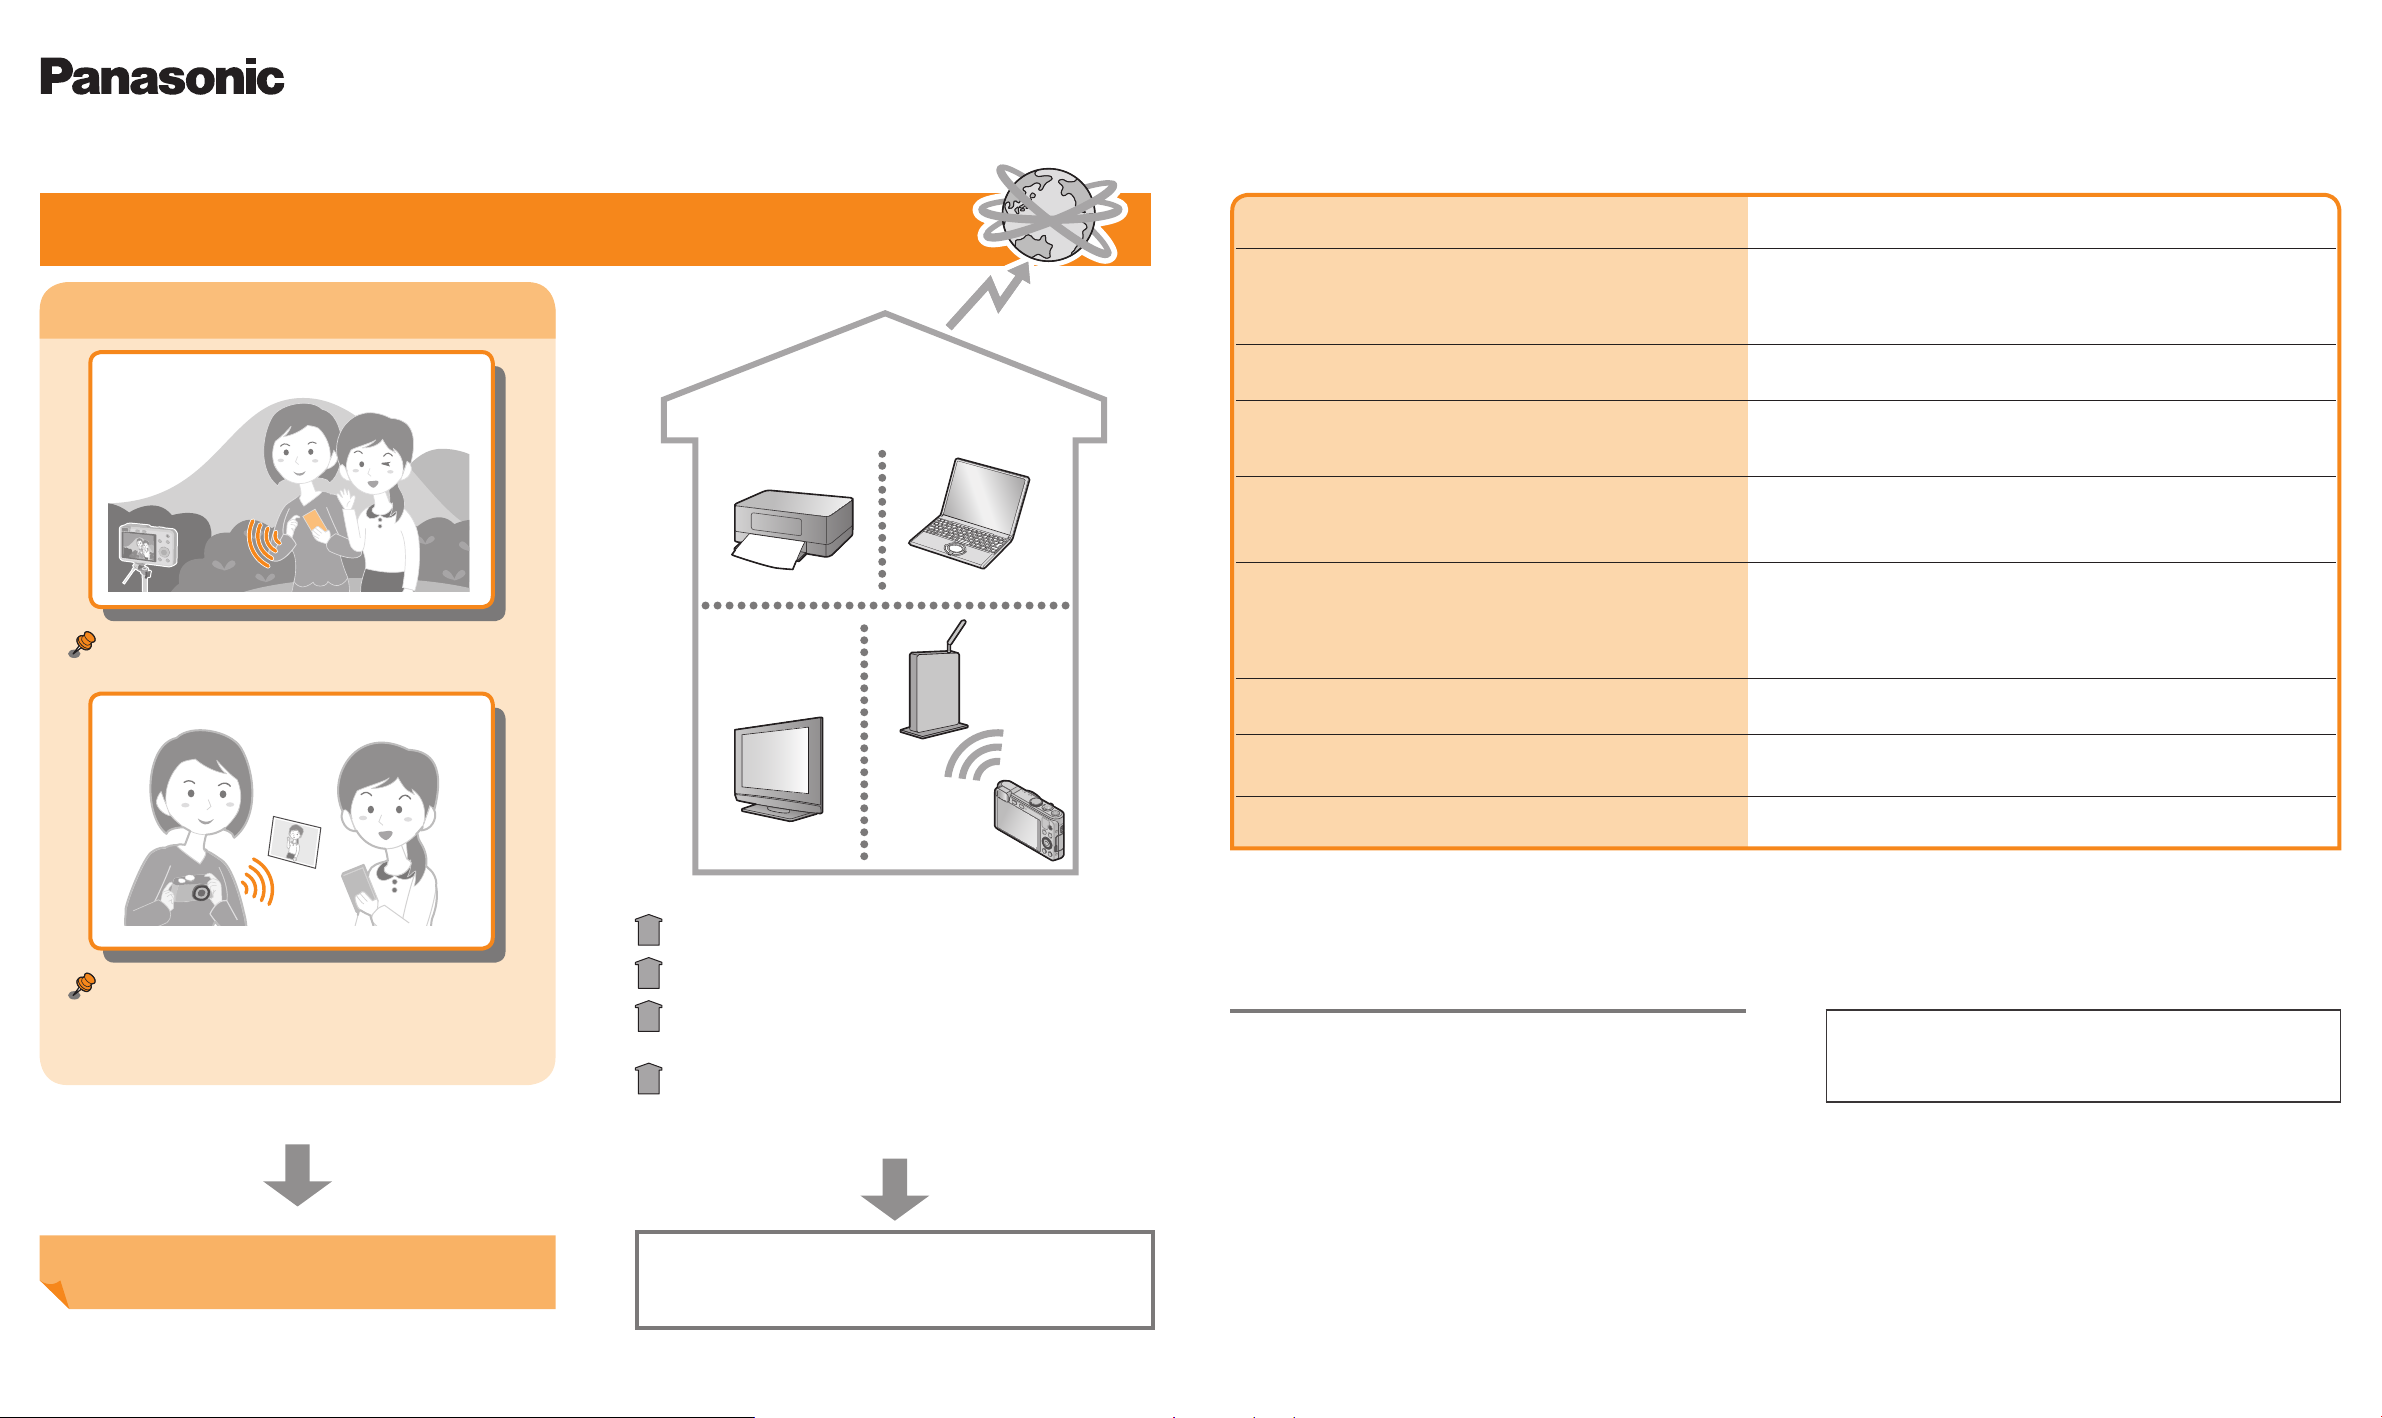
Connecting by Wi-Fi lets you use your camera in many new ways!
Connect to a smartphone
Operate the camera remotely
Internet
Connect to equipment
in the home
Printer
PC
Question Answer
What smartphones support Wi-Fi connections with
the camera?
Do I need a special app to use Wi-Fi connections?
I would like to establish a Wi-Fi connection with my
tablet.
I would like to upload recorded pictures to a social
networking service right after taking them. How
can I do that?
Are there any communication fees?
How do I connect to a PC?
Can the camera connect to a Wi-Fi hotspot in a
station or a shop?
Android and iOS smartphones support Wi-Fi connections with the
camera.
Compatible OS: Android 2.2 - Android 4.2
Your smartphone will need the “Panasonic Image App” to perform
the various operations on the camera.
You can establish a Wi-Fi connection with a tablet the same way
you do with a smartphone. Compatible OS’s and other details are
the same as with smartphones.
We recommend sending the pictures to your smartphone and
uploading them from the smartphone.
If you are only sending pictures directly from the camera to
your smartphone, there are no communication fees. However,
transferring pictures or downloading apps over mobile networks
may incur high packet communication fees, depending on the
details of your contract.
You can connect to a PC through a wireless access point (wireless
LAN router, etc.) in the home.
The camera cannot connect to public wireless LAN services (socalled Wi-Fi hotspots).
iOS 4.3 - iOS 6.1
∗
Send recorded pictures to a
smartphone
• Easy to upload pictures to a WEB service by
linking to a smartphone.
How do I do it?
See the back of this guide.
TV
View pictures on TV
Print wirelessly
Send pictures to PC for backup and
editing
Post to a WEB service
∗
You can send recorded pictures automatically, or select pictures to
send from your camera.
∗
∗
For details, please read “Operating
Instructions for advanced features” on the
CD-ROM (supplied).
How do I secure my wireless network?
∗
For details, please read “Operating Instructions for advanced features”
on the CD-ROM (supplied).
App Store is a service mark of Apple Inc.
●
Android and Google Play are trademarks or registered trademarks of
●
Google Inc.
“Wi-Fi”, “Wi-Fi Protected Setup”, “Wi-Fi Direct”, “WPA” and “WPA2” are
●
marks or registered marks of the Wi-Fi Alliance.
The camera uses WPA and WPA2 security.
Guide to support site
Find the latest information at our support site.
http://panasonic.jp/support/global/cs/dsc/ (This site is available in
English only.)
The illustrations and screens in this guide may differ from the actual
●
product.
Try using the camera connected to a
smartphone
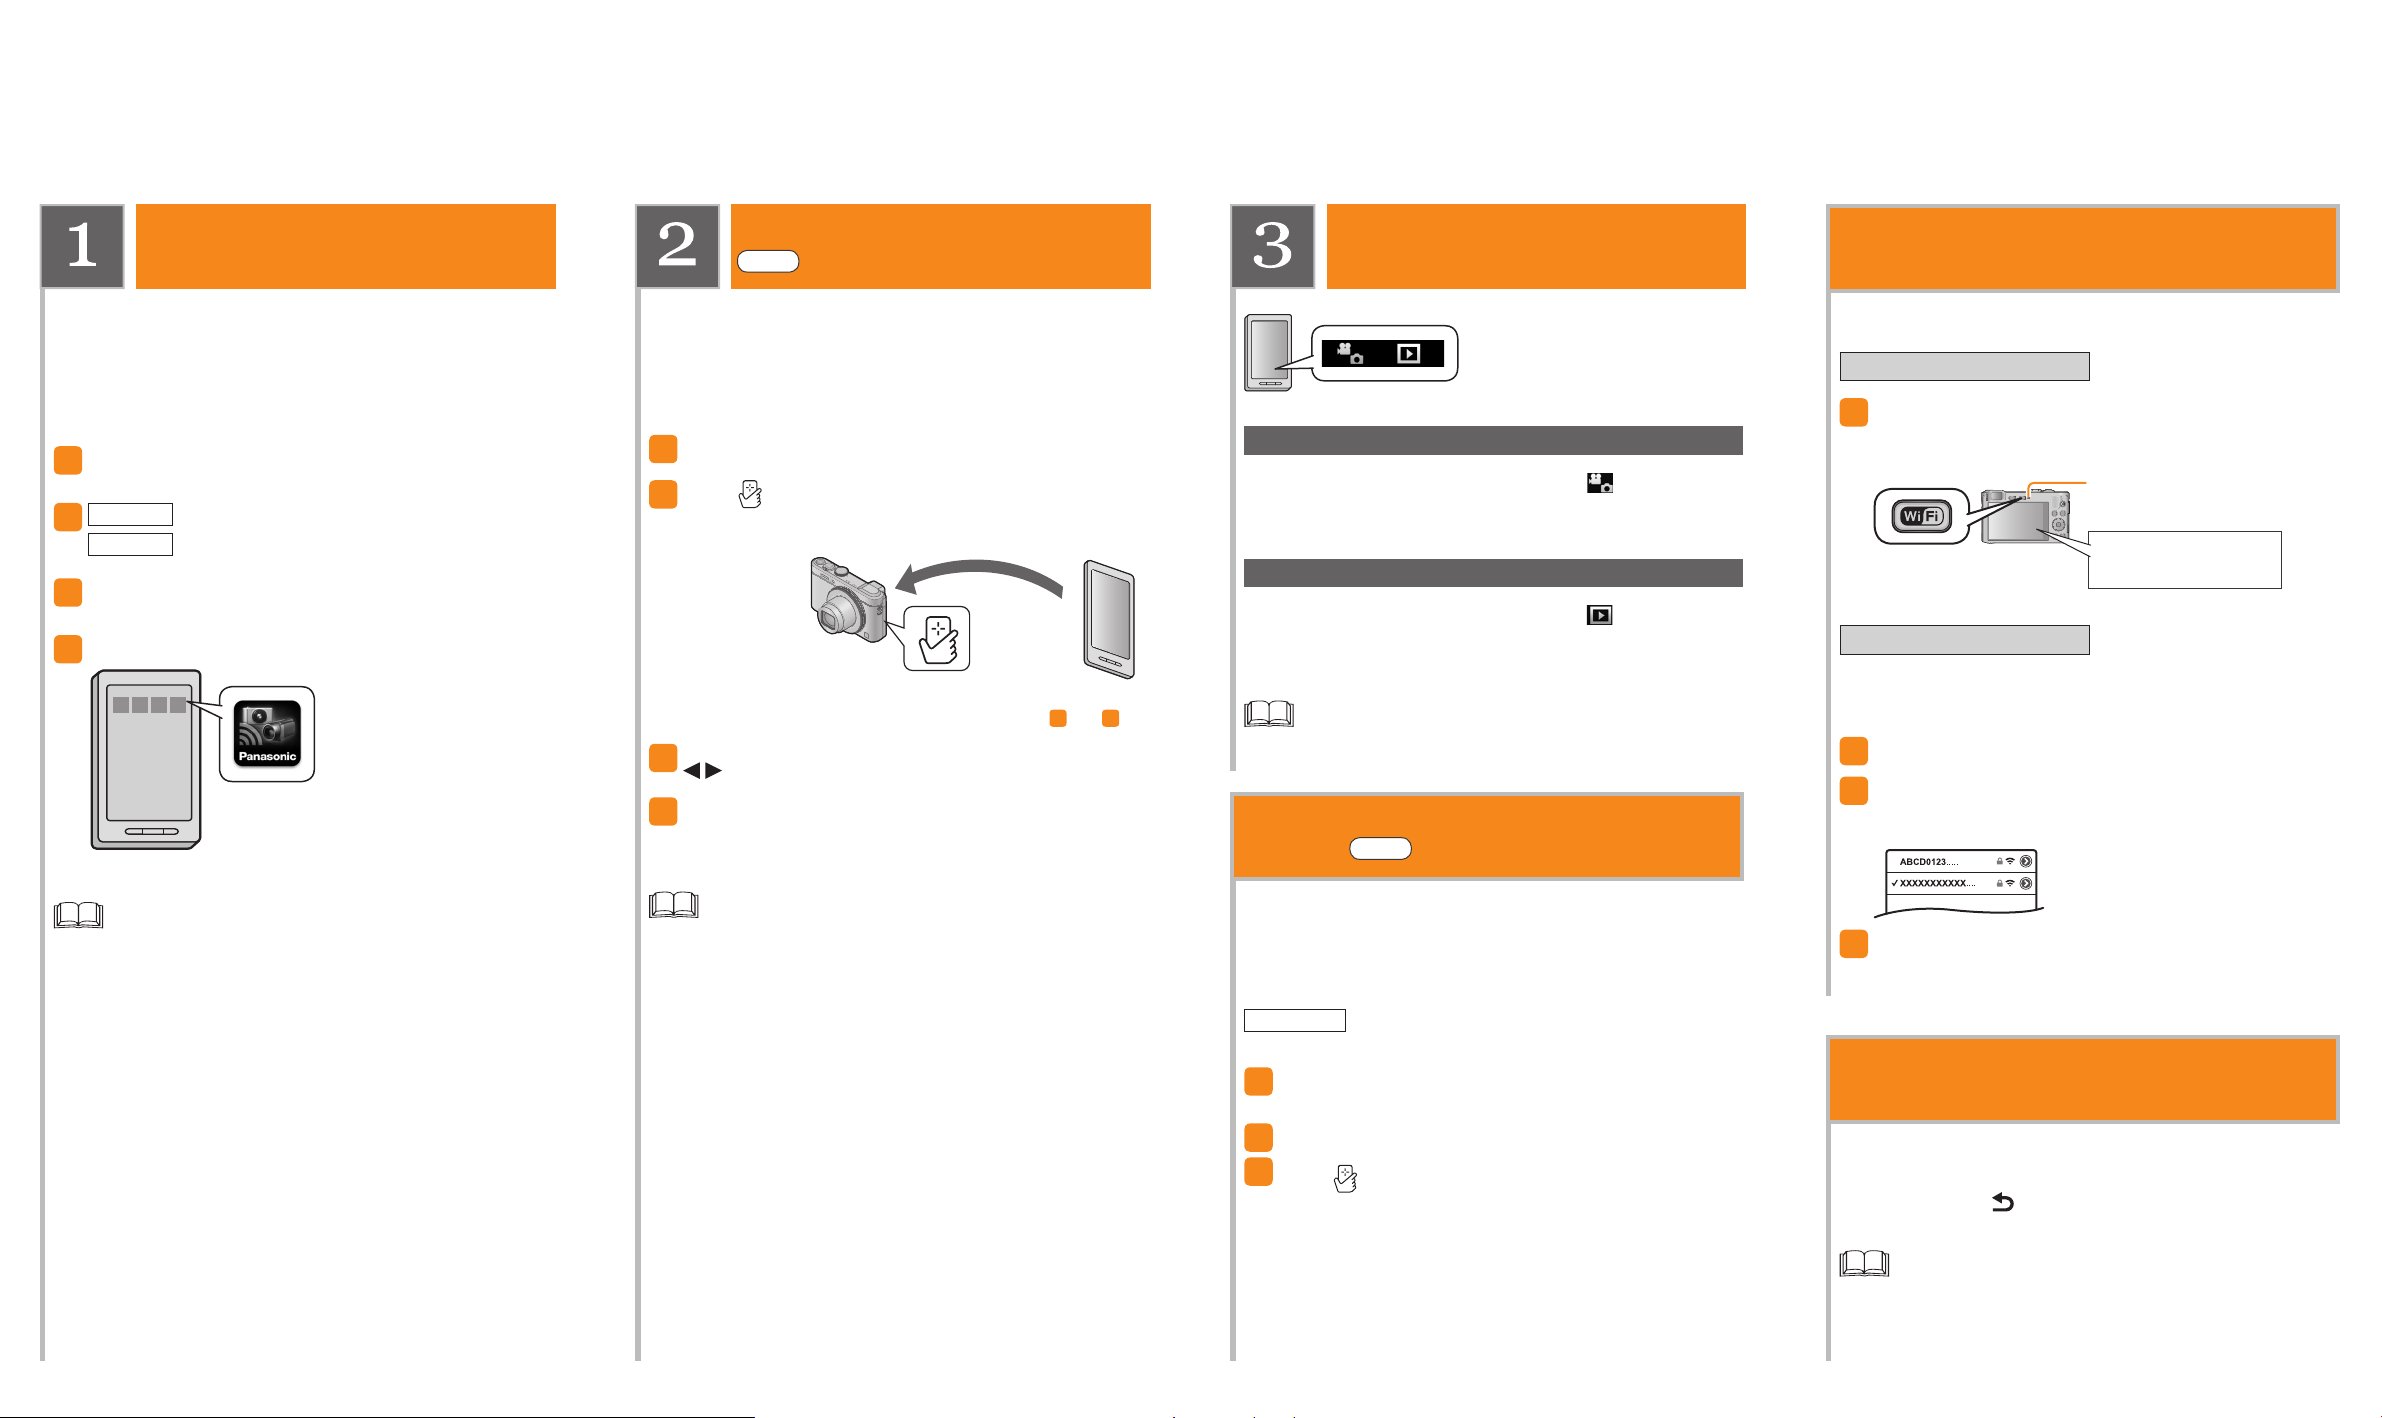
Install the special app on your
smartphone
Your smartphone will need the “Panasonic Image App” to operate the
camera.
(The app is referred to as the “Image App” in this guide.)
■
Compatible OS
Android 2.2 - Android 4.2
iOS 4.3 - iOS 6.1
Connect the smartphone to a network
1
Android
2
Enter “Panasonic Image App” in the search field
3
Select “Panasonic Image App” and install
4
Select “Google Play™ Store”
iOS
Select “App StoreSM”
Connect to a smartphone
NFC
Use the NFC function to easily complete connecting. You simply
need to hold the smartphone close to the camera. This function can
be used with NFC compatible smartphones with Android (2.3.3 or
above). (Excludes certain models)
• If using an iOS smartphone, etc., see “Connecting to a smartphone
manually” on the right.
Start “Image App” on the smartphone
1
With [ ] displayed on the “Image App”
2
connection screen, hold the smartphone close
to the camera
Hold the smartphone close to
(within about 5 mm (0.20 inch))
• When connecting for the first time, continue on to 3 and 4.
When the connection screen is displayed, press
3
to select [Yes] and press [MENU/SET]
Hold the smartphone close to the camera again
4
• When the connection is complete, live images captured by the
camera will be displayed on your smartphone.
this area
Use the smartphone to operate
the camera
Recording
On the “Image App” screen, select [ ]
You can perform operations like zoom and pressing the shutter as if
using a remote control.
Viewing pictures and saving to smartphone
On the “Image App” screen, select [ ]
To save a picture to your smartphone, touch and hold the picture and
drag it in the direction from which a message appears.
• For details, read the [Help] in the “Image App”.
• The screen may differ partially depending on the OS you are using.
Easily transferring pictures in the
camera
NFC
Connecting to a smartphone
manually
This is how to connect the camera to non-NFC-compatible equipment
such as iOS smartphones.
Operation by camera
Press and hold the [Wi-Fi] button
1
• The Wi-Fi connection lamp illuminates blue, and the information
needed for the connection is displayed.
Wi-Fi® connection lamp
(Display example)
SSID: XXXXXXXXX
Password: 12345abc
Operation by smartphone
If using an iOS smartphone, the settings screen will be displayed
when the home screen settings icon is selected.
• Operations, etc., will vary depending on the OS you are using.
Turn the Wi-Fi function on
2
On the Wi-Fi settings screen, select the item
3
with the same SSID displayed on the camera and
enter the password
• Use the latest version.
• The app may not operate properly on some smartphones.
For information on the “Image App”, refer to the support site below.
http://panasonic.jp/support/global/cs/dsc/ (This site is available in
English only.)
• You can still connect to the smartphone even if the camera is turned
off. The camera lens may come out when the power is turned on
after making a connection. Be careful that the vibration does not
cause the camera to drop.
• When the smartphone is used to operate the camera to play back
one picture, the connection is in picture transferring mode.
(→See “Easily transferring pictures in the camera”, on the right)
• Be careful not to hit the smartphone hard against the camera when
holding it close. This could damage the smartphone and/or camera.
• Contact the manufacturer of the NFC compatible smartphone for
instructions on using this function.
You can establish a Wi-Fi connection using the NFC function and
easily transfer the picture on display (just one picture) simply by
holding the smartphone close to the camera. This is convenient in
cases such as when you wish to give a recorded picture to a friend
right after you took it. To use this function, you must have an NFC
compatible smartphone with the “Image App” installed.
Preparation
On the camera, play back the picture you wish to
1
• If the camera is already connected to a different
smartphone, first cancel that connection. (→See
“Closing the connection”, on the right)
transfer
Start “Image App” on the smartphone
2
3
With [ ] displayed on the “Image App”
connection screen, hold the smartphone close
to the camera
• The picture being played back is transferred to the smartphone.
Start the “Image App”
4
• The image captured by the camera will be displayed on your
smartphone.
Closing the connection
After use, close the connection with the smartphone. When the
connection is cancelled, you will be able to record and play back
pictures on the camera as normal.
Press [Q.MENU/ ] button on the camera and select
[Yes] on the confirmation screen
• To close the app on an Android smartphone, press the back button
twice on the “Image App” screen.
 Loading...