

Page 1
Panasonic
Digital Camera
Operating Instructions
Model No. DMC-LC20EN
DMC-LC20T
TM
MuitiMediaCard
LEICA
DC VARIO-ELMARIT
Before use, please read these
instructions completely.
m
ij ’ gra№tta^i
VQT9910-1
Page 2

CilsioiBer,
Wb would like tc take this opportunity to
thank you lor purchasing this Panasonic
Digitai Camera. Please read these
Operating Instructions carefully and keep
them handy for future reference.
¡nformatbn for
Your Safety
WARNING
TO REDUCE THE RISK OF FIRE OR
SHOCK HAZARD AND ANNOYING
INTERFERENCE, USE ONLY THE
RECOMMENDED ACCESSORIES AND
DO NOT EXPOSE THIS EQUIPMENT TO
RAIN OR MOISTURE. DO NOT
REMOVE THE COVER {OR BACK);
THERE ARE NO USER SERVICEABLE
PARTS INSIDE. REFER SERVICING TO
OUAUFIEO SERVICE PERSONNEL
« Kiease note that the actual ccntrcis and
components, menu items, etc. of your
Digital Camera may lock somewhat
different from these shown in the
illustrations in these Operating
Instructions.
® SD Logo is a trademark.
® Other namiss, comipany names, and
product names printed in these ^
Instructions are trademarks or registered
trademarks cf the companies
concerned.
Carefully observe copyright laws.
Recording of pre-recorded tapes or
discs or other published or broadcast
material for purposes other than your
O'wn private use may Infringe copyright
laws. Even for the purpose of private
use, recording of certain material may
be restricted.
Page 3

Contents
Safety
Infornnaiion for Your Safety
Preparation
Standard Accessories...................................................................................................................................... 5
Names of the Components............................................................................................................................. 6
LCD Monitor Display
Quick Guide ....................................................................................................................................................... 9
inserting the Battery.........................................................................................................................................10
Charging the Battery........................................................................................................................................ 11
Inserting the Card ............................................................................................................................................ 13
Turning Power on/off .................................................................................................................................... 15
Attaching the Strap ..........................................................................................................................................16
Using the Tripod ...............................................................................................................................................17
Using the LCD Monitor
The Indicators............................................................................................................................................................................. 19 .stv;-
The Shutter Button (Pressing halfway/Pressing fully)............................................................................20
The Mode Dial
Operating the Menu ....................................................................................................................................... 22
Setting the Date/Time (Clock Set) ................................................................................................................23
.......
.......
....................................................................................................................................... 21
............................................................................................................................2
.................................................................................................................................. 8
........
...........................................................................................................................18
..9
10
11
13
15
16
17
18
19
20
21
22
23
;y; 7.;;
i
i: .T k
Recording images (Basic)
Taking Pictures .................................................................................................................................................24
Checking the Last Picture (Review)............................................................................................................. 26
Recording Motion images...............................................................................................................................27
Using the Optical Zoom ............................................................................................................................. 28
Using the Digital Zoom ...................................................................................................................................29
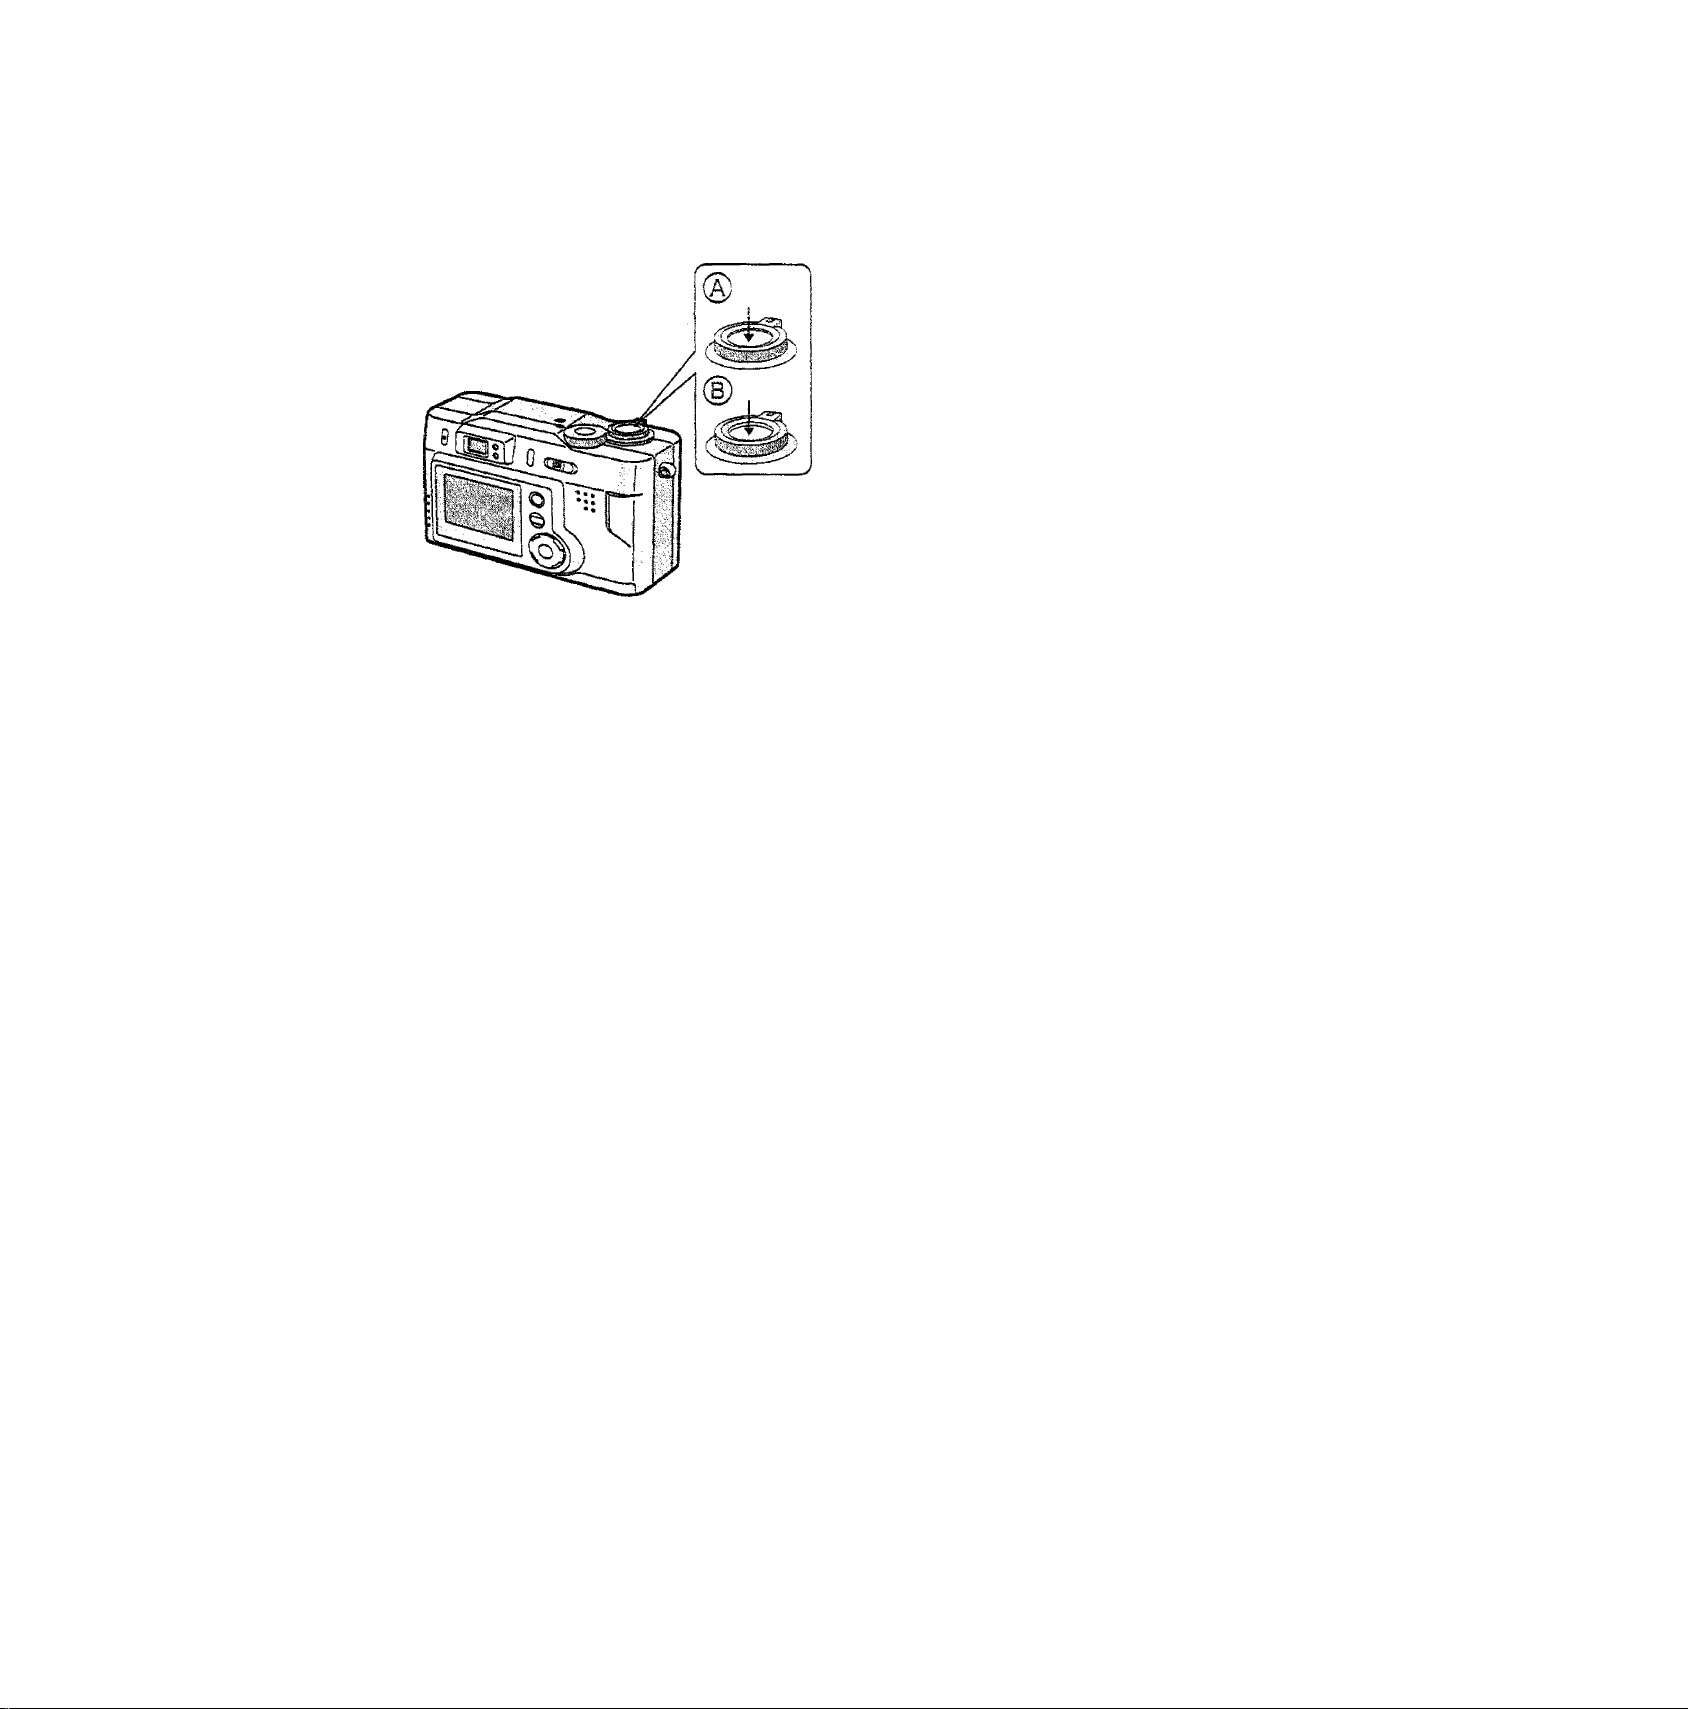
Taking Pictures with the Built-in Flash........................................................................................................30
Taking Pictures with the Self-timer ............................................................................................................. 32
Recording images (Advanced)
Changing the Picture Size ........................................................................................................................... 33
Changing the Quality (Data Compression Ratio)......................................................................................34
Compensating the Exposure ........................................................................................................................ 35
Using the AF/AE Lock......................................................................................................................................36
Setting the White Balance ..............................................................................................................................37
Setting ISO Sensitivity ....................................................................................................................................39
Taking Pictures with Macro Mode.................................................................................................................40
Taking Pictures with the Landscape Mode
Taking Pictures with the Night Portrait Mode............................................................................................42
Taking Pictures with Burst Mode ............................................................................................................... 43
..............................................................................................
41
Page 4

Playback.
Flaying Sack Still Pictures .................................................................................................. 44
9 Image Multi Playback....................................................................................................... 45
Using the Playback Zoom..................................................................................................... 46
Playing Back Motion images ................................................................................................ 47
Editing
Deleting images................................................................................................................... 48
Writing the Print Information in the Card (DPOP Setting)
Protecting Images on the Card ............................................................................................. 53
.....................................................50
Tschnical use
Playing Back with SHde Show (Automatic Playback)
Formatting the Card.............................................................................................................. 55
Adjusting the LCD Monitor Brightness................................................................................. 56
Using the Auto Review .........................................................................................................57
Setting up the Beep Sound....................................................................................................58
Setting up the Power Save Mode .........................................................................................59
Memorizing the settings......................................................................................................... 60
Resetting the File Number.................................................................................................... 61
Playing Back Images on a TV Monitor.................................................................................. 62
After Use............................................................................................................................... 63
Connecting to PC.................................................................................................................. 64
...........................................................
54
Olliers
The Menu items.....................................................................................................................65
Cautions for Use ....................................................................................................................66
Warning Indication ................................................................................................................ 69
Troubleshooting .....................................................................................................................70
Soecifications........................................................................................................................71
4
Page 5
Stindard Accessories
Before using your camera, check the contents.
I SD Memory Card (8MB)
RP-SD00S8
2 AA Ni-MH (nickel-metai hydride)
Battery
3 Battery Charger
DE-894B
5 Video Cabie
VJA1153
6 Strap
K2C R2DA 0000 4/K2 CQ2D A000 02.
K2C A2DA 0000 4
® T he P eopl e’s Repu biic of Chin a
(D Area s ot her than the Peo ple' s
Rep ubii c of Chi na
4 USB Connection Kit
USB Connection Cable
K1HA05CD0001
8 Metal Plate
VHD1110
CD-ROM
VFF0145
Page 6
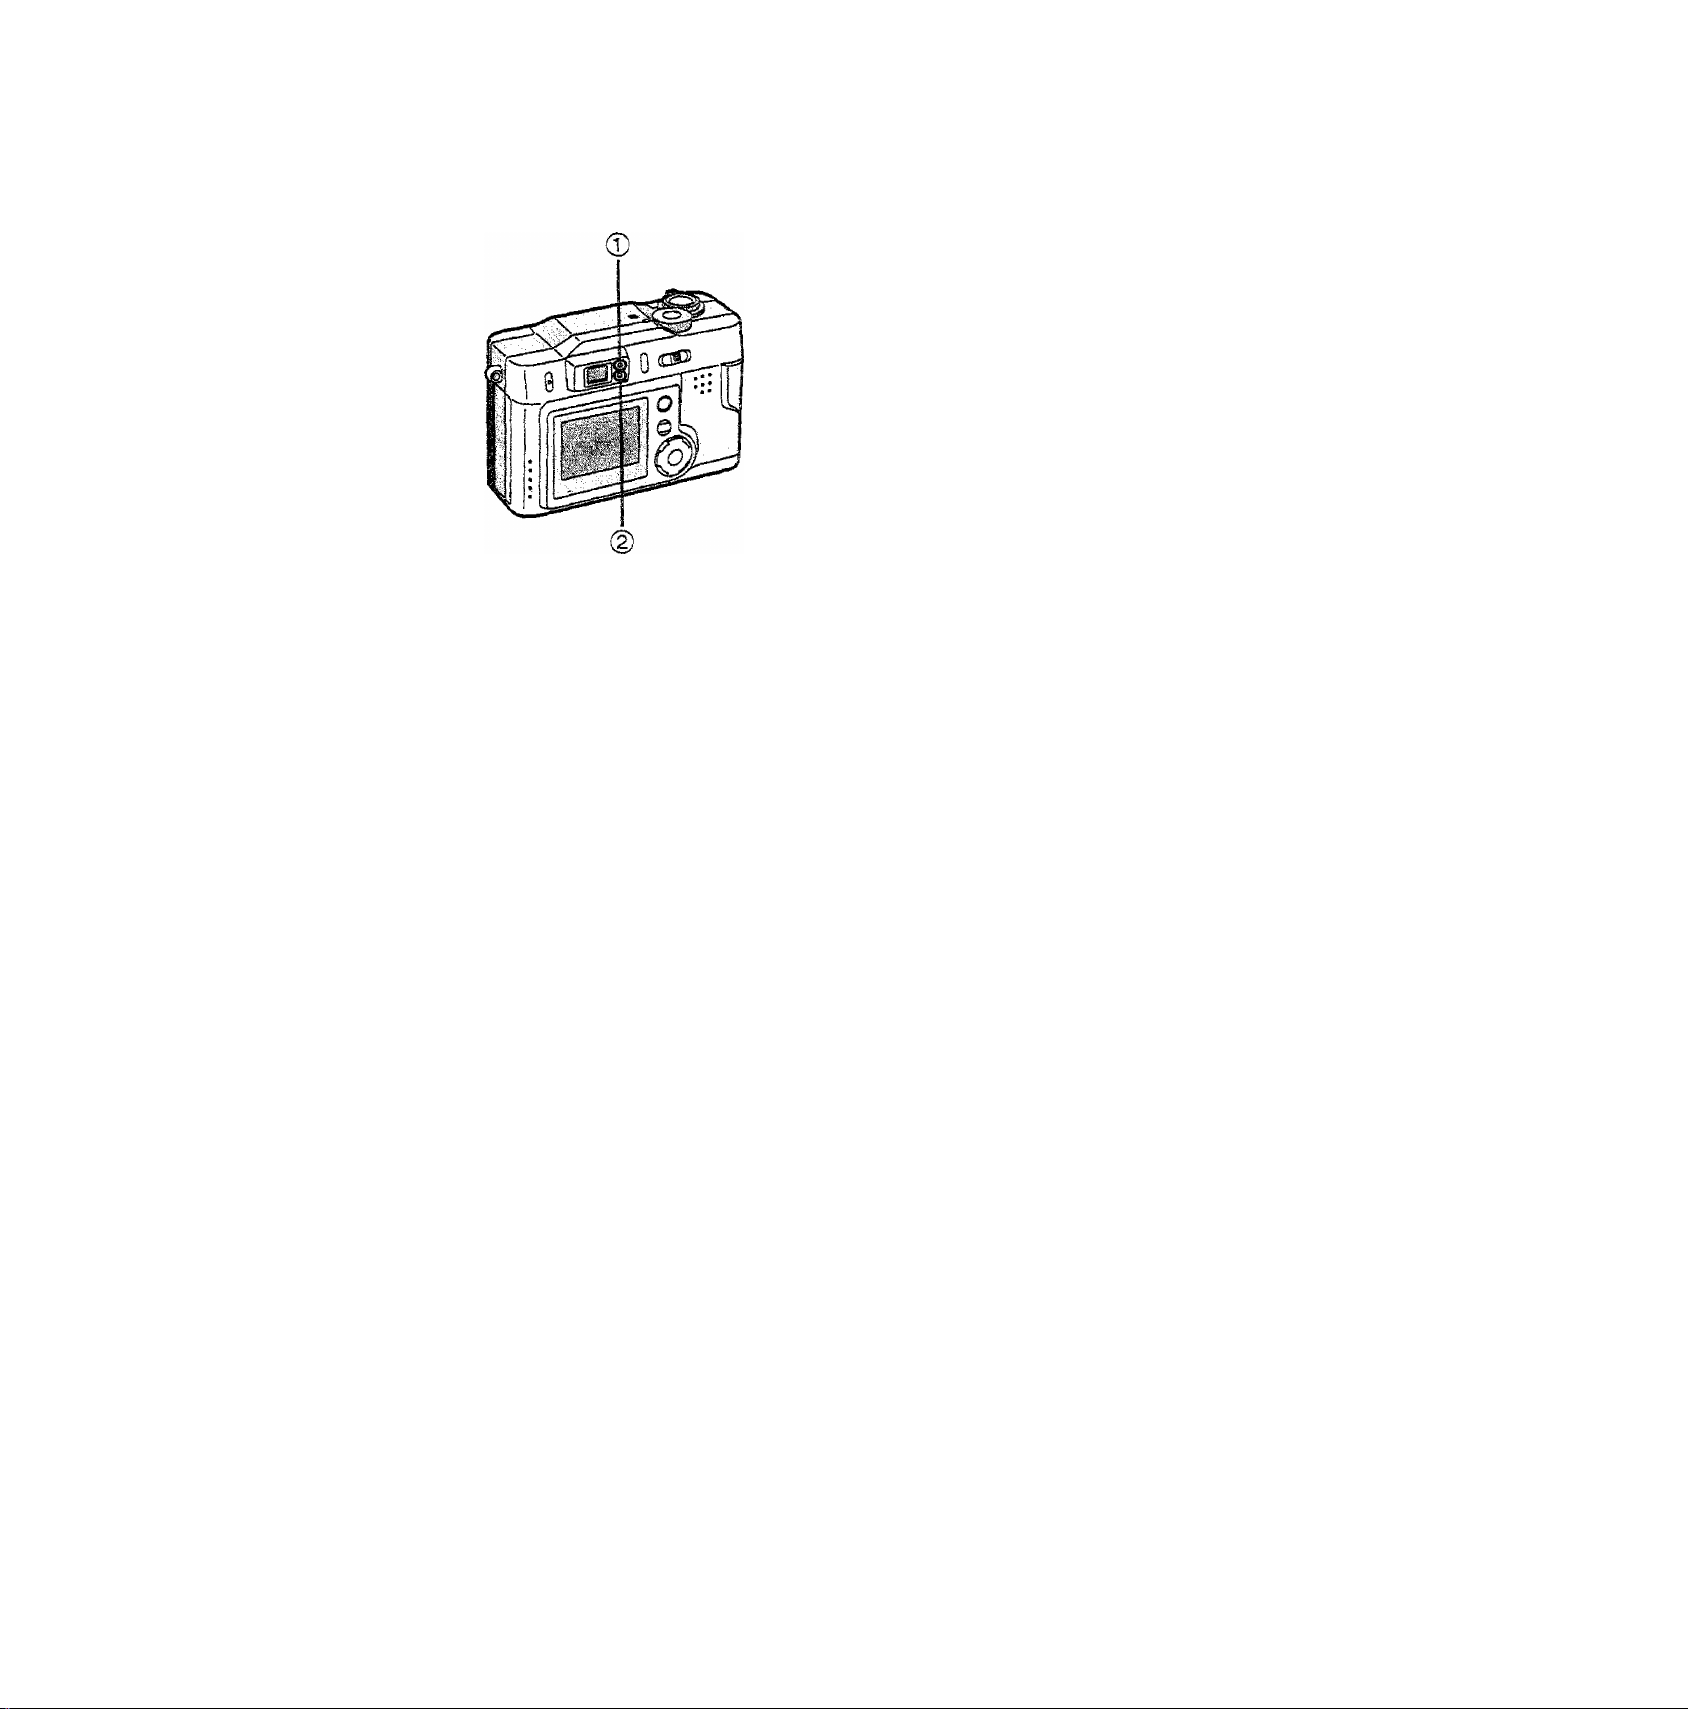
Names of the Components
[Front View]
1 Lens
2 Optical Finder (P24)
3 Fiash
4 Fiash Sensor (P31)
5 Seif-iimer indicator (P32)
[Top View]
6 Zoom Lever (P28, P29)
7 Shutter Button (P20)
8 Mode Dial (P21)
9 Microphone
10 11121314 15
[Back View]
10 Flash Mode Button (P30)
11 Optical Finder (P24)
12 Status Indicator (P19)
13 Flash/Accsss Indicator (P14,
P19)
14 Singie/Burst Mode Button (P43)
15 Power Switch (P15)
16 LCD Monitor (PS)
17 DISPLAY Button (P18)
18 MENU Button (P22)
19 Self-timer/^Button (P32)
20 REViEW/SET/TButton (P26)
21 ► Button
22 Exposure compensation/
A Button (P35)
16171819 20 21 22
Page 7
Hi
■VUi7
j ^0
■i| iSj
1
/ [
_r
i!
! 1
i
23
24
25
26
[Left Side View]
23 Strap Eyelet (P16)
24 V.OUT (Video Output) Socket
(P62)
25 DC
26 USB Socket (P64)
[Bottom View]
27 Battery Door (P10)
28 Memory Card Door (PI 0)
29 Tripod Receptacle (P17)
IN
Socket
2728
29
7
Page 8
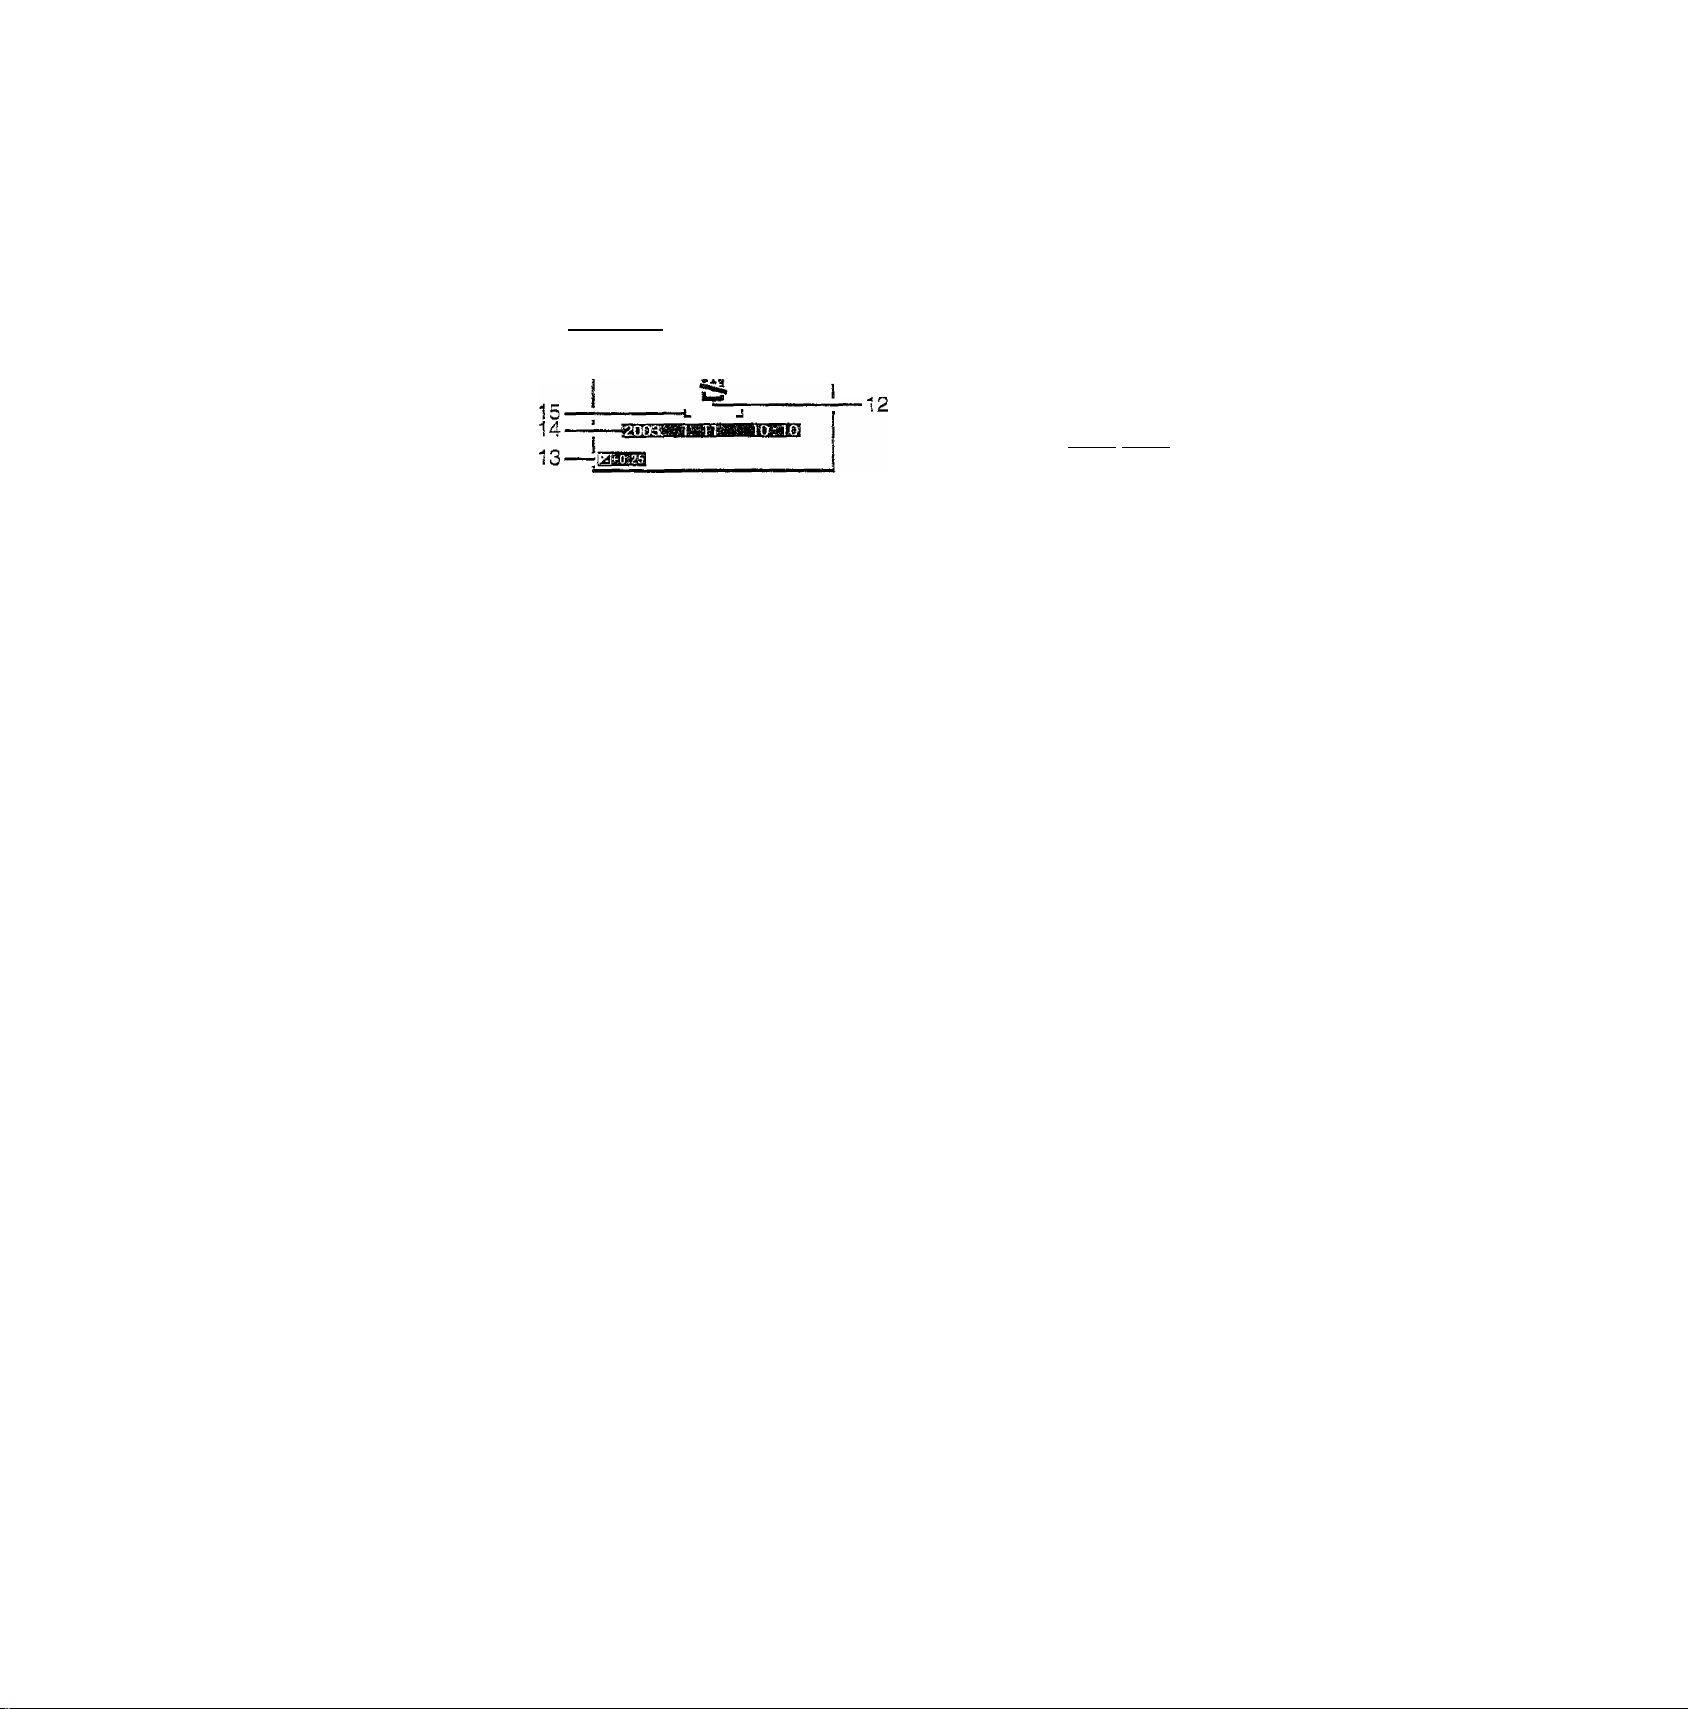
LCD Monitor Display
The LCD monitor indicates the operation status.
34 5 6 7
Гпшшвг
18 eSisortao: Ш-—8
-ij—:
-----------------кв); e 1
16—H
[!n recording]
1 R£Cmode(P21)
7 L_
-------------
_________
--------------------
:—9
i—
:—ii|^
2 Flash mode (P30)
3 White balance (P37)
4 Audio REG
5 Picture size (P33)
6 Quality (data compression ratio) (P34)
1920
[In playback]
19 Playback mode (P44)
¿1
m-.
ШИШИгШа— 22
КВ5Ш1 .150100 gg
_
20 DPOF setting (P50)
21 Protected image (P53)
22 Foider/Fiie number (P61)
23 REC data
24 Recorded time/date
7 Battery indicator (PI2)
8 Recordable number/time
« When recordable number is 1,000
or more, “999” is displayed.
9 ISO sensitivity (P39)
10 Zoom (Р2Э)
11 Seif-timer mode (P32)
12 Memory Card (P13)
13 Exposure Compensation indication
(P35)
14 Current date and time (P23)
15 Focus area (P36)
16 Shutter jiggie alert (PI 9)
17 Focus indication (P24)
18 Burst mode (P43)
8
Page 9
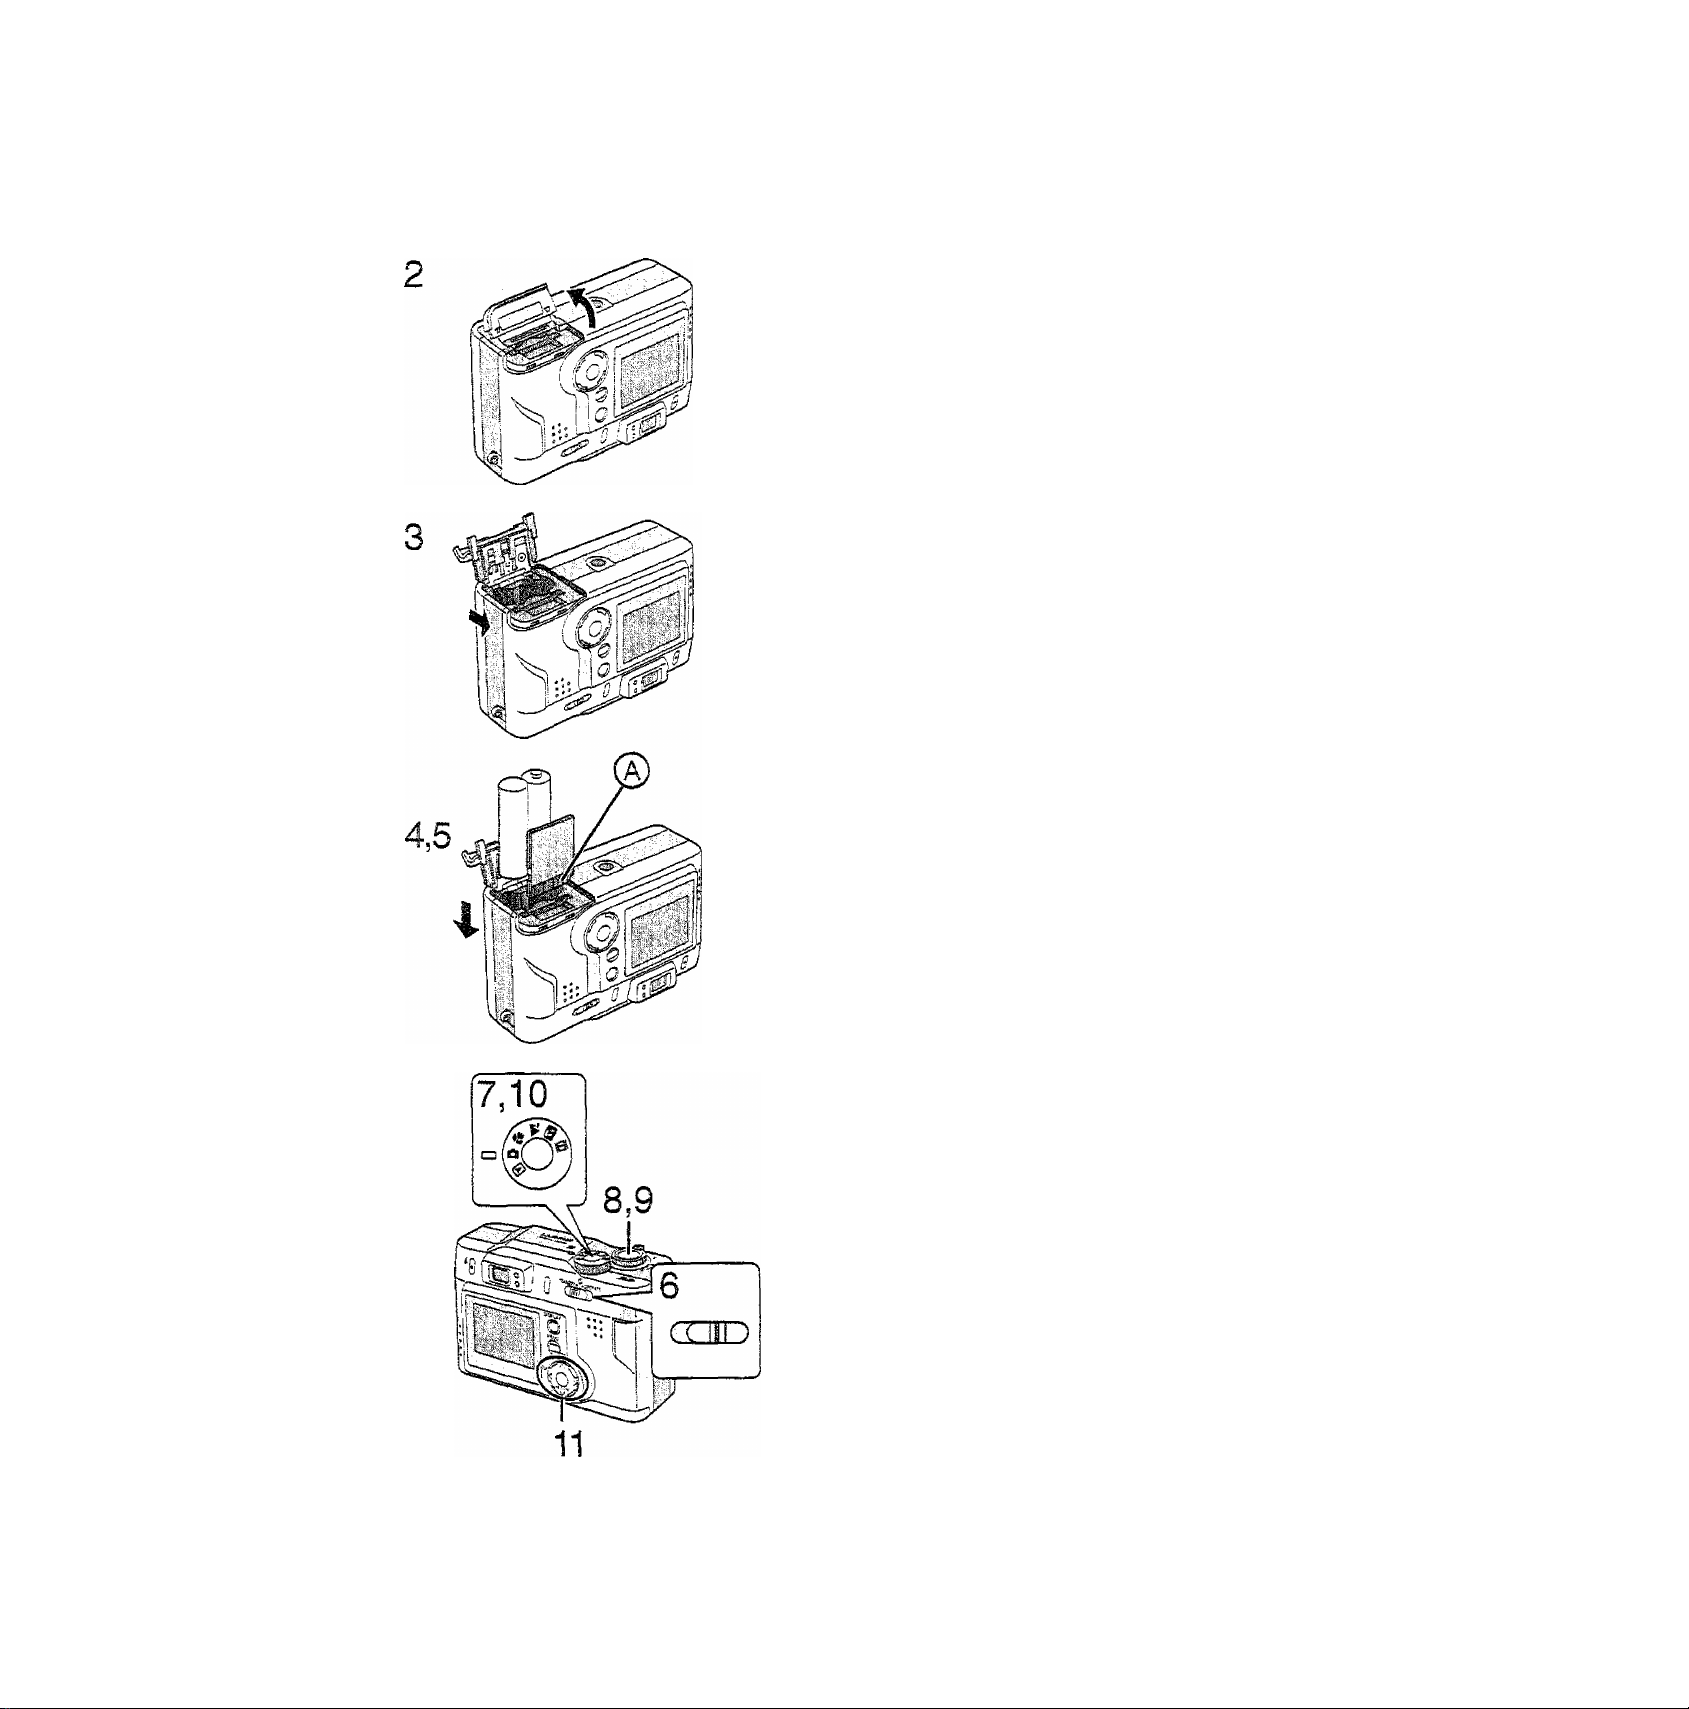
Quick Guide
Prepare following items.
• Camera
• Batteries
® Memory Card
Check that the power switch is set to
[STANDBY].
1 Charge batteries with the charger.
(P11)
2 Open the memory card door.
3 Slide the battery door and open it.
4 Insert batteries into the camera.
(P10)
5 Insert the memory card into the
camera. (P13)
(a); Connection terminal on the back
side of the card
6 Set the power switch to
[OPERATE]. (P15)
7 Set the mode dial to normal picture
mode [Hj. (P21)
8 Press the shutter button halfway to
set the focus. (P20)
9 Press the shutter button fully to
take a picture. (P20)
[Playback]
10 Set the mode dial to playback [[^].
(P44)
1 1 Press to play back a picture
you want to view.
Page 10
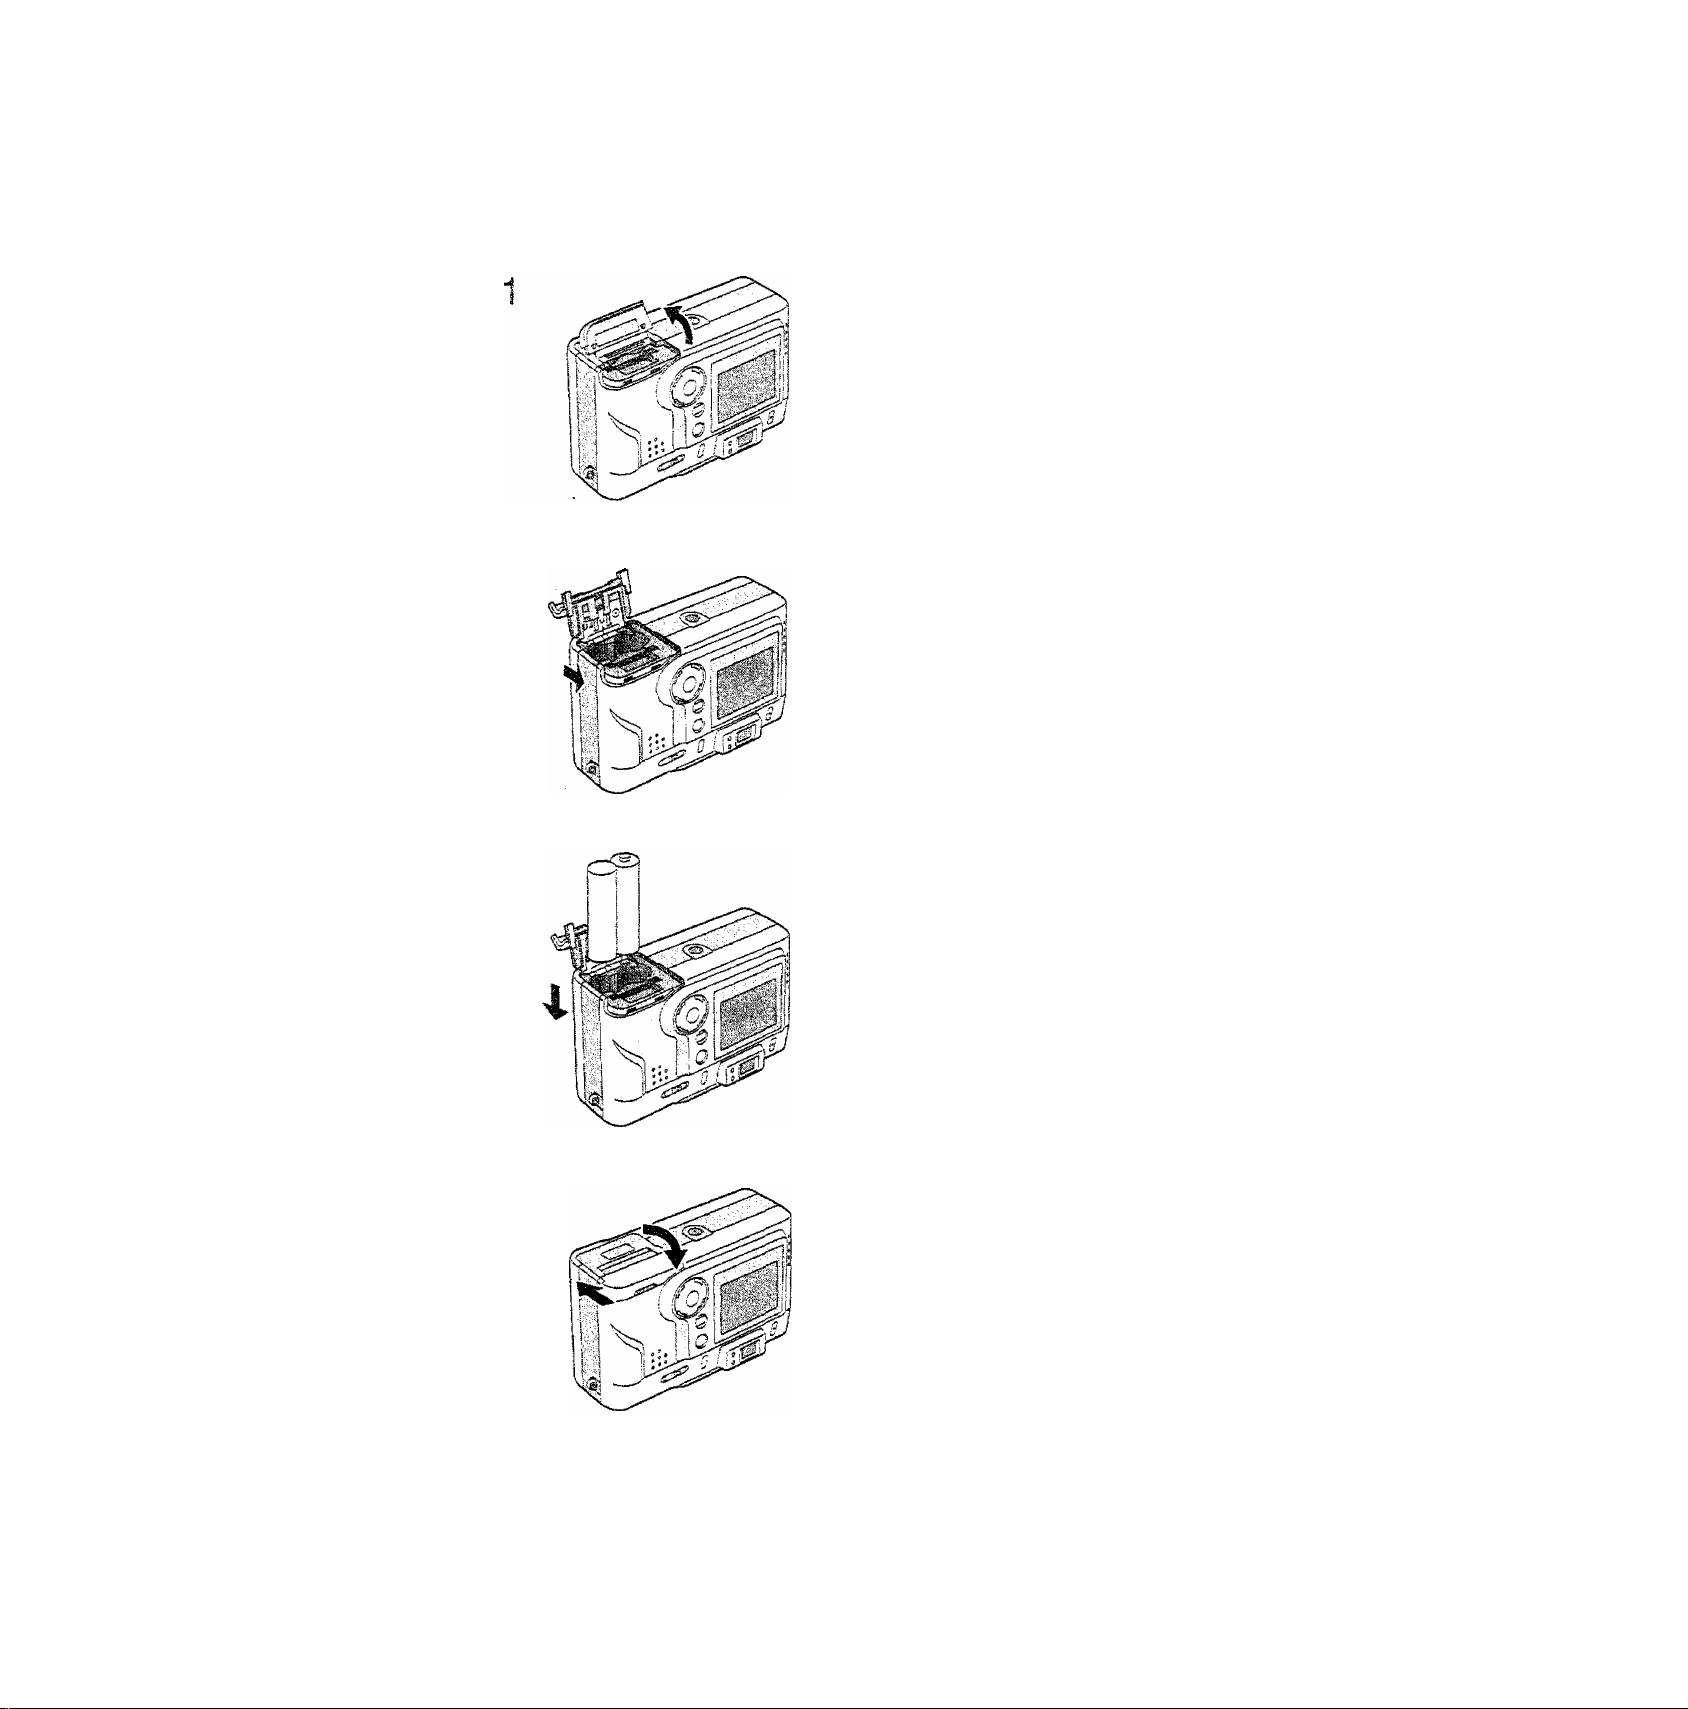
Inserting the Battery
[Preparation]
* Set the power switch to [STANDBY].
1
Open the memory card door.
Slide the battery door and open it.
Be sure to open the memory card
door.
insert batteries.
insert batteries observing the
direction of the © and 0 polarities.
Close the battery door and the
memory card door and close them
until they will dicks.
• If you do not use the camera for a iong
time, remove batteries. (When you insert
batteries again, set the date)
• When you remove batteries from the
camera, before removing set the power
switch to [STANDBY].
® When the card is being read, do not open
the battery door or the memory card door
because the card data may be deleted.
• Use Panasonic AA Ni-MH (nickei-meta!
hydride) Batteries.
• Do not mix new batteries and old
batteries,
CAUTION
Danger of explosion if battery is incorrectly
replaced. Replace only with the same or
equivalent type recommended by the
manufacturer. Dispose of used batteries
according to the manufacturer’s
10
instructions.
Page 11
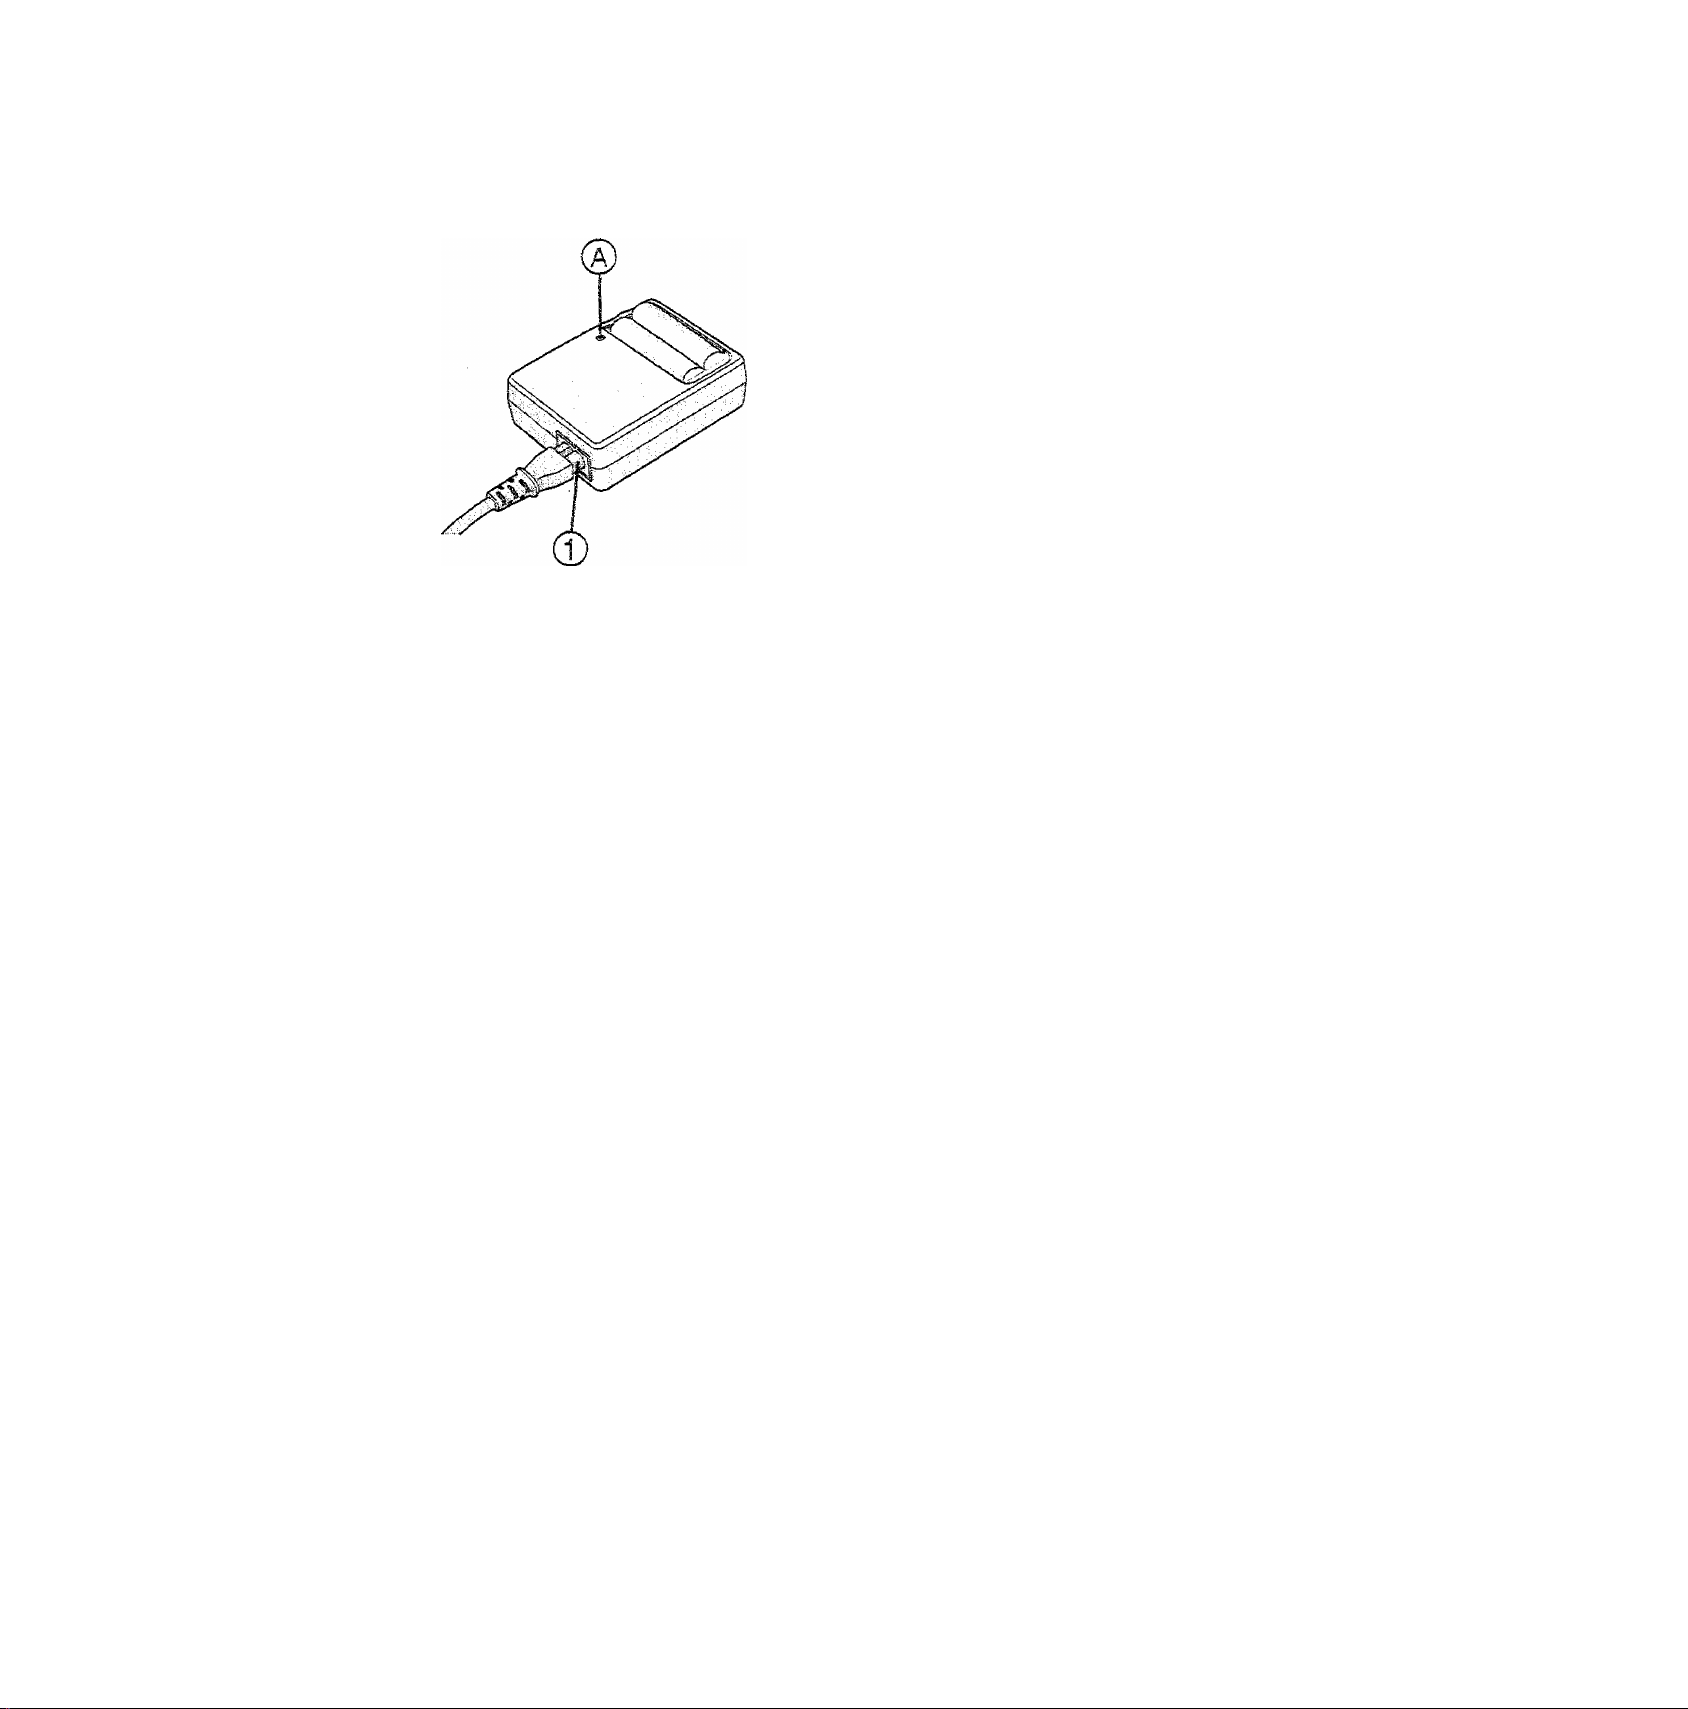
O^àrging the Battery
1 insert batteries into the charger.
2 Connect the AC Mains Lead to the
charger and AC mains socket.
® The AC Mains Lead does not fit
entirely into the socket. A gap wil!
remain as shown ©.
® The charger lamp ® lights and
charge starts.
3 Charge is completed when the
charge lamp is no longer
illuminated.
Environment/charge error
® Charge in a place with a surrounding
temperature of 0 - 40 °C (also
temperature of the battery).
® When charging starts, the charge lamp
lights.
if after charging starts the charge lamp
blinks, it indicates a charge error.
In this case, remove the charger from the
electrical outlet, take out batteries, check
whether the surrounding temperature or
the batteries are too hot or cold, and
charge again. An error cannot be
cancelled by turning the power off/on. if
after charging again the charge lamp still
blinks, consult your nearest servicentre.
• Use Panasonic AA Ni-MH (nickel-metal
hydride) Batteries.
11
Page 12

I Battery indicator
The remaining battery power is displayed on the LCD monitor, (approximation)
F—1: The battery power is sufficient
3: The remaining power is low
\ \ / /
/ \ \
: Replace or recharge the battery
(Beep sounds): The battery is empty
Available recording time
Taking pictures every 30 seconds using flash light for every other
pictures.
When the supplied 8 MB SD Memory Card is used
Supplied
batteries
©
Approx.
5 hours
Approx. 50 min. Approx. 120 min.
(equal to 100 still pictures) (equal to 240 still pictures)
® ! ©
©Charging time
©Continuous recording time (recordable number)/LCD monitor ON
©Continuous recording time (recordable number)/LCD monitor OFF
• If you use an AC adaptor (optional, DMW-AC2) and connect it to an electrical
outlet, you can use the camera without worrying about battery discharge.
Read the AC adaptor operating instructions for the connection method.
• During use, the camera becomes warm, but it is not a malfunction.
THE SOCKET OUTLET SHALL BE INSTALLED NEAR THE
EQUIPMENT AND SHALL BE EASILY ACCESSIBLE.
12
Page 13
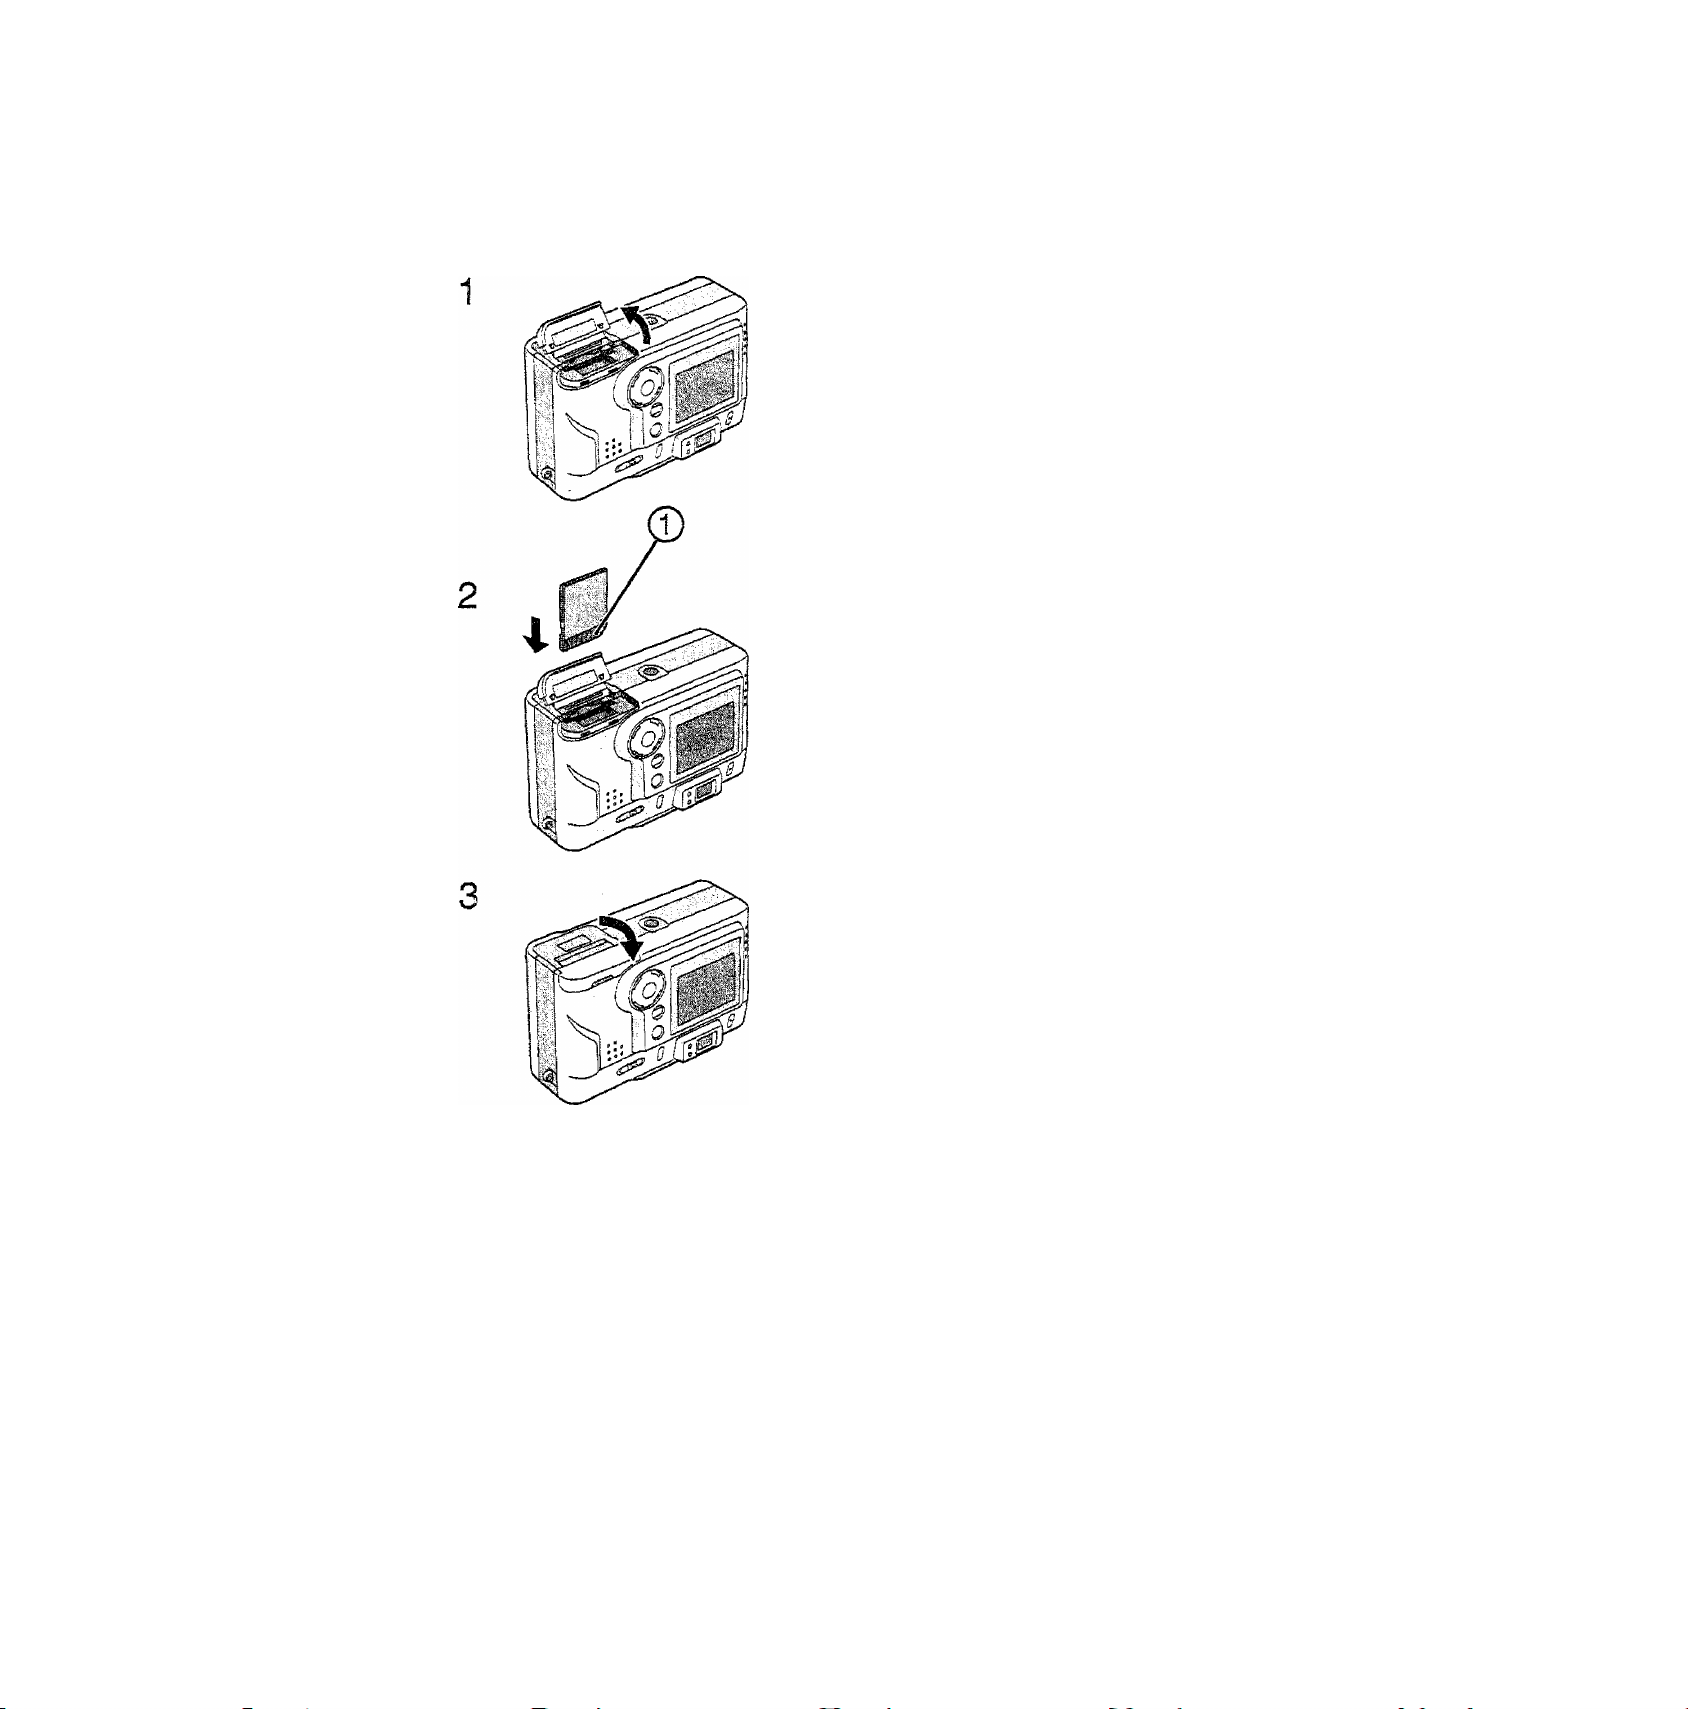
Inserting the Card
[Preparation]
« Set the power switch to [STANDBY],
1
Open the memory card door.
2
[Removing the card]
1 Press the card.
2 Puli the card out.
• Please be sure to switch off the camera
• Do not touch the connection terminal ®
• if the memory card door could not be
«If you cannot insert the card smoothly,
• We recommend that you use the
insert the card ail the way in until it
dicks.
• Check the direction of the card.
Close the memory card door unti! it
dicks.
before inserting or removing the card.
on the back side of the card.
closed completely, please remove the
card and insert it again.
verify whether the direction of the card is
correct.
Panasonic brand card. (Use only the
genuine card)
13
Page 14
Access to the card
When you access the card, the red
tiash/access indicator © lights.
When the fiash/access indicator
lights, do not remove the battery. Do
not open the memory card door and
do not puli the card out. The card and
the card contents could be destroyed
and the camera may not operate
normally.
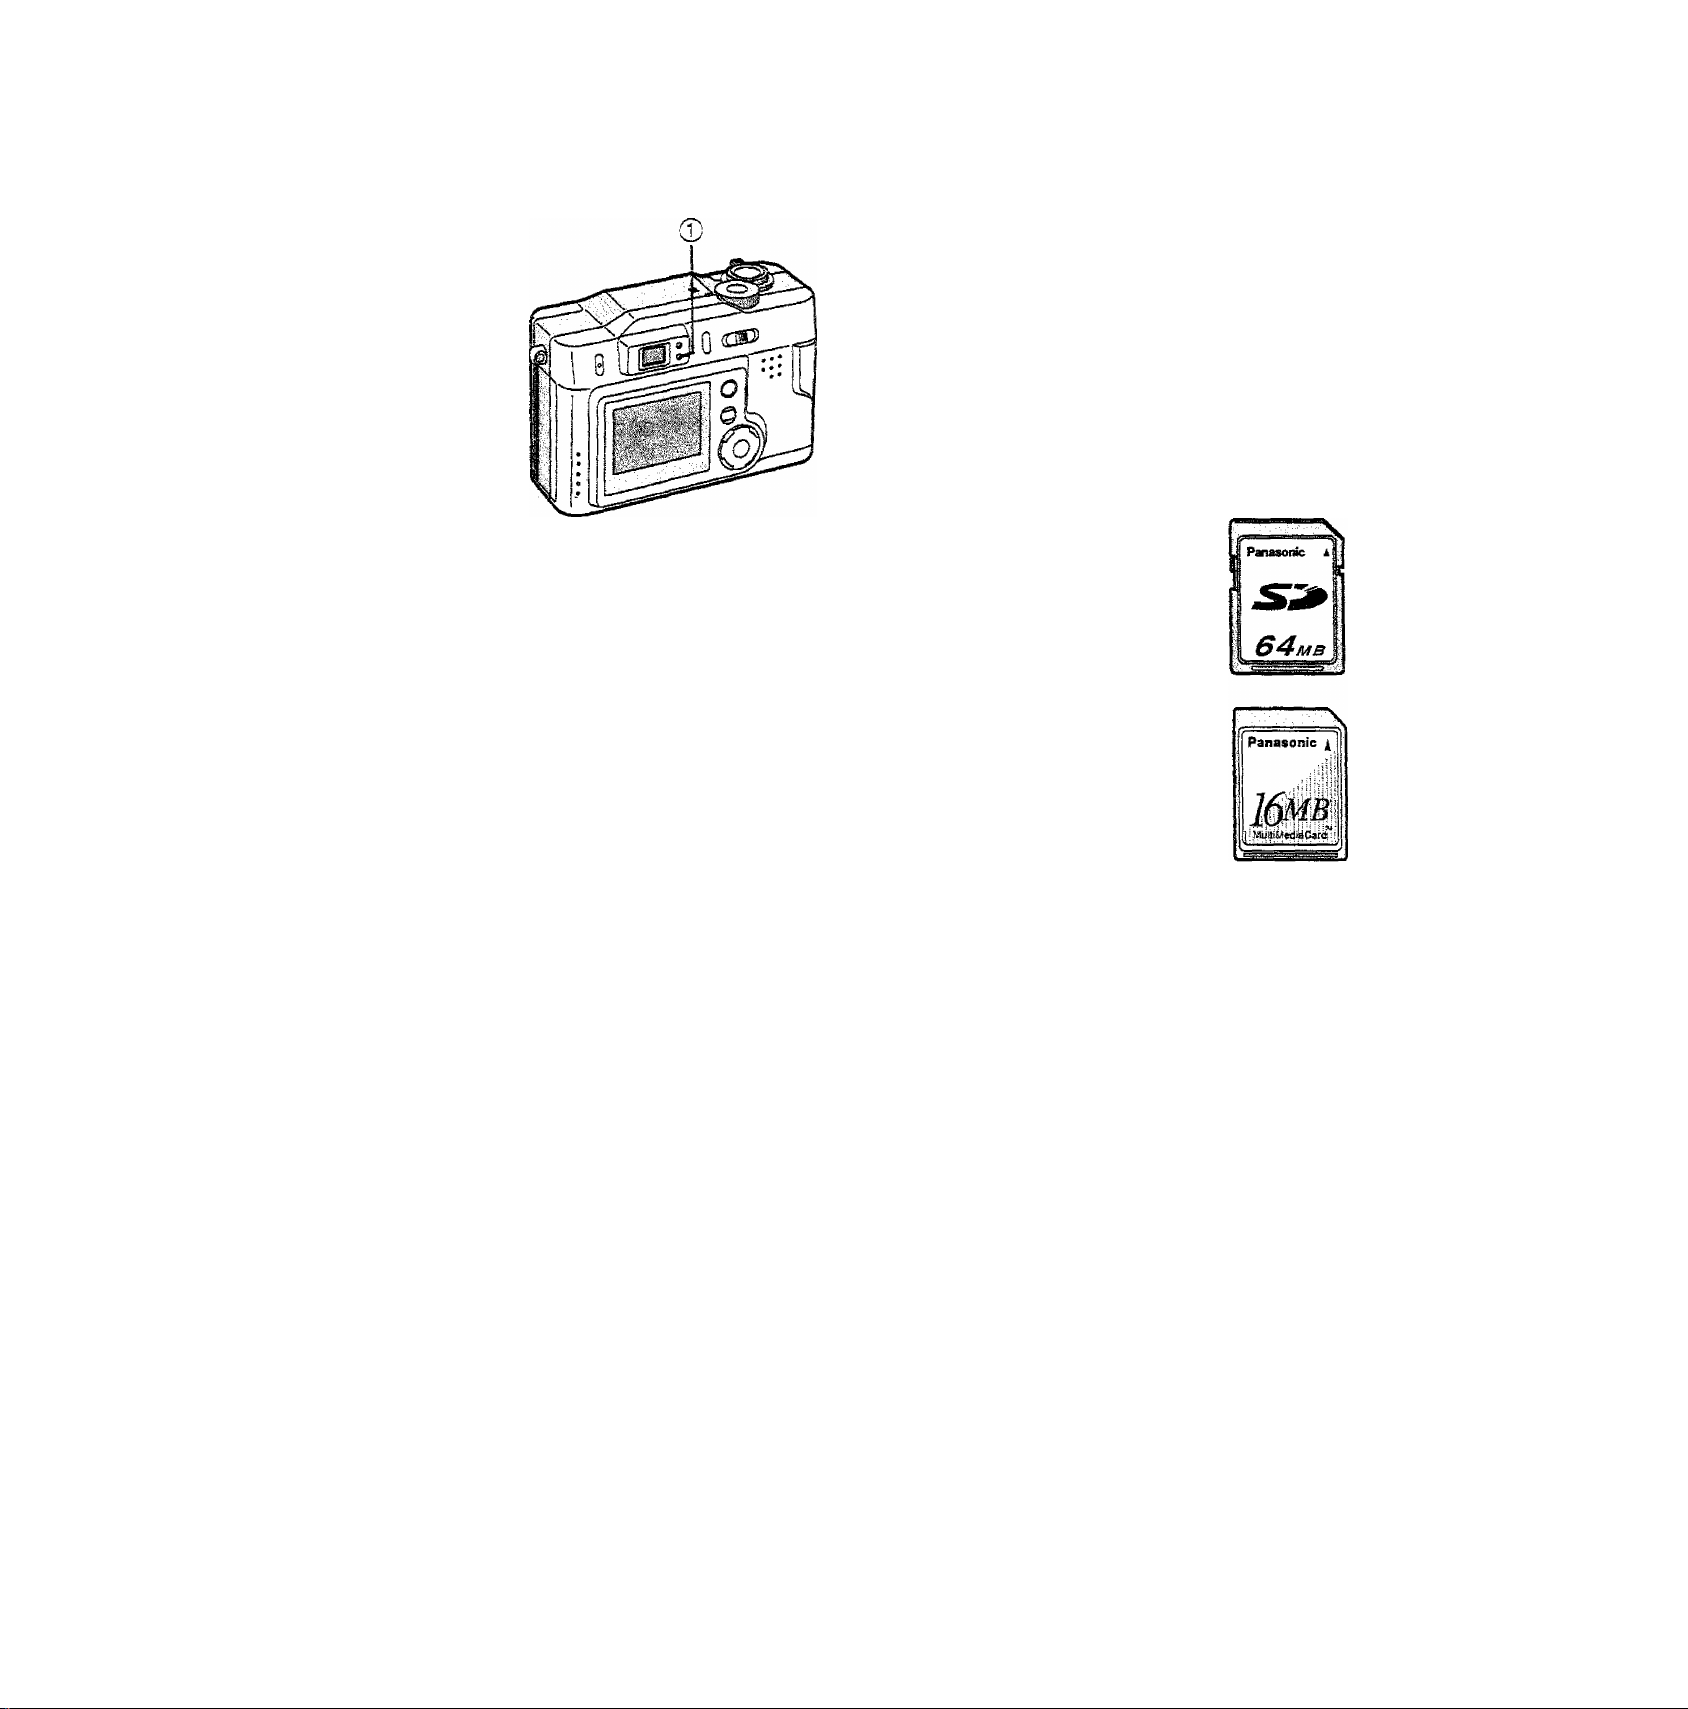
SD Memory Card (supplied) and
MultiMediaCard (optional)
The SD Memory Card and
MultiMediaCard are small,
lightweight, removable external
cards. The SD Memory Card is
equipped with a write protection
switch that can inhibit writing and
formatting.
SD Memory Card
*RP-SDH512(512MB)
® RP-SDH256 (256MB)
• RP-SD128 (128MB)
® RP-SD064B (64MB)
• RP-SD032B (32MB)
® RP-SD016B (16MB)
• RP-SD008B (8MB)
MultiMediaCard
• VW-MMC16(16MB)
® VW-MMC8 (8MB)
Since the card contents could be
damaged or erased because of the
electrical noise, static electricity and
camera and card defects, also store
the important data in a PC (P64)
using the USB socket.
14
Page 15
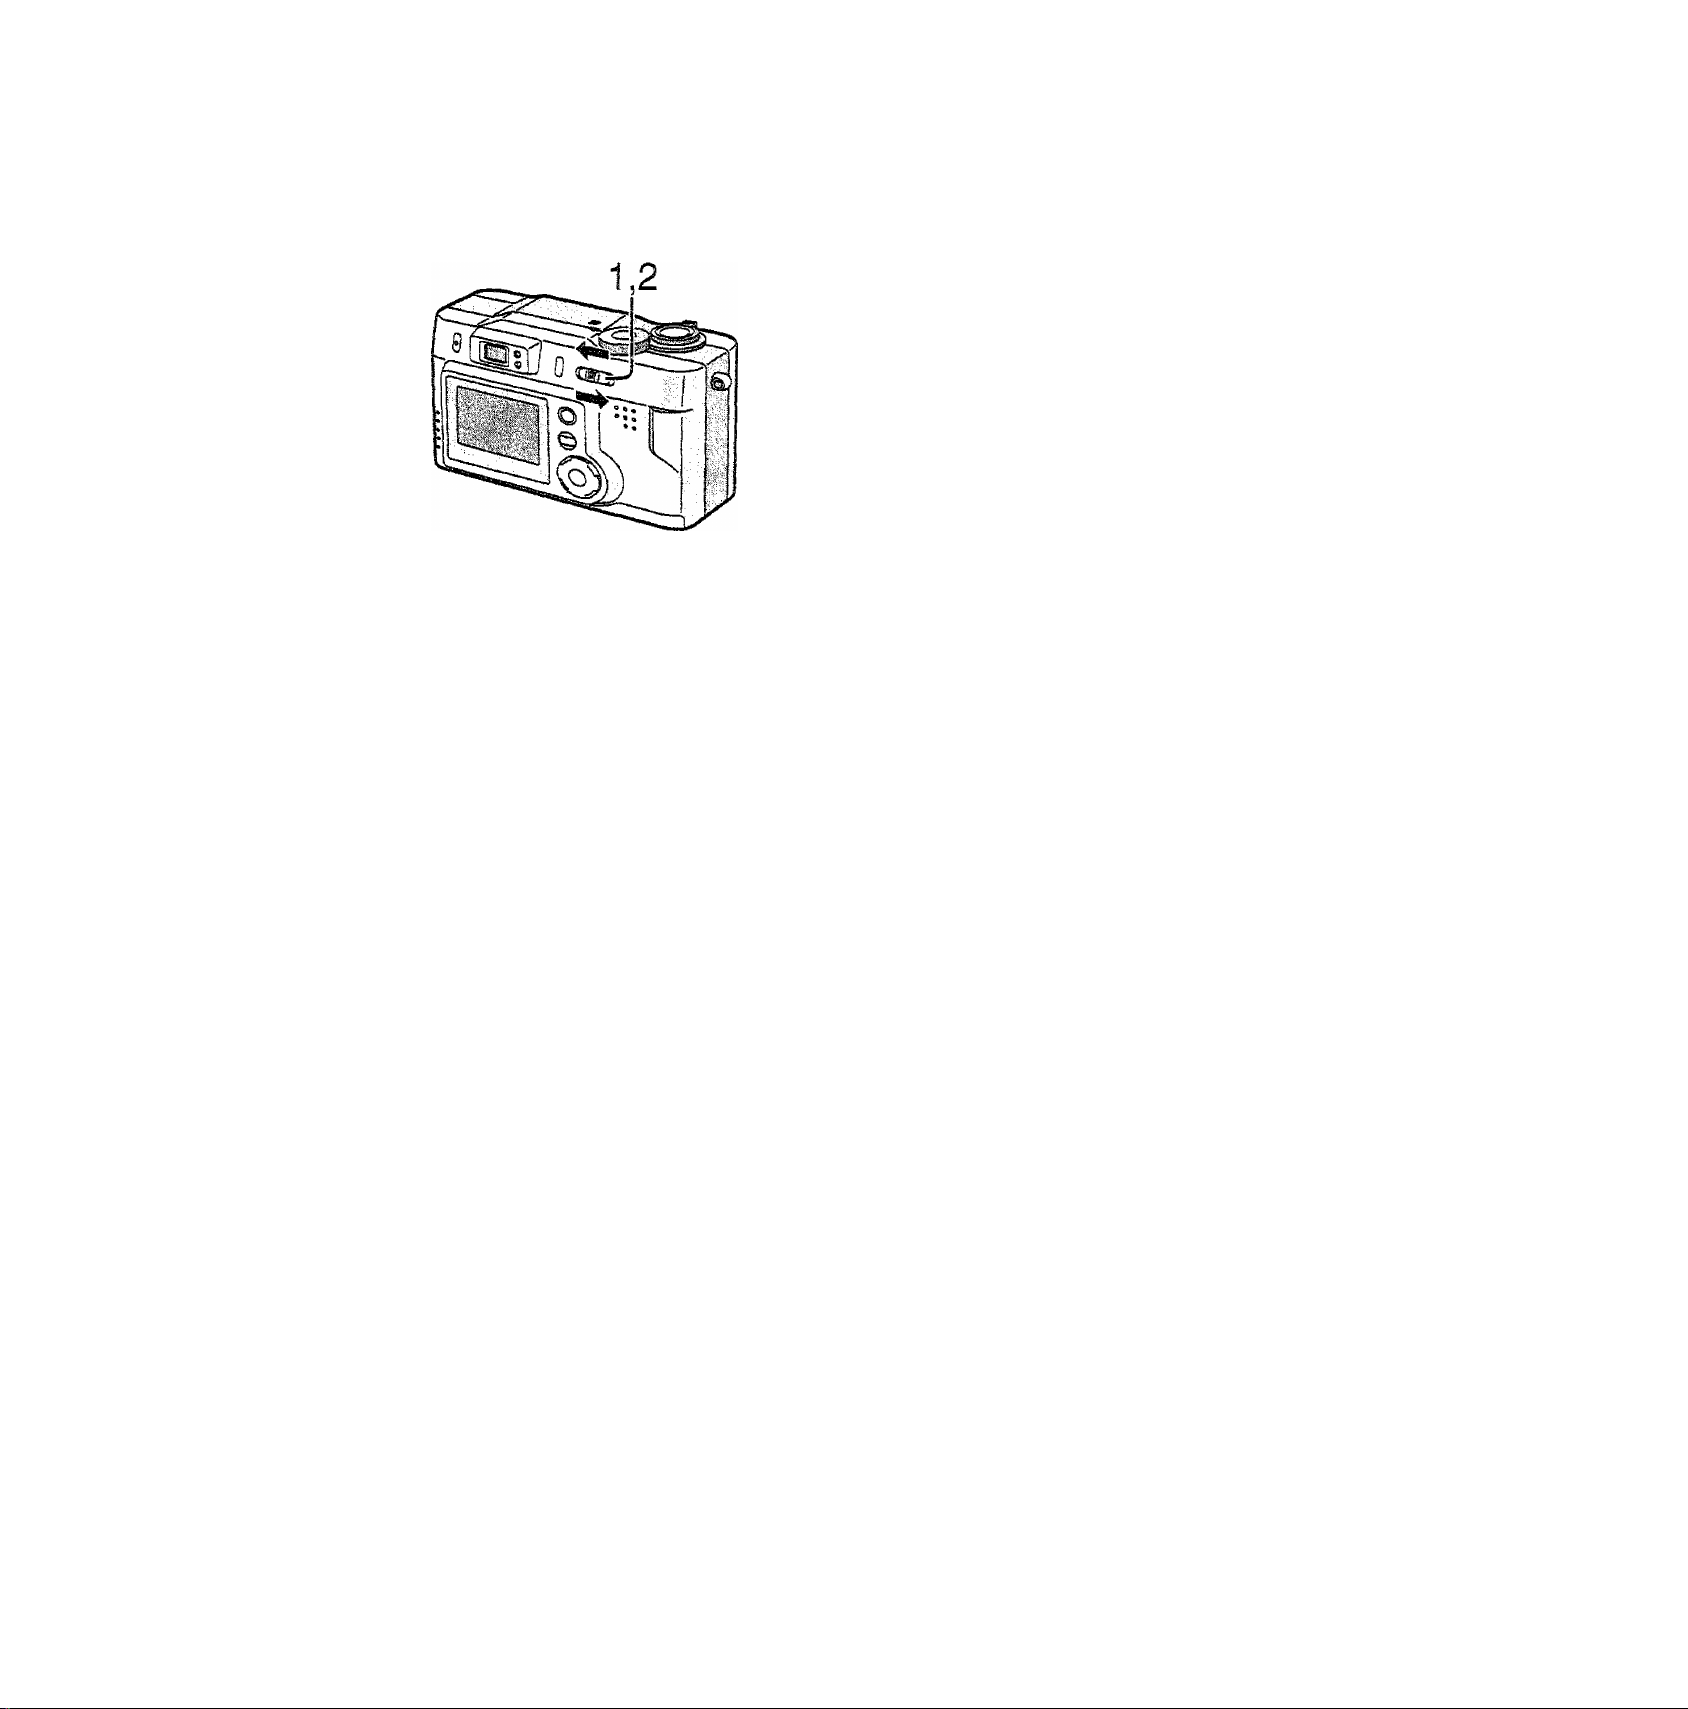
Turning Power on/off
1 Slide the power switch and set to
[OPERATE].
«The status indicator lights.
2 Set the power switch to
[STANDBY].
When switching the power on/off, do not put any obstacle in front of the lens.
15
Page 16

Attaching the Strap
1 Remove the triangular metal piece
from, the strap.
¿ Open with the metal plate and
attach it to the eyelet © of the
camera.
3 Attach the strap.
4 Attach the strap to the other side of
the camera in the same way.
16
Page 17

tlsing the Tripod
When using a tripcd, you can take pictures
in siow shutter speed or zoom in tele
position.
1 Attach the camera holder (2) to make
it match with the tripod receptacle ©
of the camera.
2 install the camera holder into the
tripod.
• Read carefully the tripod operating
instructions.
• You cannot remove the battery or card.
17
Page 18
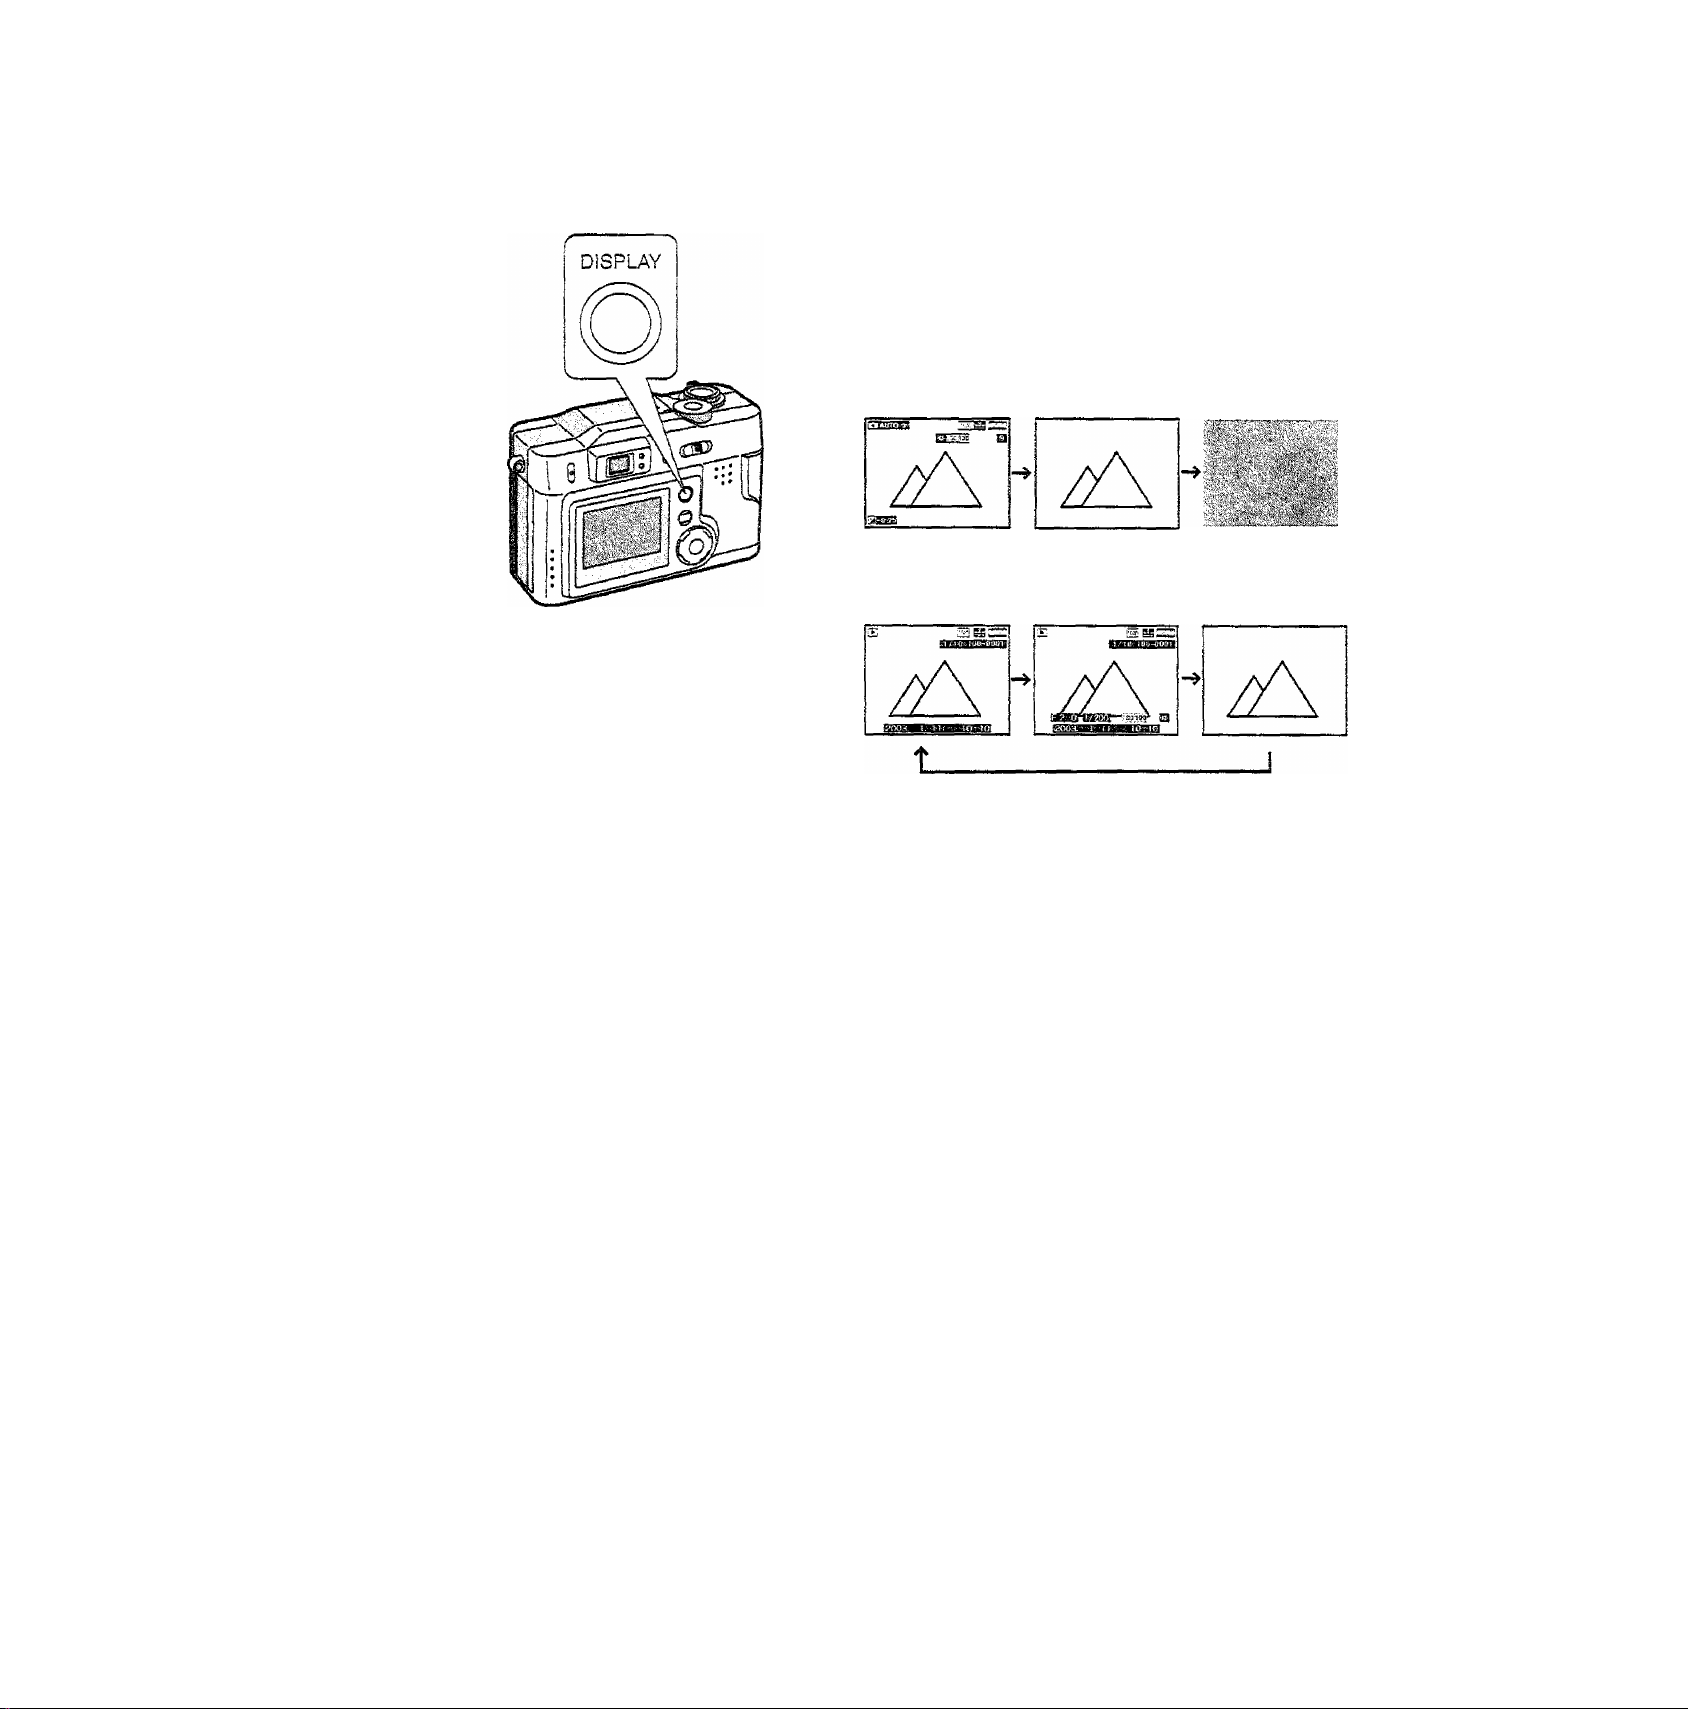
Using the LCD Monitor
Every time you press the [DISPLAY]
button, the display of the LCD monitor
changes as shown below.
® When setting the digital zoom to [ON],
the display of the LCD monitor can not be
set to [OFF].
[in recording]
[In playback]
« When setting the auto review to [ON], it is available, even if the display of the LCD
monitor is set to [OFF]. (After finishing the auto review, the display is returned to [OFF])
* After recording, if you press the [REViEW/SET] button, the review is displayed, even if
the LCD monitor is set to [OFF]. (After finishing the review, the display is returned to
[OFF])
* When charging the flash, the LCD monitor is set to [OFF].
* When you turn the camera off with the LCD monitor off, the LCD monitor is set to [OFF]
after turning it on again.
18
Page 19
The Indicators
B Status indicator (Green) ©
[Blinking]
«Warning indication
[Lighting]
• When turning the power switch to
[OPERATE]
Flash/Access Indicator (Red) @
[Blinking]
* When charging the flash
• The fiash indicator blinks quickly when
the flash is being charged. If the flash
indicator biinks slowly, it is an alert for the
shutter jiggle. This appears when you set
the fiash mode to [SLOW SYNC.] or
[OFF] and try to take a picture in a dark
situation. [ rt)} ] mark wiil also appears on
the LCD screen. In this case, use of a
tripod is recommended.
[Lighting]
* When accessing the card
• When the flash fires (It lights when the
shutter is pressed halfway)
19
Page 20
The Shutter Button
(Pressing halfway/Pressing fully)
The shutter button is pressed in 2 steps:
“pressing halfway" and “pressing fully”.
Pressing halfway (Press lightly) ®
• Focus and exposure are set.
Pressing fully (Press ail the way) (s)
• The picture is captured to the card. In
motion image mode [H|I]], the
recording starts.
You can adjust the beep sound in menu. (P58)
When pressing the shutter button fully at a stroke, the captured picture may
be unclear due to camera shake, or out of focus. - '
20
Page 21
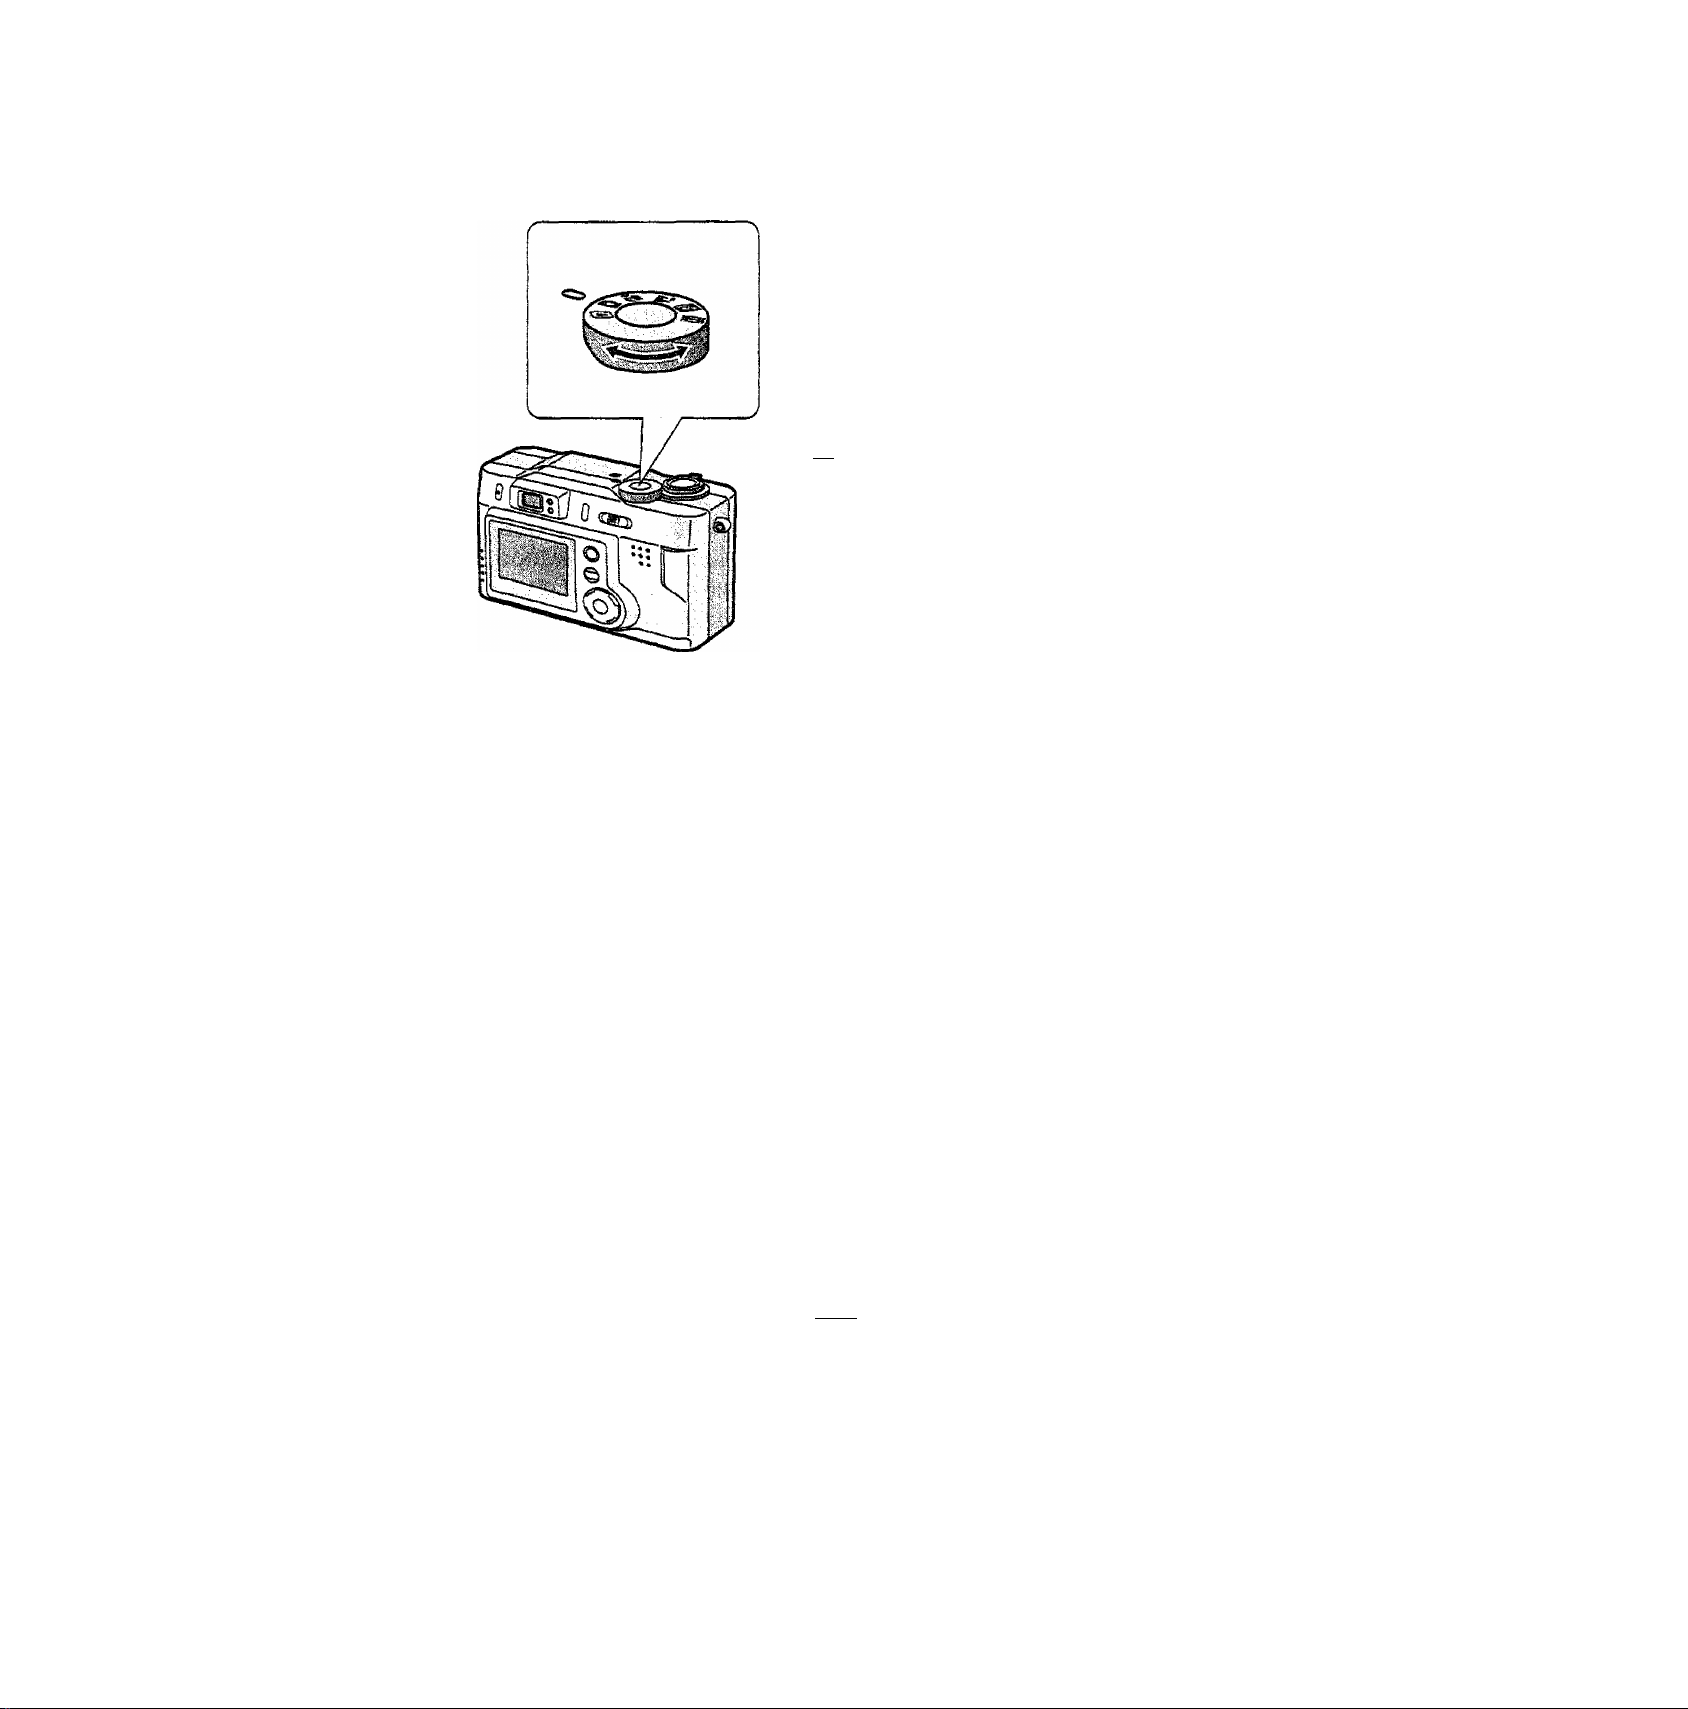
The Mode Dial
You can set modes by this dial, as shown
beiow.
0; Playback (P44)
Play back recorded images.
You can choose among 5 REC modes, as
shown below.
m: Normal Picture (P24)
When taking pictures, the shutter speed
and the aperture value are automatically
adjusted.
gg: Macro mode (P40)
When the camera lens is at a distance
from 0.15 m to 0.70 m from the subject, set
the mode.
Landscape mode (P41)
You can capture sharp and crisp
landscape photos easily. Please note that
this mode is suitable for landscape farther
than 4 m and in daylight situation.
r. Night portrait mode (P42)
When you take the picture of, for example,
your friends in front of beautiful night
illumination scenery, this mode ensures
the appropriate exposure for your subject
as well as the background, using flash and
slow shutter. Since slow shutter is set, the
use of tripod is recommended. Subject
should be placed within the range of the
flash light.
IlSil: Motion images (P27)
Recording motion images.
21
Page 22
Operating the Menu
WB w. BALANCE |
O A -A-
% PICT. SIZE
ass QUALITY
ISO SENSITIVITY 100
iS] D.ZOOM
V/3
ido:-
♦
SS5
OFF
By operating the menu, it is possible to set
the settings of the REC or playback mode,
it is also possible to set the date and time,
the beep sound and other settings. Follow
these instructions looking at the LCD
monitor.
1 Press the [MENU] button.
• if you set the mode dial to the normal
picture mode, macro mode,
Landscape mode, Night portrait
mode and motion image mode, the
REC menu is displayed; if you set to
the playback mode, the playback
menu is displayed.
2 Press A/T to choose the item and
press </> to set.
3 Press the [MENU] button.
1
E3 D.ZOOM
WB w. BALANCE
Hi PICT. SIZE
ass QUALITY
ISO SENSITIVITY
|0F.=i ON..
1
El D. ZOOM
WB W. BALANCE
'% PiCT. SIZE
ss= QUALITY
ISO SENSITIVITY
OFF joN'l
1/3
1500
100
1 /3
1500
♦
SS8
100
® The menu will disappear.
22
Page 23

Betting the Date/Time (Clock Set)
it is possible to set the year from 2002 to
2099. The 24-hour system is used.
1 Press the [MENU] button.
2 Press A/W to select [CLOCK SET]
and then press
3 Pr^ss A/W to set date, time
and style.
4 Press the [MENU] button.
® The menu will disappear.
© CLOCK SET
O MONITOR
[^' AUTO REVIEW
■))] BEEP ON
dT POWER SAVE
CLOCK SET> :
2/3
OFF
OFF
3
© CLOCK SET
YEAR
MONTH
DAY
Tíme
STYLE
2002 »-
00
00
00:00
YMD
Even if the battery is not inserted, the camera, with a built-in power source for
back-up, can store the set time for about 6 hours. But, after about 6 hours the
2/3
set time is cancelled, so set date and time again.
23
Page 24

Taking Pictures
By pressing the shutter button, the
exposure (shutter speed and aperture
value) will be automatically adjusted and
the picture is taken.
[Preparations]
* insert the card. (P13)
• Set the power switch to [OPERATE].
(P15)
1 Set the mode dial. (P21)
2 From the optical finder ©, centre
the subject in the AF target ®
inside the optica! finder and press
the shutter button halfway.
From the LCD monitor after
centering the subject in the focus
area ® on the LCD monitor, press
the shutter button halfway.
• When the focus is adjusted, the
focus indication [•] © appears.
• The shutter speed and the aperture
vaiue are automatically adjusted and
displayed on the LCD monitor.
• When the subject is out of the AF
target or the focus area, use the AF/
AE lock. (P36)
3 Press the shutter button fully to
take the picture.
• After taking a picture, when the auto
review (P57) is set to [CN], the
picture is displayed on the LCD
monitor for about 1 second.
24
Page 25

♦ When power saving time is set, if you do not operate the camera, it is
automaticaily turned off depending on the set time (approx. 2/5/10
minutes). To operate the camera again, turn the power switch first to
[STANDBY] and then to [OPERATE]. (P59)
• The brightness of the LCD monitor may differ from that of the recorded
pictures, in particular, when taking pictures in dark places with a long
exposure time, darkness appears on the LCD Monitor, but recorded
pictures are bright.
Parallax compensation mark ®
Moving the zoom lever towards T and
taking pictures at a distance of 70 cm -1 m
from the subject, match the top of the
subject with the parallax compensation
mark, so that it does not get cut off. When
an accurate framing is necessary, use the
LCD monitor.
25
Page 26

After taking а picture, when auto review
(P57) is set to [ON], the captured picture is
displayed on the LCD monitor for about 1
second, but you can also check the picture
following the method shown below.
1 After taking a picture, press the
[REViEW/SET] button.
® The last captured picture is displayed
for about 3 seconds. The captured
picture is zoomed 4 times/8 times
whenever vcu rotate the zoom lever
towards [Q^].
Щ Erasing the captured picture during
the review
j
ШГЖУГ
■
'Ш-нШЕтШШ
<\-
........
*Г ^ ..'А. i;; '^-^^;;
__
^fiii .1^
Press the [MENU] button.
Press to select [YES].
Press the [REVIEW/SET] button.
® The picture is erased. .
® Once erased, pictures cannot be
recovered.
® When using the burst mode [Qj]^
can see only the first picture with the
review.
® In motion image mode [¡¡Hj], the review
cannot be used.
«When you turn the power switch to
[STANDBY] or change the mode dial,
the review cannot be displayed.
® Even if you rotate the zoom lever
towards [H]> playback cannot be
used during the review.
26
Page 27

Recording Motion Images
[Preparations]
® insert the card. (F13)
• Set the power switch to [OPERATE],
(P15)
1 Set the mode dial to motion image
mode [¡gl]].
2 Center the subject on the LCD
monitor and press the shutter
button halfway.
« When the focus is adjusted, the
focus indication © [•] appears.
3 Pressing the shutter button fully,
the recording starts.
® The status indicator (2) blinks when
recording the motion image.
* The audio REG starts simuitaneousiy.
® The picture size is fixed at 320 x 240
pixels.
4 Pressing the shutter button fully
again, recording stops.
® If the memory of the card becomes
full during the recording, the
recording is stopped automatically.
® The motion image is recordable for
up to approximately 19 seconds per
capture.
After recording the motion image, the status indicator blinks whiie
recording it in the memory card and after recording it, the status indicator
lights. Do not operate the camera while recording to the memory card.
In motion image mode [[||||], [SENSITIVITY] is set to [AUTO]
automatically and you cannot select [D. ZOOM], [PICT. SIZE] and
[QUALITY].
In motion image mode [¡ffl]], flash mode is set to Forced OFF [^1.
in motion image mode [[|||j], you cannot take pictures with burst mode or
compensate the exposure.
27
Page 28

Using the Optical Zoom
With this function, you can make people
and subjects appear closer and
landscapes can be captured in wide angle,
because they can be further zoonned by 3
times.
[Preparation]
® Set the mode dial. (P21)
1 Aim the camera at the subject and
adjust the size with the zoom lever.
To make subjects closer (Tele);
Rotate towards T.
To make subjects wider (Wide angle):
Rotate towards W.
Ш\
2 Take a picture.
® The recording method is the same as
in 'Taking PlcturssT (P24)
® The focus is adjusted at a distance of
more than 50 cm. For information on
Macro mode, read P40.
28
Page 29

Using the Digital Zoom
it is possible to magnify a subject to 3
times by the optica! zoom, to 2 further
times by the digital zoom, until reaching a
maximum of 6 times.
[Preparation]
* Set the mode dial. (P21)
1 Press the [MENU] button.
2 Press A/V to select [D. ZOOM].
3 Press to set to [ON].
2,3
EUazooM
VJB W. BALANCE
PICT, SIZE
' =ss QUALITY
ISO SENSITIVITY
1/ 3
1SOO
100
4 Press the [MENU] button,
• The zoom adjustment and recording
method are the same as in “Using the
Optical Zoom”. (P2S)
® The menu will disappear.
In motion image mode [¡|||l], you
cannot use the digital zoom.
The digital zoom is avaiiabie only when
the LCD monitor Is set to [ON],
Using the digital zoom, the picture quality
becomes deteriorated.
29
Page 30

Taking Pictures with the Built-in Flash
[P reparation]
® Set the mode dial. (P21)
1
Press i| ].
® Every time you press [|. ], the
available settings will appear as
shown below.
t
AUnrO
[»»a: AUTO
Ths flash fires auicmaticaily according to the recording situation.
roraM: AUTO/Red-eye reduction
The flash fires automatically according to the recording situation and
simultaneously it reduces the red-eye phenomenon (when a subject’s
eyes appear red in flash light).
Use it when a subject is recorded in dark places.
g: Forced OM
The flash is forced to fire.
Use it when a subject is backlighted, under the light of a halogen lamp,
and so on.
: SLOW SYNC.
i
When you take a picture with a dark background landscape, it makes
the flash fire and the shutter speed slow, so that the dark background
landscape will become brighter.
g: Forced OFF
Even in dark places, the flash does not fire.
Use it when you take pictures in places where flash is forbidden and
for distances which the light of the flash does not reach.
30
Page 31

2 Take a picture.
The recording method is the same as in
‘Taking Pictures'’. (P24)
® The available flash range is about 20
cm - 2.4 m at a maximum wide angle
and about 20 cm -1.5 m at a maximum
telephoto setting.
• Do not cover the flash sensor ® with
your fingers or other items. Otherwise,
you will not get the correct exposure.
• in motion image mode [¡i||j], setting is
fixed to the Forced OFF [^j.
• You cannot take a picture when flash/
access lamp blinks and flash is being
charged. While flash is being charged,
LCD monitor is turned off.
• When you set to burst mode [Qli ], only
1 picture is taken for every flash firing.
• After the flash fires, it takes a few
seconds to start the next recording.
31
Page 32

;econds).
[Prsparationj
^ Set the mods dial. (P21)
1 Press the [0] button.
® Every time you press it, what is
displayed changes as shown belov'/.
I I
ClOs)
(2s)
Mi: Self-timer set to 10 seconds
Self-timer set to 2 seconds
When these Indicators are not
displayed, self-timer setting is
cancelled.
2
Press the shutter button fully.
® The self-timer indicator © blinks and
the shutter is activated after 10
seconds (or 2 seconds).
^ Before taking a picture, if you press
the [MENU] button, the seif-timer
setting is cancelled.
in motion image mode [im], it is not possible to use the self-timer,
in burst mode ], the self-timer setting covers only the first picture.
32
Page 33

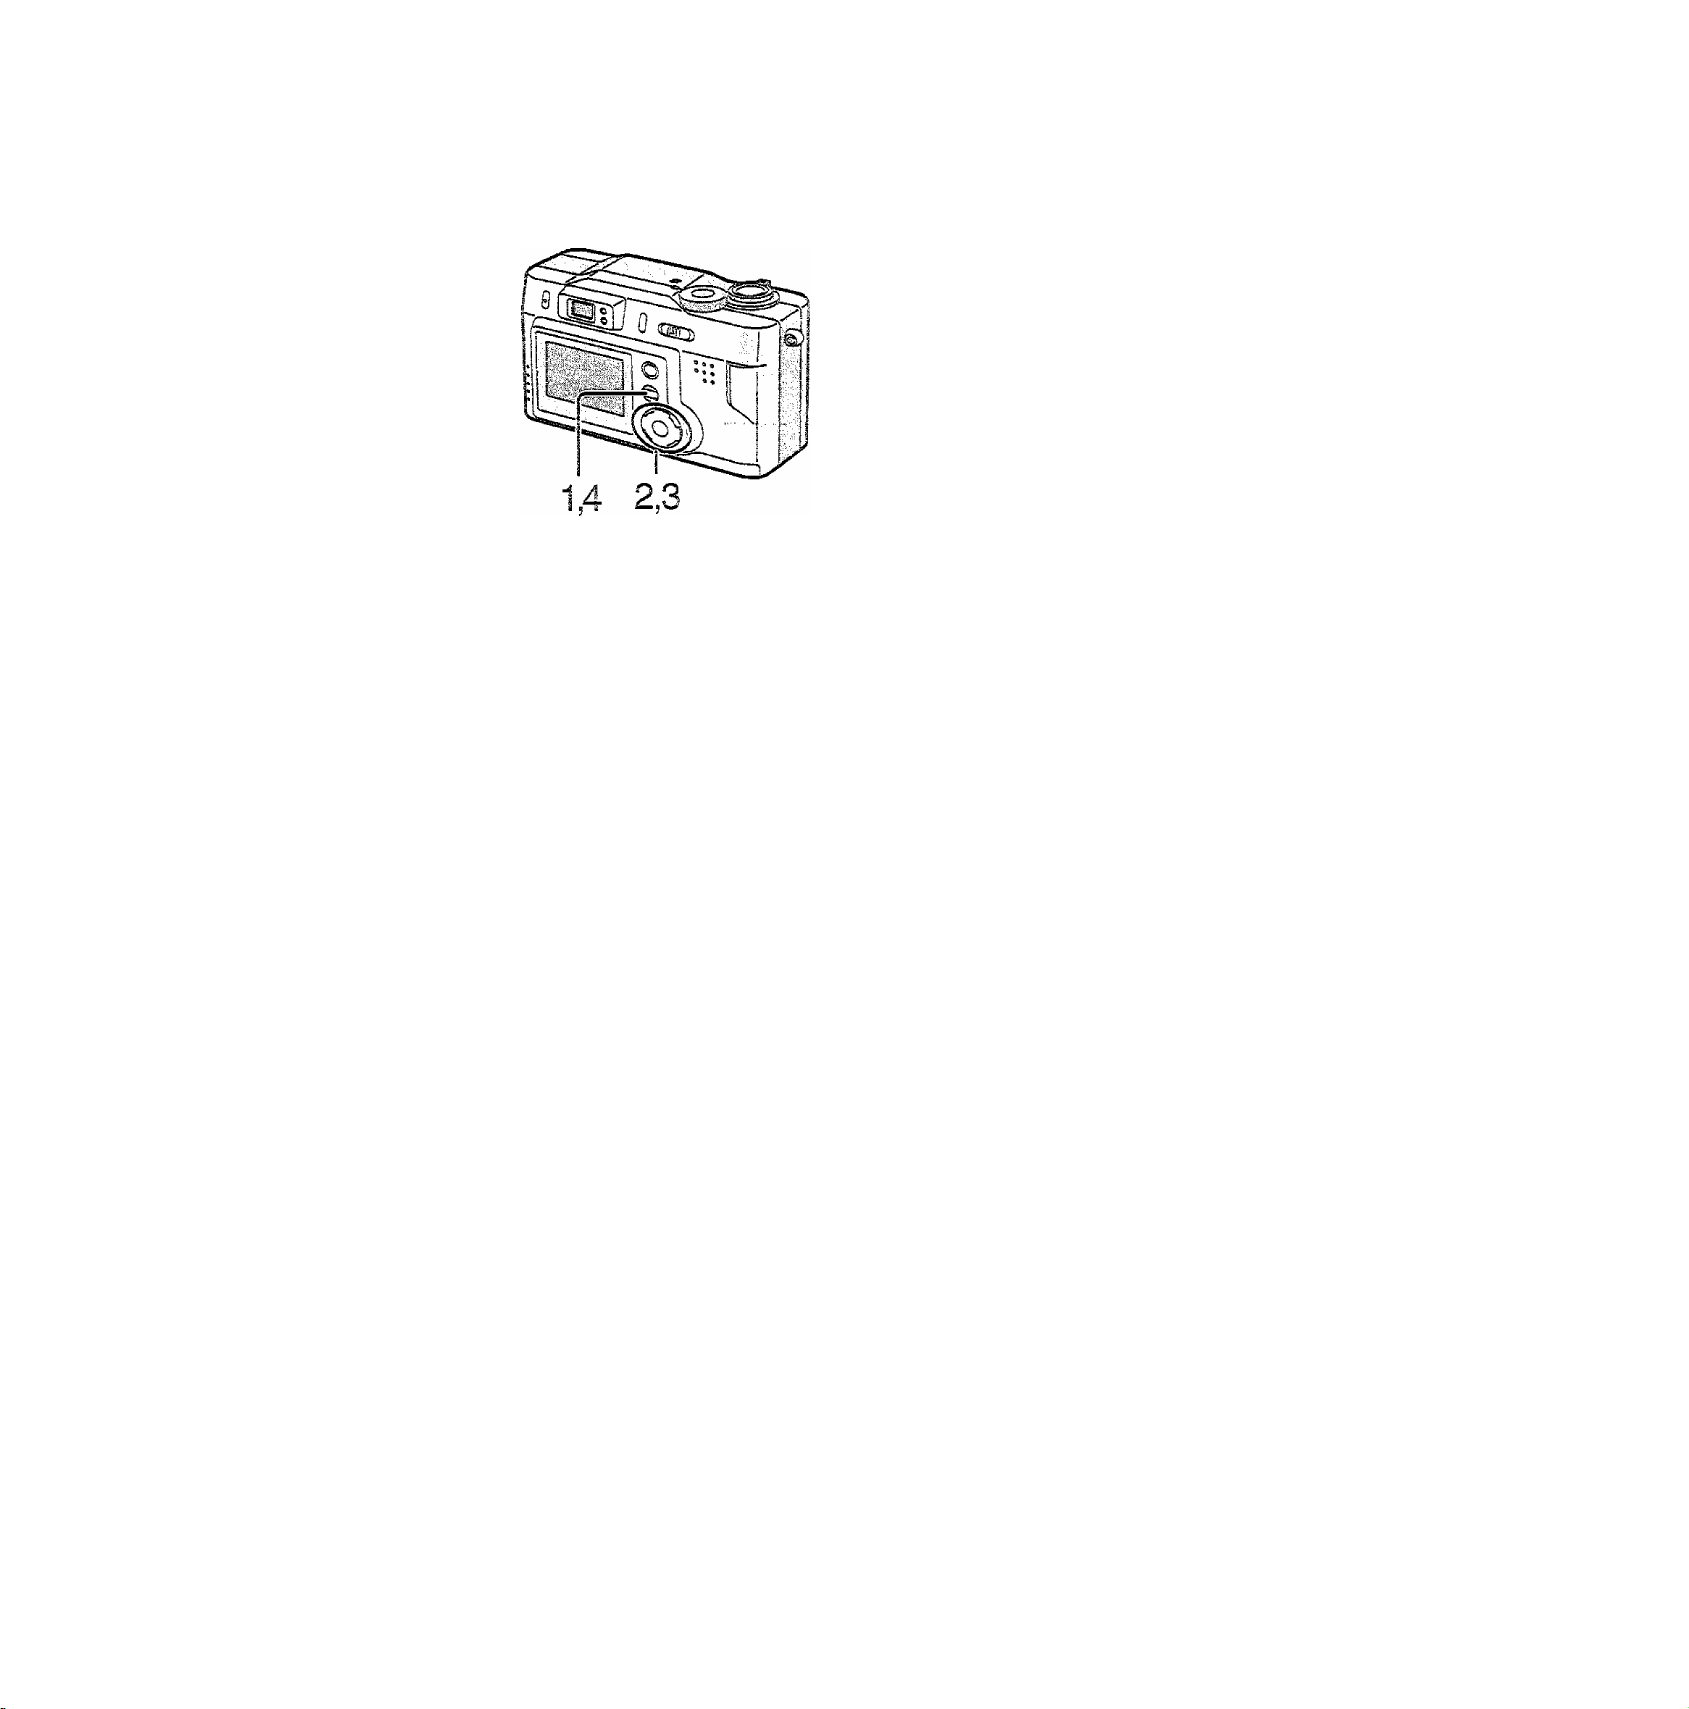
dhanging the Picture Size
You can choose among 3 picture size
settings.
[Preparation]
• Set the mode diai. (P21)
1
Press the [MENU] button.
1,4 2,3
2,3
■
PtCT.SiZE -
W3 W, BALANCE jxjrd
1024 040 . .
2
1 / 3
4 Press the [MENU] button.
Press A/V to select [PICT. SIZE].
Press </> to set the picture size.
1600
: 1600 X 1200 pixels
W: 1024 X 768 pixels
• 640
: 640 X 480 pixels
• The menu will disappear.
3SS QUALITY
ISO SENSITIVITY
ix] D. ZOOM
ass
100
OFF
» in motion image mode [[F|||], picture size is fixed to 320 x 240 pixels.
»If you set the picture size to small, the memory card can record more
pictures. Moreover, because the data volume is small, you can easily attach
the picture to an e-mail or use it in a web site.
• if you set the picture size to large, it is possible to print clearer prints.
33
Page 34

Швпдтд the Quality
(Data Compression Ratio)
You can choose among 2 quality Isveis
{Data Compression Ratio).
[Preparation]
® Set the mode dial, (F21)
1 Press the [MENU] button.
2 Press A/W to select iQUAUTYl
2.3
sss QUALITY
W3 v^. BALANCE
PiCT. SIZE
ISO SENSITIVITY
i!^ D. ZOOM
(a)
rm ® i
t ^
11600x1200 j
! 1024x768 !
§ i
040x^80 1
__
i ^
——L
i г
Ш
!
8
18 j 33 i
i
j
:S00
QF^
m !
12
66
3
Press t
i\J
OGlpnt
t the quality
(Data Compression Ratio).
@; Fine (Low compression)
it gives priority to picture quality and
records high quality pictures.
И: Standard
(Standard compression)
it gives priority to the number of
recordable pictures and records
standard quality pictures.
0: Gualio/ and number of rscordabie
pictures
j
(® Picture size, ® Quality)
® The number of recordable pictures
corresponds to the capacity of the
I
i
s
supplied 8MB SD Memory Card, (if
you mix fine quality and standard
quality or the number of pictures you
can take varies according to the
object you have taken)
Press the [MENU] button.
® The menu will disappear.
® In motion image mode quality cannot be modified.
® Due to the characteristics of JPEG compression pictures recorded in standard
mode may contain mosaic noise depending on the subjects you photographed.
® Remaining frame numsber which is displayed on the LCD mionitcr may not
correspond with the number of frames you can actually take. However, this is
not a miaifunction.
34
Page 35

Oompensating the Exposure
if there is a difference between the subject
and background brightness, since you
cannot set the correct exposure, you can
compensate it.
[Preparation]
* Set the mode diai. (P21)
1 Press [¡2]-
2 Press </> to compensate the
exposure.
• You can compensate from -2 EV to
+2 EV with 0.25 EV step.
^ EXPOSURE
ifcd. 00
CANCEL MENU
SELECT Oil SET
(EV is an abbreviation of Exposure
Value, and it Is a unit of exposure.
EVO: the exposure capacity with the
aperture value F1.0 and the shutter
speed 1 second
When the aperture value or shutter
speed rises, EV1, EV2, EV3... rise
too.)
3 Press [0].
»The exposure compensation window
will disappear.
4 Take a picture.
• The recording method is the same as
in “Taking Pictures”. (P24)
in motion image mode [[mi], it is not possible to compensate exposure.
35
Page 36

the AF/AE Lock
If the subject is out of the AF target and
you press the shutter button, the subjecf s
1.2
focus is not adjusted. After locking focus
and exposure (AF/AE lock), you can take a
clear picture with adjusted focus.
AF: Auto focus
AE: Auto exposure
[Prsparationj
® Set the mods dial. (P21)
1
If you want to take pictures similar to
the one on the left ©, aim the camera
at the subject on which you want to
adjust the focus to enter the focus
area ©on the LCD monitor and then
press the shutter button halfway (AF/
AE lock) to set it.
When the focus is adjusted, the
focus indication [•] ® appears.
2(1;
Move the carriera keeping the
chosen ccmposition and press the
shutter button all the way.
® Before pressing the shutter button, you
can set the AF/AE lock any time you
want.
36
Page 37

Setting the White Balance
With the auto white baiance, the camera
automatically adjusts the white balance to
get the natural color tone, but in some
particular situations, depending on light
and environmental conditions, you can
adjust the white balance manually.
[Preparation]
• Set the mode dial. (P21)
1 Press the [MENU] button.
1,4 2,3
2 Press A/W to select
2,3
[W.BALANCEj.
™ W. BALANCE
Н, [gl л *
PICT. SIZE
Z5S QUALITY
ISO SENSITIVITY
[X] D.20CW!
1 / 3
Ли
1600
w
s«»
100
OFF
3 Press to select the mode.
® AUTO; when the auto white balance
is set
• о (Daylight); for recording under
sunlight
• Ш (Cloudy):forrecording under
cloudy and shady sky
• -Д- (Halogen):forrecordingunder
halogen lighting
• (White set): for manual setting
(Read the following page where the
manual setting is explained in detail)
4 Press the [MENU] button.
• The menu will disappear.
5 Take a picture.
.; .л'-. .
■.AriV-À’': ■
■ ■ ■'.■Т/'“ ■■
№:■
• The recording method is the same as
in “Taking Pictures”. (P24)
37
Page 38

setting the White Balance (Continued)
Here the white set mode of white balani
is explained.
i Press the [MbNU] button.
2 Press A/T to select
[W.BALANCE].
d Press <1/^ to set to white set ].
Only when initially setting the whits
balance.
4 Press
® The menu will disappear.
5 Aim the camera at a white sheet of
paper © or similar object so that it
completely fills the frame to white
on the screen and press the shutter
button ail the way.
2,3
I W3 w. BALANCE
"O ' ■ -A-'
P!CT. SIZE
■V
QUAUTY
S5S
ISO
SENSITIVITY
D. ZOOM
[SI
FRAME THE CAMERA
AT THE WHITE SURFACE
AND PRESS SHUTTER
cancel: eu
® White balance is set. ® After the set is completed, return to
the menu.
:0OO
10G
OFF
38
Page 39

Setting ISO Sensitivity
!S0 sensitivity is a value that corresponds
to the sensitivity to light. The higher it is,
the better the camera performs in dark
places.
[Preparation]
• Set the mode dial. (P21)
2,3
sc SENSmViTY I
ws W. BALANCEITitQl
^
PICT. SIZE
sis QUALITY
IatcI
!x] D.ZOOM OFF
100 200 400
;sco
1
2
3
1
/
3
Press the [MENU] button.
Press A/W to select
[SENSITIVITY].
Press </> to seieot the sensitivity.
AUTO: if “AUTO” Is selected and
Flash mode is “Forced OFF”, if
available light requires shutter speed
slower than 1/30, the ISO sensitivity
is automatically adjusted up to ISO
200 and shutter speed stays 1/30, to
reduce the affect of a camera shake.
If your picture, is stiii too dark, please
use the flash light.
• iioo :1S0100
• m :!SO200
■■■■
i
• ffl:iSO400
4
In motion image mode [[¡gj], it is set to [AUTO].
Press the [MENU] button.
• The menu will disappear.
Take a picture.
• The recording method is the same as
in “Taking Pictures”. (P24)
39
Page 40

fiking Hctures with Macro Mode
if the camera isns is at a distance from 15
cm to 7Q cm from the subject, set macro
mcde[^].
f-r
V i / VYy
15cm
1 Set the mode dial to [^ ].
^ [Hi appear.
2 Take a picture.
® The reccrdina method is the same ai
m
in 'Taking Pictures”. (F24)
® In motion image mode [¡mi], macro mode cannot be set.
w
TOcn
—f
® When selecting the macro mode, optical finder functionality is limited.
Use the LCD monitor.
Page 41

faking Pictures with the Landscape
Mode
You can easily capture sharp and crisp
landscape photos. Please note that this
mode Is suitable for landscape photos
farther than 4 m and in daylight
situations.
1 Set the mode dial to Landscape
mode [F11.
2 Take a picture.
The recording method is the same as in
“Taking Pictures”. (P24)
41
Page 42

U/ITI
¥¥ I ài
When you take a picture of, for example,
your friends in front of beautiful night
illumination scenery, this mode ensures
the appropriate exposure for your
subject as well as the background, using
flash and slow shutter. Since slow
shutter is set, the use of a tripod is
recommended. Subject should be
placed within the range of flash light.
Set the mode dial to Night Portrait
mode [HI-
id Take a picture.
The recording method is the same as in
“Taking Pictures”. (P24)
® When the auto focus is not adjusted, the focus range beccmss 2.45 m.
42
Page 43

PiCtUiSS
itn bursi Moae
Ccntinucusly pressing the shutter button, it
Is possible to record in burst mods,
(maximum of 5 frames)
[Preparation]
® Set the mode dial. (P21)
1
Press
[Ql! ] will appear.
■X'::0MX<r.
2
® When quality is set to fine it is
--I
® In motion image mode [ill||], the burst
® There are no differences for AF/AE/
Press the shutter button halfway to
lock the focus, then press it fully to
take pictures in sequence.
possible to record in burst mode a
maximum of 3 frames.
mode cannot be used,
Whits Balance settings between the
first frami6 and other frames.
® It is not possible to record in burst
mode of 5 frames/second at some
shutter speeds or picture size.
® When you set to burst mode [Qii ], only
1 picture is taken for every flash firing.
® Only the first picture recorded is
displayed on the LCD monitor.
lii
tis
sri
43
Page 44

aymg uaa
Set the mode dial to playback
The playback window will appear.
ic piay DacKine previous
picture.
Press ^ to play back the following
picture.
® Every time you presS; the previous
(following) picture is played back.
® The picture following the last one is
the first picture.
lEJ
® This camera is based on the DCF standards (Design rule for Camera File
system) which were established by the Japan Electronic Industry Technology
Association (JEITA).
® The file format that can be played back with this camera is JPEG. (There are
also pictures that cannot be played back in JPEG format)
® When playing back still pictures that have been recorded with other
equipment, the quality of pictures may be deteriorated and pictures may not
be played back.
® When playing back a file out of standard, the foider/fiie number is indicated
i ■m .m
by [-] and the screen becomes black.
44
Page 45

It is pcsslbie to disolav 9 imaqes at once.
[Preparatlcnl
® Set the mode dial to play uaur.
IF’n.
1 During playback, rotate the zoom
lever towards [K1-
® Multi playback (9 frames) starts.
2 Press A /W M /P ^ to select images.
® To return to the normal indication,
rotate the zoom lever towards [Q^].
The image with the file numiber
colored in yellow is displayed.
ICO
i 0018 OG20...!::''...QQ2J5...
45
Page 46

Using the Playback Zoom
During play bacK, it is possible to enlarge
pictures.
[Preparation]
® Set the mode dial to playback [iH].
1 During playback, rotate the zoom
lever tov^ards [Q,].
® Every time you rotate the zoom
lever towards [Q^], the picture is
zoomed doubls/4 times/S times/16
times.
® The more the zoom lever is rotated
towards [g], the m^ore the zoom
magnification ratio decreases.
® Use A/W/</P^ to change the area
to be enlarged.
i
me-
__
2X
__
A
ms 1 B
>
\
1
1
® in miOtion image playback, it is not possible to magnify,
® The miore the zoom magnification increases, the more the picture quality
deteriorates.
® The playback zoom may not work with pictures recorded with other
equipment.
46
Page 47

'U
fPrsparaticn]
® Set the mode dial to playback [@]-
Press to select the file with
the motion image icon [j||||] ©.
2
Pressing the [REVIEW/SET] button,
the motion image playback will be
started.
® Pressing the [MENU] button, rriotion
image playback will stop.
E
PLAY MOTION IMAGE:
■ tl 1 o::T:ot^ao;0f;
® The file format that can be played back v^/ith this camera is QuickTime Motion
JPEG.
® It could happen that the Motion JPEG files recorded by other equipment
cannot be played back with this camera.
® Sound cannot be played back on this cam.sra.
47
Page 48

^ DELETE ■ .■
®. DELETE
^ PROTECT
2^ DPCF
S SLIDE SHGV\
Imaass recorded on the card can be
w
deleted. Once dsistsd, images cannot be
recovered.
\ I il :-«> ^ ii Cl L b i * w ;
® Set the mode dial to playback [[^¡].
® When an image is protected, it cannot be
deleted. Cancel the protect setting, (P53)
[Delete single image]
1 Press the fiViENU] button.
Press A /W to select [DELb i b] and
then press
3 Press A/T to select [SELECT] and
then press
4 Press to select the image to
be deleted, and then press the
[RbVlbW/SE 1 ] button.
w ■ DELETE
SELECT
ALL
FORMAT
® The selected image is deleted.
CANCEL'
48
Page 49

S! ■ DELE iE'
[Delete asi images]
Once deleted images cannot be
recovered-
1 Press the [MENU] button.
2 P re ss A/T to select [DELETE] and
then press
3 Press A/V to select [ALL] and then
press
4 Press < /> to select [DELETE] and
then press the [REVIEW/SET]
button.
® DELETE
o- PROTECT
DPOF
® SLiDE SHOW
® Al! images are deleted.
3
^ DELETE
SELECT
ALL
FORMAT
CANCEL; eu
• Do not take out the memory card while deleting, it may cause a malfunction.
49
Page 50

I i™' Í я f I " I I ^ I I ■ 'i' Í Í I f i?^ Й ,
Í ■ i -Í i if ä I ¿ i 11 Í I W ä ¿ I J &€ i i
э w ' I ^ S' Í a
It is possible to write information on the
card (DPOF data) about the images that
you want to print and the number of
sheets.
DFCF is an abbreviation of Digital Print
Order Format. To use v\/ith a DPOF
corresponding system, you can add pn ni
information to the images on the memory
card.
[Preparation]
I a? DPOF
I Ш
DELETE
j o^ PROTECT
I 2^ DPOF
SLIDE SHOW
3
I a'i
DPOF ■
SELEC^ >
ALL
INDEX
i
{
\
RESET
\
Í
t
CANCEL;
lENU
® Set the mode dial to playback [¡H]-
[SELECT!
1 Press the [MENU] button.
2 Press A /W to select [DPOF] and
then Dress
C Press A/T to sei
then oress
Press </ > to seiect a image.
Press A /W to select the number of
sheets.
® The number of sheets can be set
from 1 to 99.
6 Press the [MbNUl button.
30
Page 51

P
[ALU
Press the [MENU] button.
Press A/¥ to select [DPOF] and
then press
Press A/T to select [ALL] and then
press
4 Press A/T to select the number of
sheets to be printed.
® The nuiTiber of sheets can be set
frorPi 1 to 99.
\
On
P
w
I 2^
\ ■
W
DPOF
DPOF
DELETE
PROTECT
DPOF
SLIDE SHOW
SELECT
ALL
INDEX
RESET
mm
CANCEL: leu
. I
5 Press the [MENU] button.
I
I
® if the file is not based on the DCF
standard, the DPOF setting cannot be
set.
!
51
Page 52

Writing the Print Information in the Card
(DPÖF Setting) (Continued)
[index setting]
Press the [MENU] button.
3
2^
DPOF
0-Г!
DELETE
PROTECT
DPOF :
SLIDE SHOW
DPOF
2
Press A/W to select [DPOF] and
then press
3
Press A/T to select [INDEX] and
then press
4
Press A/V to select the number of
sheets.
The number of sheets can be set
from 1 to 99.
5 Press the [MENU] button.
« All imiages are set.
>
[RESET]
1 Press the [MENU] button.
2 Press A/T to select [DPOF] and
then press
SLECT
ALL
índex
RESET
3 Press A/T to select [RESET] and
then press
>
4 Press to select [RESET].
CANCEL: »
5 Press the [REVEW/SET] button.
• AI! DPOF settings are reset.
52
Page 53

protecting Images on the Card
It is possible to protect Important images
recorded on the card from accidental
erasure.
[Preparation]
® Set the mode dial to pla yback [0].
1 Press the [MENU] button.
2 Press A/W to select [PROTECT]
and then press ^.
3 Press A/T to select [SELECT] /
[ALL] and then press
On
PROTECT
■ W3;
Only set to [SELECT]
DELETE
On
PROTECT
DPOF
SUDE SHOW
4 Press to select a image.
5 Press the [REVIEW/SET] button.
9 [On ] will aocear,
lENU] button threePress ths
3
PROTECT.
SELECT
ALL
ALL CFF
:
CANCEL: W |
7 To cancel toe protect setting, select
\
i
I
!
times.
® The men'.
ti disappear.
[ALL OFF], press select [YES]
and then press [REVIEW/SET]
button.
Even if an image is protected, it wiii be erased in case of formatting.
When trying to delete a protected file, these messages are displayed “THIS
PICTURE IS PROTECTED” or “SOME PICTURES CANT BE DELETED”.
But if you want to delete it, cancel the protect setting.
53
Page 54

Playing Back with Slide Shoyv
(Automatic Playback)
All pictures selected in the card can be
played back ons-by-one automatically.
[r^reparaiionj
® Set the mode dial to playback [@]-
1 Press the [MENU] button.
\
-----
! Ш
SUDE SHOW
Í ■ ■
DELETE
1 Ш
t
C-7!
PROTECT
8^ DPOF
. SUDE SHOW
m
Ш SUDE
. . ALL .
DPOF
2,3,45
Ш.ПШ
SHOW
2 Press A/T to select [SLIDE
SHOW] and then press >.
3 Press A/T to select [ALL]/[DFOF]
and then press
® ALL: for playback all pictures
DPOP: for playback the DPOF set
pictures
>
4 Press A/T to set [INTERVAL],
® INTERVAL: it can be set from 1 to 10
seconds.
5 Press
® The Slide Show starts.
® Pressing the [MENU] button, it stops.
SD Slide Shov\.^
54
^ ALL .
INTERVAL igs
CANCEL:
A ►
CANCEL:
If the setup of SD slide show is carried out
by SD Viewer for DSC included on
supplied CD-ROM, when piay back screen
is displayed, the message '‘START SD
SLIDE SHOW ?" will be displayed, if you
press the [REVIEW/SET] button, it starts
the SD slide show set up by SD Viewer for
DSC.
In case of norma! playback, press [MENU].
Page 55

Womatting the Card
Usually^ it is not necessary to format
(initialize) the memory card. Format the
card when this message is displayed on
the LCD monitor “MEMORY CARD
[Preparaiicnj
® Set the mods dial to playback [Qi-
1 Press the [MENU] button.
2 Press A/W to select [DELETE] and
then press
® DELETE
. W DELETE-
o- PROTECT
DPOF
a SLIDE SHOW
I Ei DELETt
SELECT
ALL
FORMAT
CANCEL: !'KU
3 Press A/T to select [FORMAT]
and then press
4 Press to select [FORMAT] and
then press the [REVIEW/SET]
button.
® The card is formatted.
® After formatting, recorded images
and any other data cannot be
recovered.
® When the card is formatted on a PC or
other equipment, format the card on the
camera again.
® If the card cannot be formatted, consult
your dealer or servicentre.
® During formatting, do not turn the power
off. it may cause a malfunction.
55
Page 56

Adjusting the LCD Monitor Brightness
1.4 2,3
2.3
O MONITOR
[]G = i = nh
*))] BEE?
df POWER SAVE
i © CLOCK SET
m LANGUAGE
ON
OFF
ENG i
1
2
3
4
Press the [MENU] button.
Press A/T to select [MONITOR],
Press </> to adjust the
brightness.
Press the [MENU] button.
The menu will disappear.
56
Page 57

r
Recording with the auto review set to [ON],
the recorded picture is autcmaticallv
displayed on the LCD monitor for about 1
second.
Press the [MENUl button.
2
Press A/T to select [AUTO
REVIEWI.
1,4 2,3
2,3
SJ.
AUTO REVIEW.
O MONITOR
-D) SEEP
I POWER SAVE
© CLOCK SET
ON
OF?
d Press to select [ON].
4 Press the [MENU] button.
® The menu will disappear.
® In burst mode [Qj]: only the first recorded picture is displayed.
® Even if the auto review is set to [ON], it is not available in motion image mode
57
Page 58

2.3
It is possible tc set the eiectronic sound
when the menu operation is dons and the
shutter button is pressed.
Press the [MENU] button.
Press A/T to select [BEEP].
Press </>■ to select [ON].
Press the [MENU] button.4
® i he menu will disappear.
BEEP 1
O MONiTCR
OFF f pri'
POWER SAVE
0 CLOCK SET
SI LANGUAGE
■ 2:-:/. .at
OFF
ENG
58
Page 59

1.4 2,3
I r I I r ^
II i » § I
When setting this mods, the camera is
automaticaHy turned off if it is not operated
tor the specified time.
Press the [MENU] button.
Press A/T to select [POWER
SAVE].
Press to select [2M1N.] /
[5MlN.]/[10!VnN.]/[6FF].
4
Press the [MENU] button.
® The menu will disaDoear.
I sT POWER SAVE
i O MCMITOR
n)!j 3EEP
. ifi'lM. ‘¡¡'I'jN. ■ ^'C'FF^
o CLOCK SET
^ ’uANGUAQE en;
® If you want to cancel the power save mode, set the power switch to
[STANDSYl and then set it to [OPERATE] again.
® When using the AC adaptor (optional, DMW-AC2), the power save mode Is
not available.
59
Page 60
Memorizing the settings
if [MEMORY] is set to [ON], the status cf
the foiicwing settings can be memorized
after the camera has been switched off,
® ISO sensitivity
® Vv'hits balance
® Monitor brightness
® Beep sound
® Auto review
® Power save
® Dicitai zoom
® Exposure compensation
® Rash mode
w
2,3
Xin MEIAORY
G VIDEO
NTSC
ON
[Preparation]
Set the power switch to [OPERATE].
1 Press the [MENU] button.
2 Press A/W to select [MEMORY].
3 Press to select [ON].
4 Press the [MENU] button.
« The menu will disappear
Even If you set [MEMORY] to [OFF], settings of clock set and video are
memorized.
60
Page 61

e File
Since the fils numbers are recorded
sequentially by the camera: when you use
some cards, it is possible that the file
numbers on your cards are not in order.
Use this function when you insert a new
card and you want to start recording from
the file number 0001.
Press the [MENU] button.
Press A/W to select [NO. RESET].
2.3
!E$E NO. RESET
g] LANGUAGE
til MEMORY
D
Press to select [ON].
Press the [MENU] button.
® The menu will disappear.
;ng
OFF
61
Page 62

Playing Back Images on a i V Monitor
Connecting the camera with a television
via supplied video cable it is possible to
play back and view the recorded images.
[Preparation]
® Turn the camera and the television off.
1 Connect the video cable to the
V.OUT socket of the camera.
2 Connect the video cable to the video
in socket of the TV.
3 Turn the television on and then
select the appropriate external
input.
4 Turn the camera on.
® The image is displayed on the
television.
Viewing images in other countries
When setting [VIDEO] on the menu, you can view Inrsages on the TV in other
countries (regions) which use the NTSC or PAL system.
Do not use any other cables except the supplied one.
Read the TV operating instructions too.
Sound cannot be played back while playing back motion image recordings.
62
Page 63

After using the camera, it is recommenaed
that you complete the following steps;
?
1 Turn the power switch to [STANDBY].
(P15)
Open the memory card door.
Slide the batter>' door and open it.
4 Eject the card. (P13)
5 Remove batteries. (P10)
® The date back-up disappears after
about 6 hours.
4
63
Page 64

Connecting to PC
[Preparationj
Only if using V\/indows 98 or 98SE, start
the supplied CD from PC and install the
USB driver.
1 Connect the camera to PC via the
supplied USB cable.
2 After inserting the memory card Into
the camera, turn the power switch
to [OPERATE] and set the mode
dial to playback [fjCj].
[Windows]
The drive is shown on the [My
computer] folder.
® If it is the first time connecting the
camera to PC, the required driver is
installed automatically in order to iet
the camera be recognized by the
Windows Plug and Piay, then it Is
shown on the [My computer] folder.
[Macintosh]
The drive is shown on the screen.
® For further information, read the supplied operating instructions for the USB
connection kit.
® When connecting to PC, it is recommended that you use the AC adaptor
(optional, DMW-AC2) as the power source.
64
Page 65

The Menu Items
—
1 —
ws W.BALANCE
% PICT. SIZE
2—
si: QUALITY
3—
ISO SENSiTiViTY
4—
5_
Rj D. ZOOM
6—
• O MONITOR
• 2J AUTO REVIEW
7—
■ «!); BEEP
8—
- POWER SAVE
9—
• © CLOCK SET
10—
■ SOij
-V-
№Z
■ TOC
OFF
2 / 3 .
OFF
ON
C-=F
REG mode menu
W.BALANCE (P37)
PiCT. SIZE (P33)
QUALITY (P34)
SENSITIVITY (P3S)
D. ZOOM (P29)
MONITOR (P53)
AUTO REVIEW (P57)
8 BEEP(P58)
9 POWER SAVE (P59)
10 CLOCK SET (P23)
11 NO. RESET (P61)
12 LANGUAGE
13 MEMORY (P60)
11 —
■ eTs no. reset .
12—
• LANGUAGE
■ MEMORY
13—
14-
ffi DELETE
151617-
I a MONITOR ■
■ * =1.’)
■■ ti
■■ 0
22-
joFri ON
S DELETE
PROTECT
ai DPOF
fOU SLIDE SHOW
T] C3c.il a eg-
BEEP
POWER SAVE
CLOCK SET
LANGUAGE
3/3
ENG
OFF
ENG
2/3
ON
OFF
Playback mode menu
• For items without number, refer to that
with the same name of REG mode menu.
14 DELETE (P48)
15 PROTECT (P53)
16 DPOF (P50)
17 SLIDE SHOW (P54)
18 MONITOR
19 BEEP
20 POWER SAVE
21 CLOCK set ’
22 LANGUAGE
23 VIDEO (P62)
24 MEMORY
23-----S VIDEO
24-
MEMORY
PAL
65
Page 66

Cautions for Use
B Cautions for Use
Kssp the digital camera away from
magnetized equipment (such as a
microwave oven, TV, video game
equipment, etc.).
® If you use the digitai camera on or
near a TV, images m^ay be
disturbed due to electromagnetic
V'/av8 radiation.
® Do not use near a cell phone
because doing sc may cause noise
to adversely affect the images.
® Recorded data m.ay be damaged, or
images may be distorted by strong
magnetic fields created by speakers
or large motors.
® Electromagnetic wave radiation
generated by a microprocessor may
adversely affect the digital camera,
causing the disturbance of images.
® if the digital camera is affected by
magnetically charged equipment
and does not function properly, turn
the camera off, remove the batteries
and then insert batteries again.
Then, turn the camera on.
Do not use the digital camera near
radio transmitters or high-voltage
lines.
® if you record near radio transmitters
or high-voltage lines, recorded
images .may be adversely affected.
Do not spray insecticides or volatile
chemicals onto the digital camera.
® If the digital camera is sprayed with
such chemicals, the camera body
may be defcrmiSd and the surface
finish may peel off.
® Do not keep rubber or plastic
products in contact with the digital
camera for a long period of time.
When you use the digital camera on a
beach or similar place, do net let
sand or fine dust get into the camera.
® Sand or dust may damage the
digital cam.era or card. (Care should
be taken when inserting and
removing the card)
When you use your digital camiera on
a rainy or snowy day or on a beach,
make sure that no water enters the
digital camera.
® Water may cause the digital camera
or card to malfunction. (Irreparable
damage may occur)
® If sea water splashes onto the
digital camera, wet a soft cloth with
tap water, wring it well, and use it to
wipe the camera body carefuily.
Then, wipe it again thoroughly with
a soft dry cloth.
Do not use the digital camera for
surveillance purpose or other
business use.
® If you use the digital camera for a
long period of time, the internal
temperature increases and,
consequently, this may cause
malfunction.
® The digital camera is not intended
for business use.
Do not use benzine, thinneror
alcohol for cleaning the digital
camera.
® The camera body may be deformed
and the surface finish may peei off.
® Before cleaning the camera, detach
the battery.
® Wipe the digital camera with a soft,
dry cloth. To remove stubborn
stains, wipe with a doth that is
soaked in a detergent diluted with
water and afterward finish wiping
with a dry Cloth.
56
Page 67

®\Forstoring or transporting the digitai
: camera, place it in a bag or case
lined, with soft pads sc as to prevent
the coating on the camera body
from being worn.
After use, be sure to take the card
out, and remove batteries.
® If the batteries are left in the digital
camera for a long time, the voltage
drops excessively, and the batteries
will not function even after they are
recharged.
H Optfrnai Use of Batteries
® Do not throw bafieries into fire
because it may cause an explosion.
Always keep the terminals of
batteries clean.
Prevent the terminals from getting
dogged with dirt, dust, or other
substances.
if you drop the batteries accidentally,
check to see if batteries body and
terminals are deformed. Attaching a
deformed battery to the digital
camera may damage the camera.
Щ Condensation
When the condensation has
taken place:
Set the power switch to
[STANDBY] and leave the digital
camera in this condition for about 1
hour. When the camera becomes
close to the ambient temperature,
the fog disappears naturally.
Щ Cautions for Storage
Before storing the digital camera,
take the card out and remove the
batteries.
Store all the components in a dry
place with a relatively stable
temperature.
(Recommended temperature:15 to
25 "C, Recommenced humidity:40
to 60 %)
Digital camera
® Vv^rap it with a soft cloth to prevent
dust from getting into the camera.
® Do net leave the camera in. places
that expose it to high temperature.
Batteries
® Extremely high or low temperatures
will shorten the life of batteries.
® If the batteries are kept in smoky or
dusty places, the terminals may rust
and cause malfunctions.
® Do not allow the battery terminals to
come in contact with metal objects
(such as necklaces, hairpins, etc,). '
This can result in a short circuit or
heat generation, and if you touch
the battery in this condition, you
may be badly burned.
® Store the batteries in a compieteiy
discharged state. To store the
batteries for a long period of time,
we recommend you charge them
once every year and store them
again after you completely use up
the charged capacity.
Card
® When the card is being read, do not
remove the card, turn off the power,
or subject it to vibration or impact.
® Do not leave the card in places
where there is high temperature or
direct sunlight, or where
electromagnetic waves or static
eiectricity are easily generated.
® Do not bend or drop the card. The
card or the recorded content may
be damaged.
® After use, be sure to remove the
card from the digital camera.
® Do not touch the terminals on the
back of the card with your fingers.
Do not allow dirt, dust or water to
enter it.
67
Page 68

yonitor/Viewfinder
LCD monitor
® In a place vi/ith drastic tem.perature
changes, condensation may form
on the LCD monitor. Wipe it v^ith
soft dry cloth.
® if the digital camera is extremely
cold when you turn the power on,
the image on the LCD monitor is
slightly darker than usual at first.
However, as the internal
temperature Increases, It goes back
to the normal brightness.
Extremely high precision technology
is employed to produce the LCD
monitor screen featuring a total of
approximately 110,000 pixels. The
result is more than 99.99% effective
pixels with a mere 0.01 % of the pixels
inactive or always lit. However, this is
not a malfunction and does not affect
the recorded picture.
folders shown below will be
displayed.
SB^yenrid^-
Card
DCIM
L
Umisc
100._PANA
L
EXPORT I
® in the 10G„PANA folder it is
possible to record up to 999
images.
® in the MiSC folder it is possible to
record the files that have been set
with DPOF settings.
Viewfinder
® Do not direct the viewfinder or lens
to the sun. interna! components
may be seriously damaged.
Щ SO Slide Show
if setting the SD slide show with the
[SD Viewer for DSC] which is in the
supplied CD-ROM, when playing
back, the message “START SD
SLIDE SHOW ?" is displayed. Press
A/T to select [YES] and press the
[REVIEW/SET] button to start the SD
slide show.
Щ Folder Composition
When a memory card with data
recorded is inserted into a PC, the
68
Page 69

warning Indication
[MEMORY CARD FULL]
The capacity of the memory card is
fiilL Change the new memor>^ card or
delete unnecessary Images for
increasing recordable num.ber.
[PLEASE SET THE DATE.TIME]
The date has not been set up. Set the
date.
[THiS MEMORY CARD !S
PROTECTED]
The card is write-protected. Confirm
the contents and change the new
memory card or cancel the protect.
[NO VALID IMAGE TO PLAY]
[NOW DELETiNG]
This m.essage is displayed while
deleting the image data.
[PROTECTED]
This message is displayed when
trying to delete the protected picture.
[NOW FORMATTING]
This msessage is displayed while
formatting the memory card.
[MEMORY CARD ERROR]
Failed access to memory card,
insert the card again.
[READ ERROR]
When no images are recorded in the
memory card, this message wiii be
displayed if it is piayed back.
[NO MEMORY CARD]
The memory card is not inserted.
Insert the memory card.
The electrode side of a card is dirty
with dust and the fingerprint. Wipe it
with a soft dry cloth etc.
[PLEASE FORMAT THE
MEMORY CARD]
The unformatted memory card is
inserted. Format it.
[PLEASE WAIT]
Data reading error.
Play it back again.
[WRITE ERROR]
Data writing error.
Take out the card, or turn the camera
[OPERATE] again after once turning
it [STANDBY]. Or the card may be
destroyed.
[CANT BE SET ON THIS
PICTURE] / [CANT BE SET ON
SOME PICTURES]
If the image is not based on the DCF
standard, it is not possible to set the
DPOF.
This message is displayed while
saving the image data in the memory
card.
69
Page 70

1: The power does not turn on.
1-1: Check whether batteries are
inserted.
1-2: Check whether batteries are
charged.
1- 3: Use Panasonic AA Ni-MH
(nickel-metal hydride) batteries.
2: When the po¥/er is turned on,
it turns off Immediately.
2- 1: Check whether batteries are
7: The Image cannot be played
back.
7-1: Is the memorv card inside?
7- 2: There is no imiags in the memory
card.
8: The Image Is not displayed on
the television.
8- 1: Is the camiera correctly
connected with the TV? Check it.
8-2: Set the TV to video input mode.
charged.
2- 2: Has condensation occurred?
Carrying the digital camera from
a cold place to a warm piace^ it is
possible that condensation may
form inside the camera. V\/ait
until the condensation
disappears.
3: The Image cannot be
recorded,
3- 1: Is the memioiy^' card inside?
3-2: There is no capacity on the card.
Before recording, delete some
images.
4: The Image Is not displayed on
the LCD monitor.
4: is the LCD monitor set to [OFF]?
9r When connecting to PC,
images cannot be transferred.
9: Ensure the camera is correctly
connected to the PC-
5: The LCD monitor is too bright
or dark.
5: Adjust the brightness of the LCD
monitor.
6: The flash does not fire.
6: The flash mode is set to [Forced
OFF]. Change the flash mods.
70
Page 71

ions
Digital. Сашега
Power Scurcs:
Power Ccnsumotlon:
fcffsctive number of pixels
Image sensor
Lens
Focus
Recording range
Shutter system
ISO sensitivity
Shutter speed
White balance
Exposure (AE)
Metering rPiOds
LCD monitor
Optica! finder
Flash
Information for your safety
DC3V
4.2 W (When recording with LCD Monitor to on) i
0.9 W (When recording with LCD Monitor to off) )
2.7 W (When playback) ^
2.0 M
1/2.7 inch CCD, pixel number 2,110,000
Phmar/colorfilter
Opticai x3 zoom, f=5.4-16.2 mm (35 m^m films
camera conversion: 35-105 mms)/F2.8-4.6
Auto/Macro/'Auto: 50 cm - x, Macro: 15 cm - 70 cm
Electronic shutter ч- Mechanical shutter
AUTC/1GQ/200/400
Still picture mode: 1 -1/1,000
Motion image miods: 1/30 - 1/1,000
AUTO/Daylight/Cloudy/Haiogen/Whlte set
Program AE, Exposure compensation (0.25 EV
Step, -2 - -i-2 EV)
Center weiahted
1.5 inch iovv-temperature polycrystalline TFT LCD
(110,000 pixels).
Real-im.age zoom finder
built-in flash
AUTO, AUTO/Red-eye reduction, Forced ON,
Microphone
Recording media
Recording size
Quality
Recording file format
Still Picture
Motion image
Interface
Digital
Analog video
Slow SYNC., Forced OFF
recordable range: (Tele) approx. 20 cm -1,5 m
recordable range: (Wide) approx. 20 cm - 2.4 m,
Monaural
SD Memory' Card/MultlMediaCard
1600 X 1200, 1024 X 768, 640 x 480,
320 X 240 (Motion imsage mode)
Fine/Standard
JPEG (Design rule for Camera File system)
QuickTimie Motion JPEG (motion image with audio)
USB
NTSC/PAL Composite output
71
Page 72

Termmal
USB 5 pin Mini USB
Analog video <p 2.5 mm jack
DC IN ElAJ type 1 jack
Dimensions (W x H x D) 99.8 x 65.9 x 40.1 mm (excluding the projection
part)
Weight 195 g (excluding memory card and batteries)
250 g (including memory card and batteries)
Power Source
Charger (Panasonic DE-SS4B) information for your safety
input
Output
2 AA Ni-MH (nickel-metai hydride) Batteries
110V-240V,~50/60 Hz, 0.07A
1.5V--0.4AX2
72
 Loading...