

Page 1
Digital Imaging System
Operating Instructions (For Scanner)
DA-PC700
Options
DA-HD702
DA-SM08D (Except Europe)
Before operating this machine, please read
these instructions completely and keep
these operating instructions for future reference.
English
Page 2

TRADEMARKS/COPYRIGHTS
The following trademarks and registered trademarks are used throughout this manual.
Microsoft, MS-DOS, Windows, and Windows NT are either registered trademarks or trademarks
of Microsoft Corporation in the United States and/or other countries.
i386, i486, and Pentium are either registered trademarks or trademarks of Intel Corporation.
Adobe, the Adobe logo, Adobe PostScript, Acrobat, Acrobat Reader, and Acrobat logo are either
registered trademarks or trademarks of Adobe Systems Incorporated in the United States and/or
other countries.
Apple, the Apple logo, LaserWriter, Mac, Mac logo, Macintosh, Power Macintosh, and TrueType
are either registered trademarks or trademarks of Apple Computer, Inc. in the United States and/
or other countries.
Novell, Novell Client, Novell Directory Services, Novell Distributed Print Services, Netware,
intraNetware, NDPS, NDS, , IPX, IPX/SPX, NDS Admin, NDS Administrator are either registered
trademarks or trademarks of Novell, Inc., in the United States and/or other countries.
Panasonic Document Imaging Company has made every effort to supply trademark information
about company names, products and services mentioned in this documentation. All third party
and/or other trademarks identified herein are the property of their respective owners.
Copyright © 2001 by Matsushita Graphic Communication Systems, Inc.
All rights reserved.
Copyright protection claimed includes all forms and matters of copyrightable material and
information now allowed by statutory or judicial law or hereinafter granted, including without
limitation, material generated from the software programs that are displayed on the screen such
as styles, templates, icons, screen displays, looks, etc.
Contents are subject to change without notice.
Printed in Japan.
Page 3

Preface
Thank you for purchasing the Panasonic DP-6000/7000*. This manual provides all the necessary
operating instructions and precautions for the use of the scanning features.
To get the most out of the machine, please read this manual carefully in its entirety.
This manual is written with the assumption that you are familiar with the basic knowledge and way
of operating the different operating systems. Refer to the manuals of these products for information
on them.
Refer to the safety notes of the Operating Instructions (For Copier), or Operating Instruction (For
Printer) before using the scan function.
* DP-6000 USA/Canada only.
i
Page 4

Contents
Preface...........................................................................................................................................................i
Contents .......................................................................................................................................................ii
Types of Manuals ........................................................................................................................................iv
Using These Operating Instructions............................................................................................................. v
Chapter 1 Before Using the Scanner
1.1 Overview ............................................................................................................................................ 2
1.1.1 Scanning With the Mailbox.............................................................................................. 2
1.2 Required Environment........................................................................................................................ 3
1.3 Setting Up DP-6000/7000 for Using Mailbox Feature....................................................................... 4
1.3.1 Starting up the Salutation .................................................................................................4
1.3.2 Setting up the Subnet Mask/Gateway Address................................................................. 7
1.3.3 Creating a Mailbox .........................................................................................................10
1.4 Installing the Network Scanner Utility ............................................................................................. 13
1.4.1 Required Environment ................................................................................................... 13
1.4.2 Installation ...................................................................................................................... 14
1.4.3 Uninstallation ................................................................................................................. 16
Chapter 2 Operating the Scanner
2.1 Scanning Documents (Scan-to-Mailbox) .........................................................................................18
2.2 Specifying Various Features .............................................................................................................20
2.2.1 Selecting the Resolution Level....................................................................................... 20
2.2.2 Selecting the Original Type ............................................................................................21
2.2.3 Selecting the Density Level............................................................................................ 21
2.2.4 Selecting the Scan Size................................................................................................... 22
2.2.5 Scanning Documents at the Specified Ratio .................................................................. 23
2.2.6 Scanning Two Sided Originals ....................................................................................... 24
2.3 Scanning With the Job Memory ....................................................................................................... 25
2.4 Checking Job Status ......................................................................................................................... 26
2.5 Deleting Stored Documents.............................................................................................................. 28
2.6 Custom Presets for Scanning Features ............................................................................................. 30
ii
Page 5

Chapter 3 Operating the Client (Personal Computer)
3.1 Using the Network Scanner Driver .................................................................................................. 34
3.1.1 Importing the Documents Stored in the Mailbox ........................................................... 34
3.1.2 Changing Display of the Scanner Name ........................................................................ 41
3.1.3 Changing Import Settings............................................................................................... 43
3.2 Using the Mailbox Viewer................................................................................................................ 44
3.2.1 Confirm/Delete/Import the Stored Document in a Mailbox .......................................... 44
3.2.2 Setting up the Properties of Mailbox Viewer ................................................................. 49
Chapter 4 Precautions and Limitations
4.1 Precautions and Limitations ............................................................................................................. 52
Appendix
A Compatible Software ........................................................................................................................ 54
Index ................................................................................................................................................. 55
iii
Page 6

Types of Manuals
The types of manuals available for the DP-6000/7000 are as follows:
Manuals Bundled with the Main Unit (the Copier)
•
Operating Instructions (For Copier)
Explains the handling of the main unit and the copier function.
Manuals Bundled with the Printer/Scanner Kit or Printer Model
•
Operating Instructions (For Printer)
Explains the printer functions, installation/configuration of the printer drivers as well
as the setup and operations when using the machine as a network printer.
•
Operating Instructions (For Scanner)
Explains the scanner functions and installation/configuration of the scanner driver.
iv
Page 7

Using These Operating Instructions
Background Knowledge
Read this manual in detail before using the scan function of the main unit. If you are
not familiar with the operating environment for the scan function, read the relevant
manuals first.
Operating environment refers to personal computers, networks, and the respective
operating systems and applications on which these machines run.
Preparation
This manual is targeted at users who are using the DP-6000/7000 Network Scanner.
Read the contents of this manual in its entirety. You may skip sections on the options
you did not purchase.
Organisation
The following is a summary of each chapter:
Chapter 1 Before Using the Scanner
This chapter provides a summary of the scan function and preparation on using the
network scanner.
Chapter 2 Operating the Scanner
This chapter describes how to scan the document.
Chapter 3 Operating the Client (Personal Computer)
This chapter describes how to import the stored document from the mailbox of the
machine to a personal computer.
Chapter 4 Precautions and Limitations
This chapter describes the precautions and limitations when using the scan function.
Appendix
This section provides information on the software that are compatible with the
machine.
v
Page 8
Conventions
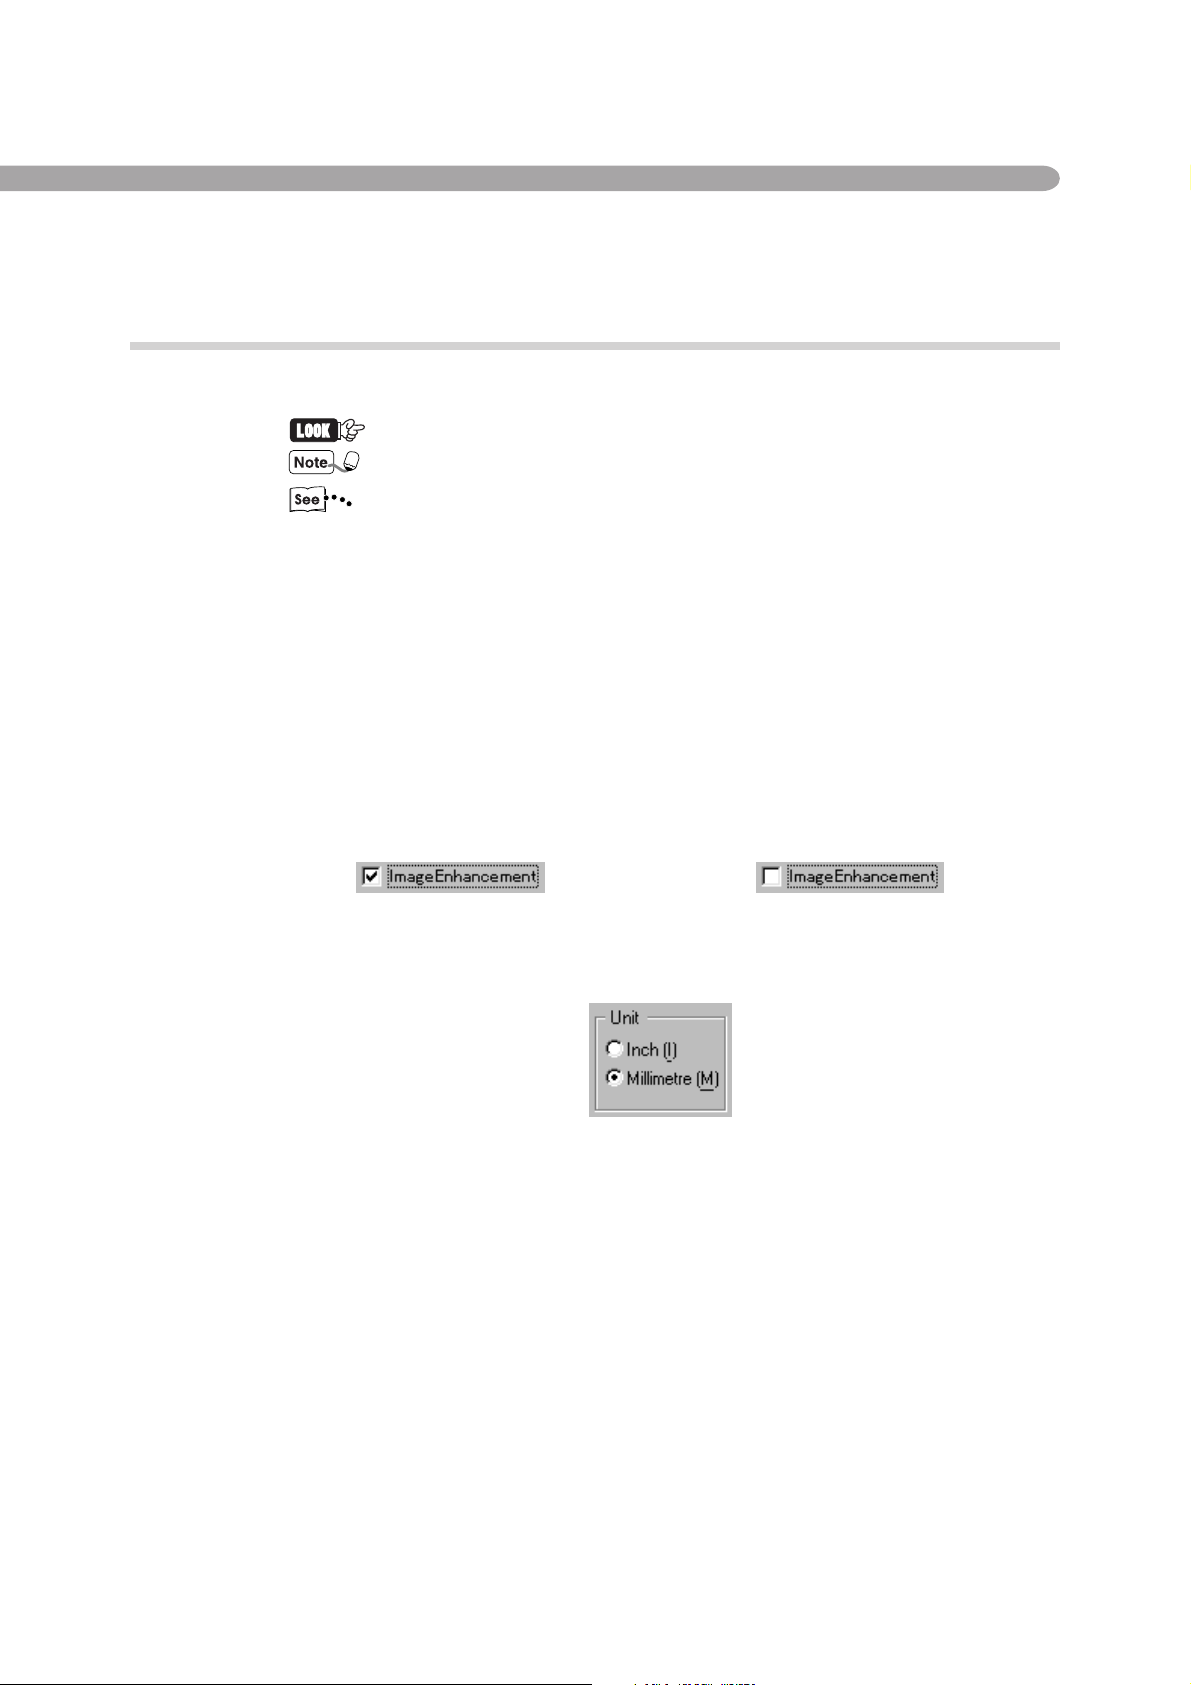
1. The following icons are used in this manual:
2. The following conventions are used in this manual:
3. When a check box is checked, it indicates ON. Otherwise it indicates OFF.
Indicates important information and must be read in detail.
Indicates supplementary information.
Indicates references used in this manual.
" " : Double quotes are used to indicate names of files, windows, dialog
boxes and input contents.
E.g. "Mailbox Viewer" dialog box appears.
Bold face : Bold face characters refer to window menu items, dialog box items
and all kinds of buttons.
E.g. Click OK.
E.g. "Image Enhancement" is on. "Image Enhancement" is off.
4. The item with the option button checked is the selected item.
E.g. "Millimeter" is selected.
vi
Page 9

Before Using
the Scanner
1.1 Overview ............................................................................................. 2
1.2 Required Environment ........................................................................ 3
1.3 Setting Up DP-6000/7000 for Using Mailbox Feature ....................... 4
1.4 Installing the Network Scanner Utility.............................................. 13
Page 10
1.1 Overview
The DP-6000/7000 Network Scanner provides the following feature:
1
• The scan feature by using the mailbox in the main unit
The following explains the summary of scan function:
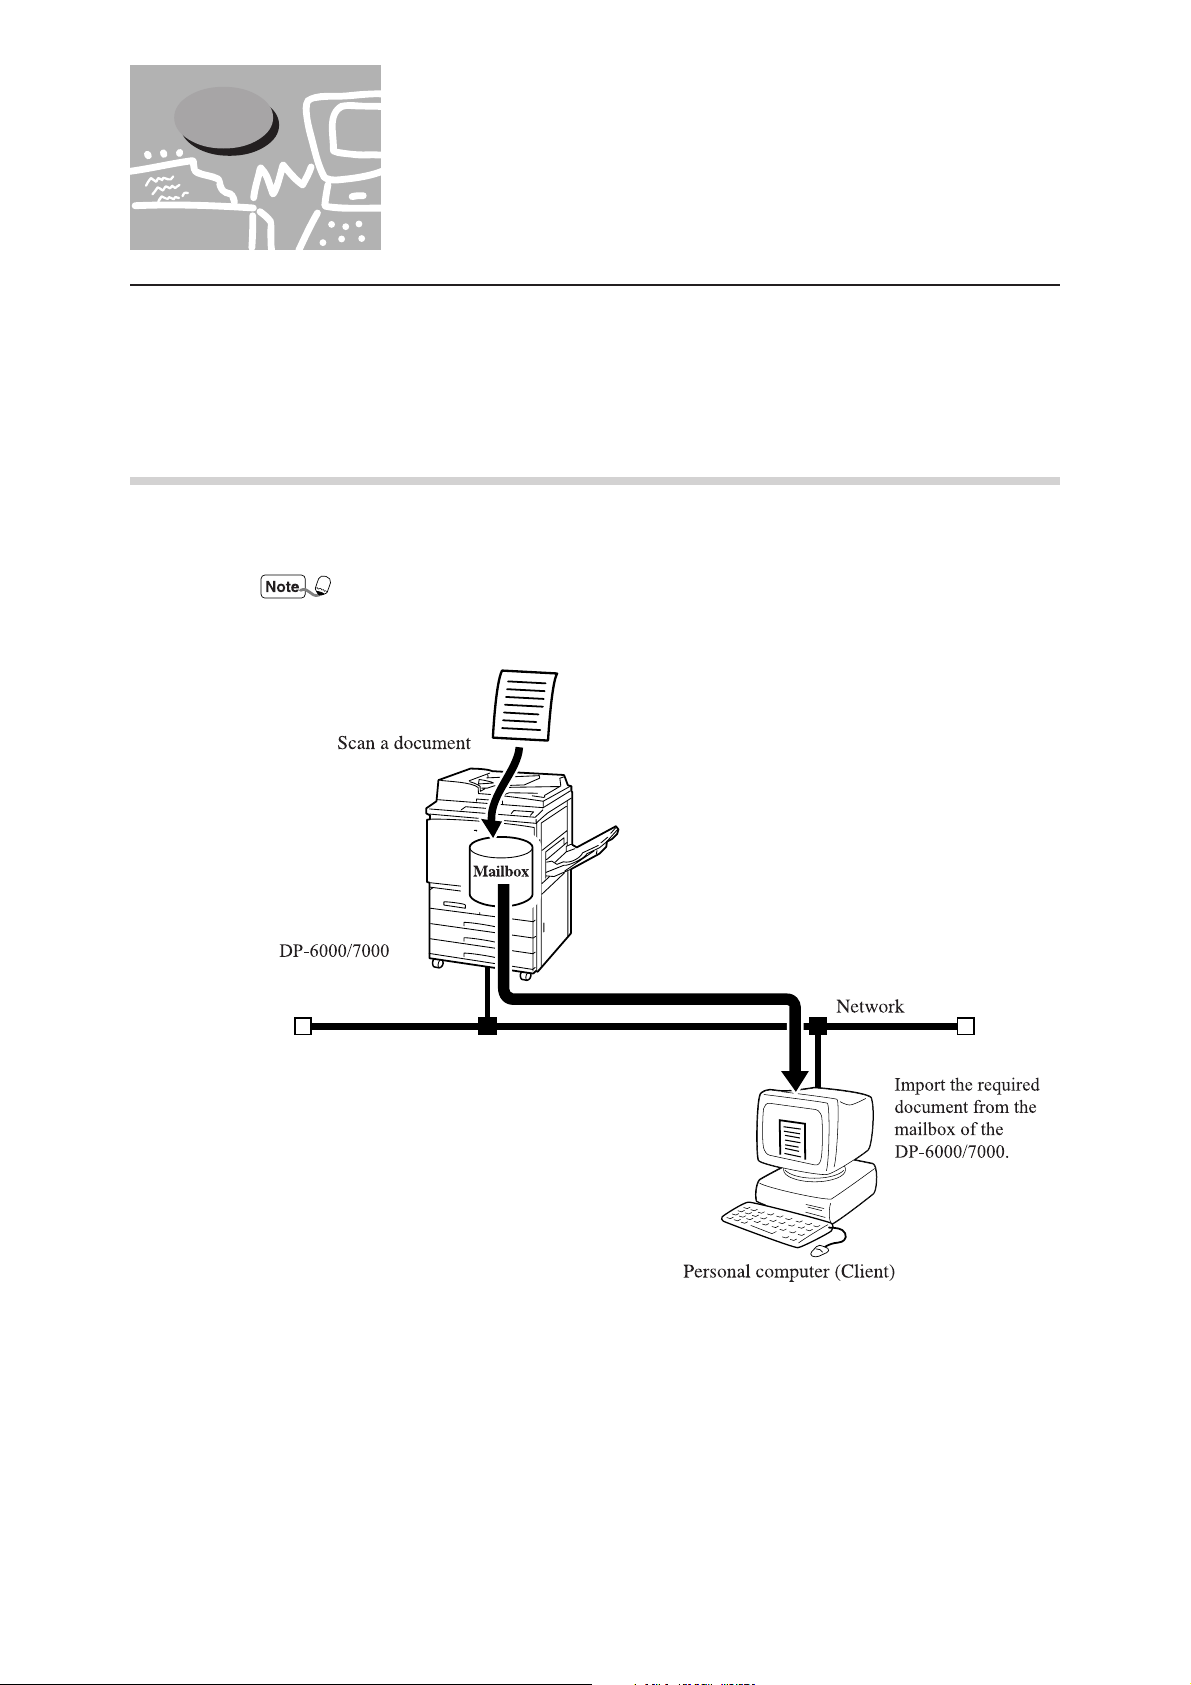
1.1.1 Scanning With the Mailbox
You can store a document in the mailbox by scanning it with DP-6000/7000. The
stored data can be imported to a personal computer (client) connected to a network.
The mailbox in this manual refer to the feature existing inside the main unit. It is
different from an optional Mail Box which is an output device with multiple bins.
2
Page 11

1.2 Required Environment
This section describes the environment required in order to use the scan feature (mailbox feature).
Personal Computer (Client)
The personal computer as a client must be installed with either one of the following
operating systems:
• Microsoft Windows 95/98/Me
• Microsoft Windows NT Version 4.0/Windows
Network
The DP-6000/7000 and the personal computer should be connected to a network and
be able to communicate using the TCP/IP protocol.
2000
1
Before Using the Scanner
3
Page 12
1.3 Setting Up DP-6000/7000 for
Using Mailbox Feature
The following preparation is necessary to scan a document using the mailbox:
1
• Activate Salutation (define IP address).
• Define subnet mask/gateway address.
• Register the mailbox.
The procedure for setup is as follows:
1.3.1 Starting up the Salutation
On the control panel of the DP-6000/7000, start up the Salutation and define the IP
address following the procedure shown below.
You do not need to define the IP address if it already exists. (The screen for defining the
IP address will not be displayed then.)
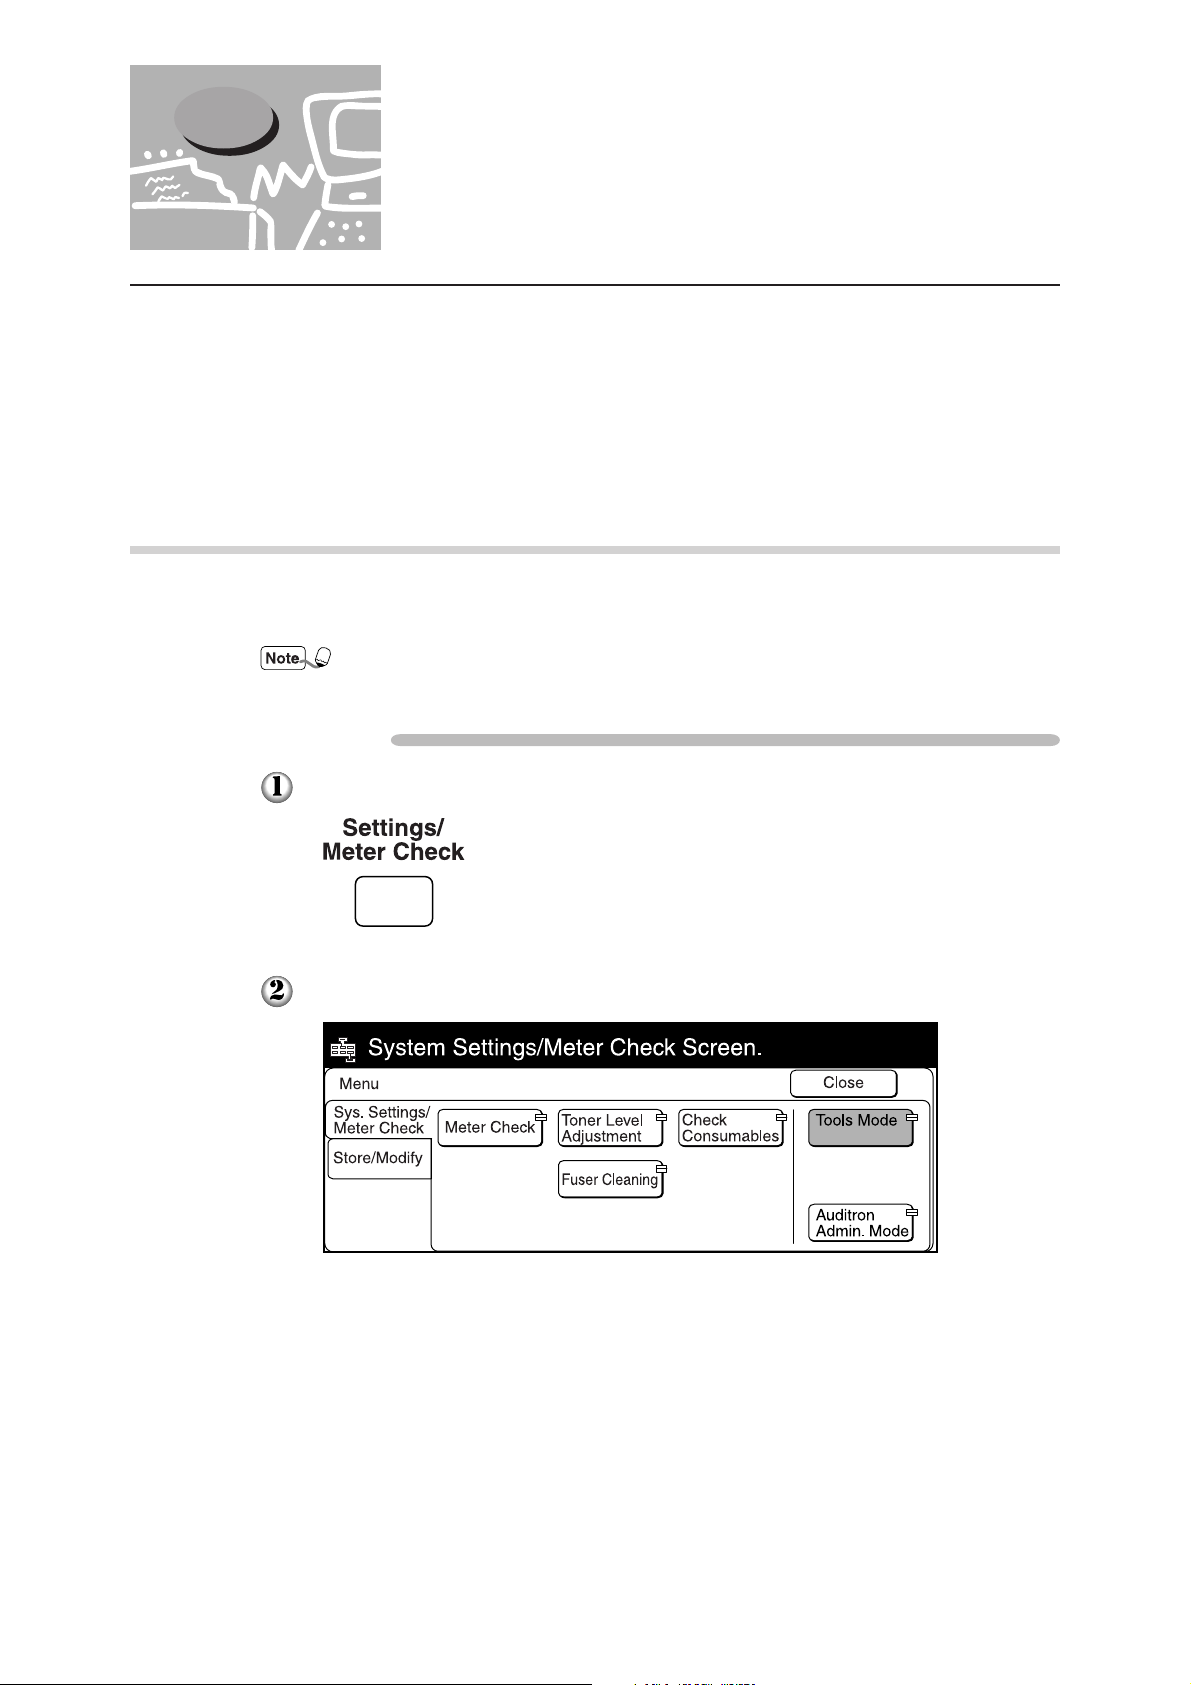
Procedure
Press Settings/Meter Check.
Select Tools Mode.
4
Page 13
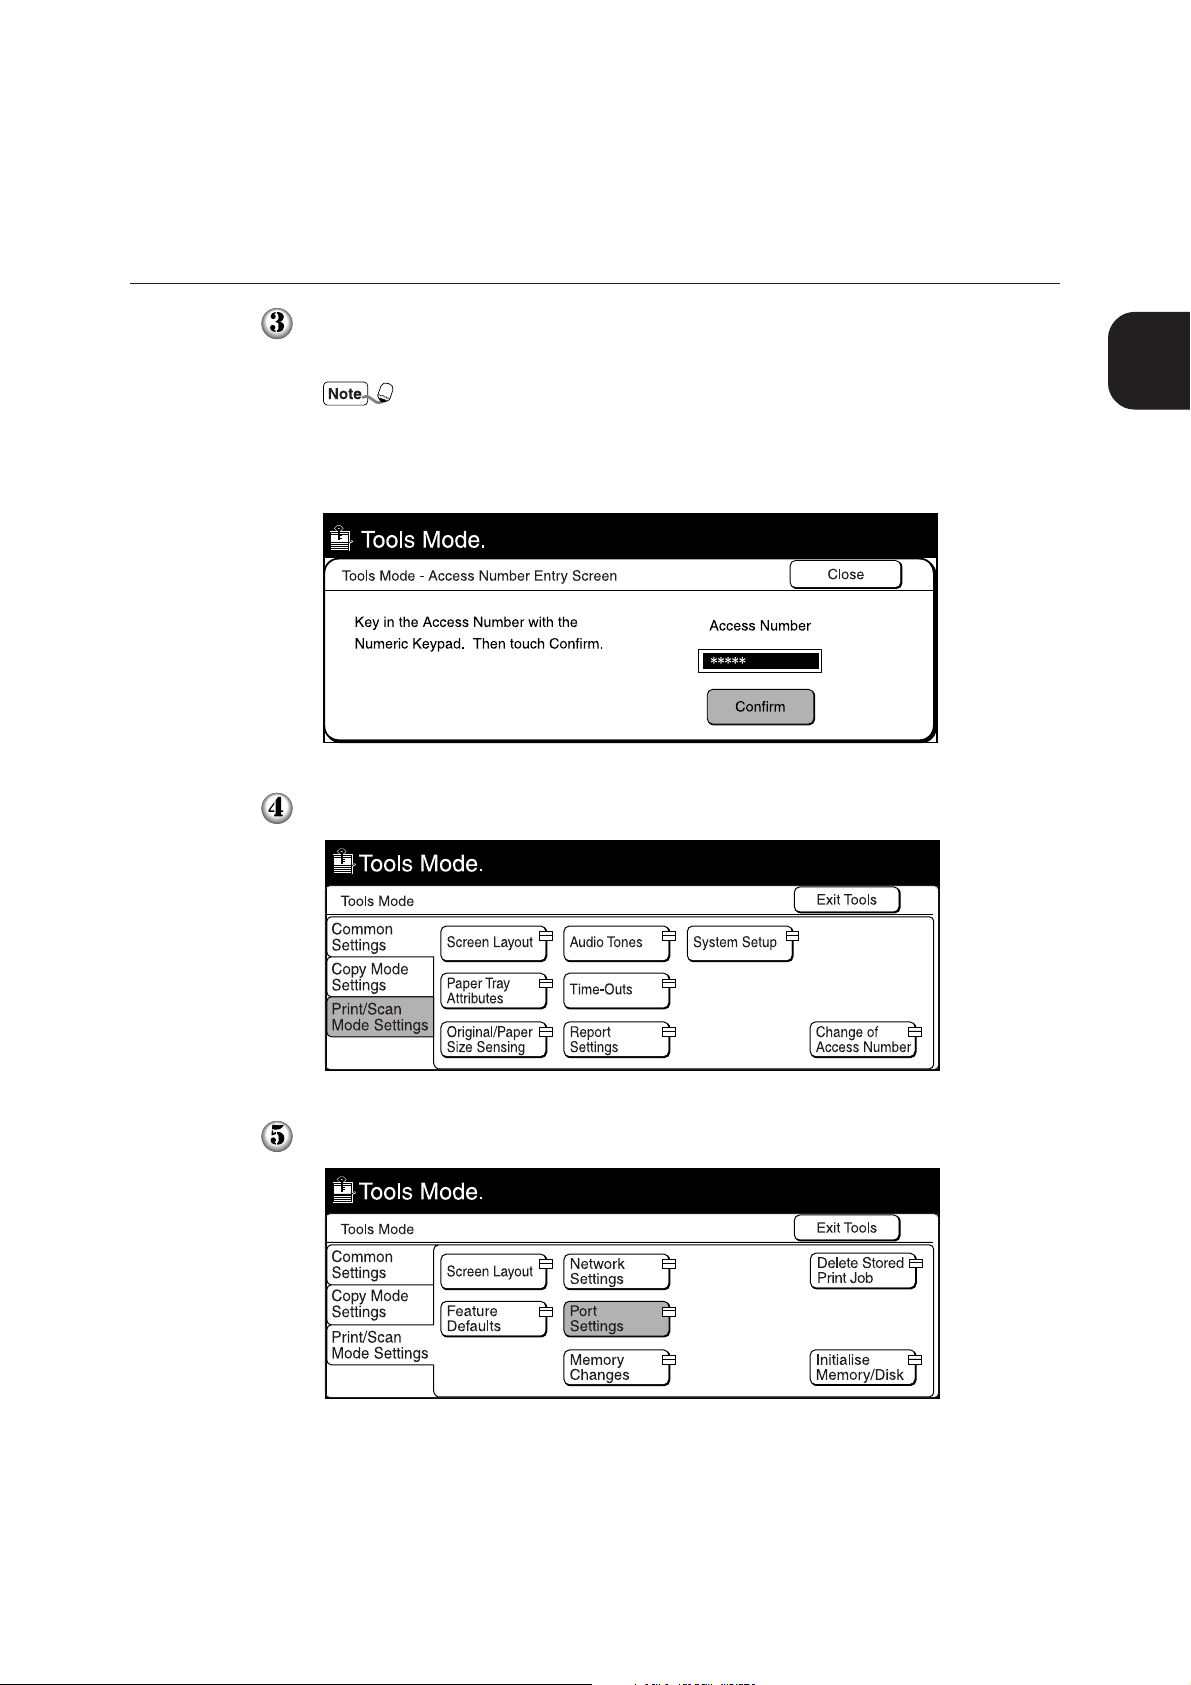
1.3 Setting Up DP-6000/7000 for Using Mailbox Feature
Enter the access number of the system administrator using the keypad, then
select Confirm. The access number is displayed as *.
• If you made an error while entering the access number, press Clear C to
clear and re-enter.
• Select Close to restart the machine.
• The factory default of the access number is "11111".
Select Print/Scan Mode Settings.
1
Before Using the Scanner
Select Port Settings.
5
Page 14
1
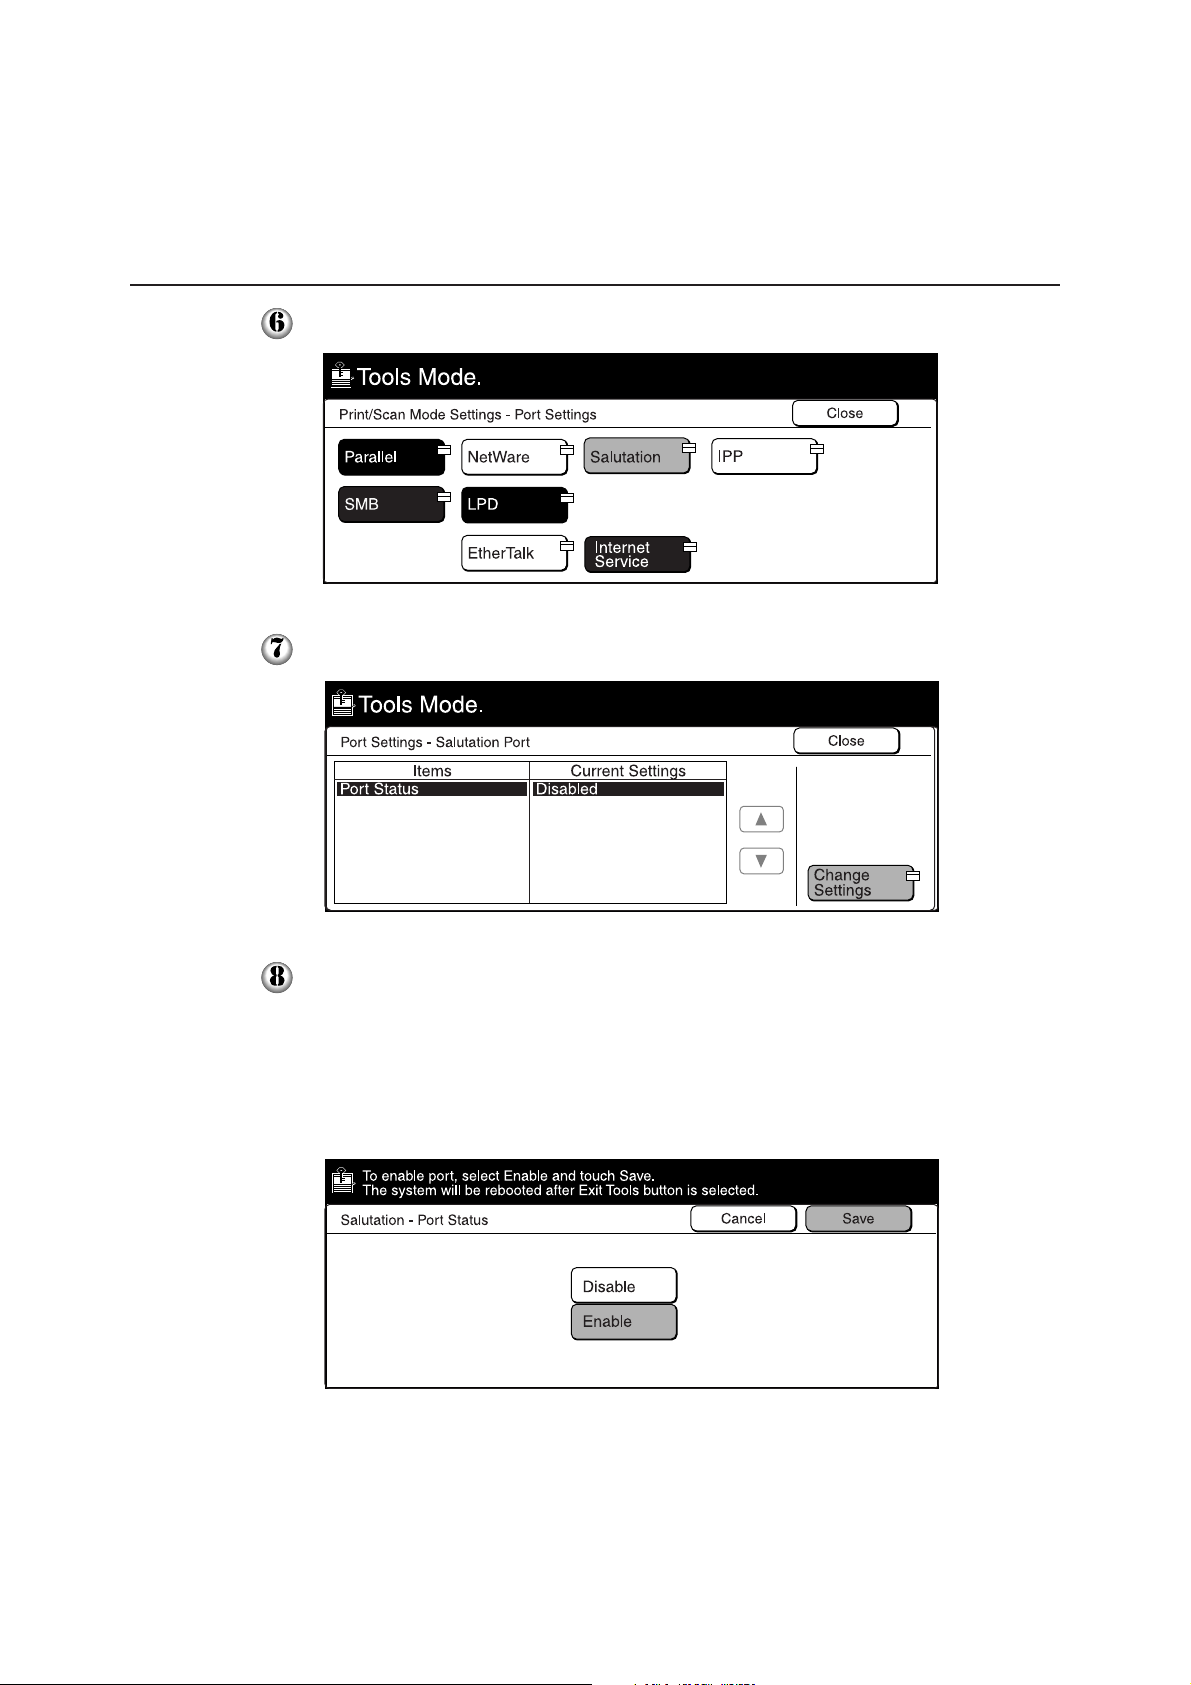
1.3 Setting Up DP-6000/7000 for Using Mailbox Feature
Select Salutation.
Select Port Status, followed by Change Settings.
Select Enable, then Save.
The Port Settings - Salutation Port screen is displayed with the new setting.
The IP address is automatically obtained via DHCP or BOOTP depending on
your setting (unless it has already been configured). To specify a specific IP
address, select Network Settings on the Tools Mode screen, followed by TCP/
IP: IP Address and Change Settings.
6
Page 15
1.3 Setting Up DP-6000/7000 for Using Mailbox Feature
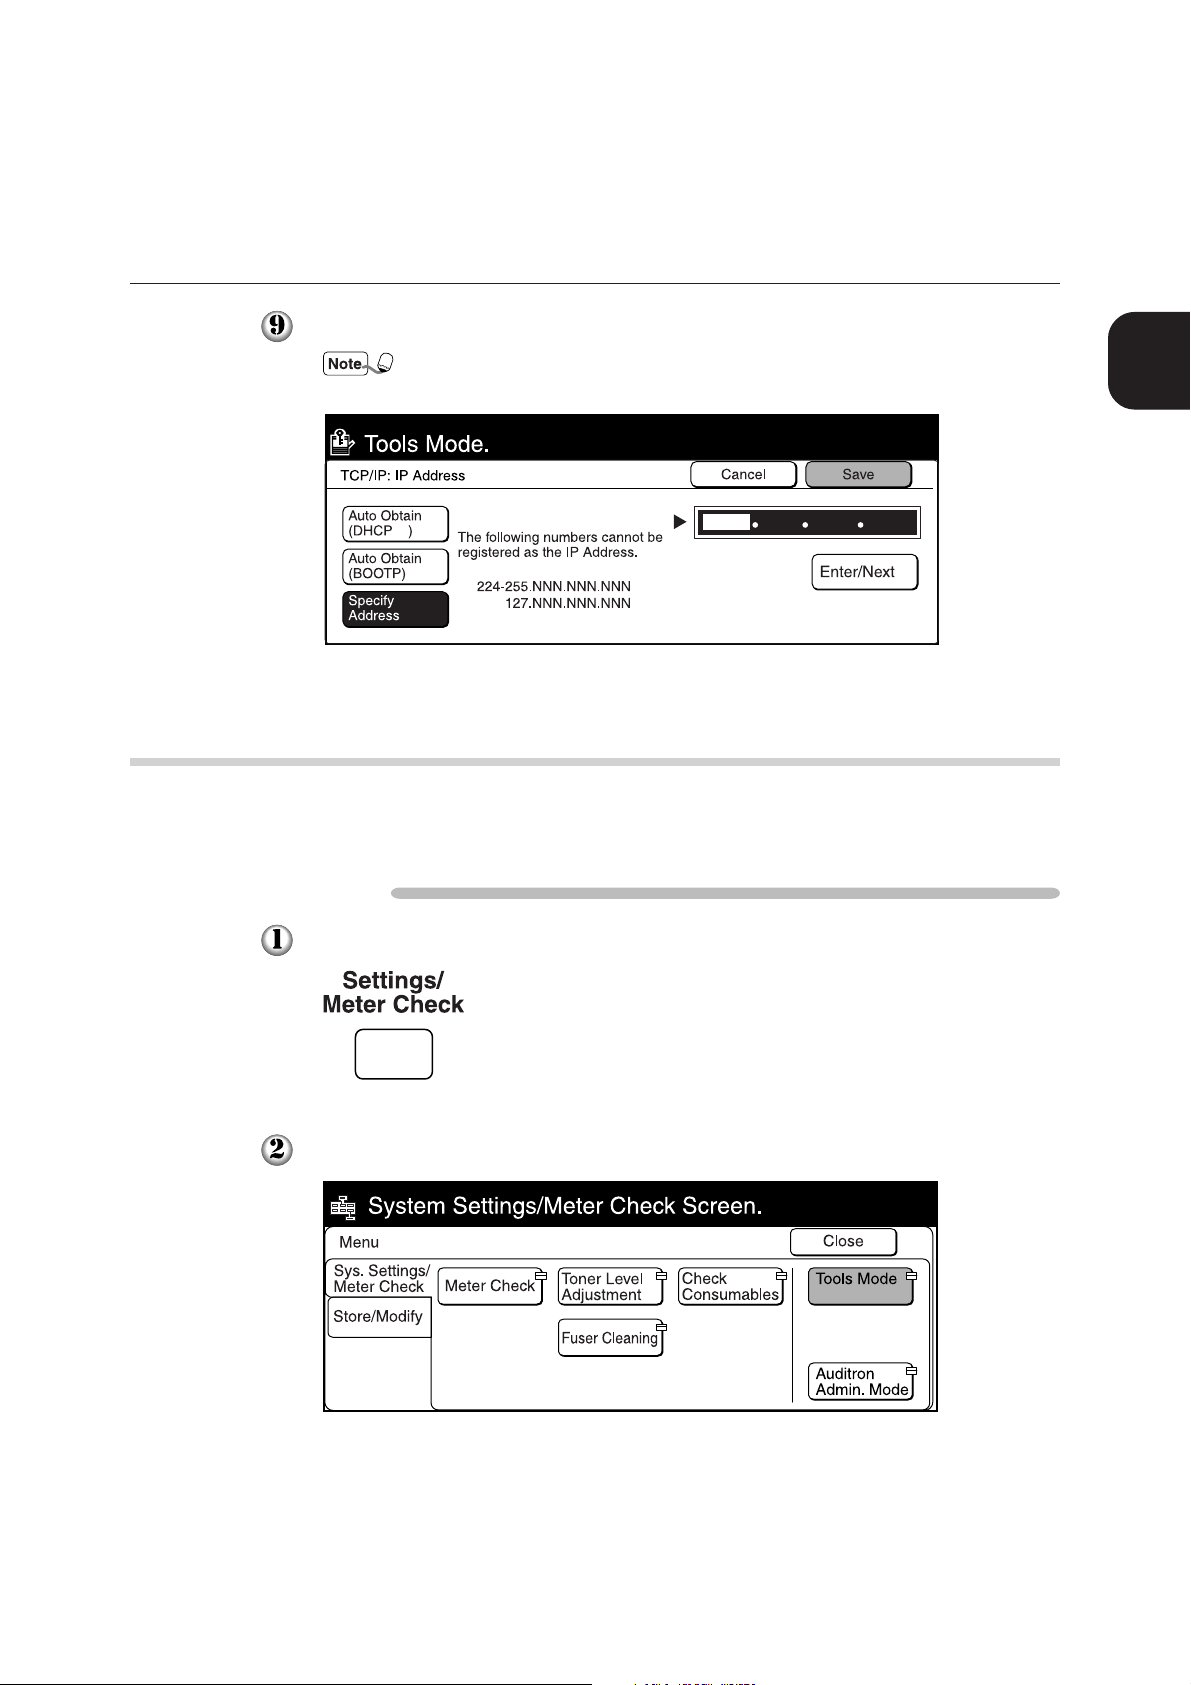
Enter the IP address using the keypad, then select Save.
When three numbers are entered, the cursor moves to the next bit automatically.
If you want to move it manually, select the Enter/Next button.
1.3.2 Setting up the Subnet Mask/Gateway Address
On the control panel of DP-6000/7000, setup the subnet mask and gateway address
according to the procedure as shown below (if needed).
Procedure
1
Before Using the Scanner
Press Settings/Meter Check.
Select Tools Mode.
7
Page 16
1
1.3 Setting Up DP-6000/7000 for Using Mailbox Feature
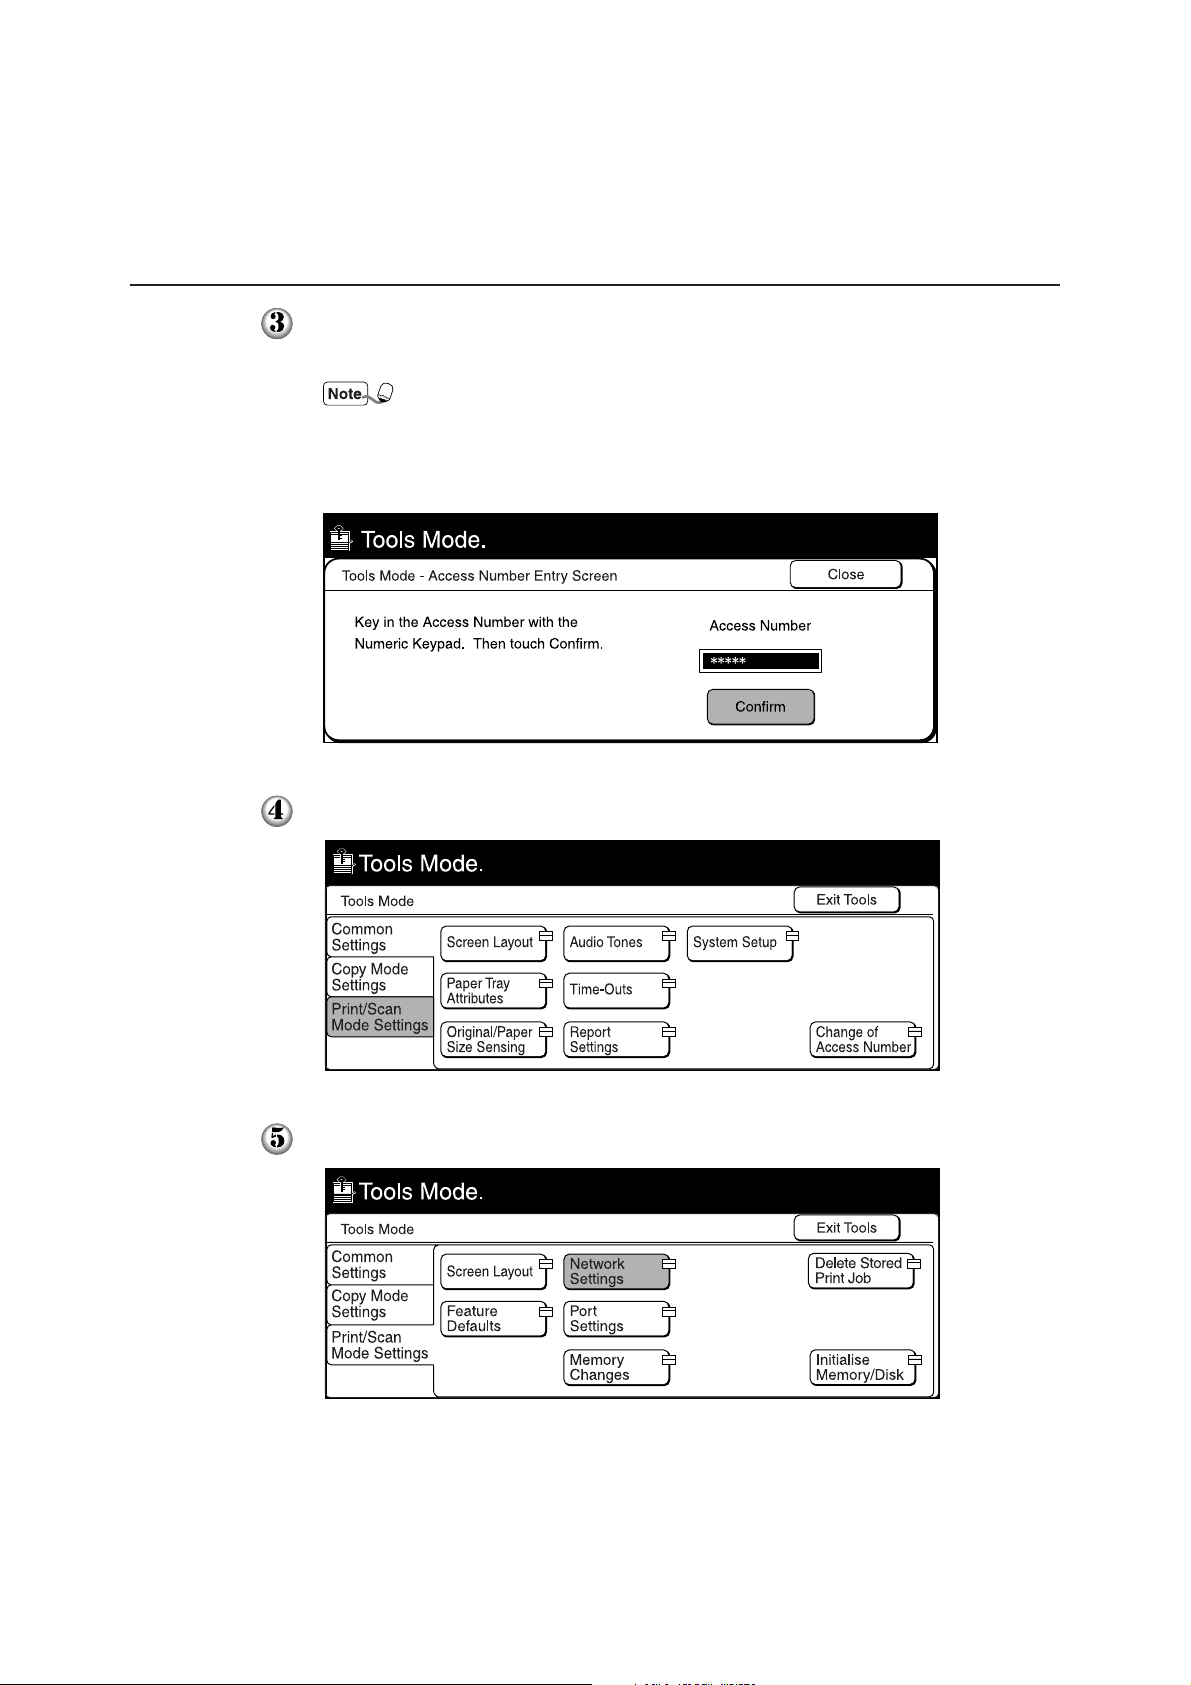
Enter the access number of the system administrator using the keypad, then
select Confirm. The access number will be displayed as *.
• If you made an error while entering the access number, press the Clear C
button to clear and re-enter.
• Select the Close button to restart the machine.
• The factory default of the access number is "11111".
Select Print/Scan Mode Settings.
Select Network Settings.
8
Page 17
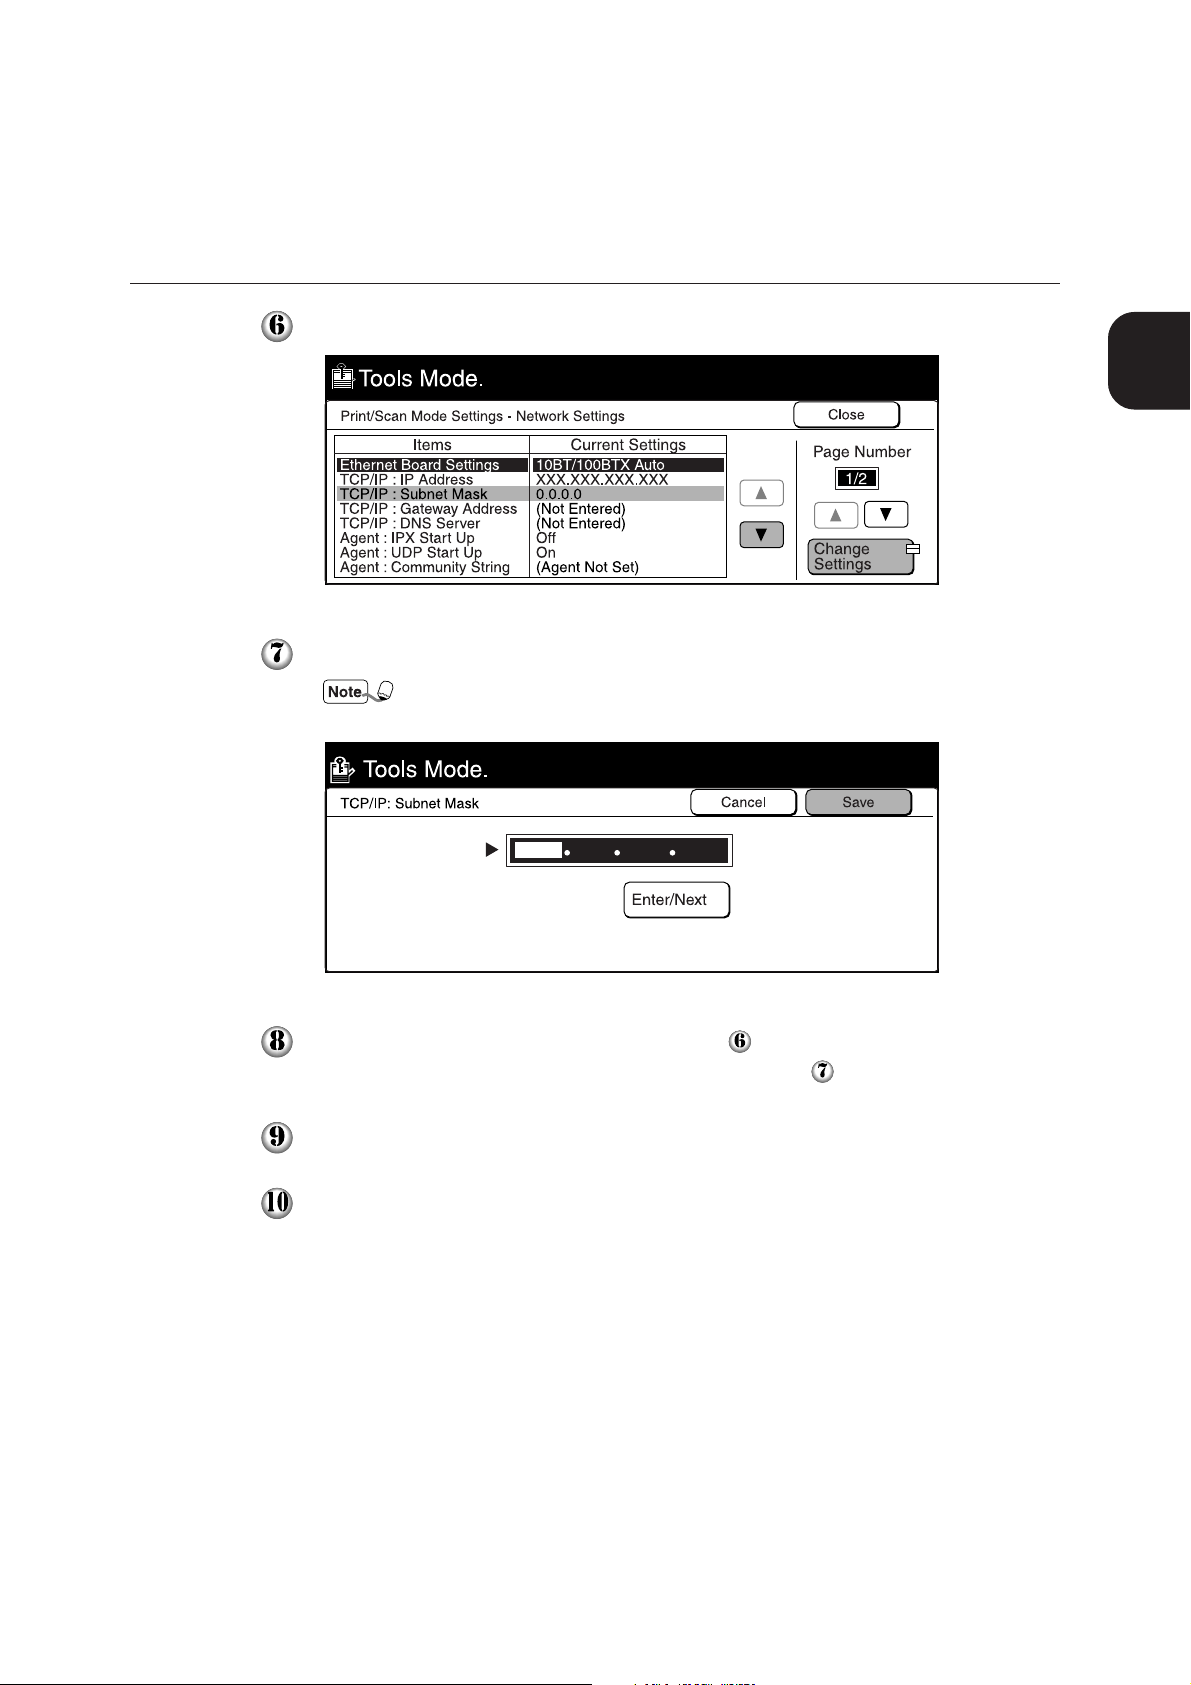
1.3 Setting Up DP-6000/7000 for Using Mailbox Feature
Select TCP/IP: Subnet Mask, then Change Settings.
Enter the subnet mask using the keypad, then select Save.
When three numbers are entered, the cursor moves to the next bit automatically.
If you want to move it manually, select Enter/Next.
1
Before Using the Scanner
Select TCP/IP: Gateway Address in Step to specify the gateway address,
followed by Change Settings, then proceed to Step
Select Close.
Select Exit Tools.
The machine will restart and the specified setting will be stored.
.
9
Page 18
1.3 Setting Up DP-6000/7000 for Using Mailbox Feature
1.3.3 Creating a Mailbox
1
Create a mailbox to store the scanned document. You can create the mailbox using
the control panel of the main unit.
You can create up to 200 mailboxes.
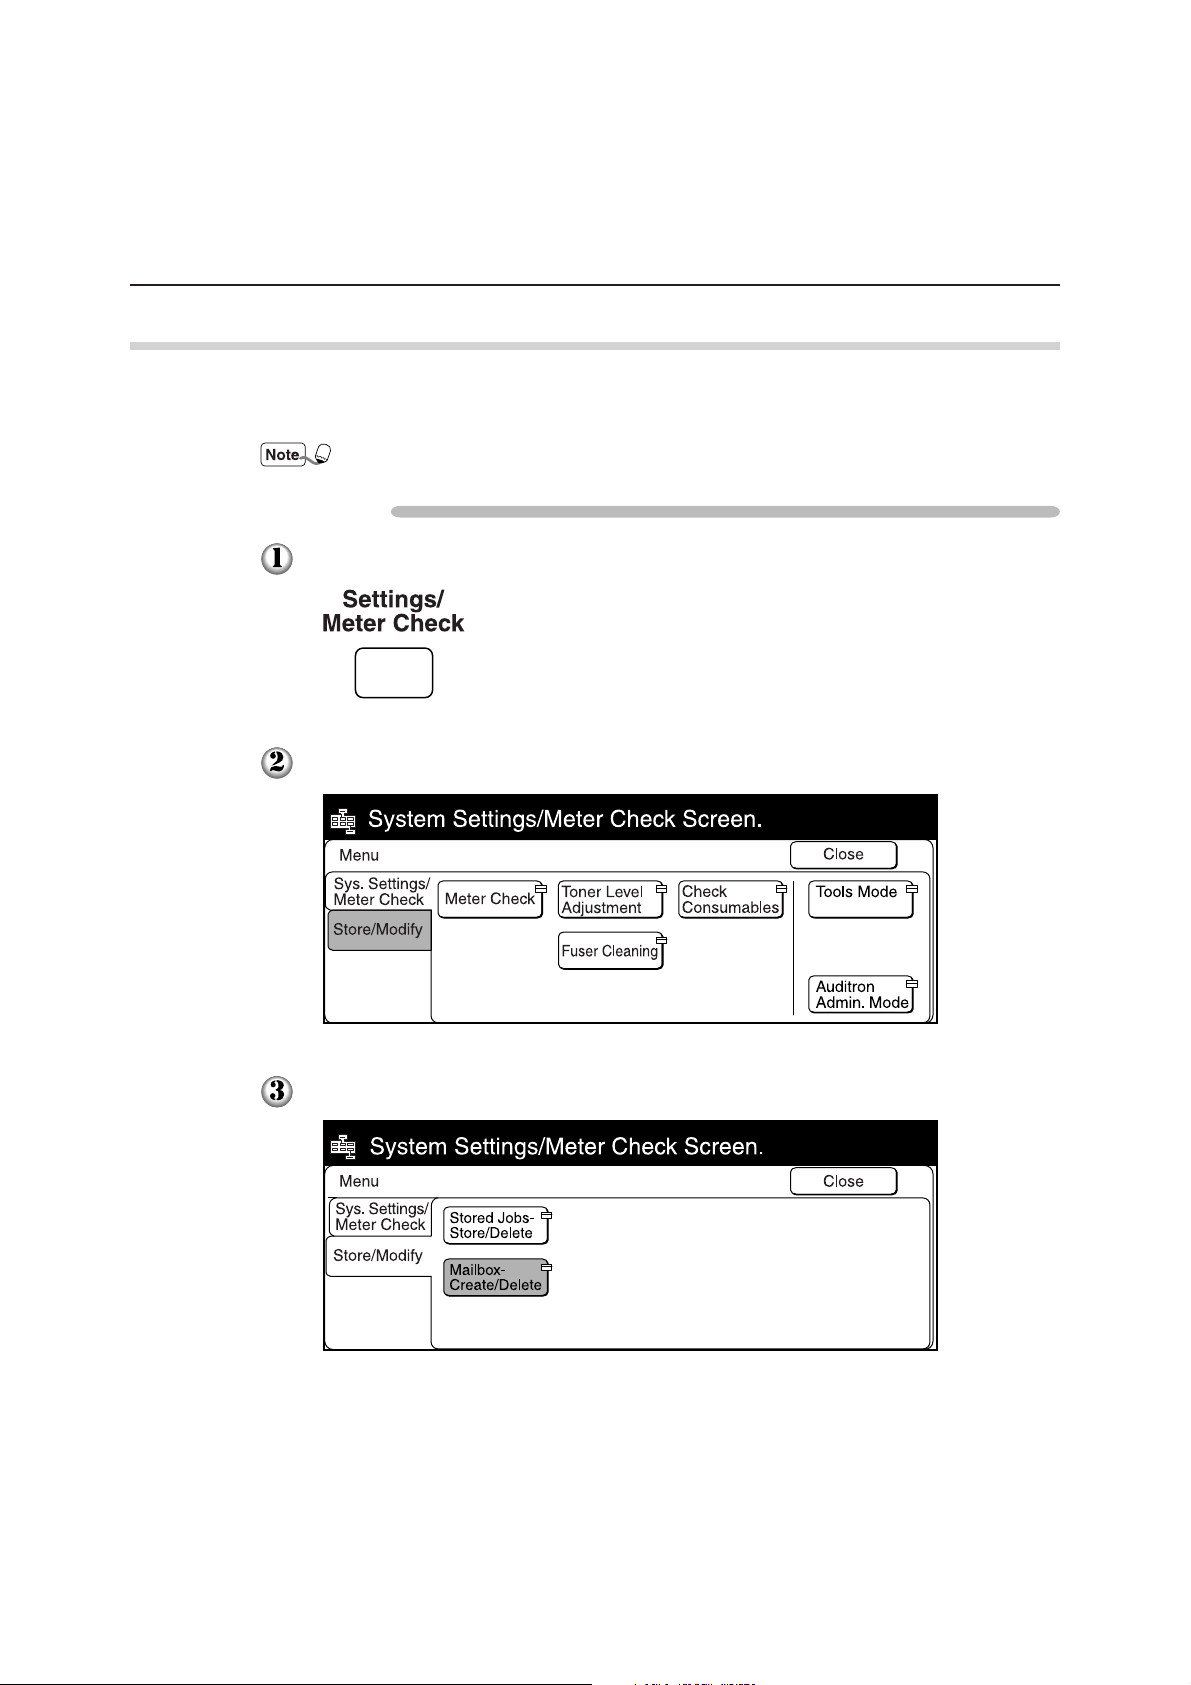
Procedure
Press Settings/Meter Check.
Select Store/Modify.
10
Select Mailbox-Create/Delete.
Page 19

1.3 Setting Up DP-6000/7000 for Using Mailbox Feature
Select an unused mailbox number, then Create/Delete.
Enter a four-digit password using the keypad, then select Confirm.
The password will be displayed as *.
The password must be unique.
1
Before Using the Scanner
Select Enter/Change Name to enter the name for mailbox.
If you do not wish to enter any name, proceed to Step
.
11
Page 20
1
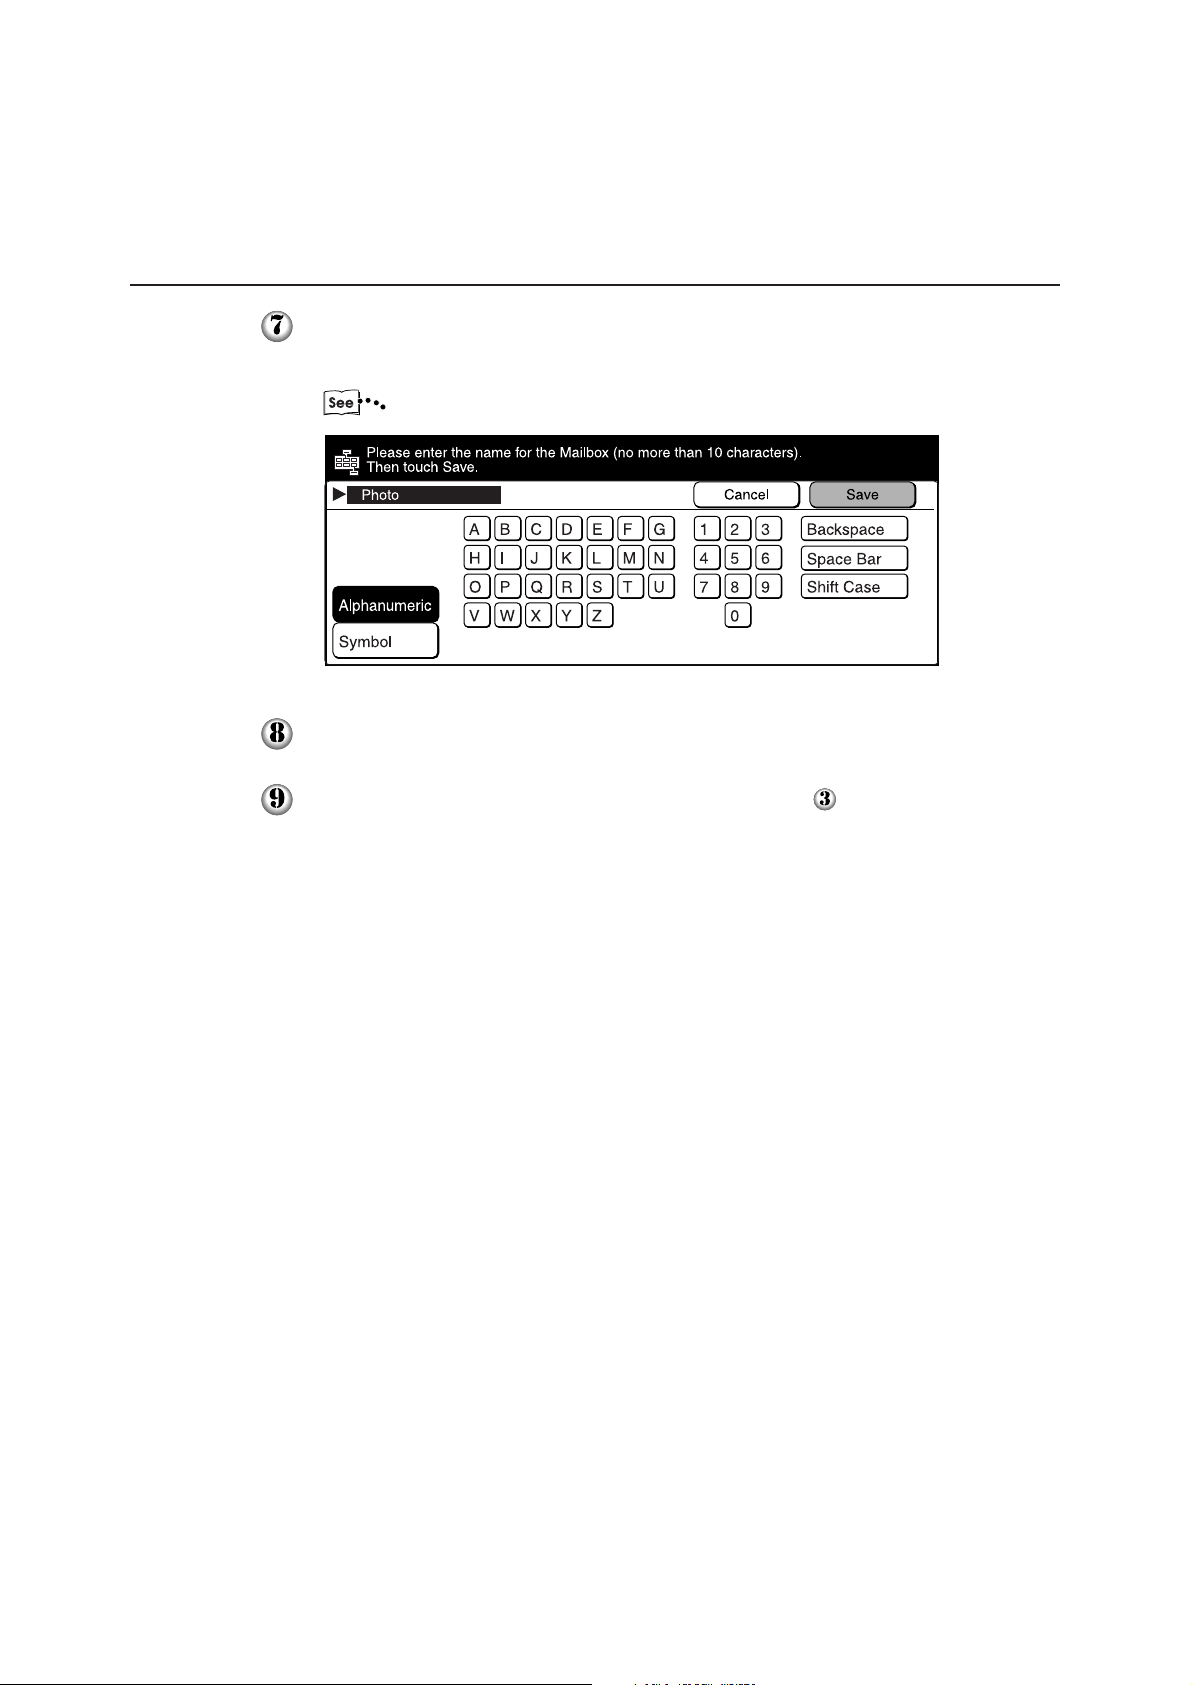
1.3 Setting Up DP-6000/7000 for Using Mailbox Feature
Enter the name of the mailbox using the keypad on the screen, then select
Save.
"Operating Instructions (For Copier)" for entering text.
Confirm the name of the mailbox, then select Save.
Select Close a few times to go to the screen on Step . The mailbox is
created.
12
Page 21

1.4 Installing the Network Scanner
Utility
The Network Scanner Utility is the software which allows you to access data stored in the mailbox
from a personal computer. This section describes the installation and uninstallation of the Network
Scanner Utility.
1.4.1 Required Environment
To install the Network Scanner Utility, a personal computer must meet all the
following requirements:
Target Operating System
The following operating systems are compatible with the utility:
• Microsoft Windows 95/98/Me
1
Before Using the Scanner
• Microsoft Windows NT Version 4.0/Windows 2000
Personal Computer
The target computer must meet all the following requirements:
• Running an i486DX4/100 MHz processor or above (Pentium 100 MHz or above is
recommended)
• 32 MB memory or more
• 25 MB or more of free hard disk space (not including the space for storing
scanned data)
Network
A personal computer has to be connected to a network and be able to communicate
with the TCP/IP protocol.
Double-click on My Computer, Control Panel, then Network to confirm that the TCP/IP
exists on the menu.
Target Application Software
To import the data stored in the mailbox to an application software, the software
must be compatible with the TWAIN interface.
"Appendix A Compatible Software" for the applications that have been verified to be
compatible with DP-6000/7000.
13
Page 22

1.4.2 Installation
The Network Scanner utility includes the following two pieces of software:
• Network Scanner Driver
Scanner driver to import the data stored in the mailbox of the DP-6000/7000 to the
software compatible with TWAIN.
• Mailbox Viewer
Software to check, import or delete the data stored in the mailbox of the DP-6000/
7000.
You can install both of these at the same time following the installation procedure
below.
Procedure
Start Windows 95, Windows 98, Windows Me, Windows NT 4.0 or Windows
2000. Click the "Start" menu and select Run. The "Run" dialog box appears.
1.4 Installing the Network Scanner Utility
14
Insert the PCL Driver/Network Utility (Windows) CD-ROM into the CDROM drive. Type the drive name (e.g. E:) and the path name
(\Utilities\Win9x_Me\Scn\Disk1\Setup), then click OK. The drive name may
be different according to your system (personal computer).
Page 23

1.4 Installing the Network Scanner Utility
Click Next to continue with the installation.
1
Before Using the Scanner
When the installation is completed, the following dialog box appears. Click
Yes, I want to restart my computer now., then Finish.
The installation is completed and Windows will restart.
15
Page 24

1.4.3 Uninstallation
This section describes the procedure to remove the Network Scanner Utility installed
in Microsoft Windows.
Procedure
Start Windows 95, Windows 98, Windows Me, Windows NT 4.0 or Windows
2000. Double-click My Computer, Control Panel, then Add/Remove
Programs.
1.4 Installing the Network Scanner Utility
16
Click Panasonic Network Scanner Utility, then Add/Remove.
Click Yes.
The uninstallation is completed.
Page 25

Operating
the Scanner
2.1 Scanning Documents (Scan-to-Mailbox) .......................................... 18
2.2 Specifying Various Features ............................................................. 20
2.3 Scanning With the Job Memory........................................................ 25
2.4 Checking Job Status .......................................................................... 26
2.5 Deleting Stored Documents .............................................................. 28
2.6 Custom Presets for Scanning Features .............................................. 30
Page 26

2.1 Scanning Documents
(Scan-to-Mailbox)
This section describes how to scan documents and to store the scanned document into a mailbox.
Procedure
Load the documents.
Select Scan Mode on the Menu screen.
If the screen below is not displayed, press the Menu button on the control panel
to display it.
Select Scan-to-Mailbox.
"1.3.3 Creating a Mailbox" to create a new mailbox.
Select the required mailbox.
18
Page 27

2.1 Scanning Documents (Scan-to-Mailbox)
The status of mailbox appears on the top of the screen. Select Close.
Select the necessary scanning features.
"2.2 Specifying Various Features" for details of scanning features.
Press Start.
2
Operating the Scanner
The following screen is displayed.
Press the Next Original button to scan other documents continuously. You can
specify different features for different documents.
The scanning starts, and the scanned document is stored into the mailbox.
19
Page 28

2
2.2 Specifying Various Features
This section describes the setting of various scanning features of the DP-6000/7000.
The available scan features are as follows:
• Scan Resolution
• Original Type
• Lighter/Darker (density level)
• Scan Size
• Reduce/Enlarge (scan ratio)
• 2 Sided Original
Select the required scanning features following the procedure below.
2.2.1 Selecting the Resolution Level
You can select the resolution level for the documents to be scanned.
The resolution levels are 200 dpi (factory default), 300 dpi, 400 dpi, and 600 dpi.
Procedure
Select Scan Resolution on the "Basic Features" screen.
You can also select Scan Resolution on the "Features Menu" screen or
"Customised Features" screen if you have registered the features on the "Screen
Layout" screen of the Tools Mode.
20
Page 29

2.2.2 Selecting the Original Type
When scanning a document which includes photo images or text, you can select the
original type in order to obtain optimum results.
Procedure
Select Original Type on the "Basic Features" screen.
• You can also select Original Type on the "Features Menu" screen or
"Customised Features" screen if you have registered the features on the
"Screen Layout" screen of the Tools Mode.
• Select Text or Text & Photo to remove the background color of texts.
• When scanning A4 or larger documents with the selection of 600 dpi
resolution and Text & Photo or Photo (Halftone), the memory could overflow
and the document may not be scanned.
2.2 Specifying Various Features
2
Operating the Scanner
2.2.3 Selecting the Density Level
You can adjust the density level for the documents to be scanned.
The machine provides seven levels of density.
Procedure
On the "Basic Features" screen, select the required density using or under
Lighter/Darker.
You can also select Lighter/Darker on the "Features Menu" screen or
"Customised Features" screen if you have registered the features on the "Screen
Layout" screen of the Tools Mode.
21
Page 30

2
2.2 Specifying Various Features
2.2.4 Selecting the Scan Size
You can select the document size for the document. This feature is used for scanning
the size you specified instead of the actual size of the document.
The scan sizes are: Auto Detect (factory default), B5
8.5 x 11"
Procedure
, 8.5 x 11", 8.5 x 14", 11 x 17"
If the original size is smaller than the specified scanning size, the scanner scans the document using the selected size.
Select Scan Size on the "Features Menu" screen.
, B5, B4, A5, A4 , A4, A3,
Select the required scan size, then Save.
22
Page 31

2.2 Specifying Various Features
2.2.5 Scanning Documents at the Specified Ratio
You can reduce or enlarge the image of the document.
Procedure
Select Reduce/Enlarge on the "Features Menu" screen.
Select the required ratio, then Save.
For USA & Canada
2
Operating the Scanner
For Europe
23
Page 32

2
2.2 Specifying Various Features
2.2.6 Scanning Two Sided Originals
The scanner automatically scans two sided documents by using the Duplex
Automatic Document Feeder (DADF).
Select the binding location to determine the Head-to-Toe orientation of the image on
both sides of the documents.
Procedure
Select 2 Sided Original on the "Features Menu" screen.
Select On on the "2 Sided Original" screen.
Select the scanning orientation of the loaded original, then Save.
24
Page 33

2.3 Scanning With the Job Memory
This section describes the procedure for scanning by accessing the stored jobs.
"Operating Instructions (For Copier)" for details on registering/deleting the job memory.
You can register the scanning features only, or the mailbox to be stored and the scanning features to the
job memory.
Procedure
Select Retrieve Stored Jobs on the "Menu" screen.
Select Scan Mode on the "Retrieve Stored Jobs" screen.
2
Operating the Scanner
If the screen below is not displayed, press the Menu button on the control panel
to display it.
Select the job number from the buttons where you have programmed the jobs,
then select Close.
25
Page 34

2
2.4 Checking Job Status
You can check the status of jobs or delete the jobs stored in the memory by pressing Job Status
Stop.
Procedure
Press Job Status Stop.
Select Scan Job.
Select the job that you want to check.
Select the Job Results button to check the completed jobs.
26
Page 35

The status of the selected job is displayed.
When you have finished checking, select Exit.
You can temporarily stop a job which is running or in waiting status by
selecting the Stop button. Refer to "3.3 Cancelling Printing from Printer" of
"Operating Instructions (For Printer)" for details on how to cancel a scan job in
progress.
Select Close.
2.4 Checking Job Status
2
Operating the Scanner
27
Page 36

2.5 Deleting Stored Documents
You can delete the stored documents from your mailbox by following the procedure below.
Procedure
Select Scan Mode on the "Menu" screen.
If the screen below is not displayed, press the Menu button on the control panel
to display it.
Select Scan-to-Mailbox.
"1.3.3 Creating a Mailbox" to create a new mailbox.
Select the mailbox from which you want to delete documents.
28
Page 37

2.5 Deleting Stored Documents
Select Delete Documents.
• When documents are stored in the mailbox, the number of stored documents is
displayed in the "Mailbox Status".
• If there are no documents in the mailbox, you cannot select the Delete
Document button.
Enter the password of the mailbox, then select Confirm.
2
Operating the Scanner
Select the document to be deleted, then select Delete.
Select Select All to delete all the documents.
When the message for confirmation is displayed, select Yes.
The document is deleted.
29
Page 38

2.6 Custom Presets for
Scanning Features
Using the Print/Scan Mode Settings on the Tools Mode, you can change the factory defaults of a
feature to one frequently used to reduce the number of setting steps for scan jobs.
The factory default items that can be changed are as follows:
Screen Layout
You can set the screen to appear first when you select the Scan button or the feature
buttons to be displayed on the "Customised Features" screen.
Feature Defaults
You can set the default values of the following items:
• Scan Resolution
• Original Type
• Lighter/Darker
Follow the procedure below when necessary.
Procedure
Press Settings/Meter Check.
Select Tools Mode.
30
Page 39

2.6 Custom Presets for Scanning Features
Enter the access number for Tools Mode using the keypad, then select
Confirm.
The access number will be displayed as *.
• If you made an error while entering the access number, press the Clear C
button to clear and re-enter.
• Select the Close button to restart the machine.
• The factory default of the access number is "11111".
Select Print/Scan Mode Settings.
2
Operating the Scanner
Select the required item.
For example, select Feature Defaults.
31
Page 40

2.6 Custom Presets for Scanning Features
Select the required item, then Change Settings.
In the example shown here, Scan Resolution is selected.
Select the required resolution, then select Save.
Select Close, then Exit Tools.
The machine will restart automatically, and the selected setting will be saved.
32
Page 41

Operating the
Client
(Personal
Computer)
3.1 Using the Network Scanner Driver ................................................... 34
3.2 Using the Mailbox Viewer ................................................................ 44
Page 42

3
3.1 Using the Network Scanner
Driver
You can use the network scanner driver to import the stored image from the mailbox to a personal
computer (client) via the network.
This section explains how to use the network scanner driver.
"1.4 Installing the Network Scanner Utility" for details of installation.
3.1.1 Importing the Documents Stored in the Mailbox
Follow the procedure to import the stored documents from the mailbox to the
application software.
Procedure
Activate Windows 95, Windows 98, Windows Me, Windows NT 4.0 or
Windows 2000, then start up the application software.
The application software must be compatible with the TWAIN interface.
"Appendix A Compatible Software" to confirm the compatible software.
Click the command to select the scanner (source) on the "File" menu.
The screen example as shown below is Imaging. The command name for
selecting the scanner (source) differs depending on the software.
34
Page 43

3.1 Using the Network Scanner Driver
Click Panasonic DP-6000/7000, then Select.
3
Click the command to import the scanned data.
The screen example as shown below is Imaging. The command name for
importing the data differs depending on the software.
Operating the Client (Personal Computer)
35
Page 44

3
3.1 Using the Network Scanner Driver
Click the name of the scanner of DP-6000/7000 on the dialog box as shown
below, then Select Scanner.
• You can change the way of displaying scanner names by clicking the Change
Display button.
• When the DP-6000/7000 is connected to the same network as your computer,
the scanner names are displayed automatically. If you want to change to a
scanner in another network, click the Change Display button, then enter the
IP address and scanner name (product name).
"3.1.2 Changing Display of the Scanner Name" for changing the scanner name,
or connecting to another network.
36
Page 45

3.1 Using the Network Scanner Driver
Enter the required mailbox number (1 to 200).
3
Enter the password for the mailbox (four digits), then click Open Mailbox.
Check the Save a Password button to skip the procedure from Steps to the
next time.
Operating the Client (Personal Computer)
37
Page 46

3
3.1 Using the Network Scanner Driver
Click the file to be imported, then click Import.
• You can import more than one document at a time.
• You can also select the Import, Delete, and Update buttons on the pop-up
menu by clicking on them with the right button of the mouse.
The following is an explanation of each item:
Scanner Name
Name of the network scanner which you are accessing now.
Mailbox No.
Mailbox number of the network scanner which you are accessing now.
File No.
Number assigned to identify the documents. This number will also be displayed in
the touch panel display when the network scanner is used to scan documents.
File Type
Scanned Image: File of image scanned from the network scanner
38
Page 47

3.1 Using the Network Scanner Driver
Date
Date and time when a file is saved.
Total
Total number of pages of the file. This item will not be displayed when the File List
Mode is set to Page.
Size
Display the paper size of the file. The paper size of the first page will be displayed
when the File List Mode is set to File. When the following paper size abbreviations
are displayed, it indicates that a document of one of the following inch sizes is
scanned:
LT Letter (8.5 x 11 inch)
HL Half Letter (5.5 x 8.5 inch)
LG Legal (8.5 x 14 inch)
LD Ledger (11 x 17 inch)
3
Operating the Client (Personal Computer)
Compress
Display the methods of compressing the file data. The network scanner will
automatically select the most suitable mode.
MH, MR and MMR are compression coding schemes. The compressed format for
scanned image is defined according to the setting of the Original Type you specified.
Import
Import the selected file from the mailbox. You can also import the file by selecting it
with a click on the mouse and then double-clicking it, or by clicking the right mouse
button and then selecting the Import button from the pop-up menu. Multiple files can
be selected and imported at the same time.
Delete
Delete the selected file from the mailbox. You can also delete the file by clicking the
right mouse button and then selecting Delete on the pop-up menu.
Change Scanner
Select another network scanner. You can select the required scanner from the latest
list of network scanners.
39
Page 48

3.1 Using the Network Scanner Driver
Update
Display the latest file list obtained by accessing the mailbox. You can also display
the latest file list by clicking the right mouse button on the list of network scanners,
and then selecting the Update button from the pop-up menu.
Setting
Display the dialog box to specify the negative image mode (On/Off), file list mode
(File/Page) and the temporary directory to save imported files.
"3.1.3 Changing Import Settings" for details.
3
When the Import button is pressed, the dialog box as shown below appears and the
data will be transferred.
The data is imported to the activated software, and the document in the mailbox is
deleted.
40
The network scanner driver expands the compressed data, and imports it to the software
in BMP format.
Page 49

3.1 Using the Network Scanner Driver
3.1.2 Changing Display of the Scanner Name
You can change the way to display the scanner name on the dialog box.
Click the Change Display on the scanner selection dialog box (see Step
or Step
Select the required scanner for which the name is to be changed by following the
procedure below.
of 3.2.1) to specify the scanner name.
of 3.1.1,
3
Operating the Client (Personal Computer)
Network
If you select Network, the machine will search for the scanner name in the HOSTS
file in \WINDOWS\HOSTS file for Windows 95/98/Me and in
\WINNT\SYSTEM32\DRIVERS\ETC\HOSTS file for Windows NT 4.0/Windows
2000.
If the network scanner is not registered for each of the HOSTS file, the name
registered in the DNS server on the network is displayed.
If the network scanner is not registered in the DNS server or if DNS is not in use,
DP-6000/7000 (IP address)] is displayed.
Local File
Display the scanner name registered in the HOSTS file format in the specified file.
Display DP-6000/7000 (IP address)], if the network scanner is not yet registered in
the specified file or if there are no specified files.
41
Page 50

3
3.1 Using the Network Scanner Driver
Other Scanners
Display scanner names existing in other networks. Since scanners can only be
identified and displayed automatically in the same network, enter the IP address and
scanner name here for scanners in other networks. However, if communication is not
successful with the added scanners when using TCP/IP, they cannot be used.
1. Click the Display other network scanner checkbox.
2. Click Add.
3. Enter the IP address of DP-6000/7000 to be connected and the corresponding
scanner name, then click OK.
42
Page 51

3.1.3 Changing Import Settings
You can change the displaying of documents or importing method when importing
the document from the mailbox.
Click Setting to change the setting on the dialog box (see Step
Specify the required setting by following the procedure below.
3.1 Using the Network Scanner Driver
of 3.1.1).
3
Operating the Client (Personal Computer)
Import Order
Select the order of importing image files.
When New => Old is selected, the sequence will be reversed.
When Old => New is selected, older files will be imported first.
File List Mode
Select the way of displaying files.
File Display the total number of pages for each multiple-page
file.
Page Display separately each page of the multiple-page file.
To be used for importing random pages from software
which cannot import multiple pages.
Negative Image
Reverse the colors between black and white areas of black and white images. To be
used for reversing the colors of images imported by the software.
ON Reverse colors.
OFF Does not reverse colors.
Save as
Specify a directory which is temporarily used to save the document during importing.
Choose a drive with sufficient free space.
43
Page 52

3.2 Using the Mailbox Viewer
The Mailbox Viewer provides the following features:
• Confirming the documents stored in the mailbox.
• Deleting the stored documents from the mailbox.
• Acquiring the documents stored in the mailbox at periodic intervals. When the new documents are
stored in the mailbox, the personal computer informs you by a sound or icon.
• Importing the new document from the mailbox and save it as TIFF format.
The following explains how to use the Mailbox Viewer:
"1.4 Installing the Network Scanner Utility"
3
3.2.1 Confirm/Delete/Import the Stored Document in a Mailbox
This section describes how to confirm, delete, and import and save the document
stored in the mailbox of DP-6000/7000 by using the Mailbox Viewer.
Procedure
Activate Windows 95, Windows 98, Windows Me, Windows NT 4.0 or
Windows 2000. Click Start on the task bar, then select Programs, then
Mailbox Viewer from Panasonic > WORKIO Utility.
If you have specified another folder name during installation, the display of
WORKIO Utility > Utility is changed to the specified name.
44
Page 53

3.2 Using the Mailbox Viewer
Click the name of DP-6000/7000 from the list, then Select Scanner.
You can change the display of scanner name by clicking Change Display.
When the DP-6000/7000 is connected to the same network as your computer,
the scanner names are displayed automatically. If you want to select a scanner
from another network, click the Change Display button, then enter the IP
address and scanner name (product name).
"3.1.2 Changing Display of the Scanner Name" for changing the scanner name,
or connecting to another network.
3
Operating the Client (Personal Computer)
Enter the mailbox number (1-200) in which the document is stored.
45
Page 54

3
3.2 Using the Mailbox Viewer
Enter the password for the mailbox (four digits), then click Open Mailbox.
Click the Save a Password button to skip the procedure from Steps to the
next time.
Carry out the required operation of the features. The detailed explanation of
each feature is as explained below.
46
Scanner Name
Name of the network scanner which you are accessing now.
Mailbox No.
Displays the mailbox number.
File No.
Number assigned to identify the documents. This number will also be displayed in
the touch panel display when the network scanner is used to scan documents.
Page 55

3.2 Using the Mailbox Viewer
File Type
Scanned Image: File of image scanned from the network scanner
Date
Date and time when a file is saved.
Total
Total number of pages of the file. This item will not be displayed when the File List
Mode is set to Page.
Size
Display the paper size of the file. When the following paper size abbreviations are
displayed, it indicates that a document of one of the following inch sizes is scanned:
LT Letter (8.5 x 11 inch)
HL Half Letter (5.5 x 8.5 inch)
LG Legal (8.5 x 14 inch)
LD Ledger (11 x 17 inch)
Compress
Displays the methods of compressing the file data. The network scanner will
automatically select the most suitable mode.
MH, MR and MMR are compression coding schemes. The compressed format for
scanned image is defined according to the setting of the Original Type you specified.
Update
Display the latest file list obtained by accessing the mailbox.
Delete
Deletes the selected file from the mailbox.
3
Operating the Client (Personal Computer)
Change Scanner
Select another network scanner. You can select the required scanner from the latest
list of network scanners.
47
Page 56

3.2 Using the Mailbox Viewer
Setting
Display the dialog box to specify what to do when opening the Mailbox Viewer
window, set the time interval to update information automatically, and how to notify
when a new file is saved.
"3.2.2 Setting up the Properties of Mailbox Viewer" for the details.
Quit
Quit Mailbox Viewer.
3
Importing the Documents Stored in the Mailbox
If you have clicked the Import all existing documents. checkbox on the "Setting"
dialog box, the Update button is changed to the Import button.
"3.2.2 Setting up the Properties of Mailbox Viewer" for the setup of importing
document properties.
48
When clicking the Import button, all the stored documents will be imported, and
saved into the specified directory (the default directory is: c:\temp) in TIFF format.
At this time, the file name is as follows:
IP address - Mailbox No. - File No. - Date Time.tif
Example : 123045123045-003-0013-9807211824.tif
Page 57

3.2 Using the Mailbox Viewer
3.2.2 Setting up the Properties of Mailbox Viewer
You can specify the operation of Mailbox Viewer and importing feature.
To set the properties, click the Setting button on the "Mailbox Viewer" dialog box
(see Step
Specify the properties as required.
on 3.2.1).
3
Operating the Client (Personal Computer)
Get information, when restoring your windows
Select whether or not to automatically redisplay the latest file imported from the
network scanner when opening the Mailbox Viewer from the taskbar or icon.
Set Timer
Specify the time interval, in minutes, to update the file list when the Mailbox Viewer
is activated.
Import all existing documents
Check this check box to automatically import all existing files from the Mailbox
Viewer. The Import Properties button will only be active when this checkbox is
checked. Also, the Update button on the Mailbox Viewer dialog box will become the
Import button.
Notification
Specify the way to notify automatically when new files are stored in the mailbox or when
the number of files has decreased after the time specified at Set Timer has lapsed.
Animation Animation is displayed when there is a change in the file
status. Animation will also be displayed when the
Viewer is minimized to an icon or a taskbar.
Sound Sound will be used to notify a change in the file status.
You can choose to specify your required sound file (in
.wav format) by pressing the Browse button.
Users of PCs without a sound card installed cannot choose to specify the sound files.
49
Page 58

3
3.2 Using the Mailbox Viewer
File Type
Specify the file type of the files stored in Mailbox to be displayed.
Scanned Image: File of image scanned from the network scanner
Import Properties
Click to display the dialog box, then specify the required compression type and drive
and/or folder.
Import Order
Select the order of importing image files.
When New => Old is selected, the sequence will be reversed.
When Old => New is selected, older files will be imported first.
Compress Type
Saves all pages of the imported files as TIFF files. Select either MMR or MH as the
compression format.
Save as
Specify a destination folder for the automatically-imported files. Choose a drive with
sufficient free space. The files saved here are in multi-page TIFF format. The file
names are automatically created based on the IP address of the scanner, Mailbox No.,
File No. and Date.
50
Page 59

Precautions
and
Limitations
4.1 Precautions and Limitations .............................................................. 52
Page 60

4.1 Precautions and Limitations
This section describes the precautions and limitations in using this scanner.
Readme.txt on the \Utilities\Win9x_Me\SCN\Disk1\setup, \Utilities\NT40\SCN\Disk1\setup or
\Utilities\Win2000\SCN\Disk1\setup of the PCL Driver/Network Utility (Windows) CD-ROM for the
precautions and limitations of the Network Scanner Driver or Mailbox Viewer.
Using the Network Scanner Driver and the Mailbox Viewer at the Same Time
You cannot access DP-6000/7000 by using the mailbox viewer and the network
scanner driver at the same time.
Importing from Several Personal Computers
You cannot import the document from DP-6000/7000 by using the network scanner
driver or the mailbox viewer while another computer is importing.
4
Using TIFF File
The TIFF file that is created with the Mailbox Viewer is compressed as MMR, MR
or MH format. When opening the TIFF file, use the software compatible with the
corresponding compression format.
52
Page 61

Appendix
A Compatible Software......................................................................... 54
Page 62

A Compatible Software
The table of compatible software is as follows:
Compatible Software Win 95 Win 98 Win Me Win NT Win 2000
Adobe Systems, Inc. Adobe Photoshop Ver. 4.0 -- Adobe Systems, Inc. Adobe Photoshop Ver. 5.0 - Adobe Systems, Inc. Adobe Photoshop Ver. 5.5
Adobe Systems, Inc. Adobe Photoshop Ver. 6.0 Eastman Software, Inc. Imaging for Windows - -Fuji Xerox Co., Ltd DocuWorks Ver. 3.02(Eng) - Fuji Xerox Co., Ltd DocuWorks Ver. 3.1(Eng) - Fuji Xerox Co., Ltd DocuWorks Ver. 3.15(Eng) Fuji Xerox Co., Ltd DocuWorks Ver. 4.04(Eng)
Microsoft Coporation Picture It! Ver. 2.0 -- Microsoft Coporation Picture It! 2000
Microsoft Corporation Word 2000
Microsoft Corporation Excel 2000
Microsoft Corporation Power Point 2000
Microsoft Corporation PhotoDraw 2000
ScanSoft, Inc. TextBridge PRO98 -- ScanSoft, Inc. TextBridge PRO 9.0 -- ScanSoft, Inc. TextBridge PRO Millennium Visioneer, Inc. PaperPort Ver. 4.0 -- Visioneer, Inc. PaperPort DELUXE7.0 WANG Laboratories, Inc. Imaging for Window95 (V1.0/V1.01) --- WANG Laboratories, Inc. Imaging for Windows Release1.1 - - - WANG Laboratories, Inc. Imaging for Windows --- Xerox Coporation Pagis PRO97 -- Xerox Coporation Pagis PRO Millennium -
54
• The applications above have been verified to be compatible with the DP-6000/7000.
Scanner as of April 2001.
• All product/brand names are trademarks or registered trademarks of the respective
holders.
Page 63

Index
A
Animation ..................................................................49
C
Change Scanner ..................................................39, 47
Checking Job Status ..................................................26
Compress ............................................................39, 47
Creating a Mailbox ....................................................10
Custom Presets for Scanning Features ......................30
D
Deleting Stored Documents.......................................28
Duplex Automatic Document Feeder (DADF)..........24
F
Feature Defaults.........................................................30
File List Mode ...........................................................43
File T ype ......................................................38, 47, 50
M
Mailbox Viewer
How to use ...........................................................44
Installation ...........................................................14
N
Negative Image..........................................................43
Network .....................................................................41
Network Scanner Driver
Installation ...........................................................14
Notification................................................................49
O
Other Scanners...........................................................42
Overview .....................................................................2
P
Precautions ................................................................52
G
Gateway Address .........................................................7
Get information, when restoring your windows........49
I
Import all existing documents ...................................49
Import Properties .......................................................50
Importing the Documents Stored in the
Mailbox...............................................................34, 48
Installation
Procedure .............................................................14
Required Environment .........................................13
IP address.....................................................................4
L
Lighter/Darker ...........................................................21
Limitations.................................................................52
Local File...................................................................41
R
Reduce/Enlarge..........................................................23
Index
S
Save as ................................................................43, 50
Scan Resolution ..................................................20, 32
Scan Size ...................................................................22
Scanned Image.............................................38, 47, 50
Scanning With the Job Memory ................................25
Scanning With the Mailbox.........................................2
Screen Layout ............................................................30
Set Timer ...................................................................49
Setting Up DP-6000/7000 for Using
Mailbox Features .........................................................4
Sound .........................................................................49
Specifying Various Features ......................................20
Subnet Mask ................................................................7
55
Page 64

U
Uninstallation ............................................................16
Using the Network Scanner Driver ...........................34
Index
56
Page 65

U.S.A. only
WARRANTY
PANASONIC DOCUMENT IMAGING COMPANY MAKES NO WARRANTIES, GUARANTEES OR
REPRESENTATIONS, EXPRESSED OR IMPLIED, TO CUSTOMER WITH RESPECT TO THIS
PANASONIC MACHINE, INCLUDING BUT NOT LIMITED TO, ANY IMPLIED WARRANTY OF
MERCHANTABILITY OR FITNESS FOR A PARTICULAR PURPOSE.
PANASONIC DOCUMENT IMAGING COMPANY ASSUMES NO RISK AND SHALL NOT BE SUBJECT
TO LIABILITY FOR ANY DAMAGE, INCLUDING, BUT NOT LIMITED TO DIRECT, INDIRECT, SPECIAL,
INCIDENTAL OR CONSEQUENTIAL DAMAGES OR LOSS OF PROFITS SUSTAINED BY THE
CUSTOMER IN CONNECTION WITH THE USE OR APPLICATION OF THIS PANASONIC MACHINE.
SEE YOUR DEALER FOR DETAILS OF DEALER’S WARRANTY.
For Service Call:
Panasonic Document Imaging Company
A Business Unit of Matsushita Electric Corporation of America
Two Panasonic Way
Secaucus, New Jersey 07094
Panasonic Canada Inc.
5770 Ambler Drive
Mississauga, Ontario L4W 2T3
DZRQ000046 S1001
October 2001
Printed in Japan
 Loading...