

Panasonic CW-XC103HU Owner’s Manual
Panasoni(
Room Air Conditioner
INSTALLATIONANDOPERATINGINSTRUCTIONS
Models: CW-XCIO3HU
CW-XC123HU
CW-XC143HU
CW-XC118H U
Please read these operating instructions thoroughly
before using your air conditioner and keep for future
reference.
For assistance, please call: 1-800-211-PANA(7262) or
Register your product at : http://www.panasonic.com/register

FOR YOURRECORDS
Write the model and serial numbers here:
Model #
Serial #
You can find them on a label on the side of the unit.
Dealer's Name
Date Purchased
Staple your receipt here for proof of purchase.
READ THIS MANUAL
Inside you will find many helpful hints on how to use and
maintain your air conditioner properly. Just a little preventive
care on your part can save you a great deal of time and
money over the life of your air conditioner.
You'll find many answers to common problems in the chart
of troubleshooting tips. If you review our chart of
Troubleshooting Tips first, you may not need to call for
service at all.
CAUTION
• Contact the authorized Service technician for repair or
maintenance of this unit.
• The air conditioner is not intended for use by young
children or infirm persons without supervision.
• Young children should be supervised to ensure that they
do not play with the air conditioner.
1
I
2

Safety Precautions
To prevent injuryto the user or other people and property damage, the following instructionsmustbe
followed.
• Incorrect operation due to ignoringof instructionwillcause harm or damage. The seriousnessis classified
bythe following indications.
WARNING : This symbol indicates the possibility of death or serious injury.
CAUTION . This symbol indicates the possibility of injury or damage to
• property only.
• Meanings of symbols used in this manual are as shown below.
(_ Be sure not to do this.
_O_( _ Be sure to follow the instructions.
WA..I.Gl
• Otherwise, itwill cause electdc
shock or fire due to heat
generation.
• It will cause electdc shock or fire
due to heat generation.
• Itwillcauseelectricshockor fire.
• Ifthepowercordisdamaged,it must
bereptacedbythe manufactureror
anauthorizedservicecenterora
similarlyqualifiedpersoninorderto
avoida hazard.
J
• It will cause electric shock or fire
due to heat generation.
• It will cause electric shock.
• This could damage your health.
J

CAUT,O.l
• It may causean injury.
• Water may enter the unit and • An oxygenshortagemay occur.
degrade the insulation, It may
causean electdcshock.
®
• Since the fan rotates at high •Thiscouldinjurethepetsor
speed during operation, it may plants.
cause an injury.
®
• Do not use this air conditioner to
preserve precision devices, food,
pets, plants, and art objects.
It may cause deterioration of
quality, etc.
0
• It maycause an electdc shock. • It maycause a fire or deformation
of the cabinet.
(r
))
®
• It may cause imperfect
combustion.
J
About the Controls on the Air Conditioner
Controls
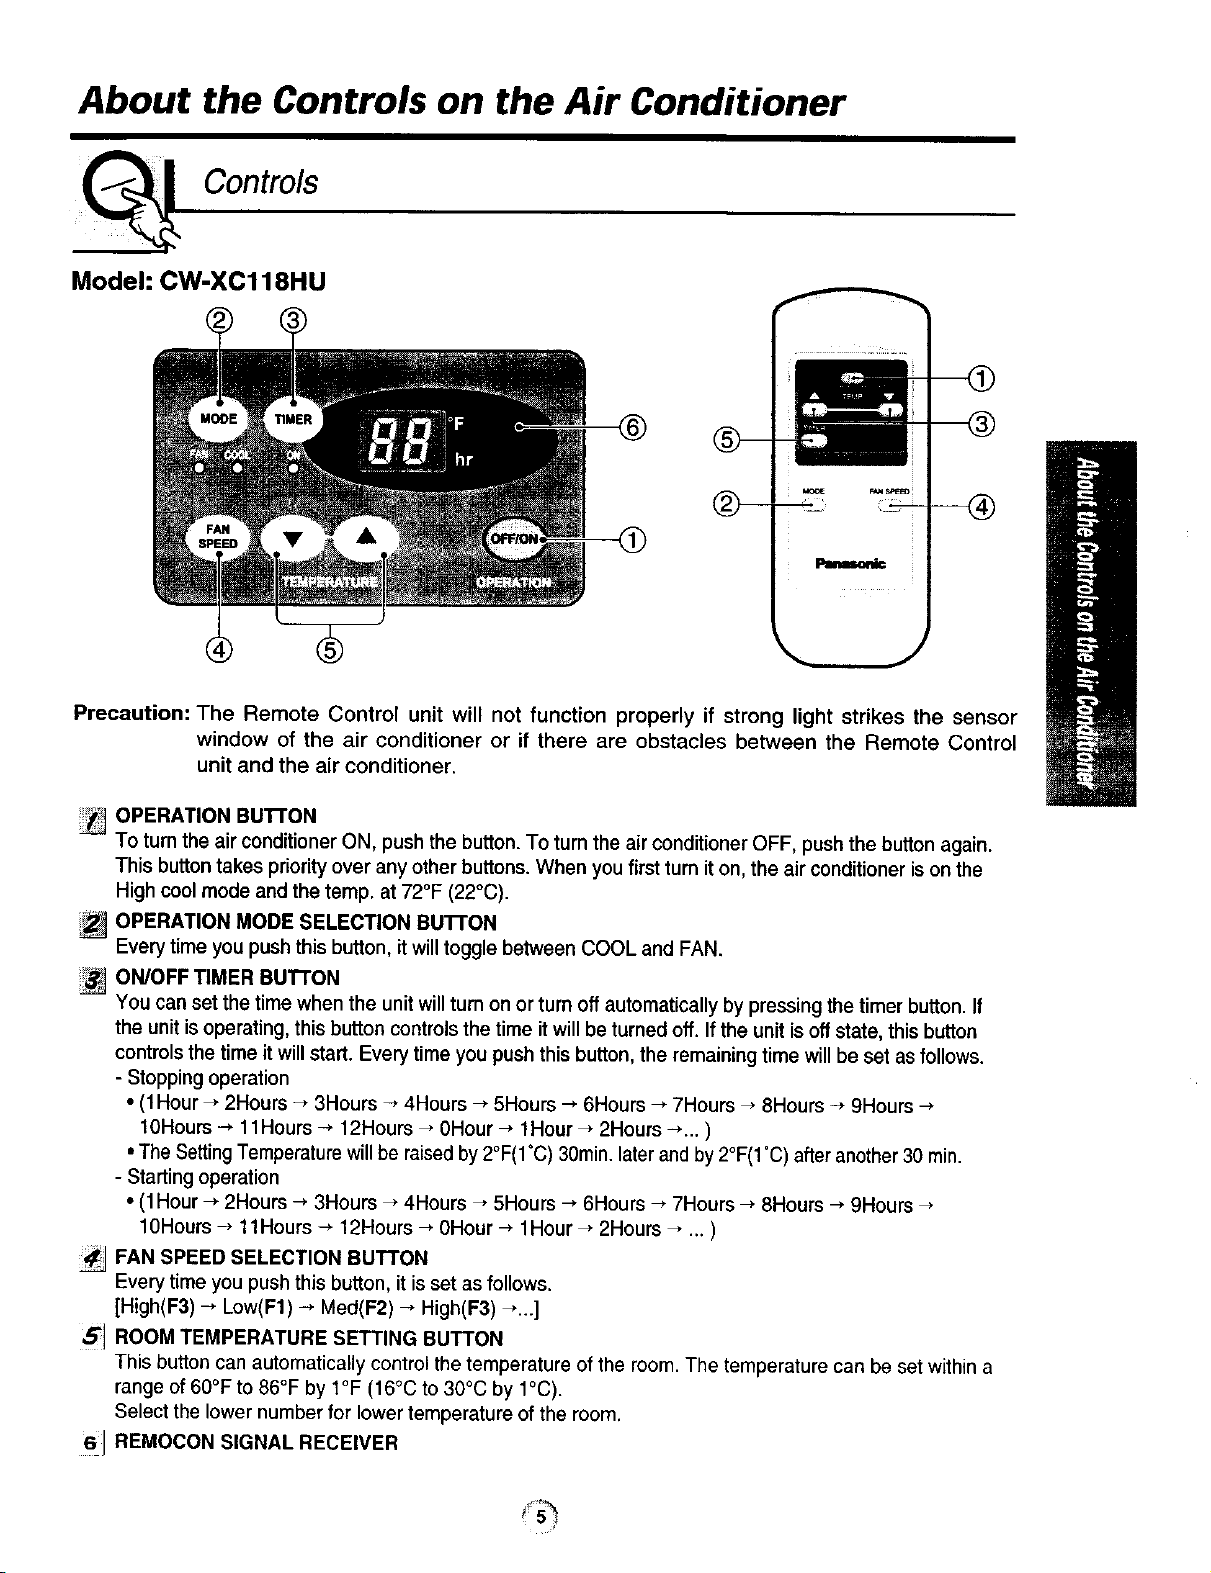
Model: CW-XC118HU
®
Precaution: The Remote Control unit will not function properly if strong light strikes the sensor
window of the air conditioner or if there are obstacles between the Remote Control
unit and the air conditioner.
OPERATION BU'B'ON
To turn the air conditioner ON, push the button. To turn the air conditioner OFF, push the button again.
This button takes priority over any other buttons. When you first tum it on, the air conditioner tson the
High cool mode and the temp. at 72°F (22°C).
OPERATION MODE SELECTION BU'FrON
Everytime you push this button, itwilltoggle between COOL and FAN,
ON/OFF TIMER BUTTON
You can set the time when the unitwillturn on or turn off automatically by pressingthe timer button, If
the unit is operating, this button controls the time it will be turned off. If the unit is off state, this button
controls the time it will start. Every time you push this button, the remaining time will be set as follows.
- Stopping operation
• (1Hour _ 2Hours _ 3Hours -, 4Hours _ 5Hours _ 6Hours _ 7Hours _ 8Hours -+ 9Hours --*
10Hours -_ 11Hours -_ 12Hours _ 0Hour --* 1Hour _ 2Hours -_... )
• The Setting Temperature will be raised by 2°F(1°C) 30rain. later and by 2°F(1"C) after another 30 rain.
- Starting operation
• (1Hour _ 2Hours _ 3Hours _ 4Hours _ 5Hours --*6Hours _ 7Hours _ 8Hours _ 9Hours
10Hours --*11Hours _ 12Hours _ 0Hour _ 1Hour _ 2Hours _ ... )
FAN SPEED SELECTION BUTTON
Every time you push this button, it is set as follows.
[High(F3)--* Low(F1) -_ Med(F2)-* High(F3)_...]
_] ROOM TEMPERATURE SETTING BUTTON
This button can automatically control the temperature of the room. The temperature can be set within a
range of 60°F to 86°F by I°F (16°C to 30°C by 1°C).
Select the lower number for lower temperature of the room.
61 REMOCON SIGNAL RECEIVER
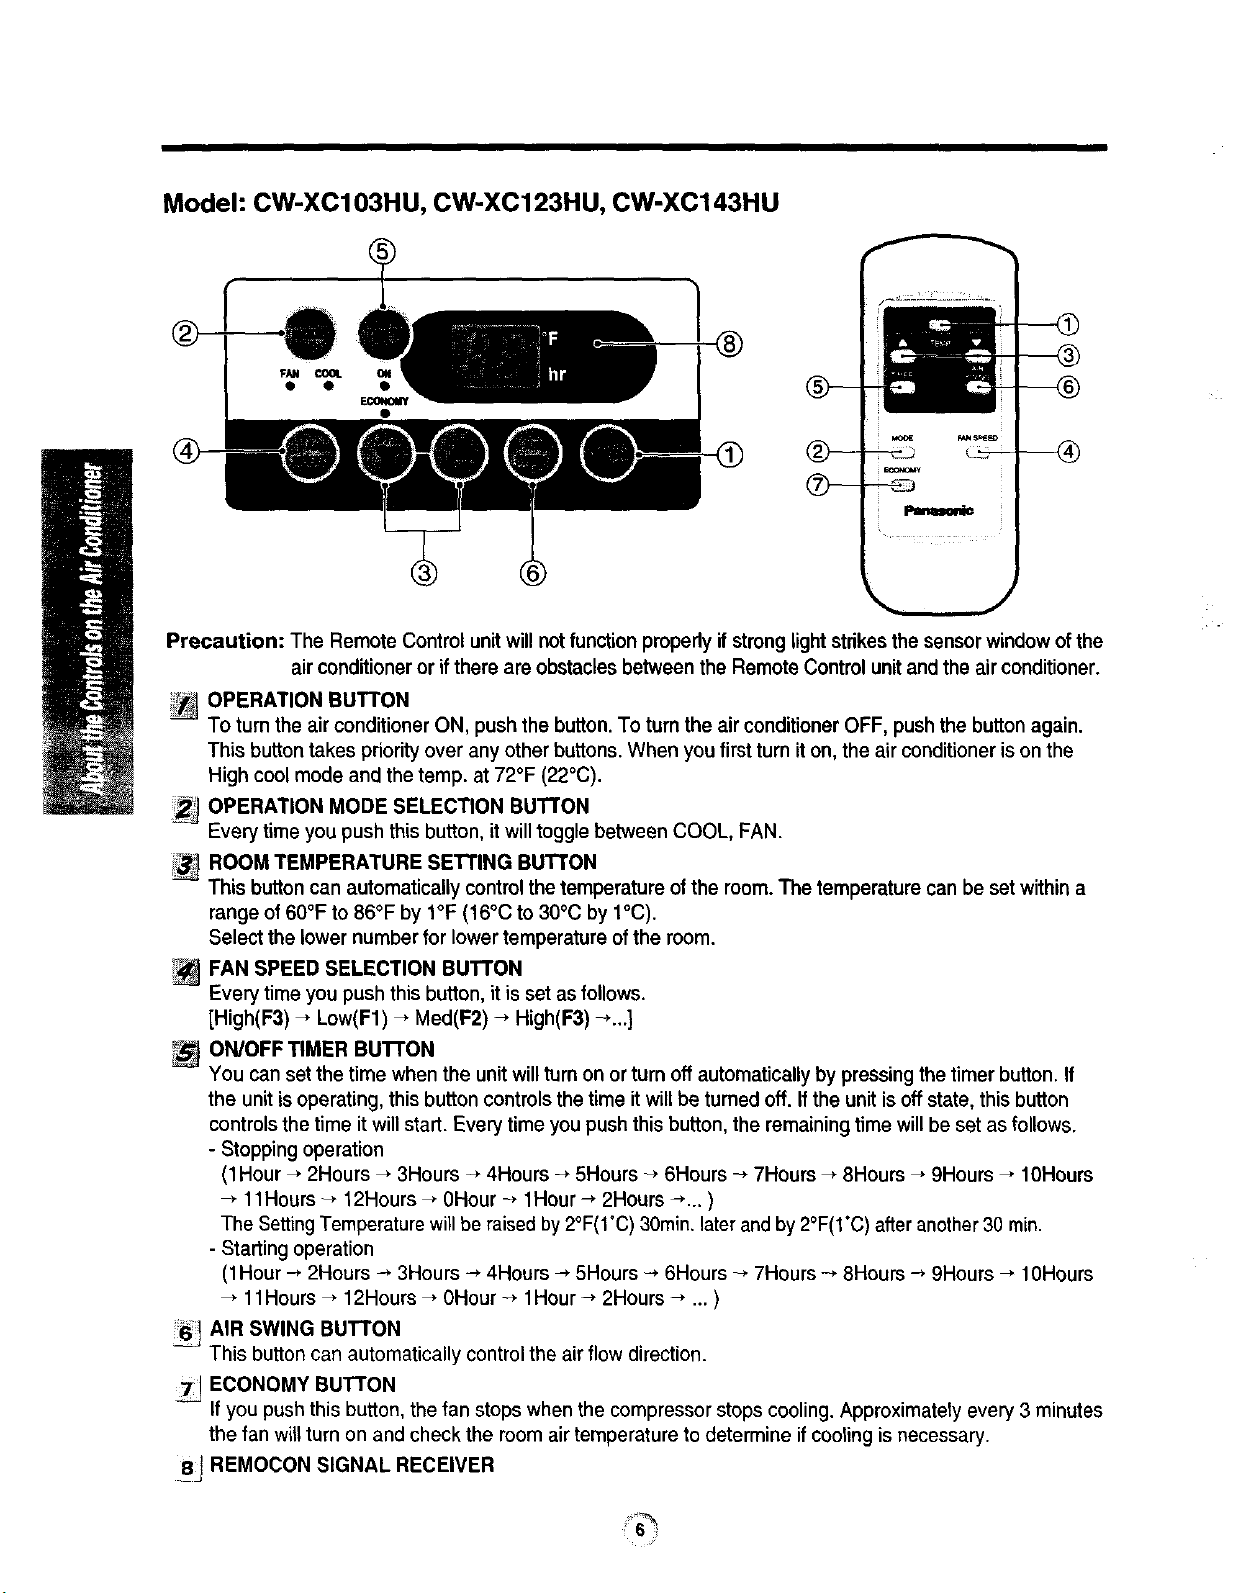
Model: CW-XC103HU, CW-XC123HU, CW-XC143HU
AOCE F_NS_=_
P_
L___
Precaution: The Remote Control unit will notfunction properly if strong light strikes the sensor windowof the
air conditioneror if there are obstaclesbetween the Remote Controlunit and the air conditioner.
OPERATION BUTTON
To turn the air conditioner ON, push the button. To turn the air conditioner OFF, push the button again.
This button takes priorityover any other buttons.When you first turn iton, the air conditioneris on the
High cool mode and the temp. at 72°F (22°C).
OPERATION MODE SELECTION BUTTON
Every time you push this button, itwilltoggle between COOL, FAN.
ROOM TEMPERATURE SETTING BUTTON
This buttoncan automaticallycontrol the temperature of the room. The temperature can be set withina
range of60°F to 86°F by I°F (16°C to 30°C by t°C).
Select the lower number for lower temperature ofthe room.
FAN SPEED SELECTION BUTTON
Every time you push this button, it is set as follows.
[High(F3) _ Low(F1) - Med(F2)-, High(F3)-,...]
ON/OFF TIMER BUTTON
You can set the time when the unitwill turn on or turn off automaticallyby pressing the timer button. If
the unitisoperating, this buttoncontrolsthe time itwill be turned off. Ifthe unitisoff state, this button
controlsthe time it willstart. Every time you push this button, the remainingtime will be set as follows.
- Stopping operation
(1Hour _ 2Hours _ 3Hours -_ 4Hours -_ 5Hours _ 6Hours -, 7Hours -, 8Hours _ 9Hours - 10Hours
-, 11Hours -, 12Hours _ 0Hour -, 1Hour--, 2Hours -,... )
The SettingTemperaturewill be raisedby2°F(1°C) 30rain.later and by2°F(I'C) after another30 rnin.
- Starting operation
(1Hour --* 2Hours -_ 3Hours -, 4Hours -> 5Hours _ 6Hours _ 7Hours _ 8Hours --* 9Hours _- 10Hours
-, 11Hours _ 12Hours _ 0Hour -_ 1Hour -, 2Hours -, ... )
AIR SWING BUTTON
This buttoncan automatically controlthe air flow direction.
ECONOMY BUTTON
If you pushthis button, the fan stops when the compressorstops cooling. Approximatety every 3 minutes
the fan will turnon and check the room air temperature to determine if coolingis necessary.
8_ REMOCON SIGNAL RECEIVER
J

Additional controls and important information.
Ventilation
The ventilation lever must be in the CLOSE positionin order to maintain the best coolingconditions.
When fresh air is necessary in the room, set the ventilation lever to the OPEN position.
The damper is opened and room air is drawn out.
CLOSE._VENT,I, OPEN
NOTE: Before using the ventilation feature, and prior to installing the front grille, pull down part ® until
level with part _.
m Air Direction
The direction of air can be controlled wherever you want to cool by adjusting the horizontal
louver and the vertical louver.
• VERTICAL AIR-DIRECTION CONTROL
Controlled
manually
Y
Part i
Part
The vertical air direction is adjusted by rotating the
horizontal louver forward or backward manually.
• HORIZONTAL AIR-DIRECTION CONTROL
Controlled
manually
The horizontal air direction is adjusted by rotating the
ControlledbyRemote
Controller
vertical louver right or left manually or by Remote Controller.
How to Secure the Drain Pipe
In humid weather, excess water may cause the BASE
PAN to overflow. To drain the water, remove the DRAIN
CAP and secure the DRAIN PIPE to the rear hole of the
BASE PAN. Press the drain pipe into the hole by pushing
down and away from the fins to avoid injury.
Drain pipe _1_
Drain cap
Care and Maintenance
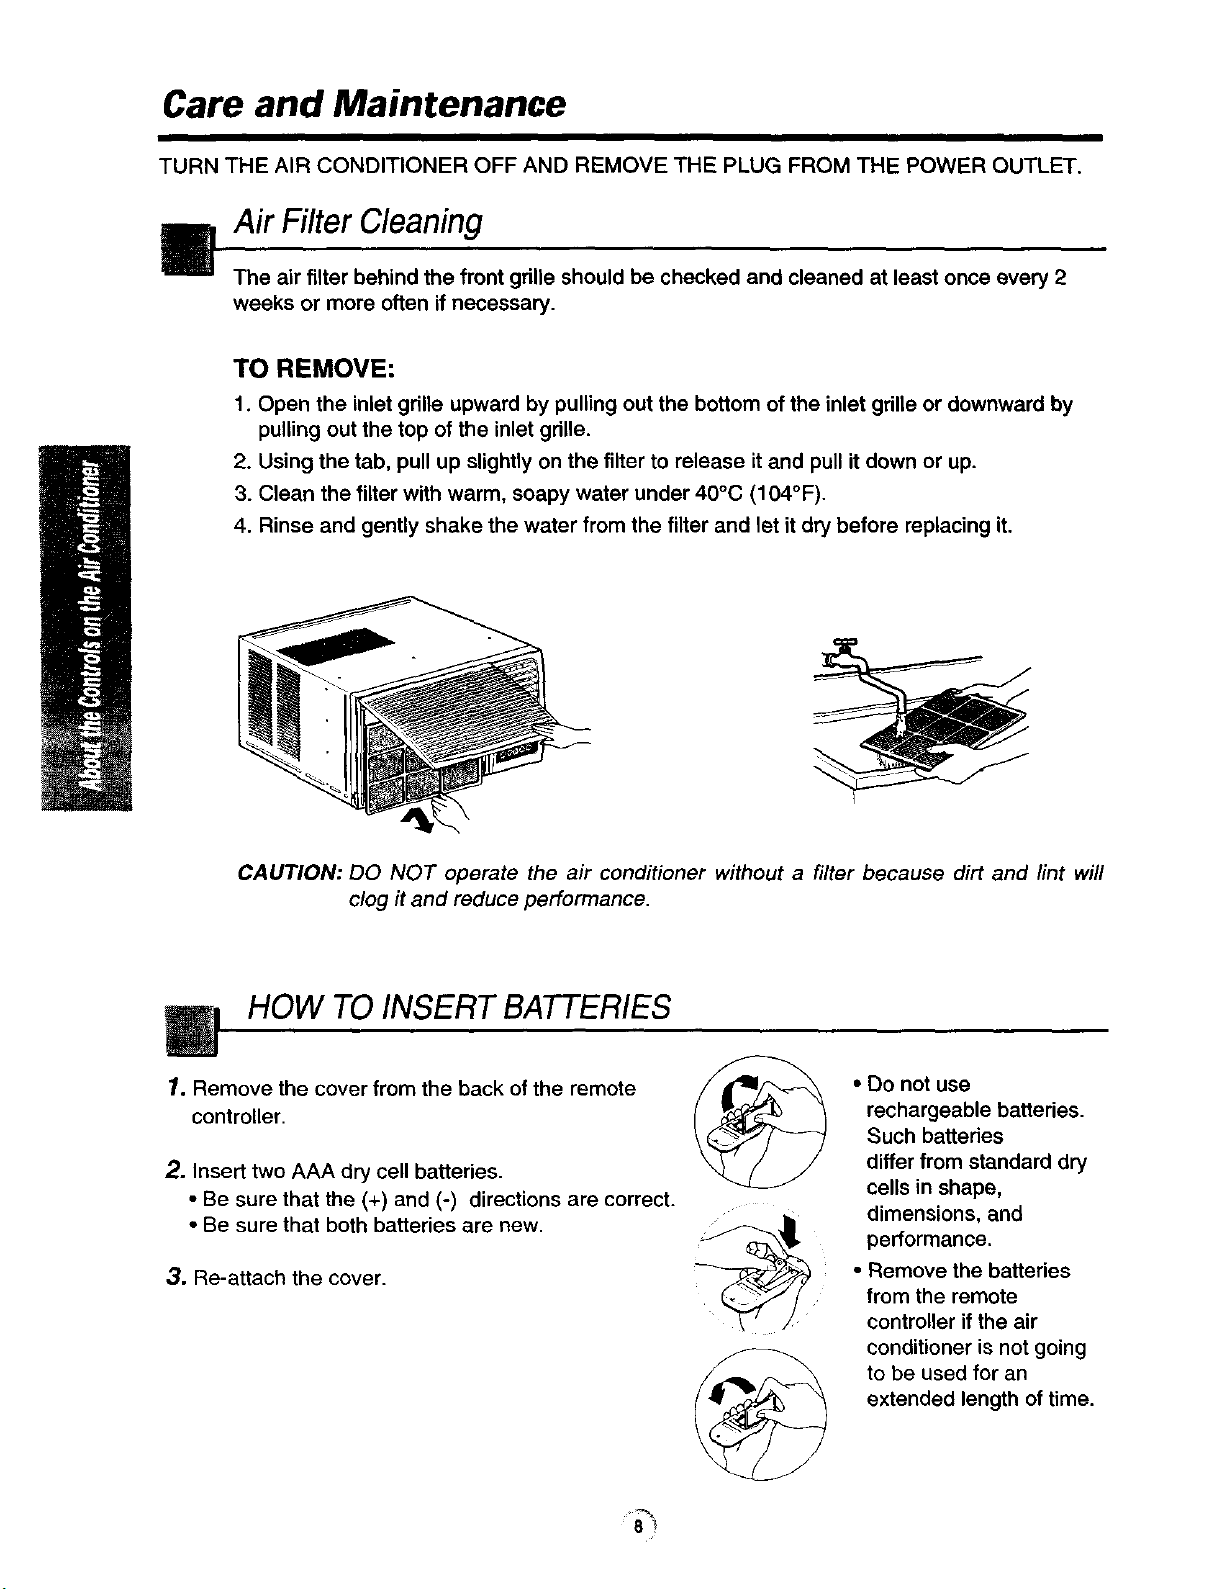
TURN THE AIR CONDITIONER OFF AND REMOVE THE PLUG FROM THE POWER OUTLET.
Ill Air Filter Cleaning
_i The air filter behind the front grille should be checked and cleaned at least once every 2
weeks or more often if necessary.
TO REMOVE:
1. Open the inlet grille upward by pulling out the bottom of the inlet grille or downward by
pulling out the top of the inlet grille.
2. Using the tab, pull up slightly on the filter to release it and pull it down or up.
3. Clean the filter with warm, soapy water under 40°C (104°F).
4. Rinse and gently shake the water from the filter and let it dry before replacing it.
CAUTION: DO NOT operate the air conditioner without a filter because dirt and tint will
clog it and reduce performance.
HOW TOINSERT BATTERIES
1o Remove the cover from the back of the remote
controller.
2. Insert two AAA dry cell batteries.
• Be sure that the (+) and (-) directions are correct.
• Be sure that both batteries are new.
3. Re-attach the cover.
• Do not use
rechargeable batteries.
Such batteries
differ from standard dry
cells in shape,
dimensions, and
performance.
• Remove the batteries
from the remote
controller if the air
conditioner is not going
to be used for an
extended length of time.

Features
I I I | I I I | I I I J I I I i i ii i i
Learning parts name prior to installation will help you understand the installation procedure.
Features
-- VERTICAL AIR DEFLECTOR
(HORIZONTAL LOUVER)
AIR DISCHARGE
FRONTGRILLE
AIR FILTER
Model: CW-XCllSHU
EVAPORATOR
CONTROL BOARD
Model: CW-XCIO3HU
CW-XC123HU
CW-XC143HU '
AIR INTAKE
(INLET GRILLE)
BASE PAN
POWER CORD
DEFLECTOR
(VERTICALLOUVER)
CONTROL BOARD
CONTROLLER _/
--- BASE PAN
POWER CORD
Installation
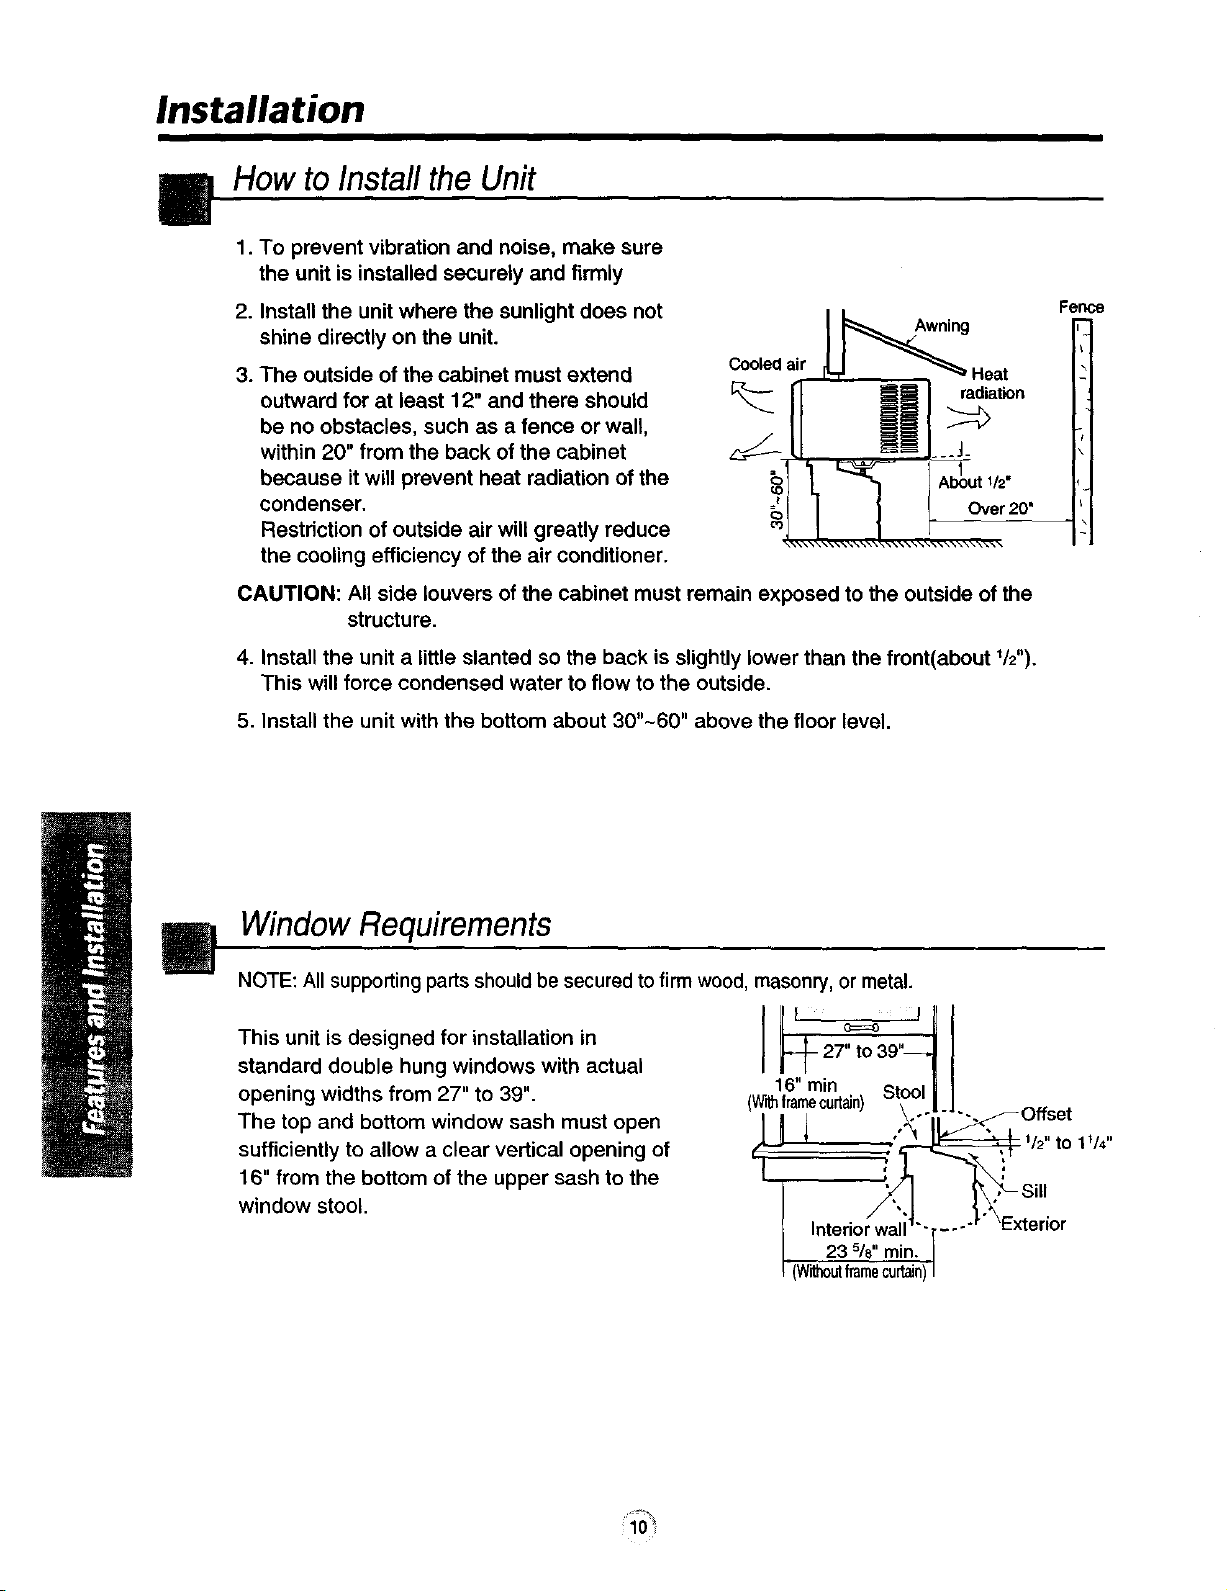
How to Installthe Unit
1. To prevent vibration and noise, make sure
the unit is installed securely and firmly
.
Install the unit where the sunlight does not
shine directly on the unit.
The outside of the cabinet must extend Cooledair
3.
outward for at least 12" and there should K_
be no obstacles, such as a fence or wall,
within 20" from the back of the cabinet _--
because it will prevent heat radiation of the
condenser. =
Restriction of outside air will greatly reduce
the cooling efficiency of the air conditioner.
CAUTION: All side louvers of the cabinet must remain exposed to the outside of the
4. Install the unit a little slanted so the back is slightly lower than the front(about 1/2").
This will force condensed water to flow to the outside.
1_1'-# _gHeat
radiation
1/2"
Over 20"
\\\\\_\\\\\_\\\\\\\\\\\\
structure.
W
5. Install the unit with the bottom about 30"-60" above the floor level.
Window Requirements
NOTE: All supporting parts should be secured to firm wood, masonry, or metal.
This unit is designed for installation in
standard double hung windows with actual
opening widths from 27" to 39".
The top and bottom window sash must open
sufficiently to allow a clear vertical opening of
16" from the bottom of the upper sash to the
window stool.
17 _ I
_- 27" to 39"_
16" rain
(W'_framecurtain)S_I Offset
_lJ 1 -:::_ '/2" to 1V,"
I _ _ Sill
in_e3isO_Wmali_- -' _Exterior
'(Withoutframecu_Jnl[ - ""
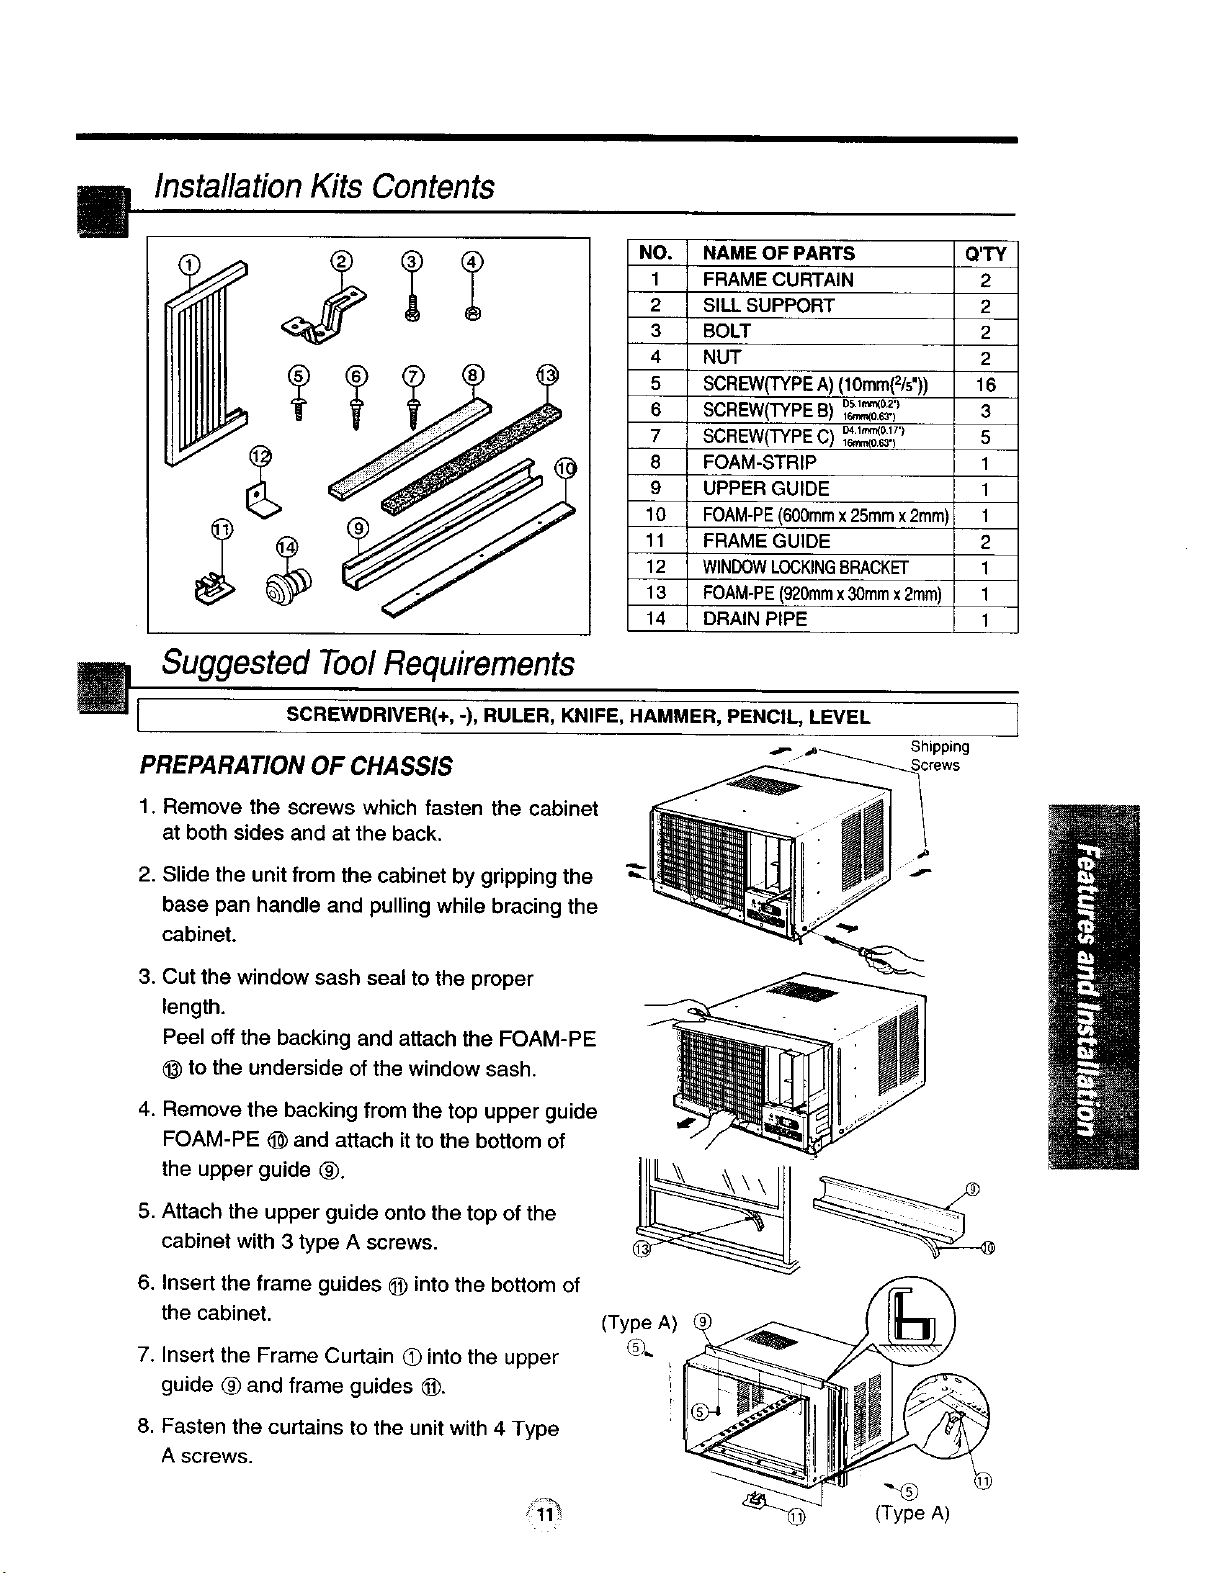
InstallationKits Contents
I
NO. NAME OF PARTS Q'TY
1 FRAME CURTAIN 2
2 SILL SUPPORT 2
3 BOLT 2
4 NUT 2
5 SCREW(TYPEA) (10mm(2/s")) 16
6 SCREW(TYPEB) o_1.._o_')
7 SCREW('P(PEC) _1._017")
8 FOAM-STRIP 1
9 UPPER GUIDE 1
10 FOAM-PE(600turnx25ramx2rnm) 1
11 FRAME GUIDE 2
12 WINDOWLOCKINGBRACKET 1
13 FOAM-PE(920turnx30rnmx2rnm) 1
14 DRAIN PIPE 1
Suggested ToolRequirements
SCREWDRIVER(+, -), RULER, KNIFE, HAMMER, PENCIL, LEVEL
PREPARATION OF CHASSIS
_6m,,_0._') 3
le,_0_') 5
1. Remove the screws which fasten the cabinet
at both sides and at the back.
2. Slide the unit from the cabinet by gripping the
base pan handle and pulling while bracing the
cabinet.
.
Cut the window sash seal to the proper
length.
Peel off the backing and attach the FOAM-PE
to the underside of the window sash.
.
Remove the backing from the top upper guide
FOAM-PE (_ and attach it to the bottom of
the upper guide ®.
S.
Attach the upper guide onto the top of the
cabinet with 3 type A screws.
6.
Insert the frame guides _) into the bottom of
the cabinet.
7.
Insert the Frame Curtain Q into the upper
guide ® and frame guides ®.
(Type A)
8.
Fasten the curtains to the unit with 4 Type
A screws.
 Loading...