

PANASONIC CS-MTZ5SKE, CS-MTZ7SKE, CS-MZ5SKE, CS-MZ5SKEM, CU2RE15SBE User Manual
...
Operating Instructions
Air Conditioner
Model No.
Z, XZ, MZ Indoor Unit
CS-Z7SKEW
CS-Z9SKEW
CS-Z12SKEW
CS-Z15SKEW
CS-Z18SKEW
CS-Z7SKEW-M
CS-Z9SKEW-M
CS-Z12SKEW-M
CS-Z15SKEW-M
CS-Z18SKEW-M
Model No.
TZ, MTZ Indoor Unit
CS-TZ9SKEW
CS-TZ12SKEW
CS-TZ15SKEW
CS-TZ18SKEW
CS-TZ24SKEW
CS-MTZ5SKE
CS-MTZ7SKE
Multi Split Outdoor Unit
CU-2E12SBE
CU-2E15SBE
CU-2E18SBE
CU-3E23SBE
CU-3E18PBE
CU-4E23PBE
CU-4E27PBE
CU-5E34PBE
CS-XZ7SKEW
CS-XZ9SKEW
CS-XZ12SKEW
CS-XZ18SKEW
CS-MZ5SKE
CS-MZ5SKE-M
CU-2RE15SBE
CU-2RE18SBE
CU-3RE18SBE
Operating Instructions
Air Conditioner
Thank you for purchasing Panasonic Air Conditioner.
Installation instructions attached.
Before operating the unit, please read these operating
instructions thoroughly and keep them for future
reference.
Comment utiliser l’appareil
Climatiseur
Nous vous remercions d’avoir porté votre choix sur un
climatiseur Panasonic.
Instructions d’installation jointes.
Avant d’utiliser l’appareil, veuillez lire ce mode d’emploi
dans son intégralité et conservez-le pour toute référence
ultérieure.
Instrucciones de funcionamiento
Climatizador de aire
Muchas gracias por elegir una unidad de aire
acondicionado Panasonic.
Incluye instrucciones de instalación.
Antes de utilizar la unidad, sírvase leer atentamente
estas instrucciones de funcionamiento y conservarlas
para futuras consultas.
Bedienungsanleitung
Klimagerät
Wir danken Ihnen für den Kauf Ihres PanasonicKlimageräts.
Die Montageanleitung liegt dem Gerät bei.
Bevor Sie das Gerät in Betrieb nehmen, lesen Sie bitte
diese Bedienungsanleitung aufmerksam durch und
bewahren Sie sie als künftige Referenz auf.
Istruzioni di funzionamento
Condizionatore d’aria
Grazie per aver acquistato un climatizzatore Panasonic.
Istruzioni d’installazione allegate.
Prima di utilizzare l’unità, leggere attentamente le
istruzioni e conservare questo opuscolo per potervi fare
riferimento in futuro.
Handleiding
Airconditioner
Hartelijk dank voor de aanschaf van de
Panasonicairconditioner.
Installatie-instructies bijgevoegd.
Lees voor u het apparaat gebruikt deze
gebruikshandleiding grondig en bewaar deze voor
toekomstig gebruik.
2-17
18-33
34-49
50-65
66-81
82-97
Nederlands Italiano Deutsch Español Français English
ACXF55-02020

For Z, XZ, MZ indoor unit
Provide maximum comfort,
clean air and optimise energy saving
ECONAVI + INVERTER The Perfect Energy Saving Technology
ECONAVI detects where energy is normally wasted and adjusts cooling/heating power depending on
room conditions and activity levels. Then, INVERTER leverages ECONAVI sensor data and varies
compressor rotation speed. This helps to optimize cooling/heating operation and reduces wasteful
cooling/heating.
See “To learn more...” for details.
nanoe For a freshness and cleaner environment
nanoe generates negative ions using the air in the room to give a healthy air.
It also provides moisturizing effect on the skin or hair and reduces the smell in the room and constrains
propagations of mold and bacteria.
Table of contents
Safety precautions ................................................................................................................................... 6-7
How to use
To learn more...
How to use
Cleaning instructions
Cleaning instructions
Troubleshooting ....................................................................................................................................... 16
Information................................................................................................................................................ 17
For Z, XZ, MZ indoor unit
For Z, XZ, MZ indoor unit
For TZ, MTZ indoor unit
For Z, XZ, MZ indoor unit
For TZ, MTZ indoor unit
................................................................................................... 8-9
........................................................................................ 10-11
................................................................................................. 12-13
.................................................................................... 14
...................................................................................... 15
2
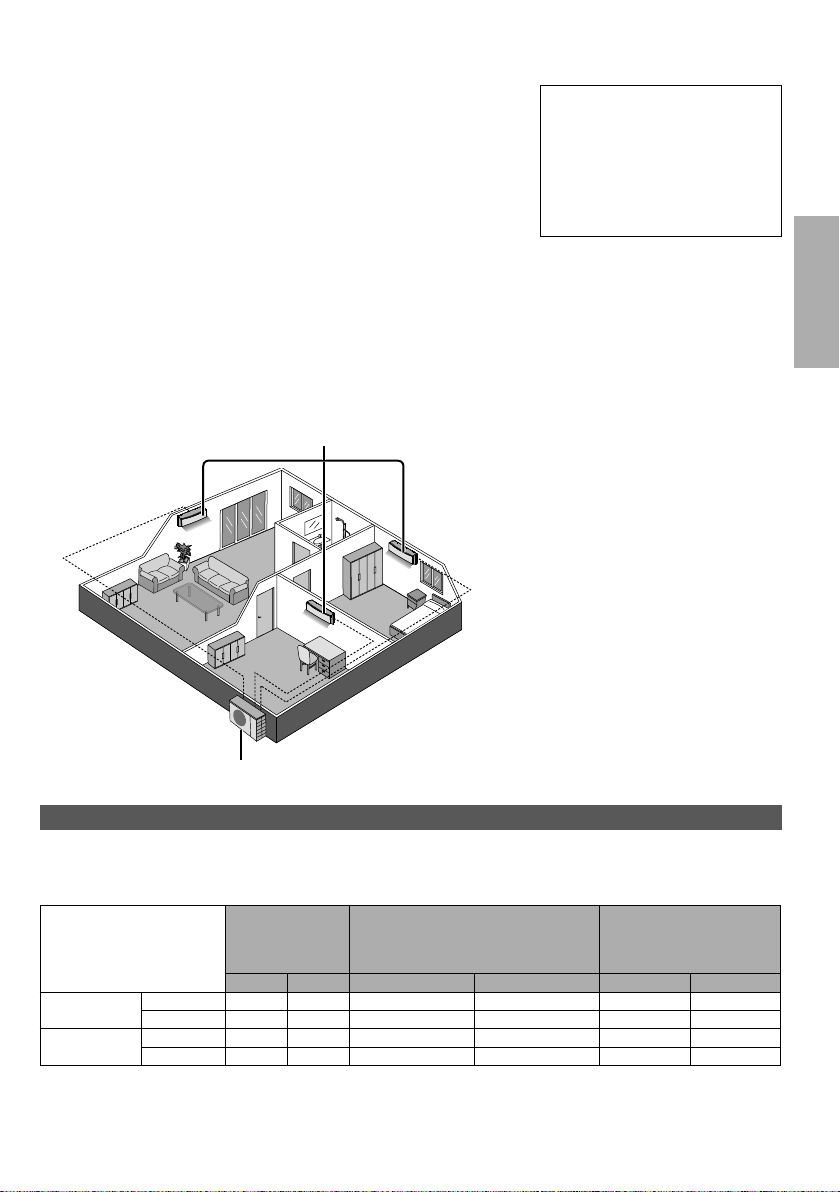
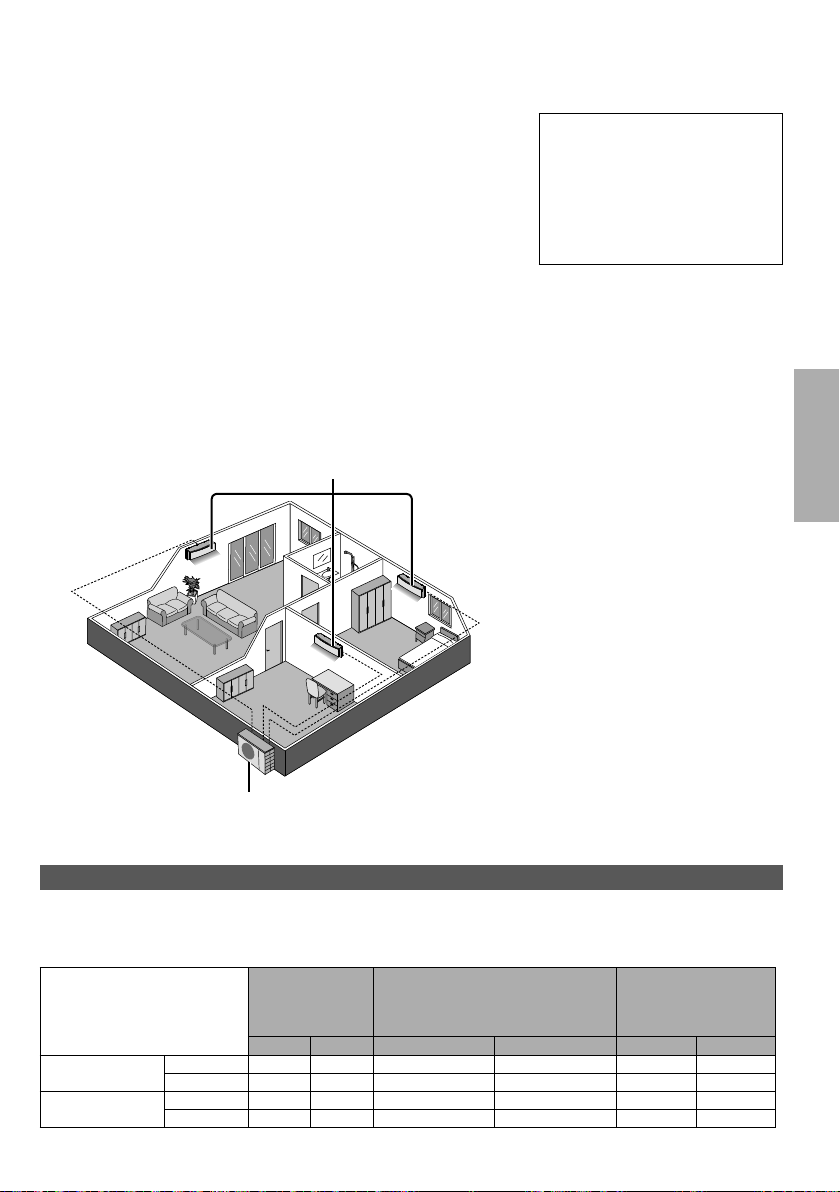
Multi air conditioner system
Multi air conditioner systems save space by letting you connect
multiple indoor units to a single outdoor unit.
• For complete product features, please refer catalogue.
Indoor units
• It is possible to operate the indoor units individually or
simultaneously. The priority of operation is placed on the fi rst
unit that turned on.
• During operation, HEAT and COOL modes cannot activate at
the same time for different indoor units.
• The power indicator blinks to indicate the indoor unit is
standing by for a different operation mode.
• For system which HEAT mode has been locked, if operation
mode other than HEAT is selected, the indoor unit stops and
the POWER indicator blinks.
Indoor units
Accessories
• Remote control
• AAA or R03 batteries × 2
• Remote control holder
• Screws for remote control
holder × 2
English
Multi split outdoor unit
Operation conditions
Use this air conditioner under the following temperature range.
DBT: Dry bulb temperature / WBT: Wet bulb temperature
Multi split outdoor unit
CU-3E18PBE, CU-4E23PBE,
Temperature (°C)
COOL
HEAT
Indoor
DBT WBT DBT WBT
Max. 32 23 46 26
Min. 16 11 -10 -
Max. 30 - 24 18
Min. 16 - -15 -16
CU-4E27PBE, CU-5E34PBE,
CU-2E12SBE, CU-2E15SBE,
CU-2E18SBE, CU-3E23SBE
CU-2RE15SBE
CU-2RE18SBE
CU-3RE18SBE
DBT WBT
43 26
16 11
24 18
-10 -11
3
Quick guide
ON
O
TIMER
CANCEL
ON
O
TIMER
CANCEL
F
D
S
P
MILD DRY
G
S
1
3
2
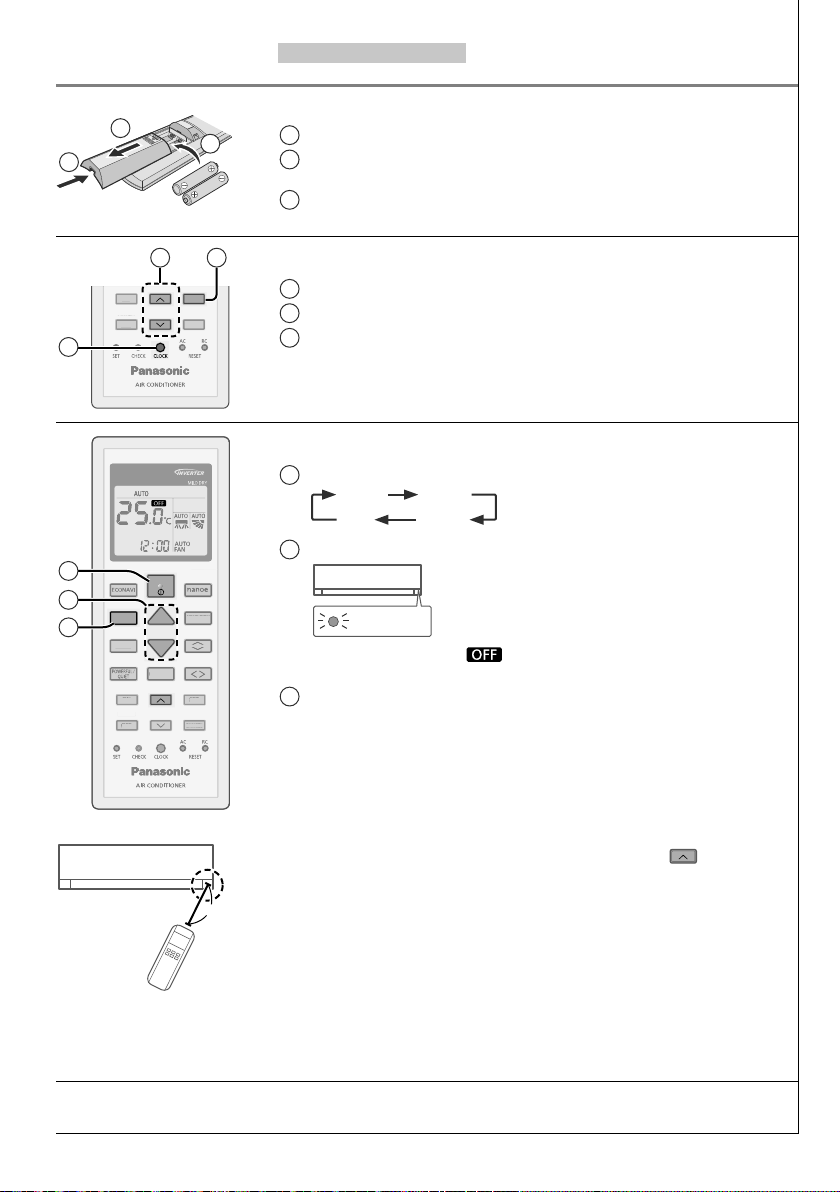
For Z, XZ, MZ indoor unit
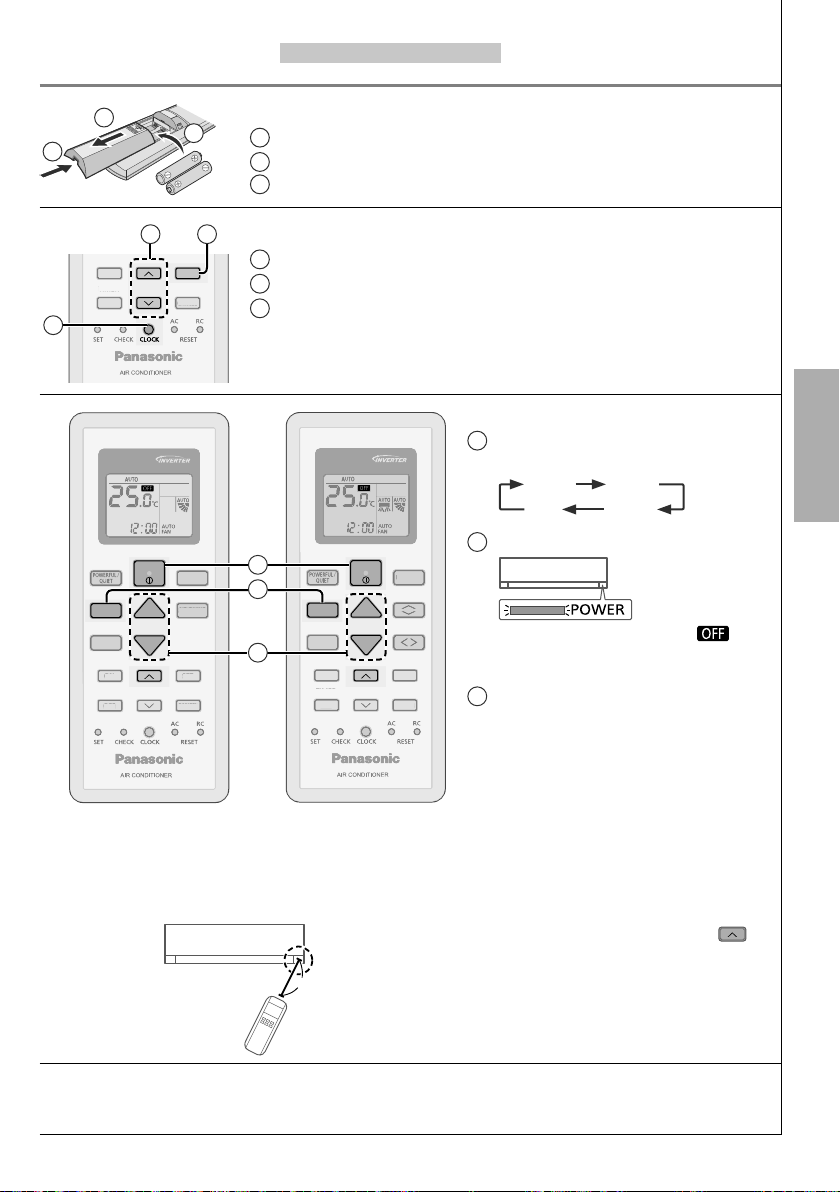
Inserting the batteries
1
Pull out the back cover of remote control
Insert AAA or R03 batteries
2
(can be used ~ 1 year)
3
Close the cover
2 3
TIMER
ON
OFF
FF
SET
CANCEL
1
Clock setting
1
Press CLOCK
2
Set the time
3
Confi rm
Basic operation
Select the desired mode
1
AUTO HEAT
DRY
Start/stop the operation
2
2
3
1
MODE
SLEEP
LEE
TIMER
OFF/ON
MILD DRY
TEMP
AIR SWING
AIR SWIN
FAN SPEED
AN SPEE
ON
FF
OFF
SET
CANCEL
ET
3
POWER
• Please note that the indication is on display to start the
unit.
Select the desired temperature
• Selection range:
16 °C ~ 30 °C.
•
Operating the unit within the recommended temperature range
may save energy.
HEAT : 20 °C ~ 24 °C.
COOL: 26 °C ~ 28 °C.
DRY : 1 °C ~ 2 °C lower than room temperature.
• To dim or restore the unit’s indicator brightness, press and hold
for 5 seconds.
8m
• Use remote control within 8 m from the remote control receiver of the
indoor unit.
COOL
The illustrations in this manual are for explanation purposes only and may differ from the actual unit.
They are subject to change without notice for future improvement.
4
Quick guide
ON
O
TIMER
CANCEL
ON
O
S
TIMER
CANCEL
A
G
S
P
F
D
ON
O
S
TIMER
CANCEL
A
G
S
P
F
D
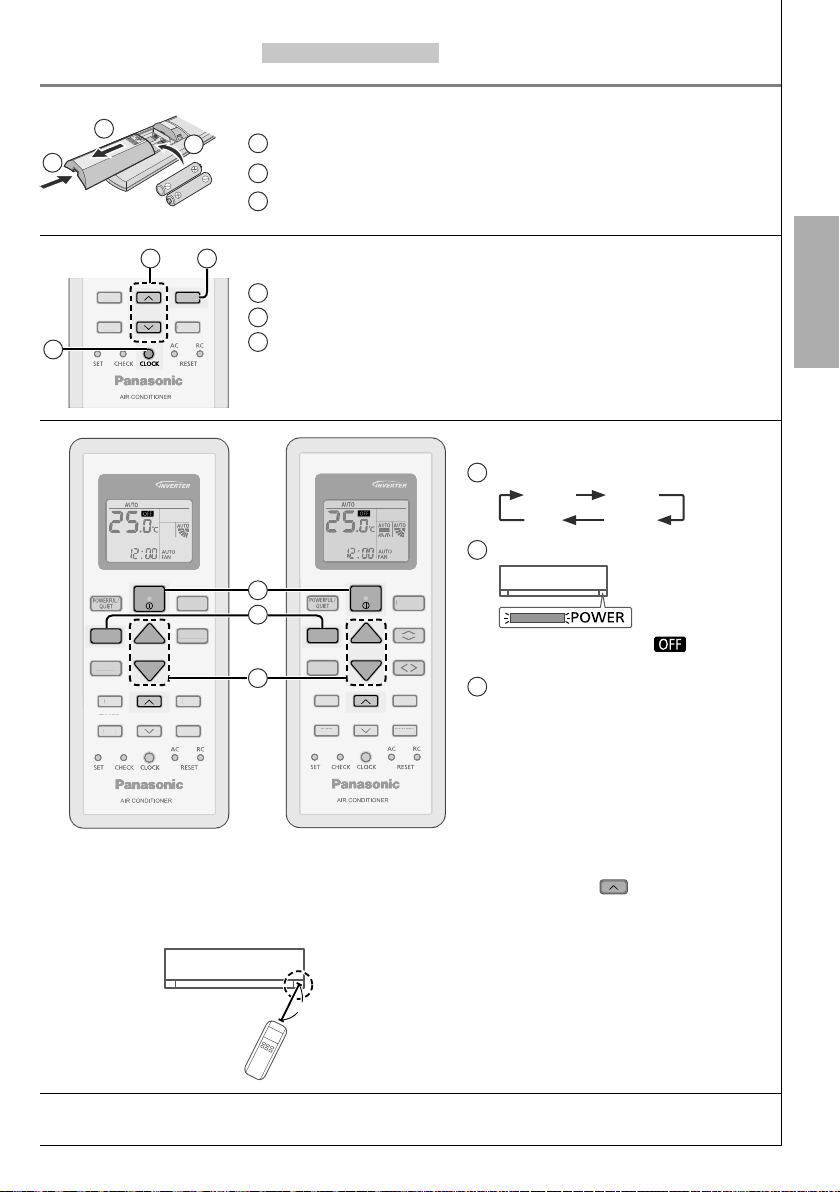
For TZ, MTZ indoor unit
1
3
TIMER
1
MODE
SLEEP
LEE
TIMER
CS-TZ9SKEW
CS-TZ12SKEW
CS-TZ15SKEW
CS-TZ18SKEW
CS-MTZ5SKE
CS-MTZ7SKE
ON
OFF
FF
ON
FF
OFF
2 3
CANCEL
OFF/ON
OFF/ON
AIR SWING
TEMP
CANCEL
2
SET
FAN SPEED
AN SPEE
IR SWIN
SET
ET
Inserting the batteries
1
Pull out the back cover of remote control
Insert AAA or R03 batteries (can be used ~ 1 year)
2
3
Close the cover
Clock setting
1
Press CLOCK
2
Set the time
3
Confi rm
Basic operation
Select the desired mode
1
AUTO HEAT
DRY
Start/stop the operation
2
OFF/ON
2
1
3
OFF/ON
FAN SPEED
AN SPEE
MODE
SLEEP
LEE
TIMER
ON
OFF
FF
TEMP
AIR SWING
IR SWIN
SET
ET
CANCEL
CS-TZ24SKEW
• Please note that the indication
is on display to start the unit.
3
Select the desired temperature
• Selection range: 16 °C ~ 30 °C.
• Operating the unit within the
recommended temperature range
may save energy.
HEAT : 20 °C ~ 24 °C.
COOL: 26 °C ~ 28 °C.
DRY : 1 °C ~ 2 °C lower than room
temperature.
• To dim or restore the unit’s indicator
brightness, press
5 seconds.
• Use remote control within 8 m from the
remote control receiver of the indoor unit.
English
COOL
and hold for
8m
The illustrations in this manual are for explanation purposes only and may differ from the actual unit.
They are subject to change without notice for future improvement.
5
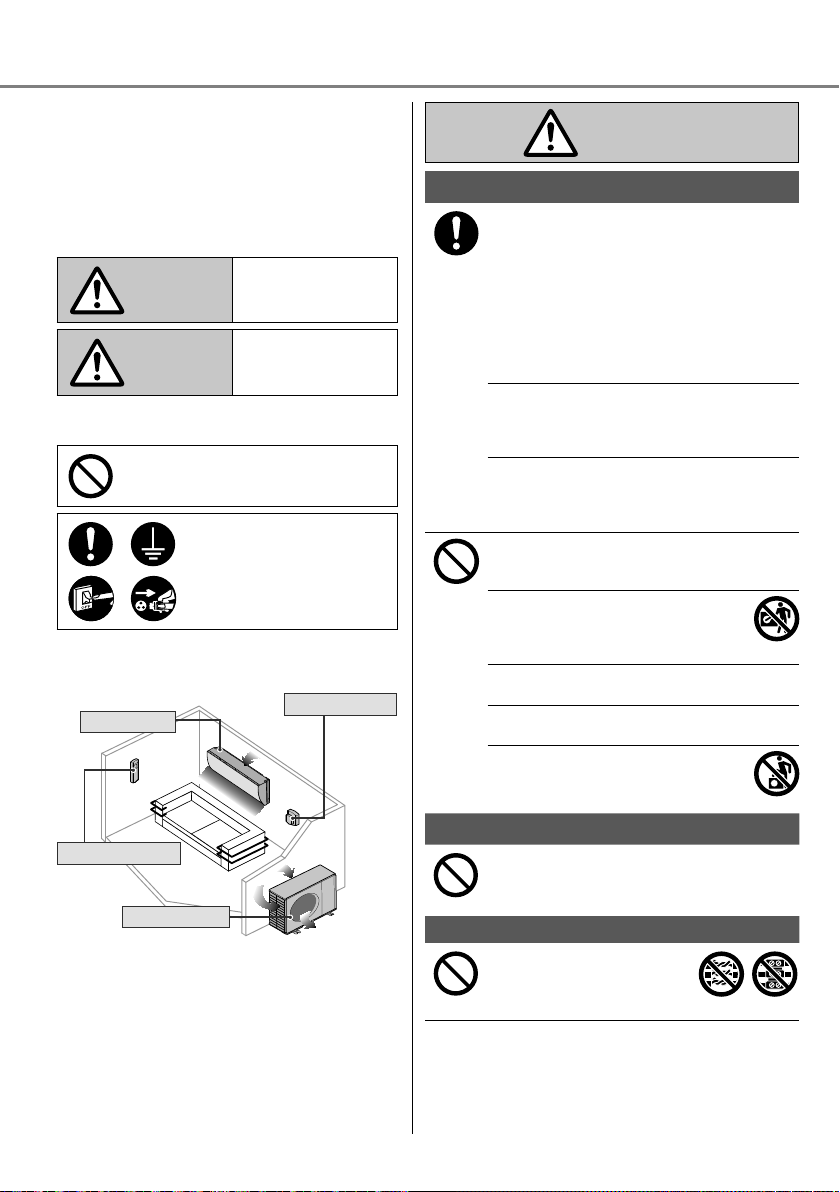
Safety precautions
Air inlet
Air inlet
Air outlet
Air outlet
To prevent personal injury, injury to others
or property damage, please comply with the
following:
Incorrect operation due to failure to follow
instructions below may cause harm or damage,
the seriousness of which is classifi ed as below:
This appliances is not intended for accessibility
by the general public.
This sign warns of
WARNING
CAUTION
The instructions to be followed are classifi ed by
the following symbols:
Indoor unit
Air outlet
Remote control
Outdoor unit
death or serious
injury.
This sign warns of
injury or damage to
property.
This symbol denotes an
action that is PROHIBITED.
These symbols denote
actions COMPULSORY.
Power supply
Air inlet
Air inlet
Air outlet
WARNING
Indoor unit and outdoor unit
This appliance can be used by children aged
from 8 years and above and persons with
reduced physical, sensory or mental capabilities
or lack of experience and knowledge if they
have been given supervision or instruction
concerning use of the appliance in a safe way
and understand the hazards involved. Children
shall not play with the appliance. Cleaning and
user maintenance shall not be made by children
without supervision.
Please consult authorised dealer or specialist to
clean the internal parts, repair, install, remove
and reinstall the unit. Improper installation and
handling will cause leakage, electric shock or fi re.
Confi rm with authorised dealer or specialist on
usage of any specifi ed refrigerant type.
Using refrigerant type other than the specifi ed
may cause product damage, burst and injury etc.
Do not install the unit in a potentially explosive
or fl ammable atmosphere. Failure to do so could
result in fi re.
Do not insert your fi ngers or other
objects into the air conditioner indoor or
outdoor unit, rotating parts may cause
injury.
Do not touch the outdoor unit during lightning, it
may cause electric shock.
Do not expose yourself directly to cold air for a
long period to avoid excess cooling.
Do not sit or step on the unit, you may
fall down accidentally.
Remote control
Do not allow infants and small children to play
with the remote control to prevent them from
accidentally swallowing the batteries.
Power supply
Do not use a modifi ed cord,
joint cord, extension cord or
unspecifi ed cord to prevent
overheating and fi re.
6
To prevent overheating, fi re or electric shock:
•
Do not share the same power outlet with
other equipment.
•
Do not operate with wet hands.
•
Do not over bend the power supply cord.
•
Do not operate or stop the unit by inserting
or pulling out the power plug.
If the supply cord is damaged, it must be
replaced by the manufacturer, service agent
or similarly qualifi ed persons in order to avoid
a hazard.
It is strongly recommended to be installed
with Earth Leakage Circuit Breaker (ELCB)
or Residual Current Device (RCD) to prevent
electric shock or fi re.
To prevent overheating, fi re or electric shock:
•
Insert the power plug properly.
•
Dust on the power plug should be
periodically wiped with a dry cloth.
Stop using the product if any abnormality/
failure occurs and disconnect the power plug
or turn off the power switch and breaker.
(Risk of smoke/fi re/electric shock) Examples
of abnormality/failure
•
The ELCB trips frequently.
•
Burning smell is observed.
•
Abnormal noise or vibration of the unit is
observed.
•
Water leaks from the indoor unit.
•
Power cord or plug becomes abnormally hot.
•
Fan speed cannot be controlled.
•
The unit stops running immediately even if it
is switched on for operation.
•
The fan does not stop even if the operation
is stopped.
Contact your local dealer immediately for
maintenance/repair.
This equipment must be earthed to prevent
electrical shock or fi re.
Prevent electric shock by switching off the
power supply and unplug:
- Before cleaning or servicing,
- When extended non-use, or
- During abnormally strong lightning activity.
CAUTION
Indoor unit and outdoor unit
Do not wash the indoor unit with water,
benzine, thinner or scouring powder to
avoid damage or corrosion at the unit.
Do not use for preservation of precise
equipment, food, animals, plants, artwork
or other objects. This may cause quality
deterioration, etc.
Do not use any combustible equipment
in front of the airfl ow outlet to avoid fi re
propagation.
Do not expose plants or pet directly to airfl ow
to avoid injury, etc.
Do not touch the sharp aluminium
fi n, sharp parts may cause injury.
Do not switch ON the indoor unit when waxing
the fl oor. After waxing, aerate the room
properly before operating the unit.
Do not install the unit in oily and smoky areas
to prevent damage to the unit.
Do not dismantle the unit for cleaning purpose
to avoid injury.
Do not step onto an unstable bench when
cleaning the unit to avoid injury.
Do not place a vase or water container on the
unit. Water may enter the unit and degrade
the insulation. This may cause an electric
shock.
Do not open window or door for long time
during COOL/DRY mode operation.
Prevent water leakage by ensuring drainage
pipe is:
- Connected properly,
- Kept clear of gutters and containers, or
- Not immersed in water
After a long period of use or use with any
combustible equipment, aerate the room
regularly.
After a long period of use, make sure the
installation rack does not deteriorate to
prevent the unit from falling down.
Remote control
Do not use rechargeable (Ni-Cd) batteries. It
may damage the remote control.
To prevent malfunction or damage of the
remote control:
•
Remove the batteries if the unit is not going
to be used for a long period of time.
•
New batteries of the same type must be
inserted following the polarity stated.
Power supply
Do not disconnect the plug by pulling the cord
to prevent electric shock.
English
Safety precautions
7
How to use
ON
O
TIMER
CANCEL
TEMP
O
ON
S
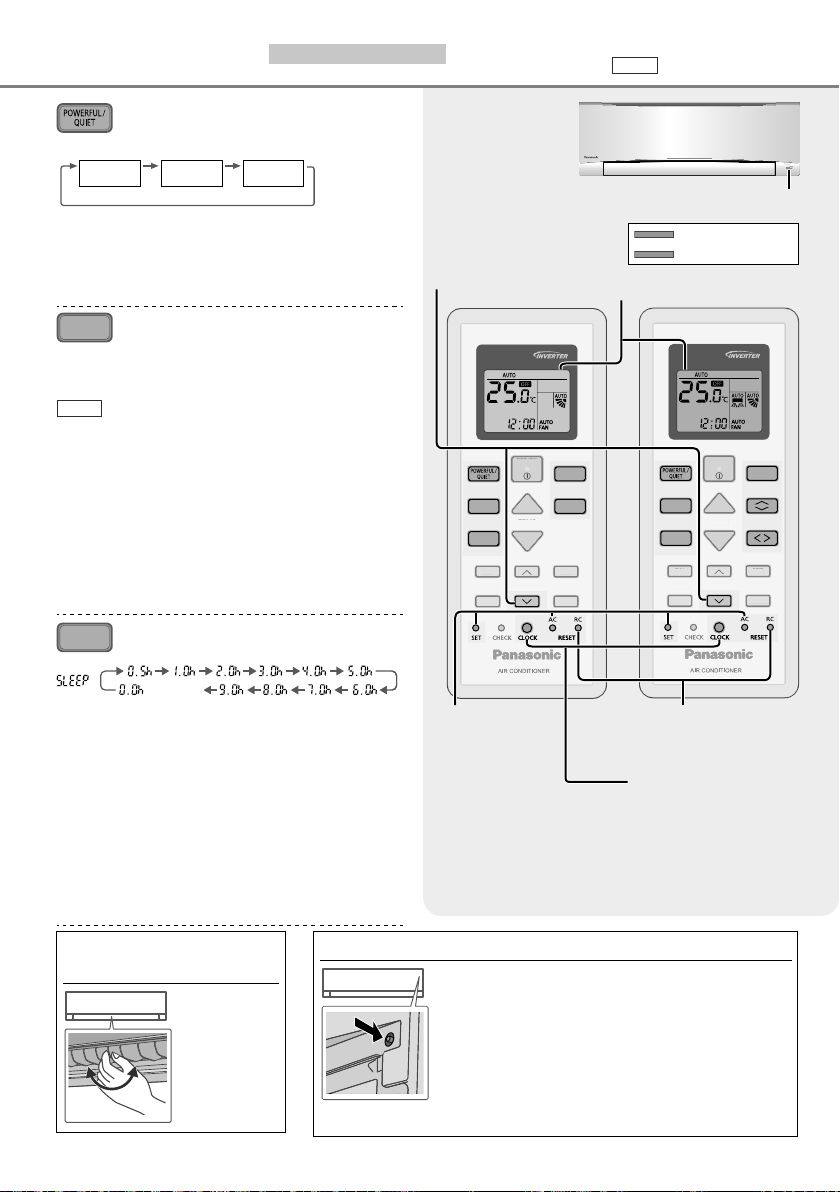
For Z, XZ, MZ indoor unit
Multi
Multi split system
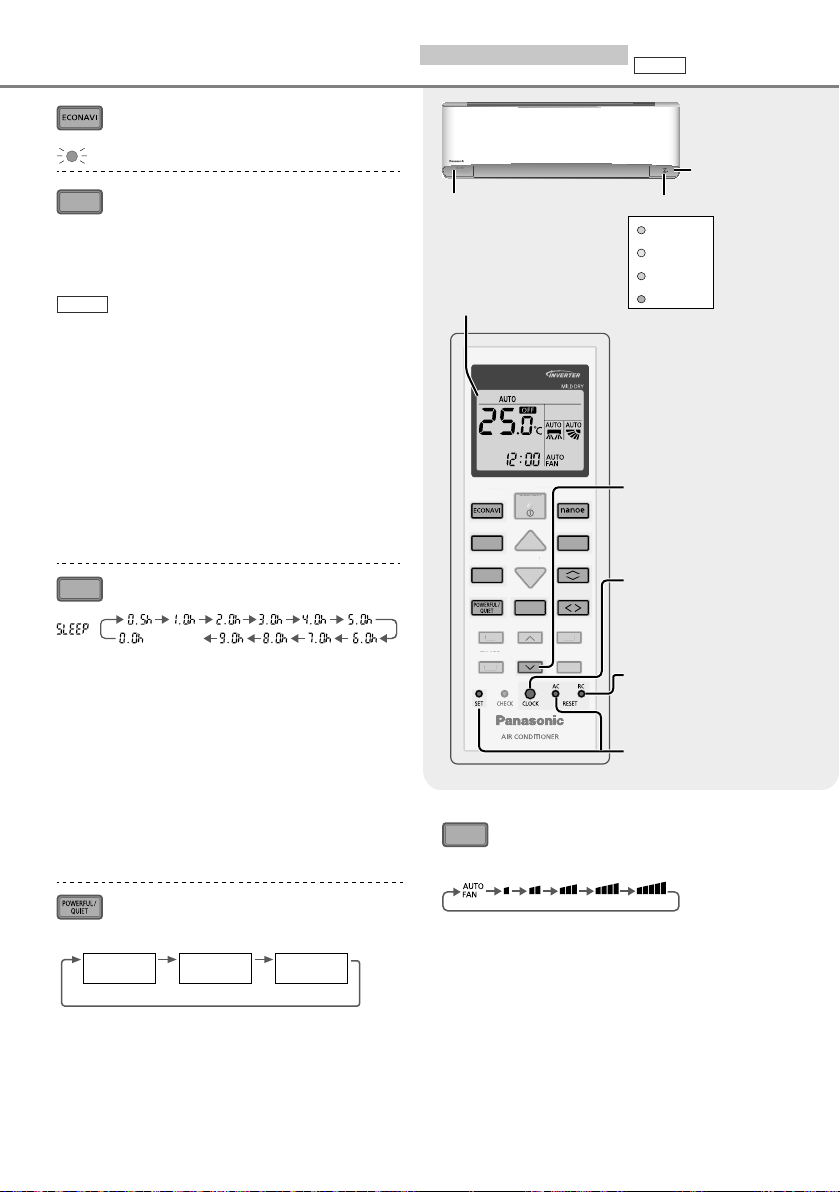
To optimise energy saving
ECONAVI
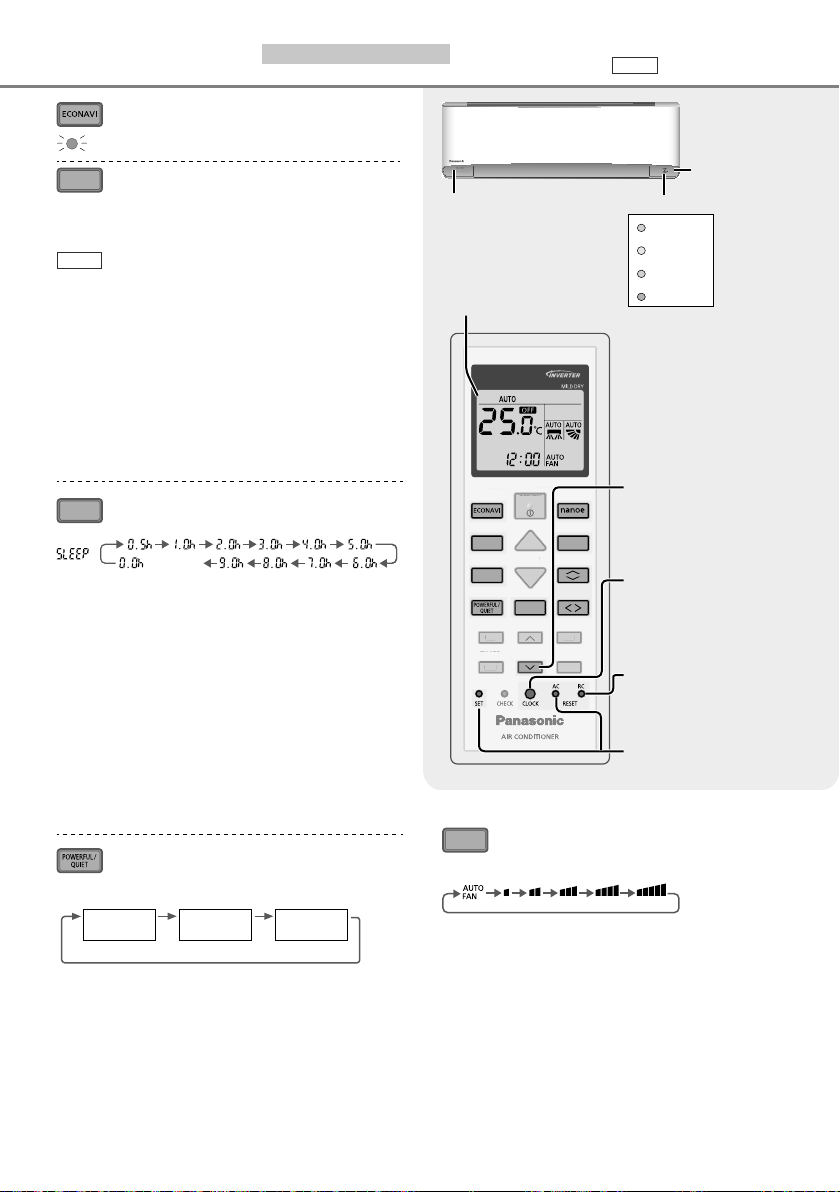
MODE
To select operation mode
AUTO mode - For your convenience
• During operation mode selection, the power
indicator will blinks at initial.
• Unit selects operation mode every 3 hours
Multi
according to setting temperature, outdoor
temperature and room temperature.
HEAT mode - To enjoy warm air
Unit takes a while to warm up. The power
•
indicator will blinks at initial during this operation.
COOL mode - To enjoy cool air
• To reduce power consumption during COOL
mode, use curtains to screen off sunlight and
outdoor heat.
DRY mode - To dehumidify the environment
• Unit operates at low fan speed to give a gentle
cooling operation.
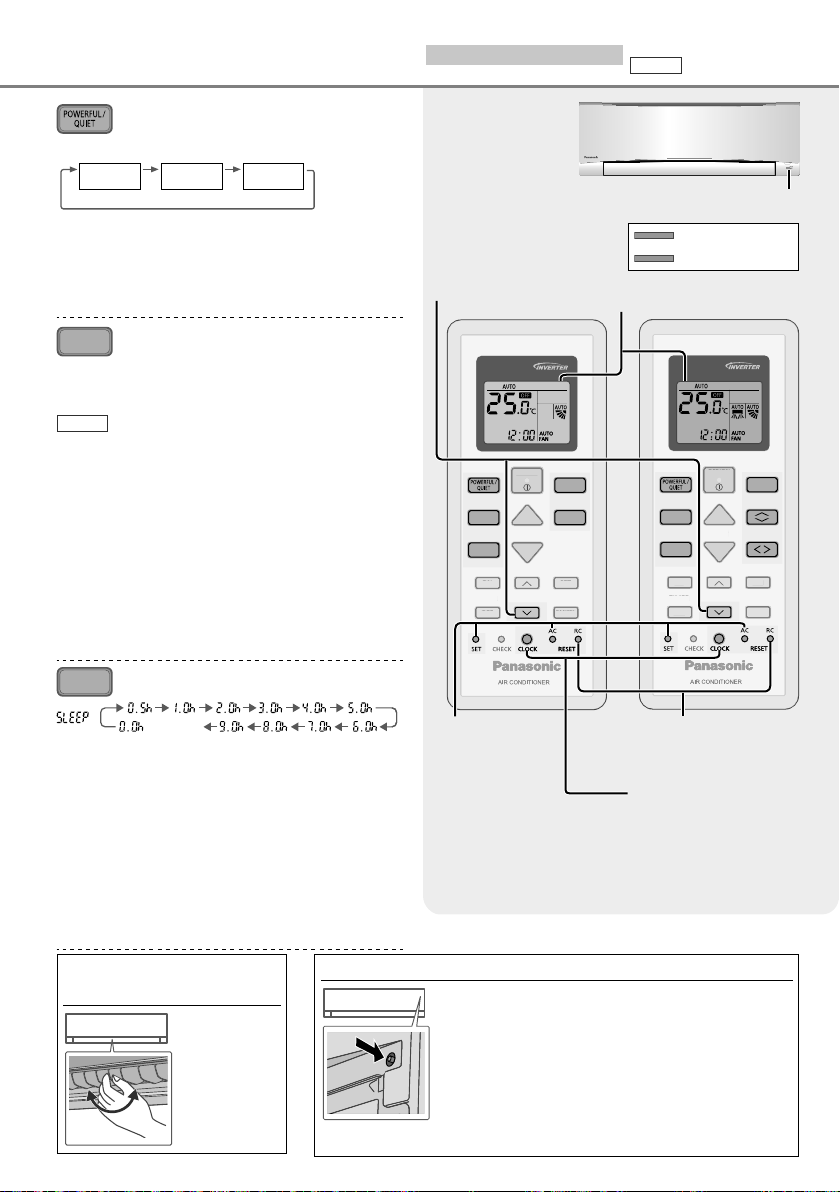
To maximise comfort while
SLEEP
sleeping
•
This operation provides you with a comfortable
(CANCEL)
environment while sleeping. It will automatically
adjust the sleep pattern temperature during the
activation period.
•
The indoor unit indicator will dim when this
operation is activated. This is not applicable if the
indicator brightness has been manually dimmed.
•
This operation is incorporated with the activation
timer (0.5, 1, 2, 3, 4, 5, 6, 7, 8 or 9 hours).
•
This operation can be set together with single
timer or twin timer. Sleep operation has the
priority over OFF timer.
•
This operation can be cancelled by pressing the
respective button when the sleep timer reaches
0.0h.
To switch between powerful &
quiet
(Remote control display)
POWERFUL
POWERFUL: To reach temperature quickly
• This operation stops automatically after
20 minutes.
QUIET: To enjoy quiet operation
• This operation reduces airfl ow noise.
QUIET
(NORMAL)
Sunlight
sensor and
remote control
receiver
Human activity sensor
Remote control display
OFF/ON
FF/
Indicator
POWER
TIMER
ECONAVI
nanoe
(White)
(White)
(White)
(White)
Press and hold for
approximately 10 seconds
to show temperature
TEMP
FAN SPEED
MILD DRY
AIR SWING
SET
ET
CANCEL
setting in °C or °F.
Press and hold for
approximately 5 seconds
to show 12-hour (am/pm)
or 24-hour time indication.
Press to restore the
MODE
SLEEP
TIMER
ON
OFF
FF
remote control to default
setting.
Not used in normal
operations.
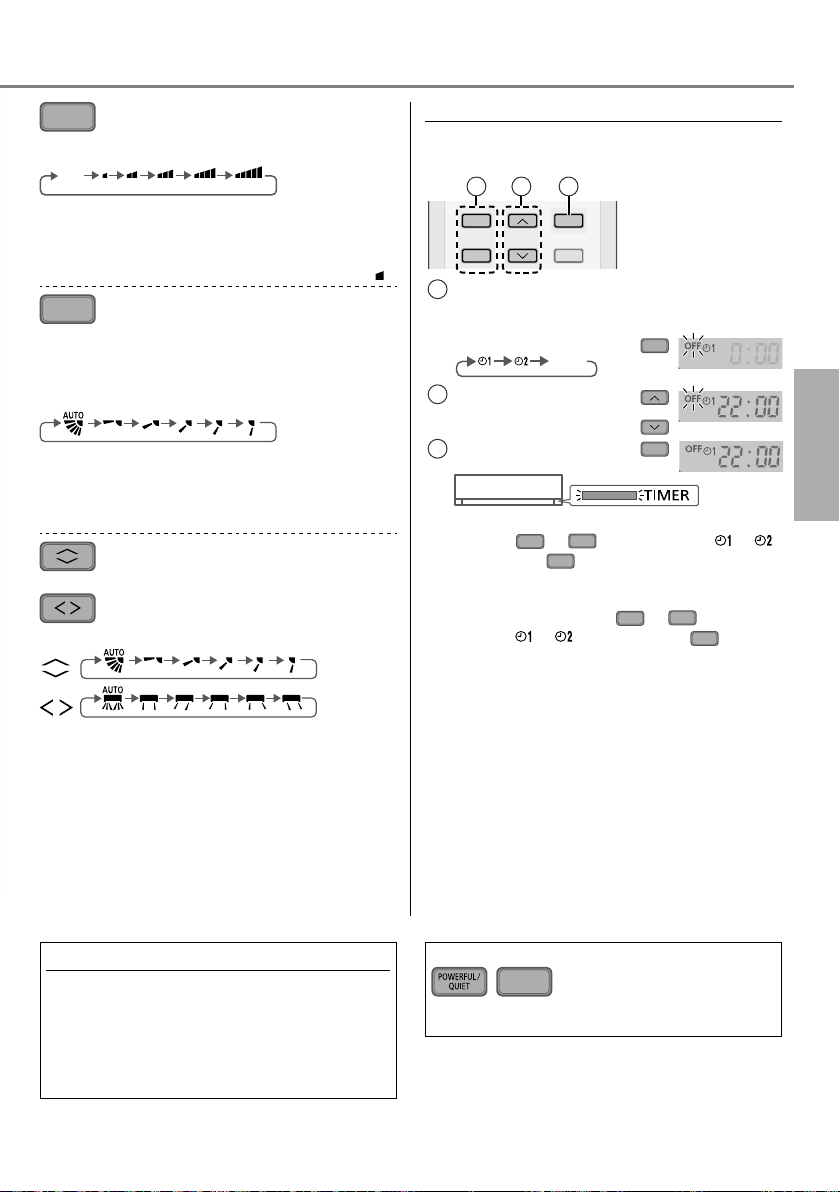
FAN SPEED
To select fan speed
(Remote control display)
• For AUTO, the indoor fan speed is automatically
adjusted according to the operation mode.
8
CANCEL
See “To learn more...” for details.
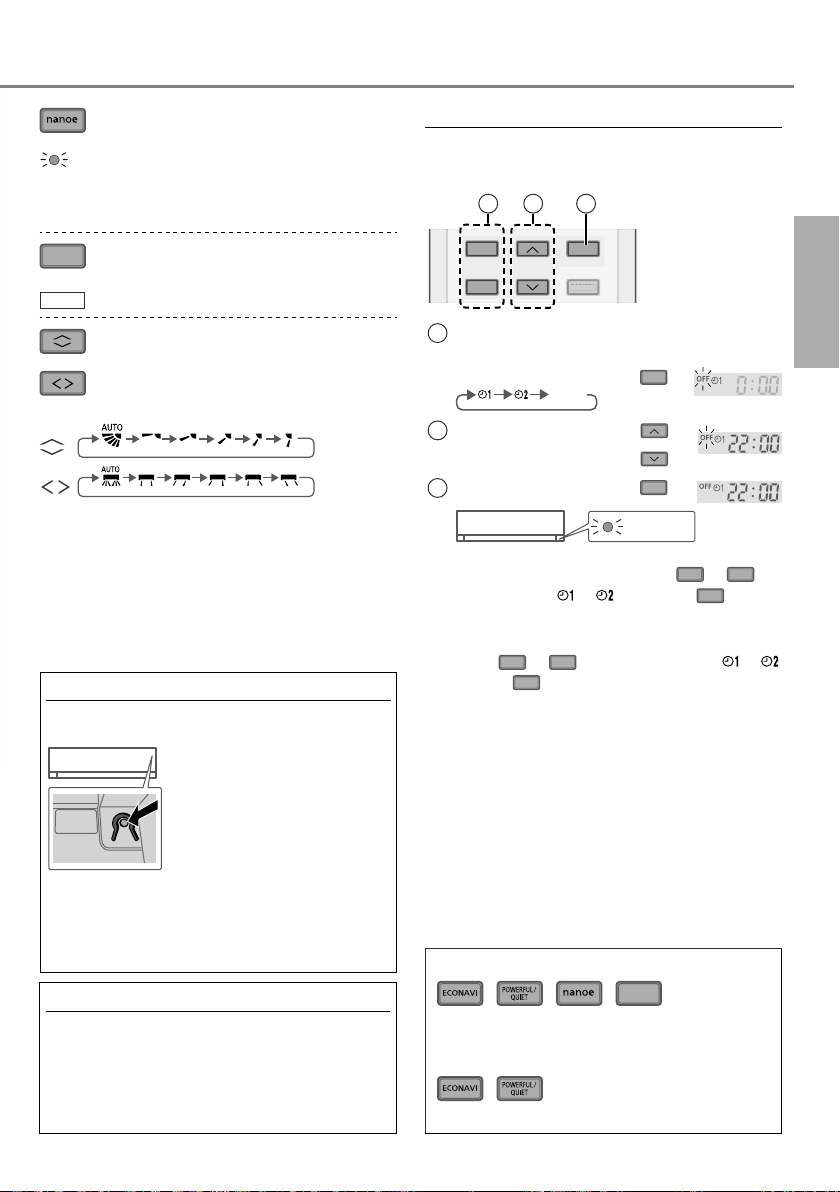
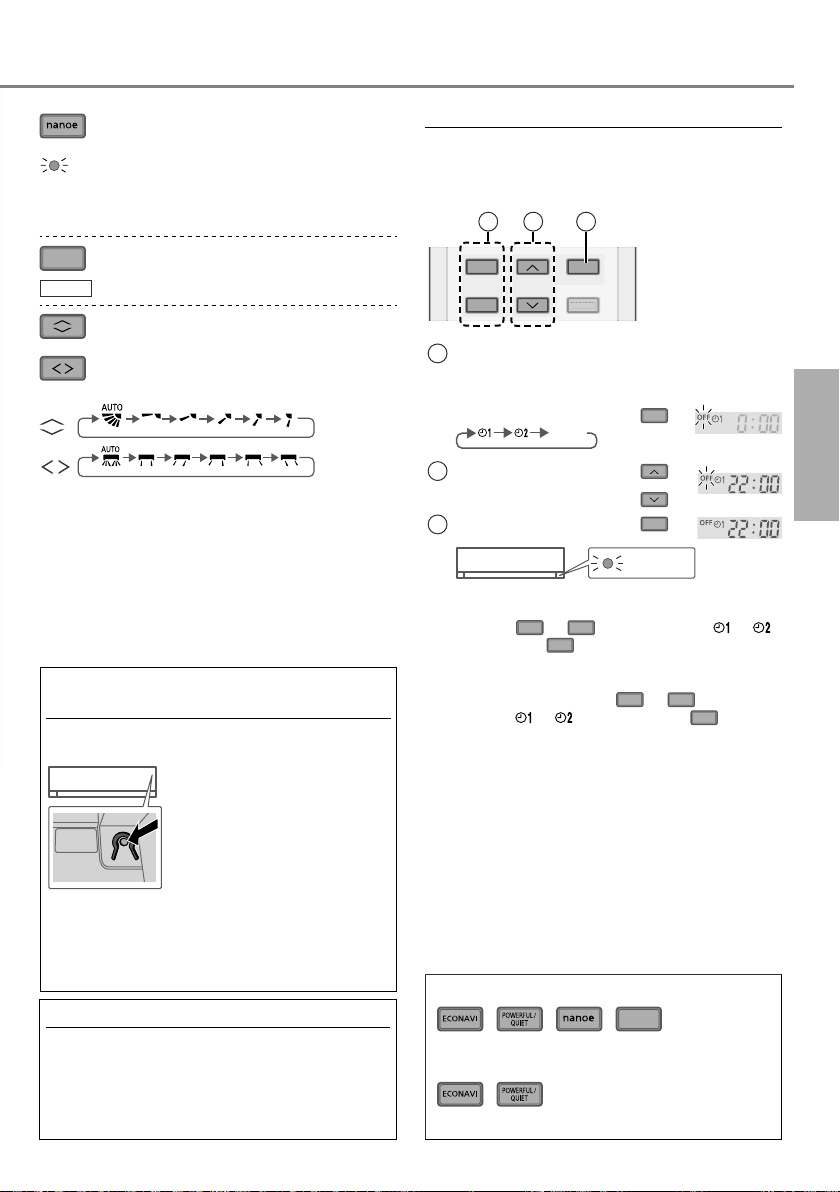
To enjoy freshness and cleaner
environment
nanoe
• This operation moisturizes your skin and
hair, reduces odor and inactivation of allergic
particulars such as pollen in the room.
To improve humidity and
MILD DRY
moisture level
• Function not applicable.
Multi
AIR SWING
To adjust airfl ow direction
(Remote control display)
• Keeps the room ventilated.
• In COOL/DRY mode, if AUTO is set, the louver
swings left/right and up/down automatically.
• In HEAT mode, if AUTO is set, the horizontal
louver is fi xed at the predetermined position.
The vertical louver swings left/right after the
temperature rises.
• Do not adjust the louver by hand.
Auto OFF/ON button
Use when remote control is misplaced or a
malfunction occurs. Raise the front panel:
1. Press the button once to
use in AUTO mode.
2. Press and hold the button
AUTO
OFF/ON
until you hear 1 beep, then
release to use in forced
COOL mode.
3. Repeat step 2. Press and
hold the button until you
hear 2 beeps, then release
to use in forced HEAT
mode.
• Press the button again to
turn off.
Auto Restart Control
• If power is resumed after a power failure, the
operation will restart automatically after a
period of time with previous operation mode
and airfl ow direction.
• This control is not applicable when TIMER is
set.
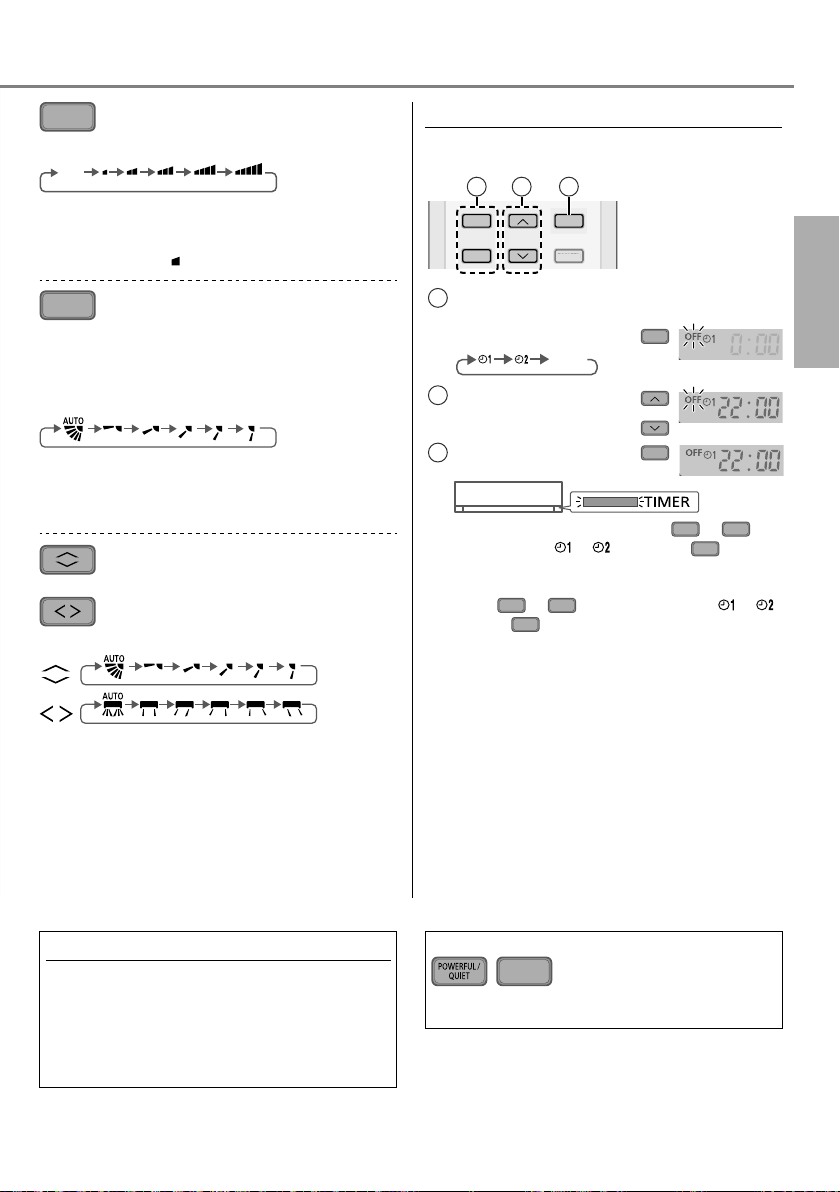
To set the timer
2 sets of ON and OFF timers are available to turn
ON or OFF the unit at different preset times.
21 3
ON
TIMER
OFF
Select ON or OFF timer Example:
1
SET
CANCEL
OFF at 22:00
• Each time pressed:
Set the time
2
Confi rm
3
Cancel
OFF
SET
TIMER
• To cancel ON or OFF timer, press ON or
select respective or then press
• If timer is cancelled manually or due to power
failure, you can restore the timer again by
pressing ON or
then press
OFF
to select respective or
SET
.
• The nearest timer setting will be displayed and
will activate in sequence.
• When ON Timer is set, the unit may start earlier
(up to 35 minutes) before the actual set time
in order to achieve the desired temperature on
time.
• Timer operation is based on the clock set in the
remote control and repeats daily once set. For
clock setting, please refer to Quick guide.
CANCEL
OFF
to
.
Note
, , ,
• Can be activated in all modes and can be
cancelled by pressing the respective button
again.
,
• Cannot be selected at the same time.
SLEEP
English
How to use
9
To learn more...
For Z, XZ, MZ indoor unit
Multi
Multi split system
ECONAVI
Note
AIR SWING
The unit will start to initialise
(for approximately 1 minute)
The human activity sensor
and the sunlight sensor will
start to detect.
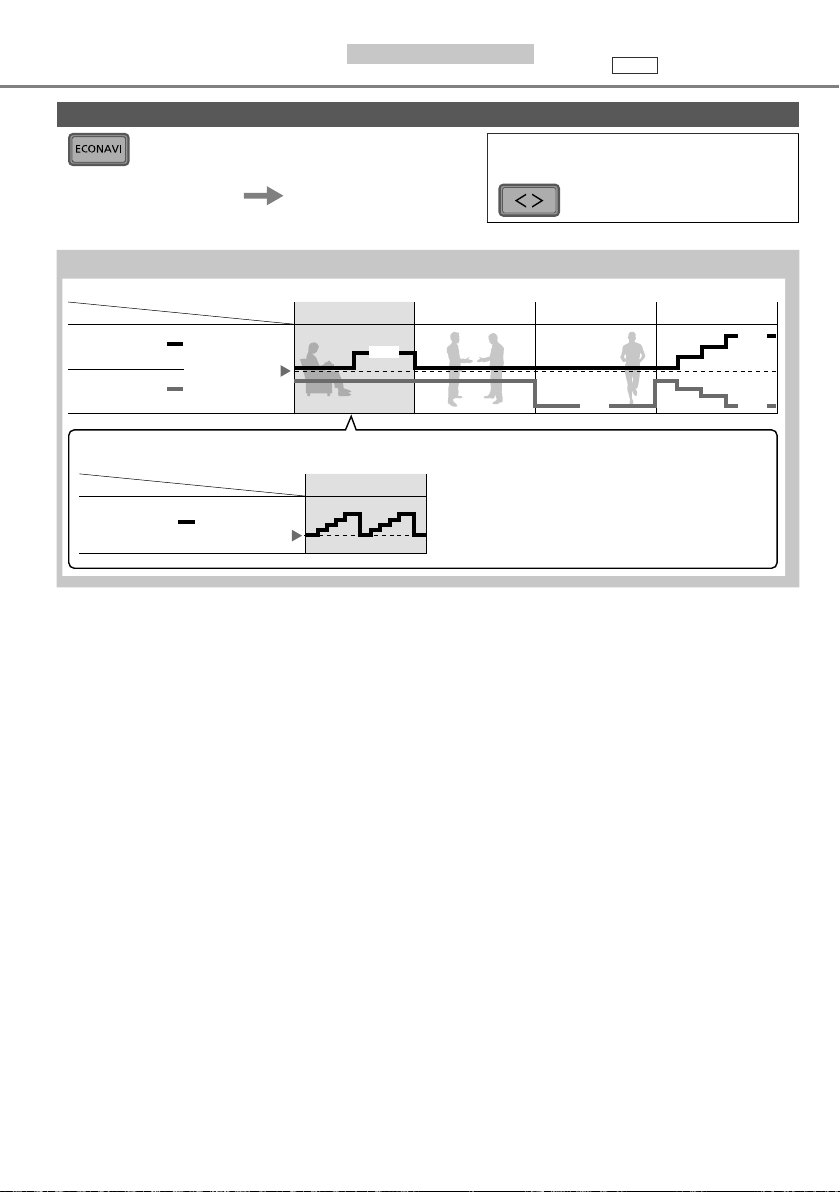
Human activity sensor operation
ECONAVI ; Detecting human presence and activity, the unit controls room temperature to save energy.
Mode
COOL/DRY
HEAT
ECONAVI
Precise control of temperature during low activity to maximise energy saving.
Mode
COOL/DRY
Human
Set
temperature
Set
temperature
Human
Low activity Normal activity High activity Absent
+1°C
Low activity
ECONAVI take advantage of the human nature that
human being takes time to feel the temperature rise
during low activity level; the unit adjusts temperature to
maximise energy saving without sacrifi cing the comfort.
When manual AIR SWING is selected,
the ECONAVI operations will be
cancelled.
+2°C
+2°C+2°C
10
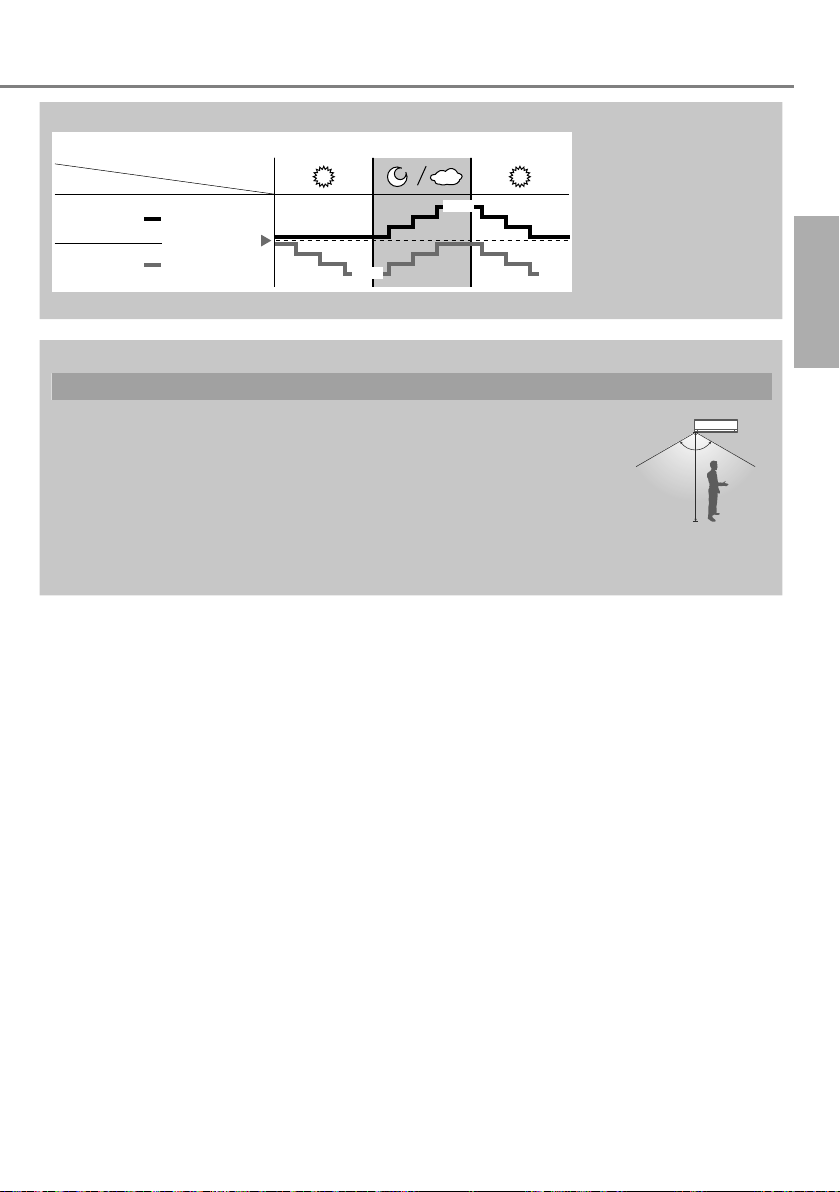
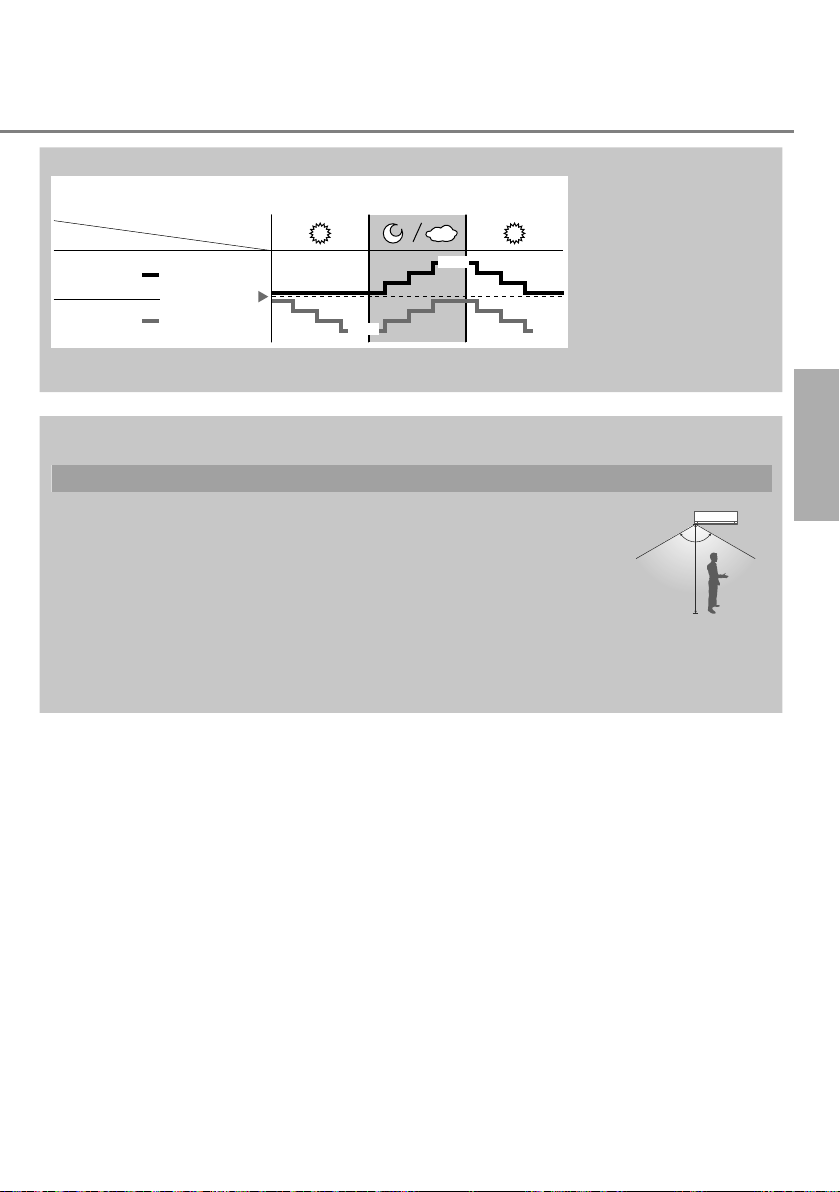
Sunlight Sensor operation
ECONAVI ; Detecting sunlight intensity, the unit adjust temperature to save energy.
Mode
COOL/DRY
HEAT
• In a room without window or with thick curtain, the sunlight sensor will judge as cloudy/night.
The human activity sensor will also scan for area of heat source and movement in a room.
• Based on area activeness horizontal airfl ow direction louver will adjust either fi x at
predetermined position or swing left/right periodically.
• The human activity sensor performance is infl uenced by indoor unit location, movement
speed, temperature range, etc.
• The human activity sensor may:
- mistakenly detect an object with heat source & movement similar to human, such as
pets, etc.
- mistakenly detect as non-heat source & movement if a human stays motionless for
certain period of time.
• Do not place large objects near the sensor and keep away heating units or humidifi er
from the sensor’s detection area. They may cause sensor malfunction.
Ambient condition
+1 °C
Set
temperature
-1 °C -1 °C
Detection area
ECONAVI is activated,
the unit maintains set
temperature until a high
sunlight intensity is detected.
The sunlight sensor detects
sunlight intensity during
weather or day/night
changes, and the unit adjusts
temperature.
120º
7m
English
To learn more...
11
How to use
ON
O
S
TIMER
CANCEL
TEMP
O
ON
ON
O
S
TIMER
CANCEL
TEMP
O
ON
For TZ, MTZ indoor unit
To switch between
powerful & quiet
(Remote control display)
POWERFUL
POWERFUL: To reach temperature quickly
• This operation stops automatically after
20 minutes.
QUIET: To enjoy quiet operation
This operation reduces airfl ow noise.
•
MODE
AUTO mode - For your convenience
During operation mode selection, the power
•
indicator will blinks at initial.
Multi
HEAT mode - To enjoy warm air
Unit takes a while to warm up. The power
•
indicator will blinks at initial during this operation.
COOL mode - To enjoy cool air
To reduce power consumption during COOL mode,
•
use curtains to screen off sunlight and outdoor heat.
DRY mode - To dehumidify the environment
Unit operates at low fan speed to give a gentle
•
cooling operation.
SLEEP
QUIET
(NORMAL)
To select operation mode
•
Unit selects operation mode every 3 hours
according to setting temperature, outdoor
temperature and room temperature.
To maximise comfort while
sleeping
Press and hold for
approximately
10 seconds to show
temperature setting
in °C or °F.
OFF/ON
OFF/ON
FF/
FAN SPEED
MODE
SLEEP
TIMER
ON
OFF
FF
AIR SWING
TEMP
SET
CANCEL
Multi
Multi split system
Remote control receiver
and indicator
Remote control display
MODE
SLEEP
ET
ON
TIMER
OFF
POWER
TIMER
FF
(Green)
(Orange)
OFF/ON
OFF/ON
FF/
TEMP
FAN SPEED
AIR SWING
SET
ET
CANCEL
•
This operation provides you with a comfortable
environment while sleeping. It will automatically
adjust the sleep pattern temperature during the
activation period.
(CANCEL)
•
The indoor unit indicator will dim when this
operation is activated. This is not applicable if the
indicator brightness has been manually dimmed.
•
This operation is incorporated with the activation
timer (0.5, 1, 2, 3, 4, 5, 6, 7, 8 or 9 hours).
•
This operation can be set together with single
timer or twin timer. Sleep operation has the
priority over OFF timer.
•
This operation can be cancelled by pressing the
respective button when the sleep timer reaches 0.0h.
To adjust horizontal
airfl ow direction
•
Manually
adjustable.
( CS-TZ9SKEW,
CS-TZ12SKEW,
CS-TZ15SKEW,
CS-TZ18SKEW,
CS-MTZ5SKE,
CS-MTZ7SKE)
12
Not used
in normal
operations.
CS-TZ9SKEW
CS-TZ12SKEW
CS-TZ15SKEW
CS-TZ18SKEW
CS-MTZ5SKE
CS-MTZ7SKE
Auto OFF/ON button
Use when remote control is misplaced or a
malfunction occurs. Raise the front panel:
• To use in AUTO mode, press the button once.
• To use in COOL mode, press and hold the
button until 1 beep is heard, then release.
• To use in HEAT mode, press and hold the
button until 1 beep is heard, then release. And
press again until 2 beeps, then release.
• Press the button again to turn off.
Press to restore the
remote control to default
setting.
Press and hold for
approximately 5 seconds
to show 12-hour (am/pm)
or 24-hour time indication.
CS-TZ24SKEW
L
FAN SPEED
To select fan speed
(Remote control display)
AUTO
FAN
•
For AUTO, the indoor fan speed is automatically
adjusted according to the operation mode.
•
To have low noise priority operation, select the
lowest fan speed ( ).
To set the timer
2 sets of ON and OFF timers are available to turn
ON or OFF the unit at different preset times.
21 3
ON
TIMER
OFF
SET
CANCELCANCE
To adjust vertical airfl ow
AIR SWING
direction
( CS-TZ9SKEW, CS-TZ12SKEW,
CS-TZ15SKEW, CS-TZ18SKEW,
CS-MTZ5SKE, CS-MTZ7SKE)
(Remote control display)
•
Keeps the room ventilated.
•
In COOL/DRY mode, if AUTO is set, the fl ap swings
up/down automatically.
•
Do not adjust the fl ap by hand.
AIR SWING
(Remote control display)
•
•
•
•
•
To adjust airfl ow direction
(CS-TZ24SKEW)
Keeps the room ventilated.
In COOL/DRY mode, if AUTO is set, the fl aps
swings left/right and up/down automatically.
In HEAT mode, if AUTO is set, the horizontal fl ap is
fi xed at the predetermined position. The vertical fl ap
swings left/right after the temperature rises.
If manual is set, the horizontal and vertical fl ap are
fi xed at the predetermined position.
Do not adjust the fl ap by hand.
Select ON or OFF timer Example:
1
OFF at 22:00
• Each time pressed:
Cancel
Set the time
2
Confi rm
3
• To cancel ON or OFF timer, press ON or
select respective or then press
OFF
SET
OFF
to
CANCEL
.
• If timer is cancelled manually or due to power
failure, you can restore the timer again by
ON
pressing
then press
OFF
or
to select respective or
SET
.
• The nearest timer setting will be displayed and will
activate in sequence.
• When ON Timer is set, the unit may start earlier
(up to 35 minutes) before the actual set time in
order to achieve the desired temperature on time.
• Timer operation is based on the clock set in the
remote control and repeats daily once set. For
clock setting, please refer to Quick guide.
EnglishHow to use
Auto Restart Control
• If power is resumed after a power failure, the
operation will restart automatically after a
period of time with previous operation mode
and airfl ow direction.
• This control is not applicable when TIMER is
set.
Note
SLEEP
,
• Can be activated in all modes and can be
cancelled by pressing the respective button again.
13

Cleaning instructions
For Z, XZ, MZ indoor unit
To ensure optimal performance of the unit,
cleaning has to be carried out at regular
intervals. Dirty unit may cause malfunction
and you may see error code “H99”. Please
consult authorised dealer.
• Switch off the power supply and unplug before
cleaning.
• Do not touch the aluminium fi n, sharp parts may
cause injury.
• Do not use benzine, thinner or scouring powder.
• Use only soap (
detergent.
• Do not use water hotter than 40 °C.
pH 7) or neutral household
Indoor unit
Wipe the unit gently with a soft,
dry cloth.
Human activity sensor
Do not hit or violently press or poke it with a sharp
object. This can lead to damage and malfunction.
Front panel
Wash gently and dry.
Remove the front panel
Pull out and lift up.
2
Indoor unit
Front panel
Human activity
sensor
Aluminium fi n
Air fi lters
Air fi lters
Once every 2 weeks
• Wash/rinse the fi lters gently
with water to avoid damage to
the fi lter surface.
• Dry the fi lters thoroughly under shade, away
from fi re or direct sunlight.
• Replace any damaged fi lters.
Remove air fi lter Attach air fi lter
Release the
1
hooks at
both ends.
Close it securely
2
Push in.
3
Close down.
4
Press both ends and center of the front panel.
14
1
Insert
at both
sides.
Insert into the unit
For seasonal inspection after extended
non-use
• Checking of remote control batteries.
• No obstruction at air inlet and air outlet vents.
• Use Auto OFF/ON button to select COOL/
HEAT operation. After 15 minutes of
operation, it is normal to have the following
temperature difference between air inlet and
air outlet vents:
COOL: ≥ 8 °C HEAT: ≥ 14 °C
For extended non-use
•
Activate HEAT mode for 2~3 hours to remove
moisture left in the internal parts thoroughly to
prevent mould growth.
• Turn off the power supply and unplug.
• Remove the remote control batteries.

Cleaning instructions
For TZ, MTZ indoor unit
To ensure optimal performance of the unit,
cleaning has to be carried out at regular
intervals. Dirty unit may cause malfunction
and you may see error code “H99”. Please
consult authorised dealer.
• Switch off the power supply and unplug before
cleaning.
• Do not touch the aluminium fi n, sharp parts may
cause injury.
• Do not use benzine, thinner or scouring powder.
• Use only soap (
detergent.
• Do not use water hotter than 40 °C.
pH 7) or neutral household
Indoor unit
Wipe the unit gently with a soft,
dry cloth.
Front panel
Wash gently and dry.
Remove the front panel
Pull out
2
Raise
1
Close it securely
Insert at both sides
1
Indoor unit
Aluminium fi nFront panel
Air Purifying Filter
Air fi lters
Air fi lters
Once every 2 weeks
• Wash/rinse the fi lters gently
with water to avoid damage to
the fi lter surface.
• Dry the fi lters thoroughly under shade,
away from fi re or direct sunlight.
• Replace any damaged fi lters.
Remove air fi lter Attach air fi lter
Insert into the unit
Air Purifying Filter
• Do not wash the air purifying fi lter.
• Replace the fi lter every 2 years or replace any
damaged fi lter.
Part no.: CZ-SA31P
English
Cleaning instructions
2
Close down
3
Press both ends of the front panel
4
For CS-TZ18SKEW, CS-TZ24SKEW:
Press at center of the front panel
Air Purifying Filter
For seasonal inspection after extended non-use
•
Checking of remote control batteries.
•
No obstruction at air inlet and air outlet vents.
•
Use Auto OFF/ON button to select COOL/
HEAT operation. After 15 minutes of operation,
it is normal to have the following temperature
difference between air inlet and air outlet vents:
COOL: ≥ 8 °C HEAT: ≥ 14 °C
For extended non-use
•
Activate HEAT mode for 2~3 hours to remove
moisture left in the internal parts thoroughly to
prevent mould growth.
•
Turn off the power supply and unplug.
•
Remove the remote control batteries.
15

Troubleshooting
ON
O
TIMER
CANCEL
S
The following symptoms do not indicate malfunction.
Mist emerges from indoor unit.
Water fl owing sound during operation.
The room has a peculiar odour.
Indoor fan stops occasionally during automatic fan
speed setting.
Airfl ow continues even after operation has stopped.
Operation is delayed a few minutes after restarting.
Outdoor unit emits water/steam.
TIMER indicator is always on.
POWER indicator blinks during HEAT mode with no
warm air supply (and louver is closed).
Indoor fan stops occasionally during heating
operation.
POWER indicator blinks before the unit is switched
on.
Cracking sound during operation.
Splashing sound during operation.
Dusts accumulated on the wall.
During COOL/DRY mode, the indoor unit stops and
POWER indicator blinks.
Discoloration of some plastic parts.
Check the following before calling for servicing.
Operation in HEAT/COOL mode is not working
effi ciently.
Noisy during operation.
Remote control does not work.
(Display is dim or transmission signal is weak.)
The unit does not work.
The unit does not receive the signal from the
remote control.
NON SERVICEABLE CRITERIAS
TURN OFF POWER SUPPLY AND
UNPLUG then please consult authorised
dealer under the following conditions:
• Abnormal noise during operation.
• Water/foreign particles have entered the
remote control.
• Water leaks from Indoor unit.
• Circuit breaker switches off frequently.
• Power cord becomes unnaturally warm.
• Switches or buttons are not functioning
properly.
16
Symptom Cause
Symptom Check
•
Condensation effect due to cooling process.
•
Refrigerant fl ow inside the unit.
•
This may be due to damp smell emitted by the wall, carpet,
furniture or clothing.
•
This helps to remove the surrounding odour.
•
Extraction of remaining heat from the indoor unit
(maximum 30 seconds).
•
The delay is a protection to the unit’s compressor.
•
Condensation or evaporation occurs on pipes.
•
The timer setting repeats daily once set.
•
The unit is in defrost mode (and AIR SWING is set to AUTO).
•
To avoid unintended cooling effect.
•
This is a preliminary step in preparation for the operation
when the ON timer has been set.
•
Changes of temperature caused the expansion/contraction
of the unit.
•
Generating the nanoe on the unit.
•
Due to air circulation or static electricity generated by the
air conditioner. Some types of wall paper may collect dusts
easily (recommended to clean the area around the air
conditioner frequently).
•
The system has locked to operate in HEAT model only.
•
Discoloration is subject to material types used in plastic parts,
accelerated when exposed to heat, sun light, UV light, or
environmental factor.
•
Set the temperature correctly.
•
Close all doors and windows.
•
Clean or replace the fi lters.
•
Clear any obstruction at the air inlet and air outlet vents.
•
Check if the unit has been installed at an incline.
•
Close the front panel properly.
•
Insert the batteries correctly.
•
Replace weak batteries.
•
Check if the circuit breaker is tripped.
•
Check if timers have been set.
•
Make sure the receiver is not obstructed.
•
Certain fl uorescent lights may interfere with signal transmitter.
Please consult authorised dealer.
The unit stops and the TIMER indicator blinks.
Use remote control to retrieve error code.
1
Press for
5 seconds
3
Press for
5 seconds
to quit
checking
For certain errors, you may restart the unit for limited
•
ON
TIMER
OFF
FF
CANCEL
2
Press until you
SET
ET
hear beep sound,
then write down
the error code
4
Turn the unit off
and reveal the
error code to
authorised dealer
operation with 4 beeps when operation starts.

Information
English
Information for Users on Collection and Disposal of Old Equipment and Used Batteries
These symbols on the products, packaging, and/or accompanying documents mean that used electrical
and electronic products and batteries should not be mixed with general household waste.
For proper treatment, recovery and recycling of old products and used batteries, please take them to
applicable collection points, in accordance with your national legislation and the Directives 2002/96/EC
and 2006/66/EC.
By disposing of these products and batteries correctly, you will help to save valuable resources and
prevent any potential negative effects on human health and the environment which could otherwise arise
from inappropriate waste handling.
For more information about collection and recycling of old products and batteries, please contact your
local municipality, your waste disposal service or the point of sale where you purchased the items.
Penalties may be applicable for incorrect disposal of this waste, in accordance with national legislation.
For business users in the European Union
If you wish to discard electrical and electronic equipment, please contact your dealer or supplier for
further information.
[Information on Disposal in other Countries outside the European Union]
These symbols are only valid in the European Union. If you wish to discard these items, please contact
your local authorities or dealer and ask for the correct method of disposal.
Note for the battery symbol (bottom two symbol examples):
This symbol might be used in combination with a chemical symbol. In this case it complies with the
requirement set by the Directive for the chemical involved.
Pb
For Z, XZ, MZ indoor unit
This air conditioner incorporates a biocidal product.
EnglishTroubleshooting / Information
Ionized air generated by a device incorporated in the air conditioner deactivates bacteria and viruses in the air, and
on surfaces, and inhibits mould growth on surfaces.
Active substances: hydroxyl radicals generated from ambient air
17

Pour unité intérieure Z, XZ, MZ
Fournir un confort maximal, nettoyer l’air
et optimiser les économies d’énergie
ECONAVI + INVERTER La technologie d’économie d’énergie parfaite
ECONAVI détecte toute perte normale d’énergie et ajuste la puissance de refroidissement/chauffage en
fonction des conditions et des niveaux d’activité de la pièce. Ensuite, l’INVERTER tire profi t des données
du capteur ECONAVI et module la vitesse de rotation du compresseur. Cela aide à optimiser la fonction
du refroidissement/chauffage et réduit le gaspillage de refroidissement/chauffage.
Voir « Pour en savoir plus… » pour les détails.
nanoe Pour garantir la fraîcheur et un environnement plus propre
nanoe génère des ions négatifs à l’aide de l’air présent dans la pièce pour produire un air sain.
Il produit également un effet hydratant sur la peau ou les cheveux, réduit la présence d’odeur dans la
pièce et limite la propagation de la moisissure et des bactéries.
Table des matières
Consignes de sécurité ......................................................................................................................... 22-23
Consignes d’utilisation
Pour en savoir plus...
Consignes d’utilisation
Instructions de nettoyage
Instructions de nettoyage
Dépannage .............................................................................................................................................. 32
Informations .............................................................................................................................................. 33
Pour unité intérieure Z, XZ, MZ
Pour unité intérieure Z, XZ, MZ
Pour unité intérieure TZ, MTZ
Pour unité intérieure Z, XZ, MZ
Pour unité intérieure TZ, MTZ
................................................................... 24-25
..................................................................... 26-27
..................................................................... 28-29
.................................................................... 30
...................................................................... 31
18
Système de climatisation multiple
Les systèmes de climatisation multiple permettent une économie
d’espace en reliant plusieurs unités intérieures à une seule unité
extérieure.
•
Pour connaître les caractéristiques complètes des produits, veuillez
vous référer à un catalogue.
Unités intérieures
Il est possible de faire fonctionner les unités intérieures
•
individuellement ou simultanément. Le mode de fonctionnement
prioritaire est affecté à la première unité mise en route.
•
Pendant le fonctionnement, les modes CHAUFFAGE et
REFROIDISSEMENT ne peuvent pas être activés simultanément sur
différentes unités intérieures.
•
Le voyant d’alimentation clignote pour indiquer que l’unité intérieure
attend un mode de fonctionnement différent.
•
Sur les systèmes dont le mode HEAT (CHAUFFAGE) a été verrouillé,
si un mode de fonctionnement autre que le mode HEAT (CHAUFFAGE)
est sélectionné, l’unité intérieure s’arrête et le voyant d’alimentation
POWER clignote.
Unités intérieures
Accessoires
•
Télécommande
•
Piles AAA ou R03 × 2
•
Support de la télécommande
•
Vis pour le support de la
télécommande × 2
Français
Unité extérieure Multisplit
Conditions d’utilisation
Utilisez ce climatiseur en respectant la plage de températures suivante
DBT : Température sèche / WBT : Température humide
Unité extérieure Multisplit
CU-3E18PBE, CU-4E23PBE,
Température (°C)
REFROIDISSEMENT
CHAUFFAGE
Unité intérieure
DBT WBT DBT WBT
Max. 32 23 46 26
Min. 16 11 -10 Max. 30 - 24 18
Min. 16 - -15 -16
CU-4E27PBE, CU-5E34PBE,
CU-2E12SBE, CU-2E15SBE,
CU-2E18SBE, CU-3E23SBE
CU-2RE15SBE
CU-2RE18SBE
CU-3RE18SBE
DBT WBT
43 26
16 11
24 18
-10 -11
19

Guide Rapide
ON
O
TIMER
CANCEL
ON
O
TIMER
CANCEL
F
D
S
P
MILD DRY
A
G
S
Pour unité intérieure Z, XZ, MZ
1
3
2 3
TIMER
ON
OFF
FF
SET
CANCEL
1
Insertion des piles
2
1
Retirez le couvercle arrière de la télécommande
Placez des piles AAA ou R03 (valables environ 1 an)
2
3
Fermez le couvercle
Réglage de l’horloge
1
Appuyez sur CLOCK
2
Réglez l’heure
3
Confi rmez
Fonctionnement de base
Sélectionnez le mode de fonctionnement souhaité
1
AUTO HEAT
DRY
Mettez l’appareil sous/hors tension
2
2
3
1
MODE
SLEEP
LEE
TIMER
OFF/ON
MILD DRY
TEMP
AIR SWING
IR SWIN
FAN SPEED
AN SPEE
ON
OFF
FF
SET
CANCEL
ET
3
POWER
• Veuillez noter que l’indication se trouve sur l’affi cheur pour
démarrer l’unité.
Sélectionnez la température souhaitée
• Plage de sélection : 16 °C ~ 30 °C.
• Le fait de faire fonctionner l’appareil dans la plage de température
recommandée peut économiser l’énergie.
CHAUFFAGE : 20 °C ~ 24 °C.
REFROIDISSEMENT : 26 °C ~ 28 °C.
DÉSHUMIDIFICATION : Inférieure de 1 °C à 2 °C par rapport à la
• Pour atténuer ou restaurer la luminosité du voyant de l’unité, maintenez
la touche enfoncée pendant 5 secondes.
• Utilisez la télécommande dans les 8 m du récepteur de la télécommande
de l’unité intérieure.
8m
COOL
température de la pièce.
Les illustrations de ce mode d’emploi sont fournies à titre d’exemple uniquement et peuvent présenter
des différences par rapport à l’appareil proprement dit. Celui-ci peut être modifi é sans préavis à des
fi ns d’amélioration.
20
Guide rapide
ON
O
TIMER
CANCEL
ON
O
S
TIMER
CANCEL
A
G
S
P
F
D
ON
O
S
TIMER
CANCEL
G
S
P
F
D
Pour unité intérieure TZ, MTZ
1
3
TIMER
1
MODE
SLEEP
LEE
TIMER
CS-TZ9SKEW
CS-TZ12SKEW
CS-TZ15SKEW
CS-TZ18SKEW
CS-MTZ5SKE
CS-MTZ7SKE
ON
OFF
ON
OFF
FF
FF
2 3
CANCEL
OFF/ON
OFF/ON
AIR SWING
TEMP
CANCEL
2
SET
FAN SPEED
AN SPEE
IR SWIN
SET
ET
Insertion des piles
1
Retirez le couvercle arrière de la télécommande.
Placez des piles AAA ou R03
2
3
Fermez le couvercle
(valables environ 1 an)
Réglage de l’horloge
1
Appuyez sur CLOCK
2
Réglez l’heure
3
Confi rmez
Fonctionnement de base
1
Sélectionnez le mode de
fonctionnement souhaité
AUTO HEAT
DRY
Mettez l’appareil sous/hors tension
2
•
Veuillez noter que l’indication se
trouve sur l’affi cheur pour démarrer
l’unité.
3
Sélectionnez la température
souhaitée
Plage de sélection : 16°C ~ 30°C.
•
•
Le fait de faire fonctionner l’appareil dans
la plage de température recommandée
peut économiser l’énergie.
CHAUFFAGE : 20°C ~ 24°C.
REFROIDISSEMENT : 26°C ~ 28°C.
DÉSHUMIDIFICATION :
Inférieure de 1°C à 2°C par rapport à la
température de la pièce.
•
Pour atténuer ou restaurer la luminosité du
voyant de l’unité, maintenez la touche
enfoncée pendant 5 secondes.
•
Utilisez la télécommande dans les 8 m du
récepteur de la télécommande de l’unité
intérieure.
2
1
3
OFF/ON
OFF/ON
MODE
TEMP
SLEEP
LEE
ON
TIMER
OFF
FF
CS-TZ24SKEW
8m
FAN SPEED
AN SPEE
AIR SWING
AIR SWIN
SET
ET
CANCEL
Français
COOL
Les illustrations de ce mode d’emploi sont fournies à titre d’exemple uniquement et peuvent présenter
des différences par rapport à l’appareil proprement dit. Celui-ci peut être modifi é sans préavis à des fi ns
d’amélioration.
21

Consignes de sécurité
Entrée d’air
Entrée d’air
Sortie d’air
Sortie d’air
Pour éviter des blessures corporelles sur vousmême et sur les autres ou des dégâts matériels,
respectez les instructions ci-dessous :
Tout dysfonctionnement dû au non-respect des
instructions peut occasionner des nuisances ou
des dégâts dont la gravité est classée comme
décrit ci-après :
Ces appareils ne sont pas conçus pour être
accessibles du grand public.
Ce symbole signale la
présence d’un danger
AVERTISSEMENT
ATTENTION
Les instructions à respecter sont classées
d’après les symboles suivants :
Ce symbole désigne une
action INTERDITE.
Ces symboles désignent des
actions OBLIGATOIRES.
Unité intérieure
Sortie d’air
Télécommande
Unité extérieure
Entrée d’air
pouvant provoquer
des blessures graves
ou mortelles.
Ce symbole signale
la présence d’un
danger pouvant
provoquer des
blessures corporelles
ou des dégâts
matériels.
Alimentation
Entrée d’air
Sortie d’air
Alimentation
AVERTISSEMENT
Unité intérieure et unité extérieure
Cet appareil peut être utilisé par des enfants
âgés de 8 ans et plus et par des personnes
ayant des capacités physiques, sensorielles ou
mentales réduites, ou dénuées d’expérience et
de connaissances si elles ont été formées et
encadrées pour l’utilisation de cet appareil en
toute sécurité et comprennent bien les dangers
auxquels ils s’exposent. Les enfants ne doivent
pas jouer avec l’appareil. Le nettoyage et
l’entretien par l’utilisateur ne doivent pas être
effectués par des enfants sans surveillance.
Veuillez consulter un revendeur agréé ou un
spécialiste pour le nettoyage des pièces internes
et pour la réparation, l’installation, le retrait et la
réinstallation de l’unité. Une installation et une
manipulation incorrectes pourraient occasionner
des fuites, un choc électrique ou un incendie.
Validez auprès du revendeur agréé ou du
spécialiste l’usage de tout type de réfrigérant
spécifi é.
L’utilisation d’un type de réfrigérant autre que
le type spécifi é peut endommager le produit ou
provoquer des explosions, des brûlures, etc.
N’installez pas l’appareil dans une atmosphère
potentiellement explosive ou infl ammable. Sinon,
il y a un risque d’incendie.
N’insérez jamais vos doigts ou des objets
dans l’unité intérieure ou extérieure
du climatiseur, les parties tournantes
peuvent causer des blessures.
Ne touchez pas l’unité extérieure au cours d’un
orage, cela pourrait provoquer un choc électrique.
Ne vous exposez pas directement à de l’air froid
pendant une période prolongée afi n d’éviter un
refroidissement excessif.
Ne vous asseyez pas et ne montez
pas sur l’unité, vous risquez de tomber
accidentellement.
Télécommande
Maintenez la télécommande hors de portée des
bébés et des enfants pour éviter qu’ils n’avalent
accidentellement les piles.
N’utilisez pas de cordon modifi é,
de raccords, de rallonge ou de
cordon non spécifi é afi n d’éviter
une surchauffe et un incendie.
22

Pour éviter une surchauffe, un incendie ou un choc
électrique :
•
Ne partagez pas la prise d’alimentation avec un
autre appareil.
•
N’utilisez pas l’unité avec des mains mouillées.
•
Ne pas plier excessivement la fi che électrique.
•
Ne pas opérer ou arrêter l’unité en insérant ou en
tirant sur la fi che électrique.
Si le cordon d’alimentation est endommagé, il doit
être remplacé par le fabriquant, par un de ses
techniciens ou par une personne qui possède des
qualifi cations équivalentes afi n d’éviter tout risque.
Il est fortement conseillé d’installer un disjoncteurdétecteur de fuite à la terre (DDFT) ou un dispositif
à courant résiduel (DCR) afi n d’éviter un choc
électrique ou un incendie.
Pour éviter une surchauffe, un incendie ou un choc
électrique :
•
Insérez la fi che d’alimentation correctement.
•
Il faut régulièrement essuyer la poussière sur la
fi che d’alimentation à l’aide d’un chiffon sec.
Cesser d’utiliser le produit lorsqu’une anomalie ou
défaillance quelconque se produit et débrancher
la fi che d’alimentation ou mettre hors tension
l’interrupteur et le disjoncteur.
(Risque de fumée / feu / choc électrique) Exemples
d’anomalie ou défaillance
•
L’ELCB se déclenche fréquemment.
•
Odeur de brûlé est observée.
•
Un bruit ou des vibrations anormales de l’unité
sont observés.
•
Fuite d’eau de l’unité intérieure.
•
Le cordon d’alimentation ou la prise deviennent
anormalement chaud.
•
La vitesse du ventilateur ne peut pas être
contrôlée.
•
L’unité s’arrête de fonctionner immédiatement
même si elle est activée pour opérer.
•
Le ventilateur ne s’arrête pas même si l’opération
est arrêtée.
Contacter immédiatement votre revendeur local
pour l'entretien / réparation.
Cet équipement doit être raccordé à la terre afi n
d’éviter un choc électrique ou un incendie.
Prévenez les chocs électriques en coupant
l’alimentation et en débranchant l’unité :
- Avant le nettoyage ou l’entretien.
- En cas de non utilisation prolongée, ou
- En période d’activité orageuse anormalement
forte.
ATTENTION
Unité intérieure et unité extérieure
Afi n d’éviter des dommages ou de la corrosion sur
l’unité, ne nettoyez pas l’unité intérieure avec de
l’eau, du benzène, du solvant ou de la poudre à
récurer.
N’utilisez pas l’unité pour conserver des appareils
de précision, des aliments, des plantes, des œuvres
d’art ou autres objets. Cela pourrait entraîner une
détérioration de la qualité, etc..
N’utiliser pas d’appareil à combustibles dans la
direction du fl ux d’air afi n d’éviter toute propagation
du feu.
N’exposez pas des plantes ou des animaux de
compagnie directement au fl ux d’air pour éviter des
blessures, etc.
Ne touchez pas l’ailette pointue
d’aluminium, les parties pointues peuvent
causer des dommages.
Ne mettez pas l’unité intérieure sous tension
lorsque vous cirez le sol. Après le cirage, aérez
suffi samment la pièce avant de faire fonctionner
l’unité.
Afi n d’éviter d’endommager l’unité, ne l’installez pas
dans des zones grasses et enfumées.
Afi n d’éviter des blessures, ne démontez pas l’unité
pour la nettoyer.
Afi n d’éviter des blessures, ne marchez pas sur un
banc instable lors du nettoyage de l’unité.
Ne placez pas de vas ou de récipient d’eau sur
l’unité. De l’eau peut pénétrer à l’intérieur de l’unité
et dégrader l’isolation. Cela pourrait entraîner un
choc électrique.
Ne pas ouvrir la fenêtre ou la porte pendant
longtemps au cours du fonctionnement en mode
REFROIDISSEMENT/DÉSHUMIDIFICATION.
Prévenez les fuites d’eau en vous assurant que le
tuyau de vidange est :
- Correctement raccordé,
- Dégagé de toute gouttière et récipient, ou
- Non immergé dans l’eau
Après une longue période d’utilisation ou après une
utilisation avec un appareil à combustibles, aérez
régulièrement la pièce.
Après une longue période d’utilisation, assurezvous que le support d’installation n’est pas détérioré
afi n d’éviter une chute de l’unité.
Télécommande
N’utilisez pas de piles rechargeables (Ni-Cd). Cela
pourrait endommager la télécommande.
Pour éviter tout dysfonctionnement ou dommages à
la télécommande :
•
Retirez les piles si vous envisagez de ne pas
utiliser l’appareil pendant une période prolongée.
•
De nouvelles piles du même type doivent être
insérées en respectant la polarité indiquée.
Alimentation
Ne débranchez pas la fi che en tirant sur le cordon
d’éviter un choc électrique.
Français
Consignes de sécurité
23
Consignes d’utilisation
ON
O
TIMER
CANCEL
TEMP
O
ON
S
Pour unité intérieure Z, XZ, MZ
Multiple
Système Multisplit
Pour optimiser les économies
d’énergie
ECONAVI
Pour sélectionner un mode de
MODE
fonctionnement
Mode AUTO - Selon vos préférences
Lors de la sélection du mode de fonctionnement,
•
le voyant d’alimentation clignotera dans un premier
temps.
• L’unité choisit le mode d’opération toutes les
Multiple
3 heures selon le réglage de la température,
la température extérieure et la température
ambiante.
Mode de CHAUFFAGE - Pour un air chaud
L’appareil met un certain temps à démarrer. Le
•
voyant d’alimentation clignotera dans un premier
temps au cours de cette opération.
Mode de REFROIDISSEMENT - Pour un air frais
•
Pour réduire la consommation d’énergie en mode
REFROIDISSEMENT, utilisez des rideaux pour faire
barrage à la lumière du soleil et à la chaleur extérieure.
Mode DÉSHUMIDIFICATION - Pour
déshumidifi er l’atmosphère
L’unité fonctionne en vitesse lente du ventilateur
•
pour fournir un refroidissement en douceur.
Pour un confort optimal
SLEEP
pendant votre sommeil
(Annuler)
•
Ce mode vous crée un environnement confortable
pendant le sommeil. Il ajuste automatiquement la
température à la structure du sommeil pendant la
période d’activation.
•
Le témoin de l’unité intérieure s’atténue lorsque
ce mode est activé. Ceci ne s’applique pas si la
luminosité du témoin a été atténuée.
•
Ce mode est intégré au minuteur d’activation
(0,5, 1, 2, 3, 4, 5, 6, 7, 8 ou 9 heures).
•
Peut être défi ni avec le minuteur simple et double.
Quand il est utilisé conjointement avec le minuteur
d’arrêt, le mode sommeil a la priorité.
•
Peut être annulé en appuyant sur la touche
respective jusqu’à atteindre 0.0h.
Pour passer de puissant à
silencieux
(Affi chage de la télécommande)
POWERFUL
QUIET
(NORMAL)
PUISSANT : Pour atteindre rapidement la
température souhaitée
•
Cette opération s’arrête automatiquement au bout
de 20 minutes.
SILENCE : Pour Un Fonctionnement
Silencieux
Cette opération réduit le bruit du fl ux d’air.
•
24
Capteur
de lumière
du soleil et
récepteur de la
télécommande
Capteur d’activité
humaine
Affi chage de la
télécommande
Indicator
POWER
TIMER
ECONAVI
nanoe
(Blanc)
(Blanc)
(Blanc)
(Blanc)
Maintenez la touche
enfoncée pendant
environ 10 secondes
pour que le réglage de la
température passe en °C
ou en °F.
Maintenez la touché
enfoncée pendant environ
5 secondes pour passer
du mode d’affi chage de
l’heure 12 h (am/pm) ou
au mode 24 heures et
inversement.
Appuyez pour revenir
MODE
SLEEP
ON
TIMER
OFF
OFF/ON
FF/
MILD DRY
TEMP
AIR SWING
FAN SPEED
SET
ET
FF
CANCEL
aux réglages par défaut
de la télécommande.
Non utilisé dans les
opérations normales.
FAN SPEED
Pour sélectionner la vitesse du
ventilateur
(Affi chage de la télécommande)
•
Pour AUTO, la vitesse du ventilateur intérieur est
automatiquement ajustée en fonction du mode de
fonctionnement.
CANCEL
Voir « Pour en savoir plus… » pour les détails.
Pour profi ter de la fraîcheur et
d’un environnement plus propre
nanoe
•
Cette opération hydrate votre peau et vos cheveux,
réduit l’odeur et l’inactivation des particules allergiques
comme le pollen dans la pièce.
Pour améliorer le niveau d’humidité
MILD DRY
et de teneur en eau
Multiple
•
Fonction non applicable.
Pour ajuster l’orientation du fl ux
AIR SWING
d’air
(Affi chage de la télécommande)
•
Permet de ventiler la pièce.
•
En mode REFROIDISSEMENT/DÉSHUMIDIFICATION,
si AUTO est défi ni, le volet oscille automatiquement
vers la gauche et la droite et vers le haut et le bas.
•
En mode CHAUFFAGE, si AUTO est réglé, l’évent
horizontal est défi ni sur une position prédéterminée.
Le volet vertical bascule vers la gauche/droite après
l’augmentation de la température.
•
Ne réglez pas le volet manuellement.
Touche Auto OFF/ON (MARCHE/
ARRÊT Automatique)
Utilisée lorsque la télécommande est perdue ou en panne.
Soulevez le panneau avant :
1. Appuyez une fois sur la touche
pour utiliser en mode AUTO.
2. Maintenez la touche enfoncée
AUTO
OFF/ON
jusqu’au retentissement d’un
bip, puis relâchez pour utiliser en
mode REFROIDISSEMENT forcé.
3. Répétez l’étape 2. Maintenez
la touche enfoncée jusqu’au
retentissement de 2 bips, puis
relâchez pour utiliser en mode
CHAUFFAGE forcé.
•
Appuyez à nouveau sur la touche
pour mettre l’appareil hors tension.
Commande de redémarrage automatique
•
Si l’alimentation électrique est rétablie après une panne
de courant, l’appareil redémarrera automatiquement
après une certaine période de temps avec le mode de
fonctionnement et l’orientation du fl ux d’air précédents.
•
Cette commande n’est pas applicable lorsque la
minuterie (TIMER) est réglée.
Pour régler l’heure
2 jeux de minuteurs de MARCHE et ARRÊT sont
disponibles pour allumer et éteindre l’unité à différentes
heures préréglées.
21 3
ON
TIMER
OFF
Sélectionnez le mode
1
marche (ON) ou arrêt
SET
CANCEL
Exemple :
ARRÊT à 22:00
de la minuterie (OFF)
À chaque pression :
•
Réglez l’heure
2
Confi rmez
3
Cancel
OFF
SET
TIMER
•
Pour annuler le minuteur de MARCHE ou ARRÊT,
appuyez sur ON ou
puis appuyez sur
•
Si le minuteur est annulé manuellement ou à cause
d’une panne d’électricité, vous pouvez restaurer
le minuteur en appuyant sur ON ou
sélectionner ou , puis appuyer sur
•
Le réglage de la minuterie le plus proche s’affi chera et
OFF
pour sélectionner ou ,
CANCEL
.
OFF
pour
SET
.
sera activé en séquence.
•
Lorsque le mode minuterie est activé, il se peut que
l’appareil démarre avant l’heure réelle défi nie de façon
à atteindre la température que vous avez choisie
(environ 35 minutes avant).
•
L’opération de minuterie se base sur le réglage
de l’horloge de la télécommande et se répète
quotidiennement une fois défi nie. Pour régler l’horloge,
veuillez consulter le Guide rapide.
Remarque
, , ,
•
Peut être activé dans tous les modes et annulé en
appuyant à nouveau sur la touche respective.
,
•
Ne peut pas être sélectionné en même temps.
SLEEP
Français
Consignes d’utilisation
25

Pour en savoir
plus...
Pour unité intérieure Z, XZ, MZ
Multiple
Système Multisplit
ECONAVI
Remarque
L’unité commencera à s’initialiser
(pendant environ 1 minute)
Le capteur d’activité humaine et
le capteur de lumière du soleil
commenceront à détecter.
AIR SWING
Fonctionnement du capteur d’activité humaine
ECONAVI ; En détectant la présence et l’activité humaine, l’unité contrôle la température de la pièce pour économiser l’énergie.
Mode
REFROIDISSEMENT/
DÉSHUMIDIFICATION
CHAUFFAGE
ECONAVI
Contrôle précis de la température en cas de faible activité pour maximiser les économies d’énergie.
Mode
REFROIDISSEMENT/
DÉSHUMIDIFICATION
Humain
Température
définie
Humain
Température
définie
Faible activité Activité normale Activité élevée Absent
+1 °C
Faible activité
Les fonctions ECONAVI tirent parti de la nature humaine,
qui prend le temps de sentir la température augmenter
pendant une activité de faible niveau ; l’unité ajuste ainsi la
température de manière à maximiser les économies
d’énergie sans sacrifier le confort.
Lorsque la fonction d’oscillation
d’air (AIR SWING) manuelle est
sélectionnée, les opérations ECONAVI
sont annulées.
+2 °C
-2 °C-2 °C
26
Fonctionnement du capteur de lumière du soleil
ECONAVI
;
En détectant l’intensité de la lumière du soleil, l’unité ajuste la température
pour économiser l’énergie.
Mode
REFROIDISSEMENT/
DÉSHUMIDIFICATION
CHAUFFAGE
•
Dans une pièce sans fenêtre ou équipée d’épais rideaux, le capteur de lumière du soleil considérera que le temps est
nuageux/nuit.
Le capteur d’activité humaine effectue un balayage pour repérer la zone de source de chaleur et de mouvement dans une
pièce.
•
En fonction du degré d’activité dans la zone, l’unité ajuste l’évent de
direction du fl ux d’air horizontal soit fi xe à une position prédéterminée,
soit basculé vers la gauche/droite.
•
La sensibilité du capteur d’activité humaine est infl uencée par l’emplacement de l’unité
intérieure, la vitesse du mouvement, la plage de température, etc.
•
Le capteur d’activité humaine peut :
- détecter par erreur un sujet dont la source de chaleur et le mouvement sont similaires à
ceux d’un être humain, tels qu’animaux domestiques, etc.
- échouer à détecter une source de chaleur et un mouvement si une personne reste immobile
pendant un certain temps.
•
Ne posez pas d’objets volumineux à proximité du capteur et éloignez les unités de chauffage
ou les humidifi cateurs de la zone de détection du capteur. Ils pourraient provoquer un
dysfonctionnement du capteur.
Condition ambiante
+1 °C
Température
définie
-1 °C -1 °C
Zone de détection
La fonction ECONAVI est
activée, l’unité maintient la
température défi nie jusqu’à ce
que l’intensité de la lumière du
soleil soit détectée. Le capteur
de lumière du soleil détecte
l’intensité de la lumière du
soleil lors des changements
du passage jour/nuit et l’unité
ajuste la température.
120º
7m
Français
Pour en savoir plus...
27
Consignes d’utilisation
ON
O
S
TIMER
CANCEL
TEMP
O
ON
ON
O
S
TIMER
CANCEL
TEMP
O
ON
Pour unité intérieure TZ, MTZ
Pour Passer De Puissant À
Silencieux
(Affi chage de la télécommande)
POWERFUL
PUISSANT: Pour Atteindre Rapidement La
Température Souhaitée
Cette opération s’arrête automatiquement au bout
•
de 20 minutes.
SILENCE : Pour Un Fonctionnement Silencieux
•
Cette opération réduit le bruit du fl ux d’air.
MODE
Mode AUTO - Selon vos préférences
Lors de la sélection du mode de fonctionnement, le
•
voyant d’alimentation clignotera dans un premier temps.
Multiple
Mode de CHAUFFAGE - Pour un air chaud
L’appareil met un certain temps à démarrer. Le voyant
•
d’alimentation clignotera dans un premier temps au
cours de cette opération.
Mode de REFROIDISSEMENT - Pour un air frais
•
Pour réduire la consommation d’énergie en mode
REFROIDISSEMENT, utilisez des rideaux pour faire
barrage à la lumière du soleil et à la chaleur extérieure.
Mode DÉSHUMIDIFICATION - Pour
déshumidifi er l’atmosphère
L’unité fonctionne en vitesse lente du ventilateur
•
pour fournir un refroidissement en douceur.
SLEEP
QUIET
(NORMAL)
Pour sélectionner un mode de
fonctionnement
•
L’unité choisit le mode d’opération toutes les 3
heures selon le réglage de la température, la
température extérieure et la température ambiante.
Pour un confort optimal
pendant votre sommeil
Maintenez la
touche enfoncée
pendant environ
10 secondes pour
que le réglage de
la température
passe en °C ou
en °F.
MODE
SLEEP
TIMER
Multiple
Système Multisplit
Récepteur et voyant de
la télécommande
POWER
(Vert)
TIMER
(Orange)
Affi chage de la télécommande
OFF/ON
OFF/ON
MODE
SLEEP
TIMER
FF/
FAN SPEED
AIR SWING
TEMP
ON
FF
OFF
SET
CANCEL
ET
OFF/ON
OFF/ON
FF/
FAN SPEED
AIR SWING
TEMP
ON
OFF
FF
SET
ET
CANCEL
•
Ce mode vous crée un environnement confortable
pendant le sommeil. Il ajuste automatiquement la
température à la structure du sommeil pendant la
période d’activation.
•
Le témoin de l’unité intérieure s’atténue lorsque
ce mode est activé. Ceci ne s’applique pas si la
luminosité du témoin a été atténuée.
•
Ce mode est intégré au minuteur d’activation (0,5, 1,
2, 3, 4, 5, 6, 7, 8 ou 9 heures).
•
Peut être défi ni avec le minuteur simple et double.
Quand il est utilisé conjointement avec le minuteur
d’arrêt, le mode sommeil a la priorité.
•
Peut être annulé en appuyant sur la touche
respective jusqu’à atteindre 0.0h.
Pour ajuster la direction
Touche Auto OFF/ON (MARCHE/ARRÊT Automatique)
du fl ux d’air horizontal
•
Ajustable
manuellement.
( CS-TZ9SKEW,
CS-TZ12SKEW,
CS-TZ15SKEW,
CS-TZ18SKEW,
CS-MTZ5SKE,
(Annuler)
28
CS-MTZ7SKE)
Non utilisé
dans les
opérations
normales.
CS-TZ9SKEW
CS-TZ12SKEW
CS-TZ15SKEW
CS-TZ18SKEW
CS-MTZ5SKE
CS-MTZ7SKE
Utilisée lorsque la télécommande est perdue ou en panne.
Soulevez le panneau avant :
•
Pour une utilisation en mode AUTO, appuyez une fois sur la
touche.
•
Pour une utilisation en mode REFROIDISSEMENT, maintenez la
touche enfoncée jusqu’au retentissement d’1 bip, puis relâchez.
•
Pour une utilisation en mode CHAUFFAGE, maintenez la touche
enfoncée jusqu’au retentissement d’un bip, puis relâchez.
Appuyez à nouveau jusqu’à entendre 2 bips, puis relâchez.
•
Appuyez à nouveau sur la touche pour mettre l’appareil hors
tension.
Appuyez pour revenir aux
réglages par défaut de la
télécommande.
Maintenez la touché
enfoncée pendant environ
5 secondes pour passer
du mode d’affi chage de
l’heure 12 h (am/pm) ou
au mode 24 heures et
inversement.
CS-TZ24SKEW
Pour sélectionner la vitesse du
L
FAN SPEED
ventilateur
(Affi chage de la télécommande)
AUTO
FAN
•
Pour AUTO, la vitesse du ventilateur intérieur est
automatiquement ajustée en fonction du mode de
fonctionnement.
•
Pour donner la priorité à un fonctionnement silencieux,
sélectionnez la vitesse de ventilateur la plus faible ( ).
Pour ajuster l’orientation
AIR SWING
verticale du fl ux d’air
( CS-TZ9SKEW, CS-TZ12SKEW,
CS-TZ15SKEW, CS-TZ18SKEW,
CS-MTZ5SKE, CS-MTZ7SKE)
(Affi chage de la télécommande)
Pour régler l’heure
2 jeux de minuteurs de MARCHE et ARRÊT sont
disponibles pour allumer et éteindre l’unité à
différentes heures préréglées.
21 3
ON
TIMER
OFF
Sélectionnez le mode
1
marche (ON) ou arrêt
de la minuterie (OFF)
À chaque pression :
•
Réglez l’heure
2
SET
CANCELCANCE
Exemple :
ARRÊT à 22h00
OFF
Cancel
•
Permet de ventiler la pièce.
•
En mode FROID/DÉSHUMIDIFICATION, si AUTO est
défi ni, le volet oscille automatiquement vers le haut et
vers le bas.
•
Ne réglez pas le volet manuellement.
Pour Ajuster L’orientation Du
AIR SWING
Flux D’air
(CS-TZ24SKEW)
(Affi chage de la télécommande)
•
Permet de ventiler la pièce.
•
En mode FROID/DÉSHUMIDIFICATION, si AUTO est
défi ni, les volets oscillent automatiquement vers la
gauche et la droite et vers le haut et le bas.
•
En mode CHAUD, si AUTO est réglé, le volet
horizontal est défi ni sur une position prédéterminée.
Le volet vertical bascule vers la gauche/droite après
l’augmentation de la température.
•
En mode manuel, les volets horizontal et vertical sont
fi xés dans la position prédéterminée.
•
Ne réglez pas le volet manuellement.
Commande de redémarrage automatique
• Si l’alimentation électrique est rétablie après
une panne de courant, l’appareil redémarrera
automatiquement après une certaine période
de temps avec le mode de fonctionnement et
l’orientation du fl ux d’air précédents.
• Cette commande n’est pas applicable lorsque
la minuterie (TIMER) est réglée.
Confi rmez
3
•
Pour annuler le minuteur de MARCHE ou ARRÊT,
appuyez sur ON ou
puis appuyez sur
•
Si le minuteur est annulé manuellement ou à cause
CANCEL
OFF
.
SET
pour sélectionner ou ,
d’une panne d’électricité, vous pouvez restaurer
le minuteur en appuyant sur ON ou
sélectionner ou , puis appuyer sur
•
Le réglage de la minuterie le plus proche s’affi chera et
OFF
pour
SET
.
sera activé en séquence.
•
Lorsque le mode minuterie est activé, il se peut que
l’appareil démarre avant l’heure réelle défi nie de façon
à atteindre la température que vous avez choisie
(environ 35 minutes avant).
•
L’opération de minuterie se base sur le réglage
de l’horloge de la télécommande et se répète
quotidiennement une fois défi nie. Pour régler l’horloge,
veuillez consulter le Guide rapide.
Remarque
SLEEP
,
•
Peut être activé dans tous les modes et annulé
en appuyant à nouveau sur la touche respective.
FrançaisConsignes d’utilisation
29
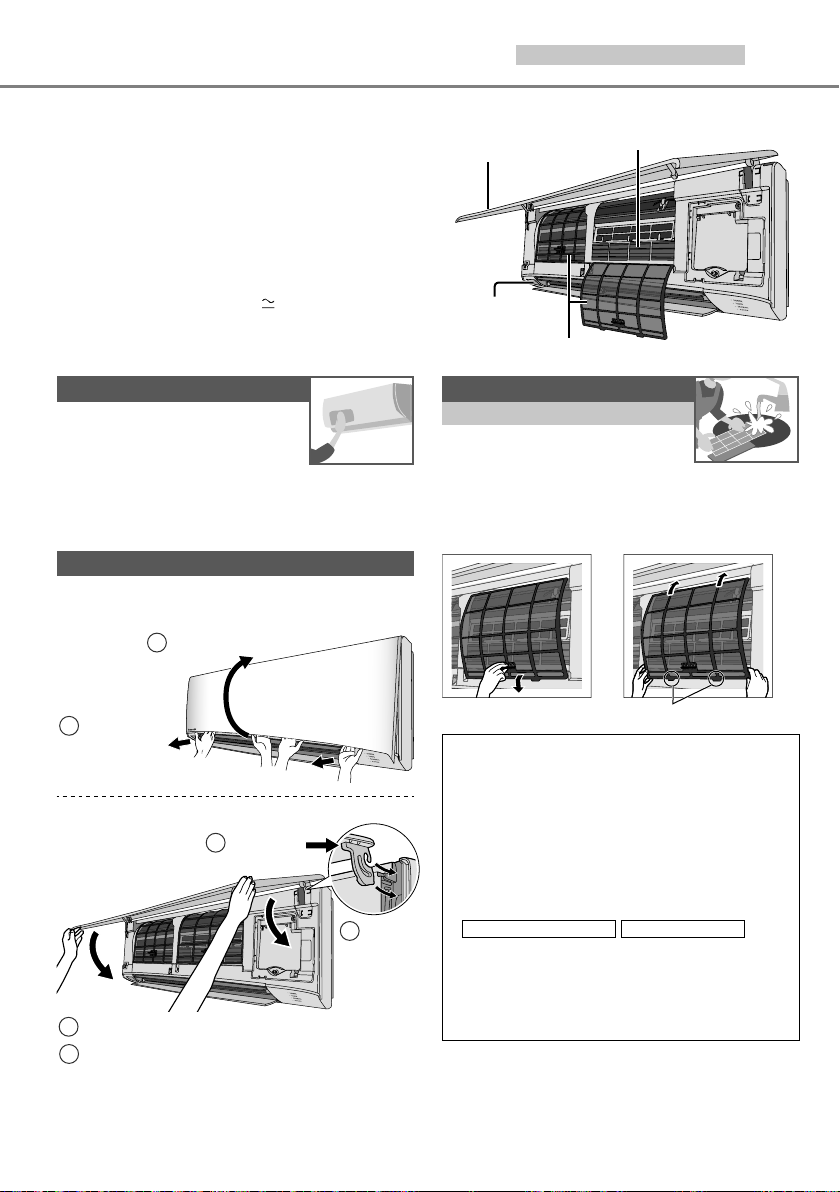
Instructions de nettoyage
Pour unité intérieure Z, XZ, MZ
Pour garantir une performance optimale de l’unité,
un nettoyage doit être effectué à intervalles
réguliers. Une unité encrassée peut provoquer des
dysfonctionnements et produire le code d’erreur
« H99 ». Veuillez consulter un revendeur agréé.
•
Coupez l’alimentation et débranchez l’appareil avant
le nettoyage.
•
Ne touchez pas l’ailette en aluminium, la partie
tranchante peut provoquer des blessures.
•
N’utilisez pas de benzène, de solvant ou de poudre à
récurer.
•
Utilisez uniquement du savon ( pH 7) ou un
détergent ménager neutre.
•
N’utilisez pas de l’eau dont la température est
supérieure à 40 °C.
Unité intérieure
Frottez délicatement l’appareil avec
un chiffon doux et sec.
Capteur d’activité humaine
Ne faites pas subir de chocs, de pression
violente ou de coups par objet tranchant. Cela
pourrait occasionner des dommages et un
dysfonctionnement.
Panneau avant
Lavez avec soin et séchez.
Retirez le panneau avant
Tirez et soulevez.
2
Unité intérieure
Panneau avant
Capteur
d’activité
humaine
Ailette En Aluminium
Filtre à air
Filtre à air
Une fois toutes les 2 semaines
•
Lavez/rincez les fi ltres avec précaution
avec de l’eau afi n d’éviter d’endommager
leur surface.
•
Séchez complètement les fi ltres à l’ombre, à distance du feu
ou de la lumière directe du soleil.
•
Si le fi ltre est endommagé, remplacez-le immédiatement.
Retirez le fi ltre à air Fixez le fi ltre à air
Libérez les
1
crochets
aux deux
extrémités.
Refermez bien
2
Poussez.
3
Fermer.
4
Appuyez sur les deux extrémités et au centre
du panneau avant.
30
Insérez
1
des
deux
côtés.
Insérez dans l’unité
Inspection annuelle après une période prolongée
d’inutilisation
•
Vérifi ez que les piles de la télécommande sont en bon
état.
•
Assurez-vous de l’absence d’obstruction des orifi ces
d’entrée et de sortie d’air.
•
Utilisez le bouton de MARCHE/ARRÊT automatique
pour sélectionner le mode REFROIDISSEMENT/
CHAUFFAGE. Après 15 minutes d’opération, il est
normal d’avoir la différence suivante de température
entre la prise d’air et la sortie de bouches d’aération :
REFROIDISSEMENT : ≥8 °C
Préparation en cas d’Inutilisation prolongée
•
Activez le mode CHAUFFAGE pendant 2 à 3 heures pour
éliminer en profondeur l’humidité restée dans les pièces
internes afi n d’éviter la formation de moisissures.
•
Couper l’alimentation et débrancher.
•
Retirez les piles de la télécommande.
CHAUFFAGE : ≥14 °C
 Loading...