

Panasonic CS-MKS12NB4U, CS-MKS9NB4U Operating Manual

Operating InstructionsAPPENDIX A
CS-MKS9NB4U & CZ-18BT1U
CS-MKS12NB4U & CZ-18BT1U
(852-6-4181-216-00-1)
A-1

Operating Instructions
Split System Air Conditioner
Model No.
Indoor Units
Outdoor Units
CS-MKS9NB4U
CS-MKS12NB4U
CU-3KS19NBU
CU-4KS24NBU
CU-4KS31NBU
Ceiling Panel
CZ-18BT1U
This air conditioner uses the refrigerant R410A.
Before operating the unit, read these operating instructions thoroughly and keep them for future reference.
Panasonic Corporation
1006 Kadoma, Kadoma City, Osaka, Japan
85264181216001
CV6233187624
FEATURES
CAUTION
This air conditioner is an inverter type unit that automatically adjusts capability as appropriate. Details on these functions are provided below;
refer to these descriptions when using the air conditioner.
• Microprocessor Controlled Operation
The interior compartment of the remote controller contains
several features to facilitate automatic operation, easy
logically displayed for easy use.
• Simple One-touch Remote Controller
The remote controller has several features to facilitate
automatic operation.
• 24-Hour ON or OFF Timer
This timer can be set to automatically turn the unit on or off
at any time within a 24 hour period.
• 1-Hour OFF Timer
This timer can be set to automatically turn off the unit at
any time after one hour.
• Night Setback
This function saves energy by controlling operation to
provide a quieter operating sound than normal.
• Automatic and 3-step Fan Speed
Auto/High/Medium/Low
• Air Sweep Control
This function moves a flap up and down in the air outlet,
directing air in a sweeping motion around the room and
providing comfort in every corner.
• Auto. Flap Control
This automatically sets the flap to the optimum position
during cooling and drying operation.
• Automatic Restart Function for Power Failure
Even when power failure occurs, preset programmed
operation can be reactivated once power resumes.
• High Power Operation
The unit operates at maximum output for 30 minutes,
regardless of the desired temperature.
The fan speed is 1 step above “High”.
CONTENTS
Page
FEATURES................................................................................. 2
PRODUCT INFORMATION........................................................ 2
SAFETY PRECAUTIONS........................................................... 2
INSTALLATION LOCATION........................................................ 3
ELECTRICAL REQUIREMENTS ............................................... 3
SAFETY INSTRUCTIONS.......................................................... 3
NAMES OF PARTS .................................................................... 4
USING THE REMOTE CONTROLLER...................................... 8
OPERATION WITH THE REMOTE CONTROLLER................... 9
1. Operation .................................................................... 9
2. Adjusting the Fan Speed............................................. 9
3. Fan Only...................................................................... 9
4. Night Setback Mode.................................................. 10
5. HIGH POWER Mode................................................. 10
SPECIAL REMARKS.....................................................10
SETTING THE TIMER...................................................10
USING THE 1-HOUR OFF TIMER................................12
TIPS FOR ENERGY SAVING........................................12
ADJUSTING THE AIRFLOW DIRECTION ....................12
OPERATION WITHOUT THE REMOTE CONTROLLER ... 13
CARE AND CLEANING.................................................13
TROUBLESHOOTING (BEFORE CALLING FOR SERVICE) ...15
OPERATING RANGE ....................................................15
WIRED REMOTE CONTROLLER .................................15
SPECIFICATIONS .........................................................16
Page
PRODUCT INFORMATION
If you have problems or questions concerning your Air
Conditioner, you will need the following information. Model
and serial numbers are on the nameplate on the bottom of
the cabinet.
Model No. __________________________________
Serial No. ___________________________________
Date of purchase _____________________________
Dealer’s address _____________________________
Phone number _______________________________
2
SAFETY PRECAUTIONS
The following symbols used in this manual, alert you
to potentially dangerous conditions to users, service
personnel or the appliance:
This symbol refers to a hazard or unsafe
practice which can result in severe
personal injury or death.
This symbol refers to a hazard or unsafe
practice which can result in personal
injury or product or property damage.

INSTALLATION LOCATION
NOTE
CAUTION
NOTICE
• We recommend that this air conditioner be installed
properly by qualified installation technicians in
accordance with the Installation Instructions
provided with the unit.
• Before installation, check that the voltage of the electric
supply in your home or office is the same as the voltage
shown on the nameplate.
• Do not install this air conditioner
where there are fumes or flammable
gases, or in an extremely humid space
such as a greenhouse.
• Do not install the air conditioner where
excessively high heat-generating
objects are placed.
Avoid:
To protect the air conditioner from heavy corrosion, avoid installing
the outdoor unit where salty sea water can splash directly onto it or
in sulphurous air near a spa.
ELECTRICAL REQUIREMENTS
1. All wiring must conform to the local electrical codes.
Consult your dealer or a qualified electrician for details.
2. Each unit must be properly grounded with a ground (or
earth) wire or through the supply wiring.
3. Wiring must be done by a qualified electrician.
Pull off the power plug from a receptacle, or switch off the breaker, or
switch off the power disconnecting mean to isolate the air conditioner
from the main power supply when not in use for a long time.
• To prevent possible hazards from insulation failure,
the unit must be grounded.
• Do not clean inside the indoor and outdoor units by users.
Engage authorized dealer or specialist for cleaning.
• In case of malfunction of this appliance, do not repair by
yourself. Contact to the sales dealer or service dealer for a
repair.
• Refrigerant gas leakage may cause fire.
• For safety, be sure to turn the air conditioner off and
also to disconnect the power before cleaning.
• Pull off the power plug from a receptacle, or switch off the
breaker, or switch off the power disconnecting mean to
isolate the air conditioner from the main power supply in
case of emergency.
• Do not turn the air conditioner on and off from the power
mains switch. Use the ON/OFF operation button.
• Do not stick anything into the air outlet of the outdoor unit.
This is dangerous because the fan is rotating at high
speed.
• Do not touch the air inlet or the sharp aluminum fins
of the outdoor unit. You may get injured.
• Keep the fire alarm and the air outlet at least 1.5m away from
the unit.
• Do not let children play with the air conditioner.
• Do not cool or heat the room too much if babies or invalids
are present.
• Do not sit or step on the unit. You may fall down
accidentally.
• Do not stick any object into the FAN CASE.
You may be injured and the unit may be damaged.
SAFETY INSTRUCTIONS
• Read this Instruction Manual carefully before using
this air conditioner. If you still have any difficulties
or problems, consult your dealer for help.
• This air conditioner is designed to give you
comfortable room conditions. Use this only for its
intended purpose as described in this Instruction
Manual.
• Confirm to authorized dealer or specialist on usage of
specified refrigerant type.
Using of refrigerant other than the specified type may cause
product damage, burst and injury etc.
• Never touch the unit with wet hands.
• Never use or store gasoline or other flammable vapor or
liquid near the air conditioner — it is very dangerous.
• Do not use this appliance in a potentially explosive
atmosphere.
• This air conditioner has no ventilator for intaking fresh air
from outdoors. You must open doors or windows frequently
when you use gas or oil heating appliances in the same
room, which consume a lot of oxygen from the air.
Otherwise there is a risk of suffocation in an extreme case.
• Do not swallow the battery.
• After removing the battery from remote controller, keep it
away from the reach of children. The battery can cause
death by suffocation if swallowed.
• When inserting the battery, make sure the polarities
(+ and -) are correct.
• This device complies with part 15 of the FCC Rules.
Operation is subject to the following two conditions:
(1) This device may not cause harmful interference, and (2) this
device must accept any interference received, including
interference that may cause undesired operation.
• This equipment has been tested and found to comply with
the limits for a Class B digital device, pursuant to part 15 of
the FCC Rules.
These limits are designed to provide reasonable protection
against harmful interference in a residential installation. This
equipment generates, uses and can radiate radio frequency
energy and, if not installed and used in accordance with the
instructions, may cause harmful interference to radio
communications. However, there is no guarantee that
interference will not occur in a particular installation. If this
equipment does cause harmful interference to radio or television
reception, which can be determined by turning the equipment off
and on, the user is encouraged to try to correct the interference
by one or more of the following measures:
• Reorient or relocate the receiving antenna.
• Increase the separation between the equipment and receiver.
• Connect the equipment into an outlet on a circuit different from
that to which the receiver is connected.
• Consult the dealer or an experienced radio/TV technician for
help.
• FCC Caution: To assure continued compliance, follow the
attached installation instructions. Any changes or modifications
not expressly approved by the party responsible for compliance
could void the user's authority to operate this equipment.
3
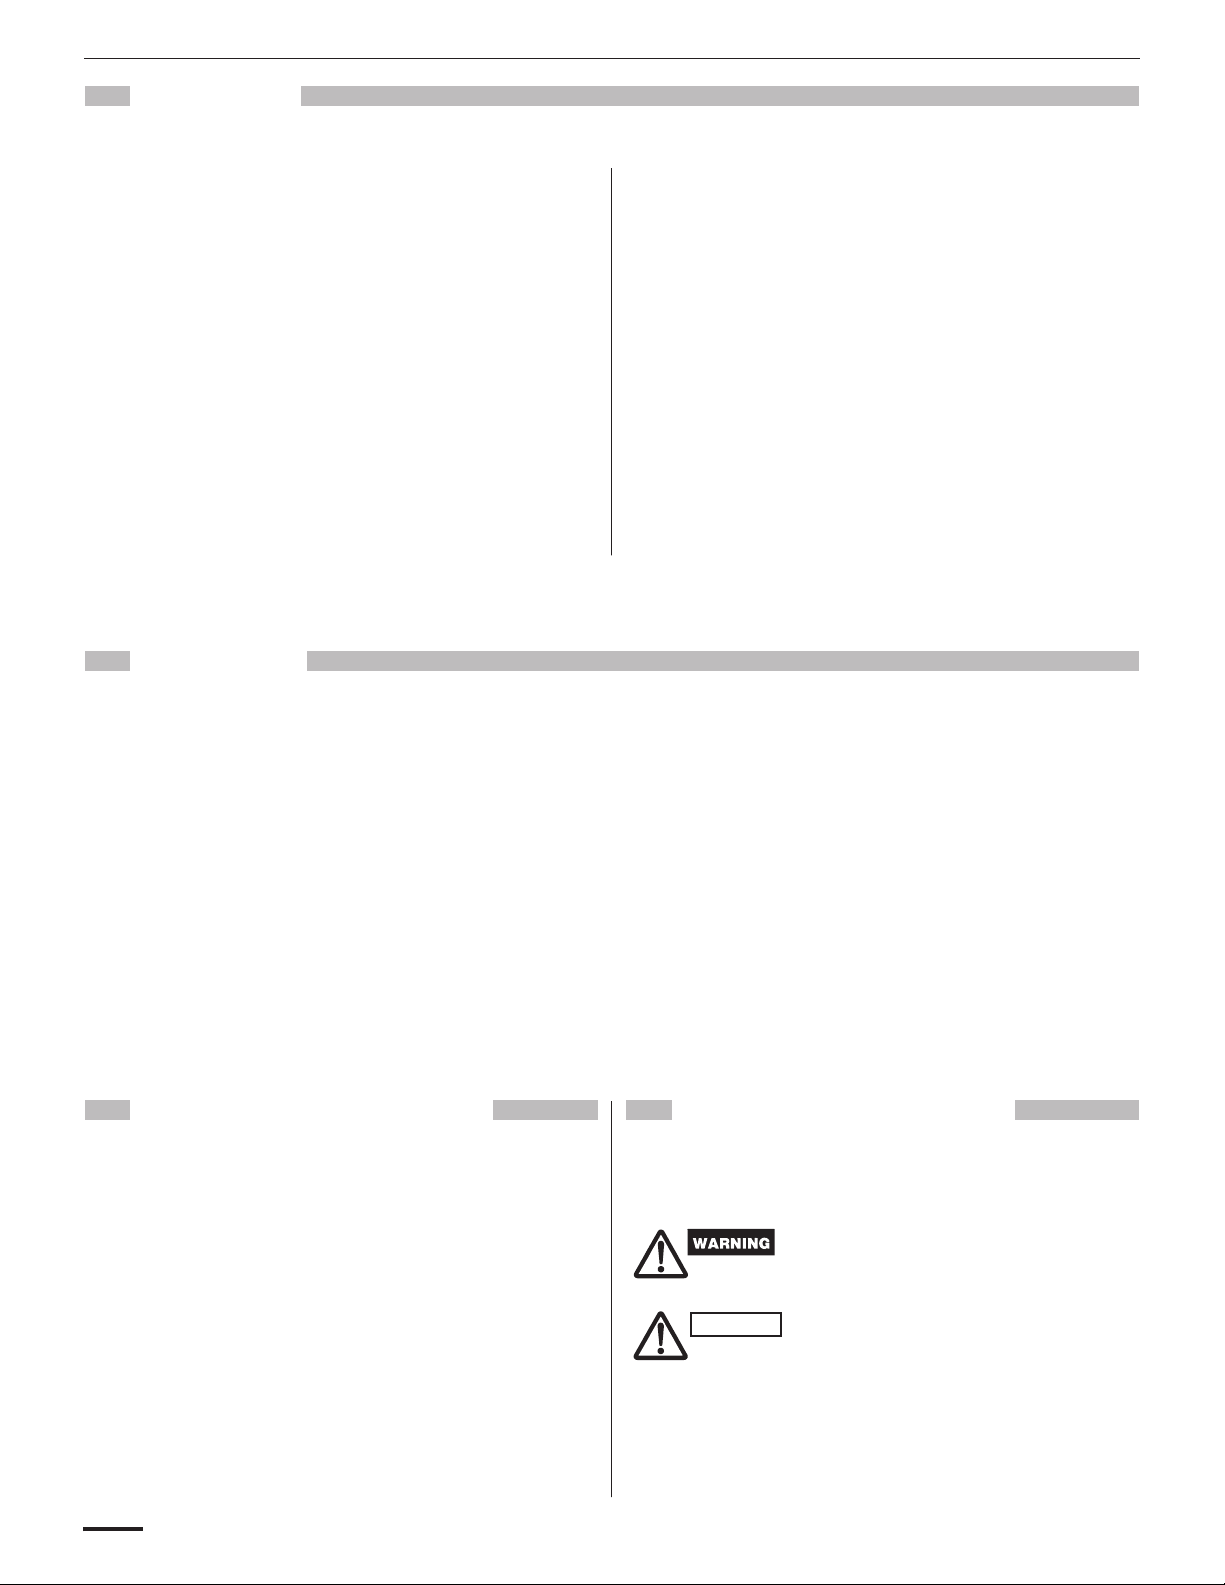
NAMES OF PARTS
INDOOR UNIT
Air Intakes
Remote Controller
Refrigerant Tubes
Drain Hose
OUTDOOR UNIT
Air Outlet
Air Outlet!
(4 locations)
NOTE
NOTE
This illustration is based on the external view of a standard model.
Consequently, the shape may differ from that of the air conditioner
which you have selected.
This air conditioner consists of an indoor unit and an outdoor unit.
You can control the air conditioner with the remote controller.
Air Intake
Air Outlet
Remote
Controller
Refrigerant
Tubes
Drain Hose
Outdoor
(Condensing)
Unit
Air from the room is drawn into this section and
passes through air filters which remove dust.
Conditioned air is blown out of the air
conditioner through the air outlet.
The remote controller controls power ON/OFF,
operation mode selection, temperature, fan
speed, timer setting, and air sweeping.
The indoor and outdoor units are connected by
copper tubes through which refrigerant gas
flows.
Moisture in the room condenses and drains off
through this hose.
The outdoor unit contains the compressor, fan
motor, heat exchanger coil, and other electrical
components.
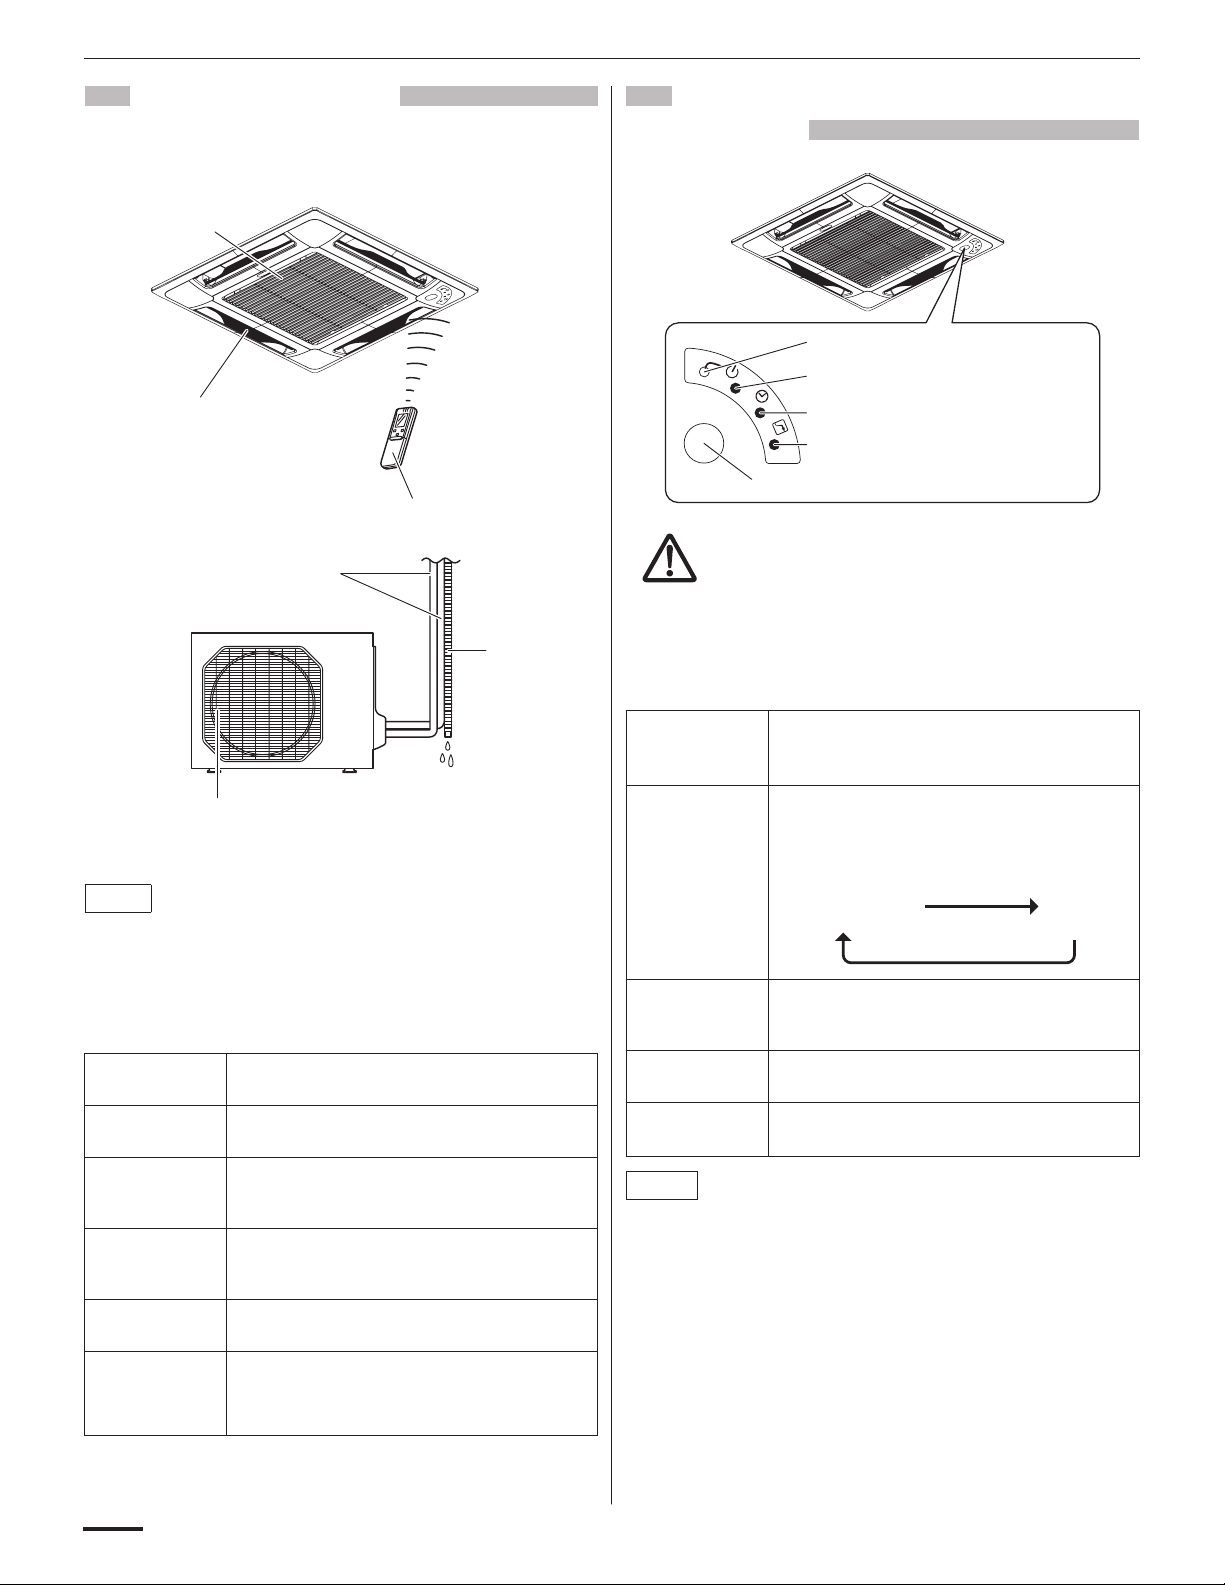
UNIT DISPLAY AND OPERATION
BUTTON
INDOOR UNIT
OPERATION button
OPERATION lamp
TIMER lamp
HIGH POWER lamp
REMOTE CONTROL receiver
IMPORTANT
Avoid using radio equipment such as mobile phone near (within
4 ft. (1.2 m)) the remote control receiver. Some radio equipment
may cause malfunction of the unit.
If the trouble happens, disconnect power and restart the air
conditioner after a few minutes.
REMOTE
CONTROL
receiver
OPERATION
button
OPERATION
lamp
TIMER lamp This lamp lights when the system is being
HIGH POWER
lamp
The unit’s display lamps are dimmed during operation in the NIGHT
SETBACK mode.
This section picks up infrared signals from the
remote controller (transmitter).
When the remote controller cannot be used,
pressing this button enables cooling operation.
Each time this button is pressed, the operation
mode changes cyclically.
Cooling operation
This lamp lights when the system is in the
continuous DRY (orange), COOL (green) and
FAN (green) mode.
controlled by the timer.
This lamp lights during operation in the HIGH
POWER mode.
Stop
4

REMOTE CONTROLLER (DISPLAY)
Displayed when the time
display is set to 12-hour
time.
Symbols
Displayed when transmitting data
Displayed when indoor unit sensor is
in use
Displayed when setting temperature
Displayed when temperature is shown
Displayed when setting timer
(1) Operation mode
MILD DRY ..............................
COOL .....................................
FAN ........................................
(2) Fan speed
Automatic operation ...............
HIGH .....................................
MEDIUM.................................
LOW .......................................
(4) Timer
24-hour clock with ON/OFF
program Timer .......................
ON Timer. ..............................
OFF Timer. ............................
1-hour OFF Timer..................
(5) NIGHT SETBACK..................
(6) Confirmation
of transmission.......................
(7) Auto. flap indication................
(3) Temperature setting
60–86°F
When set to 80 °F
temperature indication............
Flap angle indication..............
Sweep indication....................
(8) High power operation.............
5
 Loading...