

Page 1
®
Before using your air conditioner, please read
this operating instructions carefully and keep it
for future reference.
Room Air Conditioner
OPERATING INSTRUCTIONS
Before using your air-conditioner, please read this operating instructions
carefully and keep it for future reference.
H
EAT-PUMP MODEL
Indoor Outdoor
CS-A18CKPG CU-A18CKP6G
:-
ENGLISH ....................... P. 1 – P. 11
ESPAÑOL ...................... P. 12 – P. 22
Please register your product at
www.panasonic.com/register
For assistance, please call; (866)-292-7292, for
Hawaii residents call (808)-488-7779.
F563736
Page 2

Thank you for purchasing our Panasonic Room Air
Conditioner.
CONTENTS
:Features ..................................................... 1
:Safety Precautions .................................... 2
■ Installation Precautions
■ Operation Precautions
:Name of Each Part ................................ 3~4
■ Indoor Unit
■ Outdoor Unit
■ Accessories
■ Remote Control
:Preparation Before Operation .................. 5
■ Indoor Unit
■ Remote Control
:How to Operate ...................................... 5~6
:Setting the Timer ....................................... 7
:Convenience Operation ............................ 7
■ Sleep Mode Operation
■ Economy Mode Operation
■ Powerful Mode Operation
:Care and Maintenance .............................. 8
■ Cleaning the Indoor Unit and Remote Control
■ Cleaning the Air Filter
■ Cleaning the Front Panel
■ Air Purifying Filters
■ Pre-season Inspection
■ When the Air Conditioner is Not Used for an
Extended Period of Time
■ Recommended Inspection
:Helpful Information ................................... 9
:Energy Saving and Operation Hints ........ 9
:Troubleshooting ...................................... 10
■ Normal Operation
■ Abnormal Operation
■ Call the Dealer Immediately
:
Product Specification and Reference
...... 11
FEATURES
● Illuminating Button
For your convenience to operate the unit in the dark.
(Refer page 4)
● Automatic Operation
Sense indoor temperature to select the optimum
mode.
(Refer page 5)
● Sleep Mode
Prevent the room from getting too hot or too cold
while you are sleeping.
(Refer page 7)
● Economy Mode
To reduce electrical power consumption.
(Refer page 7)
● Powerful Mode
Reaches the desired room temperature quickly.
(Refer page 7)
● Removable Front Panel
For quick and easy cleaning (washable).
(Refer page 8)
● Air Purifying Filter
This new filter helps trap small airborne particles such
as dust, pollen and tobacco smoke.
(Refer page 8)
● Solar Refreshing Deodorizing Filter
Used to remove unpleasant odor and deodorize the
air in the room.
(Refer page 8)
● Auto Restart Control
Restart the unit automatically after power failure.
(Refer page 9)
! Warning
1) Operate your air conditioner from a stable 208/230 volts
AC supply.
2) Use a 15 Amps time delay fuse or a circuit breaker.
3) Disconnect from the main before servicing this appliance.
4) Do not repair by yourself.
In case of malfunction of this appliance, do not repair by
yourself. Contact the sales dealer or service dealer for a
repair.
5) Turn off the power (Isolation from main power supply).
Switch off the breaker, or switch off the power disconnecting
means to isolate the equipment from the main power supply
in case of an emergency.
POWER SUPPLY
Time Delay Fuse: Rated Volts:
15 Amps 208/230 V
Note:
Before using your air conditioner, please read
this operating instructions carefully and keep it
for future reference.
1
Page 3
SAFETY PRECAUTIONS
Before operating, please read the following
“Safety Precautions” carefully.
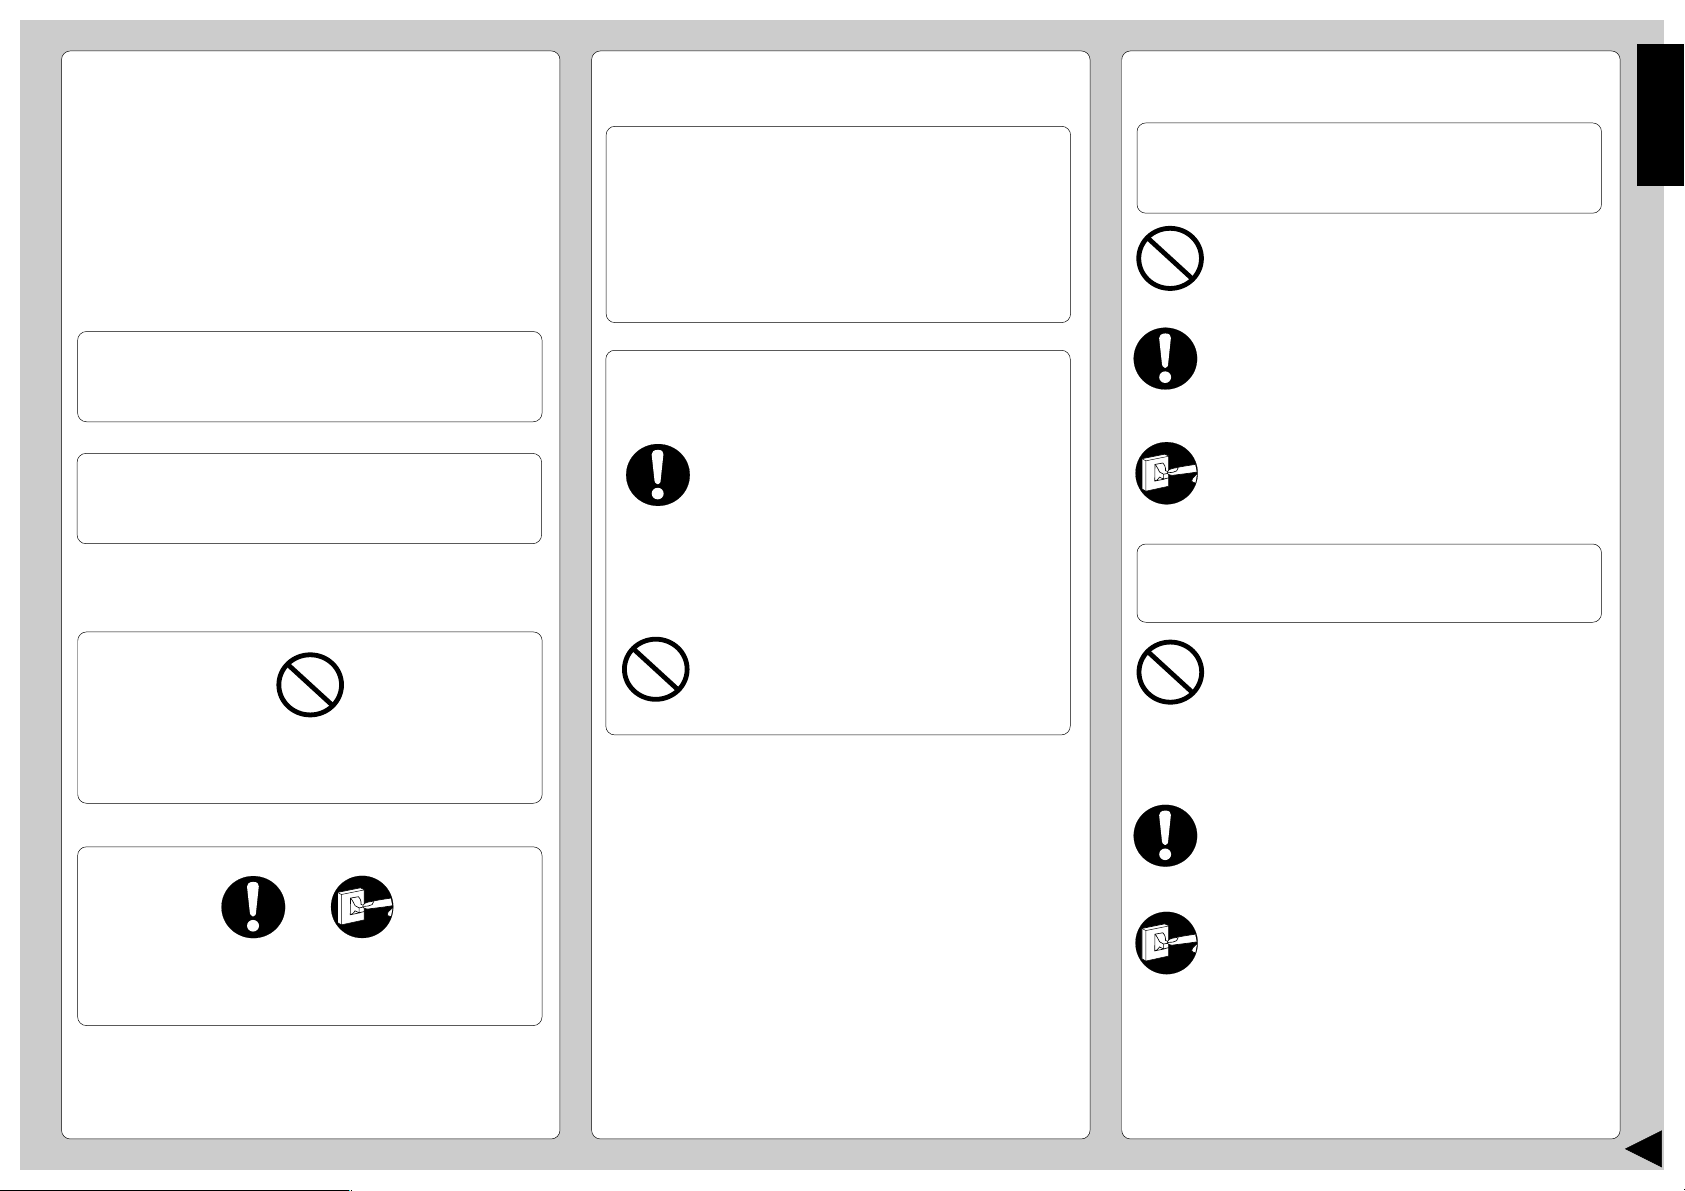
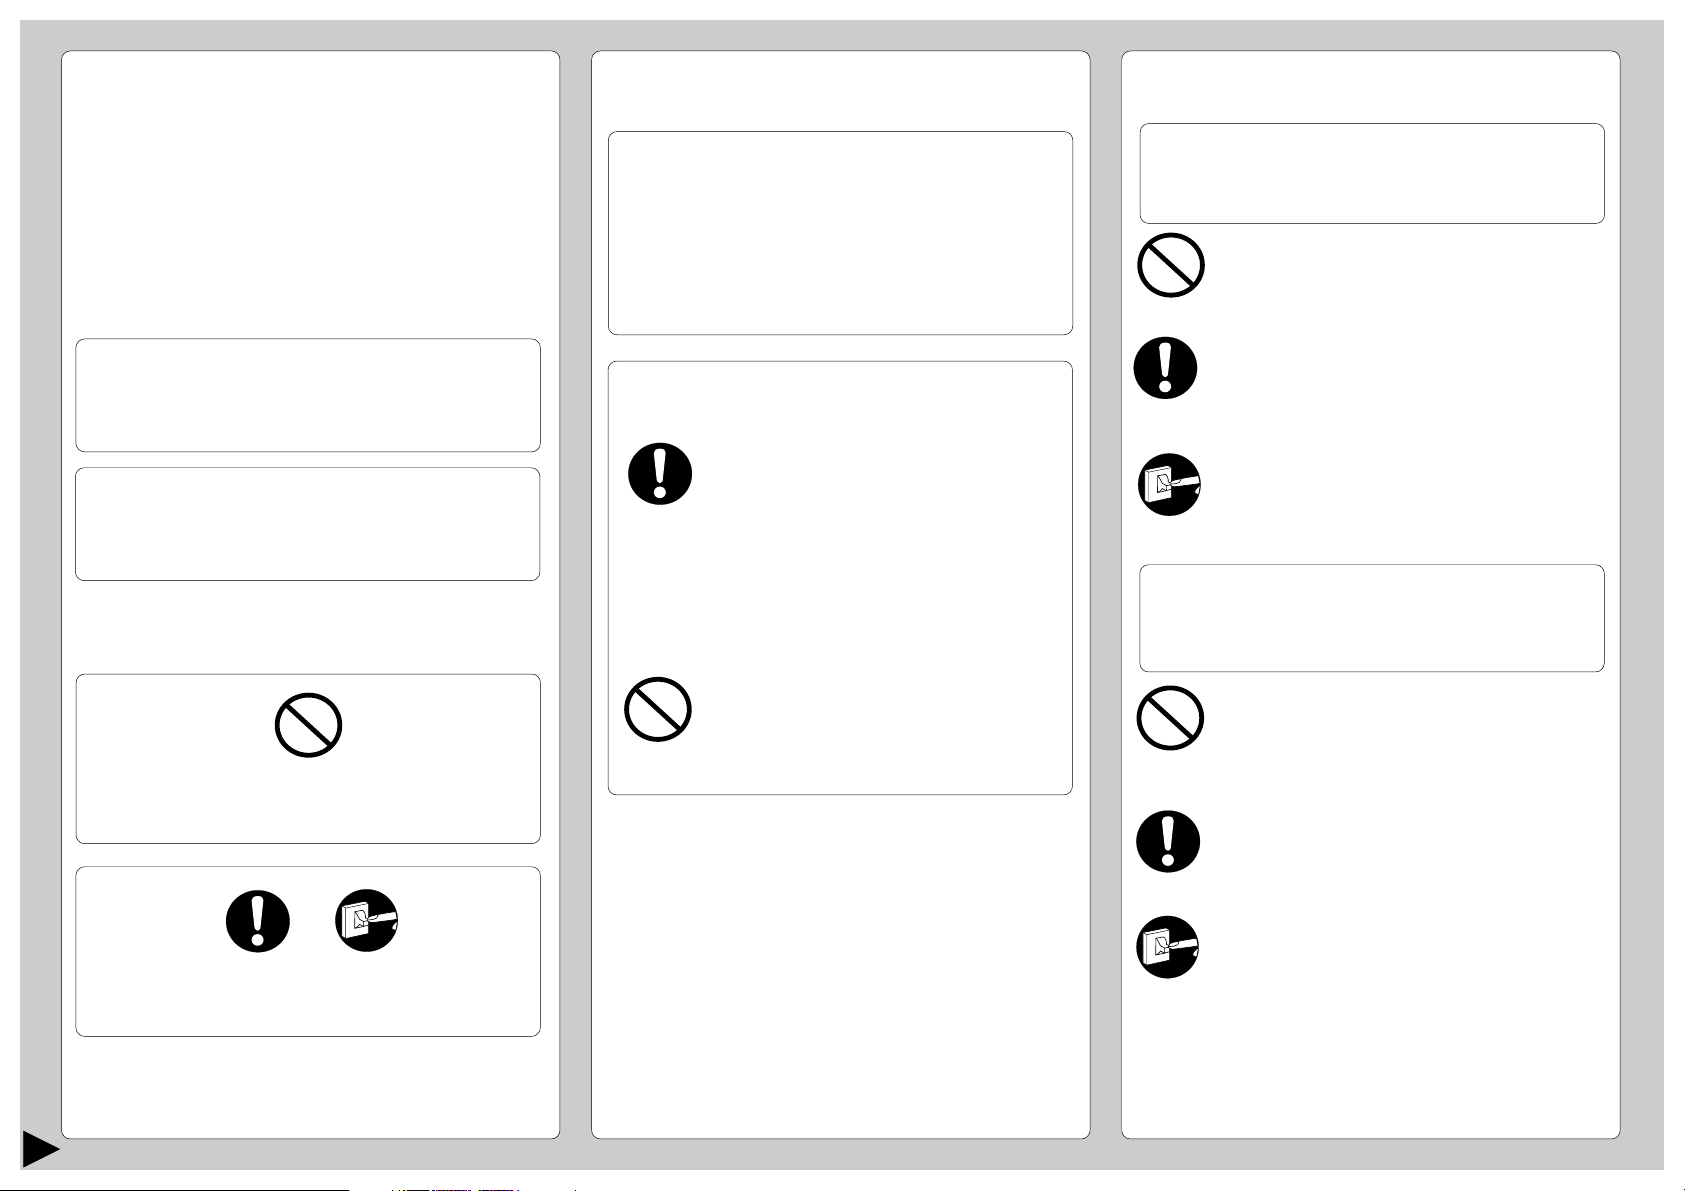
● To prevent personal injury, injury to others and
property damage, the following instructions must be
followed.
● Incorrect operation due to failure to follow instructions
will cause harm or damage, the seriousness of which
is classified as follow:
■ Installation Precautions
! Warning
● Do not install, remove and reinstall the unit by
yourself.
Improper installation will cause leakage, electric
shock or fire. Please engage an authorized dealer
or specialist for the installation work.
ENGLISH
■ Operation Precautions
! Warning
This sign warns of death or serious injury.
● Do not operate with wet hands.
● Do not insert finger or other objects into the
indoor or outdoor units.
● Do not expose directly to cold air for a long
period of time.
! Warning
This sign warns of death or serious injury.
! Caution
This sign warns of damage to property.
● The instructions to be followed are classified by the
following symbols:
This symbol (with a white background) denotes an
action that is PROHIBITED.
F
F
O
These symbols (with a black background) denote
actions that are COMPULSORY.
! Caution
● This room air conditioner must be
earthed.
Improper grounding could cause
electric shock.
● Ensure that the drainage piping is
connected properly.
Otherwise, water will leak out.
● Do not install the unit in a
potentially explosive atmosphere.
Gas leak near the unit could cause
fire.
● Use specified power cord.
● If abnormal condition (burnt smell, etc.)
F
F
O
occurs, switch off the power supply.
! Caution
This sign warns of injury.
● Do not wash the unit with water.
● Do not use for other purposes such as
preservation.
● Do not use any combustible equipment at
airflow direction.
● Do not sit or place anything on the outdoor
unit.
● Switch off the power supply before cleaning.
● Ventilate the room regularly.
● Pay attention as to whether the installation
rack is damaged after a long period of usage.
● Switch off the power supply if the unit is not
F
F
O
used for a long period.
2
Page 4
NAME OF EACH PART
HEA
AUT
AUT
DR
Y
COOL
AN
AUT
AUT
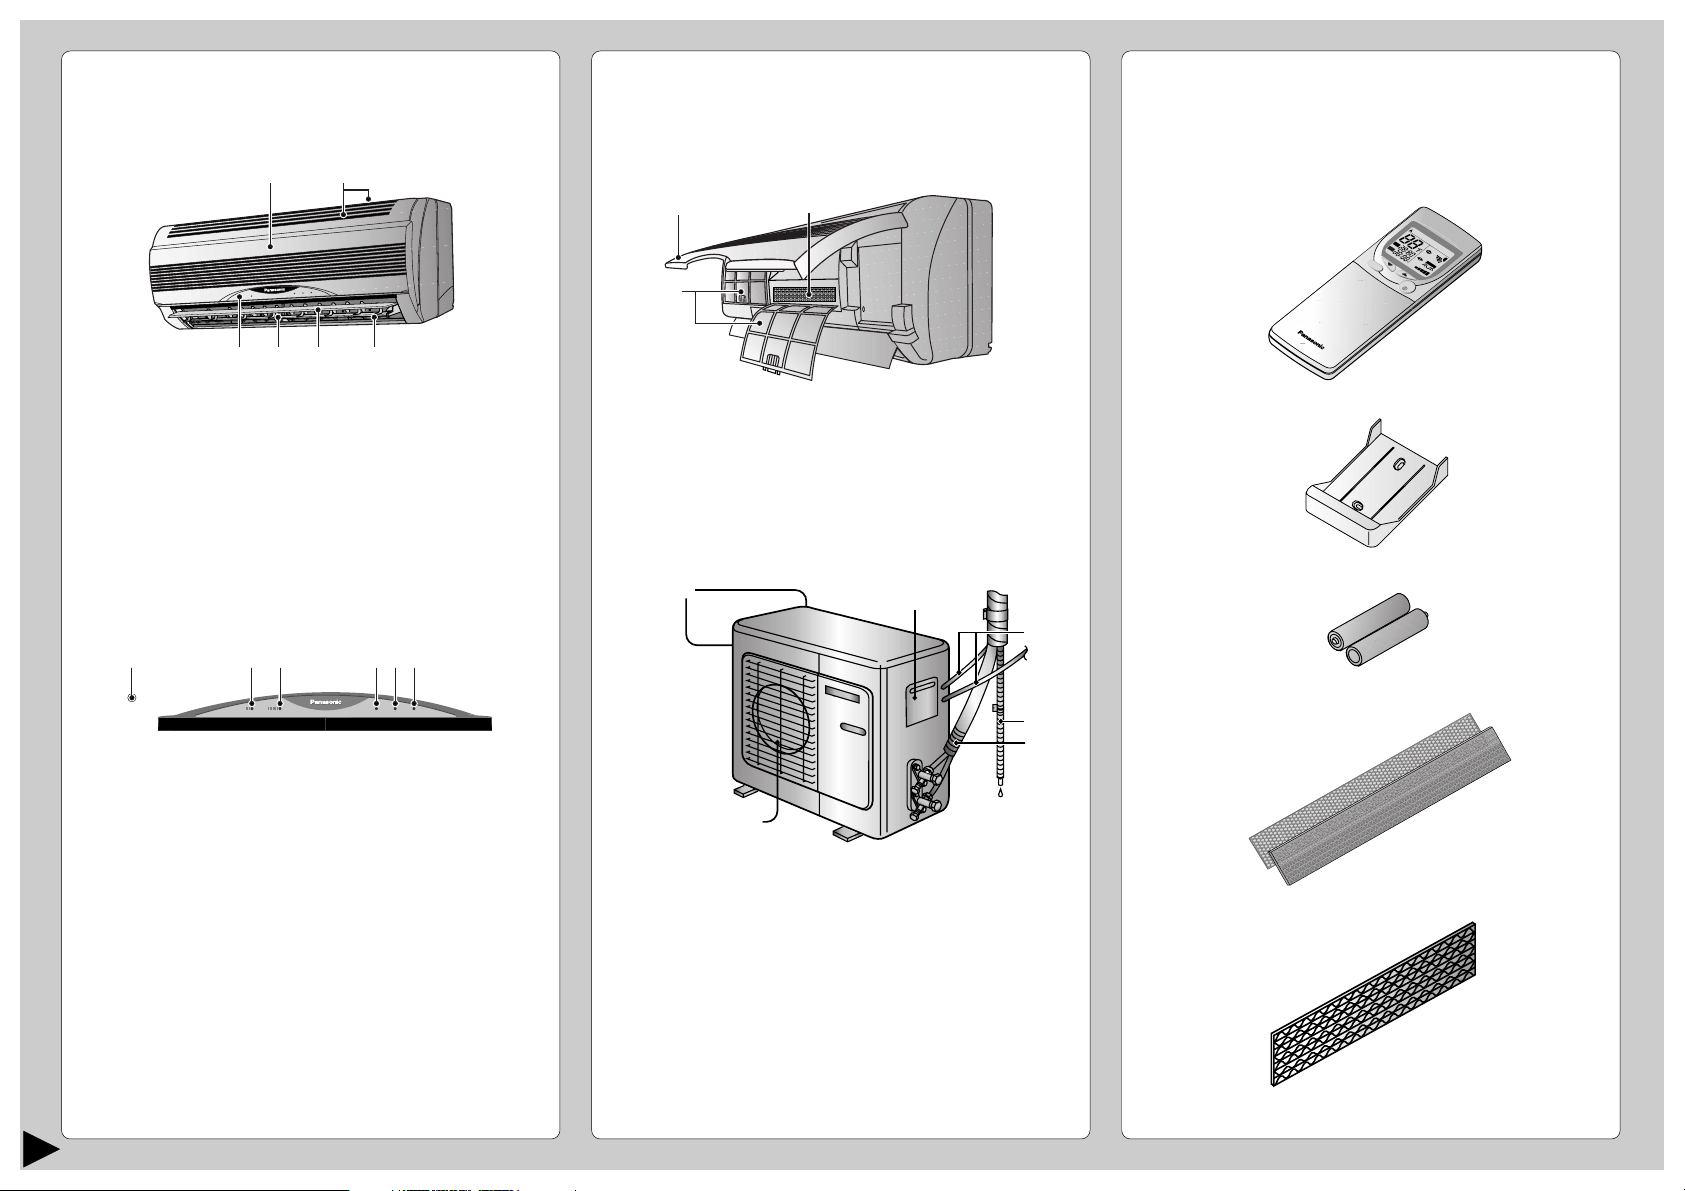
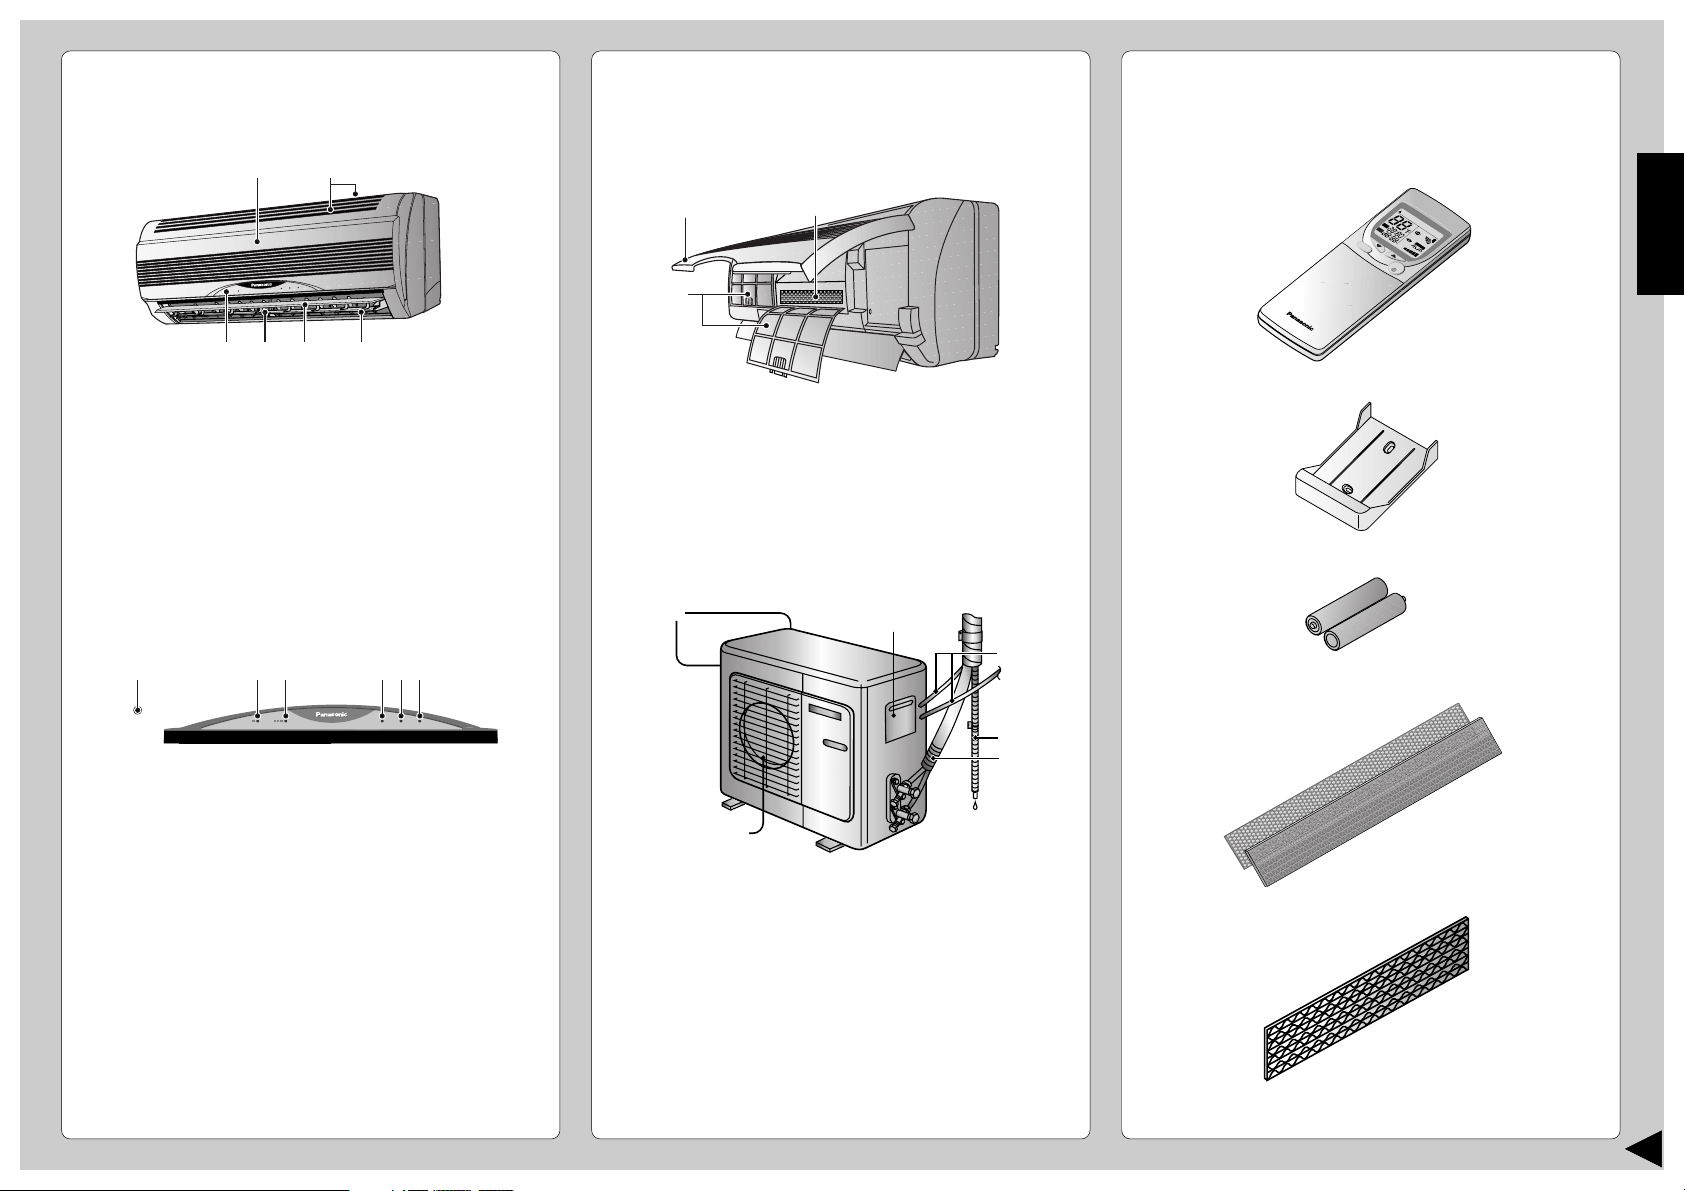
■ Indoor Unit
1
1 Front Panel
2 Air Intake Vent
3 Air Outlet Vent
4 Vertical Airflow Direction Louver
5 Horizontal Airflow Direction Louver
6 Indicator Panel
123 654
POWERFULPOWERFULECONOMYECONOMY POWERPOWER
POWERFULPOWERFULECONOMYECONOMY POWERPOWER
1 Auto Operation Button
(when the front panel is opened)
2
3465
● Indoor Unit
■ Accessories
(when the front panel is opened)
● Remote Control
1
2
1 Front Panel
3
A
U
T
O
H
E
A
T
ON
C
O
A
OFF
O
U
L
T
O
D
R
A
Y
U
T
O
A
P
U
O
FA
T
T
W
O
EM
N
E
R
F
U
P
L
MODE
O
A
F
ECONOMY
I
F
R
/
S
te
p
1
O
N
O
F
F
C
H
E
T
C
IM
K
R
E
E
R
S
E
T
L
O
C
K
+
B
A
T
T
E
R
O
S
N
W
I
N
G
SLEEP
2
F
A
N
S
P
E
E
D
3
S
E
T
C
A
N
C
E
L
YC
● Remote Control Holder
2 Air Filters
3 Air Purifying Filter
■ Outdoor Unit
1
2
● Two RO3 (AAA) dry-cell batteries or equivalent
3
SLEEPSLEEP
TIMERTIMER
SLEEPSLEEP
TIMERTIMER
4
● Air Purifying Filter
5
2 Economy Mode Indicator – GREEN
3 Powerful Mode Indicator – ORANGE
4 Power Indicator – GREEN
5 Sleep Mode Indicator – ORANGE
6 Timer Mode Indicator – ORANGE
3
6
1 Air Intake Vents
2 Ground Terminal
(Inside cover)
3 Conduit
4 Drain Hose
5 Piping
6 Air Outlet Vents
(Air Purifying Filter)
(Solar Refreshing Deodorizing Filter)
Page 5

NAME OF EACH PART
CHECK
TEMP
AUTAUTO
ON
OFF
AUTO DRDRYCOOLCOOLHEAHEAT
FANAN
AUTAUTO
AUTAUTO
RESET CLOCK
MODE
SLEEP
ECONOMY
FAN SPEED
AIR SWING
OFF
CANCEL
ON
SET
1
2
3
TIMER
OFF/ON
POWERFUL
#
!
$
%
^
$
*
&
3
5
8
7
9
0
6
4
(
AUTO
O
F
AUTOHEAT
DRY
FANCOOL
FAN
AUTO
AUTO
SLE
● How to Insert the Batteries
ENGLISH
■ Remote Control
1
2
● Remote Control Signal.
● Notes for Remote Control.
• Make sure it is not obstructed.
• Maximum distance : 10 m (32.8 ft.).
• Signal received sound :
One short beep or one long beep.
• Do not throw or drop.
• Do not get it wet.
• Certain types of fluorescent lamps may affect
signal reception. Consult your dealer.
1 Signal Transmitter
2 Operation Display
3 Powerful Mode Operation Button
4 Room Temperature Setting Button
(Illuminating button)
2
POWERFUL
MODE
A
AUTO
ECONOM
IR
S
W
IN
Y
G
1
MANUAL
ON
O
2
1.5V
C
H
1.5V
FF
E
T
C
IM
K
R
E
E
S
E
T
C
L
O
C
K
FAN SPEED
3
S
E
T
R
CANCEL
5 Operation Mode Selection Button
6 Economy Mode Operation Button
1
7 Vertical Airflow Direction Button
8 ON-Timer Button
1 Slide down the remote control cover completely
to remove it.
9 OFF-Timer Button
2 Insert the batteries
0 Reset Point
(Press with fine-tipped object to clear the memory)
! OFF/ON Button
(Illuminating button)
@ Sleep Mode Operation Button
# Fan Speed Selection Button
$ Horizontal Airflow Direction Button
% Timer Set Button
^ Timer Cancellation Button
& Time-Setting Button
* Clock Button
( Remote Control Cover
– Be sure the direction is correct
– 12:00 on display - flashing
• Set the current time (CLOCK) immediately to
prevent battery exhaustion.
3 Re-install the remote control cover by inserting it
in the side groves and pushing inward.
● About the batteries
• Can be used for approximately one year.
● Observe the following when replacing the
batteries
• Replace with new batteries of the same type.
• Do not use rechargeable batteries (Ni-Cd).
• Remove the batteries if the unit is not going to be
used for a long period.
4
Page 6
PREPARATION BEFORE OPERATION
CHECK
AUTO
AUTO H EAT DRY FANCOOL
FAN
AUTO
RESET CLOCK
FAN SPEED
AIR SWING
OFF
CANCEL
ON
SET
1
2
3
TIMER
1
2
O
F
F
ON
HEAHEAT
DRDRY
FANANCOOLCOOL
C
H
E
C
K
TEMP
AUTUTO
AU
T
UTO
FA
N
AN
AU
T
UTO
AU
T
UTO
R
E
S
E
T
C
L
O
C
K
AIR SWING
O
FF
CANCEL
1
2
3
TIMER
O
F
F
/
O
N
P
O
W
E
R
F
U
L
E
C
O
N
O
M
Y
SLEEP
O
N
SET
FAN SPEED
MODE
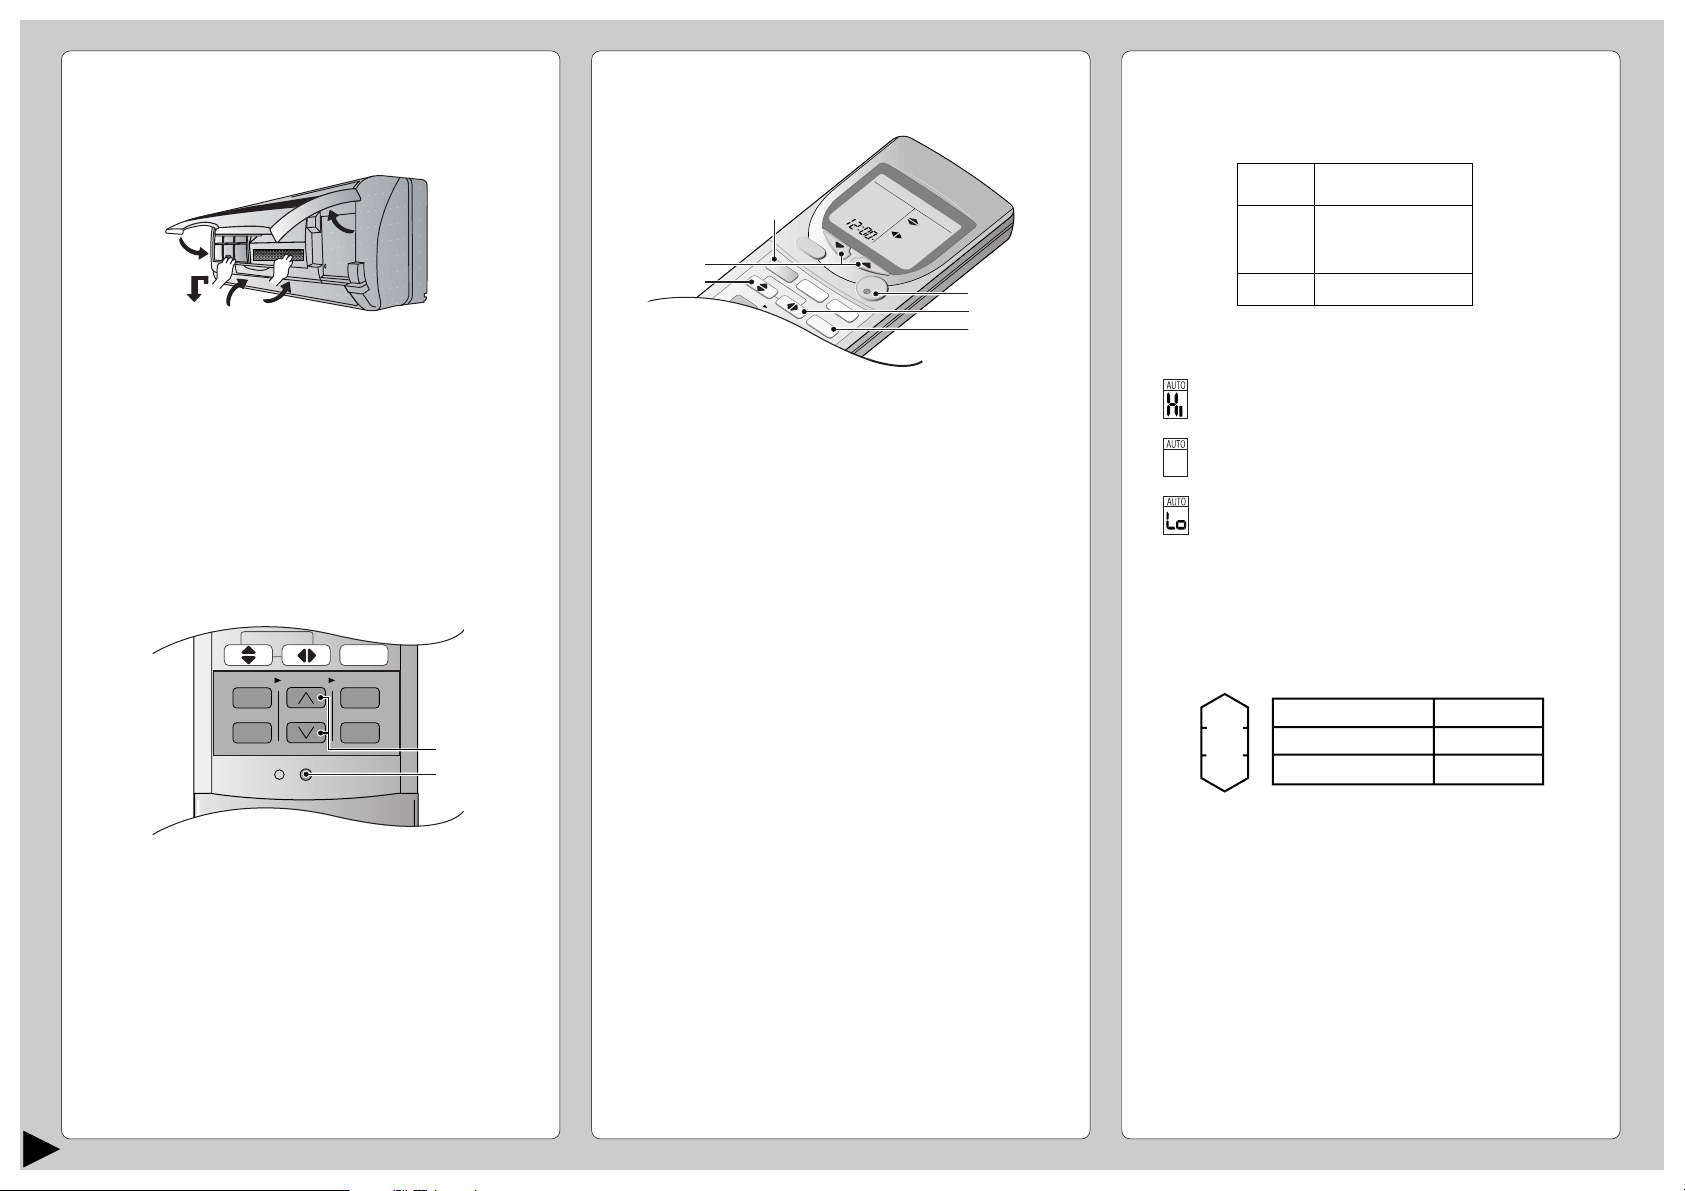
■ Indoor Unit
HOW TO OPERATE
■ Setting Temperature
• Press 3 to increase or decrease the temperature.
• The temperature can be set between 60°F ~ 86°F.
• Recommended temperature:
1
5
2
4
3
1 Open the front panel
2 Remove the air filters
3 Fit the air purifying filters in place
4 Insert the air filters
5 Close the front panel
■ Remote Control – To set the current time
2
3
5
1
6
4
■ To start the operation
• Press 1.
• POWER indicator (green) on the indoor unit will light
up.
• To stop, press once more.
■ Setting Mode
• Press 2 to select:-
AUTO – Automatic Operation
HEAT – Heating Operation
COOL – Cooling Operation
DRY – Soft Dry Operation
COOL
75°F ~ 78°F
2°F ~ 4°F
DRY
HEAT
Lower than the
room temperature
68°F ~ 75°F
• During AUTO Operation, press 3 to select:-
• Operation with 4°F higher than the standard
temperature.
• Operation with the standard temperature.
• Operation with 4°F lower than the standard
temperature.
● Standard Temperature
Indoor
temperature
73°F
68°F
Operation
Cooling
Soft Dry
Heating
Standard
temperature
77°F
72°F
70°F
1 Press 1.
2 Then press 2 to increase or decrease the time.
3 Press 1 again.
Set time on display will light up.
5
• At the beginning of the automatic operation, Heating,
Cooling or Soft Dry is automatically selected according
to the indoor temperature.
• The operation mode changes every hour, when
necessary.
Page 7
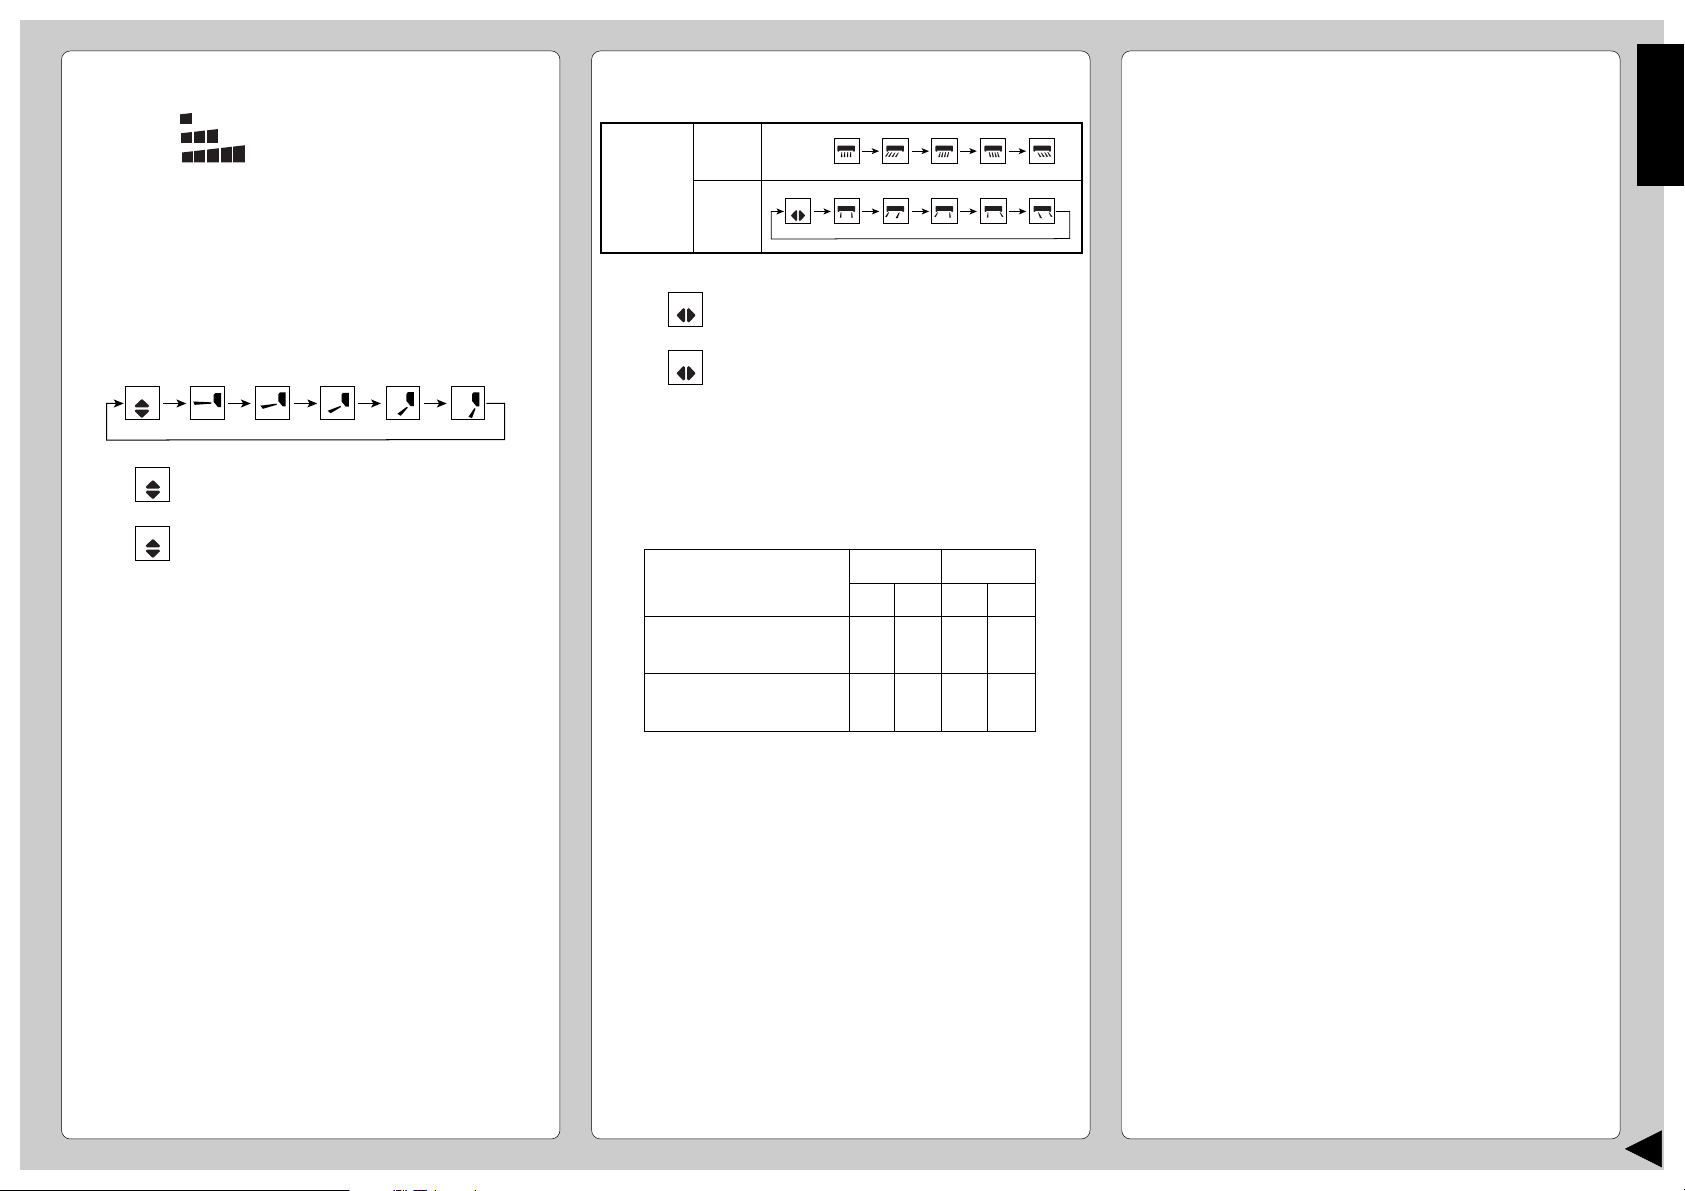
■ Setting the Fan Speed
• Press 4 to select:-
FAN – Low Fan Speed
FAN – Medium Fan Speed
FAN – High Fan Speed
AUTO
FAN – Automatic Fan Speed
The speed of the indoor fan is adjusted
automatically according to the operation.
The indoor fan stops occasionally during
cooling operation.
■ Setting the Vertical Airflow Direction
• Press 5 to select:-
AUTO
AUTO
• For COOL/DRY operation.
Swing up/down automatically.
AUTO
• For HEAT operation
When the discharge air temperature is
low such as at the start of the heating
operation, the air blows at horizontal
level. As the temperature rises, the hot
air blows in a downwards direction.
■ Setting the Horizontal Airflow Direction
• Press 6 to select:-
Indoor
Horizontal
Unit
Airflow
Direction
Remote
AUTO
Control
AUTO
• For COOL/DRY operation.
Swing left/right automatically.
• For HEAT operation
AUTO
When the discharge air temperature is
low, there is no air swing. When the
temperature rises, the horizontal airflow
louvers swing left/right automatically.
● Use this air conditioner under the following
conditions:
(Unit in °F)
WBT
73.4
(-)
51.8
(-)
Outdoor
DBT
109.4
(75.2)
60.8
(23)
DBT: Dry Bulb Temp
WBT: Wet Bulb Temp
Maximum Temperature-Cooling
(Maximum Temperature-Heating)
Minimum Temperature-Cooling
(Minimum Temperature-Heating)
Indoor
DBT
89.6
(86)
60.8
(60.8)
WBT
78.8
(64.4)
51.8
(21.2)
● Operation Details
COOL – Cooling Operation
• To set the room temperature at your preference
cooling comfort level.
AUTO – Automatic Operation
• Sense indoor temperature to select the optimum
mode.
• Temperature is not displayed on the remote control
during AUTO operation.
DRY – Soft Dry Operation
• A very gentle Cooling Operation, prior to
dehumidification. It does not lower the room
temperature.
• During Soft Dry operation, the indoor fan operates at
Low fan speed.
HEAT – Heating Operation
• Heat is obtained from outdoor air to warm up the
room. When the outdoor ambient air temperature
falls, the heating capacity of the unit might be
reduced.
• Defrosting Operation
Depending on the outdoor temperature, the operation
occasionally stops to melt the frost on the outdoor
unit.
ENGLISH
● Notes
• If the unit is not going to be used for an extended
period of time, turn off the main power supply. If it is
left at the ON position, approximately 2.5 W of
electricity will be used even if the indoor unit has been
turned off with the remote control.
• If operation is stopped, then restart immediately, the
unit will resume operation only after 3 minutes.
6
Page 8

AUTO
AUTO H EAT DRY FANCOOL
FAN
AUTO
MODE
SLEEP
ECONOMY
FAN SPEED
AIR SWING
OFF
CANCEL
ON
SET
1
2
3
TIMER
OFF/ON
POWERFUL
3
6
4
1
7
5
2
8
SETTING THE TIMER
Ensure that the current time is correct before setting
the timer. The timer cannot be set if the time display
is flashing.
■ ON-TIMER Operation
To start the air conditioner operation automatically.
• Press 1 to set the operation.
• Press 2 to increase or decrease the time.
• Then press 3.
• To cancel this operation, press 4.
■ OFF-TIMER Operation
To stop the air conditioner operation automatically.
• Press 5 to set the operation.
• Press 2 to increase or decrease the time.
• Then press 3.
• To cancel this operation, press 4.
● Timer Mode Operation Details
• When the ON-Timer is set, operation will start
before the actual set time. This is to enable the
room temperature reaches the set temperature at
the set time.
CONVENIENCE OPERATION
■ Sleep Mode Operation
To obtain a comfortable room temperature while
sleeping:-
• Press 6.
• Sleep mode indicator on the indoor unit will light up.
• To cancel this operation, press once more.
● Sleep Mode Operation Details
• When the room temperature reaches the set
temperature, the airflow volume will change to low
automatically.
• Sleep Mode Operation time is 8 hours.
• When used together with the timer, the timer has a
priority.
Temperature
Approx. 1°F
S
e
t
t
i
n
g
T
e
m
p
e
r
a
t
u
r
e
Sleep
Operation
button is
pressed.
0~1 hour
Approx.
1°F
increase.
Sleep shift
operation starts.
Approx. 4°F
decrease.
← 1 hour →
← 1 hour →
after approx. 8 hours of sleep shift
operation, it will stop automatically.
increase.
• Cooling or Soft Dry
Operation for sleep shift
operation will start to
avoid overcooling.
• Heating operation for
sleep shift operation will
start to avoid overheating.
Approx. 5°F
decrease.
Time
■ Economy Mode Operation
To save electrical power consumption.
Please use this mode when the room has reached
your desired temperature.
• Press 7.
* Economy mode indicator (green) on the indoor unit
will light up.
• Press once more to cancel this operation.
■ Powerful Mode Operation
To obtain the set temperature quickly.
• Press 8.
* Powerful mode indicator (orange) on the indoor
unit will light up.
* Powerful mode will operate for 15 minutes only.
• To cancel this operation, press once more.
●
Economy / Powerful Mode Operation Details
• Economy and Powerful operation cannot be
selected simultaneously.
• The changes of the temperature and airflow volume
are automatic.
• The remote control display remains unchanged.
• If sleep button or operation mode button is pressed,
economy or powerful operation will be cancelled.
Economy Mode
Operation
COOL / DRY
HEAT
Temperature
1°F higher
than set temp.
1°F lower
than set temp.
Airflow
volume
Super Low
Automatic
7
COOL, DRY –> 15 minutes in advance
HEAT, AUTO –> 30 minutes in advance
• Once the ON/OFF Timer is set, operation will
start/stop at the set time everyday.
• The current time is not displayed when the timers
are set.
• When both timers are used together, the TIMER
mode indicator on the indoor unit remains lit even
when the operation is stopped by the OFF-TIMER.
Powerful Mode
Operation
COOL / DRY
HEAT
Temperature
5°F lower
than set temp.
5°F higher
than set temp.
Airflow
volume
Super High
Automatic
Page 9
CARE AND MAINTENANCE
ENGLISH
■ Cleaning the Indoor Unit and Remote
Control
• Wipe gently with a soft, dry cloth.
• Do not use water hotter than 104˚F or polishing fluid
to clean the unit.
■ Cleaning the Air Filter
(Recommendation:- If the unit is operated in a dusty
environment, clean the filters every two weeks.
Continuous use of this dirty filters will reduce cooling
or heating efficiency.)
1 Remove dirt using a vacuum cleaner.
2 Wash back of the air filter with water.
3 If badly soiled, wash it with soap or a mild household
detergent.
4 Let it dry and reinstall it.
Be sure the “FRONT” mark is facing you.
* Damaged air filter.
Consult the nearest authorized dealer.
Part No.: CWD001049.
• Do not use benzene, thinner, scouring powder or
clothes soaked in caustic chemical to clean the unit.
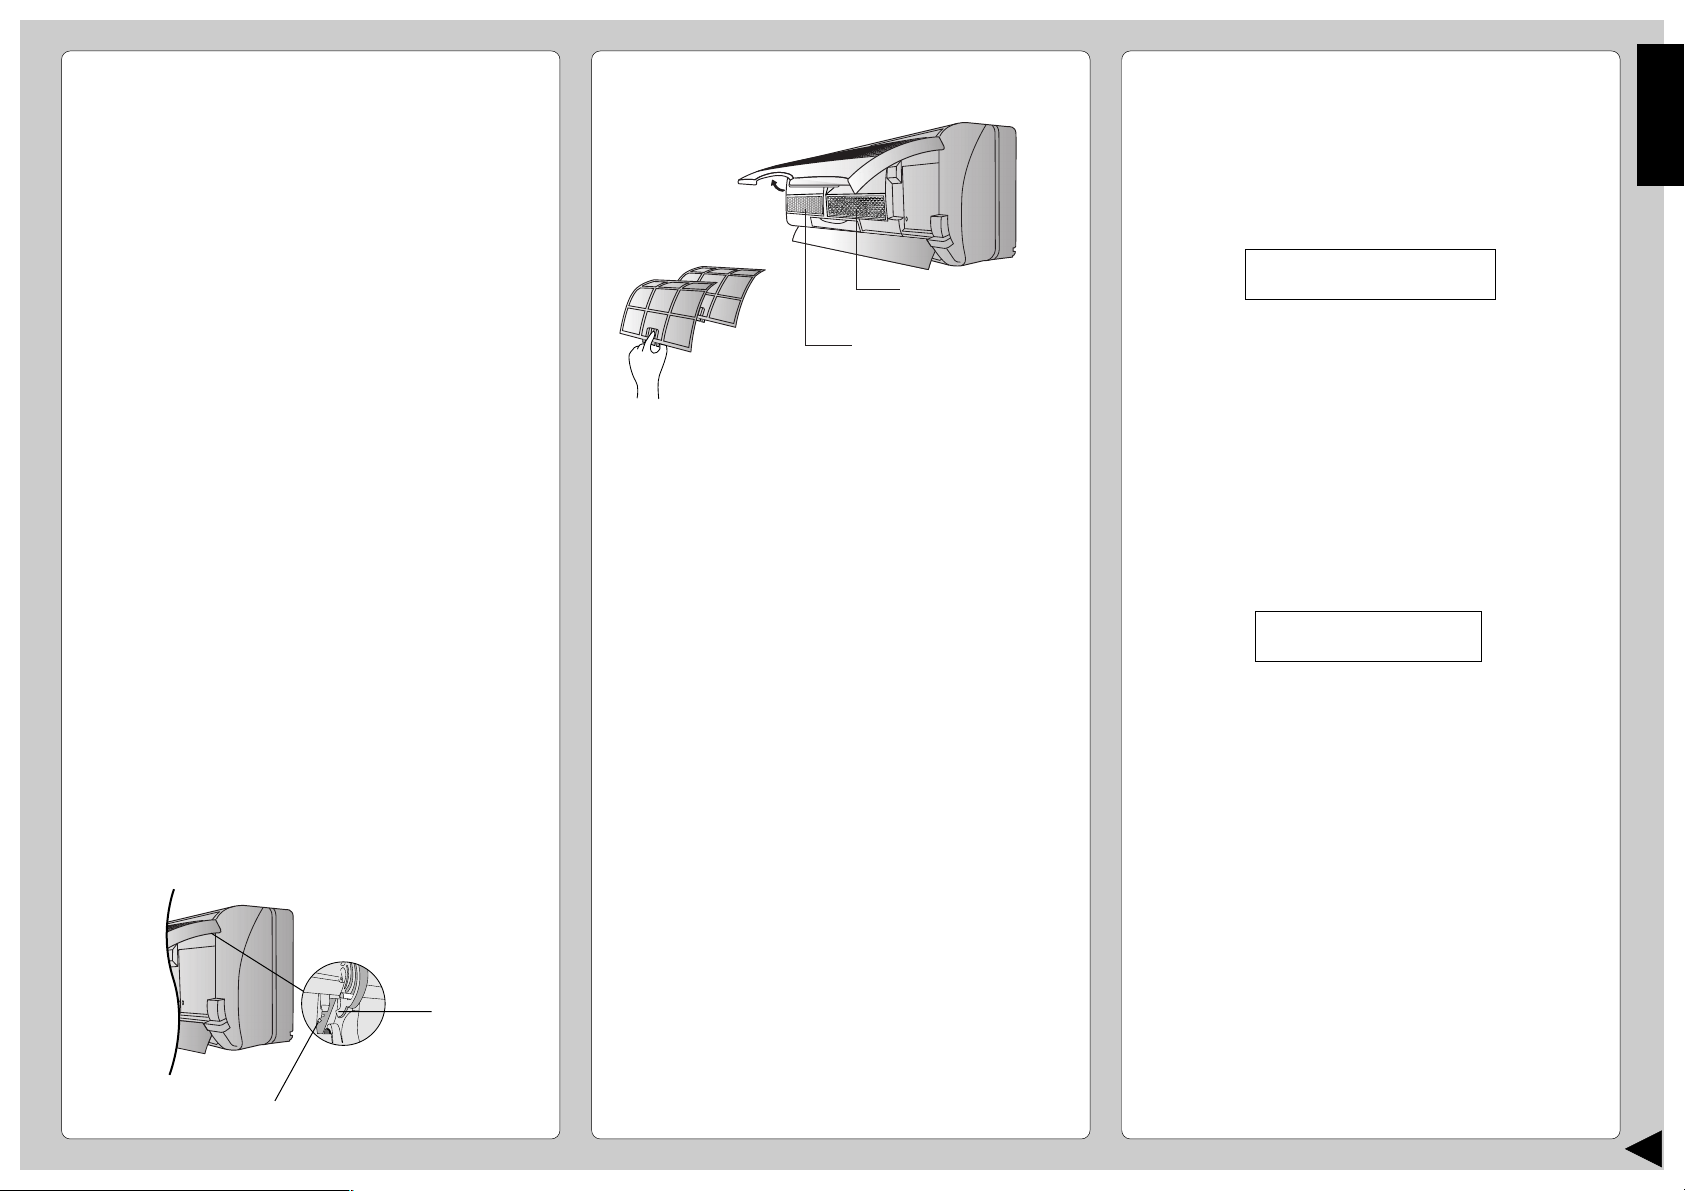
■ Cleaning the Front Panel
(Must be removed before washing)
1 Raise the front panel higher than the horizontal and
pull to remove it.
2 Gently wash with water and a sponge.
• Do not press the front panel too hard when washing.
• When use kitchen cleaning fluid (neutral detergent),
rinse throughly.
• Do not dry the front panel under direct sunlight.
3 To affix the front panel, raise the front panel
horizontally, match the protruding portion on the
indoor unit to the fulcrum and push into place.
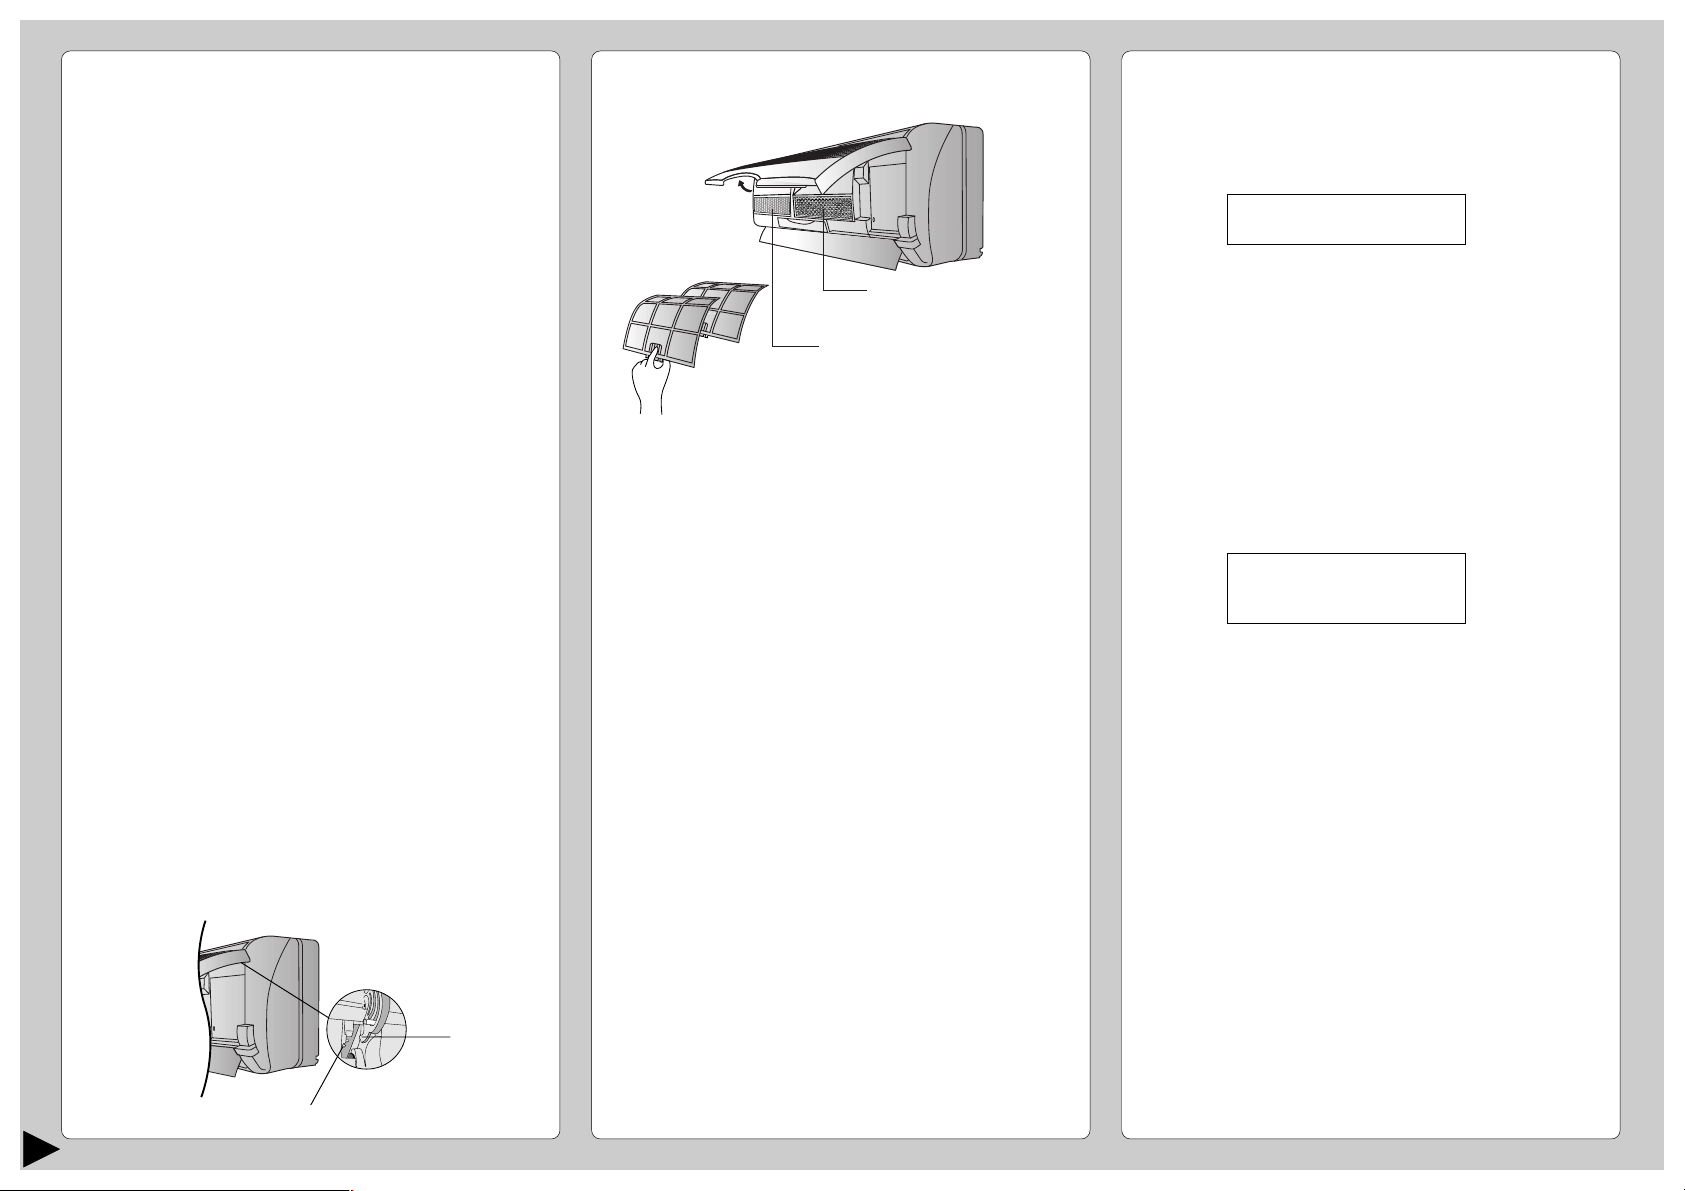
Fulcrum
■ Air Purifying Filters
1
Raise the
front panel
Solar Refreshing
Deodorizing Filter
Air Purifying Filter
Remove the air filters
2
● Solar Refreshing Deodorizing Filter
• Used to remove unpleasant odor and deodorize
the air in the room.
• Reusable.
• Vacuum, place under direct sunlight for 6 hours and
fit it back in place.
(Recommended : every 6 months)
• Recommended : change this filter every 3 years.
● Air Purifying Filter
• This new filter helps trap small airborne particles
such as dust, pollen and tobacco smoke.
• Recommended : change this filter every 3 months.
• Do not reuse damaged filters.
Consult the nearest authorized dealer to purchase a
new filter.
Air Purifying Filter No.: CZ-SF51P
Solar Refreshing Deodorizing Filter No.: CZ-SFD70P
• If you operate the air conditioner with dirty filters:-
– Air is not purified
– Cooling or heating capacity decreases
– Foul odor is emitted
■ Pre-season Inspection
● Is the discharged air cold/warm?
Operation is normal if 15 minutes after the start of
operation, the difference between the air intake and
outlet vents temperature is:-
COOL –>14°F or above
HEAT –>25°F or above
● Are the air intake or outlet vents of the indoor or
outdoor units obstructed?
● Are the remote control batteries weak?
If the remote control display appears weak, replace
the batteries.
■ When the Air Conditioner is Not Used
for an Extended Period of Time
1 To dry the internal parts of the indoor unit, operate
the unit for 2 - 3 hours using:-
COOL operation with 86°F
set temperature
2 Stop the operation by remote control and switch off
the circuit breaker.
Note : If the unit is not switched off by the remote
control, it will start operating when the circuit
breaker is switched to ON (Because the unit is
equipped with Auto Restart Control.)
3 Remove the remote control batteries.
■ Recommended Inspection
• After used over several seasons, the unit will
become dirty and thus decreases the unit’s
performance. Depending on the operation
conditions, a dirty unit may produce odor and dust
may pollute dehumidification system. Therefore, a
seasonal inspection is recommended in addition to
regular cleaning. (Consult an authorized dealer.)
Protruding portion on indoor unit
8
Page 10
HELPFUL INFORMATION
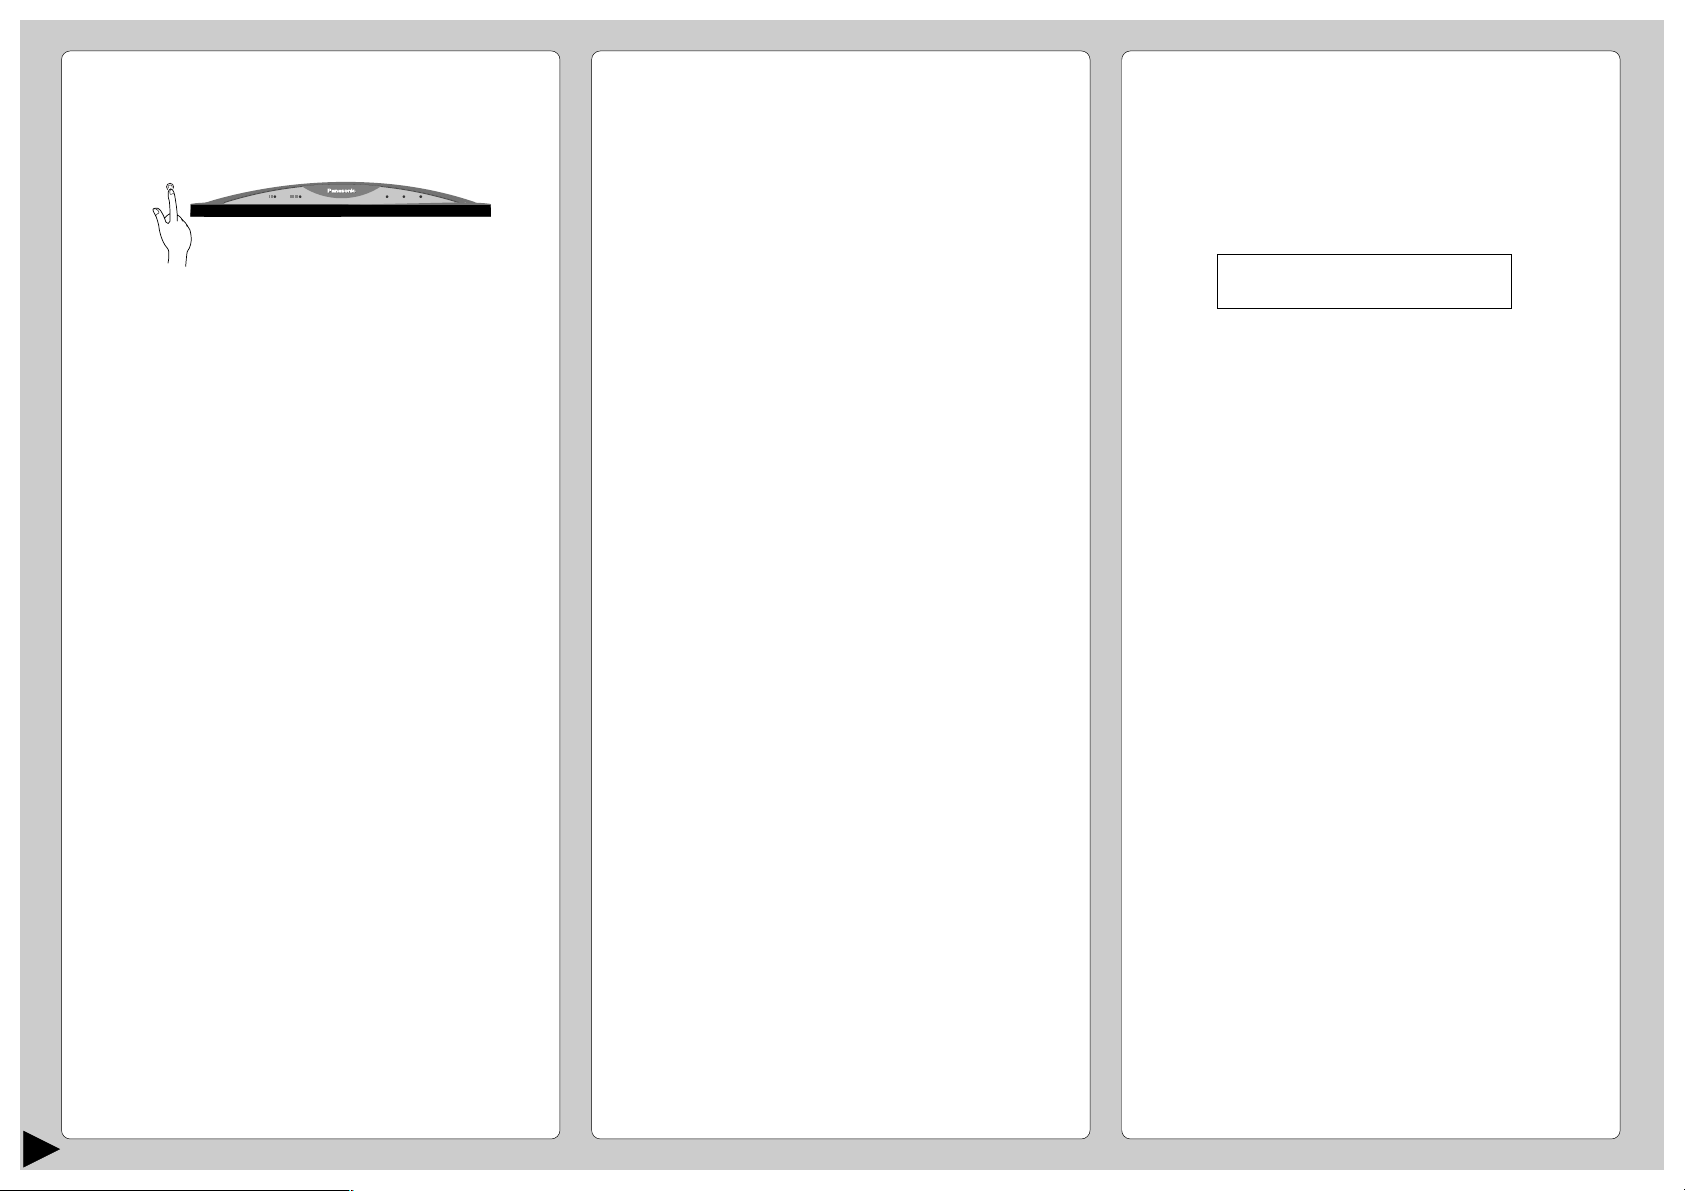
■ Auto Operation Button
POWERFULPOWERFULECONOMYECONOMY POWERPOWER
POWERFULPOWERFULECONOMYECONOMY POWERPOWER
• Raise the front panel and press.
ENERGY SAVING AND OPERATION
■ Auto Restart Control
• If power is resumed after a power failure, the
operation will restart automatically after 3 - 4
SLEEPSLEEP
TIMERTIMER
SLEEPSLEEP
TIMERTIMER
minutes.
• Operation will be restarted automatically under the
previous operation mode and airflow direction when
power is resumed as the operation is not stopped
by the remote control.
HINTS
■ Setting the Temperature
• Approximately 10% of electricity can be saved.
• Set the temperature higher or lower than the
desired temperature.
Cooling operation : 2°F higher
Heating operation : 4°F lower
● Automatic Operation
• If the remote control fails to function or has been
misplaced, press the Auto Operation button to start
the Automatic operation.
• The Automatic operation will be activated
immediately once the Auto operation button is
pressed. However, temperature cannot be adjusted
when in this mode.
• The power indicator on the indoor unit will blink until
the operation mode is selected automatically.
• To cancel this operation, press once more.
● Remote Control Signal Receiving Sound
• To switch off the beep (Signal Receiving Sound),
press the Auto Operation button for 10 seconds
continuously or longer.
A “beep”, “beep” sound will be heard at the
tenth seconds.
Note: A “beep” sound will be heard at the fifth
seconds;
However please press continuously until you
heard “beep”, “beep” sound.
• Repeat the above steps if you want to switch on the
Signal Receiving Sound.
● (This is for Servicing purposes only.)
Note: If you press this button continuously for 5 to 10
seconds, Test Run operation will be performed. A
“beep” sound will be heard at the fifth second
indicating the Test Run starts to operate.
■ Timer Setting
• When power failure occurs, the timer setting will be
cancelled. Once power is resumed, reset the timer.
■ Thunder and Lightning
• This air conditioner is equipped with a built-in surge
protective device. However, in order to further
protect your air conditioner from being damaged by
abnormally strong lightning activity, you may switch
off the circuit breaker.
■ Air Filters
• Clean the air filters every 2 weeks.
• Dirty filters may reduces cooling or heating
efficiency.
■ Keep All Doors and Windows Closed
• Otherwise, cooling or heating performance will be
reduced and electricity cost is wasted.
■ Outdoor Unit
• Do not block the air outlet vents. Otherwise, it will
lower the cooling or heating performance.
■ Timer and Sleep Mode
• To prevent wastage of electricity, use sleep mode
when sleeping or Timer when going out.
■ Avoid Direct Sunlight
• Keep curtains or drapes closed to avoid direct
sunlight during cooling operation.
9
Page 11
TROUBLESHOOTING
ENGLISH
■ Normal Operation
Is it okay?
• Air conditioner has been restarted, but does not
operate for 3 minutes.
• A sound like water flowing can be heard.
• It seems that fog is coming out from the air
conditioner.
• The room has a peculiar odor.
• During Automatic Vertical Airflow setting,
indoor fan stops occasionally.
• The outdoor unit emits water or steam.
• Operation stops for about 12 minutes during
heating (The power indicator blinks.)
• During heating operation, indoor fan may
run at on and off conditions.
Solution
• This is to protect the air conditioner. Wait until the air
conditioner begins to operate.
• This is the sound of refrigerant flowing inside the air
conditioner.
• Condensation occurs when the airflow from the air
conditioner cools the room.
• This may be a damp smell emitted by the wall,
carpet, furniture or clothing in the room.
• This is to remove smell emitted by the surroundings.
• In COOL/DRY operation, moisture in the air
condenses into water on the cool surface of outdoor
unit piping that causes dripping.
• This is to melt the frost which has accumulated on
the outdoor unit (defrosting operating). This will take
no longer than about 12 minutes. Water drips from
the outdoor unit. Wait until this operation ends. (The
power indicator will light up.)
(Frost will accumulates on the outdoor unit when the
outdoor temperature is low and humidity is high.)
• This is to prevent undesired cooling effect during
heating operation.
■ Call the Dealer Immediately
If the following conditions occur, turn off the circuit breaker,
and then call your authorized Panasonic dealers or
servicenter.
• Abnormal noise is heard during operation.
• Water or foreign material gets into the remote
control by mistake.
• Water leak from the indoor unit.
• Switches or buttons do not operate properly.
• The circuit breaker switches off frequently.
• Power supply cord becomes unusually warm.
Service information can be obtained by calling
(866)-292-7292, for Hawaii residents call (808)-488-7779.
To expedite the repair of your air conditioner:
• Please have your proof of purchase.
• List all symptoms the unit is exhibiting.
■ Abnormal Operation
Check the following points before calling for repairs or service. If the malfunction persists, please contact your nearest
servicenter. For assistance, please call: (866)-292-7292, for Hawaii residents call (808)-488-7779.
Symptoms
• The air conditioner does not operate.
• Air conditioner produces loud noise during
operation.
• The air conditioner does not cool or warm
effectively.
• Remote control / display doesn’t work.
• Has the circuit breaker been tripped?
• Is the timer being used correctly?
• Is the installation work slanted?
• Is the front grille closed properly?
• Has the temperature been set incorrectly?
• Are the filters dirty?
• Are the intake or outlet vents of the outdoor unit
obstructed?
• Are all windows and doors closed?
• Batteries not inserted?
• Batteries correctly inserted (+) and (–)?
Please check
10
Page 12
PRODUCT SPECIFICATIONS
Models
ELECTRICAL
RATING Frequency (Hz) 60
COOLING
HEATING
MOISTURE REMOVAL (pints/h) 4.0
DIMENSIONS Indoor Height cm (inches) 27.5 (10 –13/16)
Phase 1
Voltage (V) 208 – 230
Capacity (Btu/h) 16,900 – 17,000
Current (Amp) 8.5 – 7.9
Input Power (Watts) 1,720 – 1,760
EER (Btu/Watt.h) 9.8 – 9.7
SEER 10.0
Room Air Circulation (cf/min) 480
Capacity (Btu/h) 18,100 – 18,300
Current (Amp) 8.5 – 7.9
Input Power (Watts) 1,720 – 1,760
COP (Btu/Watt.h) 10.5 – 10.4
HSPF 6.8
Room Air Circulation (cf/min) 512
Width cm (inches) 99.8 (39 –9/32)
Depth cm (inches) 21.0 (8 – 9/32)
CS-A18CKPG
CU-A18CKP6G
■ REFERENCE
Model Number:
--------------------------------------------------------
Dealer’s Address:
--------------------------------------------------------
Dealer’s Tel :
--------------------------------------------------------
Serial Number :
(Located on the side of unit)
--------------------------------------------------------
Date of Purchase :
Outdoor Height cm (inches) 68.5 (26 – 31/32)
Width cm (inches) 80.0 (31 –1/2)
Depth cm (inches) 30.0 (11 –13/16)
NET Indoor kg (Ib) 11.0 (24)
WEIGHT
Outdoor kg (Ib) 53.0 (117)
GROSS Indoor kg (Ib) 13.5 (30)
WEIGHT
Outdoor kg (Ib) 60.0 (132)
• Specifications are subject to change without notice for further improvement.
11
--------------------------------------------------------
Dealer’s Name:
--------------------------------------------------------
Please affix your proof of purchase here for
future reference.
© 2002 Matsushita Electrical Co, Ltd. All Right Reserved.
Page 13
Muchas gracias por elegir la unidad de Aire
Acondicionado de Panasonic.
CONTENIDO
: Caracteristicas ....................................... 12
: Medidas De Seguridad ........................... 13
■ Precauciones al instalar
■ Precauciones al operar
: Nombre De Cada Pieza .................... 14~15
■ Unidad Interior
■ Unidad Exterior
■ Accesorios
■ Control Remoto
: Prepación Antes Del Funcionamiento.. 16
■ Unidad Interior
■ Control Remoto
: Cómo Hacerlo Funcionar................. 16~17
: Ajuste Del Temporizador ....................... 18
: Funcionamiento Conveniente ............... 18
■ Funcionamiento en modo de sueño
■ Funcionamiento en modo económico
■ Funcionamiento en modo plena potencia
: Cuidado Y Mantenimiento ..................... 19
■ Limpieza de la Unidad Interior y e Control
Remoto
■ Limpieza de los Filtros de Aire
■ Limpieza del Panel Frontal
■ Filtros Purificadores de Aire
■ Inspección de Pretemporada
■ Cuando el Acondicionador de Aire No se Utiliza
Durante un Período Largo de Tiempo
■ Inspección Recomendada
: Información Útil ...................................... 20
: Sugerencias Para Ahorrar Energia y
Para un Mejor Funcionamiento ............. 20
: Localización De Averias ........................ 21
■ Funcionamiento Normal
■ Funcionamiento Anormal
■ Comuniquese con el Distribuidor
Inmediatamente
: Especificaciones Del Producto............. 22
CARACTERÍSTICAS
● Botón Iluminable
Para facilitar su manipulaciÛn en la oscuridad.
(Página 15)
● Funcionamiento Automático
Tome la temperatura interior para seleccionar el
modo más apropiado.
(Página 16)
● Modo De Dormir
Evita que la temperatura de la habitación suba o baje
demasiado mientras duerme.
(Página 18)
● Modo Económico
Para reducir el consumo de energía eléctrica.
(Página 18)
● Modo Potente
Alcanza la temperatura deseada de la habitación
rápidamente.
(Página 18)
● Panel Frontal Extraíble
Para una limpieza más rápida y sencilla (lavable).
(Página 19)
● Filtro De Purificador De Aire
Es un filtro que puede retener el polvo, el humo de
tabaco y las particulas microscópicas del aire de la
habitación.
(Página 19)
● Filtro solar desodorizador y refrescante
Sirve para eliminar el olor desagradable y para
desodorizar el aire de la habitación.
(Página 19)
● Control Automático De Puesta En Marcha
Después de un fallo de corriente pone en marcha
automáticamente la unidad.
(Página 20)
! Advertencia
1) Haga funcionar el aparato de aire acondicionado conectándolo
a una fuente estable de CA de 208/230 voltios.
2) Utilice un fusible de retardo de 15 Amperios o un interruptor.
3) Antes de efectuar el mantenimiento de este aparato
desenchúfelo de la red.
4) No lo repare usted mismo.
En el caso de funcionamiento defectuoso de la unidad, no lo
repare usted mismo. Acuda al representante de ventas o al
servicio técnico para su reparación.
Desconecte la alimentación (corte del suministro principal de corriente).
5)
Desconecte el enchufe del tomacorriente, desconecte el
interuptor de circuito o desconecte la alimentación
desconectando el equipo del suministro principal de
alimentación para evitar accidentes.
TOMA DE CORRIENTE
Fusible de retardo: Voltaje asignado:
15 Amperios 208/230 V
ESPAÑOL
Nota:
Antes de usar el acondicionador de aire, sírvase leer
atentamente estas instrucciones de funcionamiento
y conservarlas como futuro elemento de consulta.
12
Page 14
MEDIDAS DE SEGURIDAD
Antes de operar el equipo, por favor lea
cuidadosamente las siguientes “Medidas de
Seguridad”
● Para prevenir heridas personales, heridas a otras
personas y daños de la propiedad, se deben seguir
las siguientes instrucciones.
● El uso incorrecto por no seguir las instrucciones
puede causar daños o averías; su gravedad se
clasifica con las indicaciones siguientes:
■ Precauciones al Instalar
! Advertencia
● No instale ni desinstale ni reinstale la unidad
usted mismo.
Una instalación incorrecta puede causar fugas de
agua, descargas eléctrica o incendio. Por favor
consulte al distribuidor autorizado o a un
especialista para el trabajo de instalación.
■ Precauciones al Operar
! Advertencia
Esta indicación muestra la posibilidad
de causar muerte o daños serios.
● No opere la unidad con las manos mojadas.
● No inserte los dedos ni ningún tipo de objetos en
las unidades interna o externa.
● No se exponga directamente al aire frío por
mucho tiempo.
! Advertencia
Esta indicación muestra la posibilidad de causar
muerte o daños serios.
! Cuidado
Esta indicación advierte sobre la posibilidad
de daños a la propiedad.
● Las instrucciones a seguir están clasificadas
mediante los símbolos siguientes:
Símbolo (con el fondo blanco) denota una acción
que está PROHIBIDA.
F
F
O
Símbolos (con el fondo negro) denotan una acción
que es OBLIGATORIA de hacer.
! Cuidado
● Este acondicionador de aire de
habitación debe ser conectado a
tierra.
Puede causar una sacudida eléctrica
si el contacto a tierra no es perfecto.
● Compruebe que las tuberías de
drenaje están conectadas
adecuadamente.
Sino habrá pérdidas de agua.
● No instale la unidad en una
atmósfera potencialmente
explosiva.
Las fugas de gas cerca de la unidad
pueden causar un incendio.
● Utilice el cable especificado.
● Si detecta una situación anormal (por ejemplo,
F
F
O
olor a quemado), pare el acondicionador de aire
el suministro de alimentación.
! Cuidado
Esta indicación muestra la posibilidad de causar daño
o avería solamente en la propiedad.
● No lave la unidad con agua.
● No utilice el aparato para otros fines como la
conservación de alimentos.
● Desconecte la unidad antes de limpiarla.
● No se siente o coloque objetos sobre la unidad
exterior.
●
Apague el aparato antes de proceder a su limpieza.
● Ventile la habitación regulamente.
● Compruebe si el bastidor de instalación está
dañado después de haber usado el aparato
durante un largo período.
F
F
O
● Desconecte la corriente si no va a utilizar la
unidad durante un período largo de tiempo.
13
Page 15
NOMBRE DE CADA PIEZA
HEA
AUT
AUT
DR
Y
COOL
AN
AUT
AUT
■ Unidad Interior
1
1 Panel Frontal
2 Entrada De Aire
3 Salida De Aire
4 Persiana Vertical Para El Flujo De Aire
5 Persiana Horizontal Para El Flujo Del Aire
6 Panel indicador
123 654
1 Botón de funcionamiento automático
(Al abrir el panel frontal)
2
3465
POWERFULPOWERFULECONOMYECONOMY POWERPOWER
POWERFULPOWERFULECONOMYECONOMY POWERPOWER
SLEEPSLEEP
TIMERTIMER
SLEEPSLEEP
TIMERTIMER
● Unidad Interior
(al abrir el panel frontal)
1
3
2
1 Panel frontal
2 Filtros de aire
3 Filtros purificadores de aire
■ Unidad Exterior
1
2
3
4
5
■ Accesorios
● Control Remoto
A
U
T
O
H
E
ON
OFF
A
U
T
O
A
P
U
O
FA
TEM
T
W
O
N
E
R
F
U
P
L
MODE
O
A
F
ECONOMY
I
F
R
/
S
te
p
1
O
N
O
F
F
C
H
E
T
C
IM
K
R
E
E
R
S
E
T
C
L
O
C
K
+
B
A
T
T
E
R
● Soporte del control remoto
● Dos Pilas Secas RO3 o su equivalente
● Filtros Purificadores De Aire
O
S
N
W
I
N
G
SLEEP
2
F
A
N
S
P
E
E
D
3
S
E
T
C
A
N
C
E
L
Y
ESPAÑOL
A
T
C
O
A
O
U
L
T
O
D
R
Y
2 Indicador del modo económico – VERDE
3 Indicador del modo de plena potencia – NARANJA
4 Indicador de energía – VERDE
5 Indicador del modo de sueño – NARANJA
6 Indicador del modo de temporizador – NARANJA
6
1 Entrada de aire
2 Terminal a tierra
(Cobertura interior)
3 Conducto
4 Manguera de drenaje
5 Tubería
6 Salida de Aire
(Filtro purificador de aire)
(Filtro solar desodorizador y refrescante)
14
Page 16
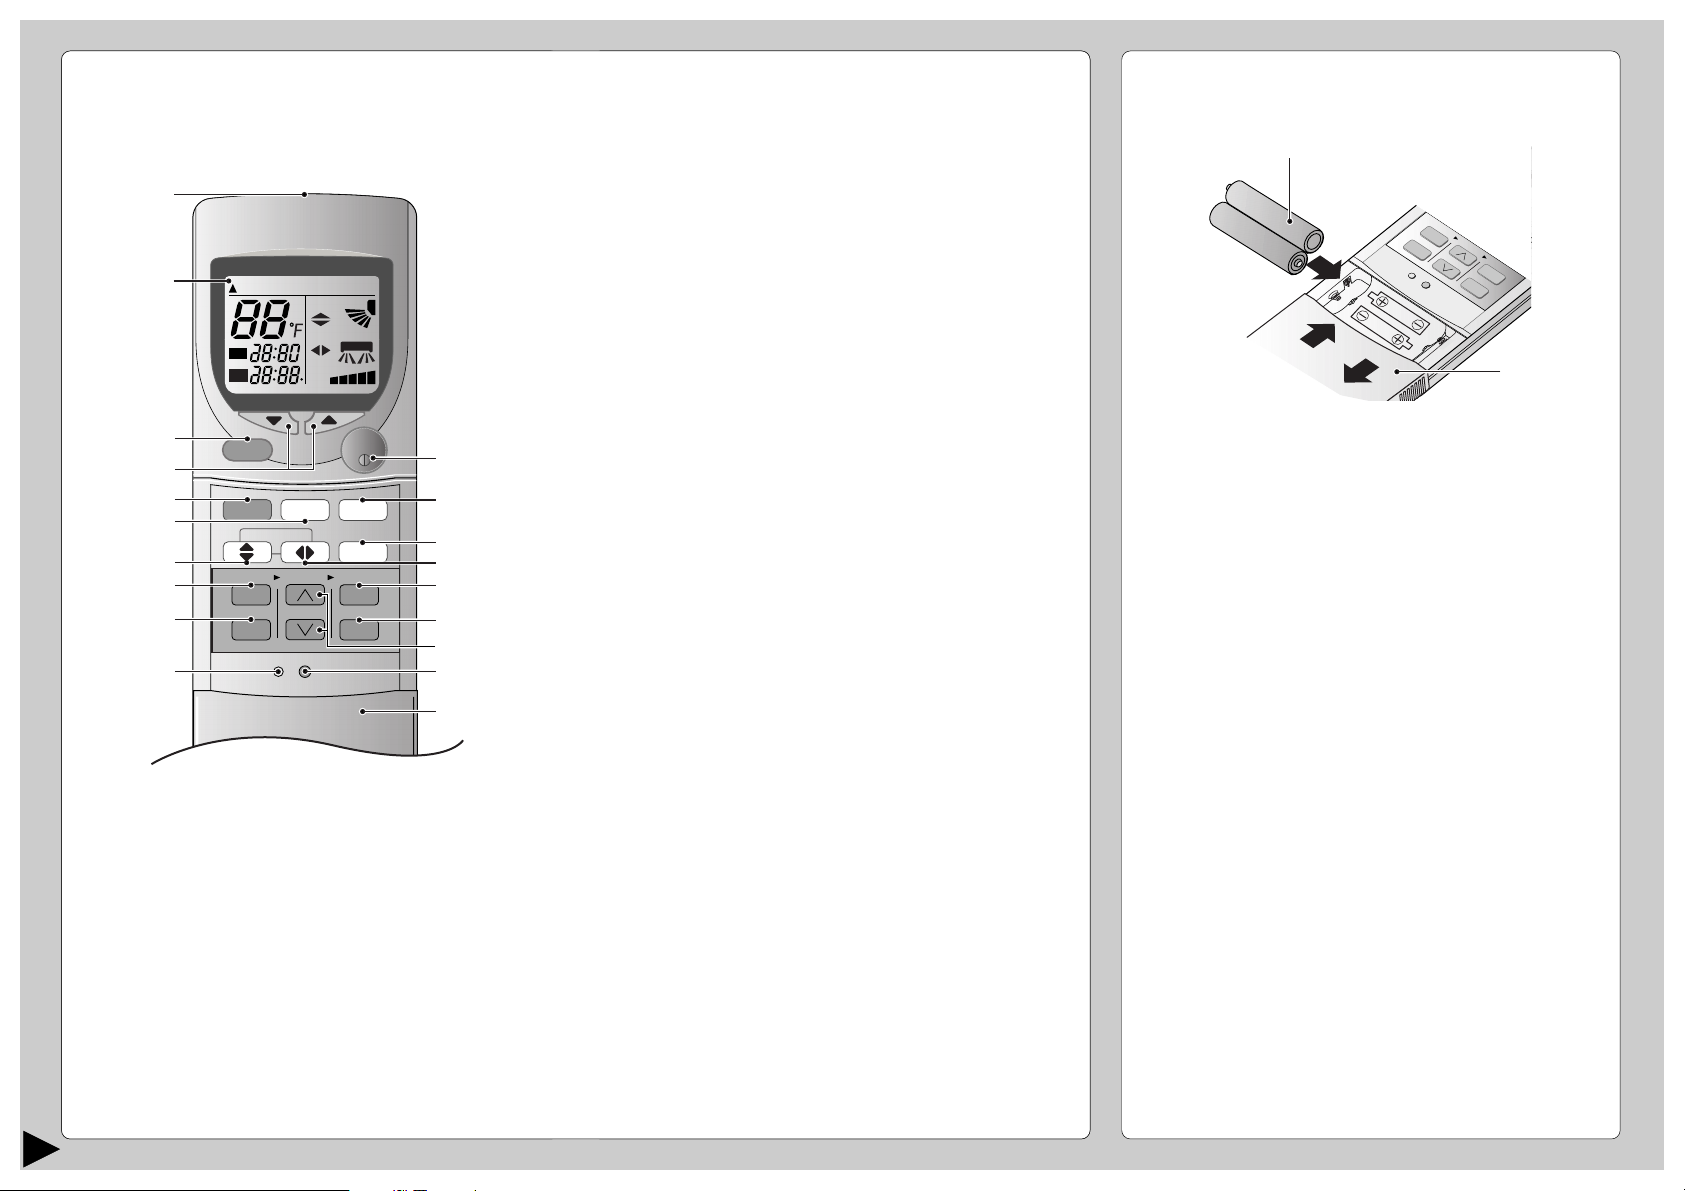
NOMBRE DE CADA PIEZA
CHECK
TEMP
AUTAUTO
ON
OFF
AUTAUTO DRDRYCOOLCOOLHEAHEAT
FANAN
AUTAUTO
AUTAUTO
RESET CLOCK
MODE
SLEEP
ECONOMY
FAN SPEED
AIR SWING
OFF
CANCEL
ON
SET
1
2
3
TIMER
OFF/ON
POWERFUL
#
!
$
%
^
$
*
&
3
5
8
7
9
0
6
4
(
AUTO
OF
AUTOHEAT
DRY
FANCOOL
FAN
AUTO
AUTO
SLE
2
1
1.5V
1.5V
● Cómo insertar las pilas
■ Control Remoto
1
2
● Señal del mando a distancia.
● Notas para el mando a distancia.
15
• Asegúrese de que el paso de la señal no está
obstruido.
• Distancia máxima: 10 m (32,8 ft.).
• Sonido de recepcion de la señal :
Un pitido corto o un pitido largo.
• No tire o deje caer el control remoto.
• No lo moje.
• Algunos tipos de lámparas fluorescentes pueden
afectar la recepción de la señal. Consulte a su
comerciante.
1 Transmisor de señales
PO
W
2 Visualización de funciones
3 Botón de funcionamiento en modo potente
4 Botón de ajuste de la temperatura de la habitación
(botón iluminable)
O
N
O
F
F
C
H
EC
TIMER
K
RE
SE
T
C
LO
C
K
ERFUL
MODE
AIR SWING
AUTO
E
C
O
N
O
M
MANUAL
2
CANCEL
Y
F
A
N
S
P
E
E
D
3
S
E
T
1
5 Botón de selección de modo de funcionamiento
6 Botón de funcionamiento en modo económico
7 Botón de direccionamiento de flujo de aire vertical
8 Botón de conexión del temporizador
1 Deslice hacia abajo por completo la tapa del
mando a distancia para retirarla.
9 Botón de desconexión del temporizador
2 Inserte las pilas
0 Puntos de reajuste
(Pulsar con un objeto de punta fina para borrar la
memoria)
! Botón OFF/ON (Conexión/desconexión)
(botón iluminable)
# Botón de funcionamien-to del modo de dormir
$ Botón de selección de la velocidad del ventilador
$ Botón de direccionamiento de flujo de aire horizontal
% Botón de ajuste de la hora
^ Botón de cancelación
& Botón de ajuste de la hora
* Botón del reloj
( Tapa del mando a distancia
– Compruebe si es la posición correcta.
– 12:00 en el visor - parpadeando.
• Ajuste inmediatamente la hora actual en el reloj
para evitar el desgaste de las pilas.(CLOCK)
3 Vuelva a colocar la tapa del mando a distancia
insertándola en las ranuras laterales y haciendo
presión hacia dentro.
● Notas sobre las pilas
• Se pueden utilizar durante aproximadamente un
año.
● Siga las siguientes condiciones cuando
reemplace las pilas
• Utilice pilas nuevas del mismo tipo.
• No use pilas recargables (Ni-Cd).
• Retire las pilas si no piensa utilizar la unidad
durante un largo tiempo.
Page 17
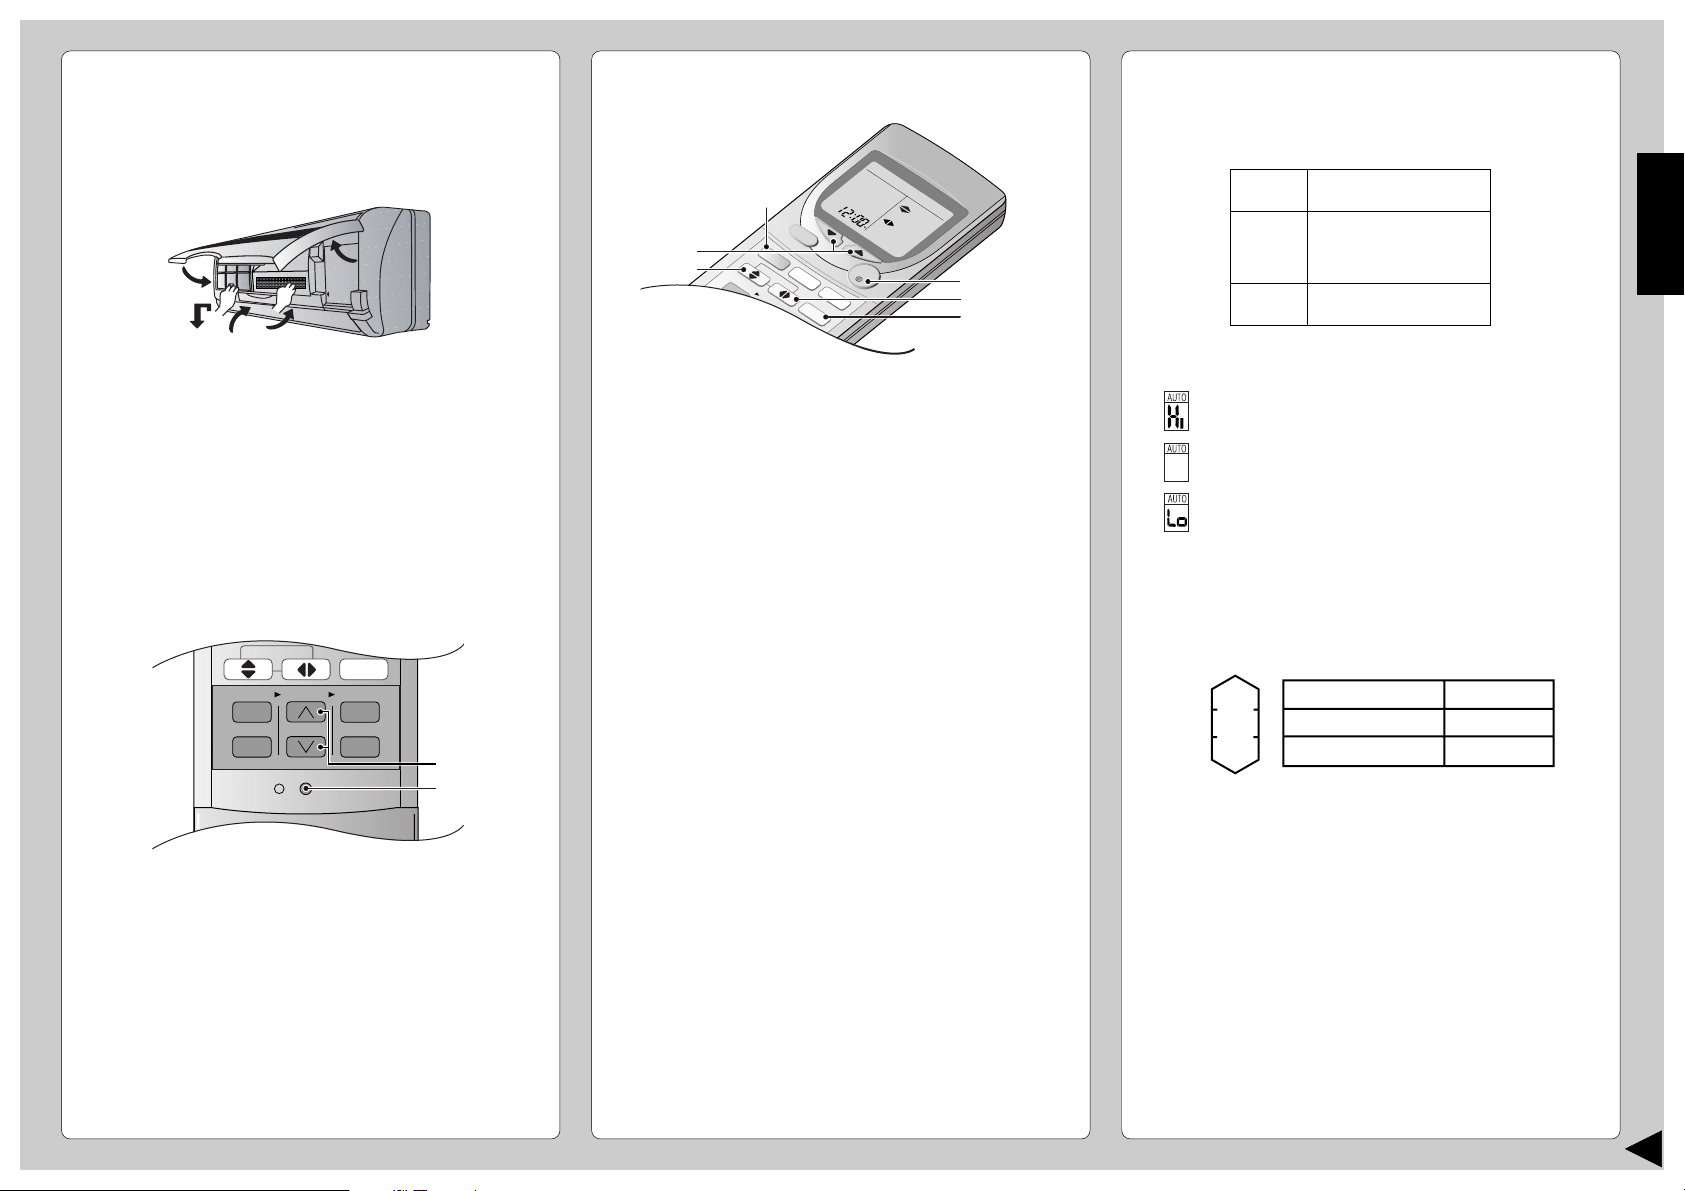
PREPARACIÓN ANTES DEL
CHECK
AUTO
AUTO H EAT DRY FANCOOL
FAN
AUTO
RESET CLOCK
FAN SPEED
AIR SWING
OFF
CANCEL
ON
SET
1
2
3
TIMER
1
2
OFF
O
N
HEAHEAT
DRDRY
FANANCOOLCOOL
CHECK
TEMP
AUTUTO
AU
T
UTO
FA
N
AN
AU
T
UTO
AU
T
UTO
RESET
CLOCK
AIR SWING
O
F
F
C
A
N
C
E
L
1
2
3
TIM
ER
O
F
F
/
O
N
POWERFUL
ECONOM
Y
SLEEP
O
N
SET
F
A
N
S
P
E
E
D
M
O
D
E
FUNCIONAMIENTO
■ Unidad Interior
1
5
2
4
3
1 Abra la parrilla delantera
2 Retire los filtros de aire
3 Coloque en su lugar los flitros purificadores de aire
4 Inserte los filtros de aire
5 Cierre el panel frontal
CÓMO HACERLO FUNCIONAR
2
3
5
■ Para iniciar el funcionamiento
• Presione 1.
• El indicador POWER (energía) (verde) de la unidad
interior se encenderá.
• Para parar, presione una vez más.
■ Ajuste del modo
• Presione 2 para seleccionar:-
1
6
4
■ Ajuste de la temperatura
• Presione 3 para aumentar o reducir la temperatura.
• La temperatura se puede ajustar entre 60°F ~ 86°F.
• Temperatura recomendada:
COOL
DRY
HEAT
• Durante el funcionamiento en AUTO, presione 3 para
seleccionar:-
• Funcionamiento a 4°F por encima de la
temperatura ambiente.
• Funcionamiento a la temperatura ambiente.
• Funcionamiento a 4°F por debajo de la
temperatura ambiente.
75°F ~ 78°F
2°F ~ 4°F
por debajo de la
temperatura ambiente
68°F ~ 75°F
ESPAÑOL
■ Control Remoto – Para poner en hora
1 Presione 1.
2 A continuación presione 2 para cambiar la hora
en sentido ascendente o descendente.
3 Vuelva a presione 1.
La hora actual se iluminará en el visor.
AUTO – Funcionamiento en modo automático
HEAT – Funcionamiento en modo calefacción
COOL– Funcionamiento en modo refrigeración
DRY – Funcionamiento en modo secado suave
● Temperatura estándar
Temperatura
de interior
Operación
Enfriado
73°F
68°F
Secado Suave
Aquecimento
• Al inicio del funcionamiento automático, los modos de
Calefacción, Refrigeración o Secado Suave se
seleccionan de acuerdo con la temperatura interior.
• El modo de operación cambia cada hora, cuando sea
necesario.
Temperatura
estándar
77°F
72°F
70°F
16
Page 18
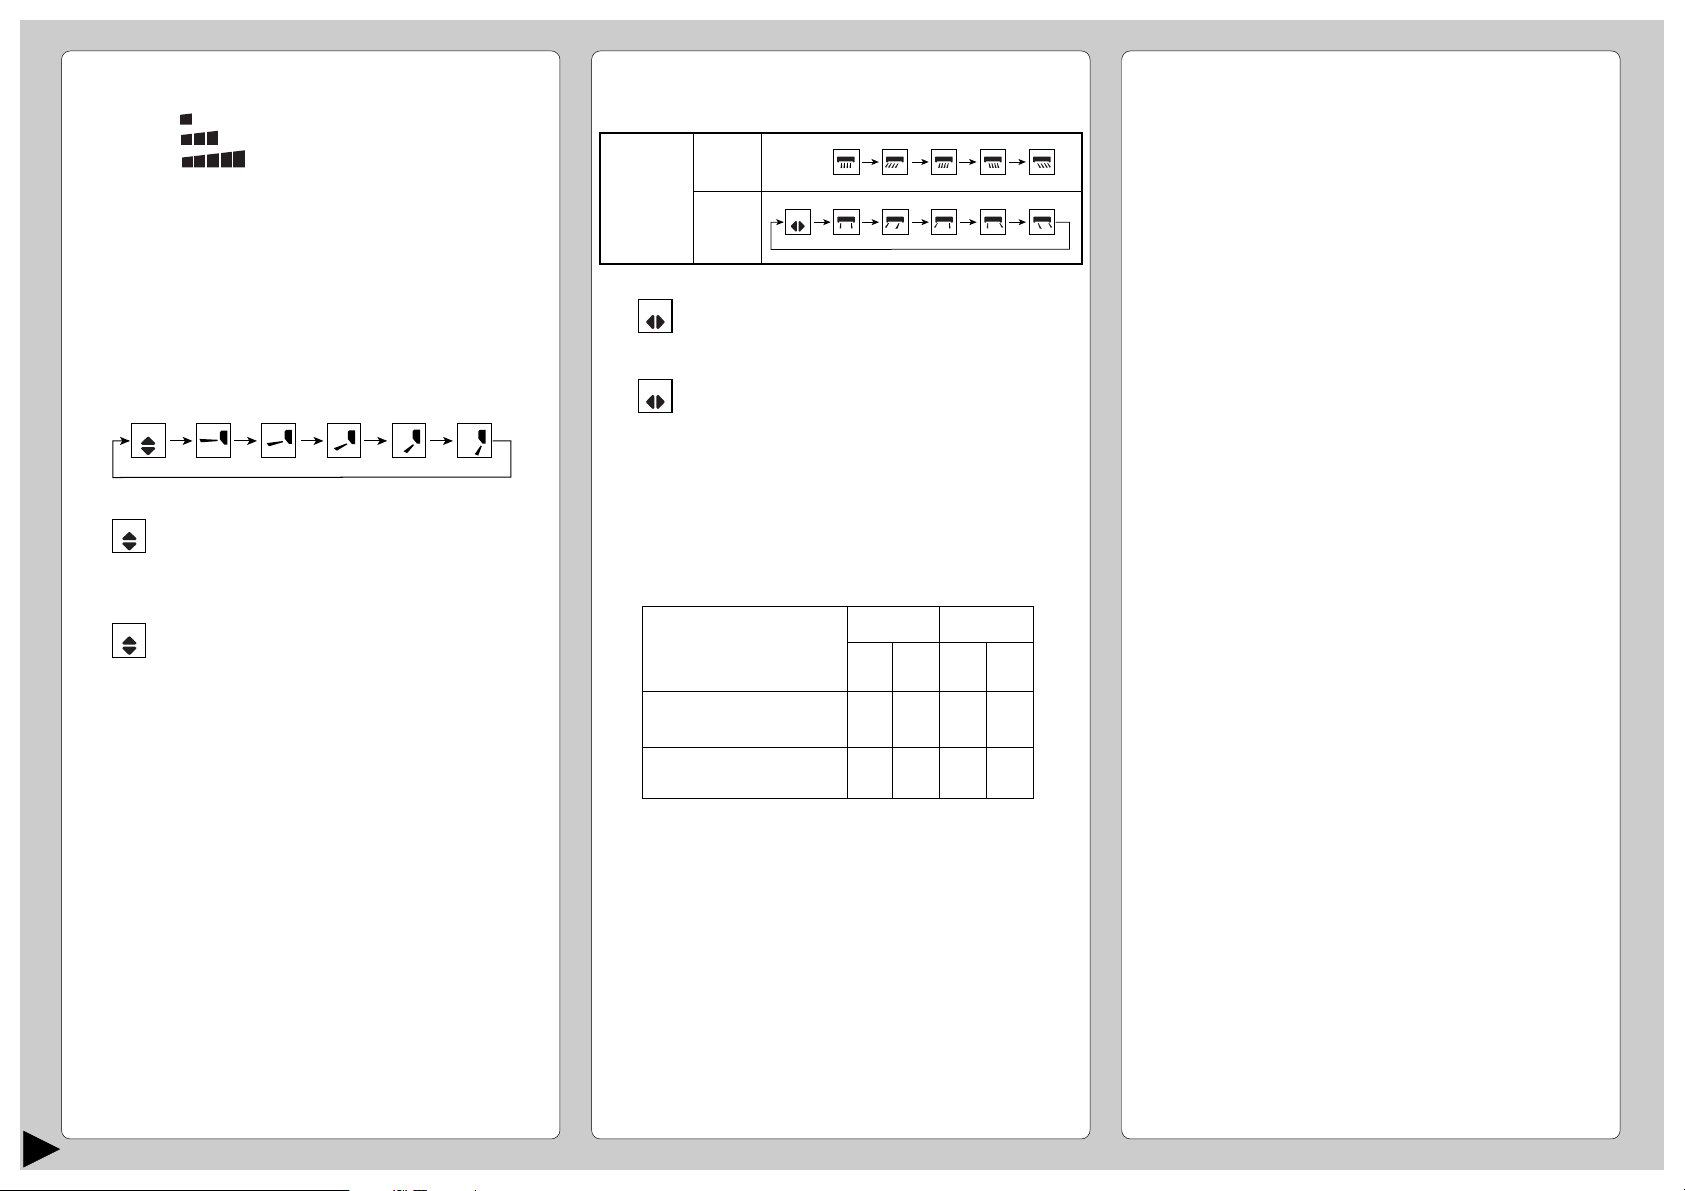
■ Ajuste de la velocidad del ventilador
• Presione 4 para seleccionar:-
FAN – Velocidad baja del ventilador
FAN – Velocidad media del ventilador
FAN – Velocidad alta del ventilador
AUTO
FAN – Velocidad automática del ventilador
La velocidad del abanico interior es
ajustada automáticamente de acuerdo
con el funcionamiento. La velocidad del
abanico interior se apaga temporalmente
durante el funcionamiento de la
modalidad de refrigeración.
■ Ajuste de la dirección vertical del flujo de aire
• Presione 5 para seleccionar:-
AUTO
• Para el funcionamiento en el modo
AUTO
COOL/DRY
Oscila hacia arriba y hacia abajo
automáticamente.
AUTO
• Para el funcionamiento en el modo HEAT
Cuando la temperatura del aire es baja,
como en el caso del arranque de la
calefacción, el aire sopla en sentido
horizontal. Cuando la temperatura sube, el
aire caliente sopla hacia abajo.
■ Ajuste de la dirección horizontal del flujo de aire
• Presione 6 para seleccionar:-
Dirección
horizontal
del flujo
de aire
Unidad
Interior
Control
Remoto
• Sólo para el funcionamiento COOL/ DRY
AUTO
AUTO
Oscila hacia derecha e izquierda
automáticamente.
• Sólo para el funcionamiento HEAT
AUTO
El flujo de aire no oscila mientras la
temperatura del aire emitido sea baja.
A medida que aumenta la temperatura,
las rejillas oscilarán a derecha e
izquierda automáticamente.
● Utilice este acondicionador de aire en las
siguientes condiciones:
(Unidad en °F)
73,4
(–)
51,8
(–)
Exterior
DBT
109,4
(75,2)
60,8
(23)
WBT
78,8
(64,4)
51,8
(21,2)
DBT: Temperatura de
bulbo seco
WBT: Temperatura de
bulbo húmedo
Temperatura máxima-Refrigeración
(Temperatura máxima-Calefacción)
Temperatura mínima-Refrigeración
(Temperatura mínima-Calefacción)
Interior
DBT
89,6
(86)
60,8
(60,8)
WBT
● Detalles de funcionamiento
COOL – Función de enfriamiento
• Para fijar la temperatura ambiente en el nivel de frío
que le resulte más agradable.
AUTO – Funcionamiento Automatico
• Tome la temperatura interior para seleccionar el
modo más apropiado.
• En el modo de funcionamiento AUTO no aparece la
temperatura en el mando a distancia.
DRY – La Operación de Secado Suave
• Una refrigeración muy suave previa a la
deshumidificación no reduce la temperatura
ambiente.
• Durante el funcionamiento de secado suave, el
ventilador del interior funcionará a velocidad lenta.
HEAT – Función de Calentamiento
• El calor para calentar la habitacion se obtiene del aire
exterior. Cuando la temperatura ambiente del aire
exterior baja, la cpacidad de calentamiento del equipo
podría verse reducida.
• Función de Descongelamiento Dependerá de la
temperatura exterior, la función ocaionalmente se
detiene para derretir el congelado en la unidad
exterior.
17
● Notas
• Si la unidad no va a ser utilizada durante un período
largo de tiempo, desconecte el interruptor de
alimentación. Si se deja en la posición ON se
utilizarán aproximádamente 2,5W de electricidad
incluso si la unidad principal ha sido desconectada
con el control remoto.
• Si se para el funcionamiento, recomience
inmediatamente, la unidad reanudará la operación
después de 3 minutos.
Page 19
AUTO
AUTO HE AT DRY FANCOOL
FAN
AUTO
MODE
SLEEP
ECONOMY
FAN SPEED
AIR SWING
OFF
CANCEL
ON
SET
1
2
3
TIMER
OFF/ON
POWERFUL
3
6
4
1
7
5
2
8
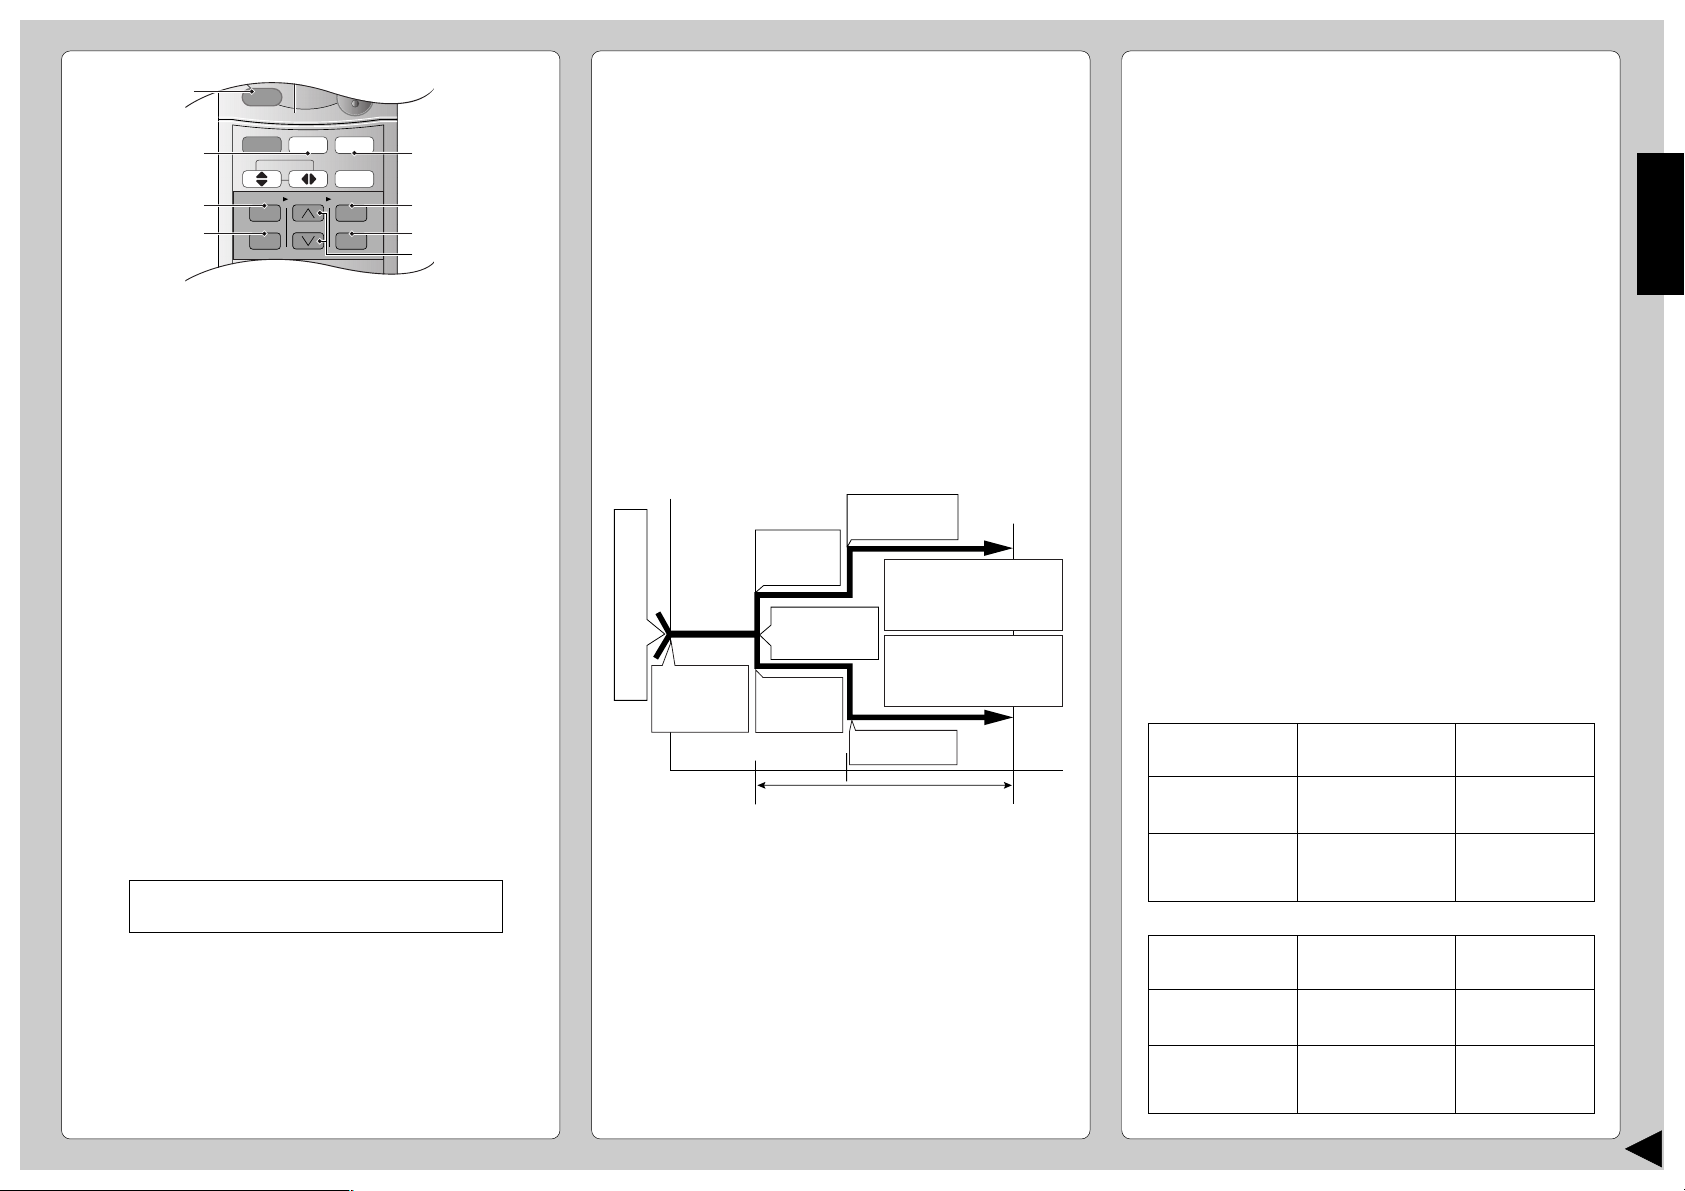
AJUSTE DEL TEMPORIZADOR
Asegúrese de que la hora actual es la correcta antes
de ajustar los temporizadores. Los temporizadores
no pueden ser ajustados si el visualizador de la hora
emite destellos.
■
Funcionamiento ON-TIMER (Temporizador de conexión)
Para poner en marcha automáticamente el
acondicionador de aire.
• Presione 1 para programar el funcionamiento.
• Presione 2 para aumentar o reducir el tiempo.
• Luego presione 3.
• Para cancelar esta operación, presione 4.
■ Funcionamiento OFF-TIMER (Temporizador de
desconexión)
Para parar automáticamente el funcionamiento del
acondicionador de aire.
• Presione 5 para programar el funcionamiento.
• Presione 2 para aumentar o reducir el tiempo.
• Luego presione 3.
• Para cancelar esta operación, presione 4.
● Detalles sobre el funcionamiento en modo
temporizador
• Cuando se ajusta ON-Timer, el funcionamiento
comenzará antes de la hora ajustada actual. Esto es
para permitir que la temperatura de la habitación
alcance la temperatura ajustada a la hora ajustada.
COOL, DRY –> 15 minutos en progresión
FUNCIONAMIENTO CONVENIENTE
■ Funcionamiento en modo de sueño
Se encenderá el indicador de modo de sueño de la
unidad interior.
• Presione 6.
• Se encenderá el indicador de modo de sueño de la
unidad interior.
• Para cancelar esta operación, vuelva a presionar
otra vez.
● Detalles del funcionamiento en modo sueño
• Cuando la temperatura ambiente alcanza el nivel
establecido, el volumen de la corriente de aire
cambiará a bajo automáticamente.
• El tiempo de la Función de Modo de dormir es de
8 horas.
• Cuando se usa junto con el temporizador, éste
tiene prioridad.
Temperatura
Aprox. aumento
T
e
F
m
i
p
j
e
r
a
a
d
t
a
u
r
Se aprieta el
a
botón de
funcionamiento
en descanso.
0~1 Hora
Aprox.
aumento de
1°F.
Función de
conmutación de
descanso se
activa.
Aprox.
descenso
de 4°F.
← 1 Hora →
después de aproximadamente 8
horas de la operación de cambio a
sueño se parará automáticamente.
de 1°F.
•
Empezará a funcionar la
refrigeración o el secado
suave para la operación de
cambio a sueño para evitar
el enfriamiento excesivo.
•
Empezará a funcionar la
calefacción para la operación
de cambio a sueño para
evitar el calentamiento
excesivo.
Aprox. descenso
de 5°F.
Hora
■ Funcionamiento en modo económico
Para ahorrar en el consumo de energína.
Conviene usar este modo cuando la habitación ha
alcanzado la temperatura deseada.
• Presione 7.
* El indicador del modo económico (verde) se
enciende en la unidad interior.
• Para cancelar esta operación, vuelva a presionar
otra vez.
■ Funcionamiento en modo plena potencia
Para conseguir rápidamente la temperatura
establecida.
• Presione 8.
* El indicador del modo de plena potencia (varanja)
se enciende en la unidad interior.
* El modo potente funcionará sólo durante 15
minutos.
• Para cancelar esta operación, vuelva a presionar
otra vez.
● Detalles sobre el funcionamiento del modo
económico/plena potencia
• No es posible seleccioner simultáneamente los
modos Económico y Potente.
• Los cambios de la temperatura y del flujo de aire
son automáticos.
• El visor del mando a distancia permanece sin
cambios.
• Si se pulsa el botón de sueño o de funcionamiento,
se cancelarán el modo de economía o de máxima
potencia.
Funcionamiento en
modo económico
COOL / DRY
HEAT
Temperatura
1°F por encima de la
temperatura establecida
1°F por debajo de la
temperatura establecida
Volumen de
flujo de aire
Super bajo
Automáticos
ESPAÑOL
HEAT, AUTO –> 30 minutos en progresión
• Una vez establecido el mecanismo de encendido y
apagado automatico (ON/OFF), el aparato se pondrá
en marcha diariamente a la hora establecida.
• La hora actual no se visualiza cuando se ajustan los
temporizadores.
• Cuando se usan a la vez ambos temporizadores, el
indicador de modo TIMER (temporizador) de la
unidad interior permanece encendido cuando el
OFF-TIMER detiene el aparato.
Funcionamiento en
modo plena potencia
COOL / DRY
HEAT
Temperatura
5°F por debajo de la
temperatura establecida
5°F
por encima de la
temperatura establecida
Volumen de
flujo de aire
Super alto
Automáticos
18
Page 20
CUIDADO Y MANTENIMIENTO
■
Limpieza de la Unidad Interior y el
Control Remoto
• Limpie suavemente con un trapo suave y seco.
• No use agua por encima de los 104°F ni
abrillantadores para limpiar la unidad.
■
Limpieza de los Filtros de Aire
(Recomendación: Si la unidad funciona en un ambiente
con polvo, limpie los filtros cada dos semanas, ya que el
uso continuado de estos filtros sucios reduce la eficacia
de la refrigeración o la calefacción)
1 Quite la suciedad utilizando una aspiradora.
2 Lave la parte posterior del filtro de aire con agua.
3 Si están muy sucios, lávelos con jabón o con un
detergente suave.
4 Deje secar los filtros y colóquelos de nuevo.
Asegúrese de que el lado marcado “FRONT” se
encuentra hacia adelante.
* Filtro de aire averiado.
Consulte con su comerciante autorizado más
proximo.
Pieza No: CWD001049.
• No use bencina, thinner, desengrasadores ni paños
empapados en productos cáusticos para la limpiar la
unidad.
■
Limpieza del Panel Frontal
(Debe ser removido antes de lavarlo)
1 Levante el panel frontal por encima del horizontal y tire
para extraerlo.
2 Lávelo suavemente con agua y una esponja.
No presione el panel frontal demasiado fuerte
•
cuando lo lave.
• Cuando use limpiadores de cocina (detergente
neutro), aclare abundantemente.
• No seque el panel frontal bajo la luz directa del sol.
3 Para fijar el panel frontal, levante el panel frontal
horizontalmente, hága coincidir la parte sobresaliente de
la unidad de interior con el punto de apoyo y haga
presión para fijarlo.
Saliente
■ Filtros Purificadores De Aire
1
Levante el
panel frontal
Filtro solar desodorizador
y refrescante
Filtro De
Purificador De Aire
2
Quite los filtros de aire
● Filtro solar desodorizador y refrescante
• Sirve para eliminar el olor desagradable y para
desodorizar el aire de la habitación.
• Reutilizable.
• Aspírelo, colóquelo a la luz directa del sol durante 6
horas y vuelva a colocarlo en su lugar.
(Recomendado: cada 6 meses)
• Se recomienda cambiar estos filtros cada 3 años.
● Filtros Purificadores De Aire
• Este nuevo filtro ayuda a retener pequeñas
partículas trasportadas en el aire, tales como
polvo, polen y humos de tabaco.
• Se recomienda cambiar estos filtros cada 3 meses.
• No reutilice los filtros dañados.
Consulte al vendedor autorizado más próximo para la
compra de un filtro nuevo.
Filtro De Purificador De Aire No: CZ-SF51P
Filtro solar desodorizador y refrescante. No: CZ-SFD70P
• Si el acondicionador de aire funciona con filtros
sucios:-
– El aire no se purifica
– La capacidad de enfriamiento o calefacción
disminuye
– Emitirá olores fétidos
■
Inspección de Pretemporada
● ¿El aire que sale es frÍo o caliente?
El funcionamiento es normal si 15 minutos después de
ponerlo en marcha, la diferencia entre las temperaturas
de entrada de aire y de la persiana de aireación es de:-
COOL –>14°F o más
HEAT –>25°F o más
● Se encuentran obstruidas las ventanillas de
entrada y salida de aire de las unidades de
interiores y de exteriores?
● Están bajas las pilas del control remoto?
Si la marca de la batería en el control remoto
parpadea o la visualización es débil, sustituya las
pilas.
■
Cuando el Acondicionador de Aire no se
Utiliza Durante un Período Largo de Tiempo
1 Para secar las partes internas de la unidad de
interior haga funcionar la unidad durante 2-3 horas
usando:-
Funcionamiento en modo
COOL (refrigeración) a 86°F
de temperatura establecida
2 Detenga el funcionamiento con el control remoto y
desconecte el cortacircuitos.
Nota: Si no se desconecta la unidad con el mando
a distancia, empezará a funcionar cuando el
cortacircuitos esté conectado (Porque la unidad
está equipada con control de reencendido
automático.)
3 Retire las pilas del control remoto.
■
Inspección Recomendada
• Después del uso durante varias temporadas, la
unidad acumula suciedad y por eso reduce su
rendimiento. Según las condiciones de
funcionamiento, una unidad con suciedad
acumulada puede contaminar el sistema
deshumidificador. Por lo tanto, se recomienda una
revisión estacional además de la limpieza regular.
(Consulte a un vendedor autorizado).
19
Soporte de la unidad interior
Page 21
INFORMACIÓN ÚTIL
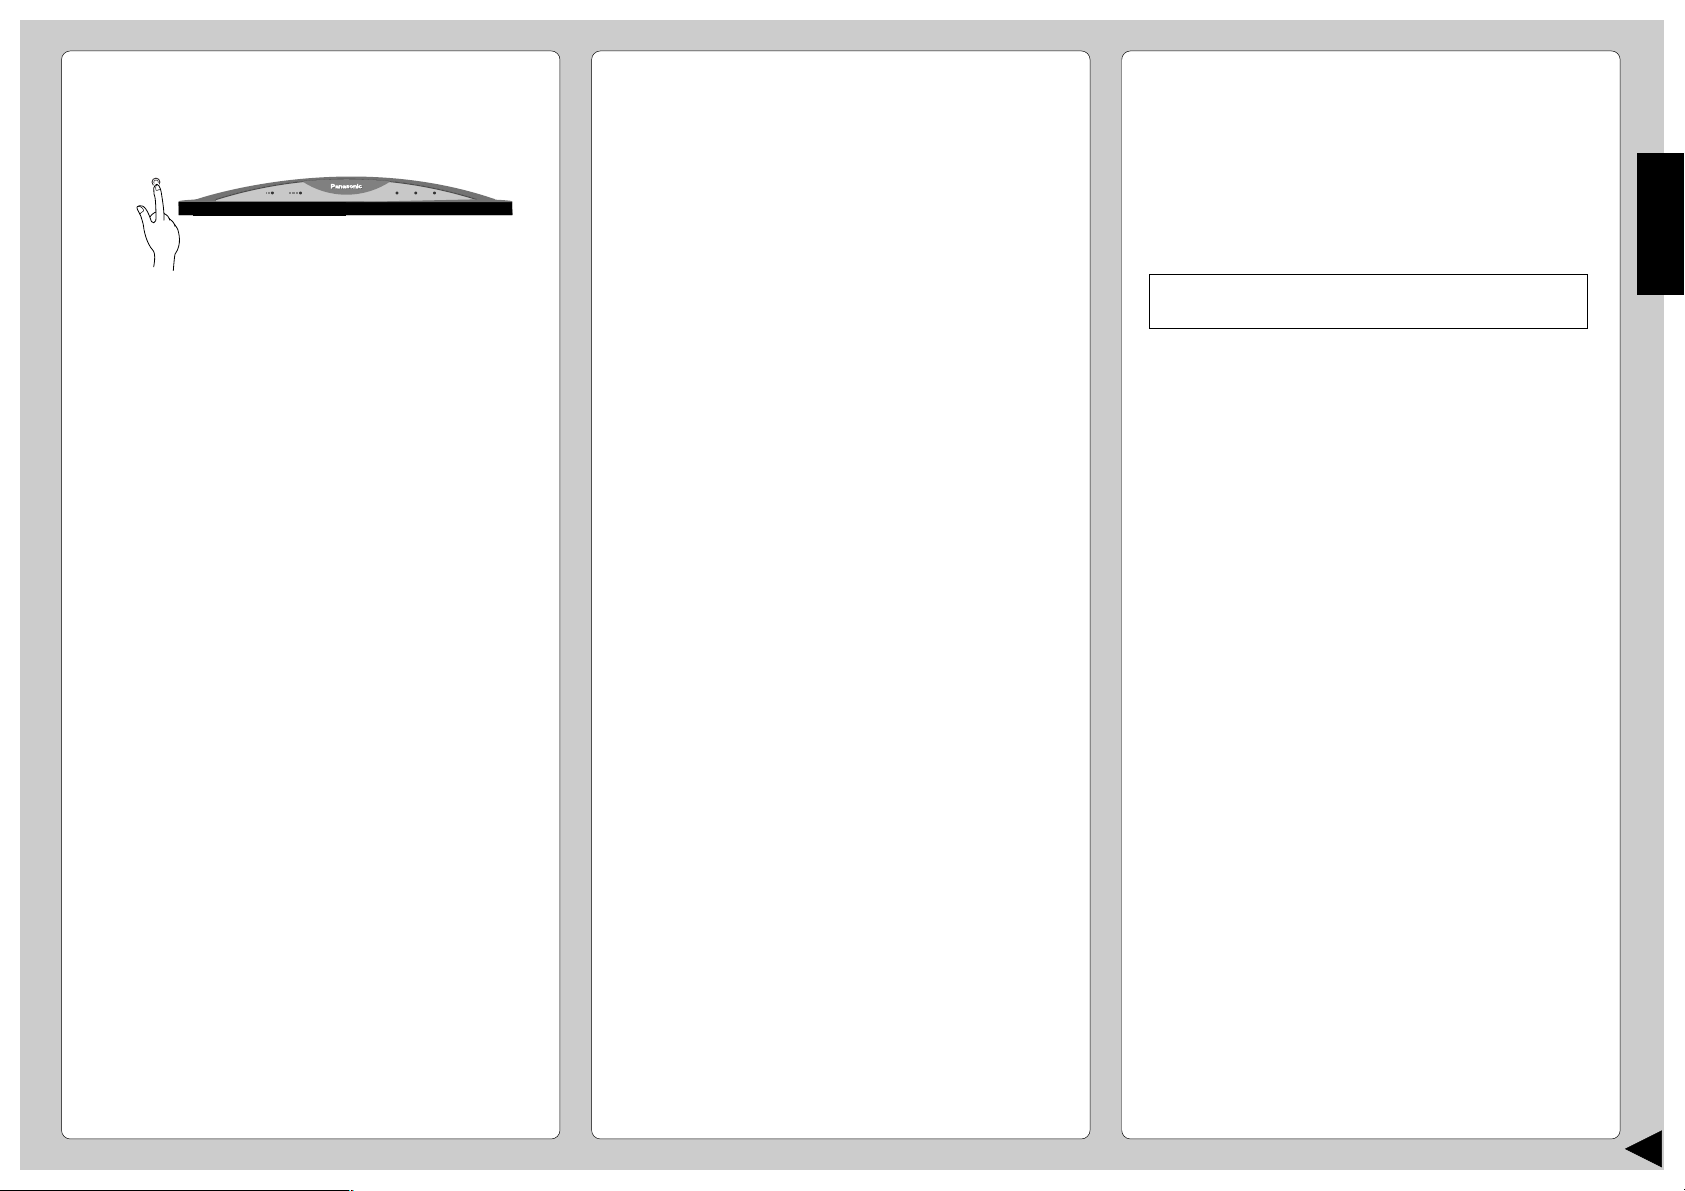
■ Botón de funcionamiento automático
POWERFULPOWERFULECONOMYECONOMY POWERPOWER
POWERFULPOWERFULECONOMYECONOMY POWERPOWER
• Levante el panel frontal y presione.
● Funcionamiento automático
• Si el mando a distancia deja de funcionar o ha
quedado mal colocado, pulse el botón de
funcionamiento automático para poner en marcha
el aparato.
• El funcionamiento automático se activará
inmediatamente al pulsar el botón Auto de
funcionamiento. Sin embargo, la temperatura no
puede ajustarse en esta operación.
• El indicador de alimentación de la unidad interior
parpadeará hasta que se seleccione
automáticamente el modo de funcionamiento.
• Para cancelar esta operación, vuelva a presionar
otra vez.
● Sonido de recepción de la señal del mando a
distancia
• Para desactivar el pitido (sonido de recepción de la
señal), pulse el botón de funcionamiento
automático por espacio de 10 segundos o más.
El sonido “beep”, “beep” se oirá pasados 10
segundos.
Nota: el sonido “beep” se oirá pasados 5
segundos;
pero debe seguir apretando hasta oir el
sonido “beep”, “beep”.
• Repita los mismos pasos si desea activar el sonido
de recepción de la señal.
SLEEPSLEEP
TIMERTIMER
SLEEPSLEEP
TIMERTIMER
■ Control de Autorecomienzo
• Si hay un corte eléctrico, la unidad comenzará a
funcionar automáticamente de 3 - 4 minutos
después de que se haya restablecido la corriente.
• El funcionamiento se reanudará automáticamente
en el modo de funcionamiento previo y en la misma
dirección del chorro de aire cuando se restablezca
el fluido eléctrico salvo que se haya interrumpido
dicho funcionamiento desde el mando a distancia.
■ Ajuste del Temporizador
• Cuando se producen cortes de corriente, se
cancelará la configuración del temporizador.
Reajuste el temporizador tan pronto como se
restablezca la corriente.
■ Tormentas Electricas
• Esta unidad de aire acondicionado está equipada
con un dispositivo protector contra subidas de
tensión incorporado. Sin embargo, para ofrecer una
mayor protección a su unidad de aire
acondicionado ante una subida anormal del flujo
eléctrico, debería desconectar el cortacircuitos.
SUGERENCIAS PARA AHORRAR ENERGÍA
Y PARA UN MEJOR FUNCIONAMIENTO
■ Ajuste de la Temperatura
• Se puede ahorrar aproximadamente el 10% de
electricidad.
• Ajusta la temperatura por encima o por debajo de la
temperatura deseada.
Funcionamiento en modo refrigeración: 2°F más
Funcionamiento en modo calefacción: 4°F menos
■ Filtro de Aire
• Limpie el filtro de aire cada dos semanas.
• Los filtros sucios pueden reducir la eficacia de la
refrigeración o calefacción.
■ Mantenga Cerradas Todas las Puertas y Ventanas
• De lo contrario, se verá reducido el rendimiento de
la refrigeración o calefacción y se usará electricidad
innecesariamente.
■ Unidad Exterior
• No bloquee las rejillas de salida de aire ya que
reduciría la eficacia de la refrigeración o
calefacción.
■ Temporizador y Modo de Dormir
• Para evitar el derroche de electricidad, use el modo
dormido mientras duerma o el temporizador cuando
salga de casa.
■ Evite la Exposición a la luz Solar Directa
• Mantenga las cortinas o los cortinajes cerrados
para evitar la luz directa del sol mientras funciona el
refrigeración.
ESPAÑOL
● (Sólo para fines de servicio técnico)
Nota: Si pulsa este botón por espacio de 5 a 10
segundos, se pondrá en marcha la prueba de
funcionamiento. A los 5 segundos se oirá un pitido
indicando el inicio de dicha prueba.
20
Page 22
LOCALIZACIÓN DE AVERÍAS
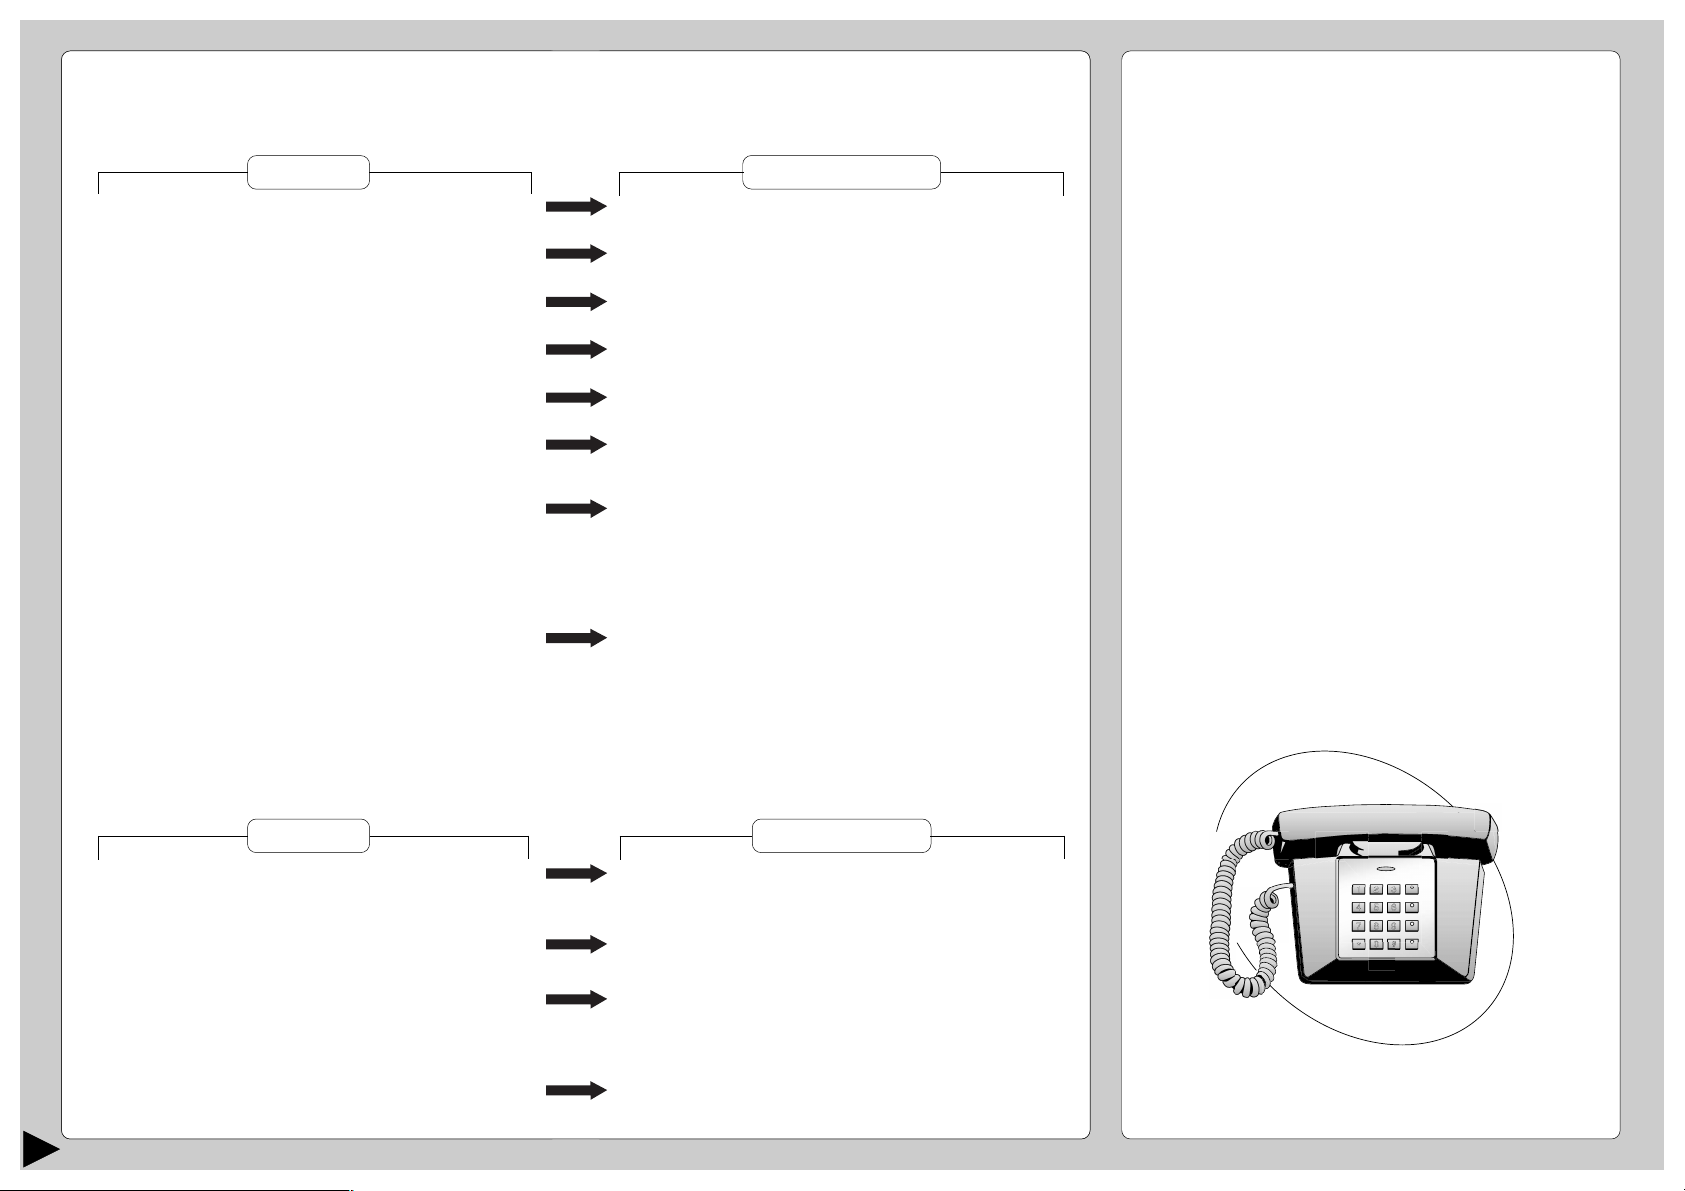
■ Funcionamiento Normal
Ocurre esto?
• Enciende el acondicionador de aire, pero no
funciona durante 3 minutos.
• Se escucha un sonido como de agua corriendo.
• Parecìerà que sale neblina del acondicionador
de aire.
• La habitación tiene un olor peculiar.
• Durante el ajuste del Flujo Automático de Aire, el ventilador
interior se suele parar.
• De la unidad exterior salen agua o vapor.
• El funcionamiento se detiene por espacio de 12 minutos
durante el calenta-miento (El indicador de energía
parpadea)
• Mientras la calefacción está en funcionamiento, el
ventilador de interior puede ponerse en marcha tanto si
está encendido como apagado.
Esta es la respuesta
• Es para proteger el acondicionador de aire. Espere hasta
que el acondicionador empiece a funcionar.
• Es el ruido del paso del refrigerante por las tuberías del
acondicionador de aire.
• La condensación se produce cuando el chorro de aire del
acondicionador enfría la habitación
• Puede tratarse del olor a humedad producido por las
paredes, las alfombras o las telas de la habitación.
• Es para quitar el olor producido por el entorno.
• En funcionamiento COOL/DRY (FRÍO/SECO), la humedad
del aire se condensa en agua sobre la superficie fría de la
tubería de la unidad exterior y gotea.
• Es para fundir la escarcha que se haya acumulado en la
unidad exterior (función de desescarchado). En un tiempo
máximo de 12 minutos, el agua empezará a gotear en la
unidad exterior. Espere hasta que finalice la operación (se
encenderá el indicador de corriente). (La escarcha se
acumula en la unidad exterior cuando la temperatura externa
es baja y la humedad alta.)
• Es para evitar el efecto de enfriamiento indeseado durante el
funcionamiento en el modo calefacción.
■ Comuniquese con el Distribuidor
Inmediatamente
Si se dan las siguientes circunstancias, apague el
cortacircuitos y desconéctelo de la red eléctrica. A
continuación, póngase en contacto con un distribuidor
autorizado o con el centro de asistencia técnica de
Panasonic.
• Si escucha ruidos extranõs durante el funcionamiento.
• Si por un descuido, vuelca agua u otro líquido sobre el
control remoto.
• Si hay escapes de agua de la unidad interior.
• Si los botones o interruptores no funcionan
correctamente.
• Si el interruptor de circuito se activa frecuentemente.
• Si el cable de alimentación y el enchufle se recalientan.
Se puede obtener informacic llamando al (866)-292-7292,
para residentes de Hawaii llame al (808)-488-7779.
Para agilizar la reparación del aire acondicionado:
• Tenga a mano la prueba de compra.
• Indique todos los síntomas que muestra la unidad.
■ Funcionamiento Anormal
Compruebe los siguientes puntos antes de llamar al servicio técnico. Si continúa funcionando mal, póngase en contacto con el centro
de asistencia técnica más próximo. Para obtener ayuda, llame al teléfono de EE.UU.: (866)-292-7292, para residentes de Hawaii
llame al (808)-488-7779.
Ocurre esto?
• El acondicionador de aire no funciona.
• El acondicionador de aire produce mucho
ruido mientras funciona.
• El acondicionador de aire no enfría ni
calienta eficazmente.
• Mando a distancia/indicación no funciona.
21
Compruebe
•
¿Ha saltado el interruptor automático? (¿Se ha producido
un cortocircuito?)
• Usa correctamente el temporizador?
• Está inclinado el trabajo de instalacion?
• Está cerrada debidamente la parrilla delantera?
• Ha fijado la temperatura correctamente?
• Los filtros estan sucios?
• Esta la entrada o salida de aire obstruida?
• Estan todas las vantanas ya puertas bien cerradas?
•¿Baterías vacias?
•¿Baterías correctamente colocadas (+) y (–)?
Page 23
ESPECIFICACIONES DEL PRODUCTO
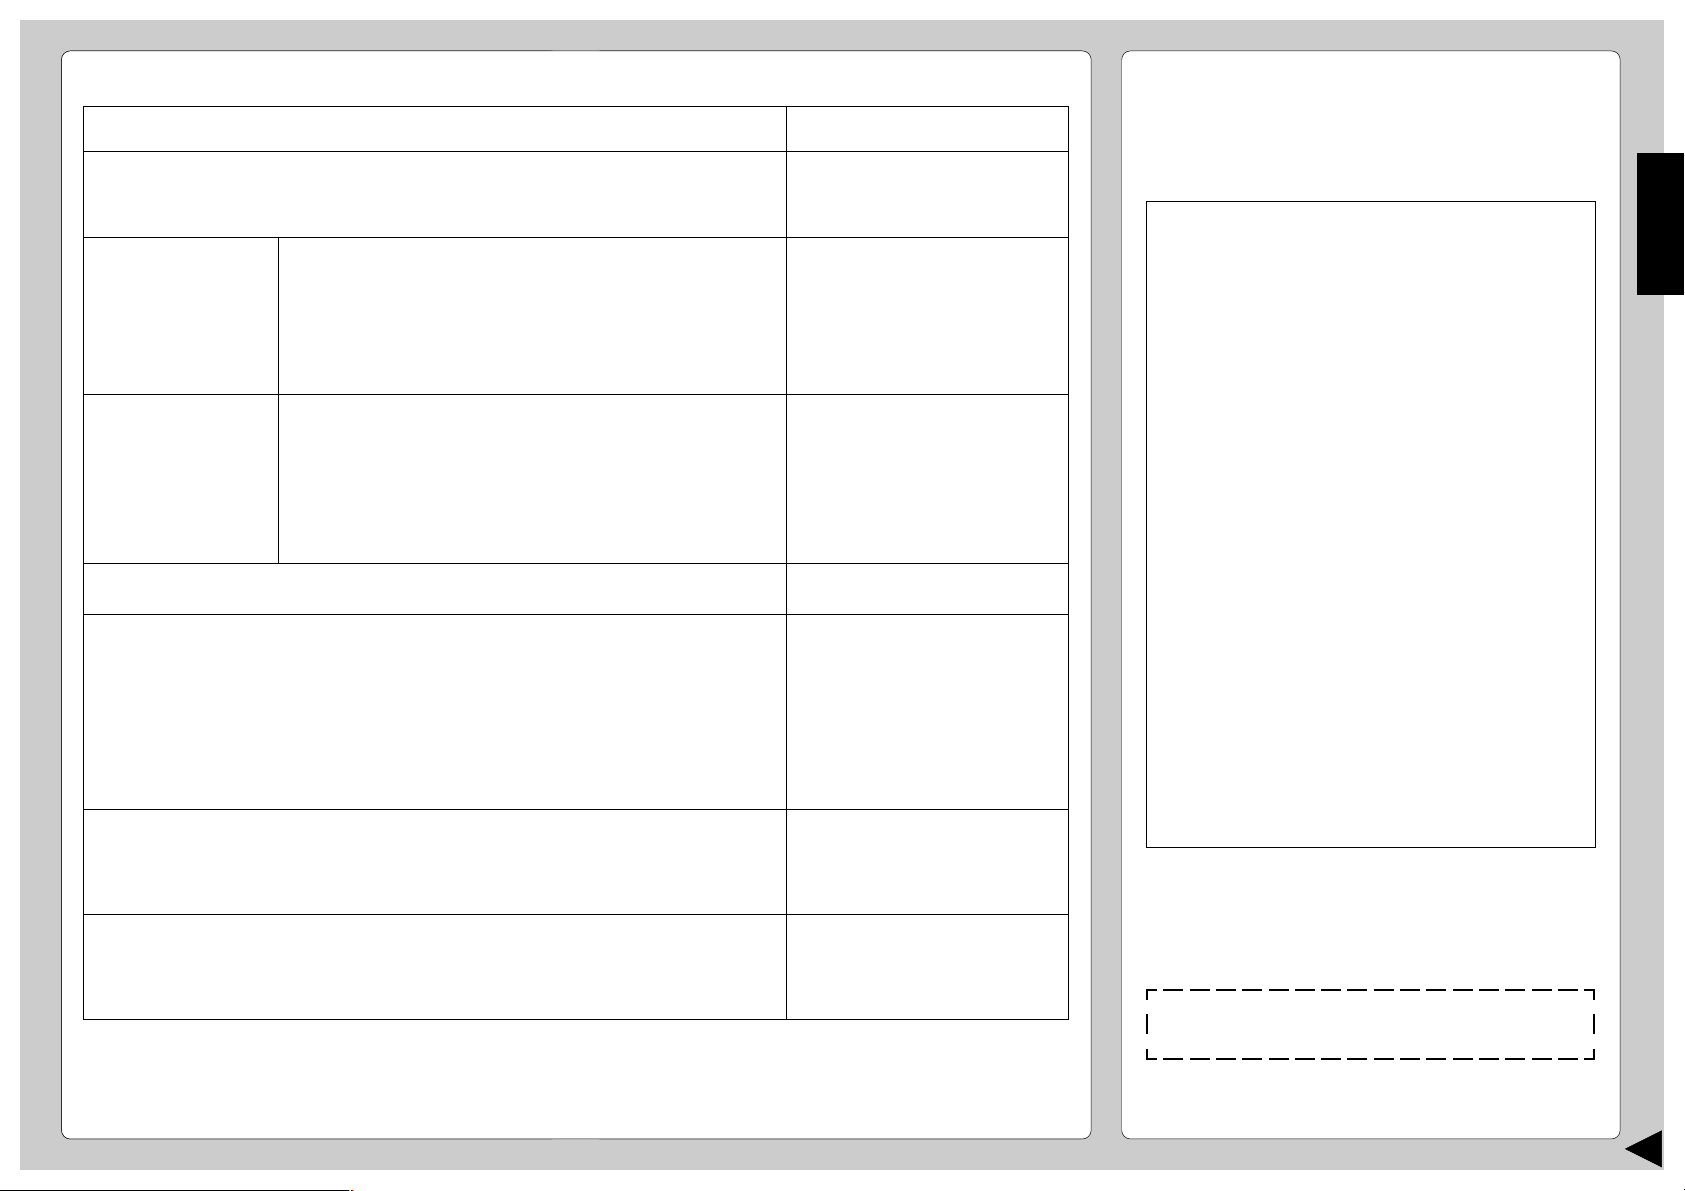
Modèlo
CLASIFICACION DE
Fase 1
CS-A18CKPG
CU-A18CKP6G
LA ÉLECTRICIDAD Fréqcuencia (Hz) 60
Voltaje (V) 208 – 230
REFRIGERACIÓN
Capacidad (Btu/h) 16 900 – 17 000
Corriente (Amps) 8,5 – 7,9
Potencia (W) 1 720 – 1 760
EER (Btu/W.h) 9,8 – 9,7
SEER 10,0
3
/min) 480
CALEFACCIÓN
Circulacion de aire (pie
Capacidad (Btu/h) 18 100 – 18 300
Corriente (Amps) 8,5 – 7,9
Potencia (W) 1 720 – 1 760
COP (Btu/W.h) 10,5 – 10,4
HSPF 6,8
3
Circulacion de aire (pie
/min) 512
DÉSHUMIDIFICACION (pinte/h) 4,0
DIMENSIONES Interior Alto cm (poulgadas) 27,5 (10 –13/16)
Ancho cm (poulgadas) 99,8 (39 –9/32)
Protundidad cm (poulgadas) 21,0 (8 – 9/32)
Exterior Alto cm (poulgadas) 68,5 (26 – 31/32)
Ancho cm (poulgadas) 80,0 (31 –1/2)
Protundidad cm (poulgadas) 30,0 (11 –13/16)
■ REFERENCIA
ESPAÑOL
Numero de modelo:
-------------------------------------------------------Nombre del comerciante:
-------------------------------------------------------Telefono del comerciante :
-------------------------------------------------------Numero de serie :
(Localizado en el costado de la unidad)
-------------------------------------------------------Fecha de adquisicion :
-------------------------------------------------------Nombre del comerciante:
--------------------------------------------------------
PESO Interior kg (libras) 11,0 (24)
NETO
Exterior kg (libras) 53,0 (117)
PESO Interior kg (libras) 13,5 (30)
BRUTO
Exterior kg (libras) 60,0 (132)
• Las especificaciones estan sujetas a cambios por mejoras sin previo aviso.
Favor de pegar la prueba de su compra aqui
para su futura referencia.
© 2002 Matsushita Electrical Co, Ltd. Derechos Reservados.
22
Page 24

PANASONIC CONSUMER ELECTRONICS COMPANY,
DIVISION OF MATSUSHITA ELECTRIC
CORPORATION OF AMERICA
One Panasonic Way
Secaucus, New Jersey 07094
PANASONIC SALES COMPANY,
DIVISION OF MATSUSHITA ELECTRIC OF PUERTO RICO, INC.,
Ave. 65 de lnfanteria, Km. 9.5
San Gabriel Industrial Park
Carolina, Puerto Rico 00985
Panasonic Split Air Conditioner Products Parts
Limited Warranty
Limited Warranty Coverage
If your product does not work properly because of a defect in materials or workmanship in a Panasonic provided part, Panasonic Consumer Electronics Company or Panasonic Sales
Company (collectively referred to as “the warrantor”) will, for the length of the period indicated on the chart below, which starts with the date of purchase (“warranty period”), at its option,
repair or provide a replacement for that part(s) with new or refurbished parts.
Product or Part Name Parts
All components of Split Air Conditioner except
Compressor and Remote Control Transmitter One (1) Year
Compressor Five (5) Year
Remote Control Transmitter (in exchange for defective item) Ninety (90) Days
During the warranty period, there will be no charge for parts. This warranty does not include labor for replacing defective parts or other costs incurred for servicing such as contractor visit
or contractor minimum charges, installing, removing, shipping or handling. Such cost may or may not be covered by a separate warranty provided by the contractor who installed the product.
If a part or parts are defective, the contractor will advise Panasonic, and Panasonic will forward the replacement part(s) to the contractor. If non-rechargeable batteries are included, they are
not warranted. This limited warranty only applies to products purchased and serviced in the United States or Puerto Rico and is extended only to the original purchaser of a new product which
was not sold “as is”. A purchase receipt or other proof of the original purchase/installation date is required for warranty service.
Exercising Your Warranty
To exercise your warranty in the United States contact the contractor who installed the product or, in all states other than Hawaii call (866)-292-7292; for Hawaii residents call (808)-488-7779.
For assistance in Puerto Rico call Panasonic Sales Company (787)-750-4300 or fax (787)-768-2910.
23
Limited Warranty Limits And Exclusions
This warranty ONLY COVERS failures due to defects in materials or workmanship in components provided by Panasonic, and DOES NOT COVER normal wear and tear or cosmetic
damage. The warranty ALSO DOES NOT COVER damages which occurred in shipment, or failures which are caused by products not supplied by the warrantor, or failures which result from
accidents, misuse, abuse, neglect, mishandling, misapplication, alteration, faulty installation, set-up adjustments, operating the product in a corrosive atmosphere containing chlorine,
fluorine, or any other chemicals, misadjustment of consumer controls, improper maintenance, power line surge, lightning damage, modification, or service by anyone other than an
authorized contractor, or damage that is attributable to acts of God.
THERE ARE NO EXPRESS WARRANTIES EXCEPT AS LISTED UNDER “LIMITED WARRANTY COVERAGE”. THE WARRANTOR IS NOT LIABLE FOR INCIDENTAL OR
CONSEQUENTIAL DAMAGES RESULTING FROM THE USE OF THIS PRODUCT, OR ARISING OUT OF ANY BREACH OF THIS WARRANTY. (As examples, this excludes damages
for lost time, parts used in connection with normal maintenance such as air filters and owner-required maintenance. The items listed are not exclusive, but are for illustration only.) ALL
EXPRESS AND IMPLIED WARRANTIES, INCLUDING THE WARRANTY OF MERCHANTABILITY, ARE LIMITED TO THE PERIOD OF THE LIMITED WARRANTY.
Some states do not allow the exclusion or limitation of incidental or consequential damages, or limitations on how long an implied warranty lasts, so the exclusions may not apply to you.
This warranty gives you specific legal rights and you may also have other rights which vary from state to state. If a problem with this product develops during or after the warranty period, you
may contact your authorized contractor. If the problem is not handled to your satisfaction, then write to the warrantor’s Consumer Affairs Department at the addresses listed for the warrantor.
PARTS WHICH ARE NOT COVERED BY THIS LIMITED WARRANTY, INCLUDING WITHOUT LIMITATION THE COST OF AN IN-HOME SERVICE CALL, ARE YOUR
RESPONSIBILITY.
Printed in Malaysia
F563736
P0211-0
Page 25

documentation manual, user maintenance, brochure, user reference, pdf manual
This file has been downloaded from:
User Manual and User Guide for many equipments like mobile phones, photo cameras, monther board, monitors, software, tv, dvd, and othes..
Manual users, user manuals, user guide manual, owners manual, instruction manual, manual owner, manual owner's, manual guide,
manual operation, operating manual, user's manual, operating instructions, manual operators, manual operator, manual product,
 Loading...