

Page 1
YEFM283944A ND1202-2043 Printed in China
Matsushita Electric Industrial Co., Ltd.
Web Site :http://www.panasonic.co.jp/global/
Removable Full Front Cassette Player/Receiver
with CD Changer Control
可控制CD換片器的可拆式面板磁帶放音機/收音機
л˙ВПМ‡fl Н‡ТТВЪМ‡fl П‡„МЛЪУО‡ Т ЩУМЪ‡О¸МУИ Б‡„ЫБНУИ Н‡ТТВЪ,
ФВ‰ЫТП‡ЪЛ‚‡˛˘‡fl ‚УБПУКМУТЪ¸ ЫФ‡‚ОВМЛfl CD-˜ВМ‰КВУП
CQ-FX323W
Operating Instructions
操作說明書
азлнкмдсаь ий щдлигмДнДсаа
¡Please read these instructions carefully before using this product and keep this manual for future reference.
¡使用本產品之前,請仔細閱讀這些說明書,並妥善保管本操作說明書以備將來使用。
¡
иВВ‰ М‡˜‡ОУП ˝НТФОЫ‡Ъ‡ˆЛЛ ‡ФФ‡‡Ъ‡ ФУТЛП ФУ˜ЛЪ‡Ъ¸ М‡ТЪУfl˘Ы˛ ЛМТЪЫНˆЛ˛ ‚МЛП‡ЪВО¸МУ Л ı‡МЛЪ¸ ВВ М‡ ФУО¸БУ‚‡МЛВ
М‡ ·Ы‰Ы˘ВВ.З˚·Л‡ИЪВ КВО‡ВП˚И ‚‡Л‡МЪ.
V
O
L
VOL
V
O
L
S
E
L
SELS
E
L
B
A
N
D
TUNETUNE
TRACKTRACK
TUNE
TRACK
P
R
G
CQ-FW323W
CASSETTE RECEIVER WITH CHANGER CONTROL
OPENOPENOPEN
REVEL
DISP
CLOCK
super bright display with level meters
SCAN
RANDOM
4
LOUD
APM
1
2
MTL
NR
3
TPS
B·S
REP
56
REPEAT
DISC
MUTE
R
E
M
O
T
E
S
O
U
R
C
E
P
W
R
M
O
N
O
/
L
O
C
DIMMER
Page 2
CQ-FX323W
中
國
語
3
安全注意事項
及緊急處理方法
請務必遵守
為避免對使用者或其他人員造成傷害或財產損失,現將須務必嚴守事項說明如下﹕
■ 對無視所示內容,造成操作錯誤而產生的危害及損害程度按下述表記加以區分、說明。
有此表記欄內的內容表示“有造成死亡或重傷等的可能性”。
有此表記欄內的內容表示“有造成傷害的可能性或僅有造成財產損失
的可能性”。
■ 對須務必嚴守事項的種類以下列圖示加以區分、說明。
(下列圖示僅為圖示之一例。)
此圖示表示不得進行的“禁止”事項。
此圖示表示必須進行的“強制”事項。
司機在開車時不得進行操作
如開車時進行操作的話,會因
對前方注意不夠而有造成交通
事故的危險。
要將車停靠在安全之處後再進
行操作。
不得將確保安全的部件用於本機
的安裝及地線配線等
如果使用方向盤、制動器等保
安部件的螺栓、螺母、小螺絲
的話,有造成故障的危險。應
按說明,使用所附的部件。
E
N
G
L
I
S
H
中
國
語
зД кмллдйе ьбхдЦ
2
CQ-FX323W
Safety Information 安全須知
аМЩУП‡ˆЛfl ‰Оfl ·ВБУФ‡ТМУТЪЛ
WARNING:
TO REDUCE THE RISK OF FIRE OR ELECTRIC
SHOCK, DO NOT EXPOSE THIS PRODUCT TO
RAIN OR MOISTURE.
TO REDUCE THE RISK OF FIRE OR ELECTRIC
SHHOCK, AND ANNOYING INTERFERENCE, USE
ONLY THE INCLUDED COMPONENTS.
警告:
為避免火災或電擊的危險,切勿使本機遭受
雨淋或受潮。
為防止火災或電擊的危險,和出現干擾,務
必要使用所附的部件。
è‰ÛÔÂʉÂÌËÂ:
óÚÓ·˚ ËÁ·Â„‡Ú¸ ËÒ͇ ÔÓʇ‡ ËÎË
˝ÎÂÍÚÓ¯Ó͇, ӷ„ËÚ ‡ÔÔ‡‡Ú ÓÚ
‚ÎËflÌËfl ‰Óʉfl ËÎË ‚·„Ë.
уЪУ·˚ ЛБ·В„‡Ъ¸ ЛТН‡ ФУК‡‡ ЛОЛ
˝ОВНЪУ¯УН‡, ЛТФУО¸БЫИЪВ ЪУО¸НУ
НУПФУМВМЪ˚, ‚ıУ‰fl˘ЛВ ‚ НУПФОВНЪ.
“мТЪ‡МУ‚ОВММ˚И ФУЛБ‚У‰ЛЪВОВП ‚
ФУfl‰НВ Ф.2 ТЪ.5 оВ‰В‡О¸МУ„У б‡НУМ‡
ко “й Б‡˘ЛЪВ Ф‡‚ ФУЪВ·ЛЪВОВИ” ТУН
ТОЫК·˚ ‰Оfl ‰‡ММУ„У ЛБ‰ВОЛfl ‡‚ВМ 7
„У‰‡П Т ‰‡Ъ˚ ФУЛБ‚У‰ТЪ‚‡ ФЛ ЫТОУ‚ЛЛ,
˜ЪУ ЛБ‰ВОЛВ ЛТФУО¸БЫВЪТfl ‚ ТЪУ„УП
ТУУЪ‚ВЪТЪ‚ЛВ Т М‡ТЪУfl˘ВИ ЛМТЪЫНˆЛВИ
ФУ ˝НТФОЫ‡Ъ‡ˆЛЛ Л ФЛПВМЛП˚ПЛ
ЪВıМЛ˜ВТНЛПЛ ТЪ‡М‰‡Ъ‡ПЛ.”
緊急處理方法
為防止使用者及其他人之危害及生命財產的損失,如有上述異常發生時,請立即關閉電源停止使
用
並
就近前往保養廠或汽車音響經銷商尋求協助。
Page 3

CQ-FX323W
中
國
語
5
u退出鍵 (EJECT)
[VOL]
¡音量 } {
[BAND](PRG)
¡BAND選擇
¡換面播放
[SEL](選擇)
¡選擇音頻模式
[SOURCE][PWR](電源)
¡電源開/關
¡選擇音源
[APM](自動電台預置記憶)
¡自動電台預置記憶
磁帶插入口
[LOUD](響度)
¡響度
[LEVEL](DIMMER)
¡電平表
¡弱光
[OPEN] 打開面板
[¡](MUTE)(MONO/LOC)
¡靜音
¡單聲道/局部選擇
[DISP](顯示器)
¡時鐘設定
¡顯示改變
[Tune], [Track], [2], [1], [}], [{]
¡調諧頻率
¡音軌選擇
¡快退和快進
電台預置鍵([1]至[6])
¡電台預置記憶
¡隨機(音軌)
¡掃描(光盤,音軌)
¡重複(音軌)
各部名稱及其功能
主機
CQ-FX323W
中
國
語
4
安裝及配線應請專門的技術人員
進行
本機的安裝及配線需要專門的技術
和經驗。
為確保安全,請委託經銷處進行安
裝及配線。
切勿進行解體或改裝
嚴禁將本機解體或進行改裝,或者
將電源線的鎧裝切開與其他電源連
接,這會有冒煙、起火、觸電或造
成故障的危險。
當出現故障及異常時不要繼續使用
當在不能發出聲音、冒煙、出現異
味等異常情況下繼續使用的話,有
起火及觸電的危險。應立即停止使
用並與經銷處取得聯系。
切勿使異物進入本機內部
如果金屬物品或易燃物等異物進入
本機內部的話,可因短路及絕緣不
良而造成發熱、起火及觸電並有出
現故障的危險。
切勿將手或手指放到本機的動作部
位切勿將異物置於光碟插入口內
將手或手指放到本機的動作部位或
將異物置於光碟插入口內的話,有
造成外傷或故障的危險。
對嬰幼兒尤其要注意。
應請專門的技術人員更換保險絲
如果使用非指定的保險絲的話,有
冒煙、起火或造成故障的危險。應
請經銷處來修理或更換保險絲。
進行配線作業時,務必要將電池的
@ 極接線柱拆開
如果不按說明正確地進行配線的
話,將會因短路而有造成觸電、外
傷以及起火或故障的危險。
供帶有直流12V@接地的車輛使用
本機僅供帶有直流12 V@ 接地的
車輛使用。大型卡車以及寒冷地帶
使用規格的柴油車等 (直流24 V車)
不能使用本機,否則會出現短路而
有造成起火或故障的危險。
切勿使本機淋上或浸水
如有水進入本機的話,將會因短路
及絕緣不良而有造成發熱、起火及
觸電或故障的危險。洗車或下雨
時,要注意不要使本機淋上水。
要調節為適當的音量使用
當在聽不到車外或周圍聲音的狀態
下開車時,有造成事故的危險。
CQ-FW323W
R
P
D
N
A
B
V
O
L
TUNE
TRACK
E
SEL
R
S
O
U
R
C
E
G
E
T
O
M
P
W
R
CASSETTE RECEIVER WITH CHANGER CONTROL
super bright display with level meters
MUTE
DISC
MTL
1
NR
M
O
N
O
/
L
O
C
2
TPS
3
RANDOM
SCAN
4
56
OPEN
LEVEL
DIMMER
CLOCK
DISP
REPEAT
REP
B·S
LOUD
APM
Page 4
6 7
CQ-FX421/FX321N
CQ-FX323W
1
E
N
G
L
I
S
H
2
E
N
G
L
I
S
H
CQ-FX323W
Panasonic welcomes you to their constantly growing family of electronic products owners.
We endeavor to give you the advantages of precise electronic and mechanical engineering, manufactured with carefully selected components, and assembled by people who are proud of the reputation their
work has built for our company. We know this product will bring you many hours of enjoyment, and after
you discover the quality, value and reliability we have built into it, you too will be proud to be a member of
our family.
Precautions
Volume Level
For your driving safety, keep the volume level low enough to be aware of road
and traffic conditions.
Car Washing
To avoid electrical shorts which may cause fire, or other damage, do not
expose this Product (including the speakers and tape) to water or excessive
moisture.
Car Ventilation
If your car is parked for several hours in direct sun-light, the temperature
inside the car may become very high. It is advisable to drive the car and give
the interior a chance to cool down before switching the unit on.
Power Supply
This Product is designed to be used in a car having a 12-Volt negative ground
battery system.
Tape Mechanism
Keep magnets, screwdrivers and other metallic objects away from the tape
mechanism and tape head.
Service
This Product is made of precision parts. Do not attempt to disassemble or
adjust any parts. For repair, please consult your nearest authorized Service
Center.
Note: The preset memory is cleared to return to the original factory setting
when the power connector or battery is disconnected.
Accessaries
¡Operating Instructions.................................................................................1
¡Supplied Hardware............................................................1set (Page a16)
¡Removable Face Plate case.......................................................................1
ENGLISH.................................................... 6-25
CHINESE........................................................ 26-45
RUSSIAN
........................................................ 46-65
Contents
Contents . . . . . . . . . . . . . . . . . . . . . . . . . . . . . . . . . . . . . . . . . . . . . . . . . . . . . . . . . . . . . . . . . . . . . . . . . . . . . . . . . . . . . . . . . . . . . . . . 6
Precaution
. . . . . . . . . . . . . . . . . . . . . . . . . . . . . . . . . . . . . . . . . . . . . . . . . . . . . . . . . . . . . . . . . . . . . . . . . . . . . . . . . . . . . . . . . . . . . 7
Accessaries
. . . . . . . . . . . . . . . . . . . . . . . . . . . . . . . . . . . . . . . . . . . . . . . . . . . . . . . . . . . . . . . . . . . . . . . . . . . . . . . . . . . . . . . . . . . 7
Remote Control (Option)
. . . . . . . . . . . . . . . . . . . . . . . . . . . . . . . . . . . . . . . . . . . . . . . . . . . . . . . . . . . . . . . . . . . . . . . . . . . . . . . . . . . 7
Power and Sound Controls
. . . . . . . . . . . . . . . . . . . . . . . . . . . . . . . . . . . . . . . . . . . . . . . . . . . . . . . . . . . . . . . . . . . . . 8
Radio
. . . . . . . . . . . . . . . . . . . . . . . . . . . . . . . . . . . . . . . . . . . . . . . . . . . . . . . . . . . . . . . . . . . . . . . . . . . . . . . . . . . . . . . . . . . . . . . . . . . .10
Clock
. . . . . . . . . . . . . . . . . . . . . . . . . . . . . . . . . . . . . . . . . . . . . . . . . . . . . . . . . . . . . . . . . . . . . . . . . . . . . . . . . . . . . . . . . . . . . . . . . . . .11
Cassette Tape Player
. . . . . . . . . . . . . . . . . . . . . . . . . . . . . . . . . . . . . . . . . . . . . . . . . . . . . . . . . . . . . . . . . . . . . . . . . . . . . .12
CD Changer Control
. . . . . . . . . . . . . . . . . . . . . . . . . . . . . . . . . . . . . . . . . . . . . . . . . . . . . . . . . . . . . . . . . . . . . . . . . . . . . . .14
Installation
. . . . . . . . . . . . . . . . . . . . . . . . . . . . . . . . . . . . . . . . . . . . . . . . . . . . . . . . . . . . . . . . . . . . . . . . . . . . . . . . . . . . . . . . . . . . .16
Anti-Theft System
. . . . . . . . . . . . . . . . . . . . . . . . . . . . . . . . . . . . . . . . . . . . . . . . . . . . . . . . . . . . . . . . . . . . . . . . . . . . . . . . . . .19
Electrical Connections
. . . . . . . . . . . . . . . . . . . . . . . . . . . . . . . . . . . . . . . . . . . . . . . . . . . . . . . . . . . . . . . . . . . . . . . . . . . .20
Speaker Connections
. . . . . . . . . . . . . . . . . . . . . . . . . . . . . . . . . . . . . . . . . . . . . . . . . . . . . . . . . . . . . . . . . . . . . . . . . . . . .22
Fuse
. . . . . . . . . . . . . . . . . . . . . . . . . . . . . . . . . . . . . . . . . . . . . . . . . . . . . . . . . . . . . . . . . . . . . . . . . . . . . . . . . . . . . . . . . . . . . . . . . . . . . .22
Maintenance
. . . . . . . . . . . . . . . . . . . . . . . . . . . . . . . . . . . . . . . . . . . . . . . . . . . . . . . . . . . . . . . . . . . . . . . . . . . . . . . . . . . . . . . . . .22
Troubleshooting
. . . . . . . . . . . . . . . . . . . . . . . . . . . . . . . . . . . . . . . . . . . . . . . . . . . . . . . . . . . . . . . . . . . . . . . . . . . . . . . . . . . . .23
Specifications
. . . . . . . . . . . . . . . . . . . . . . . . . . . . . . . . . . . . . . . . . . . . . . . . . . . . . . . . . . . . . . . . . . . . . . . . . . . . . . . . . . . . . . . . .25
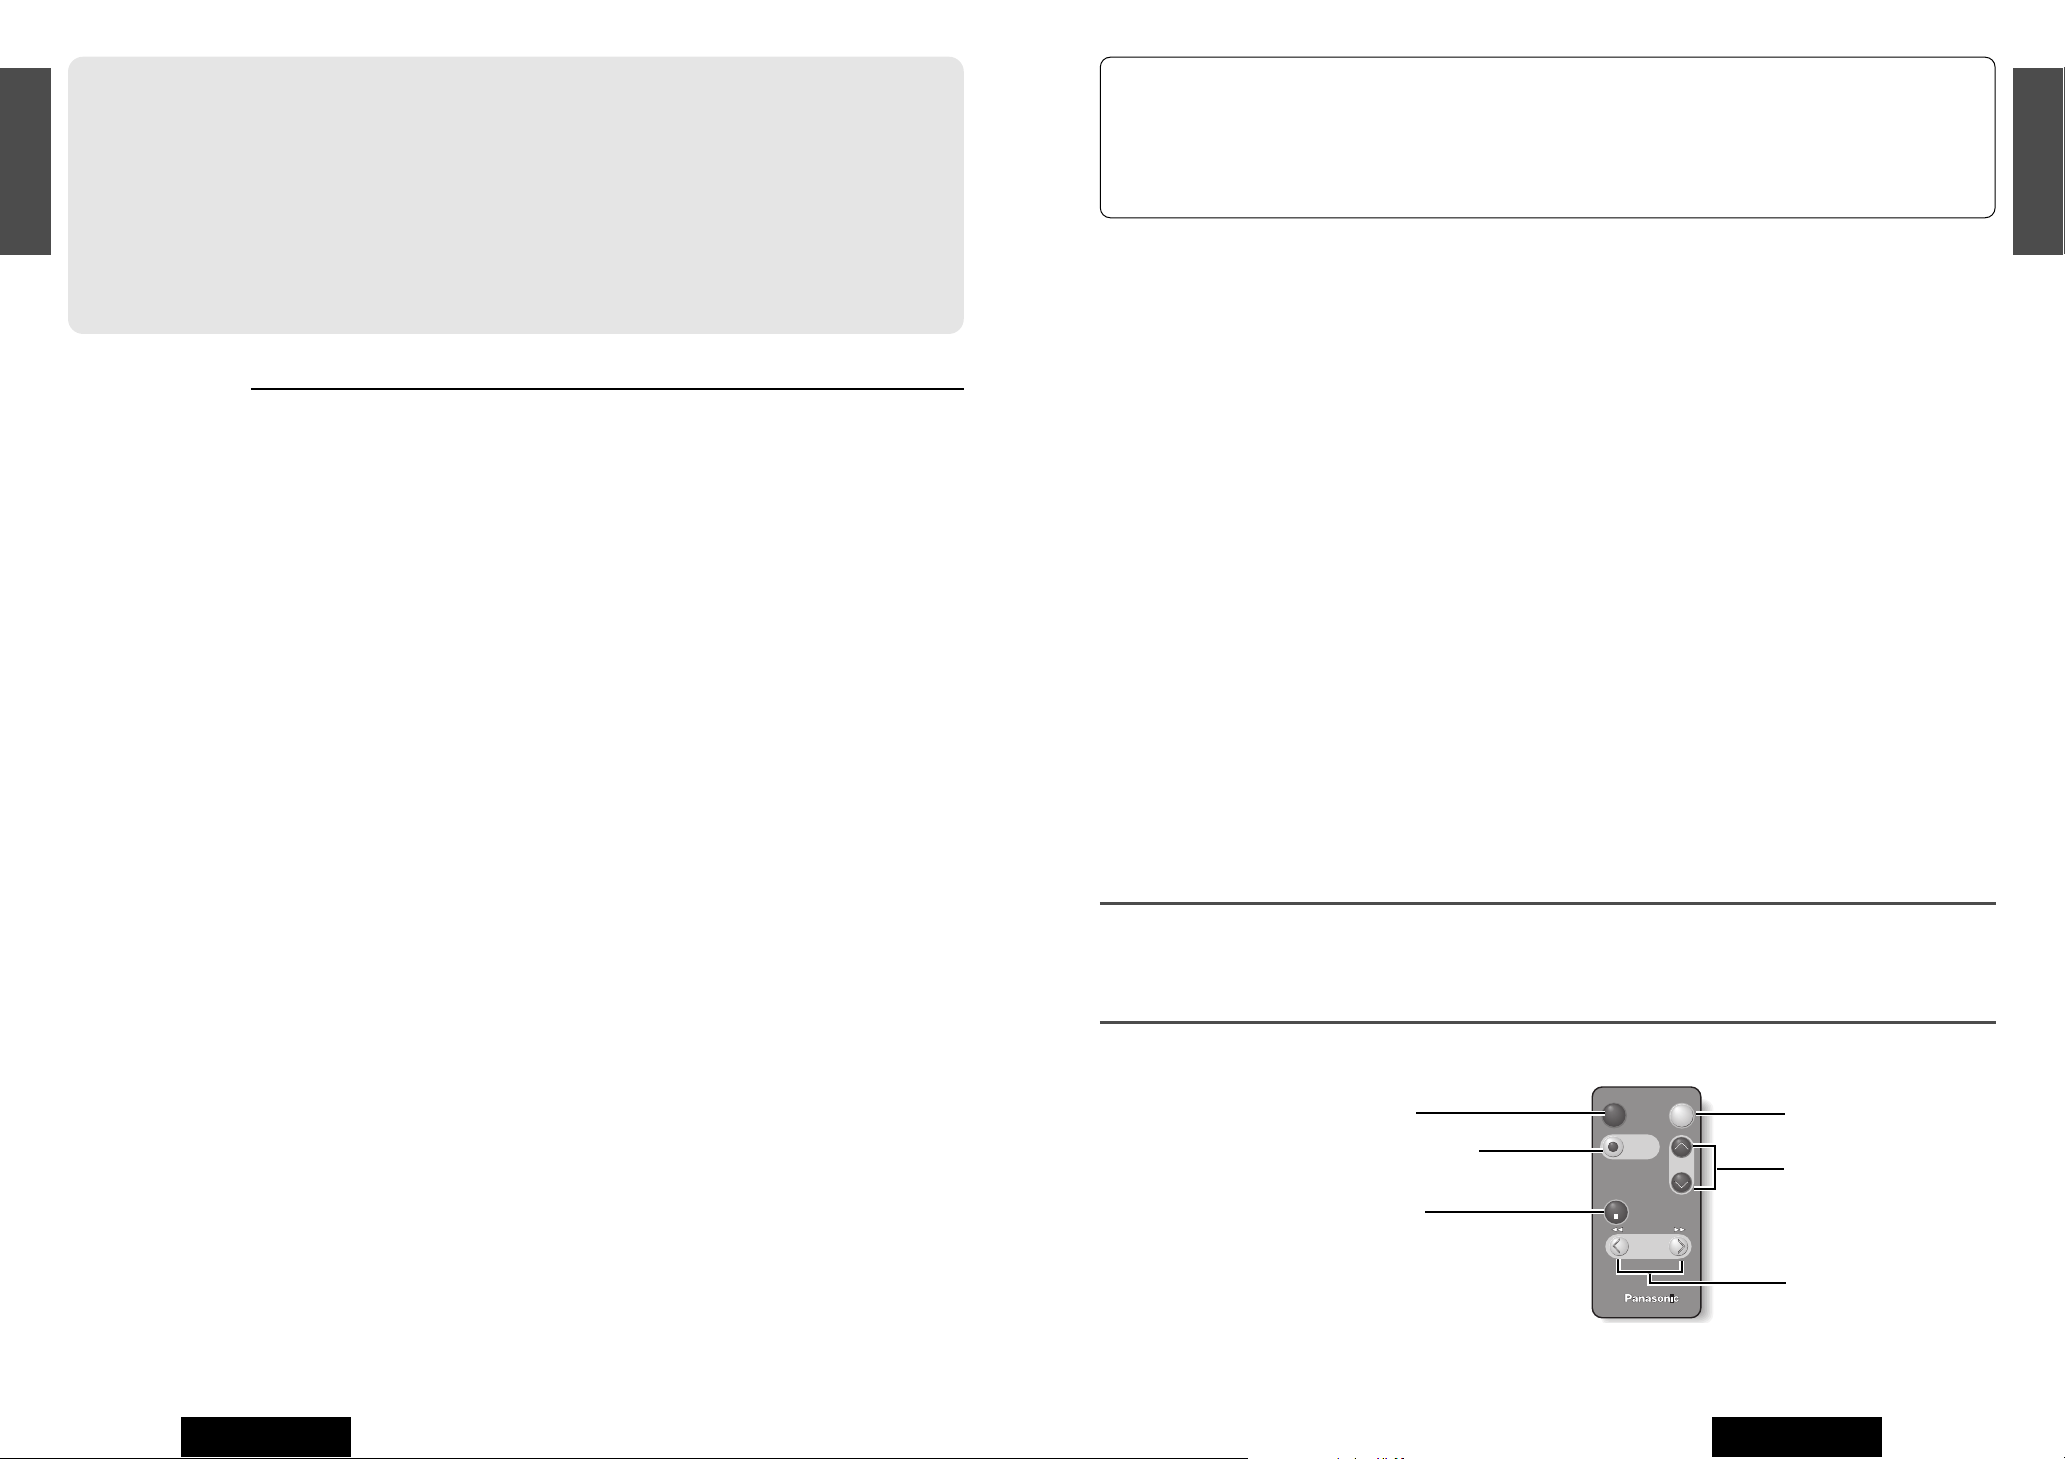
Remote Control (Option)
Car AudioCar Audio
BAND/DISC UPBAND/DISC UP
PRG
(ATT)(ATT)
PWR
VOL
MODE
MUTE
TRACK
TUNE
Mode (Source)
Power
Volume Control
Tune, Track Search,
Fast Forward/Rewind
MUTE
Band, Stop,
Disc up
Page
Notes: Optional remote controller is available from your local dealer. (CA-RC61EX).
Page 5

Loudness
Press [LOUD] to enhance bass and treble tones at
low or medium volume.
Press [LOUD] again to cancel.
LOUD
V
O
L
S
E
L
SELS
E
L
B
A
N
D
TUNETUNE
TRACKTRACK
TUNE
TRACK
PRG
CQ-FX323W
CASSETTE RECEIVER WITH CHANGER CONTROL
OPENOPENOPEN
LEVEL
DISP
CLOCK
super bright display with level meters
SCAN
RANDOM
4
LOUD
APM
1
2
MTL
NR
3
TPS
B·S
REP
56
REPEAT
DISC
MUTE
R
E
M
O
T
E
S
O
U
R
C
E
P
W
R
M
O
N
O
/
L
O
C
DIMMER
DIMMER
V
O
L
S
E
L
B
A
N
D
TUNETUNE
TRACKTRACK
TUNE
TRACK
PRG
CQ-FX323W
CASSETTE RECEIVER WITH CHANGER CONTROL
OPENOPENOPEN
LEVEL
DISP
CLOCK
super bright display with level meters
SCAN
RANDOM
4
LOUD
APM
1
2
MTL
NR
3
TPS
B·S
REP
56
REPEAT
DISC
MUTE
R
E
M
O
T
E
S
O
U
R
C
E
P
W
R
M
O
N
O
/
L
O
C
8 9
CQ-FX421/FX321N
CQ-FX323W
3
E
N
G
L
I
S
H
4
E
N
G
L
I
S
H
CQ-FX323W
Volume Level (0 to 40)
Power and Sound Controls
w
Press [}VOL] or [{VOL] to change each level.
(–12 to +12 dB)(by 3 dB step)
(default: 0 dB)
(Left / Right: 1 to 15)
(Front / Rear: 1 to 15)
Note:
If no operation takes place for more than 5 seconds in audio mode
(2 seconds in Volume mode), the display return to Regular Mode.
Audio Mode
q Press [SEL](select) to select the audio mode.
Regular Mode
Volume
Bass
Treble
Balance
Fader
Note: When the power is switched on for the
first time, a demonstration message appears on
the display.
To cancel this display, press [DISP] (Display).
Mute
Press [MUTE] to mute the sound completely.
Press [MUTE] again to cancel.
MUTE
Pattern 1
Pattern off Pattern 4
Pattern 2
Pattern 5
Pattern 3
Dimmer 3
(Brighter)
Dimmer 2
(Center)
Dimmer 1
(Darker)
Volume (VOL)
[}VOL] : Up
[{VOL] : Down
Press and hold for rapid adjustment.
Power (PWR)
Turn the key in the ignition until the accessory
indicator lights.
Power on : Press [SOURCE] (PWR).
Power off : Press and hold [SOURCE]
(PWR) again.
Dimmer
Press and hold [LEVEL](DIMMER) for more than 2
seconds to change dimmer level setting as follows
(Default:Brighter)
Level Meter
Press[LEVEL] to change each setting.
Select your desired setting.
(Default:Pattern 1)
Display Controls
Remote control sensor (REMOTE)
for an optional remote control
Level Meter (Pattern 1)
LOUD
MUTE
Scrolling....
(CNT:center)(
default
)
(CNT:center)(
default
)
indicator
(–12 to +12 dB)(by 3 dB step)
(default: 0 dB)
Page 6

V
O
L
VOLV
O
L
S
E
L
SELS
E
L
B
A
N
D
TUNE
TRACK
PRG
CQ-FX323W
CASSETTE RECEIVER WITH CHANGER CONTROL
OPENOPENOPEN
LEVEL
DISP
CLOCK
super bright display with level meters
SCAN
RANDOM
4
LOUD
APM
1
2
MTL
NR
3
TPS
B·S
REP
56
REPEAT
DISC
MUTE
R
E
M
O
T
E
P
W
R
M
O
N
O
/
L
O
C
S
O
U
R
C
E
DIMMER
Radio
10 11
CQ-FX421/FX321N
CQ-FX323W
5
E
N
G
L
I
S
H
6
E
N
G
L
I
S
H
CQ-FX323W
w Manual Preset Memory
q Use manual or seek tuning to find a station.
(a page 10)
w Press and hold one of the preset buttons [1] to [6]
until the display blinks once.
Up to 6 stations each can be stored in the FM1, FM2, FM3
and AM preset band selections.
q Band
Press [BAND] to select a desired band. (a Page 10)
Caution: To ensure safety, never attempt to preset
stations while you are driving.
MONO : Noise is significantly decreased when weak signals are received
from an FM broadcast station.
LOCAL : Only strong signals of stations are detected in seek tuning, while at
the LOCAL OFF setting, relatively weak signals are also detected.
e Manual Tuning
Press
[}TUNE] : Higher frequency.
[{TUNE] : Lower frequency.
Seek Tuning
Press and hold
[}TUNE] : Higher frequency.
[{TUNE] : Lower frequency.
Tuning will automatically stop when
the signals of the next broadcast
station are received.
q Mode Selection (SOURCE)
Press [SOURCE] to change to the radio mode.
Radio
Cassette Tape Player
(When a tape is inserted)
CD changer control
(When a CD Changer is connected)
FM1
FM2
FM3
AM
w Band
Press [BAND] to change the
bands.
e Tuning in a Preset Station
Press the corresponding preset button [1] to [6] to
tune in a preset station.
Note: You can change the memory presetting by
repeating the above procedure.
Stereo indicator lights
when FM stereo broadcasting is received
Preset Number
FM broadcasts
Press and hold [¡] (MONO/LOC) to
change the mode.Release when at the
desired point.
MONO OFF / LOCAL OFF
LOCAL OFF
MONO ON / LOCAL OFF
MONO ON / LOCAL ON
MONO OFF / LOCAL ON
LOCAL ON
AM broadcast
Press and hold [¡] (MONO/LOC)
to switch LOCAL mode on and off.
Band
How to listen to the radio
Preset Memory
Auto Preset Memory (APM)
Press [APM].
¡The 6 stations,with good reception will be automati-
cally saved in the memory under preset 1 to 6.
¡Once set, the preset stations are sequentially
scanned for 5 seconds each.
r Mono/Local Selection (MONO/LOC)
Notes:
¡The clock system is 12-hours.
¡Press [}TUNE] or [{TUNE] for more than 0.5
seconds to change numbers on the display in
sequence.
¡The [DISP](CLOCK) button will not work while the
CD Changer is set to the scan play mode.Cancel the
scan play mode before pressing [DISP](CLOCK).
10:00
12:00
10:35
10:35
10:00
r Press [DISP](CLOCK) to proceed with the
minutes setting.
w Press and hold [DISP](CLOCK) for more than 2
seconds.“12” blinks,and the time setting mode is
activated.
e Press [
}TUNE] or [{TUNE] to set the hour.
q Press [DISP](CLOCK).
“ADJUST” appears on the display
t Press [}TUNE] or [{TUNE] to set the minute.
y Once the time has been set, press [DISP](CLOCK).
Initial Time
DIMMER
V
O
L
VOLV
O
L
S
E
L
SELS
E
L
B
A
N
D
TUNE
TRACK
PRG
CQ-FX323W
CASSETTE RECEIVER WITH CHANGER CONTROL
OPENOPENOPEN
LEVEL
DISP
CLOCK
super bright display with level meters
SCAN
RANDOM
4
LOUD
APM
1
2
MTL
NR
3
TPS
B·S
REP
56
REPEAT
DISC
MUTE
R
E
M
O
T
E
S
O
U
R
C
E
P
W
R
M
O
N
O
/
L
O
C
[BAND]
[DISP]
(CLOCK)
[}TUNE]
[{TUNE]
LOCAL
MONO
Clock
[APM]
(Default)
(Default)
Clock Setting
MONO/LOCAL indicator
[1] to [6] (Preset buttons)
Page 7

Ex1.To select the last program,
press [3] (TPS) and
[1] twice.
Ex2.To select the next program,
press [3] (TPS) and
[2].
V
O
L
VOL
V
O
L
S
E
L
SELS
E
L
TUNE
TRACK
P
R
G
CQ-FX323W
CASSETTE RECEIVER WITH CHANGER CONTROL
OPENOPENOPEN
LEVEL
DISP
CLOCK
super bright display with level meters
SCAN
RANDOM
4
LOUD
APM
1
2
MTL
NR
3
TPS
B·S
REP
56
REPEAT
DISC
MUTE
R
E
M
O
T
E
P
W
R
M
O
N
O
/
L
O
C
S
O
U
R
C
E
B
A
N
D
DIMMER
Caution: Do not insert a tape when (tape indicator)
lights because a tape is already inserted.
Tape Insert and Playback
q Open the front panel.
w Insert a cassette tape.
e Close the front panel manually.
Play back will start automatically.
Stop and Tape Eject
q Open the front panel.
w Press [u] to stop tape play and eject the cassette tape.
e Close the front panel manually.
[u] Eject
OPEN
LEVEL
13
CQ-FX323W
1
E
N
G
L
I
S
H
12
7
E
N
G
L
I
S
H
CQ-FX323W
8
Metal Tape Mode
¡Press [1](MTL) when playing metal or chromium
dioxide (CrO
2
) tapes.
¡Press [1](MTL) again to cancel.
Note: Playing Normal tapes in MTL mode causes
high frequency imbalance, which affects tone quality.
Dolby Noise Reduction
¡Press [2](NR) to set the Dolby B NR mode.
¡Press [2](NR) again to cancel.
Note: Set the Dolby B NR mode when playing back
a tape recorded with Dolby B Noise Reduction.
Repeat Play
¡Press [6](REP) to repeat the current
program.
¡Press [6](REP) again to cancel.
Blank Skip
¡Press [5](B • S) to skip unrecorded portions
longer than 15 seconds on the tape.
¡Press [5](B • S) again to cancel.
Note: When repeat is on, the blank skip does
not work because the repeat has priority over
the blank skip.
B-SKIP
REP
Tape Program Search (TPS) Operation
q Press [3](TPS) to activate the Tape Program Search mode.
w To select a desired program, press [2] or [1]
corresponding times to go forward (up to 9)
or backward (up to 8).
e Press [3](TPS) again to cancel.
(Fast forward:)
1 s9
(Rewind:)
8t 0
Note: The TPS mode may not work correctly in the following cases. This, however, does not mean that the unit is
defective.
¡There is an interval less than 3 seconds or having a high level of noise or hum between programs.
¡There is particularly low-level passage during the program.
Tape indicator lights when
a tape is inserted.
CQ-FX323W
C
D
M
D
Cassette Tape Player
Listening to a Cassette Tape
Rewind and Fast Forward
Press [2] or [1] to activate fast forward or
rewind of the tape.
Press [BAND] (PRG) to resume the tape play.
Play Side Change
Press [BAND] (PRG) to reverse.
Top Side Playing
Bottom Side Playing
Source
Radio
Cassette Tape Player
(When a Tape is inserted)
CD Changer control
(When a CD Changer is connected)
Note: To maintain your cassette player in top condition,
avoid using tapes that are longer than 90 minutes (C-90).
Notes on Cassette Tape
Tape Slack:
Use a pencil or similar object to take up the slack as shown. If
a loose tape is used, this may result in the tape becoming tangled in the rotating parts of the unit.
Mode Selection
Press [SOURCE] to change to Cassette tape play
mode.
Cautions:
¡When the front panel is opened, do not force it down and
do not put anything on it since these may result in damage
to the unit.
¡When ejecting a cassette tape, do not close the front panel
until the cassette tape is ejected and removed from the
cassette slot completely.
¡Do not pinch your finger or hand in the front panel.
¡Do not insert foreign matters into the tape slot.
Exposed tape
end (Open end)
Pencil
Do not touch or
pull out the tape.
Open
Exposed tape
end(Open end)
[1]:Rewind (To cancel,press [2])
[2]:Fast forward (To cancel,press [1])
[1]:Fast forward (To cancel,press [2])
[2]:Rewind (To cancel,press [1])
Top Side Play
Bottom Side Play
MTL
B
Page 8

Track
Track
Disc
Track
Repeat
Scan
Random
V
O
L
VOLV
O
L
S
E
L
SELS
E
L
B
A
N
D
TUNE
TRACK
PRG
CQ-FX323W
CASSETTE RECEIVER WITH CHANGER CONTROL
OPENOPENOPEN
LEVEL
DISP
CLOCK
super bright display with level meters
SCAN
RANDOM
4
LOUD
APM
1
2
MTL
NR
3
TPS
B·S
REP
56
REPEAT
DISC
MUTE
R
E
M
O
T
E
P
W
R
M
O
N
O
/
L
O
C
S
O
U
R
C
E
DIMMER
¡Press and hold [5] (SCAN) for more than 2 seconds.
The first track of all discs in the magazines is
played for 10 seconds each.
¡Press again to cancel.
¡Press [5] (SCAN).
The first 10 seconds of each track on the disc
are played in sequence.
¡Press again to cancel
¡Press [6] (REP).
The current track is repeated.
¡Press again to cancel
¡Press [4] (RANDOM).
All tracks on all discs in the magazine are played
in random order.
¡Press again to cancel.
15
CQ-FX323W
10
E
N
G
L
I
S
H
14
9
E
N
G
L
I
S
H
CQ-FX323W
Playing Mode
Note: The CD Changer functions are designed for an optional CD Changer unit.
CQ-FX323W
CD Changer Control
Mode Selection
Press [SOURCE] to change to the CD Changer mode.
CDC 0000
CDC E3
CDC E2
c
DISC No.
CDC E1
c
DISC No.
Appears on the display when the compact disc is dirty or inverted.
Select the next available compact disc.
Appears on the display when compact disc is scratched.
Select the next available compact disc.
Appears on the display when the unit stops operating for some reason.
Press the reset switch on the CD Changer (option).
Appears on the display when there is no disc in the magazine.
Track Number
Disc Number Playing Time
Source
Radio
Cassette Tape Player
(When a Tape is inserted)
CD Changer control
(When a CD Changer is connected)
How to listen to CDs
Error Display Messages
Track Selection
Press
[f(f|) TRACK] : Advance to the next track.
[a(|a) TRACK] : Back to beginning of the current
track.
Back to previous track. (Press twice)
Disc Selection
[1] ({DISC): Previous disc.
[2] (}DISC): Next disc.
V
O
L
VOLV
O
L
S
E
L
SELS
E
L
B
A
N
D
TUNETUNE
TRACKTRACK
TUNE
TRACK
PRG
CQ-FX323W
CASSETTE RECEIVER WITH CHANGER CONTROL
OPENOPENOPEN
LEVEL
DISP
CLOCK
super bright display with level meters
SCAN
RANDOM
4
LOUD
APM
1
2
MTL
NR
3
TPS
B·S
REP
56
REPEAT
DISC
MUTE
R
E
M
O
T
E
S
O
U
R
C
E
P
W
R
M
O
N
O
/
L
O
C
DIMMER
Display Change
Press [DISP] to switch the clock display.
Press again to resume.
Disc/Track/Play Time
Clock display
Lights when a magazine is
loaded in the changer.
(a page 11)
Fast forward/Fast reverse
Press and hold
[f TRACK] : Fast forward
[a TRACK] : Fast reverse
Release to resume the regular
CD Changer play.
RAND
REP
Page 9

1
2
3
4
No.
1
17
CQ-FX323W
1
E
N
G
L
I
S
H
16
11
E
N
G
L
I
S
H
CQ-FX323W
Q’tyDiagramItem
Supplied Hardware
Fire Wall of the Car
tHex. Nut
rRear Support Strap
wMounting Bolt
qMounting Collar
eTapping Screw
3 mmø
(a) Using the Rear Support Strap
Rubber Cushion
(Option)
wMounting Bolt
qMounting Collar
Rear Support Bracket
(Provided on the car)
(b) Using the Rubber Cushion (Option)
Mounting Tabs
Mounting Bolt w
Insert Trim Plate u.
After installation reconnect the
negative (–) battery terminal.
Insert Mounting Collar q into the
dashboard, and bend the mounting
tabs out with a screwdriver.
q
w
e
r
t
y
Mounting Collar
Mounting Bolt (5 mmø)
Tapping Screw
(5 mmø x 16 mm)
Rear Support Strap
Hex. Nut (5 mmø)
Power Connector
1
1
1
1
1
u
Trim Plate
1
12
Caution: Do not disconnect the battery terminals of a car
with trip or navigational computer since all user settings
stored in memory will be lost. Instead take extra care with
installing the unit to prevent shorts.
Installation
Preparation
CQ-FX323W
¡Before installation, check the radio operation with antenna
and speakers.
¡Disconnect the cable from the negative (–) battery terminal
(see caution below).
¡Unit should be installed in a horizontal position with the front
end up at a convenient angle, but not more than 30°.
Dashboard Installation
Installation Opening
The unit can be installed in
any dashboard having an
opening as shown at right.
The dashboard should be
4.5 mm - 6 mm thick in order to be able to support the unit.
Installation Precautions
This product should be installed by a professional installer, if
possible.
In case of difficulty, please consult your shop when you purchased this unit.
1. This system is to be used only in a 12-volt, DC battery system (car) with negative ground.
2. Follow the electrical connections carefully (a Page 20).
Failure to do so may result in damage to the unit.
3. Connect the power lead (red) after all other connections are
made.
4. Be sure to connect the battery lead (yellow) to the positive
terminal (+) of the battery or fuse block (BAT) terminal.
5. Insulate all exposed wires to prevent short circuiting.
6. Secure all loose wires after installing the unit.
7. Please carefully read the operating and installation instructions of the respective equipment before connecting it to this
unit.
First complete the electrical connections, and
then check them for correctness.(a Page 20)
The included Mounting Collar qqis
designed specially for this unit .
Do not use it to attach any other models.
Power Connector y
Cautions:
¡We strongly recommend that you wear gloves for installation work to protect yourself from injuries.
¡When bending the mounting tab of the mounting collar with a screwdriver, be careful not to injure your hands and
fingers.
30° or less
Establish the rear connections of the
unit.
After fixing Mounting Bolt w and Power
Connector
y, Establish the rear connections of
the unit to the car body by either method (a) or (b)
shown on the previous page.
Make sure that the lock lever
(C) is flush with the mounting
collar (not projecting outward).
Lock Lever
Lock Lever (C)
182 mm
53 mm
Page 10

Blinks
OFF
To Remove the Unit
q
Remove the removable
face plate.
q
Press [OPEN]. The
removable face plate
will be opened.
w Push the face plate to
either the right or left.
e Pull it out toward you.
OPEN
19
CQ-FX323W
1
E
N
G
L
I
S
H
18
13
E
N
G
L
I
S
H
CQ-FX323W
This unit is equipped with a removable face plate. Removing
this face plate makes the radio totally inoperable.
Place Removable Face Plate
into Case
q Switch off the power of the unit.
w Remove the removable face plate. (a Page 18)
e Gently press the bottom of the case and open the cover.
Place the face plate into the case and take it with you
when you leave the car.
Install Removable Face Plate
q Fit the face plate with its right or left hole on one of the
pins provided on the main unit.
w Fit the other hole on the other pin applying slight pres-
sure.
e Move the face plate up and down a few times to make
sure it is secure. Then close the front panel and press
down the right side of the face plate until it clicks into
place.
Security Indicator
The security indicator blinks when the removable face plate
is removed from the unit.
Press and hold [SEL] for more than 2seconds when the
power is on. "LED On" is displayed,and the security indicator
turns on. (Default: LED On)
Anti-Theft System
Cautions:
¡This face plate is not water-proof. Do not expose it to water or excessive moisture.
¡Do not remove the face plate while driving your car.
¡Do not place the face plate on the dashboard or nearby areas where the temperature rises to high levels.
14
Removable Face Plate Case
CQ-FX323W
e
Pull out the unit while pushing down the lock
lever with a screwdriver.
r
Remove the unit pulling with both hands.
Installation (continued)
1
2
Cautions:
¡Do not touch the contacts on the face plate or on the main unit, since this may result in poor electrical contacts.
¡If dirt or other foreign substances get on the contacts, wipe them off with clean and dry cloth.
¡Do not apply a strong downward force onto the face plate and do not put anything on it while it is open, or it might be
damaged.
q Open
Contact
w Push
e Pull out
uTrim Plate
Screwdriver
w
Remove the trim plate u with a screwdriver.
Open
Lock Lever
Screwdriver
Security Indicator
Security IndicatorDisplay
Caution: When you want to remove the unit,the
security indicator functions can be canceled by following procedure.
¡Install the removable face plate.
¡Disconnect the power connector for more than 3
minutes and then reconnect it.
Page 11

21
CQ-FX323W
1
E
N
G
L
I
S
H
20
15
E
N
G
L
I
S
H
CQ-FX323W
Cautions:
¡This unit is designed for use in a car having a
12-volt negative ground battery system.
¡To prevent damage to the unit, be sure to follow
the connection diagram below.
¡Strip about 5 mm of the lead ends for connec-
tion.
¡Do not insert the power connector into the unit
until the wiring is completed.
¡Be sure to insulate any exposed wires to pre-
vent short circuiting with the car chassis.
Bundle all cables, and prevent cable terminals
from touching any metal parts.
Ground Lead (Black)
To a clean, bare metallic part of the car chassis
Power Lead (ACC or IGN) (Red)
To ACC power, +12 V DC
Motor Antenna Relay Control (Dark blue)
(To the auto antenna control power load of the
car.)(Max.500 mA)
This lead is not intended for use with a switch actuated Power antenna.
Amp. Relay Control Power Lead
This lead is for connection to a Panasonic power
amplifier.
Battery Lead (Yellow)
To the car battery, continuous +12 V DC
16
CQ-FX323W
Cable Wiring Diagram
Example : Connection with CD Changer CX-DP88N (Option).
Electrical Connections
Antenna
yPower
Connector
(White)
(Gray)
(Green)
(Violet)
Cassette Receiver
CQ-FX323W
R(Red)
L(White)
Front Right –
Front Right
+
Rear Right –
Rear Right
+
(Violet w/black stripe)
(Gray w/black stripe)
(White w/black stripe)
(Green w/black stripe)
CD Changer
Control Connector
Rear Left –
Rear Left +
Front Left –
Front Left +
Optional
RCA cord (Audio)
(L) (White)
(R) (Red)
(L) (White)
(R) (Red)
Stereo power
amplifier
(Rear)
Stereo power
amplifier
(Front)
(L) (White)
(R) (Red)
RCA Cord
CH•C-IN
For two speakers
Insulate unused speaker cords
with vinyl tape
Speakers
Changer Control DIN Cord
Preamp out Connector
(Pre-out) Front
Preamp out Connector
(Pre-out) Rear
(Yellow)
(Red)
(Black)
(Dark Blue)
Extension Cord
(DIN/BATT/RCA/GND)
(Supplied for an optional
CD Changer)
(Black)
CD Changer
CX-DP88N
(option)
Ground Lead
To a clean, bare
metallic part of
the car chassis
Battery Lead
To the car battery,
continuous +12V DC
(Yellow)
Fuse (3A)
BATTERY 15A
Fuse (15A)
Resistor (1kΩ)
ACC
Keep the vinyl cap covered
for insulation
if this is not used.
¡This unit can be connected to an optional CD
Changer (CX-DP9061EN, CX-DP88N, CXDP1212N, CX-DP801EN, CX-DP880N) and
optional extension cord.
¡For details consult your shop where you pur-
chased this unit.
¡For connection to a CD Changer, refer to the
operating instructions of the CD Changer (CXDP9061EN, CX-DP88N, CX-DP1212N, CXDP801EN, CX-DP880N).
Page 12

23
CQ-FX323W
18
E
N
G
L
I
S
H
22
17
E
N
G
L
I
S
H
CQ-FX323W
CQ-FX323W
Speaker Connections
Caution: Please follow the instructions given below. Failure to do so will cause damage to the unit and speakers.
Fuse
Use fuses of the same specified rating (15 A). Using different substitutes or fuses with higher ratings, or connecting the unit
directly without a fuse, could cause fire or damage to the unit.
If the fuse replacement fails, contact your shop when you purchased this unit.
Maintenance
Your product is designed and manufactured to ensure the minimum of maintenance. Use a soft cloth for routine exterior
cleaning. Never use benzine, thinner, or other solvents.
¡Use ungrounded speaker only.
¡The maximum speaker input should be 45 W or more. (If used with
the optional power amplifier, the speaker input should be higher than
the maximum amplifier output.)
¡The speaker impedance should be 4 - 8 Ω.
¡This unit uses the BTCL circuit, so each speaker should be connected
separately using parallel vinyl insulated cords.
¡The speaker cords and the power amplifier unit should be kept away
(about 30 cm apart) from the antenna and antenna extension cord.
¡Never connect the speaker cord to
the body of the car.
¡Do not use a 3-wire type speaker
system having a common earth
lead.
¡Do not connect more than one
speaker to one set of speaker
leads.
Troubleshooting
Cautions:
¡Do not use the unit if malfunctions or something is wrong.
¡Do not use the unit in abnormal condition,for example,for example,without sound,or with smoke or foul smell.
This can cause ignition or electric shock.Immediately stop using the unit and call the store where you purchased.
Preliminary Steps
Check and tape steps as described in the tables below.
If You Suspect Something is wrong.
Immediately switch the power off.
Disconnect the power connector and check that there is neither smoke nor heat from the unit before asking for repairs.
Never try to repair the unit yourself because it is dangerous to do so.
Wait for a while before use.Condensation(dew)
Noise
A mobile phone is used near the unit.
The unit's grounding wire is not connected
securely.
Keep the mobile phone away from the
unit.
Check the metal areas of the car body
(chassis), and connect the grounding
wire more securely.
Troubleshooting Tips
Common
Trouble Cause Step
Unit does not turn on.
Car's ignition switch is not on.
Turn your car's ignition switch to ACC or
ON.
Connect cables correctly.Cables are not correctly connected.
Connect the batter cable to the terminal
that is always live.
Battery cable is not correctly connected.
Accessory cable is not correctly connected.
Grounding wire is not correctly connected.
Connect the accessory cable to your car's
ACC source.
Connect the grounding wire to a metal
part of the car.
Fuse is burnt out.
Call the store where you purchased
the unit, or your nearest service station
and ask for fuse replacement.
Mute is set to ON
.
Cables are not correctly connected.
Set it to OFF.
Connect cables correctly.No sound
L
R
-
-
-
-
-
-
-
-
-
-
+
+
+
+
+
+
+
+
+
+
-
+
-
+
-
+
-
+
-
+
-
+
-
+
-
+
L
R
L
R
L
R
<Right>
<Wrong>
(White)
(White
w/black stripe)
Chassis
(Gray
w/black stripe)
(Gray)
Chassis
Page 13

24
19
E
N
G
L
I
S
H
CQ-FX323W
Frequency Range :531 - 1,602 kHz
Usable Sensitivity :28 dB/µV(S/N 20 dB)
Frequency Range :87.5 - 108 MHz
Usable Sensitivity :6 dB/µV(S/N 30 dB)
Stereo Separation :35 dB (at 1 kHz)
Reproduction System :4-track, 2-program stereo
Tape Speed :4.76 cm/sec.
FF/REW Time :Less than 110 sec. (C-60)
Frequency Response :30 - 17,000 Hz (normal)
30 - 18,000 Hz (metal)
Wow and Flutter :0.12 % (WRMS)
Signal to Noise Ratio :52 dB
(Dolby off)
62 dB
(Dolby B NR on)
Cassette Tape Player
FM Stereo Radio
25
CQ-FX323W
1
E
N
G
L
I
S
H
20
Specifications
Note: Specifications and design are subject to modification without notice due to improvements.
Manufactured under license from Dolby Laboratories.
"Dolby" and the double-D symbol are trademarks of Dolby Laboratories.
Power Supply :DC 12 V (11 V - 16 V), Test Voltage 14.4 V, Negative Ground
Tone Controls :Bass ; ±12 dB at 100 Hz
:Treble ; ±12 dB at 10 kHz
Current Consumption :Less than 2.5 A (tape mode, 0.5 W 4-Speaker)
Maximum Power Output :45 W x 4 (at 4 Ω)
Speaker Impedance :4 - 8 Ω
Pre-Amp Output Impedance :200 Ω
Pre-Amp Output Voltage :2V
Dimensions :178(W) x 50(H) x 150(D) mm
Weight :1.5 kg
General
AM Radio
Troubleshooting (continue)
Clean tape-running mechanism, or repair
it. (Ask a service representative for
advice)
Wow and Flutter level is
very high.
Check the ground connection of the
mounted base part of the antenna, and
tighten up the screw.
The ground connection of the radio antenna is not secure enough.
If there is a motor antenna in the car,
connect the antenna control lead to the
motor antenna lead that is installed in the
car correctly.
The motor antenna relay control lead is not
connected correctly.
Preset station is reset.
Connect the battery cable to the terminal
that is always live.
Battery cable is not correctly connected.
Tape sound quality is poor.
Heads are dirty.
Trouble Cause Step
Clean heads. (Ask a service representative for advice.)
Use better quality tape.Poor quality tape
Activate the Dolby B NR mode.Dolby tape played with Dolby B NR off.
Metal type tape played with Normal mode.
Non-Dolby tape plays with Dolby B NR on.
Change Normal mode to Metal mode.
Cancel the Dolby B NR mode.
Normal type tape plays with Metal mode. Change Metal mode to Normal mode.
Blank tape inserted into the unit.
Tape-running mechanism is dirty or out of
order.
Heads are magnetized.
Demagnetize heads. (Ask a service representative for advice.)
No sound
Left and right balance, or front and rear
balance is OFF on one side.
Cables are not correctly connected.
Adjust balance/fader mode as appropriate.
Connect cables correctly.
The right speaker wire is connected to the
left speaker and the left speaker wire to the
right speaker.
Reverse the speaker wire connections.
No sound from
left,right,front or rear
speakers.
Left and right sounds are
reversed in stereo listening.
Trouble Cause Step
Cassette Tape Player
Sound Setting
High tones are improperly
emphasized.
Reproduction of high tones
is poor.
Insert recorded tape into the unit.
Station is too far, or signals are too weak.
The radio antenna is not extended enough.
Select other station of higher signal level.
Extend the radio antenna.
Much noise in FM stereo
and monaural broadcasts.
Trouble Cause Step
Radio
 Loading...