

Panasonic CQ-DFX883N User Manual
Removable Full Front MP3 WMA CD Player/Receiver with CD Changer Control
Operating Instructions
instructions
TEXT
E
T
U
M
R
W
P
E
C
R
U
O
S
TA
CQ-DFX883N
OPEN
K
C
A
R
T
/
E
N
U
T
CQ-DFX883N
Operating Instructions
Operating Instructions
Bedienungsanleitung
Bedienungsanleitung
Manuel d’instructions
Manuel d’instructions
Gebruiksaanwijzing
Gebruiksaanwijzing
Bruksanvisning
Bruksanvisning
Manuale di istruzioni
Manuale di istruzioni
Manual de Instrucciones
Manual de Instrucciones
Matsushita Electric Industrial Co., Ltd.
Web Site: http://www.panasonic.co.jp/global/
YEFM283963 ND1202-1023 Printed in China
¡Please read these instructions carefully before using this product and keep this manual for future reference.
¡Bitte lesen Sie diese Bedienungsanleitung vor der Verwendung dieses Produktes aufmerksam durch und bewahren Sie sie danach
für spätere Nachschlagzwecke sorgfältig auf.
¡Prière de lire ces instructions attentivement avant d’utiliser le produit et garder ce manuel pour l’utilisation ultérieure.
¡Leest u deze instructie alstublieft zorgvuldig door voor u dit product in gebruik neemt en bewaar deze handleiding voor later gebruik.
¡Läs igenom denna bruksanvisning noga innan produkten tas i bruk. Spara bruksanvisningen för framtida behov.
¡Si prega di leggere attentamente queste istruzioni prima di usare questo prodotto e di conservare questo manuale per usi futuri.
¡Lea con atención estas instrucciones antes de utilizar el producto y guarde este manual para poderlo consultar en el futuro.
CQ-DFX883N Removable Full Front MP3 WMA CD Player/Receiver
with CD Changer Control
Contents
Panasonic welcomes you to their constantly growing family of electronic products owners.
We endeavor to give you the advantages of precise electronic and mechanical engineering,
manufactured with carefully selected components, and assembled by people who are proud
of the reputation their work has built for our company. We know this product will bring you
many hours of enjoyment, and after you discover the quality, value and reliability we have
built into it, you too will be proud to be a member of our family.
Delightful sound space thanks
to system buildup
Dual CD changer selector: CA-CD55EN
(Up Grade)
Sub-Woofer
(Up Grade)
CD Changer: CX-DP9061EN
(Up Grade)
Stereo/Mono
Power Amplifier CY-M7052EN
(Up Grade)
4 channel Power Amplifier
CY-M9054EN (Up Grade)
Specifications
■General
Power Supply
Tone Controls (Bass/Treble)
Current Consumption
Maximum Power Output
Power Output
Speaker Impedance
Preout
Subwoofer-out
External Input Impedance
External Input Sensitivity
Dimensions (Main Unit)
Weight (Main Unit)
DC 12 V (11 V - 16 V),
Test Voltage 14.4 V, Negative Ground
Bass; ±12 dB at 100 Hz
Treble; ±12 dB at 10 kHz
Less than 2.5 A
(CD mode, 0.5 W 4-Speaker)
50 W x 4 (at 4 Ω)
22 W x 4 (DIN45 324, at 4 Ω)
4 - 8 Ω
2.5 V/200 Ω
2.5 V/200 Ω
10 kΩ (AUX IN)
Max. 2 V (AUX IN)
178(W) x 50(H) x 155(D) mm
1.6 kg
■CD Player
Sampling Frequency
DA Converter
Error Correction System
Pick-Up Type
Light Source
Wavelength
Frequency Responce
Signal to Noise Ratio
Total Harmonic Distortion
Wow and Flutte
Channel Separation
CQ-DFX883N
Head unit
8 times oversampling
MASH 1 bit/4 DAC System
Panasonic Super Decoding
Algorithm
Astigma 3-beam
Semiconductor laser
780 nm
5 Hz - 20 kHz (±1 dB)
90 dB
0.01 % (1 kHz)
Below measurable limits
70 dB
www.panasonic.co.uk (for UK customers only)
¡Order accessory and consumable items for your
product with ease and confidence by telephoning
our Customer Care Centre Mon–Friday
9:00am–5:30pm. (Excluding public holidays.)
¡Or go on line through our Internet Accessory order-
ing application.
¡Most major credit and debit cards accepted.
¡All enquiries transactions and distribution facilities
are provided directly by Panasonic UK Ltd.
¡It couldn’t be simpler!
Customer Care Centre
For UK customers: 08705 357357
For Republic of Ireland customers: 01 289 8333
■Stereo Radio
Frequency Range
FM
Usable Sensitivity
Stereo Separation
Frequency Range
MW
Usable Sensitivity
Frequency Range
LW
Usable Sensitivity
87.5 - 108 MHz
6 dB/µV(S/N 30 dB)
35 dB (at 1 kHz)
531 - 1,602 kHz
28 dB/µV (S/N 20 dB)
153 - 279 kHz
32 dB/µV (S/N 20 dB)
Note
● Specifications and design are subject to modification with-
out notice due to improvements.
¡Before Use 4
¡Names 6
¡Frequently-used Operation 7
¡Radio Basics 10
¡Radio Data System (RDS)
in FM Broadcasting 13
¡CD Player 18
¡MP3/WMA Player 20
¡CD Changer Control 22
¡Audio Setting (AUDIO menu) 24
¡Function Setting (FUNCTION menu)
25
¡Display Setting (PICTURE menu) 26
¡Anti-Theft System 27
¡Troubleshooting
28
¡Error Display Messages 30
¡Maintenance/Fuse 31
¡Notes on MP3/WMA
Refer to the Installation Instructions
supplied separately for installation and wiring.
32
English
DeutschFrançaisNederlandsSvenskaItalianoEspañol
2
CQ-DFX883N
CQ-DFX883N
3
Before Use
ACC ON
■ Volume Level For your driving safety, keep the volume level low enough to be aware
Warning
■ Car Washing To avoid electrical shorts which may cause fire, or other damage, do
■ Car Ventilation If your car is parked for several hours in direct sunlight, the tempera-
■ Power Supply This product is designed to be used in a car having a 12-Volt negative
■ Disc Mechanism Do not insert coins or any small objects. Keep screwdrivers and other
■ Service This product is made of precision parts. Do not attempt to disassemble
Note: The preset memory is cleared to return to the original factory setting when the power con-
Label Indications and Their Locations
Laser Product
CLASS 1 LASER PRODUCT
¡APPREIL À LASER DE CLASSE
¡KLASS 1 LASER APPARAT
¡LUOKAN 1 LASERPLAITE
of road and traffic conditions.
not expose this product (including the speakers and CDs) to water or
excessive moisture.
ture inside the car may become very high. It is advisable to drive the
car and give the interior a chance to cool down before switching the
unit on.
ground battery system.
metallic objects away from the disc mechanism and disc.
or adjust any parts. For repair, please consult your nearest authorized
Panasonic Service Center.
nector or battery is disconnected.
Accessories
Battery into
Remote
Control
XXXXXXXXXXXXXXX
XXXXXXXXXXXXXXXXX
XXXXXXXXXXXXXX
qwer
Operating Instructions Installation Instructions Warranty Card
XXXXXXXXXXXXXXXX
OO-OOOOO
1 1 set 1
1
Removable Face Plate
Case
POWER MENU
tyu
SOURCE
SEL
NUMBER
VOL
MUTE
1 2 3
4 5 6
7 809
BAND DISP
SET
Car Audio
REPSCANRAND
Supplied Hardware (1 set)
(Refer to Installation Instructions.)
11
Remote Control Unit
(a Page 6)
Lithium Battery
(CR2025)
■ Battery Notes
w
e
q
¡Remove and dispose of an old battery immediately.
¡Battery Information:
Battery Type: Panasonic lithium battery (CR2025)
(Included)
Battery Life: Approximately 6 months under normal use
(at room temperature)
¡ Do not disassemble or short the battery. Do not throw a
battery into a fire.
¡ Keep batteries away from children to avoid the risk of
accidents.
¡ Follow local regulations when disposing of batteries.
English
4
Caution: This product utilizes a laser.
Use of controls or adjustments or performance of
procedures other than those specified herein may
result in hazardous radiation exposure.
Laser products:
Wave Length 780 nm
Laser Power No hazardous radiation is emitted with
Do not take apart this unit or attempt to make
any changes yourself.
This unit is a very intricate device that uses a laser
pickup to retrieve information from the surface of compact discs. The laser is carefully shielded so that its
rays remain inside the cabinet.
Therefore, never try to disassemble the player or alter
any of its parts since you may be exposed to laser rays
and dangerous voltages.
CQ-DFX883N
safety protection.
Caution Label
CAUTION
LASER RADIATION
WHEN OPEN. DO NOT
STARE INTO BEAM.
CAUTION LASER RADIATION WHEN OPEN.
DO NOT STARE INTO
BEAM.
VORSICHT LASERSTRAHLUNG, WENN ABDECKUNG GEÖFFNET.
NICHT IN DEN STRAHL
BLICKEN.
ATTENTION RAYONNEMENT LASER EN
CAS D'OUVERTURE.
NE PAS REGARDER
DANS LE FAISCEAU.
ADVARSEL LASERSTRÅLING VED ÅBNING.
SE IKKE IND I
STRÅLEN.
VARO! AVATTAESSA
OLET ALTTIINA LASERSÄTEILYLLE.
ÄLÄ TUIJOTA
SÄTEESEEN.
VARNING LASERSTRÅLNING NÄR DENNA
DEL ÄR ÖPPNAD.
STIRRA EJ IN I
STRÅLEN.
ADVARSEL LASERSTRÅLING NÅR DEKSEL
ÅPNES.
STIRR IKKE INN I
STRÅLEN.
Deck Ass’y
(Upper Side)
ACC Setting
(Default: OFF)
OFF
ACC
IGN
Caution: Improper use of batteries may cause overheat-
q Pull out the battery case while
ing, an explosion or ignition, resulting in injury or a fire.
pushing the tab.
w Put a battery in the case with
(+)-side facing up.
e Put the case back.
For a ACC-equipped car, select ON. (a Page 25) The following functions are available.
¡ The power is turned on automatically when inserting a disc or magazine.
¡ The clock can be displayed even if the power is off. (a page 9)
¡ After the security function (a page 25) is set to ON, the function works when turning the ignition
key to OFF.
Additionally, the functions with mark in this book are available.
Caution:
Be sure to select OFF when your car has no ACC position in the ignition switch.
Failure to do this could cause the battery to go dead.
CQ-DFX883N
5
Names
SET
BAND
5
Frequently-used Operation
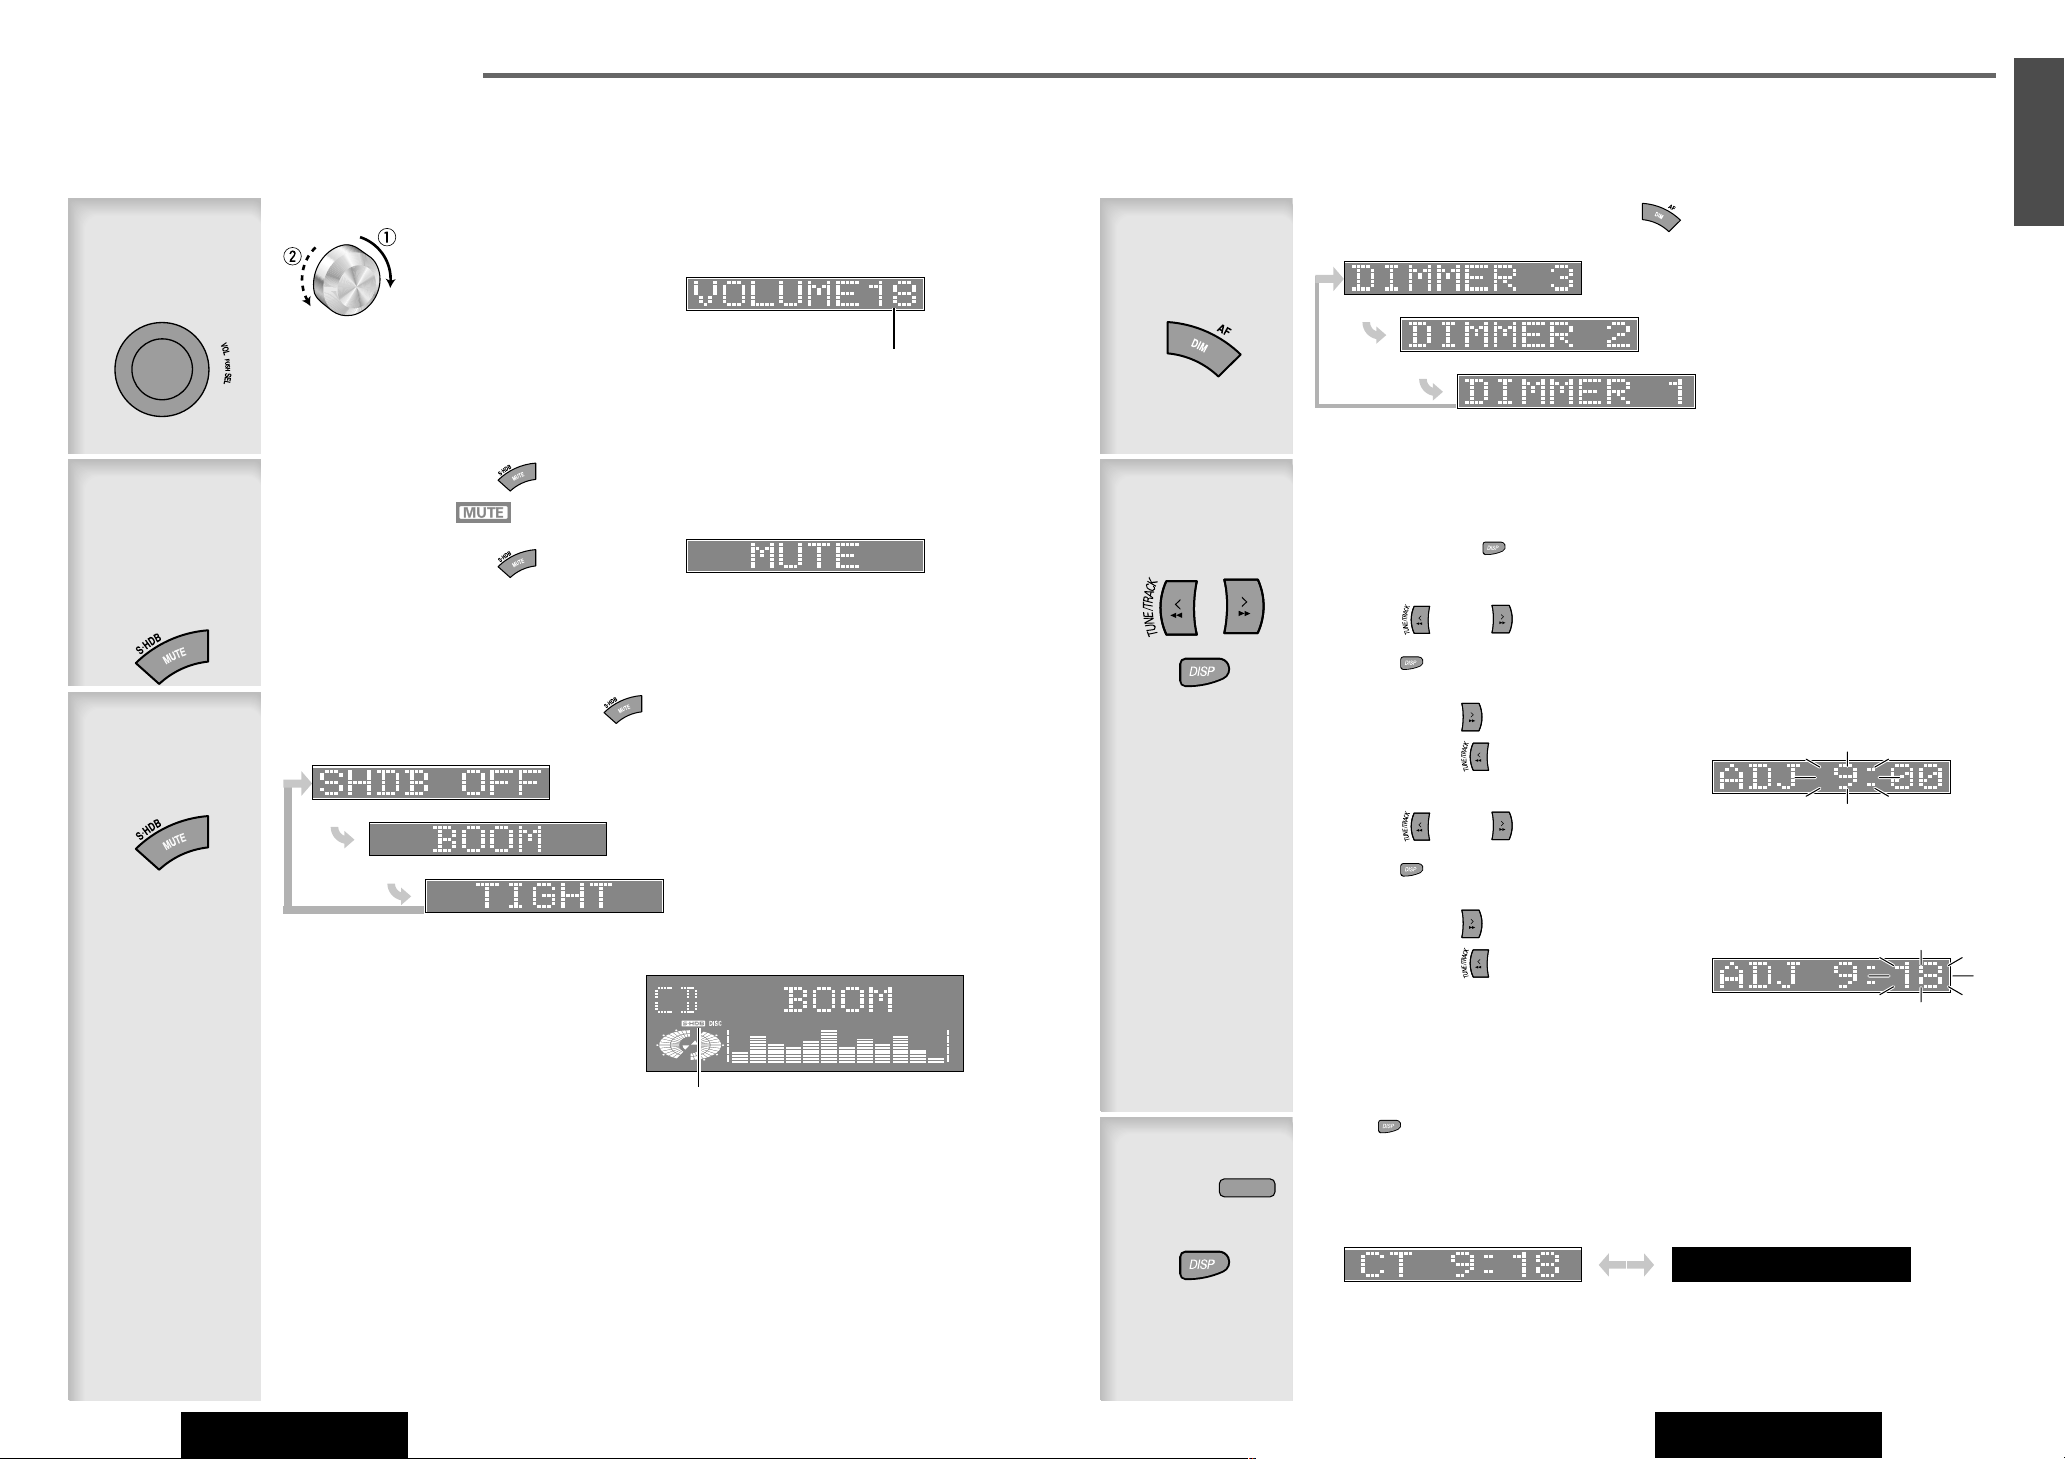
This chapter explains how to turn on or off the power, how to adjust the volume, etc.
MUTE (ATT Attenuation)
Super High Definition Bass
S·HDB
SOURCE
PWR Power
TA
VOL Volume
PUSH SEL Select
Remote
Control Unit
R
W
P
TA Traffic
Announcement
E
T
U
M
E
C
R
U
O
S
TA
Remote Control Sensor
POWER MENU
SOURCE
q
MUTE
w
e
1 2 3
4 5 6
7 809
BAND DISP
SET
MENU
PTY Program Type
DIM Dimmer
AF Alternative Frequency
5
/
Play/Pause
y
BAND
SET
Auto Preset Memory
APM
r
SEL
NUMBER
Car Audio
VOL
REPSCANRAND
t
y
u
q POWER
w MUTE
e BAND
r SEL Select
t VOL Volume
y Number Buttons
u DISP Display
CQ-DFX883N
K
C
A
R
T
/
E
N
U
T
DISP Display
SOURCE
S·HDB
SET
MENU
}:Up
{:Down
0 to 9
# Number
4 RAND Random
5 SCAN
6 REP Repeat
]7, 9[ Tune/Track/File
}8, 0{ Disc/Folder
English
OPEN
OPEN
Power On/off
Power on: Press (PWRPower).
(Power)
Power off: Hold down (PWRPower) for 1 sec. or more.
OPEN
P·SET Preset
Note: The demonstration message appears for first use.
To clear the demonstration message, press (DISP Display).
DISC
FOLDER
To display the demonstration message, hold down
(Demonstration display)
(PWR Power) for 4 sec. or more to turn the
TUNE
power on.
ACC ON
TRACK
FILE
Source
The source changes as follows every time (SOURCE) is pressed.
Selection
(Source)
Radio
FM1, FM2, FM3, AM (MW/LW)
(a Page 10)
Player
CD-DA, MP3, WMA
Depends on the loaded disc
(a Page 18, 20)
Note:
This instruction manual
explains operations for
use with the buttons on
the main unit. (Different
operations excluded)
Functions only by remote control unit
One-touch operation is available for selecting a track playing style by use of (
SCAN
SCAN
(
5
down the same button for 2 sec. or more.)
■
Direct Access
A track (CD mode), disc (CD changer), file and folder (MP3/WMA mode) can be directly selected.
Example: File number 5
q Press (# NUMBER).
), or (
NUMBER
REP
REP
6
Repeat). (For a Folder/Disc playing style, hold
RAND
4
RAND
Random),
CD Changer (sold separately)
Selectable only when a CD changer is
connected
(a Page 22)
Auxiliary
Sound source connecting to the AUX
input terminal
(a Installation Instructions)
(Direct Access display)
w Press .
e Press (SET).
Notes:
NUMBER
¡ For folder selection, enter a number after pressing (# NUMBER) twice.
¡ To suspend direct selection, press (DISP Display).
6
CQ-DFX883N
CQ-DFX883N
7
Frequently-used Operation
q Up
Volume
Adjustment
(Volume)
VOL volume
w Down
Note:
The volume level can be set independently for each source. (For radio, one
volume setting for AM, one volume
setting for all FMs)
(Volume adjusting display)
Setting Range: 0 to 40
Dimmer
Control
(Dimmer)
English
The dimmer level changes as follows every time (DIM Dimmer) is pressed.
Brighter (Default)
Medium
Darker
Temporary
Volume Off
(Down)
Mute
(Attenuation)
Bass
Enhancement
(S·HDB)
Volume off (down): Press (MUTE).
lights.
Cancel: Press (MUTE) again.
Note:
Volume-down range can be specified. (aPage 25)
The S•HDB level changes as follows every time (S•HDB Super High Definition Bass) is held
down for 2 sec. or more.
OFF (Default)
The bass sound of the speakers is strongly emphasized.
The bass sounds of the speakers are moderately emphasized.
(Muting display)
(S•HDB on display)
Clock
adjustment
Note:
Adjust the clock when
“NO CT” appears on the
display.
Select the radio AM mode.(a Page 10)
1
Press and hold (DISP Display) for more than 2 seconds.
2
Press (]) or ([) to adjust HOUR.
3
Press (DISP Display) to confirm the adjustment.
Forward: ([)
Back: (])
Press (]) or ([) to adjust MINUTE.
4
Press (DISP Display) to confirm the adjustment.
Forward: ([)
Back: (])
Note:
When a broadcast of FM Radio Data System is received, the clock is put right automatically by the
Clock Time service. (a Page 16)
S•HDB indicator
Pressing (DISP Display) toggles Clock display on and off.
Clock display at
power off
(Display)
8
CQ-DFX883N
ACC ON
Clock display (default)
CQ-DFX883N
9
6
6
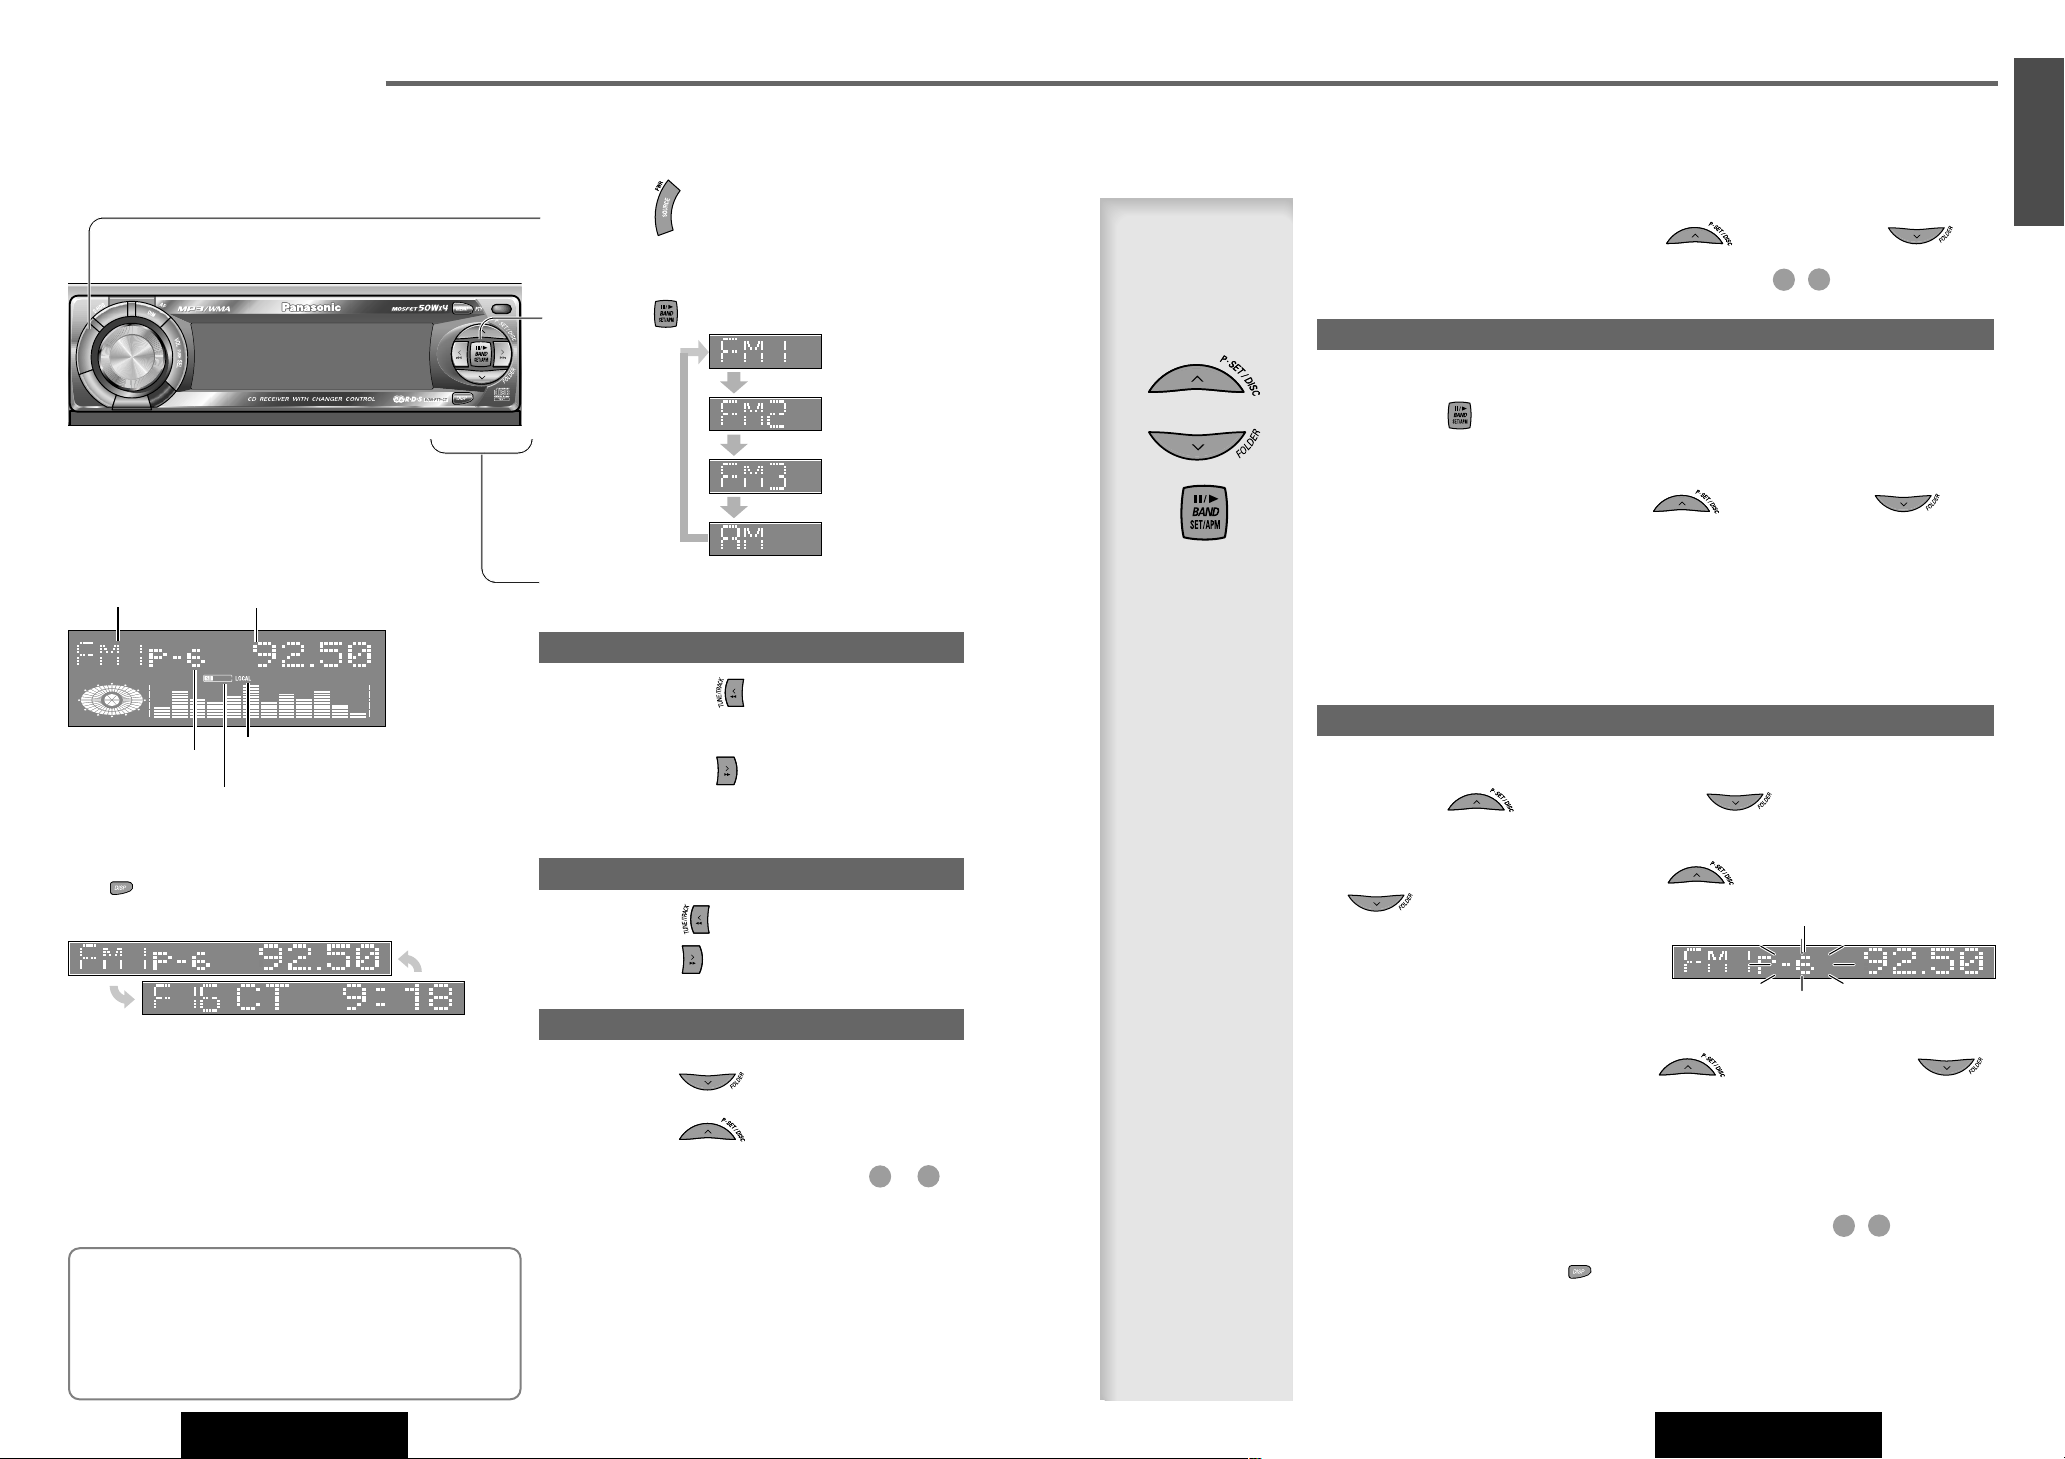
Radio Basics
TA
P
W
R
CQ-DFX883N
M
U
T
E
S
O
U
R
C
E
T
U
N
E
/
T
R
A
C
K
OPEN
6
This chapter explains how to listen to the radio.
Operation Flow
Radio mode display
Band
Preset Number
Frequency
LOCAL Indicator
STEREO/MONO (Monaural) Indicator
Press (SOURCE) to select the radio
1
mode.
Press (BAND) to select a band.
2
Select a station
3
Station search
Lower: Hold down (TUNE]) for 0.5 sec. or more
then release it.
Higher: Hold down (TUNE[) for 0.5 sec. or more
then release it.
Often-tuned
Station Preset
(Preset)
Up to 6 stations can be preset in AM, FM1, FM2, and FM3 respectively.
Preset stations can be simply called up by pressing (P·SET Preset}) or
(P·SET Preset{).
Note: Direct selection can be executed with remote control buttons ~ .
1
Auto Preset Memory (APM)
Select a band.
1
Hold down (APM Auto Preset Memory) for 2 sec. or more.
2
Up to 6 best receiving stations are preset.
The preset stations under best receiving conditions are received for 5 sec. each after presetting
the stations (SCAN). To stop scanning, press (P·SET Preset}) or
(P·SET Preset{).
Notes:
¡ New stations overwrite existing saved stations.
¡ Only RDS stations will be saved at default setting (AF ON). To select non RDS stations too, set AF
OFF. (a Page 13)
Manual station preset
Tune in to a station.
1
Hold down (P·SET Preset}) or (P·SET Preset{) for 2
2
sec. or more.
English
Display change
Press (DISP) to change.
Normal
CT Clock Time
Notes:
¡
For tuning in on only stations whose receiving condi-
Frequency adjustment
Lower: Press (TUNE]).
Higher: Press (TUNE[).
Preset station selection
Lower preset number:
Press (P·SETPreset{).
Higher preset number:
Press (P·SET Preset}).
Note: Direct selection can be executed with to
buttons on remote control.
1
Select a preset number by pressing (P·SET Preset}) or
3
(P·SET Preset{).
Preset the station by holding down (P·SET Preset}) or
4
Preset number
(P·SET Preset{)for 2 sec. or more.
Frequency/preset number blinks once.
Notes:
¡ New stations overwrite existing saved stations.
¡ In step 2, a station can be registered by holding down the numeric button ~ 2 sec. or
more.
¡ To stop presetting stations, press (DISPDisplay).
1
tions are good in the station search, set LOCAL to ON.
a Page 12)
(
¡ For reducing noise when a receiving FM stereo wave is
10
weak, set FM MONO to ON. (
a Page 12)
CQ-DFX883N
CQ-DFX883N
11
 Loading...