

Panasonic CQDF202 User Manual
E
N
G
L
I
S
H
2
CQ-DF202W
11
E
N
G
L
I
S
H
1
CQ-DF202W
10
Power and Sound Controls
Pattern 1 Pattern 3
Pattern 4Pattern off
Pattern 2
(Default)
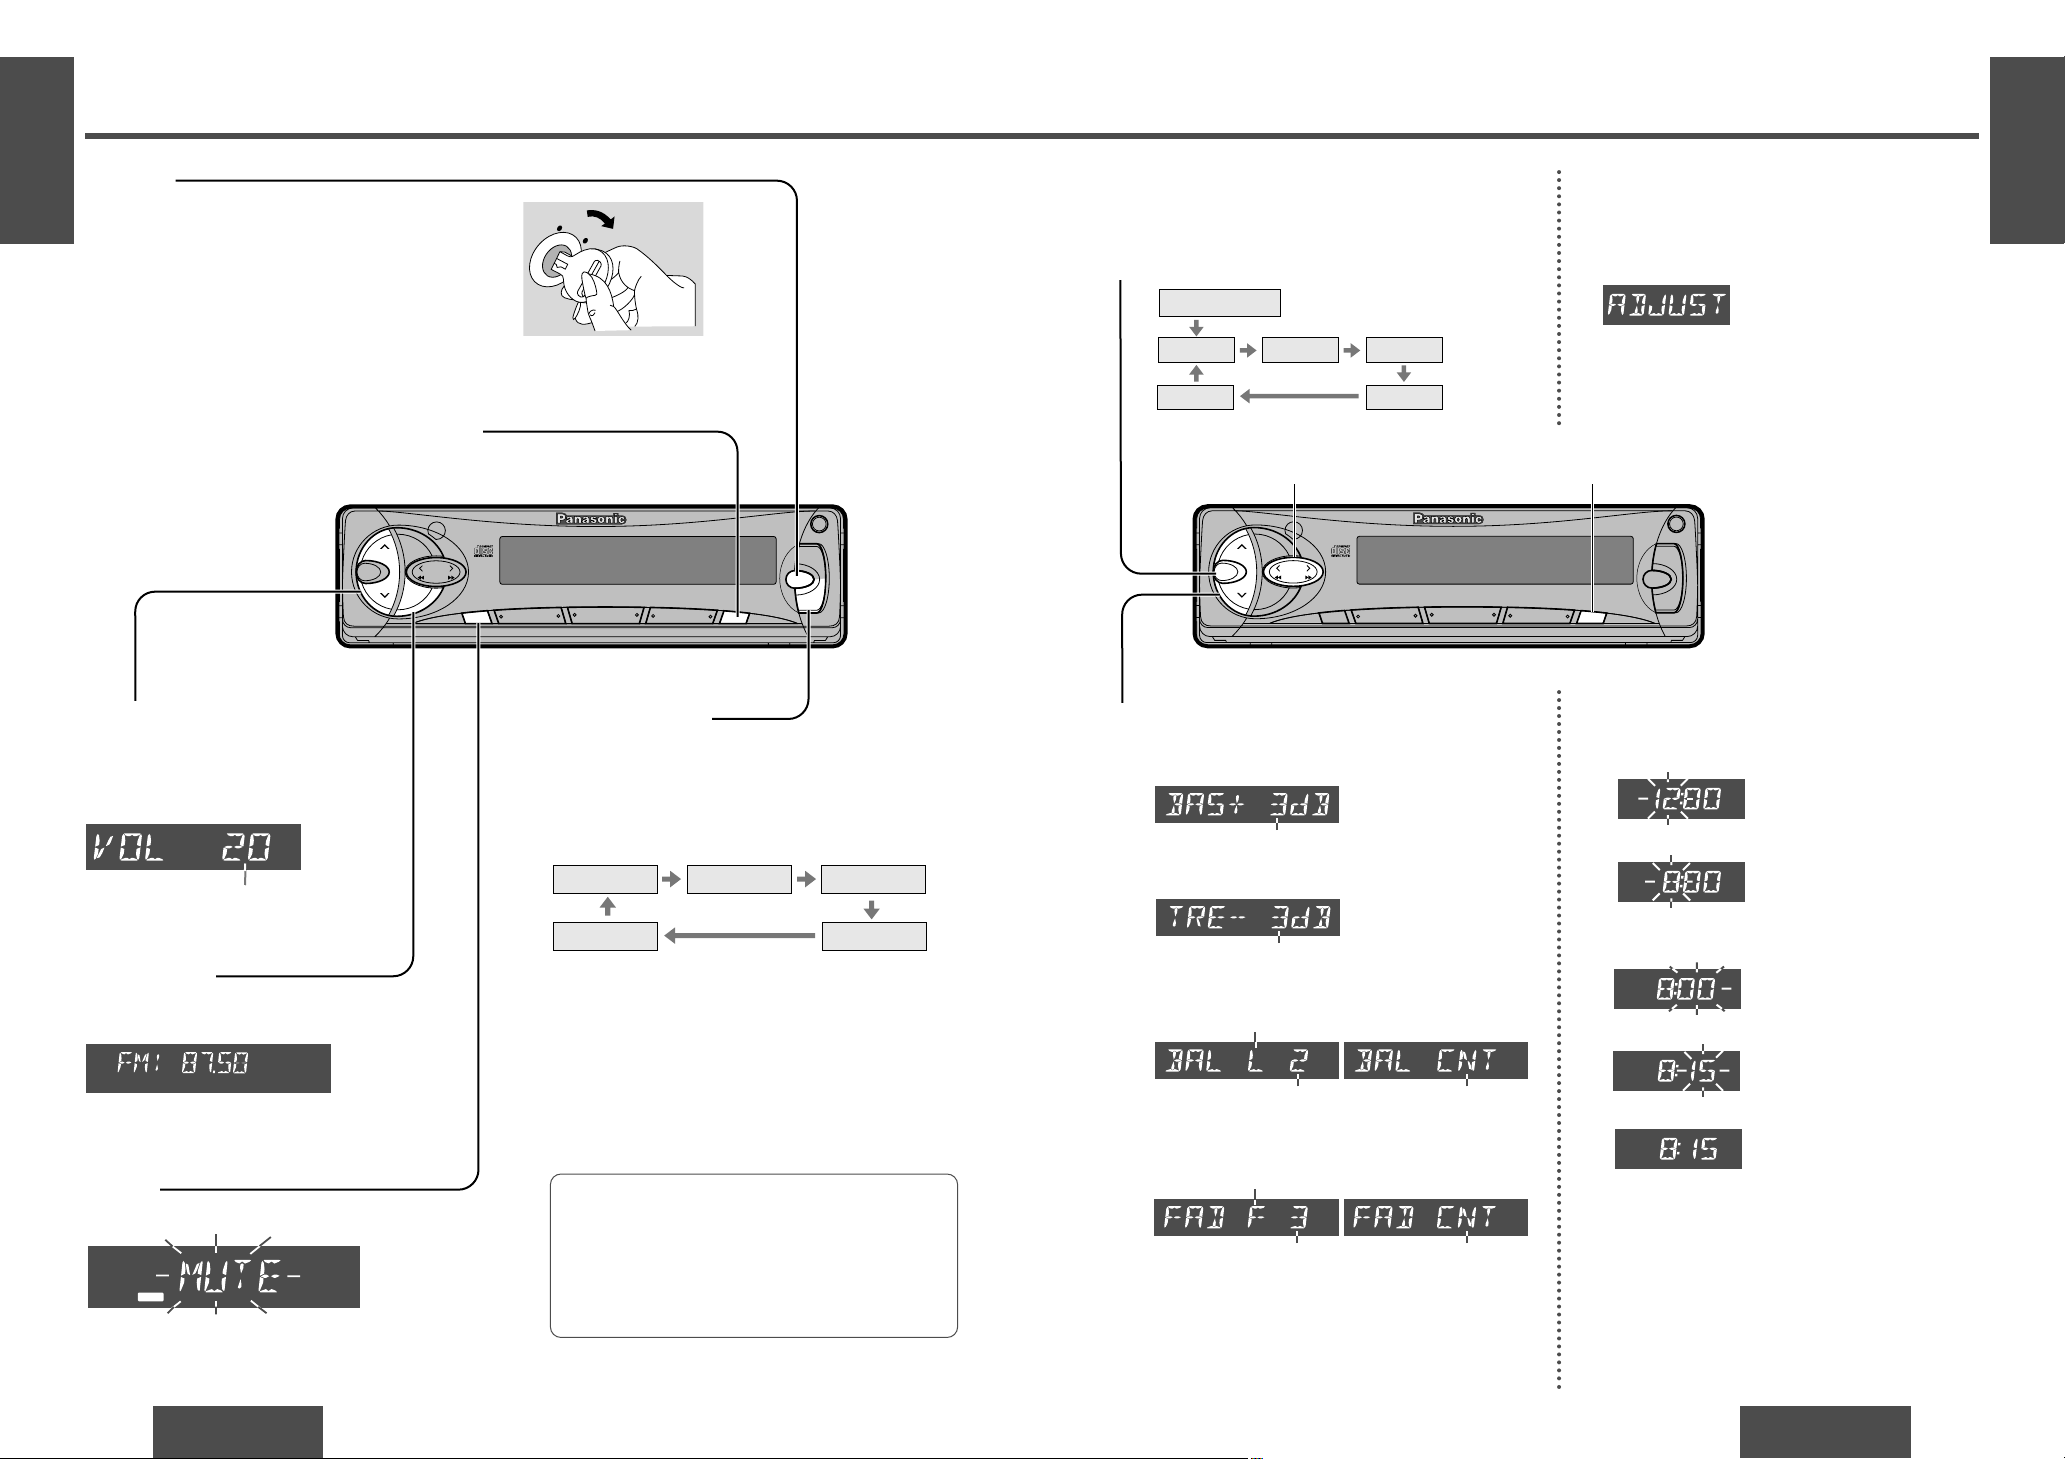
Power
Turn the key in the ignition until the accessory indicator lights.
Power on: Press [SOURCE] (PWR).
Power off: Press [SOURCE] (PWR) again and
hold.
Mute
Press [MUTE] to mute the sound completely.
Press [MUTE] again to cancel.
Note:
≥ When the power is switched on for the first
time, a demonstration message appears on the
display.
To cancel this display, press [DISP] (display).
Volume
[" VOL]: Up
[# VOL]: Down
Press and hold for rapid adjustment.
Volume level (0 to 40)
Anti-volume-blast circuit:
When the power is switched off and on again,
the volume slowly rises to the previous level.
The anti-volume-blast circuit will not work when
the volume level is set lower than position 20 on
the display.
MUTE
VOL
S
C
A
N
A
U
T
O
·P
SEL
BAND
TUNE
MUTE DISP
12
34
5
6
712
C
LO
C
K
SOURCE
REP
CQ-DF202W
CD RECEIVER WITH CHANGER CONTROL
45WX4
RANDOM
OPEN
PWR
811
910
TRACK
LOUD
M
O
N
O
/L
O
C
LEVL
REMOTE
VOL
S
C
A
N
A
U
T
O
·P
SEL
BAND
TUNE
MUTE DISP
12
34
5
6
712
CLO
C
K
SOURCE
REP
CQ-DF202W
CD RECEIVER WITH CHANGER CONTROL
45WX4
RANDOM
OPEN
PWR
811
910
TRACK
LOUD
M
O
N
O
/L
O
C
LEVL
REMOTE
Audio Mode
(Bass/Treble/Balance/Fader)
Regular mode
Volume Bass Treble
BalanceFader
Note:
≥ If no operation takes place for more than 5 seconds
in audio mode (2 seconds in volume mode), the display returns to the regular mode.
Bass:
Adjustable range: j12 dB to i12 dB
(by 3 dB step)
Treble:
Adjustable range: j12 dB to i12 dB
(by 3 dB step)
Balance:
R (right speaker) or L (left speaker)
Fader:
F (front speaker) or R (rear speaker)
Adjustable range: Balance center
1 to 15 (by 1 dB step)
Adjustable range: Fader center
1 to 15 (by 1 dB step)
Loudness
Press [LOUD] to enhance bass and treble
tones at low or medium volume.
Press [LOUD] again to cancel.
LOUD
Level Meter
When the power is on, the level of sound sources,
such as radio and CD, is displayed.
Press [LEVL] (level) to change the level meter dis-
play.
AC
C
ON
Press [SEL] to select the audio mode.
1
Press [" VOL] or [# VOL] to change each
level.
2
Clock Basics
The 12-hour system is used for the clock.
Hours
2 Press and hold [DISP] (CLOCK) for more than
2 seconds.
3 Press [% TUNE] or [$ TUNE].
Minutes
4 Press [DISP] (CLOCK).
5 Press [% TUNE] or [$ TUNE].
6 Press [DISP] (CLOCK).
Note:
≥ Press and hold [% TUNE] or [$ TUNE] for more
than 2 seconds to change numbers rapidly.
(Hours blink.)
(Hours set.)
(Minutes blink.)
(Minutes set.)
(End.)
Initial Time
1 Press [DISP] (CLOCK).
(Clock display.)
Time Reset
Press and hold [DISP] (CLOCK) for more than
2 seconds to activate the time setting mode to
reset the time.
Then, repeat steps 3 to 6.
[DISP] (CLOCK)[% TUNE], [$ TUNE] (Hours, minutes)
E
N
G
L
I
S
H
4
CQ-DF202W
13
E
N
G
L
I
S
H
3
CQ-DF202W
12
Radio Basics
VOL
S
C
A
N
/
A
U
T
O
·P
SEL
BAND
TUNE
MUTE DISP
12
34
5
6
712
CLO
CK
SOURCE
REP
CQ-DF202W
CD RECEIVER WITH CHANGER CONTROL
45WX4
RANDOM
OPEN
PWR
811
910
TRACK
LOUD
M
O
N
O
/LO
C
L R
ST
MONO
LOCAL
MUTE
LOUD
REP
DISC
RAND
TAAFPTY
RDS
EON
TP
ΙΙ
on
LEVL
REMOTE
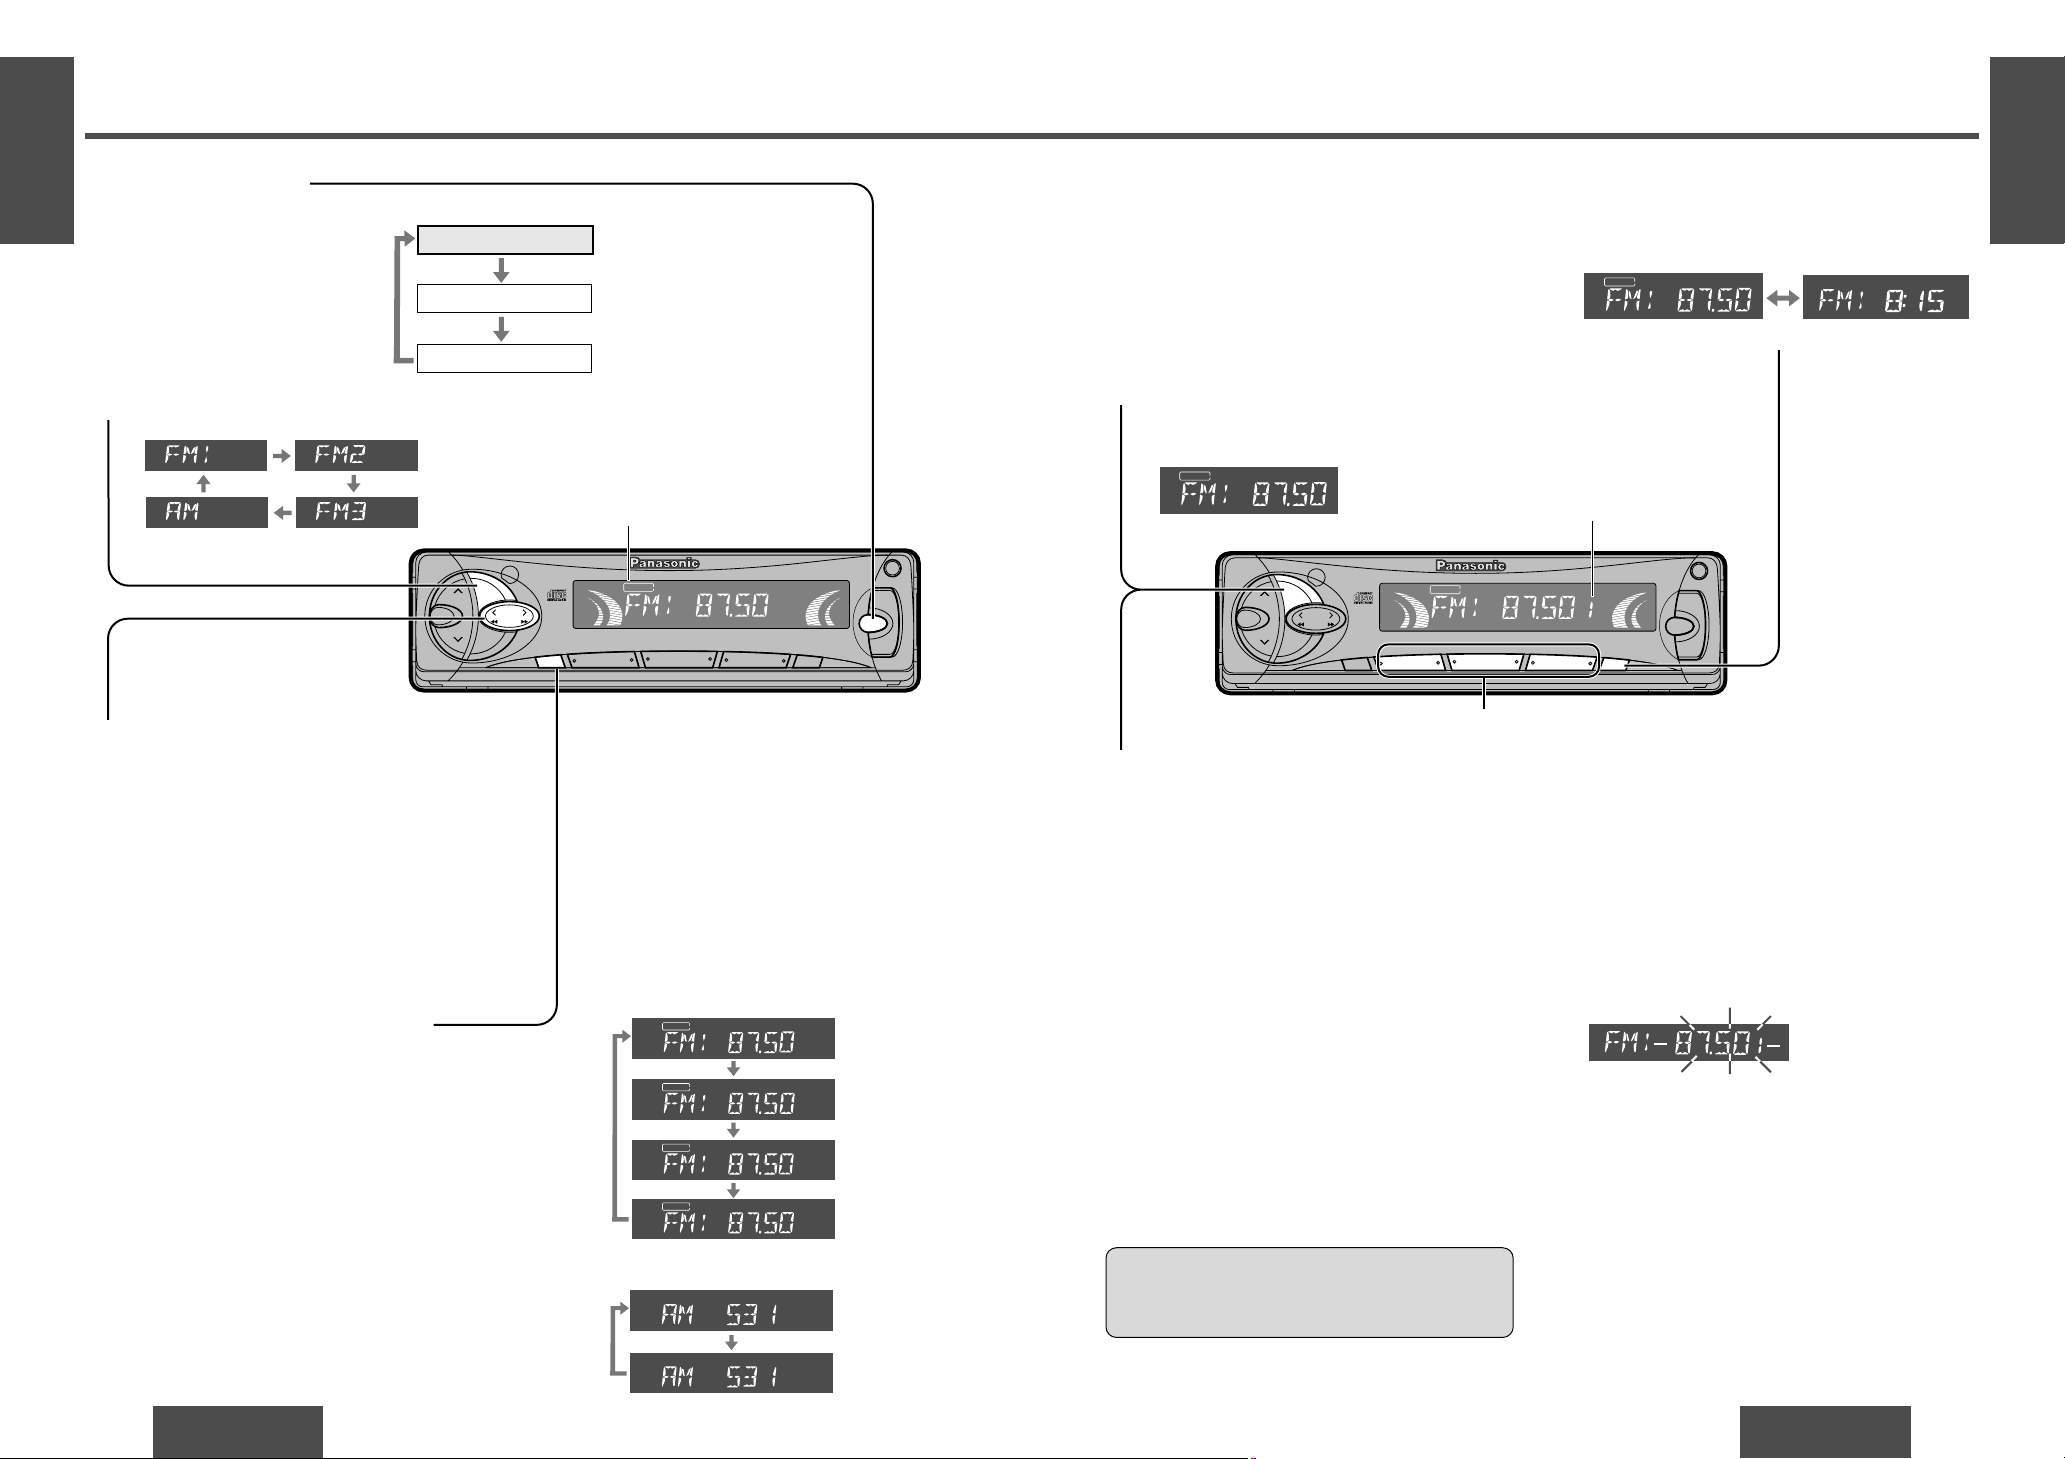
Band
Press [BAND] to change the band.
Manual Tuning
[$ TUNE]: Higher frequency
[% TUNE]: Lower frequency
Mono/Local Selection
MONO: Noise is significantly decreased when weak
signals are received from an FM broadcast
station.
LOCAL: Only strong signals of stations are searched
in seek tuning, while at the LOCAL OFF setting, relatively weak signals are also
searched.
FM broadcast:
Press and hold [MUTE] (MONO/LOC) for more than
2 seconds to change the mode.
Release at the desired point.
AM broadcast:
Press and hold [MUTE] (MONO/LOC) for more than
2 seconds to switch LOCAL mode on and off.
Radio Mode
Press [SOURCE] to change
to the radio mode.
L R
ST
MONO
LOCAL
MUTE
LOUD
REP
DISC
RAND
TAAFPTY
RDS
EON
TP
ΙΙ
on
VOL
S
C
A
N
A
U
T
O
·P
SEL
BAND
TUNE
MUTE DISP
12
34
5
6
712
CLO
CK
SOURCE
REP
CQ-DF202W
CD RECEIVER WITH CHANGER CONTROL
45WX4
RANDOM
OPEN
PWR
811
910
TRACK
LOUD
M
O
N
O
/L
O
C
LEVL
REMOTE
Up to 6 stations each can be saved in the FM1,
FM2, FM3 and AM preset station memories.
Caution:
≥ To ensure safety, never attempt to preset sta-
tions while you are driving.
Radio
CD player
(When a CD is inserted.)
Source
CD changer control
(When a CD changer is connected
and magazine is in the changer.)
FM stereo indicator
ST
MONO
LOCAL
ST
MONO
LOCAL
ST
MONO
LOCAL
ST
MONO
LOCAL
MONO off/
LOCAL off
(Default)
MONO on/
LOCAL off
MONO on/
LOCAL on
MONO off/
LOCAL on
Preset number
Seek Tuning
Press and hold ...
[$ TUNE]: Higher frequency
[% TUNE]: Lower frequency
Tuning will automatically stop when the signals of the next broadcast station are received.
Manual Preset Memory
1 Use manual or seek tuning to find a sta-
tion. (➡ page 12)
2 Press and hold one of the preset buttons
from [1] to [6] until the display blinks
once.
ST
MONO
LOCAL
ST
MONO
LOCAL
LOCAL off
(Default)
LOCAL on
FM broadcast:
AM broadcast:
Preset Station Setting
1
2
3
4
Band
Press [BAND] to select a desired band.
(➡ page 12)
1
Auto Preset Memory (AUTO·P)2
Preset Station Calling
Press the corresponding preset button from [1] to
[6] to tune in a preset station.
Press and hold [BAND] (AUTO·P: auto preset
memory) for more than 2 seconds.
≥ The 6 strongest available stations will be
automatically saved in the memory under
preset buttons from [1] to [6].
≥ Once set, the preset stations are sequential-
ly scanned for 5 seconds each.
Note:
≥ Existing saved stations are overwritten with new
stations after following this procedure.
Preset buttons from [1] to [6]
Display Change
Press [DISP] (CLOCK) to switch to the clock dis-
play.
Broadcast station Clock display
ST
ST
E
N
G
L
I
S
H
6
CQ-DF202W
15
E
N
G
L
I
S
H
5
CQ-DF202W
14
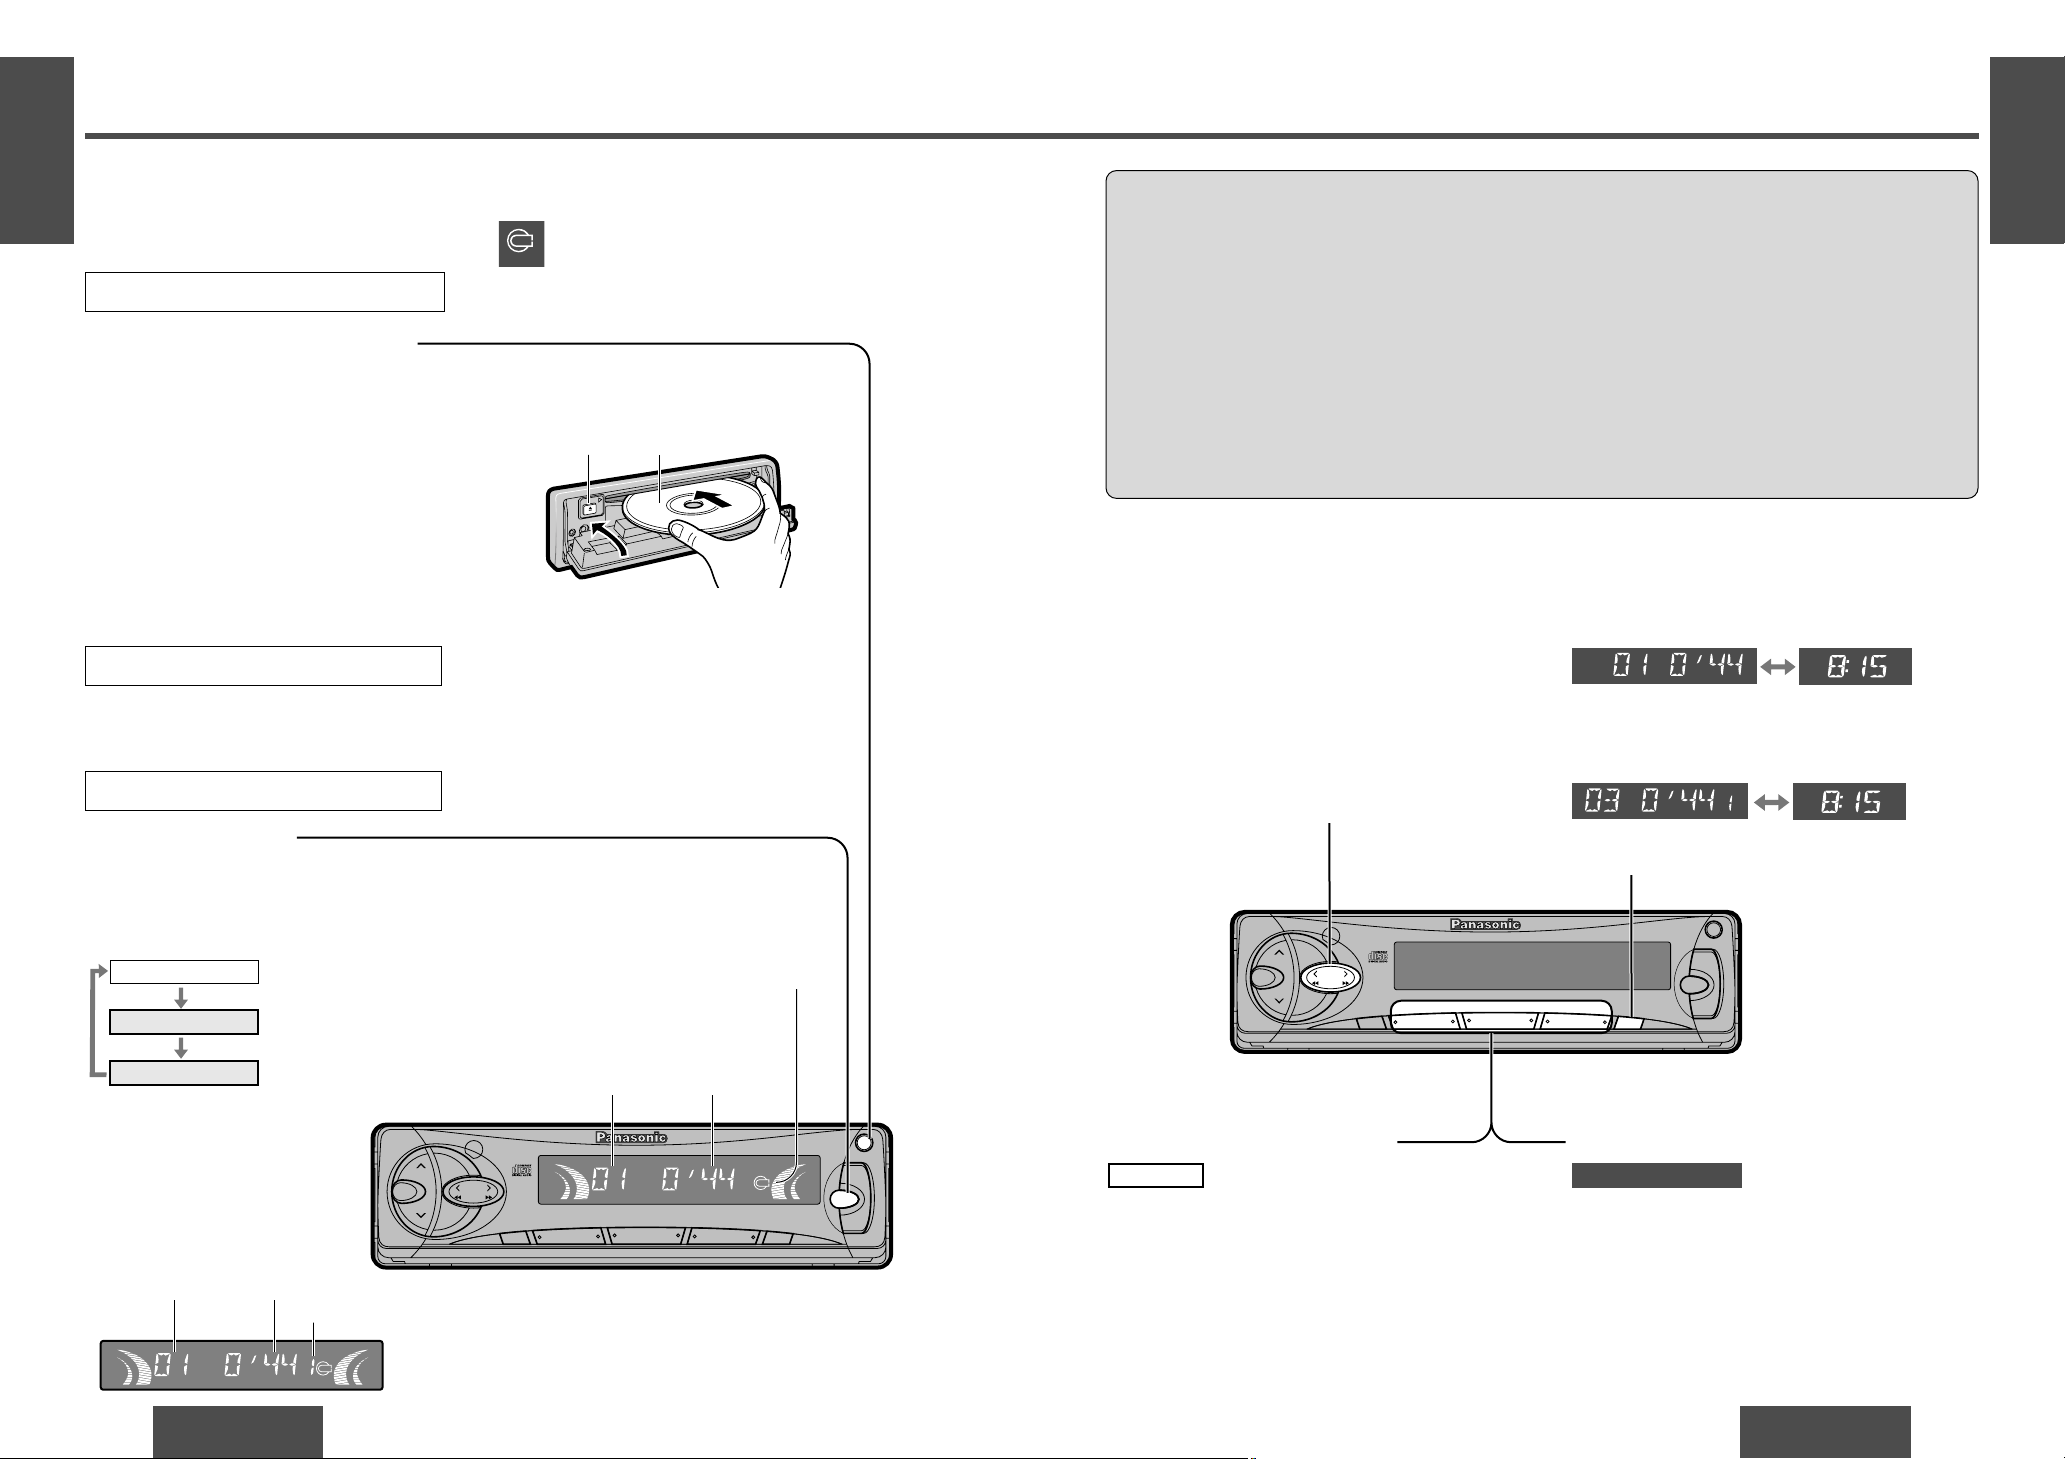
CD Player and CD Changer Control
Track Selection
[5TRACK]: Advance to the next track.
[6TRACK]: Back to the beginning of the
current track.
Back to the previous track.
(Press twice.)
Track Search
Press and hold ...
[5TRACK]: Fast forward
[6TRACK]: Fast backward
Release to resume the regular play.
Display Change
Press [DISP] (CLOCK) to switch to the clock display.
CD player:
Radio
CD player
(When a CD is inserted.)
Source
CD changer control
(When a CD changer is
connected and magazine
is in the changer.)
VOL
S
C
A
N
A
U
T
O
·P
SEL
BAND
TUNE
MUTE DISP
12
34
5
6
712
CLOCK
SOURCE
REP
CQ-DF202W
CD RECEIVER WITH CHANGER CONTROL
45WX4
RANDOM
OPEN
PWR
811
910
TRACK
LOUD
M
O
N
O
/L
O
C
L R
DISC
LEVL
REMOTE
Mode Selection
Press [SOURCE] to change to the CD player or CD
changer mode.
Playback will start automatically.
Caution:
≥ Only 12 cm CD, CD-DA data recorded CD-R and CD-RW discs are available for this unit.
≥ This unit does not support CD-ROM, CD-R or CD-RW playback through the CD changer. Use the CD
changer to listen to normal music CD exclusively.
≥ This unit does not support CD text display.
≥ This unit does not support MP3 disc playback.
≥ Refer to page 21 about notes on CD-Rs/RWs.
≥ This unit is not designed for any 8 cm disc.
≥ If you insert an 8 cm disc and can not eject it, turn ACC of your car off once and turn it on again, then
press [<] (eject).
≥ Do not use irregular shaped discs.
≥ Do not use discs that have a seal or label attached.
≥ Do not insert foreign matter into the disc slot.
Direct Track Selection
≥ Press a track number button from [1] to [6].
The corresponding track starts playing.
≥ Press and hold a track number button from [7] to
[12] ([1] to [6]) for more than 1 second.
The corresponding track starts playing.
CD player
Direct Disc Selection
≥ Press a disc number button from [1] to [6].
The corresponding disc starts playing.
≥ Press and hold a disc number button from [7] to
[12] ([1] to [6]) for more than 1 second.
The corresponding disc starts playing.
CD changer control
<CD player display>
Track number Track playing time
Track number/
track playing time
≥ Do not insert a disc when the indi-
cator lights.
≥ Lights when the disc is loaded.
Clock display
Clock display
Listening to a CD
<
(Eject) Label side
Close
1 Press [OPEN] on the front panel.
2 Press [<] (eject) to stop CD play and eject the disc.
Disc Insert and Playback
Stop and Disc Eject
1
Open the front panel
Press [OPEN] to open the front panel.
Disc insert
Playback will start automatically after the
player recognized the loaded disc as an ordinary music CD. (When a CD-R or CD-RW
which has CD-DA formatted data as the
same as an ordinary music CD is loaded,
this player recognizes it as an ordinary
music CD.)
Close the front panel manually.
2
Note:
≥ The CD changer functions are designed for Panasonic CD changer unit (optional).
≥ Do not insert a disc when the indicator lights.
DISC
Track number/track playing
time/disc number
CD changer control:
VOL
S
C
A
N
A
U
T
O
•
P
SEL
BAND
TUNE
MUTE DISP
12
34
5
6
712
CLO
CK
SOURCE
REP
CQ-DF202W
CD RECEIVER WITH CHANGER CONTROL
45WX4
RANDOM
OPEN
PWR
811
910
TRACK
LOUD
M
O
N
O
/L
O
C
LEVL
REMOTE
L R
DISC
<CD changer display>
Track number Track playing time
Disc number
 Loading...