

Panasonic CQ-C3300U User Manual
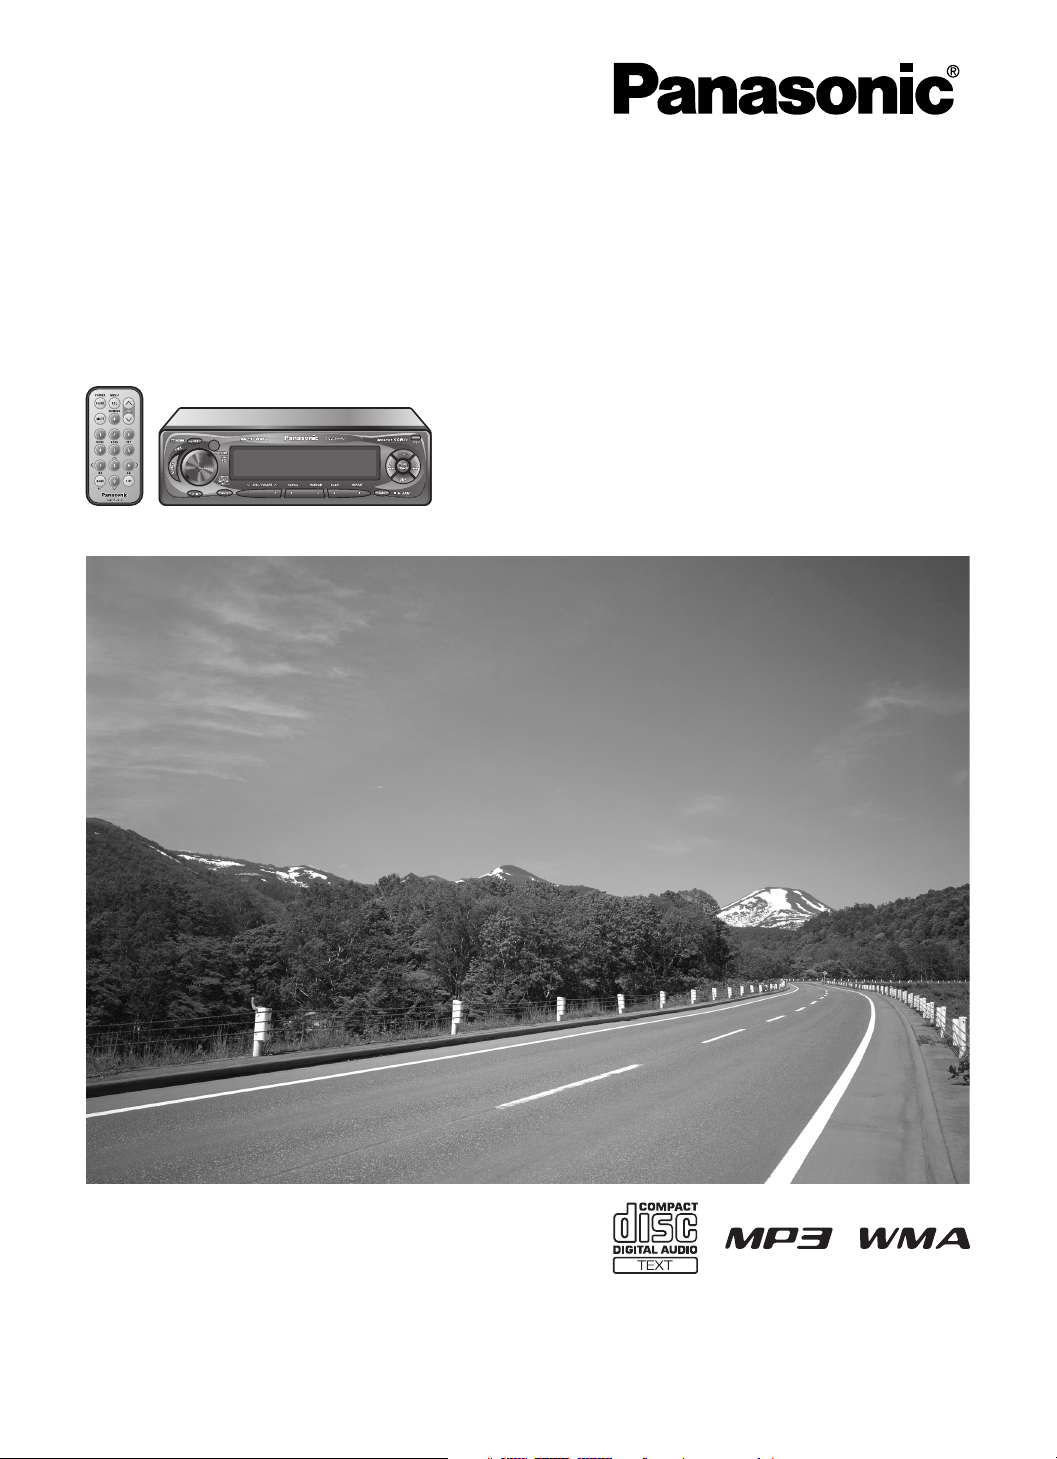
Removable Full Front MP3 WMA CD Player/Receiver with CD Changer Control
CQ-C3400/C3300U
Removable Full Front CD Player/Receiver with CD Changer Control
CQ-C3200/C3100U
(CQ-C3400U)
Operating InstructionsOperating Instructions
Manuel d’instructionsManuel d’instructions
Manual de instruccionesManual de instrucciones
≥ Please read these instructions carefully before using this product and save this manual for future use.
≥ Prière de lire ces instructions attentivement avant d’utiliser Ie produit et garder ce manuel pour l’utilisation ultérieure.
≥ Lea con atención estas instrucciones antes de utilizar el producto y guarde este manual para poderlo consultar en el futuro.
2
CQ-C3400/3300/3200/3100U
E
N
G
L
I
S
H
CQ-C3400/3300/3200/3100U
3
E
N
G
L
I
S
H
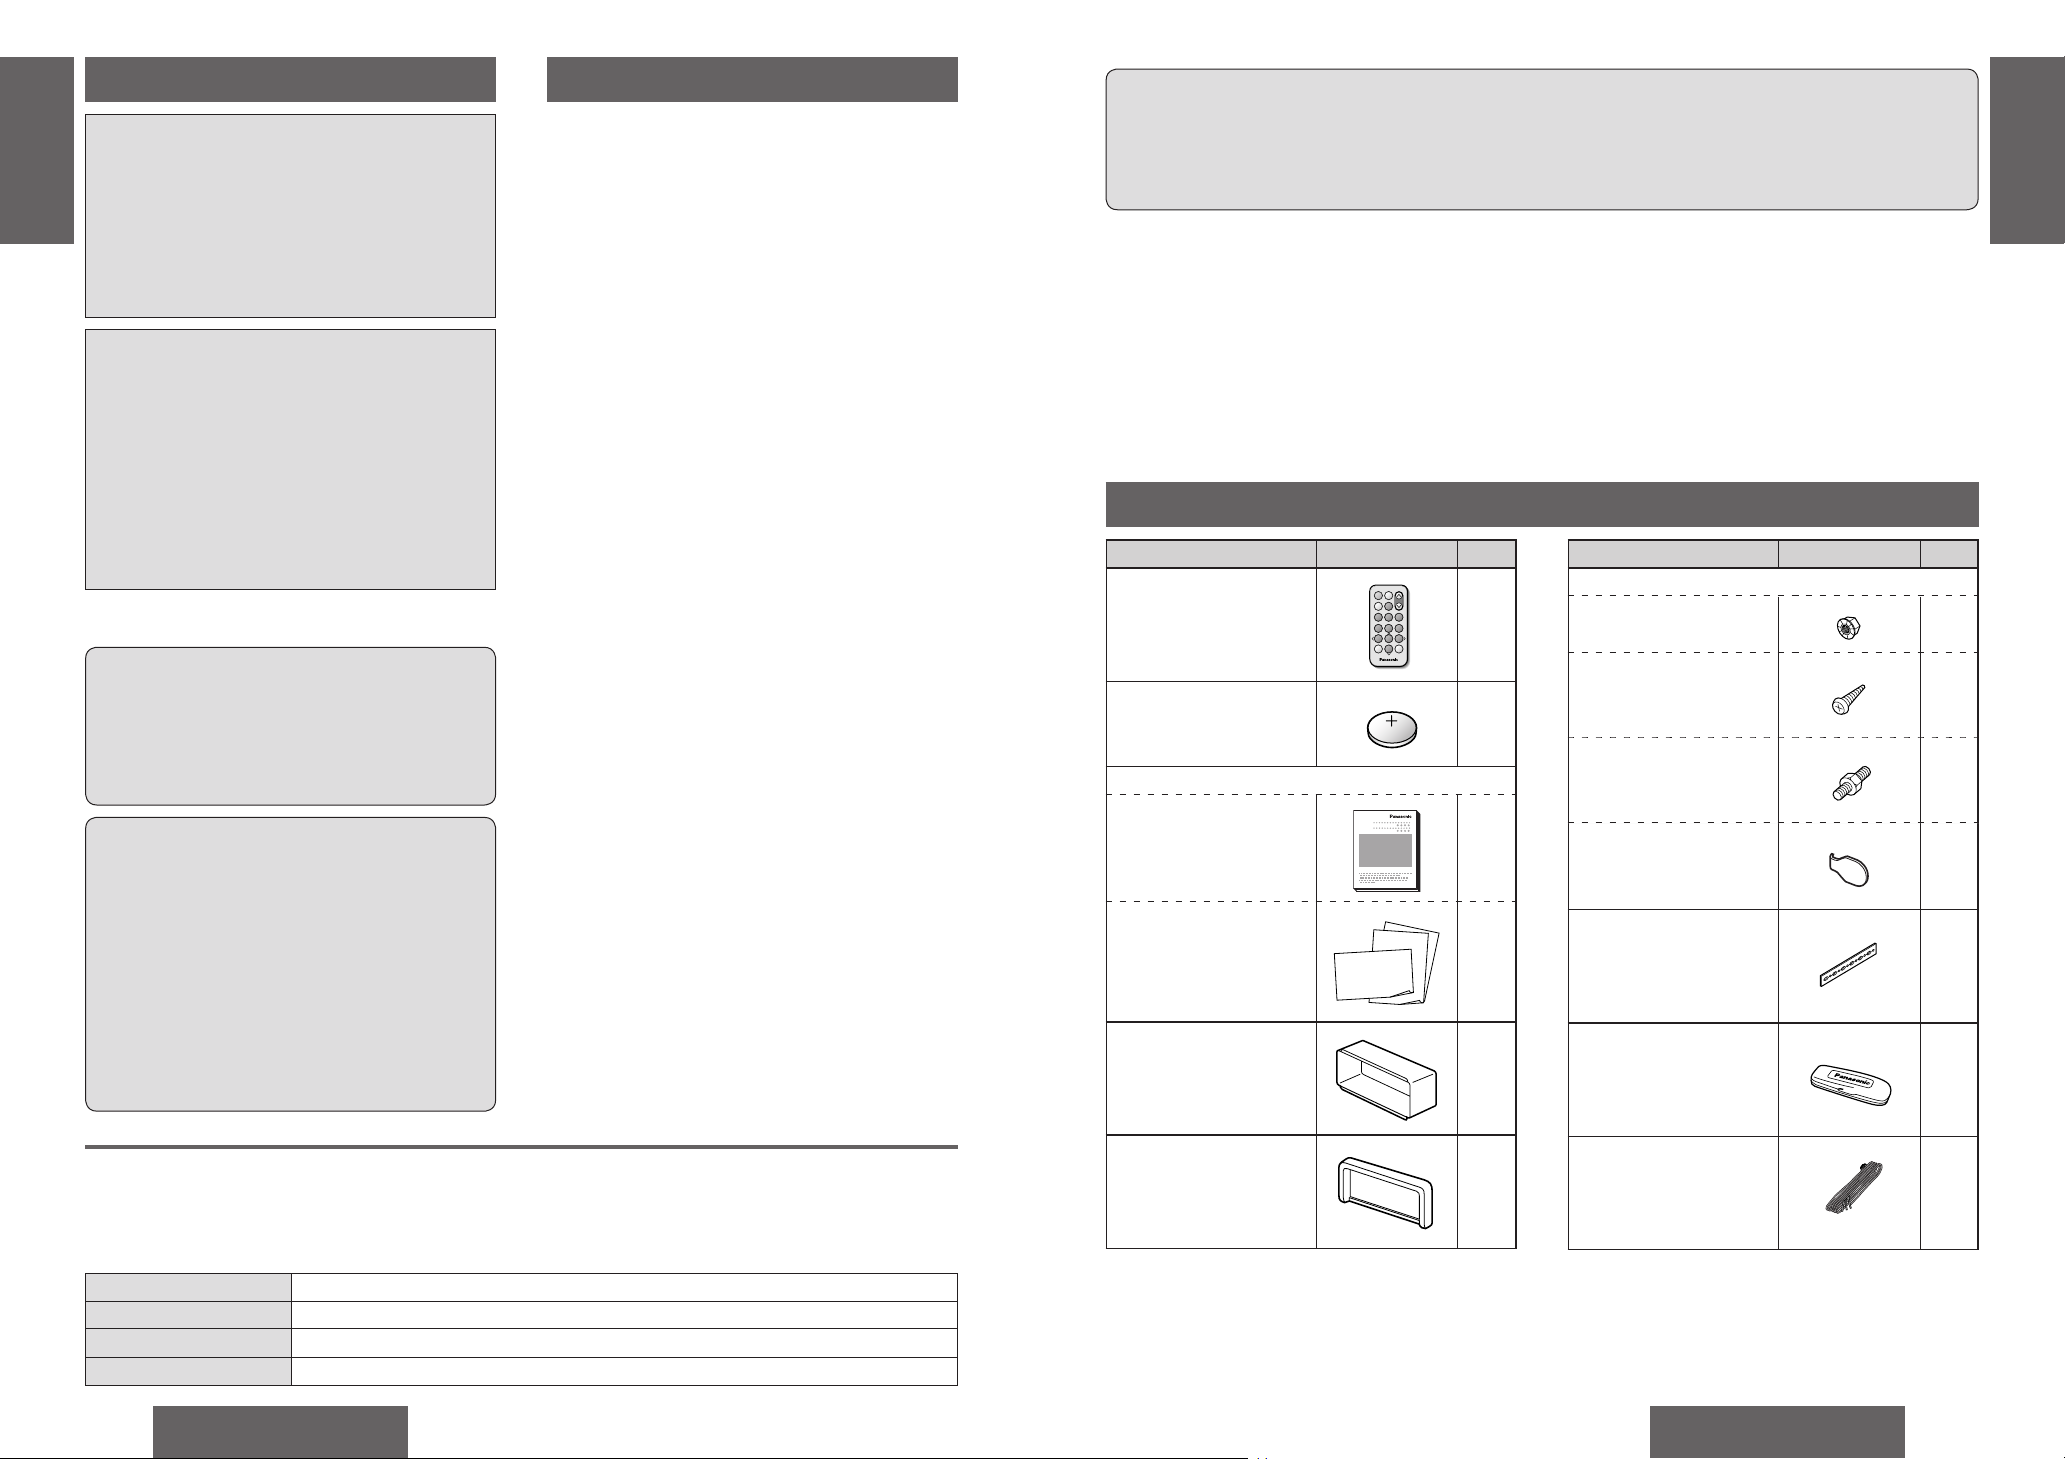
Item Diagram Q’ty
Remote Control Unit
(YEFX9992663)
1
Lithium Battery
<CR2025>
1
Instruction kit
≥ Operating Instructions
(YEFM284143)
1
≥ Warranty Card, etc.
1 set
Mounting Collar
(YEFX0216165)
1
Trim Plate
(YEFC05615)
1
Safety Information
WARNING:
TO REDUCE THE RISK OF FIRE OR ELECTRIC
SHOCK, DO NOT EXPOSE THIS PRODUCT TO
RAIN OR MOISTURE.
TO REDUCE THE RISK OF FIRE OR ELECTRIC
SHOCK, AND ANNOYING INTERFERENCE, USE
ONLY THE INCLUDED COMPONENTS.
CAUTION:
THIS PRODUCT IS A CLASS I LASER
PRODUCT.
USE OF CONTROLS OR ADJUSTMENTS OR
PERFORMANCE OF PROCEDURES OTHER
THAN THOSE SPECIFIED HEREIN MAY RESULT
IN HAZARDOUS RADIATION EXPOSURE.
DO NOT OPEN COVERS AND DO NOT REPAIR
YOURSELF. REFER SERVICING TO QUALIFIED
PERSONNEL.
The following applies only in the U.S.A.
Part 15 of the FCC Rules
FCC Warning:
Any unauthorized changes or modifi cations to
this equipment would void the user’s authority
to operate this device.
NOTICE:
This product has a fl uorescent lamp that
contains a small amount of mercury. It
also contains lead in some components.
Disposal of these materials may be regulated
in your community due to environmental
considerations.
For disposal or recycling information
please contact your local authorities,
or the Electronics Industries Alliance:
<http://www.eiae.org.>
Precautions
When Driving
Keep the volume level low enough to be aware of
road and traffi c conditions.
When Washing Your Car
Do not expose the product, including the speakers
and CDs, to water or excessive moisture. This could
cause electrical shorts, fi re, or other damage.
When Parked
Parking in direct sunlight can produce very high
temperatures inside your car. Give the interior a
chance to cool down before switching the unit on.
Use the Proper Power Supply
This product is designed to operate with a 12 V DC,
negative ground battery system (the normal system
in a North American car).
Disc Mechanism
Do not insert coins or any small objects. Keep
screwdrivers and other metallic objects away from
the disc mechanism and disc.
Use Authorized Servicenters
This product is made of precision parts. Do not
attempt to disassemble or adjust any parts. Please
refer to the Servicenter list including with this
product for service assistance.
For Installation
This product should be installed in a horizontal
position with the front end up at a convenient angle,
but not more than 30°.
Note:
≥ The preset memory is cleared to return to the
original factory setting when the power connector
or battery is disconnected.
Find the model number and serial number on either the back or bottom of the unit. Please record them in the
space below and retain this booklet as a permanent record of your purchase to help with identifi cation in case
of theft.
MODEL NUMBER CQ-C3400U / CQ-C3300U / CQ-C3200U / CQ-C3100U
SERIAL NUMBER
DATE PURCHASED
FROM
Accessories
Panasonic welcomes you to our ever growing family of electronic product owners. We know that
this product will bring you many hours of enjoyment. Our reputation is built on precise electronic and
mechanical engineering, manufactured with carefully selected components and assembled by people
who take pride in their work. Once you discover the quality, reliability, and value we have built into this
product, you too will be proud to be a member of our family.
CQ-C3400/C3300U
Removable Full Front MP3 WMA CD Player/Receiver with CD Changer Control
CQ-C3200/C3100U
Removable Full Front CD Player/Receiver with CD Changer Control
Item Diagram Q’ty
Screw kit (YEP0FZ3315)
≥ Hex. Nut (5 mm‡)
1
≥ Tapping Screw
(5 mm‡t16 mm)
1
≥ Mounting Bolt
(5 mm‡)
1
≥ Lock Cancel Plate
2
Rear Support Strap
(YEFG04024)
1
Removable Face Plate
Case
(YEFA131839)
1
Power Connector
(YEAJ02871)
1
64975
Car Audio
SOURCE
MUTE
POWER
RAND
VOL
312
DISPBAND
REP
6
5
SET
SEL
#
SCAN
MENU
NUMBER
8
0
Note:
≥ The number in parenthesis underneath each accessory part name is the part number for maintenance and
service.
≥ Accessories and their parts numbers are subject to modifi cation without prior notice due to improvements.
≥ Mounting collar 1 and trim plate 7 are mounted on the main unit at shipment (page 46).
Note:
≥ Please refer to page 9 for information on differences in each model.
8
CQ-C3400/3300/3200/3100U
E
N
G
L
I
S
H
CQ-C3400/3300/3200/3100U
9
E
N
G
L
I
S
H
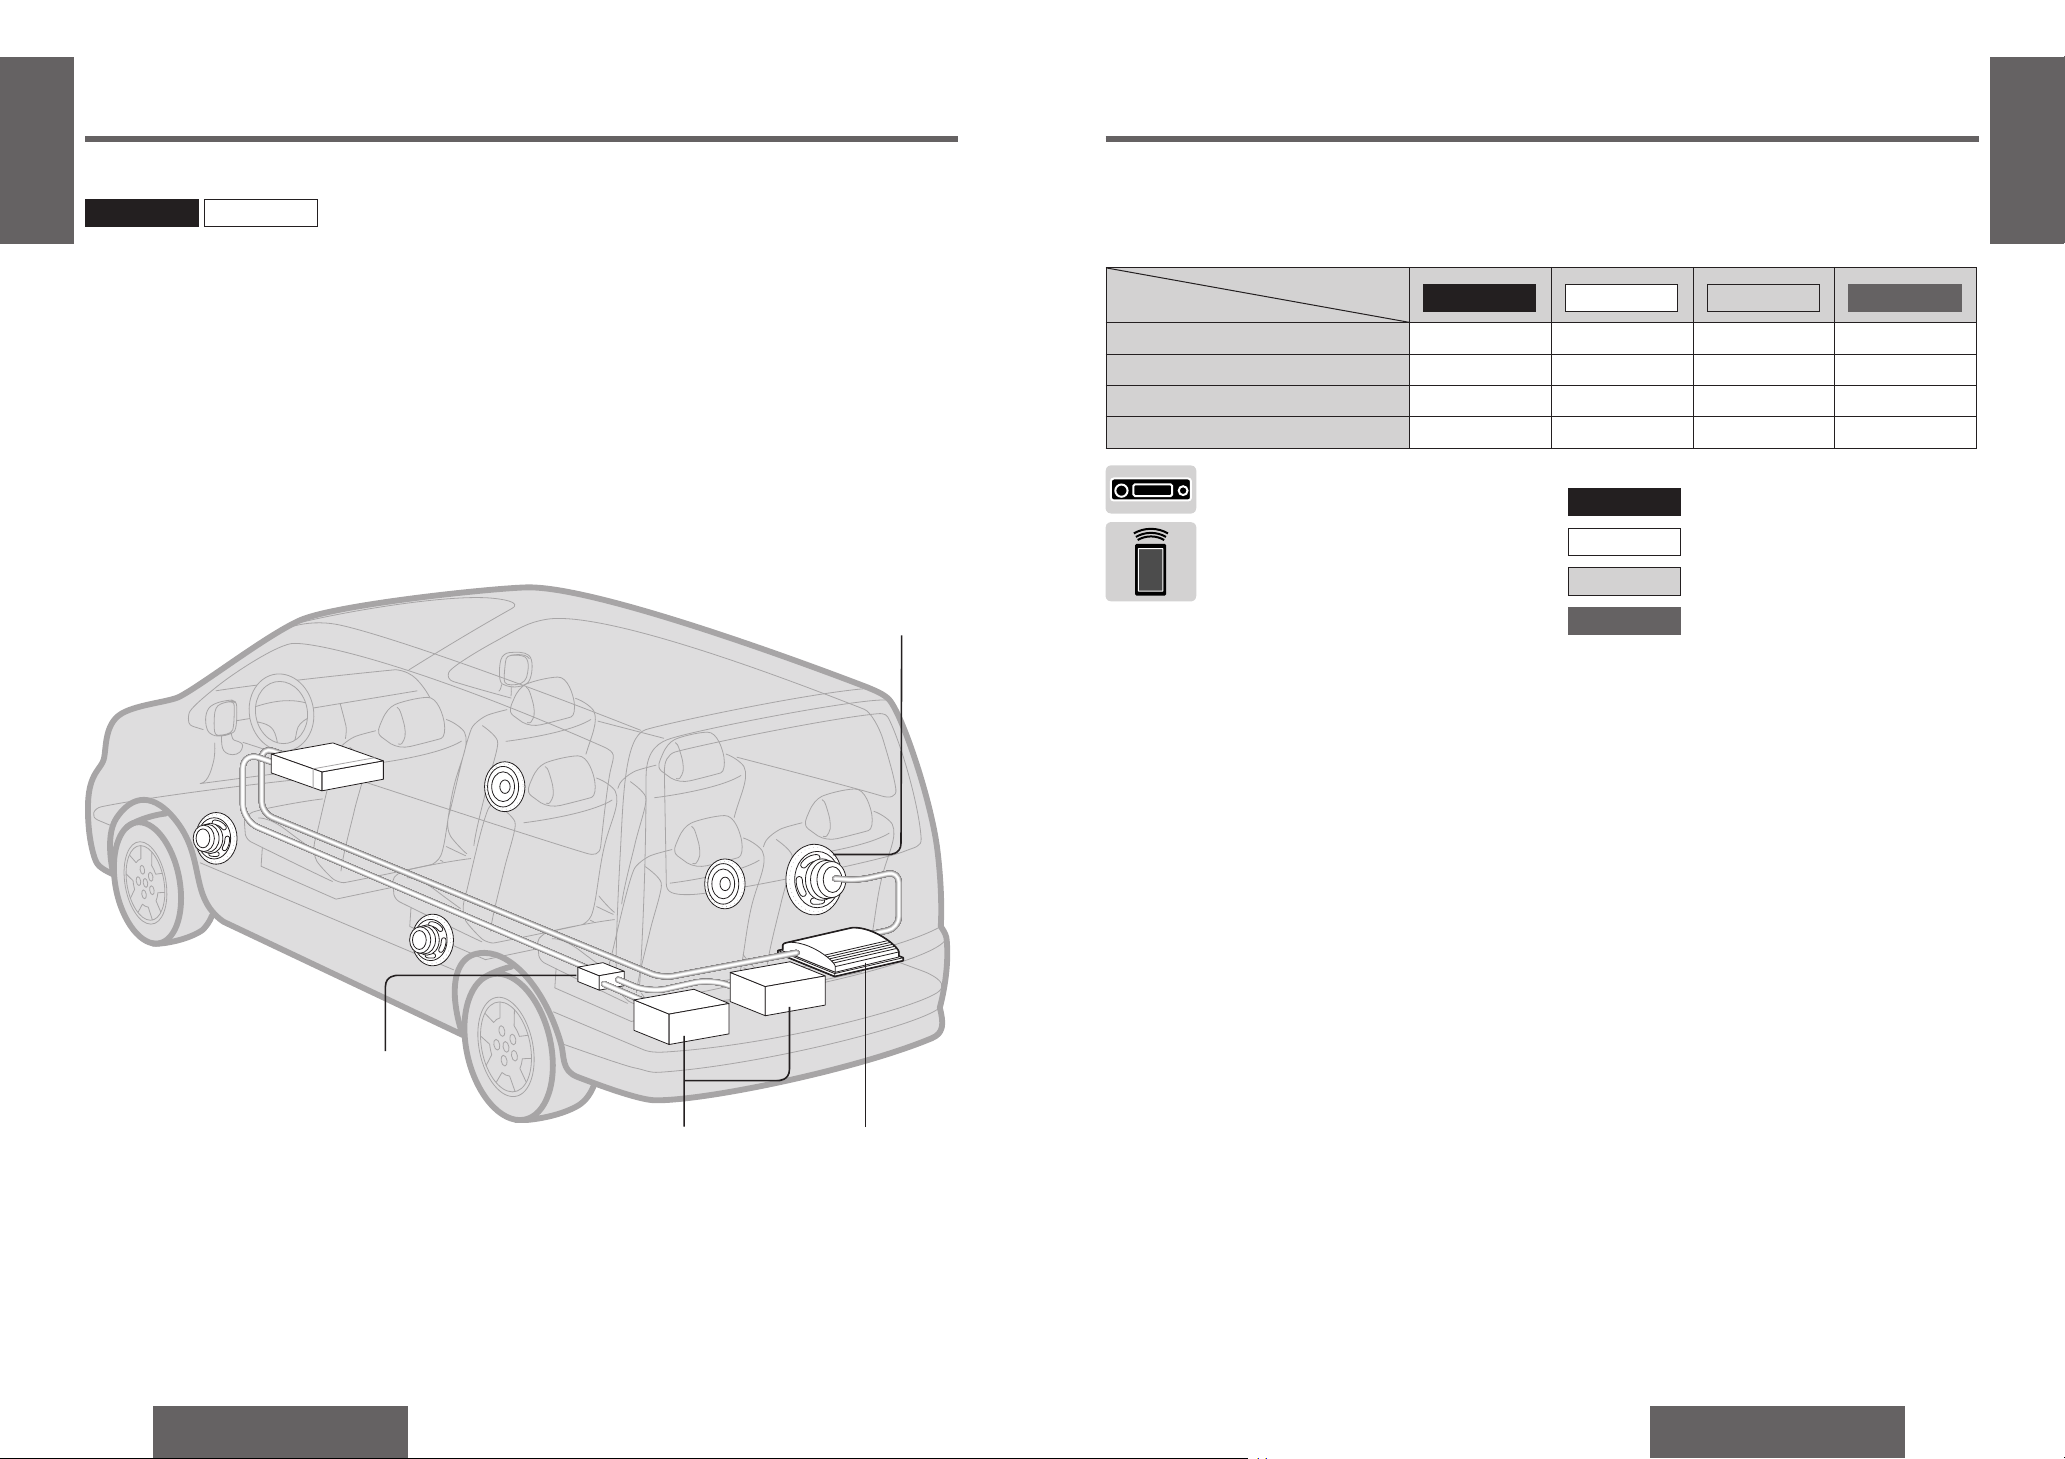
≥ This operating instruction manual applies to the following models. The differences among these models are
mentioned below.
≥ All illustrations represent model CQ-C3400U unless otherwise specifi ed.
Models
Features
MP3/WMA playback Yes Yes None None
CD text display Yes Yes None None
Subwoofer output Yes None Yes None
Subwoofer low pass fi lter setting 80 Hz/120 Hz None None None
This can only be controlled through the
main unit.
This can only be controlled through the
remote control unit.
Operations with neither mark can be performed
either by the main unit or the remote control unit.
CQ-C3400U only.
CQ-C3400U
CQ-C3300U only.
CQ-C3300U
CQ-C3200U only.CQ-C3200U
CQ-C3100U
CQ-C3100U only.
Indicates features applicable to
MP3/WMA Playback from CD-R/RW
You can play your MP3/WMA (Windows Media
Audio) fi les as well as regular CDs.
With up to 10 to 12 times* the capacity of a
conventional CD, a single MP3/WMA-encoded disc
can keep you entertained throughout your entire
journey.
*Depending on bit rate.
CD Changer Control
You can connect the optional CD changer unit. For
details, refer to the operating instructions on the CD
changer unit.
≥ 2 CD changers (option) can be controlled with
this unit. To connect 2 CD changers to it, the
dual CD changer selector CA-CD55U (option) is
necessary.
Large-sized Volume Control
An large-sized rotary volume control that looks like
one belonging to a Hi-Fi audio system is featured.
CQ-C3300U
CQ-C3400U
Before Reading these Instructions
CQ-C3400U CQ-C3300U
CQ-C3200U
CQ-C3100U
CQ-C3400U
CQ-C3300U
CQ-C3200U
CQ-C3100U
Dual CD changer selector
(CA-CD55U, option)
Subwoofer (option)
(Only for
CQ-C3400U/CQ-C3200U)
Stereo power
amplifi er (option)
Features
System Upgrade
CD changer
(CX-DP880U, option)
Note:
≥ This unit does not support Sirius satellite radio.
≥ You cannot connect CD changer and Sirius
receiver using the dual CD changer selector
(CA-CD55U, option).
10
CQ-C3400/3300/3200/3100U
E
N
G
L
I
S
H
CQ-C3400/3300/3200/3100U
11
E
N
G
L
I
S
H
Preparation
1
2
3
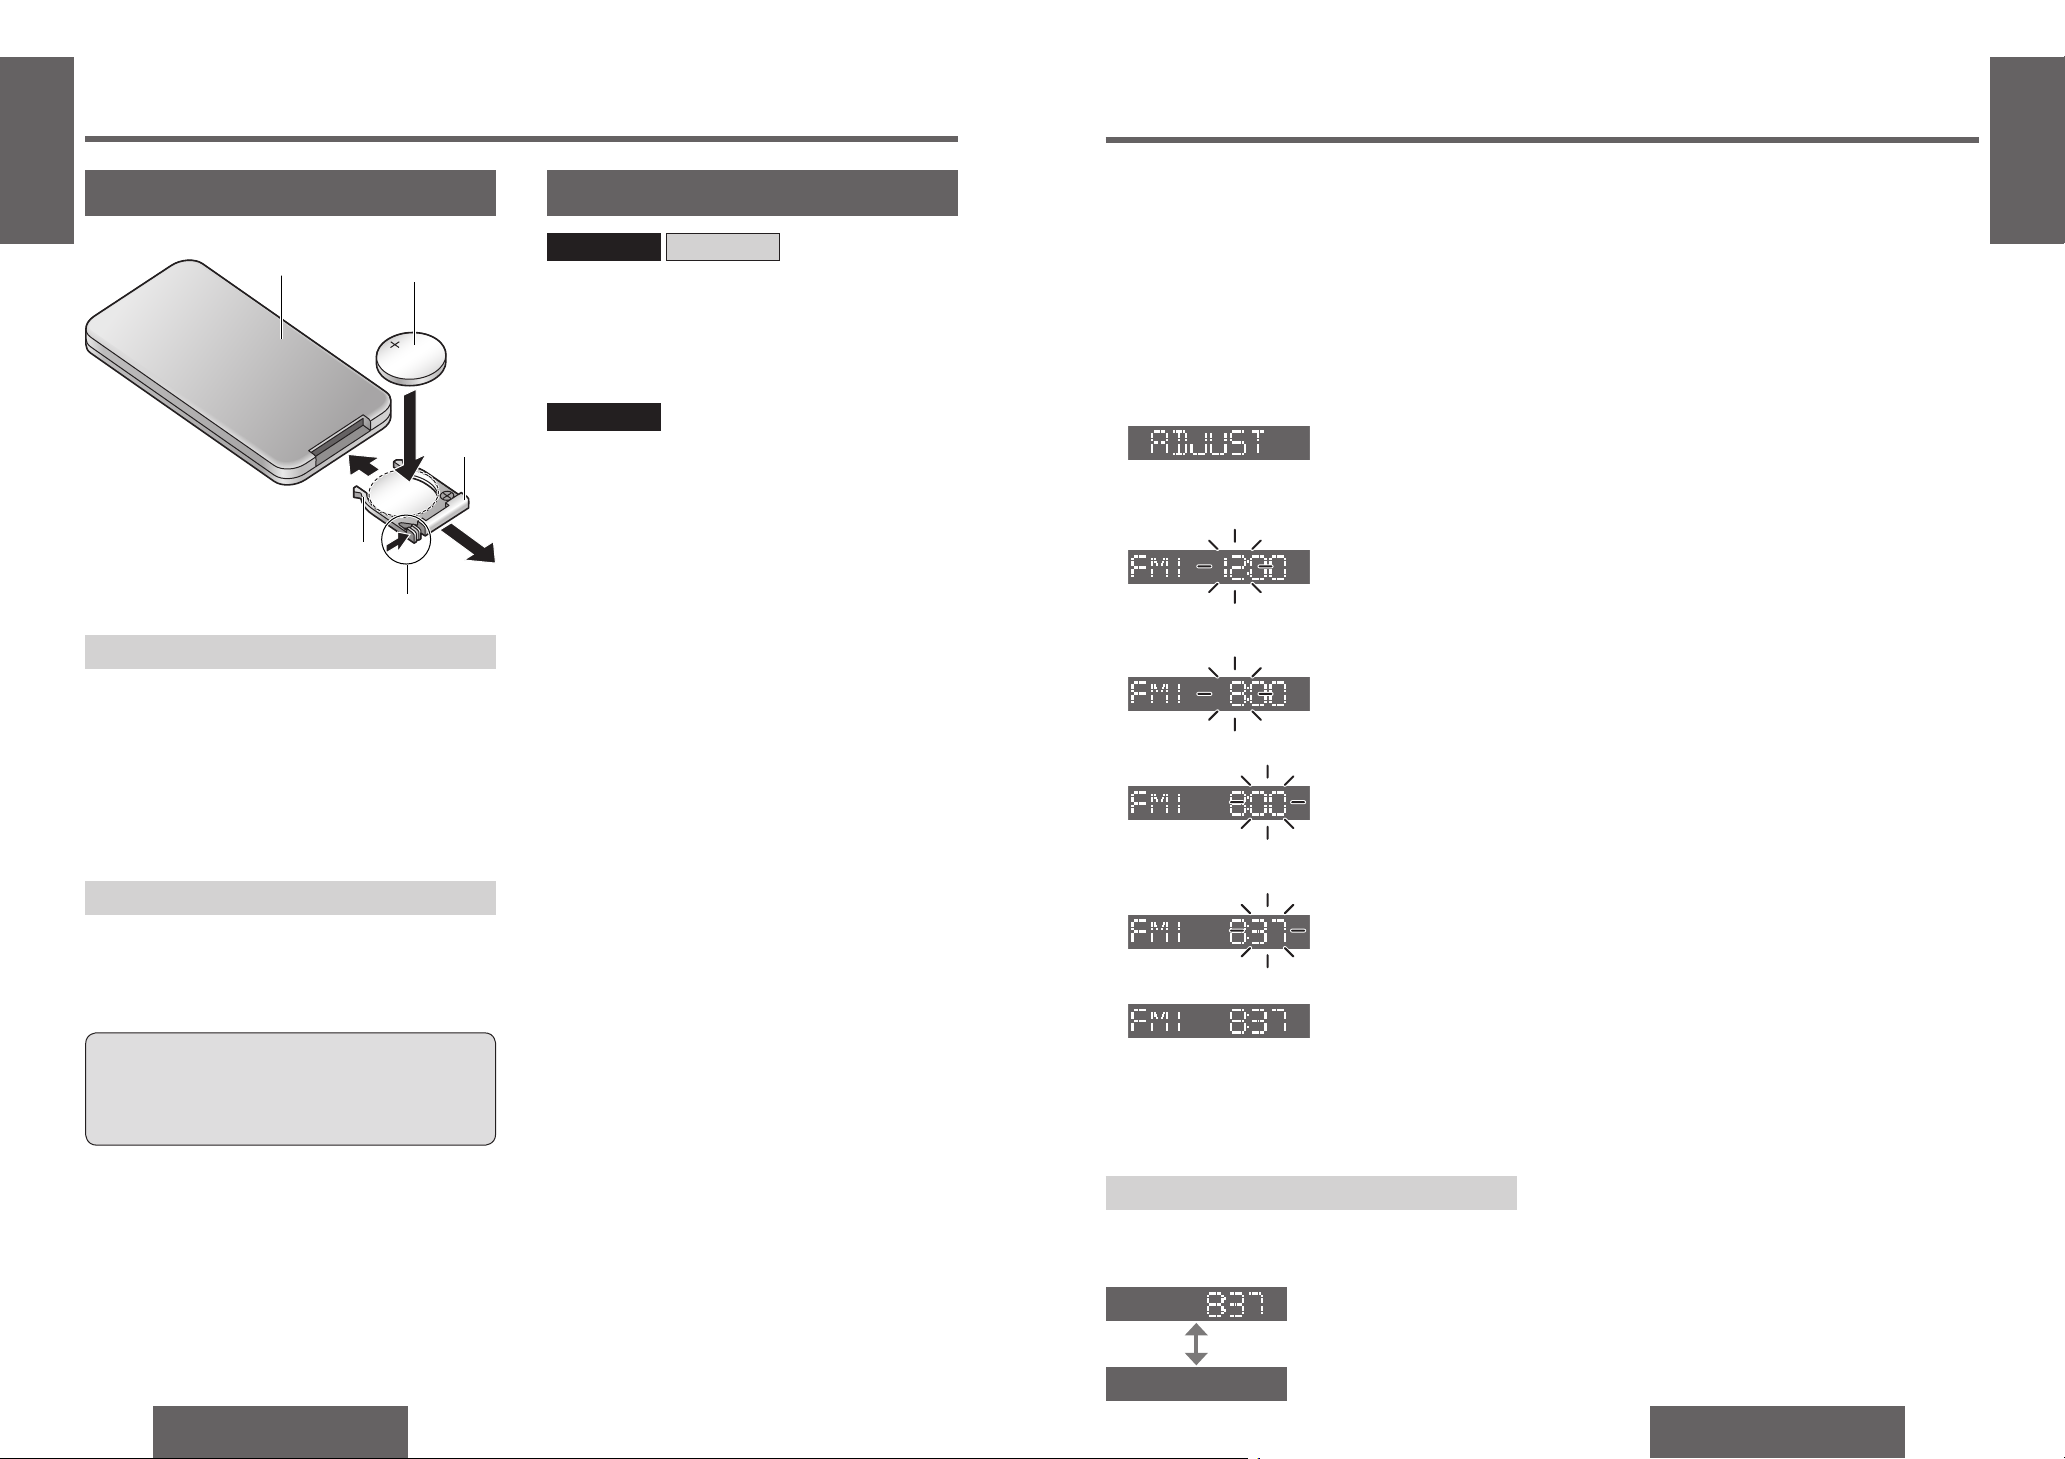
Battery Installation
1 Remove the battery holder.
Pull the holder out at position B while pushing
position A as indicated.
2 Install the battery on the battery holder.
3 Insert the battery holder back into its original
position.
Battery Notes
≥ Battery type: Panasonic lithium battery (CR2025)
(included)
≥ Battery life: Approximately 6 months under
normal use (at room temperature)
≥ Remove and dispose of an old battery
immediately.
≥ Do not disassemble or short the battery. Do not
throw a battery into a fi re.
≥ Keep the battery away from children to avoid the
risk of accidents.
≥ Follow local regulations when disposing of the
battery.
Back side
Lithium battery
(included)
Battery holder
Position A
Position B
Remote Control Unit
Caution:
≥ Improper use of the battery may cause
overheating, an explosion or ignition, resulting
in injury or a fi re.
Subwoofer
Preparation:
≥ Connect the subwoofer (option). (page 56)
Subwoofer level setting:
≥ You can change the subwoofer level. (page 34)
Subwoofer low pass fi lter setting:
≥ You can select the upper limit frequency of the
sound from subwoofer. (page 34)
CQ-C3400U
CQ-C3200U
CQ-C3400U
The 12-hour system is used for the clock.
≥ Turn your car’s ignition key to the ACC or ON
position.
≥ Press [SOURCE] (PWR).
≥ When the power is switched on for the fi rst time,
a demonstration appears on the display.
Press [DISP] (display) to change to regular
mode.
1 Press [DISP] (display).
2 Press and hold [DISP] (display) again for more
than 2 seconds.
Hours:
3 Press [%] or [$].
4 Press [DISP] (display).
Minutes:
5 Press [%] or [$].
6 Press [DISP] (display).
Note:
≥ “ADJUST” is displayed before adjusting the clock.
≥ Press and hold [%] or [$] to change numbers
rapidly.
Display Change
Press [DISP] (display).
When the power is off:
Hours blink
Hours set
Minutes blink
Minutes set
Complete
Clock display
Display off
Clock display
Clock Setting
20
CQ-C3400/3300/3200/3100U
CQ-C3400/3300/3200/3100U
21
E
N
G
L
I
S
H
1
Contents
E
N
G
L
I
S
H
2
Audio Settings....................................................... 34
Volume, bass/treble, balance/fader, subwoofer level, subwoofer low pass fi lter
(LPF), mute/attenuation
Security Setting ..................................................... 36
Security function
Troubleshooting..................................................... 38
Preliminary steps, if you suspect something wrong, troubleshooting tips, error
display messages, maintenance, product servicing, fuse
Notes on Discs ...................................................... 44
Notes on CD/CD media (CD-R, CD-RW, CD-ROM), notes on CD-Rs/RWs
Anti-Theft System................................................... 45
Remove the removable face plate, install removable face plate, security
indicator, panel removal alarm
Installation Guide................................................... 46
Electrical Connections ............................................. 52
Wiring diagram, upgrading the system 1, upgrading the system 2, speaker
system connection
Specifi cations ....................................................... 57
Safety Information .................................................................................Page 2
Precautions.....................................................................................................2
Accessories..................................................................................................... 3
Features................................................................8
Before Reading these Instructions .................................9
Preparation .......................................................... 10
Remote control unit, subwoofer
Clock Setting ........................................................ 11
General............................................................... 22
Power, source, volume, mute/attenuation,
S·HDB (Super High Defi nition Bass), level meter display pattern
Radio ................................................................. 24
Radio mode, band, tuning, display change, Direct Memory (D·M), station
preset, preset station calling
Before Disc Playback............................................... 26
Available discs, disc insert, when CD is in the player, disc eject
CD Player ............................................................ 27
Display change, track selection, fast forward/fast reverse, pause, random play,
scan play, repeat play, direct track selection
MP3/WMA Player ................................................... 28
Display change, folder selection, fi le selection, fast forward/fast reverse, pause,
ID3/WMA tag setting, random play, folder random play, scan play, folder scan
play, repeat play, folder repeat play, direct fi le selection, direct folder selection,
notes on MP3/WMA
CD Changer Control ................................................ 32
CD changer mode, display change, disc selection, track selection, fast
forward/fast reverse, random play, disc random play, scan play, disc scan play,
repeat play, disc repeat play, CD changer selection, direct disc selection
WELCOME
FM
MP3/WMA

22
CQ-C3400/3300/3200/3100U
CQ-C3400/3300/3200/3100U
23
Volume
Note:
≥ The volume level can be set independently for
each source. (For radio, one volume setting for
AM, one volume setting for all FMs)
Setting range: 0 to 40
(default: 18)
[VOL "]: Up
[VOL #]: Down
Down
Up
Point the remote control unit
at the remote control signal
sensor.
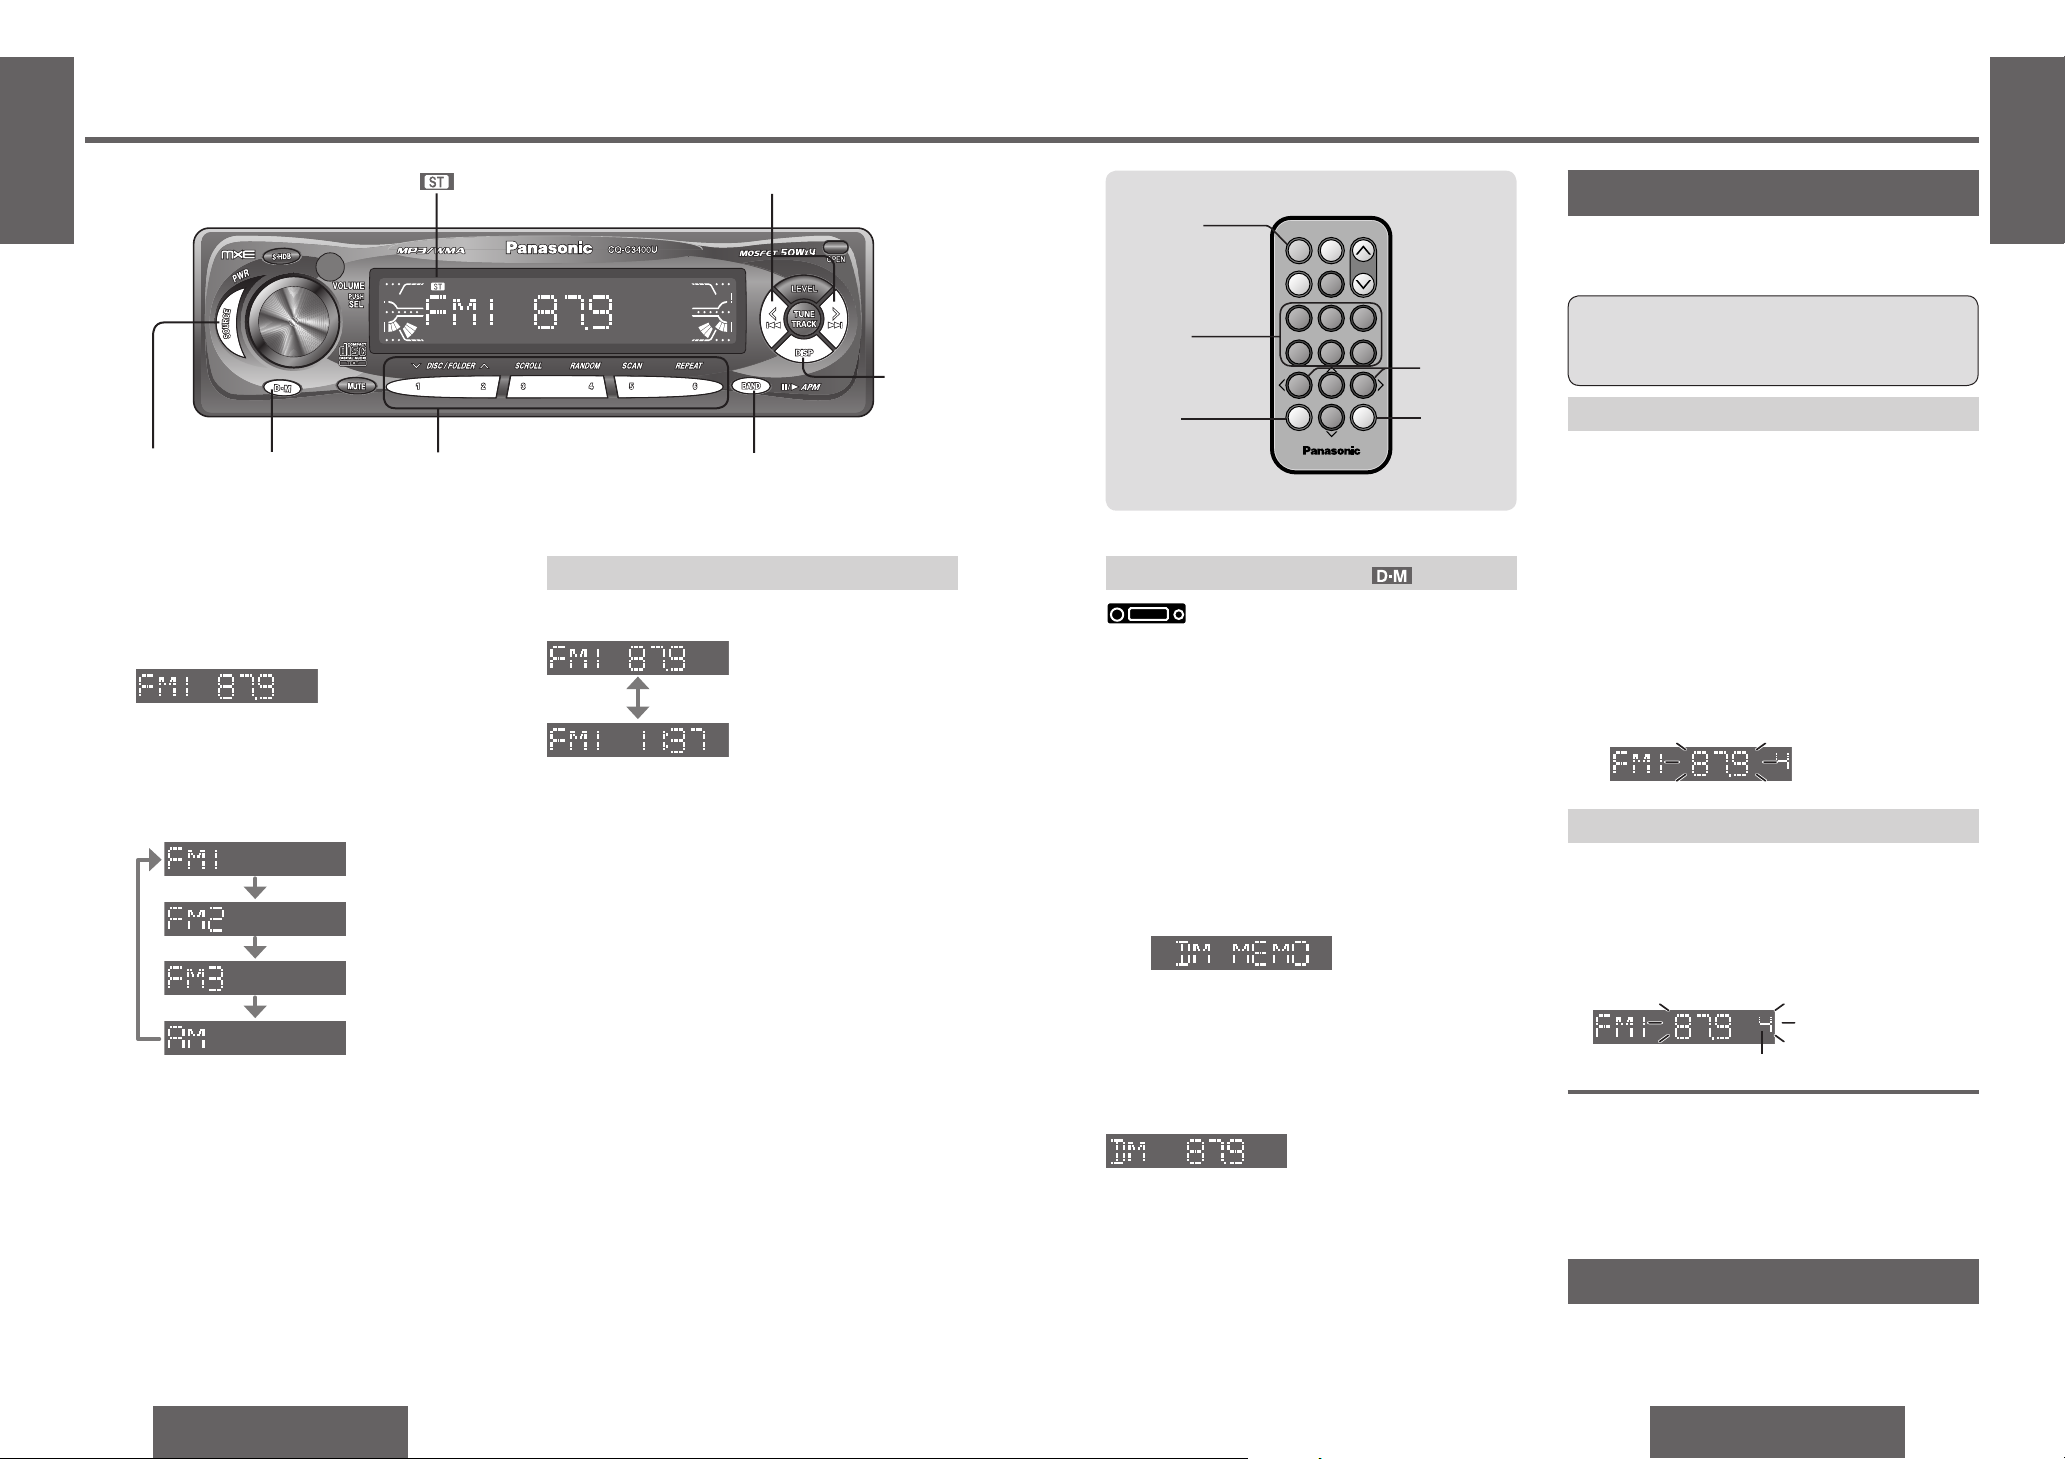
General
Source
E
N
G
L
I
S
H
4
E
N
G
L
I
S
H
3
Mute/Attenuation
ON: Press [MUTE]. ( lights.)
OFF: Press [MUTE] again.
You can select mute or attenuation. (page 34)
S·HDB
(Super High Defi nition Bass)
With music genres like rock music, the bass-sound
will be more powerful.
Press [S·HDB].
Level Meter Display Pattern
Press [LEVEL].
Power
Turn your car’s ignition key
to the ACC or ON position.
ON: Press [SOURCE] (PWR).
OFF: Press [SOURCE] (PWR) again and hold
for more than 1 second.
Note:
≥ After turning off the ignition key, a security
message is displayed, and the panel removable
alarm that reminds you to take the panel is
activated.
(When security function is set to on, page 36)
ACC
ON
Demonstration:
When the power is switched on for the fi rst time,
a demonstration appears on the display.
Press [DISP] (display) to change to regular
mode.
Note:
≥ To display the demonstration again, press and
hold [SOURCE] for more than 4 seconds when
turning power on.
64975
Car Audio
SOURCE
MUTE
POWER
RAND
VOL
312
DISPBAND
REP
6
5
SET
SEL
#
SCAN
MENU
NUMBER
8
0
[DISP]
(Display)
[SOURCE]
(Power/source)
[MUTE]
[VOL "]
[VOL #]
(Volume)
[SOURCE]
(PWR: Power)
indicator
Press [SOURCE] to change the source.
[MUTE]
(Mute/attenuation)
[VOLUME]
[S·HDB]
[LEVEL]
CQ-C3400U CQ-C3300U
When a CD is in the player.
Radio (page 24)
CD player (page 27)
When a MP3/WMA data disc
is in the player.
MP3/WMA player (page 28)
When an optional CD changer
is connected.
CD changer control (page 32)
or
CQ-C3200U
CQ-C3100U
When a CD is in the player.
Radio (page 24)
CD player (page 27)
When an optional CD changer
is connected.
CD changer control (page 32)
No sounds. (default)
Decrease the volume by 10 steps.
S·HDB off (default)
Moderately emphasized.
( lights.)
Strongly emphasized.
(
lights.)
(default)
[DISP] (Display)
Scrolling
Level meter display
pattern
Note:
≥ The level meter makes the same move in the right
and left sides in accordance with music.
24
CQ-C3400/3300/3200/3100U
CQ-C3400/3300/3200/3100U
25
Radio
Direct Memory (D·M)
This is a useful function that can call broadcast
stations directly during playback in other modes (CD,
CD Changer, etc.), even when the power is off.
Your favorite radio station can be memorized in
[D·M] (direct memory).
Default: FM 87.9 MHz
∫ Memorize
1 Select a band and frequency.
2 Press and hold [D·M] for more than 2 seconds.
≥ Frequency is saved in the memory.
Note:
≥ New stations overwrite existing saved stations
after following this procedure.
∫ Recalling the Direct Memory
Press [D·M].
Press [D·M] again to cancel.
[%] [$] (TUNE)
Caution:
≥ To ensure safety, never attempt to preset
stations while you are driving.
Auto Preset Memory (APM)
Automatically save stations with good reception in
the preset memory.
1 Select a band. (previous page)
2 Press and hold [BAND] (APM: Auto Preset
Memory) for more than 2 seconds.
≥ The 6 stations with good reception will be
automatically saved in the memory under
preset number 1 to 6.
≥ Once set, the preset stations are sequentially
scanned for 5 seconds each. (scanning)
Manual Preset Memory
Manually save a station in the preset memory.
1 Select a band and frequency. (previous page)
2 Press and hold one of the buttons from [1] to [6]
until the display blinks once.
Note:
≥ To stop scanning, press one of the buttons from
[1] to [6].
≥ New stations overwrite existing saved stations
after this procedure.
Preset Station Calling
1 Select a band. (previous page)
2 Press one of the preset buttons from [1] to [6].
[D·M] (Direct Memory)
E
N
G
L
I
S
H
5
E
N
G
L
I
S
H
6
Preset buttons [1] to [6]
(Preset station)
[BAND] (APM: Auto Preset Memory)
Display Change
Press [DISP] (display).
[SOURCE]
64975
Car Audio
SOURCE
MUTE
POWER
RAND
VOL
312
DISPBAND
REP
6
5
SET
SEL
#
SCAN
MENU
NUMBER
8
0
[DISP]
(Display)
[SOURCE]
[%] [$]
(Tuning)
[BAND]
(Auto preset
memory)
[1] to [6]
(Preset station)
(Stereo) indicator
Radio Mode
Press [SOURCE] to select the radio mode.
Radio mode display
1
Band
Press [BAND].
2
Tuning
[$]: Higher frequency
[%]: Lower frequency
Press and hold [%] or [$] for more than
0.5 seconds, then release. Seeking will start.
3
Radio mode display
(default)
Clock display
Preset number
[DISP]
(Display)
FrequencyBand
Station Preset
Up to 6 stations can be stored in each of the FM1,
FM2, FM3 and AM band selections.
26
CQ-C3400/3300/3200/3100U
CQ-C3400/3300/3200/3100U
27
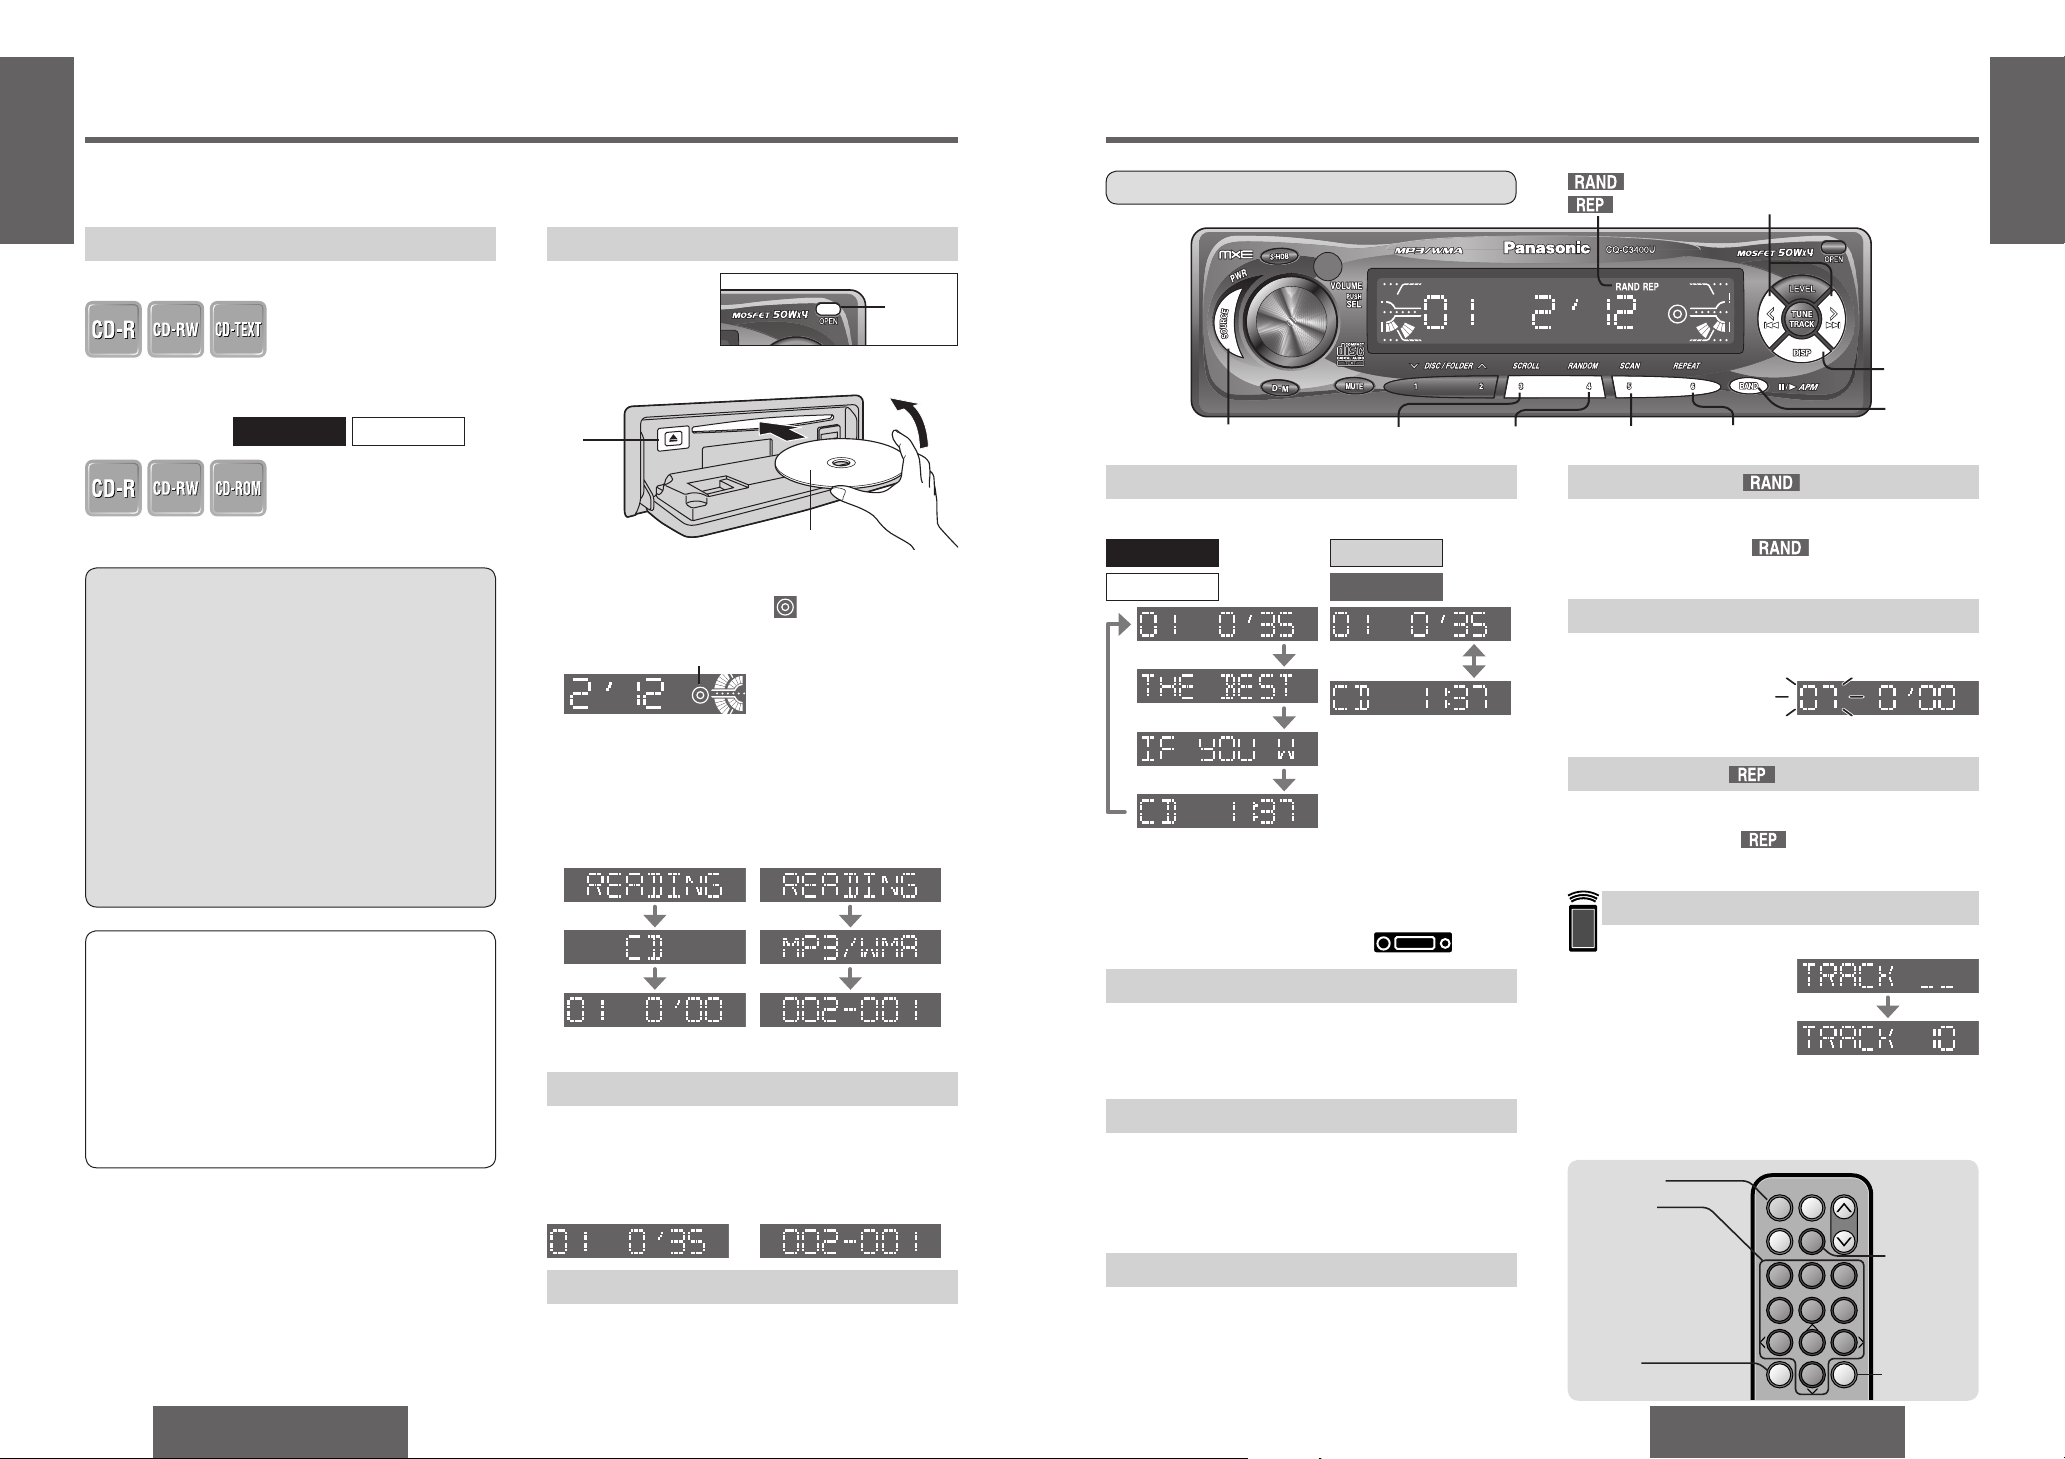
Disc Insert
1 Press [OPEN].
2 Insert a disc.
Note:
≥ Do not insert a disc when indicator lights
because a disc is already loaded.
≥ It may take some time to start playing.
3 Close the front panel manually.
4 Playback will start automatically after recognizing
the data of the loading disc.
Before Disc Playback
Display Change
Press [DISP] (display).
Note:
≥ “NO TITLE” is displayed when there is no
information on the disc.
≥ Press [3] (SCROLL) to have an another circle
scroll while a title is displayed.
Track Selection
[9]: Next track
[:]: Beginning of the current track
For the previous track, press twice.
Fast Forward/Fast Reverse
Press and hold
[9] (5): Fast forward
[:] (6): Fast reverse
Release to resume the playback.
Pause
Press [;/1].
Press [;/1] again to cancel.
CQ-C3200U/CQ-C3100U cannot play MP3/WMA fi les.
Random Play
All available tracks are played in a random sequence.
Press [4] (RANDOM). ( lights.)
Press [4] (RANDOM) again to cancel.
Scan Play
The fi rst 10 seconds of each tracks is played in
sequence.
Press [5] (SCAN).
Press [5] (SCAN) again to cancel.
Repeat Play
The current track is repeated.
Press [6] (REPEAT). ( lights.)
Press [6] (REPEAT) again to cancel.
Direct Track Selection
Example: track number 10
1 Press [fl].
2 Press [1] [0].
3 Press [BAND] (SET).
Note:
≥ To suspend direct selection, press [DISP]
(display) or [fl].
≥ Random, scan and repeat play are canceled once
[fl] is pressed.
Note:
≥ The power will be turned on automatically when
a disc is loaded.
≥ A disc which has both CD-DA data and
MP3/WMA data on it may not be reproduced
normally. (For example, it may be reproduced
without sound.)
≥ Refer to the section on “Notes on MP3/WMA”
(page 30) and “Notes on Discs” (page 44).
E
N
G
L
I
S
H
7
E
N
G
L
I
S
H
8
CD Player
Do not watch the scroll display while driving.
[OPEN]
[:]/[9] (6/5)
(Track/fast forward/fast reverse)
[3] (SCROLL)[SOURCE] [4] (RANDOM) [5] (SCAN) [6] (REPEAT)
[DISP]
(Display)
[BAND]
(;/1:
Pause)
indicator
[0] to [9]
(Track number)
[4] (Random play)
[5] (Scan play)
[6] (Repeat play)
[6] [5] (Track)
64975
SOURCE
MUTE
POWER
RAND
VOL
312
DISPBAND
REP
6
5
SET
SEL
#
SCAN
MENU
NUMBER
8
0
[DISP]
(Display)
[SOURCE]
[BAND]
(Pause) (Set)
[fl]
(Number)
Available Discs
∫ CD-DA
(CD-TEXT is only for CQ-C3400U/CQ-C3300U)
∫ MP3/WMA
Caution:
≥ 3q (8 cm) CD is not available for this unit, so
do not insert it.
≥ Do not use irregularly shaped discs.
≥ Do not use discs that have a seal or label
attached.
≥ Be sure to close the front panel while CD
playback.
≥ To avoid damaging the front panel, do not push
it down or place objects on it while it is open.
≥ Do not pinch your fi nger or hand in the front
panel.
≥ Do not insert foreign object into the disc slot.
[<]
(Eject)
Close.
Label side
CQ-C3300U
CQ-C3400U
∫ CD-DA ∫ MP3/WMA
Disc title
Track title
Clock display
CQ-C3400U
CQ-C3300U
CQ-C3200U
CQ-C3100U
Clock display
When CD is in the Player
Press [SOURCE] to select the CD (MP3/WMA)
player mode and playback starts.
∫ CD-DA
∫ MP3/WMA
Disc Eject
1 Press [OPEN].
2 Press [<] (eject) and take the disc.
3 Close the front panel manually.
Track Play time Folder File
Disc indicator
¢ Only for CQ-C3400U/CQ-C3300U
¢
¢
 Loading...