

Page 1
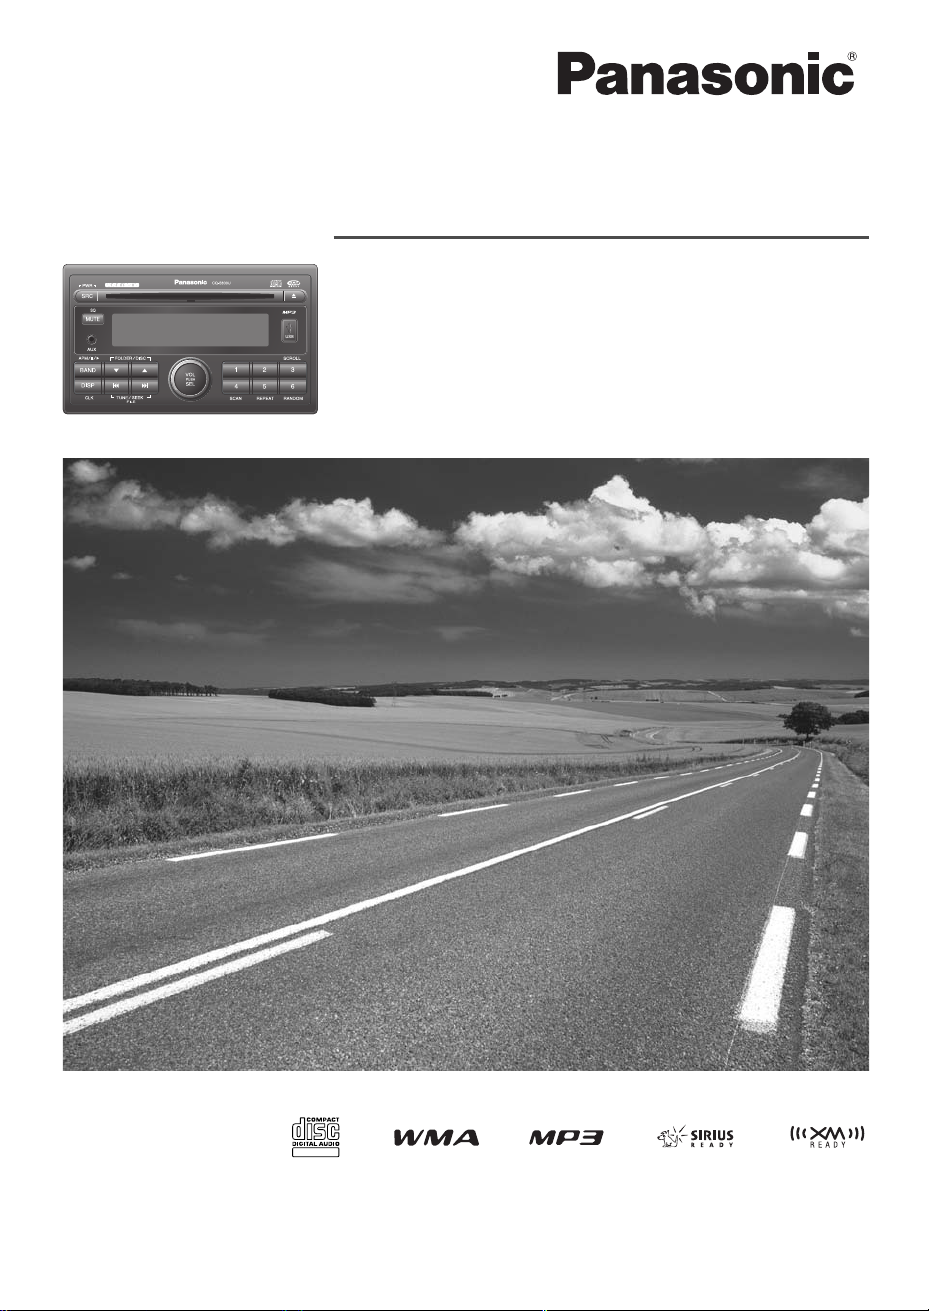
Heavy duty MP3 CD player/weather band receiver
TEXT
with CD changer control/satellite radio ready
Model: CQ-5800U
Operating Instructions
¡Please read these instructions (including “Limited Warranty” and “Customer Services Directory”) carefully before using this product and
keep this manual for future reference.
Page 2
Safety Information
■
Read the operating instructions for the unit and all other
components of your car audio system carefully before using
the system. They contain instructions about how to use the
system in a safe and effective manner. Panasonic assumes
no responsibility for any problems resulting from failure to
observe the instructions given in this manual.
This pictograph intends to alert you to the presence of important operating instructions and
Warning
installation instructions. Failure to heed the
instructions may result in severe injury or
death.
Warning
Observe the following warnings when using
this unit.
❑
The driver should not operate the system while
driving.
Operating the system will distract the driver from looking
ahead of the vehicle and can cause accidents. Always stop
the vehicle in a safe location and use the parking brake
before operating the system.
❑
Use the proper power supply.
This product is designed for operation with a negative
grounded 12 V DC battery system. Never operate this
product with other battery systems, especially a 24 V DC
battery system.
❑
Protect the Deck Mechanism.
Do not insert any foreign objects into the slot of this unit.
❑
Do not disassemble or modify the unit.
Do not disassemble, modify the unit or attempt to repair
the product yourself. If the product needs to be repaired,
consult your dealer or an authorized Panasonic
Servicenter.
❑
Do not use the unit when it is out of order.
If the unit is out of order (no power, no sound) or in an
abnormal state (has foreign objects in it, is exposed to
water, is smoking, or smells), turn it off immediately and
consult your dealer.
❑
Any NOAA broadcast weather report, including current and forecasts, may not reflect your actual
weather conditions at your exact time and location. You should always pay attention to your actual weather conditions to make safe decisions
accordingly.
■
This manual uses pictographs to show you how to use the
product safely and to alert you to potential dangers resulting
from improper connections and operations. The meanings of
the pictographs are explained below. It is important that you
fully understand the meanings of the pictographs in order to
use this manual and the system properly.
This pictograph intends to alert you to the presence of important operating instructions and
Caution
installation instructions. Failure to heed the
instructions may result in injury or material damage.
Observe the following warnings when
installing.
❑
Disconnect the lead from the negative (–) battery
terminal before installation.
Wiring and installation with the negative (–) battery terminal connected may cause electrical shock and injury due to
a short circuit.
Some cars equipped with the electrical safety system have
specific procedures of battery terminal disconnection.
FAILURE TO FOLLOW THE PROCEDURE MAY LEAD TO
THE UNINTENDED ACTIVATION OF THE ELECTRICAL
SAFETY SYSTEM RESULTING IN DAMAGE TO THE VEHICLE AND PERSONAL INJURY OR DEATH.
❑
Never use safety-related components for installation, grounding, and other such functions.
Do not use safety-related vehicle components (fuel tank,
brake, suspension, steering wheel, pedals, airbag, etc.) for
wiring or fixing the product or its accessories.
❑
Installing the product on the air bag cover or in a
location where it interferes with airbag operation
is prohibited.
❑
Check for piping, gasoline tank, electric wiring,
and other items before installing the product.
If you need to open a hole in the vehicle chassis to attach
or wire the product, first check where the wire harness,
gasoline tank, and electric wiring are located. Then open
the hole from outside if possible.
❑
Never install the product in a location where it interferes with your field of vision.
❑
Never have the power cord branched to supply
other equipment with power.
❑
After installation and wiring, you should check the
normal operation of other electrical equipment.
The continuation of their using in abnormal conditions may
cause fire, electrical shock or a traffic accident.
❑
In the case of installation to an airbag equipped
car, confirm warnings and cautions of the vehicle
manufacturer before installation.
❑
Make sure the leads do not interfere with driving
or getting in and out of the vehicle.
❑
Insulate all exposed wires to prevent short circuiting.
2
CQ-5800U
Page 3
Caution
Observe the following cautions when using
this unit.
❑
Keep the sound volume at an appropriate level.
Keep the volume level low enough to be aware of road and
traffic conditions while driving.
❑
Do not insert or allow your hand or fingers to be
caught in the unit.
To prevent injury, do not get your hand or fingers caught in
moving parts or in the disc slot. Especially watch out for
infants.
❑
This unit is designed for use exclusively in automobiles.
❑
Do not operate the unit for a prolonged period with
the engine turned off.
Operating the audio system for a long period of time with
the engine turned off will drain the battery.
❑
Do not expose the unit to direct sunlight or excessive heat.
Otherwise these will raise the interior temperature of the
unit, and it may lead to smoke, fire, or other damage to the
unit.
❑
Do not use the product where it will be exposed to
water, moisture, or dust.
Exposure of the unit to water, moisture, or dust may lead
to smoke, fire, or other damage to the unit. Make especially
sure that the unit does not get wet in car washes or on
rainy days.
❑
To ensure safety, never attempt to preset stations
while you are driving.
❑
Depending upon the transmission condition of
electro-magnetic waves, the geographical reasons
and/or the weather conditions, you may not
receive the NOAA radio partially or at all.
❑
Make sure that your weather radio can receive
properly before driving, especially, before use in a
critical condition.
❑
Set the volume level to low enough before the AUX
connection is completed.
Failure to observe this, the loud noise may come out and
damage your speakers and your hearing. Direct connection
of the speaker/headphone output of an external device
without any attenuator may distort sound or damage the
connected external device.
Observe the following cautions when
installing.
❑
Refer wiring and installation to qualified service
personnel.
Installation of this unit requires special skills and experience. For maximum safety, have it installed by your dealer.
Panasonic is not liable for any problems resulting from
your own installation of the unit.
❑
Follow the instructions to install and wire the product.
Not following the instructions to properly install and wire
the product could cause an accident or fire.
❑
Take care not to damage the leads.
When wiring, take care not to damage the leads. Prevent
them from getting caught in the vehicle chassis, screws,
and moving parts such as seat rails. Do not scratch, pull,
bend or twist the leads. Do not run them near heat sources
or place heavy objects on them. If leads must be run over
sharp metal edges, protect the leads by winding them with
vinyl tape or similar protection.
❑
Use the designated parts and tools for installation.
Use the supplied or designated parts and appropriate tools
to install the product. The use of parts other than those
supplied or designated may result in internal damage to the
unit. Faulty installation may lead to an accident, a malfunction or fire.
❑
Do not block the air vent or the cooling plate of the
unit.
Blocking these parts will cause the interior of the unit to
overheat and will result in fire or other damage.
❑
Do not install the product where it is exposed to
strong vibrations or is unstable.
Avoid slanted or strongly curved surfaces for installation. If
the installation is not stable, the unit may fall down while
driving and this can lead to an accident or injury.
❑
Installation Angle
The product should be installed in a horizontal position
with the front end up at a convenient angle, but not more
than 30˚.
The user should bear in mind that in some areas there may
be restrictions on how and where this unit must be
installed. Consult your dealer for further details.
❑
Wear gloves for safety. Make sure that wiring is
completed before installation.
❑
To prevent damage to the unit, do not connect the
power connector until the whole wiring is completed.
❑
Do not connect more than one speaker to one set
of speaker leads. (except for connecting to a
tweeter)
Caution
• PLEASE FOLLOW THE LAWS AND REGULATIONS OF YOUR STATE, PROVINCE OR COUNTRY FOR WIRING,
INSTALLATION, AND USE OF THIS UNIT AND THE DEVICES TO BE CONNECTED.
Find the model number and serial number on either the back or bottom of the unit. Please record them in the space
below and retain this booklet as a permanent record of your purchase to help with identification in case of theft.
MODEL NUMBER CQ-5800U SERIAL NUMBER
DATE PURCHASED FROM
CQ-5800U
3
Page 4
Safety Information (continued)
Warning
TO REDUCE THE RISK OF FIRE OR ELECTRIC SHOCK OR
PRODUCT DAMAGE, DO NOT EXPOSE THIS APPLIANCE TO
RAIN, SPLASHING, DRIPPING OR MOISTURE.
Caution
THIS PRODUCT IS A CLASS ILASER PRODUCT.
USE OF CONTROLS OR ADJUSTMENTS OR PERFORMANCE
OF PROCEDURES OTHER THAN THOSE SPECIFIED HEREIN
MAY RESULT IN HAZARDOUS RADIATION EXPOSURE.
DO NOT OPEN COVERS AND DO NOT REPAIR BY
YOURSELF. REFER SERVICING TO QUALIFIED
PERSONNEL.
Laser Products:
Wave length: 790 nm
Laser power: No hazardous radiation is emitted with safety
protection.
TO REDUCE THE RISK OF FIRE OR ELECTRIC SHOCK, AND
ANNOYING INTERFERENCE, USE ONLY THE INCLUDED
COMPONENTS.
The following applies only in the U.S.A.
Part 15 of the FCC Rules
FCC Warning:
Any unauthorized changes or modifications to this equipment
would void the user's authority to operate this device.
Customer Services Directory
U.S.A.
Obtain Product Information and Operating Assistance; locate
your nearest Dealer or Servicenter; purchase Parts and
Accessories; or make Customer Service and Literature requests
by visiting our Web Site at:
http://www.panasonic.com/support
or, contact us via the web at:
http://www.panasonic.com/contactinfo
You may also contact us directly at:
1-800-211-PANA (7262),
Monday-Friday 9 am-9 pm; Saturday-Sunday 10 am-7 pm, EST.
For hearing or speech impaired TTY users,
TTY : 1-877-833-8855
Accessory Purchases:
Purchase Parts, Accessories and Instruction Books online for all
Panasonic Products by visiting our Web Site at:
http://www.pasc.panasonic.com
or, send your request by E-mail to:
npcparts@panasonic.com
4
CQ-5800U
You may also contact us directly at:
1-800-332-5368 (Phone) 1-800-237-9080 (Fax Only) (MondayFriday 9 am to 8 pm, EST.)
Panasonic Services Company
20421 84th Avenue South, Kent, WA 98032
(We accept Visa, MasterCard, Discover Card, American Express,
and Personal Checks)
For hearing or speech impaired TTY users,
TTY : 1-866-605-1277
Service in Puerto Rico
Panasonic Puerto Rico, Inc.
Panasonic Sales Company
Factory Servicenter:
Ave. 65 de Infantería, Km. 9.5, San Gabriel Industrial Park,
Carolina, Puerto Rico 00985
Phone (787) 750-4300, Fax (787) 768-2910
Page 5
Limited Warranty
U.S.A.
PANASONIC CONSUMER ELECTRONICS COMPANY,
DIVISION OF PANASONIC CORPORATION OF NORTH AMERICA
One Panasonic Way, Secaucus, New Jersey 07094
PANASONIC SALES COMPANY,
DIVISION OF PANASONIC PUERTO RICO, INC.
Ave. 65 de infanteria, Km. 9.5, San Gabriel Industrial Park
Carolina, Puerto Rico 00985
PANASONIC AUTO PRODUCTS
LIMITED WARRANTY
LIMITED WARRANTY COVERAGE
If your product does not work properly because of defects in materials and
workmanship.
Panasonic Consumer Electronics Company or Panasonic Sales Company
(collectively referred to as “the warrantor”) will, for the length of the period
indicated in the chart below, which starts with the date of original purchase
(“warranty period”), at its option either (a) repair your product with new or
refurbished parts, or (b) replace it with a new or refurbished product. The
decision to repair or replace will be made by the warrantor.
Categories Parts Labor
Audio Components (except items listed
below)
MXE Series Audio Components (except
items listed below)
Speakers
Defective Car Audio Speakers under warranty must be exchanged at the place of
purchase. Contact your Dealer for details.
Accessories (in exchange for defective
items)
During the “Labor” warranty period, there will be no charge for labor. During
the “Parts” warranty period, there will be no charge for parts. You must carry
in or mail in your product prepaid during the warranty period. If nonrechargeable batteries are included, they are not warranted. This warranty
only applies to products purchased and serviced in the United States or
Puerto Rico. This warranty is extended only to the original purchaser of a
new product which was not sold “as is”. A purchase receipt or other proof of
the original purchase date is required for warranty service.
CARRY-IN OR MAIL-IN SERVICE
For Carry-In or Mail-In Service in the United States, call 1-800-211-PANA
(7262) or visit
Panasonic Web Site: http://www.panasonic.com
For assistance in Puerto Rico, call Panasonic Sales Company (787)-7504300 or fax (787)-768-2910.
LIMITED WARRANTY LIMITS AND EXCLUSIONS
This warranty ONLY COVERS failures due to defects in materials and workmanship, and DOES NOT COVER normal wear and tear or cosmetic damage.
The warranty ALSO DOES NOT COVER damages which occurred during
shipment, failures which are caused by products not supplied by the warrantor, failures which result from accident, misuse, abuse, neglect, bug infestation, mishandling, misapplication, alteration, faulty installation, set-up
adjustment, maladjustment of consumer control, improper maintenance,
improper antenna, inadequate signal reception or pickup, power line surge,
improper voltage supply, lightning, modification, commercial use (such as
use in hotels, offices, restaurants, or other business uses) or rental use of
the product, or service by anyone other than the technician from Factory
Servicenter or other authorized service centers, or damage that is attributable to acts of God.
THERE ARE NO EXPRESS WARRANTIES EXCEPT AS LISTED UNDER “LIMITED WARRANTY COVERAGE”. THE WARRANTOR IS NOT LIABLE FOR
INCIDENTAL OR CONSEQUENTIAL DAMAGES RESULTING FROM THE USE
OF THIS PRODUCT, OR ARISING OUT OF ANY BREACH OF THIS WARRAN-
(As examples, this excludes damages for lost time, cost of having some-
TY.
one remove or re-install an installed unit if applicable, travel to and from the
servicer, and loss of media, data or other memory contents. The items listed
are not exclusive, but are for illustration only.)
WARRANTIES, INCLUDING THE WARRANTY OF MERCHANTABILITY, ARE
LIMITED TO THE PERIOD OF THE LIMITED WARRANTY.
One (1) Year One (1) Year
Two (2) Years Two (2) Years
One (1) Year Not Applicable
Ninety (90) Days Not Applicable
ALL EXPRESS AND IMPLIED
Some states do not allow the exclusion or limitation of incidental or consequential damages, or limitations on how long an implied warranty lasts, so
the exclusions may not apply to you.
This warranty gives you specific legal rights and you may also have other
rights which vary from state to state. If a problem with this product develops
during or after the warranty period, you may contact your dealer or
Servicenter. If the problem is not handled to your satisfaction, then write to
warrantor’s Consumer Affairs Department at the addresses of the warrantor.
PARTS AND SERVICE WHICH ARE NOT COVERED BY THIS LIMITED WARRANTY ARE YOUR RESPONSIBILITY.
Customer’s Record
Model
No.
Serial
No.
Dealer’s
No.
Code
No.
Dealer’s
Address
Date of
Purchase
CQ-5800U
5
Page 6

Before Reading These Instructions
Panasonic welcomes you to our ever growing family of electronic product owners. We know that this product will
bring you many hours of enjoyment. Our reputation is built on precise electronic and mechanical engineering, manufactured with carefully selected components and assembled by people who take pride in their work. Once you discover the quality, reliability, and value we have built into this product, you too will be proud to be a member of our
family.
Accessories
1. Operating Instructions ..................................................................................................1
2. Supplied Hardware.............................................................................1 set (
➡ page 29)
Contents
Safety Information . . . . . . . . . . . . . . . . . . . . . .2
Customer Services Directory . . . . . . . . . . . . . . .4
Limited Warranty . . . . . . . . . . . . . . . . . . . . . . .5
Before Reading These Instructions . . . . . . . . . . .6
Features . . . . . . . . . . . . . . . . . . . . . . . . . . . . .7
Front AUX terminal, Sound Control, USB Connector
Connectable devices . . . . . . . . . . . . . . . . . . . . .7
CD Changer, XM Satellite Radio, Sirius Satellite Radio, iPod®,
Expansion Module (hub unit)
Preparation . . . . . . . . . . . . . . . . . . . . . . . . . . .8
First time power on, Clock adjustment
Controls Layout . . . . . . . . . . . . . . . . . . . . . . . .9
Main unit
General . . . . . . . . . . . . . . . . . . . . . . . . . . . . .10
Power, Source Selection, Volume, Mute, Display Change
Sound Controls . . . . . . . . . . . . . . . . . . . . . . . .11
SQ (Sound Quality) , Audio Modes (Bass/Treble/Balance/Fader)
Radio . . . . . . . . . . . . . . . . . . . . . . . . . . . . .12
Band, Frequency adjustment, Auto Preset Memory (APM),
Preset station selection, Manual Preset Memory, Tuning in a
Weather Band Station
CD/MP3/WMA Player . . . . . . . . . . . . . . . . . . . .14
Disc loading/ejection, Track/File selection, Folder selection
(MP3/WMA), Pause, Display change, Scan, Repeat, Random
USB (MP3/WMA) . . . . . . . . . . . . . . . . . . . . . .16
USB device connection, File selection, Folder selection,
Pause, Display change, Scan, Repeat, Random
iPod Control . . . . . . . . . . . . . . . . . . . . . . . . . .18
Song selection, Pause, Playing Mode selection, Repeat,
Random
XM Satellite Radio Control . . . . . . . . . . . . . . . .20
Getting Started, Band, Channel Selection, Preset channel
selection, Display change, Manual Preset Memory, Selection
by Category
Sirius Satellite Radio Control . . . . . . . . . . . . . .22
What is Sirius Satellite Radio?, Getting Started, Band, Channel
Selection, Preset channel selection, Manual Preset Memory,
Display change, Selection by Category, Parental channel
lock/unlock setting, Parental channel unlock setting (Tuned
channel), Parental lock ON/OFF setting, Pass code change,
Pass code initialization
CD Changer Control . . . . . . . . . . . . . . . . . . . . .26
Disc selection, Track selection, Display change, Scan, Repeat,
Random
Installation . . . . . . . . . . . . . . . . . . . . . . . . . .27
Electrical Connections . . . . . . . . . . . . . . . . . . .32
Troubleshooting . . . . . . . . . . . . . . . . . . . . . . .36
If You Suspect Something Wrong, Common, Radio, CD,
MP3/WMA, USB, XM Satellite Radio Control, Product
Servicing
Error Display Messages . . . . . . . . . . . . . . . . . .40
CD/MP3/WMA, CD changer, USB, iPod Control, XM Satellite
Radio Control, Sirius Satellite Radio Control
Maintenance . . . . . . . . . . . . . . . . . . . . . . . . .43
Cleaning this Unit, Caution
Notes on MP3/WMA . . . . . . . . . . . . . . . . . . . .44
Cautions as to compressed audio files, Cautions as to the
display of this unit, Cautions as to compressed audio files,
Common
Notes on Discs . . . . . . . . . . . . . . . . . . . . . . . .46
How to hold the disc, Unusable discs, Disc insert, Disc
cleaning, Notes on CD-Rs/RWs
Specifications . . . . . . . . . . . . . . . . . . . . . . . .47
General, FM Stereo Radio, AM Radio, Weather Band Radio,
CD Player
6
CQ-5800U
Page 7

Features
Front AUX terminal
Your mobile audio player and other devices are connectable to
this unit without any difficulty.
Sound Control
SQ (Sound Quality)
You have four preset modes (FLAT, ROCK, POP and VOCAL).
Connectable devices
Various optional components allow users to obtain availability
of wide range of system upgrade. Upgrading the system
delivers relaxed AV space in a car.
CD Changer
You can connect the optional Panasonic CD changer unit (CXDP880). For details, refer to the operating instructions for the
CD changer unit. (
XM Satellite Radio
You can connect the optional XM Direct2(CNP2000UC*) with
optional connection cable (CNPPAN1)*. For details, refer to the
operating instructions for the XM receiver. (
*This product is made by other media companies. (Not
Panasonic product.)
About XM
The direct satellite-to-receiver broadcasting technology is used
to provide listeners with crystal clear sound smoothly from
coast to coast. XM is over 130 channels of sheer variety: digitalquality music, news, sports, comedy, traffic & weather, talk,
children’s programs, and more.
The XM name and related logos are trademarks of XM Satellite
Radio Inc.
Sirius Satellite Radio
You can connect the optional Sirius Satellite Radio receiver
(SC-C1) with optional Interface Adaptor (CA-LSR01U)*. (
page 22)
Sirius Satellite Broadcast service
Sirius Satellite coverage is only available in the United States
(except Hawaii and Alaska) and a part of Canada. The
a
page 26)
a
page 20)
a
USB Connector
The USB connector is equipped on the front panel.
Connection of a USB memory (not included) to the USB
connector via a USB extension cable (not included) allows users
to enjoy MP3/WMA files stored on the USB memory (not
included) in the car.
instruction of Satellite Operation Controls in the Operating
Instructions and Guide will not be applied.
© SIRIUS Satellite Radio Inc. “SIRIUS” and related marks are
trademarks of SIRIUS Satellite Radio Inc.
®
iPod
The optional adapter (Direct Cable for iPod: CA-DC300U) allows
users to connect the optional iPod series.
The iPod equipped with a dock connector is exclusively connectable. Further information about the controllable iPod is
described on page 18.
*iPod is a trademark of Apple Inc., registered in the U.S. and
other countries.
Expansion Module (hub unit)
You can connect the optional Expansion Module (hub unit) (CYEM100U). Connection of the Expansion Module allows you to
simultaneously connect optional devices mentioned before as
well as other AV devices. For details, refer to the operating
instructions for the Expansion Module.
Connectable devices
¡ CD changer (max. 1)
¡ iPod (max. 2)
¡ XM Satellite Radio (max. 1)
¡ Sirius Satellite Radio (max. 1)
Note: Market conditions regarding optional devices vary with
countries and regions. For further information, consult your
dealer.
CQ-5800U
7
Page 8
Preparation
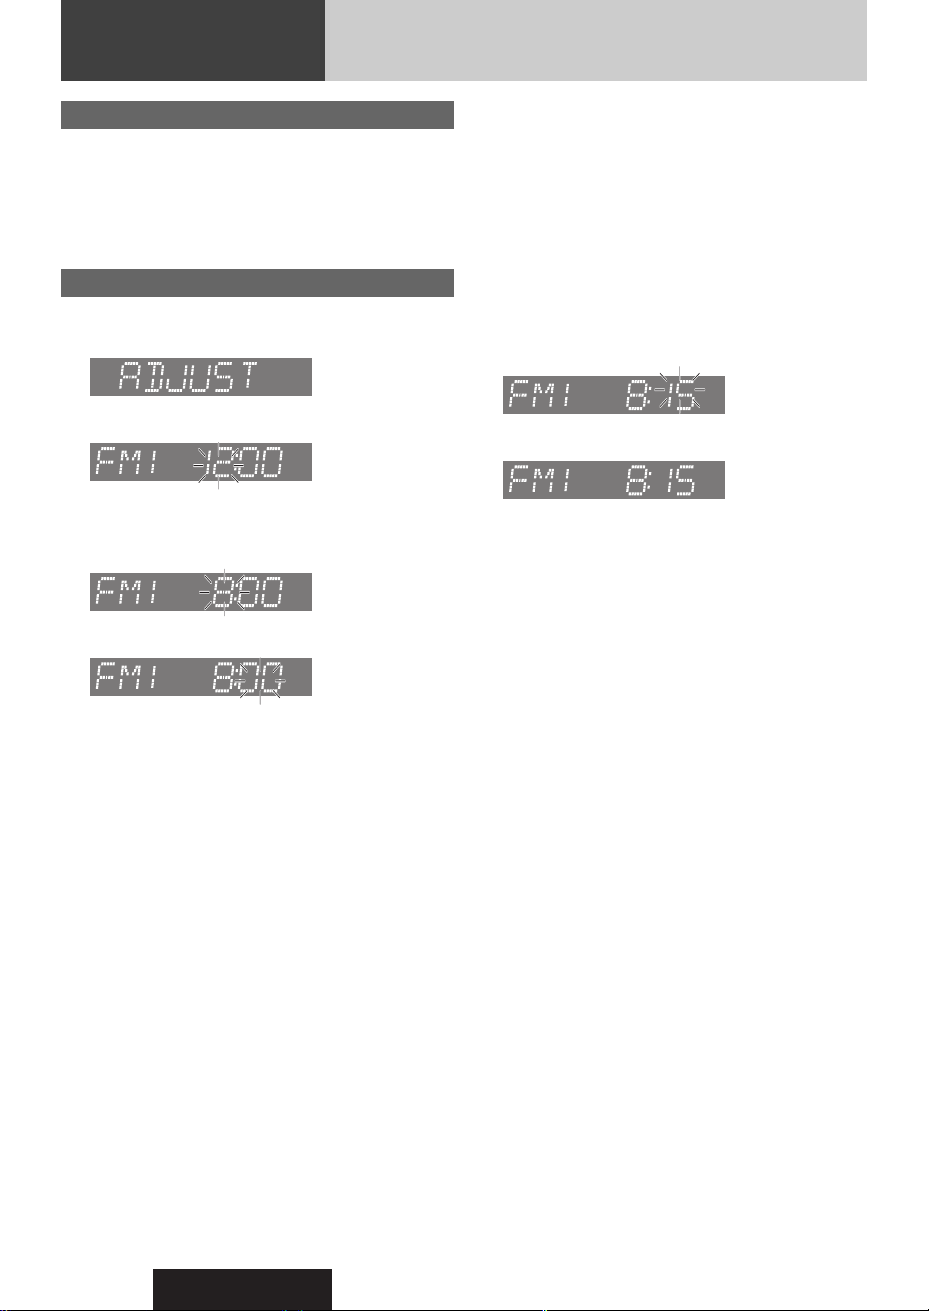
First time power on
Turn the key in the ignition until the accessory
1
indicator lights.
Press [SRC] (PWR).
2
Clock adjustment
The 12-hour system is used for the clock.
Press [DISP] (CLK).
1
(Clock display)
Hold down [DISP] (CLK) for 2 sec. or more.
2
Hour blinks
Adjust the hour.
3
[d]:Sets ahead.
[s]:Sets back.
Hour entered
Adjust the minute.
5
[d]:Sets ahead.
[s]:Sets back.
Minute entered
Press [DISP].
6
Completed
Notes:
¡ “ADJUST” is displayed before adjusting the clock.
¡ Hold down [d] or [s] to change numbers rapidly.
¡ When you want to readjust the time, repeat steps 2 to 6.
Press [DISP] (CLK).
4
Minute blinks
8
CQ-5800U
Page 9
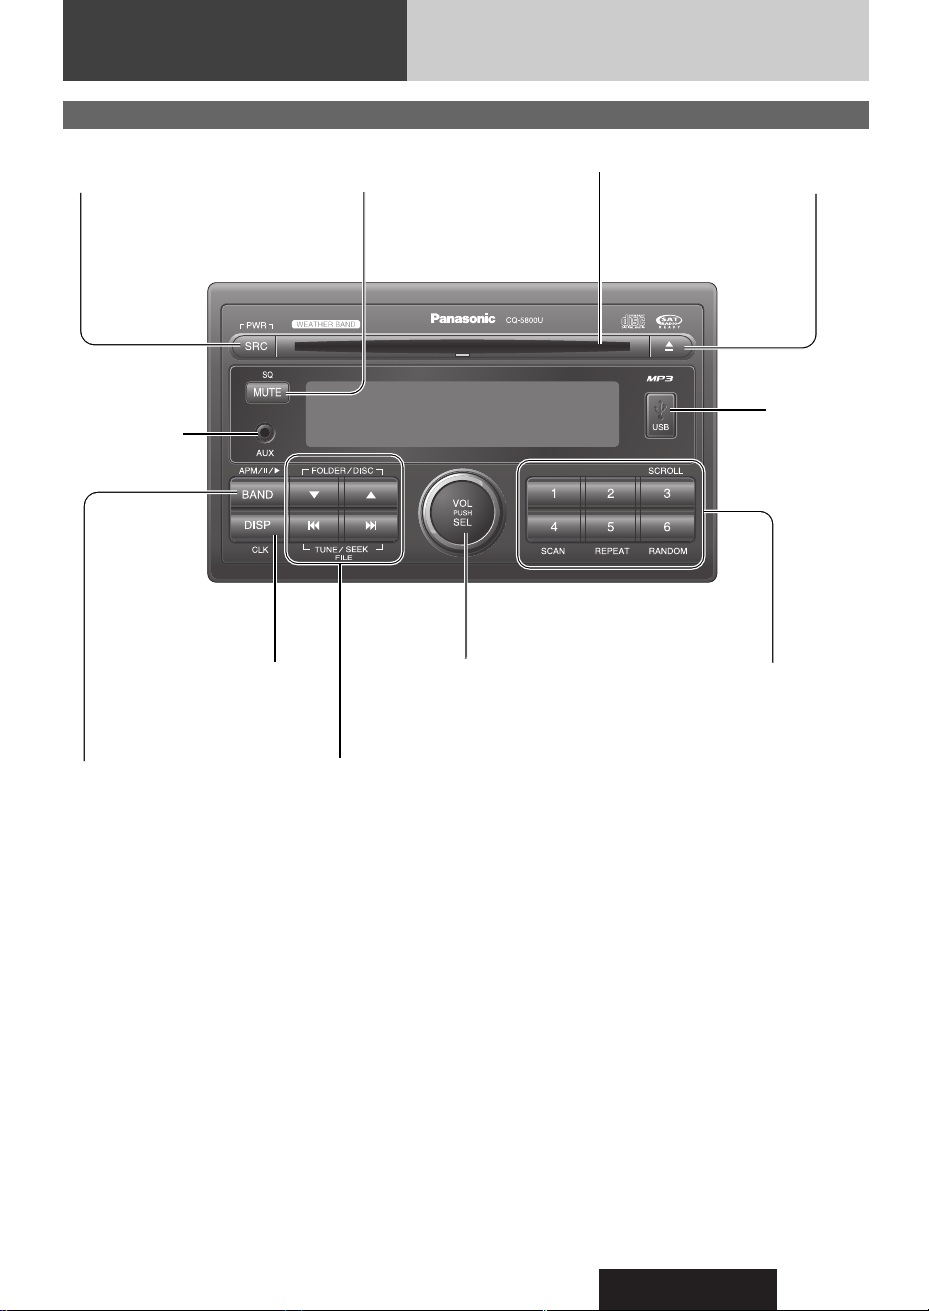
Controls Layout
Main unit
SRC Source (a page 10)
PWR Power (a page 10)
AUX
From line output of
external sound/audio
device (ex. Siliconaudio player, HDD
player, etc.)
DISP Display (a page 10, etc.)
CLK Clock (a page 8)
BAND (a page 12, 20, 22)
APM Auto Preset Memory
a page 12)
(
/ 5 Pause/Play
y
(
a page 14,16, 18)
MUTE (a page 10)
SQ Sound Quality (a page 11)
VOL (a page 10)
PUSH SEL Select
(
a page 11, 22)
TUNE/SEEK s/d (a page 12, 20, 22)
FILE (Track/File) s/d (a page 14, 16, 18, 26)
FOLDER/DISC ▲/
a page 14, 16, 18, 26)
▼ (
Disc slot
u (Eject)
(a page 14)
USB Connector
(a page 16)
Preset Buttons [1] to [6]
(a page 12, 20, 23)
SCROLL (a page 14, etc.)
SCAN/REPEAT/RANDOM
(a page 14,16,18,26)
CQ-5800U
9
Page 10
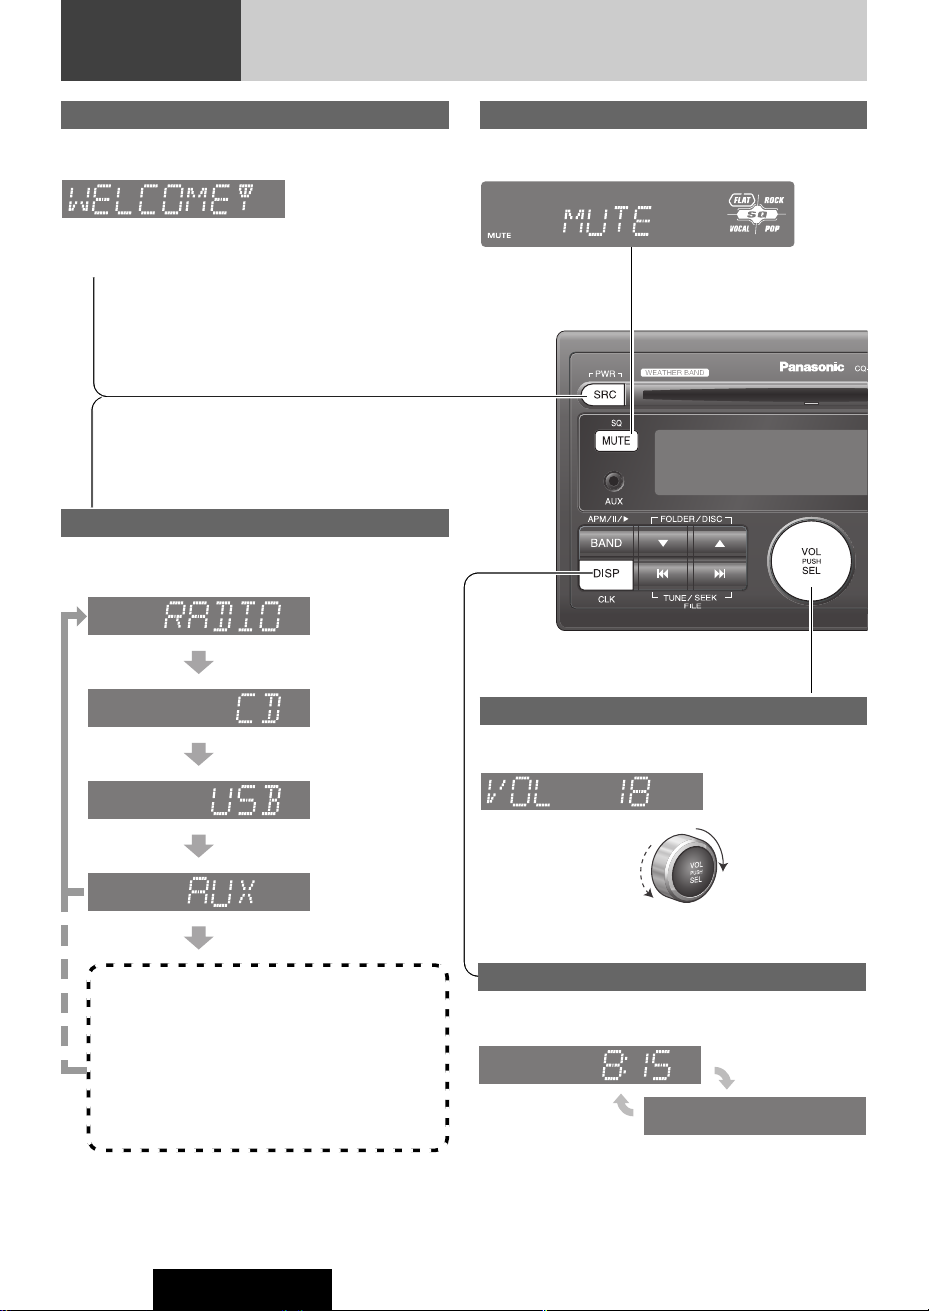
General
Power
Turn the key in the ignition until the accessory indicator lights.
Power on: Press [SRC](PWR).
Power off: Hold down [SRC](PWR) for more than 1 second.
Source Selection
The source changes as follows every time [SRC] (Source)
is pressed.
Radio
FM, AM, WB
a page 12)
(
Mute
Press [MUTE] to mute the sound completely.
Press
[MUTE] again to cancel.
Disc player
CD, MP3/WMA
a page 14)
(
USB
MP3/WMA
a page 16)
(
AUX
Device connected to
the AUX terminal of
this unit
System-up Connector
Device connected to the System-up Connector of this unit
When optional devices are connected:
Shift to connected devices
When an expansion module is connected:
The devices connected to the ports 1 to 4 are activated
in sequence after shifting to AUX1 (devices connected to
the AUX terminal of the expansion module).
Volume
Turn the knob clockwise to increase volume, and counterclockwise to decrease volume.
Volume level (0 to 40)
(default:18)
Down
Up
Display Change
Press [DISP] to switch to the clock display.
When the power is off:
clock display (default)
No display
Note: “ADJUST” is displayed when the clock is not adjusted.
a page 8)
(
10
CQ-5800U
Page 11
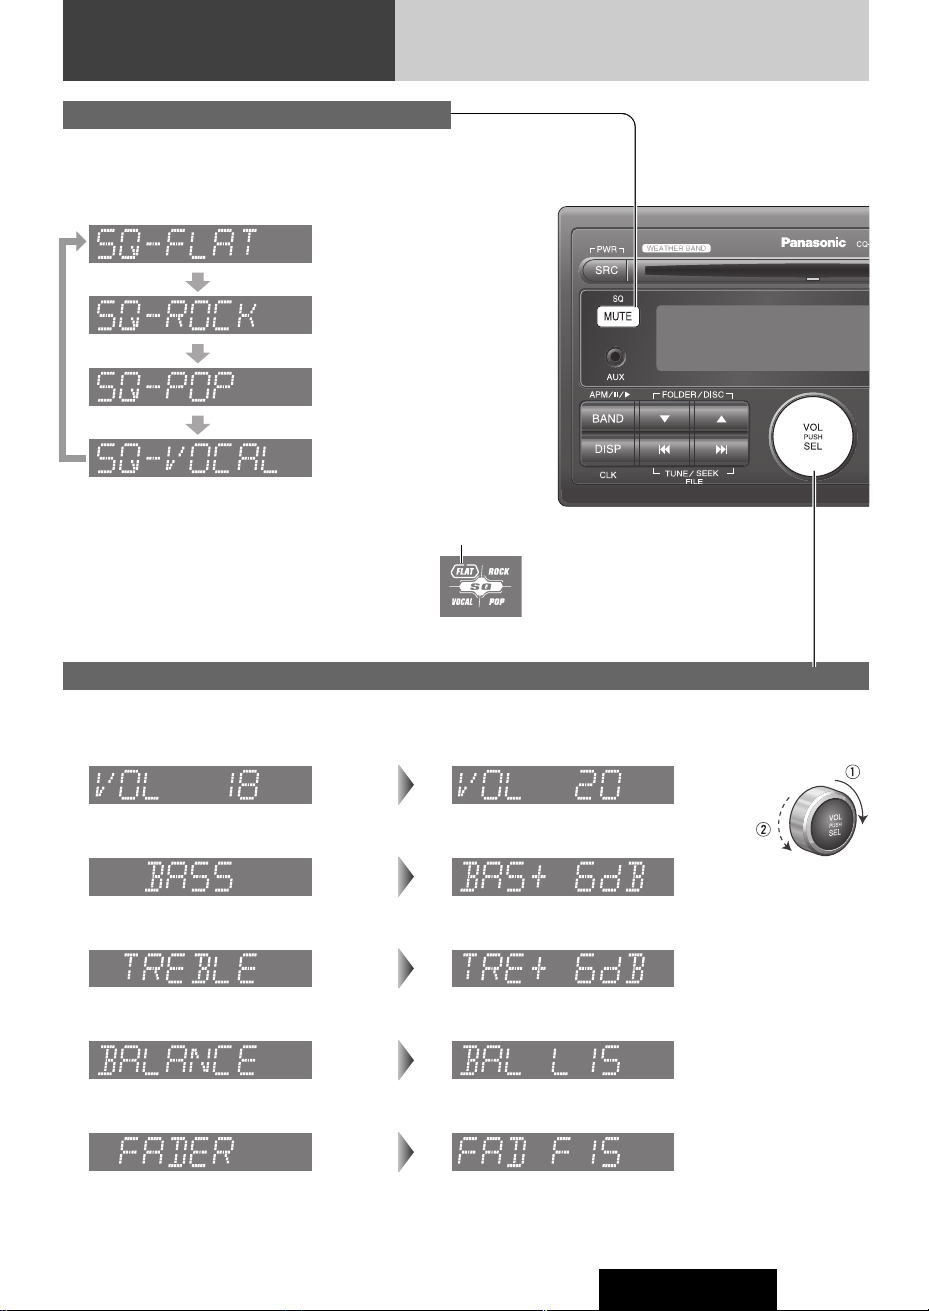
Sound Controls
SQ (Sound Quality)
SQ is a function that can call up various sound types at the
touch of button in accordance with your listening music type.
[SQ] for more than 2 seconds to select the sound type as
Press
follows:
(FLAT) flat frequency response:
does not emphasize any part.
(default)
(ROCK) speedy and heavy sound:
exaggerates bass and treble.
(POP) wide-ranged and deep sound:
slightly emphasizes bass and treble.
(VOCAL) clear sound:
emphasizes middle tone and slightly
emphasizes treble.
SQ indicator
Audio Modes (Bass/Treble/Balance/Fader)
Push [SEL] to select the audio mode.
1
(Volume)
(Setting Range: 0 to 40, Default: 18)
(Bass)
(Setting Range: –12 dB to +12 dB by 2 dB,
Default: 0 dB)
(Treble)
(Setting Range: –12 dB to +12 dB by 2 dB,
Default: 0 dB)
(Balance)
(Setting Range: 15 levels each and 0 (center),
Default: CNT)
(Fader)
(Setting Range: 15 levels each and 0 (center),
Default: CNT)
Turn [VOL] (volume) clockwise or counter-
2
clockwise to change each level.
q: Up
w: Down
q: Increased
w: Decreased
q: Increased
w: Decreased
q: Right enhanced
w: Left enhanced
q: Front enhanced
w: Rear enhanced
Note: If no operation takes place for more than 5 seconds in audio
mode (2 seconds in volume mode), the display returns to the regular
mode.
CQ-5800U
11
Page 12
Radio
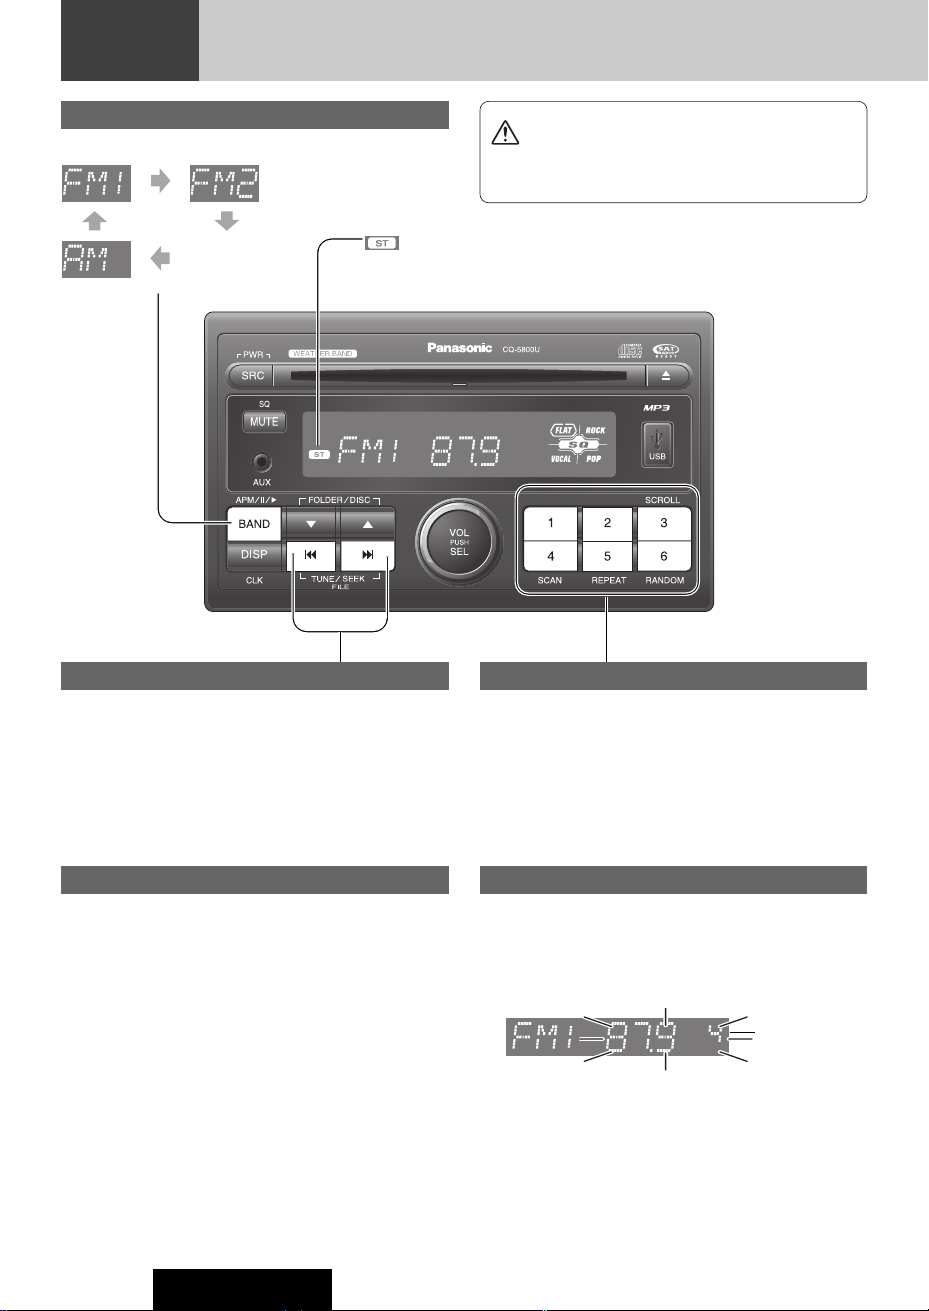
Band
Press [BAND] to change the band.
Weather Band
(a page 13)
(FM stereo) indicator
lights while receiving an FM stereo signal.
Frequency adjustment
[TUNE/SEEK s]: Lower
[TUNE/SEEKd]: Higher
Note: Hold down for 0.5 sec. or more and release for station
search.
Caution
To ensure safety, never attempt to preset stations
while you are driving.
Preset station selection
Press the corresponding preset button from [1] to [6] to tune in
a preset station.
Auto Preset Memory (APM)
Press and hold [BAND] (APM: auto preset memory) for more
than 2 seconds.
• The 6 stations with good reception will be automatically saved
in the memory under preset buttons from
• Once set, the preset stations are sequentially scanned for 5
seconds each.
• Press one of the buttons from
scan.
Note: New stations overwrite existing saved stations.
12
CQ-5800U
[1] to [6] to stop sequentially
[1] to [6].
Manual Preset Memory
Use manual or seek tuning to find a station.
1
Press and hold one of the preset buttons
2
from [1] to [6] until the display blinks once.
Preset Number
blinks once
Note: New stations overwrite existing saved stations.
Page 13

Tuning in a Weather Band Station
Press [BAND] to select WB (Weather Band).
1
(a page 12)
Press any of the buttons [1] to [6] to monitor
2
the preset station.
Note: The weather band (CH1-6) has been preset. CH7 is
selected by pressing
Weather Band Stations
National Weather Radio Broadcasts from over 380 Iocations
throughout the U.S. on seven VHF/FM frequencies.
Tune to weather band to receive continuous weather
information 24 hours a day on one of the following frequencies.
[s] or [d].
Warning
Any NOAA broadcast weather report, including current and
forecasts, may not reflect your actual weather conditions at
your exact time and location. You should always pay
attention to your actual weather conditions to make safe
decisions accordingly.
Weather Band Frequency (channel) Number
1. 162.550 MHz
2. 162.400 MHz
3. 162.475 MHz
4. 162.425 MHz
5. 162.450 MHz
6. 162.500 MHz
7. 162.525 MHz
Occasionally the frequency of an existing or planned station
must be changed because of unexpected radio frequency
interfere with adjacent NOAA weather Radio Stations and/or
with other Government or commercial Operations within the
area. If you have a question concerning NOAA Weather Radio,
please contact your nearest National Weather Service Office.
Weather Band Frequency
CQ-5800U
13
Page 14
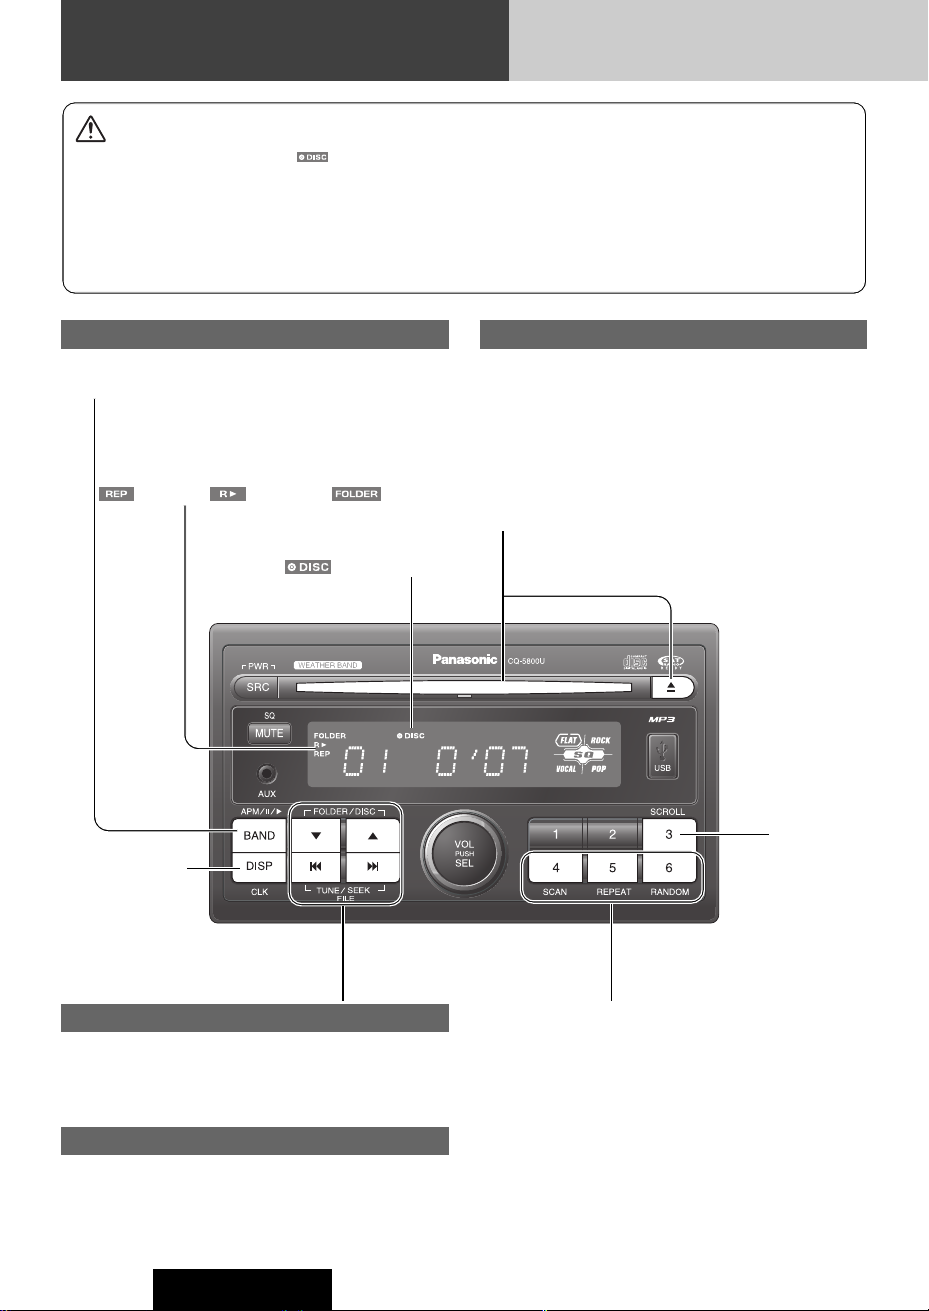
CD/MP3/WMA Player
Cautions
¡
Do not insert a disc when the indicator lights.
¡ This unit does not support 8 cm {3"} discs.
¡ Do not use irregularly shaped discs. (a page 46)
¡ Do not use discs that have a seal or label attached.
¡ Do not insert foreign matter into the disc slots.
¡ Refer to the section on “Notes on CD-Rs/RWs”
(
a page 46).
¡ Refer to the section on “Notes on MP3/WMA”. (a page 44)
¡ This unit does not support a MIX mode CD (a CD containing
both CD-DA and compressed audio data). In case of using
such a CD, problems may occur such as anacoustic playback.
Pause
Press [BAND] (
Press again to cancel.
Display change
(a page 15)
h
(Repeat)/ (Random)/ indicator
Disc loading/ejection
).
5
/
(DISC) indicator
Loading
Load a disc in with the printed side facing up.
Notes:
• The power will be turned on automatically when a disc is loaded.
• Playback will start automatically after the player recognized the
loaded disc as an ordinary music CD or MP3/WMA disc.
Ejection
Press [u] to eject the disc.
Text Scroll
Track/File selection
[FILE d]: Next track/file
[FILE s]: Preceding track/file (press twice)
Note: Hold down for fast forward/reverse.
Folder selection (MP3/WMA)
[FOLDER ▲]: Next folder
[FOLDER ▼]: Preceding folder
14
CQ-5800U
Scan, Repeat, Random
(a page 15)
Page 15
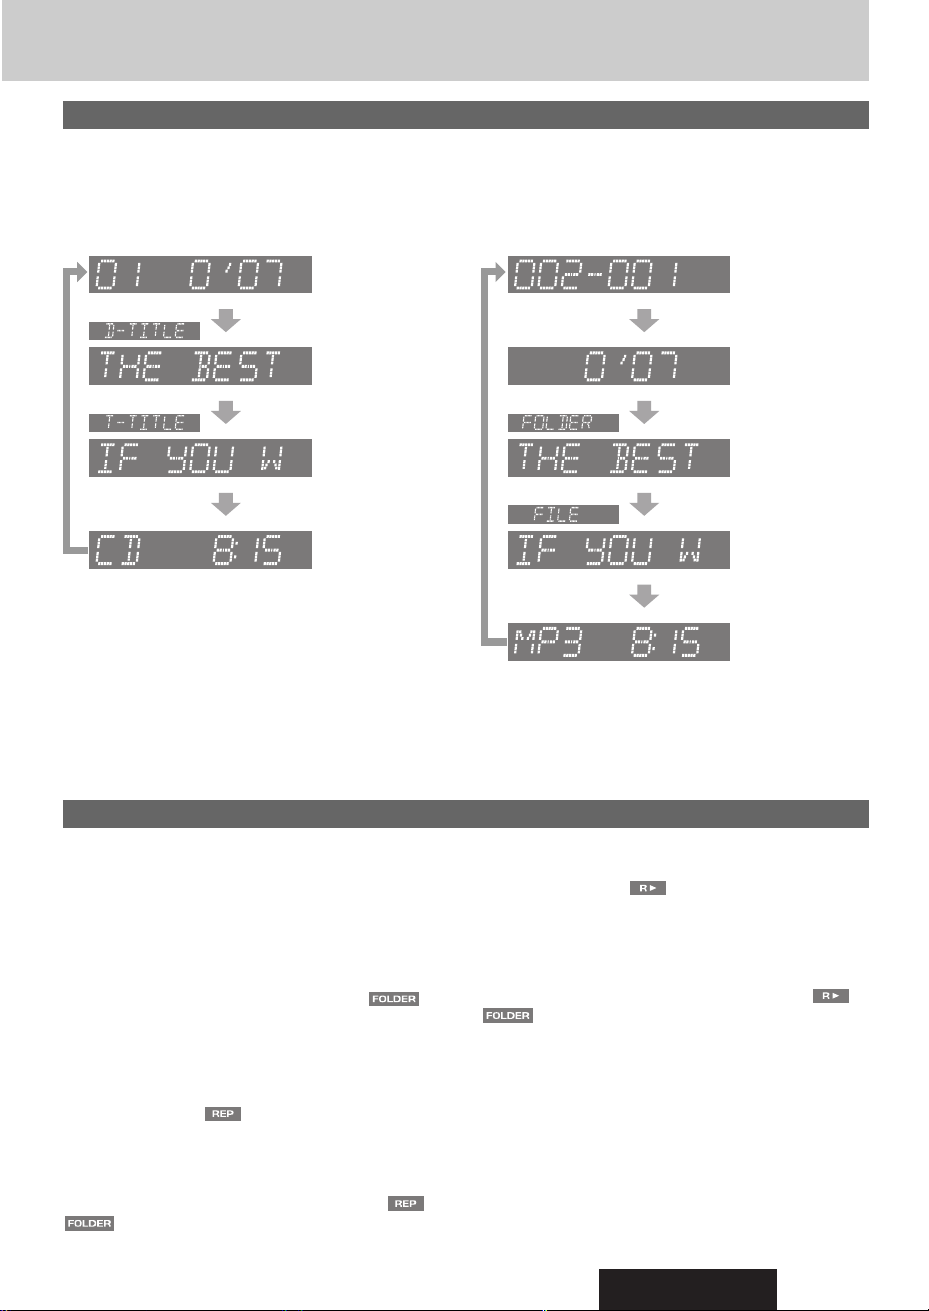
Display change
Press [DISP] to change the display.
Notes:
¡ For scrolling text, press [3] (SCROLL).
¡ “NO TEXT” is displayed when there is no information on the disc.
CD-DA MP3/WMA
Track number/
Play time
Folder number/File
number
Disc title*
Track title*
Clock
* CD TEXT Display
Disc title and Track title name are displayed.
Scan, Repeat, Random
Scan play
The first 10 seconds of each track/file is played in sequence.
[4] (SCAN). Track/file number blinks.
Press
Press again to cancel.
Folder scan play (MP3/WMA)
From the next folder, the first 10 seconds of the first file in each
folder is played in sequence.
Hold down
lights and folder number blinks.
Hold down again to cancel.
[4] (SCAN) for more than 2 seconds.
Play time
Folder name/
Album*
File name/
Title, artist*
Clock
ID3 Tag ON/OFF
*
Hold down [3] (SCROLL) for more than 2 seconds.
TAG ON: album title and song title/artist name are displayed.
TAG OFF: folder name/file name are displayed. (Default)
Random play
All the available tracks/files are played in a random sequence.
[6] (RANDOM). lights.
Press
Press again to cancel.
Folder random play (MP3/WMA)
All the available files in current folder are played in a random
sequence.
Hold down
Hold down again to cancel.
[6] (RANDOM) for more than 2 seconds. ,
lights.
Repeat play
The current track/file is repeated.
Press
[5] (REPEAT). lights.
Press again to cancel.
Folder repeat play (MP3/WMA)
The current folder is repeated.
Hold down
Hold down again to cancel.
[5] (REPEAT) for more than 2 seconds. ,
lights.
CQ-5800U
15
Page 16

USB (MP3/WMA)
Cautions
¡ Do not connect a USB device directly to this unit. If a USB
device is connected directly to this unit and an accident
occurs, or if the brakes are applied suddenly, the driver or
passenger may bump into the USB device and may be
injured.
¡ Connect your USB device to your car audio using a stan-
dard USB extension cable (5 m or less).
¡ Position the USB device and USB extension cable so that
they do not interfere with your driving.
¡ Do not connect any USB device other than a USB memory
or a USB audio player. Do not connect multiple USB
devices to the USB connector. Supplying power to multiple USB devices from the connector could cause overheating and smoking.
Pause
Press [BAND] (
Press again to cancel.
).
5
/
h
indicator
lights when a USB device is loaded
(Repeat)/ (Random)/
indicator
Compatible USB devices
¡ USB Mass Storage Class
For details as to whether your USB memory/USB Audio is
compatible with USB Mass Strage Class, please contact
the USB memory/USB Audio manufacturer.
¡ USB Standard Compatibility 1.1/2.0 Full Speed
¡ File System FAT12/16/32
¡ Maximum current less than 500 mA
¡ Capacity less than 4 GB (1 partition)
USB device connection
Open the USB connector cover and connect a USB device to this
unit.
Notes:
¡ When connecting (disconnecting) a USB device, turn down
the volume of the unit.
¡ When connecting a USB device, make sure the connector is
pushed all the way into the socket.
Display change
(a page 17)
File selection
[FILE d]: Next file
[FILE s]: Preceding file (press twice)
Note: Hold down for fast forward/reverse.
Folder selection
[FOLDER ▲]: Next folder
[FOLDER ▼]: Preceding folder
16
CQ-5800U
Text Scroll
Scan, Repeat, Random (a page 17)
Page 17

Notes:
¡ Refer to the section on “Notes on MP3/WMA”. (a page 44)
¡ Do not leave the USB device for long periods of time in places inside the car where the temperature rises too high.
¡ This unit may not operate correctly if a cable other than a USB standard cable is used.
¡ To prevent dirt and dust from adhering to the USB connector, close the cover of this unit when not in use.
¡ Back up any important data beforehand. We cannot accept responsibility for any lost data.
¡ The use of USB devices that contain data files other than MP3/WMA format is not recommended.
¡ A file with a play time exceeding 1 000 minutes will not play correctly to the end of the track.
¡ Playback or display may not be possible depending on the type of USB device or the condition of the recording.
¡ Depending on the connected USB memory, the order in which the files are played back may differ from the order in which the
files were stored.
¡ Connection of an iPod to the USB connector of this unit is not supported.
Scan, Repeat, RandomDisplay change
Press [DISP] to change the display.
Notes:
¡ For scrolling text, press [3] (SCROLL).
¡ “NO TEXT” is displayed when there is no information on the
USB device.
Folder number/
File number
Play time
Folder name/ Album*
File name/
Title, artist*
Clock
ID3 Tag ON/OFF
*
Hold down [3] (SCROLL) for more than 2 seconds.
TAG ON: album title and song title/artist name are displayed.
TAG OFF: folder name/file name are displayed. (Default)
Scan play
The first 10 seconds of each file is played in sequence.
[4] (SCAN). File number blinks.
Press
Press again to cancel.
Folder scan play
From the next folder, the first 10 seconds of the first file in each
folder is played in sequence.
Hold down
lights and folder number blinks.
Hold down again to cancel.
[4] (SCAN) for more than 2 seconds.
Repeat play
The current file is repeated.
Press
[5] (REPEAT). lights.
Press again to cancel.
Folder repeat play
The current folder is repeated.
Hold down
Hold down again to cancel.
[5] (REPEAT) for more than 2 seconds. ,
lights.
Random play
All the available files are played in a random sequence.
[6] (RANDOM). lights.
Press
Press again to cancel.
Folder random play
All the available files in current folder are played in a random
sequence.
Hold down
Hold down again to cancel.
[6] (RANDOM) for more than 2 seconds. ,
lights.
CQ-5800U
17
Page 18

iPod Control
Notes:
The iPod equipped with a dock connector is exclusively connectable. Further information about the controllable iPod is
described below.
¡Controllable iPod/software version
¡4th generation iPod/ver. 3.1.1
¡5th generation iPod/ver. 1.1.2
¡iPod Photo/ver. 1.2.1
¡iPod mini/ver. 1.4.1
¡iPod nano/ver. 1.2
* Operation check has been completed with software available
at the end of October, 2007. We do not guarantee the operation with our future products or upgraded software.
(Video playback is not supported.)
Preparation:
Connect the iPod
using the optional adapter (Direct Cable for iPod: CA-DC300U)
Pause
Press [BAND] (
Press again to cancel.
5
/
h
indicator
).
(Repeat)/
(Random)
¡ The shuffle function of iPod corresponds to the RANDOM
function of this unit.
¡ Please make sure to detach the iPod after turning off the car
engine (turning the ACC to OFF). The iPod may not shut down
while still connected, which may result in battery depletion.
¡ Please do not connect iPod accessories such as an iPod
remote control or headphones while connecting iPod with
the unit. The unit may not operate correctly.
¡ Connect this unit after turning down the volume of the iPod.
¡ “PAUSE” appears until the iPod is recognized after connect-
ing the iPod, turning on the power of the main unit, or performing source selection on the main unit side. This indicates there is nothing wrong with the main unit.
¡ We do not guarantee all the operations of connectable devices.
Playing Mode selection (a page 19)
indicator
lights when
CA-DC300U
is loaded
Display change
(a page 19)
Song selection
[FILE d]: Next song
[FILE s]: Preceding song (press twice)
Note: Hold down for fast forward/reverse.
18
CQ-5800U
Text Scroll
Repeat, Random (a page 19)
Page 19

Display change
Press [DISP] to change the display.
Notes:
¡ For scrolling text, press [3] (SCROLL).
¡ “NO TEXT” is displayed when there is no information on the
iPod.
Song number/
Total song
(iPod number*)
Play time (iPod number*)
Song title
Album name
Playing Mode selection
The type with which playback data is classified is selectable.
Press [▲] to call up the play mode selection
1
screen.
Turn [VOL] to select the play mode.
2
PLAYLIST: Playback by playlist (default)
ARTIST: Playback by artist
ALBUM: Playback by album
GENRE Playback by genre
Notes:
¡ When the [▲] button is pressed, the regular screen
appears.
¡ “NO SONG” will appear if no song exists.
Press [PUSH SEL] to determine the selec-
3
tion.
Turn [VOL] to select the portion to play.
4
Note: When the [▲] button is pressed, the previous screen
appears.
Press [PUSH SEL] to determine the selec-
5
tion.
* appears when 2 iPods are connected.
Artist name
Clock
Repeat, Random
Repeat play
The current song is repeated.
Press
[5] (REPEAT). lights.
Press again to cancel.
Note: The all Repeat Play function of iPod is always activated
and cannot be canceled from this unit.
Random play (Shuffle)
All the available songs are played in a random sequence.
[6] (RANDOM). lights.
Press
Press again to cancel.
Album random play
All the playable albums are played in a random sequence.
Hold down
blinks.
Hold down again to cancel.
[6] (RANDOM) for more than 2 seconds.
CQ-5800U
19
Page 20

XM Satellite Radio Control
Preparation:
¡Connect the optional XM Direct2(CNP2000UC) with optional Connection Cable (CNPPAN1).
Getting Started
It is required to sign up to become an XM Satellite Radio
subscriber. After checking your XM Satellite Radio ID, sign up
on the XM’s website or by calling them.
Check of XM Satellite Radio ID
1
¡ Write down the ID indicated on the carton of your
XM receiver XM Direct
¡ Check the ID shown by tuning your XM Radio to
channel 0.
2
(CNP2000UC).
Activate the XM Satellite Radio. Select either
2
of the below to sign up.
¡ Web site: http://www.xmradio.com/activation
¡ Phone number: 1-800-852-9696
Band
Press [BAND] to change the band.
Selection by Category
(a page 21)
Display change
(a page 21)
Channel Selection
[TUNE s]: Lower
[TUNEd]: Higher
Notes:
¡ “RADIO ID” is displayed with channel 0.
¡ “UPDATING” is displayed during the update of the identifica-
tion code.
¡ “LOADING” is displayed during the acquisition of audio data
or information.
Caution
To ensure safety, never attempt to preset stations
while you are driving.
(Satellite) indicator
indicates the satellite receiver is ready.
Preset channel selection
Press the corresponding preset button from [1] to [6] to tune in
a preset channel.
20
CQ-5800U
Page 21

Notes:
¡ You can connect the optional XM Direct2(CNP2000UC*) with
optional Connection Cable (CNPPAN1*).
* This products is made by other media companies. (Not
Panasonic products.)
¡ Toll free number
XM Tuner P/N: XM Direct
Call 1-800-XM-RADIO (96-72346)
Extension cord P/N: CNPPAN1
Call 1-800-942-TERK (8375)
2
Display change
Press [DISP] to change the display.
Band number/
Channel number
Channel name
Artist name
Song title
Category name
Clock
Manual Preset Memory
Use [TUNE
1
Press and hold one of the preset buttons
2
from [1] to [6] until the display blinks once.
] to find a channel.
s/d
Preset Number
blinks once
Selection by Category
You can toggle the category on and off every time you hold down
[BAND] for 2 sec. or more. If the category is set to on, the unit
operates as follows for each button:
Channel selection
[TUNE s]: Preceding channel in current category
[TUNE d]: Next channel in current category
Category selection
[▲]: Preceding category
[▼]: Next category
lights when category is set to on.
CQ-5800U
21
Page 22

Sirius Satellite Radio Control
Sirius Satellite broadcast service
Sirius Satellite coverage is only available in the United States (except Hawaii and Alaska) and a part of Canada. The instruction of
Satellite Operation Controls in the Operating Instructions and Guide will not be applied.
Preparation:
¡Connect the optional Sirius Satellite Radio receiver (SC-C1).
What is Sirius Satellite Radio?
Over 120 channels of the best entertainment and
completely commercial-free music for your car,
home or office.
Only SIRIUS has more than 65 original music channels, from
today’s hits to R&B oldies to classical masterpieces. From
authentic Country and real Bluegrass to cool Jazz, hot Latin,
Reggae, Rock and many more. Best of all, it’s all completely
commercial-free.
SIRIUS also has more than 55 channels of world-class sports,
news and entertainment. Included as part of your subscription,
you get up to 16 NFL games a week, up to 40 NBA games a week
and up to 40 NHL games a week. (Games are broadcasted during
their respective seasons.) Coupled with great sports news from
ESPN, the SIRIUS sports offering is unrivaled. And don’t forget a
host of other great news and entertainment, like NPR, CNBC, Fox
News, Radio Disney and E!Entertainment Radio.
With SIRIUS, the emphasis is on the music and entertainment
you want. The music is hosted by SIRIUS Jockeys, who are true
experts. They back-up the music with compelling information
about the song being played, and they understand that sometimes it’s best to just let the music speak for itself.
Rely on SIRIUS rocket science for superior coverage.
Only SIRIUS has three powerful satellites that fly directly over
the U.S. ensuring coast-to-coast coverage with high elevation
angles. This gives the satellites a “clear line of sight” to your car
or home, with much less concern for buildings, trees or other
objects that might block conventional satellite signals.
Once you experience more than 120 channels of digital entertainment, you’ll never want to leave your car. For more information,
visit www.sirius.com.
Getting Started
It is required to sign up to become a Sirius Satellite Radio subscriber. After checking your Sirius Satellite Radio ID, sign up on the
Sirius’s website or by calling them.
SR ID Confirmation
This shows the ID required for having contact with SIRIUS
Satellite Radio.
Note: You can also see ID number by selecting channel 0.
Press the knob [PUSH SEL] for more than 2
1
seconds.
Press the knob [PUSH SEL].
2
Press [DISP] to return to the Sirius band dis-
3
play mode.
Activation of the Sirius Satellite Radio
Select either of the below to sign up
¡ Web site: http://home.sirius.com/webCUWI
¡ Phone number: 1-888-539-SIRIUS (7474)
22
CQ-5800U
Page 23

Band
Press [BAND] to change the band.
Caution
To ensure safety, never attempt to preset stations
while you are driving.
Selection by Category (a page 24)
Parental channel lock/unlock setting (a page 24)
(Satellite) indicator
indicates the satellite receiver is ready.
Display change
(a page 24)
Channel Selection
[TUNE s]: Lower
[TUNEd]: Higher
Notes:
¡ “RADIO ID” is displayed with channel 0.
¡ UPDATING” is displayed during the update of the identifica-
tion code.
¡ When you select a locked channel, “LOCKED” is displayed
(
a page 24).
Parental Lock ON/OFF Setting (a page 25)
PASS CODE
input
Preset channel selection
Press the corresponding preset button from [1] to [6] to tune in
a preset channel.
Manual Preset Memory
Use [TUNE
1
Press and hold one of the preset buttons
2
from [1] to [6] until the display blinks once.
] to find a channel.
s/d
Preset Number
blinks once
CQ-5800U
23
Page 24

Sirius Satellite Radio Control (continued)
Display change
Press [DISP] to change the display.
Band number/
Channel number
Channel name
Artist/composer
name
Song title
Category name
Clock
Parental channel lock/unlock setting
This function allows users to lock unfavorite channels and to
release locking.
Hold down [▼] for 2 sec. or more.
1
Press button [1] to [6] to enter the 4-digit
2
pass code number. (Default: 1111)
Notes:
¡ The input pass code number will be converted into an
asterisk ( ) when you enter the pass code.
¡ To suspend lock/unlock setting, press [DISP].
Press [BAND] to confirm the pass code.
3
Press [TUNE s/d] to select a channel to
4
be locked or unlocked.
Press [BAND] to Lock/Unlock the channel.
5
indicates the
channel is locked.
Press [DISP] to confirm the channel and
6
return to the Sirius band display mode.
Selection by Category
You can toggle the category on and off every time you hold down
[BAND] for 2 sec. or more. If the category is set to on, the unit
operates as follows for each button:
Channel selection
[TUNE s]: Preceding channel in current category
[TUNE d]: Next channel in current category
Category selection
[▲]: Preceding category
[▼]: Next category
lights when category is set to on.
24
CQ-5800U
Parental channel unlock setting (Tuned channel)
This function allows users to release locking for tuned channel.
(“LOCKED” is displayed).
Hold down [▲] for 2 sec. or more.
1
Press button [1] to [6] to enter the 4-digit
2
pass code number. (Default: 1111)
Notes:
¡ The input pass code number will be converted into an
asterisk ( ) when you enter the pass code.
¡ To suspend lock/unlock setting, press [DISP].
Press [BAND] to confirm the pass code.
3
The tuned channel is unlocked.
Page 25

Parental lock ON/OFF setting
This function allows users to lock unfavorite channels and to
release locking. (default: ON)
Push the knob [PUSH SEL] for 2 sec. or
1
more.
Press button [1] to [6] to enter the 4-digit
2
pass code number. (Default: 1111)
Notes:
¡ The input pass code number will be converted into an
asterisk ( ) when you enter the pass code.
¡ To suspend lock on/off setting, press [DISP].
Press [BAND] to confirm the pass code.
3
Turn [VOL] (volume) clock-
4
wise or counterclockwise to
change each level.
q: ON
w: OFF
Press [DISP] to confirm the setting and
5
return to the Sirius band display mode.
Pass code change
The pass code is changeable (default: 1111)
Hold down [▼] for 2 sec. or more.
1
Press button [1] to [6] to enter the 4-digit
2
pass code number. (Default: 1111)
Notes:
¡ The input pass code number will be converted into an aster-
isk ( ) when you enter the pass code.
¡ To suspend pass code change setting, press [DISP].
Press [BAND] to confirm the pass code.
3
Hold down [BAND] for 2 sec. or more.
4
Press button [1] to [6] to enter the new 4-
5
digit pass code number twice.
Pass code initialization
The pass code is restored to the factory default, “1111”.
Hold down [▼] for 2 sec. or more.
1
Hold down [DISP] for 10 sec. or more.
2
¡ Hold down the button even after the screen changed.
(Regular screen)
CQ-5800U
25
Page 26

CD Changer Control
Notes :
¡ CD changer functions are designed for optional Panasonic
CD changer unit (CX-DP880, sold separately).
¡ This unit does not support the following through the CD
changer.
Preparation:
Connect the CD changer, and load a magazine (CDs).
(Repeat)/ (Random) indicator
• CD-RW playback. (except when CX-DP880 is connected)
• MP3/WMA playback.
• CD text display.
¡ Pausing does not function in the CD changer mode.
Press [DISP] to change the display.
Disc selection
[DISC ▲]: Next disc
[DISC ▼]
: Preceding disc
Track selection
[d]: Next track
[s]: Preceding track (press twice)
Note: Hold down for fast forward/reverse.
26
CQ-5800U
Track number/
Play time/
Disc number
Clock
Scan, Repeat, RandomDisplay change
Scan play
The first 10 seconds of each track is played in sequence.
Press
[4] (SCAN). Track number blinks.
Press again to cancel.
Disc scan play
From the next disc, the first 10 seconds of the first track in each
disc is played in sequence.
Hold down
blinks.
Hold down again to cancel.
Repeat play
The current track/file is repeated.
Press
Press again to cancel.
Disc repeat play
The current disc is repeated.
Hold down
Hold down again to cancel.
Random play
All the available tracks are played in a random sequence.
Press
Press again to cancel.
Disc random play
All the available tracks in current disc are played in a random
sequence.
Hold down
Hold down again to cancel.
[4] (SCAN) for more than 2 seconds. Disc number
[5] (REPEAT). lights.
[5] (REPEAT) for more than 2 seconds. blinks.
[6] (RANDOM). lights.
[6] (RANDOM) for more than 2 seconds. blinks.
Page 27

Installation
WARNING
❐ This installation information is designed for experienced installers and is not intended
for non-technical individuals. It does not contain warnings or cautions of potential dangers involved in attempting to install this product.
Any attempt to install this product in a vehicle by anyone other than a qualified installer
could cause damage to the electrical system and could result in serious
personal injury or death.
❐ If your vehicle is equipped with air bag and/or anti-theft systems, specific procedures
may be required for connection and disconnection of the battery to install this product.
Before attempting installation of this electronic component, contact your vehicle dealer
or manufacturer to determine the required procedure and strictly follow their instructions.
FAILURE TO FOLLOW THE PROCEDURE MAY RESULT IN THE UNINTENDED DEPLOY-MENT
OF AIR BAGS OR ACTIVATION OF THE ANTI-THEFT SYSTEM RESULTING IN DAMAGE TO
THE VEHICLE AND PERSONAL INJURY.
❐ Overview
This product should be installed by a professional.
However, if you plan to install this product yourself, your first step
is to decide where to install it. The instructions in these pages will
guide you through the remaining steps:
(Please refer to the “WARNING” statement above.)
• Identify and label the car wires.
• Connect the vehicle wires to the wires of the power connector.
• Install the unit in the dashboard.
• Check the operation of the unit.
If you encounter problems, please consult your nearest professional installer.
Caution
This unit operates with a 12 V DC negative ground auto battery
system only. Do not attempt to use it in any other system.
Doing so could cause serious damage.
Before you begin installation, look for the item which is packed
with your unit.
•
Installation Hardware…Needed for in-dash installation.
❐ Dashboard Specifications
THICKNESS
MIN. 4.75 mm {
MAX. 5.56 mm {
3
/16”}
7
/32”}
182 mm {7 3/16”}
111.6 mm {4
3
/8”}
CQ-5800U
27
Page 28

Installation (continued)
❐ Preparation
Warning
If your vehicle is equipped with air bag and/or anti-theft systems, specific procedures may be required for connection and
disconnection of the battery to install this product.
Before attempting installation of this electronic component,
contact your vehicle dealer or manufacturer to determine the
required procedure and strictly follow their instructions.
FAILURE TO FOLLOW THE PROCEDURE MAY RESULT IN
THE UNINTENDED DEPLOYMENT OF AIR BAGS OR ACTIVATION OF THE ANTI-THEFT SYSTEM RESULTING IN DAMAGE
TO THE VEHICLE AND PERSONAL INJURY.
• Unit should be installed in a horizontal position with the front
end up at a convenient angle, but not more than 30˚.
0 – 30°
• Disconnect the cable from the negative (–) battery terminal (see
warning and caution below).
• Remove Mounting Collar
which are already mounted at shipment.*
w from the main unit temporarily,
Caution
Various settings that have been stored in the memory in other
on-board equipment (vehicle navigation etc.) may be lost if
the battery terminals are disconnected.
Therefore, we recommend to make a record of or to back up
the settings before disconnecting the terminals.
After completing installation of the main unit, set the equipment again according to the record.
❐ Dashboard Installation
Installation Opening
This unit can be installed in any dashboard having an opening as
shown below. The dashboard should be 4.75 mm {3/16”} – 5.56
mm {7/32”} thick in order to be able to support the unit.
111.6 mm
3
{4
/8”}
182 mm
3
{7
/16”}
28
CQ-5800U
Page 29

❏ Installation Hardware
For Installation
Trim Plate
q
Mounting Collar*
w
Rear Support Strap
e
Qty.DiagramItemNo.
1
<YFC054C091ZA>
1
<YFX214C437ZA>
1
<YFG044C002ZA>
Note:
¡The number in parenthesis underneath each accessory
part name is the part number for maintenance and service.
¡Accessories and their parts numbers are subject to mod-
ification without prior notice due to improvements.
¡Use the supplied screws for installation exclusively. In
case of losing any of them, please order the specific
screw.
Lock Cancel Plate
r
Hex. Bolt
t
(5 mmø
× 25 mm)
Hex. Nut (5 mmø)
y
Plain washer (5 mmø)
u
Spring Washer (5 mmø)
i
Toothed Lock Washer
o
(5 mmø)
2
1
2
2
2
1
<ZZBIS5800U>
CQ-5800U
29
Page 30

Installation (continued)
Fire Wall of Vehicle
tHex. Bolt
(5 mmø x 25 mm)
oToothed Lock Washer
yHex. Nut (5 mmø)
yHex. Nut
iSpring Washer
iSpring Washer
uPlain Washer
uPlain Washer
eRear Support Strap
Mounting Bolt (5 mmø)
wMounting Collar
Mounting and removing the Main Unit
❏ Mounting Procedures (When using Mounting Collar w)
Note:
¡The car model, installation conditions and combination
of the units used may impose some restrictions on operating position.
q
w
e
r
t
IMPORTANT
When this unit is installed in dashboard, ensure that there
is sufficient air flow around the unit to prevent damage
from overheating. Do not block any ventilation holes on the
unit.
Insert the Mounting Collar w into the dash-
q
board, and bend the mounting tabs out with a
screwdriver.
Establish the rear connection of the unit.
w
After fixing Power Connector, fix the rear of the
unit to the car body by either method (a) or (b).
Insert the unit into Mounting Collar w.
e
Secure the clamp plate of Mounting Collar w to
the hook.
Snapping point
r
Insert Trim Plate q.
After installation reconnect the negative (–)
t
battery terminal.
Method for Fixing the Rear of the Unit
(a) Using the rear support strap e
30
CQ-5800U
(b) Using the rubber cushion (option)
Rubber cushion (option)
Rear support bracket
(provided on the vehicle)
Mounting bolt
(5 mmø)
w Mounting collar
Page 31

❏ Removing Procedures
q Remove the trim plate q.
q
w Lock release.
q Insert the lock cancel plate r until you hear a
click.
w Pull the unit out.
e Pull the unit out with both hands.
CQ-5800U
31
Page 32

Electrical Connections
Caution
• This wiring information is for experienced technical individual, for safety reason, please your dealer wire this connection.
• This product is designed to operate with a 12 V DC, negative ground battery system.
• To prevent damage to the unit, be sure to follow the connection diagram below.
• Do not insert the power connector into the unit until the wiring is completed.
• Be sure to insulate any exposed wires from a possible short-circuit from the vehicle chassis. Bundle all cables and keep cable
terminals free from touching any metal parts.
• Remember, if your vehicle has a drive computer or a navigation computer, the data of its memory maybe erased when the battery terminals are disconnected.
❐ Wiring Diagram
(White/Black)
External Remote Control Lead
When using non-Panasonic external remote control, refer to the
manufacture for their product before connecting.
CD Receiver
CQ-5800U
Antenna
The power connector does not come
along with the unit. If need, please
consult your dealer.
(Rear Side)
Power Connector
(Gray/Black)
Detail of power connector
NO. FUNCTION NO. FUNCTION
1BATTERY +12 V 9 REAR SP R
2 GROUND 10 REAR SP R
3 ——— 11 FRONT SP R
4 ——— 12 FRONT SP R
5 ——— 13 FRONT SP L
6 POWER +12 V ACC 14 FRONT SP L
7 ——— 15 REAR SP L (–)
8 ——— 16 REAR SP L (+)
ACC
Ground
Battery
Illumination
(Gray)(white)
(Green/Black)
(Green)
10 12 14 16
15
91113
7
53 1
8642
(Red)
(Black)
(Yellow)
(Orange)
(Violet/Black)
(–)
(+)
(–)
(+)
(–)
(+)
Accessory Power(ACC)
(+12 V DC, negative ground
only)
Ground Lead
(Connect to a clean, bare
metallic part of your vehicle)
Battery Lead
(Connect to vehicle battery)
Illumination Lead
(Not used)
(Violet)
32
Left Speaker
(Front)
CQ-5800U
Right Speaker
(Front)
Left Speaker
(Rear)
Right Speaker
(Rear)
Page 33

Connection with CD Changer (CX-DP880)
CD Changer
CX-DP880 (option)
Ground Lead (Black)
Power Connector
(Supplied with CX-DP880)
To a clean, bare metallic part of the car
chassis
Battery Lead
To the car battery, continuous
+12 V DC
(Yellow)
(R) (Red)
RCA Cord
System-up connector
(L) (White)
CHANGER IN
CQ-5800U
(Rear)
DIN Connector
Conversion Cable for DVD/CD
Changer
(CA-CC30U, option)
DIN Cord
(Black)
CQ-5800U
33
Page 34

Electrical Connections (continued)
Connection with XM Satellite Radio (CNP2000UC)
XM Direct
2
CNP2000UC* (option)
Protocol Interface Adapter
XM Direct2 Panasonic Connection Cable
CNPPAN1* (option)
Mini-Micro
Car Antenna
System-up Connector
XM MiniTuner
& Dock
* Please understand that Panasonic is not liable for modification of specifications, shape, name, and the like of the
optional XM receiver and digital adapter without prior notice because they are not manufactured by Panasonic.
CQ-5800U
(Rear)
Connection with Sirius Satellite Radio (SC-C1)
Sirius Satellite Radio (Sirius Connect Vehicle Tuner)
SC-C1* (option)
SC OUTPUT Connector
Interface Adapter for Sirius Satellite Radio
(CA-LSRO1U*, option)
SC AUDIO cord
(Supplied with SC-C1)
Power Connector
(Supplied with CA-LSRO1U)
System-up Connector
CQ-5800U
(Rear)
* Please understand that Panasonic is not liable for modification of specifications, shape, name and the like of the
optional Sirius Radio receiver and interface adapter without prior notice because they are not manufactured by
Panasonic.
34
CQ-5800U
Page 35

CHANGER IN
Connection with Expansion Module (CY-EM100U)
Head unit/Expansion Module
Connecting cable
(Supplied with CY-EM100U)
System-up
Connector
Expansion Module
CY-EM100U(option)
CD Changer
CX-DP880 (option)
CQ-5800U
(Rear)
iPod
(L) (White)
(R) (Red)
Conversion Cable for
CD Changer
CC30U, option)
(CA-
Direct Cable for iPod
(CA-DC300U, option)
CQ-5800U
35
Page 36

Troubleshooting
If You Suspect Something Wrong
Check and take steps as described below.
If the described suggestions do not solve the problem, it is
recommended to take the unit to your nearest authorized Panasonic
Servicenter. The product should be serviced only by qualified personnel.
Please refer the checking and the repair to professionals. Panasonic
shall not be liable for any accidents arising out of neglect of checking the
unit or your own repair after your checking.
Never take measures especially for those other than indicated by italic
letters in “Possible Solution” described below because those are
too dangerous for users to handle themselves.
Common
Problem
No power to the unit
Sound is not generated.
The power cord (battery, power and ground) is connected in the wrong way.
a Check the wiring.
Fuse blows out.
a Eliminate the cause of fuse blowout and replace the fuse with new one.
Consult your dealer.
MUTE is set to ON.
a Set MUTE to OFF.
There is contact between the external mute lead and the chassis.
a Connect the external mute lead correctly. If the lead is unused, insulate it.
The wiring of speaker lines are not correct, or a break or poor contact arises.
a Check the wiring in accordance with the wiring diagram.
Possible causeaPossible solution
Warning
¡ Do not use the unit in an irregular condition, for
example, without sound, or with smoke or a foul
smell, which can cause ignition or electric shock.
Immediately stop using the unit and consult your
dealer.
¡ Never try to repair the unit by yourself because it is
dangerous to do so.
36
Noise
Noise is made in step with
engine revolutions.
Some operations are not
executable.
CQ-5800U
There is an electromagnetic-wave generator such as a cellular phone near the unit or
its electrical lines.
a Keep an electromagnetic-wave generator such as a cellular phone away from
the unit and the wiring of the unit. In case that noise cannot be eliminated
due to the wiring harness of the car, consult your dealer.
The contact of the ground lead is poor.
a Make sure that the ground lead is connected to an unpainted part of the chas-
sis securely.
Alternator noise comes from the car.
a Change the wiring position of the ground lead.
a Mount a noise filter on the power supply.
Some operations are not executable in particular modes such as menu mode.
a Read the operating instructions carefully and cancel the mode. If the unit is
still out of order, consult your dealer.
Page 37

No sound from speaker(s)
BALANCE/FADER setting is not appropriate.
a Readjust BALANCE/FADER.
There is a break, a short circuit, poor contact or wrong wiring regarding the speaker
wiring.
a Check the speaker wiring.
The speaker channels are
reversed between right and
left.
The sound field is not clear in
the stereo mode. Central
sound does not settled.
The power fails
unintentionally.
Radio
Poor reception or noise
The speaker wiring is confused between right and left.
a Perform the speaker wiring in accordance with the wiring diagram.
The plus and minus terminals at right and left channels of speakers are connected
reversely.
a Perform the speaker wiring in accordance with the wiring diagram.
The safety device works.
a Consult your dealer, or your nearest Panasonic Servicenter.
Antenna installation or wiring of antenna cable is faulty.
a Check whether the antenna mounting position and its wiring are correct. In
addition, check to see whether the antenna ground is securely connected to
the chassis.
No power is supplied to the antenna amplifier (when using a film antenna, etc.).
a Check the wiring of the antenna battery lead.
The number of auto preset
stations is less than 6.
Preset stations cannot be
stored.
The number of receivable stations is less than 6.
a Move to an area where receivable stations number is maximum, and try pre-
setting.
The contact of the battery lead is poor, or the battery lead is not always powered.
a Make sure that the battery lead is connected securely, and preset stations
again.
CQ-5800U
37
Page 38

Troubleshooting (continued)
CD
The disc is inserted upside down.
No playback or disc ejected
a Insert a disc correctly.
There is a flaw or foreign material on the disc.
a Remove the foreign material, or use a flawless disc.
Sound skipping or noise
Sound skipping due to
vibration
Disc unejectable
MP3/WMA
No playback or disc ejected
The CD-R/RWs that are
playable on other devices are
not playable on this unit.
There is a flaw or foreign material on the disc.
a Remove the foreign material, or use a flawless disc.
The unit is not sufficiently secured.
a Secure the unit to the console box.
The unit is tilted at over 30˚ in the front-to-end direction.
a Make the angle 30˚ or less.
Something such as a peeled label obstructs the disc coming out.
a Consult your dealer.
The microcontroller in the unit operates abnormally due to noise or other factors.
a Unplug the power cord and plug it again. In case the unit is still out of order,
consult your dealer.
The disc has unplayable formatted data.
a Check the file format.
The playability of some CD-Rs/RWs may depend on the combination of media,
recording software and recorder to be used even if these CD-Rs/RWs are playable
on other devices such as a PC.
a Make CD-R/RWs in different combination of media, recording software and
recorder after referring to the description about the compressed audio player.
Sound skipping or noise
Note: Refer to “Notes on MP3/WMA”. (a Page 44)
38
CQ-5800U
There is a flaw or foreign material on the disc.
a Remove the foreign material, or use a flawless disc.
Playing VBR (Variable Bit Rate) files may cause sound skipping.
a Play Non-VBR files.
Page 39

USB
Music is not played back even
if the USB device is
connected.
“READING” is displayed but
music is not played back.
XM Satellite Radio Control
Channel unselectable
The USB device and USB extension cable are not connected correctly.
a Connect the USB device and USB extension cable correctly.
There is no music stored in a format that is supported on this unit.
a Check if there is any music data that can be played stored on the USB device.
The file system of the USB device is not compatible with this unit.
a Use a USB device with a FAT12/16/32 file system.
The current consumption of the USB device exceeds 500 mA.
a Use a USB device with a current consumption lower than 500 mA.
A USB hub is connected.
a Do not use a USB hub.
Too many recorded folders/files exist.
a When there are too many recorded folders/files, it may take a long time to
read all of the files.
No contact with XM Satellite radio Inc.
a Refer to page 20 of this book and the XM’s website to sign up for XM Radio
service.
Product Servicing
If the suggestions in the charts do not solve the problem, we recommend that you take it to your nearest authorized
Panasonic Servicenter. The product should be serviced only by a qualified technician.
CQ-5800U
39
Page 40

Error Display Messages
CD/MP3/WMA
Display
Possible causeaPossible solution
The disc is dirty, or is upside down.
a Check the disc.
The disc has scratches.
a Check the disc.
No operation by some cause.
a Unplug the power cord and plug it again. In case the unit is still out of order,
consult your dealer.
The player for some reason cannot read the file you are trying to play. (File recorded
in an unsupported file system, compression scheme, data format, file name extension, damaged data, etc.)
a Select a file that the player can read. Check the type of data recorded on the
disc. Create a new disc if necessary.
A WMA file can be copyrighted.
a The file protected by copyright is not playable.
No disc in the player.
a Insert disc into the disc slot.
40
CD changer
The disc is dirty, or is upside down.
a Check the disc.
The disc has scratches.
a Check the disc.
No operation by some cause.
a Eject the magazine. If failure persists, press the reset switch on the disc
changer. If normal operation is not restored, call the store where you purchased the unit or the nearest Panasonic Servicenter to ask for repairs.
No disc is in the CD Changer (magazine).
a Insert discs into the changer (magazine).
The changer has become disconnected from the unit in the changer mode.
a Verify the wiring.
CQ-5800U
Page 41

USB
A USB device is not connected or the connected device cannot be recognized.
a Use the type of USB memory that is suitable for this unit.
Your USB device has no playable file.
a Download playable file to your USB device.
A USB device the capacity of which exceeds the acceptable current was connected.
For some reason, an over-current was detected.
a Use a USB device that has a consumption current of less than 500 mA.
a Switch the source, and select the USB mode again.
a Check that the USB connector section is not dirty, and that there is no foreign
material.
No operation by some cause.
a Turn off the power and turn on the power again, or turn the key to the ACC OFF
position and turn the key to ACC ON position again.
problem, unplug the power cord and plug it in again. In case the unit is still
out of order, consult your dealer.
The player for some reason cannot read the file you are trying to play. (File recorded
in an unsupported file system, compression scheme, data format, file name
extension, damaged data, etc.)
a Confirm that the USB extension cable is firmly connected, and reconnect if
not. Select a file that the player can read. Check the type of data stored in the
USB device. Format the USB device if necessary.
If this does not solve the
iPod Control
A WMA file can be copyrighted.
a The file protected by copyright is not playable.
The iPod cable was disconnected in the iPod mode.
a Reconnect the iPod cable.
Your iPod has no playable music.
a Download playable music to your iPod.
CQ-5800U
41
Page 42

Error Display Messages (continued)
XM Satellite Radio Control
Cannot receive XM satellite radio.
a Verify the wiring.
XM antenna unconnected.
a Connect the XM antenna.
XM broadcasts unreceivable because of poor receiving conditions.
a Move to an area where XM broadcasts can be received well.
Channel not in service
a This channel is not currently in service. Tune to another channel.
Sirius Satellite Radio Control
Cannot receive Sirius Satellite Radio
a Verify the wiring.
Sirius antenna unconnected.
a Connect the Sirius antenna.
User’s registration has not been carried out.
a Complete user’s registration.
A channel that is not included in the agreement was selected.
a Select a channel that is included in the agreement. Refer to the operating
instructions for Sirius receiver with regard to the agreement.
The subscription information was updated.
a Wait for 3 minutes in the Sirius mode.
Your location is out of receivable areas (e.g. in a tunnel), or the unit is decoding a
selected broadcast. The display appears also while the connections are being
checked after the power has been turned on.
a Wait until getting out of the unreceivable area or completing the decoding.
42
CQ-5800U
Page 43

The selected channel is invalid.
Alcohol
Pesticide
Wax
Benzine
Thinner
a Select a channel which can be received instead.
Hardware error messages.
a Check the Hardware carefully.
Maintenance
Cleaning this Unit
Your product is designed and manufactured to ensure a
minimum of maintenance. Use a dry soft cloth for routine
exterior cleaning. Never use benzine, thinner or other solvents.
To remove stubborn stains
1 Moisten the soft cloth in dishwashing
soap diluted with water and wring well.
2 Wipe lightly. Go over the same surface
with a dry cloth.
Alcohol
Thinner
Pesticide
Wax
Benzine
Note:
¡Since there is the possibility of water drops getting
inside of the unit, do not directly apply cleanser to the
surface.
¡Do not scratch the screen with your nails or other hard
objects. The resulting scratches or marks will obscure
the images.
Caution
¡If water drops or similar wet substances get inside the
unit, it may cause a malfunction.
Caution
This product is designed without a fuse inside due to fuses already exist in your vehicle. We would recommend to use fuses
of the specified rating (15 A). Using fuses that exceed the prescribed capacity could cause this product to start smoking,
ignite or other malfunction.
If your vehicle is without the fuse or a circuit breaker to protect this unit, please your dealer add the specified fuse 15 A or a
circuit breaker at the BATTERY lead of your vehicle's harness. Please see page 32 to find out where "BATTERY +12V" is for
your dealer adding the fuse or the circuit breaker.
Refer fuse replacement to qualified service personnel. When the fuse blows out, eliminate the cause and have it replaced
with the fuse prescribed for this unit by a qualified service engineer. Incorrect replacement of the fuse may lead to smoke,
fire, and damage to the product.
CQ-5800U
43
Page 44

Notes on MP3/WMA
Both of MP3 (MPEG Audio Layer-3) and WMA (Windows Media™ Audio) is a format for compressed audio file. These formats allow
users to save all the files contained in approximately 10 pieces of existing CDs on one piece of CD-R/RW.
Note: Each of encoding software is not included with this unit.
*MPEG Layer-3 audio coding technology licensed from Fraunhofer IIS and Thomson.
Cautions as to compressed audio files
Common
¡ High bit rate and high sampling frequency are recommended
for high quality sounds.
¡ Selecting VBR (Variable Bit Rate) is not recommended
because playing time is not displayed properly and sound
may be skipped.
¡ The playback sound quality differs depending on the encoding
circumstances. For details, refer to the user manual of your
own encoding software and writing software.
¡ Be sure to put an extension compatible with the format.
Compression formats
* WMA 9 Professional/LossLess/Voice are not supported.
MP3
¡ It is recommended to set the bit rate to “128 kbps or more”
and “fixed”.
WMA
¡ It is recommended to set the bit rate to “64 kbps or more”
and “fixed”.
¡ Do not set the copy protect attribute on the WMA file to
enable this unit to play back.
Sampling frequencyVBRBit rateCompression method
32, 44.1, 48 kHzYes32 k – 320 kbpsMPEG 1 audio layer 3 (MP3)
16, 22.05, 24 kHzYes8 k – 160 kbpsMPEG 2 audio layer 3 (MP3)
8, 11.025, 12 kHzYes8 k – 160 kbpsMPEG 2.5 audio layer 3 (MP3)
32, 44.1, 48 kHzYes64 k – 160 kbpsWindows Media Audio Ver. 2, 7, 8, 9*
Caution
Never put an extension indicating compressed audio (such as “.mp3” and “.wma”) to files other than compressed audio files. This may not only produce noise from the speaker damage, but also damage your
hearing.
Cautions as to the display of this unit
Display Information
¡ CD-TEXT
Disc title
Track title
¡ MP3/WMA
Folder name,
File name
¡ MP3 (ID3 tag)
Album name,
Title name/artist name
¡ WMA (WMA tag)
Album name,
Title name/artist name
Displayable characters
¡ Displayable length of file name/folder name: within 30 charac-
ters. (Unicoded file and folder names are reduced by half in
the number of displayable characters.)
¡ Name files and folders in accordance with the standard of
each file system. Refer to the instructions of writing software
for details.
¡ ASCII character set and special characters in each language
can be displayed.
ASCII character set
A to Z, a to z, digits 0 to 9, and the following symbols:
(space) ! ” # $ % & ’ ( ) * + , - . / : ; < = > ? @ [ \ ] ˆ _ ` { | }
~
Notes:
¡ Characters may be garbled depending on encoding software
to be used
¡ Undisplayable characters and symbols will be converted into
an asterisk (
).
*
Windows Media, and the Windows
logo are trademarks, or registered
trademarks of Microsoft Corporation
in the United States and/or other
countries/regions.
44
CQ-5800U
Page 45

Cautions as to compressed audio files
Compressed audio file writing
¡ Do not save an audio file (CD-DA file) and a compressed
audio file on the same disc. Failure to observe this may
result in difficulty in playing.
¡ If compressed audio files formatted with two or more types
are saved on the same disc, each format shall have a different folder.
¡ Do not write files other than compressed audio files.
¡ Playability may depend on the combination of writing soft-
ware and disc writer to be used.
¡ This unit does not support the play list function.
¡ Write files in a disc-at-once manner unless otherwise needed.
¡ You can shorten the duration between data read and playback
by decreasing the quantity of files or folders, or the depth of
the hierarchy.
Supported file systems
■ CD-media
ISO 9660 Level 1/Level 2, Apple Extension to ISO 9660,
Joliet, Romeo
Note: Apple HFS, UDF 1.50, Mix CD and CD Extra are not
supported.
■ USB-device
File system is FAT12/16/32
Folder selection order/file playback order
■ CD-media/USB-device
2
3
Root Folder
(Root Directory)
q
4
5
6
7
e
w
r
8
Folder Selection
File Selection
q
t
y
18
–In the order
–In the order
y
(Max.)
1
Tree 1 Tree 2 Tree 3 Tree 4 Tree 8
Maximum number of files/folders
¡ Maximum number of files
CD-media: 999
USB device: 65 535
¡ Maximum number of files in one folder
CD-media: 255
USB device: 999
¡ Maximum depth of trees: 8
¡ Maximum number of folders: 255 (Root folder is included.)
Notes:
¡ This unit counts the number of folders irrespective of the
presence or absence of a compressed audio file.
¡ If the selected folder does not contain any compressed audio
file, the nearest compressed audio file in the order of playback
will play.
¡ Playback order of this unit may be different from that of other
compressed audio players even if the same disc is used
¡ “ROOT” appears when displaying the root folder name.
Common
Copyright
It is prohibited by copyright laws to copy, distribute and deliver
copyrighted materials such as music without the approval of
copyright holder except enjoying yourself personally.
No warranty
Above description complies with our investigations as of
December 2007. It has no warranty for reproducibility and
displayability of MP3/WMA.
CQ-5800U
45
Page 46

Notes on Discs
How to hold the disc
¡Do not touch the underside of the disc.
¡Do not scratch the disc.
¡Do not bend disc.
¡When not in use, keep disc in the case.
Printed side
Unusable discs
Do not use discs that fit any of the descriptions given
below. Using these discs may damage the discs or
cause the unit to malfunction.
¡Special discs in a shape which is not round
¡Partly or wholly transparent disc
Partly transparent discWholly transparent disc*
*Wholly semi-transparent disc may not be played back.
¡Discs with adhered labels, etc. on them
Disc insert
The surfaces of new discs tend to be slippery. Therefore,
when using such a disc for the first time, it may not load
satisfactorily even when it has been inserted into the unit.
At a time like this, insert the disc into the unit as far as it
will go until it is loaded properly.
¡When inserting a disc into or ejecting and removing it
from the unit, insert it straight in or eject and remove
it straight out in parallel with the unit. Otherwise, the
disc may be scratched or marked in the process.
¡When inserting a disc, do not put one disc on another.
Failure to observe this may cause the discs to be
jammed.
Do not leave discs in the following places:
¡Direct sunlight
¡Near car heaters
¡Dirty, dusty and damp areas
¡On seats and dashboards
Disc cleaning
Use a dry, soft cloth to wipe from the center outward.
Do not attach any seals or labels to your discs.
Do not write on the disc label in a heavy pen or ballpoint
pen.
or tape
Protective films or sheets
¡Damaged or deformed discs
Shoddily made discs
Discs with burrs
Please remove the burrs
before use.
46
Labels created by a printerDisc with adhered stickers
Disc accessories (stabilizers, etc.)
Discs with cracks,
scratches or parts missing
CQ-5800U
<Wrong><Correct>
Notes on CD-Rs/RWs
¡You may have trouble playing back some CD-R/RW
discs recorded on CD recorders (CD-R/RW drives),
either due to their recording characteristics or dirt, fingerprints, scratches, etc. on the disc surface.
¡CD-R/RW discs are less resistant to high temperatures
and high humidity than ordinary music CDs. Leaving
them inside a car for extended periods may damage and
make playback impossible.
¡The unit may not successfully playback a CD-R/RW that
was made by the combination of writing software, a CD
recorder (CD-R/RW drives) and a disc if they are incompatible with one another.
¡This player does not play CD-R/RW discs if the session
is not closed.
¡Be sure to observe the handling instructions of CD-
R/RW discs.
¡This player does not play CD-R/RW discs which contain
other than CD-DA or MP3/WMA data.
Page 47

Specifications
General
Power Supply: 12 V DC (11 V-16 V) test Voltage 14.4 V, Negative ground
Current consumption: Less than 2.5 A (CD mode, 0.5 W 4-speaker)
Maximum Power Output: 45 W x 4 channels at 400 Hz, Volume Control maximum
Tone adjustment range:
Bass: ± 12 dB at 100 Hz
Treble: ± 12 dB at 10 kHz
Power Output: 18 W per channel into 4 ohms, 40 to 30 000 Hz at 3 % THD
Suitable Speaker Impedance: 4-8 Ω
Dimensions (W x H x D): 178 x 100 x 155 mm {7
Weight: 1.6 k
USB connector
USB standard compatibility 1.1/2.0 full speed
File system FAT12/16/32
Maximum supply current 500 mA
Playable audio format MP3/WMA
Recommended capacity Less than 4 GB (1 partition)
Front AUX input
Input impedance 10 kΩ
Allowable external input 2.0 V
Connector 3.5 mmø Stereo mini pin
g {3.5 lbs. 56.4 oz.}
FM Stereo Radio
Frequency Range: 87.9-107.9 MHz
Useable Sensitivity: 12 dBf. (1.1 µV/ 75 Ω, S/N 30 dB)
50 dB Quieting Sensitivity: 17 dBf. (1.8 µV/ 75 Ω)
Frequency Response: 30-15 000 Hz ±3 dB
Alternate Channel Selectivity: 75 dB
Stereo Separation: 35 dB at 1 kHz
Signal/Noise Ratio: 70 dB (Mono)
” x 3 15/
” x 6 1/8”}
16
AM Radio
Frequency range: 530 kHz–1 710 kHz
Usable sensitivity: 28 dB/µV (S/N 20 dB)
Weather Band Radio
Frequency range: 162.400 –162.550 MHz
Usable sensitivity: 3 dB/µV (S/N 20 dB)
Signal/Noise Ratio (40 dB/µV): 50 dB
CD Player
Sampling Frequency: 8 times oversampling
DA Converter: 1 bit/4 DAC System
Error Correction System: Spot size detection method
Pick-Up Type: 3-beam
Light Source: Semiconductor laser
Wavalength: 790 nm
Frequency Response: 20 - 20,000 Hz (±1 dB)
Signal to Noise Ratio: 85 dB
Wow and Flutter: Below measurable limits
Channel Separation: 75 dB
Above specifications comply with EIA standards.
Note: Specifications and the design are subject to modification
without notice due to improvements in technology.
Power Output:
18 W RMS x 4 Channels at 4 Ω and ≤ 1%
THD+N
Signal to Noise Ratio:
85 dBA (reference: 1 W into 4 Ω)
CQ-5800U
47
Page 48

Panasonic Consumer
Electronics Company,
Division of Panasonic
Corporation of North America
One Panasonic Way, Secaucus,
New Jersey 07094
http://www.panasonic.com
©2008 Matsushita Electric Industrial Co., Ltd. YFM264C109CA PTW0308-2058 Printed in China
 Loading...