

Panasonic AJ-YAX800 User Manual [ru]
Operating Instructions
Video Encoder Card
Model No. AJ- G
Before operating this product, please read the instructions carefully and save this
manual for future use.
Bitte lesen Sie diese Bedienungsanleitung vor der Inbetriebnahme dieses Produkts
aufmerksam durch, und bewahren Sie sie für späteres Nachschlagen auf.
Avant d’utiliser l’appareil, lire attentivement ce mode d’emploi, et le conserver à des
fins de référence ultérieure.
Prima di far funzionare questo prodotto, leggere attentamente le istruzioni e
conservare questo manuale per riferimenti futuri.
Antes de utilizar este producto, lea cuidadosamente las instrucciones y guarde este
manual por si tiene que utilizarlo en el futuro.
お買い上げいただき、まことにありがとうございました。
この取扱説明書をよくお読みのうえ、正しくお使いください。
特に「安全上のご注意」は、ご使用前に必ずお読みいただき、安全にお使いください。
お読みになったあとは、保証書と一緒に大切に保管し、必要なときにお読みください。
ENGLISHDEUTSCHFRANÇAISITALIANOESPAÑOL
中
文
日
本
語
F0405W1045 -F @
Printed in Japan
GPL/LGPL
VQT0R61-1

FCC NOTICE (USA)
This device complies with Part 15 of FCC Rules.
Operation is subject to the following two conditions:
(1) This device may not cause harmful interference, and (2) this device must
accept any interference received, including interference that may cause
undesired operation.
To assure continued compliance, follow the attached installation instructions and
do not make any unauthorized modifications.
CAUTION:
This equipment has been tested and found to comply with the limits for a Class B
digital device, pursuant to Part 15 of the FCC Rules. These limits are designed to
provide reasonable protection against harmful interference in a residential
installation. This equipment generates, uses and can radiate radio frequency
energy and, if not installed and used in accordance with the instructions, may
cause harmful interference to radio communications. However, there is no
guarantee that interference will not occur in a particular installation. If this
equipment does cause harmful interference to radio or television reception, which
can be determined by turning the equipment off and on, the user is encouraged
to try to correct the interference by one of the following measures:
• Reorient or relocate the receiving antenna.
• Increase the separation between the equipment and receiver.
• Connect the equipment into an outlet on a circuit different from that to which the
receiver is connected.
• Consult the dealer or an experienced radio/TV technician for help.
The user may find the booklet “Something About Interference” available from
FCC local regional offices helpful.
FCC Warning:
Any unauthorized changes or modifications to this equipment could void the
user’s authority to operate this device.
NOTIFICATION (Canada)
This class B digital apparatus complies with Canadian ICES-003.
Cet appareil numéique de la classe B est conforme à la norme NMB-003 du
Canada.
• To avoid fire, electric shock, damage or malfunction to your equipment, do not
disassemble or remodel.
• Immediately stop using the card if you notice smoke, strange smells or sounds,
or if liquid gets into the card.
1 (E)

• Use of DCF Technologies under license from Multi-Format, Inc.
• This product is licensed under the MPEG-4 Visual patent portfolio license for the personal
and non-commercial use of a consumer for (i) encoding video in compliance with the
MPEG-4 Visual Standard (“MPEG-4 Video”) and/or (ii) decoding MPEG-4 Video that was
encoded by a consumer engaged in a personal and non-commercial activity and/or was
obtained from a video provider licensed by MPEG LA to provide MPEG-4 Video. No
license is granted or shall be implied for any other use. Additional information including
that relating to promotional, internal and commercial uses and licensing may be obtained
from MPEG LA, LLC.
See http://www.mpegla.com/
Software information for this product
Customer advisory: This product includes software licensed under the GNU
General Public License (GPL) and GNU Lesser General Public License (LGPL);
customers have the right to download, modify, and redistribute source code for this
software.
Details on GPL and LGPL can be found in the GPL and LGPL sections of this
manual. The description is the original (written in English).
To download the relevant source code, visit http://panasonic.biz/sav/.
Please note that we cannot answer any questions you may have about the content,
etc. of any source code you may obtain from the above Web site.
Table of contents
Handling and storage precautions . . . 2
Features . . . . . . . . . . . . . . . . . . . . . . . 3
Product composition . . . . . . . . . . . . . 3
How to remove the card from its
case . . . . . . . . . . . . . . . . . . . . . . . . . . 3
Installing a P2 PROXY card . . . . . . . . 4
Checking operations . . . . . . . . . . . . . 5
PROXY menu . . . . . . . . . . . . . . . . . . 7
Recording on SD memory cards . . . 10
Checking proxy data . . . . . . . . . . . . 11
Errors in proxy recording . . . . . . . . . 12
Specifications . . . . . . . . . . . . . . . . . . 14
Handling and storage precautions
O To avoid fire, electric shock, damage to or malfunction of your equipment, do not
subject to impact, bend, drop, or expose to moisture.
O After removing the card from equipment, immediately attach the cap to it to
protect its terminals from dust and grime.
When storing the card or carrying it around, keep it in its protective case.
O Do not leave the card where it may be exposed to corrosive gases.
O Do not remove this card from a Memory Card Camera-Recorder during proxy
data recording. Do not turn off the power of the Memory Card Camera-Recorder
or remove batteries during proxy data recording.
Such actions will delete the proxy data that are being recorded.
O For assistance with installation of this card in Memory Card Camera-Recorders
that support proxy recording, contact your distributor or designated service
provider.
2 (E)
ENGLISH
(a)
1
2
(b)
(c)
3
Features
The AJ-YAX800G (“P2 PROXY card”) is a PC card type video encoder card (same
shape as a P2 card).
It can create a compressed data file from material recorded with a Memory Card
Camera-Recorder (“P2 cam”), and store that file separately from the original
material.
Files created with this function include an audiovisual file that is compressed using
the MPEG4 format, and a real-time metadata file (time code, user’s bit and UMID
information). These can be stored on P2 cards or SD memory cards.
Material recorded with a P2 cam can be stored as data files, which are of smaller
capacity than the original material.
Product composition
O P2 PROXY card . . . . . . . . . . . . . .k1
O Cap . . . . . . . . . . . . . . . . . . . . . . .k1
O Case . . . . . . . . . . . . . . . . . . . . . . .k1
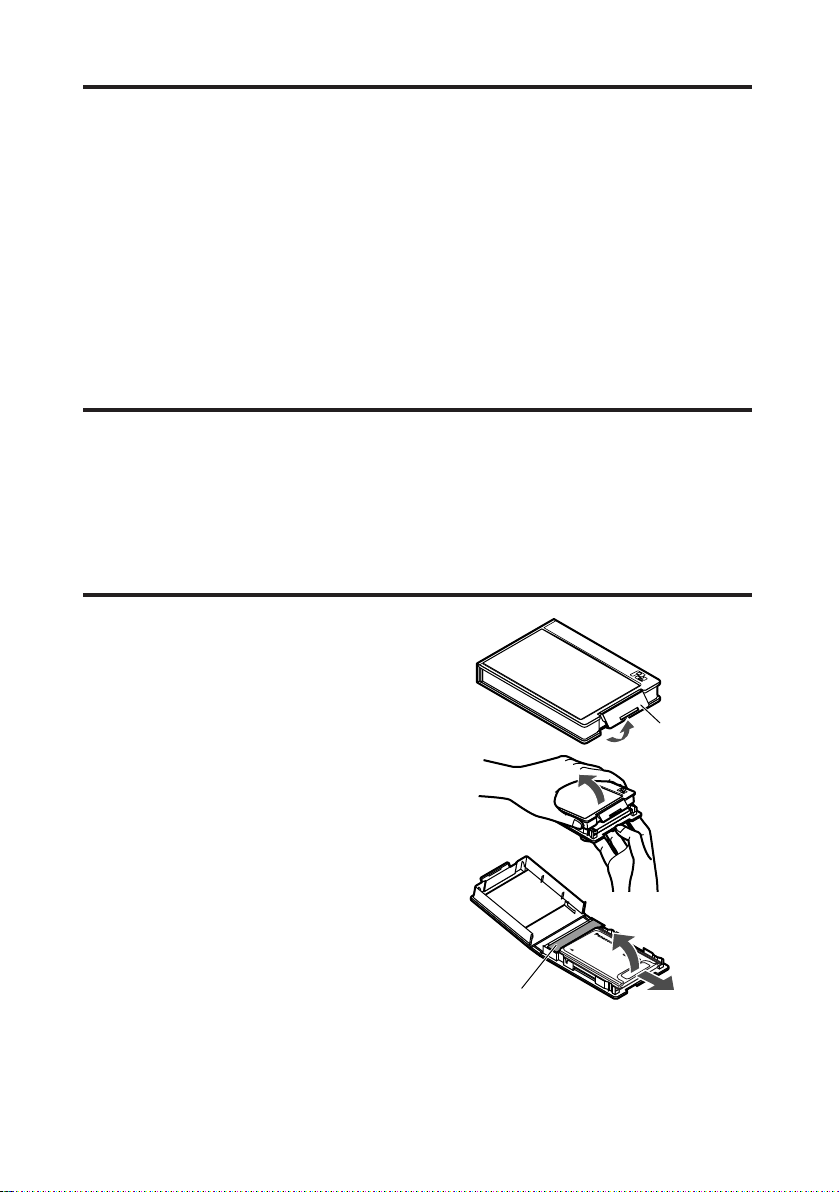
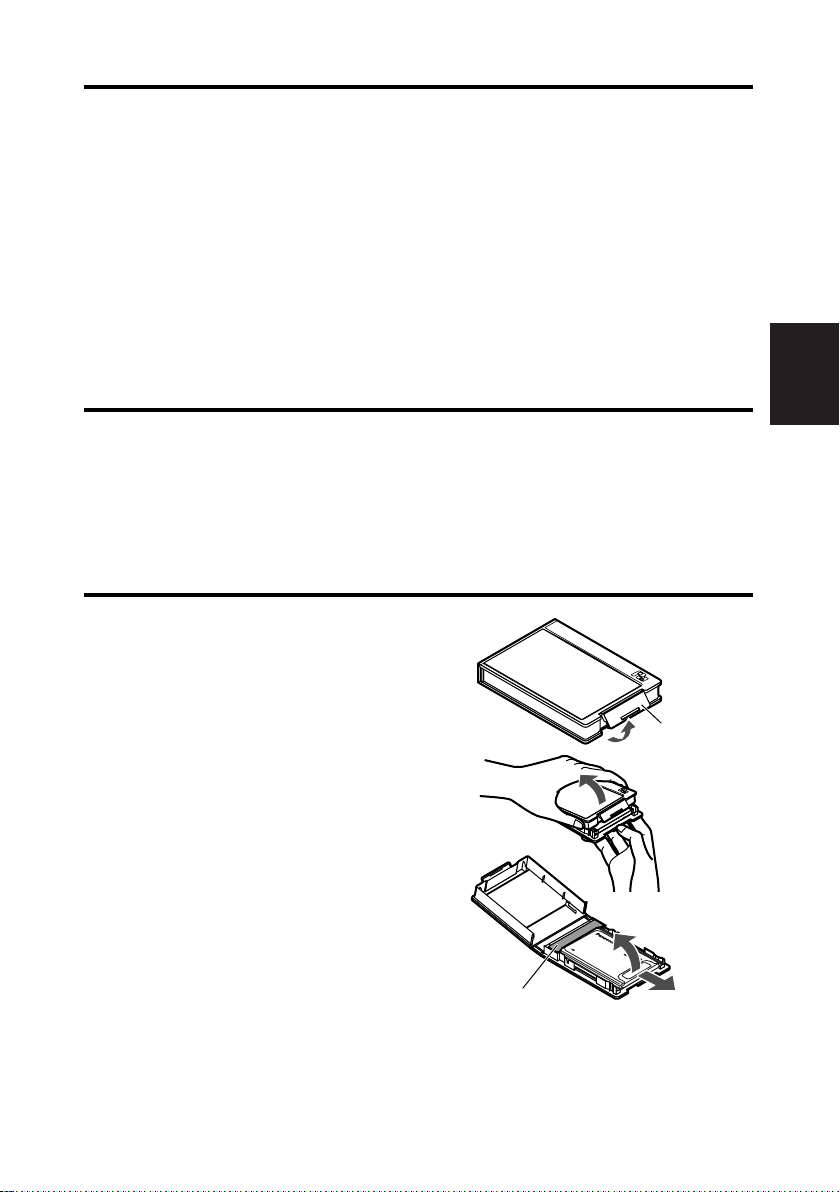
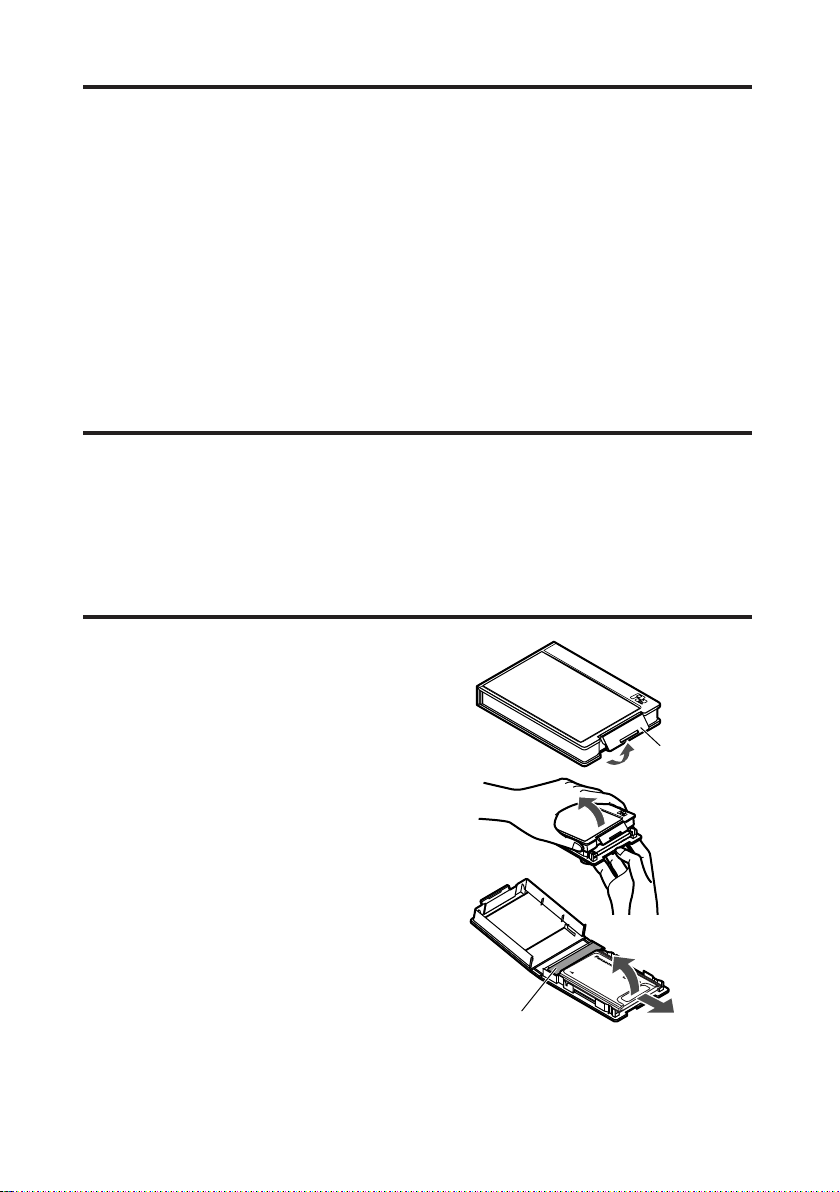
How to remove the card from its case
1 Release the lock in area (a).
2 Open the case.
O While removing the card, hold the
case in the direction shown in the
figure so that the card will not fall
onto the floor or ground.
O To avoid damaging the case, do
not attempt to open it by holding
area (a).
3 Remove the card.
O To remove only the card, slide it in
direction (b).
O To remove the card with the cap,
lift it in direction (c) while at the
same time pushing it in the cap
direction.
cap
3 (E)
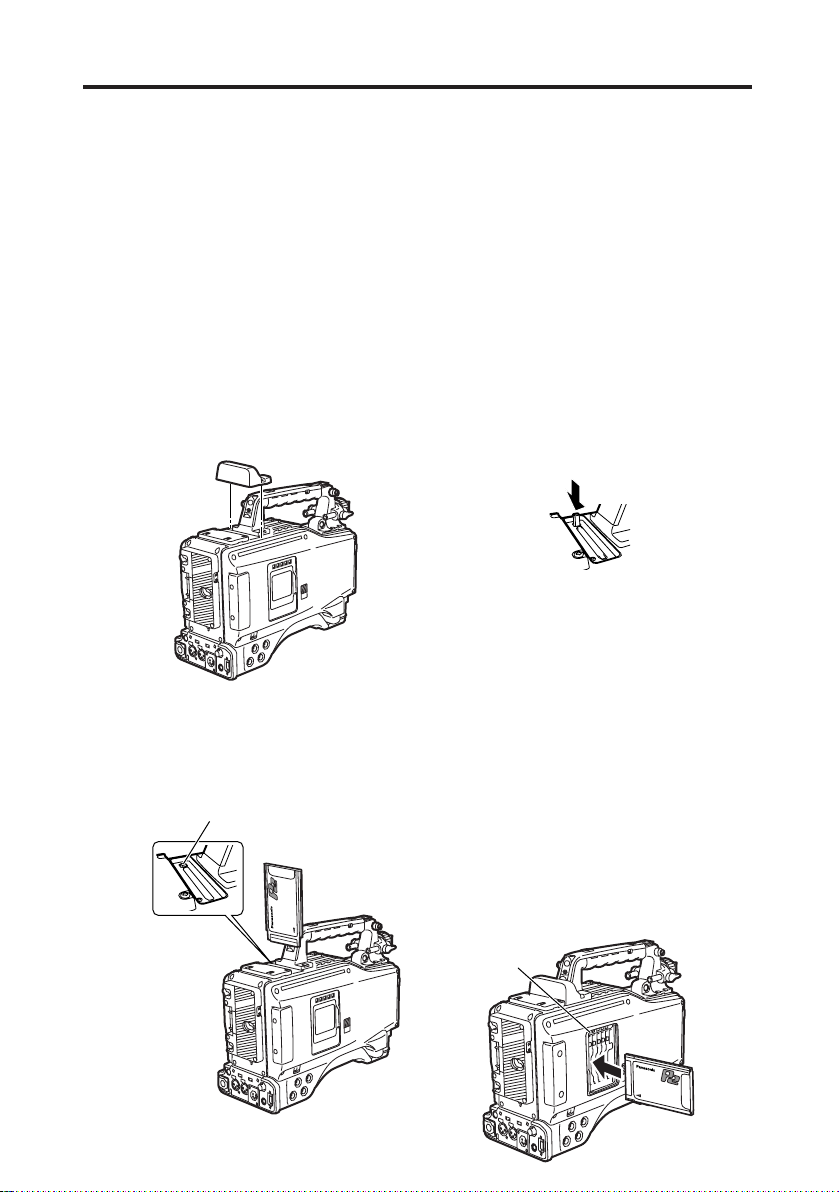
Installing a P2 PROXY card
5
Insert a P2 PROXY card into the OPTION slot of the P2 cam.
Note that the card should be inserted in P2 card slot No. 5 if another card is
already inserted in the OPTION slot.
Inserting a card into the OPTION slot
1
Turn off the P2 cam.
A P2 PROXY card will not be
recognized if it is inserted in the
camera while the power is on.
2
Remove the two screws, and lift off
the cover of the OPTION slot.
3
Confirm that the eject button is
depressed, and then insert a P2
PROXY card into the slot.
EJECT button
4
Replace the cover of the OPTION
slot, and refasten with the two
screws.
Removing the P2 PROXY card from
the OPTION slot
1Press the eject button, and confirm
that the button has popped-up.
2Press the eject button again.
This operation releases the P2
PROXY card. Remove it from the
slot.
Inserting a P2 PROXY card into the
P2 card slot
Please be sure to insert the P2 PROXY
card in the No. 5 slot. Proxy data
recording will not be performed if the P2
PROXY card is inserted in a different
slot.
For more information about inserting
cards, see the P2 cam’s instruction
manual.
ENGLISH
4 (E)

Checking operations
h
MEDIA
E
F
minM
s
frm
13 24
0
VTCG
W
BATT
EF
10
OO
40
-dB
30
20
DF
OP-SLOT
Turn on the P2 cam to confirm that the
P2 PROXY card is operating.
O When a P2 PROXY card is inserted
in the OPTION slot and it is
recognized property, the display
window of the P2 cam displays
“OP-SLOT”.
O When a P2 PROXY card is inserted
in P2 card slot No. 5 and it is
recognized property, the access LED
flashes in orange.
Access LED
For first-time use of a P2 PROXY
card with a P2 cam, the card needs
to be initialized from the PROXY
menu.
Initializing a P2 PROXY card
1Insert a P2 PROXY card into the P2
cam, and turn on the power.
2Press the THUMBNAIL button to
display the thumbnail screen.
3Press the MENU BAR button to move
the pointer to the menu bar.
4Select OPERATION 5 DEVICE
SETUP 5 PROXY 5 INITIALIZE 5
YES using the cursor buttons and the
SET button.
This completes initialization.
5 (E)
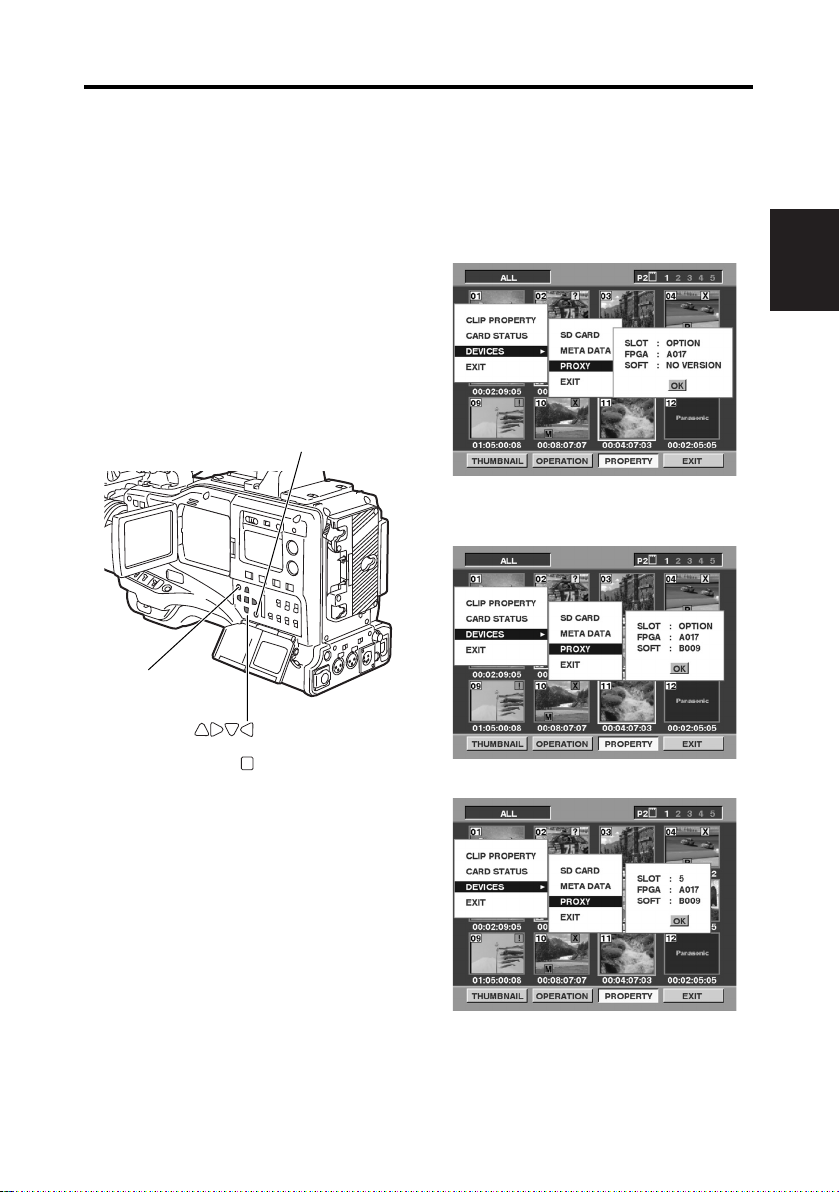
Checking operations (continued)
Checking on the thumbnail screen
1Press the THUMBNAIL button to
display the thumbnail screen.
2Press the MENU BAR button to move
the pointer to the menu bar.
3Press the cursor button to move the
pointer to “PROPERTY”, and press
the SET button.
4Press the cursor button to move the
pointer to “DEVICES”, and press the
SET button.
5Press the cursor button to move the
pointer to “PROXY”, and press the
SET button.
MENU BAR button
THUMBNAIL
button
Cursor buttons
“SOFT: NO VERSION” message is
displayed. This does not indicate an
error, but results from the fact that with
proxy data recording the version is
reflected.
When the power is ON
ENGLISH
After recording of proxy data
(OPTION slot)
SET button
(P2 card slot No. 5)
6 (E)

PROXY menu
Setting the menu
1Insert a P2 PROXY card into the P2
cam, and turn on the power.
2Press the THUMBNAIL button to
display the thumbnail screen.
3Press the MENU BAR button to move
the pointer to the menu bar.
4Select OPERATION 5 DEVICE
SETUP 5 PROXY using the cursor
buttons and the SET button.
5Select menu items and specify
values using the cursor buttons and
the SET button.
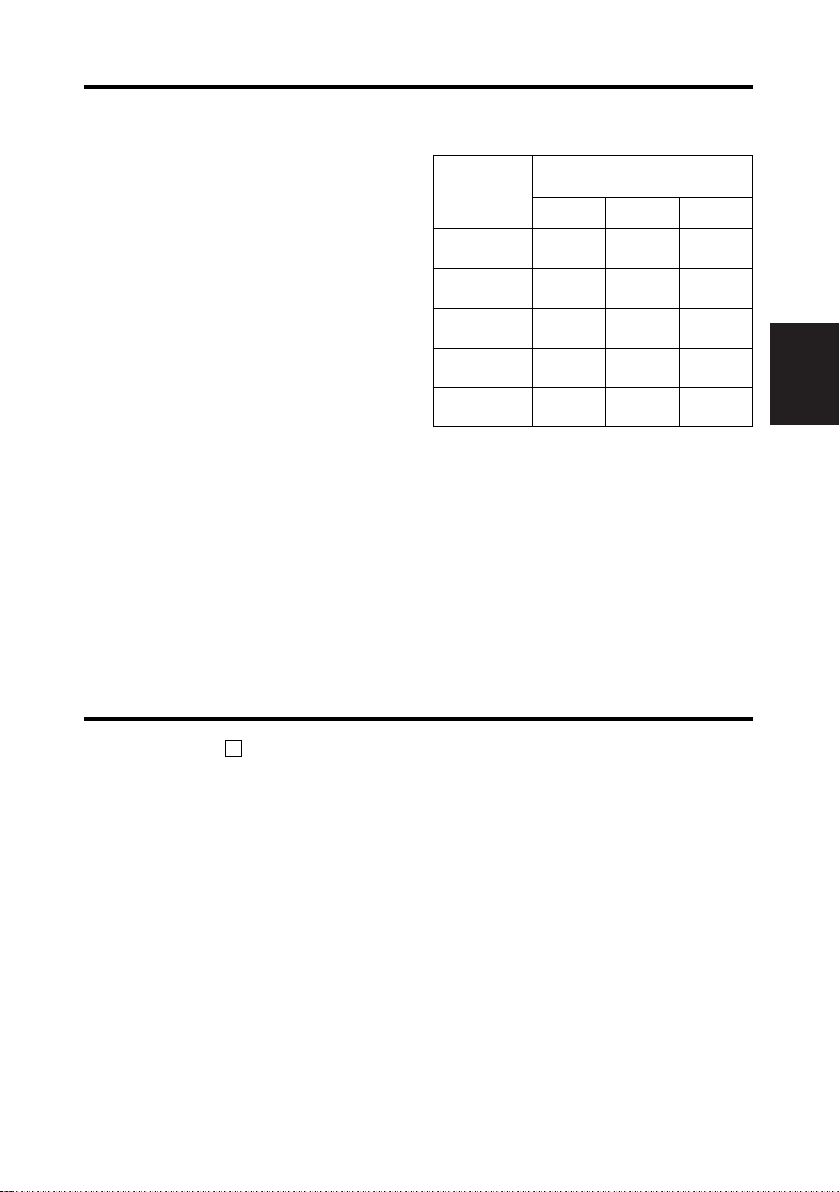
PROXY Menu
Items Adjustable Range
REC MEDIA OFF
Select media for proxy data recording.
OFF:
No proxy data are recorded.
P2:
Proxy data are recorded on the P2 card.
P2&SD:
Proxy data are recorded on both the P2 card
and the SD memory card.
O Voice memo is recorded on both the P2
card and the SD memory card, if you record
a voice memo during proxy data recording.
O If you record a voice memo after proxy data
recording finishes, voice memo is recorded
on the P2 card only.
TC SUPER OFF
Specify an option for superimposing the time
code display on the video recorded as proxy data.
OFF:
Time code display is not superimposed on the
recorded video.
UPPER:
Time code display is superimposed on the
upper area of the recorded video.
LOWER:
Time code display is superimposed on the
lower area of the recorded video.
REC RATE 192kbps
Specify the recording rate for proxy data
recording.
INITIALIZE
P2
P2&SD
UPPER
LOWER
768kbps
1500 kbps
———
7 (E)
Initializes the PROXY menu and the setting data
in the P2 cam.
O Be sure to perform this initialization the first
time you insert a P2 PROXY card in a P2 cam
that supports proxy recording.
The in the Adjustable Range column
indicates the initial value.

PROXY menu (continued)
$ Proxy data are not recorded during
operation in the following modes:
O IEEE1394 digital recording
O INTERVAL REC
O LOOP REC
$ To display information captured by
proxy data recording on the
viewfinder of the P2 cam, select “ON”
as the “PROXY REC” menu item
from the <VF INDICATOR2> screen
of the menu VF page of the P2 cam.
Either “PROXY REC P2” or “PROXY
REC P2&SD” will be displayed at the
beginning of the recording.
$ If the proxy data are recorded on the
P2 card during shooting of material,
the recording time may be shorter
than the time indicated in the P2
card’s instruction manual.
$ During PROXY menu setting, the P2
cam cannot perform any of the
recording operations.
Recording rate and recording signals
(Video and audio)
Recording
rate
192 kbps
768 kbps
1500 kbps
Recording rate indicates the recording rate for
video signals.
Video (QVGA) Audio
NTSC (525i)
15 frames/sec
PAL (625i)
12.5 frames/sec
NTSC (525i)
30 frames/sec
PAL (625i)
25 frames/sec
NTSC (525i)
30 frames/sec
PAL (625i)
25 frames/sec
Monaural
(Mixture of
CH1 and CH2),
32 kbps/ch
Stereo
(CH1•CH2),
64 kbps/ch
Stereo
(CH1•CH2),
64 kbps/ch
ENGLISH
8 (E)
PROXY menu (continued)
0
0
0 0
1
1
1 1
2
1
1 2
3
2
2 3
4
3
3 3
24P (2:3)
0
0
0 0
1
1
1 1
2
1
1 2
3
2
2 2
4
3
3 3
24PA (2:3:3:2)
0
0
0 011 1
2
1
1 232 3
4
3
3 304 4
1
5
5 525 6
3
6
6 747 7
24P (2:3)
0
0
0 011 1
2
1
1 232 2
4
3
3 304 4
1
5
5 525 6
3
6
6 647 7
24PA (2:3:3:2)
Proxy recording in 24P/24PA mode [Applicable only to NTSC (525i)]
When the operating mode of the P2 cam is set to 24P (2:3) or 24PA (2:3:3:2) for
proxy recording, the 5-frame sequence will be as follows, depending on the
recording rate:
Recording rate: 768 kbps, 1500 kbps
Sequence No.
Images of original material
Images of proxy recording
Sequence No.
Images of original material
Images of proxy recording
Recording rate: 192 kbps
If the recording rate is 192 kbps, the 5-frame sequence will not be performed
correctly.
O Underline indicates images of the
second field.
Images of original material
Images of proxy recording
Images of original material
Images of proxy recording
9 (E)
Sequence No.
Sequence No.
Recording on SD memory cards
For proxy data recording, 256 MB, 512
MB or 1 GB SD memory cards with
“High Speed” indication should be used.
For more information, please visit:
http://panasonic.biz/sav/p2
For proxy data recording, format the SD
memory card, using a P2 cam.
O SD memory cards formatted under
the SD standard on a PC can also be
used.
O For more information about handling
of SD memory cards, see the P2
cam’s instruction manual.
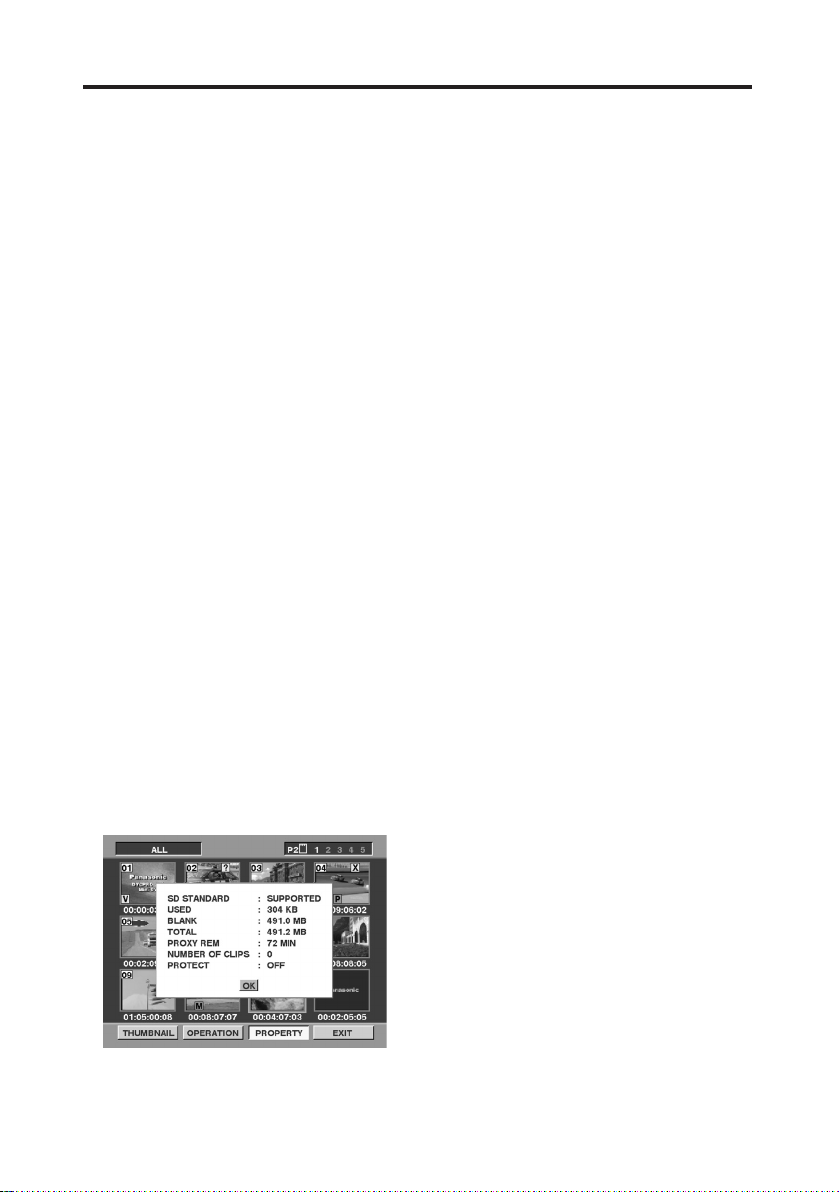
Checking an SD Memory Card
1Insert an SD memory card into the
P2 cam.
2Press the THUMBNAIL button to
display the thumbnail screen.
3Press the MENU BAR button to move
the pointer to the menu bar.
4Select PROPERTY 5 DEVICES 5
SD CARD, using the cursor buttons
and the SET button.
O Format status is displayed under “SD
STANDARD” item.
If “NOT SUPPORTED” is displayed,
format the card using the P2 cam.
O Check the remaining free space for
proxy data recording under the
current recording rate setting, by
selecting the “PROXY REM” item.
O Check the number of clips recorded
on the SD memory card by selecting
the “NUMBER OF CLIPS” item.
If the recorded number of clips
exceeds 1,000, proxy data recording
will not be performed, even if the SD
memory card still has free space.
O If the material is recorded across
multiple P2 cards, the number of clips
displayed on the thumbnail screen
will differ from the number of clips of
proxy data recorded on the SD
memory card.
O Shot mark cannot be added to the
clips on the SD memory card by
pressing the SHOT MARK button on
the P2 cam.
O Proxy data recorded on the SD
memory card will not be deleted by
deletion of the clips recorded on the
P2 card from the thumbnail screen of
the P2 cam.
ENGLISH
10 (E)
Recording on SD memory cards (continued)
Formatting an SD memory card
1Insert an SD memory card into the
P2 cam.
2Press the THUMBNAIL button to
display the thumbnail screen.
3Press the MENU BAR button to move
the pointer to the menu bar.
4Select OPERATION 5 FORMAT 5
SD CARD 5 YES, using the cursor
buttons and the SET button.
This completes formatting of the SD
memory card.
Approximate recording time for proxy
data recording
Part No. and
capacity of
SD memory
cards
RP-SDH256N1A
(256 MB)
RP-SDH512N1A
(512 MB)
RP-SDH512J1A
(512 MB)
RP-SDH0G1J1A
(1 GB)
RP-SDK0G1J1A
(1 GB)
Actual recording time depends on the recording
conditions (number of scenes, voice memos, and
clips.)
Recording rate and
recording time
192 kbps 768 kbps 1500 kbps
Approximately
137 minutes
Approximately
278 minutes
Approximately
237 minutes
Approximately
536 minutes
Approximately
536 minutes
Approximately
35 minutes
Approximately
71 minutes
Approximately
69 minutes
Approximately
139 minutes
Approximately
139 minutes
Approximately
19 minutes
Approximately
39 minutes
Approximately
38 minutes
Approximately
77 minutes
Approximately
77 minutes
<Note>
If the “REC MEDIA” menu item on the PROXY menu is set to “P2&SD”, but proxy
data recording is not performed on the SD memory card, “SD CARD WRITE ERR”
message is displayed at the beginning of the recording. If this happens, check the
SD memory card. For more information, see “Errors in proxy recording” (page 12).
Checking proxy data
$ indicator is displayed for clips of
P
material that incorporates proxy data.
$ Proxy data are recorded on a P2 card
and/or to an SD memory card as an
audiovisual file and a real-time
metadata file.
Audiovisual file:
xxxxxxxx.MP4
The data conform to the
ISO/IEC14496 standard.
Real-time metadata file:
xxxxxxxx.BIN
Time code, user’s bit and UMID
information are recorded for each
frame.
11 (E)
Check the proxy data using the P2
viewer.
For further information on the P2
viewer, please visit:
http://panasonic.biz/sav/p2

Errors in proxy recording
If an error occurs during proxy data recording, refer to the following for the
appropriate action:
Error display Operation and causes Action
Viewfinder:
TURN POWER OFF
Display window:
E-30
Viewfinder:
REC WARNING
Display window:
00:00:00:11
Viewfinder:
EOM (SD)
Viewfinder:
SD CARD WRITE
ERR
Viewfinder:
PROXY CARD
ERROR
Proxy data recording stops.
O Either the P2 card or the P2 PROXY card
is removed during recording.
Proxy data recording stops.
O An error occurs during recording on the
P2 card.
Proxy data recording on the SD memory
card stops, but recording on the P2 card
continues.
O No -spare capacity-on the SD memory
card.
Proxy data recording on the SD memory
card stops, but recording on the P2 card
continues.
This message is displayed when the “REC
MEDIA” menu item in the PROXY menu is
set to “P2&SD”, but proxy data recording
cannot be performed on the SD memory
card.
$ Message is displayed at the start of
recording
O No SD memory card inserted.
O SD memory card formatted in an
unsupported format.
O SD memory card is write-protected.
O SD memory card contains more than
1,000 recorded clips.
$ Message is displayed during recording
O SD memory card removed during
recording.
O Error occurs during recording on the
SD memory card.
Proxy data recording stops, but
recording on the P2 card continues.
O Error occurs on the P2 PROXY card.
O Error in the input signals to the P2
PROXY card.
Turn off the P2 cam and then turn
it on again, to perform recording
and playback operations for
checking purposes.
Restore the clips on the removed
P2 card (see page 13).
O Proxy data recorded on the P2
card are deleted.
O Proxy data recorded on the SD
memory card cannot be
restored.
Insert a new SD memory card
after recording finishes.
O Proxy data being recorded on
the SD memory card are
deleted.
To restore deleted proxy data,
select clips on the P2 card and
copy them to the SD memory card
(see page 13).
Check the status of the SD
memory card, and insert another
recordable card (see page 10).
Proxy data cannot be recorded
correctly.
Turn off the P2 cam and then turn
it on again to perform recording
and playback operations for
checking purposes.
ENGLISH
12 (E)
Errors in proxy recording (continued)
Restoring clips
1Press the THUMBNAIL button to
display the thumbnail screen.
2Position the pointer over the clips to be
restored using the cursor buttons, and
press the SET button.
3Press the MENU BAR button to move
the pointer to the menu bar.
4Select OPERATION 5 REPAIR CLIP
5 YES, using the cursor buttons and
the SET button.
<Note>
When clips are restored;
O Proxy data recorded on the P2 card are deleted.
O Proxy data recorded on the SD memory card cannot be restored.
Copying clips to an SD memory card
1Press the THUMBNAIL button to
display the thumbnail screen.
2Position the pointer over the clips to be
copied using the cursor buttons, and
press the SET button.
3Press the MENU BAR button to move
the pointer to the menu bar.
4Select OPERATION 5 COPY 5 SD
CARD 5 YES, using the cursor buttons
and the SET button.
13 (E)

Specifications
Input voltage:
DC 3.3 V ±0.3 V
Power consumption:
Maximum 1.5 W
Operating temperature:
0 °C to +40 °C (32 °F to +104 °F)
Operating humidity:
10 % to 85 % (no condensation)
Storage temperature:
–20 °C to +60 °C (–4 °F to +140 °F)
Storage humidity:
10 % to 85 % (no condensation)
Mass:
approx. 43 g (1.5 oz)
Dimensions (WkHkD):
approx. 54 mm k 5 mm k 85.6 mm (2
Interface:
PC card standard
File format:
MP4 (ISO/IEC14496 standard)
Video compression format:
MPEG4 simple profile (4:2:0)
Audio compression format:
AAC (Advanced Audio Coding)
Setting mode:
192 kbps
Video : QVGA, 15 frames/sec (525i), 12.5 frames/sec (625i)
Audio : Monaural (mixture of CH1 and CH2), 32 kbps/ch
768 kbps
Video : QVGA, 30 frames/sec (525i), 25 frames/sec (625i)
Audio : Stereo (CH1•CH2), 64 kbps/ch
1500 kbps
Video : QVGA, 30 frames/sec (525i), 25 frames/sec (625i)
Audio : Stereo (CH1•CH2), 64 kbps/ch
3
/16 inches k1/4 inch k 3 3/8 inches)
ENGLISH
Specifications are subject to change without notice.
Mass and dimensions shown are approximate.
14 (E)

• Öffnen und zerlegen Sie Ihre Ausrüstung nicht, um Feuer, Stromschläge,
Beschädigungen und Funktionsstörungen zu vermeiden.
• Brechen Sie die Benutzung der Karte sofort ab, falls Sie Rauch, seltsame Gerüche
oder Geräusche feststellen oder falls Flüssigkeiten in die Karte eindringen.
Softwareinformationen für dieses Produkt
Kundeninformation: Dieses Produkt enthält Software, die gemäß GPL (GNU Public
License) und LPGL (GNU Lesser General Public License) lizenziert wurde; Kunden
haben das Recht, den Quellcode für diese Software herunterzuladen, zu ändern und
wiederzuverkaufen.
Detaillierte Angaben zu GPL und LGPL finden Sie in den Abschnitten GPL und LGPL
des vorliegenden Handbuches. Die Beschreibung ist im englischen Original beigelegt.
Den entsprechenden Quellcode können Sie auf folgender Webseite herunterladen:
http://panasonic.biz/sav/.
Bitte nehmen Sie zur Kenntnis, dass wir keine Fragen zum Inhalt etc. irgendeines
Sourcecodes, den Sie von der oben genannten Webseite beziehen, beantworten
können.
Inhaltsverzeichnis
Vorsichtsmaßnahmen zur Handhabung
und Lagerung . . . . . . . . . . . . . . . . . . . 1
Leistungsmerkmale . . . . . . . . . . . . . . 2
Zusammensetzung des Produkts . . . 2
Entfernen der Karte aus ihrem
Gehäuse . . . . . . . . . . . . . . . . . . . . . . 2
Einsetzen einer P2-PROXY-Karte . . . 3
Überprüfungen . . . . . . . . . . . . . . . . . . 4
PROXY-Menü . . . . . . . . . . . . . . . . . . 6
Aufnahme auf SD-Speicherkarten . . . 9
Überprüfung der Proxy-Daten . . . . . 10
Fehler bei der Proxy-Aufnahme . . . . 11
Spezifikationen . . . . . . . . . . . . . . . . . 13
Vorsichtsmaßnahmen zur Handhabung und Lagerung
O Schützen Sie Ihre Ausrüstung vor Stößen, Verbiegungen, Stürzen und Feuchtigkeit,
um Feuer, Stromschläge, Beschädigungen und Funktionsstörungen zu vermeiden.
O Bringen Sie nach der Entfernung der Karte aus der Ausrüstung sofort die Kappe an,
um die Kontakte vor Staub und Schmutz zu schützen.
Bewahren Sie die Karte bei der Lagerung oder dem Transport in ihrem
Schutzgehäuse auf.
O Schützen Sie die Karte vor ätzenden Gasen.
O Entfernen Sie diese Karte nicht während der Proxy-Datenaufnahme aus einem
Speicherkarten-Camcorder. Schalten Sie während der Proxy-Datenaufnahme den
Speicherkarten-Camcorder nicht aus und entfernen Sie nicht die Batterien.
In diesen Fällen werden die aufgezeichneten Proxy-Daten gelöscht.
O Wenden Sie sich für Beratung zur Installation dieser Karte in Speicherkarten-
Camcorder, die die Proxy-Aufnahme unterstützen, an Ihren Händler oder an Ihren
Dienstanbieter.
1 (G)
(a)
1
2
(b)
(c)
3
Leistungsmerkmale
Die AJ-YAX800G (“P2-PROXY-Karte”) ist eine PC-Video-Encoder-Karte (gleiche
Größe wie eine P2-Karte), die ist in der Lage, aus mit einem SpeicherkartenCamcorder (“P2-Cam”) aufgenommenem Material eine komprimierte Datendatei zu
erzeugen und diese Datei separat vom Originalmaterial zu speichern.
Die mit dieser Funktion erzeugten Dateien umfassen eine Audiovideodatei, die mit
dem Format MPEG4 komprimiert ist, sowie eine Echtzeit-Metadatendatei (Zeitcode,
Benutzer-Bit und UMID-Information). Sie können auf P2-Karten oder SDSpeicherkarten gespeichert werden.
Mit einer P2-Cam aufgenommenes Material kann als Datendateien gespeichert
werden, die weniger Speicherplatz als das Originalmaterial benötigen.
Zusammensetzung des Produkts
O P2-PROXY-Karte . . . . . . . . . . . . .k1
O Kappe . . . . . . . . . . . . . . . . . . . . . .k1
O Gehäuse . . . . . . . . . . . . . . . . . . .k1
Entfernen der Karte aus ihrem Gehäuse
1 Lösen Sie die Sperre in Bereich
(a).
2 Öffnen Sie das Gehäuse.
O Halten Sie das Gehäuse beim
Entfernen der Karte in der auf der
Abbildung gezeigten Richtung,
sodass die Karte nicht auf den
Boden fallen kann.
O Versuchen Sie nicht, das Gehäuse
beim Öffnen im Bereich (a) zu
halten, um Beschädigungen zu
vermeiden.
3 Entfernen Sie die Karte.
O Schieben Sie die Karte zum
Entfernen in Richtung (b).
O Zum Entfernen der Karte mit der
Kappe heben Sie sie in Richtung
(c), während Sie sie gleichzeitig in
Richtung der Kappe drücken.
Kappe
DEUTSCH
2 (G)
Einsetzen einer P2-PROXY-Karte
5
Setzen Sie eine P2-PROXY-Karte in den Steckplatz OPTION der P2-Cam ein.
Beachten Sie bitte, dass die karte in den P2-Kartensteckplatz Nr. 5 eingesteckt
werden muss, falls bereits eine Karte in den Steckplatz OPTION eingesteckt ist.
Einsetzen der Karte in den Steckplatz
OPTION
4
1
Schalten Sie die P2-Cam aus.
Eine P2-PROXY-Karte wird nicht
erkannt, falls sie eingesetzt wird,
während die Kamera eingeschaltet
ist.
2
Entfernen Sie die beiden Schrauben
und heben Sie die Abdeckung des
Steckplatzes OPTION an.
Bringen Sie die Abdeckung des
Steckplatzes OPTION wieder und
befestigen Sie sie mit den beiden
Schrauben.
Entfernung der P2-PROXY-Karte aus
dem Steckplatz OPTION
1Drücken Sie die Auswurftaste und
stellen Sie sicher, dass die Taste
hochgekommen ist.
2Drücken Sie die Auswurftaste erneut.
Dadurch wird die P2-PROXY-Karte
freigegeben. Entfernen Sie sie aus
dem Steckplatz.
3
Stellen Sie sicher, dass die
Auswurftaste gedrückt ist, und
setzen Sie die P2-PROXY-Karte in
den Steckplatz ein.
Taste AUSWURF
3 (G)
Einsetzen der P2-PROXY-Karte in
den P2-Kartensteckplatz
Bitte stellen Sie sicher, dass die P2PROXY-Karte in den Steckplatz Nr. 5
eingesetzt wird. Die ProxyDatenaufnahme wird nicht ausgeführt,
wenn die P2-PROXY-Karte in einen
anderen Steckplatz eingesetzt wird.
Für weitere Informationen zum
Einsetzen von Karten siehe die
Bedienungsanleitung der P2-Cam.

Überprüfungen
h
MEDIA
E
F
minM
s
frm
13 24
0
VTCG
W
BATT
EF
10
OO
40
-dB
30
20
DF
OP-SLOT
Schalten Sie die P2-Cam ein und
überprüfen Sie, ob die P2-PROXYKarte in Betrieb ist.
O Wenn eine P2-PROXY-Karten in den
Steckplatz OPTION eingesteckt und
ordnungsgemäß erkannt wird, zeigt
das Displayfenster der P2-Cam “OPSLOT” an.
Bei der ersten Benutzung einer P2PROXY-Karte mit einer P2-Cam
muss die Karte mit dem PROXYMenü initialisiert werden.
Initialisieren einer P2-PROXY-Karte
1Setzen Sie eine P2-PROXY-Karte in
die P2-Cam ein und schalten Sie sie
ein.
2Drücken Sie die Taste THUMBNAIL,
um die Miniaturansicht anzuzeigen.
3Drücken Sie die Taste MENU BAR,
um den Zeiger auf die Menüleiste zu
setzen.
4Wählen Sie OPERATION 5 DEVICE
SETUP 5 PROXY 5 INITIALIZE 5
YES mit den Cusortasten und der
Taste SET.
Dadurch wird die Initialisierung
durchgeführt.
DEUTSCH
O Wenn eine P2-PROXY-Karte in den
P2-Karten-Steckplatz Nr. 5
eingesteckt und ordnungsgemäß
erkannt wird, blinkt die LED orange
auf.
LED Zugriff
4 (G)
Überprüfungen (Fortsetzung)
Überprüfung auf der Miniaturansicht
1Drücken Sie die Taste THUMBNAIL,
um die Miniaturansicht anzuzeigen.
2Drücken Sie die Taste MENU BAR,
um den Zeiger auf die Menüleiste zu
setzen.
3Drücken Sie die Cursortaste, um den
Zeiger auf “PROPERTY” zu
bewegen, und drücken Sie die Taste
SET.
4Drücken Sie die Cursortaste, um den
Zeiger auf “DEVICES” zu bewegen,
und drücken Sie die Taste SET.
5Drücken Sie die Cursortaste, um den
Zeiger auf “PROXY” zu bewegen,
und drücken Sie die Taste SET.
Taste MENU BAR
Die Meldung “SOFT: NO VERSION”
wird angezeigt. Dies ist keine
Fehlermeldung, sondern beruht darauf,
dass bei der Proxy-Datenaufnahme die
Version angezeigt wird.
Wenn das Gerät eingeschaltet ist
Nach dem Aufnehmen von Proxy-Daten
(Steckplatz OPTION)
Taste
THUMBNAIL
5 (G)
Cursortasten
Taste SET
(P2-Kartensteckplatz Nr. 5)

PROXY-Menü
Einstellung des Menüs
1Setzen Sie eine P2-PROXY-Karte in
die P2-Cam ein und schalten Sie sie
ein.
2Drücken Sie die Taste THUMBNAIL,
um die Miniaturansicht anzuzeigen.
3Drücken Sie die Taste MENU BAR,
um den Zeiger auf die Menüleiste zu
setzen.
4Wählen Sie OPERATION 5 DEVICE
SETUP 5 PROXY mit den
Cusortasten und der Taste SET.
5Wählen Sie die Menüpositionen und
geben Sie die Werte mit den
Cursortasten und der Taste SET ein.
PROXY-Menü
Positionen Einstellbereich
REC MEDIA OFF
Wählen Sie das Medium für die ProxyDatenaufnahme.
OFF:
Keine Proxy-Daten aufgenommen.
P2:
Die Proxy-Daten werden auf der P2-Karte
aufgenommen.
P2&SD:
Die Proxy-Daten werden auf der P2-Karte und der
SD-Speicherkarte aufgenommen.
O Das Voice-Memo wird auf der P2-Karte und der
SD-Speicherkarte aufgenommen, wenn Sie
während der Proxy-Datenaufnahme ein VoiceMemo aufnehmen.
O Wenn Sie ein Voice-Memo nach Beendigung
der Proxy-Datenaufnahme aufnehmen, wird
das Voice-Memo nur auf der P2-Karte
aufgenommen.
TC SUPER OFF
Geben Sie die Option für die Einblendung des
Zeitcodes für das als Proxy-Daten aufgenommene
Video an.
OFF:
Der Zeitcode wird nicht in das aufgenommene
Video eingeblendet.
UPPER:
Der Zeitcode wird im oberen Bereich in das
aufgenommene Video eingeblendet.
LOWER:
Der Zeitcode wird im unteren Bereich in das
aufgenommene Video eingeblendet.
REC RATE 192kbps
Wählen Sie die Aufnahmerate für die ProxyDatenaufnahme.
INITIALIZE
P2
P2&SD
UPPER
LOWER
768kbps
1500 kbps
———
DEUTSCH
Initialisiert das PROXY-Menü und die
Datumseinstellung der P2-Cam.
O Stellen Sie sicher, dass diese Initialisierung beim
ersten Einsetzen einer P2-PROXY-Karte in eine
P2-Cam vorgenommen wird, die die ProxyAufnahme unterstützt.
in der Spalte Einstellbereich gibt den
Ausgangswert an.
6 (G)

PROXY-Menü (Fortsetzung)
$ Die Proxy-Daten werden während
der folgenden Betriebsweisen nicht
aufgenommen:
O IEEE1394 digitale Aufnahme
O INTERVAL REC
O LOOP REC
$ Wählen Sie zum Anzeigen der von
der Proxy-Datenaufnahme
aufgezeichneten Informationen im
Viewfinder der P2-Cam “ON” für die
Menüposition “PROXY REC” der
Anzeige <VF INDICATOR2> der
Menüseite VF der P2-Cam.
Bei Beginn der Aufnahme wird
PROXY REC P2” oder “PROXY REC
P2&SD” angezeigt.
$ Wenn die Proxy-Daten während der
Aufnahme des Materials auf der P2Karte aufgenommen werden, kann
die Aufnahmezeit kürzer als in der
Bedienungsanleitung der P2-Karte
angegeben sein.
$ Während der Einstellung des
PROXY-Menüs kann die P2-Cam
keine Aufnahmen vornehmen.
Aufnahmerate und Aufnahmesignale
(Video und Audio)
Aufnahmerate
192 kbps
768 kbps
1500 kbps
Die Aufnahmnerate gibt die Aufnahmerate für
Videosignale an.
Video (QVGA) Audio
NTSC (525i)
15 Frames/Sek.
PAL (625i)
12,5 Frames/Sek.
NTSC (525i)
30 Frames/Sek.
PAL (625i)
25 Frames/Sek.
NTSC (525i)
30 Frames/Sek.
PAL (625i)
25 Frames/Sek.
Mono
(Mischung von
CH1 und CH2),
32 kbps/ch
Stereo
(CH1•CH2),
64 kbps/ch
Stereo
(CH1•CH2),
64 kbps/ch
7 (G)

PROXY-Menü (Fortsetzung)
0
0
0 0
1
1
1 1
2
1
1 2
3
2
2 3
4
3
3 3
24P (2:3)
0
0
0 0
1
1
1 1
2
1
1 2
3
2
2 2
4
3
3 3
24PA (2:3:3:2)
0
0
0 011 1
2
1
1 232 3
4
3
3 304 4
1
5
5 525 6
3
6
6 747 7
24P (2:3)
0
0
0 011 1
2
1
1 232 2
4
3
3 304 4
1
5
5 525 6
3
6
6 647 7
24PA (2:3:3:2)
Proxy-Aufnahme im Modus 24P/24PA [Nur anwendbar auf NTSC (525i)]
Wenn die Betriebsweise der P2-Cam für die Proxy-Aufnahme auf 24P (2:3) oder
24PA (2:3:3:2) eingestellt ist, ergibt sich in Abhängigkeit von der Aufnahmerate die
folgende 5-Frame-Sequenz:
Aufnahmerate: 768 kbps, 1500 kbps
Sequenz Nr.
Bilder des Originalmaterials
Bilder der Proxy-Aufnahme
Sequenz Nr.
Bilder des Originalmaterials
Bilder der Proxy-Aufnahme
Aufnahmerate: 192 kbps
Wenn die Aufnahmerate 192 kbps ist, wird die 5-Frame-Sequenz nicht korrekt
ausgeführt.
O Unterstrichen gibt die Bilder des
zweiten Felds an.
DEUTSCH
Bilder des Originalmaterials
Bilder der Proxy-Aufnahme
Bilder des Originalmaterials
Bilder der Proxy-Aufnahme
Sequenz Nr.
Sequenz Nr.
8 (G)
Aufnahme auf SD-Speicherkarten
Für die Proxy-Datenaufnahme sollten
SD-Speicherkarten zu 256 MB, 512 MB
oder 1 GB mit der Angabe “High Speed”
verwendet werden.
Für weitere Informationen siehe bitte:
http://panasonic.biz/sav/p2
Formatieren Sie die SD-Speicherkarte
für die Proxy-Datenaufnahme mit einer
P2-Cam.
O SD-Speicherkarten, die mit dem SD-
Standard auf einem PC formatiert
werden, können ebenfalls verwendet
werden.
O Für weitere Informationen zum
Umgang mit SD-Speicherkarten
siehe die Bedienungsanleitung der
P2-Cam.
Überprüfung einer SD-Speicherkarte
1Setzen Sie eine SD-Speicherkarte in
die P2-Cam ein.
2Drücken Sie die Taste THUMBNAIL,
um die Miniaturansicht anzuzeigen.
3Drücken Sie die Taste MENU BAR,
um den Zeiger auf die Menüleiste zu
setzen.
4Wählen Sie PROPERTY 5
DEVICES 5 SD CARD mit den
Cusortasten und der Taste SET.
O Der Formatierungsstatus wird unter
der Position “SD STANDARD”
angezeigt.
Formatieren Sie die Karte mit der P2Cam, falls “NOT SUPPORTED”
angezeigt wird.
O Überprüfen Sie den verbleibenden
freien Speicherplatz für die ProxyDatenaufnahme mit der aktuellen
Aufnahmerate durch Wahl der
Position “PROXY REM”.
O Überprüfen Sie die Anzahl der auf
der SD-Speicherkarte
aufgenommenen Clips durch Wahl
der Position “NUMBER OF CLIPS”.
Falls die Anzahl der aufgenommenen
Clips 1.000 überschreitet, wird die
Proxy-Datenaufnahme nicht
ausgeführt, auch wenn die SDSpeicherkarte noch freien
Speicherplatz aufweist.
O Falls das Material auf mehreren P2-
Karten aufgezeichnet wird, ist die in
der Miniaturansicht angezeigt Anzahl
der Clips von der Anzahl der auf der
SD-Speicherkarte aufgezeichneten
Clips von Proxy-Daten verschieden.
O
Es ist nicht möglich, den Clips auf der
SD-Speicherkarte durch Drücken der
Taste SHOT MARK auf der P2-Cam
Aufnahmemarkierungen hinzuzufügen.
O Die auf der SD-Speicherkarte
aufgezeichneten Proxy-Daten
werden beim Löschen der auf der
P2-Karte aufgezeichneten Clips in
der Miniaturansicht der P2-Cam nicht
gelöscht.
9 (G)
Aufnahme auf SD-Speicherkarten (Fortsetzung)
Formatierung einer SD-Speicherkarte
1Setzen Sie eine SD-Speicherkarte in
die P2-Cam ein.
2Drücken Sie die Taste THUMBNAIL,
um die Miniaturansicht anzuzeigen.
3Drücken Sie die Taste MENU BAR,
um den Zeiger auf die Menüleiste zu
setzen.
4Wählen Sie OPERATION 5
FORMAT 5 SD CARD 5 YES mit
den Cusortasten und der Taste SET.
Dadurch wird die SD-Speicherkarte
formatiert.
Annährende Aufnahmezeit für die
Proxy-Datenaufnahme
Teilenr. Und
Kapazität von
SD-
Speicherkarten
RP-SDH256N1A
(256 MB)
RP-SDH512N1A
(512 MB)
RP-SDH512J1A
(512 MB)
RP-SDH0G1J1A
(1 GB)
RP-SDK0G1J1A
(1 GB)
Die tatsächliche Aufnahmezeit ist von den
Aufnahmebedingungen abhängig (Anzahl der
Szenen, Voice-Memos und Clips.)
Aufnahmerate und
Aufnahmezeit
192 kbps 768 kbps 1500 kbps
Annährend
137 Minuten
Annährend
278 Minuten
Annährend
237 Minuten
Annährend
536 Minuten
Annährend
536 Minuten
Annährend
35 Minuten
Annährend
71 Minuten
Annährend
69 Minuten
Annährend
139 Minuten
Annährend
139 Minuten
Annährend
19 Minuten
Annährend
39 Minuten
Annährend
38 Minuten
Annährend
77 Minuten
Annährend
77 Minuten
<Hinweis>
Wenn die Menüposition “REC MEDIUM” des PROXY-Menüs auf “P2&SD”
eingestellt ist, die Proxy-Datenaufnahme jedoch nicht auf die SD-Speicherkarte
vorgenommen wird, wird die Meldung “SD CARD WRITE ERR” bei beginn der
Aufnahme angezeigt. Überprüfen Sie die SD-Speicherkarte, falls dies vorkommt.
Für weitere Informationen siehe “Fehler bei der Proxy-Aufnahme“ (Seite 11).
Überprüfung der Proxy-Daten
DEUTSCH
$ Der Indikator wird für Clips mit
P
Material angezeigt, das Proxy-Daten
aufweist.
$ Die Proxy-Daten werden auf einer
P2-Karte und/oder einer SDSpeicherkarte als Audiovideodatei
und als Echtzeit-Metadaten-Datei
aufgezeichnet.
Audiovideodatei:
xxxxxxxx.MP4
Die Daten entsprechen dem
Standard ISO/IEC14496.
Echtzeit-Metadaten-Datei:
xxxxxxxx.BIN
Für jeden Frame werden Zeitcode,
Benutzer-Bit und UMID-Information
aufgezeichnet.
Überprüfen Sie die Proxy-Daten mit
dem P2-Viewer.
Für weitere Informationen zum P2Viewer siehe bitte:
http://panasonic.biz/sav/p2
10 (G)

Fehler bei der Proxy-Aufnahme
Siehe die folgenden Angaben zur Vorgehensweise, falls Fehler während der ProxyDatenaufnahme auftreten:
Fehleranzeige Betrieb und Ursachen Vorgehensweise
Viewfinder:
TURN POWER OFF
Anzeigefenster:
E-30
Viewfinder:
REC WARNING
Anzeigefenster:
00:00:00:11
Viewfinder:
EOM (SD)
Viewfinder:
SD CARD WRITE
ERR
Viewfinder:
PROXY CARD
ERROR
Proxy-Datenaufnahme hält an.
O Die P2-Karte oder die P2-PROXY-Karte
wurden während der Aufnahme entfernt.
Proxy-Datenaufnahme hält an.
O Während der Aufnahme auf die P2-Karte ist
ein Fehler aufgetreten.
Die Proxy-Datenaufnahme auf der SDSpeicherkarte hält an, aber die Aufnahme
auf die P2-Karte fortgesetzt.
O Keine Speicherkapazität auf der SD-
Speicherkarte.
Die Proxy-Datenaufnahme auf der SDSpeicherkarte hält an, aber die Aufnahme
auf die P2-Karte fortgesetzt.
Diese Meldung wird angezeigt, wenn die
Menüposition “REC MEDIA” des PROXYMenüs auf “P2&SD” eingestellt ist, die ProxyDatenaufnahme jedoch nicht auf die SDSpeicherkarte vorgenommen wird.
$ Die Meldung wird bei Beginn der Aufnahme
angezeigt
O Keine SD-Speicherkarte eingesetzt.
O Die SD-Speicherkarte wurde in einem
nicht unterstützten Format formatiert.
O Die SD-Speicherkarte ist
schreibgeschützt.
O Die SD-Speicherkarte enthält mehr als
1.000 aufgenommene Clips.
$ Die Meldung wird während der Aufnahme
angezeigt
O Die SD-Speicherkarte wurde während der
Aufnahme entfernt.
O Während der Aufnahme auf die SD-
Speicherkarte ist ein Fehler aufgetreten.
Die Proxy-Datenaufnahme hält an, aber die
Aufnahme auf der P2-Karte wird fortgesetzt.
O Auf der P2-PROXY-Karte ist ein Fehler
aufgetreten.
O Fehler in den Eingangssignalen an die P2-
PROXY-Karte.
Schalten Sie die P2-Cam aus und
wieder ein, um die Aufnahme und
Wiedergabe zu Kontrollzwecken
vorzunehmen.
Stellen Sie die Clips auf der
entfernten P2-Karte wieder her
(siehe Seite 12).
O Die auf der P2-Karte
aufgenommenen Proxy-Daten
werden gelöscht.
O Die auf der SD-Speicherkarte
aufgenommenen Proxy-Daten
können nicht wieder hergestellt
werden.
Setzen Sie nach dem Ende der
Aufnahme eine neue SDSpeicherkarte ein.
O Die auf der SD-Speicherkarte
aufgenommenen Proxy-Daten
werden gelöscht.
Wählen Sie zum wieder Herstellen
gelöschter Proxy-Daten Clips auf der
P2-Karte und kopieren Sie sie auf die
SD-Speicherkarte (siehe Seite 12).
Überprüfen Sie den Status der SDSpeicherkarte und setzen Sie eine
andere aufnehmbare Karte ein (siehe
Seite 9).
Die Proxy-Daten können nicht
ordnungsgemäß aufgenommen
werden.
Schalten Sie die P2-Cam aus und
wieder ein, um die Aufnahme und
Wiedergabe zu Kontrollzwecken
vorzunehmen.
11 (G)

Fehler bei der Proxy-Aufnahme (Fortsetzung)
Wiederherstellung von Clips
1Drücken Sie die Taste THUMBNAIL,
um die Miniaturansicht anzuzeigen.
2Positionieren Sie den Zeiger mit den
Cursortasten auf den wieder
herzustellenden Clips und drücken Sie
die Taste SET.
3Drücken Sie die Taste MENU BAR, um
den Zeiger auf die Menüleiste zu
setzen.
4Wählen Sie OPERATION 5 REPAIR
CLIP 5 YES mit den Cusortasten und
der Taste SET.
<Hinweis>
Wenn Clips wiederhergestellt werden;
O Die auf der P2-Karte aufgenommenen Proxy-Daten werden gelöscht.
O Die auf der SD-Speicherkarte aufgenommenen Proxy-Daten können nicht
wieder hergestellt werden.
Kopieren von Clips auf eine SDSpeicherkarte
1Drücken Sie die Taste THUMBNAIL,
um die Miniaturansicht anzuzeigen.
2Positionieren Sie den Zeiger mit den
Cursortasten auf den kopierenden Clips
und drücken Sie die Taste SET.
3Drücken Sie die Taste MENU BAR, um
den Zeiger auf die Menüleiste zu
setzen.
4Wählen Sie OPERATION 5 COPY 5
SD CARD 5 YES mit den Cusortasten
und der Taste SET.
DEUTSCH
12 (G)

Spezifikationen
Eingangsspannung:
3,3 V dc ±0,3 V
Stromverbrauch:
Max. 1,5 W
Betriebstemperatur:
0 °C bis +40 °C
Betriebsfeuchtigkeit:
10 % bis 85 % (nicht kondensierend)
Lagerungstemperatur:
–20 °C bis +60 °C
Lagerungsfeuchtigkeit:
10 % bis 85 % (nicht kondensierend)
Masse:
ca. 43 g
Abmessungen (BkHkT):
ca. 54 mm k 5 mm k 85,6 mm
Schnittstelle:
PC-Standardkarte
Dateiformat:
MP4 (Standard ISO/IEC14496)
Videokompressionsformat:
MPEG4 simple profile (4:2:0)
Audiokompressionsformat:
AAC (Advanced Audio Coding)
Einstellmodus:
192 kbps
Video : QVGA, 15 Frames/Sek. (525i), 12,5 Frames/Sek. (625i)
Audio : Mono (Mischung von CH1 und CH2), 32 kbps/ch
768 kbps
Video : QVGA, 30 Frames/Sek. (525i), 25 Frames/Sek. (625i)
Audio : Stereo (CH1•CH2), 64 kbps/ch
1500 kbps
Video : QVGA, 30 Frames/Sek. (525i), 25 Frames/Sek. (625i)
Audio : Stereo (CH1•CH2), 64 kbps/ch
Die Spezifikationen können ohne Vorankündigung Änderungen unterliegen.
Die Angaben für Masse und Gewicht sind Näherungswerte.
13 (G)

• Pour éviter les dangers d’incendie, de choc électrique, les dommages ou les
dysfonctionnements de votre appareil, ne le démontez pas et ne le remodelez pas.
• Cessez immédiatement d’utiliser la carte si vous remarquez de la fumée, des odeurs
ou des bruits bizarres ou si du liquide pénètre dans la carte.
Informations logicielles pour ce produit
Informations destinées au client : Ce produit contient un logiciel associé à la licence
publique générale (GPL) et à la licence publique générale limitée (LGPL) GNU ; les
clients ont donc le droit de télécharger, modifier et redistribuer le code source de ce
logiciel.
Des informations sur les licences publiques GPL et LGPL sont disponibles dans les
sections GPL et LGPL de ce manuel. La description est l’original de la licence (rédigée
en anglais).
Pour télécharger le code source concerné, accédez aux sites Web
http://panasonic.biz/sav/.
À noter que nous ne pouvons pas répondre à toutes les questions que vous pouvez
vous poser sur le contenu, etc. d’un code source quelconque que vous auriez obtenu sur
le site Web mentionné ci-dessus.
Table des matières
Manipulation et rangement . . . . . . . . 1
Caractéristiques . . . . . . . . . . . . . . . . . 2
Composition de produit . . . . . . . . . . . 2
Comment retirer la carte de sa boîte
. . 2
Installation d’une carte P2 PROXY . . 3
Opérations de vérification . . . . . . . . . 4
Menu PROXY . . . . . . . . . . . . . . . . . . 6
Enregistrement sur des cartes
mémoires SD . . . . . . . . . . . . . . . . . . . 9
Vérification des données proxy . . . . 10
Erreurs d’enregistrement proxy . . . . 11
Spécifications . . . . . . . . . . . . . . . . . . 13
Manipulation et rangement
O Pour éviter les dangers d’incendie, de choc électrique, les dommages ou les
dysfonctionnements de votre appareil, évitez de le heurter, de le plier, de le laisser
tomber ou de l’exposer à l’humidité.
O Après avoir retiré la carte de l’appareil, fixez immédiatement le couvercle pour
protéger les bornes contre la poussière et la saleté.
Lorsque vous rangez ou portez la carte avec vous, mettez-la dans sa boîte de
protection.
O Ne laissez pas la carte à un endroit exposé à des gaz corrosifs.
O Ne retirez pas la carte d’un caméscope à carte mémoire pendant l’enregistrement des
données proxy. Ne coupez pas l’alimentation du caméscope à carte mémoire et
n’enlevez pas les batteries pendant l’enregistrement des données proxy.
Cela supprimerait les données proxy en cours d’enregistrement.
O Si vous avez besoin d’assistance pour installer la carte dans un caméscope à carte
mémoire prenant en charge l’enregistrement proxy, veuillez contacter votre revendeur
ou votre prestataire de service désigné.
FRANÇAIS
1 (F)
Caractéristiques
(a)
1
2
(b)
(c)
3
L’AJ-YAX800G (“Carte P2 PROXY”) est une carte pour encodeur vidéo du type
carte de PC (elle a la même forme que la carte P2).
Elle permet de créer un fichier de données compressées à partir du matériel
enregistré avec un caméscope à carte mémoire (“caméscope P2”) et de mémoriser
ce fichier en le séparant du matériel original.
Les fichiers créés avec cette fonction comprennent un fichier audiovisuel qui est
compressé au format MPEG4 et un fichier de métadonnées en temps réel (code
temporel, bit d’utilisateur et information UMID). Ils peuvent être mémorisés sur des
cartes P2 ou sur des cartes mémoires SD.
Le matériel enregistré avec un caméscope P2 peut être mémorisé comme un fichier
de données, sa capacité étant inférieure au matériel original.
Composition de produit
O Carte P2 PROXY . . . . . . . . . . . . .k1
O Couvercle . . . . . . . . . . . . . . . . . . .k1
O Boîte . . . . . . . . . . . . . . . . . . . . . . .k1
Comment retirer la carte de sa boîte
1 Ouvrez le verrou en (a).
2 Ouvrez la boîte.
O Lorsque vous retirez la carte, tenir
la boîte comme indiqué sur la
figure pour que la carte ne tombe
pas sur le sol.
O Pour ne pas endommager la boîte,
n’essayez pas de l’ouvrir en la
tenant en (a).
3 Retirez la carte.
O Pour retirer uniquement la carte,
glissez-la en direction (b).
O Pour retirer la carte avec le
couvercle, soulevez-la en direction
(c) tout en la poussant en direction
du couvercle.
2 (F)
Couvercle
 Loading...