

Page 1

Quick
Reference
Page 2

Intellectual property notices
© 2005–2007 Palm, Inc. All rights reser ved. Trademark, copyright,
patent, and other intellectual property notices are set forth on page ii
within your Palm
http://go.palm.com/treo755p/
®
Tre o™ 755P smartphone User Guide available at
.
Disclaimer and limitation of liability
Palm, Inc. and its suppliers assume no responsibility for any damage
or loss resulting from the use of this guide. Palm, Inc. and its
suppliers assume no responsibility for any loss or claims by third
parties that may arise through the use of this software. Palm, Inc. and
its suppliers assume no responsibility for any damage or loss caused
by deletion of data as a result of malfunction, dead battery, or repairs.
Be sure to make backup copies of all important data on other media
to protect against data loss.
Recycling
This symbol indicates that Palm products should be
recycled and not be disposed of in u nsorted municipal
waste. Palm products should be sent to a facilit y that
properly recycles electrical and electronic equipment .
For information on environmental programs visit:
www.palm.com/environment
.
Palm Take Back and Recycling Program
As part of Palm’s corporate commitment to be a good steward of the
environment, we strive to use environmentally friendly materials,
reduce waste, and develop the highest standards in electronics
recycling. Our recycling program keeps Palm handheld devices, Treo
smartphones, and mobile companions out of landfills through
evaluation and disposition for reuse and recycling.
Palm customers may participate in the recycling program free of
charge. Visit www.palm.com/recycle
for additional details and information about how you can help reduce
electronic waste.
PN: 406-11021-00
v. 1.0
or in the US call 877-869-7256
Page 3

Contents
Chapter 1: Moving around on your smartphone . . . . . . . . . . . . . . . . . . . . . . . . . . . . . . 1
®
Palm
Treo™ 755P smartphone overview . . . . . . . . . . . . . . . . . . . . . . . . . . . . . . . . . 1
Upgrading from another Palm OS
Moving around on the screen . . . . . . . . . . . . . . . . . . . . . . . . . . . . . . . . . . . . . . . . .5
Using the keyboard . . . . . . . . . . . . . . . . . . . . . . . . . . . . . . . . . . . . . . . . . . . . . . . . . 8
Opening applications . . . . . . . . . . . . . . . . . . . . . . . . . . . . . . . . . . . . . . . . . . . . . . . . 11
Synchronizing information . . . . . . . . . . . . . . . . . . . . . . . . . . . . . . . . . . . . . . . . . . . . 12
Maximizing battery life . . . . . . . . . . . . . . . . . . . . . . . . . . . . . . . . . . . . . . . . . . . . . . . 13
Chapter 2: Your phone . . . . . . . . . . . . . . . . . . . . . . . . . . . . . . . . . . . . . . . . . . . . . . . . . 15
Turning your smartphone on and off . . . . . . . . . . . . . . . . . . . . . . . . . . . . . . . . . . . .15
Making calls . . . . . . . . . . . . . . . . . . . . . . . . . . . . . . . . . . . . . . . . . . . . . . . . . . . . . . . 17
Receiving calls . . . . . . . . . . . . . . . . . . . . . . . . . . . . . . . . . . . . . . . . . . . . . . . . . . . . . 19
Using voicemail . . . . . . . . . . . . . . . . . . . . . . . . . . . . . . . . . . . . . . . . . . . . . . . . . . . . 20
What can I do when I’m on a call? . . . . . . . . . . . . . . . . . . . . . . . . . . . . . . . . . . . . . . 21
Creating a speed-dial favorite button . . . . . . . . . . . . . . . . . . . . . . . . . . . . . . . . . . . . 24
Using a hands-free device . . . . . . . . . . . . . . . . . . . . . . . . . . . . . . . . . . . . . . . . . . . . 25
Customizing ringer settings . . . . . . . . . . . . . . . . . . . . . . . . . . . . . . . . . . . . . . . . . . . 26
What are all those icons? . . . . . . . . . . . . . . . . . . . . . . . . . . . . . . . . . . . . . . . . . . . . . 27
Chapter 3: Your email, messages, and web browser . . . . . . . . . . . . . . . . . . . . . . . . . 31
The VersaMail
®
application . . . . . . . . . . . . . . . . . . . . . . . . . . . . . . . . . . . . . . . . . . . . 31
Messaging . . . . . . . . . . . . . . . . . . . . . . . . . . . . . . . . . . . . . . . . . . . . . . . . . . . . . . . . 36
Web browser . . . . . . . . . . . . . . . . . . . . . . . . . . . . . . . . . . . . . . . . . . . . . . . . . . . . . . 37
Chapter 4: Your contacts, calendar, and documents . . . . . . . . . . . . . . . . . . . . . . . . . . 41
Contacts . . . . . . . . . . . . . . . . . . . . . . . . . . . . . . . . . . . . . . . . . . . . . . . . . . . . . . . . . . 41
®
device . . . . . . . . . . . . . . . . . . . . . . . . . . . . . . . . 3
CONTENTS
iii
Page 4

Calendar . . . . . . . . . . . . . . . . . . . . . . . . . . . . . . . . . . . . . . . . . . . . . . . . . . . . . . . . . . 42
Documents . . . . . . . . . . . . . . . . . . . . . . . . . . . . . . . . . . . . . . . . . . . . . . . . . . . . . . . . 42
Chapter 5: Your pictures and music . . . . . . . . . . . . . . . . . . . . . . . . . . . . . . . . . . . . . . . 43
Camera . . . . . . . . . . . . . . . . . . . . . . . . . . . . . . . . . . . . . . . . . . . . . . . . . . . . . . . . . . . 43
Pocket Tunes
™
. . . . . . . . . . . . . . . . . . . . . . . . . . . . . . . . . . . . . . . . . . . . . . . . . . . . . 44
Chapter 6: Check out these features . . . . . . . . . . . . . . . . . . . . . . . . . . . . . . . . . . . . . . 49
Index . . . . . . . . . . . . . . . . . . . . . . . . . . . . . . . . . . . . . . . . . . . . . . . . . . . . . . . . . . . . . . 51
iv
CONTENTS
Page 5
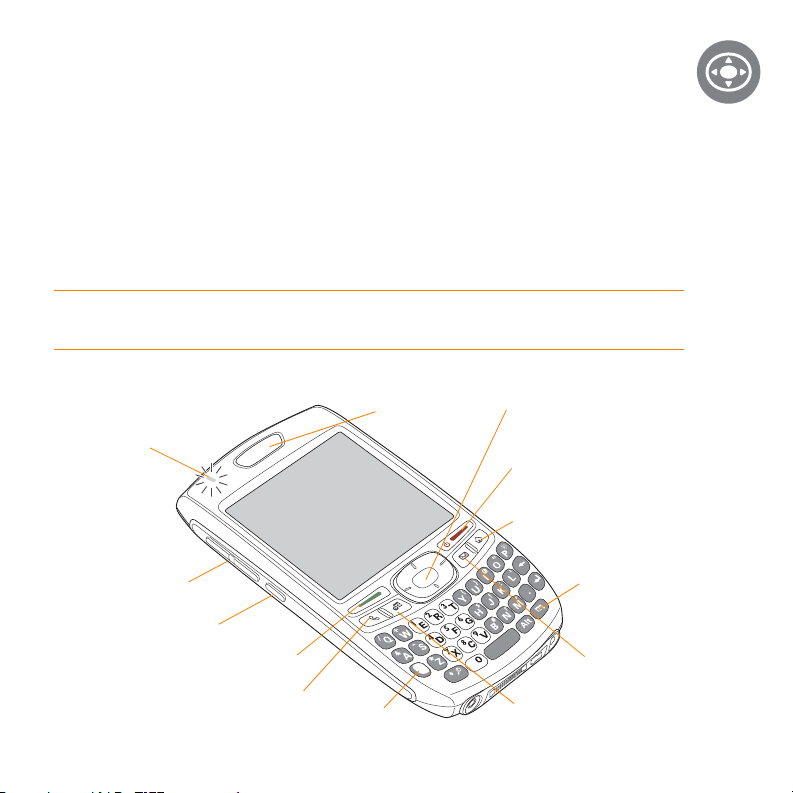
CHAPTER
Moving around on your
Indicator light (phone
and charge indicator)
Calendar
5-way navigator and
Center button
Earpiece
Menu
Send
Phone
Side button
Vol ume button
Power/End
Applications
Option
Email
smartphone
Palm®Tre o™ 755P smartphone overview
Front view
1
Page 6
MOVING AROUND ON YOUR SMARTPHONE
Camera
lens
Battery door
release
Speaker
Self-portrait mirror
Multiconnector
Headset
jack
Microphone
Stylus
Infrared
(IR) port
MiniSD
expansion card
slot
Ringer switch
Sound Off
Sound On
1
CHAPTER
PALM
2
Back view
IMPORTANT The Palm
®
Tr eo™ 755P
smartphone speaker includes a large
magnet, so be sure to keep your
smartphone away from credit cards or
other items that could be demagnetized.
®
TREO™ 755P SMARTPHONE OVERVIEW
To p vi e w
DID YOU KNOW
sounds. When you need quiet, there’s no
need to navigate menus.
?
The Ringer switch silences all
Page 7

MOVING AROUND ON YOUR SMARTPHONE
1
Upgrading from another Palm OS®device
NOTE If you’re setting up your first Palm
®
OS
device, skip this section.
You can transfer all compatible apps and
info from your previous Palm OS device to
your new Treo 755p smartphone. This
includes your calendar events, contacts,
memos, and tasks, as well as your app
settings, any compatible third-party apps,
and any files that are compatible with the
Palm OS software version 5.4.9 on your
new Treo smartphone.
Incompatible files are quarantined.
Quarantined files are not installed on your
smartphone; they are placed in a new
folder on your computer: C:\Program
Files\Palm\device name\PalmOS5
Incompatible Apps. (On some systems
Palm may be replaced with palmOne or
Handspring.)
TIP
Some third-party utilities let you back up
your old device’s info onto an expansion card
and then transfer the info to your Treo 755p
smartphone. We do not recommend this
method, because any incompatible apps are
also transferred to your smartphone.
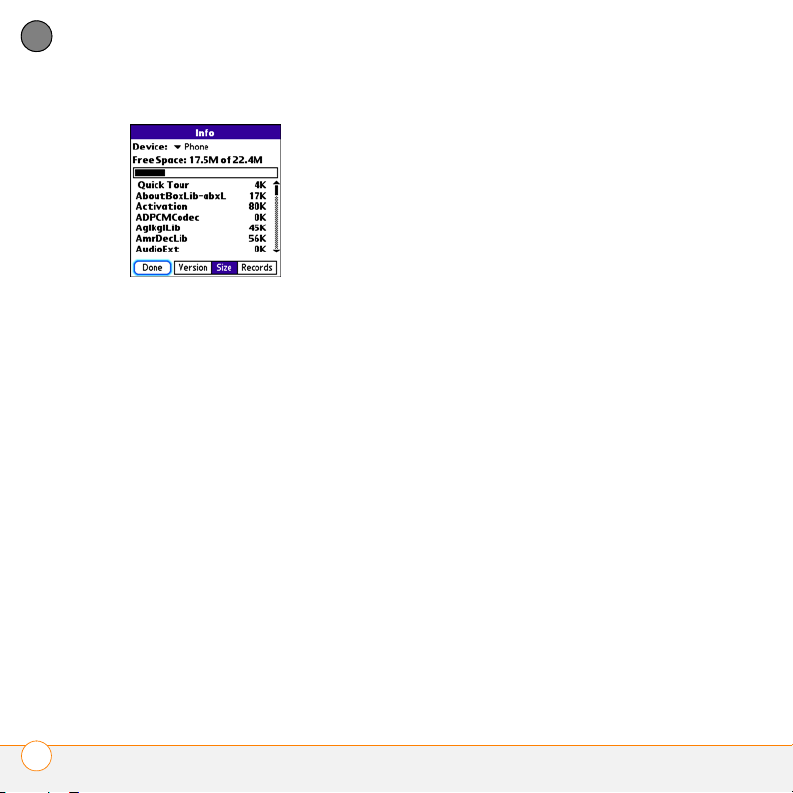
1 Calculate how much space your apps
and info occupy on your previous Palm
OS device:
• From Applications View, open the
menus.
• Select Info on the App menu.
• At the bottom of the screen, select
Size.
• Look at the numbers on the Free
Space line and subtract the number
on the left from the number on the
right to calculate the space used. For
example, on the device shown on the
next page, 22.4 – 17.5 = 4.9. This
means that the space used on this
device is 4.9MB.
CHAPTER
UPGRADING FROM ANOTHER PALM OS
®
DEVICE
3
Page 8
MOVING AROUND ON YOUR SMARTPHONE
1
CHAPTER
3 Sync your previous device with your
previous desktop software to back up
your info one last time.
4 Install the desktop synchronization
software from your new Palm Software
Installation CD (see the Read This First
booklet).
IMPORTANT Do not sync your new Treo
2 If the space used on your previous
device is 60MB or less, go to step 3.
If the space used is greater than 60MB,
do any of the following to reduce the
space used before going to the next
step:
• Delete any third-party apps that you
no longer use.
• Move large files, such as eBooks and
images, to an expansion card.
• Move third-party apps to an expansion
card.
• Purge old info in apps such as
Calendar (Date Book), Tasks (To Do),
and email. For instructions, see the
documentation that came with your
previous device.
755p smartphone with any previous
versions of Palm
®
Desktop software.
5 When prompted, do the following
during the installation process:
• Connect your new smartphone to
your computer (see the Read This
First booklet).
• Indicate whether you want to sync
only the info in your PIM apps
(Calendar, Contacts, Memos, and
Tasks) or all info and apps (excluding
apps known to be incompatible).
• Select a device name for your new
smartphone; be sure to select the
same name that you used for your old
device. (This is the name that appears
in the User list in Palm Desktop
software.)
UPGRADING FROM ANOTHER PALM OS
4
®
DEVICE
Page 9
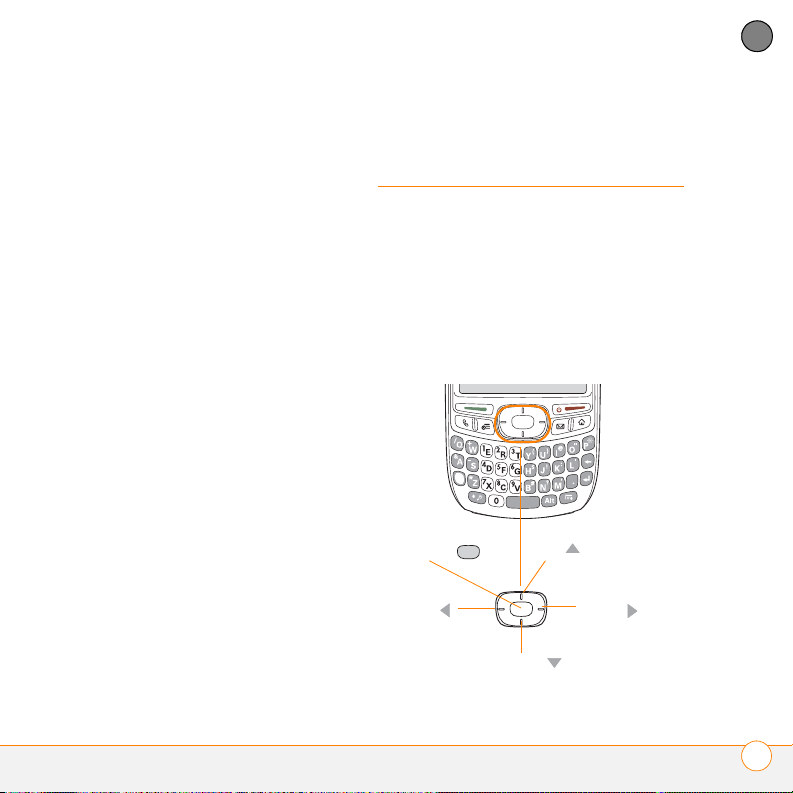
MOVING AROUND ON YOUR SMARTPHONE
Up
Right
Left
Down
Center
1
MAC ONLY If you have pictures on your
previous device, copy them from your
previous device to an expansion card or
beam them to your new Treo 755p
smartphone.
6 If you plan to continue using your
previous device, perform a hard reset to
remove its device name. (See the
documentation that came with your
previous device for hard reset
instructions.) The next time you sync
your previous device with your
computer, assign it a new name.
If any third-party apps are quarantined
during the installation, do not manually
install them. Contact the developer for
software updates and info about
compatibility with your new smartphone.
Moving around on the screen
To move around your smartphone screen,
you can use the 5-way navigator for
one-handed navigation, or you can tap
items on the screen with the stylus. With
use, you will find your own favorite way to
scroll, highlight, and select menu items.
The 5-way includes the following buttons:
CHAPTER
MOVING AROUND ON THE SCREEN
5
Page 10
MOVING AROUND ON YOUR SMARTPHONE
1
CHAPTER
Highlighting and selecting items
On most screens, one item—a button, a
list entry, or a check box—is highlighted by
default. The highlight identifies which item
is affected by your next action. Use Left ,
Right , Up , and Down on the
5-way to move the highlight from one item
to another.
TIP
If the item you want doesn’t appear on the
screen, try tapping the onscreen scroll arrows
to view more info.
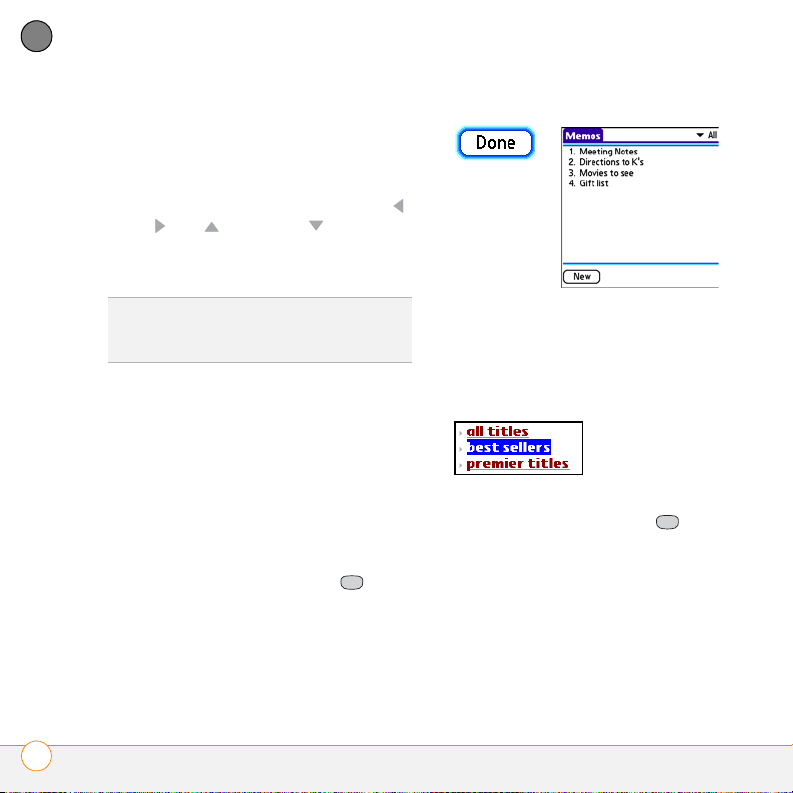
• Colored background: When text, a
phone number, an email address, a web
link, or an item in a list is highlighted,
the item is displayed as white text
Learn to recognize the highlight. It can take
against a colored background.
two forms:
• Border glow: When an entire screen,
an onscreen button (such as Done,
New, or OK), or a pick list is highlighted,
a glow appears around its border. If an
entire list screen is highlighted, the
glow appears at the top and bottom of
After highlighting an item, you can select
(activate) it by pressing Center , or by
tapping the item with the stylus.
the screen only; to highlight the first
item in the list, press Center .
MOVING AROUND ON THE SCREEN
6
Page 11
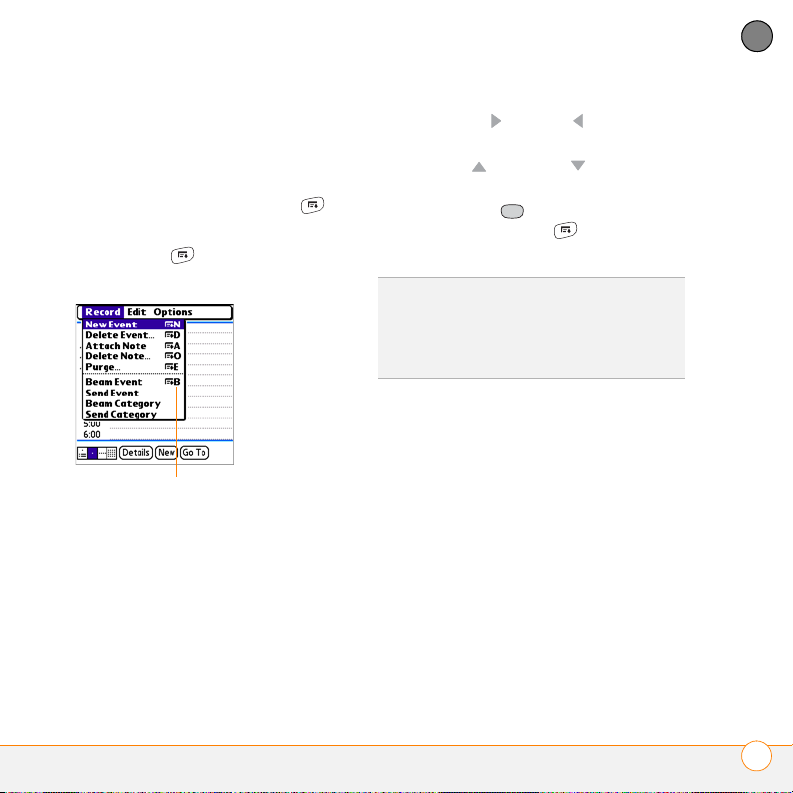
MOVING AROUND ON YOUR SMARTPHONE
Menu shortcut
1
Selecting menu items
Many applications have menus to give you
access to additional features. These menus
are usually hidden from view, but they
appear when you press the Menu key
in the lower-right corner of the keyboard.
1 Press Menu to display an
application’s menus.
2 Press Right and Left to switch
between menus.
3 Press Up and Down to highlight a
menu item.
4 Press Center to select the menu
item, or press Menu to close the
menu and cancel your selection.
TIP
Most menu items have a shortcut. To use
a menu shortcut, press Menu + the shortcut
letter. You don’t have to open a menu to use a
menu shortcut. For example, in Calendar, you
can press Menu + N to create a new event.
CHAPTER
MOVING AROUND ON THE SCREEN
7
Page 12

MOVING AROUND ON YOUR SMARTPHONE
Menu
Backspace
Return
AltSpace
Option
Shift/Find
Backlight
1
CHAPTER
Using the keyboard
TIP
When using the keyboard, most people
find it easiest to hold the Treo smartphone
with two hands and use the tips of both
thumbs to press the keys.
Entering lowercase and uppercase letters
• To enter lowercase letters, press the
desired keys.
• To enter an uppercase letter, press
Shift/Find and then press a letter
key. You don’t need to press and hold
Shift while entering a letter. When Shift
is active, an up arrow appears in the
lower-right corner of the screen.
• To turn Caps Lock on, press Shift/Find
twice. To turn it off, press Shift/
Find once. When Caps Lock is on,
an underlined up arrow appears in
the lower-right corner of the screen.
USING THE KEYBOARD
8
Page 13

MOVING AROUND ON YOUR SMARTPHONE
Letter
Symbol
1
Entering numbers, punctuation, and symbols
Numbers, punctuation, and symbols
appear above the letters on the keys.
To enter these characters, do one of
the following:
• Press Option , and then press the
key with the desired character shown
above the letter. You don’t need to press
and hold Option while pressing the
second key. When Option is active, the
symbol appears in the lower-right
corner of the screen.
• To turn Option Lock on, press
Option twice. To turn it off, press
Option once. When Option Lock is
on, the symbol appears in the
lower-right corner of the screen.
DID YOU KNOW
automatically default to Option Lock, such as
the Dial Pad View in the Phone application or
the Calculator. In this case, you do not need
to press Option to enter numbers.
?
Some application views
Entering other symbols and accented characters
Symbols and accented characters that do
not appear on the keyboard are sometimes
called alternate characters because you
enter them using the Alt key.
1 Enter the character that corresponds to
the symbol or accented character you
want. See the table on the next page.
2 Press Alt .
3 Press Up , Down , Right , or
Left to highlight the desired
character.
4 Press Center to insert the
character.
DID YOU KNOW
grouped by their similarity to the base key. For
example, when you press Alt + E you can
access the following alternate characters:
e é, è, ë, ê, and .
?
Alternate characters are
CHAPTER
USING THE KEYBOARD
9
Page 14

MOVING AROUND ON YOUR SMARTPHONE
1
CHAPTER
0
Symbols and accented characters
Enter… Then press
Enter… Then press
Alt to
select…
Alt to
select…
Enter… Then press
Alt to
select…
a á à ä â ã å æ n ñ u ú ù ü û
A Á À Ä Â Ã Å Æ N Ñ U Ú Ù Ü Û
b or B ß o ó ò ö ô œ õ x or X x ¤
c ç ¢ © O Ó Ò Ö Ô Œ Õ y ý ÿ
C Ç ¢ © p or P ¶ Y Ý Ÿ
e é è ë ê r or R ® ! ¡
E É È Ë Ê s ß š ? ¿
i í ì ï î S ß Š : :-) :-( ;-)
I Í Ì Ï Î t or T ™ $ £ ¥ ¢
l or L £
Press Alt by itself, after a space or at the beginning or end of a line, to select these
commonly used characters:
; _ • \ % = ° ÷ £ ¥ ¢ [ ] { } < > « » © ® ™ ~ ^ ø |
USING THE KEYBOARD
10
Page 15

MOVING AROUND ON YOUR SMARTPHONE
Phone
Calendar
Messaging
Applications
1
Opening applications
When you open an application using either
Applications View or an application button,
you automatically close the application you
were previously using.
Using the quick buttons
The front of the Treo 755p smartphone has
three buttons that open applications. The
fourth button opens Applications View.
TIP
You can open a button’s secondary
application by pressing Option and then
pressing the quick button.
Using Applications View
You can access all available applications
through Applications View.
1 Press Applications .
2 Use the 5-way to highlight the
application you want to use.
3 Press Center to open the selected
application.
TIP
Enter the first few letters of an app name
to highlight it. For example, if you press P, it
highlights Phone; if you then press R, it
highlights Prefs. If you pause and then press
R, it highlights the first app that starts with R.
TIP
Press Applications repeatedly to cycle
through the various categories of apps.
CHAPTER
OPENING APPLICATIONS
11
Page 16
MOVING AROUND ON YOUR SMARTPHONE
Sync cable
Sync
button
Use adapter if needed
1
CHAPTER
Synchronizing information
Synchronizing means that info you enter in
one place (your smartphone or your
computer) appears in the other, so there’s
no need to enter the info twice. We
recommend that you sync your
smartphone with your computer frequently
to keep your info up-to-date (and backed
up) in both locations.
The info from all the following applications
is updated by default each time you sync:
BEFORE YOU BEGIN You must install
®
Palm
Desktop software from the Palm
Software Installation CD that came with
your Treo 755p smartphone—even if you
sync with Outlook or another third-party
application. See the Read This First booklet
for instructions.
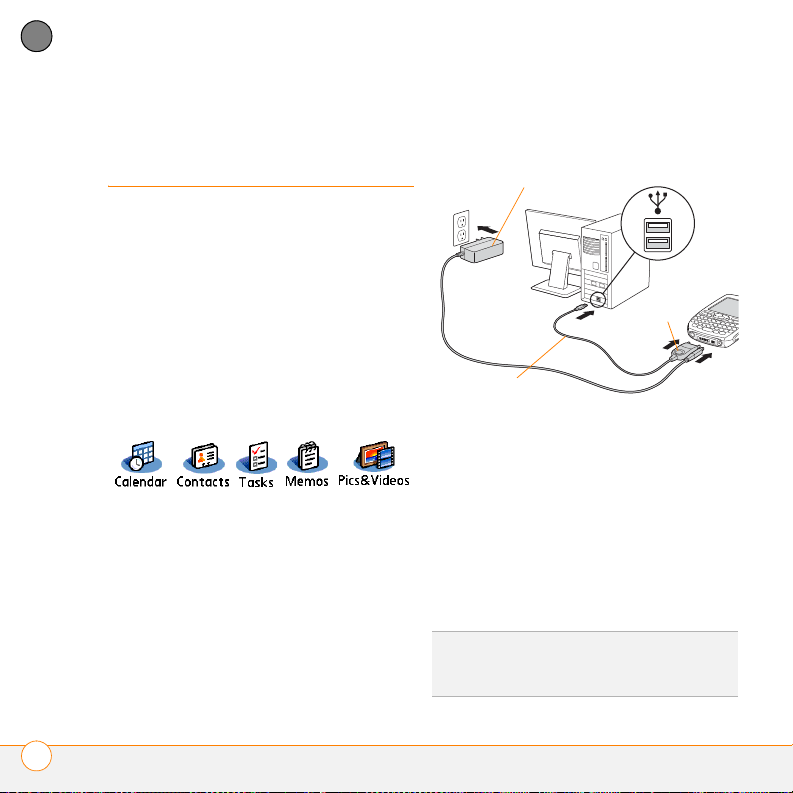
1 Connect your Treo 755p smartphone to
your computer.
2
Press the
sync
button on the sync cable.
Messages on both your computer and
your smartphone indicate that
synchronization is in progress.
3 Wait until you see the message on your
smartphone indicating that the
HotSync
®
operation is complete; then
disconnect the sync cable. Do not
disconnect the sync cable until you see
this message.
TIP
Problems synchronizing? See your
®
Palm
Tr eo™ 755P smartphone User Guide for
troubleshooting suggestions.
SYNCHRONIZING INFORMATION
12
Page 17
MOVING AROUND ON YOUR SMARTPHONE
1
Maximizing battery life
Battery life depends on how you use your
smartphone. You can maximize the life of
your battery by following a few easy
guidelines:
TIP
You can buy an extra battery as a spare for
long airplane trips or periods of heavy use. To
purchase batteries that are compatible with
your smartphone, go to http://go.palm.com/
treo755p/.
• Charge your smartphone whenever
you’re at your desk, or charge it
overnight. The lithium-ion battery has a
much longer useful life when it is
topped off frequently, versus charging it
after it is fully drained.
• Your smartphone’s wireless features
(phone, email, messaging, and web)
and media features (camera, media
players, eBooks, and games) consume
more power than its organizer features.
If you spend a lot of time using the
wireless and media features, keep an
eye on the battery icon and charge
when necessary.
• If you don’t plan to use the wireless
features on your smartphone for a
while, turn off your phone (see “Turning
your phone on and off” on page 16) and
let all calls be picked up by voicemail.
• As with any mobile phone, if you are in
an area with no wireless coverage, your
smartphone searches for a signal, which
consumes power. If you cannot move to
an area of better coverage, temporarily
turn off your phone. While your phone is
off, you can continue to use your
smartphone’s nonwireless features.
• Turn down the screen brightness.
• Decrease the settings in Power
Preferences and turn off Beam Receive.
• Turn off the Bluetooth
®
feature if you’re
not using it.
CHAPTER
MAXIMIZING BATTERY LIFE
13
Page 18

MOVING AROUND ON YOUR SMARTPHONE
1
CHAPTER
MAXIMIZING BATTERY LIFE
14
Page 19

CHAPTER
Your phone
Center
Power/End
2
Turning your smartphone on and off
NOTE In this guide the term smartphone
describes your device and its physical
aspects. The term phone describes the
feature of your Palm
smartphone that lets you connect to your
wireless service provider’s network to
make and receive calls and transmit data.
The phone and the screen of your
smartphone can be turned off and on
separately.
®
Tr eo™ 755P
Waking up the screen
Wake up the screen and leave the phone
off to use only the organizer features, for
example, when you’re on an airplane and
want to look at your calendar.
1 Press and release Power/End
to wake up the screen.
2 Press Center to turn off Keyguard.
3 Press and release Power/End
to turn off the screen and lock the
keyboard.
Page 20

YOUR PHONE
Favorite
buttons
Dial Pad
Status icons
2
CHAPTER
TIP
You can also press any of the quick buttons
or the Applications button to wake up your
smartphone screen.
TIP
You can set how long the screen stays on.
Press Applications, select Preferences,
select Power, and then adjust the Auto -off
after setting.
see the signal-strength icon at the
top of the Main View in the Phone app.
TIP
If you’re outside a coverage area, No
Service appears in the upper-left corner.
3 Press and hold Power/End
again to turn off your phone.
Turning your phone on and off
When your phone is on, it is connected to
your wireless service provider’s network (if
You know your phone is off when you
see Phone Off at the top of the Main
View in the Phone application.
you are in a coverage area) so that you can
make and answer phone calls and use
wireless services, such as email,
messaging, and the web browser.
During initial setup, your phone is
Opening the Phone application
• Press Phone to open the Main
View in the Phone application.
automatically turned on, so you can use
wireless services right away. If you turn off
your phone, you can still use the organizer
and media features such as Contacts and
the Pocket Tunes™ application.
1 Wake up the screen.
2 Press and hold Power/End to
turn on your phone.
You know your phone is on and that
you’re inside a coverage area when you
TURNING YOUR SMARTPHONE ON AND OFF
16
Page 21

YOUR PHONE
Text appears
here as you
enter it
2
Making calls
Dialing by contact name
BEFORE YOU BEGIN Create some
contacts (see “Contacts” on page 41).
1 Press Phone .
2 Select the Contacts favorite button.
3 Use the keyboard to start entering one
of the following for the contact you
want to call:
• First name (JOH for John)
• Last name (SMI for Smith)
• First initial and last name (JSM for
John Smith)
For example, entering SM displays Smilla
Anderson, John Smith, and Sally Martin.
Entering JSM finds only John Smith.
4 Select the number you want to dial.
5 Press Send to dial.
TIP
To see more info for a contact, highlight
the name and press Center on the 5-way to
view the address, company, and other details.
Dialing with a speed-dial favorite button
Your smartphone comes with a few
predefined speed-dial favorite buttons, but
you can also create your own favorites.
See “Creating a speed-dial favorite button”
on page 24.
1 Press Phone .
2 Press Down to access Favorites.
3 Use the 5-way to highlight the
speed-dial favorite you want.
Look for the icon to distinguish a
speed-dial favorite from other types of
favorites.
TIP
To view more favorite buttons, repeatedly
press Down or Right on the 5-way to scroll to
more Favorites pages.
TIP
To see all the numbers for the selected
contact, highlight a speed-dial favorite button
and press Space on the keyboard.
CHAPTER
MAKING CALLS
17
Page 22

YOUR PHONE
2
CHAPTER
MAKING CALLS
18
4 Press Center to make the call.
Redialing a recently called number
To dial the last number you called: Fro m
the Main View in the Phone app, press and
hold Send .
To select from your most recently dialed
numbers: From the Main View in the
Phone app, press Send to open the
Redial list, select the number you want to
call, and then press Send to dial.
To select from a chronological list of
calls: Select the Call Log favorite button.
Page 23

YOUR PHONE
2
Receiving calls
To receive calls, your phone must be on.
When your phone is off, your calls go to
voicemail.
Answering calls
To answer a call, do one of the following:
• Press Send .
• Select Answer.
• Press the headset button (if the
headset is attached).
TIP
The headset button may work differently
on headsets other than the one provided with
your smartphone.
Ignoring calls
To ignore a call, do one of the following:
Send the call to voicemail: Press Power/
End or select Ignore.
Send the caller a text message: Select
Ignore with Text. This option sends the
call to voicemail and opens a text message
addressed to the caller.
NOTE Sending text messages to land-line
phones may not be supported.
Silencing the ringer
To silence the phone while it is ringing, do
one of the following:
• Press any key on your smartphone
except Send, Power/End, or the 5-way.
• Slide the Ringer switch to Sound Off
.
DID YOU KNOW
while it is ringing, you can either answer the
call or let it ring through to voicemail.
?
When you silence the ringer
CHAPTER
RECEIVING CALLS
19
Page 24

YOUR PHONE
2
CHAPTER
Using voicemail
When you have messages that you have
not listened to, a Voicemail icon also
appears in the title bar in the Phone
Your wireless service provider service
includes voicemail. Keep in mind that
application. You can select this icon to
listen to your voicemail.
airtime and other charges apply when
using voicemail from your smartphone.
Setting up voicemail
1 Make sure your phone is turned on (see
“Turning your phone on and off” on
page 16).
2 Press Phone .
3 Press and hold 1 or select the
Voicemail favorite button to dial your
wireless service provider’s automated
voicemail system.
4
Follow the prompts to set up your voicemail.
Listening to voicemail messages
1 Press Phone .
2 Press and hold 1 to dial the voicemail
system, or select the Voicemail favorite
Voicemail notification
When you have a new voicemail message,
you are notified with an Alert dialog box.
• To dismiss the Alert dialog box, select
OK.
• To play the message, select Listen.
button.
3 Enter your voicemail password using
the keyboard.
DID YOU KNOW
the Voicemail favorite button (see “Creating a
speed-dial favorite button” on page 24 for
details), you can select this button to enter
your password.
?
If you defined Extra Digits for
USING VOICEMAIL
20
Page 25

YOUR PHONE
Caller’s
name and
number
Call
duration
2
What can I do when I’m on a call?
When you make or receive a call, Active
Call View appears.
TIP
If the screen dims during a call, press any
key except Power/End to restore the screen
brightness.
Use the 5-way or stylus to select the
onscreen buttons:
Ends the call immediately. You
can also press the headset
button (if the headset is
attached).
Turns on the speakerphone so
you can check your calendar,
look up contact info, and use
other features during a call.
Turns off the speakerphone
when it is on.
Replaces the Spkr-phone button
when a Bluetooth
®
headset is
attached. Select this button to
transfer the call from the
Bluetooth headset to the built-in
earpiece.
Places the current call on hold.
Lets you make another call while
the first call is on hold. For info
on handling a second incoming
call, see your Palm
®
Tr eo™ 755P
smartphone User Guide.
Opens the Dial Pad so you can
manually dial additional
numbers, such as an extension
or a response to a voice prompt.
WHAT CAN I DO WHEN I’M ON A CALL?
CHAPTER
21
Page 26

YOUR PHONE
Volume button
2
CHAPTER
Dials any extra digits (such as a
password or an extension) that
you assigned to a favorite
button. See “Creating a
speed-dial favorite button” on
page 24 for info on defining
extra digits.
Mutes the microphone so that
you cannot be heard.
Ending a call
Do one of the following:
• Press Power/End .
• Select Hang Up All.
• Press the button on the headset (if the
headset is attached).
Switching applications during a call
You can use other apps on your
smartphone during a phone conversation,
including the organizer and text messaging
features. You cannot, however, make a data
connection while on a call. This means that
you cannot browse the web or send and
receive email messages while on a call.
Adjusting call volume
While a call is in progress, press the
Vo lu me button on the side of your
smartphone to adjust the call volume.
• To increase the volume, press the upper
half of the Volum e button.
• To decrease the volume, press the
1 (Optional) If you want to continue
talking while viewing another
application, select Spkr-phone or
connect a headset.
2 Press Applications .
3 Select the icon for the application you
want to open.
lower half of the Vol um e button.
WHAT CAN I DO WHEN I’M ON A CALL?
22
Page 27

YOUR PHONE
2
4 When you’re ready to leave the app,
press Phone to return to Active Call
View.
TIP
You can also press Phone to toggle
between Active Call View and the Main View
in the Phone app, so you can access a favorite
during a call.
Making a second call
You can make a second call while your first
call is on hold.
1 Dial the first number and wait until the
person answers.
2 Select Hold.
3 Select Add Call.
4 Dial the second number using any of
the methods described in “Making
calls” on page 17.
5 When the Dial another call prompt
appears, select Ye s .
When two calls are active, Active Call View
displays two status lines, each
representing one of the calls.
DID YOU KNOW
outgoing call, you can conference the two
calls, but you cannot swap between them.
When the second call is an incoming call, you
can swap between the two calls, but you
cannot conference them.
When two calls are active and you press
Power/End, you hang up both calls. If the
second call is an outgoing call, you can return
to the first call by waiting for the person on
the second call to hang up. If you accidentally
hang up both calls, your smartphone
automatically dials the number that was on
hold.
?
When the second call is an
CHAPTER
WHAT CAN I DO WHEN I’M ON A CALL?
23
Page 28

YOUR PHONE
2
CHAPTER
Making a conference call
When you place a second outgoing call,
3 To end the conference, press Power/
End to end all the calls.
you can join the two calls in a conference
call. Please contact your wireless service
provider for availability and rate
Creating a speed-dial
information.
1 Make a second call.
2 Select Conf. This joins the two active
calls in a conference session.
favorite button
1 Press Phone .
2 Use the 5-way to select a blank
favorite button.
TIP
Press Right on the 5-way to scroll to more
Favorites pages.
3 Enter a label for the favorite:
• If the entry is for an existing contact,
select Lookup. Start entering the last
name of the contact, and select the
contact when it appears in the list.
• If the entry is for a new contact, enter
the label, press Down , and enter
the number.
CREATING A SPEED-DIAL FAVORITE BUTTON
24
Page 29

YOUR PHONE
2
4 (Optional) Enter a Quick Key, which
you can press and hold from the Main
View in the Phone application to
instantly dial this speed-dial number.
5 (Optional) Select More, and then select
advanced options:
Extra Digits: Defines additional digits
to dial, such as a password or
extension. To enter a one-second
pause, insert a comma between digits.
To add a longer pause, enter more
commas.
Dial Extra Digits Automatically: Dials
predefined extra digits immediately
after dialing the phone number, when
checked.
6 Select OK.
DID YOU KNOW
buttons for other tasks, such as opening an
application, accessing a web page, addressing
a text or email message, and more. See your
Palm
details.
?
You can also create favorite
®
Tr eo™ 755P smartphone User Guide for
Using a hands-free device
You can connect a phone headset or car kit
for hands-free operation. If you need to use
your phone while driving and this is
permitted in your area, we recommend
using the wired stereo headset included
with your smartphone or one of the
following types of compatible hands-free
devices that are sold separately:
• Wired headsets with a 2.5mm
connector (3-pin or 4-pin)
• Wireless headsets and car kits enabled
with Bluetooth 1.1 or 1.2 wireless
technology
To find compatible hands-free devices, go
to http://go.palm.com/treo755p/
.
CHAPTER
USING A HANDS-FREE DEVICE
25
Page 30
YOUR PHONE
2
CHAPTER
For info on setting up and using a Bluetooth
hands-free device, see your Palm
755
P smartphone User Guide.
®
Tr eo™
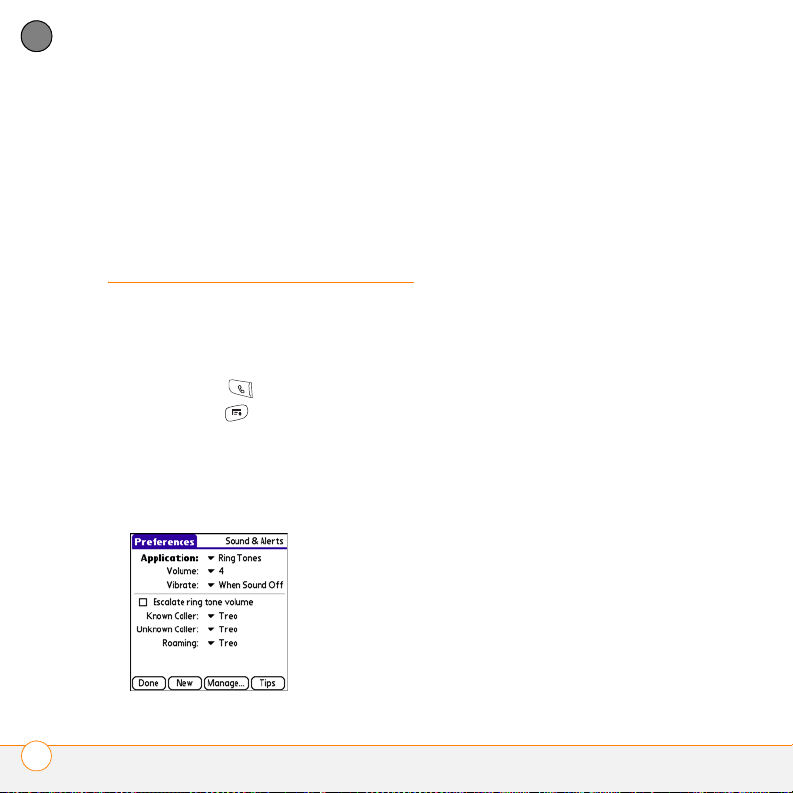
Customizing ringer settings
Selecting ringtones
You can set various tones for various types
of incoming calls.
1 Press Phone .
2 Press Menu .
3 Select Options, and then select Sound
Preferences.
4 Select the Application pick list and
select Ring Tones.
5 Select the Volume pick list and select
the volume level.
6 Select the Vibrate pick list and select
how you want your smartphone to
vibrate when there’s an incoming call.
7 (Optional) Uncheck the Escalate ring
tone volume box if you want the ring to
remain at the same volume regardless
of how long it rings.
8 Select ringtones from the following pick
lists:
Known Caller: An incoming call from
someone in your Contacts or Favorites.
Unknown Caller: An incoming call
from someone identified by caller
ID who is not in your Contacts or
Favorites.
Roaming: A special tone for incoming
calls when you’re outside your home
mobile network.
9 Select Done.
CUSTOMIZING RINGER SETTINGS
26
Page 31
YOUR PHONE
2
Adjusting ringer volume
When a call is not in progress and music is
not playing, press the Vo lu me button on
the side of your Treo smartphone to adjust
the ringer volume, and then press the Side
button to confirm your selection.
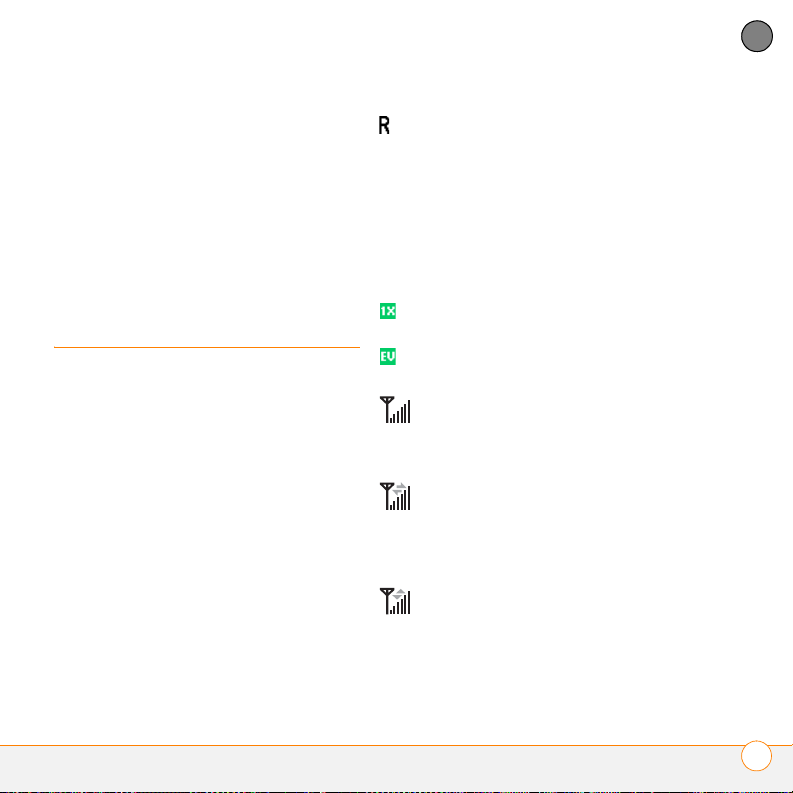
What are all those icons?
You can monitor several items by looking at
the icons in the title bar in the Phone app:
Wireless
Service
Name
Your phone is on and you’re in
your wireless service provider’s
coverage area. If you’re in an
area without any coverage, No
Service appears instead. When
you turn off your phone, Phone
Off appears.
You’re outside your wireless
service provider’s coverage area
and are roaming on another
wireless service provider’s
network. The word Roaming
also appears. The icon may flash
if the provider is not on your
wireless service provider’s
preferred roaming list.
You are in an area that supports
1xRTT data services.
You are in an area that supports
EVDO data services.
Your phone is on. The stronger
the signal, the more bars that
appear. If you’re outside a
coverage area, no bars appear.
Your phone is on and is
connected to a 1xRTT network,
but you’re not transmitting data.
You can still make and answer
calls.
Your phone is on and is
connected to an EVDO network,
but you’re not transmitting data.
You can still make and answer
calls.
CHAPTER
WHAT ARE ALL THOSE ICONS?
27
Page 32

YOUR PHONE
2
CHAPTER
Your phone is on and you’re
transmitting data over a 1xRTT
network. You can still make
calls, but you can’t answer calls
(incoming calls go to voicemail).
Your phone is on and you’re
transmitting data over an EVDO
network. You can still make or
answer calls. When you make or
answer a call, the transmission
is interrupted, and then it
resumes when you end the call.
You have new voicemail
messages. You can select this
icon to retrieve your messages.
You have a new alert, such as a
Calendar alarm or a new text
message. To view the alert,
press and hold Center .
TTY/TDD Mode is active. Use
this mode to communicate by
telephone if you have hearing,
speech, or language disabilities.
The Location setting is on and
your longitude and latitude info
is available to the network and
third-party apps. When this icon
appears with a red slash, your
location is available only during
emergency calls.
The Bluetooth
®
wireless
technology icon appears in gray
when this feature is off, in blue
when this feature is on, and in
reverse blue when your
smartphone is communicating
with another Bluetooth device.
You can tap this icon to turn
Bluetooth features on and off.
This icon replaces the Bluetooth
icon when your smartphone is
connected to a Bluetooth
hands-free device. This icon is
dark blue during a call and light
blue when you’re not on a call.
Your battery is partially drained.
As the battery drains, the icon
changes from blue to red and
then from red to clear. You can
tap this icon to see the
remaining battery power.
WHAT ARE ALL THOSE ICONS?
28
Page 33

YOUR PHONE
2
Your battery is charging. The
lightning bolt turns from red to
green when the battery is fully
charged and your smartphone
stays connected to the charger.
Your battery is fully charged and
your smartphone is not
connected to the charger.
You have new text messages.
The numbers next to the icon
indicate the number of unread
messages. You can select this
icon to retrieve your messages.
You have new email messages.
You can select this icon to
retrieve your messages.
This icon indicates the current
(or next) event from the
Calendar app. If you have an
event conflict during this time
period, a red bar appears next to
the event. To jump to the event
in the Calendar app, select this
line.
KEY TERM
1xRTT (Single-carrier [1x] radio
transmission technology): A wireless
technology that can provide fast data transfer
and Internet access with average speeds of
60–80Kbps and bursts of up to 144Kbps.
KEY TERM
EVDO (Evolution Data Optimized):
A wireless broadband technology that is
designed for very high-speed data transfer
with average download speeds of 400–
700Kbps and is capable of reaching speeds up
to 1.8Mbps and upload speeds up to 156Kbps.
CHAPTER
WHAT ARE ALL THOSE ICONS?
29
Page 34

YOUR PHONE
2
CHAPTER
WHAT ARE ALL THOSE ICONS?
30
Page 35

CHAPTER
Your email, messages, and web browser
3
The VersaMail® application
The VersaMail® application (called Email in
Applications View), lets you access your
corporate, personal, and fee-based Internet
email.
TIP
To access web-based email, like Yahoo!
Mail or Hotmail, use the web browser.
Before you can use VersaMail, you need to
enter your email account settings. If you
have multiple email accounts, you must
enter settings for each email account.
You can find additional information on using
and customizing VersaMail in the User
Guide for the VersaMail
http://go.palm.com/treo755p/
TIP
An email app like VersaMail is not an email
provider. An email app transfers messages
from an account that you set up with a
provider.
KEY TERM
Email provider The service you
use to send and receive email. Your email
provider’s name appears between the @
symbol and the dot symbol in your email
address.
BEFORE YOU BEGIN You must activate
data services on your wireless service
provider account before you can use email
on your smartphone.
®
Application at
.
Page 36

YOUR EMAIL, MESSAGES, AND WEB BROWSER
3
CHAPTER
1 If either of the following is true, see the
User Guide for the VersaMail
®
Application at http://go.palm.com/
treo755p/ for setup instructions:
• You used VersaMail on your previous
Palm OS
®
device, and you want to
transfer those settings to your
smartphone.
• You plan to use VersaMail to access
an email account on a Microsoft
Exchange server, a Lotus Notes
server, or a Microsoft MAPI server.
2 Press Applications and select
Email to open the VersaMail
application.
3 If the Initial Setup dialog box appears,
select Continue.
4 Make up a name that describes this
account and enter it in the Account
Name field. For example, Work Email.
5 Select the Mail Service pick list, select
your email provider, such as Earthlink,
and then select Next.
If your email provider’s name is not
listed, select Other and then manually
enter your provider’s settings. Ask your
system administrator or ISP to provide
you with the following info:
• Mail protocol: POP or IMAP
• Incoming and outgoing mail server
names, such as mail.myisp.com
• Incoming and outgoing mail server
port numbers, such as 110 (incoming
POP), 143 (incoming IMAP), or 25
(outgoing POP or IMAP)
• (If necessary) Security settings: APOP,
ESMTP, SSL
6 Enter the username for your email
account. Your username usually appears
before the @ symbol in your email
address.
THE VERSAMAIL
32
®
APPLICATION
Page 37

YOUR EMAIL, MESSAGES, AND WEB BROWSER
3
NOTE For some email providers, such as
Gmail, your username is your entire email
address. If you’re not sure what to enter as
your username, ask your provider.
7 Select the Password box, enter your
email account password, select OK, and
then select Next.
8 Select Next, and then select Done.
Creating and sending messages
1 From the Inbox, select New.
2 Begin entering one of the following for
the addressee:
• Email address
• First name
• Last name
TIP
If you enter info that matches your
contacts, VersaMail displays the matching
contacts. To accept a suggestion, select the
contact. To send to a different address, keep
entering the email address or name.
3 Enter the subject and message text.
TIP
To move between fields, press Up or
Down on the 5-way.
4 Select one of the following:
Send: Connects and sends all
messages immediately. If for any
reason the message cannot be sent,
the message is stored in your Outbox.
Outbox: Stores the message to be sent
later.
Drafts: Saves the message so you can
continue working on it at another time.
CHAPTER
THE VERSAMAIL
®
APPLICATION
33
Page 38

YOUR EMAIL, MESSAGES, AND WEB BROWSER
3
CHAPTER
Adding attachments to your messages
You can attach several types of files to your
email messages.
1 Create the message to which you want
to attach the item.
2 On the New Message screen, select
the red paper clip icon in the
upper-right corner.
3 From the Ty p e pick list, select the type
of file to attach.
4 Select the item you want from the list in
the Ty p e box, or follow other onscreen
prompts.
5 Select Done.
.
TIP
To remove an attachment, select the file in
the Attachments box and then select Delete.
Receiving and viewing messages
3 If a large incoming message is
truncated, select More .
1 From any mailbox, select Get or Get &
TIP
Send.
2 From the Inbox, select the message you
want to view.
When viewing a message, tap the scroll
arrows at the top of the screen to view the
previous or next message.
4 Select Done.
THE VERSAMAIL
34
®
APPLICATION
Page 39

YOUR EMAIL, MESSAGES, AND WEB BROWSER
3
Viewing attachments
There are a number of attachment types
you can open with the built-in software
on your smartphone (for example,
Microsoft Word, Excel, and PowerPoint
files; PDF files; ringtones; and photos).
1 From any folder, open the message with
the attachment you want to view.
Messages with downloaded
attachments appear with a paper clip
on the message icon.
TIP
If an attachment is not downloaded
because it is larger than your maximum
message size, the paper clip icon does not
appear and the attachment is not displayed at
the bottom of the message screen. Select
More to download and view any attachments.
2 Tap the attachment name at the bottom
of the message screen to view it in the
default viewer on your smartphone.
TIP
You can also tap the folder icon to the left
of the attachment name to open a menu of
tasks you can do with the attachment.
3 When you have finished with the
attachment, select Done.
NOTE If there is no Done button, press
Applications and select Email to
return to the account’s Inbox.
Managing your messages
The status icons that appear near the
messages in your Inbox indicate the
following:
0
The message is unread when the
subject appears in bold.
The message includes an
attachment.
The message includes a meeting
invitation.
This message has high priority.
You can rearrange the message list to
make it easier to find and view messages.
• In the Inbox, select Sort, and then
select one of the following: Sort by
Date, Sort by Name, Sort by Subject.
• To quickly switch between folders in the
list view, select the folder pick list at the
top of the screen and select the desired
folder.
CHAPTER
THE VERSAMAIL
®
APPLICATION
35
Page 40

YOUR EMAIL, MESSAGES, AND WEB BROWSER
3
CHAPTER
Messaging
Messaging lets you exchange brief text
messages (SMS) with other devices and
email addresses that support this form of
messaging. Refer to your service plan for
pricing and availability of messaging
services.
NOTE Each text message can hold up to
160 characters. (If you send a text message
to an email address, the email address is
deducted from the 160-character count.)
TIP
If you see numbers instead of letters (or
the reverse), you need to turn Option Lock on
by pressing Option twice or turn it off by
pressing Option once.
4 Enter your message. You can optionally
do any of the following:
• Insert predefined phrases by selecting
QuickText .
• Insert emoticons by selecting .
• Mark the message as urgent. Press
Menu and then select High
Priority from the Compose menu.
1 Press Messaging .
2 Select New.
3 Select the To field and do one of the
following to address the message:
• Enter the first initial and last name (no
spaces), and then select the
recipient’s phone number or email
address from your Contacts list.
• Enter the recipient’s phone number or
5 Select Send.
email address.
TIP
• Press Center and select the
recipient’s name from the list of
recent addresses.
To save a draft of the message without
sending it, press Menu and select Save as
Draft.
To access the draft, select the
pick list in the title bar and select Drafts.
category
36
MESSAGING
Page 41

YOUR EMAIL, MESSAGES, AND WEB BROWSER
3
Web browser
Viewing a web page
The Blazer
pages into a single column and resizes
images. In this format—called Optimized
Mode—you can see most content without
scrolling left or right.
BEFORE YOU BEGIN You must activate
data services on your wireless service
provider account.
1 Press Applications and select
®
web browser reformats web
Web to open the Blazer web
browser. If necessary, select Ye s to turn
on your phone, and Ye s to connect to
the Internet.
If you do not see either the 1xRTT or
EVDO icon in the title bar of the
Phone application, data services are not
available in your current location and you
cannot connect to the Internet.
2 Enter a web page address (URL) in the
Address Bar and select Go.
NOTE If you browse to a secure web
page, a lock icon appears in the
Address Bar.
Do any of the following to navigate within
the web page:
• View a page in wide layout format (as
on your computer): Press Menu ,
select Options, and then select Wide
Page Mode.
• Scroll through the page: In Optimized
Mode (the default format, which is
optimized for your smartphone screen),
press Up or Down . In Wide Page
Mode, press Up , Down , Left ,
or Right to scroll in all directions.
• Follow a link to another web page: In
Optimized Mode, highlight the link by
pressing Left or Right and then
pressing Center to go to the
CHAPTER
WEB BROWSER
37
Page 42
YOUR EMAIL, MESSAGES, AND WEB BROWSER
3
CHAPTER
selected page. In Wide Page Mode, use
the stylus to select a link.
Submit a form: Enter the info and then
select the onscreen button to submit
the form. If the form doesn’t have an
onscreen button, press Return .
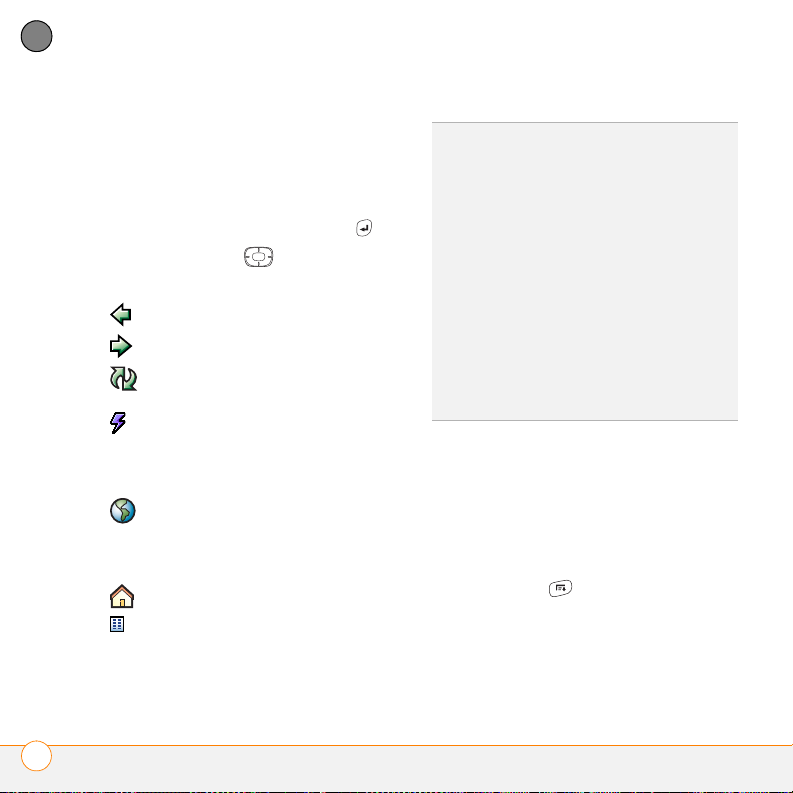
3 Use the 5-way to access any of
the following icons in the title bar:
Goes to the previous web page.
Goes to the next web page.
Refreshes the page with the
latest content from the Internet.
Opens a list where you can
select Fast Mode (no images or
style sheets) or Normal Mode
(with images and style sheets).
Opens a dialog box where you
can enter a web address you
want to go to or view a list of
recently viewed web pages.
Goes to your home page.
Displays Bookmarks View so you
can select a bookmark or saved
page you want to view.
TIP
To find a recent page or search, select the
Address Bar pick list and select the item from
the list.
TIP
Want to get to the icons faster? Press
Space to jump to the Address Bar and then
press Up on the 5-way to scroll to the icons.
You can also press Menu to access the same
commands from the menus.
TIP
To adjust the font size, open the Options
menu and select Font. To fit more text on the
screen, select Small. To make the text easier
to read, select Large.
TIP
Tap and hold the Back or Forward buttons
or select these buttons with the 5-way to pop
up a list of sites you’ve visited.
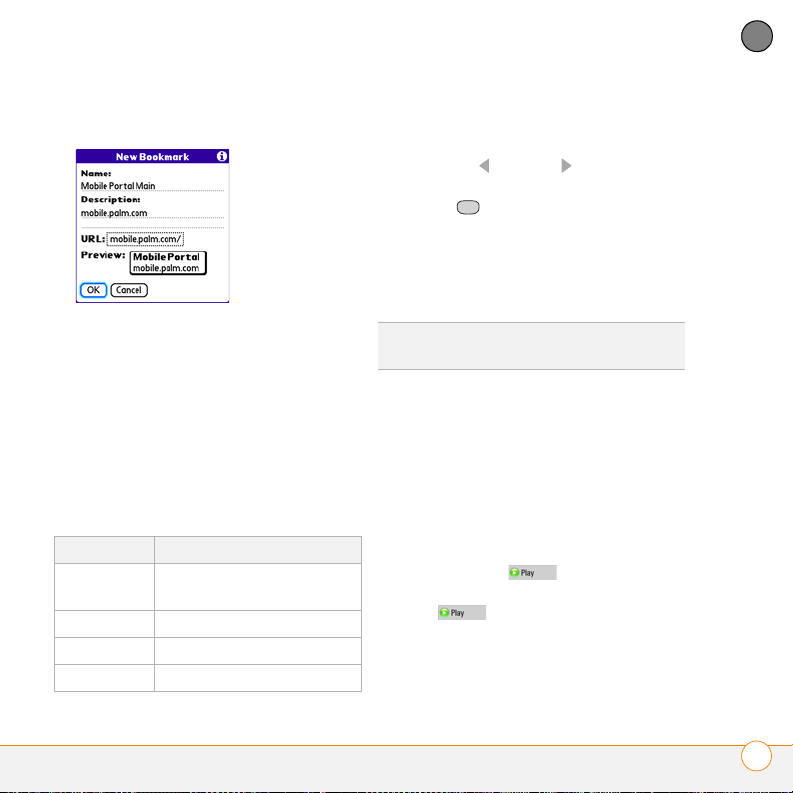
Creating a bookmark
With bookmarks you can instantly access
up to one hundred of your favorite web
pages without entering the address every
time.
1 Go to the page you want to bookmark.
2 Press Menu .
3 Select Add Bookmark from the Page
menu.
4 (Optional) Change the entries in the
Name and Description fields.
WEB BROWSER
38
Page 43
YOUR EMAIL, MESSAGES, AND WEB BROWSER
3
5 Select OK, and then select OK again.
Downloading files from a web page
When you download a file to your
smartphone, you can open it in an app that
recognizes the file. For example, download
an MP3 file to listen to it later in the Pocket
Tunes™ application. If a file isn’t recognized
by an app on your smartphone, you can
download the file to an expansion card, but
you can’t open it on your smartphone.
Item Supported File Types
Pictures JPEG, WBMP, GIF,
animated GIF
Videos MP4, 3G2, ASF, WMV
Ringtones MIDI, AAC
Music MP3, WMA
1 Go to the page with the link to the file
you want to download.
2 Press Left or Right to highlight
the link to the file, and then press
Center .
3 If prompted, select what you want to do
with the file: Play, Save To Device, or
Save To Card.
4 Select Ye s .
TIP
You can also save an image from a web
page by tapping and holding it with the stylus.
Streaming files from a web page
The web browser lets you stream files that
are recognized by one of the applications
on your smartphone. For example, you can
choose to play music and video files in
many popular formats (MP3, WMA, WMV).
1 When the web browser recognizes
streamed content on a web page, it
displays a Play icon. To view or
listen to the streamed content, select
Play .
CHAPTER
WEB BROWSER
39
Page 44

YOUR EMAIL, MESSAGES, AND WEB BROWSER
3
CHAPTER
TIP
If the content is not supported by any of
the apps on your smartphone, a Media type
not supported message appears.
2 Once streaming begins, playback starts
automatically. Use the following
controls when viewing or listening:
• Select to return to the web page
containing the streamed content.
• Select or press Center to
pause playback.
• Select or press Center to
resume playback after pausing.
• A few seconds after playback begins,
the toolbar is hidden and you can view
the content on the full screen. Press
Up or Down to display the
Installing applications from the Internet
You can use the web browser to install
Palm OS files (PRC or PDB) directly from
the Internet. When you download a PRC or
PDB file, it is automatically installed on
your smartphone. If a file is compressed
(ZIP or SIT files), you need to download it
to your computer and expand the file
before installing it on your smartphone.
1 Go to the page that contains the link to
the application you want to download.
2 Press Left or Right to highlight
the link to the file, and then press
Center to initiate the download
process.
3 Follow the onscreen instructions to
accept and install the application.
toolbar; press Up or Down
again to hide the toolbar again.
• Press the Vo lu me button on the side
of your smartphone to adjust the
volume.
WEB BROWSER
40
Page 45
CHAPTER
Your contacts, calendar, and documents
Contacts
Contacts is where you enter info about the
people you want to stay in contact with.
You can get to this info from the Phone,
Messaging, and email applications.
4
DID YOU KNOW
contacts is to enter them in your desktop
software and then sync to transfer them to
your smartphone (see “Synchronizing
information” on page 12).
1 Press Phone .
2 Select the Contacts favorite button.
3 Select New Contact.
4 Use the 5-way to move between
fields as you enter information.
?
The fastest way to enter lots of
5 Do any of the following:
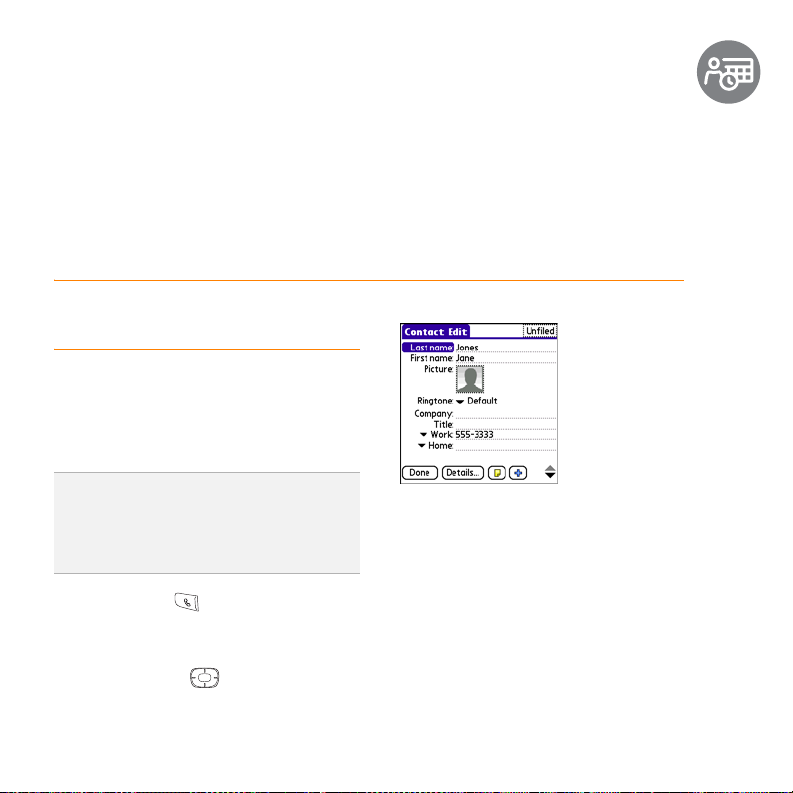
Add a caller ID photo: Select the
Picture box, and select Camera to take
a photo, or select Photos and select an
existing picture.
Add a caller ID ringtone: Select the
Ringtone pick list and select a ringtone
for this contact.
6 After you enter all the information,
select Done.
Page 46

YOUR CONTACTS, CALENDAR, AND DOCUMENTS
Selected
day
Selected
date
4
CHAPTER
Calendar
Calendar helps you manage your schedule.
You can view your calendar by day, week,
or month, or as an agenda list.
1 Press Calendar until Day View
appears.
2 Press Left or Right to select the
desired day.
3 Select New.
4 Enter a starting hour and minute for the
event, such as 545 for 5:45.
5 Select the End Time box and enter the
ending hour and minute for the event.
6 Select OK.
7 Enter a description for the event.
DID YOU KNOW
meetings or a block of vacation time by
creating an event that repeats at an interval,
and you can color-code events by category.
?
You can schedule repeating
Documents
Documents lets you create, view, and edit
Microsoft Word and Excel files on your
smartphone or on an expansion card that is
inserted into the expansion slot. You can
also view PowerPoint and PDF files.
1 Press Applications and select
Documents .
2 Select the document you want from the
list.
42
CALENDAR
Page 47

CHAPTER
Your pictures and music
5
Camera
Your smartphone comes with a built-in,
1.3-megapixel camera with 2x digital zoom.
You can use the camera to take pictures
and send them to your friends and family.
1 Press Applications and select
Camera .
2 By default, Camera stores your pictures
in the Palm folder on your smartphone.
To store a picture in a different location,
select one of the following:
<Album name>: Stores the picture in
the selected album. The storage
location is based on the location of the
album (smartphone or expansion card).
New Albums: Opens a dialog box
where you can enter an album name
and select the storage location
(smartphone or expansion card).
3 Find your subject in the screen on your
smartphone. (The lens is on the back of
your smartphone.)
4 (Optional) To get a close-up of your
subject, press Up to select 2x. Press
Down to return to 1x.
5 Press Center to capture the
picture.
Page 48
YOUR PICTURES AND MUSIC
5
CHAPTER
6 Select any of the following:
your smartphone. (If you want to use
stereo headphones with a 3.5mm
connector, then a 2.5mm stereo adapter is
required, sold separately.) To listen to
music on your smartphone, you need to
convert the music files into MP3 format
using Windows Media Player (Windows
computers) or iTunes (Mac computers) and
then transfer the music files to your
smartphone or an expansion card. After
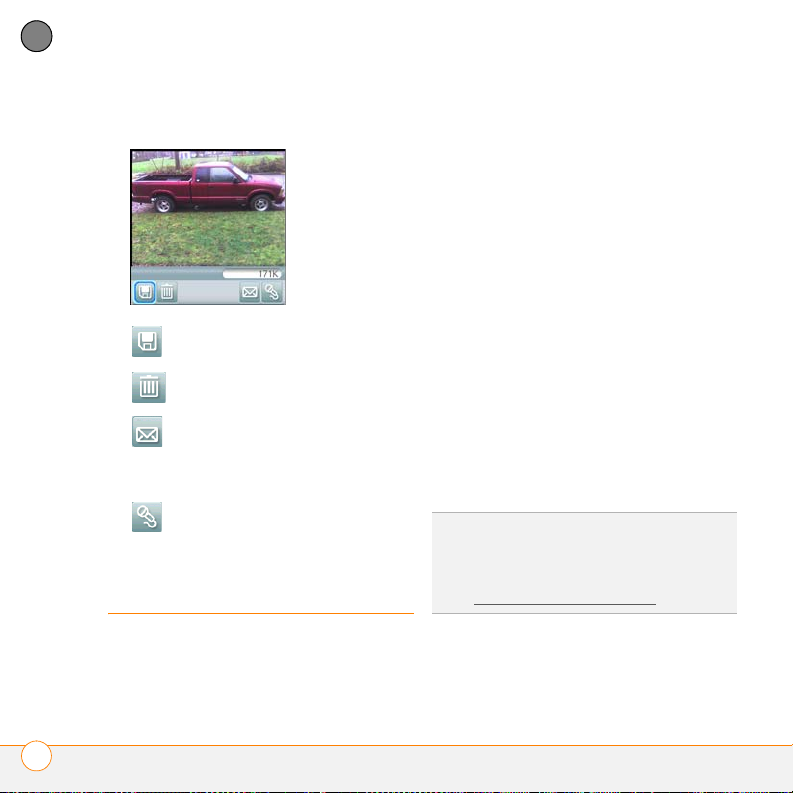
Saves the picture in the location
you selected in step 2.
Deletes the picture.
Opens a dialog box where you
can choose to attach the picture
to an email message or send it to
another Bluetooth
®
device.
you transfer the music files, you can play
them using the Pocket Tunes
™
application
on your smartphone.
BEFORE YOU BEGIN Mac You need an
expansion card (sold separately) to listen to
music on your smartphone. You cannot
transfer MP3 files from your Mac directly
onto your smartphone.
Lets you add a voice caption.
TIP
You can upgrade Pocket Tunes to a version
that supports more music file formats (such
as WMA), supports subscription music, and
Pocket Tunes™
includes additional features. For more info,
visit www.pocket-tunes.com/palm
.
You can listen to music through the
speaker on the back of your smartphone or
through the stereo headset included with
POCKET TUNES
44
™
Page 49

YOUR PICTURES AND MUSIC
Click
Properties
Select your
smartphone
Uncheck
box
5
Setting up Windows Media Player for MP3
On a Windows computer, you need to set
Windows Media Player to save your music
files in MP3 format in order for the files to
be compatible with Pocket Tunes.
1 Connect your smartphone to your
computer with the sync cable.
2 Press Applications and select
pTunes .
3 On your computer, open Windows
Media Player, and then click the
full-screen icon in the upper-right corner
to maximize the window.
4 Click To o l s , and then click Options.
5 Click the Rip Music tab, click the
Format pick list, and then select mp3.
Click OK.
6 Click To o l s , and then click Options.
7 Click the Devices tab, select Palm
Handheld from the Devices list, and
then click Properties.
8 Click the Quality tab and uncheck the
Convert files as required by this
handheld (recommended) box. Click
Apply.
9 Click OK, and then click OK again.
Windows Media Player is ready to transfer
MP3 files to Pocket Tunes.
POCKET TUNES
CHAPTER
™
45
Page 50

YOUR PICTURES AND MUSIC
5
CHAPTER
Setting up iTunes for MP3
On a Mac, use iTunes to convert music
from a CD to MP3 format. For info on
using the iTunes software, see the
documentation that came with your Mac.
1 On your Mac, open iTunes.
2 Select Preferences.
3 Click the Advanced button at the top of
the window, and then click Importing.
4 Click the Import Using pop-up menu
and select MP3 Encoder.
5 (Optional) Click the Setting pop-up
menu and select Good Quality.
Transferring MP3 files from your computer
If an expansion card is inserted into the
smartphone, Windows Media Player
copies the MP3 files to the expansion card.
If you don’t have an expansion card
inserted, the MP3 files are copied to your
smartphone’s memory.
IMPORTANT You must sync your
smartphone with your computer at least
once before you can transfer MP3 files
from your computer.
1 Connect your smartphone to your
computer with the USB sync cable.
2 On your smartphone, press
Applications and select
pTunes .
3 If you are transferring MP3 files from a
Mac, insert an expansion card into your
smartphone. This step is optional for
Windows users.
4 Do one of the following:
WINDOWS ONLY Open Windows
Media Player on your computer. Select
the Sync tab, and then select Palm
Handheld from the drop-down list.
Select Start Sync. The files are
transferred to your smartphone.
NOTE Do not press the sync button on
your cable. Windows Media Player
transfers the files, so there’s no need to do
anything.
MAC ONLY Drag and
drop the MP3 files onto
the Send To Handheld
droplet in the Palm folder.
Select your device name, the file name,
and the destination (card). Click OK.
POCKET TUNES
46
™
Page 51

YOUR PICTURES AND MUSIC
5
Synchronize your smartphone with your
computer. Be patient; transferring music
to an expansion card can take several
minutes.
DID YOU KNOW
accessory (sold separately) to transfer MP3
files from your computer to your expansion
card. Create a Music_Audio folder in the root
directory of the card, and store your MP3 files
in this folder.
?
You can also use a card reader
Transferring music from a CD to your smartphone
If your songs are on a CD, you need to
convert them to MP3 format before you
transfer the files to your smartphone.
WINDOWS ONLY
1 On your computer, open Windows
Media Player.
2 Insert the music CD into your
computer’s CD drive.
3 Select the Rip tab.
4 Select the tracks you want to convert to
MP3.
5 Select Rip Music.
6 Transfer the MP3 files to your
smartphone as described in
“Transferring MP3 files from your
computer” on page 46.
MAC ONLY
1 On your Mac, open iTunes.
2 Insert the music CD into the CD drive
on your Mac.
3 Check the boxes next to the tracks you
want to convert to MP3.
4 Click the Import button in the
upper-right corner of the iTunes window.
5 When the songs have finished
importing, click the Eject Disk button in
the lower-right corner of the iTunes
window.
6 Transfer the MP3 files to your
smartphone as described in
“Transferring MP3 files from your
computer” on page 46.
Listening to music on your smartphone
CAUTION Protect your hearing. Listening
to this device at full volume for a long
period of time can damage your hearing.
CHAPTER
POCKET TUNES
™
47
Page 52

YOUR PICTURES AND MUSIC
Previous
song
Next song
Volu me
Choose
song
Progress
indicator
Play/Pause
5
CHAPTER
POCKET TUNES
48
1 Make sure the Ringer switch is set to
Sound On .
2 Press Applications and select
pTunes .
3 Do any of the following:
• To play or resume playback of the
current song, select Play .
• To play the next song, select Next
song .
• To play the previous song, select
Previous song .
• To play a different song, select
Choose song and select a
song from the list.
• To adjust the volume during playback,
press the Volum e button on the side
of your smartphone.
• To pause playback, select Pause .
DID YOU KNOW
pause and resume playback, as well as use
the 5-way to navigate among songs or pause
and resume playback.
?
You can also press Space to
™
Pocket Tunes continues playing until it
reaches the end of your list or until you
select Pause . Music continues to play
even if you switch to another application or
turn off your screen.
TIP
If you want to stop playing music when
you exit Pocket Tunes, open the Background
Prefs menu and uncheck the Enable
background play box, and then select OK.
Page 53

CHAPTER
Check out these features
6
Your Palm®Tr e o™ 755P smartphone
includes too many features to fit into this
small guide. For more info about all your
smartphone’s features, see your
®
Palm
Tr e o™ 755P User Guide at http://
go.palm.com/treo755p/.
Here’s a sneak preview of some of the
other applications you can explore:
Find helpful tips and tricks and
a version of your Palm
755
P smartphone User Guide
that is formatted to fit your
smartphone’s screen.
Get acquainted with your
smartphone’s common
features with this on-device
tutorial.
®
Tr eo™
Set up connections with other
Bluetooth
devices, such as a hands-free
headset.
Perform basic and advanced
calculations on your
smartphone, including
scientific, financial, and
conversion functions.
Capture short videos and send
them to your friends and family
as email attachments.
View info about an expansion
card that is inserted into the
expansion slot.
Set synchronization settings,
including changing which apps
synchronize with your desktop
software.
®
wireless technology
Page 54

CHECK OUT THESE FEATURES
6
CHAPTER
Forget about losing scraps of
paper; store notes right on your
Listen to, create, and send
ringtones and other sounds.
smartphone.
View and manage pictures and
videos captured on your
smartphone or in supported
formats from a digital camera
or camcorder.
Personalize your smartphone
settings to match your lifestyle,
from date and time formats to
screen colors, power-saving
features, and more.
Stay on top of your to-do
list and track your
accomplishments.
Record and play back notes and
other important thoughts.
View the date and time in three
cities anywhere around the
globe, and use the built-in
travel alarm.
Prevent unauthorized use of
your phone and access to your
info by using Security settings.
50
Page 55

Index
NUMERICS
1xRTT technology 29
5-way navigator 1, 5
A
accented characters 9, 10
accessing
alternate characters 9, 10
application menus 7
applications 11
favorite buttons 17, 23, 24
web pages 37, 38
Account Setup dialog box 32
activating items on screen 6
Active Call View 21, 23
Add Call button 23
Add Favorites dialog box 24
Address Bar (web browser)
37, 38
addressing email 33
addressing text messages 36
agenda lists 42
Alert dialog box 20
alerts 20, 28
alternate characters 9, 10
application buttons 11
applications
See also specific built-in
applications
caution for installing 5
closing 11
displaying menus for 7
opening 11, 22
synchronizing 12
transferring 3
Applications button 1, 11, 16
Applications View 11
attachments 34, 35, 44
Auto-off after setting 16
B
backing up information 12
battery 13
battery door release 2
battery status icons 28
beaming 13
Blazer web browser 37
See also web browser
Bluetooth application 13, 49
Bluetooth devices 21, 28
bookmarks 38
Bookmarks View 38
border glow (highlight) 6
buttons 11, 17, 24
C
calculating free space 3
Calculator application 9, 49
Calendar application 42
Calendar button 1, 11
Call Log dialog box 18
caller IDs 41
Camcorder application 49
camera 43
Camera application 43–44
camera lens 2
canceling menu selection 7
Caps Lock 8
car kits 25
Card Info application 49
card readers 47
Center button 1
character entry 8–9
charge indicator 1
charging smartphone 13
Choose song button 48
clock
50
color-coding events 42
colored backgrounds 6
Compose dialog box 36
compressed files 40
conference calls 24
connections 22, 37
conserving battery 13
INDEX
51
Page 56

Contact Edit dialog box 41
contacts
adding 41
creating speed-dial
buttons for 24
looking up 17, 24
Contacts application 41
copying music files 46–47
coverage area 13, 27
D
data services 31, 37
data transfers 29
Day View 42
deleting
attachments 34
device names 5
pictures 44
device names 4
devices 3, 5, 25
See also Bluetooth
devices; smartphone
Dial Pad 9, 16, 21
documentation 15, 49
Documents application 42
downloading
attachments 35
files 39, 40
E
earpiece 1, 21
email 29, 31–35, 44
Email application 31
Email button 1
email providers 31, 32
emergency phone calls 28
emoticons 36
EVDO technology 29
events 29, 42
Excel spreadsheets 42
expansion card slot
2
expansion cards 3, 42, 44, 46
extra digits (phone) 20, 22,
25
F
favorite buttons 17, 23, 24
files
accessing 42
attaching to email 34, 35
converting music 45, 46
copying music 46–47
downloading 39, 40
transferring 3
5-way navigator 1
folders (Inbox) 35
fonts 38
Free Space information 3
G
getting started 49
H
hands-free devices 25, 28
hard resets 5
headset button 19, 21
headset jack 2
headsets 19, 21, 25, 44
highlighting
applications 11
items on screen 6
web links 37
home page 38
HotSync application 49
See also synchronizing
information
I
images 38
Inbox 34, 35
incompatible files and
applications 3
indicator light 1
information
backing up 12
entering
8–9
synchronizing 4, 12
transferring 3
INDEX
52
Page 57

infrared port, location of 2
installation 4
Internet 37, 40
IR port, location of 2
iTunes 44, 46, 47
K
keyboard 8–9, 15
keyboard buttons 8
Keyguard 15
L
Location setting 28
M
media features 13, 16
Media Player 44, 45, 46, 47
Memos application 50
Menu button 1
Menu key 7
menus 7
messages. See email; text
messages
Messaging application 36
Messaging button 11
microphone 2, 22
miniSD expansion card slot 2
mirror 2
multi-connector pin 2
music
adjusting volume 48
converting for smartphone
45, 46
downloading 39
listening to 44, 47
selecting 48
stopping 48
transferring 46–47
music files 46, 47
music formats 39, 44
music subscriptions 44
Music_Audio folder 47
mute button 22
My Treo application 49
N
naming
photo albums 43
smartphone device 4
navigator buttons 1, 5
New Bookmark dialog box 38
New Message dialog box 33,
34
numbers 9
O
opening
application menus 7
applications 11, 22
attachments 35
Call Log 18
Dial Pad 21
web browser 37
Option key 1, 9
Option Lock 9, 36
organizer features 13, 16
P
Palm Desktop software 12
Palm OS devices 3
passwords 20, 22, 33
PDF files 42
personal computers 12
phone
adjusting volume for 22
answering 19
creating speed-dial
buttons for 24
dialing 17–18, 21, 23
documentation,
conventions for 15
hanging up 21, 22, 23
holding calls 21, 23
opening apps and
22
selecting ringtones for 26
silencing 19
turning on and off 15, 16
INDEX
53
Page 58

viewing Call Log for 18
Phone application 16, 23, 27
Phone button 1, 11
phone buttons (Active Call
View) 21
phone headsets 25
phone indicator. See indicator
light
phone status icons 16, 27
photo albums 43
photos 41
See also pictures
Pics&Videos application 50
picture file types 39
pictures
attaching to email 44
downloading 39
saving 43, 44
taking 43
Play button (Pocket Tunes)
48
Play icon (web browser) 39
Pocket Tunes 44, 48
power preferences 13
Power/End button 1, 15, 16
PowerPoint files 42
Prefs application 50
priority settings 36
Q
quarantined files 3, 5
quick buttons 11, 16
Quick Keys 25
Quick Tour 49
QuickText phrases 36
R
Redial list 18
refreshing web pages 38
repeating events 42
replacing battery
13
resets 5
ringer 19, 27
Ringer switch 2
ringtone file types 39
ringtones 26, 39, 41
roaming 26, 27
S
saving
pictures 43, 44
text messages 36
web page images 39
schedules. See Calendar
application
screen
conserving battery and 13
highlighting and selecting
items on 6–7
moving around on 5
restoring brightness 21
turning on or off 15
Security application 50
self-portrait mirror 2
Send button 1
Send To Device droplet 46
Shift/Find key 8
Side button 1
signal-strength icon 16
smartphone
additional documentation
for 49
calculating free space on 3
charging 13
defined 15
devices compatible with
25
features illustrated 1–2
naming 4
personalizing 50
storing
2
upgrading 3–5
sorting email messages 35
Sound Off 2
sound preferences 26
Sounds application 50
INDEX
54
Page 59

speaker 2
speakerphone 21
special characters 9, 10
speed-dial buttons 17, 24
spreadsheets 42
status icons (email) 35
status icons (phone) 16, 27
stereo headsets and
adapters 44
style sheets 38
stylus 2
symbols 9, 10
sync button 12
synchronizing information 4,
12
T
taking pictures 43
tapping 5, 6
Tasks application 50
text 8, 17, 38
text messages 19, 29, 36
third-party applications 3, 5
touch screen. See screen
Treo smartphone. See
smartphone
U
unread messages 29, 35
updating information 12
upgrades 3–5, 44
URLs. See web addresses;
web links
usernames 33
V
VersaMail application 31–35
Vibrate pick list 26
video file types 39
videos 39
voice captions 44
Voice Memo application
50
voicemail 19, 20, 28
Voicemail icon 20
Volume button 1, 22, 27, 48
Volume pick list 26
W
waking up screen 15
web addresses 37, 38
See also web links
web browser
changing fonts for 38
creating bookmarks for 38
displaying toolbar for 40
downloading from 39, 40
installing apps from 40
opening 37
resizing text for 38
streaming content and 39
web browser application 37
web browser icons 38
web forms 38
web links 37
web pages 37–40
websites 38
wireless features 13
Word documents 42
World Clock 50
Z
zoom settings (camera) 43
INDEX
55
Page 60

INDEX
56
 Loading...