

Page 1

Sprint PCS® Service
Sprint Mobile Broadband Smart Device
TM
Tr eo
700wx by Palm
Getting Started Guide
www.sprint.com
© Sprint Nextel. All rights reserved. No reproduction in
whole or in part without prior written approval. Sprint,
the “Going Forward” logo, and other trademarks are
trademarks of Sprint Nextel.
Printed in the U.S.A.
PN: 406-10613-00
v. 1.0
Page 2

Intellectual Property Notices
© 2006 Palm, Inc. All rights reserved. Trademark, copyright, patent, and other intellectual property notices
are set forth on page ii within the Treo 700
WX User Guide installed on the user’s computer.
Disclaimer and Limitation of Liability
Palm, Inc. and its suppliers assume no responsibility for any damage or loss resulting from the use of this
guide. Palm, Inc. and its suppliers assume no responsibility for any loss or claims by third parties that may
arise through the use of this software. Palm, Inc. and its suppliers assume no responsibility for any damage
or loss caused by deletion of data as a result of malfunction, dead battery, or repairs. Be sure to make
backup copies of all important data on other media to protect against data loss.
End user notice
Microsoft® Voice Command Version 1.5 for Windows Mobile
IMPORTANT: Do not become distracted from driving safely if operating a motor vehicle while using Device
Software.
Operating certain parts of this Device requires user attention. Diverting attention away from the road
while driving can possibly cause an accident or other serious consequences. Even occasional, short diversions of attention can be dangerous if your attention is diverted away from your driving task at a critical
time. Do not change system settings or enter data non-verbally (using your hands) while driving. Stop the
vehicle in a safe and legal manner before attempting these operations. This is important since while setting up or changing some functions you might be required to distract your attention away from the road
and remove your hands from the wheel.
Microsoft makes no representations, warranties or other determinations that ANY use of the Software
Product is legal, safe, or in any manner recommended or intended while driving or otherwise operating a
motor vehicle.
®
Page 3

Intellectual Property Notices
© 2006 Palm, Inc. All rights reserved. Trademark, copyright, patent, and other intellectual property notices
are set forth on page ii within the Treo 700
WX User Guide installed on the user’s computer.
Disclaimer and Limitation of Liability
Palm, Inc. and its suppliers assume no responsibility for any damage or loss resulting from the use of this
guide. Palm, Inc. and its suppliers assume no responsibility for any loss or claims by third parties that may
arise through the use of this software. Palm, Inc. and its suppliers assume no responsibility for any damage
or loss caused by deletion of data as a result of malfunction, dead battery, or repairs. Be sure to make
backup copies of all important data on other media to protect against data loss.
End user notice
Microsoft® Voice Command Version 1.5 for Windows Mobile
IMPORTANT: Do not become distracted from driving safely if operating a motor vehicle while using Device
Software.
Operating certain parts of this Device requires user attention. Diverting attention away from the road
while driving can possibly cause an accident or other serious consequences. Even occasional, short diversions of attention can be dangerous if your attention is diverted away from your driving task at a critical
time. Do not change system settings or enter data non-verbally (using your hands) while driving. Stop the
vehicle in a safe and legal manner before attempting these operations. This is important since while setting up or changing some functions you might be required to distract your attention away from the road
and remove your hands from the wheel.
Microsoft makes no representations, warranties or other determinations that ANY use of the Software
Product is legal, safe, or in any manner recommended or intended while driving or otherwise operating a
motor vehicle.
®
Page 4

Table of Contents
Welcome to Sprint . . . . . . . . . . . . . . . . . . . . . . . . . . . . . . . . . . . . . . . . . . . . . . . . . . . . . . . . . . . .i
Where to Learn More . . . . . . . . . . . . . . . . . . . . . . . . . . . . . . . . . . . . . . . . . . . . . . . . . . . . . . . . . . . . . . . . . . . . . . . . . . . . . ii
What You Need . . . . . . . . . . . . . . . . . . . . . . . . . . . . . . . . . . . . . . . . . . . . . . . . . . . . . . . . . . . . . . . . . . . . . . . . . . . . . . . . . . v
Creating Sprint PCS Account Passwords . . . . . . . . . . . . . . . . . . . . . . . . . . . . . . . . . . . . . . . . . . . . . . . . . . . . . . . . . . vii
Device and Phone Basics . . . . . . . . . . . . . . . . . . . . . . . . . . . . . . . . . . . . . . . . . . . . . . . . . . . . . . 1
Your New Treo 700wx Smart Device . . . . . . . . . . . . . . . . . . . . . . . . . . . . . . . . . . . . . . . . . . . . . . . . . . . . . . . . . . . . . . 2
Maintaining the Battery . . . . . . . . . . . . . . . . . . . . . . . . . . . . . . . . . . . . . . . . . . . . . . . . . . . . . . . . . . . . . . . . . . . . . . . . . . 7
Inserting the Battery . . . . . . . . . . . . . . . . . . . . . . . . . . . . . . . . . . . . . . . . . . . . . . . . . . . . . . . . . . . . . . . . . . . . . . . . . . . 7
Charging the Battery . . . . . . . . . . . . . . . . . . . . . . . . . . . . . . . . . . . . . . . . . . . . . . . . . . . . . . . . . . . . . . . . . . . . . . . . . . . 8
Turning Your Smart Device On/Off . . . . . . . . . . . . . . . . . . . . . . . . . . . . . . . . . . . . . . . . . . . . . . . . . . . . . . . . . . . . . . . 9
Moving Around the Screen . . . . . . . . . . . . . . . . . . . . . . . . . . . . . . . . . . . . . . . . . . . . . . . . . . . . . . . . . . . . . . . . . . . . . . 11
Using the Keyboard . . . . . . . . . . . . . . . . . . . . . . . . . . . . . . . . . . . . . . . . . . . . . . . . . . . . . . . . . . . . . . . . . . . . . . . . . . . . . 17
Opening and Closing Applications . . . . . . . . . . . . . . . . . . . . . . . . . . . . . . . . . . . . . . . . . . . . . . . . . . . . . . . . . . . . . . . 19
Using Your Today Screen . . . . . . . . . . . . . . . . . . . . . . . . . . . . . . . . . . . . . . . . . . . . . . . . . . . . . . . . . . . . . . . . . . . . . . . . 20
Checking Signal Strength and Phone Status . . . . . . . . . . . . . . . . . . . . . . . . . . . . . . . . . . . . . . . . . . . . . . . . . . . 21
Using the Phone . . . . . . . . . . . . . . . . . . . . . . . . . . . . . . . . . . . . . . . . . . . . . . . . . . . . . . . . . . . . . . . . . . . . . . . . . . . . . . . . 24
Accessing Your Today Screen . . . . . . . . . . . . . . . . . . . . . . . . . . . . . . . . . . . . . . . . . . . . . . . . . . . . . . . . . . . . . . . . . . 24
Making Calls . . . . . . . . . . . . . . . . . . . . . . . . . . . . . . . . . . . . . . . . . . . . . . . . . . . . . . . . . . . . . . . . . . . . . . . . . . . . . . . . . . 25
Receiving Calls . . . . . . . . . . . . . . . . . . . . . . . . . . . . . . . . . . . . . . . . . . . . . . . . . . . . . . . . . . . . . . . . . . . . . . . . . . . . . . . . 27
Using Voicemail . . . . . . . . . . . . . . . . . . . . . . . . . . . . . . . . . . . . . . . . . . . . . . . . . . . . . . . . . . . . . . . . . . . . . . . . . . . . . . 28
Managing Active Calls . . . . . . . . . . . . . . . . . . . . . . . . . . . . . . . . . . . . . . . . . . . . . . . . . . . . . . . . . . . . . . . . . . . . . . . . 29
Using Sprint PCS Voice Command . . . . . . . . . . . . . . . . . . . . . . . . . . . . . . . . . . . . . . . . . . . . . . . . . . . . . . . . . . . . . 31
Defining Speed-Dial Buttons . . . . . . . . . . . . . . . . . . . . . . . . . . . . . . . . . . . . . . . . . . . . . . . . . . . . . . . . . . . . . . . . . . 33
Using a Phone Headset . . . . . . . . . . . . . . . . . . . . . . . . . . . . . . . . . . . . . . . . . . . . . . . . . . . . . . . . . . . . . . . . . . . . . . . 35
Page 5

Selecting Ringtones and Vibrate Settings . . . . . . . . . . . . . . . . . . . . . . . . . . . . . . . . . . . . . . . . . . . . . . . . . . . . . . 37
Adjusting Volume Settings . . . . . . . . . . . . . . . . . . . . . . . . . . . . . . . . . . . . . . . . . . . . . . . . . . . . . . . . . . . . . . . . . . . . 38
Assigning a Picture and Ringtone ID to a Contact . . . . . . . . . . . . . . . . . . . . . . . . . . . . . . . . . . . . . . . . . . . . . . 38
Resetting Your Smart Device . . . . . . . . . . . . . . . . . . . . . . . . . . . . . . . . . . . . . . . . . . . . . . . . . . . . . . . . . . . . . . . . . . . . 39
Wireless Features . . . . . . . . . . . . . . . . . . . . . . . . . . . . . . . . . . . . . . . . . . . . . . . . . . . . . . . . . . . 41
Using Sprint PCS Vision . . . . . . . . . . . . . . . . . . . . . . . . . . . . . . . . . . . . . . . . . . . . . . . . . . . . . . . . . . . . . . . . . . . . . . . . . 42
Accessing Sprint PCS Vision . . . . . . . . . . . . . . . . . . . . . . . . . . . . . . . . . . . . . . . . . . . . . . . . . . . . . . . . . . . . . . . . . . . 43
Personalizing Your Service With On Demand . . . . . . . . . . . . . . . . . . . . . . . . . . . . . . . . . . . . . . . . . . . . . . . . . . . . . 44
Using Your Device’s Phone as a Modem . . . . . . . . . . . . . . . . . . . . . . . . . . . . . . . . . . . . . . . . . . . . . . . . . . . . . . . . . . 47
Setting Up an Exchange Server Account . . . . . . . . . . . . . . . . . . . . . . . . . . . . . . . . . . . . . . . . . . . . . . . . . . . . . . . . . 50
Sending and Receiving Email . . . . . . . . . . . . . . . . . . . . . . . . . . . . . . . . . . . . . . . . . . . . . . . . . . . . . . . . . . . . . . . . . . . . 53
Sending and Receiving Text Messages . . . . . . . . . . . . . . . . . . . . . . . . . . . . . . . . . . . . . . . . . . . . . . . . . . . . . . . . . . . 55
Viewing a Web Page . . . . . . . . . . . . . . . . . . . . . . . . . . . . . . . . . . . . . . . . . . . . . . . . . . . . . . . . . . . . . . . . . . . . . . . . . . . . 57
Working With Favorites . . . . . . . . . . . . . . . . . . . . . . . . . . . . . . . . . . . . . . . . . . . . . . . . . . . . . . . . . . . . . . . . . . . . . . . 59
Connecting to Devices With Bluetooth® Wireless Technology . . . . . . . . . . . . . . . . . . . . . . . . . . . . . . . . . . . . . 61
Turning Wireless Services On/Off . . . . . . . . . . . . . . . . . . . . . . . . . . . . . . . . . . . . . . . . . . . . . . . . . . . . . . . . . . . . . . . . 64
Information Management . . . . . . . . . . . . . . . . . . . . . . . . . . . . . . . . . . . . . . . . . . . . . . . . . . . 65
Synchronizing - The Basics . . . . . . . . . . . . . . . . . . . . . . . . . . . . . . . . . . . . . . . . . . . . . . . . . . . . . . . . . . . . . . . . . . . . . . . 66
Working With Your Pictures and Videos . . . . . . . . . . . . . . . . . . . . . . . . . . . . . . . . . . . . . . . . . . . . . . . . . . . . . . . . . 68
Taking a Picture . . . . . . . . . . . . . . . . . . . . . . . . . . . . . . . . . . . . . . . . . . . . . . . . . . . . . . . . . . . . . . . . . . . . . . . . . . . . . . 68
Viewing a Picture or Video . . . . . . . . . . . . . . . . . . . . . . . . . . . . . . . . . . . . . . . . . . . . . . . . . . . . . . . . . . . . . . . . . . . . 69
Listening to Music . . . . . . . . . . . . . . . . . . . . . . . . . . . . . . . . . . . . . . . . . . . . . . . . . . . . . . . . . . . . . . . . . . . . . . . . . . . . . . 71
Transferring Media Files to Your Smart Device . . . . . . . . . . . . . . . . . . . . . . . . . . . . . . . . . . . . . . . . . . . . . . . . . 71
Playing Media Files on Your Smart Device . . . . . . . . . . . . . . . . . . . . . . . . . . . . . . . . . . . . . . . . . . . . . . . . . . . . . . 72
Working With Libraries . . . . . . . . . . . . . . . . . . . . . . . . . . . . . . . . . . . . . . . . . . . . . . . . . . . . . . . . . . . . . . . . . . . . . . . 73
Personal Information Management . . . . . . . . . . . . . . . . . . . . . . . . . . . . . . . . . . . . . . . . . . . . . . . . . . . . . . . . . . . . . 74
Managing Your Contacts . . . . . . . . . . . . . . . . . . . . . . . . . . . . . . . . . . . . . . . . . . . . . . . . . . . . . . . . . . . . . . . . . . . . . . 74
Page 6

Viewing or Changing Contact Information . . . . . . . . . . . . . . . . . . . . . . . . . . . . . . . . . . . . . . . . . . . . . . . . . . . . . 75
Creating and Viewing Your Calendar . . . . . . . . . . . . . . . . . . . . . . . . . . . . . . . . . . . . . . . . . . . . . . . . . . . . . . . . . . 75
Managing Your Tasks . . . . . . . . . . . . . . . . . . . . . . . . . . . . . . . . . . . . . . . . . . . . . . . . . . . . . . . . . . . . . . . . . . . . . . . . . 77
Using Word Mobile . . . . . . . . . . . . . . . . . . . . . . . . . . . . . . . . . . . . . . . . . . . . . . . . . . . . . . . . . . . . . . . . . . . . . . . . . . . . . 79
Using Find . . . . . . . . . . . . . . . . . . . . . . . . . . . . . . . . . . . . . . . . . . . . . . . . . . . . . . . . . . . . . . . . . . . . . . . . . . . . . . . . . . . . . . 81
Using Expansion Cards . . . . . . . . . . . . . . . . . . . . . . . . . . . . . . . . . . . . . . . . . . . . . . . . . . . . . . . . . . . . . . . . . . . . . . . . . . 83
Installing Applications . . . . . . . . . . . . . . . . . . . . . . . . . . . . . . . . . . . . . . . . . . . . . . . . . . . . . . . . . . . . . . . . . . . . . . . . . . 86
Customizing Your Device . . . . . . . . . . . . . . . . . . . . . . . . . . . . . . . . . . . . . . . . . . . . . . . . . . . . . . . . . . . . . . . . . . . . . . . . 89
Locking Your Smart Device and Information . . . . . . . . . . . . . . . . . . . . . . . . . . . . . . . . . . . . . . . . . . . . . . . . . . . . . 94
Glossary . . . . . . . . . . . . . . . . . . . . . . . . . . . . . . . . . . . . . . . . . . . . . . . . . . . . . . . . . . . . . . . . . . . . 97
Important Safety Information . . . . . . . . . . . . . . . . . . . . . . . . . . . . . . . . . . . . . . . . . . . . . . .101
General Precautions . . . . . . . . . . . . . . . . . . . . . . . . . . . . . . . . . . . . . . . . . . . . . . . . . . . . . . . . . . . . . . . . . . . . . . . . . . . . 102
Maintaining Safe Use of and Access to Your Device . . . . . . . . . . . . . . . . . . . . . . . . . . . . . . . . . . . . . . . . . . . . . . 103
Using Your Phone With a Hearing Aid Device . . . . . . . . . . . . . . . . . . . . . . . . . . . . . . . . . . . . . . . . . . . . . . . . . . . 106
Caring for the Battery . . . . . . . . . . . . . . . . . . . . . . . . . . . . . . . . . . . . . . . . . . . . . . . . . . . . . . . . . . . . . . . . . . . . . . . . . . 108
Radiofrequency (RF) Energy . . . . . . . . . . . . . . . . . . . . . . . . . . . . . . . . . . . . . . . . . . . . . . . . . . . . . . . . . . . . . . . . . . . . 110
Static Electricity, ESD, and Your Device . . . . . . . . . . . . . . . . . . . . . . . . . . . . . . . . . . . . . . . . . . . . . . . . . . . . . . . . . . 112
Owner’s Record . . . . . . . . . . . . . . . . . . . . . . . . . . . . . . . . . . . . . . . . . . . . . . . . . . . . . . . . . . . . . . . . . . . . . . . . . . . . . . . . 114
User’s Guide Proprietary Notice . . . . . . . . . . . . . . . . . . . . . . . . . . . . . . . . . . . . . . . . . . . . . . . . . . . . . . . . . . . . . . . . 114
Index . . . . . . . . . . . . . . . . . . . . . . . . . . . . . . . . . . . . . . . . . . . . . . . . . . . . . . . . . . . . . . . . . . . . . .115
Page 7

Page 8

Welcome to Sprint
Sprint and Nextel have come together, offering you more choice and flexibility to do whatever
you want, whenever you want.
This powerful combination brings you access to more products, more services, and more of
what you need to do more of what you want. Welcome to a future full of possibility.
Welcome to the new Sprint.
Welcome and thank you for choosing Sprint.
Getting Started
Getting Started i
Page 9

Where to Learn More
For a Quick Introduction
䢇 Quick Tour: The Quick Tour highlights many of your smart device’s features. It is already
installed on your smart device, and you can open it at any time. Press Start , select
Programs, and then select Quick Tour .
While Using Your Smart Device
䢇 User Guide: The Treo 700WX User Guide provides complete information on using your
device, including descriptions of advanced features not included in this reference guide.
To access the guide on your computer, click Start >Programs >Palm >User Manuals
>Treo700wx_UG_Sprint.pdf.. You can also view the user guide on your device by pressing
Start > Programs, and then tapping the User Guide .
䢇 Help: Many of the built-in applications include on-device Help, so that you can learn
about the tasks you can perform in that application. To access Help, go to the
application or screen you want help with, press Start , and select Help.
䢇 Online support from Palm: For up-to-date downloads, troubleshooting, and support
information, check out
www.palm.com/us/support/treo700wxsprint.
If You Need More Information
䢇 Books: Many books on Windows Mobile
retailers (look in the computers section).
䢇 Online forums: Consult online Treo device user discussion groups to swap information
and learn about topics you may find nowhere else. Visit
www.palm.com/us/support for details.
䢇 Sprint Customer Service: For questions about your account or features available on the
network, contact Sprint or visit
www.sprint.com for the latest information and help.
ii Getting Started
®
devices are available in local or online book
Page 10

Visiting the Sprint Web Site
You can get up-to-date information on Sprint PCS services and options by signing on to the
Sprint Web site at
www.sprint.com.
When you visit Sprint online, you can
䢇 Review coverage maps.
䢇 Learn how to use voicemail.
䢇 Access your account information.
䢇 Purchase accessories.
䢇 Add additional options to your service plan.
䢇 Check out frequently asked questions.
䢇 And more.
Reaching Sprint Customer Service
You can reach Sprint Customer Service in several ways:
䢇 On your Treo700wx smart device, go to your Tod a y screen, enter *2, and then press
Phone/Talk to dial.
䢇 Sign on to your account at www.sprint.com.
䢇 Call toll-free at 1-888-211-4PCS (4727) (Consumer customers),
–or–
1-888-788-4727 (Business customers).
䢇 Write to Sprint Customer Service, P.O. Box 8077, London, KY 40742.
Getting Started
Getting Started iii
Page 11

Receiving Automated Invoicing Information
For your convenience, your device gives you access to invoicing information on your Sprint
PCS account. This information includes balance due, payment received, invoicing cycle, and
the number of minutes used since your last invoicing cycle. (Normal airtime usage will
apply.)
䊳 Go to your To da y screen, enter *4, and then press Phone/Talk to dial.
Note:
This service may not be available in all Affiliate areas.
Sprint 411
You have access to a variety of services and information through Sprint 411, including
residential, business, and government listings; assistance with local or long-distance calls;
movie listings; and hotel, restaurant, shopping, and major local event information. There is
a per-call charge and you will be billed for airtime.
䊳 Go to your To da y screen, enter 411, and then press Phone/Talk to dial.
Note:
Short numbers, such as 411, may conflict with a contact name. If this
occurs, press Option to avoid starting a contact lookup.
Sprint PCS Operator Services
Sprint PCS Operator Services provides assistance with placing collect calls or with placing
calls billed to a local telephone calling card or third party.
䊳 Go to your To da y screen, enter 0, and then press Phone/Talk to dial.
For more information or to see the latest in products and services, visit Sprint online at
www.sprint.com.
iv Getting Started
Page 12

What You Need
Your Treo™ 700wx smart device box contains the following:
Hardware
䢇 Treo dev ice .
䢇 Rechargeable battery.
䢇 AC charger.
䢇 USB sync cable.
䢇 Stereo headset.
䢇 Sprint
Documentation
䢇 Read This First setup poster.
䢇 Welcome to Sprint pamphlet.
䢇 Getting Started Guide.
䢇 Setting Up Email guide.
䢇 Terms & Conditions.
䢇 War rant y.
䢇 Software License Agreement.
䢇 Audible insert.
®
charger adapter.
Getting Started
Getting Started v
Page 13

Software
䢇 Getting Started CD (includes desktop synchronization software and bonus software for
your device).
You’ll also need the following items to complete the installation and activation:
䢇 A Sprint PCS service plan.
䢇 A location with wireless coverage for your device.
䢇 An electrical outlet.
䢇 The computer with which you will synchronize your personal information.
vi Getting Started
Page 14

Creating Sprint PCS Account Passwords
Getting Started
As a Sprint PCS subscriber, you enjoy unlimited access to your personal account
information, your voicemail account, and your Sprint PCS Vision
one else has access to your information, you will need to create passwords to protect your
privacy.
®
account. To ensure that no
Account Password
If you are the account owner, you’ll have an account password to sign on to www.sprint.com
and to use when calling Sprint Customer Service. Your default account password is the last
four digits of your Social Security number. If you are not the account owner (if someone else
pays for your Sprint PCS service), you can get a sub-account password at
www.sprint.com.
Voicemail Password
You’ll create your voicemail password when you set up your voicemail.
Sprint PCS Vision Password
With your Treo700wx smart device, you may elect to set up a Sprint PCS Vision password.
This optional password can be used to authorize the purchase of Premium Services content
and to protect personal information on multi-phone accounts.
For more information or to change your passwords, sign on to
Customer Service at 1-888-211-4PCS (4727).
www.sprint.com or call Sprint
Getting Started vii
Page 15

viii Getting Started
Page 16

Device and Phone Basics
In This Section
⽧ Your New Treo 700wx Smart Device
⽧ Maintaining the Battery
⽧ Moving Around the Screen
⽧ Using the Keyboard
⽧ Opening and Closing Applications
⽧ Using Your Today Screen
⽧ Using the Phone
⽧ Resetting Your Smart Device
Basics 1
Basics
Page 17
Your New Treo 700wx Smart Device
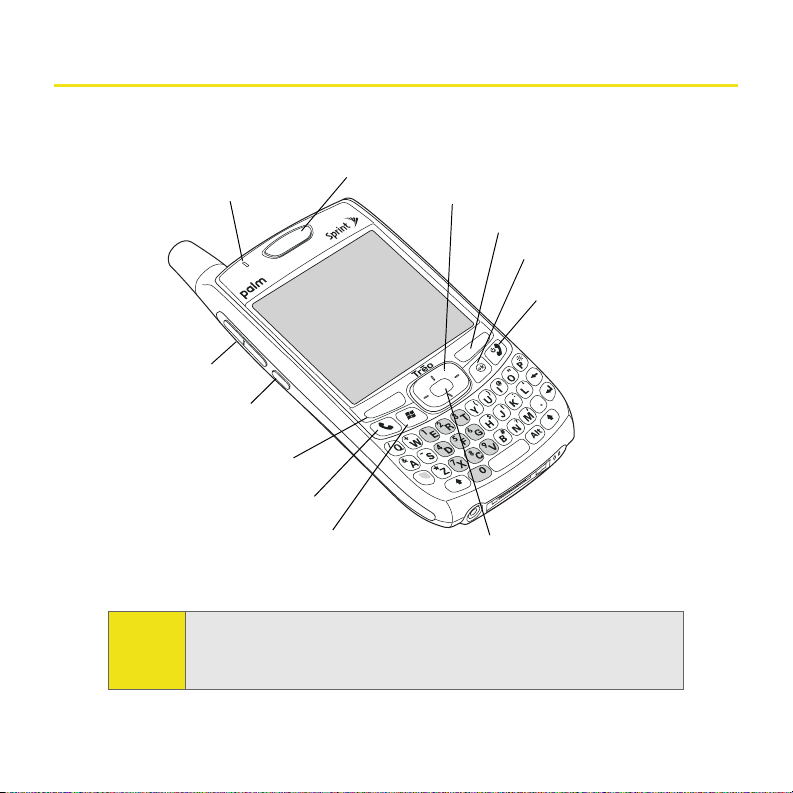
Your Device’s Features: Front View
1. Indicator Light (phone
and charge indicator)
11. Volume
10. Side Button
4. Left Softkey
9. Phone/Talk
Note:
Throughout this guide the term device is used to describe your Treo smart
device and its physical aspects. The term phone is used to describe the
feature of your smart device that enables you to connect to the Nationwide
Sprint PCS Network.
2. Earpiece
8. Start
3. 5-way Navigator
4. Right Softkey
5. OK
6. Power/End
7. Center
2 Basics
Page 18

1. Indicator Light provides status information for your device based on the color of the
light and the blink state.
2. Earpiece serves as the speaker on your device when you are not using the
speakerphone feature or a headset.
3. 5-way Navigator gives you one-handed access to moving around the device screen and
selecting options. See “Moving Around the Screen” on page 11 for instructions.
4. Right and Left Softkeys give you quick access to tasks that you can do on the current
screen.
5. OK accepts the information you entered on a screen and returns to the previous
screen.
6. Power/ End turns the device’s phone on and off, wakes up and turns off the screen, and
hangs up calls.
7. Center selects an option or menu item. After highlighting an item with the 5-way, you
can select or activate it by pressing Center .
8. Start opens the Start menu to access all the applications on your smart device.
9. Phone/Talk opens the Phone application, dials when a phone number is selected or
entered, and answers an incoming phone call.
10. Side Button launches the Windows Media Player application by default. You can also
reassign this button to open your favorite application.
11. Vol um e adjusts the earpiece, speaker, and ringer volume levels.
Basics
Basics 3
Page 19
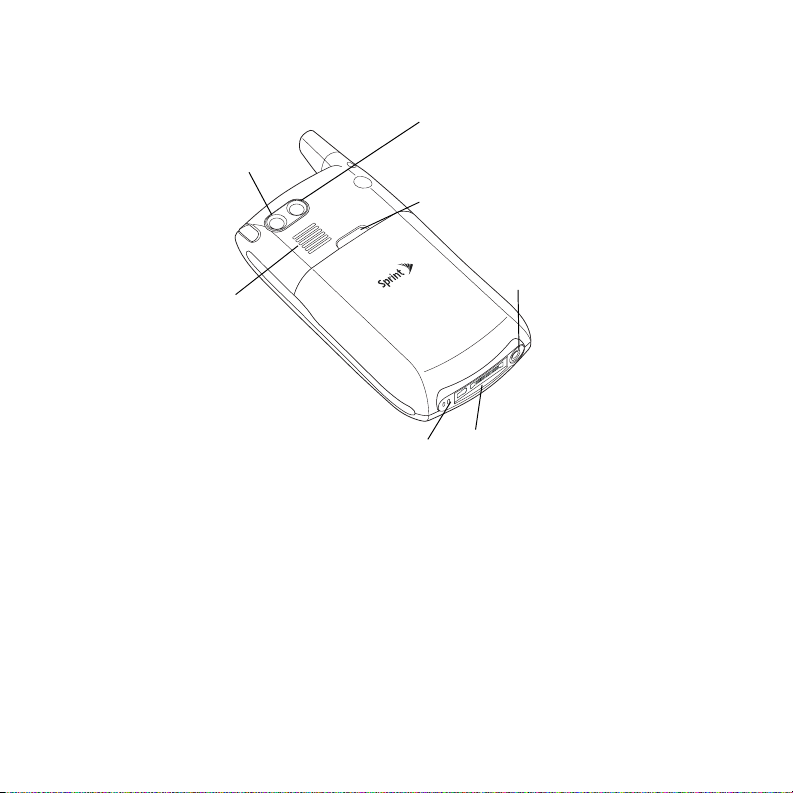
Your Device’s Features: Back View
12. Camera Lens
(camera
version
only)
18. Speaker
17. Microphone
13. Self-Portrait Mirror
(camera version only)
14. Battery Door
Release
15. Headset
Jack
16. Multi-connector
12. Camera Lens enables you to take pictures using the built-in camera (if included). There
are two models of the Treo700wx smart device: One comes with a camera and the
other does not. The packaging for your device identifies whether a camera is included.
13. Self-Portrait Mirror enables you to take a picture of yourself (if your device includes a
camera).
14. Battery Door Release opens the battery compartment.
15. Headset Jack enables you to connect a hands-free headset. Use only headsets that are
compatible with your device.
4 Basics
Page 20
16. Multi-connector enables you to attach the USB sync cable and AC charger to your
device. You can connect the charger either to the sync cable connector or directly to
the charger jack on the Multi-connector.
17. Microphone serves as the mouthpiece on your device’s phone.
18. Speaker plays ringtones and alarms, and serves as the speaker for the speakerphone
feature.
Basics
Note:
The Treo700wx smart device speaker includes a large magnet, so be sure to
keep your device away from credit cards or other items that could become
demagnetized.
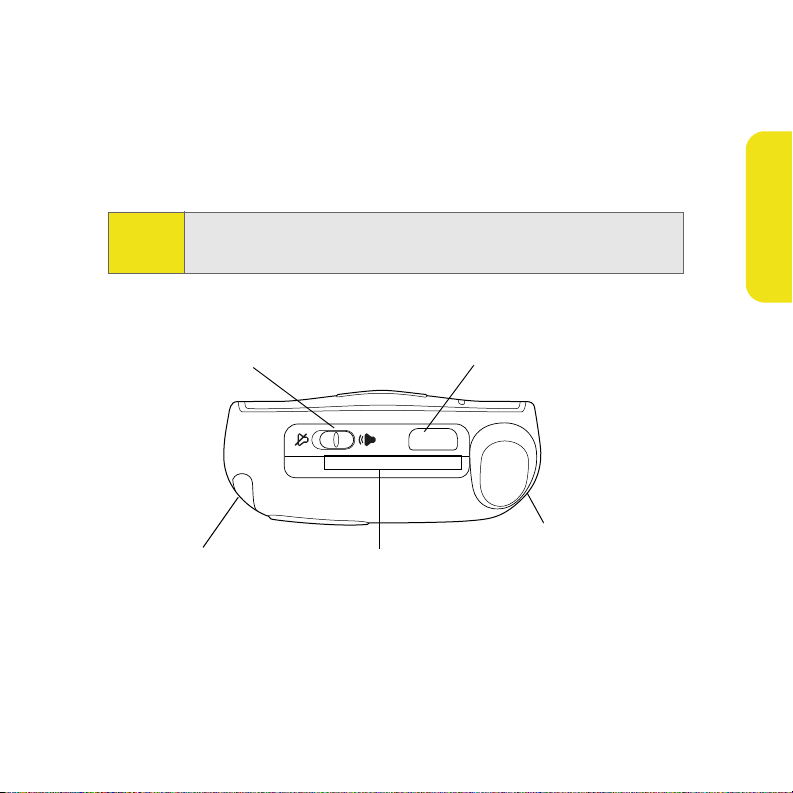
Your Device’s Features: Top View
19. Ringer Switch
23. Stylus 22. Expansion Card Slot
20. Infrared (IR) Port
21. Antenna
19. Ringer Switch controls the ringer setting. The ringer switch silences all sounds,
including music, when you need quiet. There is no need to navigate menus. See
“Selecting Ringtones and Vibrate Settings” on page 37 for details on changing the
settings.
Basics 5
Page 21

20. Infrared (IR) Port uses infrared technology to transmit information to and receive
information from other infrared-enabled devices that use compatible software.
21. Antenna receives and sends wireless communication signals. The antenna does not
retract into or extend out of your device.
22. Expansion Card Slot allows you to expand the capabilities of your device using a
MultiMediaCard, SD, or SDIO card.
23. Stylus allows you to tap options on your device’s screen. To use the stylus, slide it out
of the slot and hold it as you would a pen or pencil. Use only the black-tipped end of
the stylus on your device screen.
6 Basics
Page 22

Maintaining the Battery
Inserting the Battery
WAR NIN G:
Use only Sprint-approved or Palm-approved batteries and chargers
labeled for use with the Treo700wx smart device. The failure to use a
Sprint-approved or Palm-approved battery and charger may increase the
risk that your device will overheat, catch fire, or explode, resulting in
serious bodily injury, death, or property damage.
1. Use one hand to press the Battery Door Release, and use your other hand to slide the
battery door downward to remove it from your device.
Battery Door Release
Reset Button
Battery
Contacts
Battery
Compartment
Contacts
2. Align the battery contacts with the battery compartment contacts.
3. Insert the battery into the compartment at a 45-degree angle, and then press it into
place.
Basics 7
Basics
Page 23

4. Slide the battery door onto the back of the smart device until it clicks into place. Your
smart device screen turns on and the Treo screen appears. Wait for the progress bar
on the Treo screen to fill and the Windows Mobile
®
screen to appear.
5. Follow the onscreen instructions to finish the installation.
Note:
If your smart device does not turn on after you insert the battery, you
need to charge it by connecting it to the AC charger. If it still doesn’t start,
do a soft reset. See “Resetting Your Smart Device” on page 39.
Charging the Battery
The battery comes with a sufficient charge to complete the setup process and activate your
phone. After activation, we recommend charging your smart device for 3.5 hours (or until
the indicator light is solid green) to give it a full charge. See the Treo 700
tips on maximizing the life of your device’s battery.
1. Plug the AC charger into a wall outlet.
2. Connect the charger cable to the charger jack on the bottom of the device. Make sure
the arrow on the connector is facing up, toward your Treo device screen.
3. To confirm that your device is charging, check the indicator light.
䡲 Solid red indicates that your device is charging.
8 Basics
WX User Guide for
Page 24

Turning Your Smart Device On/Off
The phone and the screen of your Treo700wx smart device can be turned off and on
separately. This means you can wake up the screen to use just the organizer features of
your device without turning on the phone. Also, when the screen is turned off, the phone
can be on and ready for you to receive and make calls.
Note:
Turning Your Phone On and Off
When you turn on your phone, it connects to a wireless network so that you can make and
receive phone calls and use other wireless services.
1. If you are not on a call and your screen is off, briefly press Power/End to wake up
the screen.
2. Press Center on the 5-way to turn off Keygua rd.
3. Press and hold Power/End to turn on your phone. (When your smart device locates
a signal, “Sprint” and the signal-strength icon appear at the top of the screen,
indicating that you can use the phone and Internet features, if supported by the local
network.)
4. Press and hold Power/ End again to turn off your phone. (When your phone is off,
“Phone Off” and the phone-off icon appear at the top of the screen. Your smart
device is not connected to any wireless network, but you can still use the organizer
and other features.)
If Sound Mode is on, you hear a series of tones when you turn your phone on and off. For
more information on Sound Mode see “Setting the Ringer Switch” on page 89.
Throughout this guide the term device is used to describe your Treo smart
device and its physical aspects. The term phone is used to describe the
feature of your smart device that enables you to connect to the Nationwide
Sprint PCS Network.
Basics
Basics 9
Page 25

Did You
Know?
If you’re outside a coverage area, the indicator light flashes amber and
the signal-strength icon is not displayed.
Waking Up the Screen and Turning It Off
Wake up the screen and leave the phone turned off when you want to use only the
organizer features of your smart device. You can also turn off your smart device’s screen
without turning off your smart device’s wireless features.
1. Press Power/End to wake up the screen, and then press Center to turn off
Keyg uard .
2. Briefly press Power/End to turn off the screen.
Tip:
You can set how long the screen stays on during a period of inactivity.
Press Start, select Settings, select the System tab, and then select Power.
Select the Advanced tab, and then adjust the On battery power setting.
10 Basics
Page 26
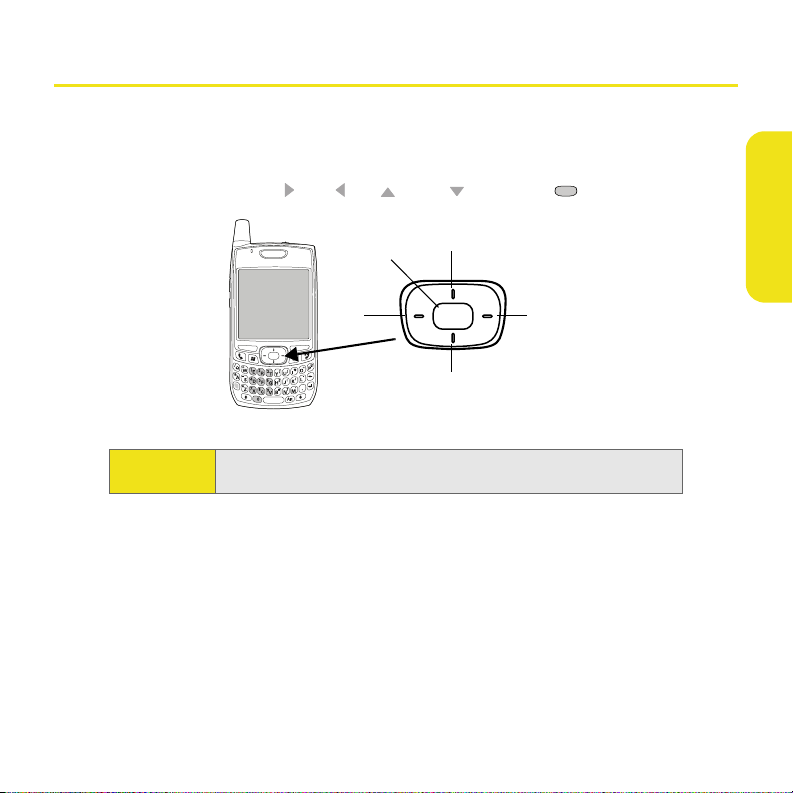
Moving Around the Screen
To move around the Treo700wx smart device screen, you can use the 5-way navigator or you
can tap items on the screen with the stylus. As you become familiar with your smart device,
you’ll find your own favorite way to scroll, highlight, and select items.
The 5-way includes the Right , Left , Up , Down , and Center buttons.
Basics
Center
Left
Tip:
Basics 11
Some third-party applications may not work with the 5-way navigator,
and you must use the stylus instead.
Up
Right
Down
Page 27

Scrolling Through Screens
As on a computer, on your smart device you scroll to move from field to field or page to
page, or in some cases to highlight an item or option in a list. There are several methods
of scrolling:
䢇 Press the 5-way on the front of your smart device. (Press Right , Left , Up , or
Down to move to the next field, button, or action in that direction.)
䢇 Press and hold Option while pressing Up or Down to scroll one screen at a time.
䢇 Press and hold Option while pressing Left or Right to jump to the top or bottom
of the current screen.
䢇 When viewing a screen with tabs, such as when adding
a contact, press Down to scroll to the tabs, and then
press Left or Right to move between tabs.
䢇 When inside a text field, press Right or Left to
move to the next character, and press Up or Down
to move between lines.
䢇 When inside a list, press and hold Up or Down to
rapidly scroll through the list.
䢇 Tap an onscreen scroll arrow.
䢇 Tap and drag the slider of an onscreen scroll bar.
Scroll Arrows
Scroll Arrows
12 Basics
Page 28
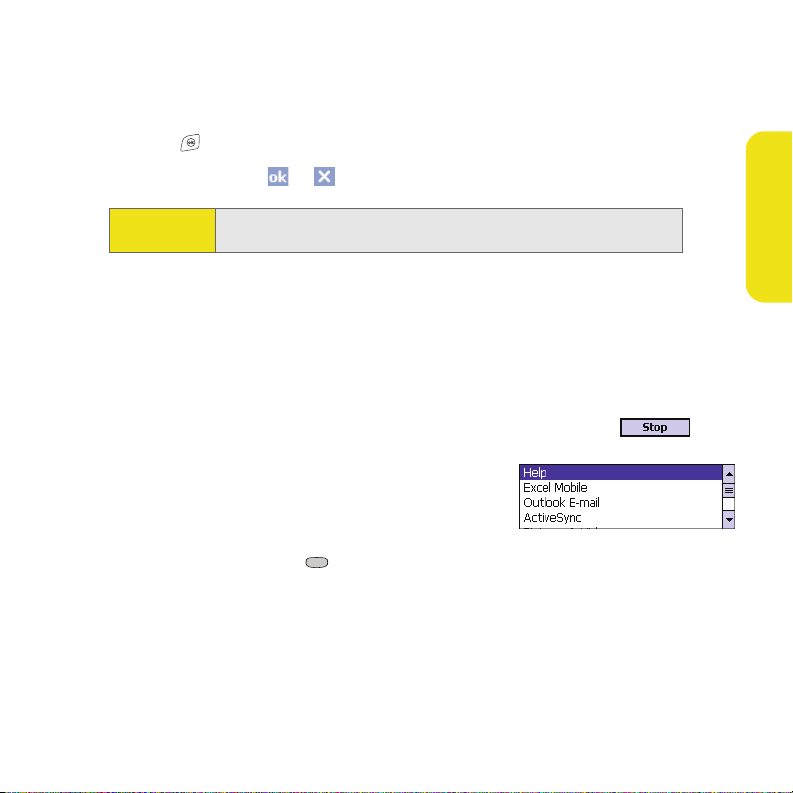
Closing Screens
To accept the information you entered on a screen and to return to the previous screen, do
one of the following:
䊳 Press OK .
䊳 Use the stylus to tap or in the upper-right corner of the screen.
Note:
When you close a screen, the application still runs in memory. See
“Opening and Closing Applications” on page 19.
Highlighting and Selecting Items
On most screens, one item—a button, a list entry, or a check box—is highlighted by default.
The highlight identifies which item is affected by your next action. Use the 5-way to move
the highlight from one item to another before opening or selecting it.
The highlight can take one of two forms, depending on what is highlighted:
䢇 Border glow: This rectangular border highlights items such as
an onscreen button (OK, Dismiss, or Hide), a check box, an
option, or a Web link.
䢇 Reverse type (light text on a dark background): This
highlights items such as a phone number, an email
address, text, or an item in a list.
After highlighting an item with the 5-way, you can select
or activate it by pressing Center or by tapping the item with the stylus.
Basics
Basics 13
Page 29
Highlighting Text
You can use the stylus to highlight text on the screen:
䊳 Tap and drag the stylus across the text you want to highlight. To highlight a word,
double-tap it. (To highlight a paragraph, triple-tap it.)
Using the Softkeys
The left and right softkeys give you quick access to tasks that you can do on the current
screen, so the softkey items vary from application to application and from screen to screen.
Look on the screen directly above the softkey to see the action that it does in the current
context. In some contexts, these keys may do nothing at all. In most cases the right softkey
opens the menu, and the left softkey activates a specific command.
Left S oftkey Ac tivate s
This Command
Left Softkey
Right Softkey Activates
This Command
Right Softkey
14 Basics
Page 30

Selecting Menu Items
In many applications, a menu provides access to additional features. The menu is hidden
until you press Menu (right softkey).
1. Press Menu (right softkey) to display an application’s
menu.
2. Press Up or Down to highlight a menu item.
3. If an arrow appears next to a menu item, press Center
or Right to display additional options for that item, and
then press Up or Down to highlight a menu item. (To
return to the main menu without making a selection, press
Left .)
4. Press Center to select the menu item, or press Left or Menu (right softkey)
to close the menu and cancel your selection.
Selecting Options in a Shortcut Menu
Most applications also provide access to context-sensitive, shortcut menus—similar to the
right-click menus on a computer. The shortcut menu options vary based on the highlighted
selection.
1. Highlight the item you want to open the shortcut menu
for.
2. Press and hold Center to open the shortcut menu.
3. Press Up or Down to highlight a menu item.
4. Press Center to select the menu item or press Left to
cancel your selection.
Basics
Basics 15
Page 31

Selecting Options in a List
Lists let you select from a range of options. You can identify whether a list is available when
you select the field. If a rectangle appears around the field along with a downwardpointing arrow, a list is available.
Tip:
When selecting fields, you might not see the downward-pointing arrow
until you press Center on the 5-way.
Lists are different from the menus described earlier in this
section.
To select from a list, do any of the following:
䢇 Use the 5-way to highlight the field, and then press Center
to display the items in the list. Press Up or Down to
highlight the item you want, and then press Center to
make your selection.
䢇 Use your stylus to tap the arrow, and then tap the item in
the list.
䢇 In fields where you see a downward-pointing arrow but no
rectangle, you must tap the arrow with the stylus to expand
the field.
䢇 To exit the list and cancel your selection, press Left .
16 Basics
Page 32

Using the Keyboard
When using the keyboard, most people find it easiest to hold the smart device with two
hands and to use the tips of both thumbs to press the keys.
Left Softkey
Phone/Talk
Start
Option
Shift
Note:
Space
Your smart device includes a keyboard backlight for low light conditions.
You can change the backlight shut-off interval. Press Start and select
Settings. Select the System tab, and then select Backlight. Set the time
interval on the Battery Power tab and on the External Power tab. The
backlight also turns off when an application’s power-saving features turn
it off.
Alt
Right Softkey
Power/End
OK
Backspace
Return
Shift
Entering Lowercase and Uppercase Letters
By default, the first letter of each sentence or field is capitalized and the remaining text you
enter is lowercase. To enter other uppercase letters, do one of the following:
䢇 Press Shift , and then enter a letter. (You don’t need to press and hold Shift while
entering a letter.)
Basics 17
Basics
Page 33

䢇 Press Shift twice to turn on Caps Lock, and then enter a series of letters. (When Caps
Lock is on, this symbol appears at the bottom of the screen: . To turn off Caps Lock,
press Shift again.)
Entering Numbers, Punctuation, and Symbols
Numbers, punctuation, and symbols appear above the letters on the keys. To enter these
characters, do one of the following:
䢇 Press Option , and then press the key of the desired character. (You don’t need to hold
Option while pressing the key.)
䢇 Press Option twice to turn on Option Lock, and then press the desired keys to enter a
series of characters. (When Option Lock is on, this symbol appears at the bottom of the
screen: . To turn off Option Lock, press Option again.)
18 Basics
Page 34

Opening and Closing Applications
Opening Applications
You can access all the applications on your smart device through the Start menu:
1. Press Start to open the Start menu.
2. Use the 5-way navigator to highlight the
application you want to use. (To view
additional applications, select Programs.)
3. Press Center to open the highlighted
application.
4. (Optional) Press OK to return to
Programs and open another application.
(The current application continues to run in the background.)
Basics
Did you
know?
You can access your Today screen by pressing Phone/Talk.
Closing Applications
You can have several applications open at once, so you don’t need to exit an application to
open another one. If you press OK to return to Programs, the current application continues
to run in the background.
1. Press and hold OK to open Memory Settings.
2. On the Running Programs tab, do one of the following:
䡲 Select the application you want to close, and then select Stop to close it.
䡲 Select Stop All to close all your open applications.
Basics 19
Page 35

Using Your Today Screen
Yo ur To d a y screen is your home base. From your To d ay screen you can quickly look up a
contact, dial a phone number or speed-dial button, see your latest calendar appointments,
see the number of unread email messages, and even search the Web.
䊳 To access your Tod a y screen, press Phone/Talk .
Title Bar and Status
Information
Speed Dial
Entries
䢇 Title Bar and Status Information: See “Checking Signal Strength and Phone Status” on
page 21 to learn about the icons that appear in this area.
䢇 Dial Lookup Field: Begin typing the name you want to look up. See “Dialing by Contact
Name” on page 25 for more information.
䢇 Web Search Field: Enter a word you want to find on the Internet, and press Center to
begin the search (data services connection required).
䢇 Speed Dial Entries: Select the picture or button you want to dial. If you press Center
while a speed dial is highlighted, your smart device dials the number.
You can select a picture for your Tod a y screen background and select which items appear in
the To d ay screen. See the Treo 700
WX User Guide for details.
Dial Lookup Field
Web Search Field
20 Basics
Page 36

Checking Signal Strength and Phone Status
You can monitor the status of your device’s signal strength and several other items, using
icons at the top of your Tod a y screen:
0
Sprint
0
0
0
0
0
0
0
0
0
Your phone is on and you’re inside the Nationwide Sprint PCS
Network. If you are outside a coverage area, No Service or Roaming
appears instead. No Service means that there is no coverage at all
and Roaming means that another wireless service provider’s
network is available. When you turn off your phone, Phone Off
appears.
You missed an incoming call.
You have a voicemail message.
You have a new email or text message.
An error occurred during synchronization.
You have more than one of the conditions listed above.
Your phone is on. The bars display the signal strength.
The stronger the signal, the more bars appear. If you are outside a
coverage area, no bars appear.
Your phone is off.
You are outside a Sprint coverage area and roaming on another
wireless service provider’s network.
A voice call is in progress.
Basics
Basics 21
Page 37

0
You are in an area that supports Sprint PCS Vision (1xRTT) data
services. 1xRTT (Single carrier [1x] radio transmission technology)
is a wireless technology that can provide fast data transfer and
Internet access with average speeds of 60–80Kbps and bursts up
to 144Kbps.
0
You are in an area that supports mobile broadband (EVDO) data
services.
EVDO (Evolution Data Optimized) is a wireless broadband
technology that is designed for very high-speed data transfer with
average download speeds of 400–600Kbps, capable of reaching
speeds up to 1.8Mbps, and upload speeds up to 156Kbps.
0
A Sprint PCS Vision data call is in progress. You can make calls, but
you cannot answer calls; any incoming calls go to voicemail. When
you make a call, the data transmission is automatically
interrupted.
0
A mobile broadband data call is in progress. You can still make or
receive calls. When you make or answer a call, the data
transmission is automatically interrupted.
0
Your phone is connected to a Sprint PCS Vision network, but you
are not actively transmitting data. You can still make or receive
calls.
0
Your phone is connected to a mobile broadband network, but you
are not actively transmitting data. You can still make or receive
calls.
0
0
Your Treo700wx smart device is connected to a computer or
network that is providing a data connection.
A data connection is not available or your phone is off.
22 Basics
Page 38

0
0
0
0
0
ActiveSync is currently synchronizing with the Exchange Server.
Your smart device’s battery is low.
Your smart device’s battery is charging.
Your smart device is connected to a power outlet and the battery
is fully charged.
Voice privacy is preventing over-the-air eavesdropping. Appears
Basics
during a call when this option is turned on and available on the
Sprint network.
0
Location privacy setting is set to Location On. Your location is
available to the Sprint network and other applications. The icon
appears with a red slash when the 911 only option has been
selected.
0
The Bluetooth® wireless technology status indicator appears in gray
when this feature is off, in blue when this feature is on, and in
reverse blue when your smart device is communicating with
another Bluetooth device. To quickly turn the Bluetooth feature on
and off, tap the Bluetooth icon to access the Bluetooth Settings
screen.
0
A call is in progress and your smart device is connected to a
Bluetooth headset or car kit.
Basics 23
Page 39

Using the Phone
You can make and receive calls and store speed-dial entries right from your Tod a y screen. Be
sure you know how to turn on your phone before reading this section (see “Turning Your
Phone On and Off” on page 9).
Important!
Palm recommends that you turn off the phone radio when using any WiFi card or remove the Wi-Fi card when not in use to ensure that you can
always make and receive phone calls. Depending on where you are on a
network and certain coverage conditions, you might experience
interruptions with your phone operation while using a Wi-Fi card (you
must purchase and install a third-party Wi-Fi card to use this feature). For
EMERGENCY calls, always remove the card from your smart device to
ensure optimal connectivity.
Accessing Your Today Screen
䊳 Press Phone/Talk .
24 Basics
Page 40

Making Calls
Dialing With the Number Pad
1. Press Phone/Talk to go to your To da y screen.
2. Using the numbered keys on the keyboard, enter a
phone number.
3. Press Phone/Talk to dial.
You do not need to press Option to access the numbers
on the keyboard. However, when dialing short
numbers, such as 411, the number may conflict with a
contact name. If this occurs, press Option to avoid starting a contact lookup. You can
always dial 911 without pressing Option first.
Dialing by Contact Name
Before you can dial a call by contact name, you must create some contacts (see “Adding a
Contact” on page 74) or import them by synchronizing (see “Synchronizing - The Basics” on
page 66).
1. Press Phone/Talk to go to your To da y screen.
2. Using the keyboard, begin entering one ofthe following for
the contact you want to call:
䡲 First name (JOH for John)
䡲 Last name (SMI for Smith)
䡲 First initial, a space, and then last initial (J S for John
Smith)
䡲 First name and last name
(JOH SMI for John Smith)
Basics
Basics 25
Page 41

(For example, entering SM finds both Smilla Anderson and John Smith. Entering SM A
finds only Smilla Anderson.)
3. Select the number you want to dial, and press Phone/Talk to dial.
Dialing With a Speed-Dial Button
You can make a call with your speed-dial buttons by doing any of
the following:
䢇 Highlight a speed-dial button with the 5-way, and then press
Center .
䢇 Tap a speed-dial button with the stylus.
䢇 Press and hold a Quick Key that you assigned to the speed-
dial button.
To see more speed-dial buttons, highlight the picture speed-dial
area and press Right or Left repeatedly, or highlight the text
speed-dial area and press Up , Down , Right , or Left .
Dialing Using the Onscreen Dial Pad
The onscreen Dial Pad provides large numbers that you can tap with your finger or stylus.
The numbers also include the corresponding letters so you can dial numbers that are
expressed as letters.
1. Go to your To da y screen.
2. Press Phone/Talk , and then select Dial Pad from the
menu.
3. Tap the onscreen Dial Pad to enter the number.
4. Press Phone/Talk to dial.
26 Basics
Page 42

Adjusting Call Volume
While a call is in progress, press the Volu me button on the side of your smart device to
adjust call volume.
Volume Button
Receiving Calls
To answer calls, your phone must be on.
Answering Calls
䢇 Press Phone/Talk .
䢇 Press Answer (left softkey).
䢇 If the headset is attached, press the headset button.
Sending Calls to Voicemail
䢇 Press Power/End .
䢇 Press Menu (right softkey) and select Ignore.
Ignoring a Call and Sending a Text Message.
䢇 Press Menu (right softkey) and select Ignore with text message. During a voice call you
can send text messages, but you cannot use data features such as Web browsing and
email.
Basics
Basics 27
Page 43

Silencing the Ringer While Your device is Ringing
䢇 Press any key on your smart device except Phone/Talk, Power/End, Start, OK, Alt, or the 5-
way. You can also use the Vol um e button to turn the ringer sound all the way down.
䢇 To immediately silence all system sounds including the ringer, slide the Ringer switch to
Sound Mode Off . (All sounds remain off until you slide the Ringer switch back to Sound
Mode On .)
When you silence the ringer, you can either answer the call or let it ring through to
voicemail.
Did you
know?
When you are on a plane, you can turn off your phone and all wireless
services using Wireless Manager (see “Turning Wireless Services On/Off”
on page 64). But you can still wake up the screen and use any application
that doesn’t require wireless services, like your smart device’s calendar,
music player, and games.
Using Voicemail
Your voicemail number is preset when you activate your device. The first time you call
voicemail, you are prompted to enter your voicemail password. If necessary, please contact
Sprint for your password and enter it as prompted.
Setting Up Voicemail
1. Go to your To da y screen.
2. Press and hold 1 on the keyboard to dial
Sprint’s voicemail system. (You can also
tap the Voi ce ma il speed-dial button with your
stylus.)
3. Follow the voice prompts to set up
your voicemail.
28 Basics
Page 44

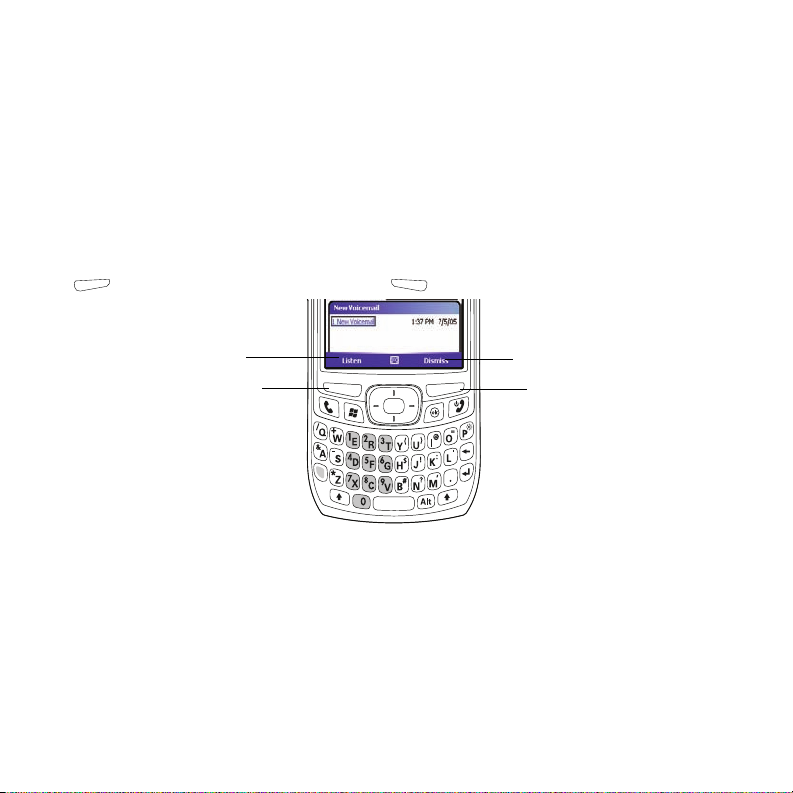
Voicemail Notification
When you have a new voicemail message, a notification screen
appears. To hear your message now, press Listen (left
softkey). To retrieve your message later, press Dismiss
(right softkey). When you have unretrieved voicemail messages,
a Voi ce ma il icon appears at the top of your screen and the
left softkey is labeled Voi ce ma il .
Retrieving Voicemail Messages
1. Go to your To da y screen.
2. Press and hold 1 on the keyboard to dial Sprint’s voicemail system.
3. Enter your voicemail password using the keyboard, or press Extra Digits (left
softkey) if you defined this option (see “Creating a Speed-Dial Button” on page 33 for
details).
4. Select Play to listen to your messages.
You do not need to press Option to enter numbers, *, or # while on an active call.
Managing Active Calls
When you make or receive a call, the active call information appears on your To da y screen.
Current Duration Of Call
Caller’s Name and Number
Mute
Speakerphone
Basics
Basics 29
Page 45

During a call, you can do any of the following:
䢇 Put the call on hold: Press Hold (left softkey). (To take the call off hold, press Off
Hold (left softkey).)
䢇 Use the built-in speakerphone: Select Speakerphone . (To turn off the Speakerphone,
select .)
䢇 Mute the microphone so you can’t be heard: Select Mute . (To turn the microphone
back on, select Mute .)
䢇 Switch to another application: Press Start and select the application.
Ending a Call
䢇 Press Power/End..
䢇 Press the headset button (if the headset is attached and has a button on it). (Some
headsets do not have a button.)
Saving Phone Numbers
After you complete a call, you are prompted to add the number if it is not already in your
Contacts list. If an incoming call uses caller ID blocking, you do not see the Add Contact
prompt.
䢇 To create a new contact for this number, select Create New Contact.
䢇 To add this number to an existing contact, select Copy and Add, and then select a
contact name.
䢇 To decline adding the number, press Dismiss (left softkey).
䢇 To permanently disable the Add Contact prompt, select Don’t show this again.
30 Basics
Page 46

Answering a Second Call (Call Waiting)
When you’re on a call and you receive a second call, the call-waiting notification appears.
䢇 Place the current call on hold and answer the new call: Press Answer (left softkey) or
Phone/Talk .
䢇 Send the new caller a text message: Press Menu (right softkey) and select Ignore with
text message.
䢇 Hang up the first call: Press Power/End . (The second call becomes an incoming call
alert, which you can choose to answer or ignore.)
䢇 Send the new call to voicemail: Press Menu (right softkey) and select Ignore.
Using Sprint PCS Voice Command
If you subscribe to the Sprint PCS Voice Command service, you can call a number by just
saying a name. (There is a monthly charge for this service.)
To activate Sprint PCS Voice Command, you must speak to a Sprint Customer
Service representative:
1. Go to your To da y screen.
2. Press * (Option + Z), and then press 2.
3. Press Phone/Talk to contact Sprint Customer Service and sign up.
Basics
Basics 31
Page 47

Setting Up Your Personal Address Book
To use Sprint PCS Voice Command, you must first set up your personal address book.
1. Go to your To da y screen.
2. Press * (Option + Z).
3. Press Phone/Talk .
4. Follow the system prompts. (You’ll hear a tone, followed by the prompt “Ready.”)
5. Say “Add Name” to begin setting up your personal address book, and then follow the
voice prompts.
Making a Call With Sprint PCS Voice Command
1. Go to your To da y screen.
2. Press * (Option + Z).
3. Press Phone/Talk . (You’ll hear a tone followed by the prompt “Ready.”)
4. After the prompt, say “Call” and the name you’ve assigned to the number you want to
call. (Your request will be repeated and you will be asked to verify it.)
5. Say “Yes” to dial the call. (Say “No” to cancel.)
Note:
32 Basics
Sprint PCS Voice Command service cannot be used with wireless
headsets that are enabled with Bluetooth wireless technology.
Page 48

Defining Speed-Dial Buttons
Your smart device lets you create both picture and text speed-dial buttons so that you can
select a button on the To da y screen to quickly dial a number.
Creating a Speed-Dial Button
You can create up to 20 picture buttons and 50 text buttons.
1. Go to your To da y screen.
2. Press Menu (right softkey) and select New Speed Dial.
3. Do one of the following:
䡲 Select Link to contact, select the contact you want to link
to this button, and then select the number you want to
dial with this button.
䡲 Select Label and enter a name for this button, and then
select Number and enter the phone number you want
to dial with this button.
䡲 (Optional) Enter a Quick Key. When the To da y screen is displayed, you can press
and hold the Quick Key to instantly dial this number. (Quick Keys can be letters or
numbers, but you can’t use both the letter and number for the same key. For
example, the voicemail Quick Key is 1. The letter equivalent for that key is E, so you
cannot assign E as a Quick Key to another speed-dial button.)
4. If this button is linked to a contact entry with a picture, select either Te xt Sp ee d D ial or
Picture Speed Dial to indicate which type of button you want to create. (If this button is
not linked to a contact or the contact doesn’t have a picture, the Picture Speed Dial
option is not available.)
Basics
Tip:
You can add a special ringtone to a contact associated with the speeddial button. See “Adding a Contact” on page 74.
Basics 33
Page 49

5. (Optional) Select the Advanced tab and set any of the
following options:
䡲 Extra Digits: Defines additional numbers to dial, such as
a password or extension. (In addition to numbers, you
can enter the following symbols: star (*) and pound (#).
You can enter a comma (,) to insert a one-second
pause.)
䡲 Dial extra digits automatically: Dials predefined extra
digits immediately after dialing the phone number. (If
you do not check this box, you need to press Extra Digits (left softkey) to dial
these digits.)
6. Press OK .
Tip:
The playback controls for the Sprint Voicemail speed-dial button are
already set up for the Sprint voicemail system.
Editing a Speed-Dial Button
1. Go to your To da y screen.
2. Highlight the speed-dial button you want to edit.
3. Press and hold Center to open the shortcut menu, and then select Edit Speed Dial.
4. Make the desired changes, and press OK .
34 Basics
Page 50

Arranging Your Speed-Dial Buttons
1. Go to your To da y screen.
2. Press Menu (right softkey) and select Speed Dial
Options.
3. Highlight the button you want to move.
4. Press Option + Up , Down , Right , or Left to move
the button in that direction.
Using a Phone Headset
You can connect a phone headset for hands-free operation. If you need to use your device
while driving and this is permitted in your area, we recommend using the phone headset
included with your device, or a hands-free car kit (sold separately).
Basics
Microphone
Speakers
Headset Button
The headset button is context sensitive, and it performs various actions based on the
situation. You can press the headset button to perform any of the following tasks:
䢇 Answer an incoming call.
䢇 Respond to call waiting.
Basics 35
Page 51

䢇 Hang up all calls.
䢇 Swap between calls if the second call is an incoming call.
䢇 Create a conference call if the second call is an outgoing call.
Using a Hands-Free Device With Bluetooth Wireless Technology
Your Treo device is also compatible with many headsets and car kits enabled with
Bluetooth wireless technology version 1.1 or 1.2. Please note, however, that you cannot use
a Bluetooth headset to listen to MP3 files on your smart device.
To learn how to set up and connect to Bluetooth devices, see “Connecting to Devices With
Bluetooth
Here are tips for working with a Bluetooth hands-free device:
䢇 To transfer a call from the handset to a Bluetooth hands-free device during a call, press
䢇 To transfer a call from a wired headset to a Bluetooth headset or car kit that is within
䢇 If you have both a compatible Bluetooth headset and car kit, the one you connected to
®
Wireless Technology” on page 61.
Menu (right softkey) and select Connect Bluetooth. (To transfer the call back to the
headset, press Menu [right softkey] and select Cancel Bluetooth.)
range and with which you’ve previously set up a partnership (Bluetooth headset or car
kit required, sold separately), unplug the wired headset and press the button on the
Bluetooth headset or car kit.
your smart device last becomes the active device.
Tip:
To find out how to transfer your contacts from your device to your car kit,
go to www.palm.com/us/support /bluetooth
36 Basics
Page 52

Selecting Ringtones and Vibrate Settings
You can set different tones for different types of incoming phone calls and notifications.
1. Turn on your phone to access your phone settings.
2. Press Start and select Settings.
3. On the Personal tab, select Sounds & Notifications .
4. Select the Notifications tab.
5. Select the Event list, and then select which type of call or notification you want to set
the ringtone for:
䡲 Phone: Known Caller: An incoming call from someone in
your Contacts list or Speed Dial list.
䡲 Phone: Missed call: A call you did not answer.
䡲 Phone: Roaming: A call that comes in when you’re
outside the Nationwide Sprint PCS Network.
䡲 Phone: Unknown Caller: An incoming call from someone
identified by caller ID who is not in your Contacts list or
Speed Dial list.
䡲 Phone: Voice mail: A new voicemail.
6. Select the Ring type list, and then select the ring style for the selected type of call.
7. Select the Ring tone list, and then select the sound for the selected type of call.
8. (Optional) Select Play to preview the sound.
9. Check the Vibrate when… boxes to turn the vibrate feature on/off based on the ringer
switch setting.
10. Repeat steps 4–7 to select ringtones for other types of calls.
11. Press OK .
Basics
Basics 37
Page 53

Adjusting Volume Settings
䢇 Call volume: While a call is in progress, press the Volu me button (on the side of your
smart device) to adjust the call volume.
䢇 Music/Video volume: While playing music or a video, press the Volu me button to adjust
the music/video volume.
䢇 Ringer volume: When a call is not in progress and you are not playing music or a video,
press the Vol um e button to adjust ringer volume.
Assigning a Picture and Ringtone ID to a Contact
1. Press Start and select Contacts.
2. Highlight the contact that you want to give a picture caller ID, and then press Center
.
3. Highlight the contact’s name, and press Edit (left softkey).
4. Select Picture.
5. Select Camera to take a picture and add it to this contact entry (if your smart device
includes a camera), or select an existing picture for this contact entry.
6. Select Ring tone and then select a tone for this contact entry.
38 Basics
Page 54

Resetting Your Smart Device
Performing a Soft Reset
A soft reset is similar to restarting a computer. If your smart device is not responding or you
have trouble synchronizing with your computer, a soft reset may help. For information on
performing a hard reset, see the Treo 700
1. Use one hand to press the Battery Door Release and use the other hand to slide the
battery door downward to remove it from your smart device.
2. Use the stylus tip to gently press the reset button on the back of your smart device.
3. Wait for the progress bar on the Treo lo go screen to fill before continuing to use your
smart device. (If the phone or Bluetooth signals were on before a reset, these signals
automatically turn on after the reset.)
WX User Guide.
Basics
Basics 39
Page 55

40 Basics
Page 56

Wireless Features
In This Section
⽧ Using Sprint PCS Vision
⽧ Personalizing Your Service With On Demand
⽧ Using Your Device’s Phone as a Modem
⽧ Setting Up an Exchange Server Account
⽧ Sending and Receiving Email
⽧ Sending and Receiving Text Messages
⽧ Viewing a Web Page
⽧ Connecting to Devices With Bluetooth
⽧ Turning Wireless Services On/Off
®
Wireless Technology
Wireless Features
Wireless Features 41
Page 57

Using Sprint PCS Vision
Sprint PCS Vision provides wireless access to the Internet anywhere on the Nationwide
Sprint PCS Network. To sign up for Sprint PCS Vision services or to access complete
instructions, visit
use a Sprint PCS Vision connection, refer to your Sprint PCS service plan.
Enabling Sprint PCS Vision
1. Make sure your device’s phone is turned on, as described in “Turning Your Smart
Device On/Off” on page 9.
2. Press Start and select Internet Explorer to open your device’s Web browser and
make a Sprint PCS Vision connection.
䡲 If you have not already done so, select Now when the Preparing Vision Services
䡲 If you want to cancel the connection, select No.
www.sprint.com. For information on charges associated with features that
dialog box appears. (This initiates a one-time process to configure your Sprint PCS
Vision services. At the end of this two-minute process, your device connects to the
Sprint PCS Vision home page.)
Tip:
To bypass the
Don’t ask me again
Connect to the Internet
box.
dialog box in the future, check the
3. Use the 5-way navigator to scroll around and select from a variety of online services.
4. Press OK to close Internet Explorer Mobile and end your session.
42 Wireless Features
Page 58

Accessing Sprint PCS Vision
Once your device is activated, you are signed in and ready to connect to Sprint PCS Vision
services at any time.
Sprint PCS Vision User Name
Your Sprint PCS Vision User Name is automatically assigned to you. Your user name, which
resembles an email address (for example,
and Messaging services. Your Sprint PCS Vision User Name is simply an additional address
that identifies your Sprint PCS Account. When your device is enabled with Sprint PCS Vision
services, your user name automatically appears on the About screen.
To find your user name:
1. Press Start and select Settings.
2. Select the System tab, and then select About .
3. Select the Phone tab, and then scroll down to Data user name.
Sprint PCS Vision Symbols on Your Screen
When you are connected to Sprint PCS Vision services, a data connection icon appears at
the top of the To da y screen. See “Checking Signal Strength and Phone Status” on page 21
for a description of the various data connection icons.
Sprint PCS Vision Billing Information
See your service plan for details on Sprint PCS Vision billing.
name@sprint.com), is used with Sprint PCS Mail
Wireless Features
Wireless Features 43
Page 59

Personalizing Your Service With On Demand
With Sprint’s On Demand feature, you can personalize your device’s data services to suit
your needs. The On Demand feature makes it easier than ever to retrieve the most popular
Web information and categories instantly. On Demand uses the ZIP code you provide to
customize the content you receive, so you can get the information you want, when you
want it.
On Demand acts like a computer browser’s customized home page, displaying a variety of
top categories such as News, Sports, Weather, Stocks, Showbiz, and more. This information
is updated throughout the day, so you’ll always be up-to-date. In addition to presenting a
number of fixed categories, On Demand also offers optional categories (for an additional
monthly charge) that allow faster access to even more information.
Initializing Your On Demand Service
1. Press Start and select Programs.
2. Select On Demand .
3. Enter your preferred ZIP code and press Next (right
softkey). (The On Demand service customizes itself to your
selected location, and the On Demand menu screen is
displayed. This process can take a few minutes to
complete.)
44 Wireless Features
Page 60

Accessing On Demand Information
Finding the information you’re looking for with On Demand is as easy as navigating a Web
browser on your computer. (The following examples illustrate how to access News and
Movies information.)
To access News information using On Demand:
1. Press Start and select Programs.
2. Select On Demand . (The On Demand menu screen is
displayed.)
3. Highlight News (the button name changes to Late Breaking
News & Photos), and then press Center .
4. Depending on which category you select, you see a menu
with additional options (for this example, you would be
able to select from such subcategories as “Top Stories,” “US
News,” “World News,” and “Politics”).
5. Select a subcategory, and then select an article you would like to view. (The article is
displayed.)
6. Navigate the content as follows:
䡲 Press Up or Down to scroll through the article.
䡲 If there is a link to a related article or picture, press Left to select the link.
䡲 Press Right to access the options at the bottom of the screen.
Wireless Features
Wireless Features 45
Page 61

To access Movies information using On Demand:
1. Press Start and select Programs.
2. Select On Demand . (The On Demand menu screen will be displayed.)
3. Highlight Showbiz (the button name changes to Hollywood News & Showtimes), and
press Center . (A list of media options is displayed.)
4. Highlight Movie Showtimes & Reviews, and press Center . (A list of current movie
titles is displayed.)
5. Select a movie title.
6. From the Movie Title display, select an option and follow
the onscreen instructions. Options available may include:
䡲 Shows for Date to select a date for the movie.
䡲 <Theater listing> to view the movie’s showtimes at a
number of selected movie theaters in your area.
(Follow the onscreen instructions to purchase will-call
tickets, which may not be available for all theaters or
for all showtimes.)
䡲 Details to view the movie’s details, which may include cast, running time, plot
synopsis, MPAA rating, reviews, and so on.
Additional fixed On Demand categories such as Stocks (which features a customizable stock
ticker [delayed 20 minutes]), Weather, and Sports (which allows you to select your top
teams), along with optional categories such as Maps and TV Guide, bring the information
you want right to your screen—all without having to go through a traditional Web search.
46 Wireless Features
Page 62

Using Your Device’s Phone as a Modem
Your device’s data capabilities enable you to use your device’s phone as a modem for your
laptop computer anywhere on the Sprint advanced wireless high-speed data network.
You’ll be able to send and receive email, browse the Internet, and access your company’s
network anywhere on the Nationwide Sprint PCS Network.
Note:
To use this service, you may be required to sign up on a Sprint PCS Vision with
Phone as Modem plan. Go to www.sprint.com or visit a Sprint Store for Phone
as Modem plan details and more information.
Setting Up a Data Connection With Your Computer
In order to use your phone as a modem, you’ll first need to load the Sprint PCS Connection
Manager software on your computer, and then use the sync cable to connect your device to
your computer.
To set up your phone-to-computer data connection:
1. Insert the Getting Started CD that came with your device into your computer’s CD
drive and select the link to download and install the
Sprint PCS Connection Manager software and drivers.
2. Make sure your device’s phone is turned on and that one of the mobile broadband
icons ( or ) appears at the top of the screen.
Note:
Wireless Features 47
If neither icon appears, you cannot use your device as a modem with Sprint PCS
Connection Manager.
Wireless Features
Page 63

3. On your smart device press Start and select Programs.
4. Select Modem Link .
5. Press OK to dismiss the Modem Link message.
6. Select the Connection list, and then select USB.
7. Press Activate (left softkey).
8. Once the Sprint PCS Connection Manager software has
been fully installed on your PC, and the Modem Link
application is activated on your smart device, connect your
device to your computer using the sync cable. (When your computer detects the
connection, The Welcome to the Found New Hardware Wizard screen appears.)
9. Select Install the software automatically, click Next, and follow the instructions to
finish installing your smart device. (An icon is displayed in the taskbar in the
lower-right corner of your computer screen.)
10. On your computer, open the Sprint PCS Connection Manager software. When the
initialization process is complete, click Go.
11. Once the connection is established, launch an Internet session, check your email, or
do anything else you would do using a traditional Internet connection.
12. When you’re ready to terminate the Internet connection, double-click the Sprint PCS
Connection Manager icon in the taskbar in the lower-right corner of your computer
screen, and then click Go to end the session.
13. On your smart device press Start and select Programs.
14. Select Modem Link .
15. Press OK to dismiss the Modem Link message.
48 Wireless Features
Page 64

16. Select the Connection list, and then select USB.
17. Press Deactivate (left softkey) to allow the smart device to connect to the PCS
network
Note:
Sprint PCS Vision services are available on the Nationwide Sprint PCS Network.
Sprint mobile broadband services work anywhere on the Nationwide
Sprint PCS Network, but broadband-like download speeds are available only in
areas with high-speed data coverage.
Wireless Features
Wireless Features 49
Page 65

Setting Up an Exchange Server Account
You can wirelessly synchronize the email, contacts, and other information on your smart
device with a Microsoft Exchange Server by using ActiveSync
®
synchronization software.
Before You Begin
䢇 To synchronize email, you must first enter settings for your email account. See the
Setting Up Email guide for more information.
䢇 To wirelessly synchronize your device with a Microsoft Exchange Server, you must
activate Sprint PCS Vision data services. See “Enabling Sprint PCS Vision” on page 42 for
more information.
䢇 For delivery of Outlook email using Direct Push Technology, make sure that your
Exchange Server 2003 is upgraded to Service Pack 2
䢇 Work with your system administrator to gather the following information:
䡲 Exchange Server address and domain name.
䡲 Your username and password.
䡲 If your server supports Outlook Web Access (OWA).
䡲 If your server supports Secure Sockets Layer (SSL).
1. Press Start and select Programs.
2. Select ActiveSync .
3. Press Menu (right softkey) and select Add Server Source. If you already set up an
Exchange Server account, Add Server Source does not appear on the menu; Configure
Server appears on the menu instead.
4. Enter the Server address, and then press Next (right softkey).
5. Enter your username, password, and domain. The password is case-sensitive. (Your
password can use numbers and text. Check whether your Caps Lock and Option Lock
are active, because they can affect the password you are entering.)
50 Wireless Features
Page 66

6. If you want to enter your password each time you access this account, do not check
the Save password box. (If you want your password entered automatically, check this
box.)
Wireless Features
Tip:
Ask your system administrator if it is OK to store your corporate email
password on your smart device. For increased security, you may need to
enter your password each time you access your email.
7. (Optional) Select Advanced to set the rules for fixing sync
conflicts.
8. Press Next (right softkey) and check the boxes for
the types of information you want to synchronize with
the Exchange Server.
9. (Optional) Highlight one of the items and select Settings
to change the synchronization settings for that type
of information.
Wireless Features 51
Page 67

10. Press Finish (right softkey).
11. Set your sync schedule. (See “Setting a Sync Schedule With an Exchange Server” on
page 52.)
Note:
Settings are not available for all items. If you want to download more
than the email message header, select E-mail in step 9 and increase the
KB setting. If you don’t increase this setting, you can manually download
the rest of the message at your convenience.
Setting a Sync Schedule With an Exchange Server
Before You
Begin:
Set up an Exchange Server email account. See “Setting Up an Exchange
Server Account” on page 50.
1. Press Start and select Programs.
2. Select ActiveSync .
3. Press Menu (right softkey) and select Schedule.
4. Set your schedule for peak and off-peak times. (To
conserve power it is recommended that you change your
settings to synchronize every 30 or 60 minutes instead
of as items arrive.)
5. Set your roaming preference. (If roaming charges are not
a concern, select Use above settings when roaming.)
6. Press OK .
52 Wireless Features
Page 68

Sending and Receiving Email
Before You Begin
To synchronize email, you must first enter settings for your email account. See the Setting
Up Email guide for more information.
Creating and Sending an Email Message
You can receive plain text and HTML messages.
1. Go to your To da y screen and press Messaging (left softkey).
2. Press Left to cycle through your Messaging accounts until you see the email account
you want to use in the title bar.
3. Press New (left softkey).
4. Do one of the following to address the message:
䡲 If the recipient’s name and email address are in your
Contacts list, enter the first few letters of the
recipient’s first or last name, and then select the
recipient’s name.
䡲 If the recipient’s name is in an online address book,
you can find the name and add it. (See the Treo 700
User Guide.)
䡲 If the recipient’s name and email address are not in
your Contacts list, enter the full email address.
5. Select Subject and enter a title for the message.
6. Enter your message, or press Menu (right softkey), select My Text, and
then select a predefined phrase you want to insert.
WX
Wireless Features
Wireless Features 53
Page 69

7. (Optional) Do any of the following:
䡲 Press Menu (right softkey) and select Insert. (Select the type of item you
want to attach, and then select the file or record a voice note.)
䡲 Press Menu (right softkey) and select Spell Check.
䡲 Press Menu (right softkey) and select Message Options. Select the Priority list,
select a setting for the message, and then press OK .
8. Press Send (right softkey).
Tip:
Not ready to send that message yet? You can save it without sending it.
While creating a message, press Menu and select Save to Drafts. To access
the draft, select the Show list in the upper-left, and then select Drafts.
Synchronizing Your Default Email Account
To send and receive messages for your default email account, simply synchronize your
smart device with your computer. See “Synchronizing - The Basics” on page 66 for details.
During synchronization, new messages are copied to your smart device’s Inbox, and
messages in the smart device’s Outbox are sent.
Tip:
Your computer must be connected to the Internet when you sync your
email.
Receiving Attachments
You can receive and open attachments in a number of formats, including Word, Excel, PPT,
and PDF. You can also set ActiveSync to automatically download attachments (see the Treo
700
WX User Guide). To receive and open attachments, do the following:
1. Select the attachment (below the subject) to mark it for download.
2. Synchronize the email account that contains the message as described in the previous
section. For synchronizing other accounts, see the Treo 700
WX User Guide
3. Select the attachment to open it.
54 Wireless Features
Page 70

Sending and Receiving Text Messages
Creating and Sending a Text Message
Each text message can hold up to 160 characters. To save time, you can select from
predefined My Text phrases, such as “Call me” or “On my way.” You can add your own My
Tex t phrases, and if you prefer, you can enter the full message text too.
1. Go to your To da y screen and press Messaging (left softkey).
2. Press Left until you see Tex t M essa ge s in the title bar.
3. Press New (left softkey).
4. Do one of the following to address the message:
䡲 If the recipient’s name and wireless number are in
your Contacts list, type the first few letters of the first
or last name or simply enter the first initial, followed
by a space, and then the last initial to find a name.
(You can enter the first few numbers of a contact’s
wireless phone number.)
䡲 If the recipient’s name is in an online address book,
press Center , enter the name, press Menu
(right softkey), and then select Find Online. (Select the name, and then select to
use either the phone number or email address. For more information, see the Treo
700
WX User Guide.)
䡲 If the recipient’s name and wireless number are not in your Contacts list, enter the
full wireless number or email address.
䡲 To address a message to multiple recipients, separate the addresses with a
semicolon (;). (If you address a single text message to three people, you are billed
for three messages.)
Wireless Features
Wireless Features 55
Page 71

5. Enter your message, or press Menu (right softkey), select My Text, and then
select a predefined phrase you want to insert.
6. (Optional) Press Menu (right softkey) and select Spell Check.
7. (Optional) Press Menu (right softkey) and select Message Options. Enter a
callback number and then press OK .
8. Press Send (left softkey).
Receiving Text Messages
When your phone is on and you are in a wireless coverage area, you automatically receive
new text messages. You can also set your smart device to notify you when a new text
message arrives.
The new message notification may include either of the following options:
䢇 Reply: Opens a message addressed to the sender’s phone number.
䢇 Menu: Opens a menu where you can select other options.
56 Wireless Features
Page 72

Viewing a Web Page
Internet Explorer Mobile provides quick and easy access to Web pages. You can view most
sites you use on your computer, including those with security and advanced features, such
as JavaScript and frames.
To browse the Web, you must activate Sprint PCS Vision data services. (See “Enabling Sprint
PCS Vision” on page 42.) Internet Explorer Mobile supports JavaScript, Secure Sockets Layer
(SSL), and cookies, but does not support plug-ins (Flash, Shockwave, etc.) or Java applets.
By default, Internet Explorer Mobile scales Web page content to fit your smart device
screen so that you can view most of the information without scrolling left or right.
1. Make sure your phone is on.
2. Press Start and select Internet Explorer.
3. Highlight the address line, enter the address of the Web
page you want to view, and then press Center . (If you
browse to a secure Web page, the Lock icon in the address
line appears closed instead of open.)
4. Press Menu (right softkey), select View, and then
select any of the following:
䡲 One Column: Arranges Web pages into one column
that is as wide as the screen, so that you don’t have to
scroll horizontally.
䡲 Default: Maintains a layout similar to what you see on a desktop computer, but it
makes items smaller and arranges the content so that you can see most of it
without scrolling horizontally.
䡲 Desktop: Keeps the same layout and size as on a desktop computer, which requires
both horizontal and vertical scrolling.
䡲 Full Screen: Hides the status and navigation areas and fills the entire screen with
the Web page. (To exit full screen mode, press (right softkey) or (left
Wireless Features
Wireless Features 57
Page 73

softkey). You can also tap and hold anywhere on the screen and uncheck
Full Screen.)
䡲 Show Pictures: Shows or hides pictures on Web pages. (Hiding pictures speeds up
the time it takes to load pages.)
5. Do any of the following:
䡲 To view the previous page, press Back (left softkey) or Backspace .
䡲 To refresh the page with the latest content from the Internet, press Menu
(right softkey) and select Refresh.
䡲 To scroll through the page in One Column view or Default view, press Up or
Down . (In Desktop view, press Up , Down , Left , or
Right to scroll in all directions.)
䡲 To follow a link to another Web page, press Up or Down to highlight the link,
and then press Center to go to the selected page. (You can also tap the link on
the screen with your stylus.)
䡲 To adjust the size of the text on Web pages, press Menu (right softkey),
select Zoom, and then select the size you want.
䡲 To view a Web page’s properties, press Menu (right softkey) and select Too l s
> Properties.
䡲 To view each item in a list, tap the list with your stylus.
䡲 In a list, press Down or Left to cycle between items, and press Center to
accept the change.
䡲 In a form, such as a browser search field, press Center to interact with the
form, and then press Center to stop interacting with the form.
䡲 You can send email from a Web page. Email addresses appear as links on Web
pages. After you configure an email application on your smart device, you can
select an email link to create a message to that address.
6. Press OK to close Internet Explorer Mobile.
58 Wireless Features
Page 74

Working With Favorites
Favorites lets you bookmark a Web page so that you can instantly access it without
entering the Web address.
Creating a Favorite
1. Go to the page you want to mark as a favorite.
2. Press Menu (right softkey) and select Add to
Favor ites.
3. (Optional) Select Name and enter a different description.
4. (Optional) Select the folder where you want to create the
favorite.
5. Select Add.
Viewing a Favorite
1. Press Start and select Internet Explorer.
2. Select Favor ites (left softkey).
3. Press Down to highlight the page you want to view in the list, and then press Center
to go to the selected page.
Wireless Features
Wireless Features 59
Page 75

Organizing Your Favorites
You can create folders for organizing your favorites. For example, you can store travel links
in one folder, stock links in another, and business links in a third folder.
1. Press Start and select Internet Explorer.
2. Select Favor ites (left softkey).
3. Select the Add/Delete tab.
4. Select New Folder.
5. Enter a name for this folder, and then select Add.
6. Press OK .
60 Wireless Features
Page 76

Connecting to Devices With Bluetooth® Wireless Technology
With your smart device’s built-in Bluetooth® wireless technology, you can connect to a
number of Bluetooth devices. If your computer is enabled with Bluetooth wireless
technology, you can also synchronize wirelessly.
Did You
Know?
Tip:
Note:
If you’re using a hands-free Bluetooth device and it is within range, your
smart device routes all calls to the hands-free device instead of to your
smart device’s earpiece. Bluetooth range is up to 30 feet in optimum
environmental conditions.
The Bluetooth icon on your Tod a y screen indicates the status of your
smart device’s Bluetooth feature:
Gray = Bluetooth off.
Blue = Bluetooth on.
White = Connected to a Bluetooth device.
Headset = Call in progress with a Bluetooth headset or car kit.
Sprint PCS Voice Command service cannot be used with wireless
headsets that are enabled with Bluetooth wireless technology.
Wireless Features 61
Wireless Features
Page 77

Setting Up a Bluetooth Connection
After you set up a connection with a Bluetooth device, you can communicate with that
device whenever it is within range (about 30 feet) and your smart device’s Bluetooth
feature is turned on.
1. If necessary, prepare the device you want to connect
with to accept a new connection. (Check the device’s
documentation for details.)
2. Go to your To da y screen, and then tap Bluetooth .
3. Check the Turn on Bluetooth box to turn on your smart
device’s Bluetooth feature.
Tip:
Your smart device supports only call audio with Bluetooth headsets. It
does not support stereo music playback with Bluetooth headsets
(enabled with Bluetooth A2DP profile).
4. Select the Devices tab, and then select New Partnership.
5. Wait for your smart device to search for devices and to
display the device list.
6. Select the device you want to connect with, and then
press Next (right softkey).
7. Enter an alphanumeric passkey between 1 and 16
characters long, and then press Next (right softkey).
62 Wireless Features
Page 78

8. If the passkey is not built-in, enter the same passkey on
the smart device and the other Bluetooth device, and then
press Finish (right softkey).
9. If you’re connecting to a headset or hands-free car kit,
check the Hands Free box, and then press Finish (right
softkey).
Important:
Some Bluetooth devices have a built-in passkey; others let you choose the
passkey. See the documentation for the Bluetooth device for more
information.
10. If you’re connecting to a GPS device, press Finish (right softkey), select the COM
Ports tab, select the GPS device you selected in step 6, and then select New Outgoing
Port . (Press Finish [right softkey]. After you set the partnership and COM port,
you can configure the GPS settings. See the Treo 700
WX User Guide for more
information. Be sure to select the same port you have assigned for GPS here.)
11. Press OK .
You can now communicate with this device whenever it is within range (about 30 feet) and
your smart device’s Bluetooth feature is turned on (see steps 2 and 3 earlier in this section).
Wireless Features
Wireless Features 63
Page 79

Turning Wireless Services On/Off
1. Press Start and select Settings.
2. Select the Connections tab, and then select Wireless
Manager.
3. Turn your smart device’s wireless features on/off. (Select All
to turn all wireless features on/off.)
4. Press OK to finish.
Note:
64 Wireless Features
The Wi-Fi selection appears only if a Wi-Fi card is installed in your smart
device. You must purchase and install a third-party Wi-Fi card to use this
feature. For more information on Wi-Fi, see the Treo 700WX User Guide.
Page 80

Information Management
In This Section
⽧ Synchronizing - The Basics
⽧ Working With Your Pictures and Videos
⽧ Listening to Music
⽧ Personal Information Management
⽧ Using Word Mobile
⽧ Using Find
⽧ Using Expansion Cards
⽧ Installing Applications
⽧ Customizing Your Device
⽧ Locking Your Smart Device and Information
Information Managment
Information Managment 65
Page 81

Synchronizing - The Basics
You can enter or change information on your smart device or in Microsoft Office Outlook on
your computer or with a Microsoft Exchange Server, and then synchronize to update the
information in both places.
We strongly recommend that you synchronize your smart device and your computer
frequently to keep your information up-to-date (and backed up) in both locations.
Synchronizing Your Device With a Computer
To synchronize the information between your Treo700wx smart device and your computer,
install the ActiveSync desktop software and connect your device to your computer using
one of the following methods:
䢇 Connect using a USB sync cable: When you connect your
device to your computer using the sync cable,
synchronization begins automatically.
䢇 Connect using Bluetooth wireless technology: You mus t fir st
set up the Bluetooth connection. (See the Treo 700
Guide.)
䢇 Connect using Infrared (IR) technology: You must first set up
your computer to receive infrared beams. (See the Treo
700
WX User Guide.)
Synchronizing Your Device With a Microsoft Exchange Server
You can synchronize the email, contacts, and other information on your smart device with a
Microsoft Exchange Server using ActiveSync. (See “Setting Up an Exchange Server Account”
on page 50.)
By default, your smart device wirelessly synchronizes with the Exchange Server over the
Sprint PCS Network when you press Sync in the ActiveSync application. You can also
synchronize your smart device with the Exchange Server when the device is connected to
WX User
66 Information Managment
Page 82

your computer using a USB, IR, or Bluetooth connection. (When a server source is
configured, your device synchronizes with the server using the connection you choose.)
What Information Is Synchronized by Default?
By default, the information in the following applications is updated each time you
synchronize:
Synchronizing With a USB Connection
1. Install the ActiveSync desktop synchronization software as described in the Treo
700
WX User Guide.
2. Connect your smart device to your computer. (You
should hear the ActiveSync
®
tone.)
3. Look for the ActiveSync icon at the top of your
smart device’s screen and the ActiveSync icon in
the taskbar on your computer.
䡲 If you don’t see the ActiveSync icon, make sure
the desktop synchronization software that came
with your smart device is running on your
computer.
䡲 If you have any problems synchronizing, see the
Tre o 700
WX User Guide for troubleshooting
This Button Has No
Function With Your
Treo 700wx Smart Device
suggestions.
Information Managment
Information Managment 67
Page 83

Working With Your Pictures and Videos
Your Treo™ 700wx smart device comes with an easy-to-use, built-in, 1.3-megapixel camera
with 2x digital zoom (camera not included with all smart devices). You can also receive and
view photos and videos, send photos and videos to other people as attachments, and use
photos to personalize your device.
Taking a Picture
By default, pictures are stored in the My Pictures folder on your smart device.
Your device has a self-portrait mirror next to the camera lens on the back of your device.
1. Press Start and select Pictures & Videos.
2. Select Camera .
3. Adjust the position of your smart device until you see the subject you want to
photograph on the screen.
4. (Optional) Adjust any of the following:
䡲 Zoom: Press Up to zoom in, or Down to zoom out.
䡲 Brightness: Press Right to increase the brightness or
Left to decrease the brightness.
䡲 Resolution: Press Menu (right softkey) and select
Resolution to change the image quality.
5. (Optional) Set a 5-second timer: Press Menu (right
softkey), select Mode, and then select Timer.
6. Press Center to capture the picture or start the timer.
7. Hold your device still until the picture renders, and then do one of the following:
䡲 Press Camera (left softkey) to take another picture.
䡲 Press OK to return to the Thumbnails view.
68 Information Managment
Page 84

Recording a Video
Videos can be any length. By default, videos are stored in the My Pictures folder on your
smart device.
1. Press Start and select Pictures & Videos.
2. Select Camera .
3. Press Menu (right softkey) and select Video Mode.
4. Adjust the position of your smart device until you see the subject you want to record
on the screen.
5. (Optional) Adjust any of the following:
䡲 Brightness: Press Right to increase the brightness or Left to decrease the
brightness.
䡲 Resolution: Press Menu and select Quality to
change the video resolution.
6. Press Center to start recording.
7. When you’ve finished recording, press Stop (left
softkey) or Center to stop recording.
8. (Optional) To review the video in Windows Media Player
Mobile, press Thumbnails (left softkey), highlight
the video, and then press Center . (Press OK to
return to the Thumbnails view.)
Viewing a Picture or Video
1. Press Start and select Pictures & Videos.
2. Select the picture or video you want to view. (For more information on viewing videos,
see “Playing Media Files on Your Smart Device” on page 72.)
3. Press OK to return to the Thumbnails view.
Information Managment
Information Managment 69
Page 85

Viewing a Slide Show
1. Press Start and select Pictures & Videos.
2. Press Menu (right softkey) and select Play Slide Show. (The slide show will play
automatically.)
3. Press Center to display the slide show toolbar, which you can use to Rotate , Play
, Pause , Reverse , Forward , and Stop the slide show.
Using a Picture as the Today Screen Background
1. Press Start and select Pictures & Videos.
2. Select the picture you want to use.
3. Press Menu (right softkey) and select Set as Today Background.
4. Select the Transparency Level list and select the appropriate level. (Use a higher
percentage for a more transparent picture or a lower percentage for a more opaque
picture.)
5. Press OK to return to the Thumbnails view.
70 Information Managment
Page 86

Listening to Music
Transferring Media Files to Your Smart Device
Use the Sync feature in the desktop version of Windows Media Player 10 to transfer digital
music, audio, video, and playlist files from your computer to an expansion card or your
smart device. Using Sync ensures that the files transfer correctly.
Before You
Begin:
Do the following:
䢇 You must have Windows Media Player 10 or later installed on your
computer.
䢇 To sync media files with your computer, you must set the Media sync
option. For more information, see “What Information Is
Synchronized by Default?” on page 67.
1. On your computer, open Windows Media Player 10.
2. (Optional) Insert a 32MB or larger expansion card into your smart device.
3. Connect your smart device to your computer with the USB sync cable.
4. When the Device Setup Wizard opens on your computer, click Automatic.
5. Check the Customize the playlists that will be synchronized box.
6. Select the playlists you want to sync.
7. Click Finish to begin the transfer. (The next time you connect your smart device to your
computer while the desktop version of Windows Media Player 10 is running,
synchronization starts automatically. Be patient; transferring media files to an
expansion card can take several minutes.)
For tips on using the desktop version of Windows Media Player, go to the Help menu in
Windows Media Player 10 on your computer.
Information Managment 71
Information Managment
Page 87

Playing Media Files on Your Smart Device
Windows Media Player Mobile can play music, audio, and video files that are stored on your
smart device or on an expansion card (sold separately) in any of the following file formats:
䡲 WMA
䡲 WMV
䡲 MP3
䡲 3G2
You can listen to these music, audio, and video files through the speaker on the back of your
smart device or through a stereo headphone (3.5mm stereo headphone adapter or 2.5mm
stereo headphone required, sold separately).
1. Press Start and select Windows Media.
2. Press Menu (right softkey) and select Library.
3. Select the Library list in the upper-left, and then select the library you want to use.
4. Select the item you want to play (such as a song, album, or artist name).
5. Press Play (left softkey).
6. Use any of the following onscreen controls during playback:
䡲 Center or Plays the current file.
䡲 Center or Pauses the current file.
䡲 Left or Skips to the beginning of the current file or to the previous file.
䡲 Right or Skips to the next file.
䡲 Sets the point from which playback begins. (Tap and drag the slider to change
the current position.)
䡲 Vol um e button or Increases the volume level.
䡲 Vol um e button or Decreases the volume level.
䡲 Turns the sound on or off.
72 Information Managment
Page 88

䡲 Displays a video using the full screen.
䡲 Displays a Web site where you can find music and videos to play.
䡲 Indicates the rating of the current file. (Select the star to change the rating.)
7. Press Menu (right softkey) and select any of the following during playback:
䡲 Library: Displays the Library screen so you can select a different song to play.
䡲 Shuffle/Repeat > Shuffle: Plays the Now Playing playlist in random order. (A check
appears next to this command when it is on.)
䡲 Shuffle/Repeat > Repeat: Plays the Now Playing playlist repeatedly.
(A check appears next to this command when it is on.)
䡲 Stop: Ends playback.
Working With Libraries
A library represents each of the storage locations available to Windows Media Player
Mobile, such as your Treo device or an optional expansion card (not included). Each library
contains links to the media files in that location. Windows Media Player Mobile usually
creates and updates the library automatically when you add media files for the first time.
For example, when you add media files to your Treo device, the My Device library is created.
When you insert an expansion card containing media files, the Storage Card library is
created. When you update a library, it automatically updates video files (WMV and 3G2)
and audio files (WMA, MP3, QCP, and WAV).
1. Press Start and select Windows Media.
2. Press Menu (right softkey) and select Library.
3. Press Menu (right softkey) and select Update Library.
4. Wait for the files to be added, and then select Done. (If you don’t see a media file that
you added, manually update the library.)
Information Managment
Information Managment 73
Page 89

Personal Information Management
Tip:
If you used Palm® Desktop software on your previous device, go to
www.palm.com/us/support/treo700wxsprint for helpful
information on migrating to Outlook.
Managing Your Contacts
Adding a Contact
Tip:
1. Press Start and select Contacts.
2. Press New (left softkey).
3. Use the 5-way navigator to move between fields as you
enter information.
4. To add a caller ID picture that appears when that person
calls, select Picture, and then select Camera and take a
picture, or select an existing picture from the Thumbnails
view.
5. To assign the entry to one or more categories, select Categories and then check the
categories under which you want this entry to appear.
6. To add a note to an entry, select the Notes tab.
7. To assign a ringtone to the entry, select Ring tone and select a tone.
8. After you enter all the information, press OK .
If you have many contacts to enter, it’s best to enter them in Microsoft
Office Outlook on your computer and then sync. See “Synchronizing - The
Basics” on page 66 for details.
74 Information Managment
Page 90

Viewing or Changing Contact Information
1. In the Contacts list (name view), begin entering one of the following for the contact
you want to view or edit:
䡲 First name.
䡲 Last name.
䡲 First initial and last initial separated by a space.
䡲 Press Option , and then enter the phone number.
2. Select the entry you want to open.
3. Press Menu (right softkey) and select Edit.
4. Make changes to the entry as necessary and press OK .
Creating and Viewing Your Calendar
Displaying Your Calendar
1. Press Start and select Calendar.
2. Press Menu (right softkey) and select View.
3. Select one of the following views:
䡲 Agenda: Shows your daily schedule in list format. (Upcoming appointments are
bold; past appointments are dimmed.)
䡲 Day: Shows your daily schedule in day-planner format.
䡲 Week : Shows your schedule for an entire week.
䡲 Month: Shows your schedule for a whole month.
A morning appointment.
An afternoon/evening appointment.
Both morning and afternoon/evening appointments.
An all-day event.
䡲 Yea r : Shows a calendar for a 6-month period.
Information Managment
Information Managment 75
Page 91

4. Use the 5-way to move to another day, week, month, or year (based on the current
view).
Creating an Appointment
Tip:
If you have several appointments to enter, it’s most efficient to enter
them in Microsoft Office Outlook on your computer and then
synchronize your smart device with your computer. For more
information, see “Synchronizing - The Basics” on page66.
1. Press Start and select Calendar.
2. Press Menu (right softkey) and select New
Appointment.
3. Enter a subject (description) and a location.
4. Select Starts and select the starting date and time.
5. Select Ends and select the ending date and time.
6. Press OK .
Tip:
To pencil in an appointment, open the appointment, select Status, and
then select Ten t at i v e .
Scheduling a Repeating Appointment
1. Create an appointment or untimed event, and then select it.
2. Press Edit (left softkey).
3. Select Occurs, and then select a repeat pattern. (To create a repeat pattern, select Edit
pattern and follow the onscreen instructions.)
4. Press OK .
76 Information Managment
Page 92

Managing Your Tasks
Did You
Know?
If you want to use Tasks Over the Air (OTA) synchronization, install the
software from your Getting Started CD. OTA features also require an
Exchange Server 2003 upgrade to Service Pack 2. The option to
synchronize tasks wirelessly in the ActiveSync application appears only if
you have the appropriate server.
Adding a Task
1. Press Start and select Programs.
2. Select Tas ks .
3. Press New (left softkey).
4. Enter a description of the task as the Subject.
5. Set any of the following:
䡲 Priority: Sets the priority level for this task. (Later you
can arrange your tasks based on the importance of
each task.)
䡲 Status: Indicates whether the task is now completed.
䡲 Starts: Specifies when the task begins.
䡲 Due: Sets the due date for the task.
䡲 Occurs: Indicates if the task repeats at regular intervals
and how often it repeats.
䡲 Reminder: Sets an alarm for this task and indicates when you want to be
reminded.
䡲 Categories: Assigns the task to one or more categories.
䡲 Sensitivity: Marks this task as Normal, Personal, Private, or Confidential.
䡲 Notes: Lets you enter additional text for the task.
Information Managment
Information Managment 77
Page 93

6. Press OK .
Tip:
You can mark a task complete by tapping the check box next to the task
Tas ks list.
on the
78 Information Managment
Page 94

Using Word Mobile
You can create and edit documents and templates and save them as DOC, RTF, TXT, and DOT
files. You can also edit Microsoft
your computer. However, keep in mind that some of the information and formatting may
be lost when you save the document on your smart device. Not all Office Word features are
supported by Word Mobile. For a list of supported and unsupported features, see the Treo
700
WX User Guide.
®
Office Word® documents and templates that you create on
Creating a Document
1. Press Start and select Programs.
2. Select Word Mobil e .
3. Press New (left softkey).
4. Enter the text of the document.
5. Press OK to save the file.
Did You
Know?
When you save a new document, it is automatically named after the first
several words in the file.
Opening an Existing Document
1. Press Start and select Programs.
2. Select Word Mobil e .
3. In the document list, select the document you want to open.
Information Managment
Information Managment 79
Page 95

Saving a Copy of a Document
1. Open the document you want to copy.
2. Press Menu (right softkey) and select File > Save As.
3. Select Name and enter a new name for the file.
4. Select the Folder list, and then select the folder where you want to save the file.
5. Select the Typ e list, and then select the format in which you want to save the file.
6. Select the Location list, and then select whether you want to store the file on your
smart device or an expansion card.
7. Select Save.
80 Information Managment
Page 96

Using Find
With the built-in search features on your smart device, you can find information quickly:
䢇 Lookup: Helps you find and dial your contacts by name or phone number. (See “Dialing
by Contact Name” on page 25 for details.)
䢇 Search: Looks through the text in all the applications on your smart device.
䢇 File Explorer: Lets you browse through the files and folders on your smart device or an
expansion card.
䢇 Global Address Lookup: Enables you to look up names in your online corporate address
list.
Using Search
Search for files and other items stored in the My Documents folder on your smart device or
on an expansion card. You can search by file name or by words located in the item. For
example, you can search for words within notes, appointments, contacts, and tasks.
1. Press Start and select Programs.
2. Select Search .
3. Select Search for, and then enter the file name, word, or
other information you want to find.
4. Select the Typ e list, and then select the kind of information
you want to find.
5. Press Search (left softkey).
6. Use the 5-way to select and view an item from the results of the search.
Information Managment
Information Managment 81
Page 97

Exploring Files and Folders
File Explorer lets you browse the contents of folders on your smart device. The root folder on
your smart device is named My Device. The storage card symbol appears next to the names
of files that are stored on an expansion card.
1. Press Start and select Programs.
2. Select File Explorer .
3. Select the Show list in the upper-left, and then select the folder you want to explore.
4. Do any of the following:
䡲 To open an item, select it.
䡲 To quickly delete, rename, beam, or email an item, highlight the item, press and
hold Center to open the shortcut menu, and then select the appropriate
command.
䡲 To move a file to another folder, highlight the item, press and hold Center to
open the shortcut menu, and then select Cut or Copy. Open the destination folder,
and press and hold Center to open the shortcut menu, and then select Paste.
䡲 To highlight multiple items, tap and drag the stylus.
82 Information Managment
Page 98

Using Expansion Cards
The expansion card slot on your smart device enables you to add SD cards and
MultiMediaCard cards to extend the storage capacity of your smart device. Your smart
device is also compatible with many Wi-Fi
make sure the card is compatible with the Treo 700wx.
Removing and Inserting Expansion Cards
1. Press down and release the dummy card.
2. After you feel the expansion card slot eject the dummy card, remove the card
from the slot.
3. To insert an expansion card, hold your smart device with the screen facing you and
the card with the label facing you. (The notch on the card should be in the lower-left
corner next to the antenna.)
®
SDIO cards. When purchasing an SDIO card,
Information Managment
Information Managment 83
Page 99

4. Insert the card into the expansion card slot until you feel it lock into place and hear
the confirmation tone.
Notch
Opening Applications on an Expansion Card
1. Insert the expansion card into the expansion card slot.
2. Press Start and select Programs.
3. Select File Explorer.
4. Select the Show list in the upper-left, and then select Storage Card.
5. Select the application you want to open.
Moving Information Between Your Smart Device and an Expansion Card
1. Insert an expansion card into the expansion card slot.
2. Open the application from which you want to move the information.
3. Go to the list view and highlight the item(s) you want to move.
84 Information Managment
Page 100

4. Press Menu (right softkey) and select Rename/Move.
5. Select the Location list, and then select where you want to move the information:
Storage Card or Main Memory.
6. Press OK .
Copying or Moving Applications and Files Between Your Smart Device and an Expansion
Card
1. Insert the expansion card into the expansion card slot.
2. Press Start and select Programs.
3. Select File Explorer.
4. Select the file or application you want to copy or move (see “Exploring Files and
Folders” on page 82). Your applications are usually located in the My Device / Program
Files folder.
5. Press Menu (right softkey) and select Edit > Copy or Edit > Cut.
6. Go to the folder where you want to place the selected item.
7. Press Menu (right softkey) and select Edit > Paste.
8. Press OK .
Information Managment
Information Managment 85
 Loading...