

Page 1

CONTENTS
Welcome . . . . . . . . . . . . . . . . . . . . . . . . . . . . . . . . . . 1
Welcome and thank you for choosing Verizon Wireless . . . . . . . . . . .1
OUR Worry-Free Guarantee® to you . . . . . . . . . . . . . . . . . . . . . . . . . . 1
How to sign up for New Every Two . . . . . . . . . . . . . . . . . . . . . . . . . . . 2
Learning the basics . . . . . . . . . . . . . . . . . . . . . . . . . . . 5
Palm® Treo™ 700wx smartphone overview . . . . . . . . . . . . . . . . . . . . 5
Turning your smartphone on/off . . . . . . . . . . . . . . . . . . . . . . . . . . . . . 7
Moving around the screen . . . . . . . . . . . . . . . . . . . . . . . . . . . . . . . . . 8
Using the keyboard . . . . . . . . . . . . . . . . . . . . . . . . . . . . . . . . . . . . . . 14
Opening and closing applications . . . . . . . . . . . . . . . . . . . . . . . . . . . 18
Using your Today screen . . . . . . . . . . . . . . . . . . . . . . . . . . . . . . . . . 19
Synchronizing information . . . . . . . . . . . . . . . . . . . . . . . . . . . . . . . .20
Maximizing battery life . . . . . . . . . . . . . . . . . . . . . . . . . . . . . . . . . . . 21
Using your phone . . . . . . . . . . . . . . . . . . . . . . . . . . . . 23
What’s my number? . . . . . . . . . . . . . . . . . . . . . . . . . . . . . . . . . . . . . 23
Making calls . . . . . . . . . . . . . . . . . . . . . . . . . . . . . . . . . . . . . . . . . . . 23
Receiving calls . . . . . . . . . . . . . . . . . . . . . . . . . . . . . . . . . . . . . . . . . 29
Using voicemail . . . . . . . . . . . . . . . . . . . . . . . . . . . . . . . . . . . . . . . . 30
What can I do during a call? . . . . . . . . . . . . . . . . . . . . . . . . . . . . . . . 31
Creating a speed-dial button . . . . . . . . . . . . . . . . . . . . . . . . . . . . . . . 34
Using a phone headset . . . . . . . . . . . . . . . . . . . . . . . . . . . . . . . . . . . 36
What are all those icons? . . . . . . . . . . . . . . . . . . . . . . . . . . . . . . . . . 39
Staying organized . . . . . . . . . . . . . . . . . . . . . . . . . . . 42
Contacts . . . . . . . . . . . . . . . . . . . . . . . . . . . . . . . . . . . . . . . . . . . . . . 42
Calendar . . . . . . . . . . . . . . . . . . . . . . . . . . . . . . . . . . . . . . . . . . . . . . 44
i
Page 2

Staying in touch . . . . . . . . . . . . . . . . . . . . . . . . . . . . . 47
Messaging . . . . . . . . . . . . . . . . . . . . . . . . . . . . . . . . . . . . . . . . . . . . 47
Browsing the web . . . . . . . . . . . . . . . . . . . . . . . . . . . . . . . . . . . . . . . 63
Setting up a Bluetooth
®
connection . . . . . . . . . . . . . . . . . . . . . . . . . 66
Playing media files . . . . . . . . . . . . . . . . . . . . . . . . . . 70
Pictures & Videos . . . . . . . . . . . . . . . . . . . . . . . . . . . . . . . . . . . . . . . 70
Windows Media Player Mobile . . . . . . . . . . . . . . . . . . . . . . . . . . . . . 73
Staying productive . . . . . . . . . . . . . . . . . . . . . . . . . . . 77
Word Mobile . . . . . . . . . . . . . . . . . . . . . . . . . . . . . . . . . . . . . . . . . . . 77
PowerPoint Mobile . . . . . . . . . . . . . . . . . . . . . . . . . . . . . . . . . . . . . . 77
Excel Mobile . . . . . . . . . . . . . . . . . . . . . . . . . . . . . . . . . . . . . . . . . . . 78
Managing files and applications . . . . . . . . . . . . . . . . . . 81
Finding information . . . . . . . . . . . . . . . . . . . . . . . . . . . . . . . . . . . . . . 81
Installing applications . . . . . . . . . . . . . . . . . . . . . . . . . . . . . . . . . . . . 83
Setting synchronization options . . . . . . . . . . . . . . . . . . . . . . . . . . . . 84
Using expansion cards . . . . . . . . . . . . . . . . . . . . . . . . . . . . . . . . . . . 90
Customizing your smartphone . . . . . . . . . . . . . . . . . . . 92
Today screen settings . . . . . . . . . . . . . . . . . . . . . . . . . . . . . . . . . . . . 92
Sound settings . . . . . . . . . . . . . . . . . . . . . . . . . . . . . . . . . . . . . . . . . 93
Display and appearance settings . . . . . . . . . . . . . . . . . . . . . . . . . . . . 96
Application settings . . . . . . . . . . . . . . . . . . . . . . . . . . . . . . . . . . . . . 97
Setting up and using Voice Command . . . . . . . . . . . . . . . . . . . . . . . 98
Locking your smartphone and info . . . . . . . . . . . . . . . . . . . . . . . . . . 99
System settings . . . . . . . . . . . . . . . . . . . . . . . . . . . . . . . . . . . . . . . 101
ii
Page 3

CONTENTS
Getting help . . . . . . . . . . . . . . . . . . . . . . . . . . . . . . 102
Performing a soft reset . . . . . . . . . . . . . . . . . . . . . . . . . . . . . . . . . . 102
Where to learn more . . . . . . . . . . . . . . . . . . . . . . . . . . . . . . . . . . . . 103
Hands-free vehicle kits and headsets . . . . . . . . . . . . . . . . . . . . . . . 104
Vehicle power chargers and home/office chargers . . . . . . . . . . . . . 104
Additional batteries . . . . . . . . . . . . . . . . . . . . . . . . . . . . . . . . . . . . . 105
Three ways to accessorize . . . . . . . . . . . . . . . . . . . . . . . . . . . . . . . 105
May we help you? . . . . . . . . . . . . . . . . . . . . . . . . . . . . . . . . . . . . . . 105
Regulatory Information . . . . . . . . . . . . . . . . . . . . . . . 107
Index . . . . . . . . . . . . . . . . . . . . . . . . . . . . . . . . . . . 113
iii
Page 4

iv
Page 5

WELCOME
WELCOME AND THANK YOU FOR CHOOSING VERIZON WIRELESS
WELCOME
You’re now connected to the power of America’s best, most reliable wireless network.* This
®
guide helps you understand your new Palm
Treo™ 700wx smartphone and all the things you
can do with it.
For more details, please refer to the User Guide. If you ever have any questions and would like to
access an online Q&A, please visit us online at
www.verizonwireless.com and check out How to
Use Your Phone.
OUR WORRY-FREE GUARANTEE® TO YOU
You’ll enjoy America’s best, most reliable wireless network.
You have the option to change to any qualifying calling plan or airtime promotion at any time.
You won’t pay any additional fees to change to any qualifying calling plan or airtime promotion.
Some calling plans require specific equipment. Calling plan changes and promotional offers will
require a new 1- or 2-year Customer Agreement.
If you ever have a problem, it becomes our problem the first time you call.
No runarounds, no hassles. If your issue can’t be resolved during the course of your first call, we
will take the responsibility to get back to you with an answer.
*Network details at www.verizonwireless.com
1
Page 6

Your satisfaction is guaranteed on any equipment you purchase from us.
We provide a 15-day satisfaction guarantee on any product you buy from us. You pay only for the
service you’ve used. See the Return Policy brochure for details.
You can get a free phone every two years with New Every Two®.
Sign up for and maintain two years of service on a digital plan of $34.99 or higher to qualify for a
free phone up to $50 or $100, depending on the monthly access of your plan. Or you can apply
your New Every Two credit toward the purchase of a more expensive phone. A two-year renewal
is required.
Certain conditions and restrictions apply.
HOW TO SIGN UP FOR NEW EVERY TWO
You are automatically enrolled when you sign up for a 2-year agreement on a calling plan with a
monthly access of $34.99 or higher. If you maintain service on a calling plan of $34.99 or higher
and fulfill your 2-year term, you will qualify for a free wireless device. If your calling plan monthly
access is $79.99 or higher for the entire three months prior to completing your New Every Two
wireless device upgrade, you will get up to $100 toward the purchase of that wireless device. If
your calling plan monthly charges are between $34.99 and $79.98 at any time during the three
months prior to your New Every Two wireless device upgrade, you will get up to $50 toward the
purchase of that wireless device. When completing your New Every Two upgrade, you will need
to renew your agreement for another two years on a calling plan with a monthly access of $34.99
or higher. If you are not currently in the program, you can enroll by agreeing to a new 2-year term
on a calling plan with a monthly access of $34.99 or higher. You will be eligible to take advantage
of the wireless device offer at the end of the 2-year term.
Subject to the Customer Agreement and calling plan.
2
Page 7

WELCOME
You must retain the same wireless device for 24 months in order to receive the advantages of this program. If you choose to
replace your wireless device at a discounted price, you will forfeit your benefits and be automatically re-enrolled if you meet
the requirements of the program. If you enrolled in the program on or after 11/25/02, you must take advantage of the New
Every Two offer within six months after becoming eligible; otherwise, you may be charged full retail price to upgrade your
current wireless device. Discount amount will be applied toward the 2-year Customer Agreement retail price. Secondary
Family SharePlan
The New Every Two discount cannot exceed the price of the wireless device after mail-in rebates. If your 2-year Customer
Agreement with a digital calling plan of $34.99 or higher began on or after 6/2/04, you were automatically enrolled in the
program. Customers who began their 2-year agreements on or after 4/1/00 on a digital calling plan of $35 or higher were also
automatically enrolled in the program. If you enrolled in the program prior to 2/5/06 and continued to meet the requirements
of the program, you will be eligible for a free wireless device up to $100, or a credit of up to $100 toward a more expensive
wireless device, when you become eligible for you next New Every Two upgrade (after which time you will be enrolled in the
$50/$100 New Every Two program described in the New Every Two brochure). New Every Two discount amounts and calling
plan tiers subject to change at Verizon Wireless’s sole discretion.
®
lines are not eligible to participate in the program.
3
Page 8

4
Page 9
LEARNING THE BASICS
LEARNING THE BASICS
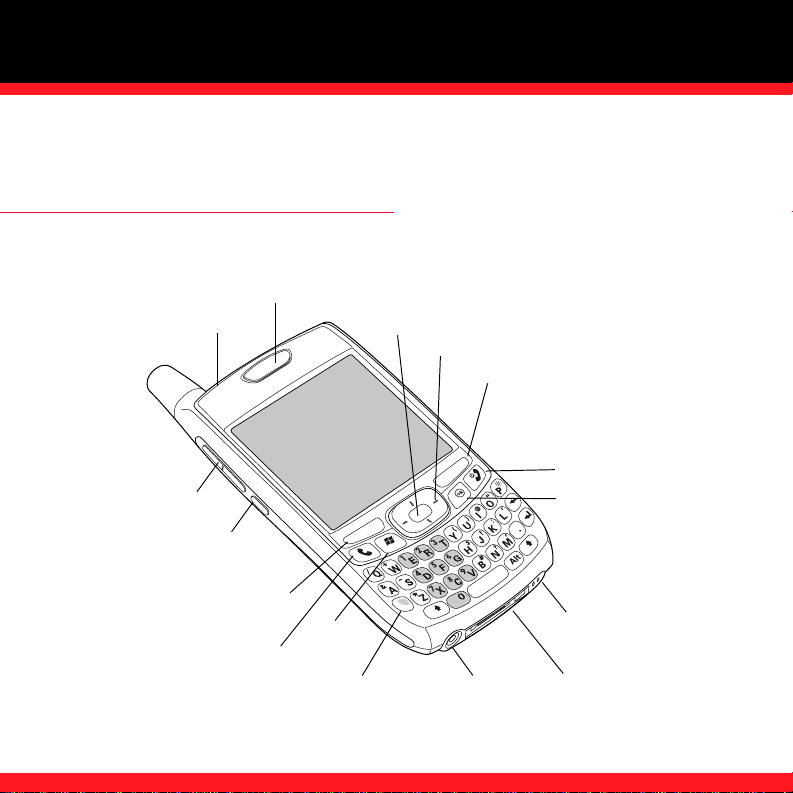
PALM® TREO™ 700wx SMARTPHONE OVERVIEW
The following illustrations show the locations and names of the physical features of your
Palm® Treo™ 700wx smartphone. Refer to these illustrations while following this guide.
Phone/Send
Earpiece
Start
Option
Center button
5-way navigator
Headset jack
Right action key
Power/End
OK
Microphone
Multi-connector
Indicator light (phone
and charge indicator)
Volume button
Side button
Left action key
5
Page 10
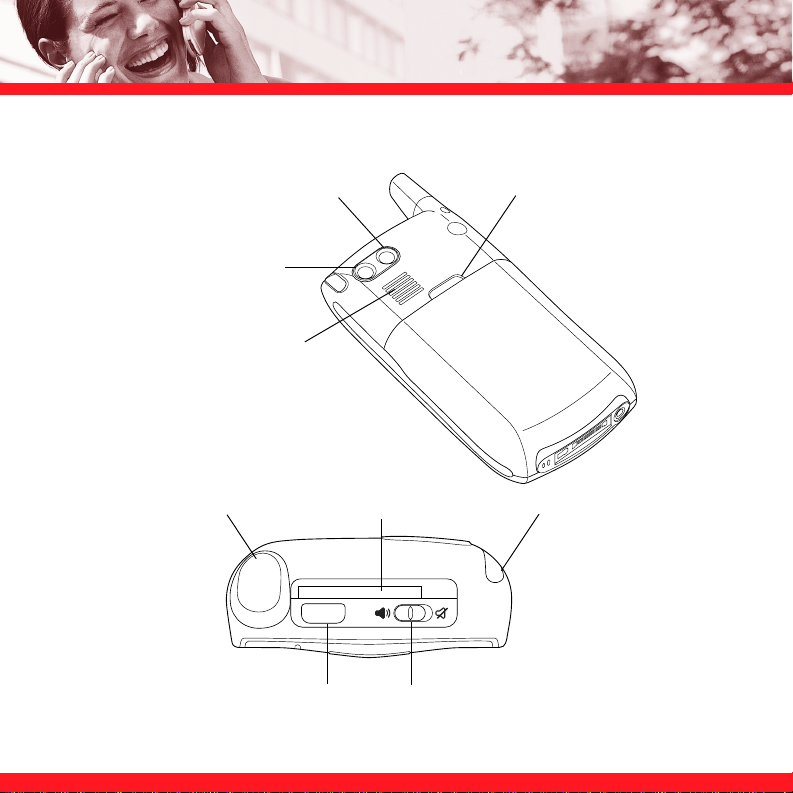
Self-portrait mirror
Camera lens
Speaker
Battery door release
Antenna
Expansion card slot
Infrared (IR) port
Ringer switch
Stylus
6
Page 11

LEARNING THE BASICS
TURNING YOUR SMARTPHONE ON/OFF
The phone and organizer features of your smartphone can be turned on and off separately. This
means you can wake up the screen to use just the organizer features, without turning on the
phone. Also, when the screen is turned off, the phone can be on and ready for you to make and
receive calls.
NOTE To conserve battery power, the screen turns off automatically after one minute. If you want the screen to stay on
longer, you can adjust the shutoff setting. Press Start, select Settings, select the System tab, and then select Power. Select
the Advanced tab, and then increase the On battery power setting.
Turning your phone on and off
When you turn on your phone, it connects to a mobile network so that you can make and receive
phone calls and use other wireless services.
1. Press and hold Power/End to turn on your phone. When your smartphone locates a
signal, the words Verizon Wireless and the signal-strength icon appear at the top of the
screen and the indicator light flashes green, indicating you can use the phone and Internet
features (if supported by the local network). If you’re outside a coverage area, the indicator
light flashes amber and no bars appear in the signal-strength icon.
2. When your phone is on, press and hold Power/End again to turn off your phone. When
your phone is off, the phone-off icon appears at the top of the screen and your
smartphone is not connected to any mobile network. You can still use the organizer and other
features.
7
Page 12
Waking up the screen
Wake up the screen and leave the phone turned off when you want to use only the organizer
features of your smartphone. You can also turn off your smartphone’s screen without turning off
your smartphone’s wireless features.
1. Press Power/End to wake up the screen.
2. Briefly press Power/End to turn off the screen.
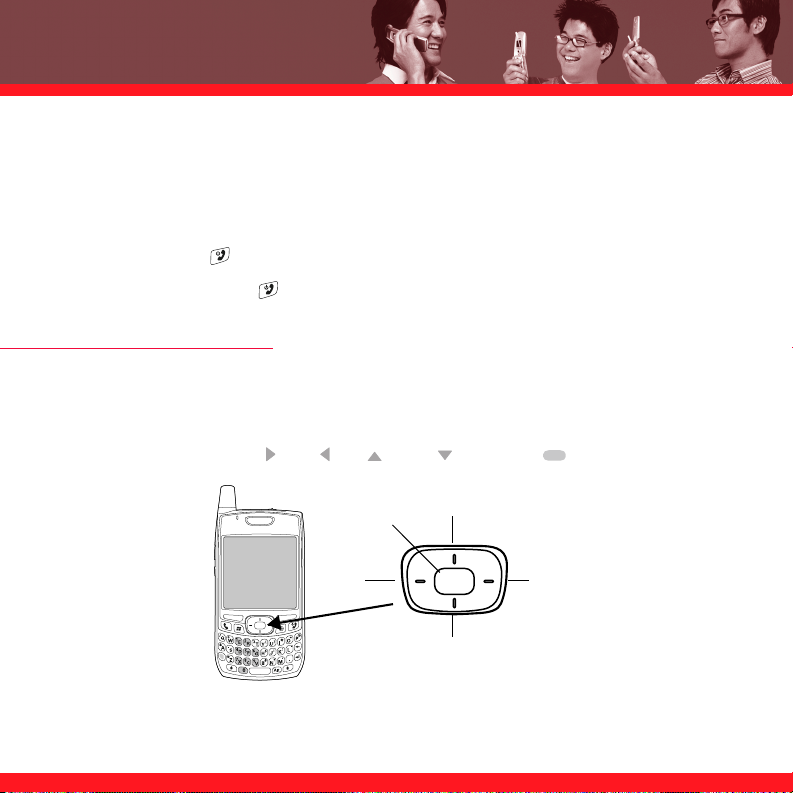
MOVING AROUND THE SCREEN
To move around your smartphone screen, you can use the 5-way navigator or you can tap items
on the screen with the stylus. As you become familiar with your smartphone, you’ll find your own
favorite way to scroll, highlight, and select items.
The 5-way includes the Right , Left , Up , Down , and Center buttons.
Center
Left
8
Up
Right
Down
Page 13
LEARNING THE BASICS
Scrolling through screens
As on a computer, on your smartphone you scroll to move from field to field or page to page,
or in some cases to highlight an item or option in a list.
There are several methods of scrolling:
■ Use the 5-way on the front of your smartphone. Press Right , Left , Up , or
Down to move to the next field, button, or action in that direction.
■ Press and hold Option while pressing Up or Down
to scroll one screen at a time. These keys work just like the
Page Up and Page Down keys on your computer keyboard.
■ Press and hold Option while pressing Left or Right
to jump to the top or bottom of the current document or
entry.
■ When viewing a screen with tabs, such as when adding a
contact or customizing settings, press Down to scroll to
the tabs, and then press Left or Right to move between
tabs.
■ When inside a text field, press Right or Left to move to
the next character, and press Up or Down to move between lines.
■ When inside a list, press and hold Up or Down to rapidly scroll through the list.
■ Tap an onscreen scroll arrow.
■ Tap and drag the slider of an onscreen scroll bar.
Scroll arrows
Scroll arrows
9
Page 14

Closing screens
To accept the information you entered on a screen (or close a screen where no information was
changed) and return to the previous screen, do one of the following:
■ Press OK .
■ Use the stylus to tap or in the upper-right corner of the screen.
Highlighting and selecting items
On most screens, one item—a button, a list entry, or a check box—is highlighted by default. The
highlight identifies which item is affected by your next action. Use the 5-way to move the
highlight from one item to another before opening or selecting it.
The highlight can take one of two forms, depending on what is highlighted:
Border: This rectangular border highlights items such as an onscreen
button (for example OK, Dismiss, or Hide), a check box, an option, or a
web link.
Reverse type (light text on a dark background): This highlights
items such as a phone number, an email address, text, or an
item in a list.
After highlighting an item with the 5-way, you can select or
activate it by pressing Center . You can also select or activate an item by tapping it with
the stylus.
10
Page 15

LEARNING THE BASICS
Using the action keys
The left and right action keys give you quick access to tasks that you can do on the current
screen, so the action key items vary from application to application and from screen to screen.
Look on the screen directly above the action key to see the action that it does in the current
context. In some contexts, these keys may do nothing at all. In most cases the right action key
opens the menu, and the left action key activates a specific command, such as New
or Edit. Remember that action key functions vary from screen to screen, so be sure to check the
onscreen label before pressing the action keys.
Left action key activates
this command
Left action key
Right action key activates
this command
Right action key
Selecting menu items
In many applications, a menu provides access to additional features. The menu is hidden until
you press Menu (right action key). To get the most out of your smartphone, it’s a good
idea to familiarize yourself with the additional features available through the menu in various
applications.
11
Page 16
1. Press Menu (right action key) to display an application’s
menu.
2. Press Up or Down to highlight a menu item.
3. If an arrow appears next to a menu item, press Center or
Right to display additional options for that item, and then press
Up or Down to highlight a menu item. To return to the main
menu without making a selection, press Left .
4. Press Center to select the menu item, or press Left or
Menu (right action key) to close the menu and cancel your selection.
Selecting options in a shortcut menu
Most applications also provide access to context-sensitive, shortcut
menus—similar to the right-click menus on a computer. The
shortcut menu options vary based on the highlighted selection.
1. Highlight the item for which you want to open the shortcut
menu.
2. Press and hold Center to open the shortcut menu.
3. Press Up or Down to highlight a menu item.
4. Press Center to select the menu item or press Left to cancel your selection.
NOTE You can also tap and hold an item with the stylus to open the shortcut menu.
12
Page 17
LEARNING THE BASICS
Selecting options in a list
Lists let you select from a range of options. You can identify whether
a list is available when you select the field. If a rectangle appears
around the field along with a downward-pointing arrow, a list is
available. Lists are different from the menus described earlier in this
section.
In a list, do any of the following:
■ Use the 5-way to highlight the field, and then press
Center to display the items in the list. Press Up or
Down to highlight the item you want, and then press
Center to accept your selection.
■ Use your stylus to tap the arrow, and then tap the item in the list
to select it.
■ To exit the list and cancel your selection, press Left .
NOTE When selecting fields you might not see the downward-pointing arrow until you
press Center on the 5-way. In fields where you see a downward-pointing arrow but no
rectangle, you must tap the arrow with the stylus to expand the field.
13
Page 18
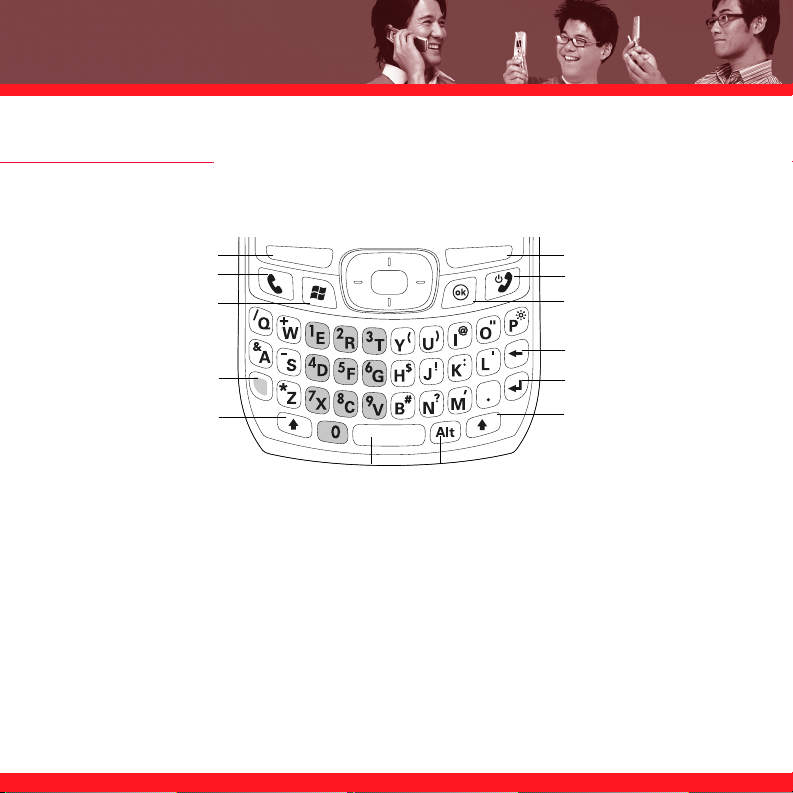
USING THE KEYBOARD
When using the keyboard, most people find it easiest to hold the smartphone with two hands and
to use the tips of both thumbs to press the keys.
Left action key
Phone/Send
Start
Option
Shift
Space
Alt
Right action key
Power/End
OK
Backspace
Return
Shift
Understanding the keyboard backlight
Your smartphone includes a keyboard backlight for low light conditions. The keyboard backlight
activates automatically when the screen turns on. The backlight turns off automatically when the
screen turns off or when you are on a call or playing music in the background for longer than the
time specified in Backlight Settings. You can set different time intervals depending on whether
the smartphone is operating on battery power or is connected to an external power source (see
the User Guide for details). The backlight also turns off when an application’s power-saving
features turn it off.
14
Page 19

LEARNING THE BASICS
Entering lowercase and uppercase letters
By default, the first letter of each sentence or field is capitalized and the remaining text you enter
is lowercase. To enter other uppercase letters, do one of the following:
■ Press Shift (this symbol appears at the bottom of the screen), and then enter a letter.
You don’t need to press and hold Shift while entering a letter.
■ Press Shift twice to turn on Caps Lock, and then enter a series of letters. When Caps
Lock is on, this symbol appears at the bottom of the screen: . To turn off Caps Lock, press
Shift again.
Entering numbers, punctuation, and symbols
Numbers, punctuation, and symbols appear above the letters on the keys. To enter these
characters, do one of the following:
■ Press Option (this symbol appears at the bottom of the screen), and then press the key
of the desired character. You don’t need to hold Option while pressing the key.
■ Press Option twice to turn on Option Lock, and then press the desired keys to enter a
series of characters. When Option Lock is on, this symbol appears at the bottom of the
screen: . To turn off Option Lock, press Option again.
15
Page 20

Entering other symbols and accented characters
You can enter symbols and accented characters that don't appear on the keys using the alternate
characters list. The alternate characters are grouped according to their similarity to the
corresponding key. For example, the alternate characters available for the e key are é, è, ë, and ê.
1. Press Alt to display the alternate character list.
2. Narrow the list by pressing the key that corresponds to the character you want. For example,
to enter an é, press e. See the table on the next page for a list of corresponding characters.
3. Press Up or Down to highlight the desired character.
4. Press Center to insert the character.
NOTE If you don’t know which key to press to narrow the list in step 2, you can scroll through the list until you find the
character you want. If you press the wrong key, press Backspace to return to the full list of alternate characters. You can then
press another key.
16
Page 21

Symbols and accented characters
LEARNING THE BASICS
Press Alt
and
enter...
a á à ä â ã å æ o ó ò ö ô œ õ 0
A Á À Ä Â Ã Å Æ O Ó Ò Ö Ô Œ Õ 1
b or B ß p or P ¶ 2
c ç ¢ © r or R ® 3
C Ç ¢ © s ß Šs
e é è ë ê S ß ŠS
E É È Ë Ê t or T ™ $ £ ¥ ¢
i í ì ï î u ú ù ü û ! ¡
I Í Ì Ï Î U Ú Ù Ü Û ? ¿
l or L £ x or X x ¤ ; :-) :-( ;-)
n ñ y ÿ . , ' " @ + -
NÑ Y
to select... Press Alt
and
enter...
to select... Press Alt
and
enter...
* / # ( or )
Ÿ
to select...
°
: & _ • % = ÷ ^ £ ¥
¢ [ ] { } < > « » © ®
~ \ Ø µ |
°
17
Page 22
OPENING AND CLOSING APPLICATIONS
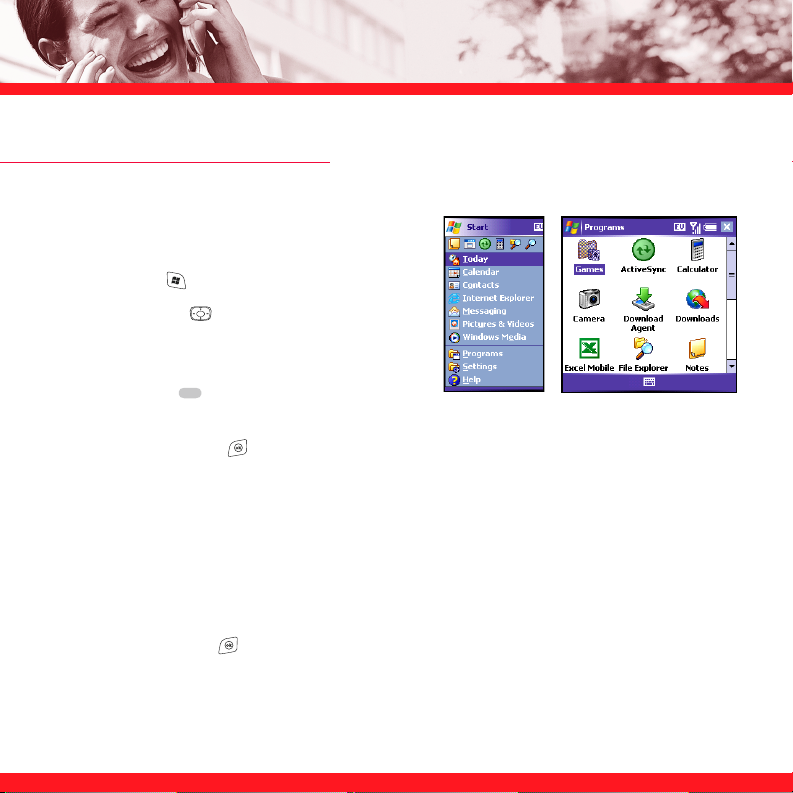
Opening applications
You can access all the applications on your
smartphone through the Start menu:
1. Press Start to open the Start menu.
2. Use the 5-way to highlight the application
you want to use. To view additional applications,
select Programs.
3. Press Center to open the highlighted
application.
4. (Optional) Press OK to return to Programs and open another application. The current
application continues to run in the background.
NOTE You can also select the applications you opened most recently from the row at the top of the Start menu.
Closing applications
You can have several applications open at once, so you don’t need to exit an application to open
another one. In most cases, applications close automatically when available memory is low, but
you can also close applications manually.
1. Press and hold OK to open Memory Settings.
2. On the Running Programs tab, do one of the following:
■
Select the application you want to close, and then select Stop to close it.
18
Page 23
LEARNING THE BASICS
■
Select Stop All to close all of your open applications.
NOTE If you press OK to return to Programs, the current application continues to run in the background.
NOTE You can also open Memory Settings by pressing Option + OK, or by pressing Start, selecting Settings, selecting the
System tab, and then selecting Memory.
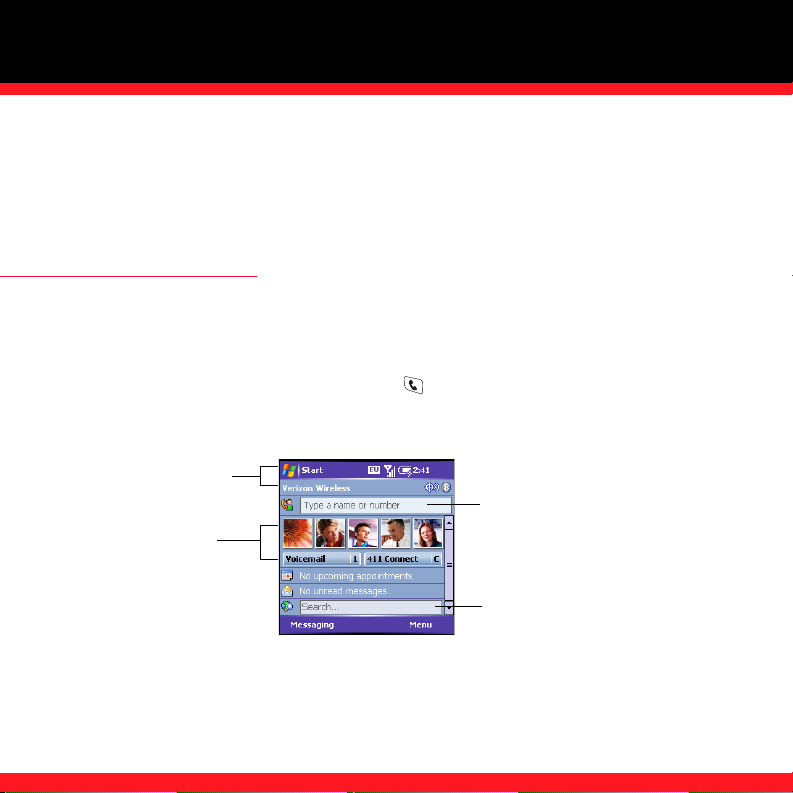
USING YOUR TODAY SCREEN
Your Today screen is your default screen or home base where you can quickly look up contacts,
dial numbers, see appointments, see the number of unread email messages, and even display a
web page.
To access your Today screen, press Phone/Send .
NOTE If you press Phone/Send while a phone number is highlighted, your smartphone dials the number. If a number is
highlighted, deselect the number and press Phone/Send, or press Start and select Today to access your Today screen.
Title bar and
status info
Speed-dial
entries
Dial Lookup field
Web search field
Title bar and status info: See “What are all those icons?” on page 39 to learn about the icons that
appear in this area.
19
Page 24

Dial Lookup field: Begin typing the name or number you want to look up. See “Dialing by contact
name” on page 25 for more info.
Web search field: Enter a word you want to find on the Internet and press Center to begin the
search (data services connection required).
Speed-dial buttons: Select the picture or button you want to dial. See “Creating a speed-dial
button” on page 34 to create your own.
SYNCHRONIZING INFORMATION
Synchronizing simply means that information you entered or updated in one place—your
smartphone, your computer, or your corporate server—is updated in the other. There’s no need
to enter the information twice. You can synchronize using a cable or you can sync wirelessly.
To synchronize using the cable, you must first install the ActiveSync
®
software from the Getting
Started CD that came with your smartphone. See the Read This First setup poster for
instructions. To synchronize wirelessly using Direct Push Technology, make sure you are
accessing an Exchange Server 2003 that is upgraded with Service Pack 2. See “Setting up an
Exchange Server email account” on page 48.
Each time you connect your smartphone to your computer, it automatically synchronizes the
items that are set to sync, including files that you set up for synchronization. You can customize
the sync settings (see “Setting synchronization options” on page 84) or use the default settings
to synchronize your info in the following applications:
20
Page 25
LEARNING THE BASICS
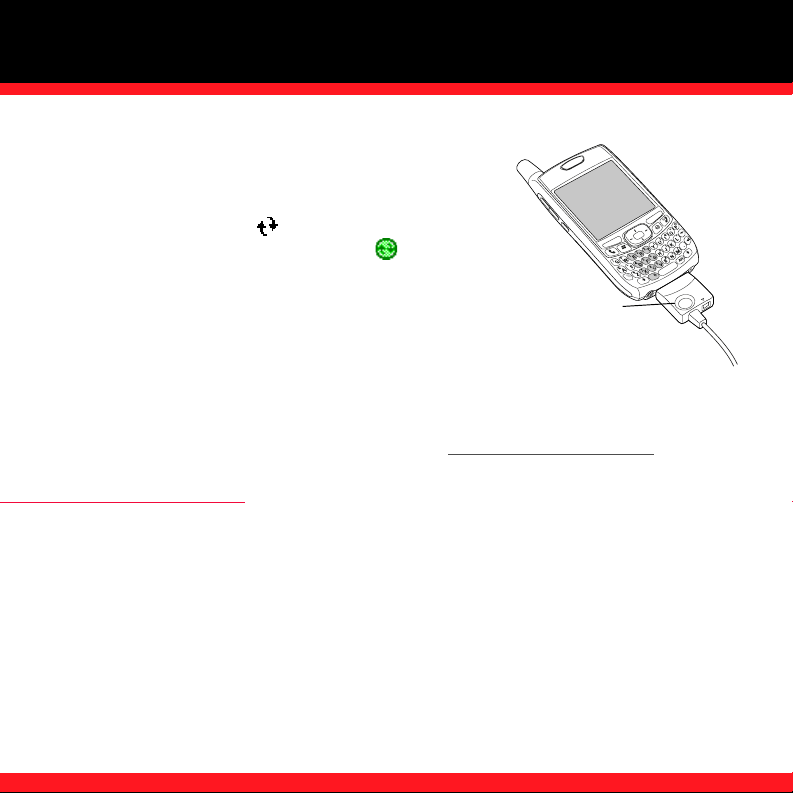
1. Connect your smartphone to your computer either
wirelessly or by using the sync cable. You should hear the
ActiveSync tone.
2. Look for the ActiveSync icon at the top of your
smartphone’s screen and the ActiveSync icon in the
taskbar on your computer.
■
If you don’t see the ActiveSync icon, make sure the
desktop synchronization software that came with your
smartphone is running on your computer.
■
If you have any problems synchronizing, see the User
Guide for troubleshooting suggestions.
NOTE A backup and restore app preserves your data and settings if your smartphone is ever lost or stolen, and it protects
your data during a hard reset. For information on using a backup, go to www.palm.com/mytreo700wxVerizon
MAXIMIZING BATTERY LIFE
Battery life depends on how you use your smartphone. You can maximize your smartphone’s
battery life by following a few easy guidelines:
[ ! ] IMPORTANT Use only the charger provided with Treo 700wx smartphone. Using any charger other than the one
included with your Treo 700wx smartphone may damage your smartphone or battery.
■ Charge your smartphone whenever you’re at your desk, or charge it overnight each day. The
battery in your smartphone has a much longer useful life when it is topped off frequently,
versus charging it after it is fully drained.
This button
has no function
with your Treo
700wx smartphone
.
21
Page 26

■ Your smartphone’s wireless features (phone, email, messaging, and web) generally consume
more power than the organizer features.
■ If you spend a lot of time using the camera (if included), games, media players, eBooks, or
other applications, keep an eye on the battery icon and charge when necessary.
■ If you don’t plan to use the wireless features on your smartphone for a while, turn off your
wireless services. You can forward calls to a different number or let all calls be picked up by
voicemail (see the User Guide for details). To see if your wireless services are on, tap the
phone-off icon, and then select Wireless Manager. If wireless services are on, you can
turn all wireless services off in Wireless Manager by selecting All.
■ As with any mobile phone, if you are in an area with no wireless coverage, your smartphone
searches for a signal, which consumes power. If you cannot move to an area of better
coverage, temporarily turn off your phone (see “Turning your phone on and off” on page 7).
■ Turn off your smartphone’s Bluetooth
®
wireless technology feature when you do not need to
have a Bluetooth connection.
■ Turn down the screen brightness (see “Adjusting the brightness” on page 96).
■ Set your screen to turn off automatically after a shorter period of inactivity (see the User
Guide for details).
■ Keep your battery away from direct sunlight and other sources of heat. Temperatures over
120 degrees Fahrenheit (50 degrees Celsius) can permanently reduce the capacity and life
span of any lithium-ion battery.
NOTE If the battery is fully drained, it may take a few moments for the indicator light to turn on while charging. Don’t worry;
your smartphone stores your info safely until you recharge the battery. To avoid draining the battery, charge and synchronize
every day, especially if you use your smartphone often.
22
Page 27
USING YOUR PHONE
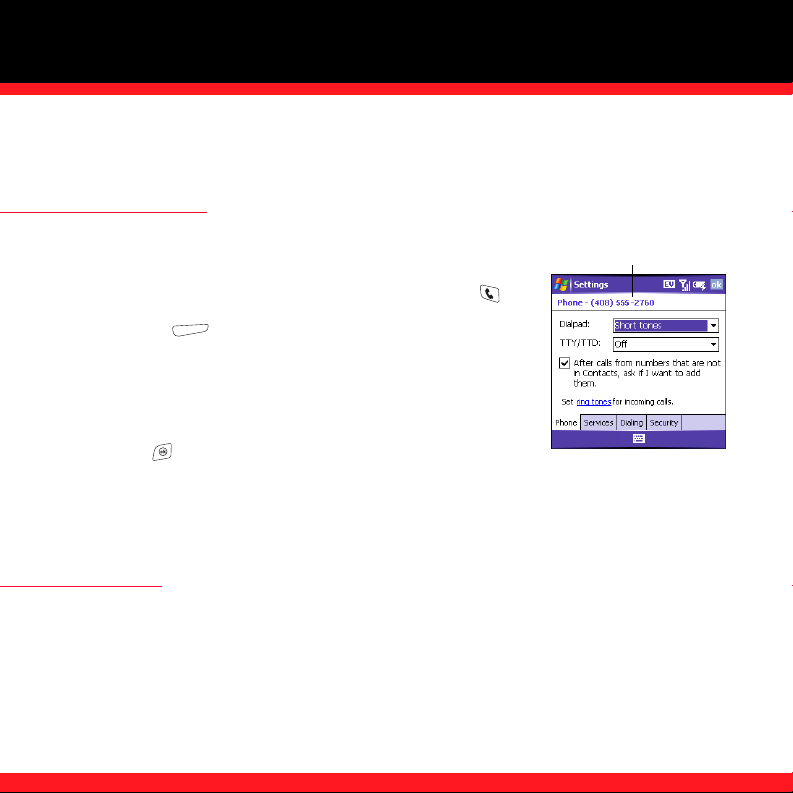
WHAT’S MY NUMBER?
USING YOUR PHONE
1. Make sure your phone is on (see “Turning your smartphone on/
off” on page 7).
Look here for your
phone number
2. If you do not see your Today screen, press Phone/Send .
3. Press Menu (right action key).
4. Select Preferences > Phone Settings.
5. On the Phone tab, look for your phone number below the title
bar.
6. Press OK .
NOTE If your phone number doesn’t appear on the Phone Settings screen, press OK, and then turn your phone off and back
on again. Repeat steps 1–6. If your phone number still doesn’t appear, your phone has not been activated. Turn your phone
off, wait a few hours, and then turn on your phone and repeat these steps. If your phone number still does not appear, please
contact Verizon Wireless for assistance.
MAKING CALLS
Your smartphone offers several ways to make phone calls. Try them all and you’ll discover which
methods you prefer.
NOTE Be sure you phone is on before you make calls using any of these methods (see “Turning your phone on and off” on
page 7).
23
Page 28
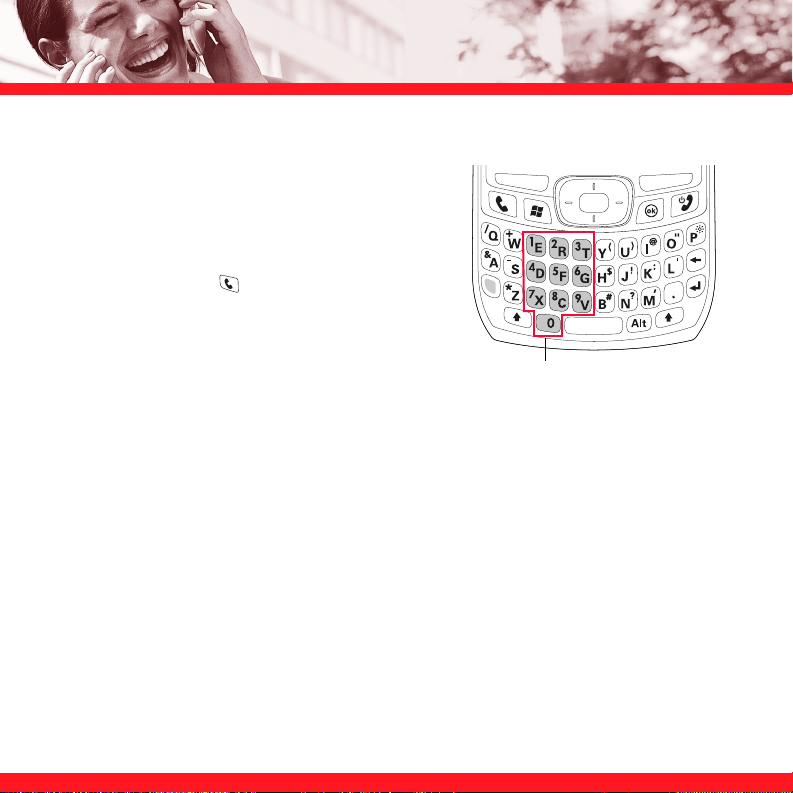
Dialing with the number pad
1. Go to your Today screen (see “Using your Today
screen” on page 19).
2. Using the numbered keys on the keyboard
(number pad), enter a phone number.
3. Press Phone/Send to dial.
NOTE You do not need to press Option to access the numbers on
the keyboard. However, when dialing short numbers, such as 411,
the number may conflict with a contact name. If this occurs, press
Option to avoid starting a contact lookup. You can always dial 911
without pressing Option first.
[ ! ] IMPORTANT Depending on where you are on a network and certain coverage conditions, you might experience
interruptions with your phone operation while using a Wi-Fi card (sold separately). Palm recommends that you turn off
the phone when using any Wi-Fi card or remove the Wi-Fi card when not in use to ensure that you can always make and
receive phone calls. For EMERGENCY calls, always remove the card from your smartphone to ensure optimal
connectivity.
Number pad
24
Page 29
USING YOUR PHONE
Dialing by contact name
You can look up contacts quickly by entering just a few letters of a contact’s name directly from
your Today screen. If you have no contacts listed on your smartphone, you can add contacts
directly into your smartphone (see “Adding a contact” on page 42), but the fastest way to enter
lots of contacts is to enter them in your desktop software and then synchronize to transfer them
from your computer to your smartphone (see “Synchronizing information” on page 20).
1. Go to your Today screen (see “Using your Today screen” on page 19).
2. Using the keyboard, begin entering one of the following for the
contact you want to call:
■
First name (JOH for John)
■
Last name (SMI for Smith)
■
First initial, a space, and then last initial (J S for John Smith)
■
First name and last name (JOH SMI for John Smith)
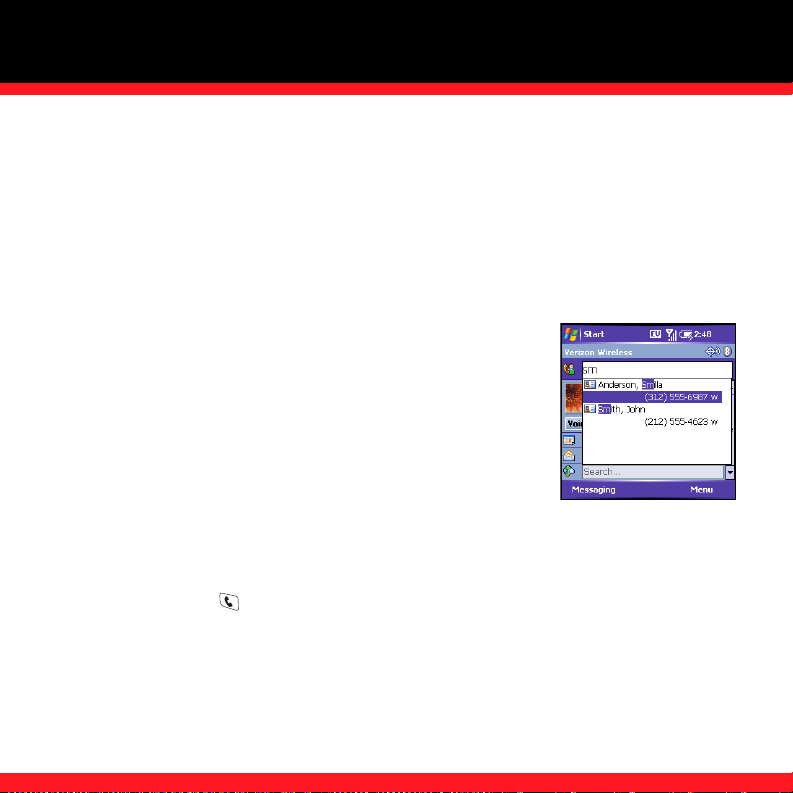
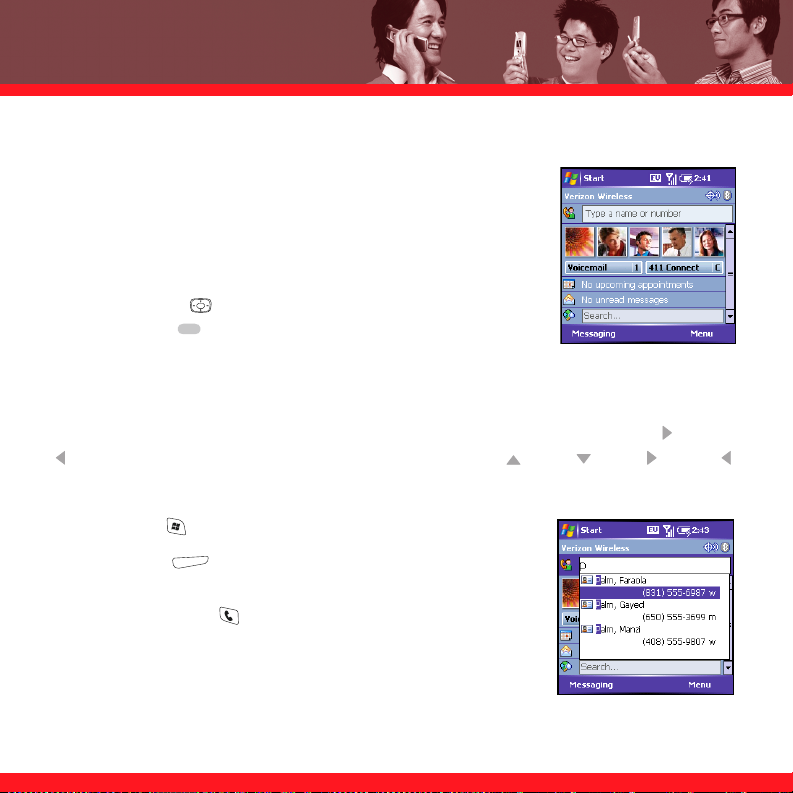
For example, entering SM finds both Smilla Anderson and John
Smith. Entering SM A finds only Smilla Anderson.
3. Select the number you want to dial.
4. Press Phone/Send to dial.
NOTE To clear the Dial Lookup field and start another Contacts search, press OK. To delete letters when correcting a
misspelled name, press Backspace.
25
Page 30
Dialing with a speed-dial button
Your smartphone comes with a few predefined speed-dial buttons,
but you can also create your own speed-dial buttons. See “Creating
a speed-dial button” on page 34.
You can make a call with a speed-dial button by doing any of the
following:
■ Use the 5-way to highlight a speed-dial button, and then
press Center .
■ Tap a speed-dial button with the stylus.
■ Press and hold the Quick Key that you assigned to the speed-dial button.
To see more speed-dial buttons, highlight the picture speed-dial area and press Right or Left
repeatedly, or highlight the text speed-dial area and press Up , Down , Right , or Left .
Dialing by company name
1. Press Start and select Contacts.
2. Press Menu (right action key) and select View By >
Company.
3. Press Phone/Send to go to your Today screen.
4. Using the keyboard, begin entering the first few letters of the
company name.
26
Page 31

USING YOUR PHONE
5. Select the number you want to dial.
6. Press Phone/Send to dial.
NOTE Until you change the View By setting, your contact list (in the Contacts application) is also sorted by company name.
Dialing from a web page or message
Your smartphone recognizes most phone numbers that appear in
web pages or in messages (text, email, or multimedia).
1. Use the 5-way to highlight the phone number you want to
dial in the web page or message.
2. Press Center to open the Phone dialog box.
3. Select Yes to dial.
Redialing a recently called number
To dial the last number you called: Go to your Today screen, and
then press and hold Phone/Send .
To select from your most recently dialed numbers: Go to your Today
screen, press Phone/Send , highlight the number or contact
name you want to call, and then press Phone/Send to dial.
27
Page 32

To select from a chronological list of calls: Go to your Today screen,
press Phone/Send , and then select Call Log. Highlight the
number you want to call, and then press Call (left action key)
to dial.
NOTE You can also access the Call Log by going to the Today screen, pressing Menu,
and then selecting Call Log.
Dialing using the onscreen Dial Pad
The onscreen Dial Pad is useful when you need to dial numbers that
are expressed as letters, such as POPCORN to check the time, and when you need large numbers
that you can tap with your finger or stylus.
1. Go to your Today screen.
2. Press Phone/Send and then select Dial Pad from the menu.
3. Tap the onscreen Dial Pad to enter the number.
4. Press Phone/Send to dial.
NOTE You can paste numbers directly into the Dial Pad. Copy a number from another
application, switch to Dial Pad, and then press and hold Center to paste the
number. You can also access the Dial Pad by going to the Today screen, pressing
Menu, and then selecting Dial Pad.
28
Page 33

USING YOUR PHONE
RECEIVING CALLS
To receive calls, your phone must be on.
■ To answer a call, do one of the following:
■
Press Phone/Send .
■
Press Answer (left action key).
■
If the headset is attached, press the headset button.
■ To ignore a call, do one of the following:
■
Press Power/End to send the call to voicemail.
■
Press Menu (right action key) and select Ignore to send the call to voicemail.
■
Press Menu (right action key) and select Ignore with text message to send the
caller a text message.
■ To silence the ringer while your smartphone is ringing:
■
Press the Volume button or any key on your smartphone except Phone/Send, Power/End,
or the 5-way.
■
To immediately silence all system sounds including the ringer, slide the Ringer switch to
the Sound Off position. All sounds remain off until you slide the Ringer switch back to
the Sound On position.
NOTE When you silence the ringer, you can either answer the call or let it ring through to voicemail.
29
Page 34

USING VOICEMAIL
Setting up your voicemail account
1. Go to your Today screen.
2. Press and hold 1 on the keyboard or select the Voicemail
speed-dial button to dial Verizon Wireless’s voicemail system.
3. Follow the voice prompts to set up your voicemail.
NOTE The 1 key is the Quick Key for the voicemail speed-dial button. For more info
on Quick Keys see “Creating a speed-dial button” on page 34.
Retrieving voicemail messages
When you have unretrieved voicemail messages, a voicemail icon appears at the top of your
screen and the left action key is labeled Voicemail.
1. Go to your Today screen.
2. Press and hold the 1 key to dial the Verizon Wireless voicemail system.
3. Enter your voicemail password using the keyboard, or press Extra Digits (left action
key) if you defined this option (see “Creating a speed-dial button” on page 34 for details).
4. Select Play to listen to your messages.
NOTE When a voicemail icon appears at the top of the screen, you can tap this icon to retrieve your voicemail.
You don’t need to press Option to enter numbers,
, or # when responding to voicemail prompts.
*
30
Page 35

USING YOUR PHONE
WHAT CAN I DO DURING A CALL?
When you make or receive a call, the active call info appears on
your Today screen.
During a call, you can do any of the following:
Put the call on hold: Press Hold (left action key). To take the
call off hold, press Off Hold (left action key).
Turn on the speakerphone: Select the speakerphone icon to
turn on the speakerphone. To return to listening through the
earpiece, select the speakerphone icon again.
Caller’s name
and number
Mute the microphone so you can’t be heard: Select the mute
icon. To turn the microphone back on, select the mute icon again.
Switch to another application: Press Start and select the application.
NOTE When a call lasts longer than one minute, the screen dims. When a call lasts longer than two minutes,
the screen turns itself off. Press any key except Power/End to wake up the screen.
Current duration
of call
Adjusting call volume
While a call is in progress, press the Volume
button on the side of your smartphone to
adjust call volume.
Volume
Speaker
volume
Earpiece
volume
31
Page 36

Ending a call
Do one of the following to end a call:
■ Press Power/End .
■ Press the headset button (if the headset is attached and has a button on it). Some headsets
do not have a button.
Returning to an active call from another application
You can use many other applications on your smartphone while holding a phone conversation,
including the organizer and SMS features. However, you cannot browse the web or send and
receive email or MMS messages while on a voice call. You can view email and messages that
have already been received, but you cannot send or receive new messages.
From any application, press Phone/Send to return to your Today screen.
Saving phone numbers
After you complete a call, you are prompted to add the number if it isn’t already in your Contacts
list.
■ To create a new contact for this number, select Create New Contact.
■ To add this number to an existing contact, select Copy and Add, and then select a contact
name.
■ To decline adding the number, press Dismiss (left action key).
■ To permanently disable the Add Contact prompt, select Don’t show this again.
32
Page 37

USING YOUR PHONE
If you don’t add a number right away, follow these steps to add it later:
1. Go to the Call Log (see “Redialing a recently called number” on page 27).
2. Highlight the number you want to save.
3. Press and hold Center to open the shortcut menu, and then select Save to Contacts.
4. Enter the information for the entry.
5. Press OK .
NOTE You can also save contact info from other applications, such as Messaging. If an incoming call uses caller ID
blocking, you do not see the Add Contact prompt.
Answering a second call (call waiting)
When you’re on a call and you receive a second call, the call waiting notification appears. When
the second call is incoming, you can swap between the two calls, but you can’t conference them.
You can do any of the following:
Place the current call on hold and answer the new call:
Press Answer (left action key) or Phone/Send .
Send the new call to voicemail: Press Menu (right action key)
and select Ignore.
Send the new caller a text message: Press Menu (right action
key) and select Ignore with text message. The second call is sent to
voicemail.
Hang up both calls: Press Power/End . The second call is sent to voicemail.
33
Page 38

NOTE When two calls are active and you press Power/End, you hang up both calls. To return to the first call, wait for the
person on the second call to hang up.
Making a conference call
When the second call is outgoing, you can join two calls in a conference session. Additional
charges may apply and minutes in your mobile account may be deducted for each active call.
Please contact Verizon Wireless for more information.
1. Put the first call on hold, and then place a second call.
2. Press Conference (left action key); this joins the two
active calls in a conference.
3. When you’re done, press End Conference (left action
key); this ends the second call and returns you to the first call. If
you’re ready to hang up both calls, press Power/End
instead.
CREATING A SPEED-DIAL BUTTON
Your smartphone lets you create both picture and text speed-dial buttons so that you can select a
button on the Today screen to quickly dial a number. You can create up to 20 picture buttons and
50 text buttons.
1. Go to your Today screen.
2. Press Menu (right action key) and select New Speed Dial.
34
Page 39

USING YOUR PHONE
3. Do one of the following:
■
Select Link, select Link to contact, select the contact you
want to link to this button, and then select the number you
want to dial with this button.
■
Select Label and enter a name for this button, and then
select Number and enter the phone number you want to dial
with this button.
4. (Optional) Enter a Quick Key. When the Today screen is
showing, you can press and hold the Quick Key to instantly dial this number.
5. If this button is linked to a contact entry with a picture, select either Text Speed Dial or
Picture Speed Dial to indicate which type of button you want to create.
6. (Optional) Select the Advanced tab and set any of the following
options:
Extra Digits: Defines additional numbers to dial, such as a
password or extension. In addition to numbers, you can enter
the following symbols: star (
second pause, enter a comma (,).
Dial extra digits automatically: Dials predefined Extra Digits
immediately after dialing the phone number. If you do not check
this box, you need to press Extra Digits (left action key) to dial these digits.
) and pound (#). To enter a one-
*
35
Page 40

Show voice mail buttons: Displays the voicemail playback controls after you dial this speed-
dial number. When this option is checked, you can enter numbers below each control to tailor
the controls to your voicemail system.
Plays the previous message.
Saves the current message.
Plays the current message.
Deletes the current message.
Repeats the current message.
Plays the next message.
7. Press OK .
NOTE To edit a speed-dial button, highlight the button, press and hold Center, and then select Edit Speed Dial from the
shortcut menu.
USING A PHONE HEADSET
You can connect a phone
headset for hands-free operation.
If you need to use your
Microphone
Headset button
smartphone while driving and
this is permitted in your area, we
recommend using a phone
headset or a hands-free car kit
(sold separately).
Speakers
36
Page 41

USING YOUR PHONE
The headset button is context sensitive and it performs different actions based on the situation.
You can press the headset button to perform any of the following tasks:
■ Answer an incoming call
■ Respond to call waiting
■ Hang up all calls
■ Swap between calls if the second call is an incoming call
■ Create a conference call, if the second call is an outgoing call
Headset specifications
Your smartphone works with mono and stereo headsets that have a 2.5mm, 3-pin connector.
When in doubt, ask the third-party headset manufacturer if the product is compatible with Treo
700wx smartphones. If you hear a headset buzz or poor microphone performance, your headset
may be incompatible with your smartphone.
Using a hands-free device with Bluetooth wireless technology
Your Treo smartphone is compatible with many headsets and car kits enabled with Bluetooth
wireless technology version 1.1 or 1.2. However, if you want to use a Bluetooth headset for voice
dialing, you must use the Voice Command software. See “Setting up and using Voice Command”
on page 98 for instructions.
[ ! ] IMPORTANT For a list of compatible hands-free devices with Bluetooth wireless technology, go to
www.palm.com/mytreo700wxVerizon
.
37
Page 42

To learn how to set up and connect to Bluetooth devices, see “Setting up a Bluetooth®
connection” on page 66. Here are tips for working with a Bluetooth hands-free device:
■ If you’re using a hands-free Bluetooth device and it is within range, your smartphone routes
all calls to the hands-free device instead of to your smartphone’s earpiece. Bluetooth range is
up to 30 feet in optimum environmental conditions.
■ To transfer the call back to the headset, press Menu (right action key) and select
Cancel Bluetooth. To transfer a call from the handset to a Bluetooth hands-free device during
a call, press Menu (right action key) and select Connect Bluetooth. You can also
transfer a call to your smartphone by using the user interface on the headset or car kit. See
the documentation that came with the device for directions.
■ To transfer a call from a wired headset to a Bluetooth headset or car kit that is within range
and with which you’ve previously set up a partnership (Bluetooth headset or car kit required,
sold separately), unplug the wired headset and press the button on the Bluetooth headset or
car kit.
NOTE If you have both a compatible Bluetooth headset and car kit, the one you connected to your smartphone last
becomes the active device and all incoming and outgoing calls go to this device when it is in range and switched on. To
change to another device, you need to switch the active device off and turn on the other device.
38
Page 43

USING YOUR PHONE
WHAT ARE ALL THOSE ICONS?
You can monitor the status of several items using icons at the top of your Today screen:
You missed an incoming call.
You have a voicemail message.
You have a new email, text, or multimedia message.
An error occurred during synchronization.
You have more than one of the conditions listed above.
Your phone is on. The bars display the signal strength. The stronger the signal, the
more bars that appear. If you are outside a coverage area, no bars appear.
Your phone is off.
You are outside a Verizon Wireless coverage area and roaming on another mobile
service provider’s network. Data services may not be available when roaming.
A voice call is in progress.
You are in an area that supports NationalAccess
speeds of 60–80Kbps and bursts up to 144Kbps.
(1xRTT) data services with average
39
Page 44

You are in an area that supports BroadbandAccess (EVDO) data services with
average download speeds of 400–600Kbps, capable of reaching speeds up
to1.8Mbps, and upload speeds up to 156Kbps.
You are using a NationalAccess connection to access email, the web, or other data
services. You can make calls but you cannot receive calls; any incoming calls go to
voicemail. When you make a call, the data transmission is automatically
interrupted.
You are using a BroadbandAccess connection to access email, the web, or other
data services. You can still make or receive calls. When you make or receive a call,
the data transmission is automatically interrupted.
Your phone is connected to a NationalAccess network, but you are not actively
transmitting data. You can still make or receive calls.
Your phone is connected to a BroadbandAccess network, but you are not actively
transmitting data. You can still make or receive calls.
Your smartphone is connected to a computer or network that is providing a data
connection.
A data connection is not available or your phone is off.
Your smartphone’s battery is almost fully drained.
Your smartphone’s battery is being charged.
Your smartphone is connected to a power outlet and the battery is fully charged.
40
Page 45

USING YOUR PHONE
Your phone is on and you’re in the Verizon Wireless coverage area. If you’re
roaming on another wireless service provider’s network, Roaming or Extended
Network appears instead. If you’re outside a coverage area, No service appears
instead, and when you turn off your phone, Phone Off appears instead.
Voice privacy is preventing over-the-air eavesdropping. Appears during a call when
this option is turned on and is available on the Verizon Wireless network.
Location privacy is turned off, so your smartphone can broadcast your GPS
location. The whereabouts of your smartphone can be determined by the Verizon
Wireless network, by emergency agencies like 911, and by other apps on your
smartphone.
Location privacy is turned on, so only emergency call operators can determine the
location of your smartphone. Your smartphone’s location cannot be determined by
other apps on your smartphone.
Bluetooth® wireless technology is off.
Bluetooth wireless technology is on.
Your smartphone is communicating with another Bluetooth device.
A call is in progress and your smartphone is connected to a Bluetooth headset or
car kit.
41
Page 46

STAYING ORGANIZED
This section introduces you to a few of the applications you can use to stay organized. To learn
about the other applications that come with your smartphone, such as Tasks and Notes, see the
User Guide.
CONTACTS
Adding a contact
®
If you have many contacts to enter, it’s best to enter them in Microsoft
Office Outlook® on your
computer and then sync. See “Synchronizing information” on page 20 for details. To enter a few
contacts, follow these steps:
NOTE Be sure to enter mobile numbers and email addresses in the correct fields. Otherwise Messaging can’t find this info
when you address a message, and Calendar can’t find your contacts to invite them to meetings.
1. Press Start and select Contacts.
2. Press New (left action key).
3. Use the 5-way to move between fields as you enter info.
4. To add a caller ID picture that appears when that person calls,
select Picture, and then select Camera and take a picture, or
select an existing picture from the Thumbnail screen.
5. To assign the entry to one or more categories, select
Categories and then check the categories under which you want this entry to appear.
6. To add a note to an entry, select the Notes tab.
42
Page 47

STAYING ORGANIZED
7. To assign a ringtone to the entry, select Ring tone and select a tone.
8. After you enter all the information, press OK .
Viewing or changing contact information
1. In the Contacts list (name view), begin entering one of the following for the contact you want
to view or edit:
■
First name
■
Last name
■
First initial and last initial separated by a space
■
Phone number
2. Select the entry you want to open.
3. Press Menu (right action key) and select Edit.
4. Make changes to the entry as necessary.
5. Press OK .
NOTE If you are using an Exchange 2003 Server with Service Pack 2, you can also access contact information from your
company’s Exchange server or Global Address List (GAL). Press Start and select Contacts. Press Menu (right action key),
and select Find Online. See your system administrator for more information on this feature.
43
Page 48

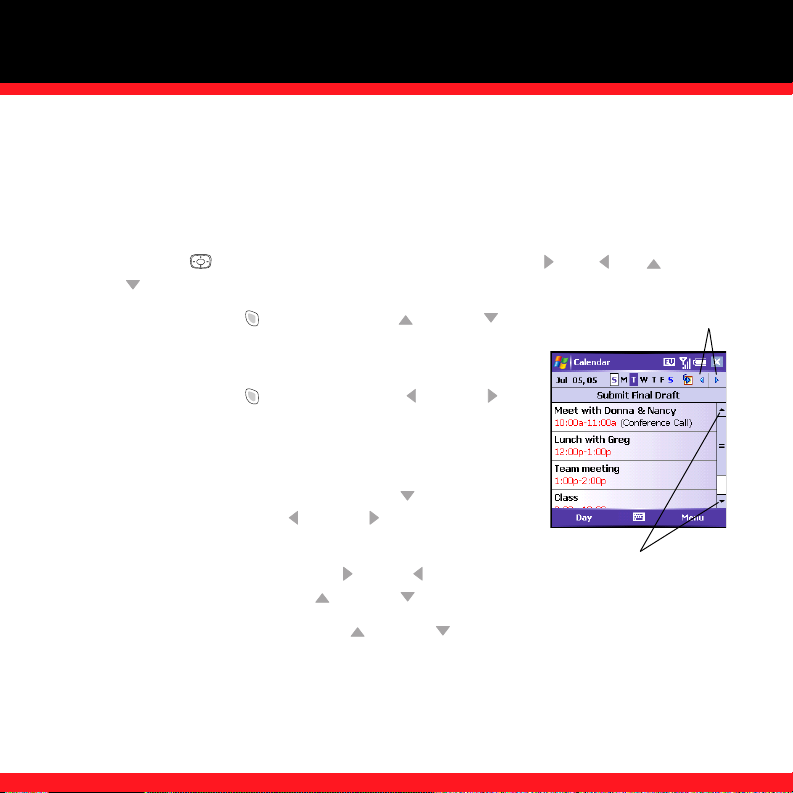
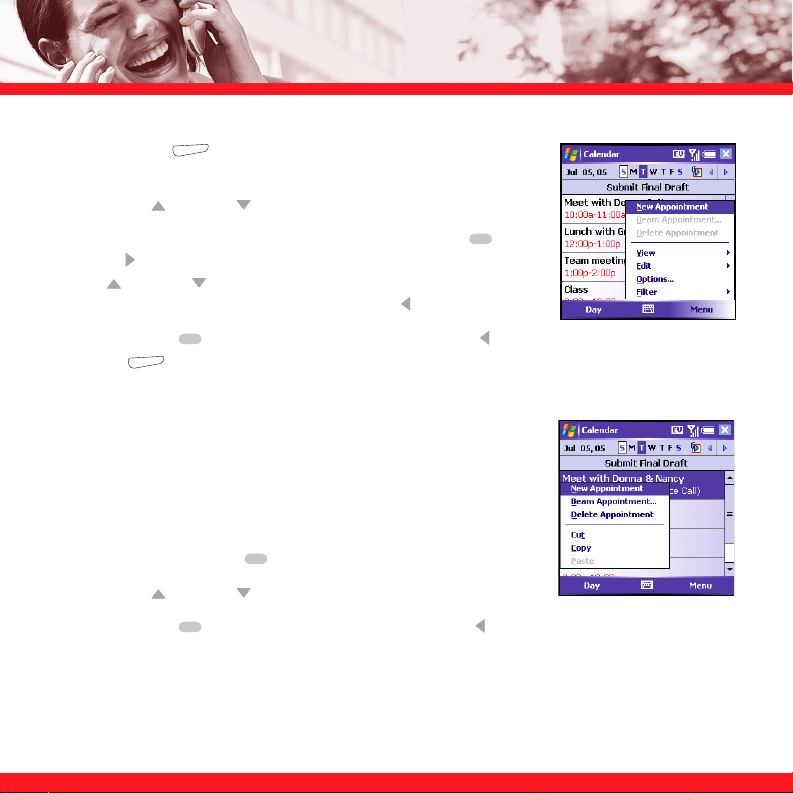
CALENDAR
Displaying your calendar
1. Press Start and select Calendar.
2. Press Menu (right action key) and select View.
3. Select one of the following views:
Agenda: Shows your daily schedule in list format. Upcoming appointments are bold, past
appointments are dimmed.
Day: Shows your daily schedule in day-planner format.
Week: Shows your schedule for an entire week.
Month: Shows your schedule for a whole month.
A morning appointment.
An afternoon appointment.
There are both morning and evening appointments.
An all-day event.
Year: Shows a calendar for a 6-month period.
4. Use the 5-way to move to another day, week, month, or year (based on the current view).
44
Page 49

STAYING ORGANIZED
Creating an appointment
If you have several appointments to enter, it’s most efficient to enter them in Microsoft Office
Outlook on your computer and then synchronize your smartphone with your computer. See
“Synchronizing information” on page 20 for details.
1. Press Start and select Calendar.
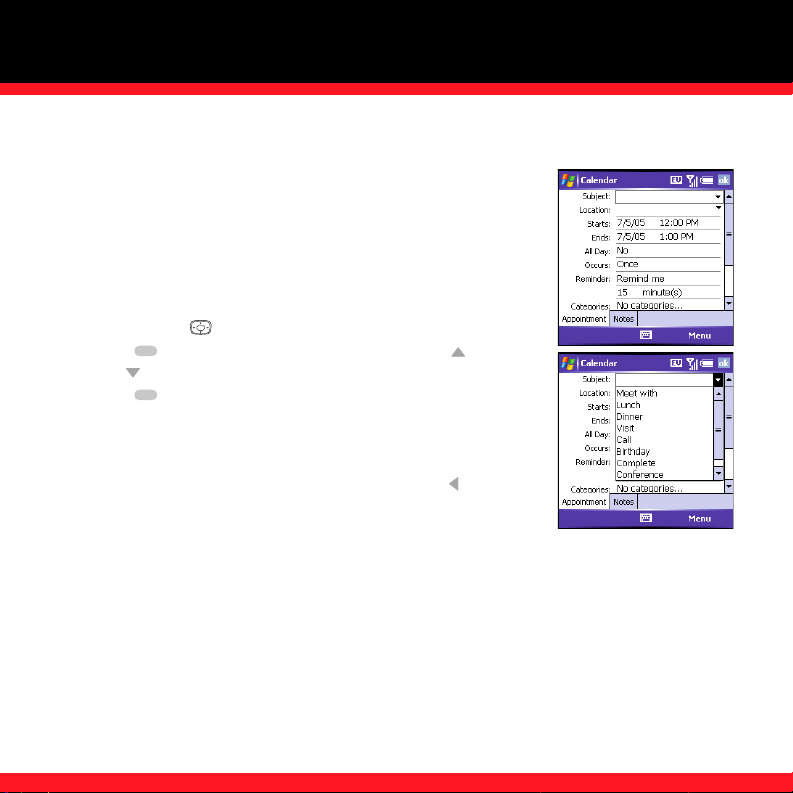
2. Press Menu (right action key) and select New Appointment.
3. Enter a subject (description) and a location.
4. Select Starts and select the starting date and time.
5. Select Ends and select the ending date and time.
6. (Optional) Set an alarm:
■
Select Reminder, and then select Remind Me.
■
Enter the number of minutes, hours, days, or weeks before
the event you want to receive the alarm.
7. Press OK .
NOTE See the User Guide to learn how to change the alarm tones.
Number of
time units
Type of
time units
45
Page 50

Sending a meeting request
You can email meeting invitations to contacts who use Microsoft Office Outlook or Outlook
Mobile.
NOTE Create contact entries with email addresses for the people you want to invite to a meeting. You can’t access contact
entries without email addresses from your calendar.
1. Create an event, and then select it.
2. Press Edit (left action key).
3. Select Attendees, and then select the name of the contact you want to invite. To invite other
attendees, select Add and select the names.
4. Press OK .
The next time you synchronize, the meeting request is sent to the attendees. When attendees
accept your meeting request, the meeting is automatically added to their schedules. When you
receive their response, your calendar is updated as well.
NOTE If you are using an Exchange Server 2003 with Service Pack 2, you can use your corporate Global Address List to
find contact information for an attendee. Select Attendees, press Menu, and then select Find Online. Enter the name of the
attendee and select Find. Make sure you enter the name exactly as it is listed in the directory. See your system administrator
for more information on this feature.
46
Page 51

STAYING IN TOUCH
STAYING IN TOUCH
MESSAGING
You can use the Messaging application to exchange email, text messages (SMS), and multimedia
messages (MMS) with other mobile devices and email addresses that support these forms of
messaging. You can also exchange instant messages (IM) with Pocket MSN. Before you use your
smartphone’s messaging features, consult Verizon Wireless for pricing and availability.
Setting up an email account
Before you set up your email account(s) on your smartphone, you must determine which type of
account(s) you want to access, as the steps vary for each account type. The following gives an
overview of the account types, and setup steps for each account type appear later in this section:
Exchange Server: Enables you to wirelessly synchronize your email and other information directly
with the information stored on a Microsoft Exchange Server 2003.
Wireless Sync: Enables you to use a Verizon Wireless Sync account to wirelessly synchronize
your email and other information with the information stored on your computer (Verizon Wireless
Sync account required, additional charges may apply).
IMAP or POP3: Enables you to send and receive email messages with a corporate email account
or an account that you have with an Internet service provider (ISP).
Hotmail: Enables you to send and receive email messages with an MSN Hotmail account.
NOTE If your email account requires a VPN connection to establish a secure connection, you must install a VPN application
(sold separately) on your smartphone before you can access your email. Visit www.palm.com/mytreo700wxVerizon
purchase a VPN application, and see the User Guide for more info.
to
47
Page 52

Setting up an Exchange Server email account
An Exchange Server account enables you to wirelessly synchronize your email, contacts,
calendar, and other information directly with the information stored on a Microsoft Exchange
2003 Server. When the Exchange Server 2003 is upgraded to Service Pack 2, new features are
available that allow you to access online address books and use Direct Push Technology. These
features include Global Address List, Tasks Over The Air (OTA), and Direct Push synchronization
of Outlook information.
Direct Push Technology is the two-way wireless delivery method used between Microsoft
Exchange Server 2003 with SP2 (Service Pack 2) servers and a smartphone with Windows
Mobile 5.0 with MSFP (Messaging and Security Feature Pack) for Outlook information (Email,
Calendar, Contacts, and Tasks). Direct Push Technology uses Internet-based communication
methods that provide lower network overhead, lower costs, and more efficient communications
than the previous SMS-based methods.
®
If you already set up your Exchange Server email settings when you installed the ActiveSync
desktop software, you do not need to repeat this process. If you did not set up an Exchange
Server email account, follow the steps in this section to set up an account now. Work with your
system administrator to gather the following info:
■ Mail server address and domain name
■ Your username and password
■ SSL information (if required by the server, ask your system administrator)
NOTE If your email account requires a VPN connection to establish a secure connection, you must install a VPN application
(sold separately) on your smartphone before you can access your email. Visit www.palm.com/mytreo700wxVerizon
purchase a VPN application, and see the User Guide for more info.
to
48
Page 53

STAYING IN TOUCH
NOTE The Exchange Server settings are case sensitive. Be sure to enter uppercase
and lowercase letters properly. See your system administrator for more information on
this feature.
1. Press Start and select Programs.
2. Select ActiveSync .
3. Press Menu (right action key) and select Add Server
Source.
4. Enter the Server address, and then press Next (right
action key).
5. Enter your username, password, and domain. The password is
case-sensitive. Your password can use numbers and text. Check
if your Caps Lock and Option Lock are active because that can
affect the password you are entering.
6. If you want your password entered automatically, check the
Save password box. If you want to enter your password each
time you access this account, do not check this box.
7. (Optional) Select Advanced to set the rules for fixing sync
conflicts.
49
Page 54

8. Press Next (right action key) and check the boxes for the
types of information you want to synchronize with Exchange
Server.
9. (Optional) Highlight an item and select Settings to change the
synchronization settings for that type of information.
NOTE Settings are not available for all items. If you want to download more than the
email message header, select E-mail and increase the KB setting. If you don’t increase
this setting, you can manually download the rest of the message at your convenience.
10. Press Finish (right action key).
11. Synchronize with your Exchange Server and set your sync schedule. See “Setting the
synchronization schedule” on page 88.
Using an online address book
You can access contact information, such as an email address or phone number, from your
organization’s online address book or Global Address List (GAL). To access a GAL, make sure
you are accessing an Exchange Server 2003 upgraded to Service Pack 2.This feature is useful
only if you know the exact name as it appears in the directory.
1. In a new message, tap the To box.
2. Press Menu (right action key), and select Add Recipient.
3. Press Menu (right action key), and select Find Online.
4. Enter the contact name as it appears in the directory and tap Find. You must spell the contact
name correctly.
50
Page 55

STAYING IN TOUCH
Setting up a Wireless Sync email account
Wireless Sync lets you sync your email and other information when you’re away from your
computer. To use Wireless Sync, you must first install the desktop synchronization software that
came with your smartphone, and you must subscribe to Verizon Wireless’s Wireless Sync feature
(additional charges may apply).
NOTE For more info about Wireless Sync, visit http://www.wirelesssync.vzw.com.
1. On your smartphone, press Start and select Programs.
2. Select Wireless Sync .
3. Press Start (left action key) and then wait a few minutes until the installation is
finished.
4. When the message “Have you created your Wireless Sync account yet?” appears on your
smartphone screen, select No - Create account now and then select Next.
5. Select the type of email account(s) you want to set up: Internet, Corporate, or Both.
6. Enter your mobile phone number. If you have not set up a Wireless Sync password, select
Get Password to receive a text message with a temporary password. If you already have a
password, enter it and select Next.
7. Check the I agree to the terms and conditions of service box, and then select Next.
8. Select your time zone and enter your zip code, and then select Next.
9. Enter your email address and the password you use to access this email account on your
computer, and then select Next.
51
Page 56

10. When the Congratulations! screen appears, press OK .
11. Press
Sync (left action key). If prompted, enter your password and select OK.
12. When the First Synchronization dialog box appears, do one of the following based on the type
of email account you set up:
Corporate email or Both: Select Refresh.
Internet email: Select Merge.
For corporate email accounts, the default settings do a wireless synchronization whenever info
changes in Microsoft
®
Office Outlook®. To find out how often you can expect message delivery,
contact your system administrator and ask about your company’s server settings. For Internet
email accounts, the default settings do a wireless synchronization every 30 minutes. To
customize your Wireless Sync settings, select Setup at the bottom of the screen, and then select
Push/ReadySync.
Setting up an IMAP or POP3 email account
You can send and receive email messages with an email account that you have with an Internet
service provider (ISP), an email account that you access using a VPN server connection (such as
a work account), or any other IMAP (Internet Message Access Protocol) or POP3 email account.
If you have problems configuring your account, go to
www.palm.com/emailsetup for more
information.
Work with your system administrator to gather the following info:
■ Account type (POP3 or IMAP)
■ Mail server name for receiving mail
52
Page 57

STAYING IN TOUCH
■ Mail server name for sending mail
■ Your username and password
■ Domain name
■ Any special security requirements
1. Go to your Today screen and press Messaging (left
action key).
2. Press Menu (right action key) and select Tools > New
Account.
3. Enter the email address that you want to set up, and then press
Next (right action key).
4. Wait until the Status box displays Completed, and then press
Next (right action key).
5. Enter your name, username, and password.
6. If you want your password entered automatically, check this
box. If you want to enter your password each time you access
this account, do not check the Save password box.
7. Press Next (right action key).
8. Select the Account type list, and then select POP3 or IMAP.
53
Page 58

9. Enter a name for this account, and then press Next (right
action key). For example, if this is your work email account,
enter “Work” or your company’s name.
10. Enter the name of the Incoming mail and Outgoing mail
servers. Do not enter anything in Domain. It is not needed for
POP3 or IMAP accounts.
11. (Optional) Select Options to set this account’s download
options.
12. Press Finish (right action key).
NOTE To delete an email account, press Menu and select Tools > Options. Highlight the account you want to delete. Press
and hold Center on the 5-way, and then select Delete
.
Signing in to Pocket MSN
Pocket MSN provides quick access to the following:
MSN Hotmail: Lets you read, write, send, and delete email, and manage your Hotmail folders.
MSN Messenger Contacts list: Lets you see who’s online and exchange instant messages (IM).
Subscribe to status updates for selected contacts so you’re notified when they’re online.
Options: Lets you customize your Pocket MSN experience.
54
Page 59

STAYING IN TOUCH
1. Press Start and select Pocket MSN.
2. Select MSN Mobile Home.
3. Select Sign in.
4. Enter the email address and password for your Passport
account or your Hotmail account.
■
To create a Passport (IM) account, go to
www.passport.com.
■
To create a Hotmail account, go to www.hotmail.com.
NOTE You also need to set up a Hotmail account on your smartphone. From the Pocket MSN screen, select MSN Hotmail
and enter your email address and password. You access your Hotmail messages from the Messaging application.
Creating and sending an email message
1. Go to your Today screen and press Messaging (left action key).
2. Press Left to cycle through your Messaging accounts until you see the email account you
want to use in the title bar.
3. Press New (left action key).
4. Do one of the following to address the message:
■
If the recipient’s name and email address are in your Contacts list, enter the first few
letters of the recipient’s first or last name, and then select the recipient’s name.
■
If the recipient’s name is in an online address book, you can find the name and add it. For
more information, see “Using an online address book” on page 50.
55
Page 60

■
If the recipient’s name and email address are not in your Contacts list, enter the full email
address.
NOTE To send a message to multiple recipients, separate the addresses with a semicolon (;).
5. Select Subject and enter a title for the message.
6. Enter your message, or press Menu (right action key),
select My Text, and then select a predefined phrase you want to
insert.
7. (Optional) Do any of the following:
■
Press Menu (right action key) and select Insert. Select
the type of item you want to attach, and then select the file
or record a voice note.
■
Press Menu (right action key) and select Spell Check.
■
Press Menu (right action key) and select Message Options. Select the Priority list,
select a setting for the message, and then press OK .
8. Press Send (right action key).
NOTE If you have difficulty sending mail, try changing your outgoing mail settings to the following:
User name: [9-digit phone number]@vzwmail.net (6505551212@vzmail.net). Password: Your www.vtext.com password.
Outgoing Server: smtp.vzwmail.net. Additionally, if you want to keep a copy of your outgoing messages in the Sent folder,
you must set your email settings to do so. For info on accessing these settings, see the User Guide.
56
Page 61

STAYING IN TOUCH
Synchronizing your email
During synchronization, new messages are copied to your smartphone’s Inbox, and messages in
the smartphone’s Outbox are sent. Your computer must be connected to the Internet when you
sync your email.
To sync your default email account, simply sync your smartphone with your computer. See
“Synchronizing information” on page 20 for details. To sync additional email accounts, such as
an Internet Service Provider (ISP) account or a work account that you access using a VPN server
connection, follow these steps:
1. Go to your Today screen and press Messaging (left action key).
2. Press Left to cycle through your Messaging accounts until you see the account you want
to download in the title bar.
3. Press Menu (right action key) and select Send/Receive to sync your smartphone with
your email server.
Receiving attachments
1. Select the attachment (below the subject) to mark it for download.
2. Sync the email account that contains the message (as described in the previous sections).
3. Select the attachment to open it.
To automatically download attachments from an Outlook email account, do the following:
1. Press Start and select Programs.
2. Select ActiveSync .
57
Page 62

3. Press Menu (right action key) and select Options.
4. Select E-mail, and then select Settings.
5. Check the Include file attachments box, and then press OK .
To automatically download attachments from an IMAP email account (typically an ISP account)
or an account that you access using a VPN server connection, do the following:
1. Go to your Today screen and press Messaging (left action key).
2. Close any open messages, and then press Menu (right action key) and select Tools >
Options.
3. On the Accounts tab, select the IMAP account name.
4. Press Next (right action key) until you reach Server information, and then select
Options.
5. Press Next (right action key) twice, and then select Get full copy of messages and
When getting full copy, get attachments.
Creating and sending a text message
Each text message can hold up to 160 characters. To save time, you can select from predefined
My Text phrases, such as “Call me” or “On my way.” You can add your own My Text phrases, and
if you prefer, you can enter the full message text too.
1. Go to your Today screen and press Messaging (left action key).
2. Press Left until you see Text Messages in the title bar.
58
Page 63

STAYING IN TOUCH
3. Press New (left action key).
4. Do one of the following to address the message:
■
If the recipient’s name and mobile number are in your
Contacts list, type the first few letters of the first or last
name or simply enter the first initial, followed by a space,
and then the last initial to find a name.
■
If the recipient’s name is in an online address book, press
Center , enter the name, press Menu (right action
key), and then select Find Online. Select the name, and then
select to use either the phone number or email address. For more information, see “Using
an online address book” on page 50.
■
If the recipient’s name and mobile number are not in your Contacts list, enter the full
mobile number or email address.
NOTE To send a message to multiple recipients, separate the addresses with a semicolon (;). If you send a message to
three people, you are billed for three messages.
5. Enter your message, or press Menu (right action key), select My Text, and then select a
predefined phrase you want to insert.
6. (Optional) Press Menu (right action key) and select Spell Check.
7. (Optional) Press Menu (right action key) and select Message Options. Enter a callback
number and then select OK.
8. Press Send (left action key).
59
Page 64

Creating and sending a multimedia message
Multimedia messages can include any of the following items presented as one or more slides:
Ringtones
■ MIDI
NOTE Even if your smartphone does not include a camera, you can still send, receive, and view pictures and videos.
Sound clips
■ WAV
■ QCELP
Pictures
■ JPEG
■ GIF
Videos
■ 3G2
1. Go to your Today screen and press Messaging (left action key).
2. Press Left until you see MMS in the title bar.
3. Press New (left action key).
4. Do one of the following to address the message:
■
If the recipient’s name and mobile number or email address are in your Contacts list,
press Center , select Add Recipient, enter the first few letters of the recipient’s first or
last name, and then select the recipient’s name.
■
If the recipient’s name is in an online address book, press Center , enter the name,
press Menu (right action key), and then select Find Online. Select the name, and
then select to use either the phone number or email address. For more information, see
“Using an online address book” on page 50.
■
If the recipient’s name and mobile number or email address are not in your Contacts list,
enter the full mobile number or email address.
■
If you want to upload a picture or video to your Verizon Wireless PIX Place account, press
Center , and then select PixPlace.
60
Page 65

STAYING IN TOUCH
NOTE To send a message to multiple recipients, separate the addresses with a
semicolon (;). If you send a message to three people, you are billed for three
messages.
5. Select Subject and enter a title for the message.
6. Select New Slide.
7. Press Center and select one of the following:
Add Picture: Lets you insert a picture. You can take the picture
with the built-in camera or insert an existing picture.
Add Video: Lets you insert a video. You can capture a video with the built-in camera or insert
an existing video clip. If you insert a video, you cannot add any more pictures, videos, or
sounds to that message.
Add Sound: Lets you record a message, such as a voice caption for a picture, or insert an
existing sound, such as a ringtone. You can add one sound per slide; to send more than one
sound in a message, add another slide to your message. If you capture a picture with the
built-in camera and save it with a voice caption, the voice caption does not count as a sound
file.
8. Enter a text caption or message for the item you inserted.
9. Select next and repeat steps 6–8 to add other items in this message.
10. (Optional) Select preview to view the message as the recipient will see it.
11. When you’re done creating the message, press OK .
12. Press Send (left action key).
61
Page 66

Receiving text and multimedia messages
When your phone is on and in a wireless coverage area, you automatically receive new text
messages. For multimedia messages, you can set your smartphone to automatically download
new messages or to notify you that messages are ready to download. You can also set your
smartphone to notify you when a new text or multimedia message arrives.
The new message notification may include any of the following
options:
View: Opens the message so you can view its full contents.
Download: Downloads the rest of the message from the server.
Reply: Opens a message addressed to the sender’s phone number.
Dismiss: Closes the notification and puts the message in your Inbox.
Menu: Opens a menu where you can select other options.
Viewing/playing a multimedia message
1. Go to your Today screen and press Messaging (left action key).
2. Press Left until you see MMS in the title bar.
3. From the Inbox, select the message you want to view.
4. If you’re viewing the message for the first time, playback begins automatically. Otherwise,
select an item to play.
62
Page 67

STAYING IN TOUCH
5. Do any of the following:
Go the previous or next slide: Tap previous or next .
Pause or resume playback: Tap pause or play .
Save the item that is playing: Press Menu (right action key)
and select Save.
Go to the top of the message: Press Menu (right action key)
and select Message Overview.
Reply to the message: Press Menu (right action key) and
select Reply or Reply All.
Call the sender: Press Menu (right action key) and select Call Sender.
Save the message as a template for other messages: Press Menu (right action key) and
select Save to Template.
6. Press OK .
BROWSING THE WEB
Internet Explorer Mobile provides quick and easy access to web pages. You can view most sites
you use on your computer, including those with security and advanced features, such as
JavaScript and frames. To browse the web, you must subscribe to data services from Verizon
Wireless.
63
Page 68

Viewing a web page
By default, Internet Explorer Mobile scales web page content to fit your smartphone screen so
that you can view most of the information without scrolling left or right.
1. Make sure your phone is on (see “Turning your phone on and
off” on page 7).
2. Press Start and select Internet Explorer.
3. Highlight the address line, enter the address of the web page
you want to view, and then press Center .
4. Press Menu (right action key), select View, and then
select one of the available formats.
5. Do any of the following:
■
To view the previous page, press Back or press Backspace .
■
To refresh the page with the latest content from the Internet, press Menu (right
action key) and select Refresh.
■
To follow a link to another web page, press Up or Down to highlight the link, and
then press Center to go to the selected page. You can also tap the link on the screen
with your stylus.
■
To adjust the size of the text on web pages, press Menu (right action key), select
Zoom, and then select the size you want.
■
To view a web page’s properties, press Menu (right action key), and select Tools >
Properties.
64
Page 69

STAYING IN TOUCH
■
To view each item in a list, select the list and scroll using Up or Down .
■
In a list, press Left or Right to cycle between items, and then press Center to
accept the change.
■
In a form, such as a browser search field, press Center to interact with the form, and
then press Center to stop interacting with the form.
6. Press OK to close Internet Explorer Mobile.
Creating a favorite
Favorites let you bookmark a web page so that you can instantly access it without entering the
web address.
1. Create the folders where you want to store your favorites.
NOTE Once you create a favorite, you can’t move it to another folder. See the User
Guide for info on organizing your favorites and creating folders.
2. Go to the page you want to mark as a favorite.
3. Press Menu (right action key) and select Add to
Favorites.
4. (Optional) Select Name and enter a different description.
5. (Optional) Select the folder where you want to add the favorite.
6. Select Add.
65
Page 70

Downloading files and images from a web page
You can download files from a web page that are usable on your smartphone, such as new
applications, MIDI ringtones, or pictures that are specifically tagged for download.
1. Go to the web page that contains the link to the file you want to download.
2. Press Left or Right to highlight the link to the file.
3. Press and hold Center , and then select Save As to download a file, or tap and hold and
select Save Image to download an image.
4. Select Name and enter a new name for the file.
5. Select the Folder list, and then select the folder where you want to save the file.
6. Select the Location list, and then select where you want to store the file: Main memory or
Storage card.
7. Press OK .
SETTING UP A BLUETOOTH® CONNECTION
With your smartphone’s built-in Bluetooth® wireless technology, you can connect to a number of
Bluetooth devices such as a headset, hands-free car kit, or GPS receiver, as well as to other
phones, handhelds, or computers. If your computer is enabled with Bluetooth wireless
technology, you can also synchronize wirelessly.
[ ! ] IMPORTANT For a list of hands-free devices using Bluetooth wireless technology that are compatible with your
smartphone, go to www.palm.com/
us/products/smartphones/treo700w/bluetooth.html.
66
Page 71

STAYING IN TOUCH
After you set up a connection with a Bluetooth device, you can
communicate with that device whenever it is within range (about
30 feet in optimum environmental conditions) and your
smartphone’s Bluetooth feature is turned on.
1. If necessary, prepare the device you want to connect with to
accept a new connection. Check the device’s documentation
for details.
2. Go to your Today screen, and then tap Bluetooth .
3. Check the Turn on Bluetooth box to turn on your smartphone’s
Bluetooth feature.
4. Select the Devices tab, and then select New Partnership.
5. Wait for your smartphone to search for devices and to display
the device list.
6. Select the device you want to connect with, and then press
Next (right action key).
7. Enter the same passkey on your smartphone and on the
Bluetooth device, and then press Next (right action key).
[ ! ] IMPORTANT Some Bluetooth devices have a preset passkey; if so, you can
find the passkey in the documentation for that device. Other devices provide a
screen where you enter a passkey that you make up. In either case, you must use
the same passkey on both your smartphone and the other Bluetooth device. We
recommend that where possible, you make up a passkey of 16 alphanumeric
67
Page 72

characters (letters and numerals only) to improve the security of your smartphone. The longer the passkey, the more
difficult it is for the passkey to be deciphered.
8. Do any of the following that apply to the type of device you’re connecting to:
Headset or hands-free car kit: Check the Hands Free box.
A2DP/AVRCP enabled stereo headset: Check the Wireless Stereo box.
GPS device: Press Finish (right action key), select the COM Ports tab, select the GPS
device you selected in step 6, and then select New Outgoing Port. After you set the
partnership and COM port, you can configure the GPS Settings (see the User Guide). Be sure
to select the same port you assigned for GPS here.
9. Press Finish (right action key), and then press OK .
You can now communicate with this device whenever it is within range (about 30 feet in optimum
environmental conditions) and your smartphone’s Bluetooth feature is turned on (see steps 1 and
2 earlier in this section). If you’re using a hands-free Bluetooth device and it is within range (30
feet), your smartphone routes all calls to the hands-free device instead of your smartphone’s
earpiece. When a call comes in, your smartphone rings and the car kit or headset beeps. Even if
you pick up the call on your smartphone earpiece, the call goes to the headset or car kit.
68
Page 73

STAYING IN TOUCH
Beaming a record
1. Highlight the entry or file you want to beam.
2. Press Menu (right action key) and select Beam… (the menu item changes names
based on the type of item you highlighted).
3. Do one of the following:
Bluetooth: When the name of the receiving device appears, tap the Tap to send link to begin
the transfer. A blue icon indicates a Bluetooth connection.
Infrared: Point the IR port on your smartphone directly at the IR port of the receiving device.
A red icon indicates an IR connection.
4. Wait for “Done” to appear next to the name of the receiving device before you continue using
your smartphone.
69
Page 74

PLAYING MEDIA FILES
PICTURES & VIDEOS
Your smartphone comes with a built-in, 1.3-megapixel camera with 2x digital zoom (camera not
included with all smartphones). You can use the camera to take, view, and send pictures and
videos, and to add a personal touch to your smartphone, use your pictures as your Today screen
background and as caller ID images, or use your videos to create video ringtones.
Even if your smartphone does not have a camera, you can still receive and view pictures and
videos, and send pictures and videos as attachments or multimedia messages. You can also
personalize your smartphone by using a picture as a background or by adding a picture to a
contact.
Taking a picture
By default, pictures are stored in the My Pictures folder on your smartphone. If you want to store
your pictures on an expansion card, see the User Guide for instructions.
1. Press Start and select Pictures & Videos.
2. Select Camera .
NOTE If you see a camcorder icon below the preview image, video mode is on. To
turn on the still camera, press Menu, and then select Still Mode. If you don’t see a
camcorder icon, skip this step.
3. Adjust the position of your smartphone until you see the subject
you want to photograph on the screen.
70
Page 75

PLAYING MEDIA FILES
4. (Optional) Adjust any of the following:
Zoom: Press Up to zoom in or Down to zoom out.
Brightness: Press Right to increase the brightness or Left to decrease the brightness.
Resolution: Press Menu (right action key) and select Resolution to change the image
quality.
5. (Optional) Set a 5-second timer: Press Menu (right action key), select Mode, and then
select Timer.
6. Press Center to capture the picture or start the timer.
7. Hold your smartphone still until the picture renders, and then do one of the following:
■
Press Camera (left action key) to take another picture.
■
Press OK to return to Thumbnail View.
Recording a video
Videos can be any length, provided you have ample storage space available. By default, videos
are stored in the My Pictures folder on your smartphone. If you want to store your videos on an
expansion card, see the User Guide for instructions.
1. Press Start and select Pictures & Videos.
2. Select Camera .
3. Press Menu (right action key) and select Video Mode.
71
Page 76

4. Adjust the position of your smartphone until you see the subject you want to record on the
screen.
5. (Optional) Adjust any of the following:
Brightness: Press Right to increase the brightness or Left to decrease the brightness.
Resolution: Press Menu (right action key) and select Quality to change the video
resolution.
6. Press Center to start recording.
7. When you’re finished recording, press Stop (left action
key) or Center to stop recording.
8. (Optional) To review the video in Windows Media Player
Mobile, press Thumbnails (left action key), highlight the
video, and then press Center . Press OK to return to
Thumbnail View in Pictures & Videos.
Viewing a picture or video
1. Press Start and select Pictures & Videos.
2. Select the picture or video you want to view. For more info on viewing videos, see “Playing
media files on your smartphone” on page 74.
3. Press OK to return to Thumbnail View.
NOTE To view pictures or videos in a different folder, go to Thumbnail View, select the Show list in the upper left, and then
select the album you want to view.
72
Page 77

PLAYING MEDIA FILES
Creating a video ringtone
You can save a video that you record as a ringtone.
1. Press Start and select Pictures & Videos.
2. Highlight the video you want to use as a ringtone.
3. Press Menu (right action key) and select Save to Contact Ring Tone.
4. Select the contact to whom you want to assign the video ringtone.
WINDOWS MEDIA PLAYER MOBILE
Windows Media Player Mobile can play music, audio, and video files that are stored on your
smartphone or on an expansion card (sold separately) in any of the following file formats: WMA,
WMV, MP3, and 3G2.
Transferring media files to your smartphone
Use the Sync feature in the desktop version of Windows Media Player 10 to transfer compatible
media files from your computer to an expansion card or your smartphone. Using the Sync feature
ensures that the files transfer correctly.
1. On your computer, open Windows Media Player 10.
2. (Optional) Insert a 32MB or larger expansion card into your smartphone.
3. Connect your smartphone to your computer with the USB sync cable.
4. When the Device Setup Wizard opens on your computer, click Automatic.
73
Page 78

5. Check the Customize the playlists that will be synchronized box.
6. Select the playlists you want to sync.
7. Click Finish to begin the transfer. The next time you connect your smartphone to your
computer while the desktop version of Windows Media Player 10 is running, synchronization
starts automatically.
NOTE Be patient; transferring media files can take several minutes.
Playing media files on your smartphone
You can listen to media files through the speaker on the back of your smartphone, through the
included stereo headset, or through a stereo headphone (3.5mm stereo headphone adapter or
2.5mm stereo headphone required, sold separately).
NOTE If you can’t find a media file on your expansion card, update the library (see “Working with libraries” on page 76).
1. Press Start and select Windows Media.
2. Press Menu (right action key) and select Library.
3. Do one of the following:
■
To play a file from a library, select the Library list in the upper left, and then select the
library you want to use.
■
To play a file that is not in a library, press Menu (right action key) and select
Open File.
74
Page 79

PLAYING MEDIA FILES
■
To play a file from the web, press Menu (right action key) on the Library screen,
and then select Open URL. Select URL and enter the website address, or select History
and select a site you’ve visited before.
4. Select the item you want to play, and then press Play (left action key).
5. Use any of the following onscreen controls during playback:
Plays the current file.
Pauses the current file.
Skips to the beginning of the current file or to the previous file.
Skips to the next file.
Sets the point where playback begins. Tap and drag the slider to change the position.
Increases the volume level.
Decreases the volume level.
Turns the sound on or off.
Displays a video using the full screen.
Displays a website where you can find music and videos to play.
Indicates the rating of the current file. Select the star to change the rating.
NOTE You can also use the Volume button to adjust the volume and the 5-way to control playback. Press Center to play or
pause the file. Press Left to skip to the beginning of the current file (or to the previous file), and press Right to skip to the
next file.
6. Press Menu (right action key) and select any of the following during playback:
Library: Displays the Library screen so you can select a different song to play.
Shuffle/Repeat > Shuffle: Plays the Now Playing playlist in random order. A check appears
next to this command when it is on.
75
Page 80

Shuffle/Repeat > Repeat: Plays the Now Playing playlist repeatedly. A check appears next to
this command when it is on.
Stop: Ends playback.
Working with libraries
A library represents a media storage location, so if you have an optional expansion card, you
should have two libraries: My Device and My Storage Card. Each library contains links to the
media files in that location. Windows Media Player Mobile usually updates the My Device library
automatically, but you must manually update the My Storage Card library.
1. Press Start and select Windows Media.
2. Press Menu (right action key) and select Library.
3. Press Menu (right action key) and select Update Library.
4. Wait for the files to be added, and then select Done.
76
Page 81

STAYING PRODUCTIVE
STAYING PRODUCTIVE
WORD MOBILE
You can create and edit documents and templates and save them as DOC, RTF, TXT, and DOT
files. You can also edit Microsoft® Office Word® documents and templates that you create on
your computer. However, keep in mind that some of the information and formatting may be lost
when you save the document on your smartphone. See the User Guide for details on supported
and unsupported features.
Creating a document
1. Press Start and select Programs.
2. Select Word Mobile .
3. Press New (left action key).
4. Enter the text of the document.
5. Press OK to save the file.
POWERPOINT MOBILE
With PowerPoint Mobile, you can open and view slide show presentations created on your
computer. Many presentation elements such as slide transitions, animations, and URL links are
also supported. See the User Guide for details on supported and unsupported features.
77
Page 82

Playing a presentation
1. Press Start and select Programs.
2. Select PowerPoint Mobile .
3. In the presentation list, highlight the presentation you want to play.
4. Press Center .
5. Do any of the following:
■
Press Right to advance to the next slide or Left to view the previous slide.
■
Press Menu (right action key), select Go to Slide, and then select the slide you
want to view.
■
Select Next or Previous to play animations.
■
Press Menu (right action key), select Zoom In, and then select to zoom in or
to zoom out. To scroll within the current slide, tap and drag the slide. To return to the
slide show, select .
6. Press Menu (right action key) and select End Show.
EXCEL MOBILE
With Excel Mobile you can create and edit workbooks and templates on your smartphone. You
can also edit workbooks and templates that you create on your computer. However, keep in mind
that you may lose some of the information and formatting when you save the workbook on your
smartphone. See the User Guide for details on supported and unsupported features.
78
Page 83

STAYING PRODUCTIVE
Creating a workbook
1. Press Start and select Programs.
2. Select Excel Mobile .
3. Press New (left action key).
4. Highlight a cell where you want to enter text or other info.
5. Enter the info in the cell, and then press Enter .
6. Repeat steps 4 and 5 to enter the remaining info.
7. Press OK to save the file.
Entering a formula
1. Highlight the cell where you want to enter the formula.
2. Enter an = sign followed by any values, cell references, name references, operators, and
functions.
Example: =(B4/25)+100=Revenue-Expenses
3. Press Enter .
79
Page 84

Inserting a function
1. Open the workbook where you want to insert the function.
2. Press Menu (right action key) and select Insert > Function.
3. Select the Category list, and then select the type of function you
want to insert.
4. Select the Function list, and then select the specific function you
want to insert.
5. Select OK.
Creating a chart
1. Open the workbook from which you want to create a chart.
2. Highlight the cells you want to include in the chart.
3. Press Menu (right action key) and select Insert > Chart.
4. Select the type of chart, and then press Next (right action key).
5. Confirm the area you want the chart to include, and then press Next (right action key).
6. Select the data layout, and then press Next (right action key).
7. Check the boxes to indicate whether the first row and column represent labels.
8. Select whether you want the chart to appear as a separate worksheet within the current
workbook, or as part of the current worksheet.
9. Press Finish (right action key).
80
Page 85

MANAGING FILES AND APPLICATIONS
MANAGING FILES AND APPLICATIONS
FINDING INFORMATION
With the built-in search features on your smartphone, you can find information quickly:
Lookup: Helps you find and dial your contacts by name or phone number. See “Dialing by contact
name” on page 25 for details.
Search: Looks through the text in all the applications on your smartphone.
File Explorer: Lets you browse files and folders on your smartphone or an expansion card.
Using Search
Search for files and other items stored in the My Documents folder on your smartphone or on an
expansion card. You can search by file name or by words located in the item. For example, you
can search for words within notes, appointments, contacts, and tasks.
1. Press Start and select Programs.
2. Select Search .
3. Select Search for, and then enter the file name, word, or other
info you want to find.
4. Select the Type list, and then select the kind of information you
want to find.
5. Press Search (left action key), and then use the 5-
way to select and view an item from the search results.
81
Page 86

Exploring files and folders
File Explorer lets you browse the contents of folders on your smartphone. The root folder on your
smartphone is named My Device. My Device is similar to My Computer on your computer.
1. Press Start and select Programs.
2. Select File Explorer .
3. Select the Show list in the upper left, and then select the folder you want to explore.
4. Do any of the following:
■
To open an item, select it.
■
To quickly delete, rename, copy, beam, or email an item, highlight the item, press and
hold Center to open the shortcut menu, and then select the appropriate command.
■
To highlight multiple items, tap and drag the stylus.
[ ! ] IMPORTANT Do not delete any files that you cannot identify. These files may be required for your smartphone to
function properly.
82
Page 87

MANAGING FILES AND APPLICATIONS
INSTALLING APPLICATIONS
You can install any of the additional software included on the Getting Started CD as well as other
third-party applications that are compatible with Windows Mobile 5.0 devices. To learn more, go
www.palm.com/mytreo700wxVerizon.
to
NOTE Be sure to select and install Microsoft Windows Mobile 5.0 software for Pocket PC Phone Edition. Microsoft
Windows Mobile 5.0 software for Smartphone is not compatible with your Treo™ smartphone. If an application does not
have a Microsoft Mobile to Market certificate, you will see a message indicating that the application is untrusted. If this
occurs, you can indicate whether you want to continue the installation.
Installing applications from the Internet
You can use Internet Explorer Mobile to install Windows Mobile apps in the CAB file format
directly from the Internet. You must use your computer to install apps in other file formats.
1. Make sure your phone is on (see “Turning your phone on and off” on page 7).
2. Press Start and select Internet Explorer.
3. Go to the page that contains the link to the application you want to download.
4. Press Left or Right to highlight the link to the file, and then press Center to start the
download process.
5. Press Start and select Programs.
6. Select File Explorer .
7. Go to the My Documents folder in File Explorer.
8. Tap the file you downloaded to start the installation program.
83
Page 88

Installing applications from your computer
1. Open My Computer or Windows Explorer on your computer.
2. Copy the application file(s) into the Mobile Device folder.
3. Connect your smartphone to your computer to synchronize and install the application(s) on
your smartphone.
4. Press Start and select Programs to open the application.
NOTE If you don’t see the application you just installed, select File Explorer, go to the My Documents folder, and then
select the application’s icon to complete the installation.
Installing applications onto an expansion card
1. Insert the expansion card (sold separately) into the expansion card slot (see “Removing and
inserting expansion cards” on page 91).
®
2. Open the ActiveSync
window on your computer.
3. Click Tools and select Explore Device.
4. Double-click My Windows Mobile-Based Device to open the Mobile Device folder.
5. Copy the application file(s) into the Storage Card folder inside the Mobile Device folder.
SETTING SYNCHRONIZATION OPTIONS
Selecting which info to sync
You can choose whether you want to sync info for specific applications. For example, if you never
use the Notes application, you may want to exclude that application from your sync list.
84
Page 89

MANAGING FILES AND APPLICATIONS
1. Press Start and select Programs.
2. Select ActiveSync .
3. Press Menu (right action key) and select Options.
4. Do any of the following:
■
Check the box next to any items you want to synchronize.
If you cannot check a box, you might have to uncheck a
box for the same information type elsewhere in the list.
■
Uncheck the box next to any items you want to stop synchronizing.
■
Select an item and then select Settings to customize the settings for that item.
Settings are not available for all items.
NOTE To sync Office files, check the Files box. For more info, see “Synchronizing your Microsoft Office files” on page 86.
Starting and stopping synchronization
If ActiveSync is running on your computer and you connect your smartphone to your computer,
synchronization begins automatically. If you ever need to manually start or stop synchronization,
follow these steps:
1. Connect your smartphone to your computer (see the Read This First setup poster for details).
If you are only synchronizing wirelessly with Exchange Server, you do not have to connect
the device.
2. Press Start and select Programs.
3. Select ActiveSync .
NOTE To end synchronization before it completes, select Stop.
85
Page 90

Synchronizing your Microsoft Office files
You can create and edit Microsoft Office files on your computer or on your smartphone and then
synchronize the files so that changes you make show up on both your computer and your
smartphone. To synchronize Microsoft Office files, you must first set Files as one of your
synchronization options; see “Selecting which info to sync” on page 84.
To synchronize your Microsoft Office files:
1. Connect your smartphone to your computer with the
USB cable.
NOTE Most options of ActiveSync desktop software are available only
when your smartphone is connected to your computer.
2. On your computer, double-click the ActiveSync
icon in the taskbar to open the ActiveSync window.
NOTE If the ActiveSync icon doesn’t appear in the taskbar, click Start >
Programs > Microsoft ActiveSync to open the ActiveSync window.
3. Under Information Type, double-click Files to view a
list of all synchronized files.
NOTE If Files doesn’t appear under Information Type, open the Tools menu and select Options. Make sure the Files box is
checked.
4. Do any of the following:
■
To copy a file from your computer to your smartphone, click Add, browse to and highlight
the file, and then click Open.
86
Page 91

MANAGING FILES AND APPLICATIONS
■
To delete a file from the file sync folder on your computer and from your smartphone,
highlight the file name and click Remove.
NOTE If you receive an error while synchronizing files, make sure that all of the files you’re trying to sync are closed on
both your computer and on your smartphone.
Where are the changes I made to my file?
Don't look for the changed file in its original location on your computer. Only the synchronized
version contains the changes, and that version is in the ActiveSync file sync folder. To find this
folder, do either of the following:
■ On your computer desktop, double-click the file sync folder icon. This is a shortcut to
the file sync folder.
■ In ActiveSync desktop software, double-click Files. The location of the file sync folder
appears in the File Synchronization Settings dialog box (under On this computer, synchronize
the files in this folder).
On your smartphone, you can find the synchronized file by doing either of the following:
■ Press Start , select Programs, and then select the application that opens the file:
Word Mobile , Excel Mobile , or PowerPoint Mobile .
■ Press Start , select Programs, and then select File Explorer . Select the Show list in
the upper-left corner and select My Device > My Documents.
87
Page 92

Synchronizing with Exchange Server
You can sync with Exchange Server using a connection to a wireless network or a computer.
1. Press Start and select Programs.
2. Select ActiveSync .
3. Press Menu (right action key) and select Configure Server. If you have not yet set up
sync with Exchange Server, this says Add Server Source.
4. Select Server address, enter the name of the server running Exchange Server, and then press
Next (right action key).
5. Enter your name, password, and domain, and then press Next (right action key).
To change the rules for resolving synchronization conflicts, select Advanced.
6. Check the boxes next to the type of info that you want to synchronize with Exchange Server,
and then press Finish (right action key).
Setting the synchronization schedule
You can schedule wireless synchronization to occur automatically at regular intervals. If you
prefer to synchronize manually, do not turn on these settings.
NOTE When you connect your smartphone to your computer using the USB cable, synchronization occurs automatically
whenever your smartphone screen is turned on. You cannot set a synchronization schedule for cable synchronization.
1. Connect your smartphone to your computer (see the Read This First setup poster). If you are
only synchronizing wirelessly with Exchange Server, you do not have to connect the device.
2. Press Start and select Programs.
3. Select ActiveSync .
88
Page 93

MANAGING FILES AND APPLICATIONS
4. Press Menu (right action key) and select Schedule.
5. Set any of the following options:
Peak times: Sets the frequency for high-traffic time periods such as when you are at work or
when email volume is high. To conserve power it is recommended that you change your
settings to synchronize every 30 or 60 minutes instead of as items arrive.
Off-peak times: Sets the frequency for low-traffic time periods such as late at night.
Use above settings while roaming: Sets the frequency while you are roaming outside the
Verizon Wireless network. By default, a scheduled sync does not work while you are roaming.
This is to prevent roaming charges on your account. If roaming charges are not a concern,
select Use above settings while roaming.
Send outgoing items immediately: Sets whether items are sent as soon as you select Send in
the Messaging application, or whether they are held until the next synchronization.
6. Press OK .
NOTE Decreasing the frequency settings conserves battery power.
Synchronizing using Bluetooth wireless technology
The PC with which you connect must have Bluetooth
®
wireless technology, either built-in or
through a Bluetooth card. Make sure that the PC's Bluetooth setting is discoverable.
1. On your computer, right-click the ActiveSync icon in the taskbar in the lower-right corner
of the screen, and select Connection Settings.
2. Check the Allow connections to one of the following box, select Bluetooth, and then
click OK.
89
Page 94

3. On your smartphone, press Start and select Settings.
4. Select the Connections tab, and then select Bluetooth .
5. Check the Turn on Bluetooth box.
6. Press Start and select Programs.
7. Select ActiveSync .
8. Press Menu (right action key) and select Connect via Bluetooth. If this is the first time
you're making a Bluetooth connection to this computer, follow the onscreen prompts to set
up a Bluetooth partnership with this computer.
9. In ActiveSync, select Sync.
10. When synchronization is finished, press Menu (right action key) and select Disconnect
Bluetooth.
NOTE To conserve power, turn off your smartphone's Bluetooth feature. Go to your Today screen, select Bluetooth ,
and then uncheck the Turn on Bluetooth box.
USING EXPANSION CARDS
The expansion card slot on your smartphone lets you add SD cards and MultiMediaCard cards to
extend the storage capacity of your smartphone. For example, expansion cards can store pictures
and videos, MP3 audio files, email attachments, games, and much more. When purchasing an
SDIO card, make sure the card is compatible with the Treo 700wx smartphone. Expansion cards
are sold separately.
NOTE The Treo 700wx smartphone does not support SDHC (Secure Digital High Capacity) expansion cards.
90
Page 95

MANAGING FILES AND APPLICATIONS
Removing and inserting expansion cards
Your smartphone comes with a dummy card inside
the expansion card slot. When you do not have a
functioning card inside the slot, reinsert the dummy
card to protect the slot opening.
1. Press down and release the dummy card.
2. After you feel the dummy card eject from the slot,
remove the card from the slot.
3. To insert an expansion card, hold your
smartphone with the screen facing you and the
card with the label facing you. The notch on the
card should be in the lower corner by the antenna.
4. Insert the card into the expansion card slot until
you feel it lock into place and hear the
confirmation tone.
Notch
91
Page 96

CUSTOMIZING YOUR SMARTPHONE
TODAY SCREEN SETTINGS
Selecting your Today screen background
1. Press Start and select Settings.
2. On the Personal tab, select Today .
3. On the Appearance tab, check the Use this picture as the
background box.
4. Select Browse.
5. Select the picture you want for your Today screen background.
6. Select the Items tab.
7. Check the boxes next to the items you want to appear on your
Today screen and uncheck any items that you want to hide.
8. (Optional) Select Options (if available) to configure the settings
for the current item. Press OK to return to Today Settings.
9. Press OK .
92
Page 97

CUSTOMIZING YOUR SMARTPHONE
SOUND SETTINGS
Setting ringtones
You can set different tones for different types of incoming phone calls and notifications.
1. Press Start and select Settings.
2. On the Personal tab, select Sounds & Notifications .
3. Make sure your phone is on.
4. Select the Notifications tab.
5. Select the Event list, and then select which type of call or notification you want to set the
ringtone for:
Phone: Known Caller: An incoming call from someone in your
Contacts list or Speed-Dial list.
Phone: Roaming: A call that comes in when you’re outside your
home mobile network.
Phone: Unknown Caller: An incoming call from someone
identified by caller ID who is not in your Contacts list or SpeedDial list.
NOTE You can also select sounds to notify you when you miss a call or receive a
new voicemail message.
6. Select the Ring type list, and then select the ring style for the selected type of call.
93
Page 98

7. Select the Ring tone list, and then select the sound for the selected type of call.
8. Check the Vibrate when… boxes to turn the vibrate feature on/off based on the Ringer switch
setting.
9. (Optional) Select play to preview the sound.
10. Repeat steps 4–7 to select ringtones for other types of calls.
11. Press OK .
Setting the Ringer switch
In certain situations, such as meetings and theaters, you need to turn off all sounds on your
smartphone. You can silence all sounds on your smartphone, including smartphone ringtones,
Calendar notifications, and system sounds, such as music that you may be playing. This does not
mute the speaker during phone calls.
1. Slide the Ringer switch to the Sound Off position.
2. To hear all sounds again, slide the Ringer switch to
the Sound On position.
When you slide the Ringer switch back to the Sound On
position, it restores the previous sound settings. For
example, if the smartphone ring volume is set to the
loudest setting and you slide the Ringer switch to the
Sound On Sound Off
Sound Off position, you do not hear the smartphone
ring. When you move the Ringer switch back to the Sound On position, the smartphone ring
volume is still set to the loudest setting.
94
Page 99

CUSTOMIZING YOUR SMARTPHONE
Selecting Sounds & Notifications
1. Press Start and select Settings.
2. On the Personal tab, select Sounds & Notifications .
3. On the Sounds tab, set any of the following options:
Events: Turns sounds on/off for system warnings and error
messages.
Programs: Turns sounds on/off in the applications on your
smartphone.
Notifications: Turns alarms and reminders on/off in the
applications on your smartphone.
Screen taps: Turns sounds associated with tapping the screen on/off, and sets the volume
level when this sound is turned on.
Hardware buttons: Turns sounds associated with pressing buttons on/off, and sets the
volume level when this sound is turned on.
4. If your phone is on, press and hold Power/End to turn your phone off, and then press
Power/End to wake up the screen.
95
Page 100

5. Select the Notifications tab and set any of the following
options:
Event: Specifies the action for which you want to change the
settings. The remaining options vary based on the action
selection.
Play sound: Lets you turn the sound on/off for the selected
event. To select a different sound select the list to the right of
this setting, and then select a different sound. To preview the
sound, select Play Sound, and then select Play.
Repeat: Indicates whether the sound plays more than once, if turned on.
Display message on screen: Indicates whether a notification message appears onscreen for
the selected event.
Vibrate: Indicates whether your smartphone vibrates to notify you about the selected event.
6. Press OK .
DISPLAY AND APPEARANCE SETTINGS
Adjusting the brightness
1. Press Option , and then press .
2. Press Left and Right to adjust the brightness.
3. Press OK .
96
 Loading...