


QUICK SETUP
1. See the illustrations at the start of this guide for setup instructions.
2. If your computer has been stored or transported in a cold or damp environment, allow it to warm to
room temperature before turning it on.
3. Allow the battery to fully charge:
Charging: LED = On
Charged: LED = Off
4. Briefly press the power button to turn on your computer.
Please read the rest of this Quick Start & Troubleshooting Guide to get to know your computer and
troubleshoot in case you encounter a problem.
Copyright Notic
Packard Bell Quick Start & Troubleshooting Guide.
may be reproduced or transmitted, in any form or by any means, whether electronic, chemical, manual or otherwise, including but
not limited to photocopying, recording, or information storage and retrieval systems, for any purpose without prior written permission
of Packard Bell B.V.
Disclaimer
Packard Bell B.V. specifically disclaims all warranties, either express or implied, including, but not limited to, implied warranties of
merchantability and fitness for a particular purpose with respect to this product and documentation. Updates to software and hardware
components are made regularly. Therefore some of the instructions, specifications and pictures in this documentation may differ
slightly from your particular situation. All items described in this guide are for illustration purposes only and may not apply to your
particular situation. No legal rights or entitlements may be obtained from descriptions made in this manual. Packard Bell B.V. reserves
the right to revise or make changes or improvements to this product or documentation at any time without obligation to notify any
person of such revisions or improvements. In no event shall Packard Bell B.V. be liable for any consequential or incidental damages,
including but not limited to loss of business profits or any other commercial damages, arising out of the use of this product.
Trademark
FireWire is a trademark of Apple Computer, Inc. Packard Bell is a registered trademark of Packard Bell B.V. All other company or
product names are trademarks, registered trademarks or service marks of their respective owners.
Piracy Warning
The illegal transfer, use and storage of copyrighted media on personal computers could result in piracy convictions, fines or prison
sentences.
2 -
Quick Start & Troubleshooting Guide
e
Copyright © 2007 Packard Bell B.V. All Rights Reserved. No part of this manual

Quick Start & Troubleshooting
Guide
TABLE OF CONTENTS
Important Information 4
Getting to know your computer 5
Turning your Computer On and Off ................................................................................... 5
External Features ............................................................................................................... 6
Control Panel..................................................................................................................... 8
Keyboard Panel .................................................................................................................. 9
Touchpad......................................................................................................................... 10
Optical Drive ................................................................................................................... 10
Computer Basics 12
Safety and Comfort ................................................................................................................ 12
Safety Precautions ............................................................................................................ 12
Health Precautions ........................................................................................................... 12
Power Supply......................................................................................................................... 13
AC Power Adapter ........................................................................................................... 13
Battery Power .................................................................................................................. 14
Upgrading your Computer...................................................................................................... 16
First steps on the Net ............................................................................................................. 17
Get Connected! ............................................................................................................... 17
Wi-Fi ............................................................................................................................... 17
Surf the Net! ................................................................................................................... 19
Helpdesk 20
Your Operating System .......................................................................................................... 20
Safe Computing ..................................................................................................................... 20
Security ........................................................................................................................... 20
Diagnose & Repair.................................................................................................................. 22
Top Troubleshooting Cases............................................................................................... 22
Miscellaneous Troubleshooting......................................................................................... 24
Packard Bell Limited Warranty 28
Regulatory Information 32
Index 34
Table of Contents -
3
IMPORTANT INFORMATION
Thank you for purchasing a Packard Bell computer!
This guide has been designed to introduce you to the features of your computer and assist in your computing
experience. It will also help you maintain your computer and troubleshoot in case you encounter a problem.
Packard Bell Website
Remember to visit www.packardbell.com often! Check out the
Support section: it contains up-to-date information, help, drivers
and downloads.
Packard Bell Support
Make sure you write down your computer serial number, date and place of
purchase and model name on the cover of this guide. Also, save your proof of
purchase and
please write down any error message causing the problem, and have the
computer in front of you and switched on if possible. Having these items to hand
when contacting us will ensure better and quicker support.
FreeDOS Operating System
Your system has been supplied without any software and is pre-installed with the FreeDOS* operating
system. Please note that certain hardware devices (modem, video card, optical disc drive etc.) and many
common applications will not run or may not run properly using FreeDOS. In order to use these devices and
applications you will need to install the appropriate operating system** and hardware device drivers.
Please see your retailer or chosen operating system provider for more information. Please also visit
www.packardbell.com and www.freedos.org.
*Note: FreeDOS is offered "AS IS". Packard Bell does not provide support for the FreeDOS operating system. You can
find support for FreeDOS at www.freedos.org
**Note: Packard Bell does not provide support for user installed operating systems. We recommend that you consult
the operating system creator for support.
Warranty & Service Sheet (if supplied)
. Before calling for support,
4 -
Quick Start & Troubleshooting Guide
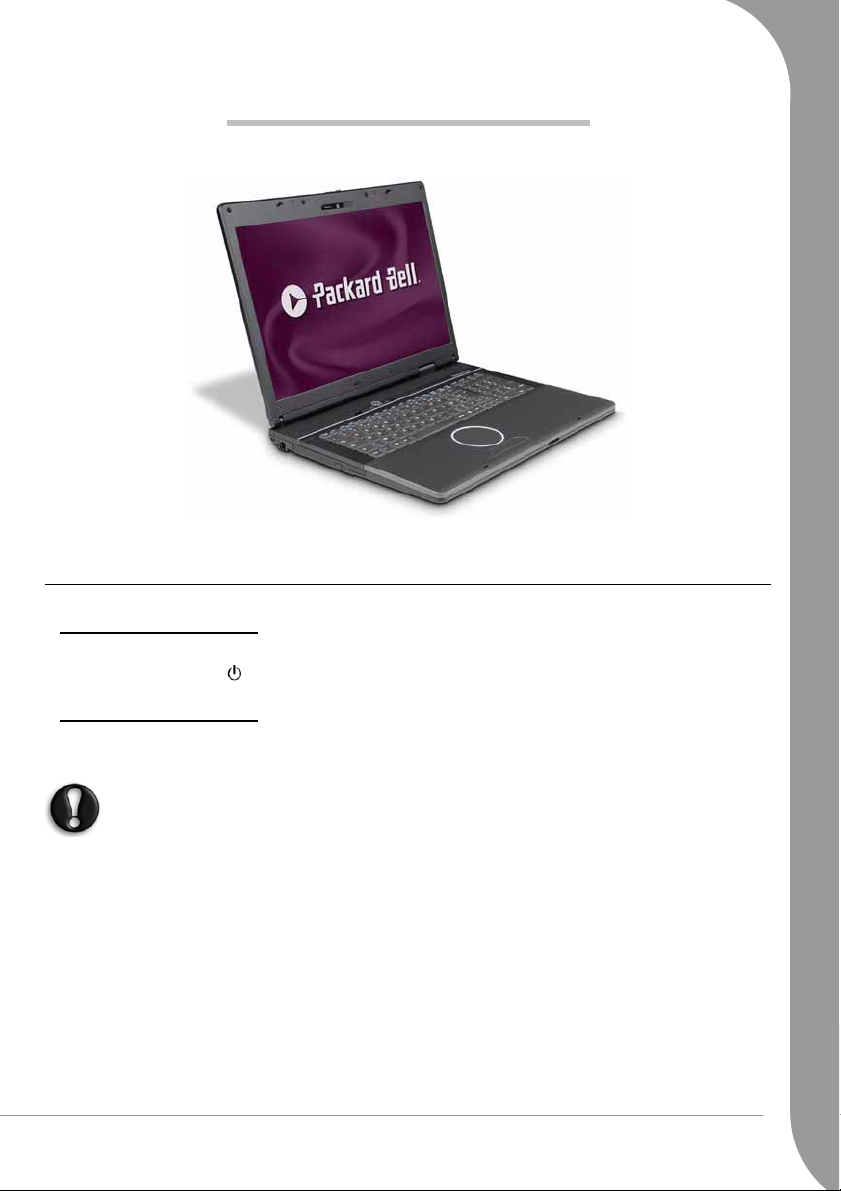
GETTING TO KNOW YOUR COMPUTER
Your computer benefits from a compact design that provides all the features you need in a portable system.
For illustration purposes only, colours may vary.
Turning your Computer On and Off
Turning your Computer On
1. Turn on any devices connected to your computer (e.g. printer).
2. Press the power button to turn your computer on (see page 8).
Turning your Computer Off
1. Press the power button to turn your computer off.
2. Turn off any devices connected to your computer.
To avoid risk of loss of data, be sure to save your work before turning your computer off.
Forced Shutdown
If your computer doesn’t respond perform a
of the LEDs turn off (typically 6 or more seconds). Wait roughly 30 seconds before turning your computer on
again.
Forced Shutdown
by holding the power button in place until all
Getting to know your computer -
5
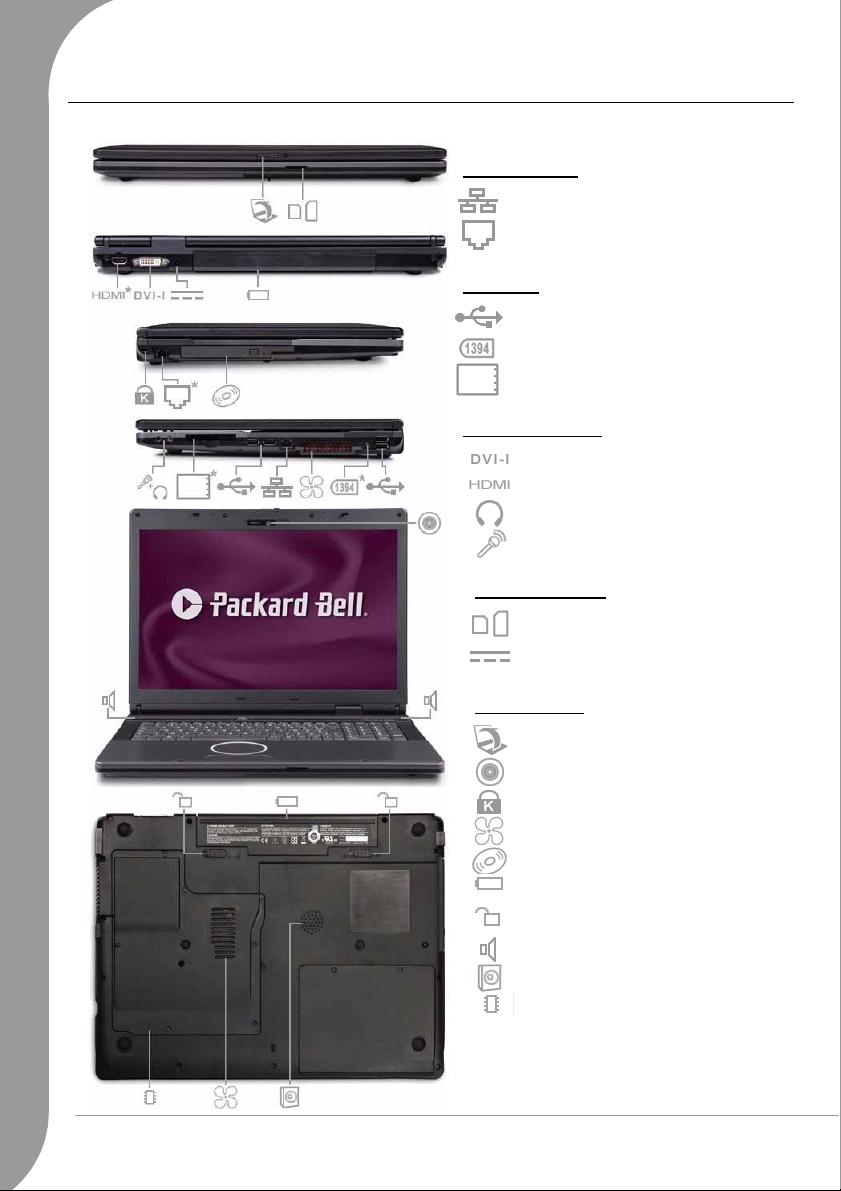
External Features
The main features of your computer are illustrated below:
Front
BackLeftRightOpenBottom
Communication
Network
Modem*
Expansion
USB (x4)
IEEE 1394 (FireWire)*
ExpressCard*
Display and Audio
DVI (for external monitor)
HDMI (with S/PDIF audio)*
Line out/Headphones (3.5mm socket)
Microphone (3.5mm socket)
Other Connectors
Memory Card Reader
AC Adapter (DC In)
Other Features
Latch
Webcam
Kensington Lock Fixture
Fan/Ventilation
Optical Drive
Main Battery Pack
Battery Security Lock /
Battery Release Latch
Speakers
Subwoofer
Memory Modules
6 -
Quick Start & Troubleshooting Guide
* - optional, depends on configuration purchased.

Your computer provides a series of ports and connectors that can be used to expand your computer to your
needs. The port and connector types described below are may be available on your Packard Bell computer.
However, certain features are optional and may not be available on the specific model you have purchased.
Connector cables may not be supplied. Please contact your retailer.
Precautions
• Before you attach any device, check the installation instructions that were supplied with it.
• Do not remove a device if the computer is using it.
• Most devices are "hot-pluggable". This means they can be added or removed while the computer is on.
However, most devices must be deactivated in the operating system before they may be removed from
the computer.
Communication Ports
Network - This port can be used to connect your computer to a network (‘LAN’) or certain high-speed
Internet connections.
Modem - A 56K internal fax/data modem connects you to the Internet over a dial-up connection.
The network port looks very similar to the modem port; they are often situated near each other and
can easily be mistaken. The network port is slightly larger than the modem port.
In thunderstorm conditions, make sure that you disconnect all your connection cables; unplug any
modem from the telephone line, any TV port from the aerial socket and any network cable. A lightning strike to nearby telephone lines or an aerial could damage a modem, network or TV card or
even your whole computer. Please note that the product warranty does not apply if damage to your
computer is the result of a lightning strike.
Expansion Ports
USB (Universal Serial Bus) - The Universal Serial Bus (USB) ports allow you to connect many peripheral
devices (for example, printers, monitors, scanners) to your computer.
IEEE 1394 (FireWire) - An IEEE 1394 port (aka FireWire™ or i.LINK) allows you to connect high-speed
digital devices to your computer, such as digital video cameras, external hard disk drives, or scanners.
ExpressCard - This slot allows you to use an ExpressCard/34 or ExpressCard/54 expansion card.
It is not possible to use a PC Card device in an ExpressCard slot.
Display and Audio Ports
DVI Port - Connect to a monitor with a DVI (Digital Video Interface) port. The appropriate cable is usually
included with the monitor.
Many monitors use a 15-pin analogue connection, so you may need to purchase an adapter or a DVIto-Analogue cable.
HDMI (TV-Out) Connection - The HDMI TV-Out port allows you to connect a compatible display device
(such as a high-definition television) with a single, easy-to-use connector.
If you want to use your television's speakers, you must change the audio output or connect the
Line-Out port of your computer to your television (or a speaker system).
Please check your television's documentation and decide what type of cable is needed.
Getting to know your computer -
7
Headphones/Line-Out - Lets you plug in stereo headphones or powered speakers. Plugging in an audio
device disables the built-in speakers.
Microphone - Allows you to connect an external microphone for mono recording or amplification through
the unit. Plugging in an external microphone disables the built-in microphone.
Other Connectors
Memory Card Reader - Memory cards are used to store and transfer data by a wide
selection of digital cameras, PDAs, MP3 players and mobile phones. Your computer
provides a memory card port that can be used with the following memory card
formats: MultiMedia Card™, Memory Stick®, Memory Stick® PRO and SD
(Secure Digital)™ Memory Card.
AC Adapter (DC In) - Lets you attach the computer to an AC power source (see page 13), using the AC
adapter that comes with your system.
Other Features
Latch - Slide this latch to the right to unlatch the LCD panel.
Webcam - The Webcam allows you to send a video signal when using a chat/instant messaging program,
make films or take photos.
Kensington Lock Fixture - This fixture allows you to attach a Kensington security lock or other compatible
lock to protect your computer from theft.
Fan/Ventilation - Allows your system to cool properly and maintain a safe operating environment.
The underside of the computer can become hot after prolonged use. Do not rest the computer on
your lap or on a surface that may block ventilation holes.
Speakers - Provide stereo sound for your multimedia presentations or listening pleasure.
Subwoofer - The computer features a bass speaker to improve sound quality
Main Battery Pack - Your computer uses the rechargeable battery pack while you are away from an AC
power supply (see page 14).
Battery Security Lock / Battery Release Latch - These latches secure the battery in place.
Memory Modules - The internal bay may be accessed to add or replace memory modules.
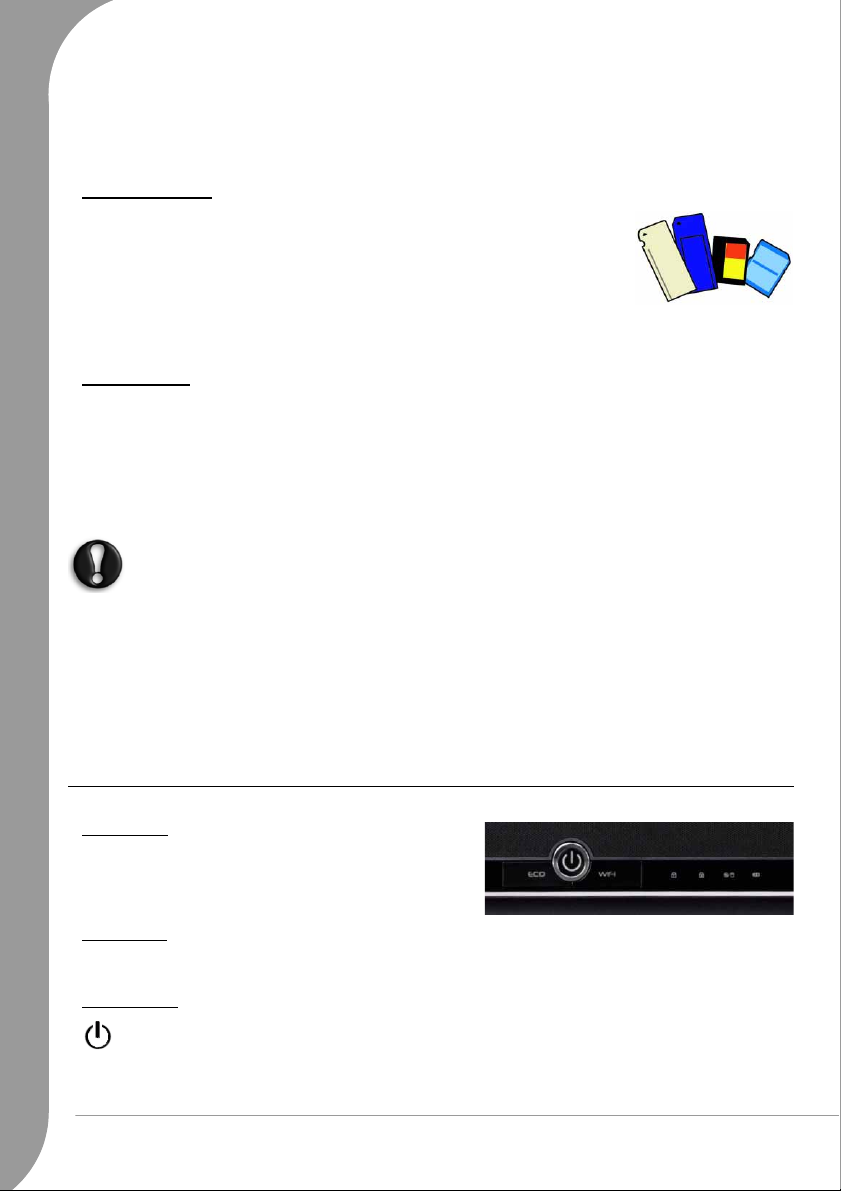
Control Panel
ECO Button
The ECO button sets the computer to 'silent mode'. The
processor speed can be reduced when performing simple
tasks to reduce fan use and increase battery life.
WIFI Button
Toggle the wireless network features of your computer on or off with the WIFI button.
Power Button
Powers on and off the computer. The Power indicator lets you know the power state of the
computer.
•Off - The computer is off or in Hibernate mode.
•On - The computer is on.
8 -
Quick Start & Troubleshooting Guide
If the Power indicator is flashing, the computer is in Sleep mode.
Status Lights
These lights provide disk activity, keyboard status and power status information.
Drive Access Indicator - Indicates when the computer uses the optical drive or hard disk drive.
Battery Charge Indicator - Indicates battery charging status
•Off - The battery is fully charged, no battery is installed or the computer is operating
under battery power.
•Lights red to indicate the battery is charging.
•Blinks red to indicate the battery is low.
Caps Lock Indicator - Lights when Caps Lock mode is active
Num Lock Indicator - Lights when Num Lock mode is active
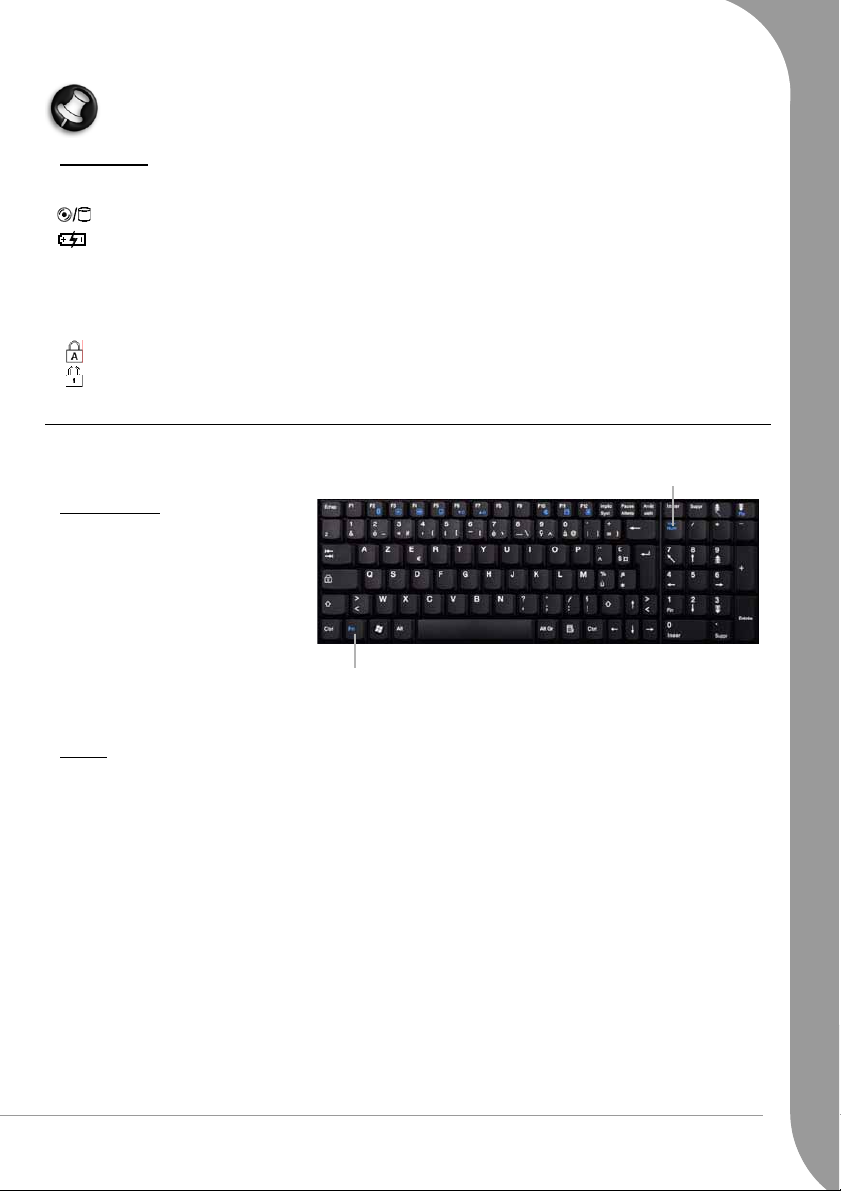
Keyboard Panel
The keyboard panel includes the
following features:
Numlock: Press the [Numlock] key to change
the function of the Numeric Keypad
Function Keys
Twelve function keys, F1 to F12, are
available on the keyboard. These
keys may provide special functions
with some programs and may be
used with the Fn key (below) to
activate hardware functions.
See the specific program's help files
for information about how each function key works within the program
you are using.
Fn: Use simultaneously with the [F1] to [F12] keys to
activate special functions
Fn key
The Fn key is found at the bottom left of the keyboard and activates the functions illustrated with coloured
icons, such as those found on the Function keys.
The following function key combinations are available:
Fn+F2 - This button toggles Bluetooth devices (optional) on or off.
Fn+F3 - Reduces speaker volume.
Fn+F4 - Increases speaker volume.
Fn+F5 - Switches display modes:
•Integrated LCD screen only.
•External display only (any device attached to the video port).
•Both (simultaneous display).
Fn+F6 - Reduces the screen brightness.
Fn+F7 - Increases the screen brightness.
Fn+F10 - Toggles the system beep (battery warning) off and on.
Fn+F11 - Switches the screen on or off.
Fn+F12 - Places the computer into Sleep mode.
Fn+Page Up - Home.
Getting to know your computer -
9
Fn+Page Down - End.
On certain models the wireless and/or Bluetooth icons are shown even if your computer does not
include these features. In this case this key combination has no function.
Numeric Keypad
The keypad lets you type numbers and mathematical operands (+, -) as you would on a
calculator. The keypad is ideal for entering long lists of numbers.
• The Num Lock key toggles between the Numeric and Paragraph mode.
• In Numeric Mode, Number keys insert numbers and the point key (.) will insert a point
when typed in a text editor.
• In Paragraph Mode the keys help you browse through a text or other document. The
numbered keys act like navigational keys.
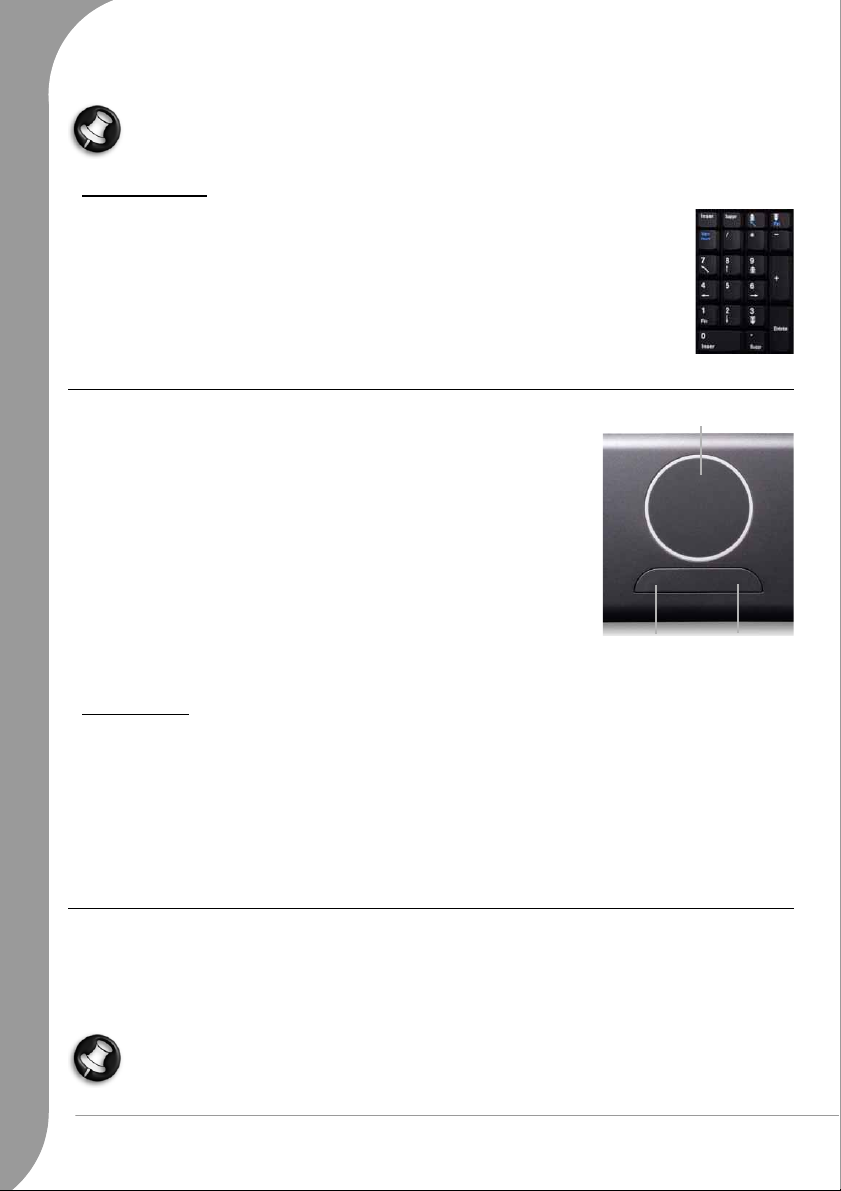
Touchpad
The touchpad is an easy way to control the pointer with your finger. Lightly
glide your finger across the touchpad and the pointer mimics the movement.
When using the touchpad, you can:
• Click on the left button (this is the primary button), or tap once on the
touchpad, equivalent to a single click of a left mouse button.
• Double tap to the touchpad, equivalent to a double click of the primary
mouse button.
• Tap and hold, then drag your finger across the touchpad, equivalent to a
click and drag of the primary mouse button.
• Slide your finger along the right side of the touchpad to scroll through your
document or screen.
Try using the buttons or double-tap features and decide which method you
prefer. If you find the double tap difficult to use, go to the section below for
general directions about adjusting the touchpad properties.
Left Button
Touchpad
Right Button
Touchpad Tips
Follow these basic ergonomic tips while working:
• Use a light touch on the touchpad surface.
• Set up the computer with your keyboard and touchpad at a comfortable height. Keep your forearms parallel to the floor. Your wrists should be relaxed and straight.
• While using the keyboard and touchpad, keep your shoulders and arms as relaxed as possible.
• Take regular breaks from the computer to rest your eyes. Perform stretching exercises to relax your fingers, hands, wrists, forearms and shoulders.
Optical Drive
An
optical disc drive
audio CDs and, if an compatible media player has been installed, watch DVD movies.
Most computers are equipped with a
save information to recordable discs (CD-R, DVD-R and DVD-R9). You may duplicate discs, create your own
music compilations, digital photo albums or keep a safe copy of your valuable data.
The front of the disc tray should feature logos that show which standards are supported by the drive.
Two types of recordable disc exist, '-' or '+', before purchasing discs, please check that the type of
disc is supported by the optical drive.
(ODD) allows you to access files and install programs from an optical disc, listen to
DVD-R9 writer
. If disc recording software has been installed, you may
10 -
Quick Start & Troubleshooting Guide

Optical Drive Front Panel Controls
The front of the optical drive features the following indicators and controls:
A. Disc tray: Provides a surface for loading a disc
into the drive.
B. Drive busy lamp (optional): Lights when the
drive is reading from a disc.
Do not eject the disc or turn off the computer
when the lamp is on.
C. Eject button: Opens the disc tray.
D. Emergency eject hole: Allows the manual ejection of a disc if the eject function is disabled or if your com-
puter has no power. To manually eject the disc, insert the end point of a wire paper clip into the hole and
press inward until the disc tray opens.
ABCD
Precautions
✓ If a program needs a disc, insert the disc into the drive before you start the program.
✓ Do not force a disc into the drive; make sure the disc is correctly inserted, then close the disc tray.
✓ Do not eject the disc without first closing the program that is using the disc. This could potentially
cause your computer to stop responding.
✓ If the tray does not eject, you may try to open it manually.
✓ Keep the disc tray closed whenever you are not using the drive. Do not touch the optical lens in the
drive, if the lens is dirty, the optical drive may not function correctly.
✓ Do not wipe the lens with a normal cloth. Use a cotton swab to gently clean the lens.
✓ The optical drive is classified as a Class 1 laser product.
Before copying a disc, make sure that its content is not protected by Trademarks and Copyrights,
and that you are authorised to replicate it. In most countries you are allowed to make an archival
backup of software or copy music for your own personal use.
Getting to know your computer -
11

COMPUTER BASICS
SAFETY AND COMFORT
Safety Precautions
Please follow the guidelines below to use your computer comfortably and to avoid health problems.
Computer Environment
Make sure that the computer:
✓ is away from direct sunlight and sources of heat;
✓ is away from magnetic fields or any device generating static electricity;
✓ is kept at least 30 centimetres away from a mobile phone;
✓ is not in a dusty or damp environment;
✓ is not placed on a carpet or any other surface that may have an electrical charge.
Cables
✓ Do not cover or place objects on the AC adapter. Keeping the adapter clear of objects allows the adapter
to cool properly during use.
✓ Only use the AC adapter that is supplied with your computer. Although other adapters may look simi-
lar, using them can damage your computer.
Cleaning your Computer
✓ Never spray cleaning product directly on the screen.
✓ If you spill liquid on your computer, switch it off immediately, unplug the AC adapter, remove the bat-
tery and make sure it is completely dry before switching it on again. Wait overnight if necessary.
Health Precautions
✓ If you work or play for hours at a time, then make sure you take regular breaks. Look away from the
computer's screen once in a while. Do not use your computer if you are tired.
✓ Arrange your computer so that you can work in a natural and relaxed position. Place items that you use
frequently within easy reach.
✓ Position your computer directly in front of you for increased safety and comfort. Ensure that your key-
board and touchpad are at a comfortable height. The screen should be about 45-70 cm from your eyes.
✓ If the “warmth” symbol is present on the underside of the computer, this indicates that the
underside surface can become hot. Avoid continuous body contact and do not place the computer on your lap while it is operating.
✓ Some disorders of the hands, wrists, arms, neck, shoulders, legs and back may be associated with, or
aggravated by certain repetitive actions. To reduce your risk of developing these disorders, type with
your wrists straight and your hands and wrists floating above the keyboard. If you experience periods of
pain, tingling, numbness or other discomfort, please contact your doctor.
✓ We advise that parents monitor the use of games by their children. If you or your child experience any of
the following symptoms: dizziness, blurred vision, eye or muscle twitches, loss of consciousness, disorientation, any involuntary movement or convulsion, IMMEDIATELY discontinue use and consult your
doctor. This may happen even if the person has no medical history of epilepsy.
12 -
Quick Start & Troubleshooting Guide

POWER SUPPLY
Your computer requires a constant, stable power source to keep running. If you are at home then the AC
adapter can be connected to a mains socket and used for as long as necessary. On the road, or if you simply
want to avoid trailing wires, your computer's battery can power the computer.
AC Power Adapter
Your computer can use the supplied external power adapter (a power 'brick') to run on AC power. A power
cable is provided that is appropriate for the country where the computer was purchased.
The power adapter provides adequate power to run your computer and recharge the battery pack at the
same time.
Do not cover or place objects on the AC adapter. Keeping the adapter clear of objects allows the
adapter to cool properly during use.
Only use the AC adapter that is supplied with your computer. Although other adapters may look
similar, using them can damage your computer.
The AC adapter and the underside of the computer can become hot after prolonged use. This is nor-
mal, but may cause injury with prolonged contact.
Keep the adapter connected whenever possible. The AC adapter charges the battery when it is connected,
whether the computer is on or off.
(A) AC Adapter
(B) Adapter Cable
(C) Power Cable
The exact form of components may vary
Do not attempt to disassemble the AC adapter. The AC adapter has no user-replaceable or service-
able parts inside. Dangerous voltage in the AC adapter can cause serious personal injury or death.
The AC adapter is intended for use with a computer and must meet EN609050 standards.
Replace the cord if it becomes damaged. The cord must be rated for at least 250VAC at 10 amps,
and must indicate international safety agency approval. The plug must be a type appropriate for the
country where it is used. Check with your local dealer for HAR type 18 AWG, 2 conductor cord, or
better. Obtain replacement cords at an authorised service centre. The replacement must be of the
same type and voltage rating as the original cord.
Connecting the AC Adapter
Connect the AC adapter as follows:
The power port on your computer is indicated by this
symbol:
1. Connect the AC adapter cable to the power port on your
computer.
2. Plug one end of the AC power cable into the AC adapter
and the other end into a properly grounded 120- or 240volt, 50 or 60-Hz wall outlet (the adapter automatically
detects and adjusts to the input voltage).
Computer Basics -
13

Battery Power
While you are away from an AC power supply, your computer uses a rechargeable battery (specifications
depend on the model purchased). The battery pack can be removed (page 15), which allows you to carry
multiple batteries for long journeys, or to replace an aged battery that has lost performance.
Although the battery is fully charged at the factory, transit and shelf time may reduce the initial battery charge. The first time you use your computer, connect the AC power adapter and charge the
battery completely.
Battery Life
Battery life depends on how the computer is used, the battery's capacity and the computer's design. Batteries
will start to perform less effectively with age (50% of maximum battery life when new).
Extending Battery Life
While on the road, it is important to be aware of the simple things you can do to extend the life of the
computer's main battery. Turning down the screen brightness extends battery life (most computers reduce
screen brightness automatically when using battery power). Battery life is best under the following conditions:
• The battery is new and fully charged.
• No peripherals (such as ExpressCards) or options (such as Wireless LAN features) are active or connected
to your computer.
• The computer's hard disk drive, optical drive and processor are idling or under low load.
• Power management features are active.
• Certain battery types require maintenance to avoid a reduction in battery life.
Replacing Batteries
Battery packs can be removed and replaced. Read the precautions on handling the battery (page 14) before
changing the battery.
A small lithium battery (‘CMOS’ battery) in some computers maintains basic configuration information (such
as the time and date). In the event that the battery fails to maintain this information, we recommend that
you contact a qualified technician who may replace this battery.
Handling the Battery
Read the following before handling the computer's battery.
Use the batteries only in the system for which they are designed. Mixing batteries from other computers, batteries from other manufacturers or using a combination of very old and new batteries can
deteriorate battery and equipment performance.
• Turn the computer off after use.
• Clean the battery terminals with a dry cloth if they get dirty.
• When not in use, store the battery in a cool dry area.
• Keep the battery out of the reach of children.
Precautions
To prevent accidental battery ignition, rupture, or explosion, adhere to the following precautions.
There is a danger of explosion if the battery is incorrectly replaced. Replace only with the same or
equivalent type recommended by the manufacturer. Discard used batteries according to the manufacturer's instructions.
To avoid personal injury and property damage, read these battery precautions on handling, charging,
and disposing Li-Ion or NiMH batteries.
14 -
Quick Start & Troubleshooting Guide

Keep the battery away from heat sources including direct sunlight, open fires, microwave ovens and
high-voltage containers. Temperatures over 60ºC may cause damage.
• Do not drop or subject the battery to impacts.
• Do not disassemble the battery.
• Do not solder the battery.
• Do not puncture the battery.
• Do not use a battery that appears damaged or deformed, has any rust on its casing, is discoloured, overheats, or emits a foul odour.
• Keep the battery dry and away from water.
• Keep metal objects away from battery terminals. Metal objects in contact with the terminals can cause a
short circuit and damage.
If the battery leaks
• If the battery leaks onto skin or clothing, wash the area immediately with clean water. Battery fluid can
cause a skin rash and damage fabric.
• If battery fluid gets into eyes, DO NOT rub; rinse with clear water immediately and consult a doctor.
• Take extra precautions to keep a leaking battery away from fire. There is a danger of ignition or explosion.
To prevent accidental battery ignition or explosion, adhere to the following:
•Keep the battery away from extreme heat.
•Keep metal objects away from the battery terminals to prevent a short circuit.
•Make sure the battery is properly installed in the battery bay.
•Read the precautions printed on the battery.
Changing the Battery
Removing the battery
1. Save your files and turn off system power.
2. Close the LCD panel and turn the computer over.
3. Slide the battery security lock (A) in the direction of the
unlock symbol .
4. Slide the battery release latch (B) in the direction of the
unlock symbol and hold firmly.
5. Continue to hold the battery release latch as you slide the
battery (C) out of the system.
Inserting the battery
1. Align the battery pack (C) with the battery bay (D).
2. Slide the battery into the bay until securely locked into
place.
3. Slide the battery security lock (A) towards the lock symbol
to lock the battery in place.
Disposing of the Battery
Batteries contain a mix of chemicals that should be treated with care. Ultimate disposal of the batteries
should be handled according to all national laws and regulations. Do not place used batteries in your regular
waste. Before disposing of the battery, put adhesive tape over the terminals.
Computer Basics -
15

Contact your local waste management officials for information regarding environmentally sound collection,
recycling and disposal of batteries.
CMOS (Complementary Metal Oxide Semiconductor) Battery
This small battery, located on your computer’s mainboard, provides battery backup and prevents BIOS data
loss when other power sources are not connected. The BIOS contains information on the computer's configuration, for example date, time, drives and memory. The CMOS battery charges when your computer is
connected to AC power.
The CMOS battery may discharge completely if the computer remains unused for approximately
two months. If this occurs you may need to enter the BIOS to reset the system date and time - other
settings should be detected automatically.
UPGRADING YOUR COMPUTER
Packard Bell strives to make your computing experience as easy and pleasant as possible. Because your
computing needs may evolve, Packard Bell is here to help you choose the right accessories and make the
most of your computer.
Storage (e.g. External Hard Disk Drive)
Whether you need additional storage space, need to create backups or need removable storage to carry your
data, an external hard disk drive will be a convenient solution to expand your computer. Simply plug it into a
USB port and "drag and drop" to transfer your valuable data in a few seconds. High capacity drives are also
ideal for storing your favourite music, photos and videos - take them with you everywhere you go!
Visit www.packardbell.com to discover our accessories and buy online or locate a store near you!
Convergence
Packard Bell aims at making the most of today's increasingly digital world with products that are ideally
suited to popular and emerging digital activities. Our products integrate the best technologies and allow you
to benefit from the latest advances, such as broadband Internet, Wi-Fi networking and digital media.Our
home entertainment range includes a collection of MP3 players to bring technology and entertainment with
you wherever you go!
Visit www.packardbell.com today and enter the Lounge, where
technology is always stress-free and personally enriching!
Warranty
Packard Bell computers come with a limited warranty. For further peace of mind, optional PB Care packs let
you extend the standard warranty up to three years and upgrade to on-site service for desktops. For information, please visit www.packardbell.com.
If your warranty has expired, or if PB Care packs are not available in your area, don't panic, Packard Bell has
the answer. Packard Bell has appointed Authorised Service Centers to provide you with high quality service!
You will benefit from the service of experienced technicians, trained on your Packard Bell product.
Recycling
You just bought a new computer or a new monitor and wonder what you can do with your old equipment?
Don't just toss it! Packard Bell encourages you to recycle!
16 -
Quick Start & Troubleshooting Guide

Most computer equipment contains hazardous materials, which are best kept out of landfills. Through
recycling, many materials used in computers can be recovered and used again. Many charitable organizations
collect computer equipment, other companies can repair and sell used computers.
FIRST STEPS ON THE NET
Get Connected!
Using the Internet has become natural part of daily computing.
Internet Service Provider
To get connected, you need to register with an Internet Service Provider (ISP), which supplies the physical
connection between your computer and the Internet.
Please refer to the instructions supplied with the installation pack supplied by the ISP. Avoid using several
ISPs.
Connection Types
Depending on your computer model, your location and your communication needs, you have several ways
to connect to the Internet.
DSL
DSL (Digital Subscriber Line) is an "always-on" connection that runs over the phone line. As DSL and phone
do not use the same frequencies, you can use your telephone at the same time you are connected to the
Internet. To be eligible for DSL, you must be located near a phone company's central office (service is
sometimes unavailable in rural areas). Connection speeds vary depending on your location, but DSL
generally provides very fast and reliable Internet connection (download speeds are significantly higher than
upload speeds). As the connection is always-on, it is generally charged at fixed monthly rates.
Cable
A cable connection provides fast and "always-on" Internet service via a cable television line. This service is
generally available in large cities. You can use your telephone and watch cable TV at the same time you are
connected to the Internet. As it is a shared connection, the connection speed can slow down when lots of
people in the same neighbourhood are online.
Network Connections (LAN)
A LAN (Local Area Network) is a group of computers (for example, within an office building or home) that
share a common communications line and resources. When you set up a network, you can share files,
peripheral devices (such as a printer) and an Internet connection. You can set up a LAN using wired technologies (such as Ethernet) or wireless technologies (such as Wi-Fi or Bluetooth).
Wi-Fi
A wireless LAN or WLAN is a wireless local area network, which links of two or more computers without
using wires. Wi-Fi (short for "wireless fidelity") is an increasingly popular type of wireless local area network
(WLAN). Setting up a Wi-Fi network is easy and allows you to share files, peripheral devices and an Internet
connection.
Computer Basics -
17

What are Benefits of a Wireless Network?
Mobility
Wireless LAN systems allow allows you and other user’s of your home network to share access to files and
devices connected to the network, for example a printer or scanner. Further options allow you to share an
Internet connection with other computers in your home.
Installation Speed and Simplicity
Installing a wireless LAN system can be fast and easy and eliminates the need to pull cables through walls
and ceilings.
Components of a Wireless LAN
To set up your Wireless network at home you need to have the following:
Access point (or router)
Access points (routers) are two-way transceivers that broadcast data into the surrounding environment.
Access points act as a mediator between wired and wireless network. Most routers have a built-in DSL
modem that will allow you access to a high speed DSL internet connection. The ISP (internet service
provider) you have chosen often supplies an modem/router with the subscription to their services. Read
carefully the documentation supplied with your access point for detailed setup instructions.
Network Cable (RJ45)
A network cable (also called RJ45) is used to connect the host computer to the access point (see Illustration below); this type of cable is also used to connect peripheral devices to the access point.
Wireless Receiver
This is connected to the computer that you wish to connect to your network, there are different types of
wireless receivers available, the most common are:
1. USB WiFi Receiver or “Dongle”: Plugs into a free USB port on your computer.
2. Wireless PC Card: This card is installed inside your computer in an available expansion slot.
3. Internal Card: This card is installed in portable computers and uses one or more internal aerials.
Diagram of a network using a router
1. Access point/Router
2. PC
3. Modem
4. Printer
5. Notebook
6. PDA
7. Network cables (RJ45)
18 -
Quick Start & Troubleshooting Guide
➎
➍
➌
➐
➐
➊
➐
➏
➋

Surf the Net!
Packard Bell Website
To get you started why not visit our website, www.packardbell.com!
Packard Bell is dedicated to provide you with on-going personalised support. Check out our Support section
to get help tailored to your needs:
✓
My PC Support
cific to your computer!
✓ The
Troubleshooter
not be available in all countries).
✓ Enter keywords in the
✓ Enter the
patches and upgrades for programs and firmware.
✓ Share your experiences with other Packard Bell users and find help in the
can recognize your computer serial number and instantly give you all information spe-
can help you find solutions in case you have a problem with your computer (may
Search
box and find all the support articles related to your search!
Downloads
area to search for and download driver updates for your computer, as well as
User Forum
.
✓ You can also search for product information by range or category, read about your warranty and find
contact information.
To learn more about the latest technologies offered by Packard Bell, check out our
Shopping
the
www.packardbell.com is your gateway to a world of online activities and services: visit us regularly for the
latest information and downloads!
section, you can locate a store near you, or see the latest Packard Bell products!
Product Showroom
. In
Computer Basics -
19

HELPDESK
YOUR OPERATING SYSTEM
FreeDOS Operating System
Your system has been supplied without any software and is pre-installed with the FreeDOS* operating
system. Please note that certain hardware devices (modem, video card, etc.) and many common applications
will not run or may not run properly using FreeDOS. In order to use these devices and applications you will
need to install the appropriate operating system** and hardware device drivers.
Please see your retailer or chosen operating system provider for more information. Please also visit
www.packardbell.com and www.freedos.org.
*Note: FreeDOS is offered "AS IS". Packard Bell does not provide support for the FreeDOS operating system. You can
find support for FreeDOS at www.freedos.org
**Note: Packard Bell does not provide support for user installed operating systems. We recommend that you consult
the operating system creator for support.
SAFE COMPUTING
To make the most of your new computer and ensure it runs smoothly for a long time, you should use the
recommended programs* below and regularly perform the actions described in this guide.
*These programs are not supplied with your computer and are referenced here for recommendation purposes only.
Please see your retailer for more information.
Security
Protect your Computer against Viruses
What is a Virus?
Malicious software, typically called "viruses", are programs designed to infect and damage computers. Most
viruses are transmitted over the Internet, e-mails or malicious Websites. A typical virus will replicate and pass
itself undetected to multiple computers. Other forms of nuisance, such as Trojan horses, worms or spam can
infect your computer in various ways, using up resources or clogging up a network.
Run an Antivirus Program
The antivirus checks your computer for viruses, including files that you download from the Internet and will
quarantine or delete any suspicious file. As new viruses appear every day, make sure you keep this program
updated at least once a week. Even if your computer is not connected to the Internet an antivirus program
can be useful as a virus could be transmitted via pirated software, removable disks or over a local network.
Please note that most antivirus programs require a subscription after an “evaluation period”. We
strongly recommend that you subscribe to such programs in order to get antivirus updates after this
limited period.
What to Do if I Find a Virus?
If your antivirus has identified viruses, it will display instructions to remove them safely from your system. If
a virus is found on a file before it is opened, simply delete the infected file.
• If the virus has overwritten some files, you need to delete these files.
• Notify everyone in your address book or anyone you may have shared files with.
• If the virus is in the memory of your system, you may need to perform a recovery.
20 -
Quick Start & Troubleshooting Guide

Packard Bell guarantees that your computer was 100% virus free at the time of purchase and does
not cover damages due to viruses.
Tips to Avoid Viruses
Download from trusted Websites: If you download a file from a Website, make sure it is from a legitimate
and reputable source. If you are uncertain, you can download the suspicious file on a removable disk and
then scan it for viruses.
Beware of e-mail attachments:
• Do not open any attachment if you do not know the sender or are unsure about it. Even if the e-mail
comes from a trusted source, always exercise extreme caution with file attachments.
• Save the attached files on your computer instead of opening them directly from your mailbox.
• Never download or execute a file attached to the e-mail. Always scan the files for viruses before opening
them.
• Never open attachments with double file extensions (i.e. "picture.bmp.exe" or "list.txt.vbs" and containing
file extensions such as ".vbs", ".shs", or ".pif"). These extensions are used by some programs, but rarely in
documents attached to e-mail (if so, chances are that they host viruses).
• Do not trust the icons of the attached files. A familiar icon can in fact be a disguised malicious file (make
sure you check the extension).
Delete junk e-mails
chain e-mail, then check one of the many Websites posting updated information on hoaxes. Do not open
attachments in unsolicited commercial e-mails, and do not click on hyperlinks contained in these advertisements.
Close the preview panel of your Inbox: This will prevent suspicious e-mails from displaying automatically.
Some specific types of viruses ("worms") can be concealed in the text of an e-mail. This means they can infect
your computer if they are automatically previewed.
Make regular backups: If you make regular copies of your personal files on CDs or DVDs and store them in a
safe place, you won't lose any valuable data in the event that a destructive virus infects your computer.
: Do not forward any chain e-mail! If you are unsure about a virus warning contained in a
Secure your Internet Connection
What is a Personal Firewall?
A personal firewall is a software program designed to prevent unauthorised access to or from a private
network. It acts as a shield to protect your Internet connection from unwanted connections, some of which
may attempt to take control of your computer to install or re-distribute viruses or malicious programs. Each
connection to your computer is monitored - programs that attempt to receive information without your
permission are detected and the firewall will display an alert. You can then decide if you will allow the
connection, if the connection is to a program you are currently using then normally you would allow it (i.e. a
game connecting to a multi-player server or an encyclopaedia making a content update).
Use a Personal Firewall
There are a wide variety of firewalls available, you can buy them from computer stores or download them
from the Internet.
Prevent Spyware Infections
What is Spyware?
Spyware refers to generally unwanted programs that are downloaded onto your computer while connected
to the Internet, often without you knowing it. Once it has infected your computer, it can snoop on your
browsing activity, collect personal information, cause pop-up ads to appear, or even change the configuration
of your computer. Spyware consumes resources on your computer; it can slow down your Internet
connection or entire computer system, and even cause crashes.
Helpdesk -
21

Spyware is sometimes used by unscrupulous companies to monitor and track the sites you visit on the
Internet so as to determine your web-surfing habits and display targeted pop-up ads on your screen.
However, some kinds of spyware go beyond simple tracking and actually monitor keystrokes and capture
passwords and other functions which pose a definite security risk.
Download and Run anti-spy Tools
Traditional antivirus programs and firewalls do not offer protection from such deceptive or unwanted
software; you will need to download special software to remove it from your computer.
You can download efficient anti-spy tools for free from many sources. These programs will help you detect
and remove spyware applications, thus protecting your privacy and ensuring your computer runs smoothly.
Be careful! Some malicious programs claim to stop spyware, but they are actually installing on your computer
and will prevent real anti-spyware programs from operating correctly in the future.
Like antivirus software, make sure you regularly run and update the program to keep your computer free of
spyware.
How Do I Know when my Computer Is at Risk?
If your computer behaves erratically, crashes unexpectedly or if some of your programs do not work
correctly, your computer may be infected by malicious software. However, do not assume that every
computer problem is caused by a virus! If you suspect your computer is infected, the first thing to do is
update -if you have not already done so, and run your antivirus and anti-spyware software.
DIAGNOSE & REPAIR
We all experience problems with our computer from time to time so do not panic! Before calling us, please
read the following. This troubleshooting guide will help you diagnose and solve some common problems.
Please note that the solutions proposed in the cases below may not be limited to that specific case and may
be used to solve other computer issues.
Check the latest fixes on www.packardbell.com.
Our online Troubleshooter can help you find
solutions in a few clicks!
Top Troubleshooting Cases
Have a look at the "symptoms" described below, see if they match the problem you encounter with your
computer and follow the steps to fix the issue. Also remember to read our recommendations in the previous
chapter ("Safe Computing", page 20) to get the most of your computer and prevent problems in the future.
✓ Nothing Displays on the Screen (page 23)
✓ The Screen Displays Applications, but They Crash or Run Erratically (page 24)
22 -
Quick Start & Troubleshooting Guide

Nothing Displays on the Screen
✓ Make sure that you have switched on both your computer and any external monitor.
✓ A screen saver may be active.
1. Strike any key to reactivate the display.
Always connect your monitor to the graphics card, if present. If one video port does not work, then
please try the other. The number of items available will depend on your computer’s configuration.
✓ Test the power socket:
1. Plug any other electrical device on the wall socket and check if it works.
2. If it does not, your wall socket is probably faulty.
✓ Test the power cord and adapter:
1. Attach the power cord and adapter to your computer.
2. Check if a power or battery LED on the computer is lit.
3. If not, then the power cable or adapter may be faulty.
✓ Try to reset your computer:
1. Unplug the computer's power cord from the wall socket, remove the main battery from the computer and press the power button for at least ten seconds.
2. Then release it, connect the power cord again and press the power button to turn on your computer.
Before you connect or disconnect the power cord to the back of the computer, please ensure that
the power plug is disconnected from the wall outlet.
✓ Check the main battery:
1. Check that the battery is correctly inserted.
2. Check that the battery is sufficiently charged.
3. Connect the AC adapter and attempt to start the notebook.
✓ Disconnect or remove additional devices:
A faulty device or main battery can in some situations prevent the computer from starting.
✓ Removing additional external devices (such as a printer, a scanner, a modem, etc.)
1. Disconnect all external devices from your computer.
2. Try to restart your computer and check that it works OK.
✓ Removing the battery on a notebook
1. Remove the battery. Usually, you just have to unlock it at the bottom of the base and pull it out.
2. Leave the AC power adaptor plugged to both your computer and the wall socket.
3. Try to switch your computer on and wait for at least 15 minutes.
4. Check if the power adapter gets warm.
✓ Removing additional internal hardware (such as additional memory, a network card, etc.)
1. Remove any additional internal device you have installed. Note that if a third party installed a device,
we advise you to refer to them to remove the device.
2. Try to restart your computer and check that it works OK.
Helpdesk -
23

Depending on your warranty conditions, you might not be allowed to open the chassis by yourself. Please
refer to the Limited Warranty section (page 28) before proceeding.
If you are sure you want to proceed, please first touch the ground to prevent electrostatic damages and
unplug the power cord and remove the main battery before opening the chassis.
The Screen Displays Applications, but They Crash or Run Erratically
When your programs run erratically, there are good chances that your operating system may not be functioning correctly. Please also check the recommendations on the previous case if the steps below do not help
solve your problem.
✓ Does this happen with only one application?
If you notice that a specific program does not work correctly, try uninstalling and reinstalling it.
✓ Are there updates available for the erratic application(s)?
If you do not notice improvement after reinstalling your program, please check the software editor's
Website for updates.
✓ Is your computer up-to-date?
Malicious programs such as virus and spyware can infect your computer and cause some of your programs
to malfunction. To fix this problem and avoid it in the future, make sure you run antivirus and anti-spyware
regularly and get the latest updates.
Miscellaneous Troubleshooting
Keyboard & Mouse/Touchpad
My Keyboard Does Not Work
1. The Numeric pad is disabled
When the Num Lock key is active, the Numeric pad can be used to enter numbers, like the keyboard of a
calculator. When the [Num Lock] key is not activated the keypad either functions as a second set of cursor
keys (on "full-sized" keyboards), or they revert to normal letter keys (on certain compact keyboards).
On some computers, the Num lock icon is shown in the Notification Area or a LED on the keyboard
indicates that it is enabled.
Display
The Display Is Not Centred or Gets Wavy
1. The image is smaller or larger than the screen surface.
a.Adjust the monitor display, image size and/or position with the screen controls.
b.If you have an LCD screen, use its optimal resolution. LCD screens are designed to use a specific res-
olution. Changing this resolution may cause the display to grow beyond or shrink away from the
edges of the screen. (See your monitor documentation).
2. I see thin lines scrolling down the screen, flickering images or wavy displays.
a.Interference from other appliances or magnetic sources may cause irregular images on your screen.
b.Switch your computer off and restart it. This should automatically adjust your display.
24 -
Quick Start & Troubleshooting Guide

The magnitude of interference, noise or distortion depends on your screen's
proximity to sources such as TV sets, mobile phones, other monitors, refrigerators, large stereo speakers, power adapters, halogen lighting with built-in
power supply or motor driven appliances. Faulty fluorescent light assemblies
or the proximity to high voltage lines can also cause distorted images. Place
your computer as far as possible from these sources.
If there is no source interference, or removing the source of interference
does not alleviate the symptoms, please refer to your monitor documentation to perform a series of screen adjustments (image size and position,
refresh rate, degauss, etc.). Certain adjustments may not be available,
depending on the display technology used.
Sound
Upon Startup, My Computer Emits a Continuous Beeping Sound
1. There is a keyboard or mouse/touchpad detection failure.
2. There is a stuck key on the keyboard or a stuck button on the mouse:
a.Switch your computer OFF.
b.Press all the keys of your keyboard to ensure that no key is stuck.
c.Tap the mouse buttons to ensure that none of them are stuck.
d.Switch your computer ON again.
My Computer Has no Sound
1. The speaker volume may be set too low.
Adjust the volume controls (either on your speakers, keyboard, or on the computer).
2. Your speakers may not be connected properly (only applies to external speakers).
a.Check all the speaker cables to ensure that they are connected properly.
b.If your speakers are equipped with a power adapter, make sure that it is plugged into a power source
(wall outlet or back of your monitor) and that the speaker power is on.
3. The operating system’s main volume control needs adjusting. (See your operating system’s documentation for more information).
4. Your computer's volume control settings needs adjusting.
5. Your sound hardware does not work properly.
a.Check that your sound card’s drivers* have been installed and that it is correctly configured.
*Please see your retailer or visit www.packardbell.com for more information on installing drivers
for your computer’s hardware.
Internet
In order to get the best possible Internet connection, ensure that you:
✓ Always connect to a grounded power socket;
✓ Connect your modem directly to the phone socket;
✓ Avoid using telephone extension cables (this degrades the signal quality).
✓ In thunderstorm conditions, make sure that you disconnect your modem from the telephone line and
pull out the power cord from the power outlet.
Helpdesk -
25

You Cannot Connect to the Internet
1. Check that your modem’s drivers* have been installed and that it is correctly configured.
*Please see your retailer or use an alternative Internet access to visit www.packardbell.com for more
information on installing drivers for your computer’s hardware.
2. Your account details have not been released yet.
a.After you have just performed your online subscription with an Internet Service Provider (ISP), it is
recommended that you restart your computer to complete the Internet setup process.
b.The first time you use your Internet connection, your account may not be accepted immediately.
Certain ISPs require a short setup period to process your account details. Please wait 30 minutes
before you try to connect to their services again.
3. You entered an incorrect user name and/or password.
a.Check your user ID and password. Re-type them if necessary.
b.Check exact spelling (upper and lower case, or any punctuation).
c.Check the login and setup information given to you by your ISP
4. The server you are trying to connect to is out of order.
Check with your ISP whether the service is available.
5. Your Internet settings (browser, e-mail, or connection) may have been changed.
When you subscribe, your ISP usually provides connection details (user name, password, server phone
number, e-mail address, etc.). Check these details and restore your Internet settings, following the
procedure given by your ISP.
6. Your account with your Internet Service Provider has been terminated or your ISP server is unavailable.
Contact your ISP and check the access conditions to their Internet server.
7. You have moved and your dialling location has changed.
You are using a DSL or cable connection
1. Your DSL connection has not been activated.
Your ISP must contact your local telephone operator to activate DSL access on your line. This may take
several weeks. To enquire about your connection, please contact your ISP.
2. Your DSL modem is not picking up the line.
a.Check all cable connections (e.g., plugs, sockets, filters).
b.Disconnect your modem and plug in a telephone to check the integrity of your telephone line. If you
can hear a normal dialling tone on the phone, then your modem or cable may be defective.
3. Your modem is defective.
Check the status lights on your modem and refer to manufacturer's documentation. If the problem persists
and the connection has been previously working, then contact your ISP.
You Cannot Send or Receive E-mails
1. You are not connected.
To send and receive e-mails, you need to be connected to the Internet.
2. Your ISP or that of your recipient is having technical difficulties.
Try again later or check with your ISP whether the service is available.
3. Using several ISPs or e-mail accounts can cause problems.
Check that you have selected the correct ISP for the account you are attempting to use.
4. Your Internet account settings may have been changed.
a.Disconnect from the Internet.
b.Check your connection details (username, password, server phone number, e-mail address, etc.) and
restore your Internet settings, following the procedure given by your ISP.
26 -
Quick Start & Troubleshooting Guide

5. You have sent a message but get an error message in reply.
a.Check the spelling of your recipient's e-mail address.
b.Check with your recipient that the e-mail address is still valid.
Printer
The guidelines below cover the most common types of problems encountered with printers. Please read
your printer's manual for specific instructions. Should you need further assistance, please contact the manufacturer of your printer.
My Printer Does not Work
1. The printer is OFF: Switch the printer ON.
2. The printer is OFF Line: Press the printer's on line button.
3. The printer is out of paper: Add paper.
4. The paper is jammed: See your printer's user's guide for information about clearing paper jams.
5. The printer has generated an error message: See your printer's manual for information about resolving
error messages.
6. The printer is not connected properly:
a.Check that the cables are securely connected to the printer and computer.
b.Use a grounded AC power outlet (or power strip). Remember to shut down your computer and
printer before disconnecting or reconnecting any cables (even if your printer uses a USB connection).
7. No power is supplied to the printer.
a.Plug the printer into a different wall socket.
b.Restart the computer and printer again and try printing to determine if the previous socket was
faulty.
8. The printer cable is damaged: if you have another printer cable, try using it to determine if your printer
cable is faulty.
9. Your printer is not installed correctly in your operating system: Try reinstalling your printer. See your
printer's manual for information about installing the printer.
Adding Software
In the event you encounter a problem with a new program or hardware, please check the supplied documentation as well as the manufacturer's Website. For support, please contact the manufacturer's hotline.
Packard Bell cannot be held responsible for any damage caused by adding hardware or software.
Software
Additional Software
Before purchasing new programs, check that they can run on your computer. Each software program has
system requirements, such as the amount of memory or hard drive space needed to run. These
requirements can usually be found printed on the software box.
For a quick overview of your computer's
specifications, please read the dedicated
sticker on your computer's packaging.
Check your operating system’s documentation for more details.
Helpdesk -
27

PACKARD BELL LIMITED WARRANTY
1. DEFINITIONS
− "Packard Bell" shall mean: Packard Bell B.V., Nieuweweg 279, 6603 BN, Wijchen, The Netherlands or its authorised representative.
− "Customer" or "You" shall mean the end-user or the purchaser of the Packard Bell product.
− "Product" shall mean Packard Bell branded hardware - desktop or notebook, including peripherals or consuma-
ble items (such as notebook battery) - or software, which are delivered with the Product in the factory packaging.
− "Peripheral" shall mean any hardware device other than processor or memory, connected to the computer (optical drive, hard disk, keyboard, monitor, mouse, speakers, printer, scanner, etc.).
− "Consumable" shall mean any supplementary item delivered with the product, to be used with the Product (a
Lithium-ion battery, earphones, cables, remote control, etc.).
− "Software" shall mean a Software program that is pre-installed on the Product or delivered with the Product in
the factory packaging.
− "Warranty" shall mean the warranty applicable by law in the country of purchase of the Product or the contractual warranty You are entitled to as a result of the purchase of the Product.
− "Warranty Period" shall mean the period during which you are entitled to the application of the Warranty on
the Product. The Warranty Period starts from the date of purchase or delivery of the Product.
− "Authorised Service Agent" shall mean the authorised service provider.
− "Service & Support" shall mean the technical assistance and service provided by the Authorised Service Agent.
2. H
OW TO ACTIVATE THE PACKARD BELL WARRANTY
Packard Bell understands your needs for product excellence as well as Service & Support.
In order to supply the best Service & Support when necessary, Packard Bell recommends that You activate the appli-
cable Warranty as soon as Your Product is installed.
This Warranty is subject to the registration of the Product. The Customer will provide Packard Bell with the correct
date of purchase in order to obtain the Warranty Period. In case of doubt, the Customer will provide Packard Bell
with a copy of the proof of purchase (invoice or delivery note).
Packard Bell will keep a record of all registrations of personal data in order to provide appropriate Service & Support
and adequate assistance to You during the Warranty Period. Packard Bell will protect this personal data to its best
effort and may transfer this personal data to third party in order to ensure Service & Support is carried out. You may
refuse transfer of personal data, have access to and/or modify your personal data by sending a letter to Packard Bell’s
address in the Country of purchase on the Warranty & Service Sheet. Packard Bell will handle all personal data
according to the applicable data protection laws.
ARRANTY COVERAGE AND WARRANTY PERIOD
3. W
Packard Bell warrants that the Product and the Software are free from defect in material and workmanship for the
Warranty Period set out below. Packard Bell guarantees that the Product is free of viruses (or other pre-programmed
devices with similar effect) at the moment of first use only.
The Warranty Period for the computer and peripherals, consumable items, notebook batteries and software (if
included) is defined by the dealer of your computer, unless a separate Warranty & Service sheet is provided with your
computer.
This warranty is limited to the replacement of the Product or part recognised as defective with an identical or comparable Product or part, new or equivalent to new. This warranty covers the repair, parts and labour included or
exchange, as set out below, during the Warranty Period.
Any items missing from the original packaging of the Product must be reported to Service & Support within 90 days
from the date of purchase. No missing items can be provided free of charge after this period as the Customer is considered to have accepted the Product as delivered. To report any missing items please contact the dealer of your
computer.
Software Warranty only applies to Software that was originally supplied with the Product. It does not provide the
Customer with Software usage support. Any other Software (e.g. games) is subject to the third party licence and
warranty conditions.
Whenever this is reasonable and at the sole discretion of Packard Bell or when this is mandatory by national consumer
legislation of the Country, Packard Bell may limit or extend the Warranty Period on the Product.
28 -
Quick Start & Troubleshooting Guide

If the Customer requests Service & Support in another country than the Country and/or when the Warranty period
on the Product is finished, Service & Support will be invoiced to the Consumer.
Specifically for batteries:
Disposable batteries that may be included with the Product are not covered by any warranty. Any charging time or
battery life otherwise indicated merely corresponds to indicative timeframes which may vary depending on EndUser’s use and provided the End-User respects Packard Bell advice to optimise the battery life time.
Specifically for Liquid Crystal Display (“LCD”) screens:
Packard Bell strives to provide the highest quality LCD display products in the industry. Your Product meets the Class
2 specifications under the ISO 13406-2 industry guidelines for LCD monitors.
LCD screens use pixels to display information. A pixel is a combination of three sub-pixels (red, green and blue) that
produce a specific colour. There are millions of these sub-pixels on each LCD screen. Pixel faults on LCD screens can
be comprised of whole pixels or sub-pixels going dark, staying permanently lit or flashing.
The ISO 13406-2 standard allows for a certain number of pixel faults based on the number of total pixels in the
monitor (determined by the screen size). Packard Bell will replace an LCD screen during the Warranty Period if it
meets the following criteria:
Native LCD
Resolution
800 x 480 384 000 2 3 4 1 1
1024 x 768 786 432 2 2 4 1 2
1200 x 800 1 024 000 2 2 4 1 2
1280 x 1024 1 310 720 3 3 7 1 3
Type 1: A full pixel is always visible on the screen, resulting in a white point.
Type 2: A full pixel does never illuminate at all, resulting in a dark point.
Type 3: One or two sub-pixels are always switched on or switched off, resulting in a pixel of one of the basic colours
(red, green, blue, cyan, magenta, yellow). Or a continuously blinking pixel occurs.
Faulty Cluster 1: Within a field of 5x5 pixels there are several malfunctions of Type 1 or Type 2.
Faulty Cluster 2: Within a field of 5x5 pixels there are several malfunctions of Type 3. Whenever this is reasonable
and at the sole discretion of Packard Bell or when this is mandatory by national consumer legislation of the Country,
Packard Bell may limit or extend the Warranty Period on the Product.
If a separate Warranty & Service sheet defines a different pixel policy, then this overrules the pixel policy described
in this Limited Warranty.
ARRANTY EXCLUSIONS
4. W
This Warranty does not apply when:
− Defective accessories, consumable items and/or peripherals have not been delivered in the factory packaging of
the Product or have been purchased separately from the Product;
− Problems are caused by hardware or software which have not been delivered in the factory packaging of the
Product;
− The original identification marks have been altered or removed from the Product;
− Defects or failures are due to accident, neglect or misuse, failure of or defect in electrical power, external elec-
trical circuitry, unusual physical or electrical stress, air conditioning or environmental controls, the effects of
weather influences; the use of items not provided by Packard Bell;
− Defects are caused by a virus or another pre-programmed device with similar effect;
− The Customer has forgotten, lost or removed any password (including BIOS password) which provides him from
having access to the Product;
− The Customer, any third party to Packard Bell or any third party to its authorised service provider has modified,
adjusted, repaired, serviced or installed the Product;
− The use or installation of the Product is not in compliance with Packard Bell’s documentation;
Number of
pixels
Type 1 Type 2 Type 3 Faulty Cluster 1 Faulty Cluster 2
Bright Dark Subpixel
Cluster of errors type 1
or 2 in 5X5 pixels
Cluster of errors type 3
in 5X5 pixels
Packard Bell Limited Warranty -
29

− The Product defect is due to any reason which in Packard Bell’s sole discretion is not a result of a defect in material or workmanship;
− The Customer has not followed all procedures set out in this Limited Warranty.
5. L
IMITATION OF LIABILITY
This Warranty replaces all other warranties, whether express or implied, including but not limited to implied warranty
of merchantability and fitness for a particular purpose with respect to the Product and its documentation.
Packard Bell’s liability hereunder is limited to the repair of the Product or the replacement thereof. In particular,
Packard Bell shall not be liable to replace or repair the Product if the Warranty is not applicable due to the reasons
set out in section 4.
In any event, Packard Bell shall in no circumstances be liable for any other costs, charges, expenses, loss or damage
of any nature whatsoever: direct or indirect, consequential or incidental, including but not limited to loss of business
profits or any other commercial damages, loss of data, arising out of the use of the Product or of the presence of a
virus (or pre-programmed device with a similar effect) on the Product or of the Service & Support intervention.
Save with regard to death or personal injury caused by the negligence of Packard Bell, its employees or service
provider, and strict product liability, this limited liability represents Packard Bell's entire liability with respect to the
Product and with respect to goods or services supplied herein and Packard Bell shall have no other obligation, duty,
or liability whatsoever in contract, tort (including liability for negligence) or otherwise to the Customer.
However, this limitation of liability does not in any way affect or limit the Customer's statutory rights under the
national legislation governing the sale of consumer goods in the Country.
Packard Bell shall not be liable for any failure or delay in performance due to any cause beyond its control. Such
circumstances include, but are not limited to, interrupted telephone service, airport closures that interrupt parts
delivery, acts of god, weather conditions, labour strikes, and the inability to contact You to confirm scheduling.
ARRANTY UPGRADES
6. W
Depending on the Country of purchase of the Product, it may be possible to purchase Extended Warranty. Please
contact the store where You purchased Your Product for more details. If You have purchased such an Extended
Warranty, the general conditions applicable to this Extended Warranty will prevail over this Warranty.
7. D
ATA BACKUP REQUIREMENT
Repair of Product may involve the re-formatting of the Hard Disk Drive ("HDD") and consequently the loss of data
stored on the HDD.
Packard Bell strongly advises the making of regular backup copies on various media (floppy disk, CDs, etc.) of any documents, data, files and/or software stored on their Product. You will be responsible for backing up data stored in the
Product prior to contacting Packard Bell Customer Contact Center and receiving Service & Support from Packard Bell.
Packard Bell and its authorised service providers are not liable for data that is lost or damaged during the Service &
Support process.
8. H
OW TO OBTAIN PACKARD BELL WARRANTY SERVICE & SUPPORT
In the unlikely event of a Product incident, Packard Bell recommends that You perform a rapid technical investigation
to find the problem with the user documentation supplied to You with the Product.
Should the problem persist, You should contact the relevant Packard Bell Authorised Service Agent. Have the
following information available:
− The serial number of the Product, which can be found on the back of your computer’s base unit (desktop) and
is preceded by S/N. On notebooks it is printed on the bottom. This serial number is essential for providing the
necessary service and MUST therefore be included in all correspondence with Packard Bell.
− The original proof of purchase of the Product;
− The operating system installed on this Product;
− Details of any software or hardware modifications made to the Product;
− Assure that the problem is not caused by third party hardware or software;
− Exact description of all failure messages;
− If contact is made by phone, You should be in front of Your Product and this is turned on (if possible).
If your computer requires a service intervention we recommend that you do the following:
− You make a backup copy of the data stored on Your Product;
− Remove all non-Packard Bell software or hardware components from the Product;
30 -
Quick Start & Troubleshooting Guide

Packard Bell reserves the right to charge parts and labour if Packard Bell discovers no defect or problem in the
Product, if the Customer has not complied with one of the conditions set out in this section or if the defect is a
customer induced defect (for example if the defect is caused by neglect or misuse).
9. S
ERVICE & SUPPORT INTERVENTION
The Authorised Service Agent will decide if any intervention is necessary and inform you of the relevant service procedure. Contact your retailer for more information.
10. T
RANSFER OF WARRANTY
In case of change of ownership of the Product, this Warranty is transferable with the Product.
Important: The new end-user will be entitled to the application of the remainder of the Warranty Period on the
Product transferred under two cumulative conditions:
− The new end-user must be in possession of the original proof of purchase of the Product, and,
− Details on the Product’s change of ownership must be sent to the Authorised Service Agent.
Packard Bell Limited Warranty -
31

REGULATORY INFORMATION
EUROPEAN NOTICE
Products with the CE marking comply with both the Electromagnetic Compatibility Directive (89/336/EEC) and the
Low Voltage Directive (73/23/EEC) - modified by the Directive 93/68/EEC - issued by the Council of the European
Communities.
Compliance with these directives implies conformity to the following European Standards:
EN55022 (1998): Radio disturbance characteristics
EN55024 (1998+A1:2001): Immunity characteristics
EN61000-3-2 (2000): Limitation of harmonic current emissions
EN61000-3-3 (1995+A1:2001): Limitation of voltage fluctuation and flicker in low-voltage supply system
EN60950-1 (2001): Product Safety. If your computer includes a telecommunication network board, the input/output
socket is classified as Telecommunication Network Voltage (TNV-3).
Note for computers equipped with wireless controllers and modems:
Hereby, Packard Bell B.V., declares that the wireless devices provided with this computer include a low power radio
transmitter in full compliance with the essential requirements and other relevant provisions of Directive 1999/05/
EC for Low Voltage, EMC and RF of the R&TTE.
P
RODUCT DISPOSAL
The Waste Electrical and Electronic Equipment (WEEE) Directive requires that used electrical and electronic products must be disposed of separately from normal household waste in order to promote reuse,
recycling, other forms of recovery and to reduce the quantity of waste to be eliminated with a view to
reducing landfill. This concerns your computer and all its accessories, such as a keyboard, mouse,
remote control, speakers, etc. When you dispose of such products, please follow the guidance of your
municipal authority and/or ask your retailer when purchasing a new product.
Battery Disposal (when applicable)
Ultimate disposal of the batteries should be handled according to all national laws and regulations. Do not place used
batteries in your regular waste: the incineration, landfilling or mixing of batteries with the municipal solid waste
stream is prohibited by law in most countries. Contact your local waste management officials for other information
regarding the environmentally sound collection, recycling, and disposal of the batteries.
CAUTION: RISK OF EXPLOSION IF BATTERY IS REPLACED BY AN INCORRECT TYPE. DISPOSE OF USED
BATTERIES ACCORDING TO THE INSTRUCTIONS.
M
ODIFICATIONS TO THE PRODUCT
CE Marking
Packard Bell B.V. cannot be held responsible for unauthorised modifications made by the user and the consequences
thereof, which may alter the conformity of the product with the CE Marking.
Radio Frequency Interference
The manufacturer is not responsible for any radio or TV interference caused by unauthorised modifications to this
equipment.
C
ONNECTIONS AND REMOTE EARTHS
PELV (Protected Extra Low Voltage)
To ensure the extra-low voltage integrity of the equipment, only connect equipment with mains-protected electricallycompatible circuits to the external ports.
SELV (Safety Extra Low Voltage)
Every input and output of this product is classified as Safety Extra Low Voltage.
Remote Earths
To prevent electrical shock, connect all local (individual office) computers and computer support equipment to the
same electrical circuit of the building wiring. If you are unsure, check the building wiring to avoid remote earth conditions.
32 -
Quick Start & Troubleshooting Guide

Building Supply
Only connect the equipment to a building supply that is in accordance with current wiring regulations in your
country. In the U.K., these are the IEE regulations.
BABT’s Apparatus Approval
This equipment complies with BABT’s Apparatus Approval No. NS/G/1234/J/100003 with regard to indirect
Connection to the BT Public Switched Telephone Network. Refer to OFTEL statement SA29 for further information.
P
OWER SUPPLY AND CABLES
Power Supply
The power supply socket-inlet and socket-outlet (if equipped) are classified as Hazardous Voltage.
You must unplug the power supply cord to disconnect the equipment from the power supply (and remove the battery
if you are using a notebook). In that aim, the socket-outlet should be installed near to the equipment and should be
easily accessible.
In the European countries, before plugging the power cord into an AC outlet, check that the voltage selector switch
of the computer's power supply (if available) is in the position "230 V". In the U.S.A. and Canada, before plugging the
power cord into an AC outlet, check that the voltage selector switch of the computer's power supply (if available) is
in the position "115 V".
Under no circumstances should the user attempt to disassemble the power supply. The power supply has no userreplaceable parts. Inside the power supply are hazardous voltages that can cause serious personal injury.
A defective power supply must be returned to your dealer.
Power Cables
This equipment requires either a 3-wire (grounded) or 2-wire (ungrounded) power cord. The cord length must not
exceed 2.5 metres. To prevent electrical hazards, do not remove or disable the ground contact on the power cord.
Replace the power cord if it gets damaged. Contact your dealer for an exact replacement. In Europe, the plug must
be rated for 250 VAC, 10 amp minimum. In the U.S.A. and Canada, the plug must be rated for 125 VAC, 10 amp
minimum. The plug must display an international agency approval marking. The cord must be suitable for use in the
end-user country. Consult your dealer or the local electrical authorities if you are unsure of the type of power cord to
use in your country.
Cables
The EMC performance of the system is guaranteed only if the cable and interface use efficient shielding.
The use of shielded interface cable is required for USB, IEEE1394, serial, printer, game, analogue or digital audio/
video, Ethernet LAN, PS2, TV or FM antennas, and generally all high speeds cables’ interfaces.
Use only UL Listed No. 26AWG or larger telecommunication cords.
Only Ethernet LAN or RTC modem cable can have length exceeding 3 meters.
For Ethernet LAN cable, use FTP shielded cables only (cat ≥ 5).
Heat Build-up and Portable Computers
The AC adapter and the underside of the computer can become hot after prolonged use. Sustained physical contact
with either should be avoided.
C
HASSIS COVER REMOVAL AND REPLACEMENT
Before removing the chassis cover to service or modify the equipment, you must disconnect all power and modem
cords (and remove the main battery in portable computers). You then must close the chassis before you plug in and
switch on the equipment.
L
ASER COMPLIANCE STATEMENT
The optical devices are tested and certified to be compliant with International Electrotechnical Commission
IEC60825-1 and European EN60825-1 standards for Class 1 laser products.
Class 1 laser products are not considered hazardous. The optical devices are designed such that there is never human
access to laser radiation above a Class 1 level during normal operation or prescribed maintenance conditions.
The optical devices installed in your computer are designed for use solely as components of such electronic product
and therefore do not comply with the appropriate requirements of Code of Federal Regulation Sec. 1040.10 and Sec.
1040.11 for COMPLETE laser products.
Because exposure to laser radiation is extremely hazardous, under no circumstances should the user attempt to disas-
semble the laser device.
Regulatory Information -
33

INDEX
A
AC Adapter .................................................. 8, 13
Attachments ..................................................... 21
Audio CDs ....................................................... 10
Audio Ports ........................................................ 7
B
Backups................................................ 16, 21, 30
Batteries ..................................................... 14, 32
Battery disposal .............................. 15, 29, 32
Battery life ........................................... 14, 29
Changing the Battery.................................. 15
CMOS ....................................................... 16
Replacing batteries ..................................... 14
C
Cable modem................................................... 26
Cables ........................................................ 12, 33
Cleaning your computer ................................... 12
Computer environment .................................... 12
Control devices
Keyboard ..................................................... 9
Touchpad................................................... 10
Convergence .................................................... 16
D
Diagnose & Repair ............................................ 22
Display Ports ...................................................... 7
Documentation
Packard Bell Website.................................. 19
Drives .............................................................. 10
DSL............................................................ 17, 26
DVD movies..................................................... 10
DVD writer ...................................................... 10
DVD-R9 ........................................................... 10
DVI.................................................................... 7
E
ECO Button ....................................................... 8
E-mail......................................................... 21, 26
Attachments............................................... 21
Epilepsy warning .............................................. 12
Expansion Ports.................................................. 7
ExpressCard ....................................................... 7
External Features................................................ 6
F
Firewall............................................................ 21
Fn key................................................................ 9
Forced Shutdown............................................... 5
H
HDMI ................................................................ 7
Headphones....................................................... 8
Health precautions ........................................... 12
Helpdesk.......................................................... 20
I
IEEE .................................................................. 7
Interference ............................................... 25, 32
Internal hardware ............................................ 23
Internet
Connection.......................................... 17, 21
Firewall ..................................................... 21
Internet Service Provider (ISP).......................... 17
K
Keyboard ..................................................... 9, 24
L
LAN (Local Area Network)............................... 17
LCD screen...................................................... 24
Line-Out ............................................................ 8
M
Memory Card Reader......................................... 8
Microphone ....................................................... 8
Monitor ..................................................... 23, 24
N
Numeric Keypad .............................................. 10
O
ODD................................................................ 10
Optical Drive ................................................... 10
P
Packard Bell Website........................................ 19
Ports & Connectors ............................................ 6
AC Adapter.................................................. 8
DVI ............................................................. 7
ExpressCard................................................. 7
HDMI.......................................................... 7
34 -
Quick Start & Troubleshooting Guide

Headphones ................................................. 8
IEEE ............................................................ 7
Line-Out....................................................... 8
Memory Card Reader ................................... 8
Microphone ................................................. 8
USB ............................................................. 7
Webcam....................................................... 8
Power cords ..................................................... 12
Power ON/OFF.................................................. 5
Printer.............................................................. 27
R
Regulatory Information ..................................... 32
S
Safe computing................................................. 20
Safety precautions............................................. 12
Screen saver ..................................................... 23
Security
Antispyware ............................................... 21
Antivirus .................................................... 20
Internet connection.................................... 21
Spyware ........................................................... 21
Storage ............................................................. 16
Support
Online Troubleshooter................................ 22
Packard Bell Website .................................. 19
System requirements ........................................ 27
T
Touchpad ......................................................... 10
Troubleshooting ............................................... 20
Display....................................................... 24
Internet...................................................... 25
Printer ....................................................... 27
Sound ........................................................ 25
TV-Out............................................................... 7
U
Upgrading
Recycling ................................................... 16
Storage....................................................... 16
Warranty.................................................... 16
USB.................................................................... 7
V
Viruses
Antivirus .................................................... 20
Tips............................................................ 21
W
Warranty.......................................... 4, 16, 24, 28
Webcam ............................................................ 8
Wi-Fi................................................................ 17
WIFI Button....................................................... 8
Index -
35

Packard Bell B.V.
Postbus 337
6600 AH Wijchen
The Netherlands
*7432080000*
7432080000
 Loading...