

Ozito ECS-2040U Original Instruction
ELECTRIC
CHAINSAW
2000W 406mm
ORIGINAL INSTRUCTIONS
SPECIFICATIONS
Power rating: 2000W
Mains voltage: 230V–240V~50Hz
Idling speed: 7800 rpm
Cutting rail length: 406mm
Cutting length max.: 375mm
Cutting speed at rated rpm: 13.5m/s
Oil tank capacity: 160ml
Protection class: II
Weight: 6.52kg
ECS-2040U
WHAT’S IN THE BOX
WARRANTY
ozito-diy.co.uk
1117
Electric Chainsaw
Guide Bar Cover
Guide Bar
Chain
OZITO UK Unit 9 Stadium Court, Wirral International Business Park, Plantation Road, Bromborough, Wirral, CH62 3QG
All of our products undergo strict quality checks to ensure that they reach
you in perfect condition. In the unlikely event that your device develops a
fault, please contact our service department at the address shown on this
guarantee card. You can also contact us by telephone using the customer
service number shown. Please note the following terms under which
guarantee claims can be made:
1. These warranty terms regulate additional warranty services, which the
manufacturer mentioned below promises to buyers of its new products
in addition to their statutory guarantee claims are not affected by this
guarantee. Our guarantee is free of charge to you.
2. The warranty services only covers defects due to material or
manufacturing faults on a product which you have bought from the
manufacturer mentioned below are limited to either the rectication of said
defects on the product or the replacement of the product, whichever we
prefer.
Please note that our devices are not designed for use in commercial, trade
or professional applications. A guarantee contract will not be created if the
device has been used by commercial, trade or industrial business or has
been exposed to similar stresses during the guarantee period.
3. The following are not covered by our guarantee:
- Damage to the device caused by a failure to follow the assembly
instructions or due to incorrect installation, a failure to follow the operating
instructions (for example connecting it to an incorrect mains voltage or
current type) or a failure to follow the maintenance and safety instructions
or by exposing the device to abnormal environmental conditions or by lack
of care and maintenance.
- Damage to the device caused by abuse or incorrect use (for example
overloading the device or the use or unapproved tools or accessories),
ingress of foreign bodies into the device (such as sand, stones or dust,
transport damage), the use of force or damage caused by external forces
(for example by dropping it).
- Damage to the device or parts of the device caused by normal or natural
wear or tear or by normal use of the device.
4. Your Product is guaranteed for a period of 36 months from the original
date of purchase and is intended for DIY (Do It Yourself) use only. Warranty
excludes consumable parts. Guarantee claims should be submitted
before the end of the guarantee period within two weeks of the defect
being noticed. No guarantee claims will be accepted after the end of the
guarantee period. The original guarantee period remains applicable to the
device even if repairs are carried out or parts are replaced. In such cases,
the work performed or parts tted will not result in an extension of the
guarantee period, and no new guarantee will become active for the work
performed or parts tted. This also applies if an on-site service is used.
IN ORDER TO MAKE A CLAIM UNDER THIS WARRANTY YOU MUST
RETURN THE PRODUCT TO THE PLACE OF PURCHASE WITH YOUR
REGISTER RECEIPT.
Please refer to the restrictions of this warranty concerning wearing parts,
consumables and missing parts as set out in the service information in
these operating instructions.
CUSTOMER SERVICE HELPLINE
GB: 0151 294 4488
IRL: 1850 882711
Ozito-diy.co.uk
Read the operating instructions.
Wear safety goggles.
Safety class II
Never expose the
device to rain
Wear ear protection
If the cable is damaged or cut, disconnect the power plug from
the mains immediately.
Maximum cutting length / chain speed vu: 13.5 m/s

3
ONLINE MANUAL
Scan this QR Code with your
mobile device to take you to
the online manual.
1. Power cord
2. Cord retainer
3. Oil level window
4. Oil tank cap
5. Side cover
6. Chain tensioning dial
7. Side cover lock
8. Guide bar
9. Chain
10. Bucking spikes
11. Chain brake
12. Front handle
13. Lock-off switch
14. On/Off trigger
15. Rear handle
16. Chain bar cover
ELECTRIC CHAINSAW
ACCESSORIES
KNOW YOUR PRODUCT
1. BEFORE USE
1 3
11
16
8139
1514
54
12
6 72
10
Items Supplied
Please check that the article is complete as specied in the scope of
delivery. If parts are missing, please contact our service centre or the
sales outlet where you made your purchase at the latest within 5 working
days after purchasing the product and upon presentation of a valid bill of
purchase. Also, refer to the warranty table in the service information at
the end of the operating instructions.
• Open the packaging and take out the equipment with care.
• Remove the packaging material and any packaging and/or
transportation braces (if available).
• Check to see if all items are supplied.
• Inspect the equipment and accessories for transport damage.
• If possible, please keep the packaging until the end of the guarantee
period.
Proper Use
The chainsaw is intended for felling trees and for cutting trunks,
branches, wooden beams, boards etc. and can be used for cross cuts
and longitudinal cuts. It is not suitable for cutting any materials other than
wood.
The equipment is to be used only for its prescribed purpose. Any other
use is deemed to be a case of misuse. The user / operator and not the
manufacturer will be liable for any damage or injuries of any kind caused
as a result of this.
Please note that our equipment has not been designed for use in
commercial, trade or industrial applications. Our warranty will be voided
if the machine is used in commercial, trade or industrial businesses or for
equivalent purposes.
DANGER! THE EQUIPMENT AND PACKAGING
MATERIAL ARE NOT TOYS. DO NOT LET
CHILDREN PLAY WITH PLASTIC BAGS, FOILS OR
SMALL PARTS. THERE IS A DANGER OF SWALLOWING
OR SUFFOCATION!
Declaration of Conformity
Gao/Product-ManagementWeichselgartner/General-Manager
explains the following conformity according to EU directives and norms for
the following product
Electric Chainsaw ECS-2040 (Ozito)
2014/29/EU
2005/32/EC_2009/125/EC
2014/35/EU
2006/28/EC
X
2014/30/EU
2014/32/EU
2014/53/EC
2014/68/EU
90/396/EC_2009/142/EC
89/686/EC_96/58/EC
X
2011/65/EU
X
2006/42/EC
X
Annex IV
Notied Body: TÜV SÜD Product Service GmbH
Ridlerstraße 65 • D-80339 München • Germany
Notied Body No.: 0123
Reg. No.: M6A 17 10 24192 01595
X
2000/14/EC_2005/88/EC
X
Annex V
Annex VI
Noise: measured LWA = 104,6 dB (A); guaranteed LWA = 108 dB (A)
P = 2 KW; L/Ø = cm
Notied Body:
2012/46/EU
Emission No.:
Standard references: EN 60745-1; EN 60745-2-13; EN 62321;
EN 55014-1; EN 55014-2; EN 61000-3-2; EN 61000-3-11
Landau/Isar, den 11.09.2017
First CE: 17 Archive-File/Record: NAPR017664
Art.-No.: 30.002.06 I.-No.: 11017 Documents registrar: R. Gehard
Subject to change without notice Wiesenweg 22, D-94405 Landau/Isar
ISC GmbH · Eschenstraße 6 · D-94405 Landau/Isar
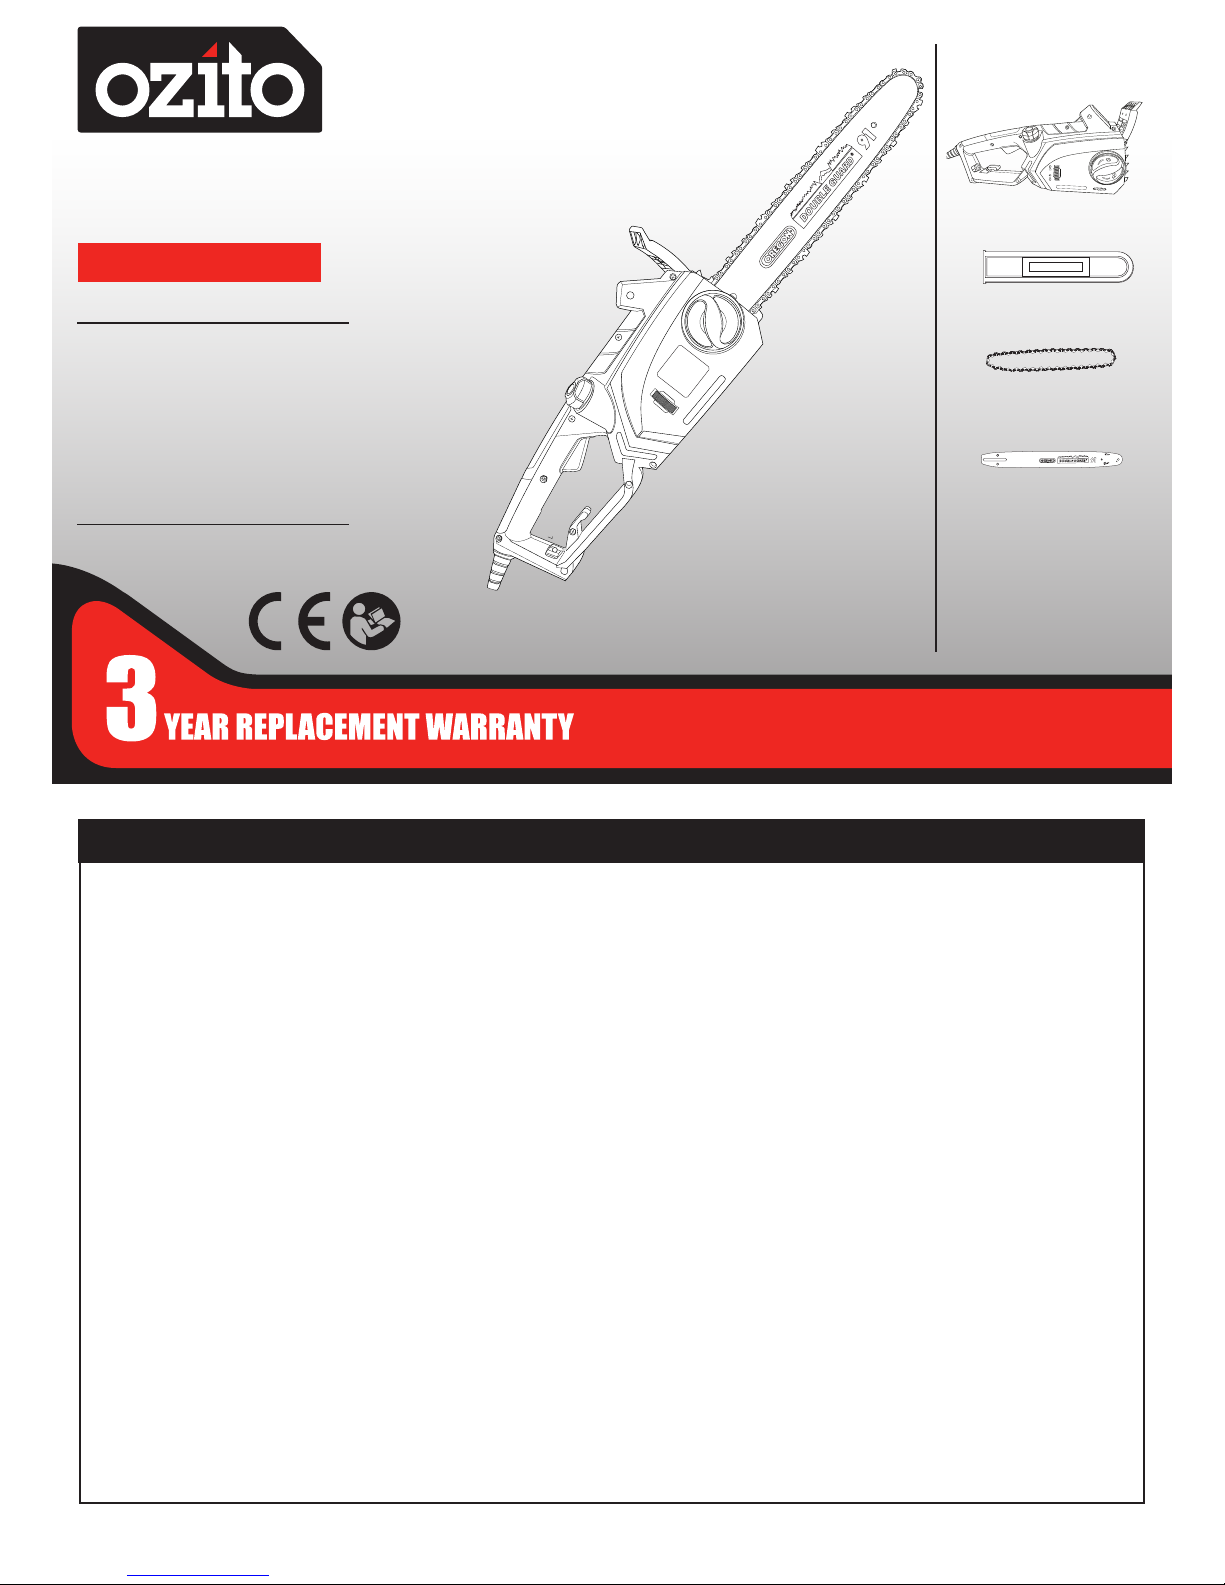
Fitting a chain and bar
1. Fully unscrew the side cover
lock by turning it in an anticlockwise direction.
2. Remove the side
cover.
3. Fit the chain over the guide bar,
making sure that the cutters are
facing in the direction of rotation.
4. Place the guide bar and chain
in position, ensuring that the
chain is around sprocket wheel
(A). Also ensure that the chain
tension pin (B) ts into the
guide bar. If it does not t, it
can be adjusted
slightly with the
chain tensioning
dial. The chain must
not slip off the bar
when you do this.
5. Pull the guide bar
forward until the
chain is closely seated. Make sure that all the drive
links are in the groove of the bar.
6. Attach the side cover and secure it with the side
cover lock.
Note: Do not fully tighten the side cover lock until after
adjusting the chain tension.
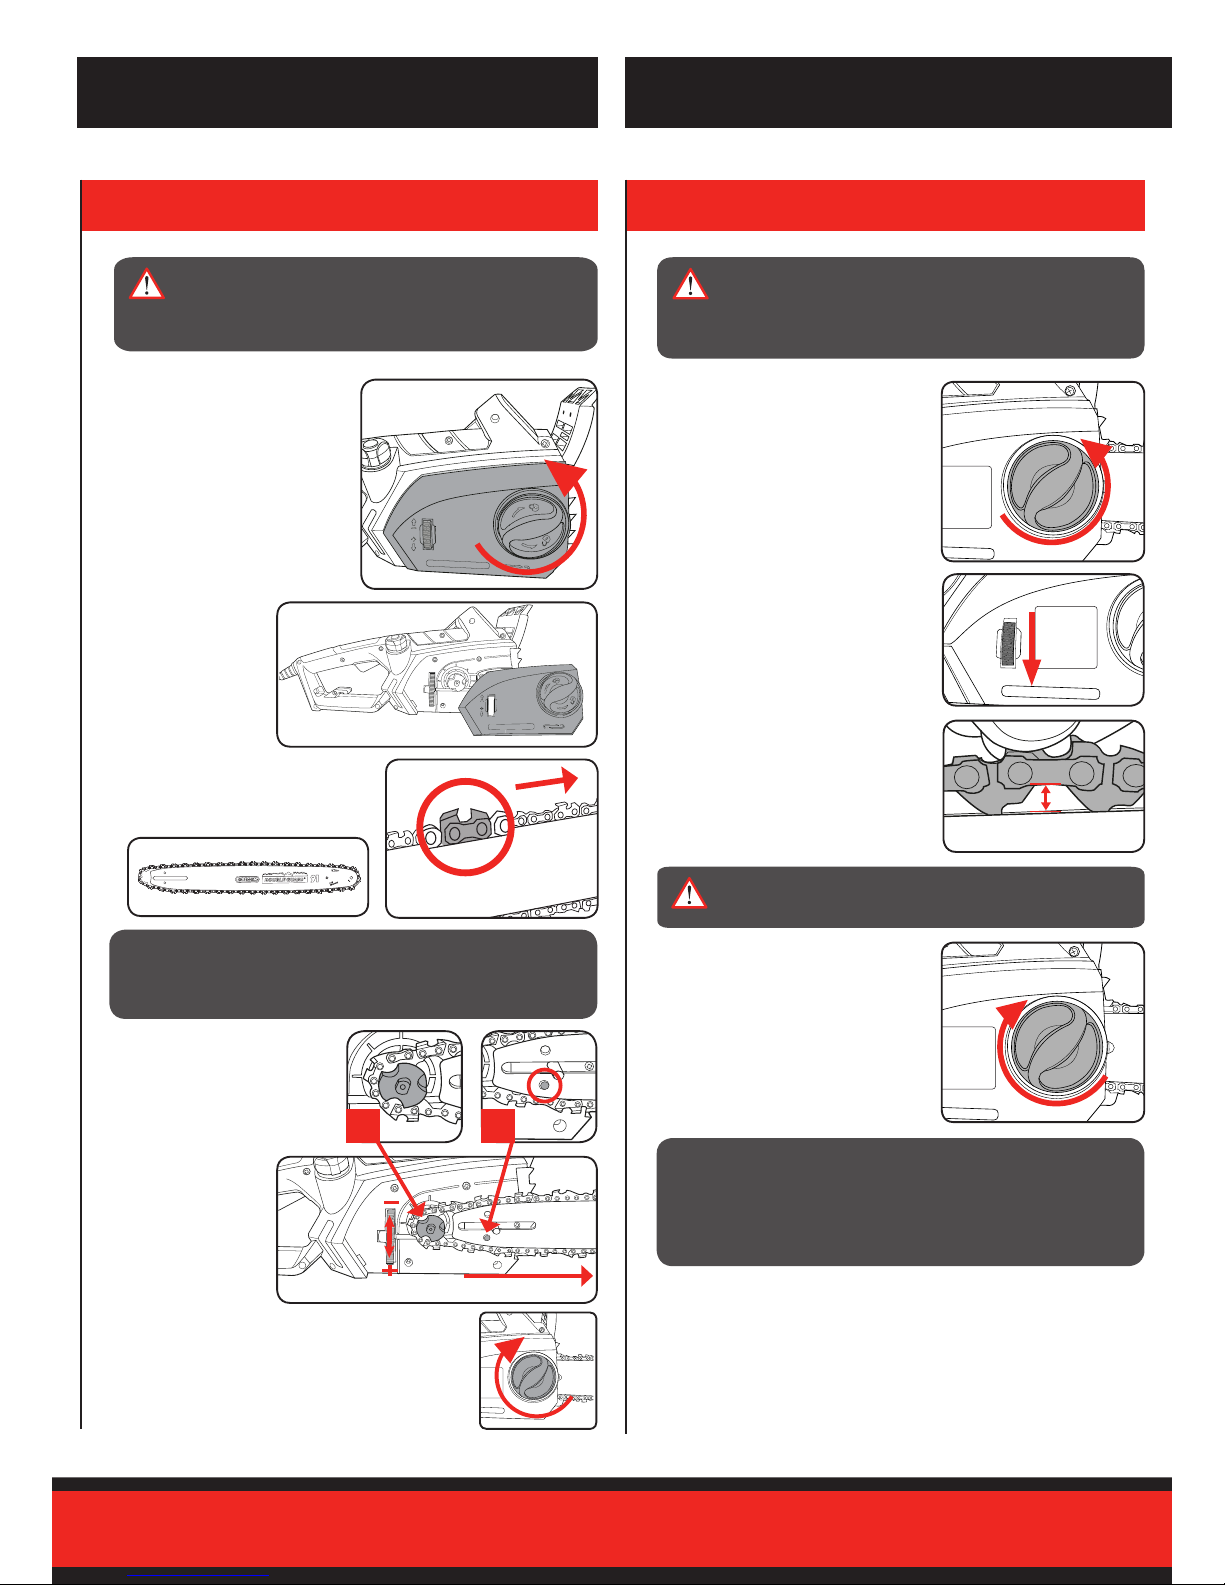
Tensioning the chain
1. Unscrew the side cover
lock a few turns to ensure it is loose.
2. Adjust the chain tension with the
chain tensioning dial. Rotating the
dial downwards increases the tension
and rotating the dial up decreases the
chain tension.
The tension is correct when the chain
can be pulled 3mm away from the guide
bar when using your nger and thumb.
Do not over-tighten as this will reduce
the life of the chain and guide bar.
3. Tighten the side cover lock.
3. CHAIN TENSION2. GUIDE BAR & CHAIN
SETUP & PREPARATIONASSEMBLY
CAUTION! ALWAYS WEAR GLOVES WHEN HANDLING
THE CHAIN AS IT IS VERY SHARP AND CAN CUT YOU
WHEN IT IS NOT MOVING.
+
3mm gap is
the ideal tension
IMPORTANT! THE CHAIN SHOULD BE ADJUSTED
BEFORE FIRST USE, AGAIN AFTER 2 – 3 MINUTES
OF OPERATION AND RECHECKED AND ADJUSTED IF
NECESSARY AFTER EACH 30 MINUTES OF USE. TAKE
CARE NOT TO OVER TENSION THE CHAIN.
WARNING! TO PREVENT ACCIDENTAL
STARTING, ENSURE THAT THE CHAINSAW IS
DISCONNECTED FROM THE POWER SUPPLY BEFORE
MAKING ANY ADJUSTMENTS.
WARNING! ALL OF THE CHAIN LINKS MUST LIE
PROPERLY IN THE GROOVE OF THE GUIDE BAR.
A B
WARNING! ENSURE THE CHAINSAW IS TURNED
OFF & DISCONNECTED FROM THE POWER
SUPPLY BEFORE PERFORMING ANY OF THE
FOLLOWING OPERATIONS.
 Loading...