

Ozito CSL-036 Instruction Manual
CORDLESS
CHAINSAW
36V Lithium Ion
INSTRUCTION MANUAL
SPECIFICATIONS
Voltage: 36V
Battery: 3.0Ah Li-ion
Charge Time: 3 Hours
Motor: Brushless Motor
Bar Type: Oregon 305mm (12”)
Chain Pitch: 9.53mm (3/8”)
No Load Speed: 8,000/min
Chain Speed: 9m/s
Chain Oil Tank Capacity: 180ml
Chain Oil: Chain Bar Oil
Weight with battery: 6.5kg
CSL-036
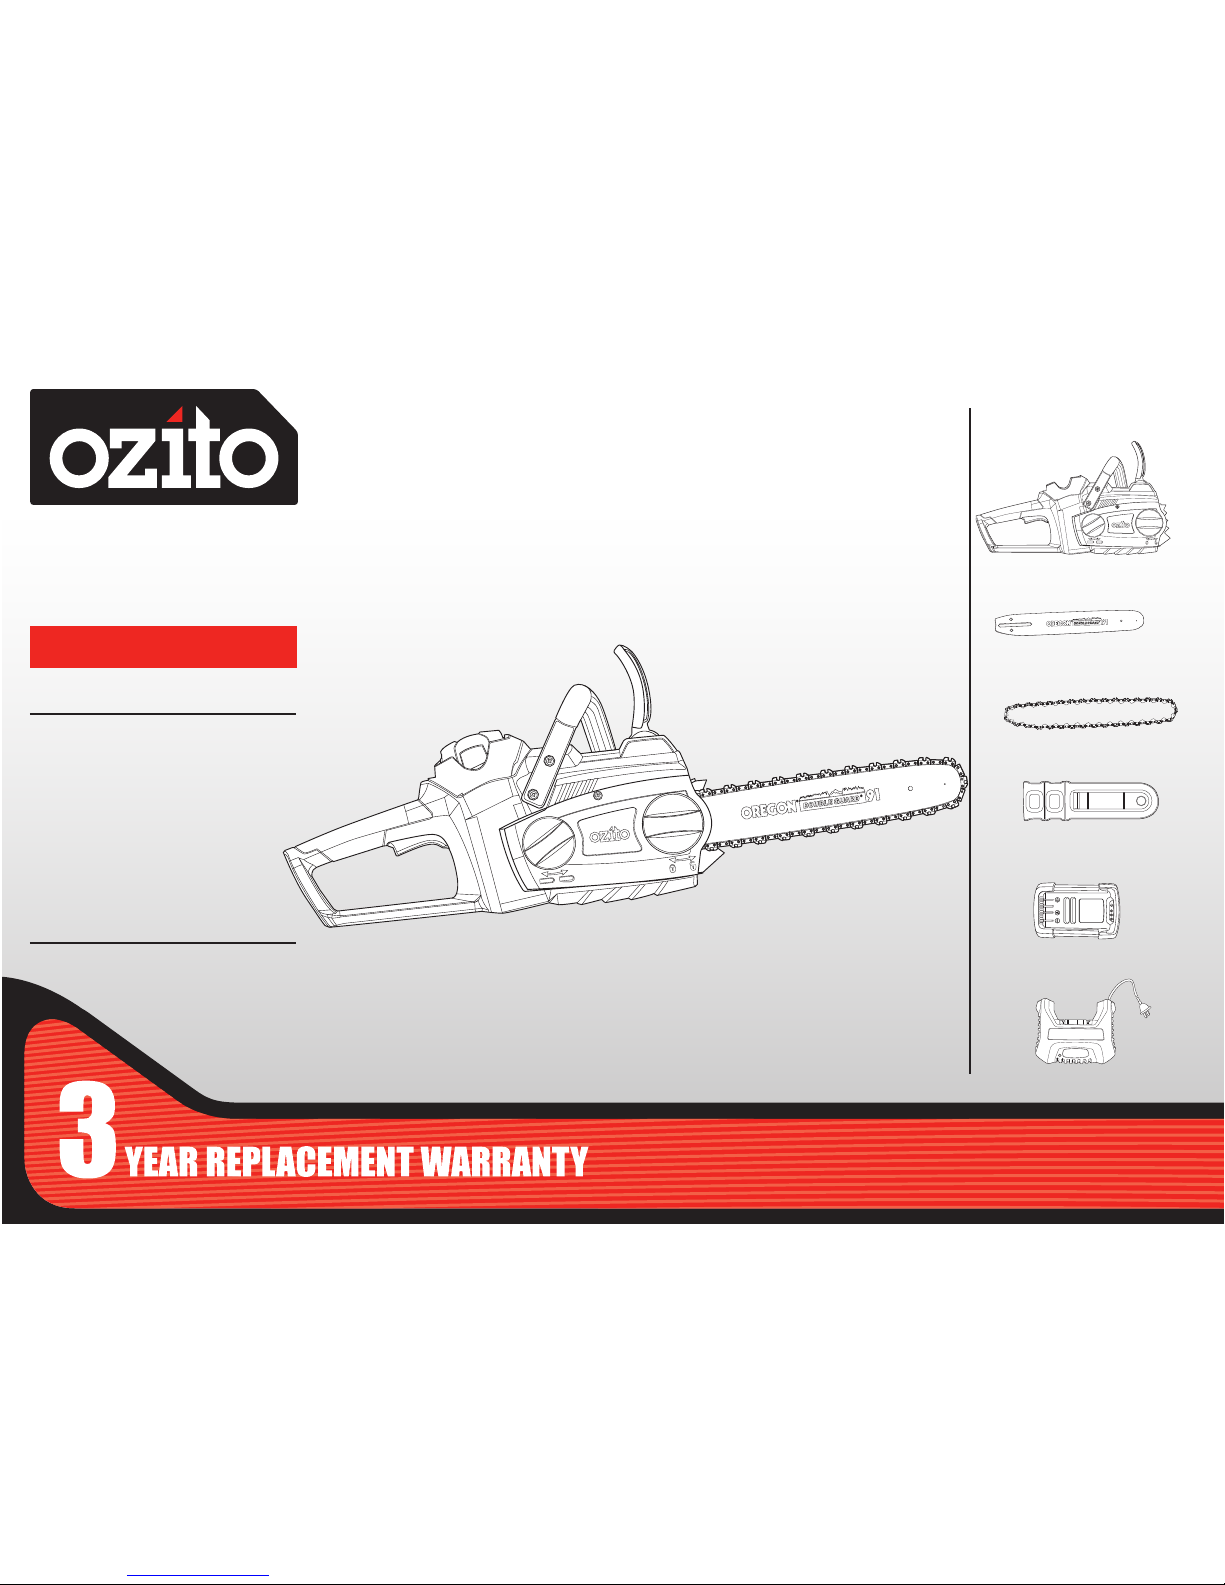
WHAT’S IN THE BOX
ozito.com.au
Chainsaw
Guide Bar Cover
Guide Bar
Chain
Battery Pack
Battery Charger
3
ONLINE MANUAL
Scan this QR Code with your
mobile device to take you to
the online manual.
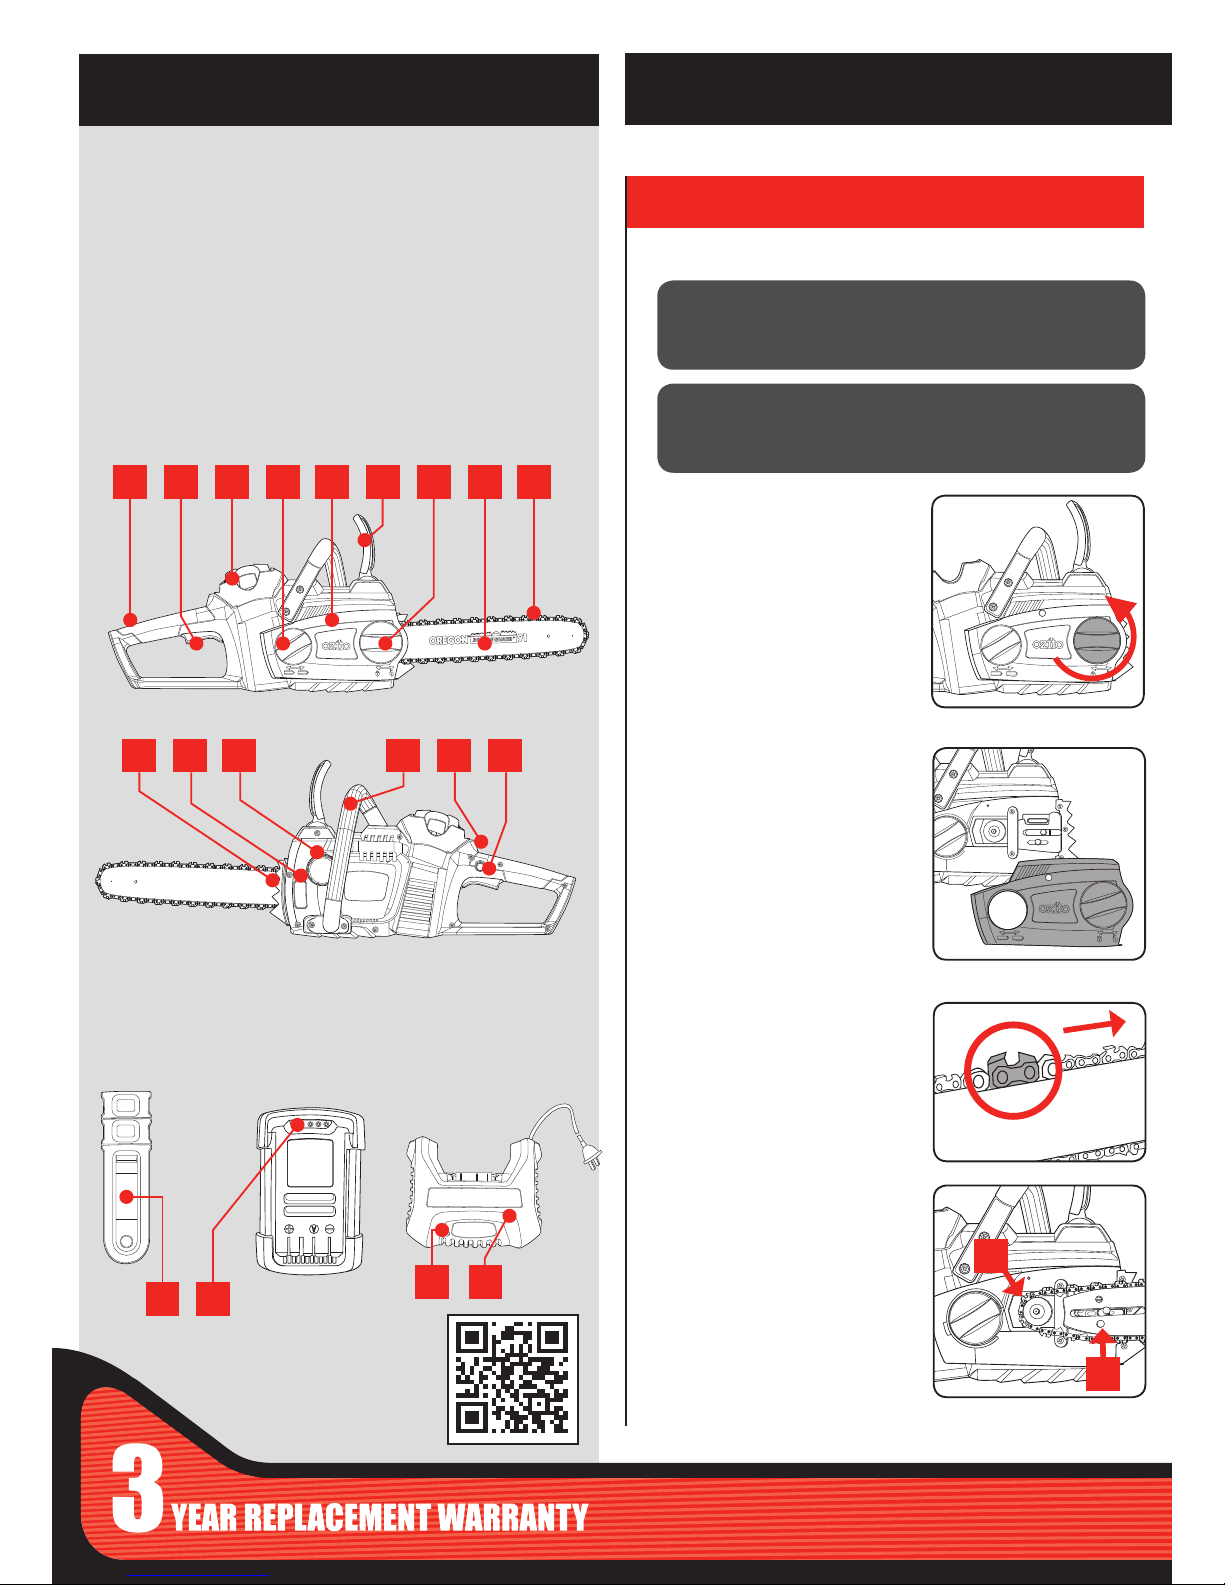
Fitting a chain and bar
1. Completely unscrew the
guide bar locking knob.
2. Remove the side cover
3. Fit the chain over the guide bar,
making sure that the cutters are
facing in the direction of rotation.
4. Place the guide bar and chain in
position, ensuring that the chain
is around sprocket wheel (A). Also
ensure that the pin (B) ts into the
hole in the guide bar.
Note: If positioning the chain around the
sprocket wheel is proving difcult, turn
the chain tensioning adjustment knob
anti-clockwise to loosen the tension.
1 Rear Handle
2 Trigger Switch
3 Battery
4 Chain Tensioning
Adjustment Knob
5 Side Cover
6 Hand Guard / Chain Brake
7 Guide Bar Locking Knob
8 Guide Bar
9 Chain
10 Bucking Spikes
11 Oil Level Window
12 Chain Oil Tank Cap
13 Front Handle
14 Battery Release Button
15 Lock-off Button
16 Chain Bar Cover
17 Charge Indicator Button /
Status LEDs
18 Battery Charger LED
19 Battery Charger
CORDLESS CHAINSAW
ACCESSORIES
KNOW YOUR PRODUCT
1. ASSEMBLY
SETUP & PREPARATION
12
161917
18
2
1310 14 15
4
11
CAUTION!: ALWAYS BE SURE THAT THE TOOL IS
SWITCHED OFF AND THE BATTERY PACK IS REMOVED
BEFORE CARRYING OUT ANY WORK ON THE TOOL.
CAUTION!: ALWAYS WEAR GLOVES WHEN HANDLING
THE CHAIN AS IT IS VERY SHARP AND CAN CUT YOU
WHEN IT IS NOT MOVING.
1 3 5 6 87 9
A
B
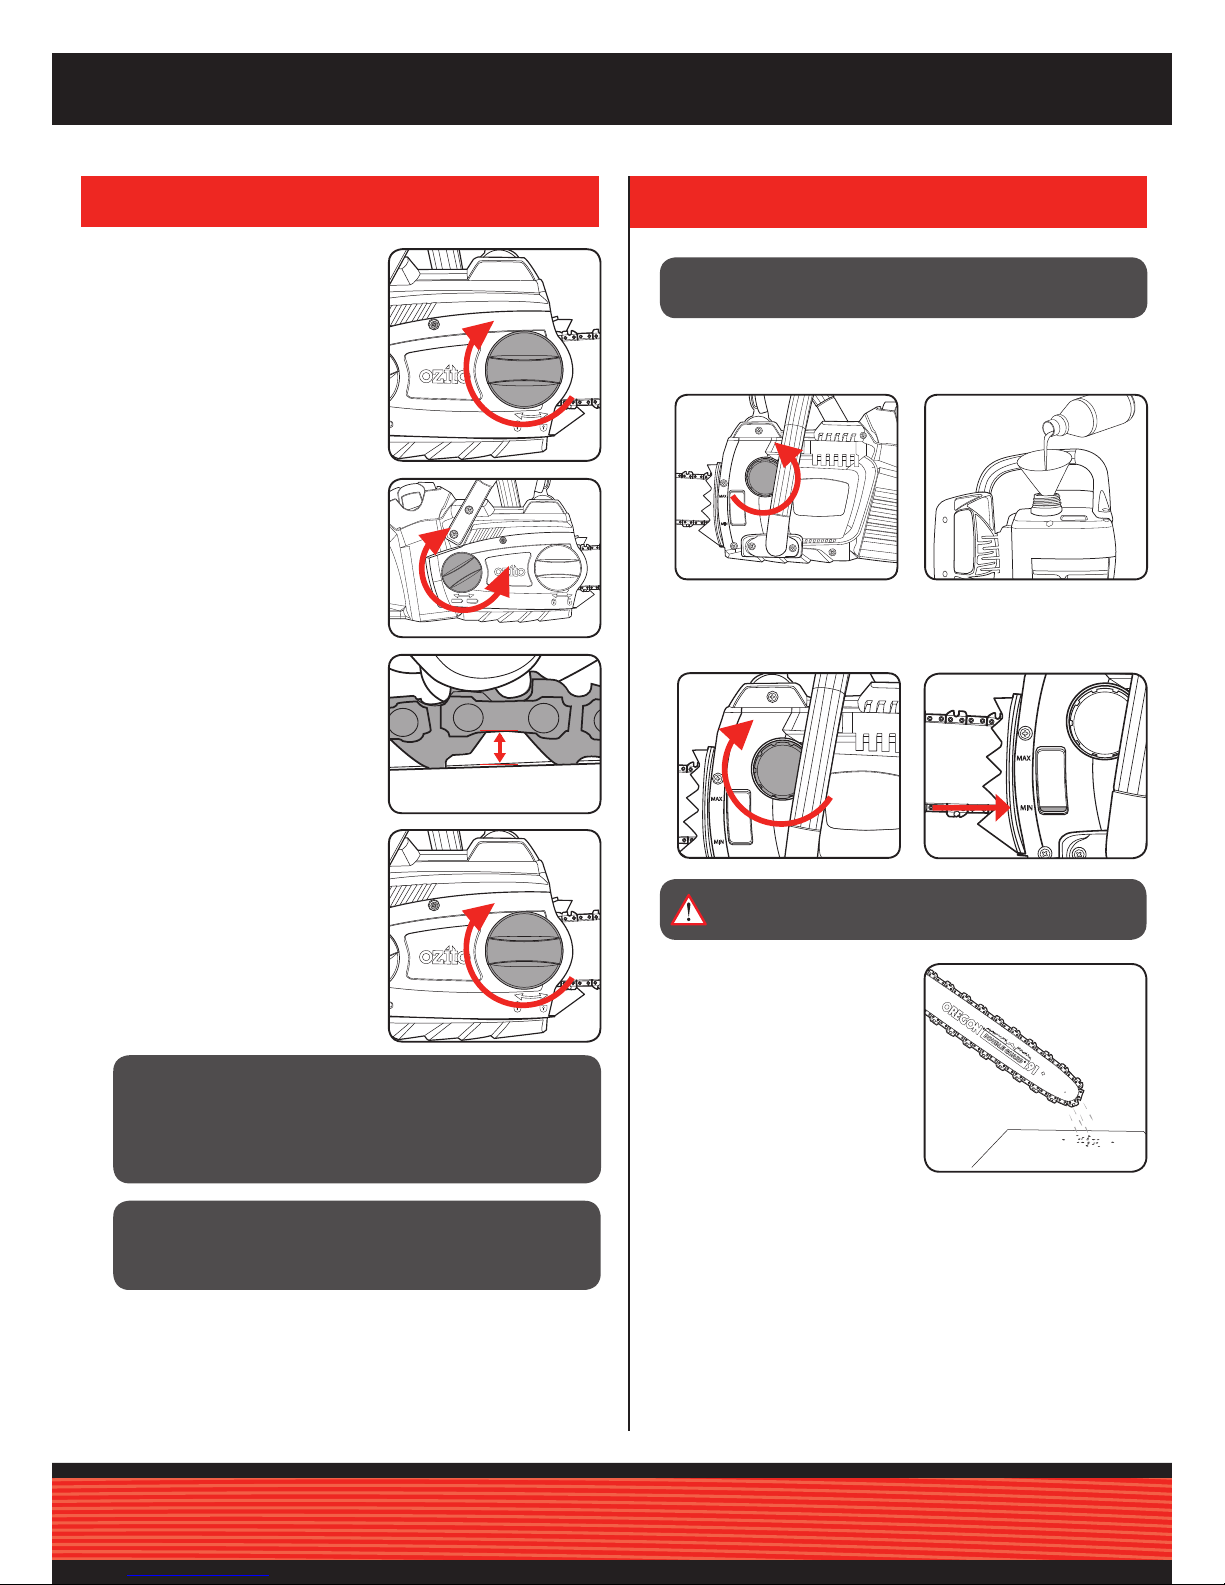
5. Fit the side cover back onto the
chainsaw. Screw on the guide bar
locking knob but do not fully tighten at
this stage.
6. Adjust the tension of the chain using
the chain tensioning adjustment knob
The tension is correct when the
chain can be pulled 3mm away
from the guide bar when using your
nger and thumb.
Do not over-tighten as this will
reduce the life of the chain and
guide bar.
7. After the chain has been accurately
tensioned, lock the guide bar in place
with the guide bar locking knob.
Tighten with rm nger force.
2. OIL
IMPORTANT: IT IS VITAL FOR THE PROPER AND SAFE
OPERATION OF THE CHAINSAW THAT THE CHAIN IS
TENSIONED CORRECTLY.
3mm gap is
the ideal tension
IMPORTANT: THE CHAIN SHOULD BE ADJUSTED
BEFORE FIRST USE, AGAIN AFTER 2-3 MINUTES OF
OPERATION AND RECHECKED AND ADJUSTED IF
NECESSARY AFTER EACH 30 MINUTES OF USE. TAKE
CARE NOT TO OVER TENSION THE CHAIN.
IMPORTANT: ONLY USE OIL THAT IS EXPRESSLY
LABELLED “CHAIN BAR OIL”.
WARNING!: NEVER START WORK UNLESS THE
CHAIN AND BAR ARE LUBRICATED.
1. Turn the chainsaw onto its side
and remove the chain oil tank cap.
3. Ret cap and clean any
oil spillage.
5. To check the lubricating system,
switch on the chainsaw and hold it
with the guide bar and chain above
some light coloured paper such as
newspaper. A steadily increasing
stain caused by oil spray shows the
lubricating system is working.
Chain bar oil may leak if the tool is
left for long periods. This is normal.
If the tool is to be left unused for an
extended time, drain the oil from
the tool. Rell before use.
4. Always ll the oil tank when the
oil level is below the minimum
mark on the oil level window.
2. Fill the tank with chain bar oil.
The capacity of the chain oil
tank is 85ml.
 Loading...