

Page 1
MODELS/MODÈLES
MODELOS
MODELS/MODÈLES
MODELOS
Instruction Manual
RICE COOKER/ STEAMER
READ ALL INSTRUCTIONS BEFORE USING THIS APPLIANCE
Manuel d’Instructions
CUISEUR A RIZ AVEC PANIER VAPEUR
LIRE TOUTES LES INSTRUCTIONS AVANT D’UTILIZER CET APPAREIL
Manual de Instrucciones
OLLA ARROCERA CON BANDEJA DE VAPOR
LEA TODAS LAS INSTRUCCIONES ANTES DE USAR ESTE APARATO
Manual de Instruções
PANELA ELÉTRICA DE ARROZ COM BANDEJA PARA VAPOR
LEIA TODAS AS INSTRUÇÕES ANTES DE USAR ESTE APARELHO
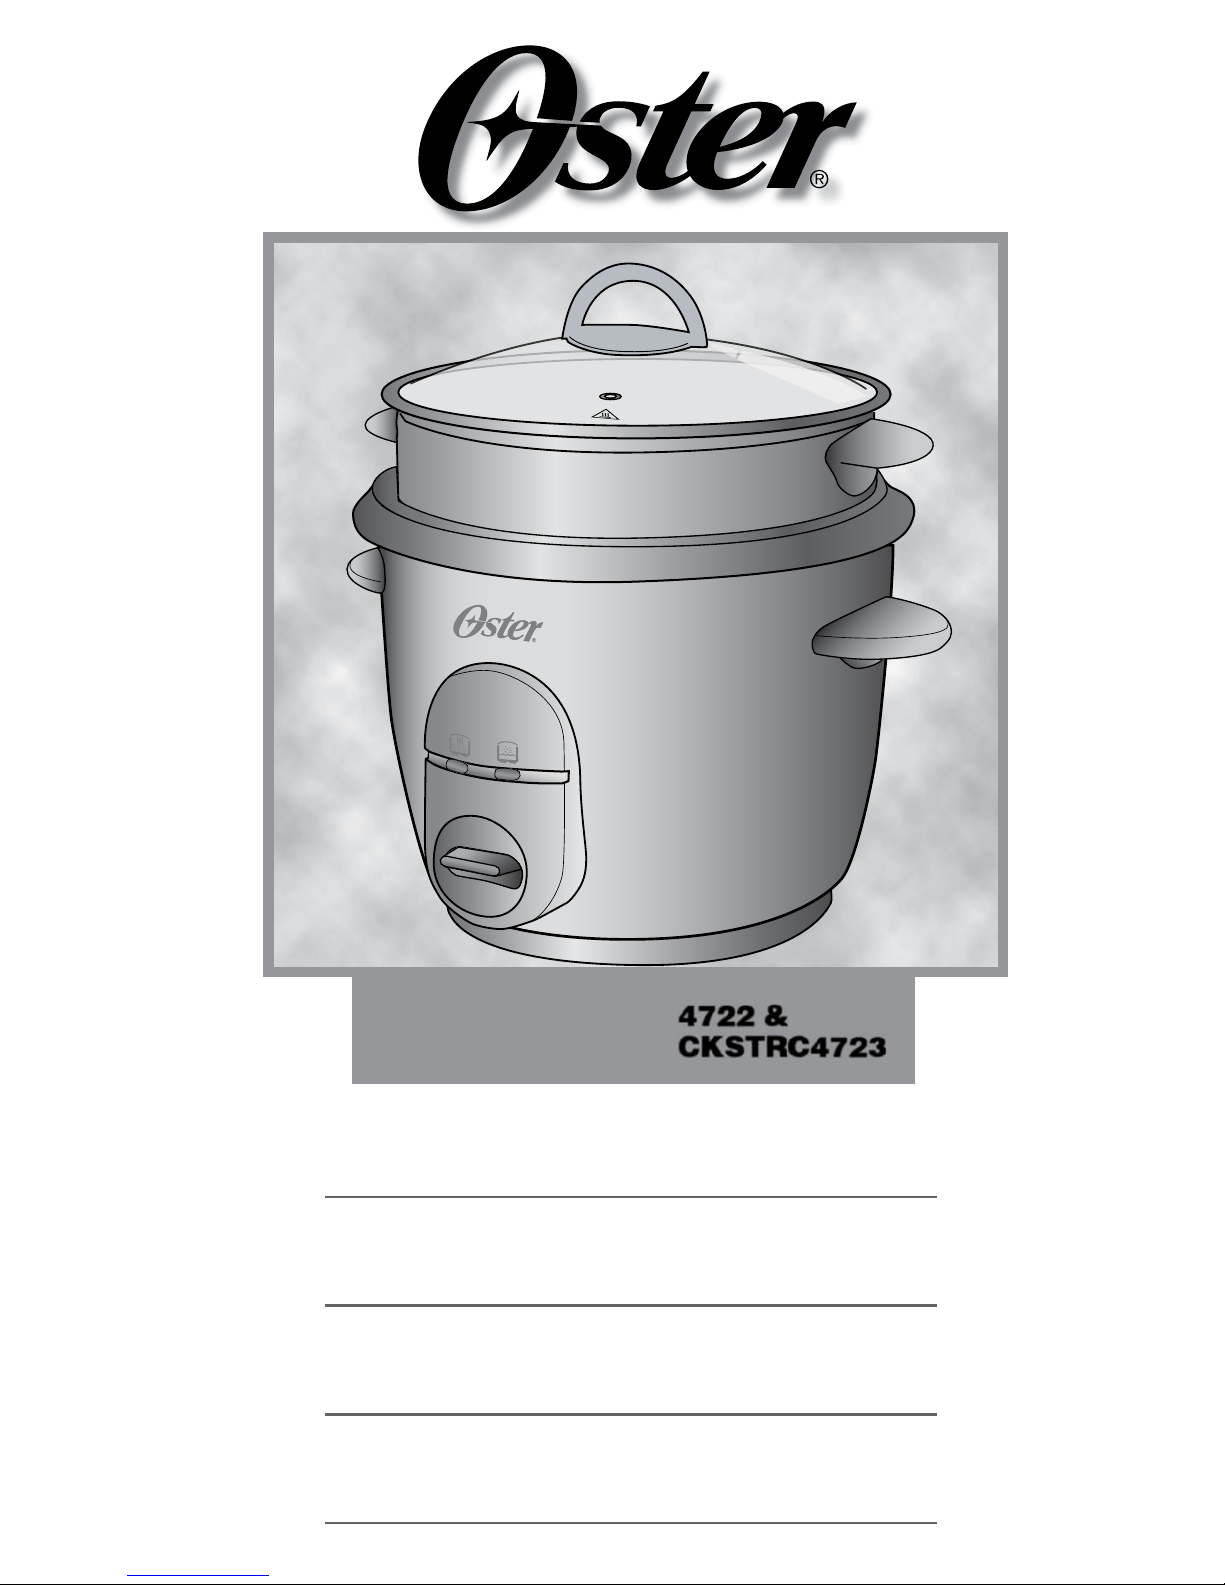
4722 &
CKSTRC4723
Page 2

1
IMPORTANT SAFEGUARDS
When using electrical appliances, basic safety instructions should always be followed,
including the following:
1. READ ALL INSTRUCTIONS BEFORE USING YOUR RICE COOKER.
2. DO NOT touch hot surfaces . Use pot holders when removing Lid or handling
hot containers to avoid steam burns.
3. To protect against risk of electric shock, do not immerse the Heating Body in water
or other liquids.
4. Unplug from outlet when not in use. Unplug before putting on or taking off parts, and
allow to cool before cleaning.
5. DO NOT operate any appliance with a damaged cord or plug, or after the appliance
malfunctions or has been damaged in any manner. Return appliance to an
Authorized Oster® Service Center for examination, repair or adjustment.
6. DO NOT use outdoors.
7. DO NOT let Cord hang over edge of table or counter, or touch hot surfaces.
8. DO NOT place on or near a hot gas or electric burner, or in a heated oven.
9. Extreme caution must be used when moving an appliance containing hot food or
water or other hot liquids.
10. DO NOT use appliance for other than its intended use.
11. Lift and open Lid carefully to avoid scalding and allow water to drip into the Inner
Pot.
12. DO NOT operate this appliance without the Lid in place on the unit. Steam is
generated during use.
13. The use of accessory attachments not recommended by this appliance manufacturer
may cause hazards.
14. To disconnect, remove plug from outlet.
15. This appliance is not intended for use by persons (including children) with reduced
physical, sensory or mental capabilities, or lack of experience and knowledge,
unless they have been given supervision or instruction concerning use of the
appliance by a person responsible for their safety. Children should be supervised to
ensure that they DO NOT play with the appliance.
16. Close supervision is necessary when any appliance is used by or near children, or
incapacitated individuals.
THIS UNIT IS FOR HOUSEHOLD USE ONLY
Page 3

2
SAVE THESE INSTRUCTIONS
(For 120 & 127 V with two at pins only)
This appliance has a polarized plug (one blade is wider than the other). To reduce the risk
of electric shock, this plug will t into a polarized plug in only one way. If you cannot
completely insert the power plug into the power outlet, reverse the direction of the plug.
If it still does not t, contact a qualied electrician. DO NOT modify the plug in any way.
If an extension cord is used, the marked electrical rating of the extension cord should be
at least as great as the electrical rating of the appliance and the cord should be arranged
so that it will not drape over the countertop or tabletop where it can be pulled on by
children or tripped over unintentionally.
A short power-supply cord is provided with this appliance to reduce the risk of becoming
entangled in or tripping over.
DO NOT IMMERSE THE HEATING BODY OF THE RICE COOKER IN WATER OR
ANY OTHER LIQUID!
Page 4
3
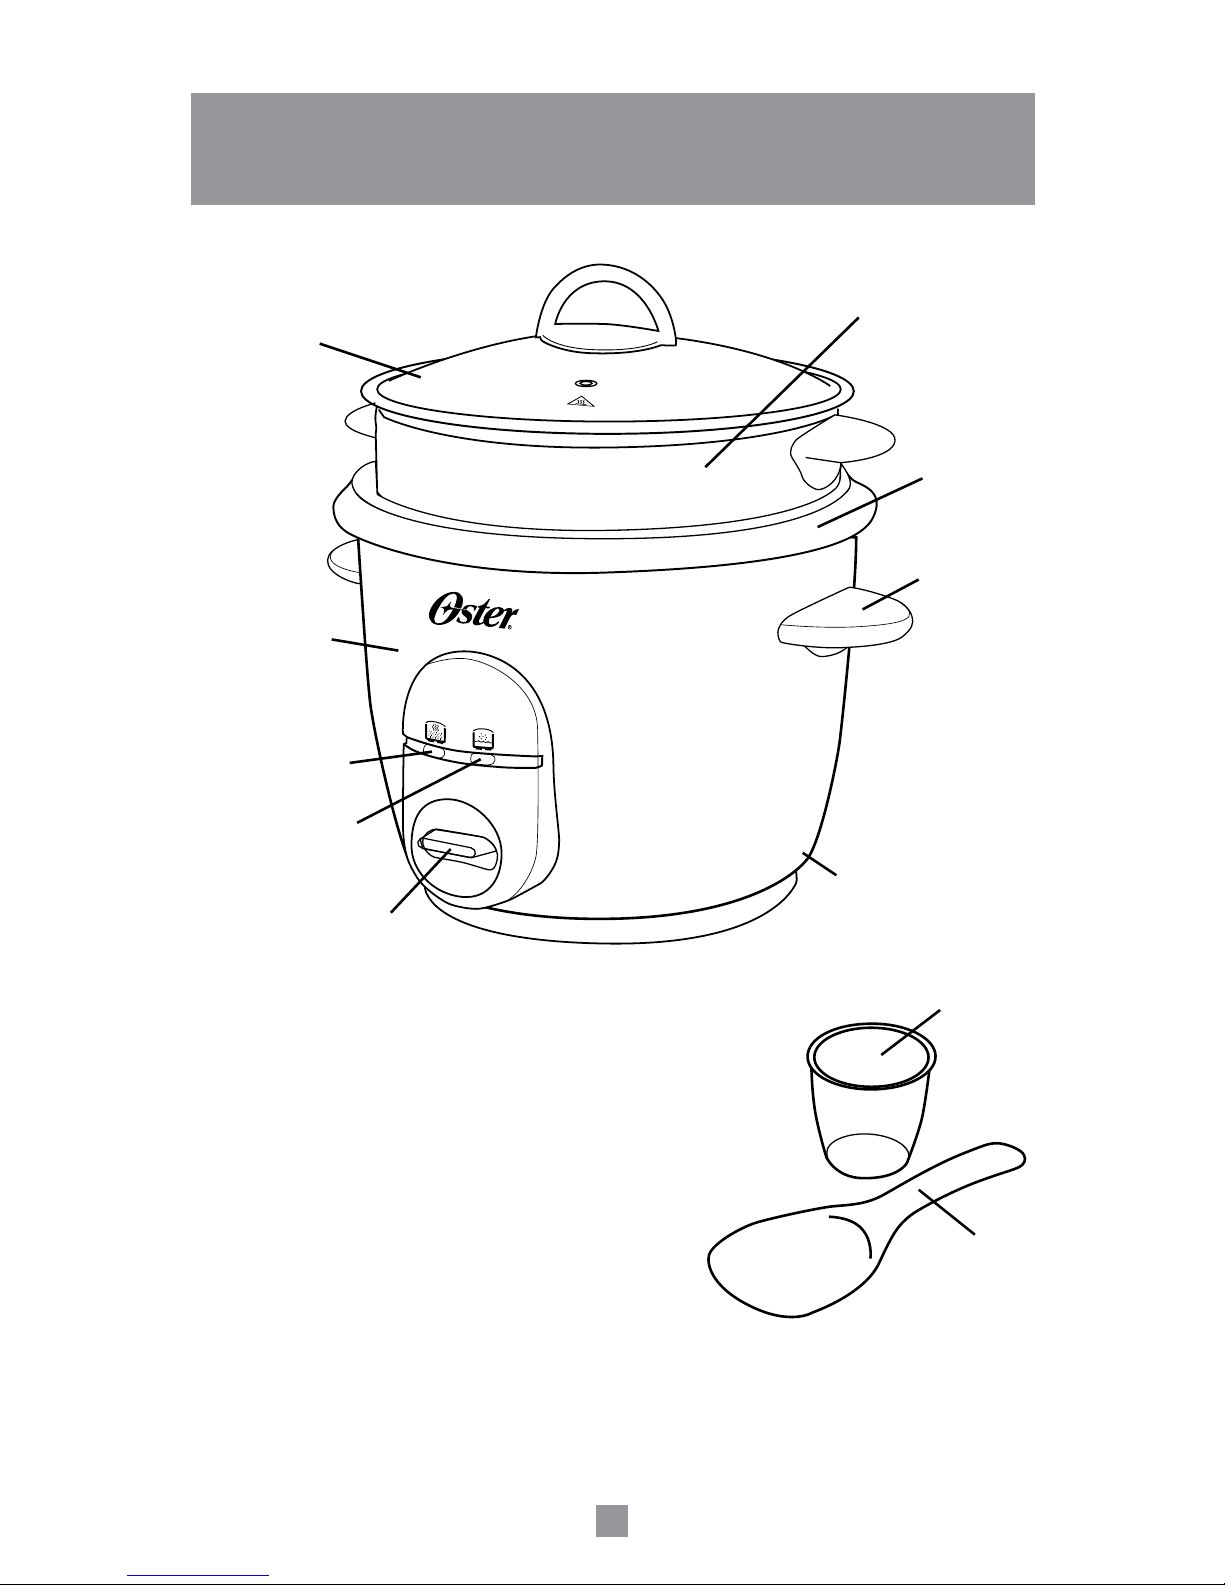
1. Glass Lid
2. Heating Body
3. Keep Warm Light (yellow)
4. Cook Light (red)
5. On-Switch Button
6. Power Cord
7. Measuring Cup
8. Paddle
9. Handle
10. Inner Pot
11. Steaming Tray
1
DESCRIPTION OF THE APPLIANCE
2
3
11
4
5
6
7
8
9
10
Page 5

4
INSTRUCTIONS FOR USE
BEFORE USING YOUR OSTER® RICE COOKER
Before using your OSTER® Rice Cooker for the rst time, clean the Glass Lid, Inner
Pot, Paddle, Steaming Tray and Measuring Cup according to the user maintenance
instructions.
1. Make sure appliance is unplugged.
2. Make sure to use the measuring cup included with the unit, which has 160 mL
capacity.
3. Using the measuring cup (160 mL) included with the unit, place 1 measuring cup of
uncooked regular rice and 2 measuring cups of water. One measuring cup (160 mL)
of uncooked rice will make two measuring cups of cooked rice.
4. For brown rice, place 1 measuring cup (160 mL) of uncooked brown rice and 3
measuring cups of water.
5. The maximum capacity for your rice cooker is 3 measuring cups (160 mL) of
uncooked rice, which will result in up to 6 measuring cups (160 mL) of cooked rice.
6. Set the Inner Pot into the Rice Cooker. Make sure that the Inner Pot sits directly in
contact with the heating plate by turning it slightly from right to left until it is seated
properly.
7. Cover with Lid. DO NOT OPERATE THIS APPLIANCE UNCOVERED. STEAM IS
GENERATED DURING USE.
8. Plug the Power Cord into an electrical outlet. Activate the Rice Cooker on by
pushing down the On-Switch Button down. Make sure the Cook Light (red) is on.
9. After 15 minutes mix the rice. Lift and remove the Lid carefully to avoid scalding and
allow water to drip into the Inner Pot. Use the Paddle or another long handheld
utensil to scoop and mix the rice. After mixing, cover the Inner Pot with the Lid.
10. When your rice is cooked, the Rice Cooker will automatically switch to the warm
function and the Keep Warm Light (yellow) will turn on. The Rice Cooker will keep
the rice warm until the unit is disconnected from the wall outlet.
11. The Rice Cooker will automatically keep rice warm at 140°F – 175°F (60°C –80°C).
12. When the rice temperature dips below this range, the yellow Keep Warm Light
will turn off and the red Cook Light will turn on indicating that the heat preservation
process has begun. When the rice temperature reaches 140°F, the Keep Warm
Light (yellow) will once again turn on and the Cook Light (red) will turn off.
13. Allow the appliance to cool completely before cleaning.
14. Disconnect the plug from the wall outlet when not in use.
NOTES: Wash the rice in a separate bowl, prior to cooking, if desired. For softer rice, we
suggest preparing rice and water in the Inner Pot and letting soak for 10 – 20 minutes
before cooking.
Page 6

5
INSTRUCTIONS TO REHEAT RICE
To reheat cold rice, add 1/4 cup (4 Tbsp.) of cold water per cup of cooked rice, stir to
mix, then press On-Switch Button to start cooking.
When rice is warm, the Rice Cooker will automatically switch to the keep warm function.
USING THE STEAMING TRAY
Steam cooking vegetables retains more nutrients than boiling or baking, while
preserving the bright, natural color.
1. Prepare vegetables by washing, peeling and then cutting into smaller sized pieces.
2. Make sure the unit is unplugged.
3. Fill the Inner Pot with the appropriate amount of water. (See Chart)
4. Set the Inner Pot into the heating body. Make sure that the Inner Pot sits directly in
contact with the heating plate.
5. Place vegetables in the Steaming Tray and position the Tray on top of the Inner
Pot. Cover with Lid. DO NOT OPERATE THIS UNIT UNCOVERED. STEAM IS
GENERATED DURING USE.
6. Plug the Power Cord into a wall outlet. Activate the Rice Cooker by pushing down the
On-Switch Button. Make sure the red Cook Light is on.
7. Time the cooking manually according to the chart below. The unit will automatically
switch to the keep warm cycle once all the water evaporates. If all the water
evaporates and you wish to extend the cooking cycle, add more water.
8. Once the vegetables have been steamed according to your personal preference,
remove the Steamer Tray from the Rice Cooker.
9. Disconnect from the wall outlet and allow the unit to cool completely before cleaning.
VEGETABLE QUANTITY WATER TIME
Green Beans 10 ounces / 300 g 1/3 Cup / 50 ml 30-35 minutes
Broccoli 10 ounces / 300 g 1/3 Cup / 50 ml 30-35 minutes
Carrots (Sliced) 8 ounces / 200 g 1/3 Cup / 50 ml 30-35 minutes
Cauliower 8 ounces / 200 g 1/3 Cup / 50 ml 30-35 minutes
Corn (Kernel) 10 ounces / 300 g 1/3 Cup / 50 ml 40-45 minutes
Peas 10 ounces / 300 g 1/3 Cup / 50 ml 30-35 minutes
Spinach 5 ounces / 150 g 1/3 Cup / 50 ml 20-30 minutes
Mixed Vegetables 10 ounces / 300 g 1/3 Cup / 50 ml 30-35 minutes
NOTE: These times are approximate. It is recommended that you monitor the steaming
process and adjust the cooking time according to your preference. Stir vegetables
occasionally during the cooking process. When cooking rice, steaming times may vary.
Page 7

6
USER MAINTENANCE INSTRUCTIONS
This appliance should be cleaned after every use.
1. Unplug the Rice Cooker from the wall outlet when not in use or before cleaning. Never
immerse the Heating Body in water or any other liquid! Allow the Rice Cooker to cool
completely before cleaning.
2. Do not use abrasive cleaners or scouring pads or steel wool to clean the Rice Cooker.
3. Heating Body: lightly wipe the exterior with a damp cloth or sponge.DO NOT
IMMERSE HEATING BODY INTO WATER OR ANY OTHER LIQUID. Dry thoroughly
with a soft cloth.
4. Inner Pot: ll with hot water and let sit for a while and then wash with hot, soapy water
using a sponge and dry thoroughly with a cloth or use dishwasher.
5. Lid, Measuring Cup and Paddle: wash in warm, soapy water. Rinse thoroughly and
dry. CAUTION: handle the Lid with extreme care, as it may become slippery when wet
or use dishwasher.
6. Heating plate: grains of rice or other foreign matter may stick to the heating plate.
These must be removed to prevent inadequate cooking. To remove cooked rice,
smooth sandpaper can be used. Smooth out and polish the spot for good contact
between the heating plate and the bottom of the Inner Pot.
7. There are no user serviceable parts inside this appliance. Do not attempt to repair this
appliance yourself as you could render it dangerous to use.
Page 8

7
PRÉCAUTIONS IMPORTANTES
II est important d’observer un certain nombre de règles de sécurité élémentaires
pendant l’utilisation du cuiseur à riz automatique ou de tout appareil électrique:
1. LISEZ TOUTES LES DIRECTIVES.
2. Eviter de toucher les surfaces chaudes . Utiliser les manivelles ou les
interrupteurs. Utiliser des poignées pour saisir le couvercle ou manipuler le récipient
lorsqu’il est chaud.
3. Pour vous protéger des risques d’électrocution, ne plongez jamais le cordon ou
l’appareil dans l’eau ou tout autre liquide.
4. Débrancher l’appareil lorsqu’il n’est pas utilisé, laissez refroidir avant d’y placer ou y
retirer des pièces et avant de le nettoyer.
5. NE pas faire fonctionner un appareil dont le l ou la che est endommagé ou après
que l’appareil ait mal fonctionné, qu’il ait été échappé ou endommagé d’une façon
quelconque. Retourner l’appareil au Centre de Service Autorisé Oster® le plus près
aux ns d’inspection, de réparation, de réglage électrique ou mécanique.
6. NEpas l’utiliser à l’extérieur. Cet appareil est conçu pour usage domestique
seulement.
7. NE pas laisser le l pendre de la table ou d’un comptoir et éviter qu’il touche à une
surface chaude.
8. NE pas placer sur ou près d’un poêle chaud ou dans un four chaud.
9. Déplacer un appareil électroménager contenant de I’ huile bouillante ou tout autre
liquide chaud en faisant preuve de la plus grande prudence.
10. NE pas utiliser cet appareil à des ns autres que celles pour lesquelles il est conçu.
11. Soulever et ouvrir le couvercle avec précaution pour éviter tout risque de brûlure et
permettre à l’eau de couler dans l’appareil.
12. NE faites pas fonctionner cet appareil sans que le couvercle ne soit en place sur
l’unité. De la vapeur est produite durant son utilisation.
13. L’utilisation d’accessoires non conseillés ou vendus par le fabricant présente des
risques d’incendie, d’électrocution ou de blessure.
14. Pour débrancher, retirer la che électrique de la prise.
15. Cet appareil n’est pas destiné à être utilisé par des personnes (enfants y compris)
dont les capacités physiques, sensorielles ou mentales sont diminuées, ou qui ne
disposent pas des connaissances ou de l’expérience nécessaire, à moins qu’elles
n’aient été formées et encadrées pour l’utilisation de cet appareil par une personne
responsable de leur sécurité. Les enfants doivent être surveillés pour s’assurer
qu’ils NE jouent PAS avec l’appareil.
16. Les enfants et personnes handicapées doivent être surveillés lorsqu’ils utilisent
l’appareil ou que l’appareil est utilisé à côté d’eux.
CET A PPAREIL EST POUR USAGE DOMESTIQUE SEULEMENT.
Page 9

8
CONSERVER CES INSTRUCTIONS
(Seulement pour appareils de 120 & 127 V avec deux ches plates) Cet appareil a
une che polarisée (l’une des lames est plus large que l’autre). An de réduire le risque
d’électrocution, cette che ne rentre dans la prise polarisée que d’une seule façon. Si
la che ne rentre pas complètement dans la prise, inverser la che. Si la che ne rentre
toujours pas, veuillez contacter un électricien qualié. NE MODIFIER LA FICHE EN
AUCUN CAS.
Si vous utiliser un câble d’alimentation détachable ou une rallonge, ne pas laisser pendre
la rallonge sur le bord d’un plan de travail ou d’une table, un enfant peut tirer dessus ou
s’y accrocher involontairement.
Pour réduire les risques d’enchevêtrement ou de chute, l’appareil est pourvu d’un câble
d’alimentation court.
NE PAS PLONGER LA BASE CHAUFFANTE DU CUISEUR À RIZ DANS L’EAU OU
DANS TOUT AUTRE LIQUIDE!
Page 10

9
1. Couvercle
2. Corps Chauffant
3. Voyant Lumineux cuisson garder a chaud
4. Voyant Lumineux cuisson
5. Interrupteur
6. Cordon d’alimentation électrique
7. Verre Gradué (160 ml)
8. Louche
9. Poignée
10. Récipient Intérieur
11. Plateau de cuisson à la vapeur
1
DESCRIPTION DE L’APPAREIL
2
3
11
4
5
6
7
8
9
10
Page 11

10
MODE D’EMPLOI
AVANT LA PREMIERE UTILISATION
Nettoyez le couvercle en verre, le récipient intérieur et le verre gradué selon les
Instructions Données au Chapitre Entretien.
MODE D’EMPLOI DU CUISEUR DE RIZ
1. Assurez-vous que l’Auto Cuiseur de Riz est bien débranché.
2. Assurez-vous d’utiliser la tasse à mesurer d’une capacité de 160 ml incluse avec
l’appareil.
3. Avec la tasse à mesurer (160 ml) incluse avec l’appareil, verser 1 tasse de riz
normal cru et 2 tasses d’eau. Une tasse de riz cru (160 ml) vous donnera 2 tasses
de riz cuit.
4. Pour du riz complet, verser 1 tasse de riz complet cru (160 ml) et 3 tasses d’eau.
5. La capacité maximum de votre cuiseur riz est de 3 tasses de riz cru (160 ml), ce qui
vous donnera jusqu’à 6 tasses de riz cuit (160 ml).
6. Mettez le bol en place dans l’Auto Cuiseur. Assurez-vous qu’il est en contact avec le
plateau chauffant. Bougez-le de droite à gauche jusqu’à ce qu’il soit bien en place.
7. Mettez le couvercle. L’APPAREIL GÉNÉRANT DE LA VAPEUR, NE L’UTILISEZ
PAS SANS COUVERCLE.
8. Brancher le cordon dans une prise électrique. Appuyer sur le bouton de
commutation pour mettre l’appareil à cuire le riz en marche. S’assurer que le voyant
de <<Marche>>, rouge est allumé.
9. Mélanger le riz. Après 15 minutes de cuisson, enlevez le couvercle en faisant
attention à la vapeur qui s’échappe. Mélangez avec une louche ou une cuiller à long
manche. Remettez le couvercle sur le récipient intérieur.
10. Une fois le riz cuit, l’appareil se mettra automatiquement en fonctionnement au
chaud et le témoin indiquant cette fonction de (chaud,) jaune s’allumera. L’unité
demeurera en fonctionnement au chaud jusqu’à ce qu’elle soit débranchée de la
prise murale.
11. La cocotte conservera automatiquement le riz au chaud à 14O”F- 175°F (6O”C80°C).
12. Lorsque la température du riz descend en dessous de ce niveau, la lampe rouge
s’allumera à nouveau, indiquant que la procédure de conservation de la chaleur a
commencé.
13. Laissez refroidir l’appareil avant de le nettoyer.
14. Débranchez l’appareil après usage.
REMARQUES:
Le riz peut être lavé dans un récipient différent. Pour obtenir un riz plus tendre, mettez
le riz et l’eau dans le récipient intérieur et laissez tremper pendant 10 à 20 minutes
avant de le faire cuire.
Page 12

11
POUR RÉCHAUFFER LE RIZ
Pour réchauffer le riz, mettez 1/4 de tasse (4 cuillers à soupe) d’eau froide par tasse de
riz cuit, mélangez et mettez l’appareil en marche.
Lorsque le riz est chaud, l’appareil se mettra automatiquement sur la position Garder au
Chaud.
UTILISATION DU PLATEAU DE CUISSON À LA VAPEUR
La cuisson des légumes à la vapeur conserve plus d’éléments nutritifs que de faire
bouillir ou de faire cuire au four, tout en préservant la couleur éclatante et naturelle.
1. Préparez les légumes en les lavant, en les pelant et en les coupant en plus petits
morceaux.
2. Assurez-vous que l’unité n’est pas branchée.
3. Remplissez la marmite intérieure avec la quantité d’eau appropriée (Voir le tableau).
4. Insérez la marmite intérieure dans la partie chauffante. Assurez-vous que la marmite
entre directement en contact avec la plaque chauffante.
5. Déposez les légumes dans le plateau de cuisson à la vapeur et placez celui-ci
par-dessus la marmite intérieure. Couvrez à l’aide du couvercle. NE FAITES
PAS FONCTIONNER CETTE UNITÉ SANS COUVERCLE. DE LA VAPEUR EST
PRODUITE DURANT SON UTILISATION.
6. Branchez le cordon électrique dans la prise murale. Démarrez le cuiseur de riz en
abaissant le bouton du commutateur. Assurez-vous que le témoin rouge de cuisson
est allumé.
7. Réglez manuellement la durée de cuisson selon le tableau suivant. L’unité va
automatiquement passer au cycle garde au chaud lorsque toute l’eau s’est évaporée.
Ajoutez plus d’eau si toute l’eau s’est évaporée et que vous désirez prolonger le
cycle de cuisson.
8. Retirez le plateau de cuisson à la vapeur du cuiseur de riz lorsque les légumes sont
cuits à la vapeur selon votre préférence personnelle.
9. Débranchez le cordon de la prise murale et laissez l’unité refroidir parfaitement avant
de la nettoyer.
LÉGUMES QUANTITÉ EAU DURÉE
Fèves vertes 300 g/ 10 onces 50 ml/ 1/3 tasse 30-35 minutes
Brocoli 300 g/ 10 onces 50 ml/ 1/3 tasse 30-35 minutes
Carottes 200 g/ 8 onces 50 ml/ 1/3 tasse 30-35 minutes
Chou-eur 200 g/ 8 onces 50 ml/ 1/3 tasse 30-35 minutes
Maïs (en grain) 300 g/ 10 onces 50 ml/ 1/3 tasse 40-45 minutes
Pois 300 g/ 10 onces 50 ml/ 1/3 tasse 30-35 minutes
Macédoine 300 g/ 10 onces 50 ml/ 1/3 tasse 30-35 minutes
NOTE: Ces durées sont approximatives. Il est recommandé de surveiller le processus
de cuisson à la vapeur et de régler la durée de cuisson selon vos préférences. Remuez
les légumes de temps en temps. Les durées de cuisson à la vapeur peuvent varier
lorsque vous faites cuire du riz.
Page 13

12
ENTRETIEN
Nettoyez l’appareil après chaque utilisation.
1. Retire o Fio da Panela Elétrica de Arroz Multiuso Oster® da tomada quando não
estiver sendo usada ou antes da limpeza. Jamais deixe a Estrutura de Aquecimento
do aparelho imersa em água ou em qualquer outro líquido. Deixe que a Panela
Elétrica de Arroz Multiuso esfrie completamente antes de limpá-la.
2. Não use materiais de limpeza abrasivos, esponjas ou palha de aço para limpar a
Panela Elétrica de Arroz Multiuso.
3. Estrutura de Aquecimento: Limpe suavemente o exterior com um pano ou esponja
macia levemente úmida. Seque bem com um pano macio.
4. Recipiente interno: Encha com água quente e deixe de molho por algum tempo e
então lave com água quente e sabão usando uma esponja secando bem com um
pano. A mesma também pode ser lavada na lava louças.
5. Tampa, Copinho Medidor e Colher Plástica: Lave-os com água quente e sabão.
Enxágüe bem e seque-os. Cuidado: Pegue a tampa com extremo cuidado pois a
mesma ca escorregadia quando molhada.
6. Elemento de Aquecimento: Grãos de arroz ou outros resíduos poderão grudar no
elemento aquecimento do aparelho. Esses resíduos devem ser removidos para evitar
o cozimento inadequado. Para removê-los use uma lixa macia. Passe a lixa e dê um
polimento leve no local até a total remoção dos resíduos para conservar o intacto o
contato entre o elemento de aquecimento e o fundo do Recipiente interno.
7. Não há nenhuma peça dentro do aparelho que possa ser consertada pelo usuário.
Não tente você próprio consertá-lo, pois poderá tornar o aparelho perigoso para o
uso.
Page 14

13
PRECAUCIONES IMPORTANTES
Cuando utilice algún aparato eléctrico siempre debe seguir precauciones básicas de
seguridad, incluyendo las siguientes:
1. LEA TODAS LAS INSTRUCCIONES ANTES DE USAR.
2. NO toque supercies calientes . Use guantes resistentes al calor para quitar la
tapa o al manejar recipientes calientes para evitar quemaduras producidas por el
vapor.
3. Para protegerse contra una descarga eléctrica no sumerja el cordón eléctrico,
enchufe o el cuerpo calefactor en agua u otros líquidos.
4. Desenchufe el electrodoméstico del tomacorriente cuando no lo esté utilizando.
Desenchufe la unidad antes de quitar o colocar piezas y deje que se enfríe antes
de limpiarla.
5. NO opere ningún electrodoméstico que tenga el cordón eléctrico o enchufe dañado,
si la unidad no funciona correctamente o si se ha dañado de alguna manera. Lleve
el electrodoméstico a un Centro Oster® de Servicio Autorizado para que lo revisen,
reparen o ajusten.
6. NO lo utilice al aire libre.
7. NO permita que el cordón eléctrico cuelgue del mostrador o la mesa ni toque
supercies calientes.
8. NO lo coloque cerca o sobre una estufa a gas/ eléctrica o en un horno caliente.
9. Tenga suma precaución al mover el electrodoméstico si contiene agua, alimentos
calientes o cualquier otro líquido caliente.
10. NO utilice el electrodoméstico para un propósito distinto para el cual fue diseñado.
11. Levante y abra la tapa cuidadosamente para evitar quemarse y deje que el agua
gotee hacia la olla Interior.
12. NO utilice este electrodoméstico sin colocar la tapa, pues produce vapor durante su
funcionamiento.
13. El uso de accesorios no recomendados por el fabricante del electrodoméstico
pueden causar heridas.
14. Para desconectar, desenchufe el cordón eléctrico del tomacorriente.
15. Este artefacto eléctrico no está destinado para ser usado por personas
(incluyendo niños) cuyas capacidades físicas, sensoriales o mentales estén
disminuidas, o carezcan de experiencia y conocimiento, a menos que una persona
responsable por su seguridad les haya supervisado o instruido en el uso de este
electrodoméstico. Los niños deberán estar bajo supervisión para cerciorarse de que
NO jueguen con el artefacto eléctrico.
16. Se requiere estricta supervisión cuando las personas discapacitadas o los niños
utilicen cualquier electrodoméstico o estén cerca de él.
ESTA UNIDAD ES SÓLO PARA USO DOMÉSTICO.
Page 15

14
GUARDE ESTAS INSTRUCCIONES
(Únicamente para productos de 120 V y 127 V con dos clavijas planas)
Este artefacto eléctrico cuenta con un enchufe polarizado (una clavija es más ancha
que la otra). Para disminuir el riesgo de descarga eléctrica, este enchufe entrará sólo de
una manera en un tomacorriente polarizado. Si el enchufe no entra por completo en el
tomacorriente, inviértalo. Si aún no encaja, comuníquese con un electricista calicado.
NO MODIFIQUE EL ENCHUFE DE NINGUNA FORMA.
Si se usa un cable de extensión, la capacidad nominal eléctrica del cable de extensión
debe ser igual o mayor que el amperaje que se muestra en el electrodoméstico y el
cordón de extensión debe ser colocado de manera que no cuelgue sobre el borde del
mostrador o mesa donde pueda halarlo un niño o tropezar con él accidentalmente.
Un cordón eléctrico corto se provee con este electrodoméstico para reducir riesgos
resultantes de enredarse o tropezarse.
¡NO SUMERJA EL CUERPO CALEFACTOR DE LA OLLA ARROCERA EN AGUA O
EN NINGUN OTRO TIPO DE LIQUIDO!
Page 16

15
1. Tapa de vidrio
2. Cuerpo calefactor
3. Luz de calentar (amarilla)
4. Luz de cocción (roja)
5. Interruptor de encendido
6. Cordón eléctrico
7. Taza medidora
8. Cucharón
9. Asas
10. Olla interior
11. Bandeja para cocinar al vapor
1
DESCRIPCIÓN DEL ARTEFACTO
2
3
11
4
5
6
7
8
9
10
Page 17

16
INSTRUCCIONES DE USO
LEA ANTES DE USAR SU OLLA ARROCERA OSTER
®
Antes de usar su Olla Arrocera OSTER® por primera vez, limpie la tapa de vidrio, la olla
Interior, el cucharón, la bandeja para cocinar al vapor y la taza medidora de acuerdo
con las instrucciones para el mantenimiento.
1. Asegúrese de que la Arrocera esté desconectada del tomacorriente.
2. Asegúrese de usar la taza medidora que se incluye con la unidad y que tiene una
capacidad de 160 ml.
3. Usando la taza medidora (160 ml) que se incluye con la unidad, coloque 1 taza
medidora de arroz regular sin cocinar y 2 tazas medidoras de agua. Una taza
medidora (160 ml) de arroz sin cocinar producirá dos tazas medidoras de arroz
cocinado.
4. Para arroz integral, coloque 1 taza medidora (160 ml) de arroz integral sin cocinar y
3 tazas medidoras de agua.
5. La máxima capacidad de su olla arrocera es de 3 tazas medidoras (160 ml) de
arroz sin cocinar, lo cual producirá hasta 6 tazas medidoras (160 ml) de arroz
cocinado.
6. Coloque la olla interior del artefacto. Asegúrese de que ésta hace contacto con
el plato calefactor, girándola ligeramente de derecha a izquierda hasta que esté
colocada correctamente.
7. Cubra con la tapa. NO OPERE ESTE ARTEFACTO SIN QUE ESTÉ CUBIERTO
CON LA TAPA. EL VAPOR SE GENERA DURANTE EL USO.
8. Conecte el cordón eléctrico. Encienda la arrocera presionando el interruptor de
encendido hacia abajo. Verique que la luz de cocción (roja) esté iluminada.
9. Después de 15 minutos mezcle el arroz. Levante y abra la tapa cuidadosamente
para evitar quemarse y deje que el agua gotee hacia la olla interior. Use el
cucharón o cualquier otro utensilio con un mango largo para mezclar el arroz.
Después de mezclar, cubra la olla interior con la tapa.
10. Cuando el arroz ya esté cocido, la arrocera automáticamente cambiará a la función
de calentar y la luz de calentar (amarilla) se iluminará. La arrocera permanecerá
calentando hasta que la unidad sea desconectada del tomacorriente.
11. La arrocera mantendrá el arroz caliente a una temperatura de 60 °C – 80 °C (140
°F – 175 °F) automáticamente.
12. Cuando la temperatura del arroz baje de este rango, la luz de calentar (amarilla)
se apagará y la luz de cocción (roja) se encenderá indicando que ha iniciado el
proceso de conservación de calor. Cuando la temperatura del arroz alcanza 140°F,
la luz amarilla se iluminará nuevamente y la luz de cocción (roja) se apagará.
13. Permita que el aparato se enfríe completamente antes de limpiar.
14. Desconecte la arrocera del tomacorriente cuando no la esté utilizando.
NOTAS:
Lave el arroz en un tazón por separado si así lo desea. Para un arroz más suave,
sugerimos que prepare el arroz y el agua en la olla interior y déjelo remojando de 10 a
20 minutos antes de cocinar.
Page 18

17
INSTRUCCIONES PARA RECALENTAR EL ARROZ
Para recalentar arroz frío, agregue 1/4 de taza (4 cucharadas) de agua fría por cada
taza de arroz, revuelva y mezcle, después presione el interruptor de encendido para
cocinar. Cuando el arroz esté caliente, la arrocera automáticamente cambiará a la
función de calentar.
CÓMO USAR LA BANDEJA PARA COCINAR A VAPOR
Los vegetales cocinados al vapor retienen mucho más los nutrientes que los vegetales
hervidos o cocidos y además conservan su color natural.
1. Prepare los vegetales, lávelos bien, pélelos y córtelos en trozos pequeños.
2. Asegúrese de que la arrocera esté desconectada del tomacorriente.
3. Llene la olla interior con la cantidad de agua recomendada (Ver la Tabla).
4. Coloque la olla interior dentro del cuerpo calefactor. Asegúrese de que la olla interior
haga contacto con el plato calefactor.
5. Coloque los vegetales en la bandeja para cocinar a vapor y coloque la bandeja
encima de la olla interior. Cubra con la tapa. NO OPERE ESTE ARTEFACTO SIN
QUE ESTÉ CUBIERTO CON LA TAPA. EL VAPOR SE GENERA DURANTE EL
USO.
6. Conecte la unidad al tomacorriente. Encienda la arrocera presionando el Interruptor
hacia abajo. Verique que la luz de cocción (roja) esté iluminada.
7. Controle manualmente el tiempo de cocción de acuerdo al siguiente cuadro.
La unidad pasará automáticamente al ciclo de mantener caliente al evaporarse toda
el agua. Si toda el agua llega a evaporarse y usted desea los alimentos más cocidos,
agregue más agua.
8. Una vez que los vegetales estén cocidos remueva la bandeja para cocinar al vapor
de la olla interior.
9. Desconecte la arrocera del tomacorriente y permita que se enfríe completamente
antes de limpiar.
VEGETAL CANTIDAD AGUA TIEMPO
Granos Verdes 300 g / 10 onzas 1/3 taza/ 50 ml 30-35 minutos
Brócoli 300 g/ 10 onzas 1/3 taza/ 50 ml 30-35 minutos
Zanahoria 200 g/ 8 onzas 1/3 taza/ 50 ml 30-35 minutos
Colior 200 g/ 8 onzas 1/3 taza/ 50 ml 30-35 minutos
Maíz (Grano) 300 g/ 10 onzas 1/3 taza/ 50 ml 40-45 minutos
Guisantes 300 g/ 10 onzas 1/3 taza/ 50 ml 30-35 minutos
Espinaca 150 g/ 5 onzas 1/3 taza/ 50 ml 20-30 minutos
Vegetales Mixtos 300 g / 10 onzas 1/3 taza/ 50 ml 30-35 minutos
NOTA: Estos tiempos son aproximados. Es recomendable que usted supervise el
proceso de cocción al vapor y ajuste los tiempos de acuerdo a su preferencia. De vez
en cuando, revuelva los vegetales durante el proceso de cocción. Al cocinar el arroz, el
tiempo para cocer al vapor puede variar.
Page 19

18
INSTRUCCIONES PARA EL MANTENIMIENTO
Limpie la Arrocera después de cada uso.
1. Desconecte la Arrocera del tomacorriente cuando no la esté utilizando y antes de
limpiarla. ¡Nunca sumerja el cuerpo calefactor en agua o en ningún otro líquido!
Permita que la arrocera se enfríe antes de limpiarla.
2. No use limpiadores abrasivos, esponjas de metal o lana para limpiar la arrocera.
3. Cuerpo calefactor: limpie ligeramente el exterior con un paño o esponja húmedos.
¡No sumerja el Cuerpo Calefactor en agua o en ningún otro líquido! Seque bien con
un paño suave.
4. Olla Interior: llene con agua caliente y permita que esté así un tiempo, después lave
con agua caliente jabonosa y una esponja; seque bien con un paño. También puede
lavarse en lavaplatos.
5. La Tapa, la Taza Medidora, el Cucharón y la Bandeja para Cocinar al Vapor: lave
en agua tibia jabonosa. Enjuague bien y seque. PRECAUCIÓN: maneje la tapa con
extremo cuidado, puede resbalarse cuando está mojada. También puede lavarse en
lavaplatos.
6. Plato Calefactor: granos de arroz y otros objetos extraños pueden pegarse al plato
calefactor. Estos deben ser removidos para prevenir un funcionamiento inadecuado al
cocinar. Para remover arroz cocido, un papel con lija suave puede usarse. Suavice y
elimine los residuos para que la Olla Interior y el plato calefactor estén en contacto al
cocinar.
7. No hay partes que usted pueda reparar dentro de la Arrocera. No intente reparar este
electrodoméstico ya que puede ser peligroso.
Page 20

19
PRECAUÇÕES IMPORTANTES
Ao usar seu eletrodoméstico ou qualquer outro aparelho elétrico deve-se seguir as
seguintes medidas de precauções básicas:
1. LEIA TODAS AS INTRUÇÕES ATENTAMENTE ANTES DE USAR.
2. NÃO toque em superfícies quentes . Use um pano ou uma agarradeira
resistente ao calor para tirar a tampa ou ao mover algum recipiente quente para
evitar queimaduras ocasionadas pelo vapor.
3. Para evitar risco de choque elétrico, NÃO submergir o o, a tomada ou a estrutura
de aquecimento em água ou qualquer outro líquido.
4. Desligue o aparelho da tomada, sempre que o mesmo não estiver em uso. Desligue
da tomada e deixe esfriar antes de colocar ou retirar peças no eletrodoméstico e
antes de limpá-lo.
5. NÃO use nenhum eletrodoméstico que tenha o o ou o plugue danicado, após
ter apresentado algum defeito ou após ter caído no chão. Leve-o a um Centro de
Serviço Autorizado Oster® para que seja revisado ou reparado.
6. NÃO use o aparelho ao ar livre.
7. NÃO deixe o o pendurado para fora da mesa ou superfície onde o aparelho estiver
sendo usado, ou em contato com superfícies quentes.
8. NÃO coloque o aparelho em cima ou perto de um fogão elétrico ou a gás, nem
sobre um forno quente.
9. Tenha extremo cuidado quando ao mover este eletrodoméstico se o mesmo estiver
com alimentos ou líquidos quentes dentro.
10. NÃO utilize este eletrodoméstico para outros ns que não sejam aqueles para os
quais o mesmo foi projetado.
11. Levante e retire a Tampa com cuidado para evitar queimaduras e deixe que a água
escorra dentro do recipiente interno.
12. NÃO utilize este eletrodoméstico sem que a tampa esteja colocada sobre a
recipiente interno, pois uma vez em funcionamento o mesmo produzirá vapor.
13. O uso de peças de reposição não recomendadas pelo fabricante, podem causar
fogo, descargas elétricas ou acidentes.
14. Para desconectar, remova o plugue da tomada elétrica.
15. Este aparelho elétrico não está destinado a ser usado por pessoas (incluindo
crianças) cujas capacidades físicas, sensoriais ou mentais estejam reduzidas ou
careçam de experiência e conhecimento necessários para utilizá-lo, a menos que
uma pessoa responsável por sua segurança tenha supervisionado ou instruído
quanto ao uso deste eletrodoméstico. As crianças deverão estar sob supervisão
para garantir que NÃO brinquem com o aparelho elétrico.
16. É necessária a estrita supervisão quando se utilize o eletrodoméstico próximo a
crianças ou pessoas incapacitadas.
ESTE APARELHO É SOMENTE PARA USO DOMÉSTICO.
Page 21

20
GUARDE ESTAS INSTRUÇÕES
(Somente para produtos de 120V & 127V com dois pinos planos) Este aparelho
elétrico conta com uma tomada polarizada (uma ponta é mais larga que a outra). A m
de reduzir o risco de descarga elétrica, este plugue entrará somente em um sentido
numa tomada elétrica polarizada. Caso plugue deste aparelho não entre completamente
na tomada elétrica, deve-se inverter o sentido. Caso, ainda assim não encaixe,
comunique-se com um eletricista qualicado. NÃO TENTE MODIFICAR A TOMADA DE
NENHUMA FORMA.
Caso seja necessário utilizar um o de extensão, a capacidade elétrica nominal do o
de extensão deve ser a mesma do produto. O o de extensão deve ser colocado de
maneira que não que pendurado no borda do balcão ou mesa onde alguém ou uma
criança possa tropeçar acidentalmente.
Como medida de segurança, o aparelho possui um o elétrico curto para prevenir o risco
de tropeços, que seja tirado da tomada ou que alguém se enrosque.
NÃO SUBMERGIR NA ÁGUA OU EM OUTRO LÍQUIDO A ESTRUTURA DE
AQUECIMENTO DA PANELA ELÉTRICA DE ARROZ!
Page 22

21
1. Tampa de vidro
2. Estrutura de aquecimento
3. Luz de manter quente (amarela)
4. Luz de cozinhar (vermelha)
5. Botão para ligar
6. Fio elétrico
7. Copinho medidor (160 ml)
8. Colher plástica
9. Alças
10. Recipiente interno
11. Bandeja para cozinhar ao vapor
1
DESCRIÇÃO DO APARELHO
2
3
11
4
5
6
7
8
9
10
Page 23

22
MODE D’EMPLOI
ANTES DE USAR PELA PRIMEIRA VEZ
Limpe a tampa de vidro, o recipiente interno, a colher de plástico, o copinho medidor
e a bandeja para cozinhar ao vapor conforme indicado nas instruções de manutenção
para usuário.
INSTRUÇÕES DE USO DA PANELA ELÉTRICA DE ARROZ MULTI-USO
1. Certique-se de que o aparelho esteja desconectado da tomada.
2. Use o copinho medidor que vem com o aparelho, que tem 160 ml de capacidade.
3. Usando o copinho medidor (160 ml) que vem com o aparelho, coloque 1 copinho de
arroz regular cru e 2 copinhos de água. Um copinho (160 ml) de arroz cru renderá
dois copinhos de arroz cozido.
4. Para preparar arroz integral, coloque 1 copinho (160 ml) de arroz integral cru e 3
copinhos de água.
5. A capacidade máxima de sua panela elétrica de arroz é de 3 copinhos (160 ml) de
arroz cru, que rendem até 6 copinhos (160 ml) de arroz cozido.
6. Coloque o recipiente interior dentro da panela elétrica de arroz. Certique-se de que
o recipiente interno esteja em contacto com o elemento de aquecimento, girando
ligeiramente da direita para a esquerda até que que colocado corretamente.
7. Cubra com a tampa. NÃO UTILIZE O APARELHO SEM A TAMPA POIS O MESMO
PRODUZ VAPOR DURANTE O FUNCIONAMENTO.
8. Ligue o o à uma tomada. Ligue o aparelho pressionando o botão. Certique-se de
que a luz de cozinhar (vermelha) esteja acesa.
9. Após 15 minutos, misture o arroz. Levante e abra a tampa com cuidado para não
se queimar com o vapor e deixe que a água formada pelo vapor goteje dentro do
recipiente interno. Use a colher plástica ou outro utensílio de cabo comprido para
mexer. Após misturar cubra o recipiente interno com a tampa.
10. Quando o arroz estiver cozido, a panela elétrica de arroz mudará automaticamente
para a função de manter quente e a luz de manter quente (amarela) se acenderá. A
panela elétrica de arroz continuará mantendo o arroz quente até que a mesma seja
desligada da tomada.
11. A panela elétrica de arroz multiuso manterá o arroz aquecido a 140°F – 175°F
(60°C – 80°C) automaticamente.
12. Quando a temperatura do arroz car abaixo destas temperaturas, a luz de cozinhar
(vermelha) se acenderá, indicando que o processo de preservação de aquecimento
foi iniciado. Quando a temperatura do arroz chegar outra vez a 140°F (60°C), a luz
de manter quente (amarela) acenderá novamente e a luz de cozinhar se apagará.
13. Deixe que o aparelho esfrie completamente antes de limpá-lo.
14. Retire o o da tomada quando o aparelho não estiver sendo usado.
OBSERVAÇÕES:
Lave o arroz medido em uma tigela separada, se desejar. Para que obtenha um arroz
mais macio, sugerimos que coloque o arroz e a água no recipiente interno e deixe de
molho de 10 a 20 minutos antes de cozinhar.
Page 24

23
INSTRUÇÕES SOBRE COMO REQUENTAR O ARROZ
Para requentar o arroz cozido, coloque 1/4 de xícara (4 colheres de sopa) de água fria
para cada xícara de arroz cozido, misture e em seguida ligue o aparelho.
Quando o arroz estiver quente, o aparelho passa automaticamente para a função de
manter quente.
COMO USAR A BANDEJA PARA COZINHAR A VAPOR
Os vegetais cozidos no vapor retém muito mais os nutrientes do que os vegetais
fervidos ou assados, além de conservar sua cor natural.
1. Prepare os vegetais, lave-os bem, retire a casca e corte em pedaços pequenos.
2. Certique-se de que o aparelho esteja desligado da tomada.
3. Encha o recipiente interno com a quantidade de água recomendada (Veja a Tabela).
4. Coloque o recipiente interno dentro da estrutura de aquecimento do aparelho.
Certique-se de que o recipiente interno esta em contato direto com o elemento
aquecedor do aparelho.
5. Coloque os vegetais dentro do bandeja para cozinhar ao vapor e coloque-a dentro
do recipiente interno. Coloque a tampa. NÃO OPERE ESTE APARELHO SEM A
TAMPA POIS O MESMO PRODUZ VAPOR DURANTE O FUNCIONAMENTO.
6. Ligue o o na tomada. Ligue a panela elétrica de arroz pressionado o botão para
baixo. Certique-se que a luz de cozinhar (vermelha) esteja ligada.
7. Controle o tempo de cozimento manualmente, usando a tabela abaixo. O aparelho
irá automaticamente mudar para o ciclo de manter quente assim que toda a água
evaporar. Caso toda a água já tiver evaporado e você deseje os alimentos ainda
mais cozidos, adicione mais água.
8. Quando os vegetais estiverem cozidos, retire a bandeja para cozinhar ao vapor do
recipiente.
9. Desligue o aparelho da tomada e deixe-o esfriar antes de limpá-lo.
LEGUME QUANTIDADE ÁGUA TEMPO
Vagem 10 onças/ 300 g 1/3 xícaras/ 50 ml 30-35 minutos
Brócolis 10 onças/ 300 g 1/3 xícaras/ 50 ml 30-35 minutos
Cenoura (Em fatias) 8 onças/ 200 g 1/3 xícaras/ 50 ml 30-35 minutos
Couve-or 8 onças/ 200 g 1/3 xícaras/ 50 ml 30-35 minutos
Milho (Em grãos) 10 onças/ 300 g 1/3 xícaras/ 50 ml 40-45 minutos
Ervilhas 10 onças/ 300 g 1/3 xícaras/ 50 ml 30-35 minutos
Espinafre 5 onças/ 150 g 1/3 xícaras/ 50 ml 20-30 minutos
Vegetais Mistos 10 onças/ 300 g 1/3 xícaras/ 50 ml 30-35 minutos
OBSERVAÇÃO: Estes tempos são aproximados. Recomenda-se a supervisão do
processo de cozimento ao vapor para ajuste dos tempos de acordo com a preferência.
De vez em quando, mecha os vegetais durante o processo de cozimento.
Quando estiver cozinhando arroz, o tempo de cozimento ao vapor poderá variar.
Page 25

24
INSTRUÇÕES SOBRE MANUTENÇÃO
PARA O USUÁRIO
Este aparelho deve ser limpo sempre que for usado.
1. Débranchez l’appareil lorsque vous ne l’utilisez pas ou avant de le nettoyer
N’immergez pas le corps chauffant dans l’eau ou dans tout autre liquide. L’appareil
doit être complètement refroidi avant de le nettoyer.
2. N’utilisez pas de détergents abrasifs, de tampons de récurage ou de laine d’acier.
3. Corps Chauffant: Nettoyez légèrement l’extérieur avec un chiffon ou une éponge
humide. N’immergez pas l’appareil dans l’eau ou dans tout autre liquide! Séchez avec
un chiffon doux.
4. Récipient Intérieur: remplissez le récipient avec de l’eau, laissez tremper puis lavez
à l’eau savonneuse chaude à l’aide d’une éponge. Essuyez minutieusement avec un
torchon.
5. Couvercle, verre gradué et louche: Lavez à l’eau savonneuse chaude. Rincez
minutieusement. ATTENTION: Le couvercle doit être manipulé avec précaution car il
peut glisser lorsqu’il est humide.
6. Plaque chauffante, thermostat: les grains de riz, morceaux de légumes, etc. qui
peuvent coller à la plaque chauffante doivent absolument être enlevés pour assurer
une bonne cuisson. II est possible d’enlever le riz cuit avec du papier-émeri très
n. Polissez la tache an d’assurer un bon contact entre la plaque chauffante et le
dessous du récipient intérieur.
7. Aucune pièce intérieure ne peut être réparée par l’utilisateur. N’essayez pas de
réparer l’appareil sous peine de rendre son utilisation dangereuse. Pour toute
réparation, veuillez-vous adresser à un service après-vente agréé.
Page 26

© 2011 Sunbeam Products, Inc. All rights reserved. Distributed by Sunbeam Latin America, LLC,
5200 Blue Lagoon Drive, Suite 470, Miami, FL 33126.
One year limited warranty – please see insert for details.
© 2011 Sunbeam Products, Inc. Tout droit réservé. Distribué par by Sunbeam Latin America, LLC,
5200 Blue Lagoon Drive, Suite 470, Miami, FL 33126.
Une année de garantie limitée – veuillez lire le feuillet sur la garantie pour plus de détails.
© 2011 Sunbeam Products, Inc. Todos los derechos reservados. Distribuido por Sunbeam Latin
America, LLC, 5200 Blue Lagoon Drive, Suite 470, Miami, FL 33126.
Garantía limitada de un año – por favor consulte los detalles en el inserto.
© 2011 Sunbeam Products, Inc. Todos os direitos reservados. Distribuído pela Sunbeam Latin
America, LLC, 5200 Blue Lagoon Drive, Suite 470, Miami, FL 33126.
Garantia limitada de um ano – para maiores detalhes, consulte o certicado.
Printed in China Imprimè en Chine Impreso en China Impresso na China
P.N. 147836
CBA -041311
OLLA ARROCERA OSTER
®
MODELOS: 4722, 4722-013,
CKSTRC4723, CKSTRC4723-013
LEA EL INSTRUCTIVO ANTES DE USAR EL APARATO
LA SIGUIENTE INFORMACION ES PARA MEXICO
IMPORTADOR: SUNBEAM MEXICANA, S.A. DE C.V.
AV. JUÁREZ No. 40-201,
EX–HACIENDA DE SANTA MÓNICA,
TLALNEPANTLA, ESTADO DE MÉXICO,
C.P. 54050, R.F.C. SME570928G90, TEL. 53660800
PAÍS DE ORIGEN: CHINA
PAÍS DE PROCEDENCIA: CHINA, E.U.A.
CONTENIDO: 1 PIEZA
CARACTERÍSTICAS ELÉCTRICAS
60 Hz 120 V 350 W
 Loading...