

Page 1
INSTRUCTIONS FOR O.S. TYPE 3H AUTOMATIC CARBURETTOR
This new carburettor incorporates an automatic mixture control device which ensures that the engine receives a
correctly balanced mixture of fuel and air at all throttle settings. The device progressively reduces the effective size
of the fuel jet orifice as the throttle is closed, thereby preventing the engine from running too rich at low speeds. This
also means that an airbleed is no longer required and, with its elimination, maximum suction is maintained at the fuel
jet at all times. This is a most important factor where manoeuvres have to be executed at low engine speeds and
through wide variations of fuel level within the fuel tank.
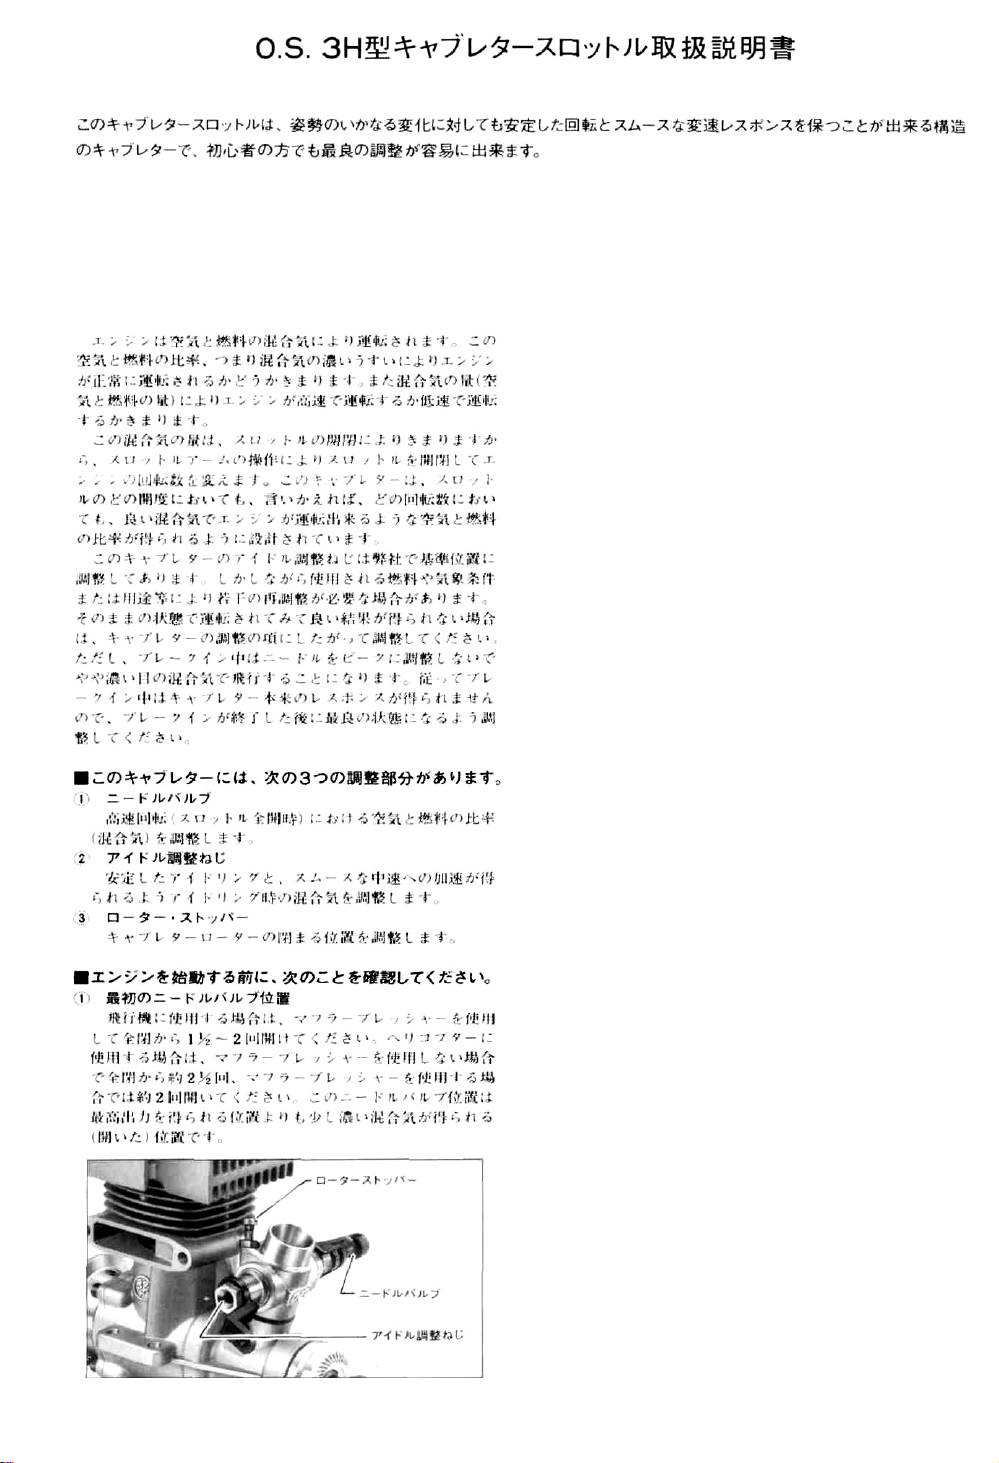
Three adjustable controls are provided on this carburettor
• The Needle-Valve: For adjusting the mixture strength
when the throttle is fully open.
• The Mixture Control Screw: For manually adjusting the
automatic mixture control valve in order to obtain a
stable idle and a smooth transition through the medium
speed range.
• The Throttle Stop Screw: For setting the position where
the carburettor rotor is closed.
Note: The Mixture Control Screw has been factory set for
the approximate best result. However, different fuels
and/or climatic conditions may necessitate minor
compensatory adjustment. Therefore, first run the
engine as received and re-set the Mixture Control
Screw only if necessary.
PROVISIONAL SETTINGS
Before starting the engine, check that the controls are set as
follows:
1) In the case of a fixed-wing aircraft, use a muffler pressurized fuel feed, and open the Needle-Valve 1 1/2 to
2 turns from the fully closed position. For helicopter
use, open the Needle-Valve 2 1/2 turns (or 2 turns if a
muffler-pressurized fuel feed is used) from the fully
closed position.
2) Make sure that the Throttle Stop Screw is set, in conjunction with the throttle lever linkage, so that (a) the throttle
rotor is fully open when the transmitter throttle stick is
fully advanced and (b) that the throttle rotor is fully
closed when both the throttle'stick and throttle trim lever
are fully pulled back.
Throttle Rotor Set-Screw
Needle Valve
Mixture Control
Screw
ADJUSTMENT (HELICOPTERS)
In helicopter flight, throttle response at medium revolutions
(i.e. hovering speeds) is most important, since this is a speed
range widely used in helicopter flight. The optimum mixture
at mid range will be obtained with a balanced adjustment of
both the Needle-Valve and the Mixture Control Screw.
A — Low Speed Performance — Mixture Control Screw
1) Start the engine with the transmitter throttle stick in the
closed position and the throttle trim lever set at the mid
position.
2) Adjust the throttle trim so that the highest possible idling
r.p.m. are obtained without actually engaging the clutch.
3) Now increase engine r.p.m. by means of the throttle stick
until the helicopter just 'floats' above the ground, allow
the engine to warm up for about 10 seconds, then gradually reduce r.p.m. and allow the engine to idle for about 5
seconds.
4) Repeat, several times, this procedure of increasing r.p.m.
so that the model 'floats' after idling for 5 seconds on the
ground. While doing this, carefully observe the exhaust
smoke and the behaviour of the engine. If, as the throttle
is opened, the engine tends to hesitate and to run with a
low-pitched exhaust note and an excess of exhaust smoke,
the mixture is too rich.
Page 2

If, on the other hand, when the throttle is opened, there
is a marked lack of exhaust smoke and the engine quickly
speeds up but runs 'hard', with a higher pitched exhaust
note and a tendency to overheat, the mixture is too lean.
5) If the mixture is too rich. turn the Mixture Control
Screw clockwise 45 degrees. If, on the other hand, the
mixture is too lean, turn the Mixture Control Screw
counter-clockwise about 90 degrees, then turn it clock-
wise 45 degrees.
Turn the Mixture Control Screw 30 to 45 degrees at a time in
the early stages. When the response improves, turn the Mixture Control Screw 10 to 15 degrees at a time. Carry out
adjustments progressively and patiently, remembering the
symptoms of rich and lean running, quoted above, until the
engine responds quickly and positively to the throttle.
B — High Speed Performance — Needle-Valve
The optimum Needle-Valve setting is usually 1/2 turn (or 1/4
turn if a muffler pressurized fuel feed is used) closed from
the starting position [i.e. 2 1/2 turns open (or 2 turns open if
a muffler-pressurized fuel feed is used) from the fully closed
position]. The precise setting depends on (a) the individual
characteristics of the helicopter and its engine/muffler installation, (b) the fuel used and (c) atmospheric conditions.
The Needle-Valve should be gradually closed until the highest
performance is obtained in flight at full power.
However, take care not to close the needle-valve to too lean a
setting and risk overheating the engine, in the pursuit of
maximum performance.
C — Mid-Range Performance — Throttle Response
As previously stated, in helicopter flight, throttle response at
medium (hovering) speeds — i.e. engine speeds widely used in
helicopter flight — is most important. If the Mixture Control
Screw (low speed) and Needle-Valve (high speed) are proper-
ly balanced, the mixture will be correct, also, through the
medium speed range. If, however, minor readjustments prove
to be necessary for the best possible throttle response, proceed
as indicated by the following symptoms and required corrective action:
1) If the mixture at mid-range is lean, gradually increased
engine speed is accompanied by diminished exhaust
smoke and a high-pitched exhaust note if hovering is
prolonged. In extreme cases, the engine will overheat
and lose speed, so that hovering cannot be maintained.
In this event, open the Needle-Valve 15 to 30 degrees and
turn the Mixture Control Screw 30 to 45 degrees counter-
clockwise.
2) If the mixture at mid-range is too rich, positive and quick
throttle response will not be obtained, the exhaust smoke
will be dense and the exhaust note will be lower, probably
accompanied by fuselage vibration.
In this event, close the Needle-Valve 30 to 60 degrees and
turn the Mixture Control Screw 45 to 90 degrees clock-
wise.
Note: It is most important to make the Needle-Valve adjust-
ment in small increments of not more than 15—30
degrees and the Mixture Control Screw adjustment not
more than 30 — 45 degrees as advised, when seeking
optimum
adjustment will upset either (A) Low-Speed Performance or (B) High-Speed Performance. Carry out readjustments patiently until the best balance of idling,
hovering and high-speed performance is achieved and
the engine responds quickly and positively to the
throttle control.
Throttle response at hovering speeds is also affected
by the relationship of the main rotor pitch angle to
throttle opening. If the optimum mid-range throttle
response cannot be obtained by the carburettor adjustments described above, try adjusting the helicopter's
pitch control characteristics.
mid-range
throttle
response.
Excessive
re-
Page 3

ADJUSTMENT (FIXED-WING AIRCRAFT)
1. Start the engine and, with the throttle fully open, gradually close the Needle-Valve until it is running at its maximum speed.
Caution: Do not close the Needle-Valve to too "lean" a
2. Having set the Needle-Valve as detailed above, close the
Note 1 If the engine stops when the transmitter throttle
Note 2 As previously stated, the Mixture Control Screw is
setting as this will cause the engine to overheat
and slow up. Set the Needle-Valve very slightly
to
the
"rich"
Make sure that the engine is fully "broken-in"
side of the
(about 1 hour of total running time in short runs)
before operating it continuously at full throttle.
throttle. The engine should idle continuously and steadily
without further adjustment.
(a) If, however, the engine begins to idle unevenly, open
the throttle. If the engine then hesitates before picking up to full speed, it is probable that the idling
mixture is too rich. Check this by closing the throttle
again and letting the engine idle for a little longer
before again opening up. If the engine now puffs out
a good deal of smoke and hesitates or even stops, it
will be necessary to close the Mixture Control Screw.
Do this by turning it clockwise: about 10~20 degrees
should be sufficient.
(b) If instead of being set too rich, the Mixture Control
Screw is set too lean, the engine will stop when the
throttle is closed, or will lose speed while idling and
then cut-out abruptly (without smoking) when the
throttle is opened again. In this case, turn the Mixture
Control Screw counter-clockwise about 90 degrees,
then turn it clockwise slowly to find the best setting.
Mixture Control Screw adjustment is not critical and
by remembering the symptoms of rich and lean run-
ning quoted above, it is a very simple matter to
establish the best setting.
stick is fully pulled back, advance the throttle trim
lever so that the idling speed is slightly raised. Do
not change the Needle-Valve setting.
pre-set before the engine leaves the factory. If the
original setting is lost, it may be reestablished as
follows: 1. Close the throttle completely. 2. Screw
in the Mixture Control Screw carefully until it
stops. 3. Unscrew the Mixture Control Screw
exactly 2 1/2 turns.
peak
r.p.m. setting.
CARBURETTOR CLEANLINESS
The correct functioning of the carburettor depends on its
small fuel orifices remaining clear. The minute particles of
foreign matter that are present in any fuel, can easily partially obstruct these orifices and upset mixture strength so that
engine performance becomes erratic and unreliable.
O.S. 'Super-Filters'
extras, to deal with this problem. One of these filters, fitted
to the outlet tube inside your refueling container, will prevent the entry of foreign material into the fuel tank. It is also
recommended that a good in-line filter be installed between
the tank and carburettor.
Do
not
forget
lint that accumulate on the filter screens. Also, clean the
carburettor itself occasionally.
If, despite the use of filters, foreign matter should reach the
carburettor, causing it to malfunction, it should be carefully
dismantled and cleaned as follows:
1. Remove complete carburettor from engine. Clean off any
external dirt.
2. Remove throttle stop screw.
3. Withdraw rotor from carburettor body, taking care not to
lose the rotor spring placed behind rotor.
to
(large
clean
and
small)
the
filters regularly
are
available,
to
as
remove
optional
dirt
and
Page 4

4. Remove needle from needle-valve assembly, followed by
hexagonal retaining nut and ratchet spring. Now push
nozzle unit through body from outside.
5. Remove fuel inlet nipple.
6. Immerse parts in solvent (e.g. gasoline, alcohol or carbontetrachloride) and clean thoroughly.
7. Re-assemble in reverse order. Note that periphery of
nozzle flange is specially shaped to key into carburettor
body.
Note:
This carburettor
is
fitted
with a short
tubular
seal
(2.5
mm
bore, 5.0 mm outer dia., 7 mm length) between the needle
and body to prevent air leakage into, or fuel leakage from,
the needle-valve. When the seal becomes worn or damaged
after a long period of use, replace with the spare seal provided, or cut a short piece of silicone fuel tubing as a replacement.
PARTS LIST
Description
Throttle lever assembly
Throttle lever assembly
Throttle lever fixing screw
Throttle lever
Throttle lever
Mixture control screw
"0" ring
Throttle rotor
Rotor spring
Carburettor body
Throttle stop screw (w/nut)
Nipple (w/washer)
Carburettor rubber gasket
Carburettor fixing screws
Needle valve assembly
Needle
Set-screw
Nozzle assembly
Ratchet spring
"0" ring
The specifications are subject to alteration for improvement without notice
c°,8=]-h
Code No.
22981400
22781401
22781420
22981410
22781411
22981600
22781800
22981200
22481506
22981100
22681306
22681953
22615000
23081706
22981900
45181973
26381501
22981960
22611302
24881824
6-15 3-chome Imagawa Higashisumiyoshi-ku
Osaka 546, Japan TEL (06) 702-0225
© Copyright 1992 by O.S. Engines Mfg. Co., Ltd. All rights reserved. Printed in Japan.
FAX (06)704-2722
109301
 Loading...