

Oregon Scientific JW3800, JW5200, JW5800, HY3800, JW4500 Assembly Manual
...
Original instructions
Petrol chainsaw
Guide for models - JW3800, JW4500, JW5200, JW5800
HY3800, HY4500, HY5200, HY5800
SLYD38, SL-YD45, SL-YD5200B, SL-YD58
Assembly / Operation Manual
©Trueshopping LTD Issue 01/MC

BOX CONTENTS –
MAIN ENGINE UNIT x1
2
GUIDE BAR x1 (Size/brand
may differ by model)
GUIDE BAR COVER x1
SAW CHAIN x1
TOOL KIT
FUEL BOTTLE

CONTENTS
l number information - Front Cover
Mode
Important safety information -
l mix and Fuelling 5
Fue
• Fuelling and first use preperation 5
• Idling speed adjustment 6
Assembling your chainsaw 6
• Attaching the chain spike 6
• Attaching the bar, chain and chain brake 7
St
arting your chainsaw 10
rating the chainsaw 11
Ope
• Chainsaw kickback 11
Fe
lling a tree 12
bing a tree 13
Lim
Buc
king a tree 13
Maintenance 13
a,b,4
hain oil 14
• C
• Changing oil supply 14
• Air filter 14
• Sprocket 14
• Saw chain 14
• Spark plug test / exchange 15
Fa
ult identification 18
l information 20
Mode
Ce
rtification Inside back cover
Warnings on the Machine and their
Model Information (location
and type differs by model)
Pull Direction
Fuel mix warning
information
Power/choke
Machine Noise level
Priming bulb information
Chain brake on/off
Meanings
information
Important
information
! Use
protection
IMPORTANT SAFETY INFORMATION
• Please note that the cutting blade
• Do not lend or rent your power tool
• Persons with pacemakers only: The
• Do not use a pressure washer to clean
• Do not spray the machine with water.
Suitable face/hearing/head
! Read the Manual
! Warning
! Kickback warning
! Handle with care
continue to run for a short period
after you let go of the throttle trigger
–This is called the flywheel effect.
without the instruction manual. Be
sure that anyone using your power
tool understands the information
contained in this manual.
ignition system of your power tool
produces an electromagnetic field of a
very low intensity. This field may
interfere with some pacemakers.
Consult your doctor if you have
concerns.
your power tool. The solid jet of water
may damage parts of the power tool.
a.

• Work calmly and carefully – in
daylight conditions and only when
visibility is good. Stay alert so as not
to endanger others.
• Your power tool produces toxic
exhaust fumes as soon as the engine
is running. These fumes may be
colourless and odourless and contain
unburned hydrocarbons and benzoyl.
Never run the engine indoors or in
poorly ventilated locations.
• The dusts, vapour and smoke
produced during operation may be
dangerous to health. If the work area
is very dusty or smoky, wear
appropriate safety equipment.
• If your power tool is subjected to
unusually high loads for which it was
not designed (e.g. heavy impact or a
fall), always check that it is in good
condition before continuing work
• When working at heights:
– Always use a lift bucket
– Never work on a ladder or in a tree
– Never work on an insecure support
– Never operate your power tool with
one hand.
Be alert and cautious when wearing hearing
protection, your ability to hear warnings
(alarms, etc.) is restricted.
b.
IMPORTANT SAFETY INFORMATION
4
General
! This product must only be operated by competent
persons.
Maintenance
! Do not perform maintenance / repairs unless they are
outlined in this guide or you are given additional detailed
instructions from the manufacturer
! Do not perform repairs while the unit is still hot
! Do not smoke or use this product on or near sources of
combustion.
! Wear suitable safety equipment (Goggles, non-slip boots,
ear plugs and thick work gloves) at all times while
handling this product
! Do not operate while under the influence of alcohol or
any substance which may impair your physical function
and alertness
! If you sell or lend out this unit, please ensure that this
manual and all relevant documentation is sold along with
it
! This unit is not to be operated, loaned or sold to any
persons under the age of 18
! Empty all fuel from the unit before attempting
maintenance
! Unless otherwise required, ensure the chain bar cover is
in place when performing maintenance
! Place the unit on a flat solid surface when performing
maintenance or repair
Usage
! Before operation, always inspect the machine for
signs of damage and wear
! Before starting the engine, make sure that the saw
chain is not touching anything
! Ensure that people and animals are at a safe
distance of at least 10m
! Keep clear of the saw chain at all times as it will
start to rotate when the engine starts
! If felling a tree, take note of the diagram (fig1.)
opposite to give you the best understanding of your
situation
General
! This product must only be operated by competent
persons.
! Do not smoke or use this product on or near sources of
combustion.
! Wear suitable safety equipment (Goggles, non-slip boots,
ear plugs and thick work gloves) at all times while
handling this product
! Do not operate while under the influence of alcohol or
any substance which may impair your physical function
and alertness
! If you sell or lend out this unit, please ensure that this
manual and all relevant documentation is sold along with
it
! This unit is not to be operated, loaned or sold to any
persons under the age of 18
! For your own safety, limit the amount of time you
use the machine continuously to 10 min sessions
taking a break of 10- 20 minutes in between. Try to
keep the total amount of work in a single day to 2
hour sessions.
! This product will produce Carbon Monoxide when
in use, DO NOT use indoors
! Do not operate while tired as your attention will
be reduced, the user is liable for any injury caused
to others
! Do not leave this product unattended at any time
! Do not operate in adverse weather or any
other conditions that may make use of this
product unsafe
! Clearly mark out your working area with a
suitable barrier (Tape / Rope)
! Shut the unit down when not in use

FUEL MIX AND FUELLING
5
Mix a regular grade petrol (LEADED OR
UNLEADED, ALCOHOL FREE) and a good quality
motor oil designed for air cooled 2 cylinder
engines.
RECOMMENDED MIXING RATIO PETROL
25
:1 OIL
When us
ing for the first time, remember that
engine problems can be caused by using an
incorrect fuel mix or using the wrong type of
petrol / oil
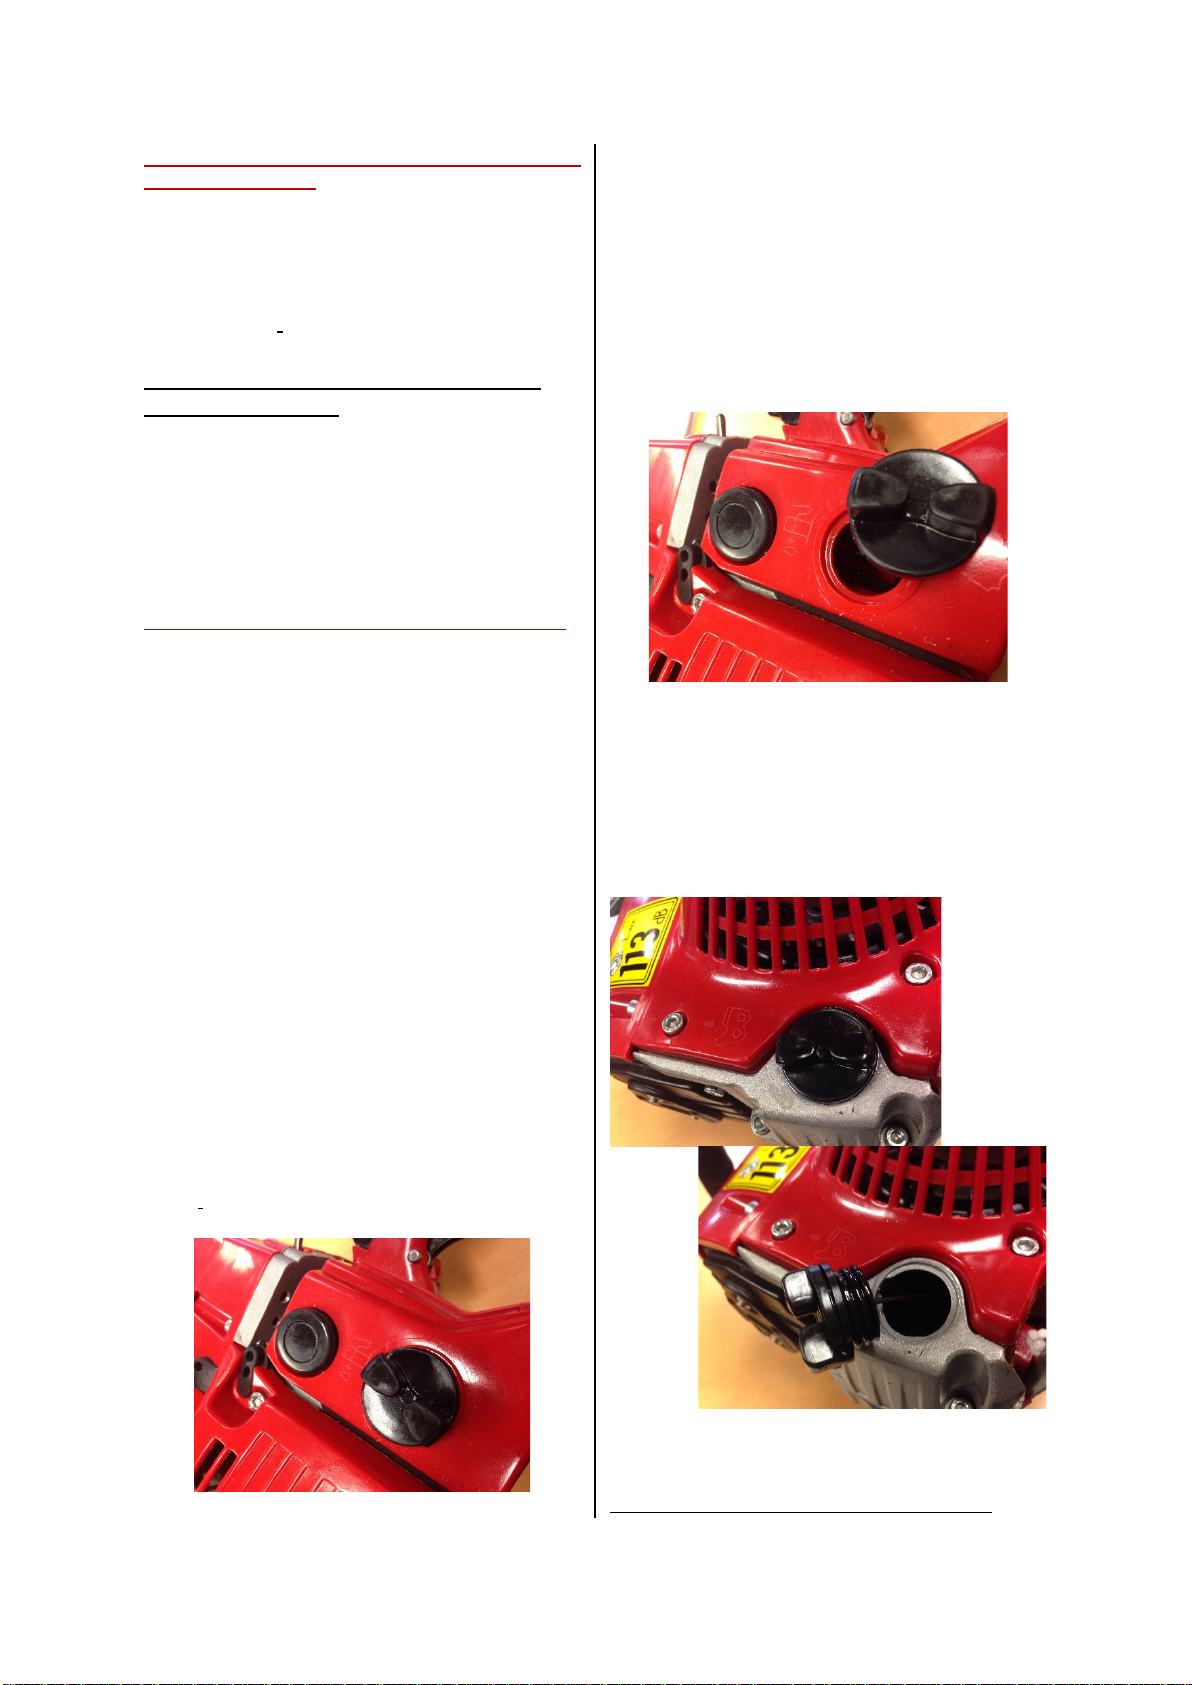
Fuelling and first use preparation
The petrol cap is clearly marked on the unit.
tate the cap Anti clockwise to release and add
Ro
your fuel mix to the engine. Then replace the
cap and rotate clockwise until secured tightly.
! When refuelling the tank ensure the engine is
off and check your surroundings for signs of
danger (open flames, sparks).
! Use a dry rag to mop up any spillages
! After refuelling carry the product away from
the refuelling location before use.
*Please note that the correct fuel mix ratio is
printed on the label located in the handle area
e chainsaw must be tipped on its side
Th
filling, not doing this will cause the fuel
overspill. To prevent spillage a small
when
tank to
funnel can
be used.
Ch
ain oil should be added to the unit before
use. It can be topped up as required.
Re
move the chain oil cap (shown below) by
turning the cap anti-clockwise.
first
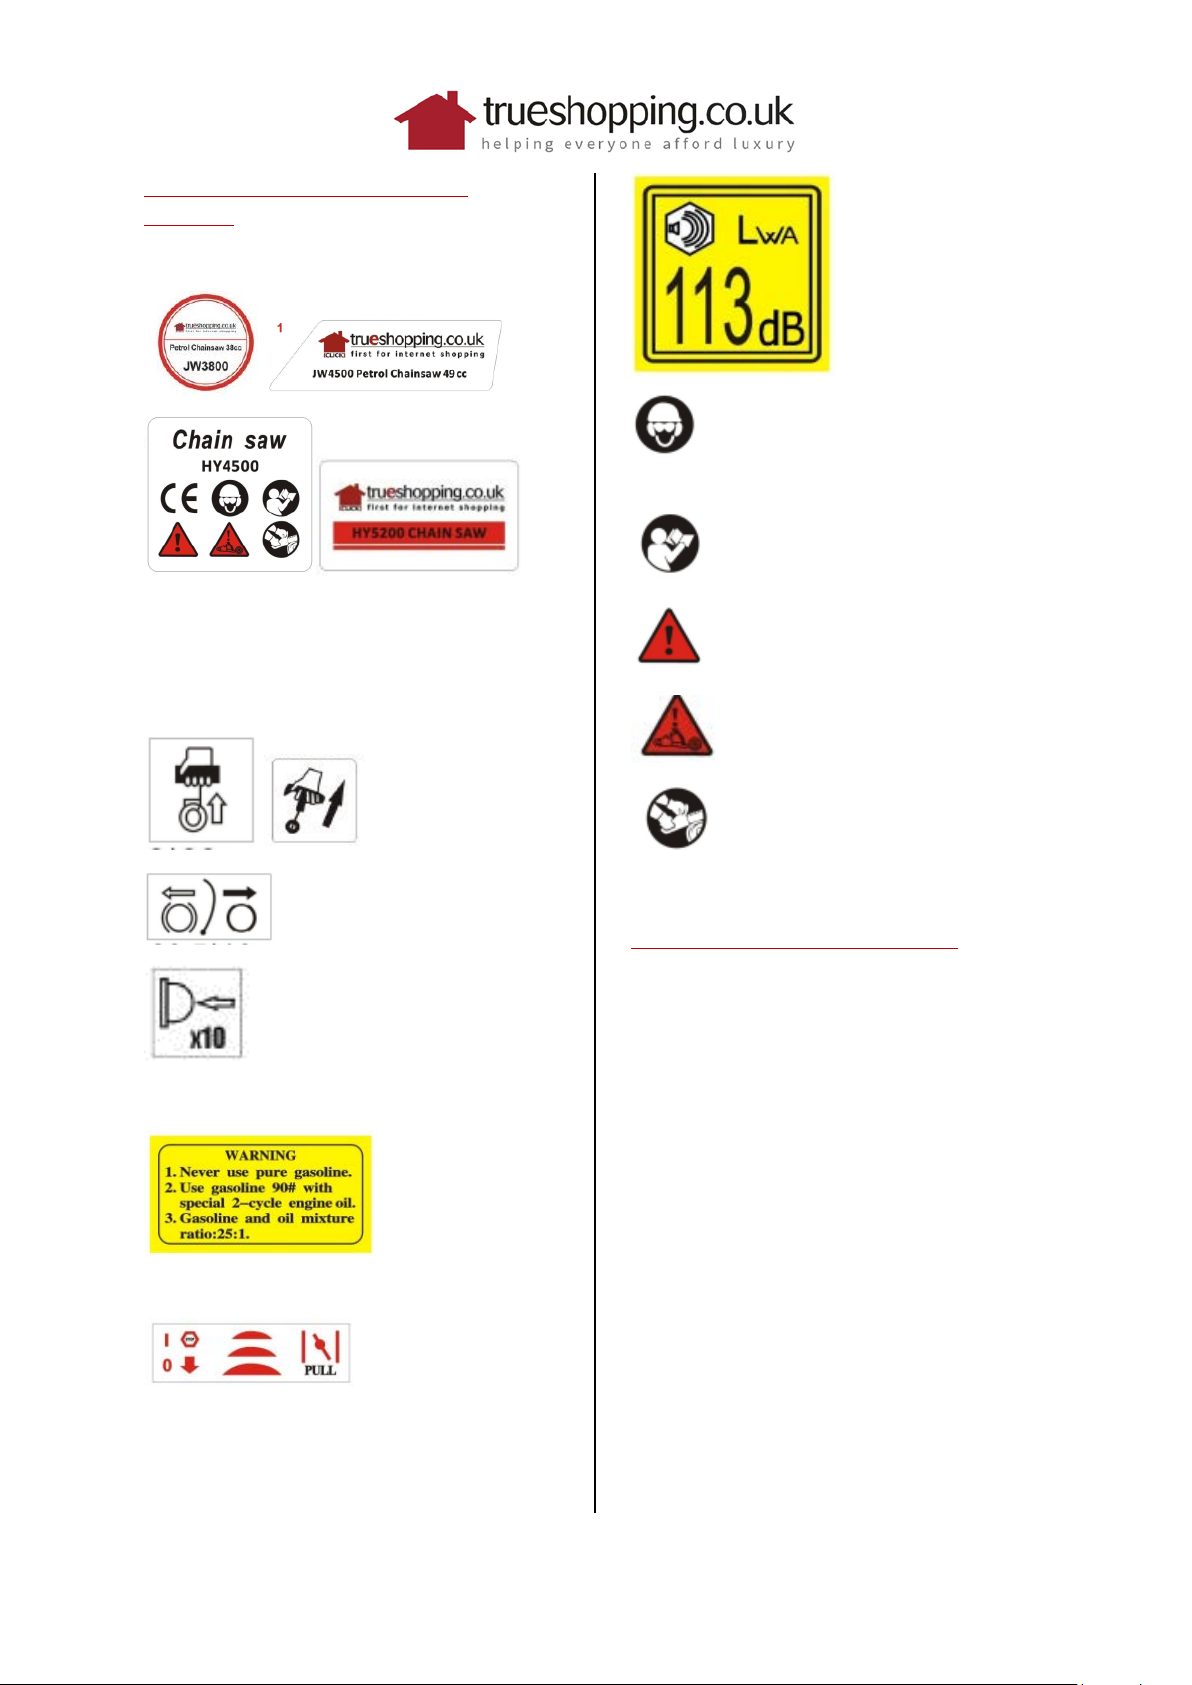
On the underside of the unit is the screw for
6
adjusting the flow of oil to the chain.
*The l
ocation of this screw may differ
dependent on model, the image below shows
the two possible locations.
justment can be made as shown on the
Ad
etching on the plastic.
Assembling your chainsaw
! Before you begin assembly, ensure that you
have accounted for all parts in the box, if
anything is missing, please contact the
manufacturer to advise.
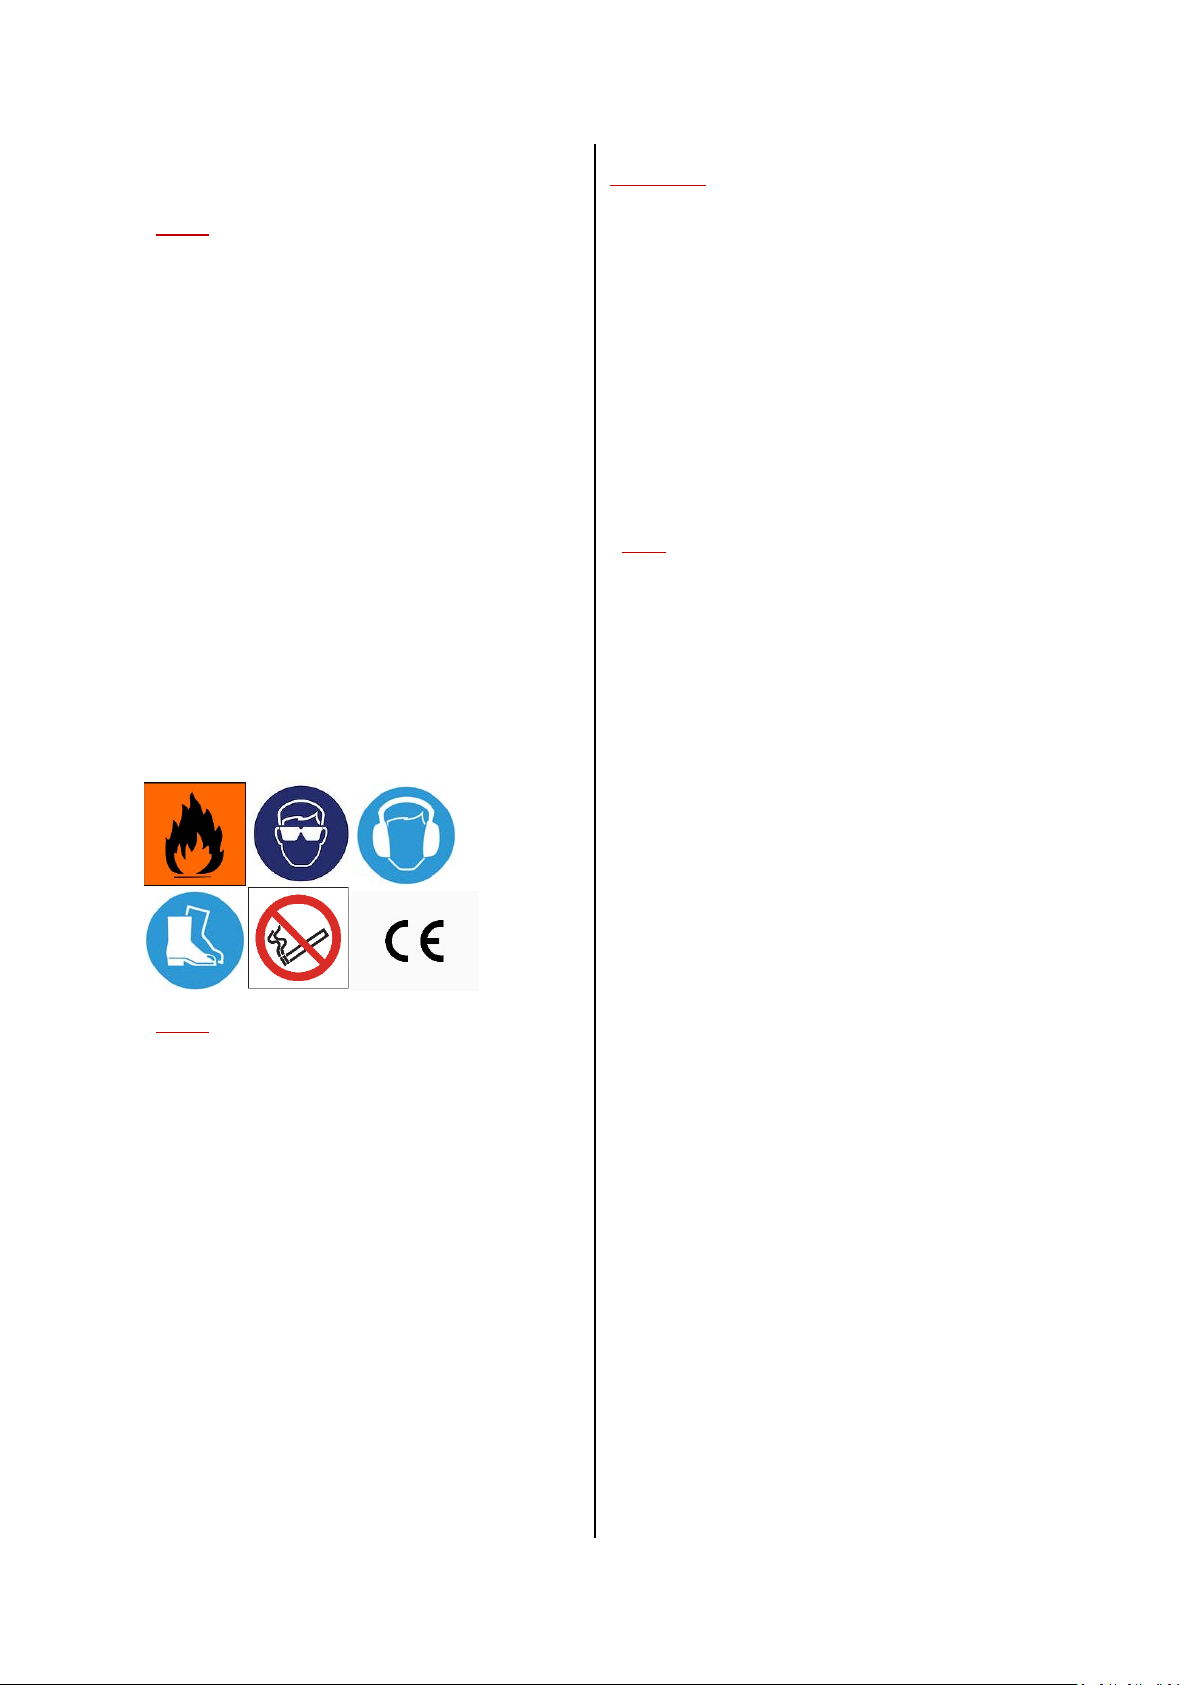
Idling speed adjustment
The following information shows how to adjust
the idling speed of the engine (the speed the
engine runs at when not cutting)
*Pl
ease note that a Carburetor adjusting tool is
required to perform this adjustment (not
provided)
As
a general guide colder working temperature
may require you to adjust for a higher idling
speed
just the idle speed Turn the low
To ad
screw (L) fully clockwise until it will no
longer move , then perform one full
turn anti - clockwise . Repeating this
with the high screw (H) will take the
carburettor back to factory settings.
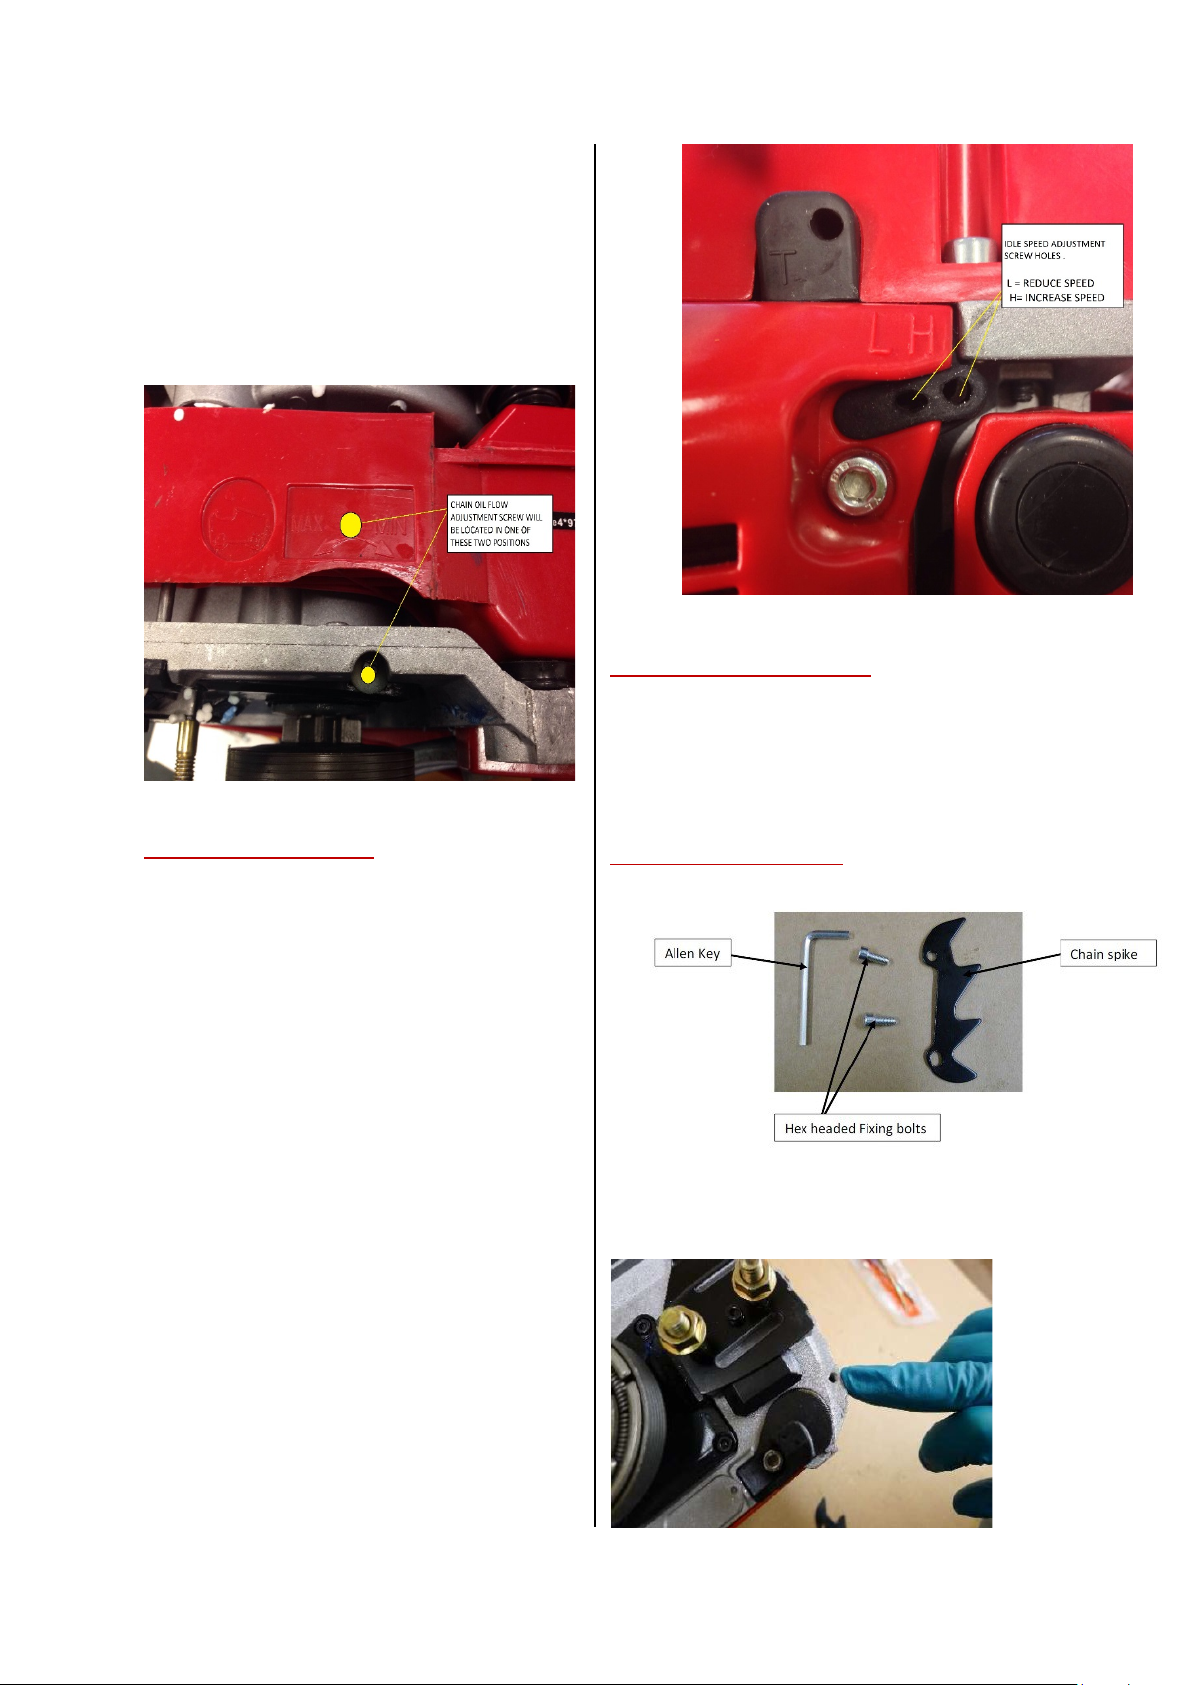
Attaching the chain spike
e the chain spike onto the engine body and
Plac
fasten in place as shown –
Attaching the Bar , chain and chain brake to the
7
engine
Carefully remove the chain from the bag and
spread it out on a flat surface.
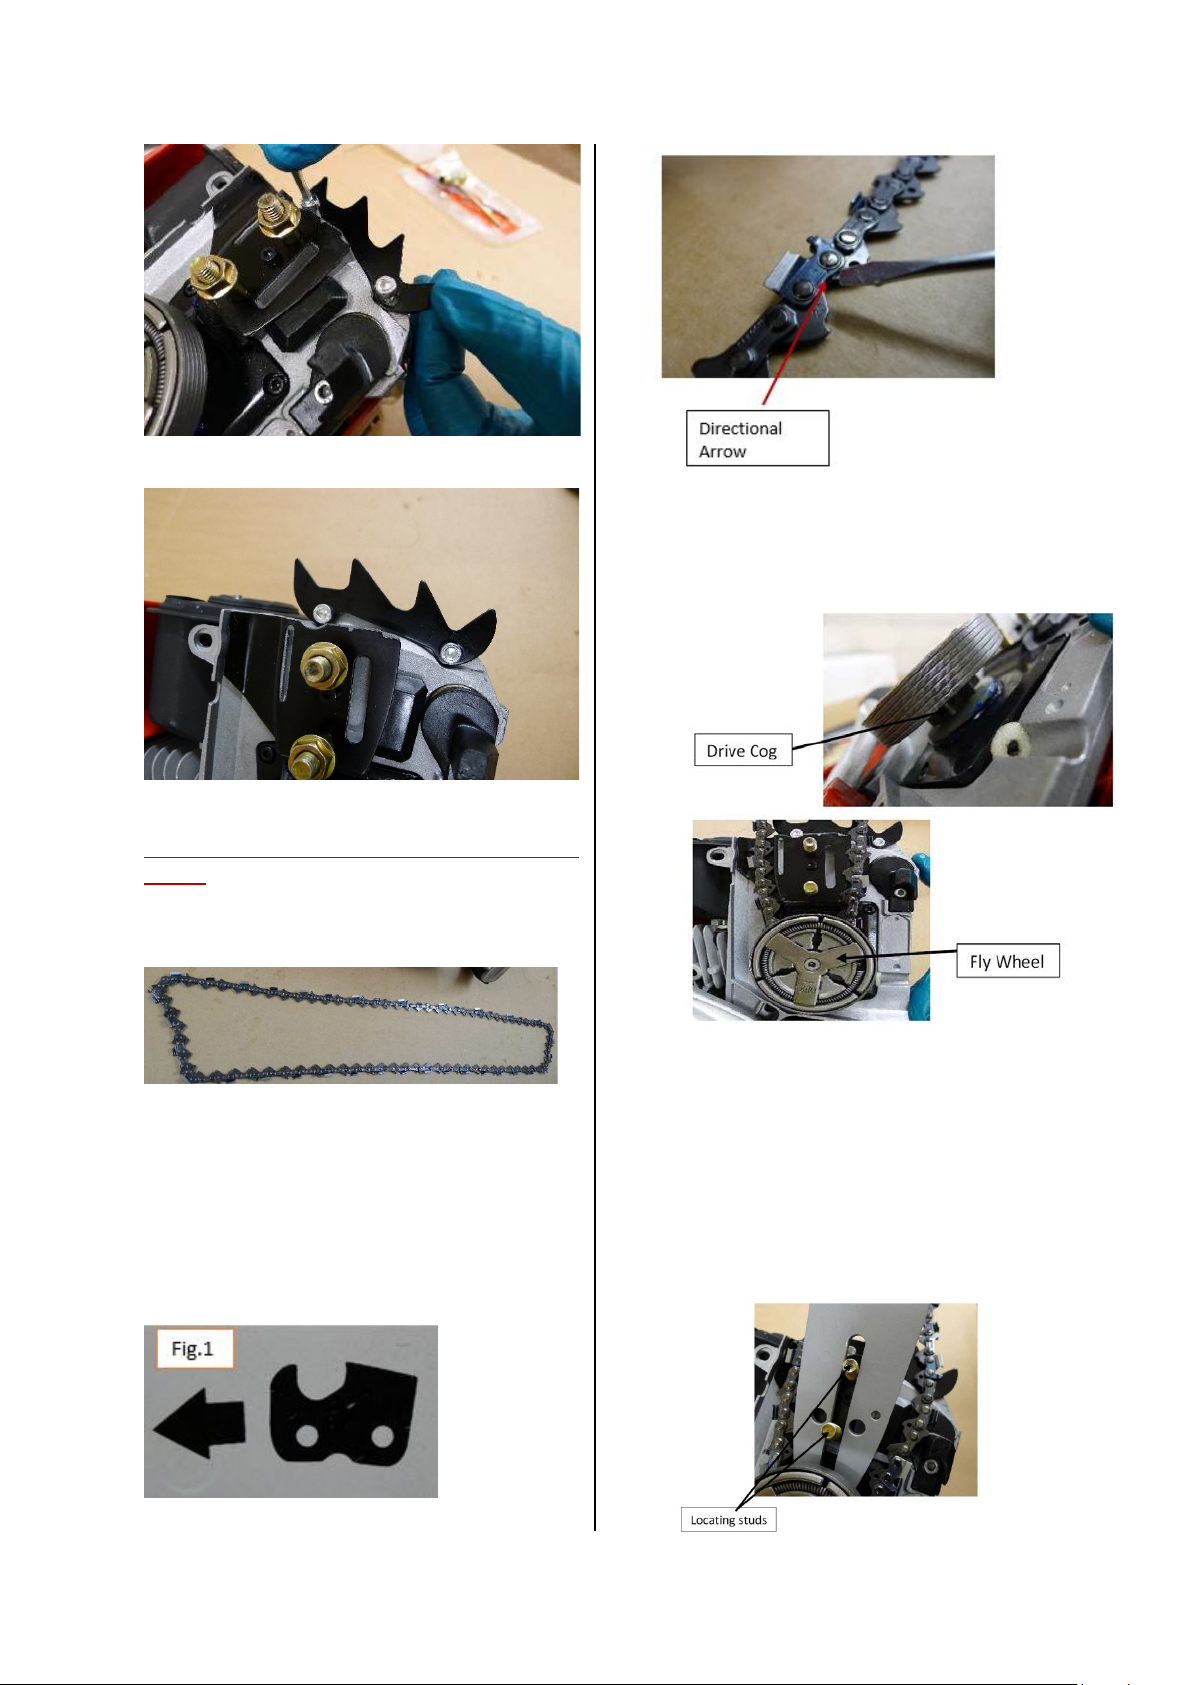
fore continuing note the directional arrow on
Be
the chain link, once attached to the chain bar
this arrow should be pointing away from the
main unit along the top of the bar, and towards
the unit along the bottom of the chain bar. The
chain bar also shows the direction of travel for
the chain (see fig 1.)
The chain should now be attached to the
drive cog that is located beneath the
flywheel.
Plac
e the Chain Bar onto the main unit at an
angle over the two locating studs and carefully
push the Chain into the groove around the
edge of the bar, once the chain is in place along
the top of the Chain, gently pull the chain bar
away from the main unit, this will relieve some
of the slack on the chain allowing you to push it
in place along the bottom of the bar.
*The c
8
hain may hang loose from the underside
of the bar when the unit is Horizontal (see
image below), this will be rectified later.
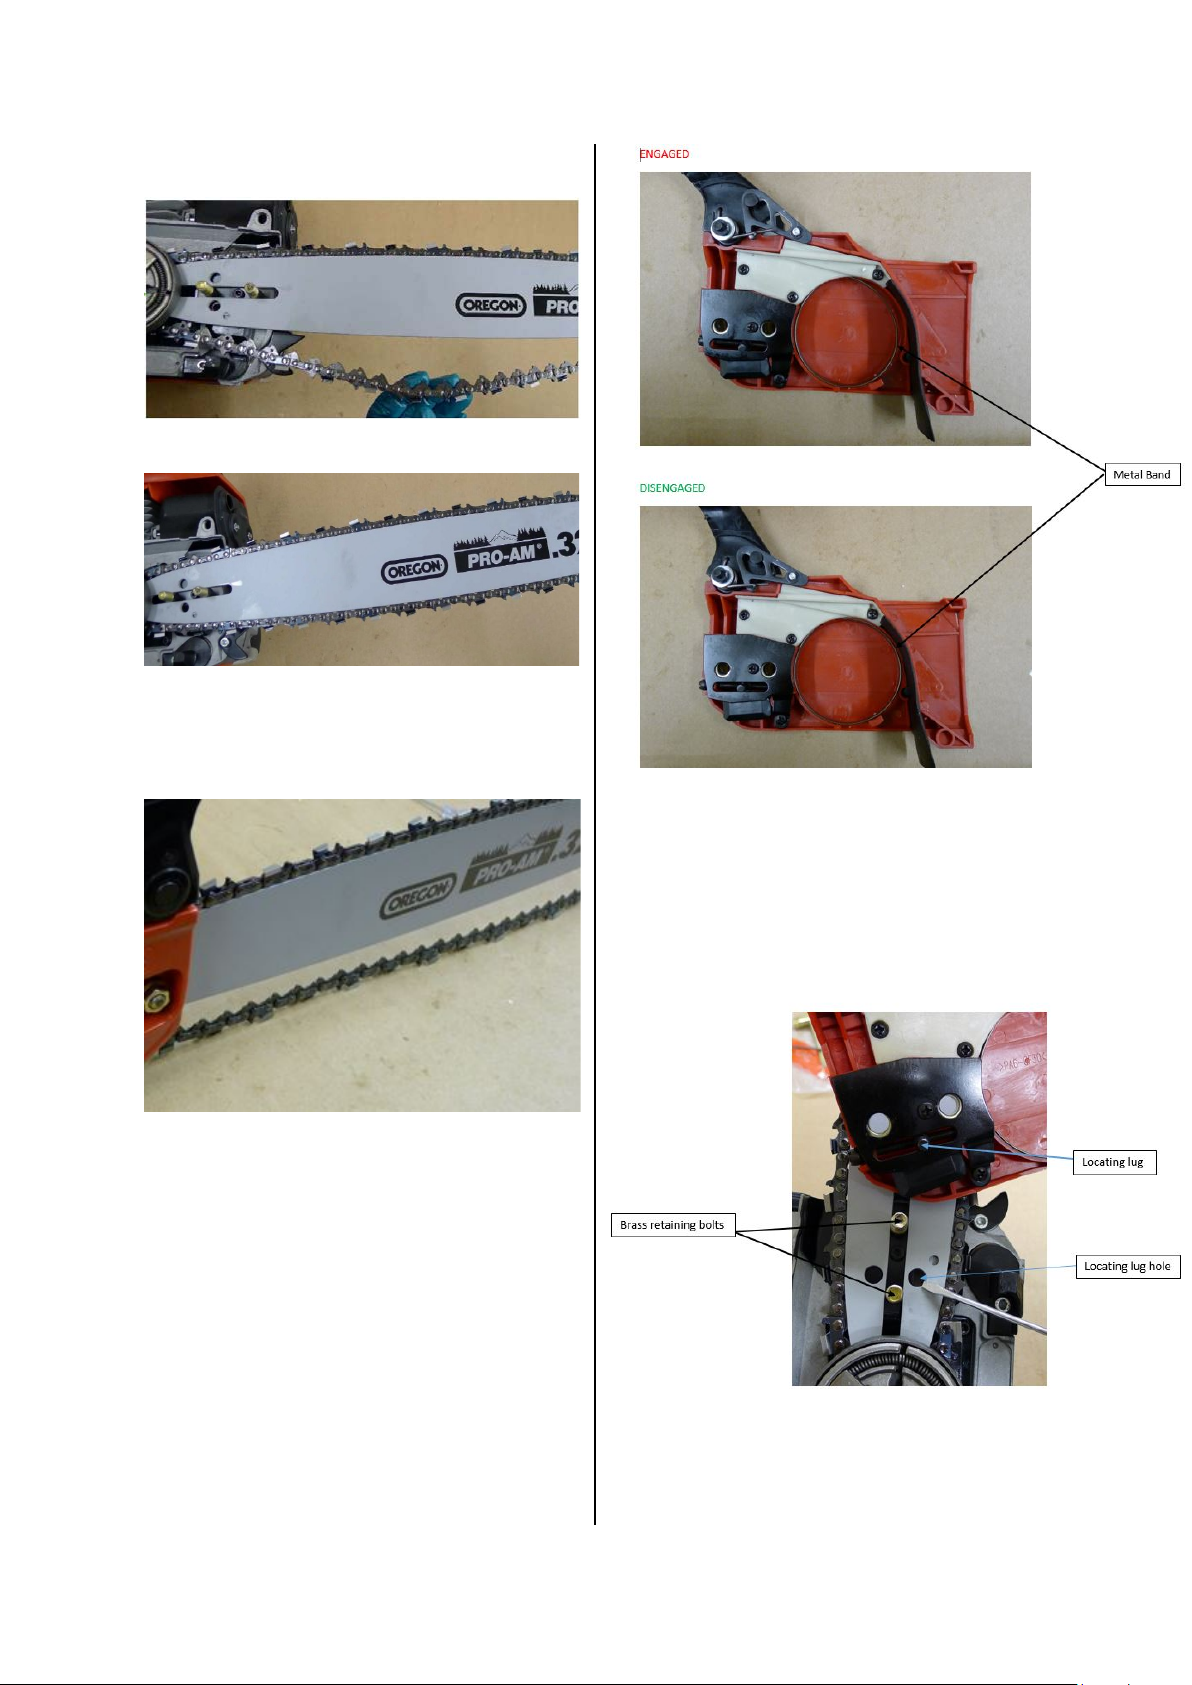
t, we will attach the chain brake.
Nex
Be
fore doing this we need to ensure that the
Chain Brake is disengaged, note the location
of the metal band in the images overleaf for
the correct position. If engaged pull back on
the Guard/Lever to Disengage an audible click
will be heard when done correctly .
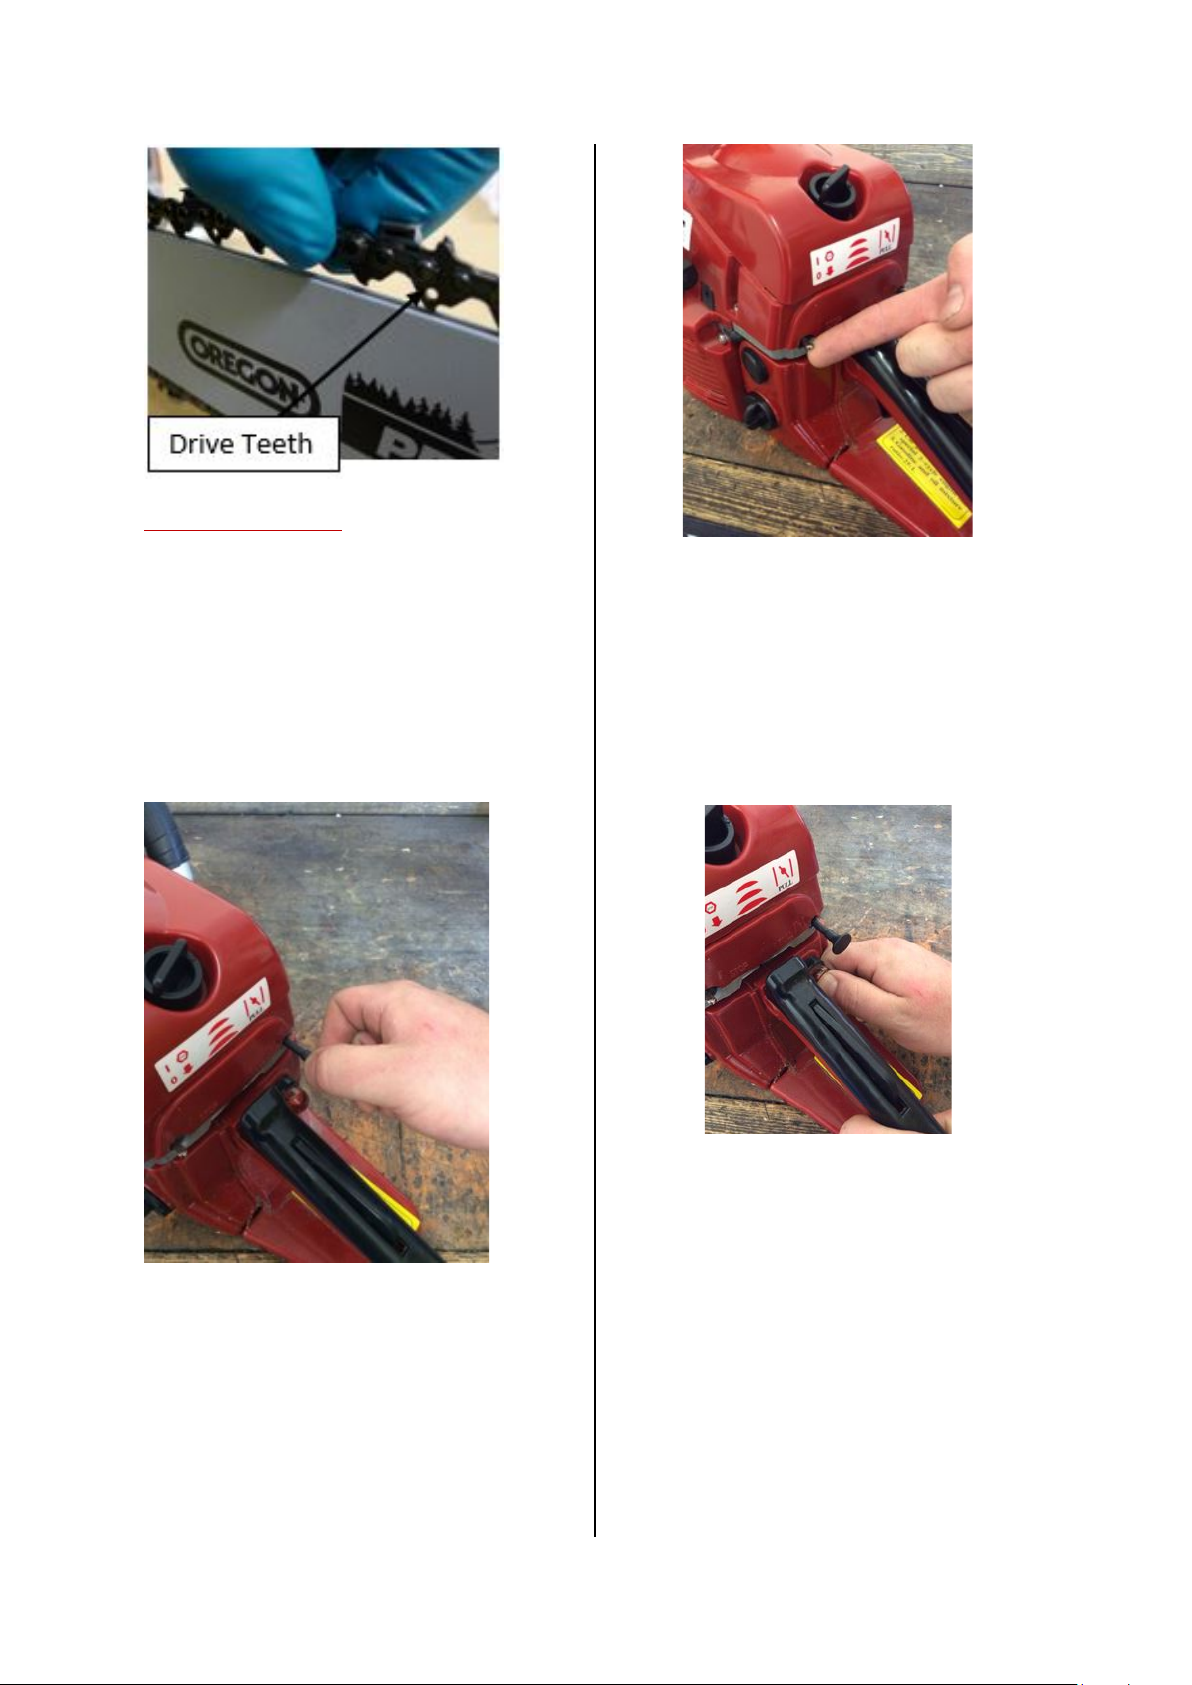
The next step is to line the two holes on the chain
brake with the two brass retaining bolts on the
main unit. Once done, push the chain break in
place. You will notice that it does fully locate onto
the unit, as the locating lug on the chain brake
needs to be adjusted to fit into the corresponding
hole on the chain bar.
(Please see the section at the end of the
guide Re: Chain brake removal)
e Locating lug can be moved by turning the
Th
adjustment screw on the chain brake, either
clockwise to move the locating lug, toward the

back of the chainsaw or anti-clockwise to move
9
the locating lug to the front of the chainsaw, to
line up the locating lug with the locating lug hole
in the chain bar, using the flat blade screw
driver, or the box spanner/screw driver,
whichever is the easiest, until the locating lug
falls into the locating lug hole. *Adjustment
screw is on the side of chain brake on 58cc
Model
No
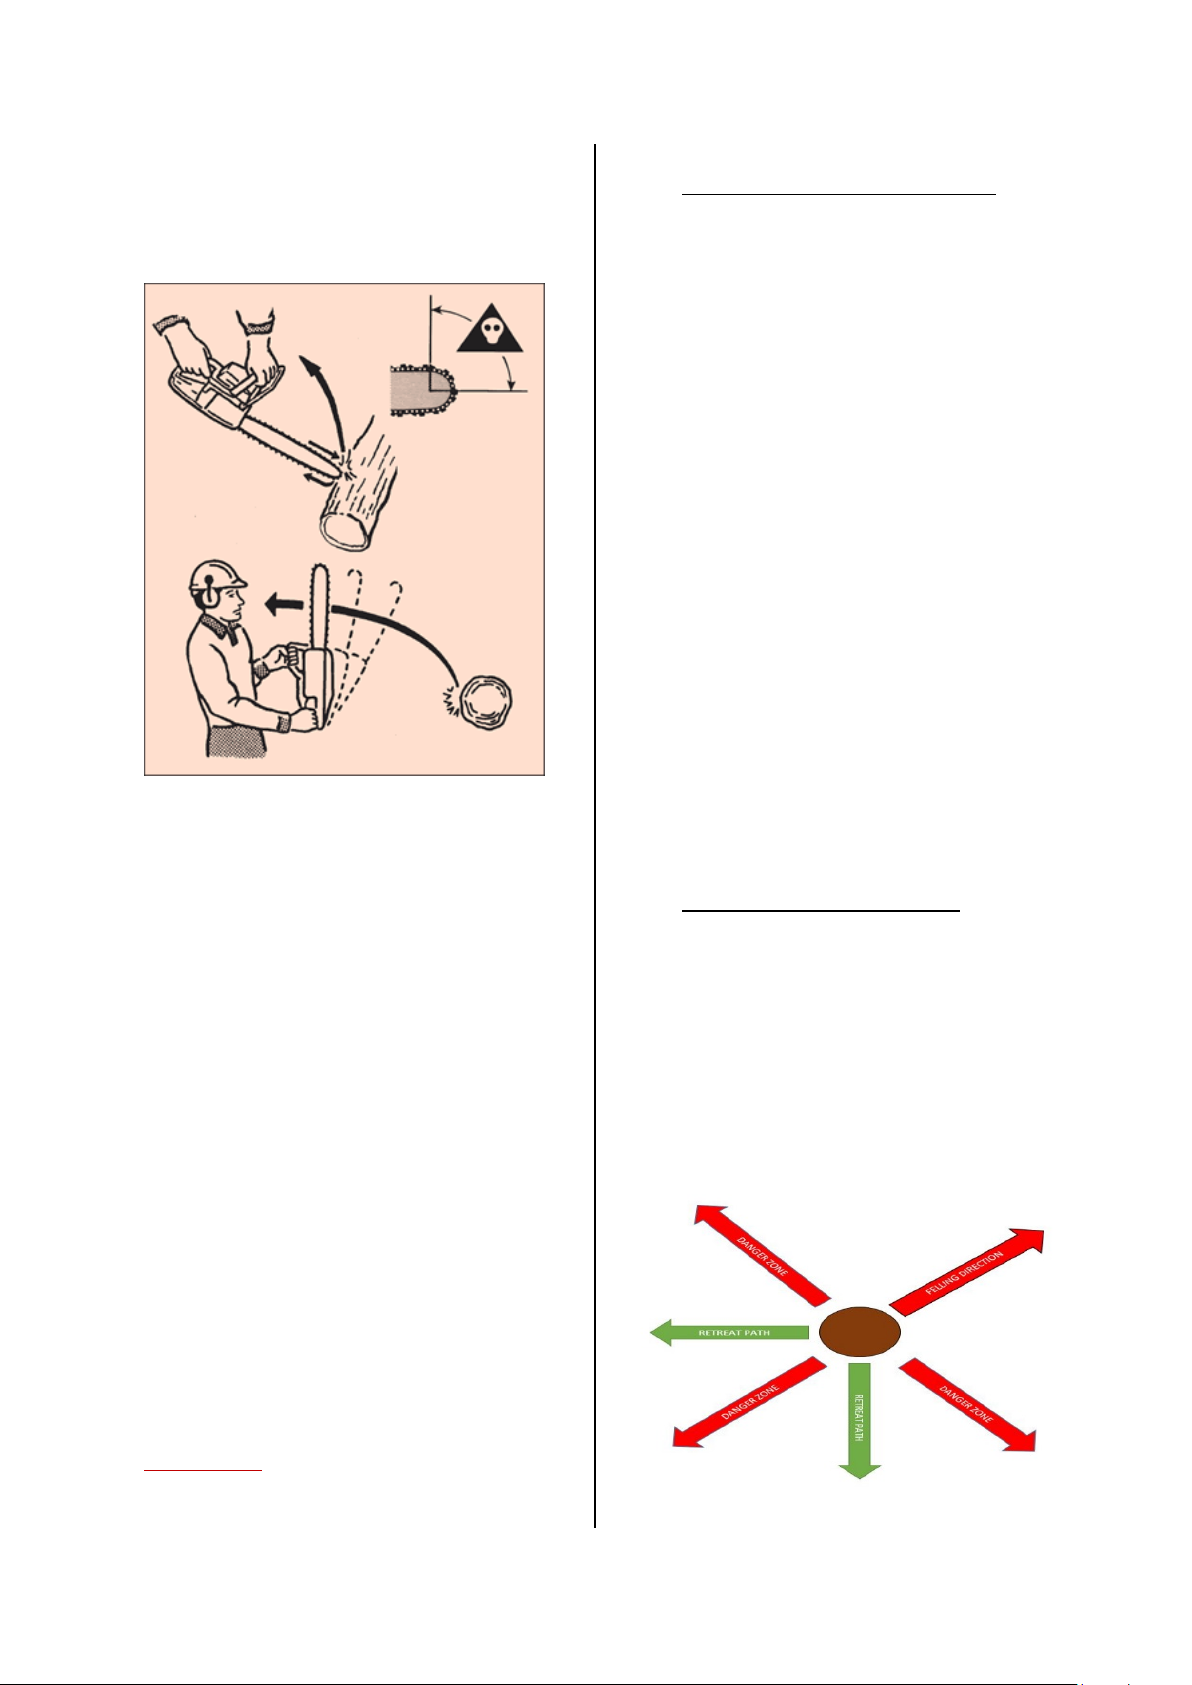
w we will tighten up the chain and chain bar
–
e the chainsaw upright onto a solid flat
Plac
surface and use the provided small flatheaded
screwdriver to turn the adjustment screw in a
clockwise direction , this will begin to tighten
the chain . The aim is to tighten to a point so
that when you pull on the chain , you can only
see 4-5 of the drive teeth . when you are close
to this point use the larger flat head screwdriver
on the provided multi tool to make the final
adjustment as this gives added torque (See
overleaf)
On
ce the chain break is fully in position , hand
tighten the retaining nuts onto the retaining
bolts protruding through the chain brake .
Starting the chainsaw
10
! Ensure that you are using the correct fuel mix
see Fuel mix and fuelling.
! Ensure that the chain brake is fully pushed
forward into the locked position, this will
prevent the chain from spinning freely when
starting and ignoring this may cause serious
injury.
Pu
ll the choke lever out fully
No
w we need to prime the engine to ensure the
chainsaw will start .To prime, push the priming
bulb in and out several times*.
*Please note, you cannot over prime the unit,
however under priming may prevent the
chainsaw from operating correctly.
xt, push the engine switch upwards into the
Ne
start position
The uni
! N
t is now ready to be started.
EVER START YOU CHAINSAW USING THE
DROP METHOD (dropping the saw with one
hand while pulling the cord with the other)
THIS IS DANGEROUS AND CAN LEAD TO SEVERE
INJURY!
Lay the unit onto the ground and position
yourself with one foot placed in the Throttle
handle area, firmly keeping the unit still.
At the same time firmly hold the main handle,
using your other hand pull the cord firmly until
the engine starts.

! E
11
nsure that you do not let go of the cord
while starting, this will cause the cord to
quickly retract and may damage the pull cord
unit.
Once you have heard a single cough or splutter
from the machine, slowly return the
handle/cord to its original position and push the
choke lever back in towards the machine.
No
w pull the starter cord until the unit starts,
this may require excessive force which is
normal.
The unit is now ready for use.
Operating the Chainsaw
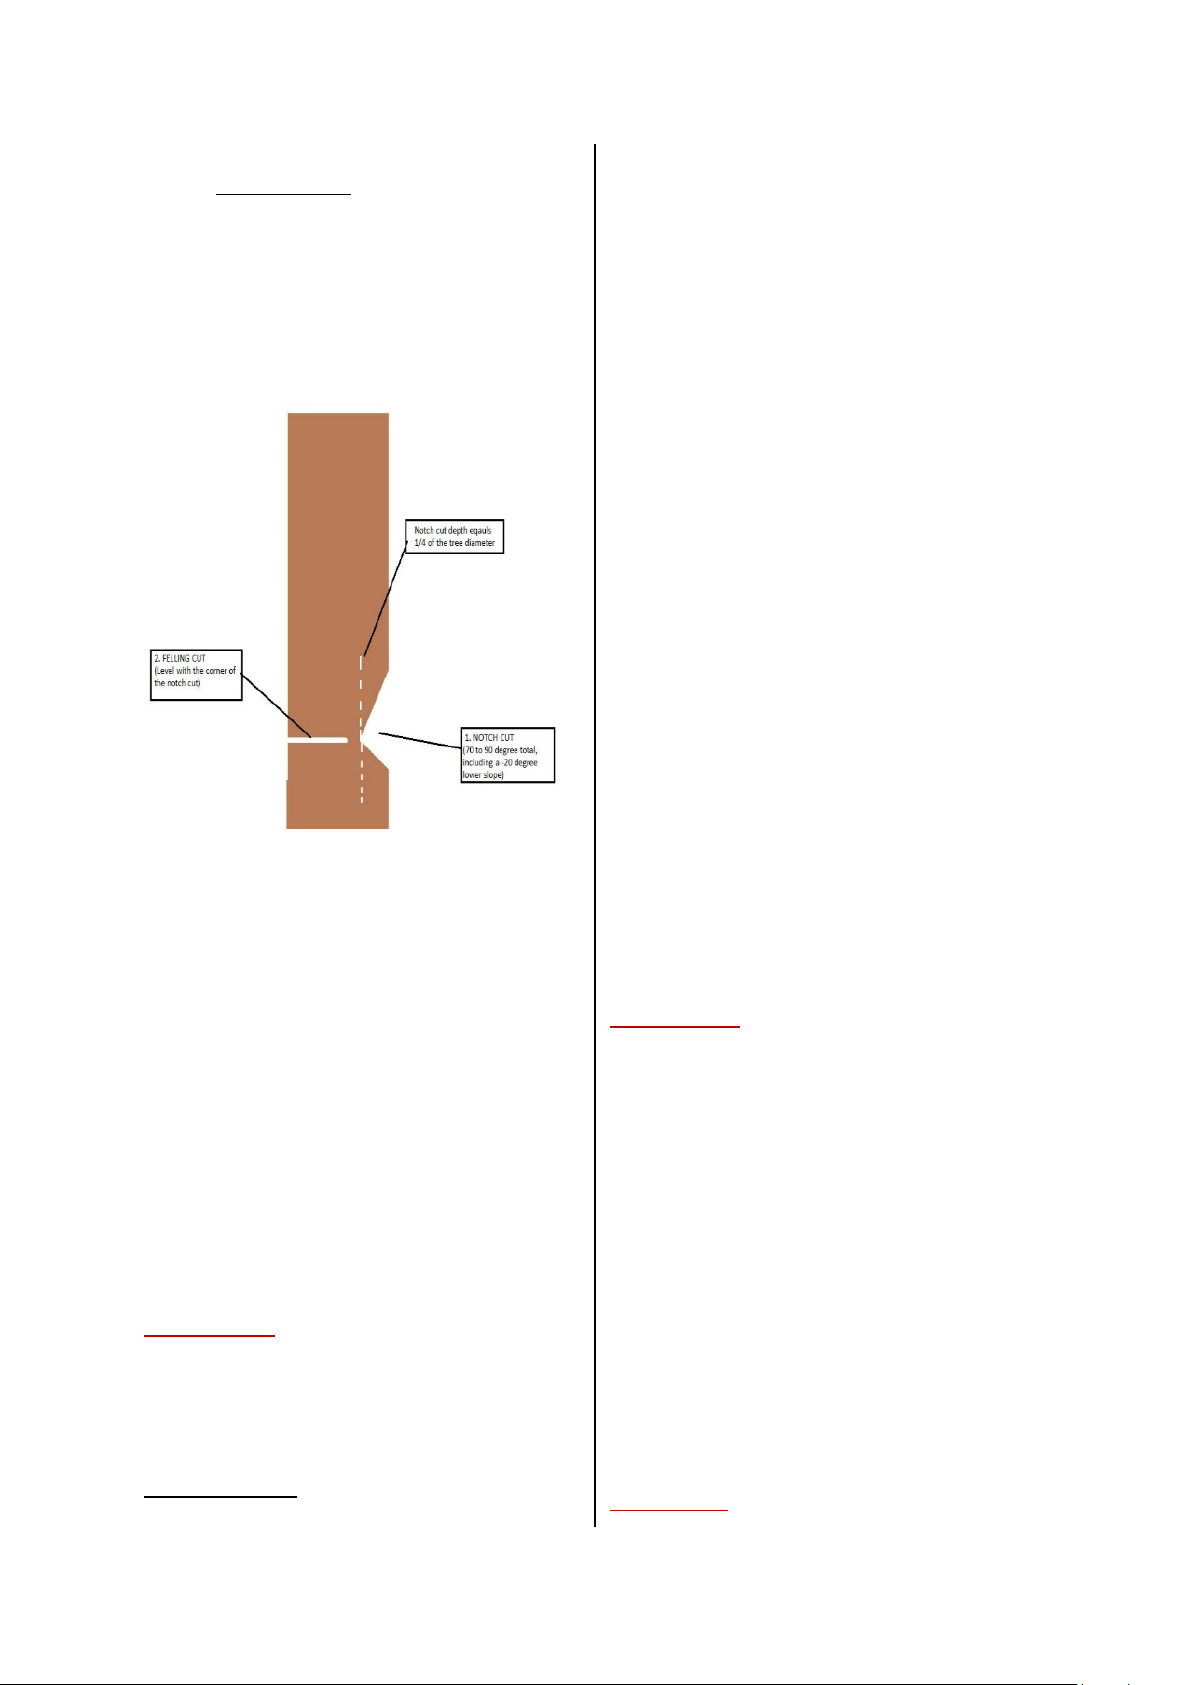
**CHAINSAW KICKBACK**
LEASE READ THE FOLLOWING INFORMATION
! P
CAREFULLY!
Chainsaw kickback can occur when the tip of the
bar comes into contact with a relatively massive
or immovable object with the chain under
power. The area of the bar tip most likely to be
involved is known as the "kickback quarter".
looking from the side of the bar, the kickback
quarter is the 90° section of bar found between
a line going along the centreline of the bar, and
another line at 90° to the first, rising upwards
from the centre of the nose sprocket. If this area
of chain comes into contact with - for instance a log, the chain will initially cut the wood, but
will also produce a reaction force which pushes
the bar upwards. As the bar rises, the chain is
forced harder into contact with the wood and
climbs upwards even harder. In a fraction of a
second the chain may jam hard into the wood
and hurl the bar upwards towards the operator,
often causing very severe injury or death. The
violence of a full kickback event is such that no
evasive action is possible, and if the operator's
head, neck or shoulders are in line with the
plane of the bar, he will certainly be struck by it.
At this point, he must rely on the chain brake
and protective clothing to save him from injury
or worse.
ce the engine has started and you are ready
On
to cut, disengage the chain brake.
Another form of kickback may occur where the
top of the bar is used for cutting and becomes
suddenly pinched by the wood moving. In this
case the saw may be forced backwards towards
the operator, or forced into a position where the
tip is pinched and the saw transitions into a
classic tip-driven kickback. Kickback may also
occur as a result of a failed or improperly
executed boring cut. Bore cutting is a
specialised technique requiring proper training,
12
and should not be attempted without such
training.
*******
*****************************
When using a chainsaw to cut firewood, trim
trees or harvest large timber you need to
perform 3 basic operations – Felling, limbing
and bucking
FELLING – Involves cutting a standing tree and
opping it in the correct manner
dr
LIMBING – The removal of branches from either
standing or downed trees
BUCKING – The process of cutting a downed
tree into the appropriate lengths
1.
Examine the tree and surroundings
spect the tree and check for any signs of
In
Rot.
! Unless you are a qualified tree surgeon,
do not touch a rotting tree. It may fall in a
haphazard manor
Make a note of the branches are laid out
and note the height of the tree.
Check your surroundings to ensure the tree
is
not going to fall on power lines / property,
and ensure that the area is clear of
pedestrian traffic.
*As
an example if the tree is 3M high,
ensure
that you have a clear circle of 4M around
the tree
! Ensure that no branches are liable to fall
on you, branches can become dislodged
during felling
! Take note of any other trees which are in
the vicinity and make sure the felled tree
will not fall into them, as this can cause the
tree to bounce and cause serious injury
2.
Plan at least two escape routes
e first should be opposite the planned
Th
direction of the tree and the other at 45 degrees
of the first (See diagram below)
Ensure that both routes are clear of people and
obstacles and do not put your tools in these
areas.
! Should you have to quickly vacate the area in
an emergency, drop the chainsaw .NEVER RUN
WHEN HOLDING A CHAINSAW.
To
correctly cut, you need to place the running
saw blade down onto the wood and rock the
blade upwards before levering it downwards
again. The saw spike will grip into the wood and
give you good leverage. This represents a more
efficient means than just pushing downwards.
Felling a tree
Felling a tree can be summarised into three
steps
3.
13
Making the cut
ar the area surrounding the base of the tree
Cle
from all brush, tree limbs and other obstruction.
If the tree is less than 250mm then make the cut
through the trunk. If the tree is larger. Two cuts
are required, the undercut (notch cut) and the
back cut (the felling cut). See diagram below
lodged onto another tree and potentially not
fully fallen to the ground. This is a potentially
dangerous situation and is best left to a
professional.
Check and ensure the following are clear –
! Are smaller trees trapped by the tree to be
limbed?
! Is the tree to be limbed totally and safely
laying on the floor?
! Is the tree to be limbed on level ground?
! Is there debris on the tree that could fall onto
you during limbing?
Once you have removed all potential obstacles
and sources of danger, stand uphill of the tree
to be limbed.
! If you stand downhill and free a limb, the tree
could potentially roll down onto you.
and firmly on the ground in a balanced
St
position that allows for full freedom of
movement. Ensure that you will not slip.
e angled cut (notch cut) is made first as
Th
shown above followed by the back cut (felling
cut).
e tree will start to fall onto the narrow section
Th
of the notch while the wood at the thicker
section remains intact therefore the tree is
pulled forward. Making these cuts is a bit of
and requires some practice.
an art
Once the tree starts to fall, turn off the saw and
take your chosen escape path so that you are
clear of the falling tree.
! Falling trees can sometimes bounce
backwards over the stump and injure an
unwary person. EXERCISE CAUTION.
Limbing a tree
ever limb a tree when the branch is above
! N
shoulder height as this can cause you to lose
control of the chainsaw.
Start at the bottom of the tree and work your
way to the top removing limbs and debris on
both sides as you go. ALWAYS cut away from
yourself and beware of kickback.
Place cut limbs in a safe location away from your
limbing location.
Cutting the limbs off close to the trunk makes
the tree easier to roll once finished. Beware of
the trunk moving as you remove heavier limbs.
Bucking a tree
This is the process of cutting the felled tree into
useable lengths and can be done as you are
limbing the tree.
! I
f the tree is laying on the ground ensure
t you do not get the saw blade caught in the
tha
earth or other debris.
and uphill of the tree and make sure you have
St
a strong, firm stance on the ground, be ready to
move quickly if the log rolls.
**A SAWBUCK OR SAWHORSE MAKES CUTTING
EASIER AND SAFER **
Examine the tree
Evaluate a fallen tree to ensure that it is not
Maintenance
! Always be sure to turn the engine off before
14
performing any maintenance checks /
procedures
! Any maintenance NOT outlined in this guide
should be left to the manufacture / supplier
! Only use replacement bars and chains
specified by the manufacturer or equivalent
! Follow the manufactures instructions
! Always carry the unit with the engine
switched off, the guide bar covered with the
protector to your rear and exhaust away from
your body
Chain oil
e following oils can be used –
Th
ALL YEAR ROUND - 10W30
Or
SUMMER – 10W30 / 10W40
WINTER – 10W20
Do not use wasted or regenerated oil as this can
cause damage to the oil pump.
Changing oil supply
sure to refill the oil tank every time you
Be
refuel the unit.
vice versa.
Saw chain
ear gloves while checking the following
! W
It is very important for smooth and safe
operation that the cutting teeth remain sharp.
Your chain will need to be replaced when –
awdust becomes powder like
! S
! You need to apply excessive force to cut
! The cut is not straight
! Vibration increases
! Fuel consumption increases
NTACT THE MANUFACTURER REGARDING
CO
ANY ADDITIONAL ADVICE WITH REGARDS TO
MAINTAINENCE / REPAIR
Spark plug Test /exchange procedure
rts required –
Pa
1x Replacement sparkplug
1x Multi tool with socket attachment (provided
with chainsaw)
The following will explain how to check for a
spark and if required how to exchange a spent
spark plug.
Th
e chain oil flow can be adjusted as outlined on
page 5
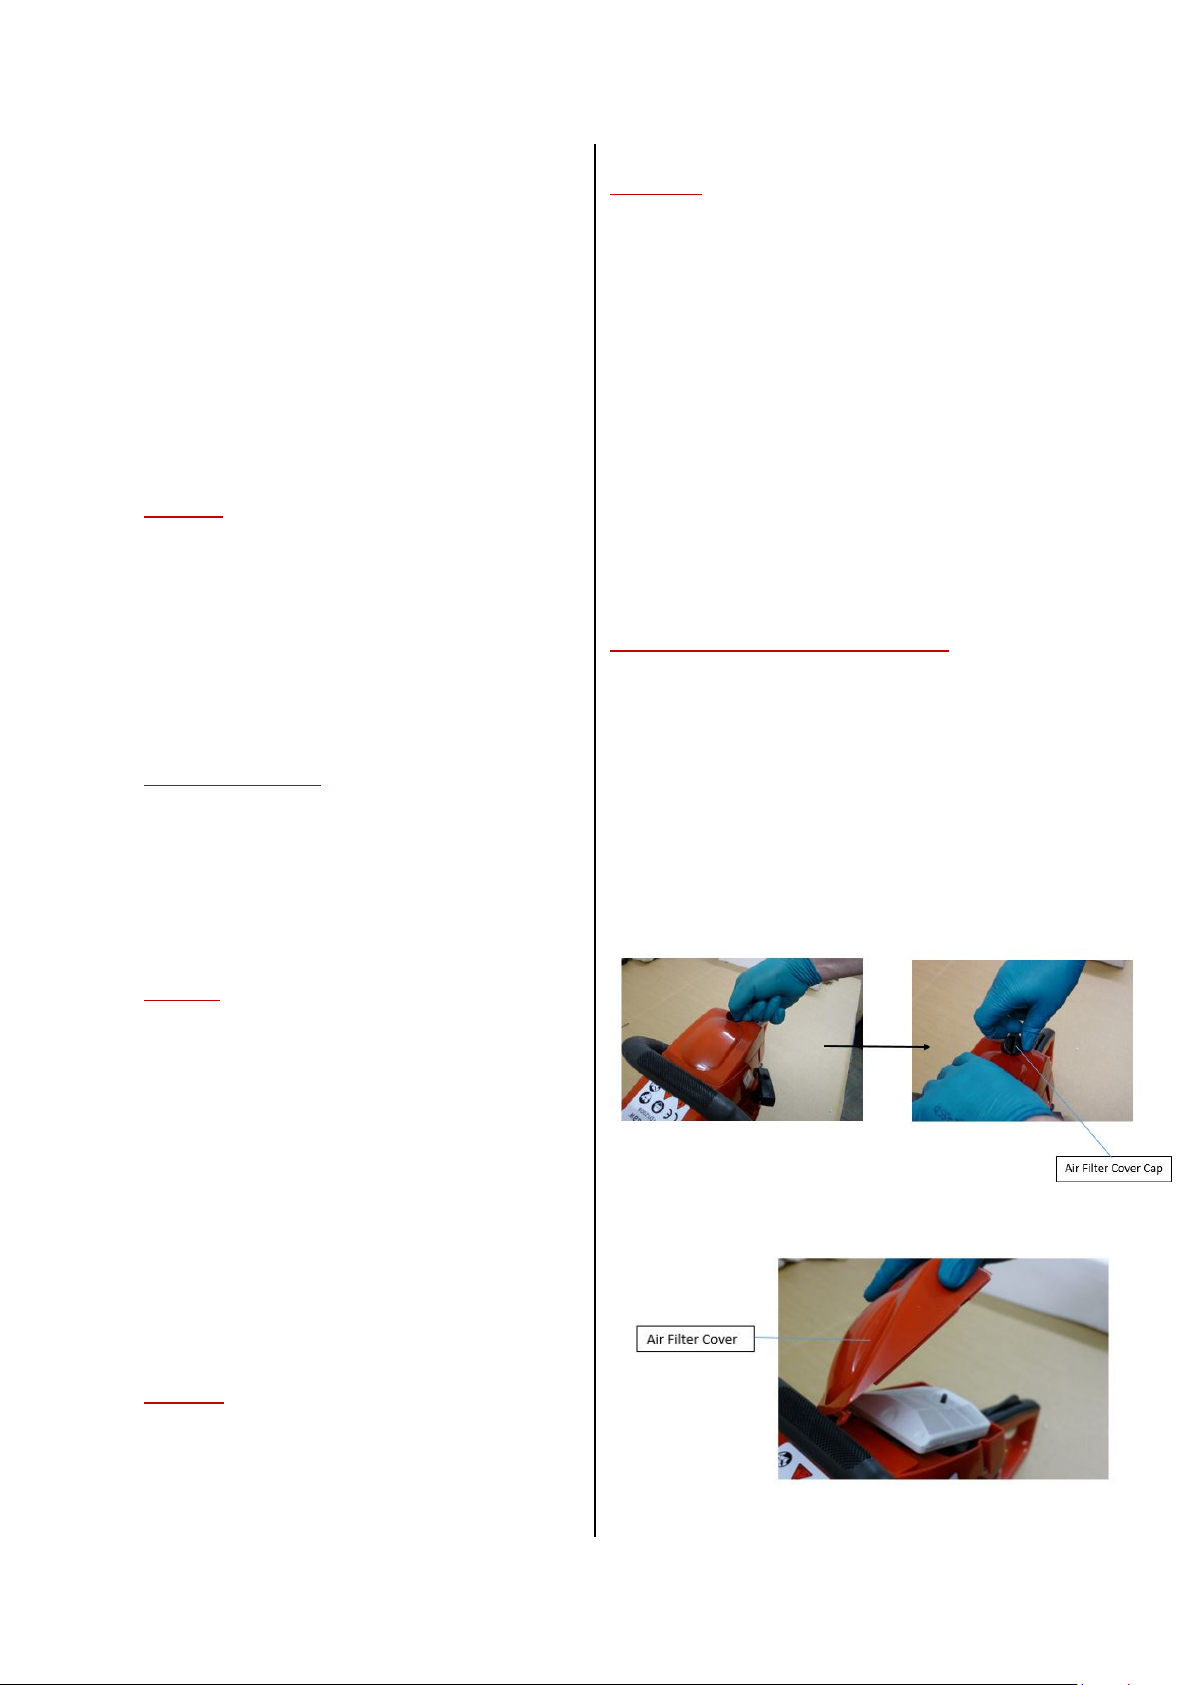
Air filter
Clean the air filter on a regular basis and change
as required.
To
access the air filter, turn the air filter cover
cap in an anti-clockwise direction to loosen and
then lift the air filter cover.
Firmly grip both sides of the air filter and pull to
remove it from the engine body.
Remove any debris and wash under a cold tap if
required.
! Ensure the filter is completely dry before
replacing in the machine.
Sprocket
Check the sprocket for cracks and signs of wear
that may be interfering with the chain drive. If
any wear is found then replace it with a new
one. Never fit a new chain onto a sprocket or
Re
move the spark plug cover cap by rotating it
anti clockwise.
Re
move the air filter cover by lifting it upwards.
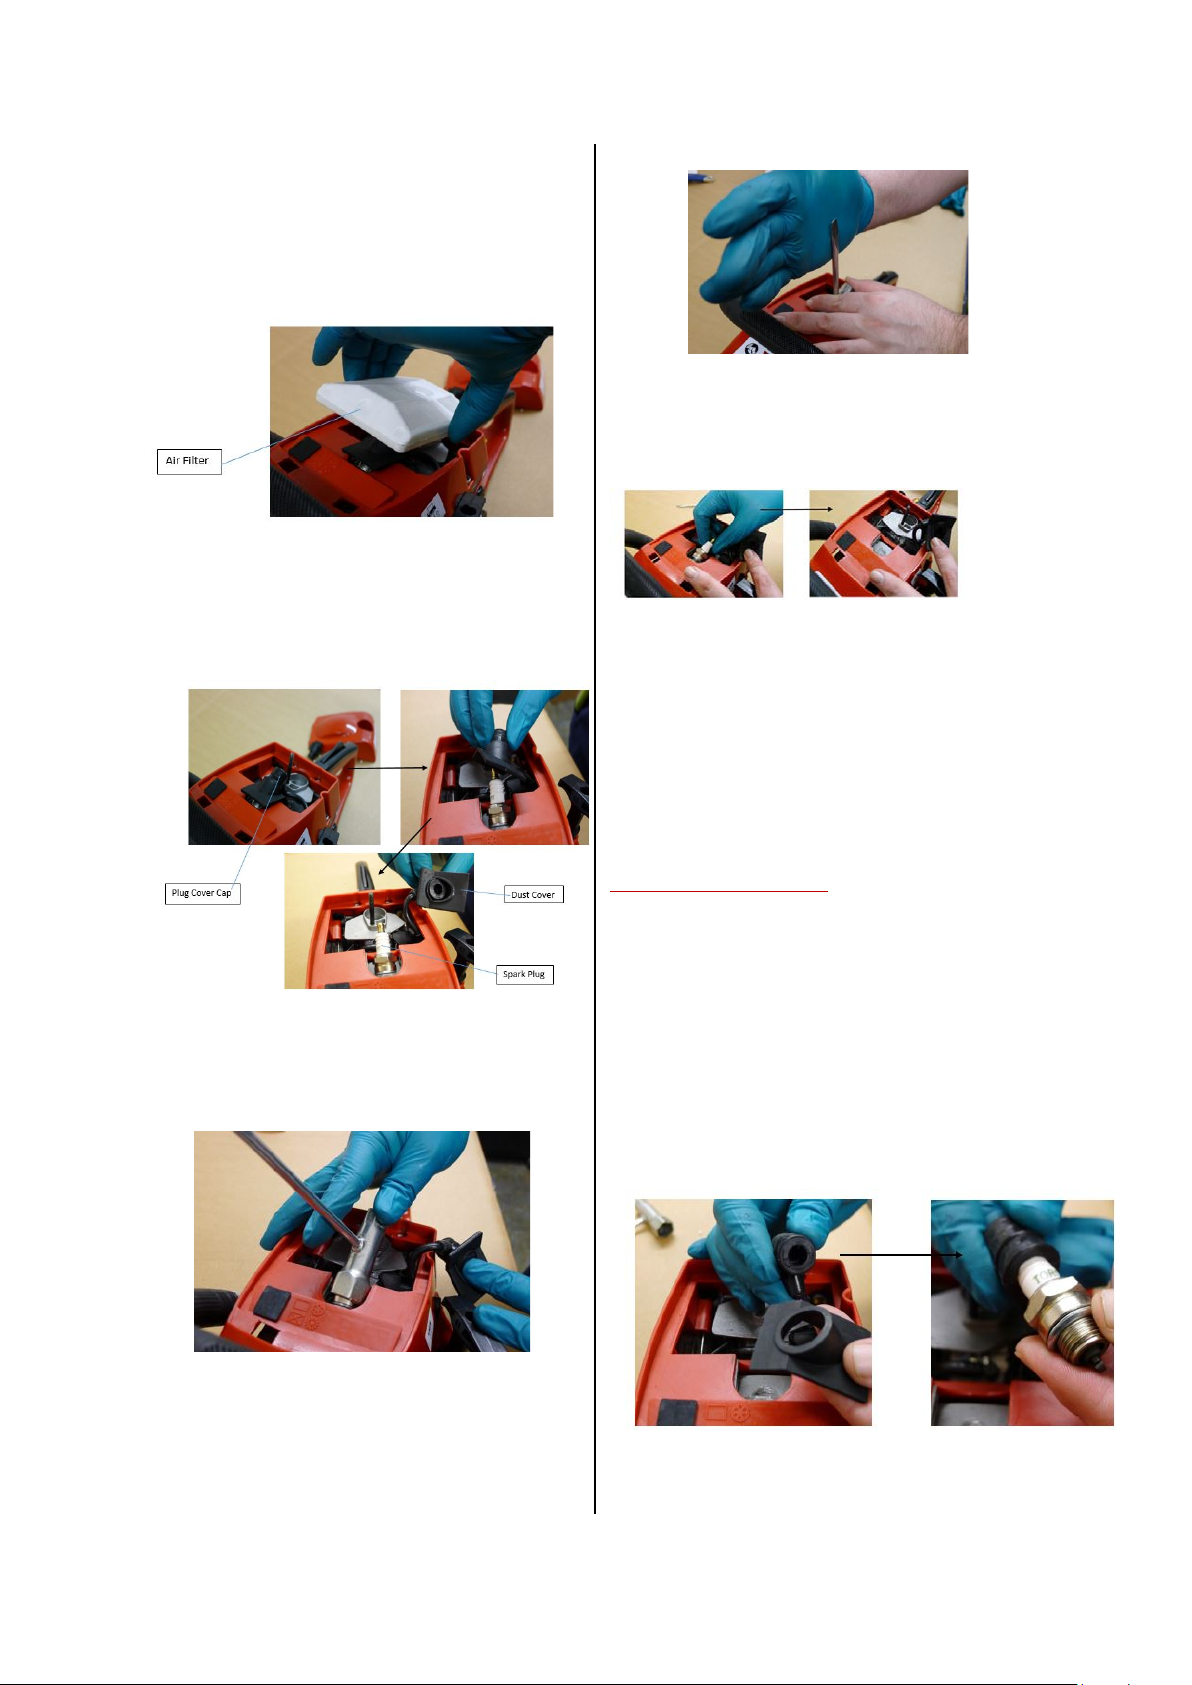
Re
15
move the air filter by holding the sides and
pulling firmly upwards.
Next,
we need to remove the spark plug cover
cap and dust shield. This is attached snugly so a
firm pull may be required.
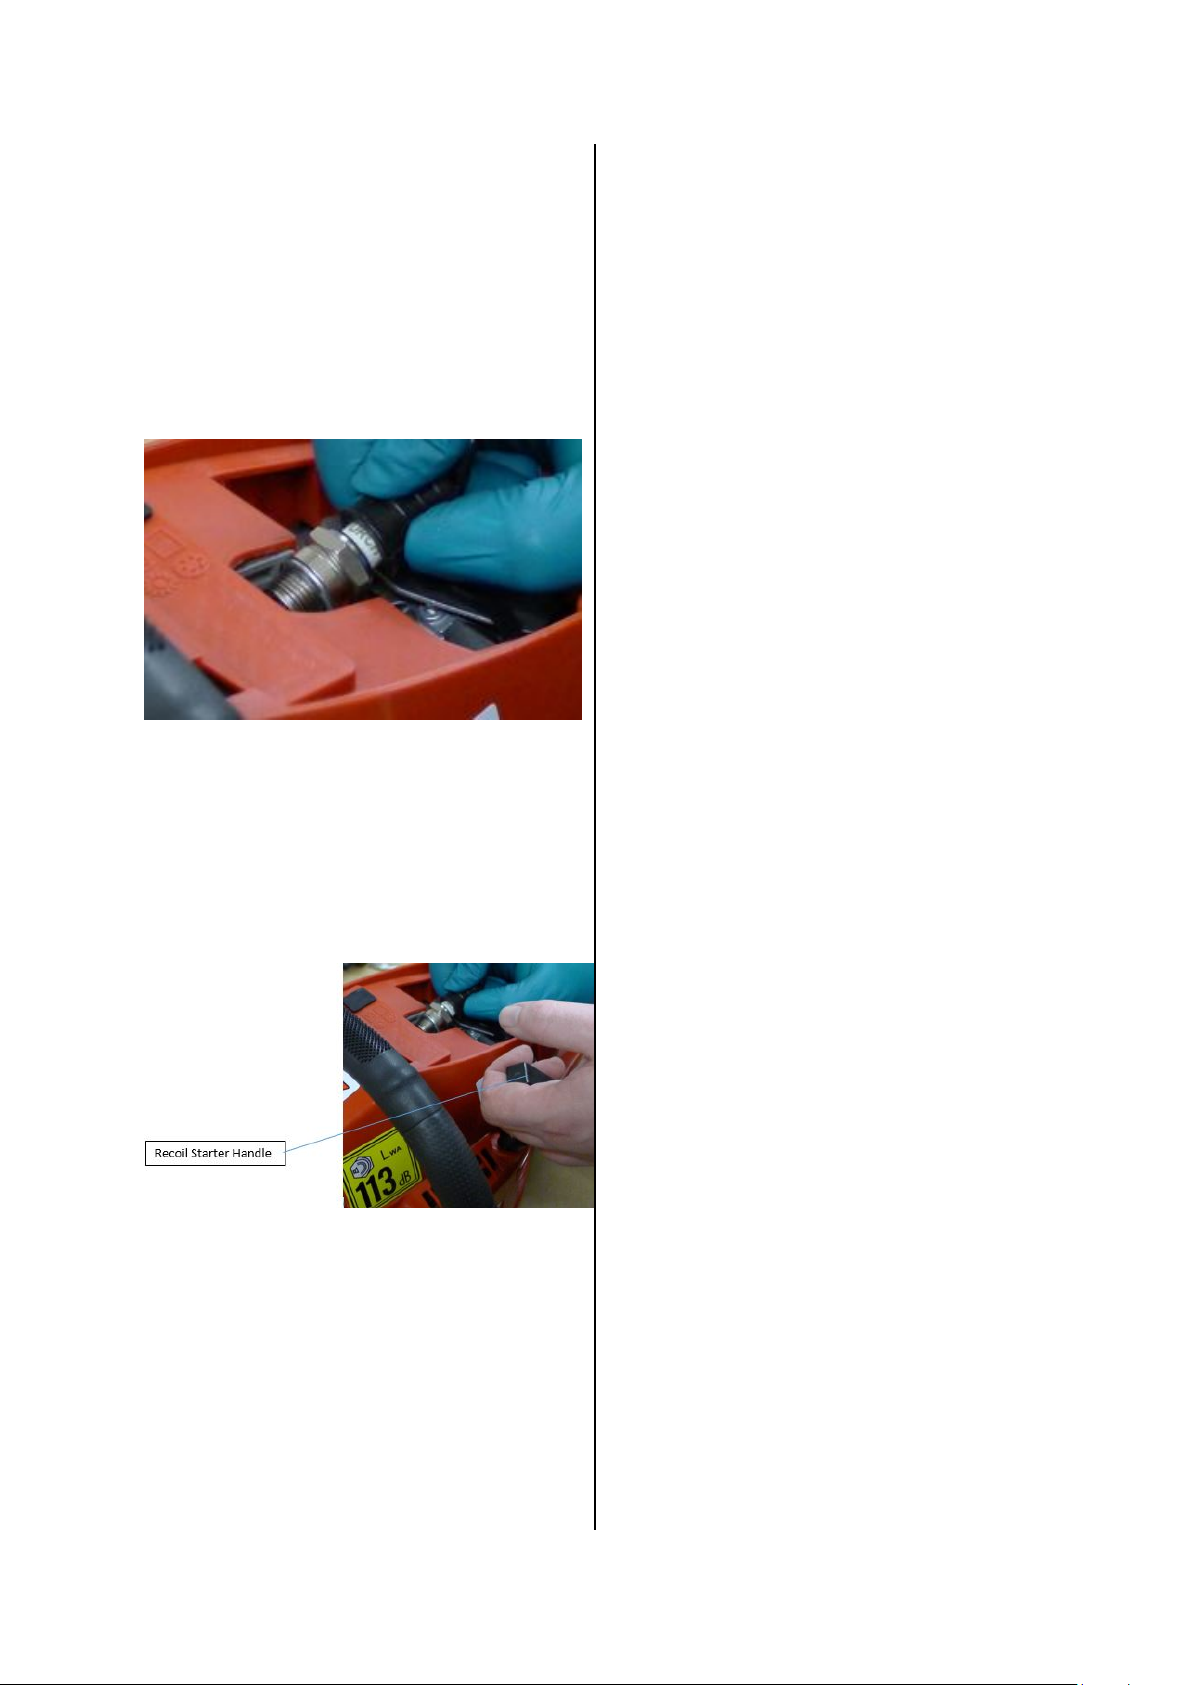
Unscrew and remove the spark plug by hand
Screw the replacement plug into the Chainsaw
body and push the Plug cap/ dust cover, then
tightening firmly into position* . Then simply
follow the instruction in reverse to re-assemble
the unit .
f the plug cap is not firmly pushed into
*I
position , the unit will not work
Using the provided multi/socket tool, place the
socket over the spark plug so that it fits as
shown.
Firmly but carefully strike the arm of the multi
tool with the palm of your hand, this should
loosen the spark plug.
Checking the Spark plug
The following can be performed after you have
removed the plug in the preceding instruction
and be
fore fitting a new plug.
This is a simple method for diagnosing if a
problem exists with the spark plug.
Re
move the dust cover and push the spark plug
firmly into the cover cap.
lding the cover cap / plug in your hand,
Ho
position the plug so that the tip makes contact
with the metal plate surrounding the area of the
16
body from which the plug was removed .
!! DO
NOT TOUCH THE METAL PART OF THE
PLUG OR ANY METAL PARTS ON THE SAW
FROM THIS POINT ESPECIALLY IF YOU SUFFER
FROM A MEDICAL CONDITION THAT COULD BE
AGGREVATED BY CONTACT WITH AN
ELECTRICAL CURRENT !!
Pu
sh the Stop / Start switch upwards into the
start position, and ensuring the plug is making
contact with the metal plate quickly pull the
recoil starter handle, if the plug is working you
should at this point see a Spark at the base of
the plug.

Online Guides
15
17
Further advice for operation and basic
maintenance of your chainsaw can be found
by following the links below or by scanning
the relevant QR code . This information can
also be accessed by visiting
www.trueshopping.co.uk
and inputting the
product code
STARTING YOUR CHAINSAW
http://www.youtube.com/watch?v=XoPn
STTkGf8
FUEL MIX SETTING
http://www.youtube.com/watch?v=pVxSqaYS
pLQ
REPLACING THE FUEL FILTER
http://www.youtube.com/watch?v=DreW99
d9gaQ
SETTING CHAIN RETENTION
http://www.youtube.com/watch?v=pOP1Ltnf
t0A
REPLACING RECOIL
http://www.youtube.com/watch?v=xUnKT76
qoiI
CHANGING THE SPARK PLUG
http://www.youtube.com/watch?v=7h3cOLbS
bCs

Troubleshooting
16
18
If the problem you are having is not covered below, or is not solved by following the advice outlined,
please call our technical helpline or visit the website for further guidance.
The Engine will not start.
• Have you added fuel to the engine?
• Check that the engine is not flooded by closing the throttle and trying to start the unit,
also remove the spark plug and dry.
• Is the spark plug dirty , remove the plug and check for carbon residue
Engine stalling
• Adjust the idle speed (page 5)
• Check fuel for water contamination and replace
• Clean the air filter
• Check oil quality and replace if required
The saw is not cutting properly
• Check chain tension
• Sharpen chain with a chain file
• Replace chain
I have a faulty part
• Go to www.trueshopping.co.uk to order the required spare.
ease note that while every attempt has been made to keep this guide up to date, changes can
Pl
occur due to design / manufacturing changes, if you have a question regarding a feature that your
product has or is missing, please visit www.trueshopping.co.uk
to download the most up to date
version of this manual.

Chainsaw Technical Specifications -
17
19
Engine type
52 cc/58cc
Air-cooled, Two-stroke, petrol
engine
Dry weight (without guide
bar, chain and with empty
4.90KGS
tank)
Volume of Fuel Tank 550ml
Volume of Oil Tank 260ml
Cutting length(mm) 480mm
Max. engine speed
9000
(min-1)
Engine Displacement 52 cc/58cc
Max. Power 2.2KW
Max Idle Speed(min-1) 3400
JW52 00/JW5800
Model
HW5200/HY5800
SL-YD5200B /SL-YD58
Petrol-oil-mixture 25:1
Sound Power Level 113db

Chainsaw Technical Specifications -38c
Engine type
Air-cooled, Two-stroke, petrol
engine
Dry weight (without guide
bar, chain and with empty
tank)
4.50KGS
Volume of Fuel Tank 310ml
Volume of Oil Tank 210ml
Cutting length(mm) 370mm
Max. engine speed
(min-1)
9000
Engine Displacement 37.2cc
Max. Power 1.25KW
Max Idle Speed(min-1) 3400
Model
JW3800
HY3800
SLYD38
Petrol-oil-mixture 25:1
Sound Power Level 113db
Chainsaw Technical Specifications -49cc
Engine type
Air-cooled, Two-stroke, petrol
engine
Dry weight (without guide
bar, chain and with empty
tank)
4.90KGS
Volume of Fuel Tank 550ml
Volume of Oil Tank 260ml
Cutting length(mm) 440mm
Max. engine speed
(min-1)
9000
Engine Displacement 49.3cc
Max. Power 1.8KW
Max Idle Speed(min-1) 3400
Model
JW4500
HY4500
SL-YD45
Petrol-oil-mixture 25:1
Sound Power Level 113db
1820192120


22

Tronçonneuse à essence
23
Guide des modèles - JW3800, JW4500, JW5200, JW5800
HY3800, HY4500, HY5200, HY5800
SLYD38, SL-YD45, SL-YD5200B, SL-YD58
©Trueshopping LTD Issue 1 m.c

CONTENUS
Informations sur le numéro du modèle 23
Consignes de sécurité importantes 25
Mélange de carburant et ravitaillement 26
• Ravitaillement et préparation pour une première utilisation 26
•
Réglage du ralenti 27
Monter la scie 27
• Montage de entraîneurs 27
Montage du guide-chaîne, de la chaîne et du frein de la chaîne 28
Démarrer la scie 31
Utilisation de la scie 33
•
*
Abattage d’un arbre 33
Ebranchage d’un arbre 34
Tronçonnage d’un arbre 34
Maintenance 35
Eviter le recul de la scie 33
• Huile de chaîne 36
• Changer l’huile 36
• Filtre à air 36
• Pignon 36
• Chaîne 36
• Test de bougie d’allumage / échange 36
Recherche de pannes 38

Consignes de sécurité importantes
25
! Avant de mettre l’outil en marche, assurez-vous
que la chaîne ne touche rien
Générale
! Ce produit ne doit être utilisé que par des personnes
compétentes.
! Interdit de fumer ou d’utiliser ce produit sur/ou près
des sources de combustion.
! Porter des équipements de sécurité adéquate (Lunettes,
bottes glissantes, protège-oreilles et des gants de travail
épais*) à chaque fois que vous utilisez ce produit.
! Ne pas utiliser la tronçonneuse lorsqu’on est sous
l’influence d’alcool ou toute autre substance qui
pourrait altérer votre jugement, vos capacités
physiques et votre état d’esprit.
! Si vous vendez ou prêtez cet ensemble, veuillez-vous
assurer que ce manuel et toute la documentation
afférente soit vendue avec l’ensemble
! Cet appareil ne doit pas être utilisé, loué ou vendu aux
personnes de moins de 18 ans
! Assurez-vous que les personnes et les animaux
soient à une distance de sécurité de 10m au moins
! Toujours garder ses distance par rapport à la scie
car elle commencera à tourner au démarrage du
moteur
! Si vous abattez un arbre, voir la note du
diagramme (fig1) à côté pour avoir une meilleure
compréhension de la situation
! Pour votre propre sécurité, réduisez le temps que
vous utilisez la machine de façon continue à des
sessions de 10 min, en prenant des pauses de 10-20
minutes d’intervalles. Eviter de dépasser un total de
2 heures de travail par jour.
! Cet appareil produit du monoxyde de carbone
lorsqu’il est en fonctionnement, NE PAS utiliser cet
appareil dans un espace fermé
! Ne pas utiliser cet appareil lorsque vous êtes
fatigué car votre concentration sera réduite,
l’utilisateur est responsable de toute blessure
causée à autrui
Maintenance
! Ne pas faire de maintenance / réparation à moins qu’elles aient
été décrite dans ce guide ou que vous ayez reçu des instructions
additionnelles détaillées du fabricant
! Ne pas faire de réparation tant que l’appareil est chaud
! Vider toute l’essence de l’appareil avant de faire toute
maintenance
! Sauf spécification contraire, assurez-vous que la protection de la
chaîne soit en place lorsque vous faites la maintenance
! Placer l’appareil sur une surface solide plate lorsque vous
faites la maintenance ou la réparation
! Ne pas laisser ce produit sans surveillance
! N’utilisez pas l’appareil dans des conditions
météorologiques difficiles qui pourraient
rendre ce produit dangereux
! Marquer clairement votre zone de travail avec
une barrière adéquate (bande / Corde)
! Éteignez l’appareil lorsque vous ne l’utilisez pas
Utilisation
! Avant tout utilisation, toujours vérifier si machine n’est
pas endommagée ou usée
MELANGE DE CARBURANT ET
26
RAVITAILLEMENT
Mélanger l’essence (avec plomb ou sans plomb,
sans alcool) et une huile à moteur de bonne
qualité conçu pour les moteurs à 2 cylindres
refroidis à l’air.
Le b
sur l’outil.
To
l’aiguille d’une montre pour l’ouvrir et ajouter
votre mélange de carburant au moteur. Ensuite
replacez le bouchon et tournez-le dans le sens
de l’aiguille d’une montre jusqu’à ce ça soit bien
TAUX D’ESSENCE MELANGE RECOMMANDE
: HUILE
rs de la première utilisation, rappelez-vous
Lo
serré.
que les problèmes de moteur peuvent être
causés par un mauvais mélange de carburant
ou l’utilisation du mauvais type d’essence /
d’huile
Remplissage du carburant et première utilisation
! Lors du remplissage du réservoir assurezvous que le moteur est éteint et vérifiez
autour de vous s’il y a des signes de danger
(feu, étincelles).
Aj
utilisation. Cela peut être remplit tel que requis.
ouchon du réservoir est clairement marqué
urnez le bouchon dans le sens contraire à
outer de l’huile à chaîne avant la première
! Utiliser un tissu sec pour nettoyer toute
éclaboussure
! Après remplissage, déplacer le produit loin du
site de remplissage avant utilisation
*Veuillez noter que le bon taux de mélange
d’essence est imprimé sur l’étiquette placé sur
la zone de la poignée
tronçonneuse doit être penchée sur le côté
La
lors du remplissage, sinon cela causera un
débordement du réservoir. Pour éviter pour
toute éclaboussure, un petit entonnoir peut être
utilisé
.
Re
tirer le bouchon de l’huile à chaîne (décrit cidessous) en tournant le bouchon dans le sens
inverse à l’aiguille d’une montre.
dessous de l’outil, vous trouverez se trouve la
En
vis de réglage du débit d’huile de la chaine.
*L’emplacement de cette vis peut varier en

fonction du modèle, l’image ci-dessous montre
27
deux emplacements possible.
justements peuvent être faits tel que
Des a
décrit sur la gravure sur le plastique.
Réglage du ralenti
L’information suivante montre comment régler
le ralenti du moteur (la vitesse à laquelle le
moteur tourne lorsqu’il n’est pas en train de
couper)
*Veuillez noter qu’un outil de réglage du
carburateur est nécessaire pour faire ce réglage
(non fourni)
Montage de la tronçonneuse
! Avant de commencer l’assemblage,
assurez-vous que vous avez toutes les
pièces dans la boite, s’il manque une
pièce, veuillez contactez xxxxx l’ assistance
pour information
Montage des entraîneurs
A titr
e de guide générale, le travail dans une
température plus froide peut nécessiter le
réglage à une vitesse de ralenti plus élevée
Pou
r régler la vitesse du ralenti Tourner la petite
vis (L) complétement dans le sens de l’aiguille
d’une montre jusqu’elle ne bouge plus, ensuite
faites un tour complet dans le sens contraire à
l’aiguille d’une montre. Répétez ceci avec la
grande vis (H) va réinitialiser le carburateur au
paramètres d’usine.
r l’entraineur dans le moteur et serrez tel
Place
que décrit –

Ce guide-chaîne montre également le sens de
28
déplacement de la chaîne (voir fig 1.)
Fixation de la barre, la chaîne et le frein de
chaîne pour le moteur
ver la chaîne du sac et
Enle
étaler sur une surface plane
Avan
t de continuer, notez la flèche directionnelle
.
sur le lien de la chaîne, après avoir monté le
guide-chaîne cette flèche doit pointer en
direction opposée à l’unité centrale en haut de la
barre, et vers l’unité en bas du guide-chaîne.
Cet
te chaîne doit être vissée au pignon
d’entrainement sous le volant
le guide-chaîne dans l’unité principale
Placer
dans un angle sur les deux goujons de
positionnement et poussez délicatement la
chaîne dans la rainure du guide-chaîne, une fois
la chaîne en place le long de la partie supérieure
de la chaîne, retirez délicatement le guide-chaîne
de l’unité principal, ceci va donner un peu de lest
 Loading...