

Page 1

Electronic Learning Products
O
u
r
m
i
s
s
i
o
n
i
s
t
o
m
a
k
e
l
e
a
r
n
i
n
g
f
u
n
For Ages 9 & UP
Page 2

Chapter 1
About YourAcceleratorVision Learning PC
Chapter 2
Getting Started
Chapter 3
Useful Features and Controls
Chapter 4
Game Rules
Chapter 5
User Settings
Chapter 6
Activities
Word Sector
Vocabulary Sector
Mathematics Sector
A. Mathematics Sector
Trivia / Games Sector
Skill / PDA Center
Tools / Reference Center
W eb Area
Chapter 7
Safe-site.net
How to sign up for Safe-site.net
Password for Child and Parent
Chapter 8
How to synchronize with your home PC
Chapter 9
X-Cable
Chapter 10
Trouble Shooting
1
3
6
9
12
14
14
16
18
21
22
25
30
38
42
43
43
44
44
45
TTable of Contents
able of Contents
Dear Parent
Thank you for choosing the Oregon Scientific Accelerator Vision.
Designed and engineered with extreme precision,
the Accelerator Vision is packed full of learning,
offering stimulating games and activities that
make an invaluable contribution to your child’s development.
Some of the activities to further your child’s skills include language,
mathematics, music, memory and logical reasoning.
The Accelerator Vision provides a dependable and
realistic introduction to computers and
encourages creativity and independent learning.
Learning with Oregon Scientific is so much fun!
Page 3
About your Accelerator Vision Learning PC
Chapter 1
Chapter 1
1
2
Features
76 Activities
• Vocabulary / Spelling
• Mathematics
• Trivia
• Games / Language Tutor
• Reference / Tools
• PDA / Keyboard Skills
• Web Area
Internet Zone
• Safe-site.net capable
• Free e-mail account
• Download new questions
• Post game scores
• Profanity check
• Newsgroups
• Design your own web page
and host it at the safe-site.net
server
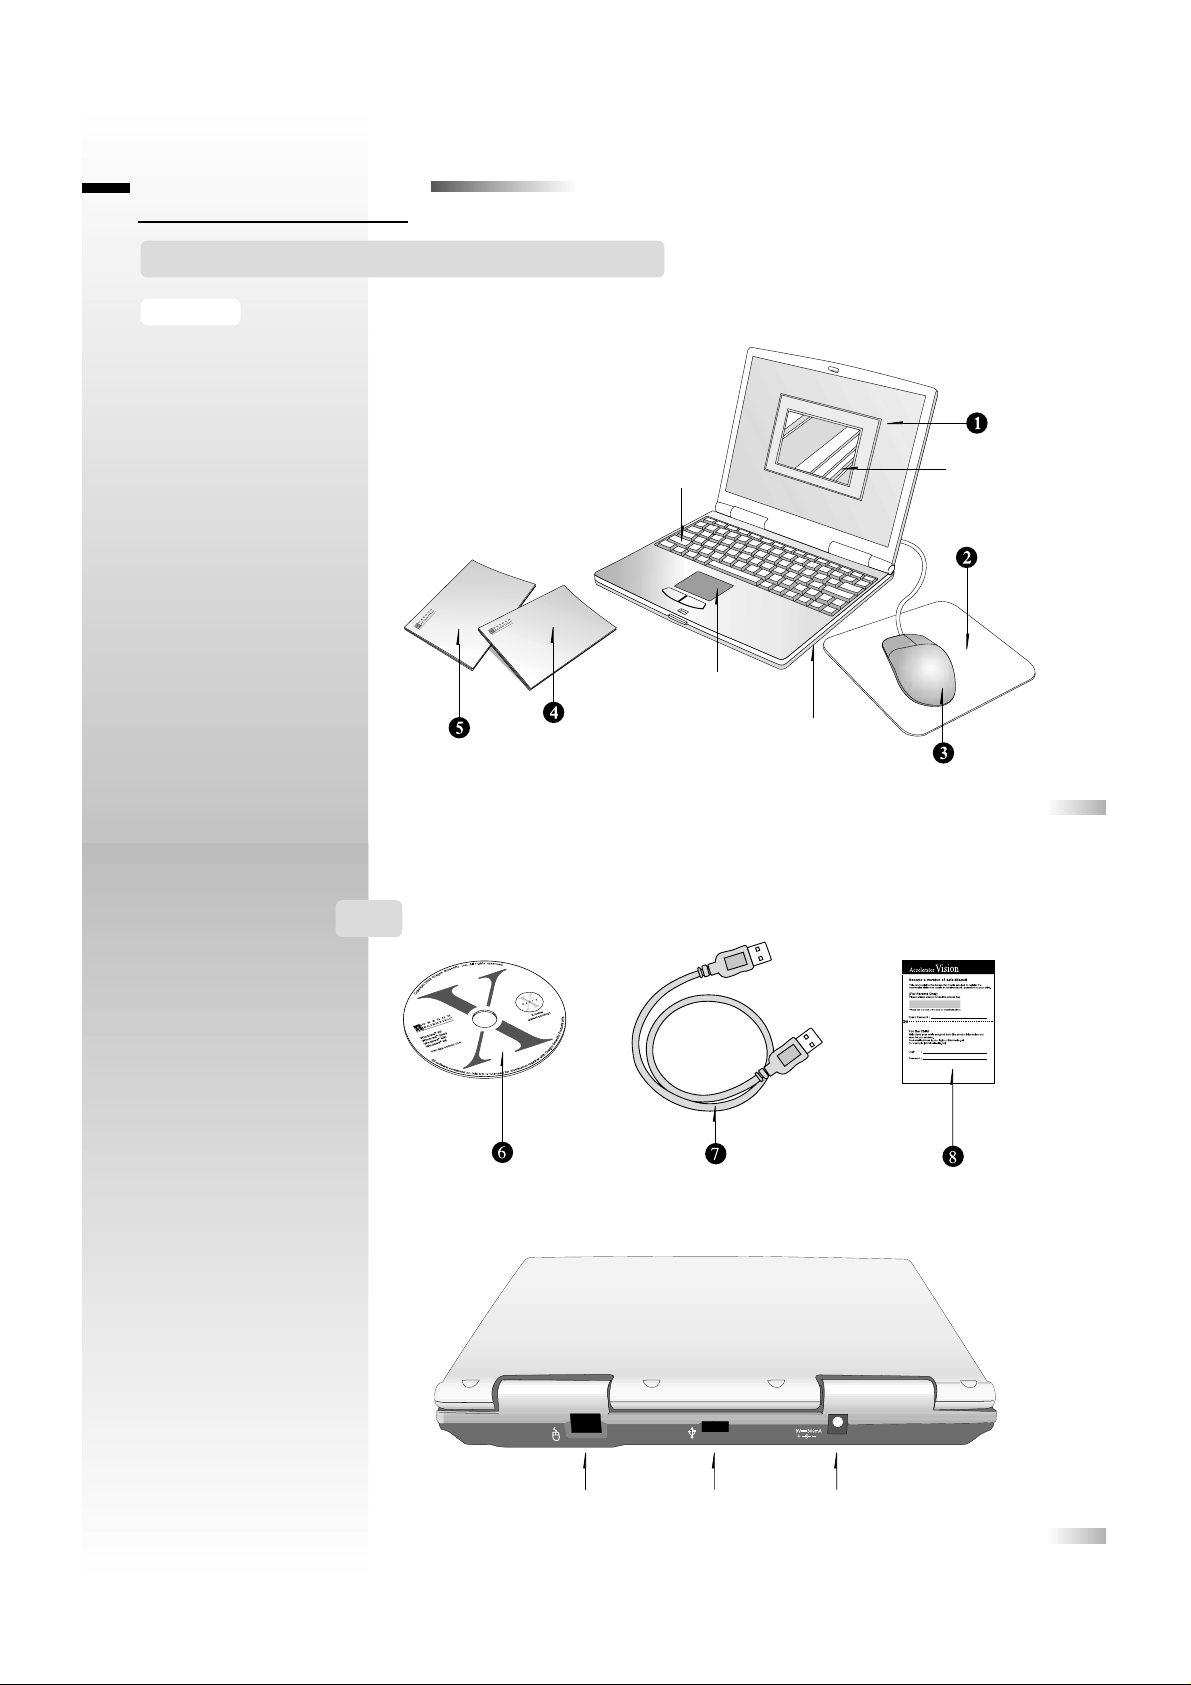
The Accelerator Vision is supplied with the following parts.
Please contact your retailer should any parts be missing.
1 - Unit
2 - Mouse Pad
3 - Opti-mechanical Mouse
4 - Instruction Manual for X-Cable
5 - User Manual for the
Accelerator Vision
6 - X-Cable software
CD-ROM
7 - X-Cable
8 - Access Key
Unit
X-Cable software CD-ROM X-Cable Access Key
Mouse jack
USB port AC jack
USB X-Cable
Connection to PC
• Transfer documents
between the
Accelerator Vision and PC
• Print to any PC
compatible printer
• Internet Connection
Keyboard
Directional Cursor Pad
Instruction Manual
for X-Cable
User Manual for the
Accelerator Vision
Speaker
Unit
LCD Screen
Mouse Pad
Opti-mechanical Mouse
Access Key
Page 4

3
4
Chapter 2
Chapter 2
1. Make sure the unit is turned off.
2. Using a Phillips screwdriver, open the big battery cover at the back of the unit.
3. Insert 4 “AA” size batteries. (Note the correct polarity +, – ).
4. Replace the cover. (The unit is automatically turned on as soon as the batteries are
installed or the adaptor is plugged in.)
1. Make sure the unit is turned off.
2. Using a Phillips screwdriver, open the small battery cover at the back of the unit.
3. Insert 2 “AAA” size batteries. (Note the correct polarity +, – ).
4. Replace the batteries and cover.
NOTE: Back-up batteries are essential for the retention of stored data.
Back-up battery installation
Your Accelerator Vision operates on 4 “AA” size batteries plus 2 “AAA” size batteries
(not included), or a 9V AC adaptor (not included).
Getting Started
Battery Installation
Caution
• Do not mix different types of batteries or old and new batteries.
• Only use batteries of the same or equivalent type as recommended.
• Remove all batteries when replacing.
• Remove batteries from the unit if the unit is not going to be used for long periods of time.
• Do not dispose of batteries in fire.
• Do not recharge non-rechargeable batteries.
• Rechargeable batteries are to be removed from the toy before being charged.
• Rechargeable batteries are only to be charged under adult supervision.
• Remove exhausted batteries from the toy.
• Do not short-circuit the supply terminals.
• The unit must not be connected to a power supply greater than 9V.
• Only use the recommended adaptor.
• The adaptor is not a toy.
• Do not short-circuit the supply terminals.
• Toys liable to be cleaned with liquid are to be disconnected from the transformer before cleaning.
Power failure may corrupt data stored in the memory. To reset your Accelerator Vision, see “Memory Failure”
in the Trouble Shooting section.
Auto-off
The learning PC will be automatically turned off after about 6 minutes of no input from the player.
AC Adaptor Connection
1. Plug the adaptor into the adaptor jack at the back of the unit.
2. Plug the adaptor into a wall outlet.
3. Please turn off the unit before plugging in the AC adaptor.
Otherwise the unit may be damaged.
Page 5

Password Screen
Logging in
1. From the pull-down menu, select your name.
2. Enter your password in the Password field and press [ Enter ]. (If you have forgotten the password,
click on [ Hint ] to see your pre-entered clue).
Logging in as “Guest”
From the pull-down menu, select “Guest”, and press [ Enter ].
NOTE: Users who log in as "Guest" will not be able to save any information or access the Web Area.
Chapter 3
Chapter 3
Useful Features and Controls
Scroll Bar
To view continuing pages, click on the arrows at the bottom of the bar or press the down arrow key.
To view previous pages, click on the arrows at the top of the bar or press the up arrow key.
Demo
Press this key to see a demonstration of the exciting features and activities on your Accelerator Vision .
5
6
Cleaning and Maintenance
The unit should be regularly examined for damage to the cord, plug, enclosure and other parts.
In the event of such damage, the unit must not be used with the adaptor until the damage has been repaired.
• Do not dismantle the unit.
• Always disconnect the power supply before cleaning.
• Do not get the unit wet.
• Wipe the unit with a dry cloth.
Mouse Connection
1. Ensure that the unit is turned OFF.
2. Open the mouse jack cover on the back of the unit.
3. Plug the mouse into the mouse jack.
4. Turn the unit ON.
5. To prolong the life of the mouse, only use it on a clean mouse pad.
Starting the Accelerator Vision Learning PC
When you first turn on the Accelerator Vision you will be asked to do the following:
1. Click on the word “YourName”. You will be prompted to type in your name and then press [ Enter ].
NOTE: This should be the same name you use when you install the X-Cable software in your PC.
2. Enter a password and then press [ Enter ]. Do this again to confirm the password and then press [ Enter ].
3. Set the date and time and then press Enter.
4. Select your time zone and then press Enter.
Mouse Jack
Page 6

A. Making a selection with the touch pad - also called “Clicking on”
Use the touch pad to position the cursor arrow over the desired icon and press the left button.
B. Making a selection with the mouse - also called “Clicking on”
Use the mouse to position the cursor arrow over the desired icon and press the left mouse button.
C. Making a selection with the arrow keys
Press the arrow keys to highlight the desired icon and press [ Enter ].
D. Making a selection using the keyboard
For multiple-choice questions, type in the letter corresponding to the chosen answer.
Return to previous screens/Quitting a game
Click on the exit icon at the top right of the title bar or press the [ ESC ] key on the keyboard.
Main Menu
When the power is turned on, a welcome animation is shown, followed by the main menu.
This menu consists of 8 sections. To reveal what activities are available in each section,
select a category by clicking on one of the icons using the touch pad or mouse (see making a
selection).
Remark: you can also assign keys to open any activity with the Hot Key settings
X-Cable
Please refer to the X-Cable manual.
The Keyboard
The keyboard operates in the same way as a computer keyboard or typewriter.
Cursor
The arrow cursor can be controlled by the mouse or touch pad.
The
Touch Pad
Use this to control the arrow cursor. Just move your finger across the touch pad in the direction you want
the cursor to move.
The Mouse
This controls the arrow cursor. Move the mouse on the mouse pad in the direction that you want the cursor
to move. The left mouse button functions as a selection key and an [ Enter ] key
(see “Making a Selection” below).
The Flashing Cursor
This shows where the next typing entry will appear. This can be repositioned by moving the
cursor arrow to a new position, and clicking the left mouse/touch pad button.
Making a Selection
In most of the activities, you will need to make a selection. This can be done in the following
four ways:
7
8
Page 7

These rules apply to most games.
Attempts
You are given three attempts to answer each question correctly.
Time Limit
There is a time limit for answers to be entered. (About one minute for each question).
The clock resets after each incorrect attempt. If the time elapses before an answer is entered,
then no more attempts to answer that question are allowed, and the game proceeds to the next
question.
Help
Use “Help” to see the instructions.
a. Press [ Help ] on the keyboard, OR
b. Click the triangle on the top of the screen.
While the Help screen is open, the game's clock stops. Click on the exit icon, or press [ Esc ]
to exit Help and resume the game.
Chapter 4
Chapter 4
Game Rules
Hints
In some activities, you can ask the learning PC for a hint. Select [ Hint ] from
the Help screen or press [ Function ] + [ T ]. Remember that there is a maximum of two hints
per question, and a point is deducted for each hint used. Activities with the hint function are:
Jail Break (1&2 player), Word Shuffle, and Anagram Slam.
Level/Score/Time Remaining
These are displayed on the Instruction/Help screen. (also see "Help").
Answer
If you don't know the answer to a question, you can press [ Ctrl ] + [ A] to see the answer.
No points are awarded.
Levels
Each game have 5 levels. There are 10 questions in each level, and your movement between
levels depends on your performance on the level just completed (see the table below). After a
round of questions, a summary screen appears, showing your score, and whether you advance
a level, go back a level, or stay at the same level.
Score Movement
Above 85% Advance to the next level
61%-84% Repeat the current level
Below 60% Move down to the previous level
9
10
Click the triangle for Help.
Page 8
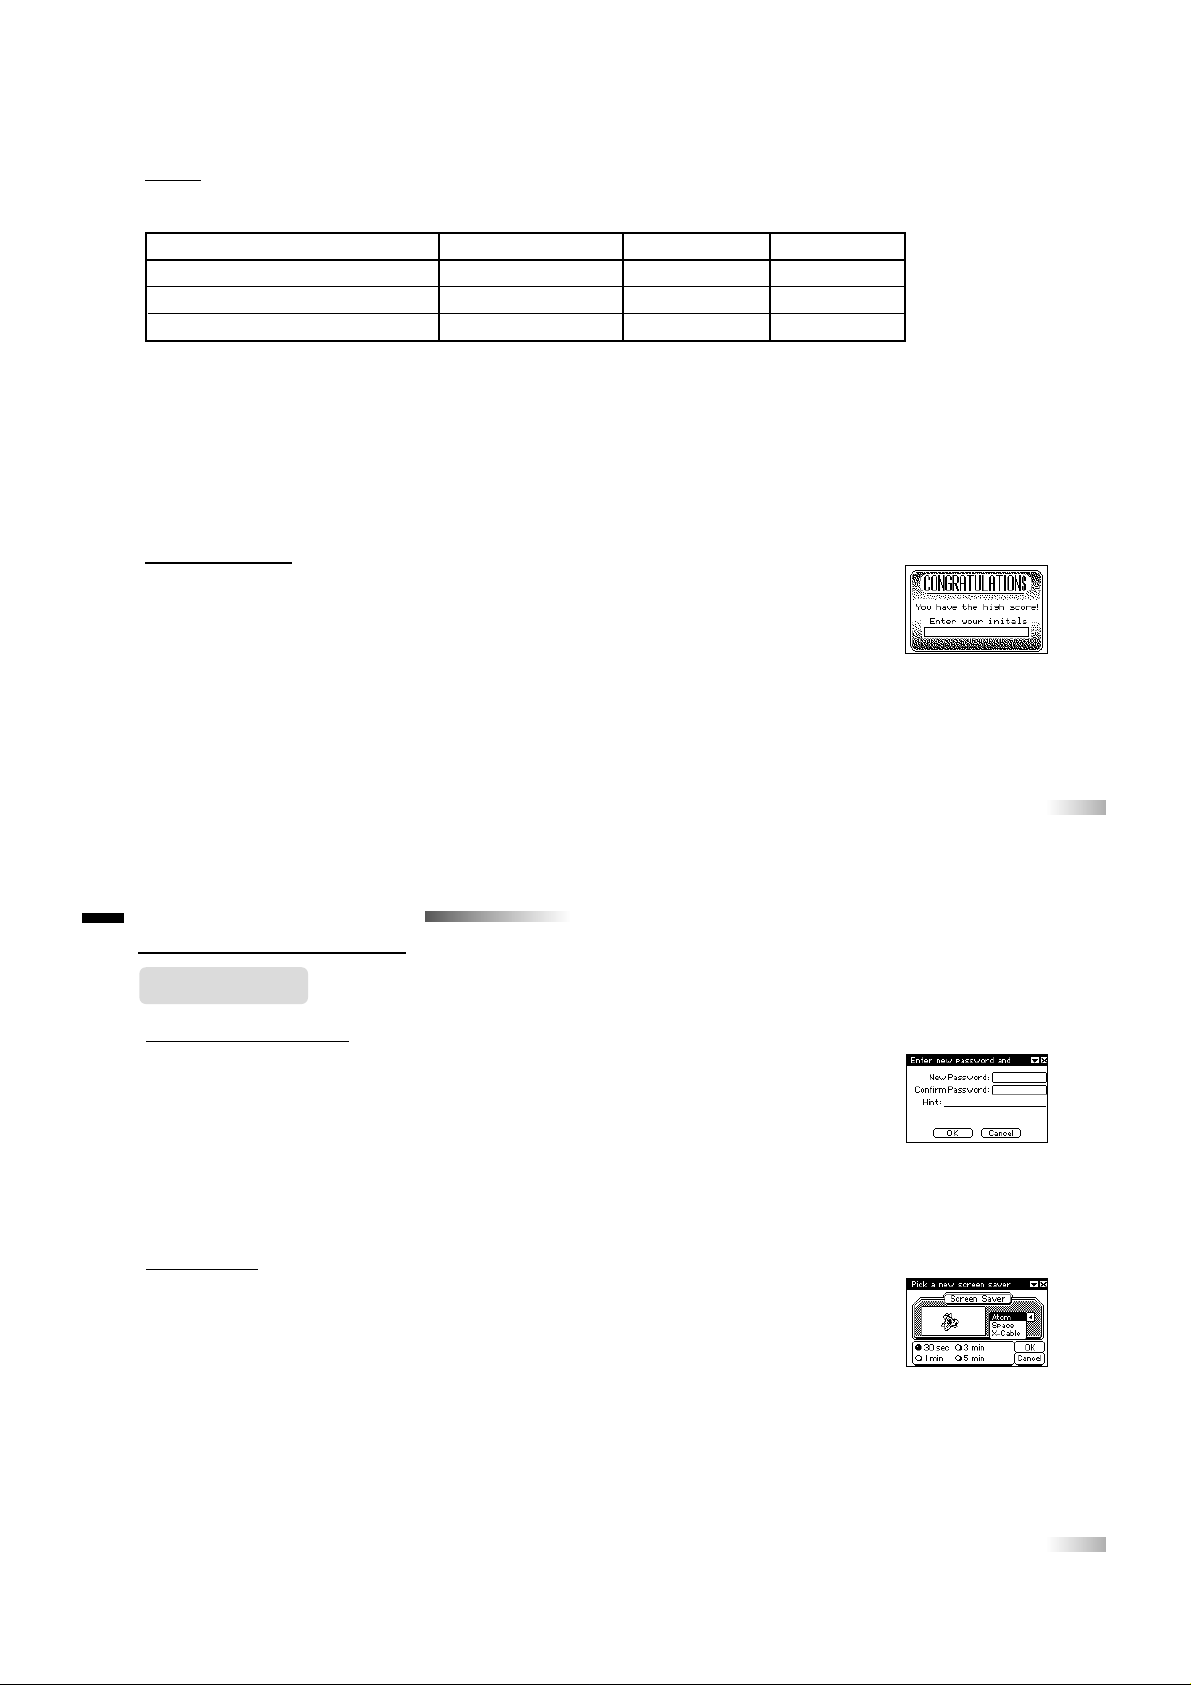
Changing the Password
1. Type your new password in the “New Password” field and the “Confirm Password” field.
The same word must be entered in both of these fields.
(An asterisk is displayed for each letter entered so that your password remains a secret.)
2. Enter a clue in the “Hint” field to remind yourself of the password in case you forget.
• Reset the password by removing and replacing the back-up batteries.
Be sure to leave all batteries out for at least 10 minutes to clear the memory.
• NOTE: Back-up batteries are essential for the retention of stored data.
Removing the back-up batteries will delete all stored data.
Screen Saver
The Screen Saver protects the screen from damage from a prolonged period of exposure
to one image. If there is no input for more than a set period of time, the Screen Saver is
turned on automatically. As soon as any key is pressed the Screen Saver is turned off and
the previous screen returns. The time that elapses before the Screen Saver picture comes
on can be changed.
1. Select “Screen Saver”.
2. Select the elapsed time before the Screen Saver comes on.
3. Press [ Enter ] or select [ OK ] to save the changes or [ Cancel ] to ignore any changes.
One point is deducted for each hint used (maximum of two per question).
Your score is totaled only when you advance a level or when or you quit the current level.
A penalty (minus 100 x level) will be given when you move down a level.
For example: If you are in level 1 and you score 95 points you move up to level 2.
In level 2 you only score 45 points, then your cumulative points are 95-100,
and you must go back to level 1.
Winning a Game
Beat level 5 and discover a special surprise. Good Luck!
If a question is answered correctly Points awarded e.g Level 2 e.g Level 3
1st Attempt 10 x level 10 x 2 = 20 10 x 3 = 30
2nd Attempt 6 x level 6 x 2 = 12 6 x 3 = 18
3rd Attempt 3 x level 3 x 2 = 6 3 x 3 = 9
Scores
Points are awarded according to the number of attempts taken to answer each question correctly.
Chapter 5
Chapter 5
User Settings
11
12
Page 9

Volume
You can adjust the volume to a lower setting.
1. You can press [ Function ] + [ Q ] to go to the volume setting screen.
2. Click on the plus or minus button or press the arrow keys to move the button to the
desired volume level.
3. Click on [ OK ] or press [ Enter ] to set any changes, or click
on [ Cancel ] to ignore any changes.
The Contrast Setting Screen
Depending on the surrounding lighting conditions, adjust the contrast for better viewing.
The Accelerator Vision features a 10 level adjust.
1. You can press [ Function ] + [ W ] to go to the Contrast setting screen.
2. Click on the plus or minus button or press the arrow keys to move the button
to the desired level.
3. Click on [ OK ] or press [ Enter ] to set the changes or [ Cancel ] to ignore any changes.
The Voice Setting Screen
1. Click on [ On ] or [ Off ] to activate or de-activate the voice prompts.
2. Click on [ OK ] or press [ Enter ] to set the changes or [ Cancel ] to ignore any changes.
The Time and Date Setting Screen
1. At the Setting sub-menu, select “ Time/Date”, OR press [ Function ] + [ E ] to go to the Time/Date
setting screen.
2. Set the date by selecting the month, day and year from the pull-down menu.
3. Set the time by highlighting the field and pressing the up or down arrow keys to change
the hour/minutes/am/pm components. Click on the time box again to confirm the time set.
4. Click on the box to activate/deactivate the 24-hour clock.
Assigning Hot Key Settings
At the Setting sub-menu, select “Hot Key”.
Assign any of the activities to the F1-F12 keys by selecting from the pull down menu.
13
14
Chapter 6
Chapter 6
WORD SECTOR
Activities
Spelling Zone
Jail Break
Your mission is to prevent the villain from escaping from jail. At the bottom of the screen is
a secret word. You must guess which letters make up the word. You can guess incorrectly 7
times, but with each incorrect guess a bar will be removed from the jail. When all the bars
are taken away, the villain will escape!
Jail Break - 2 players
Play against a friend. Take turns to score as many points as possible.
Player 1 - Enter a word (maximum 9 characters)
Player 2 - Prevent the villain from escaping from jail (see instructions for Jail Break)
Page 10

Word Warp
You must select the correct answer from the choices given.
Letter Eliminator
A word appears spelled incorrectly with an extra letter. Remove the letter by shooting it
with the Air Fighter. The Air Fighter is controlled by using the left and right arrow keys.
Once you select a letter, press the [ space bar ] or [ Enter ] to fire a laser beam that eliminates the extra letter.
Word Shuffle
Scrambled cards appear on the screen. Unscramble the cards to reveal the word.
Insert the unscrambled cards at the bottom by typing in the word using the keyboard
or using the arrow keys.
Grammar Zone
Word Detective
For each word that appears at the bottom of the screen,
you must click on the appropriate part of speech that it belongs to.
Capital Caper
On the screen is a sentence. Identify the word whose first letter requires capitalization
or un-capitalization and correct them by:
1. Use the arrow key or cursor to select a word.
2. Press [ C ] capitalized or [ U ] un-capitalized and then hit [ Enter ] to submit you answer.
15
16
Punctuation Perfection
A sentence with a punctuation error appears on the screen.
1. Use the cursor to highlight the error.
2.
Use the keyboard or arrow keys to correct the error and press [ Enter ].
Grammar Jammer
You must select the correct answer from the choices given.
Vocabulary Zone
Like It Or Not
A pair of words appears on the screen. Choose whether they are antonyms, a synonyms or
neither, by pressing one of the buttons and pressing [ Enter ]
Word Transformer
A word appears on the screen. By changing one letter, another word can be formed.
A clue is given for what the new word is. Highlight the correct space then type in a new
letter and press [ Enter ] to form a new word.
VOCABULARY SECTOR
Page 11

Anto-Match
Flip over two tiles at a time and try to match up pairs that are antonyms. Remember where
each word is, and then match it with its antonym. Each game consists of 5 pairs and each
pair is worth 2 points.
Syno-Match
Flip over two tiles at a time and try to match up pairs that are synonyms. Remember where
each word is, and then match it with its synonym.
E
ach game consists of 5 pairs and each
pair is worth 2 points.
Game Zone
W
ord Quest
You are shown a list of words hidden in a grid. When you are ready to find the words
press [ OK ] and the clock will begin to count down. All words read from left to right
or top to bottom.
1. Select the first letter of a word. Hold down the shift key and then select its last letter by
pressing the arrow key or clicking with the mouse.
2. Press [ Enter ] each time a word is found.
You can view the list of words again by pressing the [ List ] button on the screen
but the clock will continue to count down.
Word Quest – 2 player
This game is played like Word Quest but with 2 players.
Player 1 – Type in words for Player 2 to find. After typing a word, press [ Tab ].
When done press [ Enter ].
Player 2 – Look at and memorize the words to be found and when you are ready,
press [ Enter ] to start searching.
17
18
Anagram Slam
Rearrange the letters of the anagram to find the word. Aclue is given to help you find the
word. Simply type in your answer.
Silly Stories
Enter in words according to the part of speech indicated. Fill in all of the blanks and
press [ Enter ] when complete. Press [ Tab ] after each word and then [ Enter ] when done.
Crypto – Code
Guess a four-letter word by typing in four letters and pressing [ Enter ].
The following will help you make the correct guess:
1.) the black cross indicates a correct letter and a correct corresponding position.
2.) the white cross indicates a correct letter, but the wrong position.
3.) a blank space indicates a wrong letter and position.
In each level, you have 10 guesses.
You are given 3 attempts to answer each question correctly. Good Luck!
Submit your answer by:
1.
Typing in the answer or using the mouse or touch pad to click on the on-screen number pad.
2. Some games require the answer to be submitted in a different way, in which case the
instructions are given in the game description.
NOTE: If you type in the answer incorrectly, press [ Back Space ] to make a correction.
MATHEMATICS SECTOR
Page 12

Basic Math Zone
Addition, Subtraction, Multiplication and Division
These games challenge the basic arithmetic skills of addition, subtraction, multiplication and
division. Fill in the box with the correct answer.
Fraction Zone
Fraction Tutor
This is a fun introduction to fractions. Scroll down to reveal more pages and up to return to
your previous page. Some pages have places to click on the screen that show interactive
pictures to help you understand.
Fractions Addition/ Subtraction and Multiplication / Division
Develop your fraction skills by solving these problems.
Fill in the box with the correct answer.
Fraction Comparison
This activity challenges your understanding of fractions.
There is a box with three buttons: [ < ], [ = ] and [ > ].
Two fractions appear on the screen and if you think the first fraction is:
a) Greater than the second fraction, then click on [ > ] and press [ Enter ].
b) Less than the second fraction, then click on [ < ] and press [ Enter ].
c) The same size as the second fraction, then click on [ = ] and press [ Enter ].
Fraction Reaction
Four fractions appear on the screen. Select the one that is different from the others.
19
20
Decimal Zone
Decimal Tutor
This is a fun introduction to decimals. Scroll down to reveal more pages and up to return
to the previous page. Some pages have places to click on the screen that show interactive
pictures to help you understand.
Decimals Addition / Subtraction and Multiplication / Division
The purpose of these games is to develop your skill in decimal arithmetic.
Fill in the box with the correct answer.
NOTE: Please enter the numbers from last to first.
Percentage Tutor
This is a fun introduction to percentages.
Scroll down to reveal more pages and up to return to the previous page.
Some pages have places to click on the screen that show interactive pictures to help you
understand.
Per
centages Problems
Perfect yours skill with percentages by solving these problems.
Page 13

21
22
Geometry Zone
3D Geometry Tutor
This tutor will illustrate geometry formulas (area, volume, and angles) using 3D animations.
When a new formula is introduced, there will be a button showing the animation and an
example.
Geometr
y Problems
Solve these questions to prove that you really are a geometry genius!
Type your answers in the box and press [ Enter ]
Mathematics Game Zone
Big or Little
This activity challenges your understanding of Mathematics.
There is a box with three buttons: [ < ], [ = ] and [ > ].
Two equations appear on the screen. If you think the first equation is:
a. Greater than the second, then click on [ > ] and press [ Enter ].
b. Less than the second, then click on [ < ] and press [ Enter ].
c. The same size as the second, then click on [ = ] and press [ Enter ].
Operation Order
You are given 3 numbers. You must enter each of the 3 given numbers in the
correct boxes to create a correct equation. Click on the numbers to put them in place.
A. MATHEMATICS SECTOR
Trivia Zone
Science Trivia, History Trivia, and World Trivia
Test and improve your general knowledge in the Trivia Zone!
Just select the correct answer from the multiple choices.
Place
Your Order
You are given four pieces of information. Rearrange them in the proper order according
to the description.
NOTE: Make sure you scroll down and see all the choices.
Games
Repeat the Beat
Repeat the sequence shown by clicking on the tone buttons or by typing the tone number.
See the sequence again by pressing the [ Repeat ] button.
You can only use the [ Repeat ] button once in each question.
TRIVIA / GAMES SECTOR
Page 14

24
Code Buster
Guess a four digit number by typing the digits and pressing [ Enter ].
To submit your answer, type in your answer and press [ Enter ].
In each level, you have 10 guesses.
Indicator:
The position of the indicator does not necessarily correspond to the position of the numbers.
1.) the black cross indicates a correct number and correct position.
2.) the white cross indicates a correct number, but the wrong position.
3.) a blank space indicates a wrong number and position.
Note:
• Level 1: 4 columns.
• Level 2: 5 columns.
• Level 3: 6 columns.
Crystal Ball
This game tells you your fortune.
Think of a question and then press [ Enter ].
After the crystal ball stops rotating, the screen then turns to reveal the answer.
23
Water Balloon Attack
Click on a square to reveal what’s behind it. Uncover all of the squares, except those
hiding water balloons, as quickly as possible.
1. If a number appears in the square, this number tells you how many balloons are in the
surrounding 8 squares.
2. If a balloon is uncovered, then the game is over and a new game begins.
3. If there are no balloons in the surrounding 8 squares, no number is shown and all
adjoining squares are uncovered.
4. If you believe there is a balloon behind a covered square, you can mark it with a flag by
clicking the right mouse button.
5. If you think you have made a mistake, click on the flag with the right mouse button to
remove it.
The timer starts counting as soon as the first move is made.
Scoring
One point will be deducted if you exceed the time limit for that level.
Level Score Time
1 100 65 second
2 100 x 2 60 second
3 100 x 3 80 second
4 100 x 4 75 second
5 100 x 5 80 second
Page 15

25
26
Super Snake
The snake is controlled by arrow keys - once a direction is given, it keeps going until
another direction is given.
The snake should not hit itself or the wall. It grows bigger when fruit is eaten.
Each level has 10 pieces of fruit. In order to move to the next level,
you must eat all the pieces of fruit.
There are 5 levels, and the snake speeds up as you get to higher levels.
Brick Breaker
You use the paddle to hit the ball and remove all the bricks.
Use the arrow buttons to control the paddle.
There are 5 levels. If you miss the ball 3 times, the game is over and a new game begins.
Skill Zone
Keyboard Tutor
Scroll down the document and follow the instructions given in the tutorial pages.
Some pages have places to click on the screen that show interactive pictures to help you
understand.
SKILL / PDA CENTER
Hyper Typer
Find your typing speed.
Type the given paragraph. As you type the words, errors are highlighted.
At the end of the paragraph, a summary screen appears showing the total number of characters typed
and your accuracy percentage.
Keyboard Conveyor
A conveyor belt appears on the screen. Letters start rolling out on the belt.
You must type the letters as they appear, to stop them from falling off into the bin.
PDA Zone
Address Book
This special feature offers a comprehensive and convenient way to store important telephone numbers
and contacts. Depending on memory, a maximum of 96 contacts can be stored.
• Adding a new entry
1. Select [ New ] from the title bar.
2. The flashing cursor appears in the name field. Type in a name and press [ Enter ]
or [ Tab ]. The flashing cursor moves to the next field. Complete the remaining
fields in the same way. Use the scroll bar to view further down the page.
3. Click [ Save ] on the screen to save the entry or [ Esc ] to disregard any changes.
NOTE: Only the name field must be filled in. All the other fields can be skipped and filled
in later. Move between fields by clicking the cursor arrow in the desired fields or by
pressing [ Enter ] or [ Tab ].
Page 16

27
28
• Finding a record with the Search function
1. Entries are listed alphabetically by name.
Use the scroll bar to view entries further down the page, or
2. Select [ Search ] from the title bar.
3. Type in the name you are looking for and press [ Enter ].
• To view all the fields of an entry
1. Highlight the entry you want to view and press [ Edit ].
2. Alternately, click on the selected entry using the mouse.
• To print the telephone list
1. Select [ Print ] from the title bar.
Make sure your printer is connected and switched on.
• To delete an Address Book entry
1. Highlight the entry you want to remove.
2. From the title bar, select [ Delete ]. A warning screen appears.
3. Click on [ OK ] to delete or [ Cancel ] to cancel.
• To edit a saved Address Book entry
1. Highlight the entry you want to edit.
2. Select [ Edit ] from the title bar.
3. Move the flashing cursor to the required field and type over the old information.
4. Click on [ Save ] on the title bar to update the entry or [ Esc ] to ignore the changes.
Calendar
The calendar opens with today's date highlighted. If there is a day reminder
or an appointment on that day, that day is highlighted on the calendar.
• Changing the displayed months and years
To display preceding months, click on the month back icon ( ).
To display future months, click on the month forward icon ( ).
• Accessing the Appointment Book from the Calendar
You can access the Appointment Book from the Calendar.
Highlight the day you want to view, then select “Appointment book”.
• Accessing the Day Reminder from the Calendar
You can access the Day Reminder from the Calendar.
When the Calendar screen is opened, select “Day Reminder”
from the bottom right of the screen.
Page 17

29
30
Tool Zone
Word Processor
With the Accelerator Vision, you can create and print your own written documents.
You can even transfer them to your PC for editing. (See the X-Cable Manual)
The Accelerator Vision comes with a standard keyboard. Use the letter and number keys to
type your text.
• Shift Key
Hold down the ‘Shift’ key while pressing another key to make uppercase letters or to
create punctuation marks and symbols as shown on the top part of the keys.
• Caps Lock Key
Press this key to lock letters into upper or lower case.
• Back Space
Press this key to delete the character to the left of the flashing cursor or any selected,
highlighted text.
• Delete
Press this key to delete a character to the right of the flashing cursor or any highlighted text.
• Enter key
Press this key to go to a new line.
• Arrow Keys
Use these to insert the flashing cursor anywhere in the text field. The flashing cursor cannot
be moved beyond the limits of the active text.
TOOLS/REFERENCE CENTER
Day Reminder*
The Accelerator Vision will also remind you of special dates by displaying a message on
the screen every time the unit is turned on each day from 7 days in advance, up to the
actual date. When this activity is selected, today’s date is shown. You can review the
record by selecting the Task number.
1. Creating and Editing Reminders
• Select a date by clicking on the arrows in the date bar.
• Select a task number.
• Type in your message in the content field.
• Select 7 days or Yearly. If you choose Yearly the reminder will work every year.
• Press [ Save ] to save the records or [ Del ] to delete the records.
Appointment Book*
The built-in personal appointment book can remind you of special meetings and dates.
Alarm: The unit will alert you when a particular time or date is reached.
1. Creating and Editing Appointments
• Turn to the required date.
• Select a Task number.
• Click on the hour/minute components of the clock and press the arrow keys to set the time.
• Click on the message box and type in the appointment details.
• Click on [ Alarm ] or [ Reminder ].
➪
➪
The Reminder option displays a message at the marked time but only if the unit is turned on.
➪
➪ The Alarm option sets off an alarm at the designated time even when the unit is turned off.
• Click on [ Save ] to save the changes or [ Del ] to delete the records.
* Together, the Day Reminder and Appointment Book can hold thirty records in total.
In addition, records that pass in the Appointment Book will be automatically deleted after the set time has
been reached. However, records in the Day Reminder must be manually deleted after the day has passed.
Page 18

31
32
• Highlighting /selecting a block of text
1. Click on the first character of the text to be highlighted.
2. Hold down the [ shift ] key and then select the last letter by pressing the arrow key or
click with the mouse.
• Space Bar
Press this to insert a space.
• Opening a menu
1. Keyboard method:
To open the File menu, press [ Alt ] + [ F ].
To open the Edit menu, press [ Alt ] + [ E ].
To open the Format menu, press [ Alt ] + [ O ].
2. Mouse/touch pad method:
Click on the desired menu option.
• Selecting from menus
Once a menu is opened, you can select from the listed options by clicking on the option or
pressing the key combinations shown beside the menu options.
Moving Blocks of Text (Cutting/Copying and Pasting)
Cutting Text (also see Highlighting and Pasting):
1. Highlight the block of text to be moved.
2. Select “Cut” from the Edit menu or press [ Ctrl ] + [ X ].
3. Paste the block into its new position [ Ctrl ] + [ V ].
Copying Text (See Pasting):
1. Highlight the block of text to be copied.
2. Select “Copy” from the Edit menu or press [ Ctrl ] + [ C ].
3. Paste the block into its new position.
Pasting Text:
The last selection of text that has been copied or cut can be pasted to a new position.
1. Place the cursor at the new position for the text.
2. Select “Paste” from the Edit menu or press [ Ctrl ] + [ V ].
Select All:
In addition to highlighting text to copy, you may select all of the text on a page by pressing [ Ctrl ] + [ A ].
Bold
Bold the highlighted text or a new section of text boldface by selecting “Bold” from the Format menu.
Italicize
Italicize highlighted text or a new section of text by selecting “Italic” from the Format menu.
Underline
Underline highlighted text or a new section of text by selecting “Underline” from the Format menu.
Page 19

33
34
File menu
Start a new document:
Select “New” from the File menu or press [ Ctrl ] + [ N ].
Open an existing/saved document:
1. Select “Open” from the File menu or press [ Ctrl ] + [ O ]. Alist of documents are shown.
2. Select the document you wish to open by clicking on the document name.
Save a document:
Remember to save your document and any changes made so you can continue working on the latest
document in the future.
1. Select “Save” from the File menu or press [ Ctrl ] + [ S ].
2. Click on [ Save ] or press [ Enter ].
To delete a document:
If you no longer need a file, remove it from the Accelerator Vision’s memory. This releases more memory
to save other files.
1. Open the document you want to remove.
2. Select “Delete” from the File menu or press [ Ctrl ] + [ D ].
3. Adialogue box appears asking you to confirm the deletion.
Click on [ OK ] to confirm, or [ Cancel ] or escape icon to cancel the delete command.
Please note that the Accelerator Vision can store a maximum of twenty-four documents depending on the file
size of each.
Print:
Select “Print” to print out the current document. Remember to check that the:
1. Printer is connected to your PC and the power is on.
2. The X-Cable is attached to your PC.
Exit:
Selecting this option closes the Word Processor and returns you to the Tool Zone menu.
Scoreboard
Use the pull-down menu to see either Personal Best scores or Challenge Game scores.
The scores of each game are listed in the score display field. Scroll down to see all
the scores. Then you can:
1. Click on [ Print ] to print out the current scores in the display field, or
2. Click on [ Clear ] to clear the Personal Best list if the list is displayed.
World Time
Check the current time around the world. Select the country where you want to learn
the time. You can select up to four different countries at a time.
Alarm Clock
The alarm can be turned off by pressing any key on the keyboard.
1 Click on the alarm sound menu and select a sound.
2. Activate the alarm by clicking on the alarm field so “On” is displayed.
Deactivate the alarm by clicking on the alarm field so “Off” is displayed.
3. Set the alarm time by clicking on the time display. The hour component begins to flash.
Set the hour of the alarm using the up/down arrow keys. Remember to specify
am or pm. Move to minutes by pressing the left/right arrow keys then change the minutes using
the up/down arrow keys.
Page 20

35
36
Creative Zone
Percussion Pro
Here there are six different drums used to create a composition.
1. Produce the sounds by
a. Clicking on the pads.
b. Pressing the corresponding keyboard keys (shown beside each picture).
2. Click on [ ] to start Recording.
3. Click on [ ] to pause the recording.
4. Click on [ ] to hear your composition. If there is no recording, nothing plays back.
5. Click on [ Clear ] to clear the recorded composition.
6. Click on [ Pause ] to insert a pause in between the tunes.
Music Station
1. There are 10 music melodies that you can choose to play.
2.
Press the letter keys to see different animation effects on the screen.
Sequencer
Use 6 musical instruments to create a composition.
1. Select an instrument from the right hand side menu. Click on any instrument or press the up/down
arrow key, and the instrument becomes highlighted.
2. Produce the sounds by
a. Clicking on the keyboard.
b. Pressing the corresponding keyboard keys (shown on the keyboard).
3. Click on [ ] to start recording.
4. Click on [ ] to pause the recording
5. Click on [ ] to hear your composition. If there is no recording, nothing plays back.
6. Click on [ Clear ] to clear the recorded composition.
7. Click on [ Pause ] to insert a pause in between the tunes.
Music Tutor
Note Name
Learn the note names by clicking on the note mark on the staff.
It will tell you the name of each note.
Note Length
Learn the note length by clicking on the note mark on the staff.
It will tell you the length of each note.
Rest
Learn the rest names by clicking on the rest mark on the staff.
It will tell you the name of each rest.
Note Quiz
A note is displayed on the staff randomly. Select the correct note name by clicking
on a choice at the bottom.
Musical Mathematics
A random musical equation is displayed. Select the note that makes a correct equation.
Page 21

37
38
Reference Zone
Calculator
The built-in calculator has an eight-character display.
Click on the numbers or operands on the on-screen number pad and press [ Enter ],
or key in the equation using the keyboard and press [ Enter ] to see the answer.
Press [ C ] if you want to clear the equation.
Graphic Calculator
This activity plots equations and functions into accurate graphs.
Enter an equation in the field and click on [ Graph ].
If the equation is valid, the graph appears in the graph field.
Metric Converter
Enter a number beside the known unit to convert it to the corresponding U.S.
standard / metric measurement. Scroll down for additional choices.
Parts of Speech
This is a grammar reference area that defines parts of speech and provides examples.
World Atlas
Learn about over 190 different countries around the world.
1. Click on a continent to show a map with a list of the countries located there.
2. To see the location of a country, click on the country’s name.
3. Press [ Enter ] or click on a country’s name and a document appears with statistical
information about the country.
4. Click on [ X ], to return to the country name list.
Language Zone
Super Translator
You can learn common phrases in 6 languages:
French Italian Portuguese
German Japanese Spanish
Select a word from the English field to hear it in English,
and then in another language.
Translation Test
Test your ability to understand a foreign language.
Read the question carefully, and then select the correct answer from the choices given.
The Web Area is a closed system, which is designed for children to have fun and learn more
about the Internet without the risk of being exposed to inappropriate adult material or the
possibility of being contacted by dangerous people.
The Web Area has unique filters, one of which is a specially developed profanity checker
to ensure that no e-mail, sent or received, contains profanity. The Web Area also features
an online Access Control List that allows parents to select who can e-mail their child.
Additionally there is another exciting feature that lets you create your own web page and
upload it to safe-site.net.
For the connection to safe-site.net, please go to the Uplink activity.
(Also see “How to synchronize with your home PC” below).
WEB AREA
Page 22

40
Download Questions
Periodically, your child can download fun new educational questions from the Web Area.
Card Gallery
From the choice of greeting cards, your child can select one, fill it in, and send it to another
Safe-site member or to any Internet user.
Sending a greeting Card
1. Type in an e-mail address.
2. Select a greeting card and press [ Next ] to enter your message.
3. Press [ E-mail ].
Printing a Greeting Card
You may also print it out using your home PC’s printer.
1. Select a greeting Card and enter your message.
2. Press [ Print ].
Remarks:
There are two choices: the Large Card folds an 8.5” by 11” paper in half, and the Small Card
folds it in quarters. You can select the choices on the PC before printing.
(see also Card Viewer in the X-Cable manual)
Score
The Web Area stores and updates a list of the top 10 verified scores for the 10 “Challenge Games ”
for Accelerator Vision users.
When you access the Web Area, it automatically updates the scoreboard and lets you
know if you are in the top 10.
39
E-mail
Your child can send e-mail to Internet users and you can decide who may send e-mail to
your child through the online Access Control List at: www.safe-site.net
To create an e-mail
1. Go to File and select “New” or [ Ctrl ] + [ N ].
2. Type in an address in the “To” field.
3. Add a Subject.
4. Type your message.
5. Press send.
6. Make sure to go to Uplink to connect to the Internet.
(Reminder: your PC must already have a connection and be online.)
Depending on the size of each message, a maximum of 70 e-mails can be stored. In addition, the
Accelerator Vision will divide very long emails into three separate mails until it reaches a limit.
After this, the Vision cannot display any more of the text for this message. Additional emails that do
not go over the standard email memory limit can still be received
.
Newsgroups
Your child can participate in newsgroups. Each contains topics of interest that your child
can discuss with their peers.
Read a message:
After each synchronization, your newsgroups will be updated.
Post a message:
To add a message press [ Post ] and then you must go to the Uplink window and connect
to the Internet.
Download messages:
Select from each category one at a time, and press the [ Download ] button.
Page 23

41
42
Web Page Designer
1) First select a template (each template consists of 4 pages)
2) Next, enter the content for each page.
3) Once finished, you can either view your page on your PC, or upload it to Safe-site.net.
• If you choose “PC”, the web pages will only send the file to the PC after the next
synchronization.
• If you choose “Safe-site” the web page will be sent both to the PC and
Safe-site (http://web.safe.site.net/your login name).
Note: Aparent password is required to enter. If you fail to do so, the web page
cannot be uploaded onto the Word Wide Web.
REMEMBER: In order to send to Safe-site.net your Accelerator Vision must be connected
to a PC that is connected to the Internet.
Uplink
Establish a connection with the Accelerator Vision to the Server and the PC.
1. Enter your login name and password into the fields.
2. Press [ Connect ] or [ function ] + [ ] to start the “ Synchronization”
process with your home PC.
For Recovery (Also see the X-Cable Manual – Recovery)
• Please select the option as shown in the picture. You can backup files on the PC
from the Accelerator Vision or the other way round.
A safe introduction to Internet communication for children
W e all want our children to learn valuable Internet skills without the possibility of encountering undesirable web sites.
That’s why we designed www.safe-site.net
Our Web Area’s stylish design provides the same up-to-date activities that are available to all web users but
in a child-safe, friendly environment. With Safe-site.net, children can build real Internet skills in a fun and
exciting way.
Chapter 7
Chapter 7
Safe-site.net
Page 24

43
44
“Top 10” scoreboard
If your score is in the top 10, then your name will appear on the scoreboard until it is surpassed.
Web Page Designer
Design your own web page and host it at our Safe-site server.
How to sign up for safe-site.net:
Activating your account:
The product comes with a secret password for the parent that is used to open the safe-site account.
It can be found on a separate piece of paper attached to the manual, and labeled “Access Key”.
The parents first registers the product using the access key on our web site (www.safe-site.net) and obtains
the Safe-site e-mail account (login name & password) for their child. An additional parent password is also given
to oversee control of the account (also see Password for Parents).
Password for Kids:
Kids can enter the log in name and password through the Uplink activity to gain access to the Web Area.
Password for Parents:
Parent can control two main aspects:
1. The publication of the Web Page:
When you choose [ Safe-site ] in the Web Page Designer activity, a pop up window will appear and ask you
to enter your parent password. If you fail to enter a password, the web page cannot be uploaded to the
World Wide Web.
2. You may control access to your child’s account through use of our website (www.safe-site.net).
Here you may:
• Filter any unwanted e-mail.
• Delete your web pages.
Synchronization is the process that transfers data (such as Web activities) back and forth between the Internet,
the PC, and the Accelerator Vision.
1. Go to the Web Area and select Uplink.
2. Enter your login name and password (obtained after web registration).
3. Press [ connect ] or [ function ] + [ ] to begin the synchronization.
NOTE: the log in name and password are obtained after your web registration.
(also see “How to sign up for safe-site.net” )
The Accelerator Vision is sold with the X-Cable (a USB device) for use with your home PC. The X-Cable
connection is used for Web activities, printing, and file recovery. For more detailed information,
please refer to the X-Cable manual.
How to synchronize with your home PC
X-Cable
Chapter 9
Chapter 9
Chapter 8
Chapter 8
Page 25

45
46
Chapter 10
Chapter 10
Trouble Shooting
Before contacting an authorized service center, please carry out the following simple checks.
You may call at 1-800-853-8883 to speak to a customer service representative.
No Display
Is the power supply connected?
Are the batteries installed properly?
Do the batteries need replacing?
Difficult or no response from the mouse
Is the ball of the mouse or mouse pad clean and free from dust?
Is the mouse connected correctly?
Cannot connect to the Web or use E-mail
Have you established the Internet connection on your PC?
Please check the safe-site log in name and password are entered correctly.
Please check that the X-Cable is securely attached to your PC and the Accelerator Vision.
Cannot Print
Have you correctly connected your printer to your PC?
Is the printer cable securely attached to your PC?
Please check that the X-Cable is securely attached to your PC and the Accelerator Vision.
Black-out screen or abnormal display
Disconnect the power supply by removing the batteries or disconnecting the adaptor for at
least 10 seconds before connecting the power supply again.
Memory Failure
In the unlikely event that the memory becomes corrupted, reset your Accelerator Vision by:
• Removing all batteries, including back-up batteries and leave the machine unplugged for
30 minutes.
• Press [ R ] + [ ON ] to reset or press the reset key located on the bottom of the
Accelerator Vision. (Warning: All memory will be erase.)
Developing learning aids is a responsibility that we take at Oregon Scientific very seriously.
We make every effort to ensure the accuracy and appropriateness of the content that forms the
value of our products. However, errors can sometimes occur. It is important for you to know
that we stand behind our products and we encourage you to call our Consumer Services
Department at 1-800-853-8883 with any problems and/or suggestions that you might have.
Our service representatives will be happy to help you.
This product conforms to the safety requirements of ASTM F963, EN71 Parts 1,2 & 3 and
EN50088. In an effort to continually improve our products, the actual screen display on the
product may differ slightly from the diagrams shown.
Reset
Page 26

Oregon Scientific, Inc.
19861 SW 95th Place Tualatin, OR 97062
Tel: 503 639 8883 Fax: 503 684 8883
E-mail: info@oscientific.com
Look for us on the World Wide Web!
http://www.oregonscientific.com
This device complies with Part 15 of the FCC Rules. Operation is subject to the following two conditions:
(1) This device may not cause harmful interference, and (2) This device must accept any interference received, including interference
that may undesired operation.
Warning: Changes or modifications to this unit not expressly approved by the party responsible for compliance could void the user's
authority to operate the equipment.
NOTE:
This equipment has been tested and found to comply with the limits for a Class B digital device, pursuant to Part 15 of the FCC Rules.
These limits are designed to provide reasonable protection against harmful interference in a residential installation. This equipment
generates, uses, and can radiate radio frequency energy and, if not installed and used in accordance with the instructions, may cause
harmful interference to radio communications. However, there is no guarantee that interference will not occur in a particular installation.
If this equipment does cause harmful interference to radio or television reception, which can be determined by turning the equipment off
and on, the user is encouraged to try to correct the interference by one or more of the following measures:
• Reorient or relocate the receiving antenna.
• Increase the separation between the equipment and receiver.
• Connect the equipment into an outlet on a circuit different from that to which the receiver is connected.
• Consult the dealer or an experienced radio TV technician for help.
" This Class B digital apparatus complies with Canadian ICES-003."
" Cet appareil numérique de la class B est conforme à la norme NMB-003 du Canada"
Product name: Accelerator Vision Model No.: S18 US Item No.: 18035
086-000740-024
Notes
Page 27

Oregon Scientific (U.K.) Limited
Unit 1, Switchback, Gardner Road,
Maidenhead, Berkshire, SL6 7RJ
Tel: (44) 1-628-580154 Fax: (44) 1-628-634981
e-mail: sales@oregonscientific.co.uk
Look for us on the World Wide Web!
http://www.oregonscientific.com/uk
This device complies with Part 15 of the FCC Rules. Operation is subject to the following two conditions:
(1) This device may not cause harmful interference, and (2) This device must accept any interference received, including interference
that may undesired operation.
Warning: Changes or modifications to this unit not expressly approved by the party responsible for compliance could void the user's
authority to operate the equipment.
NOTE:
This equipment has been tested and found to comply with the limits for a Class B digital device, pursuant to Part 15 of the FCC Rules.
These limits are designed to provide reasonable protection against harmful interference in a residential installation. This equipment
generates, uses, and can radiate radio frequency energy and, if not installed and used in accordance with the instructions, may cause
harmful interference to radio communications. However, there is no guarantee that interference will not occur in a particular installation.
If this equipment does cause harmful interference to radio or television reception, which can be determined by turning the equipment off
and on, the user is encouraged to try to correct the interference by one or more of the following measures:
• Reorient or relocate the receiving antenna.
• Increase the separation between the equipment and receiver.
• Connect the equipment into an outlet on a circuit different from that to which the receiver is connected.
• Consult the dealer or an experienced radio TV technician for help.
" This Class B digital apparatus complies with Canadian ICES-003."
" Cet appareil numérique de la class B est conforme à la norme NMB-003 du Canada"
Product name: Accelerator Vision Model No.: S18 UK Item No.: 00961
086-000834-025
Notes
 Loading...