

Page 1
DIGITAL RF CLOCK RADIO
MODEL NO.: RRM-112A
USER’S MANUAL
SECTION 1 INTRODUCTION
Congratulations on purchasing the RRM-112A Digital RF Clock
Radio, the RRM-112A is a product with multiple features and
functions including an ExactSet TM clock that automatically sets
the time and date from signals broadcast by the US Atomic Clock,
one of the world's most accurate timekeepers.
The RRM-112A also comes with a built-in radio with digital
PLL(Phase Lock Loop) tuning, 4 U.S. zone-times selection, daily
alarm with snooze function and
backlight.
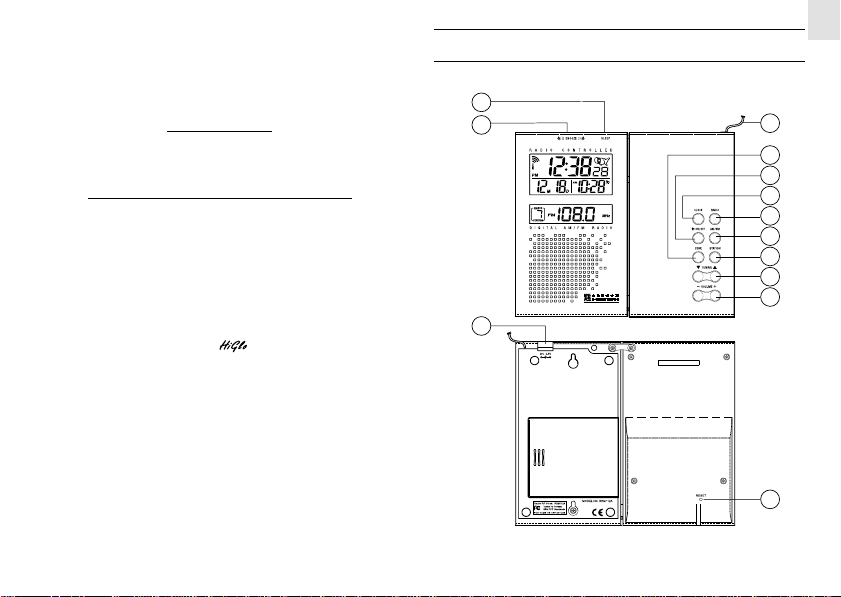
CONTROL BUTTONS AND CONNECTORS
I
J
L
1
GB
N
F
G
H
A
B
C
D
E
K
Page 2
GB
A RADIO BUTTON
Press to turn radio on and/or off.
B AM / FM BUTTON
Press to switch between AM and FM radio frequencies.
C STATION BUTTON
Press to switch among user programmed selected radio stations.
D TUNING [
Press [
E VOLUME [
Adjusts the volume of the radio or change the value of a setting.
F ZONE BUTTON
Press to sequence through the 4 US time zones: Pacific,
Mountain, Central and Eastern.
G
ON / OFF BUTTON
Press to select Beep Alarm-On, Radio Alarm-On and Alarm-Off
modes.
H CLOCK BUTTON
Press to switch between Clock with Seconds and Clock with
Day of the Week display modes.
] / [ ] BUTTONS
] or [ ] to scroll through radio station choices.
+ ] / [
-
] BUTTONS
I SLEEP BUTTON
Press to select the radio auto-off feature for 15, 30, 46, 60, 90 or
120 minutes.Activates the sleep function of the radio.
J SNOOZE / LIGHT BUTTON
Activates the snooze function or turns on the backlight.
K PRESS BUTTON
Clears all user selected settings and returns to factory set de f ault s .
L POWER ADAPTER CONNECTOR
Connection jack for optional AC Power Adapter. AC Power
Adapter is included.
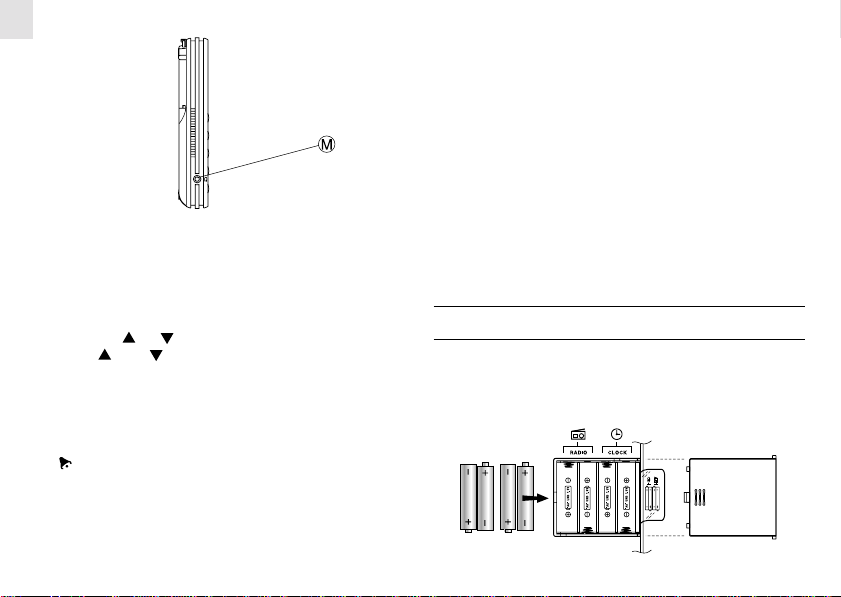
M HEADSET CONNECTOR
Connection jack for optional headset. Headset not included.
N ANTENNA
External antenna for radio.
POWER REQUIREMENTS
The RRM-112A operates on four AA-sized (UM3) batteries—two
for clock operation and two for radio. To insert the batteries, follow
the polarities shown inside the battery compartment and press
[RESET].
2
Page 3

The clock and radio have separate low-battery indicators. Change
the batteries accordingly when the respective indicator lights up.
An AC Power Adapter is included. To connect it, plug it into the
power adapter connector and a wall socket.
Note: The power adaptor supplies
power only to the radio. The clock
operates on batteries.
BEFORE YOU BEGIN
The RRM-112A is designed for table stand or wall mount.
Table Stand
Place the RRM-112A on a flat, sturdy surface. You can adjust the
display angle of the LCD by lifting up the LCD panel.
Note: Unlock the latch on the back of the unit before lifting up
the LCD panel.
Wall Mount
A wall mounting guide is included. Place the mounting guide on the
wall where the RRM-112A is to be hanged. After making appropriate
markings install two mounting screws onto the wall. Hang the
RRM-112A on the mounting screws.
Note: For wall mounting the unit should be kept flat by locking the
latch on the back of the unit.
3
GB
Page 4
GB
THE BACKLIGHT
Press [SNOOZE/LIGHT] button to activate the backlight. The
backlight will automatically turn itself off after 5 seonds.
SECTION 2 THE CALENDAR CLOCK
DISPLAY MODES
In normal display mode, Clock with Seconds will be displayed on
the top line of the LCD. Press the [CLOCK] button to switch
between the clock with seconds display and the day-of-the -week
display.
Press the [ ON / OFF ] button to sequence through Beep
Alarm-On, Radio Alarm-On or to disengage the alarms.
ABOUT RADIO RECEPTION
The ExactSet (TM) feature of the RRM-112A will automatically
synchronize current time and date with the signal broadcast by
the US Atomic Clock when the product is in reception range of
the signal.
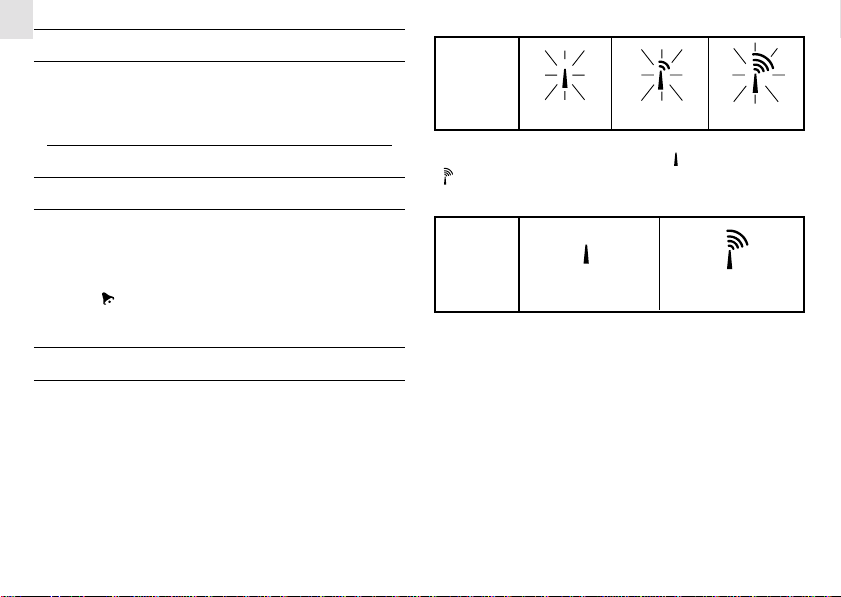
When the unit is receiving radio signal, the reception icon will start
to blink. The reception icon will show either strong, weak or no
signal depending on the strength of the radio signal. A complete
reception generally takes about 2 to 5 minutes.
Receiving
radio
signal
When the reception is completed the reception icon will stop
blinking. The reception icon will show " " for no Reception or
" " for successful reception.
Reception
complete
For best signal reception, place the RRM-112A away from other
equipment that emit RF or microwave signals such as TV's, radios.
PC's or microwave ovens. Other causes for signal interference include
electrical power transmission towers, steel reinfoced concrete
construction, and/or metal siding. Due to the density of other
signal broadcasts, the strongest signals are received between
midnight and 4 AM.
4
No signal Weak signal Strong signal
No reception, or
manually adjusted
Successful reception
Page 5
HOW TO ENABLE OR DISABLE
AUTO-RECEPTION
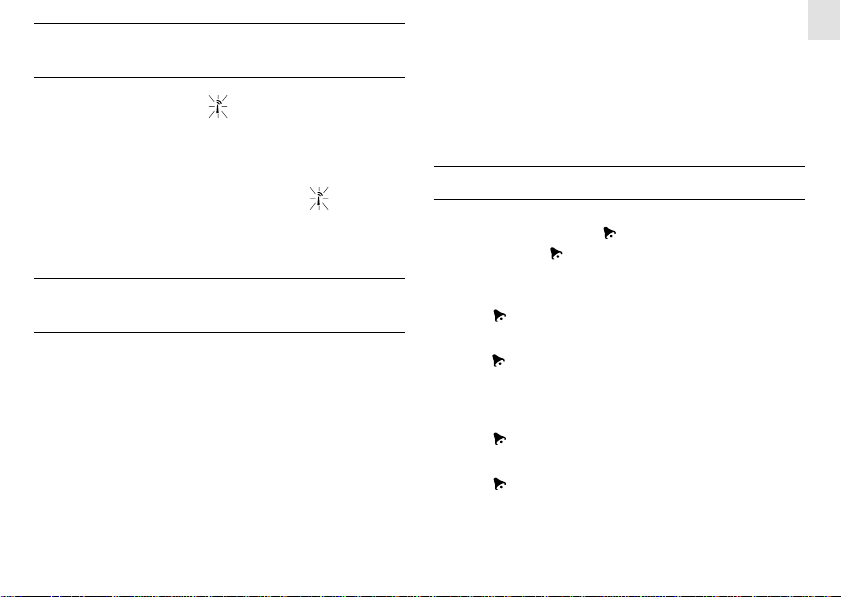
To disable the automatic signal reception feature, hold down
[ZONE] for 2 seconds. The [ ] will disappear and the RRM-
112A will not receive signal from the US Atomic Clock.
Note: The radio needs to be off before disengaging the signal
reception feature.
To activate the signal reception feature again, hold down the
[ VOLUME + ] button for two seconds.The [
will start blinking to initiate reception automatically.
When the automatic reception feature is active, manual settings
will be over-ridden by next signal recepttion.
] signal
AND SELECT DAY-OF-THE-WEEK
DISPLAY LANGUAGE
the automatic signal reception feaure is disengaged, the RRM112A can be manually set and will operate as quartz clock. To
manually set the RRM-112, the clock needs to be in normal time
display mode.
1. Press [CLOCK] for two seconds and the hours digits will start
flashing.
2. Enter the hours using the VOLUME [ + ] and VOLUME [ - ]
buttons. Hold down either button to rapidly increase or decrease
the value.
3. Press [CLOCK]. Minutes digits will flash.
4. Enter the minutes using the VOLUME [ + ] and VOLUME [ - ]
button.
5. Press [CLOCK].
6. Follow the same procedure to set the year, month, day and the
display language (English, French and Spanish).
Press [CLOCK] to save the changes and exit. If changes are made
after the minute adjustment, the seconds will reset and start from
zero.
The unit will also save all changes and return to normal display
automatically after the unit has been left idle for 1 minute.
HOW TO SET THE ALARM
1. Select between Beep-Alarm-On, Radio-Alarm-On and AlarmOff mode by pressing the [ ON / OFF ] button.
2. Press and hold [ ON / OFF ]for two seconds. Hours digits
will flash.
3. Use VOLUME [
4. Press [ ON / OFF ]. Minutes digits will flash.
5. Use VOLUME [
6. Press [ ON / OFF].
7. If the Radio Alarm-On mode has been selected, press [AM / FM]
to select the correct frequency and then [STATION] to select the
radio station.
8. Press [ ON / OFF ].
9. Use VOLUME [
10.Press [ ON / OFF ] to exit.
11. In Beep Alarm-On mode, a 2-minute crescendo alarm will sound
when alarm is active. In Radio Alarm-On mode, the radio will
remain on for 2-hours before turning off automatically if not
manually deactivate.
5
+ ] / [
-
] to enter the hours.
+ ] / [
-
] to enter the minutes.
+ ] / [
-
] to set the volume. Of the wake up radio.
GB
Page 6
GB
Note: Steps 7~10 will not operate if there is no battery for the
radio.
HOW TO USE THE ALARM
Press the[ ON/OFF]. To activate or deactivate an alarm, when the
alarm is not active the [ ] will not be displayed.
SNOOZE FUNCTION
When the snooze function is activated, the alarm will be muted
temporarily and set off again after eight minutes. To disable the
snooze function, press [ ON/OFF].
Note: The snooze function will only operate in Beep-Alarm mode.
The snooze function will not operate in the Radio-Alarm mode.
SECTION 3 THE RADIO
HOW TO USE THE RADIO
To turn on the radio, press [RADIO]. The last selected radio frequency
will be shown.
To change the frequency,
1. Press [AM/FM] to select AM or FM.
2. Use TUNING [
Press once to advance 1 step, press and hold to auto search the
next channel.
] / [ ] to locate the desired frequency.
To change the volume, use VOLUME [
To select a programmed channel, press [STATION]
To turn off the radio, press [RADIO].
+ ] / [
-
] .
AUTO SEARCH FUNCTION
The RRM112A is equipped with the Auto Search function; the unit
will automatically search for the next clear channel.
To use the auto search function,
1. Press and hold TUNING [
function,
2. The frequency increases or decreases until a clear channel is
found.
Note: User may release the key during the tuning process
] / [ ] to activate the auto search
HOW TO PROGRAM A CHANNEL
The unit allows you to program up to 8 FM and 8 AM radio stations.
To do so,
1. Turn on the radio.
2. Press [AM/FM] to select AM or FM.
3. Select the desired station number using [STATION].
4. Use TUNING [
5. Press and hold [STATION] for two seconds to confirm.
6
] / [ ] to locate the desired frequency.
Page 7
HOW TO USE THE SLEEP (AUTO-OFF) FUNCTION
1. Turn on the radio.
2. Press [SLEEP] to activate the sleep function. "0 min" will be
displayed when the function is deactivated.
3. Press [SLEEP] again to select the sleep time for the radio to
switch off automatically. You can select 120, 90, 60, 30 or 15
minutes.
NOTE ON RADIO ALARM
When the radio alarm is set off, it will keep playing for two hours
before turning itself off. You can intervene by resetting the time for
the sleep function or simply turn off the radio at any time.
BATTERY INDICATION FOR RADIO
The [ ] icon indicates the battery level is low. The radio and radio
alarm can still be activated for a while. However it is recommended
to change the batteries for the radio.
The [ ] flashing icon indicates the battery has no power, neither
the radio nor the radio alarm can be activated.
The user selected radio station will be stored in the memory as long
as there are batteries in the unit (either for the clock or the radio).
SECTION 4
GB
ADDITIONAL INFORMATION
THE RESET BUTTON
The [RESET] button is used to enhance synchronization of signals
after battery replacement or if the unit is malfunctioning.
Use a blunt stylus to hold down the button. All settings will return
to their default values.
PRECAUTIONS
This unit is engineered to give you years of satisfactory service if
handled carefully.
1. Do not immerse the unit in water.
2. Do not clean the unit with abrasive or corrosive materials.
3. Do not subject the unit to snow or excessive force, shock, dust,
temperature or humidity.
4. Do not tamper with the unit’s internal components.
5. Do not mix new and old batteries or batteries of different
specifications.
To maintain good performance
• Particularly, do not keep the unit near bathrooms, heaters, and
areas exposed to direct sunlight (e.g. inside a parked car).-
• Keep cassette tapes, magnetic cards and other magnetic recorded
materials away from the speaker as the recorded information
may be erased or noise may occur on cassette tapes.
7
Page 8

GB
Note on listening with the headphones
• Listen at moderate volumes to avoid hearing damage.
• Do not wear headphones wihile driving or cycling, doing so
may prevent you from hearing important information or traffic
sounds.
• You should use extreme caution or temporarily discontinue
use in potentially hazardous situations, such as walking,
jogging, etc.
• Wear them properly; L is left, R is right.
• The headphones should be worn with the longer cord behind
your neck.
SPECIFICATIONS
Clock
24-hr / 12-hr : 12-hr hh : mm : ss
Calendar : Month / Day
Alarm : 2 minutes crescendo
Snooze : 8 minutes
Radio
AM band frequency : 530 ~ 1710 kHz
AM step frequency : 10 kHz
FM band frequency : 87.5 ~ 108 MHz
FM step frequency : 0.1 MHz
day-of-week in one of 3 languages
(E, F, Sp )
Memory station : 8 selections for AM
8 selections for FM
Battery type : 2 UM-3 or “AA” 1.5V for Clock
2 UM-3 or “AA” 1.5V for Radio
Weight : 286.8 gm
10.03 ounces
Dimension : 132 x 158 x 23 mm (H x W x D)
5.28" x 6.32" x 0.92"
NOTE ON COMPLIANCE
Warning: Changes or modifications to this unit not expressly
approved by the party responsible for compliance could void the
user’s authority to operate the equipment.
FCC:
Note: This equipment has been tested and found to comply with
the limits for a Class B digital device, pursuant to Part 15 of the
FCC Rules. These limits are designed to provide reasonable
protection against harmful interference in a residential installation.
This equipment generates, uses and can radiate radio frequency
energy and, if not installed and used in accordance with the
instructions, may cause harmful interference to radio
communications.
However, there is no guarantee that interference will not occur in a
particular installation. If this equipment does cause harmful
interference to radio or television reception, which can be determined
by turning the equipment off and on, the user is encouraged to try
to correct the interference by one or more of the following measures:
8
Page 9
Reorient or relocate the receiving antenna.
Increase the separation between the equipment and receiver.
Connect the equipment into an outlet on a circuit different from
that to which the receiver is needed.
Consult the dealer of an experienced radio/TV technician for
help.
CAUTION
— The content of this manual is subject to change without
further notice.
— Due to printing limitation, the displays shown in this
manual may differ from the actual display.
— The contents of this manual may not be reproduced
without the permission of the manufacturer.
CUSTOMER ASSISTANCE
GB
Should you require assistance regarding this product and its
operation, please contact our customer care department at 800853-8883 or via email at [email protected]. Our customer
care department is available 24-7-365.
WARRANTY
This product is warranted to be free of manufacturing defects for a
period of 90-days from date of retail purchase. Defective product
should be directed to the place of retail purchase for exchange.
Should this not be possible, please contact our customer care
department for assistance and a return material authorization. No
returns may be made without a return material autrhorization.
Please retain your retail receipt as you may be asked to provide a
copy of the receipt for proof of purchase date.
This warranty does not cover product subjected to abuse, misuse,
tampering or accidental damage.
9
 Loading...