

Page 1
IMPORTANT: READ CAREFULLY BEFORE ASSEMBLY AND USE.
THIS PRODUCT IS INTENDED FOR HOUSEHOLD USE ONLY.
IF USED COMMERCIALLY, THE WARRANTY IS VOID.
©2018 Techtronic Floor Care Technology Limited. All Rights Reserved.
PODTM TECHNOLOGY CORDLESS VACUUMS | USER GUIDE
Cordless Captura™ Vacuums
BK51700 Series, BK11700 Series
Page 2

Visit Oreck.com
Thank you for purchasing
an Oreck® product.
Please register your product to initiate warranty,
and access expert cleaning advice.
Register your vacuum:
Call 877-533-2019
REGISTER
1
Page 3

Important Safety Instructions ............3
Vacuum Introduction ....................5
Assembly ...............................9
Operation ............................. 12
Maintenance .......................... 13
Certified Parts ......................... 14
TABLE OF CONTENTS
2
Page 4

IMPORTANT SAFETY INSTRUCTIONS
SAVE THESE INSTRUCTIONS
When using an electrical appliance, basic precautions should always be
followed, including the following: READ ALL INSTRUCTIONS BEFORE USING
THIS APPLIANCE.
WARNING: TO REDUCE THE RISK OF FIRE,
ELECTRIC SHOCK, DAMAGE, OR INJURY:
•
Fully assemble before operating.
•
Do not use appliance on wet surfaces or outdoors. Do not expose appliance to
rain. Store appliances indoors.
•
The charger is for indoor use only. Be sure to always keep the battery and
charger indoors in a dry place.
•
Do not allow to be used as a toy. Not intended for use by children age 12 and
under. Close supervision is necessary when used near children. To avoid injury
or damage, keep children away from product and do not allow children to
place fingers or other objects into any openings.
•
Use only as described in this manual. Use only Oreck certified refills, parts,
tools, attachments and products.
•
Do not use charger with damaged cord or plug. If appliance or charger is not
working as it should, has been dropped, damaged, left outdoors, or dropped
into water, take it to a service center prior to continuing use.
•
Do not pull or carry charger by cord, use cord as a handle, close a door on
cord, or pull cord around sharp edges or corners. Do not place product on cord.
Do not run appliance over cord. Keep cord away from heated surfaces.
•
Do not unplug charger by pulling on cord. To unplug charger, grasp the plug,
not the cord.
•
Do not handle charger including charger plug and charger terminals,
or appliance with wet hands.
•
Do not put any object into openings. Do not use with any opening blocked;
keep free of dust, lint, hair, and anything that may reduce air flow.
•
Keep hair, loose clothing, fingers, and all parts of body away from openings
and moving parts.
•
Use extra care when cleaning on stairs. To avoid personal injury or damage,
and to prevent the cleaner from falling, always place cleaner at bottom
of stairs on floor. Do not place cleaner on stairs or furniture, as it may result
in injury or damage.
•
Do not use to pick up flammable or combustible liquids, such as gasoline,
or fine wood shavings, or use in areas where they may be present.
•
Do not pick up anything that is burning or smoking, such as cigarettes,
matches, or hot ashes.
3
Page 5

IMPORTANT SAFETY INSTRUCTIONS
•
Do not use without Oreck refill filters in place.
•
Always turn off this appliance before connecting or disconnecting
AirPower™ motorized tools and/or any other tool.
•
Do not incinerate the charger, battery, or appliance even if it is severely
damaged. The batteries can explode in a fire.
•
This product includes rechargeable lithium-ion batteries. Do not expose
batteries to high temperatures, as they may catch fire and/or explode.
•
Do not expose battery to crushing, incineration, or similar actions.
•
Do not dispose of battery in a fire or trash compactor. See battery disposal
section for directions.
•
Do not attempt to disassemble battery.
•
Unplug the charger from the outlet before any routine cleaning or
maintenance.
•
Leaks from battery cells can occur under extreme conditions. If any liquid gets
on the skin, wash quickly with soap and water. If any liquid gets into the eyes,
do not rub eyes, immediately flush them with clean water continuously for a
minimum of 15 minutes. Seek medical attention immediately.
•
Use only the certified Oreck charger supplied to recharge. Use of non-certified
parts may void warranty.
•
Do not touch or insert objects into battery or its assembly.
•
Do not attempt to short circuit the battery or charger terminals.
•
To avoid injury, particularly to face and head, keep hair, loose clothing,
fingers, and all parts of the body away from revolving brush.
WARNING: This product contains chemicals
known to the State of California to cause cancer, birth
defects or reproductive harm. WASH HANDS AFTER
HANDLING.
4
Page 6

A Cordless Captura™ Vacuum
POD™ Case
Battery Assembly
Nozzle Opening
Case Release Bar
Snap-Fit Tool Buttons
Charging Port
B POD™ Tech Power Dial
C Oreck Refill: Type P1
D AirPower™ Pivoting Brushroll Tool
E Soft-Bristle Dust Brush Tool
F Wide-Path Crevice Tool
G Long-reach Wand*
H AirPower™ Floor Nozzle*
I Wall Mount Charger**
J Tool Rack**
NOT SHOWN
Rapid Charger:
2.5-hour charge (Included with BK51700 Series)
Standard Charger:
5-hour charge (Included with BK11700 Series)
* Included with BK51700 Series and also sold separately.
**Included with some BK51700 Series and also sold separately.
VACUUM INTRODUCTION
5
Page 7

VACUUM INTRODUCTION
The specialized brushroll has
alternating hard & soft bristles,
with hard bristles activating on
carpet and soft bristles engaging
on hard floors, simultaneously
protecting your surfaces while
delivering precision performance.
I
J
6
Page 8

VACUUM INTRODUCTION: POWER DIAL
-SPEED CLEANING
Turn dial clockwise for
standard cleaning speed.
Turn dial counterclockwise
for turbo cleaning speed.
Turn dial to center.
WARNING This vacuum cleaner has a constantly rotating brush
roll. Never leave the vacuum cleaner in one spot for an extended
period of time as this may damage the floor surface.
WARNING Risk of personal injury – the brushroll may
suddenly restart. Turn unit OFF, unplug from charging source,
and remove tool before cleaning or servicing the brushroll.
!
!
STANDARD TURBO OFF
7
Page 9

BATTERY CHARGE
CAPACITY FILL
When plugged in, all lights on unit will pulse once.
Battery indicator will pulse during charge period.
When full charge is reached, battery indicator will
read continuous green.
POD™ Technology is measuring vacuum cleaning
performance and capacity fill as you clean. POD
indicator flashes red when it’s time to replace.
NOTE: DO NOT OVERFILL. Refill should be replaced
when indicator flashes red otherwise unit may become
damaged. If overfilled, POD indicator will flash orange
and unit will shut down.
BATTERY
CHARGE
AVAILABLE
DEPLETED
CHARGE
CAPACITY
AVAILABLE
CAPACITY
FULL
VACUUM INTRODUCTION: POWER DIAL
8
Page 10
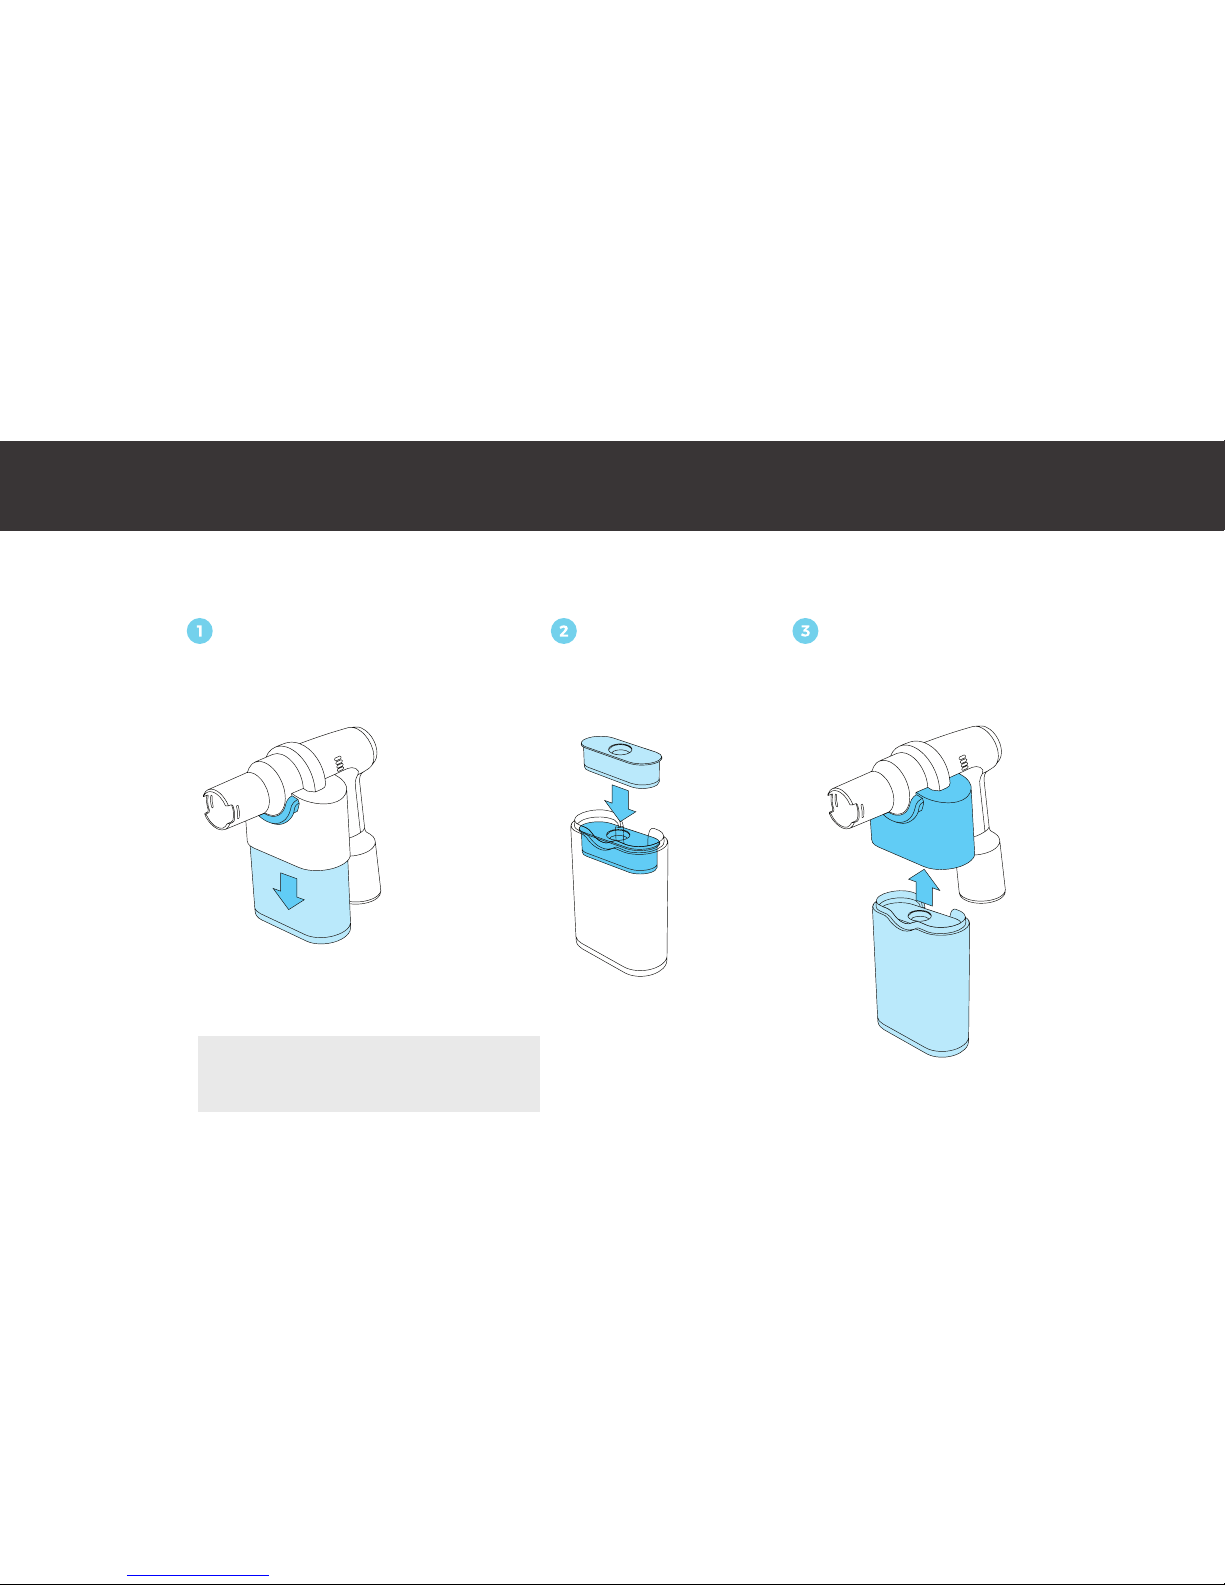
ASSEMBLY: INSTALL ORECK REFILL
Press bar to release case. Insert refill. Reinsert case until you hear a click.
Pull down on case to ensure it is fully engaged
before vacuuming.
NOTE: Ensure that a tool is installed prior to
operating vacuum.
9
Page 11

ASSEMBLY: REMOVE ORECK REFILL
Press bar to release case.
Tip over trash, and gently
shake for refill to fall into
the bin.
Insert a fresh refill. Reinsert
case until you hear a click/
Pull down on case to ensure it is fully
engaged before vacuuming.
10
Page 12

ASSEMBLY: ATTACH TOOLS ASSEMBLY: ATTACH WAND & FLOOR NOZZLE
Tools will “snap” into place
when properly installed.
Ensure that a tool is
installed prior to operating
vacuum.
Press snap-fit tool
buttons.
Slide tool into nozzle
opening with snap-fit tool
buttons still pressed.
Both buttons should click
into place before use.
To remove, press snap-fit tool
buttons and pull tool out of
nozzle opening.
Press snap-fit tool buttons
on wand and insert into
Handheld unit.
Line up the wand with the
AirPower™ floor nozzle. Slide
wand into nozzle opening
with snap-fit tool buttons
pressed to attach. Ensure
that wand end with large
cap joins with floor nozzle.
To remove, press snap-fit tool
buttons and pull tool out.
IMPORTANT Not to be used for grooming a pet.
!
Snap-fit tool buttons
IMPORTANT
This vacuum cleaner is not free standing. In between
uses or when carrying out any maintenance, always lay flat on the floor in a
suitable location so it does not become a trip hazard or can be stepped on.
!
11
Page 13
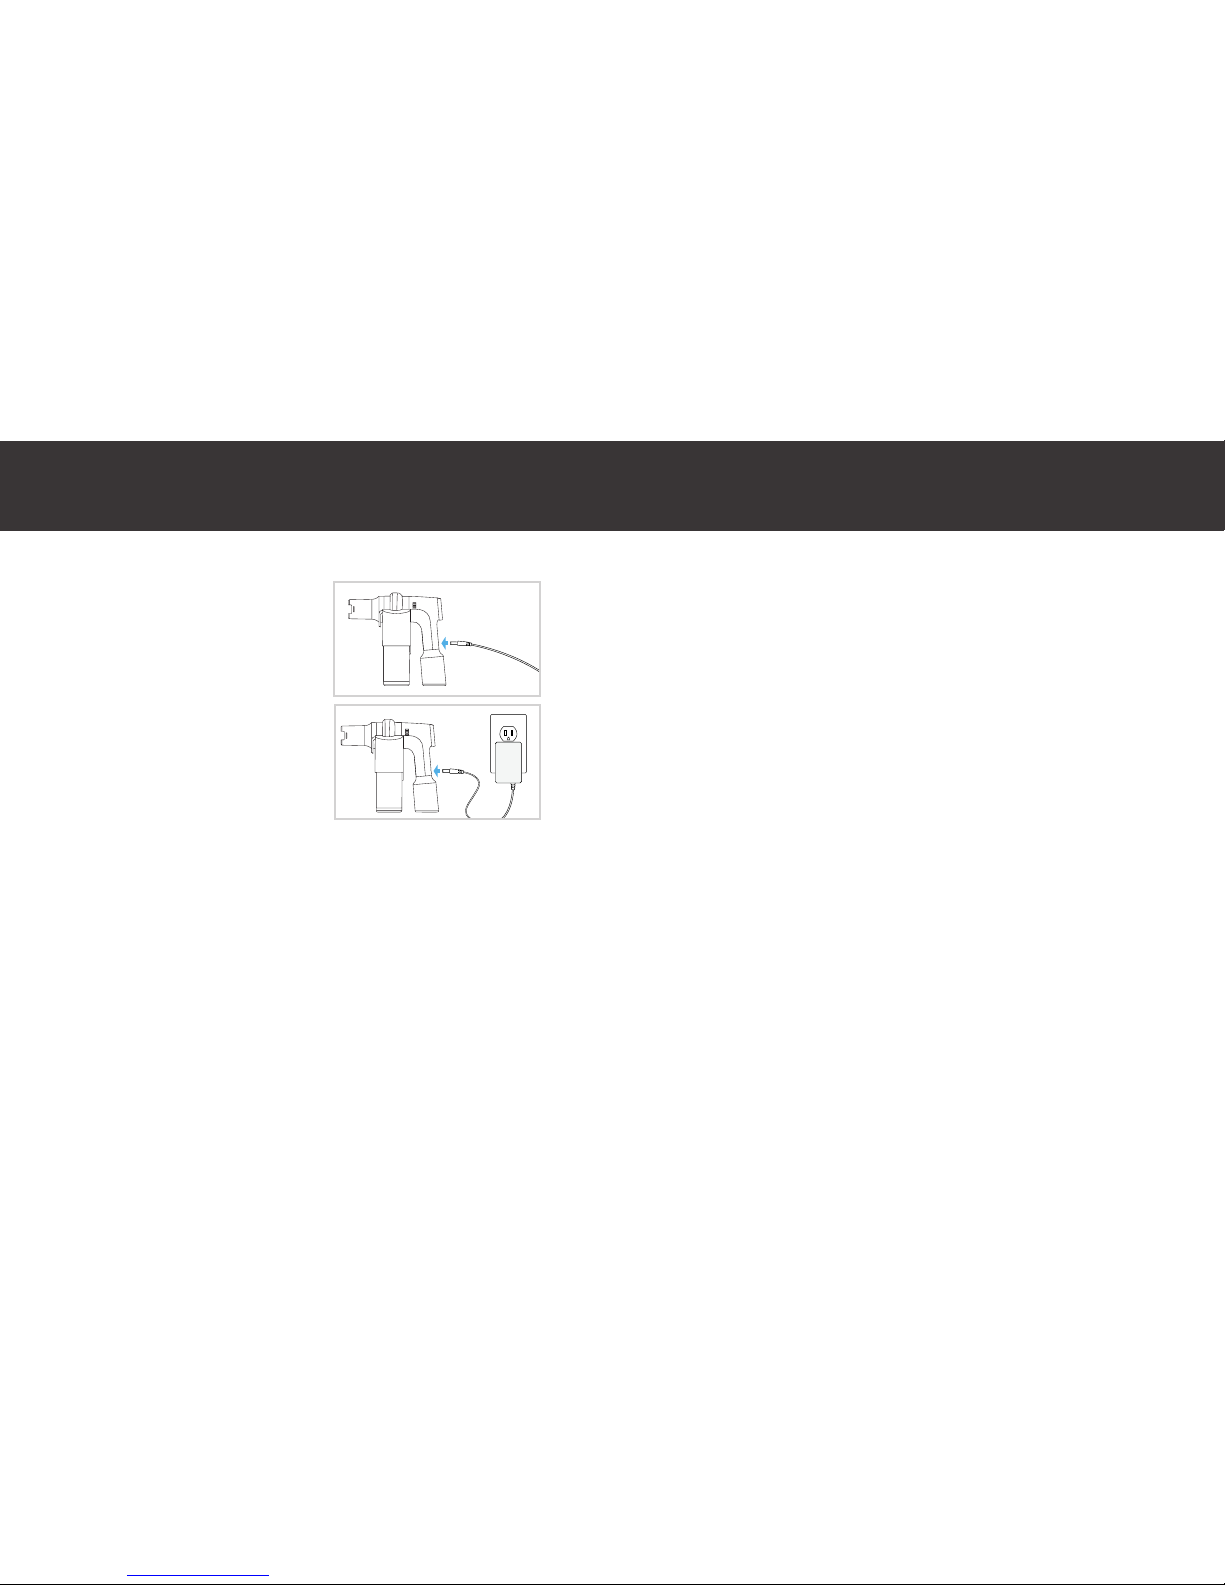
OPERATION: CHARGING
Insert the charging cord into
the charging port located on
the back of the handle.
Plug the charger plug into
the outlet.
Once fully charged,
battery indicator will read
continuous green.
NOTE: Due to federal regulations, the battery does not come
fully charged.
If charging for the first time, the initial charge time may require the
full charge time indicated by unit.
Charge time: 2.5 hours (Rapid Charger included with BK51700 Series)
Charge time: 5 hours (Standard Charger included with: BK11700 Series)
12
Page 14

POD indicator flashes red.
Speed indicators are both flashing.
POD indicator flashes orange and
motor stops.
Battery indicator flashes red.
Motor does not start when turned
to an ON position.
Battery indicator flashes red & green
PROBLEM
Capacity is full.
Brushroll has a stall.
Unit has a clog.
Battery has run out of charge.
Battery temperature is abnormal.
POSSIBLE CAUSE
Turn power dial to OFF position. Insert a fresh refill into case and
restart unit.
NOTE: DO NOT OVERFILL. Refill should be replaced when indicator flashes
red otherwise unit may become damaged. If overfilled, POD indicator will
flash orange and unit will shut down.
Turn dial to OFF position. Remove obstruction from brushroll, if any.
Wait 15 seconds and restart unit. Visit Oreck.com for detailed instructions.
Turn Dial to OFF position.
1. Remove tool & check for clog in nozzle. Clear clog, replace tool, and
restart unit.
2. Check POD Refill. Replace if full.
3. Visit Oreck.com for detailed instructions.
Turn dial to OFF position. Plug unit in to charge. Time to full charge is ≈2.5
hours for rapid charger and ≈5 hours for standard charger.
Ensure unit is in the OFF position and unplug unit from the charger.
Wait 30 minutes and then plug unit back into charger.
SOLUTION
MAINTENANCE
For maintenance, service or warranty questions, please contact an Oreck Customer Care Specialist at 877-533-2019, visit Oreck.com or your local Oreck Dealer.
13
Page 15

Dusting Brush
Part #
White, AK8BT03
Black, AK8BT02
Crevice Tool
Part #
White, AK8CT03
Black, AK8CT02
AirPower™ Pivoting
Brushroll Tool
Part #
White, AK8MT03
Black, AK8MT02
AirPower™ Floor
Nozzle
Part #
White, AK8FN03
Black, AK8FN02
Wand
Part #
Black, AK8WT02
White, AK8WT03
Refill Type P1
Item #
AK6B15A
*Pack of 5 Refills
.
CERTIFIED PARTS
Contact an Oreck Customer Care Specialist at 877-533-2019 for replacement details, or visit Oreck.com or your local Oreck Dealer.
NOTE: Any other servicing should be done by
an authorized service representative.
NOT SHOWN
NOTE: If appliance is not working as it should,
has been dropped, damaged, left outdoors, or
dropped into water, take it to a service center
prior to continuing use.
NOTE: The motor and brushroll are equipped
with bearings which contain sufficient
lubrication for their lifetime. The addition of
lubricant could cause damage. Do not add
lubricant to motor or brushroll.
Rapid Power
Charge Cord
Part #
White, BK0RC03
Black, BK0RC02
Included with
BK51700 Series
Wall Mount Charger
Part #
White, 521A00144
Tool Rack
Part #
White, 521A00145
Black, 521A00124
Included with some
models
NOT SHOWN
Standard Power
Charge Cord
Part #
White, BK0SC03
Black, BK0SC02
521A00156
521A00151
Black, 521A00123,
Included with some
models
14
Page 16
Techtronic Floor Care Technology Limited
Distributed by Royal Appliance Mfg. Co. Glenwillow, OH 44139
964A00190
©2018 Techtronic Floor Care Technology Limited
Visit Oreck.com
REGISTER YOUR VACUUM
Call 877-533-2019
Page 17
ASPIRATEURS SANS FIL DOTÉ DE LA TECHNOLOGIE PODMD | MANUEL D’UTILISATION
IMPORTANT : LISEZ ATTENTIVEMENT AVANT L’ASSEMBLAGE
ET L’UTILISATION. CE PRODUIT EST DESTINÉ À UN USAGE
DOMESTIQUE SEULEMENT. LA GARANTIE EST NULLE SI
L’APPAREIL EST UTILISÉ À DES FINS COMMERCIALES.
©Techtronic Floor Care Technology Limited, 2018. Tous droits réservés.
Aspirateurs sans
fil CapturaMC
Modèles BK51700, Modèles BK11700
Page 18

ENREGISTRER
Visitez le site Oreck.com
Merci d’avoir acheté un produit Oreck
MD
Veuillez enregistrer votre produit pour activer votre, le cautionnement et votre accès aux
conseils de nettoyage d’experts.
Pour enregistrer votre aspirateur:
Appelez au 1877 533-2019
17
Page 19

Consignes de sécurité importantes. . . . . 19
Caractéristiques de votre aspirateur ....21
Assemblage ...........................25
Fonctionnement ......................28
Dépannage ...........................29
Pièces certifiées .......................30
TABLE DES MATIÈRES
18
Page 20

CONSIGNES DE SÉCURITÉ IMPORTANTES
CONSERVEZ CES INSTRUCTIONS
Lorsque vous utilisez des appareils électriques, veuillez toujours respecter entre
autres les consignes de sécurité élémentaires y compris les suivantes: VEUILLEZ
LIRE TOUTES LES INSTRUCTIONS AVANT D’UTILISER CET APPAREIL.
AVERTISSEMENT: POUR RÉDUIRE
LES RISQUES D’INCENDIE: DE DÉCHARGES
ÉLECTRIQUES, DE DOMMAGES ET DE
BLESSURES:
•
Assemblez entièrement l’appareil avant de l’utiliser.
•
N’utilisez pas l’appareil sur des surfaces mouillées. N’exposez pas l’appareil à
la pluie. Rangez les appareils à l’intérieur.
•
Le chargeur est conçu pour être utilisé à l’intérieur seulement. Assurez-vous
de toujours conserver la pile et le chargeur à l’intérieur, dans un endroit sec.
•
Ne permettez pas aux enfants de jouer avec l’appareil. Cet appareil ne doit pas
être utilisé par des enfants de moins de 12ans. Exercez une surveillance étroite
lorsque l’appareil est utilisé à proximité d’enfants. Gardez l’appareil hors de
la portée des enfants et ne laissez pas ces derniers introduire leurs doigts ou
d’autres objets dans aucune ouverture afin d’éviter les blessures ou les bris.
•
Utilisez l’appareil uniquement aux fins décrites dans le présent guide. Utilisez
seulement des cartouches filtrantes, pièces, outils, accessoires et produits de
rechange certifiés Oreck.
•
N’utilisez pas le chargeur si la fiche ou le cordon est endommagé. Si l’appareil
ou le chargeur ne fonctionnent pas adéquatement, s’ils sont tombés sur le
sol ou dans l’eau, s’ils sont endommagés ou ont été laissés à l’extérieur,
apportez-les à un centre de service pour les faire inspecter avant de continuer
à les utiliser.
•
Ne tirez pas ni ne transportez le chargeur par le cordon, n’utilisez pas le cordon
comme une poignée, ne coincez pas le cordon dans l’embrasure d’une porte
et ne l’appuyez pas contre des arêtes tranchantes ou des coins. Ne placez pas
l’appareil sur le cordon. Ne faites pas rouler l’appareil sur le cordon. Tenez le
cordon éloigné des surfaces chaudes.
•
Ne débranchez pas le chargeur en tirant sur le cordon. Pour débrancher le
chargeur, tirez sur la fiche.
•
Ne manipulez pas le chargeur, y compris la fiche et les bornes, ni l’appareil si
vous avez les mains mouillées.
•
N’insérez aucun objet dans les ouvertures. N’utilisez pas l’appareil si les
ouvertures sont obstruées. Assurez-vous qu’elles sont exemptes de poussière,
de mousse, de cheveux ou de tout ce qui pourrait réduire le débit d’air.
•
Gardez les cheveux, les vêtements amples, les doigts et toute autre partie du
corps à l’écart des ouvertures et des pièces en mouvement.
•
Redoublez de prudence lorsque vous utilisez l’appareil dans un escalier.
Pour éviter tout dommage ou blessure et empêcher l’appareil de tomber,
placez toujours ce dernier au bas des escaliers, sur le plancher. Ne placez
pas l’appareil sur les marches d’un escalier ou sur un meuble, car cela peut
entraîner des dommages ou des blessures.
•
N’utilisez pas l’appareil pour aspirer des liquides inflammables ou
combustibles comme de l’essence, ni de la sciure de bois, ni dans des endroits
où de telles substances peuvent être présentes.
•
N’utilisez pas l’appareil pour nettoyer quoi que ce soit qui brûle ou dégage de
la fumée, comme des cigarettes, des allumettes ou des cendres chaudes.
19
Page 21

CONSIGNES DE SÉCURITÉ IMPORTANTES
•
N’utilisez pas l’appareil sans avoir installé les cartouches filtrantes.
•
Éteignez toujours l’appareil avec de raccorder ou débrancher les outils
électriques AirPowerMC ou tout autre accessoire.
•
N’incinérez pas le chargeur, la pile ou l’appareil mêmes s’ils sont gravement
endommagés. La pile peut exploser au feu.
•
Ce produit contient des piles au lithium-ion au rechargeables. N’exposez pas
les piles à des températures élevées, car elles pourraient s’enflammer et
exploser.
•
Évitez d’écraser et d’incinérer la pile ou de la soumettre à des actions
similaires.
•
Ne jetez pas la pile au feu ou dans un compresseur à déchets. Consultez le
chapitre sur l’élimination de la pile pour obtenir des instructions.
•
Ne tentez pas de démonter la pile.
•
Débranchez le chargeur de la prise avant de procéder à tout nettoyage ou
entretien de routine.
•
La pile peut fuir si elle est soumise à des conditions extrêmes. Si l’électrolyte
entre en contact avec votre peau, lavez aussitôt les parties touchées avec
de l’eau et du savon. En cas de contact avec les yeux, ne frottez pas. Rincez
immédiatement vos yeux à l’eau propre pendant au moins 15minutes. et
consultez un médecin sans attendre.
•
Utilisez seulement le chargeur certifiés d’Oreck fournis pour effectuer la
recharge. L’utilisation de pièces non certifiées peut annuler la garantie.
•
Ne touchez pas et n’insérez pas d’objets dans la pile ou son assemblage.
•
Ne tentez pas de court-circuiter la pile ou les bornes du chargeur.
•
Gardez les cheveux, les vêtements amples, les doigts et toute autre
partie du corps à l’écart de la brosse en mouvement.
AVERTISSEMENT: Ce produit contient
des produits chimiques reconnus par l’État de la Californie
comme pouvant causer le cancer, des anomalies congénitales ou des dysfonctions du système reproducteur. BIEN
SE LAVER LES MAINS APRÈS LA MANIPULATION.
20
Page 22

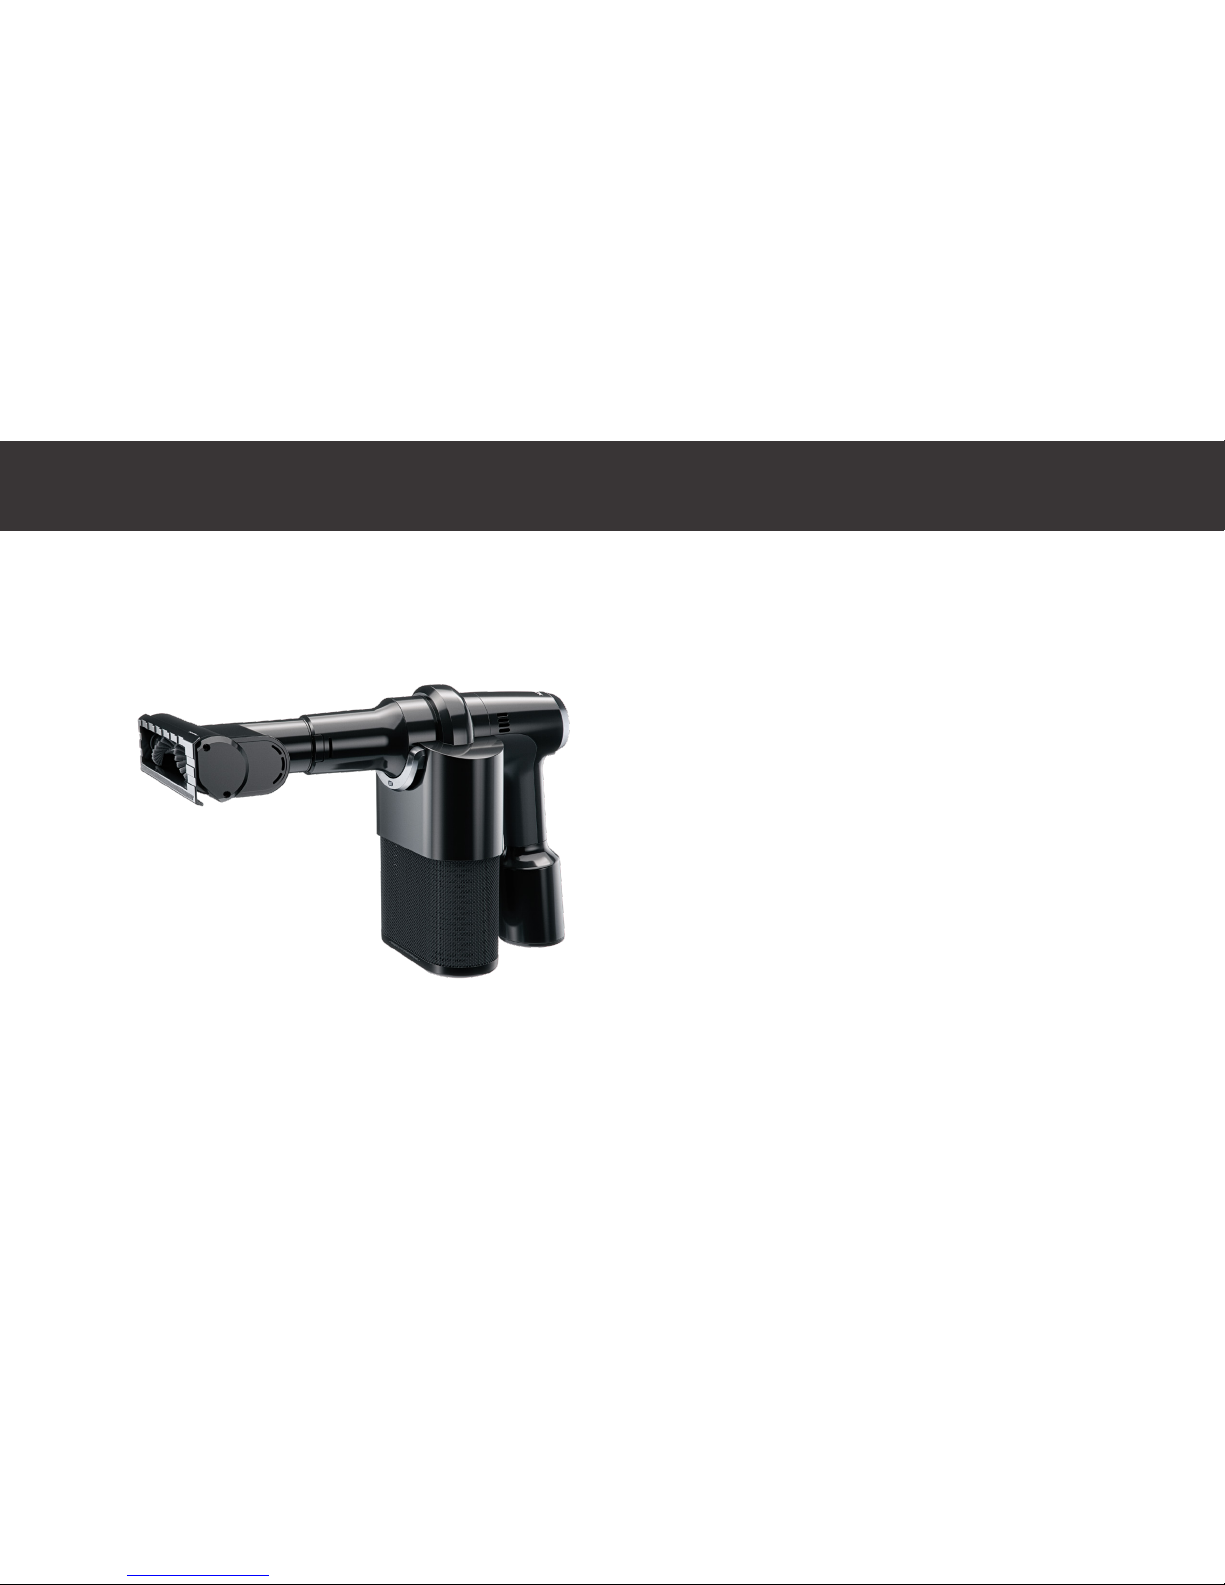
A Aspirateur sans fil Captura
MC
Boitier POD
MC
Assemblage de pile
Ouverture de buse
Barre de dégagement du boitier
Boutons d’enclenchement d’accessoires
Chargeur
B Sélecteur d’alimentation technologique POD
MC
C Cartouche filtrante Oreck: Type P1
D Rouleau-brosse pivotant AirPower
MC
E Brosse à épousseter à soie douce
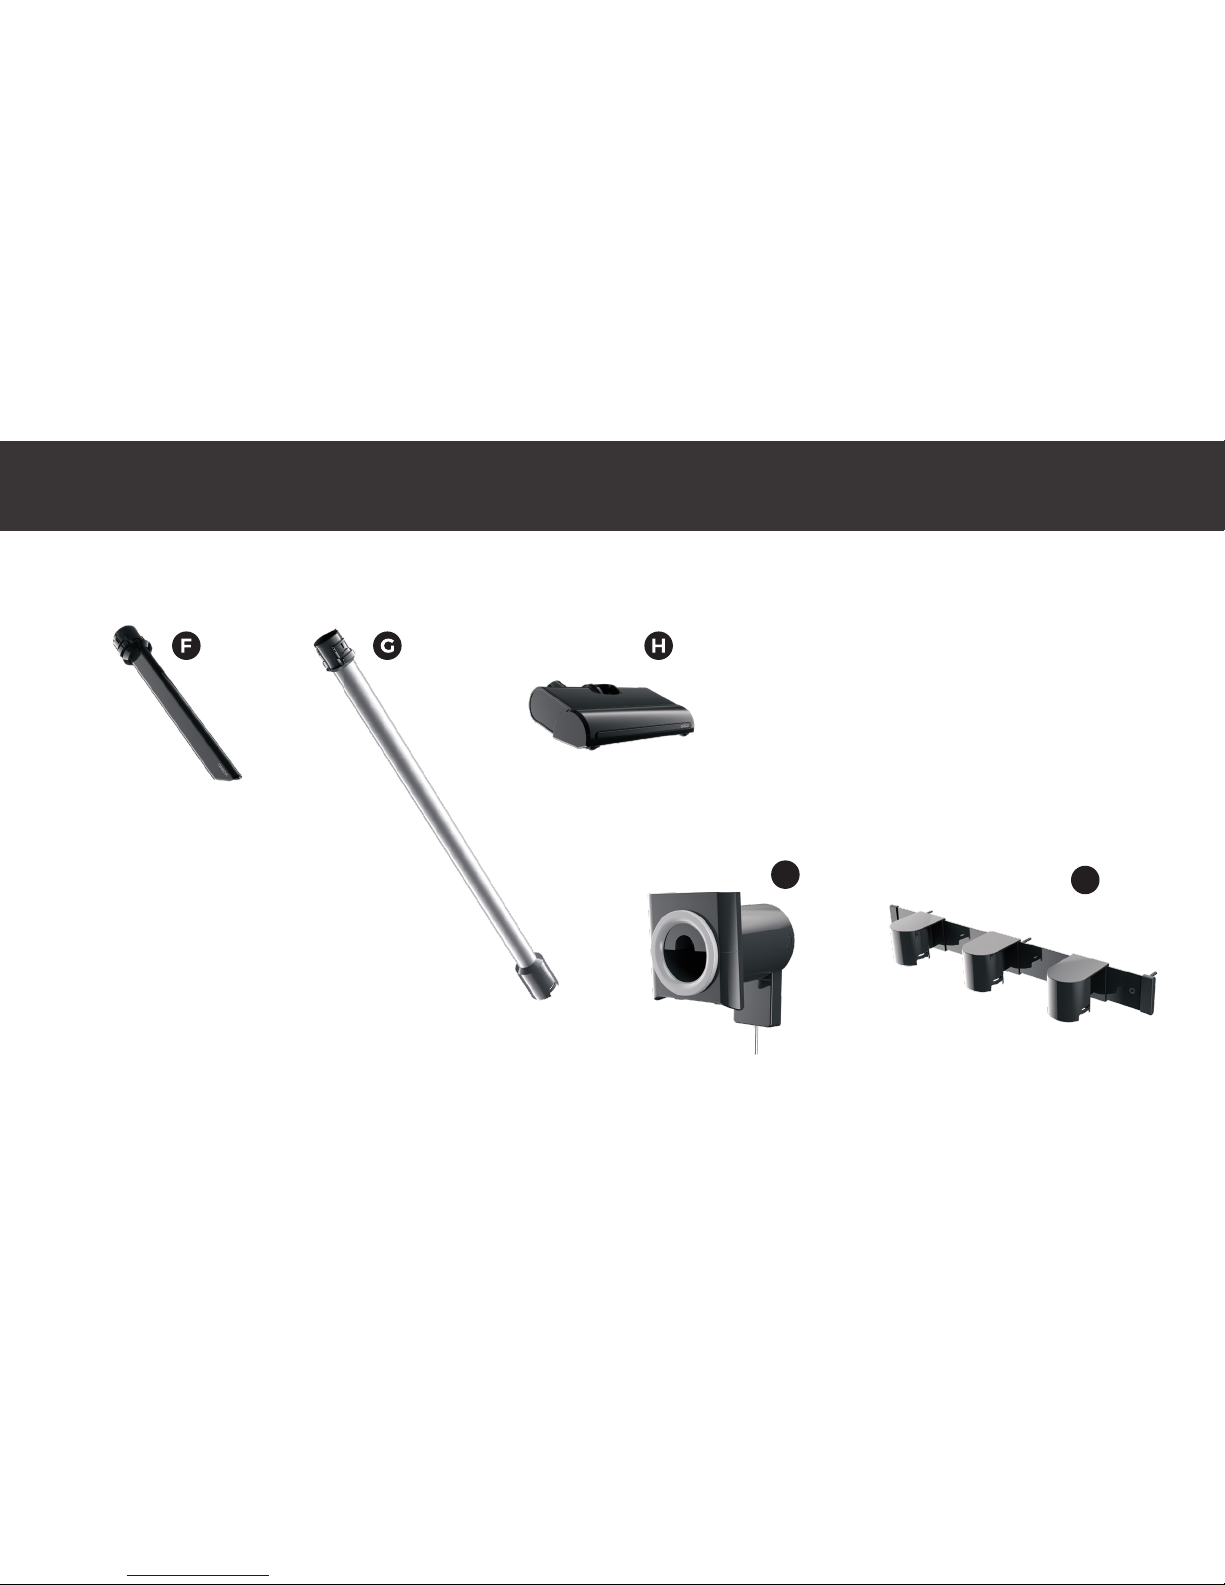
F Suceur plat à buse large
G Tube de longue portée
H Buse à plancher AirPower
MC
I Chargeur mural**
J Support à accessoires**
NON ILLUSTRÉ
Chargeur Rapide:
Charge de 2,5 heures (Inclus avec modèles BK51700)
Chargeur Standard:
Charge de 5 heures (Inclus avec modèles BK11700)
* Inclus avec la série BK51700 et également vendu séparément.
** Inclus avec certains lla série BK51700 et également vendu séparément.
CARACTÉRISTIQUES DE VOTRE ASPIRATEUR
21
Page 23
CARACTÉRISTIQUES DE VOTRE ASPIRATEUR
Le rouleau-brosse spécialisé alterne
les soies rigides et douces, des
soies rigides sont activées pour les
planchers alors que les soies douces sont activées pour les planchers
durs de manière à protéger vos surfaces en tout temps tout en vous
offrant une performance précise.
I
J
22
Page 24

INTRODUCTION DE VOTRE ASPIRATEUR: SÉLECTEUR
AVERTISSEMENT Le rouleau-brosse de cet aspirateur tourne
continuellement. Ne laissez jamais l’aspirateur au même endroit pendant
une longue période pour éviter d’endommager la surface du plancher.
AVERTISSEMENT Risque de blessures– le rouleau-brosse
peut redémarrer brusquement. Éteignez l’appareil, débranchez-le de
la source d’alimentation et retirez l’accessoire avant de nettoyer ou
réparer le rouleau-brosse.
VITESSES DE NETTOYAGE
Régulier: Tournez le sélecteur vers la gauche
Turbo : Tournez le sélecteur
vers la droite
Position OFF (arrêt)
!
!
RÉGULIER TURBO ARRÊT
23
Page 25

INTRODUCTION DE VOTRE ASPIRATEUR: SÉLECTEUR
CHARGEUR DE PILE
CAPACITÉ DE REMPLISSAGE
Lors du branchement, tous les témoins de
l’appareil clignoteront une fois. Le témoin de pile
clignotera pendant la période de charge. Dès que la
charge est terminée, le témoin sera vert et fixe.
La technologie PODMC mesure la performance de nettoyage de
l’aspirateur et sa capacité de charge pendant que vous nettoyez.
POD clignote rouge lorsqu’il est temps de remplacer.
REMARQUE: NE PAS TROP REMPLIR. Ne pas remplacer la
recharge lorsque l’indicateur rouge clignote, car cela risque
d’endommager l’appareil. Si l’appareil est trop chargé, le voyant
orange de puissance sur demande clignote et l’appareil se met
hors tension.
CHARGE
DE LA PILE
DISPONIBLE
CHARGE
ÉPUISÉE
CAPACITÉ
DISPONIBLE
CAPACITÉ
PLEIN
24
Page 26

ASSEMBLAGE INSTALLEZ UNE CARTOUCHE FILTRANTE ORECK
REMARQUE: L’aspirateur ne fonctionnera pas si la
cartouche filtrante n’est pas installée ou pleine.
Appuyez sur la barre
pour dégager le boitier.
Insérez la cartouche
filtrante.
Réinstallez le boitier et appuyez
jusqu’à ce qu’il s’enclenche (clic).
Tirer le boîtier vers le bas pour s’assurer qu’il
est complètement enclenché avant de passer
l’aspirateur.
25
Page 27

ASSEMBLAGE RETIREZ LA CARTOUCHE FILTRANTE ORECK
Appuyez sur la barre
pour dégager le boitier.
Inclinez le boitier au-dessus d’une poubelle et la
cartouche filtrante s’éjectera dans la poubelle.
Insérez une cartouche filtrante neuve.
Réinstallez le boitier et appuyez
jusqu’à ce qu’il s’enclenche (clic).
Tirer le boîtier vers le bas pour s’assurer qu’il
est complètement enclenché avant de passer
l’aspirateur.
26
Page 28
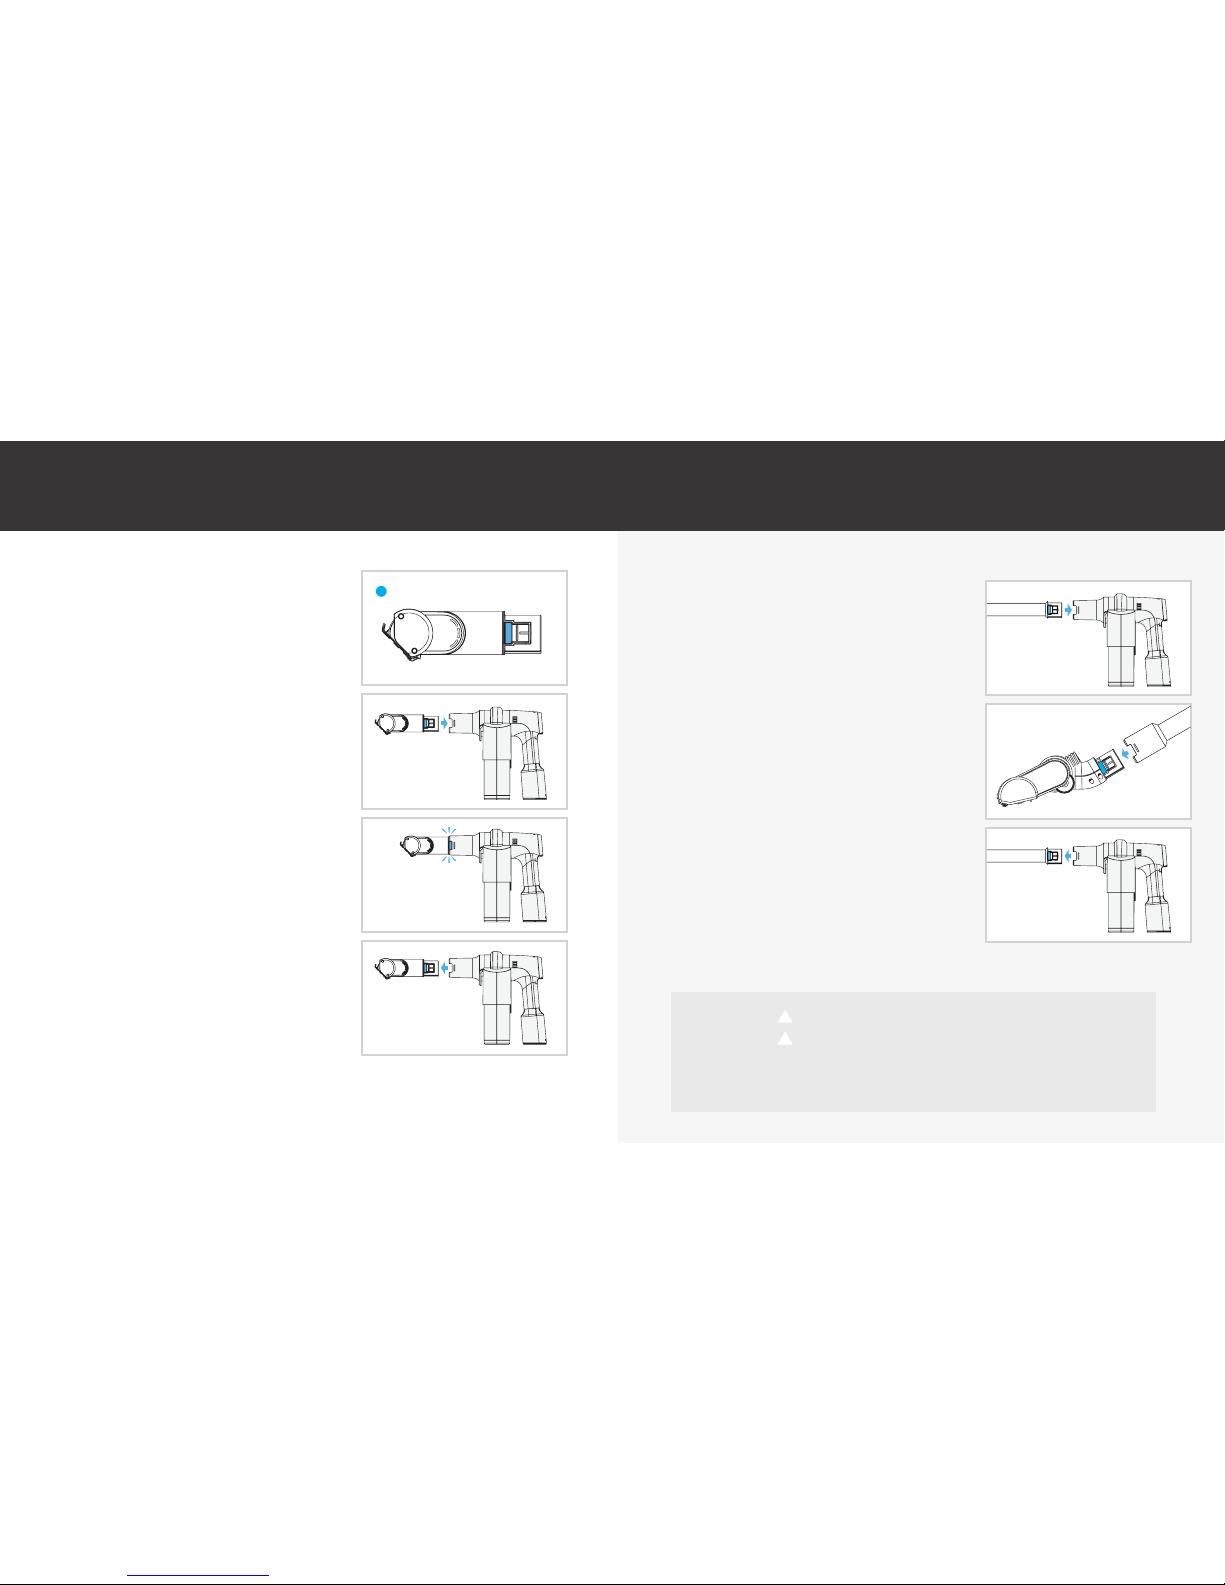
ASSEMBLAGE INSTALLATION
DES OUTILS
INSTALLEZ LE TUBE ET LA BUSE
À PLANCHERS
Les accessoires s’enclencheront correctement s’ils sont
bien insérés.
Assurez-vous que l’accessoire
est installé avant de mettre
l’aspirateur en marche.
Appuyez sur les boutons d’enclenchement d’accessoires.
Insérez l’accessoire dans l’ouverture de la buse tout en appuyant sur les boutons d’enclenchement d’accessoires.
Les deux boutons doivent
s’enclencher avant de mettre
l’appareil en marche.
Pour retirer, appuyez sur
les boutons d’enclenchement
d’accessoires et tirez
l’accessoire hors d’ouverture de
la buse.
Appuyez sur les boutons d’enclenchement d’accessoires du
tube et insérez l’aspirateur à main.
Alignez la buse à planchers
AirPowerMC avec le tube tout en
appuyant sur les boutons d’enclenchement d’accessoires. Insérez
le tube sur l’ouverture de la buse
tout en appuyant sur les boutons
d’enclenchement d’accessoires.
Assurez-vous que l’extrémité du
tube et la grande ouverture sont
raccordées à la buse à planchers.
Pour retirer, appuyez sur les boutons
d’enclenchement d’accessoires et
tirez l’accessoire pour le dégager.
IMPORTANT N’utilisez pas l’aspirateur pour toiletter un animal.
IMPORTANT
Cet aspirateur ne se tient pas seul à la verticale. Entre les utilisations ou lors de toute tâche d’entretien, déposez toujours l’aspirateur à plat sur le
sol à un emplacement où vous ne risquerez pas de trébucher ou de marcher dessus.
!
Boutons d’enclenchement
d’accessoires
!
27
Page 29

FONCTIONNEMENT : RECHARGE
Introduisez le cordon pour le
chargement dans le port de
chargement situé au dos de
la poignée.
Branchez la fiche du
chargeur sur une prise de
courant.
Le témoin vert sera fixe dès
que la charge est terminée.
Lors de la toute première charge, la durée de la charge totale peut
être nécessaire et l’appareil indiquera la fin.
Temps de charge : 2,5 heures (chargeur rapide inclus avec
modèles BK51700)
Temps de charge : 5 heures (chargeur classique inclus avec
modèles BK11700)
28
Page 30

POD indicateur clignote en rouge.
Les deux témoins de vitesse clignotent.
L’indicateur POD clignote en orange et le
moteur s’arrête.
Le témoin de la pile clignote en rouge.
L’indicateur de batterie clignote en rouge et
vert.
PROBLÈME
La capacité est atteinte.
Le rouleau-brosse est coincé.
L’appareil est bouché.
La pile est épuisée.
La température de la pile est
anormale.
CAUSE POSSIBLE
Tournez le sélecteur d’alimentation à la position « OFF » (éteint). Insérez une cartouche
filtrante neuve dans le boitier et remettez l’appareil en marche.
REMARQUE: NE PAS TROP REMPLIR. Ne pas remplacer la recharge lorsque l’indicateur
rouge clignote, car cela risque d’endommager l’appareil. Si l’appareil est trop chargé, le
voyant orange de puissance sur demande clignote et l’appareil se met hors tension.
Tournez le sélecteur à la position « OFF » (éteint). Retirez les obstructions du rouleau-brosse.
Attendez 15 secondes et remettez l’appareil en marche. Visitez le site Oreck.com pour
consulter les instructions détaillées.
Tournez le sélecteur à la position « OFF » (éteint). Retirez l’accessoire et assurez-vous que la
buse est libre d’objets. Délogez les débris, réinstallez l’accessoire et remettez l’appareil en
marche. Visitez le site Oreck.com pour consulter les instructions détaillées.
Tournez le sélecteur à la position « OFF » (éteint). Branchez l’appareil pour le charger. La durée d’une
charge complète est d’environ 2,5 heures avec un chargeur rapide ou de 5 heures avec un chargeur
régulier
Assurez-vous que l’appareil est éteint (position « OFF ») et débranchez l’appareil du chargeur. Attendez 30 minutes puis rebranchez l’appareil dans le chargeur.
SOLUTION
DÉPANNAGE
Pour toutes questions concernant l’entretien, la réparation ou la garantie, veuillez communiquer avec un spécialiste
du service à la clientèle au 1877533-2019 ou visitez le site Oreck.com ou votre détaillant Oreck local.
29
Page 31

PIÈCES CERTIFIÉES
REMARQUE: Toute autre tâche d’entretien
doit être confiée à un représentant de service
autorisé.
REMARQUE: Cessez d’utiliser l’appareil
s’il ne fonctionne pas comme prévu, s’il a
été échappé sur le sol ou dans l’eau, s’il est
endommagé ou s’il a été laissé à l’extérieur et
apportez-le au centre de réparations.
REMARQUE: Le moteur et le rouleau-brosse
sont équipés de roulements qui contiennent
suffisamment de lubrifiant pour toute leur durée
de vie. L’ajout de lubrifiant pourrait causer
des dommages. N’ajoutez pas de lubrifiant au
moteur ni au rouleau-brosse.
Brosse à
époussaeter
Pièce no
Blanc, AK8BT03
Noir, AK8BT02
Suceur plat
Pièce no
Blanc, AK8CT03
Noir, AK8CT02
Rouleau-brosse
pivotant
AirPowerMC
Pièce no
Blanc, AK8MT03
Noir, AK8MT02
Buse à planchers
AirPowerMC
Pièce no
Blanc, AK8FN03
Noir, AK8FN02
Tube
Pièce no
Noir, AK8WT02
Blanc, AK8WT03
Cartouche
filtrante TypeP1
Pièce no
AK6B15A
*Pack of 5 Refills
.
Appelez le spécialiste d’entretien du service à la clientèle d’Oreck au 1 877 533-2019 ou visitez le site Oreck.com ou votre
détaillant Oreck local pour obtenir des détails concernant le remplacement.
NON ILLUSTRÉ
Cordon
d’alimentation pour
chargeur rapide
Pièce no
Blanc, BK0RC03
Noir, BK0RC02
Inclus avec modèles
BK51700
Chargeur mural
Pièce no
Blanc, 521A00144
Support à accessoires
Pièce no
Blanc, 521A00145
Noir, 521A00124
521A00156
521A00151
Noir, 521A00123,
Inclus avec certains
modèles
Inclus avec certains
modèles
30
Page 32

964A00190
Techtronic Floor Care Technology Limited. 2018
Page 33

©2018 Techtronic Floor Care Technology Limited. Todos los derechos reservados.
Page 34

Visite Oreck.com
Gracias por comprar un producto Oreck.
Registre su producto para iniciar y tener acceso a consejos de expertos en limpieza.
Registre su aspiradora:
Llame al 877-533-2019
REGISTRAR
33
Page 35
Instrucciones de seguridad importantes. . . . . .35
Introducción a la aspiradora .................37
Ensamblaje .................................41
Funcionamiento ............................44
Resolución de problemas ...................45
Piezas certificadas ...........................46
ÍNDICE: ASPIRADORA INALÁMBRICA CON SOPORTE Y DISPOSITIVO PORTÁTIL
34
Page 36

CONSERVE ESTAS INSTRUCCIONES
Cuando se utilizan aparatos eléctricos, se deben seguir siempre precauciones
básicas, incluidas las siguientes: LEA TODAS LAS INSTRUCCIONES ANTES DE
UTILIZAR.
ADVERTENCIA: PARA DISMINUIR EL
RIESGO DE INCENDIO, DESCARGA ELÉCTRICA,
DAÑOS O LESIONES:
•
No utilice este aparato en superficies mojadas. No exponga los aparatos a la
lluvia. Almacénelo en interiores.
•
El cargador es para uso en interiores solamente. Siempre asegúrese de
guardar la batería y el cargador en interiores y en un lugar seco.
•
Evite que se lo utilice como un juguete. Los niños de 12 años o menos no
deben utilizar la unidad. Cuando se lo utilice cerca de niños, será necesario
hacerlo bajo una estricta supervisión. Para evitar lesiones o daños, mantenga
a los niños alejados del producto y no permita que introduzcan los dedos ni
objetos en ninguna de las aberturas del producto.
•
Utilice la unidad únicamente según el uso descrito en este manual. Utilice solo
rellenos, piezas, herramientas, accesorios y productos certificados por Oreck.
•
No utilice el cargador si el cable o el enchufe se encuentran dañados. Si el
aparato o el cargador no funcionan como deben; si se han caído, han sido
dañados, dejados a la intemperie o sumergidos en agua, llévelos a un Centro
Técnico antes de continuar usándolos.
•
No extraiga ni transporte el cargador tomándolo por el cable; no tire del cable,
no cierre una puerta con él ni lo enrosque alrededor de bordes o esquinas
filosas. No apoye el producto sobre el cable. No pase el aparato por encima
del cable. Mantenga el cable lejos de las superficies calientes.
•
No desenchufe el cargador tirando del cable. Para desenchufarlo, agarre el
enchufe, no el cable.
•
No manipule el cargador (incluido el enchufe y los terminales) ni el aparato
con las manos mojadas.
•
No coloque ningún objeto en las aberturas. No utilice la unidad si alguna de
sus aberturas se encuentra bloqueada. Manténgala libre de polvo, pelusas,
cabello y cualquier otro elemento que pueda disminuir el flujo de aire.
•
Evite que el cabello, la ropa suelta, los dedos y cualquier otra parte del cuerpo
entren en contacto con las aberturas y las piezas móviles de la unidad.
•
Extreme las precauciones cuando limpie en escaleras. Para evitar lesiones o
daños físicos, y a fin de evitar que la aspiradora se caiga, siempre colóquela
al pie de las escaleras, sobre el suelo. No coloque la aspiradora sobre las
escaleras ni sobre un mueble, ya que pueden generarse lesiones o daños.
•
No utilice la unidad para aspirar líquidos combustibles o inflamables, tales
como gasolina o restos de madera lijada, ni la utilice en áreas en las que
dichas sustancias puedan estar presentes.
•
No aspire nada que se encuentre en combustión o emita humo, como
cigarrillos, fósforos o cenizas calientes.
INSTRUCCIONES DE SEGURIDAD IMPORTANTES
35
Page 37

•
No utilice la unidad si los filtros de relleno no están colocados.
•
Siempre apague el aparato antes de conectar o desconectar las herramientas
motorizadas AirPower™ o cualquier otra herramienta.
•
No incinere el cargador, la batería ni el aparato, aun si estuvieran muy
dañados. Las baterías pueden explotar y provocar un incendio.
•
Este producto incluye baterías recargables de iones de litio. No exponga las
baterías a altas temperaturas, ya que pueden prenderse fuego o explotar.
•
No aplaste ni incinere la batería, ni la someta a acciones similares.
•
No deseche la batería en un incinerador ni en un compactador de desechos.
Consulte la sección sobre desecho de la batería para obtener instrucciones.
•
No intente desarmar la batería.
•
Desenchufe el cargador del tomacorriente antes de llevar a cabo una rutina de
limpieza o mantenimiento en la unidad.
•
En condiciones extremas, pueden producirse pérdidas en las celdas de la
batería. Si la piel entrara en contacto con el líquido, lávese rápidamente con
jabón y agua. Si el líquido le entrara en los ojos, no se los frote. Enjuáguelos
de inmediato con agua limpia, en forma continua durante 15 minutos como
mínimo. Consulte a un médico de inmediato.
•
Utilice solo cargadores certificados por Oreck suministrados para la recarga.
Si utiliza piezas no certificadas, se anulará la garantía.
•
No toque la batería o su conjunto ni inserte objetos en ella.
•
No intente cortocircuitar la batería ni los terminales del cargador.
•
Para evitar lesiones, particularmente en el rostro y la cabeza, mantenga los
cabellos, la ropa suelta, los dedos y todas las partes del cuerpo lejos del
cepillo para revolver.
ADVERTENCIA: Este producto contiene químicos
reconocidos por el estado de California como causantes de cáncer,
defectos de nacimiento u otros daños en el aparato reproductor.
LÁVESE LAS MANOS LUEGO DE MANIPULARLO.
INSTRUCCIONES DE SEGURIDAD IMPORTANTES
36
Page 38
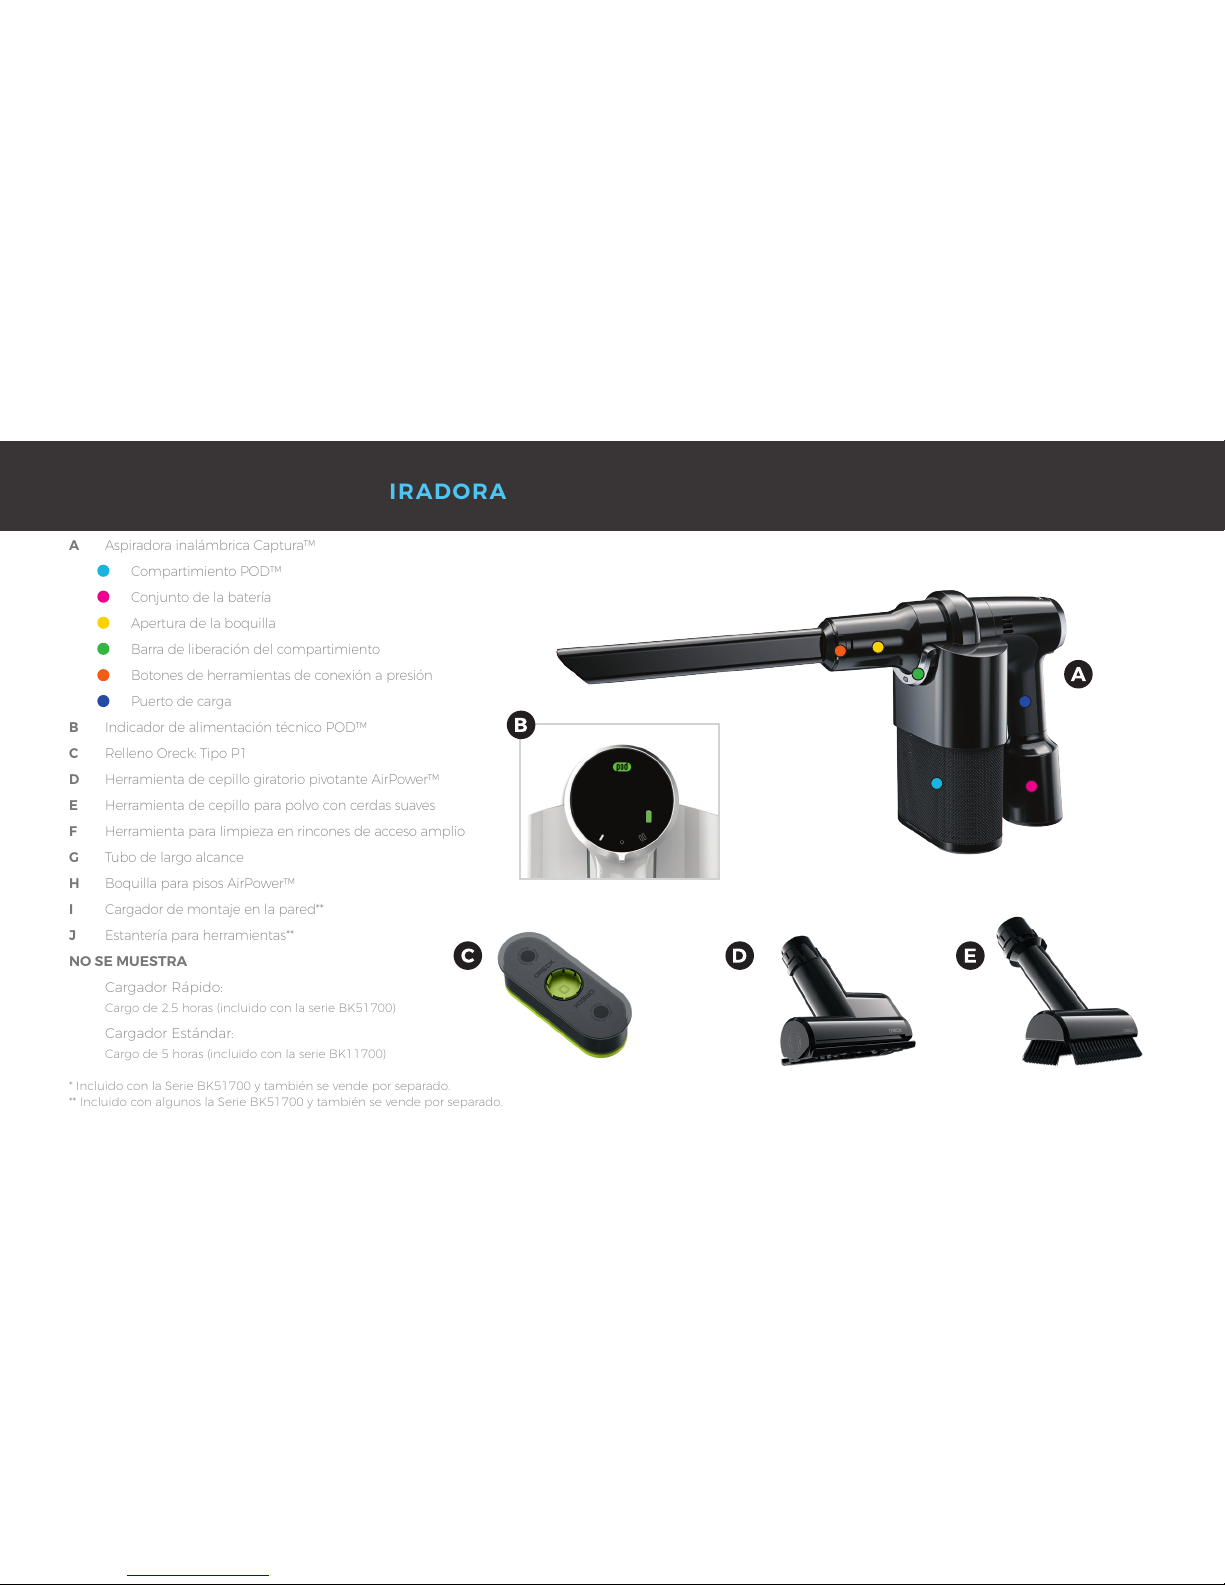
A Aspiradora inalámbrica Captura™
Compartimiento POD™
Conjunto de la batería
Apertura de la boquilla
Barra de liberación del compartimiento
Botones de herramientas de conexión a presión
Puerto de carga
B Indicador de alimentación técnico POD™
C Relleno Oreck: Tipo P1
D Herramienta de cepillo giratorio pivotante AirPower™
E Herramienta de cepillo para polvo con cerdas suaves
F Herramienta para limpieza en rincones de acceso amplio
G Tubo de largo alcance
H Boquilla para pisos AirPower™
I Cargador de montaje en la pared**
J Estantería para herramientas**
NO SE MUESTRA
Cargador Rápido:
Cargo de 2.5 horas (incluido con la serie BK51700)
Cargador Estándar:
Cargo de 5 horas (incluido con la serie BK11700)
* Incluido con la Serie BK51700 y también se vende por separado.
** Incluido con algunos la Serie BK51700 y también se vende por separado.
INTRODUCCIÓN A LA ASPIRADORA
37
Page 39

INTRODUCCIÓN A LA ASPIRADORA
El cepillo giratorio especializado
cuenta con cerdas alternantes
duras y suaves: las cerdas duras se
activan en alfombras y las suaves
en pisos duros, protegiendo las
superficies y ofreciendo un rendimiento de precisión al mismo
tiempo.
I
J
38
Page 40
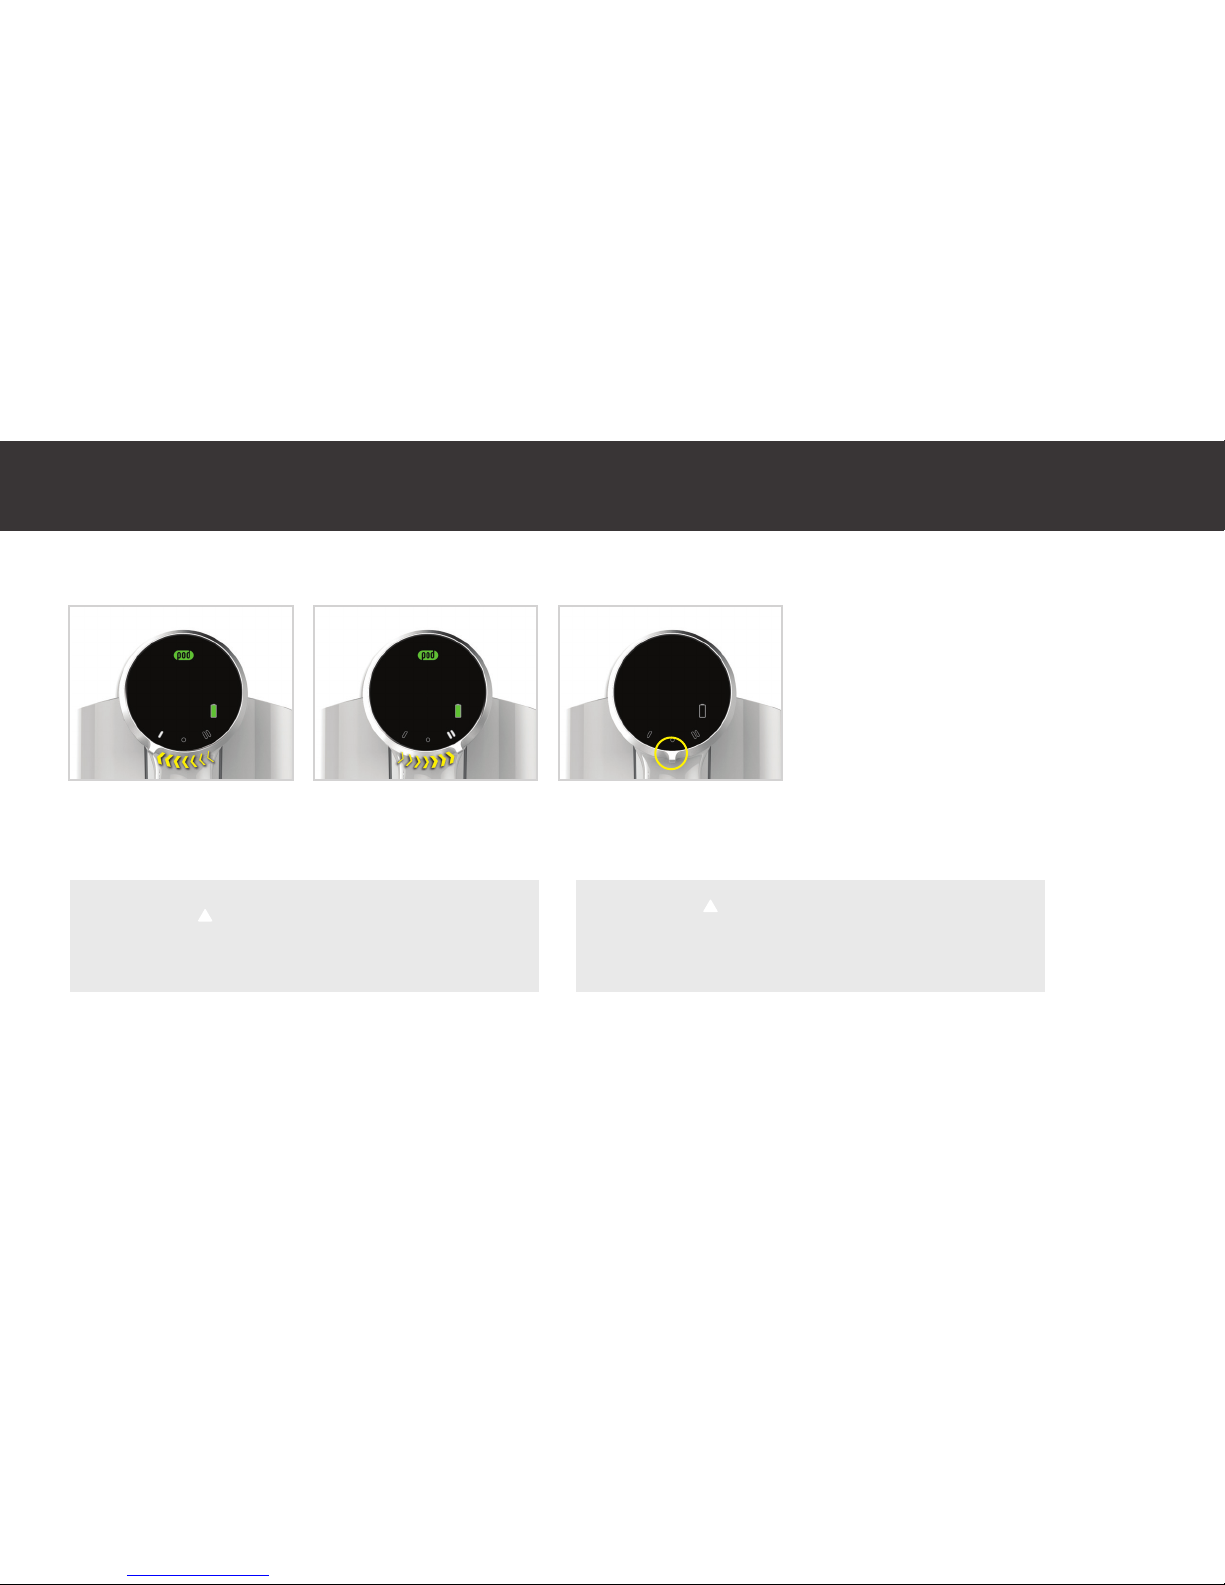
INTRODUCCIÓN A LA ASPIRADORA: INDICADOR
-SPEED CLEANING
Estándar: Gire el indicador
a la izquierda
Turbo: Gire el indicador a
la derecha
Posición de apagado
ADVERTENCIA Esta aspiradora tiene un cepillo giratorio que
rota constantemente. Nunca deje la aspiradora en un lugar por
mucho tiempo ya que podría dañar la superficie del piso.
ADVERTENCIA Riesgo de daños personales: el cepillo giratorio
puede reiniciarse repentinamente. Apague la unidad, desenchúfela
de la fuente de alimentación y retire la herramienta antes de realizar
la limpieza o el mantenimiento del cepillo giratorio.
!
!
ESTÁNDAR TURBO APAGADO
39
Page 41
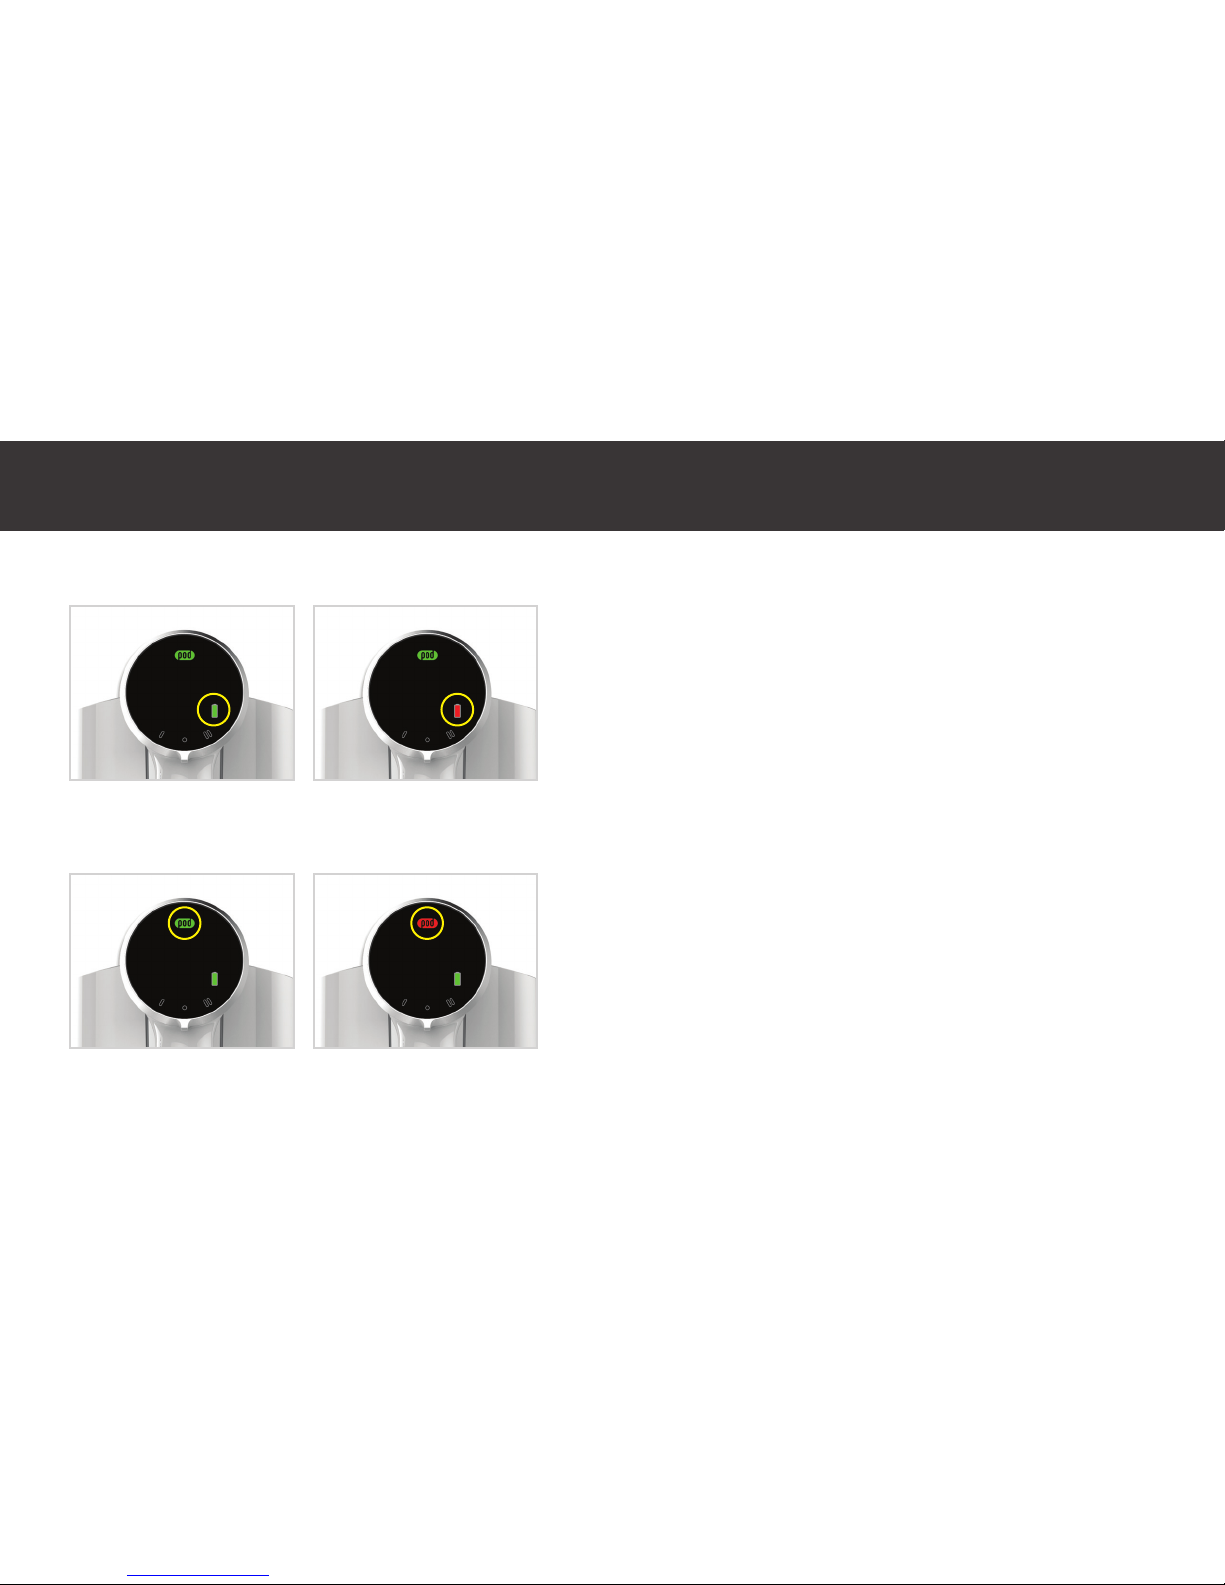
INTRODUCCIÓN A LA ASPIRADORA: INDICADOR
CARGA DE LA BATERÍA
CAPACIDAD DE LLENADO
Cuando la unidad está enchufada, todas las luces
se encenderán una vez. El indicador de la batería
se encenderá durante el período de carga. Cuando
la carga esté completa, el indicador de la batería
se verá en color verde permanente.
La tecnología POD™ mide el rendimiento de
limpieza de la aspiradora y la capacidad de
llenado. POD parpadea en rojo cuando es hora
de reemplazar.
NOTA: NO LLENAR DE MÁS. El relleno se debe cambiar cuando el
indicador parpadee en rojo, de otra forma se puede dañar la unidad.
Si se llena de más, el indicador POD parpadeará en naranja y la
unidad se apagará.
CARGA DE BATERÍA
DISPONIBLE
SIN CARGA
CAPACIDAD
DISPONIBLE
CAPACIDAD
COMPLETA
40
Page 42

ENSAMBLAJE: INSTALE EL RELLENO ORECK
NOTA: La aspiradora no funcionará si no se instala el relleno o si
se alcanzó la capacidad completa.
Presione la barra para
liberar el compartimiento.
Inserte el relleno. Vuelva a insertar el compartimiento
hasta escuchar un clic.
Tire hacia abajo el compartimiento para
asegurarse de que se fijó completamente antes
de aspirar.
41
Page 43

ENSAMBLAJE: EXTRAIGA EL RELLENO ORECK
Presione la barra para
liberar el compartimiento.
Incline el compartimiento
sobre el cubo de basura
y el relleno se eyectará
hacia el cubo.
Inserte un relleno nuevo. Vuelva a
insertar el compartimiento hasta
escuchar un clic.
Tire hacia abajo el compartimiento para
asegurarse de que se fijó completamente antes
de aspirar.
42
Page 44
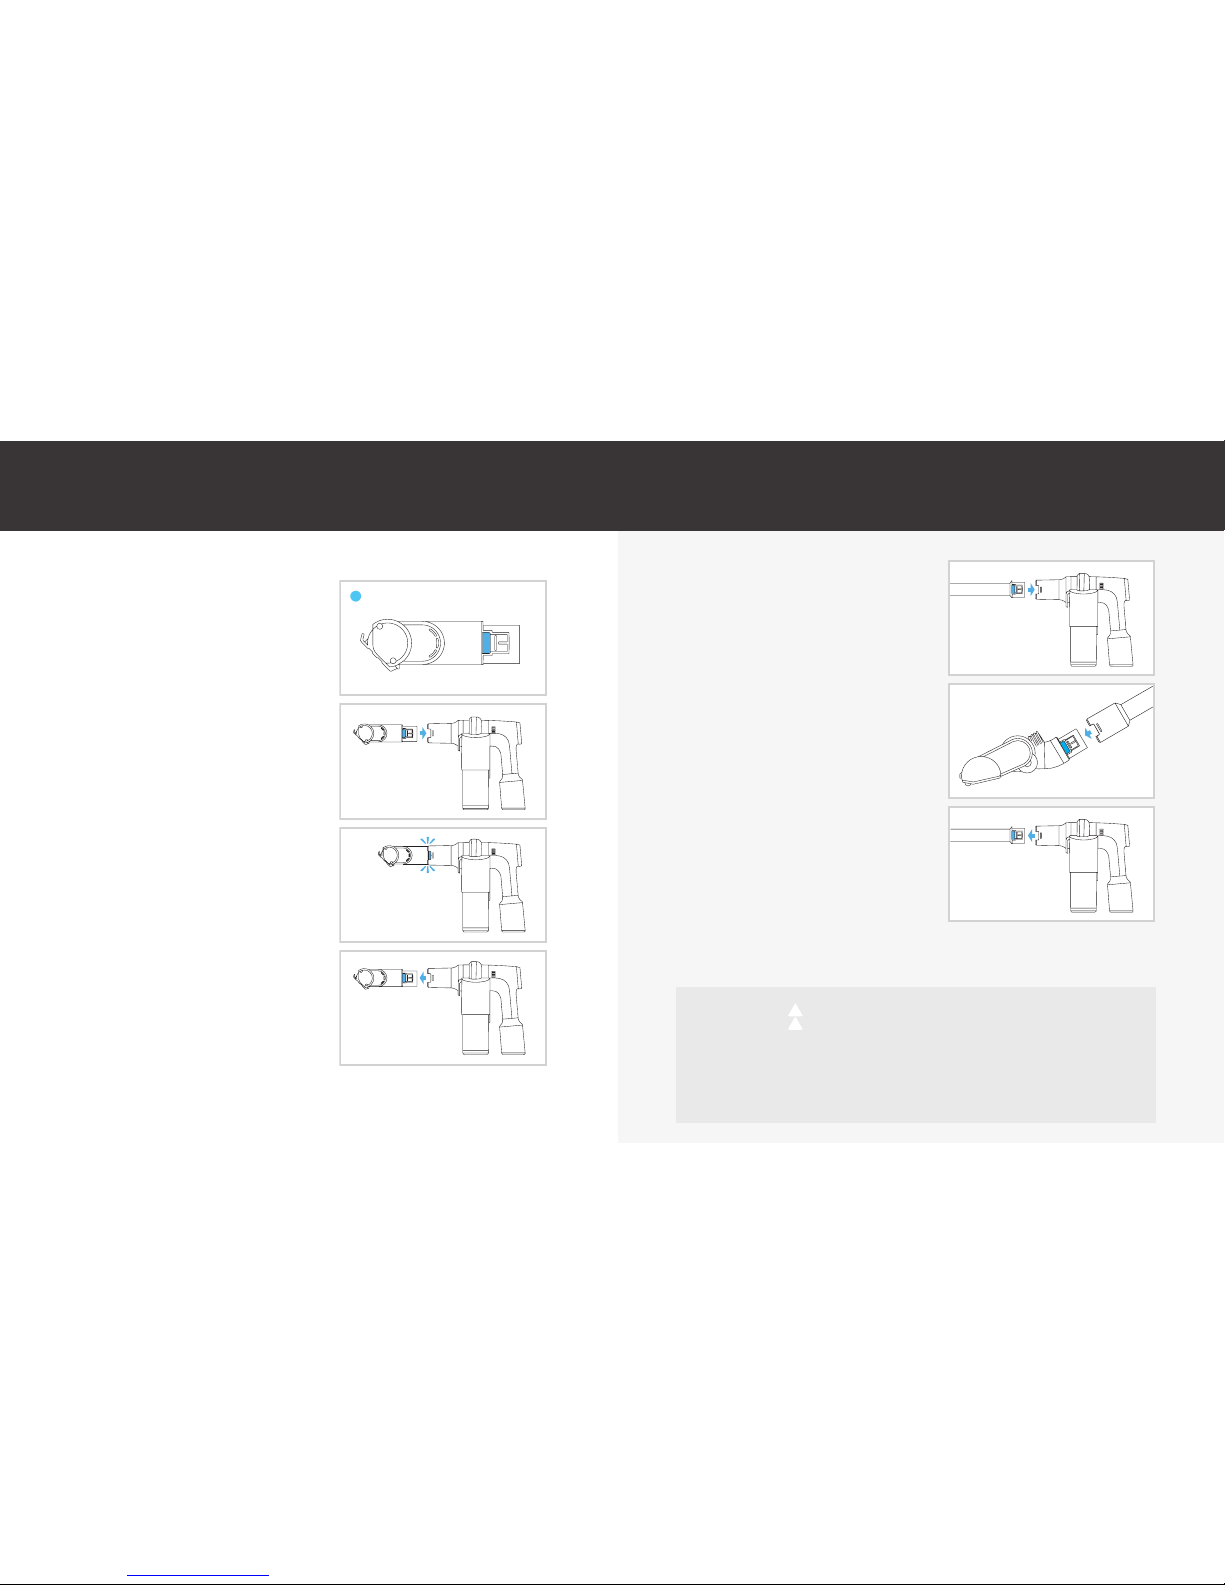
ENSAMBLAJE: CONEXIÓN DE
HERRAMIENTAS
ENSAMBLAJE: CONEXIÓN DEL TUBO Y LA
BOQUILLA PARA PISOS
Las herramientas “encajarán” en su lugar si se
instalan correctamente.
Asegúrese de que haya
una herramienta instalada
antes de hacer funcionar la
aspiradora.
Presiones los botones de la
herramienta de conexión a
presión.
Deslice la herramienta en la
apertura de la boquilla con
los botones de conexión a
presión aún presionados.
Ambos botones deben
encastrar en su lugar antes
del uso.
Para extraer, presione los
botones de la herramienta
de conexión a presión y tire
hacia afuera de la apertura
de la boquilla.
IMPORTANTE El aparato no debe utilizarse para acicalar mascotas.
IMPORTANTE Esta aspiradora no se mantiene vertical por sí sola.
Entre los usos o cuando lleve a cabo cualquier tipo de mantenimiento,
siempre recuéstela sobre el piso en una ubicación adecuada de modo que
no constituya una obstrucción en el paso ni nadie pueda pisarla.
!
!
Presione los botones de la herramienta de conexión a presión sobre el tubo e insértelo en la unidad
del dispositivo portátil.
Alinee el tubo con la boquilla para
pisos AirPower™ con los botones
de la herramientas de conexión
a presión presionados. Deslice el
tubo en la apertura de la boquilla
con los botones de la herramienta
de conexión a presión presionados
para conectar. Asegúrese de que
el extremo del tubo con la tapa
grande se una con la boquilla para
pisos.
Para extraer, presione los botones
de la herramienta de conexión a
presión y tire de la herramienta
hacia afuera.
Botones de herramientas
de conexión a presión
43
Page 45

FUNCIONAMIENTO: CARGA
Inserte el cable de carga en
el puerto de carga ubicado
en la parte posterior del
mango.
Enchufe el enchufe del cargador en el tomacorriente.
Cuando la carga esté
completa, el indicador de la
batería se verá en color verde
permanente.
Si realiza la carga por primera vez, es posible que el tiempo de carga
inicial sea igual al tiempo de carga completa indicado por la unidad.
Temps de charge : 2,5 heures (chargeur rapide inclus avec
modèles BK51700)
Temps de charge : 5 heures (chargeur classique inclus avec
modèles BK11700)
44
Page 46

El indicador POD parpadea en rojo.
Ambos indicadores de velocidad
parpadean.
El indicador POD parpadea en color
naranja y el motor se detiene.
El indicador de la batería parpadea en
color rojo.
El indicador de la batería parpadea en color
rojo y verde.
PROBLEMA
La capacidad está llena.
El cepillo giratorio está atascado.
La unidad tiene una obstrucción.
Se agotó la carga de la batería.
La temperatura de la batería es
anormal.
CAUSA POSIBLE
Gire el indicador de encendido a la posición de apagado. Inserte un relleno nuevo en el
compartimiento y reinicie la unidad.
NOTA: NO LLENAR DE MÁS. El relleno se debe cambiar cuando el indicador parpadee en rojo, de
otra forma se puede dañar la unidad. Si se llena de más, el indicador POD parpadeará en naranja y
la unidad se apagará.
Gire el indicador a la posición de apagado. Quite la obstrucción del cepillo giratorio, si existiera.
Espere 15 segundos y reinicie la unidad. Visite Oreck.com para obtener instrucciones detalladas.
Gire el indicador a la posición de apagado. Retire la herramienta e inspeccione en busca de
obstrucciones en la boquilla. Retire la obstrucción, vuelva a colocar la herramienta y reinicie la
unidad. Visite Oreck.com para obtener instrucciones detalladas.
Gire el indicador a la posición de apagado. Enchufe la unidad a la carga. El tiempo de carga
completa es aproximadamente 2,5 horas para el cargador rápido y aproximadamente 5 horas
para el cargador estándar.
Asegúrese de que la unidad esté en la posición de apagado y desenchúfela del cargador. Espere
30 minutos y vuelva a enchufar la unidad al cargador.
SOLUCIÓN
MANTENIMIENTO
Para realizar el mantenimiento, el servicio, o si tiene preguntas sobre la garantía, comuníquese con un
Especialista de atención al cliente de Oreck llamando al 877-533-2019, visite Oreck.com o su distribuidor
local de Oreck.
45
Page 47

PIEZAS CERTIFICADAS
NOTA: Cualquier otro mantenimiento lo debe re-
alizar un representante de servicio autorizado.
NOTA: Si el aparato no funciona como debe, si
se ha caído, dañado o dejado a la intemperie, o
si se ha sumergido en agua, llévelo a un centro
técnico antes de continuar usándolo.
NOTA: El motor y el cepillo giratorio vienen
equipados con cojinetes que tienen una
lubricación suficiente para toda su vida útil. La
adición de lubricante podría causar daños. No
agregue lubricantes al motor o al cepillo.*
Cepillo quitapolvo
N.° de pieza
Blanco, AK8BT03
Negro, AK8BT0
Herramienta para
limpieza en rincones
N.° de pieza
Blanco, AK8CT03
Negro, AK8CT02
Herramienta de cepillo giratorio pivotante
AirPower™
N.° de pieza
Blanco, AK8MT03
Negro, AK8MT02
Boquilla para pisos
AirPower™
N.° de pieza
Blanco, AK8FN03
Negro, AK8FN02
Comuníquese con un Especialista de atención al cliente de Oreck llamando al 877-533-2019 para ver los detalles del
reemplazo o visite Oreck.com o su distribuidor local de Oreck.
Varilla
N.° de pieza
Negro, AK8WT02
Blanco, AK8WT03
Relleno tipo P1
N.° de pieza
AK6B15A
*Pack of 5 Refills
NO SE
MUESTRA
Cable de carga de
alimentación rápida
N.° de pieza
Blanco, BK0RC03
Negro, BK0RC02
Incluido con series
BK51700
Cargador de
montaje en la pared
N.° de pieza
Blanco, 521A00144
Estantería para
herramientas
N.° de pieza
Blanco, 521A00145
Negro, 521A00124
521A00156
521A00151
Negro, 521A00123,
Incluido con algunos
modelos
Incluido con algunos
modelos
46
Page 48
Visite Oreck.com Llame al 877-533-2019
Techtronic Floor Care Technology Limited
Distribuido por Royal Appliance Mfg. Co. Glenwillow, OH 44139
964A00190
©2018 Techtronic Floor Care Technology Limited
REGISTRE SU ASPIRADORA:
 Loading...