

Page 1

URC 7200 / 7201
Cinema 7
User Manual
Page 2
MAGIC
POWER
TV
VCR
DVD/LD
RCVR
AUX
CD
CABLE/SAT
VOL
VOL
MUTE
CH
CH
ENTER
PREV CH
VOL
VOL
MUTE
CH
CH
PREV CH
SLEEP
REW
PL
FF
REC
STOP
PAUSE
TV/VCR
MENU
SEL
EXIT
SEL
EXIT
EXIT
PROG/GUIDE
SEL
DISPLAY
P
I
P
On/Off
Swap
Move
MACRO
MACRO 2
SURROUND
TV
MAGIC
POWER
VCR
MAGIC
POWER
PL
DVD/LD
MAGIC
POWER
RCVR
MAGIC
POWER
CD
MAGIC
PL
MAGIC
POWER
CABLE/SAT
MAGIC
POWER
AUX
MAGIC
TV
POWER
MAGIC
TV
VCR
MAGIC
PL
FEATURES AND FUNCTIONS
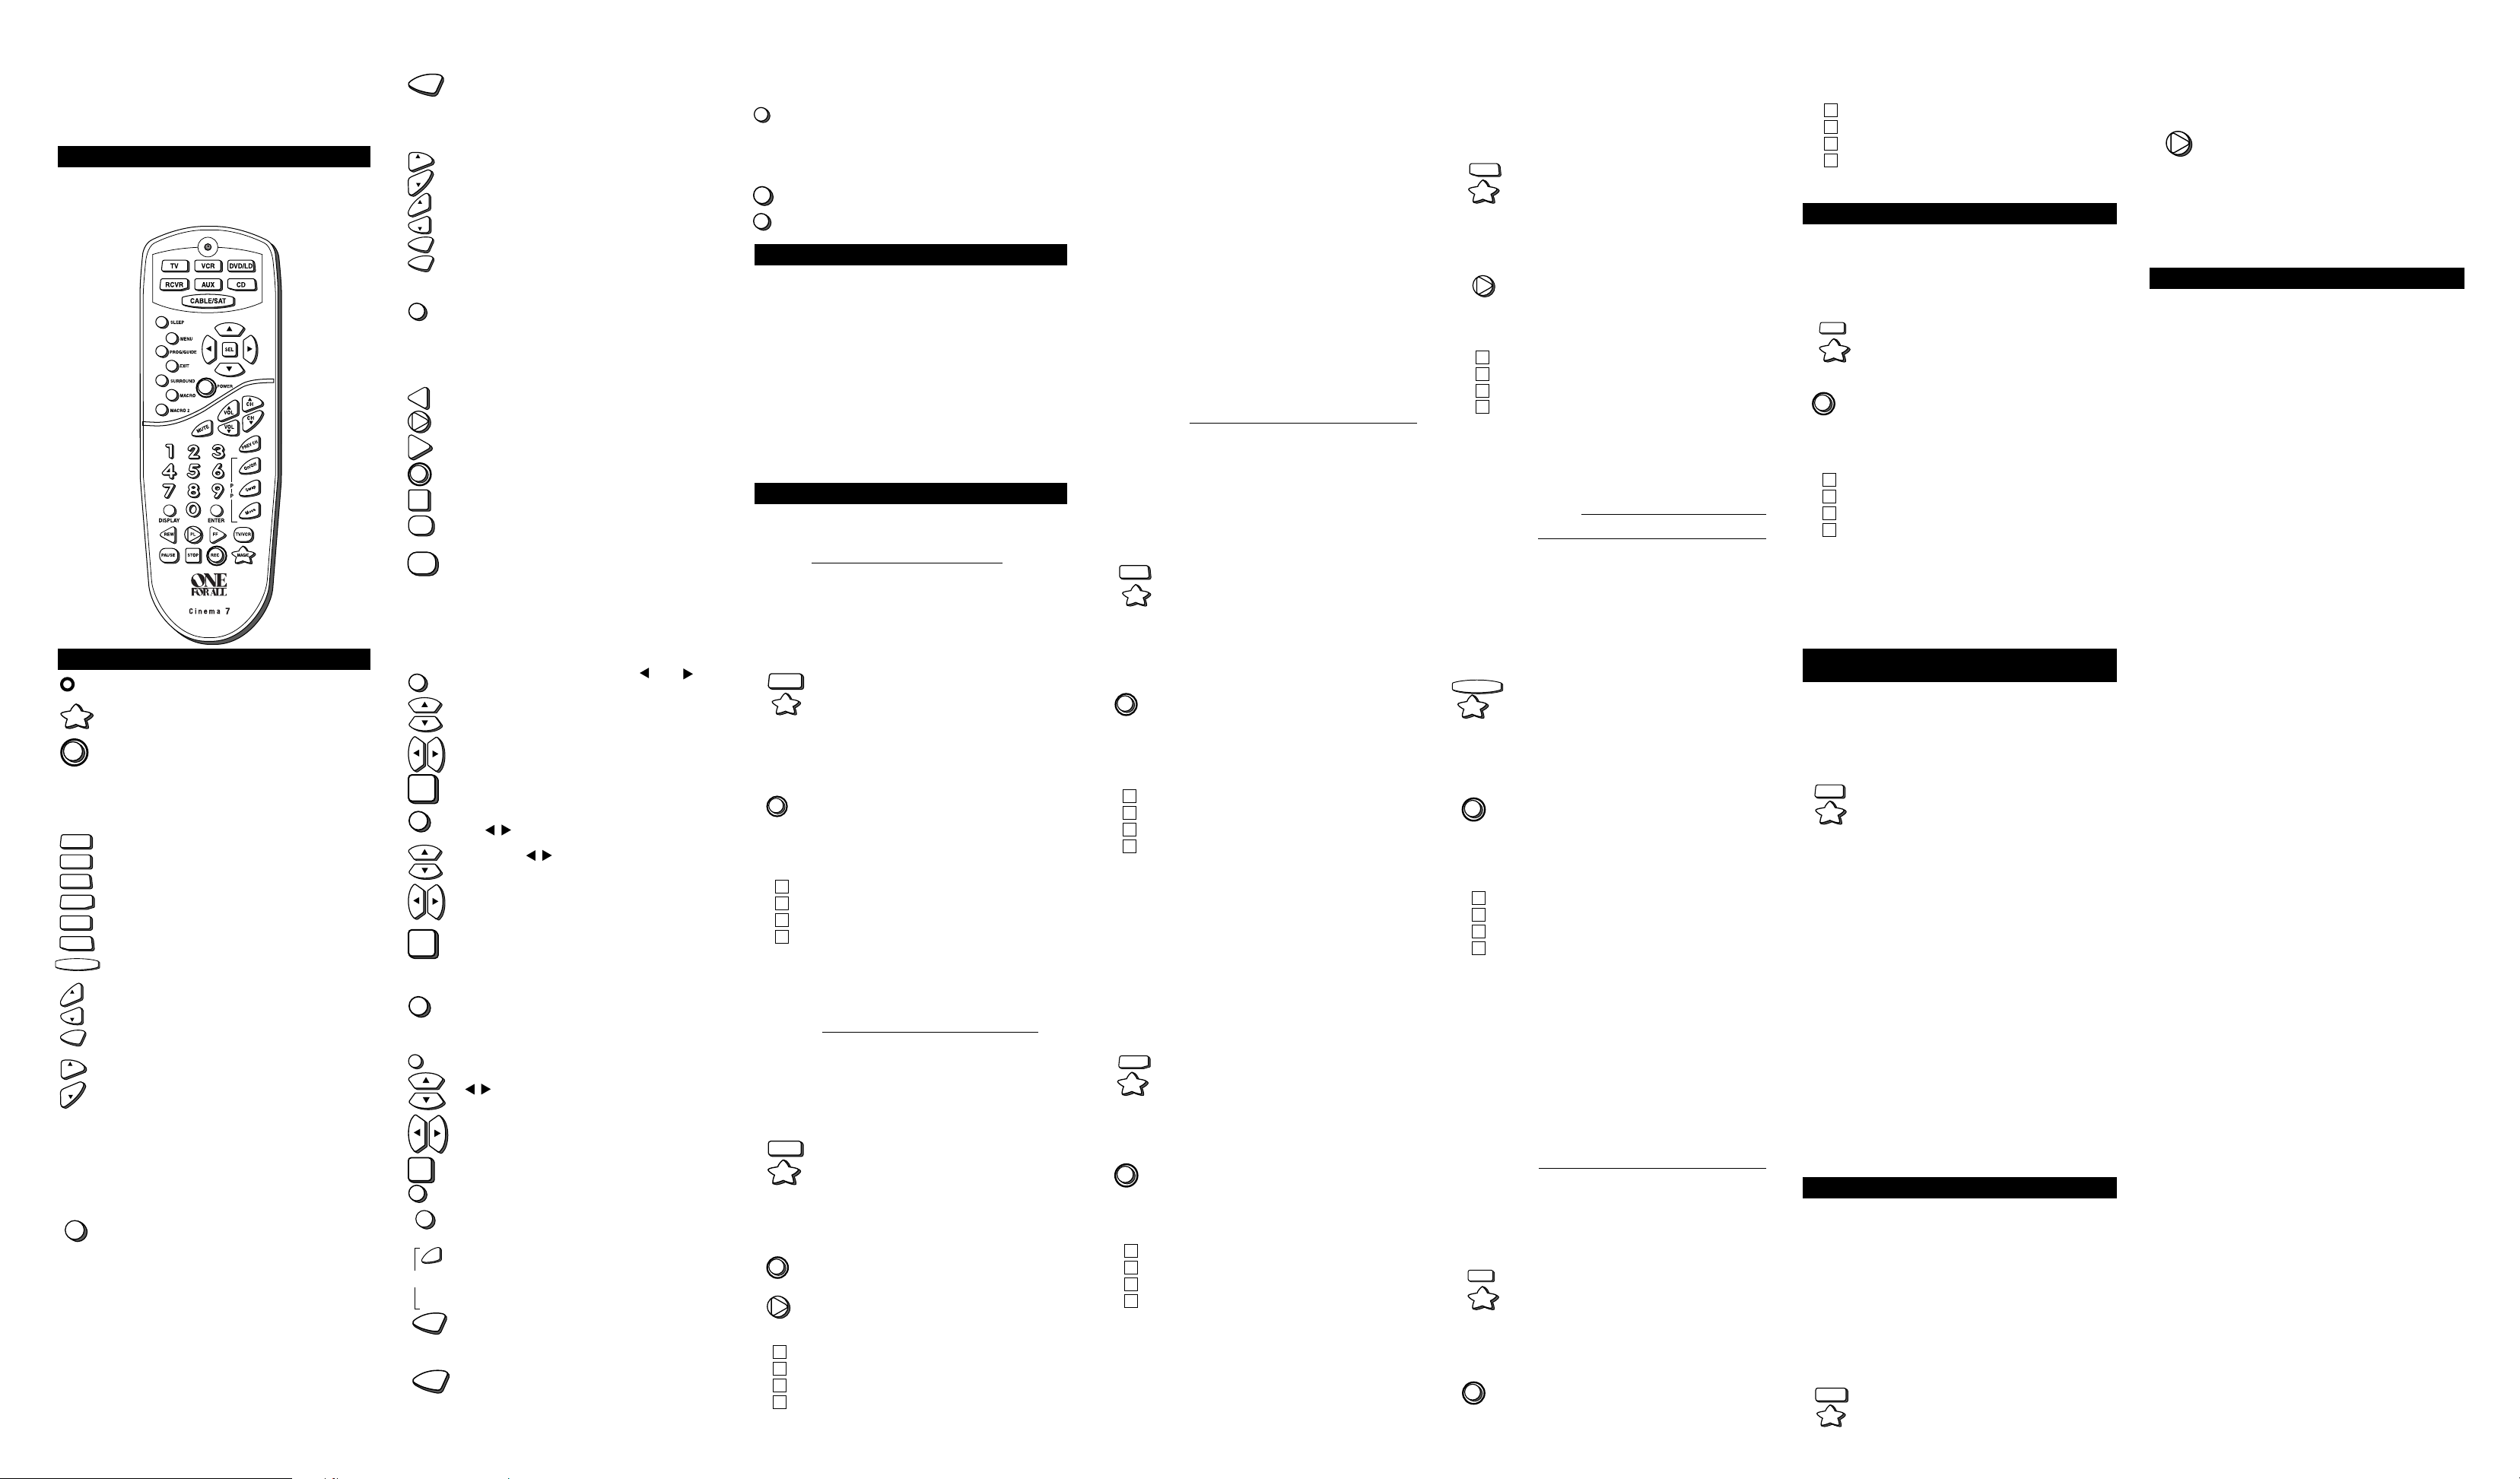
Here are the features and functions of the
universal remote control. Use the drawing to locate each
feature of the remote, then refer to the chart for a description of what function each feature performs.
FEATURES AND FUNCTIONS
The Light (LED) flashes red to show that the
remote is working and is sending a signal.
The MAGIC key is used to program your
0 - 90 - 9
0 - 9
Cinema 7
The POWER key controls power ON and OFF
the same as the POWER key on your original
remote. Please note that most CD Players do
not have an ON/OFF function on the original
remote control. If this is the case with your CD
Player, then POWER will have no effect on
your CD Player.
The TV, VCR, DVD/LD, RCVR, AUX, CD and
CABLE/SAT keys are used to select the home
entertainment component you want to control.
If your component does not respond when you
press a key on the remote control, press the
appropriate device key (TV, VCR,
DVD/LD, RCVR, AUX, CD or CABLE/SAT)
first to tell the remote control which component
you would like the remote to operate.
The VOL▲ (Volume Up), VOL▼ (Volume
Down) and MUTE keys control the volume the
same as the Volume Up and Down and Mute
keys on your original remote.
The CH▲ (Channel Up) and CH▼ (Channel
Down) keys change channels the same as the
Channel Up and Down keys on your original
remote. The CH▲/▼ keys also control the
following functions in other modes: DVD/LD
mode = Skip Forward/ Skip Reverse, RCVR,
AUX and CD mode = Preset Up/Preset Down.
The Digit keys (0-9) control direct channel
access the same as the Digit keys on your
original remote. The Digit keys (0-9) also
control the following functions in other modes:
RCVR and AUX modes = Input Selections.
The ENTER key operates the same as the
Enter key on your original remote. If your
original remote control required you to use an
Enter key to change channels, use the ENTER
key on the
channel number. The ENTER key also controls
the following functions in other modes: RCVR
and AUX modes = TAPE MON.
.
Cinema 7
after entering your
Cinema 7
0 - 90 - 9
0 - 9
The PREV CH (Previous Channel) key
operates the same as the Last Channel or
Recall key on your original remote. The PREV
CH key also controls the following functions in
other modes: DVD/LD, RCVR, AUX and CD
mode = Random.
The CH ▲/▼, VOL ▲/▼, MUTE, PREV CH
and Digit (0-9) keys are made of a phosphorescent material that glows-in-the-dark.
Expose the keys to bright light to activate the
glow-in-the-dark feature. The length of time the
keys remain illuminated will be determined by
the length of time the remote is exposed to
bright light.
The SLEEP key accesses the Sleep Timer of
your home entertainment components (TV,
CABLE/SAT, RCVR and AUX modes only).
Even if your component does not have a Sleep
Timer, the
Cinema 7
may access its own built-
in sleep timer.
The REW (Rewind), PL (PLAY), FF (Fast
Forward) REC (Record), STOP, and PAUSE
keys operate the same as the transport keys
on your original VCR, Laser Disc, DVD and CD
Player remote. As a safety feature of the
Cinema 7
, you must press the REC key twice
before recording.
The TV/VCR key operates the same as the TV/
VCR key on your original VCR remote. The TV/
VCR key also controls the following functions in
other modes: TV mode = TV/VIDEO, CBL/SAT
mode = A/B or TV/SAT, DVD/LD mode = TV/LD,
RCVR mode = Input Select, CD mode = A/B.
The MENU key operates the same as the
MENU or OSD (On Screen Display) key on
your original remote. Use ▲, ▼, , and
(Menu Up, Down, Left and Right) to navigate
your menus. If your original remote control had
a SELECT key to select options in your menus,
use SEL. Use the EXIT key to exit/clear your
On-Screen menus. Please consult your home
entertainment component’s original owner’s
manual for more detailed instructions on
accessing and navigating your On-Screen
menus.
The , , ▲ , and ▼ (Menu Up, Down, Left and
Right) keys are used to navigate your On-Screen
menus. The , , ▲, and ▼ keys also control
the following functions in other modes: RCVR
and AUX mode = Rear Level +/- and Balance
Left/Right, CD mode = Track+/- and Disc +/-.
The SEL (Select) key selects options in your
On-Screen menus. The SEL key also controls
the following functions in other modes: RCVR
and AUX mode = Surround Mode, CD mode =
Disc Select, DVD/LD mode = Chapter.
The EXIT key exits or clears your on-screen
menus. The EXIT key also controls the
following functions in other modes: RCVR,
AUX and CD mode = Open/Close.
The PROG/GUIDE key operates your
components secondary menus as well as your
DBS system’s and Cable Converter’s Guide
function. Use the
, , ▲ , and ▼ (Menu Up, Down, Left and
Right) keys to navigate your menus. If your
original remote control had a SELECT key to
select options in your menus, use SEL. Use
the EXIT key to exit/clear your On-Screen
menus. Please consult your home entertainment component’s original owner’s manual for
more detailed instructions on accessing and
navigating your On-Screen menus.
The DISPLAY key operates the Display
function of your home entertainment
components.
The PIP On/Off key accesses your TV’s
Picture-in-Picture feature. The PIP On/Off key
also controls the following functions in other
modes: CD mode =Disk Skip, DVD/LD mode =
Subtitle On/Off, CBL/SAT mode = View.
The SWAP key swaps the Picture-in-Picture
window and the TV’s main picture. The SWAP
key also controls the following functions in
other modes: CBL/SAT mode = SAT.
The MOVE PIP key moves the Picture-in-
Picture window around your TV screen. The
MOVE PIP key also controls the following
functions in other modes: DVD/LD mode =
Angle, CBL/SAT mode = Next.
The SURROUND key operates the same as the
Surround On/Off key on your original remote.
The SURROUND key also controls the following
functions in other modes: VCR mode = Auto
Tracking, DVD/LD mode = Disc, CBL/SAT mode
= Favorite Channel, CD mode = 10+.
The MACRO and MACRO2 keys can
memorize up to 15 keystrokes per key that can
be accessed in sequence with a single key
press. These keys are not mode specific.
INSTALLING THE BATTERIES
Cinema 7
Your
batteries. To install the batteries:
1. On the back of the
requires four (4) new AAA alkaline
Cinema 7
, pull back on the tab
and lift the battery cover off.
2. Match the + and - marks on the batteries to the +
and - marks in the battery case, then insert the
batteries.
3. Press the battery cover back into place.
4. Test the unit by pressing POWER. If the batteries
are inserted correctly, the red light will blink.
NOTE: Removing the batteries will not require you to
reprogram your remote control because the Cinema 7 has
unlimited memory backup.
SETTING UP YOUR COMP ONENT S
Programming the
Locate the brand name of your TV and then write it in the
space below.
Cinema 7
to operate your TV:
TV Brand:
Locate the brand name of your TV in the “Setup Codes
For TVs” section. The brands are listed in alphabetical
order with the most popular codes listed first. You will use
one of these codes to program your
your TV.
To program the
Cinema 7
to operate your TV:
Cinema 7
to operate
1. Turn on your TV.
2. Press TV and release. Press and hold MAGIC
until the
Cinema 7
’s red light blinks twice, then
release MAGIC.
3. Enter the first four-digit TV code listed for your
brand in the “Setup Codes For TVs” section. If
you perform this procedure correctly, the red
light will blink twice when you enter the final
digit of your code.
4. Aim the
Cinema 7
POWER. Your TV should turn off. If
your TV does not respond, repeat steps 2-4,
at your TV and press
trying each code listed for your
brand until you find the one that operates your
TV.
5. Your
Cinema 7
your TV. Write your TV code in
is now programmed to operate
the boxes to the left for future reference.
Remember, if you want to use your Cinema 7 to operate
your TV, press the TV key first.
Programming the
Locate the brand name of your VCR and then write it in
Cinema 7
to operate your VCR:
the space below.
VCR Brand:
Locate the brand name of your VCR in the “Setup Codes
For VCRs” section. The brands are listed in alphabetical
order with the most popular codes listed first. You will use
one of these codes to program your
your VCR.
To program the
Cinema 7
to operate your VCR:
Cinema 7
to operate
1. Turn on your VCR and insert a tape.
2. Press VCR and release. Press and hold
MAGIC until the
blinks twice, then release MAGIC.
3. Enter the first four-digit VCR code listed for
your brand in the “Setup Codes For VCRs”
Cinema 7
’s red light
section. If you perform this procedure correctly,
the red light will blink twice when you enter the
final digit of your code.
4. Aim the
or
Cinema 7
POWER. Your VCR should turn off. If your original
at your VCR and press
VCR remote control did not have a POWER key,
press PL (Play). Your VCR should start to play. If
your VCR does not respond, repeat steps 2-4,
trying each code listed for your brand until you
find the one that operates your VCR.
5. Your
Cinema 7
your VCR. Write your VCR code in the boxes to
the left for future reference.
is now programmed to operate
Remember, if you want to use your Cinema 7 to operate
your VCR, press the VCR key first.
NOTE: If your TV/VCR is working on one of the above
codes highlighted with an asterisk (*), you may need to
program a separate TV code in order to control the volume.
Check the list of codes below and follow the instructions
detailed in the “Programming the Cinema 7 to Operate
Your TV” section to program the supplied TV code.
TV/VCRs working on VCR code 0032 ma y require
TV code 0000 for volume control.
TV/VCRs working on VCR code 0035 ma y require
TV code 0051 for volume control.
TV/VCRs working on VCR code 0048 ma y require
TV code 0093 for volume control.
TV/VCRs working on VCR code 0060 ma y require
TV code 0047 for volume control.
TV/VCRs working on VCR code 0081 ma y require
TV code 0054 for volume control.
TV/VCRs working on VCR code 0162 ma y require
TV code 0250 for volume control.
TV/VCRs working on VCR code 0278 ma y require
TV code 0451 for volume control.
Programming the Cinema 7 to operate your DVD or
Laser Disc Player:
Locate the brand name of your DVD or Laser Disc Player
and then write it in the space below.
DVD/LD Brand:
Locate the brand name of your DVD or Laser Disc Player
in the “Setup Codes For DVD or Laser Disc Players”
section. The brands are listed in alphabetical order with
the most popular codes listed first. You will use one of
these codes to program your
Cinema 7
to operate your
DVD or Laser Disc Player.
To program the
Disc Player:
Cinema 7
to operate your DVD or Laser
1. Turn on your DVD or Laser Disc Player and
insert a disc.
2. Press DVD/LD and release. Press and hold
MAGIC until the
twice, then release MAGIC.
3. Enter the first four-digit DVD or Laser Disc
Player code listed for your brand in the “Setup
Cinema 7
’s red light blinks
Codes For DVD or Laser Disc Players” section.
If you perform this procedure correctly, the red
light will blink twice when you enter the final
digit of your code.
4. Aim the
Cinema 7
at your DVD or Laser Disc
Player and press POWER. Your DVD or Laser
Disc Player should turn off. If your DVD or
Laser Disc Player does not respond, repeat
steps 2-4, trying each code listed for your
brand until you find the one that operates your
DVD or Laser Disc Player.
5. Your
Cinema 7
your DVD or Laser Disc Player.
is now programmed to operate
Write your DVD or Laser Disc Player code in
the boxes to the left for future reference.
Remember, if you want to use your
your DVD or Laser Disc Player, press the DVD/LD key first.
Programming the
Tuner:
Cinema 7
Cinema 7
to operate
to operate your Receiver/
Locate the brand name of your Receiver/Tuner and then
write it in the space below.
Receiver/Tuner Brand:
Locate the brand name of your Receiver/Tuner in the
“Setup Codes For Receivers/Tuners” section. The brands
are listed in alphabetical order with the most popular
codes listed first. You will use one of these codes to
program your
To program the
1. Turn on your Receiver/Tuner.
2. Press RCVR and release. Press and hold
Cinema 7
to operate your Receiver/Tuner.
Cinema 7
MAGIC until the
to operate your Receiver/Tuner:
Cinema 7
’s red light blinks
twice, then release MAGIC.
3. Enter the first four-digit Receiver/Tuner code
listed for your brand in the “Setup Codes For
Receivers/Tuners” section. If you perform this
procedure correctly, the red light will blink twice
when you enter the final digit of your code.
4. Aim the
Cinema 7
at your Receiver/Tuner and
press POWER. Your Receiver/Tuner should
turn off. If your Receiver/Tuner does not
respond, repeat steps 2-4, trying each code
listed for your brand until you find the one that
operates your Receiver/Tuner.
5. Your
Cinema 7
your Receiver/Tuner. Write your Receiver/
Tuner code in the boxes to the left for future
is now programmed to operate
reference.
Remember, if you want to use your
Cinema 7
to operate
your Receiver/Tuner, press the RCVR key first.
Programming the
Locate the brand name of your CD Player and then write
it in the space below.
Cinema 7
to operate your CD Player:
CD Player Brand:
Locate the brand name of your CD Player in the “Setup
Codes For CD Players” section. The brands are listed in
alphabetical order with the most popular codes listed
first. You will use one of these codes to program your
Cinema 7 to operate your CD Player.
To program the
Cinema 7
to operate your CD Player:
1. Turn on your CD Player and insert a disc.
2. Press CD and release. Press and hold MAGIC
until the
Cinema 7
’s red light blinks twice, then
release MAGIC.
3. Enter the first four-digit CD Player code listed
for your brand in the “Setup Codes For CD
Players” section. If you perform this procedure
correctly, the red light will blink twice when you
enter the final digit of your code.
4. Aim the
Cinema 7
PL (Play). Your CD Player should play your
disc. If your CD Player does not respond,
at your CD Player and press
repeat steps 2-4, trying each code listed for
your brand until you find the one that operates
your CD Player.
5. Your
Cinema 7
your CD Player. Write your CD Player code in
is now programmed to operate
the boxes to the left for future reference.
Remember, if you want to use your
Cinema 7
to operate
your CD Player, press the CD key first.
Programming the Cinema 7 to operate your Cable
Converter or Satellite:
Locate the brand name of your Cable Converter or
Satellite and then write it in the space below.
Cable Converter Brand:
or
Satellite Brand:
Locate the brand name of your Cable Converter or
Satellite in the “Setup Codes For Cable Converters or
Satellites” section. The brands are listed in alphabetical
order with the most popular codes listed first. You will use
one of these codes to program your
your Cable Converter or Satellite.
To program the
or Satellite:
1. Turn on your Cable Converter or Satellite.
2. Press CABLE/SAT and release. Press and
Cinema 7
to operate your Cable Converter
hold MAGIC until the
Cinema 7
Cinema 7
to operate
’s red light
blinks twice, then release MAGIC.
3. Enter the first four-digit Cable Converter or
Satellite code listed for your brand in the “Setup
Codes For Cable Converters or Satellites”
section. If you perform this procedure correctly,
the red light will blink twice when you enter the
final digit of your code.
4. Aim the
Cinema 7
Satellite and press POWER.Your Cable
Converter or Satellite should turn off. If your
at your Cable Converter or
Cable Converter or Satellite does not respond,
repeat steps 2-4, trying each code listed for
your brand until you find the one that operates
your Cable Converter or Satellite.
5. Your
Cinema 7
is now programmed to operate
your Cable Converter or Satellite. Write your
Cable Converter or Satellite code in the boxes
to the left for future reference.
Remember, if you want to use your
Cinema 7
to operate
your Cable Converter or Satellite, press the CABLE/SAT
key first.
Programming the AUX Key:
The AUX key is already set up to accept codes for a
second Receiver/Tuner, Amplifier or other audio component. If you would like to set up the AUX key for an audio
component, follow the instructions listed below. If you
would like the AUX key to control a second TV, VCR,
Cable Converter or other component, follow the instructions in the “Re-assigning Device Keys” section to reassign the AUX key to accept codes for other components.
For example, if you are setting up an Amplifier:
Locate the brand name of your Amplifier and then write it
in the space below.
Amplifier Brand:
Locate the brand name of your Amplifier in the “Setup
Codes For Amplifiers” section. The brands are listed in
alphabetical order with the most popular codes listed first.
You will use one of these codes to program your
to operate your Amplifier.
To program the
Cinema 7
to operate your Amplifier:
Cinema 7
1. Turn on your Amplifier.
2. Press AUX and release. Press and hold
MAGIC until the
Cinema 7
’s red light
blinks twice, then release MAGIC.
3. Enter the first four-digit Amplifier code listed for
your brand in the “Setup Codes For Amplifiers”
section. If you perform this procedure correctly,
the red light will blink twice when you enter the
final digit of your code.
4. Aim the
Cinema 7
POWER. Your Amplifier should turn off. If your
at your Amplifier and press
Amplifier does not respond, repeat steps 2-4,
trying each code listed for your brand until you
find the one that operates your Amplifier.
5. Your
Cinema 7
your Amplifier. Write your Amplifier code in the
is now programmed to operate
boxes to the left for future reference.
Remember, if you want to use your
Cinema 7
to operate
your Amplifier, press the AUX key first.
SEARCHING FOR YOUR CODE
If your TV, VCR or Cable Converter does not respond to
the
Cinema 7
brand, or if your brand is not listed at all, try searching for
your code. For example, after trying all of the codes for
your TV, you still cannot get the
TV, then:
1. Turn on your TV.
2. Press TV and release. Press and hold MAGIC
after trying all of the codes listed for your
until the
Cinema 7
Cinema 7
’s red light blinks twice, then
to operate your
release MAGIC.
3. Press 9 - 9 - 1.
9-9-19-9-1
9-9-1
4. Slowly alternate between pressing POWER*
and TV until your TV turns OFF. Make sure that
the
Cinema 7
search. You may have to press this sequence
of buttons (POWER* then TV) up to 100 times
is aimed at your TV during the
to search the entire library of codes.
5. When your TV turns OFF, press and release
MAGIC to lock in the code for your TV. Your
Cinema 7
*If you are searching for your VCR, CD, LD or DVD Player
code, you may want to use the PL (Play) key instead of
is now programmed to operate your TV.
the POWER key to search for your code. When your VCR
starts to play, press MAGIC to lock in your code.
NOTE: To search for the codes of your other components,
repeat Steps 1 through 4, only substitute the appropriate
device key (VCR, DVD/LD, RCVR, AUX, CD or CABLE/
SAT) for the component you are searching for.
LEARNING THE CODES PROGRAMMED INTO
THE CINEMA 7
If you have set up the
Cinema 7
using the “SEARCHING
FOR YOUR CODE” procedure, you may want to figure out
which three-digit code is operating your equipment. Use
this procedure after you have set up your components to
find out which four-digit code is operating your equipment.
For example, to find out which code is operating your TV
after setting up your TV using the “SEARCHING FOR
YOUR CODE” procedure:
1. Press TV and release. Press and hold MAGIC
until the
Cinema 7
’s red light blinks twice, then
release MAGIC.
2. Press 9 - 9 - 0.
9-9-09-9-0
9-9-0
3. For the first digit of your four-digit code, press
11
1
1 and count the number of times the red light
(LED) blinks on the
not blink when you press the number 1, the
digit is zero.
4. For the second digit, press 2 and count the
22
2
number of times the red light (LED) blinks on
the
Cinema 7
Cinema 7
. If the light does
. If the light does not blink when
you press the number 2, the digit is zero.
5. For the third digit, press 3 and count the
33
3
number of times the red light (LED) blinks on
the
Cinema 7
. If the light does not blink when
you press the number 3, the digit is zero.
6. For the fourth and final digit, press 4 and count
44
4
the number of times the red light (LED) blinks
on the
Cinema 7
when you press the number 4, the digit is zero.
. If the light does not blink
Now you have your four-digit code.
NOTE: To find out the code for your other components,
repeat Steps 1 through 6, only substitute the
appropriate device key (VCR, DVD/LD, RCVR,
AUX, CD or CABLE/SAT) for the component
code you wish to learn.
SETTING UP OTHER COMPONENTS
In addition to the components labeled on the device keys
(TV, VCR, DVD/LD, CBL/SAT, etc.), the
Cinema 7
can also
operate the following components: Cassette Decks,
Infrared Home Automation, Video Accessories and
Miscellaneous Audio Components (Graphic Equalizers
and Digital Music Service Boxes).
The Setup Codes for these components can be accessed
under the following device keys:
Cassette Decks: Use the VCR Key
IR Home Automation: Use the CD Key
Video Accessories: Use the CBL/SAT Key
Miscellaneous Audio: Use the AUX or RCVR Key
For example, to set up a Cassette Player on the VCR key:
1. Turn on your Cassette Player and insert a tape.
2. Press VCR and release. Press and hold
MAGIC until the
Cinema 7
’s red light blinks
twice, then release MAGIC.
3. Enter the first four-digit Cassette Player code
listed for your brand in the “Setup Codes For
Audio Cassettes” section. If you perform this
procedure correctly, the red light will blink twice
when you enter the final digit of your code.
4. Aim the
Cinema 7
at your Cassette Player and
press PL (Play). Your Cassette Player
should play your tape. If your Cassette Player
does not respond, repeat steps 2-4, trying
each code listed for your brand until you find
the one that operates your Cassette Player.
5. Your
Cinema 7
your Cassette Player. Remember, if you want
to use your
is now programmed to operate
Cinema 7
to operate your Cassette
Player, press the VCR key first.
RE-ASSIGNING DEVICE KEYS
You can use the Cinema 7 to operate a second TV or a
second VCR or any combination of seven home entertainment components. For example, you may want your
Cinema 7
CD Player, 1 DVD Player and 2 VCRs. To accomplish this,
to control 1 TV, 1 Cable Converter, 1 Receiver, 1
you must re-assign one of the device keys to operate the
desired component, in this case, a second VCR. The chart
below shows you how to re-assign a particular device key
and then set up your new component.
TV to VCR MAGIC* + 992 + VCR + TV + TV +
MAGIC* + VCR code
TV to DVD/LD MAGIC* + 992 + DVD/LD + TV + TV +
TV to RCVR MAGIC* + 992 + RCVR + TV + TV +
MAGIC* + DVD or LD Player code
MAGIC* + Audio code
TV to AUX MAGIC* + 992 + AUX + TV + TV +
MAGIC* + Audio code
TV to CD MAGIC* + 992 + CD + TV + TV +
TV to CBL/SAT MAGIC* + 992 + CBL/S AT + TV + TV
MAGIC* + CD Player code
+ MAGIC* + Cable/DBS code
VCR to TV MAGIC* + 992 + TV + VCR + VCR +
MAGIC* + TV code
VCR to DVD/LD MAGIC* + 992 + D VD/LD + V CR + VCR
VCR to RCVR MAGIC* + 992 + RCVR + VCR + VCR
+ MAGIC* + DVD or LD Player code
+ MAGIC* + Audio code
VCR to AUX MAGIC* + 992 + AUX + VCR + VCR +
MAGIC* + Audio code
VCR to CD MAGIC* + 992 + CD + VCR + VCR +
VCR to CBL/SAT MAGIC* + 992 + CBL/SAT + VCR +
MAGIC* + CD Player code
VCR + MAGIC* + Cable/DBS code
DVD/LD to TV MAGIC* + 992 + TV + DVD/LD + DVD/
DVD/LD to VCR MAGIC* + 992 + VCR + DVD/LD +
LD + MAGIC* + TV code
DVD/LD + MAGIC* + VCR code
DVD/LD to RCVR MAGIC* + 992 + RCVR + DVD/LD +
DVD/LD to AUX MAGIC* + 992 + AUX + DVD/LD +
DVD/LD + MAGIC* + Audio code
DVD/LD + MAGIC* + AUDIO code
DVD/LD to CD MAGIC* + 992 + CD + DVD/LD +
DVD/LD + MAGIC* + CD Player code
DVD/LD to CBL/SAT MAGIC* + 992 + CBL/SAT + DVD/LD +
RCVR to TV MAGIC* + 992 + TV + RCVR + RCVR
DVD/LD + MAGIC* + Cable/DBS code
+ MAGIC* + TV code
RCVR to VCR MAGIC* + 992 + VCR + RCVR +
RCVR + MAGIC* + VCR code
RCVR to DVD/LD MAGIC* + 992 + DVD/LD + RCVR +
RCVR + MAGIC* + DVD or LD Player
code
RCVR to CD MAGIC* + 992 + CD + RCVR + RCVR
RCVR to CBL/SAT MAGIC* + 992 + CBL/SAT + RCVR +
+ MAGIC* + CD Player code
RCVR + MAGIC* + Cable/DBS code
AUX to TV MAGIC* + 992 + TV + AUX + AUX +
MAGIC* + TV code
AUX to VCR MAGIC* + 992 + VCR + AUX + AUX +
AUX to DVD/LD MAGIC* + 992 + DVD/LD + AUX + AUX
MAGIC* + VCR code
+ MAGIC* + DVD or LD Player code
AUX to CD MAGIC* + 992 + CD + AUX + AUX +
MAGIC* + CD Player code
AUX to CBL/SAT MAGIC* + 992 + VCR + AUX + AUX +
CD to TV MAGIC* + 992 + TV + CD + CD +
MAGIC* + Cable/DBS code
MAGIC* + TV code
CD to VCR MAGIC* + 992 + VCR + CD + CD +
MAGIC* + VCR code
CD to DVD/LD MAGIC* + 992 + DVD/LD + CD + CD
CD to RCVR MAGIC* + 992 + RCVR + CD + CD +
+ MAGIC* + DVD or LD Player code
MAGIC* + Audio code
CD to AUX MAGIC* + 992 + AUX + CD + CD +
MAGIC* + Audio code
CD to CBL/SAT MAGIC* + 992 + CBL/SAT + CD + CD
CBL/SAT to TV MAGIC* + 992 + TV + CBL/SAT +
+ MAGIC* + Cable/DBS code
CBL/SAT + MAGIC* + TV code
CBL/SAT to VCR MAGIC* + 992 + VCR + CBL/SAT +
CBL/SAT + MAGIC* + VCR code
CBL/SAT to DVD/LD MAGIC* + 992 + DVD/LD + CBL/SAT
+ CBL/SAT + MAGIC* + DVD or LD
code
CBL/SAT to RCVR MAGIC* + 992 + RCVR + CBL/SAT +
CBL/SAT to AUX MAGIC* + 992 + AUX + CBL/SAT +
CBL/SAT + MAGIC* + Audio code
CBL/SAT + MAGIC* + Audio code
CBL/SAT to CD MAGIC* + 992 + CD + CBL/SAT +
*NOTE: Here (*) you must hold MAGIC until the Cinema
7’s red light blinks twice.
CBL/SAT + MAGIC* + CD Player code
Page 3

PROGRAMMING THE MACRO KEYS
MAGIC
MACRO
MACRO 2
MAGIC
MAGIC
TV
MAGIC
RCVR
AUX
VOL
MAGIC
CABLE/SAT
SLEEP
SLEEP
POWER
The
Cinema 7
that allow the user to play back a series of keystrokes, at
has two Macro keys (MACRO and MACRO2)
any time, with the press of one key. For example, to set up a
sequence that will turn on your components and change the
components to the proper inputs:
1. Press and hold MAGIC until the
red light blinks twice, then release
MAGIC.
2. Press 9 - 9 - 5. The
9-9-59-9-5
9-9-5
blink twice.
3. Press and release one of the MACRO keys.
This will be the key that will play back the
or
series of keystrokes assigned to that key.
Cinema 7
Cinema 7
’s red light will
’s
4. Begin entering the sequence of keystrokes, up
to 15, that you wish to be played back when
you press the MACRO key. For example:
RCVR + POWER + TV + POWER + TV/VCR
(To change the input on the TV to VIDEO 1) +
CBL/SAT + POWER.
5. Once your sequence is entered, press and
hold MAGIC until the
Cinema 7
’s red light
blinks twice.
Now, using the example above, whenever the programmed
MACRO key is pressed, the Receiver would power ON, the
TV will power ON and change the input to VIDEO 1 and
then the Satellite would power ON.
Repeat steps 1 - 5 to then setup a second sequence on
the MACRO2 key.
VOLUME LOCK
Volume Lock allows the user to designate which component will control the volume in the TV, DVD/LD and CBL/
SAT modes. To set the Volume Lock to the TV mode:
1. Press and hold MAGIC until the
red light blinks twice, then release
MAGIC.
2. Press 9 - 9 - 3. The
9-9-39-9-3
9-9-3
blink twice.
3. Press and release TV. The
Now, whenever you press VOL▲, VOL▼ or MUTE in the
VCR, DVD/LD and CBL/SAT modes your TV will control
will blink twice.
Cinema 7
Cinema 7
’s red light will
Cinema 7
’s
’s red light
the volume. If you would like to change the Volume Lock
setting to the VCR, DVD/LD or CBL/SAT modes repeat
steps 1-3, only substitute the appropriate device key.
Setting the Volume Lock to the TV, VCR, DVD/LD or CBL/
SAT mode will not effect the volume control in the RCVR,
AUX and CD mode.
You can also change the Volume Lock setting so that an
Audio component controls the volume in all device modes.
To change the Volume Lock setting on the
Cinema 7
to the
RCVR or AUX mode:
1. Press and hold MAGIC until the
red light blinks twice, then release
Cinema 7
’s
MAGIC.
9-9-39-9-3
2. Press 9 - 9 - 3. The
9-9-3
blink twice.
3. Press and release RCVR or AUX. The
or
7
’s red light will blink twice.
Cinema 7
’s red light will
Cinema
Now, whenever you press VOL▲, VOL▼ or MUTE your
Audio component will control the volume in all device
modes.
You can also change the Volume Lock setting so that each
component controls its own volume. However, some
components do not have volume control. Using this setting
may eliminate volume control in some device modes. To
change the Volume Lock setting on the
mode controls its own volume:
1. Press and hold MAGIC until the
Cinema 7
Cinema 7
so each
’s
red light blinks twice, then release
MAGIC.
2. Press 9 - 9 - 3. The
9-9-39-9-3
9-9-3
blink twice.
3. Press and release VOL▲. The
Cinema 7
’s red light will
Cinema 7
’s red
light will blink twice.
Now, whenever you press VOL▲, VOL▼ or MUTE on the
Cinema 7
provided each component has volume control.
each component will control its own volume,
USING THE SLEEP KEY
The SLEEP key allows you to access the sleep timer of
your TV, Cable Converter/DBS Satellite or Audio component. You can access your TV, Cable Converter, DBS
Satellite or Audio component’s Sleep Timer by pressing
the SLEEP key. Most Sleep Timers advance in increments
of 10 or 15 minutes, however, for specific instructions on
setting your components Sleep Timer, please consult your
original owners manual.
Even if your original Cable Converter remote control did
not have a sleep timer, your
sleep timer. If your Cable Converter does not have a sleep
timer, press the SLEEP key to activate the
Cinema 7
has its own built-in
Cinema 7
’s
built-in sleep timer. For example:
1. Press and release the CBL/SAT key then press
the SLEEP key once to set the
in sleep timer for 15 minutes. The red light will
blink once.
2. Each additional press of the SLEEP key will add
15 more minutes to the Sleep Timer, up to a
Cinema 7
’s built-
maximum of 60 minutes. The LED will blink
twice when the sleep timer is set for 30 minutes,
3 times for 40 minutes, or 4 times for 60
minutes.
NOTE: The sleep timer starts 10 seconds after the last
press of the SLEEP key. Once you have activated the
Cinema 7’s built-in sleep timer, you must keep the remote
control aimed directly at the component.
3. To de-activate the built-in sleep timer, press
NOTE: Plugging your TV into the outlet on the back of the
Cable Converter may allow you to turn both your Cable
POWER.
Converter and your TV ON and OFF.
TROUBLE SHOOTING
Problem Solution
Red light does not
blink when you press
a key?
The
Cinema 7
not operate your
does
home entertainment
components or is not
performing commands properly?
The
Cinema 7
is
not performing
commands properly?
Problems programming a TV/VCR
combo?
VCR not recording?
CH ▲/▼ and PREV
CH not working for
your RCA TV?
Problems changing
channels?
The red light blinks
when you press a
key but you receive
no response from
your home entertainment component?
Replace the batteries with four
(4) new AAA alkaline batteries.
Try all of the codes listed for your
brand of home entertainment
component in the “Setup Codes”
section. Many setup codes may
allow for partial functionality,
however, only one setup code
will operate your home entertainment component correctly. Make
sure that all of the components you are setting up can
be operated with an infrared
remote control.
Try all of the codes listed for your
brand of home entertainment
component in the “Set-Up
Codes” section. Many set-up
codes may allow some degree of
operation. However, only one
set-up code will work correctly
with your home entertainment
component.
Try the VCR set-up codes for
your brand. However, some
combo units may require both a
TV code for volume control and
a VCR code for the remaining
functions.
As a safety feature on the
Cinema 7
, you must press the
REC key twice.
Due to RCA design (1983-1987),
only the original remote control
will operate these functions.
If your original remote control
required an Enter keystroke
when changing channels, press
the ENTER key on the
after you enter the channel
Cinema 7
number.
Make sure you are aiming your
Cinema 7
tainment component and that
you are within 15 feet before
at your home enter-
using your remote.
Consumer Help Line: 1-330-405-8601
World Wide Web: www.oneforall.com
ONE FOR ALL® PRODUCTS
90-DAY Limited Warranty
One For All® warrants, to the original purchaser only, that this
product will be free from defects in materials and workmanship,
under normal use, for ninety (90) days from the date of original
purchase.
This limited warranty is valid only on ONE FOR ALL® product
purchased and used in the United States of America or Canada,
and does not apply to products used for industrial or commercial
purpose.
The limited warranty does not cover damage or failure caused by
products or services not supplied by ONE FOR ALL® , or which
result from accident, misuse, abuse, neglect, mishandling, misapplication, faulty installation, set-up adjustment, improper maintenance, alteration, maladjustment of consumer controls, modifications, commercial use, or that is attributable to acts of God.
There are no express warranties except as listed above. ONE
FOR ALL® SHALL NOT BE LIABLE FOR INCIDENTAL OR CONSEQUENTIAL DAMAGES RESULTING FROM THE USE OF
THIS PRODUCT OR ARISING OUT OF ANY BREACH OF WARRANTY. ALL EXPRESS AND IMPLIED WARRANTIES, INCLUDING THE WARRANTIES OF MERCHANTABILITY AND FITNESS
FOR A PARTICULAR PURPOSE, ARE LIMITED TO THE WARRANTY PERIOD SET FORTH ABOVE. Some states do not allow
the exclusion or limitation of incidental or consequential damages,
or limitations on how long an implied warranty lasts, so the above
exclusions or limitations may not apply to you. This warranty gives
you specific legal rights and you may also have other rights which
vary from state to state.
To obtain warranty service for a defective product during the warranty period, please return the product, preferably in the original
carton, along with your purchase receipt, to the store of original
purchase. A note detailing the complaint would be helpful. The
store, at its option, will replace or repair this product if found to be
defective.
One For All
(330) 405-8655
One For All® is the registered trademark of Universal
Electronics Inc. Computime International LTD. is the Licensee
of the ONE FOR ALL® brand for the United States of America
and Canada.
Copyright 2000 by Universal Electronics Inc. No part of this
publication may be reproduced, transmitted, transcribed, stored
in any retrieval system, or translated to any language, in any
form or by any means, electronic, mechanical, magnetic, optical,
manual, or otherwise, without the prior written permission of Universal Electronics Inc.
One For All is designed for compatibility in North America
excluding Mexico.
URC-7200 Cinerma 7 01/01
Setup Codes For TVs
Abex 0032
Admiral 0093, 0179,
0180, 0016,
0047
Adventura 0046
Aiko 0092
Akai 0030
Alaron 0179
A-Mark 0003
Ambassador0177
Anam
National 0055
Anam 0180
AOC 0030, 0019,
0185, 0003,
0052
Archer 0003
Audiovox 0451, 0092,
0180, 0003
Baysonic 0180
Belcor 0019
Bell &
Howell 0154, 0016
Bradford 0180
Brockwood 0019
Broksonic 0003
Candle 0056, 0030,
0186, 0046
Carnivale 0030
Carver 0054
Celebrity 0000
Cineral 0451, 0092
Citizen 0060, 0092,
0030, 0056,
0186, 0280,
0039, 0046
Clairtone 0185
Concerto 0056
Contec 0180, 0185
Craig 0180
Crown 0180, 0039
Curtis
Mathes 0030, 0060,
0154, 0039
CXC 0180
Daewoo 0451, 0092,
0019, 0039
Daytron 0019
Denon 0145
Dumont 0017, 0019
Electroband 0000, 0185
Emerson 0463, 0236,
0180, 0019,
0154, 0177,
0178, 0179,
0185, 0280,
0282, 0038,
0039
Envision 0030
Fisher 0154, 0159
Fujitsu 0179
Funai 0171, 0179,
0180
Futuretech 0180
GE 0047, 0051,
0451, 0021,
0027, 0055,
0178, 0282,
0135
Gibralter 0019, 0030,
0017
Goldstar 0019, 0030,
0178, 0032,
0039
Gradiente 0053, 0056
Grunpy 0179, 0180
Hallmark 0178
Harvard 0180
Hitachi 0145, 0151,
0038, 0056,
0032
Infinity 0054
Janeil 0046
JBL 0054
JCB 0000
JVC 0053
Kaypani 0052
KEC 0180
Kenwood 0019, 0030
Kloss 0024, 0046
KTV 0030, 0180,
0185, 0280,
0032
LG 0056
Logik 0016
Luxman 0056
LXI 0047, 0054,
0154, 0156,
0178
Magnavox 0054, 0096,
0186, 0187,
0020, 0024,
0030, 0386
Majestic 0016
Marantz 0054, 0030
Matsushita 0250
Megatron 0145, 0003,
0178
MEI 0185
Memorex 0056, 0150,
0154, 0016,
0178
MGA 0150, 0019,
0030, 0178
Midland 0017, 0047,
0051, 0135,
0032, 0039
Minutz 0021
Mitsubishi 0150, 0093,
0019, 0178
Motorola 0093, 0055
MTC 0060, 0019,
0030, 0056,
0185
Multitech 0180
NAD 0156, 0166,
0178
NEC 0019, 0030,
0056
Nikko 0030, 0092,
0178
Noshi 0018
NTC 0092
Onwa 0180
Optimus 0250, 0154,
0166
Optonica 0093, 0165
Orion 0236, 0436
Panasonic 0250, 0051,
0055
Penney 0047, 0156,
0051, 0030,
0019, 0003,
0018, 0021,
0027, 0060,
0135, 0178,
0032, 0039
Philco 0054, 0145,
0096, 0019,
0020, 0030
Philips 0054
Pilot 0019, 0030,
0039
Pioneer 0166, 0038
Portland 0092, 0019,
0039
Prism 0051
Proscan 0047
Proton 0003, 0052,
0178
Pulsar 0017, 0019
Quasar 0250, 0051,
0055, 0165
RadioShack 0047, 0056,
0154, 0019,
0030, 0165,
0178, 0180,
0032, 0039
RCA 0047, 0018,
0019, 0038,
0090, 0135
Realistic 0056, 0154,
0019, 0030,
0165, 0178,
0180, 0032,
0039
Rhapsody 0185
Runco 0017, 0030
Sampo 0030, 0052,
0032, 0039
Samsung 0060, 0019,
0030, 0056,
0178, 0032,
0039
Samsux 0039
Sansei 0451
Sanyo 0154, 0159
Scimitsu 0019
Scotch 0178
Scott 0236, 0019,
0178, 0179,
0180
Sears 0047, 0054,
0056, 0154,
0156, 0171,
0178, 0159,
0179
Semivox 0180
Semp 0156
Sharp 0093, 0165,
0039, 0386
Shogun 0019
Signature 0016
Simpson 0186, 0187
Sony 0000, 0080
Soundesign 0178, 0179,
0180, 0186
Spectricon 0003
Squareview 0171
SSS 0019, 0180
Starlite 0180
Supre-Macy 0046
Supreme 0000
Sylvania 0054, 0096,
0020, 0030
Symphonic 0171
Tandy 0093
Tatung 0055, 0003
Technics 0250, 0051
Technol Ace 0179
Techwood 0051, 0056,
0003
Teknika 0054, 0056,
0060, 0092,
0150, 0016,
0019, 0179,
0180, 0186,
0039
Telefunken 0056
TMK 0056, 0177,
0178
Toshiba 0156, 0060,
0154
Tosonic 0185
Totevision 0039
Universal 0027
Vector
Research 0030
Victor 0053
Vidikron 0054
Vidtech 0019, 0178
Viking 0046
Wards 0016, 0019,
0030, 0054,
0056, 0080,
0096, 0165,
0178, 0179,
0020, 0021,
0027
White
Westinghouse0451, 0463,
0236, 0180
Yamaha 0019, 0030
Zenith 0017, 0092,
0016
Zonda 0003
Setup Codes For VCRs
Admiral 0048, 0121,
0184, 0039,
0060, 0202
Adventura 0000
Aiko 0278
Aiwa 0037, 0000
Akai 0041, 0061,
0106
American
High 0035
Asha 0240
Audiovox 0037
Beaumark 0240
Bell &
Howell 0104
Broksonic 0184, 0209,
0479, 0002,
0121, 0295,
0361
Calix 0037
Canon 0035
Capehart 0020
Carver 0081
CCE 0072, 0278
Cineral 0278
Citizen 0037, 0278
Colt 0072
Craig 0072, 0240,
0037, 0047,
0271
Curtis
Mathes 0035, 0041,
0060, 0202
Cybernex 0240
Daewoo 0278, 0020,
Daytron 0020
0045
Denon 0042
Dynatech 0000
Electrohome0037
Electrophonic
0037
Emerex 0032
Emerson 0209, 0184,
0479, 0278,
0000, 0002,
0036, 0037,
0043, 0061,
0068, 0121,
0184, 0208,
0212, 0295,
0361
Fisher 0104, 0047,
0054, 0066
Fuji 0033, 0035
Funai 0000
Garrard 0000
GE 0060, 0202,
0035, 0048,
0240
Goldstar 0037, 0038
Go-Video 0432, 0526
Gradiente 0000, 0008
Harley
Davidson 0000
Harman/Kardon 0038
Harwood 0072, 0068,
0072
Headquarter 0046
HI-Q 0047
Hitachi 0041, 0105,
0000, 0042
Jensen 0041
JVC 0008, 0041,
0067
KEC 0037, 0278
Kenwood 0038, 0041,
0067
KLH 0072
Kodak 0035, 0037
Lloyd’s 0000, 0208
Logik 0072
LXI 0037
Magnasonic 0278
Magnavox 0035, 0081,
0000, 0039,
0110, 0149
Magnin 0240
Marantz 0035, 0081
Marta 0037
Matsushita 0162, 0035,
0454
MEI 0035
Memorex 0162, 0240,
0035, 0037,
0104, 0000,
0039, 0046,
0047, 0048
MGA 0043, 0061,
0240
MGN
Technology
0240
Minolta 0042, 0105
Mitsubishi 0043, 0048,
0061, 0067
Motorola 0035, 0048
MTC 0240, 0000
Multitech 0000, 0072
NEC 0038, 0040,
0041, 0067,
0104
Nikko 0037
Nikon 0034, 0253
Noblex 0240
Olympus 0035
Optimus 0162, 0048,
0037, 0104,
0454
Optonica 0062
Orion 0209, 0184,
0479, 0002,
0295
Panasonic 0162, 0035,
0077, 0225,
0454
Penney 0035, 0037,
0038, 0040,
0042, 0054,
0240
Pentax 0042, 0105
Philco 0035, 0209,
0479
Philips 0035, 0081,
0062, 0110
Pilot 0037
Pioneer 0067, 0162
Portland 0020
Proscan 0060, 0202
Protec 0072
Pulsar 0039
Quarter 0046
Quartz 0046
Quasar 0162, 0035,
0077, 0454
RadioShack 0000, 0037
Radix 0037
Randex 0037
RCA 0060, 0202,
0240, 0042,
0035, 0048,
0077, 0105,
0106, 0149
Realistic 0000, 0035,
0037, 0046,
0047, 0048,
0062, 0066,
0104
Ricoh 0034, 0253
Runco 0039
Samsung 0240, 0045
Sanky 0048, 0039
Sansui 0000, 0041,
0067, 0271,
0479
Sanyo 0104, 0046,
0047, 0054,
0240
Scott 0043, 0045,
0121, 0184,
0210, 0212
Sears 0000, 0035,
0037, 0042,
0046, 0047,
0054, 0066,
0104, 0105
Semp 0045
Sharp 0048, 0062
Shintom 0072
Shogun 0240
Singer 0072
Sony 0032, 0033,
0034, 0000,
0035, 0253
STS 0042
Sunpak 0253
Sylvania 0035, 0081,
0043, 0000,
0110
Symphonic 0000
Tatung 0041
TEAC 0000, 0041
Technics 0162, 0035
Teknika 0000, 0035,
0037
Thomas 0000
TMK 0240, 0036,
0208
Toshiba 0043, 0045,
0066, 0210,
0212
Totevision 0037, 0240
Unitech 0240
Vector Research
0038, 0040
Vector 0045
Video Concepts0040,
0045, 0061
Videosonic 0240
Wards 0000, 0035,
0042, 0047,
0048, 0060,
0062, 0072,
0081, 0149,
0212, 0240
White
Westinghouse0278,
0479, 0209,
0184
XR-1000 0000, 0035,
0072
Yamaha 0038
Zenith 0039, 0000,
0033, 0034
Setup Codes For TV/
VCR Combos
American
High 0035*
Brocksonic 0002, 0294,
0479
Colt 0072
Curtis Mathes 0035*
Daewoo 0278*
Emerson 0002, 0294,
0479
Funai 0000
GE 0035*, 0060*,
0048*, 0240
Hitachi 0035*, 0000
HQ 0000
Lloyds 0000
Magnavox 0000, 0035*,
0081*
Magnin 0240
Memorex 0037, 0162*
MGA 0240
Mitsubishi 0048*
Orion 0002, 0294,
0479
Panasonic 0035*, 0162*
Penney’s 0035*, 0240,
0162*
Quasar 0035*, 0162*
RCA 0035*, 0060*,
0048*
Sansui 0000, 0479
Sanyo 0240
Sears 0000, 0037
Sony 0032*
Symphonic 0000
Zenith 0000
Setup Codes for DVD
Players
JVC 0558
Kenwood 0534
Mitsubishi 0521
Panasonic 0490
Philips 0539
Pioneer 0525
RCA 0522
Sony 0533
Toshiba 0503
Zenith 0503
Setup Codes for Laser
Disc Players
Mitsubishi 0059
NAD 0059
Pioneer 0059
Sony 0193, 0201
Setup Codes For
Receivers/Tuners
ADC 0531
Aiwa 0121, 0158,
0189
Capetronic 0531
Carver 0008, 0042,
0189, 0360
Casio 0195
Clarinette 0195
Denon 0004
Emerson 0424
Fisher 0042, 0219,
0360
Garrard 0424, 0463
Harman/Kardon0110
JVC 0074
Kenwood 0027, 0313,
0314, 0077,
0186
Koss 0424
Linn 0189
Lloyd’s 0195
LXI 0181
Magnavox 0189, 0195,
0531
Marantz 0039, 0189
MCS 0039
Modulaire 0195
NAD 0320
Nakamichi 0347
Onkyo 0135
Optimus 0042, 0080,
0177, 0181,
0186, 0219,
0531, 0670
Panasonic 0039
Penney 0195
Philips 0189
Pioneer 0014, 0080,
0150, 0531,
0630
Quasar 0039
RCA 0054, 0360,
0531
Realistic 0163, 0181,
0195
Sansui 0189
Sanyo 0219
Scott 0163, 0322
Sharp 0186
Sherwood 0491, 0502
Sony 0158, 0474
Soundesign 0670
TEAC 0163, 0463
Technics 0039, 0309,
0518
Victor 0074
Wards 0014, 0042,
0054, 0080,
0158, 0189
Yamaha 0176, 0186
Yorx 0195
Setup Codes For CD
Players
Aiwa 0124, 0157
Burmester 0420
California
Audio Lab 0029
Carver 0157, 0179,
0437
Denon 0003
DKK 0000
Emerson 0305
Fisher 0048, 0174,
0179
Garrard 0393, 0420
Genexxa 0032, 0305
Harman/Kardon0173
Hitachi 0032
JVC 0072
Kenwood 0028, 0037,
0048, 0190
Krell 0157
Linn 0157
LXI 0305
Magnavox 0157, 0305
Marantz 0029, 0157,
0180
MCS 0029
Mission 0157
MTC 0420
Nikko 0174
NSM 0157
Onkyo 0101
Optimus 0000, 0032,
0037, 0048,
0145, 0179,
0305, 0420,
0437, 0468
Panasonic 0029
Philips 0157
Pioneer 0032, 0468,
0244, 0305
Proton 0157
QED 0157
Quasar 0029
RCA 0764, 0053,
0179, 0305
Realistic 0179, 0180,
0420
Rotel 0157, 0420
SAE 0157
Sansui 0157, 0305
Sanyo 0179
Scott 0305
Sears 0305
Sharp 0037, 0180
Sherwood 0180
Sony 0000, 0185
Soundesign 0145
Tascam 0420
TEAC 0174, 0180,
0393, 0420
Technics 0029
Victor 0072
Wards 0157
Yamaha 0036, 0187
Yorx 0461
Setup Codes for Cable
Converters
ABC 0003, 0008,
0014, 0007,
0001, 0011,
0013, 0017
Allegro 0153, 0315
Antronix 0022, 0207
Archer 0797, 0153,
0022, 0207
Belcor 0056
Cable Star 0056
Cabletenna 0022
Cableview 0022
Century 0153
Citizen 0153, 0315
Colour Voice0025, 0031
Comtronics 0040
Contec 0019
Digi 0637
Eastern 0002
Emerson 0797
Everquest 0015, 0040
Focus 0400
Garrard 0153
GC
Electronics 0056, 0207
Gemini 0015
General
Instrument 0476, 0003,
0014, 0011
Goldstar 0144, 0040
Goodmind 0797
Hamlin 0259, 0009,
0020, 0034
Hitachi 0011
Hytex 0007
Jasco 0153, 0315
Jerrold 0476, 0003,
0014, 0011,
0012, 0015
Linsay 0440
Magnavox 0027
Memorex 0000
Movie Time 0063, 0156
Novaplex 0618
NSC 0063, 0156
Oak 0007, 0019
Optimus 0021
Panasonic 0021, 0107,
0000
Panther 0637
Paragon 0000
Philips 0153, 0025,
0027, 0031
Pioneer 0753, 0144,
0023
Popular
Mechanics 0400
Prelude 0770
Pulsar 0000
RadioShack 0015, 0315,
0797
RCA 0021
Realistic 0207
Recoton 0400
Regal 0259, 0020
Regency 0002
Rembrandt 0011
Runco 0000
Samsung 0144, 0040
Scientific
Atlanta 0477, 0008,
0017
Seam 0510
Signal 0015, 0040
Signature 0011
SL Marx 0040
Sprucer 0021
Starcom 0003, 0015
Stargate 0770, 0015,
0040
Starquest 0015
Sylvania 0001
Tandy 0258
Teleview 0040
Texscan 0001
TFC 0310
Timeless 0418
Tocom 0012, 0013
Toshiba 0000
Tusa 0015
TV86 0063
Unika 0153, 0022,
0207
United
Artists 0007
United
Cable 0003
Universal 0153, 0022,
0056, 0191,
0207
Videoway 0250
Viewstar 0063, 0027,
0258
Zenith 0525, 0000
Zentek 0400
Setup Codes for
Satellites
AlphaStar
DBS 0772
Chaparral 0053, 0216
Echostar
DBS 0775
Echostar 0159, 0269,
0280
Express
Vu DBS 0775
General
Instrument 0361
Hitachi DBS 0819
Homecable 0238
HTS DBS 0775
Hughes
Network
Systems
DBS 0749
IQ Prism 0210
IQ 0210
Janeil 0152
Jerrold
Primestar 0627
Jerrold 0361
Legend 0269
Magnavox
DBS 0722, 0724
Memorex
DBS 0724
Memorex 0269
Panasonic 0152
Panasonic
DBS 0701
Philips DBS 0722, 0724
Primestar 0361, 0627
RCA DSS 0566
Realistic 0052
Sony DBS 0639
Star Choice
DBS 0869
Star Trak 0180
STS 0210
Toshiba
DBS 0790
Toshiba 0082
Uniden DBS 0724
Uniden 0052, 0074,
0076, 0238
Setup Codes For
Amplifiers
Carver 0269
Denon 0160
GE 0078
JVC 0331
Kenwood 0356
Linn 0269
Luxman 0165
Magnavox 0269
Marantz 0269, 0321
Nakamichi 0321
NEC 0264
Optimus 0013, 0300,
0395
Philips 0269
Pioneer 0013, 0300
Realistic 0395
Sansui 0321
Shure 0264
Sony 0220, 0689
Soundesign 0078, 0211
Technics 0308
Victor 0331
Wards 0013, 0078,
0211
Yamaha 0133, 0143,
0354, 0504
Setup Codes For Audio
Cassette Decks
Aiwa 0029, 0197
Carver 0029
Denon 0076
Harman/Kardon 0182
JVC 0244, 0273
Kenwood 0070
Magnavox 0029
Marantz 0029
Onkyo 0135, 0282
Optimus 0027, 0220
Philips 0029
Pioneer 0027, 0099,
0220
Sansui 0029
Sony 0170, 0243,
0291
Technics 0229
Victor 0273
Wards 0027
Yamaha 0094, 0097
Setup Codes For IR
Home Automation
GE 0240
LiteTouch 0084
Lutron 0318, 0597
One For All 0167
RadioShack 0240
Security System
0167
Universal X10 0167
X10 0167
Setup Codes For Video
Accessories
Archer 0160
GC Electronics
0160
Jebsee 0160
Rabbit 0081
RadioShack 0160
Roctec 0456
SuperGuide 0169
TeleCaption 0171
Setup Codes For
Miscellaneous Audio
Aiwa 0010, 0159
Fisher 0052
Harman/Kardon0477
Jerrold 0459, 0520
JVC 0073
Nikko 0376
Paramount
Pictures 0317
RCA 0056
Schneider 0376
Scientific
Atlanta 0460
Sony 0010, 0159
Soundesign 0376
SSI 0317
Starcom 0459
Yorx 0376
 Loading...